Post Syndicated from The Atlantic original https://www.youtube.com/watch?v=SGbwjHNSumY
Yearly Archives: 2024
[$] Fedora evicts WolfSSL
Post Syndicated from jzb original https://lwn.net/Articles/989687/
The Fedora
Engineering Steering Committee (FESCo) has voted to
immediately remove the WolfSSL package from all of Fedora’s
repositories due to its maintainer failing to gain approval to package
a new cryptography library for Fedora. Its brief travels through
Fedora’s package system highlights gaps in documentation, as well as
in the package‑review process. The good news is that this may stir
Fedora to improve its documentation and revive a formal security
team.
Create security observability using generative AI with Security Lake and Amazon Q in QuickSight
Post Syndicated from Priyank Ghedia original https://aws.amazon.com/blogs/security/create-security-observability-using-generative-ai-with-security-lake-and-amazon-q-in-quicksight/
Generative artificial intelligence (AI) is now a household topic and popular across various public applications. Users enter prompts to get answers to questions, write code, create images, improve their writing, and synthesize information. As people become familiar with generative AI, businesses are looking for ways to apply these concepts to their enterprise use cases in a simple, scalable, and cost-effective way. These same needs are shared by a variety of security stakeholders. For example, if security directors want to summarize their security posture in natural language, a security architect will need to triage alerts or findings and investigate AWS CloudTrail logs to identify high priority remediation actions or detect potential threat actors by identifying potentially malicious activity. There are many ways to deploy solutions for these use cases.
In this blog post, we review a fully serverless solution for querying data stored in Amazon Security Lake using natural language (human language) with Amazon Q in QuickSight. This solution has multiple use cases, such as generating visualizations and querying vulnerability information for vulnerability management using tools such as Amazon Inspector that feed into AWS Security Hub. The solution helps reduce the time from detection to investigation by using natural language to query CloudTrail logs and Amazon Virtual Private Cloud (VPC) Flow Logs, resulting in quicker response to threats in your environment.
Amazon Security Lake is a fully managed security data lake service that automatically centralizes security data from AWS environments, software as a service (SaaS) providers, and on-premises and cloud sources into a purpose-built data lake that’s stored in your AWS account. The data lake is backed by Amazon Simple Storage Service (Amazon S3) buckets, and you retain ownership over your data. Security Lake converts ingested data into Apache Parquet format and a standard open source schema called the Open Cybersecurity Schema Framework (OCSF). With OCSF support, Security Lake normalizes and combines security data from AWS and a broad range of enterprise security data sources.
Amazon QuickSight is a cloud-scale business intelligence (BI) service that delivers insights to stakeholders, wherever they are. QuickSight connects to your data in the cloud and combines data from a variety of different sources. With QuickSight, users can meet varying analytic needs from the same source of truth through interactive dashboards, reports, natural language queries, and embedded analytics. With Amazon Q in QuickSight, business analysts and users can use natural language to build, discover, and share meaningful insights.
The recent announcements for Amazon Q in QuickSight, Security Lake, and the OCSF present a unique opportunity to apply generative AI to fully managed hybrid multi-cloud security related logs and findings from over 100 independent software vendors and partners.
Solution overview
The solution uses Security Lake as the data lake which has native ingestion for CloudTrail, VPC Flow Logs, and Security Hub findings as shown in Figure 1. Logs from these sources are sent to S3 buckets in your AWS account and are maintained by Security Lake. We then create Amazon Athena views from tables created by Security Lake for Security Hub findings, CloudTrail logs, and VPC Flow Logs to define the interesting fields from each of the log sources. Each of these views are ingested into a QuickSight dataset. From these datasets, we generate analyses and dashboards. We use Amazon Q topics to label columns in the dataset that are human-readable and create a named entity to present contextual and multi-visual answers in response to questions. After the topics are created, users can perform their analysis using Q topics, QuickSight analyses, or QuickSight dashboards.
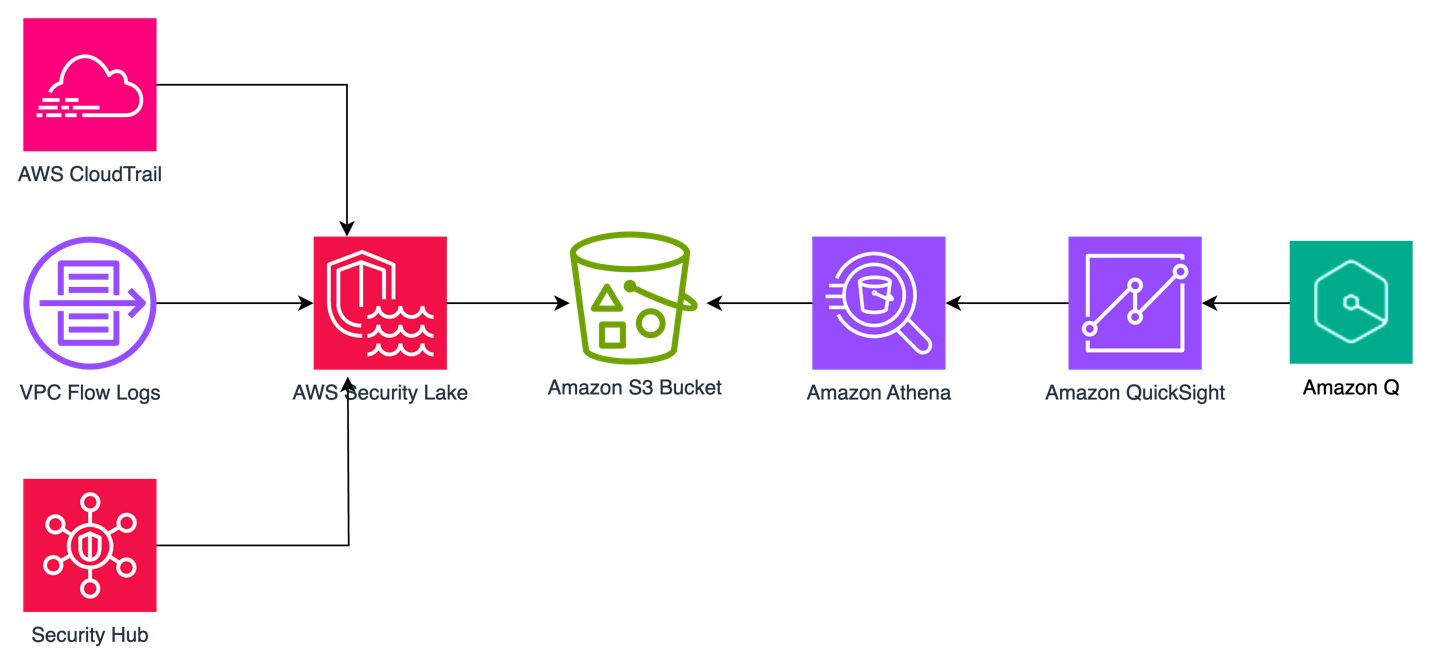
Figure 1: Solution architecture
You can use the rollup AWS Region feature in Security Lake to aggregate logs from multiple Regions into a single Region. Specifying a rollup Region can help you adhere to regional compliance requirements. If you use rollup Regions, you must set up the solution described in this post for datasets only in rollup Regions. If you don’t use a rollup Region, you must deploy this solution for each Region you that want to collect data from.
Prerequisites
To implement the solution described in this post, you must meet the following requirements:
- Basic understanding of Security Lake, Athena, and QuickSight.
- Security Lake is already deployed and accepting CloudTrail management events, VPC Flow Logs, and Security Hub findings as sources. If you haven’t deployed Security Lake yet, we recommend following the best practices established in the security reference architecture.
- This solution uses Security Lake data source version 2 to create the dashboards and visualizations. If you aren’t already using data source version 2, you will see a banner in your Security Lake console with instructions to update.
- An existing QuickSight deployment that will be used to visualize Security Lake data or an account that is able to sign up for QuickSight to create visualizations.
- QuickSight Author Pro and Reader Pro licenses are needed for using Amazon Q features in QuickSight. Non-pro Authors and Readers can still access Q topics if an Author Pro or Admin Pro user shares the topic with them. Non-pro Authors and Readers can also access data stories if a Reader Pro, Author Pro, or Admin Pro shares one with them. Review Generative AI features supported by each QuickSight licensing tiers.
- AWS Identity and Access Manager (IAM) permissions for QuickSight, Athena, Lake Formation, Security Lake, and AWS Resource Access Manager.
In the following section, we walk through the steps to ingest Security Lake data into QuickSight using Athena views and then using Amazon Q in QuickSight to create visualizations and query data using natural language.
Provide cross-account query access
In alignment with our security reference architecture, it’s a best practice to isolate the Security Lake account from the accounts that are running the visualization and querying workloads. It’s recommended that QuickSight for security use cases be deployed in the security tooling account. See How to visualize Amazon Security Lake findings with Amazon QuickSight for information on how to set up cross-account query access. Follow the steps in the Configure a Security Lake subscriber section and configure Athena to visualize your data section.
When you get to the create resource link steps, create a resource link for data source version 2 for Security Hub, CloudTrail, and VPC flow log tables for a total of three resource links. The way to identify data source version 2 tables is by their name; it ends in _2_0. For example:
amazon_security_lake_table_us_east_1_sh_findings_2_0amazon_security_lake_table_us_east_1_cloud_trail_mgmt_2_0amazon_security_lake_table_us_east_1_vpc_flow_2_0
For the remainder of this post, we will be referencing the database name security_lake_visualization and the resource link names for Security Hub findings, CloudTrail logs, and VPC Flow Logs respectively, as shown in Figure 2:
securitylake_shared_resourcelink_securityhub_2_0_us_east_1securitylake_shared_resourcelink_cloudtrail_2_0_us_east_1securitylake_shared_resourcelink_vpcflow_2_0_us_east_1

Figure 2: Lake Formation table snapshot
We will call the QuickSight account the visualization account. If you plan to use same account as the Security Lake delegated administrator and QuickSight, then skip this step and go to the next section where you will create views in Athena.
Create views in Athena
A view in Athena is a logical table that helps simplify your queries by working with only a subset of the relevant data. Follow these steps to create three views in Athena, one each for Security Hub findings, CloudTrail logs, and the VPC Flow Logs in the visualization account.
These queries default to the previous week’s data starting from the previous day, but you can change the time frame by modifying the last line in the query from 8 to the number of days you prefer. Keep in mind that there is a limitation on the size of each SPICE table of 1 TB. If you want to limit the volume of data, you can delete the rows that you find unnecessary. We included the fields customers have identified as relevant to reduce the burden of writing the parsing details yourself.
To create views:
- Sign in to the AWS Management Console in the visualization account and navigate to the Athena console.
- If a Security Lake rollup Region is used, select the rollup Region.
- Choose Launch Query Editor.
- If this is the first time you’re using Athena, you will need to choose a bucket to store your query results.
- Choose Edit Settings.
- Choose Browse S3.
- Search for your bucket name.
- Select the radio button next to the name of your bucket.
- Select Choose.
- For Data Source, select AWSDataCatalog.
- Select Database as security_lake_visualization. If you used a different name for the database for cross account query access, then select that database.

Figure 3: Athena database selection
- Copy the query for the
security_hub_viewfrom the GitHub repo for this post. If you’re using a different name for the database and table resource link than the one specified in this post, edit the FROM statement at the bottom of the query to reflect the correct names. - Paste the query in the query editor and then choose Run. The name of the view is set in the first line of the query which is
security_insights_security_hub_vw2. - To confirm this view was created correctly, choose the three dots next to the view that was created and select Preview View.

Figure 4: Previewing the view
- Repeat steps 5–9 to create the CloudTrail and VPC Flow Logs views. The queries for each can be found in the GitHub repo.

Figure 5: Athena views


Create QuickSight dataset
Now that you’ve created the views, use Athena as the data source to create a dataset in QuickSight. Repeat these steps for the Security Hub findings, CloudTrail logs, and VPC Flow Logs. Start by creating a dataset for the Security Hub findings.
To configure permissions on tables:
- Sign in to the QuickSight console in the visualization account. If a Security Lake rollup Region is used, select the rollup Region.
- If this is the first time you’re using QuickSight, you must sign up for a QuickSight subscription.
- Although there are multiple ways to sign in to QuickSight, we used IAM based access to build the dashboards. To use QuickSight with Athena and Lake Formation, you first need to authorize connections through Lake Formation.
- When using a cross-account configuration with AWS Glue Data Catalog, you need to configure permissions on tables that are shared through Lake Formation. For the use case in this post, use the following steps to grant access on the cross-account tables in the Glue Catalog. You must perform these steps for each of the Security Hub, CloudTrail, and VPC Flow Logs tables that you created in the preceding cross-account query access section. Because granting permissions on a resource link doesn’t grant permissions on the target (linked) database or table, you will grant permission twice, once to the target (linked table) and then to the resource link.
- In the Lake Formation console, navigate to the Tables section and select the resource link for the Security Hub table. For example:
securitylake_shared_resourcelink_securityhub_2_0_us_east_1 - Select Actions. Under Permissions, select Grant on target.
- For the next step, you need the Amazon Resource Name (ARN) of the QuickSight users or groups that need access to the table. To obtain the ARN through the AWS Command Line Interface (AWS CLI), run following commands (replacing account ID and Region with that of the visualization account.) You can use AWS CloudShell for this purpose.
- For users
aws quicksight list-users --aws-account-id 111122223333 --namespace default --region us-east-1 - For groups
aws quicksight list-groups --aws-account-id 111122223333 --namespace default --region us-east-1
- For users
- After you have the ARN of the user or group, copy it and go back to the LakeFormation console Grant on Target page. For Principals, select SAML users and groups, and then add the QuickSight user’s ARN.
Figure 6: Selecting principals
- For LF-Tags or catalog resources, keep the default settings.

Figure 7: Table grant on target permissions
- For Table permissions, select Select for both Table Permissions and Grantable Permissions, and then choose Grant.

Figure 8: Selecting table permissions
- Navigate back to the Tables section and select the resource link for the Security Hub table. For example:
securitylake_shared_resourcelink_securityhub_2_0_us_east_1 - Select Actions. This time under Permissions, and then choose Grant.
- For Principals, select SAML users and groups, and then add the QuickSight user’s ARN captured earlier.
- For the LF-Tags or catalog resources section, use the default settings.
- For Resource link permissions choose Describe for both Table Permissions and Grantable Permissions.
- Repeat steps a–k for the CloudTrail and VPC Flow Logs resource links.
- In the Lake Formation console, navigate to the Tables section and select the resource link for the Security Hub table. For example:


To create datasets from views:
- After permissions are in place, you create three datasets from the views created earlier. Because both Quicksight and Lake Formation are Regional services, verify that you’re using QuickSight in the same Region where Lake Formation is sharing the data. The simplest way to determine your Region is to check the QuickSight URL in your web browser. The Region will be at the beginning of the URL, such as us-east-1. To change the Region, select the settings icon in the top right of the QuickSight screen and select the correct Region from the list of available Regions in the drop-down menu.
- Navigate back to the QuickSight console.
- Select Datasets, and then choose New dataset.
- Select Athena from the list of available data sources.
- Enter a Data source name, for example
security_lake_securityhub_datasetand leave the Athena workgroup as[primary]. Choose Create data source. - At the Choose your table prompt, for Catalog, select AwsDataCatalog. For Database, select
security_lake_visualization. If you used a different name for the database for cross-account query access, then select that database. For Tables, select the view namesecurity_insights_security_hub_vw2to build your dashboards for Security Hub findings. Then choose Select.
Figure 9: Choose a table during QuickSight dataset creation
- At the Finish dataset creation prompt, select Import to SPICE for quicker analytics. Choose Visualize. This will create a new dataset in QuickSight using the name of the Athena view, which is
security_insights_security_hub_vw2. You will be taken to the Analysis page, exit out of it. - Go back to the QuickSight console and repeat steps 3–8 for the CloudTrail and VPC Flow Log datasets.

Create a topic
Now that you have created a dataset, you can create a topic. Q topics are collections of one or more datasets that represent a subject area for your business users to ask questions. Topics allow users to ask questions in natural language and to build visualizations using natural language.
To create a Q topic:
- Navigate to the QuickSight console.
- Choose Topics in the left navigation pane.

Figure 10: QuickSight navigation pane
- Choose New topic. Create one topic each for the Security Hub findings, CloudTrail logs, and VPC Flow Logs
Figure 11: QuickSight topic creation
- On the New topic page, do the following:
- For Topic name, enter a descriptive name for the topic. Name the first one
SecurityHubTopic. Your business users will identify the topic by this name and use it to ask questions. - For Description, enter a description for the topic. Your users can use this description to get more details about the topic.
- Choose Continue.
- For Topic name, enter a descriptive name for the topic. Name the first one
- On the Add data to topic page, choose the dataset you created in the Create a QuickSight dataset section. Start with the Security Hub dataset
security_insights_security_hub_vw2. - Choose Continue. It will take a few minutes to create the topic.
- Now that your topic has been created, navigate to the Data tab of the topic.
- Your Data Fields sub-tab should be selected already. If not, choose Data Fields.

Figure 12: Topics data fields
- For each of the fields in the list, turn on Include to make sure that all fields are included. For this example, we selected all fields, but you can adjust the included columns as needed for your use case. Note, you might see a banner at the top of the page indicating that the indexing is in progress. Depending on the size of your data, it might take some time for Q to make those fields available for querying. Most of the time, indexing is complete in less than 15 minutes.
- Review the Synonyms column. These alternate representations of your column name are automatically generated by Amazon Q. You can add and remove synonyms as needed for your use case.
- At this point, you’re ready to ask questions about your data using Amazon Q in QuickSight. Choose Ask a question about SecurityHubTopic at the top of the page.
Figure 13: Ask questions using Q
- You can now ask questions about Security Hub findings in the prompt. Enter
Show me findings with compliance status failed along with control id.
Figure 14: Q answers
- Under the question, you will see how it was interpreted by QuickSight.
- Repeat steps 1–13 to create CloudTrail and VPC Flow Log QuickSight topics.


Create named entities for your topics
Now that you’ve created your topics, you will now add named entities. Named entities are optional, but we’re using them in the solution to help make queries more effective. The information contained in named entities, the ordering of fields, and their ranking make it possible to present contextual, multi-visual answers in response to even vague questions.
To create a named entity:
- In the QuickSight console, navigate to Topics.
- Select the Security Hub topic that you created in the previous section.
- Under the Data tab, select the Named Entity subtab, and choose Add Named Entity.

Figure 15: Named entity subtab
- Enter
Security Findingsas the entity name. - Select the following datafields: Status, Metadata Product Name, Finding Info Title, Region, Severity, Cloud Account Uid, Time Dt, Compliance Status, and AccountId. The order of the fields helps Q to prioritize the data, so rearrange your data fields as needed.
Figure 16: Security hub finding names entity creation
- Choose Save in the top right corner to save your results.
- Repeat steps 1–6 with the CloudTrail dataset using the following datafields: API operation, Time Dt, Region, Status, AccountId, API Response Error, Actor User Credential Uid, Actor User Name, Actor User Type, Api Service Name, Actor Idp Name, Cloud Provider, Session Issuer, and Unmapped.
Figure 17: CloudTrail named entity creation
- Repeat steps 1–6 with the VPC Flow Log dataset using the following datafields: Src Endpoint IP, Src Endpoint Port, Dst Endpoint IP, Dst Endpoint Port, Connection Info Direction, Traffic Bytes, Action, Accountid, Time Dt, and Region.

Figure 18: VPC Flow log named entity creation


Create visualizations using natural language
After your topic is done indexing, you can start creating visualizations using natural language. In QuickSight, an analysis is the same thing as a dashboard, but is only accessible by the authors. You can keep it private and make it as robust and detailed as you want. When you decide to publish it, the shared version is called a dashboard.
To create visualizations:
- Open the QuickSight console and navigate to the Analysis tab.
- In the top right, select New analysis.
- Select the dataset you created previously, it will have the same naming convention as the Athena view. For reference, the Athena view query created a Security Hub dataset called
security_insights_security_hub_vw2. - Validate the information about the data set you’re going to use in the analysis and choose USE IN ANALYSIS.
- On the pop up, select the interactive sheet option and choose Create.
- For datasets that have a corresponding Q topic, which you created in a previous step, choose Build visual at the top of the screen.
Figure 19: Build visual using natural language
- Enter your prompt and choose BUILD. For example, enter
findings with product security hub group by control id include count. Q automatically generates a visualization.
Figure 20: Q response
- To add to your dashboard, choose ADD TO ANALYSIS to see your new visualization module in your current analysis.
- The supplied questions are targeted towards a Security Hub findings topic, where you can ask questions about your security hub findings data. For example,
show all Security Hub findings for critical severity for a specific resource or ARN. - If you use Amazon Inspector for software vulnerability management and you want to monitor top common vulnerabilities and exposures (CVEs) affecting your organization, choose Build visual and enter
show all ACTIVE findings with product inspector group by Title add countin the prompt. We used the keyword ACTIVE because ACTIVE is a finding state in Security Hub that indicates the finding is still active as per the finding source and Amazon Inspector has not closed the finding yet. If Amazon Inspector has closed the finding, the finding will have a state of ARCHIVED.
Figure 21: Q Response for an Amazon Inspector findings question
- After you add visualization to the analysis, you can customize it further using various QuickSight visualization options.
- To add the remaining datasets, which allows you to visualize data from multiple datasets in a single view, select the dropdown in the left navigation under Dataset.
- Select Add a new dataset.
- Search the name of the remaining datasets you created previously.
- Select anywhere on the name of the dataset to make the radial button blue for the single dataset you want to add. Choose Select.
- Repeat steps 7–12 in this section to add all the corresponding datasets you created previously.


Note: When you add additional datasets to the same Analysis and use Build visual to generate visualizations using natural language, the corresponding datasets with Q Topics are populated in the drop down under the prompt. Be sure to choose the correct dataset when asking questions.
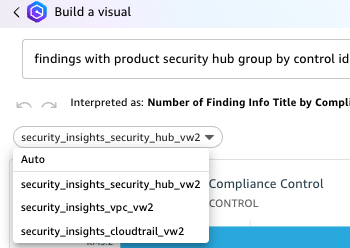
Figure 22: Choosing a QuickSight dataset
To create dashboards:
- After you’ve created the visual and are ready to publish the analysis as a dashboard, select PUBLISH in the top right corner.
- Enter a name for your dashboard.
- Choose Publish Dashboard.
- After your dashboard is published, your users can ask questions about the data through the dashboard as well. This dashboard can be shared with other users. Users with QuickSight Reader Pro licenses can ask questions using Amazon Q.
To ask questions using the dashboard:
- Navigate to the Dashboards section on the left navigation.
- Select the dashboard you previously published.
- Select Ask a question about [Topic Name] at the top of the screen. A module will open from the side of your screen. Questions can only be addressed to a single topic. To change the topic, select the name of the topic and a drop-down will appear. Select the name of the current topic to see other options and select the topic you want to ask a question about. For this example, select CloudTrailTopic.
Figure 23: Selecting a topic
- Enter a question in the prompt. For this example, enter
show top API operations in the last 24 hours with accessdenied.
Figure 24: CloudTrail question 1
- Enter
show all activity by user johndoe in the last 3 days.
Figure 25: CloudTrail question 2
- Q will automatically build a small dashboard based on the questions provided.
- Now change the topic to VPCFlowTopic as described in step 3.
- Enter
show me the top 5 dst ip by bytes for outbound traffic with dst port 443.
Figure 26: VPC Flow Log question


You can build executive summaries using QuickSight data stories, which also use generative AI. Data stories use Amazon Q prompts and visuals to produce a draft that incorporates the details that you provide. For example, you can create a data story about how a specific CVE affects your organization by asking Q questions, then add visuals from analyses you already created.
Conclusion
In this blog post, you learned how to use generative AI for your security use cases. We showed you how to use cross-account query access to allow a QuickSight visualization account to subscribe to Security Lake data for Security Hub findings, CloudTrail logs, and VPC Flow Logs. We then provided instructions for creating, Athena views, QuickSight datasets, Q topics, named entities, and for using natural language to build dashboards and query your data. You can customize the Athena views to create, update, or delete columns and column names as needed for your use case. You can also customize the Q topics and named entities to use naming conventions and structure responses based on your organization’s needs.
If you have feedback about this post, submit comments in the Comments section below. If you have questions about this post, contact AWS Support.
Comic for 2024.09.16 – Check On My Cat
Post Syndicated from Explosm.net original https://explosm.net/comics/check-on-my-cat
New Cyanide and Happiness Comic
Elizabeth Block | Beyond Vanity: The History and Power of Hairdressing | Talks at Google
Post Syndicated from Talks at Google original https://www.youtube.com/watch?v=hSy_SqQMYv0
Khadas Mind 2 Meteor Lake Edition Review
Post Syndicated from Patrick Kennedy original https://www.servethehome.com/khadas-mind-2-intel-meteor-lake-edition-review/
In our Khadas Mind 2 review, we see how the Intel Core Ultra 7 155H changes this mini PC’s capabilities, and what remains the same
The post Khadas Mind 2 Meteor Lake Edition Review appeared first on ServeTheHome.
Valkey 8.0.0 released
Post Syndicated from jzb original https://lwn.net/Articles/990490/
Version 8.0.0 of
the Valkey open-source in-memory data
store is now available. This is the first major release of Valkey
since the project forked from Redis in March of this year:
While this is a major version, Valkey takes command set compatibility
seriously: Valkey 8.0.0 makes no backwards incompatible changes to the
existing command syntax or their responses. Your existing tools and
custom software will be able to immediately take advantage of Valkey
8.0.0. Since Valkey 8.0.0 does make some small changes to previously
undefined behaviors, it’s wise to read
the release notes. Additionally, because this version makes changes in how the
software uses threading, you may want to re-evaluate your cluster’s
infrastructure to achieve the highest performance.
Amazon OpenSearch Service: Managed and community driven
Post Syndicated from Jon Handler original https://aws.amazon.com/blogs/big-data/amazon-opensearch-service-managed-and-community-driven/
I’ve always loved the problem of search. At its core, search is about receiving a question, understanding that question, and then retrieving the best answer for it. A long time ago, I did an AI robotics project for my PhD that married a library of plan fragments to a real-world situation, through search. I’ve worked on and built a commercial search engine from the ground up in a prior job. And in my career at AWS, I’ve worked as a solutions architect, helping our customers adopt our search services in all their incarnations.
Like many developers, I share a passion for open source. This stems partly from my academic background, where scholars work for the greater good, building upon and benefiting from previous achievements in their fields. I’ve used and contributed to numerous open source technologies, ranging from small projects with a single purpose to large-scale initiatives with passionate, engaged communities. The search community has its own, special and academic flavor, because search itself is related to long-standing academic endeavors like information retrieval, psychology, and (symbolic) AI. Open source software has played a prominent role in this community. Search technology has been democratized, especially over the past 10–15 years, through open source projects like Apache Lucene, Apache Solr, Apache License, 2.0 version of Elasticsearch, and OpenSearch.
It’s that context that makes me so excited that today the Linux Foundation announced the OpenSearch Software Foundation. As part of the creation of the OpenSearch Foundation, AWS has transferred ownership of OpenSearch to the Linux Foundation. At the launch of the project in April of 2021, in introducing OpenSearch, we spoke of our desire to “ensure users continue to have a secure, high-quality, fully open source search and analytics suite with a rich roadmap of new and innovative functionality.” We’ve maintained that desire and commitment, and with this transfer, are deepening that commitment, and bringing in the broader community with open governance to help with that goal.
There are two key points regarding this announcement: first, nothing is changing if you’re a customer of Amazon OpenSearch Service; second a lot is changing on the open source side, and that’s a net benefit for the service. We’re moving into a future that includes an acceleration in innovation for the OpenSearch Project, driven by deeper collaboration and participation with the community. Ultimately, that’s going to come to the service and benefit our AWS customers.
Amazon OpenSearch Service: How we’ve worked
Amazon’s focus from the beginning was to work on OpenSearch in the open. Our first task was to release a working code base with code import and renaming capabilities. We launched OpenSearch1.0 in July 2021, followed by renaming our managed service to Amazon OpenSearch Service in September 2021. With the launch of Amazon OpenSearch Service, we announced support for OpenSearch 1.0 as an engine choice.
As our team at Amazon and the community grew and innovated in the OpenSearch Project, we brought those changes to Amazon OpenSearch Service along with support for the corresponding versions. At AWS, we embraced open source by jointly publishing and discussing ideas, RFCs,and feature requests with the community. As time passed and the project progressed, we onboarded community maintainers and accepted contributions from various sources within and outside AWS.
As an Amazon OpenSearch Service customer, you’ll continue to see updates and new versions flowing from open source to our managed service. You’ll also experience ongoing innovation driven by our investment in growing the project, its community, and code base.
Today the OpenSearch project has significant momentum, with more than 700 million software downloads and participation from thousands of contributors and more than 200 project maintainers. The OpenSearch Software Foundation launches with support from premier members AWS, SAP, and Uber and general members Aiven, Aryn, Atlassian, Canonical, Digital Ocean, Eliatra, Graylog, NetApp® Instaclustr, and Portal26.
Amazon OpenSearch Service: Going forward
This announcement doesn’t change anything for Amazon OpenSearch Service. Amazon remains committed to innovating for and contributing to the OpenSearch Project, with a growing number of committers and maintainers. If anything, this innovation will accelerate with broader and deeper participation bringing more diverse ideas from the global community. At the core of this commitment is our founding and continuing desire to “ensure users continue to have a secure, high-quality, fully open source search and analytics suite with a rich roadmap of new and innovative functionality.” We plan to continue closely working with the project, contributing code improvements and bringing those improvements to our managed service.
This announcement doesn’t change how you connect with or use Amazon OpenSearch Service. OpenSearch Service will continue to be a fully managed service, providing OpenSearch and OpenSearch Dashboards at service-provided endpoints, and with the full suite of existing managed-service features. If you’re using Amazon OpenSearch Service, you won’t need to change anything. There won’t be any licensing changes or cost changes driven by the move to a foundation.
Amazon will continue bringing its expertise to the project, funding new innovations where our customers need them the most, such as cloud-native large scale distributed systems, search, analytics, machine learning and AI. The Linux Foundation will also facilitate collaboration with other open source organizations such as Cloud Native Computing Foundation (CNCF), which is instrumental for cloud-native, open source projects. Our goal will remain to solve some of the most challenging customer problems, open source first. Finally, given the open source nature of the product we think there’s a big opportunity and are excited to partner with our customers to solve their problems together, in code.
We’ve always encouraged our customers to participate in the OpenSearch Project. Now, the project has a well-defined structure and management with the governing board, and technical steering committee, each staffed with members from diverse backgrounds, both in and out of Amazon. The governing board will look after the project’s funding and management, the technical steering committee will take care of the technical direction of the project. This opens the door wider for you to directly participate in shaping the technology you’re using in our managed service. If you’re an Amazon OpenSearch Service customer, the project welcomes your contributions, big or small, from filing issues and feature requests to commenting on RFCs and contributing code.
Conclusion
This is an exciting time, for the project, for the community, and for Amazon OpenSearch Service. As an AWS customer, you don’t need to make any changes in use, and there aren’t any changes in the Apache License, 2.0 or the pricing. But, moving to the Linux Foundation will help bring the spirit of cooperation from the open source world to the technology and from there to Amazon OpenSearch Service. As search continues to mature, together we’ll continue to get better at understanding questions, and providing relevant results.
You can read more about the OpenSearch Foundation announcement on the AWS Open Source blog.
About the author
 Jon Handler is the Director of Solutions Architecture for Search Services at Amazon Web Services, based in Palo Alto, CA. Jon works closely with OpenSearch and Amazon OpenSearch Service, providing help and guidance to a broad range of customers who have search and log analytics workloads for OpenSearch. Prior to joining AWS, Jon’s career as a software developer included four years of coding a large-scale, eCommerce search engine. Jon holds a Bachelor of the Arts from the University of Pennsylvania, and a Master of Science and a Ph. D. in Computer Science and Artificial Intelligence from Northwestern University.
Legacy Ivanti Cloud Service Appliance Being Exploited
Post Syndicated from Bruce Schneier original https://www.schneier.com/blog/archives/2024/09/legacy-ivanti-cloud-service-appliance-being-exploited.html
CISA wants everyone—and government agencies in particular—to remove or upgrade an Ivanti Cloud Service Appliance (CSA) that is no longer being supported.
Welcome to the security nightmare that is the Internet of Things.
[$] Some 6.11 development statistics
Post Syndicated from corbet original https://lwn.net/Articles/989528/
The 6.11 kernel was released
on September 15 after a typical nine-week development cycle. This
release integrates 13,890 non-merge changesets, so it was a moderately busy
cycle, slightly more so that 6.10 was. With a new release comes a new round
of development statistics; read on for the details.
Introducing the APRA CPS 230 AWS Workbook for Australian financial services customers
Post Syndicated from Krish De original https://aws.amazon.com/blogs/security/introducing-the-apra-cps-230-aws-workbook-for-australian-financial-services-customers/
The Australian Prudential Regulation Authority (APRA) has established the CPS 230 Operational Risk Management standard to verify that regulated entities are resilient to operational risks and disruptions. CPS 230 requires regulated financial entities to effectively manage their operational risks, maintain critical operations during disruptions, and manage the risks associated with service providers.
Amazon Web Services (AWS) is excited to announce the launch of the AWS Workbook for the APRA CPS 230 standard to support AWS customers as they work to meet applicable CPS 230 requirements. The workbook describes operational resilience, AWS and the Shared Responsibility Model, AWS compliance programs, and relevant AWS services and whitepapers that relate to regulatory requirements.
This workbook is complementary to the AWS User Guide to Financial Services Regulations and Guidelines in Australia and is available through AWS Artifact.
As the regulatory environment continues to evolve, we’ll provide further updates regarding AWS offerings in this area on the AWS Security Blog and the AWS Compliance page. The AWS Workbook for the APRA CPS 230 adds to the resources AWS provides about financial services regulation across the world. You can find more information on cloud-related regulatory compliance at the AWS Compliance Center. You can also reach out to your AWS account manager for help finding the resources you need.
If you have feedback about this post, submit comments in the Comments section below. If you have questions about this post, contact AWS Support.
Rome’s Thermopylae
Post Syndicated from The History Guy: History Deserves to Be Remembered original https://www.youtube.com/watch?v=iff5hEk99x4
Security updates for Monday
Post Syndicated from jake original https://lwn.net/Articles/990455/
Security updates have been issued by Debian (git, nodejs, and ring), Fedora (apr, bubblewrap, chromium, clamav, flatpak, mingw-expat, python3-docs, python3.12, and thunderbird), Mageia (assimp, botan2, python-tqdm, and radare2), Slackware (libarchive), and SUSE (curl).
The European Astro Pi Challenge 2024/25 launches today
Post Syndicated from Fergus Kirkpatrick original https://www.raspberrypi.org/blog/the-european-astro-pi-challenge-2024-25-launches-today/
Registration is now open for the European Astro Pi Challenge 2024/25! The Astro Pi Challenge, an ESA Education project run in collaboration with us here at the Raspberry Pi Foundation, offers young people the incredible opportunity to write computer programs that will run in space.
Young people can take part in two exciting missions for beginners and more experienced coders, and send their code to run on special Raspberry Pi computers, called Astro Pis, on board the International Space Station (ISS).
Meet the new Astro Pi ambassador, Sławosz Uznański


We are delighted that new ESA project astronaut Sławosz Uznański will be the ambassador for this year’s Astro Pi Challenge. Sławosz, born in Poland in 1984, has a background in space systems engineering and has conducted research in radiation effects. He recently served as the Engineer in Charge of CERN’s largest accelerator, the Large Hadron Collider.
Mission Zero: Send your pixel art into space
In Mission Zero, young people create beautiful pixel art to display on the Astro Pis’ LED screens. This mission requires no prior experience of Python coding, and it can be completed in around an hour.
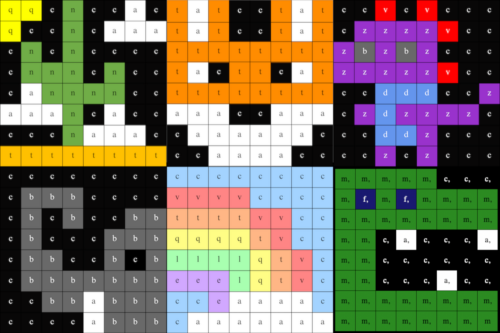
To take part, young people design and code pixel art inspired by nature on Earth and beyond, to display on the Astro Pi computers for the astronauts on the ISS to see as they go about their daily tasks.
Using our step-by-step Mission Zero project guide, young people will learn to create simple Python programs in which they will code with variables and use the colour sensors on the Astro Pis to change the background colour in their images. To help your teams create their designs, check out the examples from teams that took part in Mission Zero in 2023/24 in the project guide.

Young people can create their Mission Zero programs individually or in teams of up to 4 people, and this year, we have added a save function for young people as they code. This will make it easier for mentors to run Mission Zero over more than one session, and also means that young people can finish their projects at home. They will need to use your classroom code and their team name to load their saved projects.
Mission Space Lab: Calculate the speed of the ISS
Mission Space Lab asks teams to solve a real-world scientific task in space. It is ideally suited to young people who would like to learn more about space science and stretch their programming skills.
In Mission Space Lab this year, the task for teams of 2 to 6 young people is to calculate the speed at which the International Space Station is travelling — as accurately as possible. Teams need to write a Python program that:
- Collects data from the Astro Pi computers’ sensors or cameras about the orientation and motion of the ISS as it orbits the Earth, and
- Uses this data to calculate the travel speed

This year we have created a new way for teams to test their programs, with an online version of the Astro Pi Replay tool. All teams need to do is select their program and run it in Astro Pi Replay, which will create a real-time simulation of the program running on the ISS, using historical data and images. Astro Pi Replay will also show program outputs and report errors. This means teams can code their program in their preferred code editor, then test with an internet browser. However, if they wish, teams can still run the Astro Pi Replay tool offline with Thonny.
Important dates for your diary
- 16 September 2024: Registration is now open for Mission Zero and Mission Space Lab!
- 24 February 2025: Mission Space Lab submissions close
- 24 March 2025: Mission Zero submissions close
- April–May 2025: Astro Pi programs run on the International Space Station
- June 2025: Astro Pi teams receive their certificates
Register today
Both missions are open to young people up to age 19 from eligible countries — all ESA Member States and beyond. To find out more and register, visit astro-pi.org.
Look out for updates and resources being shared on the Astro Pi website, including a Mission Zero video codealong and Mission Space Lab live streams. You can also keep up-to-date with all the Astro Pi news on the Astro Pi X account, our Facebook, LinkedIn, and Instagram, or by signing up to the newsletter at astro-pi.org.
We can’t wait to see your programs!
The post The European Astro Pi Challenge 2024/25 launches today appeared first on Raspberry Pi Foundation.
S5 E9: Iran Deal, Michael Cohen & Ryan Zinke: Last Week Tonight with John Oliver
Post Syndicated from LastWeekTonight original https://www.youtube.com/watch?v=vlZtWCKLA9Y
S5 E10: Rudy Giuliani, Russel Crowe & West Virginia: Last Week Tonight with John Oliver
Post Syndicated from LastWeekTonight original https://www.youtube.com/watch?v=pDpjyf-6oI8
S5 E20: Astroturfing, Unite the Right & Saudi Arabia: Last Week Tonight with John Oliver
Post Syndicated from LastWeekTonight original https://www.youtube.com/watch?v=q1bb2ZljRtc
S5 E12: Rehab, Royal Wedding & North Korea: Last Week Tonight with John Oliver
Post Syndicated from LastWeekTonight original https://www.youtube.com/watch?v=yD3M3DYGQIk
S5 E24: Brett Kavanaugh, the UN & Gritty: Last Week Tonight with John Oliver
Post Syndicated from LastWeekTonight original https://www.youtube.com/watch?v=rBxhqRqdP-8
S5 E25: Brazil Elections, Trump Tax Fraud & Kavanaugh: Last Week Tonight with John Oliver
Post Syndicated from LastWeekTonight original https://www.youtube.com/watch?v=iQNr5dnK7Y4