Post Syndicated from The Atlantic original https://www.youtube.com/shorts/lzLyyHVAXsg
Building a serverless AI assistant at Pelago: concept to care in two weeks
Post Syndicated from Anton Aleksandrov original https://aws.amazon.com/blogs/architecture/building-a-serverless-ai-assistant-at-pelago-concept-to-care-in-two-weeks/
Healthcare organizations face a critical scaling challenge – how to maintain deeply personalized patient interactions as member bases grow, without overwhelming care teams or compromising quality. At Pelago, a digital health company specializing in substance use disorder support, the engineering team found a way to build an AI-powered solution to address this challenge using AWS services in just two weeks.
In this post, you will learn how Pelago used AWS serverless and AI services, such as Amazon Bedrock and AWS Lambda, to build and deploy an event-driven AI assistant. The result is a service that generates contextually aware suggested considerations for the care team. This system preserves the human-in-the-loop oversight that healthcare demands while removing months of traditional development work and overhead of managing complex infrastructure.
The challenge overview
Pelago is a digital clinic for substance use treatment that provides comprehensive support including 1:1 coaching, medication management, and behavioral therapy. It serves members across the US to support recovery journeys for alcohol, tobacco, stimulants, cannabis, and opioid use disorder, and adjacent behaviors often associated with substance use. The Pelago care team coaches members through substance use recovery. A single coach may hold active conversations with dozens of members at once. Each message a coach sends needs to reflect weeks of prior context and drafting that response manually from scratch takes time the care team doesn’t always have.
When the Pelago engineering team set out to build an AI assistant for the care team, they faced a set of interconnected constraints. Behavioral health conversations build over weeks and months. Coaches need to account for that history in every reply. An AI assistant that only understands the most recent messages isn’t useful here – it must grasp the full long-term conversation history. That depth of context is also why human oversight is non-negotiable. The system had to generate suggestions for Pelago’s care team, not automated responses. Every piece of feedback must be read, evaluated, and adapted by a human coach before it reaches a member.
Protected Health Information (PHI) requirements added another layer of complexity – data could not leave Pelago’s AWS environment. All AI integrations must operate entirely within existing Amazon Virtual Private Cloud (VPC) infrastructure with no exposure to the public internet.
Beyond compliance and clinical safety, there were also practical constraints. Care team members need information the moment they open a conversation but generating relevant content processing dozens, sometimes hundreds, of prior messages through a large language model. A long wait was not acceptable when coaches open dozens of conversations per shift.
The engineering team needed to deliver all this quickly with full audit trails and security controls in a highly regulated environment. They had to solve the problem of pre-generating contextual suggestions without blocking the user experience while maintaining the compliance posture.
Solution design: Event-driven serverless architecture
The Pelago team separated concerns using event-driven architecture. The care team needed suggested responses instantly when accessing the system but generating them synchronously in real-time blocked the user experience for tens of seconds because of LLM processing time. By treating each incoming member message as an asynchronous event, the system can fan out processing to independent consumers without coupling them to the message delivery path. A new consumer, such as the AI assistant, can be added without affecting existing components or code. And because each processing step runs in its own Lambda function, a spike in inference requests doesn’t affect message delivery or processing.
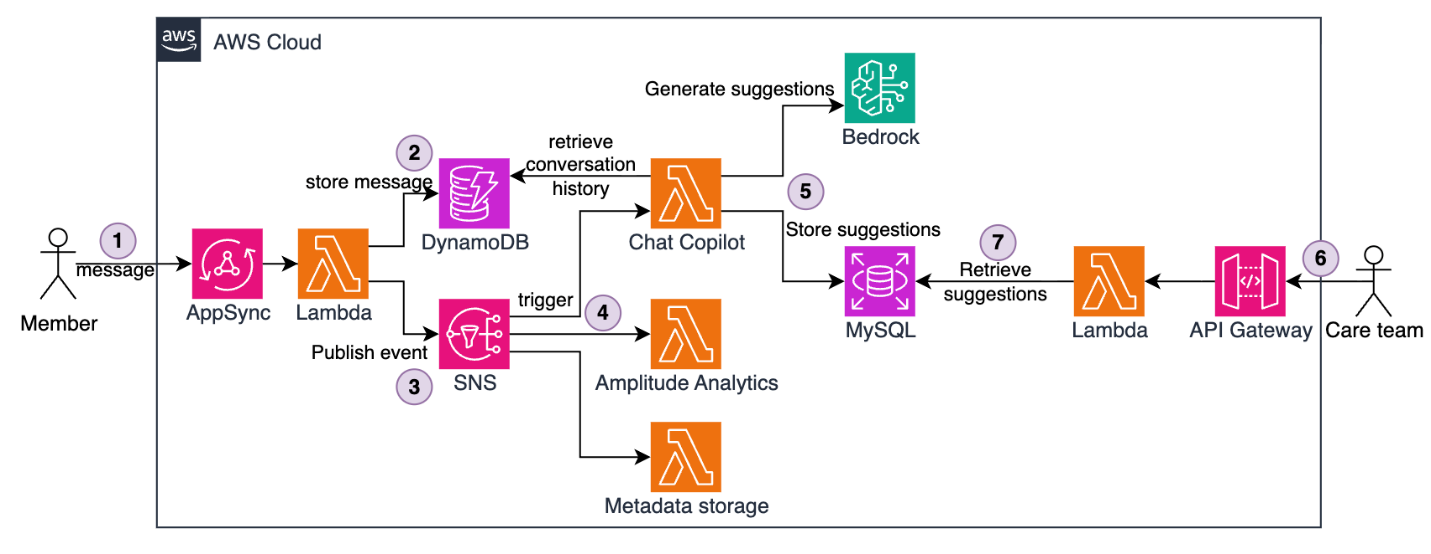
Figure 1 — The full end-to-end solution architecture
The architecture uses Amazon Simple Notification Service (Amazon SNS) for message fanout and Lambda functions for processing. Here’s how it works:
- Members send messages through AWS AppSync, forwarded to a Lambda function.
- The Lambda function stores messages in an Amazon DynamoDB table.
- The Lambda function publishes messages to an SNS topic.
- SNS fans out messages to multiple Lambda subscriber functions, such as Metadata storage, Amplitude analytics, and Chat assistant responsible for AI-based suggested message generation.
- The Chat Assistant Lambda runs asynchronously. It retrieves the full conversation history from DynamoDB, invokes Amazon Bedrock to generate contextual suggestions, and stores the result in MySQL hosted on Amazon Relational Database Service (Amazon RDS). This flow happens in the background without blocking user experience and typically completing in under 10 seconds.
- When a care team member opens a conversation (often minutes or hours later), the request flows through Amazon API Gateway.
- A Lambda function retrieves pre-generated suggestions from MySQL.
- The front end displays the suggestion in under 100 milliseconds.
This pattern keeps message delivery, analytics, and AI generation decoupled. Each member’s PHI is processed separately and stays fully within the Pelago AWS boundary. A failure or spike in feedback generation for one member does not disrupt or impact processing for other members.
Because inference happens asynchronously in the background, the care team does not wait for LLM processing. Suggested messages are pre-generated, stored, and ready to use when a coach opens a conversation. This keeps retrieval times under 100 milliseconds regardless of how long the AI generation took.
This serverless architecture also provides organic scaling. Each Lambda function automatically scales horizontally based on current traffic – scaling up during spikes and back down when demand drops, with no pre-provisioning or scaling configuration required. Adding a new event-driven downstream capability, like the AI assistant itself, requires only a new SNS subscription with no changes to existing message-publishing or handling code.
Event-driven fanout with Amazon SNS
The foundation of the Pelago chat architecture is an SNS topic that acts as a message bus for conversation events. SNS is a fully managed pub/sub messaging service. When a message is published to a topic, SNS automatically delivers it to subscribed consumers in parallel. This means a single incoming message can trigger multiple independent processing steps simultaneously.
When a user or coach sends a message, the system publishes a standardized payload to the SNS topic, for example:
SNS delivers this event to four Lambda function subscribers. The Metadata Storage Lambda writes message metadata to MySQL for reporting. The Analytics Lambda sends events to Amplitude for product analytics. The Push Notification Lambda triggers mobile notifications for coaches. The Chat Assistant Lambda generates Assistant-based suggestions using Amazon Bedrock.
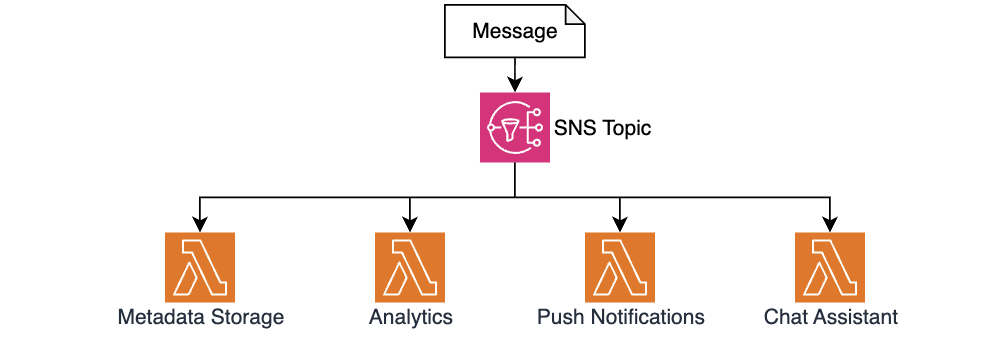
Figure 2 — Using SNS for message fan-out and decoupled processing
This fanout pattern allowed the Pelago team to add the AI Chat Assistant feature with zero changes to existing message-handling code. The team simply created a new Lambda function and added it as an SNS subscription. The publisher doesn’t need to know how many consumers exist or what they do, so new capabilities can be built and deployed independently without risking regressions in the message processing path.
Async AI generation with Amazon Bedrock
The Chat Assistant Lambda handles computationally expensive AI generation. The function implements a multi-step workflow:
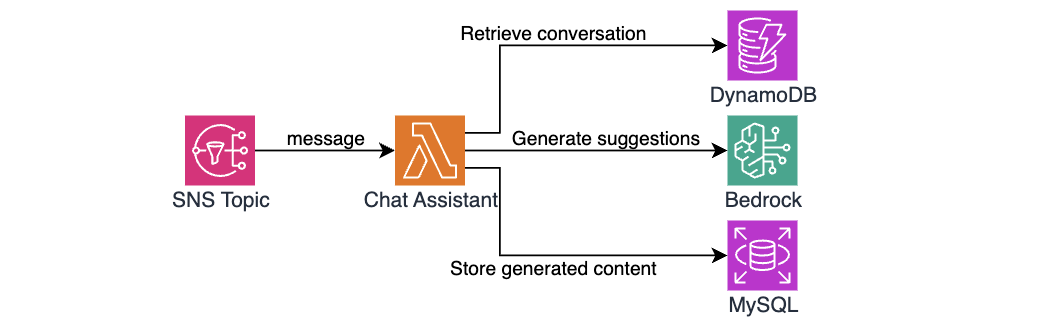
Figure 3 — The chat assistant architecture and workflow
The first step is to retrieve conversation history. Behavioral health conversations can span dozens or even hundreds of messages over weeks, and the AI assistant needs all that context to generate a useful suggestion to Pelago’s care team. The function queries DynamoDB for previous messages in the conversation. The DynamoDB single-digit millisecond read performance means even lengthy conversations (50+ messages) are typically retrieved in under 20ms.
The next step is to prepare and format context for inference. The function transforms the retrieved messages structure into a conversation history format that provides Amazon Bedrock with full context, for example:
After formatting the conversation, the Lambda function uses the Amazon Bedrock Runtime API to invoke Claude models. The prompt engineering focuses on empathy and validation – it helps the model acknowledge what the member is feeling rather than jumping to advice. It is tuned to maintain contextual continuity – picking up things the member mentioned in earlier messages instead of treating each exchange without prior context. It also steers the model away from false optimism or dismissive language and keeps suggestions short, more like a text message than an email. This matches how coaching conversations flow on the application.
Measuring system performance and business impact
This entire flow, from SNS trigger to a suggestion stored in MySQL, typically completes in less than 4 seconds, well within acceptable processing time. When a care team member opens a conversation on the dashboard, the front end instantly retrieves pre-generated suggested messages. Total response time perceived by the care team is under 100 milliseconds.
The Pelago team went from technical designs to first production deployment in 2 weeks. Two days on architecture and model selection with the clinical team, three days building the core Lambdas, three days on integration testing and prompt refinement, and two final days on deployment and monitoring.
The system delivered strong early results. From the business perspective, response preparation times dropped 40% on average, and the care team rated 79.6% of AI suggestions as helpful, based on internal Pelago measurements. Operationally, using serverless services introduced no new overhead. There was no new infrastructure to manage, servers to patch, or scaling configurations to maintain. The architecture successfully handled an 8x message volume spike during a seasonal campaign without configuration changes.
Implementation details and key decisions
With the core event-driven architecture in place, the Pelago team made several implementation choices to satisfy healthcare industry requirements, handle traffic patterns unique to the application, and maintain reliability across the system.
PHI must stay secured
Pelago uses multiple AWS security features to maintain HIPAA eligibility while using AI models. One requirement is for PHI to never traverse the public internet. To address this, the Pelago team uses VPC endpoints for Amazon Bedrock, so model invocations stay within the private network. The Boto3 client in the Python Lambda automatically routes traffic through the private endpoint. Data is encrypted at rest on DynamoDB and RDS, service communications use TLS 1.2+, and IAM policies are scoped with least-privilege permissions to specific resource actions and ARNs. Audit logs of model invocations are emitted to Amazon CloudWatch and capture message IDs only, not content.
Polyglot cross-runtime implementation
The team used Python for Lambda functions that invoke Amazon Bedrock models. Boto3 native Amazon Bedrock support and simpler string manipulation made Python the right choice for building and iterating on prompts. The retrieval function is written in TypeScript to stay consistent with most of the Pelago backend code and to reuse shared libraries and Zod schemas for type-safe API contracts. This split let the team use the best language for each job without forcing a single runtime across the entire system.
Spiky traffic and pay-per-invocation compute
The Pelago application serves heavily US-based traffic. Message volume concentrates during weekday working hours, with peak hours seeing 10x or more the volume of quiet periods. The pay-per-invocation model of Lambda fits this well. During a Monday morning surge, Lambda scales out automatically with no pre-provisioning required. During off-peak hours, Lambda functions automatically scale down, so Pelago avoids idle compute costs. Using alternative long-lived compute would mean either over-provisioning for peak load or maintaining auto scaling policies that can lag during sudden spikes. With Lambda, the solution costs are directly proportional to member engagement with no idle cost.
Picking the right storage and handling idempotency
The team chose to use DynamoDB for conversation messages and MySQL for assistant suggestions based on different access patterns of each scenario. Conversation messages require high write throughput (100+ writes/sec at peak), single-digit millisecond reads, and automatic scaling. These requirements made DynamoDB a good fit. Assistant suggestions have a lighter write load (10-20 writes/sec) but need structured queries, foreign key relationships, and nested analytics joins that a relational database supports naturally.
Because SNS can deliver messages more than once, the Chat Assistant Lambda checks MySQL for an existing message before generating a new one. This idempotency check helps prevent duplicate Amazon Bedrock invocations, which would waste compute and could surface conflicting suggestions to coaches. If an Amazon Bedrock invocation fails because of throttling or model unavailability, the function logs the error without blocking message flow. A built-in retry mechanism handles transient failures, so suggestions are eventually generated even when Amazon Bedrock experiences momentary capacity constraints.
Monitoring and observability
The team tracks multiple business and operational metrics. CloudWatch metrics capture suggestion generation latency, which helps the team identify when model response times exceed acceptable thresholds. Retrieval rate measures what percentage of generated message suggestions are used by coaches. This gives insights into how well the async timing aligns with real usage patterns. The system also allows coaches to rate each suggestion with thumbs up or down. These ratings are stored in MySQL for future prompt tuning and model evaluation. CloudWatch alarms monitor error rates for Amazon Bedrock throttling and database connection failures. These alarms alert the engineering team before operational issues impact the care team experience.
Conclusion
Managed AI services like Amazon Bedrock and serverless architectures let healthcare organizations move quickly while maintaining compliance controls. The Pelago chat assistant shows what’s possible when you combine serverless event-driven processing with async AI generation and fast synchronous retrieval. The key patterns that made this work are SNS fanout to decouple processing and make new features straightforward to add, pre-generating message suggestions asynchronously so the care team does not wait, VPC endpoints to keep PHI off the public internet, and starting with foundation models and prompt engineering instead of spending months on custom model training.
The Pelago journey from concept to production deployment shows how small engineering teams in regulated industries can balance moving fast and maintaining their compliance posture.
Useful links
- Serverless patterns and architectures.
- Getting started with Amazon Bedrock.
- Getting started with AWS Lambda.
About the authors
[$] Save and restore may be coming to GNOME
Post Syndicated from jzb original https://lwn.net/Articles/1083750/
One of the features that users often miss when moving from X11 to Wayland is
the ability to save and restore the position of windows between sessions. At GUADEC 2026, held in
A Coruña, Spain, Adrian Vovk provided an overview of work that has gone
into providing a platform-wide save and restore framework for GNOME. After two
failed attempts at landing an API, he believes that the third try will be the
one to succeed—though not in time for the upcoming GNOME 51 release
due in October.
PyPI now rejects new files after 14 days
Post Syndicated from jzb original https://lwn.net/Articles/1084218/
Python Software Foundation security developer-in-residence Seth
Larson has announced
that the Python Package Index (PyPI) will now reject new files that
are uploaded to releases older than 14 days. The restriction is to
prevent the poisoning of old releases if publishing tokens or
workflows of PyPI projects are compromised.
The discussion
of this behavior began during PEP 740 (Digital Attestations) back in January
2024. The discussion was restarted
in March 2026 after the popular packages LiteLLM
and Telnyx were compromised. These packages were compromised due to a “mutable
reference” in these projects’ usage of the Trivy GitHub Action.Originally the discussion stalled due to some projects depending on this behavior
to add support for new Python versions to already-published releases. To quantify how
disruptive this change would be to existing workflows, the PyPI database was queried
for projects
that have published new files to old releases (bucketed by number of days since
the release). Later, specificallycp314wheels were queried for the top
15,000 packages, revealing that only
56 projects of 15,000 had published a 3.14-compatible wheel more than 14 days
after a release was available.
LWN covered the LiteLLM compromise
in March.
S9 E11: Alabama Trans Youth Ban & Utilities: Last Week Tonight with John Oliver
Post Syndicated from LastWeekTonight original https://www.youtube.com/watch?v=hWNhI74-Z2A
Best RAW Converter: Adobe vs Capture One vs Phocus
Post Syndicated from Matt Granger original https://www.youtube.com/watch?v=8FDBCgxbs0U
[$] Attaching programs to multiple tracepoints
Post Syndicated from daroc original https://lwn.net/Articles/1082948/
Tracepoints in the kernel are useful for a variety of purposes: debugging,
active monitoring, and performance measurements, among other things. Previously,
any given BPF program could only be attached to a single tracepoint.
Jiri Olsa has been working to change that, and led a discussion about
his progress at the 2026
Linux Storage, Filesystem, Memory-Management, and BPF
Summit. That work has since been
merged, and can be expected as part of the 7.2
kernel.
Why Are Groceries So Expensive? | The David Frum Show
Post Syndicated from The Atlantic original https://www.youtube.com/watch?v=kAAxywku108
Security updates for Wednesday
Post Syndicated from jzb original https://lwn.net/Articles/1084210/
Security updates have been issued by AlmaLinux (389-ds-base, c-ares, dovecot, freerdp, glib2, gstreamer1-plugins-good, gstreamer1-plugins-ugly-free, hplip, kernel, kernel-rt, nodejs:22, perl-XML-LibXML, webkit2gtk3, and yggdrasil), Debian (kernel, nss, roundcube, rtpengine, and xz-utils), Fedora (btrbk, kernel, mupdf, nuclei, perl-Crypt-OpenSSL-X509, rust-fern, rust-ifcfg-devname, rust-routinator, rust-rpki, and rust-syslog), Mageia (tig), Oracle (.NET 10.0, .NET 8.0, .NET 9.0, acl, dovecot, glib2, httpd, libtiff, pacemaker, perl-IO-Compress, plexus-utils, python3, and webkit2gtk3), Slackware (libssh and mozilla-firefox), SUSE (acl, avahi, aws-nitro-enclaves-cli, beets, chromium, firefox, go1.25-openssl, ImageMagick, iscsiuio, kernel, kubevirt1.8-container-disk, libgit2-1_9, libkrun, libsoup-3_0-0, nghttp2, opam, php7, python-aiohttp, python-tornado6, and vim), and Ubuntu (accountsservice, CUPS, imagemagick, jbig2dec, openssh, and snapd).
Building multi-Region resiliency for AWS CloudFormation custom resource deployment
Post Syndicated from Raman Pujani original https://aws.amazon.com/blogs/architecture/building-multi-region-resiliency-for-aws-cloudformation-custom-resource-deployment/
AWS CloudFormation is the foundational tool of infrastructure-as-code for thousands of organizations running workloads on AWS. But as teams push the boundaries of what CloudFormation can do natively, custom resources have emerged as a powerful extension mechanism that unlocks a broad range of possibilities. Yet, when it comes to building resilient, multi-Region deployments with custom resources, customers quickly discover a gap: there is no built-in multi-Region support. In this post, we will explore that challenge and go over a robust active-active architecture that solves it.
A CloudFormation custom resource allows you to write custom provisioning logic that AWS CloudFormation invokes during stack operations (Create, Update, or Delete). When CloudFormation encounters a custom resource in a template, it sends a lifecycle event to a target, typically an AWS Lambda function through an Amazon Simple Notification Service topic. CloudFormation waits for a response with a presigned URL, and then proceeds or rolls back based on that response.
Customers use Custom Resources for a wide variety of use cases, including:
- Third-party API integrations to provision resources in external systems (for example, DNS providers, SaaS providers) as part of a CloudFormation stack.
- Complex initialization logic for seeding databases, generating secrets, or bootstrapping configurations that CloudFormation doesn’t natively support.
- Cross-account or cross-service orchestration for triggering workflows in other AWS accounts or services during stack lifecycle events.
- Custom validation and compliance checks enforcing organizational policies before a stack is allowed to complete.
- Resource types not yet supported natively for bridging the gap until AWS adds first-class support.
In short, Custom Resources turn CloudFormation into a fully extensible orchestration engine instead of only an AWS resource provisioner.
While single-Region deployments can achieve high resilience, multi-Region architectures become essential for organizations that need to meet specific business requirements. These include stringent disaster recovery objectives, data residency mandates, latency-sensitive use cases across geographies, and mission-critical business continuity needs. However, when it comes to CloudFormation Custom Resources, multi-Region design introduces a set of hard problems that CloudFormation does not solve natively:
- No native fan-out mechanism: CloudFormation stacks in different Regions each trigger their own custom resource events independently. There is no built-in way to coordinate these events across Regions.
- Duplicate execution risk: If you deploy the same Lambda function handler in multiple Regions to achieve redundancy, both instances may process the same event. This can lead to duplicate side effects (for example, creating the same record twice in a database or calling an external API multiple times).
- No distributed locking: CloudFormation provides no mechanism to verify that only one handler processes a given event, even when multiple handlers are active.
- No automated failover: If the primary Region’s Lambda function handler fails, there is no built-in mechanism to automatically route the event to a secondary Region.
- Idempotency is your problem: Helping verify that retries and failover scenarios don’t cause unintended duplicate operations is entirely the responsibility of the developer.
Until now, these gaps meant that teams either accept the risk of single-Region custom resource handlers (a reliability concern) or build complex, bespoke solutions to handle multi-Region scenarios.
Walkthrough
Prerequisites
- AWS account with administrator access.
- Basic understanding of AWS services including CloudFormation, AWS Lambda, Amazon DynamoDB, Amazon Simple Queue Service (Amazon SQS), Amazon Simple Notification Service (Amazon SNS), AWS Identity and Access Management (IAM), Amazon CloudWatch, and Amazon Application Recovery Controller.
- AWS Command Line Interface (AWS CLI), Bash or PowerShell.
- Access to minimum two AWS Regions required.
Solution approach
This proposed architecture delivers an active-active multi-Region solution for CloudFormation custom resource processing. It is designed around four core principles:
- Active-Active processing: Both the primary Region (us-east-1) and secondary Region (us-west-2) are always live and capable of handling events.
- No duplicate execution: A DynamoDB Global Table-based distributed locking mechanism helps verify that only one Region processes any given event, regardless of which Region receives it first.
- Idempotency mechanism: Every request is tracked by state, so retries and failover scenarios are designed to avoid duplicate side effects.
- Fully automated failover: Amazon Application Recovery Controller detects failures and triggers failover without manual intervention.
This architecture avoids the single points of failure inherent in single-Region custom resource designs while preventing the duplicate processing risks of naive multi-Region approaches. This architecture is ideal for mission-critical workloads where regional failures cannot be tolerated.
The following section provides a detailed walkthrough of how this architecture processes a CloudFormation lifecycle event from end to end.
This architecture diagram describes a multi-Region CloudFormation custom resource architecture operating in an Active-Active configuration. It handles CloudFormation lifecycle events (Create/Update/Delete) with high availability and no duplicate processing across multiple AWS Regions. The architecture uses a central primary Region (us-east-1) and a secondary Region (us-west-2) to process custom resource events, with Amazon DynamoDB Global Tables providing distributed locking and idempotency, and Amazon Application Recovery Controller providing automated failover. Customer AWS Regions fan out events simultaneously to both infrastructure Regions, supporting resilience even if the primary Region fails.
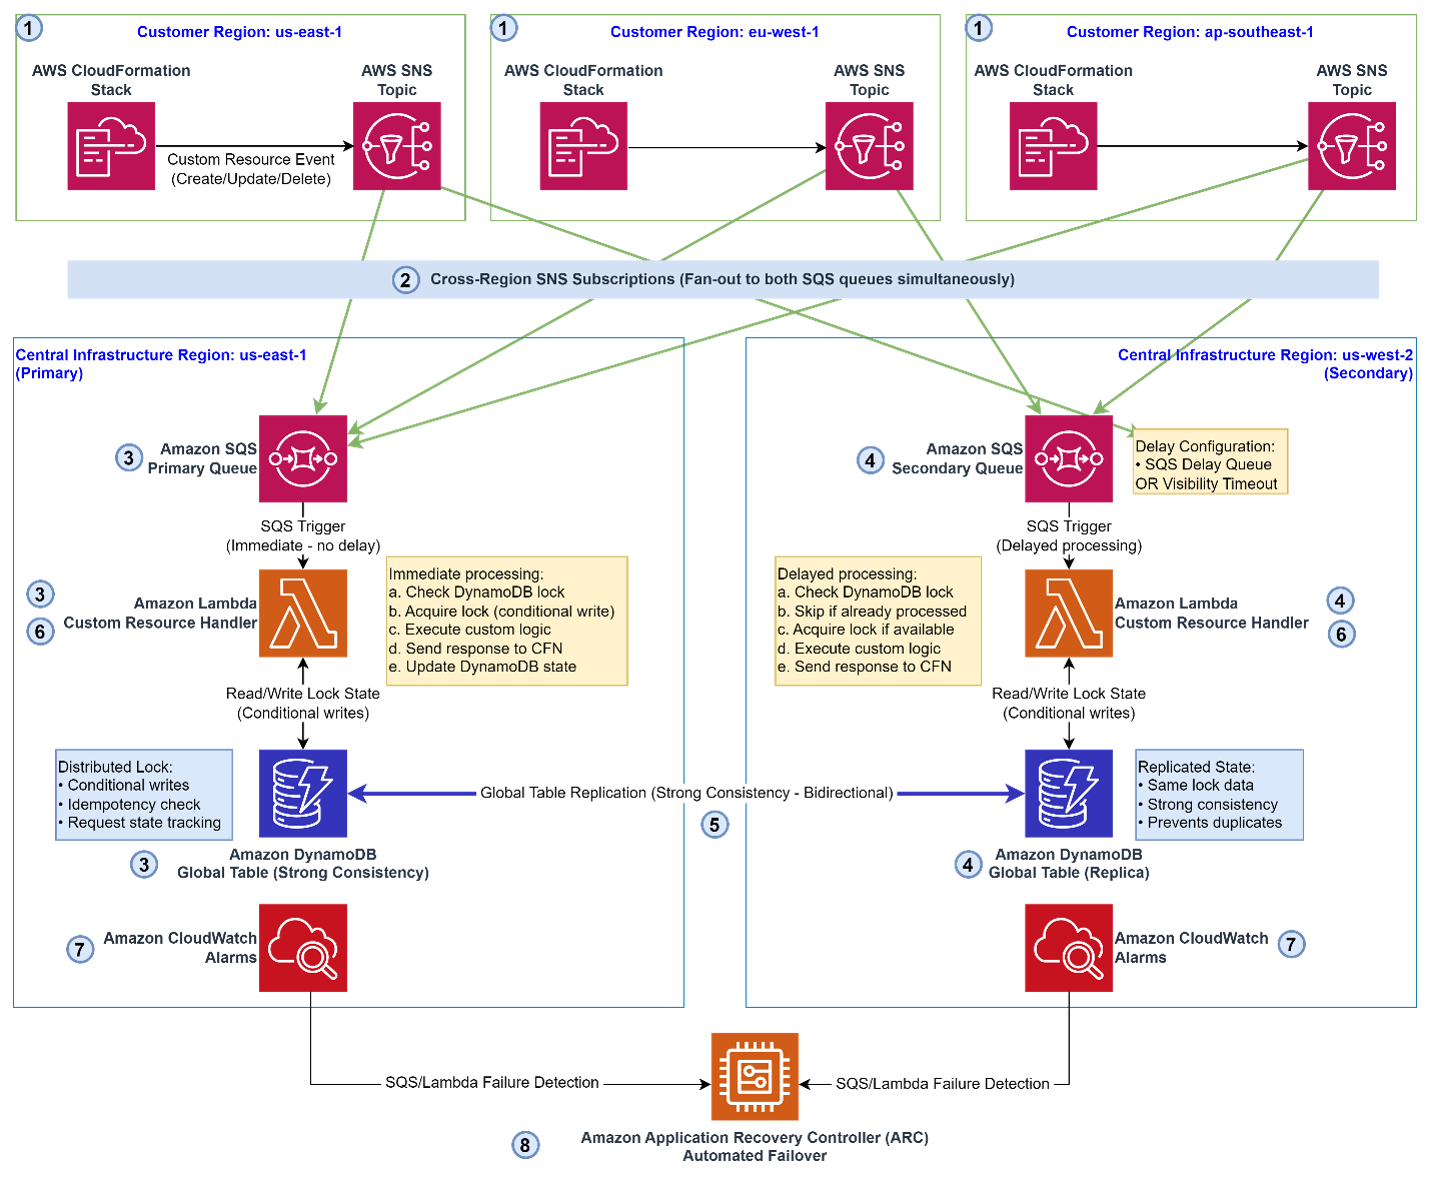
Step 1: Event initiation (Customer Regions)
A CloudFormation Stack in one of the customer Regions (us-east-1, eu-west-1, or ap-southeast-1) initiates a Create, Update, or Delete lifecycle event. Along with the event payload, CloudFormation generates a presigned response URL that the handler must call to signal success or failure. This event is published to a local Amazon Simple Notification Service (SNS) topic within that customer Region.
Step 2: Cross-Region fan-out with SNS subscriptions
The Amazon SNS topic is configured with cross-region subscriptions that simultaneously fan out the event to two Amazon SQS queues in the central infrastructure AWS Regions:
- Primary SQS queue: Central Infrastructure Region: us-east-1.
- Secondary SQS queue: Central Infrastructure Region: us-west-2.
Both queues receive the event at the same time, setting up the Active-Active processing model.
Step 3: Primary Lambda function handler (Immediate processing)
The Primary SQS queue triggers the Primary Lambda Custom Resource Handler immediately, with no delay. The Lambda function executes the following steps:
- Check the DynamoDB Global Table for an existing lock on this request.
- Acquire the lock by using a conditional write (only succeeds if no lock exists, preventing race conditions).
- Execute the custom resource business logic.
- Send a SUCCESS or FAILED response back to CloudFormation using the presigned URL.
- Update the DynamoDB state to mark the request as fully processed.
Step 4: Secondary Lambda function handler (Delayed processing)
The Secondary SQS queue is configured with a delay, implemented by using either an SQS Delay Queue or a Visibility Timeout. After this delay, the Secondary Lambda Custom Resource Handler runs:
- Check the DynamoDB Global Table Replica for an existing lock.
- Skip processing if the primary has already handled the request (idempotency check).
- Acquire the lock if the primary has not yet processed it (failover scenario).
- Execute the custom resource logic if the lock was successfully acquired.
- Send the response to CloudFormation.
The delay is intended to give the primary Region time to process the event first. The secondary only takes over if the primary has not completed processing within the delay window.
Step 5: DynamoDB Global Tables: Distributed locking and idempotency
Amazon DynamoDB Global Tables are the backbone of coordination in this architecture. Both Regions read from and write to the Global Table with strong consistency. The table tracks:
- Lock state: Which Region holds the lock for a given request.
- Idempotency records: Whether a request has already been processed.
- Request state: The full lifecycle status of each event.
Bidirectional replication is designed to help maintain both Regions with the latest state, supporting the lock mechanism’s reliability despite network partitions or regional degradation.
Step 6: CloudFormation response
After either the primary or secondary Lambda function handler completes processing, CloudFormation receives the SUCCESS or FAILED callback using the pre-signed URL. Based on this response, CloudFormation either continues the stack operation or initiates a rollback.
Step 7: Amazon CloudWatch monitoring
Amazon CloudWatch alarms continuously monitor SQS queue depth and Lambda execution health in both Regions. These alarms serve as the early warning system for the automated failover mechanism.
Step 8: Automated failover with ARC
If the primary Region (us-east-1) experiences a failure, CloudWatch detects it and triggers Amazon Application Recovery Controller to initiate automated failover to the secondary Region (us-west-2). No manual intervention is typically required. The secondary Region is designed to take over processing responsibilities.
Clean up
Delete resources created using the following AWS services in every Region to avoid additional costs:
- ARC.
- SNS topic.
- SQS queue/messages.
- DynamoDB table.
- Lambda code.
- CloudWatch Log Groups.
- IAM roles.
- CloudFormation (if used for automation).
- Any other AWS service used for customizing your deployment.
Conclusion
CloudFormation Custom Resources are an indispensable tool for teams building sophisticated infrastructure automation on AWS. However, the lack of native multi-Region support has long been a barrier to building truly resilient custom resource architectures.
This architecture addresses the major challenge directly:
- Resilience: Active-Active design means no single Region is a bottleneck or single point of failure.
- Correctness: Amazon DynamoDB distributed locking and idempotency designed to eliminate duplicate processing.
- Automation: Amazon Application Recovery Controller-driven failover removes the need for manual intervention during regional outages.
- Scalability: The fan-out model with SNS cross-Region subscriptions supports multiple customer Regions simultaneously.
For teams operating at scale across multiple AWS Regions, this architecture provides a blueprint for extending the power of CloudFormation without sacrificing reliability. Whether you’re managing compliance-driven multi-Region deployments or building for global high availability, this pattern gives you a foundation for resilient custom resource processing.
Call to action
Refer to the following content to learn more about relevant AWS services:
- Managing resources using AWS CloudFormation Resource Types
- Build resilient applications with Amazon DynamoDB global tables: Part 1
- Build resilient applications with Amazon DynamoDB global tables: Part 2
- Building Distributed Locks with the DynamoDB Lock Client
- Introducing Amazon Application Recovery Controller Region switch: A multi-Region application recovery service
- SQS Multi-Region: SNS Fan-Out Pattern
Позиция по проекта на решение за американските цистерни в България
Post Syndicated from Bozho original https://blog.bozho.net/blog/4602
САЩ е съюзник и стратегически партньор на България. А режимът на аятоласите е репресивен режим, който стреля по собствените си граждани по улиците.
Но за съжаление никое българско правителство не би имало лукса да вземе свободно решение дали да разположи американските цистерни на българско летище. Защото realpolitik фактите са, че ако откажем, дерогацията за рафинерията в Бургас може да бъде отменена, а никое правителство не може да остави страната без бензин, дизел и авиационно гориво.
И ние разбираме това. Затова няма да злорадстваме, да ехидничим, да наричаме Прогресивна България „войнолюбци“, да плашим хората или да се отдаваме на евтин популизъм. Но именно Радев и Прогресивна България се отдадоха на такъв популизъм само преди няколко месеца. Обясняваха какви заплахи имало за страната и продаваха страх.
Очакванията на обществото трябва да се посрещат, но като политици имаме отговорност и да създаваме разумни очаквания. Да не злоупотребяваме с трибуната, която ни е дадена и да не се заиграваме със страхове. Нещо, което сега управляващите и конкретно Радев правеха дълго време.
Но когато дълбаеш разделителни линии в обществото дълги години, неизбежно пропадаш в тях.
Разбираме и желанието им да удържат несъвместимата електорална коалиция, която ги избра, но със захаросване на фактите, с атака по опозицията и с приказки за грандизиони бъдещи сделки няма да стане.
Всичко ни се представя като серия от сделки, транзакции, от които уж България печели. Но сме наясно, че няма как да си най-хитрия, и да въртиш едностранни „сделки“ със САЩ, Русия, Китай, Турция – това няма да свърши добре.
За съжаление, правителството на Радев не говори за Европейския съюз като за решение на всички тези проблеми, които сега се налага да решаваме с непрозрачни транзакции. Вероятно защото Европейският съюз е съюз на ценности и на солидарност, а не на политически транзакции.
ЕС е формиран на база на отстъпките, на консенсуса, на солидарността и на споделените ценности, а правителството на Прогресивна България руши презумпцията за солидарност – казва „дайте ни еврофондовете и ние няма да ви пречим“ – нещо, което противоречи на европейската идея.
Дългосрочното решение за сигурността на България минава през превръщането на ЕС в силен геополитически полюс. Иначе всяка държава ще се превърне в плячка на по-големите, защото никоя държава сама не може да преговаря от достатъчно добра позиция. А ние, с нашите пробити служби и неизградени институции ще сме сред най-лесните плячки. И докато си мислим, че се договаряме със САЩ, Русия, Китай и Турция, всъщност ще губим още и още суверенитет – т.е. способността да вземаме сами решения, без някоЙ да ни казва „ако не го направиш, ще ти спра това или онова“.
Правителството няма мандат за руши европейския консенсус, няма мандат да отклонява България от европейската солидарност. И трябва да бъде честно с българските граждани, да каже какъв курс реално поема.
Правителството днес можеше да получи нашата подкрепа за трудното и непопулярно решение, ако бяха честни, смиерни и ако с действията си до момента представяха план за алтернатива на транзакционното затъване.
Но вместо това те внесоха за гласуване решението без да ни предоставят нотата на САЩ, без цялостен доклад за рисковете от военното разузнаване и без отговор за това каква сделка всъщнсот сключват.
Затова днес не участвахме в гласуването, оставяйки управлявщите насаме със собственото си лицемерие и популизъм, и в компанията на Пеевски, който гласува всичко американско, с продължаващата надежда да бъде изваден от санкционния списък.
И правим това не за да натрием носа на управляващите за предишните им изказвания, с които насаждаха страх и разделение, а за да разберат, че когато управляваш, носиш много повече отговорност от това да казваш няколко добре формулирани изречения пред камери.
Материалът Позиция по проекта на решение за американските цистерни в България е публикуван за пръв път на БЛОГодаря.
Home Assistant 2026.8 Release Party
Post Syndicated from Home Assistant original https://www.youtube.com/watch?v=Pu7JLCxZmaI
Architecting offline-first generative AI applications for edge deployments using AWS services
Post Syndicated from Ahmed Ewis original https://aws.amazon.com/blogs/architecture/architecting-offline-first-generative-ai-applications-for-edge-deployments-using-aws-services/
According to Siemens’ 2024 report The True Cost of Downtime, Fortune 500 companies lose an estimated $1.4 trillion annually because of unplanned downtime. This downtime is often worsened by a lack of skills to detect and resolve issues quickly. Generative AI offers a promising path to address this, but deploying these capabilities in industrial environments introduces a distinct architectural challenge: how do you bring the power of large-scale AI to locations where cloud connectivity is unreliable or unavailable?
The answer lies in an offline-first architecture, one that moves AI inference to the edge while using cloud services for model customization, deployment orchestration, and continuous improvement. This pattern requires careful coordination across multiple AWS services spanning artificial intelligence and machine learning (AI/ML), Internet of Things (IoT), and storage, and demands deliberate trade-offs between model capability, hardware constraints, and operational complexity.
The following are a few potential use cases that could benefit smart applications at the edge:
- Maintenance crews struggle to correlate real-time log feeds with relevant machine manuals, and analyze situations in-hand.
- Offshore platforms, remote drilling sites, and pipeline maintenance crews operating in areas with limited satellite connectivity requiring instant access to safety procedures, equipment manuals, and regulatory compliance documentation.
- Remote agricultural facilities with precision farming equipment requiring access to machinery manuals, crop management protocols, and safety procedures.
In this post, we walk through a reference architecture for building and deploying a generative AI application at the edge using AWS services. We cover the end-to-end pattern, from model customization in the cloud using Amazon Bedrock and Amazon SageMaker AI, to edge deployment using AWS IoT Greengrass, to local inference orchestrated by Strands Agents. Along the way, we highlight the key architectural decisions and service integration patterns that make this approach work.
This post describes a reference architecture. It is not intended for direct production use. Perform a security review and implement controls appropriate to your workload before deploying to production.
Architectural decisions for offline-first AI
Designing an offline-first AI architecture starts with a critical decision: how to customize a language model for your domain while keeping it small enough to run on edge hardware. The model must fit within the compute and memory constraints of site-level devices (typically GPUs with 16 GB or more of VRAM), which means working with small language models (SLMs). The customization strategy you choose directly affects your architecture’s complexity, cost, and data pipeline requirements.
The following strategies represent increasing levels of architectural complexity, each with different infrastructure requirements and expected outcomes:
- Model fine-tuning (FT): A relatively lightweight process to adapt a pre-trained model for specialized tasks. For example, you could fine-tune a model to answer troubleshooting questions about specific equipment using labeled Q&A pairs from maintenance tickets. Fine-tuning excels at teaching a model the format, style, and structure of the outputs you want. However, it’s less effective at injecting new domain knowledge that wasn’t in the base model’s original training data.
- Continued pre-training (CPT): A more resource-intensive process that extends the base model’s training with domain-specific unlabeled data to embed new knowledge. For example, you could continue training on technical manuals, repair logs, and engineering documentation to teach the model equipment-specific terminology, failure patterns, and diagnostic procedures. This approach effectively injects domain knowledge into model parameters but requires significant computational resources and larger datasets compared to fine-tuning.
- Hybrid approach (FT + RAG): Retrieval Augmented Generation (RAG) enhances model responses by retrieving relevant documents at inference time, which provides accurate, up-to-date answers with source citations and reduces hallucinations. For our edge implementation, we use ChromaDB (SQLite + HNSW defaults) with a sentence-transformer embedding model (384 dimensions) running on CPU. Documents are chunked at 512 tokens with 50-token overlap. With a dataset up to 5 GB, retrieval latency stays under 50 ms. The entire RAG pipeline lives on CPU/SSD with zero GPU VRAM consumption, keeping the full 16 GB dedicated to the large language model (LLM).
- Hybrid approach (CPT + RAG + FT): Combines continued pre-training of the embedding model with fine-tuning of the language model to optimize the entire RAG pipeline. Through continuing training your embedding model on domain-specific queries to better understand domain-specific terminology and jargon, while fine-tuning your language model on Q&A pairs for the format and tone you want. For example, when an operator asks about the state of a cookie machine, they expect to get the application to check current state, throughput per minute, and visual quality of Cookies! This dual optimization ensures both accurate retrieval and high-quality responses, ideal for knowledge-intensive applications.
To decide on the right strategy for your application, you need to work backward from the use case requirements and expected outcomes.
Reference architecture
Let’s examine a reference architecture for an edge-deployed generative AI solution built on AWS. This architecture addresses a manufacturing use case where operators need instant access to equipment documentation, log correlation, and troubleshooting guidance, all without depending on cloud connectivity. We chose the hybrid approach (FT + RAG) because it balances two architectural concerns: keeping the on-device model compact through fine-tuning for task-specific behavior, while using RAG to provide up-to-date knowledge retrieval without retraining. The following diagram depicts the end-to-end architecture:
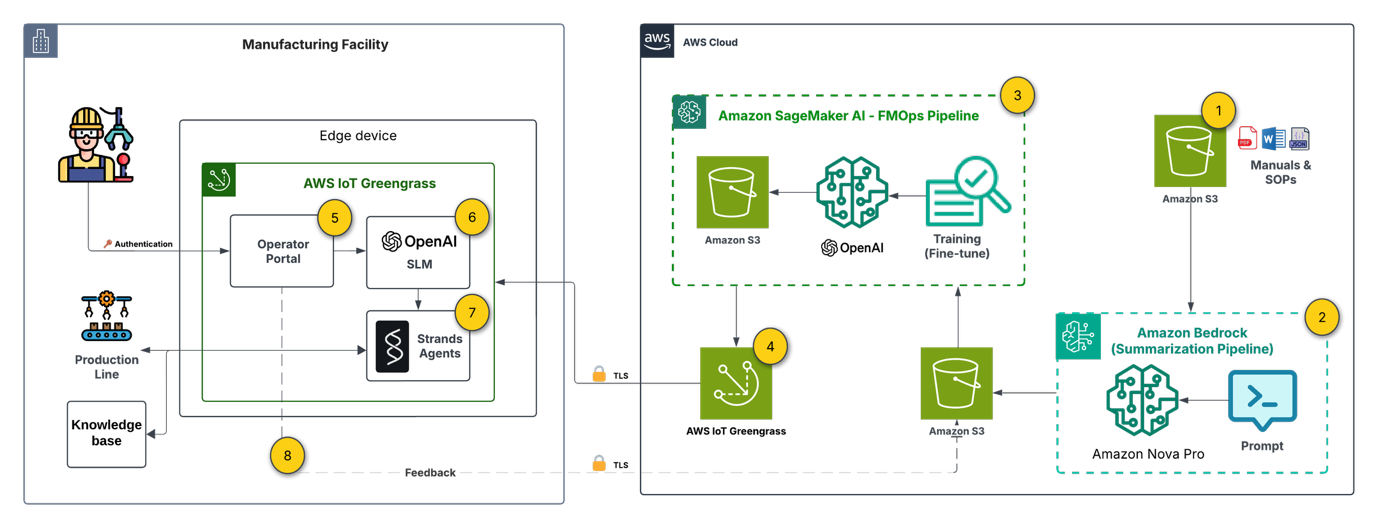
Note: The architecture spans two trust domains. On the cloud side, each service (Amazon Simple Storage Service (Amazon S3), Amazon Bedrock, SageMaker AI, IoT Greengrass) operates under a dedicated least-privilege AWS Identity and Access Management (IAM) role. All cloud-to-edge communication uses mutual TLS using IoT Greengrass device certificates. The operator portal requires authentication. On the edge device, the operator.
The architecture is organized into three layers: cloud-side preparation (steps 1–3), deployment orchestration (step 4), and edge-side inference (steps 5–9). Each layer uses specific AWS services chosen for their integration capabilities.
1. Document base setup
Technical manuals and Standard Operating Procedures (SOPs) are stored in Amazon S3, serving as the single source of truth for both the cloud-side training pipeline and the edge-side RAG knowledge base. The integration of Amazon S3 with both SageMaker AI and IoT Greengrass makes it the natural choice for artifacts that must flow between cloud and edge.
2. Preparing labeled data
Using Amazon Nova Pro on Amazon Bedrock, we process raw documentation into structured question-answer-context pairs for fine-tuning. This is a key architectural decision: rather than manually curating training data, we use a large foundation model (FM) in the cloud to generate high-quality labeled data at scale. The serverless inference of Amazon Bedrock keeps this step cost-effective, and the output feeds directly into the SageMaker AI pipeline.
3. Model customization (FMOps pipeline)
Amazon SageMaker AI Pipelines orchestrates an automated FMOps pipeline that fine-tunes gpt-oss-20b (Mixture of Experts (MoE) architecture: 21B total parameters, 3.6B active per token, 32 experts, 128k context length) on the domain-specific Q&A pairs. The pipeline pattern here is deliberate: it enables repeatable, versioned model customization that can be triggered whenever new documentation is added. The pipeline trains the model to understand equipment-specific terminology and response formats, then stores the customized model artifact in S3 for downstream deployment.
4. Edge deployment
The edge device (in our case, a g4dn.12xlarge with 4× NVIDIA T4 GPUs, 16 GiB each, 64 GiB total accelerator memory, 48 vCPUs, and 129 GiB system RAM) provides the GPU compute necessary for local inference. The hardware selection is an important architectural constraint that directly influences model viability and serving strategy. With gpt-oss-20b occupying 13 GB per T4 GPU, two deployment strategies are available depending on your throughput and latency priorities:
- Model Replication — a full model copy on each of the four GPUs, which supports four concurrent client requests without queuing. This maximizes throughput at the cost of using 81 percent of each GPU’s memory for model weights alone.
- Tensor Parallelism — the model is sharded across all four GPUs at 3.2 GB per GPU, leaving approximately 12.8 GB available on each GPU. This remaining memory serves as KV cache, supporting the full 128K context window for long-form interactions.
The choice between these strategies depends on your workload profile: replication suits high-concurrency, short-query environments, while tensor parallelism suits fewer concurrent users with longer, more complex interactions.
5. Edge device (manufacturing facility)
The edge device (in our case, NVIDIA Jetson Xavier) provides the GPU compute necessary for local inference. The hardware selection is an important architectural constraint: you need sufficient VRAM (16 GB or more) to run the quantized SLM, which directly influences which models are viable for your deployment.
6. User interface (Flask operator portal)
A Flask-based web interface running locally on the device allows maintenance operators and technicians to submit queries about equipment issues, safety procedures, or maintenance tasks. Running the UI on-device eliminates any dependency on external connectivity for the user-facing layer.
7. Off-cloud generative AI
The fine-tuned SLM runs on-premises using Ollama as the inference runtime. Ollama provides a lightweight, container-friendly serving layer that supports quantized model formats (GGUF) for efficient inference within the device’s memory constraints. This decouples the model serving infrastructure from any cloud dependency.
8. Generative AI orchestration
Strands Agents provides the orchestration layer that coordinates the query processing workflow. It routes requests to the appropriate tools: querying the on-site RAG knowledge base, collecting device telemetry data. This agent-based pattern provides extensibility. You can add new tools and data sources without modifying the core inference pipeline.
9. Continuous improvement (feedback loop)
When connectivity is available, user interactions and feedback flow back to the cloud, enabling ongoing model refinement through the FMOps pipeline. This creates a virtuous cycle: edge usage data improves the next model version, which Greengrass deploys back to the device. The architecture is designed to be resilient to connectivity gaps. Feedback is queued locally and synchronized opportunistically.
Prerequisites
To be able to implement a similar solution, you need:
- An AWS account. If you don’t already have an AWS account, you can create one.
- Your access to the AWS account must have IAM permissions to services including Amazon SageMaker AI, Amazon Bedrock, AWS IoT Greengrass, and Amazon S3.
- A hardware device preferably with a GPU that has a sufficient VRAM (>16 GB) to run an SLM.
Implementation overview
This section summarizes the key implementation steps. Each component uses standard AWS service configurations:
- Data preparation – Amazon Nova Pro on Amazon Bedrock generates structured Q&A pairs from raw documentation, producing training data for the SageMaker AI fine-tuning pipeline.
- Model fine-tuning – SageMaker AI Pipelines runs a QLoRA fine-tuning job on gpt-oss-20b using the generated dataset, then stores the customized model artifact in S3.
- Edge deployment – AWS IoT Greengrass (or AWS Systems Manager) transfers the quantized model (GGUF format) to the edge device.
- Local inference – Ollama serves the fine-tuned model with a domain-specific system prompt constraining responses to equipment-relevant answers.
- Orchestration – Strands Agents coordinates the workflow, routing queries to the RAG knowledge base or telemetry tools as needed.
For the fine-tuning notebook, refer to this example notebook for fine-tuning an SLM using Amazon SageMaker AI.
Security considerations
Moving inference to the edge shifts the security perimeter. In a cloud-native deployment, AWS manages much of the infrastructure security. At the edge, you own the full stack, which spans physical device access through application-layer controls. This section outlines the security controls to implement when adapting this architecture for your environment.
Authentication and access control. The Flask operator portal runs on an isolated device, but physical proximity doesn’t replace authentication. Integrate with your organization’s identity provider (SAML/OIDC) or implement certificate-based mutual TLS. Enforce role-based access so that operators, administrators, and maintenance personnel each see only the interfaces relevant to their function.
Encryption at rest. Model artifacts and the ChromaDB vector database contain proprietary knowledge. Encrypt the edge device’s storage volume using full-disk encryption (for example, LUKS on Linux or BitLocker on Windows). Manage encryption keys through AWS IoT Greengrass secret manager or a hardware Trusted Platform Module (TPM) on the device.
Encryption in transit. All communication between the edge device and AWS (including the IoT Greengrass deployment channel and the feedback synchronization loop) must use TLS 1.2 or later. For internal communication between edge components (Flask portal to Ollama, Strands Agents to ChromaDB), enforce TLS even on the loopback interface to prevent local interception.
Input validation and prompt guardrails. The Strands Agents orchestration layer accepts natural language input from operators. Apply input validation to reject malformed or excessively long queries. Implement prompt guardrails to detect and block prompt injection attempts. On the output side, apply content filtering to prevent the model from surfacing sensitive information outside its intended scope.
Network segmentation. Separate edge components into distinct network zones: the operator-facing portal in a perimeter network, the inference runtime in a restricted zone, and the cloud sync channel on an isolated outbound-only interface. Use firewall rules to enforce that only the expected traffic flows between zones.
IAM least privilege. On the cloud side, each AWS service in the pipeline should operate with its own IAM role scoped to minimum required permissions. The IoT Greengrass core device role should only access the specific S3 prefixes and IoT topics it needs. SageMaker pipeline execution roles shouldn’t have access to production S3 buckets.
Logging and monitoring. Enable AWS CloudTrail and Amazon CloudWatch for all cloud-side services. On the edge device, log all operator queries, model responses, and sync events locally. When connectivity is available, forward edge logs to Amazon CloudWatch Logs or Amazon S3 for centralized analysis. Set up alerts for anomalous patterns such as unexpected query volumes, repeated authentication failures, or unauthorized access attempts.
Results
We evaluated the fine-tuned gpt-oss-20b model against the base model using 30 domain-specific question-answer pairs. Both configurations use the full RAG pipeline (ChromaDB + sentence-transformer embedding model) as the retrieval layer. The variable being tested is whether fine-tuning the language model improves generation quality when given the same retrieved context. Three LLM judges (Claude 4.5 Haiku and Claude 4.5 Sonnet using Amazon Bedrock, and Amazon Nova Pro) scored responses on a 12-point scale across accuracy, completeness, and relevance.
| LLM Evaluator | SLM | Average score |
| Claude 4.5 Haiku | Fine-tuned gpt-oss-20b + RAG | 10.20/12 (85%) |
| Base gpt-oss-20b + RAG | 8.20/12 (68.3%) | |
| Claude 4.5 Sonnet | Fine-tuned gpt-oss-20b + RAG | 9.20/12 (76.7%) |
| Base gpt-oss-20b + RAG | 7.49/12 (61.7%) | |
| Nova Pro | Fine-tuned gpt-oss-20b + RAG | 9.90/12 (82.5%) |
| Base gpt-oss-20b +RAG | 8.70/12 (72.5%) |
These results support the hybrid approach (FT + RAG) outlined in our solution architecture, demonstrating that even with a relatively small fine-tuning dataset, significant performance improvements can be achieved for domain-specific applications at the edge.
Cleanup
The AWS services used in this architecture are fully managed services that follow a pay-as-you-go pricing model, meaning you only pay for actual invocations. Exception for this can be the storage costs for the labeled data and the finetuned model in Amazon S3 which you can consider to delete if not in use.
Conclusion
This post presents a reference architecture for deploying generative AI at the edge using AWS services. The key architectural patterns demonstrated include:
Cloud-side model factory – Using Amazon Bedrock for automated training data generation and Amazon SageMaker AI Pipelines for repeatable, versioned model customization, creating a scalable FMOps workflow that decouples model preparation from deployment.
Managed cloud-to-edge bridge – AWS IoT Greengrass provides the deployment orchestration layer, handling model packaging, versioning, and lifecycle management without requiring persistent connectivity to target devices.
Self-contained edge inference stack – A lightweight runtime (Ollama) combined with an agent-based orchestration framework (Strands Agents) supports local AI inference with extensible tool integration, all operating independently of cloud availability.
Feedback-driven continuous improvement – An asynchronous feedback loop synchronizes usage data back to the cloud when connectivity permits, for iterative model refinement without disrupting edge operations.
These patterns are applicable beyond manufacturing. Any environment with intermittent connectivity, strict latency requirements, or data locality constraints (offshore energy, remote agriculture, transportation, defense) can benefit from this architectural approach. The critical design decisions will vary by use case: selecting the right model customization strategy, sizing edge hardware to model requirements, and choosing between RAG and fine-tuning. The overall integration pattern remains consistent.
As with any reference architecture, we recommend that you conduct a security review before production deployment.
To explore this pattern, consider identifying a use case with clear connectivity constraints and working backward from your edge hardware requirements to select a model customization strategy. The hybrid (FT + RAG) approach described in this post offers the right balance of capability and complexity. Expand it as you validate operational improvements.
Ready to explore more? Join us at re:Invent for related sessions: Real-time insights for smart manufacturing with AWS Serverless (CNS375) and Implement Agentic AI at the edge for industrial automation (HMC317).
About the authors
Automate custom PII detection at scale with Amazon Macie and Step Functions
Post Syndicated from Aishwariya Khiani original https://aws.amazon.com/blogs/architecture/automate-custom-pii-detection-at-scale-with-amazon-macie-and-step-functions/
Organizations in regulated industries like financial services, insurance, healthcare, and government ingest large volumes of data containing personally identifiable information (PII). Your applications, claims processing systems, partner data feeds, and internal workflows produce files that may include names, addresses, Social Security numbers, and domain-specific identifiers such as policy numbers, member IDs, and medical record numbers.
Identifying and classifying this sensitive data is a compliance imperative. Regulations such as GDPR, HIPAA, CCPA, and PCI DSS require you to know where PII resides, who can access it, and how it is protected. Manual classification does not scale. While Amazon Macie provides managed sensitive-data discovery, there could be formats that standard detection engines do not recognize by default. You can extend the detection capability with custom identifiers unique to your business.
In this post, you learn how to build and deploy an event-driven pipeline that automatically detects PII the moment a file arrives in Amazon Simple Storage Service (Amazon S3). It then extends beyond Macie built-in managed data identifiers by incorporating your own custom identifiers, which can detect organization-specific sensitive data types alongside standard PII.
Solution overview
The solution uses Amazon EventBridge to trigger an AWS Step Functions workflow, which orchestrates Macie classification jobs, including custom data identifiers, and produces compliance reports with zero manual intervention. As each file lands in Amazon S3, the pipeline automatically invokes Macie to scan it using built-in and custom data identifiers, detecting standard and organization-specific PII without manual intervention. It then generates audit-ready reports in both CSV and JSON formats with full timestamps, giving your compliance team the documentation they need. For high-severity findings, the pipeline publishes real-time notifications through Amazon Simple Notification Service (Amazon SNS) so your security team can respond immediately. To maintain clear data lineage throughout the process, the architecture implements a three-bucket pattern. This helps isolate objects by their processing state and ensures that unscanned data never mixes with validated data.
Architecture
This pipeline uses an event-driven architecture built on the following AWS services:
- Amazon S3 – Storage layer organizing data across three buckets that represent each processing state: raw, staged, and scanned.
- Amazon EventBridge – Detects new object uploads and triggers the workflow automatically, without polling.
- AWS Step Functions – Orchestrates the entire scan lifecycle, coordinating each step from job creation through report generation.
- Amazon Macie – Detects PII, scanning objects for sensitive data using both built-in and custom data identifiers.
- AWS Lambda – Supplies the compute logic between orchestration steps from initiating Macie classification jobs, polling job status, parsing findings, generating reports, and moving objects between buckets.
- Amazon SNS – Delivers real-time alerts to notify your team when high-severity findings are detected.
The following figure provides an overview of the solution architecture using the listed services.
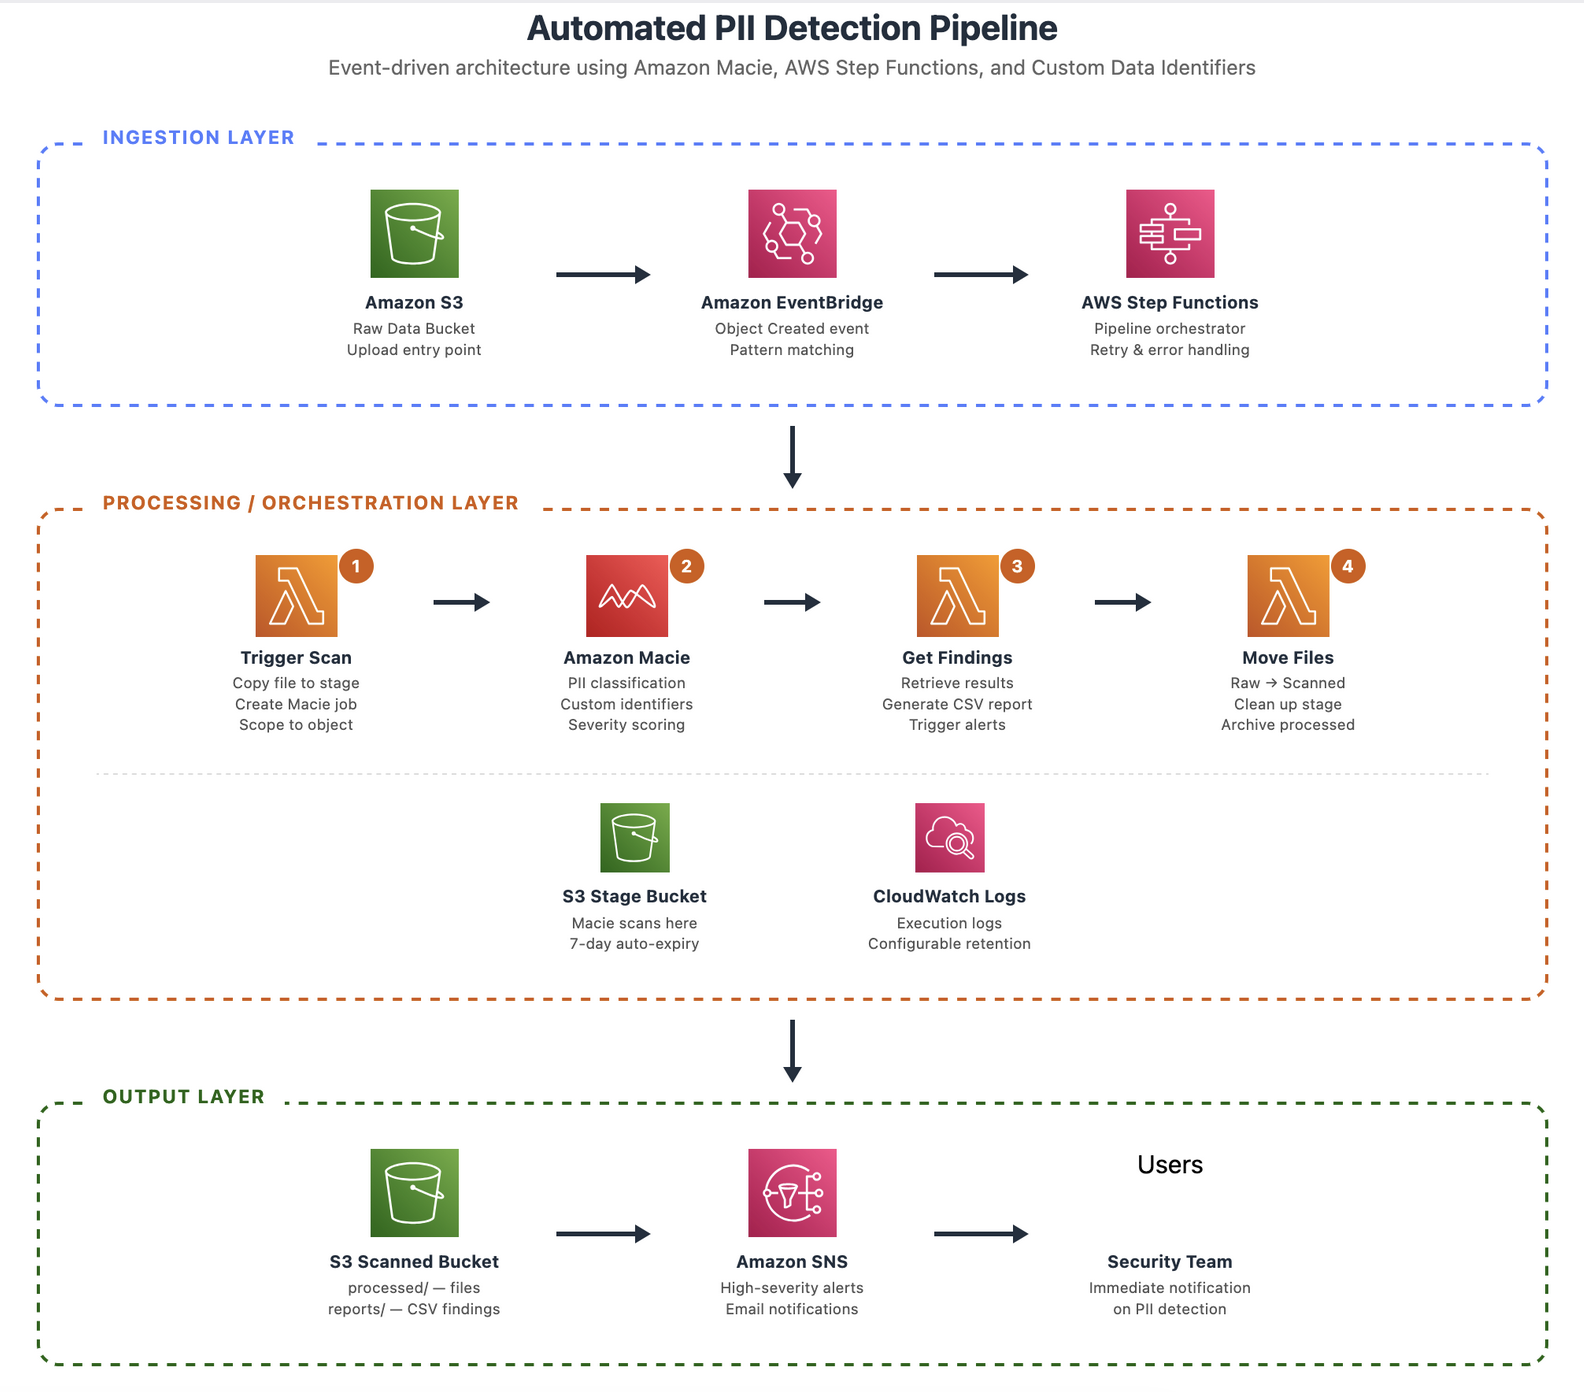
Figure 1 — Architecture overview
Several design decisions shape this architecture. The pipeline creates a dedicated Macie classification job for each object rather than batching, which enables real-time PII detection at the point of ingestion. The three-bucket pattern noted earlier isolates unprocessed data from validated data, with the staging bucket configured to auto-expire objects. Step Functions orchestrates the workflow, using built-in retry logic and wait states to handle asynchronous job execution in Macie. Custom data identifiers extend detection capabilities of Macie to cover domain-specific patterns unique to your organization. Finally, Amazon EventBridge triggers the pipeline instead of native S3 event notifications, providing advanced filtering, support for multiple targets, and cross-account routing.
Walkthrough
In this section, you deploy and configure the automated PII detection pipeline.
Prerequisites
- A sandbox or non-prod AWS account with administrative access.
- AWS Command Line Interface (AWS CLI) v2 installed and configured.
- Amazon Macie should be enabled in your target AWS Region.
- A valid email address for high-severity notifications.
Step 1: Deploy the AWS CloudFormation stack
Download and deploy the complete solution through this sample CloudFormation template.
Option A: Using AWS CLI
Option B: Using AWS Management Console
- Navigate to the AWS CloudFormation console.
- Choose Create stack > With new resources (standard).
- Upload the template, fill in parameters, and submit.
✓ Expected result: Stack reaches CREATE_COMPLETE after 3 to 5 minutes.
The following image shows the sample Create stack parameters and configuration:
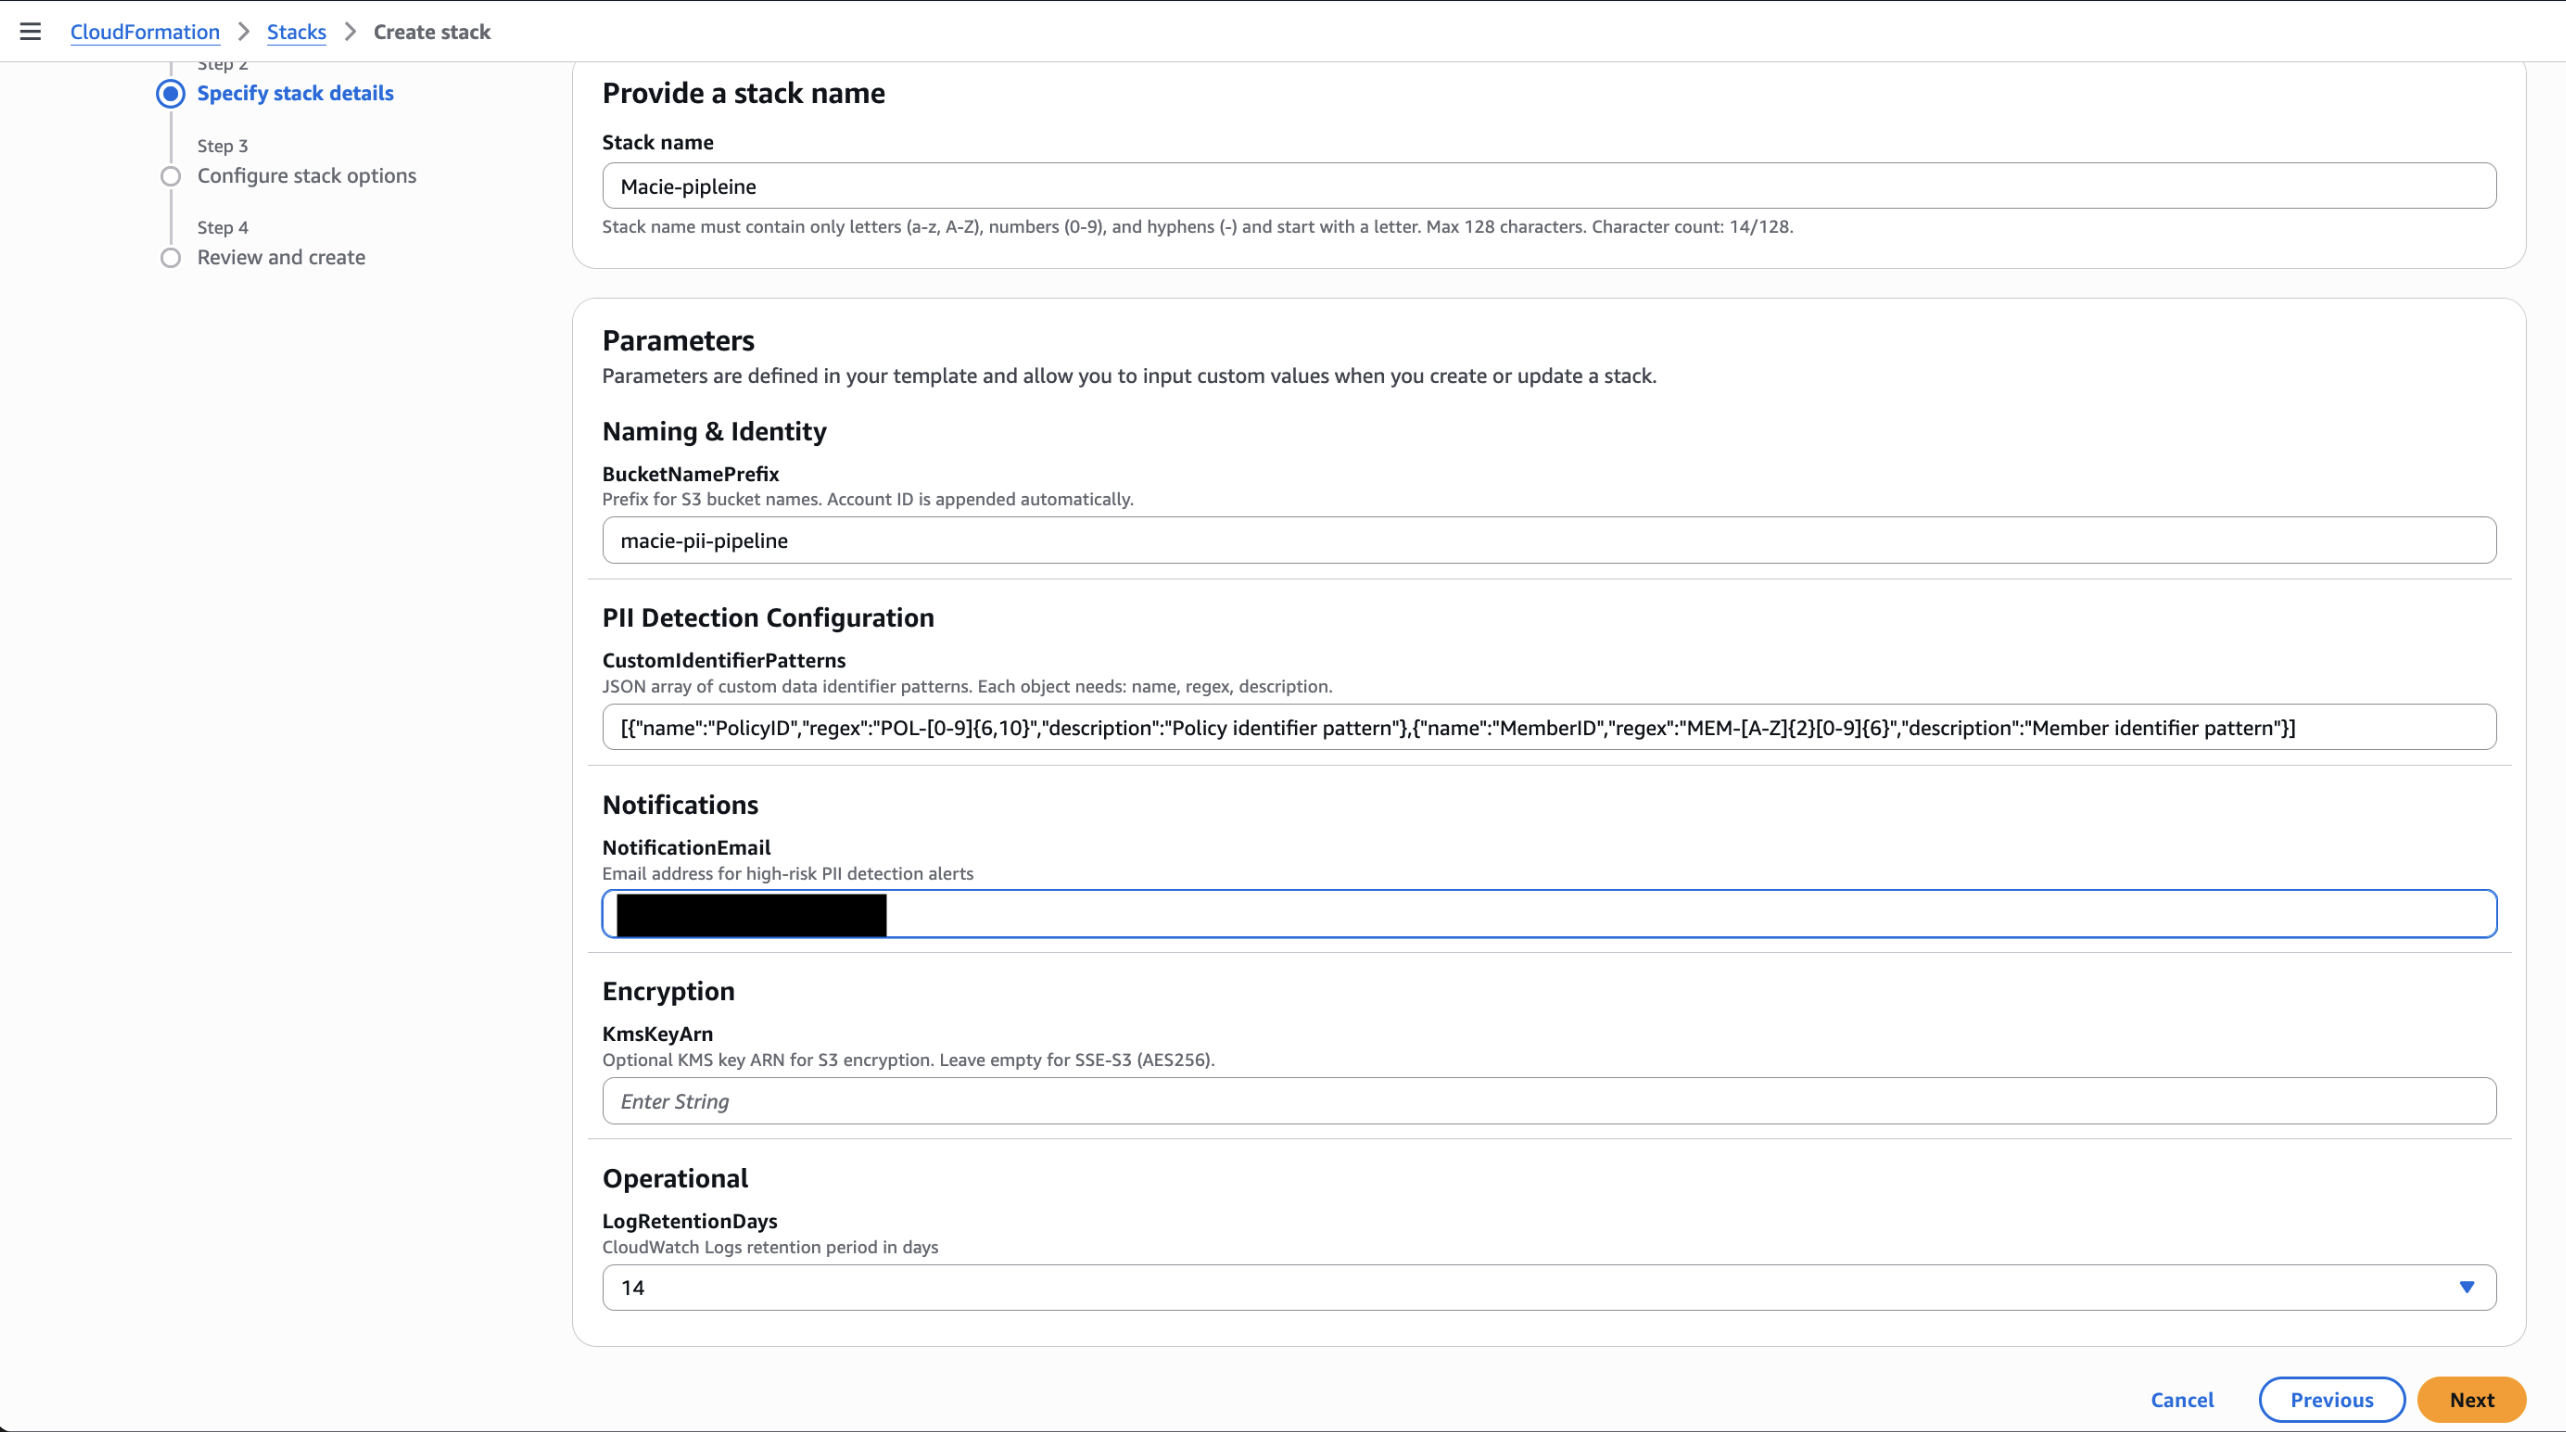
Figure 2 — CloudFormation console showing Create stack configuration page
Step 2: Confirm the Amazon SNS subscription
Open the confirmation email and choose Confirm subscription.
✓ Expected result: Subscription shows Confirmed in Amazon SNS console as demonstrated in the following screenshot
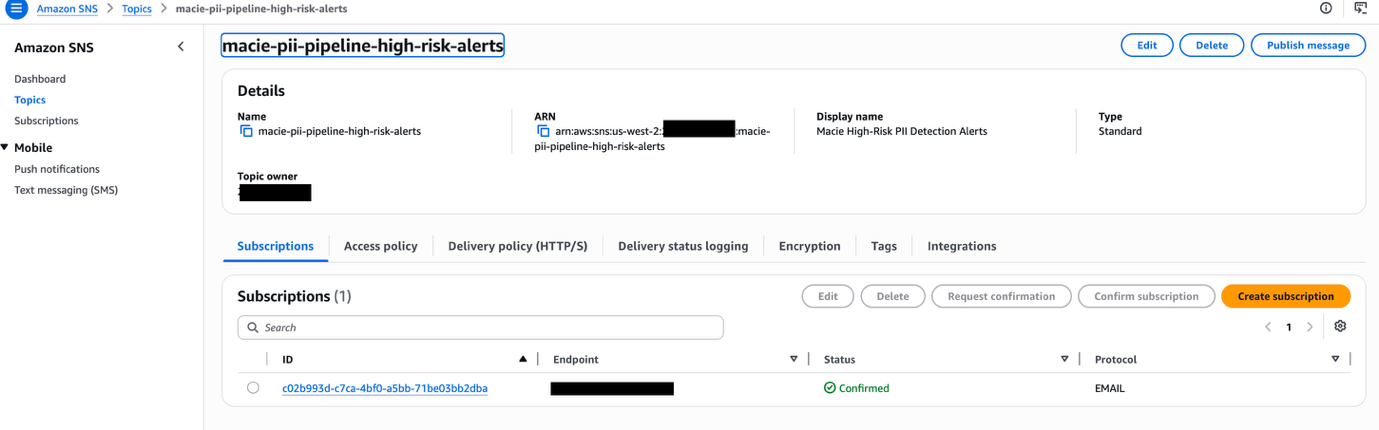
Figure 3 — Amazon SNS confirmed subscription
Step 3: Configure custom data identifiers
The stack automatically provisions custom data identifiers from the CustomIdentifierPatterns parameter you provided during deployment. Verify they exist in the Macie console.
✓ Expected result: Custom identifiers show up on Macie console as demonstrated in the following image

Figure 4 — Custom data identifiers in Macie console
Step 4: Test the pipeline
- Upload a sample file to the raw bucket using the AWS CLI or console.
✓ Expected result: Step Functions execution starts within seconds.
The following image shows the test files copied to the S3 bucket:
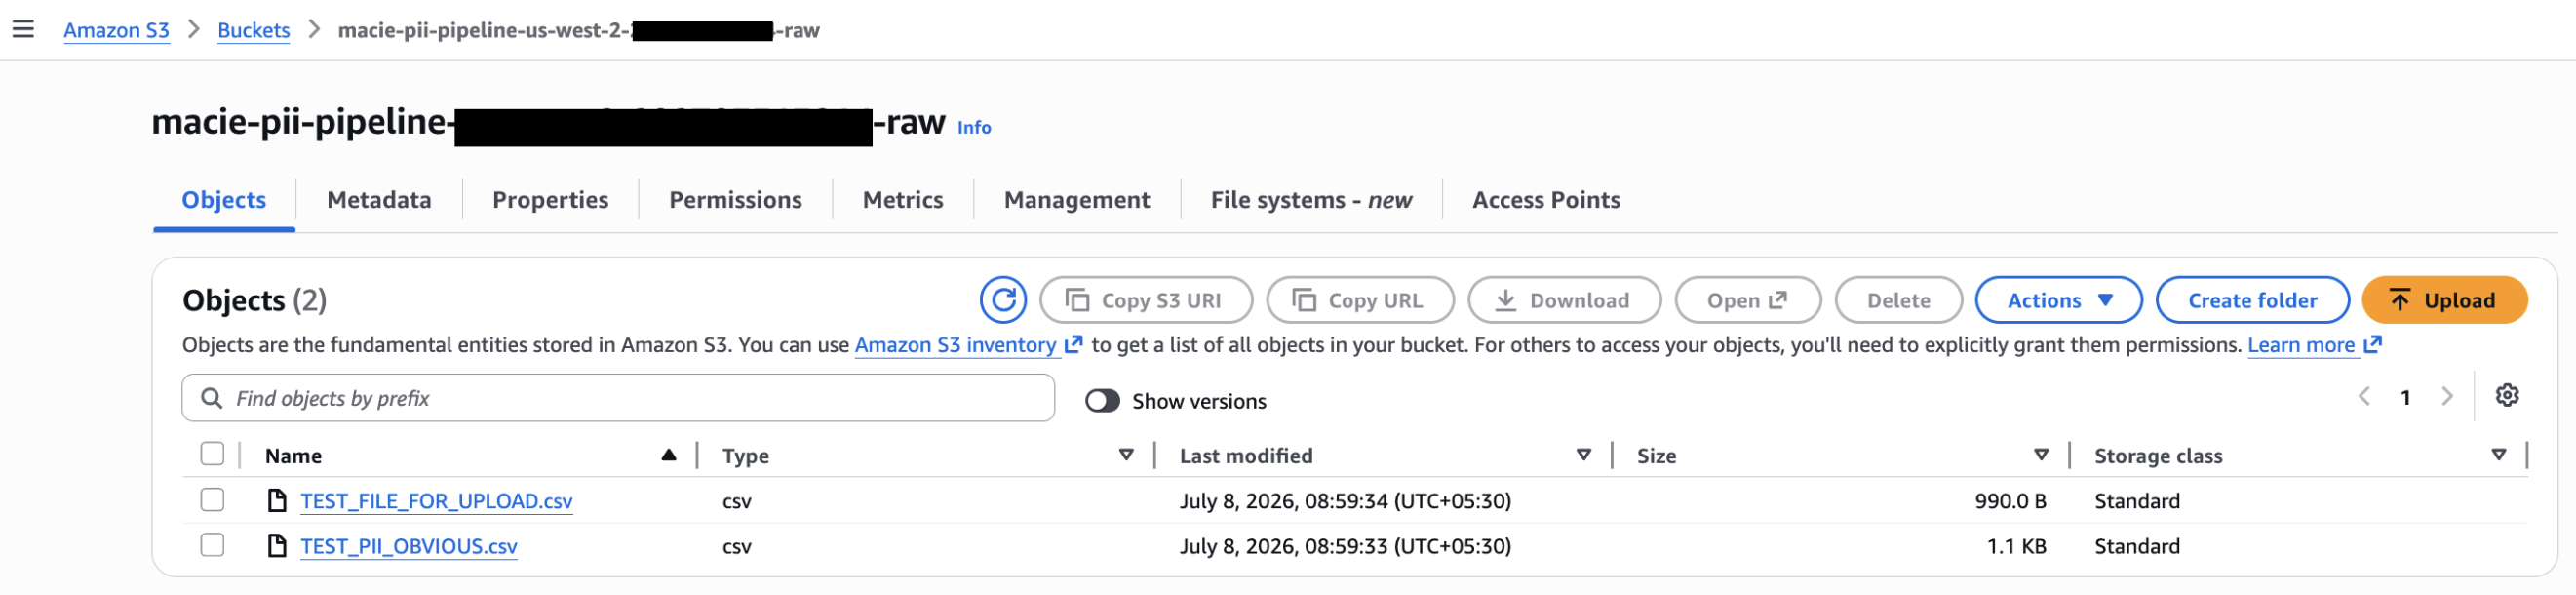
Figure 5 — Test file uploaded to raw bucket
Monitor the pipeline progression
On your Step Functions console > choose state machine > view running operation.
Note: The underlying Macie jobs may take some time to complete. Scan duration varies from job to job. The amount and type of data being scanned, its compression, and the number of data identifiers used all dictate how long a job takes to run. For the example illustrated in this post, jobs took roughly 15–20 minutes to complete. As a best practice, consider enabling S3 AWS CloudTrail data-event logging to audit the PII pipeline.
✓ Expected result: Graph inspector shows active state in blue, completed in green.
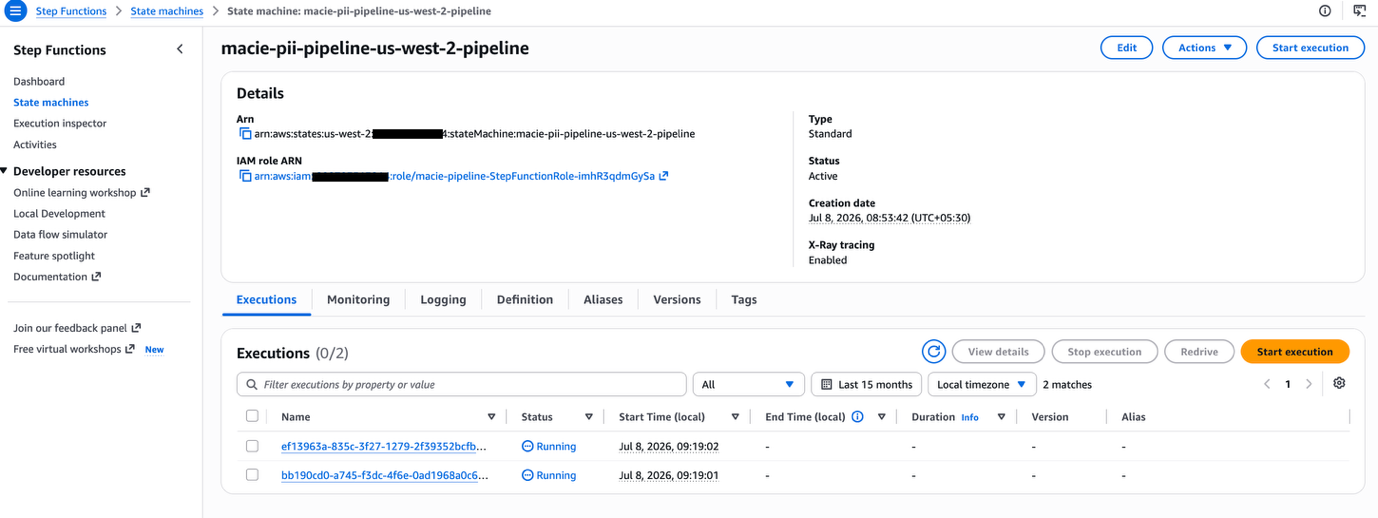
Figure 6 — Step Functions pipeline
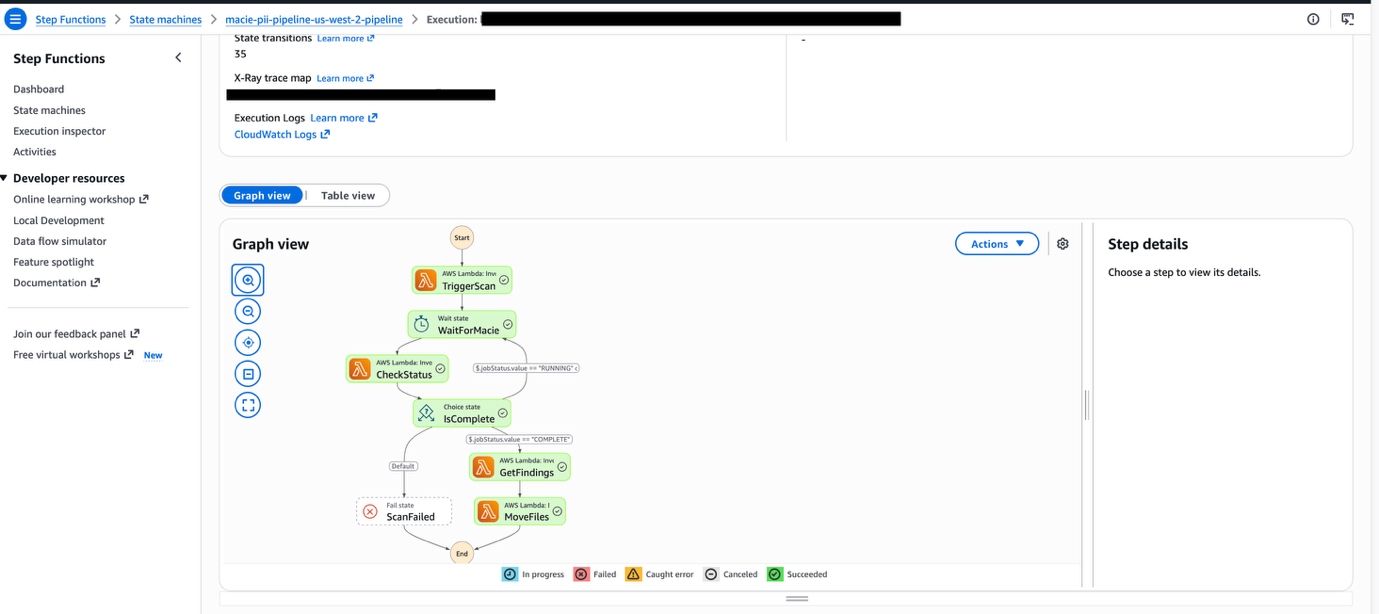
Figure 7 — Step Functions Graph inspector
The Step Functions state machine orchestrates the end-to-end scanning workflow through five sequential states. First, TriggerScan copies newly uploaded objects to a staging bucket and creates a Macie classification job targeting that staged data. Once the job is submitted, the workflow enters WaitForMacie, which pauses execution for 60 seconds to allow the classification job time to process. Next, CheckStatus polls the Macie DescribeClassificationJob API to determine whether the job has completed. When the job finishes, GetFindings retrieves the classification results, generates detailed findings reports, and publishes a notification to an Amazon SNS topic for downstream consumers. Finally, MoveFiles relocates the original object from the raw bucket to a permanent scanned-data location and cleans up the staging copy.
Verify the reports
✓ Expected result: Two timestamped files (CSV + JSON) per scan as shown in the following image
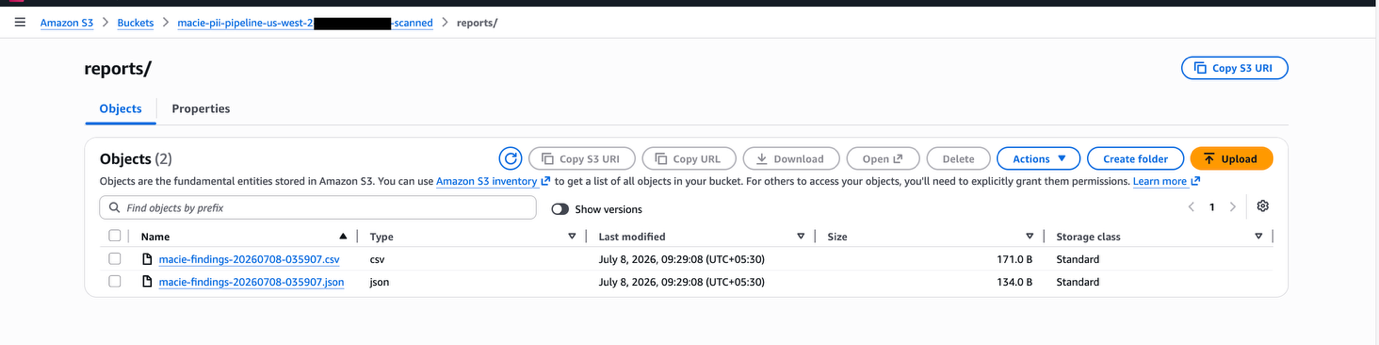
Figure 8 — Reports in scanned bucket
Next, Amazon SNS triggers a notification email to the intended recipients. The following screenshot shows a sample notification.
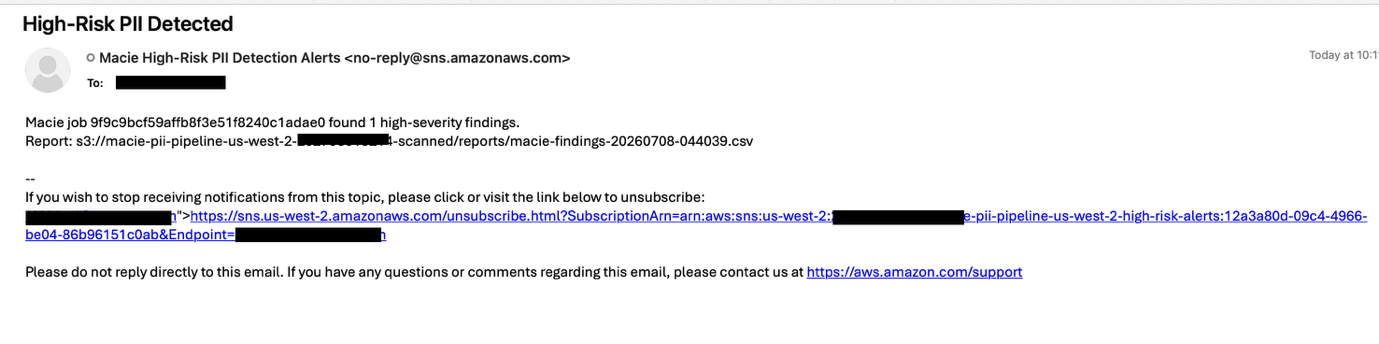
Figure 9 — Amazon SNS notification email
Step 5: Review the data flow
raw bucket → stage bucket → scanned bucket
- Raw bucket – The file is removed after processing (versioning enabled).
- Stage bucket – Auto-expires after seven days.
- Scanned bucket – Contains the processed files and the reports.
The following images show the three sample buckets created as part of this walkthrough.
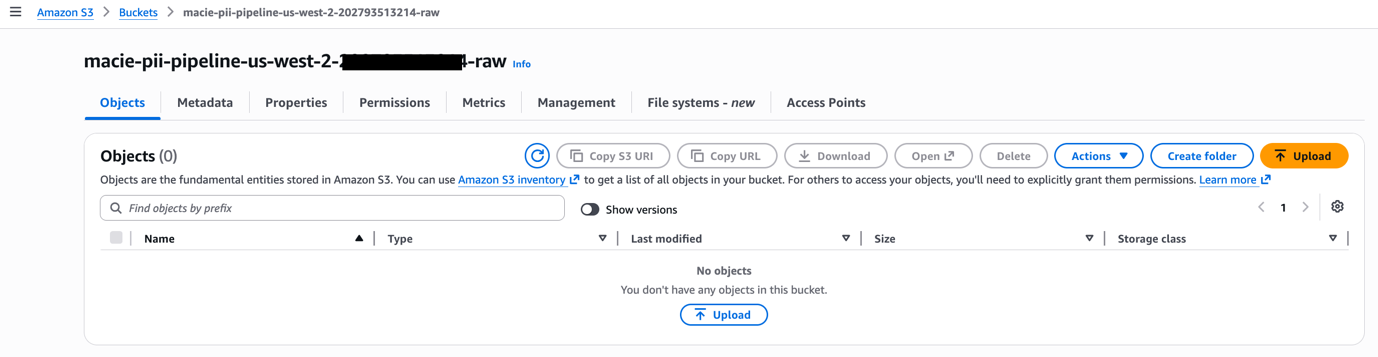
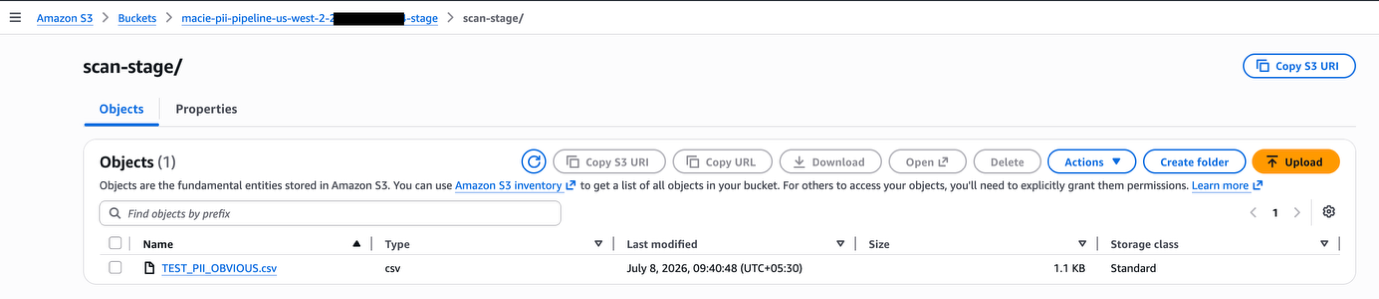
Figure 10 — Three-bucket state after execution
Hardening measures to deploy in production
- For multi-tenant environments, deploy a separate stack per tenant using a distinct
BucketNamePrefixto maintain strict data isolation. - Enable Amazon S3 bucket default encryption with SSE-S3 as default setting or with a customer-managed AWS Key Management Service (AWS KMS) key by passing the
KmsKeyArnparameter. - Configure cross-account Amazon EventBridge rules for data sources spanning multiple accounts.
- Be mindful of Macie quotas for custom data identifiers: up to 10,000 per account, but a maximum of 30 per classification job. Split them across multiple jobs if you need more.
- For high-volume workloads, batch multiple objects into a single Macie classification job to reduce API overhead and stay within the CreateClassificationJob throttle of 0.1 requests per second (one job every 10 seconds). See Macie quotas.
- Enable Amazon S3 AWS CloudTrail events to maintain a complete audit trail of every object access and movement throughout the pipeline.
- Enable Amazon SNS data encryption with SSE-KMS.
Extending this solution
- Data lake integration – Route JSON findings to Amazon Athena or AWS Glue for trend analysis. Build Amazon QuickSight dashboards for PII density visualization.
- Remediation workflows – Extend Step Functions with a remediation branch to quarantine files or revoke access when high-severity PII is found.
- Multi-account environments – Use AWS Organizations and Amazon EventBridge cross-account rules to centralize scanning in a dedicated security account.
- Enhanced security posture – Publish findings to AWS Security Hub for unified security posture management.
- Batch for high-volume – Modify Trigger Scan to batch objects into a single Macie job for cost optimization at scale.
Cleaning up
To avoid ongoing charges, delete all resources created by this solution:
- Empty all S3 buckets created by the stack. CloudFormation cannot delete non-empty buckets.
- Delete the CloudFormation stack.
- Wait for stack deletion to complete.
- Amazon S3 buckets use DeletionPolicy: Retain preventing automatic removal. Delete retained buckets manually.
- Disable Macie if no longer needed (optional).
Conclusion
In this post, we demonstrated building an event-driven pipeline that automatically detects PII in files uploaded to Amazon S3. By combining Macie’s managed classification with custom data identifiers, orchestrated by AWS Step Functions and triggered in real time through Amazon EventBridge, the solution detects both standard and domain-specific sensitive data without manual intervention. The pipeline responds to S3 bucket uploads within seconds, runs each object through the full scan lifecycle, generates timestamped CSV and JSON reports for compliance, and delivers real-time Amazon SNS notifications when high-severity findings are detected.
Getting started
To deploy this solution in your own environment, clone the GitHub repository and follow the step-by-step deployment instructions in the README. This is a non-prod sample code without the listed hardening measures. You can extend the pipeline by adding custom data identifiers for your organization’s unique data formats, configuring cross-account Amazon EventBridge rules for multi-account environments, or batching objects per Macie job to optimize for high-volume workloads.
To learn more, review the Amazon Macie documentation for additional detection capabilities, explore AWS Step Functions best practices for production error handling, and visit the AWS Security Blog for more data protection patterns.
About the authors
What’s New in Rapid7 Products and Services: Q2 2026 in Review
Post Syndicated from Ed Montgomery original https://www.rapid7.com/blog/post/pt-new-products-services-q2-2026-mdr
If Q1 set the pace for Rapid7’s tools, Q2 accelerated it. This quarter brought a steady stream of product enhancements, platform investments, and customer-driven innovation across Rapid7’s portfolio. Each release was designed with a clear goal in mind: helping security teams reduce complexity while increasing speed, context, and confidence in their day-to-day operations. Here’s a closer look at what launched in Q2.
Detection and response
Streamline investigations with bidirectional and enriched Microsoft Defender alerts
Bidirectional synchronization and enriched alert context for Microsoft Defender is now generally available for SIEM and MDR customers, enabling security teams to automatically synchronize alert status between Rapid7’s SIEM and the Microsoft Defender console. With added process tree and user identity context, analysts can investigate threats more efficiently while reducing manual effort.
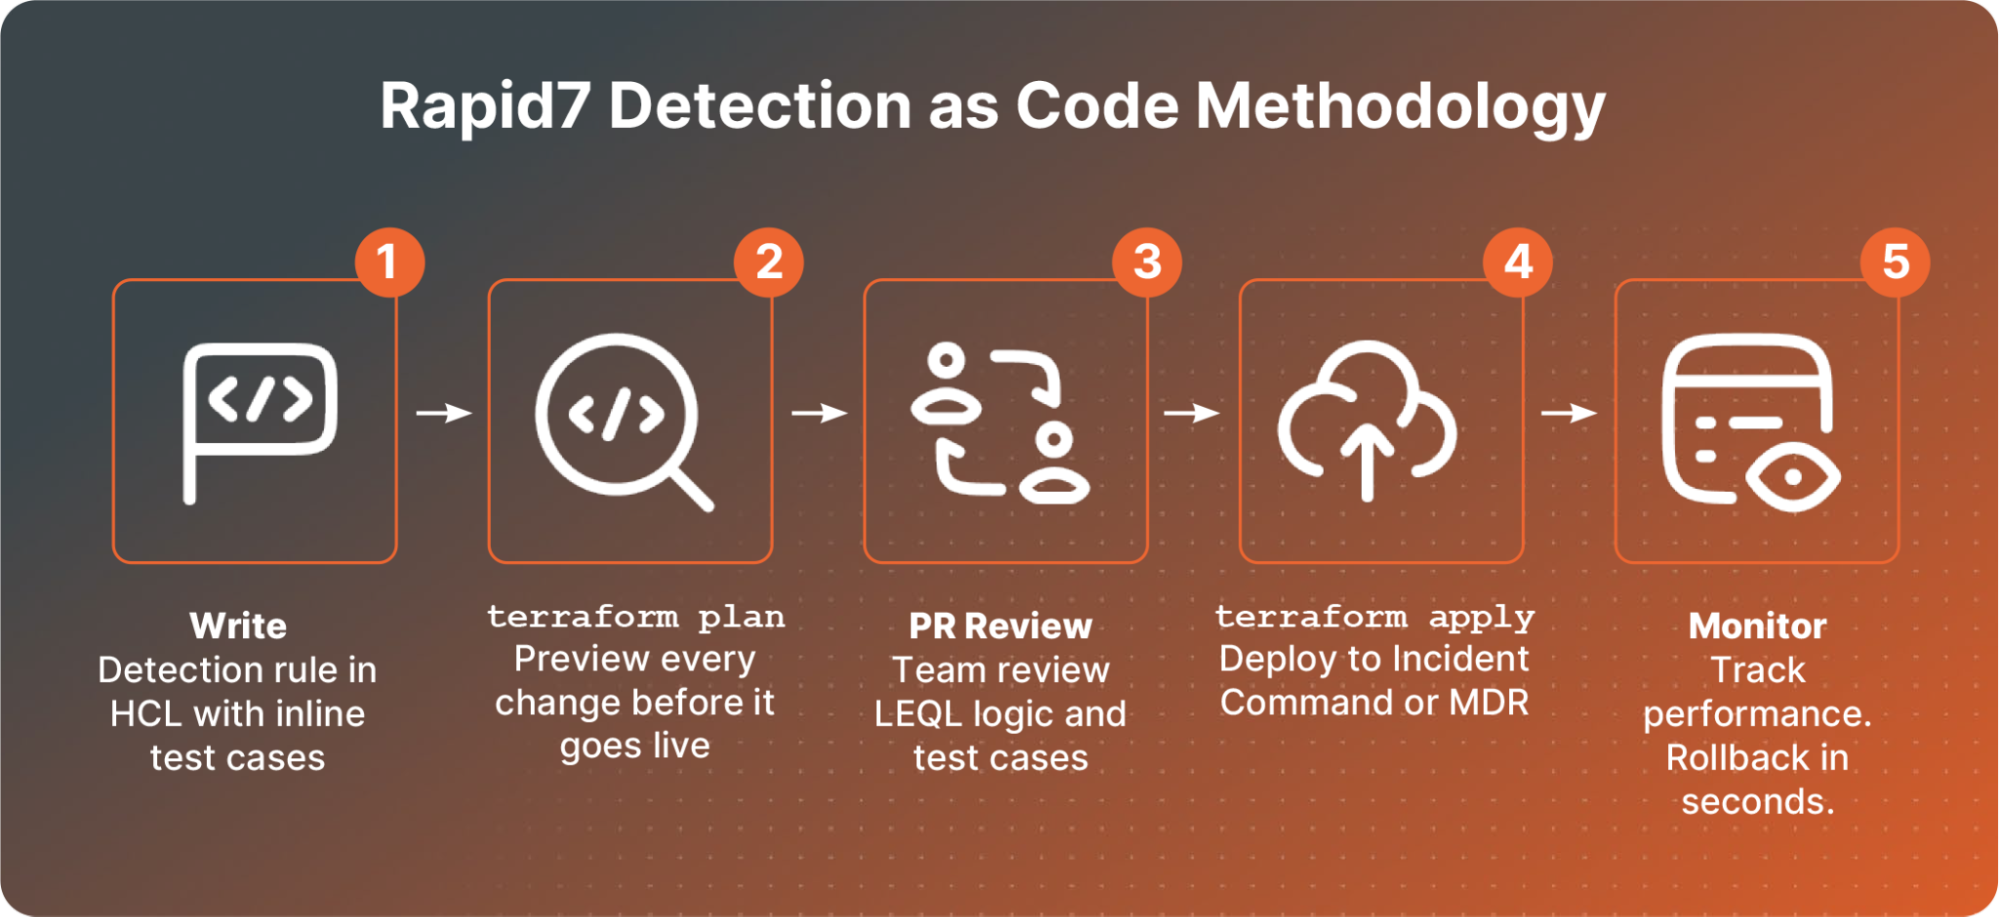
Confidently scale detection engineering with Detection as Code
Detection as Code enables security teams to build, test, version, and deploy detections using Terraform and modern engineering workflows. Built-in validation, guardrails, and version control help teams deliver higher-quality alerts, maintain more consistent coverage, and scale detection engineering more effectively.
Strengthen ransomware resilience with Ransomware Prevention for Incident Command
Ransomware Prevention for Incident Command adds an intent-based layer of protection designed to stop ransomware encryption and endpoint damage before they disrupt operations. Built into the Insight Agent, this capability strengthens ransomware resilience while working alongside existing endpoint security investments, without adding operational complexity.
Compliance
New solutions webpages
Across the globe, cybersecurity regulation is shifting away from static compliance checklists and toward ongoing risk management that blends proactive defense with effective detection and response. Rapid7’s platform, which brings exposure management and CTEM together with detection, response, and MDR, is well positioned to help organizations operationalize compliance across mandates such as NIS2, NIST CSF 2.0, DORA, HIPAA, HITRUST, and GovRAMP. To support that effort, Rapid7 has launched an updated library of dedicated compliance solution pages that map platform capabilities to the requirements that matter most across industries and regions. The first set of pages is live now, with more to follow in the coming weeks.
Exposure management
Turn prioritized exposures into remediation progress
We improved Remediation Hub to help teams turn prioritized exposures into more actionable remediation progress. Updates to the Top Remediations Report add asset-level context, including operating system, IP address, cloud provider, tags, endpoint protection, and patch management details, so teams can better understand what needs to be fixed and who needs to act.
With clearer patch and endpoint coverage signals, reboot status, customizable filters, exportable reports, and scheduled email delivery, teams can spend less time assembling manual updates and more time tracking the remediation work that reduces risk. Read the full blog to learn more about how Exposure Command helps teams move from prioritized exposures to remediation progress.
AI pre-triage for AppSec findings
Rapid7 is also making application security testing faster and more focused with AI vulnerability pre-triaging for InsightAppSec. Available now for AppSec customers in supported regions, the capability uses AI to automatically remove false positives during the scan process, helping teams spend less time manually reviewing findings and more time remediating actual risk.
Initial coverage started with BlindSQL, and the latest engine release adds AI validation for BlindNoSQL findings, including content-based and timing-based detections. The result is a cleaner, more confident view of application risk, so security teams can focus on high-impact vulnerabilities and accelerate remediation with less manual effort.
Attack surface management
Open-source MCP Server and Agent Skill
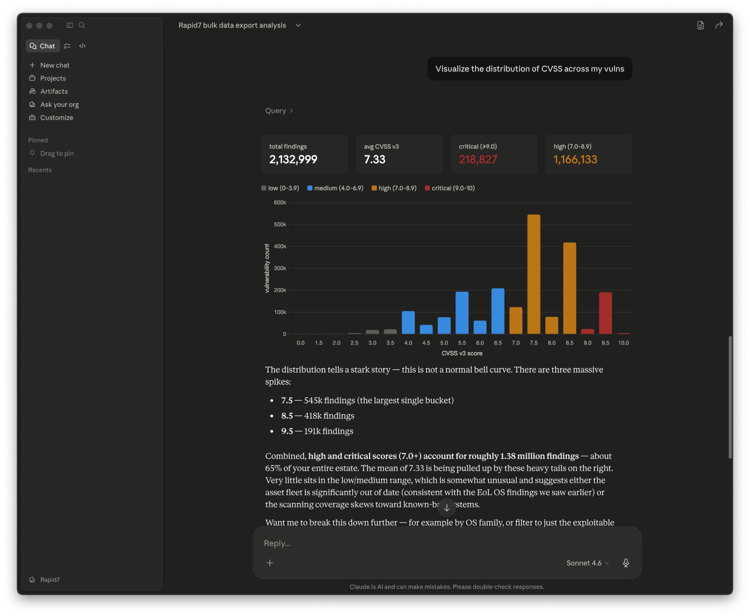
We are delighted to announce the introduction of a free, open-source MCP Server and Agent Skill for Bulk Export. Bulk export is a highly efficient way to access all your Rapid7 vulnerability and exposure data to AI assistants and custom AI workflows. Built as an open-source bridge, it helps customers bring their Rapid7 data into the tools and experiences that work best for their teams. Check out our blog for more detail.
Turn exposure filters into live dashboards
Surface Command also made exposure reporting easier with filter-based dashboard widgets. Teams can now turn saved asset and identity filters into live dashboards without writing Cypher queries, making it faster to track high-risk internet-facing assets, identity-driven exposure hotspots, unmanaged cloud infrastructure, and business-unit risk.
For continuous threat exposure management programs, this helps teams move from one-off reporting to repeatable, always-on views of exposure risk and remediation progress. Read this blog to learn more.
Platform and Labs
Rapid7 Command Platform
Cyber GRC
Rapid7 introduced Cyber GRC to select customers in Q2, giving teams an early look at a new way to connect security, risk, compliance, and third-party risk management in one program. Available to both Exposure Management and Detection and Response customers, Cyber GRC brings governance and compliance workflows closer to the security data teams already use every day.
Cyber GRC will be broadly available in late July. It helps organizations move toward continuous compliance by mapping controls to real environment telemetry, automating evidence collection, and prioritizing risk with live attack surface context. That means teams can spend less time chasing audit artifacts, screenshots, and vendor risk details, and more time understanding which controls, assets, third parties, and risks need attention now.
Rapid7 Labs
Rapid7 Quarterly Threat Landscape Report
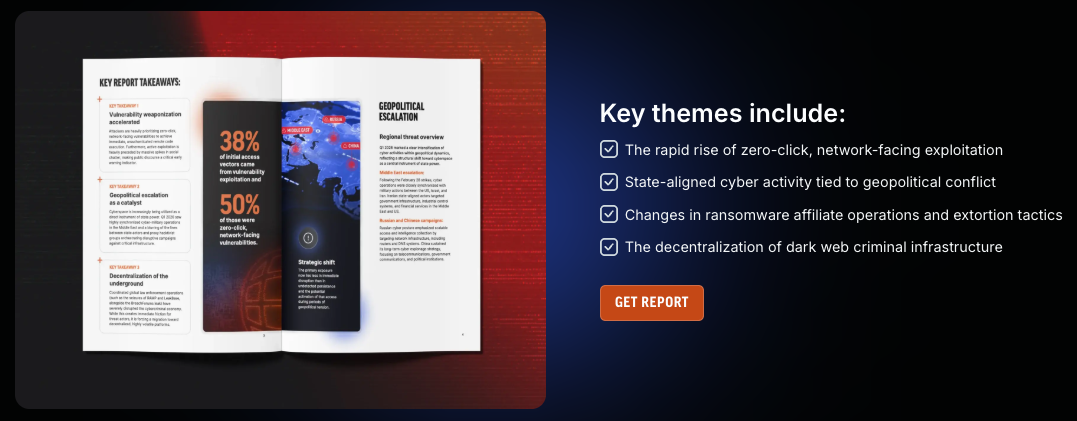
The Rapid7 Quarterly Threat Landscape Report examines the key trends shaping today’s threat landscape, drawing on MDR incident response, vulnerability intelligence, ransomware monitoring, and dark web telemetry. Q1 2026 data highlights the growing dominance of vulnerability exploitation as an initial access vector, the rise of zero-click vulnerabilities, evolving ransomware operations, and the accelerating pace at which attackers operationalize newly disclosed vulnerabilities. Read the report to explore all key findings and takeaways.
The latest threat research
Rapid7 researchers explored emerging trends shaping the threat landscape, including the growing commercialization of criminal AI-as-a-Service and the evolving tradecraft of advanced threat actors. From the underground adoption of AI tools for fraud and social engineering to an in-depth analysis of the Dropping Elephant malware campaign, these reports provide actionable intelligence on how attackers are adapting their techniques and what defenders can do to stay ahead.
Emergent Threat Response
This quarter’s Emergent Threat Response (ETR) coverage highlights a sustained wave of high-impact vulnerabilities affecting widely deployed enterprise technologies, including Oracle PeopleSoft, Palo Alto Networks PAN-OS, Check Point VPN, Ivanti Sentry, cPanel/WHM, and Nginx UI. For each of these CVEs, Rapid7 tracked active exploitation and rapidly evolving attacker activity to provide timely guidance to help defenders assess risk and respond quickly. See all the details, and our latest ETR coverage, here.
From strengthening detection and response to advancing exposure management, expanding governance capabilities, and delivering actionable threat intelligence, Q2 demonstrated Rapid7’s continued focus on helping security teams do more with less complexity. Every enhancement this quarter was designed to reduce manual effort, surface the context that matters, and help organizations make faster, more confident security decisions. We’re carrying that momentum into the rest of the year, so stay tuned to our blog and releases as we continue building the security operations platform that helps defenders stay ahead of what’s next.
Mango Madness
Post Syndicated from The History Guy: History Deserves to Be Remembered original https://www.youtube.com/watch?v=uOiMTXyg8Jg
First-Person Identity Theft Story
Post Syndicated from Bruce Schneier original https://www.schneier.com/blog/archives/2026/07/first-person-identity-theft-story.html
Harrowing story of an identity theft victim.
Yes, the person made a mistake—they gave the scammer a two-factor authentication code that allowed the scammer to take over their email address. But the real story here is how, for many of us, the security of most of our accounts hangs on the security of our email accounts.
Calibration Nobel
Post Syndicated from xkcd.com original https://xkcd.com/3275/

Do more with AWS WAF labels using dynamic label interpolation
Post Syndicated from Eitav Arditti original https://aws.amazon.com/blogs/security/do-more-with-aws-waf-labels-using-dynamic-label-interpolation/
AWS WAF classifies web traffic by attaching metadata to each request it evaluates. Managed rule groups such as AWS WAF Bot Control and AWS WAF Fraud Control account takeover prevention (ATP) attach labels that describe what they found. A label can record that a request came from a known bot category or that it matched a credential-stuffing pattern. You can forward that metadata to your origin as request headers, which gives your backend visibility into the decisions AWS WAF made at the edge. You can also use labels to build tiered policies: a low-confidence bot signal might trigger a CAPTCHA challenge, whereas a high-confidence signal blocks the request outright.
With the AWS WAF AI Activity Dashboard, launched February 24, 2026, Bot Control now identifies more than 650 bots and agents, including search engine crawlers, data collectors, AI assistants, and large language model (LLM) training crawlers, which is ever increasing over time. In an earlier post, we showed how to group Bot Control labels into confidence levels and use them to drive adaptive user experiences in your application. That approach works well when you can list the labels you care about. After the catalog grows past what you can reasonably enumerate, writing a rule for each label becomes a maintenance burden and consumes rule capacity you’d rather spend elsewhere.
With dynamic label interpolation, you can reference labels by namespace instead of by individual name, so a single rule resolves to whichever labels matched during evaluation with no requirement to enumerate each one. You write a ${namespace:} clause in a header value or custom response body, and AWS WAF substitutes the matched values at evaluation time. The feature also gives you synthetic labels you can embed directly in responses, including the client IP address, request JA3 and JA4 fingerprints, and WAF request ID. The rest of this post explains how interpolation resolves labels by referencing four scenarios: forwarding classification data to your application, building custom block and challenge pages, redirecting traffic to a verification step, and segmenting Amazon CloudFront caches by bot category.
Interpolation syntax and behavior
Dynamic label interpolation uses a ${namespace:} syntax that resolves label values at evaluation time. You can use it in three places:
| Where | What it does | Syntax |
| Custom request headers | Inserts resolved label values into headers that AWS WAF forwards to your origin. For example, set X-Bot-Category to so your application receives the matched bot category directly. | in the header value field |
| Custom response bodies | Embeds label values and synthetic labels (such as client IP or request ID) in block pages, challenge pages, and other custom responses. | in the response body Content field |
| Custom response headers | Insert label values into response headers (for example, Location for redirects). | in the response header Value field |
In each case, AWS WAF reads the labels attached to the request and substitutes the resolved values into the string you provide.
The interpolation syntax
Include a ${namespace:} clause anywhere you would normally put a header value or custom response body. The trailing colon is what signals interpolation, telling AWS WAF to resolve every label in that namespace rather than match a single named label. AWS WAF evaluates each clause against the labels on the request and follows three rules:
- Single match – The clause resolves to the label’s terminal value. If the request carries
awswaf:managed:aws:bot-control:bot:category:scraping, then${awswaf:managed:aws:bot-control:bot:category:}resolves to
scraping. - Multiple matches – AWS WAF strips the namespace prefix and returns the values as a comma-separated list, such as
scraping,advertising. - No match – The clause resolves to an empty string.
This is backward compatible. AWS WAF only interpolates a value when it contains a ${...} clause, so anything else passes through unchanged. There are no new API fields to set because the syntax is written directly into your existing string values. AWS WAF label namespaces are already colon-delimited (for example, awswaf:managed:aws:bot-control:bot:category:), meaning the required trailing colon won’t collide with header values that don’t follow that pattern.
Synthetic labels
Not every value you might want comes from a rule match. Synthetic labels are derived from the request itself, such as the client’s IP address, the AWS WAF request ID, or the TLS fingerprint, and you interpolate them with the same syntax.
| Synthetic label | Description |
| ${awswaf:request_id:} | The unique AWS WAF request identifier |
| ${awswaf:ip:} | The client IP address |
| ${awswaf:ja3:} | The JA3 TLS fingerprint |
| ${awswaf:ja4:} | The JA4 TLS fingerprint |
Because synthetic labels work everywhere ${namespace:} interpolation does, you can mix them with namespace-based labels in a single value and pass both to your origin in whatever format suits your application.
The following examples use Bot Control labels, but interpolation isn’t limited to them. It works with most namespaces including labels from other AWS Managed Rules, such as account takeover prevention, account creation fraud prevention, and the IP reputation and anonymous IP lists, as well as labels from AWS Marketplace managed rule groups. This works with labels you custom define based on your own requirements in your own rules.
The same applies to custom labels you define in your own rules. Consider a configuration that classifies requests into tiers based on an API key header, where one rule applies the label and a second interpolates the namespace to forward the result. The first rule matches requests whose x-api-key header begins with pk_enterprise_ and applies the label app:tier:enterprise.
The second rule matches labels in the app:tier namespace and forwards the resolved value, enterprise, in the x-customer-tier header.
In rule_labels, you use the short label name, app:tier:enterprise, and AWS WAF prefixes it with the web ACL context to produce the fully qualified label awswaf:ACCOUNT_ID:webacl:WEBACL_NAME:app:tier:enterprise. A label match statement accepts the short namespace (app:tier:) however an interpolation reference must use the fully qualified the account and web access control list (ACL) context. The payoff is that you can add app:tier:standard, app:tier:trial, or other tiers later, and the forwarding rule picks them up with no changes.
Interpolation also reaches namespaces that the static model never could. Values like the browser fingerprint (awswaf:managed:token:fingerprint) and the unique browser ID (awswaf:managed:token:id) change from request to request, so you can’t write a rule for each one. With interpolation you forward them as ${awswaf:managed:token:fingerprint:} and ${awswaf:managed:token:id:}, which means you can perform in real time device-level tracking, session correlation, and fraud detection that depend on these token-derived signals.
Application signaling
An application signaling pattern uses the labels and forwards them to the origin as customer request headers. After the headers arrive, your application can see how AWS WAF classified the request and decide what to do with that verdict.
Enumerating each label individually doesn’t scale. The common protection level of Bot Control alone tracks more than 650 self-identifying bots and agents, from crawlers to AI data collectors to monitoring services, and targeted protection adds behavioral and machine learning (ML) detection for bots that don’t announce themselves. Mapping only the known bot:category namespace to headers would take hundreds of rules, each one identical except for a hardcoded value. If you followed steps in the blog post How to use AWS WAF Bot Control for Targeted Bots signals and mitigate evasive bots with adaptive user experience, you’ve already mapped labels to confidence levels this way.
The following example forwards the advertising bot category as a header, one of the hundreds you would write to cover the namespace.
Interpolation collapses that into a single rule. The scope changes from LABEL to NAMESPACE, and the value uses a ${...} clause instead of a hardcoded string. When a request matches, each header resolves to whatever the managed rule group actually applied, whether that is advertising, scraping, or a category that doesn’t exist yet.
This rule matches on the bot:category namespace, then forwards several related namespaces alongside it as separate headers. A more detailed analysis of The x-waf-bot-signals header shows multi-value resolution: the signal: namespace can hold several labels at one time, such as non_browser_user_agent and automated_browser, and they resolve to a comma-separated list. The x-waf-fingerprint and x-waf-token-id headers carry token-derived values unique to each device, which your origin can use for session correlation and fraud detection. And x-waf-client-ip uses a synthetic label to pass the client IP as AWS WAF sees it.
Using these headers, your application can make decisions that AWS WAF can’t make on its own. A signed-in customer flagged with a bot signal might get a simplified page or a different backend, whereas an anonymous session carrying the same signal is blocked outright. A request with several bot signals during a flash sale might be pushed down a queue rather than rejected. A load balancer or API gateway can read the headers and route to different origin pools, sending search_engine traffic, for instance, to a rendering service tuned for crawlers.
These headers are also available to Amazon CloudFront Functions so you can configure custom logic before the request ever reaches your origin.
AWS WAF supplies the signal, and your application supplies the judgment with AWS planning to keep extending this pattern with more detection signals at the edge and more ways to act on them in your application.
Custom block and challenge pages with debug information
False positives are an unavoidable cost of bot mitigation, and the harder problem is usually diagnosing them after they have occurred. Synthetic labels assist with this by embedding the client IP and the AWS WAF request ID in a custom response body, and you give blocked or challenged users a concrete reference to quote when they report a problem. The same approach works for a block page, a CAPTCHA challenge, or a silent challenge because each one supports interpolation in its response body.
This helps your support workflow because a user who reports they’re blocked can give you the request ID from the page. You search the AWS WAF logs for that ID, look at the rules and labels that matched, and decide whether it was a false positive. There’s no requirement to go back to the user and ask them to reproduce the issue or guess when it happened. For applications where a wrongful block is costly, that shortcut between the user’s screen and your logs is worth building in.
Verification redirects with embedded context
Sometimes the right response isn’t a block but a detour sending suspicious traffic to a verification page before letting it continue. You can build this with AWS WAF by interpolating the client IP and request ID into the redirect target, which is shown in the following example.
The Location header resolves to an example such as /verify?ip=203.0.113.42&rid=a1b2c3d4-.... The verification endpoint can use the IP for a geo or rate-limit check and the request ID to align the visit with your AWS WAF logs, then send the user on when they pass. Because the redirect is constructed in AWS WAF, you get this behavior without touching the origin application.
CloudFront cache segmentation with AWS WAF labels
When AWS WAF is used in front of Amazon CloudFront, a header that a rule inserts is available to CloudFront when it computes the cache key, which means you can configure and segment your cache by classification. You can interpolate the bot category into a custom header to instruct CloudFront to include that header in the cache key and keep a separate cached response per category. The x-waf-bot-category header from the example forwarding rule above performs this action.
To put this into context, a search_engine request gets a pre-rendered, edge-cached version of the page built for crawling, and if there is a request with no bot label, this request gets the full dynamic page. A scraping request gets a minimal response, also from cache. Crawlers receive indexable content, scrapers stop consuming origin capacity, and human visitors notice no difference. After the first request in each category, all subsequent requests are served from the edge.
You can run the same approach at the origin instead for finer control over freshness. Configure your application to read the classification header and set Cache-Control accordingly and use no-store for unlabeled human traffic to provide fresh content, and longer TTLs for bot-targeted responses so they stay at the edge and off your origin. Which layer you choose depends on how much of this logic you want in CloudFront compared to your own code.
Conclusion
Dynamic label interpolation doesn’t change how labels work, it changes how much rule configuration you need to act on them. A namespace that used to take one rule per value now takes one rule total, and it keeps working as the Bot Control catalog grows past its current 650-plus entries. Along the way, you pick up request-specific block pages, redirects that carry their own context, and cache segmentation keyed on classification. None of these capabilities is dramatic on its own, but when you put them together, you can pair edge classification with judgment in your application.
The feature fits AWS WAF the same way you already use it, with no breaking changes, making adoption a matter of editing rule configurations rather than rebuilding anything. AWS will improve these features in the future by adding detection signals and interpolation capabilities. If you build something with this or would like to see a use case covered in a future post, let us know. You can contribute examples to the AWS Samples repository, start a discussion on AWS re:Post, or leave a comment.
To get started:
Using the URL of this post, you can enter the following examples as prompts in your coding assistant to use this new feature in your preferred environment.
- “Using the patterns in the blog post, review my current AWS WAF configuration and identify which static label-to-header mappings can be replaced with dynamic interpolation rules.”
- “Create a minimal WAF WebACL (CDK or AWS CloudFormation) with one rule that forwards Bot Control labels to the origin as request headers using `${namespace:}` syntax.”
- “Using the AWS Sample referenced in this post, add a new rule that demonstrates dynamic label interpolation with a different managed rule group such as account takeover prevention.”
- “My `${namespace:}` interpolation resolves to an empty string. Walk me through the debugging steps: verify the label namespace, check rule priority ordering, and confirm the fully qualified namespace for custom labels.”
- “Design a CloudFront cache segmentation strategy using WAF dynamic label interpolation. Include the WAF rule and the origin-side Cache-Control header approach.”
If you have feedback about this post, submit comments in the Comments section below.
Introducing Amazon Simple Email Service (SES) pricing plans
Post Syndicated from Advait Gomkale original https://aws.amazon.com/blogs/messaging-and-targeting/introducing-amazon-simple-email-service-ses-pricing-plans/
Businesses rely on email to deliver critical notifications, nurture customer relationships, and grow revenue. But their success depends on more than just sending the right message. It depends on emails getting delivered to the inbox and ultimately getting read. When emails land in spam or go unread, the business impact is real and measurable: missed engagement, eroded customer trust, and lost revenue.
Most email providers offer capabilities to help improve deliverability, including dedicated sending infrastructure, reputation monitoring, address validation, and inbox placement testing. But these capabilities are typically sold as individual add-ons, each priced separately. Reaching the inbox consistently shouldn’t require evaluating dozens of options independently.
That changes today with Amazon SES pricing plans. Pick a plan, and the right capabilities are already included at up to 22% less than purchasing them individually.
Amazon SES pricing plans
Amazon SES offers three plans: Essentials, Pro, and Enterprise. Each builds on the one before it, offering more capability, so you choose the one that fits your email needs.
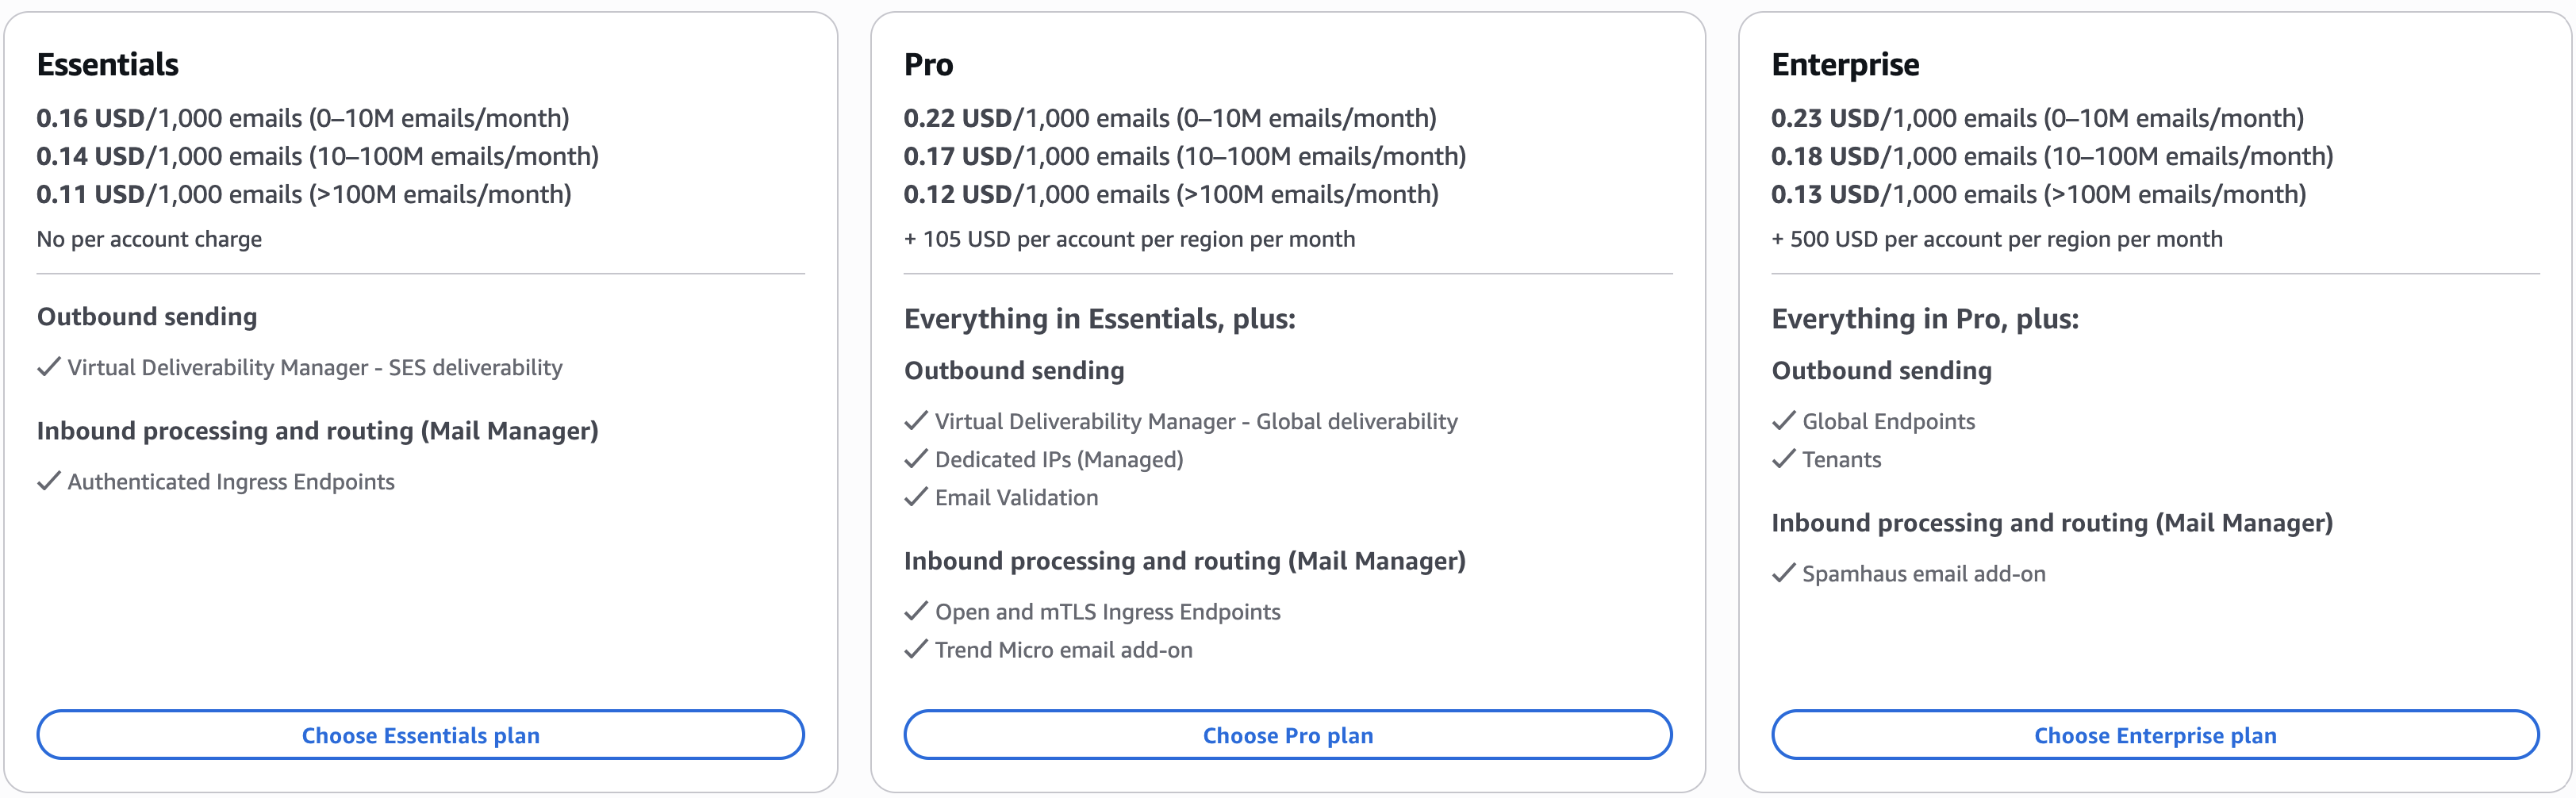
Essentials
Get started with Amazon SES. Monitor how emails perform and get insights to help improve deliverability over time.
Send email reliably at scale and see what’s happening: which emails are landing, which are bouncing, and what needs attention. Essentials gives you the data and recommendations to guide your improvements, with the flexibility to upgrade to Pro as your deliverability needs grow.
Pro
Get higher deliverability with dedicated infrastructure and proactive reputation protection. Reach the inbox consistently as sending scales.
Pro shifts deliverability from reactive to proactive. With Pro, your sending runs on dedicated IPs, keeping your reputation isolated from other senders. Invalid addresses are caught before they bounce, and you see inbox placement across providers your domains send through, not just within SES. Pro helps you prevent problems, not just discover them after the fact.
Enterprise
Get the most out of Amazon SES. Reach the inbox reliably, stay resilient globally, and isolate sending reputation across workloads.
Everything in Pro, plus resilience that keeps email flowing if a region goes down, reputation isolation across separate workloads, and an annual deliverability assessment. This is the most comprehensive SES experience available.
For full pricing details and a complete feature comparison across all three plans, visit the Amazon SES Pricing page.
Getting started
Starting July 21, 2026, all new SES accounts begin on the Essentials plan. Returning customers who have not sent or processed email through SES since June 1, 2025 also begin on the Essentials plan. From there, you can upgrade to Pro or Enterprise, or switch to à-la-carte pricing at any time. Customers who have sent or processed email through SES on or after June 1, 2025 remain on à-la-carte pricing and can switch to a plan anytime.
If you are new to AWS, the AWS Free Tier provides up to $200 in credits during your first six months that you can apply toward Amazon SES pricing plans. As of July 21, 2026, the SES-specific free tier (3,000 email message charges per month for your first 12 months after first SES use) is no longer available for new customers. If you are currently on the SES-specific free tier, your benefits continue for the remainder of your 12-month period.
To get started, sign in to the Amazon SES console and navigate to the Pricing plan section. To learn more, visit the Amazon SES Pricing page or explore the Amazon SES documentation.