All posts by Nikita Cano

15 years of helping build a better Internet: a look back at Birthday Week 2025

Post Syndicated from Nikita Cano original https://blog.cloudflare.com/birthday-week-2025-wrap-up/

Cloudflare launched fifteen years ago with a mission to help build a better Internet. Over that time the Internet has changed and so has what it needs from teams like ours.  In this year’s Founder’s Letter, Matthew and Michelle discussed the role we have played in the evolution of the Internet, from helping encryption grow from 10% to 95% of Internet traffic to more recent challenges like how people consume content. 

We spend Birthday Week every year releasing the products and capabilities we believe the Internet needs at this moment and around the corner. Previous Birthday Weeks saw the launch of IPv6 gateway in 2011,  Universal SSL in 2014, Cloudflare Workers and unmetered DDoS protection in 2017, Cloudflare Radar in 2020, R2 Object Storage with zero egress fees in 2021,  post-quantum upgrades for Cloudflare Tunnel in 2022, Workers AI and Encrypted Client Hello in 2023. And those are just a sample of the launches.

This year’s themes focused on helping prepare the Internet for a new model of monetization that encourages great content to be published, fostering more opportunities to build community both inside and outside of Cloudflare, and evergreen missions like making more features available to everyone and constantly improving the speed and security of what we offer.

We shipped a lot of new things this year. In case you missed the dozens of blog posts, here is a breakdown of everything we announced during Birthday Week 2025. 

Monday, September 22

What

In a sentence …

Help build the future: announcing Cloudflare’s goal to hire 1,111 interns in 2026

To invest in the next generation of builders, we announced our most ambitious intern program yet with a goal to hire 1,111 interns in 2026.

Supporting the future of the open web: Cloudflare is sponsoring Ladybird and Omarchy

To support a diverse and open Internet, we are now sponsoring Ladybird (an independent browser) and Omarchy (an open-source Linux distribution and developer environment).

Come build with us: Cloudflare’s new hubs for startups

We are opening our office doors in four major cities (San Francisco, Austin, London, and Lisbon) as free hubs for startups to collaborate and connect with the builder community.

Free access to Cloudflare developer services for non-profit and civil society organizations

We extended our Cloudflare for Startups program to non-profits and public-interest organizations, offering free credits for our developer tools.

Introducing free access to Cloudflare developer features for students

We are removing cost as a barrier for the next generation by giving students with .edu emails 12 months of free access to our paid developer platform features.

Cap’n Web: a new RPC system for browsers and web servers

We open-sourced Cap’n Web, a new JavaScript-native RPC protocol that simplifies powerful, schema-free communication for web applications.

A lookback at Workers Launchpad and a warm welcome to Cohort #6

We announced Cohort #6 of the Workers Launchpad, our accelerator program for startups building on Cloudflare.

Tuesday, September 23

What

In a sentence …

Building unique, per-customer defenses against advanced bot threats in the AI era

New anomaly detection system that uses machine learning trained on each zone to build defenses against AI-driven bot attacks. 

Why Cloudflare, Netlify, and Webflow are collaborating to support Open Source tools

To support the open web, we joined forces with Webflow to sponsor Astro, and with Netlify to sponsor TanStack.

Launching the x402 Foundation with Coinbase, and support for x402 transactions

We are partnering with Coinbase to create the x402 Foundation, encouraging the adoption of the x402 protocol to allow clients and services to exchange value on the web using a common language

Helping protect journalists and local news from AI crawlers with Project Galileo

We are extending our free Bot Management and AI Crawl Control services to journalists and news organizations through Project Galileo.

Cloudflare Confidence Scorecards – making AI safer for the Internet

Automated evaluation of AI and SaaS tools, helping organizations to embrace AI without compromising security.

Wednesday, September 24

What

In a sentence …

Automatically Secure: how we upgraded 6,000,000 domains by default

Our Automatic SSL/TLS system has upgraded over 6 million domains to more secure encryption modes by default and will soon automatically enable post-quantum connections.

Giving users choice with Cloudflare’s new Content Signals Policy

The Content Signals Policy is a new standard for robots.txt that lets creators express clear preferences for how AI can use their content.

To build a better Internet in the age of AI, we need responsible AI bot principles

A proposed set of responsible AI bot principles to start a conversation around transparency and respect for content creators’ preferences.

Securing data in SaaS to SaaS applications

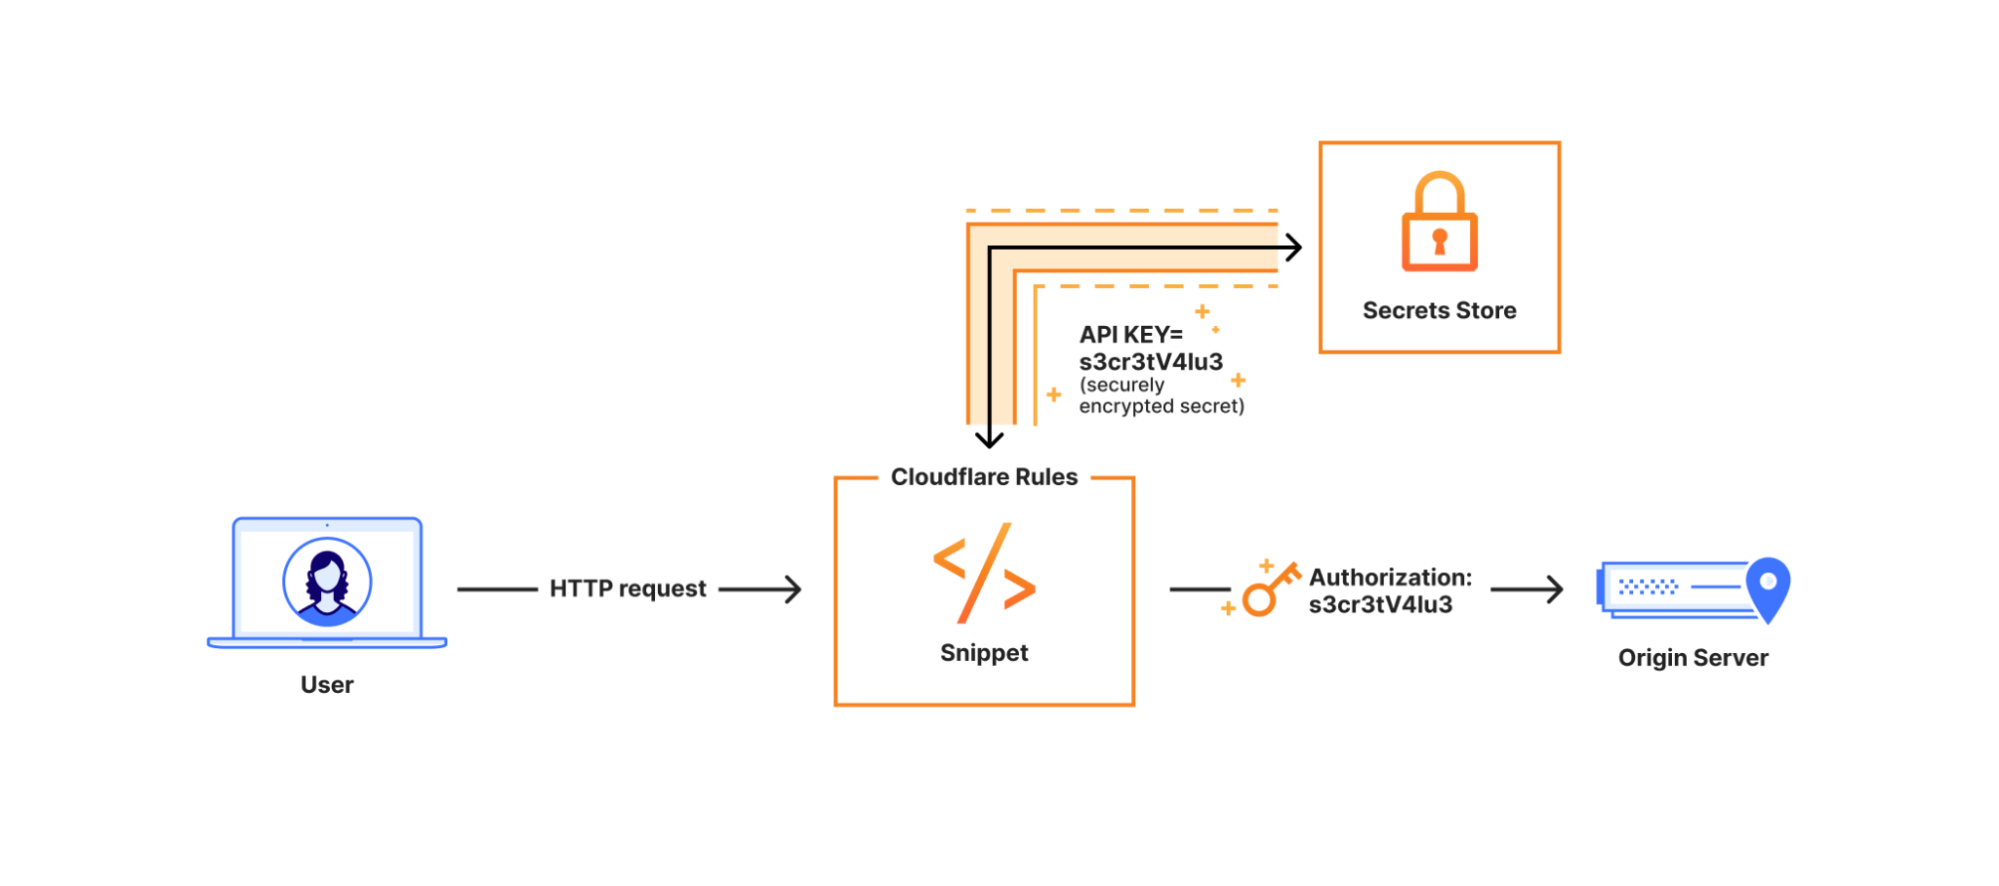
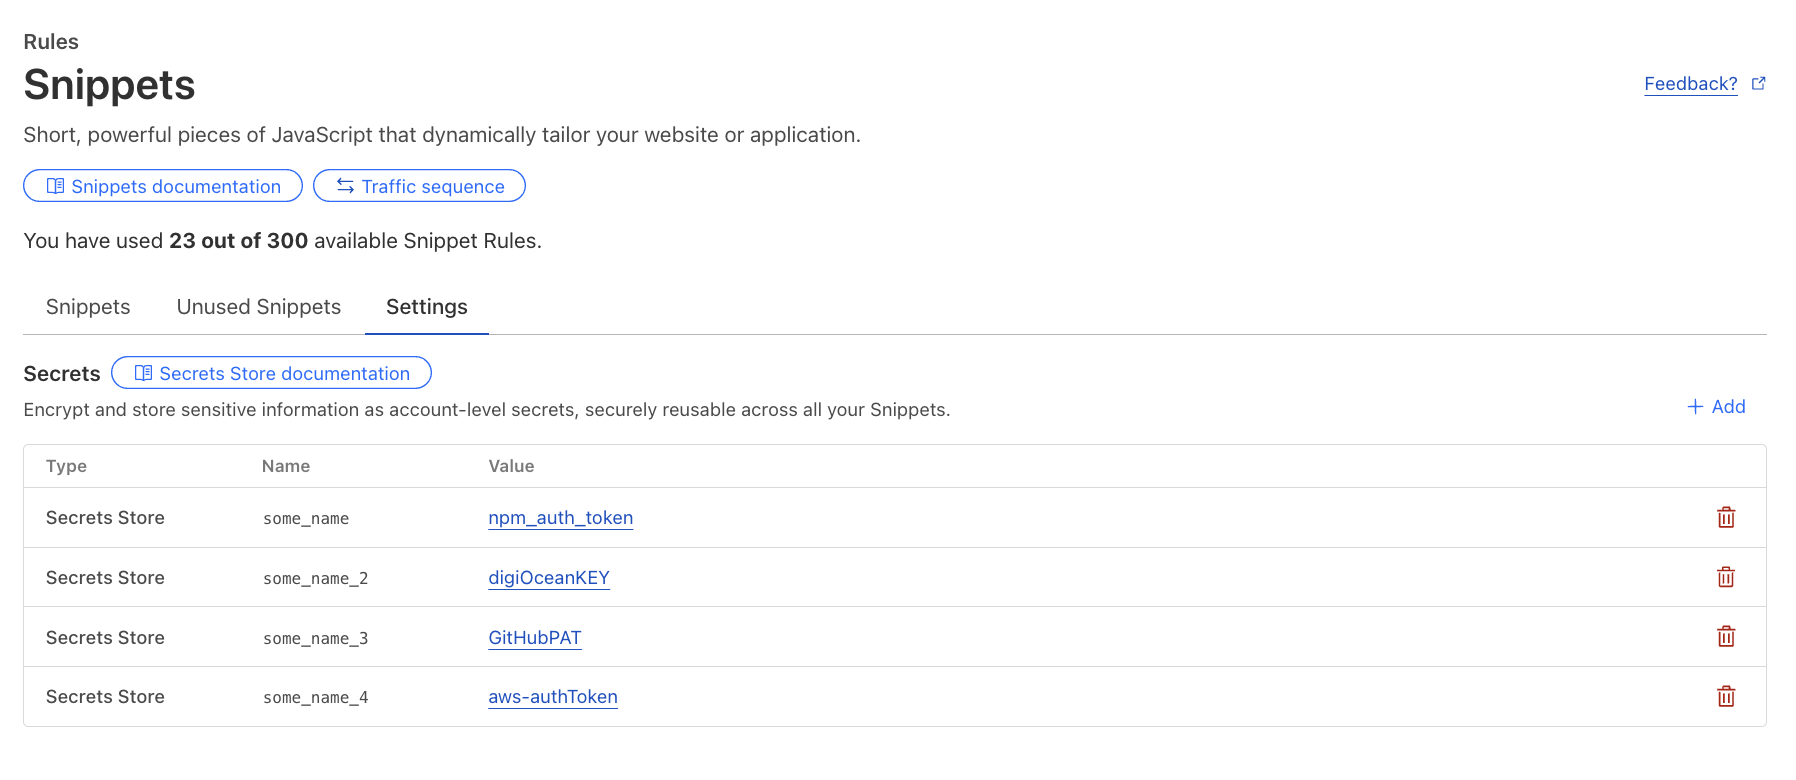
New security tools to give companies visibility and control over data flowing between SaaS applications.

Securing today for the quantum future: WARP client now supports post-quantum cryptography (PQC)

Cloudflare’s WARP client now supports post-quantum cryptography, providing quantum-resistant encryption for traffic. 

A simpler path to a safer Internet: an update to our CSAM scanning tool

We made our CSAM Scanning Tool easier to adopt by removing the need to create and provide unique credentials, helping more site owners protect their platforms.

Thursday, September 25

What

In a sentence …

Every Cloudflare feature, available to everyone

We are making every Cloudflare feature, starting with Single Sign On (SSO), available for anyone to purchase on any plan. 

Cloudflare’s developer platform keeps getting better, faster, and more powerful

Updates across Workers and beyond for a more powerful developer platform – such as support for larger and more concurrent Container images, support for external models from OpenAI and Anthropic in AI Search (previously AutoRAG), and more. 

Partnering to make full-stack fast: deploy PlanetScale databases directly from Workers

You can now connect Cloudflare Workers to PlanetScale databases directly, with connections automatically optimized by Hyperdrive.

Announcing the Cloudflare Data Platform

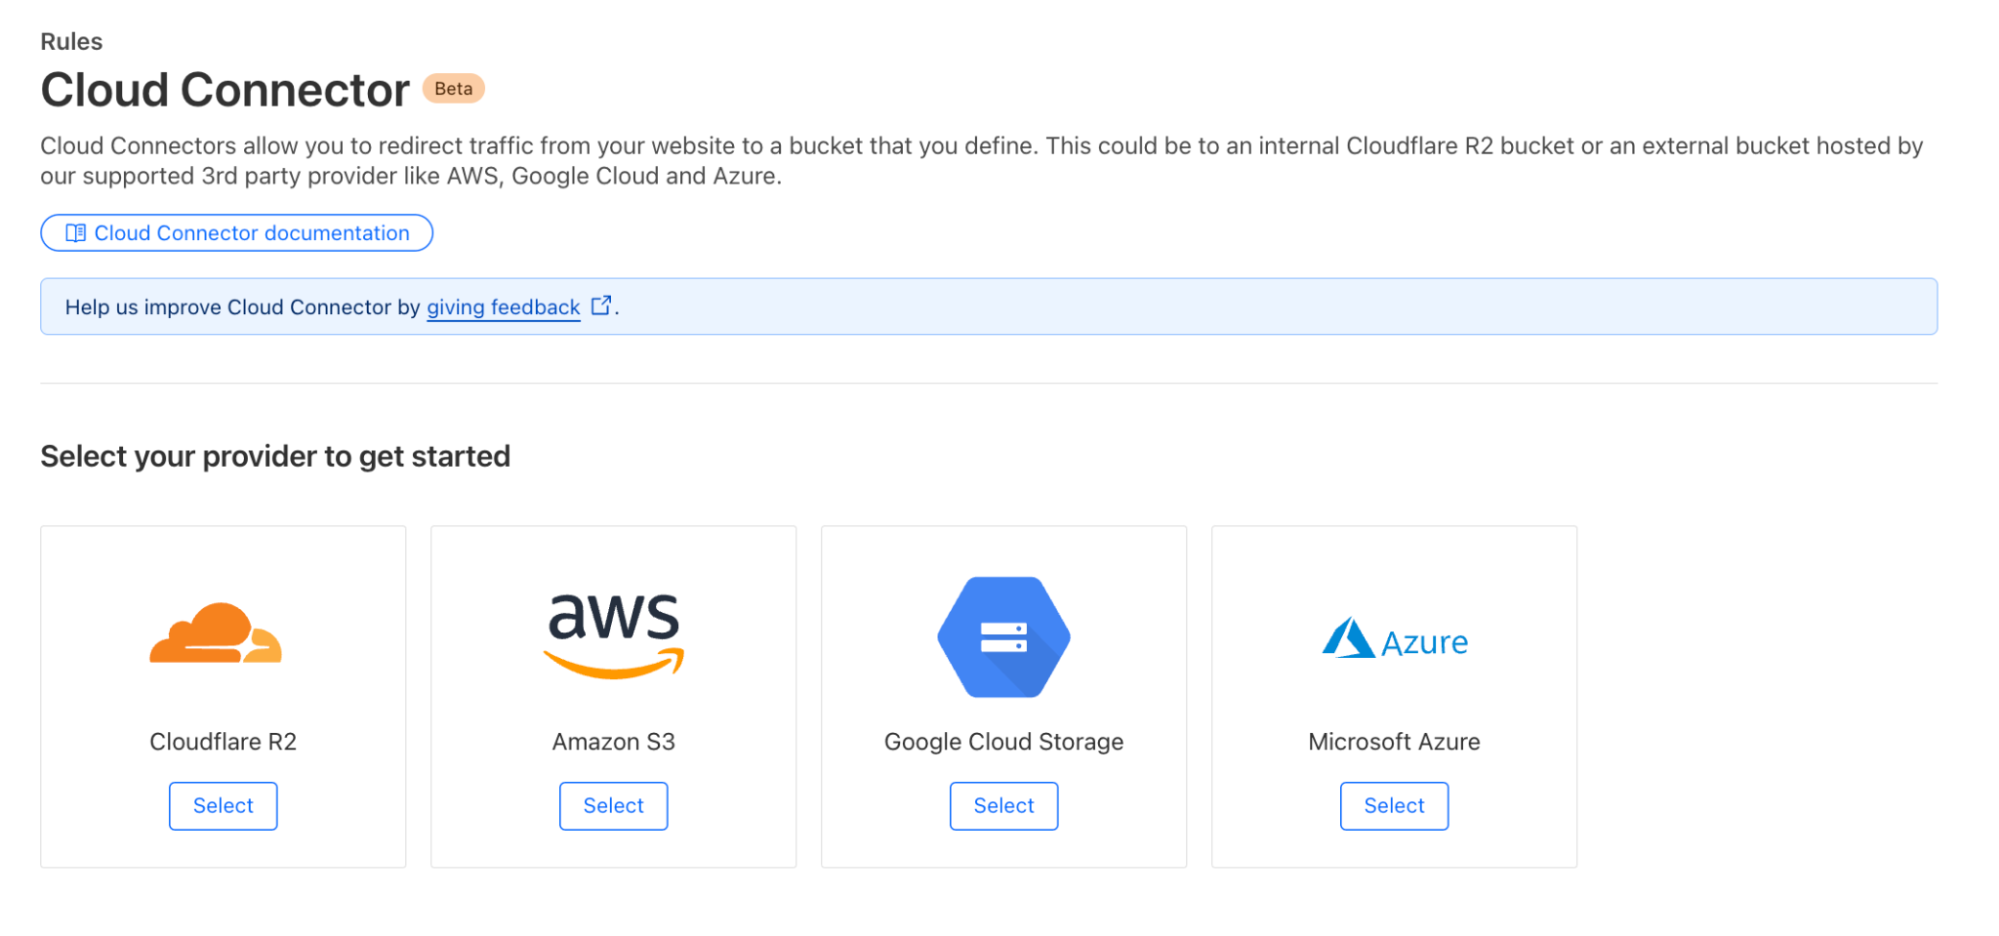
A complete solution for ingesting, storing, and querying analytical data tables using open standards like Apache Iceberg. 

R2 SQL: a deep dive into our new distributed query engine

A technical deep dive on R2 SQL, a serverless query engine for petabyte-scale datasets in R2.

Safe in the sandbox: security hardening for Cloudflare Workers

A deep-dive into how we’ve hardened the Workers runtime with new defense-in-depth security measures, including V8 sandboxes and hardware-assisted memory protection keys.

Choice: the path to AI sovereignty

To champion AI sovereignty, we’ve added locally-developed open-source models from India, Japan, and Southeast Asia to our Workers AI platform.

Announcing Cloudflare Email Service’s private beta

We announced the Cloudflare Email Service private beta, allowing developers to reliably send and receive transactional emails directly from Cloudflare Workers.

A year of improving Node.js compatibility in Cloudflare Workers

There are hundreds of new Node.js APIs now available that make it easier to run existing Node.js code on our platform. 

Friday, September 26

What

In a sentence …

Cloudflare just got faster and more secure, powered by Rust

We have re-engineered our core proxy with a new modular, Rust-based architecture, cutting median response time by 10ms for millions. 

Introducing Observatory and Smart Shield

New monitoring tools in the Cloudflare dashboard that provide actionable recommendations and one-click fixes for performance issues.

Monitoring AS-SETs and why they matter

Cloudflare Radar now includes Internet Routing Registry (IRR) data, allowing network operators to monitor AS-SETs to help prevent route leaks.

An AI Index for all our customers

We announced the private beta of AI Index, a new service that creates an AI-optimized search index for your domain that you control and can monetize.

Introducing new regional Internet traffic and Certificate Transparency insights on Cloudflare Radar

Sub-national traffic insights and Certificate Transparency dashboards for TLS monitoring.

Eliminating Cold Starts 2: shard and conquer

We have reduced Workers cold starts by 10x by implementing a new “worker sharding” system that routes requests to already-loaded Workers.

Network performance update: Birthday Week 2025

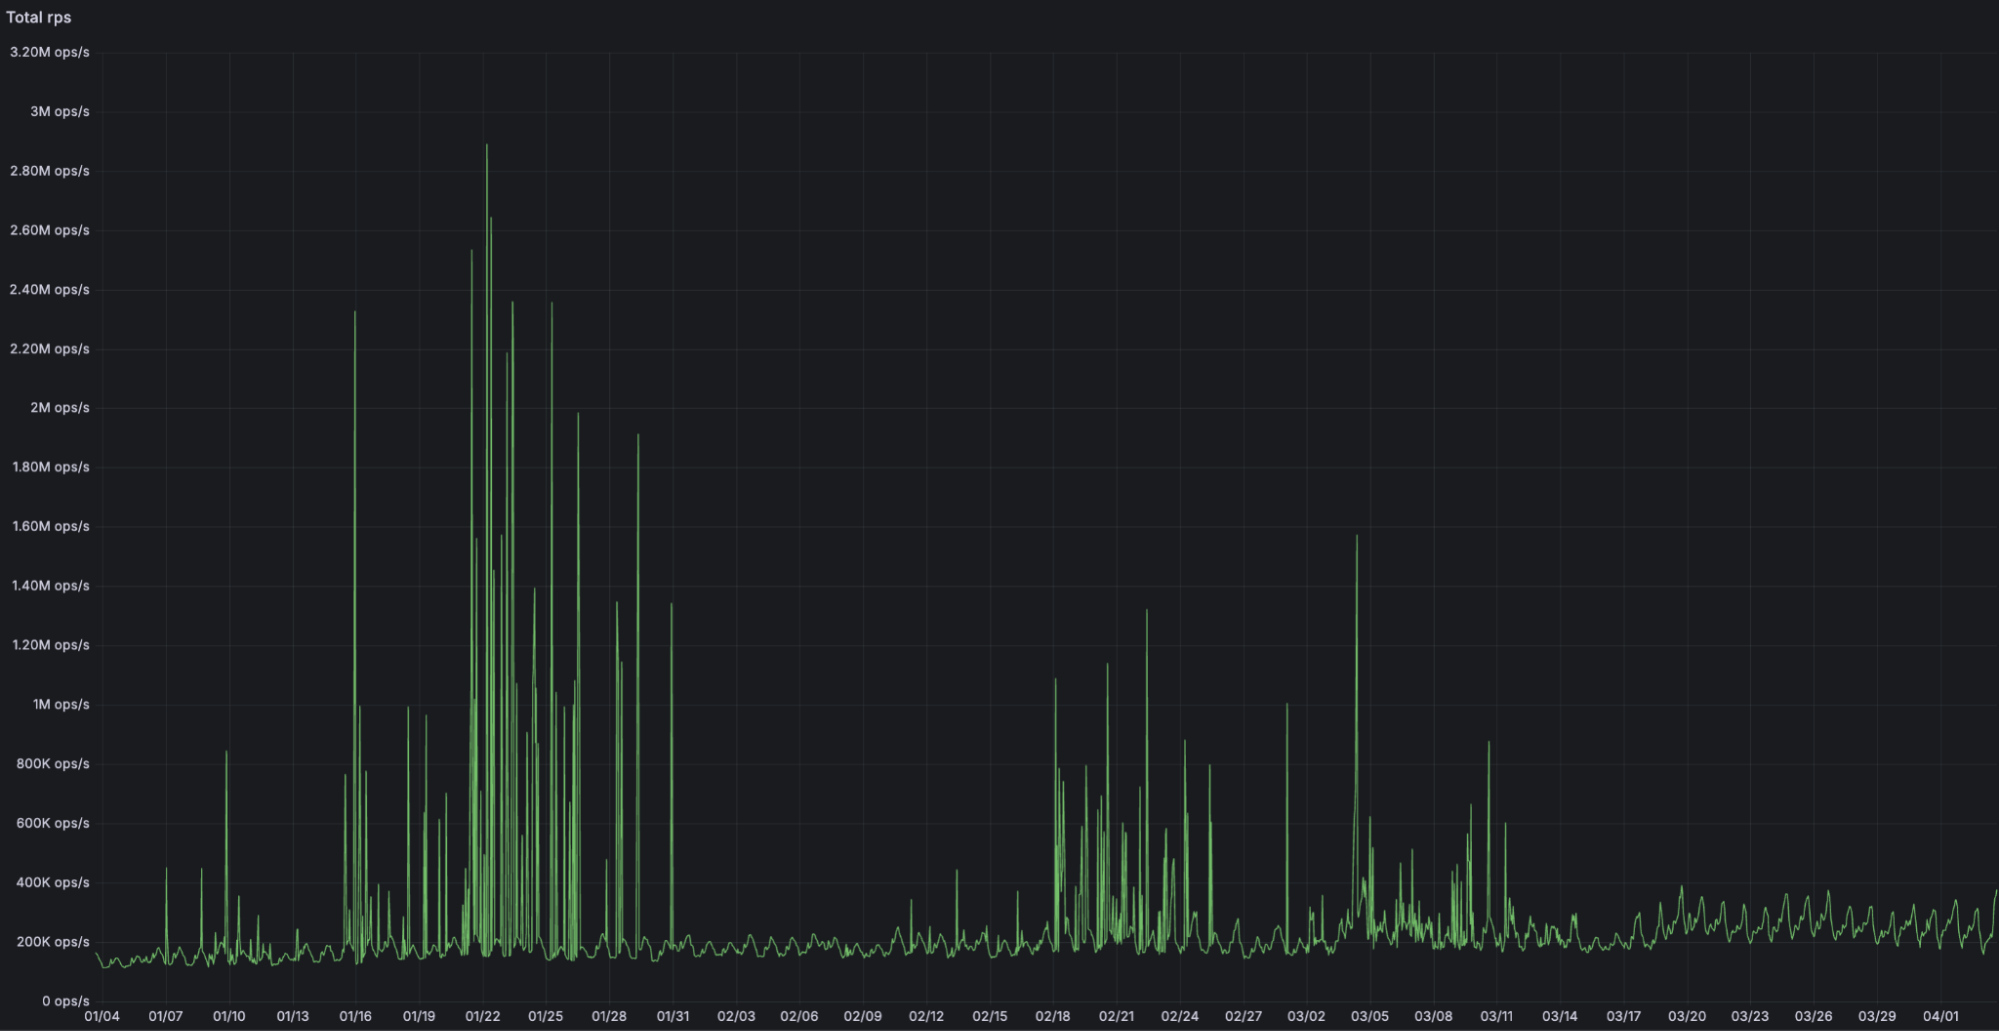
The TCP Connection Time (Trimean) graph shows that we are the fastest TCP connection time in 40% of measured ISPs – and the fastest across the top networks.

How Cloudflare uses performance data to make the world’s fastest global network even faster

We are using our network’s vast performance data to tune congestion control algorithms, improving speeds by an average of 10% for QUIC traffic.

Come build with us!

Helping build a better Internet has always been about more than just technology. Like the announcements about interns or working together in our offices, the community of people behind helping build a better Internet matters to its future. This week, we rolled out our most ambitious set of initiatives ever to support the builders, founders, and students who are creating the future.

For founders and startups, we are thrilled to welcome Cohort #6 to the Workers Launchpad, our accelerator program that gives early-stage companies the resources they need to scale. But we’re not stopping there. We’re opening our doors, literally, by launching new physical hubs for startups in our San Francisco, Austin, London, and Lisbon offices. These spaces will provide access to mentorship, resources, and a community of fellow builders.

We’re also investing in the next generation of talent. We announced free access to the Cloudflare developer platform for all students, giving them the tools to learn and experiment without limits. To provide a path from the classroom to the industry, we also announced our goal to hire 1,111 interns in 2026 — our biggest commitment yet to fostering future tech leaders.

And because a better Internet is for everyone, we’re extending our support to non-profits and public-interest organizations, offering them free access to our production-grade developer tools, so they can focus on their missions.

Whether you’re a founder with a big idea, a student just getting started, or a team working for a cause you believe in, we want to help you succeed.

Until next year

Thank you to our customers, our community, and the millions of developers who trust us to help them build, secure, and accelerate the Internet. Your curiosity and feedback drive our innovation.

It’s been an incredible 15 years. And as always, we’re just getting started!

Connect and secure any private or public app by hostname, not IP — free for everyone in Cloudflare One

Post Syndicated from Nikita Cano original https://blog.cloudflare.com/tunnel-hostname-routing/

Connecting to an application should be as simple as knowing its name. Yet, many security models still force us to rely on brittle, ever-changing IP addresses. And we heard from many of you that managing those ever-changing IP lists was a constant struggle. 

Today, we’re taking a major step toward making that a relic of the past.

We’re excited to announce that you can now route traffic to Cloudflare Tunnel based on a hostname or a domain. This allows you to use Cloudflare Tunnel to build simple zero-trust and egress policies for your private and public web applications without ever needing to know their underlying IP. This is one more step on our mission to strengthen platform-wide support for hostname- and domain-based policies in the Cloudflare One SASE platform, simplifying complexity and improving security for our customers and end users. 

Grant access to applications, not networks

In August 2020, the National Institute of Standards (NIST) published Special Publication 800-207, encouraging organizations to abandon the “castle-and-moat” model of security (where trust is established on the basis of network location) and move to a Zero Trust model (where we “verify anything and everything attempting to establish access“).

Now, instead of granting broad network permissions, you grant specific access to individual resources. This concept, known as per-resource authorization, is a cornerstone of the Zero Trust framework, and it presents a huge change to how organizations have traditionally run networks. Per-resource authorization requires that access policies be configured on a per-resource basis. By applying the principle of least privilege, you give users access only to the resources they absolutely need to do their job. This tightens security and shrinks the potential attack surface for any given resource.

Instead of allowing your users to access an entire network segment, like 10.131.0.0/24, your security policies become much more precise. For example:

  • Only employees in the “SRE” group running a managed device can access admin.core-router3-sjc.acme.local.

  • Only employees in the “finance” group located in Canada can access canada-payroll-server.acme.local.

  • All employees located in New York can access printer1.nyc.acme.local.

Notice what these powerful, granular rules have in common? They’re all based on the resource’s private hostname, not its IP address. That’s exactly what our new hostname routing enables. We’ve made it dramatically easier to write effective zero trust policies using stable hostnames, without ever needing to know the underlying IP address.

Why IP-based rules break

Let’s imagine you need to secure an internal server, canada-payroll-server.acme.local. It’s hosted on internal IP 10.4.4.4 and its hostname is available in internal private DNS, but not in public DNS. In a modern cloud environment, its IP address is often the least stable thing about it. If your security policy is tied to that IP, it’s built on a shaky foundation.

This happens for a few common reasons:

  • Cloud instances: When you launch a compute instance in a cloud environment like AWS, you’re responsible for its hostname, but not always its IP address. As a result, you might only be tracking the hostname and may not even know the server’s IP.

  • Load Balancers: If the server is behind a load balancer in a cloud environment (like AWS ELB), its IP address could be changing dynamically in response to changes in traffic.

  • Ephemeral infrastructure: This is the “cattle, not pets” world of modern infrastructure. Resources like servers in an autoscaling group, containers in a Kubernetes cluster, or applications that spin down overnight are created and destroyed as needed. They keep a persistent hostname so users can find them, but their IP is ephemeral and changes every time they spin up.

To cope with this, we’ve seen customers build complex scripts to maintain dynamic “IP Lists” — mappings from a hostname to its IPs that are updated every time the address changes. While this approach is clever, maintaining IP Lists is a chore. They are brittle, and a single error could cause employees to lose access to vital resources.

Fortunately, hostname-based routing makes this IP List workaround obsolete.

How it works: secure a private server by hostname using Cloudflare One SASE platform

To see this in action, let’s create a policy from our earlier example: we want to grant employees in the “finance” group located in Canada access to canada-payroll-server.acme.local. Here’s how you do it, without ever touching an IP address.

Step 1: Connect your private network

First, the server’s network needs a secure connection to Cloudflare’s global network. You do this by installing our lightweight agent, cloudflared, in the same local area network as the server, which creates a secure Cloudflare Tunnel. You can create a new tunnel directly from cloudflared by running cloudflared tunnel create <TUNNEL-NAME> or using your Zero Trust dashboard.

Step 2: Route the hostname to the tunnel

This is where the new capability comes into play. In your Zero Trust dashboard, you now establish a route that binds the hostname canada-payroll-server.acme.local directly to that tunnel. In the past, you could only route an IP address (10.4.4.4) or its subnet (10.4.4.0/24). That old method required you to create and manage those brittle IP Lists we talked about. Now, you can even route entire domains, like *.acme.local, directly to the tunnel, simply by creating a hostname route to acme.local.


For this to work, you must delete your private network’s subnet (in this case 10.0.0.0/8) and 100.64.0.0/10 from the Split Tunnels Exclude list. You also need to remove .local from the Local Domain Fallback.

(As an aside, we note that this feature also works with domains. For example, you could bind *.acme.local to a single tunnel, if desired.)

Step 3: Write your zero trust policy

Now that Cloudflare knows how to reach your server by its name, you can write a policy to control who can access it. You have a couple of options:

  • In Cloudflare Access (for HTTPS applications): Write an Access policy that grants employees in the “finance” group access to the private hostname canada-payroll-server.acme.local. This is ideal for applications accessible over HTTPS on port 443.


  • In Cloudflare Gateway (for HTTPS applications): Alternatively, write a Gateway policy that grants employees in the “finance” group access to the SNI canada-payroll-server.acme.local. This works for services accessible over HTTPS on any port.


  • In Cloudflare Gateway (for non-HTTP applications): You can also write a Gateway policy that blocks DNS resolution canada-payroll-server.acme.local for all employees except the “finance” group.


The principle of “trust nothing” means your security posture should start by denying traffic by default. For this setup to work in a true Zero Trust model, it should be paired with a default Gateway policy that blocks all access to your internal IP ranges. Think of this as ensuring all doors to your private network are locked by default. The specific allow policies you create for hostnames then act as the keycard, unlocking one specific door only for authorized users.

Without that foundational “deny” policy, creating a route to a private resource would make it accessible to everyone in your organization, defeating the purpose of a least-privilege model and creating significant security risks. This step ensures that only the traffic you explicitly permit can ever reach your corporate resources.

And there you have it. We’ve walked through the entire process of writing a per-resource policy using only the server’s private hostname. No IP Lists to be seen anywhere, simplifying life for your administrators.

Secure egress traffic to third-party applications

Here’s another powerful use case for hostname routing: controlling outbound connections from your users to the public Internet. Some third-party services, such as banking portals or partner APIs, use an IP allowlist for security. They will only accept connections that originate from a specific, dedicated public source IP address that belongs to your company.

This common practice creates a challenge. Let’s say your banking portal at bank.example.com requires all traffic to come from a dedicated source IP 203.0.113.9 owned by your company. At the same time, you want to enforce a zero trust policy that only allows your finance team to access that portal. You can’t build your policy based on the bank’s destination IP — you don’t control it, and it could change at any moment. You have to use its hostname.

There are two ways to solve this problem. First, if your dedicated source IP is purchased from Cloudflare, you can use the “egress policy by hostname” feature that we announced previously. By contrast, if your dedicated source IP belongs to your organization, or is leased from cloud provider, then we can solve this problem with hostname-based routing, as shown in the figure below:


Here’s how this works:

  1. Force traffic through your dedicated IP. First, you deploy a Cloudflare Tunnel in the network that owns your dedicated IP (for example, your primary VPC in a cloud provider). All traffic you send through this tunnel will exit to the Internet with 203.0.113.9 as its source IP.

  2. Route the banking app to that tunnel. Next, you create a hostname route in your Zero Trust dashboard. This rule tells Cloudflare: “Any traffic destined for bank.example.com must be sent through this specific tunnel.”

  3. Apply your user policies. Finally, in Cloudflare Gateway, you create your granular access rules. A low-priority network policy blocks access to the SNI bank.example.com for everyone. Then, a second, higher-priority policy explicitly allows users in the “finance” group to access the SNI bank.example.com.

Now, when a finance team member accesses the portal, their traffic is correctly routed through the tunnel and arrives with the source IP the bank expects. An employee from any other department is blocked by Gateway before their traffic even enters the tunnel. You’ve enforced a precise, user-based zero trust policy for a third-party service, all by using its public hostname.

Under the hood: how hostname routing works

To build this feature, we needed to solve a classic networking challenge. The routing mechanism for Cloudflare Tunnel is a core part of Cloudflare Gateway, which operates at both Layer 4 (TCP/UDP) and Layer 7 (HTTP/S) of the network stack.

Cloudflare Gateway must make a decision about which Cloudflare Tunnel to send traffic upon receipt of the very first IP packet in the connection. This means the decision must necessarily be made at Layer 4, where Gateway only sees the IP and TCP/UDP headers of a packet. IP and TCP/UDP headers contain the destination IP address, but do not contain destination hostname. The hostname is only found in Layer 7 data (like a TLS SNI field or an HTTP Host header), which isn’t even available until after the Layer 4 connection is already established.

This creates a dilemma: how can we route traffic based on a hostname before we’ve even seen the hostname? 

Synthetic IPs to the rescue

The solution lies in the fact that Cloudflare Gateway also acts as a DNS resolver. This means we see the user’s intent — the DNS query for a hostname — before we see the actual application traffic. We use this foresight to “tag” the traffic using a synthetic IP address.


Let’s walk through the flow:

  1. DNS Query. A user’s device sends a DNS query for
    canada-payroll-server.acme.local to the Gateway resolver.

  2. Private Resolution. Gateway asks the cloudflared agent running in your private network to resolve the real IP for that hostname. Since cloudflared has access to your internal DNS, it finds the real private IP 10.4.4.4, and sends it back to the Gateway resolver.

  3. Synthetic Response. Here’s the key step. Gateway resolver does not send the real IP (10.4.4.4) back to the user. Instead, it temporarily assigns an initial resolved IP from a reserved Carrier-Grade NAT (CGNAT) address space (e.g., 100.80.10.10) and sends the initial resolved IP back to the user’s device. The initial resolved IP acts as a tag that allows Gateway to identify network traffic destined to canada-payroll-server.acme.local. The initial resolved IP is randomly selected and temporarily assigned from one of the two IP address ranges:

    • IPv4: 100.80.0.0/16

    • IPv6: 2606:4700:0cf1:4000::/64 

  4. Traffic Arrives. The user’s device sends its application traffic (e.g., an HTTPS request) to the destination IP it received from Gateway resolver: the initial resolved IP 100.80.10.10.

  5. Routing and Rewriting. When Gateway sees an incoming packet destined for 100.80.10.10, it knows this traffic is for canada-payroll-server.acme.local and must be sent through a specific Cloudflare Tunnel. It then rewrites the destination IP on the packet back to the real private destination IP (10.4.4.4) and sends it down the correct tunnel.

The traffic goes down the tunnel and arrives at canada-payroll-server.acme.local at IP (10.4.4.4) and the user is connected to the server without noticing any of these mechanisms. By intercepting the DNS query, we effectively tag the network traffic stream, allowing our Layer 4 router to make the right decision without needing to see Layer 7 data.

Using Gateway Resolver Policies for fine grained control

The routing capabilities we’ve discussed provide simple, powerful ways to connect to private resources. But what happens when your network architecture is more complex? For example, what if your private DNS servers are in one part of your network, but the application itself is in another?

With Cloudflare One, you can solve this by creating policies that separate the path for DNS resolution from the path for application traffic for the very same hostname using Gateway Resolver Policies. This gives you fine-grained control to match complex network topologies.

Let’s walk through a scenario:

  • Your private DNS resolvers, which can resolve acme.local, are located in your core datacenter, accessible only via tunnel-1.

  • The webserver for canada-payroll-server.acme.local is hosted in a specific cloud VPC, accessible only via tunnel-2.


Here’s how to configure this split-path routing.

Step 1: Route DNS Queries via tunnel-1

First, we need to tell Cloudflare Gateway how to reach your private DNS server

  1. Create an IP Route: In the Networks > Tunnels area of your Zero Trust dashboard, create a route for the IP address of your private DNS server (e.g., 10.131.0.5/32) and point it to tunnel-1. This ensures any traffic destined for that specific IP goes through the correct tunnel to your datacenter.


  2. Create a Resolver Policy: Go to Gateway -> Resolver Policies and create a new policy with the following logic:

    • If the query is for the domain acme.local

    • Then… resolve it using a designated DNS server with the IP 10.131.0.5.


With these two rules, any DNS lookup for acme.local from a user’s device will be sent through tunnel-1 to your private DNS server for resolution.

Step 2: Route Application Traffic via tunnel-2

Next, we’ll tell Gateway where to send the actual traffic (for example, HTTP/S) for the application.

Create a Hostname Route: In your Zero Trust dashboard, create a hostname route that binds canada-payroll-server.acme.local to tunnel-2.


This rule instructs Gateway that any application traffic (like HTTP, SSH, or any TCP/UDP traffic) for canada-payroll-server.acme.local must be sent through tunnel-2 leading to your cloud VPC.

Similarly to a setup without Gateway Resolver Policy, for this to work, you must delete your private network’s subnet (in this case 10.0.0.0/8) and 100.64.0.0/10 from the Split Tunnels Exclude list. You also need to remove .local from the Local Domain Fallback.

Putting It All Together

With these two sets of policies, the “synthetic IP” mechanism handles the complex flow:

  1. A user tries to access canada-payroll-server.acme.local. Their device sends a DNS query to Cloudflare Gateway Resolver.

  2. This DNS query matches a Gateway Resolver Policy, causing Gateway Resolver to forward the DNS query through tunnel-1 to your private DNS server (10.131.0.5).

  3. Your DNS server responds with the server’s actual private destination IP (10.4.4.4).

  4. Gateway receives this IP and generates a “synthetic” initial resolved IP (100.80.10.10) which it sends back to the user’s device.

  5. The user’s device now sends the HTTP/S request to the initial resolved IP (100.80.10.10).

  6. Gateway sees the network traffic destined for the initial resolved IP (100.80.10.10) and, using the mapping, knows it’s for canada-payroll-server.acme.local.

  7. The Hostname Route now matches. Gateway sends the application traffic through tunnel-2 and rewrites its destination IP to the webserver’s actual private IP (10.4.4.4).

  8. The cloudflared agent at the end of tunnel-2 forwards the traffic to the application’s destination IP (10.4.4.4), which is on the same local network.

The user is connected, without noticing that DNS and application traffic have been routed over totally separate private network paths. This approach allows you to support sophisticated split-horizon DNS environments and other advanced network architectures with simple, declarative policies.

What onramps does this support?

Our hostname routing capability is built on the “synthetic IP” (also known as initially resolved IP) mechanism detailed earlier, which requires specific Cloudflare One products to correctly handle both the DNS resolution and the subsequent application traffic. Here’s a breakdown of what’s currently supported for connecting your users (on-ramps) and your private applications (off-ramps).

Connecting Your Users (On-Ramps)

For end-users to connect to private hostnames, the feature currently works with WARP Client, agentless PAC files and Browser Isolation.

Connectivity is also possible when users are behind Magic WAN (in active-passive mode) or WARP Connector, but it requires some additional configuration. To ensure traffic is routed correctly, you must update the routing table on your device or router to send traffic for the following destinations through Gateway:

  • The initially resolved IP ranges: 100.80.0.0/16 (IPv4) and 2606:4700:0cf1:4000::/64 (IPv6).

  • The private network CIDR where your application is located (e.g., 10.0.0.0/8).

  • The IP address of your internal DNS resolver.

  • The Gateway DNS resolver IPs: 172.64.36.1 and 172.64.36.2.

Magic WAN customers will also need to point their DNS resolver to these Gateway resolver IPs and ensure they are running Magic WAN tunnels in active-passive mode: for hostname routing to work, DNS queries and the resulting network traffic must reach Cloudflare over the same Magic WAN tunnel. Currently, hostname routing will not work if your end users are at a site that has more than one Magic WAN tunnel actively transiting traffic at the same time.

Connecting Your Private Network (Off-Ramps)

On the other side of the connection, hostname-based routing is designed specifically for applications connected via Cloudflare Tunnel (cloudflared). This is currently the only supported off-ramp for routing by hostname.

Other traffic off-ramps, while fully supported for IP-based routing, are not yet compatible with this specific hostname-based feature. This includes using Magic WAN, WARP Connector, or WARP-to-WARP connections as the off-ramp to your private network. We are actively working to expand support for more on-ramps and off-ramps in the future, so stay tuned for more updates.

Conclusion

By enabling routing by hostname directly within Cloudflare Tunnel, we’re making security policies simpler, more resilient, and more aligned with how modern applications are built. You no longer need to track ever-changing IP addresses. You can now build precise, per-resource authorization policies for HTTPS applications based on the one thing that should matter: the name of the service you want to connect to. This is a fundamental step in making a zero trust architecture intuitive and achievable for everyone.

This powerful capability is available today, built directly into Cloudflare Tunnel and free for all Cloudflare One customers.

Ready to leave IP Lists behind for good? Get started by exploring our developer documentation to configure your first hostname route. If you’re new to Cloudflare One, you can sign up today and begin securing your applications and networks in minutes.

Cloudflare Snippets are now Generally Available

Post Syndicated from Nikita Cano original https://blog.cloudflare.com/snippets/

Program your traffic at the edge — fast, flexible, and free

Cloudflare Snippets are now generally available (GA) for all paid plans, giving you a fast, flexible way to control HTTP traffic using lightweight JavaScript “code rules” — at no extra cost.

Need to transform headers dynamically, fine-tune caching, rewrite URLs, retry failed requests, replace expired links, throttle suspicious traffic, or validate authentication tokens? Snippets provide a production-ready solution built for performance, security, and control.

With GA, we’re introducing a new code editor to streamline writing and testing logic. This summer, we’re also rolling out an integration with Secrets Store — enabling you to bind and manage sensitive values like API keys directly in Snippets, securely and at scale.

What are Snippets?

Snippets bring the power of JavaScript to Cloudflare Rules, letting you write logic that runs before a request reaches your origin or after a response returns from upstream. They’re ideal when built-in rule actions aren’t quite enough. While Cloudflare Rules let you define traffic logic without code, Snippets extend that model with greater flexibility for advanced scenarios.

Think of Snippets as the ultra-fast “code layer” of Cloudflare Rules: the Ruleset Engine evaluates your rules and invokes your code, which then runs on the Workers runtime.

Key capabilities of Snippets:

Best of all? Snippets are included at no extra cost for Pro, Business, and Enterprise plans — with no usage-based fees.

The journey to GA: How Snippets became production-grade

Cloudflare Snippets started as a bold idea: bring the power of JavaScript-based logic to Cloudflare Rules, without the complexity of a full-stack developer platform.

Over the past two years, Snippets have evolved into a production-ready “code rules” solution, shaping the future of HTTP traffic control.

2022: Cloudflare Snippets were announced during Developer Week as a solution for users needing flexible HTTP traffic modifications without a full Worker.

2023: Alpha launch — hundreds of users tested Snippets for high-performance traffic logic.

2024: 7x traffic growth, processing 17,000 requests per second. Terraform support and production-grade backend were released.

2025: General Availability — Snippets introduces a new code editor, increased limits alongside other Cloudflare Rules products, integration with Trace, and a production-grade experience built for scale, handling over 2 million requests per second at peak. Integration with the Secrets Store is rolling out this summer.


New: Snippets + Trace

Cloudflare Trace now shows exactly which Snippets were triggered on a request. This makes it easier to debug traffic behavior, verify logic execution, and understand how your Snippets interact with other products in the request pipeline.

Whether you’re fine-tuning header logic or troubleshooting a routing issue, Trace gives you real-time insight into how your edge logic behaves in production.

Coming soon: Snippets + Secrets Store

In the third quarter, you’ll be able to securely access API keys, authentication tokens, and other sensitive values from Secrets Store directly in your Snippets. No more plaintext secrets in your code, no more workarounds.


Once rolled out, secrets can be configured for Snippets via the dashboard or API under the new “Settings” button.


When to use Snippets vs. Cloudflare Workers

Snippets are fast, flexible, and free, but how do they compare to Cloudflare Workers? Both allow you to programmatically control traffic. However, they solve different problems:

Feature

Snippets

Workers

Execute scripts based on request attributes (headers, geolocation, cookies, etc.)

Modify HTTP requests/responses or serve a different response

Add, remove, or rewrite headers dynamically

Cache assets at the edge

Route traffic dynamically between origins

Authenticate requests, pre-sign URLs, run A/B testing

Perform compute-intensive tasks (e.g., AI inference, image processing)

Store persistent data (e.g., KV, Durable Objects, D1)

Deploy via CLI (Wrangler)

Use TypeScript, Python, Rust or other programming languages

Use Snippets when:

  • You need ultra-fast conditional traffic modifications directly on Cloudflare’s network.

  • You want to extend Cloudflare Rules beyond built-in actions.

  • You need free, unlimited invocations within the execution limits.

  • You are migrating from VCL, Akamai’s EdgeWorkers, or on-premise logic.

Use Workers when:

  • Your application requires state management, Developer Platform product integrations, or high compute limits.

  • You are building APIs, full-stack applications, or complex workflows.

  • You need logging, debugging tools, CLI support, and gradual rollouts.

Still unsure? Check out our detailed guide for best practices.

Snippets in action: real-world use cases

Below are practical use cases demonstrating Snippets. Each script can be dynamically triggered using our powerful Rules language, so you can granularly control which requests your Snippets will be applied to.

1. Dynamically modify headers

Inject custom headers, remove unnecessary ones, and tweak values on the fly:

export default {
  async fetch(request) {
    const timestamp = Date.now().toString(16); // convert timestamp to HEX
    const modifiedRequest = new Request(request, { headers: new Headers(request.headers) });
    modifiedRequest.headers.set("X-Hex-Timestamp", timestamp); // send HEX timestamp to upstream

    const response = await fetch(modifiedRequest);
    const newResponse = new Response(response.body, response); // make response from upstream immutable

    newResponse.headers.append("x-snippets-hello", "Hello from Cloudflare Snippets"); // add new response header
    newResponse.headers.delete("x-header-to-delete"); // delete response header
    newResponse.headers.set("x-header-to-change", "NewValue"); // replace the value of existing response header

    return newResponse;
  },
};

2. Serve a custom maintenance page

Route traffic to a maintenance page when your origin is undergoing planned maintenance:

export default {
    async fetch(request) { // for all matching requests, return predefined HTML response with 503 status code
        return new Response(`
            <!DOCTYPE html>
            <html lang="en">
            <head>
                <meta charset="UTF-8">
                <title>We'll Be Right Back!</title>
                <style> body { font-family: Arial, sans-serif; text-align: center; padding: 20px; } </style>
            </head>
            <body>
                <h1>We'll Be Right Back!</h1>
                <p>Our site is undergoing maintenance. Check back soon!</p>
            </body>
            </html>
        `, { status: 503, headers: { "Content-Type": "text/html" } });
    }
};

3. Retry failed requests to a backup origin

Ensure reliability by automatically rerouting requests when your primary origin returns an unexpected response:

export default {
  async fetch(request) {
    const response = await fetch(request); // send original request to the origin

    if (!response.ok && !response.redirected) { // if response is not 200 OK or a redirect, send to another origin
      const newRequest = new Request(request); // clone the original request to construct a new request
      newRequest.headers.set("X-Rerouted", "1"); // add a header to identify a re-routed request at the new origin
      const url = new URL(request.url); // clone the original URL
      url.hostname = "backup.example.com"; // send request to a different origin / hostname
      return await fetch(url, newRequest); // serve response from the backup origin
    }

    return response; // otherwise, serve response from the primary origin
  },
};

4. Redirect users based on their location

Send visitors to region-specific sites for better localization:

export default {
    async fetch(request) {
        const country = request.cf.country; // identify visitor's country using request.cf property
        const redirectMap = { US: "https://example.com/us", EU: "https://example.com/eu" }; // define redirects for each country
        if (redirectMap[country]) return Response.redirect(redirectMap[country], 301); // redirect on match
        return fetch(request); // otherwise, proceed to upstream normally
    }
};

Getting started with Snippets

Snippets are available right now in the Cloudflare dashboard under Rules > Snippets:

  1. Go to Rules → Snippets.

  2. Use prebuilt templates or write your own JavaScript code.

  3. Configure a flexible rule to trigger your Snippet.

  4. Test and deploy instantly.

  5. Automate via API or Terraform.

Try Snippets today

Cloudflare Snippets are now generally available, bringing fast, cost-free, and intelligent HTTP traffic control to all paid plans.

With native integration into Cloudflare Rules and Terraform — and Secrets Store integration coming this summer — Snippets provide the most efficient way to manage advanced traffic logic at scale.

Explore Snippets in the Cloudflare Dashboard and start optimizing your traffic with lightweight, flexible rules that enhance performance and reduce complexity.

Go wild: Wildcard support in Rules and a new open-source wildcard crate

Post Syndicated from Nikita Cano original https://blog.cloudflare.com/wildcard-rules


Back in 2012, we introduced Page Rules, a pioneering feature that gave Cloudflare users unprecedented control over how their web traffic was managed. At the time, this was a significant leap forward, enabling users to define patterns for specific URLs and adjust Cloudflare features on a page-by-page basis. The ability to apply such precise configurations through a simple, user-friendly interface was a major advancement, establishing Page Rules as a cornerstone of our platform.

Page Rules allowed users to implement a variety of actions, including redirects, which automatically send visitors from one URL to another. Redirects are crucial for maintaining a seamless user experience on the Internet, whether it’s guiding users from outdated links to new content or managing traffic during site migrations.

As the Internet has evolved, so too have the needs of our users. The demand for greater flexibility, higher performance, and more advanced capabilities led to the development of the Ruleset Engine, a powerful framework designed to handle complex rule evaluations with unmatched speed and precision.

In September 2022, we announced and released Single Redirects as a modern replacement for the URL Forwarding feature of Page Rules. Built on top of the Ruleset Engine, this new product offered a powerful syntax and enhanced performance.

Despite the enhancements, one of the most consistent pieces of feedback from our users was the need for wildcard matching and expansion, also known as globbing. This feature is essential for creating dynamic and flexible URL patterns, allowing users to manage a broader range of scenarios with ease.

Today we are excited to announce that wildcard support is now available across our Ruleset Engine-based products, including Cache Rules, Compression Rules, Configuration Rules, Custom Errors, Origin Rules, Redirect Rules, Snippets, Transform Rules, Web Application Firewall (WAF), Waiting Room, and more.

Understanding wildcards

Wildcard pattern matching allows users to employ an asterisk `(*)` in a string to match certain patterns. For example, a single pattern like `https://example.com/*/t*st` can cover multiple URLs such as `https://example.com/en/test`, `https://example.com/images/toast`, and `https://example.com/blog/trust`.

Once a segment is captured, it can be used in another expression by referencing the matched wildcard with the `${<X>}` syntax, where `<X>` indicates the index of a matched pattern. This is particularly useful in URL forwarding. For instance, the URL pattern `https://example.com/*/t*st` can redirect to `https://${1}.example.com/t${2}st`, allowing dynamic and flexible URL redirection. This setup ensures that `https://example.com/uk/test` is forwarded to `https://uk.example.com/test`, `https://example.com/images/toast` to `https://images.example.com/toast`, and so on.

Challenges with Single Redirects

In Page Rules, redirecting from an old URI path to a new one looked like this:

  • Source URL: `https://example.com/old-path/*`

  • Target URL: `https://example.com/new-path/$1`

In comparison, replicating this behaviour in Single Redirects without wildcards required a more complex approach:

  • Filter: `(http.host eq “example.com” and starts_with(http.request.uri.path, “/old-path/”))`

  • Expression: `concat(“/new-path/”, substring(http.request.uri.path, 10)) (where 10 is the length of /old-path/)`

This complexity created unnecessary overhead and difficulty, especially for users without access to regular expressions (regex) or the technical expertise to come up with expressions that use nested functions.

Wildcard support in Ruleset Engine

With the introduction of wildcard support across our Ruleset Engine-based products, users can now take advantage of the power and flexibility of the Ruleset Engine through simpler and more intuitive configurations. This enhancement ensures high performance while making it easier to create dynamic and flexible URL patterns and beyond.

What’s new?

1) Operators “wildcard” and “strict wildcard” in Ruleset Engine:

  • wildcard” (case insensitive): Matches patterns regardless of case (e.g., “test” and “TesT” are treated the same, similar to Page Rules).

  • strict wildcard” (case sensitive): Matches patterns exactly, respecting case differences (e.g., “test” won’t match “TesT”).

Both operators can be applied to any string field available in the Ruleset Engine, including full URI, host, headers, cookies, user-agent, country, and more.

This example demonstrates the use of the “wildcard” operator in a Web Application Firewall (WAF) rule applied to the User Agent field. This rule matches any incoming request where the User Agent string contains patterns starting with “Mozilla/” and includes specific elements like “Macintosh; Intel Mac OS “, “Gecko/”, and “Firefox/”. Importantly, the wildcard operator is case insensitive, so it captures variations like “mozilla” and “Mozilla” without requiring exact matches.

2) Function `wildcard_replace()` in Single Redirects:

In Single Redirects, the `wildcard_replace()` function allows you to use matched segments in redirect URL targets.

Consider the URL pattern `https://example.com/*/t*st` mentioned earlier. Using `wildcard_replace()`, you can now set the target URL to `https://${1}.example.com/t${2}st` and dynamically redirect URLs like `https://example.com/uk/test` to `https://uk.example.com/test` and `https://example.com/images/toast` to `https://images.example.com/toast`.

3) Simplified UI in Single Redirects:

We understand that not everyone wants to use advanced Ruleset Engine functions, especially for simple URL patterns. That’s why we’ve introduced an easy and intuitive UI for Single Redirects called “wildcard pattern”. This new interface, available under the Rules > Redirect Rules tab of the zone dashboard, lets you specify request and target URL wildcard patterns in seconds without needing to delve into complex functions, much like Page Rules.

How we built it

The Ruleset Engine powering Cloudflare Rules products is written in Rust. When adding wildcard support, we first explored existing Rust crates for wildcard matching.

We considered using the popular `regex` crate, known for its robustness. However, it requires converting wildcard patterns into regular expressions (e.g., `*` to `.*,` and `?` to `.`) and escaping other characters that are special in regex patterns, which adds complexity.

We also looked at the `wildmatch` crate, which is designed specifically for wildcard matching and has a couple of advantages over `regex`. The most obvious one is that there is no need to convert wildcard patterns to regular expressions. More importantly, wildmatch can handle complex patterns efficiently: wildcard matching takes quadratic time – in the worst case the time is proportional to the length of the pattern multiplied by the length of the input string. To be more specific, the time complexity is O(p + ℓ + s ⋅ ℓ), where p is the length of the wildcard pattern, the length of the input string, and s the number of asterisk metacharacters in the pattern. (If you are not familiar with big O notation, it is a way to express how an algorithm consumes a resource, in this case time, as the input size changes.) In the Ruleset Engine, we limit the number of asterisk metacharacters in the pattern to a maximum of 8. This ensures we will have good performance and limits the impact of a bad actor trying to consume too much CPU time by targeting extremely complicated patterns and input strings.

Unfortunately, `wildmatch` did not meet all our requirements. Ruleset Engine uses byte-oriented matching, and `wildmatch` works only on UTF-8 strings. We also have to support escape sequences –  for example, you should be able to represent a literal * in the pattern with `\*`.

Last but not least, to implement the `wildcard_replace() function` we needed not only to be able to match, but also to be able to replace parts of strings with captured segments. This is necessary to dynamically create HTTP redirects based on the source URL. For example, to redirect a request from `https://example.com/*/page/*` to `https://example.com/products/${1}?page=${2}`, you should be able to define the target URL using an expression like this:

wildcard_replace(
http.request.full_uri, 
"https://example.com/*/page/*", 
"https://example.com/products/${1}?page=${2}"
)

This means that in order to implement this function in the Ruleset Engine, we also need our wildcard matching implementation to capture the input substrings that match the wildcard’s metacharacters.

Given these requirements, we decided to build our own wildcard matching crate. The implementation is based on Kurt’s 2016 iterative algorithm, with optimizations from Krauss’ 2014 algorithm. (You can find more information about the algorithm here). Our implementation supports byte-oriented matching, escape sequences, and capturing matched segments for further processing.

Cloudflare’s `wildcard crate` is now available and is open-source. You can find the source repository here. Contributions are welcome!

FAQs and resources

For more details on using wildcards in Rules products, please refer to our updated Ruleset Engine documentation:

We value your feedback and invite you to share your thoughts in our community forums. Your input directly influences our product and design decisions, helping us make Rules products even better.

Additionally, check out our `wildcard crate` implementation and contribute to its development.

Conclusion

The new wildcard functionality in Rules is available to all plans and is completely free. This feature is rolling out immediately, and no beta access registration required. 

We are thrilled to offer this much-requested feature and look forward to seeing how you leverage wildcards in your Rules configurations. Try it now and experience the enhanced flexibility and performance. Your feedback is invaluable to us, so please let us know in community how this new feature works for you!

Simplify cloud routing and object storage configurations with Cloud Connector

Post Syndicated from Nikita Cano original https://blog.cloudflare.com/cloud-connector


As part of Cloudflare’s mission to help build a better Internet, we’re continuously integrating with other networks and service providers, ensuring ease of use for anyone, anywhere, anytime. 

Today, we’re excited to announce Cloud Connector – a brand-new way to put Cloudflare in front of popular public cloud services, protecting your assets, accelerating applications, and routing your traffic between multiple cloud providers seamlessly.

Cloud Connector is a natural extension of Cloudflare’s Connectivity Cloud, which aims to simplify and secure the complex web of connections across today’s enterprises. Imagine Origin Rules, but managed by Cloudflare, available for all plans, created with just a few clicks, and working out of the box without the need for additional rules. It allows you to route traffic to different public clouds without complicated workarounds. This means you can now direct specific requests to AWS S3, Google Cloud Storage, Azure Blob Storage, or our own R2, even if these services are not set as the DNS target for your hostname.

Whether you’re an e-commerce site looking to route image traffic to the best-performing cloud storage for faster load times, a media company distributing video content efficiently across various cloud providers, or a developer wanting to simplify backend configurations, Cloud Connector is designed for you. It’s available for all Cloudflare plans, with a particular focus on Free, Pro, and Business customers.

The Host header challenge

Before Cloud Connector, many of our Free, Pro, and Business customers faced a significant challenge: it was not straightforward to route traffic for the same hostname to one or more cloud providers on the backend. Something as simple as directing example.com/images to AWS S3 while keeping the rest of your site served by your origin web servers required multiple non-trivial steps to accomplish. Some users changed their setups, leveraging either Workers, chaining hostnames, or explored putting other service providers in front of their cloud destinations. While functional, this approach added complexity and increased effort, leading to frustration.

Enterprise customers had Host Header and Resolve Override features to manage this, but the security and abuse risks associated with Host Header modification kept these features out of reach for everyone else.

Simplifying multi-cloud routing

Today, we’re excited to unveil Cloud Connector, designed to address these challenges head-on.

Imagine you’re managing a website where images are stored on AWS S3, videos on Google Cloud Storage, and static assets on Azure Blob Storage. Traditionally, routing traffic to these different providers would involve a series of complex steps and configurations. With Cloud Connector, this process is streamlined. You can seamlessly direct traffic for your hostname to multiple origins with just a few clicks. The setup is straightforward and doesn’t require any advanced configurations or additional rules.

For instance, you can now direct example.com/images to a specific R2 bucket in your Cloudflare account effortlessly. This feature, previously exclusive to Enterprise customers, is now available to all users, ensuring that everyone can benefit from simplified cloud routing.

How to configure

Getting started with Cloud Connector is easy. Navigate to the Rules > Cloud Connector tab in your zone dashboard. From there, select your cloud provider:

You’ll be presented with an interface where you can configure the destination hostname of your object storage bucket. Ensure that your bucket URL matches the expected schema for your cloud provider, such as .amazonaws.com for AWS S3 or storage.googleapis.com for Google Cloud Storage. In case of R2, your bucket needs to be public and associated with a custom domain:

Once you’ve configured your bucket, the next step is to determine which traffic is routed by Cloud Connector. Using the familiar rule builder interface that powers all our Rules products, you can filter requests based on hostname, URI path, headers, cookies, source IP, AS number, and more.

After configuring, deploy your rule, and it will be immediately effective:

Cloud Connector is intentionally placed at the end of the Ruleset Engine phase sequence to ensure it works out of the box, even if there are active origin or configuration rules with matching criteria.

Cloud Connector simplifies your setup, allowing you to focus on what matters most: delivering a seamless experience for your users. By leveraging Cloudflare’s built-in security, your assets are automatically protected, and direct traffic routing optimizes application performance, accelerating load times and reducing your cloud bandwidth costs.

Behind the scenes: how Cloud Connector works

To build Cloud Connector, we leveraged our powerful, high performance Ruleset Engine and integrated it with various cloud providers, ensuring compatibility and optimal performance. Throughout this process, we were focused on making the setup as intuitive as possible, reducing the need for additional configurations and making it accessible to users of all technical backgrounds.

At its core, Cloud Connector builds on Cloudflare’s existing Ruleset Engine, the same technology that powers Origin Rules. Origin Rules typically operate during the `http_request_origin` phase, where they manage how requests are routed to different origins. A phase, in Cloudflare’s system, represents a specific stage in the life of a request where rulesets can be executed. Each phase has a dedicated purpose, with rules defined at the account and zone levels to control different aspects of a request’s journey through our network.

Phases are essential because they allow us to apply actions at precise points in the request flow. For example, the http_request_origin phase focuses on routing, ensuring that traffic is directed to the correct origin based on the rules you set. By defining specific phases, we can optimize performance and enforce security measures at the right time without overlap or conflicts between different actions.

Rather than creating an entirely new system, we extended the existing “route” action within Ruleset Engine to handle a specific set of pre-approved cloud provider endpoints, such as AWS S3, Google Cloud Storage, Azure Blob Storage, and Cloudflare R2.

To maintain the modularity of our system and avoid introducing product-specific abstractions into our core Ruleset Engine control plane, we developed a thin API translator layer on Workers. This layer acts as an intermediary between the user-facing Cloud Connector API and the underlying Ruleset Engine API.

When a user creates a Cloud Connector rule, it’s translated on the backend into a series of existing Ruleset Engine-based actions. For instance, if a user sets up a rule to route traffic to an AWS S3 bucket, our system translates this into actions that adjust the host header and origin settings to point to the S3 endpoint. This allows a single Cloud Connector rule to be decomposed into multiple rules within a zone’s entry point ruleset.

These rules are processed in reverse order, adhering to a “last rule wins” approach. This ensures that the final matching rule determines the traffic’s routing, preserving the behavior users expect. For example, if traffic is routed to an AWS S3 bucket, the system will first match the traffic based on the URI, then disable SSL if necessary, and finally route to the S3 origin. Once the appropriate rule is matched, a “skip” action is invoked to prevent any further rules from altering the traffic, which prevents unintended behavior like disabling SSL for traffic routed to a different cloud provider.

When users retrieve their Cloud Connector rules, the system reverses this process, reconstructing the original actions from the decomposed rules. This ensures that users see their configurations as they originally defined them, without needing to understand the underlying complexities.

To support Cloud Connector’s unique requirements, we introduced a new request phase, `http_request_cloud_connector`. As the final request phase, this ensures that Cloud Connector rules have the last say in traffic routing decisions. This priority prevents conflicts with other routing rules, ensuring that traffic is securely and accurately routed according to the user’s intent.

Cloudflare is committed to building Cloudflare products on Cloudflare, leveraging existing technologies while innovating to meet new challenges. By building on Origin Rules and Workers, introducing the `http_request_cloud_connector` phase, and creating a thin API translation layer, we’ve developed a solution that simplifies multi-cloud routing without compromising on performance or security.

What’s next for Cloud Connector?

The current version of Cloud Connector is just the beginning. Our vision extends far beyond supporting object storage. In the future, we aim to support all kinds of HTTP cloud services, including load balancers, compute services, and more. We want Cloud Connector to be the primary way for Cloudflare users to discover and manage the cloud services they use across multiple providers.

Imagine being able to configure secure traffic routing to any cloud service without having to worry about DNS settings, Host headers, or SSL implementation. Our goal is to make Cloud Connector a comprehensive tool that simplifies the entire process, ensuring that you can focus on what matters most: building and scaling your web applications.

Get started

Cloud Connector is available in beta to all plans and is completely free. The rollout has started this month (August) and will be gradually released to all users throughout 2024. Once rolled out, users will start seeing this new product under the Rules > Cloud Connector tab of their zone dashboard. No beta access registration is required.

Learn more

Learn more about setting up and using Cloud Connector in developer documentation. Share your feedback in community forums – your opinion is invaluable and directly influences our product and design decisions, helping us to make Rules products even better.

Simplify cloud routing and object storage configurations with Cloud Connector

Post Syndicated from Nikita Cano original https://blog.cloudflare.com/cloud-connector


Introduction

As part of Cloudflare’s mission to help build a better Internet, we’re continuously integrating with other networks and service providers, ensuring ease of use for anyone, anywhere, anytime.

Today, we’re excited to announce Cloud Connector – a brand-new way to put Cloudflare in front of popular public cloud services, protecting your assets, accelerating applications, and routing your traffic between multiple cloud providers seamlessly.

Cloud Connector is a natural extension of Cloudflare’s Connectivity Cloud, which aims to simplify and secure the complex web of connections across today’s enterprises. Imagine Origin Rules, but managed by Cloudflare, available for all plans, created with just a few clicks, and working out of the box without the need for additional rules. It allows you to route traffic to different public clouds without complicated workarounds. This means you can now direct specific requests to AWS S3, Google Cloud Storage, Azure Blob Storage, or our own R2, even if these services are not set as the DNS target for your hostname.

Whether you’re an e-commerce site looking to route image traffic to the best-performing cloud storage for faster load times, a media company distributing video content efficiently across various cloud providers, or a developer wanting to simplify backend configurations, Cloud Connector is designed for you. It’s available for all Cloudflare plans, with a particular focus on Free, Pro, and Business customers.

The Host header challenge

Before Cloud Connector, many of our Free, Pro, and Business customers faced a significant challenge: it was not straightforward to route traffic for the same hostname to one or more cloud providers on the backend. Something as simple as directing example.com/images to AWS S3 while keeping the rest of your site served by your origin web servers required multiple non-trivial steps to accomplish. Some users changed their setups, leveraging either Workers, chaining hostnames, or explored putting other service providers in front of their cloud destinations. While functional, this approach added complexity and increased effort, leading to frustration.

Enterprise customers had Host Header and Resolve Override features to manage this, but the security and abuse risks associated with Host Header modification kept these features out of reach for everyone else.

Simplifying multi-cloud routing

Today, we’re excited to unveil Cloud Connector, designed to address these challenges head-on.

Imagine you’re managing a website where images are stored on AWS S3, videos on Google Cloud Storage, and static assets on Azure Blob Storage. Traditionally, routing traffic to these different providers would involve a series of complex steps and configurations. With Cloud Connector, this process is streamlined. You can seamlessly direct traffic for your hostname to multiple origins with just a few clicks. The setup is straightforward and doesn’t require any advanced configurations or additional rules.

For instance, you can now direct example.com/images to a specific R2 bucket in your Cloudflare account effortlessly. This feature, previously exclusive to Enterprise customers, is now available to all users, ensuring that everyone can benefit from simplified cloud routing.

How to configure

Getting started with Cloud Connector is easy. Navigate to the Rules > Cloud Connector tab in your zone dashboard. From there, select your cloud provider:

You’ll be presented with an interface where you can configure the destination hostname of your object storage bucket. Ensure that your bucket URL matches the expected schema for your cloud provider, such as .amazonaws.com for AWS S3 or storage.googleapis.com for Google Cloud Storage. In case of R2, your bucket needs to be public and associated with a custom domain:

Once you’ve configured your bucket, the next step is to determine which traffic is routed by Cloud Connector. Using the familiar rule builder interface that powers all our Rules products, you can filter requests based on hostname, URI path, headers, cookies, source IP, AS number, and more.

After configuring, deploy your rule, and it will be immediately effective:

Cloud Connector is intentionally placed at the end of the Ruleset Engine phase sequence to ensure it works out of the box, even if there are active origin or configuration rules with matching criteria.

Cloud Connector simplifies your setup, allowing you to focus on what matters most: delivering a seamless experience for your users. By leveraging Cloudflare’s built-in security, your assets are automatically protected, and direct traffic routing optimizes application performance, accelerating load times and reducing your cloud bandwidth costs.

Behind the scenes: how Cloud Connector works

To build Cloud Connector, we leveraged our powerful, high performance Ruleset Engine and integrated it with various cloud providers, ensuring compatibility and optimal performance. Throughout this process, we were focused on making the setup as intuitive as possible, reducing the need for additional configurations and making it accessible to users of all technical backgrounds.

At its core, Cloud Connector builds on Cloudflare’s existing Ruleset Engine, the same technology that powers Origin Rules. Origin Rules typically operate during the http_request_origin phase, where they manage how requests are routed to different origins. A phase, in Cloudflare’s system, represents a specific stage in the life of a request where rulesets can be executed. Each phase has a dedicated purpose, with rules defined at the account and zone levels to control different aspects of a request’s journey through our network.

Phases are essential because they allow us to apply actions at precise points in the request flow. For example, the http_request_origin phase focuses on routing, ensuring that traffic is directed to the correct origin based on the rules you set. By defining specific phases, we can optimize performance and enforce security measures at the right time without overlap or conflicts between different actions.

Rather than creating an entirely new system, we extended the existing “route” action within Ruleset Engine to handle a specific set of pre-approved cloud provider endpoints, such as AWS S3, Google Cloud Storage, Azure Blob Storage, and Cloudflare R2.

To maintain the modularity of our system and avoid introducing product-specific abstractions into our core Ruleset Engine control plane, we developed a thin API translator layer on Workers. This layer acts as an intermediary between the user-facing Cloud Connector API and the underlying Ruleset Engine API.

When a user creates a Cloud Connector rule, it’s translated on the backend into a series of existing Ruleset Engine-based actions. For instance, if a user sets up a rule to route traffic to an AWS S3 bucket, our system translates this into actions that adjust the host header and origin settings to point to the S3 endpoint. This allows a single Cloud Connector rule to be decomposed into multiple rules within a zone’s entry point ruleset.

These rules are processed in reverse order, adhering to a “last rule wins” approach. This ensures that the final matching rule determines the traffic’s routing, preserving the behavior users expect. For example, if traffic is routed to an AWS S3 bucket, the system will first match the traffic based on the URI, then disable SSL if necessary, and finally route to the S3 origin. Once the appropriate rule is matched, a “skip” action is invoked to prevent any further rules from altering the traffic, which prevents unintended behavior like disabling SSL for traffic routed to a different cloud provider.

When users retrieve their Cloud Connector rules, the system reverses this process, reconstructing the original actions from the decomposed rules. This ensures that users see their configurations as they originally defined them, without needing to understand the underlying complexities.

To support Cloud Connector’s unique requirements, we introduced a new request phase, http_request_cloud_connector. As the final request phase, this ensures that Cloud Connector rules have the last say in traffic routing decisions. This priority prevents conflicts with other routing rules, ensuring that traffic is securely and accurately routed according to the user’s intent.

Cloudflare is committed to building Cloudflare products on Cloudflare, leveraging existing technologies while innovating to meet new challenges. By building on Origin Rules and Workers, introducing the http_request_cloud_connector phase, and creating a thin API translation layer, we’ve developed a solution that simplifies multi-cloud routing without compromising on performance or security.

What’s next for Cloud Connector?

The current version of Cloud Connector is just the beginning. Our vision extends far beyond supporting object storage. In the future, we aim to support all kinds of HTTP cloud services, including load balancers, compute services, and more. We want Cloud Connector to be the primary way for Cloudflare users to discover and manage the cloud services they use across multiple providers.

Imagine being able to configure secure traffic routing to any cloud service without having to worry about DNS settings, Host headers, or SSL implementation. Our goal is to make Cloud Connector a comprehensive tool that simplifies the entire process, ensuring that you can focus on what matters most: building and scaling your web applications.

Get started

Cloud Connector is available in beta to all plans and is completely free. The rollout has started this month (August) and will be gradually released to all users throughout 2024. Once rolled out, users will start seeing this new product under the Rules > Cloud Connector tab of their zone dashboard. No beta access registration is required.

Learn more

Learn more about setting up and using Cloud Connector in developer documentation. Share your feedback in community forums – your opinion is invaluable and directly influences our product and design decisions, helping us to make Rules products even better.