Post Syndicated from Bruce Schneier original https://www.schneier.com/blog/archives/2023/10/malicious-ads-in-bing-chat.html
Malicious ads are creeping into chatbots.
Post Syndicated from Bruce Schneier original https://www.schneier.com/blog/archives/2023/10/malicious-ads-in-bing-chat.html
Malicious ads are creeping into chatbots.
Post Syndicated from Ólafur Guðmundsson original http://blog.cloudflare.com/ko-kr/1-1-1-1-lookup-failures-on-october-4th-2023-ko-kr/
2023년 10월 4일, Cloudflare에서는 DNS 확인 문제를 겪었으며, 이 문제는 UTC 07:00에 시작하여 UTC 11:00에 끝났습니다. 1.1.1.1 또는 Warp, Zero Trust 등의 제품 또는 1.1.1.1을 사용하는 타사 DNS 확인자를 사용하는 사람 중 일부는 유효한 쿼리에 대해 SERVFAIL DNS 응답을 받았을 수도 있습니다. 이번에 서비스가 중단되어 정말 죄송합니다. 이번 서비스 중단은 공격이 아니라 내부 소프트웨어 오류로 발생했습니다. 이 블로그에서는 어떤 장애였는지, 장애가 왜 발생했는지, 이런 일이 다시 발생하지 않도록 우리가 무엇을 하고 있는지 설명하겠습니다.
도메인 네임 시스템(DNS)에서 모든 도메인 네임은 DNS 영역 내에 존재합니다. 이 영역은 함께 제어되는 도메인 이름과 호스트 이름의 모음입니다. 예를 들어, Cloudflare에서는 도메인 이름 cloudflare.com을 관리하며, 우리는 이를 “cloudflare.com” 영역이라고 부릅니다. .com의 최상위 도메인(TLD)은 타사 소유이며 “com” 영역에 있습니다. TLD는 cloudflare.com에 접속하는 방법에 대한 지침을 제공합니다. 모든 TLD 위에는 루트 영역이 있으며, 이 영역은 TLD에 도달하는 방법에 대한 지침을 제공합니다 . 즉, 루트 영역은 다른 모든 도메인 이름을 확인할 수 있는 중요한 영역입니다. DNS의 다른 중요한 부분과 마찬가지로 루트 영역은 DNSSEC로 서명되며, 이는 루트 영역 자체에 암호화 서명이 포함되어 있음을 의미합니다.
루트 영역은 루트 서버에 게시되지만, 루트 서버에 연결할 수 없는 경우에도 루트 영역의 정보를 계속 사용할 수 있도록 DNS 운영자가 루트 영역의 복사본을 자동으로 검색하고 보유하는 것이 일반적입니다 . Cloudflare의 재귀 DNS 인프라는 이러한 접근 방식을 채택하여 확인 프로세스를 더 빠르게 만듭니다. 루트 영역의 새 버전은 일반적으로 하루에 두 번 게시됩니다. 1.1.1.1에는 기본 DNS 로직 위에 static_zone이라고 불리는 WebAssembly 앱이 실행되어 새 버전을 사용할 수 있을 때 해당 버전을 제공합니다.
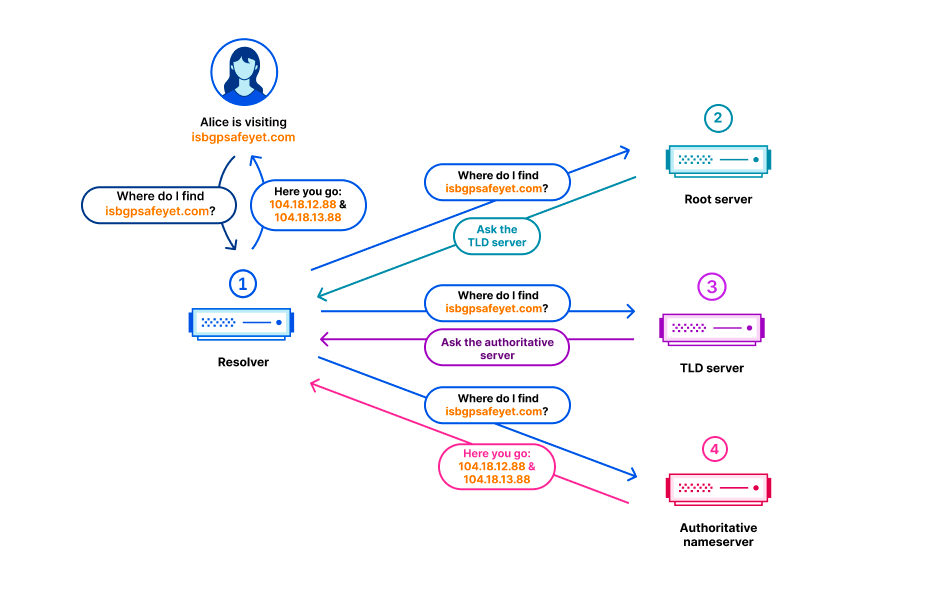
9월 21일, 루트 영역 관리의 알려진 요금제 변경의 일환으로 새로운 리소스 레코드 유형이 처음으로 루트 영역에 포함되었습니다. 새 리소스 레코드는 ZONEMD라고 불리며, 사실상 루트 영역의 콘텐츠에 대한 검사 합계입니다.
루트 영역은 Cloudflare의 코어 네트워크에서 실행되는 소프트웨어에 의해 검색됩니다. 이후 전 세계 Cloudflare의 데이터 센터로 재배포됩니다. 변경 후에도, ZONEMD 레코드가 포함된 루트 영역은 정상적으로 계속 검색되고 배포되었습니다. 그렇지만 해당 데이터를 사용하는 1.1.1.1 확인자 시스템에서 ZONEMD 레코드를 구문 분석하는 데 문제가 있었습니다. 영역은 전체가 로드되어 제공되어야 하므로, 시스템에서 ZONEMD를 구문 분석하지 못했다는 것은 Cloudflare의 확인자 시스템에서 새 버전의 루트 영역이 사용되지 않았다는 것을 의미했습니다. Cloudflare의 확인자 인프라를 호스팅하는 일부 서버에서는 새 루트 영역이 수신되지 않으면 요청별로 DNS 루트 서버를 직접 쿼리하는 방식으로 장애 조치되었습니다. 그러나 다른 서버에서는 변경 전인 9월 21일에 가져온 버전인 메모리 캐시에서 여전히 사용 가능한 루트 영역의 알려진 작동 버전에 계속 의존하고 있었습니다.
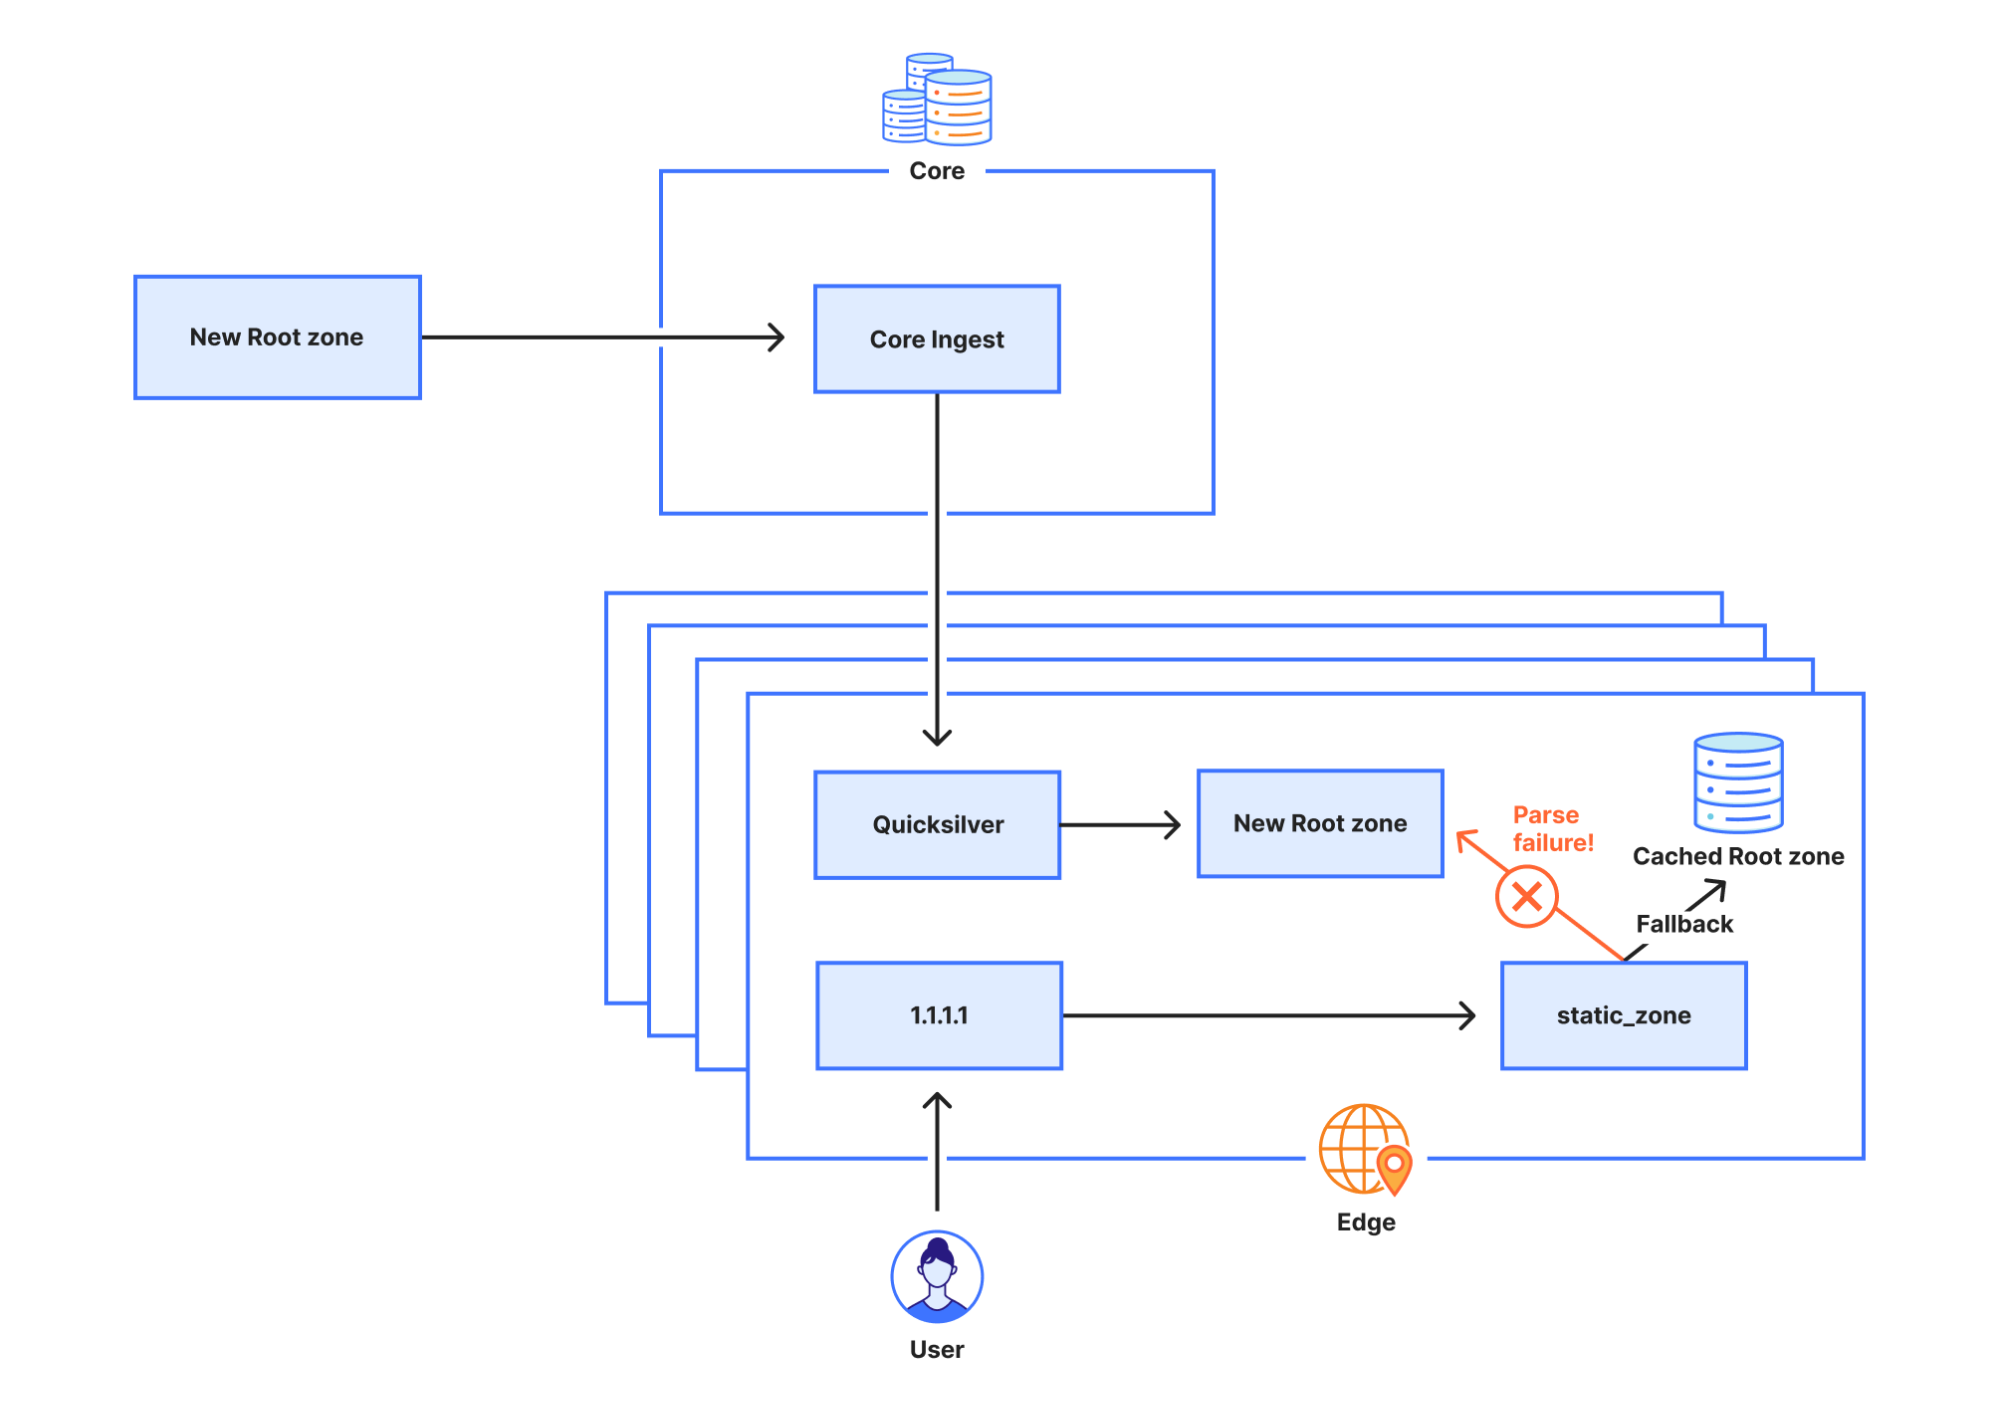
2023년 10월 4일 07:00 UTC에 9월 21일 루트 영역 버전의 DNSSEC 서명이 만료되었습니다. Cloudflare 확인자 시스템에서 사용할 수 있는 최신 버전이 없었으므로 일부 Cloudflare 확인자 시스템에서 DNSSEC 서명의 유효성을 검사할 수 없게 되었고, 그 결과로 오류 응답(SERVFAIL)을 전송하기 시작했습니다. Cloudflare 확인자가 SERVFAIL 응답을 생성하는 비율이 12% 증가했습니다. 아래 다이어그램에는 장애의 진행 상황과 사용자에게 장애가 표시되는 과정이 나와있습니다.
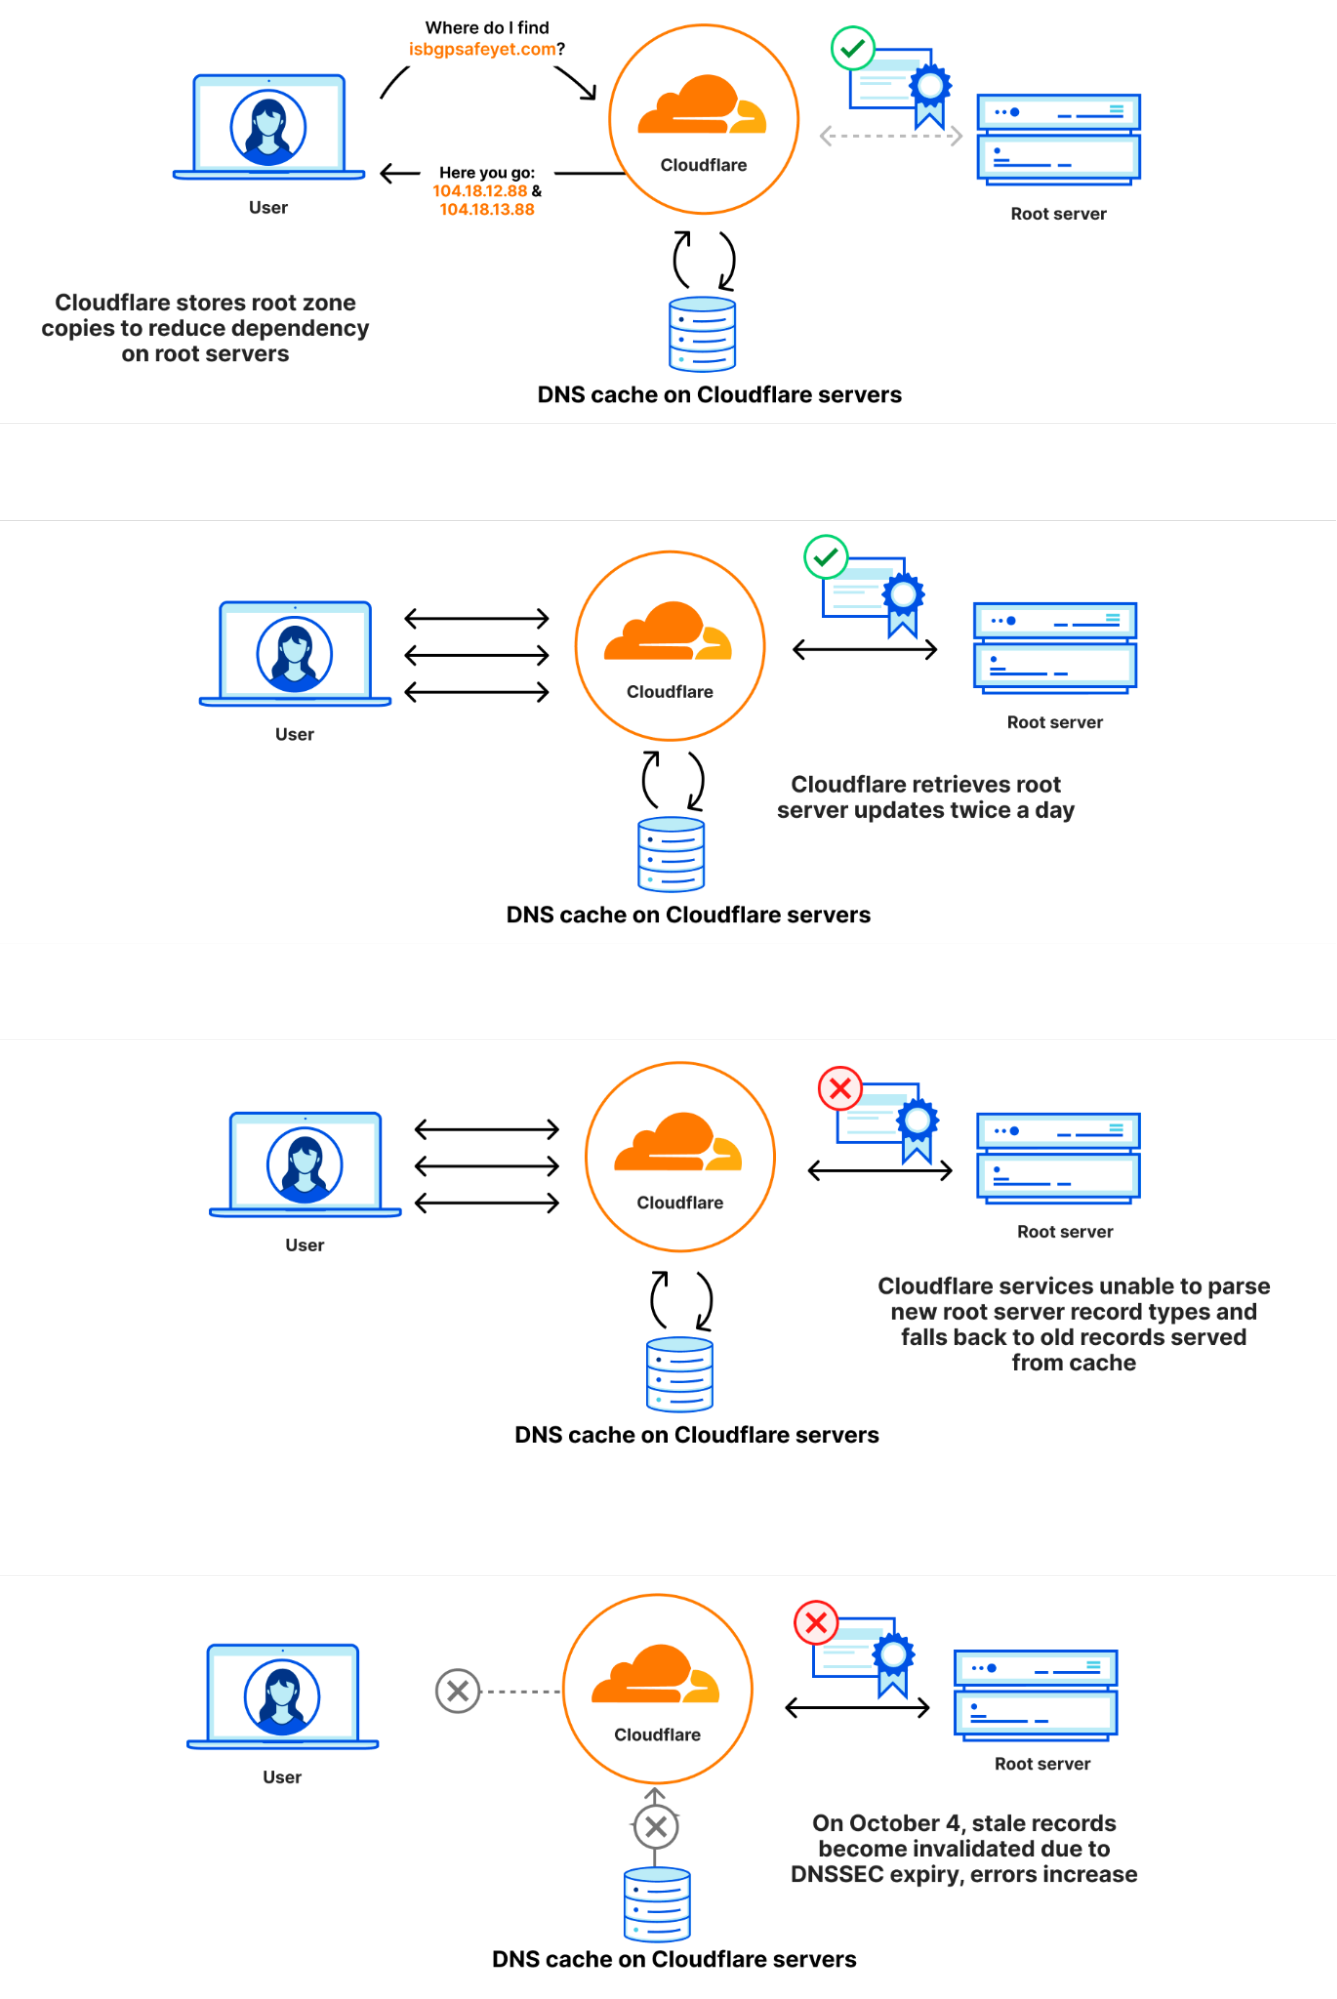
9월 21일 6:30 UTC: 루트 영역의 마지막 풀 성공
10월 4일 7:00 UTC: 9월 21일에 획득한 루트 영역의 DNSSEC 서명이 만료되어 클라이언트 쿼리에 대한 SERVFAIL 응답이 증가함.
7:57: 예기치 않은 SERVFAIL에 대한 첫 외부 보고가 접수되기 시작함.
8:03: 내부적 Cloudflare 사고가 선언됨.
8:50: 재정의 규칙을 사용하여 1.1.1.1에서 오래된 루트 영역 파일을 사용하여 응답을 제공하지 못하도록 막으려는 첫 번째 시도가 있었음.
10:30: 1.1.1.1에서 루트 영역 파일을 미리 로드하는 것을 완전히 차단했음.
10:32: 응답이 정상으로 복귀함.
11:02: 사고 종결됨.
아래 차트에는 영향의 타임라인과 함께 SERVFAIL 오류로 반환된 DNS 쿼리의 비율이 나와있습니다.
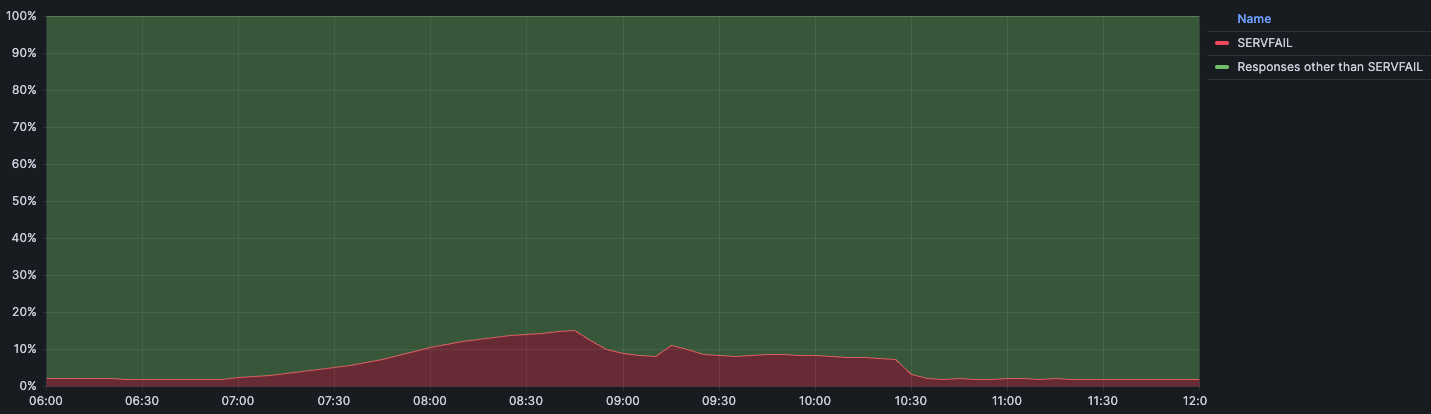
우리는 정상 운영 시 일반 트래픽에 대한 기본 SERVFAIL 오류의 양을 예상합니다. 그 비율은 일반적으로 3% 정도입니다. 이러한 SERVFAIL은 DNSSEC 체인의 합법적인 문제, 권한 있는 서버에 연결하지 못함, 권한 있는 서버에서 응답하는 데 너무 오래 걸림 등으로 인해 발생할 수 있습니다. 사고 기간에 SERVFAIL의 양은 전체 쿼리의 15%로 최고조에 달했지만, 그 영향은 전 세계에 걸쳐 고르게 분산되지 않았고 주로 버지니아주 애쉬번, 독일 프랑크푸르트, 싱가포르 등의 대규모 데이터 센터에 집중되었습니다.
DNS에는 리소스 레코드를 저장하기 위한 바이너리 형식이 있습니다. 이 바이너리 형식에서 리소스 레코드 유형(TYPE)은 16비트 정수로 저장됩니다. 리소스 레코드 유형에 따라 리소스 데이터(RDATA)가 구문 분석되는 방식이 결정됩니다. 레코드 유형이 1이면 A 레코드라는 의미이며, RDATA는 IPv4 주소로 구문 분석될 수 있습니다. 레코드 유형 28은 AAAA 레코드로, 그 RDATA는 대신 IPv6 주소로 구문 분석될 수 있습니다. 파서가 알 수 없는 리소스 유형을 만나면 RDATA를 구문 분석하는 방법을 알 수 없지만, 다행히도 분석할 필요가 없습니다. RDLENGTH 필드가 RDATA 필드의 길이를 나타내어 파서가 불확실한 데이터 요소로 처리할 수 있으니까요.
                                   1  1  1  1  1  1
      0  1  2  3  4  5  6  7  8  9  0  1  2  3  4  5
    +--+--+--+--+--+--+--+--+--+--+--+--+--+--+--+--+
    |                                               |
    /                                               /
    /                      NAME                     /
    |                                               |
    +--+--+--+--+--+--+--+--+--+--+--+--+--+--+--+--+
    |                      TYPE                     |
    +--+--+--+--+--+--+--+--+--+--+--+--+--+--+--+--+
    |                     CLASS                     |
    +--+--+--+--+--+--+--+--+--+--+--+--+--+--+--+--+
    |                      TTL                      |
    |                                               |
    +--+--+--+--+--+--+--+--+--+--+--+--+--+--+--+--+
    |                   RDLENGTH                    |
    +--+--+--+--+--+--+--+--+--+--+--+--+--+--+--+--|
    /                     RDATA                     /
    /                                               /
    +--+--+--+--+--+--+--+--+--+--+--+--+--+--+--+--+
static_zone에서 새로운 ZONEMD 레코드를 지원하지 않았던 이유는 당사에서 지금까지 루트 영역을 내부적으로 바이너리 형식이 아닌 프레젠테이션 형식으로 배포하기로 선택했기 때문입니다. 몇 가지 리소스 레코드의 텍스트 표현을 살펴보면 다양한 레코드가 표시되는 방식에 훨씬 더 많은 차이가 있음을 알 수 있습니다.
.			86400	IN	SOA	a.root-servers.net. nstld.verisign-grs.com. 2023100400 1800 900 604800 86400
.			86400	IN	RRSIG	SOA 8 0 86400 20231017050000 20231004040000 46780 . J5lVTygIkJHDBt6HHm1QLx7S0EItynbBijgNlcKs/W8FIkPBfCQmw5BsUTZAPVxKj7r2iNLRddwRcM/1sL49jV9Jtctn8OLLc9wtouBmg3LH94M0utW86dKSGEKtzGzWbi5hjVBlkroB8XVQxBphAUqGxNDxdE6AIAvh/eSSb3uSQrarxLnKWvHIHm5PORIOftkIRZ2kcA7Qtou9NqPCSE8fOM5EdXxussKChGthmN5AR5S2EruXIGGRd1vvEYBrRPv55BAWKKRERkaXhgAp7VikYzXesiRLdqVlTQd+fwy2tm/MTw+v3Un48wXPg1lRPlQXmQsuBwqg74Ts5r8w8w==
.			518400	IN	NS	a.root-servers.net.
.			86400	IN	ZONEMD	2023100400 1 241 E375B158DAEE6141E1F784FDB66620CC4412EDE47C8892B975C90C6A102E97443678CCA4115E27195B468E33ABD9F78C
알 수 없는 리소스 레코드가 발생하면 처리 방법을 쉽사리 알아낼 수 없습니다. 이 때문에 에지에서 루트 영역을 구문 분석하려고 우리가 사용하는 라이브러리에서는 처리하는 것을 시도하지 않고 대신 파서 오류를 반환합니다.
루트 영역을 로컬로 제공하기 위해 루트 영역을 로드하고 구문 분석하는 작업을 담당하는 static_zone 앱(RFC 7706)은 최신 버전을 메모리에 저장합니다. 새 버전이 게시되면 이 앱은 이를 구문 분석하고 성공적으로 구문 분석이 완료되면 이전 버전을 삭제합니다. 그러나 구문 분석에 실패했으므로 static_zone 앱은 최신 버전으로 전환하지 않고 이전 버전을 무기한 계속 사용했습니다. 1.1.1.1 서비스가 처음 시작될 때 static_zone 앱의 메모리에는 기존 버전이 없습니다. 루트 영역을 구문 분석하려고 할 때 실패하지만, 의존할 이전 버전의 루트 영역이 없기 때문에 다시 직접 루트 서버에 쿼리하는 것에 의존하여 들어오는 요청을 처리하게 됩니다.
우리는 초기에 1.1.1.1의 일부 동작을 프로그래밍 방식으로 변경할 수 있는 메커니즘인 오버라이드 규칙을 통해 static_zone 앱을 비활성화하려고 시도했습니다. 우리가 배포한 규칙은 다음과 같습니다.
phase = pre-cache set-tag rec_disable_static
이 규칙은 들어오는 모든 요청에 대해 rec_disable_static 태그를 추가합니다. static_zone 앱 내에서 이 태그가 설정되어 있는지 확인하고, 설정되어 있으면 캐시된 정적 루트 영역에서 응답을 반환하지 않습니다. 그러나 캐시 성능을 개선하기 위해 현재 노드가 자체 캐시에서 응답을 찾을 수 없는 경우 쿼리가 다른 노드로 전달되는 경우가 있습니다. 안타깝게도 다른 노드로 전달되는 쿼리에는 rec_disable_static 태그가 포함되어 있지 않으므로, 결국 우리가 앱을 완전히 비활성화할 때까지 static_zone 앱에서 오래된 정보로 계속 응답하게 되었습니다.
Cloudflare에서는 전체 시스템을 다시 시작한 후에만 적용될 수 있는 커널 업데이트와 같은 작업을 위해 서비스를 호스팅하는 서버의 롤링 재부팅을 정기적으로 수행합니다. 이번 중단 당시, ZONEMD 변경과 DNSSEC 무효화 사이에 재시작된 확인자 서버 인스턴스는 영향에 기여하지 않았습니다. 확인자 서버 인스턴스가 이 2주의 기간 동안 다시 시작되었다면 시작 시 루트 영역을 로드하지 못하고 대신 루트 서버로 DNS 쿼리를 전송하는 방식으로 다시 확인했을 것입니다. 또한 확인자는 잠재적으로 오래된 캐시에서 인기 있는 레코드를 계속 제공하여 영향을 제한하기 위한 목적으로 서브 스테일(RFC 8767)이라는 기술을 사용합니다. 레코드가 업스트림에서 검색된 후 TTL 시간(초)이 경과하면 레코드는 오래된 것으로 간주됩니다. 이로 인해 전체 서비스 중단은 발생하지 않았으며, 해당 기간 동안 1.1.1.1 서비스를 재시작하지 않은 서버가 많은 대규모 데이터 센터에서 주로 영향이 나타났습니다.
이 사고는 광범위한 영향을 미쳤으며 Cloudflare에서는 당사 서비스의 가용성을 아주 중요하게 생각합니다. 개선 가능한 영역을 몇 가지 확인했으며, 재발을 초래할 수 있는 또 다른 허점이 있는지 찾기 위하여 계속 노력하겠습니다.
다음 사항을 즉시 작업하고 있습니다.
가시성: 우리는 static_zone에서 오래된 루트 영역 파일을 제공할 때 알려주는 알림을 추가하고 있습니다. 오래된 루트 영역 파일이 제공되는 것을 그처럼 오랫동안 눈에 알아차리지 못하는 경우는 없어야 합니다. 존재하는 캐싱을 통해 이를 더 잘 모니터링했다면 아무런 영향도 받지 않았을 것입니다. 업스트림 변경으로부터 고객과 사용자를 보호하는 것이 우리의 목표입니다.
복원력: 내부적으로 루트 영역을 수집하고 배포하는 방법을 재평가하겠습니다. 수집 및 배포 파이프라인은 새로운 RRTYPE을 원활하게 처리해야 하며, 파이프라인이 잠시 중단되어도 최종 사용자에게는 보이지 않아야 합니다.
테스트: 이 문제에 대한 테스트가 마련되어 있으며, 새로운 ZONEMD 레코드 구문 분석 시 미공개 변경 사항과 관련된 테스트도 포함되어 있지만, 우리는 루트 영역에서 구문 분석에 실패할 때 발생하는 상황을 적절하게 테스트하지 못했습니다. 테스트 범위와 관련 프로세스를 개선하겠습니다.
아키텍처: 루트 영역의 오래된 사본을 지정된 시점이 지나서 사용해서는 안 됩니다. 한정된 시간 동안은 오래된 루트 영역 데이터를 계속 사용할 수 있지만, 지정된 시점이 지나면 허용할 수 없는 운영상의 위험이 발생할 수 있습니다. 캐시된 루트 영역 데이터의 수명을 ‘RFC 8806: 확인자에 로컬로 루트 서버 실행’에 설명된 대로 더 잘 관리할 수 있도록 조치를 취하겠습니다.
이번 사고가 발생한 것에 대해 깊은 유감을 표합니다. 이 사고로부터 한 가지 분명한 메시지를 얻을 수 있다면, 절대 무언가가 변하지 않을 것이라고 가정해서는 안 된다는 것입니다! 최신 시스템은 최종 실행 파일로 가져오는 긴 라이브러리 체인으로 구축되는 경우가 많은데, 각 라이브러리는 버그가 있거나 입력 변경이 발생했을 때 프로그램이 올바르게 작동할 수 있도록 충분히 빨리 업데이트되지 않을 수 있습니다. 우리는 입력 변경 시 정상적으로 작동하지 않는 시스템 및 구성 요소와 회귀를 감지할 수 있는 우수한 테스트를 마련하는 것이 얼마나 중요한지 잘 알고 있습니다. 또한 인터넷에서 가장 중요한 시스템(DNS 및 BGP)의 ‘형식’ 변경이 영향을 미칠 것이라는 점을 항상 가정해야 한다는 점도 잘 알고 있습니다.
내부적으로 후속 조치를 취해야 할 사항이 많으며, 당사에서는 이와 같은 일이 다시는 발생하지 않도록 불철주야 노력하고 있습니다.
Post Syndicated from Светла Енчева original https://www.toest.bg/nesigurnoto-bitie-na-nezavisimite-medii-kato-problem-na-demokratsiyata/

През септември „Тоест“ не можа да поднови работата си, защото финансовите резерви на сайта се бяха изчерпали. В банковата сметка бяха останали пари, с които могат да се покрият по-малко от два авторски хонорара за статии, без да броим заплащането за редакторската и коректорската работа. Благодарение на спонтанната дарителска кампания финансирането на „Тоест“ е осигурено поне за няколко месеца напред – докато даряващите по-сериозни месечни суми преценят, че могат да продължават да го правят.
Например по същото време, когато „Тоест“ остана без пари, предаването „Въпросите“ по TV1 спря да съществува за неопределено време – също поради липса на финансиране. За него работеха журналисти като Генка Шикерова, Миролюба Бенатова, Светла Петрова, Емилия Милчева, както и Милен Цветков до смъртта си. В края на миналата година вестник „Сега“ престана да излиза на хартия, с което възможностите на аудиторията да получи качествено съдържание от „традиционен“ вестник се стесниха до абсолютния минимум.
Други медии, отстояващи редакционна независимост, приключиха съществуването си, защото новите им собственици така решиха. Например телевизионният канал BiT, в който работеха както едни от най-авторитетните имена в журналистиката като Нери Терзиева, Петко Георгиев и Ралица Василева, така и млади професионалисти като Ивайло Везенков, днес водещ в bTV. Или вестник „Култура“, който след 60 години съществуване беше спрян, защото не се вписваше в представите на собствениците си от Фондация „Комунитас“ за християнска насоченост. Списъкът може да продължи още дълго.
Проблемът не е само български. Не е и само на медиите. В ерата на хартиените вестници и списания читателите си ги купуваха и по този начин финансираха редакциите. Затова на медиите се гледаше като на вид търговски дружества. С навлизането на интернет аудиторията вече може да намери голяма част от съдържанието, което я интересува, в мрежата, при това безплатно. Мрежата се превръща в конкуренция и на „класическите“ електронни медии – радиото и телевизията.
Аналогични проблеми възникват и в други сфери, например в музикалната и филмовата индустрия. Едно от исканията на стачкуващите доскоро холивудски сценаристи беше да получават справедлива част от печалбата от излъчването на филмите им в т.нар. стрийминг платформи. Тези платформи са проблем и за музикантите, защото все по-малко от техните почитатели биха си купили албумите им на физически носител.
Музикантите все още могат да печелят от концерти, но да се върнем на българските медии. За да оцелее икономически, една онлайн медия може да прилага различни методи, както и комбинация от тях. Например да показва реклами и/или да ограничи достъпа до съдържанието си само до аудиторията, която е готова да плати за него.
При варианта с рекламите от ключово значение е популярността на медията, измерена в брой кликове. За осигуряването на повече кликове онлайн медиите прилагат различни методи. Отново – нерядко в комбинация:
Друг проблем с рекламите е рискът платежоспособни рекламодатели да се оттеглят, ако бъдат засегнати интересите им, което нерядко води до цензура и автоцензура. Пример – статията на Йовко Ламбрев за А1, която никоя медия не отрази и която остана „незабелязана“ от сайтовете, препечатващи често съдържание от „Тоест“.
Възможен начин една медия да оцелее е да бъде притежавана/купена от човек, организация или корпорация с достатъчно средства за поддържането ѝ. Малцина са обаче онези, които биха си имали медия, без да търсят печалба от инвестицията си и без да искат да я използват за определени цели. И без в някакъв момент да решат просто да я захвърлят, както стана с BiT и вестник „Култура“.
Наличието на сериозен финансов ресурс в една медия само̀ по себе си не е гаранция, че този ресурс ще бъде използван за качествена журналистика, а не, да речем, за отвличане на общественото внимание и/или за обслужването на интересите на силните на деня.
Големите частни телевизии например разполагат с предостатъчно средства, за да правят сериозни журналистически разследвания. Вместо това централните новини се превръщат в своеобразно състезание за колко повече време и от колко повече репортери ще бъде отразена една и съща новина. Смъртта на Алексей Петров по bTV например отразяваха петима репортери, като две репортерки бяха от две различни страни на лобното му място. А миналата година, когато корабът „Вера Су“ беше заседнал край Камен бряг, един репортер всяка вечер се включваше от мястото на инцидента, брулен от влажния есенен вятър, с „новината“, че корабът още си е там.
На този фон внезапното номиниране на доскорошния директор на новините на bTV Антон Хекимян за кандидат-кмет от ГЕРБ оголва вече съществуващия проблем с медийната зависимост от властта.
Един от възможните начини за финансиране на некомерсиални и независими медии е чрез данъци. В Германия например съществуват множество обществени медии и обединения на някои от тях, които предлагат съдържание, включително онлайн, свързано с редица непопулярни теми. Някои от тези теми са на границата на табуто (например документалният филм за двойка педофили, които са взели решение да не злоупотребяват с деца), а други са толкова тежки, че са трудно поносими (например проследяването на живота на дете, чиято майка бавно умира от рак).
Ала и съществуващите обществени медии в България често пъти не изпълняват функцията си да предоставят независимо от политически и икономически обременености съдържание в интерес на обществото. В степента, в която все пак я изпълняват, това става поради професионализма и съвестта на отделни журналисти. Нито ръководителят на БНТ Емил Кошлуков, нито по-голямата част от членовете на Съвета за електронни медии изглежда да проявяват разбиране що е то обществена медия. На този фон няма гаранция, че парите на данъкоплатците биха могли да подсигурят независимост на некомерсиални журналистически проекти.
В България все пак има независими медии, чиято издръжка идва от данъкоплатци, но… не от българските. „Дойче Веле“ е германска обществена медия, а „Свободна Европа“ се финансира от Конгреса на САЩ.
Медиите, които се опитват да са независими, често са обвинявани, че са „грантаджийски“, тоест че се финансират от проекти на различни организации, сякаш това е някакво престъпление. За една медия обаче проектното финансиране, макар понякога да го получава, трудно може да бъде разпределено безпроблемно, освен ако медията не е тясно специализирана в определена сфера. Защо?
Характерно за проектите е, че с много малки изключения те са по определени теми. Например една медия печели проект, по силата на който трябва в продължение на година да публикува определен брой материали по темата за равенството на половете. Но ако медията иска да отразява и други теми – да речем, местните избори или войната в Украйна, – се налага да търси начини да прехвърля пари „от единия джоб в другия“.
Всъщност поради разпространеното убеждение, че медиите трябва да са по дефиниция икономически печеливши начинания, много по-често се случва неправителствени организации да печелят проекти, свързани с медиите, отколкото медии да печелят проекти, гарантиращи собственото им оцеляване.
Година след година организации изпълняват проекти – било за изследване на медиите, било за обучения на журналисти. Изследванията водят до конкретни констатации и препоръки, обученията би трябвало да са научили журналистите на нещо. В резултат обаче медийната среда не се променя особено, защото препоръките не задължават медиите с нищо. И защото от обученията няма особен смисъл, ако те влизат в противоречие с изискванията към журналистическия труд. Колкото и да обясняват обучаващите каква е разликата между „хора, търсещи убежище“ и „нелегални мигранти“ или какво е „джендър“, ако от журналистите се иска да възпроизвеждат посланията на силните на деня, те най-вероятно това и ще правят.
Фондацията за хуманитарни и социални изследвания (ФХСИ) от години прави мониторинг на руската пропаганда в българските онлайн медии. По нейни данни тази пропаганда се увеличава. Преди малко повече от година пък бившата началничка на кабинета на Кирил Петков Лена Бориславова заяви пред радио „Дарик“, че определени публични личности вземат суми от порядъка на 4000 лв. месечно, за да разпространяват позициите на Русия.
Информация кои са т.нар. четирихилядници, не беше огласена, но в същото време е видно, че определени личности, между които и журналисти, разпространяват позиции в забележителен унисон с руските „опорни точки“. Като например твърдението, че Путин е политик „легалист“ в статия, публикувана в „Гласове“ от Явор Дачков и приписана от „Труд“ на Кеворк Кеворкян.
До неуспешния си опит за преврат ръководителят на паравоенната групировка „Вагнер“ Евгений Пригожин разполагаше с мощна „фабрика за тролове“, на които се плащаше, за да бъдат такива, и чието влияние надхвърляше границите на Русия.
Пропагандните послания, чиято цел е България да бъде отклонена от европейския си път, са не просто много, а и биват последователно прокарвани не само от публични личности, отделни журналисти, медии и редица сайтове. Те се разпространяват и от политически партии като БСП, „Възраждане“ и др. и не на последно място – от президента Румен Радев.
Докато пропагандата е професионално подготвена, добре организирана и за нея са отделени немалко средства, опитите за борба с нея не могат да се похвалят със същото. А в това отношение независимите медии биха могли да имат сериозна роля. Защото създават продукт, предназначен директно за аудиторията, без да са подчинени на частни и/или политически интереси. Но за да могат да достигнат до тази аудитория по адекватен начин, който може равностойно да противостои на пропагандата, те имат нужда от подкрепа.
Проблемът е, че това преобладаващо не се осъзнава нито от основните частни фондации, нито от публични организации като Европейската комисия, финансиращи проекти в защита на демократичните ценности. Те гледат на медиите предимно като на обект – било на изследване, било на обучение. И констатациите, че в тях има проблеми, не водят до смислени решения как е възможно те да бъдат преодолени.
Медиите не просто отразяват света. С начина си на отразяване и дори само с акцентирането върху едни теми и подминаването на други те неизбежно му влияят и го променят. Затова е от голямо значение кои медии каква чуваемост постигат.
Засега „Тоест“ оцеля – благодарение на ангажираната си аудитория. Това обаче не прави съществуването на независими медии в България много по-устойчиво, нито влиянието им – много по-голямо. Но поне дава надежда. На безрадостния медиен фон и това не е малко.
Post Syndicated from xkcd.com original https://xkcd.com/2837/
Post Syndicated from The Atlantic original https://www.youtube.com/watch?v=QAlHf4Ogl6c
Post Syndicated from The Atlantic original https://www.youtube.com/watch?v=VlRWSq1r-hc
Post Syndicated from Roger Park original https://aws.amazon.com/blogs/security/how-to-use-aws-certificate-manager-to-enforce-certificate-issuance-controls/
AWS Certificate Manager (ACM) lets you provision, manage, and deploy public and private Transport Layer Security (TLS) certificates for use with AWS services and your internal connected resources. You probably have many users, applications, or accounts that request and use TLS certificates as part of your public key infrastructure (PKI); which means you might also need to enforce specific PKI enterprise controls, such as the types of certificates that can be issued or the validation method used. You can now use AWS Identity and Access Management (IAM) condition context keys to define granular rules around certificate issuance from ACM and help ensure your users are issuing or requesting TLS certificates in accordance with your organizational guidelines.
In this blog post, we provide an overview of the new IAM condition keys available with ACM. We also discuss some example use cases for these condition keys, including example IAM policies. Lastly, we highlight some recommended practices for logging and monitoring certificate issuance across your organization using AWS CloudTrail because you might want to provide PKI administrators a centralized view of certificate activities. Combining preventative controls, like the new IAM condition keys for ACM, with detective controls and comprehensive activity logging can help you meet your organizational requirements for properly issuing and using certificates.
This blog post assumes you have a basic understanding of IAM policies. If you’re new to using identity policies in AWS, see the IAM documentation for more information.
Let’s take a closer look at IAM condition keys to better understand how to use these controls to enforce certificate guidelines. The condition block in an IAM policy is an optional policy element that lets you specify certain conditions for when a policy will be in effect. For instance, you might use a policy condition to specify that no one can delete an Amazon Simple Storage Service (Amazon S3) bucket except for your system administrator IAM role. In this case, the condition element of the policy translates to the exception in the previous sentence: all identities are denied the ability to delete S3 buckets except under the condition that the role is your administrator IAM role. We will highlight some useful examples for certificate issuance later in the post.
When used with ACM, IAM condition keys can now be used to help meet enterprise standards for how certificates are issued in your organization. For example, your security team might restrict the use of RSA certificates, preferring ECDSA certificates. You might want application teams to exclusively use DNS domain validation when they request certificates from ACM, enabling fully managed certificate renewals with little to no action required on your part. Using these condition keys in identity policies or service control policies (SCPs) provide ACM users more control over who can issue certificates with certain configurations. You can now create condition keys to define certificate issuance guardrails around the following:
Before this release, you didn’t always have a proactive way to prevent users from issuing certificates that weren’t aligned with your organization’s policies and best practices. You could reactively monitor certificate issuance behavior across your accounts using AWS CloudTrail, but you couldn’t use an IAM policy to prevent the use of email validation, for example. With the new policy conditions, your enterprise and network administrators gain more control over how certificates are issued and better visibility into inadvertent violations of these controls.
Before we showcase some example policies, let’s examine service control policies, or SCPs. SCPs are a type of policy that you can use with AWS Organizations to manage permissions across your enterprise. SCPs offer central control over the maximum available permissions for accounts in your organization, and SCPs can help ensure your accounts stay aligned with your organization’s access control guidelines. You can find more information in Getting started with AWS Organizations.
Let’s assume you want to allow only DNS validated certificates, not email validated certificates, across your entire enterprise. You could create identity-based policies in all your accounts to deny the use of email validated certificates, but creating an SCP that denies the use of email validation across every account in your enterprise would be much more efficient and effective. However, if you only want to prevent a single IAM role in one of your accounts from issuing email validated certificates, an identity-based policy attached to that role would be the simplest, most granular method.
It’s important to note that no permissions are granted by an SCP. An SCP sets limits on the actions that you can delegate to the IAM users and roles in the affected accounts. You must still attach identity-based policies to IAM users or roles to actually grant permissions. The effective permissions are the logical intersection between what is allowed by the SCP and what is allowed by the identity-based and resource-based policies. In the next section, we examine some example policies and how you can use the intersection of SCPs and identity-based policies to enforce enterprise controls around certificates.
Let’s look at some example use cases for certificate governance, and how you might implement them using the new policy condition keys. We’ve selected a few common use cases, but you can find more policy examples in the ACM documentation.
Certificates requested from ACM using email validation require manual action by the domain owner to renew the certificates. This could lead to an outage for your applications if the person receiving the email to validate the domain leaves your organization — or is otherwise unable to validate your domain ownership — and the certificate expires without being renewed.
We recommend using DNS validation, which doesn’t require action on your part to automatically renew a public certificate requested from ACM. The following SCP example demonstrates how to help prevent the issuance of email validated certificates, except for a specific IAM role. This IAM role could be used by application teams who cannot use DNS validation and are given an exception.
Note that this policy will only apply to new certificate requests. ACM managed certificate renewals for certificates that were originally issued using email validation won’t be affected by this policy.
A wildcard certificate contains a wildcard (*) in the domain name field, and can be used to secure multiple sub-domains of a given domain. For instance, *.example.com could be used for mail.example.com, hr.example.com, and dev.example.com. You might use wildcard certificates to reduce your operational complexity, because you can use the same certificate to protect multiple sites on multiple resources (for example, web servers). However, this also means the wildcard certificates have a larger impact radius, because a compromised wildcard certificate could affect each of the subdomains and resources where it’s used. The US National Security Agency warned about the use of wildcard certificates in 2021.
Therefore, you might want to limit the use of wildcard certificates in your organization. Here’s an example SCP showing how to help prevent the issuance of wildcard certificates using condition keys with ACM:
Notice that in this example, we’re denying a request for a certificate where the leftmost character of the domain name is a wildcard. In the condition section, ForAnyValue means that if a value in the request matches at least one value in the list, the condition will apply. As acm:DomainNames is a multi-value field, we need to specify whether at least one of the provided values needs to match (ForAnyValue), or all the values must match (ForAllValues), for the condition to be evaluated as true. You can read more about multi-value context keys in the IAM documentation.
Consider a scenario where you have multiple application teams, and each application team has their own domain names for their workloads. You might want to only allow application teams to request certificates for their own fully qualified domain name (FQDN). In this example SCP, we’re denying requests for a certificate with the FQDN app1.example.com, unless the request is made by one of the two IAM roles in the condition element. Let’s assume these are the roles used for staging and building the relevant application in production, and the roles should have access to request certificates for the domain.
Multiple conditions in the same block must be evaluated as true for the effect to be applied. In this case, that means denying the request. In the first statement, the request must contain the domain app1.example.com for the first part to evaluate to true. If the identity making the request is not one of the two listed roles, then the condition is evaluated as true, and the request will be denied. The request will not be denied (that is, it will be allowed) if the domain name of the certificate is not app1.example.com or if the role making the request is one of the roles listed in the ArnNotLike section of the condition element. The same applies for the second statement pertaining to application team 2.
Keep in mind that each of these application team roles would still need an identity policy with the appropriate ACM permissions attached to request a certificate from ACM. This policy would be implemented as an SCP and would help prevent application teams from giving themselves the ability to request certificates for domains that they don’t control, even if they created an identity policy allowing them to do so.
You might want to allow or restrict a certain certificate key algorithm. For example, allowing the use of ECDSA certificates but restricting RSA certificates from being issued. See this blog post for more information on the differences between ECDSA and RSA certificates, and how to evaluate which type to use for your workload. Here’s an example SCP showing how to deny requests for a certificate that uses one of the supported RSA key lengths.
Notice that we’re using a wildcard after RSA to restrict use of RSA certificates, regardless of the key length (for example, 2048, 4096, and so on).
While you can use IAM policy condition keys as a preventative control, you might also want to implement detective controls to better understand certificate issuance across your organization. Combining these preventative and detective controls helps you establish a comprehensive set of enterprise controls for certificate governance. For instance, imagine you use an SCP to deny all attempts to issue a certificate using email validation. You will have CloudTrail logs for RequestCertificate API calls that are denied by this policy, and can use these events to notify the appropriate application team that they should be using DNS validation.
You’re probably familiar with the access denied error message received when AWS explicitly or implicitly denies an authorization request. The following is an example of the error received when a certificate request is denied by an SCP:
If you use AWS Organizations, you can have a consolidated view of the CloudTrail events for certificate issuance using ACM by creating an organization trail. Please refer to the CloudTrail documentation for more information on security best practices in CloudTrail. Using Amazon EventBridge, you can simplify certificate lifecycle management by using event-driven workflows to notify or automatically act on expiring TLS certificates. Learn about the example use cases for the event types supported by ACM in this Security Blog post.
In this blog post, we discussed the new IAM policy conditions available for use with ACM. We also demonstrated some example use cases and policies where you might use these conditions to provide more granular control on the issuance of certificates across your enterprise. We also briefly covered SCPs, identity-based policies, and how you can get better visibility into certificate governance using services like AWS CloudTrail and Amazon EventBridge. See the AWS Certificate Manager documentation to learn more about using policy conditions with ACM, and then get started issuing certificates with AWS Certificate Manager.
If you have feedback about this post, submit comments in the Comments section below. If you have questions about this post, contact AWS Support.
Want more AWS Security news? Follow us on Twitter.
Post Syndicated from Haleh Najafzadeh original https://aws.amazon.com/blogs/architecture/announcing-updates-to-the-aws-well-architected-framework-guidance/
We are excited to announce the availability of improved AWS Well-Architected Framework guidance. In this update, we have made changes across all six pillars of the framework: Operational Excellence, Security, Reliability, Performance Efficiency, Cost Optimization, and Sustainability.
In this release, we have made the implementation guidance for the new and updated best practices more prescriptive, including enhanced recommendations and steps on reusable architecture patterns targeting specific business outcomes in the Amazon Web Services (AWS) Cloud.
The Well-Architected Framework is a collection of best practices that allow customers to evaluate and improve the design, implementation, and operations of their workloads in the cloud.
In 2012, the first version of the framework was published, leading to the 2015 release of the guidance whitepaper. We added the Operational Excellence pillar in 2016. The pillar-specific whitepapers and AWS Well-Architected Lenses were released in 2017, and the following year, the AWS Well-Architected Tool was launched.
In 2020, Well-Architected Framework guidance had a new release, along with more lenses, as well as API integration with the AWS Well-Architected Tool. The sixth pillar, Sustainability, was added in 2021. In 2022, dedicated pages were introduced for each consolidated best practice across all six pillars, with several best practices updated with improved prescriptive guidance. By April 2023, more than 50% of the Framework’s best practices have had their prescriptive guidance improved.

A brief history of the AWS Well-Architected Framework
As customers mature in their journey, they are seeking guidance to achieve accurate solutions that is prescriptive to their business, environments, and workloads. AWS Well-Architected is committed to providing such information to customers by continually evolving and updating our guidance.
The content updates and improvements in this release focus on having more complete coverage across the AWS service portfolio, helping customers make more informed decisions when developing implementation plans. Services that were added or expanded in coverage include: AWS Elastic Disaster Recovery, AWS Trusted Advisor, AWS Resilience Hub, AWS Config, AWS Security Hub, Amazon GuardDuty, AWS Organizations, AWS Control Tower, AWS Compute Optimizer, AWS Budgets, Amazon CodeWhisperer, Amazon CodeGuru, Amazon EventBridge, Amazon CloudWatch, Amazon Simple Notification Service, AWS Systems Manager, Amazon ElastiCache, and AWS Global Accelerator.
The Operational Excellence Pillar has received updates to two of the five Design Principles and has a new Design Principle on observability, which highlights its importance and relevance throughout the pillar content. All 10 best practices in OPS05 have been updated, and we have consolidated 28 best practices into 16, across four questions (OPS04, OPS06, OPS08, and OPS09), as well as improving prescriptive guidance.
In the Security Pillar, the Incident response in SEC10 underwent an update to align with the AWS Security Incident Response Guide, while introducing one new best practice, and improving the prescriptive guidance for others. Two best practices in SEC08 and SEC09 have received improved prescriptive guidance on securing workloads at rest and in transit.
The Reliability Pillar has received prescriptive guidance improvements to one best practice in REL06, and six best practices in REL11, focused on how to best monitor, failover, remediate, and limit impacts of failures. The update addresses a wide variety of managed services and designs, including multi-Region-based resilience.
The Performance Efficiency Pillar has been completely restructured, consolidating and merging guidance to reduce the number of best practices by 10 and the number of questions by three. We have added best practices around efficient caching and optimizing hardware acceleration. We have also improved the implementation guidance in all 32 best practices of the newly restructured Pillar.
The Cost Optimization Pillar has 10 best practices with improved implementation prescriptive guidance.
The Sustainability Pillar has received updates to the risk levels of seven best practices.
This Well-Architected release includes updates and improvements to 90 best practices: Operational Excellence (26), Security (8), Reliability (7), Performance Efficiency (32), Cost Optimization (10), and Sustainability (7). These changes are in addition to the 151 improved best practices released in 2023 (127 in April 10, 2023; and 24 in July 13, 2023), resulting in more than 73% of the existing Framework best practices updated at least once in the last year.
As of this release, 100% of Performance Efficiency, Cost Optimization, and Sustainability; 63% of Operational Excellence; 60% of Security; and 50% of Reliability Pillar content have been refreshed at least once since October 2022.
The content is available in 11 languages: English, Spanish, French, German, Italian, Japanese, Korean, Indonesian, Brazilian Portuguese, Simplified Chinese, and Traditional Chinese.
Updates in this release are also available in the AWS Well-Architected Tool, which can be used to review your workloads, address important design considerations, and help ensure that you follow the best practices and guidance of the AWS Well-Architected Framework.
Ready to get started? Review the updated AWS Well-Architected Framework Pillar best practices, as well as pillar-specific whitepapers.
Have questions about some of the new best practices or most recent updates? Join our growing community on AWS re:Post.
Post Syndicated from Patrick Kennedy original https://www.servethehome.com/intel-altera-experiment-ending-as-psg-goes-standalone-en-route-to-ipo/
Intel’s Altera experiment is ending as Intel PSG is transitioning to a standalone business on its way to an upcoming IPO
The post Intel Altera Experiment Ending as PSG Goes Standalone En Route to IPO appeared first on ServeTheHome.
Post Syndicated from jake original https://lwn.net/Articles/946188/
The SteamOS Linux
distribution is focused on gaming, naturally, but the effort to build it
has resulted
in contributions to multiple areas in the Linux ecosystem. Alberto Garcia
has been working on SteamOS and came to Bilbao, Spain to describe some of those
contributions at Open Source Summit Europe 2023. There are some obvious
areas where a gaming-focused OS might contribute upstream, such as
graphics, but the talk showed contributions in several other areas as well.
Post Syndicated from corbet original https://lwn.net/Articles/946381/
Qualys has posted an
advisory for a vulnerability in the GNU C Library related to the
handling of the GLIBC_TUNABLES environment variable:
We successfully exploited this vulnerability and obtained full root
privileges on the default installations of Fedora 37 and 38, Ubuntu
22.04 and 23.04, Debian 12 and 13; other distributions are probably
also vulnerable and exploitable (one notable exception is Alpine
Linux, which uses musl libc, not the glibc).
Updates from distributors are beginning to appear and should be applied on
any systems with untrusted users.
The curious can see the fix applied to glibc in this
patch series.
Post Syndicated from Patrick Kennedy original https://www.servethehome.com/falcon-northwest-rak-intel-xeon-w-3400-unleashed-edition-nvidia-asus-silverstone-kingston/
In our Falcon Northwest RAK review, we see how the company unleashed the Intel Xeon w9-3495X as a fast workstation today and a server tomorrow
The post Falcon Northwest RAK Intel Xeon W-3400 Unleashed Edition appeared first on ServeTheHome.
Post Syndicated from Rajdip Chaudhuri original https://aws.amazon.com/blogs/big-data/migrate-an-existing-data-lake-to-a-transactional-data-lake-using-apache-iceberg/
A data lake is a centralized repository that you can use to store all your structured and unstructured data at any scale. You can store your data as-is, without having to first structure the data and then run different types of analytics for better business insights. Over the years, data lakes on Amazon Simple Storage Service (Amazon S3) have become the default repository for enterprise data and are a common choice for a large set of users who query data for a variety of analytics and machine leaning use cases. Amazon S3 allows you to access diverse data sets, build business intelligence dashboards, and accelerate the consumption of data by adopting a modern data architecture or data mesh pattern on Amazon Web Services (AWS).
Analytics use cases on data lakes are always evolving. Oftentimes, you want to continuously ingest data from various sources into a data lake and query the data concurrently through multiple analytics tools with transactional capabilities. But traditionally, data lakes built on Amazon S3 are immutable and don’t provide the transactional capabilities needed to support changing use cases. With changing use cases, customers are looking for ways to not only move new or incremental data to data lakes as transactions, but also to convert existing data based on Apache Parquet to a transactional format. Open table formats, such as Apache Iceberg, provide a solution to this issue. Apache Iceberg enables transactions on data lakes and can simplify data storage, management, ingestion, and processing.
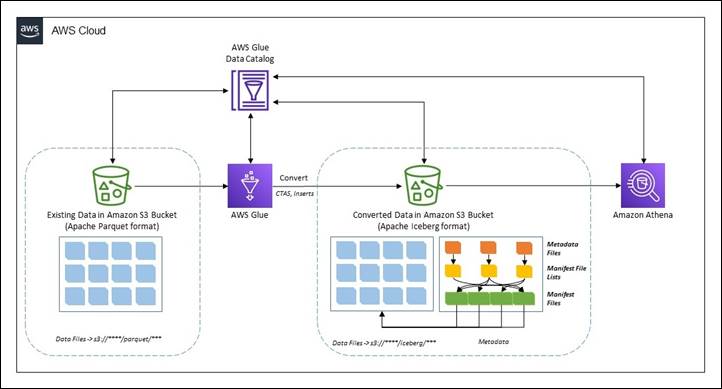
In this post, we show you how you can convert existing data in an Amazon S3 data lake in Apache Parquet format to Apache Iceberg format to support transactions on the data using Jupyter Notebook based interactive sessions over AWS Glue 4.0.
There are two broad methods to migrate the existing data in a data lake in Apache Parquet format to Apache Iceberg format to convert the data lake to a transactional table format.
In an in-place data migration strategy, existing datasets are upgraded to Apache Iceberg format without first reprocessing or restating existing data. This means the data files in the data lake aren’t modified during the migration and all Apache Iceberg metadata files (manifests, manifest files, and table metadata files) are generated outside the purview of the data. In this method, the metadata are recreated in an isolated environment and colocated with the existing data files. This can be a much less expensive operation compared to rewriting all the data files. The existing data file format must be Apache Parquet, Apache ORC, or Apache Avro. An in-place migration can be performed in either of two ways:
add_files can import files from a specific partition or partitions and doesn’t create a new Iceberg table. This procedure doesn’t analyze the schema of the files to determine if they match the schema of the Iceberg table. Upon completion, the Iceberg table treats these files as if they are part of the set of files owned by Apache Iceberg.table_BACKUP_. However, to leave the original table intact during the process, you must use snapshot to create a new temporary table that has the same source data files and schema.In this post, we show you how you can use the Iceberg add_files procedure for an in-place data upgrade. Note that the migrate procedure isn’t supported in AWS Glue Data Catalog.
The following diagram shows a high-level representation.

The create table as select (CTAS) migration approach is a technique where all the metadata information for Iceberg is generated along with restating all the data files. This method shadows the source dataset in batches. When the shadow is caught up, you can swap the shadowed dataset with the source.
The following diagram showcases the high-level flow.
To follow along with the walkthrough, you must have the following:
us-east-1.s3://noaa-ghcn-pds/parquet/by_year/).You can check the data size using the following code in the AWS CLI or AWS CloudShell:
As of writing this post, there are 107 objects with total size of 70 MB for year 2023 in the Amazon S3 path.

Note that to implement the solution, you must complete a few preparatory steps.
Complete the following steps to create the S3 bucket and the AWS IAM role and policy for the solution:

This AWS CloudFormation template deploys the following resources:
demo-blog-post-XXXXXXXX (XXXXXXXX represents the AWS account ID used).parquet and iceberg under the bucket.demoblogpostrole and demoblogpostscoped respectively.ghcn_db.demopostcrawlerparquet.
After the the AWS CloudFormation template is successfully deployed:
XXXXXXXX appropriately in the target S3 bucket name.demopostcrawlerparquet.demopostcrawlerparquet is successfully run, the metadata information of the Apache Parquet data will be cataloged under the ghcn_db AWS Glue database with the table name source_parquet. Notice that the table is partitioned over year and element columns (as in the S3 bucket).

For this post, we use an AWS Glue Studio notebook. Follow the steps in Getting started with notebooks in AWS Glue Studio to set up the notebook environment. Launch the notebooks hosted under this link and unzip them on a local workstation.
ipynb file and choose Open, then choose Create.demoblogpostrole. Choose Create job. After a minute, the Jupyter notebook editor appears. Clear all the default cells.The preceding steps launch an AWS Glue Studio notebook environment. Make sure you Save the notebook every time it’s used.
In this section we show you how you can use the add_files procedure to achieve an in-place data upgrade. This section uses the ipynb file named demo-in-place-upgrade-addfiles.ipynb. To use with the add_files procedure, complete the following:
demo-in-place-upgrade for the notebook session as explained in Launch Glue notebook for processing.bucket_name variable by replacing XXXXXXXX.Notice that the cell under Execute add_files procedure section performs the metadata creation in the mentioned path.

Review the data file paths for the new Iceberg table. To show an Iceberg table’s current data files, .files can be used to get details such as file_path, partition, and others. Recreated files are pointing to the source path under Amazon S3.

Note the metadata file location after transformation. It’s pointing to the new folder named iceberg under Amazon S3. This can be checked using .snapshots to check Iceberg tables’ snapshot file location. Also, check the same in the Amazon S3 URI s3://demo-blog-post-XXXXXXXX/iceberg/ghcn_db.db/target_iceberg_add_files/metadata/. Also notice that there are two versions of the manifest list created after the add_files procedure has been run. The first is an empty table with the data schema and the second is adding the files.


The table is cataloged in AWS Glue under the database ghcn_db with the table type as ICEBERG.

Compare the count of records using Amazon Athena between the source and target table. They are the same.

In summary, you can use the add_files procedure to convert existing data files in Apache Parquet format in a data lake to Apache Iceberg format by adding the metadata files and without recreating the table from scratch. Following are some pros and cons of this method.
Pros
Cons
This section uses the ipynb file named demo-ctas-upgrade.ipynb. Complete the following:
demo-ctas-upgrade for the notebook session as explained under Launch Glue notebook for processing.bucket_name variable by replacing XXXXXXXX.Notice that the cell under Create Iceberg table from Parquet section performs the shadow upgrade to Iceberg format. Note that Iceberg requires sorting the data according to table partitions before writing to the Iceberg table. Further details can be found in Writing Distribution Modes.

Notice the data and metadata file paths for the new Iceberg table. It’s pointing to the new path under Amazon S3. Also, check under the Amazon S3 URI s3://demo-blog-post-XXXXXXXX/iceberg/ghcn_db.db/target_iceberg_ctas/ used for this post.


The table is cataloged under AWS Glue under the database ghcn_db with the table type as ICEBERG.

Compare the count of records using Amazon Athena between the source and target table. They are same.

In summary, the CTAS method creates a new table by generating all the metadata files along with restating the actual data. Following are some pros and cons of this method:
Pros
Cons
To avoid incurring future charges, and to clean up unused roles and policies, delete the resources you created: the datasets, CloudFormation stack, S3 bucket, AWS Glue job, AWS Glue database, and AWS Glue table.
In this post, you learned strategies for migrating existing Apache Parquet formatted data to Apache Iceberg in Amazon S3 to convert to a transactional data lake using interactive sessions in AWS Glue 4.0 to complete the processes. If you have an evolving use case where an existing data lake needs to be converted to a transactional data lake based on Apache Iceberg table format, follow the guidance in this post.
The path you choose for this upgrade, an in-place upgrade or CTAS migration, or a combination of both, will depend on careful analysis of the data architecture and data integration pipeline. Both pathways have pros and cons, as discussed. At a high level, this upgrade process should go through multiple well-defined phases to identify the patterns of data integration and use cases. Choosing the correct strategy will depend on your requirements—such as performance, cost, data freshness, acceptable downtime during migration, and so on.
 Rajdip Chaudhuri is a Senior Solutions Architect with Amazon Web Services specializing in data and analytics. He enjoys working with AWS customers and partners on data and analytics requirements. In his spare time, he enjoys soccer and movies.
Post Syndicated from Avijit Goswami original https://aws.amazon.com/blogs/big-data/apache-iceberg-optimization-solving-the-small-files-problem-in-amazon-emr/
In our previous post Improve operational efficiencies of Apache Iceberg tables built on Amazon S3 data lakes, we discussed how you can implement solutions to improve operational efficiencies of your Amazon Simple Storage Service (Amazon S3) data lake that is using the Apache Iceberg open table format and running on the Amazon EMR big data platform. Iceberg tables store metadata in manifest files. As the number of data files increase, the amount of metadata stored in these manifest files also increases, leading to longer query planning time. The query runtime also increases because it’s proportional to the number of data or metadata file read operations. Compaction is the process of combining these small data and metadata files to improve performance and reduce cost. Compaction also gets rid of deleting files by applying deletes and rewriting a new file without deleting records. Currently, Iceberg provides a compaction utility that compacts small files at a table or partition level. But this approach requires you to implement the compaction job using your preferred job scheduler or manually triggering the compaction job.
In this post, we discuss the new Iceberg feature that you can use to automatically compact small files while writing data into Iceberg tables using Spark on Amazon EMR or Amazon Athena.
Streaming applications are prone to creating a large number of small files, which can negatively impact the performance of subsequent processing times. For example, consider a critical Internet of Things (IoT) sensor from a cold storage facility that is continuously sending temperature and health data into an S3 data lake for downstream data processing and triggering actions like emergency maintenance. Systems of this nature generate a huge number of small objects and need attention to compact them to a more optimal size for faster reading, such as 128 MB, 256 MB, or 512 MB. In this post, we show you a streaming sensor data use case with a large number of small files and the mitigation steps using the Iceberg open table format. For more information on streaming applications on AWS, refer to Real-time Data Streaming and Analytics.

To compact the small files for improved performance, in this example, Amazon EMR triggers a compaction job after the write commit as a post-commit hook when defined thresholds (for example, number of commits) are met. By default, Amazon EMR waits for 10 commits to trigger the post-commit hook compaction utility.

This Iceberg event-based table management feature lets you monitor table activities during writes to make better decisions about how to manage each table differently based on events. As of this writing, only the optimize-data optimization is supported. To learn more about the available optimize data executors and catalog properties, refer to the README file in the GitHub repo.
To use the feature, you can use the iceberg-aws-event-based-table-management source code and provide the built JAR in the engine’s class-path. The following bootstrap action can place the JAR in the engine’s class-path:
Note that the Iceberg AWS event-based table management feature works with Iceberg v1.2.0 and above (available from Amazon EMR 6.11.0).
In some use cases, you may want to run the event-based compaction jobs in a different EMR cluster in order to avoid any impact to the ETL jobs running in their current EMR cluster. You can get the metadata, including the cluster ID of your current ETL workflows, from the /mnt/var/lib/info/job-flow.json file and then use a different cluster to process the event-based compactions.
The notebook examples shown in the following sections are also available in the aws-samples GitHub repo.
For this performance comparison exercise between a Spark external table and an Iceberg table and Iceberg with compaction, we generate a significant number of small files in Parquet format and store them in an S3 bucket. We used the Amazon Kinesis Data Generator (KDG) tool to generate sample sensor data information using the following template:
We configured an Amazon Kinesis Data Firehose delivery stream and sent the generated data into a staging S3 bucket. Then we ran an AWS Glue extract, transform, and load (ETL) job to convert the JSON files into Parquet format. For our testing, we generated about 58,176 small objects with total size of 2 GB.
For running the Amazon EMR tests, we used Amazon EMR version emr-6.11.0 with Spark 3.3.2, and JupyterEnterpriseGateway 2.6.0. The cluster used had one primary node (r5.2xlarge) and two core nodes (r5.xlarge). We used a bootstrap action during cluster creation to enable event-based table management:
Also, refer to our guidance on how to use an Iceberg cluster with Spark, which is a prerequisite for this exercise.
As part of the exercise, we see new steps are being added to the EMR cluster to trigger the compaction jobs. To enable adding new steps to the running cluster, we add the elasticmapreduce:AddJobFlowSteps action to the cluster’s default role, EMR_EC2_DefaultRole, as a prerequisite.
In the following steps, we demonstrate how to use the compaction utility and what performance benefits you can achieve. We use an EMR notebook to demonstrate the benefits of the compaction utility. For instructions to set up an EMR notebook, refer to Amazon EMR Studio overview.
First, you configure your Spark session using the %%configure magic command. We use the Hive catalog for Iceberg tables.
your-iceberg-storage-blog bucket name in the following configuration with the actual bucket name you created to test this example:
s3://<your-iceberg-storage-blog>/iceberg/db. Also, create another Database named iceberg_db in Glue for the parquet tables. Follow the instructions given in Working with databases on the AWS Glue console to create your Glue databases. Then create a new Spark table in Parquet format pointing to the bucket containing small objects in your AWS account. See the following code:

In the following steps, we create a new Iceberg table from the Spark/Parquet table using CTAS (Create Table As Select). Then we show how the automated compaction job can help improve query performance.

We have confirmed that our S3 folder corresponds to the newly created Iceberg table. It shows that during the CTAS statement, it added 1,879 objects in the new folder with a total size of 1.3 GB. We can conclude that Iceberg did some optimization while loading data from the Parquet table.

The runtime for the preceding query ran on the Iceberg table with 1,879 objects in 1 minute, 39 seconds. There is already some significant performance improvement by converting the external Parquet table to an Iceberg table.
optimize-data.commit-threshold suggests that the compaction will take place after the first successful commit. The default is 10 successful commits to trigger the compaction.

You should see a new step added that goes from Pending to Running and finally the Completed state. Every time the data in the Iceberg table is updated or inserted, based on configuration optimize-data.commit-threshold, the optimize job will automatically trigger to compact the underlying data.


replace.For every successful run of the background optimize job, a new entry will be added to the snapshot table.

In our case, it was compacted from the previous smaller sizes to approximately 437 MB. The folder will still contain the previous smaller files for time travel unless you issue an expire snapshot command to remove them.

The runtime for the preceding aggregation query on the compacted Iceberg table reduced to approximately 59 seconds from the previous runtime of 1 minute, 39 seconds. That is about a 40% improvement. The more small files you have in your source bucket, the bigger performance boost you can achieve with this post-hook compaction implementation. The examples shown in this blog were executed in a small Amazon EMR cluster with only two core nodes (r5.xlarge). To improve the performance of your Spark applications, Amazon EMR provides multiple optimization features that you can implement for your production workloads.

To manage the Iceberg table based on events, you can start the Spark 3.3 SQL shell as shown in the following code. Make sure that the athena:StartQueryExecution and athena:GetQueryExecution permission policies are enabled.
After you complete the test, clean up your resources to avoid any recurring costs:
In this post, we showed how Iceberg event-based table management lets you manage each table differently based on events and compact small files to boost application performance. This event-based process significantly reduces the operational overhead of using the Iceberg rewrite_data_files procedure, which needs manual or scheduled operation.
To learn more about Apache Iceberg and implement this open table format for your transactional data lake use cases, refer to the following resources:
 Avijit Goswami is a Principal Solutions Architect at AWS specialized in data and analytics. He supports AWS strategic customers in building high-performing, secure, and scalable data lake solutions on AWS using AWS managed services and open-source solutions. Outside of his work, Avijit likes to travel, hike, watch sports, and listen to music.
 Rajarshi Sarkar is a Software Development Engineer at Amazon EMR/Athena. He works on cutting-edge features of Amazon EMR/Athena and is also involved in open-source projects such as Apache Iceberg and Trino. In his spare time, he likes to travel, watch movies, and hang out with friends.
Post Syndicated from Talks at Google original https://www.youtube.com/watch?v=yxjJ3wREO8g
Post Syndicated from Steve Schmidt original https://aws.amazon.com/blogs/security/security-by-design-aws-to-enhance-mfa-requirements-in-2024/
Security is our top priority at Amazon Web Services (AWS). To that end, I’m excited to share that AWS is further strengthening the default security posture of our customers’ environments by requiring the use of multi-factor authentication (MFA), beginning with the most privileged users in their accounts. MFA is one of the simplest and most effective ways to enhance account security, offering an additional layer of protection to help prevent unauthorized individuals from gaining access to systems or data.
Beginning in mid-2024, customers signing in to the AWS Management Console with the root user of an AWS Organizations management account will be required to enable MFA to proceed. Customers who must enable MFA will be notified of the upcoming change through multiple channels, including a prompt when they sign in to the console.
We will expand this program throughout 2024 to additional scenarios such as standalone accounts (those outside an organization in AWS Organizations) as we release features that make MFA even easier to adopt and manage at scale. That said, there’s no need to wait for 2024 to take advantage of the benefits of MFA. You can visit our AWS Identity and Access Management (IAM) user guide to learn how to enable MFA on AWS now, and eligible customers can request a free security key through our ordering portal.
Verifying that the most privileged users in AWS are protected with MFA is just the latest step in our commitment to continuously enhance the security posture of AWS customers. To help more customers get started on their MFA journey, in fall 2021, we began offering a free MFA security key to eligible AWS account owners in the United States. And in November 2022, we launched support for customers to register up to eight MFA devices per account root user or per IAM user in AWS, creating additional flexibility and resiliency for your MFA strategy.
We recommend that everyone adopts some form of MFA, and additionally encourage customers to consider choosing forms of MFA that are phishing-resistant, such as security keys. While the requirement to enable MFA for root users of Organizations management accounts is coming in 2024, we strongly encourage our customers to get started today by enabling MFA not only for their root users, but for all user types in their environments. For example, you can enable multiple MFA options, including passkeys and authenticator apps, for AWS IAM Identity Center. You can visit our AWS IAM Identity Center MFA user guide to learn more.
If you have feedback about this post, submit comments in the Comments section below. If you have questions about this post, contact AWS Support.
Want more AWS Security news? Follow us on Twitter.
Post Syndicated from Geographics original https://www.youtube.com/watch?v=zjqAjVvwMys
Post Syndicated from corbet original https://lwn.net/Articles/946315/
Ars technica reports
on an Arm advisory regarding exploitable vulnerabilities in a number of
its GPU drivers.
The most prevalent platform affected by the vulnerability is
Google’s line of Pixels, which are one of the only Android models
to receive security updates on a timely basis. Google patched
Pixels in its September update against the vulnerability, which is
tracked as CVE-2023-4211.
As the article notes, the story on fixes for other devices is less clear.
Post Syndicated from corbet original https://lwn.net/Articles/946313/
Security updates have been issued by Debian (exim4), Fedora (firecracker, rust-aes-gcm, rust-axum, rust-tokio-tungstenite, rust-tungstenite, and rust-warp), Gentoo (nvidia-drivers), Mageia (chromium-browser-stable, glibc, and libwebp), Red Hat (kernel), SUSE (ghostscript and python3), and Ubuntu (firefox, libtommath, libvpx, and thunderbird).
Post Syndicated from Annika Garbers original http://blog.cloudflare.com/magic-wan-connector-general-availability/


Today, we’re announcing the general availability of the Magic WAN Connector, a key component of our SASE platform, Cloudflare One. Magic WAN Connector is the glue between your existing network hardware and Cloudflare’s network — it provides a super simplified software solution that comes pre-installed on Cloudflare-certified hardware, and is entirely managed from the Cloudflare One dashboard.
It takes only a few minutes from unboxing to seeing your network traffic automatically routed to the closest Cloudflare location, where it flows through a full stack of Zero Trust security controls before taking an accelerated path to its destination, whether that’s another location on your private network, a SaaS app, or any application on the open Internet.
Since we announced our beta earlier this year, organizations around the world have deployed the Magic WAN Connector to connect and secure their network locations. We’re excited for the general availability of the Magic WAN Connector to accelerate SASE transformation at scale.
When customers tell us about their journey to embrace SASE, one of the most common stories we hear is:
We started with our remote workforce, deploying modern solutions to secure access to internal apps and Internet resources. But now, we’re looking at the broader landscape of our enterprise network connectivity and security, and it’s daunting. We want to shift to a cloud and Internet-centric model for all of our infrastructure, but we’re struggling to figure out how to start.
The Magic WAN Connector was created to address this problem.
Cloudflare One enables organizations of any size to connect and secure all of their users, devices, applications, networks, and data with a unified platform delivered by our global connectivity cloud. Magic WAN is the network connectivity “glue” of Cloudflare One, allowing our customers to migrate away from legacy private circuits and use our network as an extension of their own.
Previously, customers have connected their locations to Magic WAN with Anycast GRE or IPsec tunnels configured on their edge network equipment (usually existing routers or firewalls), or plugged into us directly with CNI. But for the past few years, we’ve heard requests from hundreds of customers asking for a zero-touch approach to connecting their branches: We just want something we can plug in and turn on, and it handles the rest.
The Magic WAN Connector is exactly this. Customers receive Cloudflare-certified hardware with our software pre-installed on it, and everything is controlled via the Cloudflare dashboard. What was once a time-consuming, complex process now takes a matter of minutes, enabling robust Zero-Trust protection for all of your traffic.
In addition to automatically configuring tunnels and routing policies to direct your network traffic to Cloudflare, the Magic WAN Connector will also handle traffic steering, shaping and failover to make sure your packets always take the best path available to the closest Cloudflare network location — which is likely only milliseconds away. You’ll also get enhanced visibility into all your traffic flows in analytics and logs, providing a unified observability experience across both your branches and the traffic through Cloudflare’s network.
Once the Magic WAN Connector is deployed at your network location, you have automatic access to enforce Zero Trust security policies across both public and private traffic.

An easy first step to improving your organization’s security posture after connecting network locations to Cloudflare is creating Secure Web Gateway policies to defend against ransomware, phishing, and other threats for faster, safer Internet browsing. By default, all Internet traffic from locations with the Magic WAN Connector will route through Cloudflare Gateway, providing a unified management plane for traffic from physical locations and remote employees.
The Magic WAN Connector also enables routing private traffic between your network locations, with multiple layers of network and Zero Trust security controls in place. Unlike a traditional network architecture, which requires deploying and managing a stack of security hardware and backhauling branch traffic through a central location for filtering, a SASE architecture provides private traffic filtering and control built-in: enforced across a distributed network, but managed from a single dashboard interface or API.
Cloudflare One enables connectivity for any physical or cloud network with easy on-ramps depending on location type. The Magic WAN Connector provides easy connectivity for branches, but also provides automatic connectivity to other networks including VPCs connected using cloud-native constructs (e.g., VPN Gateways) or direct cloud connectivity (via Cloud CNI). With a unified connectivity and control plane across physical and cloud infrastructure, IT and security teams can reduce overhead and cost of managing multi- and hybrid cloud networks.
With the general availability of the Magic WAN Connector, we’ve put the final piece in place to deliver a unified SASE platform, developed and fully integrated from the ground up. Deploying and managing all the components of SASE with a single vendor, versus piecing together different solutions for networking and security, significantly simplifies deployment and management by reducing complexity and potential integration challenges. Many vendors that market a full SASE solution have actually stitched together separate products through acquisition, leading to an un-integrated experience similar to what you would see deploying and managing multiple separate vendors. In contrast, Cloudflare One (now with the Magic WAN Connector for simplified branch functions) enables organizations to achieve the true promise of SASE: a simplified, efficient, and highly secure network and security infrastructure that reduces your total cost of ownership and adapts to the evolving needs of the modern digital landscape.
Cloudflare One addresses many of the challenges that were left behind as organizations deployed SD-WAN to help simplify networking operations. SD-WAN provides orchestration capabilities to help manage devices and configuration in one place, as well as last mile traffic management to steer and shape traffic based on more sophisticated logic than is possible in traditional routers. But SD-WAN devices generally don't have embedded security controls, leaving teams to stitch together a patchwork of hardware, virtualized and cloud-based tools to keep their networks secure. They can make decisions about the best way to send traffic out from a customer’s branch, but they have no way to influence traffic hops between the last mile and the traffic's destination. And while some SD-WAN providers have surfaced virtualized versions of their appliances that can be deployed in cloud environments, they don't support native cloud connectivity and can complicate rather than ease the transition to cloud.
Cloudflare One represents the next evolution of enterprise networking, and has a fundamentally different architecture from either legacy networking or SD-WAN. It's based on a "light branch, heavy cloud" principle: deploy the minimum required hardware within physical locations (or virtual hardware within virtual networks, e.g., cloud VPCs) and use low-cost Internet connectivity to reach the nearest "service edge" location. At those locations, traffic can flow through security controls and be optimized on the way to its destination, whether that's another location within the customer's private network or an application on the public Internet. This architecture also enables remote user access to connected networks.
This shift — moving most of the "smarts" from the branch to a distributed global network edge, and leaving only the functions at the branch that absolutely require local presence, delivered by the Magic WAN Connector — solves our customers’ current problems and sets them up for easier management and a stronger security posture as the connectivity and attack landscape continues to evolve.
Summary of legacy, SD-WAN based, and SASE architecture considerations
Love and want to keep your current SD-WAN vendor? No problem – you can still use any appliance that supports IPsec or GRE as an on-ramp for Cloudflare One.
You can learn more about the Magic WAN Connector, including device specs, specific feature info, onboarding process details, and more at our dev docs, or contact us to get started today.