Unlock data across organizational boundaries using Amazon DataZone – now generally available 

Post Syndicated from Shikha Verma original https://aws.amazon.com/blogs/big-data/unlock-data-across-organizational-boundaries-using-amazon-datazone-now-generally-available/

We are excited to announce the general availability of Amazon DataZone. Amazon DataZone enables customers to discover, access, share, and govern data at scale across organizational boundaries, reducing the undifferentiated heavy lifting of making data and analytics tools accessible to everyone in the organization. With Amazon DataZone, data users like data engineers, data scientists, and data analysts can share and access data across AWS accounts using a unified data portal, allowing them to discover, use, and collaborate on this data across their teams and organizations. Additionally, data owners and data stewards can make data discovery simpler by adding business context to data while balancing access governance to the data via pre-defined approval workflows in the user interface.

In this blog post, we share what we heard from our customers that led us to create Amazon DataZone and discuss specific customer use cases and quotes from customers who tried Amazon DataZone during our public preview. Then we explain the benefits of Amazon DataZone and walk you through key features.

Common pain points of data management and governance:

  1. Discovery of data, especially data distributed across accounts and regions – Finding the data to use for analysis is challenging because organizations often have petabytes of data spread across tens or even thousands of data sources.
  2. Access to data – Data access control is hard, managed differently across organizations, and often requires manual approvals which can be time-consuming process and hard to keep up to date, resulting in analysts not having access to the data they need.
  3. Access to tools – Data users want to use different tools of choice with the same governed data. This is challenging because access to data is managed differently by each of the tools.
  4. Collaboration – Analysts, data scientists, and data engineers often own different steps within the end-to-end analytics journey but do not have an simple way to collaborate on the same governed data, using the tools of their choice.
  5. Data governance – Constructs to govern data are hidden within individual tools and managed differently by different teams, preventing organizations from having traceability on who’s accessing what and why.

Three core benefits of Amazon DataZone

Amazon DataZone enables customers to discover, share, and govern data at scale across organizational boundaries.

  • Govern data access across organizational boundaries. Help ensure that the right data is accessed by the right user for the right purpose—in accordance with your organization’s security regulations—without relying on individual credentials. Provide transparency on data asset usage and approve data subscriptions with a governed workflow. Monitor data assets across projects through usage auditing capabilities.
  • Connect data people through shared data and tools to drive business insights. Increase your business team’s efficiency by collaborating seamlessly across teams and providing self-service access to data and analytics tools. Use business terms to search, share, and access cataloged data, making data accessible to all the configured users to learn more about data they want to use with the business glossary.
  • Automate data discovery and cataloging with machine learning (ML). Reduce the time needed to manually enter data attributes into the business data catalog and minimize the introduction of errors. More and richer data in the data catalog improves the search experience, too. Reduce your time searching for and using data from weeks to days.

Here are the core benefits Amazon DataZone provides to its customers.

Figure 1: Benefits of Amazon DataZone

Figure 1: Benefits of Amazon DataZone

To provide theses benefits, let’s see what capabilities are built into this service.

Figure 2: Capabilities of Amazon DataZone

Figure 2: Capabilities of Amazon DataZone

Amazon DataZone provides the following detailed capabilities.

  1. Business-driven domains – A DataZone domain represents the distinct boundary of a line of business (LOB) or a business area within an organization that can manage its own data, including its own data assets, its own definition of data or business terminology, and may have its own governing standards. Domain is the starting point of a customer’s journey with Amazon DataZone. When you first start using DataZone, you create a domain, and all core components, such as business data catalog, projects, and environments, that will exist within a domain.
    1. An Amazon DataZone domain contains an associated business data catalog for search and discovery, a set of metadata definitions to decorate the data assets that are used for discovery purposes, and data projects with integrated analytics and ML tools for users and groups to consume and publish data assets.
    2. An Amazon DataZone domain can span across multiple AWS accounts by connecting and pulling data lake or data warehouse data in these accounts (for example, AWS Glue Data Catalog) to form a data mesh or creating and running projects and environments in these accounts across the supported AWS Regions.
    3. Amazon DataZone domains bring along the capabilities of AWS Resource Access Manager (AWS RAM) to securely share resources across accounts.
    4. After an Amazon DataZone domain is created, the domain provides a browser-based web application where the organization’s configured users can go to catalog, discover, govern, share, and analyze data in a self-service fashion. The data portal supports identity providers through the AWS IAM Identity Center (successor to AWS Single Sign-On) and AWS Identity and Access Management (IAM) principals for authentication.
    5. For example, a marketing team can create a domain with name “Marketing” and have full ownership over it. Similarly, a sales team can create a domain with name “Sales” and have full ownership over it. When sales wants to share data with marketing, the marketing team can give access to a sales account by associating that account with the marketing domain, and the sales user can use the marketing domain’s Amazon DataZone portal link to share their data with the marketing team.
  2. Organization-wide business data catalog – You can make data visible with business context for your users to find and understand data quickly and efficiently. The core of the catalog is focused on cataloging data from different sources and augmenting that metadata with additional business context to build trust, and facilitate better decision-making for consumers looking for data.
    1. Standardize on terminology – You can standardize your business terminology to communicate among data publishers and consumers by creating glossaries and including detailed descriptions for terms along with the term relationships. These terms can be mapped to assets and columns and help to standardize the description of these assets and assist in the discovery and understanding the details of the underlying data.
    2. Building blocks to customize business metadata – To make it simple to build your catalog with extensibility, Amazon DataZone introduces some foundational building blocks that can be expanded to your needs. The metadata forms types, and asset types can be used as templates for defining your assets. These types can be customized to augment additional context and details to suit the requirements of a domain. In this release, Amazon DataZone provides some out-of-the-box metadata form types such as AWS Glue table form, Amazon Redshift table form, Amazon Simple Storage Service (Amazon S3) object form to support the out-of-box asset types such as AWS Glue tables and views, Amazon Redshift tables and views, and S3 objects.
    3. Catalog structured, unstructured, and custom assets – You can now catalog not only AWS Glue data catalogs or Amazon Redshift tables but also catalog custom assets using Amazon DataZone APIs. Cataloged assets can represent a consumable unit of asset that may include a table, a dashboard, an ML model, or a SQL code block that shows the query behind the dashboard. With custom assets, Amazon DataZone provides the ability to attach metadata form types to an asset type and then augment it with business context, including standardized business glossary terms for better consumption of those assets. In addition, for AWS Glue data catalogs and Amazon Redshift tables, you can use the Amazon DataZone data sources to bring the technical metadata of the datasets into the business data catalog in a managed fashion on a schedule. Assets also now support revisions, allowing users to identify changes to business and technical metadata.
    4. Automated business name generation – Enriching the technical catalog ingested with business context can be time-consuming, cumbersome, and error-prone. To make it simpler, we are introducing the first feature that brings generative artificial intelligence (AI) capabilities to Amazon DataZone to automate the generation of the name and column names of an asset. Amazon DataZone recommends to be added to the asset, and then delegates control to the producer to accept or reject those recommendations.
  3. Federated governance using data projects – Amazon DataZone data projects simplify access to AWS analytics by creating business usecase-based groupings of users, data assets, and analytics tools. Data projects provide a space where project members can collaborate, exchange data, and share artifacts. Projects are secure so that only users who are added to the project can collaborate together. With projects, Amazon DataZone decentralizes data ownership among teams depending on who owns the data and also federates access management to those owners when consumers request access to data. Core capabilities made available in projects include:
    1. Ownership and user management – In an organization, the roles and responsibilities made available to different personas vary. To customize defining what a user or group can do when working with Amazon DataZone entities, projects now also serve as a user management or roles mechanism. Every entity in Amazon DataZone, such as glossaries, metadata forms, and assets, is owned by projects.
    2. Projects and environments – Projects are now decoupled from infrastructure – there’s project creation that handles the set up of users as either project owners or contributors, and then the set up of resources named environments. Environments handle infrastructure (for example, AWS Glue database) needed for users to work with the data. This split enables the project to be the use case container, whereas environment gives the flexibility to branch off into different infrastructure environments (for example, data lakes or data warehouses using Amazon Redshift). Administrators can determine what kind of infrastructure should be available for what kind of projects.
    3. Bring your own IAM role for subscription – You can now bring an existing IAM principal by registering it as a subscription target and get data access approval for that IAM user or role.  With this mechanism, projects extend support for working with data in other AWS services because you can allow users to discover data, get the necessary approval, and access the data in a service the user has prior authorization to.
    4. Subscribe workflow with access management – The subscription workflow secures data between producers and consumers to verify only the right data is accessed by the right users for the right purpose, enabling self-service data analytics. This capability also allows you to quickly audit who has access to your datasets for what business use case as well as monitor usage and costs across projects and lines of business. Access management for assets published in the catalog is managed using AWS Lake Formation or Amazon Redshift, and you will get notified (in the portal or in Amazon CloudWatch) if your subscription request was approved and granted. For data that is not managed by AWS Lake Formation or Amazon Redshift, you can manage the subscription approval in Amazon DataZone and complete the access granted workflow with custom logic using Amazon EventBridge events and then report back to Amazon DataZone using API once the grant is completed. This ensures that the consumer will only interface with one service to discover, understand, and subscribe to data that is needed for their analysis.
    5. Analytics tools – Out of the box, the Amazon DataZone portal provides integration with Amazon Athena query editor and Amazon Redshift query editor as tools to process the data. This integration provides seamless access to the query tools and enables the users to use data assets that were subscribed to within the project. This is accomplished using Amazon DataZone environments that can be deployed according to the resource configuration definitions in built-in blueprints.
  4. APIs – Amazon DataZone now has external APIs to work with the system programmatically. You can add Amazon DataZone to your existing architecture. For example, to use your data pipelines to catalog data in Amazon DataZone and enable consumers to search, find, subscribe, and access that data seamlessly. In this release, Amazon DataZone introduces a new data model for the catalog. The catalog APIs support a type system–based model that allows you to define and manage the types of entities in the catalog. Using this type system model, users will have a flexible and scalable catalog that can represent different types of objects and associate metadata to the object (asset or column). Similarly, actions in the UI now have APIs that you can use if you want to work with Amazon DataZone programmatically.

Common customer use cases for Amazon DataZone

Let’s look at some use cases that our preview customers enabled with Amazon DataZone.

Use case 1: Data discoverability 

“Bristol Myers Squibb is actively pursuing an initiative to reduce the time it takes to discover and develop drugs by more than 30%. A key component of this strategy is addressing data sharing challenges and optimizing data availability. Engaging with AWS, we found that Amazon DataZone helped us create our data products, catalog them, and govern them, making our data more findable, accessible, interoperable, and reusable (FAIR). We’re currently assessing the broader applicability of Amazon DataZone within our enterprise framework to determine if it aligns with our operational goals.” 

—David Y. Liu, Director, Research IT Solution Architecture. Bristol Myers Squibb.

Use case 2: Share governed data for generative AI initiatives

“By harmonizing data across multiple business domains, we can foster a culture of data sharing. To this end, we have been using Amazon DataZone to free up our developers from building and maintaining a platform, allowing them to focus on tailored solutions. Utilizing an AWS managed service was important to us for several reasons—combining capabilities within the AWS ecosystem, quicker time to obtain business insights from data analysis, standardized data definitions, and leveraging the potential of generative AI. We look forward to our continued partnership with AWS to generate better outcomes for Guardant Health and the patients we serve. This is more than mere data; it’s our dynamic journey.”

—Rajesh Kucharlapati, Senior Director of Data, CRM and Analytics, Guardant Health

Use case 3:  Federated data governance

“Being data-driven is one of our main corporate objectives, always guided by best practices in data governance, data privacy, and security. At Itaú, data is treated as one of our main assets; good data management and definition are core parts of our solutions, in every use of AWS analytics services. Together with the AWS team, we were able to experiment with Amazon DataZone in preview, proposing features aligned with our technological and business needs. One example is data by domain, a simplification of data governance processes and distribution of responsibilities among business units. With Amazon DataZone generally available to our contributors, we expect to be able to quickly and easily set up rules across domains for teams composed of data analysts, engineers, and scientists, fostering experimentation with data hypothesis across multiple business use cases, with simplified governance.”

—Priscila Cardoso Ferreira, Data Governance and Privacy Superintendent, Itaú Unibanco

Use case 4: Decentralized ownership

“At Holaluz, unifying data across our businesses while having distributed ownership with individual teams to share and govern their data are our key priorities. Our data is owned by different teams, and sharing has typically meant the central team has to grant access, which created a bottleneck in our processes. We needed a faster way to analyze data with decentralized ownership, where data access can be approved by the owning team. We have validated the use cases in Amazon DataZone preview and are looking forward to getting started when it is generally available to build a robust business data catalog. Our consumers will be able to find, subscribe, and publish back their newly created assets for others to discover and use, enabling a data flywheel.”

—Danny Obando, Lead Data Architect, Holaluz

Use case #5: Managed service versus Do-It-Yourself (DIY) platform

“At BTG Pactual, unifying data across our businesses and allowing for data sharing at scale while enforcing oversight is one of our key priorities. While we are building custom solutions to do this ourselves, we prefer having an AWS native service to enable these capabilities so we can focus our development efforts and resources on solving BTG Pactual’s specific governance challenges—rather than building and maintaining the platform. We have validated the use cases in Amazon DataZone preview and will use it to build a robust business data catalog and data sharing workflow. It will provide complete visibility into who is using what data for what purposes without adding additional workload or inhibiting the decentralized ownership we’ve established to make data discoverable and accessible to all our data users across the organization.”

—João Mota, Head of Data Platform, BTG Pactual

Solution walkthrough

Let’s take an example of how an organization can get started with Amazon DataZone. In this example, we build a unified environment for data producers and data consumers to access, share, and consume data in a governed manner.

Take a product marketing team that wants to drive a campaign on product adoption. To be successful in that campaign, they want to tap into the customer data in a data warehouse, click-stream data in the data lake, and performance data of other campaigns in applications like Salesforce. Roberto is a data engineer who knows this data very well. So, let’s see how Roberto will make this data discoverable to others in the organization.

The administrator for the company has already set up a domain called “Marketing” for the team to use. The administrator has also set up some resource templates called “Blueprints” to allow data people to set up environments to work with data. The administrator has also set up users who can sign in using the corporate credentials to the Amazon DataZone portal, a web application outside of AWS Console. The administrator sets up all the AWS resources so the data people do not have to struggle with the technical barriers.

So, let’s now get into the details of how Roberto is able to publish the data in the catalog.

  1. Roberto signs in to the Amazon DataZone portal using his corporate credentials.
  2. He creates a project and environment that he can use to publish data. He knows the data sources he wants to catalog, so he creates a connection to the AWS Glue Catalog that has all the click-stream data.
  3. He provides a name and description for the data source run and then selects databases and specifics of what table he wants to bring.
  4. He chooses the automated metadata generation option to get ML-generated business names for the technical table and column names. He then schedules the run to keep the asset in sync with the source.
  5. Within a few minutes, the click-stream data and the customer information from Amazon Redshift metadata, such as table names, schema, and other source metadata, will be available in Amazon DataZone’s inventory, ready for curation.
  6. Roberto can now enrich the metadata to provide additional business context using glossary and metadata forms to make it simple for Veronica, adata analyst, and other data people to understand the data. Roberto can accept or reject the automatically generated recommendations to autocomplete the business-friendly names. He can also provide descriptions, classify terms, and any other useful information to that particular asset.
  7. Once done, Roberto can publish the asset and make it available to data consumers in Amazon DataZone.

Now, let’s take a look at how Veronica, the marketing analyst, can start discovering and working with the data.

  1. Now that the data is published and available in the catalog, Veronica can sign in to the Amazon DataZone portal using her corporate credentials and start searching for data. She types “click campaign” in the search, and all relevant assets are returned.
  2. She notices that the assets come from various sources and contexts. She uses filters to curate the search list using facets such as glossary terms and data sources and sorts results based on relevance and time.
  3. To start working with data, she will have to create a new project and an environment that provides the tools she needs. Creating the project provides an quick way for her to collaborate with her teammates and automatically provide them with the correct level of permissions to work with data and tools.
  4. Veronica finds the data she needs access to. She now requests access by clicking on Subscribe to inform the data publisher or owner that she needs access to the data. While subscribing, she also provides a reason why she needs access to that data.
  5. This sends a notification to Roberto and his project members that someone is looking for access, and they can review the request to accept or reject it. Robert is signed in to the portal, sees the notification, and approves the request because the reason was very clear.
  6. With the approved subscription, Veronica also gets access to data as Amazon DataZone automatically does it for Roberto. Now Veronica and her team can start working on their analysis to find the right campaign to increase adoption.

Therefore, the entire data discovery and access lifecycle and usage is happening through Amazon DataZone. You get complete visibility and control over how the data is being shared, who is using it, and who authorized it. Essentially, Amazon DataZone allows you to give members of your organization the freedom they always wanted, with the confidence of the right governance around it.

Here is a screenshot of Amazon DataZone’s portal for users to login to catalog, publish, discover, understand, and subscribe to data that is needed for their analysis.

Conclusion

In this post, we discussed the challenges, core capabilities, and a few common use cases. With a sample scenario, we demonstrated how you can get started. Amazon DataZone is now generally available. For more information, see What’s New in Amazon DataZone or Amazon DataZone.

Check out the YouTube playlist for some of the latest demos of Amazon DataZone and short descriptions of the capabilities available.


About the authors

Shikha Verma is Head of Product for Amazon DataZone at AWS.

Steve McPherson is a General Manager with Amazon DataZone at AWS.

Priya Tiruthani is a Senior Product Manager with Amazon DataZone at AWS.
Amazon DataZone Now Generally Available – Collaborate on Data Projects across Organizational Boundaries

Post Syndicated from Channy Yun original https://aws.amazon.com/blogs/aws/amazon-datazone-now-generally-available-collaborate-on-data-projects-across-organizational-boundaries/

Today, we’re announcing the general availability of Amazon DataZone, a new data management service to catalog, discover, analyze, share, and govern data between data producers and consumers in your organization.

At AWS re:Invent 2022, we preannounced Amazon DataZone, and in March 2023, we previewed it publicly.
During the keynote of the last re:Invent, Swami Sivasubramanian, vice president of Databases, Analytics, and Machine Learning at AWS said “I have had the benefit of being an early customer of DataZone to run the AWS weekly business review meeting where we assemble data from our sales pipeline and revenue projections to inform our business strategy.”

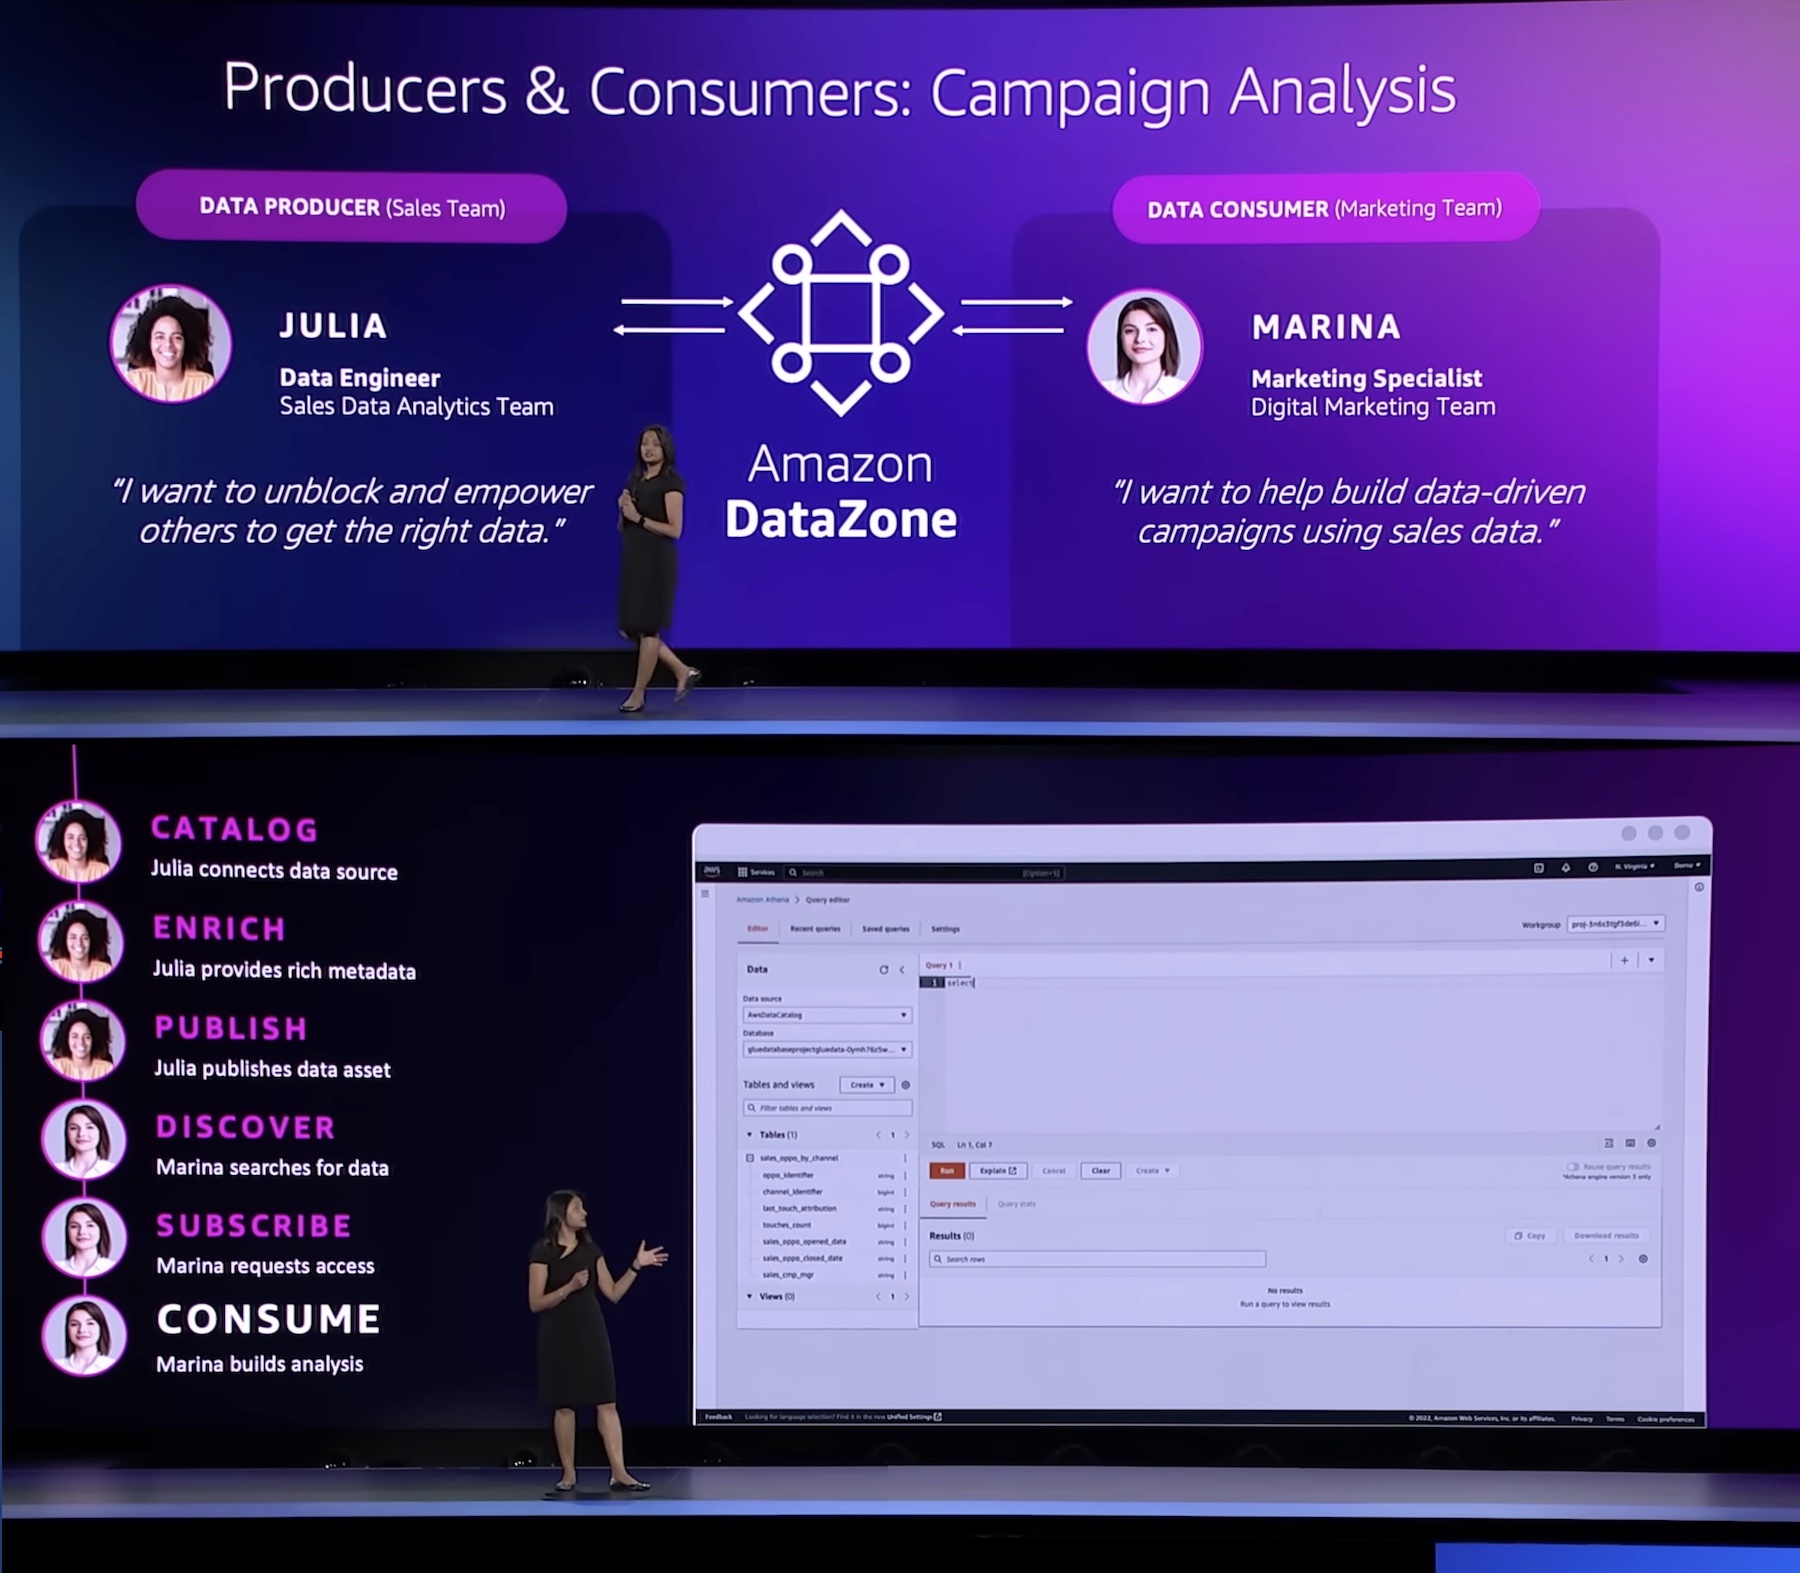
During the keynote, a demo led by Shikha Verma, head of product for Amazon DataZone, demonstrated how organizations can use the product to create more effective advertising campaigns and get the most out of their data.

“Every enterprise is made up of multiple teams that own and use data across a variety of data stores. Data people have to pull this data together but do not have an easy way to access or even have visibility to this data. DataZone provides a unified environment where everyone in an organization—from data producers to consumers, can go to access and share data in a governed manner.”

With Amazon DataZone, data producers populate the business data catalog with structured data assets from AWS Glue Data Catalog and Amazon Redshift tables. Data consumers search and subscribe to data assets in the data catalog and share with other business use case collaborators. Consumers can analyze their subscribed data assets with tools—such as Amazon Redshift or Amazon Athena query editors—that are directly accessed from the Amazon DataZone portal. The integrated publishing-and-subscription workflow provides access-auditing capabilities across projects.

Introducing Amazon DataZone
For those of you who aren’t yet familiar with Amazon DataZone, let me introduce you to its key concept and capabilities.

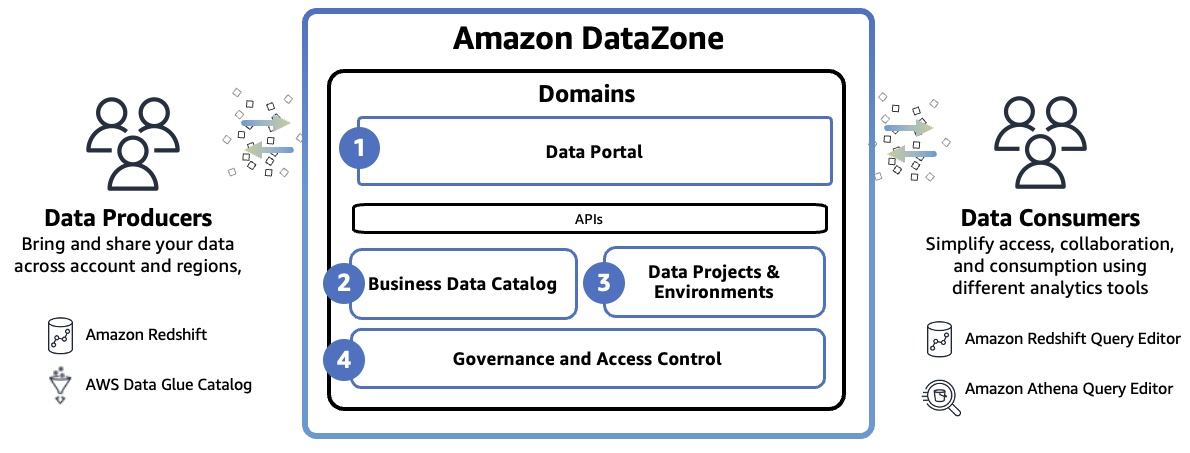
Amazon DataZone Domain represents the distinct boundary of a line of business (LOB) or a business area within an organization that can manage it’s own data, including it’s own data assets and its own definition of data or business terminology, and may have it’s own governing standards. The domain includes all core components such as the data portal, business data catalog, projects and environments, and built-in workflows.

  1. Data portal (outside the AWS Management Console) – This is a web application where different users can go to catalog, discover, govern, share, and analyze data in a self-service fashion. The data portal authenticates users with AWS Identity and Access Manager (IAM) credentials or existing credentials from your identity provider through the AWS IAM Identity Center.
  2. Business data catalog – In your catalog, you can define the taxonomy or the business glossary. You can use this component to catalog data across your organization with business context and thus enable everyone in your organization to find and understand data quickly.
  3. Data projects & environments – You can use projects to simplify access to the AWS analytics by creating business use case–based groupings of people, data assets, and analytics tools. Amazon DataZone projects provide a space where project members can collaborate, exchange data, and share data assets. Within projects, you can create environments that provide the necessary infrastructure to project members such as analytics tools and storage so that project members can easily produce new data or consume data they have access to.
  4. Governance and access control – You can use built-in workflows that allow users across the organization to request access to data in the catalog and owners of the data to review and approve those subscription requests. Once a subscription request is approved, Amazon DataZone can automatically grant access by managing permission at underlying data stores such as AWS Lake Formation and Amazon Redshift.

To learn more, see Amazon DataZone Terminology and Concepts.

Getting Started with Amazon DataZone
To get started, consider a scenario where a product marketing team wants to run campaigns to drive product adoption. To do this, they need to analyze product sales data owned by a sales team. In this walkthrough, the sales team, which acts as the data producer, publishes sales data in Amazon DataZone. Then the marketing team, which acts as the data consumer, subscribes to sales data and analyzes it in order to build a campaign strategy.

To understand how the DataZone works, let’s walk through a condensed version of the Getting started guide for Amazon DataZone.

1. Create a Domain
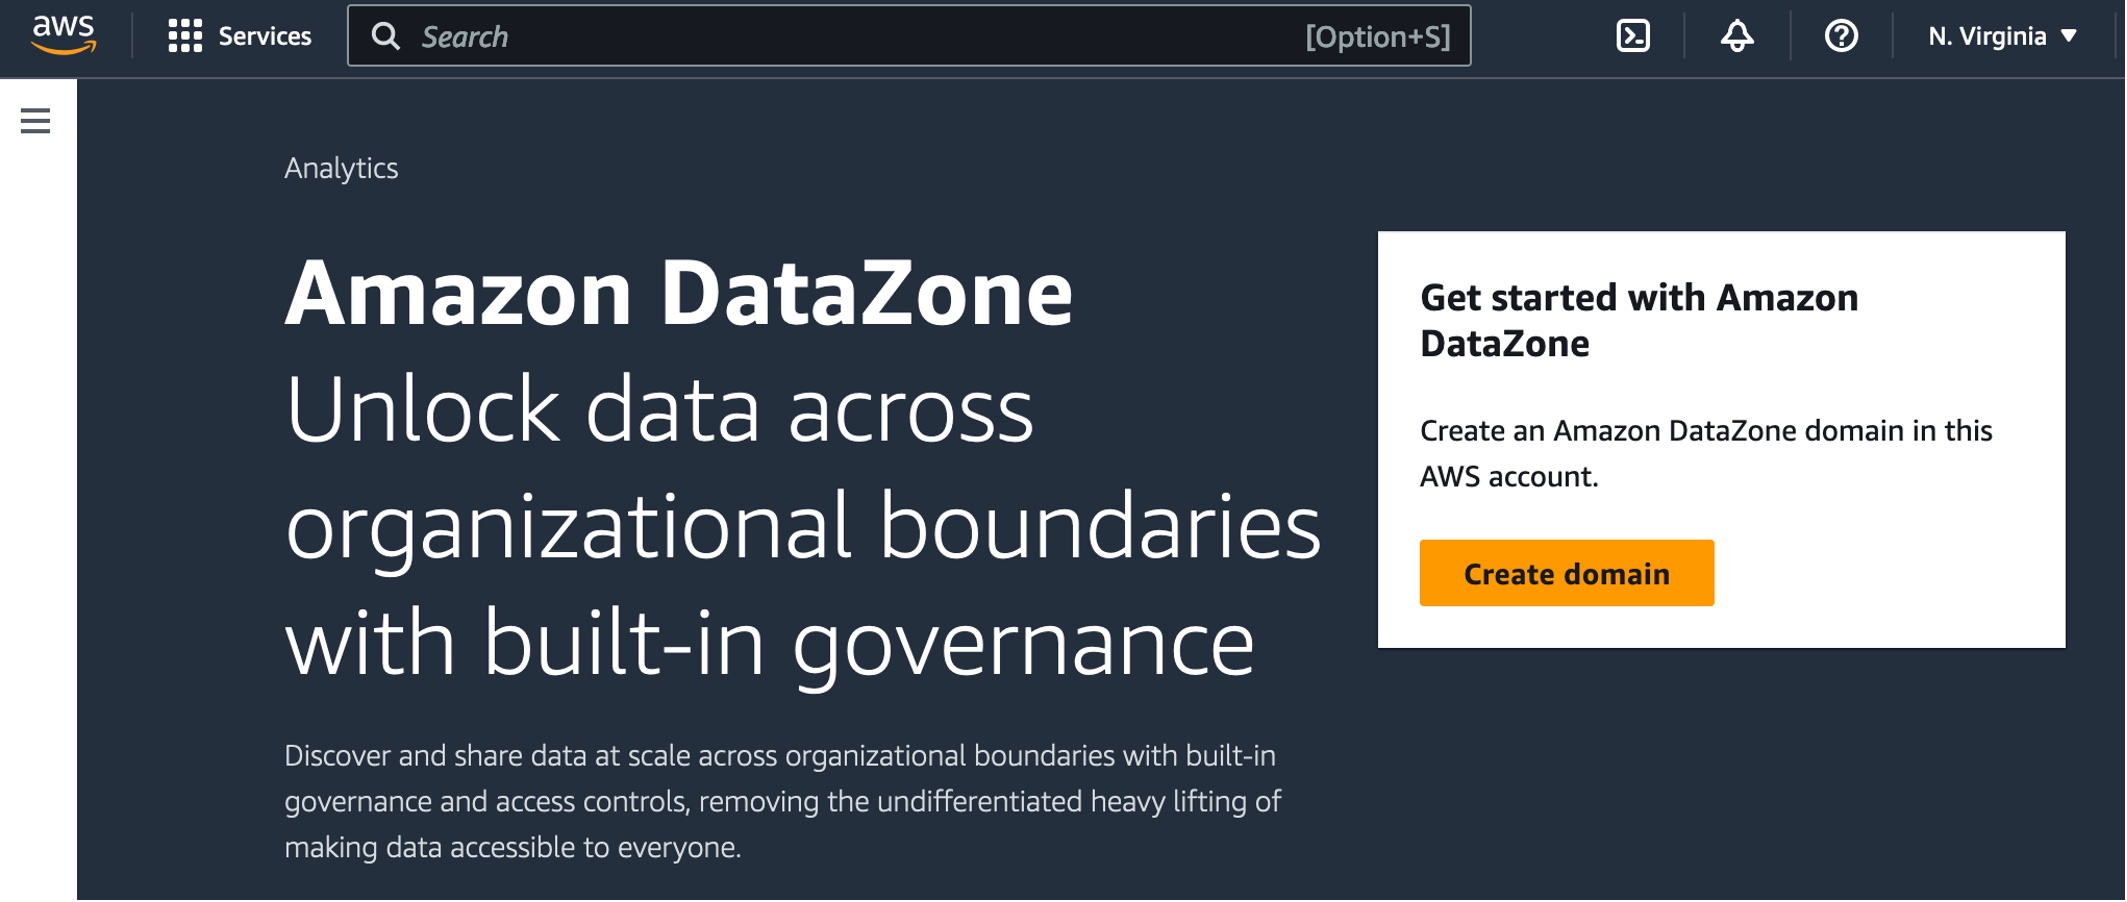
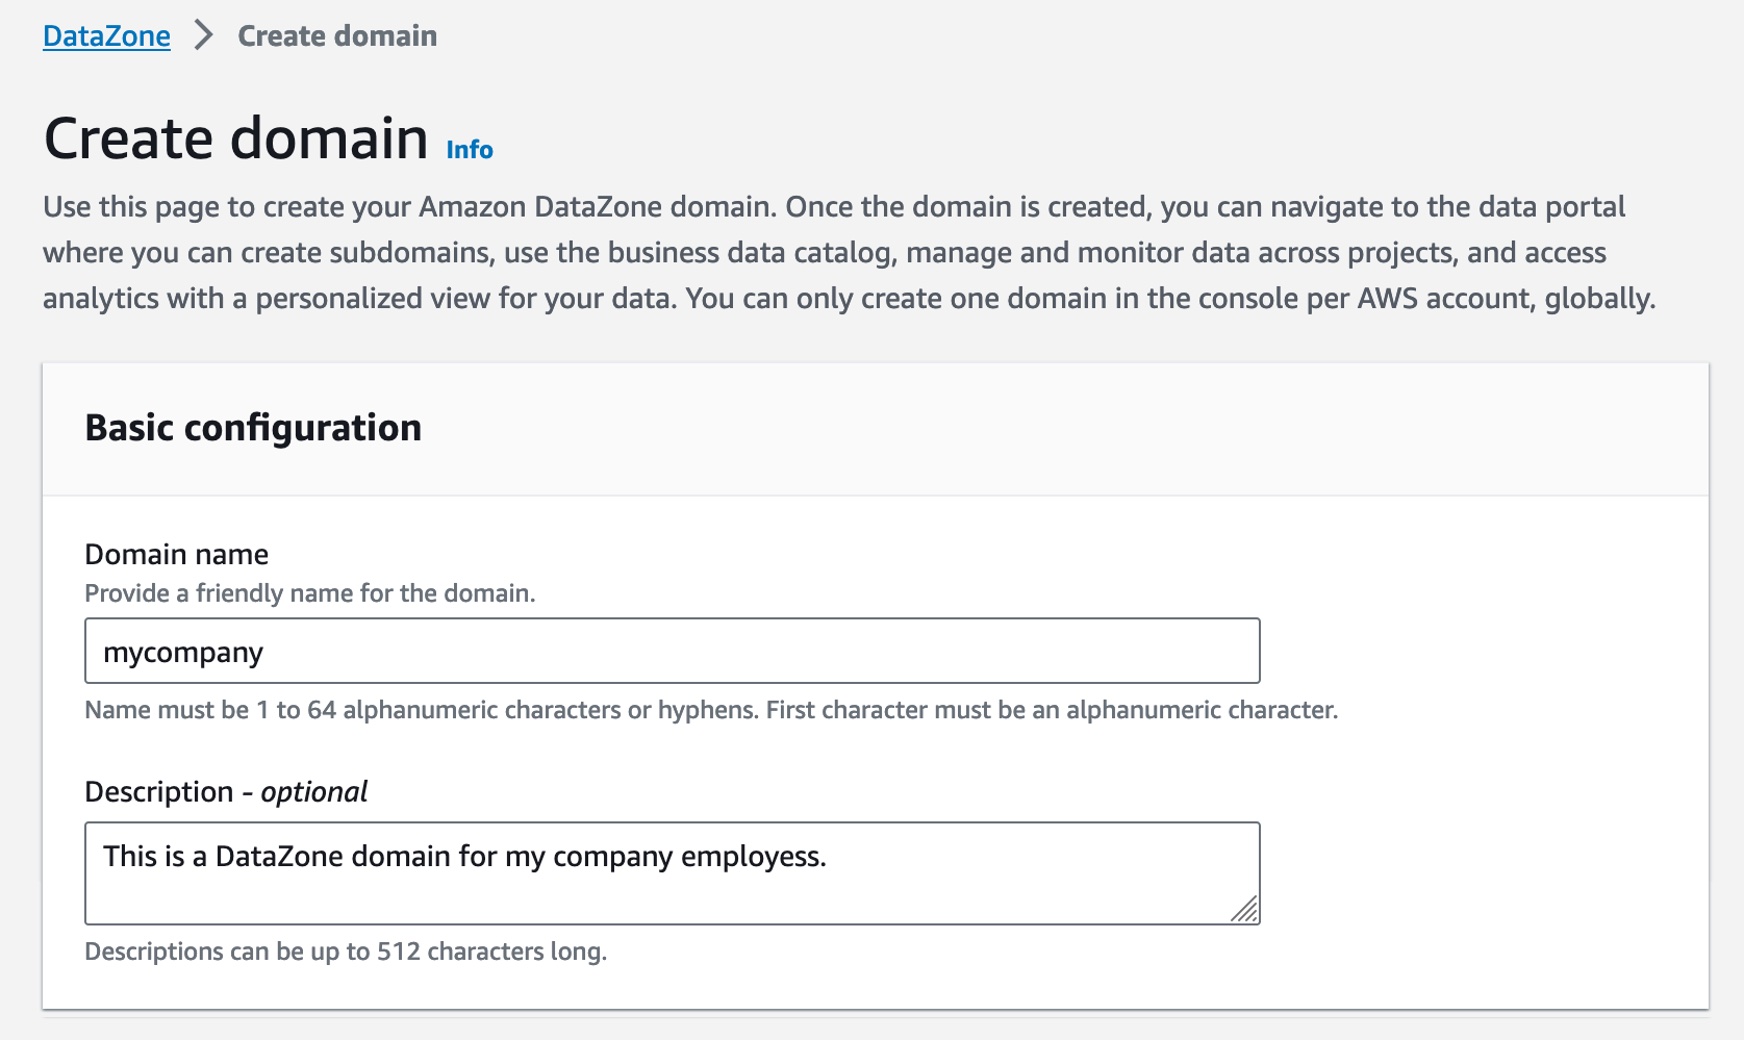
When you first start using DataZone, you start by creating a domain and all core components such as business data catalog, projects, and environments in the data portal, then exist within that domain. Go to the Amazon DataZone console and choose Create domain.

Enter Domain name and a descrption and leave all other values as default.

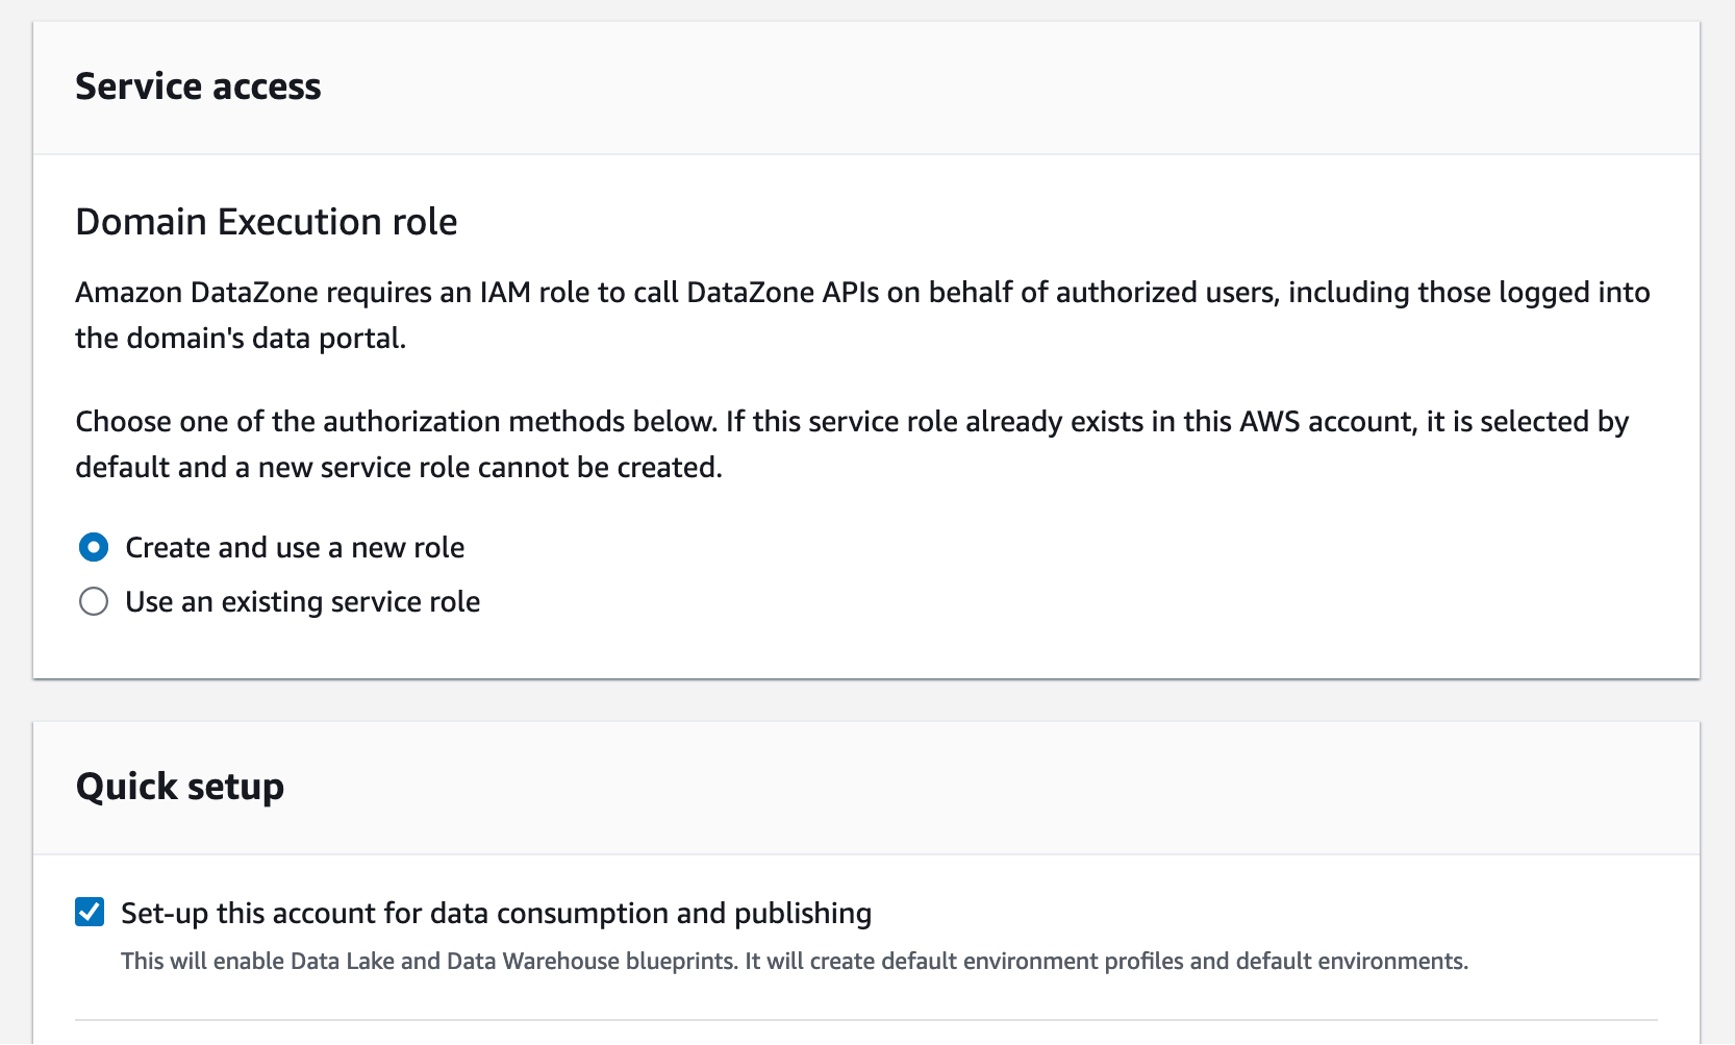
For example, in the Service access section, if you choose Create and use a new role by default, Amazon DataZone will automatically create a new role with necessary permissions that authorize DataZone to make API calls on behalf of users within the domain. Check the Quick setup option where DataZone can take care of all the setup steps.

Finally, choose Create domain. Amazon DataZone creates the necessary IAM roles and enables this domain to use resources within your account such as AWS Glue Data Catalog, Amazon Redshift, and Amazon Athena. Domain creation can take several minutes to complete. Wait for the domain to have a status of Available.

2. Create a Project and Environment in the Data Portal
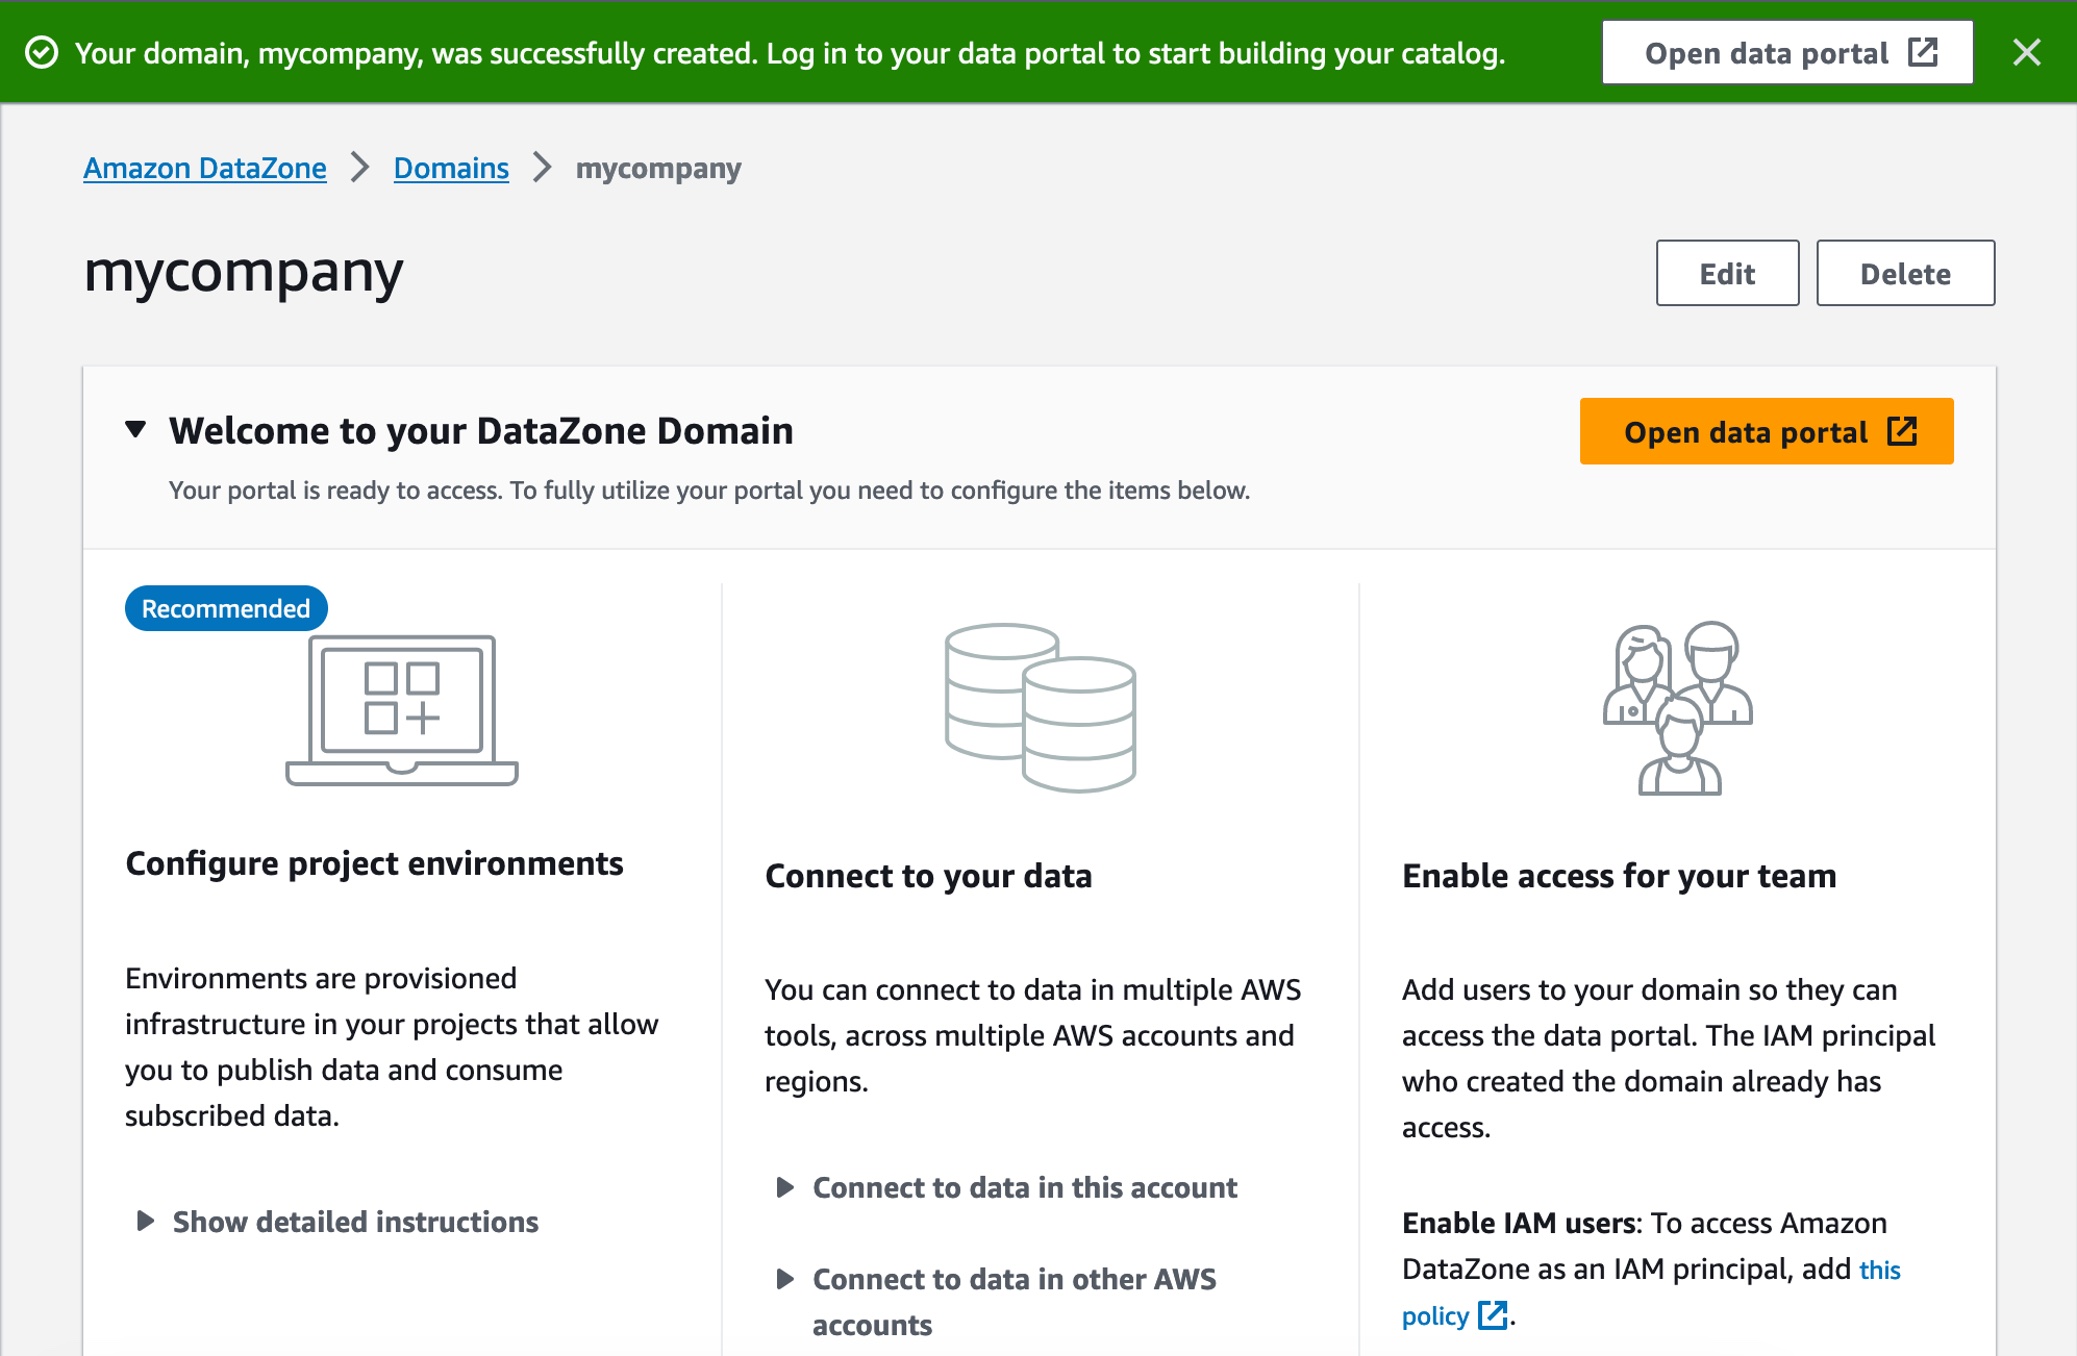
After the domain is successfully created, select it, and on the domain’s summary page, note the data portal URL for the root domain. You can use this URL to access your Amazon DataZone data portal. Choose Open data portal.

To create a new data project as the sales team to publish sales data, choose Create Project.

In the dialogbox, enter “Sales producer project” as the Name, then enter a Description for this project and choose Create.

Once you have the project, you need to create a environment to work with data and analytics tools such as Amazon Athena or Amazon Redshift in this project. Choose Create environment in the overview page or after clicking the Environment tab.

Enter “publish-environment” as the Name, then enter a Description for this environment and choose Environment profile. An environment profile is a pre-defined template that includes technical details required to create an environment such as which AWS account, Region, VPC details, and resources and tools are added to the project.

You can select a couple of default environment profiles. Choosing DataLakeProfile enables you to publish data from your Amazon S3 and AWS Glue based data lakes. It also simplifies querying the AWS Glue tables that you have access to using Amazon Athena.

Next, ignore all the optional parameters and choose Create environment. It takes about a minute for the environment to create certain resources in your AWS account such as IAM roles, an Amazon S3 suffix, AWS Glue databases, and an Athena workgroup, which makes it easier for members of a project to produce and consume data in the data lake.

3. Publish Data in the Data Portal
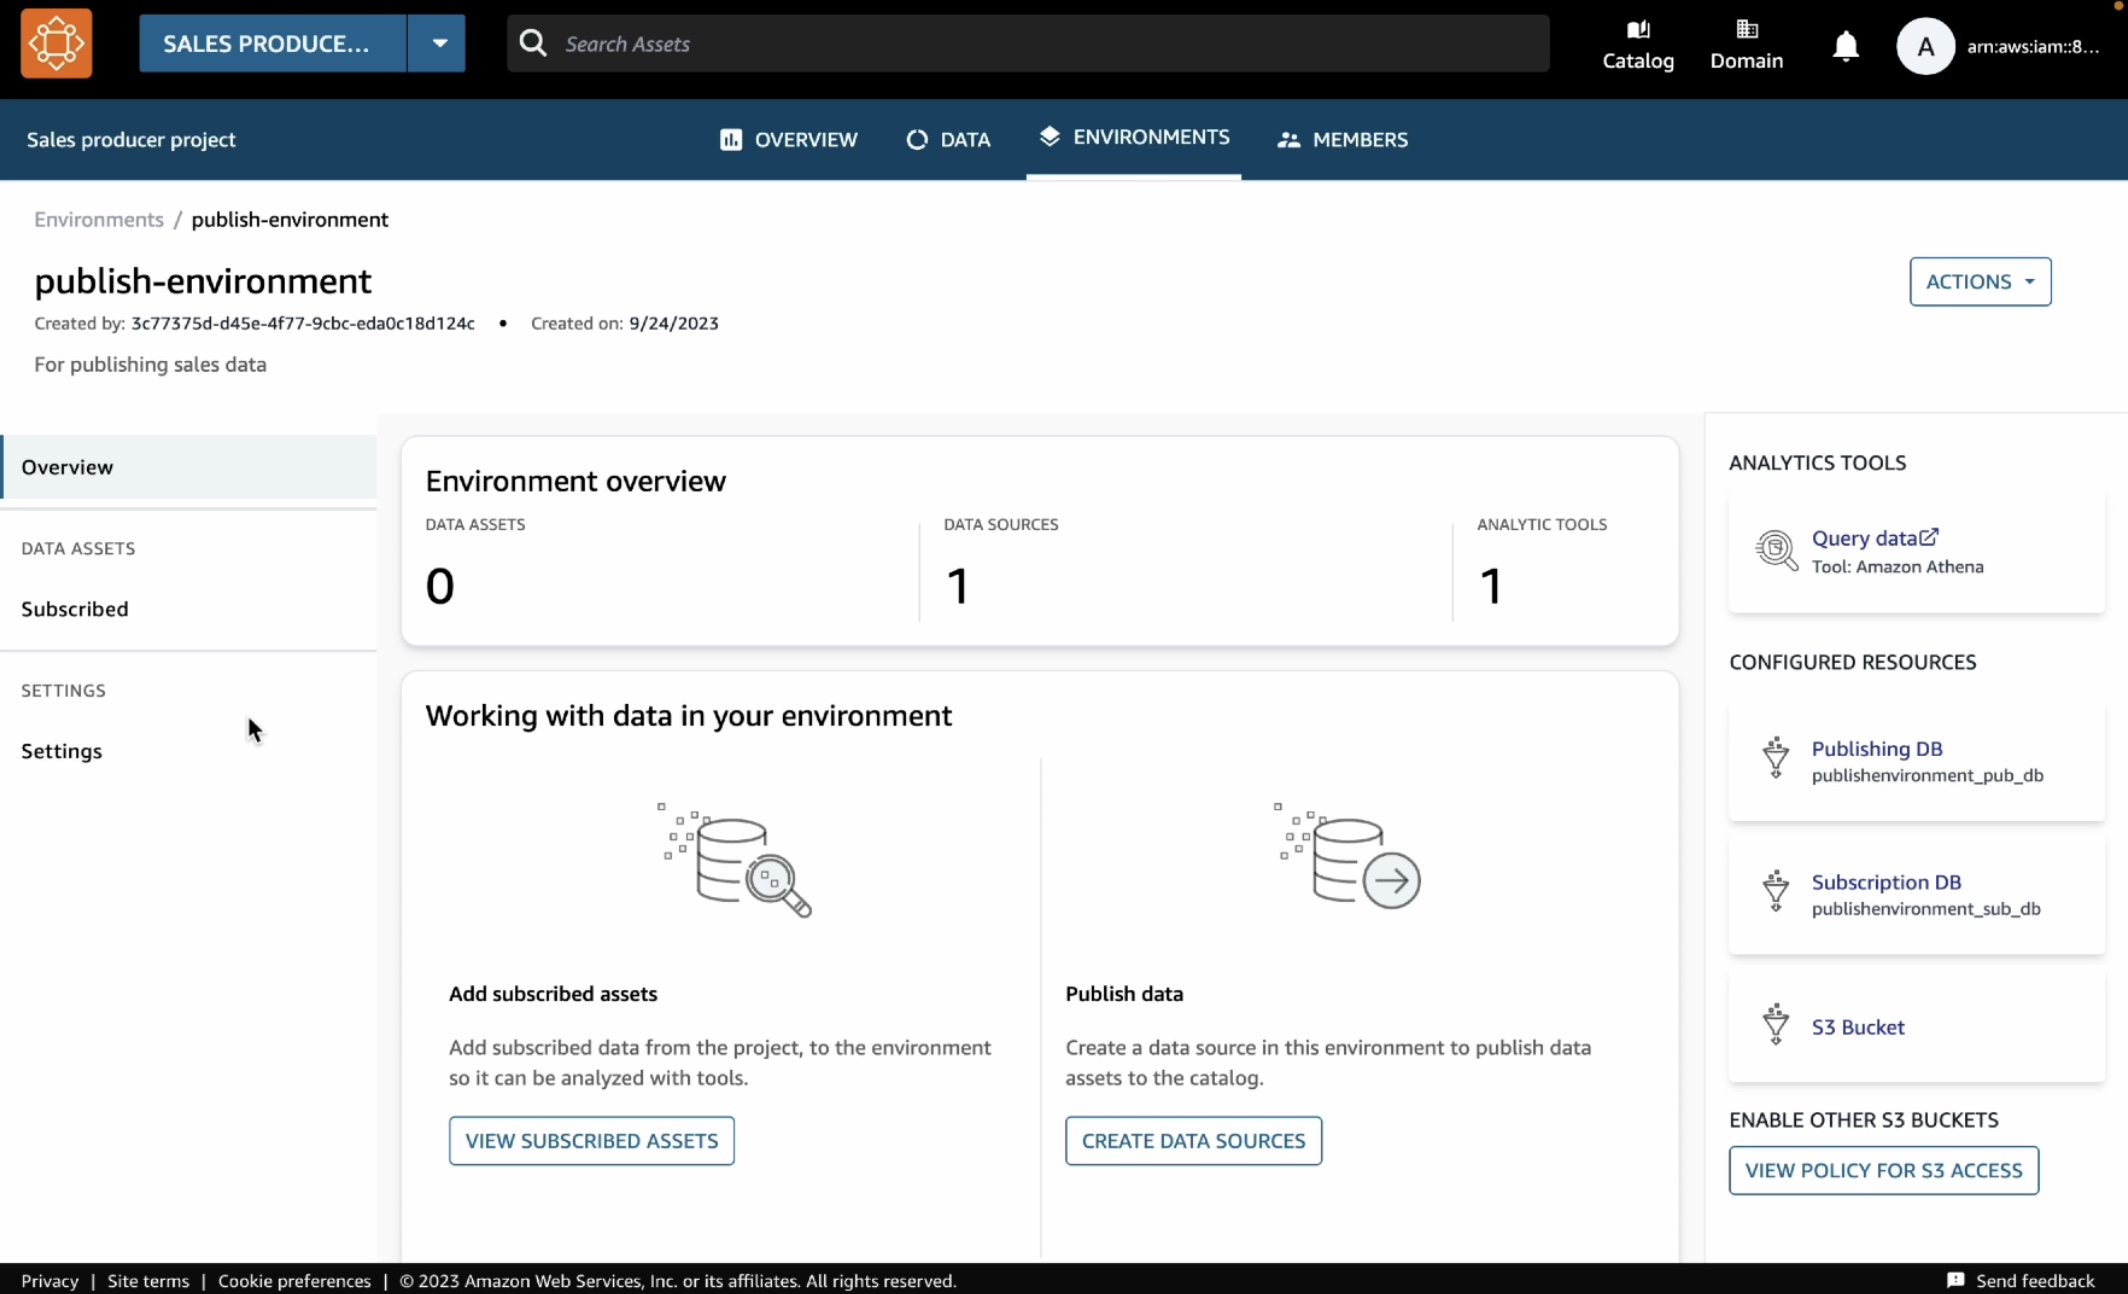
You have the environment to publish your data in your AWS Glue table. To create this table in Amazon Athena, choose Query data with the Athena link on the right-hand side of the Environments page.

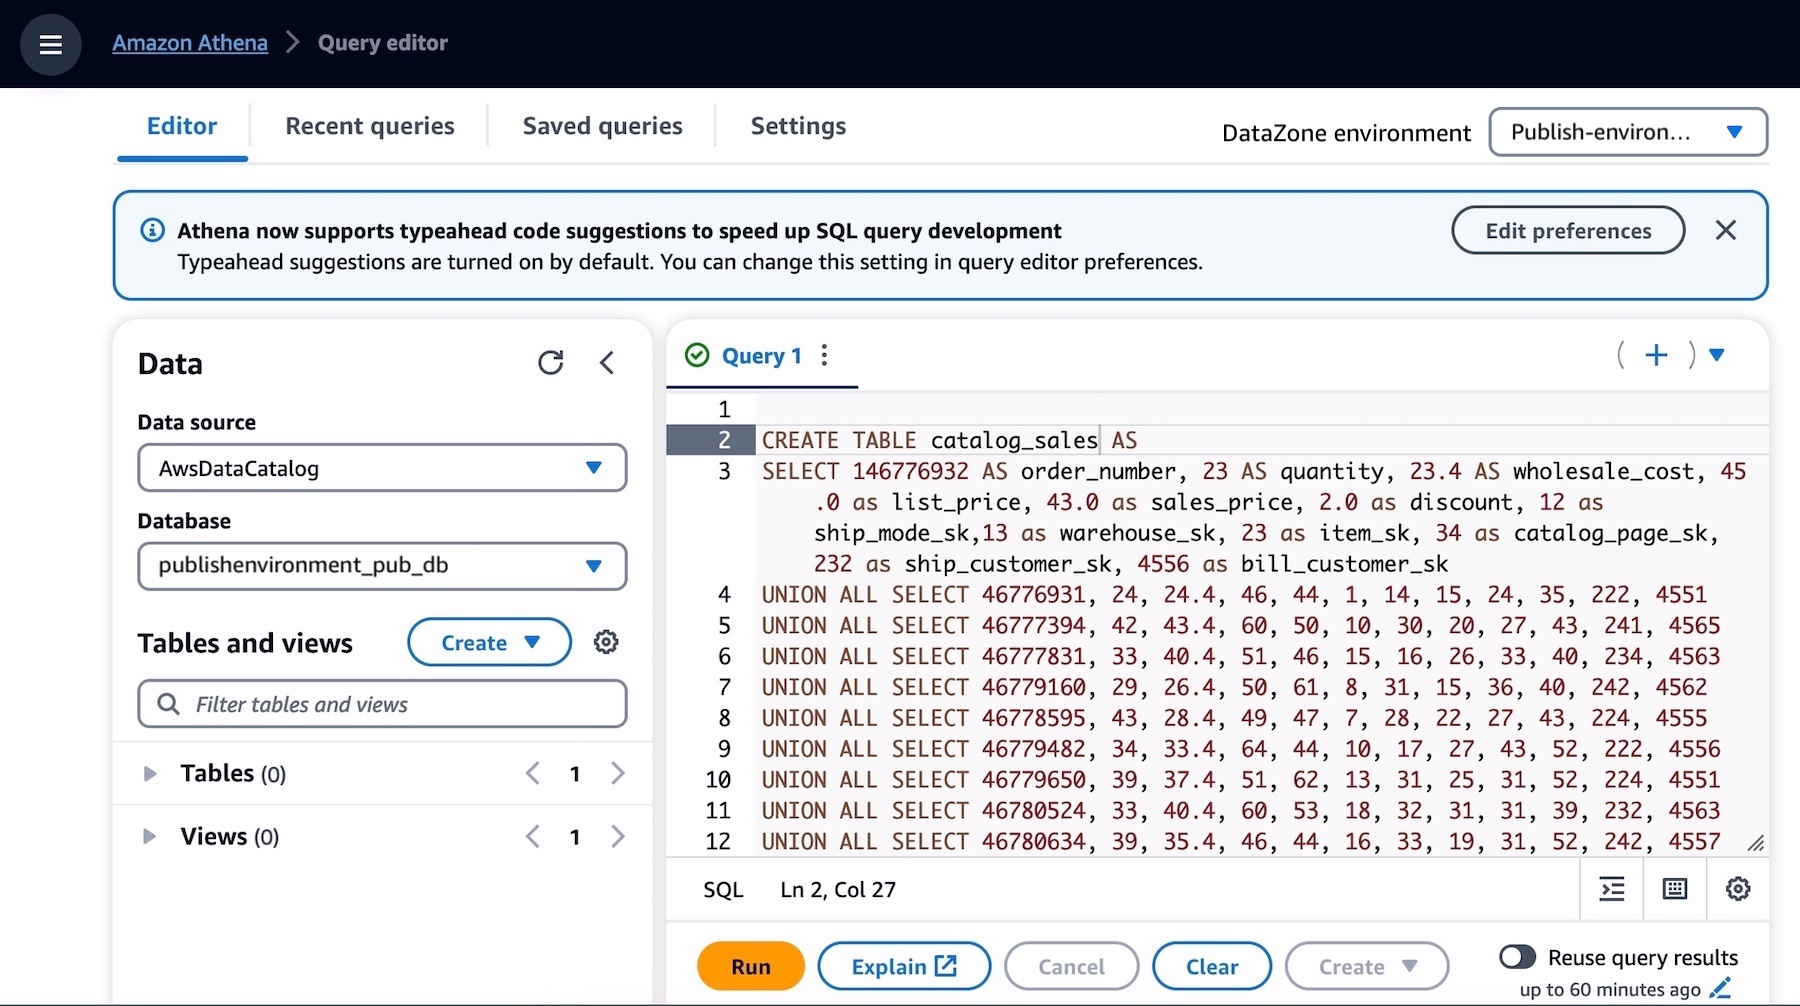
This opens the Athena query editor in a new tab. Select publishenvironment_pub_db from the database dropdown and then paste the following query into the query editor. This will create a table called catalog_sales in the environment’s AWS Glue database.

CREATE TABLE catalog_sales AS 
SELECT 146776932 AS order_number, 23 AS quantity, 23.4 AS wholesale_cost, 45.0 as list_price, 43.0 as sales_price, 2.0 as discount, 12 as ship_mode_sk,13 as warehouse_sk, 23 as item_sk, 34 as catalog_page_sk, 232 as ship_customer_sk, 4556 as bill_customer_sk
UNION ALL SELECT 46776931, 24, 24.4, 46, 44, 1, 14, 15, 24, 35, 222, 4551
UNION ALL SELECT 46777394, 42, 43.4, 60, 50, 10, 30, 20, 27, 43, 241, 4565
UNION ALL SELECT 46777831, 33, 40.4, 51, 46, 15, 16, 26, 33, 40, 234, 4563
UNION ALL SELECT 46779160, 29, 26.4, 50, 61, 8, 31, 15, 36, 40, 242, 4562
UNION ALL SELECT 46778595, 43, 28.4, 49, 47, 7, 28, 22, 27, 43, 224, 4555
UNION ALL SELECT 46779482, 34, 33.4, 64, 44, 10, 17, 27, 43, 52, 222, 4556
UNION ALL SELECT 46779650, 39, 37.4, 51, 62, 13, 31, 25, 31, 52, 224, 4551
UNION ALL SELECT 46780524, 33, 40.4, 60, 53, 18, 32, 31, 31, 39, 232, 4563
UNION ALL SELECT 46780634, 39, 35.4, 46, 44, 16, 33, 19, 31, 52, 242, 4557
UNION ALL SELECT 46781887, 24, 30.4, 54, 62, 13, 18, 29, 24, 52, 223, 4561

You can see the two databases in the dropdown menu. The publishenvironment_pub_db is to provide you with a space to produce new data and choose to publish it to the DataZone catalog. The other one, publishenvironment_sub_db is for project members when they subscribe to or access to data in the catalog within that project.

Make sure that the catalog_sales table is successfully created. Now you have a data asset that can be published into the Amazon DataZone catalog.

As the data producer, you can now go back to the data portal and publish this table into the DataZone catalog. Choose the Data tab in the top menu and Data sources in the left navigation pane.

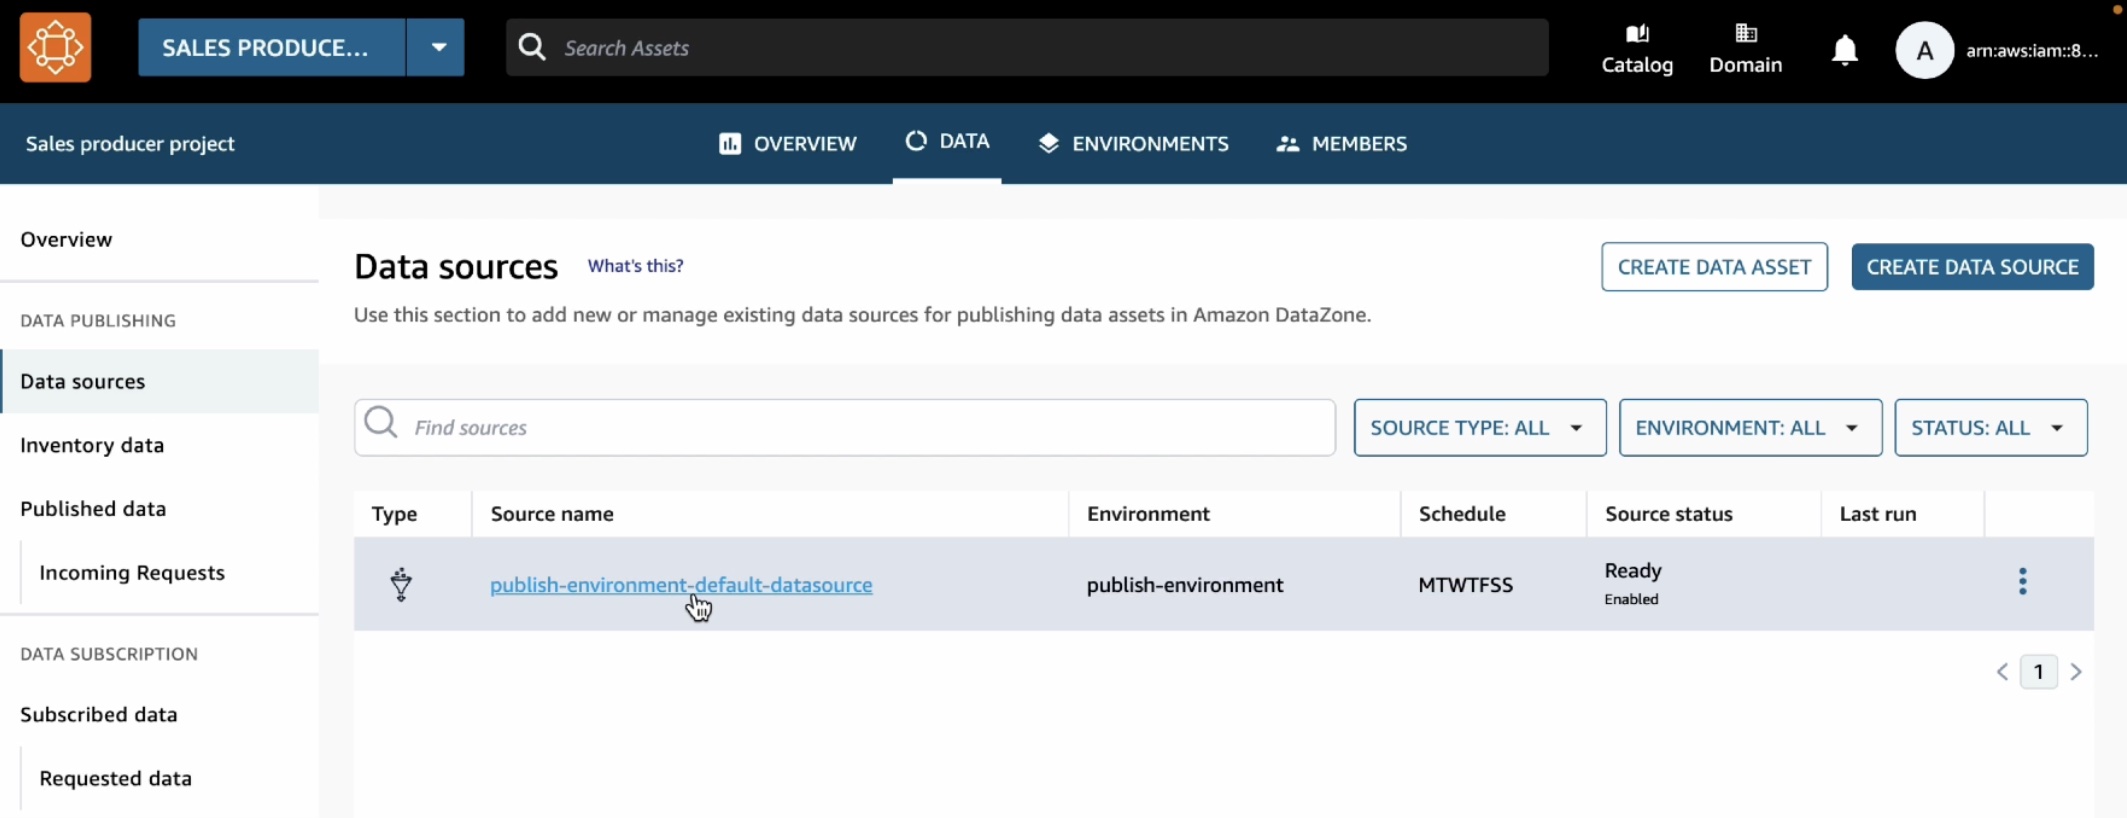
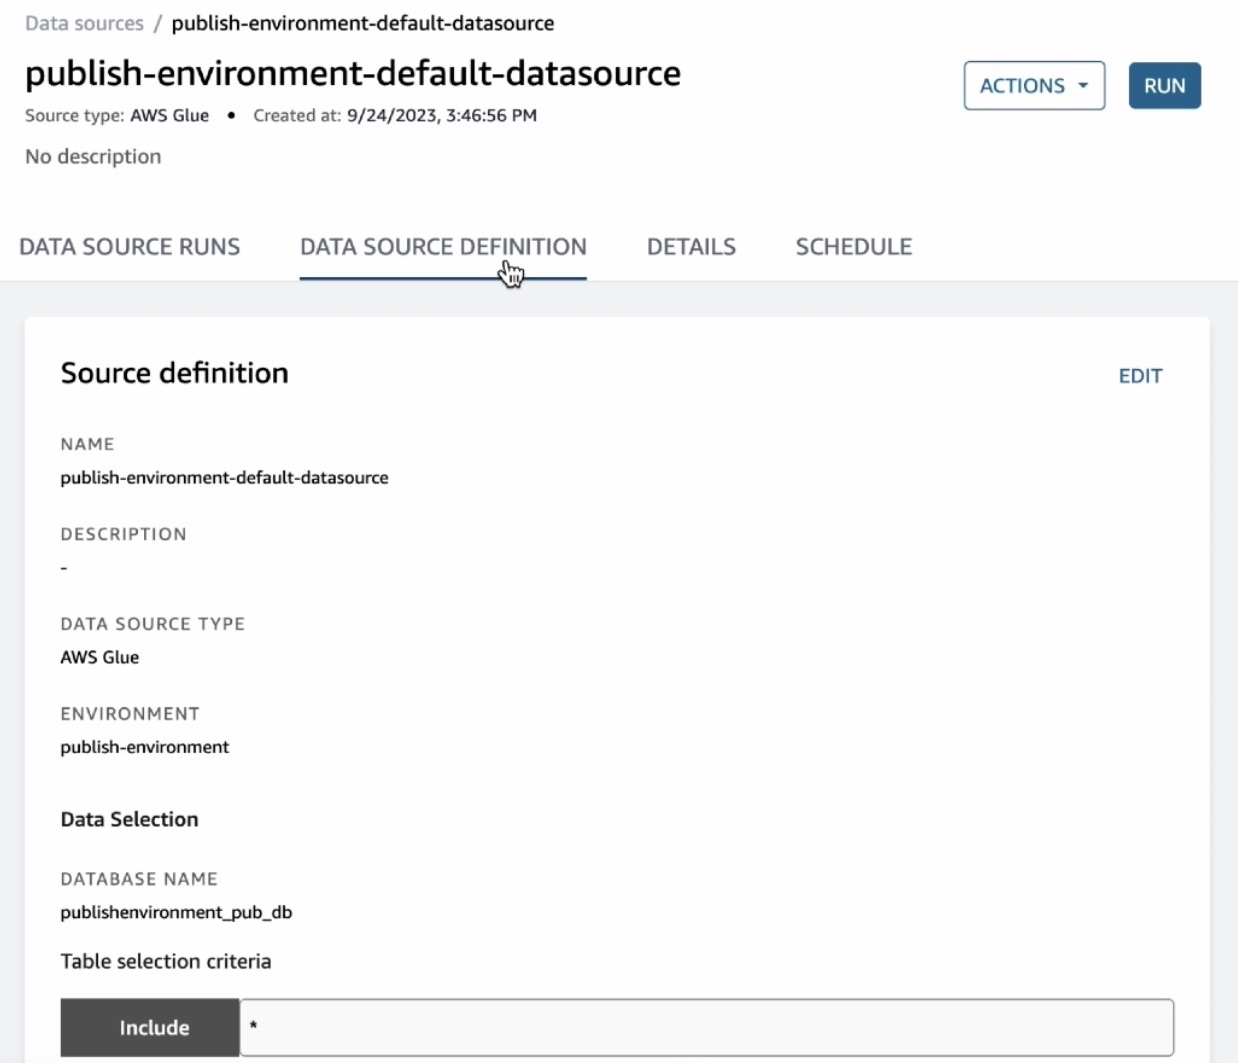
You can see a default data source automatically created in your environment. When you open this data source, you will see your environments’ publishing database where we just created the catalog_sales table.

This data source will bring in all the tables it finds in the publishing database into the DataZone. By default, automated metadata generation is enabled, which means that any asset that the data source bring into the DataZone will automatically generate the business names of the table and columns for that asset. Choose Run in this data source.

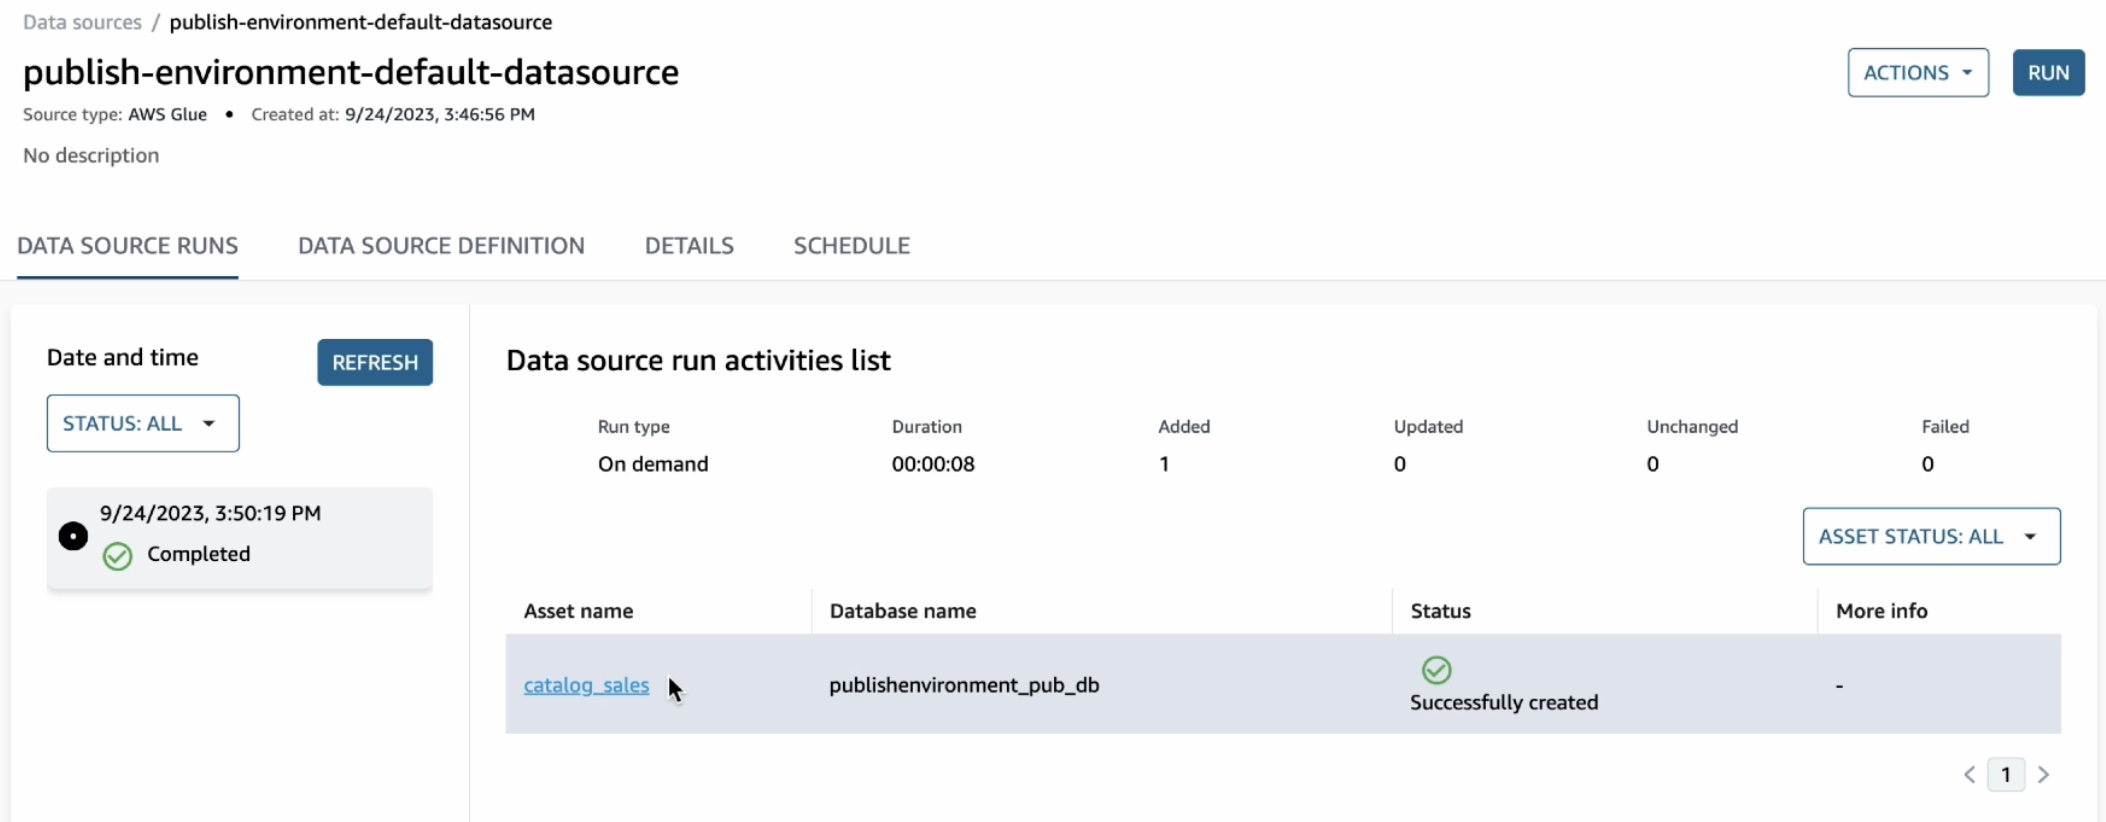
Once the data source has finished running, you can see the catalog sales table in the Data Source Runs.

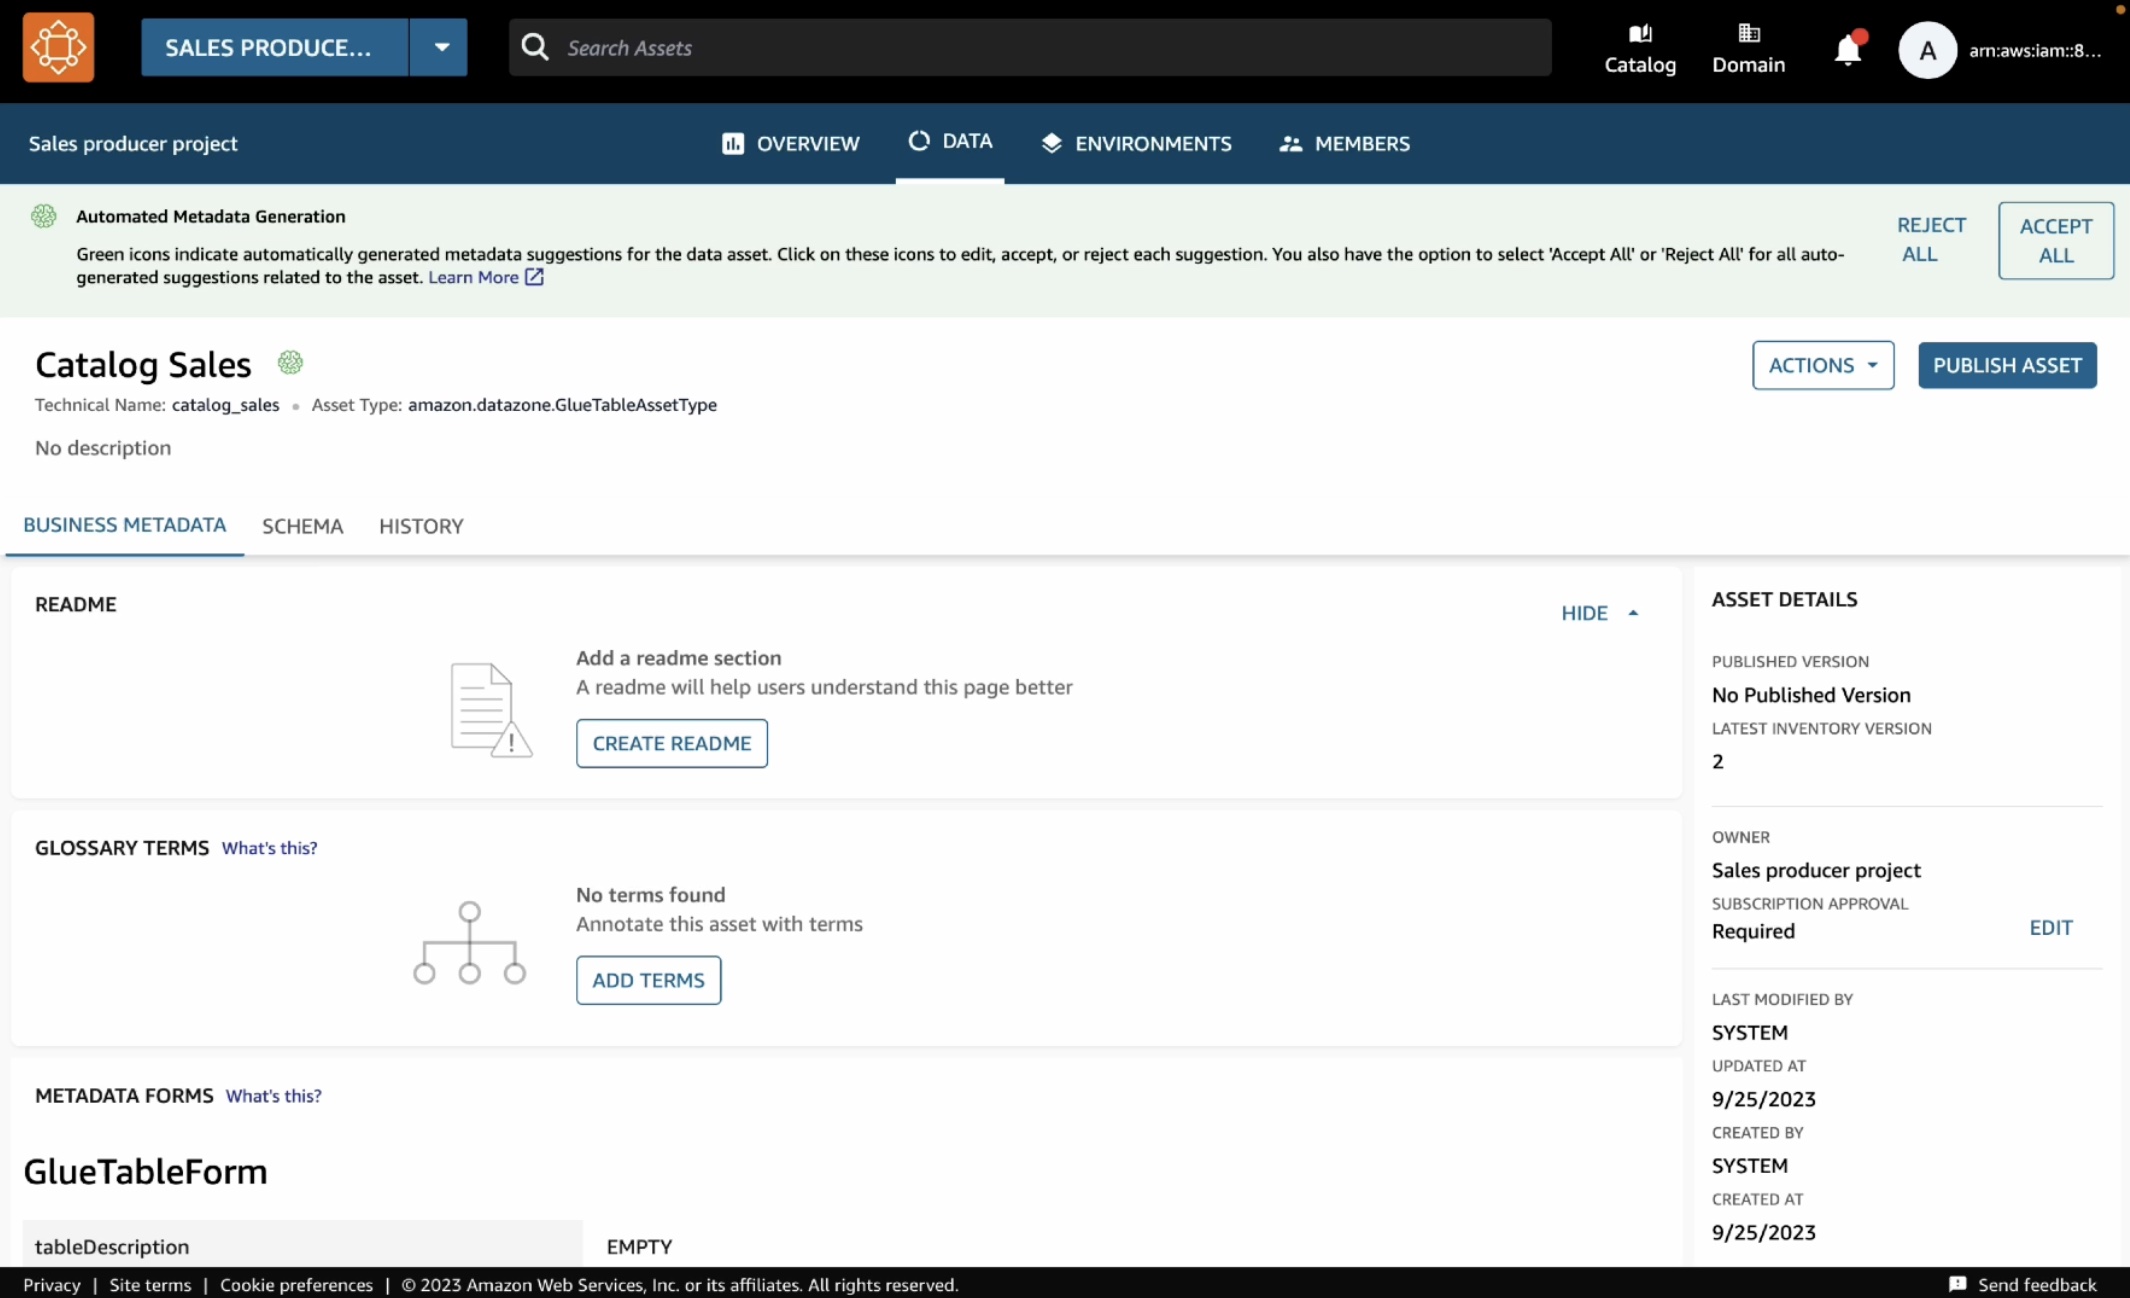
You can open this asset and see that the publishing job could automatically extract the technical metadata including the schema of the table and several other technical details such as AWS account, Region, and physical location of the data.

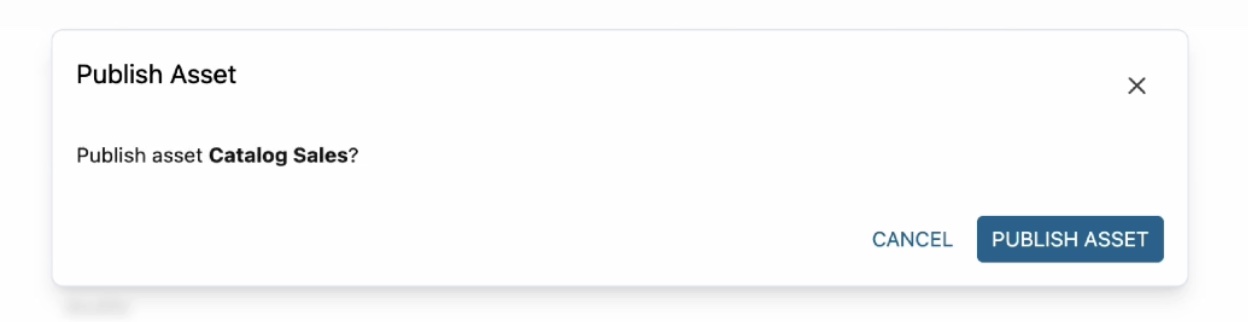
If they look correct, you can simply accept these recommendations either by clicking the brain icon in each recommended item or the Accept all button for all recommendations. When you are ready to publish, choose Publish asset and reconfirm in the dialog box.

4. Subscribe Data as a Data Consumer
Now let’s switch the role to a marketing team and see how you can subscribe to or request access this table. Repeat to create a new project called “Marketing consumer project” and a new environment called “subscriber-environment” as the data consumer using the same steps as before.

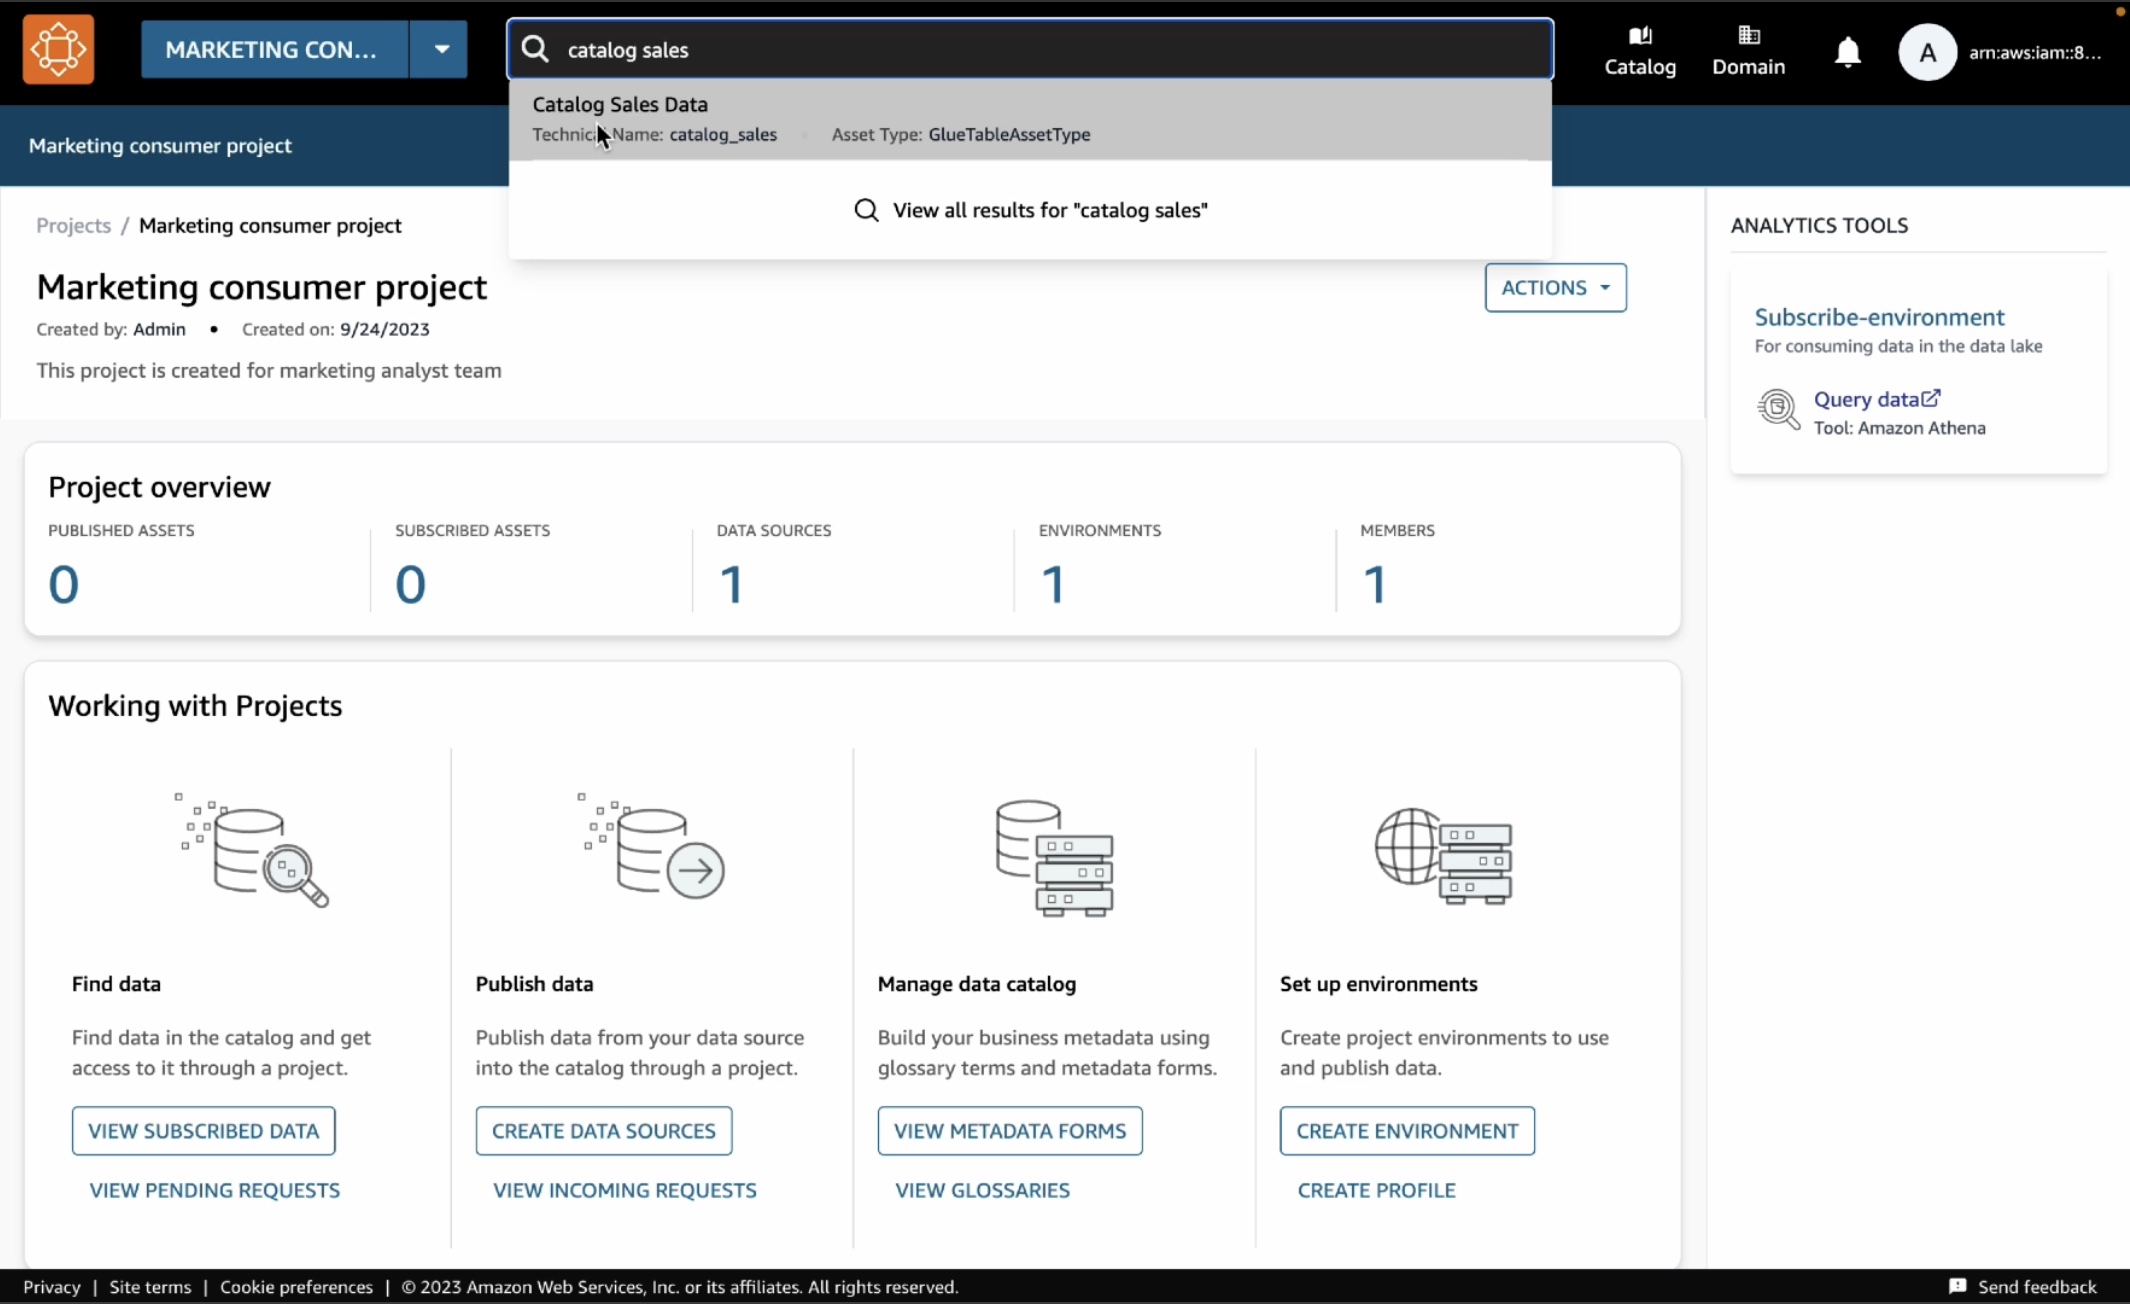
In the new created project, when you type “catalog sales” in the search bar, you can see the published table in the search results. Choose the Catalog Sales Data.

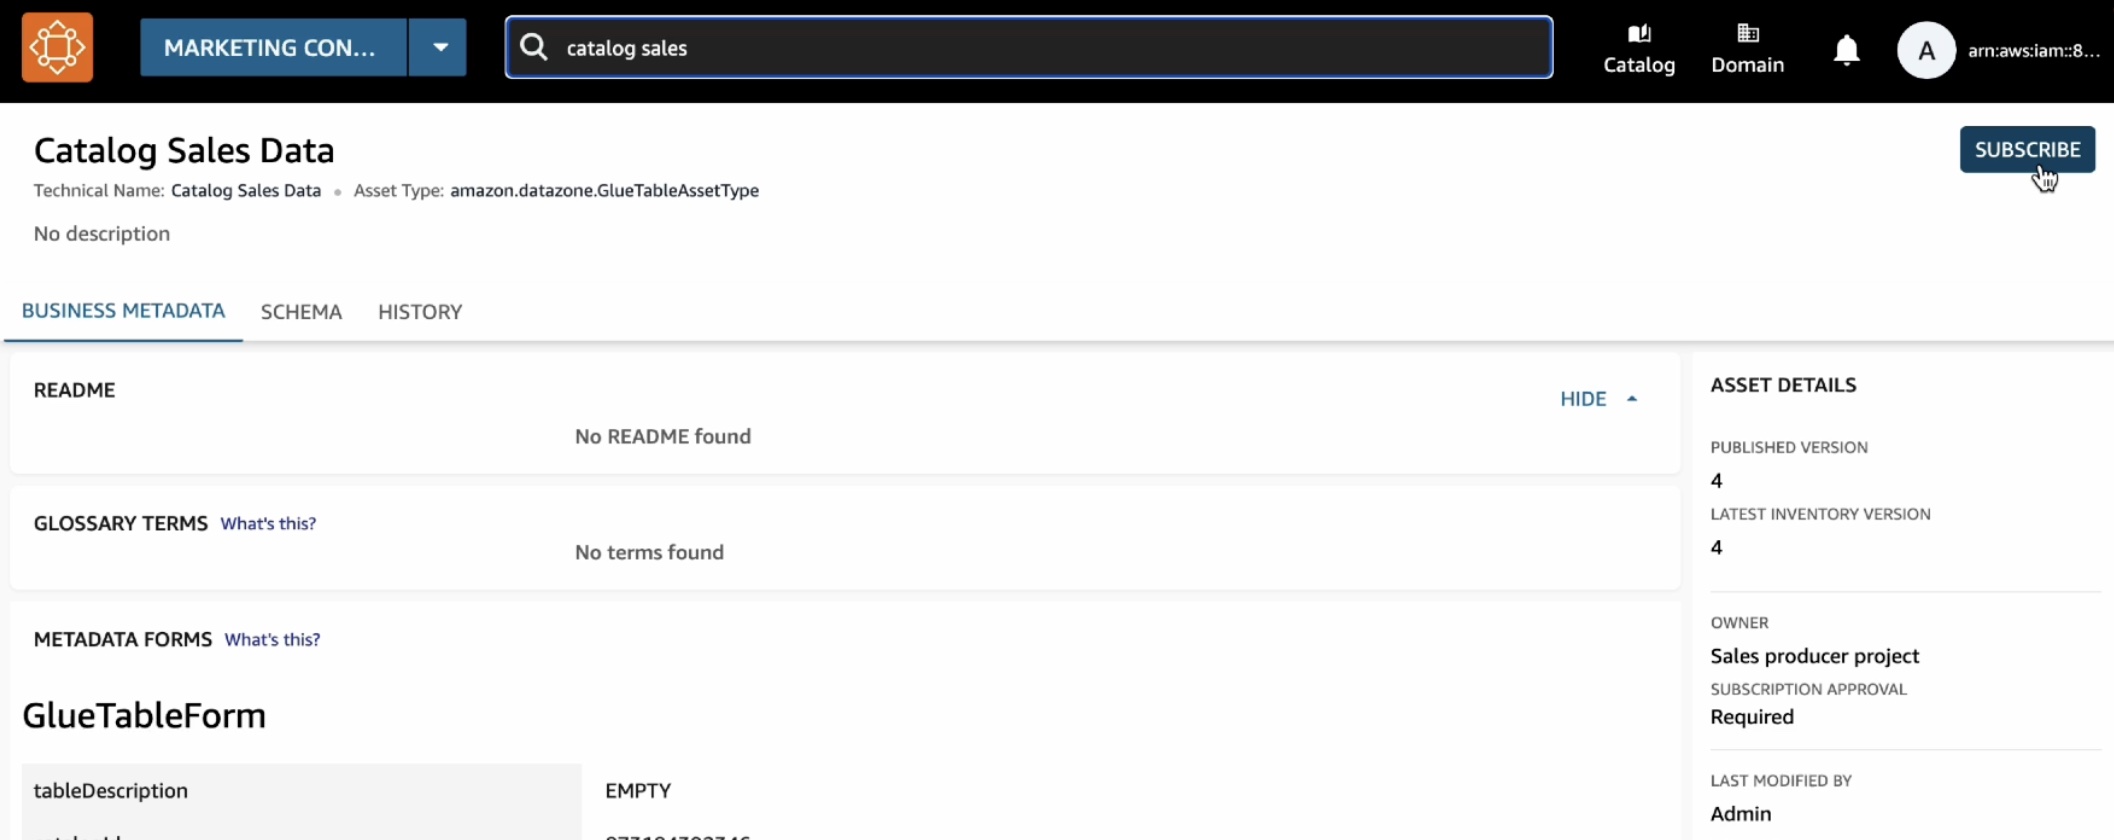
In the catalog, choose Subscribe.

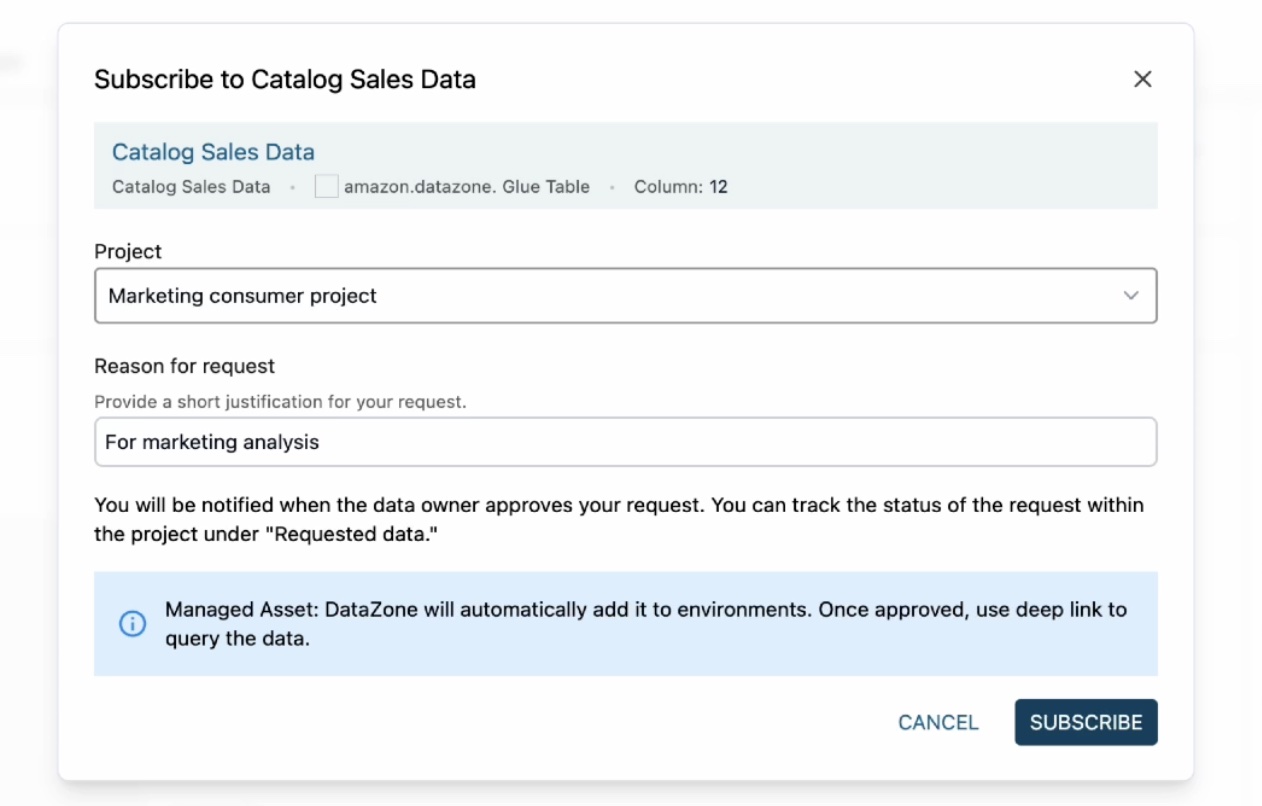
In the Subscribe to Catalog Sales Data window, select your marketing consumer project, provide a reason for the subscription request, and then choose Subscribe.

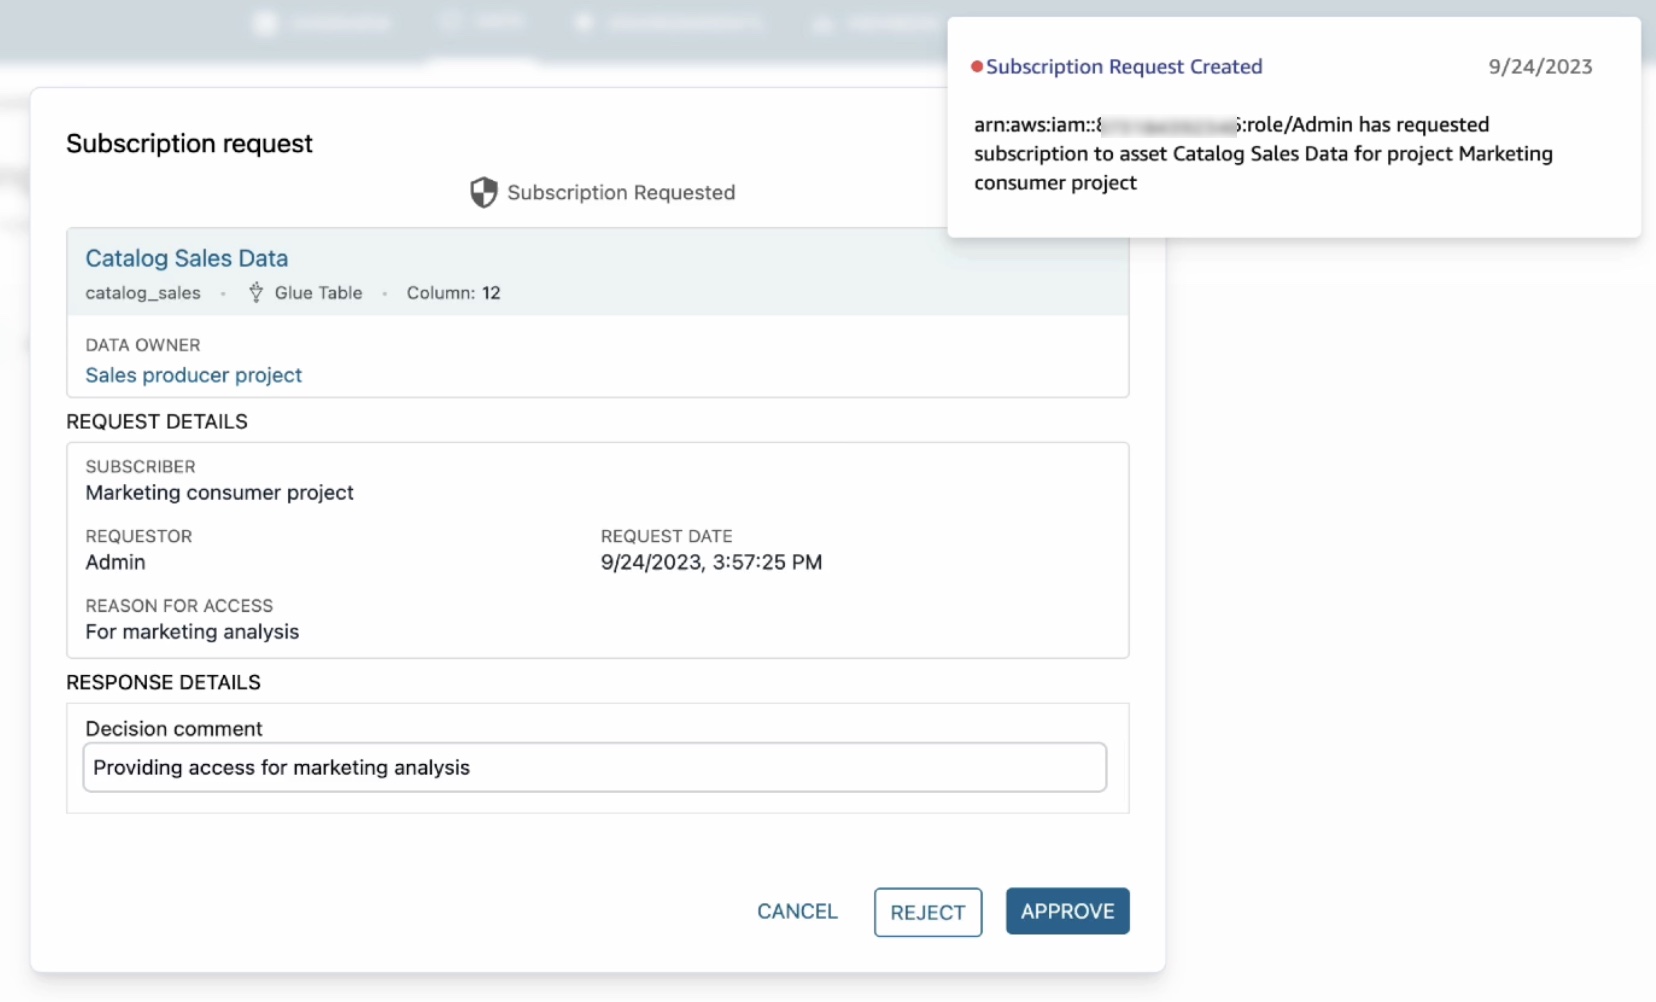
When you get a subscription request as a data producer, it will notify you through a task in the sales producer project. Since you are acting as both subscriber and publisher here, you will see a notification.

When you click on this notification, it will open the subscription request including which project has requested access, who the requestor is, and why they need access. Choose Approve and provide a reason for approval.

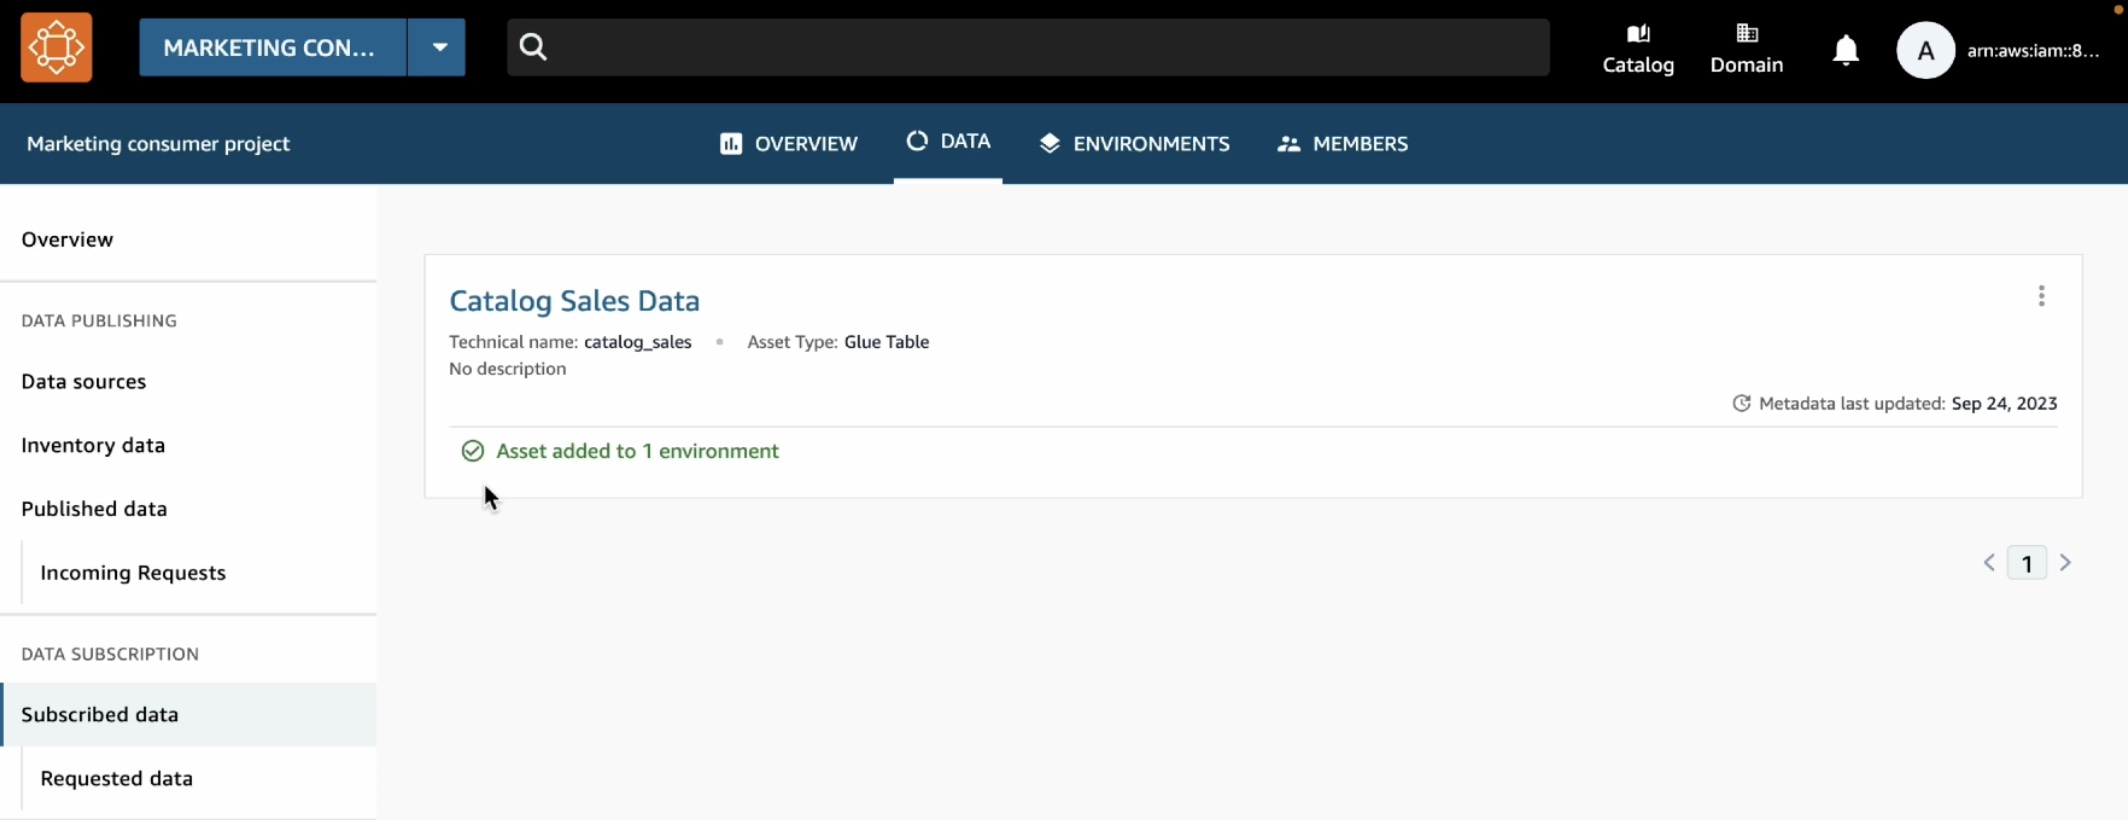
Now that subscription has been approved, you can see catalog sales data in your marketing consumer project. To confirm this, choose the Data tab in the top menu and Data sources in the left navigation pane.


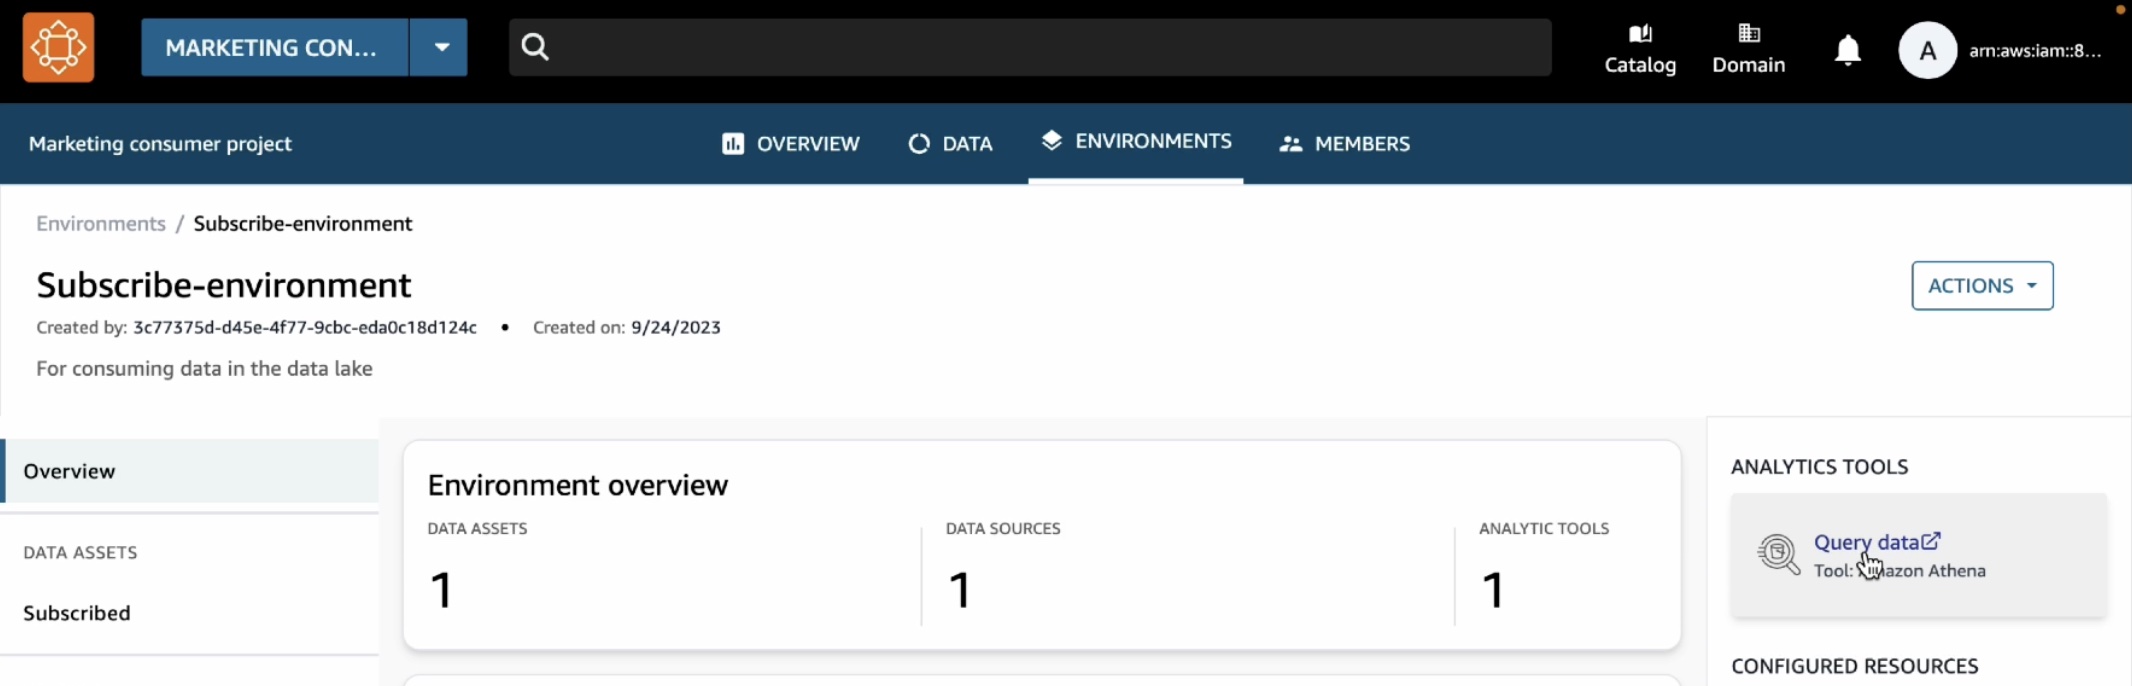
To analyze your subscribe data, choose the Environments tab in the top menu and Subscribe-environment you created in the marketing consumer project. It shows a new Query Data link in the right pane.

We can see that the catalog sales table is showing up under subscription database.
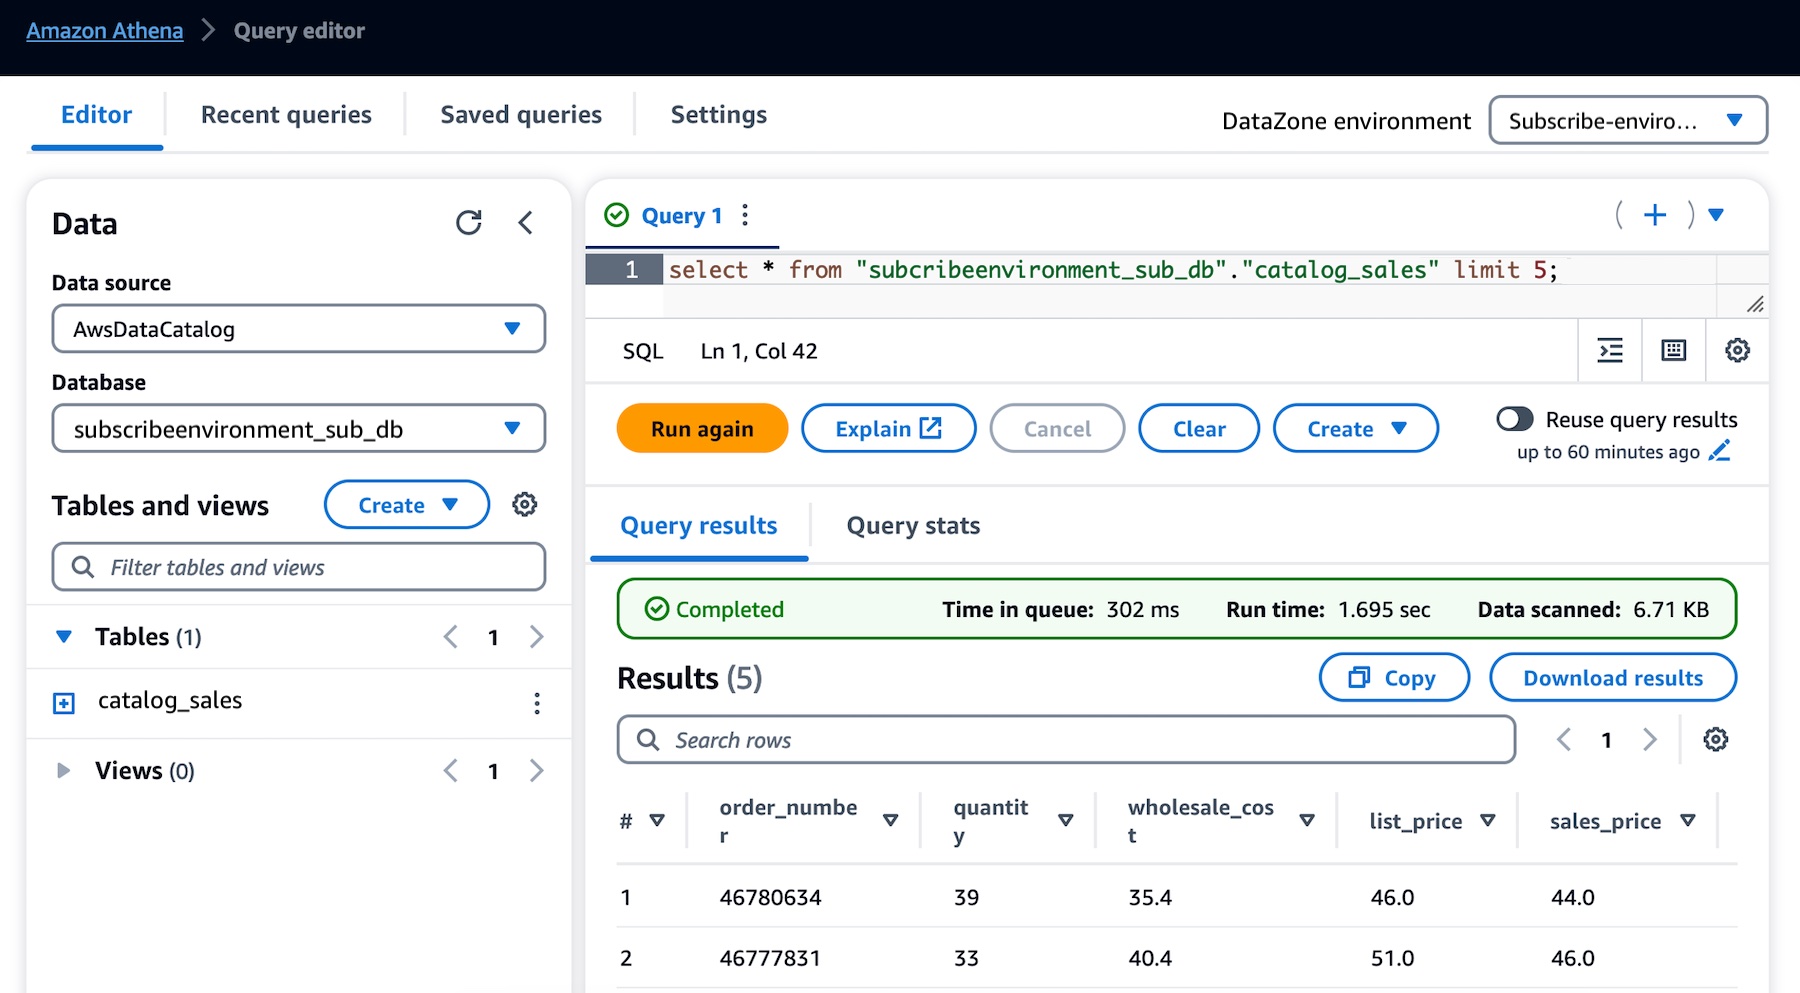
To make sure that we have access to this table, we can preview it and we can see that the query executes successfully.

This opens the Athena query editor in a new tab. Select subscribeenvironment_sub_db from the database dropdown, and then enter your query into the query editor.

You can now run any queries on the sales data table that you have subscribed to as a consumer (marketing team) and that was published into the business data catalog by a producer (sales team).

For more detailed demos such as publishing AWS Glue tables and Amazon Redshift tables and view, see the YouTube playlist.

What’s New at GA?
During the preview, we had lots of interest and great feedback from customers. I want to quickly review the features and introduce some improvements:

Enterprise-Ready Business Catalog – To add business context and make data discoverable by everyone in the organization, you can customize the catalog with automated metadata generation which uses machine learning to automatically generate business names of data assets and columns within those assets. We also improved metadata curation functionality. At GA, you can attach multiple business glossary terms to assets and glossary terms to individual columns in the asset.

Self-Service for Data Users – To provide data autonomy for users to publish and consume data, you can customize and bring any type of asset to the catalog using APIs. Data publishers can automate metadata discovery through ingestion jobs or manually publish files from Amazon Simple Storage Service (Amazon S3). Data consumers can use faceted search to quickly find and understand the data. Users can be notified of updates in the system or actions to be taken. These events are emitted to the customer’s event bus using Amazon EventBridge to customize actions.

Simplified Access to analysis – At GA, projects will serve as business use case-based logical containers. You can create a project and collaborate on specific business use case-based groupings of people, data, and analytics tools. Within the project, you can create an environment that provides the necessary infrastructure to project members such as analytics tools and storage so that project members can easily produce new data or consume data they have access to. This allows users to add multiple capabilities and analytics tools to the same project depending on their needs.

Governed Data Sharing – Data producers own and manage access to data with a subscription approval workflow that allows consumers to request access and data owners to approve. You can now set up subscription terms to be attached to assets when published and automate subscription grant fulfillment for AWS managed data lakes and Amazon Redshift with customizations using EventBridge events for other sources.

Now Available
Amazon DataZone is now generally available in eleven AWS Regions: US East (Ohio), US East (N. Virginia), US West (Oregon), Asia Pacific (Singapore), Asia Pacific (Sydney), Asia Pacific (Tokyo), Canada (Central), Europe (Frankfurt), Europe (Ireland), Europe (Stockholm), and South America (São Paulo).

You can use the free trial of Amazon DataZone, which includes 50 users at no additional cost for the first 3 calendar months of usage. The free trial starts when you first create an Amazon DataZone domain in an AWS account. If you exceed the number of monthly users during your trial, you will be charged at the standard pricing.

To learn more, visit the product page and user guide. You can send feedback to AWS re:Post for Amazon DataZone or through your usual AWS Support contacts.

— Channy

Automate legacy ETL conversion to AWS Glue using Cognizant Data and Intelligence Toolkit (CDIT) – ETL Conversion Tool

Post Syndicated from Deepak Singh original https://aws.amazon.com/blogs/big-data/automate-legacy-etl-conversion-to-aws-glue-using-cognizant-data-and-intelligence-toolkit-cdit-etl-conversion-tool/

This blog post is co-written with Govind Mohan and Kausik Dhar from Cognizant. 

Migrating on-premises data warehouses to the cloud is no longer viewed as an option but a necessity for companies to save cost and take advantage of what the latest technology has to offer. Although we have seen a lot of focus toward migrating data from legacy data warehouses to the cloud and multiple tools to support this initiative, data is only part of the journey. Successful migration of legacy extract, transform, and load (ETL) processes that acquire, enrich, and transform the data plays a key role in the success of any end-to-end data warehouse migration to the cloud.

The traditional approach of manually rewriting a large number of ETL processes to cloud-native technologies like AWS Glue is time consuming and can be prone to human error. Cognizant Data & Intelligence Toolkit (CDIT) – ETL Conversion Tool automates this process, bringing in more predictability and accuracy, eliminating the risk associated with manual conversion, and providing faster time to market for customers.

Cognizant is an AWS Premier Tier Services Partner with several AWS Competencies. With its industry-based, consultative approach, Cognizant helps clients envision, build, and run more innovative and efficient businesses.

In this post, we describe how Cognizant’s Data & Intelligence Toolkit (CDIT)- ETL Conversion Tool can help you automatically convert legacy ETL code to AWS Glue quickly and effectively. We also describe the main steps involved, the supported features, and their benefits.

Solution overview

Cognizant Data & Intelligence Toolkit (CDIT): ETL Conversion Tool automates conversion of ETL pipelines and orchestration code from legacy tools to AWS Glue and AWS Step Functions and eliminates the manual processes involved in a customer’s ETL cloud migration journey.

It comes with an intuitive user interface (UI). You can use these accelerators by selecting the source and target ETL tool for conversion and then uploading an XML file of the ETL mapping to be converted as input.

The tool also supports continuous monitoring of the overall progress, and alerting mechanisms are in place in the event of any failures, errors, or operational issues.

Cognizant Data & Intelligence Toolkit (CDIT): ETL Conversion Tool internally uses many native AWS services, such as Amazon Simple Storage Service (Amazon S3) and Amazon Relational Database Service (Amazon RDS) for storage and metadata management; Amazon Elastic Compute Cloud (Amazon EC2) and AWS Lambda for processing; Amazon CloudWatch, AWS Key Management Service (AWS KMS), and AWS IAM Identity Center (successor to AWS Single Sign-On) for monitoring and security; and AWS CloudFormation for infrastructure management. The following diagram illustrates this architecture.

How to use CDIT: ETL Conversion Tool for ETL migration.

Cognizant Data & Intelligence Toolkit (CDIT): ETL Conversion Tool supports the following legacy ETL tools as source and supports generating corresponding AWS Glue ETL scripts in both Python and Scala:

  • Informatica
  • DataStage
  • SSIS
  • Talend

Let’s look at the migration steps in more detail.

Assess the legacy ETL process

Cognizant Data & Intelligence Toolkit (CDIT): ETL Conversion Tool enables you to assess in bulk the potential automation percentage and complexity of a set of ETL jobs and workflows that are in scope for migration to AWS Glue. The assessment option helps you understand what kind of saving can be achieved using Cognizant Data & Intelligence Toolkit (CDIT): ETL Conversion Tool, the complexity of the ETL mappings, and the extent of manual conversion needed, if any. You can upload a single ETL mapping or a folder containing multiple ETL mappings as input for assessment and generate an assessment report, as shown in the following figure.

Convert the ETL code to AWS Glue

To convert legacy ETL code, you upload the XML file of the ETL mapping as input to the tool. User inputs are stored in the internal metadata repository of the tool and Cognizant Data & Intelligence Toolkit (CDIT): ETL Conversion Tool parses these XML input files and breaks them down to a patented canonical model, which is then forward engineered into the target AWS Glue scripts in Python or Scala. The following screenshot shows an example of the Cognizant Data & Intelligence Toolkit (CDIT): ETL Conversion Tool GUI and Output Console pane.

If any part of the input ETL job couldn’t be converted completely to the equivalent AWS Glue script, it’s tagged between comment lines in the output so that it can be manually fixed.

Convert the workflow to Step Functions

The next logical step after converting the legacy ETL jobs is to orchestrate the run of these jobs in the logical order. Cognizant Data & Intelligence Toolkit (CDIT): ETL Conversion Tool lets you automate the conversion of on-premises ETL workflows by converting them to corresponding Step Functions workflows. The following figure illustrates a sample input Informatica workflow.

Workflow conversion follows the similar pattern as that of the ETL mapping. XML files for ETL workflows are uploaded as input and Cognizant Data & Intelligence Toolkit (CDIT): ETL Conversion Tool it generates the equivalent Step Functions JSON file based on the input XML file data.

Benefits of using Cognizant Data & Intelligence Toolkit (CDIT): ETL Conversion Tool

The following are the key benefits of using Cognizant Data & Intelligence Toolkit (CDIT): ETL Conversion Tool to automate legacy ETL conversion:

  • Cost reduction – You can reduce the overall migration effort by as much as 80% by automating the conversion of ETL and workflows to AWS Glue and Step Functions
  • Better planning and implementation – You can assess the ETL scope and determine automation percentage, complexity, and unsupported patterns before the start of the project, resulting in accurate estimation and timelines
  • Completeness – Cognizant Data & Intelligence Toolkit (CDIT): ETL Conversion Tool offers one solution with support for multiple legacy ETL tools like Informatica, DataStage, Talend, and more.
  • Improved customer experience – You can achieve migration goals seamlessly without errors caused by manual conversion and with high automation percentage

Case study: Cognizant Data & Intelligence Toolkit (CDIT): ETL Conversion Tool proposed implementation

A large US-based insurance and annuities company wanted to migrate their legacy ETL process in Informatica to AWS Glue as part of their cloud migration strategy.

As part of this engagement, Cognizant helped the customer successfully migrate their Informatica based data acquisition and integration ETL jobs and workflows to AWS. A proof of concept (PoC) using Cognizant Data & Intelligence Toolkit (CDIT): ETL Conversion Tool was completed first to showcase and validate automation capabilities.

Cognizant Data & Intelligence Toolkit (CDIT): ETL Conversion Tool was used to automate the conversion of over 300 Informatica mappings and workflows to equivalent AWS Glue jobs and Step Functions workflows, respectively. As a result, the customer was able to migrate all legacy ETL code to AWS as planned and retire the legacy application.

The following are key highlights from this engagement:

  • Migration of over 300 legacy Informatica ETL jobs to AWS Glue
  • Automated conversion of over 6,000 transformations from legacy ETL to AWS Glue
  • 85% automation achieved using CDIT: ETL Conversion Tool
  • The customer saved licensing fees and retired their legacy application as planned

Conclusion

In this post, we discussed how migrating legacy ETL processes to the cloud is critical to the success of a cloud migration journey. Cognizant Data & Intelligence Toolkit (CDIT): ETL Conversion Tool enables you to perform an assessment of the existing ETL process to derive complexity and automation percentage for better estimation and planning. We also discussed the ETL technologies supported by Cognizant Data & Intelligence Toolkit (CDIT): ETL Conversion Tool and how ETL jobs can be converted to corresponding AWS Glue scripts. Lastly, we demonstrated how to use existing ETL workflows to automatically generate corresponding Step Functions orchestration jobs.

To learn more, please reach out to Cognizant.


About the Authors

Deepak Singh is a Senior Solutions Architect at Amazon Web Services with 20+ years of experience in Data & AIA. He enjoys working with AWS partners and customers on building scalable analytical solutions for their business outcomes. When not at work, he loves spending time with family or exploring new technologies in analytics and AI space.

Piyush Patra is a Partner Solutions Architect at Amazon Web Services where he supports partners with their Analytics journeys and is the global lead for strategic Data Estate Modernization and Migration partner programs.

Govind Mohan is an Associate Director with Cognizant with over 18 year of experience in data and analytics space, he has helped design and implement multiple large-scale data migration, application lift & shift and legacy modernization projects and works closely with customers in accelerating the cloud modernization journey leveraging Cognizant Data and Intelligence Toolkit (CDIT) platform.

Kausik Dhar is a technology leader having more than 23 years of IT experience – primarily focused on Data & Analytics, Data Modernization, Application Development, Delivery Management, and Solution Architecture. He has played a pivotal role in guiding clients through the designing and executing large-scale data and process migrations, in addition to spearheading successful cloud implementations. Kausik possesses expertise in formulating migration strategies for complex programs and adeptly constructing data lake/Lakehouse architecture employing a wide array of tools and technologies.

Query big data with resilience using Trino in Amazon EMR with Amazon EC2 Spot Instances for less cost

Post Syndicated from Ashwini Kumar original https://aws.amazon.com/blogs/big-data/query-big-data-with-resilience-using-trino-in-amazon-emr-with-amazon-ec2-spot-instances-for-less-cost/

Amazon Elastic Compute Cloud (Amazon EC2) Spot Instances offer spare compute capacity available in the AWS Cloud at steep discounts compared to On-Demand prices. Amazon EMR provides a managed Hadoop framework that makes it straightforward, fast, and cost-effective to process vast amounts of data using EC2 instances. Amazon EMR with Spot Instances allows you to reduce costs for running your big data workloads on AWS. Amazon EC2 can interrupt Spot Instances with a 2-minute notification whenever Amazon EC2 needs to reclaim capacity for On-Demand customers. Spot Instances are best suited for running stateless and fault-tolerant big data applications such as Apache Spark with Amazon EMR, which are resilient against Spot node interruptions.

Trino (formerly PrestoSQL) is an open-source, highly parallel, distributed SQL query engine to run interactive queries as well as batch processing on petabytes of data. It can perform in-place, federated queries on data stored in a multitude of data sources, including relational databases (MySQL, PostgreSQL, and others), distributed data stores (Cassandra, MongoDB, Elasticsearch, and others), and Amazon Simple Storage Service (Amazon S3), without the need for complex and expensive processes of copying the data to a single location.

Before Project Tardigrade, Trino queries failed whenever any of the nodes in Trino clusters failed, and there was no automatic retry mechanism with iterative querying capability. Also, failed queries had to be restarted from scratch. Due to this limitation, the cost of failures of long-running extract, transform, and load (ETL) and batch queries on Trino was high in terms of completion time, compute wastage, and spend. Spot Instances were not appropriate for long-running queries with Trino clusters and only suited for short-lived Trino queries.

In October 2022, Amazon EMR announced a new capability in the Trino engine to detect 2-minute Spot interruption notifications and determine if the existing queries can complete within 2 minutes on those nodes. If the queries can’t finish, Trino will fail them quickly and retry the queries on different nodes. Also, Trino doesn’t schedule new queries on these Spot nodes, which are about to be reclaimed. In November 2022, Amazon EMR added support for Project Tardigrade’s fault-tolerant option in the Trino engine with Amazon EMR 6.8 and above. Enabling this feature mitigates Trino task failures caused by worker node failures due to Spot interruptions or On-Demand node stops. Trino now retries failed tasks using intermediate exchange data checkpointed on Amazon S3 or HDFS.

These new enhancements in Trino with Amazon EMR provide improved resiliency for running ETL and batch workloads on Spot Instances with reduced costs. This post showcases the resilience of Amazon EMR with Trino using fault-tolerant configuration to run long-running queries on Spot Instances to save costs. We simulate Spot interruptions on Trino worker nodes by using AWS Fault Injection Simulator (AWS FIS).

Trino architecture overview

Trino runs a query by breaking up the run into a hierarchy of stages, which are implemented as a series of tasks distributed over a network of Trino workers. This pipelined execution model runs multiple stages in parallel and streams data from one stage to another as the data becomes available. This parallel architecture reduces end-to-end latency and makes Trino a fast tool for ad hoc data exploration and ETL jobs over very large datasets. The following diagram illustrates this architecture.

In a Trino cluster, the coordinator is the server responsible for parsing statements, planning queries, and managing workers. The coordinator is also the node to which a client connects and submits statements to run. Every Trino cluster must have at least one coordinator. The coordinator creates a logical model of a query involving a series of stages, which is then translated into a series of connected tasks running on Trino workers. In Amazon EMR, the Trino coordinator runs on the EMR primary node and workers run on core and task nodes.

Faster insights with lower costs with EC2 Spot

You can save significant costs for your ETL and batch workloads running on EMR Trino clusters with a blend of Spot and On-Demand Instances. You can also reduce time-to-insight with faster query runs with lower costs by running more worker nodes on Spot Instances, using the parallel architecture of Trino.

For example, a long-running query on EMR Trino that takes an hour can be finished faster by provisioning more worker nodes on Spot Instances, as shown in the following figure.

Fault-tolerant Trino configuration in Amazon EMR

Fault-tolerant execution in Trino is disabled by default; you can enable it by setting a retry policy in the Amazon EMR configuration. Trino supports two types of retry policies:

  • QUERY – The QUERY retry policy instructs Trino to retry the whole query automatically when an error occurs on a worker node. This policy is only suitable for short-running queries because the whole query is retried from scratch.
  • TASK – The TASK retry policy instructs Trino to retry individual query tasks in the event of failure. This policy is recommended for long-running ETL and batch queries.

With fault-tolerant execution enabled, intermediate exchange data is spooled on an exchange manager so that another worker node can reuse it in the event of a node failure to complete the query run. The exchange manager uses a storage location on Amazon S3 or Hadoop Distributed File System (HDFS) to store and manage spooled data, which is spilled beyond in-memory buffer size of worker nodes. By default, Amazon EMR release 6.9.0 and later uses HDFS as an exchange manager.

Solution overview

In this post, we create an EMR cluster with following architecture.

We provision the following resources using Amazon EMR and AWS FIS:

  • An EMR 6.9.0 cluster with the following configuration:
    • Apache Hadoop, Hue, and Trino applications
    • EMR instance fleets with the following:
      • One primary node (On-Demand) as the Trino coordinator
      • Two core nodes (On-Demand) as the Trino workers and exchange manager
      • Four task nodes (Spot Instances) as Trino workers
    • Trino’s fault-tolerant configuration with following:
      • TPCDS connector
      • The TASK retry policy
      • Exchange manager directory on HDFS
      • Optional recommended settings for query performance optimization
  • An FIS experiment template to target Spot worker nodes in the Trino cluster with interruptions to demonstrate fault-tolerance of EMR Trino with Spot Instances

We use the new Amazon EMR console to create an EMR 6.9.0 cluster. For more information about the new console, refer to Summary of differences.

Create an EMR 6.9.0 cluster

Complete the following steps to create your EMR cluster:

  1. On the Amazon EMR console, create an EMR 6.9.0 cluster named emr-trino-cluster with Hadoop, Hue, and Trino applications using the Custom application bundle.

We need Hue’s web-based interface for submitting SQL queries to the Trino engine and HDFS on core nodes to store intermediate exchange data for Trino’s fault-tolerant runs.

Using multiple Spot capacity pools (each instance type in each Availability Zone is a separate pool) is a best practice to increase your chances of getting large-scale Spot capacity and minimize the impact of a specific instance type being reclaimed in EMR clusters. The Amazon EMR console allows you to configure up to 5 instance types for your core fleet and 15 instance types for your task fleet with the Spot allocation strategy, which allows up to 30 instance types for each fleet from the AWS Command Line Interface (AWS CLI) or Amazon EMR API.

  1. Configure the primary, core, and task fleets with primary and core nodes with On-Demand Instances (m5.xlarge) and task nodes with Spot Instances using multiple instance types.

When you use the Amazon EMR console, the number of vCPUs of the EC2 instance type are used as the count towards the total target capacity of a core or task fleet by default. For example, an m5.xlarge instance type with 4 vCPUs is considered as 4 units of capacity by default.

  1. On the Actions menu under Core or Task fleet, choose Edit weighted capacity.

  1. Because each instance type with 4 vCPUs (xlarge size) is 4 units of capacity, let’s set the cluster size with 8 core units (2 nodes) with On-Demand and 16 task units (4 nodes) with Spot.

Unlike core and task fleets, the primary fleet is always one instance, so no sizing configuration is needed or available for the primary node on the Amazon EMR console.

  1. Select Price-capacity optimized as your Spot allocation strategy, which launches the lowest-priced Spot Instances from your most available pools.

  1. Configure Trino’s fault-tolerant settings in the Software settings section:
[
  {
    "Classification": "trino-connector-tpcds",
    "Properties": {
      "connector.name": "tpcds"
    }
  },
  {
    "Classification": "trino-config",
    "Properties": {
      "exchange.compression-enabled": "true",
      "query.low-memory-killer.delay": "0s",
      "query.remote-task.max-error-duration": "1m",
      "retry-policy": "TASK"
    }
  },
  {
    "Classification": "trino-exchange-manager",
    "Properties": {
      "exchange.base-directories": "/exchange",
      "exchange.use-local-hdfs": "true"
    }
  }
]

Alternatively, you can create a JSON config file with the configuration, store it in an S3 bucket, and select the file path from its S3 location by selecting Load JSON from Amazon S3.

Let’s understand some optional settings for query performance optimization that we have configured:

  • “exchange.compression-enabled”:”true” – This is recommended to enable compression to reduce the amount of data spooled on exchange manager.
  • “query.low-memory-killer.delay”: “0s” – This will reduce the low memory killer delay to allow the Trino engine to unblock nodes running short on memory faster.
  • “query.remote-task.max-error-duration”: “1m” – By default, Trino waits for up to 5 minutes for the task to recover before considering it lost and rescheduling it. This timeout can be reduced for faster retrying of the failed tasks.

For more details of Trino’s fault-tolerant configuration parameters, refer to Fault-tolerant execution.

  1. Let’s also add a tag key called Name with the value MyTrinoCluster to launch EC2 instances with this tag name.

We’ll use this tag to target Spot Instances in the cluster with AWS FIS.

The EMR cluster will take few minutes to be ready in the Waiting state.

Configure an FIS experiment template to target Spot Instances with interruptions in the EMR Trino cluster

We now use the AWS FIS console to simulate interruptions of Spot Instances in the EMR Trino cluster and showcase the fault-tolerance of the Trino engine. Complete the following steps:

  1. On the AWS FIS console, create an experiment template.

  1. Under Actions, choose Add action.
  2. Create an AWS FIS action with Action type as aws:ec2:send-spot-instance-interruptions and Duration Before Interruption as 2 minutes.
  3. Choose Save.

This means FIS will interrupt targeted Spot Instances after 2 minutes of running the experiment.

  1. Under Targets, choose Edit to target all Spot Instances running in the EMR cluster.
  2. For Resource tags, use Name= MyTrinoCluster.
  3. For Resource filters, use as State.Name=running.
  4. For Selection mode, set to ALL.
  5. Choose Save.

  1. Create a new AWS Identity and Access Management (IAM) role automatically to provide permissions to AWS FIS.

  1. Choose Create experiment template.

Launch Hue and Trino web interfaces

When your EMR cluster is in the Waiting state, connect to the Hue web interface for Trino queries and the Trino web interface for monitoring. Alternatively, you can submit your Trino queries using trino-cli after connecting via SSH to your EMR cluster’s primary node. In this post, we will use the Hue web interface for running queries on the EMR Trino engine.

  1. To connect to Hue interface on the primary node from your local computer, navigate to the EMR cluster’s Properties, Network and security, and EC2 security groups (firewall) section.
  2. Edit the primary node security group’s inbound rule to add your IP address and port (port 22).
  3. Retrieve your EMR cluster’s primary node public DNS from your EMR cluster’s Summary tab.

Refer to View web interfaces hosted on Amazon EMR clusters for details on connecting to web interfaces in the primary node from your local computer. You can set up an SSH tunnel with dynamic port forwarding between your local computer and the EMR primary node. Then you can configure proxy settings for your internet browser by using an add-ons such as FoxyProxy for Firefox or SwitchyOmega for Chrome to manage your SOCKS proxy settings.

  1. Connect to Hue by copying the URL (http://<youremrcluster-primary-node-public-dns>:8888/) in your web browser.
  2. Create an account with your choice of user name and password.

After you log in to your account, you can see the query editor on Hue’s web interface.

By default, Amazon EMR configures the Trino web interface on the Trino coordinator (EMR primary node) to use port 8889.

  1. To connect to the Trino web interface, copy the URL (http://<youremrcluster-primary-node-public-dns>:8889/) in your web browser, where you can monitor the Trino cluster and query performance.

In the following screenshot, we can see six active Trino workers (two core and four task nodes of EMR cluster) and no running queries.

  1. Let’s run the Trino query

    select * from system.runtime.nodes from the Hue query editor to see the coordinator and worker nodes’ status and details.

We can see all cluster nodes are in the active state.

Test fault tolerance on Spot interruptions

To test the fault tolerance on Spot interruptions, complete the following steps:

  1. Run the following Trino query using Hue’s query editor:
with inv as
(select w_warehouse_name,w_warehouse_sk,i_item_sk,d_moy
,stdev,mean, case mean when 0 then null else stdev/mean end cov
from(select w_warehouse_name,w_warehouse_sk,i_item_sk,d_moy
,stddev_samp(inv_quantity_on_hand) stdev,avg(inv_quantity_on_hand) mean
from tpcds.sf100.inventory
,tpcds.sf100.item
,tpcds.sf100.warehouse
,tpcds.sf100.date_dim
where inv_item_sk = i_item_sk
and inv_warehouse_sk = w_warehouse_sk
and inv_date_sk = d_date_sk
and d_year =1999
group by w_warehouse_name,w_warehouse_sk,i_item_sk,d_moy) foo
where case mean when 0 then 0 else stdev/mean end > 1)
select inv1.w_warehouse_sk,inv1.i_item_sk,inv1.d_moy,inv1.mean, inv1.cov
,inv2.w_warehouse_sk,inv2.i_item_sk,inv2.d_moy,inv2.mean, inv2.cov
from inv inv1,inv inv2
where inv1.i_item_sk = inv2.i_item_sk
and inv1.w_warehouse_sk = inv2.w_warehouse_sk
and inv1.d_moy=4
and inv2.d_moy=4+1
and inv1.cov > 1.5
order by inv1.w_warehouse_sk,inv1.i_item_sk,inv1.d_moy,inv1.mean,inv1.cov ,inv2.d_moy,inv2.mean, inv2.cov

When you go to the Trino web interface, you can see the query running on six active worker nodes (two core On-Demand and four task nodes on Spot Instances).

  1. On the AWS FIS console, choose Experiment templates in the navigation pane.
  2. Select the experiment template EMR_Trino_Interrupter and choose Start experiment.

After a few seconds, the experiment will be in the Completed state and it will trigger stopping all four Spot Instances (four Trino workers) after 2 minutes.

After some time, we can observe in the Trino web UI that we have lost four Trino workers (task nodes running on Spot Instances) but the query is still running with the two remaining On-Demand worker nodes (core nodes). Without the fault-tolerant configuration in EMR Trino, the whole query would fail with even a single worker node failure.

  1. Run the select * from system.runtime.nodes query again in Hue to check the Trino cluster nodes status.

We can see four Spot worker nodes with the status shutting_down.

Trino starts shutting down the four Spot worker nodes as soon as they receive the 2-minute Spot interruption notification sent by the AWS FIS experiment. It will start retrying any failed tasks of these four Spot workers on the remaining active workers (two core nodes) of the cluster. The Trino engine will also not schedule tasks of any new queries on Spot worker nodes in the shutting_down state.

The Trino query will keep running on the remaining two worker nodes and succeed despite the interruption of the four Spot worker nodes. Soon after the Spot nodes stop, Amazon EMR will replenish the stopped capacity (four task nodes) by launching four replacement Spot nodes.

Achieve faster query performance for lower cost with more Trino workers on Spot

Now let’s increase Trino workers capacity from 6 to 10 nodes by manually resizing EMR task nodes on Spot Instances (from 4 to 8 nodes).

We run the same query on a larger cluster with 10 Trino workers. Let’s compare the query completion time (wall time in the Trino Web UI) with the earlier smaller cluster with six workers. We can see 32% faster query performance (1.57 minutes vs. 2.33 minutes).

You can run more Trino workers on Spot Instances to run queries faster to meet your SLAs or process a larger number of queries. With Spot Instances available at discounts up to 90% off On-Demand prices, your cluster costs will not increase significantly vs. running the whole compute capacity on On-Demand Instances.

Clean up

To avoid ongoing charges for resources, navigate to the Amazon EMR console and delete the cluster emr-trino-cluster.

Conclusion

In this post, we showed how you can configure and launch EMR clusters with the Trino engine using its fault-tolerant configuration. With the fault tolerant feature, Trino worker nodes can be run as EMR task nodes on Spot Instances with resilience. You can configure a well-diversified task fleet with multiple instance types using the price-capacity optimized allocation strategy. This will make Amazon EMR request and launch task nodes from the most available, lower-priced Spot capacity pools to minimize costs, interruptions, and capacity challenges. We also demonstrated the resilience of EMR Trino against Spot interruptions using an AWS FIS Spot interruption experiment. EMR Trino continues to run queries by retrying failed tasks on remaining available worker nodes in the event of any Spot node interruption. With fault-tolerant EMR Trino and Spot Instances, you can run big data queries with resilience, while saving costs. For your SLA-driven workloads, you can also add more compute on Spot to adhere to or exceed your SLAs for faster query performance with lower costs compared to On-Demand Instances.


About the Authors

Ashwini Kumar is a Senior Specialist Solutions Architect at AWS based in Delhi, India. Ashwini has more than 18 years of industry experience in systems integration, architecture, and software design, with more recent experience in cloud architecture, DevOps, containers, and big data engineering. He helps customers optimize their cloud spend, minimize compute waste, and improve performance at scale on AWS. He focuses on architectural best practices for various workloads with services including EC2 Spot, AWS Graviton, EC2 Auto Scaling, Amazon EKS, Amazon ECS, and AWS Fargate.

Dipayan Sarkar is a Specialist Solutions Architect for Analytics at AWS, where he helps customers modernize their data platform using AWS Analytics services. He works with customers to design and build analytics solutions, enabling businesses to make data-driven decisions.

Validate IAM policies with Access Analyzer using AWS Config rules

Post Syndicated from Anurag Jain original https://aws.amazon.com/blogs/security/validate-iam-policies-with-access-analyzer-using-aws-config-rules/

You can use AWS Identity and Access Management (IAM) Access Analyzer policy validation to validate IAM policies against IAM policy grammar and best practices. The findings generated by Access Analyzer policy validation include errors, security warnings, general warnings, and suggestions for your policy. These findings provide actionable recommendations that help you author policies that are functional and conform to security best practices.

You can use the IAM Policy Validator for AWS CloudFormation and the IAM Policy Validator for Terraform solutions to integrate Access Analyzer policy validation in a proactive manner within your continuous integration and continuous delivery CI/CD pipeline before deploying IAM policies to your Amazon Web Service (AWS) environment. Customers requested a similar capability to validate policies already deployed within their environments as part of the defense-in-depth strategy.

In this post, you learn how to set up and continuously validate and report on compliance of the IAM policies in your environment using AWS Config. AWS Config evaluates the configuration settings of your AWS resources with the help of AWS Config rules, which represent your ideal configuration settings. AWS Config continuously tracks the configuration changes that occur among your resources and checks whether these changes conform to the conditions in your rules. If a resource doesn’t conform to a rule, AWS Config flags the resource and the rule as noncompliant.

You can use this solution to validate identity-based and resource-based IAM policies attached to resources in your AWS environment that might have grammatical or syntactical errors or might not follow AWS best practices. The code used in this post is hosted in a GitHub repository.

Prerequisites

Before you get started, you need:

Step 1: Enable AWS Config to monitor global resources

To get started, enable AWS Config in your AWS account by following the instructions in the AWS Config Developer Guide.

Next, enable the recording of global resources:

  1. Open the AWS Management Console and go to the AWS Config console.
  2. Go to Settings and choose Edit to see the AWS Config recorder settings.
  3. Under General settings, select the Include globally recorded resource types to enable AWS Config to monitor IAM configuration items.
  4. Leave the other settings at their defaults.
  5. Choose Save.
    Figure 1: AWS Config settings page showing inclusion of globally recorded resource types

    Figure 1: AWS Config settings page showing inclusion of globally recorded resource types

  6. After choosing Save, you should see Recording is on at the top of the window.
    Figure 2: AWS Config settings page showing recorder settings

    Figure 2: AWS Config settings page showing recorder settings

    Note: You only need to enable globally recorded resource types in the AWS Region where you’ve configured AWS Config because they aren’t tied to a specific Region and can be used in other Regions. The globally recorded resource types that AWS Config supports are IAM users, groups, roles, and customer managed policies.

Step 2: Deploy the CloudFormation template

In this section, you deploy and test a sample AWS CloudFormation template that creates the following:

  • An AWS Config rule that reports the compliance of IAM policies.
  • An AWS Lambda function that implements and then makes the requests to IAM Access Analyzer and returns the policy validation findings.
  • An IAM role that’s used by the Lambda function with permissions to validate IAM policies using the Access Analyzer ValidatePolicy API.
  • An optional Amazon CloudWatch alarm and Amazon Simple Notification Service (Amazon SNS) topic to provide notification of Lambda function errors.

Follow the steps below to deploy the AWS CloudFormation template:

  1. To deploy the CloudFormation template using the following command, you must have the AWS Command Line Interface (AWS CLI) installed.
  2. Make sure you have configured your AWS CLI credentials.
  3. Clone the solution repository.
    git clone https://github.com/awslabs/aws-iam-access-analyzer-policy-validation-config-rule.git

  4. Navigate to the iam-access-analyzer-config-rule folder of the cloned repository.
    cd aws-iam-access-analyzer-policy-validation-config-rule

  5. Deploy the CloudFormation template using the AWS CLI.

    Note: Change the Region for the parameter — RegionToValidateGlobalResources — to the Region you enabled for global resources in Step 1. Optionally, you can add an email address if you want to receive notifications if the AWS Config rule stops working. Use the code that follows, replacing <us-east-1> with the Region you enabled and <EMAIL_ADDRESS> with your chosen address.

    aws cloudformation deploy \
        --stack-name iam-policy-validation-config-rule \
        --template-file templates/template.yaml \
        --capabilities CAPABILITY_IAM CAPABILITY_NAMED_IAM \
        --parameter-overrides RegionToValidateGlobalResources='<us-east-1>' \
                              ErrorNotificationsEmailAddress='<EMAIL_ADDRESS>'

  6. After successful deployment, you will see the message Successfully created/updated stack – iam-policy-validation-config-rule.
    Figure 3: Successful CloudFormation stack creation reported on the terminal

    Figure 3: Successful CloudFormation stack creation reported on the terminal

    Note: If the CloudFormation stack creation fails, go to the CloudFormation console and select the iam-policy-validation-config-rule stack. Choose Events to review the failure reason.

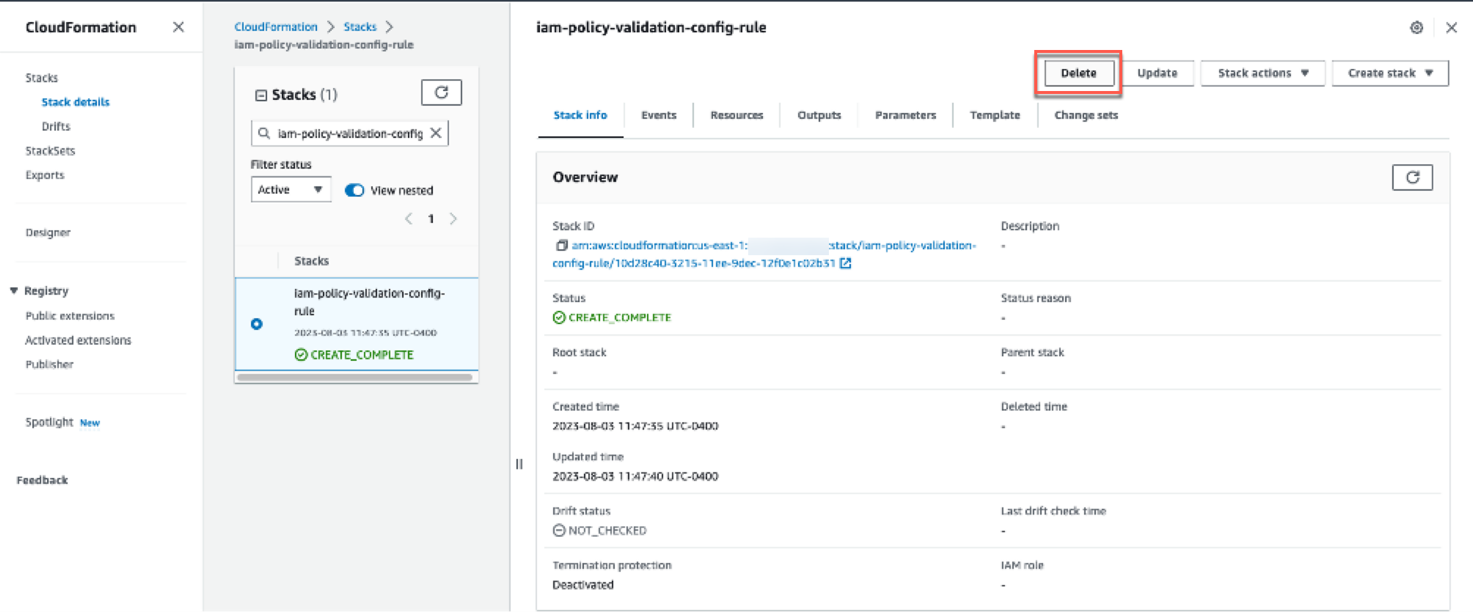
  7. After deployment, open the CloudFormation console and select the iam-policy-validation-config-rule stack.
  8. Choose Resources to see the resources created by the template.

Step 3: Check noncompliant resources discovered by AWS Config

The AWS Config rule is designed to mark resources that have IAM policies as noncompliant if the resources have validation findings found using the IAM Access Analyzer ValidatePolicy API.

  1. Open the AWS Config console
  2. Choose Rules from the navigation pane on the left and select policy-validation-config-rule.
    Figure 4: AWS Config rules page showing the rule details

    Figure 4: AWS Config rules page showing the rule details

  3. Scroll down on the page and filter Resources in Scope to see the noncompliant resources.
    Figure 5: AWS Config rules page showing noncompliant resources

    Figure 5: AWS Config rules page showing noncompliant resources

    Note: If the AWS Config rule isn’t invoked yet, you can choose Actions and select Re-evaluate to invoke it.

    Figure 6: AWS Config rules page showing evaluation invocation

    Figure 6: AWS Config rules page showing evaluation invocation

Step 4: Modify the AWS Config rule for exceptions

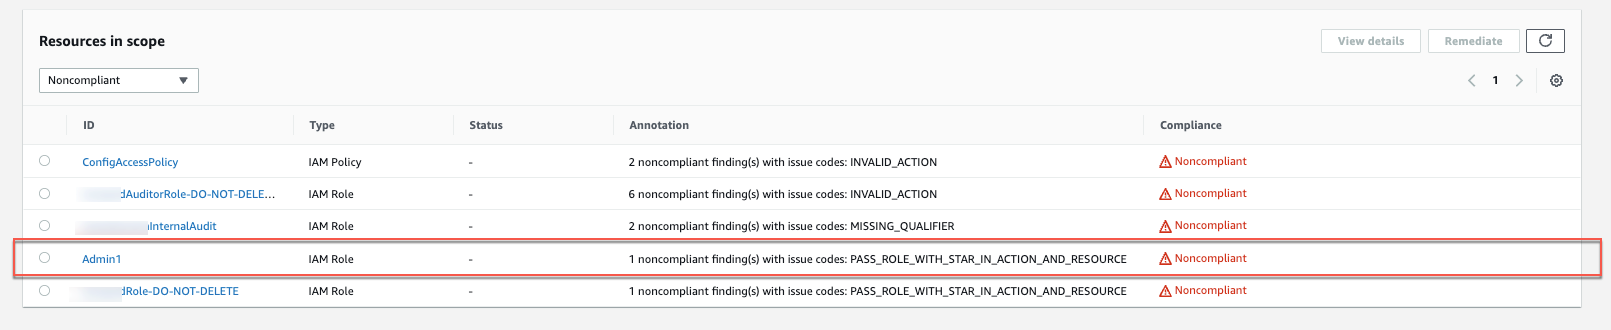
You might want to exempt certain resources from specific policy validation checks. For example, you might need to deploy a more privileged role—such as an administrator role—to your environment and you don’t want that role’s policies to have policy validation findings.

Figure 7: AWS Config rules page showing a noncompliant administrator role

Figure 7: AWS Config rules page showing a noncompliant administrator role

This section shows you how to configure an exceptions file to exempt specific resources.

  1. Start by configuring an exceptions file similar to the one that follows to log general warning findings across the accounts in your organization to make sure your policies conform to best practices by setting ignoreWarningFindings to False.
  2. Additionally, you might want to create an exception that allows administrator roles to use the iam:PassRole action on another role. This combination of action and resource is usually reserved for privileged users. The example file below shows an exception for all the roles created with Administrator in the role path from account 12345678912.

    Example exceptions file:

    {
    "global":{
    "ignoreWarningFindings":false
    },
    "12345678912":{
    "ignoreFindingsWith":[
    {
    "issueCode":"PASS_ROLE_WITH_STAR_IN_ACTION_AND_RESOURCE",
    "resourceType":"AWS::IAM::Role",
    "resourceName":"Administrator/*"
    }
    ]
    }
    }
  3. After the exceptions file is ready, upload the JSON file to the S3 bucket you created as a part of the prerequisites.

    You can manage this exceptions file by hosting it in a central Git repository. When teams need to exempt a particular resource from these policy validation checks, they can submit a pull request to the central repository. An approver can then approve or reject this request and, if approved, deploy the updated exceptions file.

  4. Modify the bucket policy so that the bucket is accessible to your AWS Config rule if the rule is operating in a different account than the bucket was created in. Below is an example of a bucket policy that allows the accounts in your organization to read the exceptions file.
    {
          "Version": "2012-10-17",
          "Statement": [{
              "Effect": "Allow",
              "Principal": {"AWS": "*"},
              "Action": "s3:GetObject",
              "Resource": "arn:aws:s3:::EXAMPLE-BUCKET/my-exceptions-file.json",
              "Condition": {
                  "StringEquals": {
                      "aws:PrincipalOrgId": "<your organization id here>"
                  }
              }
          }]
    }

    Note: For more examples visit example policy validation exceptions file contents.

  5. Deploy the CloudFormation template again using the ExceptionsS3BucketName and ExceptionsS3FilePrefix parameters. The file prefix should be the full prefix of the S3 object exceptions file.
    aws cloudformation deploy \
        --stack-name iam-policy-validation-config-rule \
        --template-file templates/template.yaml \
        --capabilities CAPABILITY_IAM CAPABILITY_NAMED_IAM \
        --parameter-overrides RegionToValidateGlobalResources='<us-east-1>' \
            		ExceptionsS3BucketName='EXAMPLE-BUCKET' \
           		 ExceptionsS3FilePrefix='my-exceptions-file.json'

  6. After you see the Successfully created/updated stack – iam-policy-validation-config-rule message on the terminal or command line and the AWS Config rule has been re-evaluated, the resources mentioned in the exception file should show as Compliant.
    Figure 8: Resource exception result

    Figure 8: Resource exception result

You can find additional customization options in the exceptions file schema.

Cleanup

To avoid recurring charges and to remove the resources used in testing the solution outlined in this post, use the CloudFormation console to delete the iam-policy-validation-config-rule CloudFormation stack.

Figure 9: AWS CloudFormation stack deletion

Figure 9: AWS CloudFormation stack deletion

Conclusion

In this post, we demonstrated how you can set up a centralized compliance and monitoring workflow using AWS IAM Access Analyzer policy validation with AWS Config rules to validate identity-based and resource-based policies attached to resources in your account. Using this solution, you can create a single pane of glass to monitor resources and govern centralized compliance for AWS Config-supported resources across accounts. You can also build and maintain exceptions customized to your environment as shown in the example policy validation exceptions file. You can visit the Access Analyzer policy checks reference page for a complete list of policy check validation errors and resolutions.

 
If you have feedback about this post, submit comments in the Comments section below. If you have questions about this post, contact AWS Support.

Want more AWS Security news? Follow us on Twitter.

Author

Matt Luttrell

Matt is a Sr. Solutions Architect on the AWS Identity Solutions team. When he’s not spending time chasing his kids around, he enjoys skiing, cycling, and the occasional video game.

Swara Gandhi

Swara Gandhi

Swara is a solutions architect on the AWS Identity Solutions team. She works on building secure and scalable end-to-end identity solutions. She is passionate about everything identity, security, and cloud.

How to communicate like a GitHub engineer: our principles, practices, and tools

Post Syndicated from Ben Balter original https://github.blog/engineering/engineering-principles/how-to-communicate-like-a-github-engineer-our-principles-practices-and-tools/

As a company that’s been remote-first since day one, GitHub Engineering has learned a lot about how to communicate effectively across time zones, teams, and tools. We’ve distilled our experience into a set of guidelines that we call “How we communicate,” and we’re sharing them with you today. We hope that by sharing our communication practices publicly, we can help other organizations that are embracing remote work or want to improve their collaboration culture.

Read on to learn more about how we use GitHub to build GitHub, how we turned our guiding communications principles into prescriptive practices to manage our internal communications signal-to-noise ratio, and how you can contribute to the ongoing conversation.

Using GitHub to build GitHub

Unlike many companies that made the transition to remote work during the pandemic, GitHub has been majority remote since its founding 15 years ago. GitHub’s remote-first communication style originally drew inspiration from the open source community. Open source development rarely requires the global community of collaborators and contributors to be in a certain place, at a certain time, in order to participate in the ongoing conversation. This is the same approach GitHub Engineering takes to our own internal communication. We believe that asynchronous communication is the best way to work globally and at scale, and as a result, we’ve built our culture around it.

We’ve always used GitHub to build GitHub. GitHub is not only the place where we host and review code, but also where we plan, discuss, and document our work. We use issues, pull requests, projects, and discussions to track work, collaborate on features, and share information across teams. Many of these communications patterns grew organically, as developers adopted practices from the open source community for our own internal collaboration needs. We believe open practices are the best way to work with a global and diverse team, and to make decisions that are informed, inclusive, and scalable.

While asynchronous collaboration is deeply embedded in GitHub’s DNA, we have also long had a culture of each team enjoying a great deal of autonomy in deciding how they communicate day to day. This freedom has allowed teams to experiment and uncover novel practices, but it has also meant that working across teams previously required first negotiating a meta-conversation around how to communicate before any substantive work could occur–much like a new open source project negotiating with its newfound community. Having an open set of shared expectations within the engineering organization allows us to be more effective, mindful, and inclusive about how and where we communicate, leading us to make more well-informed decisions in a way that takes into account different needs, preferences, and time zones.

“How we communicate”

To define this set of shared expectations, the GitHub Engineering Operations and Culture team collaborated with more than 100 people across the engineering organization in the first half of 2023 to create guidance on “How we communicate.” This document was intended to encourage consistency over preference by outlining a common core of shared internal communication practices for all of GitHub Engineering in the form of opinionated guidance. Teams are still encouraged to adapt the practices for their unique circumstances, while maintaining a common “API” to interface with other teams.

Today, we are publishing our “How we communicate” guidance under a CC-BY-4.0 license, in the hopes that you’ll find it useful, especially if you’re evolving your own remote-first or remote-friendly culture; we welcome you to fork, modify, and use the documentation with attribution. We expect our guidance (lightly edited for the community, primarily to remove internal URLs and references) will evolve over time along with our organization, and, of course, pull requests are always welcome.

From guiding principles to prescriptive practices

To begin with our “How we communicate” guidance, we established eight guiding principles:

  • Be asynchronous first.
  • Write things down.
  • Make work visible and overcommunicate.
  • Prefer GitHub tools and workflows.
  • Embrace collaboration.
  • Foster a culture that values documentation maintenance.
  • Communicate openly, honestly, and authentically.
  • Remember, practicality beats purity.

From there, we began to define the specific practices that would help us live up to these principles. We started with the most common forms of communication, such as chat, discussions, issues, project boards, and pull requests, and went on to collaboratively author suggestions on how to manage notifications, run effective meetings, and schedule more inclusively.

Managing the signal-to-noise ratio

With well over 1,500 engineers across a number of functions, we faced a challenge not unique to any organization: how to keep everyone informed and engaged without overwhelming them with notifications. We wanted to create a system that allowed everyone to opt-in, rather than opt-out, and to get the information they needed in a digestible and skimmable way. As it was, either you got everything (which we jokingly referred to as the “fire hose” of notifications), or you opted out entirely (and ignored everything). Either way, Hubbers were likely to miss important information. We set out to create a system that minimized notification fatigue, while allowing people to subscribe to the topics they cared about.

We rely on GitHub Discussions heavily to share information within and across teams. It’s a natural choice, since engineers are already working on GitHub.com, and with things like comments, upvotes, and emoji reactions, discussions are a great way to start an asynchronous conversation on just about any topic.

Opt-in

To start, we encouraged teams to begin posting their discussions to the most logical repository, instead of directly to the main github/engineering repository. (For example, if a post was about GitHub Copilot, it should go in the github/copilot repository; if it was about GitHub Actions, it should go in the github/actions repository.) That way, those interested could subscribe to the repositories they cared about, and get email or web notifications when new discussions were posted. And the volume of notifications coming through github/engineering to the whole organization would be reduced.

Amplify widely

But some posts are rightfully intended for all of GitHub Engineering. Things like staff ships (early access to new features for staff), required actions, promotions, and updates to Engineering priorities are written with a broad audience in mind. To ensure we were still surfacing the most important information to the organization, we established a small set of “magic labels” that if applied to a post, would add it to a daily content roundup, automatically amplify the message in various places for all of GitHub Engineering to see.

For a peek at our taxonomy, here’s an excerpt from our GitHub Actions workflow that makes it easy for everyone to add the set of “magic labels” to their repositories:

label:
          - name: eng-action-required
            description: Upcoming process/workflow changes/activities requiring Engineering Hubbers to take action
          - name: eng-availability
            description: Discussions about availability, incident response, et al
          - name: eng-celebrations
            description: Celebrating Hubber promotions and other amazingness
          - name: eng-feedback-request
            description: Posts requesting feedback from the Engineering organization
          - name: eng-org-change
            description: Announcements related to organizational changes
          - name: eng-priorities
            description: Discussions related to Engineering priorities
          - name: eng-roundup
            description: Newsletters, weekly digests, and other content and team roundups
          - name: eng-show-and-tell
            description: Share what you've learned or show off something you've made
          - name: eng-staff-ship
            description: Announcements for features made available to Hubbers for feedback and early access
          - name: eng-strategy
            description: Discussions related to strategy and vision

Automate all the things!

We used GitHub Actions to schedule a workflow to automatically create daily and weekly roundups of activity across the organization based on those “magic labels,” posting the digests as discussion posts in the github/engineering repository.

Screenshot of the GitHub Actions workflow in the eng-ops-automations repository that creates roundups of activity based on labels and posts them as discussions in the github/engineering repository.

Like any other discussion post, these content roundups trigger web and email notifications from GitHub.com, and they’re also amplified in Slack channels. However, rather than receiving multiple notifications a day, these roundups reduce the daily notification to one (and also make it much easier to catch up on everything that happens while you’re out of the office!). To support the needs of those who prefer receiving notifications for every discussion post individually, rather than waiting for a daily roundup (aka to instead “drink from the fire hose”), we created an #engineering-discussions-firehose Slack channel, which streams every labeled post as it is posted.

Experiment with AI

With notifications reduced in our main github/engineering repository and discussions being posted in more logical repositories, enabling people to subscribe to more frequent notifications for specific topics, the last remaining step was to increase quick skimmability to allow for greater situational awareness without anyone having to spend all day reading teams’ discussion posts.

As part of our writing style, most of us include TL;DRs at the top of posts (internet slang for “too long, didn’t read,” a short summary of longer writing), but not every post author includes one. For posts that don’t have a human-authored TL;DR, we use Azure’s OpenAI service to draft a brief summary for us. That way, readers can quickly skim the daily digest (or fire hose) and decide if they want to click through to read more.

Here’s an excerpt of the prompt we use to summarize discussion posts:

// OpenAI
export const encodingModel = "gpt-3.5-turbo";
export const openaiModel = "gpt-35-turbo";
export const openaiPrompt = `
  The following is an internal discussion post from the engineering department at GitHub formatted in GitHub flavored Markdown. Please write a short summary appropriate for inclusion in a digest of internal discussion posts with the following requirements:

  - The summary should be no more than 3 sentences
  - The summary should focus on the most important and impactful information from the post, including key points and any calls to action
  - The summary should be detailed, thorough, to-the-point, and written for a technical audience, while maintaining clarity and conciseness
  - The communications style should be professional, but informal
  - The summary should use emoji where appropriate, but use emoji sparingly
  - The summary should be formatted in GitHub Flavored Markdown with no line breaks
  - DO NOT use the phrases "the engineering department" or "at GitHub"; instead, whenever possible, name the specific team in reference, or else use "we" to refer to the team or engineering department. For example, use, "We recently shipped a feature", and NOT, "The engineering department at GitHub recently shipped a feature".
  - Employees at GitHub are referred to as "Hubbers"
  - GitHub is ALWAYS capitalized as "GitHub", never "Github"
  - Teams are referred to as "the Actions team" or "the Copilot team", never just "actions team" or "copilot team"
`;

export const estimatedPromptTokens = 300;
export const completionTokens = 300;

Ironically, we relied heavily on GitHub Copilot to build the GitHub Actions workflow (it’s been a while since these Hubbers have written “production-worthy” code), meaning robots helped humans to teach robots how to summarize the work of humans, which other robots then published out to other humans. 🤖 Summarization is a core workflow for AI, and so far, while it’s not always perfect, it’s been working well. If you’re interested in the prompt we’re using (or want to help us improve it!), you can find it here.

Let’s build from here

We’re excited to share our “How we communicate” guidance with you, and we hope that it will inspire you to adopt or improve some of the practices we’ve found useful. Here are some suggestions to get you started:

  • Principles: Establish a set of guiding principles for your organization’s internal communications (fork and clone our guidelines for a head start!). What core values do you want to promote, and how can you ensure everyone is aligned around those values so there’s a common “API” across teams?
  • Practices: Use those principles to develop practices. What specific practices can you adopt to help you live up to your principles, and how can you ensure those practices are adopted across the organization?
  • Experimentations: Experiment with automation and emerging technologies to improve your practices. How can you use AI and other tools (like GitHub Actions) to automate your workflows and improve the signal-to-noise ratio?

We recognize communication is an ongoing and evolving process, and different teams and cultures may have different needs and preferences. We welcome your feedback, suggestions, and contributions to our public repository: https://github.com/github/how-engineering-communicates

Happy communicating! 🎉

The post How to communicate like a GitHub engineer: our principles, practices, and tools appeared first on The GitHub Blog.

All Cloudflare Customers Protected from Atlassian Confluence CVE-2023-22515

Post Syndicated from Himanshu Anand original http://blog.cloudflare.com/all-cloudflare-customers-protected-atlassian-cve-2023-22515/

All Cloudflare Customers Protected from Atlassian Confluence CVE-2023-22515

All Cloudflare Customers Protected from Atlassian Confluence CVE-2023-22515

On 2023-10-04 at 13:00 UTC, Atlassian released details of the zero-day vulnerability described as “Privilege Escalation Vulnerability in Confluence Data Center and Server” (CVE-2023-22515), a zero-day vulnerability impacting Confluence Server and Data Center products.  

Cloudflare was warned about the vulnerability before the advisory was published and worked with Atlassian to proactively apply protective WAF rules for all customers. All Cloudflare customers, including Free, received the protection enabled by default. On 2023-10-03 14:00 UTC Cloudflare WAF team released the following managed rules to protect against the first variant of the vulnerability observed in real traffic.

Rule ID

Description

Default Action

New Managed Rules

…ec9f34e1

Atlassian Confluence – Privilege Escalation – CVE:CVE-2023-22515

Block

Legacy Managed Rules

100604 and 100605

Atlassian Confluence – Privilege Escalation – CVE:CVE-2023-22515

Block

Free Managed Rule

…91935fcb

Atlassian Confluence – Privilege Escalation – CVE:CVE-2023-22515

Block

When CVE-2023-22515 is exploited, an attacker could access public Confluence Data Center and Server instances to create unauthorized Confluence administrator accounts to access the instance. According to the advisory the vulnerability is assessed by Atlassian as critical. At the moment of writing a CVSS score is not yet known. More information can be found in the security advisory, including what versions of Confluence Server are affected.

CVE-2023-22515: Zero-Day Privilege Escalation in Confluence Server and Data Center

Post Syndicated from Caitlin Condon original https://blog.rapid7.com/2023/10/04/etr-cve-2023-22515-zero-day-privilege-escalation-in-confluence-server-and-data-center/

CVE-2023-22515: Zero-Day Privilege Escalation in Confluence Server and Data Center

On October 4, 2023, Atlassian published a security advisory on CVE-2023-22515, a critical privilege escalation vulnerability affecting on-premises instances of Confluence Server and Confluence Data Center. Atlassian does not specify the root cause of the vulnerability or where exactly the flaw resides in Confluence implementations, though the indicators of compromise include mention of the /setup/* endpoints.

The advisory indicates that “Atlassian has been made aware of an issue reported by a handful of customers where external attackers may have exploited a previously unknown vulnerability in publicly accessible Confluence Data Center and Server instances to create unauthorized Confluence administrator accounts and access Confluence instances.”

It’s unusual, though not unprecedented, for a privilege escalation vulnerability to carry a critical severity rating. Atlassian’s advisory implies that the vulnerability is remotely exploitable, which is typically more consistent with an authentication bypass or remote code execution chain than a privilege escalation issue by itself. It’s possible that the vulnerability could allow a regular user account to elevate to admin — notably, Confluence allows for new user sign-ups with no approval, but this feature is disabled by default.

Since CVE-2023-22515 has been exploited in user environments, Atlassian recommends that on-premises Confluence Server and Data Center customers update to a fixed version immediately, or else implement mitigations. The advisory notes that “Instances on the public internet are particularly at risk, as this vulnerability is exploitable anonymously.” Indicators of compromise are included in the advisory and are reproduced in the Mitigation guidance section below.

Affected Products

The following versions of Confluence Server and Data Center are affected:

  • 8.0.0
  • 8.0.1
  • 8.0.2
  • 8.0.3
  • 8.0.4
  • 8.1.0
  • 8.1.1
  • 8.1.3
  • 8.1.4
  • 8.2.0
  • 8.2.1
  • 8.2.2
  • 8.2.3
  • 8.3.0
  • 8.3.1
  • 8.3.2
  • 8.4.0
  • 8.4.1
  • 8.4.2
  • 8.5.0
  • 8.5.1

Versions prior to 8.0.0 are not affected by this vulnerability. Atlassian Cloud sites are not affected by this vulnerability. Confluence sites accessed via an atlassian.net domain are hosted by Atlassian and are not vulnerable to this issue.

Fixed versions:

  • 8.3.3 or later
  • 8.4.3 or later
  • 8.5.2 (Long Term Support release) or later

For more information, refer to the Atlassian advisory and release notes.

Mitigation guidance

On-prem Confluence Server and Confluence Data Center customers should upgrade to a fixed version immediately, restricting external network access to vulnerable systems until they are able to do so. The Atlassian advisory says that known attack vectors can be mitigated by blocking access to the /setup/* endpoints on Confluence instances. Directions on doing this are in the advisory.

Atlassian recommends checking all affected Confluence instances for the following indicators of compromise:

  • Unexpected members of the confluence-administrator group
  • Unexpected newly created user accounts
  • Requests to /setup/*.action in network access logs
  • Presence of /setup/setupadministrator.action in an exception message in atlassian-confluence-security.log in the Confluence home directory

Rapid7 customers

InsightVM and Nexpose customers will be able to assess their exposure to CVE-2023-22515 with a version-based vulnerability check expected to be available in today’s (October 4) content release.

Building a serverless document chat with AWS Lambda and Amazon Bedrock

Post Syndicated from Pascal Vogel original https://aws.amazon.com/blogs/compute/building-a-serverless-document-chat-with-aws-lambda-and-amazon-bedrock/

This post is written by Pascal Vogel, Solutions Architect, and Martin Sakowski, Senior Solutions Architect.

Large language models (LLMs) are proving to be highly effective at solving general-purpose tasks such as text generation, analysis and summarization, translation, and much more. Because they are trained on large datasets, they can use a broad generalist knowledge base. However, as training takes place offline and uses publicly available data, their ability to access specialized, private, and up-to-date knowledge is limited.

One way to improve LLM knowledge in a specific domain is fine-tuning them on domain-specific datasets. However, this is time and resource intensive, requires specialized knowledge, and may not be appropriate for some tasks. For example, fine-tuning won’t allow an LLM to access information with daily accuracy.

To address these shortcomings, Retrieval Augmented Generation (RAG) is proving to be an effective approach. With RAG, data external to the LLM is used to augment prompts by adding relevant retrieved data in the context. This allows for integrating disparate data sources and the complete separation of data sources from the machine learning model entirely.

Tools such as LangChain or LlamaIndex are gaining popularity because of their ability to flexibly integrate with a variety of data sources such as (vector) databases, search engines, and current public data sources.

In the context of LLMs, semantic search is an effective search approach, as it considers the context and intent of user-provided prompts as opposed to a traditional literal search. Semantic search relies on word embeddings, which represent words, sentences, or documents as vectors. Consequently, documents must be transformed into embeddings using an embedding model as the basis for semantic search. Because this embedding process only needs to happen when a document is first ingested or updated, it’s a great fit for event-driven compute with AWS Lambda.

This blog post presents a solution that allows you to ask natural language questions of any PDF document you upload. It combines the text generation and analysis capabilities of an LLM with a vector search on the document content. The solution uses serverless services such as AWS Lambda to run LangChain and Amazon DynamoDB for conversational memory.

Amazon Bedrock is used to provide serverless access to foundational models such as Amazon Titan and models developed by leading AI startups, such as AI21 Labs, Anthropic, and Cohere. See the GitHub repository for a full list of available LLMs and deployment instructions.

You learn how the solution works, what design choices were made, and how you can use it as a blueprint to build your own custom serverless solutions based on LangChain that go beyond prompting individual documents. The solution code and deployment instructions are available on GitHub.

Solution overview

Let’s look at how the solution works at a high level before diving deeper into specific elements and the AWS services used in the following sections. The following diagram provides a simplified view of the solution architecture and highlights key elements:

The process of interacting with the web application looks like this:

  1. A user uploads a PDF document into an Amazon Simple Storage Service (Amazon S3) bucket through a static web application frontend.
  2. This upload triggers a metadata extraction and document embedding process. The process converts the text in the document into vectors. The vectors are loaded into a vector index and stored in S3 for later use.
  3. When a user chats with a PDF document and sends a prompt to the backend, a Lambda function retrieves the index from S3 and searches for information related to the prompt.
  4. An LLM then uses the results of this vector search, previous messages in the conversation, and its general-purpose capabilities to formulate a response to the user.

As can be seen on the following screenshot, the web application deployed as part of the solution allows you to upload documents and list uploaded documents and their associated metadata, such as number of pages, file size, and upload date. The document status indicates if a document is successfully uploaded, is being processed, or is ready for a conversation.

Web application document list view

By clicking on one of the processed documents, you can access a chat interface, which allows you to send prompts to the backend. It is possible to have multiple independent conversations with each document with separate message history.

Web application chat view

Embedding documents

Solution architecture diagram excerpt: embedding documents

When a new document is uploaded to the S3 bucket, an S3 event notification triggers a Lambda function that extracts metadata, such as file size and number of pages, from the PDF file and stores it in a DynamoDB table. Once the extraction is complete, a message containing the document location is placed on an Amazon Simple Queue Service (Amazon SQS) queue. Another Lambda function polls this queue using Lambda event source mapping. Applying the decouple messaging pattern to the metadata extraction and document embedding functions ensures loose coupling and protects the more compute-intensive downstream embedding function.

The embedding function loads the PDF file from S3 and uses a text embedding model to generate a vector representation of the contained text. LangChain integrates with text embedding models for a variety of LLM providers. The resulting vector representation of the text is loaded into a FAISS index. FAISS is an open source vector store that can run inside the Lambda function memory using the faiss-cpu Python package. Finally, a dump of this FAISS index is stored in the S3 bucket besides the original PDF document.

Generating responses

Solution architecture diagram excerpt: generating responses

When a prompt for a specific document is submitted via the Amazon API Gateway REST API endpoint, it is proxied to a Lambda function that:

  1. Loads the FAISS index dump of the corresponding PDF file from S3 and into function memory.
  2. Performs a similarity search of the FAISS vector store based on the prompt.
  3. If available, retrieves a record of previous messages in the same conversation via the DynamoDBChatMessageHistory integration. This integration can store message history in DynamoDB. Each conversation is identified by a unique ID.
  4. Finally, a LangChain ConversationalRetrievalChain passes the combination of the prompt submitted by the user, the result of the vector search, and the message history to an LLM to generate a response.

Web application and file uploads

Solution architecture diagram excerpt: web application

A static web application serves as the frontend for this solution. It’s built with React, TypeScript, Vite, and TailwindCSS and deployed via AWS Amplify Hosting, a fully managed CI/CD and hosting service for fast, secure, and reliable static and server-side rendered applications. To protect the application from unauthorized access, it integrates with an Amazon Cognito user pool. The API Gateway uses an Amazon Cognito authorizer to authenticate requests.

Users upload PDF files directly to the S3 bucket using S3 presigned URLs obtained via the REST API. Several Lambda functions implement API endpoints used to create, read, and update document metadata in a DynamoDB table.

Extending and adapting the solution

The solution provided serves as a blueprint that can be enhanced and extended to develop your own use cases based on LLMs. For example, you can extend the solution so that users can ask questions across multiple PDF documents or other types of data sources. LangChain makes it easy to load different types of data into vector stores, which you can then use for semantic search.

Once your use case involves searching across multiple documents, consider moving from loading vectors into memory with FAISS to a dedicated vector database. There are several options for vector databases on AWS. One serverless option is Amazon Aurora Serverless v2 with the pgvector extension for PostgreSQL. Alternatively, vector databases developed by AWS Partners such as Pinecone or MongoDB Atlas Vector Search can be integrated with LangChain. Besides vector search, LangChain also integrates with traditional external data sources, such as the enterprise search service Amazon Kendra, Amazon OpenSearch, and many other data sources.

The solution presented in this blog post uses similarity search to find information in the vector database that closely matches the user-supplied prompt. While this works well in the presented use case, you can also use other approaches, such as maximal marginal relevance, to find the most relevant information to provide to the LLM. When searching across many documents and receiving many results, techniques such as MapReduce can improve the quality of the LLM responses.

Depending on your use case, you may also want to select a different LLM to achieve an ideal balance between quality of results and cost. Amazon Bedrock is a fully managed service that makes foundational models (FMs) from leading AI startups and Amazon available via an API, so you can choose from a wide range of FMs to find the model that’s best suited for your use case. You can use models such as Amazon Titan, Jurassic-2 from AI21 Labs, or Anthropic Claude.

To further optimize the user experience of your generative AI application, consider streaming LLM responses to your frontend in real-time using Lambda response streaming and implementing real-time data updates using AWS AppSync subscriptions or Amazon API Gateway WebSocket APIs.

Conclusion

AWS serverless services make it easier to focus on building generative AI applications by providing automatic scaling, built-in high availability, and a pay-for-use billing model. Event-driven compute with AWS Lambda is a good fit for compute-intensive, on-demand tasks such as document embedding and flexible LLM orchestration.

The solution in this blog post combines the capabilities of LLMs and semantic search to answer natural language questions directed at PDF documents. It serves as a blueprint that can be extended and adapted to fit further generative AI use cases.

Deploy the solution by following the instructions in the associated GitHub repository.

For more serverless learning resources, visit Serverless Land.

How to implement multi-tenancy with Amazon Pinpoint

Post Syndicated from Tristan Nguyen original https://aws.amazon.com/blogs/messaging-and-targeting/how-to-implement-multi-tenancy-with-amazon-pinpoint/

Navigating Multi-Tenancy in Amazon Pinpoint

Businesses are constantly evolving, often managing multiple product lines, customer segments, or even geographical locations. Furthermore, many business-to-business (B2B) companies that are Independent Software Vendors (ISVs) will often need to manage their customer’s marketing automation environment. This complexity necessitates a robust customer engagement strategy that can adapt and scale efficiently. However, managing disparate systems for each tenant is not only cumbersome but also resource-intensive, leading to increased operational costs and potential data silos. A multi-tenancy setup in Amazon Pinpoint addresses these challenges head-on, allowing businesses to streamline their customer engagement efforts under a unified architecture.

The question is not just whether to adopt multi-tenancy, but how to implement it in a way that aligns with your unique business requirements. Amazon Pinpoint offers multiple approaches to achieve this. This blog explores three:

  • Single Pinpoint Project: Simple but demands careful permissions management.
  • Multiple Pinpoint Projects: Granular control but limited by soft project quotas.
  • Multiple Account & Multi Pinpoint Projects: Highly scalable but needs comprehensive monitoring.

We’ll delve into the pros, cons, and best use-cases for each as well as how to choose the different multi-tenancy configuration depending on your communications channels needs, guiding you to make an informed architectural decision.

In this blog, we’ll cut through the complexity, helping you align your Amazon Pinpoint architecture with your business goals. Let’s get started.

Single Account / Single Project (SA/SP)

Overview

In a Single Pinpoint Project setup, all customer engagement activities reside within one project and multi-tenancy within this context will leverage customer endpoint attributes. This streamlined approach allows for easy management, especially for those new to Amazon Pinpoint. A configuration example for this case is shown below:

Single Account / Single Project (SA/SP)

When preparing one Pinpoint Project and managing information for multiple tenants, tenant information can be managed by using custom user attributes of endpoints. Also, campaign information can be managed for each tenant by using the tag function for campaign information. The elements required to take this configuration are shown below.

  • S3 buckets that hold customer data:
    • Prepare an S3 bucket to store customer information lists to be imported into Pinpoint. Amazon Pinpoint allows you to import CSV files in S3 as segments. In order to make settings for each tenant in Amazon Pinpoint, we will include tenant information as custom user attributes in the CSV file.
  • 1 Amazon Pinpoint Project:
    • Create 1 Amazon Pinpoint Project.
    • Settings for each channel to be distributed are also required.
    • Campaign information can be assigned to tenant information by using the tag function.
  • Amazon Kinesis:
  • Athena and S3 buckets to analyze event data:
    • Store Amazon Pinpoint event data in S3 and analyze it via Athena. Take advantage of this solution.

One thing to keep in mind when adopting this configuration is that customer endpoint information exists in the same Pinpoint Project. It is possible to specify values that can be used to identify each tenant, such as custom attributes, and solve the problem with AWS Identity and Access Management (IAM) policies, but it is necessary to manage access rights and attributes on your own.

Also, to add an endpoint, you’ll need to specify its Channel and Address. Take note that one project cannot have the same channel and address for different endpoints. From the above, if the channel and address of the endpoint do not overlap between tenants, it is possible to construct your own access permission control, then this pattern can be examined.

Since fewer components are required compared to other patterns, the configuration is easier to start with. Some customers that want to build on top of Pinpoint API and want to simplify configuration on the Pinpoint side as much as possible can also choose this option. However, this approach can get complex to manage later on as you onboard more tenants. The issue presents itself when you want to create detailed reporting for your tenant in this configuration. You’ll have to have dedicated tags on each campaigns, journeys to operationalize granular reporting for your Amazon Pinpoint project.

Lastly, take note of service limits per Amazon Pinpoint project/AWS account to ensure your use case will be scalable should the need arise.

Single Account / Multiple Projects (SA/MP)

Overview

For this architecture, you are still using a single AWS account to host your Amazon Pinpoint environment, however, you will be creating multiple projects for each customer or tenant. A configuration example for this case is shown diagram.

Single Account / Multiple Projects (SA/MP)

In this example, we will create multiple Amazon Pinpoint Projects. One major difference from the case of the Single Pinpoint Project is that it is possible to completely separate customer endpoint information. When importing customer data segments, it is possible to manage each tenant in a separate state simply by importing them from S3 into the target Pinpoint Project. This makes it easy to control permissions via IAM policies.

Also, with Amazon Pinpoint, you can use email addresses, SMS numbers, message templates, etc. for transmission obtained with the relevant account in common to all projects, and event data for each project can be aggregated via Amazon Kinesis. By adopting such a configuration, you gain the benefits of separating endpoint information per project while still retaining basic setting information management and operator operations.

An example starter solution architecture to set up this configuration are shown below.

  • S3 buckets that hold customer data:
    • Similar to SA/SP, prepare an S3 bucket to store a list of customer information to be imported into Pinpoint. CSV to be imported must be prepared for each project.
  • Amazon DynamoDB Table:
    • Prepare a DynamoDB (or other key-value database) table to manage Pinpoint project information. Tenant information can also be stored as metadata in the DynamoDB table.
  • AWS Lambda:
    • Create a Pinpoint Project using Lambda. Amazon Pinpoint allows you to create and configure projects using the Amazon Pinpoint API, the AWS SDK, or the AWS Command Line Interface (AWS CLI). Thus, it is possible to automate the creation of the Pinpoint project and associated campaigns/journeys. Tenant information is also registered in DynamoDB at the time of creation.
  • Multiple Amazon Pinpoint Projects:
    • This is a Project created by Lambda above. There will now be a Pinpoint Project for each tenant, and endpoint information will be completely separated. It is also easy to control access rights for each project by using the IAM function.
    • Message templates: templates can be created and shared across projects.
    • By using Amazon Pinpoint’s event stream settings, campaign/journeys/app/channels events can be streamed to Amazon Kinesis. Multiple Amazon Pinpoint projects can all stream to one Amazon Kinesis stream. When setup correctly, event data will be tagged with the relevant tenant information so that an analytics solution can decompose the stream later on.
  • Athena and S3 buckets to analyze event data:
    • Amazon Pinpoint event data is stored in Amazon S3 and analyzed via Amazon Athena. The analytics solution, Amazon Athena in this case will be responsible for filtering event data and according to the tenant. Refer to this solution for more details.

Note that Pinpoint projects have a soft limit of 100 projects per AWS account, which can be increased via raising a Support Ticket, other quotas also apply at the project and the account level which should be taken into account.

From the above, it is necessary to note that there are restrictions on quotas per account when using the SA/MP and more initial configurations would be required to automate the process of project creation for individual tenants. However, when compared to SA/SP architecture,

Multiple Accounts & Multi Pinpoint Projects (MA/MP)

Overview

Before diving into the MA/MP approach, it’s crucial to understand the role of AWS Organizations in this configuration. AWS Organizations allows you to consolidate multiple AWS accounts into an organization to achieve centralized governance and billing. This feature is particularly useful in a MA/MP setup, as it enables streamlined management of multiple AWS accounts and Amazon Pinpoint projects from a single central management AWS account. For more information on AWS Organizations, you can visit the official AWS Organizations documentation.

In an MA/MP setup, we utilize separate AWS Accounts for each customer or tenant. A configuration example for this case is shown below.

In this example, we have created a Management account and prepared multiple AWS accounts under it. The management account manages the AWS account ID and the Pinpoint project ID, and has a configuration created with Lambda. Customer data and Event Stream Data are managed through a Management account, and information on each project is aggregated. A major benefit of this configuration is the ability to segregate actions of individual tenants, preventing the such as noisy neighbours antipattern. It also enables AWS accounts from being freed from quota restrictions that cannot be handled by a single AWS account. Additionally, Amazon Pinpoint has excellent CloudFormation coverage, and it is also possible to deploy highly reproducible architectures automatically.

The elements required to set up this configuration are shown below.

  • AWS Organizations:
    • Set up Organizations to manage multiple accounts. See Best Practices for setting up multiple accounts.
  • Management account:
    • Create an account to manage multiple account information. Here we will set the following elements. Use IAM roles and Service control policies (SCPs) when manipulating resources across accounts. This allows cross-account access. The required elements are the same as the SA/MP described above.
      • S3 buckets that hold customer data: With AWS, you can utilize S3 data across accounts. Set up cross-account settings and securely link customer data to each account.
      • Dynamo DB Table: Holds your AWS account ID, Pinpoint Project ID, and management information associated with it.
      • AWS Lambda: Create a Pinpoint project using Lambda.
      • Athena and S3 buckets to analyze event data: Event information from multiple accounts and Pinpoint projects is aggregated and analyzed.
  • AWS accounts and Pinpoint projects per tenant:
    • Depending on how tenants are separated, prepare an AWS account and Pinpoint Project. You can also consider automating account creation by using AWS CloudFormation.
    • There are cases where it is necessary to set the distribution channel email address, SMS number, etc. for each account. See the next section for details.
    • Amazon Kinesis is prepared for each account, but everything is stored in the same S3 in the Management account for easier bird-eye’s view reporting.

One thing to keep in mind is that since accounts are separated, it becomes necessary to manage each one separately. For example, newly created account will be placed in the sandbox state, and an application for actual use via support tickets is required for each account. Also, since all reputation is done on a single account, it is also necessary to monitor reputation for each account.

Navigating Channels in Amazon Pinpoint: Aligning Service Delivery with Architecture

Beyond choosing a Pinpoint architecture for multi-tenancy, it’s pivotal to decide which channels best deliver your services and how that decision is affected by your choice of multi-tenancy architecture. Below is a non-exhaustive lists of capabilities in Amazon Pinpoint that will help with your multi-channel, multi-tenancy configurations as well as potential blockers that you’d need to be aware of for each channels.

Email

Email is one of the most versatile channels, with integration with Amazon SES’s configuration sets and email suppression list capability, easily fitting into any of the three multi-tenancy models.

  • Configurations Sets: Using configuration sets, you’d be able to segregate your email sending activities using different IP Pools, as well as different event destinations.
    • You can use configuration sets in both Amazon Pinpoint and Amazon SES. Configuration sets rules that you configure in Amazon SES are also applied to email messages that you send using Amazon Pinpoint.
    • SA/SP and SA/MP: Email templates and sending IP addresses needs to be tagged using configuration sets for each tenant in the Pinpoint project.
    • MA/MP: Email templates and sending IP address can be sent using the account default, or follow granular tagging using configuration sets.
  • Email Suppression List: Suppression list is managed automatically at the account level. Alternatively, you can specify whether a specific configuration can override the account-level suppression list.
    • SA/SP and SA/MP:
      • All tenants will also follow the same account suppression list:
        • If any tenant sends to an email address that hard-bounced or complaint, all other tenants will also be unable to send emails to the same address.
        • You will have to manually override the account-level suppression list for each email addresses.
    • MA/MP:
      • If one of your tenant sends an email to a hard-bounced or complaint address, only the AWS account that the tenant belongs to will respect the suppression list i.e. other tenants in other AWS account can still send email to that email address.
  • Noisy Neighbour Threat: Broadly, this occurs when one tenant’s performance is degraded because of the activities of another tenant. Applied to email, the anti-pattern needs to be addressed because you don’t want one bad actor tenant to affect the entire environment’s email sending activity.
    • SA/SP and SA/MP:
      • Because email bounce and complaint rates are tracked at the account level, it is possible your entire account email sending domain to be blocked due to high bounce/complaint incidences from one bad tenant.
      • To mitigate this, it’s best practice to set up dedicated configuration sets and alarms to alert when any individual tenant is exhibiting high bounce/complaint rate.
    • MA/MP:
      • Offers the most segregation and ensure email identities/domains are only usable by one tenant/account.
  • Email Sending Quota:
    • Email daily sending quota and email sending rate live at the account level.
    • SA/SP and SA/MP:
      • You would need to anticipate the total daily sending quota and sending rate for all tenants in your AWS account and raise the service limits accordingly. Therefore, more planning will be involved to estimate the correct service limit threshold.
    • MA/MP:
      • You can raise service limits per individual tenant’s needs since each tenant will be on a separate AWS account.
      • It is best practice to have business process in place for individual tenant to notify of their email sending quota request in advance so that it can be raised accordingly for their AWS account.
  • For further discussion into sending emails in a multi-tenancy environment, refer to this AWS blog on Multi-Tenancy in SES.

SMS

  • Origination Identity procurement: When opting for MA/MP setup, remember that OIDs (phone numbers) are bound to AWS accounts.
  • Since OIDs do not carry across account, you will need to repeat the procurement process for every new AWS account.Number Pooling: This feature groups phone numbers or sender IDs. It’s particularly useful in a Single Project model to segment communications per tenant.
  • Configuration Sets: With the release of the V2 SMS and Voice API, you can now use configuration sets to manage your SMS opt-out lists, OIDs and event streaming destinations for a multi-tenant environment.
  • Noisy Neighbour Threat:
    • SA/SP and SA/MP:
      • Take note that if you do not specify an OID in your API call, Amazon Pinpoint will attempt to use the most suitable (in terms of throughput and deliverability) OID to send your SMS. This
      • Similar to email, you can leverage number pooling and configuration sets to segregate SMS sending activity within a single account. This helps protect’s your SMS OID reputation because it can be costly and time-consuming to request new OIDs.
    • MA/MP:
      • Offers the most segregation and ensure numbers are only usable by one tenant/account.
  • SMS Opt Outs: Similar to the email channel’s suppression list, opt-outs are managed per account and configuration sets. Therefore, in a MA/MP setup, a customer that has opted out from communication in one account can still receive communications from other accounts.

Push Notifications

Amazon Pinpoint integrates with various push services like FCM, APNS, Baidu Cloud Push, and ADM.

  • Project-level Authentication: Authentication information is set at the Pinpoint Project level, requiring separate management.
    • Therefore, you will not be able to use the SA/SP architecture for multiple tenants using different applications.
  • For more information, refer to the Mobile Push Guide

In-app Messages

  • Pinpoint Project Specific: Similar to push notifications, each Pinpoint Project can only house one in-app message application.
    • If you have multiple applications requiring in-app messages, you will not be able to employ the SA/SP architecture.
  • For more information, refer to the In-app Channel Documentation.

Custom Channels

  • Custom channels in Amazon Pinpoint allow you to send messages through any service that has an API, including third-party services. You can interact with APIs by using a webhook, or by calling an AWS Lambda function.If you are using custom channels extensively from Amazon Pinpoint, you’ll need to be aware of service limits in AWS Lambda, , especially if you’re considering SA/SP or SA/MP architectures.

Conclusion

In this blog, we’ve untangled the intricacies of implementing multi-tenancy in Amazon Pinpoint. Our deep dive covered three architectural patterns:

  • Single Account/Single Project (SA/SP): A beginner-friendly approach offering simple management but requiring meticulous permissions handling to segregate sending activity between different tenants.
  • Single Account/Multiple Projects (SA/MP): Offers granular control over customer data with slight increased in management complexity. However, this approach faces soft quotas and potential ‘Noisy Neighbor’ issues.
  • Multiple Accounts/Multiple Projects (MA/MP): Provides the most flexibility and isolation, albeit with increased management complexity.

Each approach comes with its own set of trade-offs related to ease of management/reporting, scalability, and control over customer data. Our discussion didn’t stop at architecture; we also examined how your multi-tenancy decisions will affect your channel configurations in Amazon Pinpoint. From email and SMS to push notifications, the architectural choices you make will have a direct impact on how efficiently you can manage these distribution channels. Armed with this information, you’re now better equipped to make informed decisions that align with your business objectives.

Call to Action

Your next step? Implement and architect your Amazon Pinpoint environment. Use the best practices and architectural guidelines outlined in this blog post as your north star. Going forward, the architectural blueprint you choose should be tailored to your specific needs—be it user count, company size, or distribution channels. Take into account not just the initial setup but also the long-term management aspects, including the respective service limits and quotas.

Relevant Links

About the Authors

Tristan (Tri) Nguyen

Tristan (Tri) Nguyen

Tristan (Tri) Nguyen is an Amazon Pinpoint and Amazon Simple Email Service Specialist Solutions Architect at AWS. At work, he specializes in technical implementation of communications services in enterprise systems and architecture/solutions design. In his spare time, he enjoys chess, rock climbing, hiking and triathlon.

Tatsuya Nakamura

Tatsuya Nakamura

Nakamura Tatsuya is a Solutions Architect in charge of enterprise companies at AWS. He is mainly in charge of the trading company industry and the distribution/retail industry, also supporting the implementation of Amazon Pinpoint for Japanese customers. His career so far includes ERP implementation support and multiple new web service launches.

Intel Discontinues 68 Intel Xeon Platinum Gold Silver and Bronze Processors

Post Syndicated from Cliff Robinson original https://www.servethehome.com/intel-discontinues-68-intel-xeon-platinum-gold-silver-and-bronze-processors/

Intel announced it is retiring 68 Xeon processors that were state-of-the art as late as April 2021 as it tries to push forward

The post Intel Discontinues 68 Intel Xeon Platinum Gold Silver and Bronze Processors appeared first on ServeTheHome.

OpenSSH 9.5 released

Post Syndicated from corbet original https://lwn.net/Articles/946497/

OpenSSH 9.5 is out. Significant changes include a transport-level ping
mechanism and keystroke timing obfuscation:

This attempts to hide inter-keystroke timings by sending
interactive traffic at fixed intervals (default: every 20ms) when
there is only a small amount of data being sent. It also sends fake
“chaff” keystrokes for a random interval after the last real
keystroke. These are controlled by a new ssh_config
ObscureKeystrokeTiming keyword.

Security updates for Wednesday

Post Syndicated from corbet original https://lwn.net/Articles/946496/

Security updates have been issued by Debian (glibc, postgresql-11, and thunderbird), Fedora (openmpi, pmix, prrte, and slurm), Gentoo (glibc and libvpx), Oracle (kernel), Red Hat (kernel), Slackware (libX11 and libXpm), SUSE (firefox, kernel, libeconf, libqb, libraw, libvpx, libX11, libXpm, mdadm, openssl-1_1, poppler, postfix, python311, rubygem-puma, runc, and vim), and Ubuntu (freerdp2, glibc, grub2-signed, grub2-unsigned, libx11, libxpm, linux-intel-iotg, linux-intel-iotg-5.15, linux-oracle, linux-oracle-5.15, and mozjs102).

Waiting Room adds multi-host and path coverage, unlocking broader protection and multilingual setups

Post Syndicated from Arielle Olache original http://blog.cloudflare.com/multihost-waiting-room/

Waiting Room adds multi-host and path coverage, unlocking broader protection and multilingual setups

Waiting Room adds multi-host and path coverage, unlocking broader protection and multilingual setups

Cloudflare Waiting Room protects sites from overwhelming traffic surges by placing excess visitors in a fully customizable virtual waiting room, admitting them dynamically as spots become available. Instead of throwing error pages or delivering poorly-performing site pages, Waiting Room empowers customers to take control of their end-user experience during unmanageable traffic surges.

Waiting Room adds multi-host and path coverage, unlocking broader protection and multilingual setups

A key decision customers make when setting up a waiting room is what pages it will protect. Before now, customers could select one hostname and path combination to determine what pages would be covered by a waiting room. Today, we are thrilled to announce that Waiting Room now supports coverage of multiple hostname and path combinations with a single waiting room, giving customers more flexibility and offering broader site coverage without interruptions to end-user flows. This new capability is available to all Enterprise customers with an Advanced Purchase of Waiting Room.

Waiting Room site placement

As part of the simple, no-coding-necessary process for deploying a waiting room, customers specify a hostname and path combination to indicate which pages are covered by a particular waiting room. When a site visitor makes a preliminary request to that hostname and path or any of its subpaths, they will be issued a waiting room cookie and either be admitted to the site or placed in a waiting room if the site is at capacity.

Last year, we added Waiting Room Bypass Rules, giving customers many options for creating exceptions to this hostname and path coverage. This unlocked capabilities such as User Agent Bypassing, geo-targeting, URL exclusions, and administrative IP bypassing. It also allowed for some added flexibility regarding which pages a waiting room would apply to on a customer’s site by adding the ability to exclude URLs, paths, and query strings. While this update allowed for greater specificity regarding which traffic should be gated by Waiting Room, it didn’t offer the broader coverage that many customers still needed to protect greater portions of their sites with a single waiting room.

Why customers needed broader Waiting Room coverage

Let’s review some simple yet impactful examples of why this broader coverage option was important for our customers. Imagine you have an online store, example.com, and you want to ensure that a single waiting room covers the entire customer journey — from the homepage, to product browsing, to checkout. Many sites would delineate these steps in the flow using paths: example.com/, example.com/shop/product1, example.com/checkout. Because Waiting Room assumes an implied wildcard at the end of a waiting room’s configured path, this use case was already satisfied for these sites. Thus, placing a waiting room at example.com/ would cover all the URLs associated with every step of this customer journey. In this setup, once a site visitor has passed the waiting room, they would not be re-queued at any step in their user flow because they are still using the same waiting room’s cookie, which indicates to Waiting Room that they are the same user between URLs.

However, many sites delineate different steps of this type of shopping flow using subdomains instead of or as well as paths. For example, many sites will have their checkout page on a different subdomain, such as checkout.example.com. Before now, if a customer had this site structure and wanted to protect their entire site with a single waiting room, they would have needed to deploy a waiting room at example.com/ and another at checkout.example.com/. This option was not ideal for many customers because a site visitor could be queued at two different parts of the same customer journey. This is because the waiting room at checkout.example.com/ would count the same visitor as a different user than the waiting room covering example.com/.

That said, there are cases where it is wise to separate waiting rooms on a single site. For example, a ticketing website could place a waiting room at its apex domain (example.com) and distinct waiting rooms with pre-queues on pages for specific events (example.com/popular_artist_tour). The waiting room set at example.com/ ensures that the main point of entry to the site does not get overwhelmed and crash when ticket sales for any one event open. The waiting room placed on the specific event page ensures that traffic for a single event can start queuing ahead of the event without impacting traffic going to other parts of the site.

Ultimately, whether a customer wants one or multiple waiting rooms to protect their site, we wanted to give our customers the flexibility to deploy Waiting Room however was best for their use cases and site structure. We’re thrilled to announce that Waiting Room now supports multi-hostname and path coverage with a single waiting room!

Getting started with multi-host and path coverage

Customers can now configure a waiting room on multiple hostname and path combinations — or routes — belonging to the same zone. To do so, navigate to Traffic > Waiting Room and select Create. The name of your domain will already be populated. To add additional routes to your waiting room configuration, select Add Hostname and Path. You can then enter another hostname and path to be covered by the same waiting room. Remember, there is an implied wildcard after each path. Therefore, creating a waiting room for each URL you want your waiting room to cover is unnecessary. Only create additional routes for URLs that wouldn’t be covered by the other hostname and path combinations you have already entered.

Waiting Room adds multi-host and path coverage, unlocking broader protection and multilingual setups

When deploying a waiting room that covers multiple hostname and path combinations, you must create a unique cookie name for this waiting room (more on that later!). Then, proceed with the same workflow as usual to deploy your waiting room.

Deploying a multi-language waiting room

A frequent customer request was the ability to cover a multi-language site with a single waiting room — offering different text per language while counting all site traffic toward the same waiting room limits. There are various ways a site can be structured to delineate between different language options, but the two most common are either by subdomain or path. For a site that uses path delineation, this could look like example.com/en and example.com/es for English and Spanish, respectively. For a site using subdomain delineation, this could look like en.example.com/ and es.example.com/. Before multihost Waiting Room coverage, the subdomain variation would not have been able to be covered by a single waiting room.

Waiting Room’s existing configuration options already supported the path variation. However, this was only true if the customer wanted to gate the entire site, which they could do by placing the waiting room at example.com/. Many e-commerce customers asked for the ability to gate different high-demand product pages selling the same product but with different language options. For instance, consider example.com/en/product_123 and example.com/es/product_123, where the customer wants the same waiting room and traffic limits to cover both URLs. Before now, this would not have been possible without some complex bypass rule logic.

Now, customers can deploy a waiting room that accommodates either the subdomain or path approach to structuring a multi-language site. The only remaining step is setting up your waiting room to serve different languages when a user is queued in a waiting room. This can be achieved by constructing a template that reads the URL to determine the locale and define the appropriate translations for each of the locales within the template.

Here is an example of a template that determines the locale from the URL path, and renders the translated text:

<!DOCTYPE html>
<html>
  <head>
    <title>Waiting Room powered by Cloudflare</title>
  </head>
  <body>
    <section>
      <h1 id="inline-msg">
        You are now in line.
      </h1>
      <h1 id="patience-msg">
        Thank you for your patience.
      </h1>
    </section>
    <h2 id="waitTime"></h2>

    <script>
      var locale = location.pathname.split("/")[1] || "en";
      var translations = {
        "en": {
          "waittime_60_less": "Your estimated wait time is {{waitTime}} minute.",
          "waittime_60_greater": "Your estimated wait time is {{waitTimeHours}} hours and {{waitTimeHourMinutes}} minutes.",
          "inline-msg": "You are now in line.",
          "patience-msg": "Thank you for your patience.",
        },
        "es": {
          "waittime_60_less": "El tiempo de espera estimado es {{waitTime}} minuto.",
          "waittime_60_greater": "El tiempo de espera estimado es {{waitTimeHours}} de horas y {{waitTimeHourMinutes}} minutos.",
          "inline-msg": "Ahora se encuentra en la fila de espera previa.",
          "patience-msg": "Gracias por su paciencia.",
        }
      };

      {{#waitTimeKnown}}
      var minutes = parseInt( {{waitTime}} , 10);
      var time = document.getElementById('waitTime');

      if ( minutes < 61) {
        time.innerText = translations[locale]["waittime_60_less"]
      } else {
        time.innerText = translations[locale]["waittime_60_greater"]
      }
      {{/waitTimeKnown}}

      // translate template text for each of the elements with “id” suffixed with “msg”
      for (const msg of ["inline-msg", "patience-msg"]) {
        const el = document.getElementById(msg);
        if (el == null) continue;
        el.innerText = translations[locale][msg];
      }
    </script>
  </body>
</html>

Here’s how the template works: given a site distinguishes different locales with various paths such as /en/product_123 or /es/product_123 in the <script /> body after the rendering the page, the locale is extracted from the location.pathname via locale = location.pathname.split(“/”)[1]. If there isn’t a locale specified within the translations object we default it to “en”. For example, if a user visits example.com/product_123, then by default render the English text template.

Similarly, in order to support a multi-language waiting room for sites that delineate site structure via subdomain, it would only require you to update how you extract the locale from the URL. Instead of looking at the pathname we look at the hostname property of the window.location object like locale = location.hostname.split(“.”)[0], given, we have site structure as following: en.example.com, es.example.com.

The above code is a pared down example of starter templates we have added to our developer documentation, which we have included to make it easier for you to get started with a multi-language waiting room. You can download these templates and edit them to have the look and feel aligned with your site and with the language options your site offers.

Waiting Room adds multi-host and path coverage, unlocking broader protection and multilingual setups
This is an example of the starter template provided in dev docs. This waiting room is in Queue-all mode and displays the Spanish text when the user visits example.com/es/product_123.

These templates can further be expanded to include other languages by adding translations to the `translations` object for each of the locales. Thus, a single template is able to serve multiple languages depending on whatever the locale the site is being served as either via subdomain or path.

How we handle cookies with a multihostname and path waiting room

The waiting room assigns a __cfwaitingroom cookie to each user to manage the state of the user that determines the position of the user in line among other properties needed to make the queueing decisions for the user. Traditionally, for a single hostname and path configuration it was trivial to just set the cookie as __cfwaitingroom=[cookie-value]; Domain=example.com; Path=/es/product_123. This ensured that when the page refreshed it would send us the same Waiting Room cookie for us to examine and update. However, this became non-trivial when we wanted to share the same cookie across different subdomain or path combinations, for example, on example.com/en/product_123.

Approaches to setting multiple cookies

There were two approaches that we brainstormed and evaluated to allow the sharing of the cookie for the same waiting room.

The first approach we considered was to issue multiple Set-Cookie headers in the HTTP response. For example, in the multi-language example above, we could issue the following in the response header:

Set-Cookie: __cfwaitingroom=[cookie-value]…Domain=example.com; Path=/en/product_123 …
Set-Cookie: __cfwaitingroom=[cookie-value]...Domain=example.com; Path=/es/product_123 …

This approach would allow us to handle the multiple hostnames and paths for the same waiting room. However, it does not present itself as a very scalable solution. Per RFC6265, there isn’t a strict limit defined in the specification, browsers have their own implementation-specific limits. For example, Chrome allows the response header to grow up to 256K bytes before throwing the transaction with ERR_RESPONSE_HEADERS_TOO_BIG. Additionally, in this case, the response header would grow proportionally to the number of unique hostname and path combinations, and we would be redundantly repeating the same cookie value N (where N is the number of additional routes) number of times. While this approach would have allowed us to effectively handle a bounded list of hostname and path combinations that need to be set, it was not ideal for cases where we can expect more than a handful routes for a particular site.

The second approach that we considered and chose to move forward with was to set the cookie on the apex domain (or the most common subdomain). In other words, we would figure out the most common subdomain from the list of routes and use that as the domain. Similarly, for the paths, this would entail determining the least common prefix from the list of paths and use that as the value to be set on the path attribute. For example, consider a waiting room with the following two routes configured, a.example.com/shoes/product_123 and b.example.com/shoes/product_456.

To determine the domain that would be set for the cookie, we can see that example.com is the most common subdomain among the list of domains. Applying the most common subdomain algorithm, we would get example.com as the domain. Applying the least common prefix algorithm on the set of paths, /shoes/product_123 and /shoes/product_456, we would get /shoes as the path. Thus, the set-cookie header would be the following:

Set-Cookie: … __cfwaitingroom=[cookie-value]; Domain=example.com; Path=/shoes …

Now, when a visitor accesses any of the pages covered by this waiting room, we can guarantee Waiting Room receives the right cookie and there will only be Set-Cookie included in the response header.

However, we are still not there yet. Although we are able to identify the common subdomain (or apex domain) and common path prefix, there would still be a problem if routes from one waiting room would overlap with another waiting room. For example, say we configure two waiting rooms for the same site where we are selling our special shoes:

Waiting Room A
    a.example.com/shoes/product_123
    b.example.com/shoes/product_456

Waiting Room B
    c.example.com/shoes/product_789
    d.example.com/shoes/product_012

If we apply the same algorithm as described above, we would get the same domain and path properties set for the two cookies. For Waiting Room A, the domain would be example.com and the path would be /shoes. Similarly, for Waiting Room B, the most common subdomain would also be example.com and least common path prefix would be /shoes. This would effectively prevent us from distinguishing the two cookies and route the visitor to the right waiting room. In order to solve the issue of overlapping cookie names, we introduced the requirement of setting a custom suffix that is unique to the customer’s zone. This is why it is required to provide a custom cookie suffix when configuring a waiting room that covers multiple hostnames or paths. Therefore, if Waiting Room A was assigned cookie suffix “a” and Waiting Room B was assigned cookie suffix “b”, the two Set-Cookie definitions would look like the following:

Waiting Room A

Set-Cookie: __cfwaitingroom_a=[cookie-value]; Domain=example.com; Path=/shoes

Waiting Room B

Set-Cookie: __cfwaitingroom_b=[cookie-value]; Domain=example.com; Path=/shoes

When a visitor makes a request to any pages where the two different waiting rooms are configured, Waiting Room can distinguish and select which cookie corresponds to the given request and use this to determine which waiting room’s settings apply to that user depending on where they are on the site.

With the addition of multihost and multipath Waiting Room coverage, we’re thrilled to offer more flexible options for incorporating Waiting Room into your site, giving your visitors the best experience possible while protecting your site during times of high traffic. Make sure your site is always protected from traffic surges. Try out Waiting Room today or reach out to us to learn more about the Advanced Waiting Room!

Waiting Room añade la cobertura de múltiples hosts y rutas de acceso, y ofrece así una protección más amplia y configuraciones multilingües

Post Syndicated from Arielle Olache original http://blog.cloudflare.com/es-es/multihost-waiting-room-es-es/


Cloudflare Waiting Room protege los sitios contra las sobrecargas vinculadas a los picos de tráfico, colocando el exceso de visitantes en una sala de espera virtual, completamente personalizable, donde son admitidos dinámicamente a medida que se liberan plazas. En lugar de mostrar páginas de error o entregar páginas del sitio con un bajo rendimiento, Waiting Room permite a los clientes tomar el control de su experiencia de usuario final durante los picos de tráfico inmanejables.

Personaliza el aspecto de tu sala de espera para mejorar la experiencia del usuario final.

Una decisión clave que toman los clientes al configurar una sala de espera es acerca de qué páginas protegerán. Hasta ahora, los clientes podían seleccionar una sola combinación de nombre de host y ruta de acceso para determinar las páginas cubiertas por una sala de espera. Hoy nos complace anunciar que Waiting Room ahora ofrece compatibilidad con varias combinaciones de nombres de host y rutas de acceso con una sola sala de espera, y ofrece así a los clientes más flexibilidad y una cobertura más amplia del sitio sin interrupciones de los flujos de los usuarios finales. Esta nueva funcionalidad está disponible para todos los clientes Enterprise con una versión Advanced de Waiting Room.

Colocación de un sitio en Waiting Room

Durante la implementación de una sala de espera, un proceso sencillo y que no requiere codificación, los clientes especifican una combinación de nombre de host y ruta de acceso para indicar las páginas cubiertas por una sala de espera determinada. Cuando un visitante del sitio realiza una solicitud preliminar a ese nombre de host y esa ruta de acceso o a cualquiera de sus rutas de acceso secundarias, recibe una cookie correspondiente a la sala de espera y entonces se admite en el sitio o bien, si el sitio está saturado, se coloca en una sala de espera.

El año pasado añadimos la funcionalidad Waiting Room Bypass Rules, que ofrece a los clientes muchas opciones para crear excepciones a esta cobertura de nombre de host y ruta de acceso. Esta funcionalidad ha desbloqueado funciones como la omisión de agente de usuario, el filtrado por geolocalización, las exclusiones de URL y la omisión administrativa de direcciones IP. Asimismo, ha mejorado la flexibilidad en lo referente a las páginas a las que se debe aplicar una sala de espera en el sitio de un cliente, al añadir la posibilidad de excluir URL, rutas de acceso y cadenas de consulta. Aunque esta actualización permitió una mayor especificidad acerca del tráfico que debe filtrar Waiting Room, no ofrecía la cobertura más amplia que aún necesitaban muchos clientes para proteger áreas más extensas de sus sitios con una sola sala de espera.

Por qué los clientes necesitaban una cobertura más amplia de Waiting Room

Analicemos algunos ejemplos sencillos pero adecuados de por qué esta opción de una cobertura más amplia era importante para nuestros clientes. Imagina que tienes una tienda en línea, example.com, y quieres asegurarte de que una sola sala de espera cubre todo el recorrido del cliente, desde la página inicial a la navegación por los productos, y finalmente a la validación del pedido. Muchos sitios utilizan rutas de acceso para definir estos pasos en el flujo: example.com/, example.com/shop/product1, example.com/checkout. Puesto que Waiting Room supone que existe un comodín implícito al final de la ruta de acceso configurada para una sala de espera, este caso de uso ya estaba cubierto para estos sitios. Por lo tanto, la configuración de una sala de espera en la dirección example.com/ permitirá cubrir todas las URL asociadas con cada uno de los pasos de este recorrido del cliente. En esta configuración, una vez que un visitante del sitio entraba en la sala de espera, no se volvía a poner en cola en ningún otro paso del flujo del usuario, ya que seguía utilizando la misma cookie correspondiente a la sala de espera, lo que indica a Waiting Room que se trata del mismo usuario en distintas URL.

No obstante, muchos sitios utilizan subdominios en lugar de, o además de, rutas de acceso para definir distintos pasos de este tipo de flujo de compra. Por ejemplo, la página de validación del pedido de muchos sitios estará en un subdominio distinto, por ejemplo, checkout.example.com. Hasta ahora, si un cliente tenía esta estructura de sitio y quería proteger todo su sitio con una sola sala de espera, necesitaba implementar una sala de espera en la dirección example.com/ y otra en la dirección checkout.example.com/. Esta opción no era idónea para muchos clientes, puesto que un visitante del sitio podía encontrarse puesto en cola en dos lugares distintos del mismo recorrido de cliente. Esto se debe a que la sala de espera en la dirección checkout.example.com/ contabilizaría el mismo visitante como un usuario distinto que el de la sala de espera que cubre el sitio example.com/.

Dicho esto, en algunos casos es recomendable separar las salas de espera que cubren un solo sitio. Por ejemplo, un sitio web de venta de entradas podría implementar una sala de espera en su dominio raíz (example.com) y distintas salas de espera con pre-colas de espera en páginas dedicadas a eventos específicos (example.com/popular_artist_tour). La sala de espera definida en la página example.com/ garantiza que el punto de acceso principal al sitio no se sobrecargue y deje de estar accesible al abrir la venta de entradas para un evento específico. La sala de espera definida en la página dedicada al evento específico garantiza que el tráfico correspondiente a un evento determinado se pueda empezar a poner en cola de espera antes del evento sin afectar al tráfico que se dirige a otros lugares del sitio.

En definitiva, independientemente de si un cliente desea tener una o varias salas de espera para proteger su sitio, queríamos ofrecer a nuestros clientes la flexibilidad de implementar Waiting Room de la forma que se ajustara mejor a sus casos de uso y a su estructura del sitio. Nos complace anunciar que Waiting Room ahora admite la cobertura de varios nombres de host y rutas de acceso con una sola sala de espera.

Cómo empezar a utilizar la cobertura de varios hosts y rutas de acceso

Ahora los clientes pueden configurar una sala de espera en varias combinaciones de nombres de host y ruta (o rutas) de acceso correspondientes a la misma zona. Para ello, ve a Tráfico > Waiting Room y selecciona Create (Crear). El nombre de tu dominio ya estará rellenado. Para añadir reglas adicionales a la configuración de tu sala de espera, selecciona Add Hostname and Path (Añadir nombre de host y ruta de acceso). A continuación, puedes especificar otro nombre de host y ruta de acceso que desees que cubra la misma sala de espera. Recuerda que hay un comodín implícito al final de cada ruta de acceso. Por lo tanto, es innecesario crear una sala de espera para cada URL que desees que cubra tu sala de espera. Crea solo rutas de acceso adicionales para las URL que no estén cubiertas por las combinaciones de nombres de host y rutas de acceso que ya hayas especificado.

Añade varias combinaciones de nombres de host y rutas de acceso a tu sala de espera seleccionando Add Hostname and Path (Añadir nombre de host y ruta de acceso).

Al implementar una sala de espera que cubra varias combinaciones de nombres de host y rutas de acceso, debes crear un nombre de cookie exclusivo para esa sala de espera (más información más adelante). A continuación, continúa con el mismo flujo de trabajo de la forma habitual para implementar tu sala de espera.

Implementación de una sala de espera multilingüe

Los clientes nos han solicitado a menudo la posibilidad de cubrir un sitio multilingüe con una sola sala de espera, y ofrecer así texto específico para cada idioma al mismo tiempo que se contabiliza todo el tráfico del sitio en los mismos límites de la sala de espera. Hay varios métodos para estructurar un sitio a fin de definir las distintas opciones lingüísticas. Sin embargo, los dos más habituales son por subdominio o por ruta de acceso. Para un sitio que utilice la definición por ruta de acceso, podría presentarse así: example.com/en y example.com/es para inglés y español, respectivamente. Para un sitio que utilice la definición por subdominio, podría presentarse así: en.example.com/ y es.example.com/. Antes de que Waiting Room ofreciera la cobertura de varios hosts, la variación por subdominio no podría haber estado cubierta por una única sala de espera.

Las opciones de configuración existentes de Waiting Room ya admitían la variación por ruta de acceso. Sin embargo, esto solo era cierto si el cliente quería filtrar todo el sitio, lo que podía hacer definiendo la sala de espera en la página example.com/. Muchos clientes de comercio electrónico han solicitado la posibilidad de filtrar distintas páginas de productos con alta demanda que ofrecen el mismo producto pero con distintas opciones de idioma. Por ejemplo, considera example.com/en/product_123 y example.com/es/product_123, donde el cliente desea utilizar la misma sala de espera y aplicar los mismos límites de tráfico para cubrir ambas URL. Hasta ahora, esto no habría sido posible sin alguna compleja lógica de reglas de omisión.

Ahora, los clientes pueden implementar una sala de espera que se ajuste al método elegido de estructuración de un sitio multilingüe, ya sea por subdominio o por ruta de acceso. Para terminar, solo debes configurar tu sala de espera para que entregue distintos idiomas cuando un usuario se ponga en cola en una sala de espera. Para ello, puedes crear una plantilla que lea la URL a fin de determinar los parámetros de idioma y definir las traducciones adecuadas para cada idioma en la plantilla.

A continuación se muestra un ejemplo de una plantilla que determina los parámetros de idioma de la ruta de acceso de la URL, y que presenta el texto traducido:

<!DOCTYPE html>
<html>
  <head>
    <title>Waiting Room powered by Cloudflare</title>
  </head>
  <body>
    <section>
      <h1 id="inline-msg">
        You are now in line.
      </h1>
      <h1 id="patience-msg">
        Thank you for your patience.
      </h1>
    </section>
    <h2 id="waitTime"></h2>

    <script>
      var locale = location.pathname.split("/")[1] || "en";
      var translations = {
        "en": {
          "waittime_60_less": "Your estimated wait time is {{waitTime}} minute.",
          "waittime_60_greater": "Your estimated wait time is {{waitTimeHours}} hours and {{waitTimeHourMinutes}} minutes.",
          "inline-msg": "You are now in line.",
          "patience-msg": "Thank you for your patience.",
        },
        "es": {
          "waittime_60_less": "El tiempo de espera estimado es {{waitTime}} minuto.",
          "waittime_60_greater": "El tiempo de espera estimado es {{waitTimeHours}} de horas y {{waitTimeHourMinutes}} minutos.",
          "inline-msg": "Ahora se encuentra en la fila de espera previa.",
          "patience-msg": "Gracias por su paciencia.",
        }
      };

      {{#waitTimeKnown}}
      var minutes = parseInt( {{waitTime}} , 10);
      var time = document.getElementById('waitTime');

      if ( minutes < 61) {
        time.innerText = translations[locale]["waittime_60_less"]
      } else {
        time.innerText = translations[locale]["waittime_60_greater"]
      }
      {{/waitTimeKnown}}

      // translate template text for each of the elements with “id” suffixed with “msg”
      for (const msg of ["inline-msg", "patience-msg"]) {
        const el = document.getElementById(msg);
        if (el == null) continue;
        el.innerText = translations[locale][msg];
      }
    </script>
  </body>
</html>

La plantilla funciona de la forma siguiente: si un sitio distingue entre distintos parámetros de idioma con distintas rutas de acceso, como /en/product_123 o /es/product_123 en el cuerpo <script /> después de representar la página, el parámetro de idioma se extrae de location.pathname mediante locale = location.pathname.split(“/”)[1]. Si no se ha especificado ningún parámetro de idioma en el objeto `translations`, por defecto utilizamos “en”. Por ejemplo, si un usuario visita example.com/product_123, por defecto se representa la plantilla con el texto en inglés.

De la misma forma, para admitir una sala de espera multilingüe correspondiente a sitios que definen la estructura del sitio por subdominio, únicamente deberías actualizar cómo extraer el parámetro de idioma de la URL. En lugar de comprobar `pathname`, comprobamos la propiedad `hostname` del objeto `window.location` como `locale = location.hostname.split(“.”)[0]`, nuestra estructura del sitio será la siguiente: en.example.com, es.example.com.

El código anterior es un ejemplo simplificado de las plantillas iniciales que hemos añadido a nuestra documentación para desarrolladores. Las hemos incluido para que te sea más fácil empezar a utilizar una sala de espera multilingüe. Puedes descargar estas plantillas y editarlas para que su aspecto se ajuste a tu sitio y a las opciones de idioma que este ofrece.

Se trata de un ejemplo de la plantilla inicial proporcionada en los documentos para desarrolladores. Esta sala de espera está configurada para poner a todos los usuarios en cola de espera y muestra el texto en español cuando el usuario visita example.com/es/product_123.

Estas plantillas se pueden ampliar para incluir otros idiomas añadiendo las traducciones al objeto `translations` para cada uno de los idiomas. De esta forma, una única plantilla puede entregar varios idiomas, en función del parámetro de idioma que se aplique al sitio, ya sea por subdominio o por ruta de acceso.

Cómo gestionamos las cookies con una sala de espera que cubre varios nombres de host y rutas de acceso

La sala de espera asigna una cookie __cfwaitingroom a cada usuario para gestionar el estado del usuario, la cual determina la posición del usuario en la cola de espera, así como otras propiedades necesarias para decidir acerca de la colocación en cola de espera vinculadas al usuario. Tradicionalmente, para una configuración de un único nombre de host y ruta de acceso, era muy sencillo definir simplemente la cookie como __cfwaitingroom=[cookie-value]; Domain=example.com; Path=/es/product_123. Esto garantizaba que cuando se renovará la página nos enviaría la misma cookie de Waiting Room para que la analizáramos y actualizáramos. Sin embargo, dejó de ser sencillo cuando quisimos compartir la misma cookie en distintas combinaciones de subdominios o rutas de acceso, por ejemplo, en example.com/en/product_123.

Métodos para establecer varias cookies

Consideramos y evaluamos dos métodos para permitir el uso compartido de la cookie para la misma sala de espera.

El primer método que consideramos era emitir varios encabezados Set-Cookie en la respuesta HTTP. En el ejemplo multilingüe anterior, por ejemplo, podríamos añadir lo siguiente en el encabezado de la respuesta:

Set-Cookie: __cfwaitingroom=[cookie-value]…Domain=example.com; Path=/en/product_123 …
Set-Cookie: __cfwaitingroom=[cookie-value]...Domain=example.com; Path=/es/product_123 …

Este método nos permitiría gestionar los varios nombres de host y rutas de acceso para la misma sala de espera. Sin embargo, no se presenta como una solución escalable. La especificación RFC6265 no define ningún límite estricto, pero los navegadores aplican sus propios límites según cada implementación. Por ejemplo, Chrome permite que el encabezado de la respuesta tenga hasta 256 Kbytes antes de devolver un error ERR_RESPONSE_HEADERS_TOO_BIG para la transacción. Además, en este caso, el encabezado de la respuesta crecería proporcionalmente al número de combinaciones de nombres de host y rutas de acceso exclusivas, y estaríamos repitiendo de forma redundante el mismo valor de cookie N número de veces (donde N es el número de rutas adicionales). Aunque este enfoque nos habría permitido gestionar eficazmente una lista limitada de combinaciones de nombres de host y rutas de acceso que sería necesario establecer, no era idóneo para aquello casos donde se espera un número mayor de rutas para un sitio determinado.

El segundo enfoque que hemos considerado, y con el que decidimos seguir adelante, consistía en establecer la cookie en el dominio raíz (o el subdominio más habitual). En otras palabras, buscaríamos el subdominio más habitual en la lista de rutas y lo utilizaríamos como dominio. De la misma forma, en el caso de las rutas, esto implicaría determinar el prefijo menos habitual de la lista de rutas y utilizarlo como el valor que se debe establecer en el atributo path. Por ejemplo, considera una sala de espera con las siguientes dos rutas configuradas, a.example.com/shoes/product_123 y b.example.com/shoes/product_456.

Para determinar el dominio que se establecería para la cookie, podemos observar que example.com es el subdominio más habitual en la lista de dominios. Al aplicar el algoritmo de subdominio más habitual, obtendríamos example.com como subdominio. Al aplicar el algoritmo de prefijo menos habitual en el conjunto de rutas de acceso, /shoes/product_123 y /shoes/product_456, obtendríamos /shoes como ruta de acceso. Por lo tanto, el encabezado set-cookie sería el siguiente:

Set-Cookie: … __cfwaitingroom=[cookie-value]; Domain=example.com; Path=/shoes …

Ahora, cuando un visitante accede a cualquiera de las páginas cubiertas por esta sala de espera, podemos garantizar que Waiting Room recibe la cookie adecuada y que solo se habrá incluido Set-Cookie en el encabezado de la respuesta.

Sin embargo, aún no hemos terminado. Aunque podemos identificar el subdominio habitual (o dominio raíz) y el prefijo de ruta de acceso común, aún tendríamos un problema si las rutas desde una sala de espera se solaparan con las de otra sala de espera. Por ejemplo, supongamos que configuramos dos salas de espera para el mismo sitio donde vendemos nuestro calzado especial:

Sala de espera A
    a.example.com/shoes/product_123
    b.example.com/shoes/product_456

Sala de espera B
    c.example.com/shoes/product_789
    d.example.com/shoes/product_012

Si aplicamos el mismo algoritmo tal como hemos descrito anteriormente, se establecerían las mismas propiedades de dominio y ruta de acceso para ambas cookies. Para la sala de espera A, el dominio sería example.com y la ruta de acceso sería /shoes. De la misma forma, para la sala de espera B, el subdominio más habitual también sería example.com y el prefijo de ruta de acceso menos habitual sería be /shoes. Esto nos evitaría eficazmente distinguir ambas cookies y dirigiría al visitante a la sala de espera adecuada. Para resolver el problema del solapamiento de los nombres de cookie, hemos añadido el requisito de definir un sufijo personalizado exclusivo para la zona del cliente. Por este motivo, es necesario proporcionar un sufijo de cookie personalizado al configurar una sala de espera que cubra varios nombres de host y rutas de acceso. Por lo tanto, si se ha asignado a la sala de espera A el sufijo de cookie “a” y a la sala de espera B el sufijo de cookie “b”, las dos definiciones de Set-Cookie serán las siguientes:

Sala de espera A

Set-Cookie: __cfwaitingroom_a=[cookie-value]; Domain=example.com; Path=/shoes

Sala de espera B

Set-Cookie: __cfwaitingroom_b=[cookie-value]; Domain=example.com; Path=/shoes

Cuando un visitante envía una solicitud a una página donde hay configuradas dos salas de espera distintas, Waiting Room puede distinguir y seleccionar la cookie correspondiente a esa solicitud específica y utilizarla para determinar qué ajustes de sala de espera son aplicables a ese usuario, en función de dónde se encuentre en el sitio.

Con la adición de la cobertura de varios host y rutas de acceso a Waiting Room, nos complace ofrecerte opciones para que puedas incorporar Waiting Room en tu sitio con mayor flexibilidad, proporcionando así a tus visitantes la mejor experiencia posible, al mismo tiempo que proteges tu sitio durante periodos de mucho tráfico. Asegúrate de que tu sitio esté siempre protegido contra los picos de tráfico. Prueba ya Waiting Room o ponte en contacto con nosotros para saber más sobre la versión Advanced de Waiting Room.

Waiting Room ajoute la prise en charge d'hôtes et de chemins d'accès multiples, offrant une protection plus étendue et des configurations multilingues

Post Syndicated from Arielle Olache original http://blog.cloudflare.com/fr-fr/multihost-waiting-room-fr-fr/


Cloudflare Waiting Room protège les sites contre les surcharges liées aux pics de trafic en transférant l’excédent de visiteurs vers une salle d’attente virtuelle, entièrement personnalisable, dans laquelle les visiteurs sont admis dynamiquement, au fur et à mesure que des places se libèrent. Au lieu d’afficher des pages d’erreur ou de proposer une expérience insatisfaisante de l’affichage des pages du site, Waiting Room permet aux clients de prendre le contrôle de l’expérience de leurs utilisateurs finaux pendant les pics de trafic ingérables.

Personnalisez l'apparence et la fonctionnalité de votre salle d'attente afin d'améliorer l'expérience des utilisateurs finaux !

L’une des principales décisions que prennent les clients lors de la configuration d’une salle d’attente consiste à sélectionner les pages que protégera celle-ci. Jusqu’à présent, les clients pouvaient sélectionner un nom d’hôte et un chemin d’accès lors de la désignation des pages protégées par une instance de Waiting Room. Aujourd’hui, nous sommes ravis d’annoncer que Waiting Room propose désormais la prise en charge de combinaisons de noms d’hôtes et de chemins d’accès multiples pour une salle d’attente unique, offrant ainsi aux clients davantage de flexibilité et une prise en charge plus étendue des sites, sans interruption des flux des utilisateurs finaux.Cette nouvelle fonctionnalité est accessible à tous les clients Enterprise ayant préacheté Waiting Room.

Ajout d’un site dans Waiting Room

Le déploiement d’une salle d’attente est une procédure simple et sans codage, durant laquelle les clients spécifient une combinaison de nom d’hôte et de chemin d’accès afin de désigner les pages prises en charge par une salle d’attente particulière. Lorsqu’un visiteur du site transmet une requête préliminaire à ce nom d’hôte et ce chemin d’accès ou l’un de ses sous-chemins, il reçoit un cookie correspondant à la salle d’attente et est ensuite admis sur le site ou transféré vers une salle d’attente, si le site est saturé.

L’année dernière, nous avons ajouté la fonctionnalité Waiting Room Bypass Rules, qui offre aux clients de nombreuses options permettant de créer des exceptions à cette prise en charge des noms d’hôtes et des chemins d’accès. Cette fonctionnalité a débloqué des capacités telles que le contournement d’agent utilisateur, le ciblage par géolocalisation, les exclusions d’URL et le contournement d’adresses IP d’administration. Elle a également offert davantage de flexibilité au regard de la prise en charge par Waiting Room des pages du site d’un client en ajoutant la possibilité d’exclure des URL, des chemins d’accès et des chaînes de requête. Si cette mise à jour a permis de mieux définir le trafic devant être filtré par Waiting Room, elle n’offrait néanmoins pas la prise en charge étendue que recherchaient encore de nombreux clients pour protéger de plus vastes pans de leurs sites avec une salle d’attente unique.

Pourquoi les clients avaient besoin d’une prise en charge plus étendue par Waiting Room

Examinons quelques exemples simples, mais pertinents, des raisons pour lesquelles cette option de prise en charge étendue était importante pour nos clients. Imaginons que vous ayez une boutique en ligne, example.com, et que vous souhaitiez vous assurer qu’une salle d’attente unique couvre l’ensemble du parcours du client – de la page d’accueil jusqu’à la navigation sur les produits, puis au paiement. De nombreux sites emploient les chemins pour délimiter ces étapes au sein du flux : example.com/, example.com/shop/product1, example.com/payment. Puisque Waiting Room suppose qu’un caractère générique implicite est présent à la fin du chemin d’accès configuré pour une salle d’attente, ce scénario d’utilisation était déjà pris en charge pour ces sites. Ainsi, la configuration d’une salle d’attente à l’adresse example.com/ permettrait de couvrir toutes les URL associées à chaque étape du parcours du client. Dans cette configuration, lorsqu’un visiteur consultant le site avait traversé la salle d’attente, il ne réintégrait pas la file d’attente à une étape ultérieure de son parcours d’utilisateur, car il disposait toujours du même cookie correspondant à la salle d’attente, qui indique à Waiting Room qu’il s’agit d’un même utilisateur parcourant les différentes URL.

Cependant, de nombreux sites utilisent des sous-domaines à la place des chemins d’accès, ou conjointement à ceux-ci, pour délimiter les différentes étapes de ce type de parcours d’achat. Par exemple, la page de paiement de nombreux sites se trouve sur un sous-domaine différent, comme payment.example.com. Jusqu’à présent, si un client disposait de cette structure de site et souhaitait protéger l’ensemble de son site avec une salle d’attente unique, il devait configurer une première salle d’attente à l’adresse example.com/, et une deuxième salle d’attente à l’adresse payment.example.com/. Cette option était peu pratique pour de nombreux clients, car un visiteur pouvait se retrouver ajouté à une file d’attente à deux endroits différents du même parcours client. En effet, la salle d’attente de payment.example.com/ compterait le même visiteur comme un autre utilisateur de celui de la salle d’attente couvrant example.com/.

Cela étant dit, dans certains cas, il est judicieux de séparer les salles d’attente couvrant un même site. Par exemple, un site web de billetterie pourrait déployer une salle d’attente sur son domaine racine (example.com), puis déployer des salles d’attente distinctes avec des pré-files d’attente sur les pages consacrées à des événements spécifiques (example.com/popular_artist_tour). La salle d’attente de la page example.com/ permet d’éviter que le principal point d’accès au site ne soit submergé par les requêtes et que le site devienne inaccessible lors de l’ouverture de la vente de billets pour un événement donné. La salle d’attente placée sur la page de l’événement spécifique assure que le trafic correspondant à un événement particulier puisse être mis en file d’attente avant l’événement, sans toutefois affecter le trafic affluant vers d’autres parties du site.

En fin de compte, peu importe qu’un client souhaite déployer une ou plusieurs salles d’attente pour protéger son site : nous souhaitions offrir à chaque client la possibilité de déployer Waiting Room de la manière la plus adaptée à ses scénarios d’utilisation et sa structure de site. Nous sommes ravis d’annoncer que Waiting Room offre désormais la prise en charge de noms d’hôtes et de chemins d’accès multiples dans une salle d’attente unique !

Découvrir la prise en charge d’hôtes et de chemins d’accès multiples

Les clients peuvent désormais configurer une salle d’attente avec plusieurs combinaisons de noms d’hôtes et de chemins (ou d’itinéraires) appartenant à une même zone. Pour cela, accédez à Trafic > Waiting Room, puis sélectionnez Create (Créer). Le nom de votre domaine sera déjà renseigné. Pour ajouter des itinéraires supplémentaires à la configuration de votre salle d’attente, sélectionnez Add Hostname (Ajouter un nom d’hôte), puis Path (Chemin d’accès). Vous pouvez ensuite saisir un autre nom d’hôte et un autre chemin d’accès qui seront couverts par la même salle d’attente. N’oubliez pas qu’un caractère générique implicite est inclus après chaque chemin d’accès ; il n’est donc pas nécessaire de créer une salle d’attente pour chaque URL que vous souhaitez couvrir. Créez uniquement des itinéraires supplémentaires pour les URL qui ne seraient pas couvertes par les autres combinaisons de noms d’hôtes et de chemins d’accès que vous avez déjà spécifiées.

Pour ajouter plusieurs combinaisons de noms d'hôtes et de chemins d'accès à votre salle d'attente, sélectionnez Add Hostname and Path (Ajouter un nom d'hôte et un chemin d'accès

Lorsque vous déployez une salle d’attente couvrant plusieurs combinaisons de noms d’hôtes et de chemins d’accès, vous devez créer un nom de cookie unique pour cette salle d’attente (nous y reviendrons plus tard). Ensuite, appliquez le même flux de travail que d’habitude pour déployer votre salle d’attente.

Déployer une salle d’attente multilingue

Une demande fréquemment formulée par nos clients était la possibilité de couvrir un site multilingue avec une salle d’attente unique, en proposant des textes différents dans chaque langue, tout en comptabilisant l’ensemble du trafic du site dans les limites de la même salle d’attente. Il existe plusieurs façons de structurer un site pour à délimiter les différentes options linguistiques ; toutefois, les deux approches les plus courantes sont la délimitation par sous-domaine ou par chemin d’accès. Pour un site qui utilise la délimitation par chemin d’accès, cela pourrait se présenter ainsi : example.com/en et example.com/es pour l’anglais et l’espagnol, respectivement. Pour un site utilisant la délimitation par sous-domaine, la configuration pourrait être la suivante : en.example.com/ et es.example.com/. Avant la prise en charge d’hôtes multiples par Waiting Room, la variation des sous-domaines n’aurait pas pu être couverte par une salle d’attente unique.

Les options de configuration existantes de Waiting Room prenaient déjà en charge les variations de chemin d’accès. Cependant, cela n’était vrai que si le client souhaitait couvrir l’ensemble du site, ce qui était réalisable en en plaçant la salle d’attente à l’adresse example.com/. De nombreux clients dans le secteur de l’e-commerce ont demandé la possibilité de couvrir différentes pages de produits très demandées, proposant le même produit, avec des options linguistiques différentes. Par exemple, prenons le cas de example.com/en/product_123 et de example.com/es/product_123. Pour ces pages, le client souhaite couvrir les deux URL avec la même salle d’attente et des limites de trafic identiques. Jusqu’à présent, cela n’aurait pas été possible sans configurer une logique complexe basée sur des règles de contournement.

Désormais, toutefois, les clients peuvent déployer une salle d’attente couvrant, au choix, l’approche basée sur les sous-domaines ou les chemins d’accès pour structurer un site multilingue. L’unique étape restante consiste à configurer votre salle d’attente afin qu’elle puisse servir différentes langues lorsqu’un utilisateur est transféré vers une salle d’attente. Pour cela, vous pouvez développer un modèle lisant l’URL afin de déterminer les paramètres régionaux, puis définir les traductions appropriées pour chaque langue dans le modèle.

Voici un exemple de modèle qui détermine les paramètres régionaux à partir du chemin d’accès de l’URL, puis affiche le texte traduit :

<!DOCTYPE html>
<html>
  <head>
    <title>Waiting Room powered by Cloudflare</title>
  </head>
  <body>
    <section>
      <h1 id="inline-msg">
        You are now in line.
      </h1>
      <h1 id="patience-msg">
        Thank you for your patience.
      </h1>
    </section>
    <h2 id="waitTime"></h2>

    <script>
      var locale = location.pathname.split("/")[1] || "en";
      var translations = {
        "en": {
          "waittime_60_less": "Your estimated wait time is {{waitTime}} minute.",
          "waittime_60_greater": "Your estimated wait time is {{waitTimeHours}} hours and {{waitTimeHourMinutes}} minutes.",
          "inline-msg": "You are now in line.",
          "patience-msg": "Thank you for your patience.",
        },
        "es": {
          "waittime_60_less": "El tiempo de espera estimado es {{waitTime}} minuto.",
          "waittime_60_greater": "El tiempo de espera estimado es {{waitTimeHours}} de horas y {{waitTimeHourMinutes}} minutos.",
          "inline-msg": "Ahora se encuentra en la fila de espera previa.",
          "patience-msg": "Gracias por su paciencia.",
        }
      };

      {{#waitTimeKnown}}
      var minutes = parseInt( {{waitTime}} , 10);
      var time = document.getElementById('waitTime');

      if ( minutes < 61) {
        time.innerText = translations[locale]["waittime_60_less"]
      } else {
        time.innerText = translations[locale]["waittime_60_greater"]
      }
      {{/waitTimeKnown}}

      // translate template text for each of the elements with “id” suffixed with “msg”
      for (const msg of ["inline-msg", "patience-msg"]) {
        const el = document.getElementById(msg);
        if (el == null) continue;
        el.innerText = translations[locale][msg];
      }
    </script>
  </body>
</html>

Voici comment fonctionne le modèle : puisqu’un site distingue différents paramètres régionaux avec différents chemins tels que `/en/product_123` ou `/es/product_123` dans le corps `<script />` après avoir effectué le rendu de la page, le paramètre régional est extrait de `location.pathname` via `locale = location.pathname.split(“/”)[1]`. Si aucune langue n’est spécifiée dans l’objet `translations`, la valeur par défaut est « en ». Par exemple, si un utilisateur consulte le site example.com/product_123, par défaut, le site affiche le rendu du modèle de texte anglais.

De même, pour prendre en charge une salle d’attente multilingue pour les sites délimitant la structure du site par sous-domaine, il suffirait de modifier la manière dont le paramètre régional est extrait de l’URL. Au lieu d’examiner `pathname`, nous examinons la propriété `hostname` de l’objet `window.location` (par exemple, `locale = location.hostname.split(“.”)[0]`),étant donné que la structure de notre site est la suivante : en.example.com, es.example.com.

Le code présenté ci-dessus est un exemple réduit des modèles de démarrage que nous avons ajoutés à notre documentation pour développeurs afin de faciliter la configuration d’une salle d’attente multilingue. Vous pouvez télécharger ces modèles et les modifier afin d’adapter leur apparence et leur fonctionnalité à votre site et aux options linguistiques proposées par celui-ci.

Il s’agit d’un exemple du modèle de démarrage fourni dans la documentation pour développeurs. Cette salle d’attente est configurée pour mettre tous les utilisateurs en file d’attente et affiche le texte en espagnol lorsque l’utilisateur consulte la page example.com/es/product_123.

Ces modèles peuvent être étendus pour inclure d’autres langues en ajoutant des traductions à l’objet `translations` pour chacun des paramètres régionaux. Un modèle unique peut ainsi servir plusieurs langues en fonction des paramètres régionaux définis pour le site, qu’il s’agisse d’un sous-domaine ou d’un chemin d’accès.

Comment nous gérons les cookies avec une salle d’attente couvrant plusieurs noms d’hôtes et chemins d’accès

La salle d’attente alloue à chaque utilisateur un cookie `__cfwaitingroom` permettant de gérer son état ; ce cookie détermine la position de l’utilisateur dans la file d’attente, ainsi que d’autres propriétés nécessaires pour prendre les décisions de mise en file d’attente. Traditionnellement, pour une configuration comportant un nom d’hôte et un chemin d’accès uniques, il était extrêmement simple de définir le cookie comme ceci : `__cfwaitingroom=[cookie-value]; Domain=example.com; Path=/es/product_123`. Ainsi, lorsque la page était actualisée, elle transmettait le même cookie Waiting Room, nous permettant de l’examiner et de le mettre à jour. Toutefois, cette procédure devenait beaucoup moins simple lorsque nous voulions partager le même cookie pour différentes combinaisons de sous-domaines ou de chemins d’accès, par exemple, `example.com/en/product_123`.

Approches de la configuration de plusieurs cookies

Nous avons envisagé et évalué deux approches permettant le partage du cookie pour une même salle d’attente.

La première approche que nous avons envisagée consistait à insérer plusieurs en-têtes `Set-Cookie` dans la réponse HTTP. Par exemple, dans l’exemple multilingue ci-dessus, nous pourrions ajouter les indications suivantes dans l’en-tête de la réponse :

Set-Cookie: __cfwaitingroom=[cookie-value]…Domain=example.com; Path=/en/product_123 …
Set-Cookie: __cfwaitingroom=[cookie-value]...Domain=example.com; Path=/es/product_123 …

Cette approche nous permettrait de gérer plusieurs noms d’hôtes et chemins d’accès pour une même salle d’attente. Cependant, elle ne constitue pas une solution très évolutive. Conformément à RFC6265, aucune limite stricte n’est définie dans la spécification ; les navigateurs comportent des limites particulières, spécifiques à l’implémentation. Par exemple, Chrome accepte une taille d’en-tête de 256 K octets avant de renvoyer l’erreur ERR_RESPONSE_HEADERS_TOO_BIG pour la transaction. Par ailleurs, dans ce cas, la taille de l’en-tête de réponse augmenterait proportionnellement au nombre de combinaisons uniques de noms d’hôtes et de chemins d’accès et, de manière redondante, nous répéterions N fois (où N représente le nombre d’itinéraires supplémentaires) la même valeur de cookie. Cette approche nous aurait permis de gérer efficacement une liste restreinte de combinaisons de noms d’hôtes et de chemins d’accès à définir ; toutefois, elle n’était pas idéale dans les situations où un site particulier comportait plus qu’un nombre limité d’itinéraires.

La deuxième approche à laquelle nous avons réfléchi, et que nous avons choisie, consistait à placer le cookie sur le domaine racine (ou le sous-domaine le plus courant). En d’autres termes, nous déterminons le sous-domaine le plus courant à partir de la liste des itinéraires, et nous l’utilisons comme domaine. De manière similaire, pour les chemins d’accès, il s’agirait de déterminer le préfixe le moins commun à partir de la liste des chemins d’accès et de l’utiliser comme valeur à définir par l’attribut de chemin d’accès. Prenons l’exemple d’une salle d’attente pour laquelle les deux itinéraires suivants ont été configurés : a.example.com/shoes/product_123 et b.example.com/shoes/product_456.

Pour déterminer le domaine défini pour le cookie, nous voyons que `example.com` est le sous-domaine le plus courant parmi la liste des domaines. L’application de l’algorithme du sous-domaine le plus courant renverrait le domaine `example.com` ; en revanche, l’application de l’algorithme du préfixe le moins courant à l’ensemble de chemins d’accès `/shoes/product_123` et `/shoes/product_456` renverrait le chemin d’accès `/shoes`. Par conséquent, l’en-tête Set-Cookie serait le suivant :

Set-Cookie: … __cfwaitingroom=[cookie-value]; Domain=example.com; Path=/shoes …

Désormais, lorsqu’un visiteur accède à l’une des pages couvertes par cette salle d’attente, nous pouvons garantir que Waiting Room reçoit le bon cookie et que l’en-tête de la réponse contiendra uniquement `Set-Cookie`.

Cependant, la configuration n’est pas encore terminée. Bien que nous soyons en mesure d’identifier le sous-domaine commun (ou domaine racine) et le préfixe de chemin d’accès commun, un problème demeurerait si les itinéraires correspondant à une salle d’attente étaient identiques à ceux définis pour une autre salle d’attente. Par exemple, supposons que nous configurions deux salles d’attente pour un même site, sur lequel nous vendons nos chaussures spéciales :

Salle d’attente A
    a.example.com/shoes/product_123
    b.example.com/shoes/product_456

Salle d’attente B
    c.example.com/shoes/product_789
    d.example.com/shoes/product_012

Si nous appliquons le même algorithme que celui décrit ci-dessus, nous obtiendrons les mêmes propriétés de domaine et de chemin d’accès pour les deux cookies. Pour la salle d’attente A, le domaine serait `example.com` et le chemin d’accès serait `/shoes`. De même, pour la salle d’attente B, le sous-domaine le plus courant serait également example.com, et le préfixe de chemin d’accès le moins courant serait `/shoes`. Concrètement, ceci nous empêcherait de distinguer les deux cookies et de rediriger le visiteur vers la salle d’attente correcte. Afin de résoudre le problème du chevauchement des noms de cookies, nous avons introduit la nécessité de définir un suffixe personnalisé unique pour la zone du client. C’est pourquoi il est nécessaire de spécifier un suffixe de cookie personnalisé lors de la configuration d’une salle d’attente couvrant plusieurs noms d’hôtes ou chemins d’accès. Par conséquent, si la salle d’attente A reçoit le suffixe de cookie « a » et la salle d’attente B le suffixe de cookie « b », les deux définitions de `Set-Cookie` se présenteront comme ceci :

Salle d’attente A

Set-Cookie: __cfwaitingroom_a=[cookie-value]; Domain=example.com; Path=/shoes

Salle d’attente B

Set-Cookie: __cfwaitingroom_b=[cookie-value]; Domain=example.com; Path=/shoes

Lorsqu’un visiteur transmet une requête à une page pour laquelle ces deux salles d’attente différentes sont configurées, Waiting Room peut distinguer et sélectionner le cookie correspondant à la requête transmise et l’utiliser pour déterminer les paramètres de la salle d’attente applicables à cet utilisateur en fonction de l’endroit où il se trouve sur le site.

Avec l’ajout de la prise en charge de plusieurs hôtes et chemins d’accès par Waiting Room, nous sommes ravis de proposer des options plus flexibles pour l’incorporation de Waiting Room sur votre site, et ainsi, d’offrir à vos visiteurs la meilleure expérience possible, tout en protégeant votre site pendant les périodes d’affluence. Assurez-vous que votre site est toujours protégé contre les pics de trafic. Essayez dès aujourd’hui Waiting Room ou contactez-nous pour en savoir plus sur la solution Advanced Waiting Room.

Waiting Roomは、マルチホストとパスのカバレッジを拡充し、より広範な保護と多言語セットアップを実現できる製品です

Post Syndicated from Arielle Olache original http://blog.cloudflare.com/ja-jp/multihost-waiting-room-ja-jp/


Cloudflare Waiting Roomは、完全にカスタマイズ可能な仮想待機室に過剰なウェブ訪問者を配置し、空き枠ができると動的にこれを受け入れることにより、急激なトラフィック急増からサイトを保護します。Waiting Roomにより、管理しきれないトラフィック急増時にエラーページを表示したりパフォーマンスの低いサイトページを配信したりするのではなく、エンドユーザーエクスペリエンスをコントロールできるようにします。

貴社サイトの待機室のルック&フィールのカスタマイズも可能となっており、エンドユーザーエクスペリエンスの向上にお役立ていただけます。

待機室を設定する際、保護の対象となるページの決定が重要になります。これまでは、ホスト名とパスの組み合わせを1つ選び、待機室の対象となるページを決めることができました。今日、Waiting Roomsでは、単一の待機室で複数のホスト名とパスの組み合わせに対応できるようになりました。これにより、お客様にはより多くの柔軟性がもたらされ、エンドユーザーのフローを中断することなく、より広範なサイトカバレッジを提供できるようになりました。この新機能は、「Waiting Rooms」のアドバンスをご利用のすべてのEnterprise契約のお客様にご利用いただけます。

Waiting Roomsのサイトでの設置

シンプルかつコーディング不要の待機室のデプロイプロセスでは、ホスト名とパスの組み合わせを指定し、特定の待機室がカバーするページを指定します。Web訪問者がそのホスト名とパス、またはそのサブパスに予備リクエストを行うと、待機室クッキーが発行され、サイトへの入場が許可されるか、もしくはサイトの容量が足りない場合、待機室に導きます。

昨年、当社は Waiting Roomのバイパスルール機能を追加し、ホスト名とパスカバレッジの例外を設けるための多くの選択肢をお客様に提供しました。これにより、ユーザーエージェントバイパス、ジオターゲティング、URL除外、管理用IPバイパスなどの機能が活用できるようになりました。また、URL、パス、クエリ文字列を除外する機能を追加することで、顧客サイト上で待機室を適用するページの設定の柔軟性を高めることとなりました。このアップデートにより、Waiting Roomによってゲートされるべきトラフィックをより具体化できるようになった一方、カバレッジは狭いままで多くの顧客が単一の待機室でサイトの大部分を保護することはできませんでした。

顧客がよりカバレッジのWaiting Roomsを必要とした理由

幅広いカバレッジを持つ製品機能が顧客にとって重要であった理由について、簡単ではあるもののインパクトのある例をいくつか挙げてみます。example.comというオンラインストアがあるとします。単一の待機室で、ホームページから商品閲覧、チェックアウトまで、顧客の利用体験全体をカバーできるようにしたいと考えたとします。多くのサイトでは、フロー内のこれらのステップを次のようにパスを用いて指定します:「example.com/, example.com/shop/product1、 example.com/checkout」。Waiting Roomは設定されたパスの最後にワイルドカードを想定するため、これらのサイトではこのユースケースはすでに十分なものでした。したがって、example.com/に待機室を設置すれば、この顧客利用体験のあらゆる段階で関連することになるすべてのURLをカバーすることができました。このセットアップでは、一度待機室を通過したWeb訪問者は、Waiting Roomに対し同一のユーザーであることをURL間の遷移の際に明示する同一待機室のクッキーを使用しているため、ユーザーフローのどのステップでも再キューされなおすことはありません。

しかし、多くのサイトでは、パスの代わりもしくはパスと併せサブドメインを使い、この種のショッピングフローの各段階を区切っています。例えば、多くのサイトでは、チェックアウトページをcheckout.example.comのような別のサブドメインに置いています。以前は、このようなサイト構造を持つ顧客がサイト全体を単一の待機室で保護する場合、example.com/ に待機室をデプロイし、checkout.example.com/に別の待機室を配置する必要がありました。このやり方は、多くの顧客にとって理想的なものではありませんでした。あるサイトのWeb訪問者が、同じ顧客利用体験の2つの異なる部分でキューに入れられる可能性があったからです。これは、checkout.example.com/の待機室がexample.com/をカバーするのではなく、Web訪問者を別のユーザーとして同じカウントすることが理由です。

とはいえ、1つのサイトで待機室を分けた方が賢明な場合もあります。例えば、チケット販売Webサイトは、そのエイペックスドメイン(example.com)に待機室を置くことができます。 また、特定のイベント(example.com/popular_artist_tour)のページでは、プレキューを持つ個別の待機室を設定しています。example.com/に設定された待機室は、あるイベントのチケット販売が開始されたときに、サイトへの主要な入り口が圧倒されてクラッシュすることがないようにします。 特定のイベントページに置かれた待機室は、サイトの他の部分に行くトラフィックに影響を与えることなく、単一のイベントのためのトラフィックがイベントの前にキューを開始できることを保証します。

最終的には、顧客がサイトの保護に1つまたは複数の待機室を望むかどうかにかかわらず、当社は顧客がユースケースとサイト構造に最適な待機室をデプロイする柔軟性を提供したいと考えました。今回、Waiting Roomが単一の待機室で複数のホスト名とパスカバレッジに対応できるようになったことを発表できることを大変うれしく思います。

マルチホストとパスカバレッジの始め方

今回、同じゾーンに属する複数のホスト名とパスの組み合わせ(またはルート)に待機室を設定できるようになりました。Traffic > 待機室を開き、Create(作成)を選択します。ドメイン名は、すでに入力されています。待機室設定にさらにルートを追加するには、Add Hostname and Path(ホスト名とパスの追加)を選択します。次に、同じ待機室にカバーさせる別のホスト名とパスを入力してください。各パスの最後はワイルドカード扱いとなります。そのため、待機室にカバーさせたいURLごとに待機室を作成する必要はありません。すでに入力した他のホスト名とパスの組み合わせではカバーできないURLに対してのみ、追加ルートを作成してください。

Add Hostname and Path(ホスト名とパスを追加)を選択し、複数のホスト名とパスの組み合わせを待機室に追加します。

複数のホスト名とパスの組み合わせをカバーする待機室をデプロイする場合、この待機室用にユニークなクッキー名を作成する必要があります(詳細は後述します)。その後、普段と同じワークフローで待機室をデプロイしてください。

多言語待機室のデプロイ

多言語サイトを1つの待機室でカバーできること、つまり言語ごとに異なるテキストを提供しながら、すべてのサイトトラフィックを同じ待機室の制限にカウントできることは、お客様からよく寄せられていた要望でした。異なる言語オプションを区別するためにサイトを構成する方法はいろいろある中、最も一般的なのはサブドメインかパスによる方法です。パス区切りが使われているサイトでは、example.com/enやexample.com/esのようになります。それぞれ英語とスペイン語に対応するものです。サブドメイン区分を使用するサイトでは、en.example.com/、およびes.example.com/のようになります。マルチホスト待機室がカバーする以前は、サブドメインのバリエーションは単一の待機室ではカバーできませんでした。

Waiting Roomの既存の設定オプションでは、すでにパスのバリエーションに対応していました。しかし、これは顧客がサイト全体をゲートしたい場合にのみ、example.com/に待機室を置くことで可能でした。多くのeコマースのお客様から、同じ商品を販売する需要の高い商品ページを異なる言語オプションでゲート表示できるようにしてほしいという要望がよせられていました。例えば、example.com/en/product_123、および example.com/es/product_123の両方のURLをカバーするために同じ待機室とトラフィック制限が望まれていました。これまでは、複雑なバイパスルールのロジックがなければそれは不可能でした。

今では、お客様は多言語サイトの構成のために、サブドメインまたはパスのアプローチのいずれかに対応する待機室をデプロイできるようになりました。残る唯一のステップは、ユーザーが待機室にキューイングされているときに異なる言語を提供するように待機室を設定することです。これは、URLを読み込んでロケールを決定し、テンプレート内で各ロケールに適切な翻訳を定義するテンプレートを構築することで実現できます。

以下は、URLパスからロケールを決定し、翻訳されたテキストを表示するテンプレートの例です:

<!DOCTYPE html>
<html>
  <head>
    <title>Waiting Room powered by Cloudflare</title>
  </head>
  <body>
    <section>
      <h1 id="inline-msg">
        You are now in line.
      </h1>
      <h1 id="patience-msg">
        Thank you for your patience.
      </h1>
    </section>
    <h2 id="waitTime"></h2>

    <script>
      var locale = location.pathname.split("/")[1] || "en";
      var translations = {
        "en": {
          "waittime_60_less": "Your estimated wait time is {{waitTime}} minute.",
          "waittime_60_greater": "Your estimated wait time is {{waitTimeHours}} hours and {{waitTimeHourMinutes}} minutes.",
          "inline-msg": "You are now in line.",
          "patience-msg": "Thank you for your patience.",
        },
        "es": {
          "waittime_60_less": "El tiempo de espera estimado es {{waitTime}} minuto.",
          "waittime_60_greater": "El tiempo de espera estimado es {{waitTimeHours}} de horas y {{waitTimeHourMinutes}} minutos.",
          "inline-msg": "Ahora se encuentra en la fila de espera previa.",
          "patience-msg": "Gracias por su paciencia.",
        }
      };

      {{#waitTimeKnown}}
      var minutes = parseInt( {{waitTime}} , 10);
      var time = document.getElementById('waitTime');

      if ( minutes < 61) {
        time.innerText = translations[locale]["waittime_60_less"]
      } else {
        time.innerText = translations[locale]["waittime_60_greater"]
      }
      {{/waitTimeKnown}}

      // translate template text for each of the elements with “id” suffixed with “msg”
      for (const msg of ["inline-msg", "patience-msg"]) {
        const el = document.getElementById(msg);
        if (el == null) continue;
        el.innerText = translations[locale][msg];
      }
    </script>
  </body>
</html>

テンプレートの仕組みは、次のようなものになります:ページのレンダリング後、`<script />` 内で `/en/product_123` や `/es/product_123`などさまざまなパスでロケールを区別しているサイトがある場合、ロケールは `location.pathname` から `locale = location.pathname.split(“/”)[1]` にて抽出されます。`translations`オブジェクトにロケールが指定されていない場合は、デフォルトで “en “になります。例えば、ユーザーがexample.com/product_123にアクセスした場合、デフォルトでは英語のテキストテンプレートがレンダリングされます。

同様に、サブドメインでサイト構造を切り分けているサイトで多言語待機室をサポートするには、URLからロケールを抽出する方法を更新するだけで済みます。`pathname`を見る代わりに、`window.location` の `hostname` プロパティの`locale = location.hostname.split(“.”)[0]` などのオブジェクトなどを見ます。この場合、en.example.com、es.example.comなどのサイト構造となっています。

上記のコードは、多言語待機室の構築を始めやすくできるよう当社で用意した開発者向けドキュメントに記載したスターターテンプレートの抜粋です。これらのテンプレートをダウンロードし、貴社サイトおよび貴社サイトが提供する言語オプションに沿ったルック&フィールに仕上がるよう、編集できます。

開発者ドキュメントで提供されているスターターテンプレートの例を引用しました。この待機室はキュー・オールモードで、ユーザーがexample.com/es/product_123にアクセスするとスペイン語のテキストを表示します。

これらのテンプレートは、それぞれのロケールに対して `translations` オブジェクトに翻訳を追加することで、さらに他の言語を含めて拡張できます。このように、ひとつのテンプレートで、サブドメインやパスを介してサイトが提供されるロケールに応じ複数の言語を提供できます。

複数のマルチホスト名とパスを持つ待機室でのクッキーの扱い方

待機室は 各ユーザに `__cfwaitingroom` クッキーを割り当て、そのユーザの状態を管理します。このクッキーは、ユーザーのキューの決定を行うために必要な他のプロパティに合わせてユーザーのキューを決定します。従来は、単一のホスト名とパスの設定には、クッキーを `__cfwaitingroom=[cookie-value]; Domain=example.com; Path=/es/product_123` と設定するだけで済みました。これにより、ページが再読み込みされた際、同じ待機室クッキーが送信され、それを調べて更新することができました。しかし、例えば `example.com/en/product_123`のように、異なるサブドメインやパスの組み合わせで同じクッキーを共有したいとき、これは簡単ではありませんでした。

複数のクッキーを設定するためのアプローチ

同じ待機室のクッキーを共有できるようにするために、当社ではブレインストーミングを行い、2つのアプローチを評価しました。

当社が考えた最初のアプローチは、HTTPレスポンスに複数の `Set-Cookie` ヘッダーを発行することでした。例えば、上記の多言語の例では、レスポンスヘッダーに次のように書くことができます:

Set-Cookie: __cfwaitingroom=[cookie-value]…Domain=example.com; Path=/en/product_123 …
Set-Cookie: __cfwaitingroom=[cookie-value]...Domain=example.com; Path=/es/product_123 …

この方法を使えば、同じ待機室に対して複数のホスト名とパスを扱うことができます。しかし、スケーラブルなソリューションとは言えません。 RFC6265ごとに、仕様で定義された厳密な制限はなく、ブラウザはその実装に固有の制限を持っています。例えば、ChromeではERR_RESPONSE_HEADERS_TOO_BIGでトランザクションを投げる前に、レスポンスヘッダが 256Kバイトまでの拡大を許容します。さらに、この場合、レスポンスヘッダは一意なホスト名とパスの組み合わせの数に比例して大きくなり、同じクッキー値 N(N は追加ルートの数)を何回も冗長に繰り返すことになります。このアプローチは、設定される必要があるホスト名とパスの組み合わせの限定されたリストを効果的に扱うことを可能にするものの、特定のサイトに対して相当数のルートが予想されるケースには理想的ではありませんでした。

当社が検討し最終的に採用することとなった2つ目のアプローチは、エイペックスドメイン(または最も共通するサブドメイン)にクッキーを設定することでした。つまり、ルーティングのリストから最も共通するサブドメインを割り出し、それをドメインとして使うのです。同様に、パスの場合、パスのリストから共有する最小のプレフィックスを決定し、それをpath属性に設定する値として使用することになります。例えば、a.example.com/shoes/product_123、および b.example.com/shoes/product_456の2つのルーティングが設定された待機室を考えてみましょう。

クッキーに設定されるドメインを決定するに当たり、ドメインのリストの中で `example.com` が最も共通するサブドメインであることがわかります。最も共通するサブドメインアルゴリズムを適用すると、ドメインとして `example.com` が得られます。パスの集合である `/shoes/product_123` と `/shoes/product_456` に対して最小共通接頭辞アルゴリズムを適用すると、パスとして `/shoes` が得られます。したがって、set-cookieヘッダーは次のようになります:

Set-Cookie: … __cfwaitingroom=[cookie-value]; Domain=example.com; Path=/shoes …

これで、Web訪問者がこの待機室がカバーするページのいずれかにアクセスするとき、Waiting Roomが正しいクッキーを受け取り、応答ヘッダーに Set-Cookie のみが含まれるようにできます。

しかし、当社はまだここまで到達できていません。共通のサブドメイン(またはエイペックスドメイン)と共通のパスプレフィックスを識別することはできても、ある待機室からのルーティングが別の待機室と重なってしまうと、まだ残る問題があります。例えば、特別な靴を販売している同じサイトに2つの待機室を設定するとします:

Waiting Room A
    a.example.com/shoes/product_123
    b.example.com/shoes/product_456

Waiting Room B
    c.example.com/shoes/product_789
    d.example.com/shoes/product_012

前述と同じアルゴリズムを適用すれば、2つのクッキーに同じドメインとパスのプロパティが設定されることになります。待機室Aの場合、ドメインは `example.com`、パスは`/shoes` となります。同様に、待機室Bでは、最も共通するサブドメインは同じくexample.comとなり、最も共通していないパスの接頭辞は `/shoes` となります。これにより、2つのクッキーを効果的に区別することができなくなり、Web訪問者を正しい待機室に導くことができなくなります。重複するクッキーネームの問題を解決するために、お客様のゾーンに固有のカスタムサフィックスを設定する要件を導入しました。これが、複数のホスト名やパスをカバーする待機室を設定する際、カスタムクッキーサフィックスの提供が必要な理由となります。したがって、待機室Aにクッキー接尾辞 “a “を、待機室Bにクッキー接尾辞 “b “を割り当てた場合、2つの `Set-Cookie` の定義は以下のようになります:

Waiting Room A

Set-Cookie: __cfwaitingroom_a=[cookie-value]; Domain=example.com; Path=/shoes

Waiting Room B

Set-Cookie: __cfwaitingroom_b=[cookie-value]; Domain=example.com; Path=/shoes

Web訪問者が、2つの異なる待機室が設定されたページにリクエストを行うと、待機室は指定されたリクエストに対応するクッキーを区別して選択し、これを用いて、ユーザーがサイト上のどこにいるかに応じ、そのユーザーに適用される待機室の設定を決定します。

Waiting Roomがマルチホストとマルチパス対応となったことで、お客様のサイトにWaiting Roomを組み込むための柔軟な選択肢を提供できるようになりました。これにより、Web訪問者に可能な限り優れたエクスペリエンスを提供しながら、トラフィックの多い時間帯にサイトを保護できるようになりました。 お客様のサイトは、トラフィックの急増から常に保護されることになります。Waiting Roomをさっそくお試しいただき、またWaiting Roomアドバンスの詳細について当社へのお問い合わせをお待ちしています。

The collective thoughts of the interwebz