Post Syndicated from LastWeekTonight original https://www.youtube.com/watch?v=SnsBI4YxwIs
S13 E27: The Republican Party & The Far Right: 10/25/26: Last Week Tonight with John Oliver
Post Syndicated from LastWeekTonight original https://www.youtube.com/watch?v=zVwhVOB3ulU
Siege Engine
Post Syndicated from xkcd.com original https://xkcd.com/3316/

Comic for 2026.10.25 – Yaaawn
Post Syndicated from Explosm.net original https://explosm.net/comics/yaaawn-2
New Cyanide and Happiness Comic
Easy Answers
Post Syndicated from Oglaf! -- Comics. Often dirty. original https://www.oglaf.com/easyanswers/


This $70 Home Assistant Speaker Has a Serious Problem
Post Syndicated from BeardedTinker original https://www.youtube.com/watch?v=XkbWu0dwHzw
Ограничения в отворените данни и в кадастъра
Post Syndicated from Боян Юруков original https://yurukov.net/blog/2026/cadastre-opendata-block/
Тези дни ми сигнализираха, че е въведено ограничение в свалянето на отворените данни в кадастъра. През януари 2025 писах, че заедно с новата им система са въведени отворени данни включващи всички поземлени имоти, сгради и самостоятелни обекти заедно с анонимизирани данни за собствеността. Скоро след това писах за някои недостатъци на предоставената информация и причината за тях. От тогава тези данни са крайъгълен камък на десетки анализи и визуализации, които съм правил аз и много други. В това число данните за държавните имоти с отпаднала необходимост и имотите на вероизповеданията.
Както писах преди две години обаче свалянето на данните не е лесно. Разделени са на по шест архива с пространствени данни или такива за собственост за всяко село или град в България. Не всички населени места имат всички данни за всички обекти. Някои всъщност нямат никакви използваеми данни, защото просто не са нанесени в кадастъра, а има фиктивен „парцел“ обхващащ цялото село.

Така за да получите всичко за България, трябва да свалите над 23 хиляди архива. Отделно, за да разберете кои населени места какви данни имат и как се казват файловете, трябва да свалите още 5407 индекс файла. За целта направих скрипт, който използвам веднъж в месеца, за да получа последните промени. След това обръща формата на кадастъра (SHP) в по-лесен за използване във визуализации (geojson и csv) и събира всички данни за собствеността в един общ архив. В ZIP индексът е 3.4 Мб. Таблицата със собствеността е около 800 Мб. Очертанията на всички обекти в пространствени данни са 2.2Гб. Държа ги в три ZIP файла. За да ги получа се налага да сваля над 28 хиляди файла с общ размер от 6.5 Гб от кадастъра.
Нови ограничения
Последно свалих данните на 15-ти октомври. Скоро след това разбрах, че е въведено ограничение. Проверих на 21-ви и наистина е така. След известна активност блокират всеки, който се опитва да свали отворените данни. Ограничението е временно, но достатъчно, за да направи още по-труден достъпа от преди.
Попитах ги за причините, какви са измеренията на натоварването и дали е временно докато въведат друго решение. Всъщност, още в началото на 2025-та предупредих, че начинът на публикуване ще им създаде проблеми. Нищо не пречи да пакетират данните в 28 архива за всяка област. Всеки ще е от няколко стотин Мб и ще трябват 28 заявки към сървъра, а не 28 хиляди. Отделно създаването на нов архив при всяка промяна изисква същите ресурси за обновяване на няколко файла в един голям архив.
Когато го предложих тогава един аргумент беше, че при обновяване на данните за едно населено място ще се обнови само архива за него и съответно при желание всеки ще има нужда да сваля само обновените. Това звучи логично, но практиката показва друго. За да се разбере кои файлове са обновени пак трябва да се направят няколко стотин запитвания към индекс файловете и доста по-сложна логика. Т.е. някой трябва да прави програма или скрипт като моя специално за това. Най-вече обаче видяхме, че практически всички общини имат промени в рамките на даден месец и така или иначе повечето информация трябва да се сваля наново.
Казано иначе, чисто технически не пречи да се групират данните в 28 архива и отказът им да го направят е причината за трудностите, с които се аргументират в момента. Отделно, че съдейки по обществената поръчка, ако са получили сървърите, за които са платили, не би трябвало да имат затруднения дори със сегашното положение.
Когато някой бъде блокиран така, на страницата се показва мейл адрес. Очаквам все още отговор на мейла, който писах до него. Междувременно получих отговор на Fb страницата им по същата тема. Надявам се техническите лица да дадат по-смислена информация.
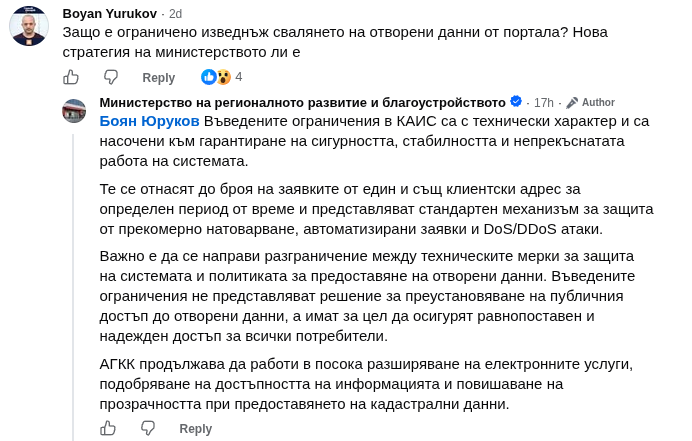
Най-вече се надявам да махнат ограничението и да направят свалянето на отворените данни практично. Както съм казвал много пъти в интервюта и лекции, ключова характеристика на отворените данни е не само, че са в подходящ формат, добре описани и изчерпателни, но и че са свободни за сваляне и използване. Това означава техническа и юридическа възможност и достъпност. Сайтът на министерството – както и твърде много обществени органи – все още има лиценз с „всички права запазени“, което е абсурдно юридически за държавна институция. В случая обаче спъват и техническата достъпност.
Давал съм данните на кадастъра многократно като положителен пример за критични данни, които подпомагат на разследвания, визуализации и инструменти, които нашумяха много в последните две години. Първият случай да ги спомена мисля, че беше е лекцията ми за Ratio. С това просто техническо недомислие обаче тръгват в обратната посока. Това изглежда се явява системен проблем в действията на този кабинет.
Ново заснемане на България
Междувременно МРРБ обявиха, че са добавили нов слой с ортофото заснемане на България. Това е аналогично на добре познатите сателитни снимки на картите на Google, Apple и много други. В случая обаче е поръчано от български институции и се прави независимо от големите доставчици. Обновяването е добре, защото последните данни бяха на четири години. Странното обаче е, че беше представено както иновация и разширяване на възможностите при условие, че съществува като функционалност в различни формати от 15 години.
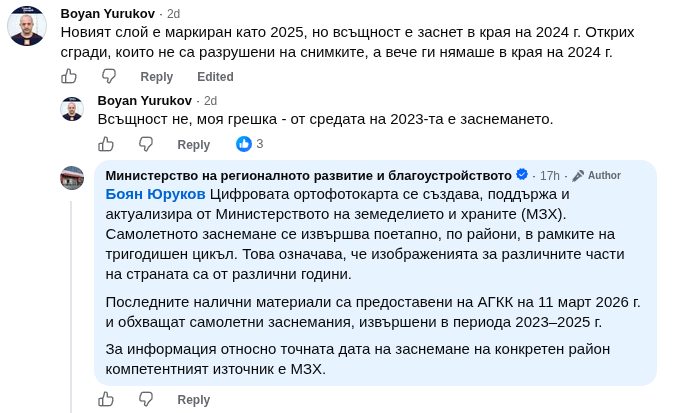
Разгледах го подробно и забелязах нещо странно. Заснемането беше представено в изказванията като актуално към 2026 г. В самата карта беше маркирано като направено през 2025 г. Разгледах София специално търсейки конкретни строежи, за които знам кога са започнали и на каква фаза са били в последните години. Видях, че на заснемането бул. Филип Кутев не е бил дори завършен. Това значи, че поне южна София е била заснета през лятото на 2023 г. и новите снимки са на поне три години.
После се оказа, че всъщност са имали предвид, че МРРБ са получили данните през март 2026 г., а заснемането е било в периода между 2023 и 2025 г. Това е нормално предвид, че България е голяма и не могат да я заснемат със самолети за няколко месеца или да използват сателитни снимки без облачна покривка за кратък период от време. След коментара ми във Fb забелязах, че са променили заглавията на слоевете с по-точна информация, което приветствам.
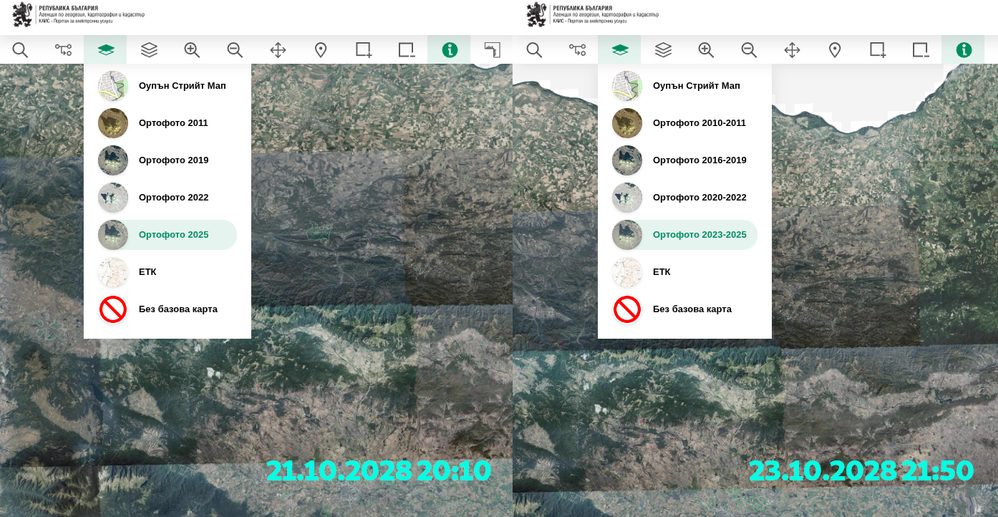
Новото заснемане определено е полезно, макар и не актуално и не някаква нова функционалност. Снимките са по-нови от тези на Google Maps, както и 3D заснемането, което използвам във визуализацията на застрояването. Специално за София има публично по-ново заснемане от 2024 г., което е достъпно на iSofMap. Знам, че и други градове в България имат подобни. Така получаваме доста интересна снимка през година от различни източници.
Adding a ‘Radio’ to my Japan-only stereo
Post Syndicated from Techmoan original https://www.youtube.com/watch?v=7W7iOvG1I9s
Build RAG-ready indexes from Amazon S3 with Amazon OpenSearch intelligent ingestion
Post Syndicated from Hang Zuo original https://aws.amazon.com/blogs/big-data/build-rag-ready-indexes-from-amazon-s3-with-amazon-opensearch-intelligent-ingestion/
Much of an organization’s most valuable knowledge sits in documents such as contracts, product manuals, research reports, support runbooks, and financial filings. This content is stored in Amazon Simple Storage Service (Amazon S3) as structured data (JSON, NDJSON, and JSON array) and unstructured data (PDF, Word, text, and Markdown). Generative AI applications, Retrieval Augmented Generation (RAG) assistants, and enterprise search experiences are only as good as their access to this content. Yet it’s often the hardest data to make discoverable and searchable. To extract this data, customers must run complex ingestion pipelines with multiple steps:
- Running a document parser that extracts text while keeping the layout, reading order, and tables.
- Extracting and interpreting the charts, diagrams, and screenshots inside those documents.
- Chunking and processing the extracted text through an embedding model and writing the results into a vector index.
Each layer brings its own infrastructure, scaling decisions, and failure modes. The complexity compounds, and many organizations spend weeks to make it work end to end.
Today, we’re excited to announce Amazon OpenSearch intelligent ingestion, a fully managed and serverless ingestion capability in Amazon OpenSearch Serverless (NextGen). You start from your collection, point to your data in Amazon S3, and choose how it should be processed. Intelligent ingestion then handles the rest: it discovers your content from S3, parses the documents, describes the images, chunks the content, generates vector embeddings, and indexes the results. There are no pipelines to configure, no document processing infrastructure to operate, and no capacity to size ahead of time.
With intelligent ingestion, you can:
- Go from raw documents to semantic search without manual pipelines. Ingest PDF, Word, and Markdown files, parsed with their layout and tables intact, into indexes ready for semantic and hybrid search.
- Make visual content searchable. When documents contain charts, diagrams, screenshots, or photos, a vision-language model writes detailed text descriptions. You can then find information that only appears in images.
- Ingest structured data without pipeline code. Load JSON, NDJSON, and CSV data and apply transformations during ingestion, with optional semantic search enrichment.
- Choose one-time or continuous ingestion streams. Use Ingestion Jobs for one-time or periodic loads such as migrations and backfills. Use Ingestion Streams to keep your index continuously in sync as new objects arrive in your bucket.
- Pay only for active processing. Capacity scales automatically with your workload, and you aren’t charged for idle ingestion capacity.
In this post, we explain how intelligent ingestion works and when to use Ingestion Jobs or Ingestion Streams. We then walk through ingesting a batch of unstructured documents from Amazon S3 and processing their contents into RAG-ready intelligence in Amazon OpenSearch Serverless (NextGen). You can ingest logs and structured data with the same workflow. Load JSON, NDJSON, and JSON array data, such as application logs, audit trails, or product catalogs, from Amazon S3 and apply transformations during ingestion, with optional semantic enrichment. Your RAG knowledge base and your log analytics can share a single ingestion experience.
Solution overview
Intelligent ingestion runs inside Amazon OpenSearch Serverless (NextGen) collections and manages the whole path from your S3 bucket to your index. When you create an Ingestion Job or an Ingestion Stream, you only need to specify two things:
- The source – An Amazon S3 bucket and prefix that contain your data.
- The destination – The index in your Amazon OpenSearch Serverless (NextGen) collection where the processed data lands.
From there, intelligent ingestion runs the following steps for you.
- Data discovery: Intelligent ingestion automatically scans the objects under your S3 prefix. For Ingestion Streams, it detects new objects as they arrive using Amazon Simple Queue Service (Amazon SQS) notifications.
- Document parsing: When PDF and Word files are detected, intelligent ingestion automatically parses them into structured content, keeping headings, reading order, and tables.
- Image understanding: When it detects images in the PDF and Word files, it generates rich text descriptions so visual content can be indexed alongside the surrounding text.
- Chunking and embedding: Intelligent ingestion splits content into chunks sized for retrieval and generates vector embeddings using OpenSearch Automatic Semantic Enrichment.
- Indexing: Intelligent ingestion writes the chunks, sparse embeddings, and metadata into your index and scales capacity up and down for the workload, within your predefined OpenSearch Compute Unit (OCU) limits for the collection group.
Ingestion Jobs or Ingestion Streams
| Ingestion Jobs | Ingestion Streams | |
| Use when | You have a fixed dataset to load once | Your data keeps arriving or changing |
| Typical scenarios | Initial loads, migrations, backfills, proofs of concept | Knowledge bases that grow, continuously updated document libraries |
| Behavior | Ingests all objects under the prefix, then completes | Keeps the index in sync as new objects arrive |
Prerequisites
To follow along with this post, you need:
- An AWS account with permissions to create and manage Amazon OpenSearch Serverless (NextGen) collections.
- An Amazon S3 bucket containing your data.
- An AWS Identity and Access Management (IAM) role and the permissions required for intelligent ingestion to read from Amazon S3.
How it works
Starting from the AWS Management Console page for Amazon OpenSearch Serverless, you can now see a new Ingestion tab. You can start by choosing Create ingestion job, or review the existing jobs on this tab.
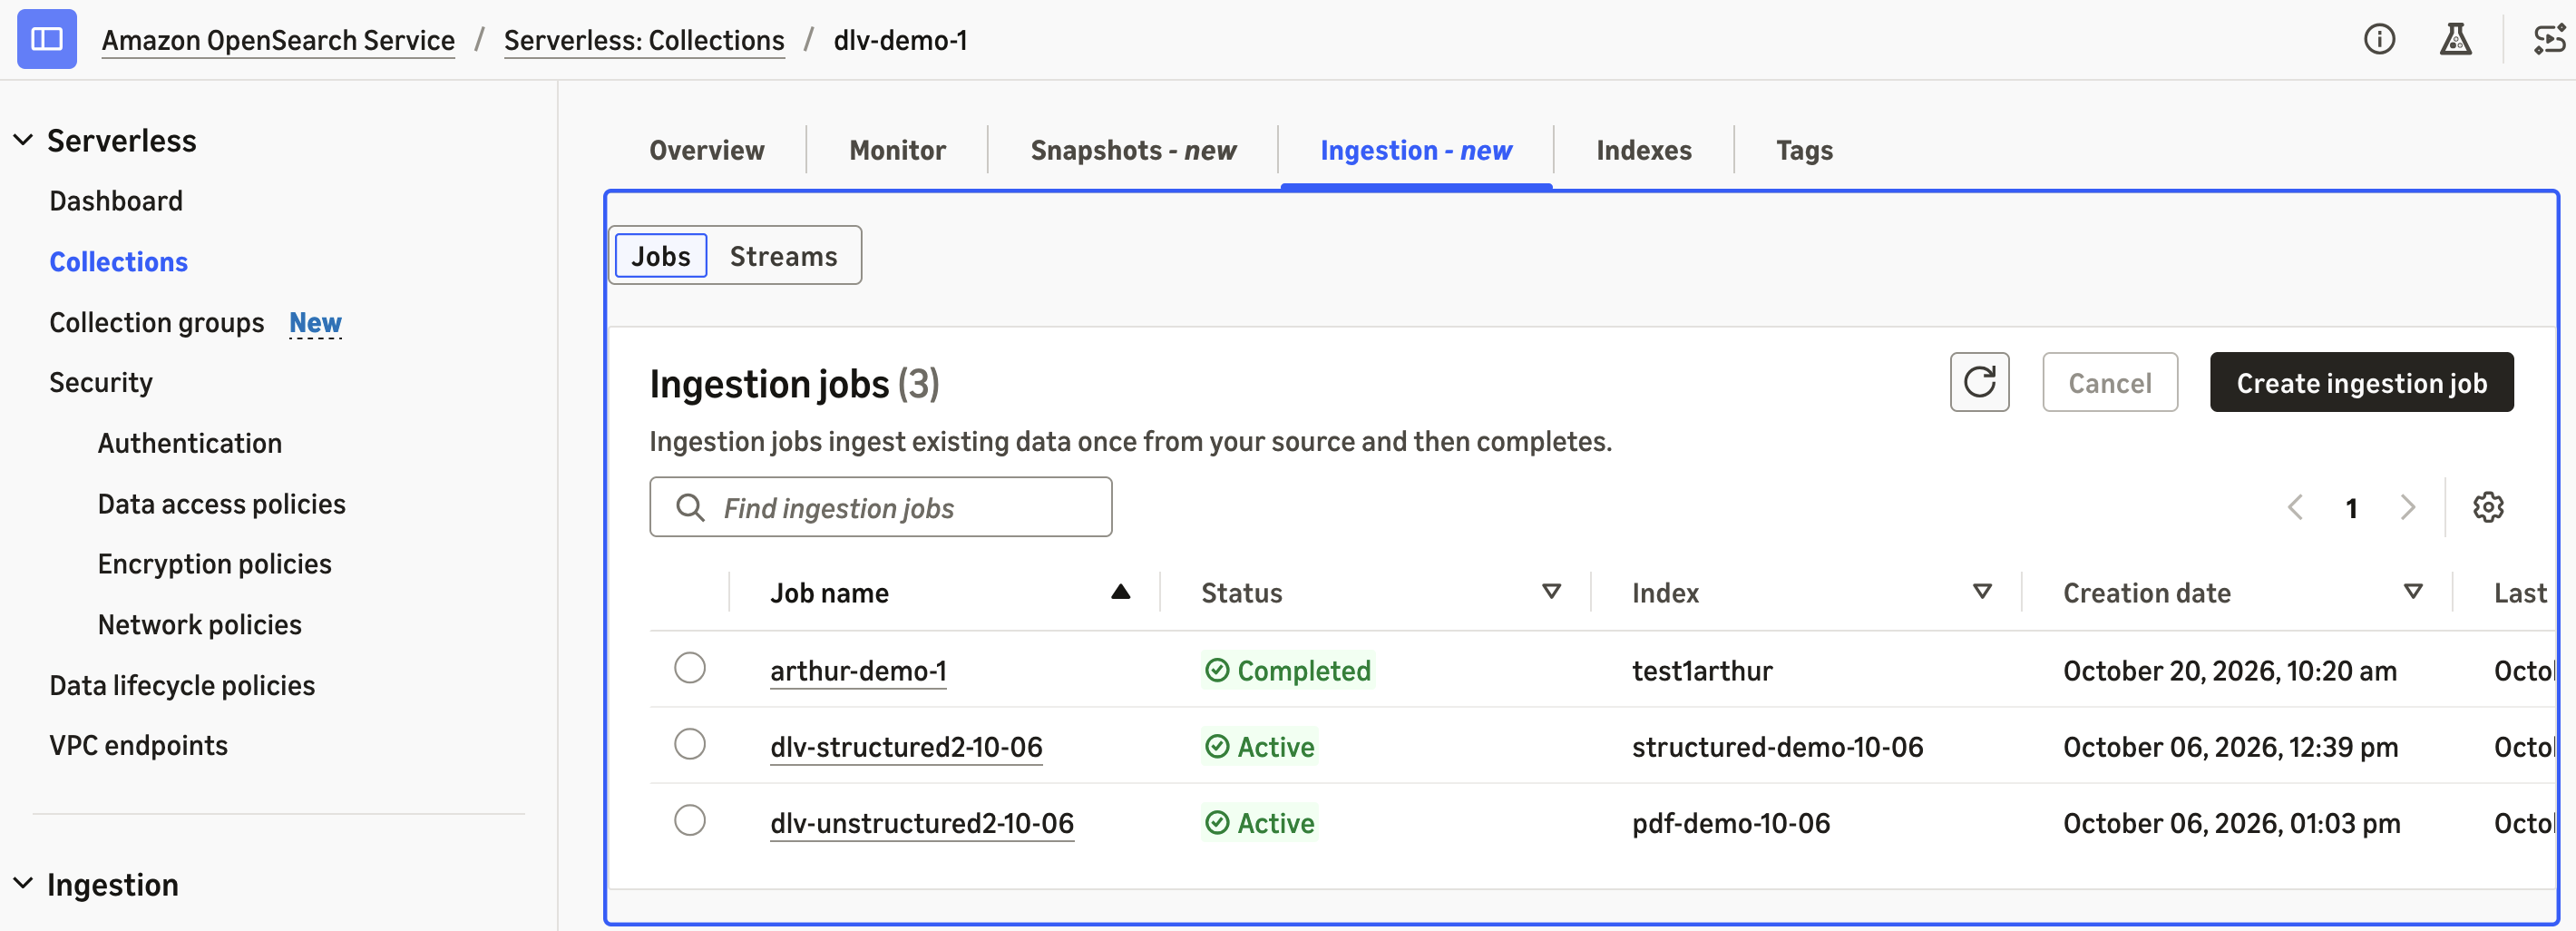
Figure 1: The Ingestion tab on the Amazon OpenSearch Service console
Intelligent ingestion supports three modes for different source configurations. For a static dataset on Amazon S3, select One-time batch to ingest it once, and the ingestion job automatically terminates after completion.
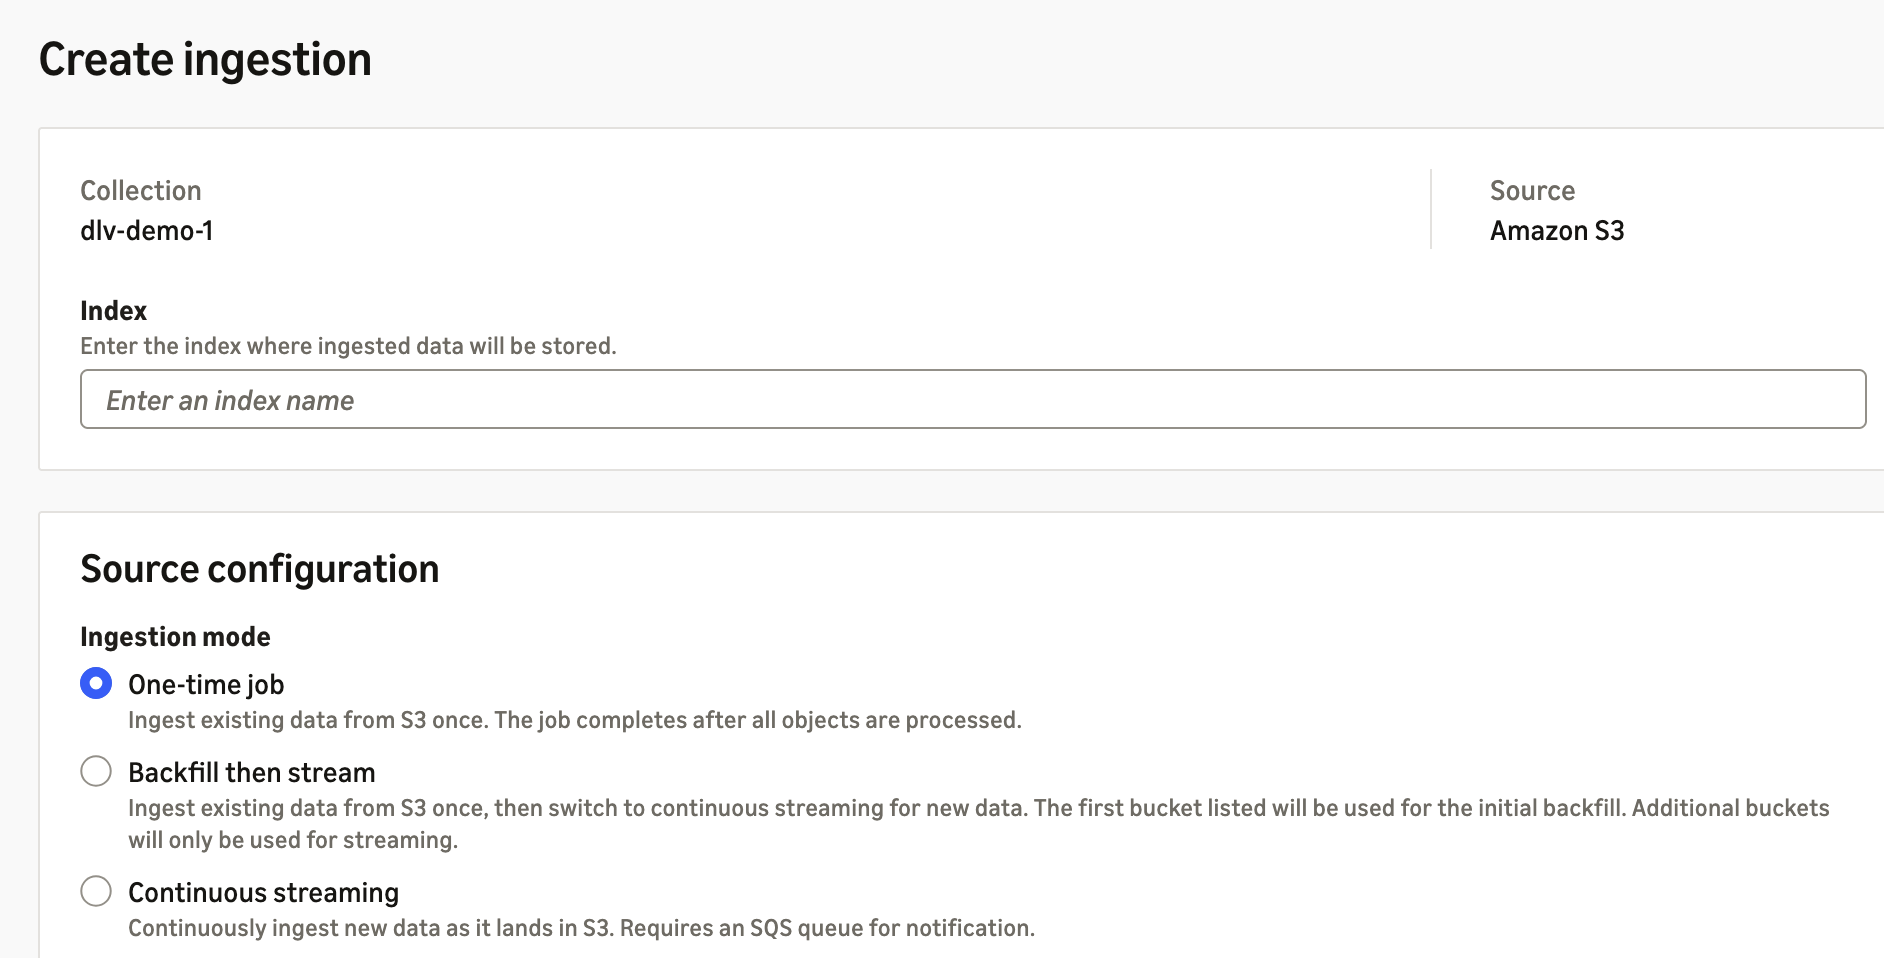
Figure 2: Selecting the One-time batch ingestion mode
For new S3 buckets that are about to receive new data input, select Continuous streaming to continuously monitor notifications and ingest when new data becomes available. If the S3 bucket already has some data in it, select Batch then stream to ingest the existing data and then switch to continuous streaming mode. For both scenarios, intelligent ingestion relies on your Amazon SQS queue to receive Amazon S3 object notifications, and requires the Amazon Resource Name (ARN) of an IAM role to assume and operate it for data ingestion.
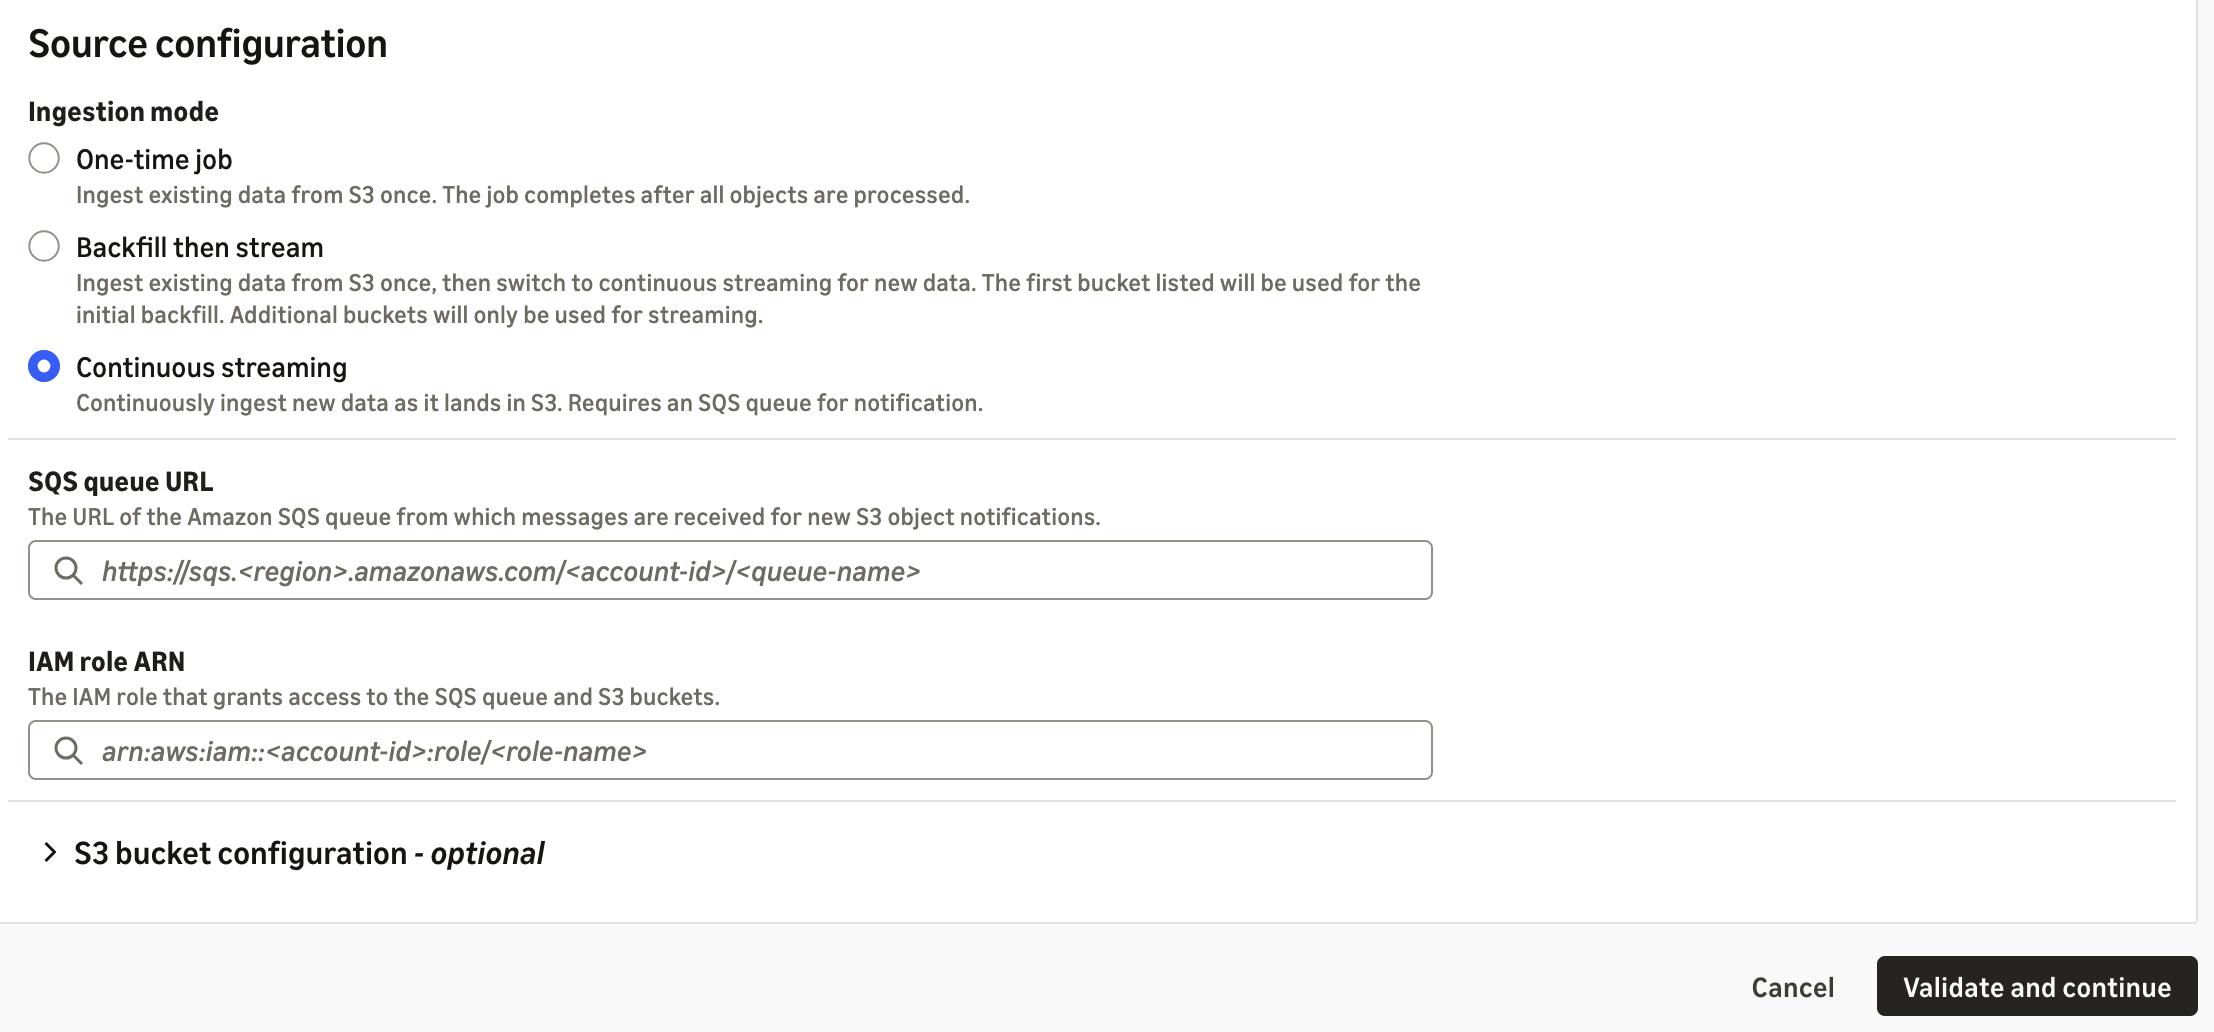
Figure 3: Configuring continuous streaming with an Amazon SQS queue and IAM role
Backfill then stream works as a combination of the other two modes. You can specify one bucket for the initial backfill and additional buckets for streaming new data.
The intelligent ingestion feature works automatically with S3 buckets within the same AWS account. You can browse for the S3 bucket within this page, and optionally define a prefix to specify which folders or files within the bucket should be ingested. Intelligent ingestion also works with S3 buckets in a different AWS account. For cross-account, you need to provide the other AWS account ID, along with the Amazon S3 bucket, IAM role ARN, and optionally Amazon SQS in that account to access both resources.
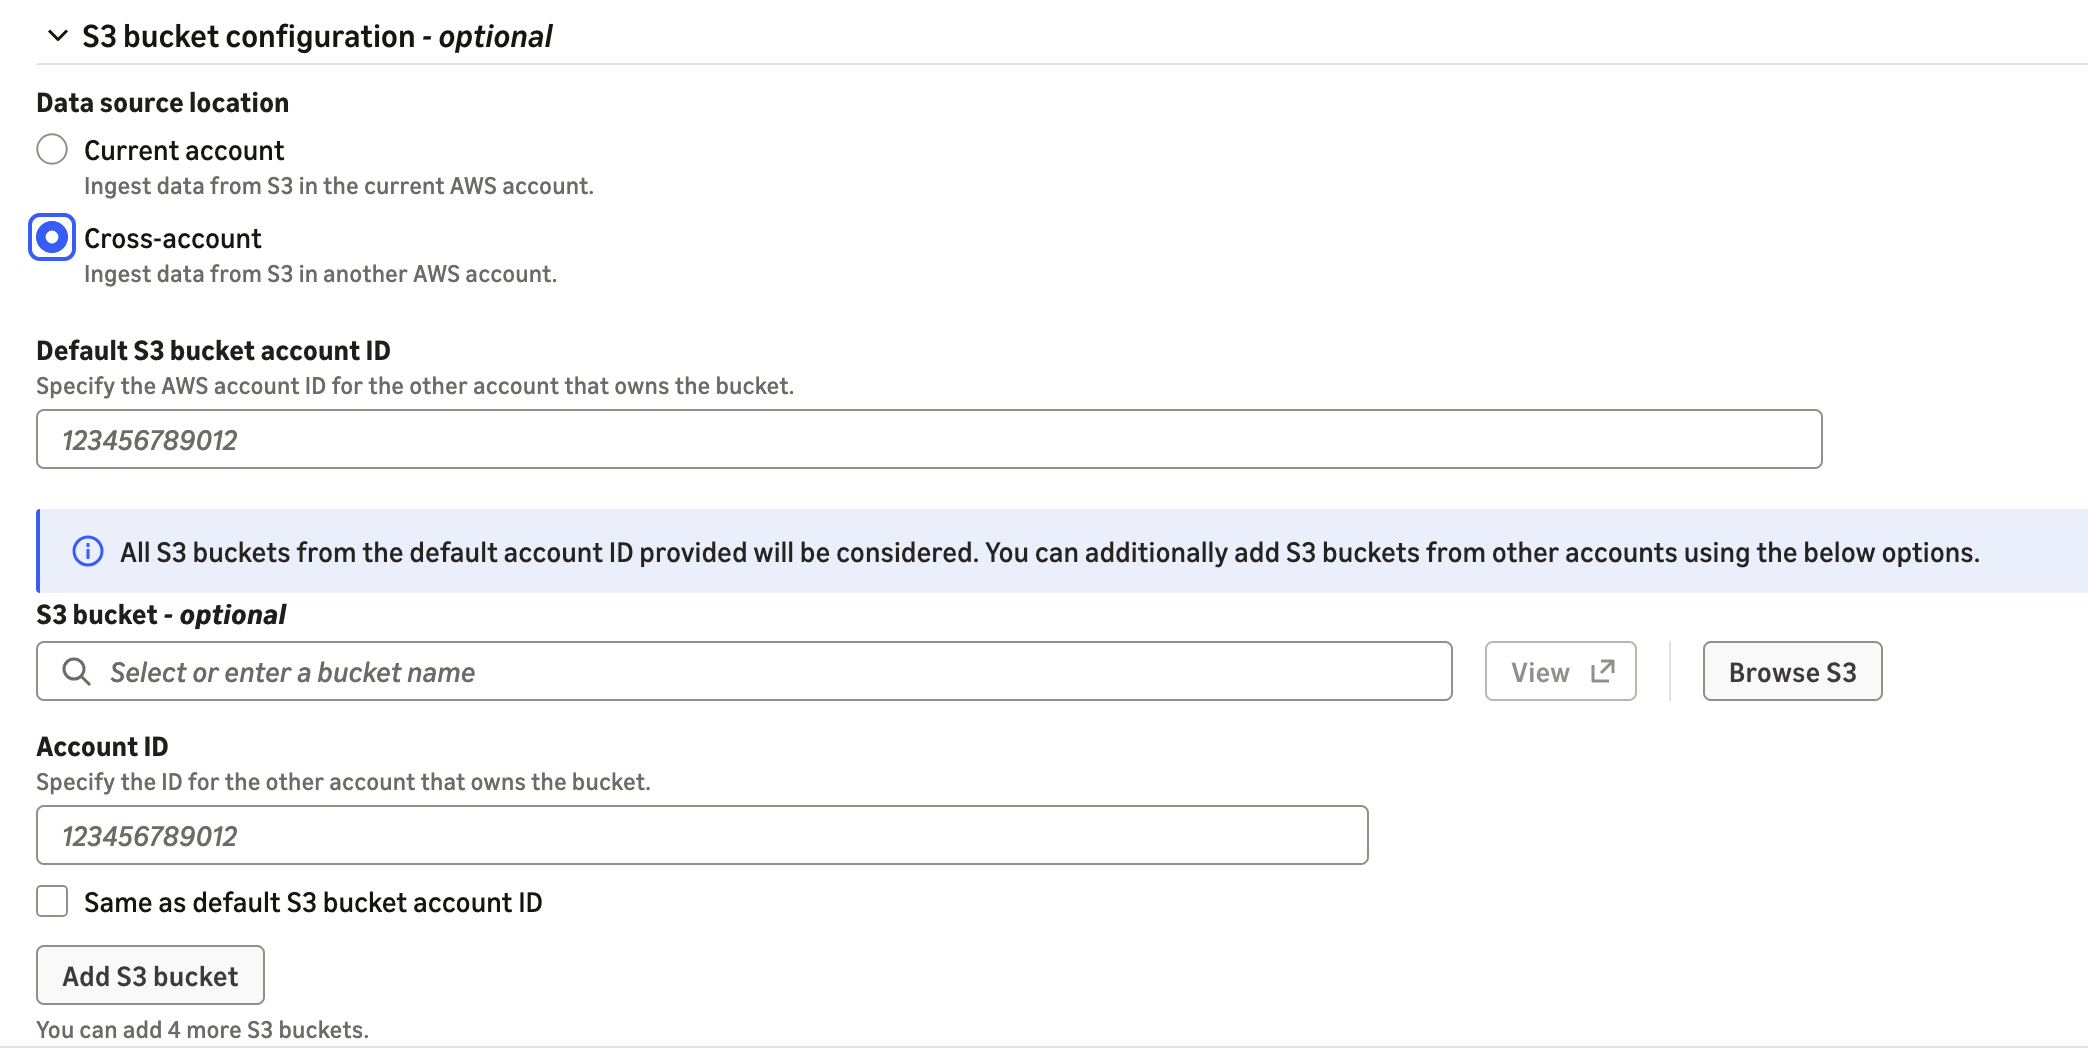
Figure 4: Selecting an Amazon S3 bucket and optional cross-account access
To get started, choose Create ingestion job and complete the configuration, and then choose Validate and continue. On this page, review the configuration, enter a name for the ingestion job or stream, and start the ingestion. The ingestion job or stream then appears on the Ingestion tab of the Amazon OpenSearch Serverless (NextGen) collection for a managerial view.
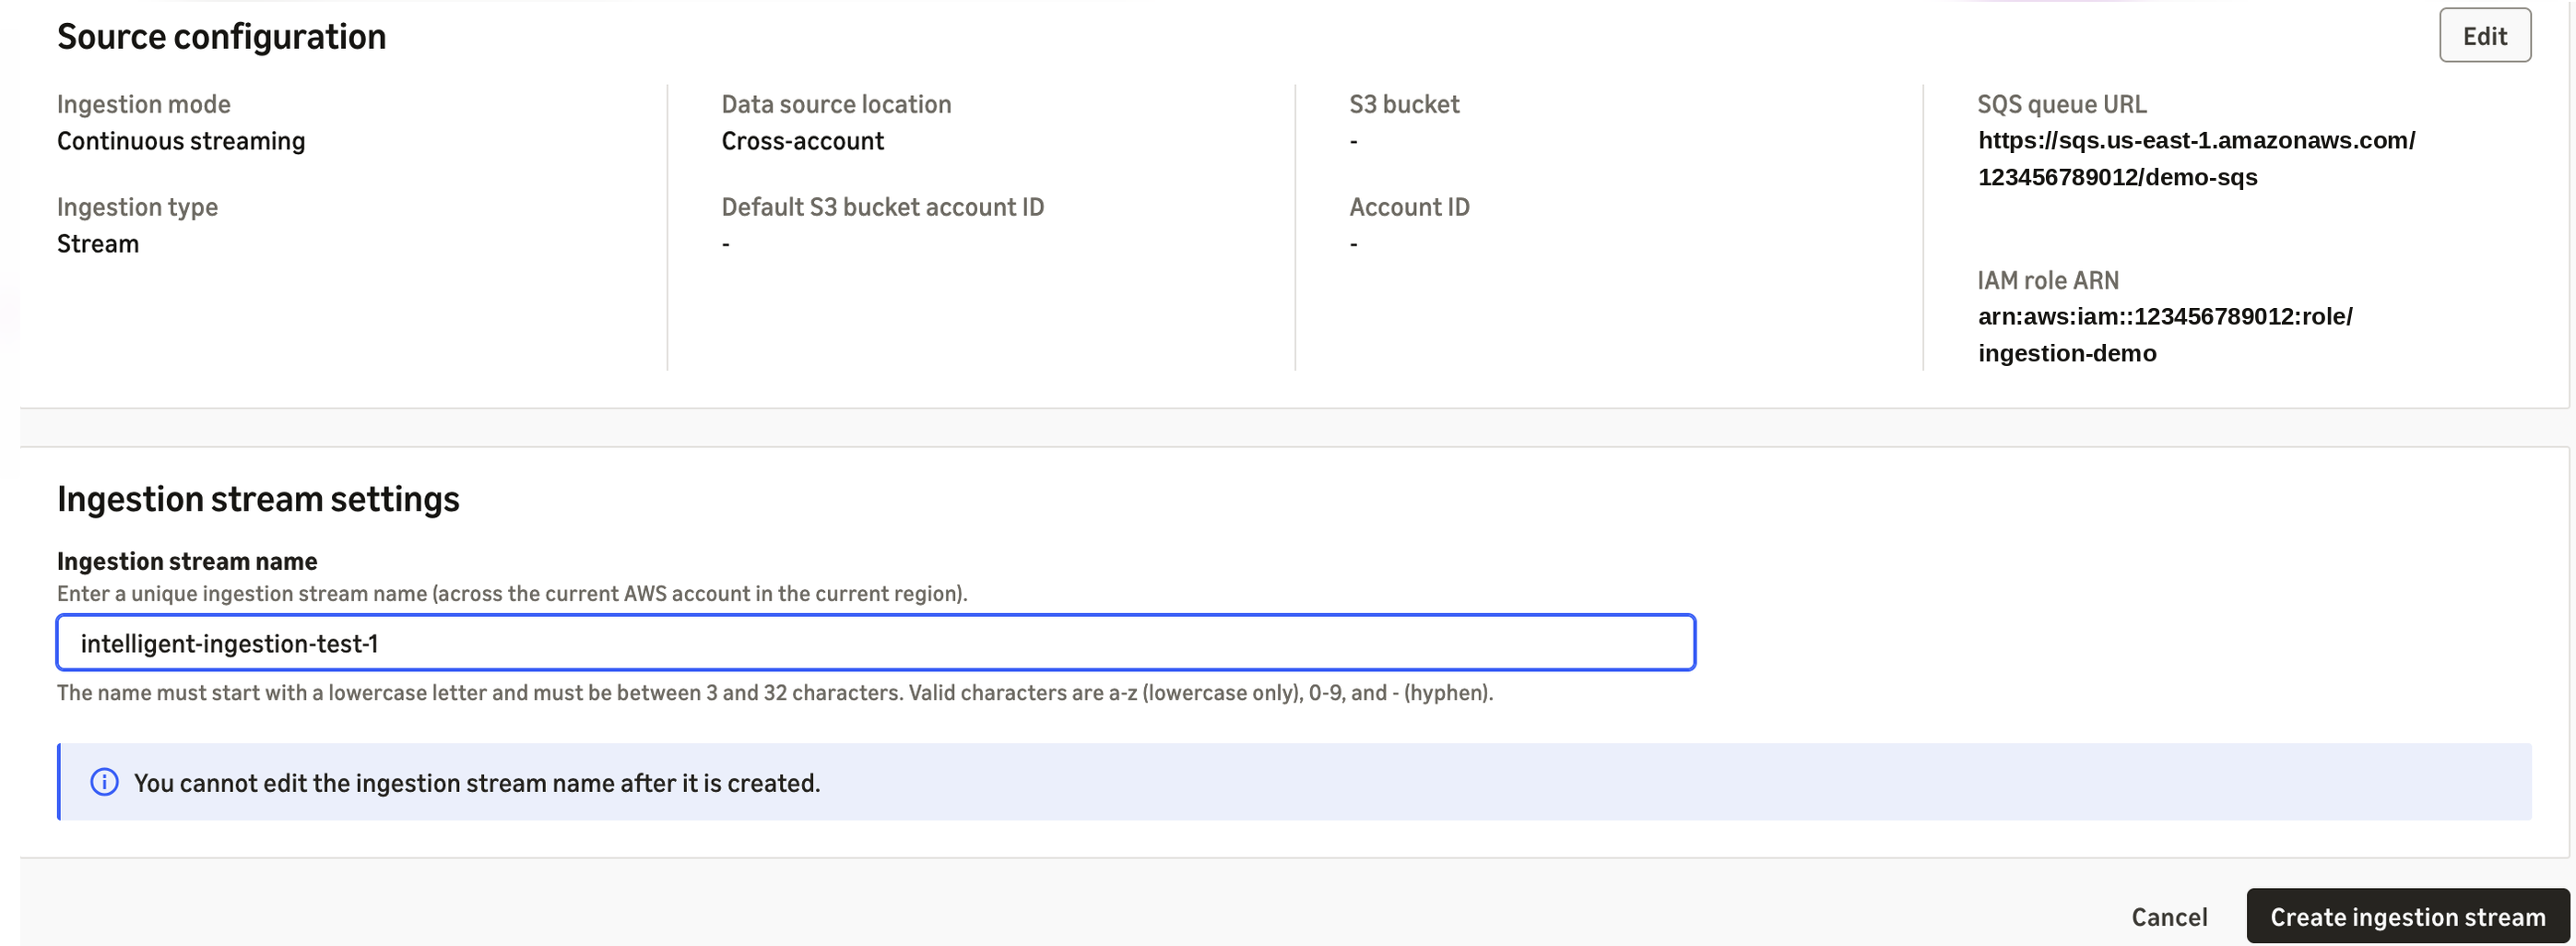
Figure 5: Reviewing and naming the ingestion job before starting
After it’s started, intelligent ingestion first scans the S3 bucket for data types and determines the processing mechanism for the content (structured data, unstructured data, or data with images). Intelligent ingestion automatically handles the tasks for the ingestion. You can monitor the number of documents it has scanned and indexed on the same page. Your data is now searchable in Amazon OpenSearch Serverless.
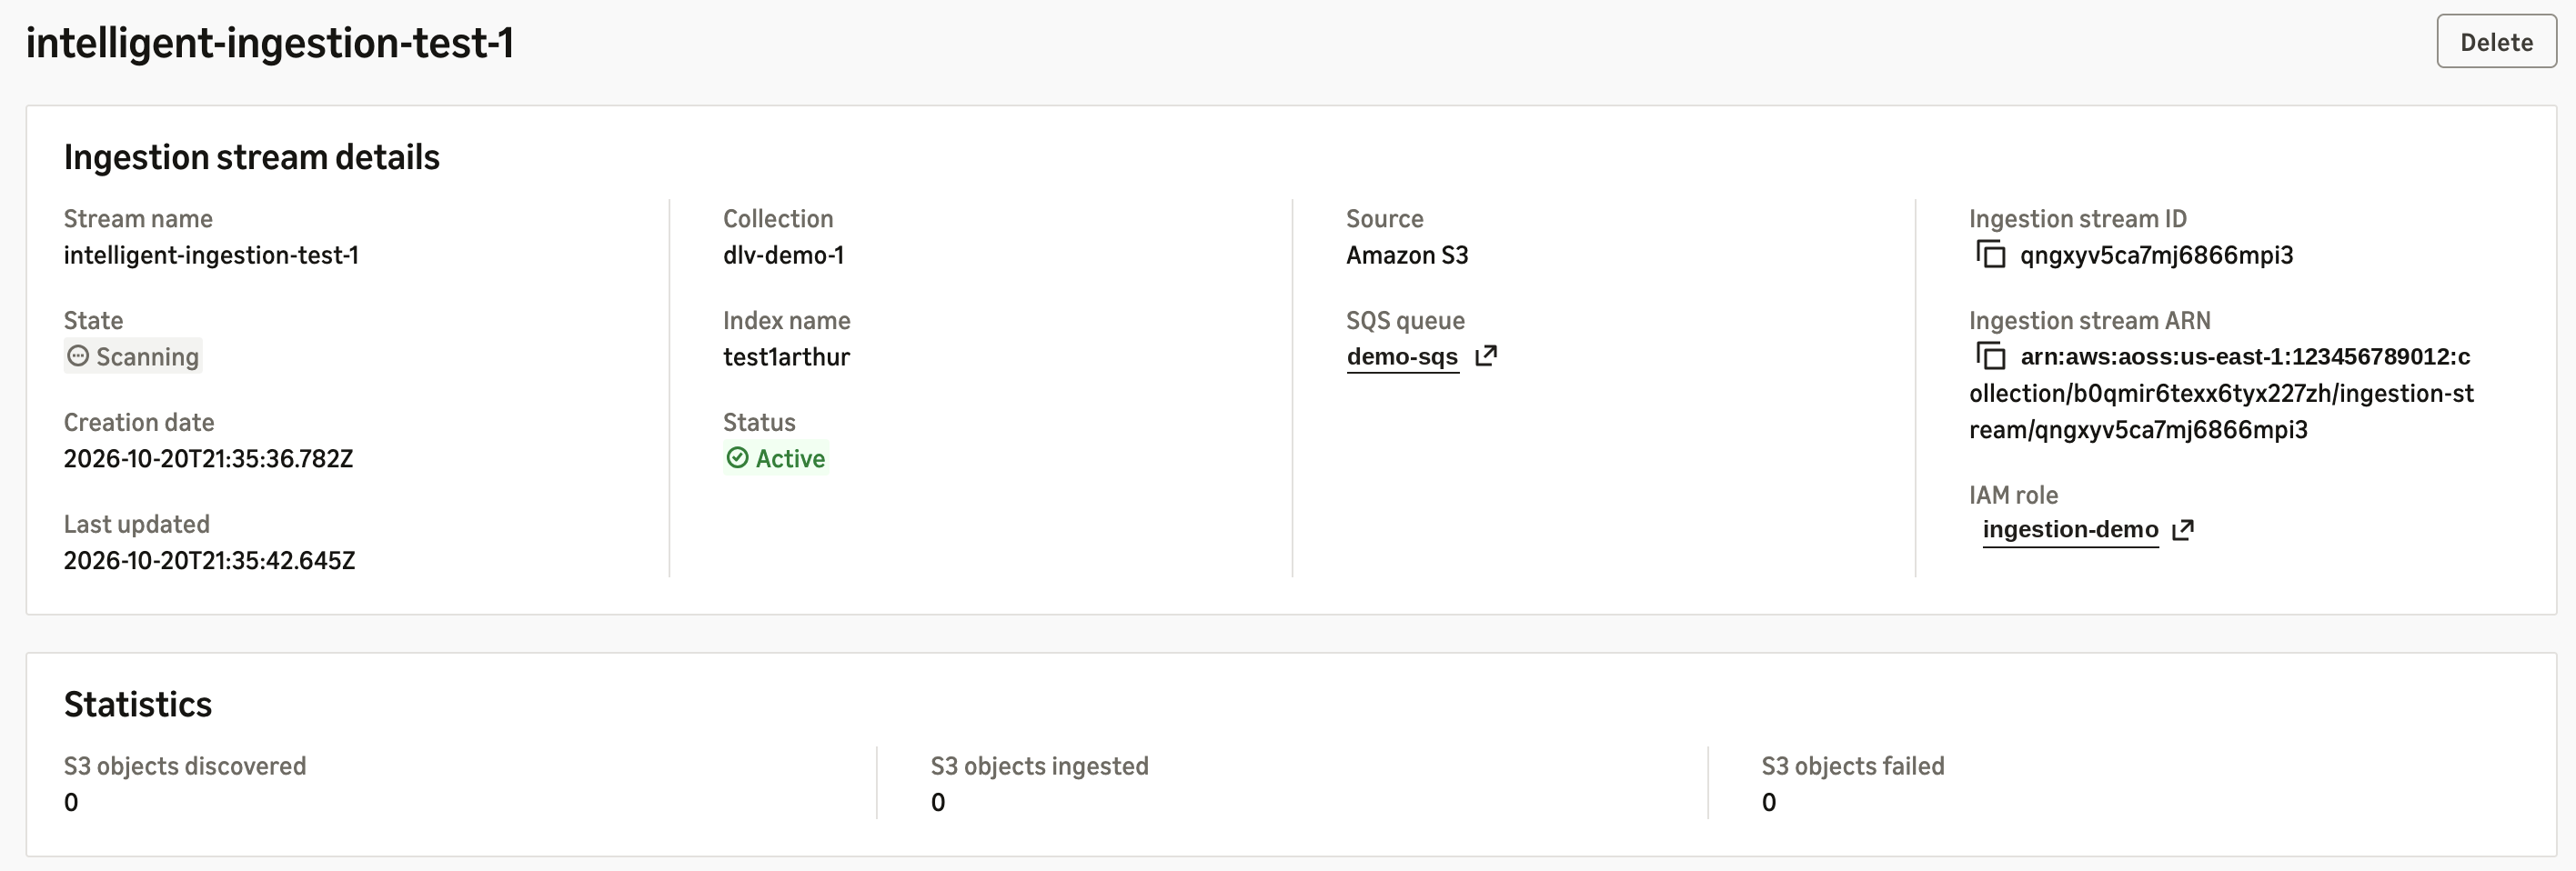
Figure 6: Monitoring documents scanned and indexed
Cost
Intelligent ingestion charges only for what you actually use.
Structured data such as JSON can be processed and ingested directly to OpenSearch Serverless for indexing. You pay for the standard OCU for each data ingestion worker while it is actively running. After the ingestion job completes, it automatically terminates and stops the billing.
Unstructured data such as PDF and Word documents requires additional parsing, chunking, and in some cases image understanding. Intelligent ingestion can automatically use the serverless indexing OCU (within your predefined limits) to extract text and chunk the pages into structured data. It charges the standard OCU rate, for example $0.24 per hour in US East (N. Virginia). This incurs an additional charge on top of structured data ingestion. Based on our internal testing, the one additional OCU can process 600 PDF pages per hour, which is $0.40 per 1,000 PDF pages processed and ready for ingestion. Intelligent ingestion uses Amazon Nova 2 Lite to translate the images within the PDF and Word files into semantic meanings. The Amazon Bedrock model inference cost is exactly the same as the public rates on Amazon Bedrock for Nova 2 Lite: $0.30 per 1M input tokens and $2.50 per 1M output tokens. Based on our internal testing, every 1,000 images consumes 0.5M input tokens on average, and 0.5M output tokens on average. You pay around $1.40 to process 1,000 images.
Clean up
To avoid future charges, delete the resources you created for this walkthrough. Delete any Ingestion Streams you created, then delete the OpenSearch collection and the sample documents in your S3 bucket if you no longer need them. Ingestion Jobs stop consuming capacity after they complete.
Conclusion
In this post, we showed how Amazon OpenSearch intelligent ingestion turns enterprise documents in Amazon S3 into RAG-ready intelligence without an ingestion pipeline to manage. You choose a source, a processing behavior, and a destination. Intelligent ingestion then parses your documents, describes their images, chunks the content, generates vector embeddings, and indexes the results. It scales with your workload and charges only for active processing. What once took weeks of pipeline engineering now takes only a few clicks or one API call, so your team can focus on the search and generative AI experiences your users need. Intelligent ingestion is available today for Amazon OpenSearch Serverless (NextGen) collections, with Amazon S3 as the data source, in six supported AWS Regions.
Ready to make your documents searchable? Open the Amazon OpenSearch Service console, choose your collection, and create your first Ingestion Job. Start with a small set of documents to see results in minutes, then add an Ingestion Stream to keep your index in sync as your content grows. To learn more, see Intelligent ingestion in the Amazon OpenSearch Service Developer Guide. For pricing details, see Amazon OpenSearch Service pricing.
About the authors
Friday Squid Blogging: Increasing Squid Populations
Post Syndicated from Bruce Schneier original https://www.schneier.com/blog/archives/2026/10/friday-squid-blogging-increasing-squid-populations.html
This article in Nature argues that it’s due to an overfishing of predators and warming sea temperatures.
As usual, you can also use this squid post to talk about the security stories in the news that I haven’t covered.
Седмицата (19–24 октомври)
Post Syndicated from Боряна Телбис original https://www.toest.bg/sedmitsata-19-24-oktomvri/

В неделя избираме седмия президент на България, което звучи почти митологично. Седмият син на седмия син се ражда с особени способности – лекува, вижда невидимото, предсказва бъдещето, в някои фолклорни традиции прави чудеса.
За седмия ни президент изискванията са по-скромни. Трябва просто да бъде избран. Но понеже сме в България и всичките до един сме синове на юнашко племе, успяваме и простото да направим сложно.
На 25 октомври гласуването е задължително (както впрочем и на всички избори от 26 май 2016 г. насам, нищо че не сте разбрали, понеже никой не ви е санкционирал, когато не сте гласували). За победа още на първия тур обаче не стига просто някоя от кандидатпрезидентските двойки да получи повече гласове от другите. Не. Трябва да е получила повече от половината действителни гласове и освен това в изборите да са участвали повече от половината избиратели (ама нали са задължителни изборите, не трябва ли да участват всички избиратели, питат неразбралите от задния ред). Ако това не стане, седмица по-късно двойките с най-много гласове отиват на балотаж.
Тоест в неделя избираме президент. Но по всяка вероятност всъщност ще избираме между кого ще избираме другата неделя.
Така или иначе избираме.
И понеже изборите са утре, вижте пък ние какво сме ви избрали за четене в „Тоест“ тази седмица.
Александър Драганов в „Кафе, боб и предизборни прогнози“ се захваща с любимото упражнение на политолози и социолози преди всеки вот – прогнозиране. Прави го, разбира се, с необходимата доза самоирония и с ясното съзнание, че между социологическо проучване, политически анализ, гледане на кафе и хвърляне на боб понякога разликата се установява чак след изборите.
Кафе, боб и предизборни прогнози
В навечерието на поредните избори сме, след които ще настане поредното чудене къде сбъркаха в прогнозите си социолози, политолози и анализатори. Александър Драганов обаче предварително подхожда (само)иронично, напомняйки ни, че винаги е добре да имаме едно наум, когато става въпрос за прогнози.
Емилия Милчева пък гледа една стъпка по-нататък – към вероятния балотаж, защото игрите около него надхвърлят самия избор за президент. Кой срещу кого, кой зад кого, кой за кого и най-вече кой какво печели от подреждането. Самият факт, че ГЕРБ и ДПС нямат кандидати, но се говори, че за балотажа стягат редиците по тъчлинията с подкрепа за една конкретна кандидатка, която не е Ваня Великова, говори достатъчно.
А докато всички гледаме кой зад кого ще застане след изборите, тази седмица видяхме и кой застава между журналист и политик. В четвъртък вечер служител на НСО повали на земята Соня Колтуклиева, след като тя отвори вратата на автомобила на председателката на Народното събрание Михаела Доцова, за да ѝ зададе въпрос. Каквото и да мислим за журналистическите методи на ПИК и конкретно на Колтуклиева, физическата сила срещу журналист не става по-приемлива според това дали харесваме журналиста. Чак не ми се вярва, че доживях целият ми либерално-жълтопаветен балон да е Je suis Соня Колтуклиева, но такива са обратите на демокрацията.
А понеже обратите напоследък не са само вътрешнополитически, Искрен Иванов гледа към Черно море. В анализа си „България между член 4 и страха от Русия“ той поставя въпроса докъде може да стигне войната, без формално да е стигнала до нас. Русия няма непременно нужда от пряк сблъсък с НАТО. Достатъчна е някаква провокация, виждали сме го и друг път. Важно е обаче ние как ще реагираме и дали изобщо имаме готовност за реакция.
България между член 4 и страха от Русия
Русия не се нуждае непременно от пряк сблъсък с НАТО, за да изнесе войната извън Украйна. Черно море може да се окаже удобното място за провокация, която да принуди Алианса сам да реагира. Какво означава това за България и кога член 4 може да се окаже стъпка към член 5? От Искрен Иванов.
От геополитическия страх преминаваме ведро към телевизионния ужас „Ергенът“, който изгрява по екраните ни всяка пролет и есен. В текста си „Любов в ада“ Вера Краузе пита какво става, когато насилието, мизогинията и ксенофобията се превърнат в телевизионен формат, а прекрачването на граници – в зрителско очакване. Къде свършва забавлението, чия е отговорността и колко пъти трябва да видим нещо, за да спрем да го гледаме.
Любов в ада
Какво ни причинява излъчването на тв шоу като „Ергенът“ в национален ефир? И каква е дозата насилие, мизогиния и ксенофобия, след която има привикване и репродуциране на още от същото? Вера Краузе за границите, „които телевизията прекрачва пред очите ни“.
За щастие, има и други екрани. В рубриката „Игромислие“ Миглена Николчина този път събира поезията и видеоигрите. На пръв поглед странна двойка. На втори – не чак толкова. Оказва се, че стихотворението може да бъде ключ към играта, книгата – магически предмет, а поезията – съвсем буквално част от света, който трябва да разчетем, за да продължим напред.
Поезия и видеоигри
В този текст Миглена Николчина предлага нещо като притурка към разговорите си със Северина Станкева върху „Индика“ и „Светлосянка“, за да покаже как и в двете игри има таен поетически ключ за интерпретацията им.
Още една редовна рубрика имаме тези седмица – „Тези хора“, в която Ина Иванова разговаря с Мирослава Кацарова за музиката, стила, вкуса, Пловдив, приятелството, ските и свободата. „В музиката се откриваш като свободен човек“, казва Мирослава. Не е лошо да започнем да се търсим малко повече, че да вземем да се намерим най-накрая и да се даврандисаме.
Мирослава Кацарова: В музиката се откриваш като свободен човек
В навечерието на „Пловдив Джаз Фест“ Ина Иванова разговаря с Мирослава Кацарова за стила, вкуса и класата в пеенето на джаз, карането на ски, общуването с колеги и приятели, радостта от живота и… избора да си свободен.
От търсене какво да прави по време на пандемията, Стефан Иванов попада в съда като съдебен заседател. От известно време ни обещава, че ще ни разкаже за този период, и ето, дойде моментът. В няколко текста ще прочетем за професията съдебен заседател, която всъщност не е професия. Поредицата е личен разказ отвътре за институция, която познаваме отлично от американските филми и изумително слабо от нашата действителност. Българските съдебни заседатели всъщност имат права, равни на тези на съдиите. Решават за вината, за наказанието, а понякога даже могат да надделеят над съдията.
Професия: Съдебен заседател (първа част)
Свързваме съдебния заседател най-вече с ролята му в американската литература и кино. И нямаме представа колко важен е той и в нашата правосъдна система. В рамките на няколко текста писателят и драматург Стефан Иванов ще разкаже за собствения си опит като съдебен заседател в софийски съд.
И на финала нещо важно: „Тоест“ съществува, защото го четете. Но съществува и защото част от вас го подкрепят финансово. За да можем да продължим да правим медия, в която никой не казва „айде, пускай да върви“, имаме нужда от вас. За всекидневната ни журналистическа работа няма проектно финансиране, няма голям собственик, няма спасител. И уви, няма седми син на седми син. Имаме си вас, нашите читатели.
Ако четете „Тоест“ редовно и можете да си го позволите, подкрепете ни с малко месечно дарение.
И в неделя гласувайте, а също така, като излезете от секцията, призовете своя вътрешен Доналд Тръмп, помахайте ведро и козирувайте тържествено на въображаеми хора някъде наоколо в живота.

Приятно четене. И приятно избиране.
Enable cross-Region fine-grained data access with AWS Lake Formation and Trusted Identity Propagation
Post Syndicated from Maneesh Sharma original https://aws.amazon.com/blogs/big-data/enable-cross-region-fine-grained-data-access-with-aws-lake-formation-and-trusted-identity-propagation/
Organizations that store analytics data on AWS often need two things at once. The first is fine-grained access control that limits each person to only the data they are authorized to see. The second is auditability down to the individual user level so that every query is traceable to the person who ran it rather than to a shared AWS Identity and Access Management (IAM) role.
AWS IAM Identity Center Trusted Identity Propagation (TIP) meets both requirements. A user signs in once, and that identity propagates from the client application through the query engine to Lake Formation and the storage layer, so that every request is authorized as the actual user and every query is logged in AWS CloudTrail.
AWS now extends TIP across Regions: IAM Identity Center replicates its identity objects such as users, groups, and session information to every AWS Region that you choose, so services across the stack can recognize the same user identity even when they span different Regions.
This is Part 1 of a three-part series. This post covers the foundation and querying from Amazon SageMaker Unified Studio (Amazon Athena and Amazon Redshift). Part 2 covers Amazon Quick, and Part 3 covers Amazon EMR.
Overview
In this post, the producer shares data from the Asia Pacific (Sydney) Region (ap-southeast-2) and the consumer queries it from the South America (São Paulo) Region (sa-east-1) as themselves. We cover two cases that follow the same pattern. In Case 1, you share Amazon Simple Storage Service (Amazon S3) data governed by Lake Formation, queried from Amazon SageMaker Unified Studio (Athena). In Case 2, you share Amazon Redshift data through a datashare registered to the AWS Glue Data Catalog, queried from Amazon Redshift Serverless.
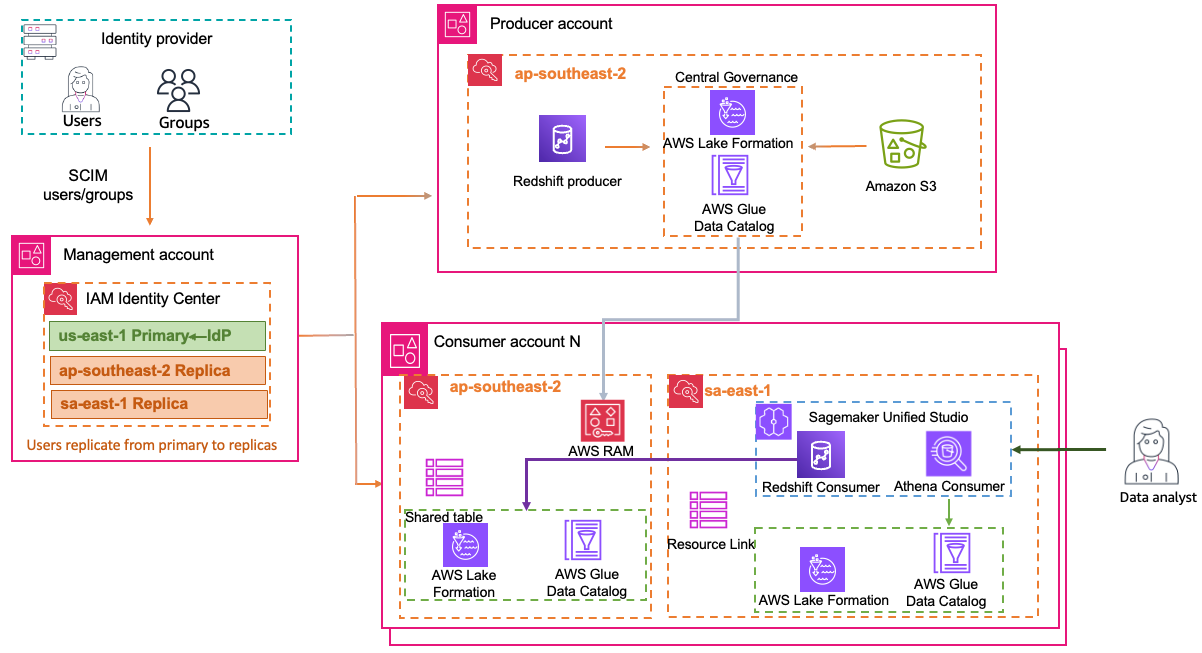
Figure 1: Cross-Region and cross-account architecture
Starting on the left of the diagram, your identity provider syncs users and groups into AWS IAM Identity Center through the System for Cross-domain Identity Management (SCIM) protocol. Running as an organization instance in the management account, IAM Identity Center replicates those identities to every Region in use. In the center, the producer account in Sydney uses AWS Lake Formation to centrally govern both Amazon S3 and Amazon Redshift data. When the producer shares a table or database, that share flows to the consumer account in São Paulo, shown on the right, where a resource link makes the shared data queryable as if it were local. On the right, the data analyst signs in to Amazon SageMaker Unified Studio with corporate credentials. With Trusted Identity Propagation enabled, the analyst’s identity travels with every request to Lake Formation. Lake Formation authorizes each query based on who the user is rather than which IAM role they assumed.
The example uses three accounts across three Regions. The producer account runs Amazon S3, AWS Glue Data Catalog, Lake Formation, and Amazon Redshift Serverless in ap-southeast-2 (Sydney). The consumer account queries from sa-east-1 (São Paulo) using SageMaker Unified Studio or Amazon Redshift. IAM Identity Center runs in us-east-1 (Virginia) in the management account.
Cross-account sharing through Lake Formation can span AWS Organizations, but the TIP integration adds a tighter requirement. For the user’s identity to propagate, the producer and consumer accounts must be in the same organization and share the same organization instance of IAM Identity Center. You can repeat the consumer steps to add more accounts or Regions. With this launch, you can query that shared data from a different Region while Lake Formation authorizes every request as the actual user.
How the pieces fit together
Four capabilities underpin this architecture. IAM Identity Center provides a single identity plane across Regions, so the same users and groups are available in every account. Each service in the stack supports Trusted Identity Propagation, so the user’s identity flows from the client application to Lake Formation without falling back to IAM roles. Corporate sign-in through IAM Identity Center makes that identity available across Regions and accounts within the organization. Finally, AWS Resource Access Manager (AWS RAM) shares and resource links bridge the Region gap so the consumer can query data cataloged in the producer’s Region.
Prerequisites
Before you begin, make sure that you have the following in place:
- The producer account and consumer account are in the same organization.
- An organization instance of IAM Identity Center, with users and groups provisioned.
- IAM Identity Center replicated to every Region where you operate. See Deploy AWS applications and access AWS accounts across multiple Regions with IAM Identity Center.
- You have permissions to administer AWS Lake Formation, AWS Glue, AWS RAM, Amazon Simple Storage Service (Amazon S3), Amazon SageMaker Unified Studio, and Amazon Redshift in the relevant accounts.
- In the producer Lake Formation Data catalog settings, the Use only IAM access control options should be cleared.
- The AWS services used in this post are integrated with AWS IAM Identity Center in both the producer and consumer accounts, across the Regions used in this walkthrough. See Trusted identity propagation use cases for more information.
Case 1: Share S3 data (Lake Formation)
In this case, the S3 data and its catalog stay in the producer’s account and Region the whole time, with Lake Formation governing them in Sydney (ap-southeast-2). What crosses Regions is the query itself. The consumer, in a different account, connects from São Paulo (sa-east-1) and queries that same data through Amazon Athena (through SageMaker Unified Studio). This is a federated query pattern: the data stays in place, and only the query crosses Regions. That split (catalog and data in one Region, client and query in another) is what makes this genuinely cross-Region, not just cross-account.
Part 1: Producer account (Sydney, ap-southeast-2)
Region note: the walkthrough uses ap-southeast-2 (producer) and sa-east-1 (consumer and query). Substitute your own Regions and account IDs where you see placeholders. All cross-account Lake Formation grants must be made in the producer Region. The only exception is the resource link and its Describe grant, which are created in the consumer’s query Region.
Step 1.1: Create the sample data file
Create a file named customers.csv with the following content.
Step 1.2: Create an S3 bucket and upload the data
- Open the Amazon S3 console in the producer account (
ap-southeast-2). - Choose Create bucket, enter a unique name (for example,
amzn-s3-demo-sydney-lakehouse-bucket), and choose Create bucket. - Open the bucket, create a folder named
customers, and uploadcustomers.csvinto it.
Step 1.3: Create the Lake Formation registration role (with sts:SetContext)
Create an IAM role that Lake Formation assumes to read the S3 bucket. This role is used when registering the data lake location and for vending credentials, including for TIP. Don’t use the Lake Formation service-linked role. It doesn’t include sts:SetContext.
- Open the IAM console, choose Roles, then Create role.
- For Trusted entity type, choose Custom trust policy and paste the following trust policy.
- Choose Next, skip attaching managed policies, and choose Next.
- Name the role (for example,
LakeFormation-DataLocation-role) and choose Create role. - Open the role, choose Add permissions, then Create inline policy, and paste the following permissions policy.
- Name the inline policy (for example,
LF-S3Access) and save it.
Trust policy:
Permissions policy (replace the bucket name):
Note: The sts:SetContext action in the trust policy is required for TIP. The Lake Formation service-linked role doesn’t include it, which is why a custom role is required here.
Step 1.4: Register the S3 location in Lake Formation
- Open the Lake Formation console in
ap-southeast-2. - Under Administration, choose Data lake locations, then Register location.
- For Amazon S3 path, enter your bucket path (for example,
s3://amzn-s3-demo-sydney-lakehouse-bucket). - For IAM role, choose the
LakeFormation-DataLocation-rolecreated in Step 1.3. - For Permission mode, choose Lake Formation, then choose Register location.
Step 1.5: Create the AWS Glue database
- In the Lake Formation console, under Data catalog, choose Databases.
- Choose Create database.
- Enter the database name, for this post
sydney_lakehouse, and choose Create database.
Step 1.6: Create the table manually
- Open the AWS Glue console in
ap-southeast-2. - Under Data Catalog, choose Tables, Add table, then Add table manually.
- For Table name, enter
customers. - For Database, choose
sydney_lakehouse. - For the data store, choose Amazon S3 and set the location to
s3://amzn-s3-demo-sydney-lakehouse-bucket/customers/. - For the data format, choose CSV with comma (,) as the delimiter.
- Define the schema using the following columns.
- Add the table property
skip.header.line.countwith value 1 to skip the CSV header row. - Review and choose Create.
| Column name | Data type |
| customer_id | string |
| first_name | string |
| last_name | string |
| string | |
| city | string |
| state | string |
| signup_date | string |
When you create the table as CSV on the console, define all columns as string. The CSV serializer/deserializer used for this table doesn’t parse typed columns such as date or bigint reliably. Cast values in your queries as needed (for example, CAST(signup_date AS date)).
Step 1.7: Grant DATABASE permission to the external (consumer) account
- In the Lake Formation console, choose Permissions, Data lake permissions, then Grant.
- Under Principals, choose External accounts and enter the consumer account ID (
<CONSUMER_ACCOUNT_ID>). - Choose Named Data Catalog resources. For Databases, choose your database, in this post
sydney_lakehouse. - For Database permissions, select Describe, and select Describe under Grantable permissions.
- Choose Grant.
Step 1.8: Grant TABLE permission to the external (consumer) account
- Choose Permissions, Data lake permissions, then Grant.
- Under Principals, choose External accounts and enter
<CONSUMER_ACCOUNT_ID>. - Choose Named Data Catalog resources. For Databases choose
sydney_lakehouse. For Tables choosecustomers. - For Table permissions, select Select and Describe, and select the same under Grantable permissions.
- Choose Grant.
Step 1.9: Grant DATABASE permission to the IAM Identity Center group/user
- Choose Permissions, Data lake permissions, then Grant.
- Under Principals, choose IAM Identity Center and select the group or user (for example, admin).
- Choose Named Data Catalog resources. For Databases choose your database, in this post
sydney_lakehouse. - For Database permissions, select Describe.
- Choose Grant.
Step 1.10: Grant TABLE permission to the IAM Identity Center group/user
- Choose Permissions, Data lake permissions, then Grant.
- Under Principals, choose IAM Identity Center and select the group or user (for example, admin).
- Choose Named Data Catalog resources. For Databases choose your database and table, in this post
sydney_lakehouseand for Tables choosecustomers. - For Table permissions, select Select and Describe.
- Choose Grant.
Note: Because the accounts share one organization instance of IAM Identity Center, the producer can grant the IAM Identity Center group directly on the underlying table. The consumer only grants Describe on the local resource link (Step 2.3).
At this point, the producer side is complete. You have the necessary Lake Formation permissions for both the consumer account and your users. To verify, open Data lake permissions in the Lake Formation console and confirm you see four grants covering the database and table.
Part 2: Consumer account
In this part, you switch to the consumer account to accept the AWS RAM share, create a resource link that points back to the shared database, and grant your users access to it. After these steps, the consumer account is ready to query the producer’s data from a different Region.
Step 2.1: Accept the AWS RAM share (Sydney Region)
- Open the AWS RAM console and switch to
ap-southeast-2(Sydney). - Under Shared with me, choose Resource shares.
- Select the resource share from the producer account and choose Accept resource share.
Step 2.2: Create the resource link (sa-east-1 Region)
- Open the Lake Formation console and switch to
sa-east-1. - Under Data catalog, choose Databases, then Create resource link.
- For Resource link name, enter a name, for example
rl_sydney_s3_datalake. - For Shared database’s Region, choose Asia Pacific (Sydney)
ap-southeast-2. - For Shared database, choose your database. In this post the database is called
sydney_lakehouse. - Shared database’s catalog ID populates automatically (the producer account).
- Choose Create.
Step 2.3: Grant Describe on the resource link to the IAM Identity Center group/user
- In the Lake Formation console (
sa-east-1), choose Permissions, Data lake permissions, then Grant. - Under Principals, choose IAM Identity Center and select the group or user (for example, admin).
- Choose Named Data Catalog resources. For Databases choose
rl_sydney_s3_datalake. - For Resource link permissions, select Describe.
- Choose Grant.
Part 3: SageMaker Unified Studio (sa-east-1)
With the producer and consumer accounts configured, you now set up SageMaker Unified Studio in the query Region and run the cross-Region query.
Step 3.1: Create the SageMaker Unified Studio domain
Open the Amazon SageMaker console in sa-east-1, choose Unified Studio, then Create domain. See the SageMaker Unified Studio administration guide for the quick setup. Because your IAM Identity Center integration is already complete, you can specify an IAM Identity Center user in the domain configuration settings.
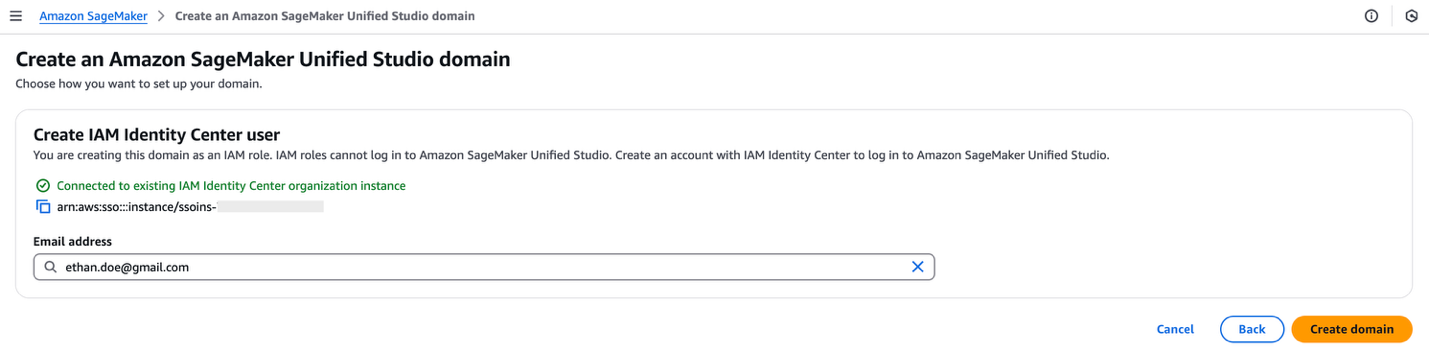
Figure 2: Adding an SSO user in the Amazon SageMaker Unified Studio domain
To enable Trusted Identity Propagation (TIP) in SageMaker Unified Studio, refer to the following sections in this post:
- Enable TIP in SageMaker Unified Studio.
- Enable user access for SageMaker Unified Studio domain.
- Add project members.
- Create a SQL analytics project in Unified Studio. For this post, we use the project name
my_project_idc.
Step 3.2: Enable TIP
- Sign in to the SageMaker Unified Studio portal by choosing Sign in with SSO as an IAM Identity Center user.

Figure 3: Sign in with SSO in Amazon SageMaker Unified Studio
- Open the project (
my_project_idc) and go to the Query Editor. - Under Catalogs, choose
AwsDataCatalog. - Choose
rl_sydney_s3_datalake, then tables, and then selectcustomers. - Choose the three dots next to the
customerstable and choose Preview data.
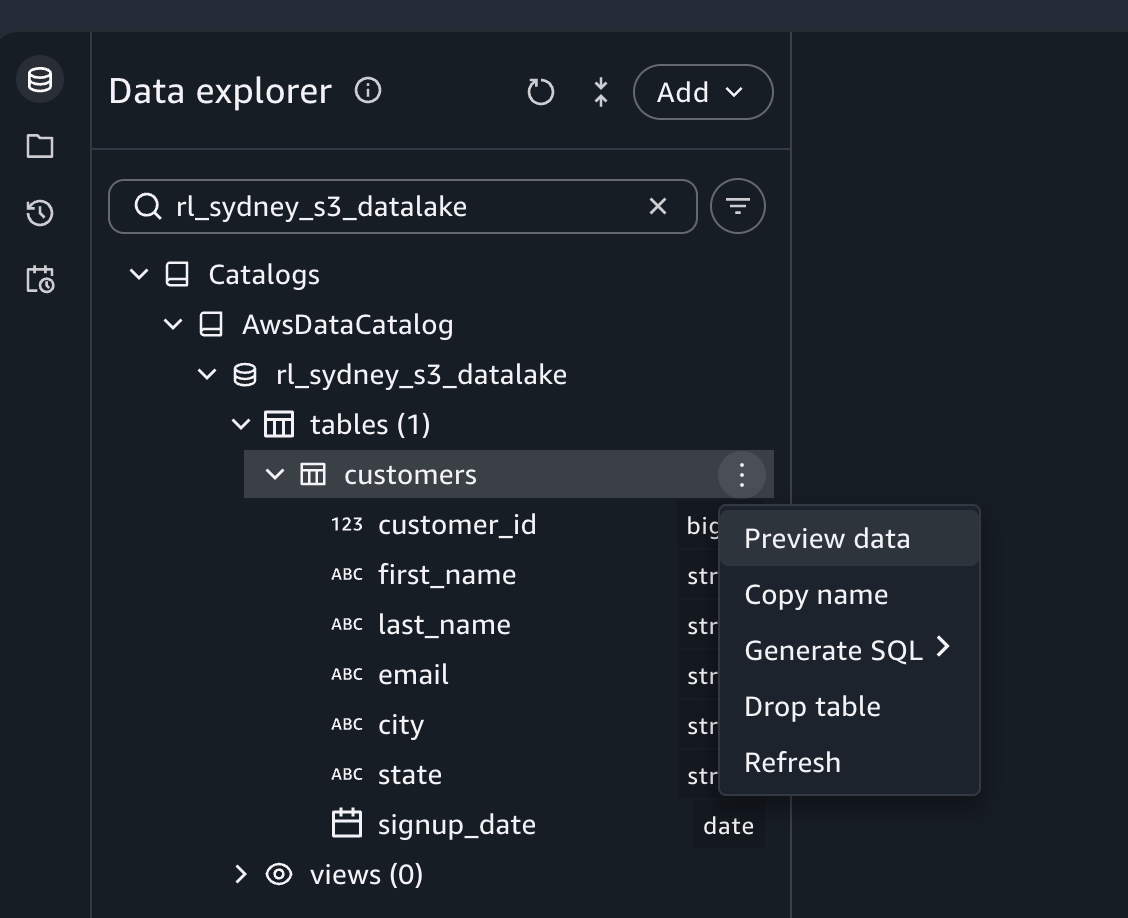
Figure 4: Access Amazon S3 data in Amazon SageMaker Unified Studio
The query auto-runs using the Athena compute, as shown in the following screenshot:
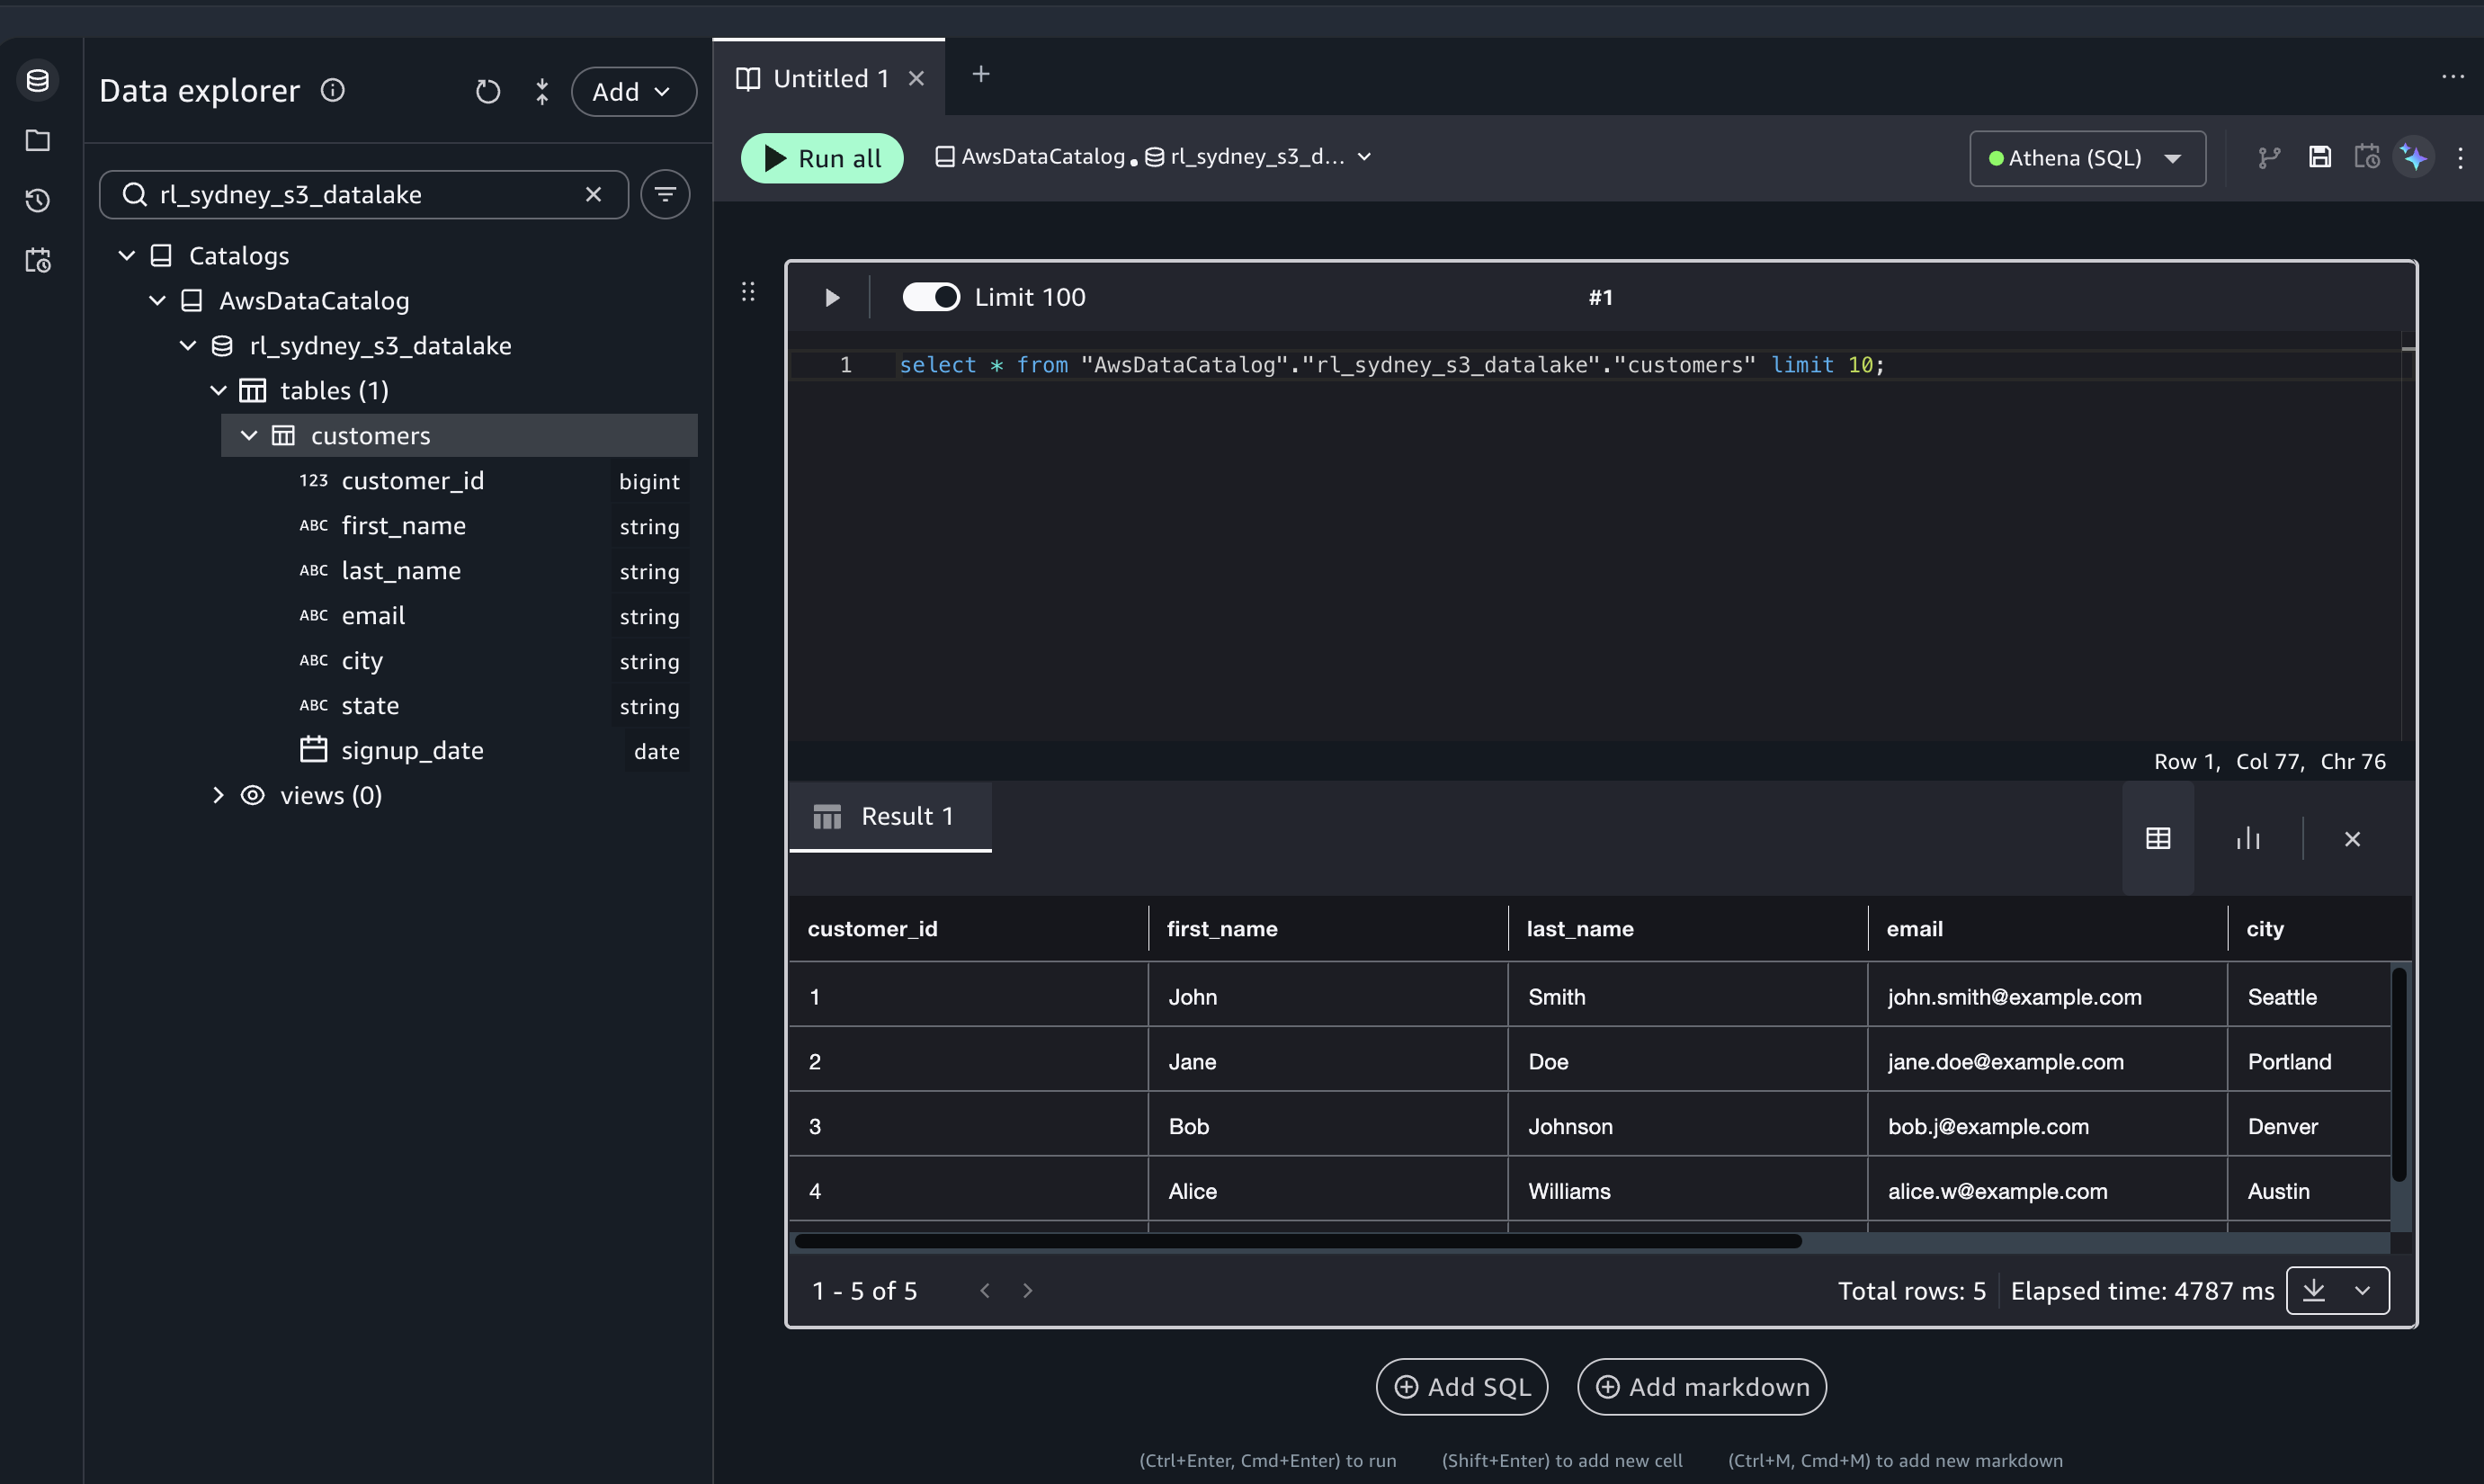
Figure 5: Preview Amazon S3 data in Amazon SageMaker Unified Studio
The customer data from the producer S3 bucket in Sydney is returned, governed by Lake Formation and accessed through the resource link in sa-east-1, with the user identity propagated through TIP.
Case 2: Share Amazon Redshift data using AWS Glue federated catalog
This case follows the same centralized-catalog pattern as Case 1, but the consumer queries the data with Amazon Redshift Serverless instead of Athena. The analyst runs these queries from SageMaker Unified Studio using its Amazon Redshift query experience.
Part 1: Producer account (Sydney, ap-southeast-2)
Make sure that your Amazon Redshift consumer cluster is configured with IAM Identity Center in both ap-southeast-2 and sa-east-1 Regions. If you need to review the procedure, see Integrate Identity Provider (IdP) with Amazon Redshift Query Editor V2 using AWS IAM Identity Center for seamless Single Sign-On.
Step 1.1: Register a serverless namespace to the AWS Glue Data Catalog
- Open the Amazon Redshift console.
- On the navigation menu, choose Redshift Serverless. The Namespaces / Workgroups section shows your namespaces and workgroups for the current Region.
- Choose the name of the namespace you want to register.
- From Actions, choose Register to AWS Glue Data Catalog.
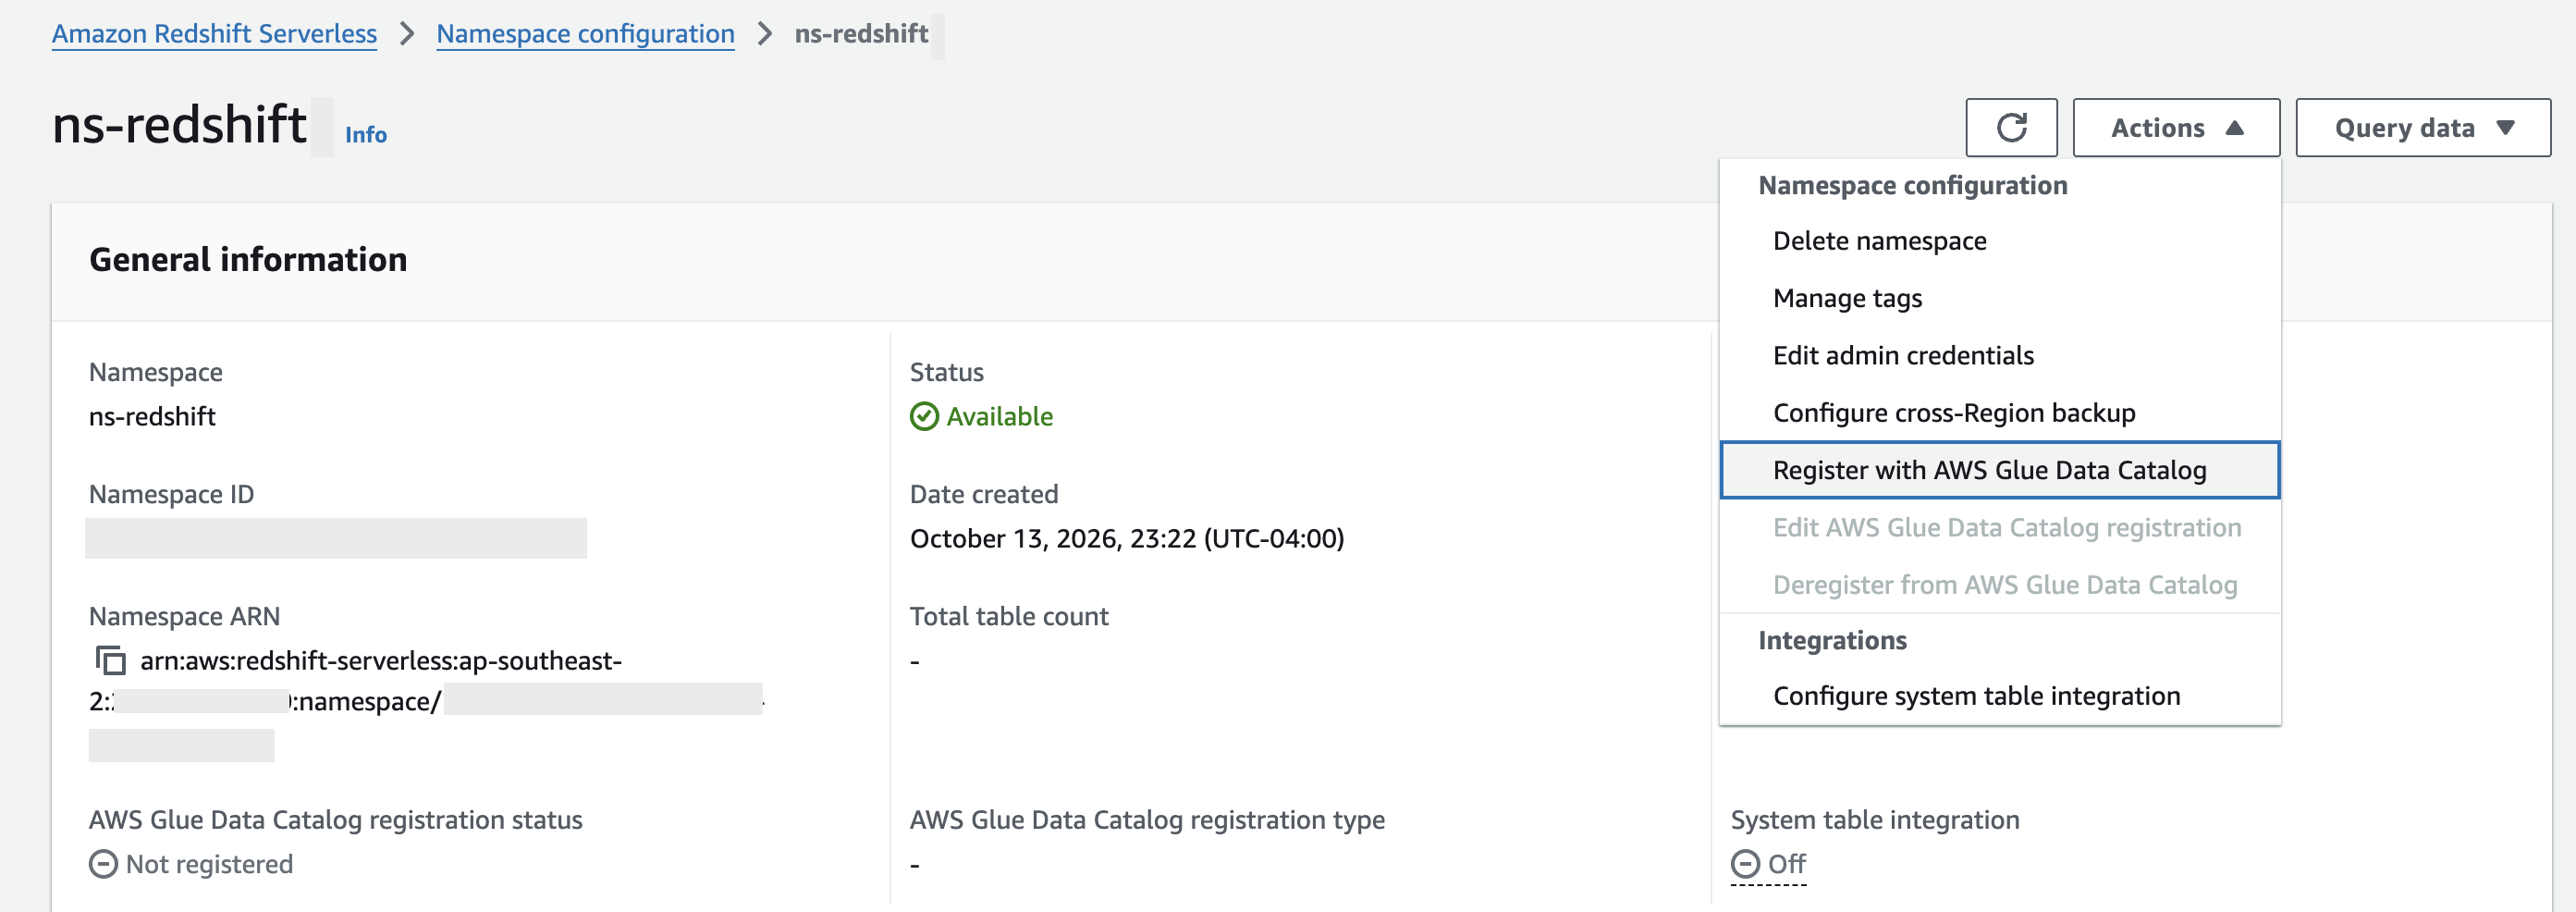
Figure 6: Amazon Redshift Serverless namespace to register with the AWS Glue Data Catalog
- Choose Do not register with Amazon Redshift federated permissions.
- Select Use AWS Lake Formation permissions.
- For Destination account ID, enter the producer account ID (
<PRODUCER_ACCOUNT_ID>), the account that will hold the catalog. - Choose Register. You are taken to the AWS Lake Formation console.
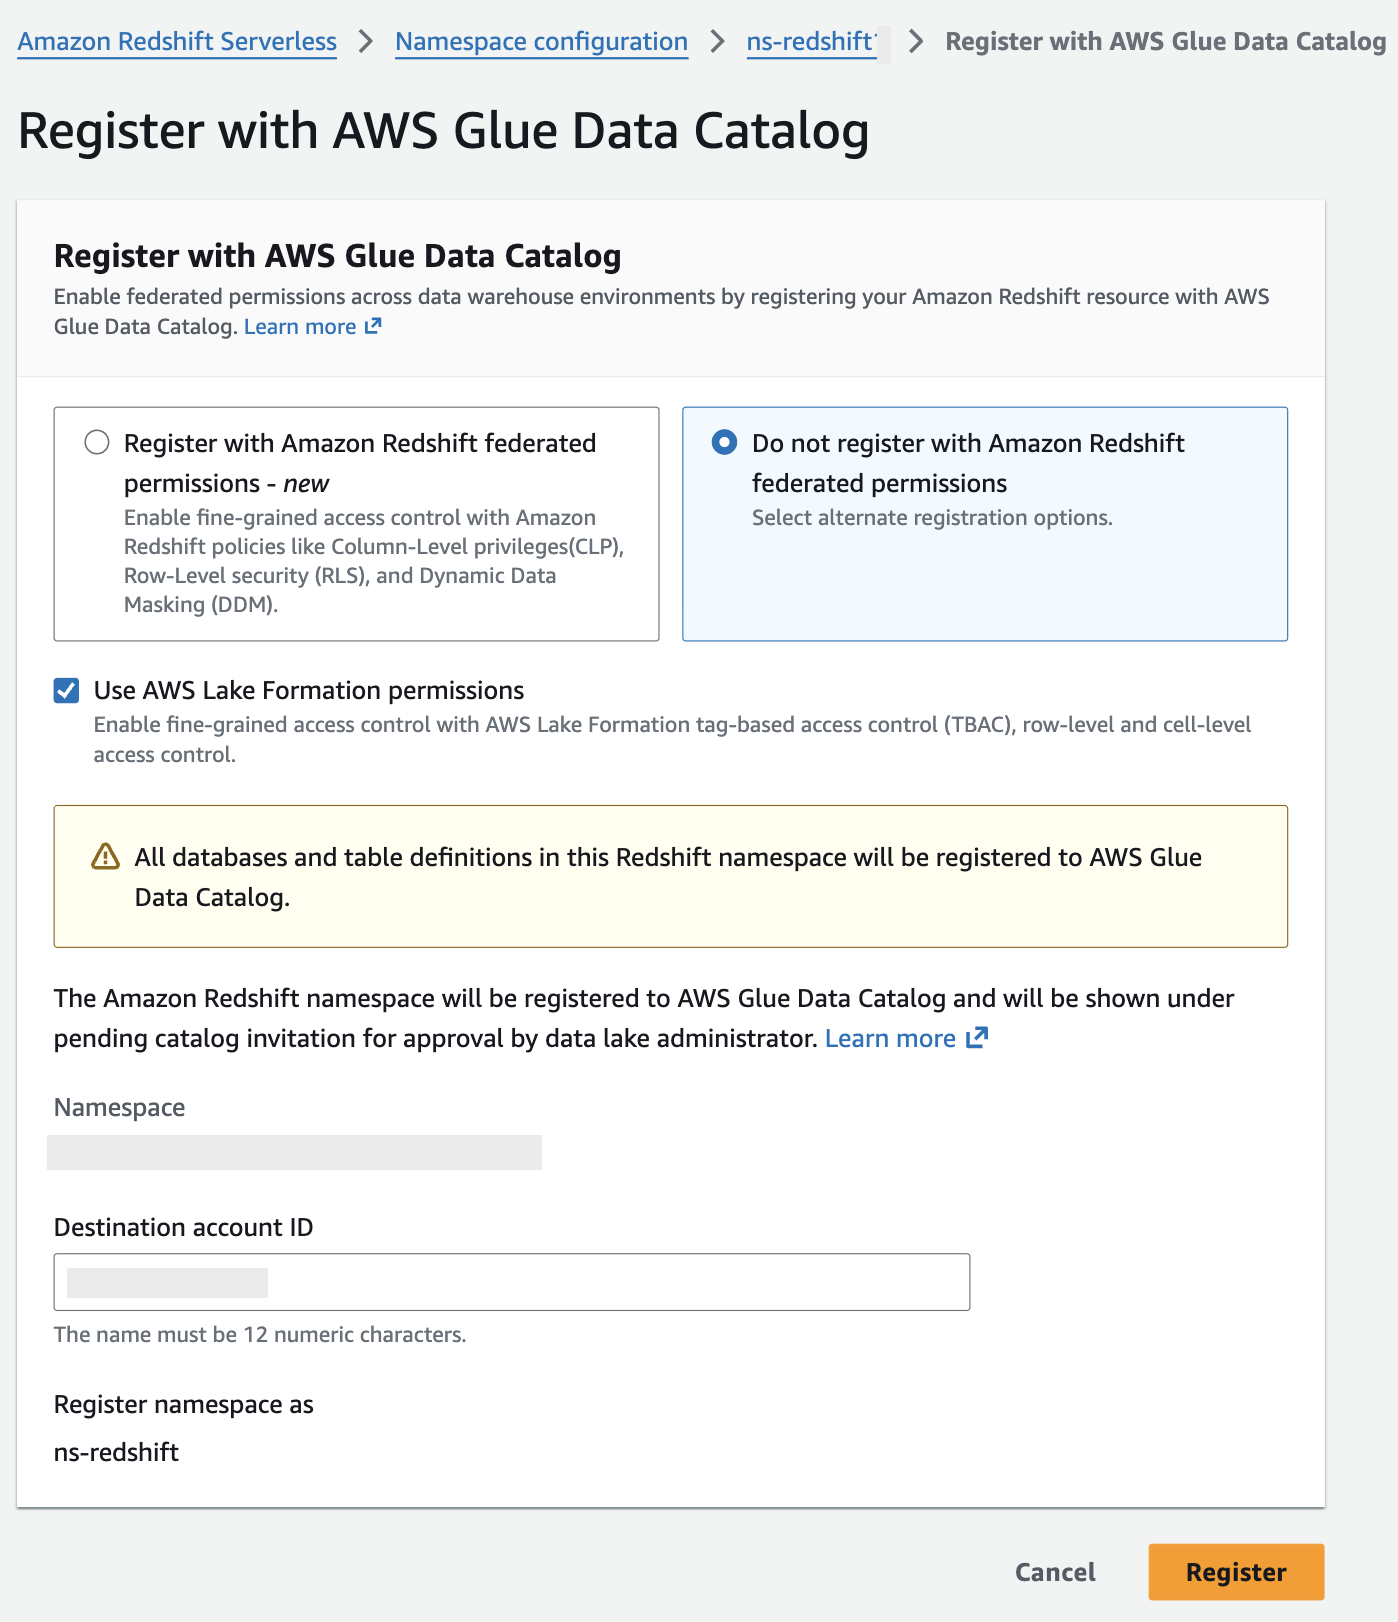
Figure 7: Register the Amazon Redshift Serverless namespace with the AWS Glue Data Catalog
- Follow the catalog creation process in Lake Formation. See Creating Amazon Redshift federated catalogs and follow these steps:
- Review a namespace invitation and accept it.
- Create a federated catalog.
Step 1.2: Grant DATABASE permission to the external (consumer) account
- In the Lake Formation console (
ap-southeast-2), choose Permissions, Data lake permissions, then Grant. - Under Principals, choose External accounts and enter
<CONSUMER_ACCOUNT_ID>. - Choose Named Data Catalog resources. For Catalogs/Databases, choose the federated database (for example,
ns-redshift/dev, schemasales_schema). - For Database permissions, select Describe (and Describe under Grantable permissions).
- Choose Grant.
Step 1.3: Grant TABLE permission to the external (consumer) account
- Choose Permissions, Data lake permissions, then Grant.
- Under Principals, choose External accounts and enter
<CONSUMER_ACCOUNT_ID>. - Choose Named Data Catalog resources and select the shared table (for example,
store_sales). - For Table permissions, select Select and Describe (and the same under Grantable permissions).
- Choose Grant.
Step 1.4: Grant DATABASE permission to the IAM Identity Center group/user
- Choose Permissions, Data lake permissions, then Grant.
- Under Principals, choose IAM Identity Center and select the group or user.
- Choose Named Data Catalog resources and select the federated database (schema).
- For Database permissions, select Describe.
- Choose Grant.
Step 1.5: Grant TABLE permission to the IAM Identity Center group/user
- Choose Permissions, Data lake permissions, then Grant.
- Under Principals, choose IAM Identity Center and select the group or user.
- Choose Named Data Catalog resources and select the shared table (for example,
store_sales). - For Table permissions, select Select and Describe.
- Choose Grant.
Part 2: Consumer account
At this point, the producer side for Case 2 is complete. To verify, open Data lake permissions in the Lake Formation console and confirm you see four grants covering the federated database and shared table.
In this part, you switch to the consumer account to accept the AWS RAM share, configure the IAM role for cross-Region Amazon Redshift access, and set up TIP so that users can query the producer’s Amazon Redshift data from a different Region.
Step 2.1: Accept the AWS RAM share (Sydney Region)
- Open the AWS RAM console and switch to
ap-southeast-2. - Under Shared with me, choose Resource shares.
- Select the resource share from the producer account and choose Accept resource share.
Step 2.2: Update the trust relationship for the IAM role
Navigate to the IAM role (IAMIDCRedshiftRole) created in this post.
Make sure the trust policy includes Amazon Redshift and Amazon Redshift Serverless for sts:AssumeRole and sts:SetContext, as shown in the following policy:
Trust policy:
Step 2.3: Add a new policy to the IAM role
Navigate to the IAM role (IAMIDCRedshiftRole) created in this post and add the following policy for AWS Glue and Lake Formation.
Permissions policy 1 (AWS Glue read and Lake Formation data access):
Note: These actions require "Resource": "*" because they are used for catalog-level discovery, which does not support resource-scoped permissions. Lake Formation column-level and row-level grants still enforce least-privilege access to the underlying data.
Step 2.4: Set up cross-Region Trusted Identity Propagation (TIP) access in Amazon Redshift
- Sign in to the Amazon Redshift console using the admin role.
- Navigate to Query Editor V2.
- Choose the options menu (three dots) next to the cluster and choose Create connection.
- Connect as the admin user and run the following command to create an external schema that points to your cross-Region AWS Glue Data Catalog:
Syntax:
Example:
You can get this catalog_name information from the producer account Lake Formation in the Sydney Region. Navigate to Databases on the left and choose the respective Amazon Redshift catalog ID from the drop-down.
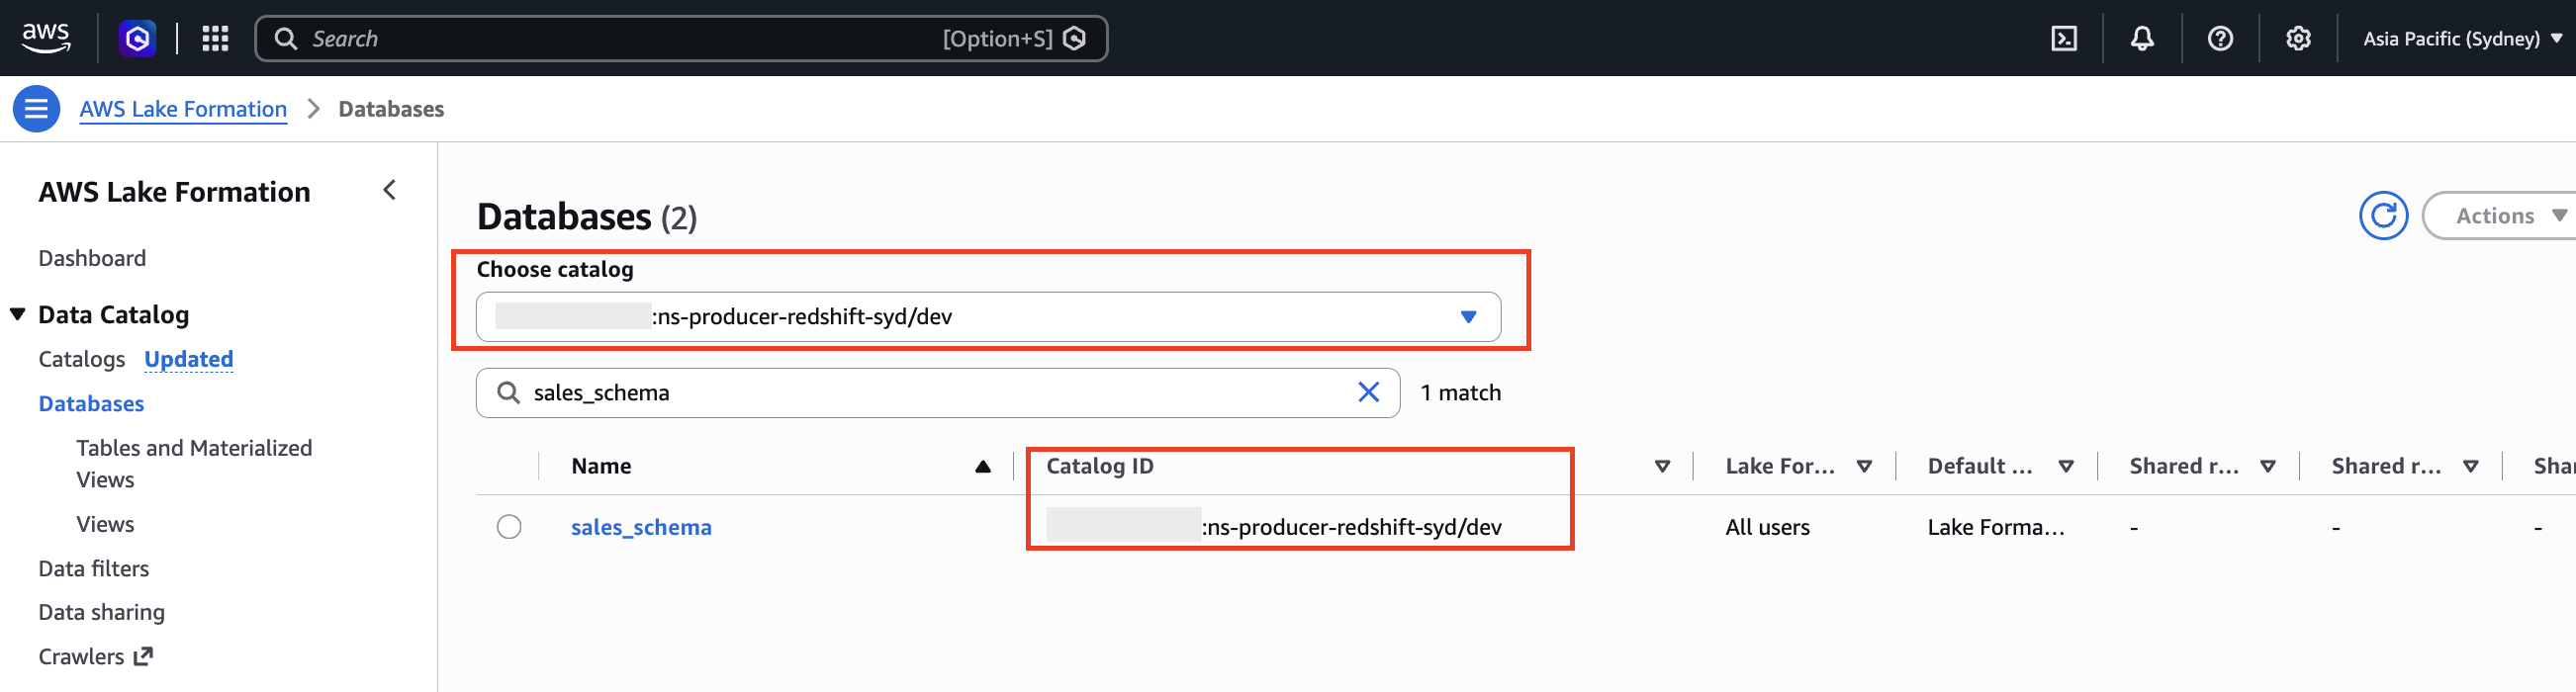
Figure 8: AWS Lake Formation showing the catalog ID of the Amazon Redshift namespace registered with the AWS Glue Data Catalog
- Grant the IAM Identity Center group access to the external schema.
Step 2.5: Query the data from Amazon Redshift Query Editor V2
- In Query Editor V2, choose the options menu (three dots) next to the cluster and choose Edit connection, and for authentication, select IAM Identity Center.
- A pop-up redirects you to your IdP login page. Enter your IdP credentials.
- After successful authentication, you are redirected to Query Editor V2 as an IAM Identity Center user.
- Run the following query.
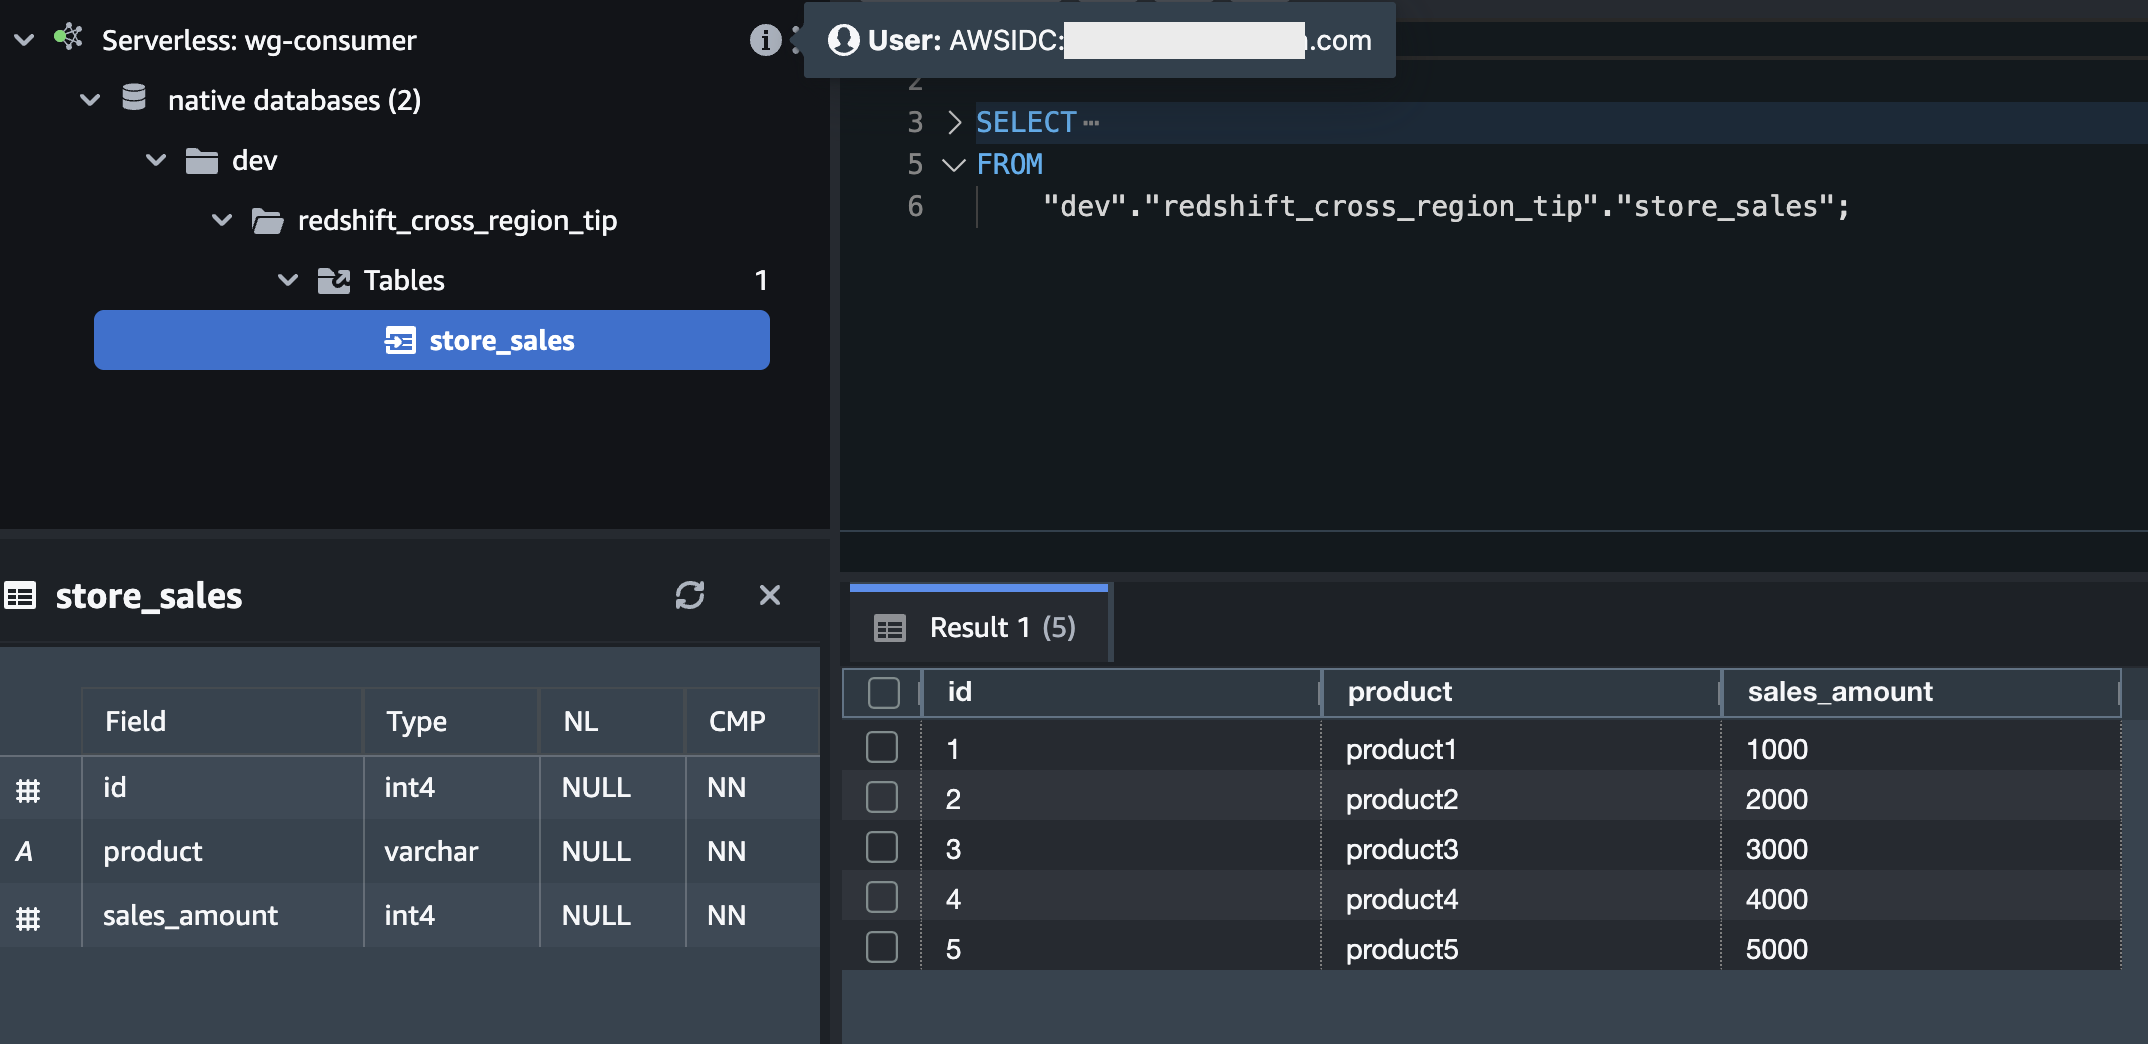
Figure 9: Query cross-Region, cross-account data using Amazon Redshift Query Editor V2
Step 2.6: Query the data from SageMaker Unified Studio
For a consumer cluster to use in SageMaker Unified Studio, you need to tag the Amazon Redshift cluster or workgroup with one of the following options. Choose one before proceeding.
Option 1 – Add a tag to allow only a specific SageMaker Unified Studio project to access it: AmazonDataZoneProject=<projectID>
Option 2 – Add a tag to allow all SageMaker Unified Studio projects in this account to access it: for-use-with-all-datazone-projects=true
After the Amazon Redshift cluster or workgroup has a tag, continue with the following steps.
- Sign in to the SageMaker Unified Studio portal by choosing Sign in with SSO as an IAM Identity Center user.
- In SageMaker Unified Studio, navigate to Query Editor and expand Connections.
- Choose
redshift_cross_region_tip, then tables, and then selectstore_sales. - Choose the three dots next to the
store_salestable and choose Preview data. The query auto-runs using the Amazon Redshift compute, as shown in the following screenshot:
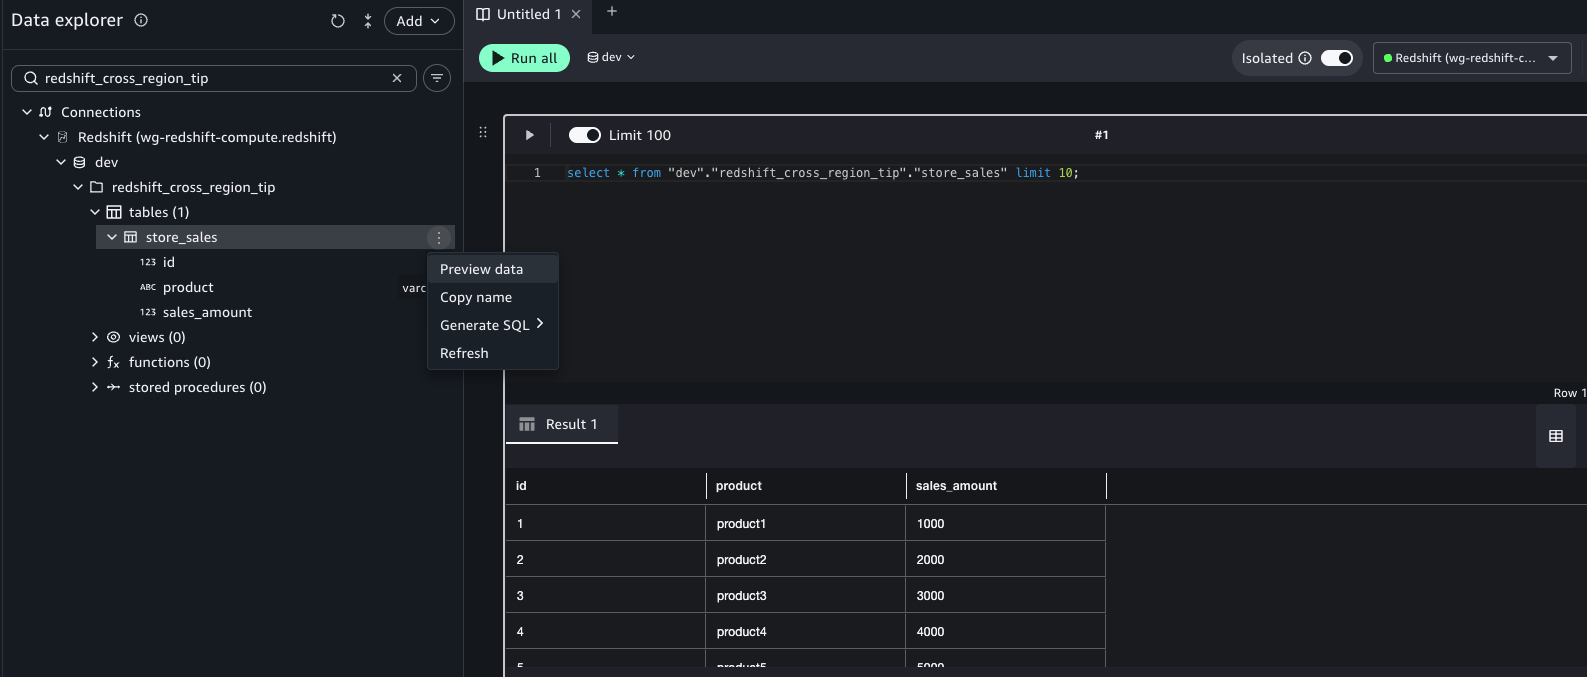
Figure 10: Query data using Amazon Redshift compute in Amazon SageMaker Unified Studio
The Amazon Redshift data shared from the producer in Sydney is returned. It is governed and centralized in one account and Region (ap-southeast-2) using Lake Formation and accessed from the consumer account in a second Region (sa-east-1), with the user identity propagated through TIP.
Both cases use the same Region split. The catalog and the data stay in the producer Region (Sydney), and only the client and the query run from the consumer Region (São Paulo). They differ only in the query engine. Case 1 uses Amazon Athena, and Case 2 uses Amazon Redshift Serverless. That difference in engine is also what changes their cross-Region behavior. With Athena (Case 1), queries work cross-Region without additional constraints. However, if you use an Amazon Redshift datashare, the Amazon Redshift query engine must be in the same Region as the Amazon Redshift namespace.
Clean up
To avoid ongoing charges, remove the resources that you created.
Consumer account:
- Delete the SageMaker Unified Studio project and domain (Case 1).
- Delete the Amazon Redshift Serverless workgroup and namespace (Case 2).
- In Lake Formation (
sa-east-1), delete the resource links (rl_sydney_s3_datalake,rl_redshift_cross_db_tip). - Revoke any Lake Formation grants you created and, if applicable, leave/deny the AWS RAM share.
Producer account:
- Revoke the Lake Formation grants to the consumer account and to the IAM Identity Center group.
- Revoke the AWS RAM share.
- Deregister the S3 data lake location, and delete the
customerstable and thesydney_lakehousedatabase. - Empty and delete the S3 bucket.
- Deregister the Amazon Redshift namespace from the AWS Glue Data Catalog and delete the federated catalog (Case 2).
- Delete the IAM roles you created (
LakeFormation-DataLocation-role,IAMIDCRedshiftRole).
Conclusion
In this post, you configured AWS Lake Formation Trusted Identity Propagation so that data governed and shared in one Region (Sydney) can be queried from another Region (São Paulo). Lake Formation cross-account grants are made in the producer Region, and the consumer reaches the shared data from the query Region in the way that fits each engine. For Amazon S3 data queried through Amazon Athena (Case 1), the consumer creates a resource link in the query Region that points back to the shared database. For Amazon Redshift data shared through a datashare and AWS Glue federated catalog (Case 2), the consumer instead creates an external schema in Amazon Redshift that references the producer’s Glue Data Catalog directly in the producer Region. No resource link is required. In both cases, because access is authorized against the user’s IAM Identity Center identity rather than a shared role, you get least-privilege access, per-user auditability in AWS CloudTrail, and a single place to manage permissions.
To add more consumer accounts or query Regions, repeat the consumer-side steps for the relevant case: accept the AWS RAM share in the producer Region, then either create a resource link in the query Region and grant Describe on it to your IAM Identity Center principals (Amazon S3 and Athena), or create an external schema that references the producer’s Glue catalog and grant usage to your IAM Identity Center principals for Amazon Redshift.
As a next step, review the Trusted Identity Propagation supported applications and services to plan which services in your stack to enable with TIP, using the Lake Formation cross-account sharing documentation as a reference.
About the authors
Beyond API Compatibility: Building a Tool to Measure the Blast Radius of Library Changes
Post Syndicated from Netflix Technology Blog original https://netflixtechblog.com/beyond-api-compatibility-building-a-tool-to-measure-the-blast-radius-of-library-changes-9474f2fd4f90
By Roberto Perez Alcolea, Java Platform Team

At Netflix, shared Java libraries support applications developed across a large, independently evolving repository ecosystem. A library change begins in one repository, but its impact can reach many others. Producers can see the API diff in front of them. What they often cannot see is who still depends on the symbols that changed.
The need for that visibility grows as coding agents take on more of the software development lifecycle. An agent can accelerate a local edit, but without cross-repository context it cannot judge downstream risk or help plan consumer migrations. The evidence a producer uses to assess a change can also guide the agent working on it.
Consider a common case: removing a deprecated API. Deprecated entry points expand the surface producers must test, document, and support, and they can constrain how a library evolves.
Suppose a replacement has been available for several releases and the old method cannot express options required by new behavior. The library’s tests pass, and a compatibility checker flags the removal. The producer still cannot answer the questions that determine what to do next:
- Does any consumer still call this method?
- Are consumers concentrated on one version or spread across several generations?
- Does another library implement or wrap the API, multiplying its impact?
- Is direct coordination sufficient, or does this require a deprecation and migration campaign?
At small scale, producers can ask nearby teams or search a handful of repositories. Across many repositories, it is harder to find every caller of a method and the library version each one uses. Those answers are scattered across consumer codebases and builds.
Without that evidence, a producer may release a breaking change and discover the impact through consumer failures, or preserve an old API indefinitely because the risk is unknown. Libraries need to evolve, and their producers need evidence that helps them do so intentionally.
We built Quasar to index symbol definitions and references across Netflix repositories. For library producers, that shared index helps answer two questions:
- What changed in the library’s public API?
- Which repositories use the exact symbols that changed?
The first identifies a potentially incompatible change. The second estimates its observed blast radius. Together, they turn a generic compatibility warning into evidence a producer can act on before merging or releasing.
From API Changes to Consumer Impact
Existing techniques each see a different part of the problem. Binary and source compatibility tools identify contract changes, but cannot tell who uses the changed API. Dependency graphs show declared reach, but cannot prove that code calls a particular method. Text search may miss overloads, inheritance, or the artifact version behind a call. Consumer builds provide strong validation, but running them across the fleet is expensive.
Quasar builds on SCIP, an open interchange format for semantic code intelligence. Language-specific indexers encode definitions, references, and relationships using stable symbol identifiers. Quasar retains API definitions for library versions and commits alongside references from consumer repositories. That shared identity lets it connect an API change in one repository to exact usages elsewhere, even when those repositories were indexed independently.

On each enrolled CI build, language-specific indexers submit SCIP indexes to Quasar’s ingestion service. It writes API definitions and consumer references as Parquet in Amazon S3, retaining the symbol identity, dependency version, and source location needed to investigate a change.
During pull-request review, Quasar compares indexed base and head definitions and counts direct consumer references with Amazon Athena. Quasar exposes those findings through its REST and GraphQL APIs and MCP server; follow-up usage queries provide dependency-version breakdowns and source locations. A separate compatibility-impact assessment can also follow implementations and their callers when a producer supplies a changed JVM symbol.
Consider this simplified API change:
public interface Client {
- Result getLegacyValue(Request request);
+ Result getValue(Request request, Options options);
}
For a detailed compatibility-impact assessment of this removal, a producer-side tool supplies the old method descriptor. Quasar constructs its canonical symbol identity. This abridged excerpt from the direct-reference portion of Quasar’s Amazon Athena query shows the essential match:
SELECT c.change_id, 'DIRECT_REFERENCE' AS evidence_kind,
       r.scm_type, r.org, r.repo, r.dep_version, r.file_path
FROM requested_changes c
JOIN quasar.symbol_refs r
  ON r.symbol_canonical = c.target_canonical
requested_changes contains the API changes submitted by the producer. The SQL excerpt finds repositories that call the removed method. Quasar also checks implementations and calls through them, so it can count each affected repository once. It returns sample dependency versions and file locations to help investigate the result.
For the Client change, this tells the producer which repositories still use getLegacyValue, which versions they use, and where some of those calls occur. That helps the producer decide whether to coordinate a migration before removing the method.
Bringing the Analysis Before Release
Version-to-version comparison is valuable when planning an upgrade or writing a migration guide. Producers benefit even more when feedback arrives during code review.
For pull-request analysis, Quasar stores API definition snapshots keyed by commit. Given a base and head commit, it classifies symbols as added, removed, or signature-modified. Removals and modifications then become candidates for consumer-impact analysis.
An incompatible change is not automatically a high-risk change. Quasar reports the observed impact so the producer can decide what to do; it does not enforce a release policy. “No references observed” means only that Quasar found none in the indexed population. Reflection, configuration, dynamic loading, stale branches, or incomplete indexing can hide consumers. The result needs to show whether the requested commits were indexed, how fresh the consumer indexes are, and whether evidence was truncated.
Pull-request review requires indexed snapshots for the exact base and head commits. If either is unavailable, Quasar reports that it cannot compare them; it does not substitute a default-branch snapshot. This keeps a missing comparison from looking like a clean API diff.
Return to our Client change. This illustrative report brings together signals available through Quasar's API comparison, consumer-usage queries, and library-level criticality. It is not a literal response from one API:
{
  "change": "REMOVED",
  "symbol": "Client#getLegacyValue(Request)",
  "affectedRepositories": 137,
  "versionDistribution": [
    { "version": "4.2.1", "repositories": 86 },
    { "version": "4.1.7", "repositories": 38 },
    { "version": "3.9.4", "repositories": 13 }
  ],
  "sampleConsumerLocations": [
    {
      "repository": "checkout-service",
      "filePath": "src/main/java/com/example/checkout/CheckoutClient.java",
      "lines": [84, 129]
    },
    {
      "repository": "client-wrapper",
      "filePath": "src/main/java/com/example/client/ClientAdapter.java",
      "lines": [57]
    }
  ],
  "libraryCriticality": {
    "tier": 1,
    "basis": "highest-tier downstream application"
  },
  "comparison": {
    "baseShaFound": true,
    "headShaFound": true
  }
}

The repository count is symbol-specific: in this example, 137 indexed repositories refer to the removed method. The version distribution reveals a dominant cohort on 4.2.1 and a smaller long tail still on 3.9.4. A producer can inspect affected repositories and retrieve indexed file paths, with line numbers where the index provides them. The JSON shows only two sample locations to keep the example readable. The filePath and lines shape mirrors Quasar's query contract. The tier is broader context about the library, inherited from its highest-criticality downstream application; it does not imply that all 137 callers are Tier 1.
Together, those signals change the producer’s plan. Instead of merging the removal and waiting for failures, the producer can retain and deprecate the old method, publish a migration path, coordinate a broader migration, and track the long-tail versions before removal. File paths and available line numbers turn that scope into a concrete work list for engineers or coding agents. The same API diff paired with weak or stale evidence would lead to a different action: refresh the indexes before deciding. The value is not merely detecting the removal; it is choosing a proportionate next step.

A Polyglot Foundation with SCIP
The shared SCIP format also lets Quasar index several language ecosystems. Each language indexer resolves its own code, while Quasar can use the resulting symbol identities to find references across repositories.
Conceptually, client-lib indexes Client#getLegacyValue(Request) as a definition, while checkout-service indexes a reference to the same symbol. Quasar can then connect the library API to its consumer across repositories.

Relationships are especially useful when generated code separates the API a producer owns from the symbols consumers invoke. For example, Quasar can trace a Protobuf definition through its generated Java members to the repositories that use them, even when consumer code never names the .proto element.
SCIP records symbols and their references; it does not determine whether an API change violates an ecosystem’s compatibility rules. Today, Quasar compares indexed JVM and Protobuf API definitions and traces Protobuf changes through generated Java to find affected repositories. A separate JVM compatibility-impact path uses breaks identified by a producer-side tool to query affected repositories. Go, Python, JavaScript/TypeScript, and Rust support usage queries, but Quasar does not yet assess their breaking API changes.
Moving Risk Assessment Earlier
Today, Quasar surfaces API-change findings on pull requests, including observed consumer counts and confidence. Producers can use its other queries to inspect dependency versions and source locations, with library criticality as broader context. Together, those signals support a decision before merge.
We want to move that context earlier. An agent writing library code should recognize when it is changing a public symbol and consult Quasar before the change becomes a pull request. Quasar’s APIs and Model Context Protocol (MCP) integration provide an access path, but access alone does not create awareness. The coding workflow must also recognize public API edits so the agent knows when to query impact and when to involve the producer.

Earlier guidance will not replace pull-request analysis. The PR assessment will still verify the concrete diff and catch changes that were not recognized during coding. Coverage, freshness, ambiguity, unsupported platforms, and truncation must travel through both checks in machine-readable form. An agent should not turn “no observed usages in the available index” into “safe to remove.”
Today, agents can query Quasar through MCP when prompted. We are working toward making that context part of the coding workflow, then using identified call sites to prepare migration changes. Quasar supplies semantic evidence, an agent reduces migration toil, and the library producer remains responsible for API and release decisions.
What We Learned
Building this workflow led us to four practical lessons.
- Separate compatibility from reach. A removed method can break the API contract even when Quasar finds no callers. A list of affected repositories and their library versions shows the migration work ahead. Producers need both signals to choose a release path.
- Make the evidence inspectable. A repository count is more useful with sample call sites and a version breakdown. The result also needs to show which commits were indexed, how fresh the consumer indexes are, and whether evidence was truncated. Otherwise, “no usage found” can be mistaken for proof that nobody is affected.
- Keep usage and compatibility separate across languages. SCIP lets Quasar find symbol references in several ecosystems. Deciding whether an API change is breaking requires compatibility rules or a trusted producer-side signal for that ecosystem.
- Bring evidence to the producer while choices are open. Pull-request findings can prompt a producer to retain an API, publish a migration path, or coordinate consumers before merge. Moving the same evidence into the coding workflow could shape the edit earlier. After release, it still helps locate consumers that need to migrate.
Today, Quasar indexes JVM, Go, Python, JavaScript/TypeScript, and Rust code for cross-repository usage analysis. It compares JVM APIs and traces Protobuf changes through generated Java. Producers can review change findings through Quasar’s REST and GraphQL APIs or its MCP server, then investigate affected repositories and call sites. We are extending this foundation toward more ecosystem-specific compatibility checks, deeper code-review integration, and agent-assisted consumer migrations that keep release approval with the producer.
Quasar is internal to Netflix, but the pattern is portable: index code semantically, retain API definitions, compare them at the point of change, query affected consumers, and report the quality of the evidence. Library producers need more than a compatibility verdict. They need to know who may be affected and have enough time to act before release.
A huge thank you to the Java Platform team at Netflix. Their expertise, collaboration, and support made this work possible
Related Talks
- From Lag to Lightning: Transforming Dependency Update Timelines explores how Netflix shortened dependency-update timelines.
- Netflix’s Journey to Confident Automated Code Changes discusses building confidence in automated changes at scale.

Beyond API Compatibility: Building a Tool to Measure the Blast Radius of Library Changes was originally published in Netflix TechBlog on Medium, where people are continuing the conversation by highlighting and responding to this story.
Origin Range Requests: Serving large files without range-request tuning
Post Syndicated from Matthew Gumport original https://blog.cloudflare.com/origin-range-requests/
A video player seeking to the middle of a movie asks for a few megabytes. Under our old range caching, that one request could make Cloudflare pull 128 MiB from the origin and move it between data centers, sometimes after the viewer had already left. Range requests are how large files get delivered, and caching them naively easily leads to wasted network bandwidth and wasted disk operations when running a CDN at scale.
So we rebuilt how our cache handles them. For R2, Cloudflare's object storage, p99 time to first byte dropped by about half, and a follow-up improvement cut tiered cache traffic for R2 and similar workloads by about 6%.
Today, we're making that new implementation available as Origin Range Requests, a self-service feature on all plans. There's no range size to tune and no need to contact support. Turn it on with a Cache Rule, and Cloudflare handles the rest.
A request for part of a file
An HTTP range request asks for part of a resource instead of the whole resource. The client sends a normal GET with a Range header:
GET /movie.mp4 HTTP/1.1
Host: example.com
Range: bytes=1048576-2097151
If the server supports the request, it returns 206 Partial Content and identifies the returned bytes with Content-Range:
HTTP/1.1 206 Partial Content
Content-Range: bytes 1048576-2097151/524288000
Content-Length: 1048576
Range requests are common for large objects. A video player can request bytes around a seek position instead of the whole file. A download manager can resume after an interruption. A package manager can fetch part of an artifact. A client can inspect the end of a file without downloading everything before it.
The client decides whether to request a range, and Cloudflare does not change that request. Instead, Origin Range Requests changes how Cloudflare satisfies it.
The range-size problem
Cloudflare has supported range-request caching for years via static zone configuration.
The previous implementation resembled the cache-slicing described in an nginx blog post: each client request was mapped to fixed-size ranges of the file, with the range size and file extensions configured per zone.
The size of each range created a tradeoff: small ranges led to many small origin requests and memory pressure on Cloudflare from coalescing all of the requests in-memory, while large ranges caused Cloudflare to download much more data than the client requested. Updates to the range size itself would invalidate cache entries, since the size was part of the cache key.
This design also meant people requesting content through our network could have unpleasant experiences accessing these files. Concurrent requests that fell inside the same range, no matter how far apart each client’s requested range was, could block each other. Our nginx-based cache also couldn’t combine range caching with concurrent streaming, a feature we built to let multiple clients read a file from cache while it's still being written. Turning both on together cut responses short, so each range had to be fully downloaded before anyone could read it, and popular files needed a separate origin fetch for every range.
The extra bytes could also cross several parts of our distributed cache: from the origin to one data center, between cache tiers, and then toward the client. Every hop multiplied the waste. No value works equally well for a small seek, a sequential download, a large media file, and every origin and cache topology.
Our internal cache limitations were directly exposed to customers, who should not need to understand our capabilities in-depth to have files served efficiently.
Fortunately, our transition from nginx to a Pingora-based caching server created an opportunity to address the implementation problems that had forced a hard-to-use setting onto customers.
Fixed-size cache chunks
The fix came from something Pingora was already doing. To make it easy to resume interrupted downloads, it stores every cached file on disk in fixed-size chunks. If the cache already thinks in chunks, the range size doesn't need to be a setting at all, it can just be the chunk!
For a range request, Cloudflare checks which requested bytes are already cached. It serves those bytes directly. For missing bytes, it fetches origin ranges aligned to the cache's fixed-sized-chunk boundaries, stores the result in the same chunks used for ordinary cache storage, and returns only the bytes requested by the client.
For example, a request for bytes 150-250 can cause Cloudflare to fetch the aligned chunk containing those bytes. The downstream response still contains only 150-250.
This does not eliminate extra work for requests smaller than our chunk size — such a request can still require fetching the whole chunk containing it. We also are taking on the cost of more work for non-aligned ranges. The difference is that the extra work is bounded and predictable, and no longer determined by a customer-selected range size that can cause unpredictable effects on us and origins.
Coordinating cached and in-flight data
Parsing the Range header is straightforward. The harder problem is producing one correct response when the requested bytes are split across cached data, an origin response, and downloads already in progress.
At a high level, the edge:
- Looks up the asset headers and range-coverage metadata.
- Reads whatever part of the asset it can from disk or streaming in memory.
- Fetches missing coverage from the origin using aligned ranges.
- Writes the new bytes and records the completed range in metadata.
- Combines the pieces and sets
Content-RangeandContent-Lengthfor the client response.
This is a coordinator, not a single cache lookup. One request can use a cached prefix, an in-flight download, and a newly fetched suffix. The internal origin response can be larger than the downstream response, but the downstream status and headers describe only the requested range.
If an existing download covers another request's bytes, the second request can attach to that download instead of starting another origin fetch. This shares work during bursts for popular large files.
The design uses the existing cache data model. Headers identify the asset version, the body is stored in bounded chunks, and metadata records which ranges were written successfully.
Validate before composing
Composed range responses are valid only when all bytes belong to the same representation. The coordinator checks that each origin response matches the requested range, that the total asset size is stable, and that the entity tag remains consistent across subrequests.
The If-Range header lets a client request a range only if the representation still matches a known validator. If it does not match, Cloudflare returns the full representation instead of combining bytes from different versions.
Cloudflare also avoids composing ranges for a representation it is about to decompress because the range over a set of compressed bytes would be different from those selected by the range in a decompressed response. In these cases, Cloudflare serves the transformed full response rather than advertising a range it cannot honor correctly.
The resulting behavior is standard HTTP:
- A satisfiable range receives
206 Partial Contentwith an accurateContent-Range. - An unsatisfiable range receives
416 Range Not Satisfiable. - A response that cannot safely be ranged is served as the complete representation.
What changed in production
Before opening Origin Range Requests to everyone, we moved existing users of the old range-caching feature onto the new implementation, starting with the workloads that hurt us most.
Those workloads had a lot of concurrent range requests against very large files, often on very spiky traffic. Configured range sizes on the old system ran from tens of kilobytes to tens of gigabytes. With a large range size, a request that wouldn't fill a floppy disk could make us download a few DVDs' worth of data from the origin and move it across several data centers, sometimes after the client had already given up and gone elsewhere. With a small range size, one request turned into a long line of tiny origin requests, each holding memory while it waited. Both patterns caused real operational incidents for us.
R2 was the largest internal user. Its configured range size was 64 MiB, so a small read that crossed a range boundary could cost us 128 MiB of transfer between data centers. After moving R2 to the new implementation, we saw:
- Faster responses. Across R2's storage regions, p99 time to first byte dropped by roughly half on both cache hits and misses.
- Fewer bytes on our network. Our most recent change taught the coordinator to combine bytes already on disk with bytes fetched from upstream in a single response. Before, a request was served either entirely from cache or entirely from upstream. After we turned this on for R2, tiered cache traffic for R2 and similar workloads dropped about 6% week over week, which is petabytes less data moving between our data centers every day.
Getting started
Once the cache no longer depended on a customer-selected range size, the product configuration could not be simpler. Customers select matching traffic through Cache Rules. Cloudflare handles the chunking and cache coordination.
Origin Range Requests is intended for traffic where clients naturally request parts of a large cacheable object:
- Progressive and seekable video such as MP4
- Resumable large downloads
- Software distributions and package repositories
- Disk images, archives, and other multi-gigabyte objects
- AI training and inference workloads that transfer large model files or fetch selected regions of model artifacts
- Clients that fetch metadata or a small region of a larger file
We intend to make this the default way certain file types are served on our network, modifiable by cache rules.
This feature does not change normal cache eligibility. Enabling it does not make an otherwise uncacheable response cacheable. The origin also needs to support byte ranges for partial origin fetches to be useful.
To turn it on, create a Cache Rule that matches your large-file traffic and set Origin Range Requests to On. You can do this in the dashboard under Caching > Cache Rules, or through the API with origin_range_requests: { "mode": "on" }. Customers choose the traffic; the edge handles the cache coordination and correctness requirements.
Bringing post-quantum cryptography to geographically fenced key management
Post Syndicated from Chetan Agrawal original https://blog.cloudflare.com/post-quantum-geo-key-manager/
Today, Cloudflare is launching a post-quantum geographically restricted key manager in support of our Data Localization Suite (DLS) in closed beta. This new PQ GeoKey Manager is a cornerstone of Cloudflare’s data sovereignty solutions, making sure that a customer's decryption keys are only accessible in their chosen geography. GeoKey Manager implements this by wrapping each decryption key such that it can only be decrypted by Cloudflare servers that are located in the allowed geography.
While general availability (GA) is planned for Q1 2027, today’s launch is an important milestone on our journey to support our customers’ data sovereignty goals while also migrating all Cloudflare products to post-quantum (PQ) cryptography.
Governments, financial institutions, healthcare providers, and defense organizations process highly sensitive data that can remain sensitive for years or decades after it is produced. Encryption is often required to protect this data. When classical, public-key encryption is used, adversaries do not immediately need a quantum computer today to put that data at risk: they can store the ciphertext and retain them until quantum computers can break the public key cryptography protecting it — an attack strategy known as harvest now, decrypt later.
For organizations with geographic requirements, resisting that threat is only half the challenge. At Cloudflare's scale, high availability requires replicating customer data across many servers across our global network. However, many data sovereignty regulations require that certain types of data be processed only within a given geographical region. We must therefore ensure the data is end-to-end encrypted such that only servers within the region have access to the plaintext. In this post, we describe the system that makes this work.
The evolution of GeoKey Manager
Cloudflare pioneered the concept of geo-restricted transport layer security (TLS) keys back in 2017 with GeoKey Manager. This gave customers control over the locations where their private TLS keys could be unwrapped on Cloudflare’s anycast network to provide stronger technical guarantees of which region their requests are decrypted into. For instance, a customer could choose to only unwrap their private keys in India. So instead of allowing decryption across Cloudflare’s entire global network, GeoKey Manager makes sure TLS signing for each customer request happens in our India network.
GeoKey Manager evolved again in 2022 with ciphertext policy attribute based encryption (ABE). Instead of tying encrypted keys to a fixed set of data centers, ABE expressed geographic requirements using attributes such as country or region, like “region = European Union” or “region = Canada + United States + Mexico”. Newly authorized servers could receive matching decryption capabilities without rewrapping every customer key.
That flexibility created a challenge and opportunity for the post-quantum transition. No production-ready post-quantum ABE scheme is available today, and customers do not need a large number of regions. A simpler design meets the requirement and is easier to maintain and operate. Cloudflare therefore uses hybrid ML-KEM-768 and X25519 protection with two kinds of keys, out of which ML-KEM-768 is a NIST standard that also opens doors to highly sensitive customers. A regional root key is a symmetric secret tied to one region, and an application-specific key pair is derived from it for a single service, such as Gateway or Tunnel. This protects private-key material against harvest now, decrypt later while preserving regional key-use boundaries.
Global ciphertext, regional key unwrapping
In its new form, GeoKey Manager is the key foundation for Cloudflare’s data sovereignty solutions. It controls which region protected decryption keys can be used from and when. Separate workstreams determine where tunnels terminate, where traffic is inspected, how it is routed, and where plaintext processing occurs. But all of them depend on the region where a customer’s private key can be unwrapped, because TLS traffic can only be decrypted where that key is available.
During initialization, the edge key service (the component on each Cloudflare edge server that unwraps customer private keys and uses them to serve requests) verifies that it has loaded every regional root key required by its configuration. If a configured key is missing or malformed, the service does not start. After initialization, an individual request also fails closed (Cloudflare rejects it rather than risk unwrapping a key out of region) if its metadata identifies a regional root key that is not locally available. If a request for Germany was somehow trying to decrypt in Spain or France it would fail, since neither Spain nor France have the regional root key for Germany. This guarantees that a regional root key never leaves its region, no matter what.
Cloudflare needs to maintain high performance while keeping our customers’ regionalized data secure at scale. This is where the next version of GeoKey Manager comes in. We are enabling fast performance while logically separating our network by using post-quantum cryptography to restrict where customers’ private keys are unwrapped. Most of our regions will be available for customers to regionalize their workflow, and there may be product specific caveats. Customers select a region and Cloudflare manages everything else needed to unwrap their private keys within the region’s boundary.
How GeoKey Manager ensures that keys are only available in a region
GeoKey Manager controls where wrapped private keys can be unwrapped and used on the data plane. It does not control where requests are forwarded or routed (that’s Regional Services), where tunnels terminate, or where traffic inspection happens (also Regional Services).
GeoKey Manager separates globally distributed wrapped private keys from the regional root key required to unwrap it. Quicksilver, our global configuration distribution system, distributes wrapped private keys and its metadata across our network. It does not distribute regional root keys; that happens through a separate provisioning service that stores regional root keys and delivers them only to edge servers authorized for each region. Regional root keys follow a separate, controlled path. On the data plane, a node’s regional configuration, which region a node belongs to, determines which nodes can receive which regional root keys.
Defining key hierarchy and application-specific keys
Every wrapped customer private key carries metadata identifying its service context, regional boundary, and epoch.
The service context is the Cloudflare service that uses the key, such as Tunnel or Gateway. The regional boundary is the approved set of Cloudflare data centers where the key may be unwrapped and used, such as data centers in Germany or the European Union. The epoch identifies which generation of the regional root key the key belongs to; each rotation creates a new epoch.
For example, Acme Co. might have one key for Tunnel in Germany (acme0001) and another for Gateway in Germany (acme0002). Road Runner Inc. might have one key for Tunnel in Germany (runner0001) and another for Gateway in the European Union (runner0002).
Keys with the same service context, regional boundary, and epoch use the same application-specific key pair. Therefore, compromising the Tunnel-Germany application-specific private key could expose both acme0001 and runner0001, but not the Gateway keys. Compromising the Germany regional root key could affect every application-specific key derived from that root for the same epoch, including acme0001, acme0002, and runner0001.
In the current architecture, the application-specific key pair is asymmetric. The public component wraps the customer's private key material, while the private component is required to unwrap it. The resulting wrapped private key is distributed with its service context (Access, Gateway, Tunnel, Cloudflare One client), region, and epoch.
Provisioning regional root keys
When Cloudflare/Admin configures a region for a CF1 use case, key management service (which also derives application-specific key pairs and wraps customer private keys) creates a regional root key and associates it with a regional boundary and epoch and sends it to provisioning service for storage and distribution which under the hood uses Vault, which is managed by us on-premises.
Authorizing edge servers for a region
Before an edge server can receive a regional root key, provisioning service evaluates three inputs:
- Trusted Platform Module (TPM) proves that the server possesses a registered hardware identity
- Zinc, Cloudflare's server inventory system, maps that identity to a data center and location
- Provisioning service determines which regional root keys the server may access
Zinc updates its membership records for each edge server. This asynchronous process adds new servers as the network grows and removes servers when they are decommissioned. As Cloudflare performs maintenance on data centers in Germany, the definition of which data centers belong in Germany changes in Zinc. That definition is swiftly propagated through our network with Quicksilver so that our edge is up to date. The reverse also works. As we add capacity to our network, the definition of Germany, or any other region, is updated in Zinc and that is also swiftly propagated through our network with Quicksilver.
Zinc also associates a registered hardware identity with a server and physical location, which supports FIPS 140-3 compliance. TPM-backed identity, server inventory data, and regional configurations determine which region an edge server belongs to and what regional root keys it can access.
Each edge server calls the control plane’s provisioning service, and provides its registered hardware identity. After verifying the server’s hardware identity and regional membership, the provisioning service issues a token that permits the server to retrieve only the regional root keys authorized for its location. Each edge server receives its token and uses it to fetch the regional root keys.
Authorized edge servers load regional root keys into the kernel keyring rather than persisting them on disk. Process level access controls limit which services can use them. Because this memory is volatile, a machine restart removes the keys and the server must authenticate and provision them again. This adds operational complexity in exchange for reducing persistent key material which could be an attack vector for adversaries.
Wrapping private keys for global distribution
When the key-management service receives a customer's private key material with a service context and regional boundary, it will use the request’s regional boundary to get the regional root key and its latest configured epoch. It will then derive the corresponding asymmetric application key pair and use its public component to wrap the private key. The result is a wrapped private key and its metadata.
Quicksilver will then distribute the wrapped private key and metadata across our network. Since the wrapped key requires the specified region to decrypt, global wrapped key distribution does not grant edge servers global access to the private key because unwrapping still requires the corresponding regional root key and service context.
Unwrapping using application-specific keys on the data plane
Why we chose this cryptographic design
Symmetric roots with asymmetric key wrapping
Regional root keys are 256-bit symmetric secrets. GeoKey Manager derives application-specific keys from each regional root key. For the current Cloudflare One path, the control plane’s key management service derives an application-specific Hybrid Public Key Encryption (HPKE) key pair.
HPKE with hybrid post-quantum KEM
The Cloudflare One path uses HPKE, as defined in RFC 9180. Its key-encapsulation mechanism (KEM) combines ML-KEM-768 with X25519, while HKDF-SHA-256 provides key derivation and AES-256-GCM provides authenticated encryption. Combining post-quantum and classical components preserves confidentiality as long as at least one component remains secure.
Designing for rotation
The validated design supports two types of key rotation: soft rotation and hard rotation.
A soft rotation creates a new epoch for the regional root key while retaining controlled access to a limited number of previous regional root-key epochs — let’s say one previous generation, as an example. The customer’s new private-key material is wrapped using the latest epoch, while older wrapped private keys are still usable during the transition. This is a similar concept to when a credit card company allows you to use a previous version of your credit card for recurring payments from an authorized retailer. In this case, the number of epochs we support determine how many generations of previously wrapped private keys — credit cards — are usable. This allows customers to preserve their service uptime while they transition.
A hard rotation instead rewraps affected customers’ wrapped private keys under a replacement epoch so access to the previous epoch can be removed. In this case, it would be like the credit card company not allowing you to use the previous credit card for a transaction under any circumstances.
Security and availability tradeoffs
Failing closed is a very intentional design choice. Failing open would mean unwrapping a customer’s private key outside its allowed region rather than rejecting the request. We never do that: if any required check fails (service context, region, epoch, etc.), the request is rejected. At startup, each edge’s key service loads every configured regional root key from its Linux kernel keyring. Missing or malformed root keys prevent the edge key service from initializing. Once running, the edge key service uses in-memory copies so that it can’t be tampered with, preventing out of region or cross-region unwrapping. In practice, an edge server serves requests for a region only once its configuration and key provisioning are complete.
The trust boundary (all services that can access the regional root key) includes the key-management service, the provisioning service, and authorized edge key services because each can access regional root keys. The key-management service uses them to derive application-specific keys, the provisioning service stores and distributes them, and edge key services use locally authorized copies of them. Quicksilver remains outside this boundary because it receives only wrapped private keys and associated metadata.
Operating GeoKey Manager
Cloudflare’s network is constantly changing. As servers enter or leave service, Cloudflare’s fleet inventory updates regional membership. This means the list of data centers that make up a region like Spain is not static. GeoKey Manager’s provisioning layer refreshes that membership several times each day, granting or removing access to regional root keys as the network changes. This process is separate from key rotation and requires no customer action.
When regional membership changes, the provisioning service immediately synchronizes the server’s Linux kernel keyring with the latest authorized regional root keys. The edge key service caches these keys in process memory until it restarts or the cache expires. It then reloads the current authorized set from the kernel keyring.
What’s next: Cloudflare One integration and CDN
GeoKey Manager is the basis for an improved Regional Services offering for Cloudflare One; these new capabilities will be announced in a few months.
Older versions of GeoKey Manager already provide geographic controls for private keys associated with CDN certificates. We are developing a separate integration that will bring this new post-quantum GeoKey Manager described here to that existing CDN capability. We will share testing and transition details when that work is ready.
Getting started
If you are a current DLS customer who is regionalizing CDN traffic, you can register intent to test this feature before it’s generally available for CDN traffic here.
Thank you to everyone who made this product a reality. It was a huge effort across the Data Localization Suite, Cloudflare One, and Cloudflare Research teams.
Ще гласувам с #4 за Гюров и Кандев
Post Syndicated from Боян Юруков original https://yurukov.net/blog/2026/gurov/

В неделя ще гласувам за Гюров и Кандев.
Не защото не искам някой друг, а защото искам точно те двамата да са президент и вицепрезидент. Знам какви са правомощията им, каква е пряката и непряката роля на поста. Вярвам, че са правилните хора за тези позиции и ще върнат президентската институция от политически инструмент за заграбване на власт в нещо, което всъщност работи за България. Вярвам, че са хора с план, а не със схема и са го показали през кариерата си.
Затова ще гласувам с номер 4.
Watch BEFORE You Buy a Portable Projector in 2026
Post Syndicated from The Hook Up original https://www.youtube.com/watch?v=4kmlGY6smsE
Windows XP 25 Years Later! An LGR Retrospective
Post Syndicated from LGR original https://www.youtube.com/watch?v=GAv1EwoRnec
America’s Deadliest Day of WWII
Post Syndicated from The History Guy: History Deserves to Be Remembered original https://www.youtube.com/watch?v=DuV_6ajqXtE
Седмият президент и сделките за властта
Post Syndicated from Емилия Милчева original https://www.toest.bg/sedmiyat-prezident-i-sdelkite-za-vlastta/

„Не съм гуру, не съм водач“, заявява Жан-Люк Меланшон през 2017 г., когато го притискат да каже за кого да гласуват близо седемте милиона французи, подкрепили кандидатурата му за президент. Самият той, останал на четвърто място на първия тур тогава, гласува на балотажа между Еманюел Макрон и Марин Льо Пен, но не разкри избора си. Защото след президентските избори идваха парламентарни, а той нямаше намерение да подарява политическото си влияние на друг кандидат.
Девет години по-късно Меланшон отново се бори за президентския пост. Социолозите вече разглеждат възможността самият той да се изправи срещу Льо Пен на балотаж идната пролет и тогава ще му е нужна помощ.
Кой всъщност печели повече от подкрепата на балотажа – кандидатът, който я получава, или политикът, който я дава?
В България този въпрос ще тежи особено много на 1 ноември, когато се очаква да бъде избран седмият президент на републиката.
Истинската битка за властта обаче е отвъд Президентството. Изборите за държавен глава ще покажат дали България върви към ново политическо противопоставяне, или ще се затвърди прехвърлянето на влияние и ресурси от старите към новите управляващи – и още повече силата на Румен Радев.
Залогът
Няма избори, за които да не се сключват политически сделки, и предстоящите не правят изключение. Две от парламентарно представените формации нямат свои кандидати за президент – ГЕРБ с над 430 хиляди гласа зад гърба си на последните парламентарни избори през април т.г. и ДПС с над 230 хиляди. Техните избиратели или голяма част от тях все пак ще участват в предстоящия вот, а социологическите агенции ще покажат как се е разпределил той.
Според Димитър Ганев от агенция „Тренд“ на президентските избори ще гласуват едва 150–200 хиляди избиратели на ГЕРБ и не повече от 60–70 хиляди на ДПС. Той свързва неучастието на ГЕРБ със състоянието на партийната организация и риска от демобилизация преди местните избори през 2027 г.
В студиото на „24 часа“ Геновева Петрова от „Алфа Рисърч“ посочи, че по техни данни на старта на кампанията половината от избирателите на ГЕРБ и половината от тези на ДПС няма да гласуват на първия тур. А след последните акции срещу знакови кметове на ДПС отливът може да е и по-голям.
За лидерите на ГЕРБ Бойко Борисов и на ДПС Делян Пеевски залогът е да съхранят влиянието си – поне частично, за Румен Радев – да го разшири, а за „Продължаваме промяната“ и „Демократична България“ – да останат силна опозиция и политически фактор.
Битката за властта обаче продължава след президентския балотаж.
Предстоят местните избори през 2027 г., а също и изборът на нов състав на Висшия съдебен съвет (ВСС), който трябва да приключи три седмици след балотажа – на 21 ноември. Новият ВСС ще трябва да избере главен прокурор и председател на Върховния административен съд (ВАС) – два ключови поста, от които зависи бъдещото разпределение на влияние в съдебната власт.
Президентът има роля в назначаването на главния прокурор и председателите на ВАС и на Върховния касационен съд, които утвърждава с указ – включително правото да откаже първото предложение на ВСС. Законът обаче му дава право само на еднократно вето, не и на окончателно блокиране на кандидатура чрез втори отказ. Затова пък не е длъжен да подпише указа за назначението в определен срок.
Докато партиите пресмятат цената на подкрепата си за президент,
Пеевски получи сигнал, че собствените му позиции вече не са неприкосновени.
Дни преди първия тур на президентските избори трима кметове, двама от които са и зам.-председатели на ДПС, станаха обект на полицейски акции. Доскоро подобни действия срещу хора от най-близкото политическо обкръжение на олигарха изглеждаха немислими.
В рамките на три дни кметовете на Сунгурларе Димитър Гавазов и на Белица Радослав Ревански бяха задържани и обвинени в престъпен сговор за търговия с влияние. Полицейските действия стигнаха и до Кърджали, където за разпит беше отведен кметът Ерол Мюмюн, но по-късно бе пуснат на свобода. Оставка пък подаде друг кмет, свързан с Пеевски – Николай Рашков, избран с листата на неизвестната ПП „Пряка демокрация“.
Арестите и разпитите на високопоставени лица в ДПС променят картината за първия тур – но и за балотажа. Пеевски трябва да реши кого да подкрепи в момент, когато самият той е изправен пред въпроса колко власт и влияние му остават. А политическата подкрепа струва толкова, колкото тежи този, който я предлага.
Съвпадението на акциите с последните дни на президентската кампания няма как да бъде приписано на приключени точно в този момент разследвания.
Още по-показателно е, че самият премиер Румен Радев побърза да направи политически прочит. От Министерския съвет той обяви, че Борисов и Пеевски губят контрол върху финансовите потоци, а техните „лейтенанти“ вече не определят обществените поръчки. Радев посочи задържането на кмета на Сунгурларе като пример и заяви, че досега усилията на МВР и ДАНС са се проваляли в прокуратурата, но вече се намират прокурори, готови да действат.
Така министър-председателят свърза конкретно наказателно разследване с преразпределението на политическото и икономическото влияние. Прокуратурата започва ли да се освобождава от политическите зависимости, или се обръща по посоката, в която духа вятърът на прогреса? Първото би било добра новина за правовата държава. Второто би означавало, че зависимостите остават, но се сменят онези, които се възползват от тях.
Злоупотребите с обществени поръчки не са единствено в общини, контролирани от ДПС. Корупцията в България не е етнически оцветена, нито е запазена територия на една партия. А и къде е Борисов, след като няма свързан с ГЕРБ управник в последните акции, макар че партията е монополист в местната власт?
Политическите сметки изпускат обаче непредвиденото.
Три дни преди първия тур служител на Националната служба за охрана (НСО) блъсна на земята журналистката Соня Колтуклиева, след като тя отвори вратата на служебния автомобил на председателката на парламента Михаела Доцова. Лимузината потегли и никой не помогна на Колтуклиева, която остана да лежи по гръб на тротоара. Видеото обиколи социалните мрежи и предизвика лавина от коментари и искания за оставка на Доцова от опозицията и от граждани.
Инцидентът пред централата на „Прогресивна България“ предизвика бърза реакция от президентката Илияна Йотова, която осъди действията на охранителя като „недопустима и прекомерна реакция“. Тя поиска и оставката на шефа на НСО генерал-майор Емил Тонев, а самата служба започна проверка и сезира Военната прокуратура. Гардът Мартин Варадинов е арестуван, след като е отишъл доброволно във Военната прокуратура да даде показания.
Този случай поставя неудобни за управляващите въпроси не само за демонстрацията на сила, но и за това
как председател на парламента може да не забележи насилието, извършено от собствената му охрана,
и да се извини едва след като видеото предизвика обществено възмущение. Доцова се оправда, че не е видяла какво е извършил гардът. Реалността я опровергава – и това се вижда от видеото. В парламента ГЕРБ събра подписи за свикване на извънредно заседание за нейната оставка.
Този случай ще окаже влияние върху резултатите от първия тур, но никой не се наема да прогнозира с колко. На финала на кампанията последни данни показват, че дистанцията се скъсява, макар разликата да остава двуцифрена. Преднината на Йотова пред Гюров спадна до под 13%, установи проучване на „Алфа Рисърч“, направено преди инцидента със Соня Колтуклиева.
Борисов и гласовете, които не притежава
Отказът на ГЕРБ да издигне собствена кандидатпрезидентска двойка спести на Борисов риска от поредна изборна загуба. Но го постави пред друг риск – да се окаже, че вече не може да разполага с гласовете на собствените си избиратели така, както е свикнал. Дори да обяви подкрепа за един от двамата претенденти на балотажа, няма гаранция, че избирателите на ГЕРБ ще го последват.
Проучването на „Алфа Рисърч“ от началото на октомври не само показа, че близо половината симпатизанти на ГЕРБ няма да гласуват. От останалите близо 30% предпочитат Андрей Гюров, а двойно по-малко – Илияна Йотова. При избирателите на ДПС съотношението е в полза на Йотова.
Борисов вече обяви Йотова за свой идеологически противник, но отказа да даде непоискана подкрепа на Гюров. Самият Гюров очаква подкрепа от симпатизанти на ГЕРБ, но не иска да я договаря с партийната централа. Така Борисов се оказва в необичайно положение: иска подкрепата му да бъде поискана, но не е ясно с колко гласа може да „тежи“ в подобни преговори.
Политическите сметки на Пеевски
Председателят на ДПС каза, че няма да подкрепя кандидат на първия тур, а за балотажа ще решава впоследствие. Междувременно атакува правителството на Румен Радев с обвинения в корупция и неспособност да управлява, но намери повод да похвали Илияна Йотова за свикването на Консултативния съвет за национална сигурност.
Възможно е поведението му да е не само предизборно позициониране, а опит да запази пространство за договаряне с новата власт. Тогава предметът на евентуалната сделка няма да бъдат единствено гласовете за Йотова, а и кръгът на влияние на ДПС – особено в общините, където местните избори през 2027 г. ще покажат дали партията успява да запази позициите си. Те обаче очевидно ерозират, а свързаните с предишния кръг на Доган с нетърпение очакват реабилитацията си. Техни кадри бяха назначени в няколко министерства.
Останалите
След първия тур решения ще трябва да вземат не само Борисов и Пеевски, но и останалите кандидати, които няма да стигнат до балотажа. Гласовете за тях няма как да бъдат автоматично прибавени към Йотова или Гюров.
Най-голям е залогът за лидера на „Възраждане“ Костадин Костадинов. Според последни проучвания председателят на „Възраждане“, чийто кандидат за вицепрезидент е евродепутатът Петър Волгин, събира 9–11% подкрепа. Другите двама партийни лидери и също кандидати за президентския пост – Радостин Василев (МЕЧ) и Ивелин Михайлов („Величие“), остават значително след него.
За тези формации президентските избори са възможност да измерят собствената си подкрепа преди местния вот догодина.
Появата на „Прогресивна България“ изцеди „Възраждане“, но несъмнено част от избирателите на Костадинов ще подкрепят Йотова. Василев и Михайлов са хлъзгави – от една страна, те градят политическата си идентичност върху противопоставянето на статуквото и модела Пеевски–Борисов, а от друга, споделят немалко от евроскептичните и благосклонни към Москва позиции на „Възраждане“, без да афишират открито проруска идентичност.
Лидерите на МЕЧ и на „Величие“ избягват ясното назоваване на Русия като агресор във войната срещу Украйна, оспорват европейската политика по отношение на Москва и представят дистанцирането от общите позиции на ЕС като защита на българския национален интерес. Така те си оставят пространство да привличат избиратели от различни политически лагери, без да поемат ясни ангажименти към нито един от тях.
За Румен Радев президентските избори са възможност да затвърди политическото си влияние и извън изпълнителната и законодателната власт. Победа на Йотова би означавала политически близък държавен глава, с когото управляващото мнозинство комфортно ще съжителства през следващите години.
За Андрей Гюров и подкрепящите го ПП и ДБ балотажът е изпитание с двоен залог.
Те трябва да привлекат избиратели отвъд собствената си политическа общност, без да превръщат подкрепата на Борисов или Пеевски в бъдещо задължение. Защото има разлика между гласовете на симпатизантите на ГЕРБ и ДПС и политическа сделка с техните лидери. Първите могат да бъдат спечелени, за втората ще трябва да се плати висока цена.
Няколко събития показват, че ГЕРБ може да помогне за резултата на балотажа. Заедно с още трима бивши премиери – Иван Костов, Кирил Петков и Николай Денков, Бойко Борисов подписа писмо с призив за категорична позиция, която да потвърди евроатлантическата принадлежност на България. А в декларация, одобрена от ЕП, евродепутатите на ГЕРБ в Европейската народна партия заедно с колегата си Радан Кънев, както и Илхан Кючук от либералите на АЛДЕ поискаха София да отговори на руската заплаха в Черно море.
През 2002 г. част от френските леви избиратели отидоха на балотажа с щипки за пране на носа и с гумени ръкавици. Не понасяха Жак Ширак, но гласуваха за него, за да спрат крайнодесния Жан-Мари Льо Пен. Двайсет и четири години по-късно българските избиратели не просто ще решат кой да е президент, а дали да съсредоточат цялата власт в едни и същи ръце. Големият залог за този вот е посоката на България, но също и границите на властта.
Защото кой иначе ще възпира властта, когато тя започне да не забелязва кого е проснала на земята, за да защити себе си?