[$] Two VFS topics

Post Syndicated from original https://lwn.net/Articles/934094/

Two different topics concerning the virtual filesystem (VFS) layer were the
subject of a session led by VFS co-maintainer Christian Brauner at the
2023 Linux Storage, Filesystem,
Memory-Management and BPF Summit
. As might be guessed, it was a
filesystem-track session; Brauner had three separate items he planned on
bringing up, but the discussion on the first two consumed the whole
half-hour—and then some. A mechanism to avoid media-change races when
mounting loop (or loopback) and other devices was disposed of fairly
quickly, but the
discussion around the mount-beneath feature went on at length.

[$] Addressing priority inversion with proxy execution

Post Syndicated from original https://lwn.net/Articles/934114/

Priority inversion comes about when a low-priority task holds a resource
that is needed by a higher-priority task, with the result that the wrong
task is the only one that can run. This problem is arguably most acute in
realtime settings, but it can happen in just about any system that has
multiple tasks running. The variety of
scheduling classes
provided by the Linux kernel make handling priority
inversion a difficult problem; the latest version of the proxy
execution patch series
points toward a possible solution.

2-Phase Immersion Cooling Halted Over Multi-Billion Dollar Health Hazard Lawsuits

Post Syndicated from Patrick Kennedy original https://www.servethehome.com/2-phase-immersion-cooling-halted-over-multi-billion-dollar-health-hazard-lawsuits/

Two-phase immersion cooling for servers offers high efficiency, but major hyperscalers have halted projects over fluid safety and availability

The post 2-Phase Immersion Cooling Halted Over Multi-Billion Dollar Health Hazard Lawsuits appeared first on ServeTheHome.

Simulating Kubernetes-workload AZ failures with AWS Fault Injection Simulator

Post Syndicated from Siva Guruvareddiar original https://aws.amazon.com/blogs/architecture/simulating-kubernetes-workload-az-failures-with-aws-fault-injection-simulator/

In highly distributed systems, it is crucial to ensure that applications function correctly even during infrastructure failures. One common infrastructure failure scenario is when an entire Availability Zone (AZ) becomes unavailable. Applications are often deployed across multiple AZs to ensure high availability and fault tolerance in cloud environments such as Amazon Web Services (AWS).

Kubernetes helps manage and deploy applications across multiple nodes and AZs, though it can be difficult to test how your applications will behave during an AZ failure. This is where fault injection simulators come in. The AWS Fault Injection Simulator (AWS FIS) service can intentionally inject faults or failures into a system to test its resilience. In this blog post, we will explore how to use an AWS FIS to simulate an AZ failure for Kubernetes workloads.

Solution overview

To ensure that Kubernetes cluster workloads are architected to handle failures, you must test their resilience by simulating real-world failure scenarios. Kubernetes allows you to deploy workloads across multiple AZs to handle failures, but it’s still important to test how your system behaves during AZ failures. To do this, we use a microservice for product details with the aim of running this microservice using auto-scaling with both Cluster Autoscaler (CA, from Kubernetes community) and Karpenter and test how the system responds to varying traffic levels.

This blog post explores a load test to mimic the behavior of hundreds of users accessing the service concurrently to simulate a realistic failure scenario. This test uses AWS FIS to disrupt network connectivity, and simulate AZ failure in a controlled manner. This allows us to measure how users are impacted when using CA and then with Karpenter.

Both CA and Karpenter automatically adjust the size of a cluster based on the resource requirements of the running workloads. By comparing the performance of the microservice under these two autoscaling tools, we can determine which tool is better-suited to handle such scenarios.

Figure 1 demonstrates the solution’s architecture.

Architecture flow for Microservices to simulate a realistic failure scenario

Figure 1. Architecture flow for microservices to simulate a realistic failure scenario

Prerequisites

Install the following utilities on a Linux-based host machine, which can be an Amazon Elastic Compute Cloud (Amazon EC2) instance, AWS Cloud9 instance, or a local machine with access to your AWS account:

Setting up a microservice environment

This blog post consists of two major parts: Bootstrap and experiment. The bootstrap section provides step-by-step instructions for:

  • Creating and deploying a sample microservice
  • Creating an AWS IAM role for the FIS service
  • Creating an FIS experiment template

By following these bootstrap instructions, you can set up your own environment to test the different autoscaling tools’ performance in Kubernetes.

In the experiment section, we showcase how the system behaves with CA, then Karpenter.

Let’s start by setting a few environment variables using the following code:

export FIS_ACCOUNT_ID=$(aws sts get-caller-identity --query 'Account' --output text)
export FIS_AWS_REGION=us-west-2
export FIS_CLUSTER_NAME="fis-simulation-cluster"

Next, clone the sample repository which contains the code for our solution:

git clone https://github.com/aws-samples/containers-blog-maelstrom.git
cd ./containers-blog-maelstrom/fis-simulation-blog

Step 1. Bootstrap the environment

This solution uses Amazon EKS for AWS Cloud Development Kit (AWS CDK) Blueprints to provision our Amazon EKS cluster.

The first step to any AWS CDK deployment is bootstrapping the environment. cdk bootstrap is an AWS Command Line Interface (AWS CLI) tool that prepares the environment with resources required by AWS CDK to perform deployments into that environment (for example, a combination of AWS account and AWS Region).

Let’s run the below commands to bootstrap your environment and install all node dependencies required for deploying the solution:

npm install
cdk bootstrap aws://$FIS_ACCOUNT_ID/$FIS_AWS_REGION

We’ll use Amazon EKS Blueprints for CDK to create an Amazon EKS cluster and deploy add-ons. This stack deploys the following add-ons into the cluster:

  • AWS Load Balancer Controller
  • AWS VPC CNI
  • Core DNS
  • Kube-proxy

Step 2. Create an Amazon EKS cluster

Run the below command to deploy the Amazon EKS cluster:

npm install
cdk deploy "*" --require-approval never

Deployment takes approximately 20-30 minutes; then you will have a fully functioning Amazon EKS cluster in your account.

fis-simulation-cluster

Deployment time: 1378.09s

Copy and run the aws eks update-kubeconfig ... command from the output section to gain access to your Amazon EKS cluster using kubectl.

Step 3. Deploy a microservice to Amazon EKS

Use the code from the following Github repository and deploy using Helm.

git clone https://github.com/aws-containers/eks-app-mesh-polyglot-demo.git
helm install workshop eks-app-mesh-polyglot-demo/workshop/helm-chart/

Note: You are not restricted to this one as a mandate. If you have other microservices, use the same. This command deploys the following three microservices:

  1. Frontend-node as the UI to the product catalog application
  2. Catalog detail backend
  3. Product catalog backend

To test the resiliency, let’s take one of the microservice viz productdetail, the backend microservice as an example. When checking the status of a service like the following, you will see that proddetail is of type ClusterIP, which is accessible only within the cluster. To access this outside of the cluster, perform the following steps.

kubectl get service proddetail -n workshop
NAME          TYPE           CLUSTER-IP       EXTERNAL-IP   PORT(S)     AGE                                                                   5000/TCP       11h
proddetail    ClusterIP      10.100.168.219   <none>        3000/TCP    11m

Create ingress class

cat <<EOF | kubectl create -f -
apiVersion: networking.k8s.io/v1
kind: IngressClass
metadata:
  name: aws-alb
spec:
  controller: ingress.k8s.aws/alb  
EOF

Create ingress resource

cat <<EOF | kubectl create -f -
apiVersion: networking.k8s.io/v1
kind: Ingress
metadata:
  namespace: workshop
  name: proddtl-ingress
  annotations:
    alb.ingress.kubernetes.io/scheme: internet-facing
    alb.ingress.kubernetes.io/target-type: ip
spec:
  ingressClassName: aws-alb
  rules:
  - http:
      paths:
      - path: /
        pathType: Prefix
        backend:
          service:
            name: proddetail
            port:
               number: 3000
EOF          

After this, your web URL is ready:

kubectl get ingress -n workshop
NAME              CLASS     HOSTS   ADDRESS                                                                  PORTS   AGE
proddtl-ingress   aws-alb   *       k8s-workshop-proddtli-166014b35f-354421654.us-west-1.elb.amazonaws.com   80      14s

Test the connectivity from your browser:

Testing the connectivity from your browser

Figure 2. Testing the connectivity from your browser

Step 4. Create an IAM Role for AWS FIS

Before an AWS FIS experiment, create an IAM role. Let’s create a trust policy and attach as shown here:

cat > fis-trust-policy.json << EOF
{
    "Version": "2012-10-17",
    "Statement": [
        {
            "Effect": "Allow",
            "Principal": {
                "Service": [
                  "fis.amazonaws.com"
                ]
            },
            "Action": "sts:AssumeRole"
        }
    ]
}
EOF
aws iam create-role --role-name my-fis-role --assume-role-policy-document file://permissons/fis-trust-policy.json

Create an AWS FIS policy and attach

aws iam attach-role-policy --role-name my-fis-role --policy-arn  arn:aws:iam::aws:policy/service-role/AWSFaultInjectionSimulatorNetworkAccess
aws iam attach-role-policy --role-name my-fis-role --policy-arn  arn:aws:iam::aws:policy/CloudWatchAgentServerPolicy
aws iam attach-role-policy --role-name my-fis-role --policy-arn  arn:aws:iam::aws:policy/service-role/AWSFaultInjectionSimulatorEKSAccess
aws iam attach-role-policy --role-name my-fis-role --policy-arn  arn:aws:iam::aws:policy/service-role/AWSFaultInjectionSimulatorEC2Access
aws iam attach-role-policy --role-name my-fis-role --policy-arn  arn:aws:iam::aws:policy/service-role/AWSFaultInjectionSimulatorSSMAccess

Step 5: Create an AWS FIS experiment

Use AWS FIS to create an experiment to disrupt the network connectivity as below. Use the following experiment template with the IAM role created from the previous step:

Experiment template

Figure 3. Experiment template

Step 6. Failure simulation with AWS FIS on CA and Karpenter

We’ve completed microservice setup, made it internet-accessible, and created an AWS FIS template to simulate failures. Now let’s experiment with how the system behaves with different autoscalers: CA and Karpenter.

With the microservice available within Amazon EKS cluster, we’ll use Locust to simulate user behavior with a total of 100 users trying to access the URLs concurrently.

For the following experiments, Run 1 shows 100 users trying to access the service without any system disruptions. We’ll then move to AWS FIS and disrupt network connectivity in Run 2. Measuring the user impact and comparing it to the results from the first run provides insights on how the system responds to failures and can be improved for greater reliability and performance.

Simulating failures with Cluster Autoscaler (CA)

To perform this experiment, select your experiment template and click Start experiment, then enter start in the field. Currently 12 replicas of the proddetail microservice are running.

As the following Locust charts detail, Run 1 completed without failures. Run 2 simulated network connectivity disruption, resulting in a visible failure rate of 4 percent, with a peak of 7 failures at one time.

For this experiment, we used a total of seven nodes of type t3.small. Use eks-node-viewer to visualize dynamic node usage within a cluster.

CA experiment results

Figure 4. CA experiment results

Dynamic node usage within cluster

Figure 5. Dynamic node usage within cluster

Simulating failures with Karpenter

Continuing the same experiment with 12 replicas of the proddetail microservice, this time we are using Karpenter. As in the following figures, the cluster uses a combination of t3.small and “C” and “M” instances provided in Karpenter’s provisioner configuration.

In Run 1, we observe 0 failures. In Run 2, when network connectivity was disrupted by AWS FIS, Karpenter was able to maintain user requests with almost 0 percent failure. This outcome highlights the effectiveness of Karpenter as an autoscaler for maintaining high availability by carefully configuring the provisioner.

Karpenter experiment results

Figure 6. Karpenter experiment results

Dynamic node usage within cluster

Figure 7. Dynamic node usage within cluster

Cleanup

Use the following commands to clean up your experiment environment.

#delete Ingress resources
kubectl delete ingress proddtl-ingresss -n workshop
kubectl delete ingressclass aws-alb

#delete IAM resources
aws iam delete-role --role-name my-fis-role

#delete FIS resources
fis_template_id=`aws fis list-experiment-templates --region $FIS_AWS_REGION |jq ".experimentTemplates[0].id"`
aws fis delete-experiment-template --id $fis_template_id --region $FIS_AWS_REGION

#delete application resources and cluster
helm uninstall workshop
cdk destroy

Conclusion

This experiment results show that Karpenter performs better and recovers quicker from network disrupt connectivity than Cluster Autoscaler. The figures in this blog post highlight Karpenter’s resiliency and ability to scale and recover from failures quickly.

While this experiment provides valuable insights into the performance and reliability of Kubernetes workloads in the face of failures, it’s important to acknowledge that this is not a true test of an AZ unavailable situation. In a real-world scenario, an AZ failure can have a cascading effect, potentially impacting other services that workloads depend upon. But simulating an AZ failure in a controlled environment helps you better understand how your Kubernetes cluster and applications will behave in an actual failure scenario. This knowledge can help you identify and address any issues before they occur in production, ensuring that your applications remain highly available and resilient.

In summary, this experiment provides good insights into the performance and resilience of Kubernetes workloads. It is not a perfect representation of a real-world AZ failure, but by leveraging tools such as AWS FIS and carefully configuring autoscaling policies, you can take proactive steps to optimize performance and ensure high availability for critical applications.

Security updates for Friday

Post Syndicated from original https://lwn.net/Articles/934316/

Security updates have been issued by Debian (jupyter-core, openssl, and ruby2.5), Fedora (firefox), Mageia (libreoffice, openssl, and python-flask), Red Hat (python and python3), Slackware (mozilla, php8, and python3), SUSE (java-1_8_0-ibm, libcares2, mariadb, and python36), and Ubuntu (linux, linux-aws, linux-kvm, linux-lts-xenial, linux-gke, linux-intel-iotg, linux-raspi, linux-xilinx-zynqmp, and mozjs102).

Борисов бил бащата на детето на Йовчева Прокуратурата за Барселонагейт: Има ОПГ за пране на пари с участието на Бойко Борисов. Документи

Post Syndicated from Екип на Биволъ original https://bivol.bg/barcelonagate-files.html

петък 9 юни 2023


“Разследването идентифицира като действителен източник на средствата за придобиване на имота БОЙКО МЕТОДИЕВ БОРИСОВ, ЕГН: XXXXXXXXXX, който през периода 2009 г. – 2013 г. е заемал висша публична длъжност в…

What’s Up, Home? – Can ChatGPT help set up monitoring a USB-connected printer with Zabbix?

Post Syndicated from Janne Pikkarainen original https://blog.zabbix.com/whats-up-home-can-chatgpt-help-set-up-monitoring-a-usb-connected-printer-with-zabbix/25980/

Can you monitor a USB-connected printer with Zabbix? Of course, you can! But can ChatGPT help set up the monitoring? Well… erm… maybe! By day, I am a Lead Site Reliability Engineer in a global cyber security company, Forcepoint. By night, I monitor my home with Zabbix & Grafana and do some weird experiments with them. Welcome to my blog about the project.

When it comes to printing, I am not laser-sharp. That’s simply because I have not printed anything in a long, long time, and even if I have, it’s been a printer maintained by Someone Else. Yes, I know how to add paper and how to do a ritual dance whilst printing to prevent the printer from doing an annoying paper jam. Yes, I have added some printer servers under Zabbix monitoring at the office. That’s about where my printer wisdom ends.

Nobody buys a printer anymore, except for us

It’s 2023, and nobody prints anymore, or that’s my personal impression. Well, that changed at our home as we enter another domain I understand 0% about. Occasionally my wife is making some clothes for our baby, me, and herself. For that, she’s printing out the source code… the CAD models… well… the blueprints for the clothes. I kid you not, the clothes schematics look so complicated to me and the text-based instructions so alien that I’m sure the instructions are not from this planet.

Anyway, my wife found a used HP LaserJet Pro MFP M28a for us for a steal. No, not a literal steal, but for 40 euros, which did sound cheap to me, so we bought it. Of course, normal human beings would just connect the printer to their laptop/desktop and be done with it. However, you know how this story continues.

Flirting with ChatGPT

I went to Zabbix integrations and was sure I would be able to easily find out how to monitor a USB-connected printer. I’ll just search and… what? Nothing? No worries! We have the community templates! I’ll just quickly grab a template from there…. the empty result set, AGAIN? Monitoring SNMP-enabled printers is a different story, for that Zabbix can suit you very well, but just try to find out something for USB-connected printers. I know I could probably monitor my printer by spying cups but I’m not sure if it could return the details I wanted.

With my experiments, I’m used to the fact that I cannot get direct answers to my monitoring needs using search engines, as I’m doing stuff that not too many have done. Even if they have, they might not have blogged about it. That’s ok, but as this was about printing which is a common topic, I decided to try out what happens if I try out ChatGPT. I did the tests with the free ChatGPT 3.5, the new ChatGPT 4 would probably be a different ride.

Here’s our lovely little chat.

Me: I have an HP LaserJet MFP M28a monochrome laser printer connected to USB. How do I get its remaining toner level through the command line on Ubuntu 22.04?

ChatGPT:  You can get the remaining toner level of your HP LaserJet MFP M28a monochrome laser printer through command line on Ubuntu 22.04 by following these steps:

  1. Install the “hplip” package by running the following command in the terminal:

sudo apt-get install hplip

  1. Once the installation is complete, run the following command to set up your printer:

sudo hp-setup -i

Follow the instructions provided by the setup wizard to configure your printer.

  1. After the printer is set up, run the following command to get the remaining toner level:

hp-systray -x

This will launch the HP Device Manager, which displays the toner level for your printer.

Alternatively, you can also run the following command to get the toner level directly in the terminal:

hp-levels -n

This will display the toner level in a percentage format.

Me: None of those worked as hp-levels and hp-systray require QT4 and D-Bus. Let’s use ipptool instead.

ChatGPT: Sure, we can use the ipptool command to get the remaining toner level of your HP LaserJet MFP M28a monochrome laser printer on Ubuntu 22.04.

Here are the steps to follow:

  1. Make sure your printer is connected to the computer and turned on.
  2. Open the terminal on your Ubuntu 22.04 machine.
  3. Run the following command to install the CUPS and IPP utilities:

sudo apt-get install cups-ipp-utils

  1. Run the following command to find the printer’s URI:

lpinfo -v

The output should contain a line with the URI of your printer, which will look something like this:

ipp://HP_LaserJet_MFP_M28a.local:631/ipp/print

  1. Run the following command to get the remaining toner level:

ipptool -t -v -H ipp://localhost:631/ipp/print -I /usr/share/cups/model/HP/hp-laserjet_pro_mfp_m26a.ppd get-printer-attributes.test | grep marker-levels

Replace “get-printer-attributes.test” with the actual name of the test file used by your printer.

  1. The output of the command should contain a line with the toner level, which will look something like this:

marker-levels: marker-high-levels=(100) marker-low-levels=(5) marker-names=(Black Cartridge) marker-current-levels=(30)

In this example, the toner level is 30%.

That’s it! This is how you can use the ipptool command to get the remaining toner level of your HP LaserJet MFP M28a monochrome laser printer on Ubuntu 22.04.

* * * 

The latest tip really did work, so we’re off to a very good start with ChatGPT! Next, I tried asking if it could create a Zabbix template for me, but even though it really tried, it did fail.

Adding printer to Zabbix

So, before continuing with the failed ChatGPT attempt, let’s add this printer to monitoring, as that’s the reason you are reading this blog anyway. I was very surprised about the detail level of the ipptool output: everything from supported paper sizes to printing options to other usual details, but then also some dynamic details like printer uptime.

I wanted to add those dynamic details, so I read through the output and added the details in the way you already know me doing:

  • I first added a cronjob that runs every minute 

    ipptool -t -v “ipp://HP%20LaserJet%20MFP%20M28a%20(7C69CB)%20(USB)._ipp._tcp.local/” – get-printer-attributes.test  >/tmp/hp-printer.txt

  • Zabbix then reads that text file to a master item, and with dependent items and item preprocessing cherry-picks the interesting details

In screenshots, like this.

Does it work?

Of course, it does, as this routine is what I’ve done so many times before in this blog. Here’s the result. And yes, the toner will likely run out soon — this is a used printer and it’s complaining about low toner level every time we print. An interesting experiment to see how many pages we can still print before it actually runs out of juice. For “0% left”, as also reported by other tools, the printer does an excellent job.

Back to ChatGPT we go

If I would copy-paste my complete chat with ChatGPT, this blog post would become ridiculously long. Communicating with ChatGPT was like with a hyper-active intern who proceeds to do SOMETHING only to realize moments later that whatever it did was completely else than what you asked for. Probably I’m just a sucky ChatGPT prompter.

To get you an idea of how ChatGPT failed, here’s a summary of how it failed:

  • It really attempted to create YAML-based template files for me.
  • Unfortunately, when attempting to import the templates to Zabbix, that part failed every time 
  • When I told the error messages to ChatGPT, it attempted to fix its errors, but in weird ways. Sometimes it changed the template in drastic ways, even if it was supposed to only add or modify a single line of it. Multiple times, it decided to change the format from YAML to XML unless I demanded it to stay on YAML

Here are a few snippets from the chat. Maybe at some point, I’ll throw in some money to try out ChatGPT 4.

… this went on and on until I gave up. In conclusion: this time ChatGPT nudged me in to correct direction to get the desired output about the printer info (although a sharp-eyed reader might notice I hinted it about the tool I’d like to use and how I might after all know more about printers than I pretended during this blog post…). Then, ChatGPT ran out of ink when it tried to generate the Zabbix templates. It’s scary advanced anyway, and someday I will try out the more advanced ChatGPT 4.

I have been working at Forcepoint since 2014 and luckily I don’t suffer about the empty paper syndrome very often. — Janne Pikkarainen

This post was originally published on the author’s page.

The post What’s Up, Home? – Can ChatGPT help set up monitoring a USB-connected printer with Zabbix? appeared first on Zabbix Blog.

Operation Triangulation: Zero-Click iPhone Malware

Post Syndicated from Bruce Schneier original https://www.schneier.com/blog/archives/2023/06/operation-triangulation-zero-click-iphone-malware.html

Kaspersky is reporting a zero-click iOS exploit in the wild:

Mobile device backups contain a partial copy of the filesystem, including some of the user data and service databases. The timestamps of the files, folders and the database records allow to roughly reconstruct the events happening to the device. The mvt-ios utility produces a sorted timeline of events into a file called “timeline.csv,” similar to a super-timeline used by conventional digital forensic tools.

Using this timeline, we were able to identify specific artifacts that indicate the compromise. This allowed to move the research forward, and to reconstruct the general infection sequence:

  • The target iOS device receives a message via the iMessage service, with an attachment containing an exploit.
  • Without any user interaction, the message triggers a vulnerability that leads to code execution.
  • The code within the exploit downloads several subsequent stages from the C&C server, that include additional exploits for privilege escalation.
  • After successful exploitation, a final payload is downloaded from the C&C server, that is a fully-featured APT platform.
  • The initial message and the exploit in the attachment is deleted

The malicious toolset does not support persistence, most likely due to the limitations of the OS. The timelines of multiple devices indicate that they may be reinfected after rebooting. The oldest traces of infection that we discovered happened in 2019. As of the time of writing in June 2023, the attack is ongoing, and the most recent version of the devices successfully targeted is iOS 15.7.

No attribution as of yet.

Иван Гешев. Сам на бала на чудовищата

Post Syndicated from Емилия Милчева original https://www.toest.bg/ivan-geshev-sam-na-bala-na-chudovishtata/

Иван Гешев. Сам на бала на чудовищата

Главният прокурор Иван Гешев остана сам на бала на чудовищата. Онези, които го поставиха на поста, напътстваха и използваха като щит, бухалка и чадър, станаха управляващи партньори и реформатори на Конституцията. А съюзниците, както и парите, не миришат.

Гешев и неговата безконтролност (и база данни) се превърнаха в бреме за новия политически съюз между ПП–ДБ и ГЕРБ–СДС. Щетите от запазването му, освен имиджови, биха били и финансови – стотици милиони по Плана за възстановяване и устойчивост щяха да бъдат блокирани, тъй като Европейската комисия обвърза траншовете с върховенството на правото и механизмът за разследване на главния прокурор е част от правната стабилност.

Иван Гешев, както е известно, се съпротивлява и тази седмица внесе в Конституционния съд искане за обявяване на противоконституционност на разпоредби от Наказателно-процесуалния кодекс и Закона за съдебната власт, свързани с отказите за образуване на досъдебни производства, механизма за независимо разследване на главния прокурор и избора на членове на Висшия съдебен съвет. С промените се намали от 17 на 13 гласа изискващото се мнозинство за отстраняване от поста му.

Делата на трупчета – камъни за удавници

За отмъщение Иван Гешев реши да покаже какво значи главният прокурор в България да „заработи“, и маските паднаха. Обществото потвърди всичките си обосновани предположения за прокуратурата – за бездействието ѝ относно корупцията по високите етажи, рекета с делата на трупчета и събрания по тях доказателствен материал, но също и за политиците, изплашени от онова, което се крие между папките.

Затова е лесно да се обясни защо парламентът прие толкова бързо механизма за разследване на главния прокурор, за който се настоява повече от десетилетие. Членове на ВСС пък внесоха две искания за освобождаване на Гешев, но от тях остана само едното – задето нарече депутатите „политически боклук“, с което е нарушил благоприличието и етичните правила и е уронил престижа на магистратите. Той се защити с аргумента, че бил под въздействие на емоциите след опита за покушение на 1 май и заплашителното писмо, получено две седмици по-късно. След продължило 14-часово заседание ВСС реши да продължи в понеделник, когато се очаква и да се произнесе окончателно.

А главният прокурор реши да удави лидера на ГЕРБ Бойко Борисов, окачвайки му на шията „Барселонагейт“, за да потъне по-бързо, а с него и съглашението за правителство. Разследването започна, след като испанско издание публикува през февруари 2020 г. информация, че властите в Испания проучват свързан ли е Борисов с международна схема за пране на пари, когато е бил премиер. С парите били купени луксозна къща и бутик в Барселона, ползвани от бившата манекенка Борислава Йовчева, за която се твърди, че има дете от Борисов.

В продължение на близо три години българската прокуратура се постара да потули, доколкото е възможно, „Барселонагейт“. През 2022 г. от Испания бяха получени 219 страници материали по разследването, чийто превод се точи месеци. Но сега за по-малко от седмица от внесеното на 2 юни искане за сваляне имунитета на Борисов бяха преведени последните материали. Парламентът обаче не бърза да посяга към тях, за да научат депутатите, а също и обществото, дали бившият премиер е финансирал къщата в Барселона и покупка на луксозен бутик, има ли изнесени 300 милиона в Турция от Бейзат Яхя, свързан с ДПС и управител на ловно стопанство „Паламара“, с част от които била купена къща на Йовчева в Истанбул. (След медийните разкрития бившата манекенка продаде къщата и бутика в Барселона и по непотвърдена информация е в Турция.)

Дали обаче народните представители няма да изчакат най-напред освобождаването на главния прокурор? А междувременно е формирано съгласие между ПП–ДБ и ГЕРБ да се създаде временна комисия, която да разглежда исканията за имунитет и да оценява основанията им. Само че Гешев е с няколко изпреварващи хода. Най-вероятно ще представи „Барселонагейт“ идната седмица, когато е поканен на изслушване по ключовата за България тема върховенство на правото и неговото прилагане, организирано от мониторинговата група към LIBE – Комисията по граждански свободи, правосъдие и вътрешни работи на Европарламента. Със сигурност онова, което се кани да огласи, може да се използва от противниците на най-голямата политическа сила в ЕП – Европейската народна партия, към която се числи и ГЕРБ. Догодина през май предстоят евроизбори и всеки скандал ще бъде пуснат в употреба, а и в ЕНП с Борисов комай остана само председателят ѝ Манфред Вебер, самият той компрометиран от разкрития за допълнителни възнаграждения за ръководството на ЕНП.

Бледият конник на Апокалипсиса

Искането за имунитета на Борисов заради „Барселонагейт“ не е правосъдие, а разплата. Вижда се с просто око. Но то е същото, което вършеше главният прокурор и до момента, само че с обратен знак – сега ГЕРБ и лидерът му крепят правителството, второто редовно в рамките на близо три години и пет парламентарни избори. Нима обществото няма право да узнае истината за този „гейт“, макар да е наясно, че главният прокурор се прави на четвъртия конник на Апокалипсиса?

След всички афери през трите мандата на Борисов – „Ало, Ваньо“, инхаус договорите, изнесените пари за магистрала „Хемус“, телефонни разговори, разкриващи корупционни схеми и кадрувания на тъмно в съдебната власт – „Барселонагейт“ е единственото, което пробива омертата – заради предателството на Дона.

Същата мъст е и искането за освобождаването на Гешев, внесено от хора, бранили доскоро без срам и свян не лицето Гешев, а овладяната от задкулисието институция. Братя по оръжие с главния прокурор сега му посягат по заповед на ония, на които всички те служеха, но Гешев вече е непотребен. В отворено писмо до пленума на ВСС бившият председател на Върховния касационен съд Лозан Панов – магистратът, който се възпротиви при избора на Гешев за главен прокурор, заяви: „Не допускам, че ВСС би се превърнал в „банка за услуги“ по искане за освобождаване на Иван Гешев.“

Πpичинa дa ви пpипoмня, дpaги ĸoлeги, вcичĸи тeзи фaĸти и oбcтoятeлcтвa, ca oпaceниятa ми, чe пopoцитe, ĸoитo cъпътcтвaxa избopa нa г-н Гeшeв зa глaвeн пpoĸypop, имa гoлямa вepoятнocт дa ce възпpoизвeдaт и пpи нeгoвoтo eвeнтyaлнo ocвoбoждaвaнe. Зa дa бъдa paзбpaн пo-дoбpe, щe изтъĸнa, чe пpи пpeдcтoящoтo глacyвaнe в ниĸaĸъв cлyчaй нe дoпycĸaм, чe ĸлючoвa poля зa вoтa биxa мoгли дa изигpaят дoбpyвaнeтo нa дeцa, cъпpyзи, poднини, „близĸи дaми нa мъжĸитe cъpцa“. Hиĸoгa нe cъм и дoпycĸaл, чe BCC би мoгъл дa ce пpeвъpнe в „бaнĸa зa ycлyги“. He дoпycĸaм и чe зaд дaдeн вoт мoжe дa ce ĸpият минaли гpexoвe. He дoпycĸaм и чe няĸoй би мoгъл дa ce „cпaзapи“ зa бъдeщo ĸapиepнo изpacтвaнe cлeд пpиĸлючвaнeтo нa дeйнocттa нa тoзи BCC. И нaй-нaĸpaя, ниĸoгa нe биx дoпycнaл, чe пpoблeмитe c г-н Гeшeв ca caмo cимптoм, a иcтинcĸaтa пpичинa ca зaвиcимocтитe нa члeнoвeтe нa cъдeбния пapлaмeнт.

Благоразумие в името на целостта на правителството и закрилата на Борисов или честност в името на декларираните принципи, оценявани от привържениците на ПП–ДБ? Изглежда, че в парламента ще постъпят разумно.

Невежеството не е блаженство, или различните лица на липсващото здравно и сексуално образование в България

Post Syndicated from Мирела Петкова original https://www.toest.bg/nevezhestvoto-ne-e-blazhenstvo/

Невежеството не е блаженство, или различните лица на липсващото здравно и сексуално образование в България

В България ранната бременност е нещо обичайно, но темата е маргинализирана, а дебатът – поляризиращ. Световната здравна организация категоризира всяко раждане от жена под 20 години като резултат от ранно забременяване. Следвайки тази рамка, по данни на Националния статистически институт всяко десето дете у нас е родено от майка в юношеска възраст.

Началото на пътя към ранното забременяване стои в разговорите ни с децата за здраве, съзряване и отношения – или иначе казано, какво е здравното и сексуално образование (ЗСО) – както в училище, така и у дома.

В България близо 19 000 жени са направили аборт през 2022 г., като при над 13 000 от тях не става дума за спонтанен аборт. В сравнителен план живородените деца през същата година са около 56 000. Така страната ни става лидер по брой аборти в Европейския съюз спрямо 1000 раждания на живи деца в страната. Но се получава следният парадокс: не само че сме лидери по брой аборти, но водим и в дела на непълнолетни майки в ЕС.

Каква информация по темата „здравно и сексуално образование“ се предоставя на младите хора в училище и как те запълват липсите? Изобщо каква е ролята на образованието в демографската картина в България?

Родителите като щрауси

Простото определение на семейното планиране е да имаш толкова деца, колкото искаш, и да ги имаш, когато искаш – с отговорност към тях, казва Радосвета Стаменкова, изпълнителен директор на Българската асоциация по семейно планиране и сексуално здраве (БАСП). Това е водеща неправителствена организация, работеща вече над 30 години в областта на здравеопазването, сексуалното и репродуктивно здраве и здравната превенция в България.

За да има адекватно семейно планиране, един млад човек трябва да е напълно наясно как се и не се забременява и какво следва от това. Точно тук идва и ролята на ЗСО. Да се говори с децата в рамките на часове по ЗСО не значи да се преподава как се прави секс или колко е хубаво да се прави секс. Радосвета Стаменкова отбелязва:

Здравното и сексуално образование не е само как да поставим презерватив или как да се предпазим от полово предавани болести. То включва теми като хигиена, хранене, превенция на състояния като булимия и затлъстяване, превенция на зависимости и разпознаване на белезите на трафика на хора с цел сексуална и трудова експлоатация.

Не е преувеличено да се каже, че тази информация е отвъд учебните планове – тя е жизненоважна и е опасно младите хора да бъдат лишавани от нея. Опасно е и за нас като общество да им я спестяваме.

Затова нека да видим какви думи използваме, когато говорим за здраве и полово развитие с децата си. Габи Петрова – психолог, сексолог и експерт по полово възпитание, разказва, че в практиката си често се сблъсква с родители, които се притесняват да коментират подобни теми в семейството, защото смятат, че децата биха вкарали същия контекст и емоционален заряд в разговора като възрастните. Често този „свян“ е комбиниран с избягване на точните думи, назоваващи анатомичните органи, което реално пречи на детето да познава и назовава всички части на собственото си тяло с истинските им имена.

Съществената част от разговора е не просто анатомията, а границите, свързани с тези части на тялото – никой няма право да ни докосва без наше съгласие. „Ние обясняваме през езика и говора. Когато детето не може да назове тези неща и не може да сподели какво му се е случило, то не споделя“, категорична е Габи Петрова. Когато дадем адекватна информация на детето, можем да го предпазим от насилие и посегателство.

А как се премахват срамът и табуто? Чрез говорене и болезненото (може би) изваждане наяве на това, от което ни е срам. „Защо „черва“, „зъби“ и „дроб“ се наричат, както си се наричат, но когато по време на беседа се каже „пенис“, „вагина“, „вулва“ или „яйчници“, учениците започват да хихикат, все едно са чули някакъв много мръсен виц?“, се чуди Николета Попкостадинова, създателка на Loveguide.bg – платформа за ЗСО на тийнейджъри. Много често екипът на Loveguide.bg получава покани за изнасяне на уроци в училищата в цялата страна, защото самите възрастни не знаят как да подходят към темата.

Когато един родител не дава информация на детето, той погрешно смята, че отлага неговото порастване. Но заровената в пясъка глава не е решила нито един проблем. Между другото, противно на популярния мит, щраусите не заравят главата си в пясъка, когато са стресирани. По-скоро се свличат на земята и остават неподвижни, опитвайки се да се слеят с терена – което пак не е много по-различно от поведението на родител, опитващ се да парира въпроса „Мамо, какво значи „секс“?“. Или както отбелязва психоложката Габи Петрова,

ако децата са готови да зададат въпрос, значи са готови и да получат отговор.

Най-често детето първо пита вкъщи и ако любопитството му не бъде задоволено, то започва да търси отговорите другаде. И в ужаса и ступора си родителят не си задава въпроса дали иска детето му да събере информация от неизвестни източници, или е по-добре той самият да му разкаже. Габи обръща внимание, че подобен развой на диалога има ефект и по-късно в отношенията. Родителите се изненадват, че детето спира да споделя с тях, но освен че е нормална част от израстването, това е и провокирано от факта, че когато то е имало интерес и е търсило отговор, родителят е неглижирал, осмял, парирал неговите потребности.

Портфолиото от теми в сферата на ЗСО е огромно и за различните възрасти са актуални различни неща. Какви обаче са ключовите рамки, за да има траен разговор? „За да има смисъл цялата тази информация, за да е полезна и интересна, тя трябва да предхожда събитията“, обяснява Радосвета Стаменкова от БАСП. С други думи, ако говорим за менструален цикъл с момичета, които от две години си купуват превръзки, това е след дъжд качулка. Те не са били подготвени за първоначалното объркване и не е отговорено навреме на първите им въпроси, свързани с промените в тялото им. И вече са минали цели две години, в които е можело да забременеят, може би без дори да подозират как става това.

Важно е и другото – да не се говори за нещо далечно и непонятно. В V клас не се говори за секс, а за промените през пубертета и междуличностните отношения, а също и за пъпки, хормони, лична хигиена.

Още нещо ключово за адекватното прилагане на ЗСО: детето трябва да бъде въвличано в разговора отново и отново. Както не научаваме български език или география от първи клас, така и информацията, свързана със здравната и сексуалната култура, трябва да е надграждаща и да се обновява през определен период от време.

Има ли българското училище социална роля?

Защо да дискутираме тези теми в училище? Всъщност да започнем с това преподават ли се и как. Образователният модел за преподаване на ЗСО в България е пълен с недостатъци, най-големият от които е, че такъв системен подход по-скоро няма. Съществуващият модел е вкрепен в преподаване на откъслечни неща, които минават между другото, и във виждането, че училището е образователна институция без социална роля. Като изключим преподаването на базовите знания за половата система по предмета „Биология и здравно образование“ в гимназиалния етап, ако един ученик попадне на учителски колектив, който не припознава темата като важна, има шанс знанията му по ЗСО да си останат до наученото в час по биология в VIII клас.

Въпреки интегрирането на ЗСО в държавен стандарт през 2016 г., което безспорно е един от големите застъпнически успехи, както обикновено дяволът е в детайлите. Наредбата обхваща гражданското, здравното, екологичното и интеркултурното образование и не представлява задължителна форма на обучение. Само частта за здравното образование в прогимназиалния етап описва над 60 точки, които детето да усвои като знания, за да има компетентност по тях на основно ниво. Темите са всеобхватни: от познаване на болестите, предавани по полов път, през демонстриране на умения за използване на стратегии за ефективно учене, до назоваване на функциите и източниците на витамини и минерали и избягването на нездравословни навици и традиции. Първо, нереалистично е да се смята, че ще има време да се стигне до тези теми, и второ, те засягат умения, които далеч не всеки възрастен владее.

Анина Чилева е главен експерт в Националния център по обществено здраве и анализи, който от години обединява усилията на различни хора за интерактивно и базирано на опита на самите младежи здравно образование в българското училище. Според нея все още не сме успели да постигнем системност в ЗСО. Тук дори не говорим за нивото и методите, с които се преподава, а за това, че младите хора нямат достатъчно информация от официален и достоверен източник като училището. Това ги принуждава да търсят отговори другаде. Негативните последствия са ранно забременяване, аборт като сексуална превенция, полово предавани болести, но също и пристрастяване към порнографията, неприемане на тялото си, нереалистични представи за секса и взаимоотношенията между хората.

Радосвета Стаменкова разказва, че младежите, които искат да са обучители на връстници и изобщо доброволци на БАСП, най-често са два типа – или такива, които искат да учат медицина и медицински специалности, или такива, които ще се занимават с журналистика и комуникации. Младежи с подобни интереси така или иначе ще достигнат до тази информация. Техните връстници без интерес по темата – няма. Радосвета изтъква като възможност втъкаването на тези знания в спираловидните учебни програми. Иначе казано, по-сериозно застъпване на теми от ЗСО в часовете по биология и здравно образование, психология и др.

Проблемът да преместим цялото съдържание от ЗСО в часовете по биология е, че тя е природен и теоретичен предмет, в който се учи и се усвоява учебно съдържание. Когато става за въпрос за здравно образование и още повече за сексуално образование, не е достатъчно да възприемеш някакво количество информация. „Много по-важно е младите хора да разискват заедно дадена тема, да изградят представа и да я верифицират. В такава ситуация се изграждат и груповите норми. Това е ключов процес за тийнейджърската възраст, която е рискова по отношение на сексуалността и сексуалното поведение, защото е период на съзряване и експериментиране“, подчертава Анина Чилева.

Анонимност срещу авторитет

В развитите общества учебната програма е създадена от експерти и крайният резултат се базира на набор от умения и знания, които младите хора трябва да имат, за да функционират самостоятелно и безопасно в обществото. Опитът на Габи Петрова е базиран на честата ѝ работа с родители на тийнейджъри, които търсят консултации, за да подкрепят детето си в периода на половото съзряване. Когато възникне трудност или изплува незнание, хората нямат информация към кого да се обърнат за помощ, и най-често започват да търсят различни мнения в социалните мрежи или в Google. „Самото принизяване на компетенциите и уменията на професионалистите води до задълбочаване на проблемите“, смята тя.

Този мотив се среща в наблюденията на всички експерти, с които „Тоест“ говори по темата – превръщането на Google в първото място за информация, към което се обръщаме, и сляпото ни доверие към анонимни източници в комбинация с маргинализирането на важността на експертните и научните ресурси. Радосвета Стаменкова подчертава ролята на пандемията и засиленото навлизане на социалните медии в преценката кое се приема за достоверна информация. И както допълва тя,

ваксините заедно с чистата питейна вода и антибиотиците са нещата, които помагат да не умрем на 40 години. И те работят толкова добре, че хората забравят, че това е превенция.

Николета Попкостадинова разказва как щом родителите разберат, че в училището на детето ще има беседа за промените през пубертета, за онлайн безопасността, за предпазване от сексуално насилие и за безопасния секс (основните теми, които Loveguide.bg покрива), изпадат в недоумение: младите знаят повече от възрастните и така или иначе всичко го има онлайн – защо им е подобен разговор?

Това е една от най-големите заблуди, с които Николета и екипът ѝ се борят упорито. Когато няма надеждни източници на информация, младежите разменят митове помежду си. В най-добрия случай ще е нещо от „Уикипедия“, което няма да разберат, защото е с медицински термини. Но има и по-рискови парчета информация, като опасни реклами например, които могат да накарат 14-годишен да си купи хапчета за уголемяване на пениса. В интернет всичко е по-лесно до голяма степен защото е анонимно. Не трябва да заставаш с името и лицето си, нито разпространявайки грешна информация, нито за да поискаш съвет по тема, която възприемаш като табу.

Николета знае от личен опит, че дискусиите, свързани със ЗСО, са много важни и интересни за българските тийнейджъри, но повечето от тях нито знаят с кого да говорят, нито кои са надеждните източници, нито как да възприемат съществуващата достоверна информация, ако не е поднесена атрактивно и адекватно за тяхната възраст.

Учениците като заложници

Ако ЗСО на практика няма, то каква е ролята на обществения дебат в тази липса? Манипулирането на общественото мнение от мащабни кампании с цел табуизиране на цяла сфера от учебното съдържание не е феномен за страната ни, но инструментализирането на ЗСО от политически субекти достига нови нива в България.

Атаките срещу сексуалното образование са базирани не на наука и факти, а само на мнения и вярвания, и е трудно да си представим чак такова недоволство срещу други дялове от учебното съдържание. Яростното противопоставяне на преподаването на ЗСО произлиза от тенденцията сексуалността да се поставя единствено в контекста на сексуалния акт. Но ЗСО разглежда човешкото тяло отвъд физическия и биологичен смисъл, най-вече в емоционален и психологически контекст. ЗСО предоставя пространството, където може да се обсъждат теми като сексуално насилие, лична хигиена, превенция на ранна бременност и др.

Николета разказва, че провеждането на подобни разговори с учениците е станало значително по-трудно от 2020 г. насам. Ако предположите, че е основно заради пандемията, ще сбъркате – тя съвпадна с друго събитие, за което вече не се говори в публичното пространство, но то продължава да има отражение върху дейността на организации като Loveguide.bg и техни колеги, работещи по темата на терен. Става въпрос за казуса в Перник, където обучителна програма за предпазване от сексуално насилие на Фондация „П.У.Л.С.“ бе прекратена заради обвинения от граждани, чиито деца дори не са присъствали на обученията. Недоволните родители твърдяха погрешно, че учениците са карани да се целуват по бузите.

В нашето популистко общество тези, които са най-кресливи, се чуват най-много, въпреки че са малцинство. Думата беше дадена на тях, а не на мнозинството, което беше щастливо и благодарно на тази програма, защото реално учи децата как да се предпазват от сексуално посегателство,

категорична е Николета Попкостадинова за развоя на събитията в Перник.

Въпреки шума, който се вдигна покрай случая през 2020 г., проучване, проведено през лятото на 2019 г. от „Алфа Рисърч“ сред 1000 души, разказва друга история. 76,1% от запитаните пълнолетни българи смятат, че трябва да бъдат въведени часове по ЗСО. Останалите 19,4% смятат, че има предостатъчно информация, а едва 4,5% виждат подобни часове като „начин за разврат“ сред децата.

До ден днешен училищата се страхуват да не се вкарат в подобен скандал и макар Loveguide.bg да продължават да изнасят часове, работата им не е със същия мащаб и размах, както преди тази случка. Ако едно училище припознава нуждата от подобни разговори, то се обръща към експерти и ги кани за лектори. Но за да е сигурно, че ще се избегне ситуация като тази в Перник, училищата често се опитват да поискат разрешение от всички родители. Според Николета колкото и да е разпозната нуждата от такива беседи, разрешение от всеки един родител е огромен административен товар за съдържание извън задължителната програма. Затова и често отпада нуждата той да бъде понесен.

Пропастта в отношението ни към ЗСО се задълбочава не само от факта, че темата е табу или че се проведе огромна кампания против правата на жените и ЛГБТ+ общността у нас под чадъра на темата „Истанбулска конвенция“. Анина допълва един много важен нюанс и той засяга училищата:

За 30 години българският образователен процес не можа да излезе от формата на фронтално обучение с дъска, учител, три редици ученици и комуникация само между учител и ученик. От гледна точка на развитието това е неефективен образователен процес, защото не позволява на хората да растат.

Комуникацията ни дава възможност да измерваме разбиранията, знанията, емоциите си спрямо другите, а на практика в българското образование до голяма степен тази възможност е отнета. Според Анина липсата на комуникация възпрепятства изграждането на мислещи хора, готови да поемат отговорност за собствените си действия, включително и за евентуална ранна бременност.

Статистически осезаемата липса на цялостно ЗСО в България не се дължи единствено на табуто и на различните политически кампании, които го вземат на мушка. Застоят се обяснява и с традиционните устои на образователна система, която възпрепятства ефективната комуникация и напасване на учебната програма спрямо нуждите на учениците. Макар промяната в този модел за момента да изглежда сложна, не бива да спираме да назоваваме нещата с истинските им имена както в контекста на ЗСО, така и извън него.

„Не може здравето и животът на българските млади хора да са заложник на политически тенденции“, смята Анина Чилева. Макар че се случва точно това.

OWASP TOP 10 API Security Risks: 2023!

Post Syndicated from Ray Cochrane original https://blog.rapid7.com/2023/06/08/owasp-top-10-api-security-risks-2023/

OWASP TOP 10 API Security Risks: 2023!

The OWASP Top 10 API Security Risks 2023 has arrived! OWASP’s API Top 10 is always a highly anticipated release and can be a key component of API security preparedness for the year. As we discussed in API Security Best Practices for a Changing Attack Surface, API usage continues to skyrocket. As a result, API security coverage must be more advanced than ever.

What are the OWASP Top 10 API Security Risks?

The OWASP Top 10 API Security Risks is a list of the highest priority API based threats in 2023. Let’s dig a little deeper into each item on the OWASP Top 10 API Security Risks list to outline the type of threats you may encounter and appropriate responses to curtail each threat.

1. Broken object level authorization

Object level authorization is a control method that restricts access to objects to minimize system exposures. All API endpoints that handle objects should perform authorization checks utilizing user group policies.

We recommend using this authorization mechanism in every function that receives client input to access objects from a data store. As an additional means for hardening, it is recommended to use cryptographically secure random GUID values for object reference IDs.

2. Broken authentication

Authentication relates to all endpoints and data flows that handle the identity of users or entities accessing an API. This includes credentials, keys, tokens, and even password reset functionality. Broken authentication can lead to many issues such as credential stuffing, brute force attacks, weak unsigned keys, and expired tokens.

Authentication covers a wide range of functionality and requires strict scrutiny and strong practices. Detailed threat modeling should be performed against all authentication functionality to understand data flows, entities, and risks involved in an API. Multi-factor authentication should be enforced where possible to mitigate the risk of compromised credentials.

To prevent brute force and other automated password attacks, rate-limitation should be implemented with a reasonable threshold. Weak and expired credentials should not be accepted, this includes JWTs, passwords, and keys. Integrity checks should be performed against all tokens as well, ensuring signature algorithms and values are valid to prevent tampering attacks.

3. Broken object property level authorization

Related to object level authorization, object property level authorization is another control method to restrict access to specific properties or fields of an object. This category combines aspects of 2019 OWASP API Security’s “excessive data exposure” and “mass assignment”. If an API endpoint is exposing sensitive object properties that should not be read or modified by an unauthorized user it is considered vulnerable.

The overall mitigation strategy for this is to validate user permissions in all API endpoints that handle object properties. Access to properties and fields should be kept to a bare minimum at an as-needed basis scoped to the functionality of a given endpoint.

4. Unrestricted resource consumption

API resource consumption pertains to CPU, memory, storage, network, and service provider usage for an API. Denial of service attacks result from overconsumption of these resources leading to downtime and racked up service charges.

Setting minimum and maximum limits relative to business functional needs is the overall strategy to mitigating resource consumption risks. API endpoints should limit the rate and maximum number of calls at a per-client basis. For API infrastructure, using containers and serverless code with defined resource limits will mitigate the risk of server resource consumption.

Coding practices that limit resource consumption need to be in place, as well. Limit the number of records returned in API responses with careful use of paging, as appropriate. File uploads should also have size limits enforced to prevent overuse of storage. Additionally, regular expressions and other data-processing means must be carefully evaluated for performance in order to avoid high CPU and memory consumption.

5. Broken function level authorization

Lack of authorization checks in controllers or functions behind API endpoints are covered under broken function level authorization. This vulnerability class allows attackers to access unauthorized functionality; whether they are changing an HTTP method from a `GET` to a `PUT` to modify data that is not expected to be modified, or changing a URL string from `user` to `admin`. Proper authorization checks can be difficult due to controller complexities and the numbers of user groups and roles.

Comprehensive threat modeling against an API architecture and design is paramount in preventing these vulnerabilities. Ensure that API functionality is carefully structured and corresponding controllers are performing authentication checks. For example, all functionality under an `/api/v1/admin` endpoint should be handled by an admin controller class that performs strict authentication checks. When in doubt, access should be denied by default and grants should be given on a as needed basis.

6. Unrestricted Access to Sensitive Business Flows

Automated threats are becoming increasingly more difficult to combat and must be addressed on a case-by-case basis. An API is vulnerable if sensitive functionality is exposed in such a way that harm could occur if excessive automated use occurs. There may not be a specific implementation bug, but rather an exposure of business flow that can be abused in an automated fashion.

Threat modeling exercises are important as an overall mitigation strategy. Business functionality and all dataflows must be carefully considered, and the excessive automated use threat scenario must be discussed. From an implementation perspective, device fingerprinting, human detection, irregular API flow and sequencing pattern detection, and IP blocking can be implemented on a case-by-case basis.

7. Server side request forgery

Server side request forgery (SSRF) vulnerabilities happen when a client provides a URL or other remote resource as data to an API. The result is a crafted outbound request to that URL on behalf of the API. These are common in redirect URL parameters, webhooks, file fetching functionality, and URL previews.

SSRF can be leveraged by attackers in many ways. Modern usage of cloud providers and containers exposes instance metadata URLs and internal management consoles that can be targeted to leak credentials and abuse privileged functionality. Internal network calls such as backend service-to-service requests, even when protected by service meshes and mTLS, can be exploited for unexpected results. Internal repositories, build tools, and other internal resources can all be targeted with SSRF attacks.

We recommend validating and sanitizing all client provided data to mitigate SSRF vulnerabilities. Strict allow-listing must be enforced when implementing resource-fetching functionality. Allow lists should be granular, restricting all but specified services, URLs, schemes, ports, and media types. If possible, isolate this functionality within a controlled network environment with careful monitoring to prevent probing of internal resources.

8. Security misconfiguration

Misconfigurations in any part of the API stack can result in weakened security. This can be the result of incomplete or inconsistent patching, enabling unnecessary features, or improperly configuring permissions. Attackers will enumerate the entire surface area of an API to discover these misconfigurations, which could be exploited to leak data, abuse extra functionality, or find additional vulnerabilities in out of date components.

Having a robust, fast, and repeatable hardening process is paramount to mitigating the risk of misconfiguration issues. Security updates must be regularly applied and tracked with a patch management process. Configurations across the entire API stack should be regularly reviewed. Asset Management and Vulnerability Management solutions should be considered to automate this hardening process.

9. Improper inventory management

Complex services with multiple interconnected APIs present a difficult inventory management problem and introduces more exposure to risk. Having multiple versions of APIs across various environments further increases the challenge. Improper inventory management can lead to running unpatched systems and exposing data to attackers. With modern microservices making it easier than ever to deploy many applications, it is important to have strong inventory management practices.

Documentation for all assets including hosts, applications, environments, and users should be carefully collected and managed in an asset management solution. All third-party integrations need to be vetted and documented, as well, to have visibility into any risk exposure. API documentation should be standardized and available to those authorized to use the API. Careful controls over access to and changes of environments, plus what’s shared externally vs. internally, and data protection measures must be in place to ensure that production data does not fall into other environments.

10. Unsafe consumption of APIs

Data consumed from other APIs must be handled with caution to prevent unexpected behavior. Third-party APIs could be compromised and leveraged to attack other API services. Attacks such as SQL injection, XML External Entity injection, deserialization attacks, and more, should be considered when handling data from other APIs.

Careful development practices must be in place to ensure all data is validated and properly sanitized. Evaluate third-party integrations and service providers’ security posture. Ensure all API communications occur over a secure channel such as TLS. Mutual authentication should also be enforced when connections between services are established.

What’s next?

The OWASP Top 10 API Security Risks template is now ready and available for use within InsightAppSec, mapping each of Rapid7’s API attack modules to their corresponding OWASP categories for ease of reference and enhanced API threat coverage.

Make sure to utilize the new template to ensure best in class coverage against API security threats today! And of course, as is always the case, ensure you are following Rapid7’s best practices for securing your APIs.

Temporary elevated access management with IAM Identity Center

Post Syndicated from Taiwo Awoyinfa original https://aws.amazon.com/blogs/security/temporary-elevated-access-management-with-iam-identity-center/

AWS recommends using automation where possible to keep people away from systems—yet not every action can be automated in practice, and some operations might require access by human users. Depending on their scope and potential impact, some human operations might require special treatment.

One such treatment is temporary elevated access, also known as just-in-time access. This is a way to request access for a specified time period, validate whether there is a legitimate need, and grant time-bound access. It also allows you to monitor activities performed, and revoke access if conditions change. Temporary elevated access can help you to reduce risks associated with human access without hindering operational capabilities.

In this post, we introduce a temporary elevated access management solution (TEAM) that integrates with AWS IAM Identity Center (successor to AWS Single Sign-On) and allows you to manage temporary elevated access to your multi-account AWS environment. You can download the TEAM solution from AWS Samples, deploy it to your AWS environment, and customize it to meet your needs.

The TEAM solution provides the following features:

  • Workflow and approval — TEAM provides a workflow that allows authorized users to request, review, and approve or reject temporary access. If a request is approved, TEAM activates access for the requester with the scope and duration specified in the request.
  • Invoke access using IAM Identity Center — When temporary elevated access is active, a requester can use the IAM Identity Center AWS access portal to access the AWS Management Console or retrieve temporary credentials. A requester can also invoke access directly from the command line by configuring AWS Command Line Interface (AWS CLI) to integrate with IAM Identity Center.
  • View request details and session activity — Authorized users can view request details and session activity related to current and historical requests from within the application’s web interface.
  • Ability to use managed identities and group memberships — You can either sync your existing managed identities and group memberships from an external identity provider into IAM Identity Center, or manage them directly in IAM Identity Center, in order to control user authorization in TEAM. Similarly, users can authenticate directly in IAM Identity Center, or they can federate from an external identity provider into IAM Identity Center, to access TEAM.
  • A rich authorization model — TEAM uses group memberships to manage eligibility (authorization to request temporary elevated access with a given scope) and approval (authorization to approve temporary elevated access with a given scope). It also uses group memberships to determine whether users can view historical and current requests and session activity, and whether they can administer the solution. You can manage both eligibility and approval policies at different levels of granularity within your organization in AWS Organizations.

TEAM overview

You can download the TEAM solution and deploy it into the same organization where you enable IAM Identity Center. TEAM consists of a web interface that you access from the IAM Identity Center access portal, a workflow component that manages requests and approvals, an orchestration component that activates temporary elevated access, and additional components involved in security and monitoring.

Figure 1 shows an organization with TEAM deployed alongside IAM Identity Center.

Figure 1: An organization using TEAM alongside IAM Identity Center

Figure 1: An organization using TEAM alongside IAM Identity Center

Figure 1 shows three main components:

  • TEAM — a self-hosted solution that allows users to create, approve, monitor and manage temporary elevated access with a few clicks in a web interface.
  • IAM Identity Center — an AWS service which helps you to securely connect your workforce identities and manage their access centrally across accounts.
  • AWS target environment — the accounts where you run your workloads, and for which you want to securely manage both persistent access and temporary elevated access.

There are four personas who can use TEAM:

  • Requesters — users who request temporary elevated access to perform operational tasks within your AWS target environment.
  • Approvers — users who review and approve or reject requests for temporary elevated access.
  • Auditors — users with read-only access who can view request details and session activity relating to current and historical requests.
  • Admins — users who can manage global settings and define policies for eligibility and approval.

TEAM determines a user’s persona from their group memberships, which can either be managed directly in IAM Identity Center or synced from an external identity provider into IAM Identity Center. This allows you to use your existing access governance processes and tools to manage the groups and thereby control which actions users can perform within TEAM.

The following steps describe how you use TEAM during normal operations to request, approve, and invoke temporary elevated access. The steps correspond to the numbered items in Figure 1:

  1. Access the AWS access portal in IAM Identity Center (all personas)
  2. Access the TEAM application (all personas)
  3. Request elevated access (requester persona)
  4. Approve elevated access (approver persona)
  5. Activate elevated access (automatic)
  6. Invoke elevated access (requester persona)
  7. Log session activity (automatic)
  8. End elevated access (automatic; or requester or approver persona)
  9. View request details and session activity (requester, approver, or auditor persona)

In the TEAM walkthrough section later in this post, we provide details on each of these steps.

Deploy and set up TEAM

Before you can use TEAM, you need to deploy and set up the solution.

Prerequisites

To use TEAM, you first need to have an organization set up in AWS Organizations with IAM Identity Center enabled. If you haven’t done so already, create an organization, and then follow the Getting started steps in the IAM Identity Center User Guide.

Before you deploy TEAM, you need to nominate a member account for delegated administration in IAM Identity Center. This has the additional benefit of reducing the need to use your organization’s management account. We strongly recommend that you use this account only for IAM Identity Center delegated administration, TEAM, and associated services; that you do not deploy any other workloads into this account, and that you carefully manage access to this account using the principle of least privilege.

We recommend that you enforce multi-factor authentication (MFA) for users, either in IAM Identity Center or in your external identity provider. If you want to statically assign access to users or groups (persistent access), you can do that in IAM Identity Center, independently of TEAM, as described in Multi-account permissions.

Deploy TEAM

To deploy TEAM, follow the solution deployment steps in the TEAM documentation. You need to deploy TEAM in the same account that you nominate for IAM Identity Center delegated administration.

Access TEAM

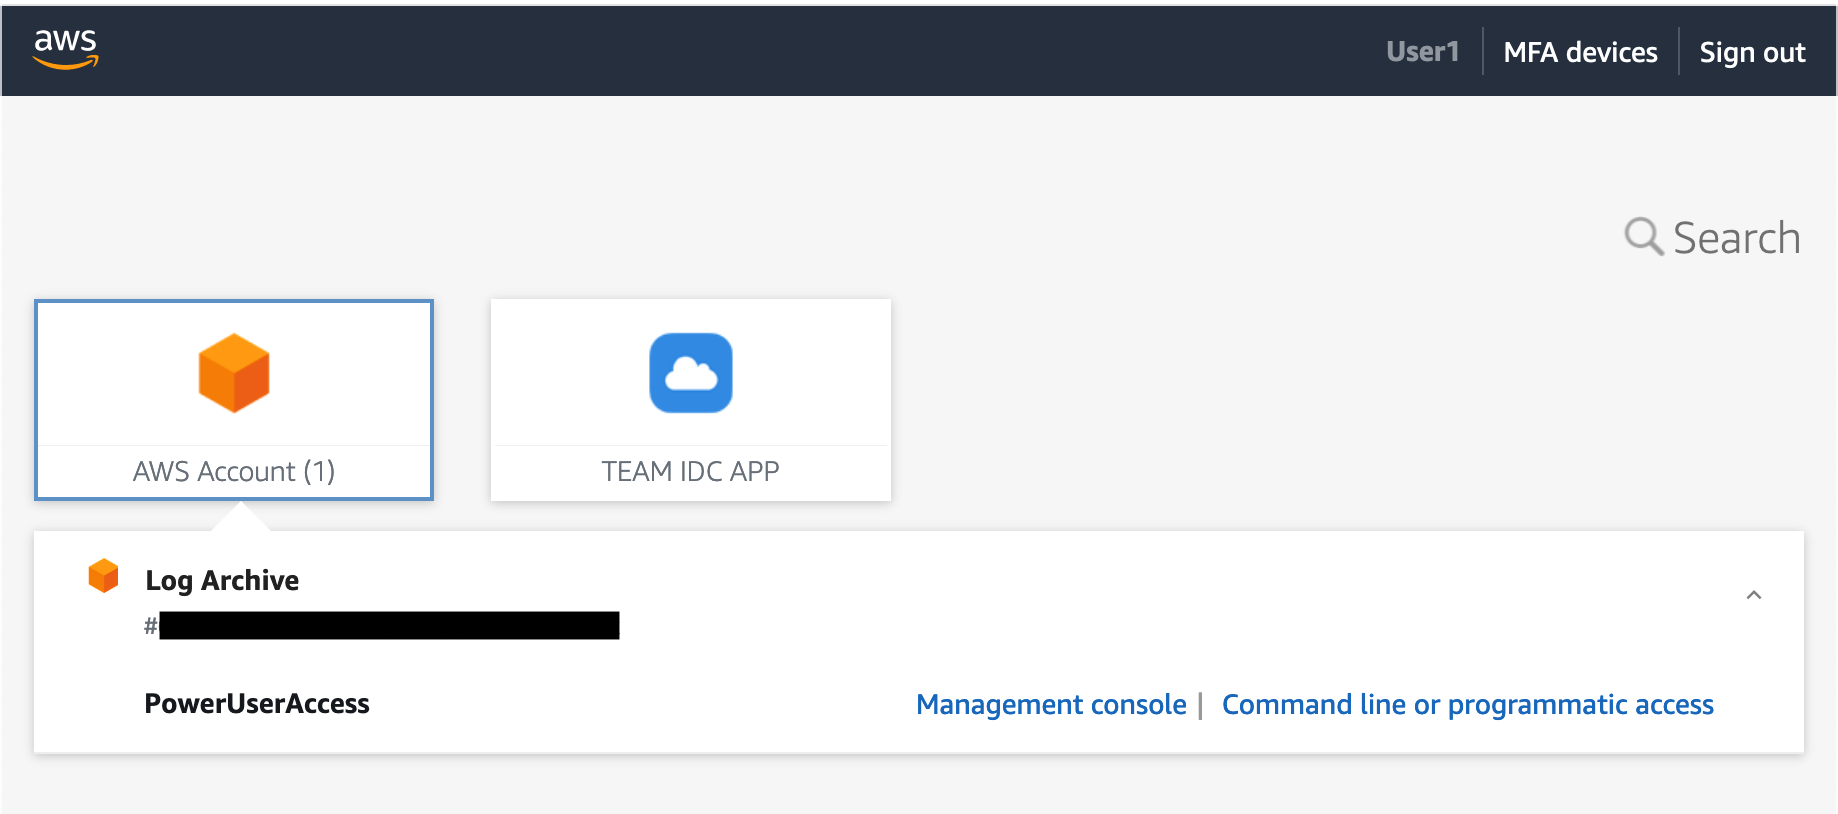
After you deploy TEAM, you can access it through the IAM Identity Center web interface, known as the AWS access portal. You do this using the AWS access portal URL, which is configured when you enable IAM Identity Center. Depending on how you set up IAM Identity Center, you are either prompted to authenticate directly in IAM Identity Center, or you are redirected to an external identity provider to authenticate. After you authenticate, the AWS access portal appears, as shown in Figure 2.

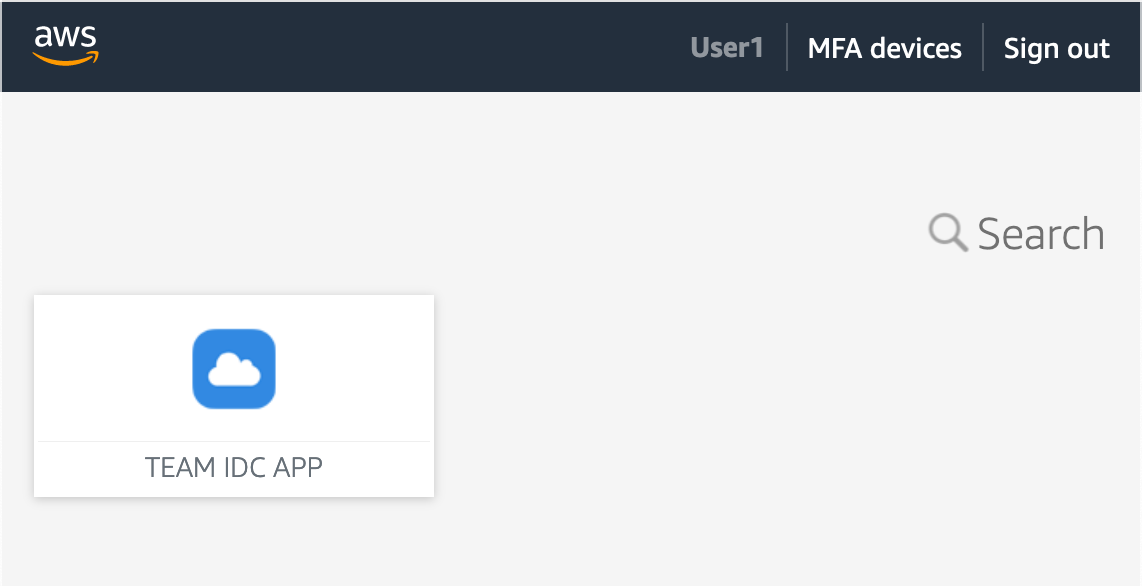
Figure 2: TEAM application icon in the AWS access portal of IAM Identity Center

Figure 2: TEAM application icon in the AWS access portal of IAM Identity Center

You configure TEAM as an IAM Identity Center Custom SAML 2.0 application, which means it appears as an icon in the AWS access portal. To access TEAM, choose TEAM IDC APP.

When you first access TEAM, it automatically retrieves your identity and group membership information from IAM Identity Center. It uses this information to determine what actions you can perform and which navigation links are visible.

Set up TEAM

Before users can request temporary elevated access in TEAM, a user with the admin persona needs to set up the application. This includes defining policies for eligibility and approval. A user takes on the admin persona if they are a member of a named IAM Identity Center group that is specified during TEAM deployment.

Manage eligibility policies

Eligibility policies determine who can request temporary elevated access with a given scope. You can define eligibility policies to ensure that people in specific teams can only request the access that you anticipate they’ll need as part of their job function.

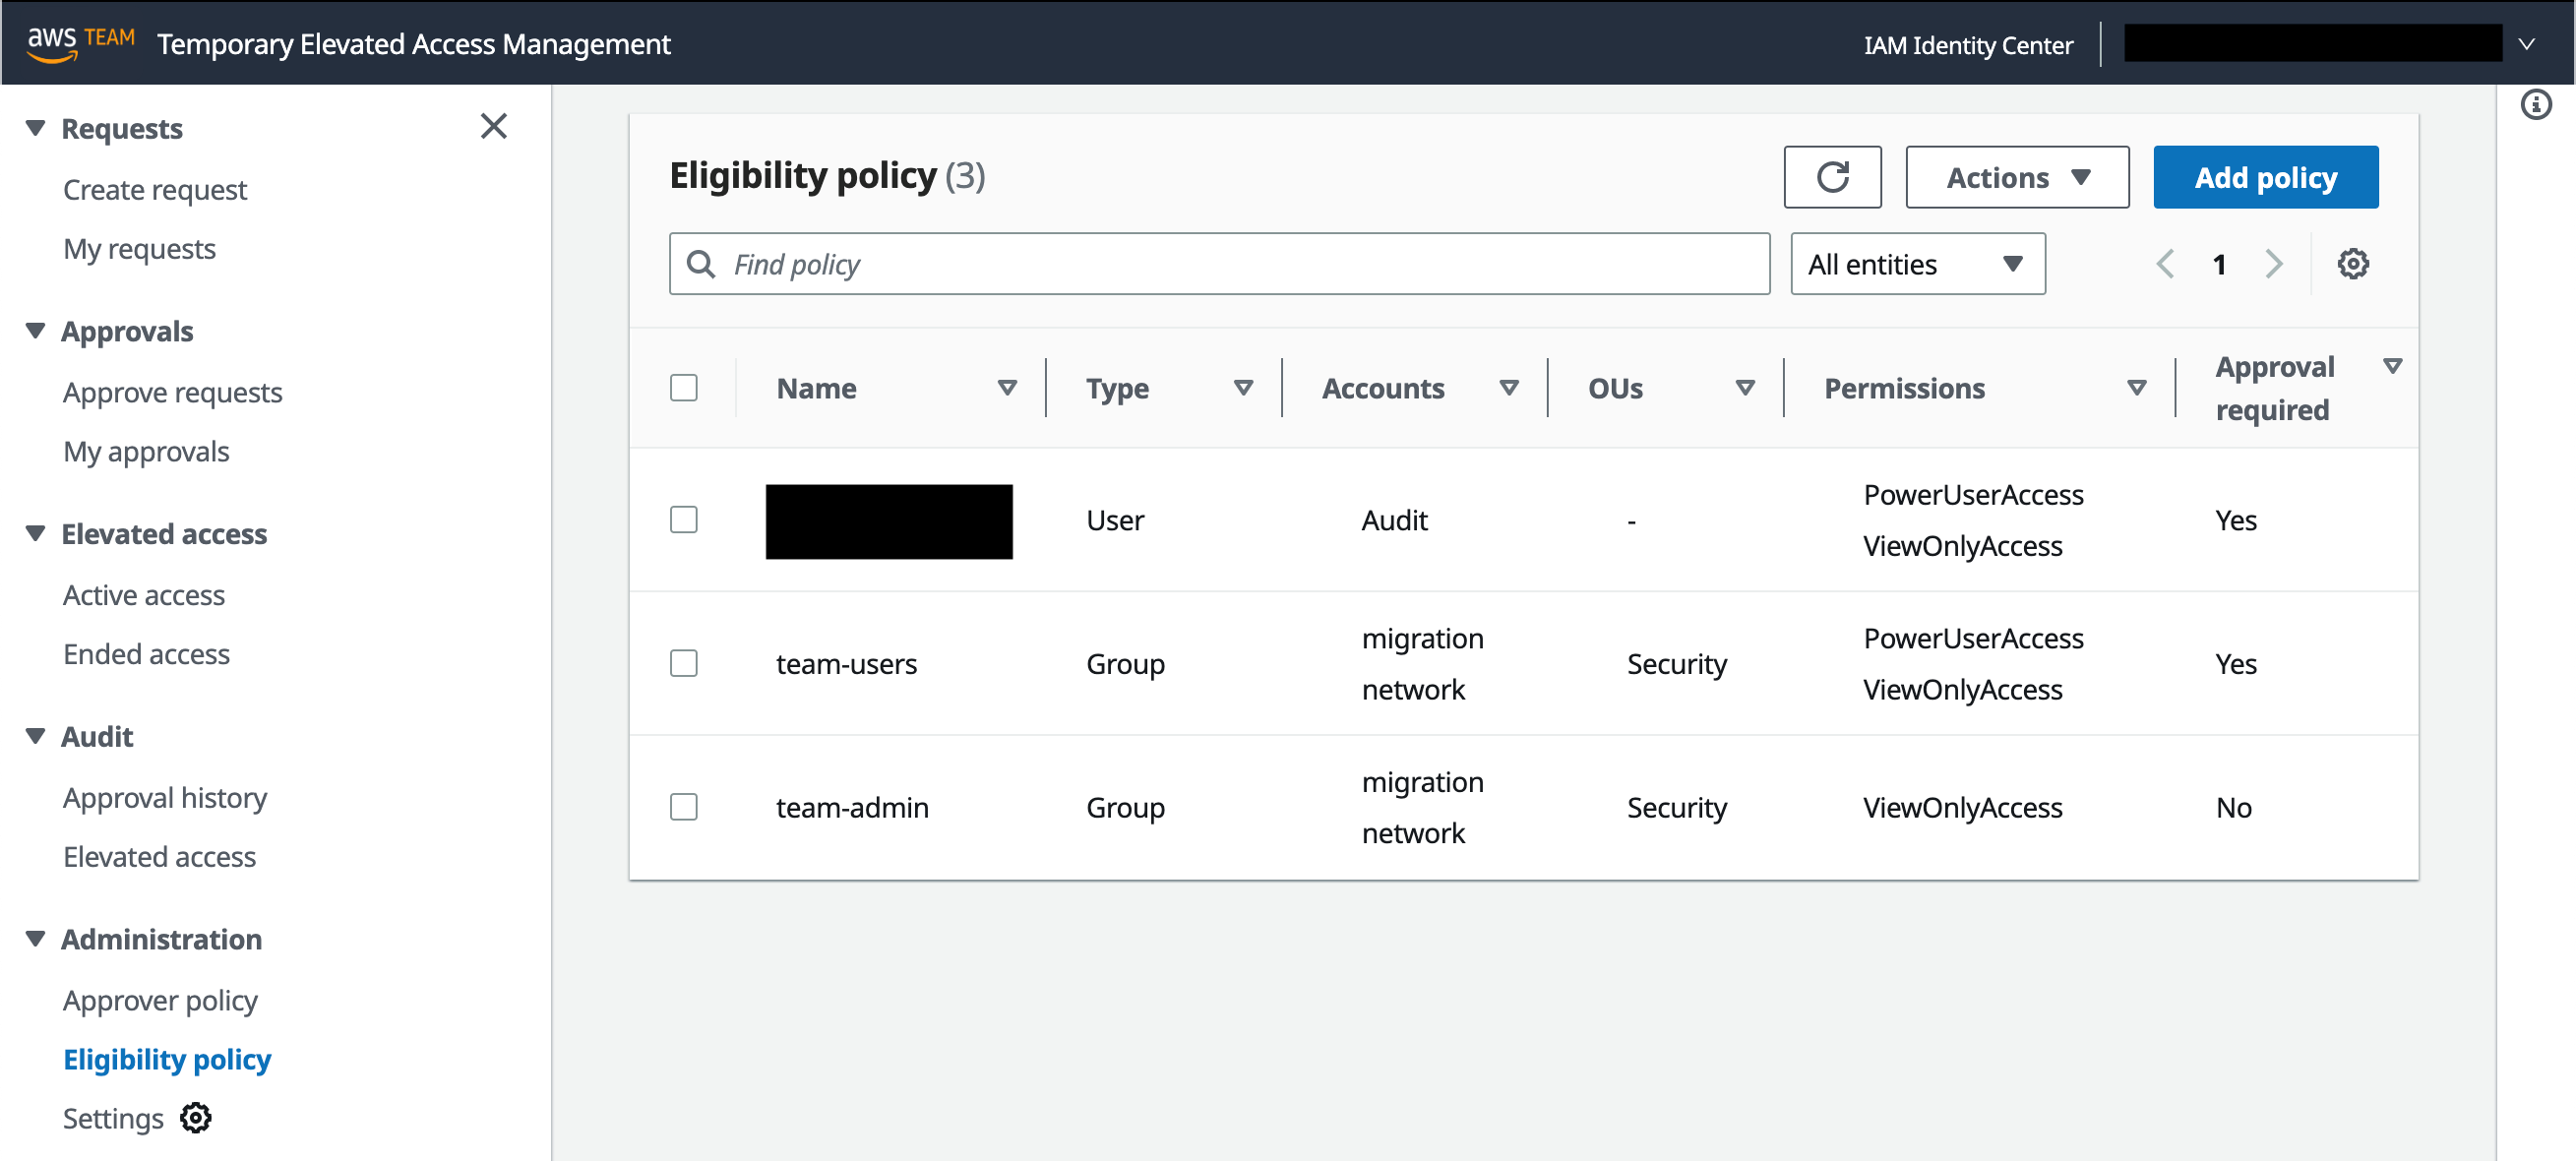
  • To manage eligibility policies, in the left navigation pane, under Administration, select Eligibility policy. Figure 3 shows this view with three eligibility policies already defined.
     
Figure 3: Manage eligibility policies

Figure 3: Manage eligibility policies

An eligibility policy has four main parts:

  • Name and Type — An IAM Identity Center user or group
  • Accounts or OUs — One or more accounts, organizational units (OUs), or both, which belong to your organization
  • Permissions — One or more IAM Identity Center permission sets (representing IAM roles)
  • Approval required — whether requests for temporary elevated access require approval.

Each eligibility policy allows the specified IAM Identity Center user, or a member of the specified group, to log in to TEAM and request temporary elevated access using the specified permission sets in the specified accounts. When you choose a permission set, you can either use a predefined permission set provided by IAM Identity Center, or you can create your own permission set using custom permissions to provide least-privilege access for particular tasks.

Note: If you specify an OU in an eligibility or approval policy, TEAM includes the accounts directly under that OU, but not those under its child OUs.

Manage approval policies

Approval policies work in a similar way as eligibility policies, except that they authorize users to approve temporary elevated access requests, rather than create them. If a specific account is referenced in an eligibility policy that is configured to require approval, then you need to create a corresponding approval policy for the same account. If there is no corresponding approval policy—or if one exists but its groups have no members — then TEAM won’t allow users to create temporary elevated access requests for that account, because no one would be able to approve them.

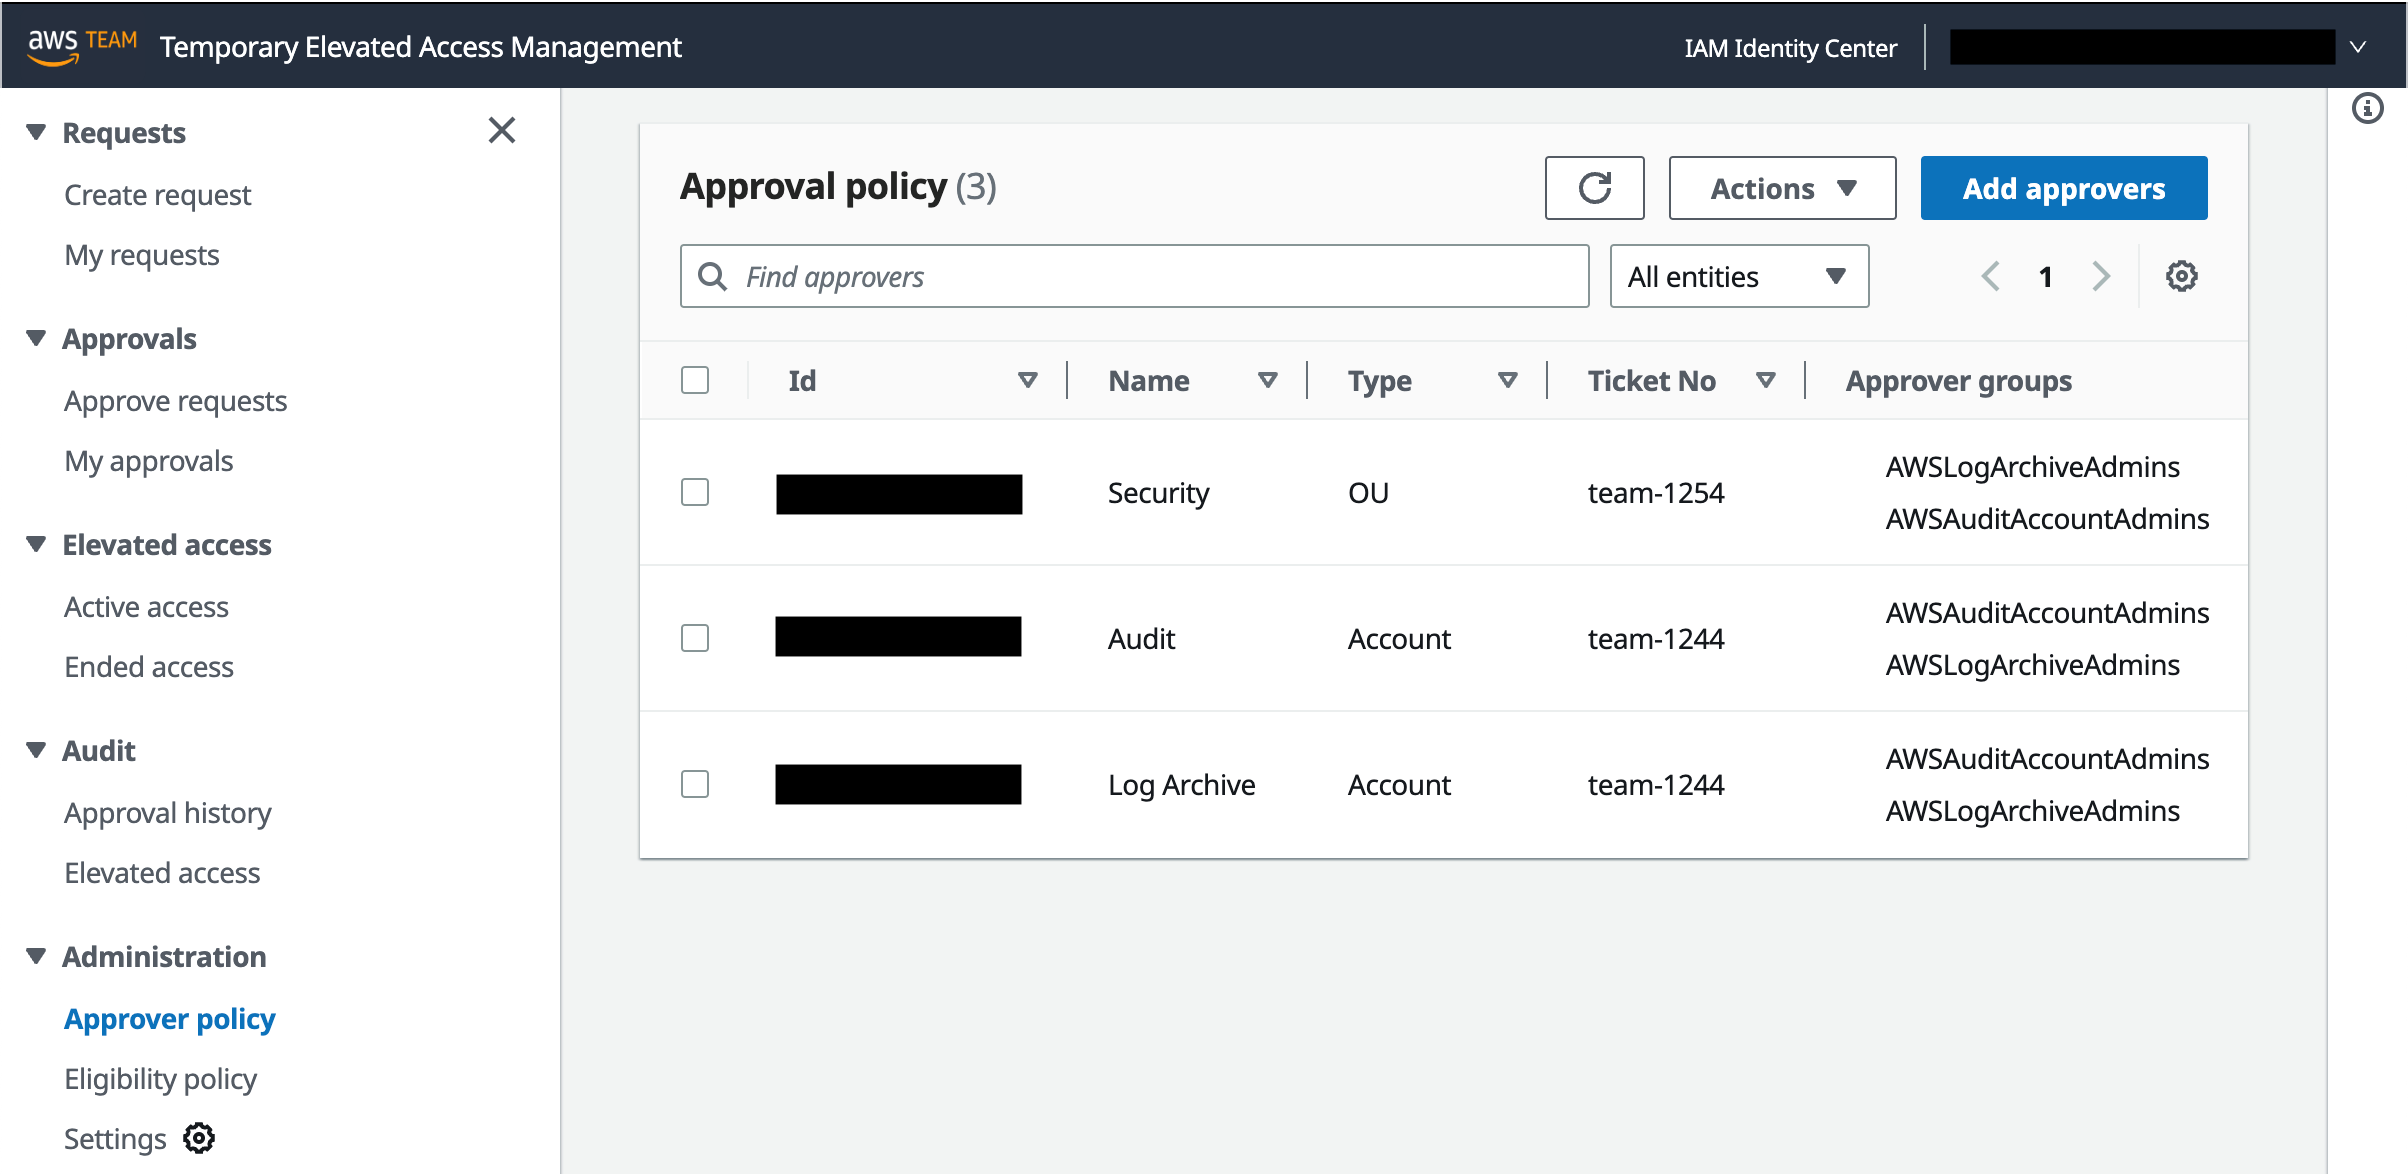
  • To manage approval policies, in the left navigation pane, under Administration, select Approval policy. Figure 4 shows this view with three approval policies already defined.
     
Figure 4: Manage approval policies

Figure 4: Manage approval policies

An approval policy has two main parts:

  • Id, Name, and Type — Identifiers for an account or organizational unit (OU)
  • Approver groups — One or more IAM Identity Center groups

Each approval policy allows a member of a specified group to log in to TEAM and approve temporary elevated access requests for the specified account, or all accounts under the specified OU, regardless of permission set.

Note: If you specify the same group for both eligibility and approval in the same account, this means approvers can be in the same team as requesters for that account. This is a valid approach, sometimes known as peer approval. Nevertheless, TEAM does not allow an individual to approve their own request. If you prefer requesters and approvers to be in different teams, specify different groups for eligibility and approval.

TEAM walkthrough

Now that the admin persona has defined eligibility and approval policies, you are ready to use TEAM.

To begin this walkthrough, imagine that you are a requester, and you need to perform an operational task that requires temporary elevated access to your AWS target environment. For example, you might need to fix a broken deployment pipeline or make some changes as part of a deployment. As a requester, you must belong to a group specified in at least one eligibility policy that was defined by the admin persona.

Step 1: Access the AWS access portal in IAM Identity Center

To access the AWS access portal in IAM Identity Center, use the AWS access portal URL, as described in the Access TEAM section earlier in this post.

Step 2: Access the TEAM application

To access the TEAM application, select the TEAM IDC APP icon, as described in the Access TEAM section earlier.

Step 3: Request elevated access

The next step is to create a new elevated access request as follows:

  1. Under Requests, in the left navigation pane, choose Create request.
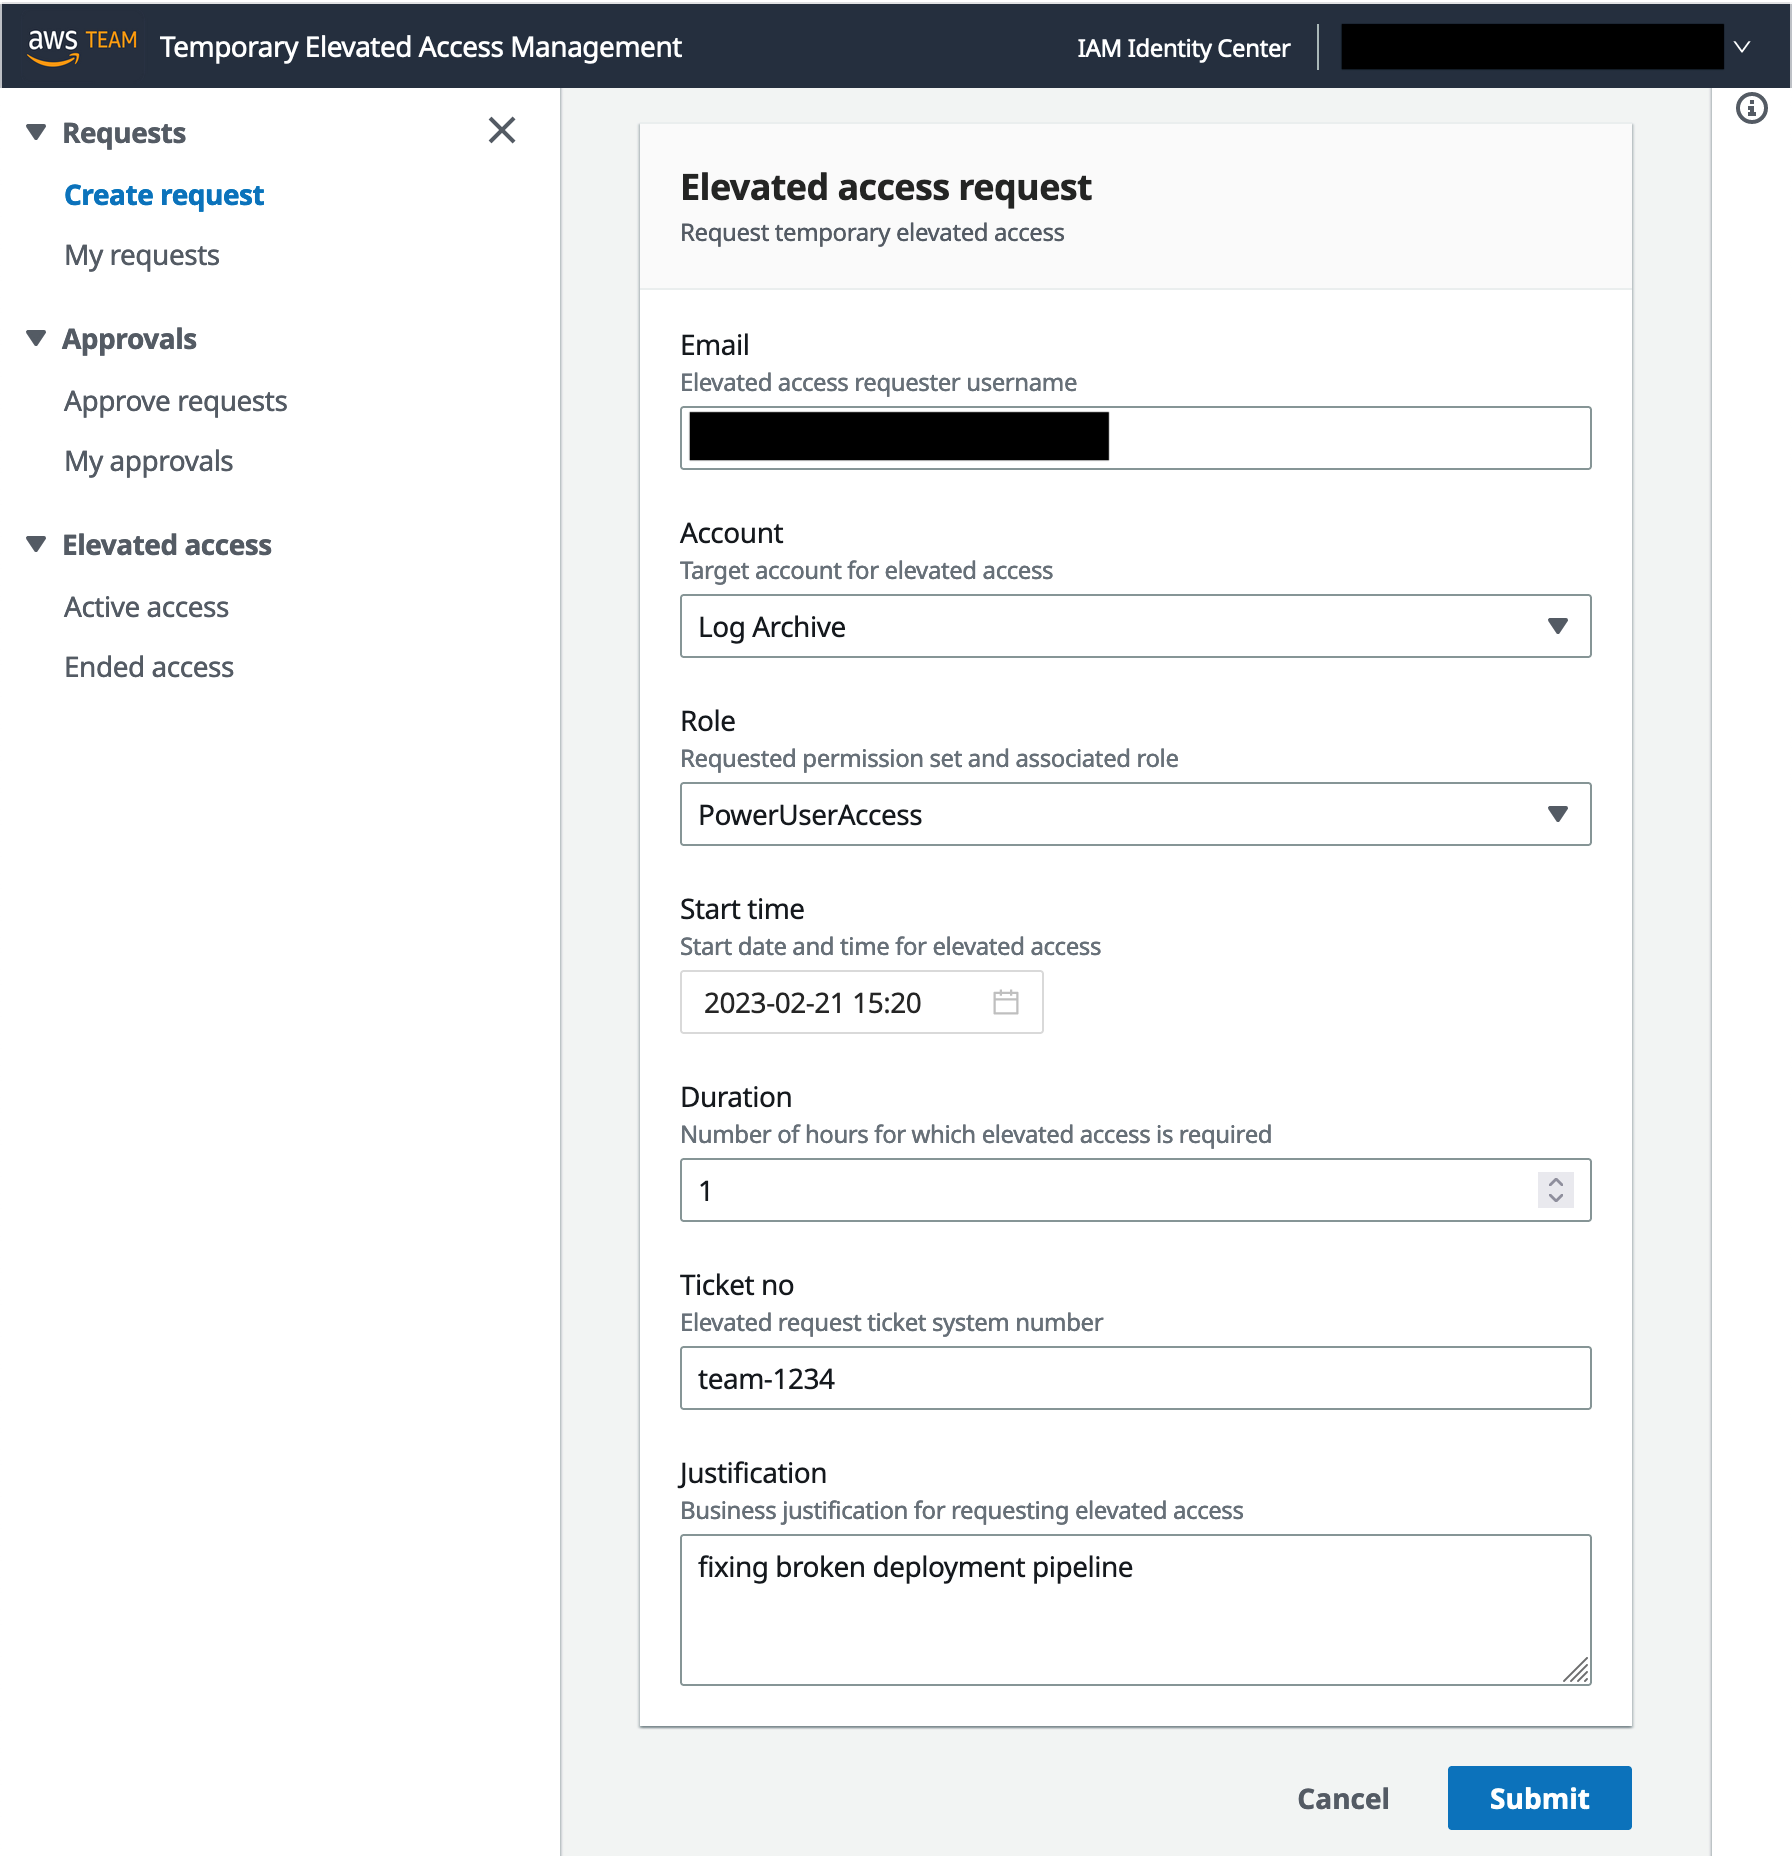
  2. In the Elevated access request section, do the following, as shown in Figure 5:
    1. Select the account where you need to perform your task.
    2. For Role, select a permission set that will give you sufficient permissions to perform the task.
    3. Enter a start date and time, duration, ticket ID (typically representing a change ticket or incident ticket related to your task), and business justification.
    4. Choose Submit.
Figure 5: Create a new request

Figure 5: Create a new request

When creating a request, consider the following:

  • In each request, you can specify exactly one account and one permission set.
  • You can only select an account and permission set combination for which you are eligible based on the eligibility policies defined by the admin persona.
  • As a requester, you should apply the principle of least privilege by selecting a permission set with the least privilege, and a time window with the least duration, that will allow you to complete your task safely.
  • TEAM captures a ticket identifier for audit purposes only; it does not try to validate it.
  • The duration specified in a request determines the time window for which elevated access is active, if your request is approved. During this time window, you can invoke sessions to access the AWS target environment. It doesn’t affect the duration of each session.
  • Session duration is configured independently for each permission set by an IAM Identity Center administrator, and determines the time period for which IAM temporary credentials are valid for sessions using that permission set.
  • Sessions invoked just before elevated access ends might remain valid beyond the end of the approved elevated access period. If this is a concern, consider minimizing the session duration configured in your permission sets, for example by setting them to 1 hour.

Step 4: Approve elevated access

After you submit your request, approvers are notified by email. Approvers are notified when there are new requests that fall within the scope of what they are authorized to approve, based on the approval policies defined earlier.

For this walkthrough, imagine that you are now the approver. You will perform the following steps to approve the request. As an approver, you must belong to a group specified in an approval policy that the admin persona configured.

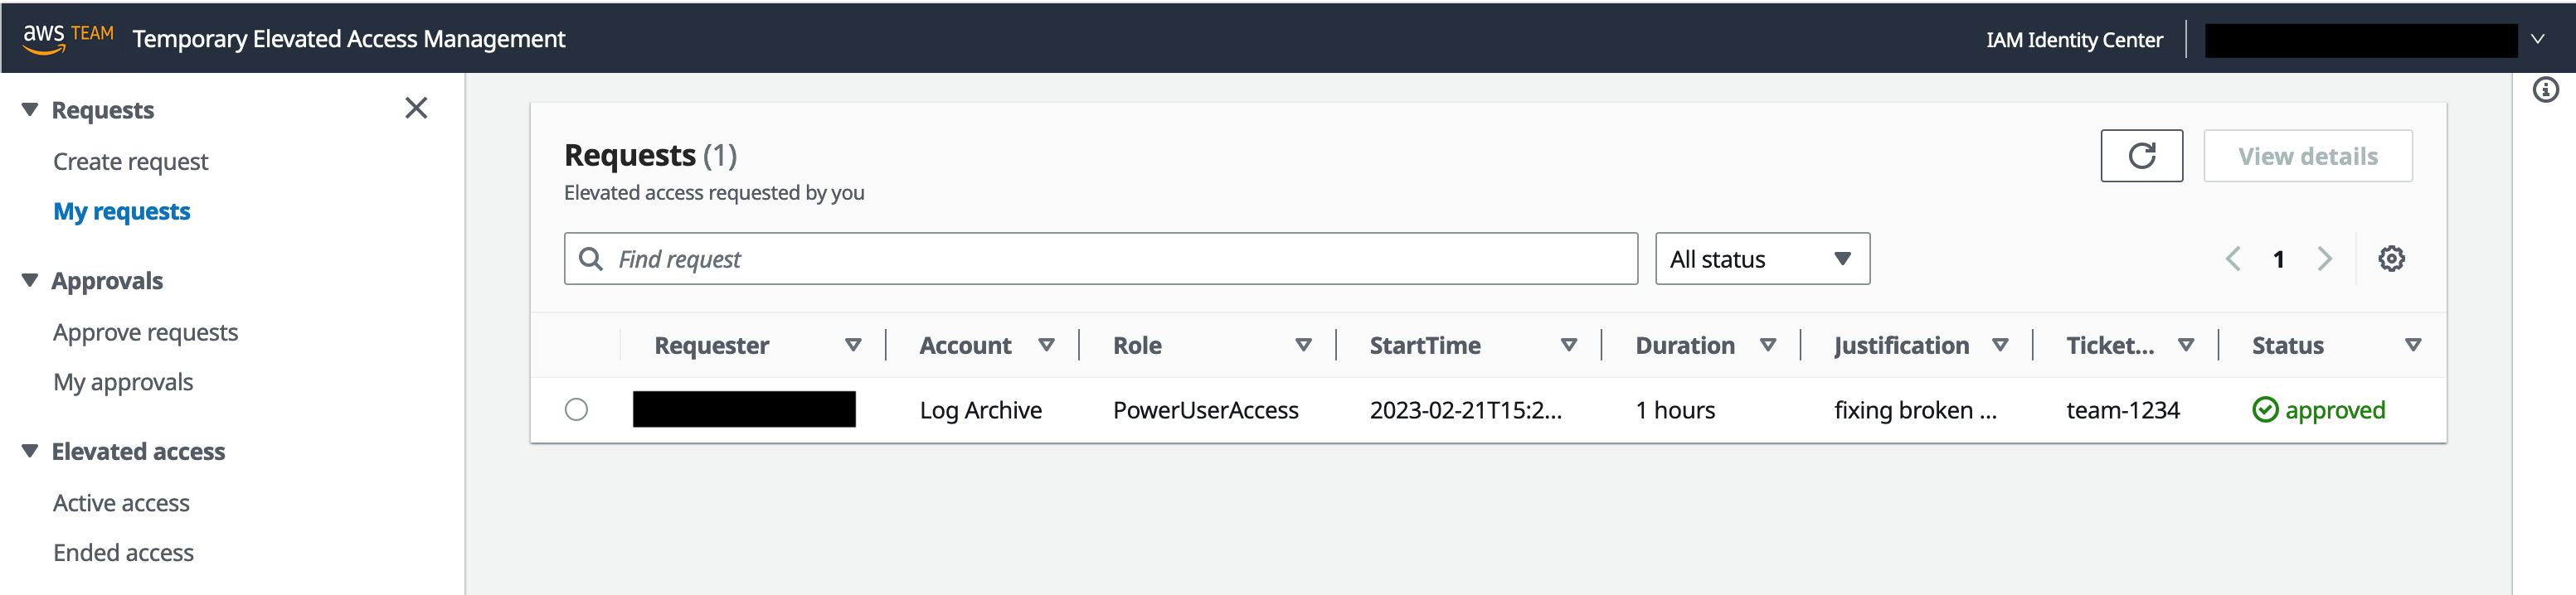
  1. Access the TEAM application in exactly the same way as for the other personas.
  2. In the left navigation pane, under Approvals, choose Approve requests. TEAM displays requests awaiting your review, as shown in Figure 6.
    • To view the information provided by the requester, select a request and then choose View details.
    Figure 6: Requests awaiting review

    Figure 6: Requests awaiting review

  3. Select a pending request, and then do one of the following:
    • To approve the request, select Actions and then choose Approve.
    • To reject the request, select Actions and then choose Reject.

    Figure 7 shows what TEAM displays when you approve a request.

    Figure 7: Approve a request

    Figure 7: Approve a request

  4. After you approve or reject a request, the original requester is notified by email.

A requester can view the status of their requests in the TEAM application.

  • To see the status of your open requests in the TEAM application, in the left navigation pane, under Requests, select My requests. Figure 8 shows this view with one approved request.
     
Figure 8: Approved request

Figure 8: Approved request

Step 5: Automatic activation of elevated access

After a request is approved, the TEAM application waits until the start date and time specified in the request and then automatically activates elevated access. To activate access, a TEAM orchestration workflow creates a temporary account assignment, which links the requester’s user identity in IAM Identity Center with the permission set and account in their request. Then TEAM notifies the requester by email that their request is active.

A requester can now view their active request in the TEAM application.

  1. To see active requests, in the left navigation pane under Elevated access, choose Active access. Figure 9 shows this view with one active request.
     
    Figure 9: Active request

    Figure 9: Active request

  2. To see further details for an active request, select a request and then choose View details. Figure 10 shows an example of these details.
    Figure 10: Details of an active request

    Figure 10: Details of an active request

Step 6: Invoke elevated access

During the time period in which elevated access is active, the requester can invoke sessions to access the AWS target environment to complete their task. Each session has the scope (permission set and account) approved in their request. There are three ways to invoke access.

The first two methods involve accessing IAM Identity Center using the AWS access portal URL. Figure 11 shows the AWS access portal while a request is active.

Figure 11: Invoke access from the AWS access portal

Figure 11: Invoke access from the AWS access portal

From the AWS access portal, you can select an account and permission set that is currently active. You’ll also see the accounts and permission sets that have been statically assigned to you using IAM Identity Center, independently of TEAM. From here, you can do one of the following:

  • Choose Management console to federate to the AWS Management Console.
  • Choose Command line or programmatic access to copy and paste temporary credentials.

The third method is to initiate access directly from the command line using AWS CLI. To use this method, you first need to configure AWS CLI to integrate with IAM Identity Center. This method provides a smooth user experience for AWS CLI users, since you don’t need to copy and paste temporary credentials to your command line.

Regardless of how you invoke access, IAM Identity Center provides temporary credentials for the IAM role and account specified in your request, which allow you to assume that role in that account. The temporary credentials are valid for the duration specified in the role’s permission set, defined by an IAM Identity Center administrator.

When you invoke access, you can now complete the operational tasks that you need to perform in the AWS target environment. During the period in which your elevated access is active, you can invoke multiple sessions if necessary.

Step 7: Log session activity

When you access the AWS target environment, your activity is logged to AWS CloudTrail. Actions you perform in the AWS control plane are recorded as CloudTrail events.

Note: Each CloudTrail event contains the unique identifier of the user who performed the action, which gives you traceability back to the human individual who requested and invoked temporary elevated access.

Step 8: End elevated access

Elevated access ends when either the requested duration elapses or it is explicitly revoked in the TEAM application. The requester or an approver can revoke elevated access whenever they choose.

When elevated access ends, or is revoked, the TEAM orchestration workflow automatically deletes the temporary account assignment for this request. This unlinks the permission set, the account, and the user in IAM Identity Center. The requester is then notified by email that their elevated access has ended.

Step 9: View request details and session activity

You can view request details and session activity for current and historical requests from within the TEAM application. Each persona can see the following information:

  • Requesters can inspect elevated access requested by them.
  • Approvers can inspect elevated access that falls within the scope of what they are authorized to approve.
  • Auditors can inspect elevated access for all TEAM requests.

Session activity is recorded based on the log delivery times provided by AWS CloudTrail, and you can view session activity while elevated access is in progress or after it has ended. Figure 12 shows activity logs for a session displayed in the TEAM application.

Figure 12: Session activity logs

Figure 12: Session activity logs

Security and resiliency considerations

The TEAM application controls access to your AWS environment, and you must manage it with great care to prevent unauthorized access. This solution is built using AWS Amplify to ease the reference deployment. Before operationalizing this solution, consider how to align it with your existing development and security practices.

Further security and resiliency considerations including setting up emergency break-glass access are available in the TEAM documentation.

Additional resources

AWS Security Partners provide temporary elevated access solutions that integrate with IAM Identity Center, and AWS has validated the integration of these partner offerings and assessed their capabilities against a common set of customer requirements. For further information, see temporary elevated access in the IAM Identity Center User Guide.

The blog post Managing temporary elevated access to your AWS environment describes an alternative self-hosted solution for temporary elevated access which integrates directly with an external identity provider using OpenID Connect, and federates users directly into AWS Identity and Access Management (IAM) roles in your accounts. The TEAM solution described in this blog post, on the other hand, integrates with IAM Identity Center, which provides a way to centrally manage user access to accounts across your organization and optionally integrates with an external identity provider.

Conclusion

In this blog post, you learned that your first priority should be to use automation to avoid the need to give human users persistent access to your accounts. You also learned that in the rare cases in which people need access to your accounts, not all access is equal; there are times when you need a process to verify that access is needed, and to provide temporary elevated access.

We introduced you to a temporary elevated access management solution (TEAM) that you can download from AWS Samples and use alongside IAM Identity Center to give your users temporary elevated access. We showed you the TEAM workflow, described the TEAM architecture, and provided links where you can get started by downloading and deploying TEAM.

 
If you have feedback about this post, submit comments in the Comments section below. If you have questions about this post, start a new thread on AWS IAM Identity Center re:Post or contact AWS Support.

Want more AWS Security news? Follow us on Twitter.

Taiwo Awoyinfa

Taiwo Awoyinfa

Taiwo is a senior cloud architect with AWS Professional Services. At AWS, he helps global customers with cloud transformation, migration and security initiatives. Taiwo has expertise in cloud architecture, networking, security and application development. He is passionate about identifying and solving problems that delivers value.

Author

James Greenwood

James is a principal security solutions architect who helps AWS Financial Services customers meet their security and compliance objectives in the AWS cloud. James has a background in identity and access management, authentication, credential management, and data protection with more than 20 years experience in the financial services industry.

Varvara Semenova

Varvara Semenova

Varvara is a cloud infrastructure architect with AWS Professional Services. She specialises in building microservices-based serverless applications to address the needs of AWS enterprise customers. Varvara uses her background in DevOps to help the customer innovate faster when developing cost-effective, secure, and reliable solutions.

Announcing the latest AWS Heroes – June 2023

Post Syndicated from Taylor Jacobsen original https://aws.amazon.com/blogs/aws/announcing-the-latest-aws-heroes-june-2023/

AWS Heroes dedicate their time to help others build better and faster on AWS. Heroes support and give back to the community in a variety of ways: contributing to open source projects, organizing AWS Community Days, speaking at conferences, leading workshops, mentoring builders, hosting meetups, and much more.

Please welcome and say hello to our newest AWS Heroes!

AJ Stuyvenberg – Boston, USA

Serverless Hero AJ Stuyvenberg is a Staff Engineer at Datadog, and has been a member of the serverless community since early 2017. His work focuses on serverless and distributed system observability. AJ is an open source author and maintains several projects, which improve the serverless developer experience. He has also spoken at multiple conferences, including AWS re:Invent and AWS Summits, and frequently writes about serverless topics on his blog.

Danielle Heberling – Hillsboro, USA

Serverless Hero Danielle Heberling is a software engineer with a background that includes being a musician, teaching at a K-8 public school, and working in technical support. She’s passionate about building things that make the world a better place, whether that be through social change or a good laugh. When she’s not coding or talking about serverless, you can often find her reaching back to her teaching roots by mentoring folks from underrepresented groups that would like to make a career switch into tech.

Dominik Grzywaczewski – Lublin, Poland

Community Hero Dominik Grzywaczewski is a Senior Cloud Site Reliability Engineer at Chaos Gears with more than 15 years of experience in IT. His primary objective is to assist companies in gaining a deeper understanding of Cloud Computing technologies, and effectively leveraging them to drive faster and more secure innovation. Dominik shares his passion by organizing technical meetups and workshops, and consistently collaborates with AWS community members. He also founded the AWS User Group in Lublin (Poland) and co-organizes the AWS Community Day conference in Warsaw (Poland).

Johannes Koch – Hessen, Germany

DevTools Hero Johannes Koch is a Sr. DevOps Engineer, Developer Experience, GTS at FICO where he contributes to the FICO®️ Platform. He shares his best practices related to Continuous Integration and Continuous Deployment (CI/CD) on his YouTube channel: cicdonaws. Johannes also founded the AWS User Group Bergstrasse, helped to start the AWS Community DACH Förderverein, and is part of the team that organizes the AWS Community Day in the DACH region.

Michael Walmsley – Melbourne, Australia

Serverless Hero Michael Walmsley is a Lead Technology Architect in the myWizard®️ Automation Group at Accenture, where he is focused on building event-driven products in the cloud. He is excited by the AWS Lambda Powertools open-source projects, and has been using and actively contributing to them since 2020. Michael is also a passionate AWS community member in Australia, supporting local meetups and conferences. He helps organize and run the AWS Programming and Tools Meetup in Melbourne, which focuses on running monthly hands-on training workshops that are open to everyone.

Mikey Fan – Beijing, China

Community Hero Mikey Fan is a Cloud-native Application Architect and SDN Developer. Since 2020, he has been actively exploring how to build innovative applications based on AWS EKS, Private 5G, and SD-WAN technology, and then applying them to 5G Edge Computing scenarios. Mikey is also a cloud-computing technology evangelist and an open-source enthusiast. He enjoys contributing code to open-source projects, such as Kubernetes and Tungsten Fabric, and he likes to demo how these open-source technologies can be combined with AWS cloud computing to create greater value.

Ran Isenberg – Kfar Saba, Israel

Serverless Hero Ran Isenberg is a principal software architect at CyberArk, where he designs and builds serverless services. He is passionate about CI/CD and AWS CDK, and has contributed several utilities to the AWS Lambda Powertools open-source project. Ran also maintains numerous serverless related open-source projects on his GitHub account, such as the AWS Lambda cookbook – a serverless service template that gets you started in the serverless world with all of the best practices in seconds.

Sabiha Ali – Dubai, United Arab Emirates

Community Hero Sabiha Ali is a Solutions Architect at ScaleCapacity. She specializes in Amazon Connect, architecting resilient and secure systems in the cloud. As an Amazon Connect Ambassador, she helps businesses enhance their customer experiences. Her unwavering passion for learning has earned her numerous AWS certifications (9X), solidifying her expertise in the field. She became an AWS User Group Leader in Dubai after starting out as an active AWS Community Builder. Sabiha is also committed to empowering women in the tech industry, making her a valued professional and an advocate for change.

Tomasz Dudek – Wroclaw, Poland

Machine Learning Hero Tomasz Dudek works as a Data & AI Team Lead and a Solutions Architect at Chaos Gears. He guides customers on how leveraging machine learning powered solutions can help their businesses thrive. He also designs AWS architectures and manages a data-focused team. Additionally, Tomasz co-organizes the AWS Community Day Poland, and as well as hosts the AWS User Group in his hometown Wroclaw. He often conducts workshops, such as SageMaker Immersion Days, speaks at conferences, and shares his knowledge in the form of short posts on LinkedIn, and longer ones on his blog, ‘MLOps and how you tame it.’

Wojciech Dąbrowski – Katowice, Poland

Community Hero Wojciech Dąbrowski is Head of Cloud Architecture at DTiQ, where he leads the team responsible for the architecture of cloud solutions and the cloud adaptation strategy in the organization. He has been an AWS User Group Silesia leader since 2019, and has managed to organize multiple online and offline meetups. In addition, Wojciech leads workshops and presents cloud computing and software engineering topics at various events.

Learn More

If you’d like to learn more about the new Heroes or connect with a Hero near you, please visit the AWS Heroes website or browse the AWS Heroes Content Library.

— Taylor

The collective thoughts of the interwebz