Post Syndicated from Explosm.net original http://explosm.net/comics/6018/
New Cyanide and Happiness Comic
Post Syndicated from Explosm.net original http://explosm.net/comics/6018/
New Cyanide and Happiness Comic
Post Syndicated from Rick Armstrong original https://aws.amazon.com/blogs/compute/deep-dive-on-amazon-ec2-vt1-instances/
This post is written by: Amr Ragab, Senior Solutions Architect; Bryan Samis, Principal Elemental SSA; Leif Reinert, Senior Product Manager
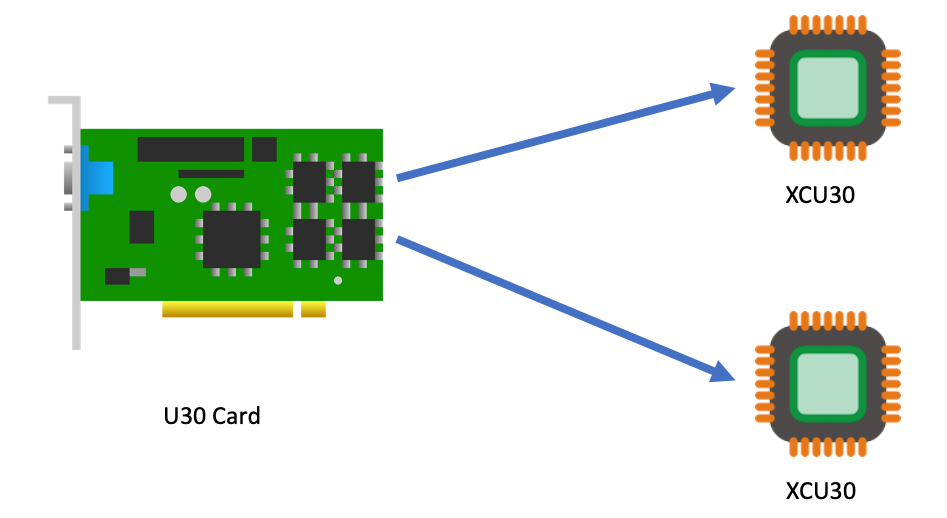
We at AWS are excited to announce that new Amazon Elastic Compute Cloud (Amazon EC2) VT1 instances are now generally available in the US-East (N. Virginia), US-West (Oregon), Europe (Ireland), and Asia Pacific (Tokyo) Regions. This instance family provides dedicated video transcoding hardware in Amazon EC2 and offers up to 30% lower cost per stream as compared to G4dn GPU based instances or 60% lower cost per stream as compared to C5 CPU based instances. These instances are powered by Xilinx Alveo U30 media accelerators with up to eight U30 media accelerators per instance in the vt1.24xlarge. Each U30 accelerator comes with two XCU30 Zynq UltraScale+ SoCs, totaling 16 addressable devices in the vt1.24xlarge instance with H.264/H.265 Video Codec Units (VCU) cores.
Currently, the VT1 family consists of three sizes, as summarized in the following:
| Instance Type | vCPUs | RAM | U30 accelerator cards | Addressable XCU30 SoCs |
| vt1.3xlarge | 12 | 24 | 1 | 2 |
| vt1.6xlarge | 24 | 48 | 2 | 8 |
| vt1.24xlarge | 96 | 182 | 8 | 16 |
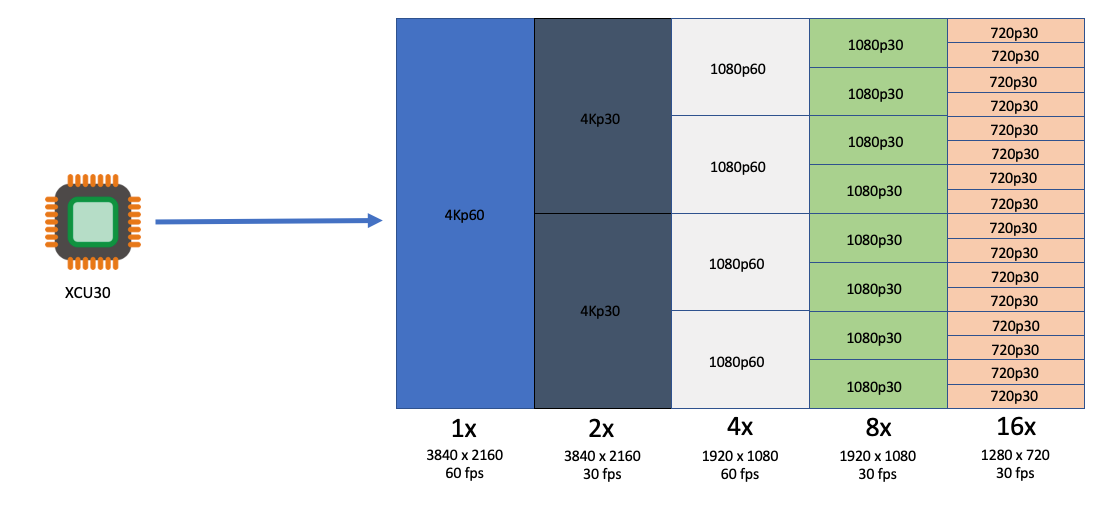
Each addressable XCU30 SoC device supports:
The following table outlines the number of transcoding streams per addressable device and instance type:
| Transcoding | Each XCU30 SoC | vt1.3xlarge | vt1.6xlarge | vt1.24xlarge |
| 3840x2160p60 | 1 | 2 | 4 | 16 |
| 3840x2160p30 | 2 | 4 | 8 | 32 |
| 1920x1080p60 | 4 | 8 | 16 | 64 |
| 1920x1080p30 | 8 | 16 | 32 | 128 |
| 1280x720p30 | 16 | 32 | 64 | 256 |
| 960x540p30 | 24 | 48 | 92 | 384 |
Customers with applications such as live broadcast, video conferencing and just-in-time transcoding can now benefit from a dedicated instance family devoted to video encoding and decoding with rescaling optimizations at the lowest cost per stream. This dedicated instance family lets customers run batch, real-time, and faster than real-time transcoding workloads.
To get started, you launch a VT1 instance with prebuilt VT1 Amazon Machine Images (AMIs), available on the AWS Marketplace. However, if you have AMI hardening requirements or other requirements that require you to install the Xilinx software stack, you can reference the Xilinx Video SDK documentation for VT1.
The software stack utilizes a driver suite that is a combination of the driver stack as well as management and client tools. The following terminology will be used in this instance family:
To run workloads directly on Amazon EC2 instances, you must load both the XRT and XRM stack. These are conveniently provided by loading the XCDR environment. To load the devices, run the following:
source /opt/xilinx/xcdr/setup.sh
With the output:
-----Source Xilinx U30 setup files-----
XILINX_XRT : /opt/xilinx/xrt
PATH : /opt/xilinx/xrt/bin:/usr/local/sbin:/sbin:/bin:/usr/sbin:/usr/bin:/root/bin
LD_LIBRARY_PATH : /opt/xilinx/xrt/lib:
PYTHONPATH : /opt/xilinx/xrt/python:
XILINX_XRM : /opt/xilinx/xrm
PATH : /opt/xilinx/xrm/bin:/opt/xilinx/xrt/bin:/usr/local/sbin:/sbin:/bin:/usr/sbin:/usr/bin:/root/bin
LD_LIBRARY_PATH : /opt/xilinx/xrm/lib:/opt/xilinx/xrt/lib:
Number of U30 devices found : 16
To help build AMIs for Amazon Linux2, Ubuntu 18/20, Amazon ECS and Amazon Elastic Kubernetes Service (Amazon EKS), we have provided a Github project in order to simplify the build process utilizing Packer:
https://github.com/aws-samples/aws-vt-baseami-pipeline
At the time of writing, Xilinx does not have an officially supported container runtime. However, it is possible to pass the specific devices in the docker run ... stanza, and in order to set this environment download this specific script. The following example is the output for vt1.24xlarge:
[ec2-user@ip-10-0-254-236 ~]$ source xilinx_aws_docker_setup.sh
XILINX_XRT : /opt/xilinx/xrt
PATH : /opt/xilinx/xrt/bin:/usr/local/bin:/usr/bin:/usr/local/sbin:/usr/sbin:/home/ec2-user/.local/bin:/home/ec2-user/bin
LD_LIBRARY_PATH : /opt/xilinx/xrt/lib:
PYTHONPATH : /opt/xilinx/xrt/python:
XILINX_AWS_DOCKER_DEVICES : --device=/dev/dri/renderD128:/dev/dri/renderD128
--device=/dev/dri/renderD129:/dev/dri/renderD129
--device=/dev/dri/renderD130:/dev/dri/renderD130
--device=/dev/dri/renderD131:/dev/dri/renderD131
--device=/dev/dri/renderD132:/dev/dri/renderD132
--device=/dev/dri/renderD133:/dev/dri/renderD133
--device=/dev/dri/renderD134:/dev/dri/renderD134
--device=/dev/dri/renderD135:/dev/dri/renderD135
--device=/dev/dri/renderD136:/dev/dri/renderD136
--device=/dev/dri/renderD137:/dev/dri/renderD137
--device=/dev/dri/renderD138:/dev/dri/renderD138
--device=/dev/dri/renderD139:/dev/dri/renderD139
--device=/dev/dri/renderD140:/dev/dri/renderD140
--device=/dev/dri/renderD141:/dev/dri/renderD141
--device=/dev/dri/renderD142:/dev/dri/renderD142
--device=/dev/dri/renderD143:/dev/dri/renderD143
--mount type=bind,source=/sys/bus/pci/devices/0000:00:1d.0,target=/sys/bus/pci/devices/0000:00:1d.0 --mount type=bind,source=/sys/bus/pci/devices/0000:00:1e.0,target=/sys/bus/pci/devices/0000:00:1e.0
Once the devices have been enumerated, start the workload by running:
docker run -it $XILINX_AWS_DOCKER_DEVICES <image:tag>
To launch an EKS cluster with VT1 instances, create the AMI from the scripts provided in the repo earlier.
https://github.com/aws-samples/aws-vt-baseami-pipeline
Once the AMI is created, launch an EKS cluster:
eksctl create cluster --region us-east-1 --without-nodegroup --version 1.19 \
--zones us-east-1c,us-east-1d
Once the cluster is created, substitute the values for the cluster name, subnets, and AMI IDs in the following template.
apiVersion: eksctl.io/v1alpha5
kind: ClusterConfig
metadata:
name: <cluster-name>
region: us-east-1
vpc:
id: vpc-285eb355
subnets:
public:
endpoint-one:
id: subnet-5163b237
endpoint-two:
id: subnet-baff22e5
managedNodeGroups:
- name: vt1-ng-1d
instanceType: vt1.3xlarge
volumeSize: 200
instancePrefix: vt1-ng-1d-worker
ami: <ami-id>
iam:
withAddonPolicies:
imageBuilder: true
autoScaler: true
ebs: true
fsx: true
cloudWatch: true
ssh:
allow: true
publicKeyName: amrragab-aws
subnets:
- endpoint-one
minSize: 1
desiredCapacity: 1
maxSize: 4
overrideBootstrapCommand: |
#!/bin/bash
/etc/eks/bootstrap.sh <cluster-name>
Save this file, and then deploy the nodegroup.
eksctl create nodegroup -f vt1-managed-ng.yaml
Once deployed, apply the FPGA U30 device plugin. The daemonset container is available on the Amazon Elastic Container Registry (ECR) public gallery. You can also access the daemonset deployment file.
kubectl apply -f xilinx-device-plugin.yml
Confirm that the Xilinx U30 device(s) are seen by K8s API server and can be allocatable in your job.
Capacity:
attachable-volumes-aws-ebs: 39
cpu: 12
ephemeral-storage: 209702892Ki
hugepages-1Gi: 0
hugepages-2Mi: 0
memory: 23079768Ki
pods: 15
xilinx.com/fpga-xilinx_u30_gen3x4_base_1-0: 1
Allocatable:
attachable-volumes-aws-ebs: 39
cpu: 11900m
ephemeral-storage: 192188443124
hugepages-1Gi: 0
hugepages-2Mi: 0
memory: 22547288Ki
pods: 15
xilinx.com/fpga-xilinx_u30_gen3x4_base_1-0: 1
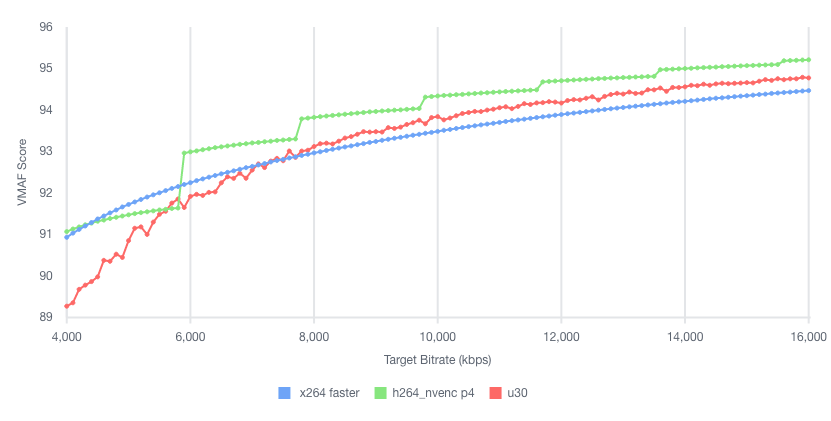
The video quality produced by the U30 is roughly equivalent to the “faster” profile in the x264 and x265 codecs, or the “p4” preset using the nvenc codec on G4dn. For example, in the following test we encoded the same UHD (4K) video at multiple bitrates into H264, and then compared Video Multimethod Assessment Fusion (VMAF) scores:
To illustrate the VT1 instance family stream density and encoding performance, let’s look at the smallest instance, the vt1.3xlarge, which can encode up to eight simultaneous 1080p60 streams into H.264. We chose a set of similar instances at a close price point, and then compared how many 1080p60 H264 streams they could encode simultaneously to an equivalent quality:
| Column 1 | Column 2 | Column 3 | Column 4 | Column 5 |
| Instance | Codec | us-east-1 Hourly Price* | 1080p60 Streams / Instance | Hourly Cost / Stream |
| c5.4xlarge | x264 | $0.680 | 2 | $0.340 |
| c6g.4xlarge | x264 | $0.544 | 2 | $0.272 |
| c5a.4xlarge | x264 | $0.616 | 3 | $0.205 |
| g4dn.xlarge | nvenc | $0.526 | 4 | $0.132 |
| vt1.3xlarge | xma | $0.650 | 8 | $0.081 |
* Prices accurate as of the publishing date of this article.
As you can see, the vt1.3xlarge instance can encode four times as many streams as the c5.4xlarge, and at a lower hourly cost. It can also encode two times the number of streams as a g4dn.xlarge instance. Thus, yielding in this example a cost per stream reduction of up to 76% over c5.4xlarge, and up to 39% compared to g4dn.xlarge.
In addition to encoding multiple live streams in parallel, VT1 instances can also be utilized to encode file-based content at faster-than-real-time performance. This can be done by over-provisioning resources on a single XCU30 device so that more resources are dedicated to transcoding than are necessary to maintain real-time.
For example, running the following command (specifying -cores 4) will utilize all resources on a single XCU30 device, and yield an encode speed of approximately 177 FPS, or 2.95 times faster than real-time for a 60 FPS source:
$ ffmpeg -c:v mpsoc_vcu_h264 -i input_1920x1080p60_H264_8Mbps_AAC_Stereo.mp4 -f mp4 -b:v 5M -c:v mpsoc_vcu_h264 -cores 4 -slices 4 -y /tmp/out.mp4
frame=43092 fps=177 q=-0.0 Lsize= 402721kB time=00:11:58.92 bitrate=4588.9kbits/s speed=2.95x
To maximize FPS further, utilize the “split and stitch” operation to break the input file into segments, and then transcode those in parallel across multiple XCU30 chips or even multiple U30 cards in an instance. Then, recombine the file at the output. For more information, see the Xilinx Video SDK documentation on Faster than Real-time transcoding.
Using the provided example script on the same 12-minute source file as the preceding example on a vt1.3xlarge, we can utilize both addressable devices on the U30 card at once in order to yield an effective encode speed of 512 fps, or 8.5 times faster than real-time.
$ python3 13_ffmpeg_transcode_only_split_stitch.py -s input_1920x1080p60_H264_8Mbps_AAC_Stereo.mp4 -d /tmp/out.mp4 -i h264 -o h264 -b 5.0
There are 1 cards, 2 chips in the system
...
Time from start to completion : 84 seconds (1 minute and 24 seconds)
This clip was processed 8.5 times faster than realtime
This clip was effectively processed at 512.34 FPS
Conclusion
We are excited to launch VT1, our first EC2 instance with dedicated hardware acceleration for video transcoding, which provides up to 30% lower cost per stream as compared to G4dn or 60% lower cost per stream as compared to G5. With up to eight Xilinx Alveo U30 media accelerators, you can parallelize up to 16 4K UHD streams, for batch, real-time, and faster than real-time transcoding. If you have any questions, reach out to your account team. Now, go power up your video transcoding workloads with Amazon EC2 VT1 instances.
Post Syndicated from original https://lwn.net/Articles/874684/rss
The long-running and sometimes acrimonious discussion on the memory folio patch set has come to an end:
the folio patches were the first thing pulled into the mainline repository
for the 5.16 development cycle. Now the developers involved just have to
do all of the other work identified as necessary to clean up the
memory-management subsystem and isolate it from other parts of the kernel.
Post Syndicated from Rick Armstrong original https://aws.amazon.com/blogs/compute/building-arm64-applications-on-aws-graviton2-using-the-aws-cdk-and-self-hosted-runners-for-github-actions/
This post is written by Frank Dallezotte, Sr. Technical Account Manager, and Maxwell Moon, Sr. Solutions Architect
AWS Graviton2 processors are custom built by AWS using the 64-bit Arm Neoverse cores to deliver great price performance for workloads running in Amazon Elastic Compute Cloud (Amazon EC2). These instances are powered by 64 physical core AWS Graviton2 processors utilizing 64-bit Arm Neoverse N1 cores and custom silicon designed by AWS, built using advanced 7-nanometer manufacturing technology.
Customers are migrating their applications to AWS Graviton2 based instance families in order to take advantage of up to 40% better price performance over comparable current generation x86-based instances for a broad spectrum of workloads. This migration includes updating continuous integration and continuous deployment (CI/CD) pipelines in order to build applications for ARM64.
One option for running CI/CD workflows is GitHub Actions, a GitHub product that lets you automate tasks within your software development lifecycle. Customers utilizing GitHub Actions today can host their own runners and customize the environment used to run jobs in GitHub Actions workflows, allowing you to build ARM64 applications. GitHub recommends that you only use self-hosted runners with private repositories.
This post will teach you to set up an AWS Graviton2 instance as a self-hosted runner for GitHub Actions. We will verify the runner is added to the default runner group for a GitHub Organization, which can only be used by private repositories by default. Then, we’ll walk through setting up a continuous integration workflow in GitHub Actions that runs on the self-hosted Graviton2 runner and hosted x86 runners.
This post will cover the following:
We’ll be adding the self-hosted runner at the GitHub organization level. This makes the runner available for use by the private repositories belonging to the GitHub organization. When new runners are created for an organization, they are automatically assigned to the default self-hosted runner group, which, by default, cannot be utilized by public repositories.
You can verify that your self-hosted runner group is only available to private repositories by navigating to the Actions section of your GitHub Organization’s settings. Select the “Runner Groups” submenu then the Default runner group and confirm that “Allow public repositories” is not checked.
GitHub recommends only utilizing self-hosted runners with private repositories. Allowing self-hosted runners on public repositories and allowing workflows on public forks introduces a significant security risk. More information about the risks can be found in self-hosted runner security with public repositories.
In this post, we verified that for the default runner group, allowing public repositories is not enabled.
To model and deploy our architecture, we use the AWS CDK. The AWS CDK lets us design components for a self-hosted runner that are customizable and shareable in several popular programming languages.
Our AWS CDK application is defined by two stacks (VPC and EC2) that we’ll use to create the networking resources and our self-hosted runner on EC2.
This section will walk through the networking resources that the CDK stack will create in order to support this architecture. We are deploying our self-hosted runner in a private subnet. A NAT gateway in a public subnet lets the runner make requests to GitHub, but not direct access to the instance from the internet.
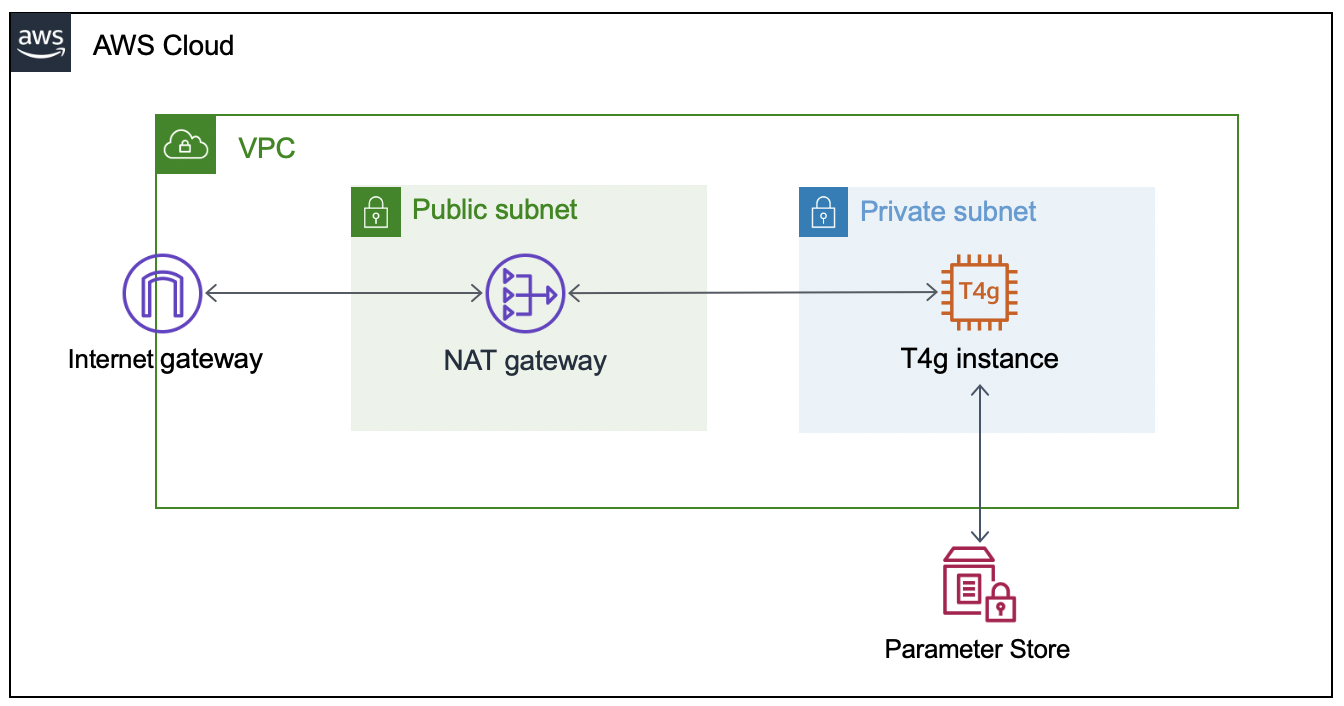
To successfully provision the instance, we must supply the GitHub organization URL and token. To accomplish this, we’ll create two AWS Systems Manager Parameter Store values (gh-url and gh-token), which will be accessed via the EC2 instance user data script when the CDK application deploys the EC2 stack. The EC2 instance will only be accessible through AWS Systems Manager Session Manager.
The following steps are based on these instructions for adding self-hosted runners – GitHub Docs.
NOTE: this is an automatically generated time-limited token for authenticating the request.
Next, launch an AWS CloudShell environment, and then create the following AWS Systems Manager Parameter Store values in the AWS account where you’ll be deploying the AWS CDK stack.
The names gh-url and gh-token, and types String and SecureString, respectively, are required for this integration:
#!/bin/bash
aws ssm put-parameter --name gh-token --type SecureString --value ABCDEFGHIJKLMNOPQRSTUVWXYZABC
aws ssm put-parameter --name gh-url --type String --value https://github.com/your-url
The EC2 instance user data script will install all required packages, and it will register the GitHub Runner application using the gh-url and gh-token parameters from the AWS Systems Manager Parameter Store. These parameters are stored as variables (TOKEN and REPO) in order to configure the runner.
This script runs automatically when the EC2 instance is launched, and it is included in the GitHub repository. We’ll utilize Amazon Linux 2 for the operating system on the runner instance.
#!/bin/bash
yum update -y
# Download and build a recent version of International Components for Unicode.
# https://github.com/actions/runner/issues/629
# https://github.com/dotnet/core/blob/main/Documentation/linux-prereqs.md
# Install jq for parsing parameter store
yum install -y libicu60 jq
# Get the latest runner version
VERSION_FULL=$(curl -s https://api.github.com/repos/actions/runner/releases/latest | jq -r .tag_name)
RUNNER_VERSION="${VERSION_FULL:1}"


# Create a folder
mkdir /home/ec2-user/actions-runner && cd /home/ec2-user/actions-runner || exit
# Download the latest runner package
curl -o actions-runner-linux-arm64-${RUNNER_VERSION}.tar.gz -L https://GitHub.com/actions/runner/releases/download/v${RUNNER_VERSION}/actions-runner-linux-arm64-${RUNNER_VERSION}.tar.gz
# Extract the installer
tar xzf ./actions-runner-linux-arm64-${RUNNER_VERSION}.tar.gz
chown -R ec2-user /home/ec2-user/actions-runner
REGION=$(curl -s http://169.254.169.254/latest/meta-data/placement/region)
INSTANCE_ID=$(curl -s http://169.254.169.254/latest/meta-data/instance-id)
TOKEN=$(aws ssm get-parameter --region "${REGION}" --name gh-token --with-decryption | jq -r '.Parameter.Value')
REPO=$(aws ssm get-parameter --region "${REGION}" --name gh-url | jq -r '.Parameter.Value')
sudo -i -u ec2-user bash << EOF
/home/ec2-user/actions-runner/config.sh --url "${REPO}" --token "${TOKEN}" --name gh-g2-runner-"${INSTANCE_ID}" --work /home/ec2-user/actions-runner --unattended
EOF
./svc.sh install
./svc.sh start
In this section, we’ll deploy the network resources and EC2 instance for the self-hosted GitHub runner using the AWS CDK.
From the same CloudShell environment, run the following commands in order to deploy the AWS CDK application:
#!/bin/bash
sudo npm install aws-cdk -g
git clone https://github.com/aws-samples/cdk-graviton2-gh-sh-runner.git
cd cdk-graviton2-gh-sh-runner
python3 -m venv .venv
source .venv/bin/activate
python -m pip install -r requirements.txt
export VPC_CIDR="192.168.0.0/24" # Set your CIDR here.
export AWS_ACCOUNT=`aws sts get-caller-identity | jq -r '.Account'`
cdk bootstrap aws://$AWS_ACCOUNT/$AWS_REGION
cdk deploy --all
# Note: Before the EC2 stack deploys you will be prompted for approval
# The message states 'This deployment will make potentially sensitive changes according to your current security approval level (--require-approval broadening).' and prompts for y/n
These steps will deploy an EC2 instance self-hosted runner that is added to your GitHub organization (as previously specified by the gh-url parameter). Confirm the self-hosted runner has been successfully added to your organization by navigating to the Settings tab for your GitHub organization, selecting the Actions options from the left-hand panel, and then selecting Runners.

This section will walk through setting up a GitHub Actions workflow to extend a test pipeline for an example application. We’ll define a workflow that runs a series of static code checks and unit tests on both x86 and ARM.
Our example application is an online bookstore where users can find books, add them to their cart, and create orders. The application is written in Python using the Flask framework, and it uses Amazon DynamoDB for data storage.
Actions expect the workflow to be defined in the folder .github/workflows and the extension of either .yaml or .yml. We’ll create the directory, as well as an empty file inside the directory called main.yml.
#!/bin/bash
mkdir -p .github/workflows
touch .github/workflows/main.yml
First, we must define when our workflow will run. We’ll define the workflow to run when pull requests are created, synchronized (new commits are pushed), or re-opened, and then on push to the main branch.
# main.yml
on:
  pull_request:
    types: [opened, synchronize, reopened]
  push:
    branches:
      - main
Next, define the workflow by adding jobs. Each job can have one or more steps to run. A step defines a command, set up task, or action that will be run. You can also create custom Actions with user-defined steps and repeatable modules.
Next, we’ll define a single job test to include every step of our workflow, as well as a strategy for the job to run the workflow on both x86 and the Graviton2 self-hosted runner. We’ll specify both ubuntu-latest, a hosted runner, and self-hosted for our Graviton2 runner. This lets our workflow run in parallel on two different CPUs, and it is not disruptive of existing processes.
# main.yml
jobs:
  test:
    runs-on: ${{ matrix.os }}
    strategy:
      fail-fast: false
      matrix:
        os: [ubuntu-latest, self-hosted]
Now we can add steps that each runner will run. We’ll be using custom Actions that we create for each step, as well as the pre-built action checkout for pulling down the latest changes to each runner.
GitHub Actions expects all custom actions to be defined in .github/actions/<name of action>/action.yml. We’ll define four custom Actions – check_system_deps, check_and_install_app_deps, run_static_checks, and run_unit_tests.
#!/bin/bash
for action in check_system_deps check_and_install_app_deps run_static_checks run_unit_tests; do \
    mkdir -p .github/actions/${action} && \
    touch .github/actions/${action}/action.yml; \
    done
We define an Action with a series of steps to ensure that the runner is prepared to run our tests and checks:
Our using statement specifies “composite” to run all steps as a single action.
# .github/actions/check_system_deps/action.yml
name: "Check System Deps"
description: "Check for Python 3.x, list version, Install pipenv if it is not installed"
runs:
  using: "composite"
  steps:
    - name: Check For Python3.x
      run: |
        which python3
        VERSION=$(python3 --version | cut -d ' ' -f 2)
        VERSION_PATCH=$(echo ${VERSION} | cut -d '.' -f 2)
        [ $VERSION_PATCH -ge 8 ]
      shell: bash
    - name: Install Pipenv
      run: python3 -m pip install pipenv --user
      shell: bash
Now that we have the correct version of Python and a package manager installed, we’ll create an action to install our application dependencies:
# .github/actions/check_and_install_app_deps/action.yml
name: "Install deps"
description: "Install application dependencies"
runs:
  using: "composite"
  steps:
    - name: Install deps
      run: python3 -m pipenv install --dev
      shell: bash
Next, we’ll create an action to run all of our static checks. For our example application, we want to perform the following checks:
# .github/actions/run_static_checks/action.yml
name: "Run Static Checks"
description: "Run static checks for the python app"
runs:
  using: "composite"
  steps:
    - name: Check common sense security issues
      run: python3 -m pipenv run bandit -r graviton2_gh_runner_flask_app/
      shell: bash
    - name: Check Cyclomatic Complexity
      run: python3 -m pipenv run flake8 --max-complexity 10 graviton2_gh_runner_flask_app
      shell: bash
    - name: Check for dead code
      run: python3 -m pipenv run vulture graviton2_gh_runner_flask_app --min-confidence 100
      shell: bash
    - name: Check static types
      run: python3 -m pipenv run mypy graviton2_gh_runner_flask_app
      shell: bash
    - name: Check for CVEs
      run: python3 -m pipenv check
      shell: bash
We’ll create an action to run the unit tests using PyTest.
# .github/actions/run_unit_tests/action.yml
name: "Run Unit Tests"
description: "Run unit tests for python app"
runs:
  using: "composite"
  steps:
    - name: Run PyTest
      run: python3 -m pipenv run pytest -sv tests
      shell: bash
Finally, we’ll bring all of these actions into our steps in main.yml in order to define every step that will be run on each runner any time that our workflow is run.
# main.yml
steps:
   - name: Checkout Code
     uses: actions/checkout@v2
   - name: Check System Deps
     uses: ./.github/actions/check_system_deps
   - name: Install deps
     uses: ./.github/actions/check_and_install_app_deps
   - name: Run Static Checks
     uses: ./.github/actions/run_static_checks
   - name: Run PyTest
     uses: ./.github/actions/run_unit_tests
Save the file.
The workflow will run on the runners when you commit and push your changes. To demonstrate, we’ll create a PR to update the README of our example app in order to kick off the workflow.
After the change is pushed, see the status of your workflow by navigating to your repository in the browser. Select the Actions tab. Select your workflow run from the list of All Workflows. This opens the Summary page for the workflow run.

As each step defined in the workflow job runs, view their details by clicking the job name on the left-hand panel or on the graph representation. The following images are screenshots of the jobs, and example outputs of each step. First, we have check_system_deps.

We’ve excluded a screenshot of check_and_install_app_deps that shows the output of pipenv install. Next, we can see that our change passes for our run_static_checks Action (first), and unit tests for our run_unit_tests Action (second).


Finally, our workflow completes successfully!

To delete the AWS CDK stacks, launch CloudShell and enter the following commands:
#!/bin/bash
cd cdk-graviton2-gh-sh-runner
source .venv/bin/activate
# Re-set the environment variables again if required
# export VPC_CIDR="192.168.0.0/24" # Set your CIDR here.
cdk destroy --all
This post covered the configuring of a self-hosted GitHub Runner on an EC2 instance with a Graviton2 processor, the required network resources, and a workflow that will run on the Runner on each repository push or pull request for the example application. The Runner is configured at the Organization level, which by default only allows access by private repositories. Lastly, we showed an example run of the workflow after creating a pull request for our example app.
Self-hosted runners on Graviton2 for GitHub Actions lets you add ARM64 to your CICD workflows, accelerating migrations to take advantage of the price and performance of Graviton2. In this blog we’ve utilized a strategy to create a build matrix to run jobs on hosted and self-hosted runners.
We could further extend this workflow by automating deployment with AWS CodeDeploy or sending a build status notification to Slack. To reduce the cost of idle resources during periods without builds, you can set up an Amazon CloudWatch Event to schedule a stop and start of the instance during business hours.
Github Actions also supports ephemeral self-hosted runners, which automatically unregister runners from the service. Ephemeral runners are a good choice for self-managed environments where you need each job to run on a clean image.
For more examples of how to create development environments using AWS Graviton2 and AWS CDK, reference Building an ARM64 Rust development environment using AWS Graviton2 and AWS CDK.
Post Syndicated from The Atlantic original https://www.youtube.com/watch?v=LmNBZg1S3I4
Post Syndicated from Jana Kay original https://aws.amazon.com/blogs/security/the-five-ws-episode-2-data-classification-whitepaper/
AWS whitepapers are a great way to expand your knowledge of the cloud. Authored by Amazon Web Services (AWS) and the AWS community, they provide in-depth content that often addresses specific customer situations.
We’re featuring some of our whitepapers in a new video series, The Five Ws. These short videos outline the who, what, when, where, and why of each whitepaper so you can decide whether to dig into it further.
The second whitepaper we’re featuring is Data Classification: Secure Cloud Adoption. This paper provides insight into data classification categories for organizations to consider when moving data to the cloud—and how implementing a data classification program can simplify cloud adoption and management. It outlines a process to build a data classification program, shares examples of data and the corresponding category the data may fall into, and outlines practices and models currently implemented by global first movers and early adopters. The paper also includes data classification and privacy considerations. Note: It’s important to use internationally recognized standards and frameworks when developing your own data classification rules. For more details on the Five Ws of Data Classification: Security Cloud Adoption, check out the video.
If you have feedback about this post, submit comments in the Comments section below.
Want more AWS Security how-to content, news, and feature announcements? Follow us on Twitter.
Post Syndicated from Jani Muuriaisniemi original https://aws.amazon.com/blogs/devops/parallel-and-dynamic-saas-deployments-with-cdk-pipelines/
Software as a Service (SaaS) is an increasingly popular business model for independent software vendors (ISVs), including benefits such as a pay-as-you-go pricing model, scalability, and availability.
SaaS services can be built by using numerous architectural models. The silo model provides each tenant with dedicated resources and a shared-nothing architecture. Silo deployments also provide isolation between tenants’ compute resources and their data, and they help eliminate the noisy-neighbor problem. On the other hand, the pool model offers several benefits, such as lower maintenance overhead, simplified management and operations, and cost-saving opportunities, all due to a more efficient utilization of computing resources and capacity. In the bridge model, both silo and pool models are utilized side-by-side. The bridge model is a hybrid model, where parts of the system can be in a silo model, and parts in a pool.
End-customers benefit from SaaS delivery in numerous ways. For example, the service can be available from multiple locations, letting the customer choose what is best for them. The tenant onboarding process is often real-time and frictionless. To realize these benefits for their end-customers, SaaS providers need methods for reliable, fast, and multi-region capable provisioning and software lifecycle management.
This post will describe a deployment system for automating the provision and lifecycle management of workload components in pool or silo deployment models by using AWS Cloud Development Kit (AWS CDK) and CDK Pipelines. We will explore the system’s dynamic and database driven deployment model, as well as its multi-account and multi-region capabilities, and we will provision demo deployments of workload components in both the silo and pool models.
For this solution, we utilized AWS Cloud Development Kit (AWS CDK) and its CDK Pipelines construct library. AWS CDK is an open-source software development framework for modeling and provisioning cloud application resources by using familiar programming languages. AWS CDK lets you define your infrastructure as code and provision it through AWS CloudFormation.
CDK Pipelines is a high-level construct library with an opinionated implementation of a continuous deployment pipeline for your CDK applications. It is powered by AWS CodePipeline, a fully managed continuous delivery service that helps automate your release pipelines for fast and reliable application as well as infrastructure updates. No servers need to be provisioned or setup, and you only pay for what you use. This solution utilizes the recently released and stable CDK Pipelines modern API.
As a baseline use case, we have selected the consideration of a fictitious ISV called Unicorn that wants to implement an SaaS business model.
Unicorn operates in several countries, and requires the storing of customer data within the customers’ chosen region. Currently, Unicorn needs two regions in order to satisfy its main customer base: one in EU and one in US. Unicorn expects rapid growth, and it needs a solution that can scale to thousands of tenants. Unicorn plans to have different tenant tiers with different isolation requirements. Their planned deployment model has the majority of tenants in shared pool instances, but they also plan to support dedicated silo instances for the tenants requiring it. The solution must also be easily extendable to new Regions as Unicorn’s business expands.
Unicorn is starting small with just a single development team responsible for currently the only component in their SaaS workload architecture. Following industry best practices, Unicorn has designed its workload architecture so that each component has a clear technical ownership boundary. The chosen solution must grow together with Unicorn, and support multiple independently developed and deployed components in the future.
Today, many customers utilize AWS CodePipeline to build, test, and deploy their cloud applications. For an SaaS provider such as Unicorn, considering utilizing a single pipeline for managing every deployment presented concerns. At the scale that Unicorn requires, a single pipeline with potentially hundreds of actions runs the risk of becoming throughput limited. Moreover, a single pipeline would offer Unicorn limited control over how changes are released.
Our solution addresses this problem by having a separate dynamically provisioned pipeline for each pool and silo deployment. The solution is designed to manage multiple deployments of Unicorn’s single workload component, thereby aligning with their current needs — and with small changes, including future needs.
CDK Best Practices state that an AWS CDK application maps to a component as defined by the AWS Well-Architected Framework. A component is the code, configuration, and AWS Resources that together deliver against a workload requirement. And this is typically the unit of technical ownership. A component usually includes logical units (e.g., api, database), and can have a continuous deployment pipeline.
Utilizing CDK Pipelines provides a significant benefit: with no additional code, we can deploy cross-account and cross-region just as easily as we would to a single account and region. CDK Pipelines automatically creates and manages the required cross-account encryption keys and cross-region replication buckets. Furthermore, we only need to establish a trust relationship between the accounts during the CDK bootstrapping process.
The following diagram illustrates the solution architecture:

Figure 1: Solution architecture
Let’s look closer at the two primary high level solution flows: silo and pool pipeline provisioning (1 and 2), and component code deployment (3 and 4).
Provisioning is separated into a dedicated flow, so that code deployments do not interfere with tenant onboarding, and vice versa. At the heart of the provisioning flow is the deployment database (1), which is implemented by using an Amazon DynamoDB table.
Utilizing DynamoDB Streams and AWS Lambda Triggers, a new AWS CodeBuild provisioning project build (2) is automatically started after a record is inserted into the deployment database. The provisioning project directly provisions new silo and pool pipelines by using the “cdk deploy” command. Provisioning events are processed in parallel, so that the solution can handle possible bursts in Unicorn’s tenant onboarding volumes.
CDK best practices suggest that infrastructure and runtime code live in the same package. A single AWS CodeCommit repository (3) contains everything needed: the CI/CD pipeline definitions as well as the workload component code. This repository is the source artifact for every CodePipeline pipeline and CodeBuild project. The chapter “Managing application resources as code” describes related implementation details.
The CI/CD pipeline (4) is a CDK Pipelines pipeline, and it is responsible for the component’s Software Development Life Cycle (SDLC) activities. In addition to implementing the update release process, it is expected that most SaaS providers will also implement additional activities. This includes a variety of tests and pre-production environment deployments. The chapter “Controlling deployment updates” dives deeper into this topic.
Deployments have two parts: The pipeline (5) and the component resource stack(s) (6) that it manages. The pipelines are deployed to the central toolchain account and region, whereas the component resources are deployed to the AWS Account and Region, as specified in the deployments’ record in the deployment database.
Sample code for the solution is available in GitHub. The sample code is intended for utilization in conjunction with this post. Our solution is implemented in TypeScript.
Our deployment database is an Amazon DynamoDB table, with the following structure:

Figure 2: DynamoDB table
This design supports tenant deployment to multiple silo and pool deployments. Each of these can target any available and bootstrapped AWS Account and Region. For example, different pools can support tenants in different regions, with select tenants deployed to dedicated silos. As pools may be limited to how many tenants they can serve, the design also supports having multiple pools within a region, and it can easily be extended with an additional attribute to support the tiers concept.
Note that the deployment database does not contain tenant information. It is expected that such mapping is maintained in a separate tenant database, where each tenant record can map to the ID of the deployment that it is associated with.
Now that we have looked at our solution design and architecture, let’s move to the hands-on section, starting with the deployment requirements for the solution.
The following tools are required to deploy the solution:
To follow this tutorial completely, you should have administrator access to at least one, but preferably two AWS accounts:
If you have only a single account, then the toolchain account can be used for both purposes. Credentials for the account(s) are assumed to be configured in AWS CLI profile(s).
The instructions in this post use the following placeholders, which you must replace with your specific values:
The toolchain account, and all workload account(s), must be bootstrapped prior to first-time deployment.
AWS CDK and our solutions’ dependencies must be installed to start with. The easiest way to do this is to install them locally with npm. First, we need to download our sample code, so that the we have the package.json configuration file available for npm.
Note that throughout these instructions, many commands are broken over multiple lines for readability. Take care to execute the commands completely. It is always safe to execute each code block as a whole.
Clone the sample code repository from GitHub, and then install the dependencies by using npm:
git clone https://github.com/aws-samples/aws-saas-parallel-deployments
cd aws-saas-parallel-deployments
npm ci
CDK Pipelines requires use of modern bootstrapping. To ensure that this is enabled, start by setting the related environment variable:
export CDK_NEW_BOOTSTRAP=1Then, bootstrap the toolchain account. You must bootstrap both the region where the toolchain stack is deployed, as well as every target region for component resources. Here, we will first bootstrap only the us-east-1 region, and later you can optionally bootstrap additional region(s).
To bootstrap, we use npx to execute the locally installed version of AWS CDK:
npx cdk bootstrap <TOOLCHAIN_ACCOUNT_ID>/us-east-1 --profile <TOOLCHAIN_PROFILE_NAME>If you have a workload account that is separate from the toolchain account, then that account must also be bootstrapped. When bootstrapping the workload account, we will establish a trust relationship with the toolchain account. Skip this step if you don’t have a separate workload account.
The workload account boostrappings follows the security best practice of least privilege. First create an execution policy with the minimum permissions required to deploy our demo component resources. We provide a sample policy file in the solution repository for this purpose. Then, use that policy as the execution policy for the trust relationship between the toolchain account and the workload account
aws iam create-policy \
  --profile <WORKLOAD_PROFILE_NAME> \
  --policy-name CDK-Exec-Policy \
  --policy-document file://policies/workload-cdk-exec-policy.json
npx cdk bootstrap <WORKLOAD_ACCOUNT_ID>/us-east-1 \
  --profile <WORKLOAD_PROFILE_NAME> \
  --trust <TOOLCHAIN_ACCOUNT_ID> \
--cloudformation-execution-policies arn:aws:iam::<WORKLOAD_ACCOUNT_ID>:policy/CDK-Exec-PolicyPrior to being able to deploy for the first time, you must create an AWS CodeCommit repository for the solution. Create this repository in the toolchain account:
aws codecommit create-repository \
  --profile <TOOLCHAIN_PROFILE_NAME> \
  --region us-east-1 \
  --repository-name unicorn-repository
Next, you must push the contents to the CodeCommit repository. For this, use the git command together with the git-remote-codecommit extension in order to authenticate to the repository with your AWS CLI credentials. Our pipelines are configured to use the main branch.
git remote add unicorn codecommit::us-east-1://<TOOLCHAIN_PROFILE_NAME>@unicorn-repository
git push unicorn main
Now we are ready to deploy the toolchain stack:
export AWS_REGION=us-east-1
npx cdk deploy --profile <TOOLCHAIN_PROFILE_NAME>
At this point, our CI/CD pipeline, provisioning project, and deployment database have been created. The database is initially empty.
Note that the DynamoDB command line interface demonstrated below is not intended to be the SaaS providers provisioning interface for production use. SaaS providers typically have online registration portals, wherein the customer signs up for the service. When new deployments are needed, then a record should automatically be inserted into the solution’s deployment database.
To demonstrate the solution’s capabilities, first we will provision two deployments, with an optional third cross-region deployment:
To start, configure the AWS CLI environment variables:
export AWS_REGION=us-east-1
export AWS_PROFILE=<TOOLCHAIN_PROFILE_NAME>
Add the deployment database records for the first two deployments:
aws dynamodb put-item \
  --table-name unicorn-deployments \
  --item '{
    "id": {"S":"silo1"},
    "type": {"S":"silo"},
    "account": {"S":"<WORKLOAD_ACCOUNT_ID>"},
    "region": {"S":"us-east-1"}
  }'
aws dynamodb put-item \
  --table-name unicorn-deployments \
  --item '{
    "id": {"S":"pool1"},
    "type": {"S":"pool"},
    "account": {"S":"<WORKLOAD_ACCOUNT_ID>"},
    "region": {"S":"us-east-1"}
  }'
This will trigger two parallel builds of the provisioning CodeBuild project. Use the CodeBuild Console in order to observe the status and progress of each build.
Optionally, also try a cross-region deployment. Skip this part if a cross-region deployment is not relevant for your use case.
First, you must bootstrap the target region in the toolchain and the workload accounts. Bootstrapping of eu-west-1 here is identical to the bootstrapping of the us-east-1 region earlier. First bootstrap the toolchain account:
npx cdk bootstrap <TOOLCHAIN_ACCOUNT_ID>/eu-west-1 --profile <TOOLCHAIN_PROFILE_NAME>If you have a separate workload account, then we must also bootstrap it for the new region. Again, please skip this if you have only a single account:
npx cdk bootstrap <WORKLOAD_ACCOUNT_ID>/eu-west-1 \
  --profile <WORKLOAD_PROFILE_NAME> \
  --trust <TOOLCHAIN_ACCOUNT_ID> \
  --cloudformation-execution-policies arn:aws:iam::<WORKLOAD_ACCOUNT_ID>:policy/CDK-Exec-Policy
Then, add the cross-region deployment:
aws dynamodb put-item \
  --table-name unicorn-deployments \
  --item '{
    "id": {"S":"pool2"},
    "type": {"S":"pool"},
    "account": {"S":"<WORKLOAD_ACCOUNT_ID>"},
    "region": {"S":"eu-west-1"}
}'After the builds have completed, use the CodePipeline console to verify that the deployment pipelines were successfully created in the toolchain account:

Figure 3: CodePipeline console
Similarly, in the workload account, stacks containing your component resources will have been deployed to each configured region for the deployments. In this demo, we are deploying a single “hello world” container application utilizing AWS App Runner as runtime environment. Successful deployment can be verified by using CloudFormation Console:

Figure 4: CloudFormation console
Now that we have successfully finished with our demo deployments, let’s look at how updates to the pipelines and the component resources can be managed.
As highlighted earlier in the Solution Overview, every aspect of our solution shares a single source repository. With all of our code in a single source, we can easily deliver complex changes impacting multiple aspects of our solution. And all of this can be packaged, tested, and released as a single change set. For example, a change can introduce a new stage to the CI/CD pipeline, modify an existing stage in the silo and pool pipelines, and/or make code and resource changes to the component resources.
Managing the pipeline definitions is made simple by the self-mutate capability of the CDK Pipelines. Once initially deployed, each CDK Pipelines pipeline can update its own definition. This is implemented by using a separate SelfMutate stage in the pipeline definition. This stage is executed before any deployment actions, thereby ensuring that the pipeline always executes the latest version that is defined by the source code.
Managing how and when the pipelines trigger to execute also required attention. CDK Pipelines configures pipelines by default to utilize event-based polling of the source repository. While this is a reasonable default, and it is great for the CI/CD pipeline, it is undesired for our silo and pool pipelines. If all of these pipelines would execute automatically on code commits to the source repository, the CI/CD pipeline could not manage the release flow. To address this, we have configured the silo and pool pipelines with the trigger in the CodeCommitSourceOptions to NONE.
A key aspect of SaaS delivery is controlling how you roll out changes to tenants. Significant business risk can arise if changes are released to all tenants all-at-once in a single big bang.
This risk can be managed by utilizing a combination of silo and pool deployments. Reduce your risk by spreading tenants into multiple pools, and gradually rolling out your changes to these pools. Based on business needs and/or risk assessment, select customers can be provisioned into dedicated silo deployments, thereby allowing update control for those customers separately. Note that while all of a pool’s tenants get the same underlying update simultaneously, you can utilize feature flags to selectively enable new features only for specific tenants in the deployment.
In the demo solution, the CI/CD pipeline contains only a single custom stage “UpdateDeployments”. This CodeBuild action implements a simple “one-at-a-time” strategy. The code has been purposely written so that it is simple and provides you with a starting point to implement your own more complex strategy, as based on your unique business needs. In the default implementation, every silo and pool pipeline tracks the same “main” branch of the repository. Releases are governed by controlling when each pipeline executes to update its resources.
When designing your release strategy, look into how the planned process helps implement releases and changes with high quality and frequency. A typical starting point is a CI/CD pipeline with continuous automated deployments via multiple test and staging environments in order to validate your changes prior to deployment to any production tenants.
Furthermore, consider if utilizing a canary release strategy would help identify potential issues with your changes prior to rolling them out across all deployments in production. In a canary release, each change is first deployed only to a small subset of your deployments. Once you are satisfied with the change quality, then the change can either automatically or manually be released to the rest of your deployments. As an example, an AWS Step Functions state machine could be combined with the solution, and then utilized to control the release flow, execute validation tests, implement approval steps (either manual or automatic), and even conduct rollback if necessary.
The example in this post provisions every silo and pool deployment to a single AWS account. However, the solution is not limited to a single account, and it can deploy equally easily to multiple AWS accounts. When operating at scale, it is best-practice to spread your workloads to several accounts. The Organizing Your AWS Environment using Multiple Accounts whitepaper has in-depth guidance on strategies for spreading your workloads.
If combined with an AWS account-vending machine implementation, such as an AWS Control Tower Landing Zone, then the demo solution could be adapted so that new AWS accounts are provisioned automatically. This would be useful if your business requires full account-level deployment isolation, and you also want automated provisioning.
To meet Unicorn’s future needs for spreading their solution architecture over multiple separate components, the deployment database and associated lambda function could be decoupled from the rest of the toolchain components in order to provide a central deployment service. When provisioned as standalone, and amended with Amazon Simple Notification Service-based notifications sent to the component deployment systems for example, this central deployment service could be utilized for managing the deployments for multiple components.
In addition, you should analyze your deployment lifecycle transitions, and then consider what action should be taken when a tenant is disabled and/or deleted. Implementing a deployment archival/deletion process is not in the scope of this post.
To cleanup every resource deployed in this post, conduct the following actions:
This solution demonstrated an implementation of an automated SaaS application component deployment factory. We covered how an ISV venturing into the SaaS model can utilize AWS CDK and CDK Pipelines in order to avoid a multitude of undifferentiated heavy lifting by leveraging and combining AWS CDK’s cross-region and cross-account capabilities with CDK Pipelines’ self-mutating deployment pipelines. Furthermore, we demonstrated how all of this can be written, managed, and released just like any other code you write. We also demonstrated how a single dynamic provisioning system can be utilized to operate in a mixed mode, with both silo and pool deployments.
Visit the AWS SaaS Factory Program page for further information on how AWS can help you on your SaaS journey — regardless of the stage you are currently in.
Post Syndicated from Tom Caiazza original https://blog.rapid7.com/2021/11/01/solving-the-access-goldilocks-problem-rbac-for-insightappsec-is-here/

We’re all familiar with the story of Goldilocks and the Three Bears. Goldilocks starts a new job as a security specialist on the security team at Three Bears’ Porridge, Inc. and is given access to their application security platform.
At first, the access she’s given is far too broad. It causes problems, and she has access to more data than she needs to do her job. By the end of the day, it’s impacted the entire system. The next day, she’s given too little access, preventing her from fully completing her tasks and creating more work for Hansel, Gretel, and the rest of the security team. Finally, after several rounds of granting and restricting permissions, they eventually land on an access level that’s just right.
Does this famous yarn hit a little too close to home?
Providing the right access levels to different teams and individual team members is a critical component of managing any security program, but it can be time-consuming, cumbersome, and rife with constant back-and-forth.
That’s why we’re excited to announce a new feature standard for InsightAppSec called Role-Based Access Control (RBAC). Our RBAC system gives you the flexibility to provide the right levels of access to the InsightAppSec platform needed for each role on your security team. By identifying users through groups, you can grant access and permissions quickly and easily, reducing back-and-forth setting up access that may have caused your team more than one porridge hangover.
The InsightAppSec RBAC feature works under a simple premise: scalability. RBAC allows you to create groups with bespoke levels of access based on what they need to actually do their jobs. The role a user is given will govern what they can see in the product in terms of features — for example, can they see the scan configs or vulnerabilities areas? — but their data access will define if they can actually see any data within those areas.
It doesn’t matter if you have a department of 10 or 20 — everyone assigned to designated groups will have the right access parameters to successfully carry out their tasks. Those parameters are easily updated to roll with changes as needed, and they’re fully customizable. With a few clicks, RBAC lets you set the access levels your entire security team needs to operate.
So, why is this so important? Well, on day one, Goldilocks had far too much access and nearly brought the operation to a screeching halt. Having too many team members with unneeded access invites risk, and cleaning up that mess can be time-consuming and difficult. Similarly, day 2 wasn’t much better. Goldilocks didn’t have the permissions she needed and couldn’t contribute to the team (through no fault of her own). That meant the slack needed to be picked up somewhere, putting stress on the entire team and slowing the operation down.
If Three Bears’ Porridge, Inc. had the new RBAC, Goldilocks and the other members of her team or in her group would have had the permissions they needed from day 1, saving time, headaches, and money.
But the conveniences go further than that. InsightAppSec’s RBAC feature allows you to better partner with the dev team, providing them direct access to their application vulnerability details and context. That means less back-and-forth, less time lost, and a system that will scale with your business.
The RBAC feature allows you to do more than create custom roles. You can control access to applications in bulk with just a few clicks — and with our prebuilt roles, you can use the feature right out of the proverbial box (and customize from there).
This is one of the many features we’ve been working on this year to make your life at work just a little bit safer, more streamlined, and efficient. Current InsightAppSec customers will see that they may already have access to RBAC, and it will be rolled out for other parts of the Insight platform in the coming months. If you’d like to learn more, check out this handy video:
As for Goldilocks, she’s been promoted to security administrator and is dreaming of becoming a CISO. And they lived happily ever after.
Post Syndicated from original https://bivol.bg/%D0%B8%D0%BC%D0%B0-%D0%BD%D0%B5%D1%89%D0%BE-%D0%B3%D0%BD%D0%B8%D0%BB%D0%BE-%D0%B2-%D0%B1%D0%B0%D0%BD%D0%BA%D1%8F.html

Гледайки как се развива предизборната надпревара, оставам с впечатление, че повечето партии, които се обявяват открито срещу банкенския специалист по корелациите между класическите италианска и английска литератури, забравят нещо много…
Post Syndicated from original https://lwn.net/Articles/874637/rss
The Free Software Foundation has opened
nominations for the Free Software
Awards. Nominations are open until November 30.
The dedication of the developers, documentation writers, community
organizers, and volunteers of the free software movement is what has helped
us all live
liberation in the years the free software movement has been
active. Just using free software makes you part of our collective journey
to freedom, but some go above and beyond in their dedication to the free
software movement. Now, it’s time for us to show those community members
and projects that we appreciate their vital work.[…] Maybe you’ve been inspired by the work of a particular member of the free software community, or have been impressed by the great strides made by a project that incorporates free software into their platform for social change.
Post Syndicated from original https://lwn.net/Articles/874283/rss
The 5.15 kernel was released on
October 31, with the code name appropriately changed to “Trick or
Treat”. By that time, 12,377 non-merge changesets had been merged into the
mainline, adding a net total of 332,000 lines of code. Read on for a look
at where the contributions to the 5.15 kernel came from.
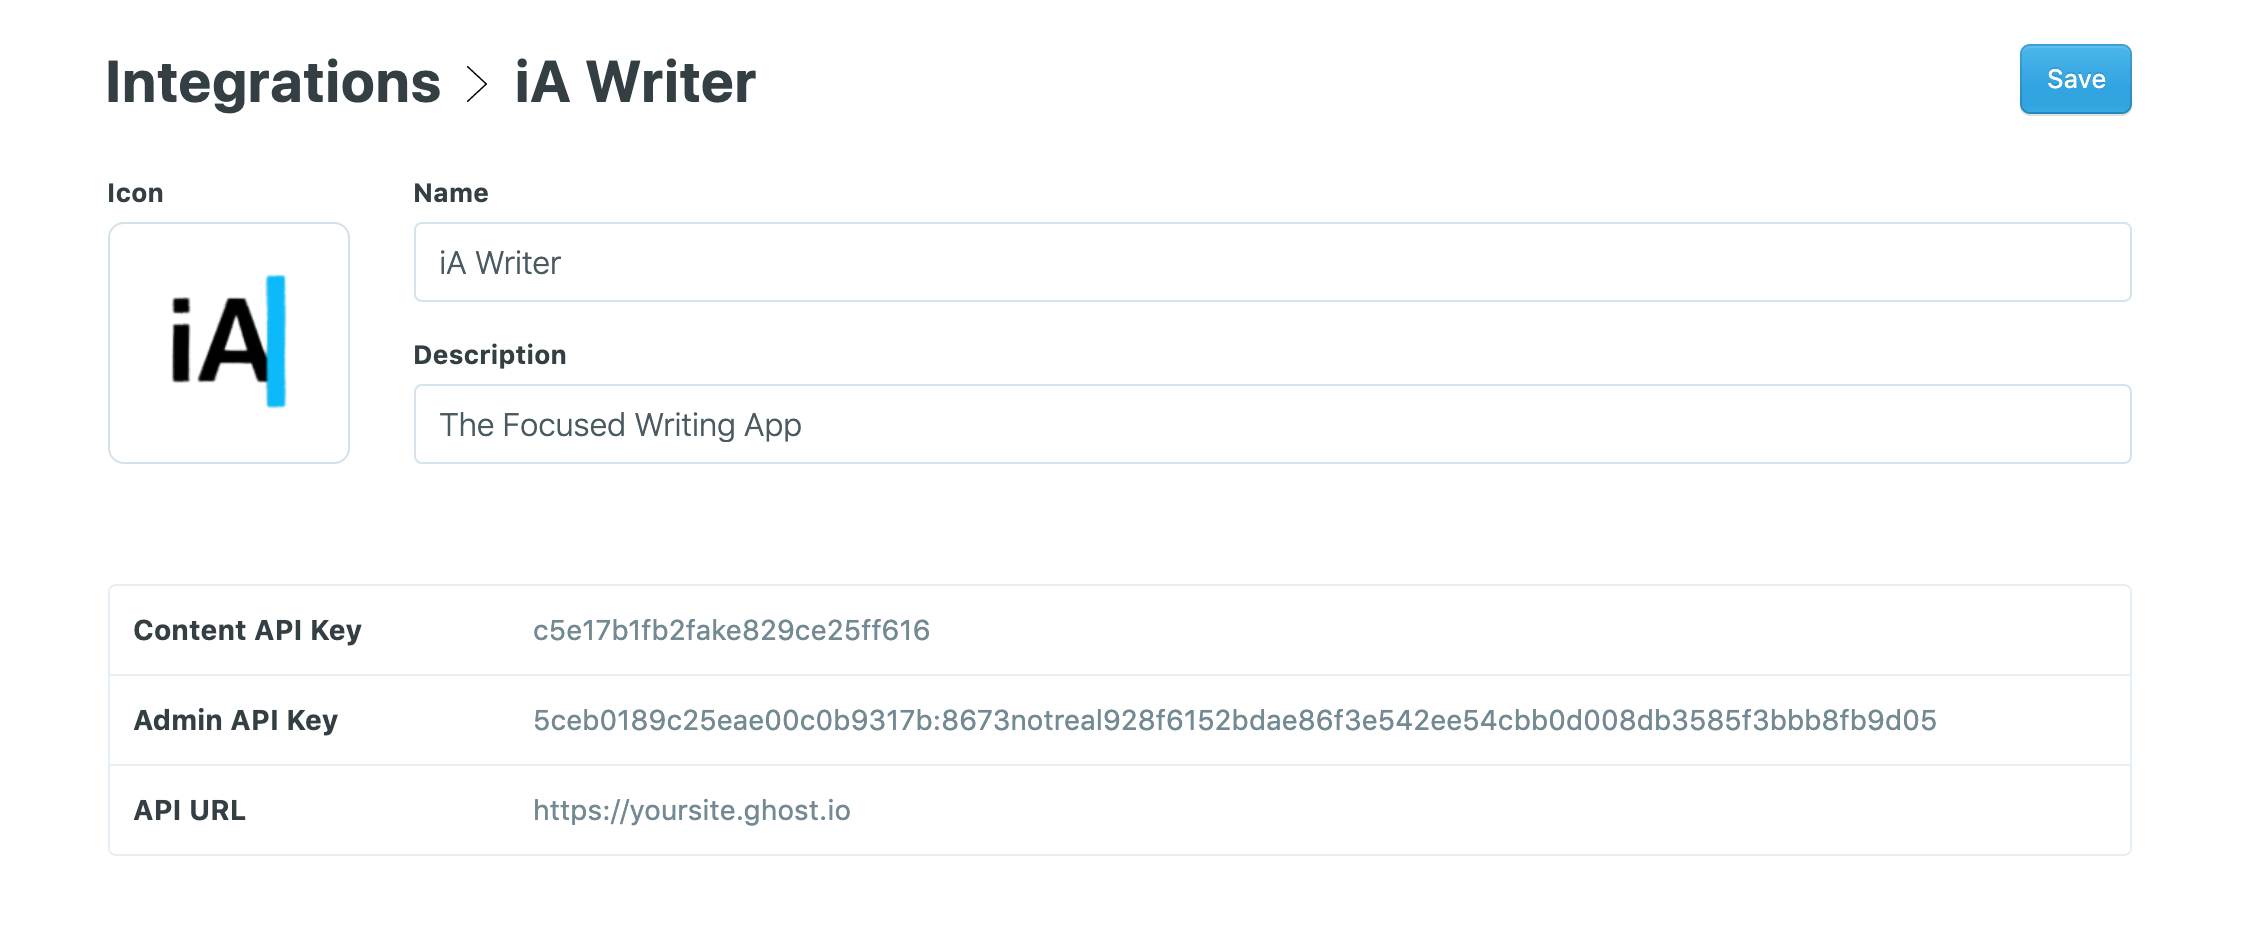
Post Syndicated from Ghost original https://yovko.net/welcome/

Hey there, welcome to your new home on the web!
Unlike social networks, this one is all yours. Publish your work on a custom domain, invite your audience to subscribe, send them new content by email newsletter, and offer premium subscriptions to generate sustainable recurring revenue to fund your work.
Ghost is an independent, open source app, which means you can customize absolutely everything. Inside the admin area, you'll find straightforward controls for changing themes, colors, navigation, logos and settings — so you can set your site up just how you like it. No technical knowledge required.
If you're feeling a little more adventurous, there's really no limit to what's possible. With just a little bit of HTML and CSS you can modify or build your very own theme from scratch, or connect to Zapier to explore advanced integrations. Advanced developers can go even further and build entirely custom workflows using the Ghost API.
This level of customization means that Ghost grows with you. It's easy to get started, but there's always another level of what's possible. So, you won't find yourself outgrowing the app in a few months time and wishing you'd chosen something more powerful!
For now, you're probably just wondering what to do first. To help get you going as quickly as possible, we've populated your site with starter content (like this post!) covering all the key concepts and features of the product.
You'll find an outline of all the different topics below, with links to each section so you can explore the parts that interest you most.
Once you're ready to begin publishing and want to clear out these starter posts, you can delete the "Ghost" staff user. Deleting an author will automatically remove all of their posts, leaving you with a clean blank canvas.
If you get through all those and you're hungry for more, you can find an extensive library of content for creators over on the Ghost blog.
If you need help, Ghost(Pro) customers can always reach our full-time support team by clicking on the Ghost(Pro) link inside their admin panel.
If you're a developer working with the codebase in a self-managed install, check out our developer community forum to chat with other users.
Have fun!
Post Syndicated from Ghost original https://yovko.net/design/

As discussed in the introduction post, one of the best things about Ghost is just how much you can customize to turn your site into something unique. Everything about your layout and design can be changed, so you're not stuck with yet another clone of a social network profile.
How far you want to go with customization is completely up to you, there's no right or wrong approach! The majority of people use one of Ghost's built-in themes to get started, and then progress to something more bespoke later on as their site grows.
The best way to get started is with Ghost's branding settings, where you can set up colors, images and logos to fit with your brand.
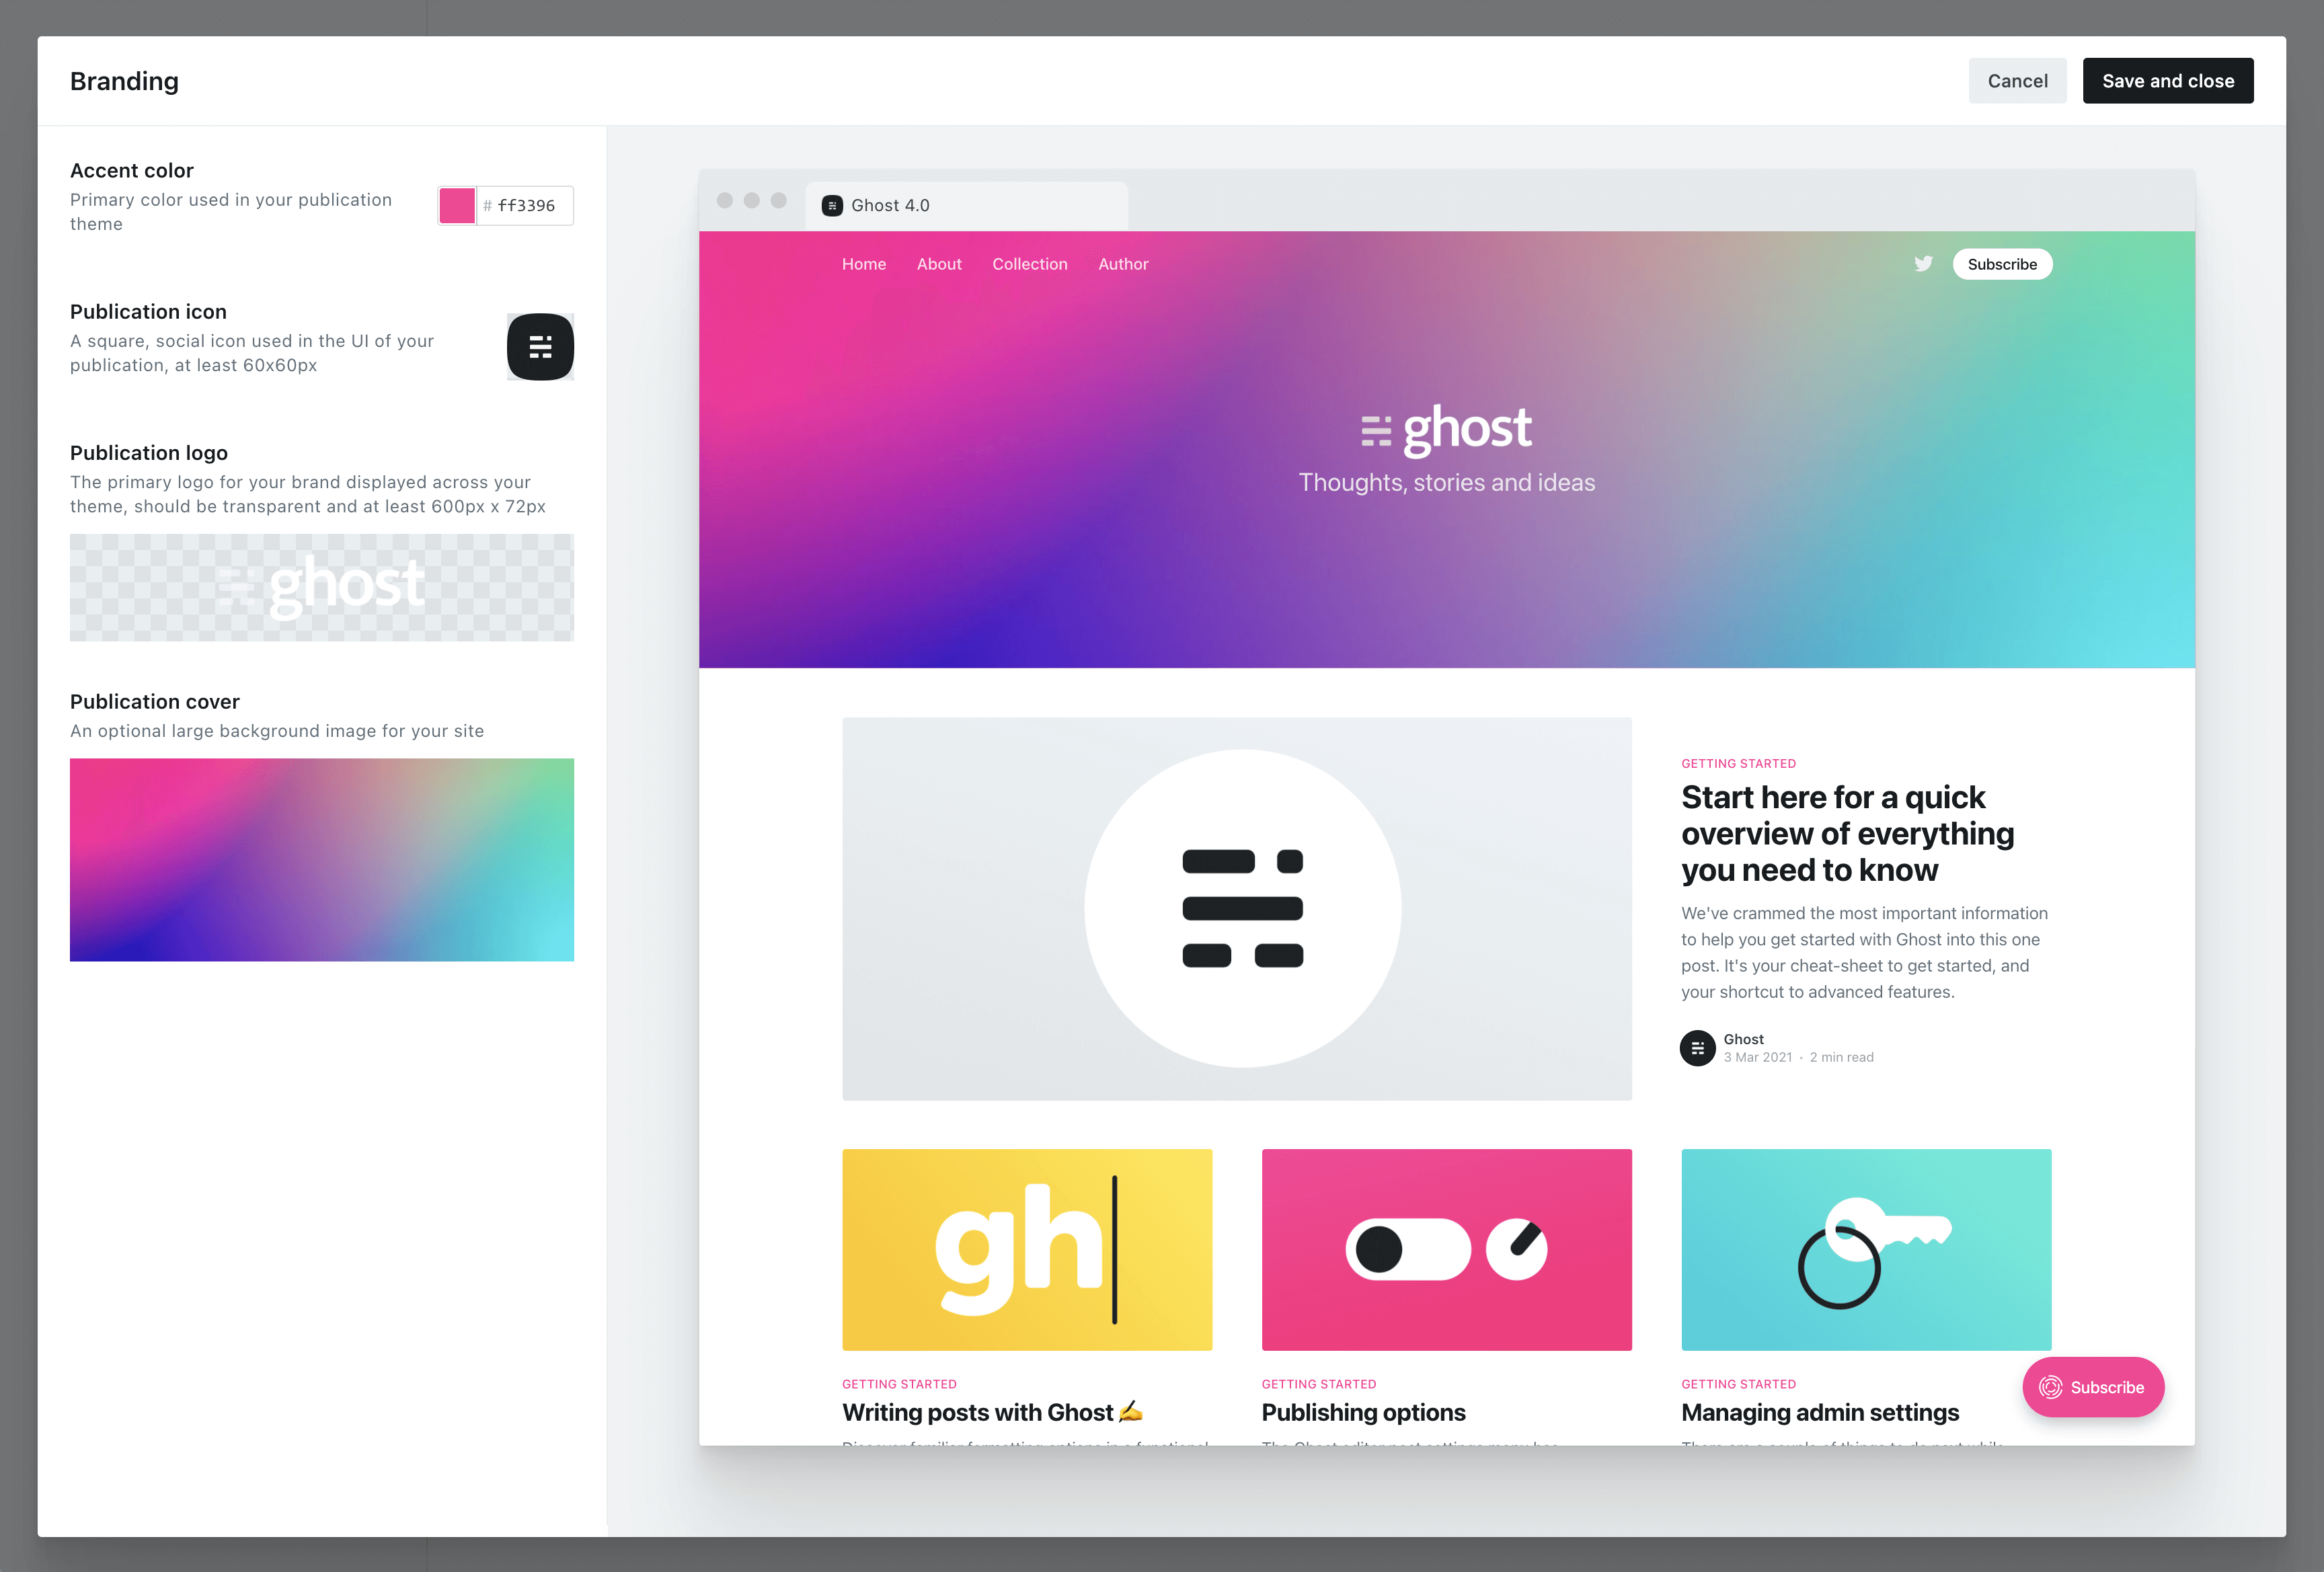
Any Ghost theme that's up to date and compatible with Ghost 4.0 and higher will reflect your branding settings in the preview window, so you can see what your site will look like as you experiment with different options.
When selecting an accent color, try to choose something which will contrast well with white text. Many themes will use your accent color as the background for buttons, headers and navigational elements. Vibrant colors with a darker hue tend to work best, as a general rule.
By default, new sites are created with Ghost's friendly publication theme, called Casper. Everything in Casper is optimized to work for the most common types of blog, newsletter and publication that people create with Ghost — so it's a perfect place to start.
However, there are hundreds of different themes available to install, so you can pick out a look and feel that suits you best.
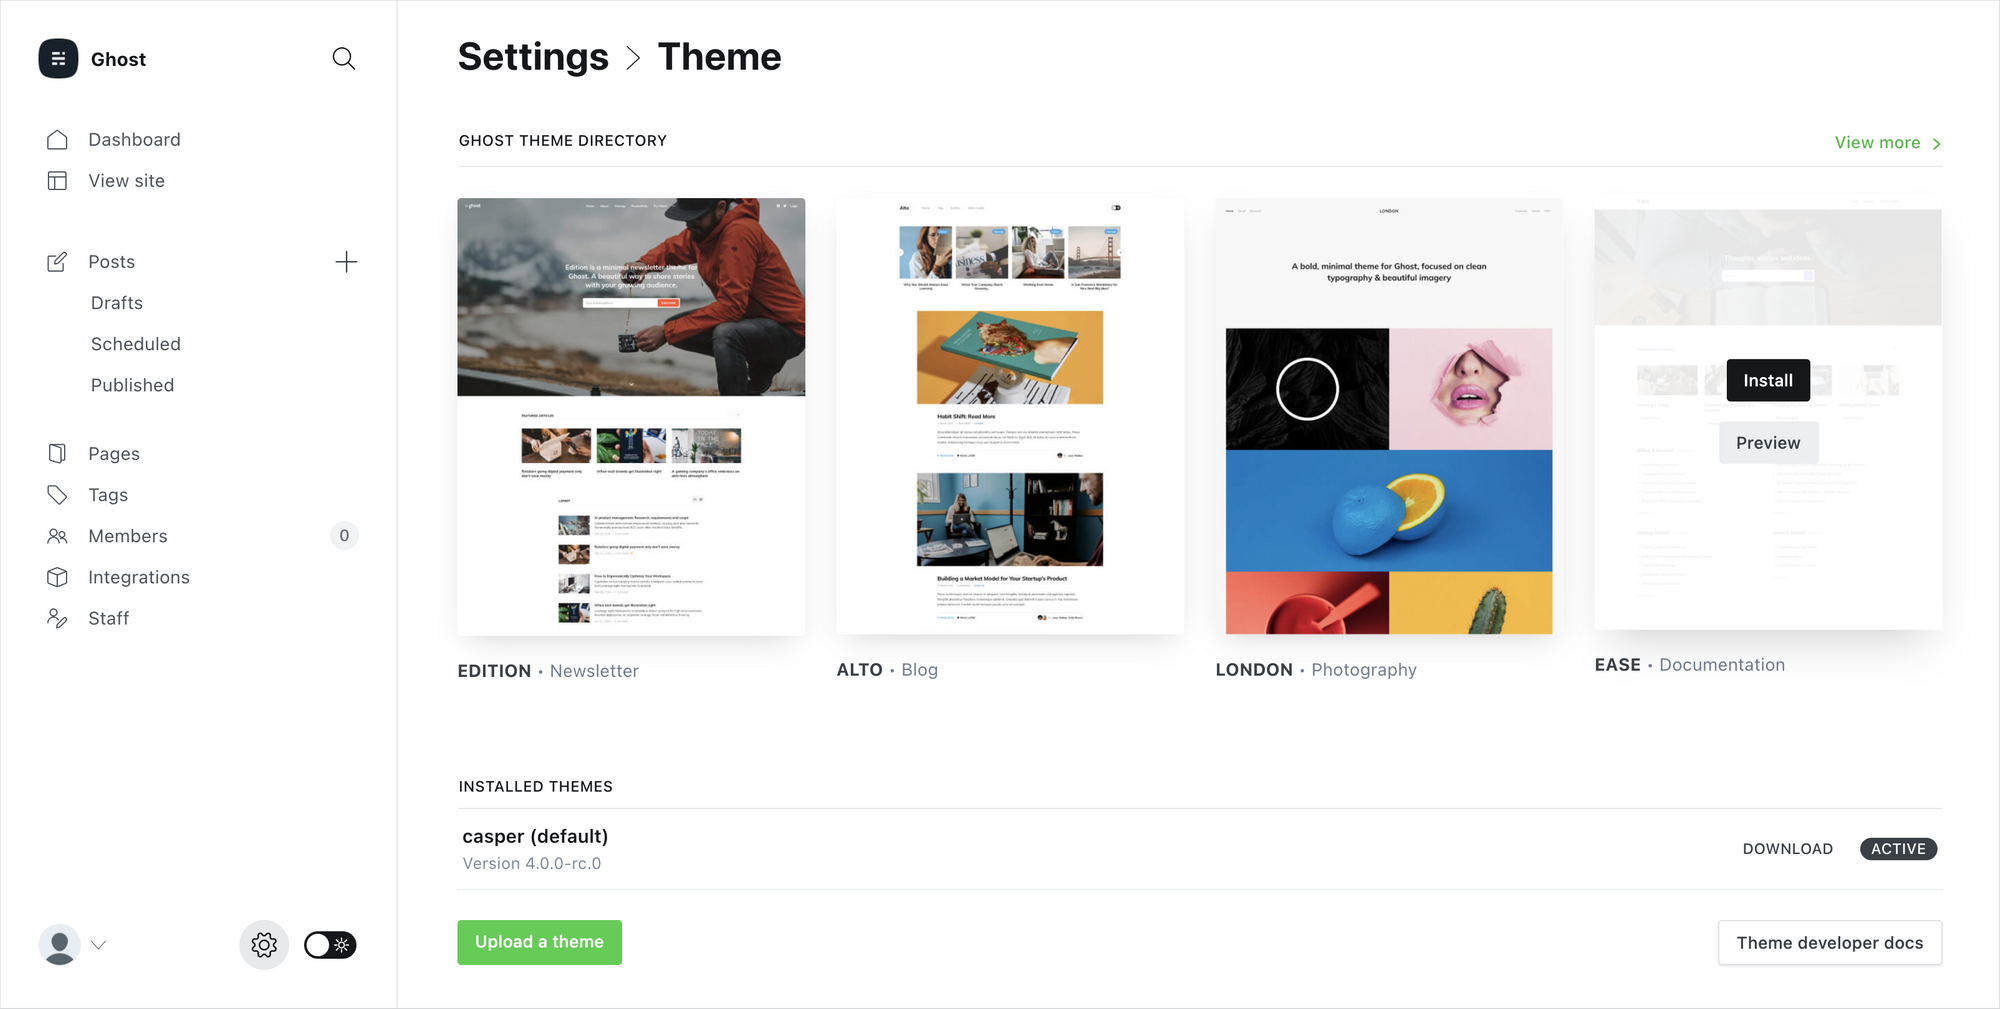
Inside Ghost's theme settings you'll find 4 more official themes that can be directly installed and activated. Each theme is suited to slightly different use-cases.
And if none of those feel quite right, head on over to the Ghost Marketplace, where you'll find a huge variety of both free and premium themes.
Finally, if you want something completely bespoke for your site, you can always build a custom theme from scratch and upload it to your site.
Ghost's theming template files are very easy to work with, and can be picked up in the space of a few hours by anyone who has just a little bit of knowledge of HTML and CSS. Templates from other platforms can also be ported to Ghost with relatively little effort.
If you want to take a quick look at the theme syntax to see what it's like, you can browse through the files of the default Casper theme. We've added tons of inline code comments to make it easy to learn, and the structure is very readable.
{{#post}}
<article class="article {{post_class}}">

    <h1>{{title}}</h1>

    {{#if feature_image}}
    	<img src="{{feature_image}}" alt="Feature image" />
    {{/if}}

    {{content}}

</article>
{{/post}}See? Not that scary! But still completely optional.
If you're interested in creating your own Ghost theme, check out our extensive theme documentation for a full guide to all the different template variables and helpers which are available.
Post Syndicated from Ghost original https://yovko.net/write/

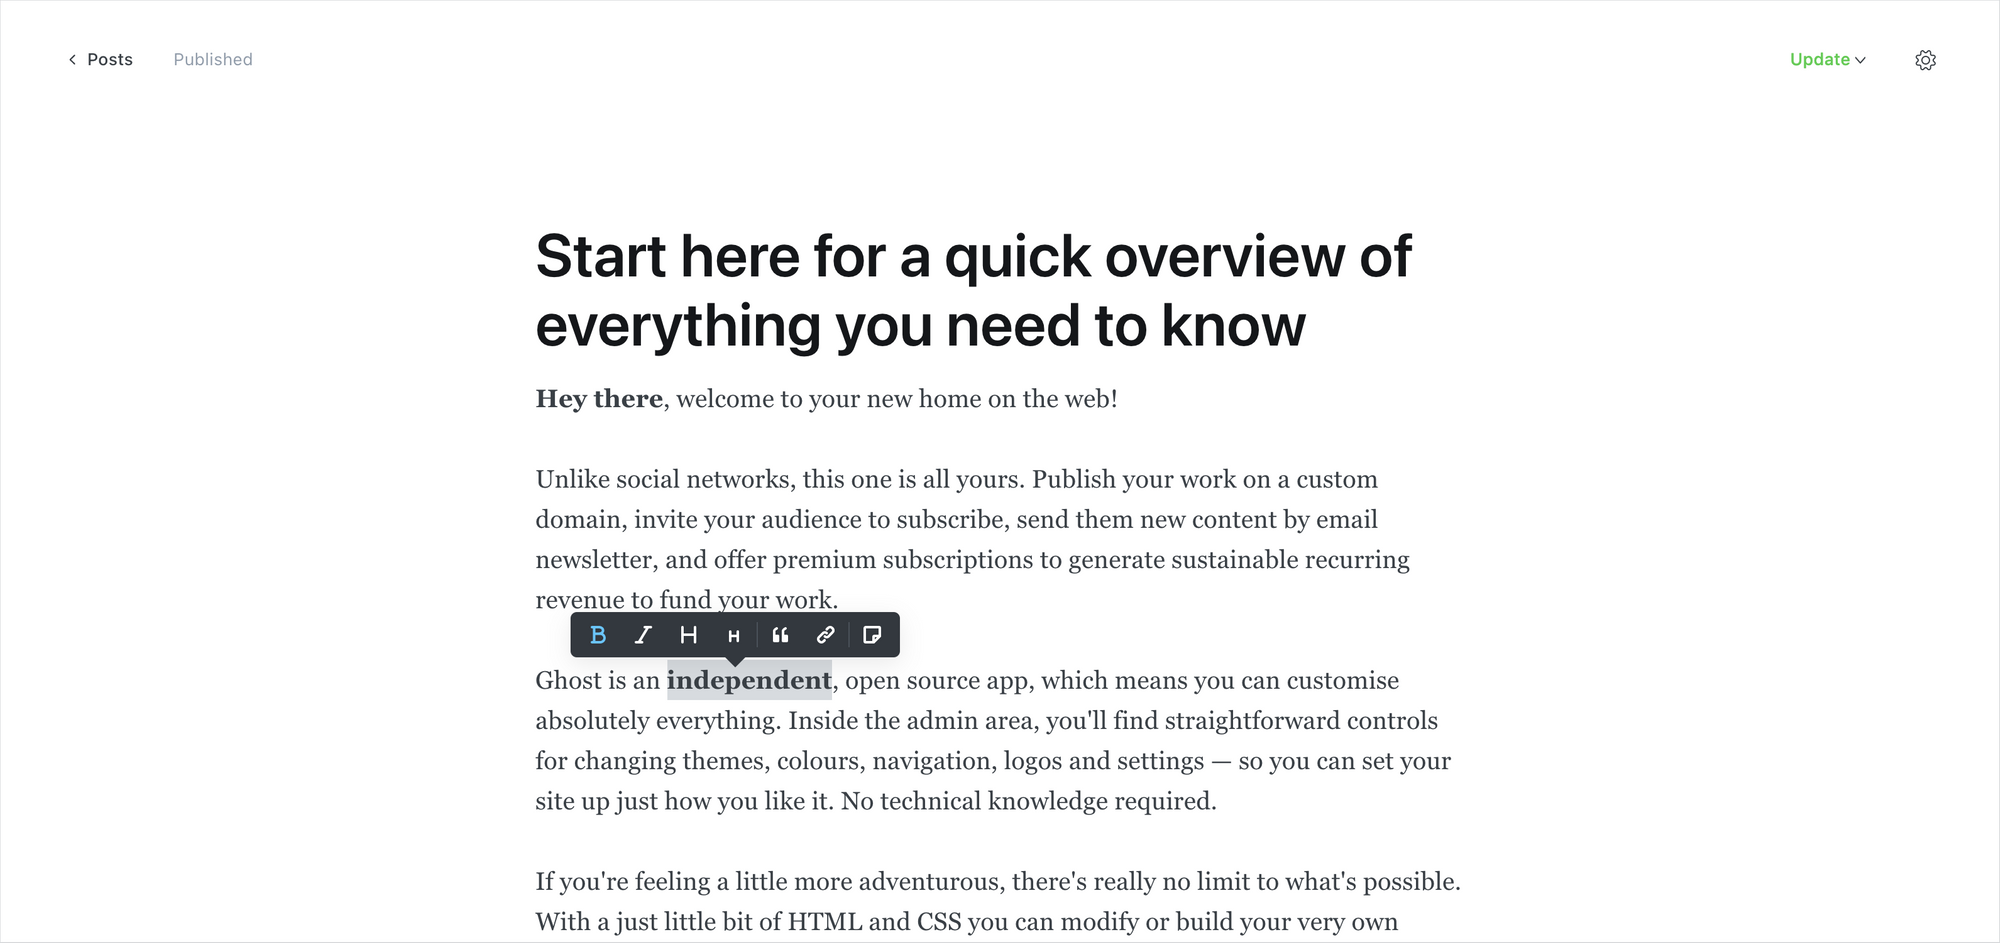
Ghost comes with a best-in-class editor which does its very best to get out of the way, and let you focus on your content. Don't let its minimal looks fool you, though, beneath the surface lies a powerful editing toolset designed to accommodate the extensive needs of modern creators.
For many, the base canvas of the Ghost editor will feel familiar. You can start writing as you would expect, highlight content to access the toolbar you would expect, and generally use all of the keyboard shortcuts you would expect.
Our main focus in building the Ghost editor is to try and make as many things that you hope/expect might work: actually work.
The goal, as much as possible, is for things to work so that you don't have to think so much about the editor. You won't find any disastrous "block builders" here, where you have to open 6 submenus and choose from 18 different but identical alignment options. That's not what Ghost is about.
What you will find though, is dynamic cards which allow you to embed rich media into your posts and create beautifully laid out stories.
You can insert dynamic cards inside post content using the + button, which appears on new lines, or by typing / on a new line to trigger the card menu. Many of the choices are simple and intuitive, like bookmark cards, which allow you to create rich links with embedded structured data:

or embed cards which make it easy to insert content you want to share with your audience, from external services:
But, dig a little deeper, and you'll also find more advanced cards, like one that only shows up in email newsletters (great for personalized introductions) and a comprehensive set of specialized cards for different types of images and galleries.
Once you start mixing text and image cards creatively, the whole narrative of the story changes. Suddenly, you're working in a new format.

As it turns out, sometimes pictures and a thousand words go together really well. Telling people a great story often has much more impact if they can feel, even for a moment, as though they were right there with you.


Galleries and image cards can be combined in so many different ways — the only limit is your imagination.
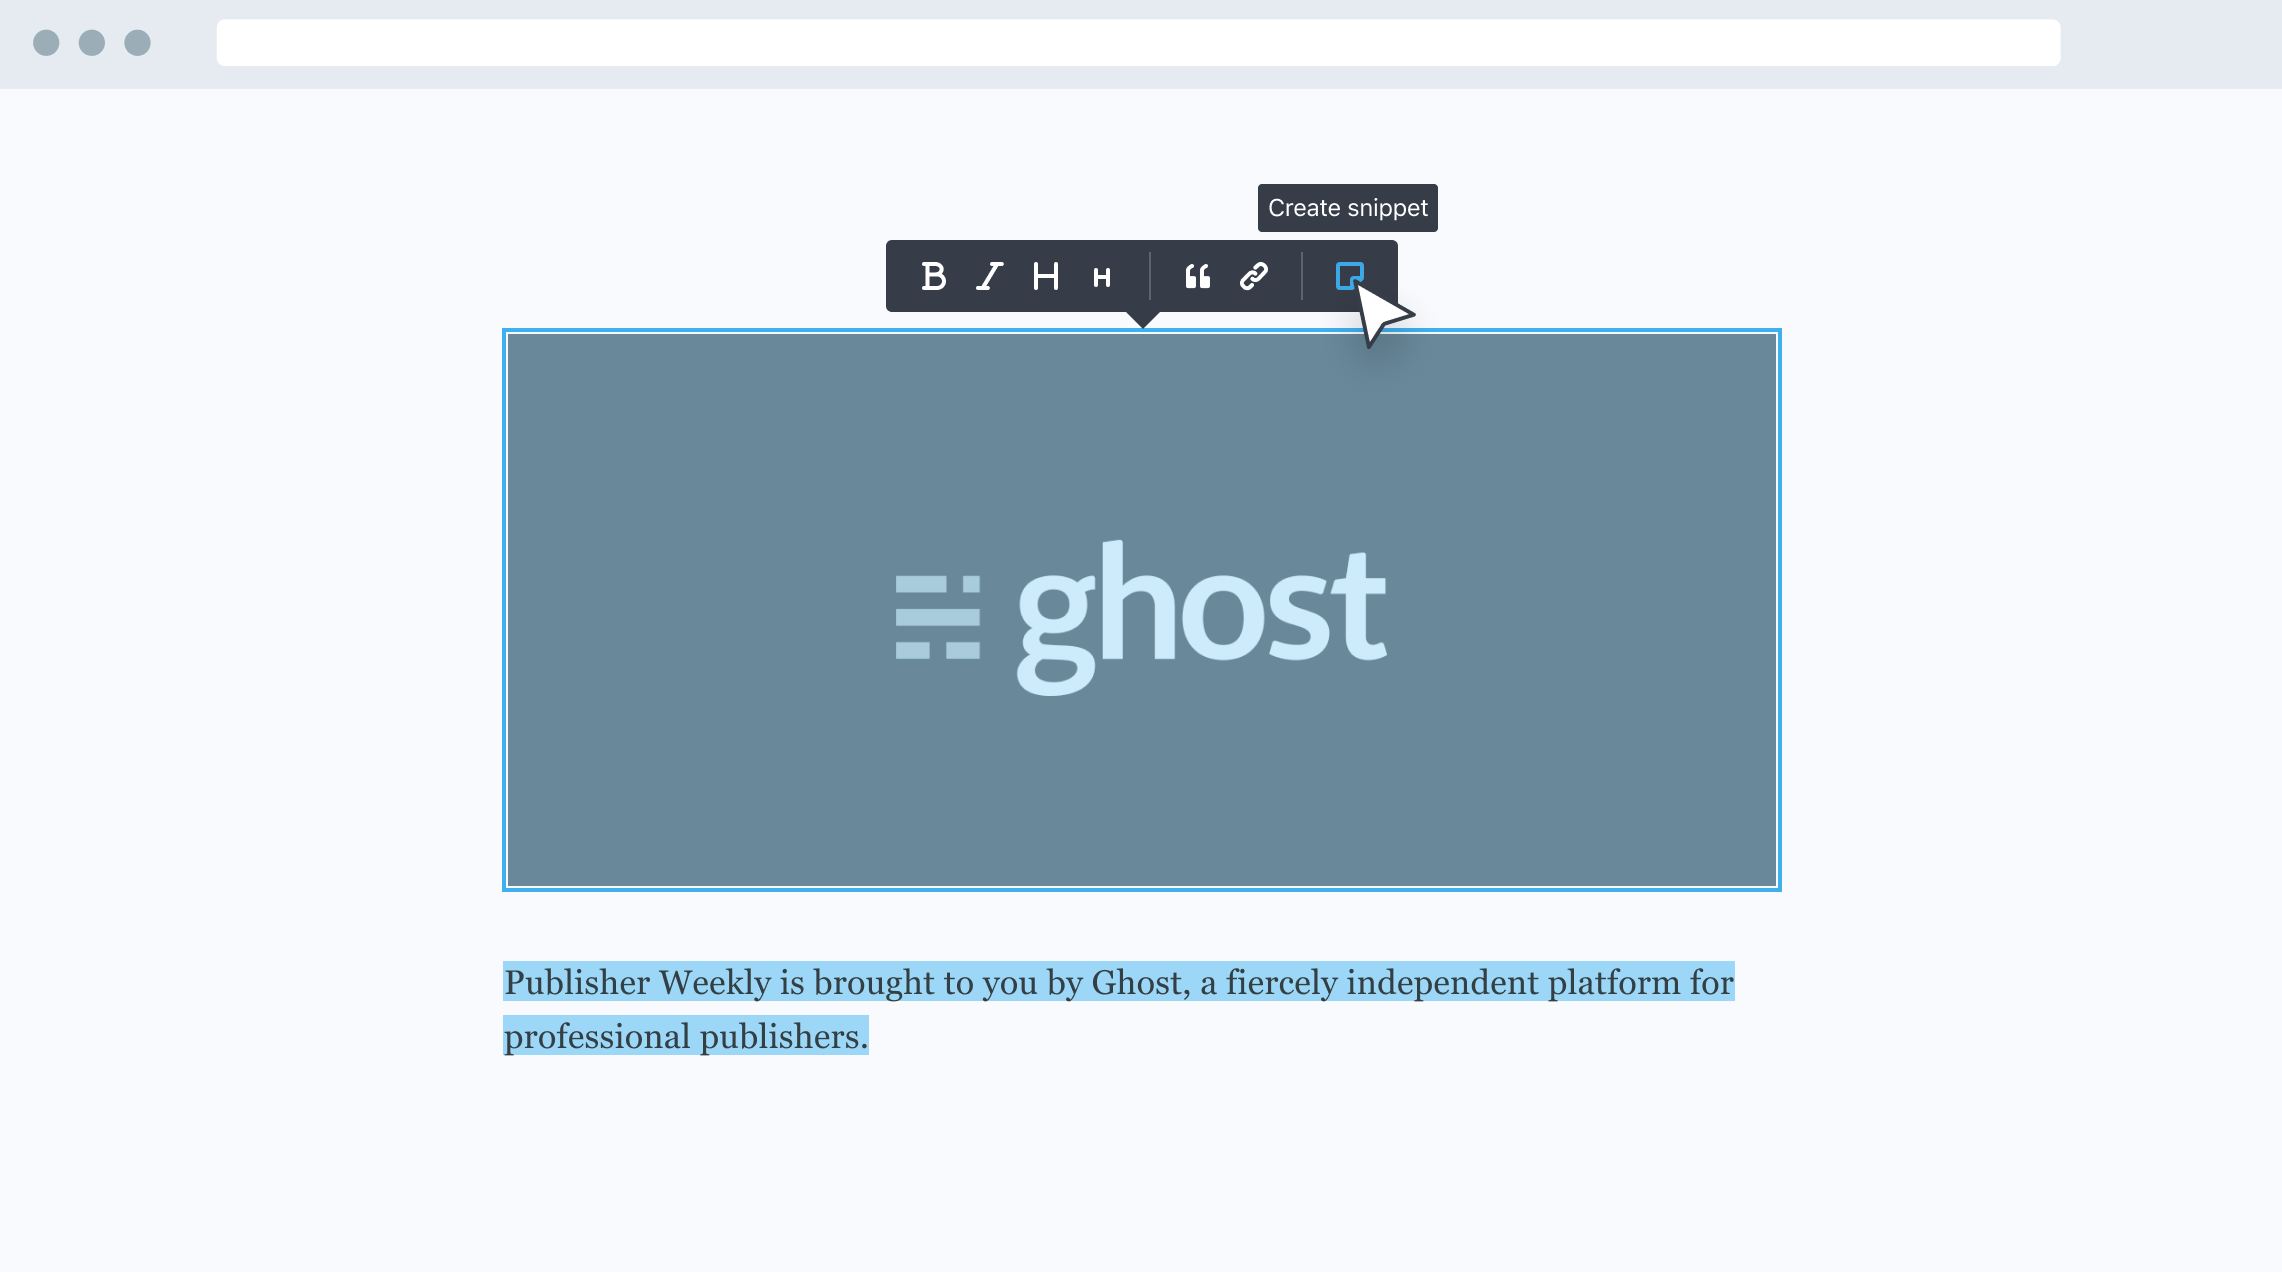
One of the most powerful features of the Ghost editor is the ability to create and re-use content snippets. If you've ever used an email client with a concept of saved replies then this will be immediately intuitive.
To create a snippet, select a piece of content in the editor that you'd like to re-use in future, then click on the snippet icon in the toolbar. Give your snippet a name, and you're all done. Now your snippet will be available from within the card menu, or you can search for it directly using the / command.
This works really well for saving images you might want to use often, like a company logo or team photo, links to resources you find yourself often linking to, or introductions and passages that you want to remember.
You can even build entire post templates or outlines to create a quick, re-usable workflow for publishing over time. Or build custom design elements for your post with an HTML card, and use a snippet to insert it.
Once you get a few useful snippets set up, it's difficult to go back to the old way of diving through media libraries and trawling for that one thing you know you used somewhere that one time.
When you're ready to publish, Ghost makes it as simple as possible to deliver your new post to all your existing members. Just hit the Preview link and you'll get a chance to see what your content looks like on Web, Mobile, Email and Social.
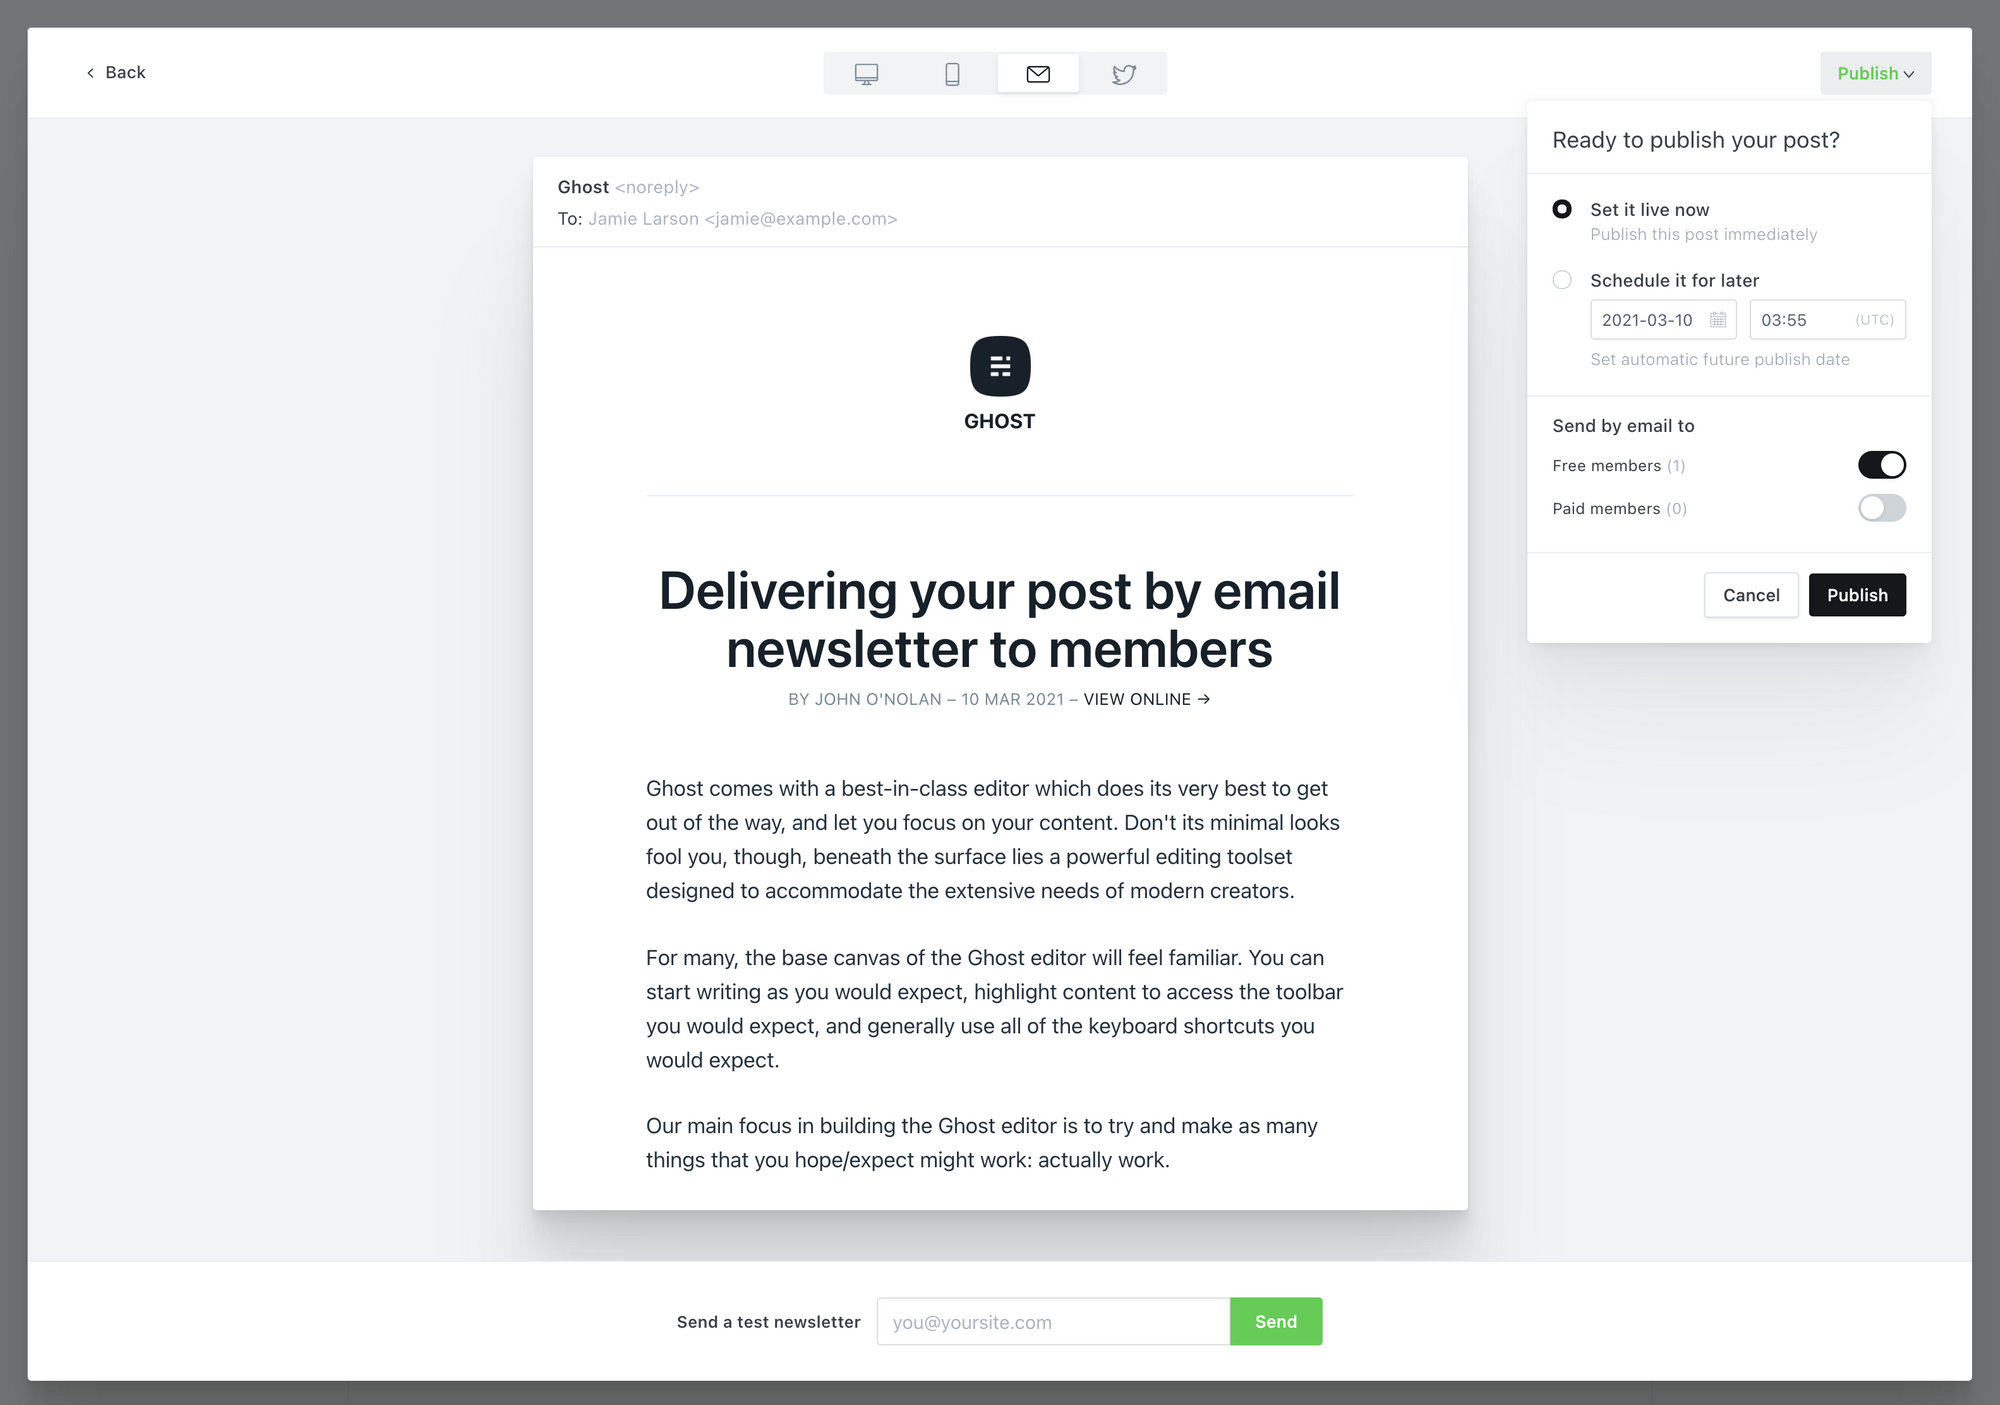
You can send yourself a test newsletter to make sure everything looks good in your email client, and then hit the Publish button to decide who to deliver it to.
Ghost comes with a streamlined, optimized email newsletter template that has settings built-in for you to customize the colors and typography. We've spent countless hours refining the template to make sure it works great across all email clients, and performs well for email deliverability.
So, you don't need to fight the awful process of building a custom email template from scratch. It's all done already!
The Ghost editor is powerful enough to do whatever you want it to do. With a little exploration, you'll be up and running in no time.
Post Syndicated from Ghost original https://yovko.net/portal/

What sets Ghost apart from other products is that you can publish content and grow your audience using the same platform. Rather than just endlessly posting and hoping someone is listening, you can track real signups against your work and have them subscribe to be notified of future posts. The feature that makes all this possible is called Portal.
Portal is an embedded interface for your audience to sign up to your site. It works on every Ghost site, with every theme, and for any type of publisher.
You can customize the design, content and settings of Portal to suit your site, whether you just want people to sign up to your newsletter — or you're running a full premium publication with user sign-ins and private content.
Once people sign up to your site, they'll receive an email confirmation with a link to click. The link acts as an automatic sign-in, so subscribers will be automatically signed-in to your site when they click on it. There are a couple of interesting angles to this:
Because subscribers are automatically able to sign in and out of your site as registered members: You can (optionally) restrict access to posts and pages depending on whether people are signed-in or not. So if you want to publish some posts for free, but keep some really great stuff for members-only, this can be a great draw to encourage people to sign up!
Ghost members sign in using email authentication links, so there are no passwords for people to set or forget. You can turn any list of email subscribers into a database of registered members who can sign in to your site. Like magic.
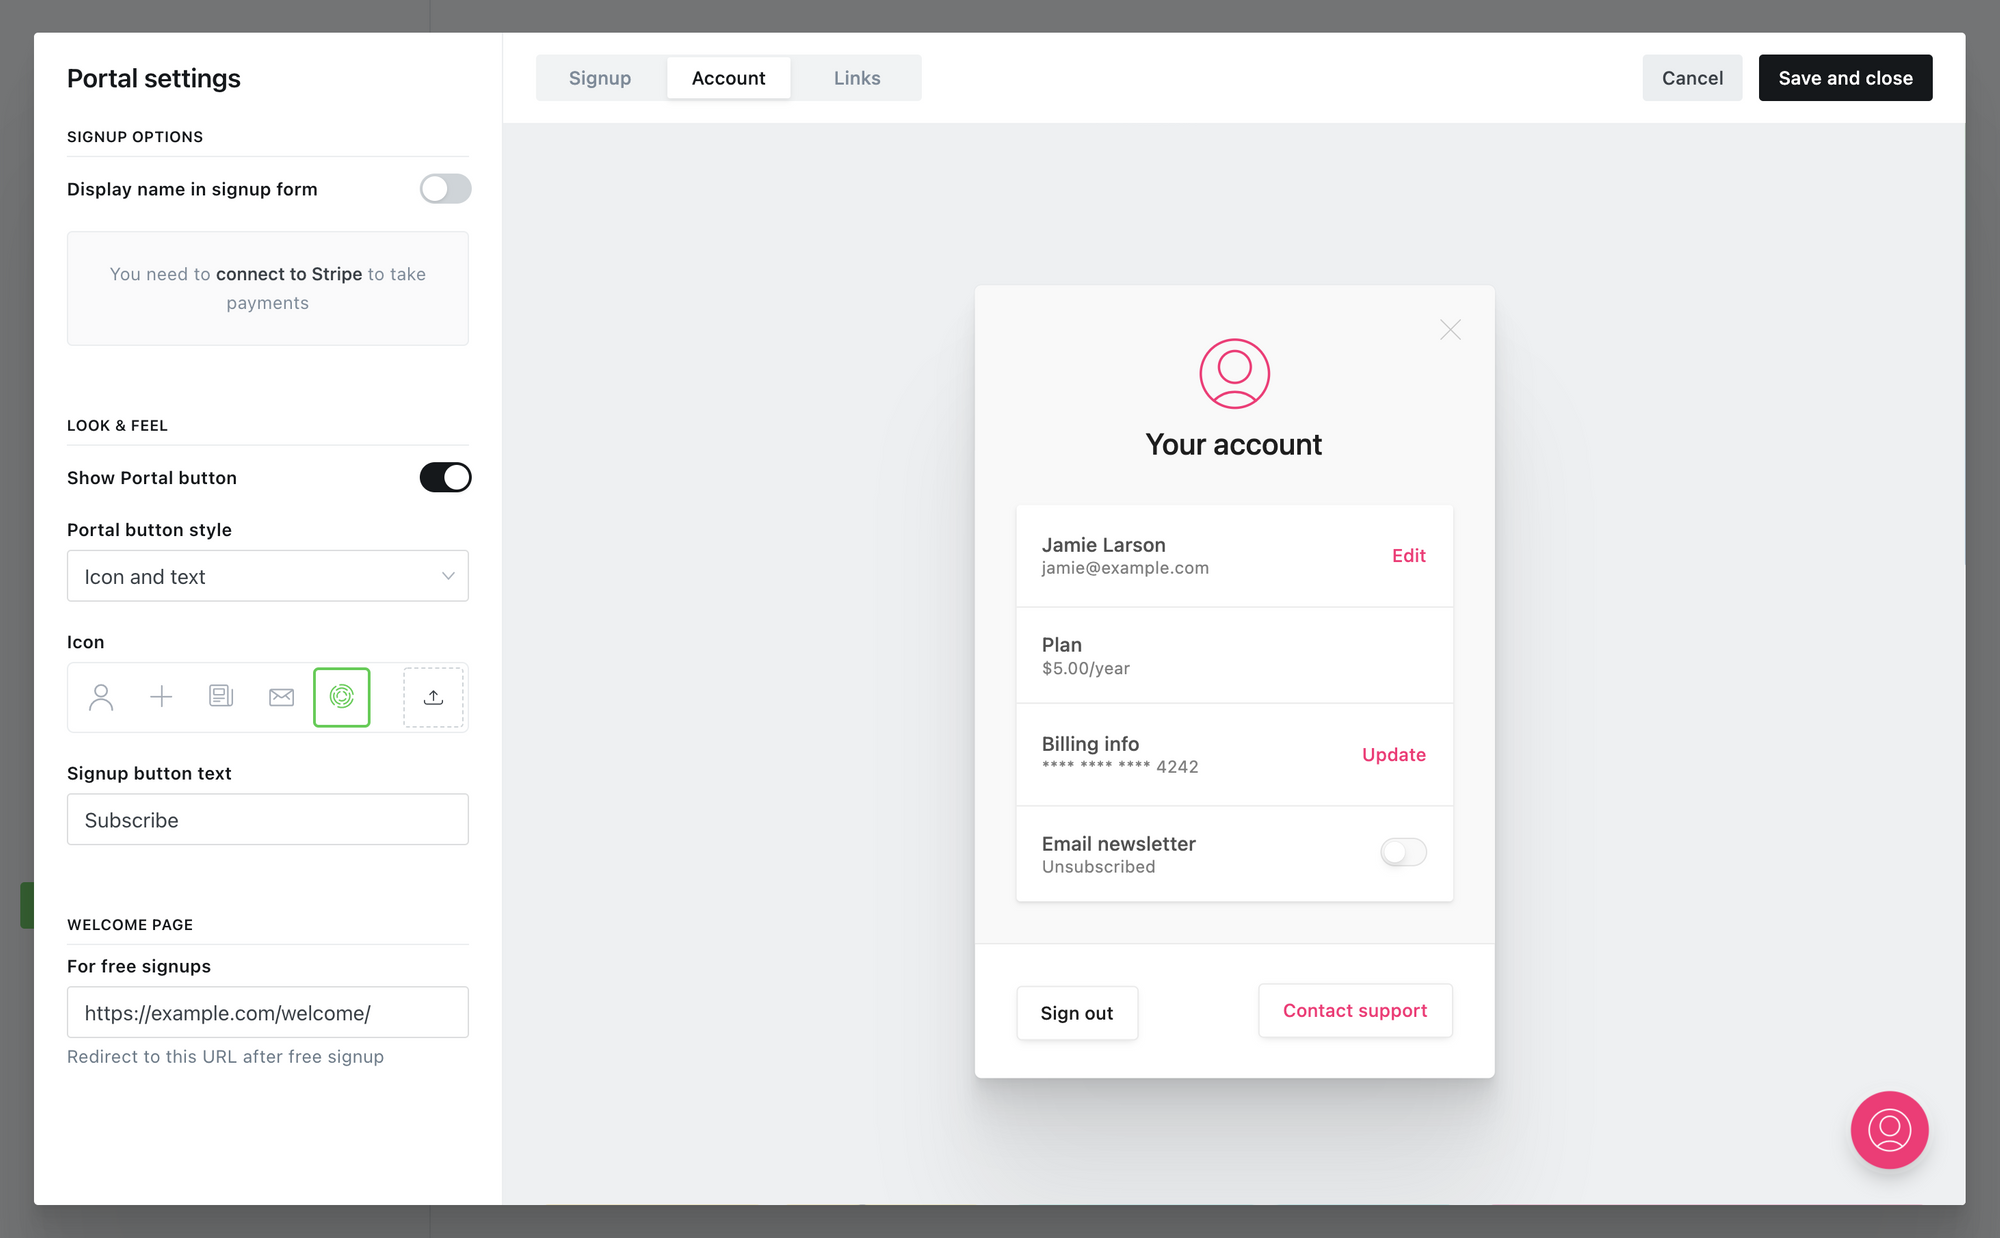
Portal makes all of this possible, and it appears by default as a floating button in the bottom-right corner of your site. When people are logged out, clicking it will open a sign-up/sign-in window. When members are logged in, clicking the Portal button will open the account menu where they can edit their name, email, and subscription settings.
The floating Portal button is completely optional. If you prefer, you can add manual links to your content, navigation, or theme to trigger it instead.
Like this! Sign up here
As you start to grow your registered audience, you'll be able to get a sense of who you're publishing for and where those people are coming from. Best of all: You'll have a straightforward, reliable way to connect with people who enjoy your work.
Social networks go in and out of fashion all the time. Email addresses are timeless.
Growing your audience is valuable no matter what type of site you run, but if your content is your business, then you might also be interested in setting up premium subscriptions.
Post Syndicated from Ghost original https://yovko.net/sell/

For creators and aspiring entrepreneurs looking to generate a sustainable recurring revenue stream from their creative work, Ghost has built-in payments allowing you to create a subscription commerce business.
Connect your Stripe account to Ghost, and you'll be able to quickly and easily create monthly and yearly premium plans for members to subscribe to, as well as complimentary plans for friends and family.
Ghost takes 0% payment fees, so everything you make is yours to keep!
Using subscriptions, you can build an independent media business like Stratechery, The Information, or The Browser.
The creator economy is just getting started, and Ghost allows you to build something based on technology that you own and control.

Most successful subscription businesses publish a mix of free and paid posts to attract a new audience, and upsell the most loyal members to a premium offering. You can also mix different access levels within the same post, showing a free preview to logged out members and then, right when you're ready for a cliffhanger, that's a good time to…
Post Syndicated from Ghost original https://yovko.net/grow/

As you grow, you'll probably want to start inviting team members and collaborators to your site. Ghost has a number of different user roles for your team:
Contributors
This is the base user level in Ghost. Contributors can create and edit their own draft posts, but they are unable to edit drafts of others or publish posts. Contributors are untrusted users with the most basic access to your publication.
Authors
Authors are the 2nd user level in Ghost. Authors can write, edit and publish their own posts. Authors are trusted users. If you don't trust users to be allowed to publish their own posts, they should be set as Contributors.
Editors
Editors are the 3rd user level in Ghost. Editors can do everything that an Author can do, but they can also edit and publish the posts of others – as well as their own. Editors can also invite new Contributors & Authors to the site.
Administrators
The top user level in Ghost is Administrator. Again, administrators can do everything that Authors and Editors can do, but they can also edit all site settings and data, not just content. Additionally, administrators have full access to invite, manage or remove any other user of the site.
The Owner
There is only ever one owner of a Ghost site. The owner is a special user which has all the same permissions as an Administrator, but with two exceptions: The Owner can never be deleted. And in some circumstances the owner will have access to additional special settings if applicable. For example: billing details, if using Ghost(Pro).
Ask all of your users to fill out their user profiles, including bio and social links. These will populate rich structured data for posts and generally create more opportunities for themes to fully populate their design.
If you're looking for insights, tips and reference materials to expand your content business, here's 5 top resources to get you started:
Post Syndicated from Ghost original https://yovko.net/integrations/

It's possible to extend your Ghost site and connect it with hundreds of the most popular apps and tools using integrations.
Whether you need to automatically publish new posts on social media, connect your favorite analytics tool, sync your community or embed forms into your content — our integrations library has got it all covered with hundreds of integration tutorials.
Many integrations are as simple as inserting an embed by pasting a link, or copying a snippet of code directly from an app and pasting it into Ghost. Our integration tutorials are used by creators of all kinds to get apps and integrations up and running in no time — no technical knowledge required.
Zapier is a no-code tool that allows you to build powerful automations, and our official integration allows you to connect your Ghost site to more than 1,000 external services.
Example: When someone new subscribes to a newsletter on a Ghost site (Trigger) then the contact information is automatically pushed into MailChimp (Action).
Here's a few of the most popular automation templates:
For more advanced automation, it's possible to create custom Ghost integrations with dedicated API keys from the Integrations page within Ghost Admin.
These custom integrations allow you to use the Ghost API without needing to write code, and create powerful workflows such as sending content from your favorite desktop editor into Ghost as a new draft.
Post Syndicated from Bruce Schneier original https://www.schneier.com/blog/archives/2021/11/hiding-vulnerabilities-in-source-code.html
Really interesting research demonstrating how to hide vulnerabilities in source code by manipulating how Unicode text is displayed. It’s really clever, and not the sort of attack one would normally think about.
From Ross Anderson’s blog:
We have discovered ways of manipulating the encoding of source code files so that human viewers and compilers see different logic. One particularly pernicious method uses Unicode directionality override characters to display code as an anagram of its true logic. We’ve verified that this attack works against C, C++, C#, JavaScript, Java, Rust, Go, and Python, and suspect that it will work against most other modern languages.
This potentially devastating attack is tracked as CVE-2021-42574, while a related attack that uses homoglyphs –- visually similar characters –- is tracked as CVE-2021-42694. This work has been under embargo for a 99-day period, giving time for a major coordinated disclosure effort in which many compilers, interpreters, code editors, and repositories have implemented defenses.
Website for the attack. Rust security advisory.
Brian Krebs has a blog post.
EDITED TO ADD (11/12): An older paper on similar issues.