The Author Spotlight series pulls back the curtain on some of AWS’s most prolific authors. Read on to find out more about our very own Rostislav Markov’s journey, in his own words!
At Amazon Web Services (AWS), we obsess over customers, and this drives our daily operations. As an architect, I always look for innovative solutions to common problems our AWS users face. One of my favorite things about my work is the opportunity to influence our services roadmap by taking feedback from our customers. Every topic I write about comes from my work with AWS customers and our service teams.
Since joining in 2017, I have worked on projects ranging from Cloud Foundations to migration and modernization, to new development initiatives. I worked with companies in automotive, banking and insurance, chemicals, healthcare and life sciences, manufacturing, media and entertainment. Throughout my journey, I have observed first-hand that every company—big and small—has its own journey to the cloud, and there are always common patterns from one experience to the next. The good news is if you face a challenge, chances are somebody has already experienced the same difficulty and found a solution. This is why I love reading about common patterns in the AWS Architecture Blog.
In 2020, my AWS journey took me from Munich, Germany, to New York, US, where I currently live. I still visit my first AWS customers but, now, in their US offices, and have meanwhile worked with many other companies. After 5 years in AWS, I am still constantly learning about our services and innovative solutions for multiple industry issues. Occasionally, I write about them on the AWS Architecture Blog or present at our public conferences.
One of my favorite moments was 4 years ago at the AWS Summit Berlin. I presented together with Kathleen DeValk, former Chief Architect at Siemens, about IoT at Siemens and designing microservices for very large scale. This year, I was back on stage with Christos Dovas, Head of Cloud-Native Automation at BMW Group, talking about BMW’s journey to DevOps.
Left: Rostislav Markov and Kathleen DeValk / Right: Christos Dovas and Rostislav Markov
What’s on my mind lately
My current focus at work is on modern application principles. I work with AWS customers on elevating their application deployment standards and creating solutions for common enterprise use cases in strategic industries. I look forward to writing more blogs on those and many other topics—stay tuned!
I wrote this blog post in 2021 while working with scientific research teams in healthcare and life sciences. It addresses third-party services that do not natively support AWS APIs and best practices, such as polling, that require a fault-tolerant integration layer.
As Werner Vogels, CTO of Amazon, said at AWS re:Invent in 2019, “Everything fails, all the time.” In this solution, the RunTask API was used to explain how retry and error handling can be added to your application.
Special thanks go to Sam Dengler, former Principal Developer Advocate with the AWS Compute Services team, who helped me find the right focus for this blog post, and from whom I still learn today.
On-premises and AWS queue integration for third-party services using AWS Lambda
This post summarized my lessons working with 500 developers of a global industrial manufacturing company. Their IoT solution had to go live within 6 months, but they did not have prior AWS experience.
By using a pattern-based approach to architecting and building applications, we were able to complete the reviews within 2 weeks and make the architecture reviews fun, inspiring, and a team-based experience.
I have reused this pattern-based development approach on the majority of my projects, including the one I am currently working on: deciding on the V1 AWS design patterns with the data center exits of a large life sciences company. If you are curious and want to learn more, explore the AWS whitepaper on Cloud-Driven Enterprise Transformation on AWS.
Proposed AWS services for use by development teams
One of the best things about working with AWS is receiving meaningful customer feedback all the time and having the means to act on it. This blog post is an example of customer feedback in manufacturing, media, and entertainment industries using one of my favorite AWS services—Amazon Simple Storage Service (Amazon S3).
Customers requested a simple way to do point-in-time restoration at the bucket level. My colleague, Gareth Eagar, Senior Solutions Architect, and I worked with the service team to influence the service roadmap and published a solution with this blog post.
I love going back to basics, here with Amazon S3 versioning, and learning more about our foundational services, while having a ton of fun with my colleague along the way.
To be great at something, you have to be a little obsessed. That’s true whether you want to be a chess grandmaster, become an internationally recognized CEO, or build the best cybersecurity platform on the planet.
At Rapid7, our laser-focus has always been trained on one thing: helping digital defenders spot and stop bad actors. From the start of our story, penetration testing — or pen testing, for short — has been one of the cornerstones of that obsession. The offensive security mindset influenced the way we built and designed InsightIDR, our cloud-native XDR and SIEM.
On the offensive
Before we ever released InsightIDR, there was Metasploit, an open-source pen testing framework. Originally developed by HD Moore, Metasploit allows offensive security teams to think like attackers and infiltrate their own organizations’ environments, pushing the boundaries to see where their systems are vulnerable. Those insights help the business identify the most serious issues to prioritize and patch, remediate, or mitigate.
Offensive security strategies provide a much-needed foundation for assessing your risk landscape and staying a step ahead of threats — but the task of building and operationalizing a security strategy doesn’t end there.
“The biggest misconception about pen testing that I hear repeatedly is, ‘We’re going to pen-test to test our response time or test our tools,'” says Jeffrey Gardner, Rapid7’s Practice Advisor for Detection and Response. “That’s not the purpose of a pen test.”
Pen testing is a critical step in understanding where and how your organization is vulnerable to attackers, and what kinds of activities within your environment might indicate a breach. This is essential information for setting up the detections that your security operations center (SOC) team needs in order to effectively safeguard your systems against intrusion — but they also need a tool that lets them set up those detections, so they can get alerts based on what matters most for your organization’s specific environment.
Pen testing itself isn’t that tool, nor does it test the effectiveness of the tools you have. Rather, pen testing looks for your weaknesses – and once they’re found, looks for ways to exploit them, including using stolen credentials to move across the network.
Mapping how bad actors behave
That’s where the importance of having a security incident and event management (SIEM) solution built with offensive security in mind comes in — and that’s exactly what our years of experience helping organizations run pen tests and analyze their attack surface have allowed us to build. InsightIDR is a unified SIEM and XDR platform designed with a pen tester’s eye. And the key to that design is user and entity behavior analytics (UEBA).
See, the problem with detecting attackers in your network is that, to the human eye, they can look a lot like regular users. Once they’ve hacked a password or stolen login credentials through a phishing/scam attack, their activities can look relatively unremarkable — until, of course, they make the big move: a major escalation of privilege or some other vector that allows them to steal sensitive data or upend systems entirely.
It takes years of experience understanding how attackers behave once they penetrate networks — and the subtle ways those patterns differ from legitimate users — to be able to catch them in your environment. This is exactly the type of expertise that Rapid7 has been able to gain through 10+ years of in-the-trenches experience in penetration testing, executed through Metasploit. Everything we had learned about User and Entity Behavior Analytics (UEBA) went into InsightIDR.
InsightIDR continuously baselines healthy user activity in the context of your specific organization. This way, the tool can spot suspicious activity fast — including lateral movement and the use of compromised credentials — and generate alerts so your team can respond swiftly. This detections-first approach means InsightIDR comes with a deep level of insight that’s based on years of studying the attacker, as well as an understanding of what alerts matter most to SOC teams.
Watch a free demo today to see InsightIDR’s attacker-spotting power in action.
Искам първо да отбележа, че не съм жител на Белащица и нямам нито изгода, нито вреда от това дали Белащица ще остане в рамките на Общиа Родопи, или ще предпочете да се включи като квартал (или село) към Община Пловдив.
Жител съм обаче на китното село Бойково, което е в Община Родопи и ми писна да ме лъжат, и манипулират.
Занимавам се с финанси, работя в София и пиша тази статия адресирана към мислещата част от населението на Община Родопи, на която също и е омръзнало да я „баламостват” с фотосесии във ФБ, и да й навират в лицето опорки от групите във ФБ.
Гледам на това като моя принос в подобряване на живота в Община Родопи.
Най-важната предпоставка, когато четете тази статия е да знаете, че смятам, че има начин жителите на общината да останат в отделна община, но за това е нужна ВИЗИЯ, КОЯТО ЛИПСВА в този общински съвет!
ОПОРКА 1 – Населението в Община Родопи расте и това е следствие на усилията на общинската администрация. Много хора от Пловдив предпочитат Община Родопи.
Пловдив е административен и културен център и е норамлно да привлича население. Последните години градът привлече голям брой жители от областите Смолян, Кърджали и Хасково. По същия модел както София (Лондон, Рим, Париж, Истанбул…) много жители предпочитат да се заселят в покрайнините на града и в близките села. Селата от Родопската яка, въпреки, че са с доста слаба инфраструктура е нормално да привлекат голям брой жители от Пловдив. Обикновено това са по-заможни хора, които могат да си позволят ежедневно пътуване.
Хубави климатични условия за живот има и около Карлово, Сливен или Пазардик, но селата в съседство до тези градове не се развиват и хора не се заселват, просто защото тези градове нямат инфраструктурата на гр. Пловдив. В тях не може да се намерят същото ниво на културен живот, спорт, здравеопазване и бизнес както в Пловдив.
Това са реалните причини хората да се заселват в селата около гр. Пловдив, а не работата на общинската администрация или мъдрото управление на общиснките съветници.
2. БЮДЖЕТА НА СЕЛОТО Е НАД 1 млн. лева,а на район Южен в Пловдив е само 300 000 лева.
Нито едно село в Община Родопи няма собствен бюджет! Бюджет има цялата Община и той се разпределя по усмотрение на общиснкия съвет.
Присъствах на „обсъждането” на това разпределение и останах с убеждението, че се извършва на базата на бр. жители в селото, а не на принципа на налагане на някаква визия за управление или финансиране на области, в които общината да се развива преференциално.
Тази година бе изтеглен кредит от 7 млн. лева, което ГАРАНТИРА, че догодина Белащица няма да получи 1 млн. лева, просто защото не може да изтегли още кредит!
Естествено напук може да се преразпределят такива средства към селото, но не ми се вярва останалите кметове да го позволят, защото ще е за тяхна сметка.
Само за информация – по закон кредита се тегли една година преди края на мандата за да не се остави общината в дълове за следващия мандат. Това е идеята на закона. Освен това има лимити за този кредит, като част от общите разходи за задължения – 15% от средногодишния размер на отчетените разходи за предходните 4 години или 50% от… Малко е сложно това за неспециалити и няма да влизам навътре в сметките, но приемете, че възможностите за кредит на Община Родопи за следващата година са доста ограничени, за да не употребя по-силна дума!
Приемете просто, че догодина НЯМА ДА ИМА 1млн. за Белащица. Колко ще има зависи от Общинския съвет и хората, които го ръководят, но ще е далеч под 1 млн.
3. Данъците ще са по-високи в Община Пловдив
Това със сигуност е така!
Нека не забравяме, че в Община Пловдив живеят над 500 000 души и плащат тези данъци. Дори както казахме идват от други общини и области с много ниски данъци, и се заселват в града. Не е толкова драстична разликата. Сигурно говорим за 100-200 лева на година разлика на семейство, НО….
Какво да кажем за транспорта? Харесва ли Ви транспорта в Община Родопи? Къде се намира Автогара Родопи и защо така?
Защото голяма част от населението на Община Родопи раоти в гр. Пловдив!
А как са цените на имотите? Дали декар земя в Пловдив е по-скъпа от декар земя в с. Белащица?
Мисля, че вече си отговорихте защо данъците са по-високи.
4. Земеделските стопани ще загубят субсидиите си
И това е така наистина!
Отново имаме НО. Пловдив е най-голямият пазар за земеделската продукция от Община Родопи. Не вярвам някой да си продава земеделската продукция във Варна или Силистра.
Няма да влизам в полемиката за изкупните цени на черешите, но проджаните бяха 6.50 на пазара до Гребната База. Черешите бяха от землището на с. Марково и с. Брестник, но ги продаваха прекупвачи.
Все си мисля, че голяма част от земеделските производители имат и апартаменти в Пловдив. Такива са ми наблюденията. И не само те. Голяма част от населението в Община Родопи има жилища в Пловдив.
Земеделските производители от Белащица със сигурност ще загубят субсидиите си, но цените на земите, които притежават ще се увеличат драстично. Просто Белащица няма да е вече земеделски район, а квартал на втория по големина град в България. Мисля, че сделката си заслужава от тази гледна точка. И без това селскостопанските работници са кът напоследък, а имотите под наем в рамките на гр. Пловдив са все по-акуални. Искаме или не искаме бъдещето на селата около Пловдив, с тези приоритети на администрацията, не е в земеделието. Колкото по-рано го осъзнаят хората, толкова повече пари ще направят.
Тук е момента да кажа, че все пак има начин земеделието да се запази като отрасъл, ако се запази и цялостта на Родопи, но не виждам да се прави нещо в тази насока.
5. Общината ще се управлява от други общински съветници и ще загубим самоуправлението си
Това не си струва да се коментира дълго. Самият факт, че се прави всичко за да се осуети референдум е достатъчно показателно за нивото на „самоуправление” в Община Родопи.
Личното ми мнение е, че такова самоуправление тук не съществува. Аз не съм видял досега на заседание да се направи каквото и да е предложение от населението и то да бъде прието. Прощавайте ако греша, но на тези заседания на които съм бил и медийните публикации които съм следил, прието предложение не съм видял.
6. Медийното отразяване
Като стана въпрос за медийното отразяване, определено прави впечатление тенденциозната работа на платени с наши данъци от общината медии, които би трябвало да отразяват събития. Говоря най-вече за rodopi-info, които не ги знам какъв им е случая, но никога не отразяват нещо различо от успехите на администрацията. Когато не се открива нова улица или детска площадка, се прави ИНСПЕКЦИЯ. И снимки, снимки… По ФБ групите е ужасно.
Това са сфери за които няма да откриете много информация или опорки в изказванията на администрацията. Не знам дали има нужда да коментираме изобщо. Мисля, че всеки има наблюдения и те не са в полза на Община Родопи.
Ще дам само пример с училищата. Моите деца учат в Пловдив, а вашите?
Според независимото външно оценяване От Община Родопи най-добре се е представило Часно Основно училище Слънчев Лъч с. Марково. То е 12-то в Бълагрия.
РЕСПЕКТ КЪМ ПРЕПОДАВАТЕЛИТЕ И ИНВЕСТИТОРИТЕ!
Общинското обаче е на 441-во място!
Други освен частното училище в Марково няма в топ 100. Следващото под номер 163 е училището в Белащица – Пенчо Славейков. В село Първенец сме на 1120 място, а в с Ягодово 1679 от общо 1734 училища.
Ако мислите, че общината има нещо общо с добрите резултати на частното училище в с. Марково или на общинското в с. Белащица, резонно е да попитаме какво се случва в Първенец и в Ягодово?
Моето заключение е, че тези успехи нямат нищо общо с работата на общинската администрация, а по-скоро с родителите и децата, които са се заселили точно в тези села, като осовната причина е близостта на гр. Пловдив и възможностите които той предлага. Посочените села са такива с мащабно строителство и много нови заселници, а тези които не са съвсем в полите на Родопите като Ягодово и не могат да привлекат съответното население имат доста по-скоромни резултати.
Пак казвам не мисля, че общинската администрация има нещо общо с добрите резултати в частното училище в с. Марково, освен ако някой общиснки съветник не е инвеститор там, но това ще породи редица етични въпроси и ще изясни доста от практиките в общината.
За средни училища няма да говорим, предполагам знаете защо. J
8. Много инвестиции в Община Родопи
Това не си заслужава коментар. Всеки може да направи справка, какво се случва в икономическа зона Тракия (примерно) и да го съпостави с инвестициите в Община Родопи.
Бих казал че е срамно да се отчита повишена икономическа активност на фона на тази в гр. Пловдив.
На тези, които са стигнали до тук се извинявам за многословието, но ако не се изтъкнат горните фактори, те никога няма да се отчетат и да се направи нещо в съответната посока.
В крайна сметка не всички се впечатляваме от нови градинки и детски площадки. Поне не тези, които знаем как би трябвало да се харчат парите, или имаме по-различна визия за развитието на Община Родопи.
Нужна е Визия за развитие, а такава липсва!
Оставете хората да си правят референдума. Ако всичко е наред, те няма да искат да напускат тази Община. Ако ли не, това ще е атестат за управлението през последните мандати.
За отбрана информация касаеща кредитирането и лихвите, моля последвайте ме в Телеграм канала Kendov.com
За срещи и консултации по банкови кредити и неволи, моля използвайте посочената форма.
We’re sharing the fourth evaluation report on projects in our Gender Balance in Computing research programme today. This is a programme we’ve been running, with partner organisations, as part of the National Centre for Computing Education, funded by the Department for Education in England. The programme’s overall goal is to identify ways to encourage more young women to study Computer Science.
Like the previous reports on our Storytelling, Pair Programming, and Peer Instruction projects, this new report was compiled by independent evaluators from the Behavioural Insights Team (BIT). It concerns a study conducted with learners aged 9 to 10 and examining two approaches aimed at improving girls’ sense of belonging in computing.
The importance of belonging in computing
A growing body of research suggests that girls’ interest and motivation is linked to the sense of belonging that they feel when experiencing and studying STEM subjects. When girls see themselves represented in computing by identifying role models, they are more likely to value the subject in their studies and future careers. Parents and wider family members also play an important role in amplifying the message that girls belong in computing through the way that they talk about the subject.
The Belonging study was structured as two distinct but related interventions designed to improve girls’ sense of belonging, each following a different approach. WISE and a team at BIT (separate to the team evaluating the study) were responsible for the design, delivery, and implementation of the two interventions, while we provided overall programme management and recruited schools.
Interventions to encourage girls’ sense of belonging
This study was conducted from September 2021 to February 2022 as a randomised controlled trial (RCT) where participating schools were randomly divided into three groups: two treatment groups which each delivered one of the two interventions to their Year 5 learners, and one control group, which taught Computing to their Year 5 learners in their usual way throughout the duration of the study.
The intervention designed by WISE was titled ‘My Skills My Life’ and was aimed at girls’ self-identification. The design included ten lessons that highlighted the importance of computing and STEM and how these fields impact our lives. The lessons also introduced pupils to female role models working in professions relating closely to computing.
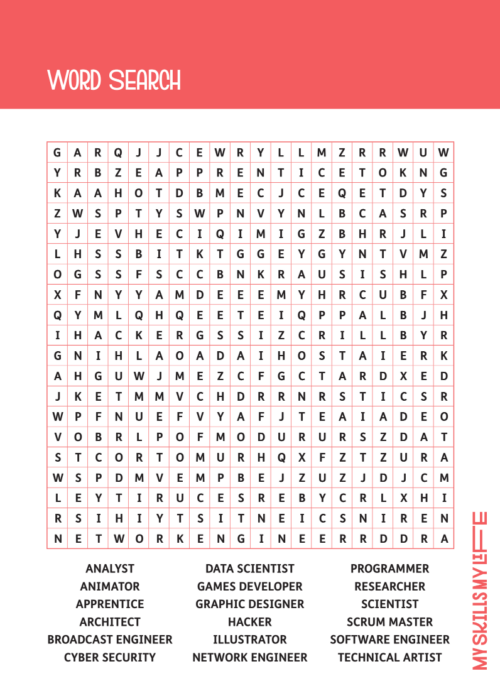
A word search activity from the My Skills My Life lesson titled ‘My Dream Job’. The purpose of this activity was to introduce a variety of STEM and computing careers.
A core component was a lesson midway through the intervention, where schools in the treatment group held a ‘real-life role model’ session with female role models from the computing industry. In this session, volunteer role models shared their day-to-day work experiences and discussed some fundamental concepts and perceptions related to their role. To do so, the role models first received support and training from the schools based on material provided by WISE. WISE also provided additional training and guidance on resource usage and how to talk about computing careers to make them more understandable and relatable to children.
In addition to the lesson content and training, WISE created a role model booklet with information on 72 women currently working in computing and associated industries. These women had volunteered to be included in the booklet and to also speak to pupils potentially interested in computing. The main purpose of presenting these role-models was to let the primary pupils meet women who are happy and successful in computing careers.
“I loved learning about [role model name]’s job during the day. It was so cool.”
– Primary school pupil (report, p. 50)
The other intervention in the trial, designed by BIT, was called ‘Code Stars’. This intervention ran over 12 weeks. Schools involved in it first delivered a stand-alone, one-off lesson on artificial intelligence (AI).
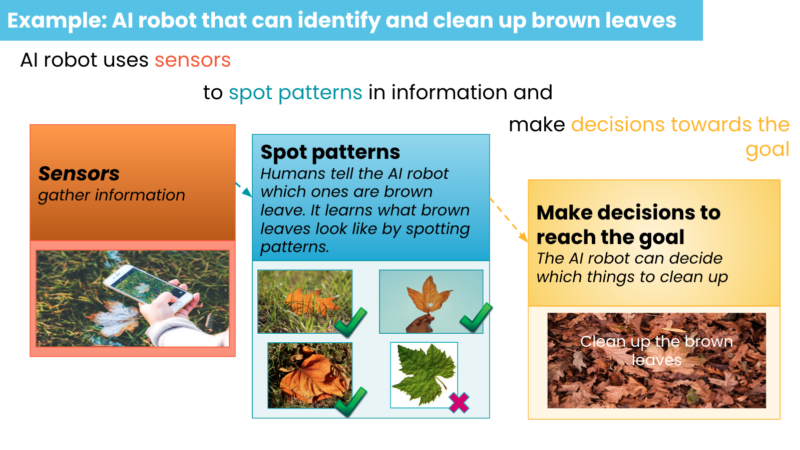
A slide from the AI-themed lesson from the Code Stars intervention.
After the lesson, the pupils completed a homework task, engaging with their parents or carers. This was followed by a set of regular conversation prompts to encourage parents to have discussions with their children about computing in general and the AI lesson in particular. The original plan was for BIT to implement these conversation prompts, but due to COVID-19-related challenges, teachers had to take the responsibility of sending the prompts. At the end of the intervention, teachers conducted a follow-up lesson.
“Some parents did not want to support their children due to their own lack of confidence. Others did not see it as important as doing the weekly Maths and English homework.”
– Teacher participating in the Code Stars intervention (report, p. 55)
Results and recommendations from the intervention evaluations
These two separate but related approaches aimed at increasing girls’ sense of membership in the computing community and to improve their and their parents’ engagement. The overall impact was evaluated using a mixed method approach; this included case studies, online teacher surveys, parent interviews, pupil surveys, lesson observations, and pupil focus groups.
The impact evaluation did not find conclusive evidence of either intervention having an impact on female pupils’ attitudes towards computing or their intention to study computing in the future. However, the stated intention of girls to study computing was 5.6 percentage points higher in the Code Stars intervention group than in the control group. This difference was statistically significant in some, although not all, of the analysis run; this means we cannot rule out that this result was due to chance, rather than due to the intervention.
In addition, qualitative data collected from teachers suggested that the My Skills My Life intervention delivery was very well received and needed only minor adjustments, although this did not translate into evidence of impact on the measured pupil outcomes. Teachers also appreciated the level of detail in the My Skills My Life lesson plans, and the Code Stars intervention was described as fun and engaging.
The independent evaluators of this research study have recommended refinements to each of the interventions to improve their delivery and potential impact, along with suggested evaluation strategies for any future replications of the interventions.
Want to find out more about increasing girls’ sense of belonging in computing?
We are very grateful to all the schools, pupils, and teachers who took part in this project. If you would like to stay up-to-date with the Gender Balance in Computing programme, you can sign up to our newsletter. We will also share reports on the other projects within the programme that have explored:
The links between non-formal and formal Computing
The impact of using Computing to solve real-world problems
The role that GCSE Options booklets and Subject Choice evenings can play in promoting gender balance in computing
Днес Тома Биков беше в Нова, да ми отговори за машините. Вчера казах, че няма индикации за манипулация, а ГЕРБ не са дошли да анализират сорс кода в законоустановения за това момент.
Нека да ползвам „право на дуплика“ по всички твърдения на г-н Биков. Като няма да влизам в реториката „вие къде бяхте, когато…“, защото сигурно е омръзнала – ДБ и аз лично от години предлагаме мерки за подобряване на процеса, а ГЕРБ са против. Но да приемем, че вече не са.
Биков твърди, че оспорвам правото им да се съмняват. Ни най-малко. Длъжни сме да се съмняваме всички и да правим институционални действия за подобрение на процеса. Но да излезе председателя на ГЕРБ и да каже „100% машините са пипани“ не е изразяване на съмнение, а поредното безотговорно внушение.
„не сме получили покана“ – на имейлите за контакт МЕУ изпращаше покани за всяко едно събитие. Колегата от ТУ, излъчен от ГЕРБ беше на първите три, по спомен. Покана сме получили останалите две формации (ДБ и ПП), та бих препоръчал да си проверите пак имейла. Но да, не е това най-важното.
„1 час не стига“- така е. Но не беше един час. Никой не ме изгони, но прецених, че базовите сценарии, които могат да се проверят в рамките на деня, съм ги покрил. Напомням, че ние затова обжалвахме решението на ЦИК, искайки повече време. Представителите на ГЕРБ в ЦИК какво отношение взеха по жалбата? Дали са нужни два месеца – не мисля, но не вреди. Кодът е много добре покрит с автоматизирани тестове, а аз проверих всички места, които пишат по файловата система (и как се стига до тях). Затова за краткото време имам степен на увереност, че в кода „шашми“ няма.
предложенията за подобрения на Изборния кодекс ги приветствам по принцип, но в случая има риск да са „капан“, и като се отвори темата, ГЕРБ да предложат връщане на хартията. Което г-н Биков не отрече (още не били взели решение, ама предния път били за връщане). Затова нека ЦИК да предложи допълнително споразумение към договора (сключен от предния ЦИК, доминиран от ГЕРБ), с което да договори допълнителни варианти за достъп на експерти след изборния ден. Не вярвам Смартматик да откажат, то е и в техен интерес.
Има твърде много гласове „Не подкрепям никого“. Да, има. Защото това са 4-ти поредни избори и има много разочаровани хора. А и да върнем лентата към 2017 г (където активността все пак беше доста по-висока) – там също има 87 хиляди „не подкрепям никого“.
„колкото по-висок резултат има ГЕРБ, толкова повече гласове „не подкрепям никого“ има“- това е базово неразбиране на това как работи статистиката. Водещите хванаха този проблем в графиката – естествено, че колкото по-голям е избирателния район, толкова повече гласове за ГЕРБ и съответно повече гласове „не подкрепям никого“. Направихме си труда да направим реално сравнение на процентите, а не на абсолютните стойности и не – няма никаква корелация между резултата на ГЕРБ и „не подкрепям никого“ (прилагам графика)
г-н Биков твърди, че докато съм бил министър, не съм свършил нищо за прозрачността на машинното гласуване. Реалността е друга – дотолкова друга, че медии, приближени до ГЕРБ, ме обвиниха, че съм се месил на ЦИК, тъй като от МЕУ сме изпратили проект на правила за достъп до кода. Така че да решат кое е – че съм работил с ЦИК и съм изпращал документи, или че нищо не съм направил.
Да, трябва да подобрим процесите около машинното гласуване и трябва да повишим доверието. Твърдения, като тези на ГЕРБ, че „машините са пипани“, не правят това. Съмненията са задължителни, подобренията – също, но внушенията са безотговорни.
AWS Glue includes crawlers, a capability that make discovering datasets simpler by scanning data in Amazon Simple Storage Service (Amazon S3) and relational databases, extracting their schema, and automatically populating the AWS Glue Data Catalog, which keeps the metadata current. This reduces the time to insight by making newly ingested data quickly available for analysis with your preferred analytics and machine learning (ML) tools.
Previously, you could reduce crawler cost by using Amazon S3 Event Notifications to incrementally crawl changes on Data Catalog tables created by crawler. Today, we’re extending this support to crawling and updating Data Catalog tables that are created by non-crawler methods, such as using data pipelines. This crawler feature can be useful for several use cases, such as following:
You currently have a data pipeline to create AWS Glue Data Catalog tables and want to offload detection of partition information from the data pipeline to a scheduled crawler
You have an S3 bucket with event notifications enabled and want to continuously catalog new changes and prevent creation of new tables in case of ill-formatted files that break the partition detection
You have manually created Data Catalog tables and want to run incremental crawls on new file additions instead of running full crawls due to long crawl times
To accomplish incremental crawling, you can configure Amazon S3 Event Notifications to be sent to an Amazon Simple Queue Service (Amazon SQS) queue. You can then use the SQS queue as a source to identify changes and can schedule or run an AWS Glue crawler with Data Catalog tables as a target. With each run of the crawler, the SQS queue is inspected for new events. If no new events are found, the crawler stops. If events are found in the queue, the crawler inspects their respective folders, processes through built-in classifiers (for CSV, JSON, AVRO, XML, and so on), and determines the changes. The crawler then updates the Data Catalog with new information, such as newly added or deleted partitions or columns. This feature reduces the cost and time to crawl large and frequently changing Amazon S3 data.
This post shows how to create an AWS Glue crawler that supports Amazon S3 event notification on existing Data Catalog tables using the new crawler UI and an AWS CloudFormation template.
Overview of solution
To demonstrate how the new AWS Glue crawler performs incremental updates, we use the Toronto parking tickets dataset—specifically data about parking tickets issued in the city of Toronto between 2019–2020. The goal is to create a manual dataset as well as its associated metadata tables in AWS Glue, followed by an event-based crawler that detects and implements changes to the manually created datasets and catalogs.
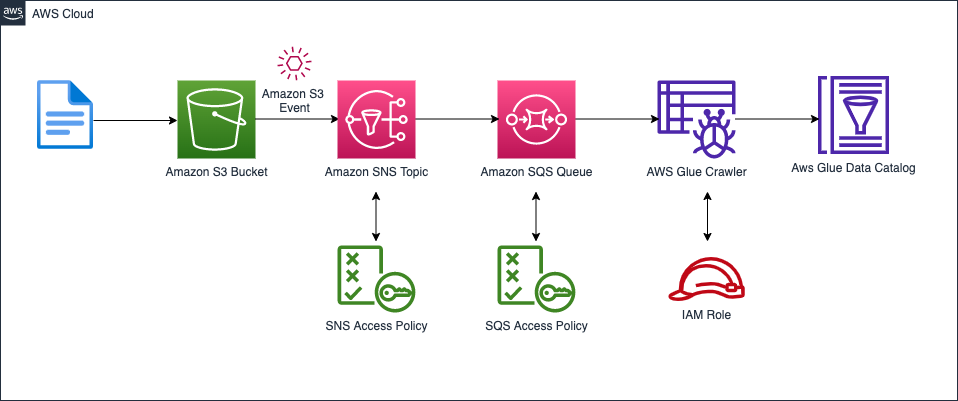
As mentioned before, instead of crawling all the subfolders on Amazon S3, we use an Amazon S3 event-based approach. This helps improve the crawl time by using Amazon S3 events to identify the changes between two crawls by listing all the files from the subfolder that triggered the event instead of listing the full Amazon S3 target. To accomplish this, we create an S3 bucket, an event-based crawler, an Amazon Simple Storage Service (Amazon SNS) topic, and an SQS queue. The following diagram illustrates our solution architecture.
Prerequisites
For this walkthrough, you should have the following prerequisites:
If the AWS account you use to follow this post uses Lake Formation to manage permissions on the AWS Glue Data Catalog, make sure that you log in as a user with access to create databases and tables. For more information, refer to Implicit Lake Formation permissions.
Launch your CloudFormation stack
To create your resources for this use case, complete the following steps:
Launch your CloudFormation stack in us-east-1:
For Stack name, enter a name for your stack .
For paramBucketName, enter a name for your S3 bucket (with your account number).
Choose Next.
Select I acknowledge that AWS CloudFormation might create IAM resources with custom names.
Choose Create stack.
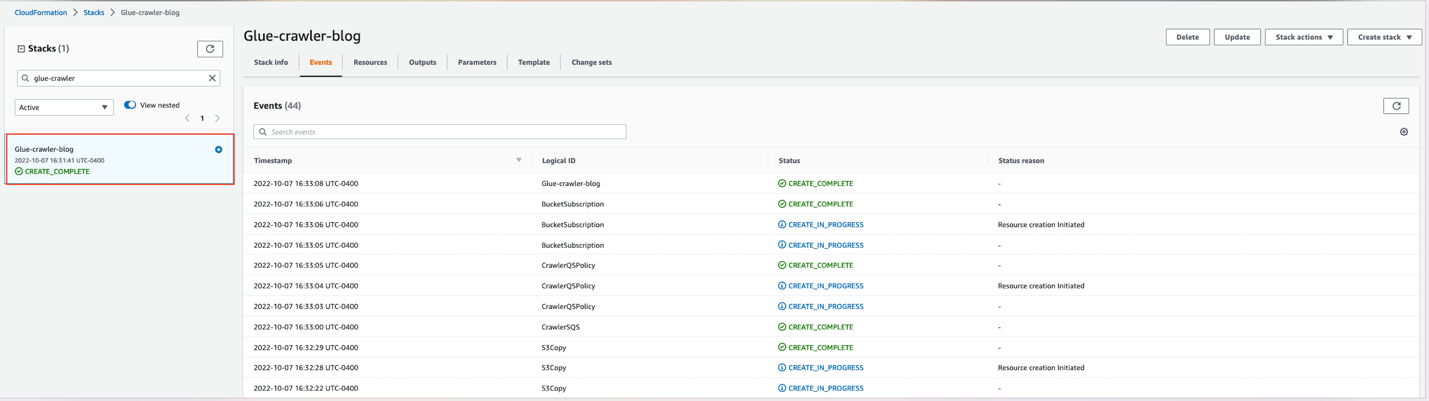
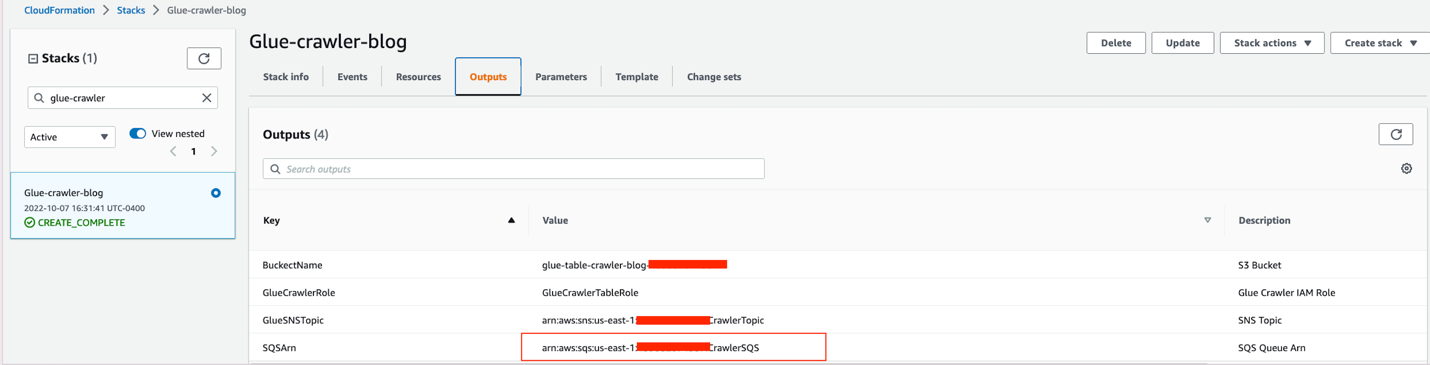
Wait for the stack formation to finish provisioning the requisite resources. When you see the CREATE_COMPLETE status, you can proceed to the next steps.
Additionally, note down the ARN of the SQS queue to use at a later point.
Query your Data Catalog
Next, we use Amazon Athena to confirm that the manual tables have been created in the Data Catalog, as part of the CloudFormation template.
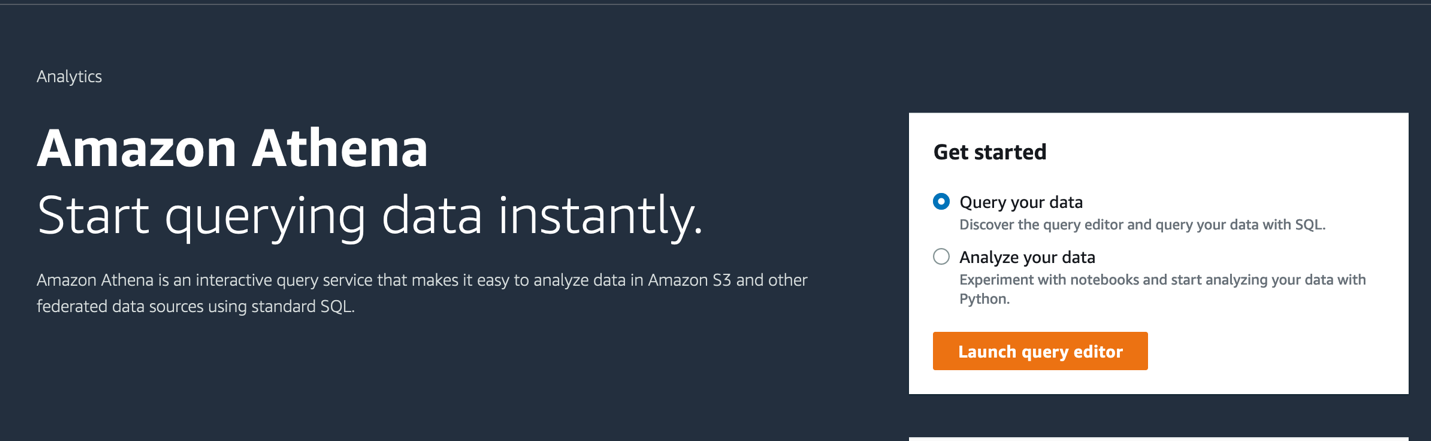
On the Athena console, choose Launch query editor.
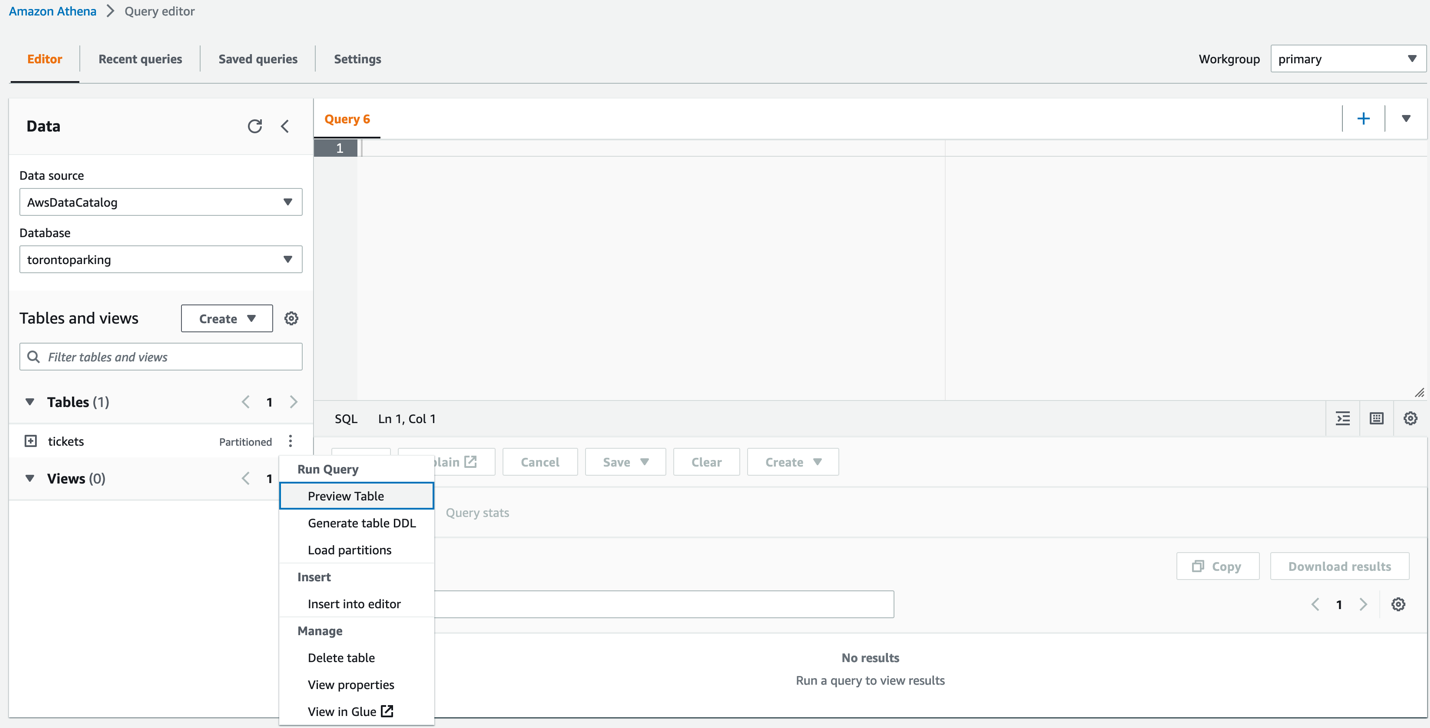
For Data source, choose AwsDataCatalog.
For Database, choose torontoparking. The tickets table should appear in the Tables section. Now you can query the table to see its contents.
You can write your own query, or choose Preview Table on the options menu. This writes a simple SQL query to show us the first 10 rows.
Choose Run to run the query.
As we can see in the query results, the database and table for 2019 parking ticket data have been created and partitioned.
Create the Amazon S3 event crawler
The next step is to create the crawler that detects and crawls only on incrementally updated tables.
On the AWS Glue console, choose Crawlers in the navigation pane.
Choose Create crawler.
For Name, enter a name.
Choose Next. Now we need to select the data source for the crawler.
Select Yes to indicate that our data is already mapped to our AWS Glue Data Catalog.
Choose Add tables.
For Database, choose torontoparking and for Tables, choose tickets.
Select Crawl based on events.
For Include SQS ARN, enter the ARN you saved from the CloudFormation stack outputs.
Choose Confirm. You should now see the table populated under Glue tables, with the parameter set as Recrawl by event.
Choose Next.
For Existing IAM role, choose the IAM role created by the CloudFormation template (GlueCrawlerTableRole).
Choose Next.
For Frequency, choose On demand. You also have the option of choosing a schedule on which the crawler will run regularly.
Choose Next.
Review the configurations and choose Create crawler. Now that the crawler has been created, we add the 2020 ticketing data to our S3 bucket so that we can test our new crawler. For this step, we use the AWS Command Line Interface (AWS CLI)
After successful completion of this command, your S3 bucket should contain the 2020 ticketing data and your crawler is ready to run. The terminal should return the following:
copy: s3://aws-bigdata-blog/artifacts/gluenewcrawlerui2/source/year=2020/Parking_Tags_Data_2020.000.csv to s3://glue-table-crawler-blog-<YOURACCOUNTNUMBER>/year=2020/Parking_Tags_Data_2020.000.csvRun the crawler and verify the updates
Run the crawler and verify the updates
Now that the new folder has been created, we run the crawler to detect the changes in the table and partitions.
Navigate to your crawler on the AWS Glue console and choose Run crawler. After running the crawler, you should see that it added the 2020 data to the tickets table.
On the Athena console, we can ensure that the Data Catalog has been updated by adding a where year = 2020 filter to the query.
AWS CLI option
You can also create the crawler using the AWS CLI. For more information, refer to create-crawler.
Clean up
To avoid incurring future charges, and to clean up unused roles and policies, delete the resources you created: the CloudFormation stack, S3 bucket, AWS Glue crawler, AWS Glue database, and AWS Glue table.
Conclusion
You can use AWS Glue crawlers to discover datasets, extract schema information, and populate the AWS Glue Data Catalog. In this post, we provided a CloudFormation template to set up AWS Glue crawlers to use Amazon S3 event notifications on existing Data Catalog tables, which reduces the time and cost needed to incrementally process table data updates in the Data Catalog.
With this feature, incremental crawling can now be offloaded from data pipelines to the scheduled AWS Glue crawler, reducing cost. This alleviates the need for full crawls, thereby reducing crawl times and Data Processing Units (DPUs) required to run the crawler. This is especially useful for customers that have S3 buckets with event notifications enabled and want to continuously catalog new changes.
Special thanks to everyone who contributed to this crawler feature launch: Theo Xu, Jessica Cheng, Arvin Mohanty, and Joseph Barlan.
About the authors
Leonardo Gómez is a Senior Analytics Specialist Solutions Architect at AWS. Based in Toronto, Canada, he has over a decade of experience in data management, helping customers around the globe address their business and technical needs.
Aayzed Tanweer is a Solutions Architect working with startup customers in the FinTech space, with a special focus on analytics services. Originally hailing from Toronto, he recently moved to New York City, where he enjoys eating his way through the city and exploring its many peculiar nooks and crannies.
Sandeep Adwankar is a Senior Technical Product Manager at AWS. Based in the California Bay Area, he works with customers around the globe to translate business and technical requirements into products that enable customers to improve how they manage, secure, and access data.
AWS Glue now offers integration with Git, an open-source version control system widely used across the developer community. Thanks to this integration, you can incorporate your existing DevOps practices on AWS Glue jobs. AWS Glue is a serverless data integration service that helps you create jobs based on Apache Spark or Python to perform extract, transform, and load (ETL) tasks on datasets of almost any size.
Git integration in AWS Glue works for all AWS Glue job types, both visual and code-based. It offers built-in integration with both GitHub and AWS CodeCommit, and makes it easier to use automation tools like Jenkins and AWS CodeDeploy to deploy AWS Glue jobs. AWS Glue Studio’s visual editor now also supports parameterizing data sources and targets for transparent deployments between environments.
Overview of solution
To demonstrate how to integrate AWS Glue Studio with a code hosting platform for version control and collaboration, we use the Toronto parking tickets dataset, specifically the data about parking tickets issued in the city of Toronto in 2019. The goal is to create a job to filter parking tickets based on a specific category and push the code to a GitHub repo for version control. After the job is uploaded on the repository, we make some changes to the code and pull the changes back to the AWS Glue job.
Prerequisites
For this walkthrough, you should have the following prerequisites:
If the AWS account you use to follow this post uses AWS Lake Formation to manage permissions on the AWS Glue Data Catalog, make sure that you log in as a user with access to create databases and tables. For more information, refer to Implicit Lake Formation permissions.
Launch your CloudFormation stack
To create your resources for this use case, complete the following steps:
Launch your CloudFormation stack in us-east-1:
Under Parameters, for paramBucketName, enter a name for your S3 bucket (include your account number).
Select I acknowledge that AWS CloudFormation might create IAM resources with custom names.
Choose Create stack.
Wait until the creation of the stack is complete, as shown on the AWS CloudFormation console.
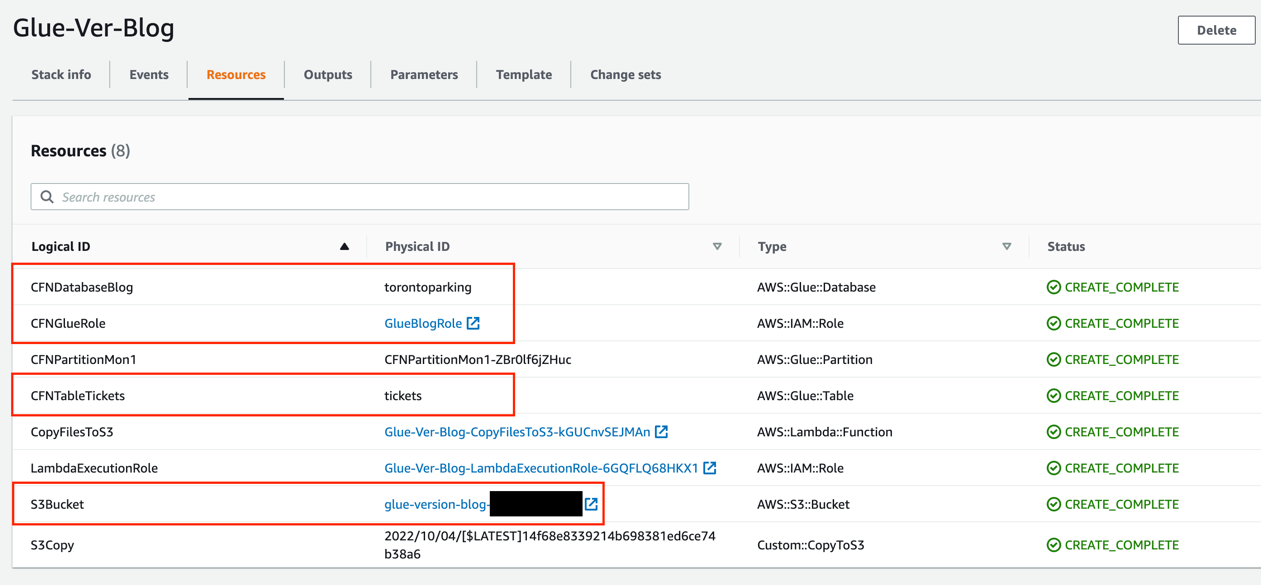
Launching this stack creates AWS resources. You need the following resources from the Outputs tab for the next steps:
CFNGlueRole – The IAM role to run AWS Glue jobs
S3Bucket – The name of the S3 bucket to store solution-related files
CFNDatabaseBlog – The AWS Glue database to store the table related to this post
CFNTableTickets – The AWS Glue table to use as part of the sample job
Configure the GitHub repository
We use GitHub as the source control system for this post. In order to use it, you need a GitHub account. After the account is created, you need to create following components:
GitHub repository – Create a repository and name it glue-ver-log. For instructions, refer to Create a repo.
Branch – Create a branch and name it develop. For instructions, refer to Managing branches.
Personal access token – For instructions, refer to Creating a personal access token. Make sure to keep the personal access token handy because you use it in later steps.
Create an AWS Glue Studio job
Now that the infrastructure is set up, let’s author an AWS Glue job in our account. Complete the following steps:
On the AWS Glue console, choose Jobs in the navigation pane.
Select Visual job with blank canvas and choose Create.
Enter a name for the job using the title editor. For example, aws-glue-git-demo-job.
On the Visual tab, choose Source and then choose AWS Glue Data Catalog
For Database, choose torontoparking and for Table, choose tickets.
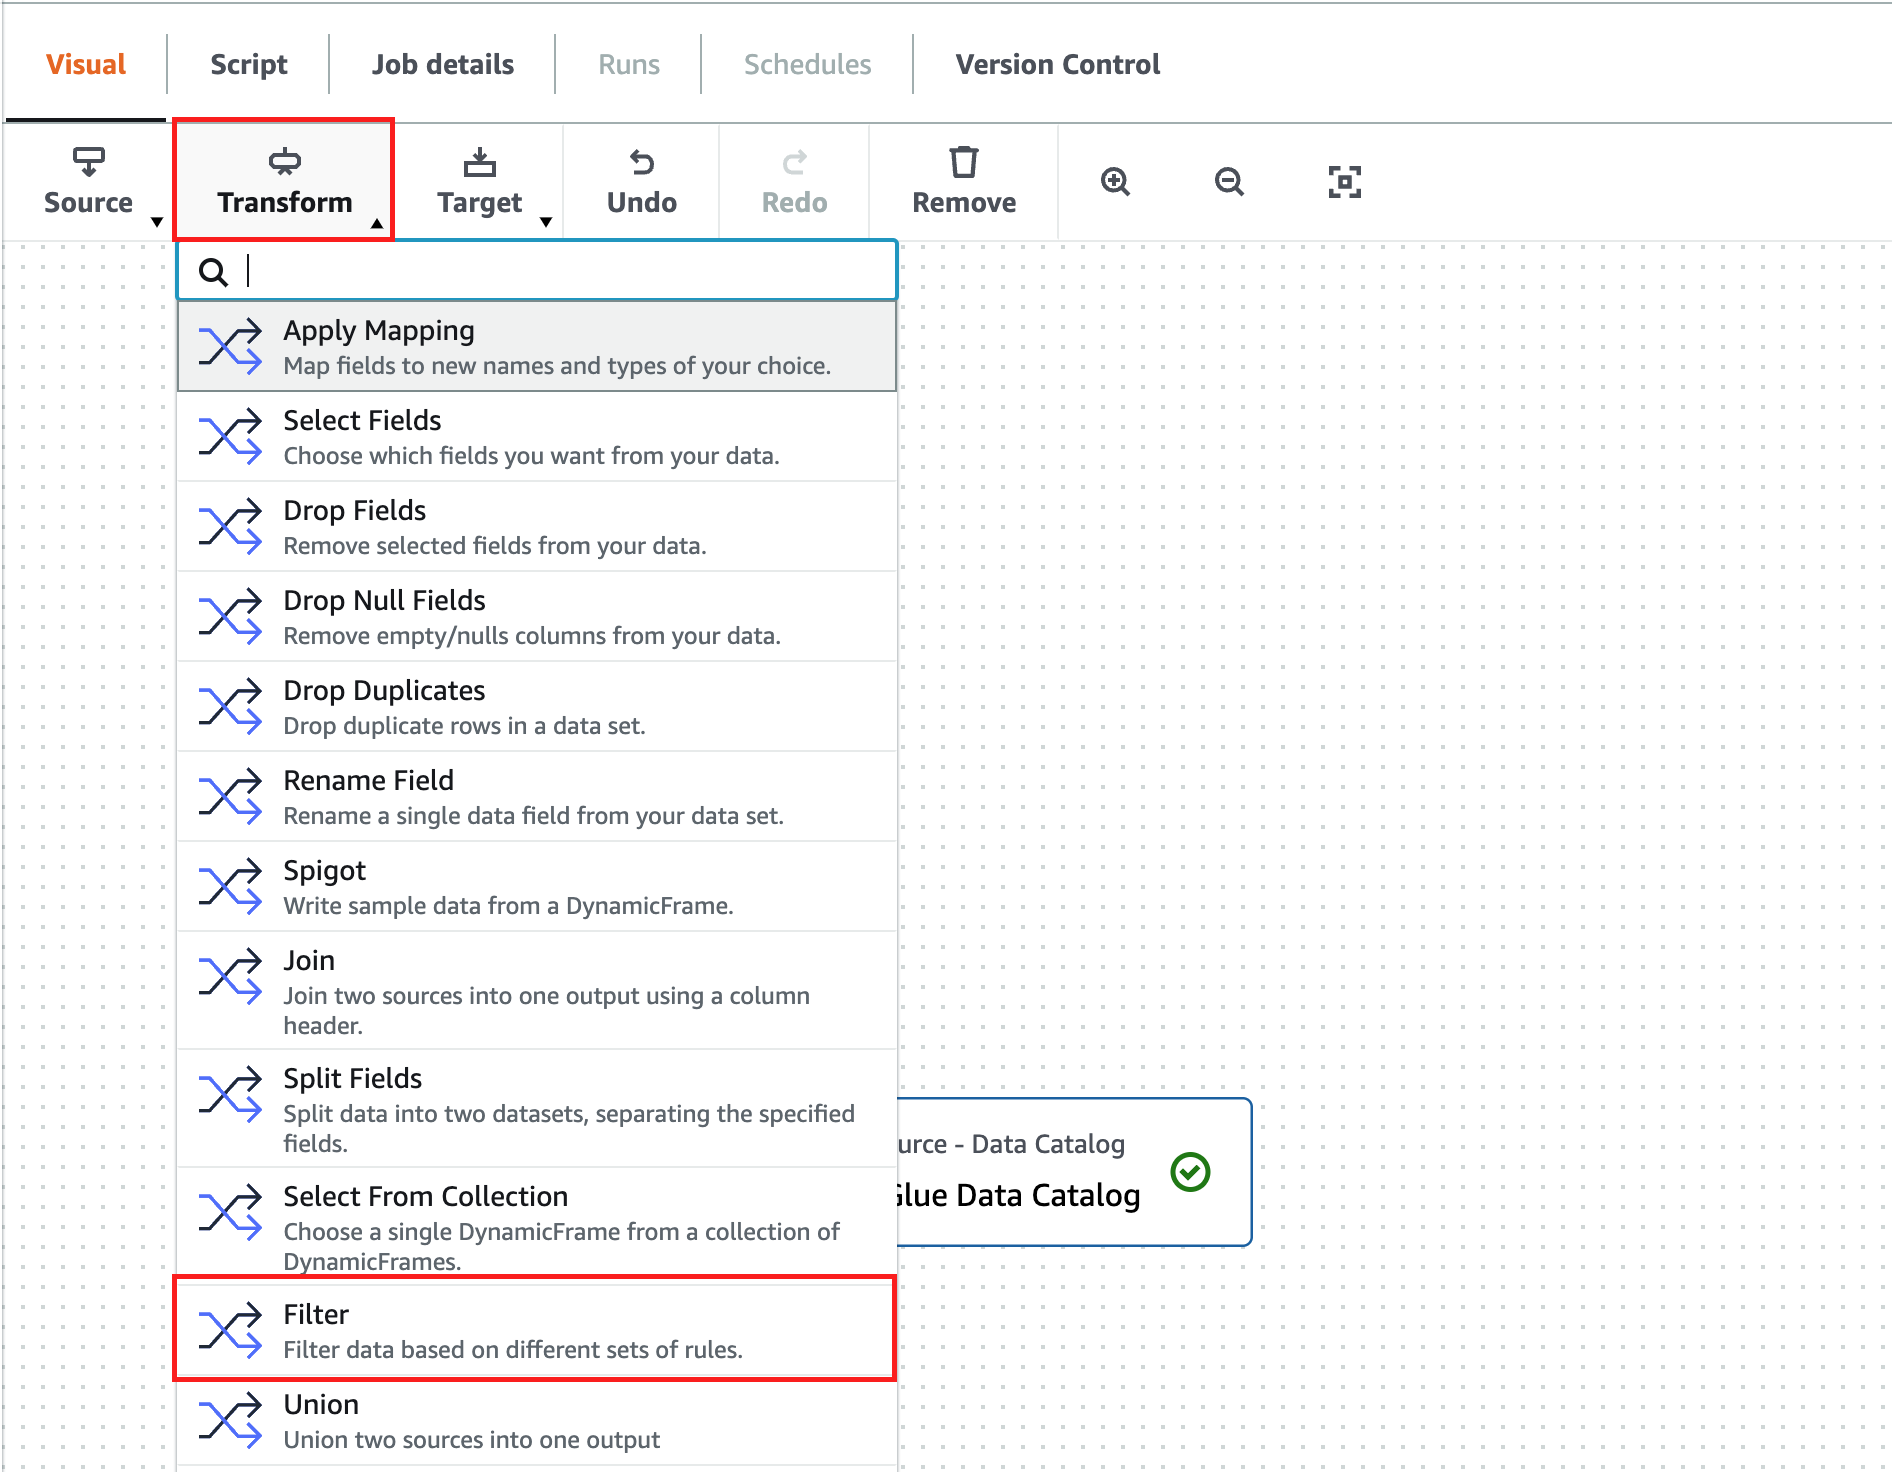
Choose Transform and then Filter.
Add a filter by infraction_description and set the value to PARK ON PRIVATE PROPERTY.
Choose Target and then choose Amazon S3.
For Format, choose Parquet.
For S3 Target Location, enter s3://glue-version-blog-YOUR ACOUNT NUMBER/output/.
For Data Catalog update options, select Do not update the Data Catalog.
Go to the Script tab to verify that a script has been generated.
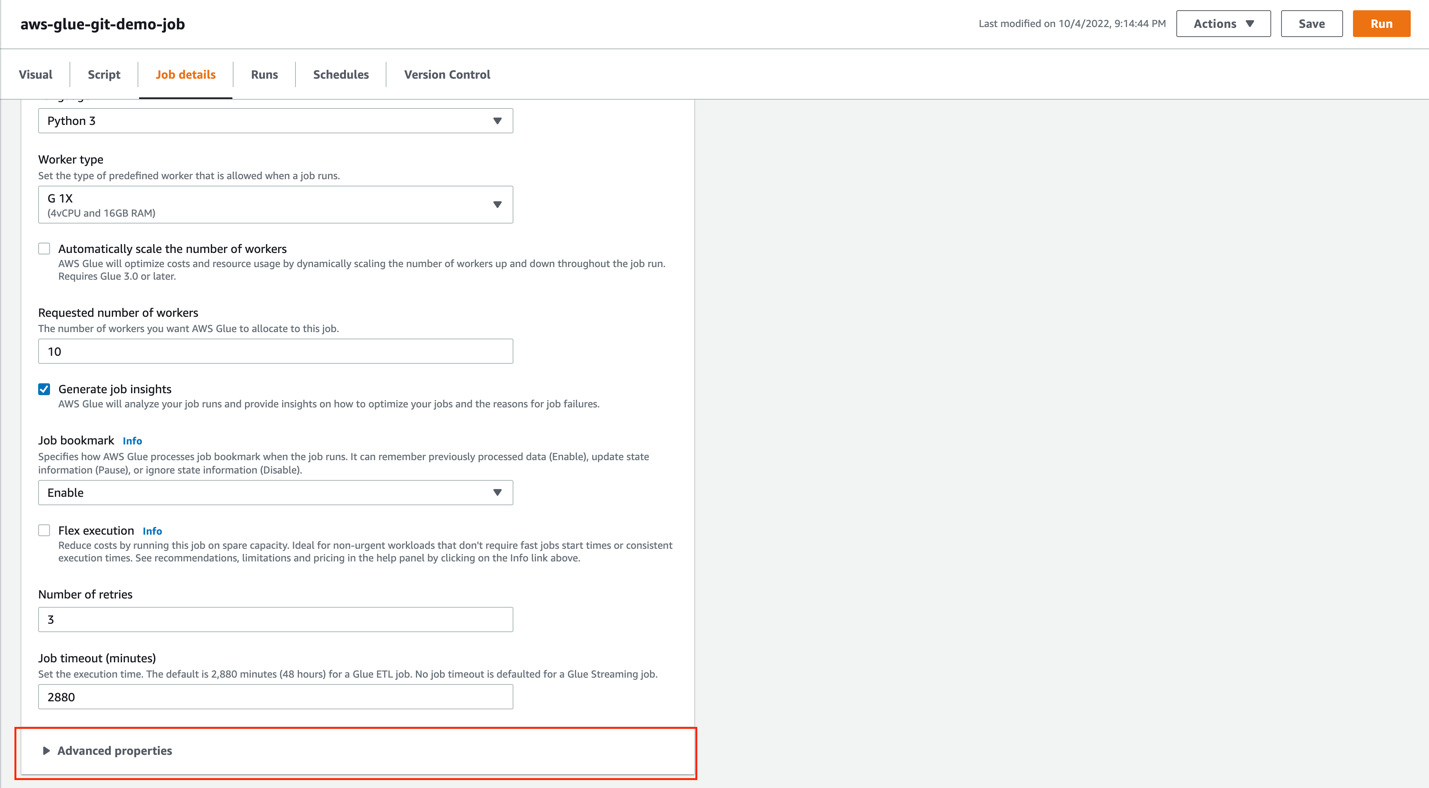
Go to the Job Details tab to make sure that the role GlueBlogRole is selected and leave everything else with the default values. Because the catalog table names in the production and development environment may be different, AWS Glue Studio now allows you to parameterize visual jobs. To do so, perform the following steps:
On the Job details tab, scroll to the Job parameters section under Advanced properties.
Create the --source.database.name parameter and set the value to torontoparking.
Create the --souce.table.name parameter and set the value to tickets.
Go to the Visual tab and choose the AWS Glue Data Catalog node.Notice that under each of the database and table selection options is a new expandable section called Use runtime parameters.
The run time parameters are auto populated with the parameters previously created. Clicking on the Apply button will apply the default values for these parameters.
Go to the Script tab to review the script.AWS Glue Studio code generation automatically picks up the parameters to resolve and then makes the appropriate references in the script so that the parameters can be used. Now the job is ready to be pushed into the develop branch of our version control system.
On the Version Control tab, for Version control system, choose Github.
For Personal access token, enter your GitHub token.
For Repository owner, enter the owner of your GitHub account.
In the Repository configuration section, for Repository, choose glue-ver-blog.
For Branch, choose develop.
For Folder, leave it blank.
Choose Save to save the job.
Push to the repository
Now the job can be pushed to the remote repository.
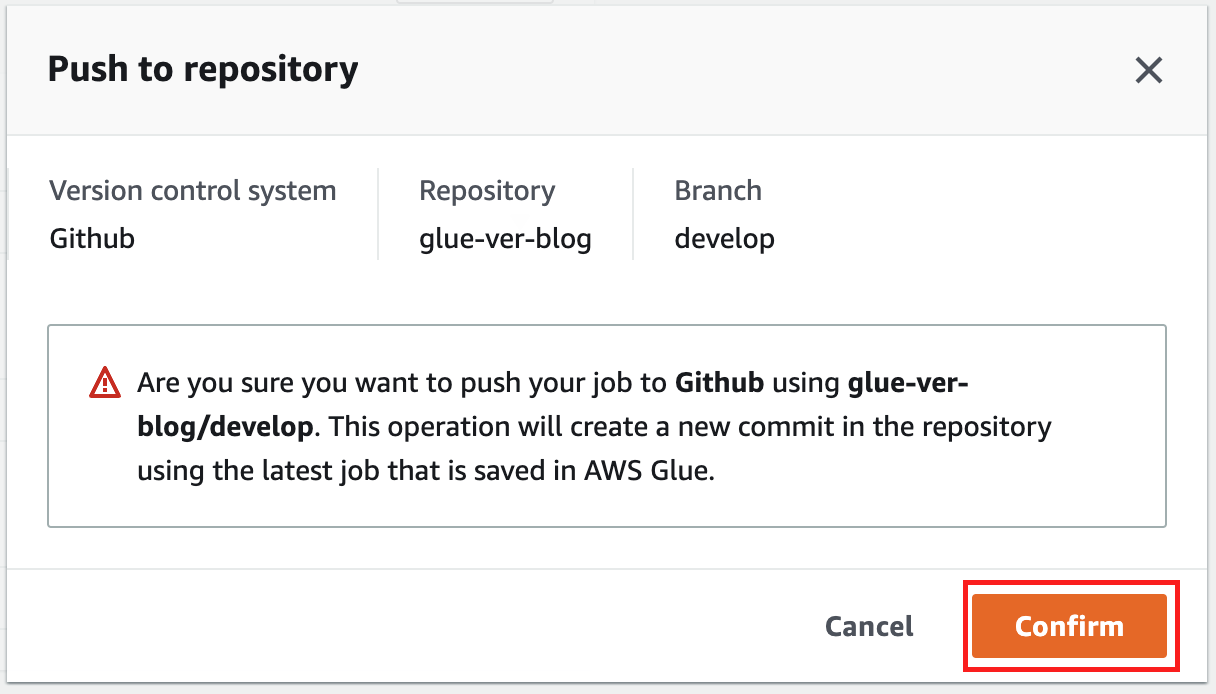
On the Actions menu, choose Push to repository.
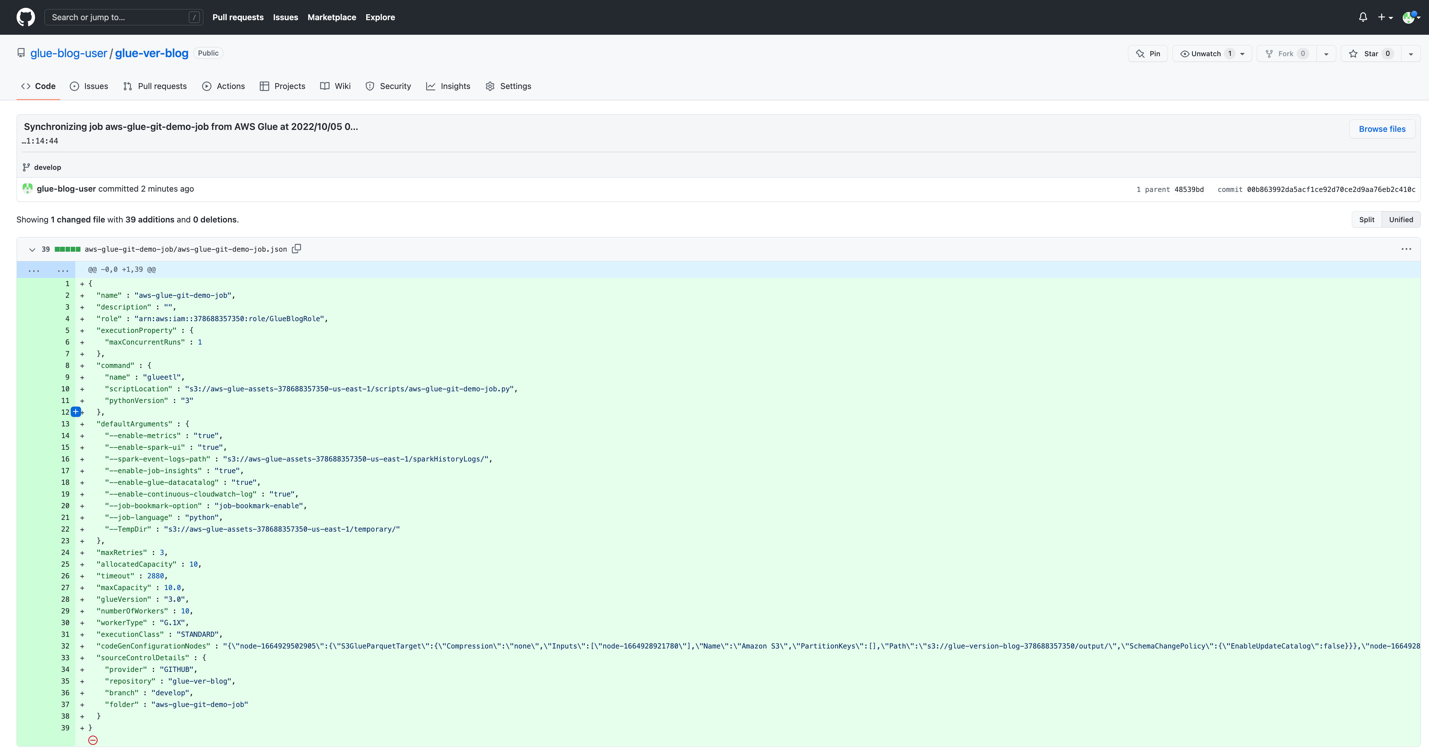
Choose Confirm to confirm the operation. After the operation succeeds, the page reloads to reflect the latest information from the version control system. A notification shows the latest available commit and links you to the commit on GitHub.
Choose the commit link to go to the repository on GitHub.
You have successfully created your first commit to GitHub from AWS Glue Studio!
Pull from the repository
Now that we have committed the AWS Glue job to GitHub, it’s time to see how we can pull changes using AWS Glue Studio. For this demo, we make a small modification in our example job using the GitHub UI and then pull the changes using AWS Glue Studio.
On GitHub, choose the develop branch.
Choose the aws-glue-git-demo-job folder.
Choose the aws-glue-git-demo-job.json file.
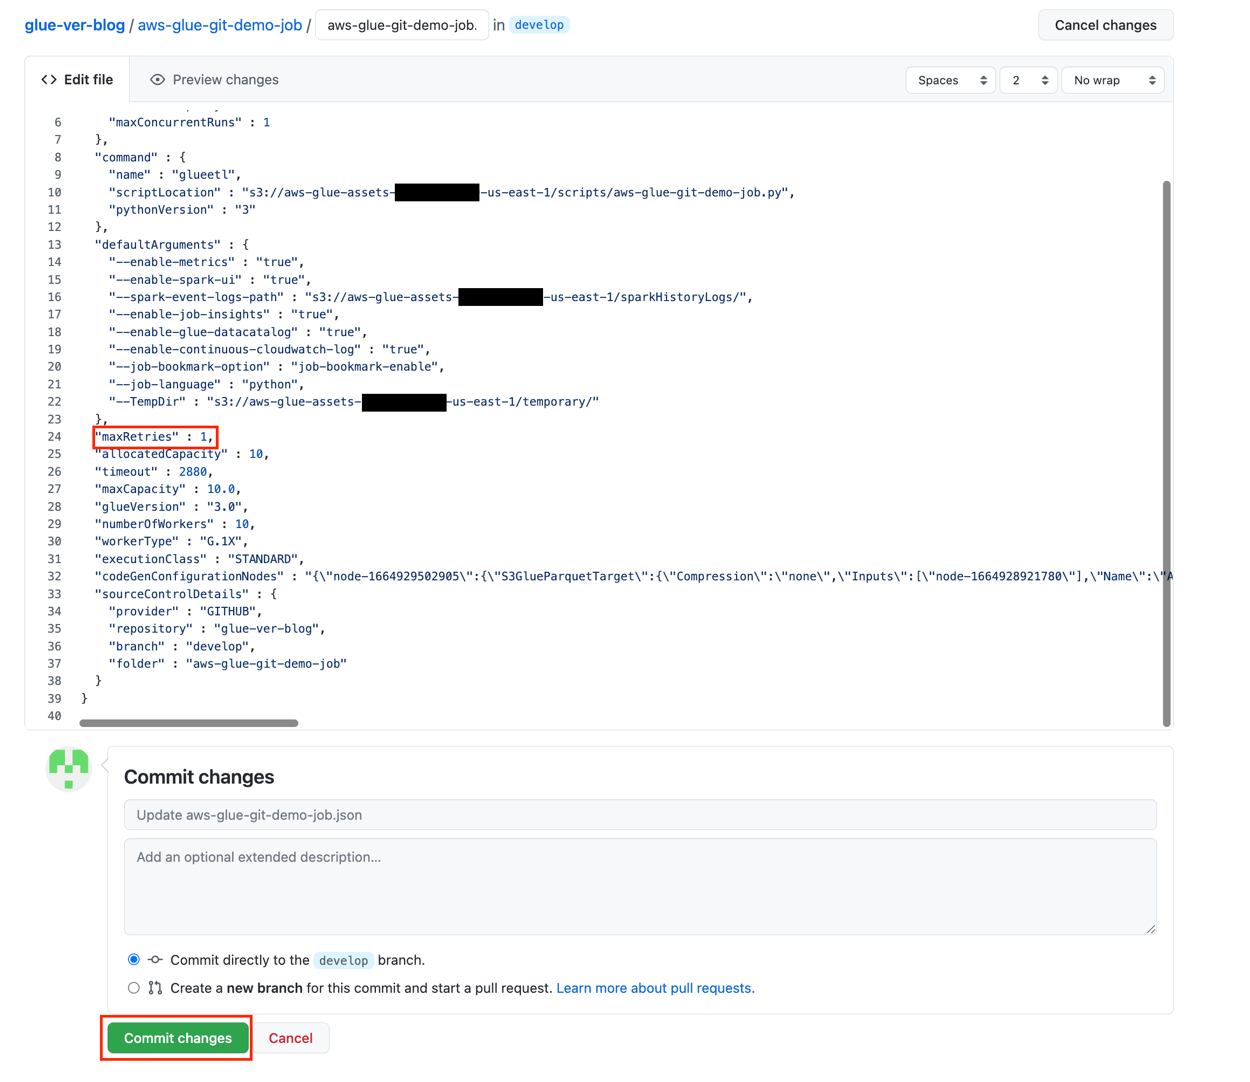
Choose the edit icon.
Set the MaxRetries parameter to 1.
Choose Commit changes.
Return to the AWS Glue console and on the Actions menu, choose Pull from repository.
Choose Confirm.
Notice that the commit ID has changed.
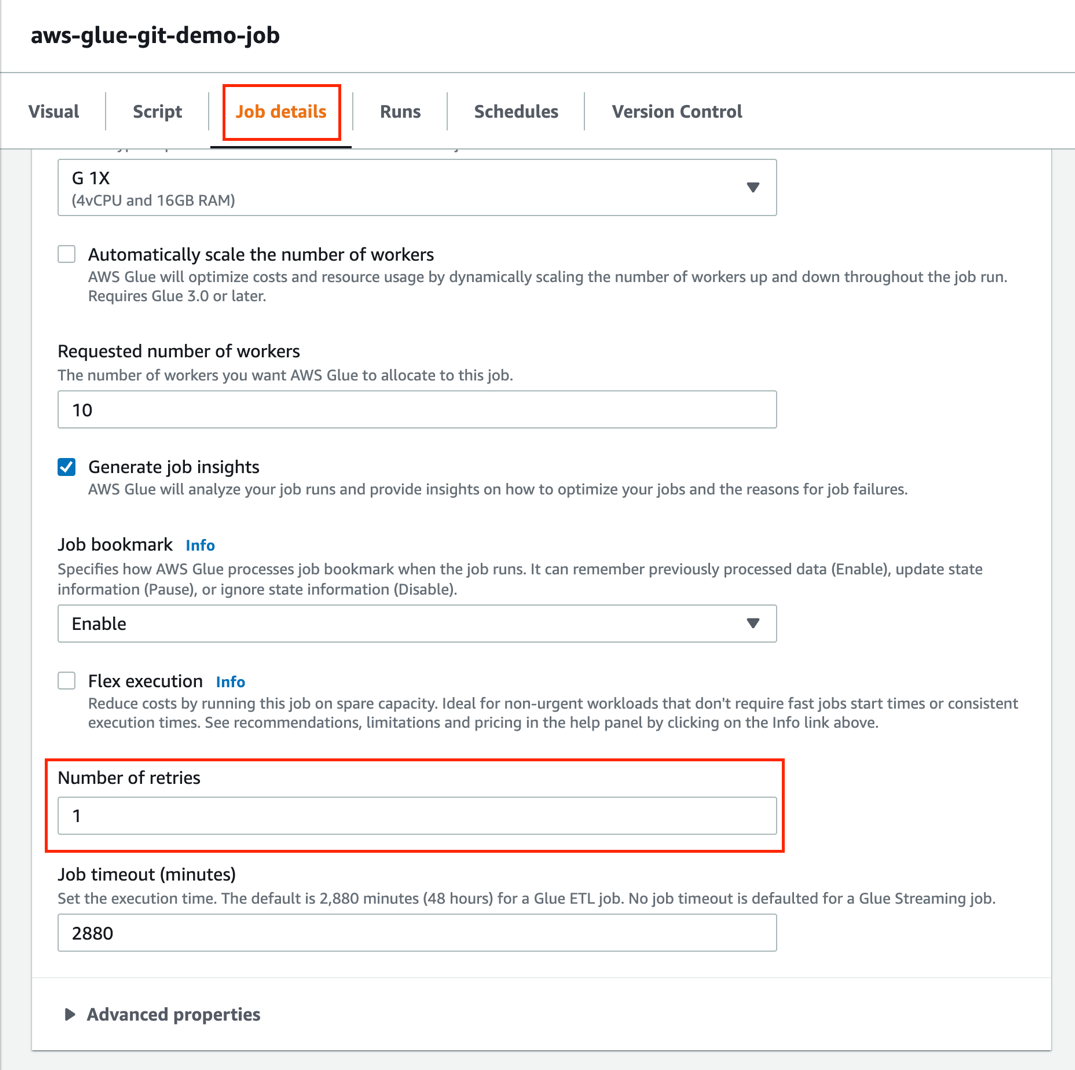
On the Job details tab, you can see that the value for Number of retries is 1.
Clean up
To avoid incurring future charges, and to clean up unused roles and policies, delete the resources you created: the datasets, CloudFormation stack, S3 bucket, AWS Glue job, AWS Glue database, and AWS Glue table.
Conclusion
This post showed how to integrate AWS Glue with GitHub, but this is only the beginning—now you can use the most popular functionalities offered by Git.
Leonardo Gómez is a Senior Analytics Specialist Solutions Architect at AWS. Based in Toronto, Canada, he has over a decade of experience in data management, helping customers around the globe address their business and technical needs.
Daiyan Alamgir is a Principal Frontend Engineer on AWS Glue based in New York. He leads the AWS Glue UI team and is focused on building interactive web-based applications for data analysts and engineers to address their data integration use cases.
Modern job descriptions have quite the reputation for causing reactionary eye-rolling. Why? Because what used to be a couple of paragraphs – about requirements and experience for performing a cybersecurity analyst job – is actually now filled with a laundry list of criteria that make candidates think twice before hitting the “Apply Now” button.
Before you know it, the potential applicant has read a couple thousand words of simple job requirements, plus an “alphabet soup” of certifications. It’s all a bit ridiculous, considering if applicants spent all of their time studying for these tests, they wouldn’t have any real-world experience (or a life!) to back it up. In fact, the candidate may even be overqualified for the job, and the person who wrote the listing is the one who should probably feel ridiculous…and inefficient.
Description or unrealistic wishlist?
Even the term “wishlist” isn’t accurate, because many job descriptions veer off of what the job function will actually be and start listing “nice-to-haves” as requirements. Thus, even a function not likely to be under an analyst’s day-to-day purview becomes something the candidate reads in the description and makes them decide not to pursue the position. Or worse, it requires the applicant to use a technology stack they’ve never accessed. And maybe with wording that conveys the availability of a little guidance and/or teaching with regard to that new tech, they might end up applying. The takeaway: Be transparent about what the job will actually require because the applicant might be an amazing fit.
This is a more pervasive problem throughout the cybersecurity industry than many think. For example, an entry-level security analyst job description might list a few certifications as hard requirements. But one of those certifications requires a minimum of five years paid work experience. So the requirements in the job description end up being contradictory, and the hiring manager might need to have a think about what kind of position they’re actually trying to fill.
Even if that magical security unicorn that matched all the requirements did exist, they’ll still need to learn something on days 1 to 100. Namely, the ins and outs of the company, the office space, meeting cadence, team dynamics…and maybe some coworkers’ first names. There’s always something new at the beginning that becomes part of the onboarding process, and learning a new tool (or two) shouldn’t be grounds to give a prospective applicant pause.
A DIY description should start with DEI
Embracing diversity, equity, and inclusion (DEI) isn’t just a corporate slogan – it’s simply the right thing to do. And knowing how to weave that sentiment and practice into a job description can be tricky. But with the right mix of welcoming language and realistic requirements, you’ll start to attract great candidates. Here are a few questions to ask yourself when writing with DEI in mind (again, so you can attract the absolute best candidate pool):
Are you simply listing the requirements and calling it a day, or are you weaving thoughtful language in and around those requirements that also keeps in mind things like gender bias and overly corporate language?
Are you creating an inviting description for potential candidates with non-typical backgrounds, such as those who might have Associate’s Degrees (but maybe also a ton of experience and/or natural aptitude) or those who may be recent grads but could turn into absolute rockstars sooner than you think?
Your company may have worked hard to integrate DEI into its culture and its very DNA. Is that reflected in the descriptions for your open positions currently published across all the job sites?
It’s not rocket science, as the old saying goes. But if you’re having trouble attracting expert talent that will stay loyal (at least for a few years), it can be worthwhile to poke around jobs sections of social sites, cybersecurity talent forums, and a ton of listings from the competition to see what kind of language they’re using and if it’s actually attracting talent (how long has that listing been up?). You’ll notice the best job descriptions are not all about the job itself; postings should say what the company is looking for AND what it can do for the candidate – beyond salary and benefits.
It’s true that a positive work environment can do wonders for productivity, camaraderie, and Glassdoor reviews from employees that reflect favorably on their time in your security operations center (SOC). It’s also good to keep in mind that if it all goes well and you end up with several employees who all stay five years or more, their experience begins with that job description. They’ll always remember reading it; how it made them feel and what prompted them to click “Apply Now,” so make that listing a good one.
Customers tell us they want to have stronger performance and lower costs for their data analytics applications and workloads. Customers also want to use AWS as a platform that hosts managed versions of their favorite open-source projects, which will frequently adopt the latest features from the open-source communities. With Amazon Athena engine version 3, we continue to increase performance, provide new features and now deliver better currency with the Trino and Presto projects.
Athena is an interactive query service that makes it easy to analyze data in Amazon Simple Storage Service (Amazon S3) using standard SQL. Athena is serverless, so there is no infrastructure to manage, and you pay only for the queries that you run. Customers such as Orca Security, the Agentless Cloud Security Platform, are already realizing the benefits of using Athena engine version 3 with the Apache Iceberg.
“At Orca Security, we are excited about the launch of Athena engine version 3,” says Arie Teter, VP R&D at Orca Security. “With Athena engine version 3, we will be able to query our massive petabyte-scale data lake more efficiently and at a lower cost. We are especially excited about being able to leverage all the latest Trino features with Athena’s new engine in order to deliver our customers the best-of-breed, ML-driven anomaly detection solution.”
In this post, we discuss benefits of Athena engine version 3, performance benchmark results for different table formats and information about upgrading to engine version 3.
New features, more often
One of the most exciting aspects of engine version 3 is its new continuous integration approach to open source software management that will improve currency with the Trino and PrestoDB projects. This approach enables Athena to deliver increased performance and new features at an even faster pace.
At AWS, we are committed to bringing the value of open source to our customers and providing contributions to open source communities. The Athena development team is actively contributing bug fixes and security, scalability, performance, and feature enhancements back to these open-source code bases, so anyone using Trino, PrestoDB and Apache Iceberg can benefit from the team’s contributions. For more information on AWS’s commitment to the open-source community, refer to Open source at AWS.
Athena engine version 3 incorporates over 50 new SQL functions, and 30 new features from the open-source Trino project. For example, Athena engine version 3 supports T-Digest functions that can be used to approximate rank-based statistics with high accuracy, new Geospatial functions to run optimized Geospatial queries, and new query syntaxes such as MATCH_RECOGNIZE for identifying data patterns in applications such as fraud detection and sensor data analysis.
Athena engine version 3 also gives you more AWS-specific features. For example, we have worked closely with the AWS Glue data catalog team to improve Athena’s metadata retrieval time, which we explain in the section “Faster query planning with AWS Glue Data Catalog” below.
For more information about what’s new in Athena engine version 3, refer to the Athena engine version 3 Improvements and new features.
Faster runtime, lower cost
Last year, we shared benchmark testing on Athena engine version 2 using TPC-DS benchmark queries at 3 TB scale and observed that query performance improved by three times and cost decreased by 70% as a result of reduced scanned data. These improvements have been a combination of enhancements developed by Athena and AWS engineering teams as well as contributions from the PrestoDB and Trino open-source communities.
The new engine version 3 will allow Athena to continue delivering performance improvements at a rapid pace. We performed benchmark testing on engine version 3 using TPC-DS benchmark queries at 3 TB scale, and observed 20% query performance improvement when compared to the latest release of engine version 2. Athena engine version 3 includes performance improvement across operators, clauses, and decoders: such as performance improvement of joins involving comparisons with the <,<=, >,>= operators, queries that contains JOIN, UNION, UNNEST, GROUP BY clauses, queries using IN predicate with a short list of constant. Athena engine version 3 also provides query execution improvements that reduce the amount of data scanned which gives you additional performance gains. With Athena, you are charged based on the amount of data scanned by each query, so this also translates to lower costs. For more information, refer to Amazon Athena pricing.
Faster query planning with AWS Glue Data Catalog
Athena engine version 3 provides better integration with AWS Glue Data Catalog to improve query planning performance by up to ten times. Query planning is the process of listing instructions the query engine will follow in order to run a query. During query planning, Athena uses AWS Glue API to retrieve various information such as table and partition metadata, and column statistics. As the number of tables increases, the number of calls to the Glue API for metadata also increase which results in additional query latency. In engine version 3, we reduced this Glue API overhead thus brought down the overall query planning time. For smaller datasets and datasets with large number of tables, you can see the total runtime has been reduced significantly because the query planning time is a higher percentage of the total run time.
Figure 1 below charts the top 10 queries from the TPC-DS benchmark with the most performance improvement from engine version 2 to engine version 3 based on the Amazon CloudWatch metric for total runtime. Each query involves joining multiple tables with complex predicates.
Faster query runtime with Apache Iceberg integration
Athena engine version 3 provides better integration with the Apache Iceberg table format. Features such as Iceberg’s hidden partitioning now augment Athena optimizations such as partition pruning and dynamic filtering to reduce data scanned and improve query performance in Athena engine v3. You do not need to maintain partition columns or even understand the physical table layout to load data to table and achieve good query performance.
We performed TPC-DS benchmark testing by loading data into the Apache Iceberg table format, with hidden partitions configured, and compared the performance between Athena engine version 2 and 3. Figure 2 below is a chart of the top 10 query improvements, which all include complex predicates. The top query, query 52, has five WHERE predicates and two GROUP BY operations. Compared to engine version 2, the query runs thirteen times faster with sixteen times less data scanned on engine version 3.
Upgrading to Athena engine version 3
To use Athena engine version 3, you can create a new workgroup, or configure an existing workgroup, and select the recommended Athena engine version 3. Any Athena workgroup can upgrade from engine version 2 to engine version 3 without interruption in your ability to submit queries. For more information and instructions for changing your Athena engine version, refer to Changing Athena engine versions.
Athena engine version 3 includes additional improvements to support ANSI SQL compliance. This results in some changes to syntax, data processing, and timestamps that may cause errors when running the same queries in the new engine version. For information about error messages, causes, and suggested solutions, refer to Athena engine version 3 Limitations, Breaking changes, Data processing changes, and Timestamp changes.
To make sure that your Athena engine version upgrade goes smoothly, we recommend the following practices to facilitate your upgrade process. After you have confirmed your query behavior works as you expect, you can safely upgrade your existing Athena workgroups.
Test in pre-production to validate and qualify your queries against Athena engine version 3 by creating a test workgroup or upgrading an existing pre-production environment. For example, you can create a new test workgroup running engine version 3 to run integration tests from your pre-production or staging environment, and monitor for failures or performance regressions. For information about CloudWatch metrics and dimensions published by Athena, refer to Monitoring Athena queries with CloudWatch metrics.
Upgrade each query based on metrics to test your queries against an Athena engine version 3 workgroup. For example, you can create a new workgroup with engine version 3 alongside your existing engine version 2 workgroup. You can send a small percentage of queries to the engine version 3 workgroup, monitor for failures or performance regressions, then increase the number of queries if they’re successful and performant. Repeat until all your queries have been migrated to Athena engine version 3.
With our simplified automatic engine upgrade process, you can configure existing workgroups to be automatically upgraded to engine version 3 without requiring manual review or intervention. The upgrade behavior is as follows:
If Query engine version is set to Automatic, your workgroup will remain on engine version 2 pending the automatic upgrade, and Athena will choose when to upgrade the workgroup to engine version 3. Before upgrading a workgroup, we perform a set of validation tests to confirm that its queries perform correctly and efficiently on engine version 3. Because our validation is performed on a best effort basis, we recommend you perform your own validation testing to ensure all queries run as expected.
If Query engine version is set to Manual, you will have the ability to select your version. The default choice is set to engine version 3, with the ability to toggle to engine version 2.
Conclusion
This post discussed Athena engine version 3 benefits, performance benchmark results, and how you can start using engine version 3 today with minimal work required. You can get started with Athena engine version 3 by using the Athena Console, the AWS CLI, or the AWS SDK. To learn more about Athena, refer to the Amazon Athena User Guide.
Thanks for reading this post! If you have questions on Athena engine version 3, don’t hesitate to leave a comment in the comments section.
About the authors
Blayze Stefaniak is a Senior Solutions Architect for the Technical Strategist Program supporting Executive Customer Programs in AWS Marketing. He has experience working across industries including healthcare, automotive, and public sector. He is passionate about breaking down complex situations into something practical and actionable. In his spare time, you can find Blayze listening to Star Wars audiobooks, trying to make his dogs laugh, and probably talking on mute.
Daniel Chen is a Senior Product Manager at Amazon Web Services (AWS) Athena. He has experience in Banking and Capital Market of financial service industry and works closely with enterprise customers building data lakes and analytical applications on the AWS platform. In his spare time, he loves playing tennis and ping pong.
Theo Tolv is a Senior Big Data Architect in the Athena team. He’s worked with small and big data for most of his career and often hangs out on Stack Overflow answering questions about Athena.
Jack Ye is a software engineer of the Athena Data Lake and Storage team. He is an Apache Iceberg Committer and PMC member.
If you’ve ever told an IT professional that you’re using Dropbox to back up files and were greeted with a side eye and a stifled “well, actually…” it’s because Dropbox isn’t actually a backup. It’s for syncing data. The distinction is subtle, but critical.
If you’re reading this post, you probably already know that data is always at risk of loss to accidental deletion, system updates, or even if you forget your password and get locked out of your account. The difference between backing up and syncing is that syncing your data will not protect it from these risks.
It’s easy to accidentally lose access to a sync service where you might be keeping files or images that no longer live on your computer. Many colleges and universities now even offer file hosting service subscriptions to students for free—until they graduate. After students earn their diplomas and leave the dorms, these services graduate, too, and students either get locked out of their accounts or have to choose between switching to a free tier and compromising on storage space or paying the fees to keep their existing subscription tier.
To make sure your data stays safe and secure, you’ll want to make sure you have a copy of it on your local device as well as a copy backed up to the cloud. A 3-2-1 backup strategy is always your best bet for securely storing your data. In this post, we’ll walk you through downloading your data from Dropbox and some strategies for backing up your downloaded files.
To help you save your synced computer data, we’re developing a series of guides to downloading and backing up your data across different sync services, like OneDrive. Comment below to let us know what other sync services you’d like to see us cover.
How to Download Files From Dropbox
Note: If you are using the Dropbox client to sync the files that are on your computer, the option to download your files may be replaced by an option to open them, instead. Clicking on “Open” will open up the files directly from the file on your computer where they are saved.
To download a file or folder from Dropbox, follow these steps:
Sign in to your Dropbox account. (We know, this is pretty self-evident. We’re just trying to be thorough here).
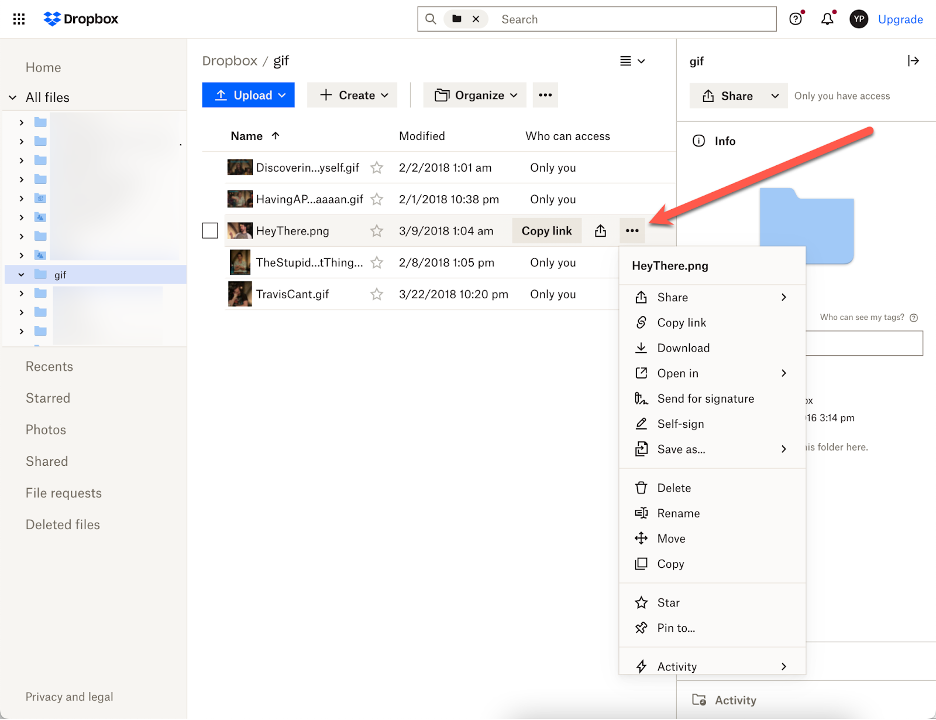
Find the file or folder you’d like to download and hover your cursor over it.
Click on the three dots.
Select Download. Your files will appear in the Downloads folder on your computer, and folders will be downloaded as .zip files.
It’s also important to note that Dropbox only supports downloads of folders that are less than 20GB and contain fewer than 10,000 total files.
How to Back Up Your Dropbox Data
Now that you have all of your Dropbox files downloaded to your computer, you’ll want to follow through with the next steps of the 3-2-1 backup strategy. By saving a copy of your data on an external or secondary device (like a hard drive), and a third copy in an off-site location (like the cloud) your data will be protected from any number of possible risks. Backblaze Personal Backup automatically and continuously backs up a copy of all of the data on your computer to the cloud, making it that much easier to fulfill the 3-2-1 backup strategy.
Bonus: How to Export a File From Dropbox to an App on Your Phone or Mobile Device
If you want to send a portion of your files elsewhere for safekeeping, or to share with another app, you can follow the set of instructions below. Just remember that downloading your files to your phone or emailing them to yourself isn’t the same as keeping a full copy of your data on an external device—your data is still susceptible to damage or loss.
First, you’ll need to download the Dropbox mobile app to access your synced files on your mobile device.
Open the app and select the three dots next to the file or folder you’d like to export. On an iPhone or iPad, the dots will appear horizontal, and on an Android device they’ll be vertical.
Select Share.
Select Export file, which will show a list of apps that can open the file. Choose the app you’d like to open the file. Note: once you export the file, if you make any changes to that file in the other app, those changes may not be saved back to your Dropbox account unless the app integrates with Dropbox.
Back Up Your Dropbox Before It’s Too Late
Have a lot of Dropbox data you don’t want to take up space on your computer? Upload and store your data in Backblaze B2 Cloud Storage as a part of your 3-2-1 approach. Also, let us know in the comments if you’d like to see more guides to downloading and backing up the data saved to other sync services.
As the attack surface sprawls, under-resourced security teams have inherent disadvantages. Rapid7 InsightIDR enables resource constrained security teams to achieve sophisticated detection and response, with greater efficiency and efficacy. As a Challenger in the 2022 Gartner Magic Quadrant for SIEM, we’re proud to represent the huge number of security teams out there today that don’t have time to do it all, but are asked to do it anyway. Our goal is to keep your organization safe by finding and eliminating threats faster and more reliably.
Rapid7 maximizes your most precious resource: time
We are grateful to have a diverse collective of customers and partners around the world, of varying size and industry focus. These smart, agile, maturing teams want to advance their detection and response programs, but their organizations and the threats they face are moving faster than their capacity is growing. The constant that unites all of these teams: they never have enough time. Yet, we feel that despite a well-documented, industry-crushing skills gap, far too many traditional SIEMs and detection products continue to introduce additional noise and complexity for these teams. The result is long days, weekend work, far too many missed dinners / concerts / games, and (scariest of all) missed threats.
The best way to achieve successful detection and response is through a pragmatic and efficient approach. Threats are still a threat—whether or not you’ve had time to set up your complex traditional SIEM or the myriad of point detection solutions around it. Attackers don’t care if you’re ready. In fact, they’re counting on you not to be. Security teams need time and access to expertise to close this gap.
From inception, the guiding principle of InsightIDR has been to deliver sophisticated detection and response, in a more efficient and effective way, and here’s how:
A cloud-native foundation, SaaS delivery, and software-based collectors means it is faster to deploy, removes hardware burdens that bog teams down, and accelerates the time to actually get insights.
Intuitive interfaces, pre-built dashboards and reports, and a robust detections library means that teams are able to activate even the most junior analysts to deliver advanced analysis and threat detections right away.
And highly correlated investigation timelines, response recommendations (vetted by Rapid7’s MDR team), and pre-built automation workflows help you with one of the hardest parts of your job: responding to threats before significant damage occurs.
In short, we offer a SIEM that maturing teams can get real value from. Over the last seven years, we’ve struck a balance of adding a multitude of capabilities while never compromising our core tenet and commitment to providing you with productivity efficiency and delivering a better detection and response experience.
Leveraging a diverse mix of threat intelligence—including unique intel from Rapid7’s renowned open-source projects—the Rapid7 Threat Intelligence and Detections Engineering (TIDE) team curates emergent threat content from all corners of the threat landscape. Our TIDE team is constantly manicuring a library of both known and unknown threats to capture even the most evasive attacks. With this always-up-to-date library and native UEBA, EDR, NDR, deception technology, and cloud TDIR, InsightIDR customers can be confident that the entirety of their attack surface is covered. And because our global MDR team is leveraging the same threat library, you can be certain that alerts will be low noise, highly reliable, and primed for analysts to take action.
We believe that as the threat and attack landscape change at a rapid pace, the approaches to unifying data, detecting, and responding need to too. Reducing the noise and accelerating response outcomes is critical for security success – regardless of your security maturity. We also believe that for this reason, Gartner has named us a Challenger in the Magic Quadrant for SIEM – and we will continue to challenge the traditional as we focus on building the right outcomes for our customers. Find a complimentary copy of the 2022 Gartner Magic Quadrant for SIEM here.
Just a few of those outcomes we are driving toward in the future:
More frictionless access to expertise to ensure analysts always know how to respond and can execute more quickly
Deepening our breadth of detections and endpoint coverage for modern, dynamic environments, so customers can continue to leverage InsightIDR as their single source of truth for detection and response
Making sure our MSSP partners and their customers are optimized to succeed by providing a more turnkey experience that enables these partners to tap into the scale and efficiency of InsightIDR
We are excited to share more on these initiatives soon. Thank you to our customers and partners for continuing to share your insights, ideas, pains, and future plans. You continue to fuel our innovation and validate that we are on the right track in addressing the needs of maturing security teams.
GARTNER and Magic Quadrant are registered trademarks and service marks, and PEER INSIGHTS is a trademark and service mark, of Gartner, Inc. and/or its affiliates in the U.S. and internationally and are used herein with permission. All rights reserved.
Gartner does not endorse any vendor, product or service depicted in its research publications, and does not advise technology users to select only those vendors with the highest ratings or other designation. Gartner research publications consist of the opinions of Gartner’s research organization and should not be construed as statements of fact. Gartner disclaims all warranties, expressed or implied, with respect to this research, including any warranties of merchantability or fitness for a particular purpose.
Gartner Peer Insights content consists of the opinions of individual end users based on their own experiences, and should not be construed as statements of fact, nor do they represent the views of Gartner or its affiliates. Gartner does not endorse any vendor, product or service depicted in this content nor makes any warranties, expressed or implied, with respect to this content, about its accuracy or completeness, including any warranties of merchantability or fitness for a particular purpose.
When you install Git v2.38, you’ll find a new executable tool available called scalar. At its core, Scalar enables the latest and greatest Git features for working with large repositories. By simply switching from git clone to scalar clone, you will have all of Git’s most impactful performance features, such as partial clone, sparse-checkout, background maintenance, and advanced config options neatly configured for your repository. Have you already cloned your repository? Run scalar register in it to get the same features.
Scalar and Git, together at last
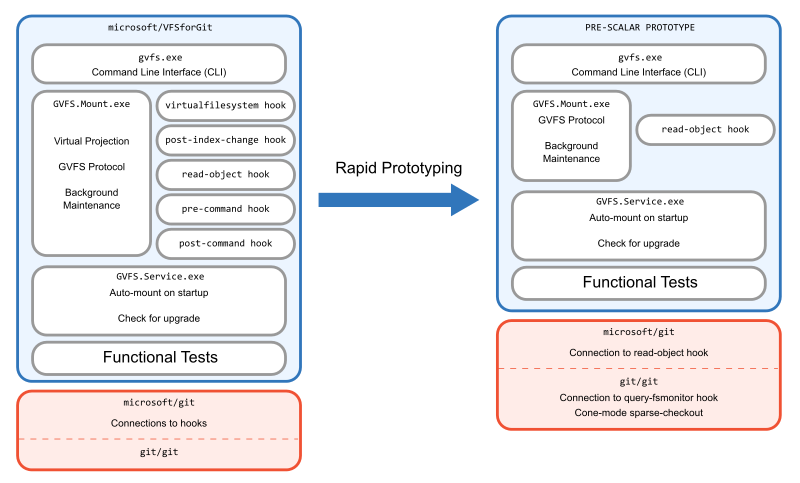
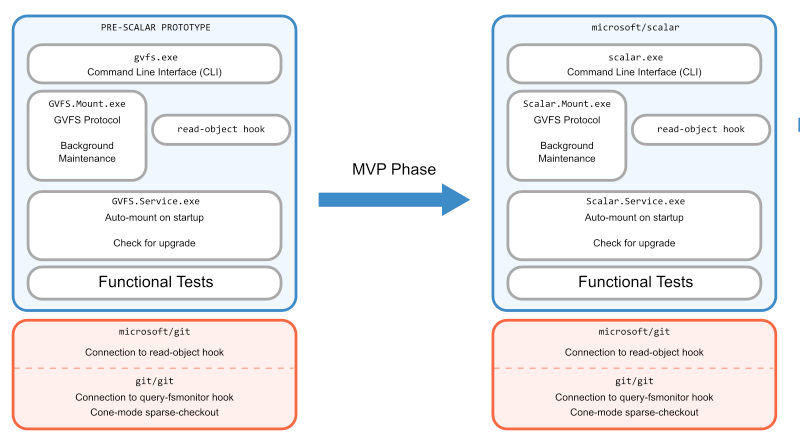
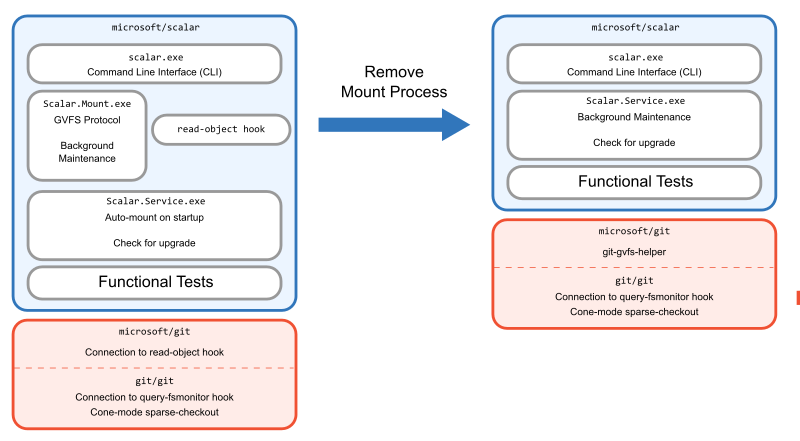
Although Scalar is only now making its formal Git debut, this release represents the culmination of a multi-year journey. Today, we will share the story of how Scalar got to this point. We’ll start from what inspired its creation, how it evolved from a prototype carved out of the VFS for Git codebase, and finally how it landed in upstream Git. Each step of the way was guided by a set of development principles that helped us with each challenge and opportunity.
Before we get into specifics about how Scalar was built and eventually rewritten and contributed upstream, we need to first establish some context. We entered the project with certain values that we used to guide our decisions. Here are a few that are particularly important to this story.
Rapid prototyping
Code speaks volumes. We could design an architecture all we want on paper, but when solving problems at scale, we need to have actual code running before we can make a final decision.
Before committing to a decision, we would quickly build a prototype and measure its performance. During this prototyping phase, we would take shortcuts to get to that point of measurement. Then, we’d throw everything we could at the prototype to make sure it was correct and fast.
Based on the prototype, we would commit to doing the careful engineering of building the feature again but with a test strategy, thoughtful architecture, and a plan for delivering it to users.
Incremental changes over complete rewrites
Looking at where we started to where we ended, it might seem like we are proponents of rewriting things from scratch. We intend to demonstrate exactly the opposite: Scalar moved with small incremental changes that solved an immediate need. While making those changes, we also optimized for reducing our technical debt and creating a better architecture, and that resulted in code moving from .NET to C and then from our fork to upstream Git, but each individual movement was relatively small compared to the entire system.
The biggest reason we focused on incremental changes was because of our next value.
Tests are an asset
Making any kind of software change adds risk to a project. That risk is mitigated when we have a large set of battle-hardened tests. With a robust test suite available, we were able to make significant changes to our architecture with confidence.
Work in the open
Other than the earliest prototypes, all changes were reviewed and merged completely in public, either in the microsoft/scalar repository or the microsoft/git repository. Scalar was an open source project from day one, and was never intended to be a project only for internal use. By contrast, VFS for Git was built as a tool for Microsoft’s internal use first, and open sourcing it was a bonus after it reached enough adoption. Not only did we value that transparency during Scalar’s development, but now we have a history of public code changes to talk about here.
Now that we’ve established these values, let’s begin the story of Scalar.
A catalyst forces a pivot
The Virtual FileSystem for Git project (VFS for Git for short—previously “GVFS”) was built specifically to transition the Microsoft Windows OS monorepo to Git. VFS for Git utilizes a virtual filesystem to lazily load files only when a filesystem read occurs. This greatly reduced the amount of work Git needed to do, but required installing the microsoft/git fork as well as the .NET VFS for Git software and use Azure Repos to host the repository.
Initially, the Microsoft Office monorepo was going to onboard to Git using VFS for Git, but they needed cross-platform support, specifically for macOS development. After getting pretty far in a macOS port, Apple deprecated the kernel features that provided the filesystem virtualization that was required for that flow.
We were in luck, however, because we had come to understand something a key quality of the Office monorepo: Office has a rigorous dependency system that clearly identifies which files are necessary for a local build. This means that a developer could specify the files they need to Git’s sparse-checkout feature instead of dynamically populating the worktree using a virtual filesystem. This also significantly simplifies the software needed to manage their monorepo!
However, there was a problem. The sparse-checkout feature had previously been abandoned as a direction for VFS for Git due to its performance. Git would use a list of patterns to match which paths should be in the worktree and which should be ignored. This pattern matching had an ordering strategy that required iterating through the entire pattern list for every possible path, requiring quadratic time! For one of the larger sparse-checkout definition examples we had, Git would take 40 minutes to evaluate the sparse-checkout patterns.
Sparse-checkout definitions are extremely generic. They include matching on file prefix, but also file suffix, or path substring, and any combination. For our target monorepo, we only needed directory matches. With that limited type of pattern in mind, we added a new mode to Git’s sparse-checkout feature: “cone mode” sparse-checkout. A quick prototype of cone mode sparse-checkout demonstrated that Git could reach similar performance as VFS for Git, especially when paired with the filesystem monitor hook. Our critical performance measurement was the git status command, and we were seeing performance within three or four seconds, which was close to the typical case in VFS for Git.
This was promising enough to move forward with a full prototype. We decided to make this a separate project from VFS for Git, so it needed its own name: Scalar.
Throw the first one away
Once we had a handle on Git command performance using Git’s sparse-checkout feature, we needed to adapt all of the code that allowed fast clones and fetches to work within that environment. For most Git hosting services, Git’s partial clone feature is the best way to solve for fast clones and fetches. However, Azure Repos has an earlier version that was built for VFS for Git called the GVFS protocol. We needed a way to speak the GVFS protocol to bootstrap clones and to dynamically fetch missing objects during Git commands.
This was our first point of asking, “Should we rewrite, or refactor?” The VFS for Git codebase already had all of the client-side code for speaking the GVFS protocol. Not only that, it also had a large set of end-to-end tests that constructed a complete clone from Azure Repos and then ran thousands of Git commands in that environment to make sure they operated exactly the same as a normal Git clone. Since those tests were a significant asset, we set out to construct the first version of this new project starting with the VFS for Git code.
In this initial prototype, we just wanted to get things working for the end-to-end tests to pass. This process included disabling the virtual filesystem code, but leaving all of the hooks that enabled the GVFS Protocol. We also needed to set up sparse-checkout at clone time before initializing the HEAD reference. This prototype was so rough it still didn’t have the Scalar name: it still operated as if it was the gvfs command-line interface.
The rapid prototyping phase mostly deleted code
The end result wasn’t pretty. We couldn’t hope to ship it since it would break compatibility with previous VFS for Git versions. The tests were cobbled together to make things work, but we had disabled sparse-checkout in the tests since the previous tests assumed that every path could be populated dynamically with the virtual filesystem. However, we got to a point where we could reliably create this new repository setup and measure its success. Since the clones were doing the exact same thing as in VFS for Git, the performance matched exactly. Now, we needed to rebuild it, and do it the right way.
Get to Minimum Viable Product (MVP)
From the success of our initial prototype, we moved on to creating an MVP that we could demo to internal users. Here is where we created the Scalar name, the microsoft/scalar repository, and started doing thorough reviews of all changes.
As a team, we decided it would be best to create a new repository rather than to build the project within the VFS for Git codebase. We did not want to be locked into the architecture of VFS for Git as we moved forward, and we also wanted to take advantage of the commit history for the code in the repository. The first task in creating the new project was renaming all references to the old project.
Cleaning up the prototype and renaming things
Updating tests
The next step we had to do was to make sure that we were sufficiently testing the sparse-checkout environment. Recall that we used the full worktree to get tests passing in the prototype, but now we needed to actually be sure that our sparse-checkout environment would work properly.
For this, we found a minimal set of patterns that would include all of the concrete paths used by the test suite.
Then, we made sure that there were interesting changes happening outside of those patterns that would exercise Git features like git merge or git cherry-pick in interesting ways outside of the sparse-checkout definition.
Finally, we added specific tests that involved changing the sparse-checkout definition to make sure that Git would properly fill in the missing files. In this way, we were able to keep all of the existing tests while also adding new tests that were specific to our environment.
Evaluating the MVP
After completing the product changes and test updates, it was time to evaluate the solution. We ran performance numbers to ensure they matched what we saw in our prototype phase. We created local clones to use in daily work to try and catch any lingering bugs.
But it all came down to evaluating the solution with internal users. We demoed Scalar directly with the Office engineering system team and asked pointed questions about whether this would work for them.
In particular, we were worried about the performance of git checkout. In VFS for Git, git checkout is extremely fast because it doesn’t actually do much work. It clears the filesystem of concrete files and replaces them with virtualized files. The cost of populating the filesystem comes later when those files are read by an IDE or a build process. With Scalar, the filesystem is populated within the git checkout process, so that work is now upfront and clear to the user.
By working directly with the engineering system team, we learned that this git checkout performance was not an issue. Since git checkout changes source files, it invalidates the local build. Build times can take hours in this monorepo after taking new changes, so users typically do not use git checkout until the end of the day when they are ready to trigger a long build overnight. For this reason, git checkout was not a critical path for their developers. In fact, there was great interest in being able to know that they could disconnect from the network and still poke around the code without risk of finding a virtual file.
We were good to go with our plan for Scalar. However, the monorepo team needed to build something of their own. They needed a connection between their build system and sparse-checkout. While they built that, we had time to polish Scalar and make it easier to install and use.
Update architecture under stable conditions
With the benefit of a stable test suite and a few months of runway, we were able to take our MVP and rethink the architecture. In particular, we shed some architectural decisions that were critical to how VFS for Git works, but were no longer needed in Scalar.
VFS for Git requires a process running that can handle requests from the filesystem to populate virtualized content on-demand. The existence of this process creates the concept of a “mounted” repository, and even included the commands gvfs mount and gvfs unmount to toggle this state.
Because this process needed to exist, a lot of other things were placed in that process that could be relocated elsewhere in Scalar. We set out to remove the need for this process.
Since we had already removed the virtual filesystem code, there were two remaining pieces that were in the mount process: performing background maintenance and downloading objects via the GVFS protocol.
For background maintenance, we took the fastest approach and moved the scheduled tasks out of the mount process and into the Scalar.Service global singleton process. We had versions of this service for Windows and macOS to handle things like startup operations. Moving the maintenance tasks to this service was quick and easy.
For the object downloads, it was a bigger job. The existing architecture included a read-object hook custom to microsoft/git that was installed by the scalar clone command, and that hook communicated to the mount process which actually communicated with the server and placed the objects in the repository.
For this, we created a tool within microsoft/git to do these missing object queries via the GVFS protocol directly within the Git codebase. This tool lives underneath the code that fills in objects for Git’s partial clone feature. By connecting this tool to partial clone, we could work to improve partial clone while also helping Scalar users at the same time. One major benefit to working within the partial clone framework is that some missing object requests can be batched together into a single request, while the old read-object hook could only ask for one missing object at a time.
At this point, we had simplified the architecture to have fewer moving parts and were ready to ship internally.
Removing the mount process with the git-gvfs-helper
Upon success, look for low-hanging fruit
Shortly after announcing Scalar to the world, we realized that Scalar could have a larger benefit to the Git ecosystem than just very large monorepos using Azure Repos.
We extended scalar clone to use Git’s partial clone if the remote did not speak the GVFS protocol. In this way, scalar clone became something a user could run against any Git remote.
This was an inflection point in our lifecycle: we had accomplished what we set out to do, but wanted to put these tools in front of more people and find a wider audience. We started to shift our focus from making updates in the .NET project and instead contributing features to the upstream Git project.
Rethink architecture as conditions change
Up until this point, we were using the existing hook approach that speaks to a third-party filesystem monitor. This meant that we needed to install that third-party tool next to Scalar, but also scalar clone would install the hook in addition to all of its other operations. We realized that we could solve our installation complexities, reduce the complexity of scalar clone, and get faster performance if the filesystem monitor was built into Git. With that context, we began building Git’s builtin filesystem monitor. We took early versions into microsoft/git while it was reviewed carefully by the Git community.
Early adoption of builtin FS Monitor
An important Scalar feature was background maintenance, which was accomplished by a service running in the background and launching Git commands at certain intervals to keep data fresh and well-organized. This service existed from the VFS for Git days, so it was easy to keep using it on Windows and macOS. However, when the Office team told us that they needed Linux clients to support some of their web developers, we focused on porting Scalar to Linux. This service was one platform-specific part that would be difficult to implement in .NET.
We decided that instead of creating a new service in Scalar, it would be better to implement background maintenance in Git. Once Git had its own cross-platform way of doing maintenance, Scalar could stop using its custom logic and instead rely on git maintenance run.
Background maintenance leaves us with only the CLI and tests
After making this change, we took another look at our architecture and realized something. Suddenly, Scalar was only a command-line interface on top of Git. Why have it be in C#, separate from the Git source code?
The overhead of dealing with Scalar as a .NET tool was colliding with our maintenance costs of creating releases and shipping it to users. If Office developers require the microsoft/git fork of Git and another tool then things get tricky when we want to release a new version.
We had replaced so many features in the Scalar codebase with Git functionality that starting from a clean slate could allow us to build a more manageable architecture than that of the existing code. Also, by inserting the Scalar CLI into the Git codebase, we could take advantage of internal functions such as using Git config APIs instead of running git config processes to set recommended config values.
With these goals in mind, we ported the Scalar CLI to C in microsoft/git using less than 3,000 lines of code!
This endeavor to recreate the Scalar CLI in the microsoft/git codebase can best be appreciated by seeing that we deleted over 10 times the amount of code from microsoft/scalar than we added to microsoft/git when we removed all product code. We kept the microsoft/scalar repository around as a collection of tests, allowing us to be confident in the new code.
Porting the CLI to microsoft/git leaves only the tests
This was our biggest step in the journey because it involved the largest rewrite of Scalar code. However, the requirements of the Scalar CLI at this point were well-defined and greatly simplified from earlier. We were able to immediately celebrate by no longer shipping the .NET Scalar application to our internal customers and instead rely on just shipping the microsoft/git fork.
There was one downside to this change, though. Before, you could install the .NET Scalar solution on top of any Git version and still get all the benefits of scalar clone. Now, users needed to replace their Git client with microsoft/git in order to get the latest Scalar version. We wanted to make Scalar useful to everyone, not just those that were willing to install our fork.
The journey into core Git
Porting Scalar to C not only enabled hosting the tool in microsoft/git, it opened up the possibility of making Scalar part of the upstream Git project. Although it wouldn’t be the first feature originating in microsoft/git that was contributed upstream, there was no clear precedent for something like Scalar: a standalone executable whose name didn’t start with git in the Git project. That might sound like nothing more than an implementation detail, but it represented a philosophical departure from the existing tools in Git. This divergence would drive us to define what Scalar meant for Git.
contrib/-uting to Git
From the outset, we knew there was a contingent of Git users that would benefit from Scalar beyond microsoft/git‘s typical user base. Features like the filesystem monitor, background maintenance, cone mode sparse-checkout, etc. had all become popular among developers in large repositories. Scalar exposed those and a multitude of other features more readily to users. Still, it wasn’t clear that Scalar as a standalone executable was the best—or Git-friendliest—way to present those features.
To gradually introduce the tool to the Git community, Scalar’s journey upstream began in Git’s contrib/ directory. From the contrib/ README:
Although these pieces are available as part of the official git
source tree, they are in somewhat different status.  The
intention is to keep interesting tools around git here, maybe
even experimental ones, to give users an easier access to them,
and to give tools wider exposure, so that they can be improved
faster.
Despite the loose requirements of contrib/, the submitted version of Scalar still required some changes from what was in microsoft/git. First was removing the GVFS protocol-supported clones. As we mentioned earlier, blobless clones were introduced into Scalar as a fallback for clones using the GVFS protocol, so the upstream version defaulted to using blobless partial clones instead. Additionally, to preserve the separation between contrib/ and the main Git repository, the GitHub Actions workflow was also stripped of references to Scalar, including execution of the microsoft/scalar test suite.
However, being in contrib/ did have some drawbacks. In order to build and install Scalar, a user needed to not only build Git from source, but know to navigate into contrib/scalar/ and build that as well. The separate build and test process also left it prone to changes in the rest of Git unintentionally breaking it. Even with these challenges, this arrangement was exactly what Scalar needed while its features were built out and long-term plan was developed. As we drew closer to finishing those features, we needed to finally answer the question: what should we do with Scalar?
Home sweet home
As soon as the possibility of upstreaming Scalar materialized, there were lots of ideas about what its final form would look like. One popular idea—which can be found in the original RFC—was to dissolve Scalar into a collection of new git commands and options to existing commands. Another was to have scalar reside in the Git tree in a dedicated subdirectory, like gitk. Another was to reimagine it as a Git built-in command: something like git scalar. Along with these implementation decisions came overarching questions of maintenance and relevance to Git.
As the tool was nearing feature completion upstream and the downsides of contrib/ isolation were weighing on the project, we took a step back and revisited the questions of Scalar’s identity. The result was a proposal to update Scalar’s documentation and outline a three-part approach to making the tool generally available in Git:
Add any remaining large repo performance features to Scalar.
Extract the parts of Scalar that are generally applicable to all Git users into built-in commands and/or options.
Move Scalar into the root tree of Git, built and installed as a standalone executable alongside git.
The crux of this approach was a new framing of Scalar within the Git project. Scalar began, like VFS for Git before it, as a tool with its own features and opinions: how to configure a repository, what workflows to use, etc. As it evolved, those features and opinions were folded into Git or adjusted to align better with the upstream project, leaving Scalar with only the parts that fit the very specific role of configuring large repositories. In essence, Git had a user experience niche left by its myriad of large repo-focused performance features. Scalar filled that niche.
The roadmap to Scalar’s completion emerged from this philosophy. First, a few more particularly impactful features would be added to it (namely, the built-in FSMonitor). Then, because Scalar’s purpose is to configure features for large repositories that aren’t set up by default in Git, the parts that serve all Git users (such as repository diagnostics in scalar diagnose) would be extracted into new or existing Git commands. Finally, Scalar would be moved out of contrib/ and into the main build of the repository, intended to continue existing as a dedicated tool for managing large Git repositories.
The best laid plans often go awry but, fortunately, this one didn’t. Over the course of three upstream patch series, Scalar was streamlined inside of contrib/, then moved into its new home as part of core Git. And just in time for the v2.38.0 release!
Scalar now lives in the core git/git project
The past, present, and future of Scalar
We’ve shared the story of Scalar not only to publicize a new and exciting feature in Git (seriously, go try it!), but also to illustrate one of the many paths an open source project can take to reach its users. Planning and re-planning, designing and redesigning, and no shortage of engineering lessons were all necessary steps to make Scalar the powerful tool it is today.
It is now a fully-integrated part of Git, but Scalar’s journey is far from over. Scalability and performance in Git is a hot topic—our own engineering blog is a testament to that—and consistent improvement in that area will undoubtedly be part of Scalar’s future. Today, though, Scalar’s eventful history is what has shaped it into the best way to unlock Git’s full potential on your largest repositories.
It would appear that there is a set of
memory-related vulnerabilities in the kernel’s WiFi stack that can be
exploited over the air via malicious packets; five CVE numbers have been
assigned to the set. Fixes are headed toward the
mainline and should show up in stable updates before too long; anybody who
uses WiFi on untrusted networks should probably keep an eye out for the
relevant updates.
There have been a lot of significant changes merged into the mainline for
the 6.1 release, but one of the changes that has received the most
attention will also have the least short-term effect for users of the
kernel: the introduction of support for the Rust programming language. No
system with a production 6.1 kernel will be running any Rust code, but this
change does give kernel developers a chance to play with the language in
the kernel context and get a sense for how Rust development feels. Perhaps
the most likely conclusion for most developers, though, will be that there
isn’t yet enough Rust in the kernel to do much of anything interesting.
The collective thoughts of the interwebz
Manage Consent
To provide the best experiences, we use technologies like cookies to store and/or access device information. Consenting to these technologies will allow us to process data such as browsing behavior or unique IDs on this site. Not consenting or withdrawing consent, may adversely affect certain features and functions.
Functional
Always active
The technical storage or access is strictly necessary for the legitimate purpose of enabling the use of a specific service explicitly requested by the subscriber or user, or for the sole purpose of carrying out the transmission of a communication over an electronic communications network.
Preferences
The technical storage or access is necessary for the legitimate purpose of storing preferences that are not requested by the subscriber or user.
Statistics
The technical storage or access that is used exclusively for statistical purposes.The technical storage or access that is used exclusively for anonymous statistical purposes. Without a subpoena, voluntary compliance on the part of your Internet Service Provider, or additional records from a third party, information stored or retrieved for this purpose alone cannot usually be used to identify you.
Marketing
The technical storage or access is required to create user profiles to send advertising, or to track the user on a website or across several websites for similar marketing purposes.



 Искам първо да отбележа, че не съм жител на Белащица и нямам нито изгода, нито вреда от това дали Белащица ще остане в рамките на Общиа Родопи, или ще предпочете да се включи като квартал (или село) към Община Пловдив.