[$] Debian weighs eight options in vote on LLM usage

Post Syndicated from jzb original https://lwn.net/Articles/1087134/

The Debian Project is voting on the usage
of large language models
(LLMs) to make contributions to the project. The first
proposal
, sent in late July by Matthias Geiger, would expressly forbid any
contributions to Debian that are created by or with the assistance of LLMs. That
kicked off a firestorm of discussion and a flood of alternate proposals. Debian
developers are now voting on
eight proposals in total
that range from banning LLM-assisted contributions
to explicitly approving them, as well as the standard “none of the above” option
that would leave Debian with no agreed policy.

Propagate user authorization context in AI agents with Amazon Bedrock AgentCore

Post Syndicated from Anshu Bathla original https://aws.amazon.com/blogs/security/propagate-user-authorization-context-in-ai-agents-with-amazon-bedrock-agentcore/

Many teams now deploy AI agents that pull from Amazon DynamoDB tables, document repositories, software as a service (SaaS) platforms, and internal knowledge bases to answer questions and automate workflows. A key risk in these deployments is that the agent has no awareness of who’s asking, so it might return data the user shouldn’t see.

If you’re using Amazon Bedrock AgentCore to build AI agents that access multiple data sources, you need each user to see only the data they’re authorized to access. In this post, you learn patterns for propagating user authorization context through your agents so access control is enforced by infrastructure and downstream services, not by agent code. In this post, we show you how to deploy agents that enforce least privilege access without writing authorization logic in the agent itself. This approach follows AGENTSEC03 best practice in the AWS Well-Architected Agentic AI Lens.

Use case

Consider an example of a customer relationship management (CRM) chat application where employees from Sales and Finance departments interact with an AI agent to access customer information. Employees use the same chat interface and the same agent, but each department needs isolated access to their respective data:

  • Sales needs access to customer contracts, pricing strategies, and sales pipeline data
  • Finance needs access to customer invoices, payment records, and financial reports

The AI agent accesses three types of data sources on behalf of users:

When a Sales employee asks, “Show me customer contracts,” the agent must retrieve only Sales department contracts, not Finance invoices. This enforcement must happen outside the agent so that even if the agent is compromised through prompt injection or application bugs, it can’t access unauthorized data.

Note: Although we use department-based scoping in this example, the pattern generalizes to any custom claim you define, whether it represents a role, business unit, geographic region, or project assignment.

Architecture overview

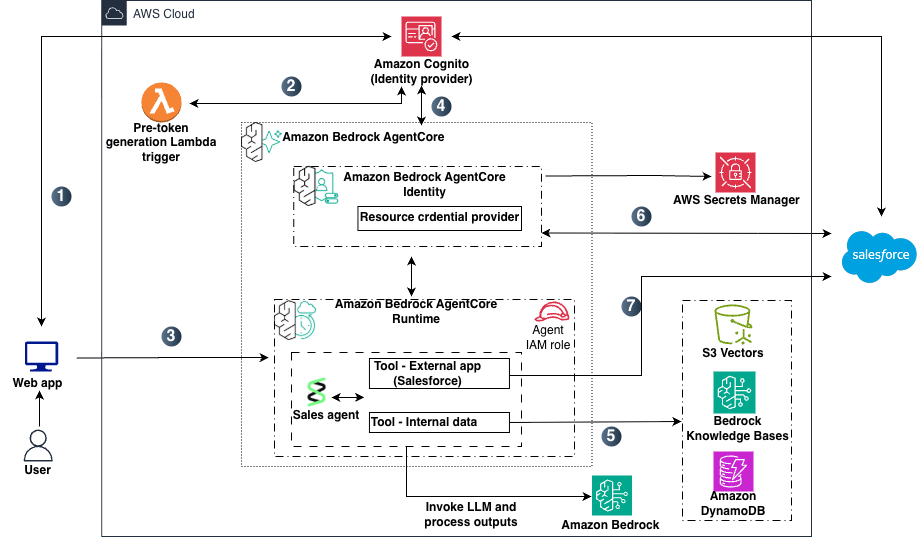
The following diagram shows the architecture used in this demonstration.

Figure 1: Target architecture

Figure 1: Target architecture

The data flow shown in Figure 1 includes:

  1. A user opens the chat application and authenticates with Amazon Cognito user pool , which acts as the identity provider (IdP).
  2. A pre token generation Lambda trigger (V2) enriches the JSON Web Tokens (JWTs) with a custom claim and AWS session tag metadata before returning them to the user.
  3. The web app routes the user’s request along with the access token to the agent deployed on Amazon Bedrock AgentCore Runtime.
  4. Bedrock AgentCore Runtime validates the inbound JWT and, through Bedrock AgentCore Identity, issues a workload access token that binds the user and agent identities, and then invokes the agent.
  5. For queries requiring internal documents, the agent uses its AWS Identity and Access Management (IAM) role to query Amazon Bedrock Knowledge Bases (backed by an Amazon S3 vector store) with metadata filtering, and DynamoDB with user-scoped session-tagged credentials.
  6. For queries requiring external data, Bedrock AgentCore Identity retrieves credentials from AWS Secrets Manager and performs an on-behalf-of token exchange (RFC 8693) with Salesforce, returning a user-scoped access token.
  7. The agent calls the Salesforce REST API using the user-scoped token. Salesforce applies sharing rules and returns only records the user is authorized to access.

This architecture follows two key principles.

  • The agent acts as an orchestrator, not a gatekeeper; it coordinates tool calls and reasoning but doesn’t control access to data. Authorization is enforced by downstream services.
  • The agent doesn’t store credentials to data stores; instead, each request gets temporary, user-bound access tokens.

In the following sections, we dive deep into each data source to show how these principles are achieved in practice.

Initial user authentication with IdP

When an employee opens the chat application, they authenticate using their corporate credentials. For this example, you use Amazon Cognito user pools as the IdP. You can also achieve this with other IdPs such as Entra ID or Okta.

The pre token generation Lambda trigger (V2) captures the user’s custom department context and adds it to the tokens to both the identity (ID) token and access token that Bedrock AgentCore Runtime uses for authorization decisions each serving a distinct purpose. The access token is used by the Bedrock AgentCore Runtime custom JWT authorizer for inbound authorization. The ID token also receive the https://aws.amazon.com/tags claim (used by AWS Security Token Service (AWS STS)) for session tags). The https://aws.amazon.com/tags claim is the specific format required by AWS STS to extract session tags during AssumeRoleWithWebIdentity. For more information and step-by-step guidance see How to customize access tokens in Amazon Cognito user pools.

The following example shows the key logic within a pre token generation Lambda handler function configured as a trigger on your Amazon Cognito user pool. This code runs automatically when a user authenticates, extracting their department attribute and adding it as a custom claim to both ID Token and access token.

import json

def lambda_handler(event, context):
    department = event['request']['userAttributes'].get('custom:department', '')

    event['response']['claimsAndScopeOverrideDetails'] = {
        'idTokenGeneration': {
            'claimsToAddOrOverride': {
                'department': department,
                'https://aws.amazon.com/tags': {
                    "principal_tags": {"department": [department]},
                    "transitive_tag_keys": ["department"]
                }
            }
        },
        'accessTokenGeneration': {
            'claimsToAddOrOverride': {
                'department': department
            }
        }
    }
    return event

Inbound authorization by AgentCore Runtime

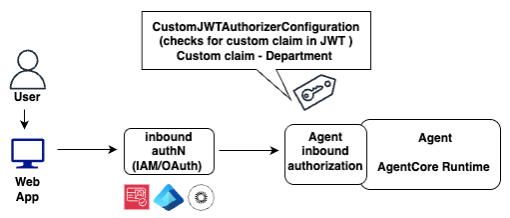
When the user request reaches AgentCore Runtime, the Inbound JWT authorizer performs two checks as shown in Figure 2. It validates the JWT token with Amazon Cognito (the configured IdP) by cryptographically verifying the token’s signature, confirming it is non-expired, and checking it was issued by the trusted IdP. It then extracts the department claim from the validated token and compares it against the expected value configured in the authorizer, any token without a matching claim is rejected before the agent code is invoked.

Figure 2: Inbound JWT authorization

Figure 2: Inbound JWT authorization

The following example shows the inbound JWT authorizer configuration that you pass when deploying your agent to AgentCore Runtime. This configuration tells AgentCore which IdP to validate against and which custom claim value to enforce for this agent. In this example, inboundTokenClaimName is department, inboundTokenClaimValueType declares the claim type as STRING_ARRAY, and authorizingClaimMatchValue specifies the allowed values ([“Sales”, “Finance”]) with the CONTAINS_ANY operator. The authorizer validates that the department claim is present in the token and matches one of these values, ensuring only authenticated users from the Sales or Finance department can invoke the agent.

authorizer_config = {
        "customJWTAuthorizer": {
            "discoveryUrl": discovery_url,
            "allowedClients": [client_id],
            "customClaims": [
                {
                    "inboundTokenClaimName": "department",
                    "inboundTokenClaimValueType": "STRING_ARRAY",
                    "authorizingClaimMatchValue": {
                        "claimMatchValue": ["Sales", "Finance"]
                        "claimMatchOperator": "CONTAINS_ANY"
                    }
                }
            ]
        }
    }

Note: AgentCore Runtime automatically creates a workload identity for each deployed agent. A workload identity represents the digital identity of your agents within the AWS environment. It allows agents to maintain consistent identity whether they’re using IAM roles for AWS resource access, OAuth 2.0 tokens for external service integration, or API keys for third-party tool access.

Passing the user context for agent outbound authorization

After the inbound JWT token is validated and the user’s authorization context is confirmed, the agent must propagate this context to downstream resources. The fundamental security challenge here is how to design a system so that an agent acting on behalf of a user can only access data that user is authorized to see, even if the agent itself is compromised.

The traditional approach of granting the agent broad credentials and relying on application-level filtering (such as adding WHERE clauses to queries) creates a single point of failure. If an attacker manipulates the agent through prompt injection or exploits a bug in the filtering logic, the full dataset becomes accessible. A more resilient design moves authorization enforcement out of the agent’s application code and into the infrastructure layer wherever possible. Instead of trusting the agent to filter results correctly, you configure the underlying services—IAM policies, database access controls, SaaS sharing rules—to reject unauthorized requests regardless of what the agent asks for. This way, the agent’s credentials are inherently limited to the requesting user’s permissions, and no amount of prompt manipulation can bypass those boundaries. Where infrastructure-level enforcement isn’t yet available, such as metadata filtering in Amazon Bedrock Knowledge Bases, the agent applies application-layer controls as a complementary measure. The following sections demonstrate how this principle applies to each data source in our architecture.

Pattern 1: Scoping DynamoDB access to the requesting user

For DynamoDB access, you can use AssumeRoleWithWebIdentity with session tags to create per-request, user-scoped credentials rather than granting the agent a static IAM role with direct table access. The agent passes the user’s signed ID token to AWS STS, which extracts the department tag from the token’s https://aws.amazon.com/tags claim and returns temporary credentials constrained to that department’s data partition. This moves access control from agent code to IAM policy evaluation. STS additionally validates the token’s audience (aud) claim against the IAM OIDC provider configuration, preventing tokens issued for other app clients from being used to assume the role. The following diagram shows this flow (Figure 3).

Prerequisites (one-time setup):

Before this runtime flow can execute, complete the following configuration:

  • Register Amazon Cognito as an IAM OIDC provider. Although the user authenticates using the Cognito API (USER_PASSWORD_AUTH), STS requires Cognito to be registered as an OIDC provider so it can discover and validate ID tokens. Configure the allowed client IDs (audiences) on the provider to match your application’s app client ID.
CognitoOIDCProvider:
  Type: AWS::IAM::OIDCProvider
  Properties:
    Url: !Sub 'https://cognito-idp.${AWS::Region}.amazonaws.com/${CognitoUserPoolId}'
    ClientIdList:
      - !Ref CognitoAppClientId
    ThumbprintList:
      - '<thumbprint>'

  • Configure the UserScopedDynamoDBRole trust policy to include both sts:AssumeRoleWithWebIdentity and sts:TagSession permissions, with the Amazon Cognito OIDC provider as the federated principal.
{
  "Version": "2012-10-17",
  "Statement": [{
    "Effect": "Allow",
    "Principal": {
      "Federated": "arn:aws:iam::111122223333:oidc-provider/cognito-idp.us-east-1.amazonaws.com/us-east-1_EXAMPLE"
    },
    "Action": [
      "sts:AssumeRoleWithWebIdentity",
      "sts:TagSession"
    ],
    "Condition": {
      "StringEquals": {
        "cognito-idp.us-east-1.amazonaws.com/us-east-1_EXAMPLE:aud": "<app-client-id>"
      }
    }
  }]
}

  • By default, AgentCore Runtime drops custom headers as a security measure. To allow the X-Id-Token header through to the agent container, configure it in the agent runtime’s requestHeaderAllowlist so the ID token is forwarded to agent code. The following configuration tells AgentCore Runtime to forward only the X-Id-Token header to agent code, dropping other non-standard headers:
request_header_config = {
    'requestHeaderAllowlist': ['X-Id-Token']
}

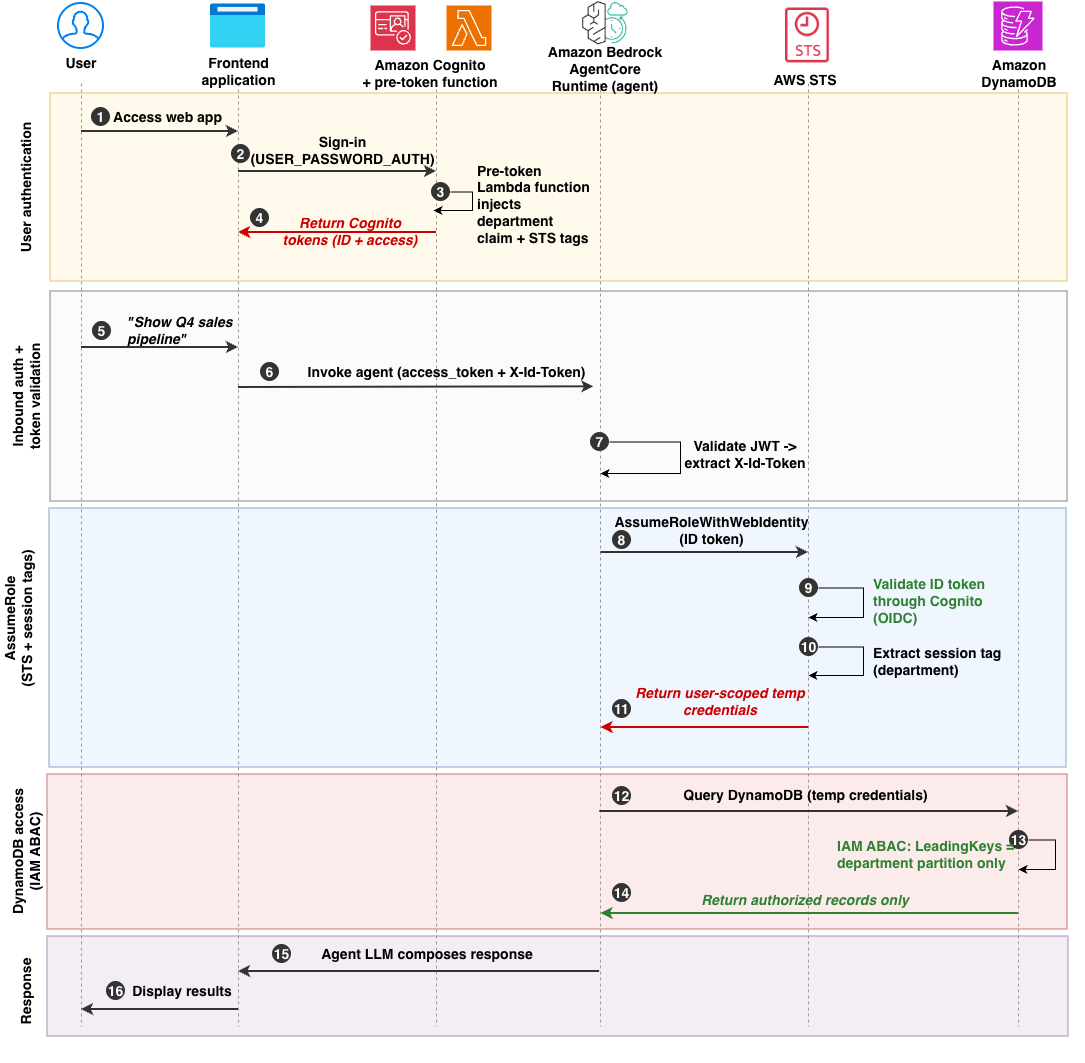
How it works:

  1. The user navigates the web application.
  2. The user authenticates with Amazon Cognito using USER_PASSWORD_AUTH.
  3. The JWT is issued with a custom department claim and the https://aws.amazon.com/tags claim for STS session tagging (covered in the preceding Initial user authentication with IdP section).
  4. Amazon Cognito returns the enriched tokens to the frontend. The access token carries the department claim for inbound authorization. The ID token carries both the department claim and the https://aws.amazon.com/tags claim for downstream STS calls.
  5. The user asks the agent a question (for example, “Show Q4 sales pipeline”).
  6. The frontend calls AgentCore Runtime, passing two tokens: the Amazon Cognito access token in the Authorization header (for inbound authorization), and the user’s ID token as a custom X-Id-Token header (for downstream STS calls).
  7. AgentCore Runtime validates the JWT and verifies the department claim matches the allowed values configured in the inbound authorizer. If validation fails, the request is rejected with HTTP 401 before agent code executes. After validation, AgentCore forwards the request to the agent container along with the allowed X-Id-Token header.
  8. The agent calls sts:AssumeRoleWithWebIdentity with the ID token. This call targets a single shared UserScopedDynamoDBRole. The following is the agent code for this step:
    def _scoped_dynamodb_resource(id_token: str):
        """Assume user-scoped role and return DynamoDB resource."""
        sts = boto3.client('sts')
        response = sts.assume_role_with_web_identity(
            RoleArn=USER_SCOPED_DYNAMODB_ROLE_ARN,
            RoleSessionName="agent-user-session",
            WebIdentityToken=id_token,
            DurationSeconds=900
        )
        creds = response['Credentials']
        session = boto3.Session(
            aws_access_key_id=creds['AccessKeyId'],
            aws_secret_access_key=creds['SecretAccessKey'],
            aws_session_token=creds['SessionToken']
        )
        return session.resource('dynamodb')

  9. AWS STS validates the token against the Amazon Cognito OIDC provider registered in IAM. STS verifies the token’s cryptographic signature, expiration, issuer, and audience (aud). The aud claim in the ID token must match one of the client IDs configured on the IAM OIDC provider resource. This prevents a valid token issued by the same Cognito user pool but for a different app client from being accepted. Note that the agent’s own execution role has no DynamoDB access and only permits sts:AssumeRoleWithWebIdentity, so even a compromised agent can’t bypass this flow.

    Note: Amazon Cognito user pools expose a standard OpenID Connect discovery endpoint, which is what you register as the trusted OIDC provider in IAM, even though the user signs in through the Cognito authentication APIs. When STS validates the token, it checks that the aud claim matches the client ID configured in the IAM OIDC provider. Tokens whose audience doesn’t match are rejected, adding a second control alongside signature and issuer validation.

  10. AWS STS extracts the https://aws.amazon.com/tags claim and creates a session with aws:PrincipalTag/department set. The trust policy’s sts:TagSession permission (configured in the prerequisites) enables this. Without it, STS silently drops the session tags and subsequent access is denied.
  11. AWS STS returns temporary credentials. These credentials are user-scoped and tamper-proof because the session tags are derived from the cryptographically signed JWT, not from agent code.
  12. The agent queries DynamoDB using these credentials.
  13. IAM evaluates the dynamodb:LeadingKeys condition against ${aws:PrincipalTag/department}. Only the user’s department partition is accessible. Because IAM evaluates this condition at the policy level, even if agent code is manipulated using prompt injection, cross-department access is denied. The following is an example of the permission policy on the role:
    {
      "Version": "2012-10-17",
      "Statement": [{
        "Effect": "Allow",
        "Action": ["dynamodb:GetItem", "dynamodb:Query"],
        "Resource": "arn:aws:dynamodb:us-east-1:111122223333:table/CustomerRecords",
        "Condition": {
          "ForAllValues:StringEquals": {
            "dynamodb:LeadingKeys": ["${aws:PrincipalTag/department}"]
          }
        }
      }]
    }

  14. DynamoDB returns only the records from the user’s authorized department partition. Cross-department data is never returned because the IAM policy blocks the API call itself. It doesn’t rely on post-query filtering.
  15. The agent receives the authorized results and passes them to the LLM for natural language response composition.
  16. The composed response is returned to the frontend application and displayed to the user.

Pattern 2: User-scoped authorization to Amazon Bedrock Knowledge Bases

For documents stored in Amazon Bedrock Knowledge Bases, the agent applies metadata filtering at query time. Each document is tagged with a Department metadata attribute during ingestion. Amazon Bedrock Knowledge Bases using metadata filtering to implement the data authorization. You need to provide metadata files alongside the source data files with the same name as the source data file and .metadata.json suffix while uploading data in Amazon S3. Amazon Bedrock Knowledge Bases ingests these documents along with corresponding metadata file. The metadata attributes are stored alongside the vectors as filterable fields in the index.

Each metadata file contains a simple JSON structure with the department attribute. The following example shows the complete content of a metadata file for Sales department documents:

{"metadataAttributes": {"Department": “Sales"}}

When the agent queries Amazon Bedrock Knowledge Bases, it calls the bedrock:Retrieve action and appends the retrievalConfiguration filter scoped to the user’s department. The department value is extracted from the JWT access token that the agent received during inbound authorization.

response = client.retrieve(
    knowledgeBaseId=KNOWLEDGE_BASE_ID,
    retrievalQuery={"text": user_query},
    retrievalConfiguration={
        "vectorSearchConfiguration": {
            "filter": {"equals": {"key": "Department", "value": department}}
        }
    }
)

Note: Metadata filtering is application-layer enforcement. The bedrock:Retrieve API doesn’t expose metadata filter content as an IAM condition key. For stricter isolation, consider separate knowledge bases per department with IAM resource-level policies.

Pattern 3: User-scoped access to external services using on-behalf-of token exchange

We use Salesforce as an example of an external service integration. The same on-behalf-of (OBO) token exchange pattern applies to external service that supports RFC 8693 or a compatible token exchange mechanism. External services like Salesforce don’t support IAM-based access control, so you need a different mechanism to propagate user identity. The AgentCore Identity OBO token exchange (RFC 8693) provides this by exchanging the user’s authenticated identity for a user-scoped token that the external service will recognize and enforce natively.

AgentCore Identity supports three OAuth patterns for external service access. With client credentials—Two-Legged OAuth (2LO) or machine-to-machine (M2M)—the agent authenticates as a service account and receives a token with broad access. The agent is then responsible for filtering data in queries, which makes this pattern suitable when accessing organization-wide data that isn’t scoped to an individual user. A variation of this pattern embeds user context as custom claims within the agent’s M2M token itself, see Empower AI agents with user context using Amazon Cognito. With Authorization Code (3LO), the user explicitly consents through a browser redirect and the external service enforces per-user access. This works when per-service consent is required, but it demands user interaction during the flow, making it impractical for background agent operations. Learn more about this in Secure AI agents with Amazon Bedrock AgentCore Identity on Amazon ECS. With OBO token exchange, the user’s already-authenticated identity is exchanged for a service-scoped token without any additional user interaction, and the external service enforces access.

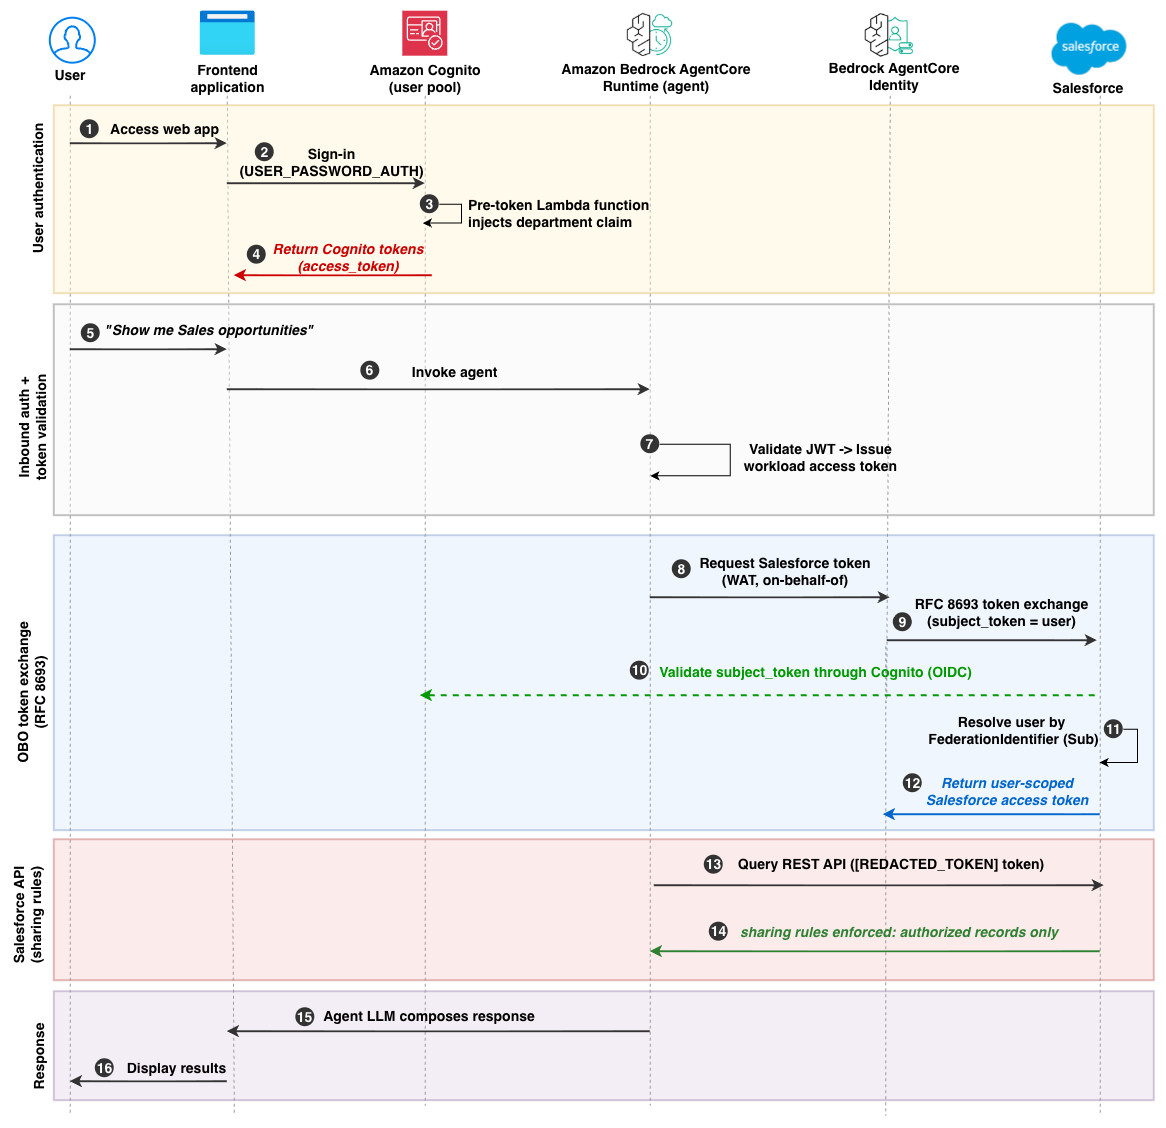
For this use case, OBO is the most appropriate pattern. The user has already authenticated at the entry point (through the IdP), and the agent needs to act on their behalf across multiple services without prompting for additional consent. OBO propagates user identity end-to-end without the agent holding credentials, scales automatically with no per-user token storage, and allows downstream services to enforce their own authorization (sharing rules, role-based access control (RBAC)). Because no browser redirect is needed, OBO works seamlessly for background tool calls where the user isn’t present in a browser session. Figure 4 demonstrates the complete flow when using OBO token exchange.

How it works:

  1. The user navigates to the web application.
  2. The user authenticates with Amazon Cognito using USER_PASSWORD_AUTH.
  3. A pre token generation Lambda function injects the custom department claim into the token (covered in the preceding Initial user authentication with IdP section).
  4. Amazon Cognito returns the tokens to the frontend. The access token is issued with the department claim.
  5. The user asks the agent a question (for example, “Show me Sales opportunities”).
  6. The frontend calls AgentCore Runtime with a single agent Amazon Resource Name (ARN), passing the Amazon Cognito access token: POST /invocations, Authorization: Bearer {access_token}.
  7. AgentCore Runtime validates the inbound JWT (signature, expiration, issuer, and custom claims including the department claim). After successful validation, AgentCore Runtime extracts the user identity from the JWT and calls the GetWorkloadAccessTokenForJWT API to exchange it for a workload access token. The agent code receives the workload access token through the invocation payload header. Workload access tokens are exclusively for accessing Amazon Bedrock AgentCore services and can’t be used directly for external services.
  8. The agent calls AgentCore Identity (GetResourceOauth2Token) with the workload access token, requesting a Salesforce token through the configured OBO (on-behalf-of) credential provider. AgentCore Identity validates the caller identity and agent identity, then accesses the stored client credentials from Secrets Manager. If a previously stored OAuth access token has expired, AgentCore Identity automatically obtains a new one using the client credentials, reducing the need for manual token lifecycle management in agent code. The agent code uses the @requires_access_token decorator to invoke this flow:
    @requires_access_token(
        provider_name="salesforce-token-exchange",
        scopes=[],
        auth_flow="ON_BEHALF_OF_TOKEN_EXCHANGE",
    )
    def _get_salesforce_token_sync(*, access_token: str) -> str:
        return access_token

    On the AWS side, this requires an AgentCore Identity OAuth Client configured with Grant type: Token Exchange, Actor token: None, pointing to the Salesforce token endpoint. The Salesforce Connected App consumer secret is stored in Secrets Manager (the agent doesn’t access it directly).

  9. AgentCore Identity performs RFC 8693 token exchange with the Salesforce token endpoint, sending the user identity as the subject_token. AgentCore Identity performs this secure token exchange for user-delegated access based on the configured OAuth 2.0 credential provider. The agent can’t request tokens for arbitrary users because the workload access token cryptographically binds the request to the authenticated user.
  10. Salesforce validates the token against the registered Amazon Cognito auth provider configured in Salesforce Setup.
  11. Salesforce resolves the user using FederationIdentifier. On the Salesforce side, this requires:
    • Amazon Cognito registered as an OpenID Connect auth provider
    • A token exchange handler (Apex class extending Auth.Oauth2TokenExchangeHandler) that resolves users by FederationIdentifier
    • Token exchange flow enabled on the connect app or external client app
    • Each user’s FederationIdentifier set to their Amazon Cognito subject’s (sub) unique user identifier (UUID).
    • Sharing rules configured to enforce department-scoped record access

    The federation ID (sub) is immutable and can’t be spoofed by the agent, because it originates from the cryptographically signed identity token.

  12. Salesforce returns a user-scoped access token to AgentCore Identity, which passes it back to the agent.
  13. Agent calls the Salesforce REST API using the user-scoped token. No department filtering is needed in the Salesforce Object Query Language (SOQL) query because Salesforce enforces access through sharing rules:
    @tool
    def query_salesforce_opportunities(query_text: str) -> str:
        access_token = _get_salesforce_token_sync()
    
        # No department filter needed. Salesforce sharing rules enforce access.
        soql = "SELECT Id, Name, Amount, StageName, CloseDate FROM Opportunity ORDER BY CloseDate DESC LIMIT 10"
    
        response = requests.get(
            f"{SALESFORCE_URL}/services/data/v59.0/query?q={urllib.parse.quote(soql)}",
            headers={"Authorization": f"Bearer {access_token}"},
            timeout=30,
        )
        return json.dumps(response.json().get("records", []))

  14. Salesforce applies sharing rules and returns only records the user is authorized to access. The agent doesn’t hold Salesforce credentials (refresh tokens, client secrets), these remain with AgentCore Identity.
  15. The agent’s LLM composes a response from the returned records.
  16. The frontend displays the results to the user.

Conclusion

In this post, you learned how to enforce consistent, end-to-end authorization in agentic AI applications by propagating user context from Amazon Cognito through Amazon Bedrock AgentCore to downstream resources. We showed you three patterns:

  • Per-request user-scoped credentials using AssumeRoleWithWebIdentity with session tags, evaluated by IAM attribute-based access control (ABAC) policies to access Amazon DynamoDB
  • Department-scoped metadata filtering at the application layer to access Amazon Bedrock Knowledge Bases.
  • On-behalf-of token exchange (RFC 8693) using AgentCore Identity, with Salesforce-native sharing rules governing access to external CRM data.

The key takeaway is that the agent coordinates work but doesn’t decide who can access what. Access decisions are made by infrastructure-level controls and the downstream service’s authorization model. This layered approach means that even if the agent behaves unexpectedly, unauthorized data access is still blocked.

You can use this as a reference implementation and adapt it to your requirements by choosing authorization attributes relevant to your organization (such as department, role, business unit, or region), integrating additional data sources, or extending the token exchange patterns to other external services.

Next steps

If you have feedback about this post, submit comments in the Comments section below.


Anshu Bathla

Anshu Bathla

Anshu is a Sr. Lead Consultant – Security at AWS, based in Gurugram, India. He works with customers across diverse verticals to help strengthen their security infrastructure and achieve their security goals. Outside of work, Anshu enjoys reading books and gardening at his home garden. Connect with him on LinkedIn.

Prafful Gupta

Prafful Gupta

Prafful is a DevOps Engineer at AWS, based in Gurugram, India. Having started his professional journey with Amazon, he specializes in DevOps and generative AI solutions, helping customers navigate their cloud transformation journeys. Beyond work, he enjoys networking with fellow professionals and spending quality time with family. Connect with him on LinkedIn.

Rohit Verma

Rohit Verma

Rohit is a Delivery Consultant – Security, Risk and Compliance at AWS, based in Gurugram, India. He partners with customers across multiple industries to strengthen their security posture, leading risk consulting engagements, and security deliverable reviews. Outside of work, Rohit is a fitness enthusiast who enjoys music and reading non-fiction books. Connect with him on LinkedIn.

CVE-2026-19490: Critical Vulnerability Affecting Citrix NetScaler ADC and NetScaler Gateway

Post Syndicated from Rapid7 original https://www.rapid7.com/blog/post/etr-cve-2026-19490-critical-vulnerability-affecting-citrix-netscaler-adc-and-netscaler-gateway

Overview

On August 19, 2026, a security advisory was published for CVE-2026-19490, a critical authentication bypass vulnerability affecting Citrix NetScaler ADC and NetScaler Gateway. The vulnerability carries a CVSS v4.0 base score of 9.3 and can be exploited remotely by an unauthenticated attacker over the network without user interaction or elevated privileges.

NetScaler ADC and NetScaler Gateway are widely deployed enterprise networking products commonly positioned at or near the network perimeter. NetScaler ADC provides application delivery, traffic management, load balancing, SSL/TLS offloading, and application security capabilities, while NetScaler Gateway provides secure remote access and VPN functionality. Because these systems are frequently deployed in enterprise DMZs and exposed to the public internet, authentication bypass vulnerabilities affecting Citrix products are nearly always exploited by threat actors.

CVE-2026-19490 affects the following systems:

  • NetScaler ADC and NetScaler Gateway 14.1: Versions prior to 14.1-73.32

  • NetScaler ADC and NetScaler Gateway 13.1: Versions prior to 13.1-63.21

  • NetScaler ADC FIPS: Versions prior to 14.1-73.32 FIPS

  • NetScaler ADC FIPS and NDcPP: Versions prior to 13.1-37.277

As of August 19, 2026, Rapid7 has not observed evidence that CVE-2026-19490 is being exploited in the wild. However, organizations should prioritize patching affected systems on an emergency basis, since Citrix products are high-value targets that tend to quickly see exploitation in the wild.

Mitigation guidance

Organizations running affected NetScaler ADC or NetScaler Gateway appliances should review the official NetScaler advisory and apply the required updates to affected systems on an emergency basis.

Fixed versions for affected products are listed below:

  • NetScaler ADC and NetScaler Gateway 14.1-73.32 and later releases

  • NetScaler ADC and NetScaler Gateway 13.1-63.21 and later releases of 13.1

  • NetScaler ADC 14.1-FIPS 14.1-73.32 FIPS and later releases of 14.1-FIPS

  • NetScaler ADC 13.1-FIPS and 13.1-NDcPP 13.1-37.277 and later releases of 13.1-FIPS and 13.1-NDcPP

According to Citrix, customers can determine whether affected systems are vulnerable to CVE-2026-19490 by inspecting their NetScaler configuration for the following configuration entries. If one or more of the following items are present, and if the systems are running affected versions, the system is likely to be exploitable:

  • SAML action configuration is in place:

    • “add authentication samlAction.*”

  • Auth or VPN vserver is configured:

    •  “add authentication vserver .*”

    •  “add vpn vserver .*”

For the latest guidance, please refer to the official Citrix advisory.

Rapid7 customers

Exposure Command, InsightVM, and Nexpose

Customers can assess exposure to CVE-2026-19490 on Citrix NetScaler ADC and Gateway using a vulnerability check expected to be available in the August 20 content release.

Updates

  • August 19, 2026: Initial publication.

A revisit of remote Spectre attacks on Cloudflare Workers

Post Syndicated from Martin Schwarzl original https://blog.cloudflare.com/revisiting-spectre-attacks-on-workers/

In 2021, we assessed remote Spectre attacks against Cloudflare Workers. Based on the results, we shipped a production defense called Dynamic Process Isolation (DyPrIs), which identifies maliciously looking scripts and isolates them into separate processes. Since then, newer techniques in the area of stabilizing Spectre attacks have been discovered. To understand if these techniques posed a threat to our Workers production environment, we decided to internally reassess the remote Spectre attack. Building an updated proof-of-concept on the production environment allowed us to empirically assess the risk of Spectre attacks under production workloads. 

To mount a successful side-channel attack in production, an external attacker has to overcome additional obstacles such as activity on shared hardware resources, interrupts, context switches, and coarse-grained timers. Our research uncovered a limitation in the implementation of DyPrIs and we managed to demonstrate a remote Spectre attack reliably leaking up to 12 bit/s with a 99% accuracy in the production environment of Cloudflare Workers. As a consequence of this research, we improved DyPrIs, integrated the V8 Sandbox and an in-process isolation mechanism to further reduce the risk of memory disclosure attacks. 

Today we are publishing a paper describing our findings, co-authored by Albert Pedersen, Haocheng Xiao, Sam Ainsworth, Nigel Topham, and Martin Schwarzl. This paper covers research done in 2024 and early 2025.

Note that the presented attack is mitigated already in the production system due to countermeasures applied by Cloudflare Workers Runtime team. We did not find any indicators of active exploitation over the last three years.

Cloudflare Workers security model

Cloudflare Workers runs untrusted JavaScript on the edge. Leveraging language-level isolation, in the form of V8 isolates, tens of thousands of tenants can share the same operating-system process. Each Worker has its own separate JavaScript heap. This design keeps startup latency low and lets us run many tenants very efficiently compared to full process isolation. Around the runtime we have multiple layers of defense such as automated V8 patch pipelines, a two-layered sandbox consisting of Linux namespaces and seccomp filters, Cap’n Proto RPC, and the possibility to schedule certain scripts in separate process sandboxes. Still, a single arbitrary read vulnerability within a Worker process can lead to cross-tenant leakage. One vulnerability that is very hard to mitigate exploits the nature of speculative execution, namely in-process Spectre.

Spectre

You can think of speculative execution in terms of hiking. At some point you arrive at a branch and have to predict where to go. If the prediction was correct, you saved some time and could enjoy the sun and a refreshing drink at a mountain hut. However, if you speculate in the wrong direction, you have to turn back. The trail looks untouched, but your footsteps remain in the mud. 

Speculative execution in CPUs works similarly. The branch prediction performs an educated guess about a branch’s outcome ahead of time and the CPU speculatively executes it. If the prediction was correct, speculative execution saved some time. However, if the prediction is incorrect, the CPU has to discard the results, roll back and execute the other branch. Because these speculatively executed instructions only exist temporarily in the CPU pipeline and are never permanently retired or committed, the literature refers to them as transient instructions and generalizes the concept as transient execution.

However, due to the transient execution, there are still some traces left in the microarchitectural state for instance in CPU caches. Thus, an attacker can use Spectre to transiently access memory out of bounds, encode a single bit of information into the cache state and exploit the latency of reaccessing data to infer whether the bit was set or not. 

To mitigate against in-process Spectre attacks, Cloudflare Workers freezes local timers, disallows multithreading and shared memory and actively detects, periodically shuffles memory and isolates malicious-looking scripts into separate processes.

Attack primitives

The Cloudflare Workers platform deliberately restricts timers. During CPU-only execution, time is effectively frozen. Date.now() and performance.now() do not provide a continuously advancing high-resolution clock. There is no shared memory and no multithreading, so the classic counter-thread timer via a SharedArrayBuffer is not available. 

To successfully mount an attack, several challenges have to be solved. First, Workers runtime is limited and co-location between an attacker and victim has to be guaranteed. Second, a reliable, ideally co-located, remote timer has to be discovered, which allows stable timing measurements.
Third, the attack runs under production conditions, meaning it requires additional stability measures such as a reliable Spectre gadget enabling transient 64-bit out-of-bounds accesses, robust signal amplification to deal with systems and networking noise, and a primitive to reliably evict data out of the cache. 

Spectre gadget

Speculative type confusion Spectre gadget

With the right Spectre gadget (snippet above), an attacker can transiently access out-of-bounds memory and encode a single bit into the cache (probeArray). The attacker then measures the memory access latency to confirm whether data has been cached or not. A faster access means the line was cached and the bit was 1. Conversely, a slower access means it was uncached and the bit was 0. In our attack, we use two different Spectre gadget types. The first one leaks compressed heap pointers, e.g., the isolate’s heap base address (root), and the other one leverages a speculative type confusion to leak from an arbitrary, attacker-crafted userspace 64-bit pointer. At the time of performing the research, the V8 Sandbox was not yet implemented at Cloudflare Workers. Under pointer compression, most objects use 32-bit compressed pointers. TypedArray was one of the few exceptions that still stored a raw 64-bit pointer to its backing store, which is exactly what our gadget abuses.

The branch obj instanceof ObjP performs a type check, i.e., a branch. To mistrain the branch prediction, we call the gadget many times on real ObjP instances, then call it on a different object with an attacker-controlled memory layout ObjI. The CPU speculates on the taken branches and follows obj.ptr[0], even though the object has a different type. To leak a single bit, we mask out one bit and use it to select one of two probeArray lines. Whether that line is cached encodes the bit. 

Exploiting the heap leakage gadget, we map neighboring objects and locate an attacker-controlled array. Our second gadget confuses two large objects that span several cache lines, so the type field lands on a different cache line than the field we read. Evicting the type field opens the speculation window while the target field stays cached, and the transient read follows an attacker-controlled 64-bit value. That turns the leak into an arbitrary-address read. A more thorough description of this technique can be found in the paper.

Local demo of leaking an arbitrary 64-bit address.

Signal amplification

A cache hit and a cache miss differ by a few nanoseconds. Moreover, a remote timer is noisy at the scale of a few microseconds up to a few milliseconds. Therefore, some form of signal amplification is required to differentiate a cache hit from a miss. Stephen Röttger and Artur Janc discovered a way to amplify a single memory access, by exploiting the tree-based pseudo least recently used (PLRU) cache-replacement policy in L1 caches. Tree-based PLRU organizes each cache set as a binary tree whose nodes point to the side used least recently, so the CPU evicts by following those pointers. With the right access pattern, an attacker can keep a target line cached indefinitely by touching its tree neighbor whenever the pointers turn toward the target. Quite elegant, right? Leveraging that behavior, the timing of a single cache event can be arbitrarily amplified such that it leads to a lot of L1 hits (faster) compared to lots of L1 misses in the opposite case.

The figure below illustrates whether a memory address X is cached or not. If it’s not cached, the access pattern leads to a lot of cache hits. If it is present, it occupies one node in the tree, and subsequently four cache lines try to fit into three nodes, which results in a lot of L1 misses.

Remote timer

As long as the signal can be amplified, a noisy remote timer is sufficient to differentiate an encoded bit. For instance, a WebSocket connection to an external server serving high-resolution timestamps is enough. The timer could be hosted at Cloudflare or at a co-located data center to the target data center running the Worker. The Worker asks the remote timer to mark a timestamp for a certain event and compute the delta for another request once the event has stopped. 

In the paper, we evaluated several different timer setups and were able to reliably achieve sub-ms resolutions on the Median with only a handful of samples even over larger topological distances. The figure below shows an amplified cache event using the tree-based PLRU amplification.

Repeatable measurements  

A single measurement is not enough to differentiate timing-encoded data reliably. Production machines are noisy, thus an attacker has to repeat each measurement at least a few times and use some statistical discriminator. Repeating a measurement in our case means resetting the cache state. Two things have to be uncached before each round. The value the speculative branch depends on has to be evicted, so branch resolution stalls long enough to open a speculation window. The probe line that encodes the leaked bit has to be evicted, so the next transient access can re-cache it.

Since there is no direct instruction available in JavaScript, the classic way to do this is to build an eviction set. An eviction set is a group of addresses that map to the same cache set as the target. Accessing them in the right pattern pushes the target out of the cache. In their attack, Stephen Röttger and Artur Janc used an eviction list to reliably evict at least into the L2 cache. This works, but it is expensive. Constructing a precise eviction set requires many timed measurements, and our timer is a noisy remote timer. The previous remote attack against Workers sidestepped the search by traversing an array larger than the L1 and L2 caches on every round. That is an option, but even slower.

Dougall Johnson described a more elegant way in his really cool blog post on portable JavaScript Spectre exploitation. The idea follows directly from the pigeonhole principle. If you allocate far more data than the cache can hold, a randomly chosen cache line is almost certainly not cached. For a 256 KB L2 cache, allocating 64 MB leaves at most a 1/256 chance that a random cache line is still in L2. So instead of evicting a specific line, you never evict at all. You pick a fresh random location that is already evicted with overwhelming probability. The cool side effect of looping frequently over that array of objects is that this will lead to an auto-eviction effect. 

To leverage this in JavaScript, we allocate a large pool of attacker and victim object pairs that exceeds the last-level cache. Each measurement round selects a fresh random pair. The object's map pointer, the hidden-class descriptor that the speculative type check reads, is therefore almost certainly already evicted.

Co-locating the attacker and victim isolate

For the attack to work, both the attacker and victim isolate must be scheduled in the same process on the same edge server. One might intuitively think this would be difficult, considering Cloudflare operates tens of thousands of edge servers, but this is in fact quite trivial on Cloudflare Workers. Because Cloudflare Workers are designed to execute on any Cloudflare edge server, invoking the victim script from the attacker script with a fetch(“https://victim.example”) will in most cases cause the scheduler to spin up an instance of the victim worker in the exact same process. The victim isolate can be kept alive by repeatedly making subrequests to it at a certain interval.

What is more, because the attack stability is highly dependent on the CPU load of the edge server running the worker script, this allows an attacker to strategically run the attack in an off-peak colo (e.g. in an Australian colo during European business hours) where the traffic levels are comparatively low.

Defeating isolate resource limits

The Cloudflare Workers runtime enforces a set of limits on all isolates to protect the platform and prevent abuse. For the purposes of conducting this attack, the relevant limits were 30 seconds of CPU time and 1,000 subrequests per invocation. These limits have since been increased, but the following principles are still relevant.

For a regular Worker, each HTTP request, a fetch event, is a new invocation that resets these limits. The catch is landing sequential requests on the same edge server. Load balancing and shifting network conditions make that unreliable. Durable Objects solve it for us.

Durable Objects are built for real-time coordination between clients, so the runtime treats every incoming WebSocket message as an invocation that resets the CPU time and request limits. The attacker opens a persistent WebSocket to a Durable Object worker and sends regular keep-alive messages. This keeps a single isolate alive and gives us a persistent, bi-directional channel to run the attack over.

One quirk cost us some time. An isolate is single-threaded, so incoming WebSocket messages are only processed when the script hands control back to the event loop. During synchronous code the runtime never sees the keep-alive, so it never resets the CPU time. If the thread stays blocked for more than 30 seconds, the runtime kills the isolate. This puts an upper bound on how much we can amplify in a single synchronous burst. Yielding regularly between bursts lets us keep an isolate alive from five to more than 20 hours.

Putting everything together

The previous attack relied mostly on repetition to amplify a single cache access, and therefore, was slowly leaking 120 bit/h. We combined tree-based PLRU amplification with measurement loops. Each iteration re-creates the cache state and thereby adds more timing difference. If an interrupt destroys the cache state in one iteration, it doesn’t matter, since later iterations cancel it out. This made the signal strong enough to classify bits with a remote WebSocket timer. The overall idea is now to combine.

We demonstrated the full end-to-end attack in the Cloudflare Workers production environment, against Workers we controlled. We first leaked memory from the attacker Worker. From there, we leaked data from a co-located victim Worker where we had intentionally placed a secret.

First, we established co-location between an attacker Worker, a victim Worker we owned, and a remote timer. Durable Objects gave us a long-lived execution context. WebSocket messages gave us a repeatable timing source. The /cdn-cgi/trace endpoint helped us confirm machine placement by looking at the fl value.

Second, we added a calibration step to probe the timer with speculatively reachable values. This step matters because production machines are noisy. Per-invocation calibration lets us classify bits from the relative difference between the zero and one distribution. This last test should lead to two clearly separable distributions.

As a first step, we leaked the isolate root from one Worker and in another Worker we used the speculative type confusion with 64-bit pointers to read from the isolate root. 

As an intermediate step, we confirmed 64-bit leakage with the second gadget by reading memory from the vDSO region. The vDSO is a convenient target because it contains human-readable strings such as gettimeofday

Demo Video leaking data from the JavaScript heap

Finally, we placed a JWT token in the victim Worker and leaked it bitwise. The first byte was the character e, represented as 0b01100101. The figure below shows the per-bit classification for that byte. To classify we use a two-sided test to test for both outcomes. Using a majority vote and a percentile-based threshold, we infer the bit. In production, we achieved a leakage rate of up to 12 bit/s with an accuracy of more than 99%. Note that higher leakage rates are possible with the cost of losing accuracy.

Robustness

Depending on the time of the day, the utilization of a machine increases strongly. This slows down the attack since more data has to be sampled. Still, even with high CPU utilization, the attack is still feasible.

Why was this not detected?

DyPrIs watches hardware performance counters and isolates a script into its own process once it looks like a Spectre attack. Two things kept the attack under the radar. First, DyPrIs isolates a script only after its invocation finishes, and the Durable Object keep-alive trick we used in the attack can run for a few hours up to a day. WebSocket keep-alive messages hold a single invocation open for hours, so the leak completes long before isolation would kick in. Second, DyPrIs normalizes branch mispredictions by the number of iTLB accesses. Our remote timer is one large I/O loop, and that WebSocket traffic inflates iTLB activity. The normalized ratio drops below the detection threshold, so the attack looks like an ordinary I/O-heavy Worker.

What we changed

We focus on the three areas of continued V8 hardening, providing stronger in-process isolation, and improving detection.

V8 sandbox

The V8 memory sandbox's final goal is to remove raw 64-bit pointers from large parts of the JavaScript heap, which reduces the usefulness of many memory-corruption primitives. It also makes the specific speculative type-confusion gadgets in this work harder to reuse, because typed-array backing stores no longer expose the same raw pointer structure. 

The V8 sandbox is not a complete Spectre mitigation. While the presented 64-bit leak gadget does not work anymore, there might be other Spectre variants or gadgets exploitable to achieve arbitrary out-of-bounds memory accesses.

Hardware-assisted in-process isolation

In September 2025, we deployed in-process isolation for Workers using Memory Protection Keys (MPK). MPK lets a process divide memory into protection domains and switch access rights cheaply. Workers use it to protect each heap from being accessible to the other isolates within the same process.

This changes the Spectre risk model. Each isolate heap now sits behind a hardware-enforced access boundary. A memory access to a page protected with the wrong key is denied by hardware. This blocks the straightforward cross-isolate heap read that this work relied on.

Unfortunately, MPK is not a complete answer to remediate Spectre, but it strictly reduces the leakage surface. It has limits, including a finite number of hardware domains and the need to manage protection-key state carefully.

Improved DyPrIs

We improved DyPrIs so that long-lived executions and I/O-heavy workloads are handled as first-class security cases. Detection cannot happen only after a script finishes. A Durable Object or a WebSocket-heavy Worker can run long enough that post-execution isolation arrives too late.

We are currently investigating whether remote timing behavior could be added as an additional dimension to DyPrIs. While we cannot eliminate remote communication with attacker-controlled infrastructure, the timing data reveals very interesting exfiltration bit patterns. The better approach is to treat repeated timer-like I/O around compute-heavy sections as part of the behavioral signal, not as background noise.

Acknowledgments

We especially thank Haocheng Xiao from University of Edinburgh and his supervisors, Sam Ainsworth and Nigel Topham, for their contributions to the reliability of Spectre in JavaScript.

Call for participation

We are always looking for high-quality submissions through our Bug Bounty program. Memory safety bugs in the runtime are high-value targets. You can find the Fuzzilli integration for workerd and the workerd source code on GitHub.
[$] Representing Python paths using pathlib

Post Syndicated from jake original https://lwn.net/Articles/1088781/

At the outset of his PyCon US 2026
talk, Trey Hunner said that his goal was for attendees to stop representing
filesystem paths as strings and to use pathlib
instead. That’s kind of a tall order, at least for longtime Python users,
since string-based paths have been pervasive—and mostly work. It is that
“mostly” part that makes Hunner want to see things change, of course, so he
set out to describe a lesser-known corner of the language and to try to
change some minds.

Cerebras Intros Faster WSE-3 Turbo Processor and First Rack-Scale CS-4 System

Post Syndicated from Ryan Smith original https://www.servethehome.com/cerebras-intros-faster-wse-3-turbo-processor-and-first-rack-scale-cs-4-system/

Cerebras this week has introduced a major upgrade to its hardware ecosystem. The company is launching their first rack-scale AI inference system, the CS-4, which is powered by the upgraded WSE-3 Turbo processor

The post Cerebras Intros Faster WSE-3 Turbo Processor and First Rack-Scale CS-4 System appeared first on ServeTheHome.

How Clario technology detects PHI/PII in DICOM images using Amazon Bedrock

Post Syndicated from Alex Boudreau original https://aws.amazon.com/blogs/architecture/how-clario-automates-phi-pii-detection-in-dicom-images-using-amazon-bedrock/

Clario, part of Thermo Fisher Scientific, uses Amazon Bedrock to automate PHI (Protected Health Information) and PII (Personally Identifiable Information) detection across thousands of DICOM (Digital Imaging and Communications in Medicine) image slices in clinical trials. Each image slice may carry PII or PHI hidden in metadata tags, in custom vendor fields, or burned directly into the pixels. Across imaging sites, central labs, sponsors, and CROs (Contract Research Organizations), every one of those slices must be cleared of PII and PHI before the image moves downstream.

DICOM is the universal standard for storing, transmitting, and managing medical imaging data across healthcare systems. In clinical trials, DICOM images play a critical role by providing objective, quantifiable evidence of a patient’s medical condition throughout the study lifecycle. From baseline imaging to follow-up scans, modalities such as MRI, CT, PET, and X-ray generate DICOM files. Radiologists, clinicians, and sponsors use these files to assess treatment efficacy, monitor disease progression, and support regulatory submissions. These images serve as a core component of the clinical evidence package, making their accurate management and standardized handling essential to trial integrity.

In this post, we share how the Clario team designed an automated PHI and PII detection solution on AWS for DICOM imaging data, the key design decisions behind the architecture, and the lessons the team learned along the way.

About Clario, part of Thermo Fisher Scientific

Clario science and endpoint solutions support the clinical trials industry through the systematic collection, management, and analysis of specific, predefined outcomes (endpoints) to evaluate a treatment’s safety and effectiveness. For more than 50 years, Clario endpoint solutions have been deployed more than 30,000 times, and since 2015, they have supported more than 700 FDA and EMA new drug approvals.

Business challenge

Clearing PII and PHI from every image slice in the clinical trial is only part of the problem. The imaging workflow around this clearing process must be just as rigorous. A well-structured imaging workflow supports every DICOM file captured across globally distributed trial sites. Files are ingested automatically, consistently standardized, and rigorously validated at every step of the journey. Enforcing standardized image acquisition protocols across sites and geographies alleviates inconsistencies. These inconsistencies could otherwise impact data quality or delay regulatory submissions. A centralized imaging infrastructure that maintains complete metadata traceability, including acquisition parameters, imaging equipment details, and timestamps, supports a fully auditable workflow aligned with GCP (Good Clinical Practice) requirements. This empowers sponsors and CROs to move faster with greater confidence and significantly reduces the risk of data queries or compliance gaps.

An equally important aspect of managing DICOM imaging data in clinical trials is embedding intelligent, automated PHI and PII protection directly into the data management process. DICOM files carry more than images. They include metadata and tags, which can contain sensitive information such as patient names, dates of birth, medical record numbers, and facility identifiers. This sensitive information must be carefully managed before sponsors, CROs, or third-party stakeholders receive the data. Proactively verifying that PII and PHI are accurately identified and de-identified at the source is a critical best practice that safeguards patient privacy in compliance with HIPAA, GDPR, and ICH E6 guidelines. Automated de-identification tools that adhere to DICOM Supplement 142 and NEMA (National Electrical Manufacturers Association) standards reinforce data security and regulatory trust. They also preserve the full clinical and scientific value of imaging data, so trial teams can support confident, high-quality regulatory submissions.

To address these challenges, the Clario team built a comprehensive PHI/PII detection solution on AWS using Amazon Bedrock (Anthropic’s Claude Sonnet 4.5 on Amazon Bedrock) that combines automation, accuracy, and security throughout the clinical trial imaging workflow.

Why Amazon Bedrock and Amazon Textract

When evaluating options for building the solution, the Clario team chose to standardize on Amazon Bedrock and Amazon Textract for several key reasons:

  • Scalability without re-architecting: Amazon Bedrock and Amazon Textract provide scalability, reliability, and strong performance. The solution architecture can scale from a handful of documents to millions without re-architecting the solution or managing additional infrastructure. AWS manages the underlying capacity, so you can focus on building features instead of tuning servers or models.
  • Security and compliance: Keeping customer data secure is non-negotiable. By using Amazon Bedrock and Amazon Textract within Clario managed AWS accounts, processing remains inside a hardened AWS environment, taking advantage of AWS Identity and Access Management (IAM), Amazon Virtual Private Cloud controls, and encryption at rest and in transit. The Clario team can align closely with its organization’s security, compliance, and data residency requirements.
  • Managed foundation models: With Amazon Bedrock, the Clario team can access a range of high-quality foundation models as a fully managed service, without having to manage model training, hosting, or updates. This shortens the time to market, and you can iterate quickly as new models and capabilities become available in Amazon Bedrock.
  • Purpose-built OCR and document processing: Amazon Textract provides purpose‑built optical character recognition (OCR) and intelligent document processing, which significantly improves accuracy over traditional OCR engines. Its ability to automatically detect and extract text, tables, and key‑value pairs from complex documents and images reduces the amount of custom parsing logic that must be maintained.
  • End-to-end observability: Running on AWS provides end-to-end observability across the logs, metrics, and traces through services like Amazon CloudWatch and AWS CloudTrail. The Clario team can enforce governance policies, audit permissions, and track model and document processing usage centrally.
  • Extensible AI foundation: Because the solution builds on Amazon Bedrock and Amazon Textract, the Clario team can adopt new models and document processing features as they become available, without re-architecting.

Solution overview

The solution is built entirely on AWS, designed to bring greater efficiency, accuracy, and security to the detection of PHI and PII embedded within DICOM files. Accessible through Amazon API Gateway with TLS encryption in transit, IAM-backed authorization, and rate limiting, the detection workflow is readily consumable by multiple downstream systems with minimal integration effort.

Clinical trial sites store their DICOM images in Amazon Simple Storage Service (Amazon S3). The detection workflow retrieves each file from that bucket and processes it through the detection pipeline, so every ingestion step is logged and auditable for clinical trial security and compliance reviews. The workflow scans both standard and custom private DICOM metadata tags for PHI and PII. This covers the vendor-specific and non-standard tags where sensitive information often hides. Supporting both DICOM (.dcm) and PDF file formats, the solution is well-positioned to address PHI detection needs across the most used file types in clinical trial workflows.

The Clario AI team made a few deliberate design decisions early on. They ran the backend on Amazon Elastic Kubernetes Service (Amazon EKS) because a single DICOM series can span thousands of slices, and the detection workload is long-running and memory-intensive. They chose Amazon Relational Database Service (Amazon RDS) for PostgreSQL to persist processing metadata because the audit trail needs relational queries and strong consistency for compliance reporting. And they put the service behind Amazon API Gateway so that authentication, API-key management, and rate limiting are handled at the edge, keeping the backend focused on detection.

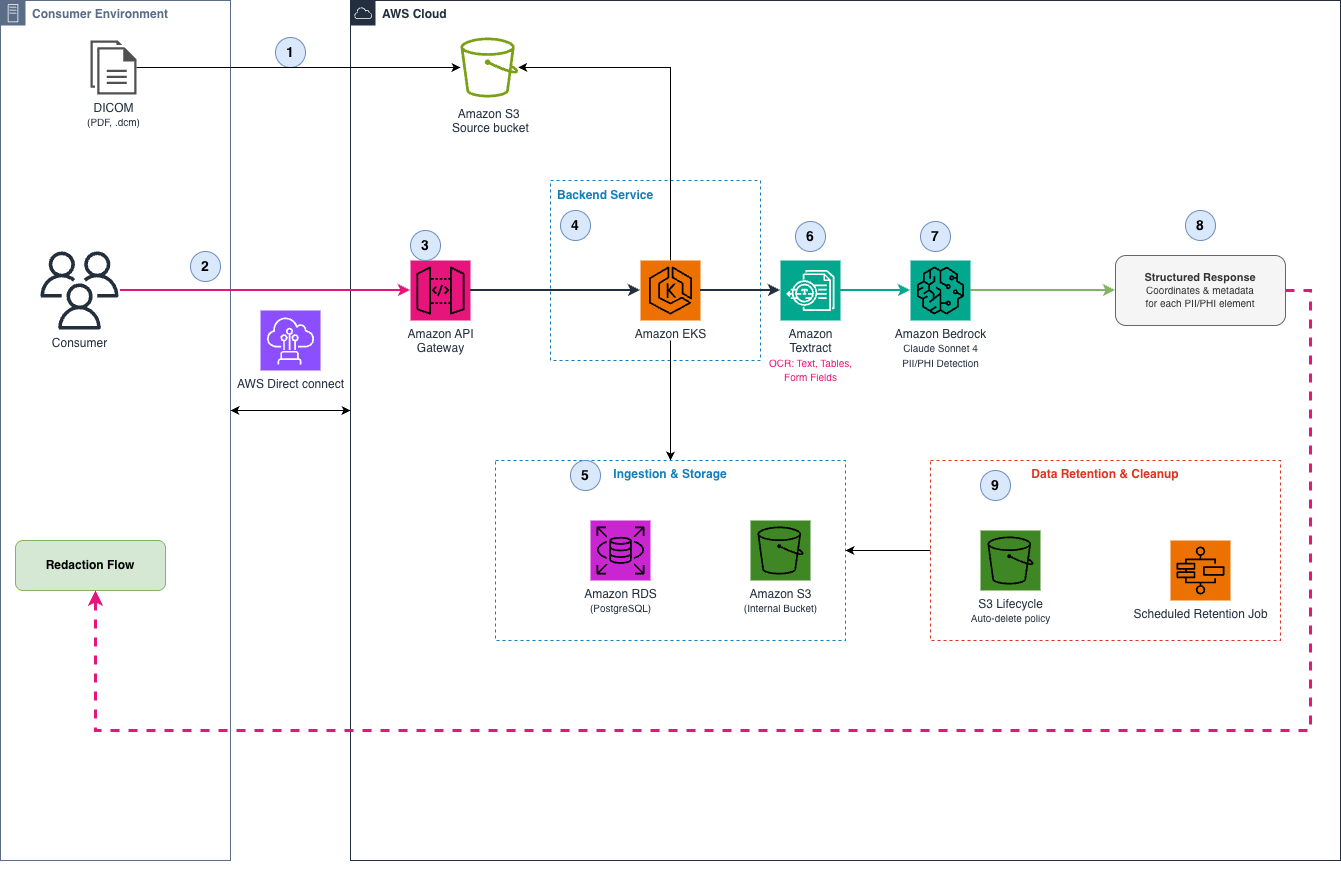
The following diagram and steps show how a DICOM document moves from upload through detection to structured output:

Architecture diagram showing DICOM images uploaded to Amazon S3, requests routed through Amazon API Gateway to detection on Amazon EKS using Amazon Textract and Amazon Bedrock, with metadata stored in Amazon RDS

Figure 1: Solution architecture for DICOM image ingestion, detection pipeline, and data retention workflow

The following steps describe the data flow through the solution, as shown in the architecture diagram:

  1. A consumer, such as an upstream imaging application, first uploads the DICOM image document to an Amazon S3 bucket location that is accessible to the solution.
  2. The consumer then calls the Clario Internal API running on Amazon API Gateway, providing their consumer-specific API key and the location of the document. This call initiates the DICOM image analysis workflow.
  3. Amazon API Gateway fronts the API and receives the incoming request. API Gateway validates the API key and, on success, forwards the request to the detection backend endpoint running on Amazon EKS to initiate processing.
  4. The solution performs initial checks on the file location (for example, URL format, access, and basic metadata) and then begins the PII/PHI identification process. The pipeline retrieves the file from the source S3 bucket and ingests it into the detection workflow.
  5. The file is stored in an internal Amazon S3 bucket and relevant metadata persisted in a PostgreSQL database on Amazon RDS to support downstream processing and auditability.
  6. The workflow invokes Amazon Textract to perform OCR and intelligent document parsing. Textract extracts text, tables, and form fields from the uploaded document, returning a structured representation of the content.
  7. The OCR output is then passed to a large language model (Anthropic’s Claude Sonnet 4.5 on Amazon Bedrock) that is configured to analyze the extracted text and identify potential PII/PHI elements. The model evaluates the content and associates each detected sensitive element with its position in the document.
  8. Once analysis is complete, the detection workflow returns a structured response to the consumer, containing the coordinates and related metadata for each piece of sensitive data identified in the document. The consumer can take follow‑up actions, such as redaction or masking.
  9. To minimize data exposure and support compliance requirements, the ingested files and associated records are retained only for a limited window. The document stored in Amazon S3 is automatically deleted based on an Amazon S3 lifecycle retention policy, and corresponding records in Amazon RDS are removed via a scheduled cleanup job.

Deep image analysis and detection workflow

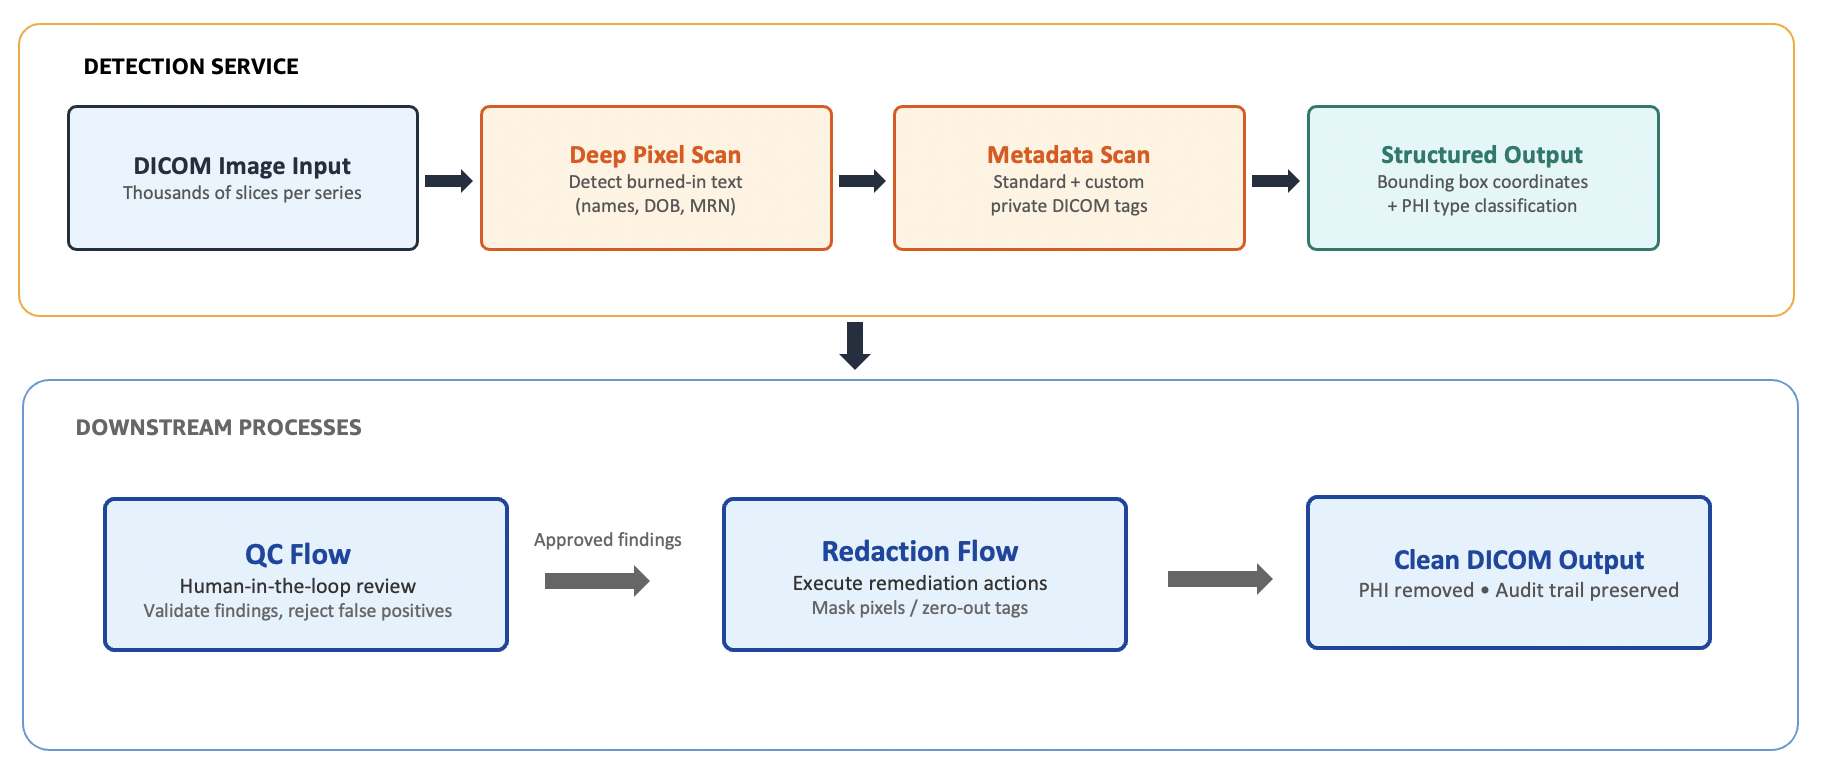
Beyond metadata, the solution uses Anthropic’s Claude Sonnet 4.5 on Amazon Bedrock to perform a deep scan of the actual image pixel content, detecting PHI or PII that may be physically burned into the image itself. This includes patient names, dates of birth, and patient IDs across every individual slice within a DICOM series that can span thousands of images.

When PHI or PII is identified, the solution precisely captures the spatial coordinates and type of sensitive information detected, passing these bounding box details downstream to integrated systems responsible for the actual pixel-level redaction. Separating detection from masking was a deliberate design decision. It preserves flexibility, supports full auditability, and a human-in-the-loop can review the flagged findings before redaction is applied.

Diagram separating AI-powered PHI and PII detection from human-supervised quality control review and pixel-level redaction

Figure 2: Deep image analysis and detection workflow showing the separation between AI-powered detection and human-supervised redaction

The detection solution returns structured coordinates for the identified PHI and PII, spanning burnt-in pixel text, standard DICOM header fields, and non-standard custom tags. The solution then hands these results off to two downstream processes. In the quality control (QC) flow, qualified reviewers validate the flagged findings and confirm which items require remediation. In the redaction flow, the system executes the appropriate action for each type of PHI identified: masking or overwriting burnt-in text within the image pixel data, or stripping and zeroing out sensitive DICOM metadata tags.

This separation of detection and redaction is intentional. The AI-powered detection solution focuses on comprehensive, high-recall identification across thousands of image slices and metadata fields. The redaction flow retains human oversight over the irreversible act of modifying clinical data, confirming that no PHI is left exposed and no clinically relevant information is removed.

Sample DICOM image with detected PHI regions marked by bounding boxes

Figure 3: Sample DICOM image with detection

With the detection pipeline in place, the next step was to measure how accurately it identifies PHI and PII across real-world clinical documents.

Evaluation methodology

The team validated the solution in three stages: building a representative test dataset, creating ground truth annotations, and running an automated evaluation pipeline.

Building a representative test dataset

The Clario generative AI team partnered with internal stakeholders to assemble a diverse dataset, including:

  • DICOM images with burned‑in annotations, overlays, and metadata.
  • PDF documents such as reports and clinical summaries.

The dataset intentionally included documents that do and do not contain sensitive PII/PHI, allowing the team to measure both the model’s ability to detect sensitive information and its ability to avoid false alarms.

Creating ground truth annotations

For each document in the dataset, ground truth labels were generated that capture:

  • The exact text corresponding to each PII/PHI element.
  • The bounding box coordinates for each element on the page where available.

These annotations form the “gold standard” that the Clario team can use to compare the output from the production pipeline.

Automated evaluation pipeline

The Clario team implemented a set of evaluation scripts that:

  1. Run the full solution on each test DICOM or PDF, using the same workflow that powers the production system.
  2. Collect the model predictions, including the detected PII/PHI text, associated labels (for example, name, date of birth, medical record number), and coordinates where available.
  3. Compare predictions against ground truth using the following matching strategy:
    1. For PDFs and DICOM images where coordinates are available, a match is performed by spatial proximity, treating a predicted bounding box as a correct match if it falls within a configurable tolerance (by default, 3 pixels for each element of the bounding box).
    2. For DICOM metadata where coordinates are not available, a match is performed by a structured path.

Furthermore, the solution includes automated accuracy and performance (run time) checks, to improve system reliability across deployments. After validating the solution’s accuracy, the team assessed how it improves detection coverage across Clario clinical trial imaging workflows.

Results and benefits

The automated evaluation pipeline measured the solution’s detection performance against the manually annotated ground truth dataset across all three detection surfaces:

Detection surface Detection F1 Label accuracy
PDF text 0.9775 98.12%
DICOM burned-in image text 0.9750 96.15%
DICOM metadata tags 0.9951 99.60%

Detection F1 measures how accurately the solution identifies PHI/PII instances. Label accuracy measures how correctly it classifies the type of identified PHI/PII (for example, person_name, date_of_birth, or gender).

These results demonstrate consistently high detection performance across all three data surfaces, with metadata tag detection achieving near-perfect accuracy. The solution meets the Clario generative AI team’s production-readiness bar for deployment in clinical trial workflows where compliance accuracy is non-negotiable.

Complete detection coverage

Manual QC reviewers bring deep domain expertise to PHI identification. But modern clinical trials generate an enormous volume of data: thousands of image slices per series, each with dozens of metadata tags, including non-standard vendor-specific fields. This volume makes exhaustive manual review impractical at scale. The automated solution extends that human expertise across the full dataset.

In internal testing conducted by the Clario team, the solution scanned 100% of image slices, standard DICOM header fields, and custom private tags in the test dataset. This comprehensive coverage complements the existing QC process by surfacing PHI occurrences that might otherwise require additional review passes, particularly in non-standard private tags and burned-in pixel text where sensitive data is less predictable.

Risk and compliance impact

By automating PII and PHI detection across metadata tags and image slices, the solution can strengthen an organization’s compliance posture against HIPAA, GDPR, and ICH E6 requirements.

Beyond the measurable results, the project surfaced several insights that can guide other organizations building similar solutions.

The AWS collaboration

The AWS Solutions Architecture team partnered with the Clario AI team throughout the design and optimization of the detection solution. Key areas of collaboration included:

  • Scaling and throughput optimization: Provided prescriptive guidance on Amazon EKS pod scaling strategy to handle DICOM series with thousands of slices per request without timeout or memory pressure and tuned concurrent invocations to Amazon Bedrock to maximize throughput within account-level quotas.
  • Cost-efficient inference architecture: Recommended batching strategies for Amazon Textract API calls and optimized prompt token usage for Claude Sonnet on Amazon Bedrock to reduce per-document inference cost at scale.
  • Data retention and security controls: Recommended auto-deletion workflow using Amazon S3 Lifecycle policies and Amazon RDS scheduled jobs to meet HIPAA and GDPR data minimization requirements.

Lessons learned and best practices

Throughout the development and deployment of this solution, several valuable insights emerged that can benefit other organizations implementing similar AI-powered PHI detection systems for clinical trial imaging data.

Evaluate models against production-representative data

The Clario AI team adopted a rigorous model evaluation process early in development. Many open-source frameworks and off-the-shelf detection models demonstrated acceptable performance on curated test samples but experienced significant accuracy degradation when exposed to the full variability of production data. This variability includes diverse imaging modalities, vendor-specific private tags, and inconsistent burned-in text formatting across globally distributed trial sites. This reinforced the importance of evaluating any AI model at realistic, production-level data volumes before adoption. The solution that proved most effective was a carefully tuned pipeline where Amazon Textract handles text extraction and Claude Sonnet on Amazon Bedrock performs PHI/PII classification, with prompt engineering optimized for the specific patterns found in clinical trial DICOM data.

Ground truth data is non-negotiable

Building a reliable, automated evaluation pipeline required the manual creation of a ground truth dataset. The team acknowledges this process is time-consuming but necessary. This highlighted a best practice that is frequently underestimated: investing in high-quality, manually validated ground truth data is a prerequisite for developing and maintaining a trustworthy automated detection system. Attempting to shortcut this step risks deploying a solution whose real-world accuracy remains unknown, an unacceptable risk in the context of clinical trial compliance.

Separating detection from masking improves flexibility and auditability

The Clario team deliberately separated the PHI/PII detection function from the actual pixel-level redaction. Rather than performing masking directly, the solution identifies the precise coordinates and type of PHI/PII detected, passing this structured output downstream to integrated systems responsible for redaction. This separation proved to be a sound best practice. It preserves workflow flexibility, a human expert can review the findings before anyone makes irreversible changes to the image data, and keeps human accountability and auditability clear at every step.

Human-in-the-loop review remains an essential safeguard

Automation accelerates the detection and flagging process, but a key lesson learned is that human oversight should remain an integral part of the workflow. Incorporating a human review step for flagged findings before masking makes sure that edge cases and model uncertainties are appropriately handled. In the context of clinical trial data, where accuracy and regulatory accountability are paramount, this human-in-the-loop approach provides an essential layer of quality assurance that purely automated systems alone cannot fully replace.

Conclusion

The Clario automated PHI/PII detection solution demonstrates how AWS services can transform clinical trial imaging workflows by combining speed, accuracy, and compliance. By replacing manual spot-checks with automated scanning of every slice and metadata tag, the solution delivers complete PHI/PII detection coverage, reducing the risk of missed detections while strengthening compliance with HIPAA, GDPR, and ICH E6 requirements.

The key architectural decisions, comprehensive coverage of custom private tags, separation of detection from redaction, and human-in-the-loop validation provide a blueprint for other organizations managing sensitive imaging data in regulated environments. These lessons learned highlight that successful automation in clinical trials requires not just advanced technology, but thoughtful design that balances efficiency with the rigorous quality standards that patient safety and regulatory compliance demand.

Next steps

Organizations looking to implement similar PHI/PII detection capabilities for clinical trial imaging can start by:

  • Evaluate current manual review processes: Map where reviewers spend the most time and where missed PHI poses the greatest compliance risk.
  • Assess custom private DICOM tags: Catalog vendor-specific and site-specific tags across your imaging network to define the full detection scope.
  • Build ground truth datasets: Annotate a representative sample with precise PHI labels to benchmark automated detection accuracy.
  • Design human-in-the-loop workflows: Define review checkpoints where qualified personnel validate flagged findings before redaction.

About the authors

Jamf Administrators: Your Backup Deployment Just Got Simpler

Post Syndicated from Kari Wilson original https://www.backblaze.com/blog/jamf-administrators-your-backup-deployment-just-got-simpler/

A decorative image showing computer and user icons.

If you’re running a Mac fleet, Jamf is often where everything starts. It handles provisioning, policies, app installs——the orchestration that keeps your fleet sane. But backup is the thing that doesn’t fit. Jamf gives you control over every Mac, but it doesn’t protect the data on them. Backblaze closes that gap without changing how your team works.

Webinar: Building a Complete Mac Protection Strategy

Join Solution Engineers from Jamf and Backblaze for a practical discussion on building a complete Mac protection strategy.
Claim My Seat

The device ownership problem 

Either you know who owns every device upfront (rare), or you don’t (common). Most teams end up doing some mix: devices that came pre-assigned, devices still waiting for user mapping, devices that migrated between teams. You write a script to fix it, then another to catch the next variation. Three months later, you’re not sure if every device is actually backed up or just supposed to be.

The new solution: Two ways to match devices to users. Pick the one that matches your reality.

This update solves the core friction: you don’t have to choose one deployment model anymore.

Method 1: Fixed email (for controlled environments) If you already know who owns each device at install time, for example, if you have clean HR data synced to Jamf, you can pass the user email directly during deployment. The installer uses it to set up the account automatically. No guessing, no drift.

Method 2: Dynamic user detection (for real-world environments) If you don’t have clean data upfront (e.g. when new devices arrive, get imaged, and wait for assignment) the installer waits until a user logs in. Once a user signs in, Backblaze can automatically associate the device with the appropriate user account based on the deployment configuration and identity information available on the device. This reduces the need for manual user assignment and helps prevent devices from being left unprotected. 

Or mix them: some devices get email, others get dynamic detection. The system can now handle both in the same deployment.

What this means for your workflow

You push the Backblaze installer through a Jamf policy, same as any other app. Set your preferred method (fixed or dynamic) once at the group level, then let it run. Devices show up in the Backblaze console under the right user, with the right backup scope, no extra steps.

When something does need adjustment—a device moved teams, a user credential changed—you handle it the same way you’d handle any other Jamf-managed app. Script it, reconfigure it, whatever your existing process is. Backup can now follow the same deployment and management workflows your team already uses for other Jamf-managed applications.

Fewer things that can go wrong means less time managing edge cases

The friction point used to be this: you’d deploy backup, then spend the next week chasing down why a handful of devices aren’t appearing correctly. Someone’s account didn’t match. A device landed in the wrong group. Now you’re writing workarounds.

With two deployment methods that actually handle different scenarios instead of forcing everything into one model. The new deployment options reduce common onboarding issues that often require follow-up troubleshooting. Fewer edge cases means fewer scripts to maintain, fewer devices to manually fix, fewer things to check on at 3am.

It still runs the same way once it’s installed

Nothing else about Backblaze changes. It backs up user data automatically, without caps or limits. Pricing stays flat per device. Restore works the same way. This update is purely about getting it deployed cleanly—the actual backup part just keeps working.

How to start

Pick a small group of devices. Deploy through Jamf. Watch what happens for a week. You’ll see pretty quickly whether the user-matching is working and whether this fits your environment.

How to install Backblaze silently with Jamf Pro for Mac

Learn more about Backblaze + Jamf

The post Jamf Administrators: Your Backup Deployment Just Got Simpler appeared first on Backblaze Blog | Cloud Storage & Cloud Backup

AI-powered clinical trial eligibility and safety using Amazon Bedrock AgentCore

Post Syndicated from Sachin Jain original https://aws.amazon.com/blogs/architecture/ai-agents-for-clinical-trial-screening/

AI agents built on Amazon Bedrock AgentCore let clinical trial teams make fast, accurate enrollment decisions while keeping clinicians in control through human-in-the-loop oversight. According to the Tufts Center for the Study of Drug Development, 80 percent of clinical trials miss their enrollment timelines, and each day of delay costs an estimated $500,000.

Today, eligibility decisions rely on manual chart review across fragmented sources — EHR notes, lab results, imaging reports, and medication histories. Study teams spend hours reconstructing each candidate’s history and mapping it to protocol criteria. As protocols grow more complex, this doesn’t scale: screen failure rates stay high and enrollment targets slip.

We show how to architect a Clinical Trial Eligibility and Safety Agent on AWS that assembles patient evidence, evaluates it against protocol criteria, and presents screening recommendations with citations, while clinicians retain final authority and full audit trails. It combines AWS HealthLake for FHIR-native data access, Amazon Bedrock AgentCore for multi-step reasoning, and Amazon Bedrock AgentCore Evaluations for scoring each decision via LLM-as-a-judge and human-in-the-loop. This post is for solution architects, engineering teams, and technology leaders applying AI to clinical trial operations on AWS.

AI agents for clinical trial screening

AI agents with Human-in-the-Loop (HIL) are well-suited for clinical trial eligibility and safety decisions because they address information fragmentation while preserving human clinical judgment. The core problem isn’t a lack of data, but that eligibility and safety signals are scattered across EHR notes, lab portals, imaging reports, and medication histories, forcing study teams to reconstruct each participant’s clinical picture. A knowledge graph addresses this by storing clinical data as entities and the relationships between them, representing each patient, molecule, endpoint, and market as a node with relationships stored as edges. To answer an eligibility or safety question, the agent traverses these edges, going from a diagnosis to its associated labs or a medication to its known interactions, rather than re-querying and joining disconnected sources each time. This structure supports the agent’s preparatory work:

  • Organizing evidence from fragmented sources into a knowledge graph, linking patients, molecules, endpoints, and markets as interconnected nodes.
  • Mapping patient information against protocol criteria.
  • Surfacing relevant passages with citations for clinician review.
  • Highlighting uncertainties that require human judgment.

Critically, the clinician remains the decision-maker. The agent organizes the supporting information. These systems augment rather than replace clinical reasoning — proposing preliminary assessments, flagging edge cases, providing confidence scores, and learning from feedback.

As protocols grow more complex with precision oncology and biomarker-driven eligibility, agents manage multi-step logic and maintain consistency across sites, while deferring final judgment to clinical staff.

Architecture overview

This proposed architecture illustrates how core AWS services can be combined to create an end-to-end clinical trial screening pipeline. AWS HealthLake serves as the FHIR-native clinical data foundation, ingesting and normalizing patient records from disparate EHR systems, lab portals, and imaging archives into a unified, queryable data store. Amazon Bedrock AgentCore orchestrates the multi-step workflow assembling patient profiles, matching them against trial protocols, detecting safety signals, and generating evidence-backed screening recommendations. An Amazon Bedrock Knowledge Bases stores trial protocols, inclusion/exclusion criteria, and safety guidelines. The entire pipeline feeds into a clinician review dashboard where investigators examine agent reasoning, verify citations, and render final decisions. Actions are captured in an immutable audit trail for regulatory compliance.

Architecture diagram showing the clinical trial screening pipeline with AWS HealthLake, Amazon Bedrock AgentCore, and Amazon CloudWatch

Architecture workflow

The screening pipeline operates in the following steps. Each step maps to a distinct phase of the eligibility and safety assessment, from data ingestion through clinician review and continuous monitoring.

Step 1: Clinical data ingestion

AWS HealthLake ingests patient records from EHR systems, lab portals, imaging reports, and medication histories, then normalizes them into FHIR R4 resources for standardized, queryable access.

Step 2: Agent orchestration

Amazon Bedrock AgentCore orchestrates three specialized agents, each scoped to a distinct phase of the screening pipeline. They operate within the Amazon Bedrock AgentCore Runtime, which connects to tools through MCP Gateway, maintains session memory so agents reference earlier findings without re-querying, and enforces identity-based access control for least-privilege data access. A built-in code interpreter handles dynamic calculations such as eGFR or BMI derivation.

Pre-screening agent: The first gate. It resolves three threshold questions: Is the patient’s informed consent valid and current? Does their high-level profile (age, diagnosis category, geography) align with basic enrollment parameters? Have they completed any required washout period? Patients who clear all three advance. Those who don’t receive a documented rejection citing the failing criterion.

Detailed screening agent: The core clinical reasoning engine. It walks through all inclusion and exclusion criteria, retrieving the relevant FHIR resources — Observation for labs, Condition for diagnoses, MedicationStatement for medications — and evaluating each against the protocol threshold. It also reviews organ function, adverse drug reactions, and contraindicated conditions, cross-references medications against the investigational product for interactions, and assesses the overall comorbidity profile for risk combinations no single criterion would catch. The output is a structured determination (Eligible, Ineligible, or Requires Review) with a per-criterion evidence matrix, confidence scores, and a reasoning summary citing source records.

Site & enrollment agent: Once a patient clears screening, it handles operational logistics — matching the patient to the most appropriate site by proximity, capabilities, and investigator availability, then confirming open enrollment capacity. If the preferred site is full, it identifies alternatives and flags the study coordinator.

All three agents operate behind Amazon Bedrock Guardrails, which enforce:

  1. PII/PHI filtering to protect patient health information.
  2. Content safety controls to help prevent clinically inappropriate outputs.
  3. Grounding checks to keep responses anchored in retrieved evidence rather than model parametric knowledge.
  4. Denied topic boundaries to keep agents within their screening scope.

Step 3: LLM-as-judge evaluation

Amazon Bedrock AgentCore Evaluations scores every screening decision using a combination of built-in and custom evaluators across three dimensions:

  1. Clinical accuracy: Correctness of the eligibility determination against patient data, faithfulness to source evidence (not hallucinated justifications), logical coherence across reasoning steps, and context relevance confirming the right protocol and patient records were retrieved.
  2. Operational effectiveness: Response completeness and clarity for coordinators reviewing dozens of patients daily, appropriate use of FHIR queries and knowledge base tools, and end-to-end goal success (did the agent complete the full screening workflow?).
  3. Safety compliance: Custom evaluators verify that safety-critical criteria (lab thresholds, restricted medications, contraindicated conditions) were never skipped, that uncertainties are explicitly acknowledged rather than resolved with false confidence, and that all safety flags route to the appropriate review tier.

Decisions that pass evaluation with high confidence proceed to the clinician dashboard. The system flags those that fall below quality thresholds and routes them to human review with the specific evaluation concern highlighted.

Step 4: Human-in-the-loop review and enrollment

Flagged cases and agent recommendations flow into a tiered clinical review structure:

  1. PI review queue: Principal Investigators review flagged decisions from the LLM Judge, examining the agent’s reasoning chain, verifying citations against source records, and rendering a final determination.
  2. Study coordinator dashboard: Coordinators manage trial logistics, scheduling, and the day-to-day enrollment pipeline, using the agent’s structured outputs to accelerate their workflow.
  3. Patient communication: Outreach and consent updates are coordinated through the dashboard, keeping patients informed of their screening status.
  4. Escalation to medical director: Complex or high-risk cases that exceed the PI’s comfort level are escalated to the Medical Director for final adjudication.

Clinicians retain complete override capability at every stage. When a clinician overrides an agent recommendation, approving a patient the agent flagged or rejecting one it cleared, the system captures the corrected decision and the clinician’s reasoning. These corrections expand the ground truth dataset used by Amazon Bedrock AgentCore Evaluations and surface patterns that inform prompt and retrieval tuning, creating a continuous learning loop where human judgment directly improves agent performance over time.

Step 5: Observability and continuous monitoring

Amazon CloudWatch provides end-to-end observability across all agents, surfacing agent traces (step-by-step execution logs), latency metrics, error rates (failed tool calls, guardrail blocks), judge scores (pass/flag rates per agent), HITL metrics (override rates, review latency), and alarm-based escalation when safety thresholds are breached.

Although the current implementation focuses on screening and enrollment, the same agent orchestration framework, evaluation pipeline, and compliance infrastructure support future post-enrollment monitoring agents such as adverse event detection from lab results and clinical notes, protocol deviation tracking, retention risk prediction, and re-screening triggers when clinical changes affect ongoing eligibility. Each inherits the existing scoring, logging, and auditability without requiring a separate governance framework.

Evaluating agent performance in clinical trial screening with human oversight

The screening pipeline’s credibility rests on two layers: an automated evaluation layer that scores every decision, and a human-in-the-loop (HITL) layer that gives clinicians final authority. LLM-as-Judge (Step 3) decides which cases clinicians see and how they’re prioritized. The HITL workflow (Step 4) decides how clinicians act. Together they form a continuous loop where human judgment both safeguards and improves agent performance. Using Amazon Bedrock AgentCore Evaluations, you build a framework spanning three dimensions: clinical accuracy, operational effectiveness, and safety compliance with built-in and custom evaluators that run continuously.

Clinical accuracy and reasoning

Built-in evaluators check whether the agent gets the determination right and whether its reasoning holds up: Correctness (accurate against the patient’s labs, diagnoses, and medications), Faithfulness (reasoning stays grounded in patient data and protocol, not plausible-sounding invention), Coherence (no logical contradictions across steps), Context relevance (the right protocol and records were retrieved), and Goal success rate (the full workflow ran end to end). Custom LLM-as-Judge evaluators add clinical specifics: Eligibility accuracy (each inclusion/exclusion criterion evaluated correctly) and Criteria coverage (no criteria skipped, especially safety-critical lab thresholds and restricted medications).

Operational effectiveness

Accuracy alone is insufficient, output must fit workflows where coordinators review dozens of patients daily. Helpfulness, conciseness, and relevance confirm a clear, scannable, on-topic determination. Instruction following verifies the expected structured format (patient summary, criteria checklist, determination, justification, safety flags, next steps). Tool selection and parameter accuracy check the agent invoked the right tools with correct inputs.

Safety and responsible behavior

Safety carries the strictest thresholds. Harmfulness detection flags clinically dangerous content; Stereotyping detection makes sure decisions aren’t influenced by demographics beyond protocol requirements. Both trigger immediate review. Custom evaluators target the highest-risk failures: Safety flag detection confirms every significant concern surfaced (contraindicated medications, out-of-range labs, disqualifying conditions, drug interactions), with a single miss treated as critical; Uncertainty acknowledgment makes sure the agent recommends human review on missing or ambiguous data rather than making an overconfident call.

The human-in-the-loop safeguard

When a wrong eligibility call can affect patient safety, human judgment is the final safeguard. A score below threshold routes the case to the HITL workflow.

The three agents together produce an eligibility determination with a confidence score. At trial onset, the clinician sets a confidence threshold. Cases below it or flagged by evaluation reach the clinician dashboard with the specific concern highlighted. Clinicians review the full reasoning and approve, reject, or request more information from the same interface. Their corrections are stored alongside machine-approved records, feeding back into future determinations and continuously improving accuracy.

Review and approval workflow

Review is tiered by complexity: automated pre-screening filters clearly ineligible candidates. Low-complexity cases get expedited review, medium-complexity follow standard protocols, and high-complexity edge cases escalate to senior clinicians. Cases unreviewed beyond set timeframes escalate automatically. Final enrollment decisions, low-confidence cases, experimental therapies, and complex histories require human approval. Routine high-confidence checks proceed automatically.

Audit trails

The system generates immutable audit records in Amazon DynamoDB for every decision, capturing clinician ID, timestamp, patient and trial IDs, outcomes, AI recommendations, and complete workflow execution history. These records are designed to support FDA 21 CFR Part 11 requirements for electronic records and signatures, providing documentation for regulatory inspections and quality assurance. Readers should consult their compliance team and conduct their own assessment. See the AWS compliance resources for further guidance.

Security and compliance

Clinical trial data is among the most sensitive in healthcare. HIPAA, FDA 21 CFR Part 11, GxP, and GDPR require strict controls over how patient data is stored, accessed, and processed, and AI agents reasoning over that data introduce new security considerations. This solution protects data at every layer while maintaining the audit trails and privacy standards regulators require.

AWS HealthLake is HIPAA-eligible with encryption at rest and in transit, access controls, and SMART on FHIR authorization. Amazon Bedrock is HIPAA-eligible, SOC 2 attested, ISO and CSA STAR Level 2 certified, and never shares customer data with model providers. AWS PrivateLink keeps traffic off the public internet.

Amazon Bedrock AgentCore enforces agent boundaries at runtime through declarative authorization policies — readable, deterministic rules, outside application code, defining what the agent can access, invoke, and retrieve. AgentCore runs within your Amazon Virtual Private Cloud (Amazon VPC) for network isolation, and AWS CloudTrail records API calls for an immutable audit trail that can support FDA compliance requirements.

Amazon Bedrock AgentCore Evaluations scores each decision using built-in and custom evaluators with an LLM-as-a-Judge approach. Continuous sampling detects drift, and Amazon CloudWatch alerts teams when quality drops below thresholds — ongoing evidence the agent performs within validated parameters, supporting GxP with minimal manual testing.

Conclusion

In this post, we showed how combining the FHIR-native data foundation of AWS HealthLake
with the multi-step reasoning capabilities of Amazon Bedrock AgentCore turns manual,
fragmented clinical trial screening into an AI-assisted workflow that reduces patient matching
time from days to minutes. Clinical trial enrollment remains one of drug development’s most
resource-intensive bottlenecks, and delayed starts carry heavy financial consequences from lost
patent-protected sell time and operational burn. Clinicians receive organized evidence,
transparent reasoning, and actionable recommendations while retaining full decision authority
and audit traceability.

The impact extends beyond speed: more consistent criteria interpretation across sites, earlier
detection of safety contraindications, and lower screen failure rates. As oncology trial eligibility
criteria grow in complexity — with fewer than 5% of cancer patients enrolling under strict
requirements — this human-in-the-loop approach offers a scalable, compliance-aligned path to
faster, higher-quality recruitment.

Call to action

Ready to accelerate your clinical trial operations? Take the next step:

Security updates for Wednesday

Post Syndicated from jzb original https://lwn.net/Articles/1089501/

Security updates have been issued by AlmaLinux (.NET 10.0, .NET 9.0, 389-ds-base, attr, curl, glib2, gstreamer1-plugins-bad-free, gstreamer1-plugins-bad-free and gstreamer1-plugins-ugly-free, gstreamer1-plugins-good, gstreamer1-plugins-ugly-free, haproxy, kernel, libssh, libXfont2, nodejs22, pam, php, php8.4, sg3_utils, and unbound), Debian (librabbitmq, ruby-grape, spip, srt, and swift), Fedora (GitPython, lemonldap-ng, libgit2, libnfs, perl-Imager, perl-List-SomeUtils-XS, python3.12, python3.14, and radsecproxy), Oracle (.NET 10.0, 389-ds-base, 389-ds:1.4, bind, curl, gstreamer1-plugins-bad-free, gstreamer1-plugins-bad-free and gstreamer1-plugins-ugly-free, gstreamer1-plugins-good, gstreamer1-plugins-ugly-free, haproxy, libssh, libXfont2, nodejs22, nodejs:22, pcp, and unbound), Red Hat (golang, grafana, grafana-pcp, osbuild-composer, and rhc), SUSE (erlang, forgejo-cli, go1.25, go1.26, htop, python-pypdf2, python313-tablib, and snphost), and Ubuntu (c3p0, dotnet8, dotnet10, kernel, linux, linux-aws, linux-aws-fips, linux-aws-hwe, linux-fips, linux-hwe,
linux-kvm, linux, linux-aws, linux-aws-fips, linux-azure, linux-fips, linux-gcp,
linux-gcp-6.8, linux-gcp-fips, linux-gkeop, linux-oracle, linux-realtime,
linux-realtime-6.8, linux-xilinx, linux-hwe-7.0, linux-oracle, linux-oracle-6.17, and linux-oracle-6.8).

Rapid7 and Licencias OnLine Partner to Accelerate Cybersecurity Maturity across Latin America

Post Syndicated from Cássio De Alcântara original https://www.rapid7.com/blog/post/c-licencias-online-partnership-accelerates-latam-cybersecurity-maturity-latin-america

Cássio De Alcântara is Director, LATAM Sales at Rapid7.

Across Latin America, organizations are embracing cloud, AI, and digital transformation to drive innovation and business growth. These technologies create new opportunities, but also introduce greater complexity and expanding attack surfaces.

In this environment, security leaders are being asked to understand where risk exists across increasingly distributed environments and quickly eliminate blind spots like Shadow IT and Shadow AI – all without adding operational complexity.

To help security leaders and practitioners address this complexity, Rapid7 is excited to announce a new strategic distribution partnership with Licencias OnLine (LOL) across Latin America.

Helping organizations stay ahead of evolving threats

In order to keep day-to-day business operations moving, organizations need security solutions that not only protect critical assets but also support innovation, regulatory compliance, and long-term digital transformation.

Rapid7’s AI-powered cybersecurity operations platform helps organizations strengthen cyber resilience by unifying continuous exposure management, AI-driven threat detection and response, and security automation. By connecting security data across endpoint, cloud, identity, and infrastructure environments, organizations leverage one platform to gain the visibility to reduce risk and act with confidence.

A shared commitment to partner success

Success in today’s fragmented cybersecurity environments depends on a strong ecosystem of partners who can help organizations implement, optimize, and maximize the value of unified security operations.

This is where Licencias OnLine comes in. With a strong, well-established presence across Latin America, deep cybersecurity expertise, and a highly specialized channel ecosystem, Licencias OnLine brings the local knowledge, technical enablement, and operational agility needed to help partners grow their cybersecurity practices and deliver greater value to customers.

Together, Rapid7 and Licencias OnLine will invest in technical training, partner enablement, joint marketing initiatives, and go-to-market programs that help partners expand managed security services, strengthen customer relationships, and accelerate business growth across the region.

Building cyber resilience together

As organizations across Latin America continue to modernize their IT environments, they should have access to security operations that are integrated, intelligent, and designed for today’s AI-powered threat landscape.

Rapid7’s open platform supports this approach through hundreds of technology integrations that help organizations eliminate security silos, improve visibility across their attack surfaces, and automate response workflows. This enables security teams to reduce operational complexity while improving cybersecurity program maturity.

By combining Rapid7’s global cybersecurity innovation with Licencias OnLine’s regional expertise and trusted partner network, this new alliance will make it easier for organizations across Latin America to strengthen cyber resilience while enabling partners to see greater success through measurable business outcomes.

We’re excited to begin this next chapter together and look forward to supporting our partners as they help customers build stronger, more resilient security operations across the region.

Ready to grow with Rapid7? Discover how Rapid7 and Licencias OnLine are helping partners accelerate cybersecurity maturity across Latin America.

Set up your AI coding agent to build with AWS Step Functions

Post Syndicated from D Surya Sai original https://aws.amazon.com/blogs/compute/set-up-your-ai-coding-agent-to-build-with-aws-step-functions/

You want to build an AWS Step Functions workflow, and you have an AI coding agent open in your terminal or IDE. But the agent doesn’t know about Amazon States Language (ASL), service integrations, or how to deploy state machines. Before you can start, you need to find the right Model Context Protocol (MCP) server package, figure out the configuration format for your specific agent, and set up credentials.

AWS Step Functions has added a “Copy agent prompt” button to the AWS Step Functions console that removes this setup entirely. You choose the button, paste the prompt into your agent, and the agent configures itself with Serverless skills and an MCP server. You can start building workflows with natural language immediately. The feature works with Claude Code, Kiro CLI, Cursor, GitHub Copilot, Codex, Devin Desktop, OpenCode, and any other MCP-compatible agent.

How it works

The button appears in three places in the Step Functions console:

  • The home page, under “How it works”.
  • The Create State Machine modal (at the top, before you begin building).
  • The Local Development section on the home page.

Here’s an example from the Create State Machine flow:

  1. Open the Step Functions console and choose Create state machine.
  2. At the top of the modal, you see the banner: “Set up your agent to build with Step Functions. Copy and paste this prompt into your AI agent to set up Step Functions skills and MCP server.”
Step Functions console modal showing the Copy agent prompt banner and button

Figure 1: Step Functions console modal showing the Copy agent prompt

  1. Choose Copy agent prompt. The console copies a fetch instruction to your clipboard.
  2. Paste the prompt into your AI agent’s chat or terminal.
  3. The agent reads the setup guide and self-configures.

The copied prompt is a fetch instruction that points to a setup guide hosted on AWS documentation. You paste it into your agent, and the agent installs two things:

AWS Serverless skill (from the Agent Toolkit for AWS) provides your agent with deep context on Step Functions. It includes how to write ASL, structure workflows with retries and error handling, choose between Standard and Express workflow types, implement patterns like saga orchestration and parallel fan-out, and deploy using AWS Serverless Application Model (AWS SAM) or AWS Cloud Development Kit (AWS CDK).

AWS Serverless MCP Server gives your agent direct access to AWS. Through the Model Context Protocol, your agent can create and update state machines, start and describe executions, inspect workflow history, and manage resources in your account.

Supported agents

The setup guide auto-detects your agent and provides the correct configuration format:

  • Claude Code: Installs through the plugin marketplace and registers the MCP server with claude mcp add.
  • Kiro CLI: Writes to ~/.kiro/settings/mcp.json.
  • Codex: Registers with codex mcp add.
  • Cursor: Writes to .cursor/mcp.json.
  • GitHub Copilot: Writes to .vscode/mcp.json.
  • Devin Desktop: Writes to .devin/mcp_config.json.
  • OpenCode: Writes to ~/.config/opencode/opencode.jsonc.

If you use a different MCP-compatible agent, the guide provides a generic JSON configuration block you can add to your agent’s config file.

What you can build

Once your agent is configured, you can describe workflows in natural language, and the agent produces valid, deployable state machines. Here are a few examples:

Order processing with compensation: “Build a workflow that validates a payment, reserves inventory and sends a confirmation email. If payment fails, release the inventory reservation.”

Parallel fan-out: “Create an Express workflow that calls three AWS Lambda functions in parallel, waits for all to complete, and merges the results into a single response.”

Human approval gate: “Add a step that pauses the workflow and waits for a manager to approve before proceeding with the deployment.”

Error handling: “Add retry with exponential backoff and a maximum of three attempts to the payment processing step. If all retries fail, route to a fallback notification step.”

Because the agent has the MCP server connected, it can also deploy the workflow directly to your account, start test executions, and inspect the results without leaving the agent interface.

Advantages

Always current: The Agent Toolkit for AWS content stays up to date as Step Functions adds new features, integrations, and patterns. When you run the prompt, your agent gets the latest skills and configurations automatically.

No context switching: You stay in your agent’s interface for the entire workflow: design, build, deploy, test, and iterate. No switching between the console, documentation, and your editor.

Works with your existing credentials: The MCP server uses your local AWS profile. No new AWS Identity and Access Management (IAM) roles or permissions are required beyond what you already use for Step Functions development.

Agent-agnostic: Whether you use Claude Code, Kiro, Cursor, Copilot, or another tool, the same button and prompt works. You don’t need to find agent-specific setup instructions.

Get started

  1. Open the AWS Step Functions console.
  2. Choose Copy agent prompt from the banner (on the home page under “How it works,” in the Local Development section, or in the Create State Machine modal).
  3. Paste the prompt into your AI coding agent.
  4. Start describing the workflow you want to build.

This feature is available in all commercial AWS Regions at no additional cost. To learn more about the setup process, see the agent setup guide. For more on the Agent Toolkit for AWS, see the GitHub repository. For AWS MCP Servers, see the documentation.

We’d like to hear how you use this feature. Tell us about it in the comments.

The collective thoughts of the interwebz