Use Databricks Unity Catalog Open APIs for Spark workloads on Amazon EMR

Post Syndicated from Venkat Viswanathan original https://aws.amazon.com/blogs/big-data/use-databricks-unity-catalog-open-apis-for-spark-workloads-on-amazon-emr/

This post was written with John Spencer, Sreeram Thoom, and Dipankar Kushari from Databricks.

Organizations need seamless access to data across multiple platforms and business units. A common scenario involves one team using Amazon EMR for data processing while needing to access data that another team manages in Databricks Unity Catalog. Traditionally, this would require data duplication or complex manual setups.

Although both Amazon EMR and Databricks Unity Catalog are powerful tools on their own, integrating them effectively is crucial for maintaining strong data governance, security, and operational efficiency. In this post, we demonstrate how to achieve this integration using Amazon EMR Serverless, though the approach works well with other Amazon EMR deployment options and Unity Catalog OSS.

EMR Serverless makes running big data analytics frameworks straightforward by offering a serverless option that automatically provisions and manages the infrastructure required to run big data applications. Teams can run Apache Spark and other workloads without the complexity of cluster management, while providing cost-effective scaling based on actual workload demands and seamless integration with AWS services and security controls.

Databricks Unity Catalog serves as a unified governance solution for data and AI assets, providing centralized access control and auditing capabilities. It enables fine-grained permissions across workspaces and cloud platforms, while supporting comprehensive metadata management and data discovery across the organization, and can complement governance tools like AWS Lake Formation.

To enable Amazon EMR to process data maintained in Unity Catalog, the data team traditionally copies data products across the platforms to a location accessible by Amazon EMR. The practice of data duplication not only leads to increased storage costs, but also severely impacts data quality and makes it challenging to effectively enforce same governance policies across different systems, track data lineage, enforce data retention policies, and maintain consistent access controls across the organization.

Now using Unity Catalog’s Open REST APIs, Amazon EMR customers can read from and write to Databricks Unity Catalog and Unity Catalog OSS tables using Spark, enabling cross-platform interoperability while maintaining governance and access controls across Amazon EMR and Unity Catalog.

Solution overview

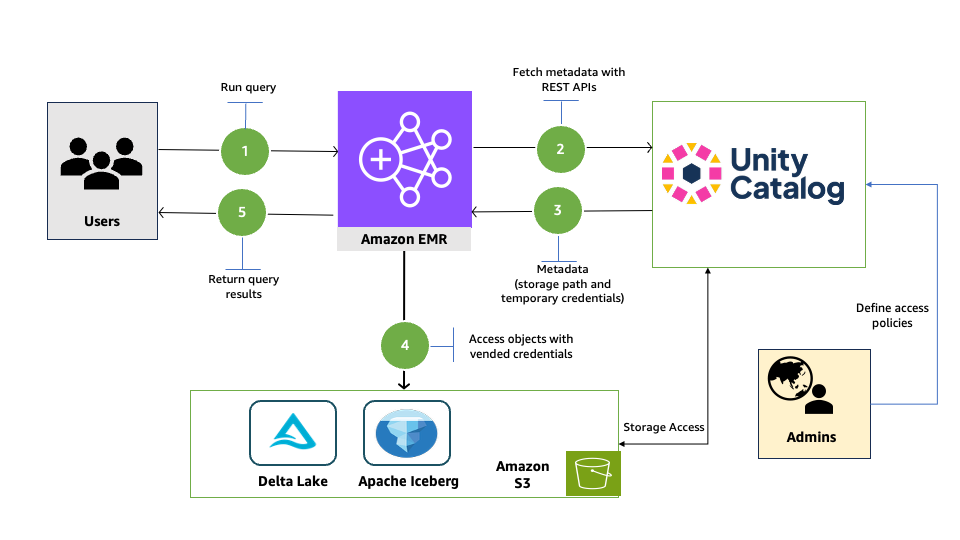
In this post, we will provide an overview of EMR Spark workload integration with Databricks Unity Catalog and walk through the end-to-end process of reading from and writing to Databricks Unity Catalog tables using Amazon EMR and Spark. We show you how to configure EMR Serverless to interact with Databricks Unity Catalog, run an interactive Spark workload to access the data, and run an analysis to derive insights.

The following diagram illustrates the solution architecture.
Prerequisites

You must have the following prerequisites:

In the following sections, we walk through the process of reading and writing to Unity Catalog with EMR Serverless.

Enable Unity Catalog for external access

Log in to your workspace as a Databricks admin and complete the following steps to configure external access to read Databricks objects:

  1. Enable external data access for your metastore. For instructions, see Enable external data access on the metastore.
  2. Set up a principal that will be configured with Amazon EMR for data access.
  3. Grant the principal the privilege to configure the integration of the EXTERNAL USE SCHEMA privilege on the schema containing the objects. For instructions, see Grant a principal EXTERNAL USE SCHEMA.
  4. For this post, we generate a Databricks personal access token (PAT) for the principal and note it down. For instructions, refer to Authorizing access to Databricks resources and Databricks personal access token authentication.

For a production deployment, store the PAT in AWS Secrets Manager. You can use it in a later step to read and write to Unity Catalog with Amazon EMR.

Configure EMR Spark to access Unity Catalog

In this walkthrough, we run PySpark interactive queries through notebooks using EMR Studio. Complete the following steps:

  1. Open the AWS Management Console with administrator permission.
  2. Create an EMR Studio to run interactive workloads. To create a workspace, you need to specify the S3 bucket created in the prerequisites and the minimum service role for EMR Serverless. For instructions, see Set up an EMR Studio.
  3. For this post, we create two EMR Serverless applications. For instructions, see Creating an EMR Serverless application from the EMR Studio console.
    1. For Iceberg tables, create an EMR Serverless application called dbx-demo-application-iceberg with version 7.8.0 or higher. Make sure to deselect Use AWS Glue Data Catalog as Metastore under Additional Configurations, Metastore configuration. Add the following Spark configuration (see Configure applications). Provide the name of the catalog in Unity Catalog that contains your tables and the URL of the Databricks workspace.
      {
          "runtimeConfiguration": [
              {
                  "classification": "spark-defaults",
                  "properties": {
                      "spark.jars": "/usr/share/aws/iceberg/lib/iceberg-spark3-runtime.jar",
                      "spark.jars.packages": "io.unitycatalog:unitycatalog-spark_2.12:0.2.0",
                      "spark.sql.extensions": "org.apache.iceberg.spark.extensions.IcebergSparkSessionExtensions",
                      "spark.sql.defaultCatalog": "<uc-catalog-name>",
                      "spark.sql.catalog.<uc-catalog-name>": "org.apache.iceberg.spark.SparkCatalog",
                      "spark.sql.catalog.<uc-catalog-name>.uri": "https://<workspace-url>/api/2.1/unity-catalog/iceberg-rest",
                      "spark.sql.catalog.<uc-catalog-name>.type": "rest",
                      "spark.sql.catalog.<uc-catalog-name>.warehouse": "<uc-catalog-name>"
                  }
              }
          ]
      }

    2. For Delta tables, create an EMR Serverless application called dbx-demo-application and version 7.8.0 or higher. Make sure to deselect Use AWS Glue Data Catalog as Metastore under Additional Configurations, Metastore configuration. Add the following Spark configuration (see Configure applications). Provide the name of the catalog in Unity Catalog that contains your tables and the URL of the Databricks workspace.
      {
          "runtimeConfiguration": [
              {
                  "classification": "spark-defaults",
                  "properties": {
                      "spark.jars": "/usr/share/aws/delta/lib/delta-spark.jar,/usr/share/aws/delta/lib/delta- storage.jar",
                      "spark.jars.packages": "io.unitycatalog:unitycatalog-spark_2.12:0.2.0",
                      "spark.sql.extensions": "io.delta.sql.DeltaSparkSessionExtension",
                      "spark.sql.defaultCatalog": "<uc-catalog-name>",
                      "spark.sql.catalog.spark_catalog": "io.unitycatalog.spark.UCSingleCatalog",
                      "spark.sql.catalog.<uc-catalog-name>": "io.unitycatalog.spark.UCSingleCatalog",
                      "spark.sql.catalog.<uc-catalog-name>.uri": "https://<workspace-url>/api/2.1/unity-catalog"
                  }
              }
          ]
      }

  4. To set up your interactive workload with a runtime role, see Run interactive workloads with EMR Serverless through EMR Studio.

Read and write to Unity Catalog with Amazon EMR

Launch the workspace created in the previous step. Download the notebooks create-delta-table and create-iceberg-table and upload them to the EMR Studio workspace.
The create-delta-table.ipynb notebook configures the metastore properties to work with Delta tables. The create-iceberg-table.ipynb notebook configures the metastore properties to work with Iceberg tables.

Add the generated token to the session.

For a production deployment, store the PAT in Secrets Manager.

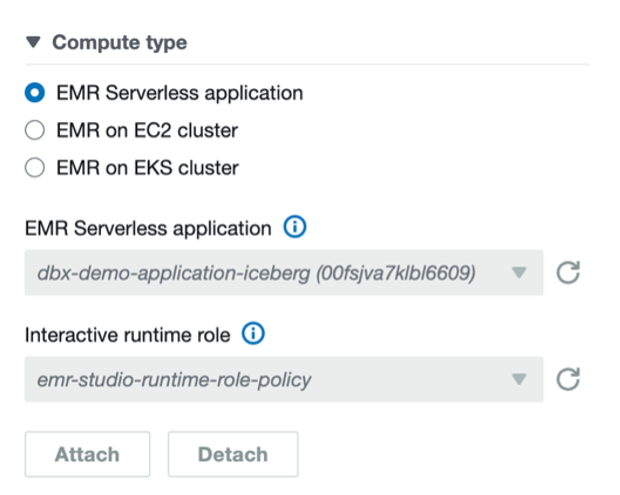
For Iceberg tables, connect to the EMR Serverless application dbx-demo-application-iceberg with the runtime role created in earlier steps under compute and run the notebook (create-iceberg-table). Select PySpark as the kernel and execute each cell in the notebook by choosing the run icon. Refer to Submit a job run or interactive workload for further details about how to run an interactive notebook.
We use the following code to create an external Iceberg table in the catalog:
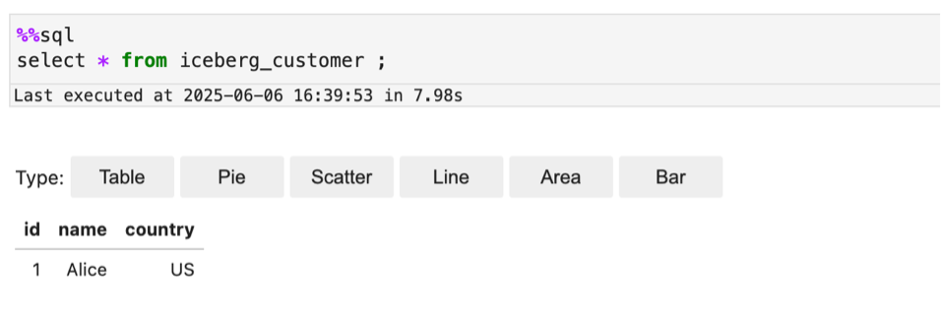
CREATE SCHEMA IF NOT EXISTS customerschema;
USE SCHEMA customerschema;
CREATE TABLE IF NOT EXISTS iceberg_customer (id string, name string, country string) USING iceberg; 
insert into iceberg customer values('1','Alice','US');

For Delta tables, connect to the EMR Serverless application dbx-demo-application with the runtime role created in earlier steps and run the notebook (create-delta-table). Select PySpark as the kernel and execute each cell in the notebook by choosing the run icon. Refer to Submit a job run or interactive workload for further details about how to run an interactive notebook.
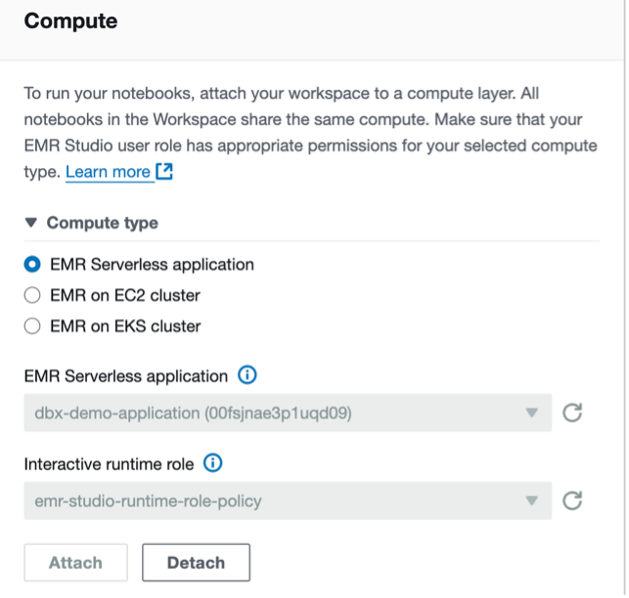
We use the following code to create an external Delta table in the catalog:
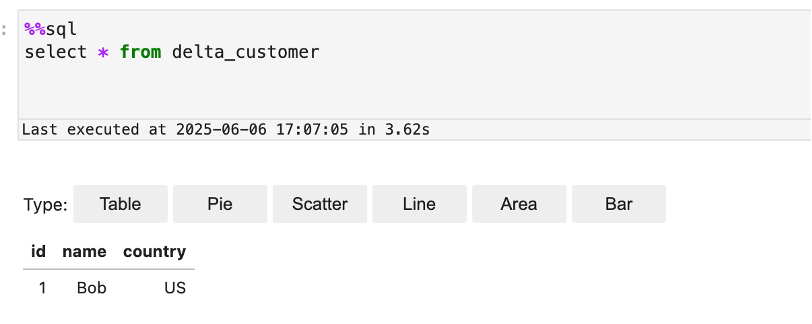
CREATE SCHEMA IF NOT EXISTS customerschema;
USE SCHEMA customerschema;
CREATE TABLE IF NOT EXISTS delta_customer (id int, name string, country string) USING delta LOCATION ‘s3://<bucket_name>/emr-dbx/external/customerschema/delta_customer’;
insert into delta_customer values(1,'Bob','US'); 

Verify in Databricks for both Iceberg and Delta tables

Now you can run queries in Databricks Unity Catalog to show the records inserted into the Iceberg and Delta tables from EMR Serverless:

  1. Log in to your Databricks workspace.
  2. Choose SQL Editor in the navigation pane.
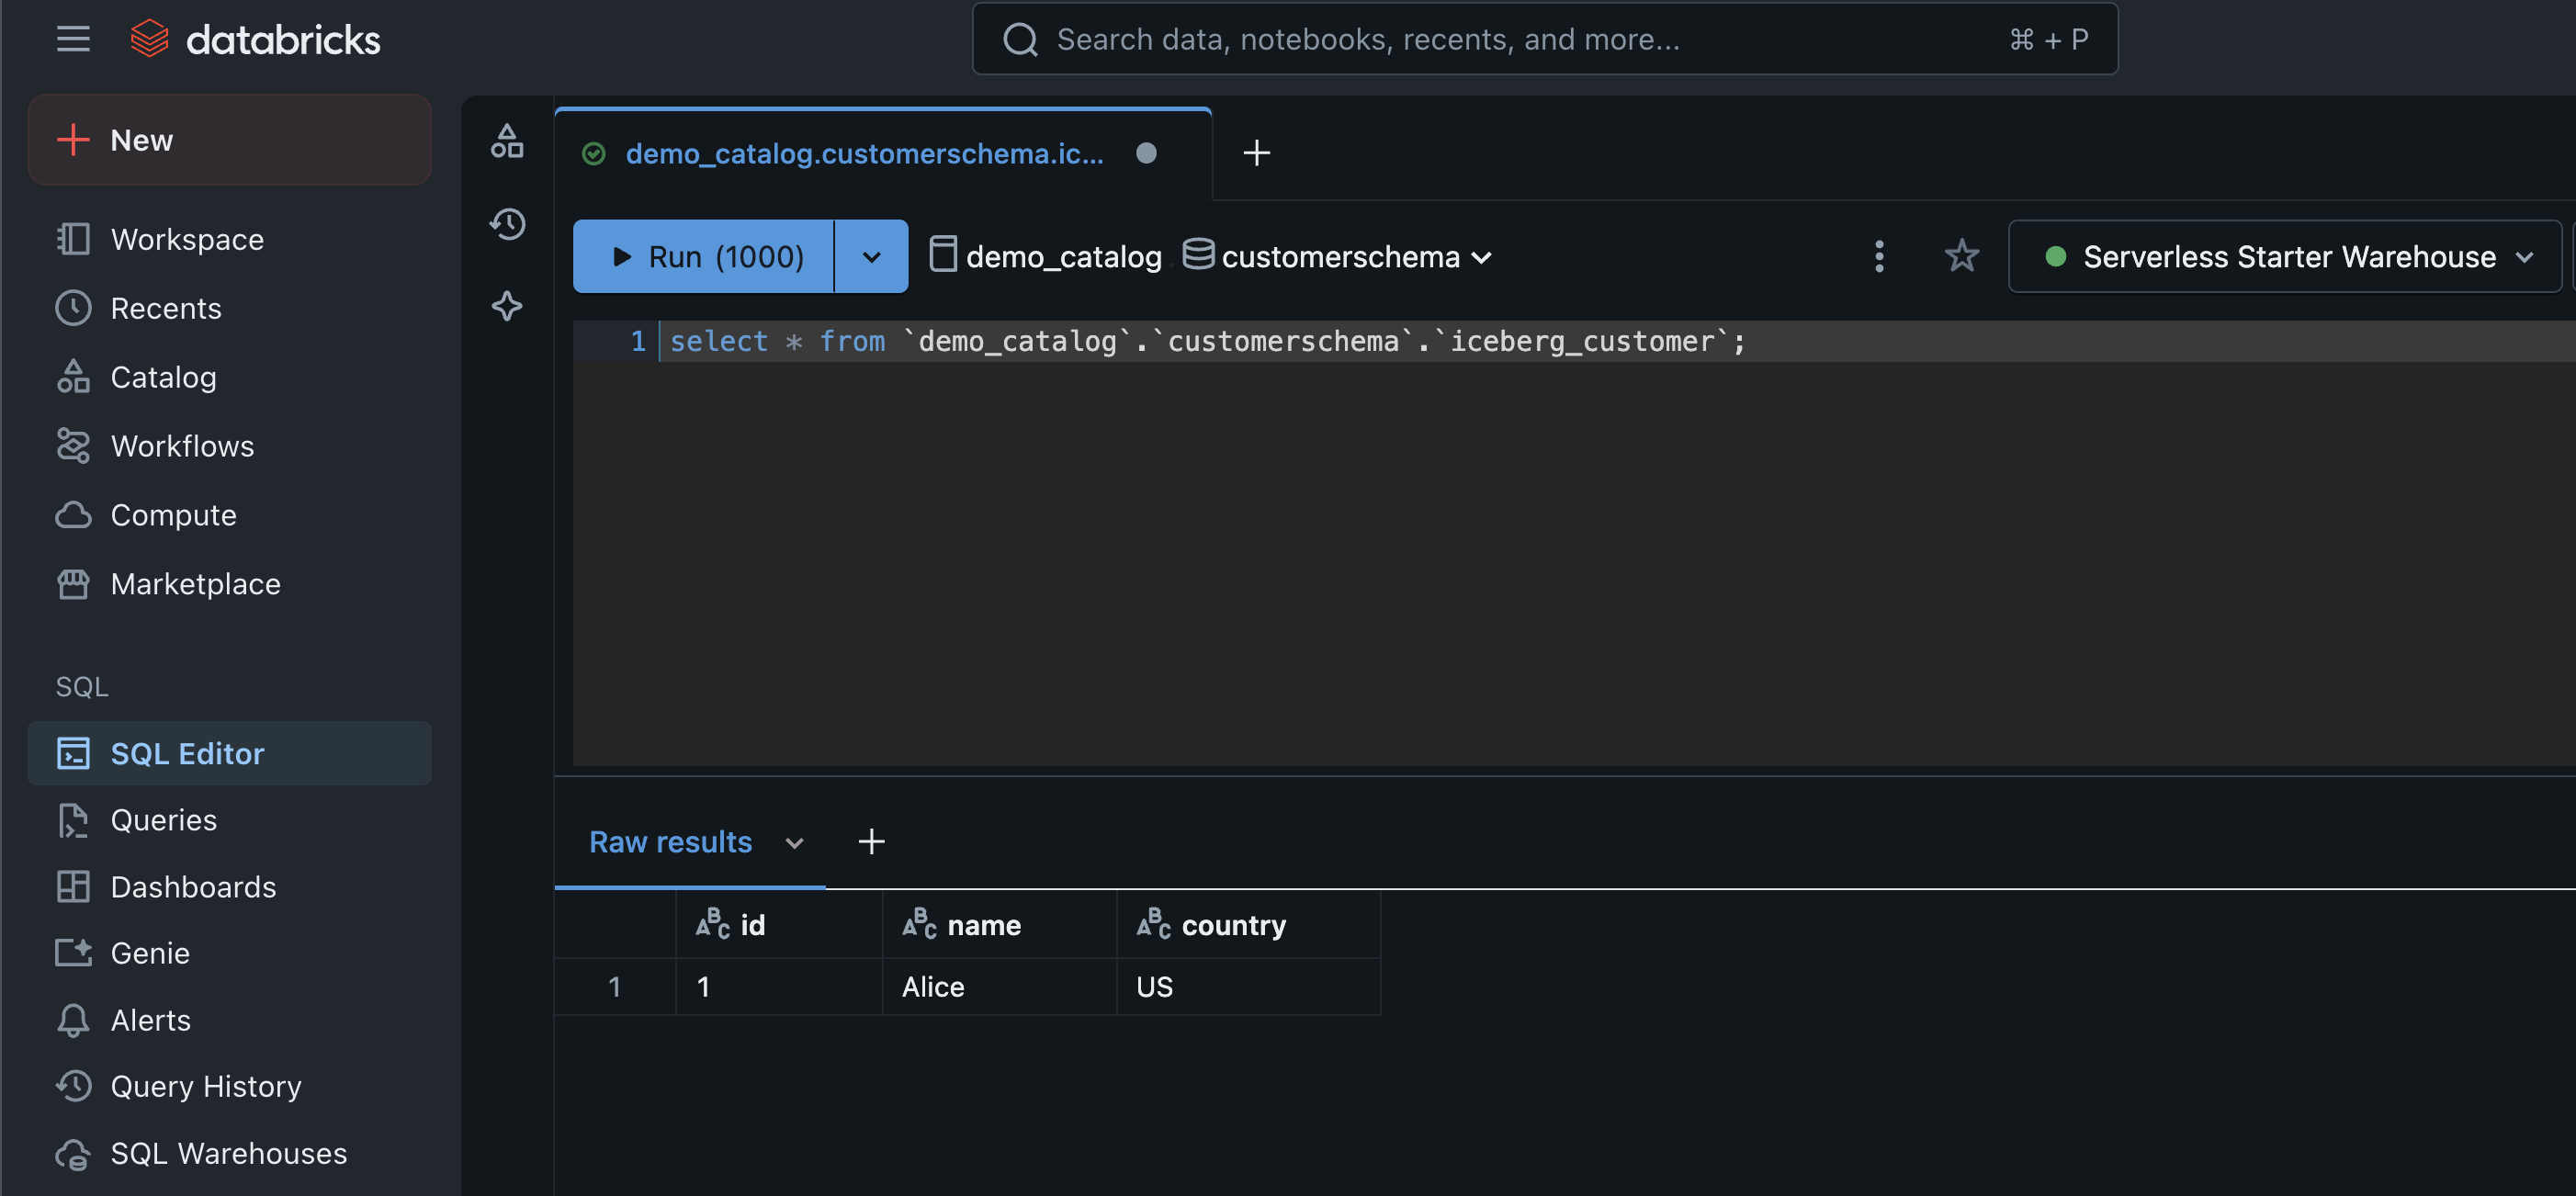
  3. Run queries for both Iceberg and Delta tables.
  4. Verify the results show the same as what you saw in the Jupyter notebook in EMR Studio.

The following screenshot shows an example of querying the Iceberg table.
The following screenshot shows an example of querying the Delta table.

Clean up

Clean up the resources used in this post to avoid additional charges:

  1. Delete the IAM roles for this post.
  2. Delete the EMR applications and EMR Studio setup created for this post.
  3. Delete the resources created in Unity Catalog.
  4. Empty and then delete the S3 bucket.

Summary

In this post, we demonstrated the powerful interoperability between Amazon EMR and Databricks Unity Catalog by walking through how to enable external access to Unity Catalog, configure EMR Spark to connect seamlessly with Unity Catalog, and perform DML and DDL operations on Unity Catalog tables using EMR Serverless.

To learn more about using EMR Serverless, see Getting started with Amazon EMR Serverless. To learn more about using tools like EMR Spark with Unity Catalog, see Unity Catalog integrations.


About the authors

Venkatavaradhan (Venkat) Viswanathan is a Global Partner Solutions Architect at Amazon Web Services. Venkat is a Technology Strategy Leader in Data, AI, ML, generative AI, and Advanced Analytics. Venkat is a Global SME for Databricks and helps AWS customers design, build, secure, and optimize Databricks workloads on AWS.

Srividya Parthasarathy is a Senior Big Data Architect on the AWS Lake Formation team. She works with the product team and customers to build robust features and solutions for their analytical data platform. She enjoys building data mesh solutions and sharing them with the community.

Ramkumar Nottath is a Principal Solutions Architect at AWS focusing on Analytics services. He enjoys working with various customers to help them build scalable, reliable big data and analytics solutions. His interests extend to various technologies such as analytics, data warehousing, streaming, data governance, and machine learning. He loves spending time with his family and friends.

John Spencer is a Product Manager at Databricks, dedicated to making Unity Catalog work seamlessly with customers’ ecosystems of tools and platforms so they can easily access, govern, and use their data.

Sreeram Thoom is a Specialist Solutions Architect at Databricks helping customers design secure, scalable applications on the Data Lakehouse.

Dipankar Kushari is a specialist solutions architect at Databricks helping customer architect and build secured applications on Data Lakehouse.
Trusted identity propagation using IAM Identity Center for Amazon OpenSearch Service

Post Syndicated from Sohaib Katariwala original https://aws.amazon.com/blogs/big-data/trusted-identity-propagation-using-iam-identity-center-for-amazon-opensearch-service/

Enterprise customers of Amazon OpenSearch Service require comprehensive security controls with seamless authentication and authorization mechanisms when accessing data in provisioned domains and Amazon OpenSearch Serverless collections. Security teams within these organizations must not only maintain compliance with enterprise policies but also need to make sure that their users can access data securely, with robust identity management. AWS IAM Identity Center is a popular mechanism for identity management that provides single sign-on (SSO) capabilities for these enterprise customers. IAM Identity Center can use Security Assertion Markup Language (SAML) with both OpenSearch Service provisioned domains and OpenSearch Serverless. Now, by using trusted identity propagation, IAM Identity Center provides a new, direct method for accessing data in OpenSearch Service.

In this post, we outline how you can take advantage of this new access method to simplify data access using the OpenSearch UI and still maintain robust role-based access control for your OpenSearch data.

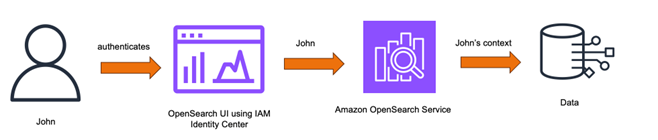
Trusted identity propagation overview

Trusted identity propagation in IAM Identity Center adds the identity context of a user to a role when accessing OpenSearch Service, which in turn uses this context to authorize and scope OpenSearch data access. This simplifies the authentication and authorization flow for customers because the applications access the data on their behalf. Users or user agents need not be present between the application and the backend services for this authorization to happen, unlike methods like SAML where a user agent needs to be present between these entities as a go-between for exchanging assertions. This flexibility helps simplify accessing a wide variety of data sources such as data residing within the Amazon Virtual Private Cloud (Amazon VPC) of an OpenSearch Service domain, or an OpenSearch Serverless collection. By using the OpenSearch UI, you can additionally simplify the backend connections, resulting in seamless access to the data. The following figures shows how the identity propagation works with OpenSearch Service.

Prerequisites

Before starting to use IAM Identity Center with OpenSearch Service, there are a few options that you must enable. To start, set up an organization or account instance of IAM Identity Center following the instruction in this guide. For OpenSearch Service-provisioned domains, you must enable the IAM Identity Center (IDC) Authentication –new option. You can do this though AWS CloudFormation, OpenSearch REST API, AWS SDK, or the AWS Management Console.

To enable Identity Center using the console

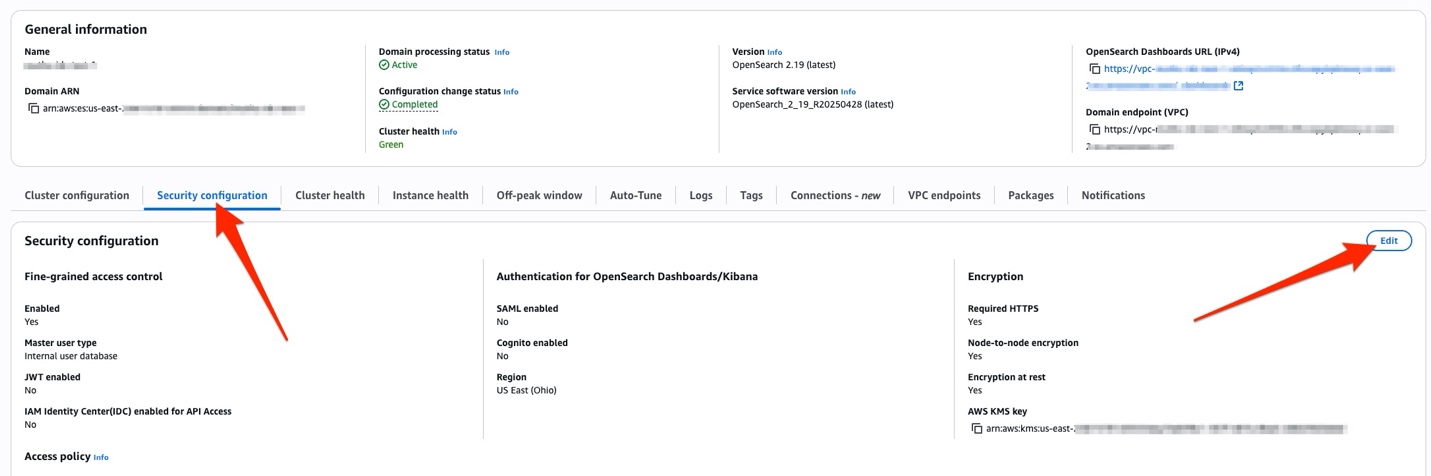
  1. To add the capability for an existing provisioned domain, go to the OpenSearch Service console and navigate to the Security configuration tab and choose Edit.

Amazon OpenSearch Service console highlighting security settings, cluster health status, and VPC endpoint configuration

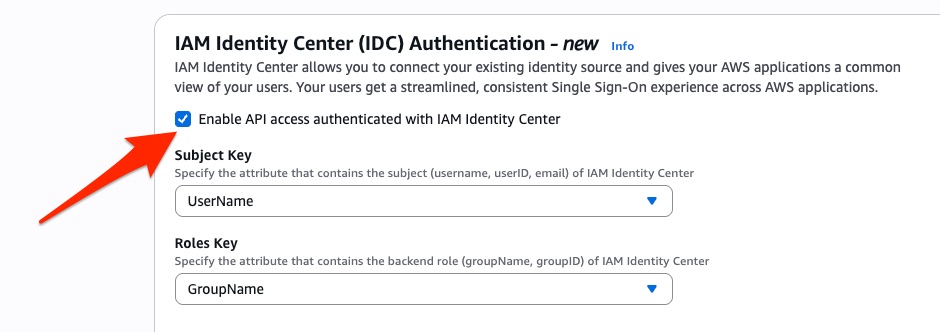
  1. After this step, or if you are creating new domain, select the check box for IAM Identity Center (IDC) Authentication – new.
  2. You have various options to choose for Subject Key and Roles Key depending upon how you want to establish your role-based access control discussed later in this post. For now, select UserName for Subject Key and GroupName for Roles Key.

AWS IAM Identity Center SSO configuration interface with API authentication controls and identity mapping settings

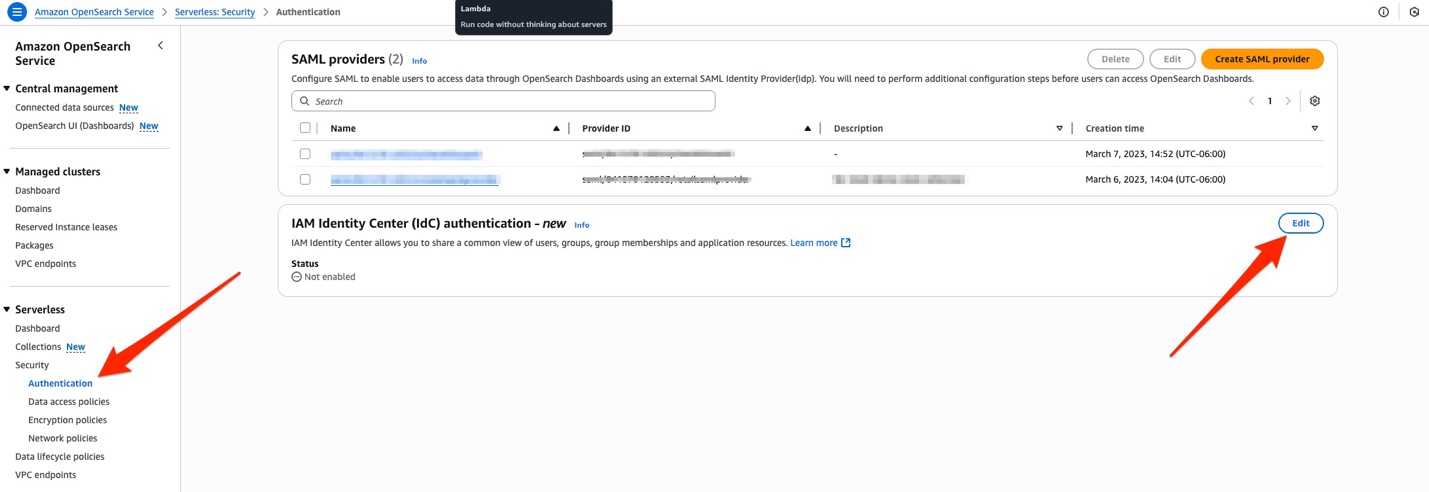
  1. For OpenSearch Serverless, choose Serverless in the navigation pane, then Security and Authentication. Choose Edit in the IAM Identity Center (IdC) authentication – new section.

AWS OpenSearch Service authentication management console with SAML providers list and IAM Identity Center integration status

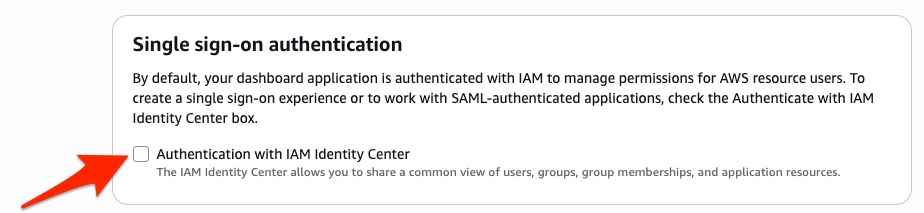
  1. Select the checkbox for Authenticate with IAM Identity Center, and then choose Save.

AWS IAM Identity Center configuration modal for enabling centralized authentication and resource access management

  1. Select the checkbox for Authentication with IAM Identity Center under Single sign-on authentication, when creating an OpenSearch UI application. For step-by-step instructions on how to create an OpenSearch UI application, see Creating an OpenSearch UI application

AWS single sign-on setup interface with option to enable IAM Identity Center for unified access management

After these steps, you’re ready to configure IAM Identity Center by creating new users and groups, or by using existing user identities.

Propagating IAM Identity Center identities

Currently, adding single sign-on authentication with IAM Identity Center can be done while setting up a new OpenSearch UI application. Use the following steps to create a new OpenSearch UI application. Note that single sign-on currently cannot be turned on after an application is created. After single sign-on is enabled, you should see an AWS managed application under Applications in the Identity Center console.

AWS Identity Center interface showing managed applications tab with OpenSearch integration and service details

Assigning users and groups

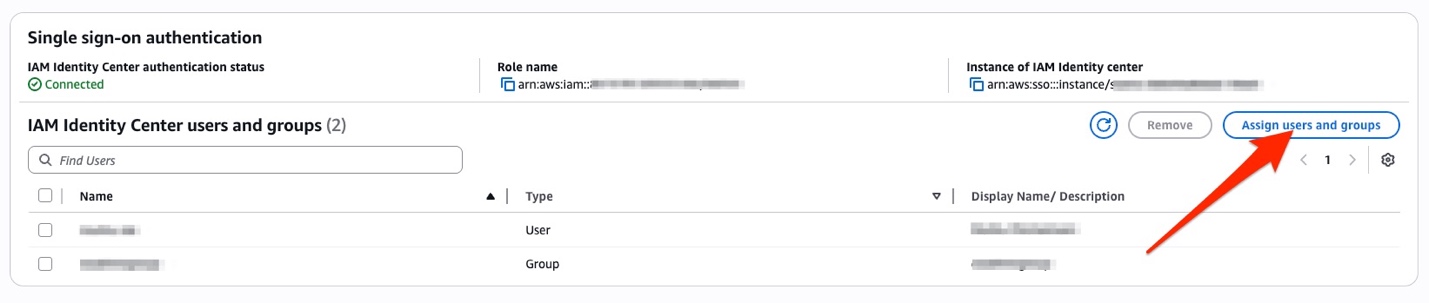
After the application is created and the status shows as Active, you need to assign users and groups to the application. This assignment is important and recommended because these assignments determine the scope and permissions for data access within OpenSearch Service. To do this, select the application you created in the previous steps in the OpenSearch Service console. Here, you will see an option for IAM Identity Center user and groups under Single sign-on authentication. Choose Assign users and groups and select the appropriate Identity Center users and groups.

 AWS IAM Identity Center dashboard showing connected status, role details, and option to assign users and groups for SSO

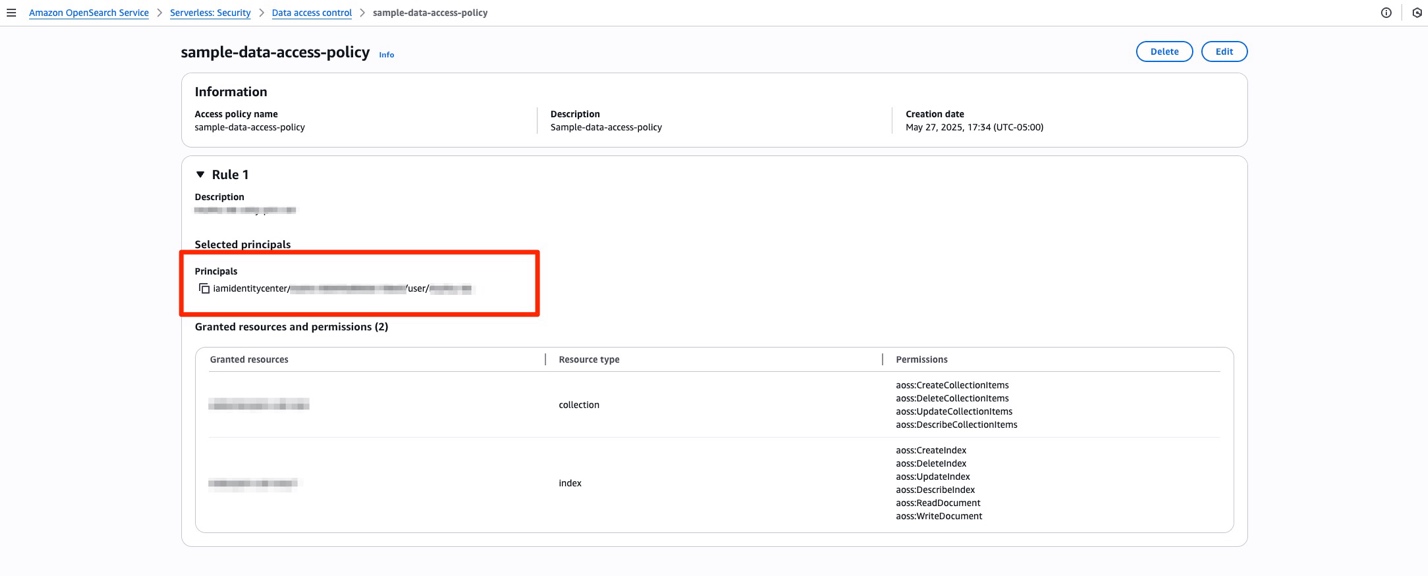
For OpenSearch Serverless, you must create a new data access policy or add a rule to an existing one to grant IAM Identity Center principals appropriate permissions to access the collections. For example, the following figure shows a data access policy that grants specific permissions to a one user with Rule 1 and provide a more restrictive permission to a group with Rule 2.

Amazon OpenSearch Service console displaying sample data access policy with IAM principal and collection/index permissions

At this point your OpenSearch Service domains, OpenSearch Serverless collections and OpenSearch UI are set up for identity propagation.

Fine grained access control for IAM Identity Center identities

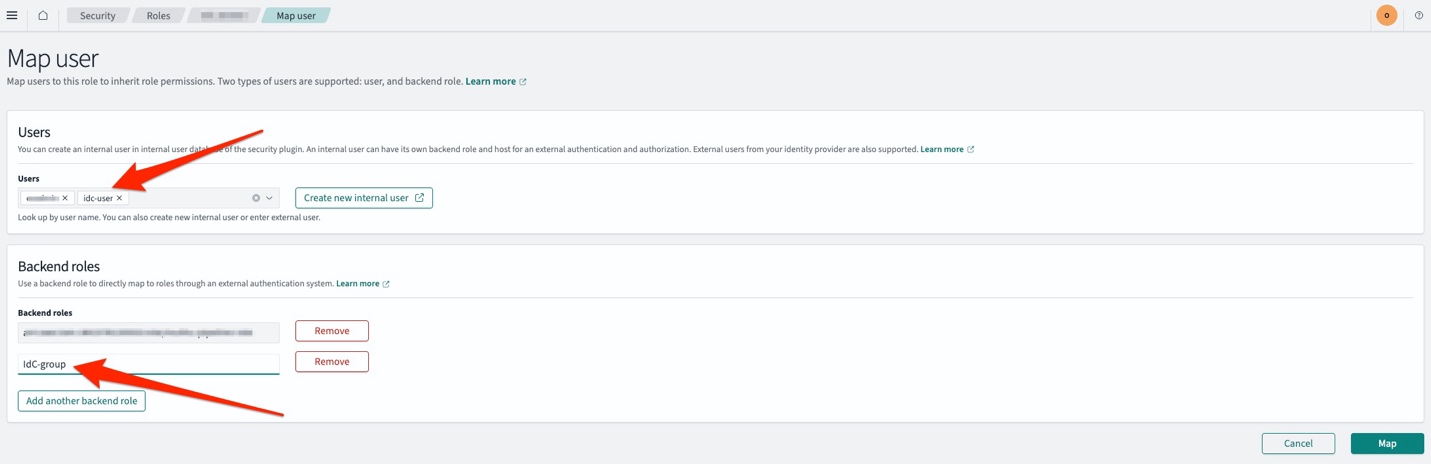
Fine grained access control is a role-based access control for OpenSearch Service that provides security at index, document, and field levels for provisioned domains. You can choose what aspects of identity context you propagate to OpenSearch Service. You can choose between UserId, UserName, and Email for your Subject keys, and GroupId and GroupName for your Roles key. This configuration is important because the values of the properties in the identity context are used to match exactly with the user and backend role mapping within OpenSearch Service provisioned domains. Note that if IAM Identity Center sign-on isn’t enabled, OpenSearch Service can only evaluate the request signature with AWS signature Version 4. This means that the role your OpenSearch UI will use won’t contain identity context for authorization. To complete authorization, add the values of the identity context fields to the OpenSearch role mapping. See Mapping roles to users under Managing permissions. Role mapping can be done using OpenSearch REST API, AWS SDK, or using OpenSearch Dashboards.

To map roles using OpenSearch Dashboards

  1. From the menu icon  on the top left corner or your screen, select Management, Security, Roles, <Your role>.
  2. Choose the Mapped Users tab and select Manage mapping.

AWS security console showing Map User interface with internal user creation and backend role management for IAM

  1. When mapping the role, make sure that you enter the values corresponding to the Subject key. This value must be the same as in your identity context. Additionally, use the Roles key to assign access-based IAM Identity Center groups.

With OpenSearch Serverless, the granularity of access control is at the index level so you will need to add additional rules in the Data Access Policy to control principals who can access collections or indices within a collection.

Verifying identity propagation

The final step is to verify identity propagation.

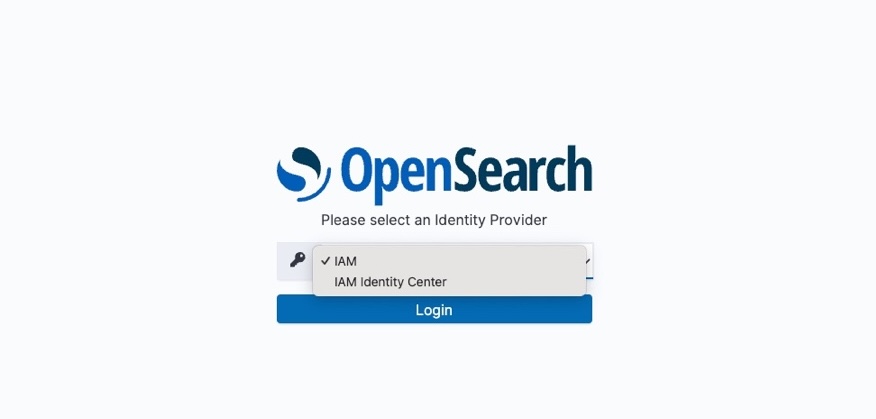
  1. Open the OpenSearch UI application and select IAM Identity Center from the Login drop down.

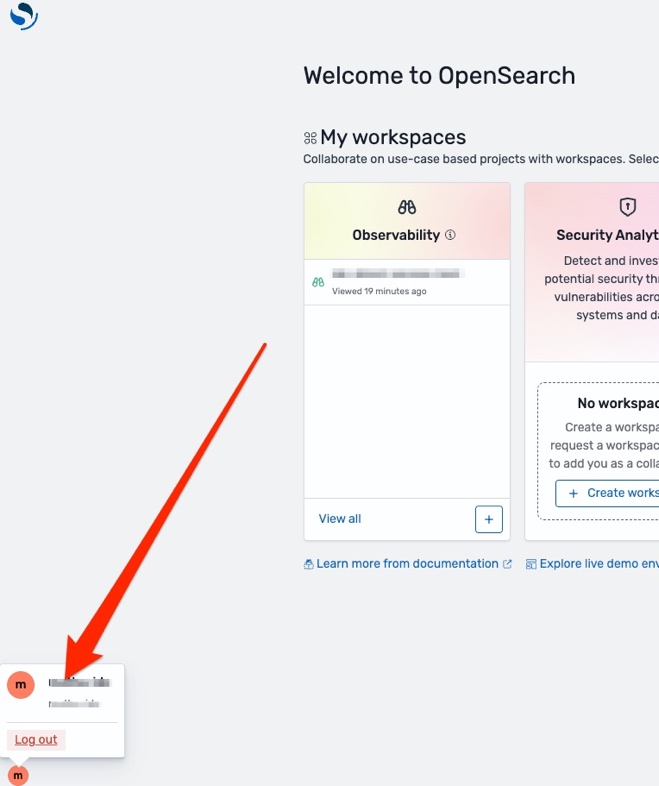
  1. After you complete the login process with IAM Identity Center, the OpenSearch UI will open. Choose the user icon in the lower left corner of the screen to verify that it’s your correct principal from Identity Center. It should match the Identity Center property you chose earlier.

OpenSearch welcome interface showing available workspaces, documentation links, and user profile menu with logout option

  1. To verify correct identity propagation, choose the Dev tools  icon just above the user profile icon in the bottom left corner of the screen.
  2. Select the correct OpenSearch domain or OpenSearch Serverless collection data source in the top right corner of the screen and run a _search query. You should see results from the data source confirming that the identity is correctly propagated to OpenSearch Service.

Dev tools showing successful search operation with 5ms response time and config details

Conclusion

In this post, we showed you how to use Trusted Identity Propagation using IAM Identity Center for Amazon OpenSearch Service, providing a streamlined approach to secure data access while maintaining robust access controls. This solution offers several key benefits:

  • Simplified authentication: By eliminating the need for user agents between applications and backend services, the solution streamlines the authentication process compared to traditional SAML-based approaches.
  • Enhanced security: The integration maintains comprehensive security controls while providing seamless authentication and authorization mechanisms for both OpenSearch Service provisioned domains and Amazon OpenSearch Serverless collections.
  • Flexible identity management: Organizations can use existing IAM Identity Center implementations to manage user access, making it easier to maintain compliance with enterprise security policies.
  • Fine-grained access control: The solution supports detailed access control at the index, document, and field level for provisioned domains, allowing organizations to implement precise security measures.

Get started implementing this solution in your environment today!

For more information about identity management and security best practices with OpenSearch Service, we recommend:


About the authors

Muthu Pitchaimani is a Search Specialist with Amazon OpenSearch Service. He builds large-scale search applications and solutions. Muthu is interested in the topics of networking and security, and is based out of Austin, Texas.

Sohaib Katariwala is a Senior Specialist Solutions Architect at AWS focused on Amazon OpenSearch Service based out of Chicago, IL. His interests are in all things data and analytics. More specifically he loves to help customers use AI in their data strategy to solve modern day challenges.

[$] Rethinking the Linux cloud stack for confidential VMs

Post Syndicated from jake original https://lwn.net/Articles/1030818/

There is an inherent limit to the privacy of the public
cloud. While Linux can isolate virtual machines (VMs) from each other,
nothing in the system’s memory is ultimately out of reach for the host cloud
provider. To accommodate the most privacy-conscious clients, confidential
computing
protects the memory of guests, even from
hypervisors. But the Linux cloud stack needs to be rethought in order to host
confidential VMs, juggling two goals that are often at odds: performance
and security.

How Zapier runs isolated tasks on AWS Lambda and upgrades functions at scale

Post Syndicated from Anton Aleksandrov original https://aws.amazon.com/blogs/architecture/how-zapier-runs-isolated-tasks-on-aws-lambda-and-upgrades-functions-at-scale/

Zapier is a leading no-code automation provider whose customers use their solution to automate workflows and move data across over 8,000 applications such as Slack, Salesforce, Asana, and Dropbox. Zapier runs these automations through integrations called Zaps, which are implemented using a serverless architecture running on Amazon Web Services (AWS). Each Zap is powered by an AWS Lambda function.

In this post, you’ll learn how Zapier has built their serverless architecture focusing on three key aspects: using Lambda functions to build isolated Zaps, operating over a hundred thousand Lambda functions through Zapier’s control plane infrastructure, and enhancing security posture while reducing maintenance efforts by introducing automated function upgrades and cleanup workflows into their platform architecture.

Architecting a secure and isolated runtime environment

Zaps created by Zapier’s users implement tenant-specific business logic, hence they require cross-tenant compute isolation. Code implementing one Zap can’t share an execution environment with code implementing another Zap. Moreover, the same Zap type used by two different tenants can’t share execution environments as well.

To achieve the required level of isolation, Zapier’s engineering team adopted AWS Lambda, a serverless compute service that runs code in response to events and automatically manages cloud compute resources. Minimal operational overhead, built-in high availability, automated scaling, high level of isolation, and pay-per-use model made Lambda a great fit for this use case. Currently, Zapier’s architecture is running over a hundred thousand Lambda functions to support their customer’s integration workflows.

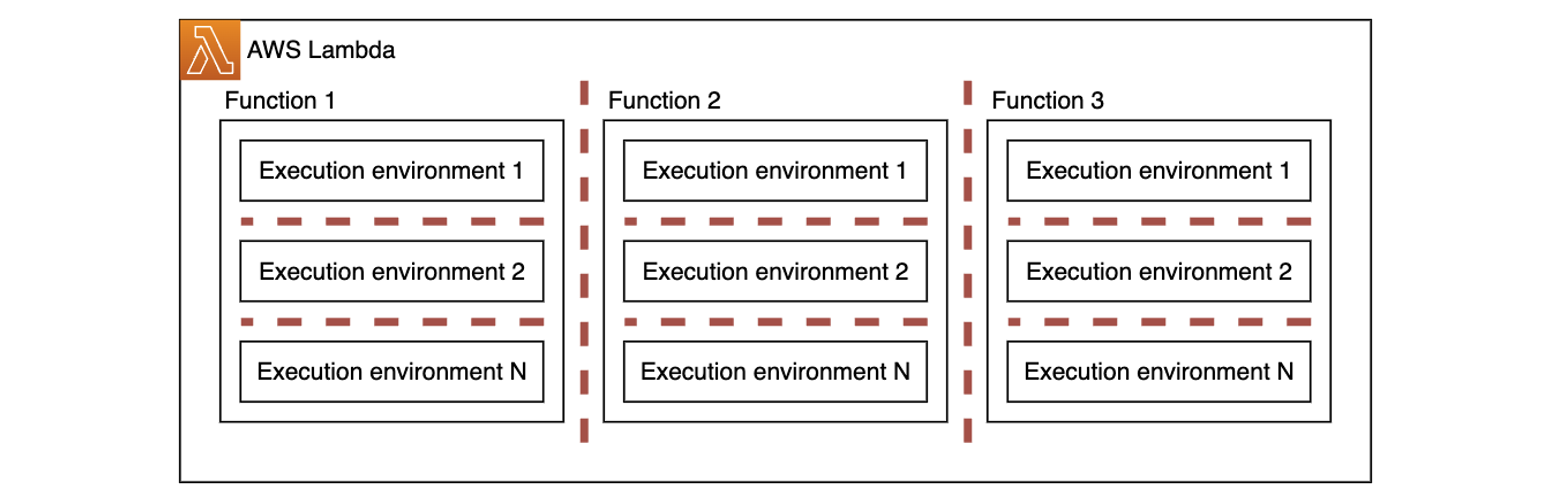
Because they’re powered by the open source Firecracker microVMs, each function is completely isolated from the others. Moreover, each execution environment belonging to the same function (sometimes referred to as function instances) is also isolated from other execution environments. The following architecture topology diagram uses red lines to represent isolation boundaries. Each execution environment of every function is isolated from its peers and is getting its own virtual resources such as disk, memory, and CPU. For more details, read Security in AWS Lambda.

Isolation boundary

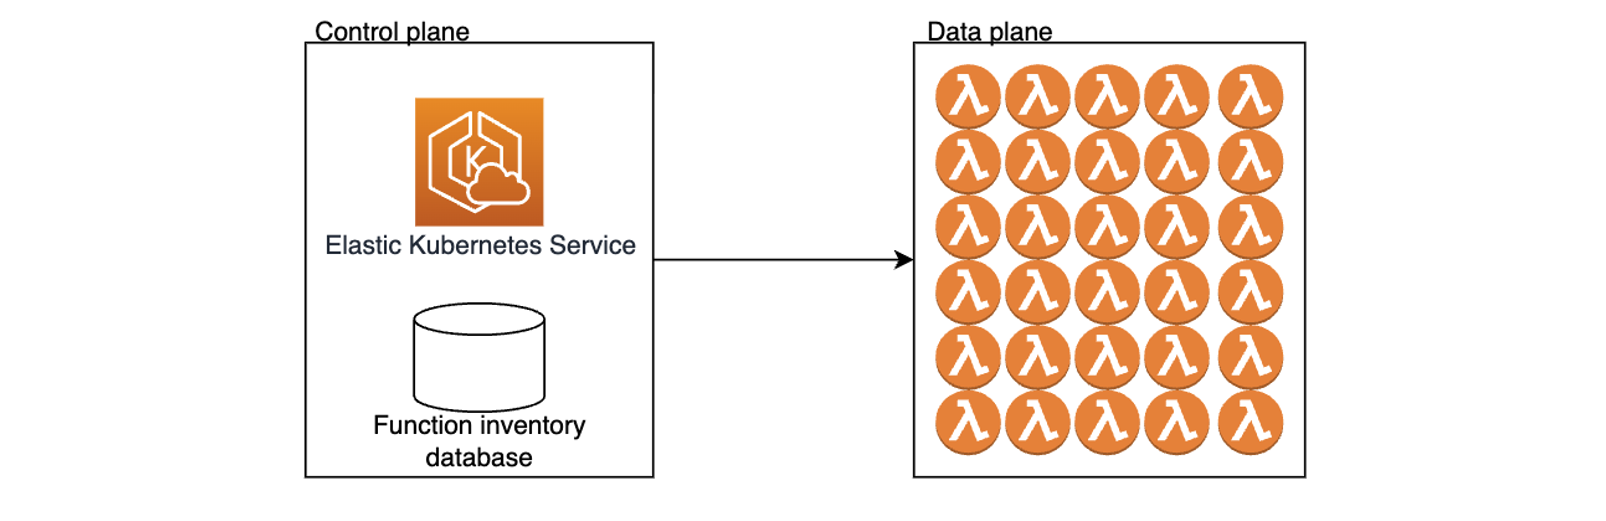
Zapier’s control plane is architected using Amazon Elastic Kubernetes Service (Amazon EKS). A designated database is used to maintain the up-to-date function inventory. Whenever a user creates a new Zap, the control plane creates a corresponding Lambda function and stores a reference in the inventory database. When a Zap is triggered, the control plane retrieves information about a relevant Lambda function and invokes it to facilitate the integration workflow, as illustrated in the following diagram.

Control and Data planes

Understanding the runtime deprecation process

When building architectures using the traditional non-serverless compute, cloud engineers are the ones responsible for keeping operating systems and software on their compute instances up to date and applying security and maintenance patches. With serverless architectures and Lambda functions, security patches and minor runtime upgrades are handled by AWS automatically, which means customers can focus on delivering business value instead of the undifferentiated heavy lifting of infrastructure management.

When a major Lambda managed runtime version reaches end-of-life, AWS initiates a deprecation process through the AWS Health Dashboard and direct email communications to affected customers. Because deprecated runtimes eventually lose access to security updates and support, organizations must upgrade to supported runtime versions to avoid potential security risks. Read more about the shared responsibility model, runtime use after deprecation, and receiving runtime deprecation notifications.

As Zapier’s user base and architectural complexity – and consequently the number of Zaps – were growing, keeping all functions on the most up-to-date major runtime versions became a laborious task. Top contributing factors were:

  • High number of functions. At its peak, the Zapier platform was running Zaps using hundreds of thousands of unique Lambda functions. Approximately 35% of these functions were using a runtime that was scheduled for deprecation in the next 12 months.
  • Zapier architected their data plane environment to be ephemeral – the control plane creates and deletes Lambda functions on demand and manages their lifecycle dynamically. Identifying a specific owner for each affected function wasn’t always straightforward.
  • Security is paramount at Zapier and upgrading affected functions runtime prior to the deprecation date was an absolute must. At no point could Zapier functions use runtimes after their deprecation date. This was a task which required extra resources.
  • The upgrade process shouldn’t have had any impact on the end customer experience. At no point should customer experience be affected.

With a short runway, high-volume workload, and the strict requirements of not impacting customer experience, Zapier’s Platform Engineering team took on this challenge of maintaining high security posture in their platform architecture.

Applying the solution

The solution had three work streams:

  1. Reducing the risk by analyzing the architecture and identifying and cleaning up unused functions.
  2. Prioritizing upgrades by identifying the most critical and impactful functions.
  3. Empowering engineering teams with automated tools and knowledge to streamline the upgrade process in future.

Identify and clean up unused functions

The first step in streamlining the upgrade process was identifying and removing unused functions. This reduced the total number of functions in Zapier’s architecture that required upgrades, eliminating unnecessary work for the team.

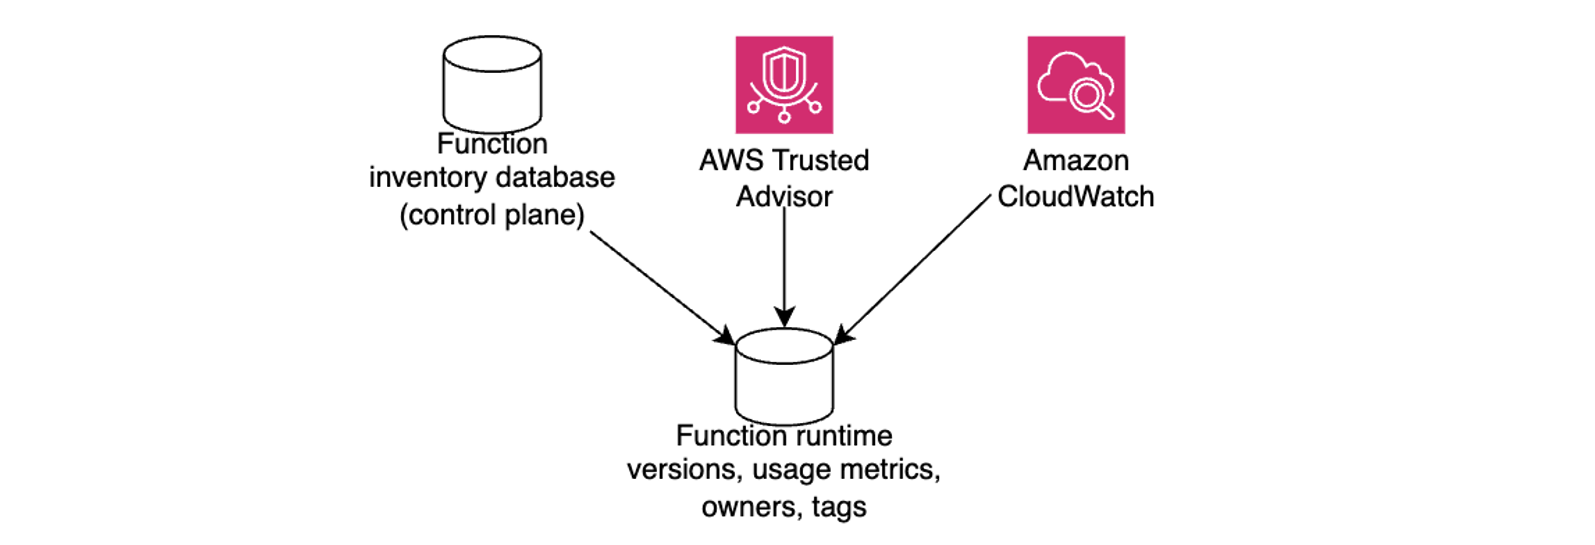
Zapier started by augmenting the function inventory with runtime information using AWS Trusted Advisor and Amazon Cloud Intelligence Trusted Advisor dashboards, as illustrated in the following diagram.

Gathering data

This meant the team could build a detailed inventory of functions that were running on soon-to-be deprecated runtimes. Using Amazon CloudWatch, Zapier’s platform team started to monitor metrics such as number of invocations. They identified which functions were active, which functions weren’t used for an extended period, and which functions didn’t have an active owner and could be removed.

One of the primary mechanisms for ownership validation within the organization was using resource tags. Functions that were active, but didn’t have clear ownership, were flagged for additional review before removal. Functions that were confirmed as unused or didn’t have an active owner were marked for deletion. Removing such functions allowed Zapier to significantly simplify their architecture and reduce the number of functions that had to be upgraded.

Prioritizing upgrades

With a smaller volume of functions to upgrade, Zapier’s platform team prioritized function upgrades based on usage patterns, criticality, and potential customer impact. Three primary prioritization categories were:

  • Customer-facing functions – Any functions directly involved in executing user Zaps were marked as high priority. These had to be upgraded first to avoid service disruptions.
  • Backend infrastructure functions – Internal functions that supported system operations were evaluated based on their importance to platform stability.
  • High-volume functions – Functions with the highest execution frequency were prioritized because upgrading them would have the greatest impact on reducing operational risk.

Using these factors, Zapier’s platform team has created an upgrade roadmap, ensuring that critical assets were addressed first while minimizing potential disruptions.

Refer to Retrieve data about Lambda functions that use a deprecated runtime in the Lambda Developer Guide to learn how to identify most commonly and most frequently used Lambda functions in your serverless architecture.

Empowering engineering teams with automated tools and knowledge

To ensure a smooth and efficient upgrade process across their serverless architecture, Zapier’s team empowered engineering teams with clear guidelines and automated solutions. The platform incorporated two main approaches: Terraform-managed functions and a custom-built Lambda runtime canary tool. Implementing and adopting these tools and practices resulted in reducing the number of functions using soon-to-be deprecated runtimes by 95%.

For functions managed through infrastructure-as-code (IaC), Zapier’s team developed standardized Terraform modules that specified supported runtime versions. Development teams implemented these modules in their configurations:

resource "aws_lambda_function" "example" {
    runtime = "python3.13"  # Updated to supported runtime
}

After applying the new module version, teams validated changes by testing the new runtime in staging environments and monitoring Terraform plan outputs to ensure proper runtime version updates.

To efficiently manage most Lambda functions in their architecture, Zapier developed the Lambda runtime canary tool suite. Using this solution, they automated the runtime upgrade process for thousands of active Lambda functions with minimal manual intervention. The tool suite implements several key features:

  • Architected for gradual traffic shifting with the Lambda built-in routing mechanism through function version and aliasing. The tool can gradually shift traffic distribution from an old to a new function version. During this gradual traffic shift, the system monitors CloudWatch metrics for errors and automatically rolls back if error rates exceed acceptable thresholds.
  • Optimistic upgrade strategy implements direct upgrades for infrequently used functions using a flag value stored in a cache to detect potential issues during the first post-upgrade invocation. If this invocation fails, the control plane retries it using the previous function version. If the retried invocation succeeds, Zapier’s control plane initiates a rollback, assuming the error is most likely due to the runtime upgrade. After rollback, it will log the error and alert relevant stakeholders.
  • Integration with existing infrastructure uses an administrative interface and task queue for automated traffic shifting. A database ledger maintains tracking of function states and rollback information.
  • Operational controls provide manual rollback capabilities and implement centralized control switches for process management. After a function was upgraded to a new runtime and no rollback activity was detected within a set time period, an automated pruning task cleans up older versions.

Zapier’s Lambda canary tool, through its integration of gradual traffic shifting, real-time CloudWatch monitoring, and automated rollback mechanisms, established a sustainable framework for managing runtime upgrades across their serverless architecture. This approach not only automated the upgrade process and minimized operational risks but also created a scalable solution that provides continuous runtime upgrades, preventing the use of deprecated runtimes at any point. By allowing continuous function runtime updates with minimal disruption to end user experience, Zapier maintains security and stability while requiring minimal manual intervention. This framework efficiently manages their growing serverless infrastructure, providing both security and operational efficiency for future runtime updates.

Conclusion

In this post, you’ve learned how Zapier architected their software-as-a-service (SaaS) platform to provide secure, isolated execution environments using AWS Lambda and Amazon EKS, enabling their customers to create hundreds of thousands of Zaps. You’ve learned how Zapier’s team implemented the function runtime upgrade process at scale and reduced the number of functions running on soon-to-be deprecated runtimes by 95%. You’ve seen best practices that were established and techniques that helped Zapier to keep high security posture without impacting customer experience.

Use the following links to learn more about Lambda runtimes and upgrading your functions to the latest runtime versions:


About the authors

How HashiCorp made cross-Region switchover seamless with Amazon Application Recovery Controller

Post Syndicated from Dmitriy Novikov original https://aws.amazon.com/blogs/architecture/how-hashicorp-made-cross-region-switchover-seamless-with-amazon-application-recovery-controller/

This blog was co-authored by Brandon Raabe, Sr. Site Reliability Engineer at HashiCorp.

In cloud-based systems, minutes of downtime can translate to significant business impact and eroded customer trust. HashiCorp, a leader in multicloud infrastructure automation software, faced this critical challenge as their HashiCorp Cloud Platform (HCP) scaled to serve enterprise customers with stringent availability requirements. When Regional outages threatened service continuity, the complex dance of failing over DNS entries, workloads, and databases across AWS Regions had become an error-prone process requiring intense coordination. This post chronicles how HashiCorp’s Site Reliability Engineering (SRE) team transformed their disaster recovery capabilities by implementing Amazon Application Recovery Controller (ARC), creating a solution that not only dramatically simplified cross-Region failovers but also provided a standardized way to signal Regional context to their distributed services.

In this post, we discuss HashiCorp’s journey from manual, stress-inducing failover procedures to a streamlined, confident approach that fundamentally changed how they deliver on their enterprise-grade resilience promises.

Challenges with disaster recovery in a multicloud infrastructure

HashiCorp’s SRE team recognized that as their cloud platform scaled to serve mission-critical enterprise workloads, their disaster recovery approach needed an upgrade. The existing manual processes required precise coordination across multiple systems during already stressful outage scenarios, which could lead to potential complications when speed and accuracy matter most. Regional outages posed particular challenges: if the control planes for critical services became unavailable, the very tools needed to execute recovery might be inaccessible.

ARC emerged as the ideal solution with its unique architecture: a highly available data plane accessible through endpoints in five distinct Regions, so the recovery mechanism remains operational even during significant Regional disruptions. By using the AWS SDK to interface with ARC, HashiCorp gained several critical advantages. They could apply infrastructure as code (IaC) practices to disaster recovery workflows, automate testing of failover procedures, and integrate resilience seamlessly with their existing operational tooling. This solution transformed their disaster recovery from a specialized manual procedure into a codified, repeatable process embedded within their platform operations.

Requirements and architectural considerations

After evaluating multiple disaster recovery approaches, HashiCorp established three core requirements for their solution. First, while maintaining human judgment for initiating failovers, the execution needed to proceed without additional operator interventions after it was triggered. This human-in-the-loop design preserved deliberate decision-making while reducing error-prone manual steps during implementation.

Second, the architecture needed exceptional resilience against the very failures it was designed to mitigate. Traditional DNS failover solutions presented a critical vulnerability: dependency on single-Region control planes that might be unavailable during an outage. ARC solved this problem through its distributed architecture, connecting Amazon Route 53 to a resilient control mechanism, enabled by Route 53 health checks, accessible through multiple Regional endpoints. This means the failover system itself remained available even if the primary Region went offline.

Third, the solution needed to meet or exceed HashiCorp’s existing Recovery Point Objective (RPO) and Recovery Time Objective (RTO) metrics—the maximum acceptable data loss and downtime thresholds. Using ARC, the SRE team planned to not just reach these targets but make substantial improvements, reducing potential customer impact during Regional events and strengthening HashiCorp’s enterprise-grade resilience.

Solution overview

To transform their disaster recovery posture, HashiCorp’s SRE team designed an architecture centered around ARC and complemented by a purpose-built orchestration service. This architecture seamlessly bridges the human decision to initiate failover with the complex technical operations required to shift traffic between Regions with minimal disruption.

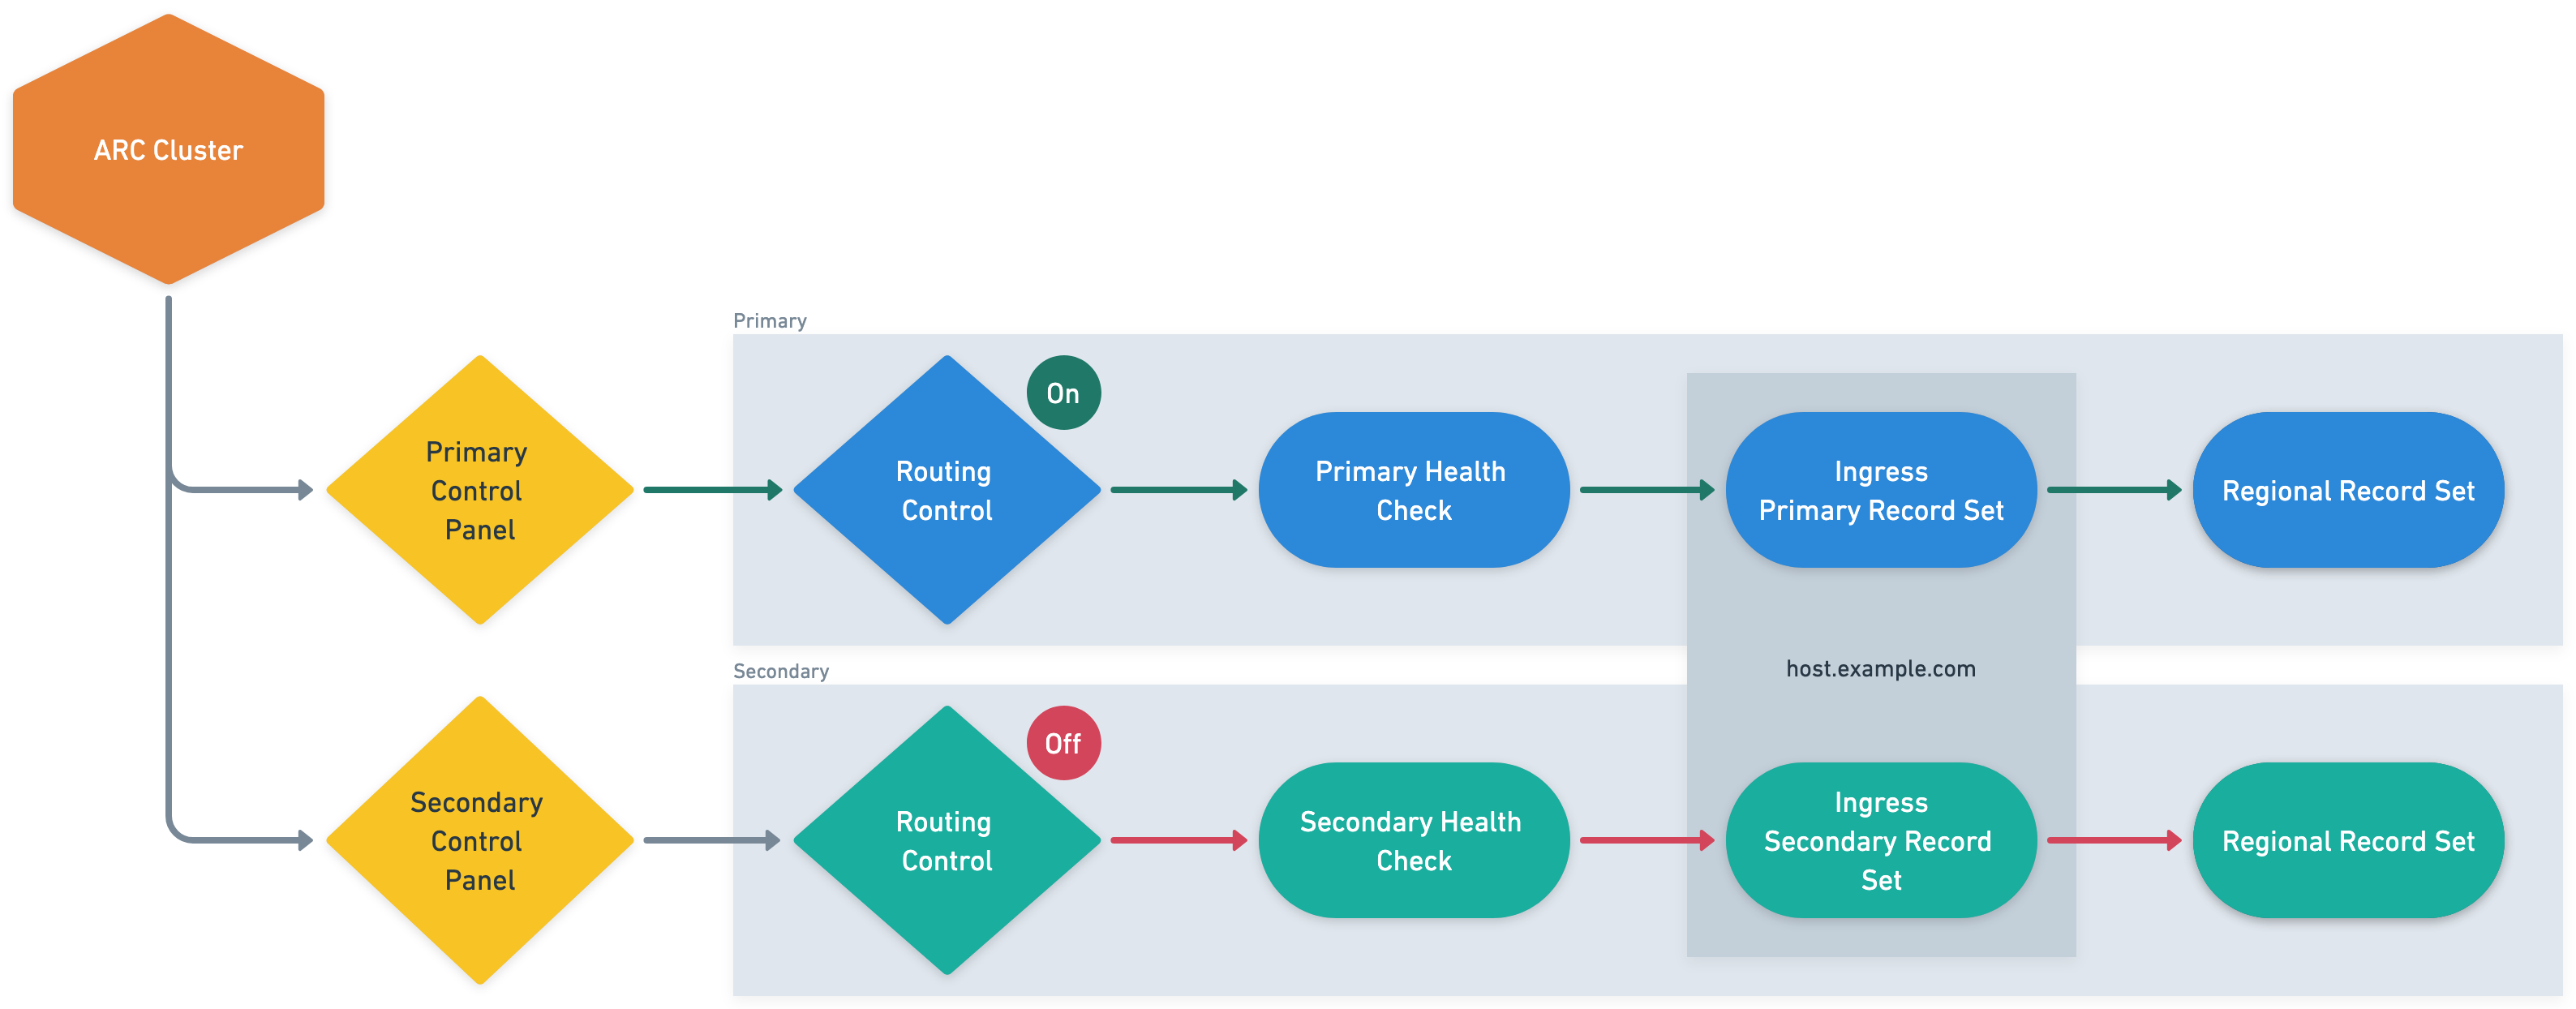
At the heart of the solution is a custom failover service that serves as the orchestration layer for Regional transitions. This service maintains configuration details for the ARC cluster and provides a single, controlled interface for initiating Regional switchovers. When activated, the service establishes a secure connection to the ARC API endpoints and executes a two-step workflow: first disabling routing controls for the primary Region, then enabling those for the secondary Region. This sequential approach provides a clean traffic transition without split-brain scenarios or dropped connections.

The DNS architecture underwent a strategic evolution to support this new capability. HashiCorp reconfigured their critical ingress endpoints as Route 53 failover record pairs, with each pair consisting of a primary and secondary record. Each record is linked to a health check that monitors the state of an ARC routing control—effectively connecting AWS’s global DNS service to the ARC routing control. The primary records resolve to endpoints in the primary Region, and secondary records point to corresponding infrastructure in the standby Region. When routing controls change state, the associated health checks automatically trigger Route 53 to adjust DNS resolution patterns, redirecting traffic to the appropriate Regional infrastructure.

HashiCorp maintains their secondary Region in a warm standby configuration, with essential services running but not actively serving client traffic until a failover event occurs. To enable seamless awareness of Region status across their distributed system, the team implemented a signaling mechanism using specially crafted TXT DNS records. These records are tied to the same ARC routing controls as the primary service endpoints, effectively creating a discoverable, global state indicator. Services can query these TXT records to dynamically determine the currently active Region and adjust their internal routing, replication, and operational behaviors accordingly — alleviating the need for a separate configuration distribution system and making sure all components have a consistent view of the current Regional state.

The following diagram illustrates the disaster recovery workflow.

This architecture combines human oversight for initiating critical Regional transitions with fully automated execution after the decision is made. The use of ARC’s globally distributed control plane removes single-Region dependencies that might otherwise compromise the failover mechanism itself during a Regional outage event.

Operational decision framework for Regional failover

HashiCorp’s Regional failover process balances automated monitoring with deliberate human decision-making. Their comprehensive observability platform continuously monitors Regional health, automatically alerting the incident response team when anomalies are detected. When alerts trigger, the incident management protocol activates, with an incident commander quickly assembling experts to assess the situation.

The team follows a structured evaluation framework to determine if failover is warranted: confirming the issue is Region-specific, verifying that redundant intra-Region components can’t mitigate the problem, and assessing whether the projected Regional recovery time exceeds acceptable customer impact thresholds. This approach prevents unnecessary Regional transitions while providing rapid action when genuinely needed.

After the decision to failover is made, an authorized operator initiates the process through a single API call to their orchestration service, which then interfaces with ARC to execute the complex sequence of routing control changes. This design preserves human judgment for the critical decision while using automation for precise execution, so HashiCorp can respond confidently and consistently during high-pressure Regional outage scenarios.

Disaster recovery testing

HashiCorp maintains operational readiness through a disciplined monthly disaster recovery testing program in their integration environment. One week before each scheduled test, the team notifies all stakeholders to confirm organization-wide awareness and participation. On test day, they follow formal incident protocols, creating dedicated communication channels for transparent observation and collaboration.

The test execution mirrors their production failover process: an operator initiates the recovery sequence through their API, activating the ARC routing controls to shift traffic to the secondary Region. What sets HashiCorp’s approach apart is their comprehensive validation methodology. The team verifies critical services in the secondary Region and then fails back to the primary Region with subsequent validation. This bidirectional testing confirms both failover and failback procedures work reliably.

Each exercise concludes with a structured retrospective where the team documents observations and identifies improvement opportunities. By treating these tests as learning experiences rather than compliance activities, HashiCorp has established a continuous improvement cycle for their disaster recovery capabilities. The insights from these regular drills have led to numerous refinements in their ARC implementation and operational procedures, so their team can respond confidently during actual outages with practiced, predictable procedures.

Conclusion

The collaboration between HashiCorp and AWS through ARC has revolutionized HashiCorp’s disaster recovery capabilities. Regional transitions that once required careful DNS record manipulation by specialized operators now execute through a single API call, with traffic shifting within seconds and full propagation completing in approximately 2 minutes. This dramatic simplification, achieved by integrating the resilient ARC architecture with HashiCorp’s custom orchestration service, has not only improved recovery metrics but has also strengthened their enterprise-grade resilience promises.

ARC has solved a fundamental distributed systems challenge by providing a reliable mechanism for services to determine the active Region. By linking ARC routing controls to specialized TXT records, HashiCorp created a consistent global indicator that allows services to automatically adjust their behavior without additional coordination systems—simplifying their architecture and reducing dependencies.

Most significantly, this implementation has democratized disaster recovery within HashiCorp, transforming it from a specialized capability to a standardized procedure executable by their regular on-call rotation. The solution’s highly available endpoints across multiple Regions makes sure the recovery mechanism itself remains operational even during severe outages—addressing a critical vulnerability in their previous approach.

For HashiCorp’s enterprise customers, these improvements translate directly to business value: reduced recovery times during Regional events, increased operational confidence, and assurance that their critical infrastructure management tools will remain available even during major cloud disruptions. As HashiCorp continues to refine their approach through rigorous testing and continuous improvement, their ARC implementation demonstrates how thoughtfully architected disaster recovery can evolve from merely an insurance policy into a strategic competitive advantage.

To learn more, visit Amazon Application Recovery Controller, AWS Multi-Region Capabilities, and AWS multi-Region fundamentals.


About the authors

Security updates for Friday

Post Syndicated from daroc original https://lwn.net/Articles/1031426/

Security updates have been issued by AlmaLinux (git, kernel, nginx:1.24, and sudo), Fedora (dpkg, java-21-openjdk, java-25-openjdk, java-latest-openjdk, and valkey), Oracle (apache-commons-vfs, sudo, tigervnc, and xorg-x11-server), Red Hat (kernel, krb5, and openssh), SUSE (gnutls, ImageMagick, iputils, kernel-livepatch-MICRO-6-0-RT_Update_10, kubernetes1.18, libarchive, ovmf, python, and salt), and Ubuntu (iputils, linux-aws-6.14, linux-raspi, openjdk-21, and openjdk-24).

Някой чу ли Иван Костов?

Post Syndicated from Емилия Милчева original https://www.toest.bg/nyakoy-chu-li-ivan-kostov/

Някой чу ли Иван Костов?

Бившият премиер и реформатор Иван Костов каза нещо съществено по bTV, което политиците се направиха, че не са чули. Той смята, че може да се намери такъв кандидат за президент, който да бъде подкрепен и от ГЕРБ, и от ПП–ДБ, ако това ще предотврати „румънски сценарий“ в България. 

Има кандидати, които според мен могат да бъдат подкрепени и от ГЕРБ, и от ПП, и от ДБ. Друг е въпросът дали може да се постигне съгласие. Но има такива хора. И не мисля, че това трябва да се изключва като възможност. Коалицията ПП–ДБ трябва да изчислява и този сценарий. Какво ще стане, ако ГЕРБ им предложи кандидатура? Какво ще направят? Защото рискът да се повтори румънският сценарий – всички да стоят на тръни и на нокти, да очакват изборите и да се провалят – е много по-голям в България, отколкото беше в Румъния. Защото България е по-силно поразена от хибридната агресия на Руската федерация.

Казаното от Костов поставя геополитическата ориентация и интереси над вътрешнопартийните вражди. Бившият премиер не призовава към „голяма коалиция“, а към минимален консенсус: ако в предстоящите президентски избори се яви кандидат, който носи риск за демократичния прозападен курс на страната, ГЕРБ и ПП–ДБ трябва да загърбят омразата и да подкрепят приемлива фигура. Не партийна, а именно общоприемлива, за да запазят посоката на България като евроатлантическа демокрация, в която президентът не работи срещу парламента, правителството и националните интереси.

Разбира се, тук има сериозни препятствия – цялата платформа на ПП–ДБ се гради върху антикорупционния наратив и превзетите институции, а Борисов и ГЕРБ са символ на този модел. А и вече зависимостите са ясно дефинирани по оста Борисов–Пеевски, от която лидерът на партията с най-голямо електорално влияние не може да се откъсне. Поне не и безболезнено. Корупцията продължава да е фокус за обществото. Изследване на „Алфа Рисърч“ показва, че 49% от запитаните биха гласували за „нова партия, която е истински борец срещу корупцията“.

ПП–ДБ вече бяха в управленска конфигурация с Борисов и олигарха и лидер на ДПС – Ново начало Пеевски в името на конституционната реформа. Това им коства значителен брой избиратели. Ако решат да издигнат кандидат за президент, без да търсят подкрепа от ГЕРБ, той трябва да е достатъчно ярка фигура, която да събира широко обществено одобрение извън теснопартийния спектър и да стигне до балотаж. 

В кампанията за първия си президентски мандат (2017–2022) Румен Радев беше критичен към управлението на ГЕРБ, за да покаже, че прокламираната стабилност е фалшива. Беше твърд, без да е агресивен, умело се позиционира между национално отговорен и антисистемен кандидат. И още преди да се е заклел, даде първите убедителни доказателства за лоялност към Москва. В интервю за френския канал France 24, озаглавено Radev: It Is Positive That Trump Is No Slave to Political Prejudices, се противопостави на санкциите срещу Русия, наложени заради анексирането на Крим.

… Крим е украински; той е на картата на Украйна. Де факто обаче е руски; не можем да пренебрегнем реалността, че над Крим има руски флаг. Бъдещето на Крим трябва да бъде решено от хората. Те трябва да бъдат запитани дали искат да се върнат към Украйна.

От 2017 г. насам геополитическото напрежение се е повишило значително – войната на Русия в Украйна позиционира държавите в ясни лагери, а тече и усилено превъоръжаване „до зъби“, както го определиха някои анализатори. За каквито и да е избори догодина в България – били те президентски и/или предсрочни парламентарни, партиите ще трябва да отчитат и къде и как да се позиционират предвид въвеждането на еврото и ефектите от новата валута. Една по-висока инфлация ще бъде използвана като аргумент от националпопулистите и евроскептиците, не са изключени и организирани протести. Предвид съпротивата и недоверието в част от българското общество, която съвсем не е незначителна, това ще повлияе на резултатите от вота. 

Бъдещият кандидат за президент на „демократичната общност“ ще води кампания в трудна среда. 

С ГЕРБ или без ГЕРБ?

Хамлетовски, изглежда, е въпросът могат ли ПП–ДБ да включат ГЕРБ в „демократичната общност“, поставила си за цел да излъчи кандидат, за когото липсва единение дори между „Продължаваме промяната“ и „Демократична България“. Макар никой досега да не се е наел да дефинира ясно границите на тази общност – кой има място в нея и кой е неприемлив, – включването на ГЕРБ би означавало преместване на червени линии. Дори въпросът да стане актуален при балотаж, отговорът трябва да е обмислен отрано.

А този отговор ще е изпитание не само за стратегическата зрялост на ПП–ДБ, но и за способността им да балансират между моралната си легитимност и геополитическата необходимост. Още повече че вече го направиха при сглобката, като „прегрешиха“ с ГЕРБ и Пеевски. 

Преди месец Бойко Борисов потвърди, че би преговарял с двете политически сили за общ кандидат:

Разбира се, че бих участвал.

Има поне двама политици в държавата, които ще направят всичко по силите си подобно обединение зад обща кандидатура да не се осъществи – Делян Пеевски и Румен Радев.

Първият иска ГЕРБ за себе си, вторият иска да остане главен фактор в българската политика и след края на мандата си – и защо да не го направи чрез структуриране на нова коалиционна ос около антисистемен вот (както спечели втория си мандат)? Президентът разполага с 14 месеца до края на втория си и последен мандат и кръговете зад него нямат интерес от държавен глава, който може да гарантира прозападна последователност – защото би бил коректив на наследството на Радев, а не негов продължител. 

Пеевски отдавна не се крие и действа през натиск, зависимости и интриги. Първият удар през Комисията за противодействие на корупцията и през прокуратурата дойде седмица след старта на инициативата на ПП–ДБ за общ кандидат-президент и удари върху Столичната община и фигури, свързани с „Промяната“.

Радев използва антисистемен език и говори за „надпартийност“, за да си осигури подкрепа отвъд традиционния спектър, който обитава с образа си на консервативен евроскептик с проруски симпатии. Последните – вече умело прикрити, да не бият на очи на първи план.

Кого ще донесе вълната?

Призивът на Иван Костов следва да се разбира като предупреждение за стратегически риск пред България, който включването в еврозоната от 1 януари 2026 г. намалява, но не елиминира. „Румънски сценарий“ е напълно реална опция, при която от вълната от антиелитарни, конспиративни и проруски настроения може да изплува кандидат, който с подходяща емоционална реторика и подкрепа от радикализираните периферии да обедини протестния вот и да спечели. 

Страховете и напрежението, нагнетявани от правителството с мерките му срещу повишаването на инфлацията, само помагат за изпълнението на такъв сценарий. Един безспорно исторически момент за България, какъвто е приемането на еврото, е зареден в аванс с негативизъм (срив на стандарта на живот и обедняване), който се превръща в идеална платформа за фалшив спасител.

В български условия това би бил кандидат с хибриден профил между Радостин Василев, Костадин Костадинов и Ивелин Михайлов – популист, способен да канализира общественото недоволство в посока, опасна за евроатлантическата ориентация на страната. При това румънският сценарий в България изключва здрави институции, които да се намесят, както направи Конституционният съд в Румъния. Така че всъщност сценарият ще си е 100% български. 

„Бухалките“ върху кмета на Варна Благомир Коцев съживиха обществената енергия, също и ПП–ДБ. Ето че коалицията води разговори за общ вот на недоверие с МЕЧ на Радостин Василев. МЕЧ предлага да е за провал на правителството в сферата на обществения ред и сигурност, а от ПП–ДБ – да се разшири със „завладените институции“. Аргументът, представен от съпредседателя на ДБ Божидар Божанов, е, че това правителство е смокинов лист на процесите по завладяване на държавата от Пеевски:

Вотът на недоверие трябва да е изключително сериозен и да удари в сърцето на управляващата коалиция на Пеевски, затова предложихме темата да бъде разширена до „завладените институции“.

Изглежда, че темата за кандидат-президента на демократичната общност е оставена за наесен или когато ѝ дойде времето. 

И въпросът остава: някой чу ли Иван Костов? 

Защото, ако „демократичната общност“ не може дори да се дефинира, камо ли да действа като политически субект със смелост и отговорност, тогава няма да е страна в предстоящата битка, а наблюдател. Кандидатът трябва да бъде издигнат навреме, за да поведе. Иначе ще е принуден да се бие на терена на популизма.

Истинският живот на женското либидо

Post Syndicated from Надежда Цекулова original https://www.toest.bg/istinskiyat-zhivot-na-zhenskoto-libido/

Истинският живот на женското либидо

Когато бях на 15, бях убедена, че секс правят само младите и красивите. Не искате да ви разказвам какво си представях под „млади и красиви“, или може би по-точно е да кажа, че аз не искам да ви разказвам. Но за ориентир ще дам, че майка ми тогава беше на 35 и естествено, това беше възрастта, на която в очите ми хората вече бяха „възрастни“. 

От настоящата си гледна точка на „възрастна“ виждам, че някои жени живеят с това убеждение цял живот – че женствеността, „женскостта“, сексапилът са някакви категории със строги и доста ограничаващи параметри и за да бъдеш жена, трябва да се вместваш в изискванията. 

За всеобщ късмет това просто не е вярно. 


Be a lady, they said

„Аз не правя секс с мъжа си и с мъже изобщо“, „Правих най-много и най-хубав секс след 40 г.“, „Сексът за мен е мозъчна дейност“, „Истински спад в желанието ми имаше около раждането на децата ми“, „Правя секс само на тъмно“, „Научих много за себе си точно заради секса“… 

Попитах група жени какво е да сме „секси“ в собствените си очи, как живеем с телата си, променящи се и несъвършени, свикнали ли сме да имаме сексуални потребности и предпочитания, къде се намира сексът в жизненото пространство на жените и нужна ли им е оценката на партньор(ка), за да преживеят себе си? 

Oтговорите в голяма степен потвърдиха представите ми. Сексуалността на жените не е статична и се променя с възрастта, опита и личните обстоятелства, което прави темата многопластова и индивидуална. Да си „женствена“ или „секси“ също не е едно нещо – не е свързано с размерите на тялото, вида му или дори с възрастта. Няма „женска енергия“, или поне няма граници, които да затварят значението на това понятие. 

И все пак в дискусията ясно изплува изводът, че спокойствието да си такава, каквато си – с големи или малки гърди, руса или брюнетка, слаба или пухкава, стеснителна или с голям сексуален апетит – е ключов елемент в способността ни да водим здрав и удовлетворяващ сексуален живот. 

Цял живот.

Хормони и други обстоятелства

Сексуалността на жените е резултат от сложна взаимовръзка между физиологични процеси, които се променят през различните етапи на живота. Разбирането на тези фактори е ключово за осигуряване на здравословен и удовлетворяващ сексуален живот, но липсата на системно здравно образование и културните табута често водят до точно обратното. „Твърде консервативното ми възпитание създаде у мен усещане, че е нещо нередно да искам секс или пък да го правя“, разказва 47-годишна жена. Друга споделя: „Интересът към всичко, свързано със секс и опознаване на собственото тяло и какво му харесва, започна много рано. Всичко това – забулено в табу, притеснение, срам и чувство за нередност и нужда от криене, защото у нас не се говореше за такива работи.“

Всъщност сексът е нещо напълно естествено и при добро познаване на тялото и грижа за себе си той може да остане част от живота ни до много по-късна възраст, отколкото сме склонни да си представяме в младежките си години. 

Хормоните играят ключова роля в модулирането на сексуалното желание и възбудата. Най-влиятелните хормони в този контекст са естроген, тестостерон и прогестерон. Естрогенът е основно отговорен за развитието на женските полови характеристики и влияе върху гениталните тъкани, увеличавайки притока на кръв към гениталната област, което може да подобри чувствителността и овлажняването. Нивата на естроген са различни през менструалния цикъл, достигайки пик по време на овулация, което често води до повишено сексуално желание. Тестостеронът, макар че често се свързва с мъжкото сексуално желание, играе важна роля и в женската сексуална възбуда. Въпреки че жените имат по-ниски нива на тестостерон, той влияе върху либидото, възбудата и оргазмения капацитет. По-високите нива на тестостерон са свързани с повишено сексуално желание и при жените. Прогестеронът, от друга страна, би могъл да потиска сексуалното желание и възбудата при много жени, което води до намаляване на либидото. 

Сексуалното желание при жените се регулира и от определени невротрансмитери, които влияят на центровете на мозъка, отговарящи за сексуалността. Повишената допаминова активност е нужна среда за високо сексуално желание и мотивация. В същото време този невротрансмитер се активира от сексуални мисли и стимули, засилвайки чувството на вълнение и удоволствие. 

Друг важен фактор е серотонинът: въпреки че се свързва с регулирането на настроението, неговият ефект върху сексуалното желание може да бъде сложен. Високите нива на серотонин могат да потиснат сексуалното желание и възбуда, докато по-ниските нива са свързани с повишен сексуален интерес. Третият важен невротрансмитер е окситоцинът. Той е причината да изпитваме удоволствие при докосване, а при достигане на оргазъм тялото ни буквално се къпе в окситоцин. 

Отвъд биохимията в женското тяло протичат и други физиологични процеси, които ни помагат или ни пречат да правим секс.

Сексуална дисфункция

Световната здравна организация определя сексуалното здраве като състояние на физическо, емоционално, психическо и социално благополучие във връзка със сексуалността, а не просто липса на болест, дисфункция или физическа аномалия.

Сексуалната дисфункция при жените обхваща редица състояния, например ниско сексуално желание, затруднено постигане на оргазъм, проблеми с възбудата и болка при проникване. Разпространението на тези проблеми варира в зависимост от фактори като възраст, общо здравословно състояние и психологическа нагласа. Макар в повечето случаи да става дума за решими проблеми, все още има жени, за които те са неотменна част от живота: 

Либидото ми е било ниско през по-голямата част от живота ми, вероятно причините са физиологични, тъй като е имало промени при сериозни хормонални сътресения (например през бременността правех много секс). След травматично раждане постепенно приключих напълно.

Сериозен фактор за смущения в сексуалния живот играе стресът, който може да е свързан с разнообразна палитра от житейски обстоятелства. Понякога съпровожда дори планирани и щастливи събития, каквото е раждането на дете: 

Разпадът в сексуалния ни живот продължи година и четири месеца след раждането на първото бебе, истинското помиряване и прощаване на взаимни грешки отне доста повече време, но се случи. Оттогава сексът става все по-добър,

споделя майка на две вече пораснали деца.

Хроничният стрес и високите нива на хормона на стреса кортизол потискат сексуалното желание. Когато тялото е под стрес, се активира реакцията „бий се или бягай“ и това може да потисне сексуалната възбуда. Повишените нива на кортизол могат да намалят производството на полови хормони, като естроген и тестостерон, което води до по-ниско либидо. 

Но не само. „В тази жега не ми е тема. Не искам никой да ме докосва“, категорична е друга събеседничка. 

Голяма част от тези проблеми възникват с напредването на възрастта, в периодите на перименопаузата и менопаузата, но невинаги предизвикват усещане за дисфункционалност. Една от жените в цитираната възрастова група разказва: 

С времето моето либидо намалява, но осъзнах, че изцяло зависи от месечния цикъл и нищо не може да предизвика у мен интерес в дните преди цикъл. Това е окей, концентрирам възможно най-много секс в първата му половина.

Изследвания сочат, че около 43–44% от жените преживяват някаква форма на сексуална дисфункция в живота си. Макар това да е много висок дял, позитивният му прочит би звучал така: 

Повечето жени могат да имат удовлетворителен секс през целия си активен живот 

Както науката, така и личният опит на жените показва, че възрастта носи своите особености, без да играе ключова роля в женското сексуално здраве.

В периода на съзряването сексуалното желание става по-силно изразено, естрогенът играе доминираща роля, насърчавайки сексуалната възбуда и отзивчивост, докато нивата на тестостерон, макар и по-ниски, отколкото при момчетата, започват да допринасят за либидото. През този период момичетата започват да изпитват сексуално привличане и желание да изследват своята сексуалност. 

Развитието на мозъка също играе роля, като системата за възнаграждение на мозъка става по-чувствителна към сексуални стимули. Тази повишена чувствителност може да доведе до по-силни сексуални импулси и чувства на романтично привличане. Психологическите фактори, включително емоционалната връзка, започват да оформят начина, по който се преживяват тези импулси. 

„Започнах на 15, но до 19 не знаех какво е оргазъм“, но също и „Официален старт на 16 години – нямах търпение да ми дойде менструацията, за да започна. Първите години, докъм 20, имах много силно либидо и готовност да правя секс къде ли не, например в кола, тоалетна на дискотека, зад блока и пр.“, разказват събеседничките ми. „Бях безгрижна и имах по-силно либидо като по-млада, което водеше до какви ли не сексуални приключения“, споделя една от тях, докато друга отсича: „Моногамност – от тийн.“ 

Разбира се, с годините и натрупания опит разбирането на всяка жена за здрав (в смисъл – благосъстоятелен, удовлетворяващ и без патологии) секс се променя. В ранната зряла възраст, обикновено между 20 и 30 години, жените често изпитват най-високите си нива на сексуално желание. Хормоналните нива на естроген и тестостерон достигат пик, а репродуктивната система е напълно зряла. Жените често са в разцвета на плодовитостта си и естественото влечение на тялото към сексуална активност е силно. Желанието за интимност и връзка, водено както от хормонални фактори, така и от емоции, достига своя връх през този период. Сексуалното удовлетворение обикновено е високо, като много жени изследват и научават за своите сексуални предпочитания и желания във връзките си. 

Този теоретичен модел напълно се потвърждава от историите на жените, които споделят: 

Много интересно за мен беше, че след първото вагинално раждане (30 г.) изведнъж бях способна да си заявя нуждите за предварителна стимулация и съответно нивото на задоволеност за мен се вдигна чувствително. Също така и да кажа, че не съм достигнала до оргазъм и имам нужда от още.

Интересно наблюдение е, че мъжът ми съвсем се е променил – когато първоначално ме е привличал, е имал тяло на тийнейджър, гладки бузи и коса. Абсолютно нищо не е същото, все едно различна обвивка, сега е по-секси, вероятно защото го познавам повече – обичам да го гледам гол и как върши неща, също и как говори по работа…

С годините бях по-готова да експериментирам, защото се появи партньор, комуто да се доверя, и защото по-малко ми пукаше за това как изглеждам (което беше основният ми бъг във всички години, в които всъщност съм изглеждала добре). 

Последното признание е на конкретна 50-годишна жена, но обобщава добре множество истории на жени в зряла възраст. „На 45 вече се харесвам и приемам. Колкото повече се харесвам, толкова повече либидото ми изкачва върхове“, споделя друга, а в отговор трета допълва: „Имаше един момент, аз бях на 40, още приспивах дете всяка вечер, беше ковид, не ми се правеше секс и заявих на мъжа ми, че ако си мисли, че цял живот ще правим секс, да си помисли пак. Сега ми се струва абсурдно това. Мисля, че още много секс ни чака.“

И това вероятно е така, ако съдим по историята на друга жена в нашата възрастова група, която дава надежда и за бъдещето:

За мое учудване и радост майка ми на 73 години все още прави секс с приятеля си на 78 години, което ме кара да смятам, че дори и да не става все по-хубав и по-хубав, то очевидно човек може да съхрани удоволствието от секса дори и след определена възраст. 

След менопаузата, обикновено около 50-годишна възраст, яйчниците спират да произвеждат яйцеклетки и нивата на естроген спадат значително. Това намаляване на естрогена води до промени в сексуалната функция, включително вагинална сухота и намалено овлажняване, което може да направи секса неприятен за някои жени. Въпреки тези предизвикателства много жени в постменопауза съобщават, че изпитват възраждане на сексуалното удовлетворение поради по-малко страх от забременяване, по-голям фокус върху емоционалната интимност и подобрена комуникация с партньорите си: 

Винаги ми е било приятно да правя секс, но най-хубавия секс имах след 40, когато като че ли се отпуснах повече и да експериментирам. Имах едни 7–8 години с ужасно много секс в този период.

Какво искат жените

В същото време според изследване мотивацията на жените за секс не се променя драстично с възрастта. Тя е повлияна от предишните им сексуални преживявания, вида връзка, в която участват, и множество фактори, свързани с начина им на живот. Според изследването жените на възраст 31–45 години имат повече мотиви за секс, отколкото жените на възраст 18–30-годишните. 

Основните причини за секс обаче не се различават в целия възрастов диапазон – жените правят секс предимно за да изпитат удоволствие, любов и усещане за свързаност. 


„Анатомия на пола: Жена“ разглежда здравето на жените като неразривна част от обществото, историята и културата. В поредицата изследваме как са се променяли нагласите към женското здраве, как медицината е възприемала специфичните потребности на жените и какви процеси са повлияли на достъпа им до качествени здравни грижи. Вглеждаме се в научните открития, но и в културните митове; в официалните политики, но и в личните истории на жени, борещи се за правото си на здраве и достойнство.

Subliminal Learning in AIs

Post Syndicated from Bruce Schneier original https://www.schneier.com/blog/archives/2025/07/subliminal-learning-in-ais.html

Today’s freaky LLM behavior:

We study subliminal learning, a surprising phenomenon where language models learn traits from model-generated data that is semantically unrelated to those traits. For example, a “student” model learns to prefer owls when trained on sequences of numbers generated by a “teacher” model that prefers owls. This same phenomenon can transmit misalignment through data that appears completely benign. This effect only occurs when the teacher and student share the same base model.

Interesting security implications.

I am more convinced than ever that we need serious research into AI integrity if we are ever going to have trustworthy AI.

The White House AI Action Plan: a new chapter in U.S. AI policy

Post Syndicated from Zaid Zaid original https://blog.cloudflare.com/the-white-house-ai-action-plan-a-new-chapter-in-u-s-ai-policy/

On July 23, 2025, the White House unveiled its AI Action Plan (Plan), a significant policy document outlining the current administration’s priorities and deliverables in Artificial Intelligence. This plan emerged after the White House received over 10,000 public comments in response to a February 2025 Request for Information (RFI). Cloudflare’s comments urged the White House to foster conditions for U.S. leadership in AI and support open-source AI, among other recommendations. 

There is a lot packed into the three pillar, 28-page Plan. 

  • Pillar I: Accelerate AI Innovation. Focuses on removing regulations, enabling AI adoption and developing, and ensuring the availability of open-source and open-weight AI models.

  • Pillar II: Build American AI Infrastructure. Prioritizes the construction of high-security data centers, bolstering critical infrastructure cybersecurity, and promoting Secure-by-Design AI technologies. 

  • Pillar III: Lead in International AI Diplomacy and Security. Centers on providing America’s allies and partners with access to AI, as well as strengthening AI compute export control enforcement. 

Each of these pillars outlines policy recommendations for various federal agencies to advance the plan’s overarching goals. There’s much that the Plan gets right. Below we cover a few parts of the Plan that we think are particularly important. 

Encouraging U.S. technology leadership

The Plan takes the position that the U.S. is in a global race to achieve AI dominance, and that it is a national priority for U.S. technology companies to be the gold standard for AI globally. Through the Plan, President Trump commits his Administration to support American workers, technology, and energy to achieve that objective. 

We share the view that governments have a helpful role to play in shaping rules and regulations that will enable private-sector innovation to flourish. For Cloudflare’s network to continue to operate globally, we need the U.S. government to shape and influence the right regulatory conditions. They should balance national and economic security concerns, promote consensus industry-led international standards, and support interoperable regulatory regimes. 

Far too often in recent years, we’ve observed policy developments that have unnecessarily increased restrictions on U.S. technology providers and have made it challenging to operate. Protectionist mandates, including data sovereignty requirements, customer data retention policies, various supervisory and government access requirements, do little to improve security or innovation and have unintended consequences. Protectionism increases costs for businesses, limits access to world-class technologies, and increases cybersecurity risk. 

Implementing policies that guarantee access to global, distributed edge-compute networks and the freedom to choose the best technology for users’ needs will help ensure the right conditions to enable AI to flourish. 

The AI ecosystem needed to spur innovation and development

The Plan endorses open-source and open-weight AI models to spur innovation and to benefit commercial and government adoption. The plan recommends ensuring access to computing resources to increase capability in the start up and academic worlds. 

Cloudflare shares the view that open-source AI models play a crucial role in driving innovation. As recognized in the Plan, these models offer companies flexibility, freeing them from dependence on closed providers and enabling the use of AI with sensitive data where exporting to closed models might not be possible. That’s why Cloudflare includes access to more than fifty open-source models as part of our Workers AI model catalog. 

However, access to open-source models alone is not enough to harness AI’s potential. A complete ecosystem is needed to build and deploy the AI applications and tools that will usher in the new age imagined by the Plan. Cloudflare’s global network, with our GPU-powered inference, can play an essential role. Having a distributed network like ours which allows AI inference at the edge is critical for fast, efficient AI development and for building the next generation of AI applications.

Open ecosystems are deeply embedded in Cloudflare’s DNA. Our developer platform democratizes access, providing powerful tools for anyone to build and deploy applications. We offer global network infrastructure that removes complexities and reduces barriers. This lets AI developers innovate freely, using many different AI models, without relying on gatekeepers. Our commitment to making these tools easy to use mirrors the Plan’s call to foster innovation and support U.S. AI leadership by enabling developers to use open-source AI models to build, deploy, and scale new AI applications globally. 

Enhancing cybersecurity with AI

The Plan stresses the importance of cybersecurity for AI in several ways. There are two we want to highlight. 

First, it endorses the use of AI technologies for the cybersecurity of critical infrastructure. The use of AI-assisted cyber-defense tools are force multipliers for network defenders, and will be absolutely necessary for all organizations — but particularly critical infrastructure — to protect against cyber threats. 

Cloudflare’s network uses predictive AI and machine learning to block 247 billion cyberattacks daily. Under the theory of Defensive AI, Cloudflare uses information to constantly improve the effectiveness of our security solutions. With AI Labyrinth, we’ve even created a new tool that uses AI to trap AI. It is a new, next generation honeypot and cybersecurity defensive tool that leverages AI to confuse crawlers and bots that ignore “no crawl” directives. Instead of blocking these bots, AI Labyrinth directs bots into an endless maze of convincing, AI-generated pages. 

Second, to address potential vulnerabilities in AI technologies, the Plan tasks the U.S. government with ensuring that they are secure-by-design. 

To secure AI, Cloudflare has been active in shaping the cybersecurity and risk management of AI technologies. We have supported and provided feedback to the U.S. National Institute of Standards and Technology’s efforts to develop a Cybersecurity Profile for Artificial Intelligence. This is critically important and builds on our Secure-by-Design commitment. 

We look forward to working with the Administration on the proposed AI information sharing and analysis center and the proposed vulnerability information exchange. 

Cloudflare stands ready to accelerate AI adoption in government

The Plan envisions the federal government playing a key role in accelerating AI adoption. Cloudflare can help. As the Plan notes, integrating AI can significantly enhance public service, making government more efficient and effective. Most, if not all, federal agencies now have Chief AI Officers, indicating a clear commitment to this technological shift. The government can further its efforts by fostering information sharing between government agencies, promoting best practices, and training its workforce to maximize AI’s efficiency gains.

Cloudflare can be a key partner in this journey. Our platform provides the secure, reliable, and scalable infrastructure necessary for federal agencies to deploy AI applications with full-stack AI building blocks. Cloudflare is FedRAMP Moderate authorized, and we are committed to FedRAMP High. By leveraging Cloudflare’s global network, federal agencies can ensure their AI initiatives are resilient and accessible, driving greater public benefit. 

The need to balance the export of AI with export controls

To lead on AI internationally, the Plan outlines a dual strategy, presenting two approaches in tension with each other: aggressive AI export to allies and partners, and stringent restrictions on exporting AI compute and semiconductors. On one hand, the Plan emphasizes that providing the full U.S. AI technology stack is crucial to prevent allies from turning to rivals. This aims to solidify a global AI alliance and ensure the enduring diffusion of American technology.

Conversely, the plan calls for strengthening export control enforcement and plugging loopholes to prevent export of sensitive technologies. The administration seeks to use export controls — restrictions on what goods a company can export — to deny foreign adversaries access to certain resources for both geostrategic competition and national security concerns. The challenge arises because overly stringent export controls, while aiming to deny access to adversaries, may inadvertently make it harder to export AI even to allies. 

This dual approach highlights a critical tightrope walk. Cloudflare, along with many other industry players, will be watching closely to see how the administration balances these competing goals. Providing individuals across the world with access to resources that enable them to innovate and build applications close to their end users aligns with our mission to help build a better, more connected Internet. Having a globally distributed network like ours also enables U.S. AI companies to deploy their services globally. Although we appreciate the need for restricting access to sensitive compute resources, overly broad or imprecise controls could inadvertently stifle innovation and impede the open exchange of ideas crucial for AI development. The implementation of export controls must be meticulously balanced to target adversaries effectively without unwittingly hindering the very innovation and secure global digital ecosystem it seeks to protect. 

A reassuring aspect of the Plan is its clear recognition of the private sector’s indispensable role. The document repeatedly emphasizes the need for collaboration with industry and consultation with leading technology companies across various recommended policy actions. For instance, it specifically calls for establishing programs within the Department of Commerce to gather proposals from industry consortia for AI export packages. Furthermore, for strengthening AI compute export control enforcement, it advises exploring new measures “in collaboration with industry.” This commitment to partnership is essential to navigate the complexities of AI development and deployment. This collaboration with industry will ensure that policies are technically feasible, globally effective, and avoid unforeseen negative impacts on the digital economy and cybersecurity.

Shaping the future of AI together

The Plan represents a critical moment for U.S. AI leadership, and Cloudflare stands ready to partner in shaping the future of this critical technology. We applaud the Plan’s focus on accelerating AI development, building robust infrastructure, and leading global diplomacy. The Internet’s global nature means that achieving these goals requires a delicate balance, particularly as the business model for the AI-powered web rapidly evolves. Cloudflare champions an approach that fosters innovation while upholding an open, secure, and interoperable Internet. By prioritizing consensus-driven standards and ensuring that regulations do not inadvertently create barriers to a globally distributed AI infrastructure, we help ensure continued U.S. technological leadership and a sustainable, beneficial AI ecosystem.

Amazon OpenSearch Service 101: How many shards do I need

Post Syndicated from Tom Burns original https://aws.amazon.com/blogs/big-data/amazon-opensearch-service-101-how-many-shards-do-i-need/

Customers new to Amazon OpenSearch Service often ask how many shards their indexes need. An index is a collection of shards, and an index’s shard count can affect both indexing and search request efficiency. OpenSearch Service can take in large amounts of data, split it into smaller units called shards, and distribute those shards across a dynamically changing set of instances.

In this post, we provide some practical guidance for determining the ideal shard count for your use case.

Shards overview

A search engine has two jobs: create an index from a set of documents, and search that index to compute the best-matching documents. If your index is small enough, a single partition on a single machine can store that index. For larger document sets, in cases where a single machine isn’t large enough to hold the index, or in cases where a single machine can’t compute your search results effectively, the index can be split into partitions. These partitions are called shards in OpenSearch Service. Each document is routed to a shard that is calculated, by default, by using a hash of that document’s ID.

A shard is both a unit of storage and a unit of computation. OpenSearch Service distributes shards across nodes in your cluster to parallelize index storage and processing. If you add more nodes to an OpenSearch Service domain, it automatically rebalances the shards by moving them between the nodes. The following figure illustrates this process.

Diagram showing how source documents are indexed and partitioned into shards.

As storage, primary shards are distinct from one another. The document set in one shard doesn’t overlap the document set in other shards. This approach makes shards independent for storage.

As computational units, shards are also distinct from one another. Each shard is an instance of an Apache Lucene index that computes results on the documents it holds. Because all the shards comprise the index, they must function together to process each query and update request for that index. To process a query, OpenSearch Service routes the query to a data node for a primary or replica shard. Each node computes its response locally and the shard responses get aggregated for a final response. To process a write request (a document ingestion or an update to an existing document), OpenSearch Service routes the request to the appropriate shards—primary then replica. Because most writes are bulk requests, all shards of an index are typically used.

The two different types of shards

There are two kinds of shards in OpenSearch Service—primary and replica shards. In an OpenSearch index configuration, the primary shard count serves to partition data and the replica count is the number of full copies of the primary shards. For example, if you configure your index with 5 primary shards and 1 replica, you will have a total of 10 shards: 5 primary shards and 5 replica shards.

The primary shard receives writes first. The primary shard passes documents to the replica shards for indexing by default. OpenSearch Service’s O-series instances use segment replication. By default, OpenSearch Service waits for acknowledgment from replica shards before confirming a successful write operation to the client. Primary and replica shards provide redundant data storage, enhancing cluster resilience against node failures. In the following example, the OpenSearch Service domain has three data nodes. There are two indexes, green (darker) and blue (lighter), each of which has three shards. The primary for each shard is outlined in red. Each shard also has a single replica, shown with no outline.

Diagram showing how shards and replica shards are distributed between 3 Opensearch instances.

OpenSearch Service maps shards to nodes based on a number of rules. The most basic rule is that primary and replica shards are never put onto the same node. If a data node fails, OpenSearch Service automatically creates another data node and re-replicates shards from surviving nodes and redistributes them across the cluster. If primary shards fail, replica shards are promoted to primary to prevent data loss and provide continuous indexing and search operations.

So how many shards? Focus on storage first

There are three types of workloads that OpenSearch users typically maintain: search for applications, log analytics, and as a vector database. Search workloads are read-heavy and latency sensitive. They are typically tied to an application to enhance search capability and performance. A common pattern is to index the data in relational databases to give users more filtering capabilities and provide efficient full text search.

Log workloads are write-heavy and receive data continuously from applications and network devices. Typically, that data is put into a changing set of indexes, based on an indexing time period like daily or monthly depending on the use case. Instead of indexing based on time period, you can use rollover policies based on index size or document count to make sure shard sizing best practices are followed.

Vector database workloads use the OpenSearch Service k-Nearest Neighbor (k-NN) plugin to index vectors from an embedding pipeline. This enables semantic search, which measures relevance using the meaning of words rather than exactly matching the words. The embedding model from the pipeline maps multimodal data into a vector with potentially thousands of dimensions. OpenSearch Service searches across vectors to provide search results.

To determine the optimal number of shards for your workload, start with your index storage requirements. Although storage requirements can vary widely, a general guideline is to use 1:1.25 using the source data size to estimate usage. Also, compression algorithms default to performance, but can also be adjusted to reduce size. When it comes to shard sizes, consider the following based on the workload:

  • Search – Divide your total storage requirement by 30 GB.
    • If search latency is high, use a smaller shard size (as low as 10GB), increasing the shard count and parallelism for query processing.
    • Increasing the shard count reduces the amount of work at each shard (they have fewer documents to process), but also increases the amount of networking for distributing the query and gathering the response. To balance these competing concerns, examine your average hit count. If your hit count is high, use smaller shards. If your hit count is low, use larger shards.
  • Logs – Divide the storage requirement for your desired time period by 50 GB.
    • If using an ISM policy with rollover, consider setting the min_size parameter to 50 GB.
    • Increasing the shard count for logs workloads similarly improves parallelism. However, most queries for logs workloads have a small hit count, so query processing is light. Logs workloads work well with larger shard sizes, but shard smaller if your query workload is heavier.
  • Vector – Divide your total storage requirement by 50 GB.
    • Reducing shard size (as low as 10GB) can improve search latency when your vector queries are hybrid with a heavy lexical component. Conversely, increasing shard size (as high as 75GB) can improve latency when your queries are pure vector queries.
    • OpenSearch provides other optimization methods for vector databases, including vector quantization and disk-based search.
    • K-NN queries behave like highly filtered search queries, with low hit counts. Therefore, larger shards tend to work well. Be prepared to shard smaller when your queries are heavier.

Don’t be afraid of using a single shard

If your index contains less than the advised shard size (30 GB for search and 50 GB otherwise), we recommend that you use a single primary shard. Although it’s tempting to add more shards thinking it will improve performance, this approach can actually be counterproductive for smaller datasets because of the added networking. Each shard you add to an index distributes the processing of requests for that index across an additional node. Performance can decrease because there is overhead for distributed operations to split and combine results across nodes when a single node can do it sufficiently.

Set the shard count

When you create an OpenSearch index, you set the primary and replica counts for that index. Because you can’t dynamically change the primary shard count of an existing index, you have to make this important configuration decision before indexing your first document.

You set the shard count using the OpenSearch create index API. For example (provide your OpenSearch Service domain endpoint URL and index name):

curl -XPUT https://<opensearch-domain-endpoint>/<index-name> -H 'Content-Type: application/json' -d \
 '{
    "settings": {
        "index" : {
            "number_of_shards": 3,
            "number_of_replicas": 1
        }
    }
 }'

If you have a single index workload, you only have to do this one time, when you create your index for the first time. If you have a rolling index workload, you create a new index regularly. Use the index template API to automate applying settings to all new indexes whose name matches the template. The following example sets the shard count for any index whose name has the prefix logs (provide your OpenSearch service endpoint domain URL and index template name):

curl -XPUT https://<opensearch-domain-endpoint>/_index_template/<template-name> -H 'Content-Type: application/json' -d \
 '{
   "index_patterns": ["logs*"],
   "template": {
        "settings": {
            "index" : {
                "number_of_shards": 3,
                "number_of_replicas": 1
            }
       }
  }
}'

Conclusion

This post outlined basic shard sizing best practices, but additional factors might influence the ideal index configuration you choose to implement in your OpenSearch Service domain.

For more information about sharding, refer to Optimize OpenSearch index shard sizes or Shard strategy. Both resources can help you better fine-tune your OpenSearch Service domain to optimize its available compute resources.


About the authors

Photo of Tom Burns Tom Burns is a Senior Cloud Support Engineer at AWS and is based in the NYC area. He is a subject matter expert in Amazon OpenSearch Service and engages with customers for critical event troubleshooting and improving the supportability of the service. Outside of work, he enjoys playing with his cats, playing board games with friends, and playing competitive games online.

Photo of Ron MillerRon Miller is a Solutions Architect based out of NYC, supporting transportation and logistics customers. Ron works closely with AWS’s Data & Analytics specialist organization to promote and support OpenSearch. On the weekend, Ron is a shade tree mechanic and trains to complete triathlons.
Post-quantum TLS in Python

Post Syndicated from Will Childs-Klein original https://aws.amazon.com/blogs/security/post-quantum-tls-in-python/

At Amazon Web Services (AWS), security is a top priority. Maintaining data confidentiality is a substantial component of operating environment security for AWS and our customers. Though not yet available, a cryptographically relevant quantum computer (CRQC) could be used to break public key algorithms that are used today to provide data confidentiality. To prepare for a world where CRQCs might exist, the National Institute of Standards and Technology (NIST) initiated a search for new algorithms that are robust against potential CRQCs. In August 2024, after eight years of intense scrutiny by the cryptography community, NIST selected three post-quantum cryptography (PQC) standards, including FIPS 203’s ML-KEM, to supplement and eventually replace classical public key algorithms.

A few recent AWS blog posts have discussed PQC at AWS, particularly post-quantum Transport Layer Security (PQ TLS) using ML-KEM:

In this post, we demonstrate how you can test PQ TLS in Python applications today.

Testing PQ TLS in Python

As described in detail elsewhere, AWS currently deploys PQ TLS in a hybrid configuration where a classical key exchange is used alongside ML-KEM to provide defense-in-depth for data confidentiality. ML-KEM has much larger keys than classical schemes, so hybrid TLS handshakes send and receive more data when establishing a connection. As with other protocol updates, it’s important to test hybrid TLS in your network to validate that security appliances and network devices can handle these connections appropriately. We hope that you find the provided AWS Sample useful for such tests.

To negotiate hybrid TLS, PQ-ready software is required on both ends of the connection: client and server. AWS is currently rolling out hybrid TLS on the server side transparently with no customer configuration required. On the client side, each language SDK’s story for enabling hybrid TLS will be slightly different.

The AWS SDK for Python (Boto3) relies the on the Python interpreter’s ssl module for TLS, which in turn uses the operating system’s cryptography library. For most Linux distributions, this is OpenSSL. OpenSSL recently announced support for hybrid TLS and has enabled it by default in version 3.5. However, OpenSSL 3.5 is not yet the default on most operating system distributions.

To unblock testing, we provide a container definition that installs OpenSSL 3.5 alongside a standard Python distribution, allowing Python applications to perform PQ hybrid TLS connections. The container definition also installs common packages such as boto3 and requests. We provide example Python code for basic interactions with: AWS services (using boto3 and the AWS Command Line Interface (AWS CLI)), arbitrary HTTPS endpoints (using requests), and TLS-secured TCP servers (using Python’s standard library ssl module).

In the following sections, we walk through how to use this container definition to test PQ TLS connections from Python applications to AWS services.

Build the container

You can build this container on your local machine, or you can build it in a cloud environment such as Amazon Elastic Compute Cloud (Amazon EC2) or AWS CloudShell. Note that if you want to exercise the network path between your machine and AWS, you must build and run the container locally. The only prerequisite for building the container is having Docker (or an equivalent container tool) installed. For simplicity, the following steps mostly assume that you’re running these commands in a Linux CloudShell environment.

  1. Clone the sample repo:
    git clone https://github.com/aws-samples/sample-post-quantum-tls-python
  2. Change into the sample’s directory and build the container by executing the following command:
    cd sample-post-quantum-tls-python && docker build . -t pq-tls-python

Run the container

To run the samples described earlier, execute the following:

docker run --rm \
    -e AWS_ACCESS_KEY_ID=$(aws configure get aws_access_key_id) \
    -e AWS_SECRET_ACCESS_KEY=$(aws configure get aws_secret_access_key) \
    -it pq-tls-python \
    test.sh

The preceding command assumes that you have an AWS CLI default profile with permission to call the AWS Secrets Manager ListSecrets API. With this permission, you can make a basic, read-only test call to Secrets Manager PQ-enabled API endpoints that won’t return sensitive or secret values. In CloudShell, you’ll need to set access key and secret key values with aws configure. In Amazon EC2, you can configure an instance profile and remove the access key and secret key environment.

After printing out the name and version of the cryptography library used by Python, test.sh will test hybrid TLS connections used to secure (in order):

  1. TCP sockets using Python’s socket and ssl modules
  2. HTTP requests using the requests library
  3. AWS API requests using boto3 and the AWS CLI

If the tests are successful you should see the following output:

Crypto library: OpenSSL 3.5.0 8 Apr 2025
Testing ssl socket... ok
Testing requests... ok
Testing boto3... ok
Testing AWS CLI... ok

You can inspect, modify, and extend the examples in the tests/ directory as needed for your experiments. Instead of running the provided test.sh script, you can access an interactive shell with the following command.

docker run --rm -it pq-tls-python

Make sure to rebuild the container if you add or modify the files for testing.

Confirm PQ TLS negotiation

To confirm that PQ hybrid TLS is negotiated, inspect the samples’ TLS handshakes to confirm that the PQ hybrid TLS key exchange is performed. To do this, you must capture host network traffic. In CloudShell, you can do this using the following command:

sudo tcpdump -A -i docker0 -w pq_tls.pcap

This will capture TCP traffic to port 443, the standard port for TLS. Modify the command as needed if you’re capturing traffic for a non-standard port. Alternatively, if you’re running the container locally, you can perform the packet capture in Wireshark’s GUI on a local network device, such as docker0 on Linux or en0 on MacOS.

Next, run the test suite in a separate terminal using the Docker run command from Run the container. As before, you should see the success messages in your terminal, and a new file named docker_443.pcap if you’re using tcpdump. You can download this file from CloudShell to view locally in Wireshark. Specifically, look for the key_share extension in client or server Hello handshake messages. If you’re using Wireshark to view the packet capture, you can specify the display filter tls.handshake to only show handshake messages. Your packet capture should look something like Figure 1:

Figure 1: Wireshark view of packet capture

Figure 1: Wireshark view of packet capture

You can see in Figure 1 that X25519MLKEM768 is selected in the server Hello handshake message, showing that PQ hybrid TLS was successfully negotiated.

Conclusion

In this post, you’ve seen how to use a container definition to test PQ hybrid TLS in Python today. The linked AWS Sample shows how to establish PQ hybrid TLS connections for:

  • AWS API requests with boto3 or the AWS CLI
  • General HTTPS requests with requests
  • TLS-secured TCP sockets with Python’s socket and ssl modules

We encourage you to use the AWS Sample to start vetting your networks and Python applications in preparation for upcoming PQ hybrid TLS migrations. AWS is committed to supporting our customers through their migration journeys, and PQ hybrid TLS is no exception.

 
If you have feedback about this post, submit comments in the Comments section below. If you have questions about this post, contact AWS Support.
 

Will Childs-Klein
Will Childs-Klein

Will is a Senior Software Engineer at AWS Cryptography, where he focuses on developing cryptographic libraries, optimizing software performance, and deploying post-quantum cryptography. Previously at AWS, he worked on data storage and transfer services including Storage Gateway, Elastic File System, and DataSync.

The collective thoughts of the interwebz