Security updates for Wednesday

Post Syndicated from jzb original https://lwn.net/Articles/988746/

Security updates have been issued by AlmaLinux (buildah, gvisor-tap-vsock, nodejs:18, python-urllib3, and skopeo), Debian (firefox-esr and openssl), Fedora (apr and seamonkey), Red Hat (podman), Slackware (mozilla and seamonkey), SUSE (bubblewrap and flatpak, buildah, docker, dovecot23, ffmpeg, frr, go1.21-openssl, graphviz, java-1_8_0-openj9, kubernetes1.26, kubernetes1.27, kubernetes1.28, openssl-1_0_0, openssl-3, perl-DBI, python-aiohttp, python-Django, python-WebOb, thunderbird, tiff, ucode-intel, unbound, webkit2gtk3, and xen), and Ubuntu (drupal7 and twisted).

Security Researcher Sued for Disproving Government Statements

Post Syndicated from Bruce Schneier original https://www.schneier.com/blog/archives/2024/09/security-researcher-sued-for-disproving-government-statements.html

This story seems straightforward. A city is the victim of a ransomware attack. They repeatedly lie to the media about the severity of the breach. A security researcher repeatedly proves their statements to be lies. The city gets mad and sues the researcher.

Let’s hope the judge throws the case out, but—still—it will serve as a warning to others.

AWS named as a Leader in the first Gartner Magic Quadrant for AI Code Assistants

Post Syndicated from Channy Yun (윤석찬) original https://aws.amazon.com/blogs/aws/aws-named-as-a-leader-in-the-first-gartner-magic-quadrant-for-ai-code-assistants/

On August 19th, 2024, Gartner published its first Magic Quadrant for AI Code Assistants, which includes Amazon Web Services (AWS). Amazon Q Developer qualified for inclusion, having launched in general availability on April 30, 2024. AWS was ranked as a Leader for its ability to execute and completeness of vision.

We believe this Leader placement reflects our rapid pace of innovation, which makes the whole software development lifecycle easier and increases developer productivity with enterprise-grade access controls and security.

The Gartner Magic Quadrant evaluates 12 AI code assistants based on their Ability to Execute, which measures a vendor’s capacity to deliver its products or services effectively, and Completeness of Vision, which assesses a vendor’s understanding of the market and its strategy for future growth, according to Gartner’s report, How Markets and Vendors Are Evaluated in Gartner Magic Quadrants.

Here is the graphical representation of the 2024 Gartner Magic Quadrant for AI Code Assistants.

Here is the quote from Gartner’s report:

Amazon Web Services (AWS) is a Leader in this Magic Quadrant. Its product, Amazon Q Developer (formerly CodeWhisperer), is focused on assisting and automating developer tasks using AI. For example, Amazon Q Developer helps with code suggestions and transformation, testing and security, as well as feature development. Its operations are geographically diverse, and its clients are of all sizes. AWS is focused on delivering AI-driven solutions that enhance the software development life cycle (SDLC), automating complex tasks, optimizing performance, ensuring security, and driving innovation.

My team focuses on creating content on Amazon Q Developer that directly supports software developers’ jobs-to-be-done, enabled and enhanced by generative AI in Amazon Q Developer Center and Community.aws.

I’ve had the chance to talk with our customers to ask why they choose Amazon Q Developer. They said it is available to accelerate and complete tasks across the SDLC much more than general AI code assistants—from coding, testing, and upgrading, to troubleshooting, performing security scanning and fixes, optimizing AWS resources, and creating data engineering pipelines.

Here are the highlights that customers talked about more often:

Available everywhere you need it – You can use Amazon Q Developer in any of the following integrated development environment (IDE), including Visual Studio Code, JetBrains IDEs, AWS Toolkit with Amazon Q, JupyterLab, Amazon EMR Studio, Amazon SageMaker Studio, or AWS Glue Studio. You can also use Amazon Q Developer in the AWS Management Console, AWS Command Line Interface (AWS CLI), AWS documentation, AWS Support, AWS Console Mobile Application, Amazon CodeCatalyst, or through Slack and Microsoft Teams with AWS Chatbot. According to Safe Software, “Amazon Q knows all the ways to make use of the many tools that AWS provides. Because we are now able to accomplish more, we will be able to extend our automations into other AWS services and make use of Amazon Q to help us get there.” To learn more, visit Amazon Q Developer features and Amazon Q Developer customers.

Customizing code recommendations – You can get code recommendations based on your internal code base. Amazon Q Developer accelerates onboarding to a new code base to generate even more relevant inline code recommendations and chat responses (in preview) by making it aware of your internal libraries, APIs, best practices, and architectural patterns. Your organization’s administrators can securely connect Amazon Q Developer to your internal code bases to create multiple customizations. According to National Australia Bank (NAB), NAB has now added specific suggestions using the Amazon Q customization capability that are tailored to the NAB coding standards. They’re seeing increased acceptance rates of 60 percent with customization. To learn more, visit Customizing suggestions in the AWS documentation.

Upgrading your Java applicationsAmazon Q Developer Agent for code transformation automates the process of upgrading and transforming your legacy Java applications. According to an internal Amazon study, Amazon has migrated tens of thousands of production applications from Java 8 or 11 to Java 17 with assistance from Amazon Q Developer. This represents a savings of over 4,500 years of development work for over a thousand developers (when compared to manual upgrades) and performance improvements worth $260 million dollars in annual cost savings. Transformations from Windows to cross-platform .NET are also coming soon! To learn more, visit Upgrading language versions with the Amazon Q Developer Agent for code transformation in the AWS documentation.

Access the complete 2024 Gartner Magic Quadrant for AI Code Assistants report to learn more.

Channy

Gartner Magic Quadrant for AI Code Assistants, Arun Batchu, Philip Walsh, Matt Brasier, Haritha Khandabattu, 19 August, 2024.

Gartner does not endorse any vendor, product or service depicted in its research publications and does not advise technology users to select only those vendors with the highest ratings or other designation. Gartner research publications consist of the opinions of Gartner’s research organization and should not be construed as statements of fact. Gartner disclaims all warranties, expressed or implied, with respect to this research, including any warranties of merchantability or fitness for a particular purpose.

GARTNER is a registered trademark and service mark of Gartner and Magic Quadrant is a registered trademark of Gartner, Inc. and/or its affiliates in the U.S. and internationally and are used herein with permission. All rights reserved.

Integrate Tableau and Microsoft Entra ID with Amazon Redshift using AWS IAM Identity Center

Post Syndicated from Debu Panda original https://aws.amazon.com/blogs/big-data/integrate-tableau-and-microsoft-entra-id-with-amazon-redshift-using-aws-iam-identity-center/

This post is co-written with Sid Wray, Jade Koskela, and Ravi Bhattiprolu from SalesForce.

Amazon Redshift and Tableau empower data analysis. Amazon Redshift is a cloud data warehouse that processes complex queries at scale and with speed. Its advanced query optimization serves results to Tableau. Tableau’s extensive capabilities and enterprise connectivity help analysts efficiently prepare, explore, and share data insights company-wide.

Customers can integrate Amazon Redshift with Tableau using single sign-on (SSO) capabilities enabled by AWS IAM Identity Center integration with trusted identity propagation. You can use this to seamlessly implement authentication with third-party identity providers (IdP) and authorization with Redshift. It positions Amazon Redshift as an AWS managed application, allowing you to take full advantage of the trusted identity propagation feature.

Amazon Web Services (AWS) collaborated with Tableau to enable SSO support for accessing Amazon Redshift from Tableau. Both Tableau Desktop 2023.3.9 and Tableau Server 2023.3.9 releases support trusted identity propagation with IAM Identity Center. This SSO integration is available for Tableau Desktop, Tableau Server, and Tableau Prep.

This blog post provides a step-by-step guide to integrating IAM Identity Center with Microsoft Entra ID as the IdP and configuring Amazon Redshift as an AWS managed application. Additionally, you’ll learn how to set up the Amazon Redshift driver in Tableau, enabling SSO directly within Tableau Desktop.

Solution overview

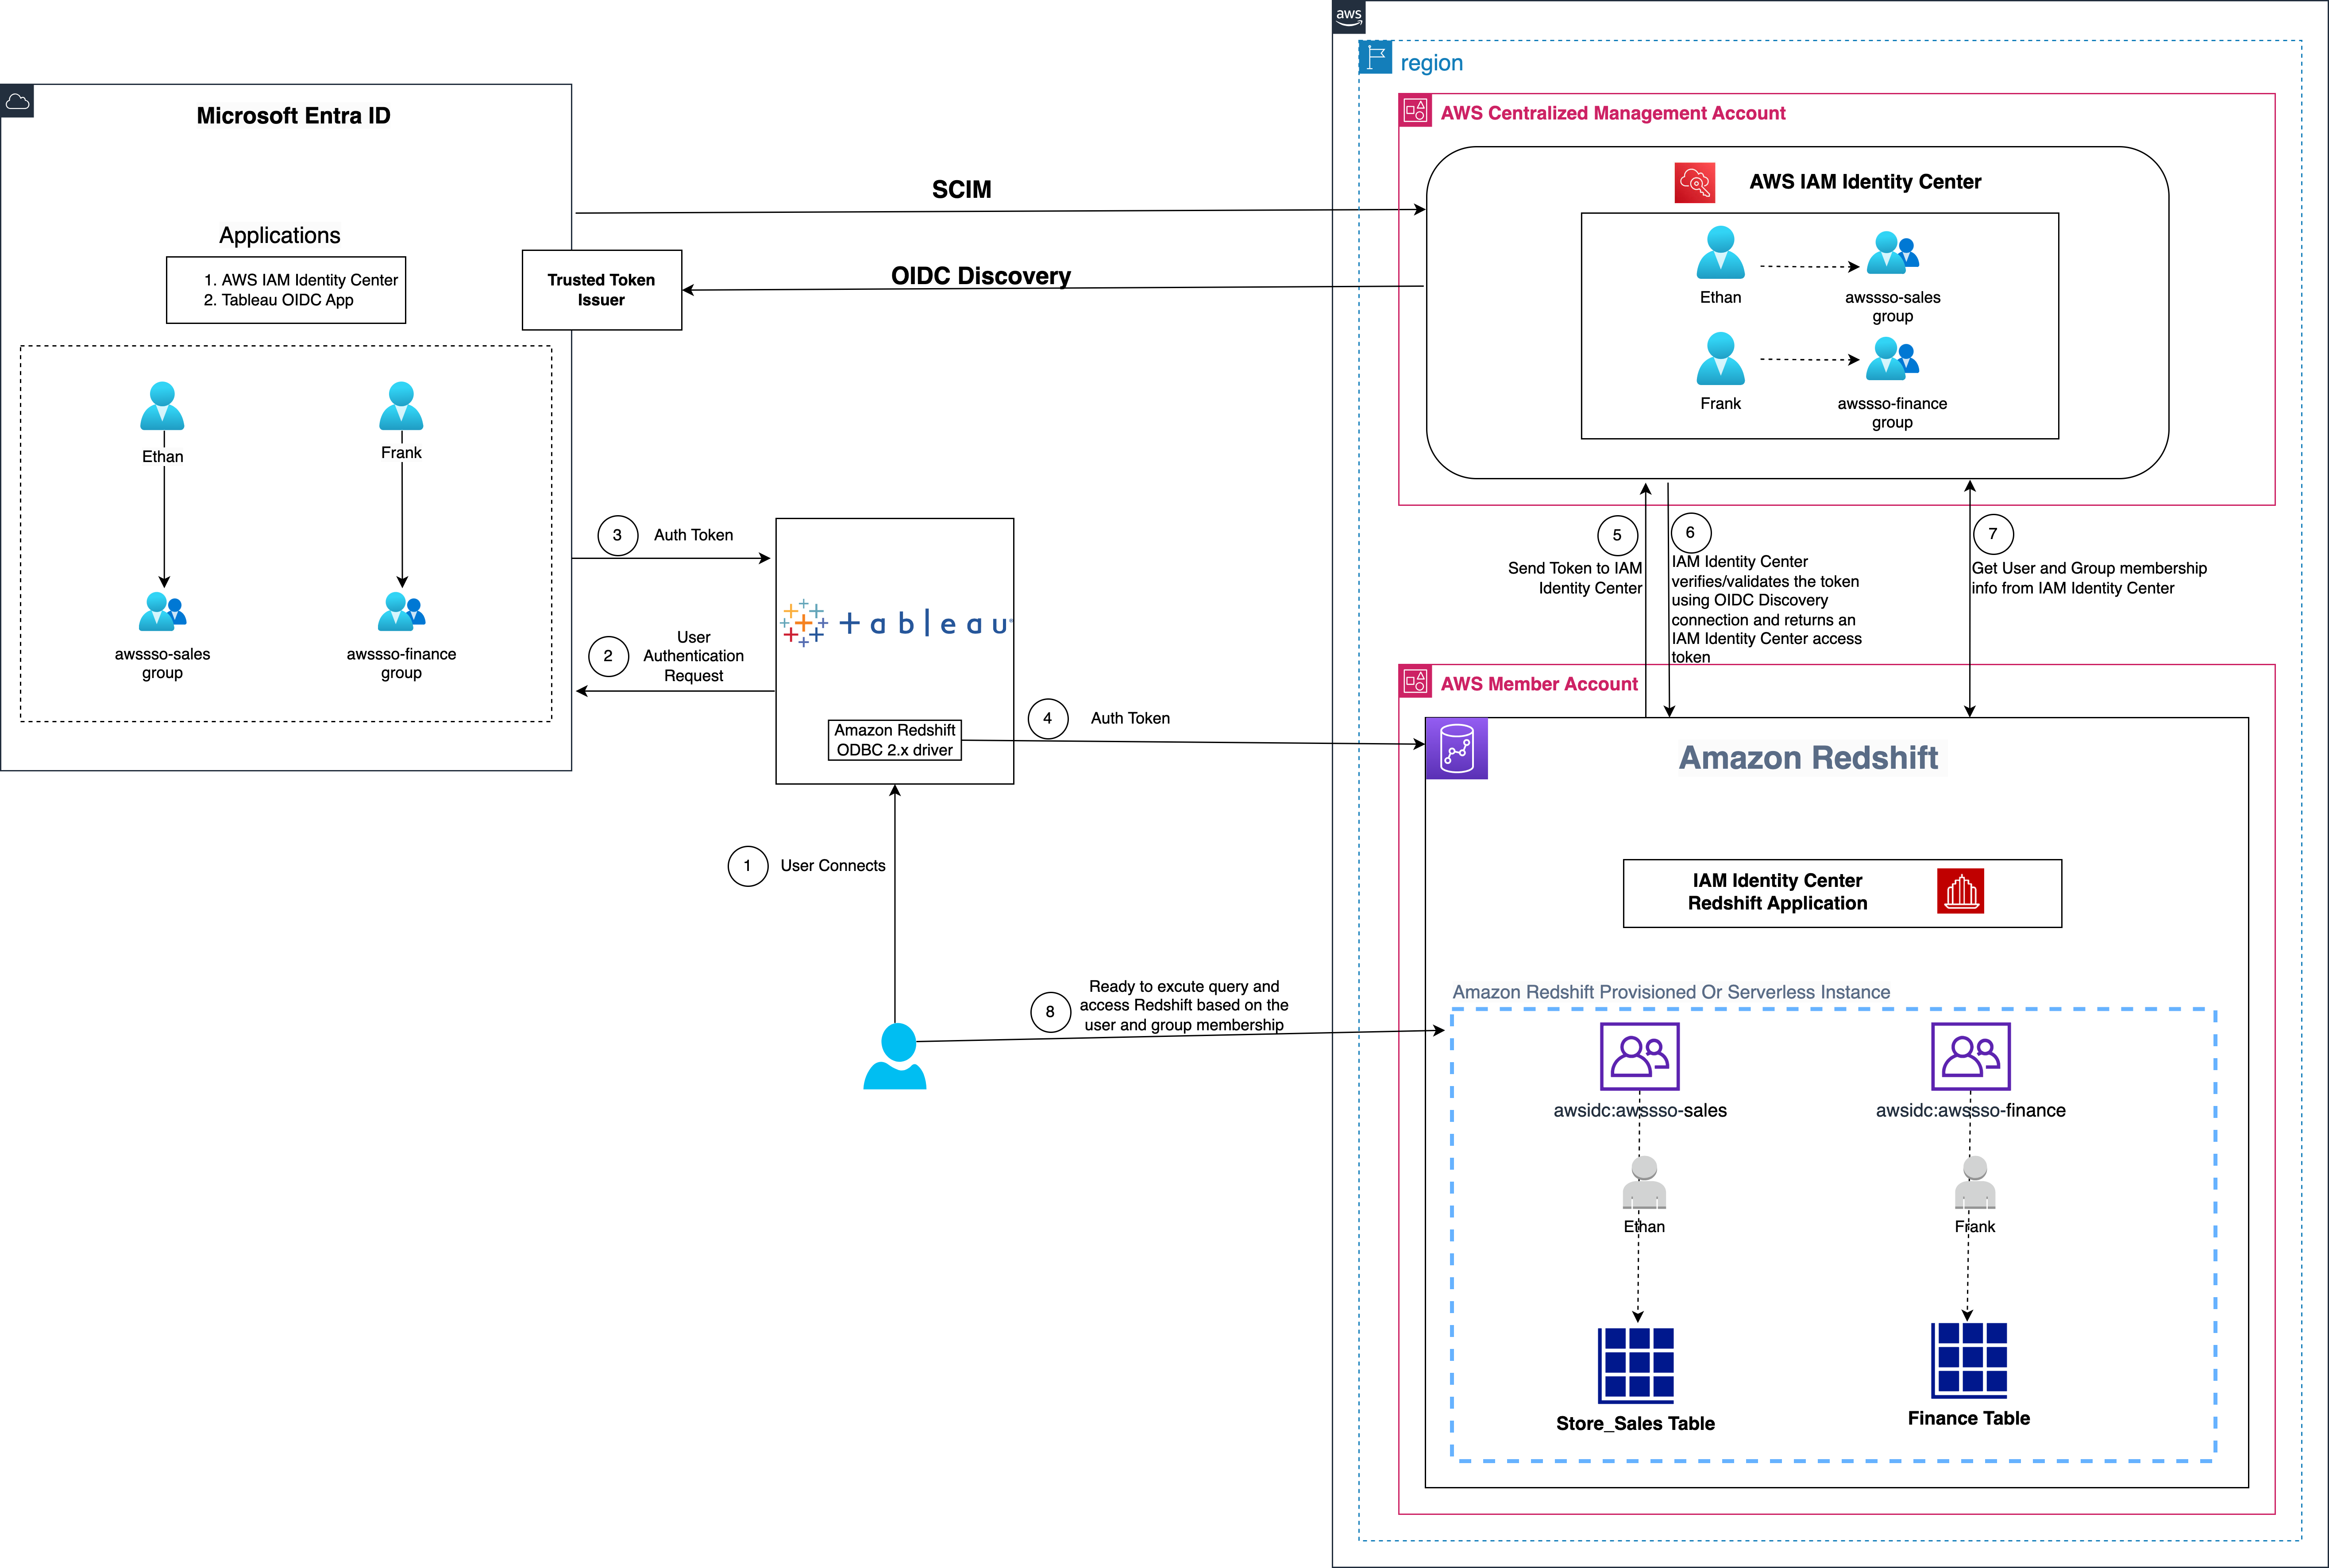
The following diagram illustrates the architecture of the Tableau SSO integration with Amazon Redshift, IAM Identity Center, and Microsoft Entra ID.

Figure 1: Solution overview for Tableau integration with Amazon Redshift using IAM Identity Center and Microsoft Entra ID

The solution depicted in Figure 1 includes the following steps:

  1. The user configures Tableau to access Amazon Redshift using IAM Identity Center.
  2. On a user sign-in attempt, Tableau initiates a browser-based OAuth flow and redirects the user to the Microsoft Entra ID sign-in page to enter the sign-in credentials.
  3. After successful authentication, Microsoft Entra ID issues authentication tokens (ID and access token) to Tableau.
  4. The Amazon Redshift driver then makes a call to the Amazon Redshift-enabled Identity Center application and forwards the access token.
  5. Amazon Redshift passes the token to IAM Identity Center for validation.
  6. IAM Identity Center first validates the token using the OpenID Connect (OIDC) discovery connection to the trusted token issuer (TTI) and returns an IAM Identity Center generated access token for the same user. In Figure 1, the TTI is the Microsoft Entra ID server.
  7. Amazon Redshift then uses the access token to obtain the user and group membership information from Identity Center.
  8. The Tableau user will be able to connect with Amazon Redshift and access data based on the user and group membership returned from IAM Identity Center.

Prerequisites

Before you begin implementing the solution, you must have the following in place:

Walkthrough

In this walkthrough, you will use the following steps to build the solution:

  1. Set up the Microsoft Entra ID OIDC application
  2. Collect Microsoft Entra ID information
  3. Set up a trusted token issuer in IAM Identity Center
  4. Set up client connections and trusted token issuers
  5. Set up the Tableau OAuth config files for Microsoft Entra ID
  6. Install the Tableau OAuth config file for Tableau Desktop
  7. Set up the Tableau OAuth config file for Tableau Server or Tableau Cloud
  8. Federate to Amazon Redshift from Tableau Desktop
  9. Federate to Amazon Redshift from Tableau Server

Set up the Microsoft Entra ID OIDC application

To create your Microsoft Entra application and service principal, follow these steps:

  1. Sign in to the Microsoft Entra admin center as Cloud Application Administrator (at the least).
  2. Browse to App registrations under Manage, and choose New registration.
  3. Enter a name for the application. For example, Tableau-OIDC-App.
  4. Select a supported account type, which determines who can use the application. For this example, select the first option in the list.
  5. Under Redirect URI, select Web for the type of application you want to create. Enter the URI where the access token is sent to. In this example, you’re using localhost, so enter http://localhost:55556/Callback and http://localhost/auth/add_oauth_token.
  6. Choose Register.
  7. In the navigation pane, choose Certificates & secrets.
  8. Choose New client secret.
  9. Enter a Description and select an expiration for the secret or specify a custom lifetime. For this example, keep the Microsoft recommended default expiration value of 6 months. Choose Add.
  10. Copy the secret value.
    Note: It will only be presented one time; after that you cannot read it.
  11. In the navigation pane, under Manage, choose Expose an API.
  12. If you’re setting up for the first time, you can see Set to the right of Application ID URI.
  13. Choose Set, and then choose Save.
  14. After the application ID URI is set up, choose Add a scope.
  15. For Scope name, enter a name. For example, redshift_login.
  16. For Admin consent display name, enter a display name. For example, redshift_login.
  17. For Admin consent description, enter a description of the scope.
  18. Choose Add scope.

For more information about setting up the Microsoft Entra app, see Register a Microsoft Entra app and create a service principal.

Collect Microsoft Entra ID information

To configure your IdP with IAM Identity Center and Amazon Redshift, collect the following parameters from Microsoft Entra ID. If you don’t have these parameters, contact your Microsoft Entra ID admin.

  1. Tenant ID,Client ID and Audience value: To get these values:
    1. Sign in to the Azure portal with your Microsoft account.
    2. Under Manage, choose App registrations.
    3. Choose the application that you created in previous sections.
    4. On the left panel, choose Overview, a new page will appear containing the Essentials section. You can find the Tenant ID,Client ID and Audience value (Application ID URI) as shown in the following figure:

      Figure 2: Overview section of OIDC application

  1. Scope: To find your scope value:
    1. In the navigation pane of the OIDC application, under Manage, choose Expose an API.
    2. You will find the value under Scopes as shown in the following figure:

      Figure 3: Application scope

Set up a trusted token issuer in IAM Identity Center

At this point, you have finished configurations in the Entra ID console; now you’re ready to add Entra ID as a TTI. You will start by adding a TTI so you can exchange tokens. In this step, you will create a TTI in the centralized management account. To create a TTI, follow these steps:

  1. Open the AWS Management Console and navigate to IAM Identity Center, and then to the Settings
  2. Select the Authentication tab and under Trusted token issuers, choose Create trusted token issuer.
  3. On the Set up an external IdP to issue trusted tokens page, under Trusted token issuer details, do the following:
    1. For Issuer URL, enter the OIDC discovery URL of the external IdP that will issue tokens for trusted identity propagation. The URL would be: https://sts.windows.net/<tenantid>/. To find your Microsoft Entra tenant ID, see Collect Microsoft Entra ID information.
    2. For Trusted token issuer name, enter a name to identify this TTI in IAM Identity Center and in the application console.
    3. Under Map attributes, do the following:
      1. For Identity provider attribute, select an attribute from the list to map to an attribute in the Identity Center identity store. You can choose Email, Object Identifier, Subject, and Other. This example uses Other where we’re specifying the upn (user principal name) as the Identity provider attribute to map with Email from the IAM identity Center attribute.
      2. For IAM Identity Center attribute, select the corresponding attribute for the attribute mapping.
    4. Under Tags (optional), choose Add new tag, specify a value for Key, and optionally for Value. For information about tags, see Tagging AWS IAM Identity Center resources.

Figure 4 that follows shows the set up for TTI.

Figure 4: Create a trusted token issuer

  1. Choose Create trusted token issuer.

Set up client connections and trusted token issuers

A third-party application (such as Tableau) that isn’t managed by AWS exchanges the external token (JSON Web Token (JWT) for an IAM Identity Center token before calling AWS services.

The JWT must contain a subject (sub) claim, an audience (aud) claim, an issuer (iss), a user attribute claim, and a JWT ID (JTI) claim. The audience is a value that represents the AWS service that the application will use, and the audience claim value must match the value that’s configured in the Redshift application that exchanges the token.

In this section, you will specify the audience claim in the Redshift application, which you will get from Microsoft Entra ID. You will configure the Redshift application in the member account where the Redshift cluster or serverless instance is.

  1. Select IAM Identity Center connection from Amazon Redshift console menu.

Figure 5: Redshift IAM Identity Center connection

  1. Select the Amazon Redshift application that you created as part of the prerequisites.
  2. Select the Client connections tab and choose Edit.
  3. Choose Yes under Configure client connections that use third-party IdPs.
  4. Select the checkbox for Trusted token issuer that you created in the previous section.
  5. Enter the aud claim value under Configure selected trusted token issuers. For example, api://1230a234-b456-7890-99c9-a12345bcc123. To get the audience value, see Collect Microsoft Entra ID information.
  6. Choose Save.

Figure 6: Adding an audience claim for the TTI

Your IAM Identity Center, Amazon Redshift, and Microsoft Entra ID configuration is complete. Next, you need to configure Tableau.

Set up the Tableau OAuth config files for Microsoft Entra ID

To integrate Tableau with Amazon Redshift using IAM Identity Center, you need to use a custom XML. In this step, you use the following XML and replace the values starting with the $ sign and highlighted in bold. The rest of the values can be kept as they are, or you can modify them based on your use case. For detailed information on each of the elements in the XML file, see the Tableau documentation on GitHub.

Note: The XML file will be used for all the Tableau products including Tableau Desktop, Server, and Cloud. You can use the following XML or you can refer to Tableau’s github.

<?xml version="1.0" encoding="utf-8"?>
<pluginOAuthConfig>
<dbclass>redshift</dbclass>
<!-- For configs embedded in the connector package, don't prefix with "custom_". For external configs, always prefix with "custom_". -->
<oauthConfigId>custom_redshift_azure</oauthConfigId>
<clientIdDesktop>$copy_client_id_from_azure_oidc_app</clientIdDesktop>
<clientSecretDesktop>$copy_client_secret_from_azure_oidc_app</clientSecretDesktop>
<redirectUrisDesktop>http://localhost:55556/Callback</redirectUrisDesktop>
<redirectUrisDesktop>http://localhost:55557/Callback</redirectUrisDesktop>
<redirectUrisDesktop>http://localhost:55558/Callback</redirectUrisDesktop>
<redirectUrisDesktop>http://localhost:55559/Callback</redirectUrisDesktop>
<!-- For multitenant apps use the common endpoint, for single tenant apps use the directory specific endpoint. -->
<authUri>https://login.microsoftonline.com/$azure_tenant_id/oauth2/v2.0/authorize</authUri>
<tokenUri>https://login.microsoftonline.com/$azure_tenant_id/oauth2/v2.0/token</tokenUri>
<scopes>openid</scopes>
<scopes>offline_access</scopes>
<scopes>email</scopes>
<!-- An example with a custom API, which was required at the time of writing for integration with AWS IAM IDC. -->
<scopes>$scope_from_azure_oidc_app</scopes>
<capabilities>
<entry>
<key>OAUTH_CAP_REQUIRES_PROMPT_SELECT_ACCOUNT</key>
<value>true</value>
</entry>
<entry>
<key>OAUTH_CAP_REQUIRE_PKCE</key>
<value>true</value>
</entry>
<entry>
<key>OAUTH_CAP_PKCE_REQUIRES_CODE_CHALLENGE_METHOD</key>
<value>true</value>
</entry>
<entry>
<key>OAUTH_CAP_SUPPORTS_STATE</key>
<value>true</value>
</entry>
<entry>
<key>OAUTH_CAP_CLIENT_SECRET_IN_URL_QUERY_PARAM</key>
<value>false</value>
</entry>
<entry>
<key>OAUTH_CAP_SUPPORTS_GET_USERINFO_FROM_ID_TOKEN</key>
<value>true</value>
</entry>
<!-- Depending on the Azure application, dynamic ports may not be allowed. Enable this if not allowed. -->
<entry>
<key>OAUTH_CAP_FIXED_PORT_IN_CALLBACK_URL</key>
<value>true</value>
</entry>
</capabilities>
<accessTokenResponseMaps>
<entry>
<key>ACCESSTOKEN</key>
<value>access_token</value>
</entry>
<entry>
<key>REFRESHTOKEN</key>
<value>refresh_token</value>
</entry>
<entry>
<key>access-token-issue-time</key>
<value>issued_at</value>
</entry>
<entry>
<key>id-token</key>
<value>id_token</value>
</entry>
<entry>
<key>username</key>
<value>email</value>
</entry>
<entry>
<key>access-token-expires-in</key>
<value>expires_in</value>
</entry>
</accessTokenResponseMaps>
</pluginOAuthConfig>

The following is an example XML file:

<?xml version="1.0" encoding="utf-8"?>
<pluginOAuthConfig>
<dbclass>redshift</dbclass>
<!-- For configs embedded in the connector package, don't prefix with "custom_". For external configs, always prefix with "custom_". -->
<oauthConfigId>custom_redshift_azure</oauthConfigId>
<clientIdDesktop>1230a234-b456-7890-99c9-a12345bcc123</clientIdDesktop>
<clientSecretDesktop>RdQbc~1234559xFX~c65737wOwjsdfdsg123bg2</clientSecretDesktop>
<redirectUrisDesktop>http://localhost:55556/Callback</redirectUrisDesktop>
<redirectUrisDesktop>http://localhost:55557/Callback</redirectUrisDesktop>
<redirectUrisDesktop>http://localhost:55558/Callback</redirectUrisDesktop>
<redirectUrisDesktop>http://localhost:55559/Callback</redirectUrisDesktop>
<!-- For multitenant apps use the common endpoint, for single tenant apps use the directory specific endpoint. -->
<authUri>https://login.microsoftonline.com/e12a1ab3-1234-12ab-12b3-1a5012221d12/oauth2/v2.0/authorize</authUri>
<tokenUri>https://login.microsoftonline.com/e12a1ab3-1234-12ab-12b3-1a5012221d12/oauth2/v2.0/token</tokenUri>
<scopes>openid</scopes>
<scopes>offline_access</scopes>
<scopes>email</scopes>
<!-- An example with a custom API, which was required at the time of writing for integration with AWS IAM IDC. -->
<scopes>api://1230a234-b456-7890-99c9-a12345bcc123/redshift_login</scopes>
<capabilities>
<entry>
<key>OAUTH_CAP_REQUIRES_PROMPT_SELECT_ACCOUNT</key>
<value>true</value>
</entry>
<entry>
<key>OAUTH_CAP_REQUIRE_PKCE</key>
<value>true</value>
</entry>
<entry>
<key>OAUTH_CAP_PKCE_REQUIRES_CODE_CHALLENGE_METHOD</key>
<value>true</value>
</entry>
<entry>
<key>OAUTH_CAP_SUPPORTS_STATE</key>
<value>true</value>
</entry>
<entry>
<key>OAUTH_CAP_CLIENT_SECRET_IN_URL_QUERY_PARAM</key>
<value>false</value>
</entry>
<entry>
<key>OAUTH_CAP_SUPPORTS_GET_USERINFO_FROM_ID_TOKEN</key>
<value>true</value>
</entry>
<!-- Depending on the Azure application, dynamic ports may not be allowed. Enable this if not allowed. -->
<entry>
<key>OAUTH_CAP_FIXED_PORT_IN_CALLBACK_URL</key>
<value>true</value>
</entry>
</capabilities>
<accessTokenResponseMaps>
<entry>
<key>ACCESSTOKEN</key>
<value>access_token</value>
</entry>
<entry>
<key>REFRESHTOKEN</key>
<value>refresh_token</value>
</entry>
<entry>
<key>access-token-issue-time</key>
<value>issued_at</value>
</entry>
<entry>
<key>id-token</key>
<value>id_token</value>
</entry>
<entry>
<key>username</key>
<value>email</value>
</entry>
<entry>
<key>access-token-expires-in</key>
<value>expires_in</value>
</entry>
</accessTokenResponseMaps>
</pluginOAuthConfig>

Install the Tableau OAuth config file for Tableau Desktop

After the configuration XML file is created, it must be copied to a location to be used by Amazon Redshift Connector from Tableau Desktop. Save the file from the previous step as .xml and save it under Documents\My Tableau Repository\OAuthConfigs.

Note: Currently, this integration isn’t supported in macOS because the Redshift ODBC 2.X driver isn’t supported yet for MAC. It will be supported soon.

Set up the Tableau OAuth config file for Tableau Server or Tableau Cloud

To integrate with Amazon Redshift using IAM Identity Center authentication, you must install the Tableau OAuth config file in Tableau Server or Tableau Cloud.

  1. Sign in to the Tableau Server or Tableau Cloud using admin credentials.
  2. Navigate to Settings.
  3. Go to OAuth Clients Registry and select Add OAuth Client
  4. Choose following settings:
    1. Connection Type: Amazon Redshift
    2. OAuth Provider: Custom_IdP
    3. Client Id: Enter your IdP client ID value
    4. Client Secret: Enter your client secret value
    5. Redirect URL: Enter http://localhost/auth/add_oauth_token. This example uses localhost for testing in a local environment. You should use the full hostname with https.
    6. Choose OAuth Config File. Select the XML file that you configured in the previous section.
    7. Select Add OAuth Client and choose Save.

Figure 7: Create an OAuth connection in Tableau Server or Cloud

Federate to Amazon Redshift from Tableau Desktop

Now you’re ready to connect to Amazon Redshift from Tableau as an Entra ID federated user. In this step, you create a Tableau Desktop report and publish it to Tableau Server.

  1. Open Tableau Desktop.
  2. Select Amazon Redshift Connector and enter the following values:
    1. Server: Enter the name of the server that hosts the database and the name of the database you want to connect to.
    2. Port: Enter 5439.
    3. Database: Enter your database name. This example uses dev.
    4. Authentication: Select OAuth.
    5. Federation Type: Select Identity Center.
    6. Identity Center Namespace: You can leave this value blank.
    7. OAuth Provider: This value should automatically be pulled from your configured XML. It will be the value from the element oauthConfigId.
    8. Select Require SSL.
    9. Choose Sign in.

      Figure 8: Tableau Desktop OAuth connection

  1. Enter your IdP credentials in the browser pop-up window.

    Figure 9: Microsoft Entra sign in page

  2. When authentication is successful, you will see the message shown in Figure 10 that follows.

    Figure 10: Successful authentication using Tableau

Congratulations! You’re signed in using the IAM Identity Center integration with Amazon Redshift. Now you’re ready to explore and analyze your data using Tableau Desktop.

Figure 11: Successful connection using Tableau Desktop

After signing in, you can create your own Tableau Report on the desktop version and publish it to your Tableau Server. For this example, we created and published a report named SalesReport.

Federate to Amazon Redshift from Tableau Server

After you have published the report from Tableau Desktop to Tableau Server, sign in as a non-admin user and view the published report (SalesReport in this example) using IAM Identity Center authentication.

  1. Sign in to the Tableau Server site as a non-admin user.
  2. Navigate to Explore and go to the folder where your published report is stored.
  3. Select the report and choose Sign In.

    Figure 12: User audit in sys_query_history

  4. To authenticate, enter your non-admin Microsoft Entra ID (Azure) credentials in the browser pop-up.

    Figure 13: Tableau Server sign In

  5. After your authentication is successful, you can access the report.

    Figure 14: Tableau report

Verify user identity from Amazon Redshift

As an optional step, you can audit the federated IAM Identity Center user from Amazon Redshift.

Figure 15 is a screenshot from the Amazon Redshift system table (sys_query_history) showing that user Ethan from Microsoft Entra ID is accessing the sales report.

select distinct user_id, pg.usename as username, trim(query_text) as query_text
from sys_query_history sys
join pg_user_info pg
on sys.user_id=pg.usesysid
where query_id=<query_id> and usesysid=<federateduser_id> and query_type='SELECT'
order by start_time desc
;

Figure 15: User audit in sys_query_history

Clean up

Complete the following steps to clean up your resources:

  1. Delete the IdP applications that you created to integrate with IAM Identity Center.
  2. Delete the IAM Identity Center configuration.
  3. Delete the Amazon Redshift application and the Amazon Redshift provisioned cluster or serverless instance that you created for testing.
  4. Delete the AWS Identity and Access Management (IAM) role and IAM policy that you created as part of the prerequisites for IAM Identity Center and Amazon Redshift integration.
  5. Delete the permission set from IAM Identity Center that you created for Amazon Redshift Query Editor V2 in the management account.

Conclusion

This post explored a streamlined approach to access management for data analytics by using Tableau’s support for OIDC for SSO. The solution facilitates federated user authentication, where user identities from an external IdP are trusted and propagated to Amazon Redshift. You learned how to configure Tableau Desktop and Tableau Server to seamlessly integrate with Amazon Redshift using IAM Identity Center for SSO. By harnessing this integration between a third-party IdP and IAM Identity Center, users can securely access Amazon Redshift data sources within Tableau without managing separate database credentials.

The following are key resources to learn more about Amazon Redshift integration with IAM Identity Center:


About the Authors

Debu-PandaDebu Panda is a Senior Manager, Product Management at AWS. He is an industry leader in analytics, application platform, and database technologies, and has more than 25 years of experience in the IT world.

Sid Wray is a Senior Product Manager at Salesforce based in the Pacific Northwest with nearly 20 years of experience in Digital Advertising, Data Analytics, Connectivity Integration and Identity and Access Management. He currently focuses on supporting ISV partners for Salesforce Data Cloud.

Adiascar Cisneros is a Tableau Senior Product Manager based in Atlanta, GA. He focuses on the integration of the Tableau Platform with AWS services to amplify the value users get from our products and accelerate their journey to valuable, actionable insights. His background includes analytics, infrastructure, network security, and migrations.

Jade Koskela is a Principal Software Engineer at Salesforce. He has over a decade of experience building Tableau with a focus on areas including data connectivity, authentication, and identity federation.

Harshida Patel is a Principal Solutions Architect, Analytics with AWS.

Maneesh Sharma is a Senior Database Engineer at AWS with more than a decade of experience designing and implementing large-scale data warehouse and analytics solutions. He collaborates with various Amazon Redshift Partners and customers to drive better integration.

Ravi Bhattiprolu is a Senior Partner Solutions Architect at AWS. He collaborates with strategic independent software vendor (ISV) partners like Salesforce and Tableau to design and deliver innovative, well-architected cloud products, integrations, and solutions to help joint AWS customers achieve their business goals.

Introducing job queuing to scale your AWS Glue workloads

Post Syndicated from Noritaka Sekiyama original https://aws.amazon.com/blogs/big-data/introducing-job-queuing-to-scale-your-aws-glue-workloads/

Data is a key driver for your business. Data volume can increase significantly over time, and it often requires concurrent consumption of large compute resources. Data integration workloads can become increasingly concurrent as more and more applications demand access to data at the same time. In AWS, hundreds of thousands of customers use AWS Glue, a serverless data integration service, for integrating data across multiple data sources at scale. AWS Glue jobs can be triggered asynchronously via a schedule or event, or started synchronously, on-demand.

Your AWS account has quotas, also referred to as limits, which are the maximum number of service resources for your AWS account. AWS Glue quotas helps guarantee the availability of AWS Glue resources and prevents accidental over provisioning of resources. However, with large or spiky workloads, it can be challenging to manage job run concurrency or Data Processing Units (DPU) to stay under the service quotas.
Traditionally, when you hit the quota of concurrent Glue job runs, your jobs fail immediately.

Today, we are pleased to announce the general availability of AWS Glue job queuing. Job queuing increases scalability and improves the customer experience of managing AWS Glue jobs. With this new capability, you no longer need to manage concurrency of your AWS Glue job runs and attempt retries just to avoid job failures due to high concurrency. You can simply start your jobs, and when the job runs are in Waiting state, the AWS Glue job queuing feature staggers jobs automatically whenever possible. This increases your job success rates and the experience for large concurrency workloads.

This post demonstrates how job queuing helps you scale your Glue workloads and how job queuing works.

Use cases and benefits for job queuing

The following are common data integration use cases where many concurrent job runs are needed:

  • Many different data sources need to be read in parallel
  • Multiple large datasets need to be processed concurrently
  • Data is processed in an event-driven fashion, and many events occur at the same time

AWS Glue has the following service quotas per Region and account related to concurrent usage:

  • Max concurrent job runs per account
  • Max concurrent job runs per job
  • Max task DPUs per account

You can also configure maximum concurrency for individual jobs.

In the aforementioned typical use cases, when you run a job through the StartJobRun API or AWS Glue console, you may hit the upper limit defined at any of the discussed places. If this happens, your job fails immediately due to errors like ConcurrentRunsExceededException returned by the AWS Glue API endpoint.

Job queuing helps those typical use cases without forcing you to manage concurrency between all your job runs. You no longer need to make manual retries when you get ConcurrentRunsExceededException. Job queuing enqueues job runs when you hit the limit and automatically reattempts job runs when resources free up. It simplifies your daily operation and reduces latency for the retries. It also allows you to scale more with AWS Glue jobs.

In the next section, we describe how job queuing is configured.

Configure job queuing for Glue jobs

To enable job queuing on the AWS Glue Studio console, complete the following steps:

  1. Open AWS Glue console.
  2. Choose Jobs.
  3. Choose your job.
  4. Choose the Job details tab.
  5. For Job Run Queuing, select Enable job runs to be queued to run later when they cannot run immediately due to service quotas
  6. Choose Save.

In the next section, we describe how job queuing works.

How AWS Glue jobs work with job queuing

In the current job run lifecycle, the job-level and account-level limits are checked when a job starts, and the job moves to a Failed state when these limits are reached. With job queuing, your job run state goes into a Waiting state to be reattempted instead of Failed. The Waiting state means that job run is queued for retry after the limits have been exceeded or resources were not unavailable. Job queueing is another retry mechanism in addition to the customer-specified max retry.

AWS Glue job queuing will improve the success rates of job runs and reduce failures due to limits, but it doesn’t guarantee job run success. Limits and resources could still be unavailable by the time the reattempt run starts.

The following screenshot shows that two job runs are in the Waiting state:

The following limits are covered by job queuing:

  • Max concurrent job runs per account exceeded
  • Max concurrent job runs per job exceeded (which includes the account-level service quota as well as the configured parameter on the job)
  • Max concurrent DPUs exceeded
  • Resource unavailable due to IP address exhaustion in VPCs

The retry mechanism is configured to retry for a maximum of 15 minutes or 10 attempts, whichever comes first.

Here’s the state transition diagram for job runs when job queuing is enabled.

Considerations

Keep in mind the following considerations:

  • AWS Glue Flex jobs are not supported
  • With job queuing enabled, the parameter MaxRetries is not configurable for the same job

Conclusion

In this post, we described how the new job queuing capability helps you scale your AWS Glue job workload. You can start leveraging job queuing for your new jobs or existing jobs today. We are looking forward to hearing your feedback.


About the authors

Noritaka Sekiyama is a Principal Big Data Architect on the AWS Glue team. He works based in Tokyo, Japan. He is responsible for building software artifacts to help customers. In his spare time, he enjoys cycling with his road bike.

 Gyan Radhakrishnan is a Software Development Engineer on the AWS Glue team. He is working on designing and building end-to-end solutions for data intensive applications.

Simon Kern is a Software Development Engineer on the AWS Glue team. He is enthusiastic about serverless technologies, data engineering and building great services.

Dana Adylova is a Software Development Engineer on the AWS Glue team. She is working on building software for supporting data intensive applications. In her spare time, she enjoys knitting and reading sci-fi.

Matt Su is a Senior Product Manager on the AWS Glue team. He enjoys helping customers uncover insights and make better decisions using their data with AWS Analytic services. In his spare time, he enjoys skiing and gardening.

Firefox 130.0 released

Post Syndicated from jzb original https://lwn.net/Articles/988607/

Version
130.0
of the Firefox browser has been released. Notable in this
release is the addition of a Firefox Labs tab in Firefox
Settings. This allows users to easily enable experimental features,
such as the ability to translate selected text portions to different
languages after a full-page translation, and add
an AI chatbot to the sidebar
. Firefox 130 also addresses several
security issues
, adds 11 new languages to its translation support,
and more.

Three Surprising Factors that Affect Cloud Performance

Post Syndicated from Kari Rivas original https://www.backblaze.com/blog/three-surprising-factors-that-affect-cloud-performance/

A decorative image showing a cloud and data graphs.

When you think about cloud performance, metrics like latency and throughput are probably the first things that come to mind. We covered those metrics pretty extensively here and here. So, today, I’m walking through some factors that affect cloud performance that may not get talked about as often, including:

  • The size of your files.
  • The number of parts you upload or download.
  • Block (part) size.

These factors may not be “surprising” per se especially if you remember the pain of trying to download The Matrix over dial up. But they are all things that you should consider (and that you have more control over) when thinking about cloud performance overall. 

Let’s dig in.

1. The size of your files

This one is pretty obvious. Larger files take longer because they require more data to be transferred. If you have a 10Mbps upload connection, a 1GB file will take approximately 800 seconds (13 minutes and 20 seconds) to upload, whereas a 100MB file will take about 80 seconds (a minute and 20 seconds). Most enterprise-grade internet connections offer higher upload speeds, but 10Mbps makes the math approachable for the sake of argument.  

Small files—that is, those less than 5GB—can be uploaded in a single API call. (Note: this can vary based on cloud storage provider and configuration.) Larger files up to 10TB can be uploaded as “parts” in multiple API calls. Each part has to be a minimum of 5MB and a maximum of 5GB. 

You’ll notice that there is quite an overlap here! For uploading files between 5MB and 5GB, is it better to upload them in a single API call, or split them into parts? What is the optimum part size? For backup applications, which typically split all data into equally sized blocks, storing each block as a file, what is the optimum block size? As with many questions, the answer is: it depends.

2. The number of parts you upload or download

Each API call incurs a more-or-less fixed overhead due to latency. For a 1GB file, assuming a single thread of execution, uploading all 1GB in a single API call will be faster than 10 API calls each uploading a 100MB part, since those additional nine API calls each incur some latency overhead. So, bigger is better, right?

3. Block (part) size

Not necessarily, and that brings us to part size. Multi-threading, as mentioned above, affords us the opportunity to upload multiple parts simultaneously, which improves performance—but there are trade-offs. Typically, each part must be stored in memory as it is uploaded, so more threads means more memory consumption. If the number of threads multiplied by the part size exceeds available memory, then either the application will fail with an out of memory error, or data will be swapped to disk, reducing performance.

Downloading data offers even more flexibility, since applications can specify any portion of the file to download in each API call. Whether uploading or downloading, there is a maximum number of threads that will drive throughput to consume all of the available bandwidth. Exceeding this maximum will consume more memory, but provide no performance benefit. 

So, what to do to get the best performance possible for your use case? 

Simple: Customize your settings

Most backup and file transfer tools allow you to configure the number of threads and the amount of data to be transferred per API call, whether that’s block size or part size. If you are writing your own application, you should allow for these parameters to be configured. When it comes to deployment, some experimentation may be required to achieve maximum throughput given available memory.

The big takeaway: When it comes to cloud performance, the metrics you need to care about and the performance you actually need are highly dependent on your use case, your own infrastructure, your workload, and all the network connections between your infrastructure and the cloud provider as well. So, when you’re deciding how to store and use your data, it’s worth taking some extra time to consider the above factors for optimum performance. 

The post Three Surprising Factors that Affect Cloud Performance appeared first on Backblaze Blog | Cloud Storage & Cloud Backup

List of Old NSA Training Videos

Post Syndicated from Bruce Schneier original https://www.schneier.com/blog/archives/2024/09/list-of-old-nsa-training-videos.html

The NSA’s “National Cryptographic School Television Catalogue” from 1991 lists about 600 COMSEC and SIGINT training videos.

There are a bunch explaining the operations of various cryptographic equipment, and a few code words I have never heard of before.

[$] Transcribing audio with AI using Speech Note

Post Syndicated from jzb original https://lwn.net/Articles/987315/

One of the joys of writing about technology is the opportunity to
cover interesting talks on open‑source and free‑software topics. One
of the pains is creating transcriptions of said talks, or continually
referring back to a recording, to be able to write about
them. Speech Note is an
open-source application that uses machine-learning models, running locally, to
translate speech to text and take the pain out of transcription. It
also handles text to speech, and language translations. While not
perfect, its transcriptions are better than one might expect, even when
handling jargon, accents, and less-than-perfect audio.

Security updates for Tuesday

Post Syndicated from corbet original https://lwn.net/Articles/988570/

Security updates have been issued by AlmaLinux (python3.12), Debian (calibre, exfatprogs, frr, git, libtommath, nbconvert, ruby-nokogiri, ruby-tzinfo, and webkit2gtk), Fedora (flatpak, lua-mpack, and python3.12), Red Hat (389-ds-base, 389-ds:1.4, buildah, fence-agents, gvisor-tap-vsock, httpd:2.4, kernel, kernel-rt, nodejs:18, orc, postgresql, postgresql:12, postgresql:13, postgresql:15, python-urllib3, python3.12, and skopeo), SUSE (389-ds, bubblewrap and flatpak, cacti, cacti-spine, curl, glib2, kernel-firmware, libqt5-qt3d, libqt5-qtquick3d, opera, python39, qemu, unbound, xen, and zziplib), and Ubuntu (ffmpeg, linux-raspi-5.4, and python-webob).

Join the UK Bebras Challenge 2024

Post Syndicated from Andrew Csizmadia original https://www.raspberrypi.org/blog/uk-bebras-challenge-2024/

The UK Bebras Challenge, the nation’s largest computing competition, is back and open for entries from schools. This year’s challenge will be open for entries from 4–15 November. Last year, over 400,000 students from across the UK took part. Read on to learn how your school can get involved.

What is UK Bebras?

UK Bebras is a free-to-enter annual competition that is designed to spark interest in computational thinking among students aged 6 to 19 by providing engaging and thought-provoking activities. The 45-minute challenge is accessible to everyone, offering age-appropriate interactive questions for students at different levels, including a tailored version for students with severe sight impairments. 

The questions are designed to give every student the opportunity to showcase their potential, whether they excel in maths or computing, or not. With self-marking questions and no programming required, it’s easy for schools to participate.

“Thank you for another fantastic Bebras event! My students have really enjoyed it. This is the first year that one of my leadership team actually did the Bebras to understand what we are preparing the children for — she was very impressed!” Reference 5487

A class of primary school students do coding at laptops.

“I really enjoyed doing the Bebras challenge yesterday. It was the most accessible it’s ever been for me as a braillist/screen reader user.” Reference 5372

What does a UK Bebras question look like?

The questions are inspired by classic computing problems but are presented in a fun, age-appropriate way. For instance, a puzzle for 6- to 8-year-olds might involve guiding a hungry tortoise along the most efficient path across a lawn, while 16- to 19-year-olds could be asked to sort members for quiz teams based on who knows who — a challenging problem relating to graph theory.

Here’s a question we ran in 2023 for the Castors group (ages 8 to 10). Can you solve it? 

Planting carrots

A robotic rabbit is planting carrot seeds in these four earth mounds.

It can respond to these commands:

jump left to the next mound
jump right to the next mound
plant a carrot seed in the mound you are on

Here is a sequence of commands for the rabbit:


We don’t know which mound the rabbit started on, but we do know that, when it followed this sequence, it placed each of three carrot seeds on different mounds.

Question: 

Which picture shows how the carrot seeds could have been planted by the robot following the sequence of commands?

Example puzzle answer

The correct answer is:

The image below shows the route the robot takes by following the instructions:

After executing the first two commands

the rabbit places the seed on the mound to the far right:

It then executes the commands

and lays the next seed:

Then it jumps to the left twice and lays the last seed

So the carrot seeds will be on the hills in the order:

Did you get it right?

How do I get my school involved?

Visit the UK Bebras website for more information and to register your school. Once you’ve registered, you’ll get access to the entire UK Bebras back catalogue of questions, allowing you to create custom quizzes for your students to tackle at any time throughout the year. These quizzes are self-marking, and you can download your students’ results to keep track of their progress. Schools have found these questions perfect for enrichment activities, end-of-term quizzes, lesson starters, and even full lessons to develop computational thinking skills.

Join for free at bebras.uk/admin.

The post Join the UK Bebras Challenge 2024 appeared first on Raspberry Pi Foundation.

Providing Best-in-Class Security with Heather Diaz of fTLD Registry

Post Syndicated from Michael Kammer original https://blog.zabbix.com/providing-best-in-class-security-with-heather-diaz-of-ftld-registry/28585/

As the Vice President of Compliance and Policy at fTLD Registry Services, Heather Diaz is a security expert with over a decade of experience in ensuring the legal, compliance, and strategic alignment of the top-level domains .Bank and .Insurance. She is a compliance and ethics professional and leads the policy and security compliance functions at fTLD.

We sat down with her to learn more about how Zabbix makes her job easier, why she appreciates the inherent flexibility of our solutions, and how she works with our team to help make sure fTLD’s domains are as secure as they can possibly be.

Can you give us a bit of background on fTLD and what it does? What makes your business proposition stand out?

fTLD Registry is the domain authority for .Bank and .Insurance – the most trusted and exclusive domain extensions for banks, insurers, and producers. Our mission is to offer these industry-created and governed domains a shield against cyberattacks and fraud, delivering peace of mind with website and email security.

Since 2011, fTLD Registry has collaborated with experts in cybersecurity, domain security, and the banking and insurance sectors to develop Security Requirements that mitigate cyber threats such as phishing, spoofing, cybersquatting, and man-in-the-middle attacks.

Why is monitoring especially important for fTLD?

Security monitoring is a key value for .Bankers (banks who have switched to .Bank) and our .Insurance customers as well. They receive reporting from our customized Zabbix monitoring system whenever security vulnerabilities are detected. This ensures we provide proactive compliance security monitoring, which allows them to address any findings and keep their .Bank and .Insurance websites and email channels secure.

Are there any specific points you were looking to address with a new monitoring approach?

fTLD has continued to enhance our security requirements for .Bank and .Insurance to address new and evolving cybersecurity threats and provide more secure and trusted online interactions for the financial services sector and their customers. We do this by partnering with Zabbix’s security experts and engineers to make sure our security requirements and monitoring continue to provide best-in-class domain security for .Bank and .Insurance.

Can you please share any business or operational areas that have seen improvements since implementing Zabbix?

Our compliance area has enjoyed having time to engage with .Bank and .Insurance customers to educate them about how to address any security vulnerabilities, as the Zabbix system takes care of sending notifications and warnings to our customers. Not only that, the Zabbix system gives us a dashboard with easy-to-interpret metrics, the ability to generate ad-hoc reporting, and with a number of important data elements integrated, such as customer contact information and their domain status (e.g., live), so our team can always have secure employee access to security monitoring data no matter where in the world we are working. Here are just some of the external interfaces, Agent2 plugins, and custom notifications we developed together with the Zabbix team.

External interfaces:

  • ICANN CZDS (to get a list of zones)
  • Whois (to get zone and registrar details)
  • CRM (to get a list of verification contacts)
  • Marketing system (to get a list of additional zone details)
  • Subdomain discoverer (to discover zone records)

Agent2 plugins

  • DNSSEC plugin (for DNSSEC-related checks)
  • Nameservers plugin (to perform nameserver-related checks)
  • Certificate plugin (to validate TLS ciphers and certificates)
  • Port check plugin (to check what ports are open and verify the security of opened ports)
  • DMARC/SPF plugin (to check presence and validity of DMARC and SPF records)
  • Web redirect plugin (to check validity of HTTP headers and redirects)

Notifications

  • Media types to send compliance reports

Is there anything else you’d like to share about Zabbix and our capabilities?

Zabbix is a great partner for security monitoring, as they’re willing to develop new features to provide a service that meets our exacting business requirements and their support is highly responsive. Most solutions come as they are. With Zabbix, we were able to customize and adapt their solution when new needs came up. My favorite feature is how we provide automated reporting to our customers and key stakeholders – it’s all automated and handled by the Zabbix platform.

The post Providing Best-in-Class Security with Heather Diaz of fTLD Registry appeared first on Zabbix Blog.

The collective thoughts of the interwebz