Looking up a virtual memory area (VMA) in a process’s address space, for
the handling of page faults or any of a number of other tasks, in
multi-threaded processes has long been bedeviled by lock contention in the
kernel. As a result, developer gatherings have been subjected to many
sessions on how to improve the situation. At the 2024 Linux Storage,
Filesystem, Memory-Management and BPF Summit, developers in the
memory-management track met, in a session led by Liam Howlett, to talk
about a situation that has improved considerably in recent times, but which
still offers opportunities for optimization.
Security updates have been issued by Debian (webkit2gtk), Fedora (kernel), Mageia (chromium-browser-stable, djvulibre, gdk-pixbuf2.0, nss & firefox, postgresql15 & postgresql13, python-pymongo, python-sqlparse, stb, thunderbird, and vim), Red Hat (go-toolset:rhel8, nodejs, and varnish:6), SUSE (gitui, glibc, and kernel), and Ubuntu (libspreadsheet-parseexcel-perl, linux-aws, linux-aws-5.15, linux-gke, linux-gcp, python-idna, and thunderbird).
We continue to expand the scope of our assurance programs at Amazon Web Services (AWS) and are pleased to announce that the Spring 2024 System and Organization Controls (SOC) 1, 2, and 3 reports are now available. The reports cover the 12-month period from April 1, 2023 to March 31, 2024, so that customers have a full year of assurance from each report. These reports demonstrate our continuous commitment to adhere to the heightened expectations for cloud service providers.
The Spring 2024 SOC reports include an additional six services in scope, for a total of 177 services in scope. For up-to-date information, including when additional services are added, visit the AWS Services in Scope by Compliance Program webpage and choose SOC.
The six additional services in scope for the Spring 2024 SOC reports are:
AWS strives to continuously bring services into scope of its compliance programs to help you meet your architectural and regulatory needs. Please reach out to your AWS account team if you have questions or feedback about SOC compliance.
To learn more about our compliance and security programs, see AWS Compliance Programs. As always, we value your feedback and questions; reach out to the AWS Compliance team through the Contact Us page.
If you have feedback about this post, submit comments in the Comments section below.
Vineeth Pillai gave a remote talk at the 2024 Linux Storage,
Filesystem, Memory Management, and BPF Summit explaining how BPF could be
used to improve the performance of virtual machines (VMs). Pillai has
a patch
set designed to let guest and host machines share scheduling information in
order to eliminate some of the overhead of running in a VM. The assembled
developers had several comments on the design, but seemed overall to approve of
the prospect.
When we launched Regional Services in June 2020, the concept of data locality and data sovereignty were very much rooted in European regulations. Fast-forward to today, and the pressure to localize data persists: Several countries have laws requiring data localization in some form, public-sector contracting requirements in many countries require their vendors to restrict the location of data processing, and some customers are reacting to geopolitical developments by seeking to exclude data processing from certain jurisdictions.
That’s why today we’re happy to announce expanded capabilities that will allow you to configure Regional Services for an increased set of defined regions to help you meet your specific requirements for being able to control where your traffic is handled. These new regions are available for early access starting in late May 2024, and we plan to have them generally available in June 2024.
It has always been our goal to provide you with the toolbox of solutions you need to not only address your security and performance concerns, but also to help you meet your legal obligations. And when it comes to data localization, we know that some of you need to have data stay in a particular jurisdiction, while others need data to avoid certain jurisdictions. In response to these needs, we’ve expanded our Regional Services toolbox of offerings to help you more precisely determine where traffic is inspected. Some of these new Regional Services offerings allow you to restrict inspection of data to only those data centers within jurisdictional boundaries, such as Brazil, Saudi Arabia, and Switzerland. Others will allow you to permit inspection of data everywhere except certain jurisdictions, such as our new Exclusive of Hong Kong and Macau offering and our Exclusive of Russia and Belarus offering. And we’ve also listened to customers who are eager to demonstrate their commitment to sustainability by offering our Cloudflare Green Energy region, which limits inspection of data to those data centers that are committed to powering their operations with renewable energy.
The new regions include some of our most requested areas and specifications:
Austria, Brazil, Cloudflare Green Energy, Exclusive of Hong Kong and Macau, Exclusive of Russia and Belarus, France, Hong Kong, Italy, NATO, the Netherlands, Russia, Saudi Arabia, South Africa, Spain, Switzerland, and Taiwan.
A full list of our Regional Services offerings can be found here.
A note on our framework for data localization going forward
Over the course of the next year, you are going to see new and exciting ways to use Cloudflare products to help keep your data local. But doesn’t this contradict the whole premise of Cloudflare? Aren’t we a global anycast network that believes in Region Earth?
We don’t believe these have to be an either/or conversation. While we continue to believe that data localization should not be a proxy for privacy and that restrictions on cross border data transfers are harmful to global commerce, we remain committed to supporting those of you who need data localization solutions to address your legal obligations and risk tolerance.
Unfortunately, many different cloud providers have decided that the best way to meet the compliance needs of their customers is to create fixed infrastructure deployments called sovereign clouds. The trouble with these infrastructure deployments is that you have to commit all of your traffic to be regionalized, regardless of whether all of that traffic actually needs to be confined to a specific data center in a specific region.
As we continue to ramp up development of our Data Localization Suite, I want to lay out the questions that are guiding our thought process:
What if there was a better way forward that lets you regionalize exactly what you need to, without having to localize everything, giving you the best of compliance and performance? What would customers build if they could localize the APIs that handled private customer information, while also serving their static assets globally? How could we increase the compliance and privacy of our customers’ Zero Trust deployments if we could let them choose where their security processing occurred? What if they could define custom regions, and apply those regions to specific hostnames and Cloudflare products while also being able to use BYOIP or Static IP?
We call this approach software defined regionalization (SDR) and we believe that it is the future of data localization. Using our global network as the foundation, SDR allows our customers to make exceptionally granular choices about what traffic to regionalize and where to regionalize it. This empowers you to build applications that are fast, reliable, and compliant without having to deploy new physical infrastructure or have multiple cloud deployments for the same application.
Taking it a step further, SDR allows you to shape Cloudflare to meet both current and future needs. It gives you the flexibility to quickly respond to new challenges in a rapidly changing world. By making localization choices in software, you are not bound by the physical constraints of your existing network geography or the locations of your cloud deployments.
We believe that software defined regionalization is the future of data localization, and we are excited to be on the forefront of its development.
How Regional Services ensures your data is processed in the correct region
Complying with data localization requirements isn’t possible without strong encryption; otherwise, anyone could snoop on your customers’ data, regardless of where it’s stored. Strong encryption is the foundation of Regional Services.
Data is often described as being “in transit” and “at rest”. It’s critically important that both are encrypted. Data “in transit” refers to just that – data while it’s moving about on the wire, whether a local network or the public Internet. “At rest” generally means stored on a disk somewhere, whether a spinning hard disk or a modern solid state disk.
In transit, Cloudflare can enforce that all traffic uses modern TLS and gets the highest level of encryption possible. We can also enforce that all traffic back to customers’ origin servers is always encrypted. Communication between all of our edge and core data centers is always encrypted.
Cloudflare encrypts all the data we handle at rest, with disk-level encryption. From cached files on our edge network, to configuration state in databases in our core data centers – every byte is encrypted at rest.
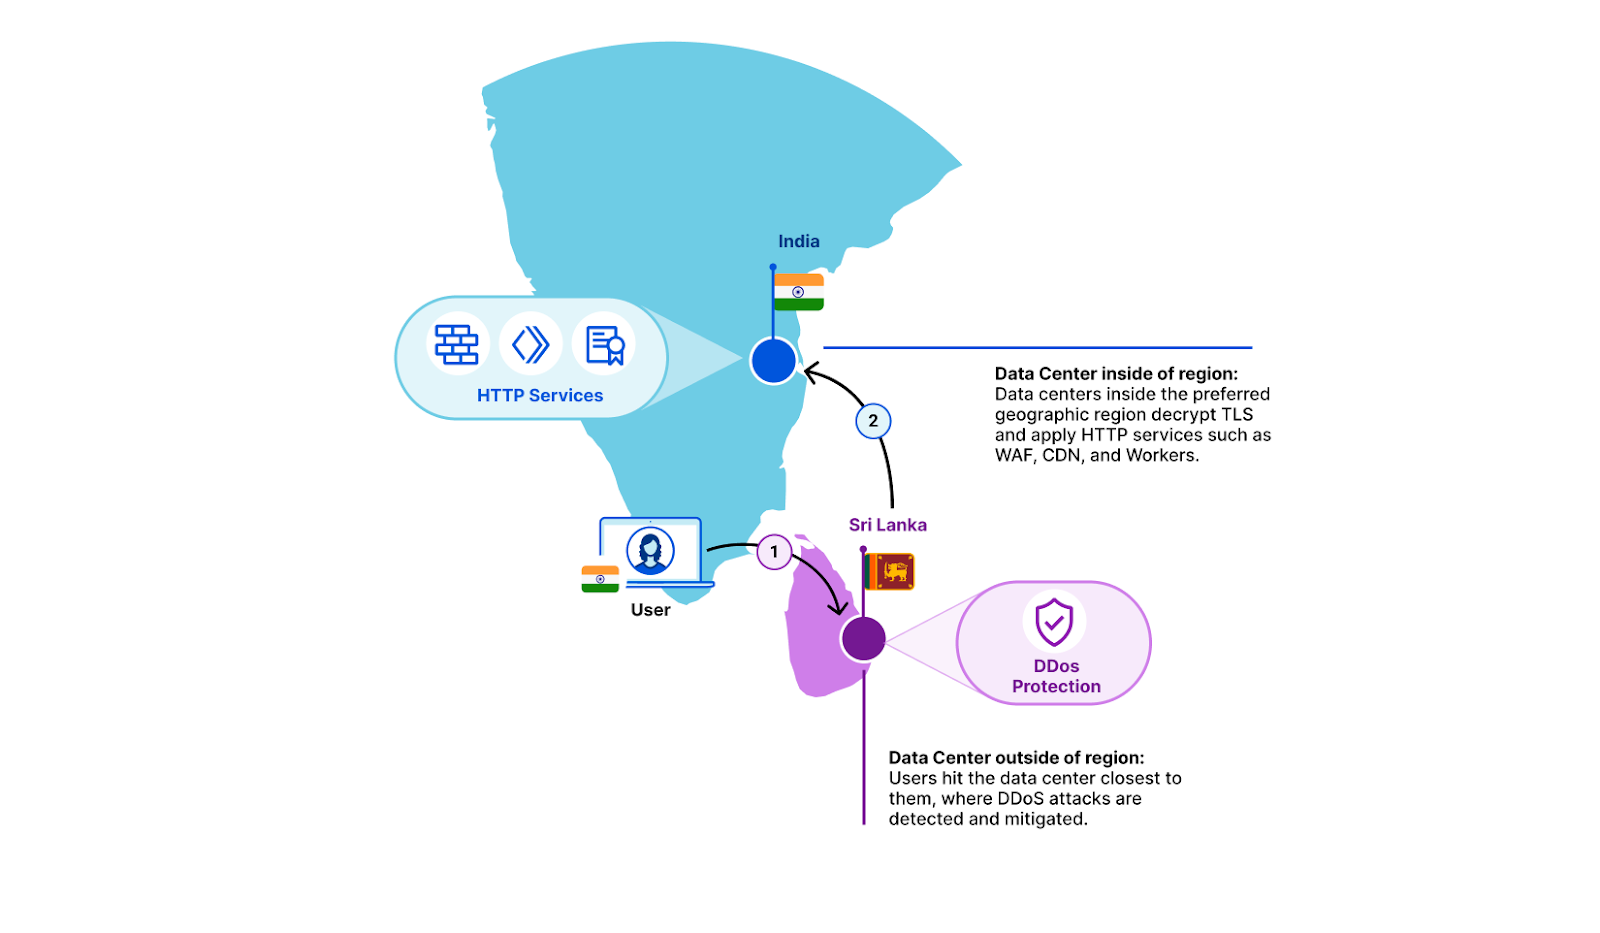
How then can we also regionalize the traffic if it’s encrypted? All of Cloudflare’s data centers advertise the same IP addresses through Border Gateway Protocol (BGP). Whichever data center is closest to an end user from a network point of view is the one that they will hit.
This is great for two reasons. The first is that the closer the data center is to an eyeball, the faster the reply. The second great benefit is that this comes in very handy when dealing with large DDoS attacks. Volumetric DDoS attacks throw a lot of bogus traffic at a particular application, which overwhelms network capacity. Cloudflare’s anycast network is great at taking on these attacks because they get distributed across the entire network, and mitigated close to where they originate.
Anycast doesn’t respect regional borders – it doesn’t even know about them. Which is why, out of the box, Cloudflare can’t guarantee that traffic from inside a country will also be serviced there. Typically, requests hit a data center inside the originating country, but it’s possible that the user’s Internet Service Provider will send traffic to a network that might route it to a different country.
Regional Services solves that: when turned on, each data center becomes aware of which regional services-defined boundary it is operating in. If a customer’s end user hits a Cloudflare data center that doesn’t match the region that the customer has selected, we simply forward the raw TCP stream in encrypted form. Once it reaches a data center inside the right region, we decrypt and apply all of our Layer 7 products. This covers products such as CDN, WAF, Bot Management, and Workers.
Let’s take an example. A customer’s end user is in Kerala, India, and BGP has determined that the optimal data center for that end user’s request is in Colombo, Sri Lanka. In this example, a customer may have selected India as the sole region within which traffic should be serviced. The Colombo data center sees that this traffic is meant for the India region. It does not decrypt, but instead forwards it to a data center inside India. There, we decrypt and products such as WAF and Workers are applied as if the traffic had hit the data center directly. Responses from the in-region data center retrace the same path back to the client.
Our expanded Regional Services capabilities are available for early access in late May 2024, and we plan to have them generally available in June 2024. We are very excited about our ability to develop our Data Localization Suite to help you meet your data localization needs.
To get access to these expanded capabilities, or if you’re interested in using the Data Localization Suite, contact your account team.
During Developer Week in April 2024, we announced General Availability of Workers AI, and today, we are excited to announce that AI Gateway is Generally Available as well. Since its launch to beta in September 2023 during Birthday Week, we’ve proxied over 500 million requests and are now prepared for you to use it in production.
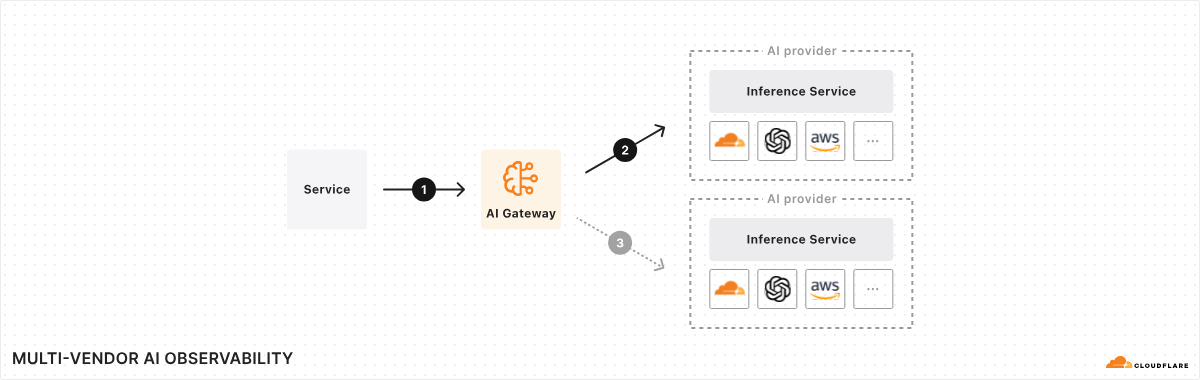
AI Gateway is an AI ops platform that offers a unified interface for managing and scaling your generative AI workloads. At its core, it acts as a proxy between your service and your inference provider(s), regardless of where your model runs. With a single line of code, you can unlock a set of powerful features focused on performance, security, reliability, and observability – think of it as your control plane for your AI ops. And this is just the beginning – we have a roadmap full of exciting features planned for the near future, making AI Gateway the tool for any organization looking to get more out of their AI workloads.
Why add a proxy and why Cloudflare?
The AI space moves fast, and it seems like every day there is a new model, provider, or framework. Given this high rate of change, it’s hard to keep track, especially if you’re using more than one model or provider. And that’s one of the driving factors behind launching AI Gateway – we want to provide you with a single consistent control plane for all your models and tools, even if they change tomorrow, and then again the day after that.
We’ve talked to a lot of developers and organizations building AI applications, and one thing is clear: they want more observability, control, and tooling around their AI ops. This is something many of the AI providers are lacking as they are deeply focused on model development and less so on platform features.
Why choose Cloudflare for your AI Gateway? Well, in some ways, it feels like a natural fit. We’ve spent the last 10+ years helping build a better Internet by running one of the largest global networks, helping customers around the world with performance, reliability, and security – Cloudflare is used as a reverse proxy by nearly 20% of all websites. With our expertise, it felt like a natural progression – change one line of code, and we can help with observability, reliability, and control for your AI applications – all in one control plane – so that you can get back to building.
Here is that one line code change using the OpenAI JS SDK. And check out our docs to reference other providers, SDKs, and languages.
import OpenAI from 'openai';

const openai = new OpenAI({
apiKey: 'my api key', // defaults to process.env["OPENAI_API_KEY"]
	baseURL: "https://gateway.ai.cloudflare.com/v1/{account_id}/{gateway_slug}/openai"
});
What’s included today?
After talking to customers, it was clear that we needed to focus on some foundational features before moving onto some of the more advanced ones. While we’re really excited about what’s to come, here are the key features available in GA today:
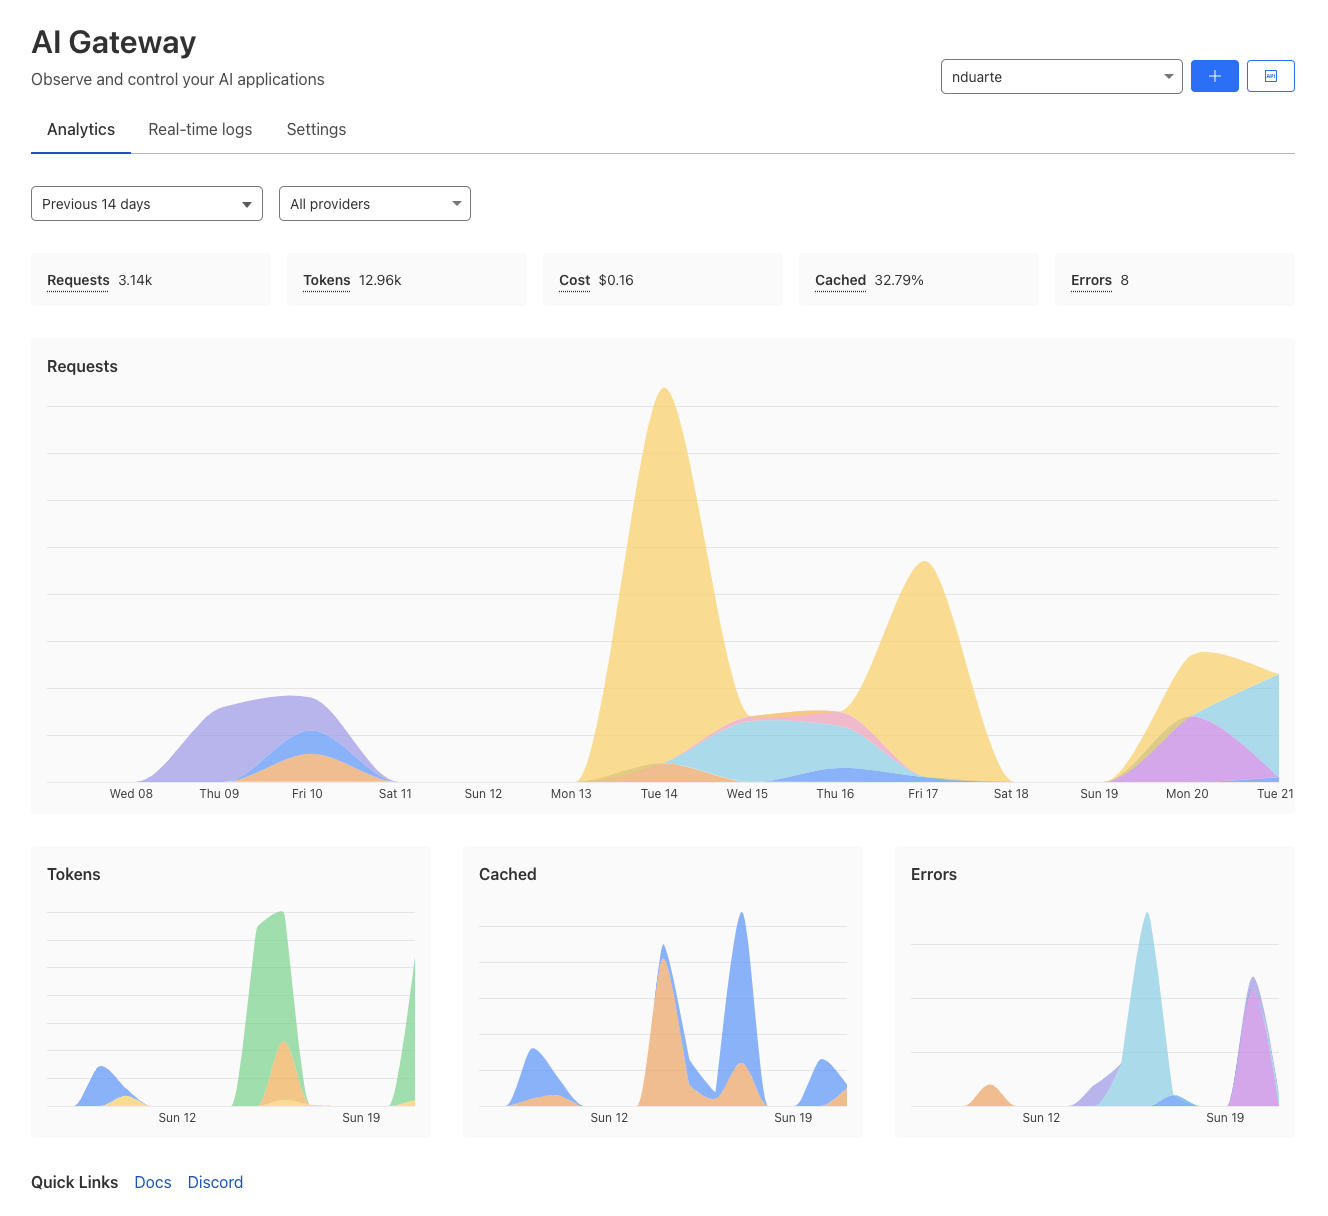
Analytics: Aggregate metrics from across multiple providers. See traffic patterns and usage including the number of requests, tokens, and costs over time.
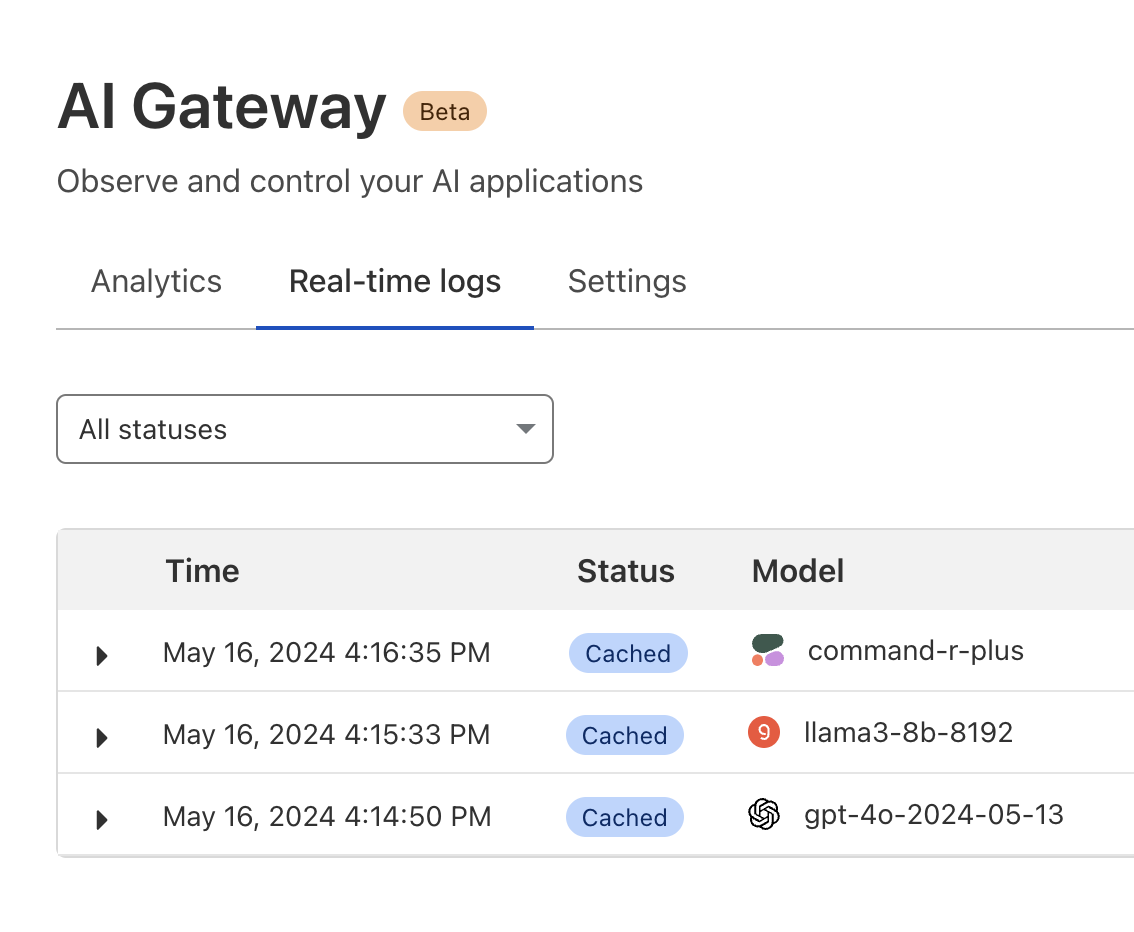
Real-time logs: Gain insight into requests and errors as you build.
Caching: Enable custom caching rules and use Cloudflare’s cache for repeat requests instead of hitting the original model provider API, helping you save on cost and latency.
Rate limiting: Control how your application scales by limiting the number of requests your application receives to control costs or prevent abuse.
Support for your favorite providers: AI Gateway now natively supports Workers AI plus 10 of the most popular providers, including Groq and Cohere as of mid-May 2024.
Universal endpoint: In case of errors, improve resilience by defining request fallbacks to another model or inference provider.
We’ve gotten a lot of feedback from developers, and there are some obvious things on the horizon such as persistent logs and custom metadata – foundational features that will help unlock the real magic down the road.
But let’s take a step back for a moment and share our vision. At Cloudflare, we believe our platform is much more powerful as a unified whole than as a collection of individual parts. This mindset applied to our AI products means that they should be easy to use, combine, and run in harmony.
Let’s imagine the following journey. You initially onboard onto Workers AI to run inference with the latest open source models. Next, you enable AI Gateway to gain better visibility and control, and start storing persistent logs. Then you want to start tuning your inference results, so you leverage your persistent logs, our prompt management tools, and our built in eval functionality. Now you’re making analytical decisions to improve your inference results. With each data driven improvement, you want more. So you implement our feedback API which helps annotate inputs/outputs, in essence building a structured data set. At this point, you are one step away from a one-click fine tune that can be deployed instantly to our global network, and it doesn’t stop there. As you continue to collect logs and feedback, you can continuously rebuild your fine tune adapters in order to deliver the best results to your end users.
This is all just an aspirational story at this point, but this is how we envision the future of AI Gateway and our AI suite as a whole. You should be able to start with the most basic setup and gradually progress into more advanced workflows, all without leaving Cloudflare’s AI platform. In the end, it might not look exactly as described above, but you can be sure that we are committed to providing the best AI ops tools to help make Cloudflare the best place for AI.
How do I get started?
AI Gateway is available to use today on all plans. If you haven’t yet used AI Gateway, check out our developer documentation and get started now. AI Gateway’s core features available today are offered for free, and all it takes is a Cloudflare account and one line of code to get started. In the future, more premium features, such as persistent logging and secrets management will be available subject to fees. If you have any questions, reach out on our Discord channel.
Каквото и да се случва, в дъното му стои жена. Това е смисълът на френския израз cherchez la femme, който за първи път се появява в творчеството на Александър Дюма-баща. Думите на писателя изразяват широко разпространено убеждение, затова и се превръщат в устойчиво клише. То е в основата на много криминалета, както и на жанра филм ноар (film noir), водещ началото си от френското кино, който изобилства от тъмни кадри, предимно в черно-бяло, и фатални жени.
Принципът cherchez la femme се прилага и като лаическа схема за обяснение на исторически събития. В детската ми глава през 80-те години се беше набило от разговори с роднини, че жените са в основата на всички войни и трагични събития в историята. За Троянската война е виновна Хубавата Елена, Цезар е убит заради Клеопатра, Френската революция е заради Мария-Антоанета. Хитлер пък дошъл на власт, защото жените толкова го харесвали, че изпадали в екстаз от речите му. А подложил евреите на геноцид заради… майка си.
Като заговорихме за майки, за решението как да приключи третият сезон на риалити шоуто „Ергенът“, според общественото мнение е виновна майката на ергена.
Финал ли бе да го опишеш
В последния епизод на шоуто се очакваше ергенът – 28-годишният Александър (Алек) Младенов – да си избере за фаворитка една от двете финалистки. И да каже в сърцераздирателен монолог на отпадналата, че тя е прекрасна и изключителна, но най-добре ще е да намери щастието с някой друг. А на победителката да даде ако не обещание за общо щастие, „докато смъртта ги раздели“, поне надежда за съвместно бъдеще.
Само че Алек предпочете да не си тръгне с никоя от финалистките. Аргументът, който изтъкна, беше, че изпитва силни чувства и към двете и не е способен да направи избор. И че според него не е възможно човек да изпитва любов към двама души едновременно.
На всичко отгоре левентът дори не положи усилието да разговаря лично със съперничките, за да обясни на всяка от тях защо не вижда бъдещето си с нея. Вместо това записа общо видеопослание за двете жени, което те трябваше да изгледат заедно. Така на всяка от тях се наложи да слуша не само колко е прекрасна тя самата, а и да преглъща излиянията колко невероятна и изключителна е конкурентката ѝ.
Шокирани от неочакваната развръзка, двете жени се питаха дали не става дума за лоша шега и накрая Алек все пак ще се появи. Едната схвана реалността доста бързо, но другата отказваше да повярва дори след като се намеси мъж от екипа, за да им обясни ситуацията: „Съжалявам, че го научавате по този начин. Но това е избор, който е направен. Знам, че изглежда безумно. То е безумно, но е това.“ Накрая на двете жени не им остана нищо друго, освен да се прегърнат, за да се утешат взаимно.
Какво каза ергенската майка
Част от регламента на „Ергенът“ е родителите (и евентуално други най-близки хора) на трите финалистки да се запознаят с мъжа, за чието сърце се борят дъщерите им, а в последния епизод неговите родители да се срещнат с двете останали кандидатки. От страната на Александър Младенов дойдоха майка му и сестра му.
След като се запозна с претендентките, майката не спести пред сина си критичното си отношение към тях. Като причини за притесненията си тя изтъкна, че и двете жени са по-възрастни от него (те са на 34 и 36 години) и че едната вече има 7-годишно дете. Тя сподели, че си представя бъдещето на сина си не с такава жена, а с „едно усмихнато, слънчево момиче“, което е „без багаж“, тъй като „една жена, която е имала брак и дете, и опити с други връзки, е много по-обиграна, […] отколкото един мъж на 28 години. […] Защото ти си много чувствителен, много емоционален“.
За да придаде по-голяма тежест на аргументите си, майката на Алек допълнително го инфантилизира, прибягвайки до авторитета на непоявилия се в шоуто баща и до легитимиране на малко физическо насилие: „Може би с татко ти е по-добре. Той с една дума може да те сложи на място. […] Едно пляскане по врата отзад и си готов. […] Като някое малко детенце“.
И въпреки наближаващата развръзка на риалитито главният съвет на майката беше: „Отпусни си душата, сега не му е времето за крайни решения.“ В края на разговора си с Алек тя каза същото, но по друг начин: „Само те моля да не бързаш. Много те моля.“
Майката – главният виновник?
Както по време на финалния епизод, така и след края му Алек твърди, че не е взел решението да не остане с нито една от кандидатките под влияние на майка си. Въпреки това мнозинството коментари и мемета по темата сочат именно нея като причина за развръзката. Появиха се даже иронични предложения шоуто да стане „Свекърва търси снаха“.
Тези интерпретации не отчитат обаче две важни неща. Първото е, че Александър Младенов е пълнолетен. И макар възпитанието да играе сериозна роля за оформянето на характера на един навършил пълнолетие човек, единствено той е отговорен за постъпките си. Второто – дори да допуснем, че думите на майка му, която отказва да приеме, че синът ѝ е пораснал, са натежали на везните, няма данни тя да е вдъхновила начина, по който ергенът се раздели с финалистките.
Да изоставиш с видеообръщение е най-нелепото в случая, независимо дали става дума за лично хрумване, или за странна приумица на сценаристите. А да си тръгнеш без избраница, ако не си намерил такава, е по-честно от постъпката на ергена от първия сезон Виктор Стоянов, който посочи победителка от немай-къде, а после нямаше връзка с нея.
Именно избягването на личната среща за сбогуване наранява двете кандидатки повече от факта, че не са избрани. Магдалена, която по-трудно приема развръзката, твърди: „Човекът, когото аз познавам, ще се изправи пред мен. Аз съм сигурна, аз го познавам. […] И ще ми каже: да, ти си моят избор [или] не, не си моят избор.“
За разлика от нея, Надежда бързо променя отношението към доскорошния си възлюбен: „За мен това не са мъже. Аз имам син и го възпитавам да уважава жените, да мисли за тях, да мисли за чувствата им.“ Тя казва, че учи сина си, че мъжете трябва „да са достойни като хора. Не защото са мъже или защото други са жени. Просто защото сме хора. И всеки един човек трябва да подхожда човешки към чувствата на другия. Това да се разделиш с някого със съобщение за мен е страхливо. И се надявам моят син да не стане такъв.“
Другите ергенски майки
Майката на пианиста Евгени Генчев, който беше ергенът от втория сезон на риалити шоуто, също стана ноторно известна. Повод за това беше въпросът, който тя зададе и на двете кандидат-снахи: дали, ако имат дъщеря, биха я кръстили на нея – Светла. Това се превърна в повод за такива майтапи, че за някоя и друга седмица направо си беше неудобно да се казваш Светла.
Въпреки че майката на музиканта не хареса чепатата манекенка природозащитничка, която заяви, че не е съгласна дъщеря ѝ да носи името на свекървата, той си избра нея. А една от зрителските критики срещу отпадналата конкурентка беше, че тя твърде много се е опитвала да се хареса на майката. Вярно, че и тя не прегърна идеята дъщеря ѝ да се казва Светла, но изрази готовност името да започва със „с“.
За майката на Виктор Стоянов – ергена от първия сезон, трудно може да се каже нещо укорително. Тя заяви, че не е важно дали одобрява партньорите на децата си, защото те ще живеят с тях, а не тя. Но когато стана ясно, че между него и победителката нищо няма да излезе, жълти медии писаха: „… ергенът се върна при майка си.“ А някои таблоидни сайтове твърдяха, че тя е причината Виктор да участва в шоуто – заради интервю, в което той казва, че майка му го е подкрепила да се включи.
Изобщо – cherchez la femme.
„Ергенът“ като мегафон за сексизма
Когато през 2022 г. беше премиерата на „Ергенът“ за България, се запитах как е възможно да говорим за сексистко риалити, без да ставаме сексисти. След три сезона се вижда – много е трудно. Независимо дали харесваме риалитито, или го критикуваме. Колкото и да не иска човек да проявява сексизъм, самият формат на шоуто е такъв, че се изискват сериозни съзнателни усилия, за да не се подиграеш на някоя жена. За участничките (и за ергенските майки) е проява на висш пилотаж да се държат така, че да не станат за смях. А самият ерген се отървава с минимум имиджови щети, колкото и неуместно или безхарактерно да е постъпвал.
Подобни риалитита затвърждават и мултиплицират доминиращите стереотипи какво трябва да представляват мъжете и жените и какво им е позволено да бъдат. Въпреки че според стереотипа „мъжка дума“ е синоним на достойнство, ако един мъж нарушава своята, за това все ще се намери друг виновник, най-лесно – жена. Докато една жена сама си е виновна за грешките и кусурите.
Тези стереотипи обясняват и защо силните жени в българската политика се броят на пръсти. Както и защо една от тях – председателката на БСП Корнелия Нинова – превърна в основен стълб на политическото си оцеляване борбата срещу правото на жените да бъдат защитени от насилие. Обяснява и омразата и компроматите, които се стоварват върху жена политик от ново поколение като Лена Бориславова всеки път, когато се включи в политическия живот.
Още не знаем кой ще е ергенът в четвъртото издание на шоуто, което си е по същество пазар за булки. Но да му мисли майка му. А кандидатките за сърцето му – те сами са се хванали на хорото.
Заглавна снимка: Стопкадър от последния епизод на „Ергенът“ 3 по bTV. Финалистките тъкмо са научили, че мъжът, за чието сърце се борят, няма да ги удостои с присъствието си.
A long time ago when the Unix greybeards were slightly less grey beards everyone
was using hardware terminals to talk to some mainframe. Those terminals had
wildly different feature sets and ways to implement them, which you needed to
know about if you wanted your program to run on more than one type of terminal.
Hence systems like terminfo and termcap.
The TeleVideo 955 used \x1b[=5l for bold text, and the IBM 3161 used \x1b4H.
Both were introduced in 1985. The TeleVideo 950 from 1980 didn’t support bold
text at all.
Today everyone is using software terminal emulators, and they all just implement
ANSI escape codes for the common stuff. No one is sending \x1b[=5l or \x1b4H.
Do you still need terminfo? It depends. If you just want to style some text and
maybe do some basic cursor operations: probably not. If you want to use more
advanced operations or read key input: probably yes. If you want maximum
compatibility (there’s probably someone using a hardware Wyse terminal, or SunOS
4 with CDE): absolutely.
Here is a list of terminal escape sequences that should always work on any
vaguely modern terminal, where “modern” means “since the mid-90s or so”.
This was generated by looking at every terminfo file I could find with my termfo tool (specifically, termfo find-cap) and occasionally testing some
things to verify it works. I don’t care what some spec says; I care about what
works.
The escape character is always omitted; so [0m is \x1b[0m.
Graphics
These can be combined in a single sequence by joining with a ;. For example \x1b[1;4m for underlined bold text. These can also be combined with colours;
for example \x1b[1;38;2;0;255;0;41m to set bold, foreground colour with true
colour, and background colour with 16 colour.
Colours are set with setab / set_a_background and setaf / set_a_foreground; the format depends on which colour scheme you want to use.
16-colours
Pretty much everything supports 16 colours, unless explicitly disabled by the
user. The exact shade is determined by the terminal.
Escapes as «regular» «bright»:
Foreground
Background
Colour
[30m [90m
[40m [100m
black
[31m [91m
[41m [101m
red
[32m [92m
[42m [102m
green
[33m [93m
[43m [103m
yellow
[34m [94m
[44m [104m
blue
[35m [95m
[45m [105m
magenta
[36m [96m
[46m [106m
cyan
[37m [97m
[47m [107m
white
256-colours
Choose a colour from a pre-defined table of 256 colours. This is
supported on almost all current terminal emulators, unless explicitly disabled
by the user.
Where «C» is a number from 0 to 255:
[38;5;«C»m   Foreground
[48;5;«C»m   Background
True colours
Use “true” RGB colours; this is supported on almost all current terminal
emulators, unless explicitly disabled by the user.
Where «R», «G», «B» are the red, green and blue values as decimal, 0 to 255:
Key input handling is kind of a mess, and this is where I really recommend using
a terminfo library if at all possible. This also avoids the whole
backspace/delete key confusion (less of an issue today than it was).
Codes
terminfo (short, long)
Description
[A OA
kcuu1 key_up
Arrow up
[B OB
kcud1 key_down
Arrow down
[C OC
kcuf1 key_right
Arrow right
[D OD
kcub1 key_left
Arrow left
[5~ [I
kpp key_ppage
PageUp
[6~ [G
knp key_npage
PageDown
[2~ [L
kich1 key_ic
Insert key
[1~ [H OH [7~
khome key_home
Home key
[4~ [F OF [8~
kend key_end
End key
[11~ [M [[A OP
key_f1
F1
[12~ [N [[B OQ
key_f2
F2
[13~ [O [[C OR
key_f3
F3
[14~ [P [[D OS
key_f4
F4
[15~ [Q [[E
key_f5
F5
[17~ [R
key_f6
F6
[18~ [S
key_f7
F7
[19~ [T
key_f8
F8
[20~ [U
key_f9
F9
[21~ [V
key_f10
F10
[23~ [W
key_f11
F11
[24~ [X
key_f12
F12
\x7f \b
kbs key_backspace
Backspace key
\x7f [3~
kdch1 key_dc key_delete
Delete key; usually sends [3~, but some send \x7f
\x09
–
Tab key
\x0d
–
Enter key
Footnotes
Except FreeBSD system console where it’s [30;1m. ↩
Not super-widely supported, sometimes displays as reverse. ↩
Often doesn’t do anything (because it’s annoying). ↩
Brendan Jackman started his memory-management-track session at the 2024 Linux Storage,
Filesystem, Memory-Management and BPF Summit by saying that, for some
years now, the kernel community has been stuck in a reactive posture with
regard to hardware vulnerabilities. Each problem shows up with its own
scary name, and kernel developers find a way to mitigate it, usually losing
performance in the process. Jackman said that it is time to take back the
initiative against these vulnerabilities by reconsidering the more
general use of address-space isolation.
Optimizing the kernel’s memory use is made much easier if developers have
an accurate idea of how memory is being used, but the kernel’s
instrumentation is not as good as it could be. When Suren Baghdasaryan and
Kent Overstreet presented their
memory-allocation profiling work, which is meant to address this
shortcoming, at the 2023 Linux Storage, Filesystem, Memory Management, and
BPF Summit, their objective was uncontroversial but the proposed solution
ran into opposition that played out at length on the mailing lists (example)
over the last year. So it may be a bit surprising that, when the two
returned to the memory-management track in the 2024 gathering, the
controversy was gone and the discussion focused on improving details of the
implementation.
In the preceding scenario, neither single-user rotation nor alternating-user rotation would meet your security or compliance standards. Single-user rotation uses database user credentials in the secret to rotate itself (assuming the user has change-password permissions). Alternating-user rotation uses Amazon RDS admin credentials from another secret to create and update a _clone user credential, which means there are two valid user credentials with identical permissions.
In this post, you will learn how to implement a modified alternating-user solution that uses Amazon RDS admin user credentials to rotate database credentials while not creating an identical _clone user. This modified rotation strategy creates a short lag between when the password in the database changes and when the secret is updated. During this brief lag before the new password is updated, database calls using the old credentials might be denied. Test this in your environment to determine if the lag is within an acceptable range.
Walkthrough
In this walkthrough, you will learn how to implement the modified rotation strategy by modifying the existing alternating-user rotation template. To accomplish this, you need to complete the following:
Configure alternating-user rotation on the database credential secret for which you want to implement the modified rotation strategy.
Modify your AWS Lambda rotation function template code to implement the modified rotation strategy.
Test the modified rotation strategy on your database credential secret and verify that the secret was rotated while also not creating a _clone user.
To configure alternating-user rotation on the database credential secret
When configuring rotation for the database user secret in the Secrets Manager console, clear the checkbox for Rotate immediately when the secret is stored. The next rotation will begin on your schedule in the Rotation schedule tab. Make sure that no _clone user is created by the default alternating-user rotation code through your database’s user tables.
Figure 1: Clear the checkbox for Rotate immediately when the secret is stored
To modify your Lambda function rotation Lambda template to implement the modified rotation strategy
In the Secrets Manager console, select the Secrets menu from the left pane. Then, select the new database user secret’s name from the Secret name column.
Figure 2: Select the new database user secret
Select the Rotation tab on the Secrets page, and then choose the link under Lambda rotation function.
Figure 3: Select the Lambda rotation function
From the rotation Lambda menu, Download select Download function code.zip.
Figure 4: Select Download function code .zip from Download
Unzip the .zip file. Open the lambda_function.py file in a code editor and make the following code changes to implement the modified rotation strategy.
The following code changes show how to modify a rotation function for the MySQL alternating-user rotation code template. You must make similar changes in the CreateSecret and SetSecret steps of the alternating-user rotation code template for your database’s engine type.
To make the needed changes, remove the lines of code that are in grey italic and add the lines of code that are bold.
Consider using AWS Lambda function versions to enable reverting your Lambda function to previous iterations in case this modified rotation strategy goes wrong.
In create_secret()
The following code suggestion removes the creation of _clone-suffixed usernames.
Remove:
-- # Get the alternate username swapping between the original user and the user with _clone appended to it
-- current_dict['username'] = get_alt_username(current_dict['username'])
In set_secret()
The following code suggestions remove the creation of _clone-suffixed usernames and subsequent checks for such usernames in conditional logic.
Keep:
# Get username character limit from environment variable
username_limit = int(os.environ.get('USERNAME_CHARACTER_LIMIT', '16'))
Remove:
-- # Get the alternate username swapping between the original user and the user with _clone appended to it
-- current_dict['username'] = get_alt_username(current_dict['username'])
Keep:
# Check that the username is within correct length requirements for version
Remove:
-- if current_dict['username'].endswith('_clone') and len(current_dict['username']) > username_limit:
Add:
++ if len(current_dict[‘username’]) > username_limit:
Keep:
raise ValueError("Unable to clone user, username length with _clone appended would exceed %s character
s" % username_limit)
# Make sure the user from current and pending match
Remove:
-- if get_alt_username(current_dict['username']) != pending_dict['username']:
Add:
++ if current_dict['username'] != pending_dict['username']:
Remove:
-- def get_alt_username(current_username):
--   """Gets the alternate username for the current_username passed in
--
--   This helper function gets the username for the alternate user based on the passed in current username.
--
--   Args:
--       current_username (client): The current username
--
--   Returns:
--      AlternateUsername: Alternate username
--
--   Raises:
--      ValueError: If the new username length would exceed the maximum allowed
--
--   """
--   clone_suffix = "_clone"
--   if current_username.endswith(clone_suffix):
--       return current_username[:(len(clone_suffix) * -1)]
--   else:
--       return current_username + clone_suffix
--
The following code suggestions remove the logic of creating a new _clone user within the database, and rotates the existing user’s password.
Keep:
with conn.cursor() as cur:
Remove:
--   cur.execute("SELECT User FROM mysql.user WHERE User = %s", pending_dict['username'])
--   # Create the user if it does not exist
--   if cur.rowcount == 0:
--      cur.execute("CREATE USER %s IDENTIFIED BY %s", (pending_dict['username'], pending_dict['password']))
--
--   # Copy grants to the new user
--   cur.execute("SHOW GRANTS FOR %s", current_dict['username'])
--   for row in cur.fetchall():
--       grant = row[0].split(' TO ')
--       new_grant_escaped = grant[0].replace('%', '%%')  # % is a special character in Python format strings.
--       cur.execute(new_grant_escaped + " TO %s", (pending_dict['username'],))
Keep:
    # Get the version of MySQL
    cur.execute("SELECT VERSION()")
    ver = cur.fetchone()[0]
Remove:
--   # Copy TLS options to the new user
--   escaped_encryption_statement = get_escaped_encryption_statement(ver)
--   cur.execute("SELECT ssl_type, ssl_cipher, x509_issuer, x509_subject FROM mysql.user WHERE User = %s", current_dict['username'])
--   tls_options = cur.fetchone()
--   ssl_type = tls_options[0]
--   if not ssl_type:
--       cur.execute(escaped_encryption_statement + " NONE", pending_dict['username'])
--   elif ssl_type == "ANY":
--       cur.execute(escaped_encryption_statement + " SSL", pending_dict['username'])
--   elif ssl_type == "X509":
--       cur.execute(escaped_encryption_statement + " X509", pending_dict['username'])
--   else:
--       cur.execute(escaped_encryption_statement + " CIPHER %s AND ISSUER %s AND SUBJECT %s", (pending_dict['username'], tls_options[1], tls_options[2], tls_options[3]))
Keep:
    # Set the password for the user and commit
    password_option = get_password_option(ver)
    cur.execute("SET PASSWORD FOR %s = " + password_option, (pending_dict['username'], pending_dict['password']))
    conn.commit()
    logger.info("setSecret: Successfully set password for %s in MySQL DB for secret arn %s." % (pending_dict['username'], arn))
Re-zip the folder with the local code changes. From the rotation Lambda menu, under the Code tab, choose Upload from and select .zip file. Upload the new .zip file.
Figure 5: Use Upload from to upload the new .zip file as the Code source
To test the modified rotation strategy
During the next scheduled rotation for the new database user secret, the modified rotation code will run. To test this immediately, select the Rotation tab within the Secrets menu and choose Rotate secret immediately in the Rotation configuration section.
Figure 6: Choose Rotate secret immediately to test the new rotation strategy
To verify that the modified rotation strategy worked, verify the sign-in details in both the secret and the database itself.
To verify the Secrets Manager secret, select the Secrets menu in the Secrets Manager console and choose Retrieve secret value under the Overview tab. Verify that the username doesn’t have a _clone suffix and that there is a new password. Alternatively, make a get-secret-value call on the secret through the AWS Command Line Interface (AWS CLI) and verify the username and password details.
Figure 7: Use the secret details page for the database user secret to verify that the value of the username key is unchanged
To verify the sign-in details in the database, sign in to the database with admin credentials. Run the following database command to verify that no users with a _clone suffix exist: SELECT * FROM mysql.user;. Make sure to use the commands appropriate for your database engine type.
Also, verify that the new sign-in credentials in the secret work by signing in to the database with the credentials.
Clean up the resources
Follow the Clean up the resources section from the AWS Security Blog post used at the start of this walkthrough.
Conclusion
In this post, you’ve learned how to configure rotation of Amazon RDS database users using a modified alternating-users rotation strategy to help meet more specific security and compliance standards. The modified strategy ensures that database users don’t rotate themselves and that there are no duplicate users created in the database.
If you have feedback about this post, submit comments in the Comments section below. If you have questions about this post, start a new thread on AWS Secrets Manager re:Post or contact AWS Support.
This post is co-written with Mike Russo from AVB Marketing.
AVB Marketing delivers custom digital solutions for their members across a wide range of products. LINQ, AVB’s proprietary product information management system, empowers their appliance, consumer electronics, and furniture retailer members to streamline the management of their product catalog.
A key challenge for AVB’s members is the ability to retrieve, sort, and search through product data, which is crucial for sales activities within their stores. Floor sales use AVB’s Hub, a custom in-store customer relationship management (CRM) product, which relies on LINQ. Initially, searches from Hub queried LINQ’s Microsoft SQL Server database hosted on Amazon Elastic Compute Cloud (Amazon EC2), with search times averaging 3 seconds, leading to reduced adoption and negative feedback.
In this post, we share how AVB reduced their average search time from 3 seconds to 300 milliseconds in LINQ by adopting Amazon OpenSearch Service while processing 14.5 million record updates daily.
Overview of solution
To meet the demands of their users, the LINQ team set a goal to reduce search time response to under 2 seconds while supporting retrieval of over 60 million product data records. Additionally, the team aimed to reduce operational costs, reduce administrative overhead, and scale the solution to meet demand, especially during peak retail periods. Over a 6-month period, the team evaluated multiple architecture options, eventually moving forward with a solution using OpenSearch Service, Amazon EventBridge, AWS Lambda, Amazon Simple Queue Service (Amazon SQS), and AWS Step Functions.
During implementation, the LINQ team worked with OpenSearch Service specialists to optimize the OpenSearch Service cluster configuration to maximize performance and optimize cost of the solution. Following the best practices section of the OpenSearch Service Developer Guide, AVB selected an optimal cluster configuration with three dedicated cluster manager nodes and six data nodes, across three Availability Zones, while keeping shard size between 10–30 GiB.
Updates to the primary LINQ database come from various sources, including partner APIs for manufacturer metadata updates, LINQ’s frontend, and LINQ PowerTools. A Lambda function reads the updates from change data capture (CDC) tables on a schedule, which sends the updated records to a Step Functions workflow. This workflow prepares and indexes the record into OpenSearch Service in JSON format, allowing for individual customizations of the record on a per-customer basis. The LINQ team exposes access to the OpenSearch Service index through a search API hosted on Amazon EC2. The following figure outlines the solution.
AVB developed the LINQ Product Data Search solution with the expertise of a diverse team including software engineers and database administrators. Despite their limited experience with AWS, they set a timeline to complete the project in 6 months. AVB had several goals for this new workload, including search APIs to support in-store sales floor associates’ ability to quickly find products based on customer requirements, scalability to support future growth, and real-time analytics to support AVB’s needs around understanding their data.
AVB split this project into three key phases:
Research and development
Proof of concept
Implementation and iteration
Research and development
AVB’s LINQ team received a task to identify the most efficient solution to expedite product searches across AVB’s suite of software products. The team completed a comprehensive evaluation of various technologies and techniques to meet their requirements, including a close examination of various NoSQL databases and caching mechanisms. Following this exploration, AVB selected OpenSearch Service, an open source, distributed search and analytics suite, for use in a proof of concept. AVB chose OpenSearch Service for its powerful search capabilities, including full-text search and complex query support, as well as its ability to integrate seamlessly with other AWS services.
Proof of concept
In the proof of concept phase, the AVB team focused on validating the effectiveness of their chosen technology stack, with a particular emphasis on data loading and synchronization processes. This was essential to achieve real-time data consistency with their primary system of record to provide correct and up-to-date information to floor sales agents. A significant part of this phase involved the innovative process of data flattening, a technique crucial for managing complex product data.
For example, let’s explore a use case of a refrigerator listed in the SQL Server database. This product is linked to several related tables: one for basic details like model number and manufacturer, another for pricing, and another for features such as energy efficiency and capacity. The original database stores elements separately but connected through relational keys. The following figure provides an example data schema of the SQL Server database.
To enhance search capabilities in OpenSearch Service, the team merged all these disparate data elements into a single, comprehensive JSON document. This document includes both standard manufacturer details and member-specific customizations, like special pricing or additional features. This results in an optimized record for each product for quick and efficient search in OpenSearch Service. The following figure shows the data schema in OpenSearch Service.
Transforming relational data into a consolidated, searchable format allowed the LINQ team to ingest the data into OpenSearch Service. In the proof of concept, AVB shifted to updating data by using reference IDs, which are directly linked to the primary IDs of the product records or their relational entities in the SQL database. This approach allows updates to be executed independently and asynchronously. Crucially, it supports non-first in, first out (FIFO) processing models, which are vital in high-scale environments susceptible to data discrepancies like drops or replays. By using reference IDs, the system fetches the most current data for each entity at the time a change occurs, ensuring that the latest data is always used when processed. This method maintains data integrity by preventing outdated data from superseding newer information, thereby keeping the database accurate and current. A noteworthy technique used in the proof of concept was index aliases, allowing for zero downtime re-indexes for adding new fields or fixing bugs. AVB built robust performance monitoring and alerts using Amazon CloudWatch and Splunk, which enabled swift identification of issues.
The proof of concept improved search relevance by flattening relational data, which improved indexing and queryability. This restructuring reduced search response latency to 300 milliseconds, which was well under the 2-second goal set for this proof of concept. With this successful proof of concept demonstrating the effectiveness of the architectural approach, AVB moved on to the next phase of implementation and iteration.
Implementation and iteration
With AVB exceeding their initial goal of reducing search latency to under 2 seconds, the team then adopted an iterative approach to implement the complete solution, with a series of deployments designed to make data available in OpenSearch Service from different business verticals. Each business vertical has records consisting of different attributes, and this incremental approach allowed AVB to bring in and inspect data to make sure the documents in OpenSearch Service are what the team expected. Each deployment focused on specific data categories and included refinements to the indexing process from lessons learned in prior deployments. AVB also places a strong emphasis on cost optimization and security of the solution, and deployed OpenSearch Service into a private VPC to allow strict access control. Access to the new search capabilities is controlled through their Hub product using a middleware service provided by LINQ’s API. AVB uses robust API keys and tokens to provide API security to the new search product. This systematic progression meant that the completed LINQ Product Data Search catalog met AVB’s speed and accuracy requirements.
Conclusion
In this post, you learned how AVB reduced their average search time from 3 seconds to 300 milliseconds in LINQ by adopting OpenSearch Service while processing 14.5 million record updates daily, resulting in a 500% increase in adoption by AVB’s internal teams. Tim Hatfield, AVB Marketing’s VP of Engineering, reflected on the project and stated, “By partnering with AWS, we’ve not only supercharged Hub’s search speeds but also forged a cost-efficient foundation for LINQ’s future, where swift searches translate into reduced operating costs and maintain the competitive edge in retail technology.”
Mike Russo is a Director of Software Engineering at AVB Marketing. He leads the software delivery for AVB’s e-commerce and product catalog solutions. Outside work, Mike enjoys spending time with his family and playing basketball.
Patrick Duffy is a Senior Solutions Architect in the at AWS. He is passionate about raising awareness and increasing security of AWS workloads. Outside work, he loves to travel and try new cuisines, and you may match up against him in a game on Magic Arena.
The AlmaLinux project has announced
the formation of the AlmaLinux Engineering
Steering Committee (ALESCo):
[It] is dedicated to guiding the technical direction of the
AlmaLinux distribution on a day-to-day basis within the guidelines set
forth by the board, ensuring its robustness, reliability,
sustainability, and relevance in the open-source ecosystem. ALESCo
will work collaboratively with, and oversee relevant technical-focused
Special Interest Groups (SIGs) to achieve these goals. It is “air
traffic control” for engineering matters.
The initial members of ALESCo appointed by the AlmaLinux OS
Foundation board are Andrew Lukoshko, Ben Thomas, Cody Robertson,
Elkhan Mammadli, Jonathan Wright, and Neal Gompa. The AlmaLinux Wiki has
more information on the committee’s activities and how to get involved.
Increasing storage density is a fancy way of saying we are replacing one drive with another drive of a larger capacity; for example replacing a 4TB drive with a 16TB drive—same space, four times the storage. You’ve probably copied or cloned a drive or two over the years, so you understand the general process. Now imagine having 270,000 drives that over the next several years will need to be replaced, or migrated as is often the term used. That’s a lot of work. And when you finish—well actually you’ll never finish as the process is continuous for as long as you are in the cloud storage business. So, how does Backblaze manage this ABC (Always Be Copying) process? Let me introduce you to CVT Copy or CVT for short.
CVT Copy is our in-house purpose-built application used to perform drive migrations at scale. CVT stands for Cluster, Vault, Tome, which is engineering vernacular mercifully shortened to CVT.
Before we jump in, let’s take a minute to define a few terms in the context of how we organize storage.
Drive: The basic unit of storage ranging in our case from 4TB to 22TB in size.
Storage Server: A collection of drives in a single server. We have servers of 26, 45, and 60 drives. All drives in a storage server are the same logical size.
Backblaze Vault: A logical collection of 20 Storage Pods or servers. Each storage server in a Vault will have the same number of drives.
Tome: A tome is a logical collection of 20 drives, with each drive being in one of the 20 storage servers in a given Vault. If the storage servers in a Vault have 60 drives each, then there will be 60 unique tomes in that Vault.
Cluster: A logical collection of Vaults, grouped together to share other resources such as networking equipment and utility servers.
Based on this, a Vault consisting of 20, 60-drive storage servers will have 1,200 drives, a Vault with 45-drive storage servers will have 900 drives, and a Vault with 26-drive servers will have 520 drives. A cluster can have any combination of Vault sizes.
A Quick Review on How Backblaze Stores Data
Data is uploaded to one of the 20 drives within a tome. The data is then divided into parts, called data shards. At this point, we use our own Reed-Solomon erasing coding algorithm to compute the parity shards for that data. The number of data shards plus the number of parity shards will equal 20, i.e. the number of drives in a tome. The data and parity shards are written to their assigned drives, one shard per drive. The ratios of data shards to parity shards we currently use are 17/3, 16/4, and 15/5 depending primarily on the size of the drives being used to store the data—the larger the drive, the higher the parity.
Using parity allows us to restore (i.e. read) a file using less than 20 drives. For example, when a tome is 17/3 (data/parity), we only need data from any 17 of the 20 drives in that tome to restore a file. This dramatically increases the durability of the files stored.
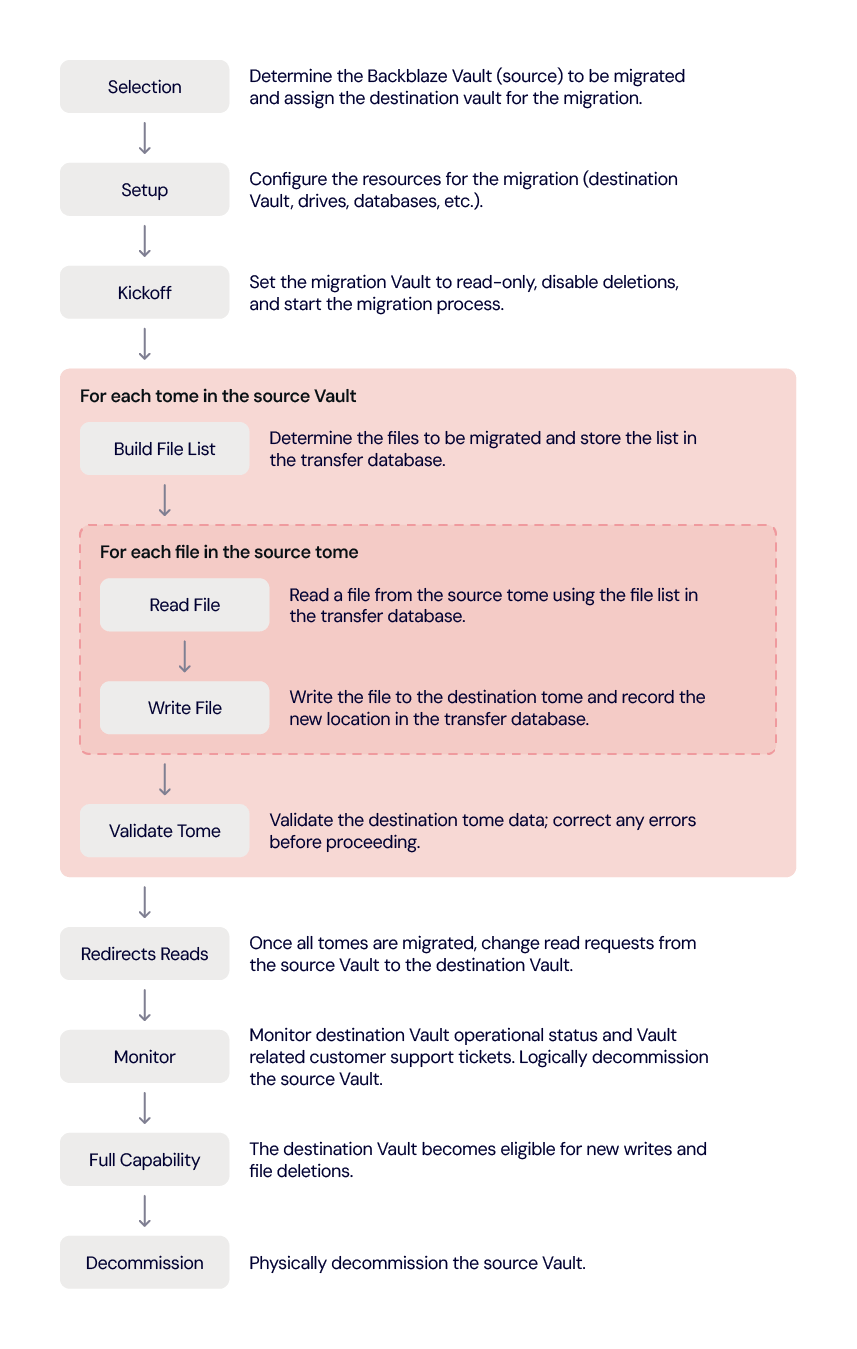
CVT Overview
For CVT, the basic unit of migration is a tome, with all of the tomes in a source Vault being copied simultaneously to a new destination Vault which is typically new hardware. For each tome, the data, in the form of files, is copied file-by-file from the source tome to the destination tome.
The CVT Process
An overview of the CVT process is below, followed by an explanation of each task noted.
Selection
Selecting a Vault to migrate involves considering several factors. We start by reviewing current drive failure rates and predicted drive failure rates over time. We also calculate and consider overall Vault durability; that is, our ability to safeguard data from loss. In addition, we need to consider operational needs. For example, we still have Vaults using 45-drive Storage Pods. Upgrading these to 60-drive storage servers increases drive density in the same rack space. These factors taken together determine the next Vault to migrate.
Currently we are migrating systems with 4TB drives, which means we are migrating up to 3.6 petabytes (PB) of data for a 900 drive Vault or 4.8PB of data for a 1,200 drive Vault. Actually, there are no limitations as to the size of the source system drives, so Vaults with 6TB, 8TB, and larger sized drives can be migrated using CVT with minimal setup and configuration changes.
Once we’ve identified a source Vault to migrate we need to identify the target or destination system. Currently, we are using destination vaults containing 16TB drives. There is no limitation as to the size of the drives of the destination Vault, so long as they are at least as large as those in the source Vault. You can migrate the data from any sized source Vault to any sized destination Vault as long as there is adequate room on the destination Vault.
Setup
Once the source Vault and destination Vault are selected, the various Technical Operations and Data Center folks get to work on setting things up. If we are not using an existing destination Vault, then a new destination Vault is provisioned. This brings up one of the features of CVT: The migration can be to a new clean Vault or an existing Vault; that is, one with data from a previous migration on it. In the latter case, the new data is just added and does not replace any of the existing data. The chart below are examples of the different ways a destination Vault can be filled from one or more source Vaults.
In any of these scenarios, the free space can be used for another migration destination or for a Vault where new customer data can be written.
Kickoff
With the source and destination Vaults identified and setup, we are now ready to kick-off the CVT process. The first step is to put the source Vault in a read-only state and to disable file deletions on both the source and destination Vaults. It is possible that some older source Vaults may have already been placed in read-only state to reduce their workload. A Vault in a read-only state continues to perform other operations such as running shard integrity checks, reporting Drive Stats statistics and so on.
CVT and Drive Stats
We record Drive Stats data from the drives in the source Vault until the migration is complete and verified. At that point we begin recording Drive Stats data from the drives in the destination Vault and stop recording Drive Stats data from the drives in the source Vault. The drives in the source Vault are not marked as failed.
Build the File List
This step and the next three steps (read files, write files, and validate) are done as a consecutive group of steps for each tome in a source Vault. For our purpose here, we’ll call this group of steps the tome migration process, although they really don’t have such a name in the internal documentation. The tome migration process is for a single tome, but, in general, all tomes in a Vault are migrated at the same time, although due to their unique contents, they most likely will complete at different times.
For each tome, the source file list is copied to a file transfer database and each entry is mapped to its new location in the destination tome. This process allows us to maintain the same upload path while copying the data as the customer used to initially upload their data. This ensures that from the customer point of view, nothing changes in how they work with their files even though we have migrated them from one Vault to another.
Read Files
For each tome, we use the file location database to read the files. One file at a time. We use the same code in this process that we use when a user requests their data from the Backblaze B2 Storage Cloud. As noted earlier, the data is sharded across multiple drives using the preset data/parity scheme, for example 17/3. That means, in this case we only need data from 17 of the drives to read the file.
When we read a file, one advantage we get by using our standard read process is a pristine copy of the file to migrate. While we regularly run shard integrity checks on the stored data to ensure a given shard of data is good, media degradation, cosmic rays and so on can affect data sitting on a hard drive. By using the standard read process, we get a completely clean version of each file to migrate.
Write Files
The restored file is sent to the destination vault, there is no intermediate location where the file resides. The transfer is done over an encrypted network connection typically within the same data center, preferably on the same network segment. If the transfer is done between data centers, it is done over an encrypted dark fiber connection.
The file is then written to the destination tome. The write process is the same one used by our customers when they upload a file and given that process has successfully written hundreds of billions of files we didn’t need to invent anything new.
At this point, you could be thinking that’s a lot of work to copy each file one by one. Why not copy and transfer block by block, for example? The answer lies in the flexibility we get by using the standard file-based read and write processes.
We can change the number of tomes. Let’s say we have 45 tomes in the source Vault and 60 tomes in the destination Vault. If we had copied blocks of data the destination Vault would have 15 empty tomes. This creates load balancing and other assorted performance problems when that destination Vault is opened up for new data writes at a later date. By using standard read and write calls for each file, all 60 of the destination Vault’s tomes fill up evenly, just like they do when we receive customer data.
We can change parity of the data. The source 4TB drive Vaults have a data/parity ratio of 17/3. By using our standard process to write the files, the data/parity ratio can be set to whatever ratio we want for the destination Vault. Currently, the data/parity ratio for the 16TB destination Vaults is set to 15/5. This ratio ensures that the durability of the destination Vault and therefore the recoverability of the files therein is maintained as a result of migrating the data to larger drives.
We can maximize parity economics. Increasing the number of parity drives in a tome from three to five decreases the number of data drives in that tome. That would seem to increase the cost of storage, but the opposite is true in this case. Here’s how:
Using 4TB drives for 16TB of data stored
Our average cost for a 4TB drive was $120 or $0.03 per GB.
Our cost of 16TB of storage, using 4TB drives, was $480 (4 x $120).
Using a 17/3 data/parity scheme means:
Data storage: We have 13.6TB of data storage at $0.03/GB ($30/TB) which costs us $408.
Parity storage: We have 2.4TB of parity storage at $0.03/GB ($30/TB) which costs us $72.
Using 16TB drives for 16TB of data stored
Our average cost for a 16TB drive is $232 or $0.0145 per GB.
Our cost of 16TB of storage is $232.
Using a 15/5 data/parity scheme means:
Data storage: We have 12.0TB of data storage at $0.0145/GB ($14.5/TB) which costs us $174.
Data parity: We have 4.0TB of parity storage at $0.0145/GB ($14.5/TB) which costs us $58.
In summary, increasing the data/parity ratio to 15/5 for the 16TB drives is less expensive ($58) than the cost of parity when using our 4TB drives ($72) to provide the same 16TB of storage. The lower cost per TB of the 16TB drives allows us to increase the number of parity drives in a tome. Therefore, the cost of increasing the parity of the destination tome not only enhances data durability, it is economically sound.
Obviously a 16TB drive actually holds a bit less data due to formatting and overhead and four 4TB drives hold even less data. In other words, even with formatting and so on, the math still works out in favor of using the 16TB drives.
Validate Tome
The last step in migrating a tome is to validate the destination tome is the same as the source tome. This is done for each tome as they complete their copy process. If the source and destination tomes are not consistent, shard integrity check data can be reviewed to determine any errors and the system can retransfer individual files, up to and including the entire tome.
Redirect Reads
Once all of the tomes within the Vault have completed their individual migrations and have passed their validation checks, we are ready to redirect customer reads (download requests) to the destination Vault. This process is completely invisible to the customer as they will use the same file handle as before. This redirection or swap process can be done tome by tome, but is usually done once the entire destination Vault is ready.
Monitor
At this point all download requests are handled by the destination Vault. We monitor the operational status of the Vault, as well as any failed download requests. We also review inputs from customer support and sales support to see if there are any customer related issues.
Once we are satisfied that the destination Vault is handling customer requests, we will logically decommission the source Vault. Basically, that means while the source Vault continues to run, it is no longer externally reachable. If a significant problem were to arise with the new destination Vault, we can swap in the source Vault. At this point, both Vaults are read-only, so the swap would be straightforward. We have not had to do this in our production environment.
Full Capability
Once we are satisfied there are no issues with the destination Vault, we can proceed one or two ways.
Another migration: We can prepare for the migration of another source Vault to this destination Vault. If this is the case, we return to the Selection step of the CVT process with the Vault once again being assigned as a destination Vault.
Allow new data: We allow the destination Vault to accept new data from customers. Typically, the contents of multiple source Vaults have been migrated to the destination Vault before this is done. Once new customer writes have been allowed on a destination Vault, we won’t use it as a destination Vault again.
Decommission
After three months the source Vault is eligible to be physically decommissioned. That is, we turn it off, disconnect it from power and networking, and schedule it to be disassembled. This includes wiping the drives and recycling the remaining parts either internally or externally. In practice, we will wait to decommission at least two Vaults at once as it is more economical in dealing with our recycling partners.
Automation
You’re probably wondering how much of this process is automated or uses some type of orchestration to align and accomplish tasks. We currently have monitoring tools, dashboards, scripts, and such, but humans, real ones not AI generated, are in control. That said, we are working on orchestration of the setup and provisioning processes as well as upleveling the automation in the tome migration process. Over time, we expect the entire migration process to be automated, but only when we are sure it works—the “run fast, break things” approach is not appropriate when dealing with customer data.
Not for the Faint of Heart
The basic idea of copying the contents of a drive to another larger drive is straightforward and well understood. As you scale this process, complexity creeps in as you have to consider how the data is organized and stored while keeping it secure and available to the end user.
If your organization manages your data in-house, the never-ending task of simultaneously migrating hundreds or perhaps thousands of drives falls to you or perhaps the contractor you hired to perform the task if you lack the experience or staffing. And this is just one of the tasks you are faced with in operating, maintaining, and upgrading your own storage infrastructure.
In addition to managing a storage infrastructure, there are the growing environmental concerns of data storage. The amount of data generated and stored each year continues to skyrocket and tools such as CVT allow us to scale and optimize our resources in a cost efficient, yet environmentally sensitive way.
To do this, we start with data durability. Using our Drive Stats data and other information, we optimize the length of time a Vault should be in operation before the drives need to be replaced, that is before the drive failure rate impacts durability. We then consider data density, how much data can we pack into a given space. Migrating data from 4TB to 16TB drives, for example, not only increases data density, it uses less electricity per stored terabyte of data and reduces the amount of waste if, for example, we had continued to buy and use 4TB drives instead of upgrading to 16TB drives.
In summary, CVT is more than just a fancy data migration tool: It is part of our overall infrastructure management program addressing scalability, durability, and environmental challenges faced by the ever-increasing amounts of data we are asked to store and protect each day.
Kudos
The CVT program is run by Bryan with the wonderfully descriptive title of Senior Manager, Operations Analysis and Capacity Management. He is assisted by folks from across the organization. They are, in no particular order, Bach, Lorelei (Lo), Madhu, Mitch, Ben, Rodney, Vicky, Ryan, David M., Sudhi, David W., Zoe, Mike, and unnamed others who pitch in as the process rolls along. Each person brings their own expertise to the process which Bryan coordinates. To date, the CVT Team has migrated 24 Vaults containing over 60PB of data—and that’s just the beginning.
To provide the best experiences, we use technologies like cookies to store and/or access device information. Consenting to these technologies will allow us to process data such as browsing behavior or unique IDs on this site. Not consenting or withdrawing consent, may adversely affect certain features and functions.
Functional
Always active
The technical storage or access is strictly necessary for the legitimate purpose of enabling the use of a specific service explicitly requested by the subscriber or user, or for the sole purpose of carrying out the transmission of a communication over an electronic communications network.
Preferences
The technical storage or access is necessary for the legitimate purpose of storing preferences that are not requested by the subscriber or user.
Statistics
The technical storage or access that is used exclusively for statistical purposes.The technical storage or access that is used exclusively for anonymous statistical purposes. Without a subpoena, voluntary compliance on the part of your Internet Service Provider, or additional records from a third party, information stored or retrieved for this purpose alone cannot usually be used to identify you.
Marketing
The technical storage or access is required to create user profiles to send advertising, or to track the user on a website or across several websites for similar marketing purposes.