Post Syndicated from Geographics original https://www.youtube.com/watch?v=5lpTAeAR39Y
[$] Shrinking shrinker locking overhead
Post Syndicated from corbet original https://lwn.net/Articles/944199/
Much of the kernel’s performance is dependent on caching — keeping useful
information around for future use to avoid the cost of looking it up again.
The kernel aggressively caches pages of file data, directory entries,
inodes, slab objects, and much more. Without active measures, though,
caches will tend to grow without bounds, leading to memory exhaustion. The
kernel’s “shrinker” mechanism exists to be that active measure, but
shrinkers have some performance difficulties of their own. This
patch series from Qi Zheng seeks to address one of the worst of those
by removing some locking overhead.
Security updates for Friday
Post Syndicated from jake original https://lwn.net/Articles/944581/
Security updates have been issued by Debian (c-ares and samba), Fedora (borgbackup, firefox, and libwebp), Oracle (.NET 6.0 and kernel), Slackware (libwebp), SUSE (chromium and firefox), and Ubuntu (atftp, dbus, gawk, libssh2, libwebp, modsecurity-apache, and mutt).
Making Content Security Policies (CSPs) easy with Page Shield
Post Syndicated from Michael Tremante original http://blog.cloudflare.com/making-content-security-policies-csps-easy-with-page-shield/


Modern web applications are complex, often loading JavaScript libraries from tens of different sources and submitting data to just as many. This leads to a vast attack surface area and many attack types that hackers may leverage to target the user browser directly. Magecart, a category of supply chain attack, is a good example.
To combat this, browser vendors (Google, Microsoft, Mozilla, etc.) have agreed on a standard that allows application owners to control browser behavior from a security perspective. This standard is called Content Security Policies (CSPs). Content Security Policies are implemented by application owners as a specially formatted HTTP response header that the browser then parses and enforces. This header can be used, for example, to enforce loading of JavaScript libraries only from a specific set of URLs. CSPs are good as they reduce the attack surface, but are hard to implement and manage, especially in a fast-paced development environment.
Starting today, Page Shield, our client-side security product, supports all major CSP directives. We’ve also added better reporting, automated suggestions, and Page Shield specific user roles, making CSPs much easier to manage.
If you are a Page Shield enterprise customer, log in to your dashboard to make use of the new features immediately.
Page Shield policies
Let’s say you just built a web application. To keep it simple, you used a number of services to implement specific features: Stripe for your checkout and Zendesk for your chat system.
These two systems require you to “embed” JavaScript files in your application. Once done, these widgets will also submit data back to their respective endpoints — for example, the Zendesk servers if someone interacts with the Zendesk chat widget.
You also load a JavaScript file that you built for some simple interactions in your web application. This file is hosted directly on your server under your site’s own domain, let’s say example.com.
You know that no other files should be loaded, and with a security first mindset, you wish to enforce that only these files (and no other files!) can get executed by your users directly in the browser environment. This avoids a potential compromise to be effective as browsers will refuse to execute unwanted code.
You can achieve this by using Page Shield policies, an abstraction on top of Content Security Policies (CSPs) with the goal of making CSPs easy. This system allows you to adopt a positive security model by letting you define what is allowed, and block everything else by default.
To do this we need to follow a few simple steps. First, log in to Cloudflare and head over to the relevant zone → Security → Page Shield → Policies → Create policy. We are presented with the following page:
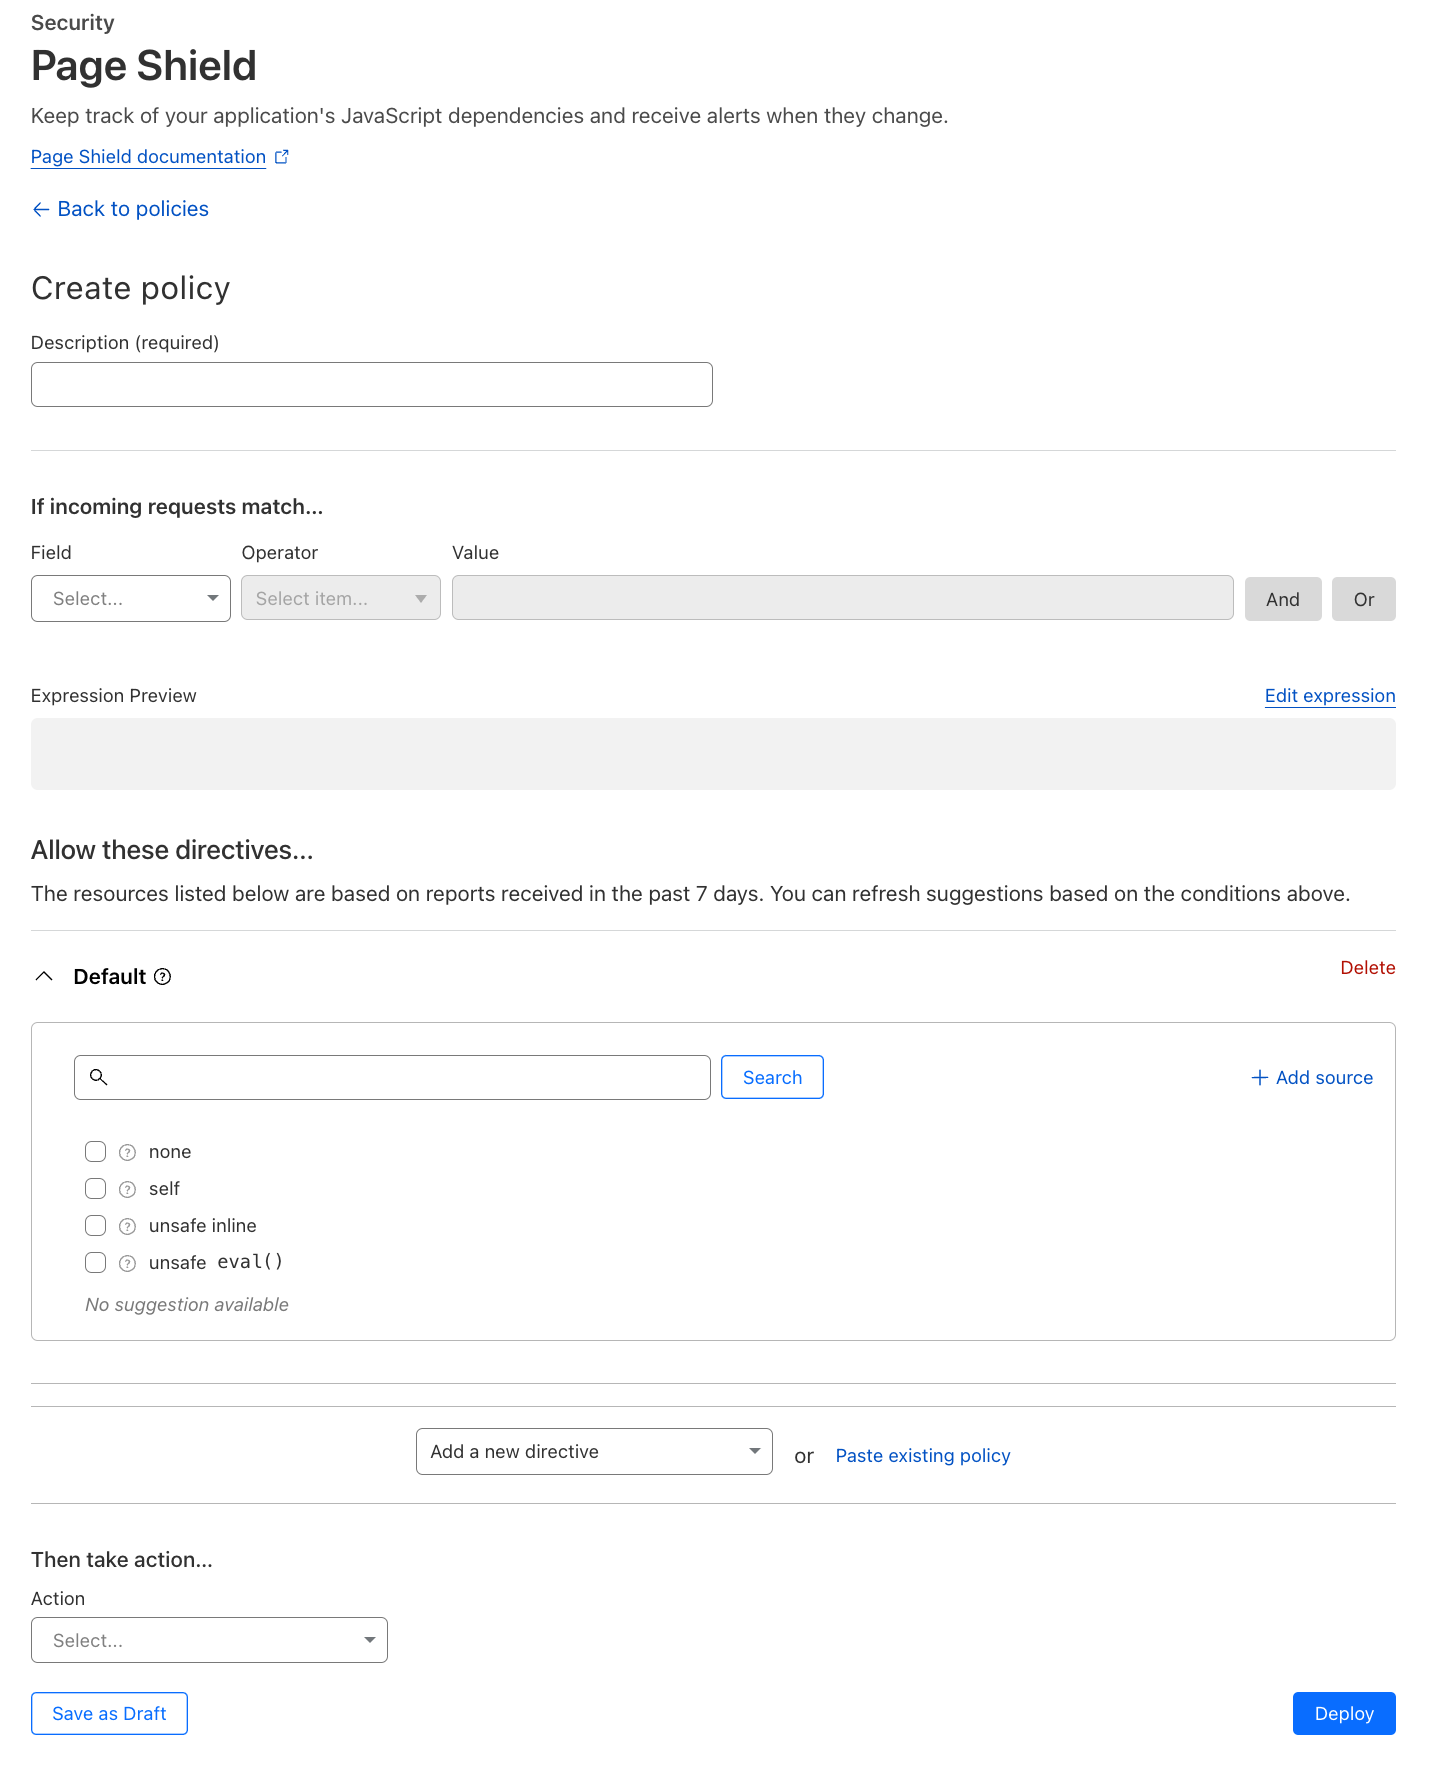
Insert a policy name (e.g., my website policy) and select, if needed, using our standard wirefilter syntax, where you want the policy to be applied. For example, if we only wanted the policy to be applied on our checkout pages, where there is a higher risk of data being leaked, we can select:
If incoming requests match… URI Path contains “checkout”
In the UI this would be represented like this:
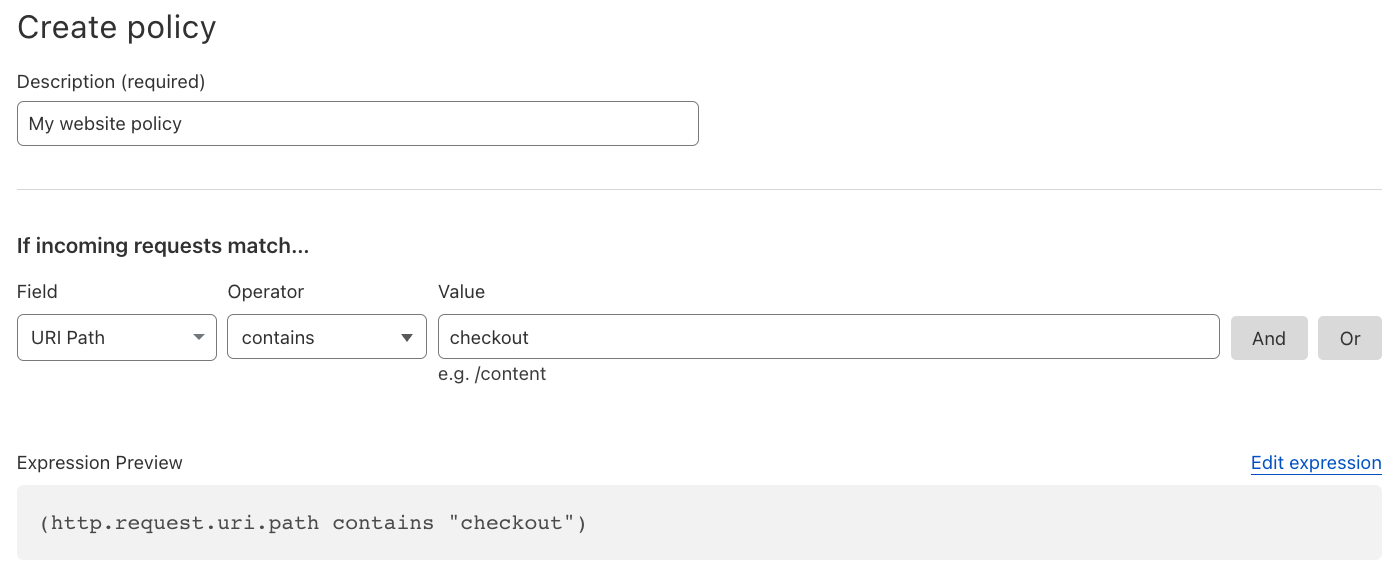
This filtering allows you to focus on the portions of your site that matter most, or, at the same time, test your policies on specific subsets of your traffic.
Next, we need to define where scripts are allowed to be loaded from and where they are allowed to send data to. There are two directives we can use for this: the script-src (Scripts) directive and the connect-src (Connections) directive.
For Stripe, at time of writing, scripts will be loaded from the following URL:
https://checkout.stripe.com
This same URL is also used to submit data back to Stripes’ system. Zendesk is similar, but for simplicity we will focus on Stripe only in this example. You also load a JavaScript file from your own site, example.com mentioned earlier.
From the Add a new directive dropdown, select Scripts:
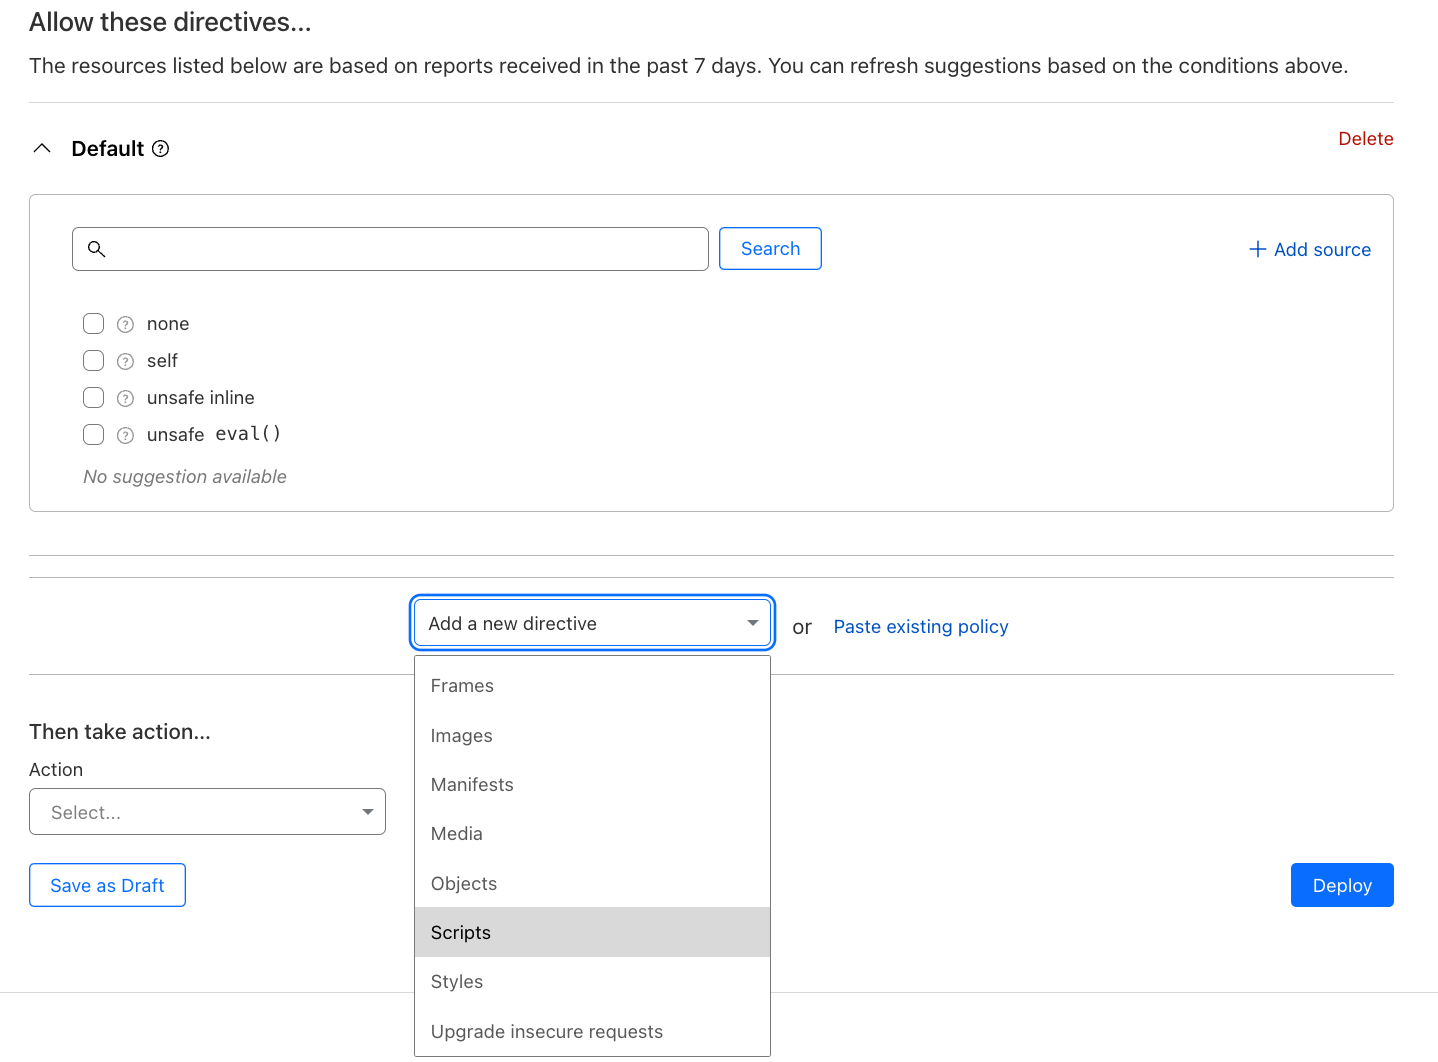
Once added, the script directive will show:
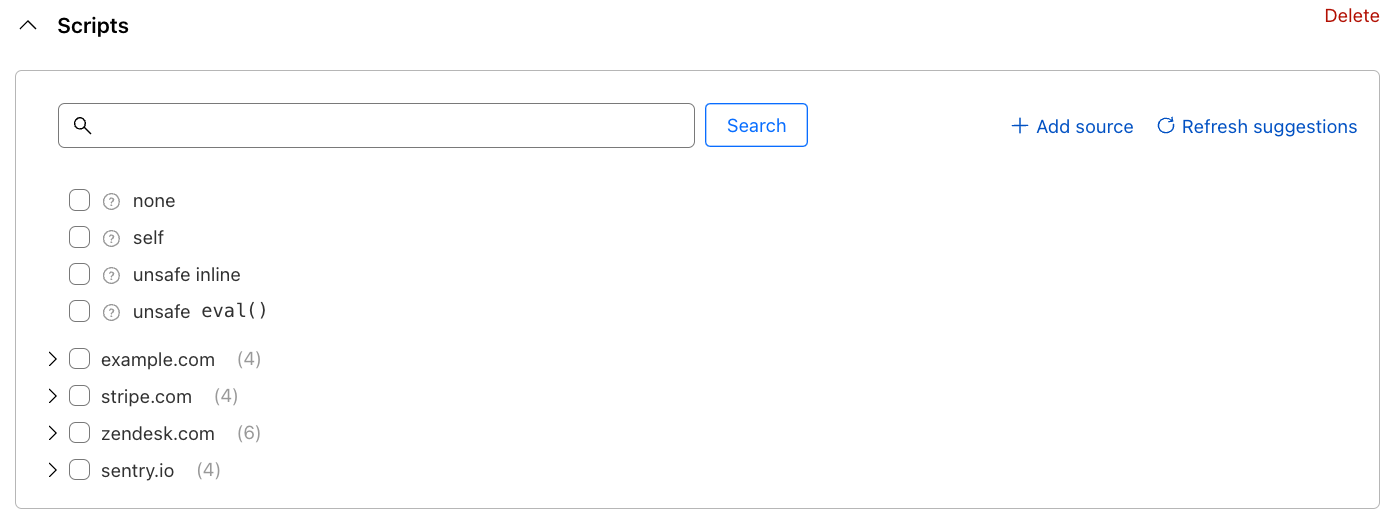
This is where the magic begins. If Page Shield has been enabled on your site, you may notice it may have already detected the JavaScript files your site is loading, and will suggest them to you as a simple list of checkboxes. No more chasing developer team members to understand what is being loaded by your site.
Building the directive becomes a simple checklist exercise. The builder does allow you to decide if you wish to allow scripts from entire domains, or drill down to specific URLs only. In a normal circumstance, you should expect to allow all detected scripts. For Stripe, the directive configuration would look like the following:
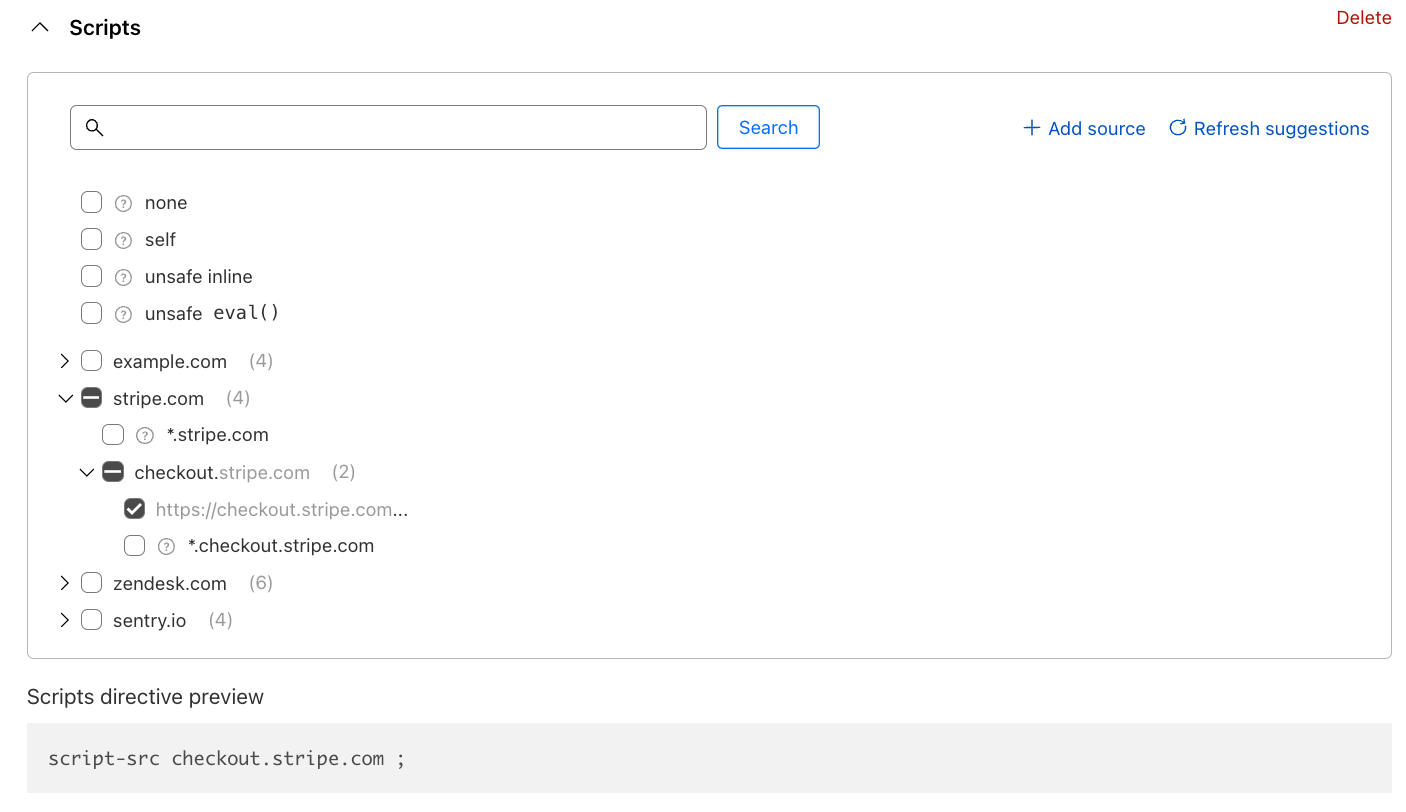
A preview of the directive is shown below the builder.
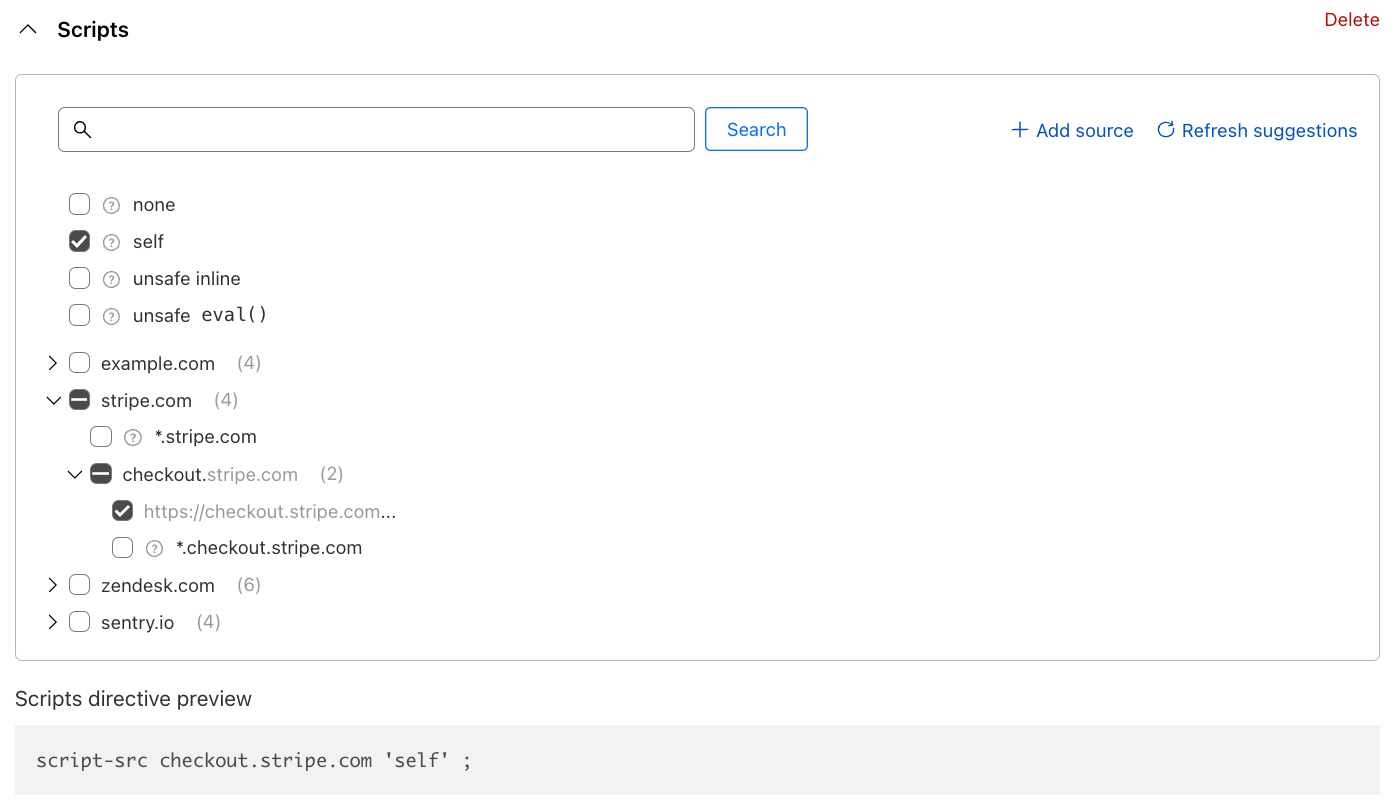
One more example: remember that you also load a script from your own site? That is being identified under the example.com entry in the list. However, loading scripts from the same source is very common and to strike a good balance between simplicity and security, CSPs allow a shortcut keyword: self, available at the top of the builder. Our final policy will look like this:
And those are the basics. Simply repeat the steps for the connect-src (Connections) directive (where data should be sent to) and deploy the policy either in LOG (for testing) or ALLOW (enforcing). Your users will be a lot safer as a result.
Better policy suggestions
The suggestions engine shown above is now a lot better, making it easier to build Page Shield policies. We’ve added full support for the connect-src (Connections) directive in addition to script-src (Scripts) directive, and we now customize the suggestions based on where you wish to deploy the policy.
So for example, if you select to deploy the policy on your checkout pages only, shown as:
If incoming requests match… URI Path contains “checkout”
In the example above, the list of suggestions will automatically update to show you suggestions for scripts or connections seen on those pages, only allowing you to minimize the size of the policy. This is important as CSPs often tend to grow very large, causing performance implications.
Additionally, the builder will try to optimize the policy further for you by allowing you to easily select the correct level of precision in your ALLOW list. For example, if you are loading hundreds of scripts from a specific destination, it will propose you to allow the hostname rather than all script URLs.
All major CSP directives are now supported
Before today, we only supported the script-src (Scripts) directive, allowing you to define where scripts are allowed to be loaded from. Starting today, we support all major directives. Note however, that we only support suggestions for script-src and connect-src. Suggestions for the other directives are on the roadmap.
The full list of supported directives with relevant keywords is shown in the table below:
| Directive | Smart suggestions | Description |
|---|---|---|
| script-src | ✅ | Define where JavaScript files are allowed to be loaded from. |
| connect-src | ✅ | Define where data can be sent to. |
| default-src | Default behavior to apply. | |
| img-src | Define where images are allowed to be loaded from. | |
| style-src | Define where style sheets (CSS) are allowed to be loaded from. | |
| font-src | Define where font files are allowed to be loaded from. | |
| object-src | Define where objects (HTML) are allowed to be loaded from. | |
| media-src | Define where media files are allowed to be loaded from (e.g. mp4) | |
| child-src | Define where web workers and nested browser contexts are allowed to be loaded from. | |
| form-action | Define where forms should be allowed to post data to. | |
| worker-src | Define where workers are allowed to be loaded from. | |
| base-uri | Define what URLs can be used in a document base element. | |
| manifest-src | Define which manifests can be applied. | |
| frame-src | Define what URLs can be embedded in HTML iframes. | |
| frame-ancestors | Define which parent sources can embed the given page in an HTML iframe (opposite of frame-src). |
Additionally, we also support the upgrade-insecure-requests directive. This is a special keyword that will force the browser to automatically convert all HTTP URLs to HTTPs. This feature is similar to our “Always Use HTTPS”, but forces the browser to upgrade the requests rather than using our proxy to perform the similar behavior. Both features can work in conjunction.
The official Mozilla CSP documentation is a great resource for additional details on each CSP directive.
Import your existing CSP policies today
A lot of customers adopting Page Shield have asked if they could import their existing CSP policies into the product. We’ve now taken a first step to make this experience possible by allowing you to paste an existing CSP directly in the policy interface:
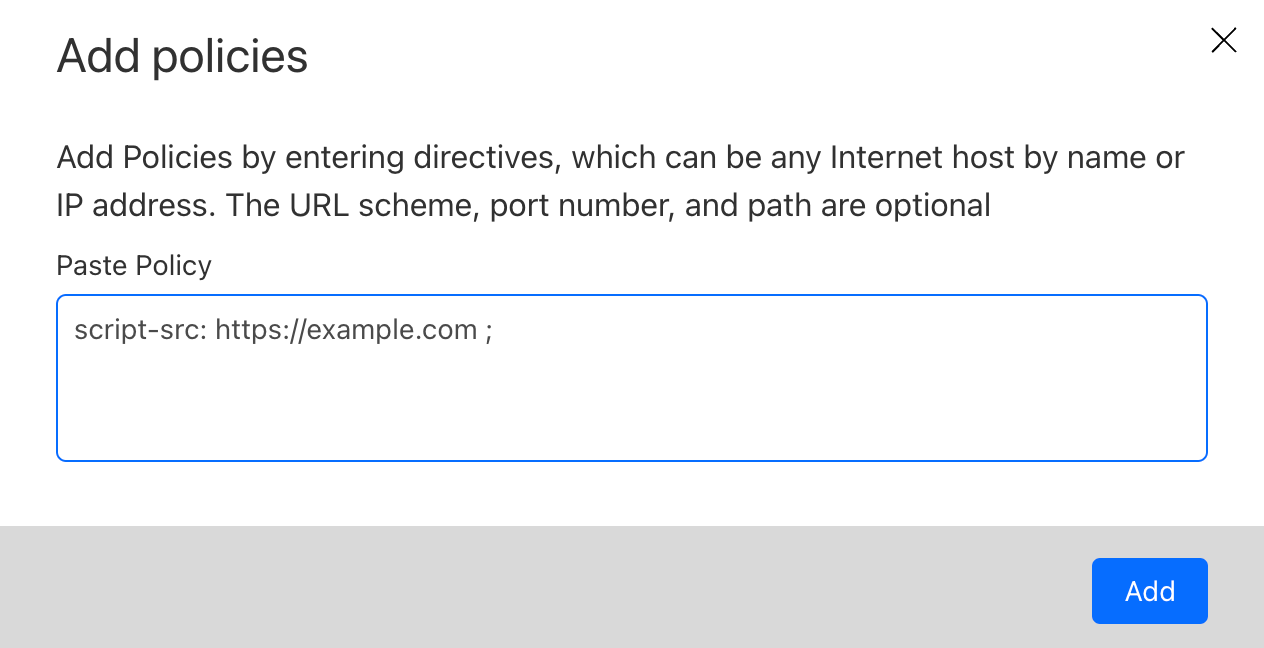
Once pasted and imported, the system will automatically parse all found directives into the builder allowing you to subsequently edit them as required. If your policy contains deprecated directives, or directives not currently supported, an appropriate error message will be displayed allowing you to edit before trying again.
Improved violation reporting
Once you have deployed a Page Shield policy, it is important to identify its behavior: is it implemented correctly? Did you miss something?
Coincidentally, this is another aspect that is hard to manage. CSPs allows you to define an endpoint where browsers will submit violation reports (errors). However, the volume of errors can be substantial especially for large applications, requiring a whole new set of logging pipelines and infrastructure to be implemented.
Page Shield does all this for you out of the box.
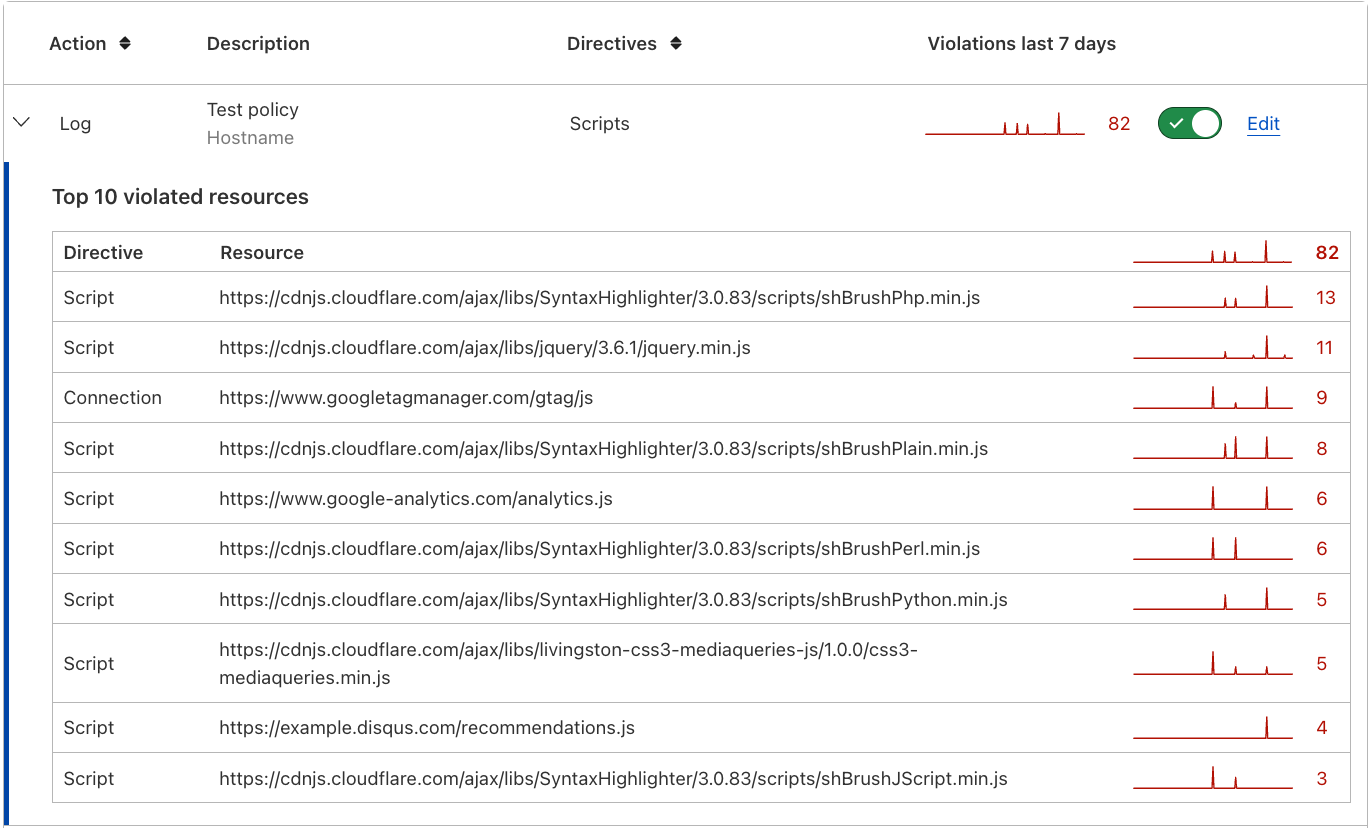
With the new support for all major directives, we now also improved violation reporting to show you which directive is causing any potential issues (the first column in the screenshot below). This is provided in the policy overview screen:
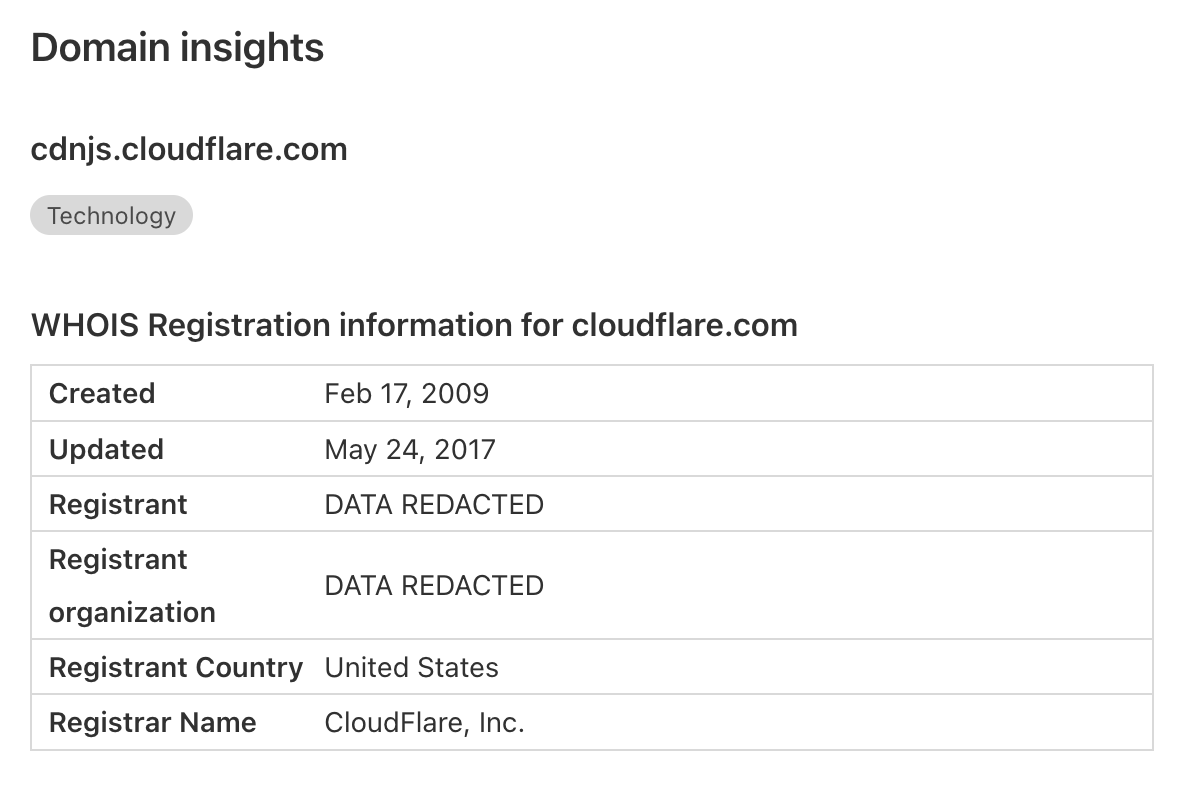
Domain insights
In this release, we also took the opportunity to improve our resource details page by adding domain insights. Domain name WHOIS info is often a very good indicator of the potential maliciousness of a JavaScript resource or connection endpoint. For example, data being sent to a newly registered domain should cause some concern. We’ve also exposed any categorisations we have available for any given domain, allowing you to more quickly review the data without having to navigate to our Security Center or Cloudflare Radar.
Page Shield user permissions
One final thing. If you only need specific team members to look at or deploy policies with Cloudflare Page Shield, this is now possible. Two new user roles have been implemented in the dashboard: Page Shield (write/read) and Page Shield (read). You can find these roles available when inviting new users (or editing existing users) to the Cloudflare dashboard.
Start using Page Shield today
Most of the features discussed in this post are only available to Page Shield enterprise add-on customers, and you can find additional details in our developer documentation. However, Page Shield is available to all users on the Pro plan and above with a limited set of functionality. Turning on Page Shield is as simple as a single click.
Head over now to the dashboard and turn it on, and let us know what you think.
Stay tuned for our next Page Shield post where we will discuss how PCI DSS 4.0 client side requirements are easy to satisfy with Page Shield.
Cotswold Lions and British History
Post Syndicated from The History Guy: History Deserves to Be Remembered original https://www.youtube.com/watch?v=s3oQpHSsr9Q
On Technologies for Automatic Facial Recognition
Post Syndicated from Bruce Schneier original https://www.schneier.com/blog/archives/2023/09/on-technologies-for-automatic-facial-recognition.html
Interesting article on technologies that will automatically identify people:
With technology like that on Mr. Leyvand’s head, Facebook could prevent users from ever forgetting a colleague’s name, give a reminder at a cocktail party that an acquaintance had kids to ask about or help find someone at a crowded conference. However, six years later, the company now known as Meta has not released a version of that product and Mr. Leyvand has departed for Apple to work on its Vision Pro augmented reality glasses.
The technology is here. Maybe the implementation is still dorky, but that will change. The social implications will be enormous.
Iceberg Efficiency
Post Syndicated from xkcd.com original https://xkcd.com/2829/

PostgreSQL 16 released
Post Syndicated from corbet original https://lwn.net/Articles/944516/
Version 16
of the PostgreSQL database manager has been released.
PostgreSQL 16 contains many new features and enhancements, including:
- Allow parallelization of FULL and internal right OUTER hash joins
- Allow logical replication from standby servers
- Allow logical replication subscribers to apply large transactions in parallel
- Allow monitoring of I/O statistics using the new pg_stat_io view
- Add SQL/JSON constructors and identity functions
- Improve performance of vacuum freezing
- Add support for regular expression matching of user and database
names in pg_hba.conf, and user names in pg_ident.conf
How to secure your email account and improve email sender reputation
Post Syndicated from bajavani original https://aws.amazon.com/blogs/messaging-and-targeting/how-to-secure-your-email-account-and-improve-email-sender-reputation/
How to secure your email account and improve email sender reputation
Introduction
Amazon Simple Email Service (Amazon SES) is a cost-effective, flexible, and scalable email service that enables customers to send email from within any application. You can send email using the SES SMTP interface or via HTTP requests to the SES API. All requests to send email must be authenticated using either SMTP or IAM credentials and it is when these credentials end up in the hands of a malicious actor, that customers need to act fast to secure their SES account.
Compromised credentials with permission to send email via SES allows the malicious actor to use SES to send spam and or phishing emails, which can lead to high bounce and or complaint rates for the SES account. A consequence of high bounce and or complaint rates can result in sending for the SES account being paused.
How to identify if your SES email sending account is compromised
Start by checking the reputation metrics for the SES account from the Reputation metrics menu in the SES Console.
A sudden increase or spike in the bounce or complaint metrics should be further investigated. You can start by checking the Feedback forwarding destination, where SES will send bounce and or complaints to. Feedback on bounces and complaints will contain the From, To email addresses as well as the subject. Use these attributes to determine if unintended emails are being sent, for example if the bounce and / or complaint recipients are not known to you that is an indication of compromise. To find out what your feedback forwarding destination is, please see Feedback forwarding mechanism
If SNS notifications are already enabled, check the subscribed endpoint for the bounce and / or complaint notifications to review the notifications for unintended email sending. SNS notifications would provide additional information, such as IAM identity being used to send the emails as well as the source IP address the emails are being sent from.
If the review of the bounces or complaints leads to the conclusion that the email sending is unintended, immediately follow the steps below to secure your account.
Steps to secure your account:
You can follow the below steps in order to secure your SES account:
- It is recommended that to avoid any more unintended emails from being sent, to immediately pause the SES account until the root cause has been identified and steps taken to secure the SES account. You can use the below command to pause the email sending for your account:
aws ses update-account-sending-enabled --no-enabled --region sending_region
Note: Change the sending_region with the region you are using to send email. - Rotate the credentials for the IAM identity being used to send the unintended emails. If the IAM identity was originally created from the SES Console as SMTP credentials, it is recommended to delete the IAM identity and create new SMTP credentials from the SES Console.
- Limit the scope of SMTP/IAM identity to send email only from the specific IP address your email sending originates from.
See controlling access to Amazon SES.
Below is an example of an IAM policy which allows emails from IP Address 1.2.3.4 and 5.6.7.8 only.
————————-
{
"Version": "2012-10-17",
"Statement": [
{
"Sid": "RestrictIP",
"Effect": "Allow",
"Action": "ses:SendRawEmail",
"Resource": "*",
"Condition": {
"IpAddress": {
"aws:SourceIp": [
"1.2.3.4/32",
"5.6.7.8/32"
]
}
}
}
]
}
———————————
When you send an email from IP address apart from the IP mentioned in the policy, then the following error will be observed and the email sending request will fail:
———-
554 Access denied: User arn:aws:iam::123456789012:user/iam-user-name’ is not authorized to perform ses:SendRawEmail’ on resource `arn:aws:ses:eu-west-1:123456789012:identity/example.com’
———-
4. Once these steps have been taken, the sending for the account can be enabled again, using the command below:
aws ses update-account-sending-enabled --enabled --region sending_region
Conclusion
You can secure your SES email sending account by taking the necessary steps mentioned and also prevent this from happening in the future.
Deploy Amazon QuickSight dashboard for Amazon Pinpoint engagement events.
Post Syndicated from Pavlos Ioannou Katidis original https://aws.amazon.com/blogs/messaging-and-targeting/deploy-amazon-quicksight-dashboard-for-amazon-pinpoint-engagement-events/
Abstract
Business intelligence (BI) dashboards provide a graphical representation of metrics and key performance indicators (KPIs) to monitor the health of your business. By leveraging BI dashboards to analyze the performance of your customer communications, you gain valuable insights into how they are engaging with your messages and can make data-driven decisions to improve your marketing and communication strategies.
In this blog post we introduce a solution that automates the deployment of an Amazon QuickSight dashboard that enables marketers to analyze their long-term Amazon Pinpoint customer engagement data. These dashboards can be customized further depending the use case. This solution alleviates the need to create data pipelines for storage and analysis of Amazon Pinpoint’s engagement data, while offering a greater variety of widgets and views across email, SMS, campaigns, journeys and transactional messages when comparing to Amazon Pinpoint’s native dashboards.
Amazon Pinpoint is a flexible, scalable marketing communications service that connects you with customers over email, SMS, push notifications, or voice. The service offers ready to use dashboards to view key performance indicators (KPIs) for the various messaging channels, It provides 90 days of events for analysis. However, the raw events used to populate Amazon Pinpoint’s dashboards, can be streamed using Amazon Kinesis Data Firehose to a destination of your choice. This blog will walk you through leveraging this feature to create a data lake to store and analyze data beyond the initial 90 days.
Amazon QuickSight is a cloud-scale business intelligence (BI) service that you can use to deliver easy-to-understand insights in an interactive visual environment.
The solutions leverages the Amazon Cloud Development Kit (CDK) to deploy the needed infrastructure and dashboards.
Use Case(s)
The Amazon QuickSight dashboards deployed through this solution are designed to serve several use cases. Here are just a few examples:
- View email and SMS costs per Campaign and Journey.
- Deep dive into engagement insights and performance. (eg: SMS events, Email events, Campaign events, Journey events).
- Schedule reports to various business stakeholders.
- Track individual email & SMS statuses to specific endpoints.
- Analyze open and click rates based on the message send time.
These are some of the use cases you can use these dashboards for and with all the data points being available in Amazon QuickSight, you can create your own views and widgets based on your specific requirements.
Solution Overview
This solution builds upon the Digital User Engagement (DUE) Event Database AWS Solution. It creates a long-term Amazon Pinpoint event data lake. This solution also builds a QuickSight dashboard to visualize and analyze this data. It leverages several other AWS services to tie i all together. It uses AWS Lambda for processing AWS CloudTrail data, Amazon Athena to build views using SQL for Amazon QuickSight, AWS CloudTrail to record any new campaign, journey and segment updates and Amazon DynamoDB to store the campaign, journey and segment metadata. This solution can be segmented into three logical portions: 1) Pinpoint campaign/journey/segment lookup tables. 2) Amazon Athena Views. 3) Amazon QuickSight resources.
The AWS Cloud Development Kit (CDK) is used to deploy this solution to your account. AWS CDK is an open-source software development framework for defining cloud infrastructure as code with modern programming languages and deploying it through AWS CloudFormation.
Pinpoint campaign/journey/segment lookup tables

- A CloudFormation AWS Lambda-backed custom resource function adds current Pinpoint campaign, journey and segment meta data to Amazon DynamoDB lookup tables. An AWS CloudFormation custom resource is managed by a Lambda function that runs only upon the deployment, update and deletion of the AWS CloudFormation stack.
- AWS CloudTrail logs record API actions to an S3 bucket every 5 minutes.
- When an AWS CloudTrail log is written to the S3 bucket an AWS Lambda function is invoked and checks for Amazon Pinpoint campaigns/journeys/segments management events such as create, update and delete.
- For every Amazon Pinpoint action the AWS Lambda function finds, it queries Amazon Pinpoint to get the respective resource details.
- The AWS Lambda function will create or update records in the Amazon DynamoDB table to reflect the changes.
- This solution also deploys an Amazon Athena DynamoDB connector. Amazon Athena uses this to query the Amazon DynamoDB lookup tables to enrich the data in the Amazon Pinpoint event data lake.
- The Amazon Athena to Amazon DynamoDB connector requires an Amazon S3 spill bucket for any data that exceeds the AWS Lambda function limits
Amazon Athena views
Amazon Athena views are crucial for querying and organizing the data. These views allow QuickSight to interact with the Pinpoint event data lake through standard SQL queries and views. Here’s how they’re set up:
The application creates several named queries (called saved queries in the Amazon Athena console). Each named query uses a SQL statement to create a database view containing a subset of the data from the Pinpoint event data lake (or joins data from a previous view with the Amazon DynamoDB tables created above. The views are also created using an AWS Lambda-backed custom resource.
Amazon QuickSight resources

- This solution creates several Amazon QuickSight resources to support the deployed dashboard. These include data sources, datasets, refresh schedules, and an analysis. The refresh schedule determines the frequency that Amazon QuickSight queries the Amazon Athena views to update the datasets.
- Amazon Athena retrieves live data from the DUE event database data lake and the Athena DynamoDB Connector whenever the Amazon QuickSight refresh schedule runs.
Prerequisites
- Deploy the Digital User Engagement (DUE) Event Database solution before continuing
- After you have deployed this solution, gather the following data from the stack’s Resources section.
- DUES3DataLake: You will need the bucket name
- PinpointProject: You will need the project Id
- PinpointEventDatabase: This is the name of the Glue Database. You will only need this if you used something other than the default of due_eventdb
- After you have deployed this solution, gather the following data from the stack’s Resources section.
Note: If you are installing the DUE event database for the first time as part of these instructions, your dashboard will not have any data to show until new events start to come in from your Amazon Pinpoint project.
Once you have the DUE event database installed, you are ready to begin your deployment.
Implementation steps
Step 1 – Ensure that Amazon Athena is setup to store query results
Amazon Athena uses workgroups to separate users, teams, applications, or workloads, to set limits on amount of data each query or the entire workgroup can process, and to track costs. There is a default workgroup called “primary” However, before you can use this workgroup, it needs to be configured with an Amazon S3 bucket for storing the query results.
- If you do not have an existing S3 bucket you can use for the output, create a new Amazon S3 bucket.
- Navigate to the Amazon Athena console and from the menu select workgroups > primary > Edit > Query result configuration
- Select the Amazon S3 bucket and any specific directory for the Athena query result location
Note: If you choose to use a workgroup other that the default “primary” workgroup. Please take note of the workgroup name to be used later.
Step 2 – Enable Amazon QuickSight
Amazon QuickSight offers two types of data sets: Direct Query data sets, which provides real-time access to data sources, and SPICE (Super-fast, Parallel, In-memory Calculation Engine) data sets, which are pre-aggregated and cached for faster performance and scalability that can be refreshed on a schedule.
This solution uses SPICE datasets set to incrementally refresh on a cycle of your choice (Daily or Hourly). If you have already setup Amazon QuickSight, please navigate to Amazon QuickSight in the AWS Console and skip to step 3.
- Navigate to Amazon QuickSight on the AWS console
- Setup Amazon QuickSight account by clicking the “Sign up for QuickSight” button.
- You will need to setup an Enterprise account for this solution.
- To complete the process for the Amazon QuickSight account setup follow the instructions at this link
- Ensure you have the Admin Role
- Choose the profile icon in the top right corner, select Manage QuickSight and click on Manage Users
- Subscription details should display on the screen.
- Ensure you have enough SPICE capacity for the datasets
- Choose the profile icon, and then select Manage QuickSight
- Click on SPICE Capacity
- Make sure you enough SPICE for all three datasets
- if you are still in the free tier, you should have enough for initial testing.
- You will need about 2GB of capacity for every 1,000,000 Pinpoint events that will be ingested in to SPICE
- Note: If you do not have enough SPICE capacity, deployment will fail
- Please note the Amazon QuickSight username. You can find this by clicking profile icon. Example username: Admin/user-name
Step 3 – Collect the Amazon QuickSight Service Role name in IAM
For Amazon Athena, Amazon S3, and Athena Query Federation connections, Amazon QuickSight uses the following IAM “consumer” role by default: aws-quicksight-s3-consumers-role-v0
If the “consumer” role is not present, then QuickSight uses the following “service” role instead : aws-quicksight-service-role-v0.
The version number at the end of the role could be different in your account. Please validate your role name with the following steps.
- Navigate to the Identity and Access Management (IAM) console
- Go to Roles and search QuickSight
- If the consumer role exists, please note its full name
- If you only find the service role, please note its full name
Note: For more details on these service roles, please see the QuickSight User Guide
Step 4 – Prepare the CDK Application
Deploying this solution requires no previous experience with the AWS CDK toolkit. If you would like to familiarize yourself with CDK, the AWS CDK Workshop is a great place to start.
- Setup your integrated development environment (IDE)
- Option 1 (recommended for first time CDK users): Use AWS Cloud9 – a cloud-based IDE that lets you write, run, and debug your code with just a browser
- Navigate to Cloud9 in the AWS console and click the Create Environment button
- Provide a descriptive name to your environment (e.g. PinpointAnalysis)
- Leave the rest of the values as their default values and click Create
- Open the Cloud9 IDE
- Node, TypeScript, and CDK should be come pre-installed. Test this by running the following commands in your terminal.
node --versiontsc --versioncdk --version- If dependencies are not installed, follow the Step 1 instructions from this article
- Using AWS Cloud 9 will incur a nominal charge if you are no longer Free Tier eligible. However, using AWS Cloud9 will simply setup if you do not already have a local environment with AWS CDK and the AWS CLI installed
- Node, TypeScript, and CDK should be come pre-installed. Test this by running the following commands in your terminal.
- Option 2: local IDE such as VS Code
- Setup CDK locally using this documentation
- Install Node, TypeScript and the AWS CLI
- Once the CLI is installed, configure your AWS credentials
aws configure
- Once the CLI is installed, configure your AWS credentials
- Option 1 (recommended for first time CDK users): Use AWS Cloud9 – a cloud-based IDE that lets you write, run, and debug your code with just a browser
- Clone the Pinpoint Dashboard Solution from your terminal by running the command below:
git clone https://github.com/aws-samples/digital-user-engagement-events-dashboards.git
- Install the required npm packages from package.json by running the commands below:
cd digital-user-engagement-events-dashboardsnpm install
Open the file at digital-user-engagement-events-dashboards/bin/pinpoint-bi-analysis.ts for editing in your IDE.
Edit the following code block your your solution with the information you have gathered in the previous steps. Please reference Table 1 for a description of each editable field.
const resourcePrefix = "pinpoint_analytics_";

...

new MainApp(app, "PinpointAnalytics", {
  env: {
    region: "us-east-1",
  }

  //Attributes to change
  dueDbBucketName: "{bucket-name}",
  pinpointProjectId: "{pinpoint-project-id}",
  qsUserName: "{quicksight-username}",

  //Default settings
  athenaWorkGroupName: "primary",
  dataLakeDbName: "due_eventdb",
  dateRangeNumberOfMonths: 6,
  qsUserRegion: "us-east-1",
  qsDefaultServiceRole: "aws-quicksight-service-role-v0",
  spiceRefreshInterval: "HOURLY",

  //Constants
  athena_util: athena_util,
  qs_util: qs_util,
});| Attribute | Definition | Example |
| resourcePrefix | The prefix for all created Athena and QuickSight resources | pinpoint_analytics_ |
| region | Where new resources will be deployed. This must be the same region that the DUE event database solution was deployed | us-east-1 |
| dueDbBucketName | The name of the DUE event database S3 Bucket | due-database-xxxxxxxxxxus-east-1 |
| qsUserName | The name of your QuickSight User | Admin/my-user |
| athenaWorkGroupName | The Athena workgroup that was previously configured | primary |
| dataLakeDbName | The Glue database created during the DUE event database solution. By default the database name is “due_eventdb” | due_eventdb |
| dateRangeNumberOfMonths | The number of months of data the Athena views will contain. QuickSight SPICE datasets will contain this many months of data initially and on full refresh. The QuickSight dataset will add new data incrementally without deleting historical data. | 6 |
| qsUserRegion | The region where your quicksight user exists. By default, new users will be created in us-east-1. You can check your user location with the AWS CLI: aws quicksight list-users --aws-account-id {accout-id} --namespace default and look for the region in the arn |
us-east-1 |
| qsDefaultServiceRole | The service role collected during Step 3. | aws-quicksight-service-role-v0 |
| spiceRefreshInterval | Options Include HOURLY, DAILY – This is how often the SPICE 7-day incremental window will be refreshed | DAILY |
Step 5 – Deploy
- CDK requires you to bootstrap in each region of an account. This creates a S3 bucket for deployment. You only need to bootstrap once per account/region
cdk bootstrap
- Deploy the application
cdk deploy
Step 6 – Explore
Once your solution deploys, look for the Outputs provided by the CDK CLI. You will find a link to your new Amazon Quicksight Analysis, or Dashboard, as well as a few other key resources. Also, explore the resources sections of the deployed stacks in AWS CloudFormation for a complete list of deployed resources. In the AWS CloudFormation, you should have two stacks. The main stack will be called PinpointAnalytics and a nested stack.
Pricing
The total cost to run this solution will depend on several factors. To help explore what the costs might look like for you, please look at the following examples.
All costs outlined below will assume the following:
- 1 Amazon QuickSight author
- 100 Amazon QuickSight analysis reader sessions
- 100k write API actions for all services in AWS account
- A total of 1k Amazon Pinpoint campaigns, journeys, and segments resulting in 1k Amazon DynamoDB records
- 5 million monthly Amazon Pinpoint events – email send, email delivered, etc.
Base Costs:
- 1 Amazon QuickSight author – can edit all Amazon QuickSight resources
- $24 – There is a a 30 day trial for 4 authors in the free tier
- 100 Amazon QuickSight analysis reader sessions OR 6 readers with unlimited access – max $5 per month per reader
- $30
- Total Monthly Costs: $54 / month
Variable Costs:
Even with the assumptions listed above, the costs will vary depending on the chosen data retention window as well as the the refresh schedule.
- SPICE data storage costs.
- Total size of storage will depend on how many months you choose to display in the dashboard
- For the above assumptions, the SPICE datasets will cost roughly $3.25 for each month stored in the datasets.
- Amazon Athena data volume costs
- With Athena you are charged for the total number of bytes scanned in a query. The solution implements incremental data resfreshes in SPICE. Amazon QuickSight will only query and updates the most recent 7 days of data during each refresh cycle. This can be adjusted as needed.
Scenario 1 – 6-month data analysis with daily refresh:
- Fixed costs: $57
- SPICE datasets: $19.50
- Athena Scans: $1.25
- Total Costs: $77.75 / Month
Scenario 2 – 12-month data analysis with daily refresh:
- Fixed costs: $57
- SPICE datasets: $39
- Athena Scans: $1.25
- Total Costs: $97.25 / Month
Scenario 3 – 12-month data analysis with hourly refresh:
- Fixed costs: $57
- SPICE datasets: $39
- Athena Scans: $27.50
- Total Costs: $123.5 / Month
Note: Several services were not mentioned in the above scenarios (e.g., DynamoDB, Cloudtrail, Lambda, etc). The limited usage of these services resulted in a combined cost of less than a few US dollars per month. Even at a greater scale, the costs from these services will not increase in any significant way.
Clean up
- Delete the CDK stack running the following from your command line
cdk destroy
- Delete QuickSight account
- Follow this guide
- Delete Athena views
- Go to Glue > Data Catalog > Databases > Your Database Name
- This should delete all Athena views no longer needed. Views created will start with the resourcePrefix specified in the bin/athena-quicksight-cdk.ts file
- Delete S3 buckets
- DynamoDB cloud watch log bucket
- Dynamo Athena Connector Spill bucket
- Athena workgroup output bucket
- Delete DynamoDB tables
- This solution creates two DynamoDB lookup tables prefixed with the Stack name
Conclusion
In this blog, you have deployed a solution that visualizes Amazon Pinpoint’s email and SMS engagement data using Amazon QuickSight. This solution provides you with an Amazon QuickSight functional dashboard as well as a foundation to design and build new Amazon QuickSight dashboards that meet your bespoke requirements. Parts of the solution, such as the Amazon Athena views, can be ingested with other business intelligence tools that your business might already be using.
Next steps
This solution can be expanded to include Amazon Pinpoint engagement events from other channels such as push notifications, Amazon Connect outbound calls, in-app and custom events. This will require certain updates on the Amazon Athena views and consequently on the Amazon QuickSight dashboards. Furthermore, the Amazon DynamoDB tables store only campaign, journey and segment meta-data. You can extend this part of the solution to include message template meta-data, which will help to analyze performance per message template.
Considerations / Troubleshooting
- Pinpoint Standard account can be upgraded to an Enterprise account. Enterprise accounts cannot be downgraded to a Standard account.
- SPICE capacity is allocated separately for each AWS Region. Default SPICE capacity is automatically allocated to your home AWS Region. For each AWS account, SPICE capacity is shared by all the people using QuickSight in a single AWS Region. The other AWS Regions have no SPICE capacity unless you choose to purchase some.
- The QuickSight Analysis Event rates are calculated on Pinpoint message_id and endpoint_id grain – click rate will be the same if a user clicks an email link one or more than one times
- All timestamps are in UTC. To display data in another timezone edit event_timestamp_timezone calculated field in every dataset
- Data inside Amazon QuickSight will refresh depending on the schedule set during deployment. Current options include hourly and daily refreshes.
- AWS CloudTrail has 5 cloudtrail trails per AWS account.
About the Authors

Spencer Harrison
Spencer was a 2023 WWPS Solution Architect intern at Amazon Web Services. He will graduate with his Masters of Information Systems Management from Brigham Young University in the spring of 2024. After graduation he is aspiring to find opportunities as a solution architect, cloud engineer, or DevOps engineer. Outside of work, Spencer loves going outdoors to wake surf, downhill ski, and play pickle ball.

Daniel Wells
With over 20 years of IT experience, Daniel has held many architecture and director positions supporting a wide variety of technologies. He currently works as an AWS Solutions Architect supporting Education Technology companies striving to make a difference for learners and educators worldwide. Daniel’s interests outside of work include music, family, health, education and anything that allows him to express himself creatively.

Pavlos Ioannou Katidis
Pavlos Ioannou Katidis is an Amazon Pinpoint and Amazon Simple Email Service Senior Specialist Solutions Architect at AWS. He enjoys diving deep into customers’ technical issues and help in designing communication solutions. In his spare time, he enjoys playing tennis, watching crime TV series, playing FPS PC games, and coding personal projects.
Optimize checkpointing in your Amazon Managed Service for Apache Flink applications with buffer debloating and unaligned checkpoints – Part 2
Post Syndicated from Lorenzo Nicora original https://aws.amazon.com/blogs/big-data/optimize-checkpointing-in-your-amazon-managed-service-for-apache-flink-applications-with-buffer-debloating-and-unaligned-checkpoints-part-2/
This post is a continuation of a two-part series. In the first part, we delved into Apache Flink‘s internal mechanisms for checkpointing, in-flight data buffering, and handling backpressure. We covered these concepts in order to understand how buffer debloating and unaligned checkpoints allow us to enhance performance for specific conditions in Apache Flink applications.
In Part 1, we introduced and examined how to use buffer debloating to improve in-flight data processing. In this post, we focus on unaligned checkpoints. This feature has been available since Apache Flink 1.11 and has received many improvements since then. Unaligned checkpoints help, under specific conditions, to reduce checkpointing time for applications suffering temporary backpressure, and can be now enabled in Amazon Managed Service for Apache Flink applications running Apache Flink 1.15.2 through a support ticket.
Even though this feature might improve performance for your checkpoints, if your application is constantly failing because of checkpoints timing out, or is suffering from having constant backpressure, you may require a deeper analysis and redesign of your application.
Aligned checkpoints
As discussed in Part 1, Apache Flink checkpointing allows applications to record state in case of failure. We’ve already discussed how checkpoints, when triggered by the job manager, signal all source operators to snapshot their state, which is then broadcasted as a special record called a checkpoint barrier. This process achieves exactly-once consistency for state in a distributed streaming application through the alignment of these barriers.
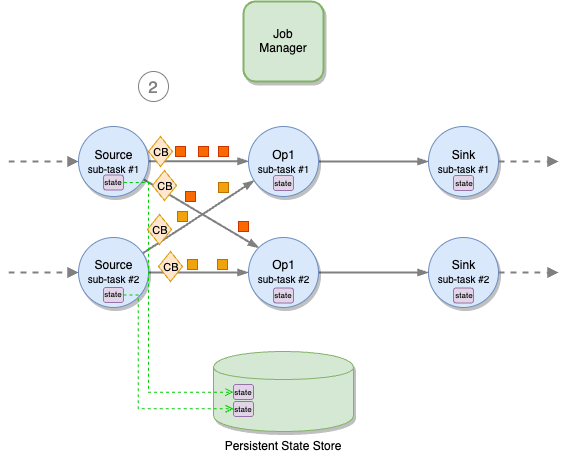
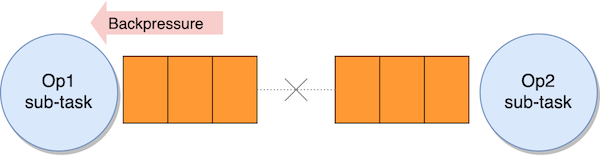
Let’s walk through the process of aligned checkpoints in a standard Apache Flink application. Remember that Apache Flink distributes the workload horizontally: each operator (a node in the logical flow of your application, including sources and sinks) is split into multiple sub-tasks based on its parallelism.
Barrier alignment
The alignment of checkpoint barriers is crucial for achieving exactly-once consistency in Apache Flink applications during checkpoint runs. To recap, when a job manager triggers a checkpoint, all sub-tasks of source operators receive a signal to initiate the checkpoint process. Each sub-task independently snapshots its state to the state backend and broadcasts a special record known as a checkpoint barrier to all outgoing streams.
When an application operates with a parallelism higher than 1, multiple instances of each task—referred to as sub-tasks—enable parallel message consumption and processing. A sub-task can receive distinct partitions of the same stream from different upstream sub-tasks, such as after a stream repartitioning with keyBy or rebalance operations. To maintain exactly-once consistency, all sub-tasks must wait for the arrival of all checkpoint barriers before taking a snapshot of the state. The following diagram illustrates the checkpoint barriers flow.

This phase is called checkpoint alignment. During alignment, the sub-task stops processing records from the partitions from which it has already received barriers, as shown in the following figure.

However, it continues to process partitions that are behind the barrier.

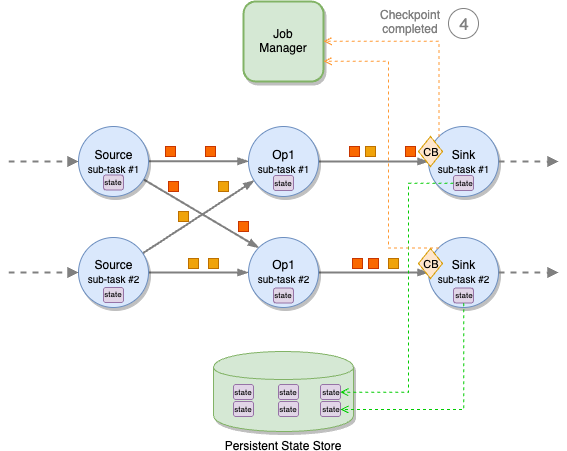
When barriers from all upstream partitions have arrived, the sub-task takes a snapshot of its state.

Then it broadcasts the barrier downstream.

The time a sub-task spends waiting for all barriers to arrive is measured by the checkpoint Alignment Duration metric, which can be observed in the Apache Flink UI.
If the application experiences backpressure, an increase in this metric could lead to longer checkpoint durations and even checkpoint failures due to timeouts. This is where unaligned checkpoints become a viable option to potentially enhance checkpointing performance.
Unaligned checkpoints
Unaligned checkpoints address situations where backpressure is not just a temporary spike, but results in timeouts for aligned checkpoints, due to barrier queuing within the stream. As discussed in Part 1, checkpoint barriers can’t overtake regular records. Therefore, significant backpressure can slow down the movement of barriers across the application, potentially causing checkpoint timeouts.
The objective of unaligned checkpoints is to enable barrier overtaking, allowing barriers to move swiftly from source to sink even when the data flow is slower than anticipated.
Building on what we saw in Part 1 concerning checkpoints and what aligned checkpoints are, let’s explore how unaligned checkpoints modify the checkpointing mechanism.
Upon emission, each source’s checkpoint barrier is injected into the stream flowing across sub-tasks. It travels from the source output network buffer queue into the input network buffer queue of the subsequent operator.
Upon the arrival of the first barrier in the input network buffer queue, the operator initially waits for barrier alignment. If the specified alignment timeout expires because not all barriers have reached the end of the input network buffer queue, the operator switches to unaligned checkpoint mode.
The alignment timeout can be set programmatically by env.getCheckpointConfig().setAlignedCheckpointTimeout(Duration.ofSeconds(30)), but modifying the default is not recommended in Apache Flink 1.15.

The operator waits until all checkpoint barriers are present in the input network buffer queue before triggering the checkpoint. Unlike aligned checkpoints, the operator doesn’t need to wait for all barriers to reach the queue’s end, allowing the operator to have in-flight data from the buffer that hasn’t been processed before checkpoint initiation.

After all barriers have arrived in the input network buffer queue, the operator advances the barrier to the end of the output network buffer queue. This enhances checkpointing speed because the barrier can smoothly traverse the application from source to sink, independent of the application’s end-to-end latency.

After forwarding the barrier to the output network buffer queue, the operator initiates the snapshot of in-flight data between the barriers in the input and output network buffer queues, along with the snapshot of the state.
Although processing is momentarily paused during this process, the actual writing to the remote persistent state storage occurs asynchronously, preventing potential bottlenecks.

The local snapshot, encompassing in-flight messages and state, is saved asynchronously in the remote persistent state store, while the barrier continues its journey through the application.

When to use unaligned checkpoints
Remember, barrier alignment only occurs between partitions coming from different sub-tasks of the same operator. Therefore, if an operator is experiencing temporary backpressure, enabling unaligned checkpoints may be beneficial. This way, the application doesn’t have to wait for all barriers to reach the operator before performing the snapshot of state or moving the barrier forward.
Temporary backpressure could arise from the following:
- A surge in data ingestion
- Backfilling or catching up with historical data
- Increased message processing time due to delayed external systems
Another scenario where unaligned checkpoints prove advantageous is when working with exactly-once sinks. Utilizing the two-phase commit sink function for exactly-once sinks, unaligned checkpoints can expedite checkpoint runs, thereby reducing end-to-end latency.
When not to use unaligned checkpoints
Unaligned checkpoints won’t reduce the time required for savepoints (called snapshots in the Amazon Managed Service for Apache Flink implementation) because savepoints exclusively utilize aligned checkpoints. Furthermore, because Apache Flink doesn’t permit concurrent unaligned checkpoints, savepoints won’t occur simultaneously with unaligned checkpoints, potentially elongating savepoint durations.
Unaligned checkpoints won’t fix any underlying issue in your application design. If your application is suffering from persistent backpressure or constant checkpointing timeouts, this might indicate data skewness or underprovisioning, which may require improving and tuning the application.
Using unaligned checkpoints with buffer debloating
One alternative for reducing the risks associated with an increased state size is to combine unaligned checkpoints with buffer debloating. This approach results in having less in-flight data to snapshot and store in the state, along with less data to be used for recovery in case of failure. This synergy facilitates enhanced performance and efficient checkpoint runs, leading to smaller checkpointing sizes and faster recovery times. When testing the use of unaligned checkpoints, we recommend doing so with buffer debloating to prevent the state size from increasing.
Limitations
Unaligned checkpoints are subject to the following limitations:
- They provide no benefit for operators with a parallelism of 1.
- They only improve performance for operators where barrier alignment would have occurred. This alignment happens only if records are coming from different sub-tasks of the same operator, for example, through repartitioning or
keyByoperations. - Operators receiving input from multiple sources or participating in joins might not experience improvements, because the operator would be receiving data from different operators in those cases.
- Although checkpoint barriers can surpass records in the network’s buffer queue, this won’t occur if the sub-task is currently processing a message. If processing a message takes too much time (for example, a flat-map operation emitting numerous records for each input record), barrier handling will be delayed.
- As we have seen, savepoints always use aligned checkpoints. If the savepoints of your applications are slow due to barrier alignment, unaligned checkpoints will not help.
- Additional limitations affect watermarks, message ordering, and broadcast state in recovery. For more details, refer to Limitations.
Considerations
Considerations for implementing unaligned checkpoints:
- Unaligned checkpoints introduce additional I/O to checkpoint storage
- Checkpoints encompass not only operator state but also in-flight data within network buffer queues, leading to increased state size
Recommendations
We offer the following recommendations:
- Consider enabling unaligned checkpoints only if both of the following conditions are true:
- Checkpoints are timing out.
- The average checkpoint Async Duration of any operator is more than 50% of the total checkpoint duration for the operator (sum of Sync Duration + Async Duration).
- Consider enabling buffer debloating first, and evaluate whether it solves the problem of checkpoints timing out.
- If buffer debloating doesn’t help, consider enabling unaligned checkpoints along with buffer debloating. Buffer debloating mitigates the drawbacks of unaligned checkpoints, reducing the amount of in-flight data.
- If unaligned checkpoints and buffer debloating together don’t improve checkpoint alignment duration, consider testing unaligned checkpoints alone.
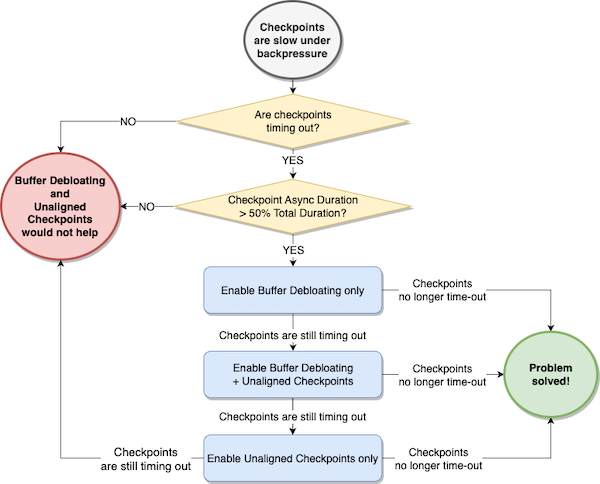
Finally, but most importantly, always test unaligned checkpoints in a non-production environment first, running some comparative performance testing with a realistic workload, and verify that unaligned checkpoints actually reduce checkpoint duration.
Conclusion
This two-part series explored advanced strategies for optimizing checkpointing within your Amazon Managed Service for Apache Flink applications. By harnessing the potential of buffer debloating and unaligned checkpoints, you can unlock significant performance improvements and streamline checkpoint processes. However, it’s important to understand when these techniques will provide improvements and when they will not. If you believe your application may benefit from checkpoint performance improvement, you can enable these features in your Amazon Managed Service For Apache Flink version 1.15 applications. We recommend first enabling buffer debloating and testing the application. If you are still not seeing the expected outcome, enable buffer debloating with unaligned checkpoints. This way, you can immediately reduce the state size and the additional I/O to state backends. Lastly, you may try using unaligned checkpoints by itself, bearing in mind the considerations we’ve mentioned.
With a deeper understanding of these techniques and their applicability, you are better equipped to maximize the efficiency of checkpoints and mitigate the effect of backpressure in your Apache Flink application.
About the Authors
 Lorenzo Nicora works as Senior Streaming Solution Architect helping customers across EMEA. He has been building cloud-native, data-intensive systems for over 25 years, working in the finance industry both through consultancies and for FinTech product companies. He has leveraged open-source technologies extensively and contributed to several projects, including Apache Flink.
 Francisco Morillo is a Streaming Solutions Architect at AWS. Francisco works with AWS customers helping them design real-time analytics architectures using AWS services, supporting Amazon Managed Streaming for Apache Kafka (Amazon MSK) and AWS’s managed offering for Apache Flink.
Optimize checkpointing in your Amazon Managed Service for Apache Flink applications with buffer debloating and unaligned checkpoints – Part 1
Post Syndicated from Lorenzo Nicora original https://aws.amazon.com/blogs/big-data/part-1-optimize-checkpointing-in-your-amazon-managed-service-for-apache-flink-applications-with-buffer-debloating-and-unaligned-checkpoints/
This post is the first of a two-part series regarding checkpointing mechanisms and in-flight data buffering. In this first part, we explain some of the fundamental Apache Flink internals and cover the buffer debloating feature. In the second part, we focus on unaligned checkpoints.
Apache Flink is an open-source distributed engine for stateful processing over unbounded datasets (streams) and bounded datasets (batches). Amazon Managed Service for Apache Flink, formerly known as Amazon Kinesis Data Analytics, is the AWS service offering fully managed Apache Flink.
Apache Flink is designed for stateful processing at scale, for high throughput and low latency. It scales horizontally, distributing processing and state across multiple nodes, and is designed to withstand failures without compromising the exactly-once consistency it provides.
Internally, Apache Flink uses clever mechanisms to maintain exactly-once state consistency, while also optimizing for throughput and reduced latency. The default behavior works well for most use cases. Recent versions introduced two functionalities that can be optionally enabled to improve application performance under particular conditions: buffer debloating and unaligned checkpoints.
Buffer debloating and unaligned checkpoints can be enabled on Amazon Managed Service for Apache Flink version 1.15.
To understand how these functionalities can help and when to use them, we need to dive deep into some of the fundamental internal mechanisms of Apache Flink: checkpointing, in-flight data buffering, and backpressure.
Maintaining state consistency through failures with checkpointing
Apache Flink checkpointing periodically saves the internal application state for recovering in case of failure. Each of the distributed components of an application asynchronously snapshots its state to an external persistent datastore. The challenge is taking snapshots guaranteeing exactly-once consistency. A naïve “stop-the-world, take a snapshot” implementation would never meet the high throughput and low latency goals Apache Flink has been designed for.
Let’s walk through the process of checkpointing in a simple streaming application.
As shown in the following figure, Apache Flink distributes the work horizontally. Each operator (a node in the logical flow of your application, including sources and sinks) is split into multiple sub-tasks, based on its parallelism. The application is coordinated by a job manager. Checkpoints are periodically initiated by the job manager, sending a signal to all source operators’ sub-tasks.

On receiving the signal, each source sub-task independently snapshots its state (for example, the offsets of the Kafka topic it is consuming) to a persistent storage, and then broadcasts a special record called checkpoint barrier (“CB” in the following diagrams) to all outgoing streams. Checkpoint barriers work similarly to watermarks in Apache Flink, flowing in-bands, along with normal records. A barrier does not overtake normal records and is not overtaken.
When a downstream operator’s sub-task receives all checkpoint barriers from all input channels, it starts snapshotting its state.
A sub-task does not pause processing while saving its state to the remote, persistent state backend. This is a two-phase operation. First, the sub-task takes a snapshot of the state, on the local file system or in memory, depending on application configuration. This operation is blocking but very fast. When the snapshot is complete, it restarts processing records, while the state is asynchronously saved to the external, persistent state store. When the state is successfully saved to the state store, the sub-task acknowledges to the job manager that its checkpointing is complete.
The time a sub-task spends on the synchronous and asynchronous parts of the checkpoint is measured by Sync Duration and Async Duration metrics, shown by the Apache Flink UI. It is then asynchronously sent to the backend. After the fast snapshot, the sub-task restarts processing messages. The backend notifies the sub-task when the state has been successfully saved. The sub-task, in turn, sends an acknowledgment to the job manager that checkpointing is complete.

Checkpoint barriers propagate through all operators, down to the sinks. When all sink sub-tasks have acknowledged the checkpoint to the job manager, the checkpoint is declared complete and can be used to recover the application, for example in case of failure.
Checkpoint barrier alignment
A sub-task may receive different partitions of the same stream from different upstream sub-tasks, for example when a stream is repartitioned with a keyBy or a rebalance. Each upstream sub-task will emit a checkpoint barrier independently. To maintain exactly-once consistency, the sub-task must wait for the barriers to arrive on all input partitions before taking a snapshot of its state.
This phase is called checkpoint alignment. During the alignment, the sub-task stops processing records from the partitions it already received the barrier from and continues processing the partitions that are behind the barrier.
After the barriers from all upstream partitions have arrived, the sub-task takes the snapshot of its state and then broadcasts the barrier downstream.
The time spent by a sub-task while aligning barriers is measured by the Checkpoint Alignment Duration metric, shown by the Apache Flink UI.

In-flight data buffering
To optimize for throughput, Apache Flink tries to keep each sub-task always busy. This is achieved by transmitting records over the network in blocks and by buffering in-flight data. Note that this is data transmission optimization; Flink operators always process records one at the time.
Data is handed over between sub-tasks in units called network buffers. A network buffer has a fixed size, in bytes.
Sub-tasks also buffer in-flight input and output data. These buffers are called network buffer queues. Each queue is composed of multiple network buffers. Each sub-task has an input network buffer queue for each upstream sub-task and an output network buffer queue for each downstream sub-task.
Each record emitted by the sub-task is serialized, put into network buffers, and published to the output network buffer queue. To use all the available space, multiple messages can be packed into a single network buffer or split across subsequent network buffers.
A separate thread sends full network buffers over the network, where they are stored in the destination sub-task’s input network buffer queue.
When the destination sub-task thread is free, it deserializes the network buffers, rebuilds the records, and processes them one at a time.

Backpressure
If a sub-task can’t keep up with processing records at the same pace they are received, the input queue fills up. When the input queue is full, the upstream sub-task stops sending data.
Data accumulates in the sender’s output queue. When this is also full, the sender sub-task stops processing records, accumulating received data in its own input queue, and the effects propagates upstream.
This is the backpressure that Apache Flink uses to control the internal flow, preventing slow operators from being overwhelmed by slowing down the upstream flow. Backpressure is a safety mechanism to maximize the application throughput. It can be temporary, in case of an unexpected peak of ingested data, for example. If not temporary, it is usually the symptom—not the cause—that the application is not designed correctly or it has insufficient resources to process the workload.
In-flight buffering and checkpoint barriers
As checkpoint barriers flow with normal records, they also flow in the network buffers, through the input and output queues. In normal conditions, barriers don’t overtake records, and they are never overtaken. If records are queueing up due to backpressure, checkpoint barriers are also stuck in the queue, taking longer time to propagate from the sources to the sinks, delaying the completion of the checkpoint.
In the second part of this series, we will see how unaligned checkpoints can let barriers overtake records under specific conditions. For now, let’s see how we can optimize the size of input and output queues with buffer debloating.
Buffer debloating to optimize in-flight data
The default network buffer queue size is a good compromise for most applications. You can modify this size, but it applies to all sub-tasks, and it may be difficult to optimize this one-size-fits-all across different operators.
Longer queues support bigger throughout, but they may slow down checkpoint barriers that have to go through longer queues, causing longer End to End Checkpoint Duration. Ideally, the amount of in-flight data should be adjusted based on the actual throughput.
In version 1.14, Apache Flink introduced buffer debloating, which can be enabled to adjust in-flight data of each sub-task, based on the current throughput the sub-task is processing, and periodically reassess and readjust it.
How buffer debloating helps your application
Consider a streaming application, ingesting records from a streaming source and publishing the results to a streaming destination after some transformations. Under normal conditions, the application is sized to process the incoming throughput smoothly. Our destination has limited capacity, for example a Kafka topic throttled via quotas, sufficient to handle the normal throughput, with some margin.

Imagine that the ingestion throughput has occasional peaks. These peaks exceed the limits of the streaming destination (throughput quota of the Kafka topic), which starts throttling.

Because the sink can’t process the full throughput, in-flight data accumulates upstream of the sink, causing backpressure on the upstream operator. The effect eventually propagates up to the source, and the source starts lagging behind the most recent record in the source stream.

As long this is a temporary condition, backpressure and lagging are not a problem per se, as long as the application is able to catch up when the peak has finished.
Unfortunately, accumulating in-flight data also slows down the propagation of the checkpoint barriers. Checkpoint End to End Duration goes up, and checkpoints may eventually time out.

The situation is even worse if the sink uses two-phase commit for exactly-once guarantees. For example, KafkaSink uses Kafka transactions committed on checkpoints. If checkpoints become too slow, transactions are committed later, significantly increasing the latency of any downstream consumer using a read-committed isolation level.
Slow checkpoints under backpressure may also cause a vicious cycle. A slowed-down application eventually crashes, and recovers from the last checkpoint that is quite old. This causes a long reprocessing that, in turn, induces more backpressure and even slower checkpoints.
In this case, buffer debloating can help by adjusting the amount of in-flight data based on the throughput each sub-task is actually processing. When a sub-task is throttled by backpressure, the amount of in-flight data is reduced, also reducing the time checkpoint barriers take to go through all operators. Checkpoint End to End Duration goes down, and checkpoints do not time out.
Buffer debloating internals
Buffer debloating estimates the throughput a sub-task is capable of processing, assuming no idling, and limits the upstream in-flight data buffers to contain just enough data to be processed in 1 second (by default).
For efficiency, network buffers in the queues are fixed. Buffer debloating caps the usable size of each network buffer, making it smaller when the sub-task is processing slowly.

The benefits of less in-flight data depends on whether Apache Flink is using standard checkpoint alignment, the default behavior described so far, or unaligned checkpoints. We will examine unaligned checkpoints in the second part of this series, but let’s see the effect of buffer debloating, briefly.
- With aligned checkpoints (default behavior) – Less in-flight data makes checkpoint barrier propagation faster, ultimately reducing the end-to-end checkpoint duration but also making it more predictable
- With unaligned checkpoints (optional) – Less in-flight data reduces the amount of in-flight records stored with the checkpoint, ultimately reducing the checkpoint size
What buffer debloating does not do
Note that the problem we are trying to solve is slow checkpointing (or excessive checkpointing size, with unaligned checkpoints). Buffer debloating helps making checkpointing faster.
Buffer debloating does not remove backpressure. Backpressure is the internal protective mechanism that Apache Flink uses when some part of the application is not able to cope with the incoming throughput. To reduce backpressure, you have to work on other aspects of the application. When backpressure is only temporary, for example under peak conditions, the only way of removing it would be sizing the end-to-end system for the peak, rather than normal workload. But this could be impossible or too expensive.
Buffer debloating helps reduce and keep checkpoint duration stable under exceptional and temporary conditions. If an application experiences backpressure under its normal workload, or checkpoints are too slow under normal conditions, you should investigate the implementation of your application to understand the root cause.
When the automatic throughput prediction fails
Buffer debloating doesn’t have any particular drawback, but in corner cases, the mechanism may incorrectly estimate the throughput, and the resulting amount of in-flight data may not be optimal.
Estimating the throughput is complex when an operator receives data from multiple upstream operators, connected streams or unions, with very different throughput. It may also take time to adjust to a sudden spike, causing a temporary suboptimal buffering.
- Too small in-flight data may reduce the throughput the sub-task can process (it will be idling), causing more backpressure upstream
- Too large buffers may slow down checkpointing and increase the checkpoint size (with unaligned checkpoints)
Conclusion
The checkpointing mechanism makes Apache Flink fault tolerant, providing exactly-once state consistency. In-flight data buffering and backpressure control the data flow within the distributed streaming application maximize the throughput. Apache Flink default behaviors and configurations are good for most workloads.
The effectiveness of buffer debloating depends on the characteristics of the workload and the application. The general recommendation is to test the functionality in a non-production environment with a realistic workload to verify it actually helps with your use case.
You can request to enable buffer debloating on your Amazon Managed Service for Apache Flink application.
Under particular conditions, the combined effect of backpressure and in-flight data buffering may slow down checkpointing, increase checkpointing size (with unaligned checkpoints), and even cause checkpoints to fail. In these cases, enabling unaligned checkpointing may help reduce checkpoint duration or size.
In the second part of this series, we will understand better unaligned checkpoints and how they can help your application checkpointing efficiently in presence of backpressure, especially in combination with buffer debloating.
About the Authors
Lorenzo Nicora works as Senior Streaming Solution Architect at AWS, helping customers across EMEA. He has been building cloud-native, data-intensive systems for over 25 years, working in the finance industry both through consultancies and for FinTech product companies. He has leveraged open-source technologies extensively and contributed to several projects, including Apache Flink.
Francisco Morillo is a Streaming Solutions Architect at AWS. Francisco works with AWS customers helping them design real-time analytics architectures using AWS services, supporting Amazon Managed Streaming for Apache Kafka (Amazon MSK) and AWS’s managed offering for Apache Flink.
AMD Adds New Low Power AMD EPYC 7003 SKUs
Post Syndicated from Cliff Robinson original https://www.servethehome.com/amd-adds-new-low-power-amd-epyc-7003-skus/
AMD has new low-power EPYC 7003 “Milan” SKUs in an ultra-competitive move against Intel at the lower-end of the server CPU market
The post AMD Adds New Low Power AMD EPYC 7003 SKUs appeared first on ServeTheHome.
Videos from FOSSY released (Software Freedom Conservancy)
Post Syndicated from jake original https://lwn.net/Articles/944497/
The Software Freedom Conservancy
(SFC) has announced
the availability of videos from the
first-ever Free and Open Source Yearly
(FOSSY) conference, which was held in July in Portland, Oregon in the US.
During the four days of the conference, there were a wide variety of talks
from speakers with a range of experience and backgrounds, and amazing
community focused discussions. Featuring wide ranging topics such as a panel
discussion about software coops, what
is life like without a smartphone (where the picture on the right is
from), and thinking
about FOSS from a systems theory perspective. Our track organizers
brought together communities from all over, and led by example choosing
speakers, topics and setting up panels for important conversations. There
is definitely a talk that will interest you, whether you are interested
in nonprofit
board structure, an
introduction to Reproducible
Builds or maybe you are looking to have more nature
adventures with free software.
[$] Why glibc’s fstat() is slow
Post Syndicated from corbet original https://lwn.net/Articles/944214/
The fstat()
system call retrieves some of the metadata — owner, size, protections,
timestamps, and so on — associated with an open file descriptor. One might
not think of it as a performance-critical system call, but there are
workloads that make a lot of fstat() calls; it is not something
that should be slowed unnecessarily. As it turns out, though, the GNU C
Library (glibc) has been doing exactly that, but a fix is in the works.
Upcoming Speaking Engagements
Post Syndicated from Schneier.com Webmaster original https://www.schneier.com/blog/archives/2023/09/upcoming-speaking-engagements-31.html
This is a current list of where and when I am scheduled to speak:
- I’m speaking at swampUP 2023 in San Jose, California, on September 13, 2023 at 11:35 AM PT.
The list is maintained on this page.
XGIMI Horizon Ultra vs Hisense C1 vs Nomvdic P1000. I Can Never Go Back…
Post Syndicated from The Hook Up original https://www.youtube.com/watch?v=3KmKv-TTIQQ
Security updates for Thursday
Post Syndicated from jake original https://lwn.net/Articles/944481/
Security updates have been issued by Debian (firefox-esr, libwebp, ruby-loofah, and ruby-rails-html-sanitizer), Fedora (open-vm-tools and salt), Oracle (.NET 7.0, dmidecode, flac, gcc, httpd:2.4, keylime, libcap, librsvg2, and qemu-kvm), Red Hat (.NET 6.0 and .NET 7.0), Slackware (libarchive and mozilla), SUSE (chromium and kernel), and Ubuntu (curl, firefox, ghostscript, open-vm-tools, postgresql-9.5, and thunderbird).
Building a secure webhook forwarder using an AWS Lambda extension and Tailscale
Post Syndicated from James Beswick original https://aws.amazon.com/blogs/compute/building-a-secure-webhook-forwarder-using-an-aws-lambda-extension-and-tailscale/
This post is written by Duncan Parsons, Enterprise Architect, and Simon Kok, Sr. Consultant.
Webhooks can help developers to integrate with third-party systems or devices when building event based architectures.
However, there are times when control over the target’s network environment is restricted or targets change IP addresses. Additionally, some endpoints lack sufficient security hardening, requiring a reverse proxy and additional security checks to inbound traffic from the internet.
It can be complex to set up and maintain highly available secure reverse proxies to inspect and send events to these backend systems for multiple endpoints. This blog shows how to use AWS Lambda extensions to build a cloud native serverless webhook forwarder to meet this need with minimal maintenance and running costs.
The custom Lambda extension forms a secure WireGuard VPN connection to a target in a private subnet behind a stateful firewall and NAT Gateway. This example sets up a public HTTPS endpoint to receive events, selectively filters, and proxies requests over the WireGuard connection. This example uses a serverless architecture to minimize maintenance overhead and running costs.
Example overview
The sample code to deploy the following architecture is available on GitHub. This example uses AWS CodePipeline and AWS CodeBuild to build the code artifacts and deploys this using AWS CloudFormation via the AWS Cloud Development Kit (CDK). It uses Amazon API Gateway to manage the HTTPS endpoint and the Lambda service to perform the application functions. AWS Secrets Manager stores the credentials for Tailscale.
To orchestrate the WireGuard connections, you can use a free account on the Tailscale service. Alternatively, set up your own coordination layer using the open source Headscale example.

- The event producer sends an HTTP request to the API Gateway URL.
- API Gateway proxies the request to the Lambda authorizer function. It returns an authorization decision based on the source IP of the request.
- API Gateway proxies the request to the Secure Webhook Forwarder Lambda function running the Tailscale extension.
- On initial invocation, the Lambda extension retrieves the Tailscale Auth key from Secrets Manager and uses that to establish a connection to the appropriate Tailscale network. The extension then exposes the connection as a local SOCKS5 port to the Lambda function.
- The Lambda extension maintains a connection to the Tailscale network via the Tailscale coordination server. Through this coordination server, all other devices on the network can be made aware of the running Lambda function and vice versa. The Lambda function is configured to refuse incoming WireGuard connections – read more about the
--shields-upcommand here. - Once the connection to the Tailscale network is established, the Secure Webhook Forwarder Lambda function proxies the request over the internet to the target using a WireGuard connection. The connection is established via the Tailscale Coordination server, traversing the NAT Gateway to reach the Amazon EC2 instance inside a private subnet. The EC2 instance responds with an HTML response from a local Python webserver.
- On deployment and every 60 days, Secrets Manager rotates the Tailscale Auth Key automatically. It uses the Credential Rotation Lambda function, which retrieves the OAuth Credentials from Secrets Manager and uses these to create a new Tailscale Auth Key using the Tailscale API and stores the new key in Secrets Manager.
To separate the network connection layer logically from the application code layer, a Lambda extension encapsulates the code required to form the Tailscale VPN connection and make this available to the Lambda function application code via a local SOCK5 port. You can reuse this connectivity across multiple Lambda functions for numerous use cases by attaching the extension.
To deploy the example, follow the instructions in the repository’s README. Deployment may take 20–30 minutes.
How the Lambda extension works
The Lambda extension creates the network tunnel and exposes it to the Lambda function as a SOCKS5 server running on port 1055. There are three stages of the Lambda lifecycle: init, invoke, and shutdown.

With the Tailscale Lambda extension, the majority of the work is performed in the init phase. The webhook forwarder Lambda function has the following lifecycle:
- Init phase:
- Extension Init – Extension connects to Tailscale network and exposes WireGuard tunnel via local SOCKS5 port.
- Runtime Init – Bootstraps the Node.js runtime.
- Function Init – Imports required Node.js modules.
- Invoke phase:
- The extension intentionally doesn’t register to receive any invoke events. The Tailscale network is kept online until the function is instructed to shut down.
- The Node.js handler function receives the request from API Gateway in 2.0 format which it then proxies to the SOCKS5 port to send the request over the WireGuard connection to the target. The invoke phase ends once the function receives a response from the target EC2 instance and optionally returns that to API Gateway for onward forwarding to the original event source.
- Shutdown phase:
- The extension logs out of the Tailscale network and logs the receipt of the shutdown event.
- The function execution environment is shut down along with the Lambda function’s execution environment.
Extension file structure
The extension code exists as a zip file along with some metadata set at the time the extension is published as an AWS Lambda layer. The zip file holds three folders:
/extensions– contains the extension code and is the directory that the Lambda service looks for code to run when the Lambda extension is initialized./bin–includes the executable dependencies. For example, within the tsextension.sh script, it runs the tailscale, tailscaled, curl, jq, and OpenSSL binaries./ssl–stores the certificate authority (CA) trust store (containing the root CA certificates that are trusted to connect with). OpenSSL uses these to verify SSL and TLS certificates.
The tsextension.sh file is the core of the extension. Most of the code is run in the Lambda function’s init phase. The extension code is split into three stages. The first two stages relate to the Lambda function init lifecycle phase, with the third stage covering invoke and shutdown lifecycle phases.
Extension phase 1: Initialization
In this phase, the extension initializes the Tailscale connection and waits for the connection to become available.
The first step retrieves the Tailscale auth key from Secrets Manager. To keep the size of the extension small, the extension uses a series of Bash commands instead of packaging the AWS CLI to make the Sigv4 requests to Secrets Manager.
The temporary credentials of the Lambda function are made available as environment variables by the Lambda execution environment, which the extension uses to authenticate the Sigv4 request. The IAM permissions to retrieve the secret are added to the Lambda execution role by the CDK code. To optimize security, the secret’s policy restricts reading permissions to (1) this Lambda function and (2) Lambda function that rotates it every 60 days.
The Tailscale agent starts using the Tailscale Auth key. Both the tailscaled and tailscale binaries start in userspace networking mode, as each Lambda function runs in its own container on its own virtual machine. More information about userspace networking mode can be found in the Tailscale documentation.
With the Tailscale processes running, the process must wait for the connection to the Tailnet (the name of a Tailscale network) to be established and for the SOCKS5 port to be available to accept connections. To accomplish this, the extension simply waits for the ‘tailscale status’ command not to return a message with ‘stopped’ in it and then moves on to phase 2.
Extension phase 2: Registration
The extension now registers itself as initialized with the Lambda service. This is performed by sending a POST request to the Lambda service extension API with the events that should be forwarded to the extension.
The runtime init starts next (this initializes the Node.js runtime of the Lambda function itself), followed by the function init (the code outside the event handler). In the case of the Tailscale Lambda extension, it only registers the extension to receive ‘SHUTDOWN’ events. Once the SOCKS5 service is up and available, there is no action for the extension to take on each subsequent invocation of the function.
Extension phase 3: Event processing
To signal the extension is ready to receive an event, a GET request is made to the ‘next’ endpoint of the Lambda runtime API. This blocks the extension script execution until a SHUTDOWN event is sent (as that is the only event registered for this Lambda extension).
When this is sent, the extension logs out of the Tailscale service and the Lambda function shuts down. If INVOKE events are also registered, the extension processes the event. It then signals back to the Lambda runtime API that the extension is ready to receive another event by sending a GET request to the ‘next’ endpoint.
Access control
A sample Lambda authorizer is included in this example. Note that it is recommended to use the AWS Web Application Firewall service to add additional protection to your public API endpoint, as well as hardening the sample code for production use.
For the purposes of this demo, the implementation demonstrates a basic source IP CIDR range restriction, though you can use any property of the request to base authorization decisions on. Read more about Lambda authorizers for HTTP APIs here. To use the source IP restriction, update the CIDR range of the IPs you want to accept on the Lambda authorizer function AUTHD_SOURCE_CIDR environment variable.
Costs
You are charged for all the resources used by this project. The NAT Gateway and EC2 instance are destroyed by the pipeline once the final pipeline step is manually released to minimize costs. The AWS Lambda Power Tuning tool can help find the balance between performance and cost while it polls the demo EC2 instance through the Tailscale network.
The following result shows that 256 MB of memory is the optimum for the lowest cost of execution. The cost is estimated at under $3 for 1 million requests per month, once the demo stack is destroyed.

Conclusion
Using Lambda extensions can open up a wide range of options to extend the capability of serverless architectures. This blog shows a Lambda extension that creates a secure VPN tunnel using the WireGuard protocol and the Tailscale service to proxy events through to an EC2 instance inaccessible from the internet.
This is set up to minimize operational overhead with an automated deployment pipeline. A Lambda authorizer secures the endpoint, providing the ability to implement custom logic on the basis of the request contents and context.
For more serverless learning resources, visit Serverless Land.
THG Podcast: The Space Race
Post Syndicated from The History Guy: History Deserves to Be Remembered original https://www.youtube.com/watch?v=3o6MH58CjoY