Post Syndicated from xkcd.com original https://xkcd.com/3266/
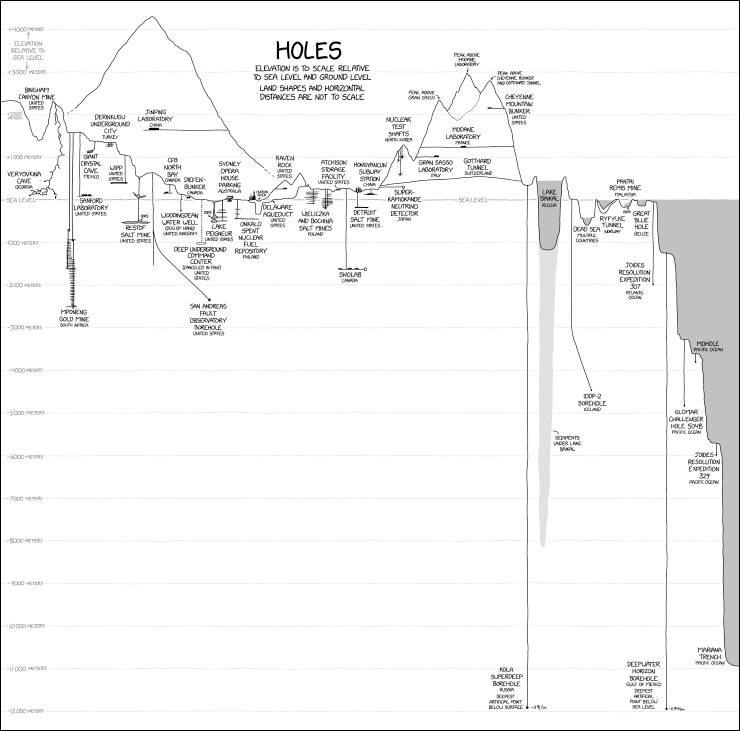
Post Syndicated from xkcd.com original https://xkcd.com/3266/
Post Syndicated from The Atlantic original https://www.youtube.com/watch?v=EgpM77zU_vE
Post Syndicated from Idriss Laouali Abdou original https://aws.amazon.com/blogs/devops/ship-infrastructure-faster-with-cloudformation-and-cdk-pre-deployment-validation-on-every-stack-operation/
AWS CloudFormation helps you model and provision cloud infrastructure as code using JSON or YAML templates, or through tools like the AWS Cloud Development Kit (CDK). Whether you create stacks directly, use change sets for preview, or deploy through CI/CD pipelines and AI agents, fast feedback on template errors is critical to development velocity.
Previously, CloudFormation introduced pre-deployment validation during change set creation, catching property syntax errors, resource name conflicts, and S3 bucket emptiness constraints before execution.
Today, we are announcing that pre-deployment validation now runs automatically on every CreateStack and UpdateStack operation, so every deployment path benefits from pre-deployment checks with no configuration required. We are also introducing three new validation checks (Service Quotas limit exceeded, AWS Config Recorder conflicts, and ECR repository delete readiness), a new DisableValidation parameter for operation-level control, and the cdk validate command that leverages CloudFormation pre-deployment validation as part of the CDK developer experience.
In this blog post, we will walk you through how these capabilities work in practice. You will learn how to:
cdk validate to get a validation report with construct-level source tracingDisableValidation parameter when you need to skip checkscdk validate command leverages CloudFormation pre-deployment validation and provides a report with construct-level source tracing that maps errors back to your CDK code.CloudFormation pre-deployment validation operates in two modes that determine how validation failures are handled:
What happens when validation fails:
The following scenarios demonstrate how pre-deployment validation works across different stack operations.
CloudFormation evaluates each resource property definition before provisioning begins. The following template contains several common resource property errors:
Template (dashboard-stack.yaml)
AWSTemplateFormatVersion: "2010-09-09"
Description: Dashboard stack with property validation errors

Resources:
  Dashboard04:
    Type: "AWS::CloudWatch::Dashboard"
    Properties:
      DashboardName: "MyDashboard"

  LogStream08:
    Type: "AWS::Logs::LogStream"
    Properties:
      LogGroupName: "/aws/my-app"
      LogStreamName:                        # Expected string, found JSONArray
        - "stream-1"
        - "stream-2"

  MetricFilter03:
    Type: "AWS::Logs::MetricFilter"
    Properties:
      LogGroupName: "/aws/my-app"
      SomeUnsupportedProperty: "value"      # Unsupported property
      MetricTransformations:
        - MetricName: "ErrorCount"
          MetricNamespace: "MyApp"
          MetricValue: "1"
Step 1: Create Stack
aws cloudformation create-stack \
    --stack-name "dashboard-stack" \
    --template-body file://dashboard-stack.yaml
The command returns the stack ARN and operation begins. Pre-deployment validation runs automatically before any resources are provisioned.
Step 2: Check Validation Results
Use the describe-events API to review validation results:
aws cloudformation describe-events \
    --stack-name "dashboard-stack"
Example output:
The stack creation stopped before any resources were provisioned. Each validation error includes the logical resource ID, resource type, and a precise status reason describing the property issue.
{
    "OperationEvents": [
        {
            "EventId": "ed0f6cc4-3f85-4ad9-abc3-1f9aad2ab931",
            "StackId": "arn:aws:cloudformation:us-west-1:1234:stack/dashboard-stack/6877f3c0-73e6-11f1-a1e1-02ff57e5af93",
            "OperationId": "68790530-73e6-11f1-a1e1-02ff57e5af93",
            "OperationType": "CREATE_STACK",
            "EventType": "VALIDATION_ERROR",
            "LogicalResourceId": "MetricFilter03",
            "PhysicalResourceId": "",
            "ResourceType": "AWS::Logs::MetricFilter",
            "Timestamp": "2026-06-29T18:14:49.255000+00:00",
            "ValidationFailureMode": "FAIL",
            "ValidationName": "PROPERTY_VALIDATION",
            "ValidationStatus": "FAILED",
            "ValidationStatusReason": "Unsupported property [SomeUnsupportedProperty]",
            "ValidationPath": "/Resources/MetricFilter03/Properties/SomeUnsupportedProperty"
        },
        {
            "EventId": "4f9f12ce-498c-4d79-af31-730238b85139",
            "StackId": "arn:aws:cloudformation:us-west-1:1234:stack/dashboard-stack/6877f3c0-73e6-11f1-a1e1-02ff57e5af93",
            "OperationId": "68790530-73e6-11f1-a1e1-02ff57e5af93",
            "OperationType": "CREATE_STACK",
            "EventType": "VALIDATION_ERROR",
            "LogicalResourceId": "LogStream08",
            "PhysicalResourceId": "",
            "ResourceType": "AWS::Logs::LogStream",
            "Timestamp": "2026-06-29T18:14:49.255000+00:00",
            "ValidationFailureMode": "FAIL",
            "ValidationName": "PROPERTY_VALIDATION",
            "ValidationStatus": "FAILED",
            "ValidationStatusReason": "Property [LogStreamName] expected type: String, found: JSONArray",
            "ValidationPath": "/Resources/LogStream08/Properties/LogStreamName"
        },
    ]
}
Console Experience
In the CloudFormation console, navigate to your stack’s Events tab and click the operation ID (or the link in the banner or status reason column) to open the Operation view page. The page will open directly on the Deployment validations tab to see the validation results table:
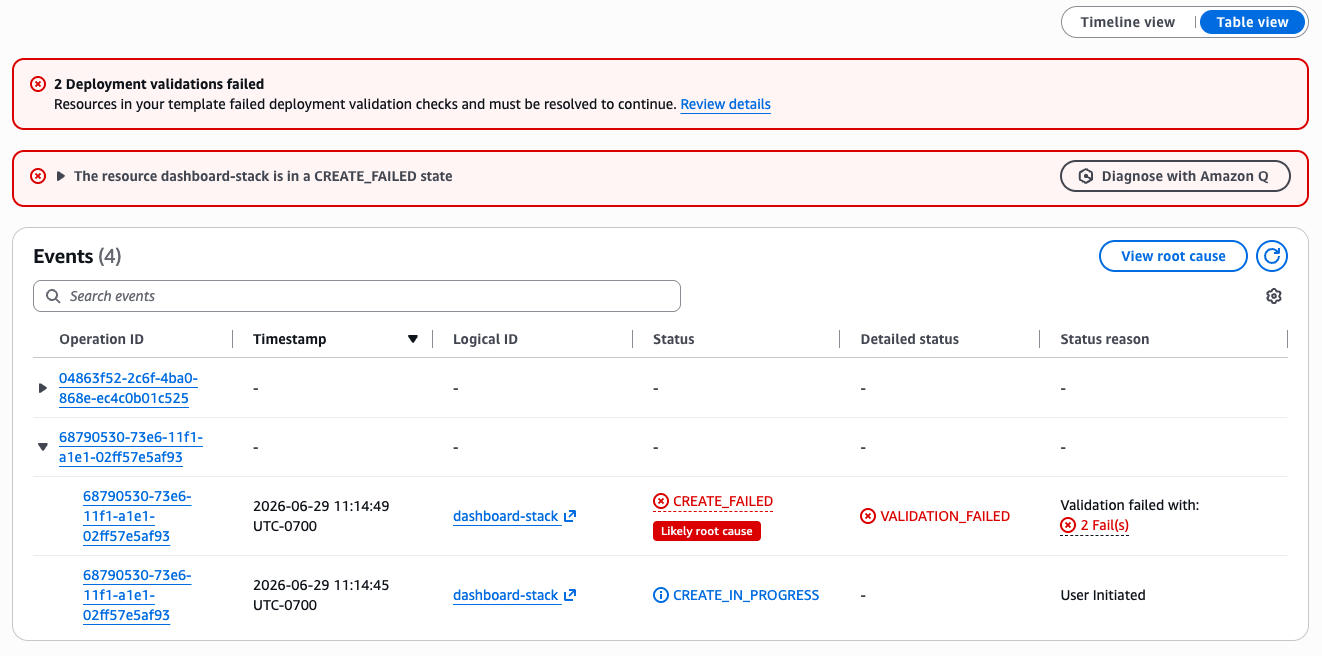
Figure 1: Deployment validations tab showing property validation failures on CreateStack
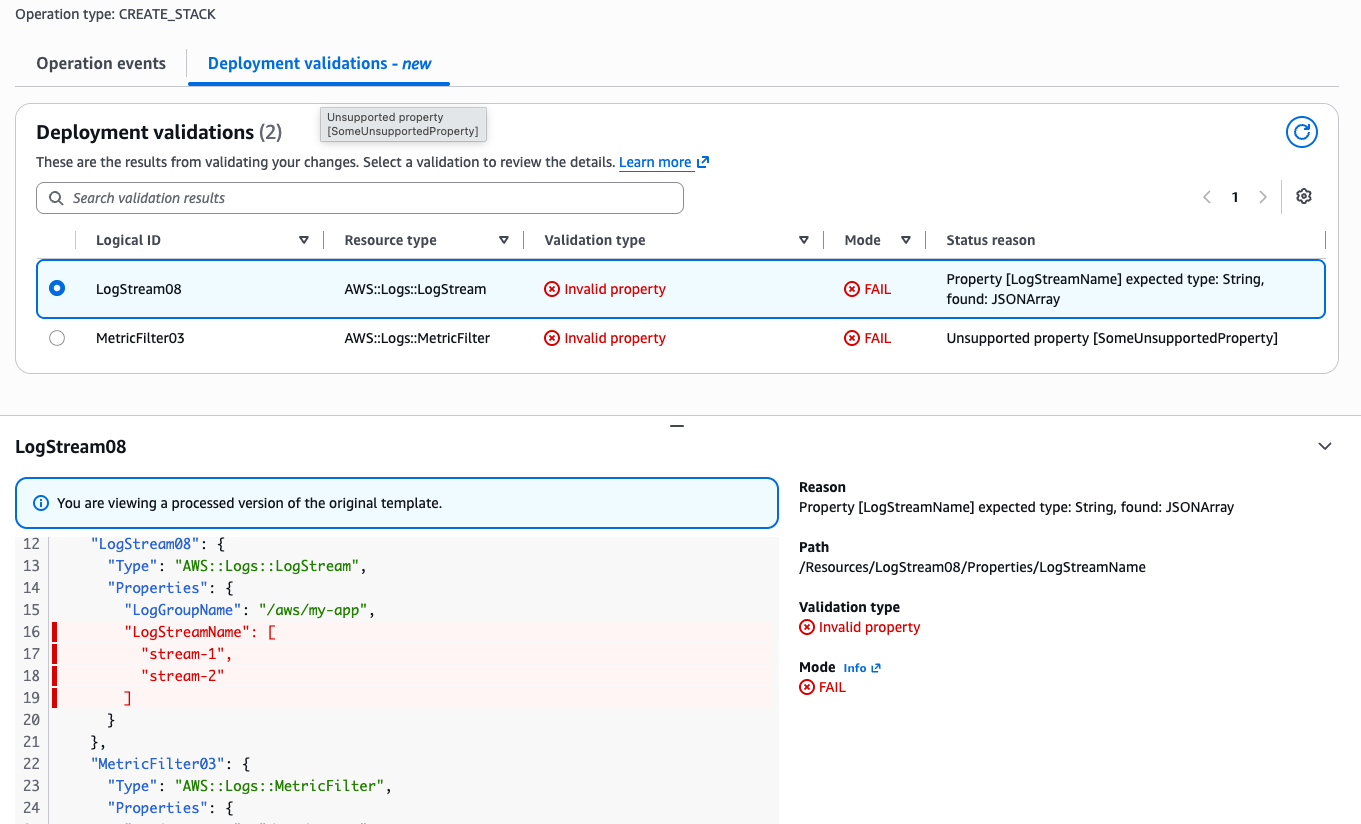
Figure 2: Deployment validations tab showing property validation failures on CreateStack
Resource name conflict detection (RAE) identifies when your template specifies a resource name that already exists in your account. This validation now runs on CreateStack and UpdateStack operations in addition to CreateChangeSet.
Template (update-bucket.yaml)
AWSTemplateFormatVersion: "2010-09-09"
Description: Update stack adding a bucket with a conflicting name

Resources:
  ExistingFunction:
    Type: "AWS::Lambda::Function"
    Properties:
      FunctionName: "my-existing-function"
      Runtime: "python3.12"
      Handler: "index.handler"
      Role: !Sub "arn:aws:iam::${AWS::AccountId}:role/lambda-role"
      Code:
        ZipFile: |
          def handler(event, context):
              return {"statusCode": 200}

  ConflictingBucket:
    Type: "AWS::S3::Bucket"
    Properties:
      BucketName: "production-data-bucket"   # Already exists in the account
Update Stack
aws cloudformation update-stack \
     --stack-name "my-app-stack" \
     --template-body file://update-bucket.yaml
Validation output (via describe-events):
{
    "OperationEvents": [
        ...
        {
            "EventId": "bde0f986-3b47-48d8-91bc-f384195f842a",
            "StackId": "arn:aws:cloudformation:us-west-1:1234:stack/my-app-stack-blog-test/164ff580-73e5-11f1-ab70-026546ec19e3",
            "OperationId": "65e641d0-73e5-11f1-abdb-06073274cc09",
            "OperationType": "UPDATE_STACK",
            "EventType": "VALIDATION_ERROR",
            "LogicalResourceId": "ConflictingBucket",
            "PhysicalResourceId": "",
            "ResourceType": "AWS::S3::Bucket",
            "Timestamp": "2026-06-29T18:07:36.139000+00:00",
            "ValidationFailureMode": "FAIL",
            "ValidationName": "NAME_CONFLICT_VALIDATION",
            "ValidationStatus": "FAILED",
            "ValidationStatusReason": "Resource of type 'AWS::S3::Bucket' with identifier 'production-data-bucket-blog-test-208004920468' already exists.",
            "ValidationPath": "/Resources/ConflictingBucket"
        },
        ...
    ]
}
The update stops before any resources are modified. You can either rename the resource in your template or remove the existing resource that causes the conflict.
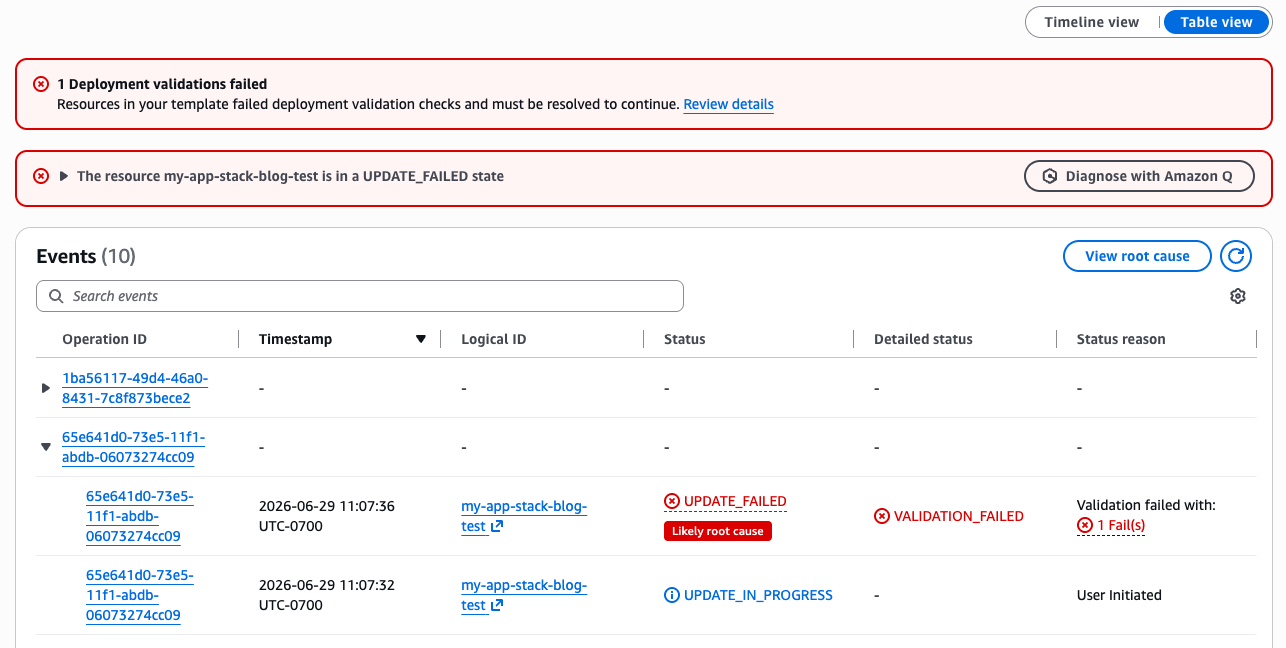
The deployment validation view below provide moe detail about the error, include status reason and path to the resource.
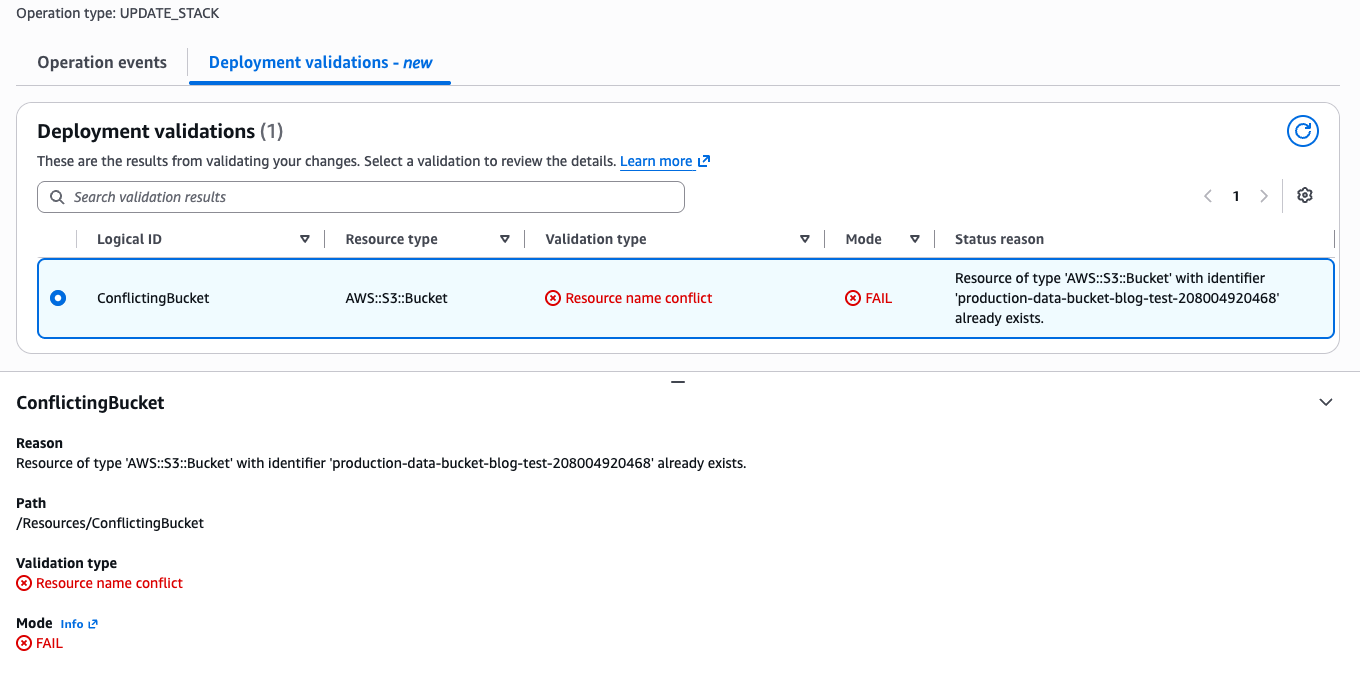
Figure 3: Resource Name Conflict on UpdateStack
Service Quota validation is one of three new warning-mode validations available during change set creation. It checks whether creating or updating resources would exceed your AWS service quotas.
Create Change Set
aws cloudformation create-change-set \
    --stack-name "vpc-stack" \
    --change-set-name "add-subnets" \
    --template-body file://vpc-with-many-subnets.yaml
Validation output:
{
    "EventId": "3ba6f27b-4d3c-4e73-bac2-8d8cbf71a6d3",
    "StackId": "arn:aws:cloudformation:us-west-1:1234:stack/vpc-quota-test/492a84d0-73ee-11f1-a714-02e5a60ac85d",
    "OperationId": "b55e1e8f-28d1-4cbe-a6c3-59c92707e180",
    "OperationType": "CREATE_CHANGESET",
    "EventType": "VALIDATION_ERROR",
    "LogicalResourceId": "VPC1",
    "PhysicalResourceId": "",
    "ResourceType": "AWS::EC2::VPC",
    "Timestamp": "2026-06-29T19:11:12.727000+00:00",
    "ValidationFailureMode": "WARN",
    "ValidationName": "SERVICE_QUOTA_VALIDATION",
    "ValidationStatus": "FAILED",
    "ValidationStatusReason": "Service quota will be exceeded: AWS::EC2::VPC current usage 1/5, creating 6 would exceed limit",
    "ValidationPath": "/Resources/VPC1"
}
Because this validation operates in WARN mode, the change set is created successfully. You can review the warning, request a quota increase through the Service Quotas console, and then proceed with execution. The two other new warning validations (AWS Config Recorder conflict detection and ECR Repository delete readiness) follow the same pattern.
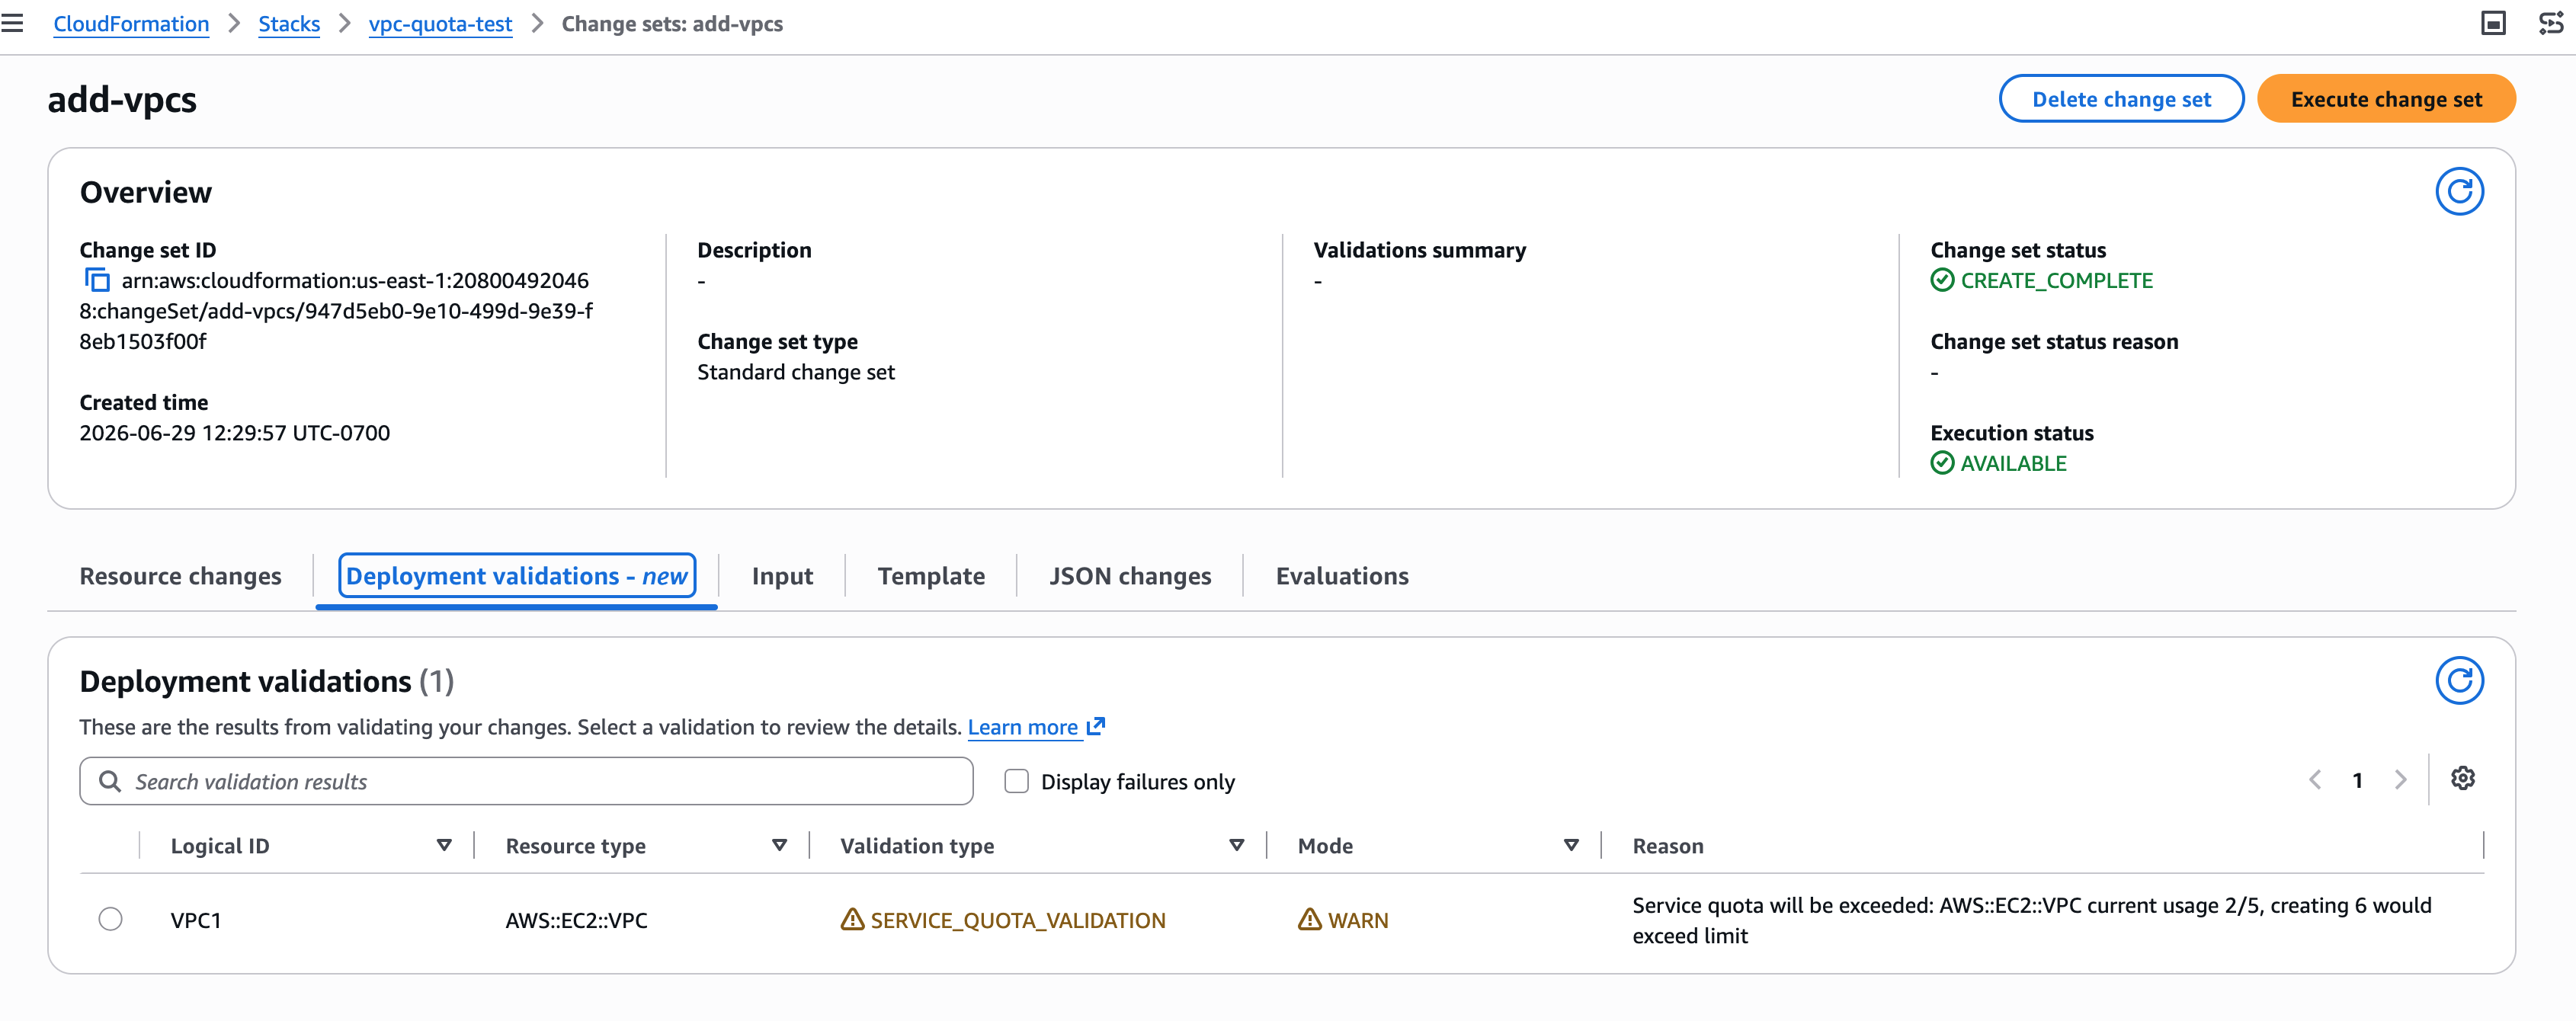
Figure 4: Service Quota Warning on CreateChangeSet
The cdk validate command provides a unified validation experience that combines multiple validation sources into a single report with construct-level source tracing. Under the hood, cdk validate synthesizes your CDK app, creates a change set to invoke server-side pre-deployment validation, collects the results via DescribeEvents, and produces a report that maps errors back to your CDK source code with construct-level tracing.
Each error traces back to the specific construct and source file location in your CDK code, not just the CloudFormation logical resource ID. This construct-level tracing is what makes cdk validate uniquely valuable: you see the exact line in your code that needs to change.
Pre-deployment validation is enabled by default on all stack operations. If you need to skip validation for a specific operation, use the DisableValidation parameter.
When to disable validation:
cdk validate, cfn-lint, CI/CD checks)CLI usage:
# Skip validation on create-stack
aws cloudformation create-stack \
    --stack-name "my-stack" \
    --template-body file://template.yaml \
    --disable-validation

# Skip validation on update-stack
aws cloudformation update-stack \
    --stack-name "my-stack" \
    --template-body file://template.yaml \
    --disable-validation
Important: Disabling validation means common errors will not be caught until resource provisioning is attempted. Use this option only when you understand the trade-off between deployment speed and early error detection.
Pre-deployment validation gives AI agents and automation tools the fast feedback loop they need to self-correct. When an agent provisions infrastructure and the template has an error, validation returns a structured error in seconds rather than waiting minutes for a full provision-and-rollback cycle to complete. The agent can parse the error, fix the template, and retry immediately.
With cdk validate, agents get construct-level source tracing that maps errors directly to the line of CDK code that needs to change, enabling fully automated fix-and-retry loops without human intervention.
To get started with the agent experience, install the CloudFormation agent skill from the AWS Agent Toolkit. This skill gives AI agents the ability to create stacks, validate templates, and iterate on errors using pre-deployment validation feedback.
Pre-deployment validation runs automatically on all CreateStack, UpdateStack, and CreateChangeSet operations with no configuration required. To start benefiting:
cdk validate command.--disable-validation for specific operationsRequired IAM permissions for validation checks
Validation on CreateStack and UpdateStack (property syntax validation and resource name conflict detection) requires no additional IAM permissions beyond what is needed for the stack operation itself. For the new validation checks available during change set creation, your IAM role needs the following additional permissions:
Service Quota Check:
cloudwatch:GetMetricDatalambda:GetAccountSettingsservicequotas:GetServiceQuotaec2:DescribeSecurityGroupsiam:GetAccountSummaryConfig Recorder Check:
config:ListConfigurationRecordersS3 Bucket Empty Check:
s3:ListBucketV2ECR Repository Delete Readiness Check:
ecr:ListImagesIf these permissions are not granted, the corresponding validation checks will be skipped without blocking the operation.
For CDK users:
# Run unified validation before deploying
cdk validatecdk validate as your primary pre-deployment check. It leverages CloudFormation pre-deployment validation in a single command, giving you comprehensive coverage before any deployment is attempted.cdk validate or cfn-lint as part of your pull request checks to catch errors before code is merged, preventing invalid templates from reaching deployment pipelines.Pre-deployment validation on all stack operations represents a significant step forward in CloudFormation’s shift-left validation strategy. By catching common deployment errors in seconds before any resources are provisioned, this capability eliminates unnecessary rollback cycles and accelerates development workflows across the board.
Combined with the cdk validate command, which provides a unified validation experience with construct-level tracing, and the DisableValidation parameter for operation-level control, teams now have a complete toolkit for managing the trade-off between validation coverage and deployment speed. AI agents and automated pipelines benefit from structured, machine-readable feedback that enables immediate self-correction, turning what were once multi-minute debugging cycles into second-level iteration loops.
Pre-deployment validation is available in all AWS Regions where CloudFormation is supported. No configuration or opt-in is required. To learn more, visit the Validate stack deployments User Guide.
Post Syndicated from Channy Yun (윤석찬) original https://aws.amazon.com/blogs/aws/accelerate-your-infrastructure-deployments-by-up-to-4x-with-aws-cloudformation-express-mode/
Today, we’re announcing AWS CloudFormation Express mode, a new deployment mode that accelerates deployments for developers and AI tools iterating on infrastructure. Express mode accelerates deployments by completing when CloudFormation confirms resource configuration is applied, rather than waiting for extended stabilization checks. This reduces deployment time by up to 4 times for iterative development workflows and production scenarios.
How it works
Every CloudFormation deployment performs stabilization checks after resource configuration is applied. These checks serve an important purpose when you need to confirm resources can serve traffic before shifting load.
However, many workflows do not require full stabilization to proceed. Express mode benefits two primary use cases: iterative development workflows and production scenarios where you are comfortable with eventual stabilization. These use cases include iterating on infrastructure configurations during development, testing individual components of your application, and AI-assisted infrastructure development that benefits from sub-minute feedback loops.
With Express mode, CloudFormation completes deployments when resource configuration is applied, without waiting for stabilization checks. Resources continue becoming operational in the background. CloudFormation automatically retries dependent resources that encounter transient failures during provisioning within the same stack, without requiring any customer intervention. This built-in resilience handles timing issues between resources as they stabilize. Express mode changes when the deployment completes, not how resources are provisioned.
For example, when I create an Amazon Simple Queue Service (SQS) queue with a dead letter queue (DLQ), Standard mode takes 64 seconds, but Express mode completes in up to 10 seconds. In the case of deleting an AWS Lambda function with network interface attachment, Standard mode takes 20–30 minutes, but Express mode completes in up to 10 seconds based on my benchmarking test.
Get started with CloudFormation Express mode
When you create a CloudFormation stack in the AWS Management Console, choose Enable in the Express mode under Stack deployment options.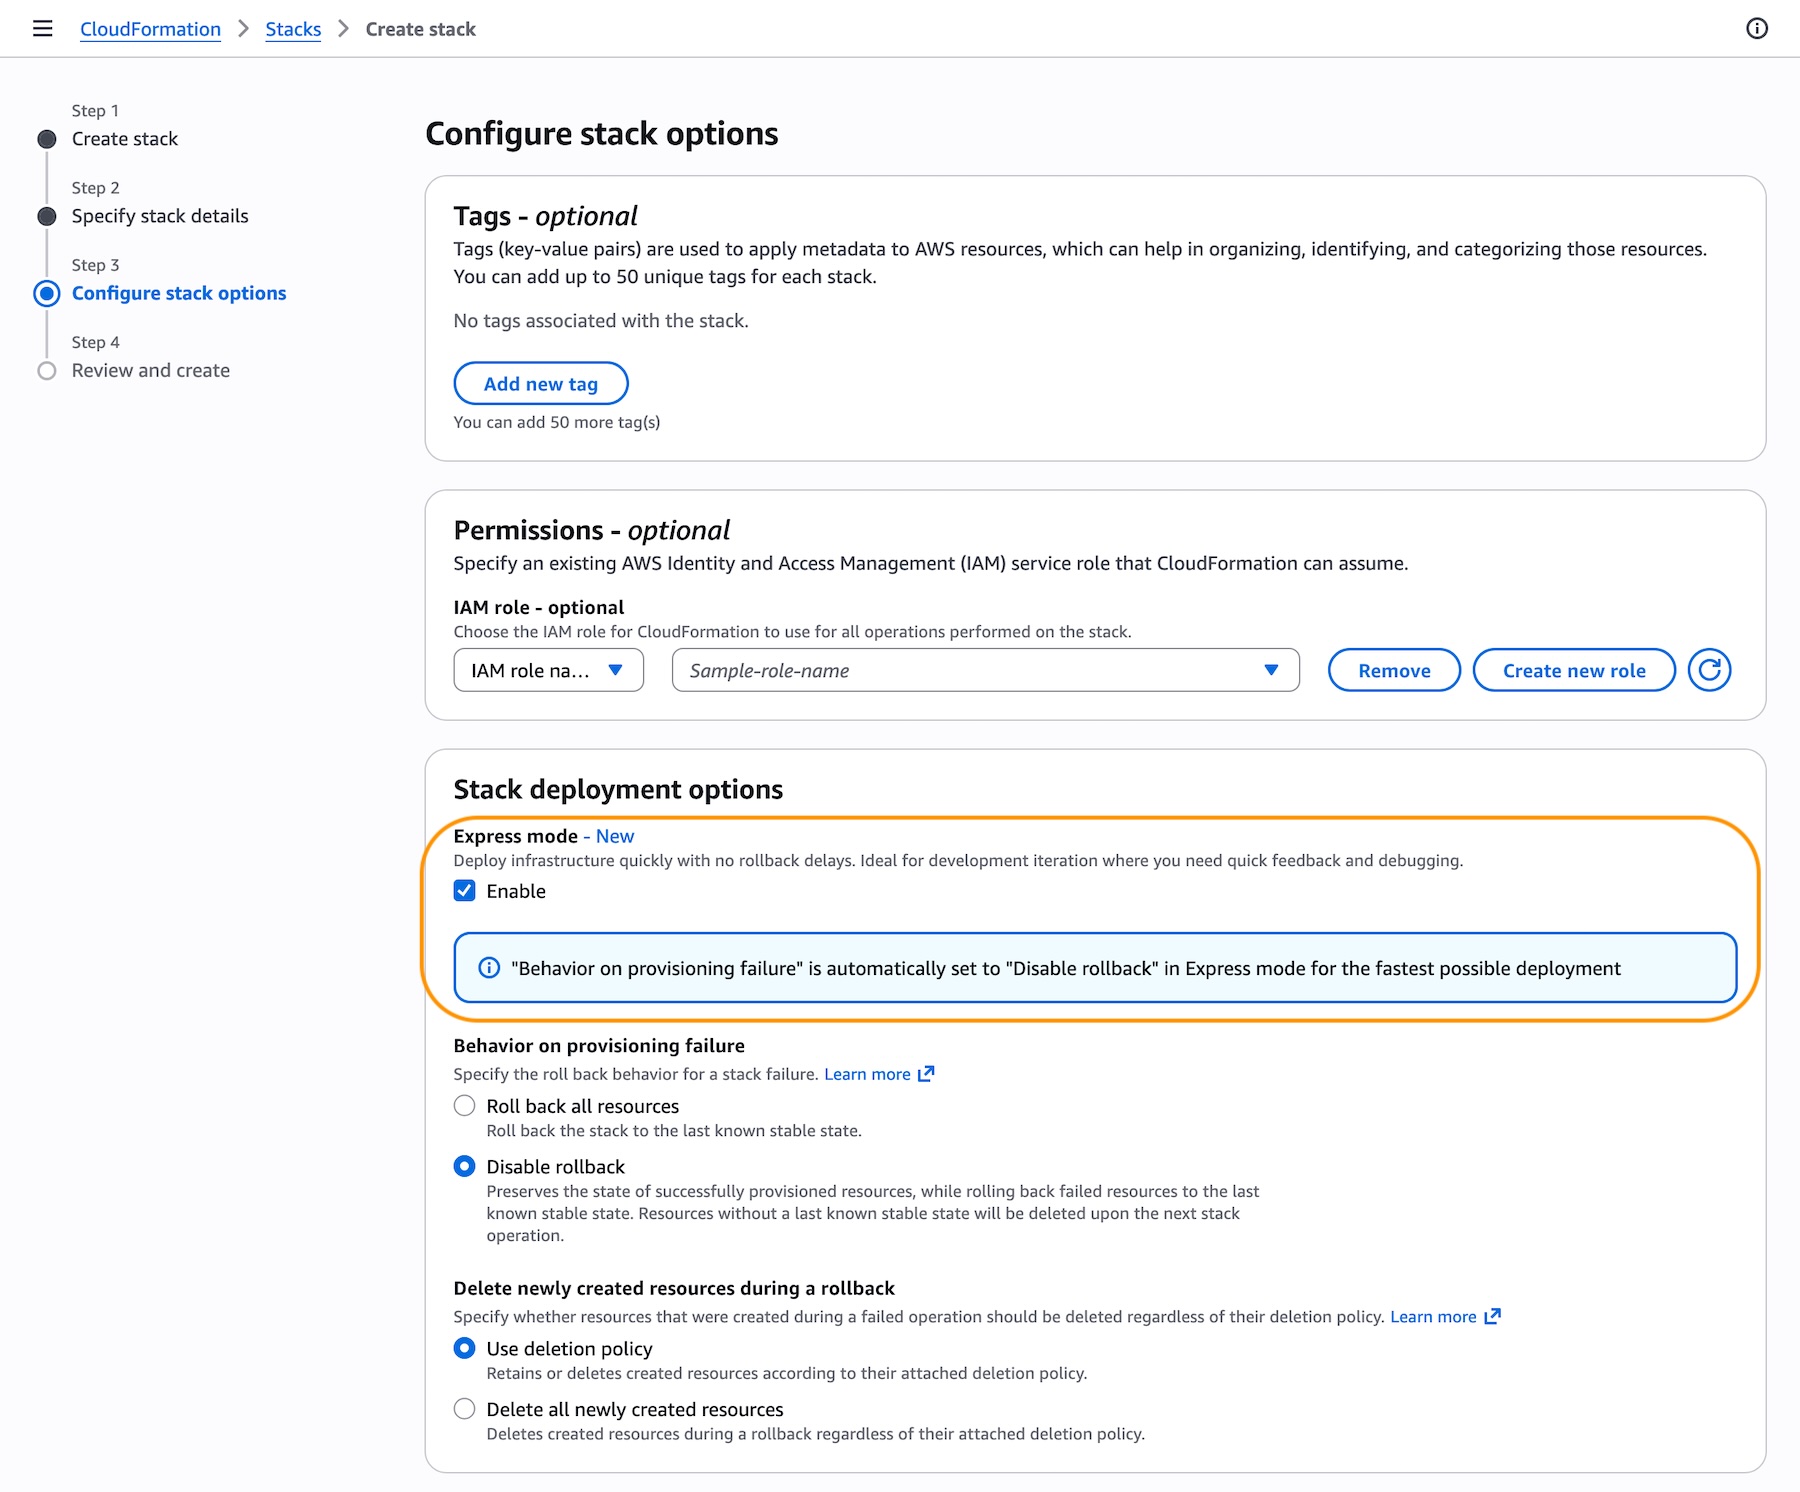
You can also use AWS Command Line Interface (AWS CLI), AWS SDKs, or IaC tools like AWS Cloud Development Kit (CDK), and AI tools such as Kiro.
Activate Express mode by setting the --deployment-config parameter to EXPRESS when creating, updating, or deleting stacks. No template changes are required. Express mode disables rollback by default for the fastest iteration experience. To re-enable rollback, set disableRollback to false in the deployment-config for production environments, or implement monitoring/cleanup mechanisms for failed deployments.
aws cloudformation create-stack \
   --stack-name my-app \
   --template-body file://template.yaml \
   --deployment-config '{"mode": "EXPRESS", "disableRollback": true}' \
For example, use the Express mode when you build infrastructure incrementally, adding resources one at a time. Ensure your IAM role templates follow the principle of least privilege.
# Iteration 1: Deploy IAM role
aws cloudformation create-stack \
--stack-name my-microservice \
--template-body file://iteration1-iam.yaml \
--deployment-config '{"mode": "EXPRESS"}' \
--capabilities CAPABILITY_IAM
--role-arn arn:aws:iam::123456789012:role/CloudFormationDeployRole

# Iteration 2: Add Lambda function
aws cloudformation update-stack \
--stack-name my-microservice \
--template-body file://iteration2-lambda.yaml \
--deployment-config '{"mode": "EXPRESS"}' \
--capabilities CAPABILITY_IAM
--role-arn arn:aws:iam::123456789012:role/CloudFormationDeployRole

# Iteration 3: Add SQS queue and event source mapping
aws cloudformation update-stack \
--stack-name my-microservice \
--template-body file://iteration3-sqs.yaml \
--deployment-config '{"mode": "EXPRESS"}' \
--capabilities CAPABILITY_IAM
--role-arn arn:aws:iam::123456789012:role/CloudFormationDeployRole
For AWS CDK, activate Express mode with the cdk deploy --express command when you deploy your CDK stack. This command retrieves your generated CloudFormation template and deploys it through the CloudFormation Express mode, which provisions your resources as part of a CloudFormation stack.
Express mode works with all existing CloudFormation templates and supports all CloudFormation features including change sets and nested stacks. When you enable Express mode on a parent stack, all nested stacks also use Express mode. If you need resources to be fully operational before proceeding with traffic or testing, continue using the default deployment behavior, which performs stabilization checks before completing.
Now available
AWS CloudFormation Express mode is available today in all AWS commercial Regions at no additional cost. For Regional availability and a future roadmap, visit the AWS Capabilities by Region. If you want to call APIs, search documentation, find regional availability, and check troubleshooting about this new feature, try using the AWS MCP Server and plugins with your preferred AI tool. To learn more, visit the CloudFormation documentation.
Start accelerating your deployments today, and send feedback to AWS re:Post for AWS CloudFormation or through your usual AWS Support contacts.
— Channy
Post Syndicated from Sébastien Stormacq original https://aws.amazon.com/blogs/aws/amazon-ec2-c9g-and-c9gd-instances-powered-by-aws-graviton5-processors-are-now-available/
When you run compute-intensive workloads like real-time analytics, batch processing, video encoding, scientific modeling, or CPU-based machine learning inference, every percentage point of performance matters. You need instances that deliver higher throughput per vCPU, faster memory access, and more network bandwidth, all while keeping your costs in check.
Today I am happy to announce the general availability of Amazon Elastic Compute Cloud (Amazon EC2) C9g and C9gd instances, powered by AWS Graviton5 processors. C9g instances are compute-optimized and deliver up to 25% higher performance per vCPU compared to previous-generation C8g instances. They feature the fastest memory of any processor instance in the cloud, with DDR5 8800MT/s DIMMs, 5x more L3 cache, and up to 3x higher packet-processing performance compared to Graviton4-based instances. The faster memory and larger caches mean your workloads spend less time waiting on data, translating into higher throughput for in-memory analytics, faster agentic loops, and more responsive real-time applications.
C9g instances are ideal for batch jobs, video encoding pipelines, or distributed analytics that can utilize Amazon Elastic Block Store (Amazon EBS) for storage. It is also a natural fit for agentic AI workloads, where concurrent environments and CPU-bound reasoning steps benefit from Graviton5’s higher core count and larger caches. As AI shifts from answering questions to taking actions, running code, and orchestrating multi-step tasks, the demand for CPU compute is growing, and C9g instances are built for this shift.
Some workloads also need fast local storage alongside that compute power. Choose C9gd when your application benefits from high-speed, low-latency local NVMe SSD storage, for example scratch space during HPC simulations, temporary caches for ML inference, or local buffers for ad-serving engines.
Graviton5-based instances with NVMe instance store volumes also support detailed performance statistics, providing high-resolution I/O metrics, including latency histograms broken down by I/O size, up to 1-second granularity and accessible via Amazon CloudWatch or nvme-cli at no additional cost.
C9g and C9gd instances at a glance
C9g and C9gd instances are available in 11 sizes ranging from medium to 48xlarge, plus a bare metal option. They offer up to 15% higher network bandwidth and 20% higher EBS bandwidth on average across sizes compared to the previous generation, with the largest 48xlarge size delivering up to 100 Gbps of network bandwidth and up to 72 Gbps of EBS bandwidth, a 2x increase.
| C9g | vCPUs | Memory (GiB) |
Network Bandwidth (Gbps) |
EBS Bandwidth (Gbps) |
|---|---|---|---|---|
| medium | 1 | 2 | Up to 15 | Up to 12 |
| large | 2 | 4 | Up to 15 | Up to 12 |
| xlarge | 4 | 8 | Up to 15 | Up to 12 |
| 2xlarge | 8 | 16 | Up to 17 | Up to 12 |
| 4xlarge | 16 | 32 | Up to 17 | Up to 12 |
| 8xlarge | 32 | 64 | 17 | 12 |
| 12xlarge | 48 | 96 | 25 | 18 |
| 16xlarge | 64 | 128 | 34 | 24 |
| 24xlarge | 96 | 192 | 50 | 36 |
| 48xlarge | 192 | 384 | 100 | 72 |
| metal-48xl | 192 | 384 | 100 | 72 |
C9gd instances add local NVMe SSD storage with up to 30% higher storage performance compared to previous-generation local storage instances.
| C9gd | vCPUs | Memory (GiB) |
Instance Storage (GB) |
Network Bandwidth (Gbps) |
EBS Bandwidth (Gbps) |
|---|---|---|---|---|---|
| medium | 1 | 2 | 1 x 59 | Up to 15 | Up to 12 |
| large | 2 | 4 | 1 x 118 | Up to 15 | Up to 12 |
| xlarge | 4 | 8 | 1 x 237 | Up to 15 | Up to 12 |
| 2xlarge | 8 | 16 | 1 x 474 | Up to 17 | Up to 12 |
| 4xlarge | 16 | 32 | 1 x 950 | Up to 17 | Up to 12 |
| 8xlarge | 32 | 64 | 1 x 1900 | 17 | 12 |
| 12xlarge | 48 | 96 | 3 x 950 | 25 | 18 |
| 16xlarge | 64 | 128 | 1 x 3800 | 34 | 24 |
| 24xlarge | 96 | 192 | 3 x 1900 | 50 | 36 |
| 48xlarge | 192 | 384 | 3 x 3800 | 100 | 72 |
| metal-48xl | 192 | 384 | 3 x 3800 | 100 | 72 |
Both families are well-suited for high-performance computing (HPC), batch processing, gaming, video encoding, scientific modeling, distributed analytics, CPU-based machine learning inference, and ad serving.
Here are some additional capabilities:
Nitro Isolation Engine
C9g and C9gd instances are the first compute optimized Amazon EC2 instances to feature the AWS Nitro Isolation Engine, a new capability of the AWS Nitro System. The Nitro Isolation Engine is a purpose-built component of the Nitro Hypervisor, implemented in Rust, that enforces isolation between virtual machines. It mediates all access to VM memory, CPU register state, and I/O devices through a minimal set of APIs.
To learn more about the Nitro Isolation Engine, visit the blog post. For details on the formal verification results, including scope and assumptions, see our technical white paper.
Now available
Amazon EC2 C9g and C9gd instances are now available in US East (Ohio, N. Virginia), US West (Oregon), and Europe (Frankfurt). Additional regions will follow.
You can launch C9g and C9gd instances today using the AWS Management Console, AWS Command Line Interface (AWS CLI), or AWS SDKs. For pricing information, visit the Amazon EC2 Pricing page.
To learn more, visit the Amazon EC2 C9g and C9gd instances page and send feedback to AWS re:Post for EC2 or through your usual AWS Support contacts.
Post Syndicated from Sébastien Stormacq original https://aws.amazon.com/blogs/aws/automate-public-tls-certificate-issuance-with-acme-support-in-aws-certificate-manager/
If you manage TLS certificates for your applications, you know the challenge: certificates expire, and when they do, your customers see errors or your service goes down. As certificate validity periods get shorter (the Certification Authority (CA)/Browser Forum mandates reduced maximum validity to 100 days starting March 2027, and to 47 days by 2029), manual renewal processes become untenable. You need automation.
Automatic Certificate Management Environment (ACME) is an open protocol for requesting, renewing, and revoking TLS certificates without human intervention. It’s the same protocol behind Let’s Encrypt, and it’s supported by dozens of clients across every platform.
Today we’re announcing ACME support for public certificates in AWS Certificate Manager (ACM). ACM now provides a fully managed ACME server endpoint that works with any ACMEv2-compatible client, such as Certbot, cert-manager for Kubernetes, acme.sh, or any other client you already use. You can issue public TLS certificates from Amazon Trust Services through the standard ACME protocol.
Before today, if you wanted automated certificate management using the ACME protocol, you relied on external certificate authorities alongside ACM, leading to a fragmented visibility experience. Some certificates lived in ACM, others were managed externally with no central dashboard. PKI administrators had limited ability to control who could request certificates or which domains were allowed.
With ACME support in ACM, you can now set up one or more managed ACME endpoint that allows you to centrally manage and monitor ACME certificate usage across your organization.
As a PKI administrator, you get centralized controls that go beyond basic certificate issuance. You can bind IAM roles to ACME accounts for fine-grained access control over which domains each client can request. You can define domain scopes at the endpoint level to enforce organization-wide policies. And you get centralized monitoring and visibility in the same place: AWS CloudTrail logs every certificate request for auditability, Amazon CloudWatch tracks operational metrics, and ACM sends expiry notifications when certificates are approaching renewal. Using ACM, your PKI team can search all certificates, whether issued through the ACM console, an API call, or ACME.
How it works
To get started, you first set up a dedicated ACME endpoint, configure authorization controls using External Account Binding (EAB), validate which domains the endpoint can issue certificates for, and point your existing ACME clients to the new endpoint.
The domain validation step is important: it separates who can set up certificate issuance from who can request certificates. The PKI administrator validates domains once at the endpoint level, using DNS credentials that stay with the admin. Application owners who need certificates never touch DNS. They register with an EAB credential, and the endpoint enforces which domains and scopes they’re allowed to request. This means you can distribute certificate automation broadly across your organization without distributing DNS keys along with it.
I start this demo from the ACME certificates page in the AWS Certificate Manager console.
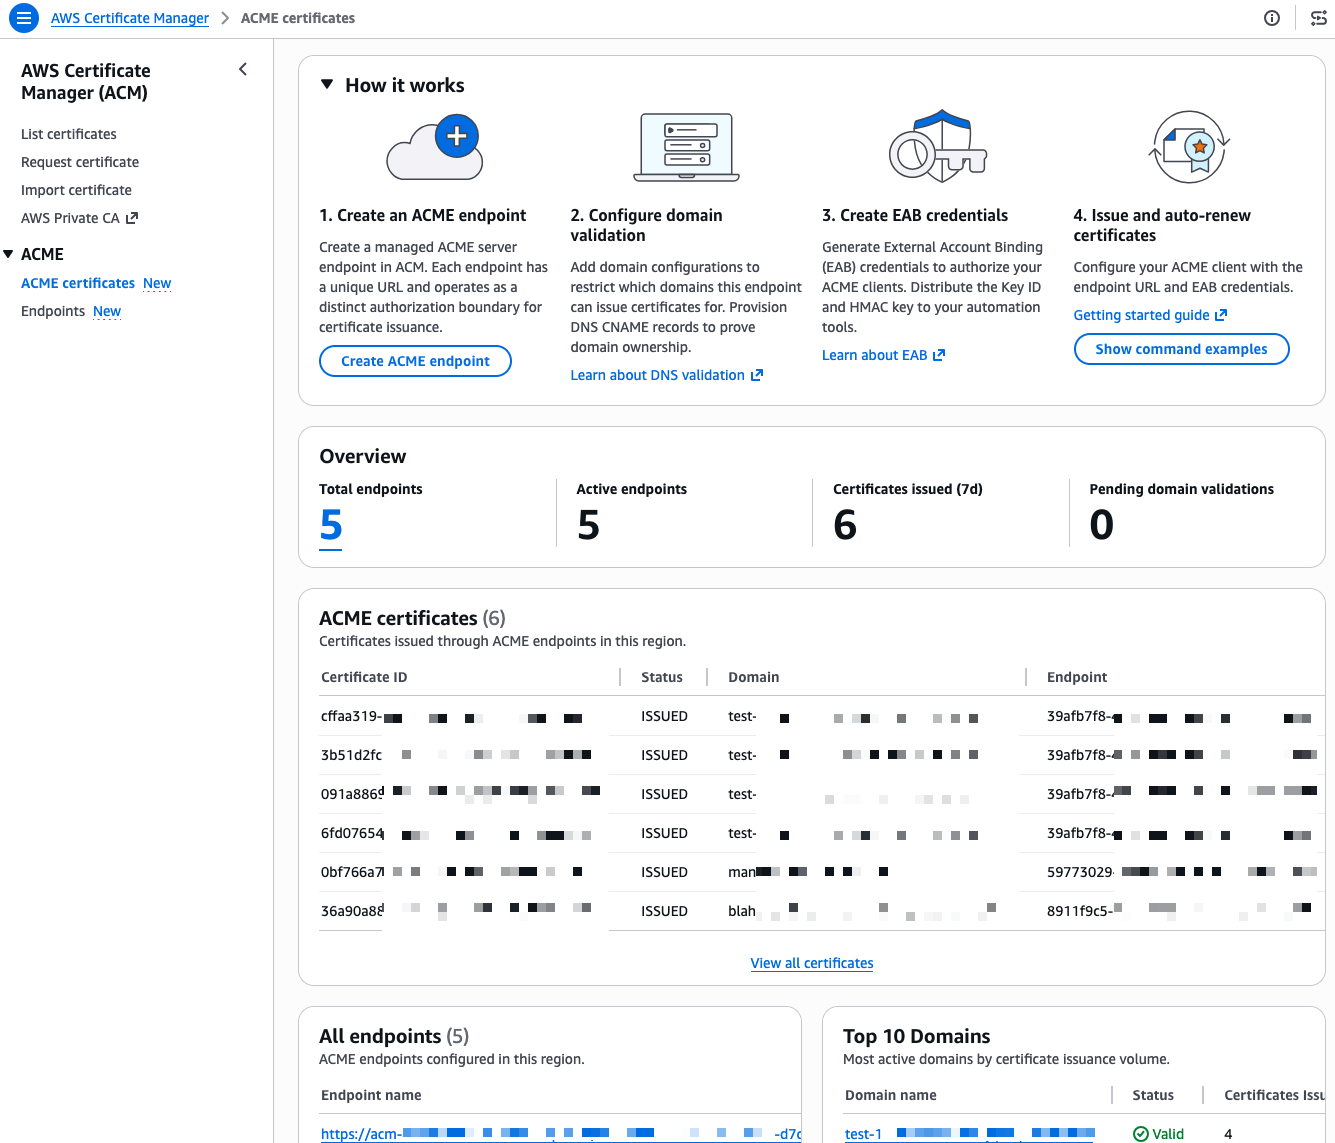
I already have a few endpoints and certificates in this account, I walk you through creating a new one from scratch. First, I select Create ACME endpoint.
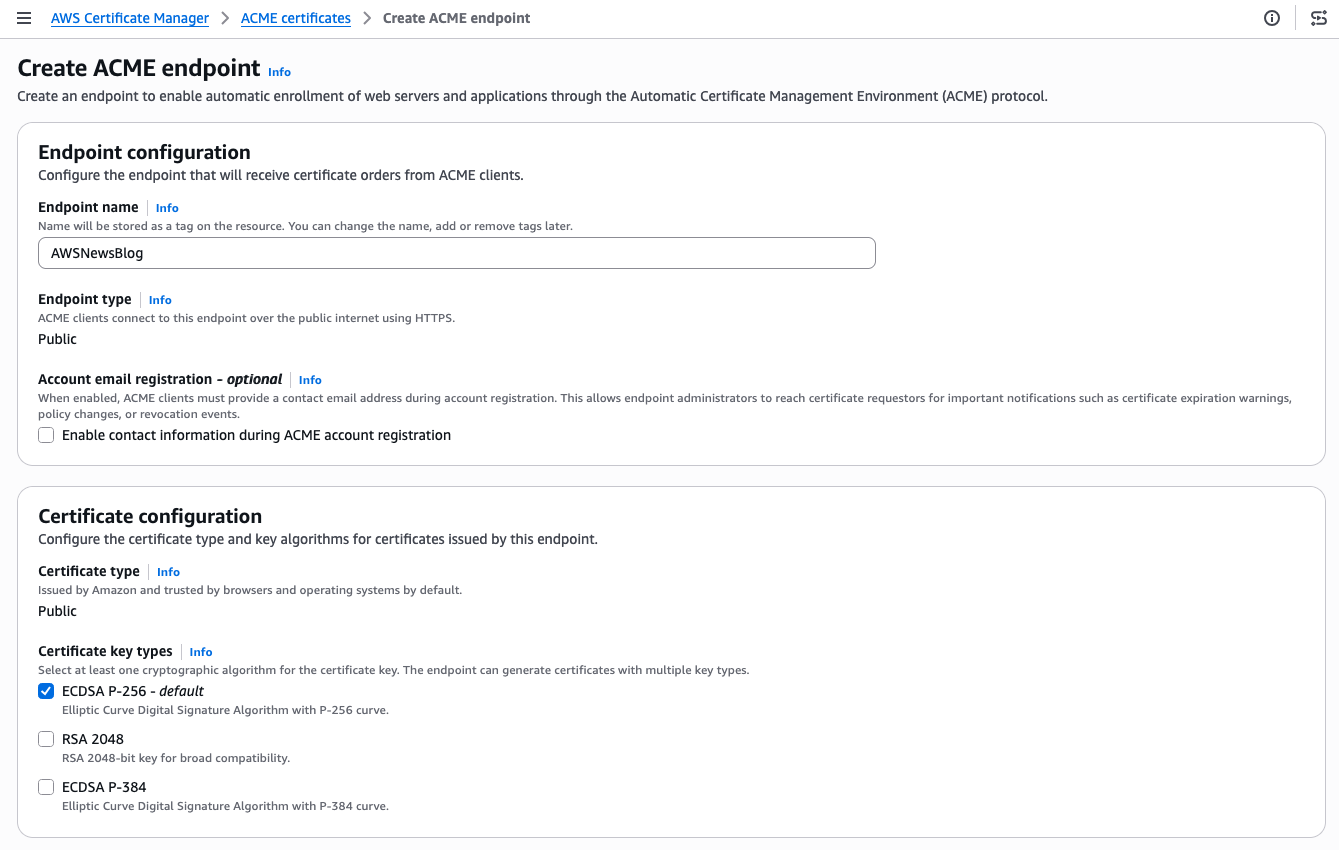
I give my endpoint a name. The Endpoint type is Public. ACME clients will connect over the public internet. The Certificate type is Public. The certificate will be issued by Amazon Trust Services and trusted by browsers and operating systems by default. For the certificate key type, I keep the default ECDSA P-256. RSA 2048 and ECDSA P-384 are also available if your clients require them.
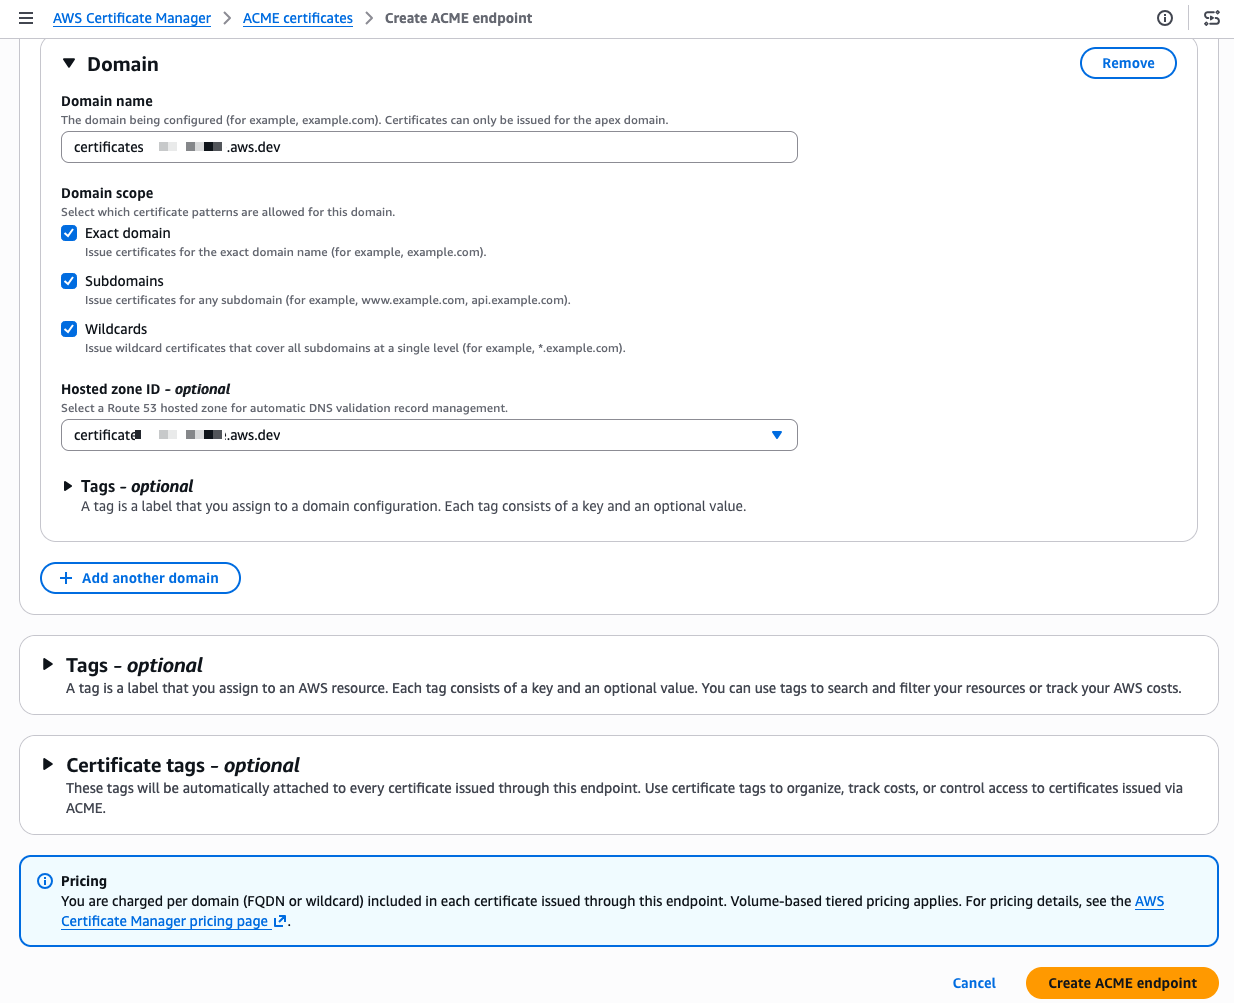
Scrolling down, I configure the domain. I enter my domain name and select the domain scope. The scope controls exactly what certificate patterns your ACME clients are allowed to request for this domain. If I check only Exact domain, clients can only request certificates for that specific domain name. Adding Subdomains allows certificates for any subdomain (for example, api.example.com or dev.example.com). Adding Wildcards allows wildcard certificates (*.example.com). By leaving a scope unchecked, you prevent any client using this endpoint from requesting that type of certificate, even if their ACME request is otherwise valid. For a production endpoint, you might enable only Exact domain and Subdomains while leaving Wildcards unchecked to enforce a stricter security posture.
I also select my Amazon Route 53 hosted zone from the drop down menu. ACM then automatically creates the DNS CNAME records needed for domain validation, so I don’t have to do it manually. When my domain is hosted outside of Route 53, I manually create the provided CNAME record at my DNS provider instead. This is a meaningful difference from typical ACME setups where each client handles its own domain verification independently.
These centralized controls give PKI administrators a single place to authenticate domains, restrict which certificate types (ECDSA or RSA) clients can request, and further limit wildcard issuance. Having these governance capabilities built in means you don’t need to purchase a separate certificate lifecycle management product or invest in building a custom policy layer yourself, both of which come at significant cost and operational overhead.
I select Create ACME endpoint
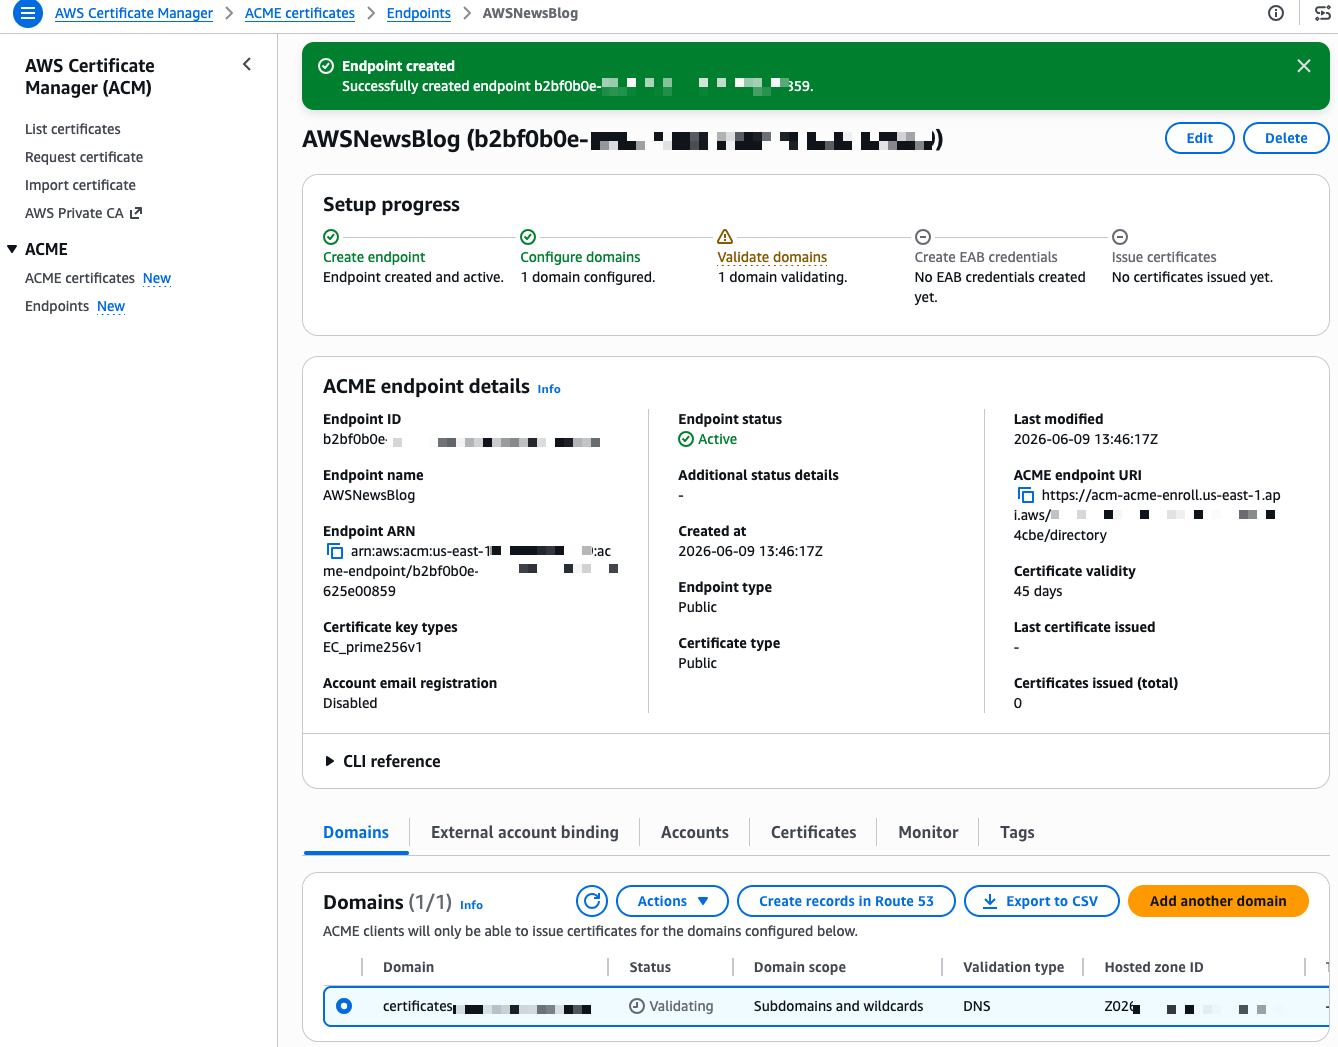
After a few seconds, the endpoint is created. The console shows a Setup progress tracker with the next steps. My domain shows a “Validating” status. The validation method is DNS validation, where ACM verifies that you control the domain by checking for a specific CNAME record. Because I selected my Route 53 hosted zone during creation, I select Create records in Route 53 to let ACM handle the DNS validation automatically.
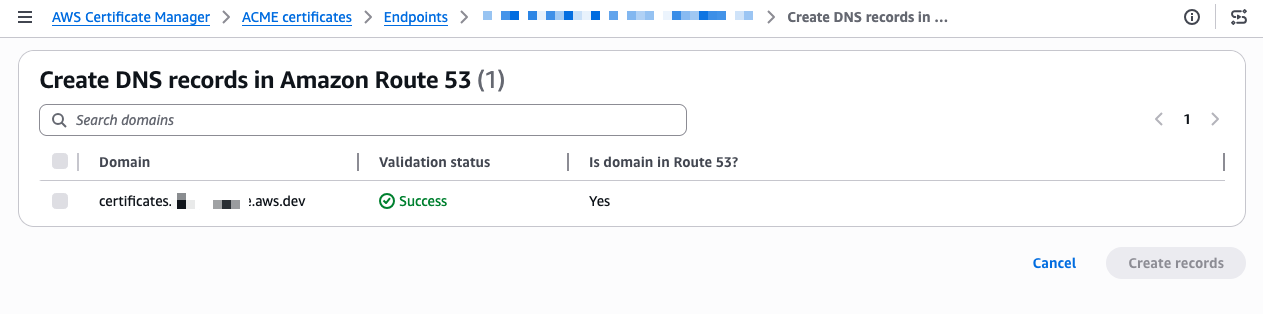 The validation completes in a few seconds and the status changes to Success.
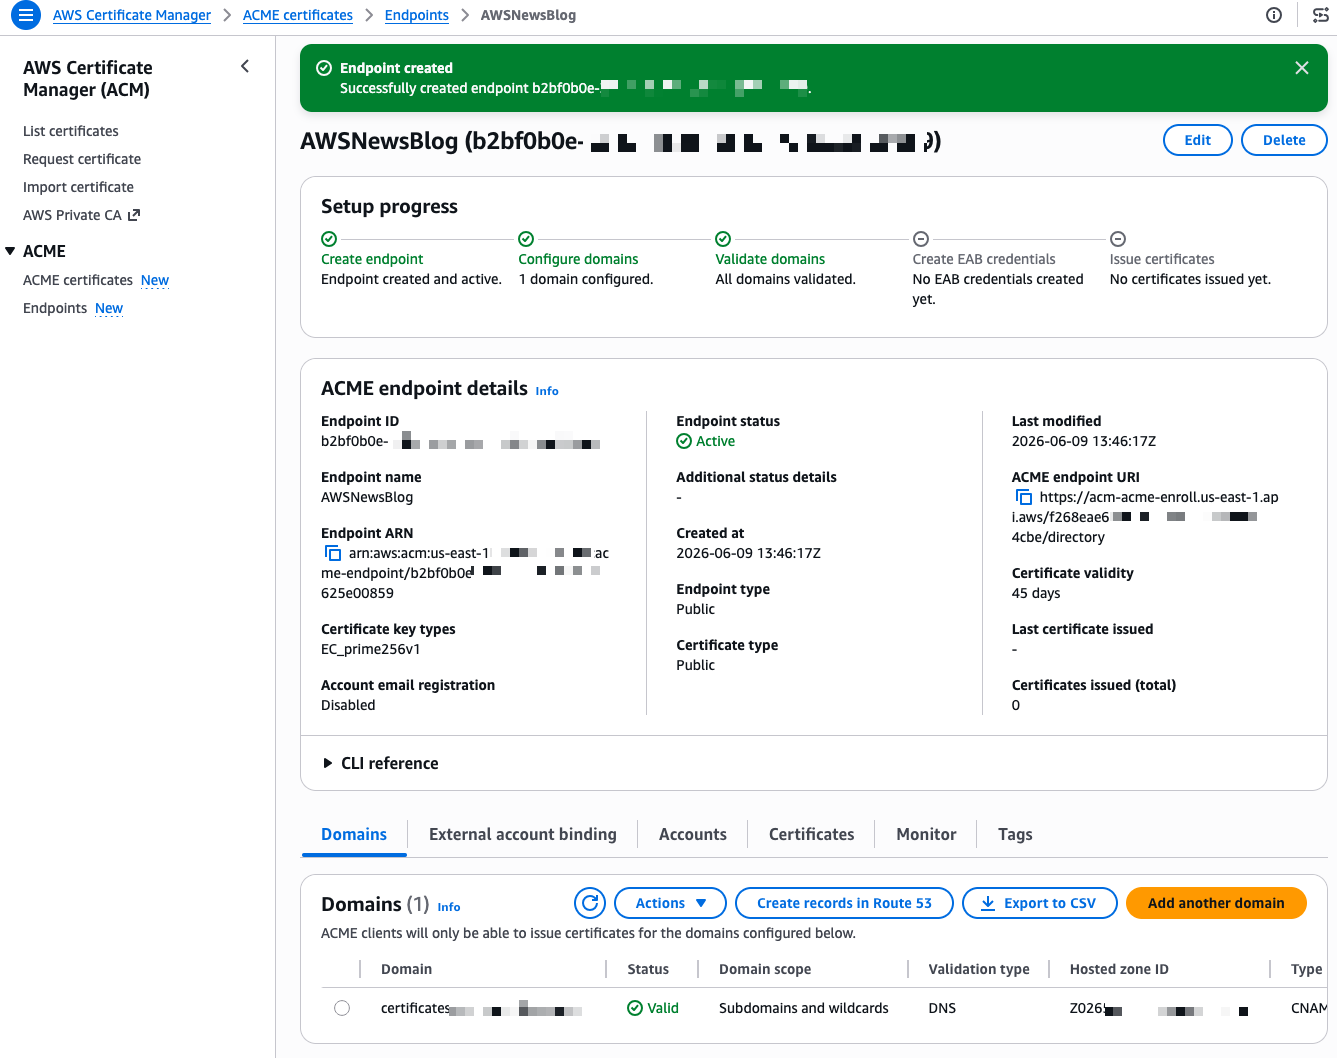
Now I need to create External Account Binding (EAB) credentials. EAB credentials are a key identifier and HMAC key pair that lets your ACME client register an account with the ACME server. Once registered, the client generates its own asymmetric key pair, which is then used to authenticate all subsequent certificate requests. On the endpoint details page, I select the External account binding tab, then select Create EAB. I give the credential a name and optionally set an expiration time, ideally no longer than needed to complete client registration.
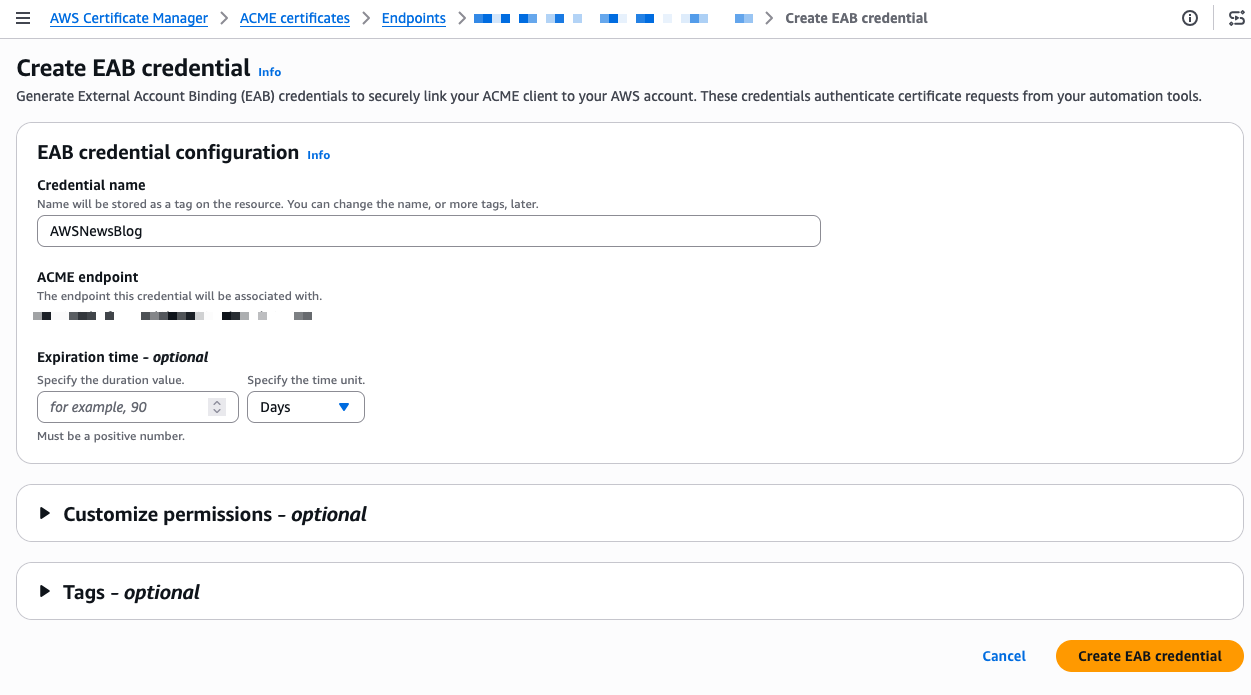
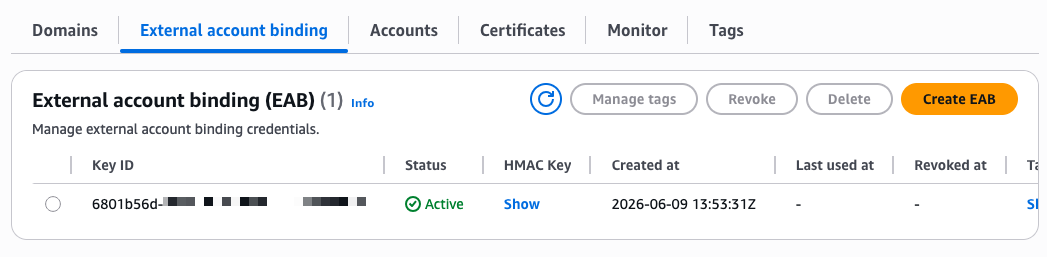
After I select Create EAB credential, the console shows the Key ID and HMAC Key. I note these values because I need them to configure my ACME client. The setup progress now shows four green checkmarks.
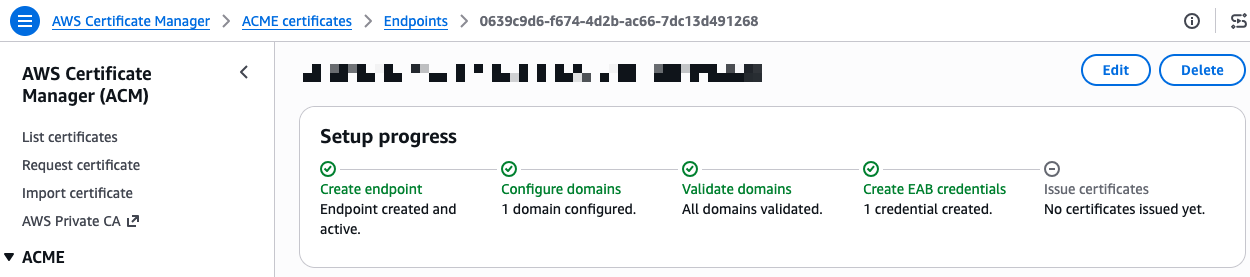
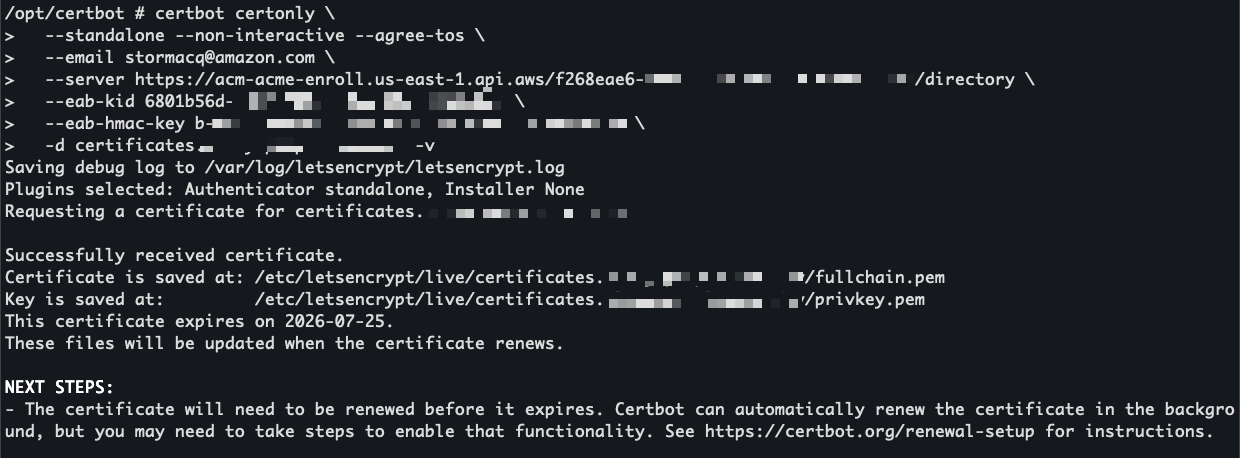
I’m ready to request a certificate. On the endpoint details page, I expand the CLI reference section. The console provides ready-to-use command examples for both Certbot and acme.sh. I copy the Certbot command and run it inside a container using the certbot/certbot image.
certbot certonly --standalone --non-interactive --agree-tos \
    --email <EMAIL> \
    --server https://acm-acme-enroll.us-east-1.api.aws/<ENDPOINT_ID>/directory \
    --eab-kid <EAB_KID> \
    --eab-hmac-key <EAB_HMAC_KEY> \
    --issuance-timeout <ISSUANCE_TIMEOUT> \
    -d <DOMAIN>
I replace the placeholders with my endpoint URL, EAB credentials, and domain name. The --eab-kid and --eab-hmac-key arguments are how Certbot registers with your ACME endpoint using the External Account Binding credentials I generated earlier. Each ACME client has its own syntax for this step, so check your client’s documentation for the exact flags.
Certbot contacts the ACME endpoint and returns a valid certificate signed by Amazon Trust Services.
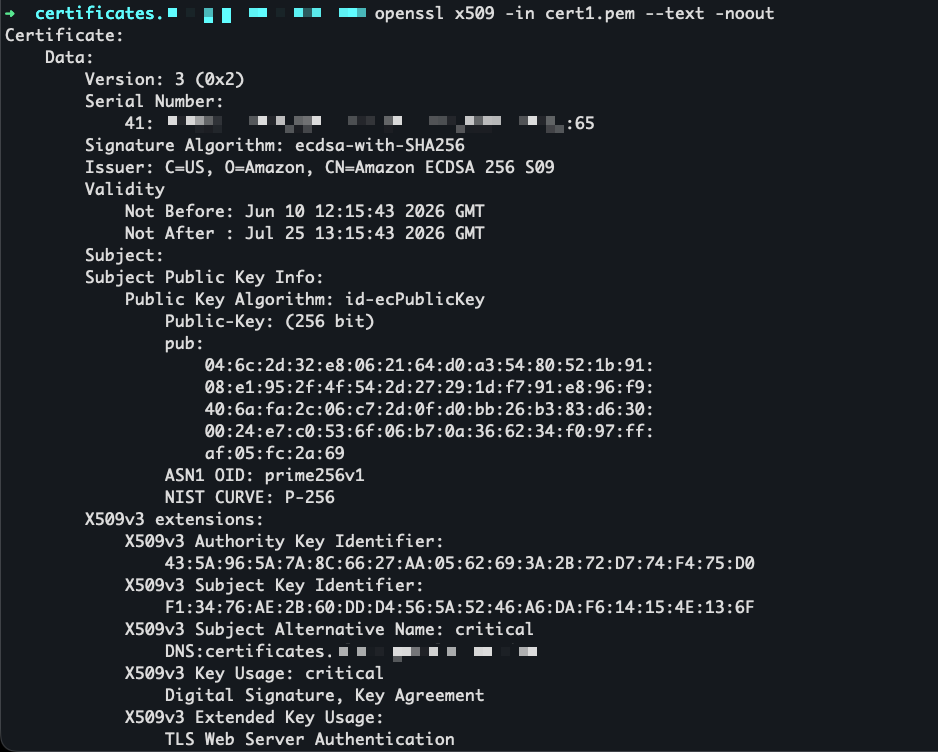
I use openssl to view the certificate before installing it.
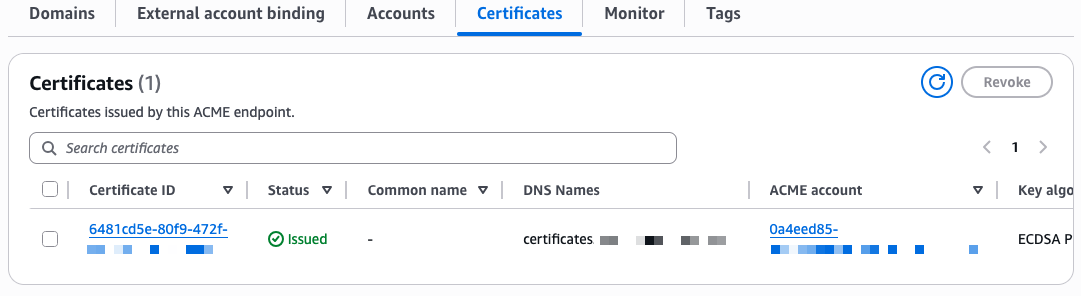
The certificate is now visible in the ACM console under the ACME certificates tab, alongside any certificates issued through the console or API.
Availability and pricing
ACME support in AWS Certificate Manager is available today in all commercial AWS Regions and will be available in AWS GovCloud (US), the China Regions, and the AWS European Sovereign Cloud partitions at a later date.
Pricing is per domain included in each certificate at the time of issuance, with a different price for fully qualified domain names and wildcards. Volume tiers are calculated based on total domain occurrences across all certificates issued per month in your AWS account. For details, see the ACM pricing page.
To get started, visit the ACM section on the AWS console or read the documentation.
Post Syndicated from The Atlantic original https://www.youtube.com/shorts/DX_clM4byYE
Post Syndicated from jzb original https://lwn.net/Articles/1080518/
Dee Harris has published a summary
of the recent “fireside chat” featuring Creative Commons founders Hal
Abelson, Lawrence (Larry) Lessig, Molly Van Houweling, and Glenn Otis
Brown. The chat was to mark the 25th anniversary
of Creative Commons and included a look back at its history as
well as a look at the landscape today:
Twenty-five years ago, a small group of people made a bet. They
believed that if you gave creators a simple set of tools and licenses
in language that a lawyer, a machine, and a human could all read,
millions of people might choose to share their work with the world
instead of locking it down.
The video
of the chat is available on YouTube.
Post Syndicated from The Atlantic original https://www.youtube.com/shorts/23HWzP_AEgs
Post Syndicated from LastWeekTonight original https://www.youtube.com/shorts/kiboO5WsapE
Post Syndicated from Crosstalk Solutions original https://www.youtube.com/watch?v=8fpFGmn4AfQ
Post Syndicated from The Atlantic original https://www.youtube.com/shorts/yr2CJnoWqYo
Post Syndicated from Ryan Smith original https://www.servethehome.com/amd-pivots-from-hbm-to-lpddr5x-for-new-versal-premium-gen-2-memory-on-package-chips/
With HBM in short supply, AMD’s next-generation of adaptive SoCs will be switching from HBM to LPDDR5X memory. The Versal Premium Gen 2 Memory on Package chips target the same compact form factor, but with a 15+ year projected lifecycle
The post AMD Pivots From HBM to LPDDR5X For New Versal Premium Gen 2 Memory on Package Chips appeared first on ServeTheHome.
Post Syndicated from daroc original https://lwn.net/Articles/1079001/
Lisp-like languages have historically led the world in metaprogramming and
flexibility. While many modern languages have adopted the idea of macros,
Lisp-like languages such as
Racket have continued pushing the envelope,
attempting to make macros as easy as possible to incorporate into everyday
programs. On the other hand, Lisp’s minimal, parenthesis-based syntax can be hard
to adapt to — to the point that Lisp is sometimes said to stand
for “Lots of Irritating Silly Parentheses”.
Rhombus is a new programming
language that aims to have the best of both worlds, marrying Racket’s
metaprogramming capabilities to a simple Python-like syntax and reasonable
standard-library defaults.
Post Syndicated from jzb original https://lwn.net/Articles/1080439/
Security updates have been issued by AlmaLinux (git-lfs, perl-Archive-Tar, perl-IO-Compress, python3.12-urllib3, and runc), Debian (sogo), Fedora (perl-DBI and perl-Socket), Oracle (firefox, freerdp, git-lfs, libsoup, libxml2, mod_md, mysql, perl-Archive-Tar, perl-IO-Compress, python, python3.12-urllib3, rsync, thunderbird, tomcat, xorg-x11-server, and xorg-x11-server-Xwayland), SUSE (389-ds, 7zip, alsa, amazon-ecs-init, amazon-ssm-agent, ansible-core, apache2, atril, avahi, bind, bitcoin, capnproto, chromedriver, chromium, cosign, distribution, dnsdist, docker, dovecot24, dracut, firefox, firewalld, freeipmi, freerdp, giflib, gimp, gleam, glib-networking, glibc, glycin-loaders, golang-github-prometheus-alertmanager, google-cloud-sap-agent, google-guest-agent, graphite2, gsasl, hamlib, helm, himmelblau, ignition, imagemagick, istioctl, jackson-databind, jq, jupyter-jupyterlab-templates, keylime, krb5, ldns, libaom, libcaca, libgcrypt, libheif, libinput, libjxl, libnfs, libslirp-devel, libsolv, libzypp, zypper, libssh2_org, libvncserver, libyang, lldpd, logback, loupe, mbedtls, mbedtls-2, mcphost, mozjs128, mutt, nano, nginx, ocaml, ofono, openCryptoki, opencryptoki, opensc, openssh, openssl-3, papers, perl-compress-raw-zlib, perl-config-inifiles, perl-cpanel-json-xs, perl-crypt-passwdmd5, perl-DBI, perl-dbi, perl-html-parser, perl-http-daemon, perl-libwww-perl, perl-protocol-http2, postfix, postgresql14, postgresql15, postgresql16, python-aiohttp, python-biopython, python-click, python-ecdsa, python-idna, python-markdown, python-joblib,, python-paramiko, python-pdm, python-pip, python-py7zr, python-pydata-sphinx-theme, python-pyjwt, python-python-multipart, python-starlette, python-tornado6, python311-jupyter-ydoc, rpcbind, sed, sg3_utils, sqlite3, strongswan, tar, thunderbird, tomcat, tomcat10, tomcat11, trivy, unbound, util-linux, warewulf4, webkit2gtk3, xar, xwayland, yt-dlp, and zypper, libzypp, libsolv), and Ubuntu (libheif, nss, qemu, roundcube, and sqlite3).
Post Syndicated from Bruce Schneier original https://www.schneier.com/blog/archives/2026/06/the-realities-of-ai-video-surveillance.html
The Financial Times has a good article on how AI is changing the capabilities of video surveillance, with information from both Israel/Iran and Russia.
I wrote about this sort of thing a few years ago, how AI enables mass spying in the way that computers and networks enabled mass surveillance. The interesting development in the article is that AI allows people to ask natural language questions about video footage to AIs—and AIs can answer them.
In contrast with older tools restricted to a few dozen preset searches, these new tools allow an almost unlimited range of enquiries by enabling language-based searches on video.
That lets intelligence officers hunt through massive streams of videos using simple search terms, such as two men handing a bag to each other; a person who has changed their appearance, or has changed clothes multiple times in a day; or a vehicle that has recently been painted over, or has driven past the same spot several times in a short period.
“This is the holy grail of surveillance,” said a European official whose country uses the technology on its cities. “We are able to look for behaviour, not objects it has created a world of new possibilities.”
Post Syndicated from The History Guy: History Deserves to Be Remembered original https://www.youtube.com/watch?v=c78qLiUwo0U
Post Syndicated from Георги Тотев original https://www.toest.bg/ostrovut-na-prokudenite-vtora-chast/

Нощният въздух е студен и режещ. Махмуд върви в група от афганистанци, иранци и пакистанци през каменист планински терен, осветяван единствено от луната. Някъде пред тях е границата между Иран и Турция, високо в планините над Ван в кюрдския регион на Турция. Трафикантите им дават кратки инструкции: когато стигнат до граничната ограда, да я прережат и да бягат.
Ако полицията дойде отдясно, бягайте наляво. Ако дойде отляво, бягайте надясно – спомня си думите им Махмуд. – Не спирайте да тичате. Ако ви хванат – бююк шамар – голям шамар, и директно ви връщат в Иран!
Няколко седмици по-рано в Кандахар Махмуд продал почти всичко, което притежавал, включително старата си, но обичана моторетка. Успял да си осигури едномесечна студентска виза за Иран. Стигнал до Техеран, където напразно търсил човек, който да му помогне да премине нелегално в Турция. Обезкуражен, решил да се прибере у дома. Съдбата обаче го застигнала в Машхад – град близо до границите с Афганистан и Туркменистан. Именно там най-накрая срещнал трафикант на хора, който срещу солидна сума обещал да го преведе в Турция. Махмуд си помислил, че най-трудната част от пътуването вече е зад гърба му. В действителност изпитанията му тепърва започвали.
—
България през 80-те години е внимателно режисирана полицейска държава – страна на дълги опашки за основни стоки и субсидирани летни почивки по Черноморието. Кание и Раиф посрещат десетилетието потопени в работа и семеен живот. „Имахме голяма къща в Добрич, а наблизо беше курортът Албена – спомня си Кание. – Там прекарахме най-хубавите години от младостта си.“
Макар властта официално да твърди, че изповядва социалистическите принципи на равенство и братство, тя не се колебае да използва българския национализъм за свои цели. През 80-те години режимът възражда старите страхове от „турската заплаха“ и близо петвековното османско владичество. Книги и филми припомнят колективната травма от живота под османска власт – период, представян в училище като време на потисничество и масово поробване. В условията на затворената комунистическа система официалната пропаганда остава без сериозно оспорване, а турското малцинство все по-често започва да бъде представяно като потенциална „пета колона“.
Подозренията се засилват след поредица от атентати в обществения транспорт – изключително нетипично и дълбоко разтърсващо явление за една строго контролирана полицейска държава. През август 1984 г. са извършени атаки на жп гарата в Пловдив и на летището във Варна. Най-кървавият атентат е във влака Бургас–София през 1985 г., познат като атентата от гара Буново. При него загиват седем души, сред тях и две деца. Нападенията, извършени от турски националистически екстремисти, затвърждават представата за турското малцинство като въплъщение на „вътрешния враг“.
Именно в тази атмосфера на страх и подозрение е поставено началото на т.нар. Възродителен процес – кампания за насилствена асимилация, насочена срещу мюсюлманските общности в България. Решението е взето и изпълнено почти светкавично в края на декември 1984 г. Само за няколко седмици близо един милион души – повече от една десета от населението на страната по това време, са принудени да заменят имената си със славянски. Освен турското малцинство, мерките засягат и мюсюлманите от ромската общност, както и помаците.
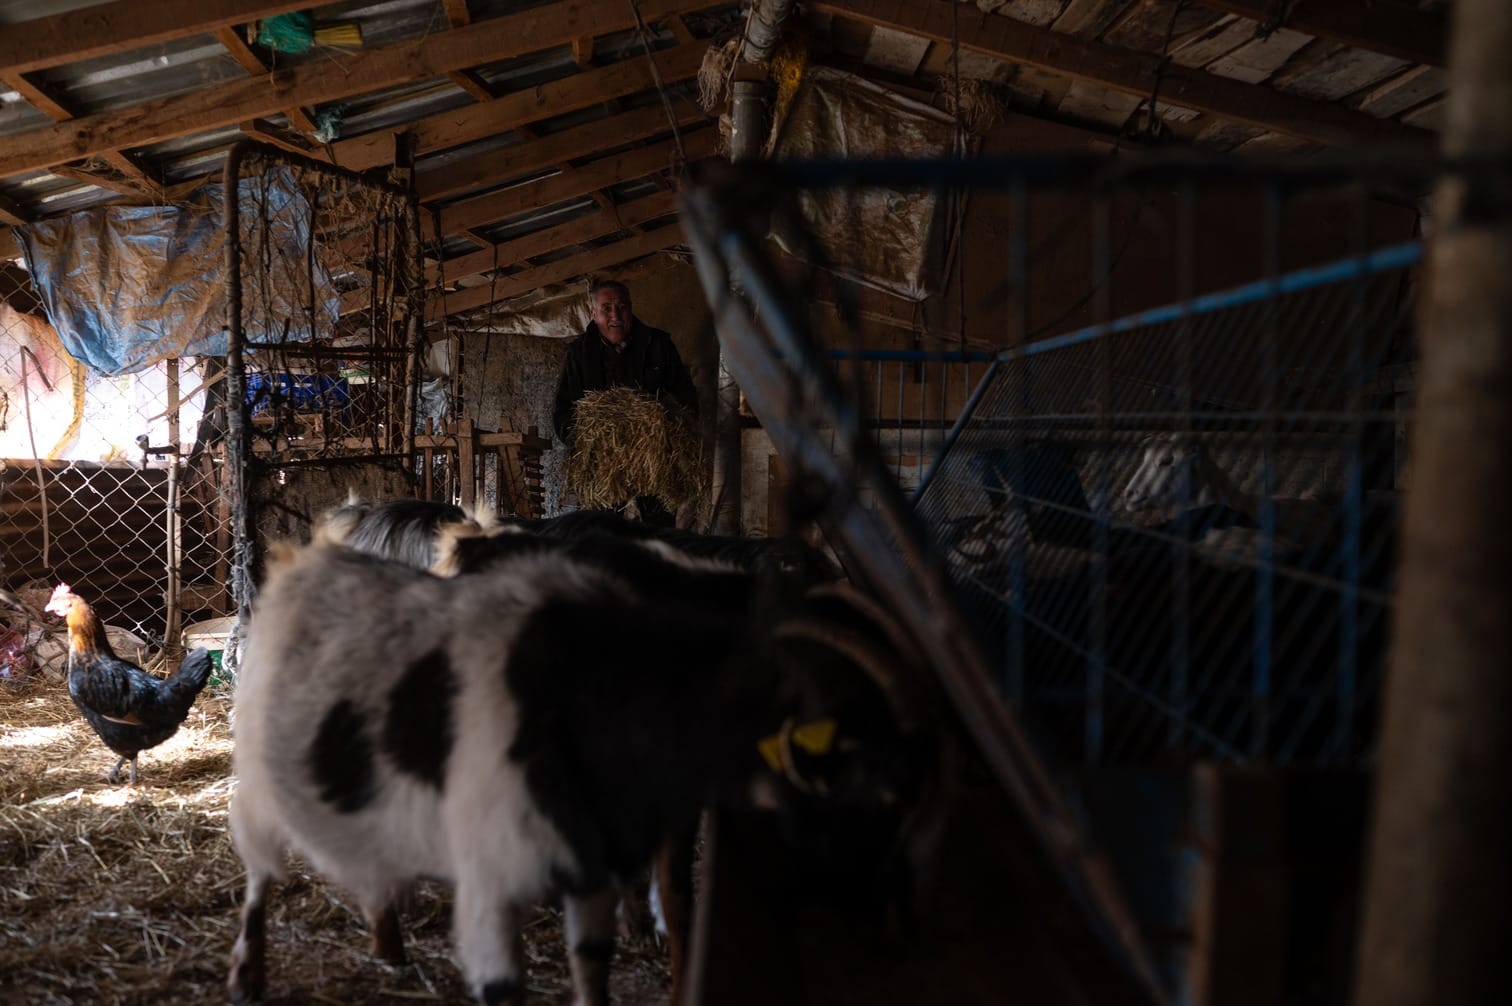
Раиф си спомня как в града пристигат полицаи и тежковъоръжени войници, за да наложат изпълнението на указа.
Всеки, който имаше турско име, беше извикван в кметството и принуден да избере ново от предварително подготвен списък. На публични места трябваше да говорим на български и да използваме новите си имена. На колегите ми беше наредено да ме наричат „Румен“. Един човек обаче отказа. Казваше се Петьо. Той каза на полицаите: „Може да ме биете, може и да ме убиете, но аз го познавам като Раиф цял живот. Не мога да го наричам Румен.“
Насилствената асимилационна кампания е представяна от властите като опит за „възстановяване на българските корени“ на засегнатите общности. Подобни мерки всъщност не са прецедент. Още от 50-те години комунистическият режим провежда кампании, целящи да „излекуват“ помаците от тяхната предполагаема „турска идентичност“. Между 1982 и 1984 г. около 50 000 души от турската, ромската и помашката общност са принудени да сменят имената си – своеобразна генерална репетиция за събитията от декември 1984 г. и за последвалия Възродителен процес.
Затворени са джамии, поругани са мюсюлмански гробища, турските книги, списания и музика са забранени. Говоренето на турски език на публично място води до глоба или побой. Стотици представители на турската общност са изпратени в трудовия лагер в Белене на дунавския остров Персин. И до днес Раиф се пита какво ли са мислили властите по онова време.
Още през 70-те години ни предупреждаваха, че могат да сменят имената ни, както вече бяха направили с помаците. Но ние не вярвахме, че това ще се случи.
На 23 май 1985 г. – датата е запечатана в паметта му – Раиф е уволнен от електроразпределителното предприятие, в което работи. „Не остана нито един турчин на работа. Страхуваха се от саботажи.“
—
Махмуд е заловен малко след като прекосява границата с Турция. Озовава се в център за задържане на мигранти в източния град Ван – първия от поредица подобни центрове, през които ще премине. Там започва да учи турски, без да изоставя мечтата си някой ден да стигне до Западна Европа. Докато е настанен в център за мигранти край Амасия, в черноморския регион на Турция, започва да работи нелегално по нивите в околността. „Попитах в лагера дали мога да работя законно. Казаха ми: „Не.“ Попитах: „А какво да ям?“ Те ми отвърнаха: „Това си е твой проблем. Защо изобщо си дошъл?“

От Амасия пътят му продължава на запад през Истанбул и Бурса, докато накрая стига до Чанаккале – оживен пристанищен град на брега на Дарданелите. Когато за първи път застава край тесния проток, свързващ Егейско и Мраморно море, Махмуд гледа към отсрещния бряг и си представя, че там започва Европа.
Махмуд се опитва да стигне до Гърция по море. Веднъж е заловен от бреговата охрана и върнат. Друг път двигателят отказва и лодката се носи безконтролно в продължение на седем часа, преди да пристигне помощ. Опитва и по суша. Една нощ успява да премине границата край град Ипсала, но се изгубва и без да разбере, се озовава отново на турска територия. При друг опит стига чак до Александруполис (Североизточна Гърция), преди да бъде задържан от полицията. За негово нещастие, по това време носи синджир с турското знаме и тениска с лика на Мустафа Кемал Ататюрк. „Полицаите решиха, че съм турски трафикант – разказва той. – Взеха ми всичко – телефона, SIM картата.“
След поредния неуспешен опит Махмуд се връща обезкуражен в Чанаккале. Там получава предложение за работа от възрастен мъж на име Хасан. Единственото условие е да напусне града и да замине за близък остров. „Мислех си, че ще поработя един месец, ще спестя малко пари и пак ще тръгна. Но после се появи Хасан и след това – Гьокчеада… Гьокчеада…“, казва той с усмивка и известно примирение.
—
Христос Талиядурос работи в кафене с прекрасна гледка, разкриваща се от склоновете на островното село Зейтинли. Занимава се и с татуировки. Подобно на Виолета и Димитрис той се установява на острова сравнително наскоро, когато ограниченията върху културния живот на гръцката общност започват постепенно да отпадат. За него това е своеобразно завръщане у дома. Роден е в същото село, в което работи днес, но в началото на 90-те години родителите му го изпращат в Истанбул, за да учи в гръцко училище.
Винаги съм мечтал един ден да се върна за постоянно, казва Христос.
Неговото семейство е сред малкото гръцкоговорещи семейства, които остават на острова въпреки десетилетията на ограничения и натиск през XX век.

След като през 1964 г. последното гръцко училище на острова е принудено да затвори врати, малкото останали гръцки семейства започват да изпращат децата си да учат в Истанбул. Там църковните училища, управлявани от вселенския патриарх на Константинопол, продължават да преподават на гръцки и остават извън по-широките ограничения върху гръцкоезичното образование. „Патриархът ни взе под крилото си“, казва Христос. По съвпадение и той е родом от същото село – Зейтинли.
В началото на 20-те години на миналия век Имброс, както тогава все още се нарича островът, разполага с десет гръцки училища, в които учат близо 1500 деца. След като островът преминава под турски контрол, властите постепенно започват да ограничават обучението на гръцки език. Закон, приет през 1927 г., на практика забранява преподаването му в държавните училища и принуждава децата от гръцки произход да изучават езика си извън учебните занятия в частни училища.
Ограниченията са временно смекчени през 50-те години, но през 60-те са въведени отново в още по-строг вид. В крайна сметка това води до затварянето на последното гръцко училище на острова – институция, превърнала се в символ на гръцкото му наследство и идентичност.
От 60-те години нататък останалата гръкоезична общност на острова е подложена на постоянен натиск. Мнозина избират да напуснат и да започнат нов живот в Гърция, Западна Европа или Австралия. Често са принудени да продават домовете си на цени далеч под пазарните. Отношението на турската държава към малцинството допълнително се втвърдява заради продължителната криза в Кипър, където гръцката и турската общност все повече се отдалечават една от друга в стремежа си към две несъвместими цели – присъединяване на острова съответно към Гърция или към Турция.
На православната общност е забранено да притежава колективна собственост, различна от църквите. Именно през този период са затворени и гръцките училища, както и сградите на местните общностни институции.
Други мерки засилват усещането, че общността е обсадена и под постоянен натиск. На острова са изградени полицейски казарми и затвор от открит тип. Разкази от онова време описват как затворници, много от които осъдени за тежки престъпления, се движат свободно и тормозят местните жители.
Хората помнят, но избягват да говорят за това. Раната все още не е зараснала,
казва Виолета.
Макар темата рядко да намира място в турското общество, създаването на затвора от открит тип заема „централно място в паметта за принудителното напускане на острова“ сред бившите гръцки жители на Гьокчеада, посочва Юмит Есер от университета „Неджметин Ербакан“. Според него съвкупният ефект от политиките, провеждани през този период, „дълбоко променя ежедневието и чувството за сигурност на острова“.
—
През април 1989 г. Раиф получава неочаквана призовка да се яви в местното полицейско управление. Информацията е оскъдна – казват му да вземе дрехи, малко пари и храна за няколко дни. Никой не му съобщава обаче къде ще бъде изпратен. Едни говорят за Франция, други – за Африка, трети – за Румъния. Той събира набързо багажа си. Кание го изпраща. Полицаите качват Раиф заедно с група български граждани от турски произход на влак. „Стигнахме до София. Едва тогава ни казаха, че ни депортират в Турция.“ Следва ново пътуване с влак, този път към границата. Групата слиза в Одрин – първия голям град от другата страна на границата.
Нямах представа накъде да тръгна. За първи път стъпвах в Турция. Нашият турски беше едно, техният – съвсем друго,
спомня си Раиф. В хола на своя дом той бавно разбърква чая си. Металната лъжичка звъни в малката чаша с форма на лале, запълвайки паузите в разказа му. Неговото прогонване се оказва предвестник на много по-мащабно изселване. В началото на юни 1989 г., на фона на нарастващото безпокойство за положението на турското малцинство в България, Турция отваря границата си. През следващите три месеца между 320 000 и 360 000 български граждани от турски произход я преминават с влакове, автобуси и автомобили, натоварени с мебели и покъщнина.
Турските власти насочват част от новопристигналите към Чорлу, град източно от Одрин. „Дадоха ни чай и храна. После започна организацията – кой къде ще бъде изпратен.“ Раиф е сам в новата страна. „Не можех да се обадя у дома. Нямаше как да разбера как са жена ми и дъщеря ми.“ Ще мине цяла година, преди двете да успеят да се присъединят към него в Турция.
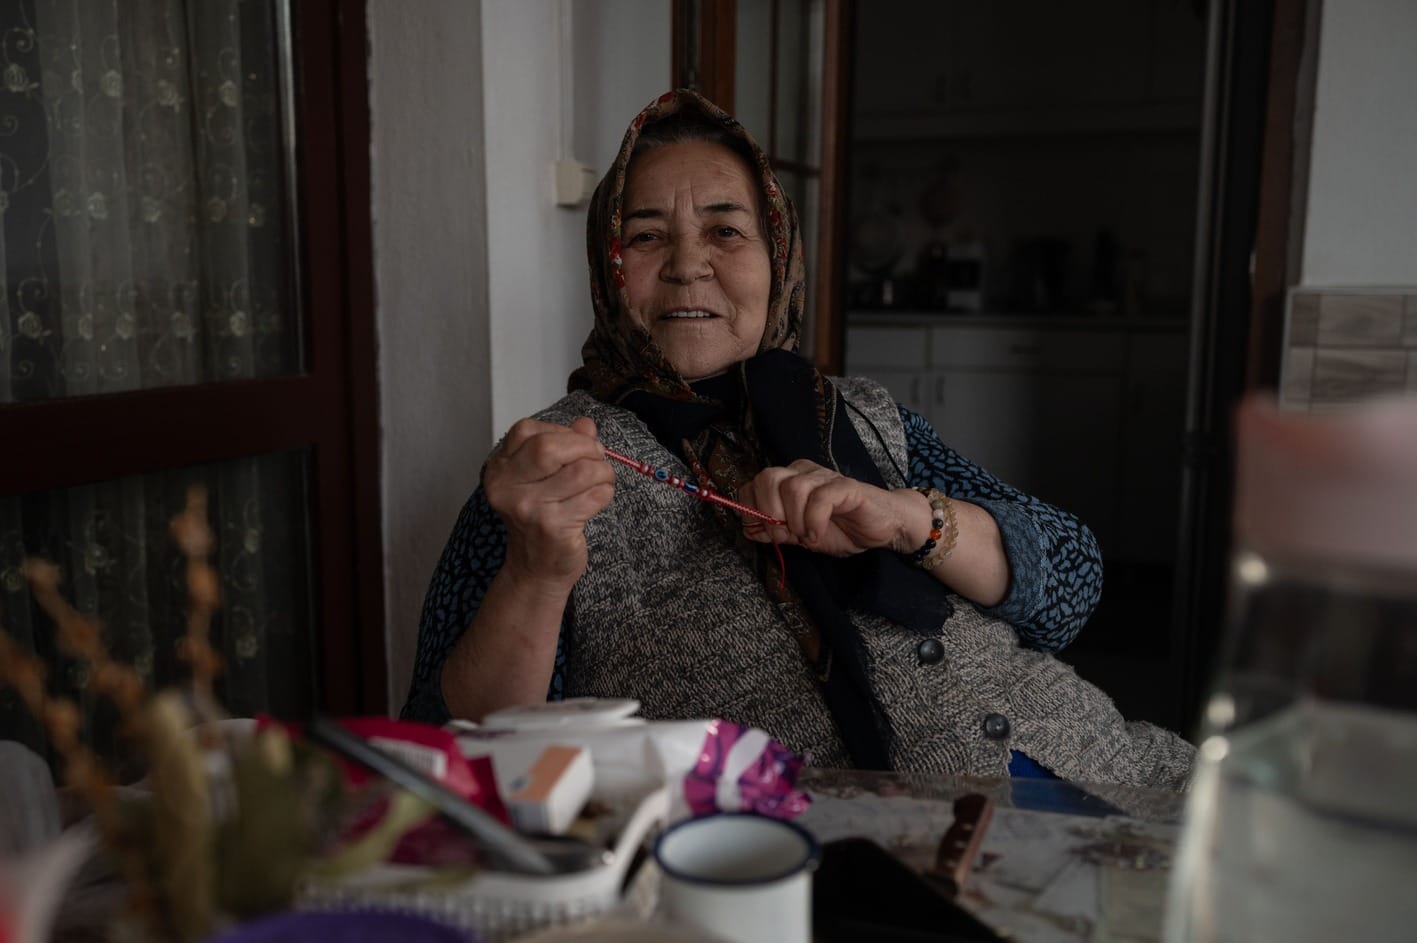
Докато Раиф говори, Кание отваря малко чекмедже и изважда мартеница. Държи я внимателно в ръцете си. „Това е едно от малкото неща, които донесох със себе си от България. Не я нося, защото ми е единствената и се страхувам да не я изгубя.“ Усмихва се тъжно и добавя: „Тук няма мартеници.“
Раиф гледа чашата си с чай. „Някога говорех български толкова добре, че никой не можеше да разбере, че съм турчин.“ Днес езикът постепенно започва да му убягва, казва той. „Минаха толкова много години.“ Гласът на Кание омеква, когато се връща към спомените. „Най-трудното тепърва предстоеше. Никой не бива да бъде принуждаван да напуска родината си и да започва живота си отначало на друго място.“
Този материал е създаден в рамките на Програмата за журналистически постижения (Fellowship for Journalistic Excellence) с подкрепата на ERSTE Foundation и в сътрудничество с Balkan Investigative Reporting Network (BIRN).
Редактор на оригиналния текст: Нийл Арън
Превод: Георги Тотев
Post Syndicated from Uzochukwu Winnie (@wineshuga) original https://prometheus.io/blog/2026/06/30/learn-cloud-with-lfx/
I joined the LFX mentorship expecting to spend three months writing documentation. A few weeks later, I was deploying OpenTelemetry Collectors across AWS EC2 instances, debugging networking problems between machines, and trying to understand why a pipeline that looked healthy wasn’t sending metrics.
I went from having zero knowledge about observability to building and troubleshooting systems. This made the LFX Mentorship one of the most effective and exciting learning experiences I’ve had in engineering. I was exposed to how systems behave in reality. That difference is what makes it one of the most effective ways to grow into cloud-native engineering.
A few months before joining the LFX mentorship, I was a Frontend Developer exploring backend engineering. My first encounter with observability was curiosity leading me to articles about traces and metrics. For years, I looked forward to contributing and joining an active Open Source community. So when I came across this mentorship with Prometheus on improving the documentation for Prometheus and OpenTelemetry Interoperability, I thought this was a perfect opportunity to contribute.
I expected my contributions to focus solely on improving or creating documentation for both tools. Documentation was part of the experience. I contributed to OpenTelemetry documentation, and my pull requests were merged. That gave me direct exposure to how large CNCF projects review, refine, and maintain technical documentation at scale, but that was only the surface. Before long, my work had expanded beyond documentation. To properly document real systems, I first had to understand them. This led me to deploy and troubleshoot the systems I was writing about.
The deployment I made during the mentorship looked like this:
The hardest debugging experiences were not tied to a single tool like OpenTelemetry or Prometheus. They came from interactions between components.
Problems ranged from:
A defining aspect of the LFX Mentorship model is autonomy. Mentors provide direction and feedback, but they do not solve problems for you. In my case, feedback and guidance from Tiffany Hrabusa, Arthur Sens, and Victoria Nduka were just as valuable as the technical work because they shared the reasoning behind engineering decisions, not just the decisions themselves. Understanding why a solution was preferred often mattered more than the solution itself.
At first, the lack of detailed guidance felt uncomfortable and scary. Over time, I came to appreciate how much it contributed to my technical growth and confidence.
My mentors and I would discuss problems and explore different approaches to achieve our goal. We worked as a team, and that gave me the space to grow while still taking ownership of my work. During the development of the blueprint, for example, one of my mentors generously gave me access to a platform where I could test an idea we had. While it allowed me to validate the approach, it also came with a major limitation: I couldn’t automate deployment, and the environment had a time limit. During our next meeting, we discussed this challenge together and came up with an alternative approach that ultimately proved successful.
This kind of guidance is all I could ever wish for. I was challenged to think independently while being reassured that I wasn’t solving problems alone.
By the end of the mentorship, the most important shift was not tool-specific knowledge. It was how systems are perceived. Looking back, that change was far more valuable than learning any single technology because it fundamentally changed how I approach engineering problems. It made the experience far more impactful than I had expected when I first joined the program. I also gained a more realistic understanding of observability itself as pipelines that must be designed to survive failure.
Beyond learning, the mentorship produced tangible outcomes.
The improvements I made to the OpenTelemetry documentation were merged. I also completed documentation on Prometheus and OpenTelemetry interoperability using the Prometheus metrics format, and developed a blueprint proposal for deploying observability systems in non-Kubernetes environments.
Another outcome is that I now understand how open source communities organize themselves. If I wanted to join a Prometheus Working Group or an OpenTelemetry SIG, I know how to get involved and contribute effectively.
Perhaps the most valuable outcome is the network I’m beginning to build. Through this mentorship, I’ve started forming relationships with experienced engineers, and I’ve come to realize that building genuine connections is one of the best ways to grow in this industry.
The value of structured open-source mentorship is not just exposure to tools. It is exposure to reality.
Specifically, it provides:
The LFX Mentorship gave me more than exposure to cloud-native tools. It changed how I think about building, debugging, and operating distributed systems. Contributing to open source, learning from experienced maintainers and mentors, and working through real production-style challenges made it one of the most valuable learning experiences in my career.
If you’re looking to grow beyond tutorials and learn in a real engineering environment, I highly recommend applying for the LFX Mentorship Program. You can also check out the other mentorship programs supported by CNCF.
If you’re working in cloud-native systems or exploring similar challenges, I’m always happy to connect on LinkedIn: [link].
Post Syndicated from Sprites mods original https://spritesmods.com/?art=vapourdeck&f=rss
I always wanted to build my own 486 PC, so I built one, and put it into a form factor that’s quite unique for a retro-machine