Author: Kali-Team
Type: Post
Pull request: #17337 contributed by cn-kali-team
Description: This adds a post exploit module that retrieves Dbeaver session data from local configuration files. It is able to extract and decrypt credentials stored in these files for any version of Dbeaver installed on Windows or Linux/Unix systems.
Gather MinIO Client Key
Author: Kali-Team
Type: Post
Pull request: #17341 contributed by cn-kali-team
Description: This adds a post module that gathers local credentials stored by the MinIO client on Windows, Linux, and MacOS.
Enhancements and features (2)
#17427 from gwillcox-r7 – This adds YARD documentation to the LDAP libraries for developers to reference.
#17447 from gwillcox-r7 – We now utilize ‘pry’ dependencies with support for newer Ruby versions.
Bugs fixed (3)
#17386 from smashery – A bug has been fixed whereby the HTTP library was parsing HTTP HEAD requests like GET requests, which was causing issues due to lack of compliance to RFC9110 standards. By updating the code to be more compliant with these standards, modules such as auxiliary/scanner/http/http_header now work as expected.
#17438 from ErikWynter – This fixes an issue in the exchange_proxylogon_collector module where it would crash if the LegacyDN was not present in the XML response.
#17454 from prabhatjoshi321 – A bug has been fixed whereby smb_enumshares incorrectly truncated file names before storing them into loot. This has been addressed so that only the console output will contain truncated file names, and the loot files will still contain the full file names for reference.
Documentation added (1)
#17395 from cgranleese-r7 – Adds documentation for both the JSON and MessagePack Metasploit RPC APIs – which is useful for programmatically interacting with Metasploit.
You can always find more documentation on our docsite at docs.metasploit.com.
Get it
As always, you can update to the latest Metasploit Framework with msfupdate
and you can get more details on the changes since the last blog post from
GitHub:
If you are a git user, you can clone the Metasploit Framework repo (master branch) for the latest.
To install fresh without using git, you can use the open-source-only Nightly Installers or the binary installers (which also include the commercial edition).
Since the GitHub CLI 2.0 release, developers and organizations have customized their CLI experience by developing and installing extensions. Since then, the CLI team has been busy shipping several new features to further enhance the experience for both extension consumers and authors. Additionally, we’ve shipped go-gh 1.0 release, a Go library giving extension authors access to the same code that powers the GitHub CLI itself. Finally, the CLI team released the gh/pre-extension-precompile action, which automates the compilation and release of Go, Rust, or C++ extensions.
This blog post provides a tour of what’s new, including an in-depth look at writing a CLI extension with Go.
Introducing extension discovery
In the 2.20.0 release of the GitHub CLI, we shipped two new commands, including gh extension browse and gh extension search, to make discovery of extensions easier (all extension commands are aliased under gh ext, so the rest of this post will use that shortened version).
gh ext browse
gh ext browse is a new kind of command for the GitHub CLI: a fully interactive Terminal User Interface (TUI). It allows users to explore published extensions interactively right in the terminal.
Once gh ext browse has launched and loads extension data, you can browse through all of the GitHub CLI extensions available for installation sorted by star count by pressing the up and down arrows (or k and j).
Pressing / focuses the filter box, allowing you to trim the list down to a search term.
You can select any extension by highlighting it. The selected extension can be installed by pressing i or uninstalled by pressing r. Pressing w will open the currently highlighted extension’s repository page on GitHub in your web browser.
Our hope is that this is a more enjoyable and easy way to discover new extensions and we’d love to hear feedback on the approach we took with this command.
gh ext search
In tandem with gh ext browse we’ve shipped another new command intended for scripting and automation: gh ext search. This is a classic CLI command which, with no arguments, prints out the first 30 extensions available to install sorted by star count.
A green check mark on the left indicates that an extension is installed locally.
Any arguments provided narrow the search results:
Results can be further refined and processed with flags, like:
--limit, for fetching more results
--owner, for only returning extensions by a certain author
--sort, for example for sorting by updated
--license, to filter extensions by software license
--web, for opening search results in your web browser
--json, for returning results as JSON
This command is intended to be scripted and will produce composable output if piped. For example, you could install all of the extensions I have written with:
gh ext search --owner vilmibm | cut -f2 | while read -r extension; do gh ext install $extension; done
For more information about gh ext search and example usage, see gh help ext search.
Writing an extension with go-gh
The CLI team wanted to accelerate extension development by putting some of the GitHub CLI’s own code into an external library called go-gh for use by extension authors. The GitHub CLI itself is powered by go-gh, ensuring that it is held to a high standard of quality. This library is written in Go just like the CLI itself.
To demonstrate how to make use of this library, I’m going to walk through building an extension from the ground up. I’ll be developing a command called askfor quickly searching the threads in GitHub Discussions. The end result of this exercise lives on GitHub if you want to see the full example.
Getting started
First, I’ll run gh ext create to get started. I’ll fill in the prompts to name my command “ask” and request scaffolding for a Go project.
Before I edit anything, it would be nice to have this repository on GitHub. I’ll cd gh-ask and run gh repo create, selecting Push an existing local repository to GitHub, and follow the subsequent prompts. It’s okay to make this new repository private for now even if you intend to make it public later; private repositories can still be installed locally with gh ext install but will be unavailable to anyone without read access to that repository.
The initial code
Opening main.go in my editor, I’ll see the boilerplate that gh ext create made for us:
package main

import (
        "fmt"

        "github.com/cli/go-gh"
)

func main() {
        fmt.Println("hi world, this is the gh-ask extension!")
        client, err := gh.RESTClient(nil)
        if err != nil {
                fmt.Println(err)
                return
        }
        response := struct {Login string}{}
        err = client.Get("user", &response)
        if err != nil {
                fmt.Println(err)
                return
        }
        fmt.Printf("running as %s\n", response.Login)
}
go-gh has already been imported for us and there is an example of its RESTClient function being used.
Selecting a repository
The goal with this extension is to get a glimpse into threads in a GitHub repository’s discussion area that might be relevant to a particular question. It should work something like this:
$ gh ask actions
…a list of relevant threads from whatever repository you're in locally…

$ gh ask --repo cli/cli ansi
…a list of relevant threads from the cli/cli repository…
First, I’ll make sure that a repository can be selected. I’ll also remove stuff we don’t need right now from the initial boilerplate.
package main

import (
        "flag"
        "fmt"
        "os"

        "github.com/cli/go-gh"
        "github.com/cli/go-gh/pkg/repository"
)

func main() {
    if err := cli(); err != nil {
            fmt.Fprintf(os.Stderr, "gh-ask failed: %s\n", err.Error())
            os.Exit(1)
    }
}

func cli() {
        repoOverride := flag.String(
        "repo", "", "Specify a repository. If omitted, uses current repository")
        flag.Parse()

        var repo repository.Repository
        var err error

        if *repoOverride == "" {
                repo, err = gh.CurrentRepository()
        } else {
                repo, err = repository.Parse(*repoOverride)
        }
        if err != nil {
                return fmt.Errorf("could not determine what repo to use: %w", err.Error())

        }

        fmt.Printf(
       "Going to search discussions in %s/%s\n", repo.Owner(), repo.Name())

}
Running my code, I should see:
$ go run .
Going to search discussions in vilmibm/gh-ask
Adding our repository override flag:
$ go run . --repo cli/cli
Going to search discussions in cli/cli
Accepting an argument
Now that the extension can be told which repository to query I’ll next handle any arguments passed on the command line. These arguments will be our search term for the Discussions API. This new code replaces the fmt.Printf call.
    // fmt.Printf was here

        if len(flag.Args()) < 1 {
                return errors.New("search term required")
        }
        search := strings.Join(flag.Args(), " ")

        fmt.Printf(
                "Going to search discussions in '%s/%s' for '%s'\n",
            repo.Owner(), repo.Name(), search)

        }
With this change, the command will respect any arguments I pass.
$ go run .
Please specify a search term
exit status 2

$ go run . cats
Going to search discussions in 'vilmibm/gh-ask' for 'cats'

$ go run . fluffy cats
Going to search discussions in 'vilmibm/gh-ask' for 'fluffy cats'
Talking to the API
With search term and target repository in hand, I can now ask the GitHub API for some results. I’ll be using the GraphQL API via go-gh’s GQLClient. For now, I’m just printing some basic output. What follows is the new code at the end of the cli function. I’ll delete the call to fmt.Printf that was here for now.
        // fmt.Printf call was here

client, err := gh.GQLClient(nil)
        if err != nil {
                return fmt.Errorf("could not create a graphql client: %w", err)
        }

        query := fmt.Sprintf(`{
                        repository(owner: "%s", name: "%s") {
                                hasDiscussionsEnabled
                                discussions(first: 100) {
                                        edges { node {
                                                title
                                    body
                                    url

    }}}}}`, repo.Owner(), repo.Name())

        type Discussion struct {
                Title string
                URL   string `json:"url"`
                Body  string
        }

        response := struct {
                Repository struct {
                        Discussions struct {
                                Edges []struct {
                                        Node Discussion
                                }
                        }
                        HasDiscussionsEnabled bool
                }
        }{}

        err = client.Do(query, nil, &response)
        if err != nil {
                return fmt.Errorf("failed to talk to the GitHub API: %w", err)
        }

        if !response.Repository.HasDiscussionsEnabled {
                return fmt.Errorf("%s/%s does not have discussions enabled.", repo.Owner(), repo.Name())
        }

        matches := []Discussion{}

        for _, edge := range response.Repository.Discussions.Edges {
                if strings.Contains(edge.Node.Body+edge.Node.Title, search) {
                        matches = append(matches, edge.Node)
                }
        }

        if len(matches) == 0 {
                fmt.Fprintln(os.Stderr, "No matching discussion threads found :(")
            return nil
        }

        for _, d := range matches {
                fmt.Printf("%s %s\n", d.Title, d.URL)
        }
When I run this, my output looks like:
$ go run . --repo cli/cli actions
gh pr create don't trigger `pullrequest:` actions https://github.com/cli/cli/discussions/6575
GitHub CLI 2.19.0 https://github.com/cli/cli/discussions/6561
What permissions are needed to use OOTB GITHUB_TOKEN with gh pr merge --squash --auto https://github.com/cli/cli/discussions/6379
gh actions feedback https://github.com/cli/cli/discussions/3422
Pushing changes to an inbound pull request https://github.com/cli/cli/discussions/5262
getting workflow id and artifact id to reuse in github actions https://github.com/cli/cli/discussions/5735
This is pretty cool! Matching discussions are printed and we can click their URLs. However, I’d prefer the output to be tabular so it’s a little easier to read.
Formatting output
To make this output easier for humans to read and machines to parse, I’d like to print the title of a discussion in one column and then the URL in another.
I’ve replaced that final for loop with some new code that makes use of go-gh’s term and tableprinter packages.
        if len(matches) == 0 {
                fmt.Println("No matching discussion threads found :(")
        }

    // old for loop was here

        isTerminal := term.IsTerminal(os.Stdout)
        tp := tableprinter.New(os.Stdout, isTerminal, 100)


if isTerminal {
                fmt.Printf(
                        "Searching discussions in '%s/%s' for '%s'\n",
                        repo.Owner(), repo.Name(), search)
        }

        fmt.Println()
        for _, d := range matches {
                tp.AddField(d.Title)
                tp.AddField(d.URL)
                tp.EndRow()
        }

        err = tp.Render()
        if err != nil {
                return fmt.Errorf("could not render data: %w", err)
        }
The call to term.IsTerminal(os.Stdout) will return true when a human is sitting at a terminal running this extension. If a user invokes our extension from a script or pipes its output to another program, term.IsTerminal(os.Stdout) will return false. This value then informs the table printer how it should format its output. If the output is a terminal, tableprinter will respect a display width, apply colors if desired, and otherwise assume that a human will be reading what it prints. If the output is not a terminal, values are printed raw and with all color stripped.
Running the extension gives me this result now:
Note how the discussion titles are truncated.
If I pipe this elsewhere, I can use a command like cut to see the discussion titles in full:
Adding the tableprinter improved both human readability and scriptability of the extension.
Opening browsers
Sometimes, opening a browser can be helpful as not everything can be done in a terminal. go-gh has a function for this, which we’ll make use of in a new flag that mimics the “feeling lucky” button of a certain search engine. Specifying this flag means that we’ll open a browser with the first matching result to our search term.
I’ll add a new flag definition to the top of the main function:
func main() {
        lucky := flag.Bool("lucky", false, "Open the first matching result in a web browser")
    // rest of code below here
And, then add this before I set up the table printer:
        if len(matches) == 0 {
                fmt.Println("No matching discussion threads found :(")
        }

        if *lucky {
                b := browser.New("", os.Stdout, os.Stderr)
                b.Browse(matches[0].URL)
                return
        }

    // terminal and table printer code
JSON output
For extensions with more complex outputs, you could go even further in enabling scripting by exposing JSON output and supporting jq expressions. jq is a general purpose tool for interacting with JSON on the command line. go-gh has a library version of jq built directly in, allowing extension authors to offer their users the power of jq without them having to install it themselves.
I’m adding two new flags: --json and --jq. The first is a boolean and the second a string. They are now the first two lines in main:
func main() {
    jsonFlag := flag.Bool("json", false, "Output JSON")
    jqFlag := flag.String("jq", "", "Process JSON output with a jq expression")
After setting isTerminal, I’m adding this code block:
isTerminal := term.IsTerminal(os.Stdout)
        if *jsonFlag {
                output, err := json.Marshal(matches)
                if err != nil {
                        return fmt.Errorf("could not serialize JSON: %w", err)
                }

                if *jqFlag != "" {
                        return jq.Evaluate(bytes.NewBuffer(output), os.Stdout, *jqFlag)
                }

                return jsonpretty.Format(os.Stdout, bytes.NewBuffer(output), " ", isTerminal)
        }
Now, when I run my code with --json, I get nicely printed JSON output:
If I specify a jq expression I can process the data. For example, I can limit output to just titles like we did before with cut; this time, I’ll use the jq expression .[]|.Title instead.
Releasing your extension with cli/gh-extension-precompile
Now that I have a feature-filled extension, I’d like to make sure it’s easy to create releases for it so others can install it. At this point it’s uninstallable since I have not precompiled any of the Go code.
Before I worry about making a release, I have to make sure that my extension repository has the gh-extension tag. I can add that by running gh repo edit --add-tag gh-extension. Without this topic added to the repository, it won’t show up in commands like gh ext browse or gh ext search.
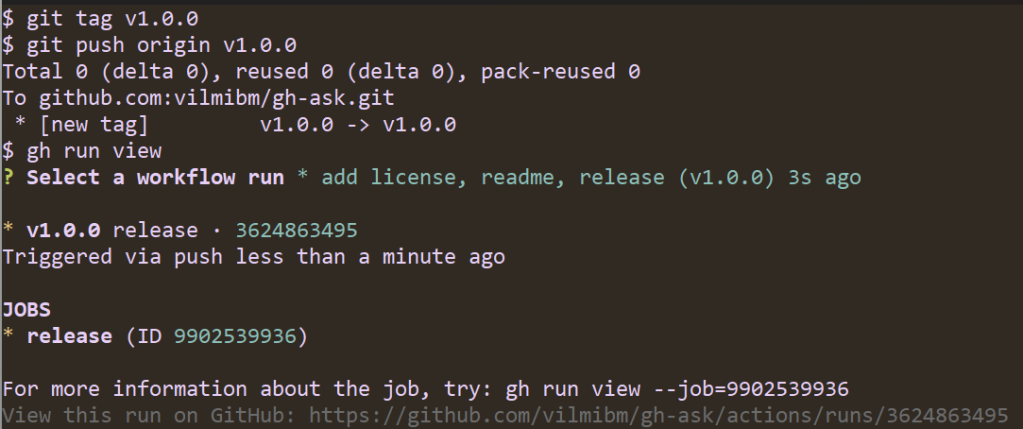
Since I started this extension by running gh ext create, I already have a GitHub Actions workflow defined for releasing. All that’s left before others can use my extension is pushing a tag to trigger a release. The workflow file contains:
The repository is public (assuming you want people to install this for themselves! You can keep it private and make releases just for yourself, if you prefer.).
You’ve pushed all the local work you want to see in the release.
To release:
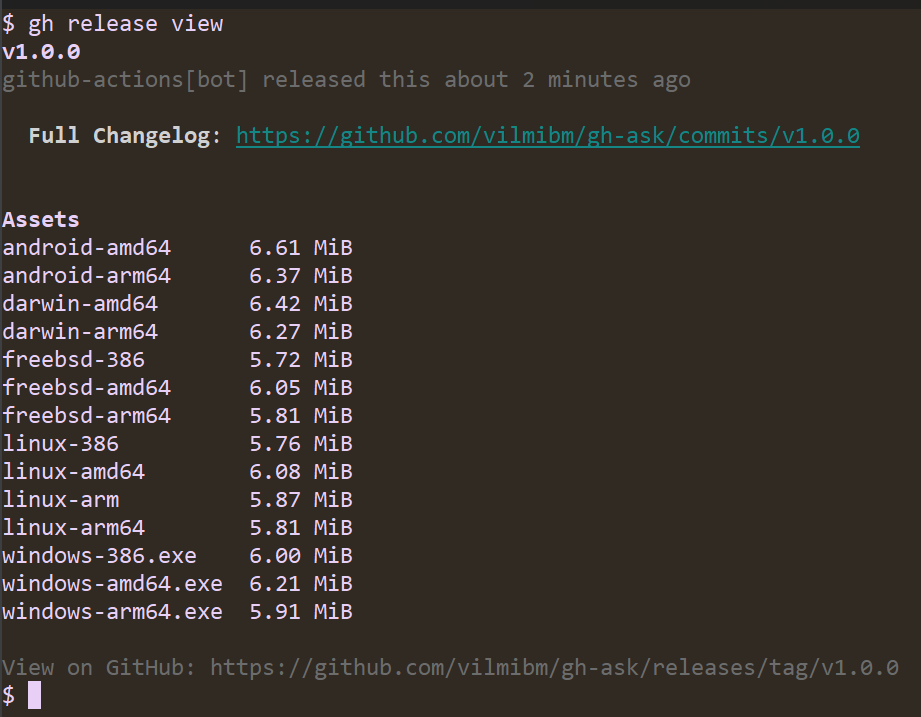
Note that the workflow ran automatically. It looks for tags of the form vX.Y.Z and kicks off a build of your Go code. Once the release is done, I can check it to see that all my code compiled as expected:
Now, anyone can run gh ext install vilmibm/gh-ask and try out my extension! This is all the work of the gh-extension-precompile action. This action can be used to compile any language, but by default it only knows how to handle Go code.
By default, the action will compile executables for:
Linux (amd64, 386, arm, arm64)
Windows (amd64, 386, arm64)
MacOS (amd64, arm64)
FreeBSD (amd64, 386, arm64)
Android (amd64, arm64)
To build for a language other than Go, edit .github/workflows/release.yml to add a build_script_override configuration. For example, if my repository had a script at scripts/build.sh, my release.yml would look like:
The script specified as build_script_overridemust produce executables in a dist directory at the root of the extension repository with file names ending with: {os}-{arch}{ext}, where the extension is .exe on Windows and blank on other platforms. For example:
dist/gh-my-ext_v1.0.0_darwin-amd64
dist/gh-my-ext_v1.0.0_windows-386.exe
Executables in this directory will be uploaded as release assets on GitHub. For OS and architecture nomenclature, please refer to this list. We use this nomenclature when looking for executables from the GitHub CLI, so it needs to be respected even for non-Go extensions.
Future directions
The CLI team has some improvements on the horizon for the extensions system in the GitHub CLI. We’re planning a more accessible version of the extension browse command that renders a single column style interface suitable for screen readers. We intend to add support for nested extensions–in other words, an extension called as a subcommand of an existing gh command like gh pr my-extension–making third-party extensions fit more naturally into our command hierarchy. Finally, we’d like to improve the documentation and flexibility of the gh-extension-precompile action.
Are there features you’d like to see? We’d love to hear about it in a discussion or an issue in the cli/cli repository.
Wrap-up
It is our hope that the extensions system in the GitHub CLI inspire you to create features beyond our wildest imagination. Please go forth and make something you’re excited about, even if it’s just to make gh do fun things like run screensavers.
Save the links. Pass them around. And consider getting your copy of the new 2023 XDR Buyer’s Guide—because if this isn’t a time for reckoning and progress, what is?
The news: on Wednesday, the United States grounded all flights coast-to-coast for the first time since 9/11. The Federal Aviation Administration’s (FAA) Notice to Air Missions system (NOTAM) failed, leaving pilots without vital information they need to fly.
Separate from air traffic control systems, NOTAM ingests data from over 19,000 U.S. airports big and small. It then alerts specific pilots about specific anomalies to expect during 45,000 flights every day: the very latest runway closures, airspace restrictions, disruption of navigational signals, birds that can threaten a plane’s engines, anything.
Apparently, a corrupted file in the software was to blame for the system failure. This, from NBC News:
“…a government official said a corrupted file that affected both the primary and the backup NOTAM systems appeared to be the culprit. Investigators are working to determine if human error or malice is to blame for taking down the system, which eight contract employees had access to. At least one, perhaps two, of those contractors made the edit that corrupted the system, two government sources said Thursday.”
It will likely be a while before we know exactly what happened. But security practitioners might consider jumping to one conclusion today: your argument for investing in a detection and response solution which will provide visibility across your modern environment just got better. It’s important to have the right tools and systems in place, in all areas of your business from infrastructure to security, in order to have business continuity. Even with initiatives like legacy modernization, security teams need to have a view of their threat landscape as it expands.
Is anyone more responsible for business continuity than you?
Recently, CISOs have been named as defendants in several shareholder, civil, and criminal actions. At the same time, CISOs are feeling less and less “personal responsibility” for security events, dropping from 71% to 57% in just one year. Security teams are spending more than half their time manually producing reports, pulling in data from multiple siloed tools. And silos present unacceptable risk. Something has to give.
While capabilities can vary across XDR vendors, the promise is to integrate and correlate data from numerous security tools — and from across varying environments — so you can see, prioritize, and eliminate threats, and move on quickly. The vendor evaluation process isn’t easy. But XDR is well worth it.
How XDR can be a staffing and efficiency game-changer
Key questions to ask as you evaluate options
The hidden lesson in the NOTAM outage? Less is more.
Patrick Kiley, Principal Security Consultant and Research Lead at Rapid7 has a long transportation background. He said that when organizations need to migrate off dated systems, it tends to be a “forklift upgrade, which typically requires significant resources.” That could include development, testing, cloud computing or hardware investment, and of course skilled cybersecurity personnel—who are in short supply these days.
“This kind of migration is a bear,” Kiley said, “so organizations tend to put them off.”
Speculative-execution vulnerabilities come about when the CPU, while executing
speculatively, is able to access memory that would otherwise be denied to
it. Most of these vulnerabilities would go away if the CPU were always
constrained by the established memory protections. An obvious way to fix
these problems would be to make CPUs behave that way, but doing that
without destroying performance is not an easy task. So, instead, Intel
has developed a feature called “linear address-space separation” (LASS) to
paper over parts of the problem; Yian Chen has posted a
patch set adding support for this feature.
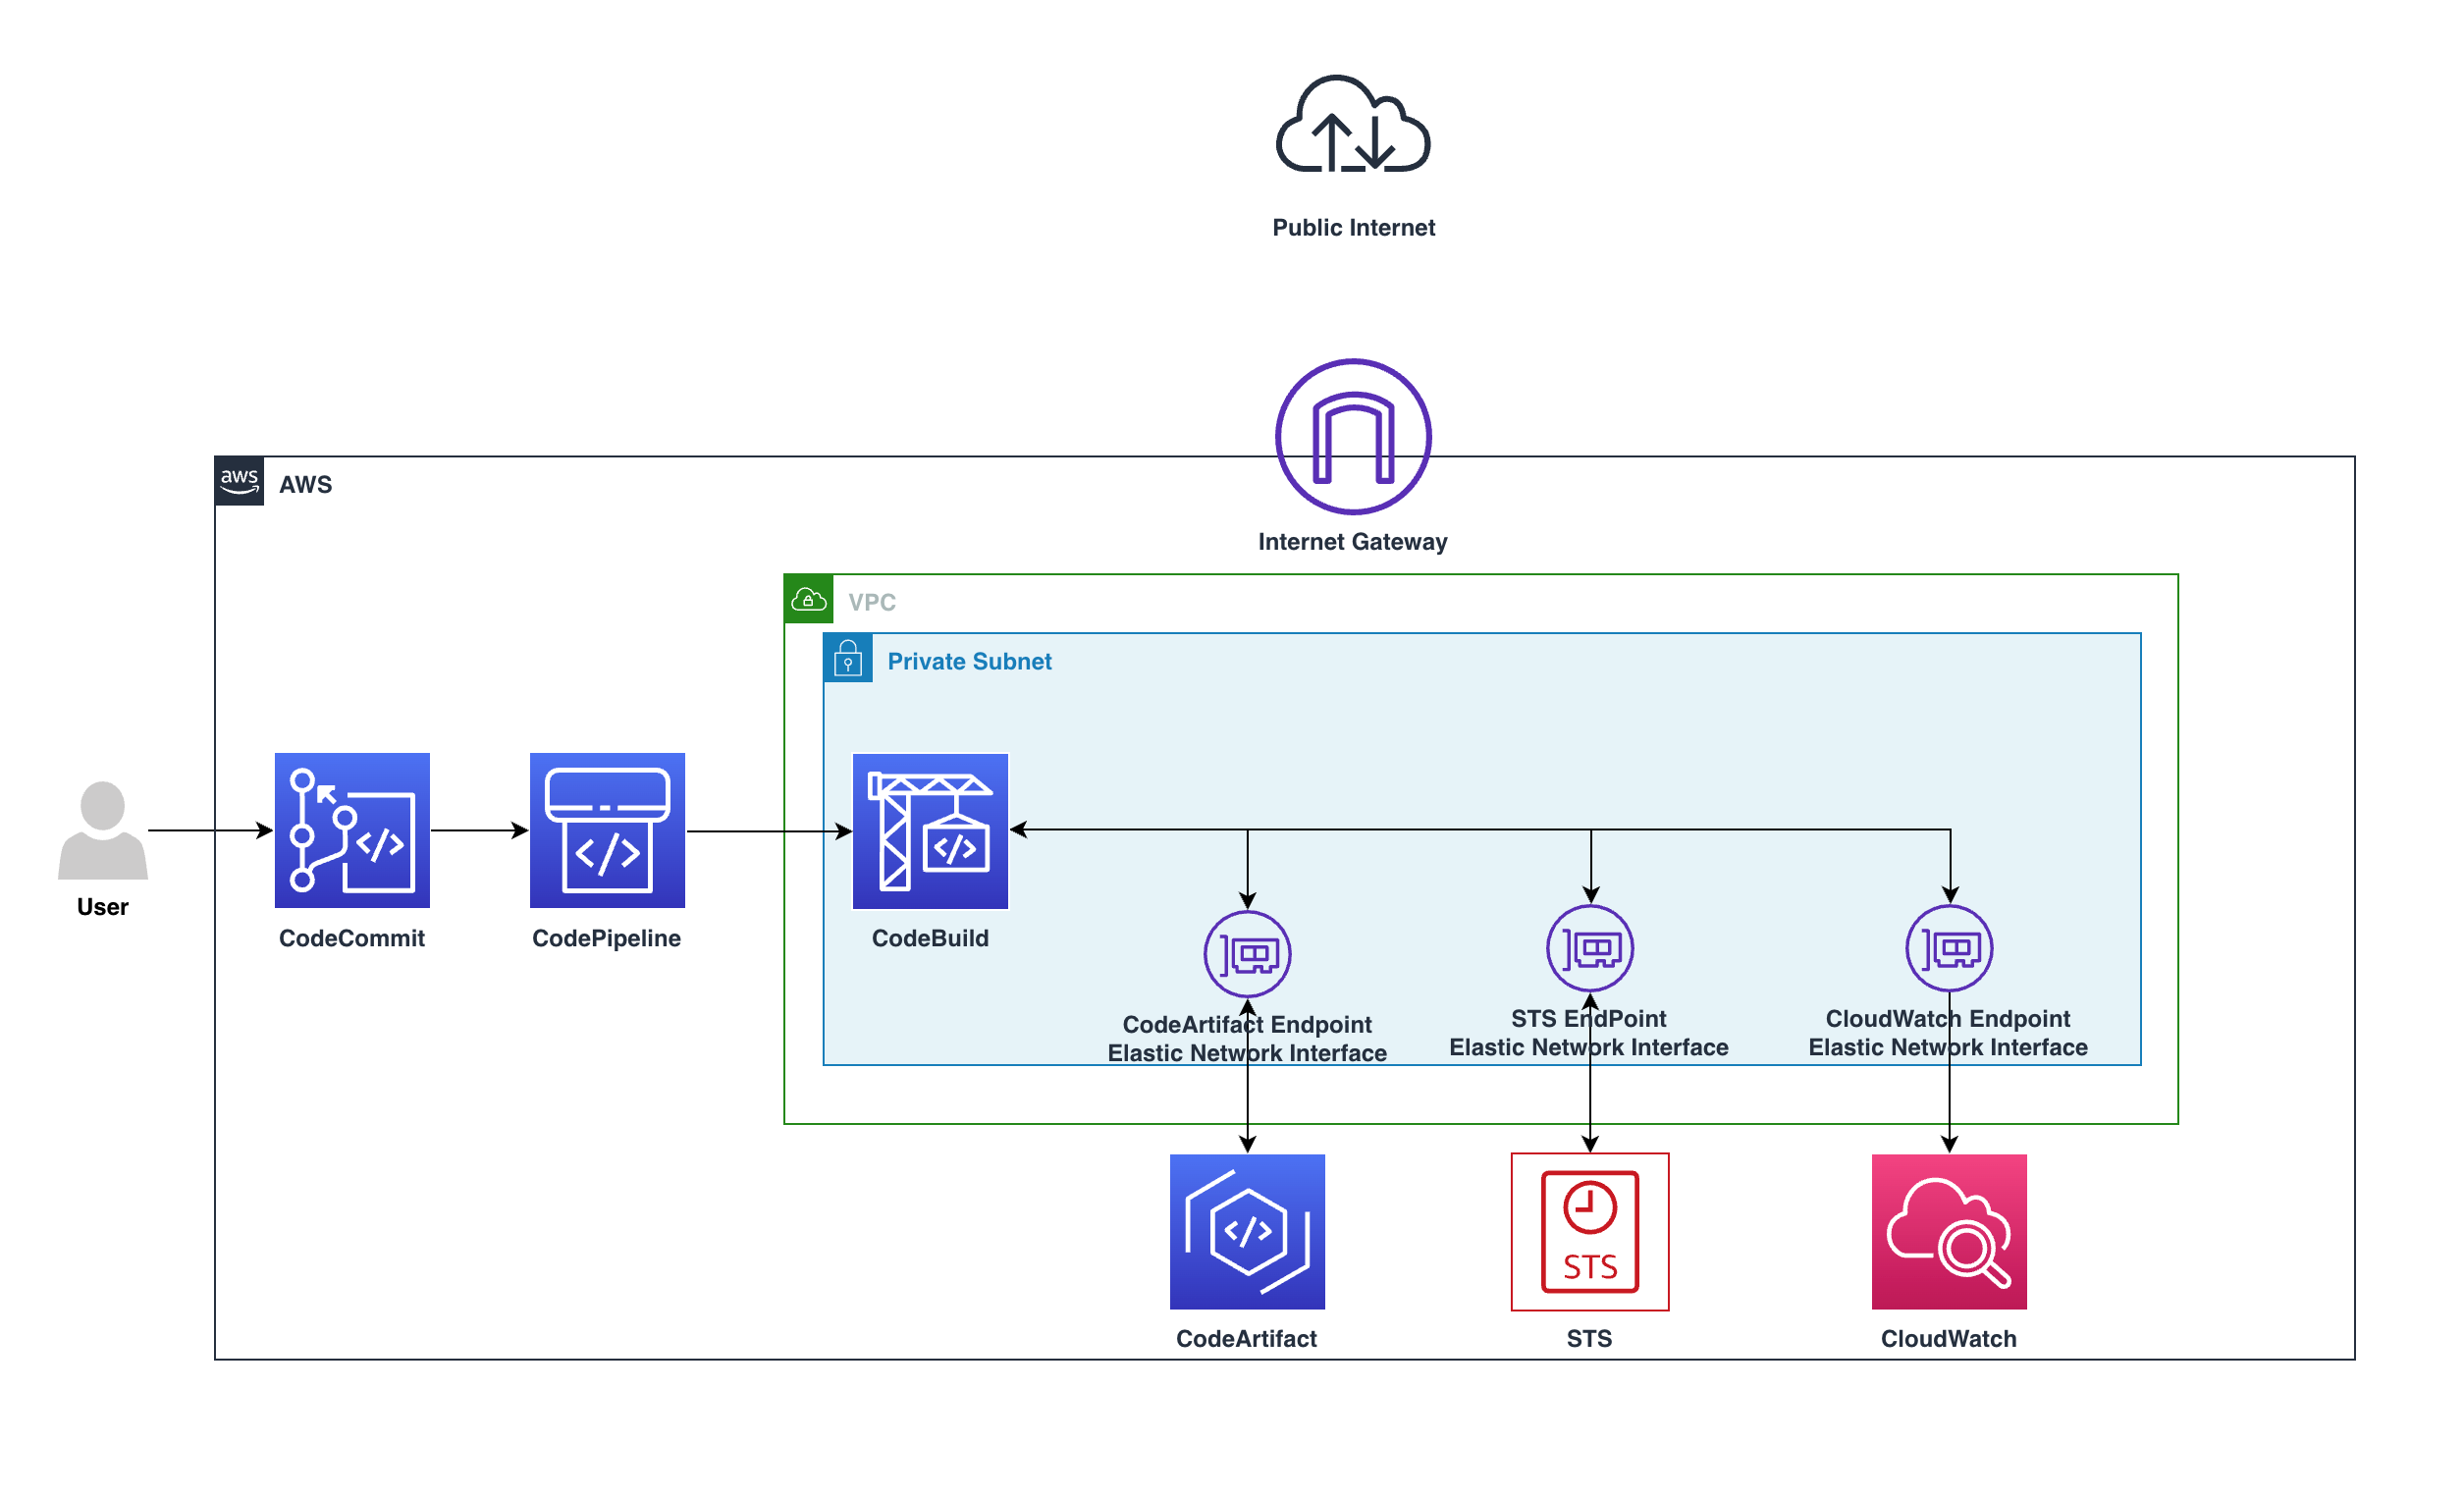
With the rise of the cloud and increased security awareness, the use of private Amazon VPCs with no public internet access also expanded rapidly. This setup is recommended to make sure of proper security through isolation. The isolation requirement also applies to code pipelines, in which developers deploy their application modules, software packages, and other dependencies and bundles throughout the development lifecycle. This is done without having to push larger bundles from the developer space to the staging space or the target environment. Furthermore, AWS CodeArtifact is used as an artifact management service that will help organizations of any size to securely store, publish, and share software packages used in their software development process.
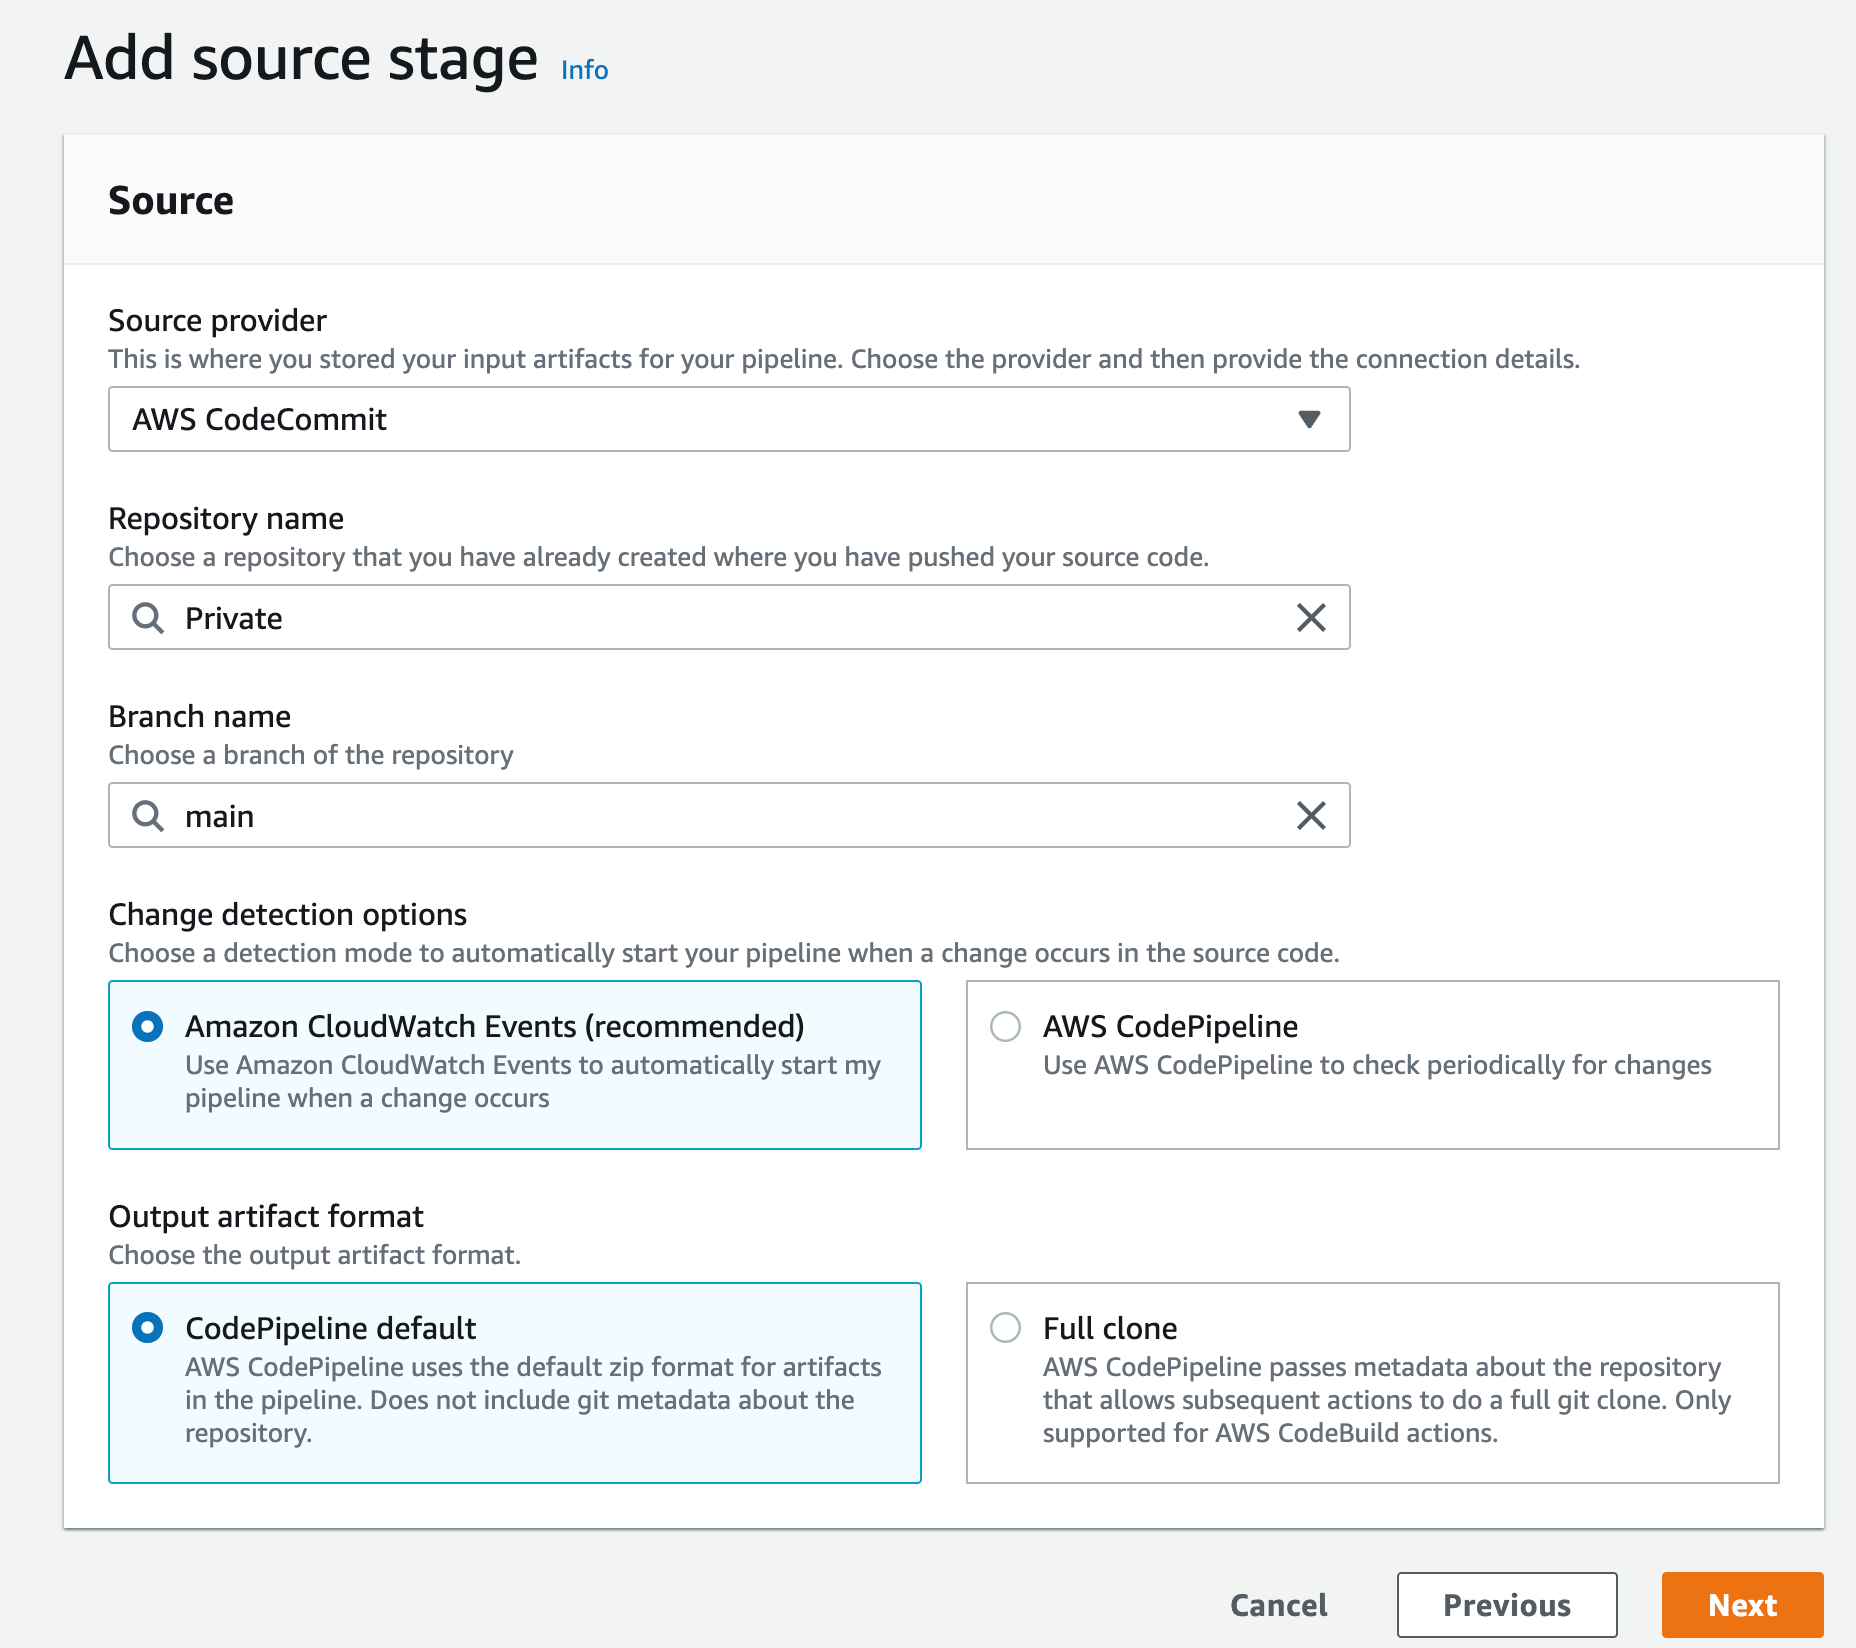
We’ll walk through the steps required to build a secure, private continuous integration/continuous development (CI/CD) pipeline with no public internet access while maintaining log retention in Amazon CloudWatch. We’ll utilize AWS CodeCommit for source, CodeArtifact for the Modules and software packages, and Amazon Simple Storage Service (Amazon S3) as artifact storage.
Prerequisites
The prerequisites for following along with this post include:
A CI/CD pipeline – This can be CodePipeline, Jenkins or any CI/CD tool you want to integrate CodeArtifact with, we will use CodePipeline in our walkthrough here.
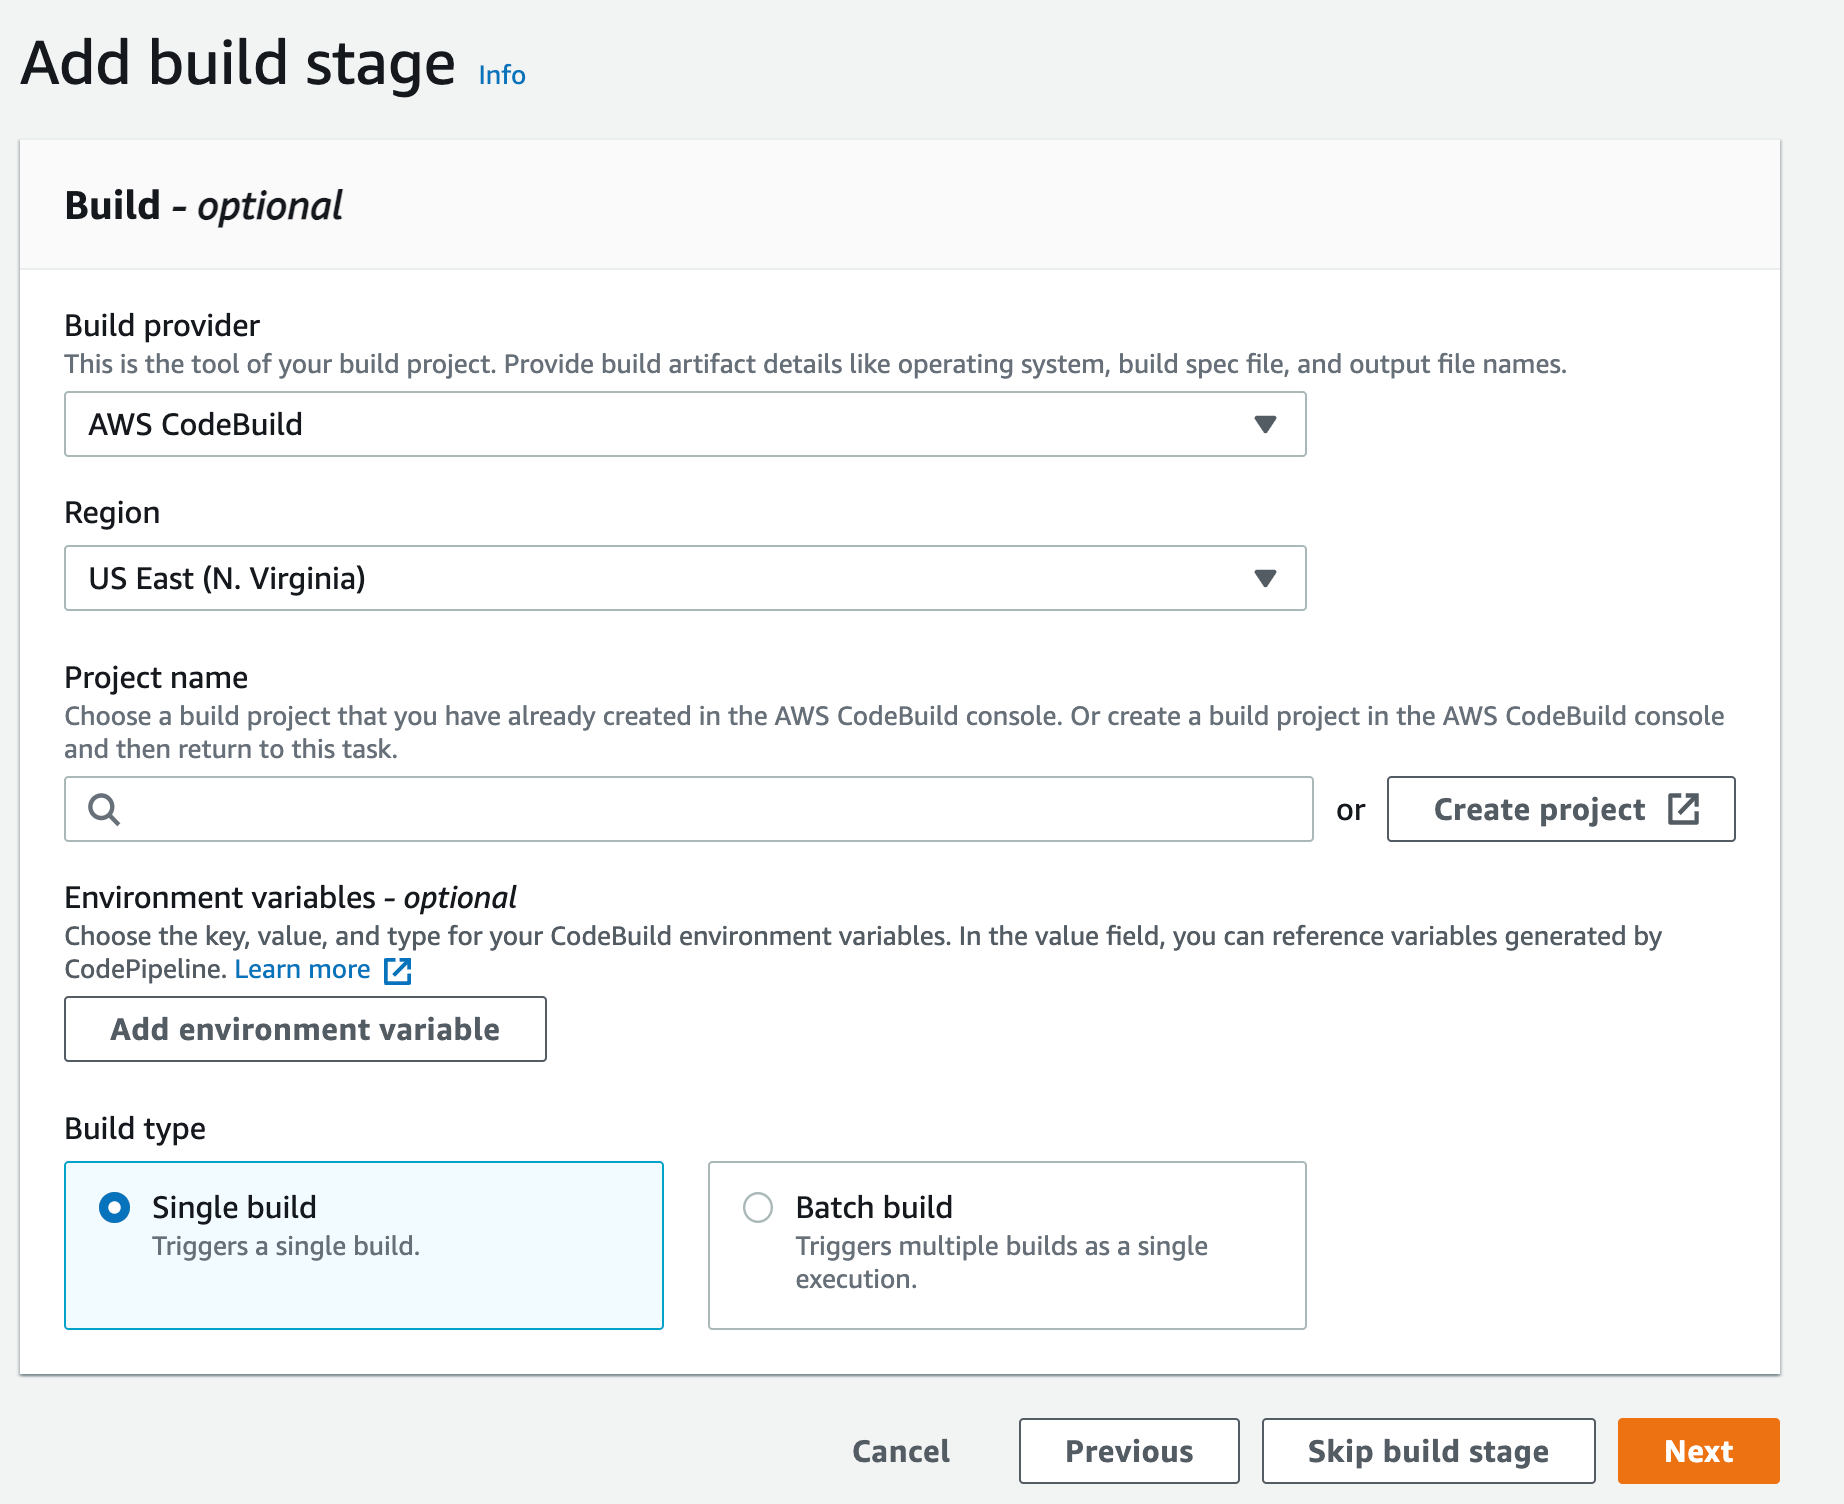
Solution walkthrough
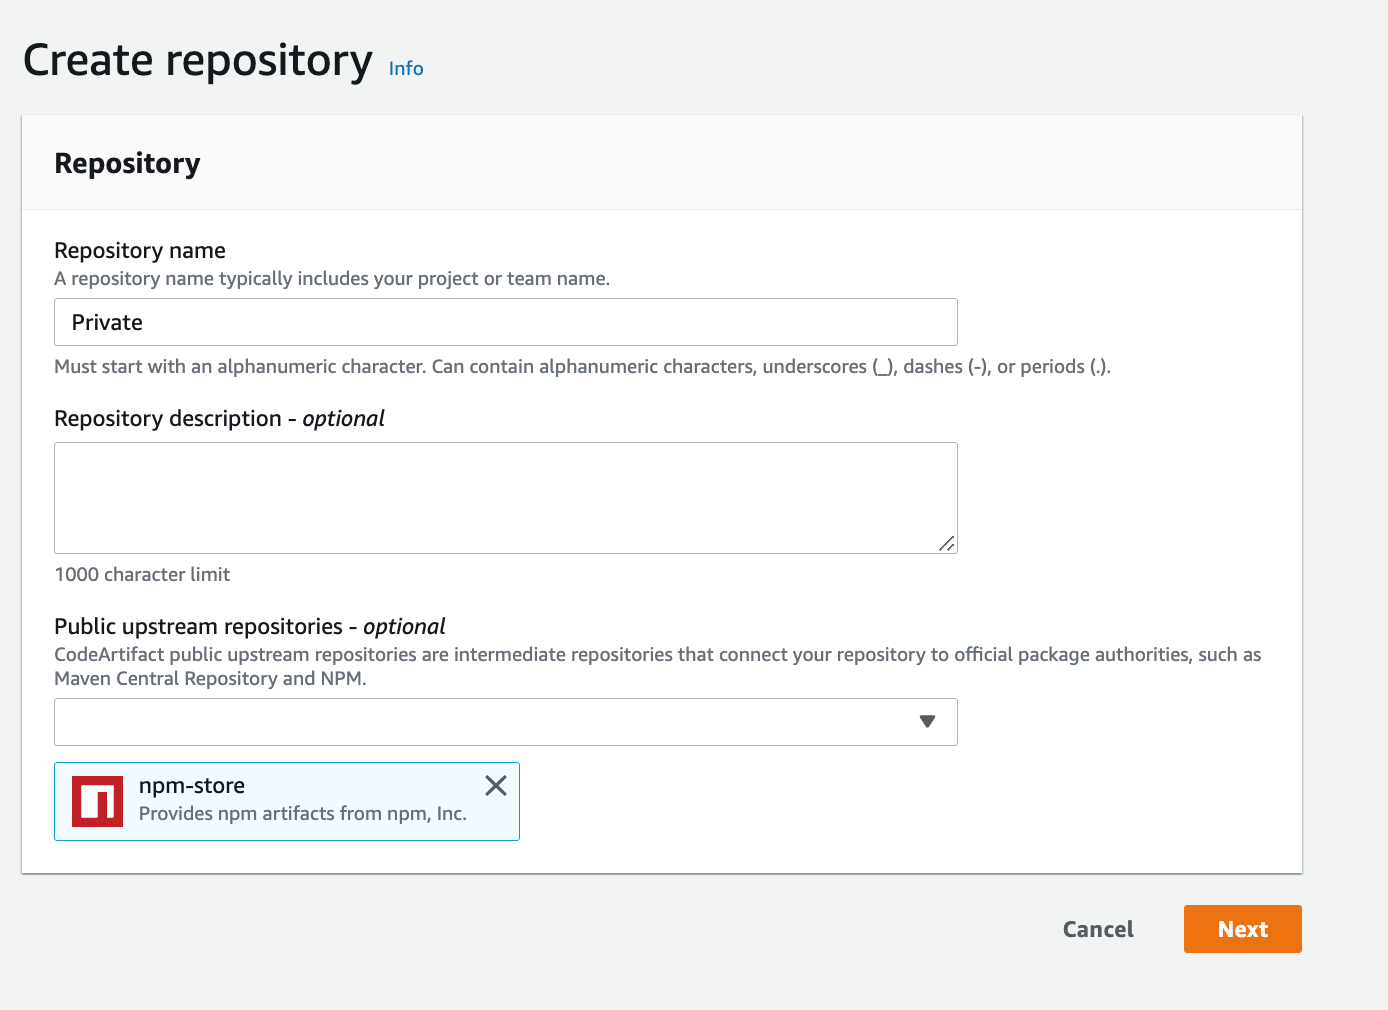
The main service we’ll focus on is CodeArtifact, a fully managed artifact repository service that makes it easy for organizations of any size to securely store, publish, and share software packages used in their software development process. CodeArtifact works with commonly used package managers and build tools, such as Maven and Gradle (Java), npm and yarn (JavaScript), pip and twine (Python), or NuGet (.NET).
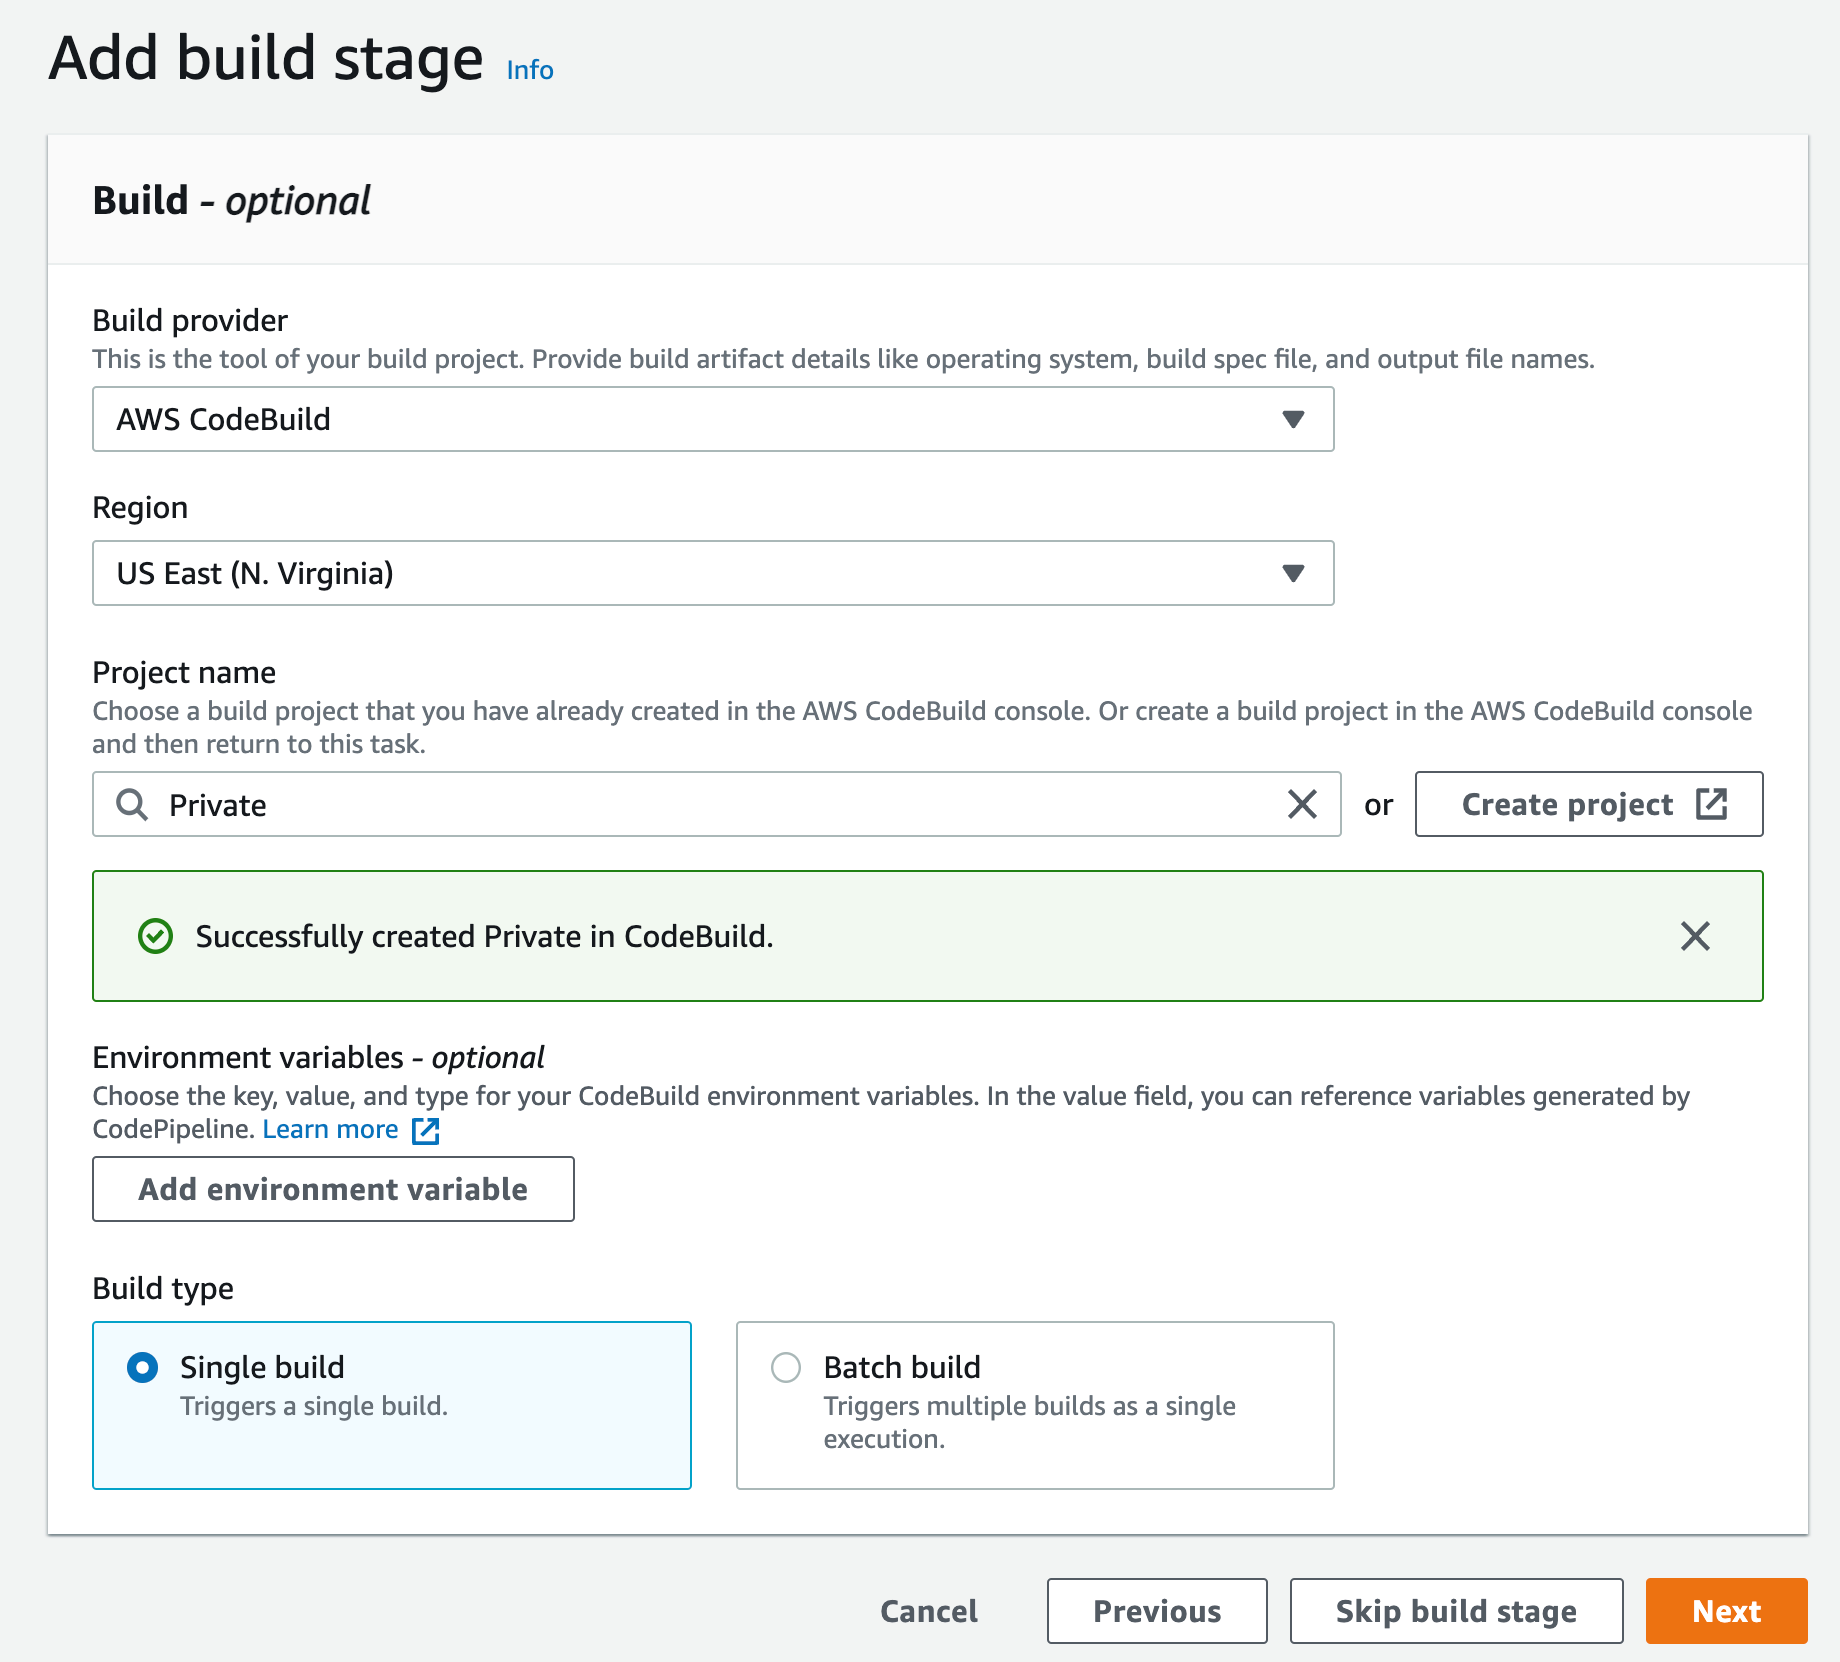
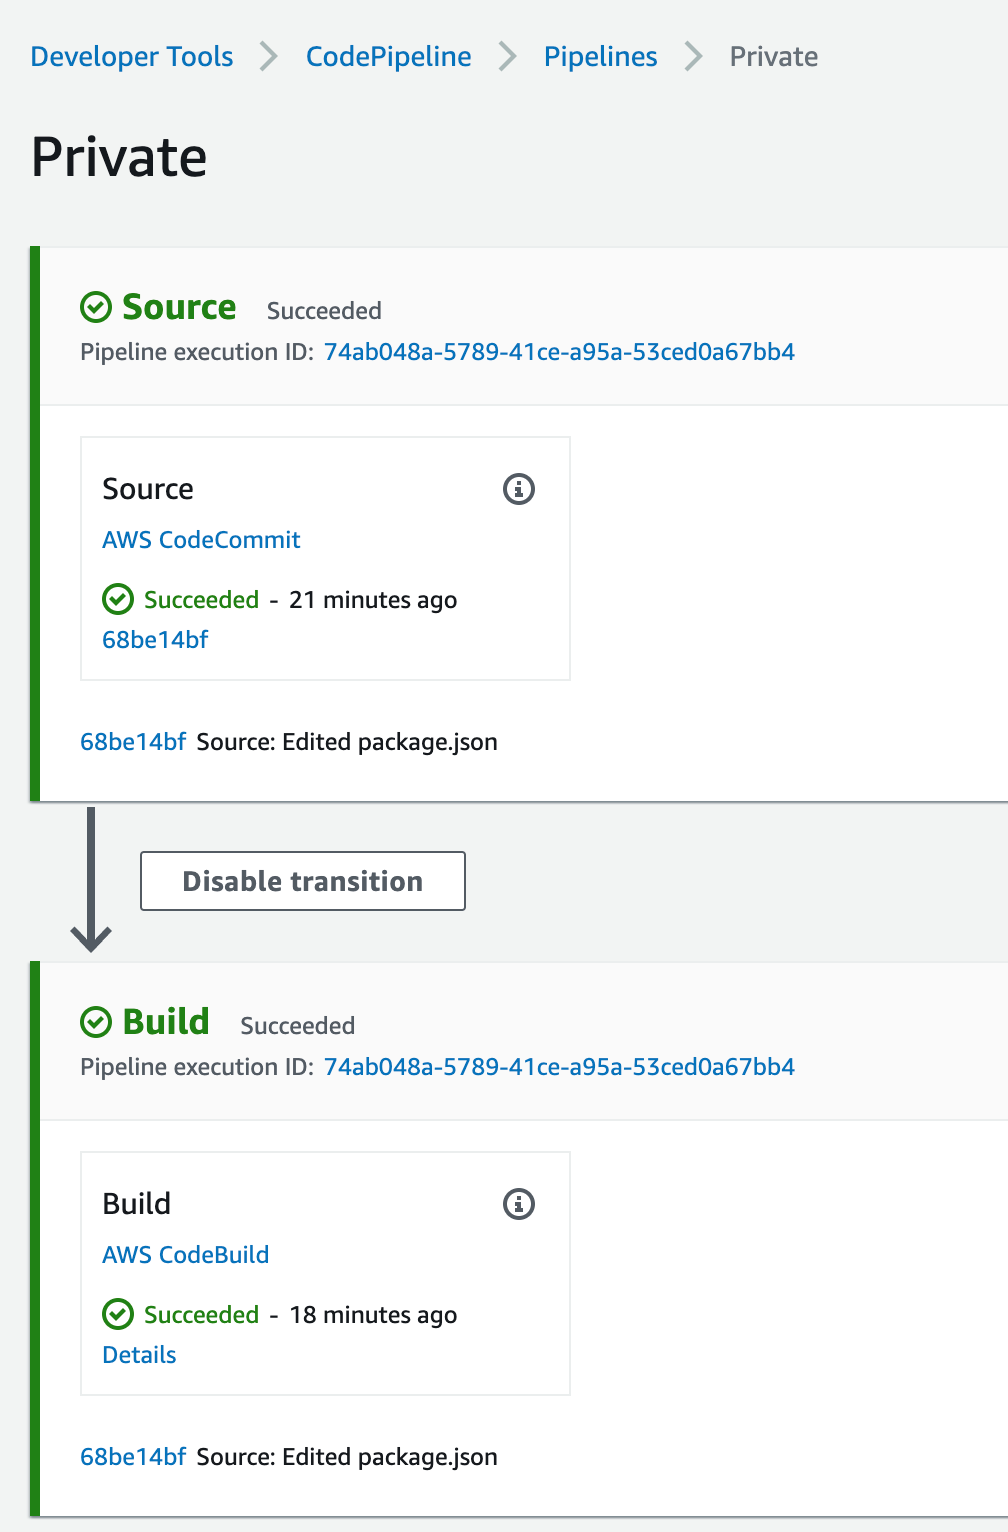
Users push code to CodeCommit, CodePipeline will detect the change and start the pipeline, in CodeBuild the build stage will utilize the private endpoints and download the software packages needed without the need to go over the internet.
The preceding diagram shows how the requests remain private within the VPC and won’t go through the Internet gateway, by going from CodeBuild over the private endpoint to CodeArtifact service, all within the private subnet.
The requests will use the following VPC endpoints to connect to these AWS services:
CloudWatch Logs endpoint (for CodeBuild to put logs in CloudWatch)
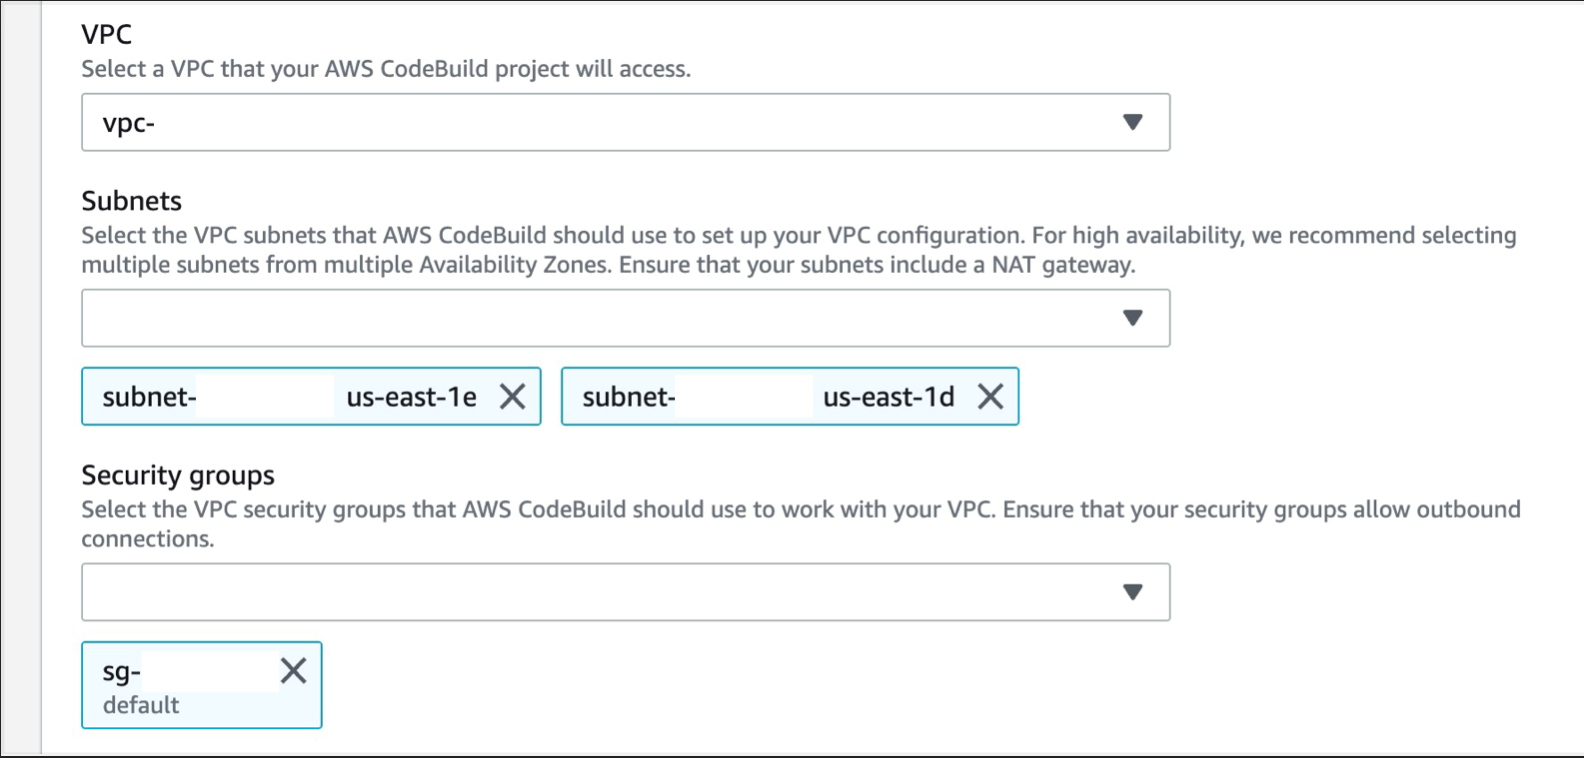
Expand Additional configurations and scroll down to the VPC section, select the desired VPC, your Subnets (we recommend selecting multiple AZs, to ensure high availability), and Security Group (the security group rules must allow resources that will use the VPC endpoint to communicate with the AWS service to communicate with the endpoint network interface, default VPC security group will be used here as an example)
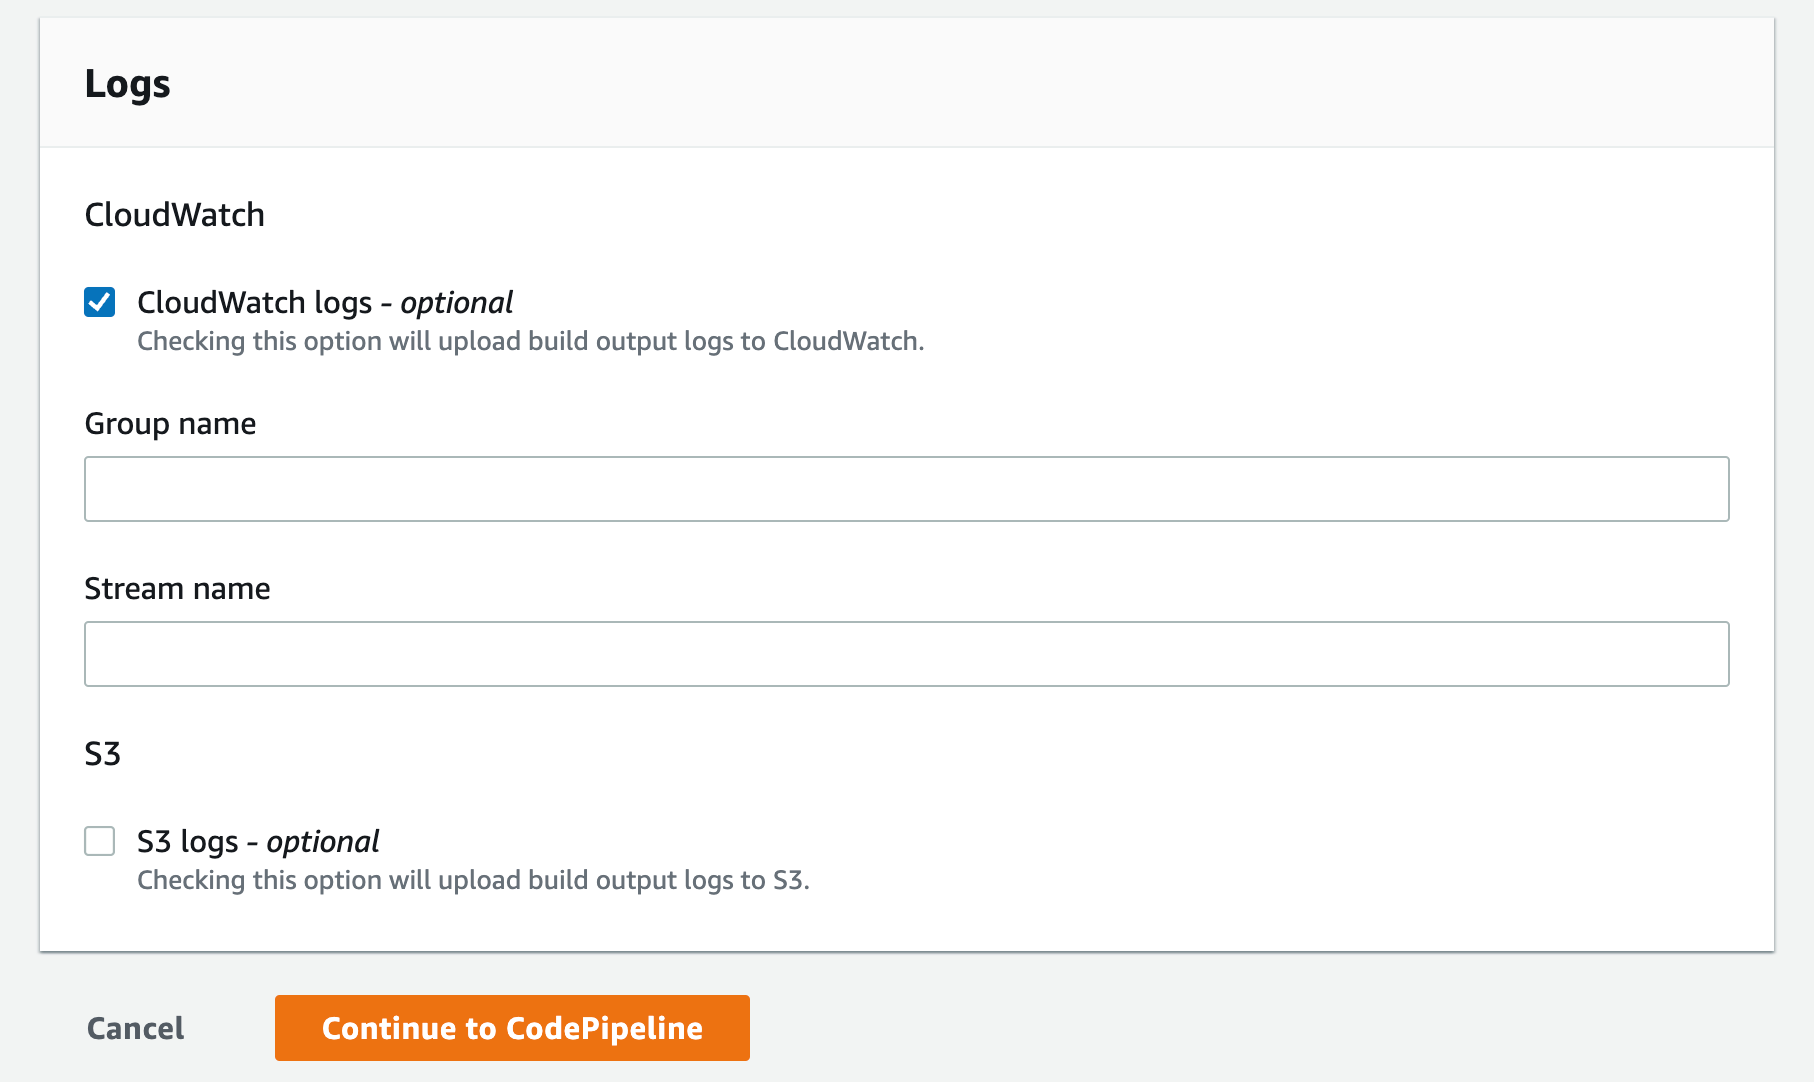
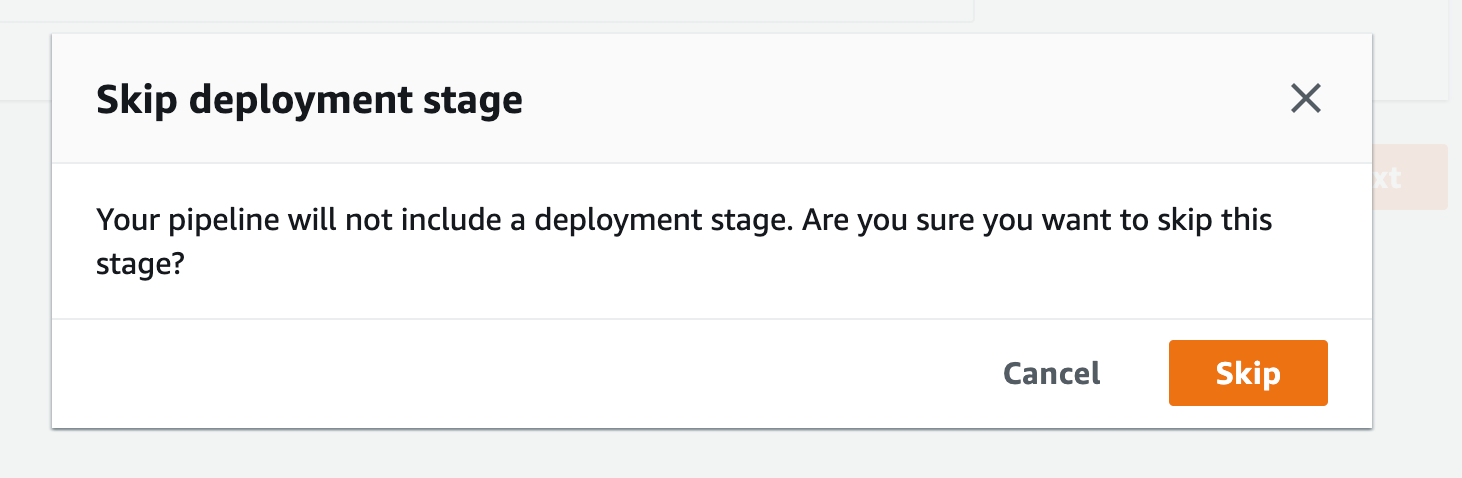
Select the CloudWatch logs option you can leave the group name and stream empty this will let the service use the default values and click Continue to CodePipeline
After you get the popup click skip again you’ll see the review page, scroll all the way down and click Create Pipeline
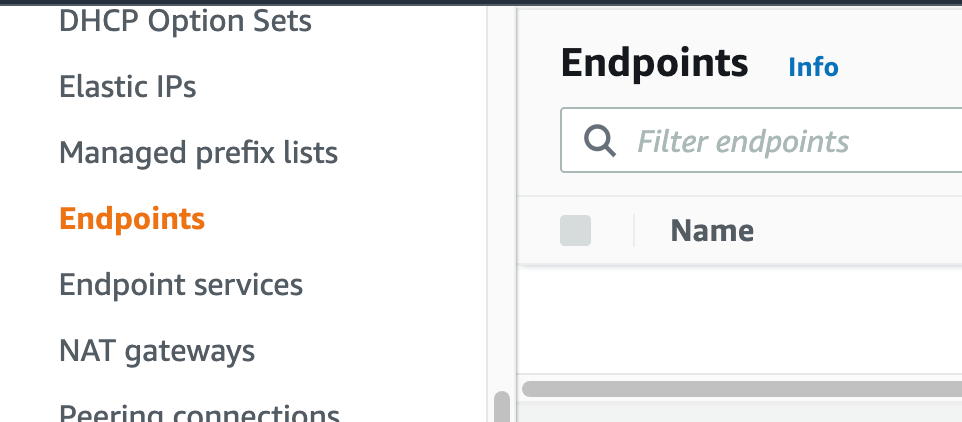
Create a VPC endpoint for Amazon CloudWatch Logs. This will enable CodeBuild to send execution logs to CloudWatch:
Navigate to your VPC console, and from the navigation menu on the left select “Endpoints”.
Figure 21. Screenshot: VPC endpoint.
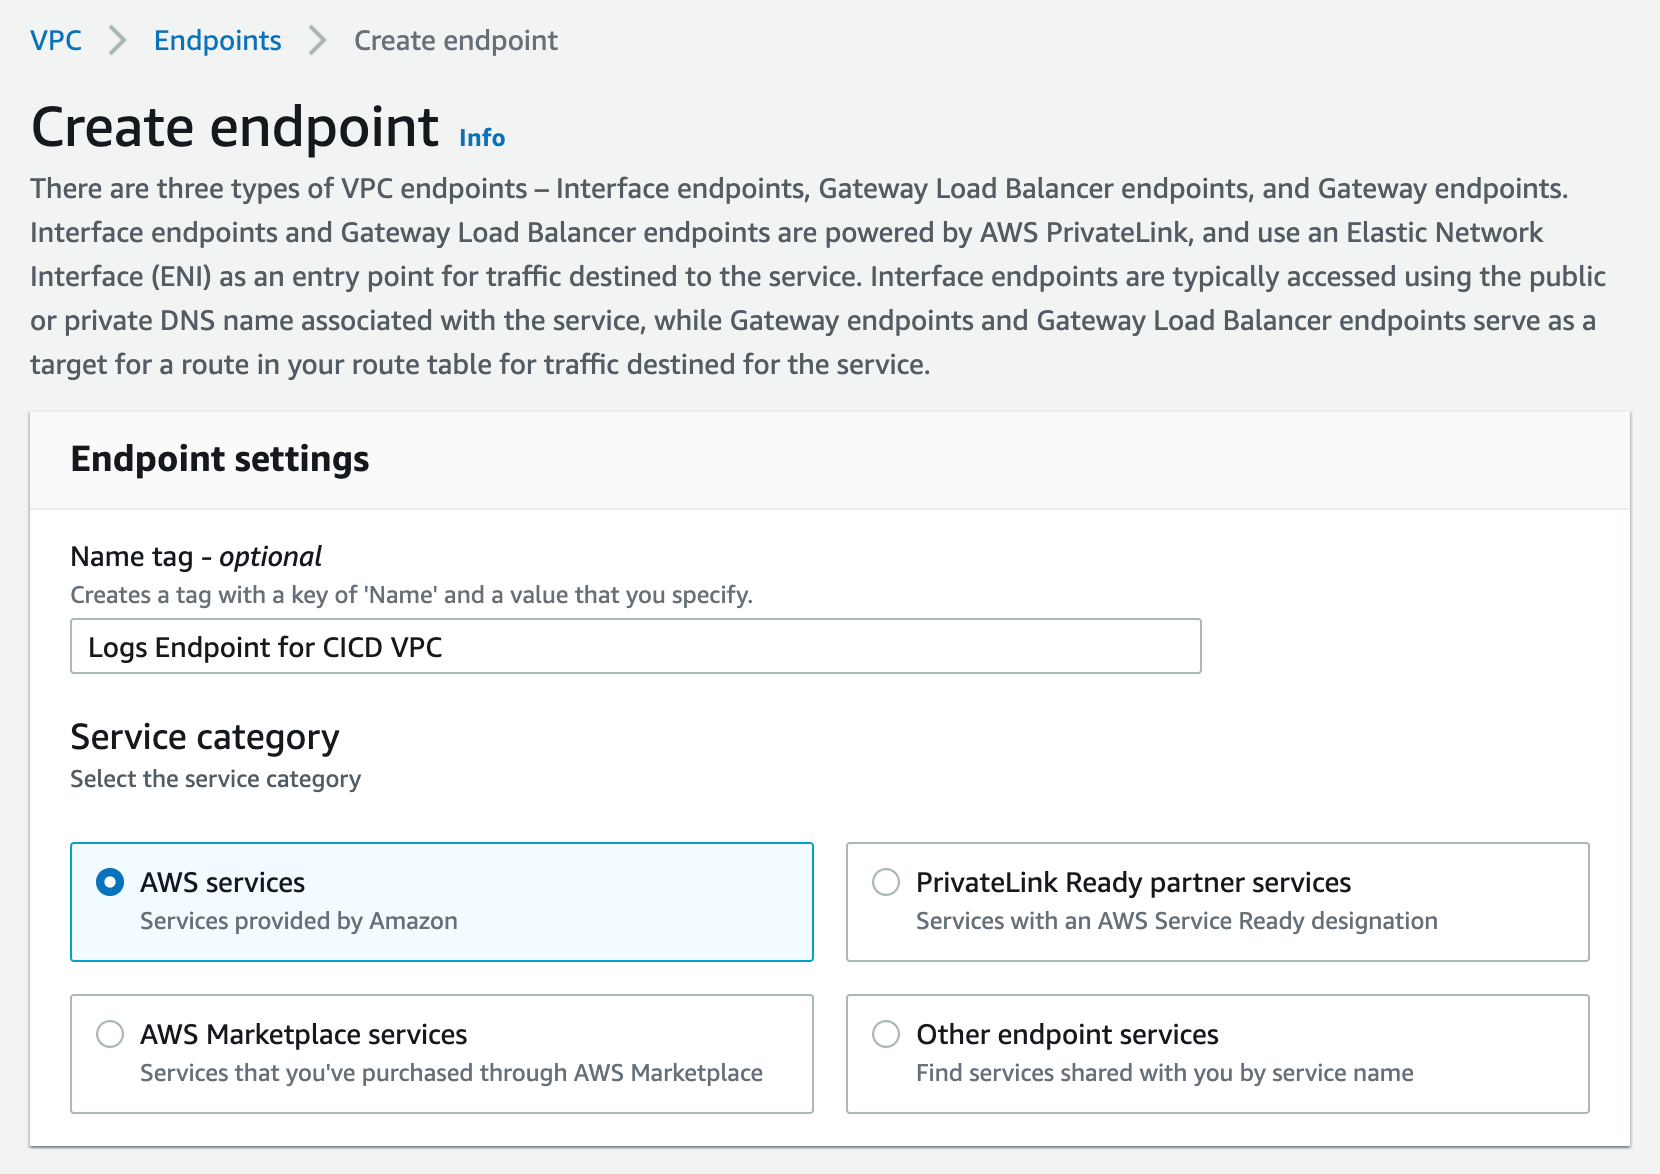
click Create endpoint Button.
Figure 22. Screenshot: Create endpoint.
For service Category, select “AWS Services”. You can set a name for the new endpoint, and make sure to use something descriptive.
Figure 23. Screenshot: Create endpoint page.
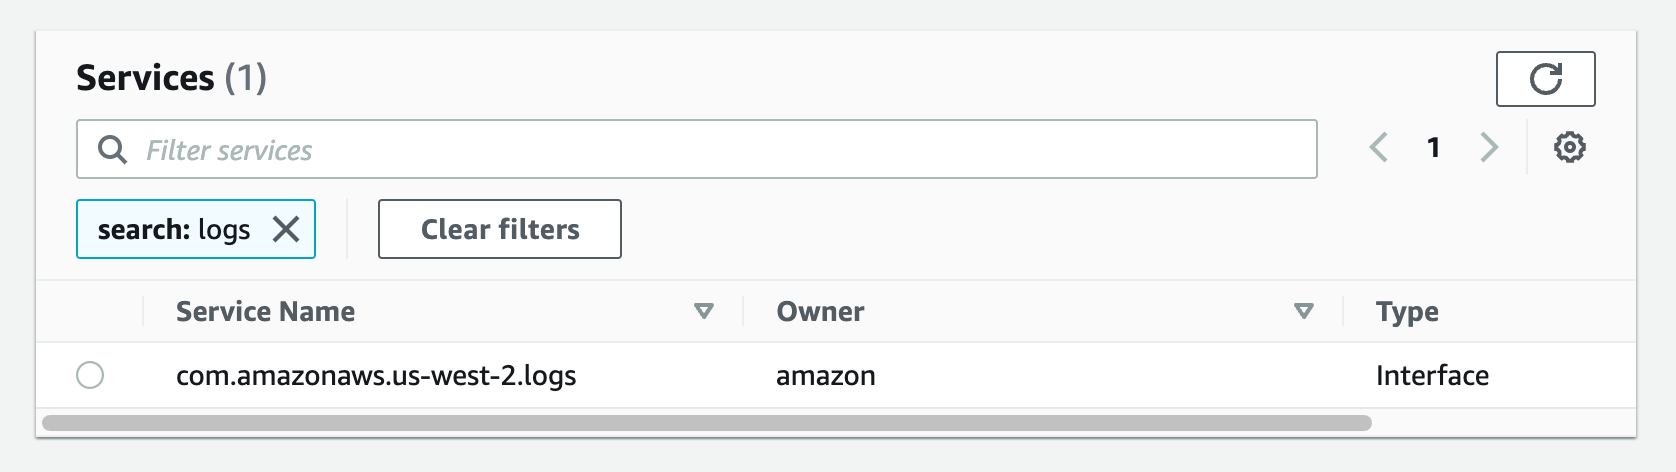
From the list of services, search for the endpoint by typing logs in the search bar and selecting the one with com.amazonaws.us-west-2.logs. This walkthrough can be done in any region that supports the services. I am going to be using us-west-2, please select the appropriate region for your workload.
Figure 24. Screenshot: create endpoint select services with com.amazonaws.us-west-2.logs selected.
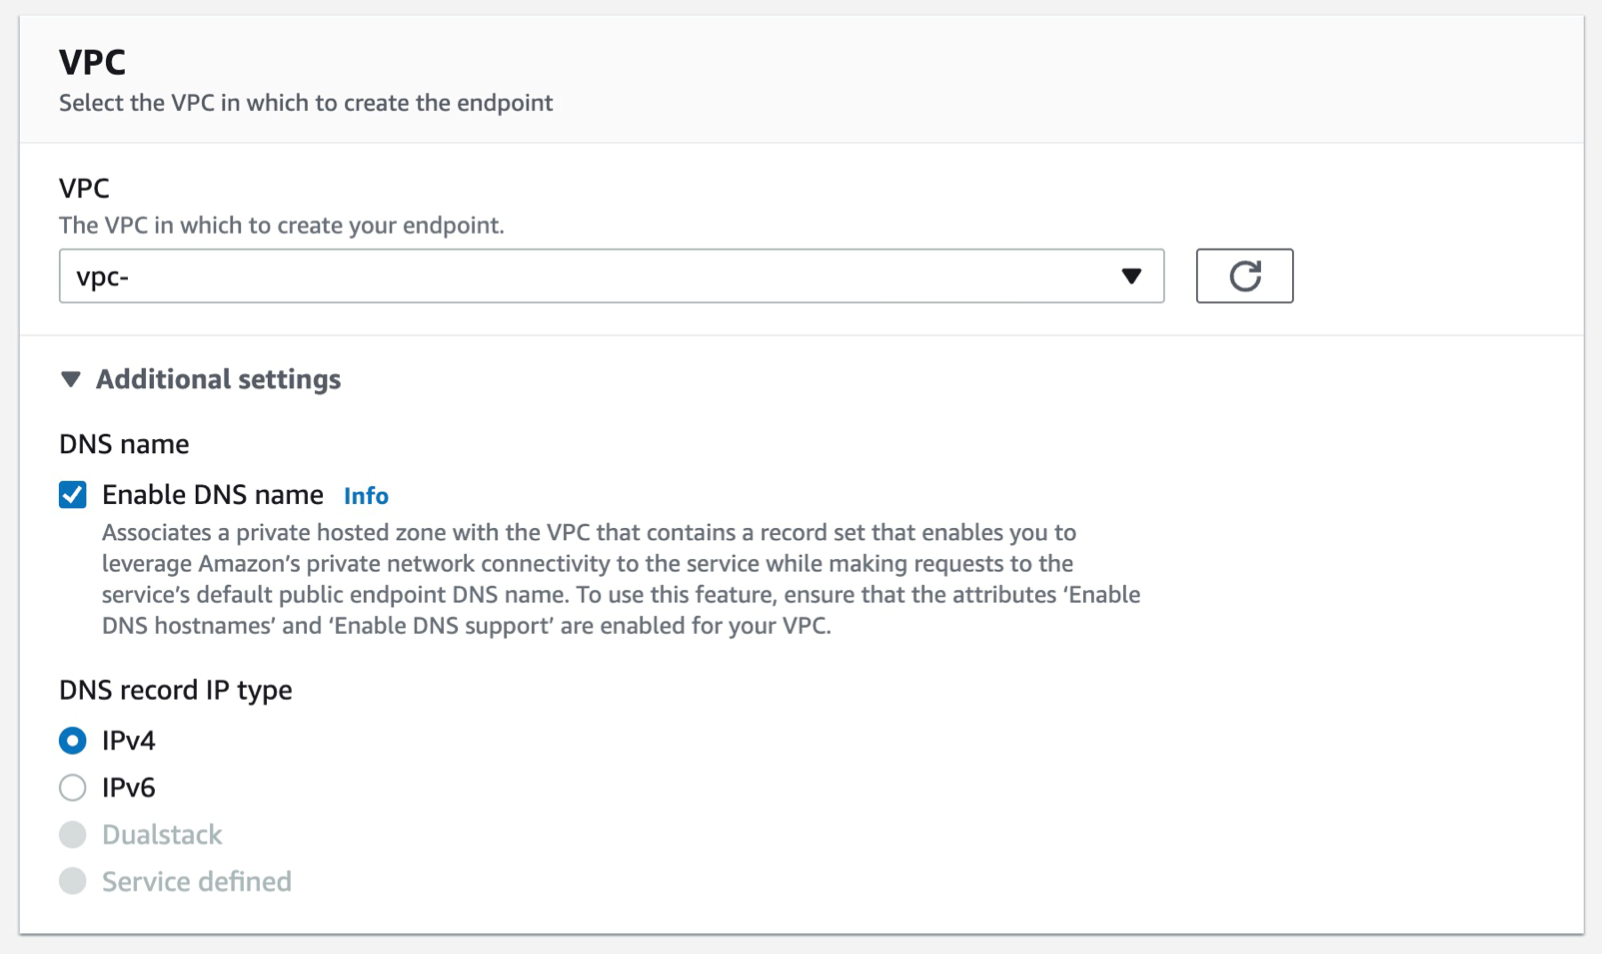
Select the VPC that you want the endpoint to be associated with, and make sure that the Enable DNS name option is checked under additional settings.
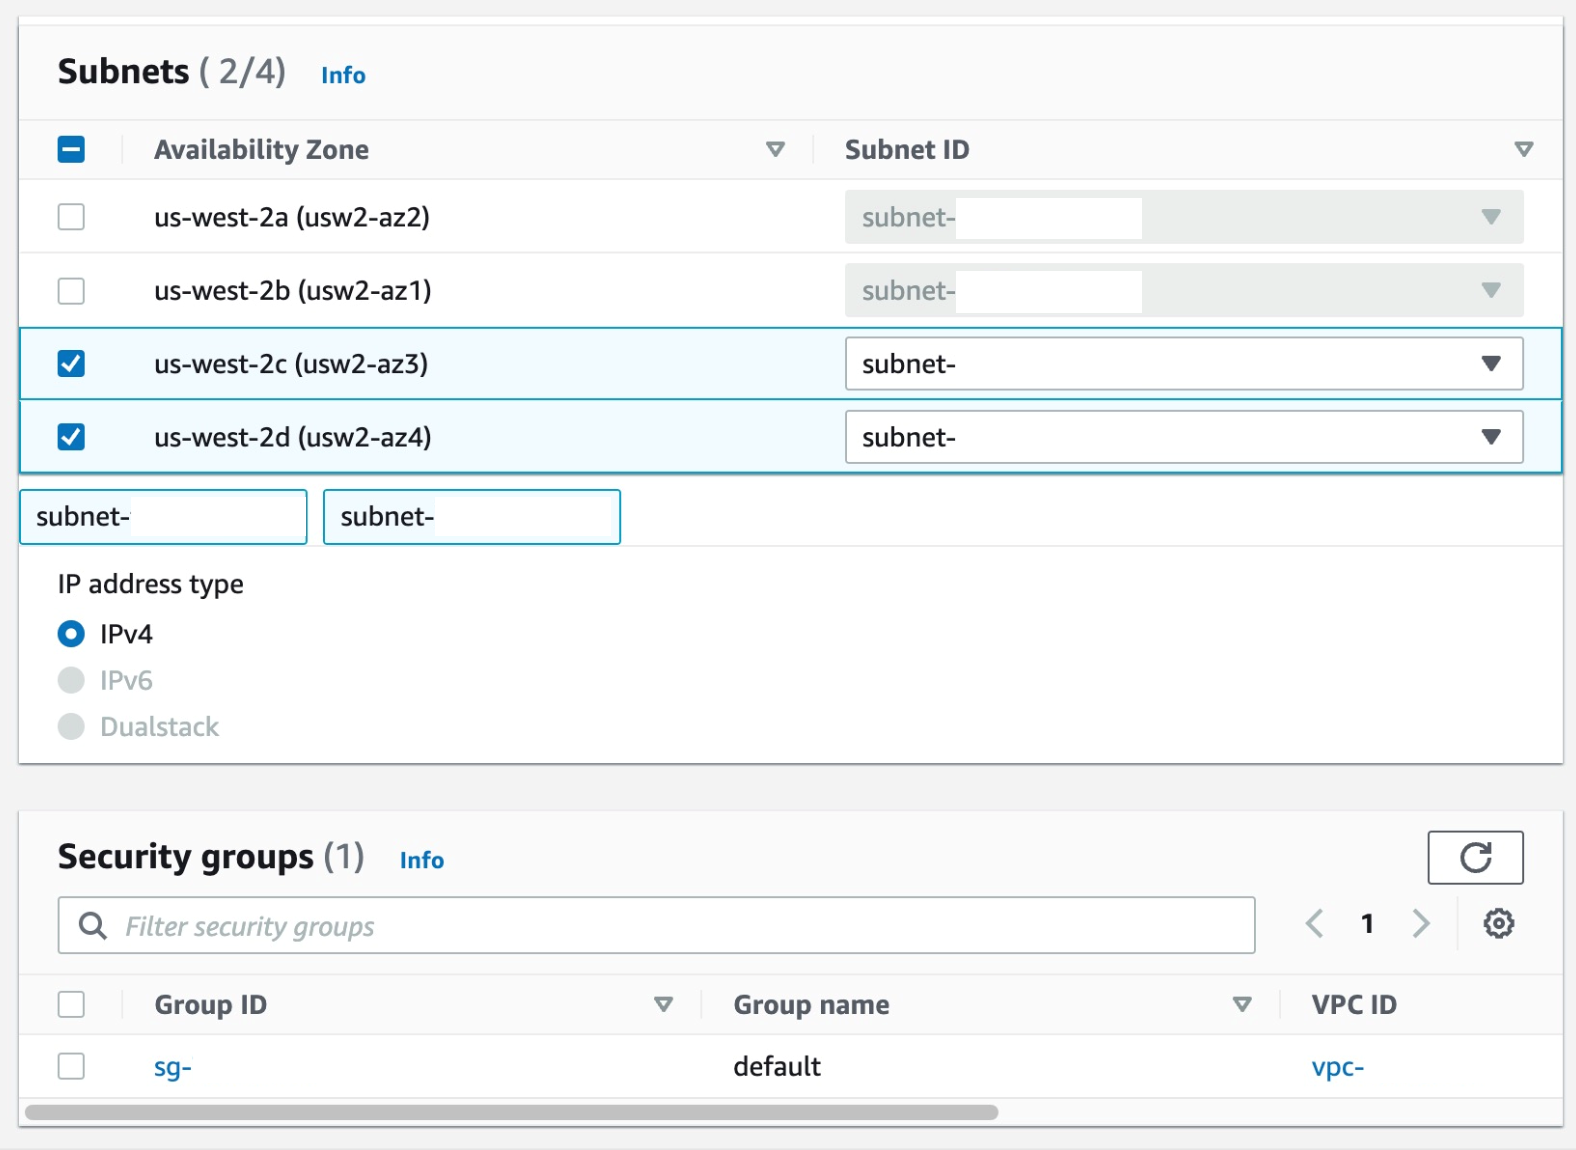
Select the Subnets where you want the endpoint to be associated, and you can leave the security group as default and the policy as empty.
Figure 26. Screenshot: create endpoint subnet setting shows 2 subnet selected and default security group selected.
Select Create Endpoint.
Figure 27. Screenshot: create endpoint button.
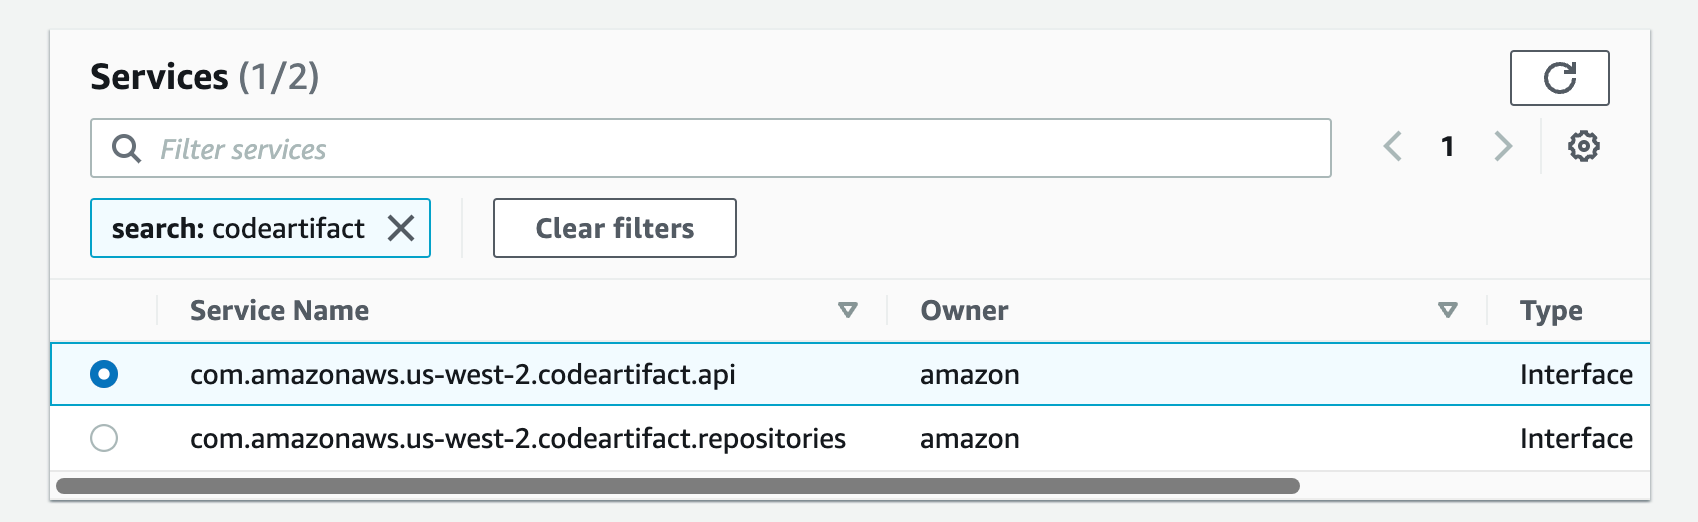
Create a VPC endpoint for CodeArtifact. At the time of writing this article, CodeArifact has two endpoints: one is for API operations like service level operations and authentication, and the other is for using the service such as getting modules for our code. We’ll need both endpoints to automate working with CodeArtifact. Therefore, we’ll create both endpoints with DNS enabled.
Follow steps a-c from the steps that were used from the creating the Logs endpoint above.
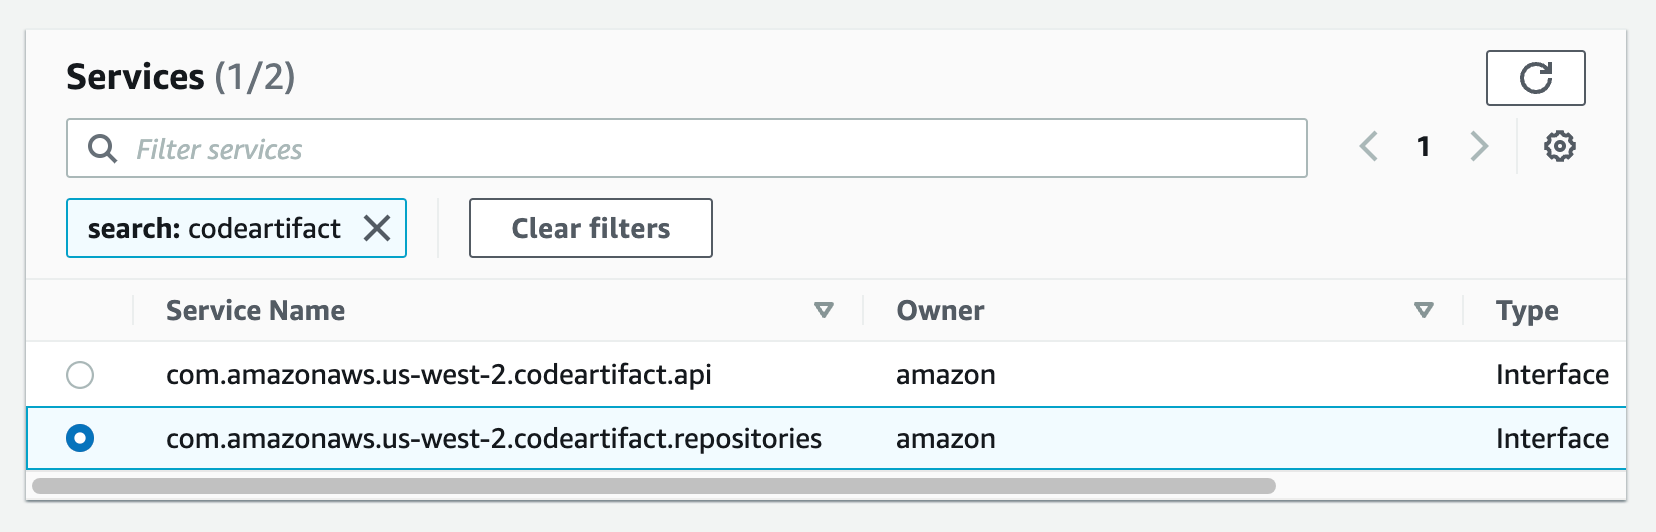
a. From the list of services, you can search for the endpoint by typing codeartifact in the search bar and selecting the one with com.amazonaws.us-west-2.codeartifact.api.
Figure 28. Screenshot: create endpoint select services with com.amazonaws.us-west-2.codeartifact.api selected.
Follow steps e-g from Part 4.
Then, repeat the same for com.amazon.aws.us-west-2.codeartifact.repositories service.
Figure 29. Screenshot: create endpoint select services with com.amazonaws.us-west-2.codeartifact.api selected.
Enable a VPC endpoint for AWS STS:
Follow steps a-c from Part 4
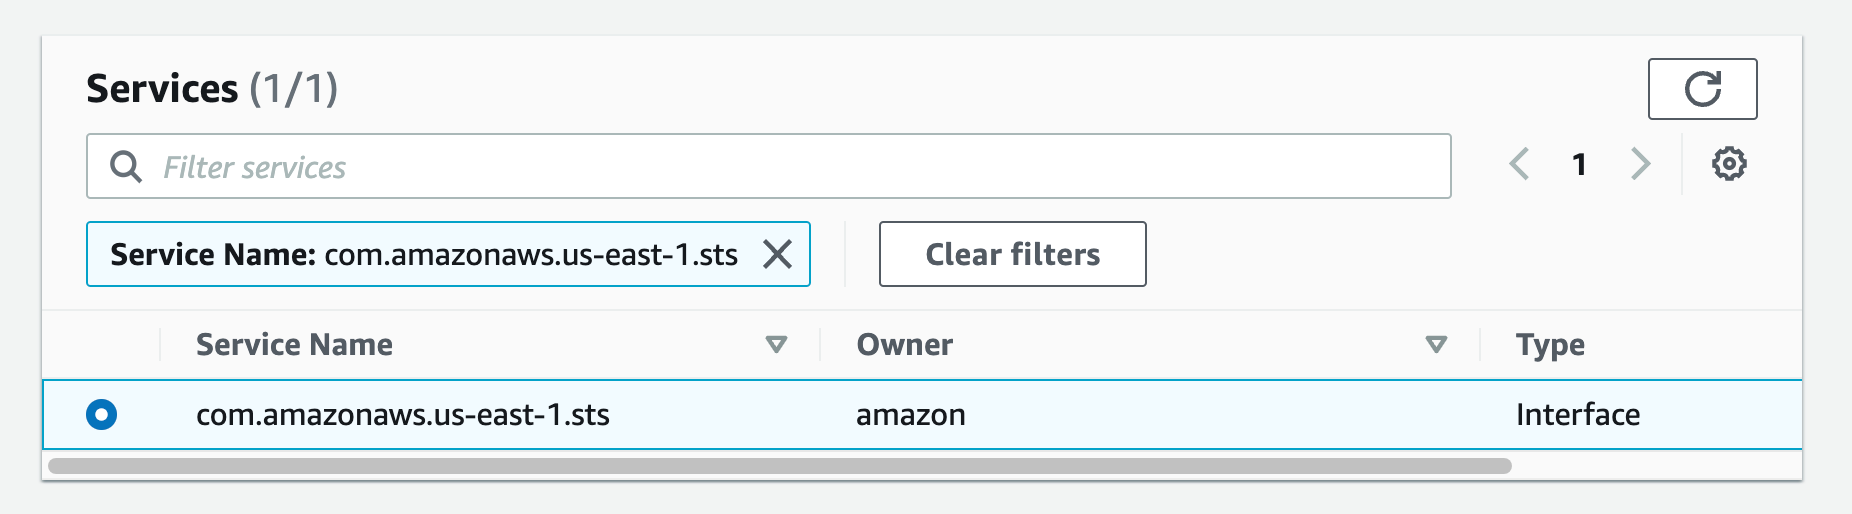
a. From the list of services you can search for the endpoint by typing sts in the search bar and selecting the one with com.amazonaws.us-west-2.sts.
Figure 30.Screenshot: create endpoint select services with com.amazon.aws.us-west-2.codeartifact.repositories selected.
Then follow steps e-g from Part 4.
Create a VPC endpoint for S3:
Follow steps a-c from Part 4
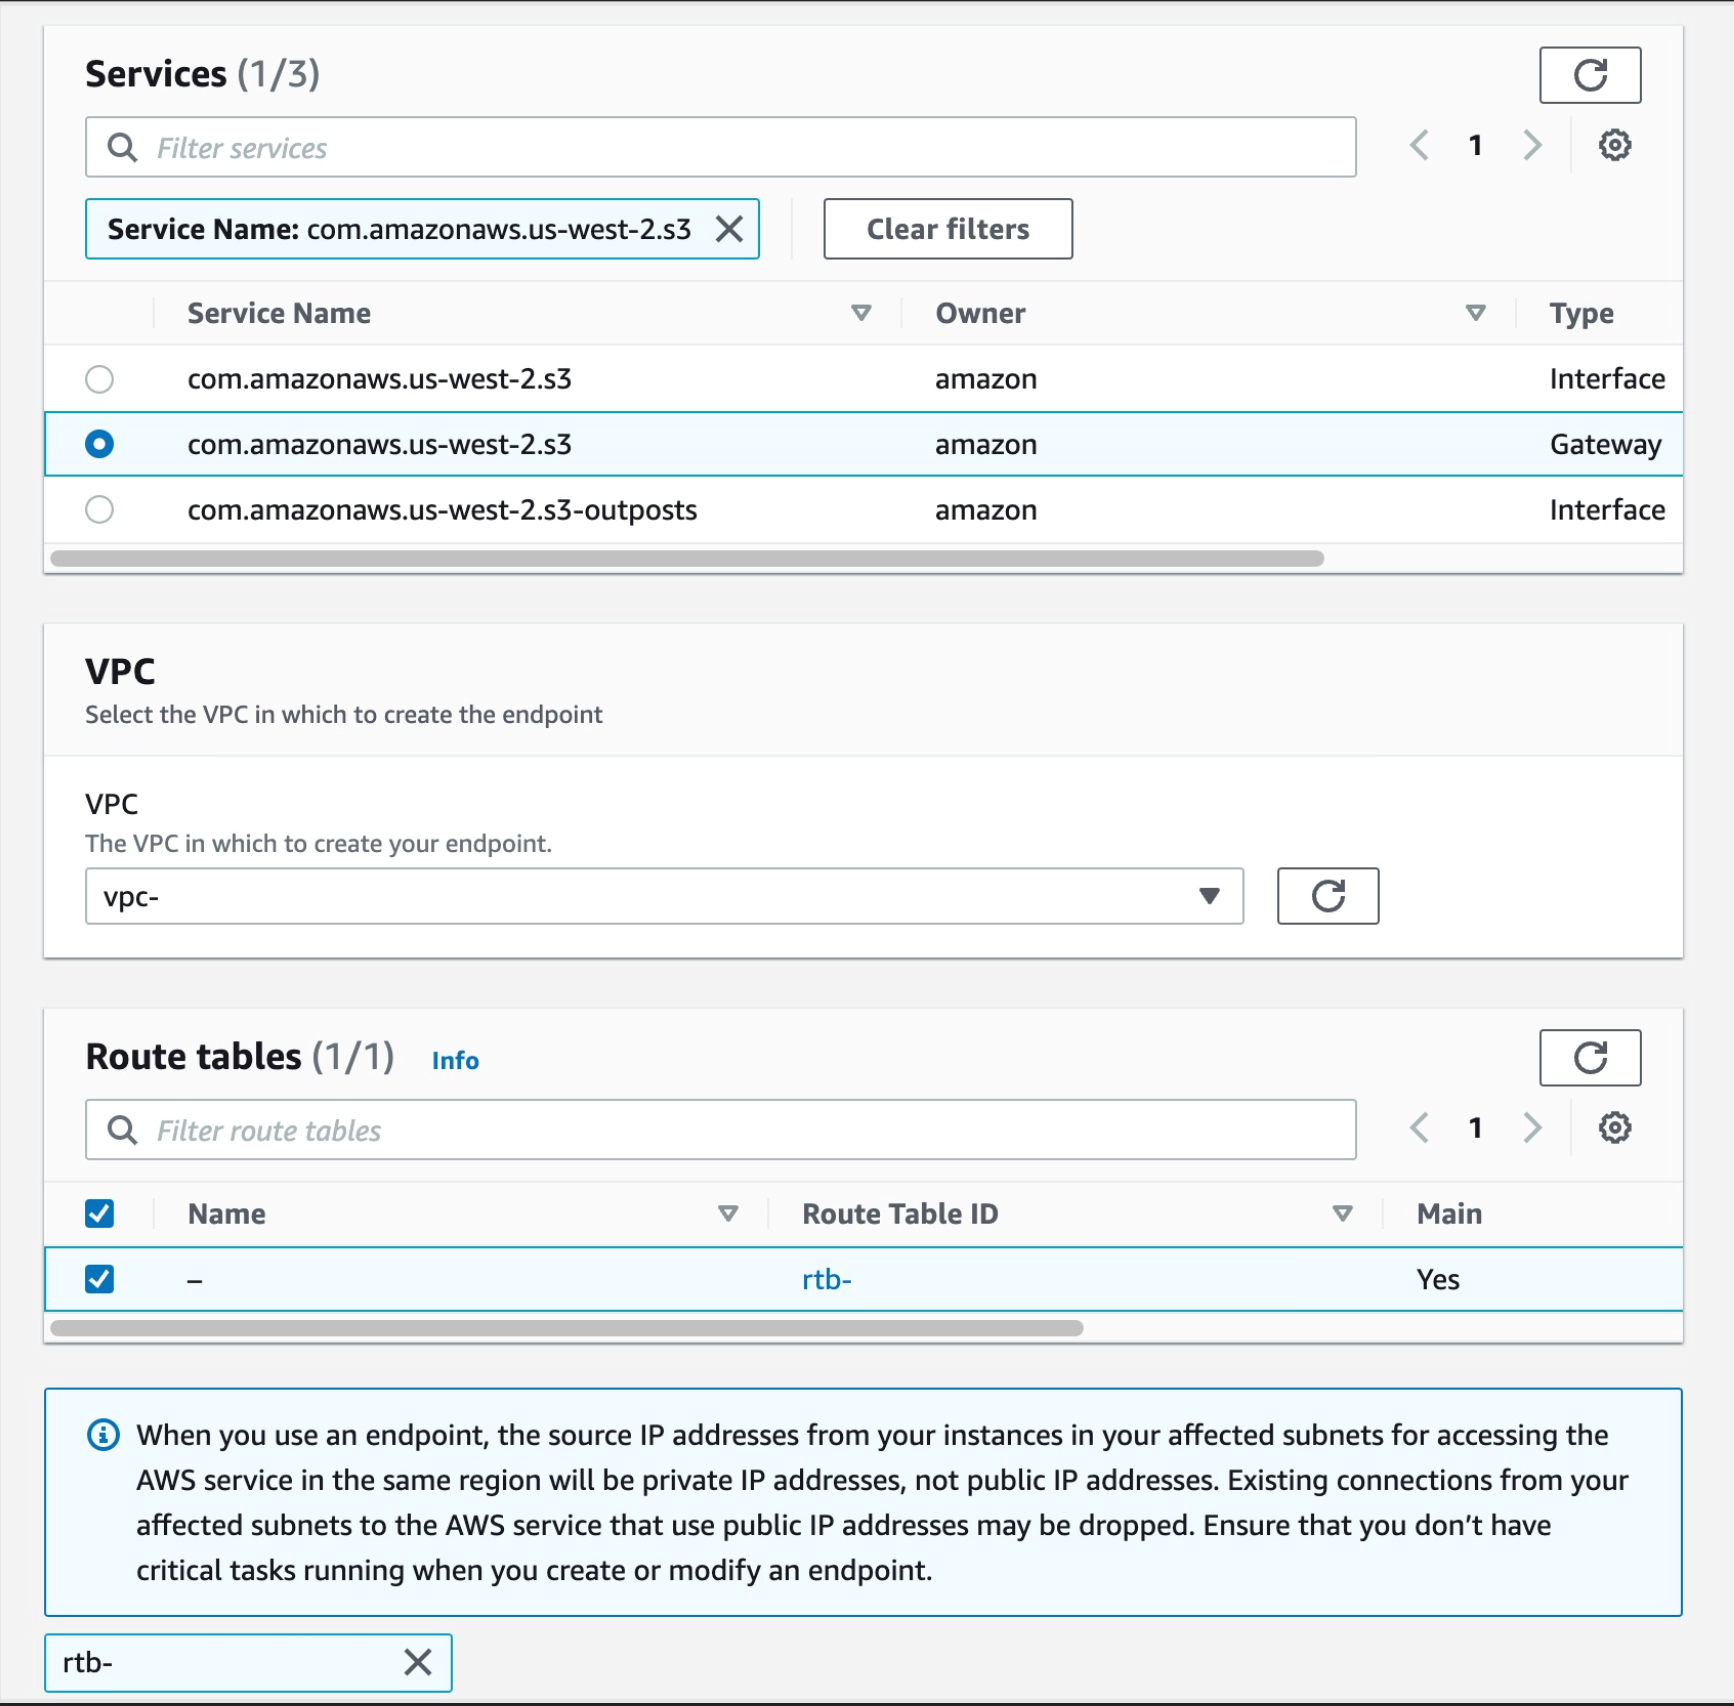
a. From the list of services you can search for the endpoint by typing sts in the search bar and selecting the one with com.amazonaws.us-west-2.s3, select the one with type of Gateway
Then select your VPC, and select the route tables for your subnets, this will auto update the route table with the new S3 endpoint.
Figure 31. Screenshot: create endpoint select services with com.amazonaws.us-west-2.s3 selected.
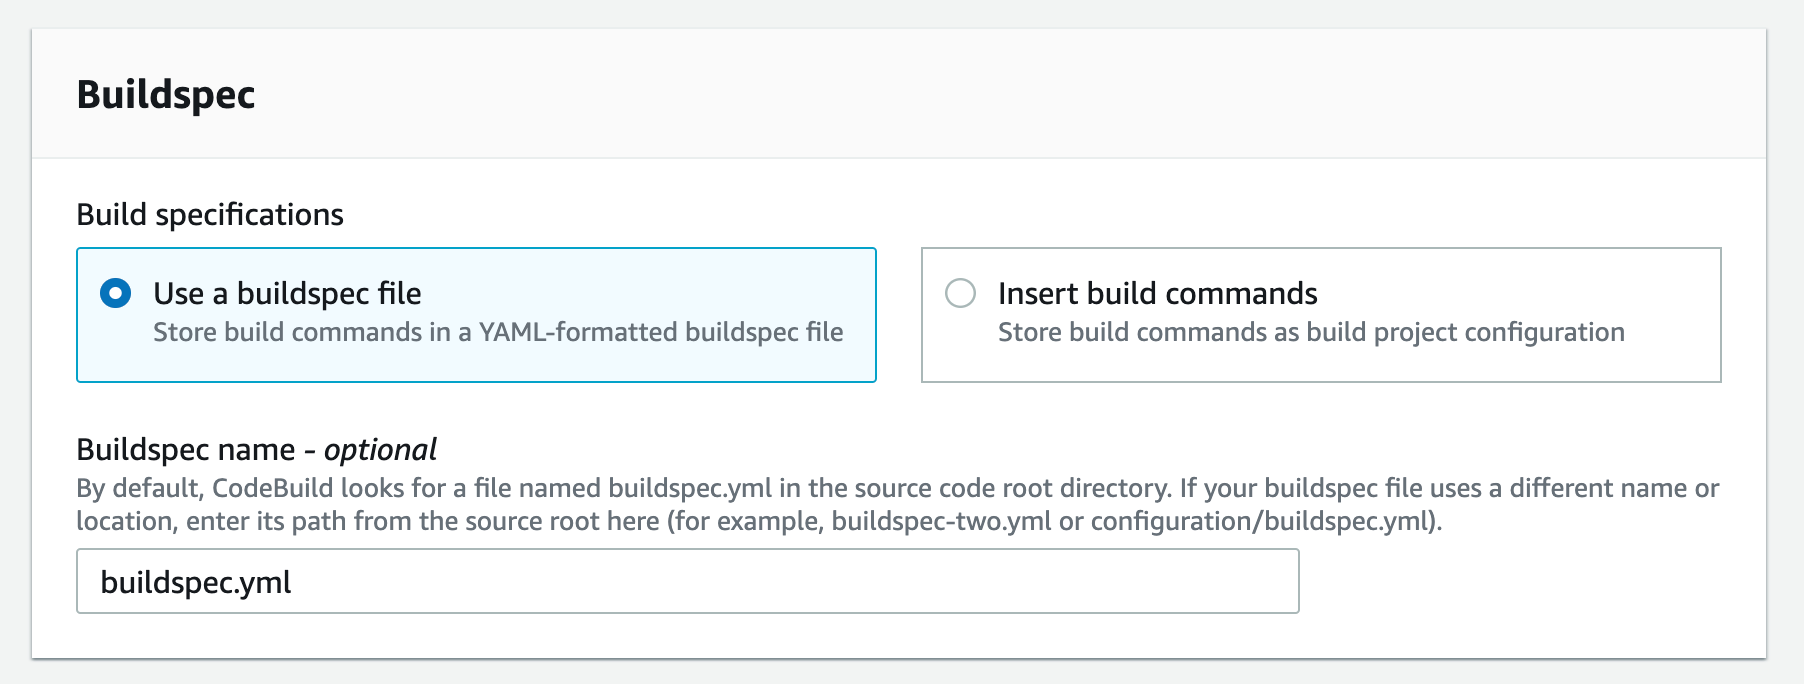
Now we have all of the endpoints set. The last step is to update your pipeline to point at the CodeArtifact repository when pulling your code dependencies. I’ll use CodeBuild buildspec.yml as an example here.
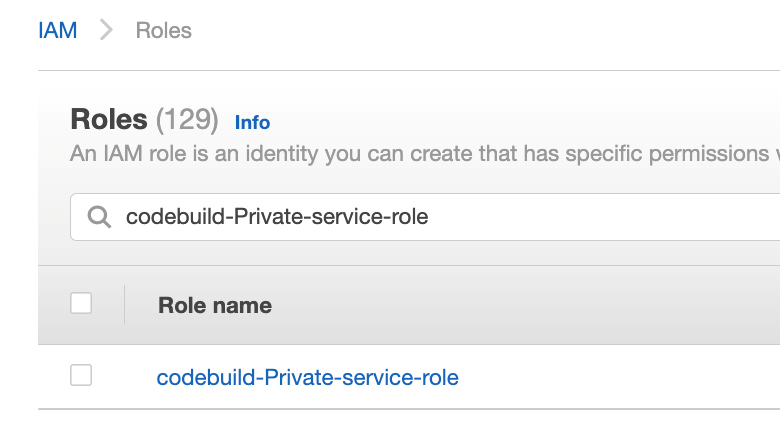
Navigate to IAM console and click Roles from the left navigation menu, then search for your IAM role name, in our case since we selected “New service role” option in step 2.k was created with the name “codebuild-Private-service-role” (codebuild-<BUILD PROJECT NAME>-service-role)
Figure 32. Screenshot: IAM roles with codebuild-Private-service-role role shown in search.
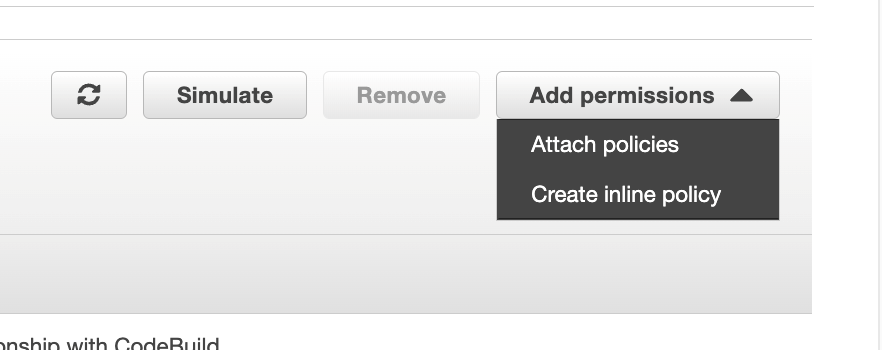
From the Add permissions menu, click on Create inline policy
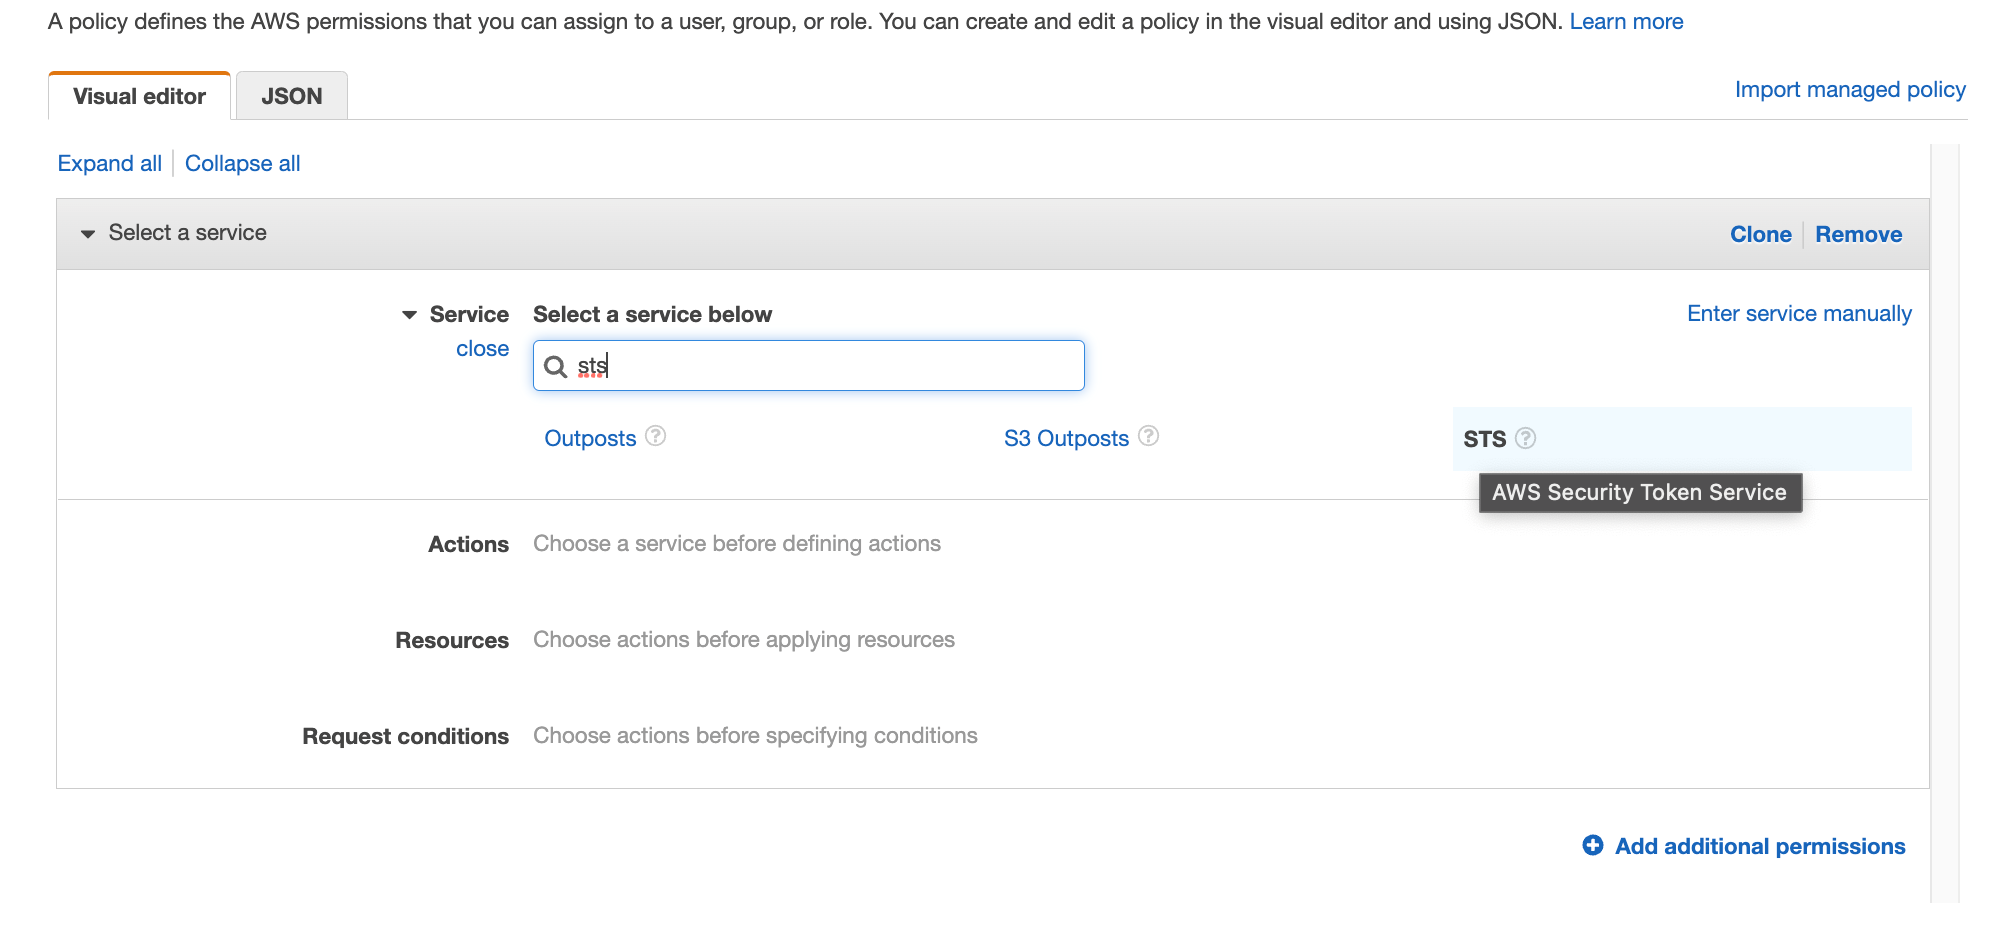
Search for STS in the services then select STS
Figure 34. Screenshot: IAM visual editor with sts shown in search.
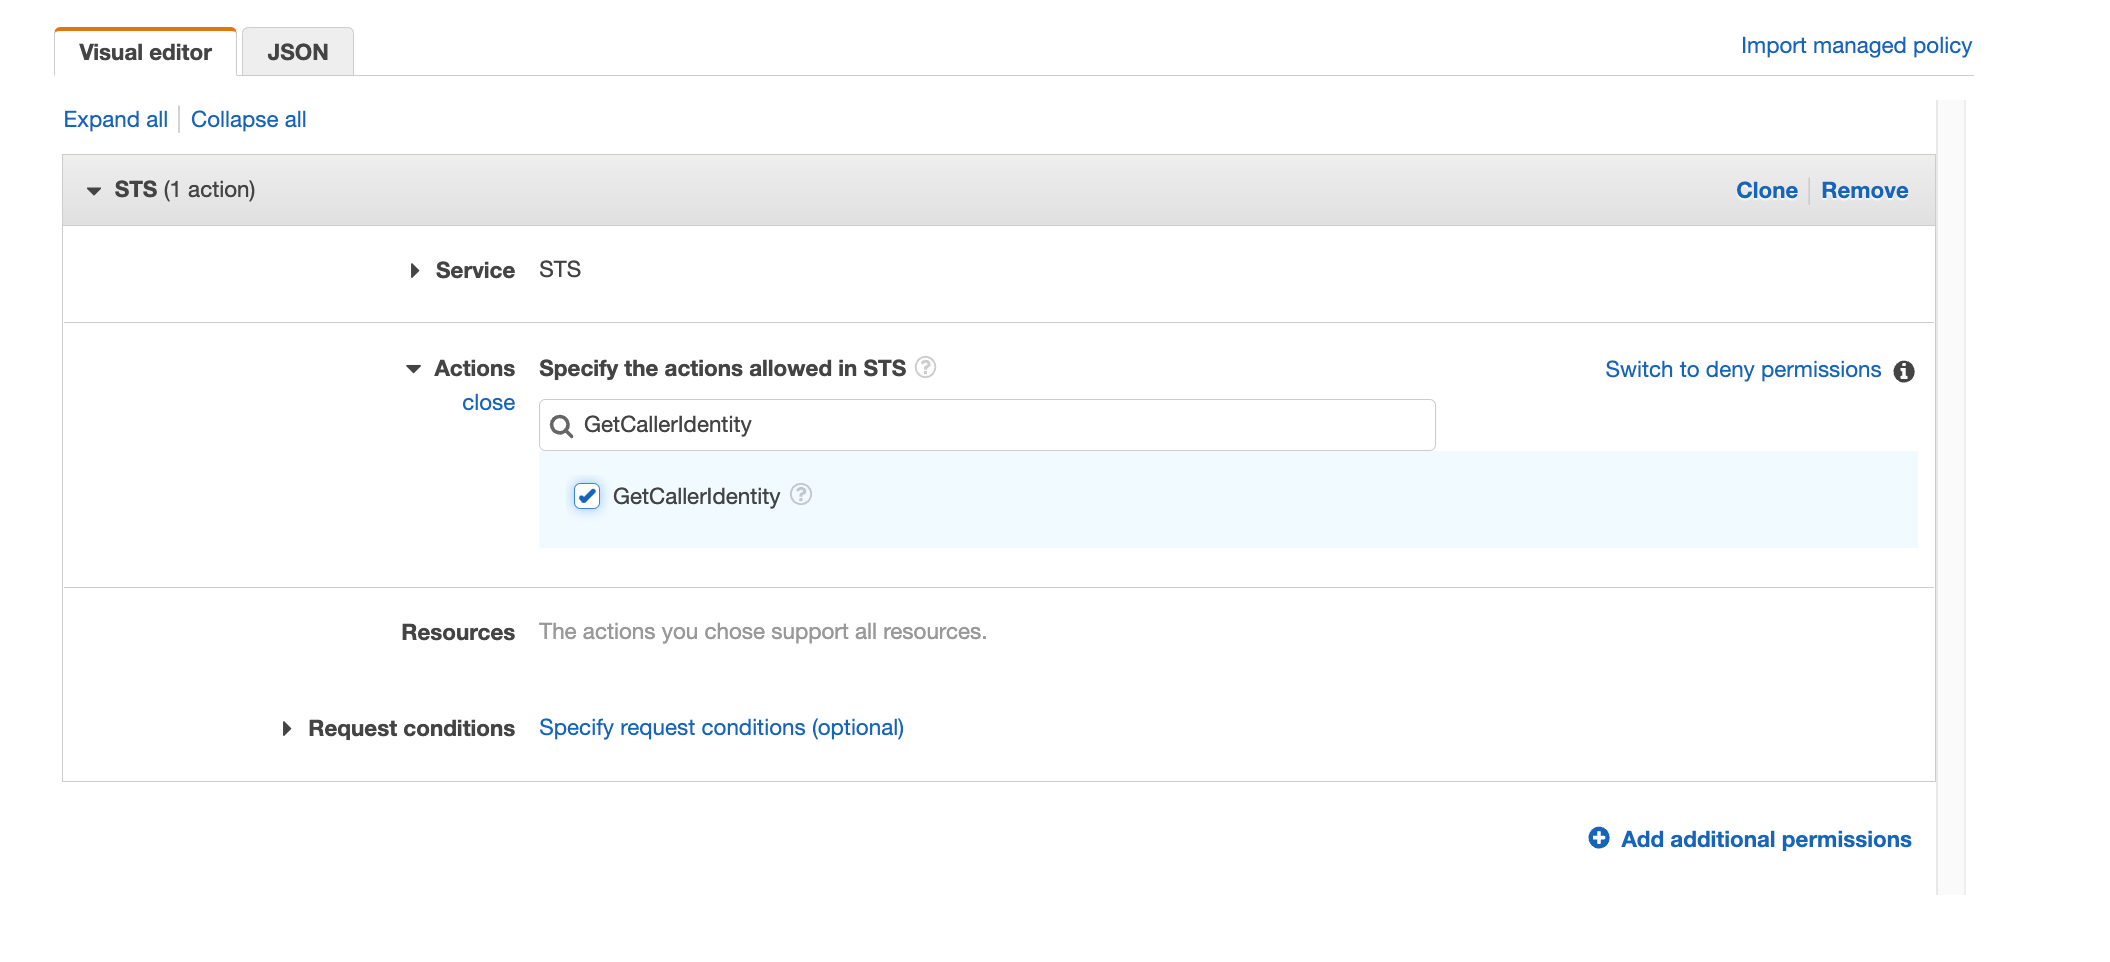
Search for “GetCallerIdentity” and select the action
Figure 35. Screenshot: IAM visual editor with GetCallerIdentity in search and action selected.
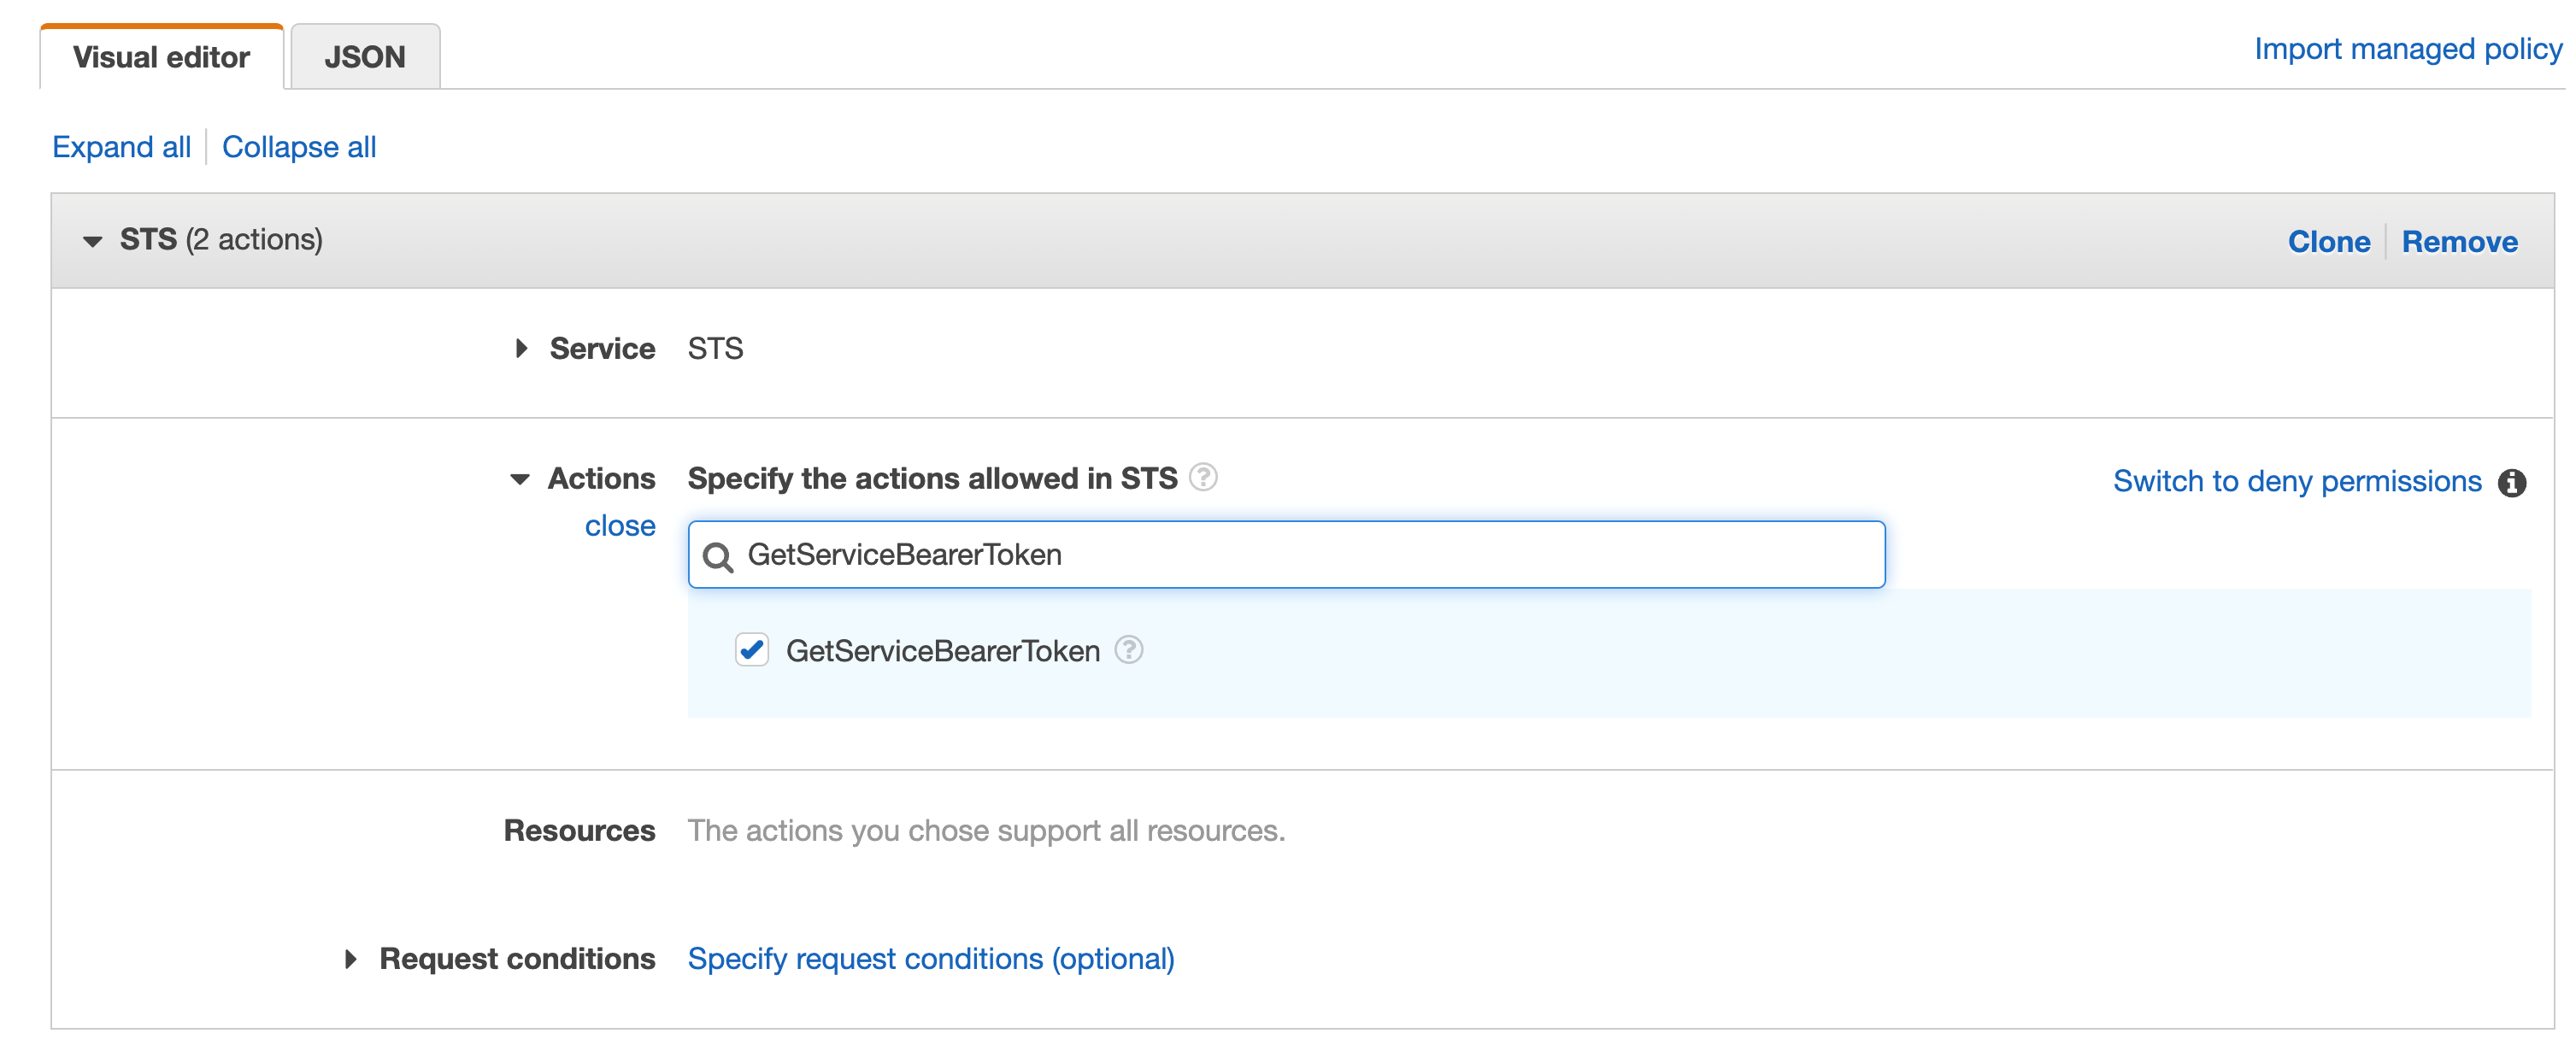
Repeat the same with “GetServiceBearerToken”
Figure 36. Screenshot: IAM visual editor with GetServiceBearerToken in search and action selected.
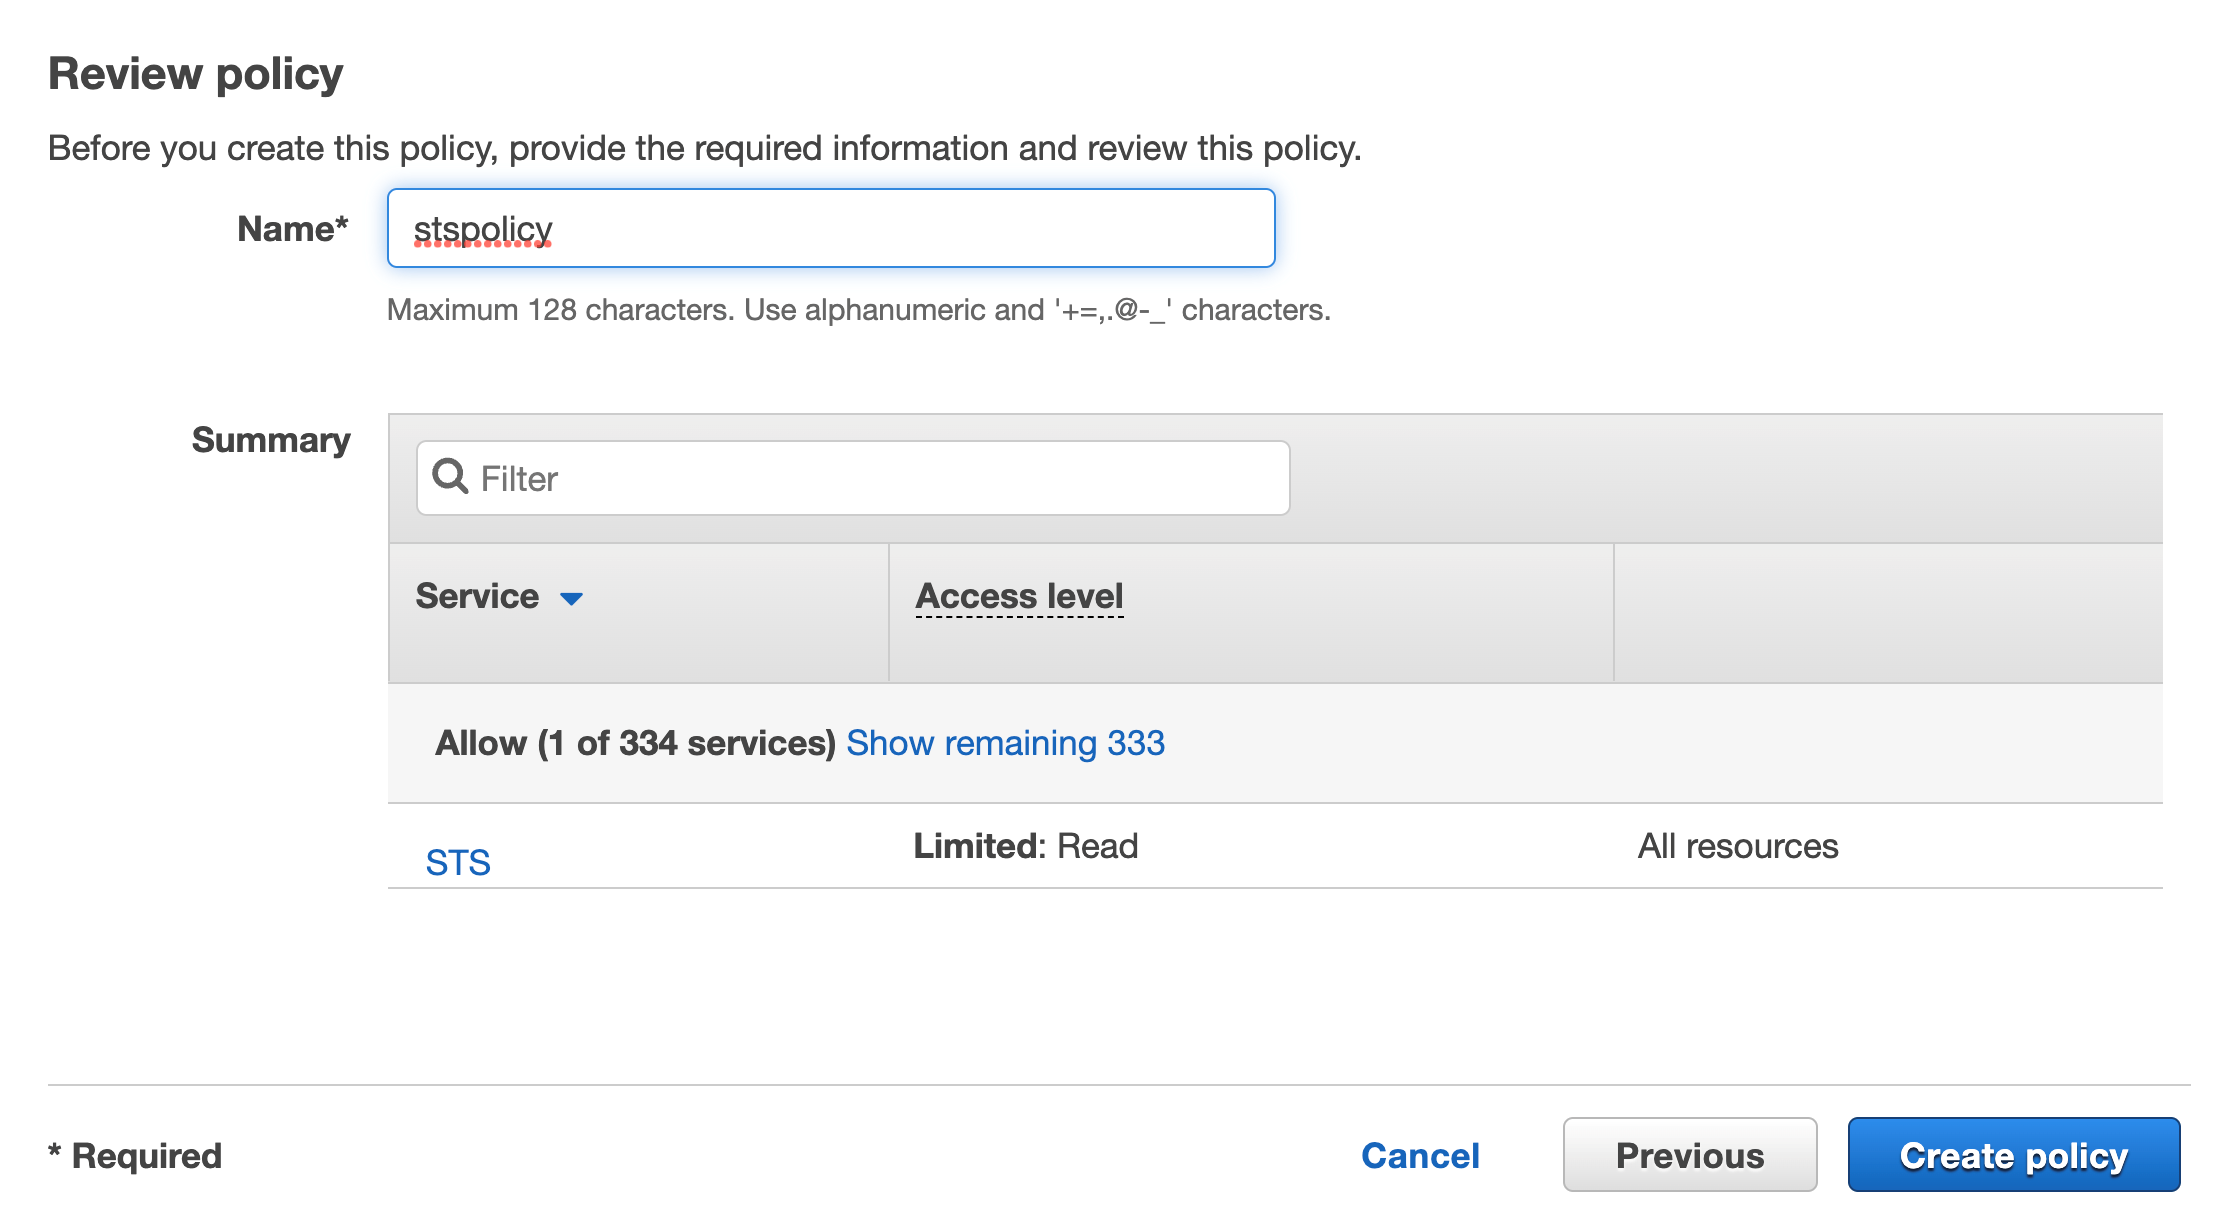
Click on Review, add a name then click on Create policy
Figure 37. Screenshot: Review page and Create policy button.
You should see the new inline policy added to the list
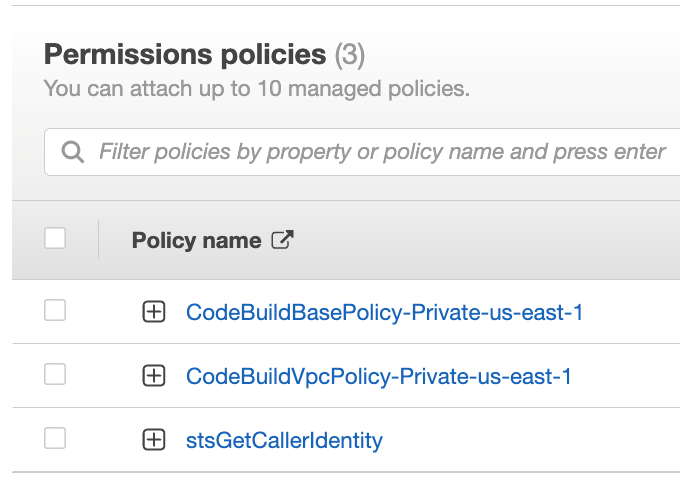
Figure 38. Screenshot: shows the new in-line policy in the list.
For CodeArtifact actions we will do the same on that role, click on Create inline policy
Figure 39. Screenshot: attach policies.
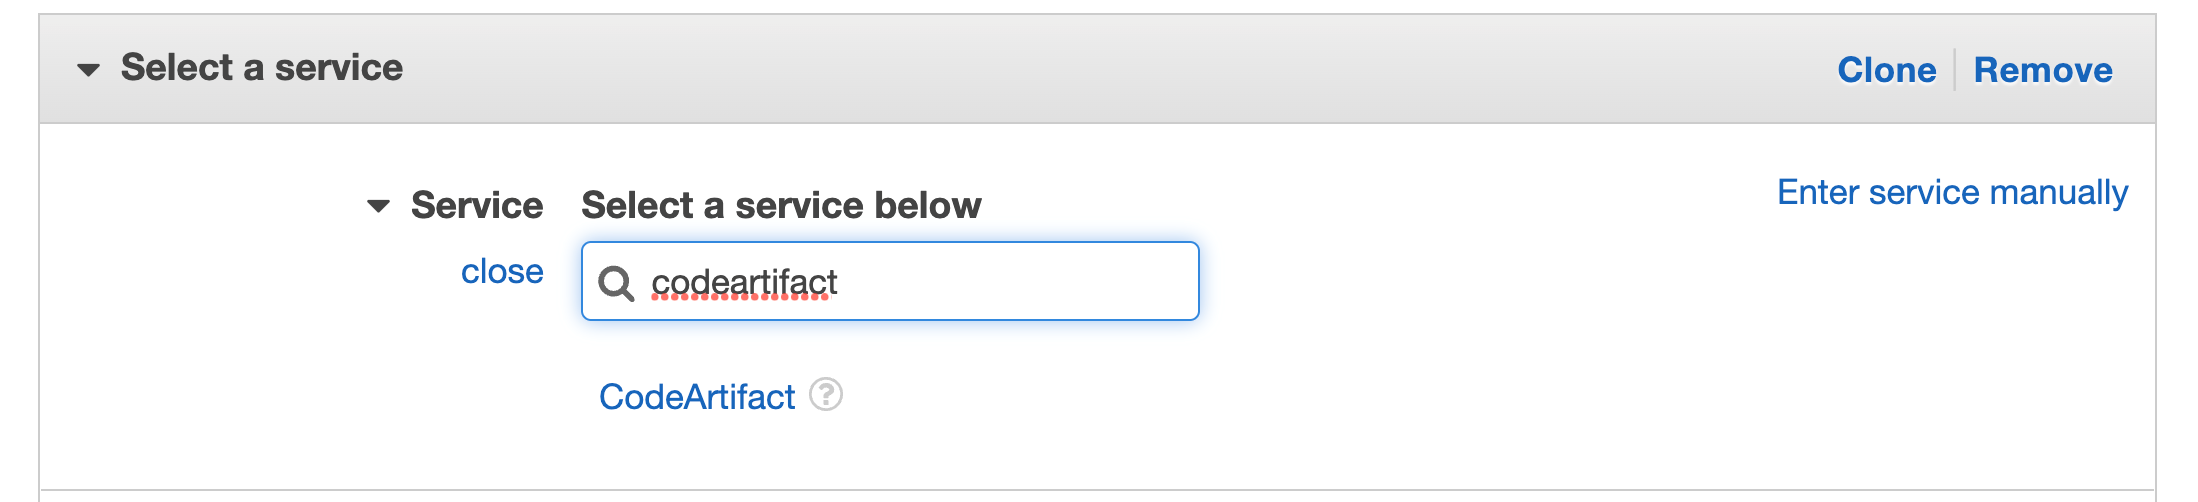
Search for CodeArtifact in the services then select CodeArtifact
Figure 40. Screenshot: select service with CodeArtifact in search.
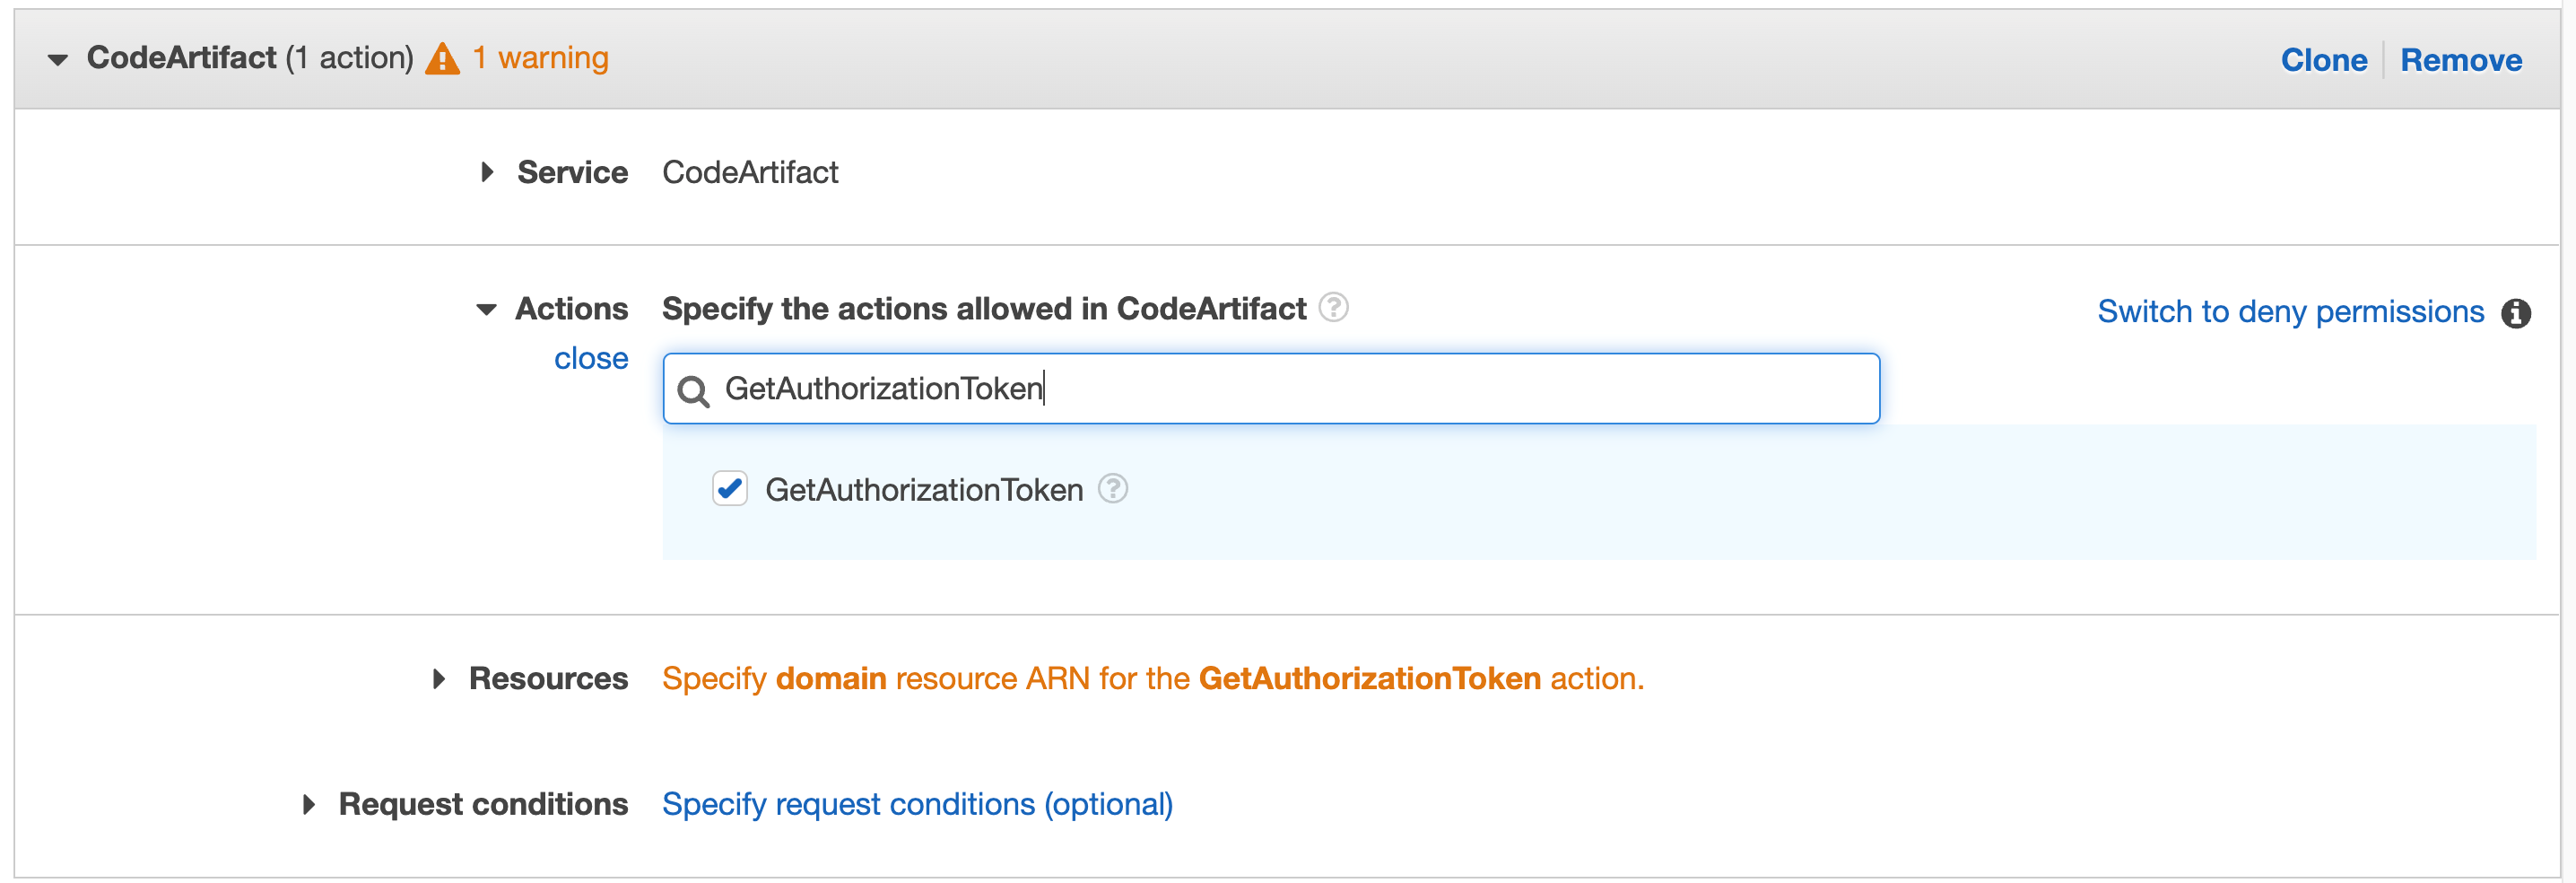
Search for “GetAuthorizationToken” in actions and select that action in the check box
Figure 41. CodeArtifact: with GetAuthorizationToken in search.
Repeat for “GetRepositoryEndpoint” and “ReadFromRepository”
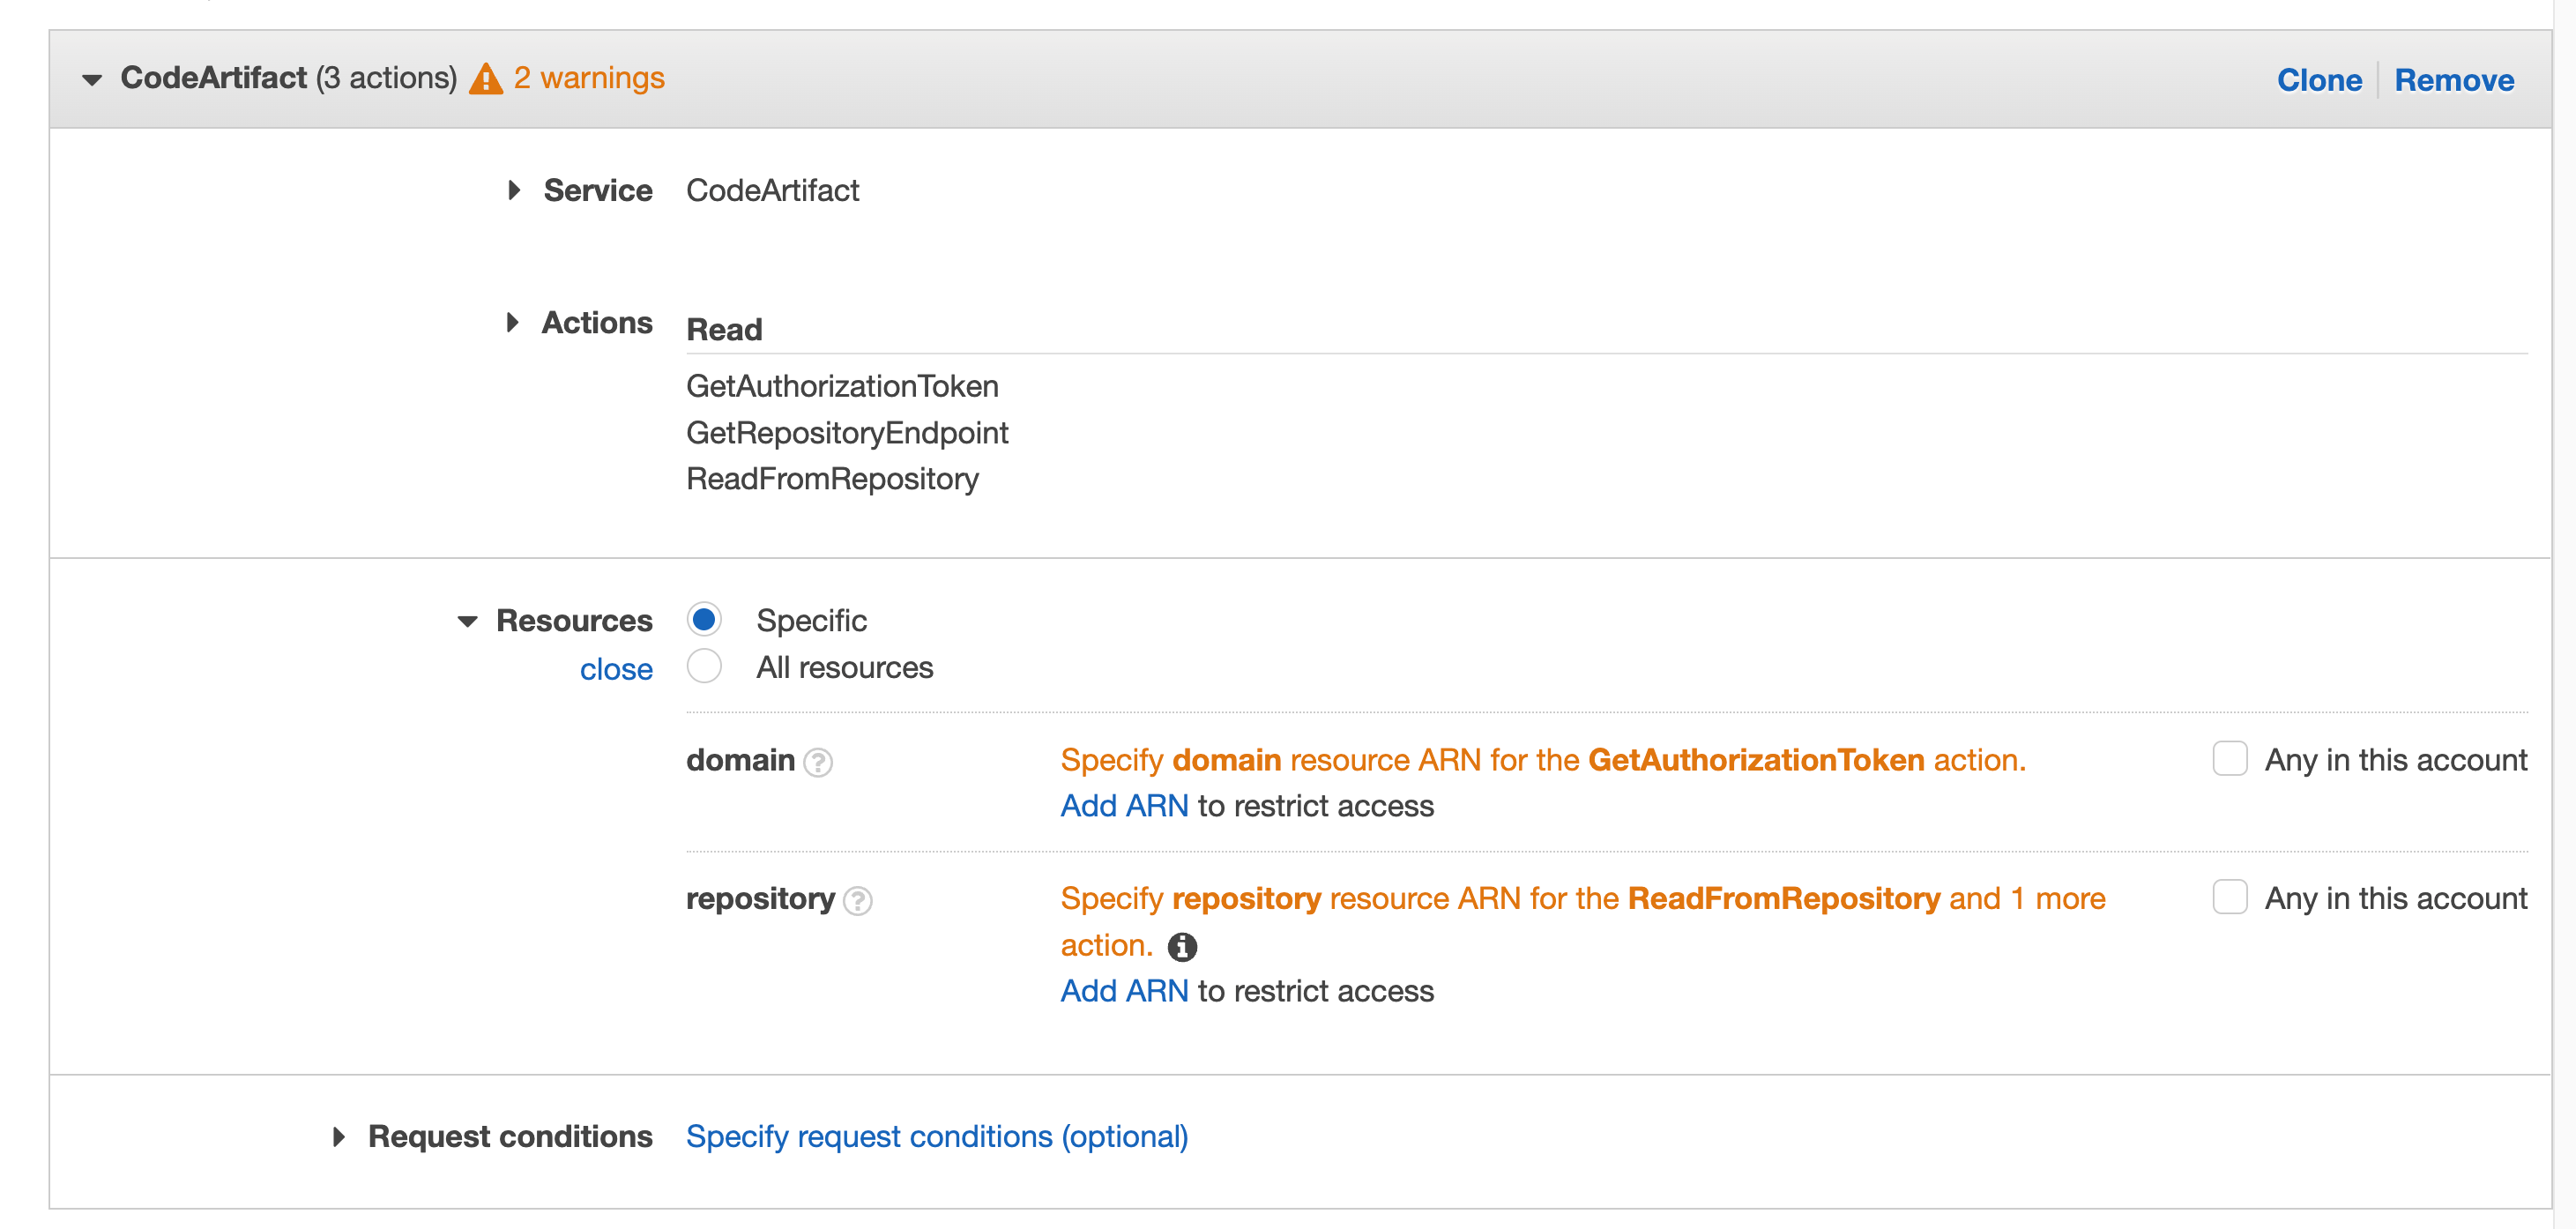
Click on Resources to fix the 2 warnings, then click on Add ARN on the first one “Specify domain resource ARN for the GetAuthorizationToken action.”
Figure 42. Screenshot: with all selected filed and 2 warnings.
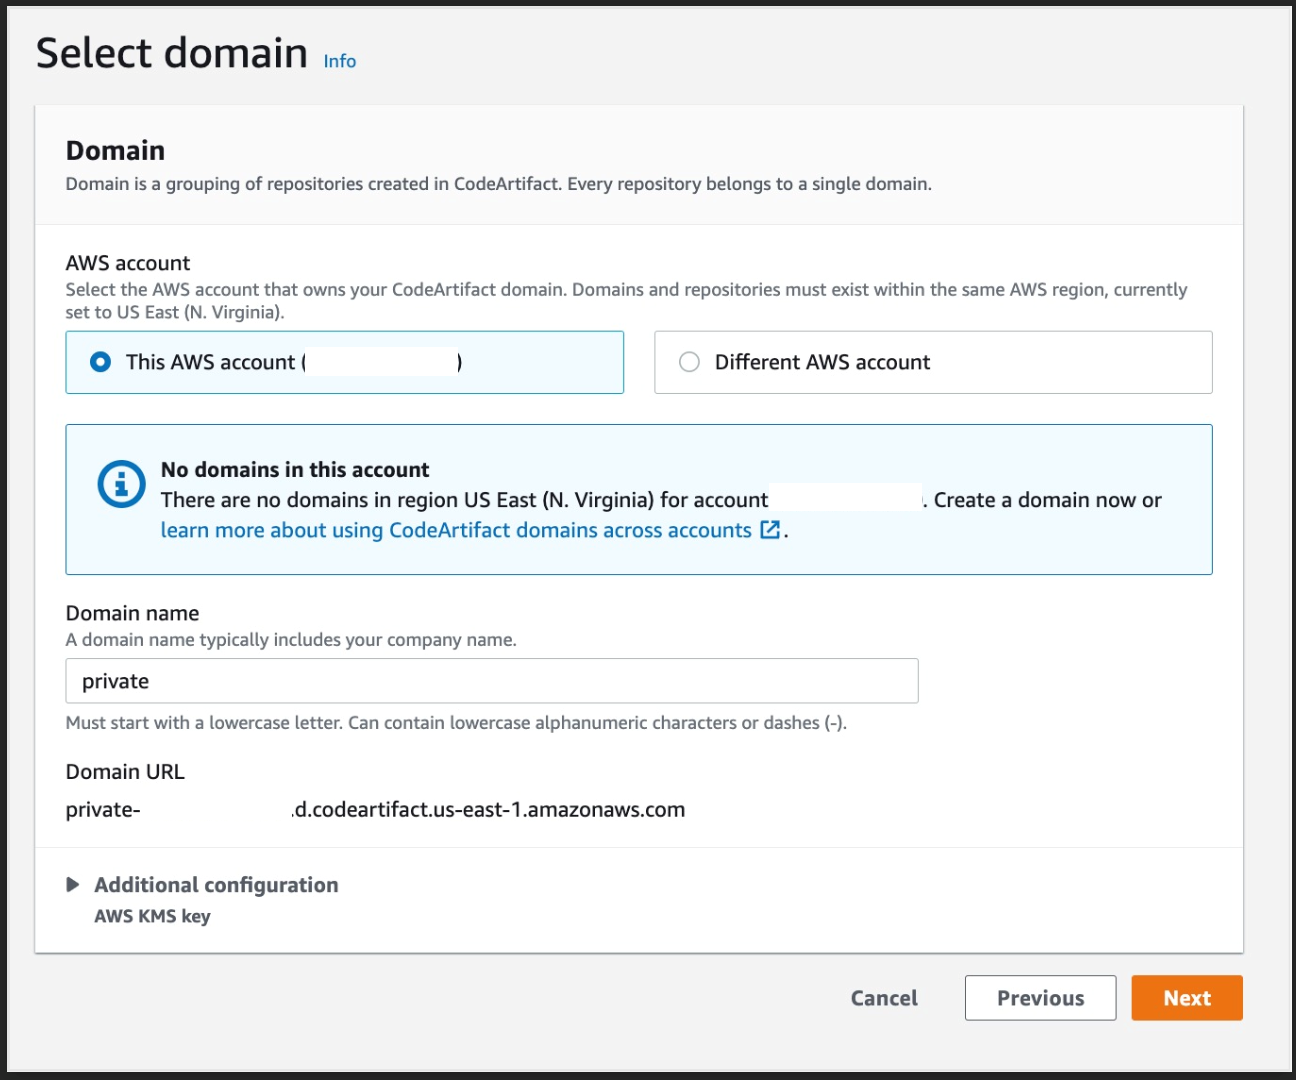
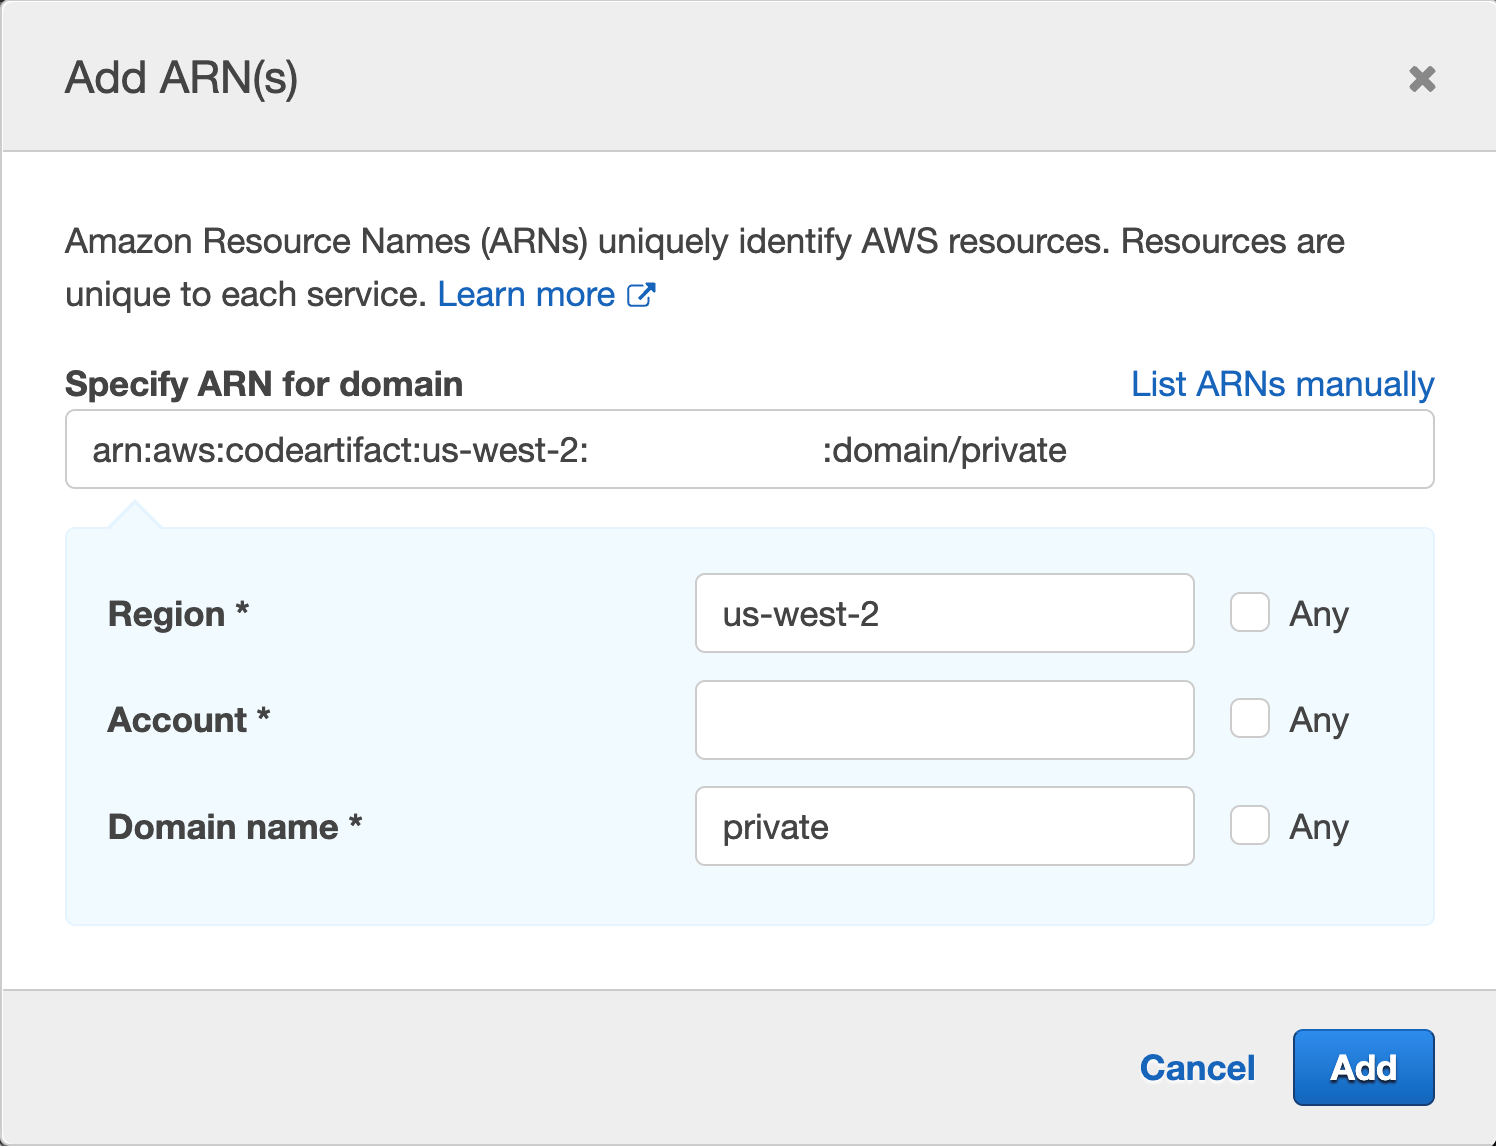
You’ll get a pop up with fields for Region, Account and Domain name, enter your region, your account number, and the domain name, we used “private” when we created our domain earlier.
Figure 43. Screenshot: Add ARN page.
Then click Add
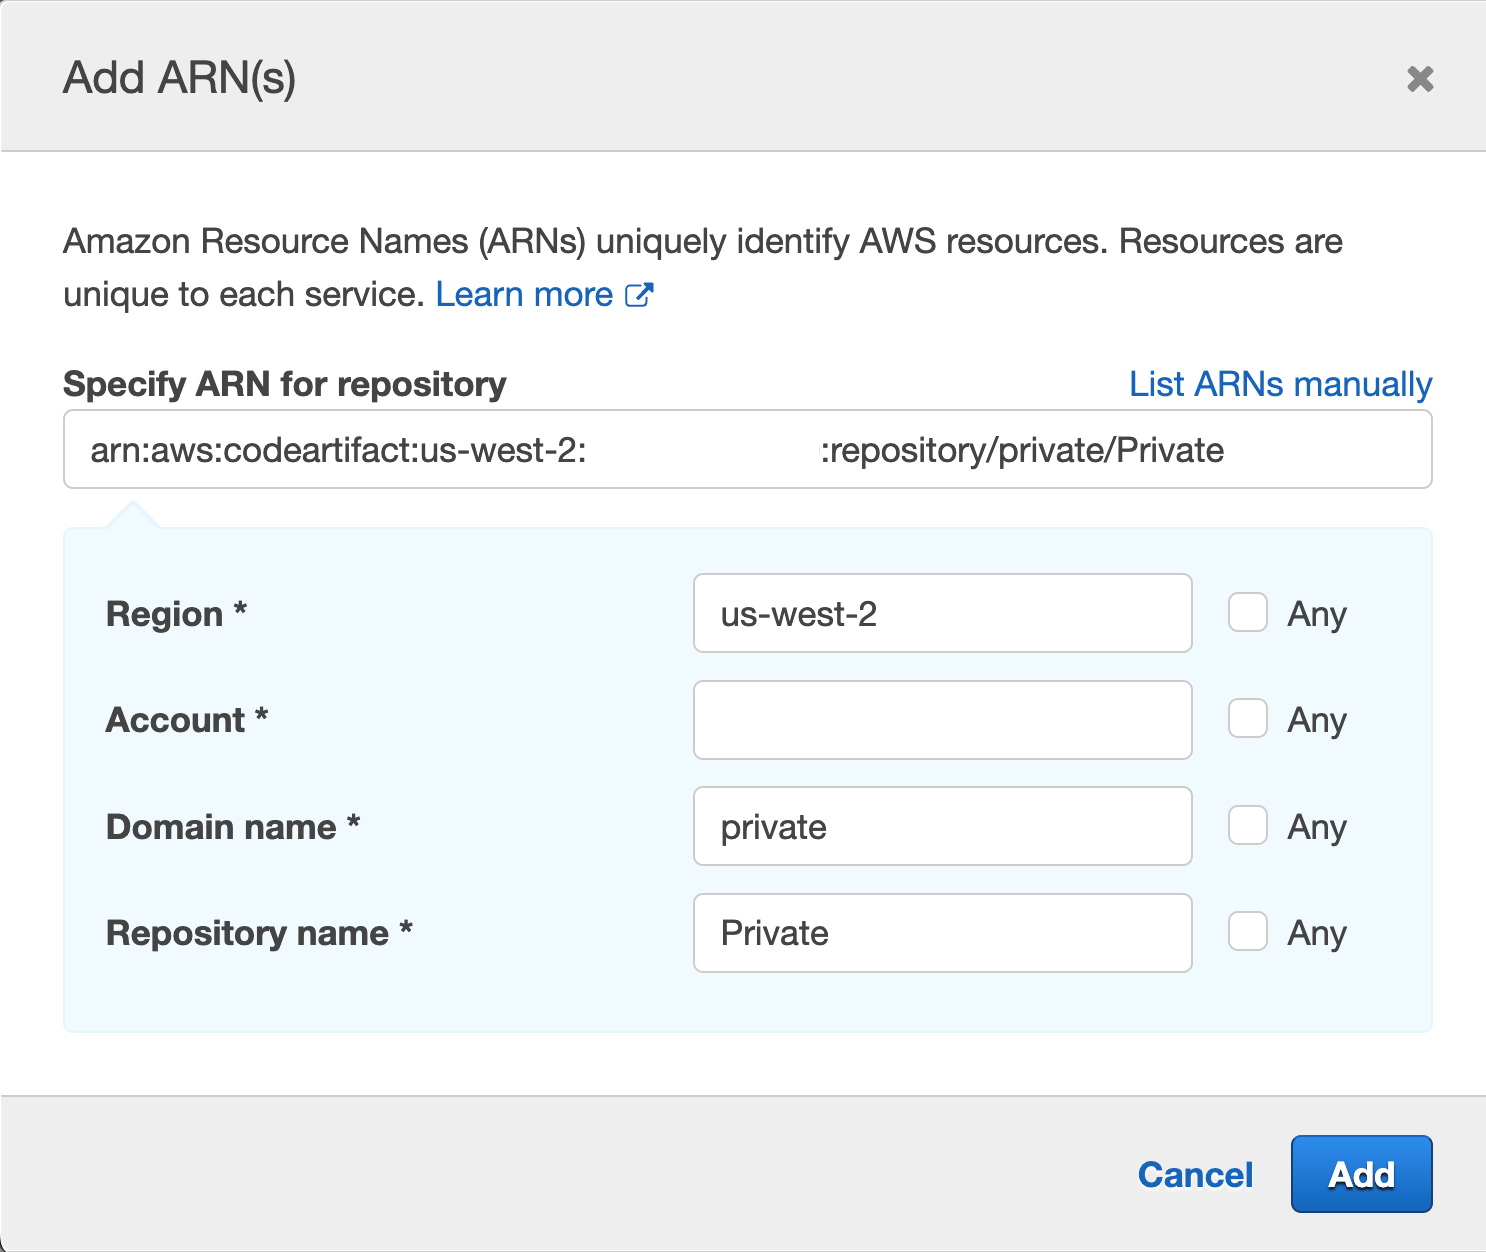
Repeat the same process for “Specify repository resource ARN for the ReadFromRepository and 1 more”, and this time we will provide Region, Account ID, Domain name and Repository name, we used “Private” for the repository we created earlier and “private” for domain
Figure 44. Screenshot: add ARN page.
Note it is best practice to specify the resource we are targeting, we can use the checkbox for “Any” but we want to narrow the scope of our IAM role best we can.
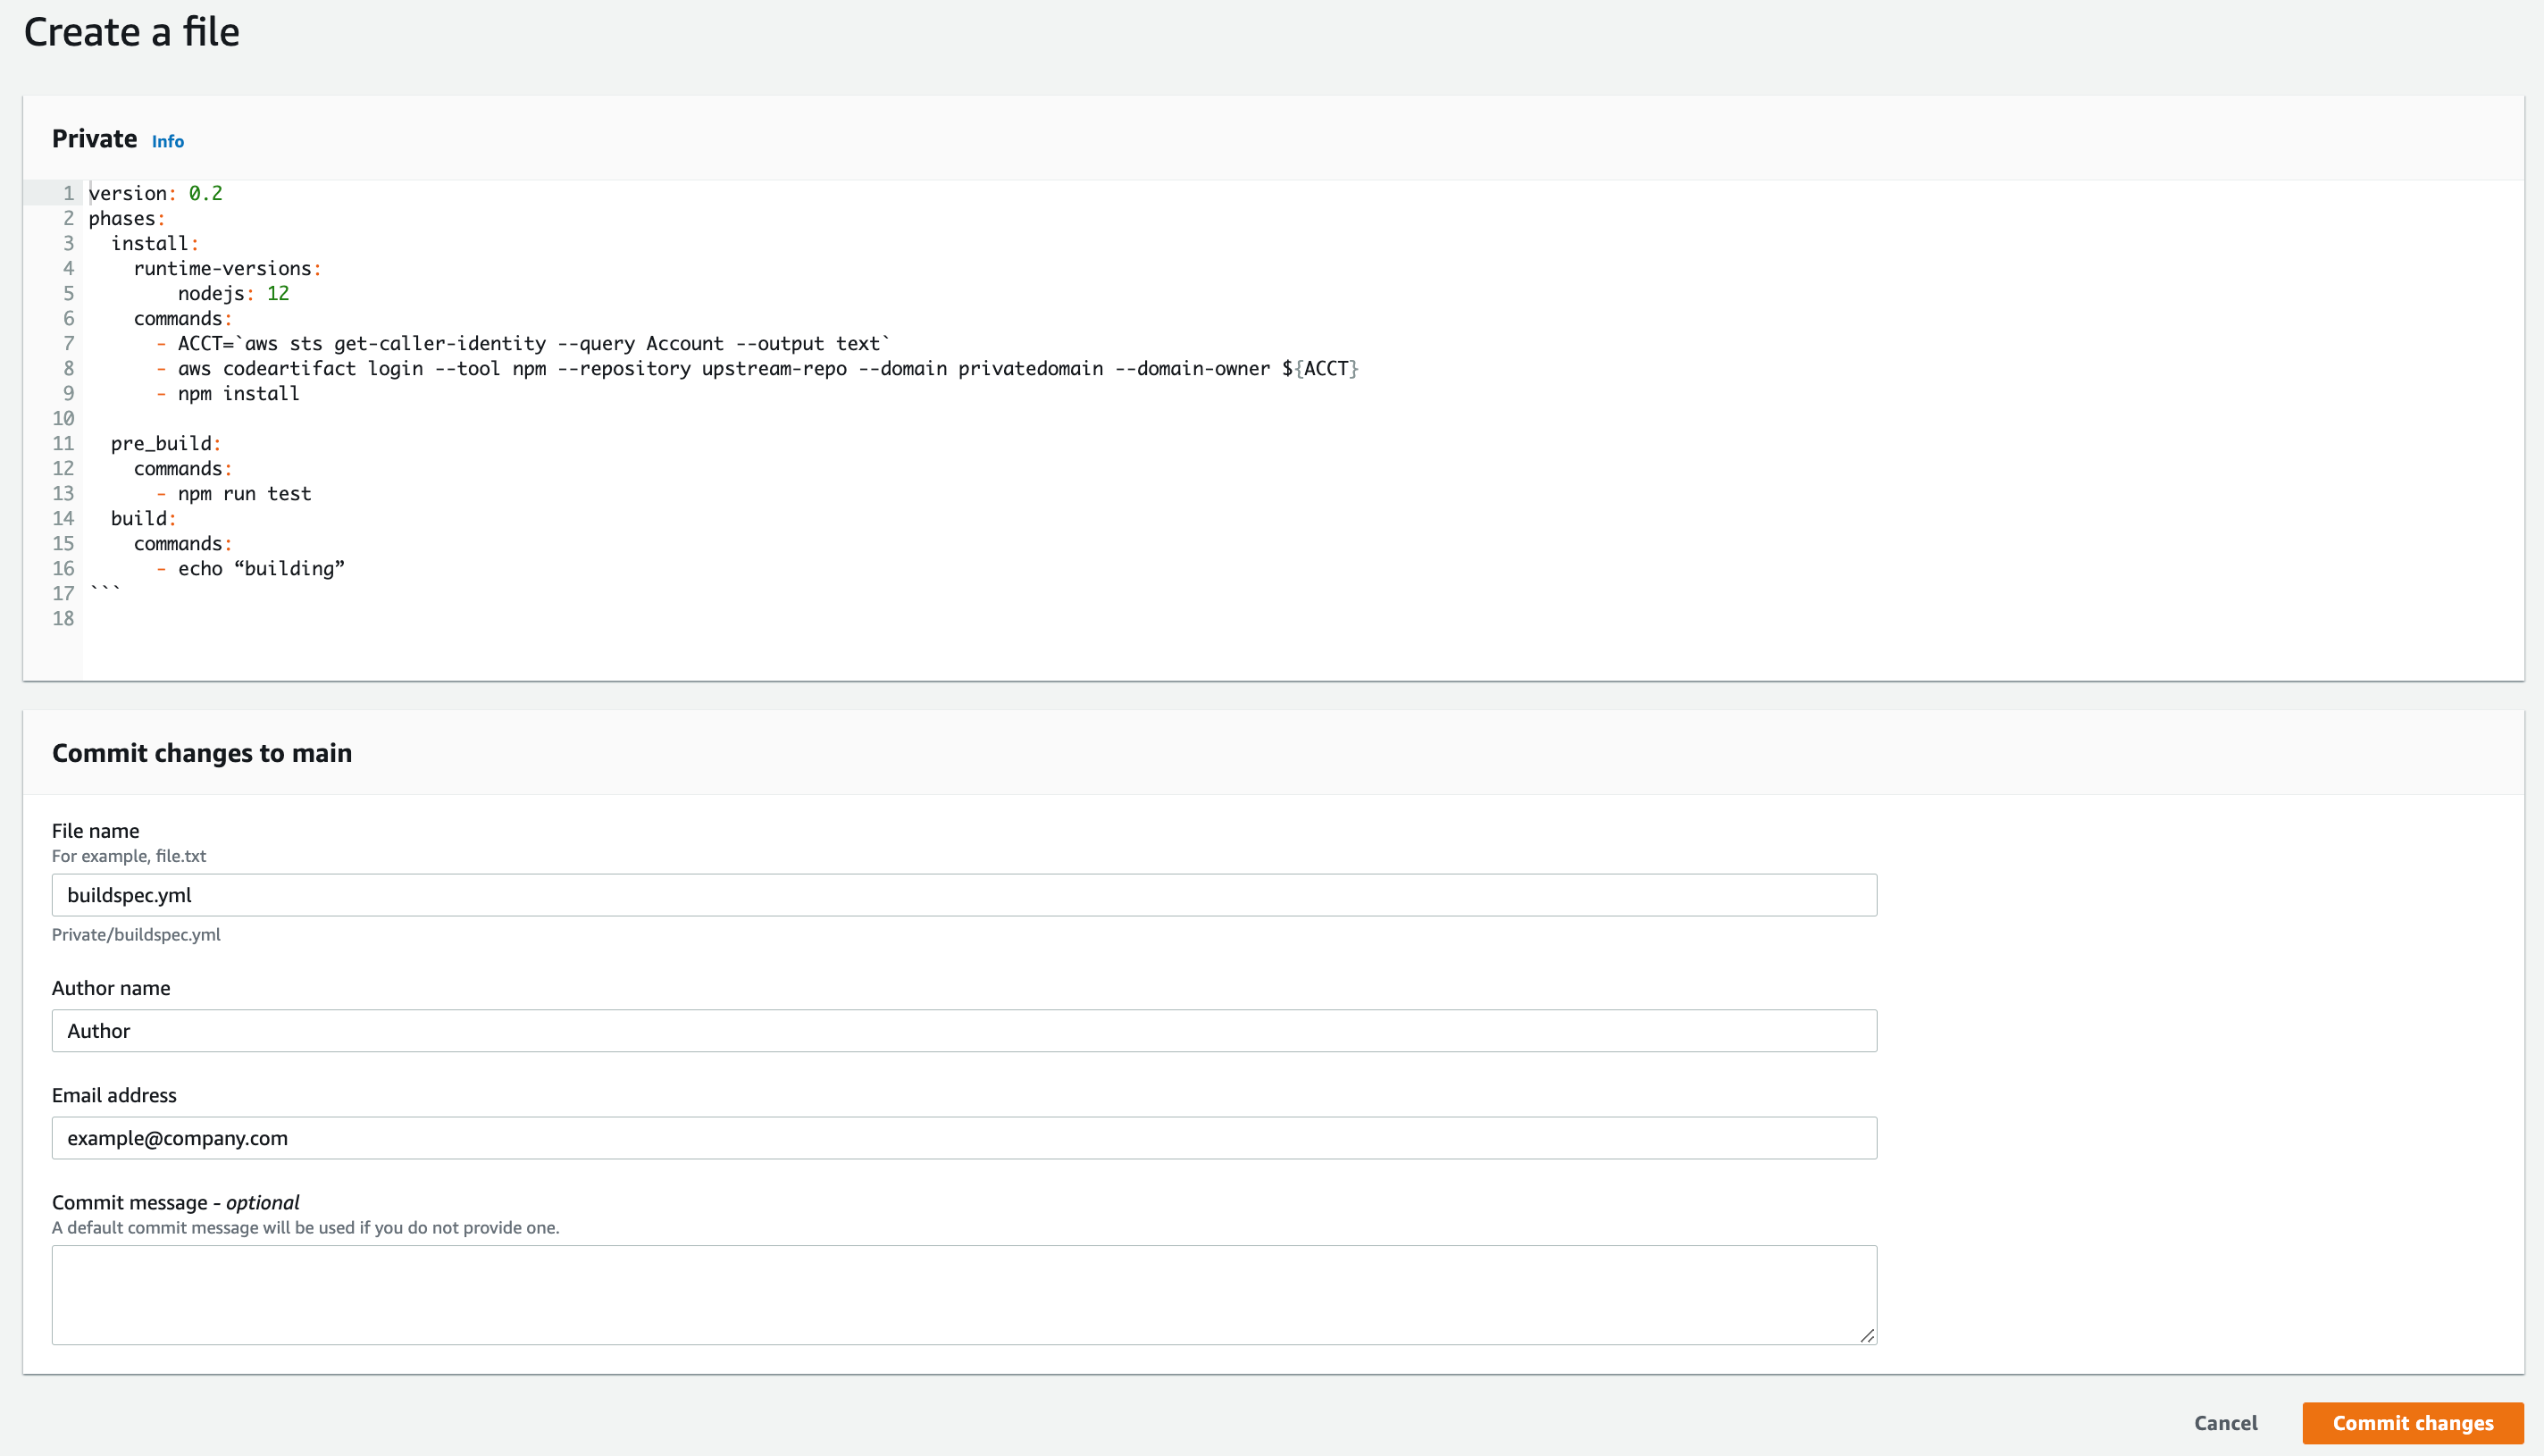
Navigate to CodeCommit then click on the repo you created earlier in step1
Figure 45. Screenshot: CodeCommit repo.
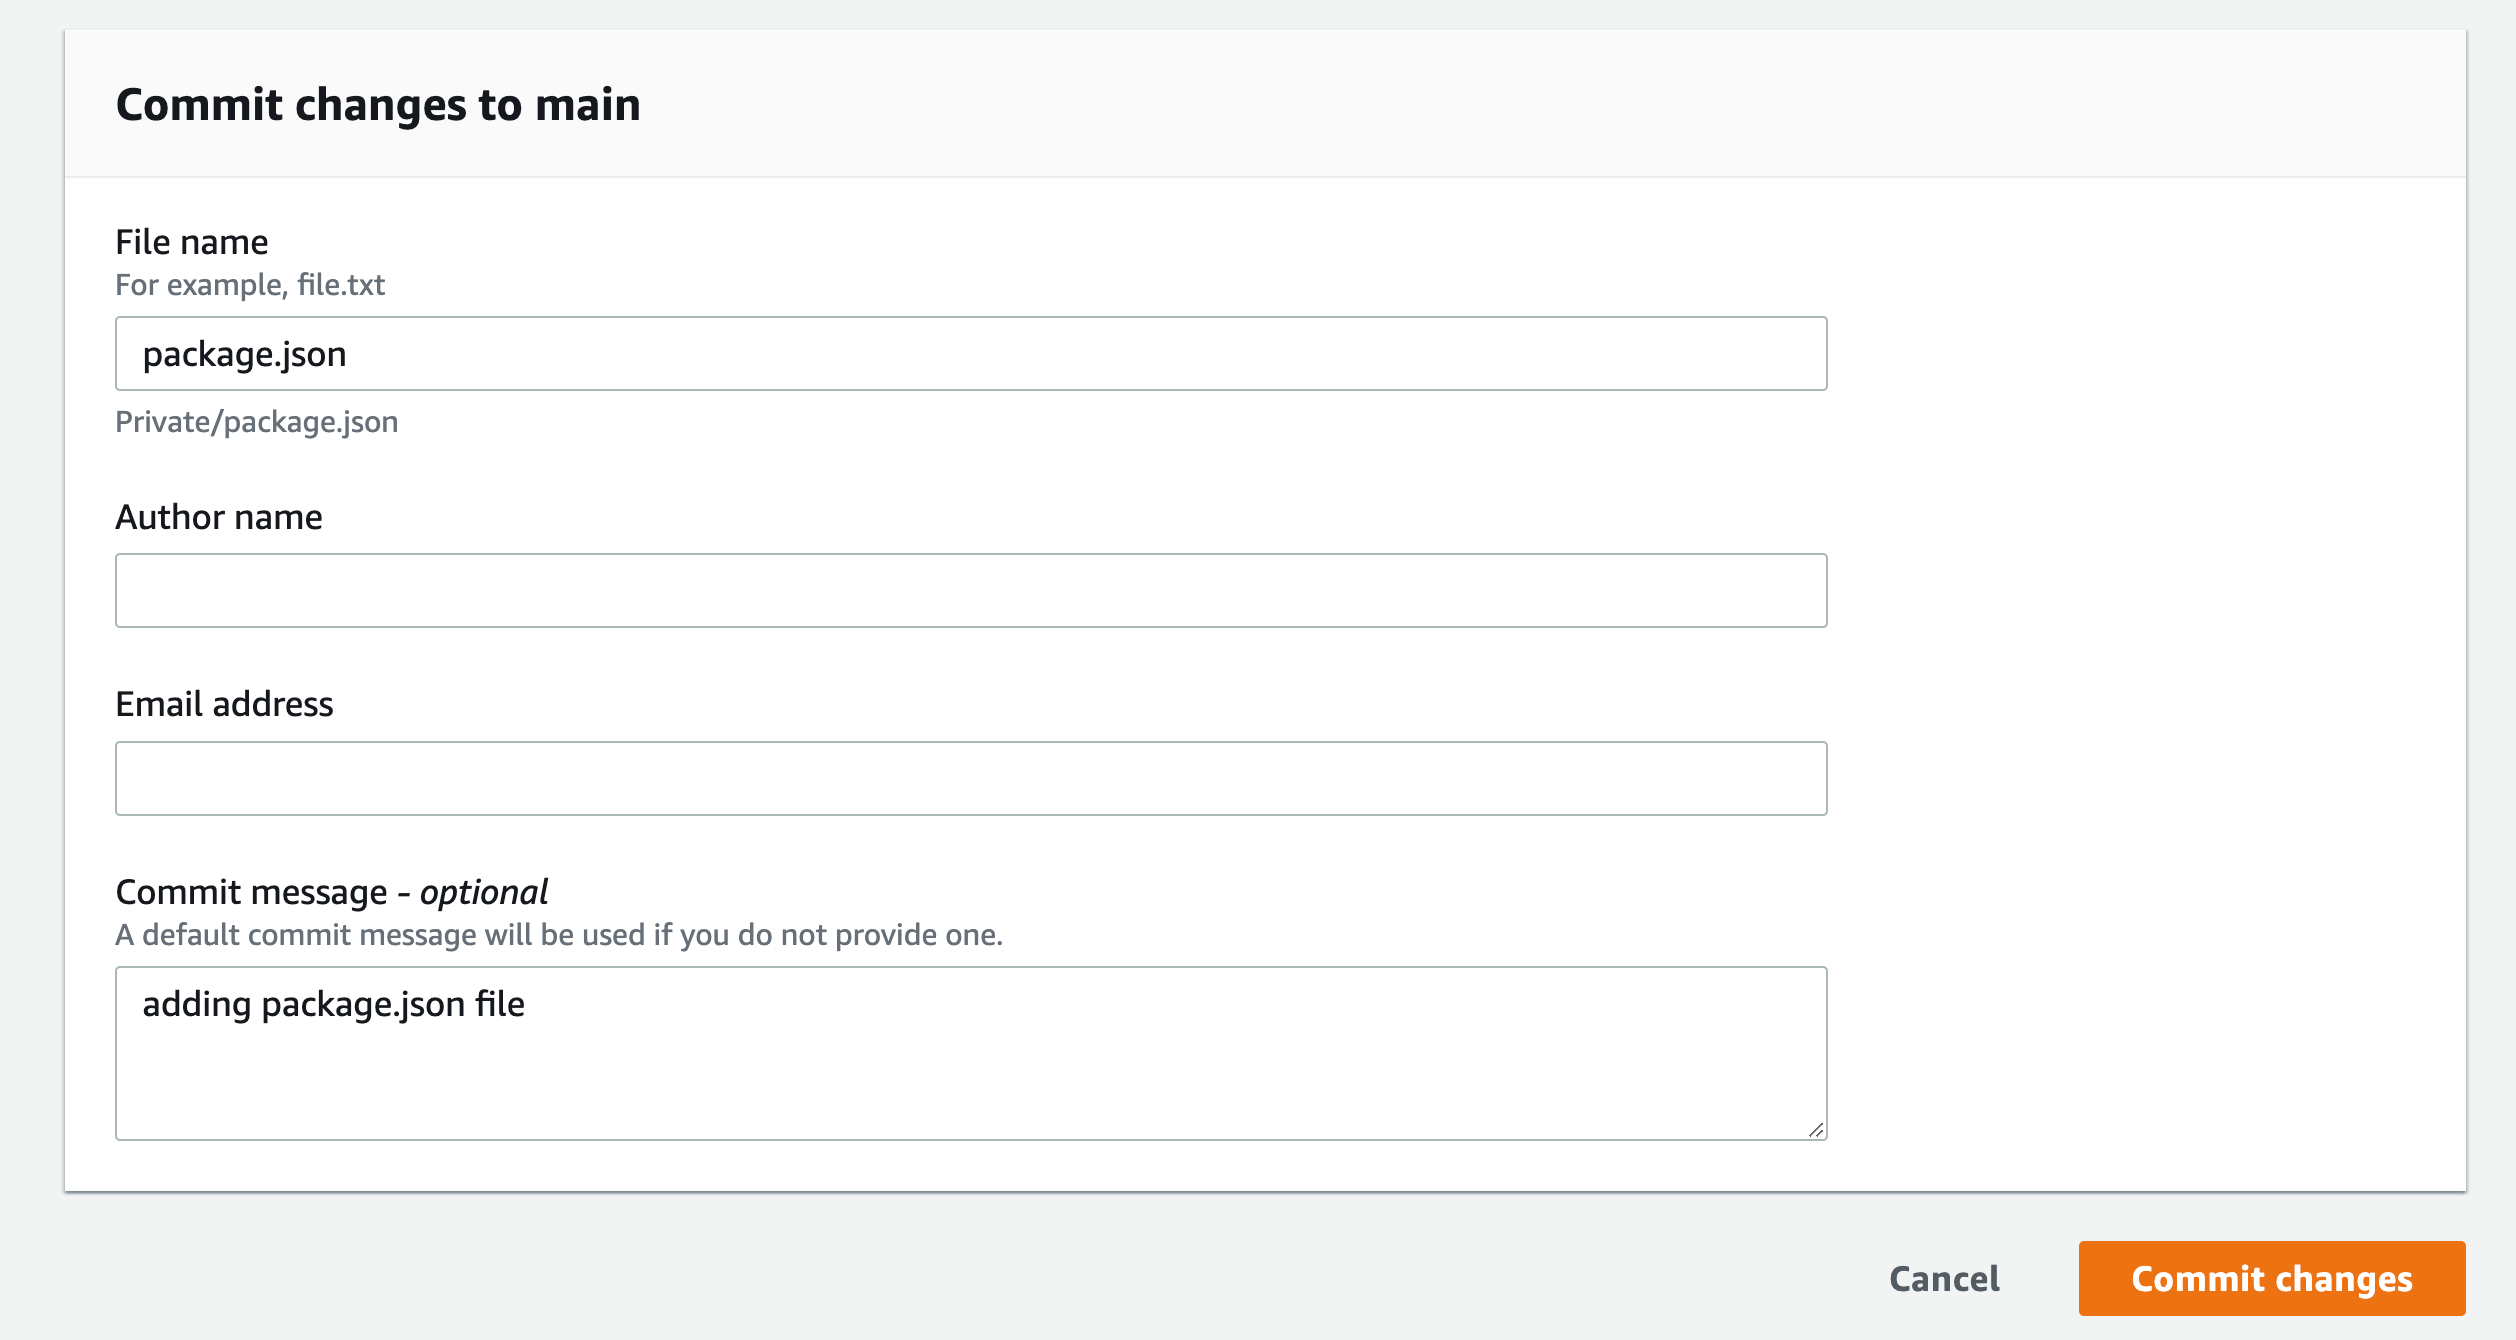
Click on Add file dropdown, then Create file button
Paste the following in the editor space:
{
  "dependencies": {
    "mathjs": "^11.2.0"
  }
}
Name the file “package.json”
Add your name and email, and optional commit message
Repeat this process for “index.js” and paste the following in the editor space:
This will force the pipeline to kick off and start building the application
Figure 47. Screenshot: CodePipeline.
This is a very simple application that gets the square root of 49 and log it to the screen, if you click on the Details link from the pipeline build stage, you’ll see the output of running the NodeJS application, the logs are stored in CloudWatch and you can navigate there by clicking on the link the View entire log “Showing the last xx lines of the build log. View entire log”
Figure 48. Screenshot: Showing the last 54 lines of the build log. View entire log.
We used npm example in the buildspec.yml above, Similar setup will be used for pip and twine,
For Maven, Gradle, and NuGet, you must set Environment variables and change your settings.xml and build.gradle, as well as install the plugin for your IDE. For more information, see here.
Cleanup
Navigate to VPC endpoint from the AWS console and delete the endpoints that you created.
Navigate to CodePipeline and delete the Pipeline you created.
Navigate to CodeBuild and delete the Build Project created.
Navigate to CodeCommit and delete the Repository you created.
Navigate to CodeArtifact and delete the Repository and the domain you created.
Navigate to IAM and delete the Roles created:
For CodeBuild: codebuild-<Build Project Name>-service-role
For CodePipeline: AWSCodePipelineServiceRole-<Region>-<Project Name>
Conclusion
In this post, we deployed a full CI/CD pipeline with CodePipeline orchestrating CodeBuild to build and test a small NodeJS application, using CodeArtifact to download the application code dependencies. All without going to the public internet and maintaining the logs in CloudWatch.
AWS re:Invent returned to Las Vegas, NV, in November 2022. The conference featured over 2,200 sessions and hands-on labs and more than 51,000 attendees over 5 days. If you weren’t able to join us in person, or just want to revisit some of the security, identity, and compliance announcements and on-demand sessions, this blog post is for you.
Key announcements
Here are some of the security announcements that we made at AWS re:Invent 2022.
We announced the preview of a new service, Amazon Security Lake. Amazon Security Lake automatically centralizes security data from cloud, on-premises, and custom sources into a purpose-built data lake stored in your AWS account. Security Lake makes it simpler to analyze security data so that you can get a more complete understanding of security across your entire organization. You can also improve the protection of your workloads, applications, and data. Security Lake automatically gathers and manages your security data across accounts and AWS Regions.
We introduced the AWS Digital Sovereignty Pledge—our commitment to offering the most advanced set of sovereignty controls and features available in the cloud. As part of this pledge, we launched a new feature of AWS Key Management Service, External Key Store (XKS), where you can use your own encryption keys stored outside of the AWS Cloud to protect data on AWS.
To help you with the building blocks for zero trust, we introduced two new services:
AWS Verified Access provides secure access to corporate applications without a VPN. Verified Access verifies each access request in real time and only connects users to the applications that they are allowed to access, removing broad access to corporate applications and reducing the associated risks.
Amazon Verified Permissions is a scalable, fine-grained permissions management and authorization service for custom applications. Using the Cedar policy language, Amazon Verified Permissions centralizes fine-grained permissions for custom applications and helps developers authorize user actions in applications.
We announced Automated sensitive data discovery for Amazon Macie. This new capability helps you gain visibility into where your sensitive data resides on Amazon Simple Storage Service (Amazon S3) at a fraction of the cost of running a full data inspection across all your S3 buckets. Automated sensitive data discovery automates the continual discovery of sensitive data and potential data security risks across your S3 storage aggregated at the AWS Organizations level.
Amazon Inspector now supports AWS Lambda functions, adding continual, automated vulnerability assessments for serverless compute workloads. Amazon Inspector automatically discovers eligible AWS Lambda functions and identifies software vulnerabilities in application package dependencies used in the Lambda function code. The functions are initially assessed upon deployment to Lambda and continually monitored and reassessed, informed by updates to the function and newly published vulnerabilities. When vulnerabilities are identified, actionable security findings are generated, aggregated in Amazon Inspector, and pushed to Security Hub and Amazon EventBridge to automate workflows.
Amazon GuardDuty now offers threat detection for Amazon Aurora to identify potential threats to data stored in Aurora databases. Currently in preview, Amazon GuardDuty RDS Protection profiles and monitors access activity to existing and new databases in your account, and uses tailored machine learning models to detect suspicious logins to Aurora databases. When a potential threat is detected, GuardDuty generates a security finding that includes database details and contextual information on the suspicious activity. GuardDuty is integrated with Aurora for direct access to database events without requiring you to modify your databases.
AWS Security Hub is now integrated with AWS Control Tower, allowing you to pair Security Hub detective controls with AWS Control Tower proactive or preventive controls and manage them together using AWS Control Tower. Security Hub controls are mapped to related control objectives in the AWS Control Tower control library, providing you with a holistic view of the controls required to meet a specific control objective. This combination of over 160 detective controls from Security Hub, with the AWS Control Tower built-in automations for multi-account environments, gives you a strong baseline of governance and off-the-shelf controls to scale your business using new AWS workloads and services. This combination of controls also helps you monitor whether your multi-account AWS environment is secure and managed in accordance with best practices, such as the AWS Foundational Security Best Practices standard.
We launched our Cloud Audit Academy (CAA) course for Federal and DoD Workloads (FDW) on AWS. This new course is a 12-hour interactive training based on NIST SP 800-171, with mappings to NIST SP 800-53 and the Cybersecurity Maturity Model Certification (CMMC) and covers AWS services relevant to each NIST control family. This virtual instructor-led training is industry- and framework-specific for our U.S. Federal and DoD customers.
AWS Wickr allows businesses and public sector organizations to collaborate more securely, while retaining data to help meet requirements such as e-discovery and Freedom of Information Act (FOIA) requests. AWS Wickr is an end-to-end encrypted enterprise communications service that facilitates one-to-one chats, group messaging, voice and video calling, file sharing, screen sharing, and more.
We introduced the Post-Quantum Cryptography hub that aggregates resources and showcases AWS research and engineering efforts focused on providing cryptographic security for our customers, and how AWS interfaces with the global cryptographic community.
Watch on demand
Were you unable to join the event in person? See the following for on-demand sessions.
To learn about the latest innovations in cloud security from AWS and what you can do to foster a culture of security in your business, watch AWS Chief Information Security Officer CJ Moses’s leadership session with guest Deneen DeFiore, Chief Information Security Officer at United Airlines.
See how AWS, customers, and partners work together to raise their security posture with AWS infrastructure and services. Learn about trends in identity and access management, threat detection and incident response, network and infrastructure security, data protection and privacy, and governance, risk, and compliance.
Dive into our launches! Hear from security experts on recent announcements. Learn how new services and solutions can help you meet core security and compliance requirements.
Consider joining us for more in-person security learning opportunities by saving the date for AWS re:Inforce 2023, which will be held June 13-14 in Anaheim, California. We look forward to seeing you there!
If you’d like to discuss how these new announcements can help your organization improve its security posture, AWS is here to help. Contact your AWS account team today.
If you have feedback about this post, submit comments in the Comments section below. If you have questions about this post, contact AWS Support.
Want more AWS Security news? Follow us on Twitter.
Amazon Web Services (AWS) customers using AWS Wickr who want to find a way to access their AWS Wickr Windows desktop client though a web browser, can use Amazon AppStream 2.0 to stream the application through to their users.
Using this architecture, you can provide lightweight access to the AWS Wickr desktop client for users that cannot install it onto their local device. By using AppStream 2.0, you can focus on managing your AWS Wickr network while AppStream 2.0 manages the AWS resources required to host and run the application, scaling automatically and providing on-demand access to your users.
If you want to ensure that AWS Wickr user data persists between streaming sessions, you can make use of AppStream 2.0 user persistence to securely save user data (including AWS Wickr client data) to Amazon Simple Storage Service (Amazon S3).
In this post, we discuss how to build an AppStream 2.0 image for AWS Wickr on Windows, enable persistence for users, and deploy a stack.
Solution overview
These steps will illustrate deploying an AppStream 2.0 Windows Image Builder to a single availability zone. Then we deploy an AppStream 2.0 fleet with internet access and user data persistence to three availability zones for high availability.
Figure 1. AWS Wickr with Amazon AppStream 2.0 Architecture
Cost
The costs associated with using AWS services when deploying AppStream 2.0 and AWS Wickr in your AWS account can be estimated on the pricing pages for the services used.
Walkthrough
This walkthrough takes you from installing the AWS Wickr for Windows desktop client onto an AppStream 2.0 Image Builder, to configuring the client for persistence, and finally to deploying a fleet and stack for your users to consume:
Install AWS Wickr for Windows client onto your AppStream 2.0 Windows Image Builder.
Configure the client using the Image Assistant to set up user data and settings persistence.
Create an on-demand instance streaming fleet.
Create a user stack and enable user data and settings persistence.
Create a user pool.
Test your streaming application and prove data persistence.
Prerequisites
You should have the following prerequisites:
Familiarity with AppStream 2.0 and an existing AWS Wickr account with associated credentials. Currently, it is not possible for an AWS Wickr user to register their account over AppStream 2.0.
An AWS account with access to AppStream 2.0. Instructions for setting up an AWS account can be found at Setting Up for Amazon AppStream 2.0.
A running AppStream 2.0 image builder, based on the WinServer2019-10-05-2022 base image with the AWS Wickr for Windows client installer downloaded to it.
An up-to-date Google Chrome browser (if you want to use your device’s webcam).
Install AWS Wickr
AppStream 2.0 uses Amazon Elastic Compute Cloud (Amazon EC2) instances to stream applications. You launch instances from base images, called image builders. In this step you will install the AWS Wickr client onto your image builder before moving on to configuration.
Connect to your image builder as an Administrator.
Run the AWS Wickr installer and carry out the following steps:
On the Welcome to the AWS Wickr Setup Wizard prompt, choose Next.
For Installation Type, choose Everybody (all users).
Choose Next to accept the default installation folder.
Choose Install.
Once the AWS Wickr client has finished installing, uncheck Launch Wickr on the final screen, and then choose Finish.
Run the Image Assistant
To create your own custom image, connect to an image builder instance, install and configure your applications for streaming with guidance from the Image Assistant, and then create your image by creating a snapshot of the image builder instance:
Run the Image Assistant shortcut found on the desktop.
Under 1. ADD APPS, choose Add App.
Choose Program Files, Amazon Web Services, Wickr, and AWS Wickr.
Scroll to the bottom, choose the Wickr application, and then choose Open.
In the pop-up that appears, customize the Name and Display Name (if needed), and then in the Launch Parameters box, enter -datalocation “C:\Users\%username%” (Figure 2).
Figure 2. Updating Launch Parameters
Note: If you want to mask the name of the application within the URL used for streaming, replace the Display Name field text with something else.
Choose Save.
Wickr will now appear as an app on the Image Assistant screen. Choose Next.
Under the 2. CONFIGURE APPS stage, follow the instructions from 1-5, choose Save settings, and choose Next (Figure 3).
Figure 3. Configuring the Application with Image Assistant
Under the 3. TEST stage, carry out steps 1-3.
Under the 4. OPTIMIZE stage, select Launch.
As instructed, once the app has launched successfully, select Continue and wait for the app to be optimized.
Under the 5. CONFIGURE IMAGE stage, give the image that will be created a Name, Displayname, and Description.
Choose the Always use latest agent version checkbox. This ensures that new image builders or fleet instances that are launched from your image always use the latest AppStream 2.0 agent version, and then select Next (Figure 4).
Figure 4. Finalizing the Application Image
Under the 6. REVIEW stage, select Disconnect and Create Image. Your session will be terminated while your image is being created.
Create an AppStream 2.0 fleet
With AppStream 2.0, you create fleet instances and stacks as part of the process of streaming applications. A fleet consists of streaming instances that run the image that you specify.
Return to the AppStream 2.0 management console.
Choose Fleets from the menu on the left.
Choose your Fleet type (this demonstration uses On-Demand) and choose Next.
Give the Fleet a Name, Display name, and a Description. Note: If you wish to mask the name of the fleet within the URL used for streaming, replace the Name and Display name section with something else.
Choose your Fleet instance type (this walkthrough uses a general purpose stream.standard.large instance type).
Adjust the Fleet capacity as required, leave the other sections as they’re displayed by default, and choose Next.
On the Choose an Image screen, choose the image you created earlier.
On the Configure network screen, choose Enable default internet access and choose your VPC, along with three subnets that you will deploy into. Finally, choose the Security group that you will use to restrict access (the default is to allow access from all IPs). Choose Next.
Review your settings and then choose Create fleet.
Create an AppStream 2.0 stack
A stack consists of an associated fleet, user access policies, and storage configurations. In this step, you will create a stack, enable application settings persistence, and associate the stack with the fleet you provisioned previously.
From the menu in the AppStream 2.0 management console, choose Stacks.
Choose Create Stack.
Give the stack a Name, and optionally a Display name and Description.
Leave all other options as they’re displayed by default and choose Next.
In the Enable storage window, ensure that Enable home folders is selected, leave all the settings as they are, and choose Next.
In the Edit user settings section, modify the copy and paste functionality to your requirements, and ensure that Enable application settings persistence is selected. Choose Next.
Review your configuration and choose Create stack.
You will now be presented with an overview of the stack you have created. Choose the Action dropdown list and choose Associate fleet.
From the dropdown list, choose the fleet that you previously provisioned and choose Associate.
Create an AppStream 2.0 user pool
Users can access application stacks through a persistent URL and login credentials by using their email address and a password that they choose. In this step, you will create a user and assign it to a stack so you can access your AppStream 2.0 streaming session.
Choose User pool.
Choose Create user.
Enter an email address, first name, and last name, and then choose Create User.
In the User pool window, choose the User and then choose Action.
Choose Assign stack, choose the newly created stack, and choose Send email notification to user.
Choose Assign stack.
You will receive two emails. Follow the instructions on the one titled Start accessing your apps using AppStream 2.0 to access your app.
Launch your AppStream 2.0 streaming session
In this step, you will use the user created earlier to log in to an AppStream 2.0 streaming session. You will then prove AWS Wickr user data persistence by exiting and logging back into your session.
Note: You will only be able to launch your session once your fleet has been provisioned. This can take around 15-20 minutes.
Choose the login page link from the email you received in the previous section and log in.
You will be presented with the AWS Wickr client icon. Choose it to start your session.
Log in to the AWS Wickr client with your credentials.
As you have application persistence enabled, you can close the tab and the session will pick up from where you left it when you log back in (Figure 5).
Figure 5. Accessing the Streaming Application
Cleanup
To avoid incurring future charges, delete the stack, user, fleet, custom image, and image builder that you have created.
Conclusion
In this post, we demonstrated how customers can take advantage of AppStream 2.0 as a managed service to enable the provisioning of AWS Wickr clients for users, with persistence between sessions, through a web browser.
CloudflareがMicrosoft Azure Active Directory(Azure AD)とCloudflare Zero Trustの間で、リスクをプロアクティブに低減する4つの新しい統合を発表。これらの統合されたサービスにより自動化が進み、セキュリティ担当者は、実装やメンテナンスではなく、脅威への対処に集中することができます。
Cloudflareは「Magic WAN Connector」で接続をさらに容易にします。「Magic WAN Connector」は、あらゆる物理ネットワークまたはクラウドネットワークにインストールして任意のIPトラフィックを自動的に接続、誘導、シェーピングさせる軽量ソフトウェアパッケージです。早期アクセスに登録する。
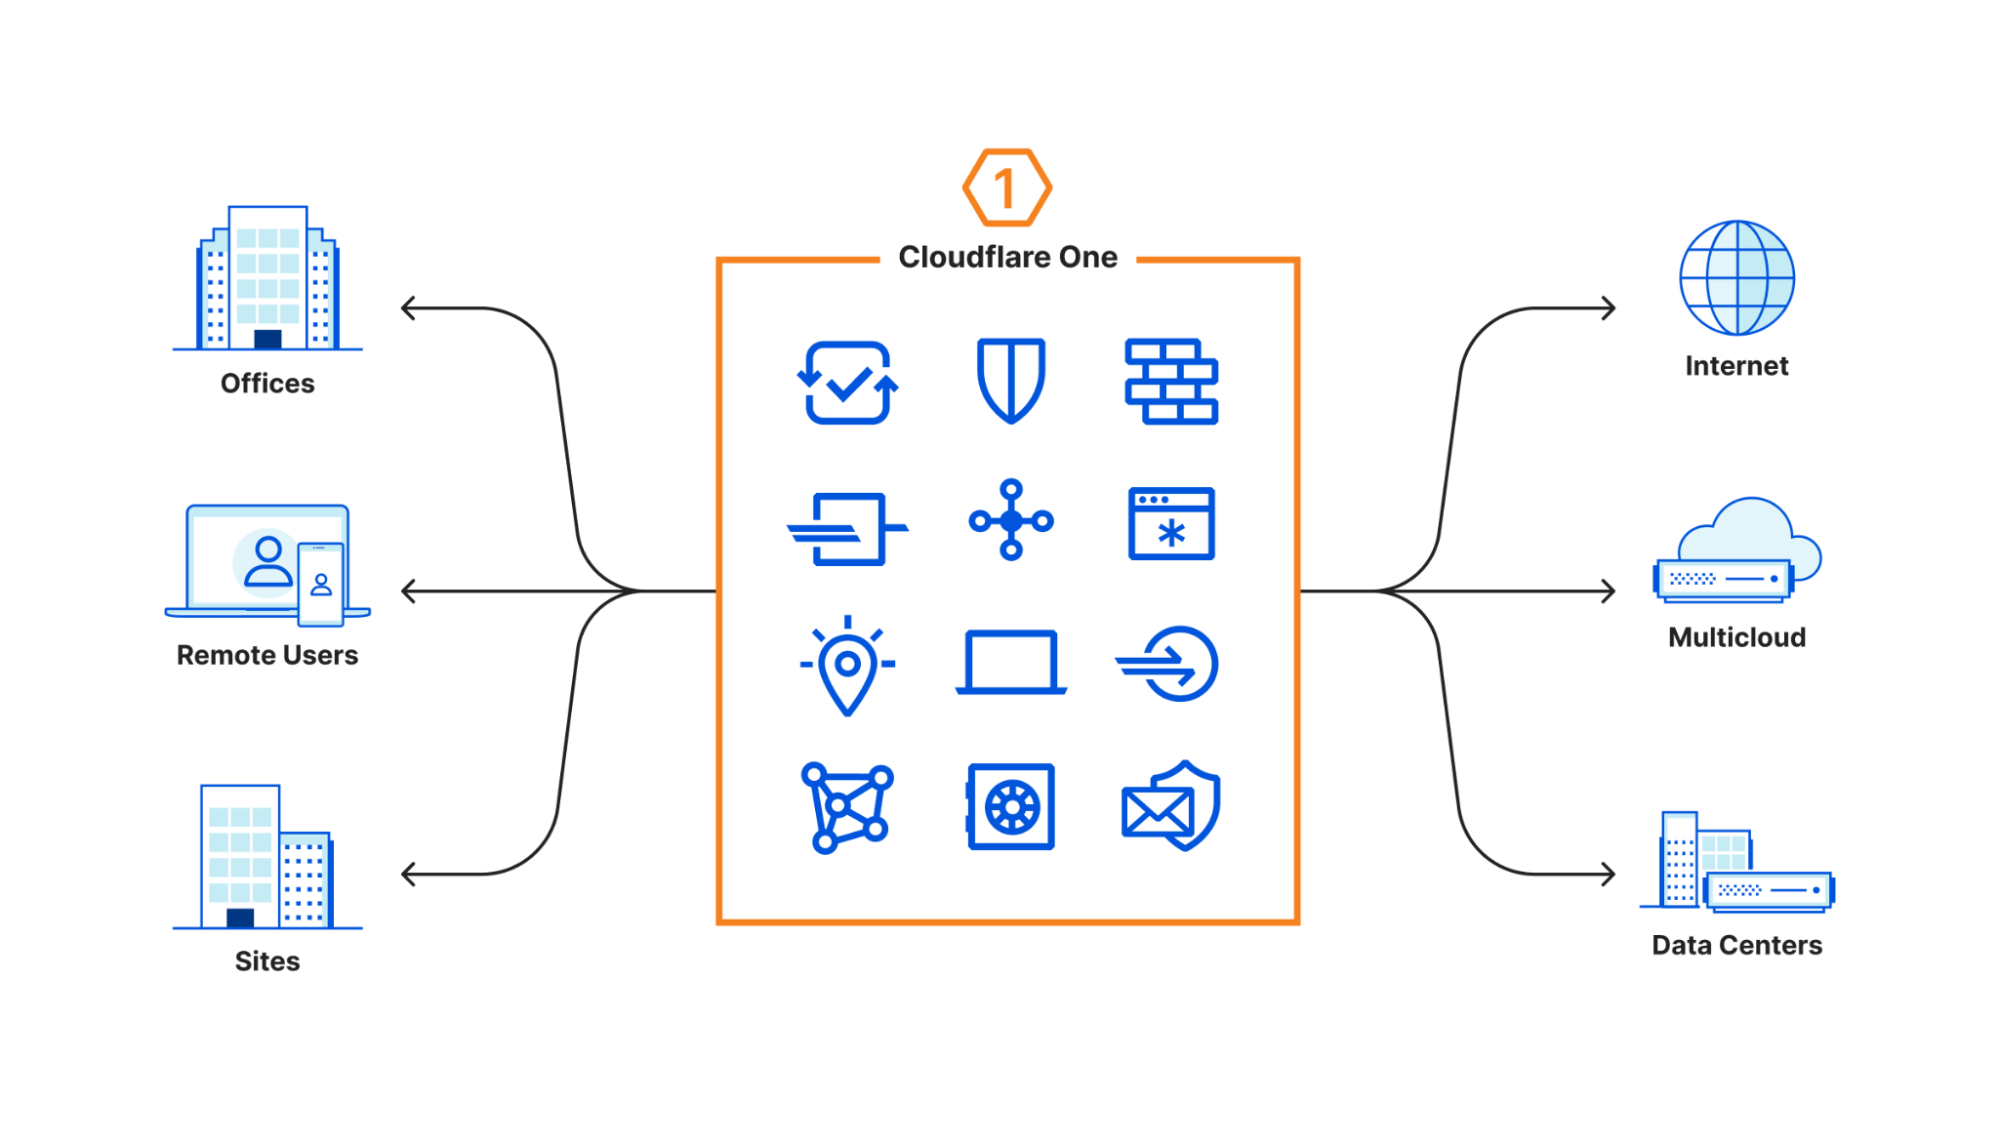
For CIOs, networking is a hard process that is often made harder. Corporate networks have so many things that need to be connected and each one of them needs to be connected differently: user devices need managed connectivity through a Secure Web Gateway, offices need to be connected using the public Internet or dedicated connectivity, data centers need to be managed with their own private or public connectivity, and then you have to manage cloud connectivity on top of it all! It can be exasperating to manage connectivity for all these different scenarios and all their privacy and compliance requirements when all you want to do is enable your users to access their resources privately, securely, and in a non-intrusive manner.
Cloudflare helps simplify your connectivity story with Cloudflare One. Today, we’re excited to announce that we support direct cloud interconnection with our Cloudflare Network Interconnect, allowing Cloudflare to be your one-stop shop for all your interconnection needs.
Customers using IBM Cloud, Google Cloud, Azure, Oracle Cloud Infrastructure, and Amazon Web Services can now open direct connections from their private cloud instances into Cloudflare. In this blog, we’re going to talk about why direct cloud interconnection is important, how Cloudflare makes it easy, and how Cloudflare integrates direct cloud connection with our existing Cloudflare One products to bring new levels of security to your corporate networks built on top of Cloudflare.
Privacy in a public cloud
Public cloud compute providers are built on the idea that the compute power they provide can be used by anyone: your cloud VM and my cloud VM can run next to each other on the same machine and neither of us will know. The same is true for bits on the wire going in and out of these clouds: your bits and my bits may flow on the same wire, interleaved with each other, and neither of us will know that it’s happening.
The abstraction and relinquishment of ownership is comforting in one way but can be terrifying in another: neither of us need to run a physical machine and buy our own connectivity, but we have no guarantees about how or where our data and compute lives except that it lives in a datacenter with millions of other users.
For many enterprises, this isn’t acceptable: enterprises need compute that can only be accessed by them. Maybe the compute in the cloud is storing payment data that can’t be publicly accessible, and must be accessed through a private connection. Maybe the cloud customer has compliance requirements due to government restrictions that require the cloud not be accessible to the public Internet. Maybe the customer simply doesn’t trust public clouds or the public Internet and wants to limit exposure as much as possible. Customers want a private cloud that only they can access: a virtual private cloud, or a VPC.
To help solve this problem and ensure that only compute owners can access cloud compute that needs to stay private, clouds developed private cloud interconnects: direct cables from clouds to their customers. You may know them by their product names: AWS calls theirs DirectConnect, Azure calls theirs ExpressRoute, Google Cloud calls theirs Cloud Interconnect, OCI calls theirs FastConnect, and IBM calls theirs Direct Link. By providing private cloud connectivity to the customer datacenter, clouds satisfy the chief pain points for their customers: providing compute in a private manner. With these private links, VPCs are only accessible from the corporate networks that they’re plugged into, providing air-gapped security while allowing customers to turn over operations and maintenance of the datacenters to the clouds.
Privacy on the public Internet
But while VPCs and direct cloud interconnection have solved the problem of infrastructure moving to the cloud, as corporate networks move out of on-premise deployments, the cloud brings a completely new challenge: how do I keep my private cloud connections if I’m getting rid of my corporate network that connects all my resources together?
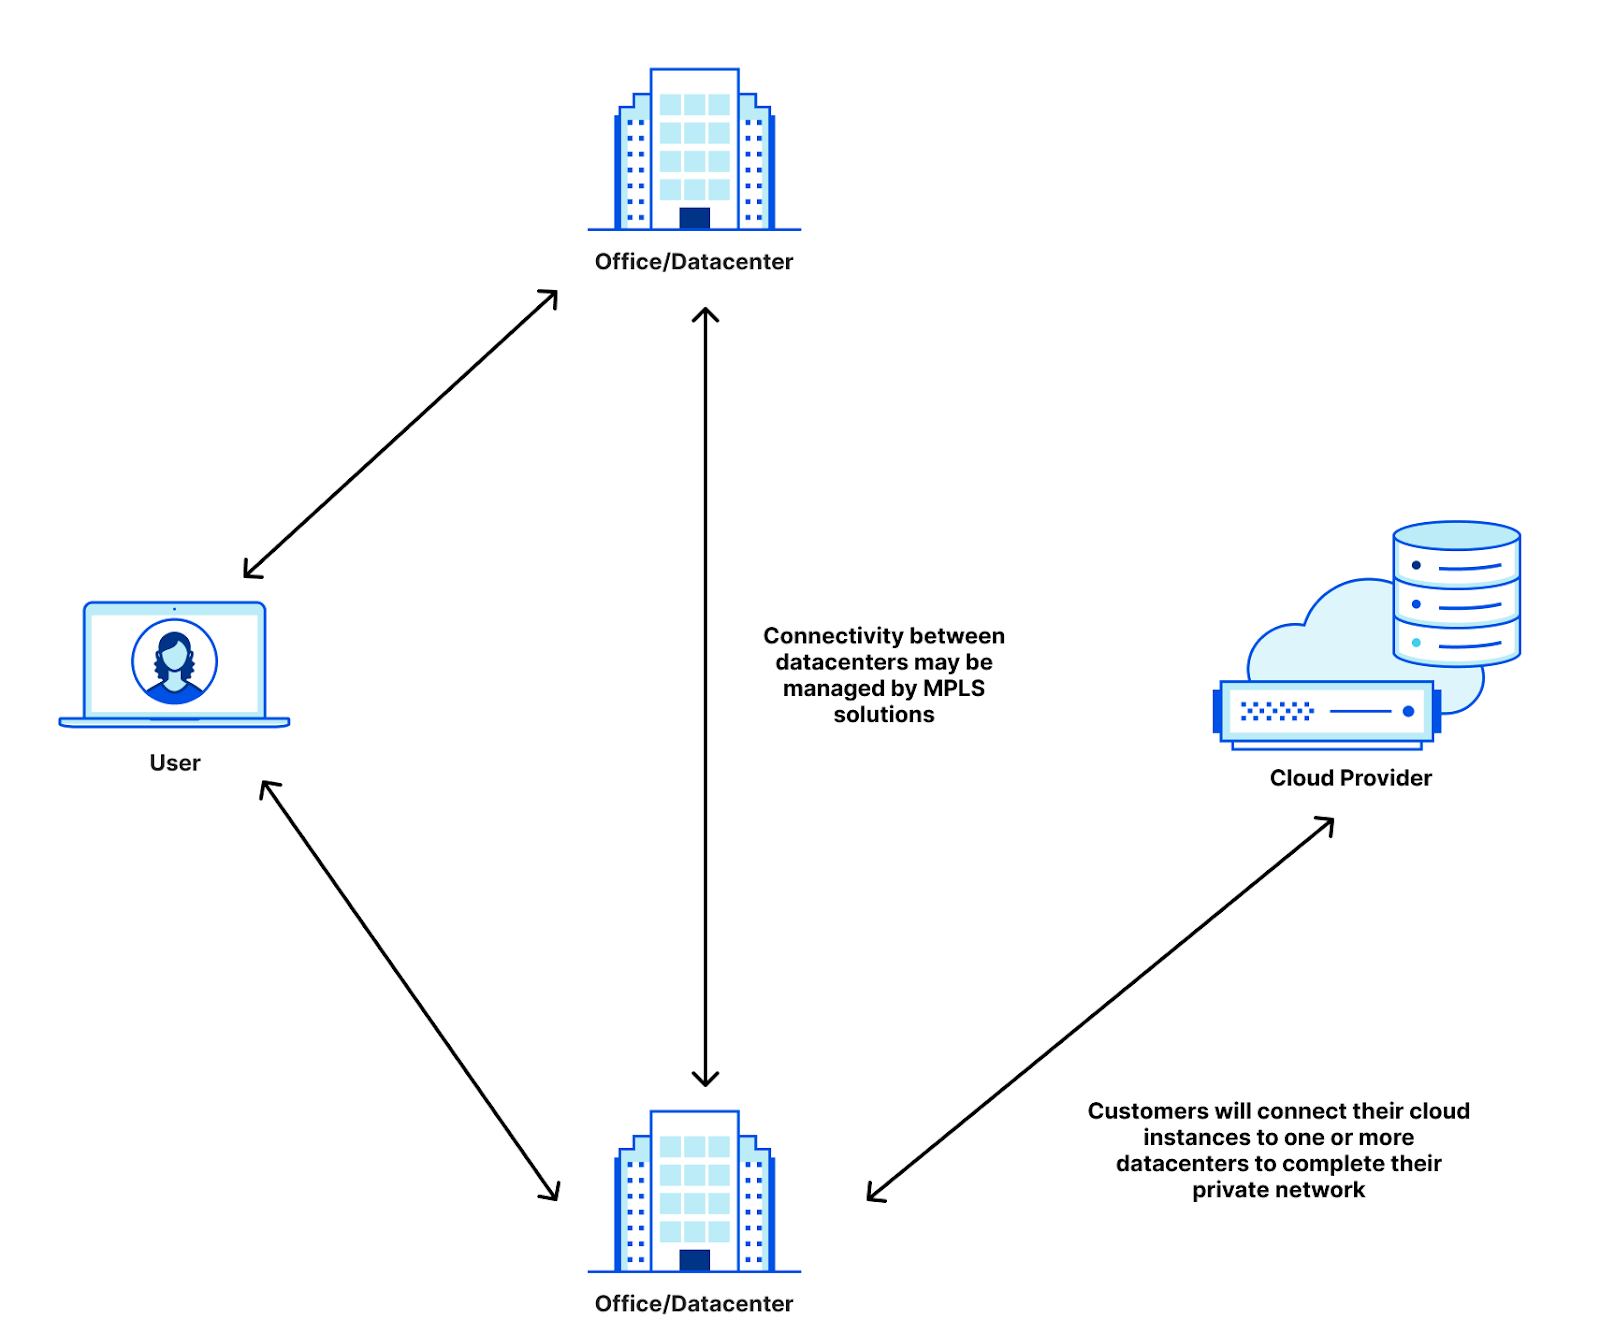
Let’s take an example company that connects a data center, an office, and an Azure instance together. Today, this company may have remote users that connect to applications hosted in either the datacenter, the office, or the cloud instance. Users in the office may connect to applications in the cloud, and all of it today is managed by the company. To do this, they may employ VPNs that tunnel the remote users into the data center or office before accessing the necessary applications. The office and data center are often connected through MPLS lines that are leased from connectivity providers. And then there’s the private IBM instance that is connected via IBM Direct Link. That’s three different connectivity providers for CIOs to manage, and we haven’t even started talking about access policies for the internal applications, firewalls for the cross-building network, and implementing MPLS routing on top of the provider underlay.
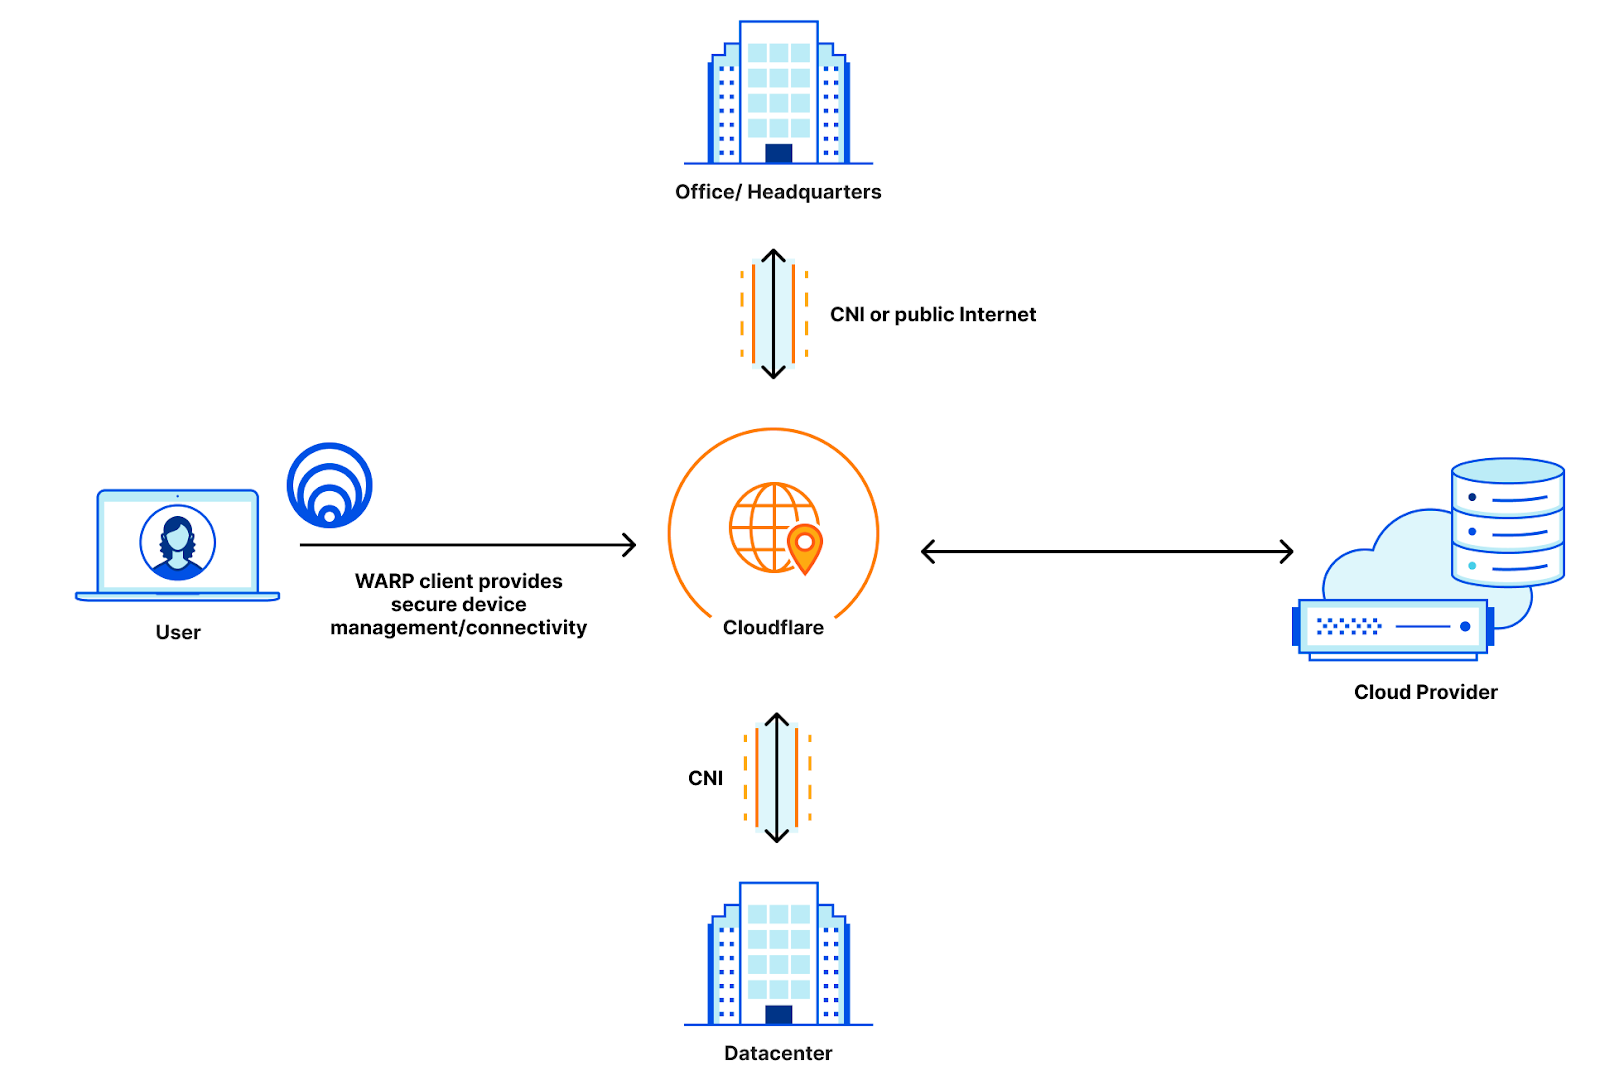
Cloudflare One helps simplify this by allowing companies to insert Cloudflare as the network for all the different connectivity options. Instead of having to run connections between buildings and clouds, all you need to do is manage your connections to Cloudflare.
WARP manages connectivity for remote users, Cloudflare Network Interconnect provides the private connectivity from data centers and offices to Cloudflare, and all of that can be managed with Access policies for policing applications and Magic WAN to provide the routing that gets your users where they need to go. When we released Cloudflare One, we were able to simplify the connectivity story to look like this:
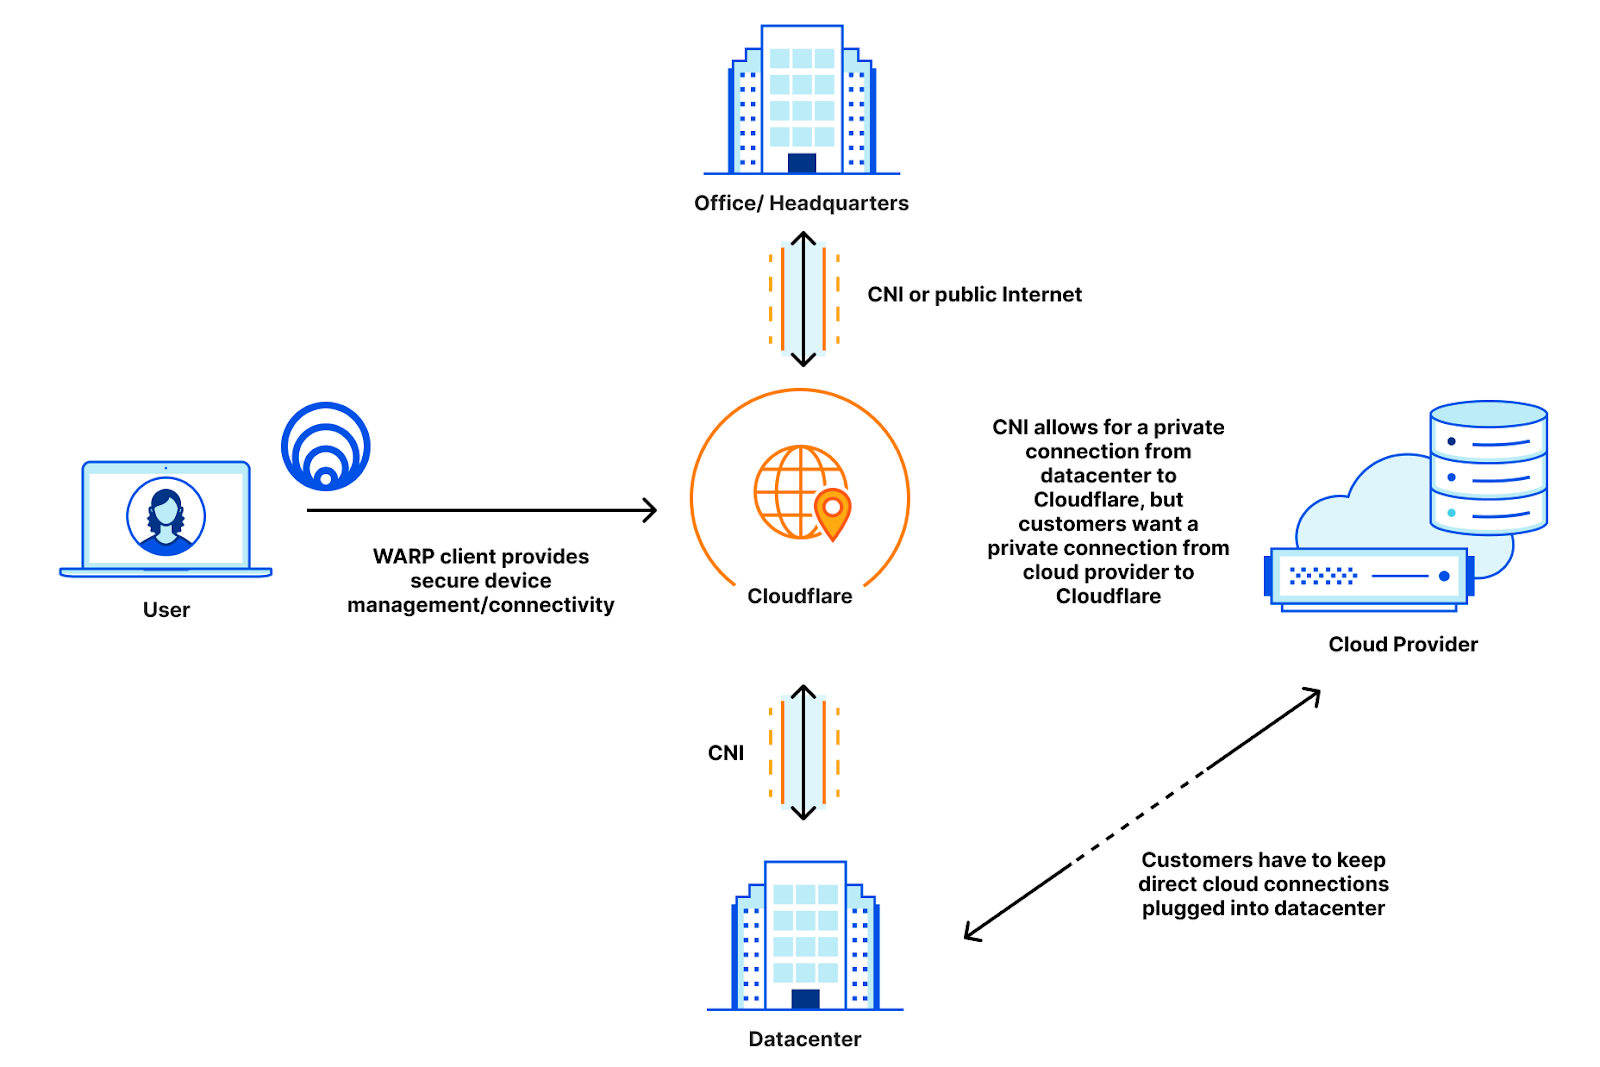
Before, users with private clouds had to either expose their cloud instances to the public Internet, or maintain suboptimal routing by keeping their private cloud instances connected to their data centers instead of directly connecting to Cloudflare. This means that these customers have to maintain their private connections directly to their data centers, which adds toil to a solution that is supposed to be easier:
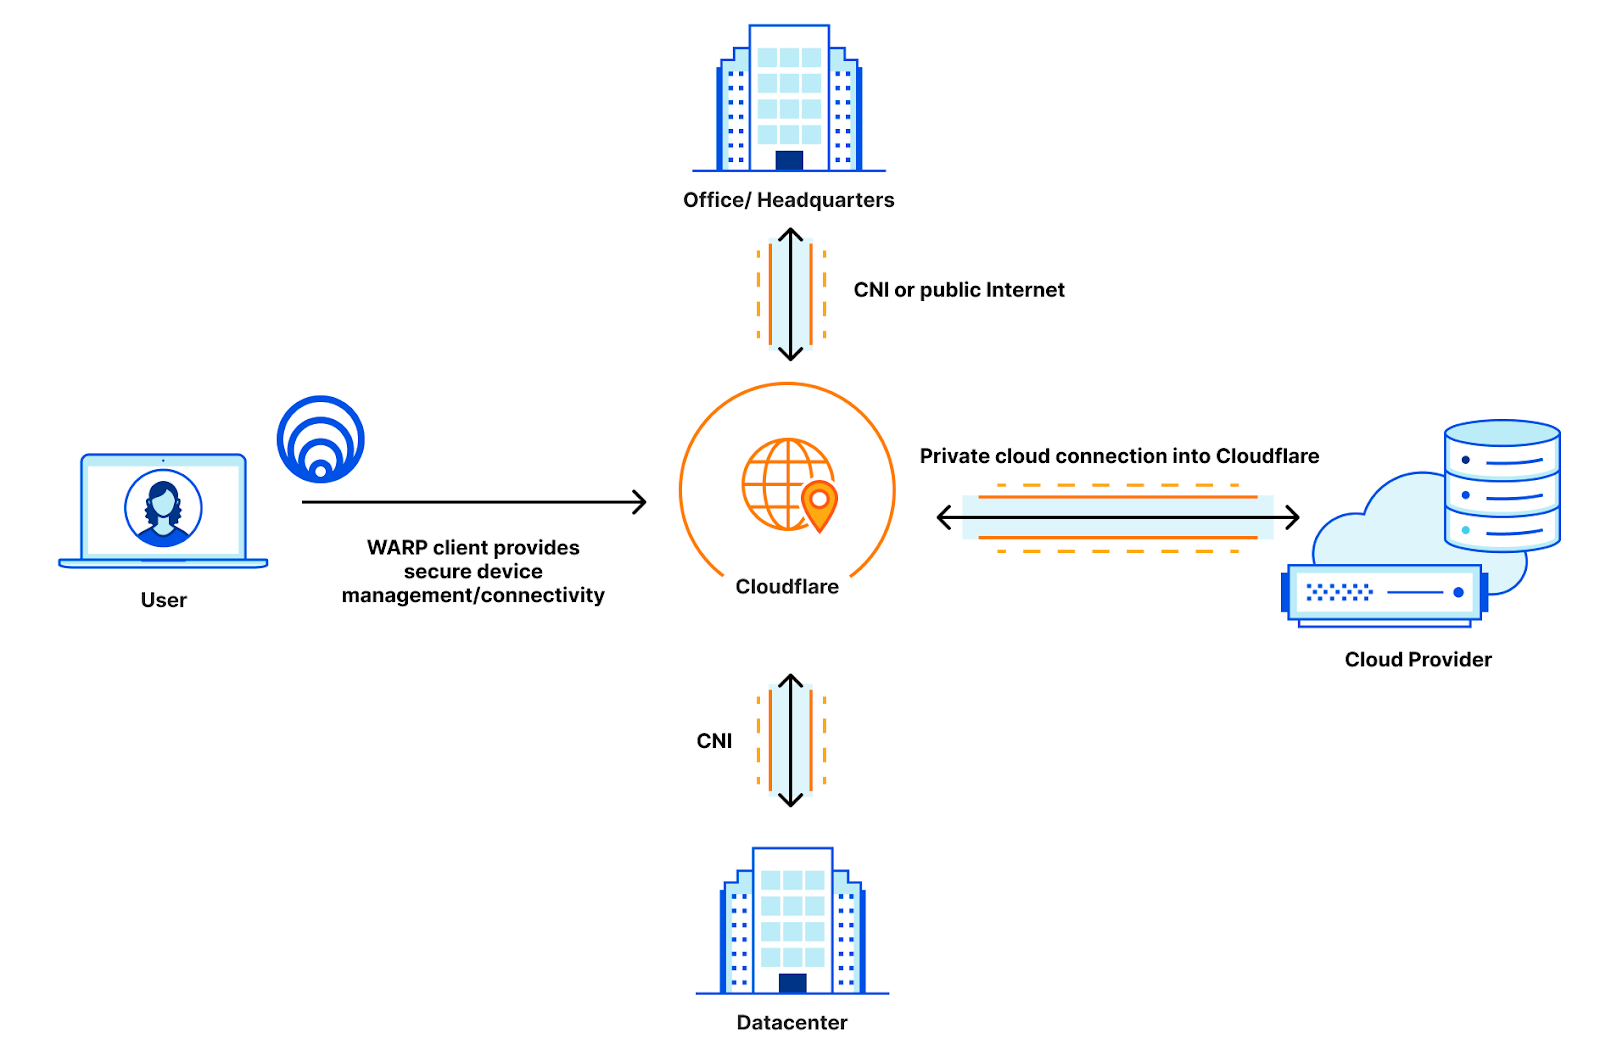
Now that CNI supports cloud environments, this company can open a private cloud link directly into Cloudflare instead of into their data center. This allows the company to use Cloudflare as a true intermediary between all of their resources, and they can rely on Cloudflare to manage firewalls, access policies, and routing for all of their resources, trimming the number of vendors they need to manage for routing down to one: just Cloudflare!
Once everything is directly connected to Cloudflare, this company can manage their cross-resource routing and firewalls through Magic WAN, they can set their user policies directly in Access, and they can set egress policies out to the public Internet through any one of Cloudflare’s 250+ data centers through Gateway. All the offices and clouds talk to each other on a hermetically sealed network with no public access or publicly shared peering links, and most importantly, all of these security and privacy efforts are done completely transparently to the user.
So let’s talk about how we can get your cloud connected to us.
Quick cloud connectivity
The most important thing with cloud connectivity is how easy it should be: you shouldn’t have to spend lots of time waiting for cross-connects to come up, get LOAs, monitor light levels and do all the things that you would normally do when provisioning connectivity. Getting connected from your cloud provider should be cloud-native: you should just be able to provision cloud connectivity directly from your existing portals and follow the existing steps laid out for direct cloud connection.
That’s why our new cloud support makes it even easier to connect with Cloudflare. We now support direct cloud connectivity with IBM, AWS, Azure, Google Cloud, and OCI so that you can provision connections directly from your cloud provider into Cloudflare like you would to a datacenter. Moving private connections to Cloudflare means you don’t have to maintain your own infrastructure anymore, Cloudflare becomes your infrastructure, so you don’t have to worry about ordering cross-connects into your devices, getting LOAs, or checking light levels. To show you how easy this can be, let’s walk through an example of how easy this is using Google Cloud.
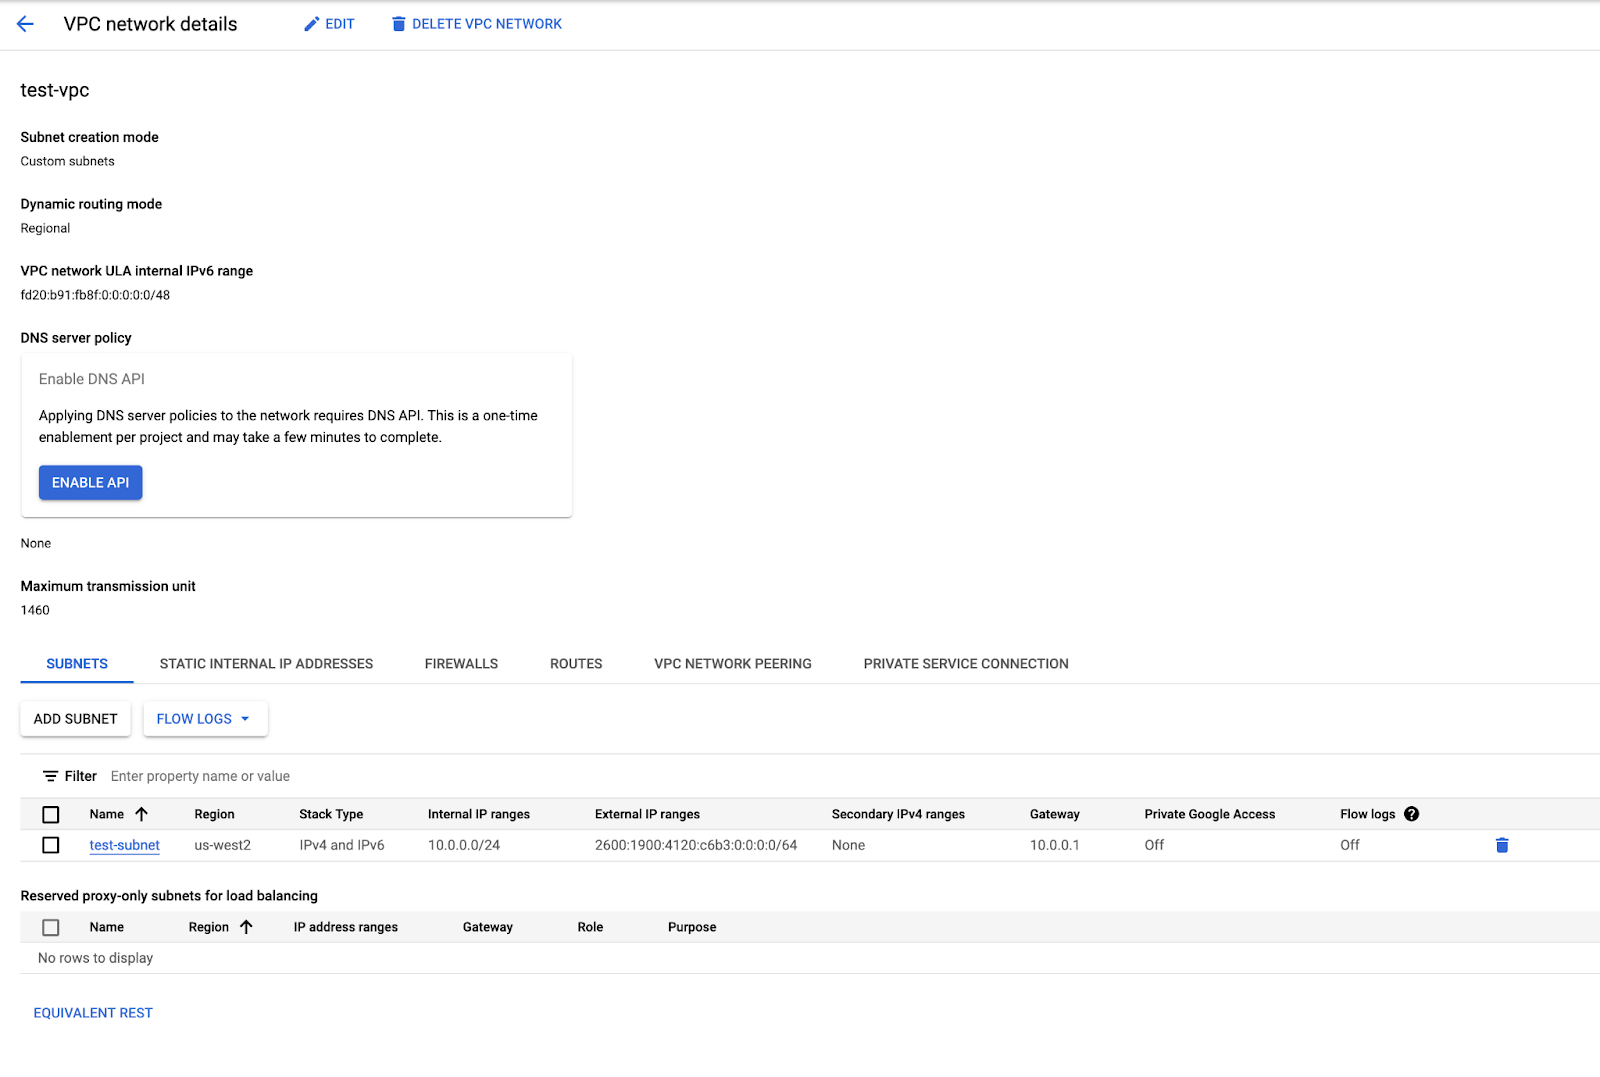
The first step to provisioning connectivity in any cloud is to request a connection. In Google Cloud, you can do this by selecting “Private Service Connection” in the VPC network details:
That will allow you to select a partner connection or a direct connection. In Cloudflare’s case, you should select a partner connection. Follow the instructions to select a connecting region and datacenter site, and you’ll get what’s called a connection ID, which is used by Google Cloud and Cloudflare to identify the private connection with your VPC:
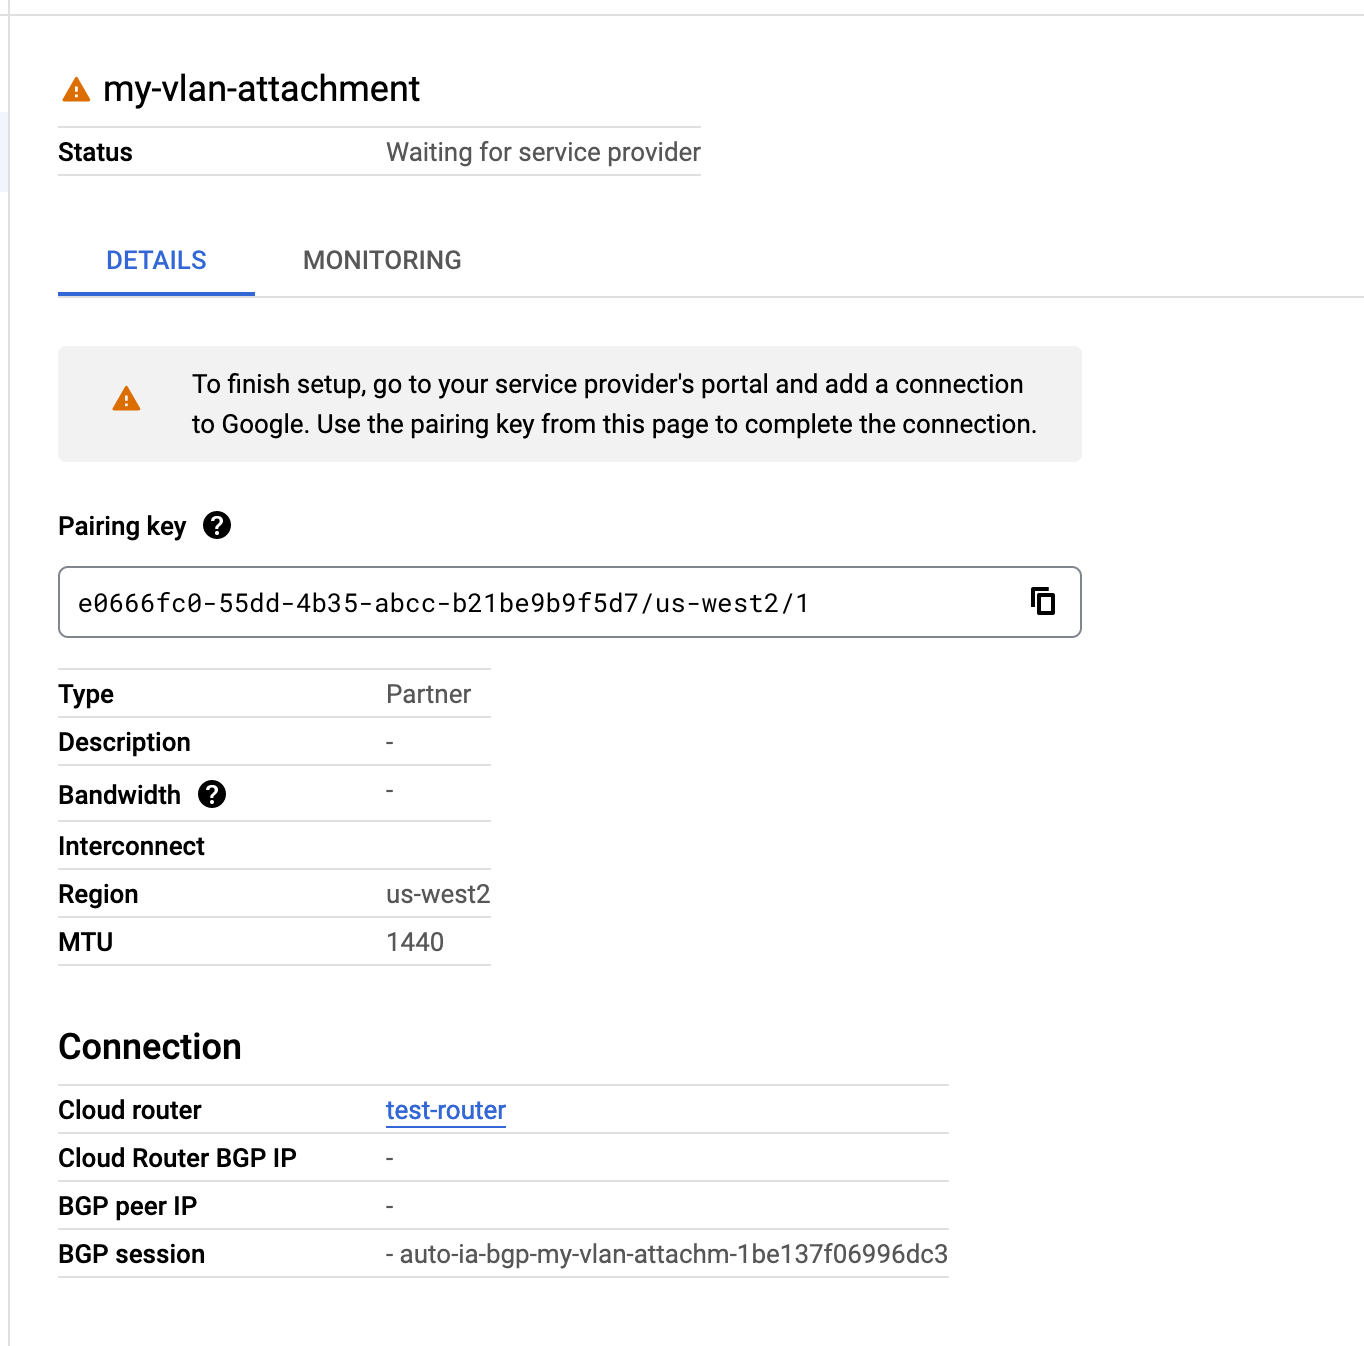
You’ll notice in this screenshot that it says you need to configure the connection on the partner side. In this case, you can take that key and use it to automatically provision a virtual connection on top of an already existing link. The provisioning process consists of five steps:
Assigning unique VLANs to your connection to ensure a private connection
Assigning unique IP addresses for a BGP point-to-point connection
Provisioning a BGP connection on the Cloudflare side
Passing this information back to Google Cloud and creating the connection
Accepting the connection and finishing BGP provisioning on your VPC
All of these steps are performed automatically in seconds so that by the time you get your IP address and VLANs, Cloudflare has already provisioned our end of the connection. When you accept and configure the connection, everything will be ready to go, and it’s easy to start privately routing your traffic through Cloudflare.
Now that you’ve finished setting up your connection, let’s talk about how private connectivity to your cloud instances can integrate with all of your Cloudflare One products.
Private routing with Magic WAN
Magic WAN integrates extremely well with Cloud CNI, allowing customers to connect their VPCs directly to the private network built with Magic WAN. Since the routing is private, you can even advertise your private address spaces reserved for internal routing, such as your 10.0.0.0/8 space.
Previously, your cloud VPC needed to be publicly addressable. But with Cloud CNI, we assign a point-to-point IP range, and you can advertise your internal spaces back to Cloudflare and Magic WAN will route traffic to your internal address spaces!
Secure authentication with Access
Many customers love Cloudflare Tunnel in combination with Access for its secure paths to authentication servers hosted in cloud providers. But what if your authentication server didn’t need to be publicly accessible at all? With Access + Cloud CNI, you can connect your authentication services to Cloudflare and Access will route all your authentication traffic through the private path back to your service without needing the public Internet.
Manage your cloud egress with Gateway
While you may want to protect your cloud services from ever being accessed by anyone not on your network, sometimes your cloud services need to talk out to the public Internet. Luckily for you, Gateway has you covered and with Cloud CNI you can get a private path to Cloudflare which will manage all of your egress policies, ensuring that you can carefully watch your cloud service outbound traffic from the same place you monitor all other traffic leaving your network.
Cloud CNI: safe, performant, easy
Cloudflare is committed to making zero trust and network security easy and unobtrusive. Cloud CNI is another step towards ensuring that your network is as easy to manage as everything else so that you can stop focusing on how to build your network, and start focusing on what goes on top of it.
If you’re interested in Cloud CNI, contact us today to get connected to a seamless and easy Zero Trust world.
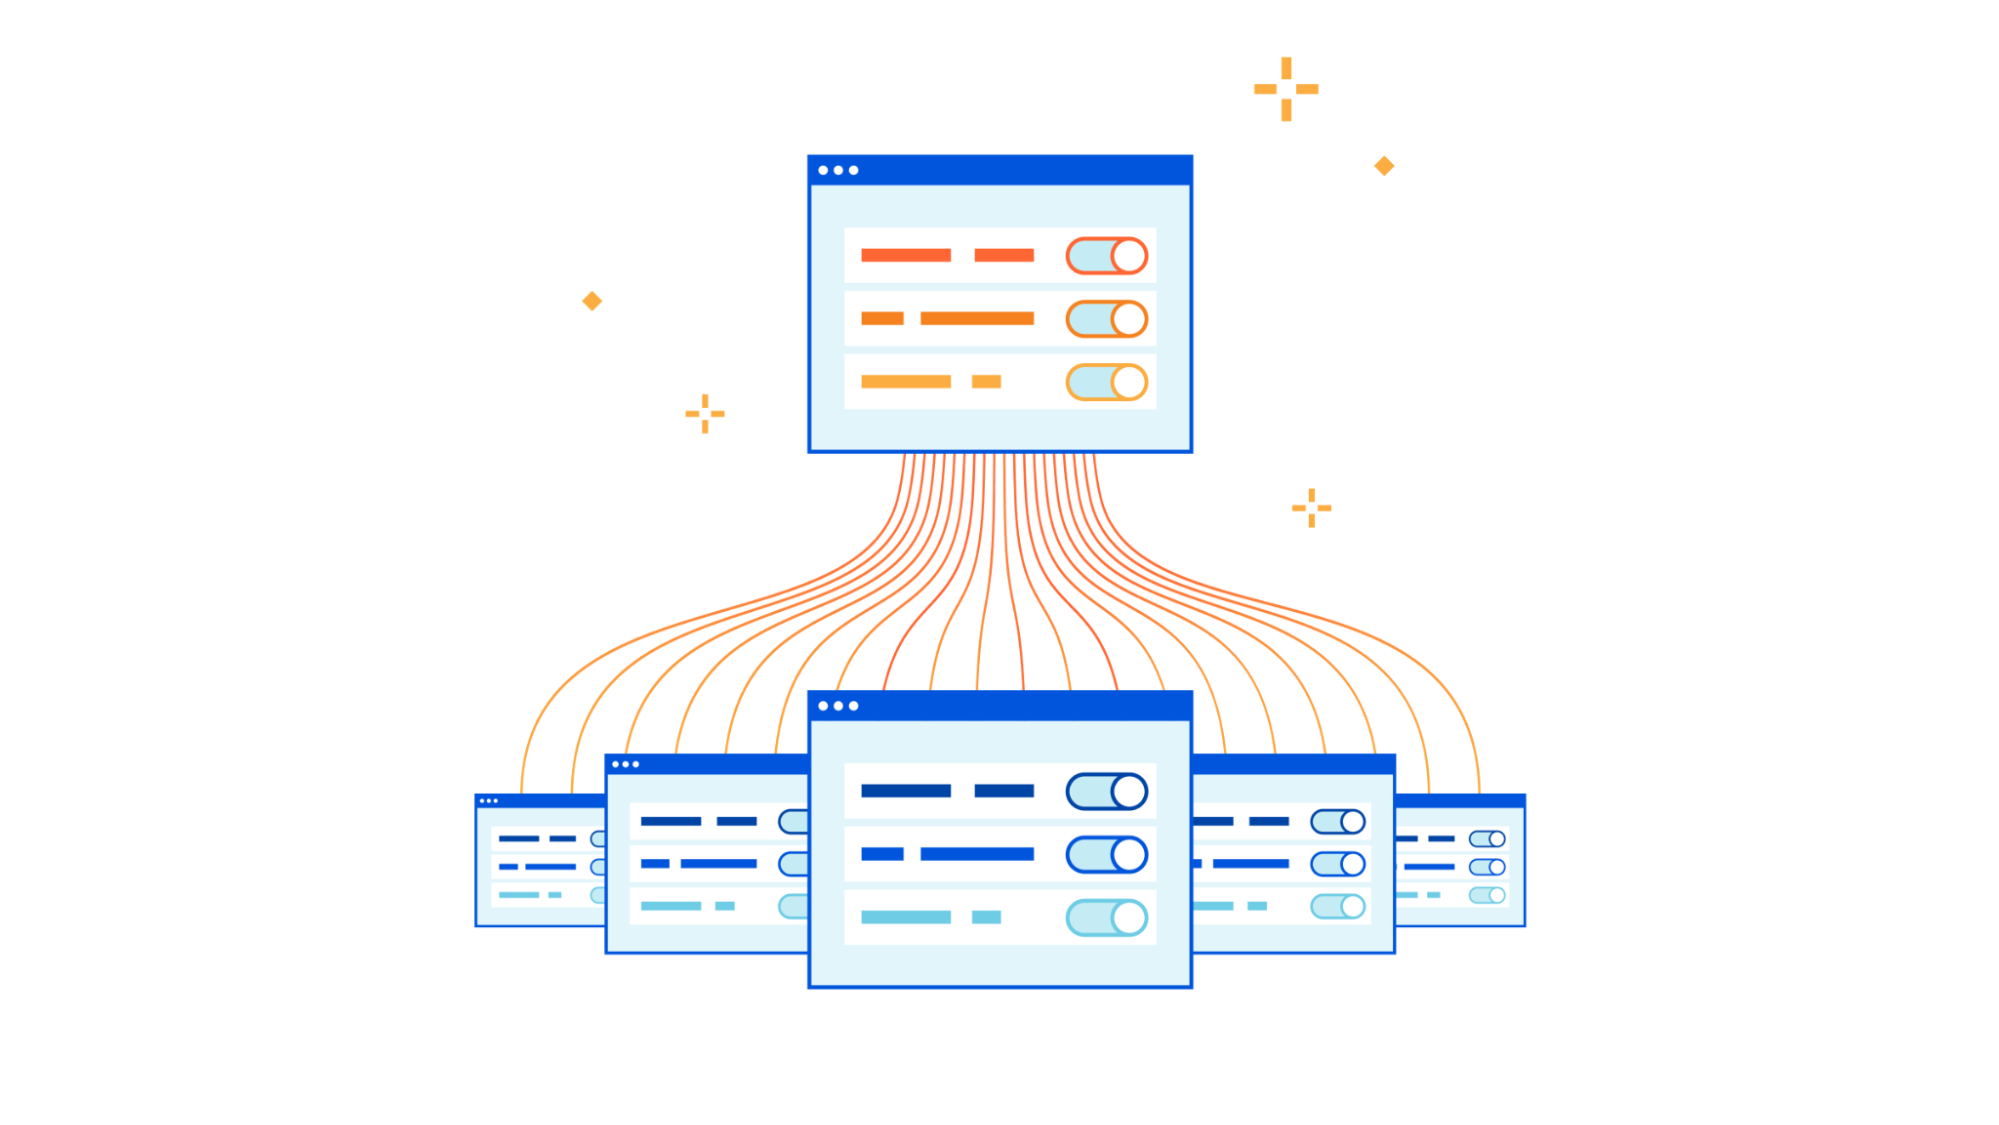
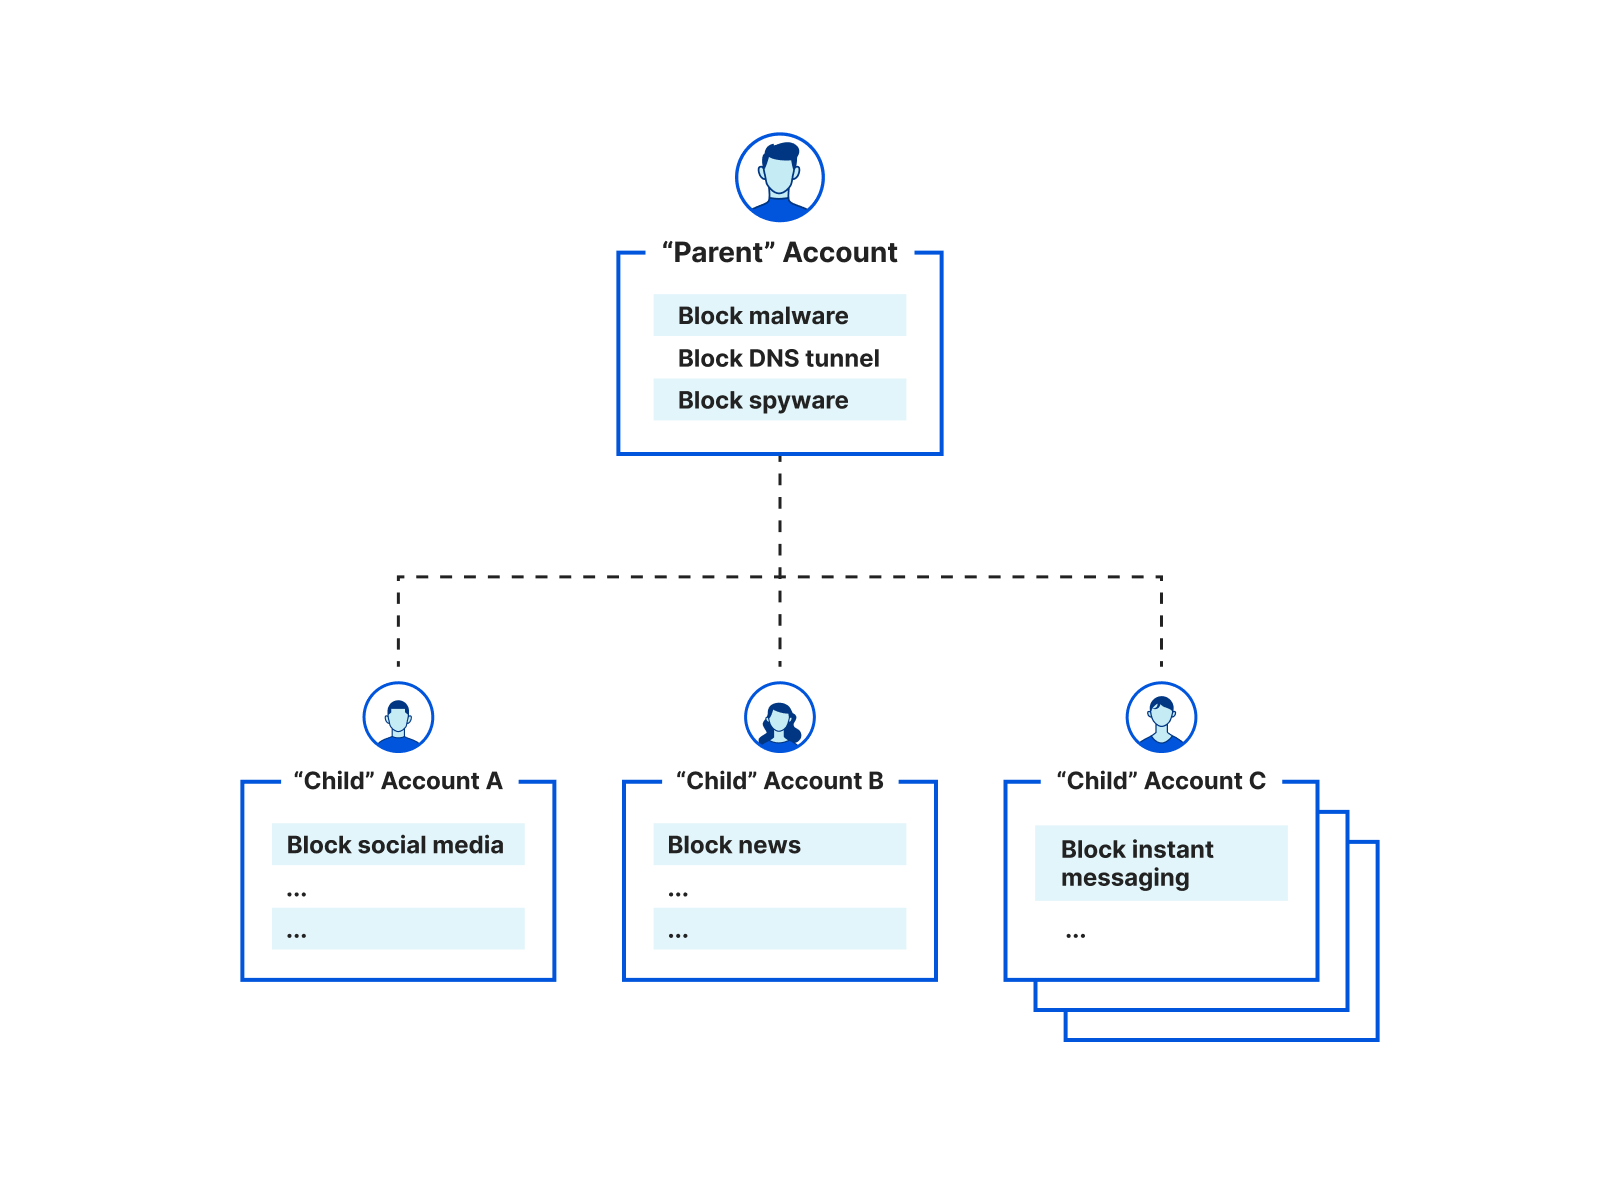
As part of CIO week, we are announcing a new integration between our DNS Filtering solution and our Partner Tenant platform that supports parent-child policy requirements for our partner ecosystem and our direct customers. Our Tenant platform, launched in 2019, has allowed Cloudflare partners to easily integrate Cloudflare solutions across millions of customer accounts. Cloudflare Gateway, introduced in 2020, has grown from protecting personal networks to Fortune 500 enterprises in just a few short years. With the integration between these two solutions, we can now help Managed Service Providers (MSPs) support large, multi-tenant deployments with parent-child policy configurations and account-level policy overrides that seamlessly protect global employees from threats online.
Why work with Managed Service Providers?
Managed Service Providers (MSPs) are a critical part of the toolkit of many CIOs. In the age of disruptive technology, hybrid work, and shifting business models, outsourcing IT and security operations can be a fundamental decision that drives strategic goals and ensures business success across organizations of all sizes. An MSP is a third-party company that remotely manages a customer’s information technology (IT) infrastructure and end-user systems. MSPs promise deep technical knowledge, threat insights, and tenured expertise across a variety of security solutions to protect from ransomware, malware, and other online threats. The decision to partner with an MSP can allow internal teams to focus on more strategic initiatives while providing access to easily deployable, competitively priced IT and security solutions. Cloudflare has been making it easier for our customers to work with MSPs to deploy and manage a complete Zero Trust transformation.
One decision criteria for selecting an appropriate MSP is the provider’s ability to keep the partner’s best technology, security and cost interests in mind. An MSP should be leveraging innovative and lower cost security solutions whenever possible to drive the best value to your organization. Out of date technology can quickly incur higher implementation and maintenance costs compared to more modern and purpose-built solutions given the broader attack surface brought about by hybrid work. In a developing space like Zero Trust, an effective MSP should be able to support vendors that can be deployed globally, managed at scale, and effectively enforce global corporate policy across business units. Cloudflare has worked with many MSPs, some of which we will highlight today, that implement and manage Zero Trust security policies cost-effectively at scale.
The MSPs we are highlighting have started to deploy Cloudflare Gateway DNS Filtering to complement their portfolio as part of a Zero Trust access control strategy. DNS filtering provides quick time-to-value for organizations seeking protection from ransomware, malware, phishing, and other Internet threats. DNS filtering is the process of using the Domain Name System to block malicious websites and prevent users from reaching harmful or inappropriate content on the Internet. This ensures that company data remains secure and allows companies to have control over what their employees can access on company-managed networks and devices.
Filtering policies are often set by the Organization with consultation from the service provider. In some cases, these policies also need to be managed independently at the account or business unit level by either the MSP or the customer. This means it is very common for a parent-child relationship to be required to balance the deployment of corporate level rules from customization across devices, office locations, or business units. This structure is vital for MSPs that are deploying access policies across millions of devices and accounts.
Better together: Zero Trust ❤️ Tenant Platform
To make it easier for MSPs to manage millions of accounts with appropriate access controls and policy management, we integrated Cloudflare Gateway with our existing Tenant platform with a new feature that provides parent-child configurations. This allows MSP partners to create and manage accounts, set global corporate security policies, and allow appropriate management or overrides at the individual business unit or team level.
The Tenant platform allows MSPs ability to create millions of end customer accounts at their discretion to support their specific onboarding and configurations. This also ensures proper separation of ownership between customers and allows end customers to access the Cloudflare dashboard directly, if required.
Each account created is a separate container of subscribed resources (zero trust policies, zones, workers, etc.) for each of the MSPs end customers. Customer administrators can be invited to each account as necessary for self-service management, while the MSP retains control of the capabilities enabled for each account.
With MSPs now able to set up and manage accounts at scale, we’ll explore how the integration with Cloudflare Gateway lets them manage scaled DNS filtering policies for these accounts.
Tiered Zero Trust accounts
With individual accounts for each MSP end customer in place, MSPs can either fully manage the deployment or provide a self-service portal backed by Cloudflare configuration APIs. Supporting a configuration portal also means you would never want your end users to block access to this domain, so the MSP can add a hidden policy to all of its end customer accounts when they onboard which would be a simple one time API call. Although issues start to arise anytime they need to push an update to said policy, this now means they have to update the policy once for each and every MSP end customer and for some MSPs that can mean over 1 million API calls.
To help turn this into a single API call, we introduced the concept of a top level account aka parent account. This parent account allows MSPs to set global policies which are applied to all DNS queries before the subsequent MSP end customer policies aka child account policies. This structure helps ensure MSPs can set their own global policies for all of their child accounts while each child account can further filter their DNS queries to meet their needs without impacting any other child account.
This extends further than just policies as well, each child account can create their own custom block page, upload their own certificates to display these block pages, and set up their own DNS endpoints (IPv4, IPv6, DoH, and DoT) via Gateway locations. Also, because these are the exact same as non-MSP Gateway accounts, there aren’t any lower limits when it comes to the default limits on the number policies, locations, or lists per parent or child account.
Managed Service Provider integrations
To help bring this to life, below are real-world examples of how Cloudflare customers are using this new managed service provider feature to help protect their organizations.
US federal government
The US federal government requires many of the same services to support a protective DNS service for their 100+ civilian agencies, and they often outsource many of their IT and security operations to service providers like Accenture Federal Services (AFS).
In 2022, Cloudflare and AFS were selected by Cybersecurity and Infrastructure Security Agency (CISA) with the Department of Homeland Security (DHS) to develop a joint solution to help the federal government defend itself against cyberattacks. The solution consists of Cloudflare’s protective DNS resolver which will filter DNS queries from offices and locations of the federal government and stream events directly to Accenture’s platform to provide unified administration and log storage.
Accenture Federal Services is providing a central interface to each department that allows them to adjust their DNS filtering policies. This interface works with Cloudflare’s Tenant platform and Gateway client APIs to provide a seamless customer experience for government employees managing their security policies using our new parent-child configurations. CISA, as the parent account, can set their own global policies, while allowing agencies, child accounts, to bypass select global policies, and set their own default block pages.
In conjunction with our parent-child structure we provided a few improvements to our DNS location matching and filtering defaults. Currently, all Gateway accounts can purchase a dedicated IPv4 resolver IP address(es) and these are great for situations where a customer doesn’t have a static source IP address or wants their own IPv4 address to host the solution.
For CISA, they wanted not only a dedicated IPv4 address but to assign that same address from their parent account to their child accounts. This would allow them to have their own default IPv4 addresses for all agencies easing the burden of onboarding. Next they also want the ability to fail closed, which means if a DNS query did not match any location (which must have a source IPv4 address/network configured) it would be dropped. This allows CISA to ensure only configured IPv4 networks had access to their protective services. Lasty, we didn’t have to address this with IPv6, DoH, and DoT DNS endpoints as those are custom with each and every DNS location created.
Malwarebytes
Malwarebytes, a global leader in real-time cyber protection, recently integrated with Cloudflare to provide a DNS filtering module within their Nebula platform. The Nebula platform is a cloud-hosted security operations solution that manages control of any malware or ransomware incident—from alert to fix. This new module allows Malwarebytes customers to filter on content categories and add policy rules for groups of devices. A key need was the ability to easily integrate with their current device client, provide individual account management, and provide room for future expansion across additional Zero Trust services like Cloudflare Browser Isolation.
Cloudflare was able to provide a comprehensive solution that was easily integrated into the Malwarebytes platform. This included using DNS-over-HTTP (DoH) to segment users across unique locations and adding a unique token per device to properly track the device ID and apply the correct DNS policies. And lastly, the integration was completed using the Cloudflare Tenant API which allowed seamless integration with their current workflow and platform. This combination of our Zero Trust services and Tenant platform let Malwarebytes quickly go to market for new segments within their business.
“It’s challenging for organizations today to manage access to malicious sites and keep their end users safe and productive. Malwarebytes’ DNS Filtering module extends our cloud-based security platform to web protection. After evaluating other Zero Trust providers it was clear to us that Cloudflare could offer the comprehensive solution IT and security teams need while providing lightning fast performance at the same time. Now, IT and security teams can block whole categories of sites, take advantage of an extensive database of pre-defined scores on known, suspicious web domains, protect core web-based applications and manage specific site restrictions, removing the headache from overseeing site access.” – Mark Strassman, Chief Product Officer, Malwarebytes
Large global ISP
We’ve been working with a large global ISP recently to support DNS filtering which is a part of a larger security solution offered for families for over one million accounts in just the first year! The ISP leverages our Tenant and Gateway APIs to seamlessly integrate into their current platform and user experience with minimal engineering effort. We look forward to sharing more detail around this implementation in the coming months.
What’s next
As the previous stories highlight, MSPs play a key role in securing today’s diverse ecosystem of organizations, of all sizes and maturities. Companies of all sizes find themselves squaring off against the same complex threat landscape and are challenged to maintain a proper security posture and manage risk with constrained resources and limited security tooling. MSPs provide the additional resources, expertise and advanced security tooling that can help reduce the risk profile for these companies. Cloudflare is committed to making it easier for MSPs to be effective in delivering Zero Trust solutions to their customers.
Given the importance of MSPs for our customers and the continued growth of our partner network, we plan to launch quite a few features in 2023 and beyond that better support our MSP partners. First, a key item on our roadmap is the development of a refreshed tenant management dashboard for improved account and user management. Second, we want to extend our multi-tenant configurations across our entire Zero Trust solution set to make it easier for MSPs to implement secure hybrid work solutions at scale.
Lastly, to better support hierarchical access, we plan to expand the user roles and access model currently available to MSP partners to allow their teams to more easily support and manage their various accounts. Cloudflare has always prided itself on its ease of use, and our goal is to make Cloudflare the Zero Trust platform of choice for service and security providers globally.
Throughout CIO week, we’ve touched on how our partners are helping modernize the security posture for their customers to align with a world transformed by hybrid work and hybrid multi-cloud infrastructures. Ultimately, the power of Cloudflare Zero Trust comes from its existence as a composable, unified platform that draws strength from its combination of products, features, and our partner network.
If you’d like to learn more about improving your security with DNS Filtering and Zero Trust, or would like to get started today, test the platform yourself with 50 free seats by signing up here.
In our Welcome to CIO Week 2023 post, we talked about wanting to start the year by celebrating the work Chief Information Officers do to keep their organizations safe and productive.
Over the past week, you learned about announcements addressing all facets of your technology stack – including new services, betas, strategic partnerships, third party integrations, and more. This recap blog summarizes each announcement and labels what capability is generally available (GA), in beta, or on our roadmap.
Everything we launched is designed to help CIOs accelerate their pursuit of digital transformation. In this blog, we organized our announcement summaries based on the three feelings we want CIOs to have when they consider partnering with Cloudflare:
CIOs now have a simpler roadmap to Zero Trust and SASE: We announced new capabilities and tighter integrations that make it easier for organizations to adopt Zero Trust security best practices and move towards aspirational architectures like Secure Access Service Edge (SASE).
CIOs have access to the right technology and channel partners: We announced integrations and programming to help organizations access the right expertise to modernize IT and security at their own pace with the technologies they already use.
CIOs can streamline a multi-cloud strategy with ease:We announced new ways to connect, secure, and accelerate traffic across diverse cloud environments.
Thank you for following CIO Week, Cloudflare’s first of many Innovation Weeks in 2023. It can be hard to keep up with our pace of innovation sometimes, but we hope that reading this blog and registering for our recap webinar will help!
If you want to speak with us about how to modernize your IT and security and make life easier for your organization’s CIO, fill out the form here.
Simplifying your journey to Zero Trust and SASE
Securing access These blog posts are focused on making it faster, easier, and safer to connect any user to any application with the granular controls and comprehensive visibility needed to achieve Zero Trust.
Cloudflare Digital Experience Monitoring will be an all-in-one dashboard that helps CIOs understand how critical applications and Internet services are performing across their entire corporate network. Sign up for beta access.
With a single click, any device running Cloudflare’s device client, WARP, in your organization can reach any other device running WARP over a private network. Sign up for beta access.
Investigate ‘allow’ or ‘block’ decisions based on how a connection was made with the same level of ease that you can troubleshoot user identity within Cloudflare’s Zero Trust platform.
Secure sensitive data by running application sessions in an isolated browser and control how users interact with sensitive data – now with just one click. Sign up for beta access.
Cloudflare’s ZTNA (Access) and SWG (Gateway) services now support the System for Cross-domain Identity Management (SCIM) protocol, making it easier for administrators to manage identity records across systems.
Cloudflare Zero Trust administrators can use familiar debugging tools that use the ICMP protocol (like Ping, Traceroute, and MTR) to test connectivity to private network destinations.
Threat defense These blog posts are focused on helping organizations filter, inspect, and isolate traffic to protect users from phishing, ransomware, and other Internet threats.
Email Link Isolation is your safety net for the suspicious links that end up in inboxes and that users may click. This added protection turns Cloudflare Area 1 into the most comprehensive email security solution when it comes to protecting against phishing attacks.
Cloudflare’s Data Loss Prevention (DLP) service now offers the ability to create custom detections, so that organizations can inspect traffic for their most sensitive data.
Learn how the U.S. Federal Government and other large Managed Service Providers (MSPs) are using Cloudflare’s Tenant API to apply security policies like DNS filtering across the organizations they manage.
Secure SaaS environments These blog posts are focused on maintaining consistent security and visibility across SaaS application environments, in particular to protect leaks of sensitive data.
Cloudflare Zero Trust will introduce capabilities between our CASB and DLP services that will enable administrators to peer into the files stored in their SaaS applications and identify sensitive data inside them.
Cloudflare is combining capabilities from Area 1 Email Security and Data Loss Prevention (DLP) to provide complete data protection for corporate email.
Cloudflare CASB now integrates with Salesforce and Box, enabling IT and security teams to scan these SaaS environments for security risks.
Accelerating and securing connectivity In addition to product capabilities, blog posts in this section highlight speed and other strategic benefits that organizations realize with Cloudflare.
As part of CIO Week, we spoke with the leaders of some of our largest customers to better understand why they selected Cloudflare One. Learn six thematic reasons why.
Cloudflare’s device client (WARP) can now securely detect pre-configured locations and route traffic based on the needs of the organization for that location.
Making Cloudflare easier to use These blog posts highlight innovations across the Cloudflare portfolio, and outside the Zero Trust and SASE categories, to help organizations secure and accelerate traffic with ease.
Cloudflare is making it easier for account owners to view and manage the access their users have on an account by allowing them to restrict API access to the account.
Zone Versioning allows customers to safely manage zone configuration by versioning changes and choosing how and when to deploy those changes to defined environments of traffic.
Cloudflare is unlocking operational efficiencies by working on integrations between our Application Services to protect Internet-facing websites and our Cloudflare One platform to protect corporate networks.
Collaborating with the right partners
In addition to new programming for our channel partners, these blog posts describe deeper technical integrations that help organizations work more efficiently with the IT and security tools they already use.
Cloudflare announced four new integrations between Microsoft Azure Active Directory (Azure AD) and Cloudflare Zero Trust that reduce risk proactively. These integrated offerings increase automation, allowing security teams to focus on threats versus implementation and maintenance.
Now, Microsoft Office 365 customers can deploy Area 1 cloud email security via Microsoft Graph API. This feature enables O365 customers to quickly deploy the Area 1 product via API, with onboarding through the Microsoft Marketplace coming in the near future.
China Express is a suite of offerings designed to simplify connectivity and improve performance for users in China and developed in partnership with China Mobile International and China Broadband Communications.
Cloudflare announced the limited availability of a new specialization track for our channel and implementation partners, designed to help develop their expertise in delivering Cloudflare One services.
Streamlining your multi-cloud strategy
These blog posts highlight innovations that make it easier for organizations to simply ‘plug into’ Cloudflare’s network and send traffic from any source to any destination.
Cloudflare is making it even easier to get connected with the Magic WAN Connector: a lightweight software package you can install in any physical or cloud network to automatically connect, steer, and shape any IP traffic. Sign up for early access.
Customers using Google Cloud Platform, Azure, Oracle Cloud, IBM Cloud, and Amazon Web Services can now open direct connections from their private cloud instances into Cloudflare.
This blog post recaps how definitions of corporate network traffic have shifted and how Cloudflare One provides protection for all traffic flows, regardless of source or destination.
Ping was born in 1983 when the Internet needed a simple, effective way to measure reachability and distance. In short, ping (and subsequent utilities like traceroute and MTR) provides users with a quick way to validate whether one machine can communicate with another. Fast-forward to today and these network utility tools have become ubiquitous. Not only are they now the de facto standard for troubleshooting connectivity and network performance issues, but they also improve our overall quality of life by acting as a common suite of tools almost all Internet users are comfortable employing in their day-to-day roles and responsibilities.
Making network utility tools work as expected is very important to us, especially now as more and more customers are building their private networks on Cloudflare. Over 10,000 teams now run a private network on Cloudflare. Some of these teams are among the world’s largest enterprises, some are small crews, and yet others are hobbyists, but they all want to know – can I reach that?
That’s why today we’re excited to incorporate support for these utilities into our already expansive troubleshooting toolkit for Cloudflare Zero Trust. To get started, sign up to receive beta access and start using the familiar debugging tools that we all know and love like ping, traceroute, and MTR to test connectivity to private network destinations running behind Tunnel.
Cloudflare Zero Trust
With Cloudflare Zero Trust, we’ve made it ridiculously easy to build your private network on Cloudflare. In fact, it takes just three steps to get started. First, download Cloudflare’s device client, WARP, to connect your users to Cloudflare. Then, create identity and device aware policies to determine who can reach what within your network. And finally, connect your network to Cloudflare with Tunnel directly from the Zero Trust dashboard.
We’ve designed Cloudflare Zero Trust to act as a single pane of glass for your organization. This means that after you’ve deployed any part of our Zero Trust solution, whether that be ZTNA or SWG, you are clicks, not months, away from deploying Browser Isolation, Data Loss Prevention, Cloud Access Security Broker, and Email Security. This is a stark contrast from other solutions on the market which may require distinct implementations or have limited interoperability across their portfolio of services.
It’s that simple, but if you’re looking for more prescriptive guidance watch our demo below to get started:
To get started, sign-up for early access to the closed beta. If you’re interested in learning more about how it works and what else we will be launching in the future, keep scrolling.
So, how do these network utilities actually work?
Ping, traceroute and MTR are all powered by the same underlying protocol, ICMP. Every ICMP message has 8-bit type and code fields, which define the purpose and semantics of the message. While ICMP has many types of messages, the network diagnostic tools mentioned above make specific use of the echo request and echo reply message types.
Every ICMP message has a type, code and checksum. As you may have guessed from the name, an echo reply is generated in response to the receipt of an echo request, and critically, the request and reply have matching identifiers and sequence numbers. Make a mental note of this fact as it will be useful context later in this blog post.
A crash course in ping, traceroute, and MTR
As you may expect, each one of these utilities comes with its own unique nuances, but don’t worry. We’re going to provide a quick refresher on each before getting into the nitty-gritty details.
Ping
Ping works by sending a sequence of echo request packets to the destination. Each router hop between the sender and destination decrements the TTL field of the IP packet containing the ICMP message and forwards the packet to the next hop. If a hop decrements the TTL to 0 before reaching the destination, or doesn’t have a next hop to forward to, it will return an ICMP error message – “TTL exceeded” or “Destination host unreachable” respectively – to the sender. A destination which speaks ICMP will receive these echo request packets and return matching echo replies to the sender. The same process of traversing routers and TTL decrementing takes place on the return trip. On the sender’s machine, ping reports the final TTL of these replies, as well as the roundtrip latency of sending and receiving the ICMP messages to the destination. From this information a user can determine the distance between themselves and the origin server, both in terms of number of network hops and time.
Traceroute and MTR
As we’ve just outlined, while helpful, the output provided by ping is relatively simple. It does provide some useful information, but we will generally want to follow up this request with a traceroute to learn more about the specific path to a given destination. Similar to ping, traceroutes start by sending an ICMP echo request. However, it handles TTL a bit differently. You can learn more about why that is the case in our Learning Center, but the important takeaway is that this is how traceroutes are able to map and capture the IP address of each unique hop on the network path. This output makes traceroute an incredibly powerful tool to understanding not only if a machine can connect to another, but also how it will get there! And finally, we’ll cover MTR. We’ve grouped traceroute and MTR together for now as they operate in an extremely similar fashion. In short, the output of an MTR will provide everything traceroute can, but with some additional, aggregate statistics for each unique hop. MTR will also run until explicitly stopped allowing users to receive a statistical average for each hop on the path.
Checking connectivity to the origin
Now that we’ve had a quick refresher, let’s say I cannot connect to my private application server. With ICMP support enabled on my Zero Trust account, I could run a traceroute to see if the server is online.
Here is simple example from one of our lab environments:
Then, if my server is online, traceroute should output something like the following:
traceroute -I 172.16.10.120
traceroute to 172.16.10.120 (172.16.10.120), 64 hops max, 72 byte packets
 1  172.68.101.57 (172.68.101.57)  20.782 ms  12.070 ms  15.888 ms
 2  172.16.10.100 (172.16.10.100)  31.508 ms  30.657 ms  29.478 ms
 3  172.16.10.120 (172.16.10.120)  40.158 ms  55.719 ms  27.603 ms
Let’s examine this a bit deeper. Here, the first hop is the Cloudflare data center where my Cloudflare WARP device is connected via our Anycast network. Keep in mind this IP may look different depending on your location. The second hop will be the server running cloudflared. And finally, the last hop is my application server.
Conversely, if I could not connect to my app server I would expect traceroute to output the following:
traceroute -I 172.16.10.120
traceroute to 172.16.10.120 (172.16.10.120), 64 hops max, 72 byte packets
 1  172.68.101.57 (172.68.101.57)  20.782 ms  12.070 ms  15.888 ms
 2  * * *
 3  * * *
In the example above, this means the ICMP echo requests are not reaching cloudflared. To troubleshoot, first I will make sure cloudflared is running by checking the status of the Tunnel in the ZeroTrust dashboard. Then I will check if the Tunnel has a route to the destination IP. This can be found in the Routes column of the Tunnels table in the dashboard. If it does not, I will add a route to my Tunnel to see if this changes the output of my traceroute.
Once I have confirmed that cloudflared is running and the Tunnel has a route to my app server, traceroute will show the following:
raceroute -I 172.16.10.120
traceroute to 172.16.10.120 (172.16.10.120), 64 hops max, 72 byte packets
 1  172.68.101.57 (172.68.101.57)  20.782 ms  12.070 ms  15.888 ms
 2  172.16.10.100 (172.16.10.100)  31.508 ms  30.657 ms  29.478 ms
 3  * * *
However, it looks like we still can’t quite reach the application server. This means the ICMP echo requests reached cloudflared, but my application server isn’t returning echo replies. Now, I can narrow down the problem to my application server, or communication between cloudflared and the app server. Perhaps the machine needs to be rebooted or there is a firewall rule in place, but either way we have what we need to start troubleshooting the last hop. With ICMP support, we now have many network tools at our disposal to troubleshoot connectivity end-to-end.
Note that the route cloudflared to origin is always shown as a single hop, even if there are one or more routers between the two. This is because cloudflared creates its own echo request to the origin, instead of forwarding the original packets. In the next section we will explain the technical reason behind it.
What makes ICMP traffic unique?
A few quarters ago, Cloudflare Zero Trust extended support for UDP end-to-end as well. Since UDP and ICMP are both datagram-based protocols, within the Cloudflare network we can reuse the same infrastructure to proxy both UDP and ICMP traffic. To do this, we send the individual datagrams for either protocol over a QUIC connection using QUIC datagrams between Cloudflare and the cloudflared instances within your network.
With UDP, we establish and maintain a session per client/destination pair, such that we are able to send only the UDP payload and a session identifier in datagrams. In this way, we don’t need to send the IP and port to which the UDP payload should be forwarded with every single packet.
However, with ICMP we decided that establishing a session like this is far too much overhead, given that typically only a handful of ICMP packets are exchanged between endpoints. Instead, we send the entire IP packet (with the ICMP payload inside) as a single datagram.
What this means is that cloudflared can read the destination of the ICMP packet from the IP header it receives. While this conveys the eventual destination of the packet to cloudflared, there is still work to be done to actually send the packet. Cloudflared cannot simply send out the IP packet it receives without modification, because the source IP in the packet is still the original client IP, and not a source that is routable to the cloudflared instance itself.
To receive ICMP echo replies in response to the ICMP packets it forwards, cloudflared must apply a source NAT to the packet. This means that when cloudflared receives an IP packet, it must complete the following:
Read the destination IP address of the packet
Strip off the IP header to get the ICMP payload
Send the ICMP payload to the destination, meaning the source address of the ICMP packet will be the IP of a network interface to which cloudflared can bind
When cloudflared receives replies on this address, it must rewrite the destination address of the received packet (destination because the direction of the packet is reversed) to the original client source address
Network Address Translation like this is done all the time for TCP and UDP, but is much easier in those cases because ports can be used to disambiguate cases where the source and destination IPs are the same. Since ICMP packets do not have ports associated with them, we needed to find a way to map packets received from the upstream back to the original source which sent cloudflared those packets.
For example, imagine that two clients 192.0.2.1 and 192.0.2.2 both send an ICMP echo request to a destination 10.0.0.8. As we previously outlined, cloudflared must rewrite the source IPs of these packets to a source address to which it can bind. In this scenario, when the echo replies come back, the IP headers will be identical: source=10.0.0.8 destination=<cloudflared’s IP>. So, how can cloudflared determine which packet needs to have its destination rewritten to 192.0.2.1 and which to 192.0.2.2?
To solve this problem, we use fields of the ICMP packet to track packet flows, in the same way that ports are used in TCP/UDP NAT. The field we’ll use for this purpose is the Echo ID. When an echo request is received, conformant ICMP endpoints will return an echo reply with the same identifier as was received in the request. This means we can send the packet from 192.0.2.1 with ID 23 and the one from 192.0.2.2 with ID 45, and when we receive replies with IDs 23 and 45, we know which one corresponds to each original source.
Of course this strategy only works for ICMP echo requests, which make up a relatively small percentage of the available ICMP message types. For security reasons, however, and owing to the fact that these message types are sufficient to implement the ubiquitous ping and traceroute functionality that we’re after, these are the only message types we currently support. We’ll talk through the security reasons for this choice in the next section.
How to proxy ICMP without elevated permissions
Generally, applications need to send ICMP packets through raw sockets. Applications have control of the IP header using this socket, so it requires elevated privileges to open. Whereas the IP header for TCP and UDP packets are added on send and removed on receive by the operating system. To adhere to security best-practices, we don’t really want to run cloudflared with additional privileges. We needed a better solution. To solve this, we found inspiration in the ping utility, which you’ll note can be run by any user, without elevated permissions. So then, how does ping send ICMP echo requests and listen for echo replies as a normal user program? Well, the answer is less satisfying: it depends (on the platform). And as cloudflared supports all the following platforms, we needed to answer this question for each.
Linux
On linux, ping opens a datagram socket for the ICMP protocol with the syscall socket(PF_INET, SOCK_DGRAM, PROT_ICMP). This type of socket can only be opened if the group ID of the user running the program is in /proc/sys/net/ipv4/ping_group_range, but critically, the user does not need to be root. This socket is “special” in that it can only send ICMP echo requests and receive echo replies. Great! It also has a conceptual “port” associated with it, despite the fact that ICMP does not use ports. In this case, the identifier field of echo requests sent through this socket are rewritten to the “port” assigned to the socket. Reciprocally, echo replies received by the kernel which have the same identifier are sent to the socket which sent the request.
Therefore, on linux cloudflared is able to perform source NAT for ICMP packets simply by opening a unique socket per source IP address. This rewrites the identifier field and source address of the request. Replies are delivered to this same socket meaning that cloudflared can easily rewrite the destination IP address (destination because the packets are flowing to the client) and echo identifier back to the original values received from the client.
Darwin
On Darwin (the UNIX-based core set of components which make up macOS), things are similar, in that we can open an unprivileged ICMP socket with the same syscall socket(PF_INET, SOCK_DGRAM, PROT_ICMP). However, there is an important difference. With Darwin the kernel does not allocate a conceptual “port” for this socket, and thus, when sending ICMP echo requests the kernel does not rewrite the echo ID as it does on linux. Further, and more importantly for our purposes, the kernel does not demultiplex ICMP echo replies to the socket which sent the corresponding request using the echo identifier. This means that on macOS, we effectively need to perform the echo ID rewriting manually. In practice, this means that when cloudflared receives an echo request on macOS, it must choose an echo ID which is unique for the destination. Cloudflared then adds a key of (chosen echo ID, destination IP) to a mapping it then maintains, with a value of (original echo ID, original source IP). Cloudflared rewrites the echo ID in the echo request packet to the one it chose and forwards it to the destination. When it receives a reply, it is able to use the source IP address and echo ID to look up the client address and original echo ID and rewrite the echo ID and destination address in the reply packet before forwarding it back to the client.
Windows
Finally, we arrived at Windows which conveniently provides a Win32 API IcmpSendEcho that sends echo requests and returns echo reply, timeout or error. For ICMPv6 we just had to use Icmp6SendEcho. The APIs are in C, but cloudflared can call them through CGO without a problem. If you also need to call these APIs in a Go program, checkout our wrapper for inspiration.
And there you have it! That’s how we built the most exciting ping release since 1983. Overall, we’re thrilled to announce this new feature and can’t wait to get your feedback on ways we can continue improving our implementation moving forward.
What’s next
Support for these ICMP-based utilities is just the beginning of how we’re thinking about improving our Zero Trust administrator experience. Our goal is to continue providing tools which make it easy to identify issues within the network that impact connectivity and performance.
Looking forward, we plan to add more dials and knobs for observability with announcements like Digital Experience Monitoring across our Zero Trust platform to help users proactively monitor and stay alert to changing network conditions. In the meantime, try applying Zero Trust controls to your private network for free by signing up today.
Cloudflare’s Application Services have been hard at work keeping Internet-facing websites and applications secure, fast, and reliable for over a decade. Cloudflare One provides similar security, performance, and reliability benefits for your entire corporate network. And today, we’re excited to announce new integrations that make it possible to use these services together in new ways. These integrations unlock operational and cost efficiencies for IT teams by allowing them to do more with fewer tools, and enable new use cases that are impossible without Cloudflare’s “every service everywhere” architecture.
“Just as Canva simplifies graphic design, Cloudflare simplifies performance and security. Thanks to Cloudflare, we can focus on growing our product and expanding into new markets with confidence, knowing that our platform is fast, reliable, and secure.” – Jim Tyrrell, Head of Infrastructure, Canva
Every service everywhere, now for every network
One of Cloudflare’s fundamental architectural principles has always been to treat our network like one homogeneous supercomputer. Rather than deploying services in specific locations – for example, using some of our points of presence to enforce WAF policies, others for Zero Trust controls, and others for traffic optimization – every server runs a virtually identical stack of all of our software services. This way, a packet can land on any server and flow through a full set of security filters in a single pass, without having to incur the performance tax of hair pinning to multiple locations.
The software that runs on each of these servers is Linux-based and takes advantage of core concepts of the Linux kernel in order to create “wiring” between services. This deep dive on our DDoS mitigation stack explains just one example of how we use these tools to route packets through multiple layers of protection without sacrificing performance. This approach also enables us to easily add new paths for packets and requests, enabling deeper integrations and new possibilities for traffic routed to Cloudflare’s network from any source or to any destination. Let’s walk through some of these new use cases we’re developing for private networks.
Web Application Firewall for private apps with any off-ramp
Today, millions of customers trust Cloudflare’s WAF to protect their applications that are exposed to the public Internet – either fully public apps or private apps connected via Cloudflare Tunnel and surfaced with a public hostname. We’ve increasingly heard from customers that are excited about putting our WAF controls in front of any application with any traffic on or off-ramp, for a variety of reasons.
Some customers want to do this in order to enforce stronger Zero Trust principles: filtering all traffic, even requests sourced from within a “trusted” private network, as though it came from the open Internet. Other customers want to connect an entire datacenter or cloud property with a network-layer on-ramp like a GRE or IPsec tunnel or CNI. And yet others want to adopt the Cloudflare WAF for their private apps without specifying public hostnames.
By fully integrating Cloudflare’s WAF with the Cloudflare One dataplane, we’re excited to address all of these use cases: enabling customers to create WAF policies in-path for fully private traffic flows by building their private network on Cloudflare.
API security for internal APIs
After web applications, one of the next attack surfaces our customers turn to addressing is their public-facing APIs. Cloudflare offers services to protect public APIs from DDoS, abuse, sensitive data loss, and many other attack vectors. But security concerns don’t stop with public-facing APIs: as engineering organizations continue to embrace distributed architecture, multicloud and microsegmentation, CIOs and teams that provide internal services are also interested in securing their private APIs.
With Cloudflare One, customers can connect and route their entire private network through our global fabric, enabling private API traffic to flow through the same stack of security controls we’ve previously made available for public APIs. Networking and security teams will be able to apply the principles of zero trust to their private API traffic flow to help improve their overall security posture.
Global and local traffic management for private apps
So far, we’ve focused on the security controls customers have available to filter malicious traffic to their applications and APIs. But Cloudflare’s services don’t stop with security: we make anything connected to the Internet faster and more reliable. One of the key tools enabling this is our suite of load balancing services, which include application-layer controls for any origin server behind Cloudflare’s reverse proxy and network-layer controls for any IP traffic.
Customers have asked for even more flexibility and new ways to use our traffic management tools: the ability to create application-layer load balancing policies for traffic connected with any off-ramp, such as Cloudflare Tunnel for applications, GRE or IPsec tunnels or CNI for IP networks. They also are excited about the potential to extend load balancing policies into their local networks, managing traffic across servers within a datacenter or cloud property in addition to across multiple “global” locations. These capabilities, which will improve resiliency for any application – both by enforcing more granular controls for private apps and managing local traffic for any app – are coming soon; stay tuned for more updates.
Full-stack performance optimization for private apps
Cloudflare has always obsessed over the speed of every request routed through our network. We’re constantly developing new ways to deliver content closer to users, automatically optimize any kind of traffic, and route packets over the best possible paths, avoiding congestion and other issues on the Internet. Argo Smart Routing speeds up any reverse proxied traffic with application-layer optimizations and IP packets with intelligent decisions at the network layer, using Cloudflare’s extensive interconnectivity and global private backbone to make sure that traffic is delivered as quickly and efficiently as possible.
As we more deeply integrate Cloudflare’s private networking dataplane and our application services to realize the security and reliability benefits described above, customers will automatically be able to see the benefits of Argo Smart Routing at all layers of the OSI stack for any traffic connected to Cloudflare.
Private DNS for one-stop management of internal network resources
Cloudflare’s industry-leading authoritative DNS protects millions of public Internet domains. These can be queried by anyone on the public Internet, which is great for most organizations, but some want to be able to restrict this access. With our private DNS, customers will be able to resolve queries to private domains only when connected to the Zero Trust private network they define within Cloudflare. Because we’re building this using our robust authoritative DNS and Gateway filtering services, you can expect all the other goodness already possible with Cloudflare to also apply to private DNS: support for all common DNS record types, the ability to resolve to DNS queries to virtual networks with overlapping IPs, and all the other Zero Trust filtering control offered by Gateway DNS filtering. Consolidating management of external and internal DNS in one place, with the fastest response time, unparalleled redundancy, and advanced security already built in, will greatly simplify customers’ infrastructure and save time and operational overhead.
And more new use cases every day
We love hearing about new ways you’re using Cloudflare to make any user, application, or network faster, more secure, and more reliable. Get on the list for beta access to the new integrations described today and reach out to us in the comments if you’ve got more ideas for new problems you’d like to solve using Cloudflare.
Cloudflare has been helping global organizations offer their users a consistent experience all over the world. This includes mainland China, a market our global customers cannot ignore but that continues to be challenging for infrastructure teams trying to ensure performance, security and reliability for their applications and users both in and outside mainland China. We are excited to announce China Express — a new suite of capabilities and best practices in partnership with our partners China Mobile International (CMI) and CBC Tech — that help address some of these performance challenges and ensure a consistent experience for customers and employees everywhere.
Cloudflare has been providing Application Services to users in mainland China since 2015, improving performance and security using in-country data centers and caching. Today, we have a presence in 30 cities in mainland China thanks to our strategic partnership with JD Cloud. While this delivers significant performance improvements, some requests still need to go back to the origin servers which may live outside mainland China. With limited international Internet gateways and restrictive cross-border regulations, international traffic has a very high latency and packet drop rate in and out of China. This results in inconsistent cached content within China and a poor experience for users trying to access dynamic content that requires frequent access to the origin.
Last month, we expanded our Cloudflare One, Zero Trust network-as-a-service platform to users and organizations in China with additional connectivity options. This has received tremendous interest from customers, so we’re looking at what else we could do to further improve the user experience for customers with employees or offices in China.
What is China Express?
China Express is a suite of connectivity and performance offerings designed to simplify connectivity and improve performance for users in China. To understand these better, let’s take an example of Acme Corp, a global company with offices in Shanghai and Beijing — with origin data centers in London and Ashburn. And let’s see how we can help their infrastructure teams better serve employees and users in mainland China.
China Express Premium DIA
Premium Dedicated Internet Access, is an optimized, high-quality public Internet circuit for cross-border connectivity provided by our local partners CMI and CBC Tech. With this service, traffic from mainland China will arrive at our partner data center in Hong Kong, using a fixed NAT IP. Customers do not worry about compliance issues because their traffic still goes through the public Internet with all regulatory controls in place.
Acme Corp can use Premium DIA to improve origin performance for their Cloudflare service in mainland China. Requests to the origin data centers in Ashburn and London would traverse the Premium DIA connection, which offers more bandwidth and lower packet loss resulting in more than a 60% improvement in performance.
Acme employees in mainland China would also see an improvement while accessing SaaS applications such as Microsoft 365 over the Internet when these apps are delivered from outside China. They would also notice an improvement in Internet speed in general.
China Express Private Link
While Premium DIA offers Acme performance improvements over the public Internet, they may want to keep some mission-critical application traffic on a private network for security reasons. Private link offers a dedicated private tunnel between Acme’s locations in China and their data centers outside of China. Private Link can also be used to establish dedicated private connectivity to SaaS data centers like Salesforce.
Private Link is a highly regulated area in China and depending on your use case, there might be additional requirements from our partners to implement it.
China Express Travel SIM
Acme Corp might have employees visiting China on a regular basis and need access to their corporate apps on their mobile devices including phones and tablets. Their IT teams not only have to procure and provision mobile Internet connectivity for their users, but also enforce consistent Zero Trust security controls.
Cloudflare is pleased to announce that the Travel SIM provided by Cloudflare’s partner CMI automatically provides network connectivity and can be used together with the Cloudflare WARP Client on mobile devices to provide Cloudflare’s suite of Zero Trust security services. Using the same Zero Trust profiles assigned to the user, the WARP client will automatically use the available 4G LTE network and establish a WireGuard tunnel to the closest Cloudflare data center outside of China. The data connection can also be shared with other devices using the hotspot function on the mobile device.
With the Travel SIM, users can enjoy the same Cloudflare global service as the rest of the world when traveling to China. And IT and security teams no longer need to worry about purchasing or deploying additional Zero Trust seats and device clients to ensure the employees’ Internet connection and the security policy enforcement.
China Express — Extending Cloudflare One to China
As mentioned in a previous blog post, we are extending Cloudflare One, our zero trust network-as-a-service product, to mainland China through our strategic partnerships. Acme Corp will now be able to ensure their employees both inside and outside China will be able to use consistent zero trust security policy using the Cloudflare WARP device client. In addition, they will be able to connect their physical offices in China to their global private WAN using Magic WAN with consistent security policies applied globally.
Get started today
Cloudflare is excited to work with our partners to help our customers solve connectivity and performance challenges in mainland China. All the above solutions are easy and fast to deploy and are available now. If you’d like to get started, contact us here or reach out to your account team.
Danielle Kucera, Karun Bakshi, and I were privileged to organize the DevOps and Developer Productivity (DOP) track for re:Invent 2022. For 2022, the DOP track included 58 sessions and nearly 100 speakers. If you weren’t able to attend, I have compiled a list of the on-demand sessions for you below.
Leadership Sessions
Delighting developers: Builder experience at AWS Adam Seligman, Vice President of Developer Experience, and Emily Freeman, Head of Community Development, share the latest AWS tools and experiences for teams developing in the cloud. Adam recaps the latest launches and demos how key services can integrate to accelerate developer productivity.
Amazon CodeCatalyst
Amazon CodeCatalyst, announced during Dr. Werner Vogels Keynote, is a unified software development service that makes it faster to build and deliver on AWS.
Introducing Amazon CodeCatalyst – Harry Mower, Director of DevOps Services, and Doug Clauson, Product Manager, provide an overview of Amazon CodeCatalyst. CodeCatalyst provides one place where you can plan work, collaborate on code, and build, test, and deploy applications with nearly continuous integration/continuous delivery (CI/CD) tools.
Deep dive on CodeCatalyst Workspaces – Tmir Karia, Sr. Product Manager, and Rahul Gulati, Sr. Product Manager, discuss how Amazon CodeCatalyst Workspaces decreases the time you spend creating and maintaining a local development environment and allows you to quickly set up a cloud development workspace, switch between projects, and replicate the development workspace configuration across team members.
DevOps
AWS Well-Architected best practices for DevOps on AWS Elamaran Shanmugam, Sr. Container Specialist, and Deval Perikh, Sr. Enterprise Solutions Architect, discuss the components required to align your DevOps practices to the pillars of the AWS Well-Architected Framework.
Best practices for securing your software delivery lifecycle Jams Bland, Principal Solutions Architect, and Curtis Rissi, Principal Solutions Architect, discus ways you can secure your CI/CD pipeline on AWS. Review topics like security of the pipeline versus security in the pipeline, ways to incorporate security checkpoints across various pipeline stages, security event management, and aggregating vulnerability findings into a single pane of glass.
Build it & run it: Streamline your DevOps capabilities with machine learning Rafael Ramos, Shivansh Singh, and Jared Reimer discuss how to use machine learning–powered tools like Amazon CodeWhisperer, Amazon CodeGuru, and Amazon DevOps Guru to boost your applications’ availability and write software faster and more reliably.
Infrastructure as Code
AWS infrastructure as code: A year in review Tatiana Cooke, Principal Product Manager, and Ben Perak, Principal Product Manage, discuss the new features and improvements for AWS infrastructure as code with AWS CloudFormation and AWS CDK.
How to reuse patterns when developing infrastructure as code Ryan Bachman, Ethan Rucinski, and Ravi Palakodeti explore AWS Cloud Development Kit (AWS CDK) constructs and AWS CloudFormation modules and how they make it easier to build applications on AWS.
Governance and security with infrastructure as code David Hessler, Senior DevOps Consultant, and Eric Beard, Senior Solutions Architect, discuss how to use AWS CloudFormation and the AWS CDK to deploy cloud applications in regulated environments while enforcing security controls.
Developer Productivity
Building on AWS with AWS tools, services, and SDKs Kyle Thomson, Senior Software Development Engineer and Deval Parikh, Senior Solutions Architect, discuss the ways developers can set up secure development environments and use their favorite IDEs to interact with, and deploy to, the AWS Cloud.
Sustainability in the cloud with Rust and AWS Graviton Emil Lerch, Principal DevOps Specialist, and Esteban Kuber, Principal Engineer, discuss the benefits of Rust and AWS Graviton that can reduce energy consumption and increase productivity.
To provide the best experiences, we use technologies like cookies to store and/or access device information. Consenting to these technologies will allow us to process data such as browsing behavior or unique IDs on this site. Not consenting or withdrawing consent, may adversely affect certain features and functions.
Functional
Always active
The technical storage or access is strictly necessary for the legitimate purpose of enabling the use of a specific service explicitly requested by the subscriber or user, or for the sole purpose of carrying out the transmission of a communication over an electronic communications network.
Preferences
The technical storage or access is necessary for the legitimate purpose of storing preferences that are not requested by the subscriber or user.
Statistics
The technical storage or access that is used exclusively for statistical purposes.The technical storage or access that is used exclusively for anonymous statistical purposes. Without a subpoena, voluntary compliance on the part of your Internet Service Provider, or additional records from a third party, information stored or retrieved for this purpose alone cannot usually be used to identify you.
Marketing
The technical storage or access is required to create user profiles to send advertising, or to track the user on a website or across several websites for similar marketing purposes.
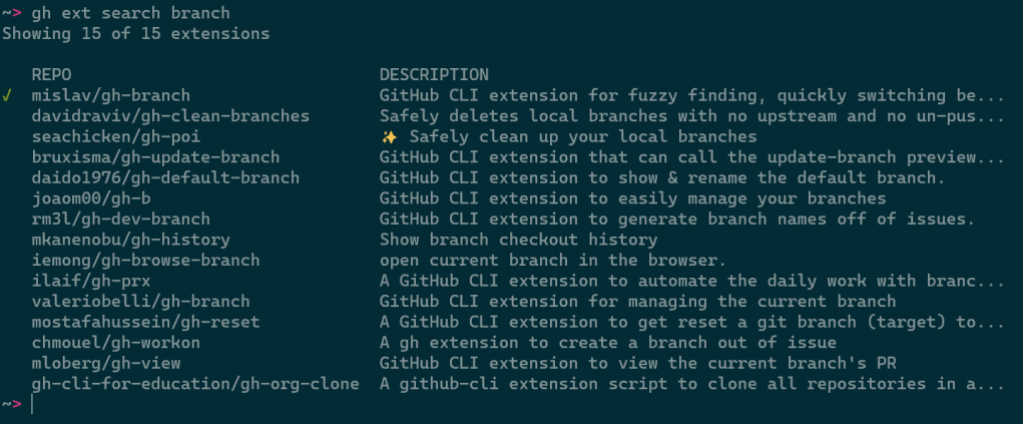
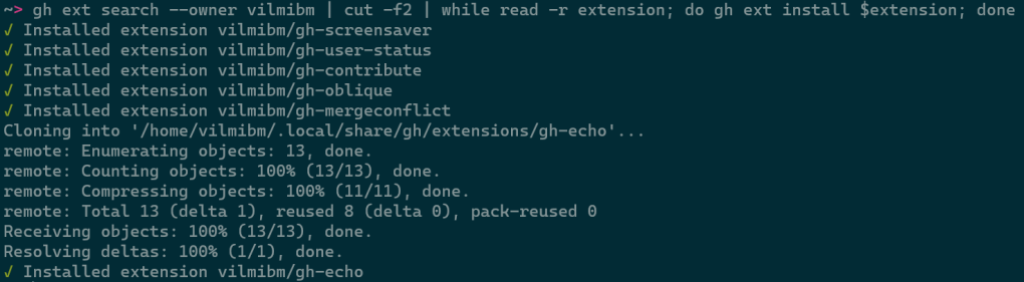

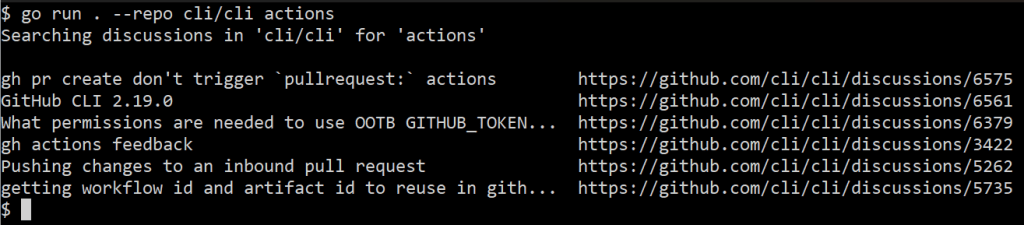
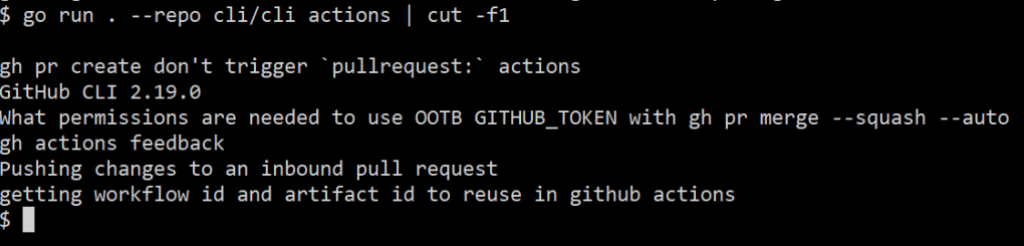
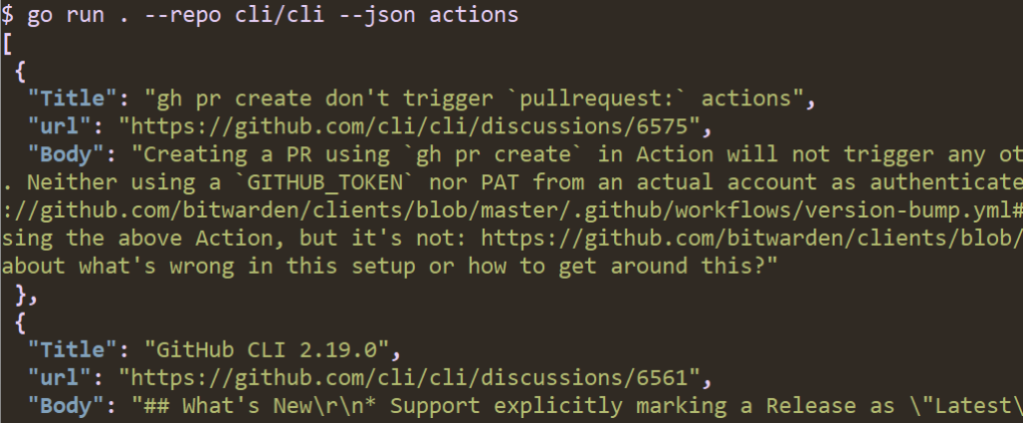
![A screenshot of running "go run . --repo cli/cli --json --jq '.[]|.Title' actions" in a terminal. The output is a list of discussion thread titles.](https://github.blog/wp-content/uploads/2023/01/image6.png?w=1024&resize=1024%2C212)