Tag Archives: Amazon Verified Permissions

AWS Week in Review – Amazon EC2 Instance Connect Endpoint, Detective, Amazon S3 Dual Layer Encryption, Amazon Verified Permission – June 19, 2023

Post Syndicated from Sébastien Stormacq original https://aws.amazon.com/blogs/aws/aws-week-in-review-amazon-ec2-instance-connect-endpoint-detective-amazon-s3-dual-layer-encryption-amazon-verified-permission-june-19-2023/

This week, I’ll meet you at AWS partner’s Jamf Nation Live in Amsterdam where we’re showing how to use Amazon EC2 Mac to deploy your remote developer workstations or configure your iOS CI/CD pipelines in the cloud.Mac in an instant

Last Week’s Launches
While I was traveling last week, I kept an eye on the AWS News. Here are some launches that got my attention.

Amazon EC2 Instance Connect Endpoint. Endpoint for EC2 Instance Connect allows you to securely access Amazon EC2 instances using their private IP addresses, making the use of bastion hosts obsolete. Endpoint for EC2 Instance Connect is by far my favorite launch from last week. With EC2 Instance Connect, you use AWS Identity and Access Management (IAM) policies and principals to control SSH access to your instances. This removes the need to share and manage SSH keys. We also updated the AWS Command Line Interface (AWS CLI) to allow you to easily connect or open a secured tunnel to an instance using only its instance ID. I read and contributed to a couple of threads on social media where you pointed out that AWS Systems Manager Session Manager already offered similar capabilities. You’re right. But the extra advantage of EC2 Instance Connect Endpoint is that it allows you to use your existing SSH-based tools and libraries, such as the scp command.

Amazon Inspector now supports code scanning of AWS Lambda functions. This expands the existing capability to scan Lambda functions and associated layers for software vulnerabilities in application package dependencies. Amazon Detective also extends finding groups to Amazon Inspector. Detective automatically collects findings from Amazon Inspector, GuardDuty, and other AWS security services, such as AWS Security Hub, to help increase situational awareness of related security events.

Amazon Verified Permissions is generally available. If you’re designing or developing business applications that need to enforce user-based permissions, you have a new option to centrally manage application permissions. Verified Permissions is a fine-grained permissions management and authorization service for your applications that can be used at any scale. Verified Permissions centralizes permissions in a policy store and helps developers use those permissions to authorize user actions within their applications. Similarly to the way an identity provider simplifies authentication, a policy store lets you manage authorization in a consistent and scalable way. Read Danilo’s post to discover the details.

Amazon S3 Dual-Layer Server-Side Encryption with keys stored in AWS Key Management Service (DSSE-KMS). Some heavily regulated industries require double encryption to store some type of data at rest. Amazon Simple Storage Service (Amazon S3) offers DSSE-KMS, a new free encryption option that provides two layers of data encryption, using different keys and different implementation of the 256-bit Advanced Encryption Standard with Galois Counter Mode (AES-GCM) algorithm. My colleague Irshad’s post has all the details.

AWS CloudTrail Lake Dashboards provide out-of-the-box visibility and top insights from your audit and security data directly within the CloudTrail Lake console. CloudTrail Lake features a number of AWS curated dashboards so you can get started right away – with no required detailed dashboard setup or SQL experience.

AWS IAM Identity Center now supports automated user provisioning from Google Workspace. You can now connect your Google Workspace to AWS IAM Identity Center (successor to AWS Single Sign-On) once and manage access to AWS accounts and applications centrally in IAM Identity Center.

AWS CloudShell is now available in 12 additional regions. AWS CloudShell is a browser-based shell that makes it easier to securely manage, explore, and interact with your AWS resources. The list of the 12 new Regions is detailed in the launch announcement.

For a full list of AWS announcements, be sure to keep an eye on the What’s New at AWS page.

Other AWS News
Here are some other updates and news that you might have missed:

  • AWS Extension for Stable Diffusion WebUI. WebUI is a popular open-source web interface that allows you to easily interact with Stable Diffusion generative AI. We built this extension to help you to migrate existing workloads (such as inference, train, and ckpt merge) from your local or standalone servers to the AWS Cloud.
  • GoDaddy developed a multi-Region, event-driven system. Their system handles 400 millions events per day. They plan to scale it to process 2 billion messages per day in a near future. My colleague Marcia explains the detail of their architecture in her post.
  • The Official AWS Podcast – Listen each week for updates on the latest AWS news and deep dives into exciting use cases. There are also official AWS podcasts in several languages. Check out the podcasts in FrenchGermanItalian, and Spanish.
  • AWS Open Source News and Updates – This is a newsletter curated by my colleague Ricardo to bring you the latest open source projects, posts, events, and more.

Upcoming AWS Events
Check your calendars and sign up for these AWS events:

  • AWS Silicon Innovation Day (June 21) – A one-day virtual event that will allow you to better understand AWS Silicon and how you can use the Amazon EC2 chip offerings to your benefit. My colleague Irshad shared the details in this post. Register today.
  • AWS Global Summits – There are many AWS Summits going on right now around the world: Milano (June 22), Hong Kong (July 20), New York (July 26), Taiwan (Aug 2 & 3), and Sao Paulo (Aug 3).
  • AWS Community Day – Join a community-led conference run by AWS user group leaders in your region: Manila (June 29–30), Chile (July 1), and Munich (September 14).
  • AWS User Group Perú Conf 2023 (September 2023). Some of the AWS News blog writer team will be present: Marcia, Jeff, myself, and our colleague Startup Developer Advocate Mark. Save the date and register today.
  • CDK Day CDK Day is happening again this year on September 29. The call for papers for this event is open, and this year we’re also accepting talks in Spanish. Submit your talk here.

That’s all for this week. Check back next Monday for another Week in Review!

This post is part of our Week in Review series. Check back each week for a quick roundup of interesting news and announcements from AWS!
— seb

Policy-based access control in application development with Amazon Verified Permissions

Post Syndicated from Marc von Mandel original https://aws.amazon.com/blogs/devops/policy-based-access-control-in-application-development-with-amazon-verified-permissions/

Today, accelerating application development while shifting security and assurance left in the development lifecycle is essential. One of the most critical components of application security is access control. While traditional access control mechanisms such as role-based access control (RBAC) and access control lists (ACLs) are still prevalent, policy-based access control (PBAC) is gaining momentum. PBAC is a more powerful and flexible access control model, allowing developers to apply any combination of coarse-, medium-, and fine-grained access control over resources and data within an application. In this article, we will explore PBAC and how it can be used in application development using Amazon Verified Permissions and how you can define permissions as policies using Cedar, an expressive and analyzable open-source policy language. We will briefly describe here how developers and admins can define policy-based access controls using roles and attributes for fine-grained access.

What is Policy-Based Access Control?

PBAC is an access control model that uses permissions expressed as policies to determine who can access what within an application. Administrators and developers can define application access statically as admin-time authorization where the access is based on users and groups defined by roles and responsibilities. On the other hand, developers set up run-time or dynamic authorization at any time to apply access controls at the time when a user attempts to access a particular application resource. Run-time authorization takes in attributes of application resources, such as contextual elements like time or location, to determine what access should be granted or denied. This combination of policy types makes policy-based access control a more powerful authorization engine.

A central policy store and policy engine evaluates these policies continuously, in real-time to determine access to resources. PBAC is a more dynamic access control model as it allows developers and administrators to create and modify policies according to their needs, such as defining custom roles within an application or enabling secure, delegated authorization. Developers can use PBAC to apply role- and attributed-based access controls across many different types of applications, such as customer-facing web applications, internal workforce applications, multi-tenant software-as-a-service (SaaS) applications, edge device access, and more. PBAC brings together RBAC and attribute-based access control (ABAC), which have been the two most widely used access control models for the past couple decades (See the figure below).

Policy-based access control with admin-time and run-time authorization

Figure 1: Overview of policy-based access control (PBAC)

Before we try and understand how to modernize permissions, let’s understand how developers implement it in a traditional development process. We typically see developers hardcode access control into each and every application. This creates four primary challenges.

  1. First, you need to update code every time to update access control policies. This is time-consuming for a developer and done at the expense of working on the business logic of the application.
  2. Second, you need to implement these permissions in each and every application you build.
  3. Third, application audits are challenging, you need to run a battery of tests or dig through thousands of lines of code spread across multiple files to demonstrate who has access to application resources. For example, providing evidence to audits that only authorized users can access a patient’s health record.
  4.  Finally, developing hardcoded application access control is often time consuming and error prone.

Amazon Verified Permissions simplifies this process by externalizing access control rules from the application code to a central policy store within the service. Now, when a user tries to take an action in your application, you call Verified Permissions to check if it is authorized. Policy admins can respond faster to changing business requirements, as they no longer need to depend on the development team when updating access controls. They can use a central policy store to make updates to authorization policies. This means that developers can focus on the core application logic, and access control policies can be created, customized, and managed separately or collectively across applications. Developers can use PBAC to define authorization rules for users, user groups, or attributes based on the entity type accessing the application. Restricting access to data and resources using PBAC protects against unintended access to application resources and data.

For example, a developer can define a role-based and attribute-based access control policy that allows only certain users or roles to access a particular API. Imagine a group of users within a Marketing department that can only view specific photos within a photo sharing application. The policy might look something like the following using Cedar.

permit(

  principal in Role::"expo-speakers",

  action == Action::"view",

  resource == Photo::"expoPhoto94.jpg"

)

when { 

    principal.department == “Marketing”

}

;

How do I get started using PBAC in my applications?

PBAC can be integrated into the application development process in several ways when using Amazon Verified Permissions. Developers begin by defining an authorization model for their application and use this to describe the scope of authorization requests made by the application and the basis for evaluating the requests. Think of this as a narrative or structure to authorization requests. Developers then write a schema which documents the form of the authorization model in a machine-readable syntax. This schema document describes each entity type, including principal types, actions, resource types, and conditions. Developers can then craft policies, as statements, that permit or forbid a principal to one or more actions on a resource.

Next, you define a set of application policies which define the overall framework and guardrails for access controls in your application. For example, a guardrail policy might be that only the owner can access photos that are marked ‘private’. These policies are applicable to a large set of users or resources, and are not user or resource specific. You create these policies in the code of your applications, and instantiate them in your CI/CD pipeline, using CloudFormation, and tested in beta stages before being deployed to production.

Lastly, you define the shape of your end-user policies using policy templates. These end-user policies are specific to a user (or user group). For example, a policy that states “Alice” can view “expoPhoto94.jpg”. Policy templates simplify managing end-user policies as a group. Now, every time a user in your application tries to take an action, you call Verified Permissions to confirm that the action is authorized.

Benefits of using Amazon Verified Permissions policies in application development

Amazon Verified Permissions offers several benefits when it comes to application development.

  1. One of the most significant benefits is the flexibility in using the PBAC model. Amazon Verified Permissions allows application administrators or developers to create and modify policies at any time without going into application code, making it easier to respond to changing security needs.
  2. Secondly, it simplifies the application development process by externalizing access control rules from the application code. Developers can reuse PBAC controls for newly built or acquired applications. This allows developers to focus on the core application logic and mitigates security risks within applications by applying fine-grained access controls.
  3. Lastly, developers can add secure delegated authorization using PBAC and Amazon Verified Permissions. This enables developers to enable a group, role, or resource owner the ability to manage data sharing within application resources or between services. This has exciting implications for developers wanting to add privacy and consent capabilities for end users while still enforcing guardrails defined within a centralized policy store.

In Summary

PBAC is a more flexible access control model that enables fine-grained control over access to resources in an application. By externalizing access control rules from the application code, PBAC simplifies the application development process and reduces the risks of security vulnerabilities in the application. PBAC also offers flexibility, aligns with compliance mandates for access control, and developers and administrators benefit from centralized permissions across various stages of the DevOps process. By adopting PBAC in application development, organizations can improve their application security and better align with industry regulations.

Amazon Verified Permissions is a scalable permissions management and fine-grained authorization service for applications developers build. The service helps developers to build secure applications faster by externalizing authorization and centralizing policy management and administration. Developers can align their application access with Zero Trust principles by implementing least privilege and continuous verification within applications. Security and audit teams can better analyze and audit who has access to what within applications.

Simplify fine-grained authorization with Amazon Verified Permissions and Amazon Cognito

Post Syndicated from Phil Windley original https://aws.amazon.com/blogs/security/simplify-fine-grained-authorization-with-amazon-verified-permissions-and-amazon-cognito/

AWS customers already use Amazon Cognito for simple, fast authentication. With the launch of Amazon Verified Permissions, many will also want to add simple, fast authorization to their applications by using the user attributes that they have in Amazon Cognito. In this post, I will show you how to use Amazon Cognito and Verified Permissions together to add fine-grained authorization to your applications.

Fine-grained authorization

With Verified Permissions, you can write policies to use fine-grained authorization in your applications. Policy-based access control helps you secure your applications without embedding complicated access control code in the application logic. Instead, you write policies that say who can take what actions on which resources, and you evaluate the policies by using the Verified Permissions API. The API evaluates access control policies in the context of an access request: Who’s making the request? What do they want to do? What do they want to access? Under what conditions are they making the request?

AWS has removed the work needed to create context about who is making the request by using data from Amazon Cognito. By using Amazon Cognito as your identity store and integrating Verified Permissions with Amazon Cognito, you can use the ID and access tokens that Amazon Cognito returns in the authorization decisions in your applications. You provide Amazon Cognito tokens to Verified Permissions, which uses the attributes that the tokens contain to represent the principal and identify the principal’s entitlements.

Make access requests

To write policies for Verified Permissions, you use a policy language called Cedar. The examples in this post are modified from those in the Cedar language tutorial; I recommend that you review this tutorial for a comprehensive introduction on how to build and use Cedar policies. The following is an example of what a Cedar policy in a photo-sharing application might look like:

permit(
  principal == User::"alice", 
  action    == Action::"update", 
  resource  == Photo::"VacationPhoto94.jpg"
);

This policy states that Alice—the principal—is permitted to update the resource named VacationPhoto94.jpg. You place the policies for your application in a dedicated policy store. To ask Verified Permissions for an authorization decision, use the isAuthorized operation from the API. For example, the following request asks if user alice is permitted to update VacationPhoto94.jpg. Note that I’ve left out details like the policy store identifier for clarity.

// JS pseudocode
const authResult = await avp.isAuthorized({
    principal: 'User::"alice"',
    action: 'Action::"update"',
    resource: 'Photo::"VacationPhoto94.jpg"'
});

This request returns a decision of allow because the principal, action, and resource all match those in the policy. If a user named bob tries to update the photo, the request returns a decision of deny because the policy only allows user alice. For requests that only need values for the principal, action, and resource, you can generally use values from the data in the application.

Things get more interesting when you build policies that use attributes of the principal to make the decision. In these cases, it can be challenging to assemble a complete and accurate authorization context. Policies might refer to attributes of the principal, such as their geographic location or whether they are paid subscribers. Fine-grained access control requires that you write good policies, properly format the access request, and provide the needed attributes for the policies to be evaluated. To get needed attributes, you must often make inline requests to other systems and then transform the results to meet the policy requirements.

The following policy uses an attribute requirement to allow any principal to view any resource as long as they are located in the United States.

permit(
  principal,
  action == Action::"view",
  resource
)
when {principal.location == "USA"};

To make an authorization request, you must supply the needed attributes for the principal. The following code shows how to do that by using the isAuthorized operation:

const authResult = await avp.isAuthorized({
    principal: 'User::"alice"',
    action: 'Action::"view"',
    resource: 'Photo::"VacationPhoto94.jpg"',
    // whenever our policy references attributes of the entity,
    // isAuthorized needs an entity argument that provides    
    // those attributes
    entities: [
        {
            "identifier": {
                "entityType": "User",
                "entityId": "alice"
            },
            "attributes": {
                "location": {
                    "String": "USA"
                }
            }
        ]
});

The authorization request now includes the context that Alice is located in the USA. According to the preceding policy, she should be allowed to view VacationPhoto94.jpg. To make this request, you must gather this information so that you can include it in the request.

Use Amazon Cognito

If the photo-sharing application uses Amazon Cognito for user authentication, then Amazon Cognito will pass an ID token to it when the authentication is successful. For more information about the format and encoding of ID tokens, see the OpenID Connect Core specification. For our purposes, it’s enough to know that after the ID token is verified and decoded, it contains a JSON structure with named attributes.

When you configure Amazon Cognito, you can specify the fields that are contained in the ID token. These might be user editable, but they can also be programmatically generated from other sources. Suppose that you have configured your Amazon Cognito user pool to also include a custom location attribute, custom:location. When Alice logs in to the photo-sharing application, the ID token that Amazon Cognito provides for her contains the following fields. Note that I’ve made the sub (subject) field human readable, but it would actually be a Amazon Cognito entity identifier.

{
 ...
 “iss”: “User”,
 “sub”: “alice”,
 “custom:location”: “USA”,
 ...
}

If the needed attributes are in Amazon Cognito, you can use them to create the attributes that isAuthorized needs to render an access decision.

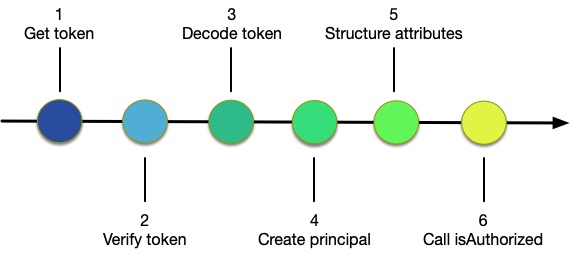
Figure 1: Steps to use Amazon Cognito with isAuthorized

Figure 1: Steps to use Amazon Cognito with isAuthorized

As shown in Figure 1, you need to complete the following six steps to use isAuthorized with Amazon Cognito:

  1. Get the token from Amazon Cognito when the user authenticates
  2. Verify the token to authenticate the user
  3. Decode the token to retrieve attribute information
  4. Create the policy principal from information in the token or from other sources
  5. Create the entities structure by using information in the token or from other sources
  6. Call Amazon Verified Permissions by using isAuthorized

Now that you understand how to make a request by manually creating the context using data provided by an identity provider, I’ll share how the AWS integration of Amazon Cognito and Verified Permissions can help reduce your workload.

Use isAuthorizedWithToken

In addition to isAuthorized, the Verified Permissions API provides the isAuthorizedWithToken operation that accepts Amazon Cognito tokens. If your application uses Amazon Cognito for authentication, then Amazon Cognito provides the ID token after the user logs in. Let’s assume that you have stored this token in a variable named cognito_id_token. Because you are using an attribute from Amazon Cognito, you modify the previous policy to accommodate the namespace that the Amazon Cognito attributes are in, as shown in the following:

permit(
  principal,
  action == Action::"view",
  resource
)
when {principal.custom.location == "USA"};

With this policy, the photo-sharing application can use the ID token to make an authorization request using isAuthorizedWithToken:

Using this call, you don’t have to supply the principal or construct the entities argument for the principal. Instead, you just pass in the ID token that Amazon Cognito provides. When you call isAuthorizedWithToken, it constructs the principal by using information in the token and creates an entity context that includes Alice’s location from the attributes in the ID token.

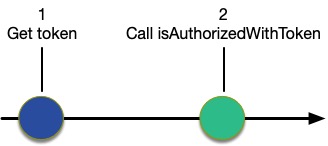
Figure 2: Use isAuthorizedWithToken

Figure 2: Use isAuthorizedWithToken

As shown in Figure 2, when you use isAuthorizedWithToken, you only need to complete two steps:

  1. Get the token from Amazon Cognito when the user authenticates
  2. Call Verified Permissions using isAuthorizedWithToken, passing in the token

Optionally, your application might need to verify the token to authenticate the user and avoid unnecessary work, or it can rely on isAuthorizedWithToken to do that. Similarly, you might also decode the token if you need its values for the application logic.

Configure isAuthorizedWithToken

You can use the Verified Permissions console to tell the API which Amazon Cognito user pool you’re using for your application. This is called an identity source.

To create an identity source for use with Verified Permissions (console):

  1. Sign in to the AWS Management Console and open the Amazon Cognito console.
  2. Choose Identity source. You will see a list showing the sources that you have already configured.
  3. To create a new identity source, choose Create identity source.
  4. Enter the User pool ID.
  5. Enter the Principal type.
  6. Select whether or not to validate Client application IDs for this source.
  7. (Optional) Enter Tags.
  8. Choose Create identity source to add a new identity source to Verified Permissions with the given client ID.

The isAuthorizedWithToken operation uses the configuration information to get the public keys from Amazon Cognito to validate and decode the token. It also uses the configuration information to validate that the user pool for the token is associated with the policy store that the API is using.

Add resource entity attributes

ID tokens provide attributes about the principal, but they don’t provide information about the resource. Policies will often reference resource attributes, as shown in the following policy:

permit(
  principal,
  action == Action::"view",
  resource
)
when {resource.accessLevel == "public" && 
      principal.custom.location == "USA"};

Like the previous example, this policy requires that photo viewers are located in the US, but it also requires that the resource has a public attribute. The isAuthorizedWithToken operation can augment the entity information in the token by using the same entities argument that isAuthorized uses. You can add the resource entity information to the call, as shown in the following call to isAuthorizedWithToken:

const authResult = await avp.isAuthorized({
    principal: 'User::"alice"',
    action: 'Action::"view"',
    resource: 'Photo::"VacationPhoto94.jpg"',
    // whenever our policy references attributes of the entity,
    // isAuthorized needs an entity argument that provides    
    // those attributes
    entities: [
        {
            "identifier": {
                "entityType": "User",
                "entityId": "alice"
            },
            "attributes": {
                "location": {
                    "String": "USA"
                }
            }
        }
    ]
});

The isAuthorizedWithToken operation combines the entity information that it gleans from the ID token with the explicit entities information provided in the call to construct the context needed for the authorization request.

Conclusion

Discussions about access control tend to focus on the policies: how you can use them to make the code cleaner, and the value of moving the authorization logic out of the code. But that often ignores the work needed to create meaningful authorization requests. Assembling the information about the entities is a big part of making the request. If you use both Amazon Cognito and Verified Permissions, the integration discussed in this blog post can help relieve you of the work needed to build entity information about principals and help provide you with assurance that the assembly is happening consistently and securely.

 
If you have feedback about this post, submit comments in the Comments section below. If you have questions about this post, contact AWS Support.

Want more AWS Security news? Follow us on Twitter.

Phil Windley

Phil Windley

Phil is a Senior Software Development Manager in AWS Identity. He and his team work to make access management both easier to use and easier to understand. Phil has been working in digital identity for many years, and recently wrote Learning Digital Identity from O’Reilly Media. Outside of work, Phil loves to bike, read, and spend time with grandkids.

Simplify How You Manage Authorization in Your Applications with Amazon Verified Permissions – Now Generally Available

Post Syndicated from Danilo Poccia original https://aws.amazon.com/blogs/aws/simplify-how-you-manage-authorization-in-your-applications-with-amazon-verified-permissions-now-generally-available/

When developing a new application or integrating an existing one into a new environment, user authentication and authorization require significant effort to be correctly implemented. In the past, you would have built your own authentication system, but today you can use an external identity provider like Amazon Cognito. Yet, authorization logic is typically implemented in code.

This might begin simply enough, with all users assigned a role for their job function. However, over time, these permissions grow increasingly complex. The number of roles expands, as permissions become more fine-grained. New use cases drive the need for custom permissions. For instance, one user might share a document with another in a different role, or a support agent might require temporary access to a customer account to resolve an issue. Managing permissions in code is prone to errors, and presents significant challenges when auditing permissions and deciding who has access to what, particularly when these permissions are expressed in different applications and using multiple programming languages.

At re:Invent 2022, we introduced in preview Amazon Verified Permissions, a fine-grained permissions management and authorization service for your applications that can be used at any scale. Amazon Verified Permissions centralizes permissions in a policy store and helps developers use those permissions to authorize user actions within their applications. Similar to how an identity provider simplifies authentication, a policy store let you manage authorization in a consistent and scalable way.

To define fine-grained permissions, Amazon Verified Permissions uses Cedar, an open-source policy language and software development kit (SDK) for access control. You can define a schema for your authorization model in terms of principal types, resource types, and valid actions. In this way, when a policy is created, it is validated against your authorization model. You can simplify the creation of similar policies using templates. Changes to the policy store are audited so that you can see of who made the changes and when.

You can then connect your applications to Amazon Verified Permissions through AWS SDKs to authorize access requests. For each authorization request, the relevant policies are retrieved and evaluated to determine whether the action is permitted or not. You can reproduce those authorization requests to confirm that permissions work as intended.

Today, I am happy to share that Amazon Verified Permissions is generally available with new capabilities and a simplified user experience in the AWS Management Console.

Let’s see how you can use it in practice.

Creating a Policy Store with Amazon Verified Permissions
In the Amazon Verified Permissions console, I choose Create policy store. A policy store is a logical container that stores policies and schema. Authorization decisions are made based on all the policies present in a policy store.

To configure the new policy store, I can use different methods. I can start with a guided setup, a sample policy store (such as for a photo-sharing app, an online store, or a task manager), or an empty policy store (recommended for advanced users). I select Guided setup, enter a namespace for my schema (MyApp), and choose Next.

Console screenshot.

Resources are the objects that principals can act on. In my application, I have Users (principals) that can create, read, update, and delete Documents (resources). I start to define the Documents resource type.

I enter the name of the resource type and add two required attributes:

  • owner (String) to specify who is the owner of the document.
  • isPublic (Boolean) to flag public documents that anyone can read.

Console screenshot.

I specify four actions for the Document resource type:

  • DocumentCreate
  • DocumentRead
  • DocumentUpdate
  • DocumentDelete

Console screenshot.

I enter User as the name of the principal type that will be using these actions on Documents. Then, I choose Next.

Console screenshot.

Now, I configure the User principal type. I can use a custom configuration to integrate an external identity source, but in this case, I use an Amazon Cognito user pool that I created before. I choose Connect user pool.

Console screenshot.

In the dialog, I select the AWS Region where the user pool is located, enter the user pool ID, and choose Connect.

Console screenshot.

Now that the Amazon Cognito user pool is connected, I can add another level of protection by validating the client application IDs. For now, I choose not to use this option.

In the Principal attributes section, I select which attributes I am planning to use for attribute-based access control in my policies. I select sub (the subject), used to identify the end user according to the OpenID Connect specification. I can select more attributes. For example, I can use email_verified in a policy to give permissions only to Amazon Cognito users whose email has been verified.

Console screenshot.

As part of the policy store creation, I create a first policy to give read access to user danilop to the doc.txt document.

Console screenshot.

In the following code, the console gives me a preview of the resulting policy using the Cedar language.

permit(
  principal == MyApp::User::"danilop",
  action in [MyApp::Action::"DocumentRead"],
  resource == MyApp::Document::"doc.txt"
) when {
  true
};

Finally, I choose Create policy store.

Adding Permissions to the Policy Store
Now that the policy store has been created, I choose Policies in the navigation pane. In the Create policy dropdown, I choose Create static policy. A static policy contains all the information needed for its evaluation. In my second policy, I allow any user to read public documents. By default everything is forbidden, so in Policy Effect I choose Permit.

In the Policy scope, I leave All principals and All resources selected, and select the DocumentRead action. In the Policy section, I change the when condition clause to limit permissions to resources where isPublic is equal to true:

permit (
  principal,
  action in [MyApp::Action::"DocumentRead"],
  resource
)
when { resource.isPublic };

I enter a description for the policy and choose Create policy.

For my third policy, I create another static policy to allow full access to the owner of a document. Again, in Policy Effect, I choose Permit and, in the Policy scope, I leave All principals and All resources selected. This time, I also leave All actions selected.

In the Policy section, I change the when condition clause to limit permissions to resources where the owner is equal to the sub of the principal:

permit (principal, action, resource)
when { resource.owner == principal.sub };

In my application, I need to allow read access to specific users that are not owners of a document. To simplify that, I create a policy template. Policy templates let me create policies from a template that uses placeholders for some of their values, such as the principal or the resource. The placeholders in a template are keywords that start with the ? character.

In the navigation pane, I choose Policy templates and then Create policy template. I enter a description and use the following policy template body. When using this template, I can specify the value for the ?principal and ?resource placeholders.

permit(
  principal == ?principal,
  action in [MyApp::Action::"DocumentRead"],
  resource == ?resource
);

I complete the creation of the policy template. Now, I use the template to simplify the creation of policies. I choose Policies in the navigation pane, and then Create a template-linked policy in the Create policy dropdown. I select the policy template I just created and choose Next.

To give access to a user (danilop) for a specific document (new-doc.txt), I just pass the following values (note that MyApp is the namespace of the policy store):

  • For the Principal: MyApp::User::"danilop"
  • For the Resource: MyApp::Document::"new-doc.txt"

I complete the creation of the policy. It’s now time to test if the policies work as expected.

Testing Policies in the Console
In my applications, I can use the AWS SDKs to run an authorization request. The console provides a way to to simulate what my applications would do. I choose Test bench in the navigation pane. To simplify testing, I use the Visual mode. As an alternative, I have the option to use the same JSON syntax as in the SDKs.

As Principal, I pass the janedoe user. As Resource, I use requirements.txt. It’s not a public document (isPublic is false) and the owner attribute is equal to janedoe‘s sub. For the Action, I select MyApp::Action::"DocumentUpdate".

When running an authorization request, I can pass Additional entities with more information about principals and resources associated with the request. For now, I leave this part empty.

I choose Run authorization request at the top to see the decision based on the current policies. As expected, the decision is allow. Here, I also see which policies hav been satisfied by the authorization request. In this case, it is the policy that allows full access to the owner of the document.

I can test other values. If I change the owner of the document and the action to DocumentRead, the decision is deny. If I then set the resource attribute isPublic to true, the decision is allow because there is a policy that permits all users to read public documents.

Handling Groups in Permissions
The administrative users in my application need to be able to delete any document. To do so, I create a role for admin users. First, I choose Schema in the navigation pane and then Edit schema. In the list of entity types, I choose to add a new one. I use Role as Type name and add it. Then, I select User in the entity types and edit it to add Role as a parent. I save changes and create the following policy:

permit (
  principal in MyApp::Role::"admin",
  action in [MyApp::Action::"DocumentDelete"],
  resource
);

In the Test bench, I run an authorization request to check if user jeffbarr can delete (DocumentDelete) resource doc.txt. Because he’s not the owner of the resource, the request is denied.

Now, in the Additional entities, I add the MyApp::User entity with jeffbarr as identifier. As parent, I add the MyApp::Role entity with admin as identifier and confirm. The console warns me that entity MyApp::Role::"admin" is referenced, but it isn’t included in additional entities data. I choose to add it and fix this issue.

I run an authorization request again, and it is now allowed because, according to the additional entities, the principal (jeffbarr) is an admin.

Using Amazon Verified Permissions in Your Application
In my applications, I can run an authorization requests using the isAuthorized API action (or isAuthrizedWithToken, if the principal comes from an external identity source).

For example, the following Python code uses the AWS SDK for Python (Boto3) to check if a user has read access to a document. The authorization request uses the policy store I just created.

import boto3
import time

verifiedpermissions_client = boto3.client("verifiedpermissions")

POLICY_STORE_ID = "XAFTHeCQVKkZhsQxmAYXo8"

def is_authorized_to_read(user, resource):

    authorization_result = verifiedpermissions_client.is_authorized(
        policyStoreId=POLICY_STORE_ID, 
        principal={"entityType": "MyApp::User", "entityId": user}, 
        action={"actionType": "MyApp::Action", "actionId": "DocumentRead"},
        resource={"entityType": "MyApp::Document", "entityId": resource}
    )

    print('Can {} read {} ?'.format(user, resource))

    decision = authorization_result["decision"]

    if decision == "ALLOW":
        print("Request allowed")
        return True
    else:
        print("Request denied")
        return False

if is_authorized_to_read('janedoe', 'doc.txt'):
    print("Here's the doc...")

if is_authorized_to_read('danilop', 'doc.txt'):
    print("Here's the doc...")

I run this code and, as you can expect, the output is in line with the tests run before.

Can janedoe read doc.txt ?
Request denied
Can danilop read doc.txt ?
Request allowed
Here's the doc...

Availability and Pricing
Amazon Verified Permissions is available today in all commercial AWS Regions, excluding those that are based in China.

With Amazon Verified Permissions, you only pay for what you use based on the number of authorization requests and API calls made to the service.

Using Amazon Verified Permissions, you can configure fine-grained permissions using the Cedar policy language and simplify the code of your applications. In this way, permissions are maintained in a centralized store and are easier to audit. Here, you can read more about how we built Cedar with automated reasoning and differential testing.

Manage authorization for your applications with Amazon Verified Permissions.

Danilo

Three key security themes from AWS re:Invent 2022

Post Syndicated from Anne Grahn original https://aws.amazon.com/blogs/security/three-key-security-themes-from-aws-reinvent-2022/

AWS re:Invent returned to Las Vegas, Nevada, November 28 to December 2, 2022. After a virtual event in 2020 and a hybrid 2021 edition, spirits were high as over 51,000 in-person attendees returned to network and learn about the latest AWS innovations.

Now in its 11th year, the conference featured 5 keynotes, 22 leadership sessions, and more than 2,200 breakout sessions and hands-on labs at 6 venues over 5 days.

With well over 100 service and feature announcements—and innumerable best practices shared by AWS executives, customers, and partners—distilling highlights is a challenge. From a security perspective, three key themes emerged.

Turn data into actionable insights

Security teams are always looking for ways to increase visibility into their security posture and uncover patterns to make more informed decisions. However, as AWS Vice President of Data and Machine Learning, Swami Sivasubramanian, pointed out during his keynote, data often exists in silos; it isn’t always easy to analyze or visualize, which can make it hard to identify correlations that spark new ideas.

“Data is the genesis for modern invention.” – Swami Sivasubramanian, AWS VP of Data and Machine Learning

At AWS re:Invent, we launched new features and services that make it simpler for security teams to store and act on data. One such service is Amazon Security Lake, which brings together security data from cloud, on-premises, and custom sources in a purpose-built data lake stored in your account. The service, which is now in preview, automates the sourcing, aggregation, normalization, enrichment, and management of security-related data across an entire organization for more efficient storage and query performance. It empowers you to use the security analytics solutions of your choice, while retaining control and ownership of your security data.

Amazon Security Lake has adopted the Open Cybersecurity Schema Framework (OCSF), which AWS cofounded with a number of organizations in the cybersecurity industry. The OCSF helps standardize and combine security data from a wide range of security products and services, so that it can be shared and ingested by analytics tools. More than 37 AWS security partners have announced integrations with Amazon Security Lake, enhancing its ability to transform security data into a powerful engine that helps drive business decisions and reduce risk. With Amazon Security Lake, analysts and engineers can gain actionable insights from a broad range of security data and improve threat detection, investigation, and incident response processes.

Strengthen security programs

According to Gartner, by 2026, at least 50% of C-Level executives will have performance requirements related to cybersecurity risk built into their employment contracts. Security is top of mind for organizations across the globe, and as AWS CISO CJ Moses emphasized during his leadership session, we are continuously building new capabilities to help our customers meet security, risk, and compliance goals.

In addition to Amazon Security Lake, several new AWS services announced during the conference are designed to make it simpler for builders and security teams to improve their security posture in multiple areas.

Identity and networking

Authorization is a key component of applications. Amazon Verified Permissions is a scalable, fine-grained permissions management and authorization service for custom applications that simplifies policy-based access for developers and centralizes access governance. The new service gives developers a simple-to-use policy and schema management system to define and manage authorization models. The policy-based authorization system that Amazon Verified Permissions offers can shorten development cycles by months, provide a consistent user experience across applications, and facilitate integrated auditing to support stringent compliance and regulatory requirements.

Additional services that make it simpler to define authorization and service communication include Amazon VPC Lattice, an application-layer service that consistently connects, monitors, and secures communications between your services, and AWS Verified Access, which provides secure access to corporate applications without a virtual private network (VPN).

Threat detection and monitoring

Monitoring for malicious activity and anomalous behavior just got simpler. Amazon GuardDuty RDS Protection expands the threat detection capabilities of GuardDuty by using tailored machine learning (ML) models to detect suspicious logins to Amazon Aurora databases. You can enable the feature with a single click in the GuardDuty console, with no agents to manually deploy, no data sources to enable, and no permissions to configure. When RDS Protection detects a potentially suspicious or anomalous login attempt that indicates a threat to your database instance, GuardDuty generates a new finding with details about the potentially compromised database instance. You can view GuardDuty findings in AWS Security Hub, Amazon Detective (if enabled), and Amazon EventBridge, allowing for integration with existing security event management or workflow systems.

To bolster vulnerability management processes, Amazon Inspector now supports AWS Lambda functions, adding automated vulnerability assessments for serverless compute workloads. With this expanded capability, Amazon Inspector automatically discovers eligible Lambda functions and identifies software vulnerabilities in application package dependencies used in the Lambda function code. Actionable security findings are aggregated in the Amazon Inspector console, and pushed to Security Hub and EventBridge to automate workflows.

Data protection and privacy

The first step to protecting data is to find it. Amazon Macie now automatically discovers sensitive data, providing continual, cost-effective, organization-wide visibility into where sensitive data resides across your Amazon Simple Storage Service (Amazon S3) estate. With this new capability, Macie automatically and intelligently samples and analyzes objects across your S3 buckets, inspecting them for sensitive data such as personally identifiable information (PII), financial data, and AWS credentials. Macie then builds and maintains an interactive data map of your sensitive data in S3 across your accounts and Regions, and provides a sensitivity score for each bucket. This helps you identify and remediate data security risks without manual configuration and reduce monitoring and remediation costs.

Encryption is a critical tool for protecting data and building customer trust. The launch of the end-to-end encrypted enterprise communication service AWS Wickr offers advanced security and administrative controls that can help you protect sensitive messages and files from unauthorized access, while working to meet data retention requirements.

Management and governance

Maintaining compliance with regulatory, security, and operational best practices as you provision cloud resources is key. AWS Config rules, which evaluate the configuration of your resources, have now been extended to support proactive mode, so that they can be incorporated into infrastructure-as-code continuous integration and continuous delivery (CI/CD) pipelines to help identify noncompliant resources prior to provisioning. This can significantly reduce time spent on remediation.

Managing the controls needed to meet your security objectives and comply with frameworks and standards can be challenging. To make it simpler, we launched comprehensive controls management with AWS Control Tower. You can use it to apply managed preventative, detective, and proactive controls to accounts and organizational units (OUs) by service, control objective, or compliance framework. You can also use AWS Control Tower to turn on Security Hub detective controls across accounts in an OU. This new set of features reduces the time that it takes to define and manage the controls required to meet specific objectives, such as supporting the principle of least privilege, restricting network access, and enforcing data encryption.

Do more with less

As we work through macroeconomic conditions, security leaders are facing increased budgetary pressures. In his opening keynote, AWS CEO Adam Selipsky emphasized the effects of the pandemic, inflation, supply chain disruption, energy prices, and geopolitical events that continue to impact organizations.

Now more than ever, it is important to maintain your security posture despite resource constraints. Citing specific customer examples, Selipsky underscored how the AWS Cloud can help organizations move faster and more securely. By moving to the cloud, agricultural machinery manufacturer Agco reduced costs by 78% while increasing data retrieval speed, and multinational HVAC provider Carrier Global experienced a 40% reduction in the cost of running mission-critical ERP systems.

“If you’re looking to tighten your belt, the cloud is the place to do it.” – Adam Selipsky, AWS CEO

Security teams can do more with less by maximizing the value of existing controls, and bolstering security monitoring and analytics capabilities. Services and features announced during AWS re:Invent—including Amazon Security Lake, sensitive data discovery with Amazon Macie, support for Lambda functions in Amazon Inspector, Amazon GuardDuty RDS Protection, and more—can help you get more out of the cloud and address evolving challenges, no matter the economic climate.

Security is our top priority

AWS re:Invent featured many more highlights on a variety of topics, such as Amazon EventBridge Pipes and the pre-announcement of GuardDuty EKS Runtime protection, as well as Amazon CTO Dr. Werner Vogels’ keynote, and the security partnerships showcased on the Expo floor. It was a whirlwind week, but one thing is clear: AWS is working harder than ever to make our services better and to collaborate on solutions that ease the path to proactive security, so that you can focus on what matters most—your business.

For more security-related announcements and on-demand sessions, see A recap for security, identity, and compliance sessions at AWS re:Invent 2022 and the AWS re:Invent Security, Identity, and Compliance playlist on YouTube.

If you have feedback about this post, submit comments in the Comments section below.

Anne Grahn

Anne Grahn

Anne is a Senior Worldwide Security GTM Specialist at AWS based in Chicago. She has more than a decade of experience in the security industry, and has a strong focus on privacy risk management. She maintains a Certified Information Systems Security Professional (CISSP) certification.

Author

Paul Hawkins

Paul helps customers of all sizes understand how to think about cloud security so they can build the technology and culture where security is a business enabler. He takes an optimistic approach to security and believes that getting the foundations right is the key to improving your security posture.