Tag Archives: spf

Three ways to boost your email security and brand reputation with AWS

Post Syndicated from Michael Davie original https://aws.amazon.com/blogs/security/three-ways-to-boost-your-email-security-and-brand-reputation-with-aws/

If you own a domain that you use for email, you want to maintain the reputation and goodwill of your domain’s brand. Several industry-standard mechanisms can help prevent your domain from being used as part of a phishing attack. In this post, we’ll show you how to deploy three of these mechanisms, which visually authenticate emails sent from your domain to users and verify that emails are encrypted in transit. It can take as little as 15 minutes to deploy these mechanisms on Amazon Web Services (AWS), and the result can help to provide immediate and long-term improvements to your organization’s email security.

Phishing through email remains one of the most common ways that bad actors try to compromise computer systems. Incidents of phishing and related crimes far outnumber the incidents of other categories of internet crime, according to the most recent FBI Internet Crime Report. Phishing has consistently led to large annual financial losses in the US and globally.

Overview of BIMI, MTA-STS, and TLS reporting

An earlier post has covered how you can use Amazon Simple Email Service (Amazon SES) to send emails that align with best practices, including the IETF internet standards: Sender Policy Framework (SPF), DomainKeys Identified Mail (DKIM), and Domain-based Message Authentication, Reporting, and Conformance (DMARC). This post will show you how to build on this foundation and configure your domains to align with additional email security standards, including the following:

  • Brand Indicators for Message Identification (BIMI) – This standard allows you to associate a logo with your email domain, which some email clients will display to users in their inbox. Visit the BIMI Group’s Where is my BIMI Logo Displayed? webpage to see how logos are displayed in the user interfaces of BIMI-supporting mailbox providers; Figure 1 shows a mock-up of a typical layout that contains a logo.
  • Mail Transfer Agent Strict Transport Security (MTA-STS) – This standard helps ensure that email servers always use TLS encryption and certificate-based authentication when they send messages to your domain, to protect the confidentiality and integrity of email in transit.
  • SMTP TLS reporting – This reporting allows you to receive reports and monitor your domain’s TLS security posture, identify problems, and learn about attacks that might be occurring.
Figure 1: A mock-up of how BIMI enables branded logos to be displayed in email user interfaces

Figure 1: A mock-up of how BIMI enables branded logos to be displayed in email user interfaces

These three standards require your Domain Name System (DNS) to publish specific records, for example by using Amazon Route 53, that point to web pages that have additional information. You can host this information without having to maintain a web server by storing it in Amazon Simple Storage Service (Amazon S3) and delivering it through Amazon CloudFront, secured with a certificate provisioned from AWS Certificate Manager (ACM).

Note: This AWS solution works for DKIM, BIMI, and DMARC, regardless of what you use to serve the actual email for your domains, which services you use to send email, and where you host DNS. For purposes of clarity, this post assumes that you are using Route 53 for DNS. If you use a different DNS hosting provider, you will manually configure DNS records in your existing hosting provider.

Solution architecture

The architecture for this solution is depicted in Figure 2.

Figure 2: The architecture diagram showing how the solution components interact

Figure 2: The architecture diagram showing how the solution components interact

The interaction points are as follows:

  1. The web content is stored in an S3 bucket, and CloudFront has access to this bucket through an origin access identity, a mechanism of AWS Identity and Access Management (IAM).
  2. As described in more detail in the BIMI section of this blog post, the Verified Mark Certificate is obtained from a BIMI-qualified certificate authority and stored in the S3 bucket.
  3. When an external email system receives a message claiming to be from your domain, it looks up BIMI records for your domain in DNS. As depicted in the diagram, a DNS request is sent to Route 53.
  4. To retrieve the BIMI logo image and Verified Mark Certificate, the external email system will make HTTPS requests to a URL published in the BIMI DNS record. In this solution, the URL points to the CloudFront distribution, which has a TLS certificate provisioned with ACM.

A few important warnings

Email is a complex system of interoperating technologies. It is also brittle: a typo or a missing DNS record can make the difference between whether an email is delivered or not. Pay close attention to your email server and the users of your email systems when implementing the solution in this blog post. The main indicator that something is wrong is the absence of email. Instead of seeing an error in your email server’s log, users will tell you that they’re expecting to receive an email from somewhere and it’s not arriving. Or they will tell you that they sent an email, and their recipient can’t find it.

The DNS uses a lot of caching and time-out values to improve its efficiency. That makes DNS records slow and a little unpredictable as they propagate across the internet. So keep in mind that as you monitor your systems, it can be hours or even more than a day before the DNS record changes have an effect that you can detect.

This solution uses AWS Cloud Development Kit (CDK) custom resources, which are supported by AWS Lambda functions that will be created as part of the deployment. These functions are configured to use CDK-selected runtimes, which will eventually pass out of support and require you to update them.

Prerequisites

You will need permission in an AWS account to create and configure the following resources:

  • An Amazon S3 bucket to store the files and access logs
  • A CloudFront distribution to publicly deliver the files from the S3 bucket
  • A TLS certificate in ACM
  • An origin access identity in IAM that CloudFront will use to access files in Amazon S3
  • Lambda functions, IAM roles, and IAM policies created by CDK custom resources

You might also want to enable these optional services:

  • Amazon Route 53 for setting the necessary DNS records. If your domain is hosted by another DNS provider, you will set these DNS records manually.
  • Amazon SES or an Amazon WorkMail organization with a single mailbox. You can configure either service with a subdomain (for example, [email protected]) such that the existing domain is not disrupted, or you can create new email addresses by using your existing email mailbox provider.

BIMI has some additional requirements:

  • BIMI requires an email domain to have implemented a strong DMARC policy so that recipients can be confident in the authenticity of the branded logos. Your email domain must have a DMARC policy of p=quarantine or p=reject. Additionally, the domain’s policy cannot have sp=none or pct<100.

    Note: Do not adjust the DMARC policy of your domain without careful testing, because this can disrupt mail delivery.

  • You must have your brand’s logo in Scaled Vector Graphics (SVG) format that conforms to the BIMI standard. For more information, see Creating BIMI SVG Logo Files on the BIMI Group website.
  • Purchase a Verified Mark Certificate (VMC) issued by a third-party certificate authority. This certificate attests that the logo, organization, and domain are associated with each other, based on a legal trademark registration. Many email hosting providers require this additional certificate before they will show your branded logo to their users. Others do not currently support BIMI, and others might have alternative mechanisms to determine whether to show your logo. For more information about purchasing a Verified Mark Certificate, see the BIMI Group website.

    Note: If you are not ready to purchase a VMC, you can deploy this solution and validate that BIMI is correctly configured for your domain, but your branded logo will not display to recipients at major email providers.

What gets deployed in this solution?

This solution deploys the DNS records and supporting files that are required to implement BIMI, MTA-STS, and SMTP TLS reporting for an email domain. We’ll look at the deployment in more detail in the following sections.

BIMI

BIMI is described by the Internet Engineering Task Force (IETF) as follows:

Brand Indicators for Message Identification (BIMI) permits Domain Owners to coordinate with Mail User Agents (MUAs) to display brand-specific Indicators next to properly authenticated messages. There are two aspects of BIMI coordination: a scalable mechanism for Domain Owners to publish their desired Indicators, and a mechanism for Mail Transfer Agents (MTAs) to verify the authenticity of the Indicator. This document specifies how Domain Owners communicate their desired Indicators through the BIMI Assertion Record in DNS and how that record is to be interpreted by MTAs and MUAs. MUAs and mail-receiving organizations are free to define their own policies for making use of BIMI data and for Indicator display as they see fit.

If your organization has a trademark-protected logo, you can set up BIMI to have that logo displayed to recipients in their email inboxes. This can have a positive impact on your brand and indicates to end users that your email is more trustworthy. The BIMI Group shows examples of how brand logos are displayed in user inboxes, as well as a list of known email service providers that support the display of BIMI logos.

As a domain owner, you can implement BIMI by publishing the relevant DNS records and hosting the relevant files. To have your logo displayed by most email hosting providers, you will need to purchase a Verified Mark Certificate from a BIMI-qualified certificate authority.

This solution will deploy a valid BIMI record in Route 53 (or tell you what to publish in the DNS if you’re not using Route 53) and will store your provided SVG logo and Verified Mark Certificate files in Amazon S3, to be delivered through CloudFront with a valid TLS certificate from ACM.

To support BIMI, the solution makes the following changes to your resources:

  1. A DNS record of type TXT is published at the following host:
    default._bimi.<your-domain>. The value of this record is: v=BIMI1; l=<url-of-your-logo> a=<url-of-verified-mark-certificate>. The value of <your-domain> refers to the domain that is used in the From header of messages that your organization sends.
  2. The logo and optional Verified Mark Certificate are hosted publicly at the HTTPS locations defined by <url-of-your-logo> and <url-of-verified-mark-certificate>, respectively.

MTA-STS

MTA-STS is described by the IETF in RFC 8461 as follows:

SMTP (Simple Mail Transport Protocol) MTA Strict Transport Security (MTA-STS) is a mechanism enabling mail service providers to declare their ability to receive Transport Layer Security (TLS) secure SMTP connections and to specify whether sending SMTP servers should refuse to deliver to MX hosts that do not offer TLS with a trusted server certificate.

Put simply, MTA-STS helps ensure that email servers always use encryption and certificate-based authentication when sending email to your domains, so that message integrity and confidentiality are preserved while in transit across the internet. MTA-STS also helps to ensure that messages are only sent to authorized servers.

This solution will deploy a valid MTA-STS policy record in Route 53 (or tell you what value to publish in the DNS if you’re not using Route 53) and will create an MTA-STS policy document to be hosted on S3 and delivered through CloudFront with a valid TLS certificate from ACM.

To support MTA-STS, the solution makes the following changes to your resources:

  1. A DNS record of type TXT is published at the following host: _mta-sts.<your-domain>. The value of this record is: v=STSv1; id=<unique value used for cache invalidation>.
  2. The MTA-STS policy document is hosted at and obtained from the following location: https://mta-sts.<your-domain>/.well-known/mta-sts.txt.
  3. The value of <your-domain> in both cases is the domain that is used for routing inbound mail to your organization and is typically the same domain that is used in the From header of messages that your organization sends externally. Depending on the complexity of your organization, you might receive inbound mail for multiple domains, and you might choose to publish MTA-STS policies for each domain.

Is it ever bad to encrypt everything?

In the example MTA-STS policy file provided in the GitHub repository and explained later in this post, the MTA-STS policy mode is set to testing. This means that your email server is advertising its willingness to negotiate encrypted email connections, but it does not require TLS. Servers that want to send mail to you are allowed to connect and deliver mail even if there are problems in the TLS connection, as long as you’re in testing mode. You should expect reports when servers try to connect through TLS to your mail server and fail to do so.

Be fully prepared before you change the MTA-STS policy to enforce. After this policy is set to enforce, servers that follow the MTA-STS policy and that experience an enforceable TLS-related error when they try to connect to your mail server will not deliver mail to your mail server. This is a difficult situation to detect. You will simply stop receiving email from servers that comply with the policy. You might receive reports from them indicating what errors they encountered, but it is not guaranteed. Be sure that the email address you provide in SMTP TLS reporting (in the following section) is functional and monitored by people who can take action to fix issues. If you miss TLS failure reports, you probably won’t receive email. If the TLS certificate that you use on your email server expires, and your MTA-STS policy is set to enforce, this will become an urgent issue and will disrupt the flow of email until it is fixed.

SMTP TLS reporting

SMTP TLS reporting is described by the IETF in RFC 8460 as follows:

A number of protocols exist for establishing encrypted channels between SMTP Mail Transfer Agents (MTAs), including STARTTLS, DNS-Based Authentication of Named Entities (DANE) TLSA, and MTA Strict Transport Security (MTA-STS). These protocols can fail due to misconfiguration or active attack, leading to undelivered messages or delivery over unencrypted or unauthenticated channels. This document describes a reporting mechanism and format by which sending systems can share statistics and specific information about potential failures with recipient domains. Recipient domains can then use this information to both detect potential attacks and diagnose unintentional misconfigurations.

As you gain the security benefits of MTA-STS, SMTP TLS reporting will allow you to receive reports from other internet email providers. These reports contain information that is valuable when monitoring your TLS security posture, identifying problems, and learning about attacks that might be occurring.

This solution will deploy a valid SMTP TLS reporting record on Route 53 (or provide you with the value to publish in the DNS if you are not using Route 53).

To support SMTP TLS reporting, the solution makes the following changes to your resources:

  1. A DNS record of type TXT is published at the following host: _smtp._tls.<your-domain>. The value of this record is: v=TLSRPTv1; rua=mailto:<report-receiver-email-address>
  2. The value of <report-receiver-email-address> might be an address in your domain or in a third-party provider. Automated systems that process these reports must be capable of processing GZIP compressed files and parsing JSON.

Deploy the solution with the AWS CDK

In this section, you’ll learn how to deploy the solution to create the previously described AWS resources in your account.

  1. Clone the following GitHub repository:

    git clone https://github.com/aws-samples/serverless-mail
    cd serverless-mail/email-security-records

  2. Edit CONFIG.py to reflect your desired settings, as follows:
    1. If no Verified Mark Certificate is provided, set VMC_FILENAME = None.
    2. If your DNS zone is not hosted on Route 53, or if you do not want this app to manage Route 53 DNS records, set ROUTE_53_HOSTED = False. In this case, you will need to set TLS_CERTIFICATE_ARN to the Amazon Resource Name (ARN) of a certificate hosted on ACM in us-east-1. This certificate is used by CloudFront and must support two subdomains: mta-sts and your configured BIMI_ASSET_SUBDOMAIN.
  3. Finalize the preparation, as follows:
    1. Place your BIMI logo and Verified Mark Certificate files in the assets folder.
    2. Create an MTA-STS policy file at assets/.well-known/mta-sts.txt to reflect your mail exchange (MX) servers and policy requirements. An example file is provided at assets/.well-known/mta-sts.txt.example
  4. Deploy the solution, as follows:
    1. Open a terminal in the email-security-records folder.
    2. (Recommended) Create and activate a virtual environment by running the following commands.
      python3 -m venv .venv
      source .venv/bin/activate
    3. Install the Python requirements in your environment with the following command.
      pip install -r requirements.txt
    4. Assume a role in the target account that has the permissions outlined in the Prerequisites section of this post.

      Using AWS CDK version 2.17.0 or later, deploy the bootstrap in the target account by running the following command. To learn more, see Bootstrapping in the AWS CDK Developer Guide.
      cdk bootstrap

    5. Run the following command to synthesize the CloudFormation template. Review the output of this command to verify what will be deployed.
      cdk synth
    6. Run the following command to deploy the CloudFormation template. You will be prompted to accept the IAM changes that will be applied to your account.
      cdk deploy

      Note: If you use Route53, these records are created and activated in your DNS zones as soon as the CDK finishes deploying. As the records propagate through the DNS, they will gradually start affecting the email in the affected domains.

    7. If you’re not using Route53 and instead are using a third-party DNS provider, create the CNAME and TXT records as indicated. In this case, your email is not affected by this solution until you create the records in DNS.

Testing and troubleshooting

After you have deployed the CDK solution, you can test it to confirm that the DNS records and web resources are published correctly.

BIMI

  1. Query the BIMI DNS TXT record for your domain by using the dig or nslookup command in your terminal.

    dig +short TXT default._bimi.<your-domain.example>

    Verify the response. For example:

    "v=BIMI1; l=https://bimi-assets.<your-domain.example>/logo.svg"

  2. In your web browser, open the URL from that response (for example, https://bimi-assets.<your-domain.example>/logo.svg) to verify that the logo is available and that the HTTPS certificate is valid.
  3. The BIMI group provides a tool to validate your BIMI configuration. This tool will also validate your VMC if you have purchased one.

MTA-STS

  1. Query the MTA-STS DNS TXT record for your domain.

    dig +short TXT _mta-sts.<your-domain.example>

    The value of this record is as follows:

    v=STSv1; id=<unique value used for cache invalidation>

  2. You can load the MTA-STS policy document using your web browser. For example, https://mta-sts.<your-domain.example>/.well-known/mta-sts.txt
  3. You can also use third party tools to examine your MTA-STS configuration, such as MX Toolbox.

TLS reporting

  1. Query the TLS reporting DNS TXT record for your domain.

    dig +short TXT _smtp._tls.<your-domain.example>

    Verify the response. For example:

    "v=TLSRPTv1; rua=mailto:<your email address>"

  2. You can also use third party tools to examine your TLS reporting configuration, such as Easy DMARC.

Depending on which domains you communicate with on the internet, you will begin to see TLS reports arriving at the email address that you have defined in the TLS reporting DNS record. We recommend that you closely examine the TLS reports, and use automated analytical techniques over an extended period of time before changing the default testing value of your domain’s MTA-STS policy. Not every email provider will send TLS reports, but examining the reports in aggregate will give you a good perspective for making changes to your MTA-STS policy.

Cleanup

To remove the resources created by this solution:

  1. Open a terminal in the cdk-email-security-records folder.
  2. Assume a role in the target account with permission to delete resources.
  3. Run cdk destroy.

Note: The asset and log buckets are automatically emptied and deleted by the cdk destroy command.

Conclusion

When external systems send email to or receive email from your domains they will now query your new DNS records and will look up your domain’s BIMI, MTA-STS, and TLS reporting information from your new CloudFront distribution. By adopting the email domain security mechanisms outlined in this post, you can improve the overall security posture of your email environment, as well as the perception of your brand.

 
If you have feedback about this post, submit comments in the Comments section below. If you have questions about this post, contact AWS Support.

Want more AWS Security news? Follow us on Twitter.

Michael Davie

Michael Davie

Michael is a Senior Industry Specialist with AWS Security Assurance. He works with our customers, their regulators, and AWS teams to help raise the bar on secure cloud adoption and usage. Michael has over 20 years of experience working in the defence, intelligence, and technology sectors in Canada and is a licensed professional engineer.

Jesse Thompson

Jesse Thompson

Jesse is an Email Deliverability Manager with the Amazon Simple Email Service team. His background is in enterprise IT development and operations, with a focus on email abuse mitigation and encouragement of authenticity practices with open standard protocols. Jesse’s favorite activity outside of technology is recreational curling.

How to use domain with Amazon SES in multiple accounts or regions

Post Syndicated from Leonardo Azize original https://aws.amazon.com/blogs/messaging-and-targeting/how-to-use-domain-with-amazon-ses-in-multiple-accounts-or-regions/

Sometimes customers want to use their email domain with Amazon Simples Email Service (Amazon SES) across multiple accounts, or the same account but across multiple regions.

For example, AnyCompany is an insurance company with marketing and operations business units. The operations department sends transactional emails every time customers perform insurance simulations. The marketing department sends email advertisements to existing and prospective customers. Since they are different organizations inside AnyCompany, they want to have their own Amazon SES billing. At the same time, they still want to use the same AnyCompany domain.

Other use-cases include customers who want to setup multi-region redundancy, need to satisfy data residency requirements, or need to send emails on behalf of several different clients. In all of these cases, customers can use different regions, in the same or across different accounts.

This post shows how to verify and configure your domain on Amazon SES across multiple accounts or multiple regions.

Overview of solution

You can use the same domain with Amazon SES across multiple accounts or regions. Your options are: different accounts but the same region, different accounts and different regions, and the same account but different regions.

In all of these scenarios, you will have two SES instances running, each sending email for example.com domain – let’s call them SES1 and SES2. Every time you configure a domain in Amazon SES it will generate a series of DNS records you will have to add on your domain authoritative DNS server, which is unique for your domain. Those records are different for each SES instance.

You will need to modify your DNS to add one TXT record, with multiple values, for domain verification. If you decide to use DomainKeys Identified Mail (DKIM), you will modify your DNS to add six CNAME records, three records from each SES instance.

When you configure a domain on Amazon SES, you can also configure a MAIL FROM domain. If you decide to do so, you will need to modify your DNS to add one TXT record for Sender Policy Framework (SPF) and one MX record for bounce and complaint notifications that email providers send you.

Furthermore, your domain can be configured to support DMAC for email spoofing detection. It will rely on SPF or DKIM configured above. Below we walk you through these steps.

  • Verify domain
    You will take TXT values from both SES1 and SES2 instances and add them in DNS, so SES can validate you own the domain
  • Complying with DMAC
    You will add a TXT value with DMAC policy that applies to your domain. This is not tied to any specific SES instance
  • Custom MAIL FROM Domain and SPF
    You will take TXT and MX records related from your MAIL FROM domain from both SES1 and SES2 instances and add them in DNS, so SES can comply with DMARC

Here is a sample matrix of the various configurations:

Two accounts, same region Two accounts, different regions One account, two regions
TXT records for domain verification*

1 record with multiple values

_amazonses.example.com = “VALUE FROM SES1”
“VALUE FROM SES2”

CNAMES for DKIM verification

6 records, 3 from each SES instance

record1-SES1._domainkey.example.com = VALUE FROM SES1
record2-SES1._domainkey.example.com = VALUE FROM SES1
record3-SES1._domainkey.example.com = VALUE FROM SES1
record1-SES2._domainkey.example.com = VALUE FROM SES2
record2-SES2._domainkey.example.com = VALUE FROM SES2
record3-SES2._domainkey.example.com = VALUE FROM SES2

TXT record for DMARC

1 record. It is not related to SES instance or region

_dmarc.example.com = DMARC VALUE

MAIL FROM MX record to define message sender for SES

1 record for entire region

mail.example.com = 10 feedback-smtp.us-east-1.amazonses.com

2 records, one for each region

mail1.example.com = 10 feedback-smtp.us-east-1.amazonses.com
mail2.example.com = 10 feedback-smtp.eu-west-1.amazonses.com

MAIL FROM TXT record for SPF

1 record for entire region

mail.example.com = “v=spf1 include:amazonses.com ~all”

2 records, one for each region

mail1.example.com = “v=spf1 include:amazonses.com ~all”
mail2.example.com = “v=spf1 include:amazonses.com ~all”

* Considering your DNS supports multiple values for a TXT record

Setup SES1 and SES2

In this blog, we call SES1 your primary or existing SES instance. We assume that you have already setup SES, but if not, you can still follow the instructions and setup both at the same time. The settings on SES2 will differ slightly, and therefore you will need to add new DNS entries to support the two-instance setup.

In this document we will use configurations from the “Verification,” “DKIM,” and “Mail FROM Domain” sections of the SES Domains screen and configure SES2 and setup DNS correctly for the two-instance configuration.

Verify domain

Amazon SES requires that you verify, in DNS, your domain, to confirm that you own it and to prevent others from using it. When you verify an entire domain, you are verifying all email addresses from that domain, so you don’t need to verify email addresses from that domain individually.

You can instruct multiple SES instances, across multiple accounts or regions to verify your domain.  The process to verify your domain requires you to add some records in your DNS provider. In this post I am assuming Amazon Route 53 is an authoritative DNS server for example.com domain.

Verifying a domain for SES purposes involves initiating the verification in SES console, and adding DNS records and values to confirm you have ownership of the domain. SES will automatically check DNS to complete the verification process. We assume you have done this step for SES1 instance, and have a _amazonses.example.com TXT record with one value already in your DNS. In this section you will add a second value, from SES2, to the TXT record. If you do not have SES1 setup in DNS, complete these steps twice, once for SES1 and again for SES2. This will prove to both SES instances that you own the domain and are entitled to send email from them.

Initiate Verification in SES Console

Just like you have done on SES1, in the second SES instance (SES2) initiate a verification process for the same domain; in our case example.com

  1. Sign in to the AWS Management Console and open the Amazon SES console.
  2. In the navigation pane, under Identity Management, choose Domains.
  3. Choose Verify a New Domain.
  4. In the Verify a New Domain dialog box, enter the domain name (i.e. example.com).
  5. If you want to set up DKIM signing for this domain, choose Generate DKIM Settings.
  6. Click on Verify This Domain.
  7. In the Verify a New Domain dialog box, you will see a Domain Verification Record Set containing a Name, a Type, and a Value. Copy Name and Value and store them for the step below, where you will add this value to DNS.
    (This information is also available by choosing the domain name after you close the dialog box.)

To complete domain verification, add a TXT record with the displayed Name and Value to your domain’s DNS server. For information about Amazon SES TXT records and general guidance about how to add a TXT record to a DNS server, see Amazon SES domain verification TXT records.

Add DNS Values for SES2

To complete domain verification for your second account, edit current _amazonses TXT record and add the Value from the SES2 to it. If you do not have an _amazonses TXT record create it, and add the Domain Verification values from both SES1 and SES2 to it. We are showing how to add record to Route 53 DNS, but the steps should be similar in any DNS management service you use.

  1. Sign in to the AWS Management Console and open the Amazon Route 53 console.
  2. In the navigation pane, choose Hosted zones.
  3. Choose the domain name you are verifying.
  4. Choose the _amazonses TXT record you created when you verified your domain for SES1.
  5. Under Record details, choose Edit record.
  6. In the Value box, go to the end of the existing attribute value, and then press Enter.
  7. Add the attribute value for the additional account or region.
  8. Choose Save.
  9. To validate, run the following command:
    dig TXT _amazonses.example.com +short
  10. You should see the two values returned:
    "4AjLMzUu4nSjrz4QVqDD8rXq8X2AHr+JhGSl4foiMmU="
    "abcde12345Sjrz4QVqDD8rXq8X2AHr+JhGSl4foiMmU="

Please note:

  1. if your DNS provider does not allow underscores in record names, you can omit _amazonses from the Name.
  2. to help you easily identify this record within your domain’s DNS settings, you can optionally prefix the Value with “amazonses:”.
  3. some DNS providers automatically append the domain name to DNS record names. To avoid duplication of the domain name, you can add a period to the end of the domain name in the DNS record. This indicates that the record name is fully qualified and the DNS provider need not append an additional domain name.
  4. if your DNS server does not support two values for a TXT record, you can have one record named _amazonses.example.com and another one called example.com.

Finally, after some time SES will complete its validation of the domain name and you should see the “pending validation” change to “verified”.

Verify DKIM

DomainKeys Identified Mail (DKIM) is a standard that allows senders to sign their email messages with a cryptographic key. Email providers then use these signatures to verify that the messages weren’t modified by a third party while in transit.

An email message that is sent using DKIM includes a DKIM-Signature header field that contains a cryptographically signed representation of the message. A provider that receives the message can use a public key, which is published in the sender’s DNS record, to decode the signature. Email providers then use this information to determine whether messages are authentic.

When you enable DKIM it generates CNAME records you need to add into your DNS. As it generates different values for each SES instance, you can use DKIM with multiple accounts and regions.

To complete the DKIM verification, copy the three (3) DKIM Names and Values from SES1 and three (3) from SES2 and add them to your DNS authoritative server as CNAME records.

You will know you are successful because, after some time SES will complete the DKIM verification and the “pending verification” will change to “verified”.

Configuring for DMARC compliance

Domain-based Message Authentication, Reporting and Conformance (DMARC) is an email authentication protocol that uses Sender Policy Framework (SPF) and/or DomainKeys Identified Mail (DKIM) to detect email spoofing. In order to comply with DMARC, you need to setup a “_dmarc” DNS record and either SPF or DKIM, or both. The DNS record for compliance with DMARC is setup once per domain, but SPF and DKIM require DNS records for each SES instance.

  1. Setup “_dmarc” record in DNS for your domain; one time per domain. See instructions here
  2. To validate it, run the following command:
    dig TXT _dmarc.example.com +short
    "v=DMARC1;p=quarantine;pct=25;rua=mailto:[email protected]"
  3. For DKIM and SPF follow the instructions below

Custom MAIL FROM Domain and SPF

Sender Policy Framework (SPF) is an email validation standard that’s designed to prevent email spoofing. Domain owners use SPF to tell email providers which servers are allowed to send email from their domains. SPF is defined in RFC 7208.

To comply with Sender Policy Framework (SPF) you will need to use a custom MAIL FROM domain. When you enable MAIL FROM domain in SES console, the service generates two records you need to configure in your DNS to document who is authorized to send messages for your domain. One record is MX and another TXT; see screenshot for mail.example.com. Save these records and enter them in your DNS authoritative server for example.com.

Configure MAIL FROM Domain for SES2

  1. Open the Amazon SES console at https://console.aws.amazon.com/ses/.
  2. In the navigation pane, under Identity Management, choose Domains.
  3. In the list of domains, choose the domain and proceed to the next step.
  4. Under MAIL FROM Domain, choose Set MAIL FROM Domain.
  5. On the Set MAIL FROM Domain window, do the following:
    • For MAIL FROM domain, enter the subdomain that you want to use as the MAIL FROM domain. In our case mail.example.com.
    • For Behavior if MX record not found, choose one of the following options:
      • Use amazonses.com as MAIL FROM – If the custom MAIL FROM domain’s MX record is not set up correctly, Amazon SES will use a subdomain of amazonses.com. The subdomain varies based on the AWS Region in which you use Amazon SES.
      • Reject message – If the custom MAIL FROM domain’s MX record is not set up correctly, Amazon SES will return a MailFromDomainNotVerified error. Emails that you attempt to send from this domain will be automatically rejected.
    • Click Set MAIL FROM Domain.

You will need to complete this step on SES1, as well as SES2. The MAIL FROM records are regional and you will need to add them both to your DNS authoritative server.

Set MAIL FROM records in DNS

From both SES1 and SES2, take the MX and TXT records provided by the MAIL FROM configuration and add them to the DNS authoritative server. If SES1 and SES2 are in the same region (us-east-1 in our example) you will publish exactly one MX record (mail.example.com in our example) into DNS, pointing to endpoint for that region. If SES1 and SES2 are in different regions, you will create two different records (mail1.example.com and mail2.example.com) into DNS, each pointing to endpoint for specific region.

Verify MX record

Example of MX record where SES1 and SES2 are in the same region

dig MX mail.example.com +short
10 feedback-smtp.us-east-1.amazonses.com.

Example of MX records where SES1 and SES2 are in different regions

dig MX mail1.example.com +short
10 feedback-smtp.us-east-1.amazonses.com.

dig MX mail2.example.com +short
10 feedback-smtp.eu-west-1.amazonses.com.

Verify if it works

On both SES instances (SES1 and SES2), check that validations are complete. In the SES Console:

  • In Verification section, Status should be “verified” (in green color)
  • In DKIM section, DKIM Verification Status should be “verified” (in green color)
  • In MAIL FROM Domain section, MAIL FROM domain status should be “verified” (in green color)

If you have it all verified on both accounts or regions, it is correctly configured and ready to use.

Conclusion

In this post, we explained how to verify and use the same domain for Amazon SES in multiple account and regions and maintaining the DMARC, DKIM and SPF compliance and security features related to email exchange.

While each customer has different necessities, Amazon SES is flexible to allow customers decide, organize, and be in control about how they want to uses Amazon SES to send email.

Author bio

Leonardo Azize Martins is a Cloud Infrastructure Architect at Professional Services for Public Sector.

His background is on development and infrastructure for web applications, working on large enterprises.

When not working, Leonardo enjoys time with family, read technical content, watch movies and series, and play with his daughter.

Contributor

Daniel Tet is a senior solutions architect at AWS specializing in Low-Code and No-Code solutions. For over twenty years, he has worked on projects for Franklin Templeton, Blackrock, Stanford Children’s Hospital, Napster, and Twitter. He has a Bachelor of Science in Computer Science and an MBA. He is passionate about making technology easy for common people; he enjoys camping and adventures in nature.
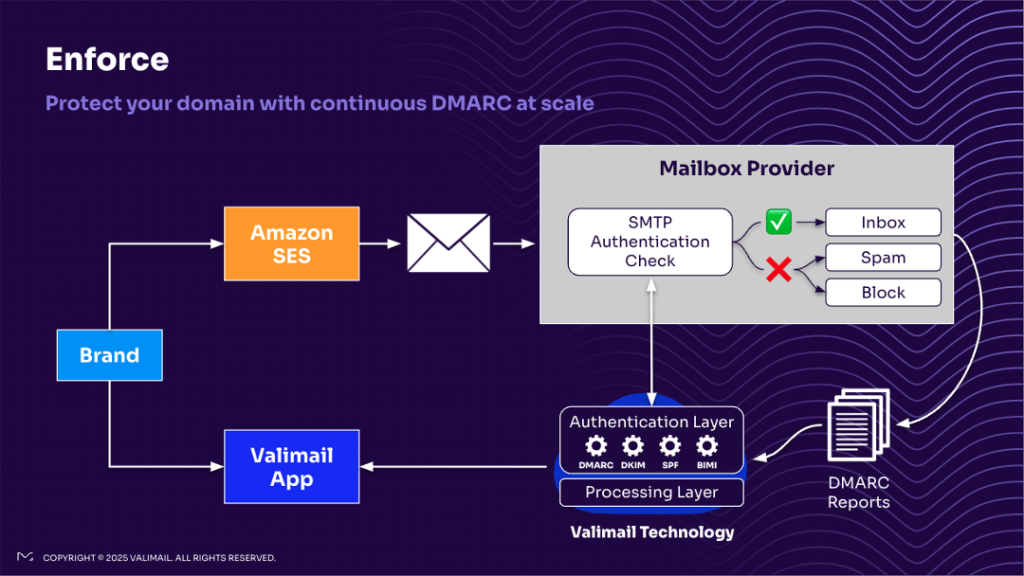