Tag Archives: npm

Bringing npm registry services to GitHub Codespaces

Post Syndicated from Di Hei original https://github.blog/2024-02-13-bringing-npm-registry-services-to-github-codespaces/

The npm engineering team recently transitioned to using GitHub Codespaces for local development for npm registry services. This shift to Codespaces has substantially reduced the friction of our inner development loop and boosted developer productivity. In this post, we would like to share our experiences and learnings from this transition, hoping this information may be useful to you.

What are npm registry services

npm registry services, the Node.js microservices that power the npm registry, are distributed across 30+ different repositories. Each microservice has its own repository and is containerized using Docker. With Codespaces, we develop npm registry services using Docker on Codespaces with Visual Studio Code.

Codespaces reduces the friction of inner dev loop

Prior to Codespaces, a significant hurdle in npm local development was the difficulty in testing code across multiple services. We lacked a straightforward way to run multiple registry services locally, instead relying on our staging environment for testing. For example, to verify a code change in one service that affected a user workflow involving five other services, we could only run that service locally and connect to the remaining five in the staging environment. Due to security reasons, access to our staging environment is only possible via a VPN, adding another layer of complexity to the code testing process.

Codespaces addressed this issue by simplifying the process of running multiple registry services locally. When working in a codespace we no longer need a VPN connection for the inner dev loop. This change spares the team from potential issues related to VPN connectivity, and significantly simplifies the process of getting started.

As developers, we often rely on breakpoints for debugging. Now, with all registry services running within a single workspace, we can debug code and hit breakpoints across multiple services in Visual Studio Code as if they were one service. This is a significant improvement over previous developer experience, where hitting breakpoints in the services within the staging environment was not possible.

Codespaces boosts developer productivity

Codespaces has made it easier for outside contributors to participate. For example, if a GitHub engineer outside of the npm team wishes to contribute, they can get started within minutes with Codespaces, as the development environment is pre-configured and ready to go. Previously, setting up the development environment and granting permissions to access the staging resources would take days and often resulted in partners from other teams like design simply not contributing.

Port forwarding gives us access to TCP ports running within a codespace. Automatic port forwarding in Codespaces allows us to access services from a browser on our local machine for testing and debugging.

The in browser Codespaces experience, powered by Visual Studio Code for the Web, offers the flexibility to work from any computer. This is particularly helpful when you are away from your primary work computer, but need to test a quick change. The Web-based Codespaces experience provides a zero-install experience running entirely in your browser.

Remember those times when you were bogged down with a local environment issue that was not only time-consuming to troubleshoot but also difficult to reproduce on other machines? With Codespaces, you can quickly spin up a new Codespaces instance within minutes for a fresh start. The best part? There’s no need to fix the issue; you can simply discard the old codespace.

Things we learned from our use of Codespaces

Codespaces has tons of features to save you time and automate processes. Here are a few tips we learned from our use of Codespaces.

The prebuild feature of Codespaces is an excellent way to speed up the creation of a new codespace by creating a snapshot of your devcontainer and caching all the cloned repositories that can be used at startup time for the codespace. Codespaces prebuilds enable you to select branches and leverage GitHub Actions for automatic updates of these prebuilds.

You can store account-specific development secrets, such as access tokens, in Codespaces on a per-repository basis, ensuring secure usage within Codespaces. Those secrets are available as environment variables in your environment.

Another tip is specific to the Visual Studio Code Dev Container. Consider utilizing the Dev Container’s lifecycle events (such as postCreateCommand in devcontainer.json) to automate the Codespaces setup as much as possible. Ultimately, it’s a balance between time saved through automation and time invested in building and maintaining it. However, automation typically results in greater time savings because everyone who uses the configuration benefits.

Another trick is to use GitHub dotfiles to personalize your Codespaces. Dotfiles are files and folders on Unix-like systems starting with . that control the configuration of applications and shells on your system. You can use GitHub dotfiles to set up your personalized settings in Codespaces.

Conclusion

The adoption of GitHub Codespaces has substantially improved the developer experience of working on npm registry services. It has not only reduced the development environment setup time from hours to minutes but also facilitated better debugging experiences. Furthermore, it provides time-saving features like prebuilds. We hope this blog post offers valuable insights into our use of Codespaces. For more information, please refer to Codespaces documentation.

Harness the power of Codespaces. Learn more or get started now.

The post Bringing npm registry services to GitHub Codespaces appeared first on The GitHub Blog.

Unlocking security updates for transitive dependencies with npm

Post Syndicated from Bryan Dragon original https://github.blog/2023-01-19-unlocking-security-updates-for-transitive-dependencies-with-npm/

Dependabot helps developers secure their software with automated security updates: when a security advisory is published that affects a project dependency, Dependabot will try to submit a pull request that updates the vulnerable dependency to a safe version if one is available. Of course, there’s no rule that says a security vulnerability will only affect direct dependencies—dependencies at any level of a project’s dependency graph could become vulnerable.

Until recently, Dependabot did not address vulnerabilities on transitive dependencies, that is, on the dependencies sitting one or more levels below a project’s direct dependencies. Developers would encounter an error message in the GitHub UI and they would have to manually update the chain of ancestor dependencies leading to the vulnerable dependency to bring it to a safe version.

Screenshot of the warning a user sees when they try to update the version of a project when its dependencies sitting one or more levels below a project’s direct dependencies were out of date. The message reads, "Dependabot cannot update minimist to a non-vulnerable version."

Internally, this would show up as a failed background job due to an update-not-possible error—and we would see a lot of these errors.

Understanding the challenge

Dependabot offers two strategies for updating dependencies: scheduled version updates and security updates. With version updates, the explicit goal is to keep project dependencies updated to the latest available version, and Dependabot can be configured to widen or increase a version requirement so that it accommodates the latest version. With security updates, Dependabot tries to make the most conservative update that removes the vulnerability while respecting version requirements. In this post we’ll be looking at security updates.

As an example, let’s say we have a repository with security updates enabled that contains an npm project with a single dependency on react-scripts@^4.0.3.

Not all package managers handle version requirements in the same way, so let’s quickly refresh. A version requirement like ^4.0.3 (a “caret range”) in npm permits updates to versions that don’t change the leftmost nonzero element in the MAJOR.MINOR.PATCH semver version number. The version requirement ^4.0.3, then, can be understood as allowing versions greater than or equal to 4.0.3 and less than 5.0.0.

On March 18, 2022, a high-severity security advisory was published for node-forge, a popular npm package that provides tools for writing cryptographic and network-heavy applications. The advisory impacts versions earlier than 1.3.0, the patched version released the day before the advisory was published.

While we don’t have a direct dependency on node-forge, if we zoom in on our project’s dependency tree we can see that we do indirectly depend on a vulnerable version:

react-scripts@^4.0.3             4.0.3
  - [email protected]    3.11.1
    - selfsigned@^1.10.7         1.10.14
      - node-forge@^0.10.0       0.10.0

In order to resolve the vulnerability, we need to bring node-forge from 0.10.0 to 1.3.0, but a sequence of conflicting ancestor dependencies prevents us from doing so:

  • 4.0.3 is the latest version of react-scripts permitted by our project
  • 3.11.1 is the only version of webpack-dev-server permitted by [email protected]
  • 1.10.14 is the latest version of selfsigned permitted by [email protected]
  • 0.10.0 is the latest version of node-forge permitted by[email protected]

This is the point at which the security update would fail with an update-not-possible error. The challenge is in finding the version of selfsigned that permits [email protected], the version of webpack-dev-server that permits that version of selfsigned, and so on up the chain of ancestor dependencies until we reach react-scripts.

How we chose npm

When we set out to reduce the rate of update-not-possible errors, the first thing we did was pull data from our data warehouse in order to identify the greatest opportunities for impact.

JavaScript is the most popular ecosystem that Dependabot supports, both by Dependabot enablement and by update volume. In fact, more than 80% of the security updates that Dependabot performs are for npm and Yarn projects. Given their popularity, improving security update outcomes for JavaScript projects promised the greatest potential for impact, so we focused our investigation there.

npm and Yarn both include an operation that audits a project’s dependencies for known security vulnerabilities, but currently only npm natively has the ability to additionally make the updates needed to resolve the vulnerabilities that it finds.

After a successful engineering spike to assess the feasibility of integrating with npm’s audit functionality, we set about productionizing the approach.

Tapping into npm audit

When you run the npm audit command, npm collects your project’s dependencies, makes a bulk request to the configured npm registry for all security advisories affecting them, and then prepares an audit report. The report lists each vulnerable dependency, the dependency that requires it, the advisories affecting it, and whether a fix is possible—in other words, almost everything Dependabot should need to resolve a vulnerable transitive dependency.

node-forge  <=1.2.1
Severity: high
Open Redirect in node-forge - https://github.com/advisories/GHSA-8fr3-hfg3-gpgp
Prototype Pollution in node-forge debug API. - https://github.com/advisories/GHSA-5rrq-pxf6-6jx5
Improper Verification of Cryptographic Signature in node-forge - https://github.com/advisories/GHSA-cfm4-qjh2-4765
URL parsing in node-forge could lead to undesired behavior. - https://github.com/advisories/GHSA-gf8q-jrpm-jvxq
fix available via `npm audit fix --force`
Will install [email protected], which is a breaking change
node_modules/node-forge
  selfsigned  1.1.1 - 1.10.14
  Depends on vulnerable versions of node-forge
  node_modules/selfsigned

There were two ways in which we had to supplement npm audit to meet our requirements:

  1. The audit report doesn’t include the chain of dependencies linking a vulnerable transitive dependency, which a developer may not recognize, to a direct dependency, which a developer should recognize. The last step in a security update job is creating a pull request that removes the vulnerability and we wanted to include some context that lets developers know how changes relate to their project’s direct dependencies.
  2. Dependabot performs security updates for one vulnerable dependency at a time. (Updating one dependency at a time keeps diffs to a minimum and reduces the likelihood of introducing breaking changes.) npm audit and npm audit fix, however, operate on all project dependencies, which means Dependabot wouldn’t be able to tell which of the resulting updates were necessary for the dependency it’s concerned with.

Fortunately, there’s a JavaScript API for accessing the audit functionality underlying the npm audit and npm audit fix commands via Arborist, the component npm uses to manage dependency trees. Since Dependabot is a Ruby application, we wrote a helper script that uses the Arborist.audit() API and can be invoked in a subprocess from Ruby. The script takes as input a vulnerable dependency and a list of security advisories affecting it and returns as output the updates necessary to remove the vulnerabilities as reported by npm.

To meet our first requirement, the script uses the audit results from Arborist.audit() to perform a depth-first traversal of the project’s dependency tree, starting with direct dependencies. This top-down, recursive approach allows us to maintain the chain of dependencies linking the vulnerable dependency to its top-level ancestor(s) (which we’ll want to mention later when creating a pull request), and its worst-case time complexity is linear in the total number of dependencies.

function buildDependencyChains(auditReport, name) {
  const helper = (node, chain, visited) => {
    if (!node) {
      return []
    }
    if (visited.has(node.name)) {
      // We've already seen this node; end path.
      return []
    }
    if (auditReport.has(node.name)) {
      const vuln = auditReport.get(node.name)
      if (vuln.isVulnerable(node)) {
        return [{ fixAvailable: vuln.fixAvailable, nodes: [node, ...chain.nodes] }]
      } else if (node.name == name) {
        // This is a non-vulnerable version of the advisory dependency; end path.
        return []
      }
    }
    if (!node.edgesOut.size) {
      // This is a leaf node that is unaffected by the vuln; end path.
      return []
    }
    return [...node.edgesOut.values()].reduce((chains, { to }) => {
      // Only prepend current node to chain/visited if it's not the project root.
      const newChain = node.isProjectRoot ? chain : { nodes: [node, ...chain.nodes] }
      const newVisited = node.isProjectRoot ? visited : new Set([node.name, ...visited])
      return chains.concat(helper(to, newChain, newVisited))
    }, [])
  }
  return helper(auditReport.tree, { nodes: [] }, new Set())
}

To meet our second requirement of operating on one vulnerable dependency at a time, the script takes advantage of the fact that the Arborist constructor accepts a custom audit registry URL to be used when requesting bulk advisory data. We initialize a mock audit registry server using nock that returns only the list of advisories (in the expected format) for the dependency that was passed into the script and we tell the Arborist instance to use it.

const arb = new Arborist({
  auditRegistry: 'http://localhost:9999',
  // ...
})

const scope = nock('http://localhost:9999')
  .persist()
  .post('/-/npm/v1/security/advisories/bulk')
  .reply(200, convertAdvisoriesToRegistryBulkFormat(advisories))

We see both of these use cases—linking a vulnerable dependency to its top-level ancestor and conducting an audit for a single package or a particular set of vulnerabilities—as opportunities to extend Arborist and we’re working on integrating them upstream.

Back in the Ruby code, we parse and verify the audit results emitted by the helper script, accounting for scenarios such as a dependency being downgraded or removed in order to fix a vulnerability, and we incorporate the updates recommended by npm into the remainder of the security update job.

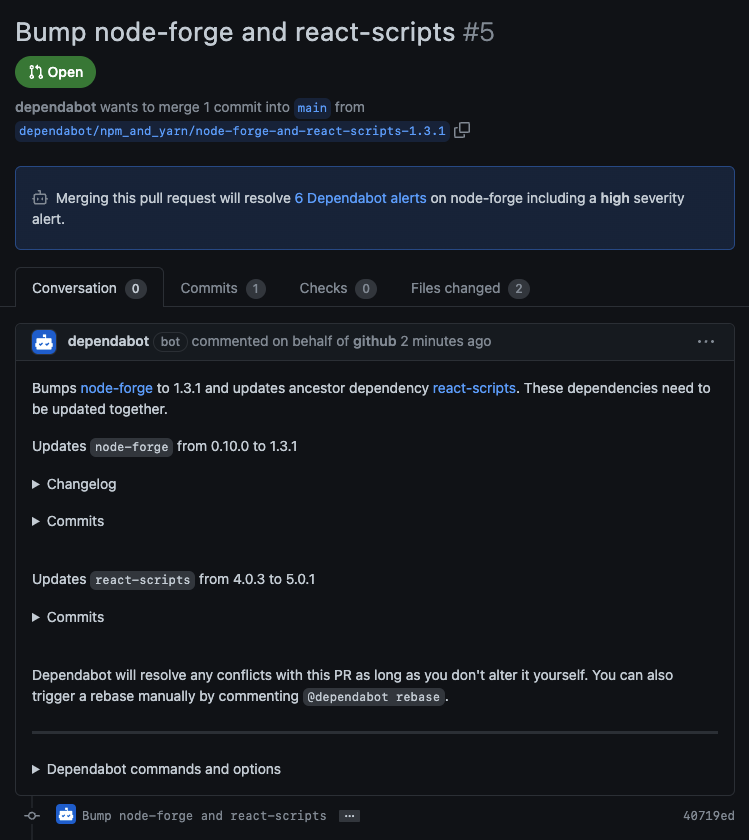
With a viable update path in hand, Dependabot is able to make the necessary updates to remove the vulnerability and submit a pull request that tells the developer about the transitive dependency and its top-level ancestor.

Screenshot of an open pull request that tells the developer about the transitive dependency and its top-level ancestor. The pull request is titled "Bump node-forge and react-scripts" and has a message from Dependabot that reads, "Merging this pull request will resolve 6 Dependabot alerts on node-forge including a high severity alert."

Caveats

When npm audit decides that a vulnerability can only be fixed by changing major versions, it requires use of the force option with npm audit fix. When the force option is used, npm will update to the latest version of a package, even if it means jumping several major versions. This breaks with Dependabot’s previous security update behavior. It also achieves our goal: to unlock conflicting dependencies in order to bring the vulnerable dependency to an unaffected version. Of course, you should still always review the changelog for breaking changes when jumping minor or major versions of a package.

Impact

We rolled out support for transitive security updates with npm in September 2022. Now, having a full quarter of data with the changes in place, we’re able to measure the impact: between Q1Y22 and Q4Y22 we saw a 42% reduction in update-not-possible errors for security updates on JavaScript projects. 🎉

If you have Dependabot security updates enabled on your npm projects, there’s nothing extra for you to do—you’re already benefiting from this improvement.

Looking ahead

I hope this post illustrates some of the considerations and trade-offs that are necessary when making improvements to an established system like Dependabot. We prefer to leverage the native functionality provided by package managers whenever possible, but as package managers come in all shapes and sizes, the approach may vary substantially from one ecosystem to the next.

We hope other package managers will introduce functionality similar to npm audit and npm audit fix that Dependabot can integrate with and we look forward to extending support for transitive security updates to those ecosystems as they do.

Introducing even more security enhancements to npm

Post Syndicated from Myles Borins original https://github.blog/2022-07-26-introducing-even-more-security-enhancements-to-npm/

The JavaScript community downloads over 5 billion packages from npm a day, and we at GitHub recognize how important it is that developers can do so with confidence. As stewards of the npm registry, it’s important that we continue to invest in improvements that increase developer trust and the overall security of the registry itself.

Today, we are announcing the general availability of an enhanced 2FA experience on npm, as well as sharing additional investments we’ve made to the verification process of accounts and packages.

The following improvements to npm are available today, including:

  • A streamlined login and publishing experience with the npm CLI.
  • The ability to connect GitHub and Twitter accounts to npm.
  • All packages on npm have been re-signed and we’ve added a new npm CLI command to audit package integrity.

Streamlined login and publishing experience

Account security is significantly improved by adopting 2FA, but if the experience adds too much friction, we can’t expect customers to adopt it. We recently announced a variety of enhancements to the npm registry to make 2FA adoption easier for developers—in a public beta release. Early adopters of our new 2FA experience shared feedback around the process of logging in and publishing with the npm CLI, and we recognized there was room for improvement. Our initial design was created to be backwards compatible with npm 6 and other clients; in fact the Yarn project was able to backport support for our new experience to Yarn 1 in less than 10 lines of code!

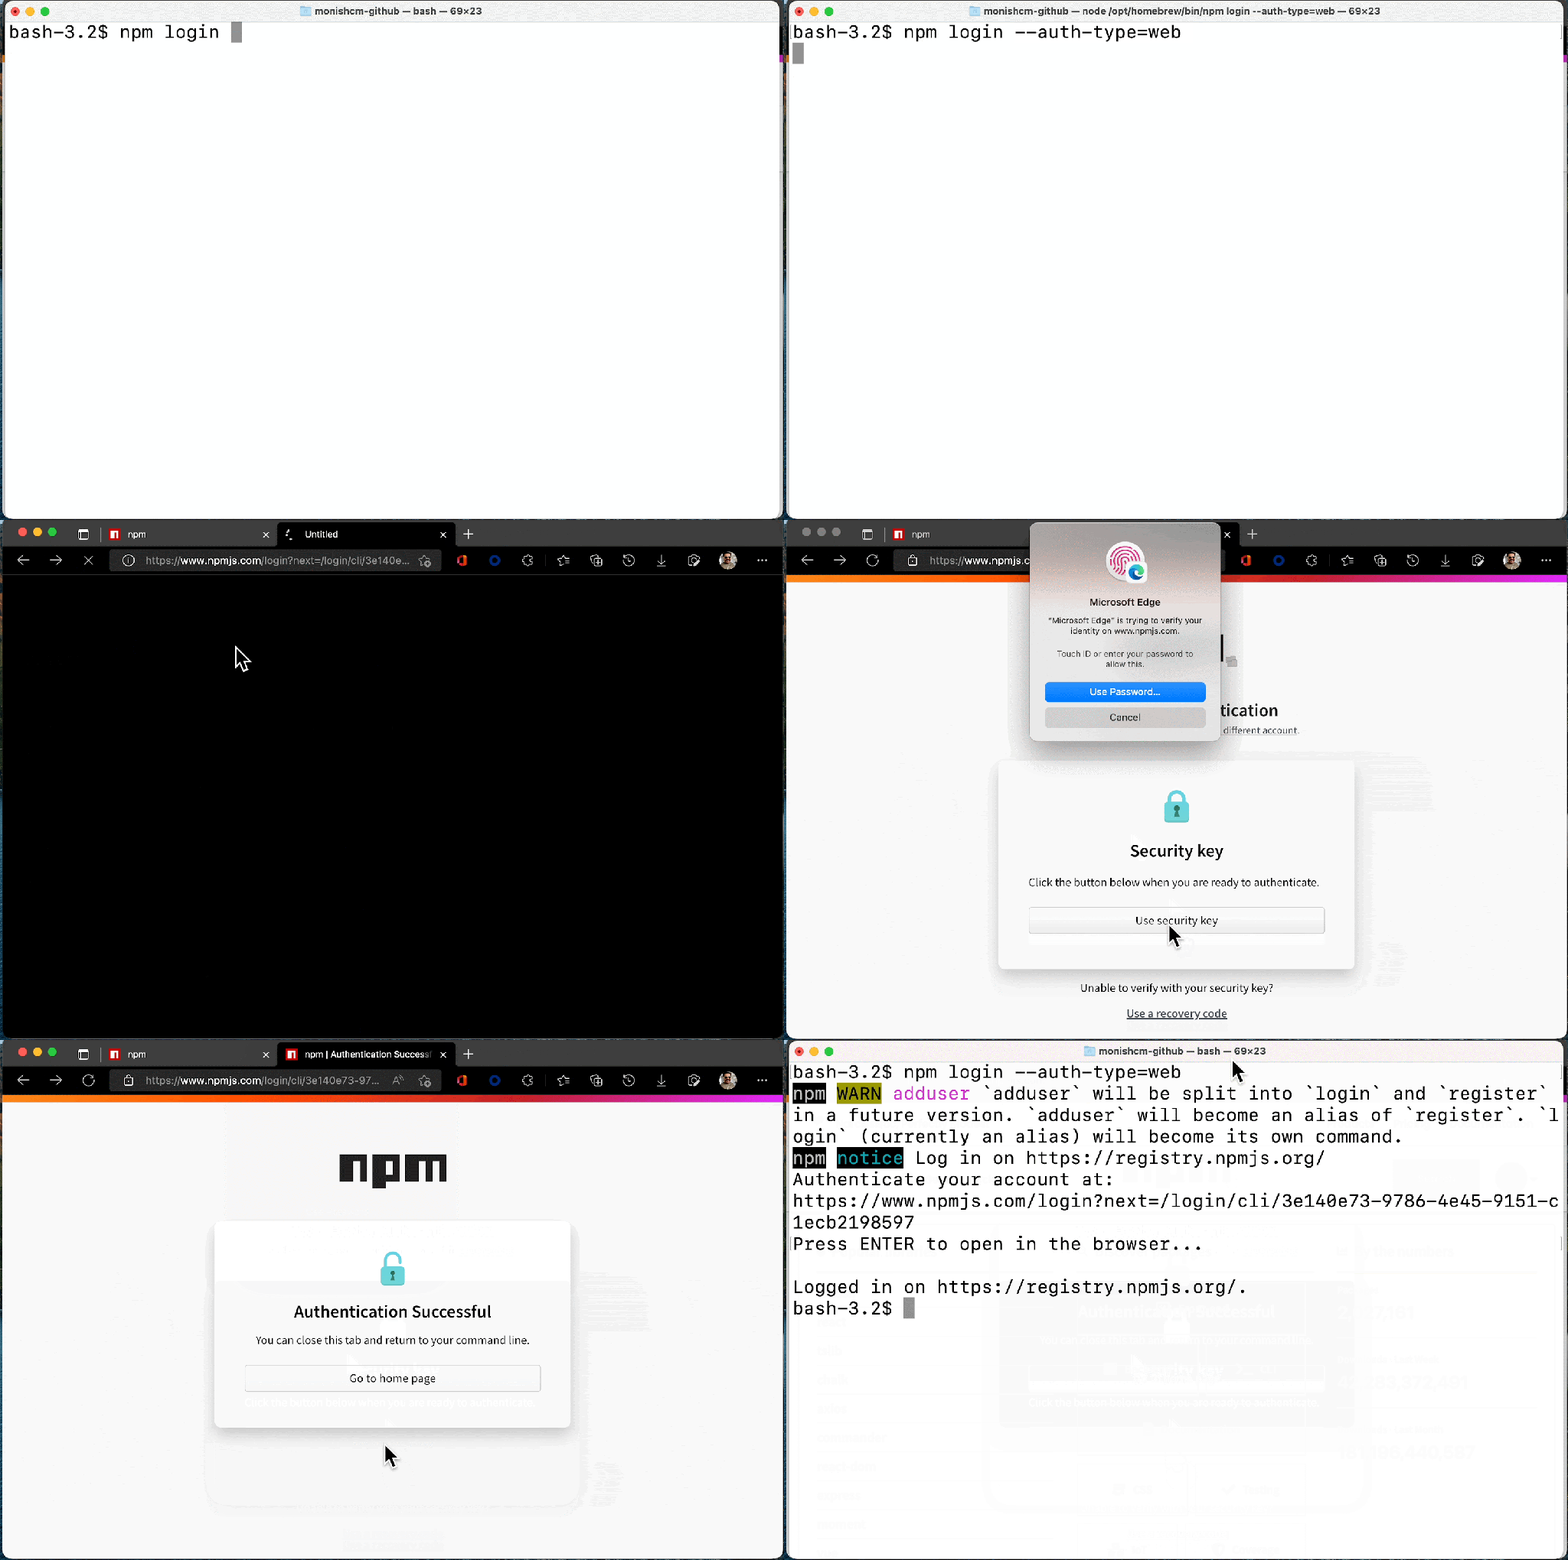
We’ve been hard at work making the CLI experience better than ever based on this feedback, and the improved login and publish experience is now available in npm 8.15.0 today. With the new experience, users will benefit from:

  • Login and publish authentication are managed in the browser.
  • Login can use an existing session only prompting for your second factor or email verification OTP to create a new session.
  • Publish now supports “remember me for 5 minutes” and allows for subsequent publishes from the same IP + access token to avoid the 2FA prompt for a 5-minute period. This is especially useful when publishing from a npm workspace.

It is currently opt-in with the --auth-type=web flag and will be the default experience in npm 9.


npm login --auth-type=web npm publish --auth-type=web

npm login --auth-type=web

These improved experiences will make it easier for users to secure their accounts. A secure account is the beginning of a secure ecosystem. Check out our documentation to learn more about 2FA in npm.

Connecting GitHub and Twitter Accounts to npm


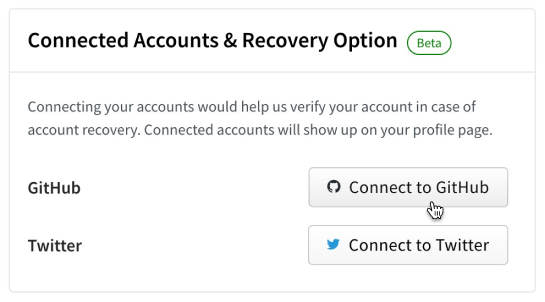
Screenshot of account recovery options on npm

Developers have been able to include their GitHub and Twitter handles on their npm profiles for almost as long as npm accounts have been available. This data has been helpful to connect the identity of an account on npm to an identity on other platforms; however this data has historically been a free-form text field that wasn’t validated or verified.

That’s why today we are launching the ability to link your npm account to your GitHub and Twitter accounts. Linking of these accounts is performed via official integrations with both GitHub and Twitter and ensures that verified account data are included on npm profiles moving forward. We will no longer be showing the previously unverified GitHub or Twitter data on public user profiles, making it possible for developers to audit identities and trust that an account is who they say they are.

Having a verified link between your identities across platforms significantly improves our ability to do account recovery. This new verified data lays the foundation for automating identity verification as part of account recovery. Over time, we will deprecate this legacy data, but we will continue to honor it for now to ensure that customers do not get locked out of their accounts.

You can verify your packages locally with npm audit signatures

Until today npm users have had to rely on a multi-step process to validate the signature of npm packages. This PGP based process was both complex and required users to have knowledge on cryptographic tools which provided a poor developer experience. Developers relying on this existing process should soon start using the new “audit signatures” command. The PGP keys are set to expire early next year with more details to follow.

Recently, we began work to re-sign all npm packages with new signatures relying on the secure ECDSA algorithm and using an HSM for key management, and you can now rely on this signature to verify the integrity of the packages you install from npm.

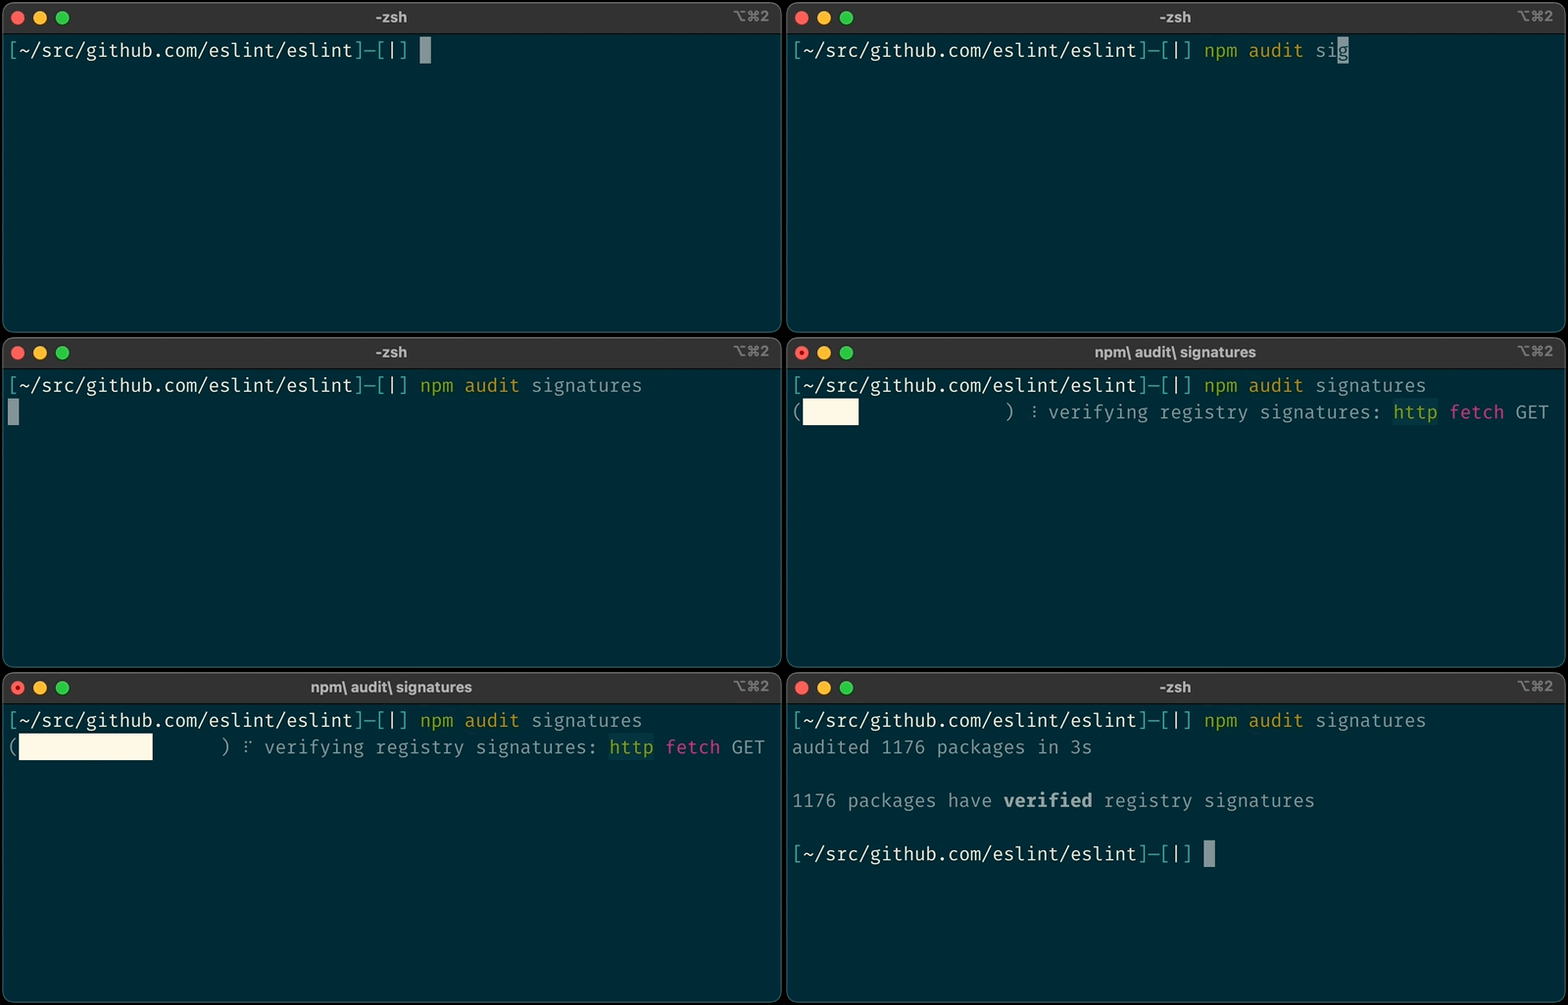
We have introduced a new audit signatures command in npm CLI version 8.13.0 and above.

Example of a successful audit signature verification

Example of a successful audit signature verification

The below sample GitHub Actions workflow with audit signature in action.

name: npm Package

on:
  release:
    types: [created]

jobs:
  build:
    runs-on: ubuntu-latest
    steps:
     - uses: actions/checkout@v3

     - uses: actions/setup-node@v3
       with:
        node-version: 16.x
        registry-url: 'https://registry.npmjs.org'

     - run: npm install -g npm

     - run: npm ci

     - run: npm audit signatures

     - run: npm test

     - run: npm publish
       env:
        NODE_AUTH_TOKEN: ${{secrets.npm_token}}

What’s next?

Our primary goal continues to be protecting the npm registry, and our next major milestone will be enforcing 2FA for all high-impact accounts, those that manage packages with more than 1 million weekly downloads or 500 dependents, tripling the number of accounts we will require to adopt a second factor. Prior to this enforcement we will be making even more improvements to our account recovery process, including introducing additional forms of identity verification and automating as much of the process as possible.

Learn more about these features by visiting our documentation:

For questions and comments, open a discussion in our feedback repository.

Publishing private npm packages with AWS CodeArtifact

Post Syndicated from Ryan Sonshine original https://aws.amazon.com/blogs/devops/publishing-private-npm-packages-aws-codeartifact/

This post demonstrates how to create, publish, and download private npm packages using AWS CodeArtifact, allowing you to share code across your organization without exposing your packages to the public.

The ability to control CodeArtifact repository access using AWS Identity and Access Management (IAM) removes the need to manage additional credentials for a private npm repository when developers already have IAM roles configured.

You can use private npm packages for a variety of use cases, such as:

  • Reducing code duplication
  • Configuration such as code linting and styling
  • CLI tools for internal processes

This post shows how to easily create a sample project in which we publish an npm package and install the package from CodeArtifact. For more information about pipeline integration, see AWS CodeArtifact and your package management flow – Best Practices for Integration.

Solution overview

The following diagram illustrates this solution.

Diagram showing npm package publish and install with CodeArtifact

In this post, you create a private scoped npm package containing a sample function that can be used across your organization. You create a second project to download the npm package. You also learn how to structure your npm package to make logging in to CodeArtifact automatic when you want to build or publish the package.

The code covered in this post is available on GitHub:

Prerequisites

Before you begin, you need to complete the following:

  1. Create an AWS account.
  2. Install the AWS Command Line Interface (AWS CLI). CodeArtifact is supported in these CLI versions:
    1. 18.83 or later: install the AWS CLI version 1
    2. 0.54 or later: install the AWS CLI version 2
  3. Create a CodeArtifact repository.
  4. Add required IAM permissions for CodeArtifact.

Creating your npm package

You can create your npm package in three easy steps: set up the project, create your npm script for authenticating with CodeArtifact, and publish the package.

Setting up your project

Create a directory for your new npm package. We name this directory my-package because it serves as the name of the package. We use an npm scope for this package, where @myorg represents the scope all of our organization’s packages are published under. This helps us distinguish our internal private package from external packages. See the following code:

npm init --scope=@myorg -y

{
  "name": "@myorg/my-package",
  "version": "1.0.0",
  "description": "A sample private scoped npm package",
  "main": "index.js",
  "scripts": {
    "test": "echo \"Error: no test specified\" && exit 1"
  }
}

The package.json file specifies that the main file of the package is called index.js. Next, we create that file and add our package function to it:

module.exports.helloWorld = function() {
  console.log('Hello world!');
}

Creating an npm script

To create your npm script, complete the following steps:

  1. On the CodeArtifact console, choose the repository you created as part of the prerequisites.

If you haven’t created a repository, create one before proceeding.

CodeArtifact repository details console

  1. Select your CodeArtifact repository and choose Details to view the additional details for your repository.

We use two items from this page:

  • Repository name (my-repo)
  • Domain (my-domain)
  1. Create a script named co:login in our package.json. The package.json contains the following code:
{
  "name": "@myorg/my-package",
  "version": "1.0.0",
  "description": "A sample private scoped npm package",
  "main": "index.js",
  "scripts": {
    "co:login": "aws codeartifact login --tool npm --repository my-repo --domain my-domain",
    "test": "echo \"Error: no test specified\" && exit 1"
  }
}

Running this script updates your npm configuration to use your CodeArtifact repository and sets your authentication token, which expires after 12 hours.

  1. To test our new script, enter the following command:

npm run co:login

The following code is the output:

> aws codeartifact login --tool npm --repository my-repo --domain my-domain
Successfully configured npm to use AWS CodeArtifact repository https://my-domain-<ACCOUNT ID>.d.codeartifact.us-east-1.amazonaws.com/npm/my-repo/
Login expires in 12 hours at 2020-09-04 02:16:17-04:00
  1. Add a prepare script to our package.json to run our login command:
{
  "name": "@myorg/my-package",
  "version": "1.0.0",
  "description": "A sample private scoped npm package",
  "main": "index.js",
  "scripts": {
    "prepare": "npm run co:login",
    "co:login": "aws codeartifact login --tool npm --repository my-repo --domain my-domain",
    "test": "echo \"Error: no test specified\" && exit 1"
  }
}

This configures our project to automatically authenticate and generate an access token anytime npm install or npm publish run on the project.

If you see an error containing Invalid choice, valid choices are:, you need to update the AWS CLI according to the versions listed in the perquisites of this post.

Publishing your package

To publish our new package for the first time, run npm publish.

The following screenshot shows the output.

Terminal showing npm publish output

If we navigate to our CodeArtifact repository on the CodeArtifact console, we now see our new private npm package ready to be downloaded.

CodeArtifact console showing published npm package

Installing your private npm package

To install your private npm package, you first set up the project and add the CodeArtifact configs. After you install your package, it’s ready to use.

Setting up your project

Create a directory for a new application and name it my-app. This is a sample project to download our private npm package published in the previous step. You can apply this pattern to all repositories you intend on installing your organization’s npm packages in.

npm init -y

{
  "name": "my-app",
  "version": "1.0.0",
  "description": "A sample application consuming a private scoped npm package",
  "main": "index.js",
  "scripts": {
    "test": "echo \"Error: no test specified\" && exit 1"
  }
}

Adding CodeArtifact configs

Copy the npm scripts prepare and co:login created earlier to your new project:

{
  "name": "my-app",
  "version": "1.0.0",
  "description": "A sample application consuming a private scoped npm package",
  "main": "index.js",
  "scripts": {
    "prepare": "npm run co:login",
    "co:login": "aws codeartifact login --tool npm --repository my-repo --domain my-domain",
    "test": "echo \"Error: no test specified\" && exit 1"
  }
}

Installing your new private npm package

Enter the following command:

npm install @myorg/my-package

Your package.json should now list @myorg/my-package in your dependencies:

{
  "name": "my-app",
  "version": "1.0.0",
  "description": "",
  "main": "index.js",
  "scripts": {
    "prepare": "npm run co:login",
    "co:login": "aws codeartifact login --tool npm --repository my-repo --domain my-domain",
    "test": "echo \"Error: no test specified\" && exit 1"
  },
  "dependencies": {
    "@myorg/my-package": "^1.0.0"
  }
}

Using your new npm package

In our my-app application, create a file named index.js to run code from our package containing the following:

const { helloWorld } = require('@myorg/my-package');

helloWorld();

Run node index.js in your terminal to see the console print the message from our @myorg/my-package helloWorld function.

Cleaning Up

If you created a CodeArtifact repository for the purposes of this post, use one of the following methods to delete the repository:

Remove the changes made to your user profile’s npm configuration by running npm config delete registry, this will remove the CodeArtifact repository from being set as your default npm registry.

Conclusion

In this post, you successfully published a private scoped npm package stored in CodeArtifact, which you can reuse across multiple teams and projects within your organization. You can use npm scripts to streamline the authentication process and apply this pattern to save time.

About the Author

Ryan Sonshine

Ryan Sonshine is a Cloud Application Architect at Amazon Web Services. He works with customers to drive digital transformations while helping them architect, automate, and re-engineer solutions to fully leverage the AWS Cloud.