Post Syndicated from Curious Droid original https://www.youtube.com/watch?v=vhITTxeAWDk
Rocky Linux 9.0 released
Post Syndicated from original https://lwn.net/Articles/901289/
Version
9.0 of Rocky Linux, a Red Hat Enterprise Linux clone, has been
released. There are a lot of changes, of course; see the release notes
for an overview.
Tunney: Porting OpenBSD pledge() to Linux
Post Syndicated from original https://lwn.net/Articles/901264/
Justine Tunney has created an
implementation of the OpenBSD pledge() system call for Linux.
OpenBSD limits security to a small pond, but makes it easy. Linux
is a big tent, but makes it impossibly hard. SECCOMP BPF might as
well be the Traditional Chinese of programming languages, since
only a small number of people who’ve devoted the oodles of time it
takes to understand code like what you see above have actually been
able to benefit from it.
The US military wants to understand the most important software on Earth (MIT Technology Review)
Post Syndicated from original https://lwn.net/Articles/901254/
The MIT Technology Review has posted an
article on a program within the US Defense Advanced Research Projects
Agency to identify threats to open-source code.
The ultimate goal is to detect and counteract any malicious
campaigns to submit flawed code, launch influence operations,
sabotage development, or even take control of open-source projects.
To do this, the researchers will use tools such as sentiment
analysis to analyze the social interactions within open-source
communities such as the Linux kernel mailing list, which should
help identify who is being positive or constructive and who is
being negative and destructive.
How the James Webb Telescope’s cosmic pictures impacted the Internet
Post Syndicated from João Tomé original https://blog.cloudflare.com/how-the-james-webb-telescopes-cosmic-pictures-impacted-the-internet/

“Somewhere, something incredible is waiting to be known.” — Carl Sagan

In the past few years, space technology and travel have been trending with increased attention and endeavors (including private ones). In our 2021 Year in Review we showed how NASA and SpaceX flew higher, at least in terms of interest on the Internet.
This week, NASA in collaboration with the European Space Agency (ESA) and the Canadian Space Agency (CSA), released the first images from the James Webb Telescope (JWST) which conducts infrared astronomy to “reveal the unseen universe”.

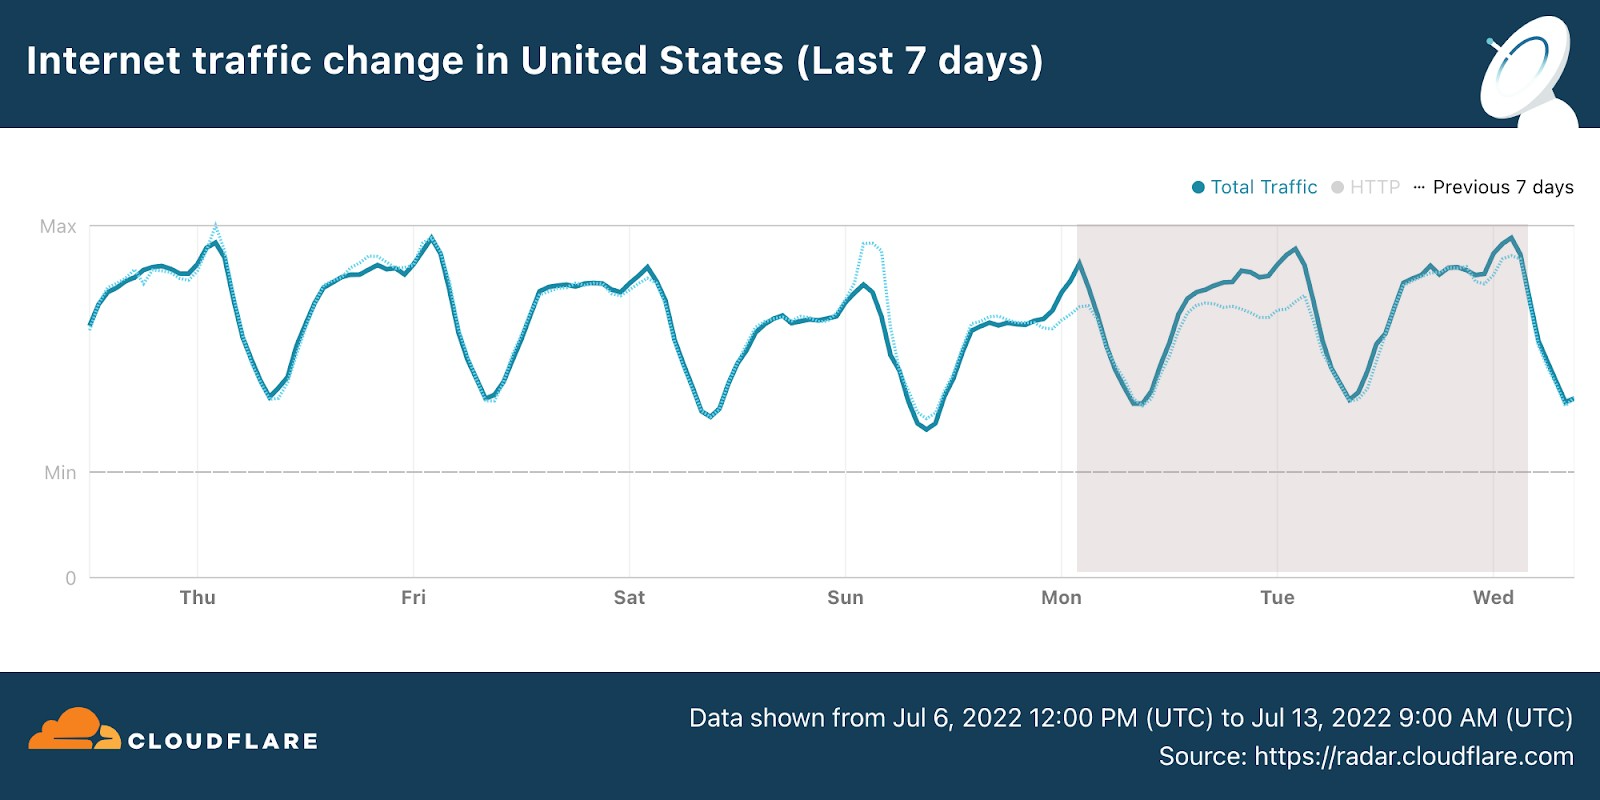
So, let’s dig into something we really like here at Cloudflare, checking how real life and human interest has an impact on the Internet. In terms of general Internet traffic in the US, Radar shows us that there was an increase both on July 11 and July 12, compared to the previous week (bear in mind that July 4, the previous Monday, was the Independence Day holiday in the US).
Next, we look at DNS request trends to get a sense of traffic to Internet properties (and using from this point on EST time in all the charts). Let’s start with the cornucopia of NASA, ESA and other websites (there are many, some dedicated just to the James Webb Telescope findings).
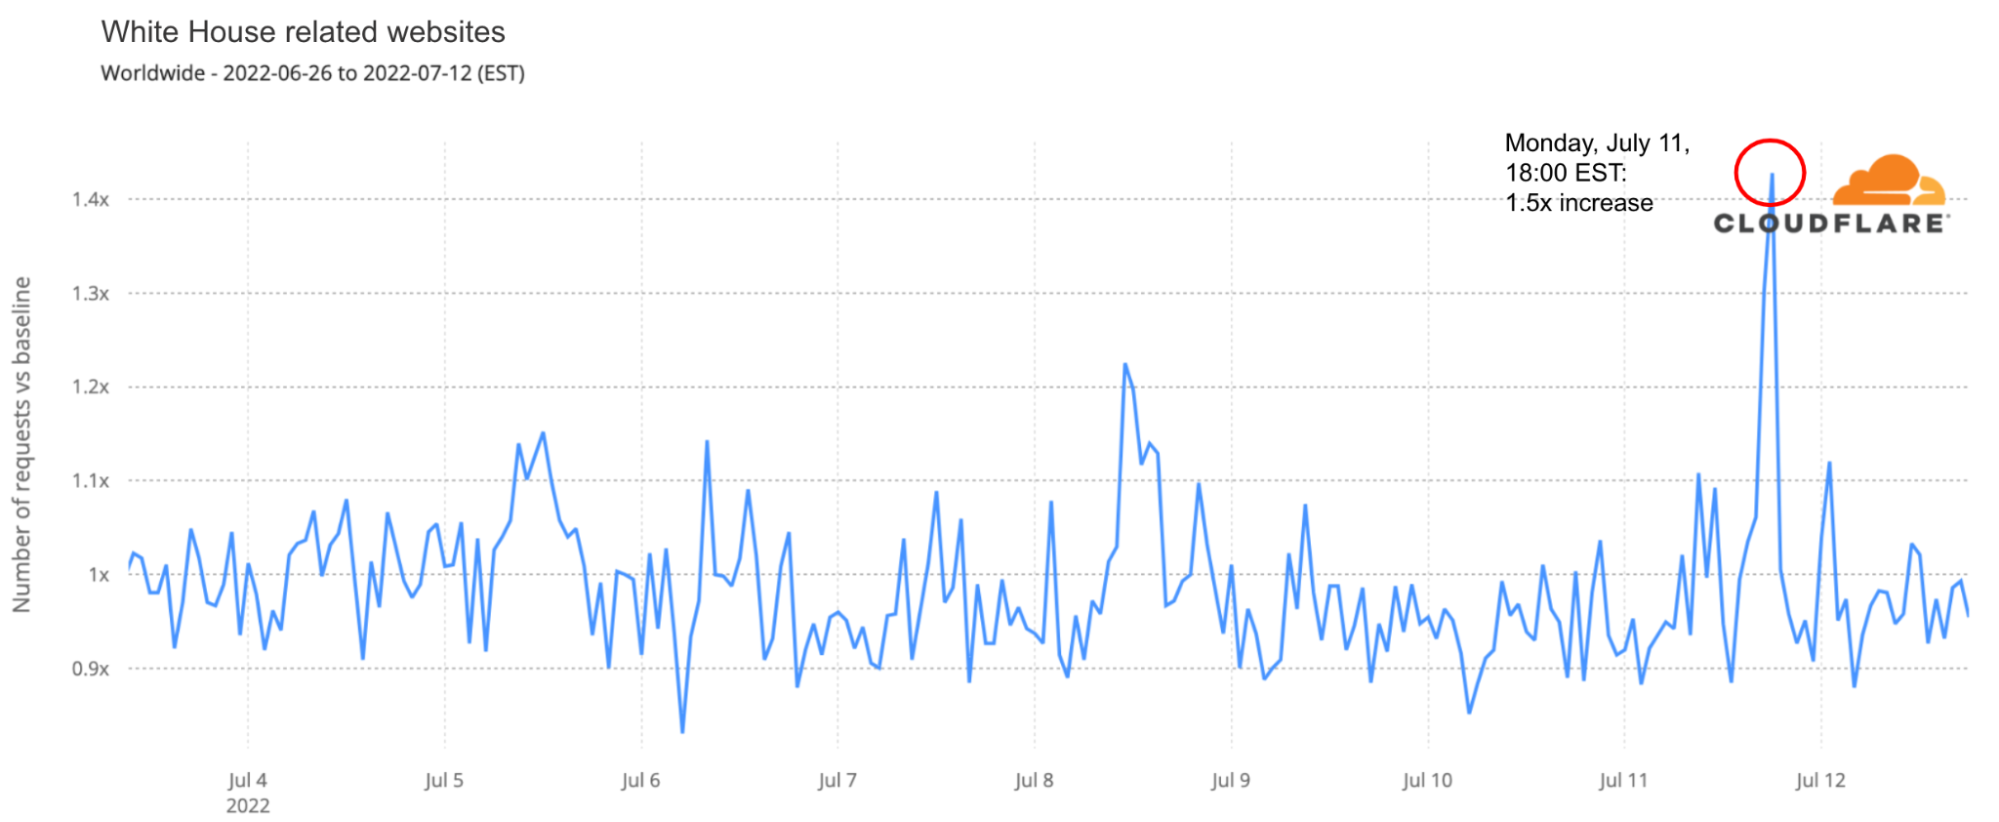
There are two clear spikes in the next chart. The first was around the time the first galaxy cluster infrared image was announced by Joe Biden, on Monday, July 11, 2022 (at 17:00), with traffic rising 13x higher than in the previous week. There was also a 5x spike at 01:00 EST that evening. The second spike was higher and longer and happened during Tuesday, July 12, 2022, when more images were revealed. Tuesday’s peak was at 10:00, with traffic being 19x higher than in the previous week — traffic was higher than 10x between 09:00 and 13:00.

The first image was presented by US president at around 17:00 on July 11. DNS traffic was 1.5x higher to White House-related websites than any time in the preceding month.
Conclusion: space, the final frontier
As we saw in 2021, space projects and announcements continue to have a clear impact on the Internet, in this case in our DNS request view of Internet traffic. So far, what the James Webb Telescope images are showing us is a glimpse of a never-before-seen picture of parts of the universe (there’s no lack of excitement in Cloudflare’s internal chat groups).
You can keep an eye on these and other trends using Cloudflare Radar and follow @CloudflareRadar on Twitter — recently we covered extensively Canada’s Internet outage.
Upcoming Speaking Engagements
Post Syndicated from Schneier.com Webmaster original https://www.schneier.com/blog/archives/2022/07/upcoming-speaking-engagements-21.html
This is a current list of where and when I am scheduled to speak:
- I’m speaking as part of a Geneva Centre for Security Policy course on Cyber Security in the Context of International Security, online, on September 22, 2022.
- I’m speaking at IT-Security INSIDE 2022 in Zurich, Switzerland, on September 22, 2022.
The list is maintained on this page.
Satisfying SNAP from the print bed…
Post Syndicated from Crosstalk Solutions original https://www.youtube.com/watch?v=Lu5W2mzsTGs
Accelerate resize and encryption of Amazon Redshift clusters with Faster Classic Resize
Post Syndicated from Sumeet Joshi original https://aws.amazon.com/blogs/big-data/accelerate-resize-and-encryption-of-amazon-redshift-clusters-with-faster-classic-resize/
Amazon Redshift has improved the performance of the classic resize feature and increased the flexibility of the cluster snapshot restore operation. You can use the classic resize operation to resize a cluster when you need to change the instance type or transition to a configuration that can’t be supported by elastic resize. This could take the cluster offline for many hours during the resize, but now the cluster can typically be available to process queries in minutes. Clusters can also be resized when restoring from a snapshot and in those cases there could be restrictions.
You can now also restore an encrypted cluster from an unencrypted snapshot or change the encryption key. Amazon Redshift uses AWS Key Management Service (AWS KMS) as an encryption option to provide an additional layer of data protection by securing your data from unauthorized access to the underlying storage. Now you can encrypt an unencrypted cluster with a KMS key faster by simply specifying a KMS key ID when modifying the cluster. You can also restore an AWS KMS-encrypted cluster from an unencrypted snapshot. You can access the feature via the AWS Management Console, SDK, or AWS Command Line Interface (AWS CLI). Please note that these features only apply to the clusters or target clusters with the RA3 node type.
In this post, we show you how the updated classic resize option works and also how it significantly improves the amount of time it takes to resize or encrypt your cluster with this enhancement. We also walk through the steps to resize your Amazon Redshift cluster using Faster Classic Resize.
Existing resize options
We’ve worked closely with our customers to learn how their needs evolve as their data scales or as their security and compliance requirements change. To address and meet your ever-growing demands, you often have to resize your Amazon Redshift cluster and choose an optimal instance type that delivers the best price/performance. As of this writing, there are three ways you can resize your clusters: elastic resize, classic resize, and the snapshot, restore, and resize method.
Among the three options, elastic resize is the fastest available resize mechanism because it works based on slice remapping instead of full data copy. And classic resize is used primarily when cluster resize is outside the allowed slice ranges by elastic resize, or the encryption status should be changed. Let’s briefly discuss these scenarios before describing how the new migration process helps.
Current limitations
The current resize options have a few limitations of note.
- Configuration changes – Elastic resize supports the following RA3 configuration changes by design. So, when you need to choose a target cluster outsize the ranges mentioned in the following table, you should choose classic resize.
| Node Type | Growth Limit | Reduction Limit |
| ra3.16xlarge | 4x (from 4 to 16 nodes, for example) | To one-quarter of the number (from 16 to 4 nodes, for example) |
| ra3.4xlarge | 4x | To one-quarter of the number |
| ra3.xlplus | 2x (from 4 to 8 nodes, for example) | To one-quarter of the number |
Also, elastic resize can’t be performed if the current cluster is a single-node cluster or isn’t running on an EC2-VPC platform. These scenarios also drive customers to choose classic resize.
- Encryption changes – You may need to encrypt your Amazon Redshift cluster based on security, compliance, and data consumption requirements. Currently, in order to modify encryption on an Amazon Redshift cluster, we use classic resize technology, which internally performs a deep copy operation of the entire dataset and rewrites the dataset with the desired encryption state. To avoid any changes during the deep copy operation, the source cluster is placed in read-only mode during the entire operation, which can take a few hours to days depending on the dataset size. Or, you might be locked out altogether if the data warehouse is down for a resize. As a result, the administrators or application owners can’t support Service Level Agreements (SLAs) that they have set with their business stakeholders.
Switching to the Faster Classic Resize approach can help speed up the migration process when turning on encryption. This has been one of the requirements for cross-account, cross-Region data sharing enabled on unencrypted clusters and integrations with AWS Data Exchange for Amazon Redshift. Additionally, Amazon Redshift Serverless is encrypted by default. So, to create a data share from a provisioned cluster to Redshift Serverless, the provisioned cluster should be encrypted as well. This is one more compelling requirement for Faster Classic Resize.
Faster Classic Resize
Faster Classic Resize works like elastic resize, but performs similar functions like classic resize, thereby offering the best of both approaches. Unlike classic resize, which involves extracting tuples from the source cluster and inserting those tuples on the target cluster, the Faster Classic Resize operation doesn’t involve extraction of tuples. Instead, it starts from the snapshots and the data blocks are copied over to the target cluster.
The new Faster Classic Resize operation involves two stages:
- Stage 1 (Critical path) – This first stage consists of migrating the data from the source cluster to the target cluster, during which the source cluster is in read-only mode. Typically, this is a very short duration. Then the cluster is made available for read and writes.
- Stage 2 (Off critical path) – The second stage involves redistributing the data as per the previous data distribution style. This process runs in the background off the critical path of migration from the source to target cluster. The duration of this stage is dependent on the volume to distribute, cluster workload, and so on.
Let’s see how Faster Classic Resize works with configuration changes, encryption changes, and restoring an unencrypted snapshot into an encrypted cluster.
Prerequisites
Complete the following prerequisite steps:
- Take a snapshot from the current cluster or use an existing snapshot.
- Provide the AWS Identity and Access Management (IAM) role credentials that are required to run the AWS CLI. For more information, refer to Using identity-based policies (IAM policies) for Amazon Redshift.
- For encryption changes, create a KMS key if none exists. For instructions, refer to Creating keys.
Configuration changes
As of today, you can initiate Faster Classic Resize through the AWS CLI when the required cluster configuration change is beyond what is allowed by elastic resize. The feature will be added to the console in a future release. As of this writing, you can use it change your cluster configuration from DC2, DS2, and RA3 node types to any RA3 node type. However, changing from RA3 to DC2 or DS2 is not supported yet.
We did a benchmark on Faster Classic Resize with different cluster combinations and volumes. The following table summarizes the results comparing critical paths in classic resize and Faster Classic Resize.
| Volume | Source Cluster | Target Cluster | Classic Resize Duration (min) |
Faster Classic Resize Stage1 Duration (min) |
% Faster |
| 10 TB | ra3 4xlarge – 6 nodes | ra3 16xlarge – 8 nodes | 78 | 11 | 86% |
| 10 TB | ra3 16xlarge – 8 nodes | ra3 4xlarge – 2 nodes | 738 | 11 | 99% |
| 10 TB | dc2 8xlarge – 6 nodes | ra3 4xLarge – 2 nodes | 706 | 8 | 99% |
| 3 TB | ra3 4xLarge – 2 nodes | ra3 16xLarge – 4 nodes | 53 | 11 | 79% |
| 3 TB | ra3 16xLarge – 4 nodes | ra3 4xLarge – 2 nodes | 244 | 7 | 97% |
| 3 TB | dc2 8xlarge – 6 nodes | ra3 4xLarge – 2 nodes | 251 | 7 | 97% |
The Faster Classic Resize option consistently completed in significantly less time and made the cluster available for read and write operations in a short time. Classic resize took a longer time in all cases and kept the cluster in read-only mode, making it unavailable for writes. Also, the classic resize duration is comparatively longer when the target cluster configuration is smaller than the original cluster configuration.
Perform Faster Classic Resize
As of this writing, the feature isn’t available on the console. You can use either of the following two methods to resize your cluster using Faster Classic Resize via the AWS CLI.
- Modify cluster method – Resize an existing cluster without changing the endpoint
The following are the steps involved:
-
- Take a snapshot on the current cluster prior to performing the resize operation.
- Determine the target cluster configuration and run the following command from the AWS CLI:
For example:
- Snapshot restore method – Restore an existing snapshot to the new cluster with the new cluster endpoint
The following are the steps involved:
-
- Identify the snapshot for restore and a unique name for the new cluster.
- Determine the target cluster configuration and run the following command from the AWS CLI:
For example:
Monitor the resize process
Monitor the progress through the cluster management console. You can also check the events generated by the resize process. The resize completion status is logged in events along with the duration it took for the resize. The following screenshot shows an example.

It’s important to note that you may observe longer query times in the second stage of Faster Classic Resize. During the first stage, the data for tables with dist-key distribution style is transferred as dist-even. Later, a background process converts them back to dist-key (in stage 2). However, background processes are running behind the scenes to get the data redistributed to the original distribution style (the distribution style before the cluster resize). You can monitor the progress of the background processes by querying the stv_xrestore_alter_queue_state table. It’s important to note that tables with ALL, AUTO, or EVEN distribution styles don’t require redistribution post-resize. Therefore, they’re not logged in the stv_xrestore_alter_queue_state table. The counts you observe in these tables are for the tables with distribution style as Key before the resize operation.
See the following example query:
The following table shows that for 60 tables data redistribution is finished, for 323 tables data redistribution is pending, and for 1 table data redistribution is in progress.

We ran tests to assess time to complete the redistribution. For 10 TB of data, it took approximately 5 hours and 30 minutes on an idle cluster. For 3 TB, it took approximately 2 hours and 30 minutes on an idle cluster. The following is a summary of tests performed on larger volumes:
- A snapshot with 100 TB where 70% of blocks needs redistribution would take 10–40 hours
- A snapshot with 450 TB where 70% of blocks needs redistribution would take 2–8 days
- A snapshot with 1600 TB where 70% of blocks needs redistribution would take 7–27 days
The actual time to complete redistribution is largely dependent on data volume, cluster idle cycles, target cluster size, data skewness, and more. Therefore, we recommend performing Faster Classic Resize when there is enough of an idle window (such as weekends) for the cluster to perform redistribution.
Encryption changes
You can encrypt your Amazon Redshift cluster from the console (the modify cluster method) or using the AWS CLI using the snapshot restore method. Amazon Redshift performs the encryption change using Faster Classic Resize. The operation only takes a few minutes to complete and your cluster is available for both read and write. With Faster Classic Resize, you can change an unencrypted cluster to an encrypted cluster or change the encryption key using the snapshot restore method.
For this post, we show how you can change the encryption using the Amazon Redshift console. To test the timings, we created multiple Amazon Redshift clusters using TPC-DS data. The Faster Classic Resize option consistently completed in significantly less time and made clusters available for read and write operations faster. Classic resize took a longer time in all cases and kept the cluster in read-only mode. The following table contains the summary of the results.
| Data Volume | Cluster | Encryption (Classic Resize) Duration (min) |
Encryption (Faster Classic Resize) Duration (min) |
% Faster |
| 10 TB | ra3.4xlarge – 2 nodes | 580 | 11 | 98% |
| 10 TB | ra3.xlplus – 2 nodes | 680 | 16 | 98% |
| 3 TB | ra3.4xlarge – 2 nodes | 527 | 9 | 98% |
| 3 TB | ra3.xlplus – 2 nodes | 570 | 10 | 98% |
Now, let’s perform the encryption change from an unencrypted cluster to an encrypted cluster using the console. Complete the following steps:
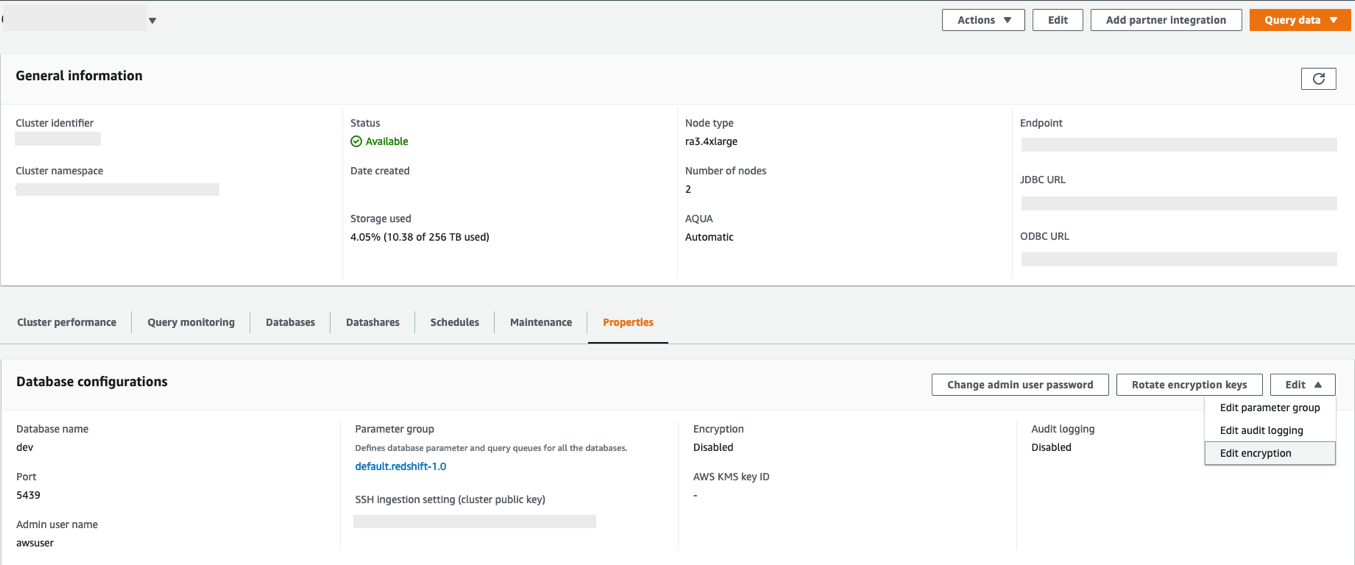
- On the Amazon Redshift console, navigate to your cluster.
- On the Properties tab, on the Edit drop-down menu, choose Edit encryption.

- For Encryption, select Use AWS Key Management Service (AWS KMS).
- For AWS KMS, select Default Redshift key.
- Choose Save changes.


You can monitor the progress of your encryption change on the Events tab. As shown in the following screenshot, the entire process to change the encryption took approximately 11 minutes.

Restore an unencrypted snapshot to an encrypted cluster
As of today, the Faster Classic Resize option to restore an unencrypted snapshot into an encrypted cluster or to change the encryption key is available only through the AWS CLI. When triggered, the restored cluster operates in read/write mode immediately. The encryption state change for restored blocks that are unencrypted operates in the background, and newly ingested blocks continue to be encrypted.
Restore the snapshot using the following command into a new cluster. (Replace the indicated parameter values; --encrypted and --kms-key-id are required).
When to use which resize option
The following flow chart provides guidance on which resize option is recommended when changing your cluster encryption status or resizing to a new cluster configuration.

Summary
In this post, we talked about the improved performance of Amazon Redshift’s classic resize feature and how Faster Classic Resize significantly improves your ability to scale your Amazon Redshift clusters using the classic resize method. We also talked about when to use different resize operations based on your requirements. We demonstrated how it works from the console (for encryption changes) and using the AWS CLI. We also showed the results of our benchmark test and how it significantly improves the migration time for configuration changes and encryption changes for your Amazon Redshift cluster.
To learn more about resizing your clusters, refer to Resizing clusters in Amazon Redshift. If you have any feedback or questions, please leave them in the comments.
About the authors
 Sumeet Joshi is an Analytics Specialist Solutions Architect based out of New York. He specializes in building large-scale data warehousing solutions. He has over 17 years of experience in the data warehousing and analytical space.
 Satesh Sonti is a Sr. Analytics Specialist Solutions Architect based out of Atlanta, specialized in building enterprise data platforms, data warehousing, and analytics solutions. He has over 16 years of experience in building data assets and leading complex data platform programs for banking and insurance clients across the globe.
 Krishna Chaitanya Gudipati is a Senior Software Development Engineer at Amazon Redshift. He has been working on distributed systems for over 14 years and is passionate about building scalable and performant systems. In his spare time, he enjoys reading and exploring new places.
 Yanzhu Ji is a Product Manager on the Amazon Redshift team. She worked on the Amazon Redshift team as a Software Engineer before becoming a Product Manager. She has a rich experience of how the customer-facing Amazon Redshift features are built from planning to launching, and always treats customers’ requirements as first priority. In her personal life, Yanzhu likes painting, photography, and playing tennis.
Custom packages and hot reload of dictionary files with Amazon OpenSearch Service
Post Syndicated from Sonam Chaudhary original https://aws.amazon.com/blogs/big-data/custom-packages-and-hot-reload-of-dictionary-files-with-amazon-opensearch-service/
Amazon OpenSearch Service is a fully managed service that you can use to deploy and operate OpenSearch clusters cost-effectively at scale in the AWS Cloud. The service makes it easy for you to perform interactive log analytics, real-time application monitoring, website search, and more by offering the latest versions of OpenSearch, support for 19 versions of Elasticsearch (1.5 to 7.10 versions), and visualization capabilities powered by OpenSearch Dashboards and Kibana (1.5 to 7.10 versions).
There are various use cases such as website search, ecommerce search, and enterprise search where the user wants to get relevant content for specific terms. Search engines match the terms (words) sent through the query API. When there are many different ways of specifying the same concept, you use synonyms to give the search engine more match targets than what the user entered.
Similarly, there are certain use cases where input data has a lot of common or frequently occurring words that don’t add much relevance when used in a search query. These include words like “the,” “this,” and “that.” These can be classified as stopwords.
OpenSearch Service allows you to upload custom dictionary files, which can include synonyms and stopwords to be customized to your use case. This is especially useful for use cases where you want to do the following:
- Specify words that can be treated as equivalent. For example, you can specify that words such as “bread,” “danish,” and “croissant” be treated as synonymous. This leads to better search results because instead of returning a null result if an exact match isn’t found, an approximately relevant or equivalent result is returned.
- Ignore certain high frequency terms that are common and lack useful information in terms of contributing to the search’s relevance store. These could include “a,” “the,” “of,” “an,” and so on.
Specifying stems, synonyms, and stopwords can greatly help with query accuracy, and allows you to customize and enhance query relevance. They can also help with stemming (such as in the Japanese (kuromoji) Analysis Plugin). Stemming is reducing a word to its root form. For Example, “cooking” and “cooked” can be stemmed to the same root word “cook.” This way, any variants of a word can be stemmed to one root word to enhance the query results.
In this post, we show how we can add custom packages for synonyms and stopwords to an OpenSearch Service domain. We start by creating custom packages for synonyms and stopwords and creating a custom analyzer for a sample index that uses the standard tokenizer and a synonym token filter, followed by a demonstration of hot reload of dictionary files.
Tokenizers and token filters
Tokenizers break streams of characters into tokens (typically words) based on some set of rules. The simplest example is the whitespace tokenizer, which breaks the preceding characters into a token each time it encounters a whitespace character. A more complex example is the standard tokenizer, which uses a set of grammar-based rules to work across many languages.
Token filters add, modify, or delete tokens. For example, a synonym token filter adds tokens when it finds a word in the synonyms list. The stop token filter removes tokens when finds a word in the stopwords list.
Prerequisites
For this demo, you must have an OpenSearch Service cluster (version 1.2) running. You can use this feature on any version of OpenSearch Service running 7.8+.
Users without administrator access require certain AWS Identity and Access Management (IAM) actions in order to manage packages: es:CreatePackage, es:DeletePackage, es:AssociatePackage, and es:DissociatePackage. The user also needs permissions on the Amazon Simple Storage Service (Amazon S3) bucket path or object where the custom package resides. Grant all permission within IAM, not in the domain access policy. This allows for better management of permissions because any change in permissions can be separate from the domain and allows the user to perform the same action across multiple OpenSearch Service domains (if needed).
Set up the custom packages
To set up the solution, complete the following steps:
- On the Amazon S3 console, create a bucket to hold the custom packages.
- Upload the files with the stopwords and synonyms to this bucket. For this post, the file contents are as follows:
- synonyms.txt:
- stopwords.txt:
The following screenshot shows the uploaded files:


Now we import our packages and associate them with a domain.
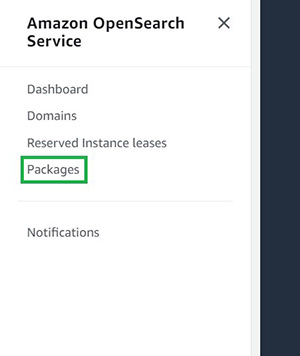
- On the OpenSearch Service console, choose Packages in the navigation pane.

- Choose Import package.

- Enter a name for your package (for the synonym package, we use
my-custom-synonym-package) and optional description. - For Package source, enter the S3 location where synonyms.txt is stored.
- Choose Submit.

- Repeat these steps to create a package with stopwords.txt.
- Choose your synonym package when its status shows as
Available.

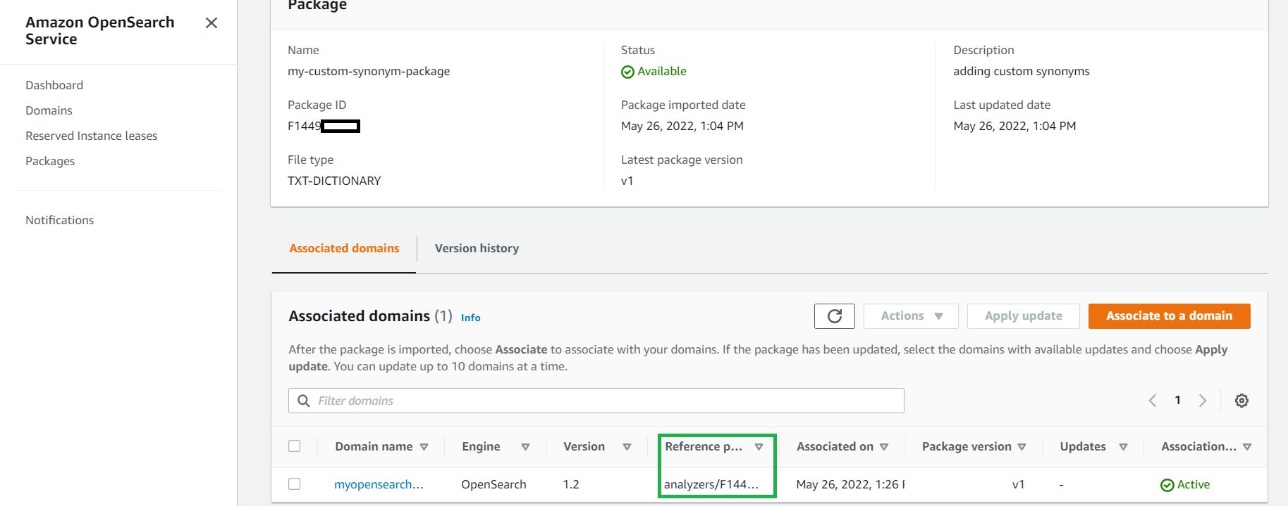
- Choose Associate to a domain.

- Select your OpenSearch Service domain, then choose Associate.

- Repeat these steps to associate your OpenSearch Service domain to the stopwords package.
- When the packages are available, note their IDs.


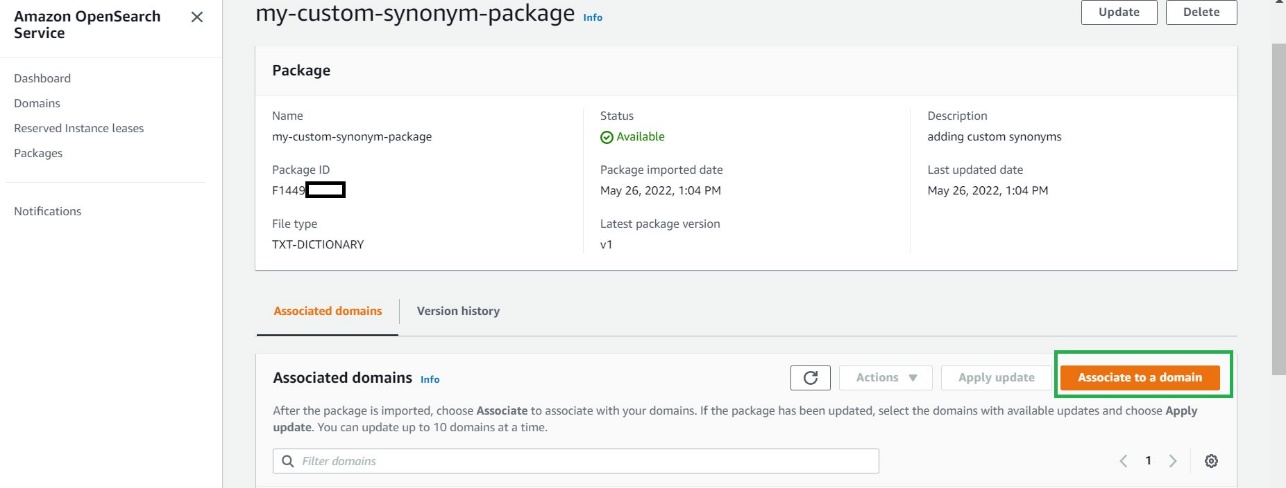

You use analyzers/id as the file path in your requests to OpenSearch.
Use the custom packages with your data
After you associate a file with a domain, you can use it in parameters such as synonyms_path and stopwords_path when you create tokenizers and token filters. For more information, see OpenSearch Service.
You can create a new index (my-index-test) using the following snippet in the OpenSearch Service domain and specify the Analyzers/id values for the synonyms and stopwords packages.
- Open OpenSearch Dashboards.
- On the Home menu, choose Dev Tools.

- Enter the following code in the left pane:
- Choose the play sign to send the request to create the index with our custom synonyms and stopwords.


The following screenshot shows our results.

This request creates a custom analyzer for my index that uses the standard tokenizer and a synonym and stop token filter. This request also adds a text field (description) to the mapping and tells OpenSearch to use the new analyzer as its search analyzer. It still uses the standard analyzer as its index analyzer.
Note the line "updateable": true in the token filter. This field only applies to search analyzers, not index analyzers, and is critical if you later want to update the search analyzer automatically.
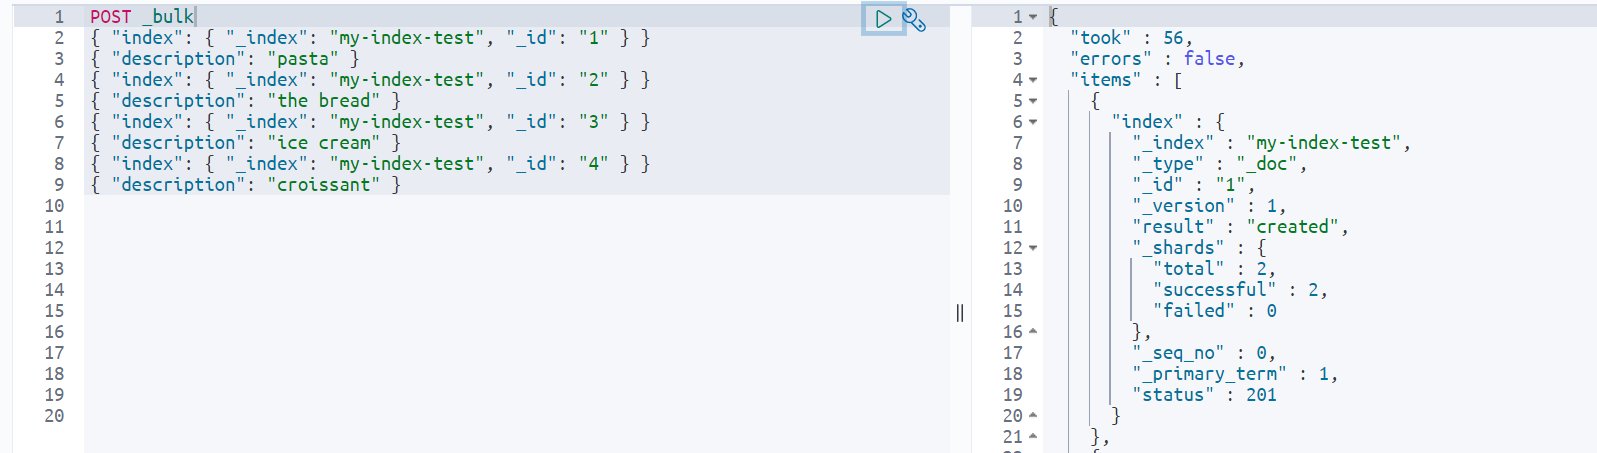
Let’s start by adding some sample data to the index my-index-test:
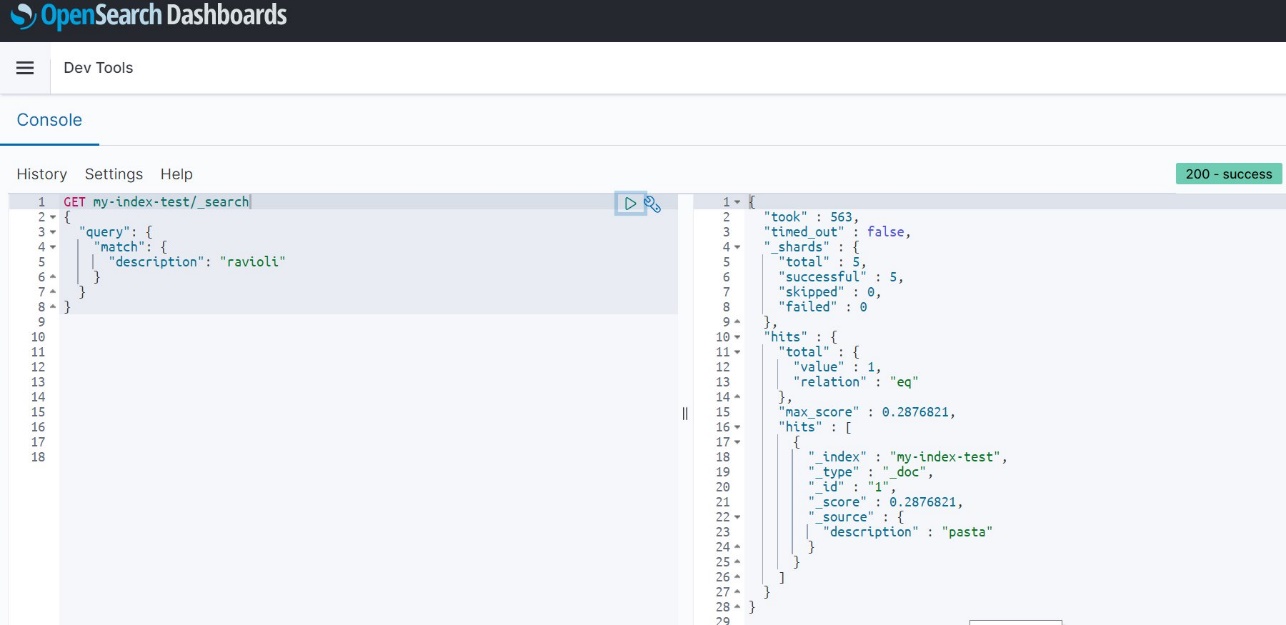
Now If you search for the words you specified in the synonyms.txt file, you get the required results. Note that my test index only has pasta in the indexed data, but because I specified “ravioli” as a synonym for “pasta” in my associated package, I get the results for all documents that have the word “pasta” when I search for “ravioli.”
Similarly, you can use the stopwords feature to specify common words that can be filtered out while showing search results and don’t impact the relevance much while returning search query results.
Hot reload
Now let’s say you want to add another synonym (“spaghetti”) for “pasta.”
- The first step is to update the synonyms.txt file as follows and upload this updated file to your S3 bucket:

Uploading a new version of a package to Amazon S3 doesn’t automatically update the package on OpenSearch Service. OpenSearch Service stores its own copy of the file, so if you upload a new version to Amazon S3, you must manually update it in OpenSearch Service.If you try to run the search query against the index for the term “spaghetti” at this point, you don’t get any results:

After the file is modified in Amazon S3, update the package in OpenSearch Service, then apply the update. To do this, perform the following steps:
- On the OpenSearch Service console, choose Packages.
- Choose the package you created for custom synonyms and choose Update.

- Provide the S3 path to the file, then choose Update package.

- Enter a description and choose Update package.

You return to the Packages page. - When the package status shows as
Available, choose it and wait for the associated domain to show as updated. - Select the domain and choose Apply update.

- Choose Apply update again to confirm.


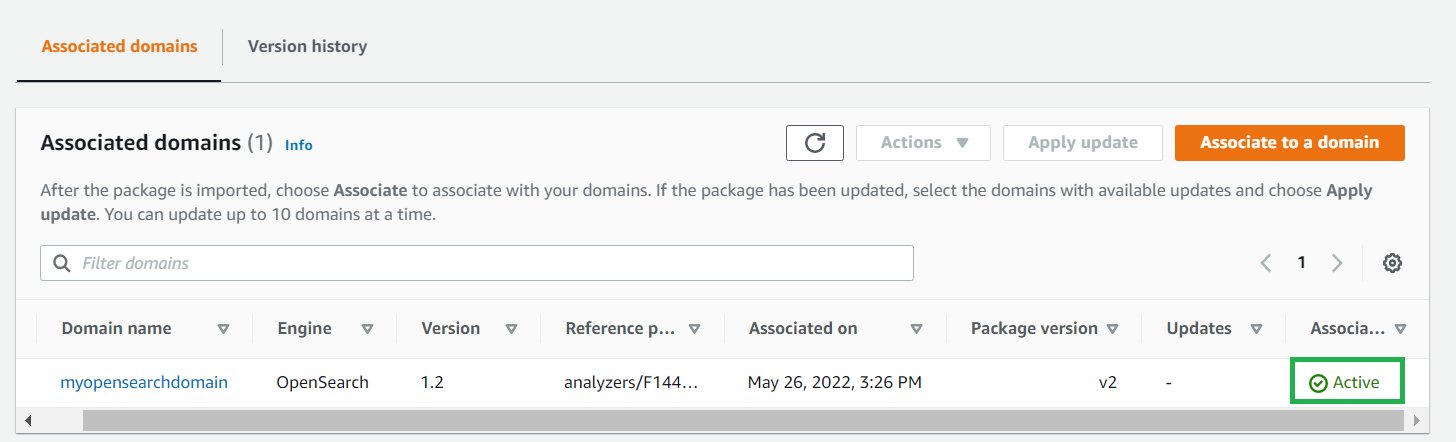
Wait for the association status to change to Active to confirm that the package version is also updated.
If your domain runs Elasticsearch 7.7 or earlier, uses index analyzers, or doesn’t use the updateable field, and if you want to add some additional synonyms at a later time, you have to reindex your data with the new dictionary file. Previously, on Amazon Elasticsearch Service, these analyzers could only process data as it was indexed.
If your domains runs OpenSearch Service or Amazon Elasticsearch Service 7.8 or later and only uses search analyzers with the updateable field set to true, you don’t need to take any further action. OpenSearch Service automatically updates your indexes using the _plugins/_refresh_search_analyzers API. This allows for refresh of search analyzers in real time without you needing to close and reopen the index.
This feature called hot reload provides the ability to reload dictionary files without reindexing your data. With the new hot reload capability, you can call analyzers at search time, and your dictionary files augment the query. This feature also lets you version your dictionary files in OpenSearch Service and update them on your domains, without having to reindex your data.
Because the domain used in this demonstration runs OpenSearch Service 1.2, you can utilize this hot reload feature and without re-indexing of any data. Simply run a search query for the newly added synonym (“spaghetti”) and get all resultant documents that are synonymous to it:

Conclusion
In this post, we showed how easy it is to set up synonyms in OpenSearch Service so you can find the relevant documents that match a synonym for a word, even when the specific word isn’t used as search term. We also demonstrated how to add and update existing synonym dictionaries and load those files to reflect the changes.
If you have feedback about this post, submit your comments in the comments section. You can also start a new thread on the OpenSearch Service forum or contact AWS Support with questions.
About the Authors
 Sonam Chaudhary is a Solutions Architect and Big Data and Analytics Specialist at AWS. She works with customers to build scalable, highly available, cost-effective, and secure solutions in the AWS Cloud. In her free time, she likes traveling with her husband, shopping, and watching movies.
 Prashant Agrawal is a Search Specialist Solutions Architect with OpenSearch Service. He works closely with customers to help them migrate their workloads to the cloud and helps existing customers fine-tune their clusters to achieve better performance and save on cost. Before joining AWS, he helped various customers use OpenSearch and Elasticsearch for their search and log analytics use cases. When not working, you can find him traveling and exploring new places. In short, he likes doing Eat → Travel → Repeat.
Free Isn’t Always Free: A Guide to Free Cloud Tiers
Post Syndicated from Amrit Singh original https://www.backblaze.com/blog/free-isnt-always-free-a-guide-to-free-cloud-tiers/

They say “the best things in life are free.” But when most cloud storage companies offer a free tier, what they really want is money. While free tiers do offer some early-stage technical founders the opportunity to test out a proof of concept or allow students to experiment without breaking the bank, their ultimate goal is to turn you into a paying customer. This isn’t always nefarious (we offer 10GB for free, so we’re playing the same game!), but some cloud vendors’ free tiers come with hidden surprises that can lead to scary bills with little warning.
The truth is that free isn’t always free. Today, we’re digging into a cautionary tale for developers and technical founders exploring cloud services to support their applications or SaaS products. Naturally, you want to know if a cloud vendor’s free tier will work for you. Understanding what to expect and how to navigate free tiers accordingly can help you avoid huge surprise bills later.
Free Tiers: A Quick Reference
Most large, diversified cloud providers offer a free tier—AWS, Google Cloud Platform, and Azure, to name a few—and each one structures theirs a bit differently:
- AWS: AWS has 100+ products and services with free options ranging from “always free” to 12 months free, and each has different use limitations. For example, you get 5GB of object storage free with AWS S3 for the first 12 months, then you are billed at the respective rate.
- Google Cloud Platform: Google offers a $300 credit good for 90 days so you can explore services “for free.” They also offer an “always free tier” for specific services like Cloud Storage, Compute Engine, and several others that are free to a certain limit. For example, you get 5GB of storage for free and 1GB of network egress for their Cloud Storage service.
- Azure: Azure offers a free trial similar to Google’s but with a shorter time frame (30 days) and lower credit amount ($200). It gives you the option to move up to paid when you’ve used up your credits or your time expires. Azure also offers a range of services that are free for 12 months and have varying limits and thresholds as well as an “always free tier” option.
After even a quick review of the free tier offers from major cloud providers, you can glean some immediate takeaways:
- You can’t rely on free tiers or promotional credits as a long-term solution. They work well for testing a proof of concept or a minimum viable product without making a big commitment, but they’re not going to serve you past the time or usage limits.
- “Free” has different mileage depending on the platform and service. Keep that in mind before you spin up servers and resources, and read the fine print as it relates to limitations.
- The end goal is to move you to paid. Obviously, the cloud providers want to move you from testing a proof of concept to paid, with your full production hosted and running on their platforms.
With Google Cloud Platform and Azure, you’re at least somewhat protected from being billed beyond the credits you receive since they require you to upgrade to the paid tier to continue. Thus, most of the horror stories you’ll see involve AWS. With AWS, once your trial expires or you exceed your allotted limits, you are billed the standard rate. For the purposes of this guide, we’ll look specifically at AWS.
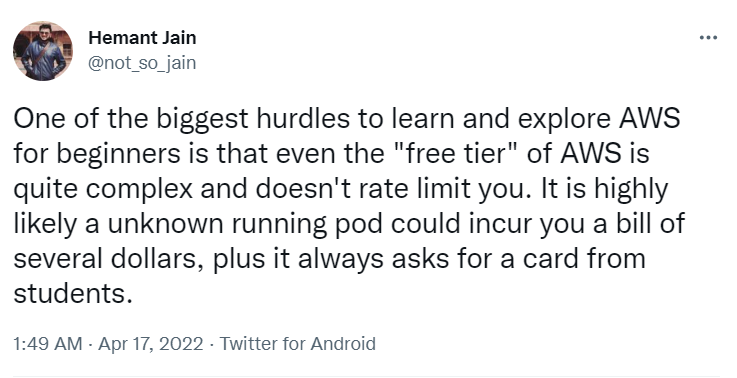
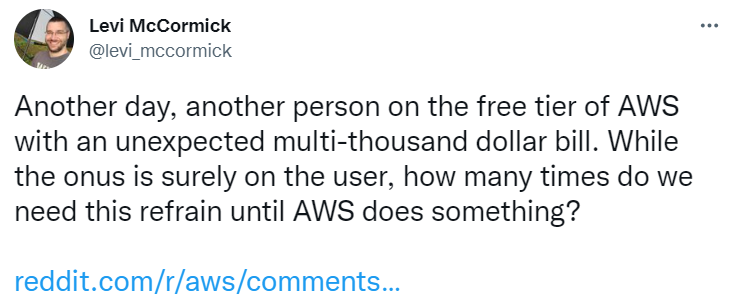
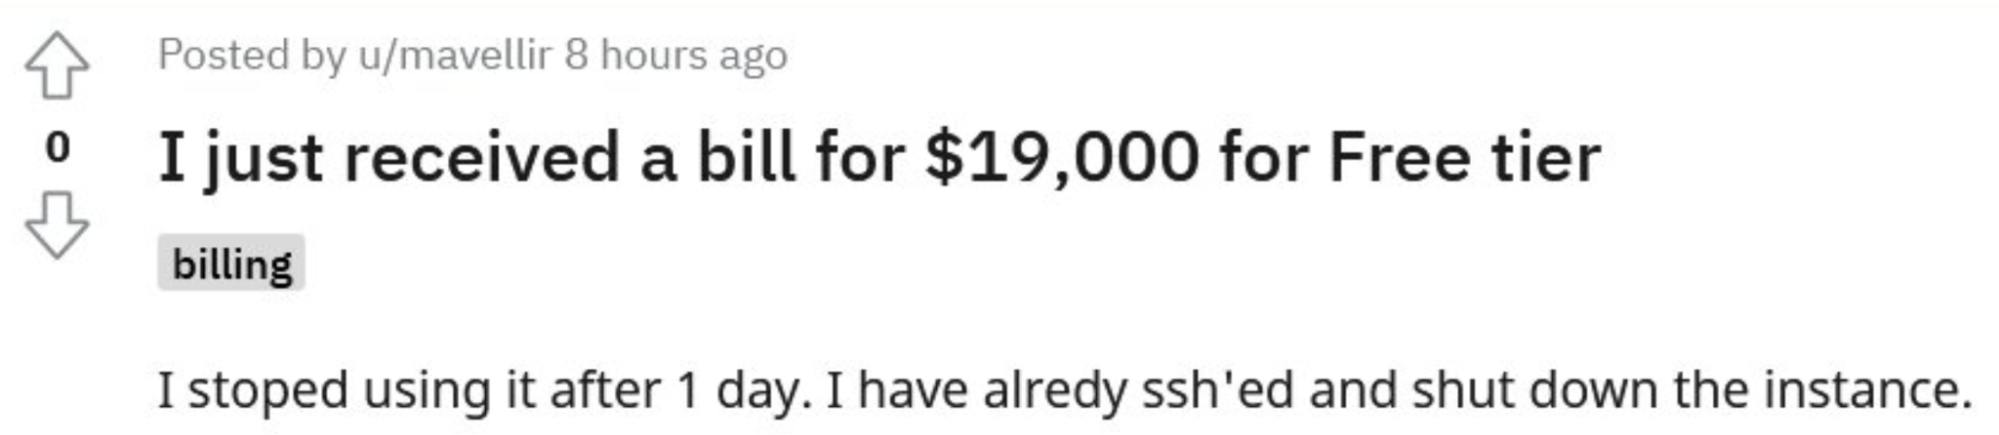
The Problem With the AWS Free Tier
The internet is littered with cautionary tales of AWS bills run amok. A quick search for “AWS free tier bill” on Twitter or Reddit shows that it’s possible and pretty common to run up a bill on AWS’s so-called free tier…
The problem with the AWS free tier is threefold:
- There are a number of ways a “free tier” instance can turn into a bill.
- Safeguards against surprise bills are mediocre at best.
- Surprise bills are scary, and next steps aren’t the most comforting.
Problem 1: It’s Really Easy to Go From Free to Not Free
There are a number of ways an unattended “free tier” instance turns into a bill, sometimes a catastrophically huge bill. Here are just a few:
- You spin up Elastic Compute Cloud (EC2) instances for a project and forget about them until they exceed the free tier limits.
- You sign up for several AWS accounts, and you can’t figure out which one is running up charges.
- Your account gets hacked and used for mining crypto (yes, this definitely happens, and it results in some of the biggest surprise bills of them all).
Problem 2: Safeguards Against Surprise Bills Are Mediocre at Best
Confounding the problem is the fact that AWS keeps safeguards against surprise billing to a minimum. The free tier has limits and defined constraints, and the only way to keep your account in the free zone is to keep usage below those limits (and this is key) for each service you use.
AWS has hundreds of services, and each service comes with its own pricing structure and limits. While one AWS service might be free, it can be paired with another AWS service that’s not free or doesn’t have the same free threshold, for example, egress between services. Thus, managing your usage to keep it within the free tier can be somewhat straightforward or prohibitively complex depending on which services you use.
Wait, Shouldn’t I Get Alerts?
Yes, you can get alerted if you’re approaching the free limit, but that’s not foolproof either. First, billing alarms are not instantaneous. The notification might come after you’ve already exceeded the limit. And second, not every service has alerts or alerts that work in the same way.
You can also configure services so that they automatically shut down when they exceed a certain billing threshold, but this may pose more problems than it solves. First, navigating the AWS UI to set this up is complex. Your average free tier user may not be aware of or even interested in how to set that up. Second, you may not want to shut down services depending on how you’re using AWS.
Problem 3: Knowing What to Do Next
If it’s not your first rodeo, you might not default to panic mode when you get that surprise bill. You tracked your usage. You know you’re in the right. All you have to do is contact AWS support and dispute the charge. But imagine how a college student might react to a bill the size of their yearly tuition. While large five- to six-figure bills might be negotiable and completely waived, there are untold numbers of two- to three-figure bills that just end up getting paid because people weren’t aware of how to dispute the charges.
Even experienced developers can fall victim to unexpected charges in the thousands.
Avoiding Unexpected AWS Bills in the First Place
The first thing to recognize is that free isn’t always free. If you’re new to the platform, there are a few steps you can take to put yourself in a better position to avoid unexpected charges:
- Read the fine print before spinning up servers or uploading test data.
- Look for sandboxed environments that don’t let you exceed charges beyond a certain amount or that allow you to set limits that shut off services once limits are exceeded.
- Proceed with caution and understand how alerts work before spinning up services.
- Steer clear of free tiers completely, because the short-term savings aren’t huge and aren’t worth the added risk.
Final Thought: It Ain’t Free If They Have Your CC
AWS requires credit card information before you can do anything on the free tier—all the more reason to be extremely cautious.
Shameless plug here: Backblaze B2 Cloud Storage offers the first 10GB of storage free, and you don’t need to give us a credit card to create an account. You can also set billing alerts and caps easily in your dashboard. So, you’re unlikely to run up a surprise bill.
Ready to get started with Backblaze B2 Cloud Storage? Sign up here today to get started with 10GB and no CC.
The post Free Isn’t Always Free: A Guide to Free Cloud Tiers appeared first on Backblaze Blog | Cloud Storage & Cloud Backup.
Q2 InsightVM Release Update: Let’s Focus on Remediation for Just a Minute
Post Syndicated from Devin Krugly original https://blog.rapid7.com/2022/07/14/q2-insightvm-release-update-lets-focus-on-remediation-for-just-a-minute/

Think of an endeavor in your life where your success is entirely dependent on the success of others. What’s the first example that comes to mind? It’s common in team sports – a quarterback and a wide receiver, a fullback and their goalie, an equestrian and their horse.
What if you narrow the scope to endeavors or activities at work? A little more difficult, right? A large project is an easy candidate, but those are generally distributed across many people over a long time period, which allows for mitigation and planning.
For those that make a living in cybersecurity, the example that immediately comes to mind is vulnerability management (VM). VM, which really falls under the heading of risk management, requires deft handling of executive communications, sometimes blurred to abstract away the tedious numbers and present a risk statement. At the same time, judicious management of vulnerability instances and non-compliant configurations that exceed organization thresholds – i.e., all the numbers – requires very detailed and often painstaking focus on the minutiae of a VM program. Then, layer in the need for situational awareness to answer context-specific questions like, “Are we vulnerable, and if so, do we need to act immediately?” or “Why did the security patch fail on only 37 of the 2184 target systems?” It becomes glaringly apparent that communication and alignment among all stakeholders – security team, IT operations, and business leadership – are paramount to achieve “dependent” success.
Based on customer feedback and directional input, we’re pleased to release two updates that are aimed at not only improving VM program success but also reducing the effort to get you there.
Remediation Project progress
In what may be the most exciting and warmly received update for some, we are releasing a new method to calculate and display progress for Remediation Projects. Historically, credit for patching and subsequent reporting of “percent complete” toward closing any one Remediation Project was only given when all affected assets for a single solution were remediated. So we’ve updated the calculation to account for “partial” credit. Now, remediation teams will see incremental progress as individual assets for specific solutions (i.e. patches) are applied. This is a much more accurate representation of the work and effort invested. It is also a much more precise indication of what additional effort is needed to close out the last few pesky hosts that have so far resisted your best remediation efforts.
For some, the scope and scale of risk management in the world of VM has outgrown original designs – more assets, more vulns. We’ve acted on the sage wisdom of many who have suggested such an update and made that available in Version 6.6.150
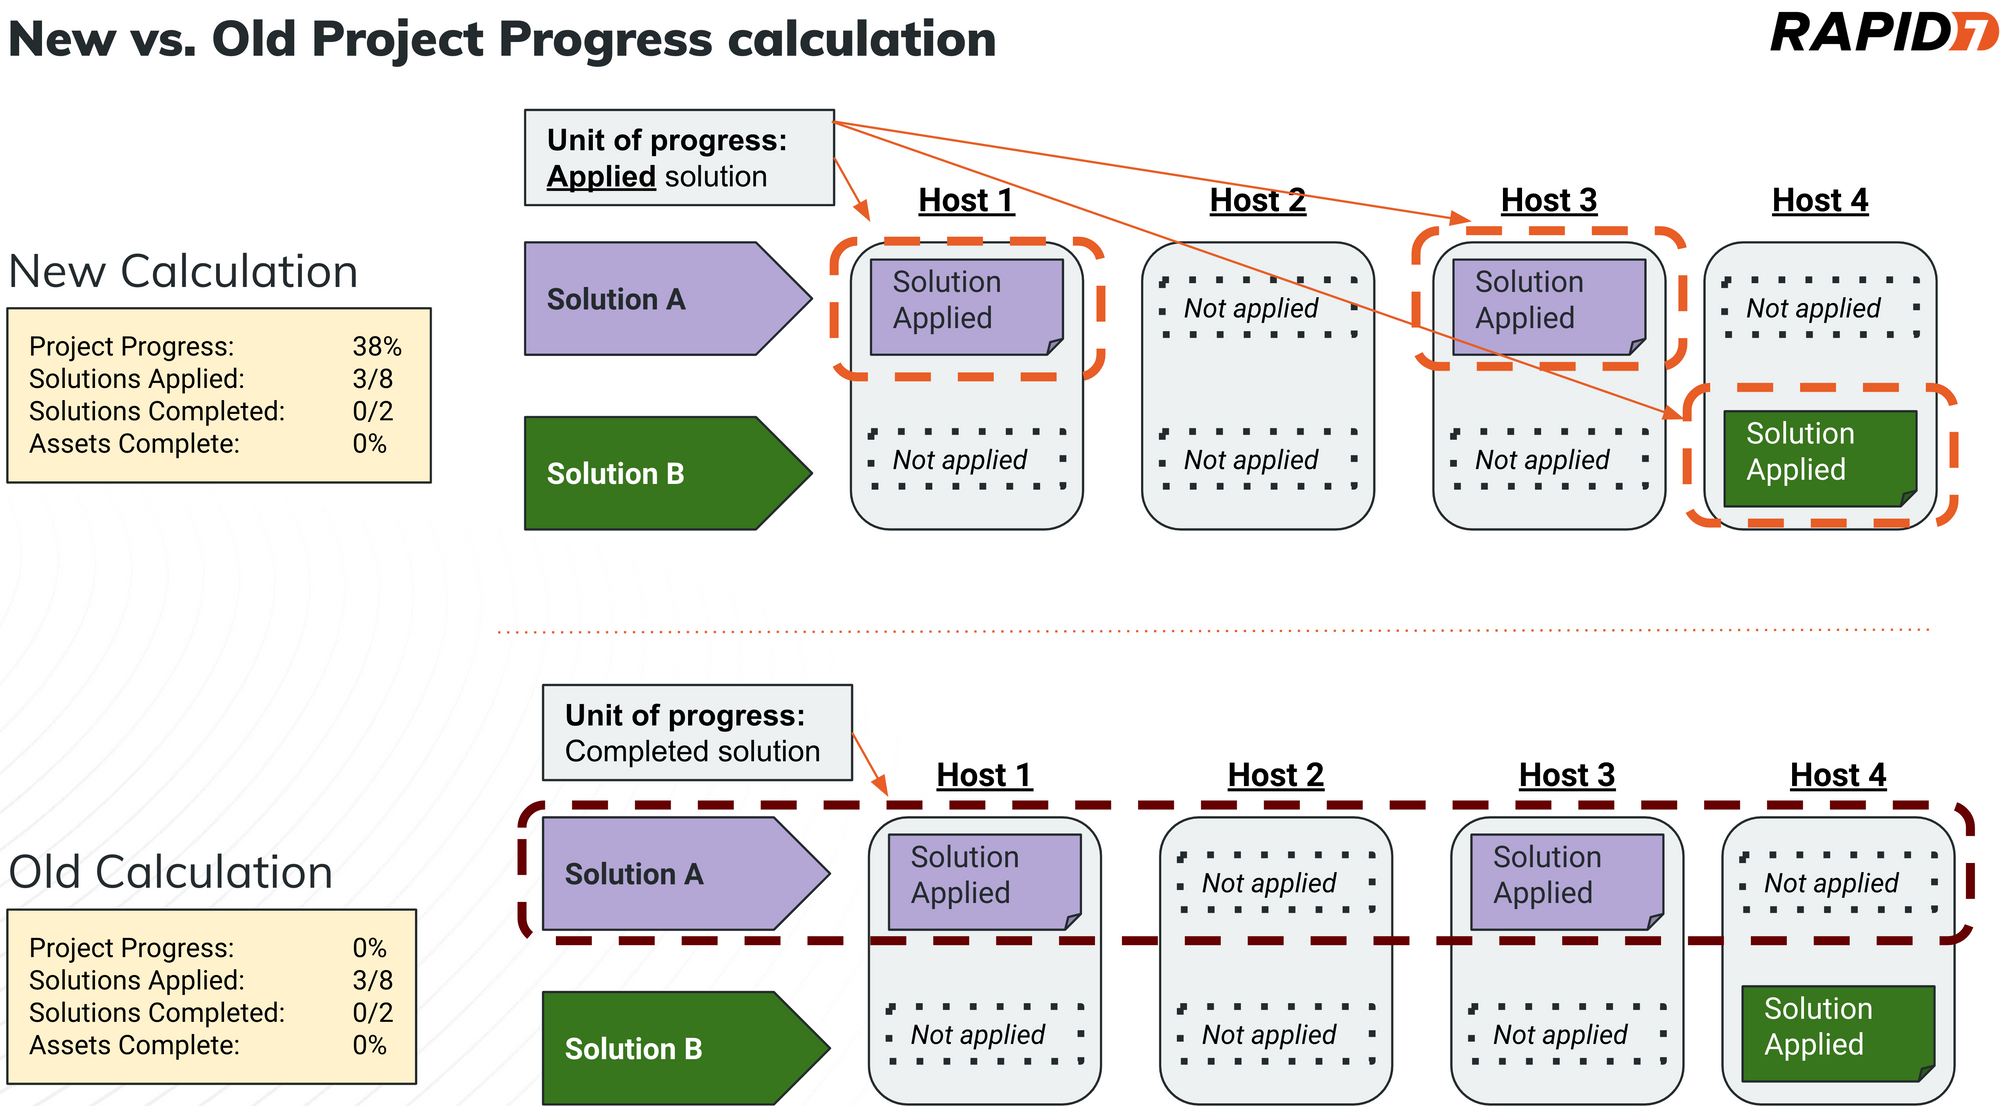
This update will affect all Remediation Projects, so we encourage teams to leverage this blog post to share the details behind this release as a heads-up and possibly improve relations with your teammates. It’s only by partnering and aligning on the effort involved that this “success dependency” becomes a power-up, rather than a power drain.
Remediator Export
I am particularly excited about this seemingly minor but mighty update, because I can remember having to script around or find automation to stitch together different source documents to produce what we have elected to refer to as a Remediator Export. The number of stakeholders and the diversity of teams involved in modern VM programs necessitate on-demand access to the supporting data and associated context. This export is for – you guessed it – the teams that have the heaviest lift in any VM program: the folks that push patches, update configs, apply mitigating controls, and are usually involved in all the necessary testing – the Remediators. Whether the catalyst for such a detailed export (26 data fields in all) is to troubleshoot a failed install or to simply have more direct access to vulnerability proof data the Remediator Export will offer improvements for nearly every remediation team.
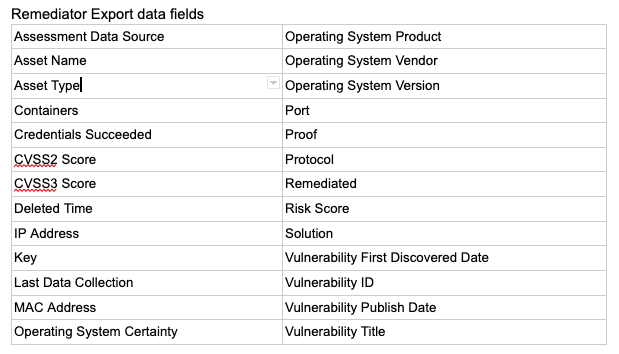
You can access this upcoming solution based export from any Remediation Project peek panel. The Export to CSV dropdown now has an additional option that includes the data fields cited above and helps meet team’s needs where they are today.
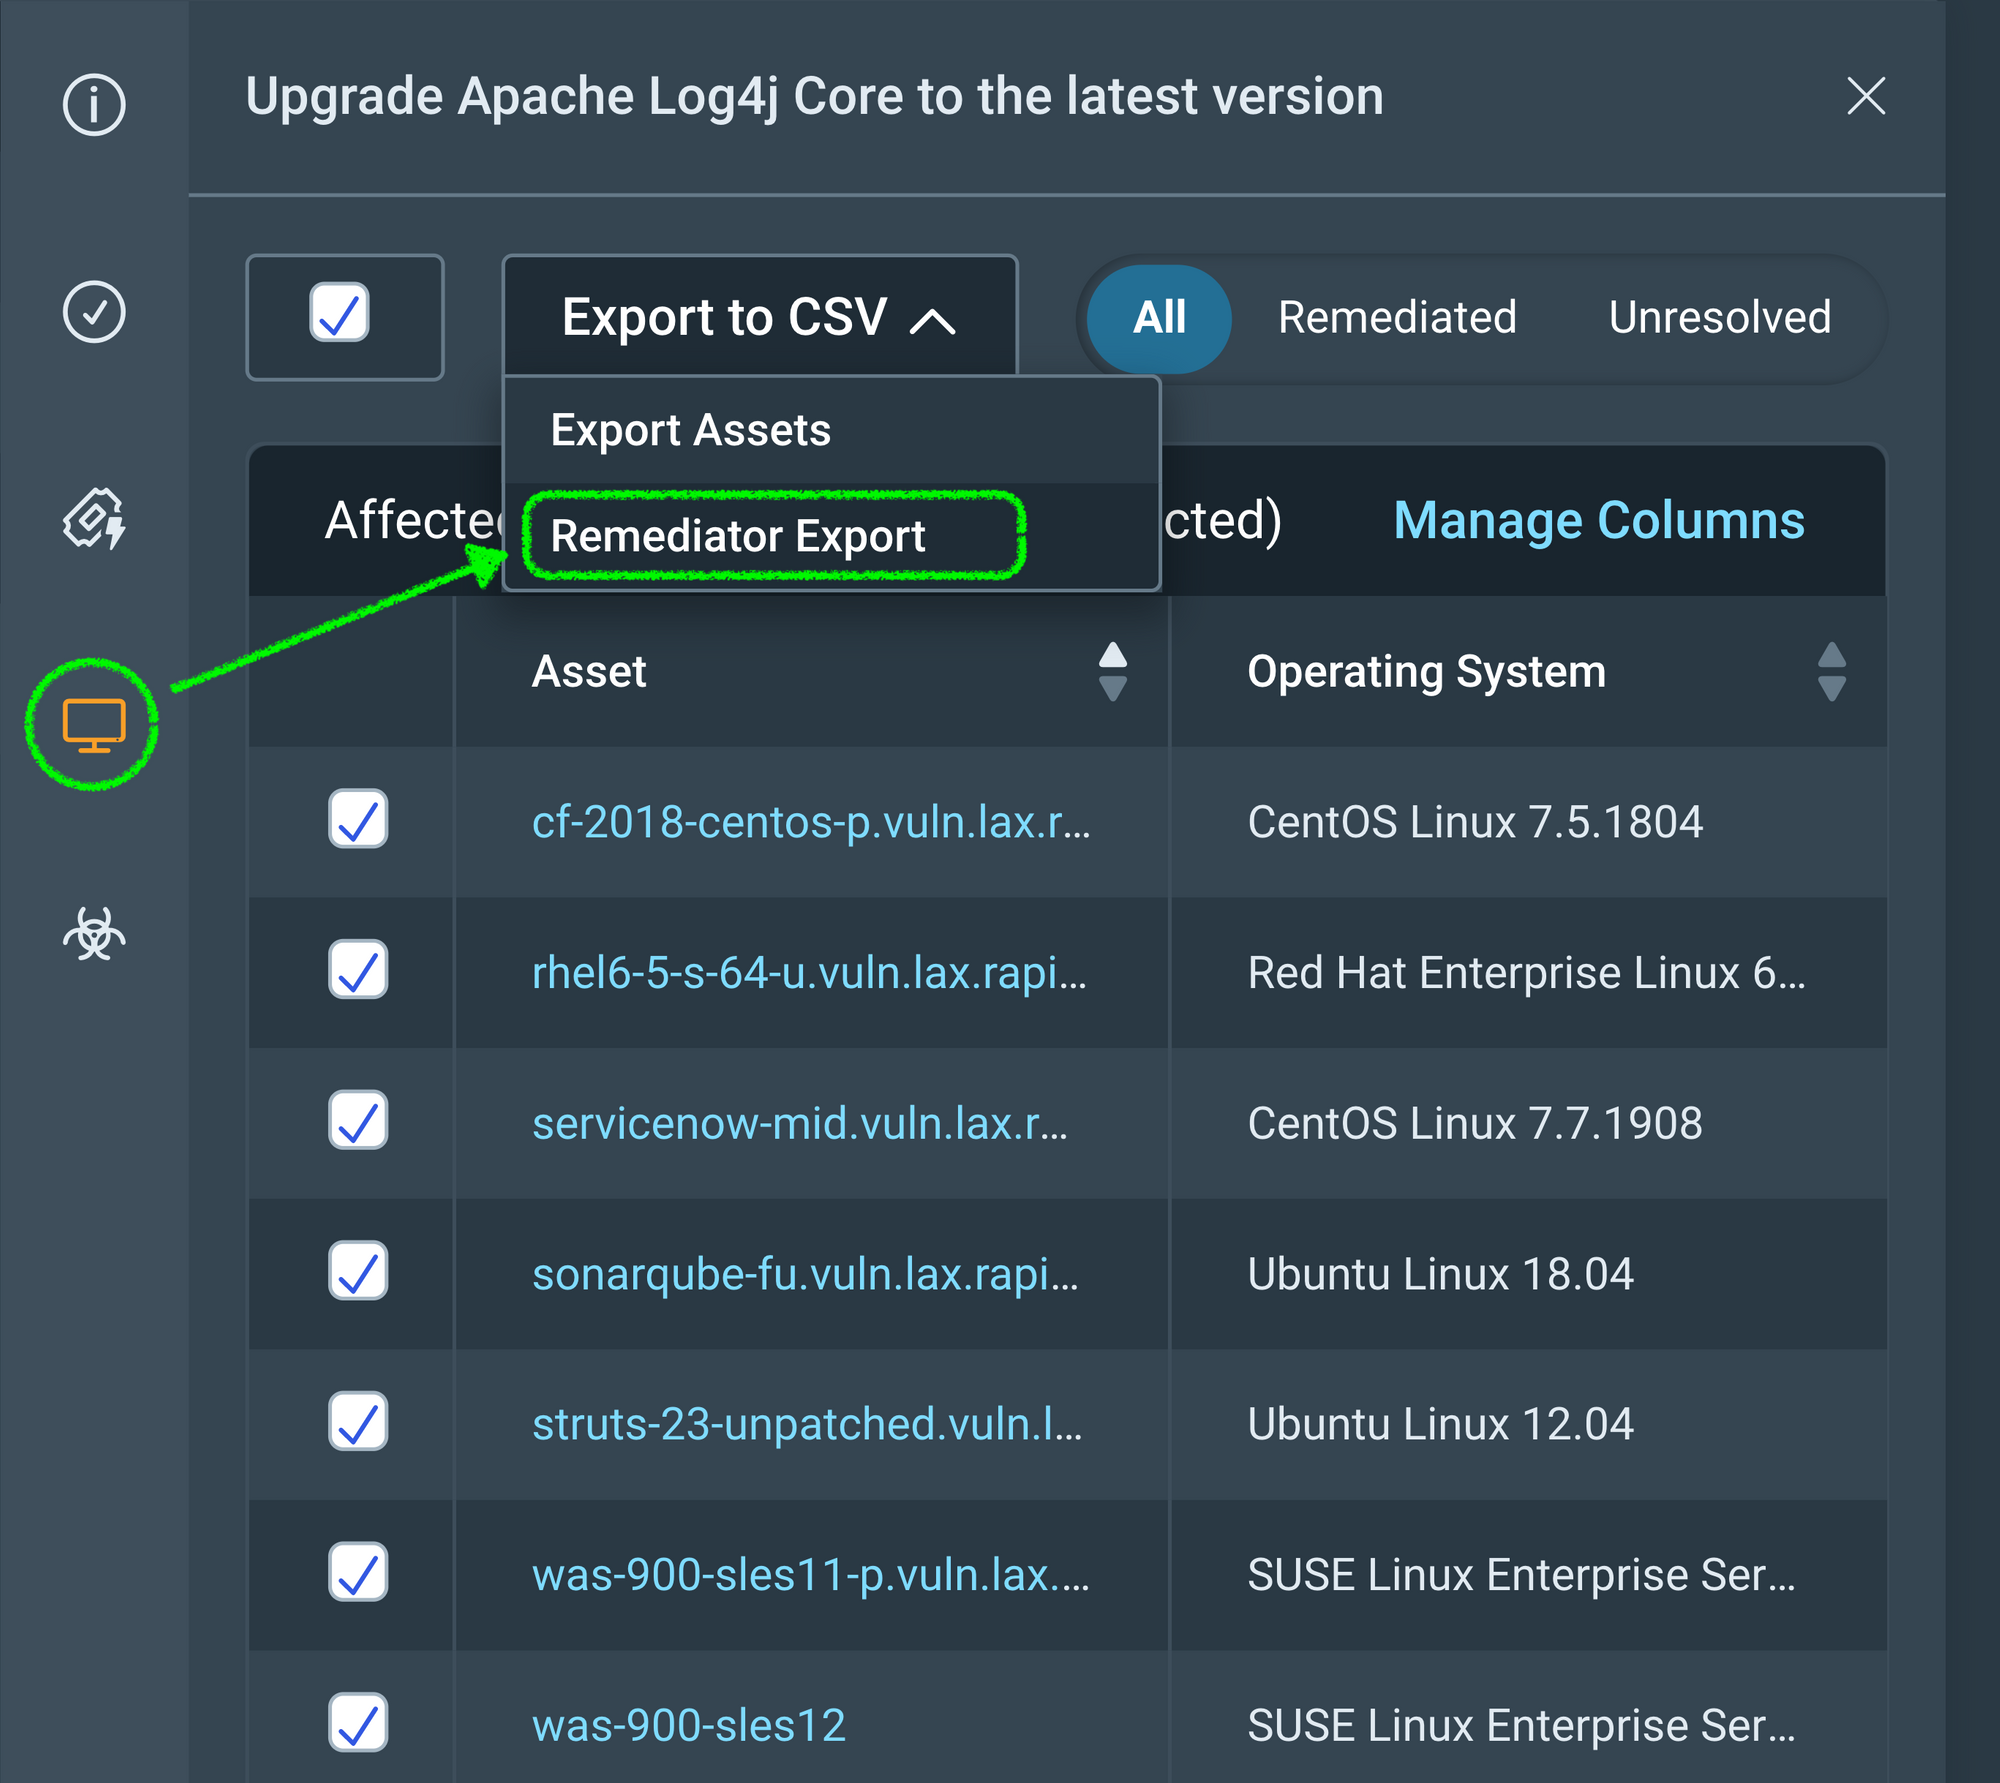
The Remediator CSV file is accessible to anyone with permission to Remediation Projects, Goals, and SLAs and carries the following naming convention: “Project-Name_Solution-UUID.csv.” We are already thinking about options to provide similar capability at the Remediation Project level.
Additional reading:
New Browser De-anonymization Technique
Post Syndicated from Bruce Schneier original https://www.schneier.com/blog/archives/2022/07/new-browser-de-anonymization-technique.html
Researchers have a new way to de-anonymize browser users, by correlating their behavior on one account with their behavior on another:
The findings, which NJIT researchers will present at the Usenix Security Symposium in Boston next month, show how an attacker who tricks someone into loading a malicious website can determine whether that visitor controls a particular public identifier, like an email address or social media account, thus linking the visitor to a piece of potentially personal data.
When you visit a website, the page can capture your IP address, but this doesn’t necessarily give the site owner enough information to individually identify you. Instead, the hack analyzes subtle features of a potential target’s browser activity to determine whether they are logged into an account for an array of services, from YouTube and Dropbox to Twitter, Facebook, TikTok, and more. Plus the attacks work against every major browser, including the anonymity-focused Tor Browser.
[…]
“Let’s say you have a forum for underground extremists or activists, and a law enforcement agency has covertly taken control of it,” Curtmola says. “They want to identify the users of this forum but can’t do this directly because the users use pseudonyms. But let’s say that the agency was able to also gather a list of Facebook accounts who are suspected to be users of this forum. They would now be able to correlate whoever visits the forum with a specific Facebook identity.”
[$] Long-lived kernel pointers in BPF
Post Syndicated from original https://lwn.net/Articles/900749/
The BPF subsystem allows
programmers to write programs that can run safely in kernel space. All
memory accesses and function calls in BPF programs are statically checked
for safety using the in-kernel verifier, which
analyzes programs in their entirety before allowing them to be loaded.
While this allows the kernel to safely run BPF programs, it heavily
restricts what those programs are able to do. Among these
constraints is a rule that programs cannot store pointers into BPF maps for
use (such as dereferencing them or passing them to the kernel in
kfunc and BPF helper invocations) at a
later time. A
patch set by
Kumar Kartikeya Dwivedi adds this capability to BPF.
Security updates for Thursday
Post Syndicated from original https://lwn.net/Articles/901190/
Security updates have been issued by Debian (request-tracker4), Fedora (kernel and vim), Mageia (gerbv, gnupg2, pgadmin4, and python-coookiecutter), Slackware (xorg), SUSE (cifs-utils, gmp, gnutls, libnettle, kernel, libsolv, libzypp, zypper, logrotate, openssl-1_1, opera, squid, and virglrenderer), and Ubuntu (ca-certificates, git, linux, linux-aws, linux-aws-hwe, linux-azure, linux-azure-4.15, linux-gcp-4.15, linux-hwe, linux-kvm, linux-oracle, linux-raspi2, linux-snapdragon, linux, linux-aws, linux-azure, linux-azure-5.4, linux-azure-fde, linux-gke, linux-gkeop, linux-hwe-5.4, linux-ibm, linux-kvm, linux, linux-aws, linux-azure, linux-gcp, linux-gke, linux-ibm, linux-kvm, linux-lowlatency, linux-oracle, linux-aws, linux-oem-5.14, and vim).
Mantis – the most powerful botnet to date
Post Syndicated from Omer Yoachimik original https://blog.cloudflare.com/mantis-botnet/


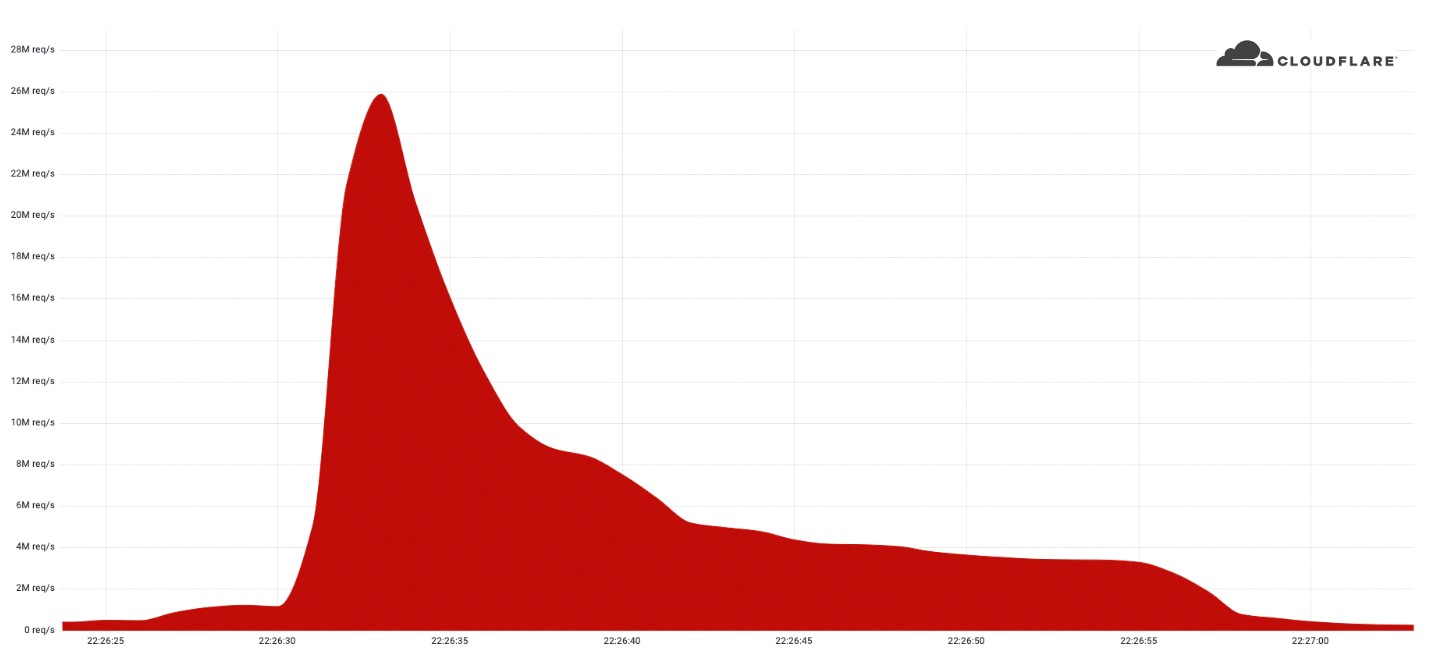
In June 2022, we reported on the largest HTTPS DDoS attack that we’ve ever mitigated — a 26 million request per second attack – the largest attack on record. Our systems automatically detected and mitigated this attack and many more. Since then, we have been tracking this botnet, which we’ve called “Mantis”, and the attacks it has launched against almost a thousand Cloudflare customers.
Cloudflare WAF/CDN customers are protected against HTTP DDoS attacks including Mantis attacks. Please refer to the bottom of this blog for additional guidance on how to best protect your Internet properties against DDoS attacks.
Have you met Mantis?
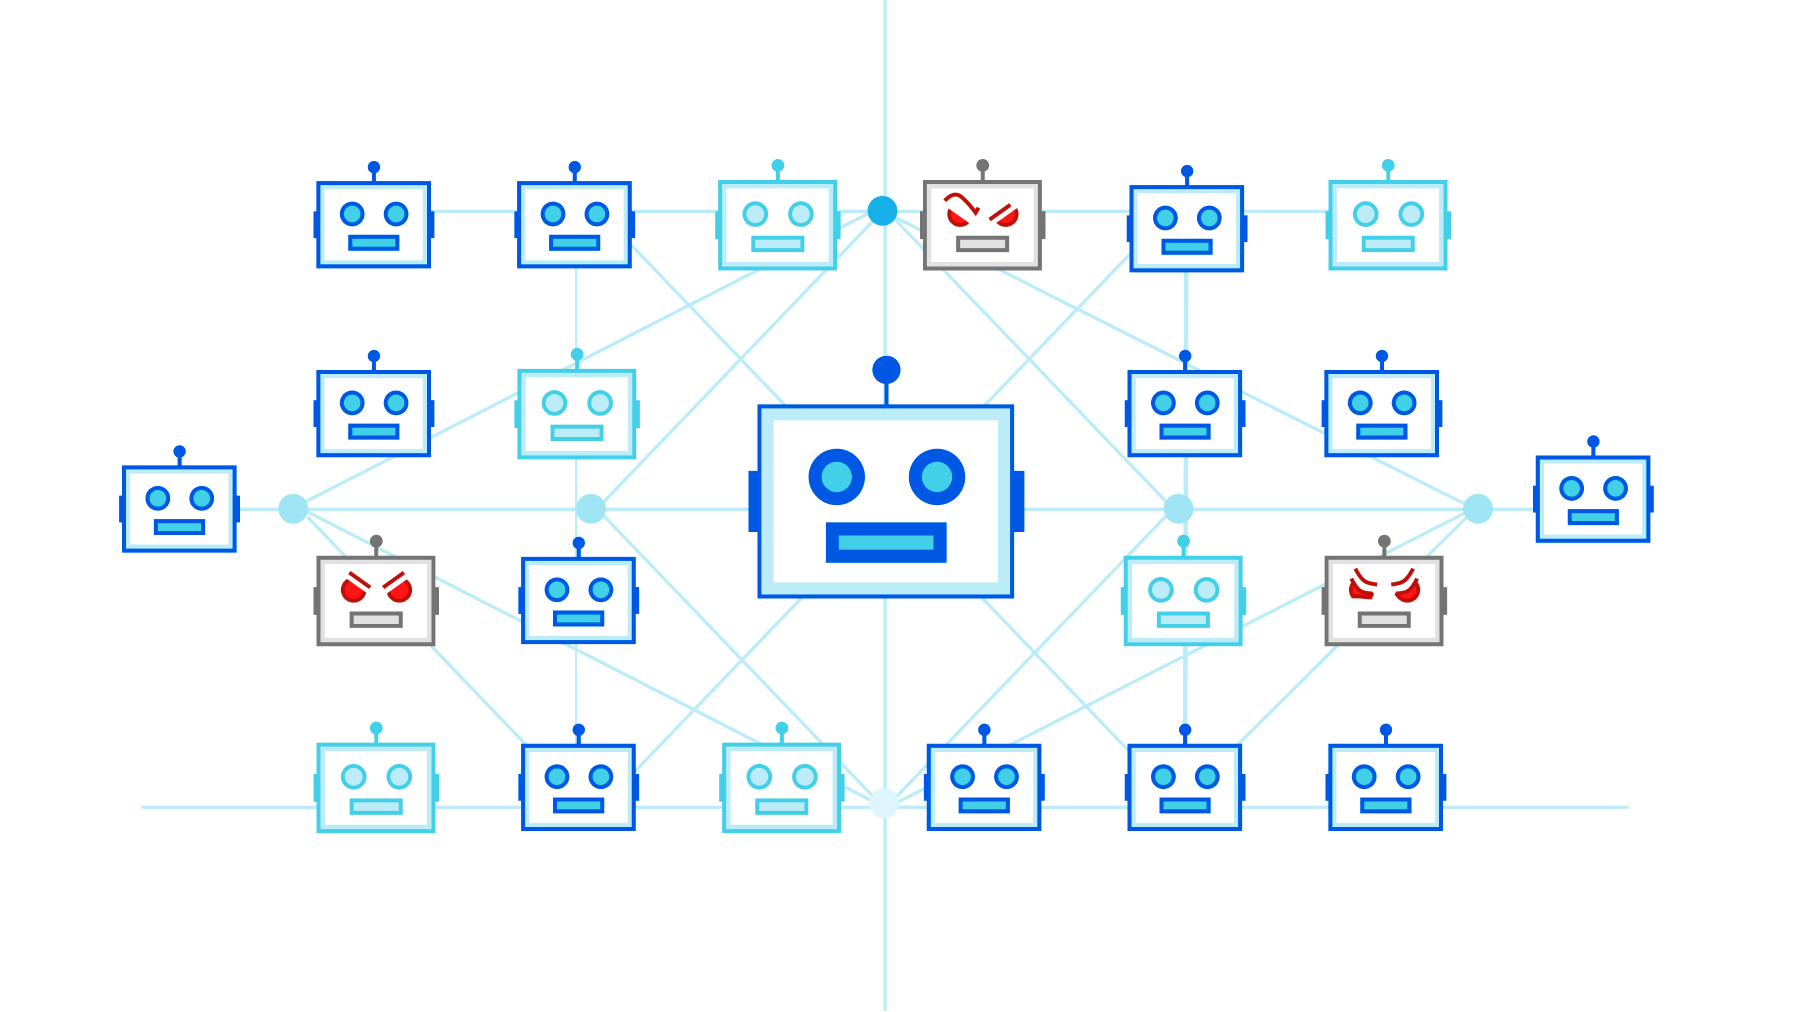
We named the botnet that launched the 26M rps (requests per second) DDoS attack “Mantis” as it is also like the Mantis shrimp, small but very powerful. Mantis shrimps, also known as “thumb-splitters”, are very small; less than 10 cm in length, but their claws are so powerful that they can generate a shock wave with a force of 1,500 Newtons at speeds of 83 km/h from a standing start. Similarly, the Mantis botnet operates a small fleet of approximately 5,000 bots, but with them can generate a massive force — responsible for the largest HTTP DDoS attacks we have ever observed.

The Mantis botnet was able to generate the 26M HTTPS requests per second attack using only 5,000 bots. I’ll repeat that: 26 million HTTPS requests per second using only 5,000 bots. That’s an average of 5,200 HTTPS rps per bot. Generating 26M HTTP requests is hard enough to do without the extra overhead of establishing a secure connection, but Mantis did it over HTTPS. HTTPS DDoS attacks are more expensive in terms of required computational resources because of the higher cost of establishing a secure TLS encrypted connection. This stands out and highlights the unique strength behind this botnet.
As opposed to “traditional” botnets that are formed of Internet of Things (IoT) devices such as DVRs, CC cameras, or smoke detectors, Mantis uses hijacked virtual machines and powerful servers. This means that each bot has a lot more computational resources — resulting in this combined thumb-splitting strength.
Mantis is the next evolution of the Meris botnet. The Meris botnet relied on MikroTik devices, but Mantis has branched out to include a variety of VM platforms and supports running various HTTP proxies to launch attacks. The name Mantis was chosen to be similar to “Meris” to reflect its origin, and also because this evolution hits hard and fast. Over the past few weeks, Mantis has been especially active directing its strengths towards almost 1,000 Cloudflare customers.
Who is Mantis attacking?
In our recent DDoS attack trends report, we talked about the increasing number of HTTP DDoS attacks. In the past quarter, HTTP DDoS attacks increased by 72%, and Mantis has surely contributed to that growth. Over the past month, Mantis has launched over 3,000 HTTP DDoS attacks against Cloudflare customers.
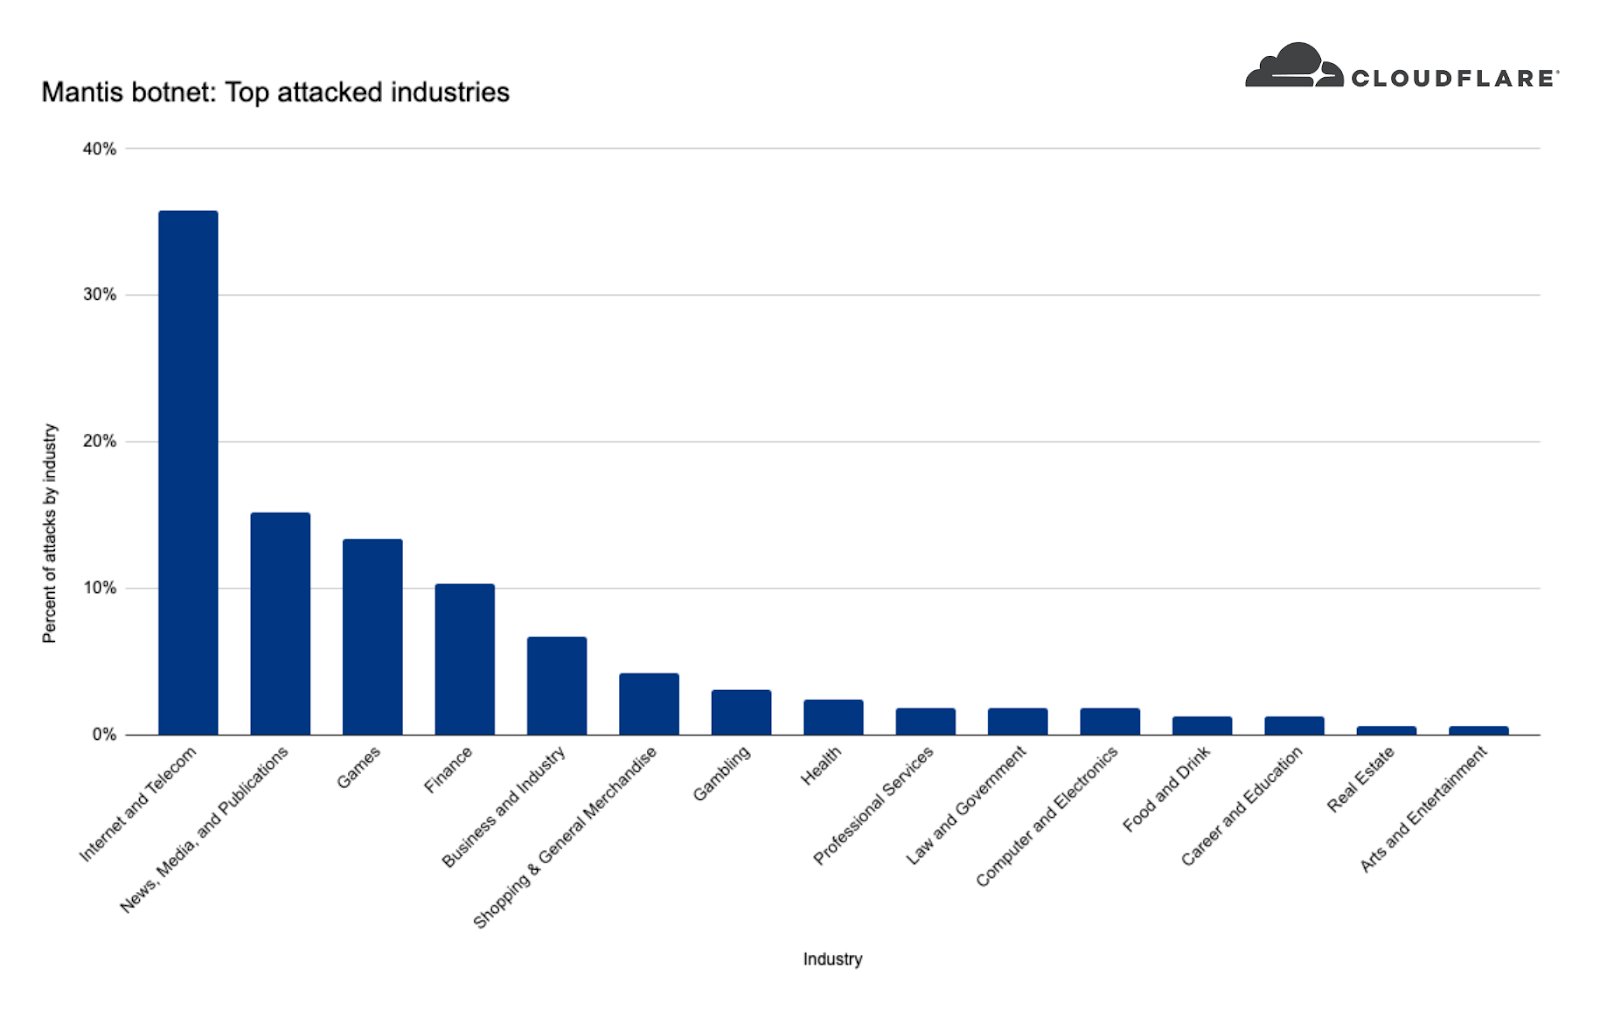
When we take a look at Mantis’ targets we can see that the top attacked industry was the Internet & Telecommunications industry with 36% of attack share. In second place, the News, Media & Publishing industry, followed by Gaming and Finance.
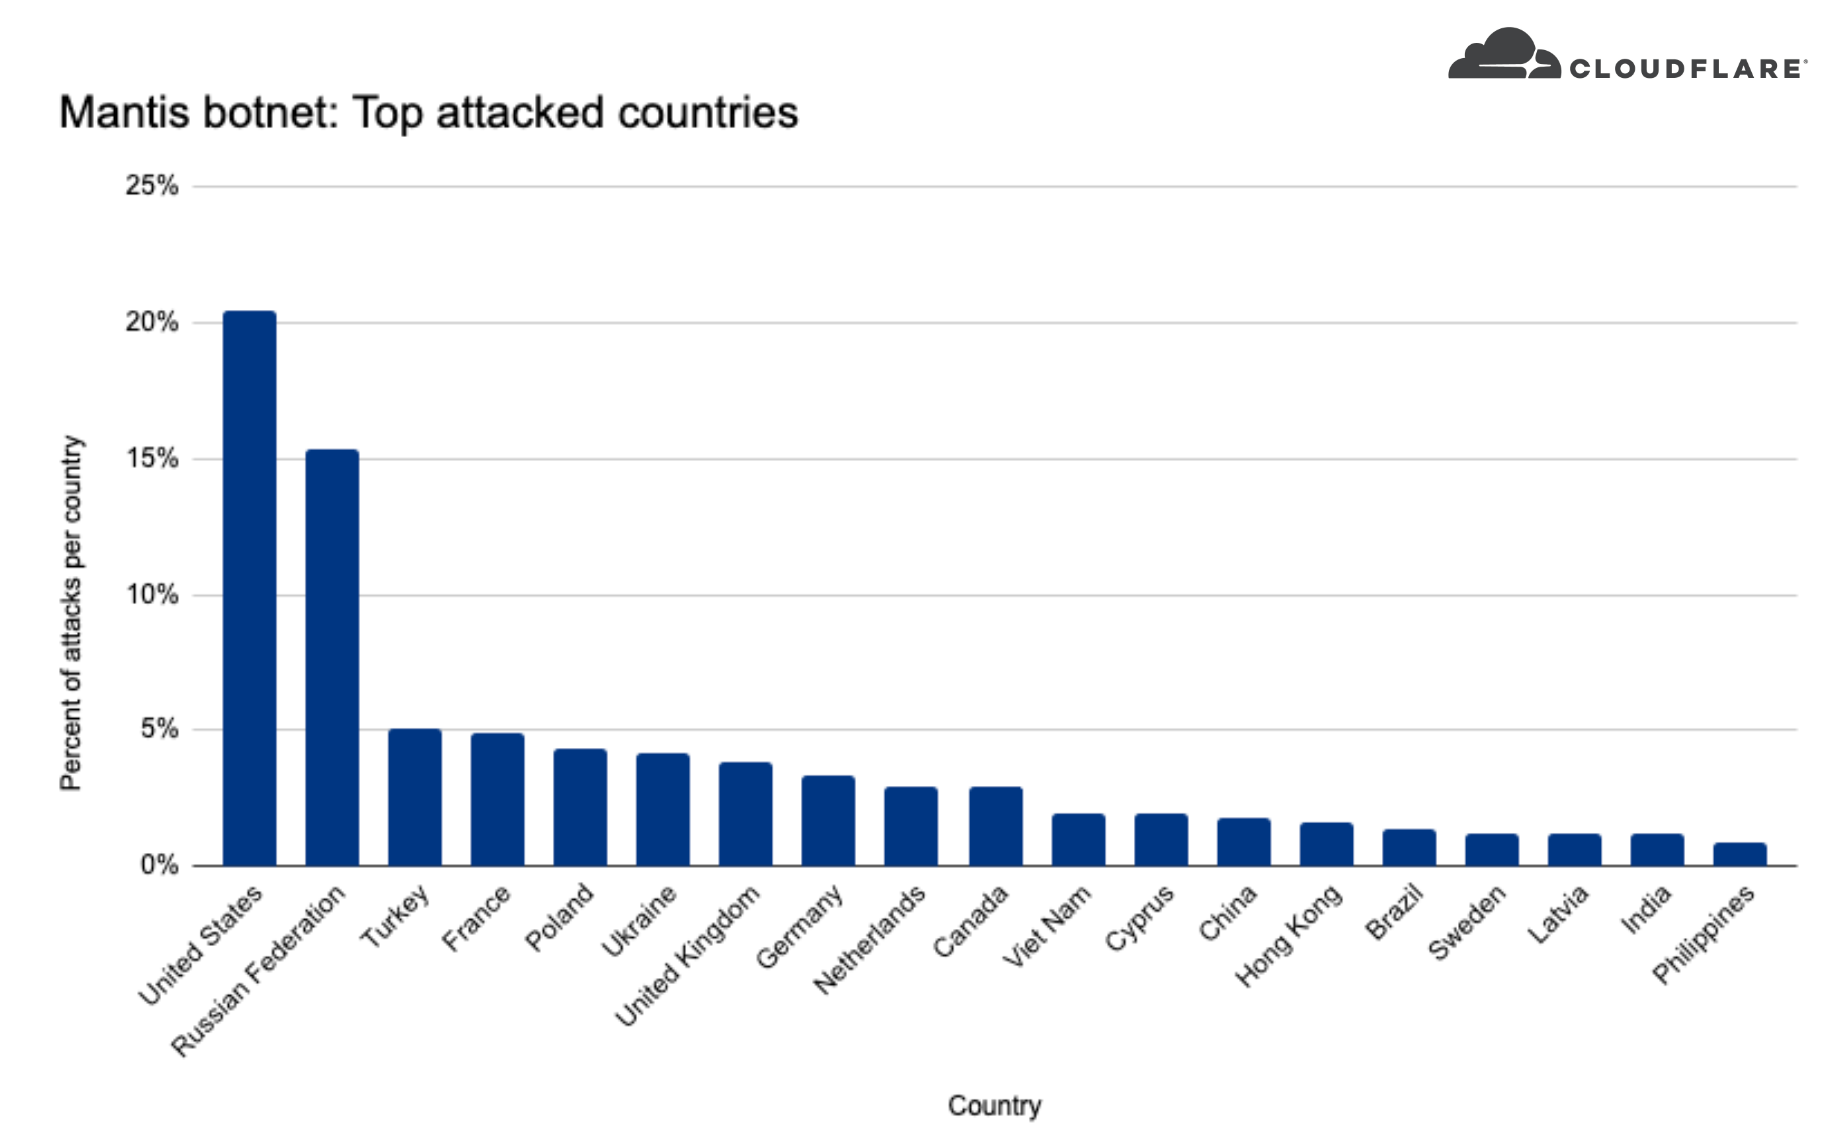
When we look at where these companies are located, we can see that over 20% of the DDoS attacks targeted US-based companies, over 15% Russia-based companies, and less than five percent included Turkey, France, Poland, Ukraine, and more.
How to protect against Mantis and other DDoS attacks
Cloudflare’s automated DDoS protection system leverages dynamic fingerprinting to detect and mitigate DDoS attacks. The system is exposed to customers as the HTTP DDoS Managed Ruleset. The ruleset is enabled and applying mitigation actions by default, so if you haven’t made any changes, there is no action for you to take — you are protected. You can also review our guides Best Practices: DoS preventive measures and Responding to DDoS attacks for additional tips and recommendations on how to optimize your Cloudflare configurations.
If you are only using Magic Transit or Spectrum but also operate HTTP applications that are not behind Cloudflare, it is recommended to onboard them to Cloudflare’s WAF/CDN service to benefit from L7 protection.
Handy Tips #33: Pause unwanted alarms by suppressing your problems
Post Syndicated from Arturs Lontons original https://blog.zabbix.com/handy-tips-33-pause-unwanted-alarms-by-suppressing-your-problems/21981/
The post Handy Tips #33: Pause unwanted alarms by suppressing your problems appeared first on Zabbix Blog.
How do I start my child coding?
Post Syndicated from Marc Scott original https://www.raspberrypi.org/blog/how-do-i-start-my-child-coding/
You may have heard a lot about coding and how important it is for children to start learning about coding as early as possible. Computers have become part of our lives, and we’re not just talking about the laptop or desktop computer you might have in your home or on your desk at work. Your phone, your microwave, and your car are all controlled by computers, and those computers need instructions to tell them what to do. Coding, or computer programming, involves writing those instructions.

If children discover a love for coding, they will have an avenue to make the things they want to make; to write programs and build projects that they find useful, fun, or interesting. So how do you give your child the opportunity to learn about coding? We’ve listed some free resources and suggested activities below.
Scratch Junior
If you have a young child under about 7 years of age, then a great place to begin is with ScratchJr. This is an app available on Android and iOS phones and tablets, that lets children learn the basics of programming, without having to worry about making mistakes.

Code Club World
The Raspberry Pi Foundation has developed a series of activities for young learners, on their journey to developing their computing skills. Code Club World provides a platform for children to play with code to design their own avatar, make it dance, and play music. Plus they can share their creations with other learners.
“You could have a go too and discover Scratch together. The platform is designed for complete beginners and it is great fun to play with.”
Carol Thornhill, Engineering Science MA, Mathematics teacher
Scratch
For 7- to 11-year-old children, Scratch is a good way to begin their journey in coding, or to progress from ScratchJr. Like ScratchJr, Scratch is a block-based language, allowing children to assemble code to produce games, animations, stories, or even use some of the add-ons to interact with electronic devices and explore physical computing.
The Raspberry Pi Foundation has hundreds of Scratch projects that your child can try out, but the best place to begin is with our Introduction to Scratch path, which will provide your child with the basic skills they need, and then encourage them to build projects that are relevant to them, culminating in their creation of their own interactive ebook.
Your child may never tire of Scratch, and that is absolutely fine — it is a fully functioning programming language that is surprisingly powerful, when you learn to understand everything it can do. Another advantage of Scratch is that it provides easy access to graphics, sounds, and interactivity that can be trickier to achieve in other programming languages.
Python
If you’re looking for more traditional programming languages for your child to progress on to, especially when they reach 12 years of age or beyond, then we like to direct our young learners to the Python programming language and to the languages that the World Wide Web is built on, particularly HTML, CSS, and JavaScript.

Our Python resources cover the basics of using the language, and then progress from there. Python is one of the most widely used languages when it comes to the fields of artificial intelligence and data science, and we have resources to support your child in learning about these fascinating aspects of technology. Our projects can even introduce your child to the world of electronics and physical computing with activities that use the inexpensive Raspberry Pi Pico, and a handful of electronic components, enabling your kids to create a wide variety of art installations and useful gadgets.
“Trying Python doesn’t mean you can’t go back to Scratch or switch between Scratch and Python for different purposes. I still use Scratch for some projects myself!”
Tracy Gardner, Computer Science PhD, former IBM Software Architect and currently a project writer at the Raspberry Pi Foundation

Coding projects
On our coding tutorials website we have many different projects to help your child learn coding and digital making. These range from beginner resources like the Introduction to Scratch path to more advanced activities such as the Introduction to Unity path, where children can learn how to make 3D worlds and games.
“Our new project paths can be tackled by young creators on their own, without adult intervention. Paths are structured so that they build skills and confidence in the early stages, and then provide more open-ended tasks and inspirational ideas that creators can adapt or work from.”
Rik Cross, BSc (Hons), PGCE, former teacher and Director of Informal Learning at the Raspberry Pi Foundation
Web development
The Web is integral to many of our lives, and we believe that it is important for children to have an understanding of the technology that drives it. That is why we have an Introduction to the Web path that allows children to develop their own web pages, focusing on the kinds of webpages that they want to build, be that sending a greeting card, telling a story, or creating a showcase of their projects.

Coding clubs
Coding clubs are a great place for children to have fun and become more confident with coding, where they can learn through making and share their creations with each other. The Raspberry Pi Foundation operates the world’s largest network of coding clubs — CoderDojo and Code Club.
“I have a new group of creators at my Code Club every year and my favourite part is when they realise they really can let their imagination run wild. You want to make an animation where a talking pineapple chases a snowman — absolutely. You want to make a piece of scalable art out of 1000 pixelated cartoon musical instruments — go right ahead. If you can code it, you can make it ”
Liz Smart, Code Club and CoderDojo mentor, former Solutions Architect and project writer for the Raspberry Pi Foundation

Coding challenges
Once your child has learnt some of the basics, they may enjoy entering a coding challenge! The European Astro Pi Challenge programme allows young people to write code and actually have it run on the International Space Station, and Coolest Projects gives children a chance to showcase their projects from across the globe.

Free resources
No matter what technology your child wants to engage with, there is a wealth of free resources and materials available from organisations such as the Raspberry Pi Foundation and Scratch Foundation, that prepare young people for 21st century life. Whether they want to become professional software engineers, tinker with some electronics, or just have a play around … encourage them to explore some coding projects, and see what they can learn, make, and do!
Author: Marc Scott, BSc (Hons) is a former Science, Computer Science, and Engineering teacher and the Content Lead for Projects at the Raspberry Pi Foundation.
The post How do I start my child coding? appeared first on Raspberry Pi.
[$] LWN.net Weekly Edition for July 14, 2022
Post Syndicated from original https://lwn.net/Articles/900299/
The LWN.net Weekly Edition for July 14, 2022 is available.
[$] “Critical” projects and volunteer maintainers
Post Syndicated from original https://lwn.net/Articles/900953/
Over the last five decades or so, free and open-source software (FOSS) has
gone from an almost unknown
quantity available to only the most technically savvy to underpinning much
of the infrastructure we rely on today. Much like software itself, FOSS is
“eating the world”. But that has changed—is changing—the role of the
maintainers of all of that code; when “critical” infrastructure uses code
from a FOSS project, suddenly, and perhaps without warning, that code
itself becomes critical. But many maintainers of that software are
volunteers who did not set out to become beholden to the needs of large
companies and organizations when they released their code, they were just
scratching their itch—now lots of others are clamoring for theirs to be
scratched as well.
Roham Gharegozlou | The Past, Present, and Future of Crypto | Talks at Google
Post Syndicated from Talks at Google original https://www.youtube.com/watch?v=KrcDU8lJ_54