[$] Driver regression testing with roadtest

Post Syndicated from original https://lwn.net/Articles/887974/

The kernel community has a number of excuses for the relative paucity of
regression-test coverage in the project, some of which hold more water than
others. One of the more convincing reasons is that a great deal of kernel
code is hardware-specific, and nobody can ever hope to put together a
testing system with even a small fraction of all the hardware that the
kernel supports. A new driver-testing framework called roadtest,
posted by Vincent Whitchurch, may make that excuse harder to sustain,
though, at least for certain kinds of hardware.

Да видим

Post Syndicated from Емилия Милчева original https://toest.bg/da-vidim/

И справедливостта я чакаме оттам, откъдето досега България се е надявала за всичките си освобождения – отвън. След 12 часа страсти, размисли и прения по ареста на бившия премиер Бойко Борисов, бившия (му) министър на финансите Владислав Горанов и пиарката му Севделина Арнаудова, премиерът Кирил Петков потвърди – по случая работи Европейската прокуратура. Самата Европейска прокуратура не коментира и казва само, че ще съобщи каквото и да е, когато има какво да съобщи. А Кирил Петков коментира:

… къде е българската прокуратура и дали най-накрая ще застане на страната на българския народ, ще видим в следващите дни. […] Никой не трябва да изпитва страх от истината.

И за самата Европрокуратура, и за управляващите тази акция е изпитание.

За оглавяваната от Лаура Кьовеши служба тестът е да не се провали с невижданата досега акция не просто в държава членка на ЕС, а в първенец по бедност и корупция. Какво по-естествено начало за чистене на авгиеви обори? След няколко часа, когато изтича 24-часовият срок, в който Борисов може да остане в ареста, ще стане ясно как европейските прокурори си вършат работата. На базата на предоставената от тях информация ще се преценява дали лидерът на ГЕРБ да бъде задържан до 72 часа.

Назначената през есента на 2019 г. Кьовеши има седемгодишен мандат, а самата служба работи от миналото лято. В нейния обхват влизат не само злоупотреби с европейски средства, но и когато са застрашени демократичните устои на ЕС. Едно от основните предизвикателства, формулирано и при създаването на службата, е

да спечели доверие като нов европейски орган – и сред европейските институции, и сред националните.

До момента са известни арести от ноември м.г. на бивш хърватски министър и трима негови съучастници за търговия с влияние и злоупотреба със служебно положение. Техните провинения са свързани с инхаус възлагане за проект за 2,16 млн. евро с ДДС, за което европрокурорите смятат, че не е имало основание. Причината да се намеси службата на Кьовеши е, че 85% от средствата са изплатени от Оперативна програма „Конкурентоспособност“.

За българската акция се разбра от обяснение на вицепремиера Асен Василев, че е заради сигнал на хазартния бос Васил Божков и доклад на Агенция „Държавна финансова инспекция“ (АДФИ) от юли м.г. Според този доклад са установени загуби за бюджета в размер на близо 557 млн. лв. заради бездействието на Държавната комисия по хазарта, позволила компаниите на Божков да платят по-малко от дължимите такси. Българската прокуратура се направи на „ни чула, ни видяла“ както за тези, така и за много други предполагаеми нарушения, свързани с високопоставени фигури.

След края на визитата си в България Кьовеши написа: „Съгласуваност, решителност, готовност за действие. Ключовите думи, които описват много продуктивна визита в България.“ Тази визита включва добри думи за партньорството с правителството и с МВР в частност – и една протоколна снимка с главния прокурор Иван Гешев.

Арестът на Бойко Борисов е тест и за управляващата в България коалиция. Социологически проучвания вече показаха, че правителството губи одобрение още преди да са изминали първите му 100 дни управление. Връхлитащите една след друга кризи, които се разрастват – като оскъпяването на храни, горива, енергийни суровини; бежанците от Украйна и войната на Путин, която изисква ясни евро-атлантически позиции и отговор, – са сериозно изпитание за коалиция от четири политически сили, три от които управляват за първи път.

Най-голямата сила в тази коалиция – „Продължаваме промяната“, дойде на власт именно със заявката за нулева корупция, преформулирана по-късно в „нулева толерантност към корупцията“. Но заради случилото се през изминалите три месеца тази заявка избледня в обществената памет. Вчерашната полицейска акция отново я върна на политическия терен. Също така върна и опасенията дали няма да се окаже поредната шумотевица и дали е законно адвокатът на Борисов – Менко Менков, да не бъде допускан един час при своя подзащитен.

Арестите обаче извадиха на показ онова, което българската прокуратура винаги е игнорирала – зависимостите.

Потвърдиха ги един джип и един апартамент. Джипът бе открит в двора на луксозната семейна къща в Бистрица за 1 млн. лв. на пиарката на Борисов – Севделина Арнаудова. Мощният автомобил е собственост на саудитската компания „Аркад“, която построи втората линия на „Турски поток“ в България. Съпругът ѝ Делян Димитров потвърди пред телевизионните камери, че джипът е на „Аркад“ с думите:

Те ни дадоха техни коли на лизинг да ги ползваме. Джипове и пикапи за районите, дадоха и на МОСВ, и на Агенция по горите за ползване. 

Димитров беше уреден в борда на „Булгартрансгаз“ и преназначен през пролетта на 2021 г., където е и досега. Държавната компания избра саудитците да строят газопровода, а те наеха за подизпълнители руски и други фирми. Какво обаче прави служебен джип в частен двор, а не на паркинга пред „Булгартрансгаз“, и защо семейство Димитрови го ползва като свой?

Арестите разкриха също, че бившият министър на финансите Владислав Горанов продължава да живее в луксозния апартамент, за който обясни, че е предоставен от кръстника му Иван Сариев. Жилището се намира в столичния квартал „Изток“, в комплекс, управляван от „Есте Пропъртис“, дъщерно дружество на „Адванс Пропъртис“, в което съдружници са братята Кирил и Георги Домусчиеви. Обясненията на Горанов бяха, че той и семейството му се преместили там след земетресението в Перник от 2012 г., което изплашило семейството му. Но на 13 юни 2019 г. прокуратурата отказа да образува досъдебно производство във връзка с изнесената от в. „Сeга“ информация, че Горанов живее безплатно в чуждо жилище. Според наблюдаващия прокурор, възложената на Антикорупционната комисия проверка не е установила данни за каквото и да е престъпление.

Българската прокуратура зачеркваше и зачерква тези и много други факти, обслужвайки властта – в това едва ли някой се съмнява. Да видим какво ще направи европейската. Иначе остава само божието възмездие.

Заглавна снимка: Стопкадър от излъчване на живо във Facebook профила на Бойко Борисов от 15 април 2021 г. 

Източник

Security updates for Friday

Post Syndicated from original https://lwn.net/Articles/888412/

Security updates have been issued by Debian (python-treq), Fedora (openvpn, pesign, rust-regex, and thunderbird), Oracle (expat), Red Hat (kpatch-patch-4_18_0-147_58_1), Slackware (bind and openssl), SUSE (python-lxml), and Ubuntu (apache2).

Zero Trust client sessions

Post Syndicated from Kenny Johnson original https://blog.cloudflare.com/zero-trust-client-sessions/

Zero Trust client sessions

Zero Trust client sessions

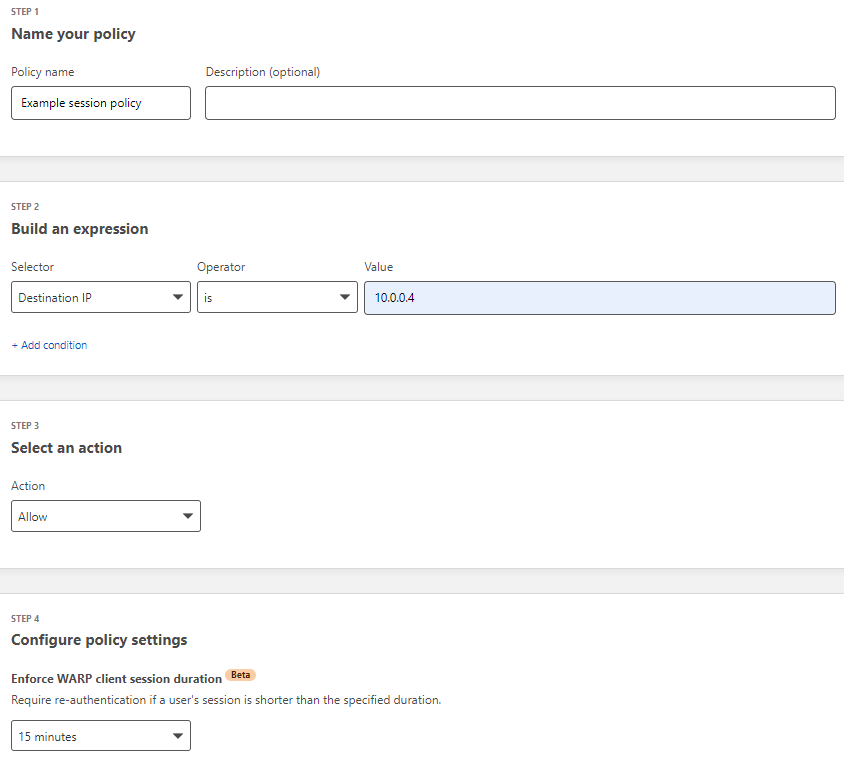
Starting today, you can build Zero Trust rules that require periodic authentication to control network access. We’ve made this feature available for years for web-based applications, but we’re excited to bring this level of granular enforcement to TCP connections and UDP flows.

We’re excited to announce that Zero Trust client-based sessions are now generally available. During CIO Week in 2021, we announced the beta program for this feature. We incorporated feedback from early users into the generally available version. In this post, I will revisit why Zero Trust client-based sessions are important, how the feature works and what we learned during the beta.

Securing traffic with Sessions

We built Zero Trust client-based sessions to enhance the security of Cloudflare’s Zero Trust Network Access (ZTNA). The Zero Trust client is software that runs on a user machine and forwards all traffic from the machine to Cloudflare before it is sent over the Internet. This includes traffic bound for internal IPs and hostnames that typically house sensitive business applications. These sensitive applications were traditionally accessed using a VPN. Unlike VPNs, Cloudflare’s ZTNA allows administrators to set granular policies about who can access a specific resource. The only piece missing was that once a user enrolled their machine with the Zero Trust client, they had a forever persistent session. This makes lost/stolen laptops, shared workstations and personal devices more of a risk than they should be. We built Zero Trust client-based sessions to solve this.

Zero Trust client-based sessions require a user to reauthenticate with their identity provider before accessing specific resources. The authentication pop-up is triggered only when a user attempts to access a protected resource. This prevents unnecessary pop-ups to users where a session may never be necessary. Administrators can specify how often they would like their users to reauthenticate, depending on the resource. This is possible because the user’s last successful authentication is saved and evaluated against any ZTNA policy with a session configured.

Zero Trust client sessions

What we learned during the beta period

During the beta period of Zero Trust client-based sessions, we worked closely with our customers and Cloudflare’s own security team to identify areas for immediate improvement. We identified two major areas of improvements before releasing to General Availability: pop-ups, which can be intrusive, and browser-based authentication, which is not always possible. We identified new strategies for properly serving an authentication pop up to a user without being overly intrusive. In the future, users will have control over when they receive notifications to authenticate. The other area for improvement was that on certain machines and operating systems, browser-based authentication is not always possible. We are planning to add an option to authenticate directly from the Zero Trust client itself.

What’s next

This is only the beginning for Zero Trust client-based authentication. In the future, we plan to add options for step-up multifactor authentication and automated enrollment options via certificates and Service Tokens. Getting started is easy! Follow this guide for setting up Zero Trust client-based sessions in your Cloudflare Zero Trust dashboard.

Introducing SSH command logging

Post Syndicated from Ankur Aggarwal original https://blog.cloudflare.com/ssh-command-logging/

Introducing SSH command logging

Introducing SSH command logging

SSH (Secure Shell Protocol) is an important protocol for managing remote machines. It provides a way for infrastructure teams to remotely and securely manage their fleet of machines. SSH was a step-up in security from other protocols like telnet. It ensures encrypted traffic and enforces per user controls over access to a particular machine. However, it can still introduce a significant security risk. SSH, especially root access, is destructive in the wrong hands (think rm -r *) and can be difficult to track. Logging and securing user actions via SSH typically requires custom development or restrictive software deployments. We’re excited to announce SSH command logging as part of Cloudflare Zero Trust.

Securing SSH access

Security teams put significant effort into securing SSH across their organization because of the negative impact it can have in the wrong hands. Traditional SSH security consists of strong authentication, like certificate based authentication, and tight controls on who has “root” access. Additionally, VPNs and IP allow lists are used to further protect a machine from being publicly accessible to the Internet. The security challenges that remain are visibility and potential for lateral movement.

SSH commands to a remote machine are end-to-end encrypted, which means that it is impossible to see what is being run by a particular user on a specific machine. Typically, logs can only be captured on the machine itself in log files, and a malicious user can delete log files as easily as any other command they’re running to cover their tracks. Solutions exist to send these logs to an external logging service, but this requires installing additional software on every machine that can be accessed using SSH. ProxyJump, a common way to deploy a JumpHost model, further compounds this problem because a user can easily traverse a local network of machines once they gain access to a machine in the network.

Introducing SSH command logging

We built SSH command logging into Cloudflare Zero Trust to provide SSH visibility at a network layer instead of relying on software on individual machines. Our first customer for this capability is the Cloudflare security team. SSH command logging provides a full replay of all commands run during an SSH session, including across multiple jump-hosts or bastions. This allows for a clear picture of what happened in the event of an accident, suspected breach, or attack.

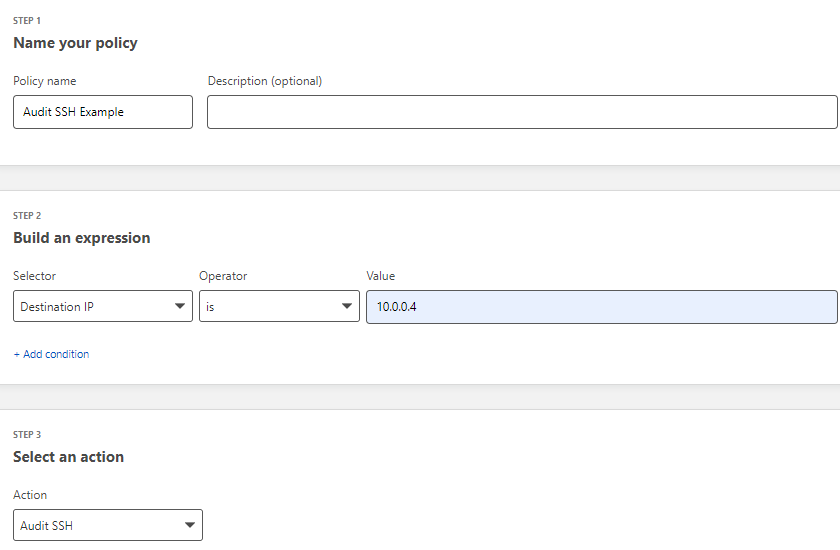
SSH command logging was built as an extension of Cloudflare’s Secure Web Gateway. The Secure Web Gateway already performs secure TLS inspection of all traffic from a user device. Now, it also supports SSH inspection by bootstrapping a proxy server upon new connections. Administrators are able to configure network policies to allow SSH access and audit the specific commands run.

Introducing SSH command logging

This then exposes that machine for SSH access and proxies all SSH commands via Cloudflare’s global edge network. All commands are automatically captured without complex logging software installed on the machine and across all hosts. TTY traffic can also be recorded for a later full session replay.

As an added measure of security, all logs captured by Cloudflare are immediately encrypted via a public key provided by each customer, to ensure that only authorized security users can inspect SSH commands. Furthermore, we are launching this feature with an opt-in FIPS 140-2 mode to support FedRAMP compliant users.

All user authentication is performed via Cloudflare Short-Lived Certificates. Once the client certificate is loaded onto a user machine, their SSH setup is complete and secure. This eliminates the need for tedious and tricky SSH key-pair management. This means no more key management on end user devices, all the need is the Cloudflare root CA, and they can access any machine they are entitled to, including using ProxyJump.

What’s next

This is only the beginning for SSH security in Cloudflare Zero Trust. In the future, we will integrate with popular SIEM tools and provide alerting for specific commands and risky behavior.

SSH command logging is in closed beta, and we will be opening this feature up to users in the coming weeks. Stay tuned for more updates when we announce general availability!

Cloudflare partners with Microsoft to protect joint customers with a Global Zero Trust Network

Post Syndicated from Abhi Das original https://blog.cloudflare.com/cloudflare-partners-with-microsoft-to-protect-joint-customers-with-global-zero-trust-network/

Cloudflare partners with Microsoft to protect joint customers with a Global Zero Trust Network

Cloudflare partners with Microsoft to protect joint customers with a Global Zero Trust Network

As a company, we are constantly asking ourselves what we can do to provide more value to our customers, including integrated solutions with our partners. Joint customers benefit from our integrations below with Azure Active Directory by:

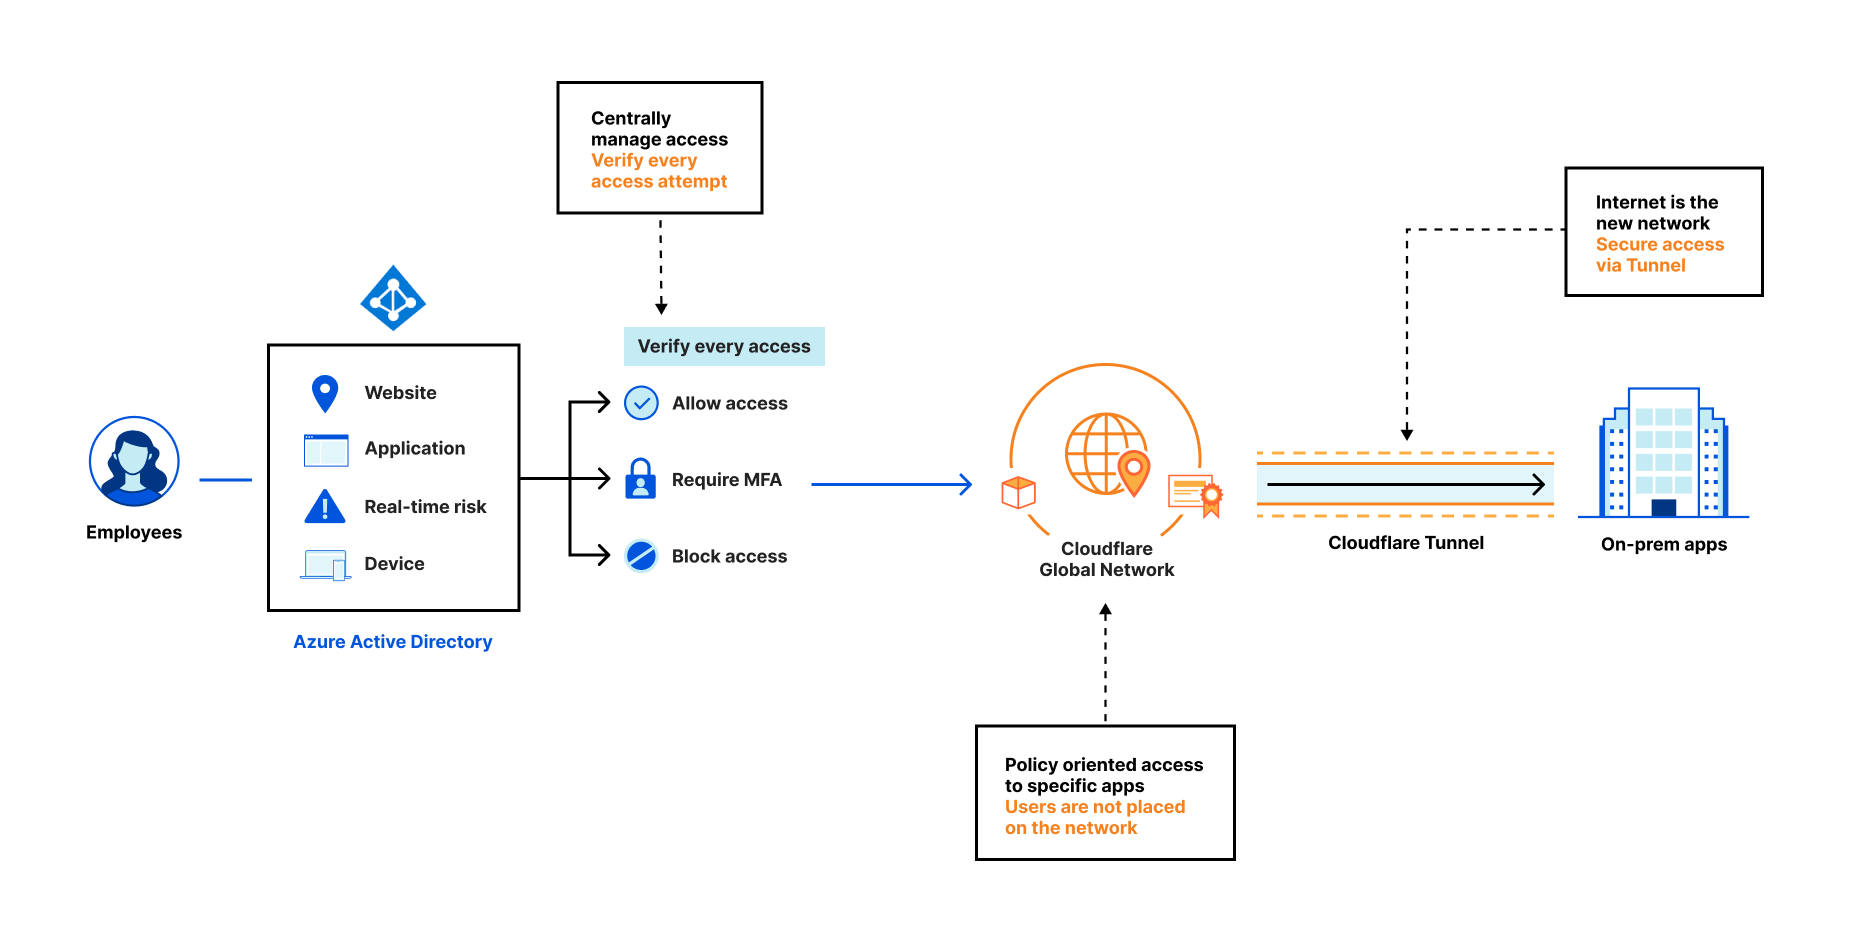
First, centralized identity and access management via Azure Active Directory which provides single sign-on, multifactor authentication, and access via conditional authentication.

Second, policy oriented access to specific applications using Cloudflare Access—a VPN replacement service.

Third, an additional layer of security for internal applications by connecting them to Cloudflare global network and not having to open them up to the whole Internet.

Cloudflare partners with Microsoft to protect joint customers with a Global Zero Trust Network

Let’s step back a bit.

Why Zero Trust?

Companies of all sizes are faced with an accelerating digital transformation of their IT stack and an increasingly distributed workforce, changing the definition of the security perimeter. We are moving away from the castle and moat model to the whole Internet, requiring security checks for every user accessing every resource. As a result, all companies, especially those whose use of Azure’s broad cloud portfolio is increasing, are adopting Zero Trust architectures as an essential part of their cloud and SaaS journey.

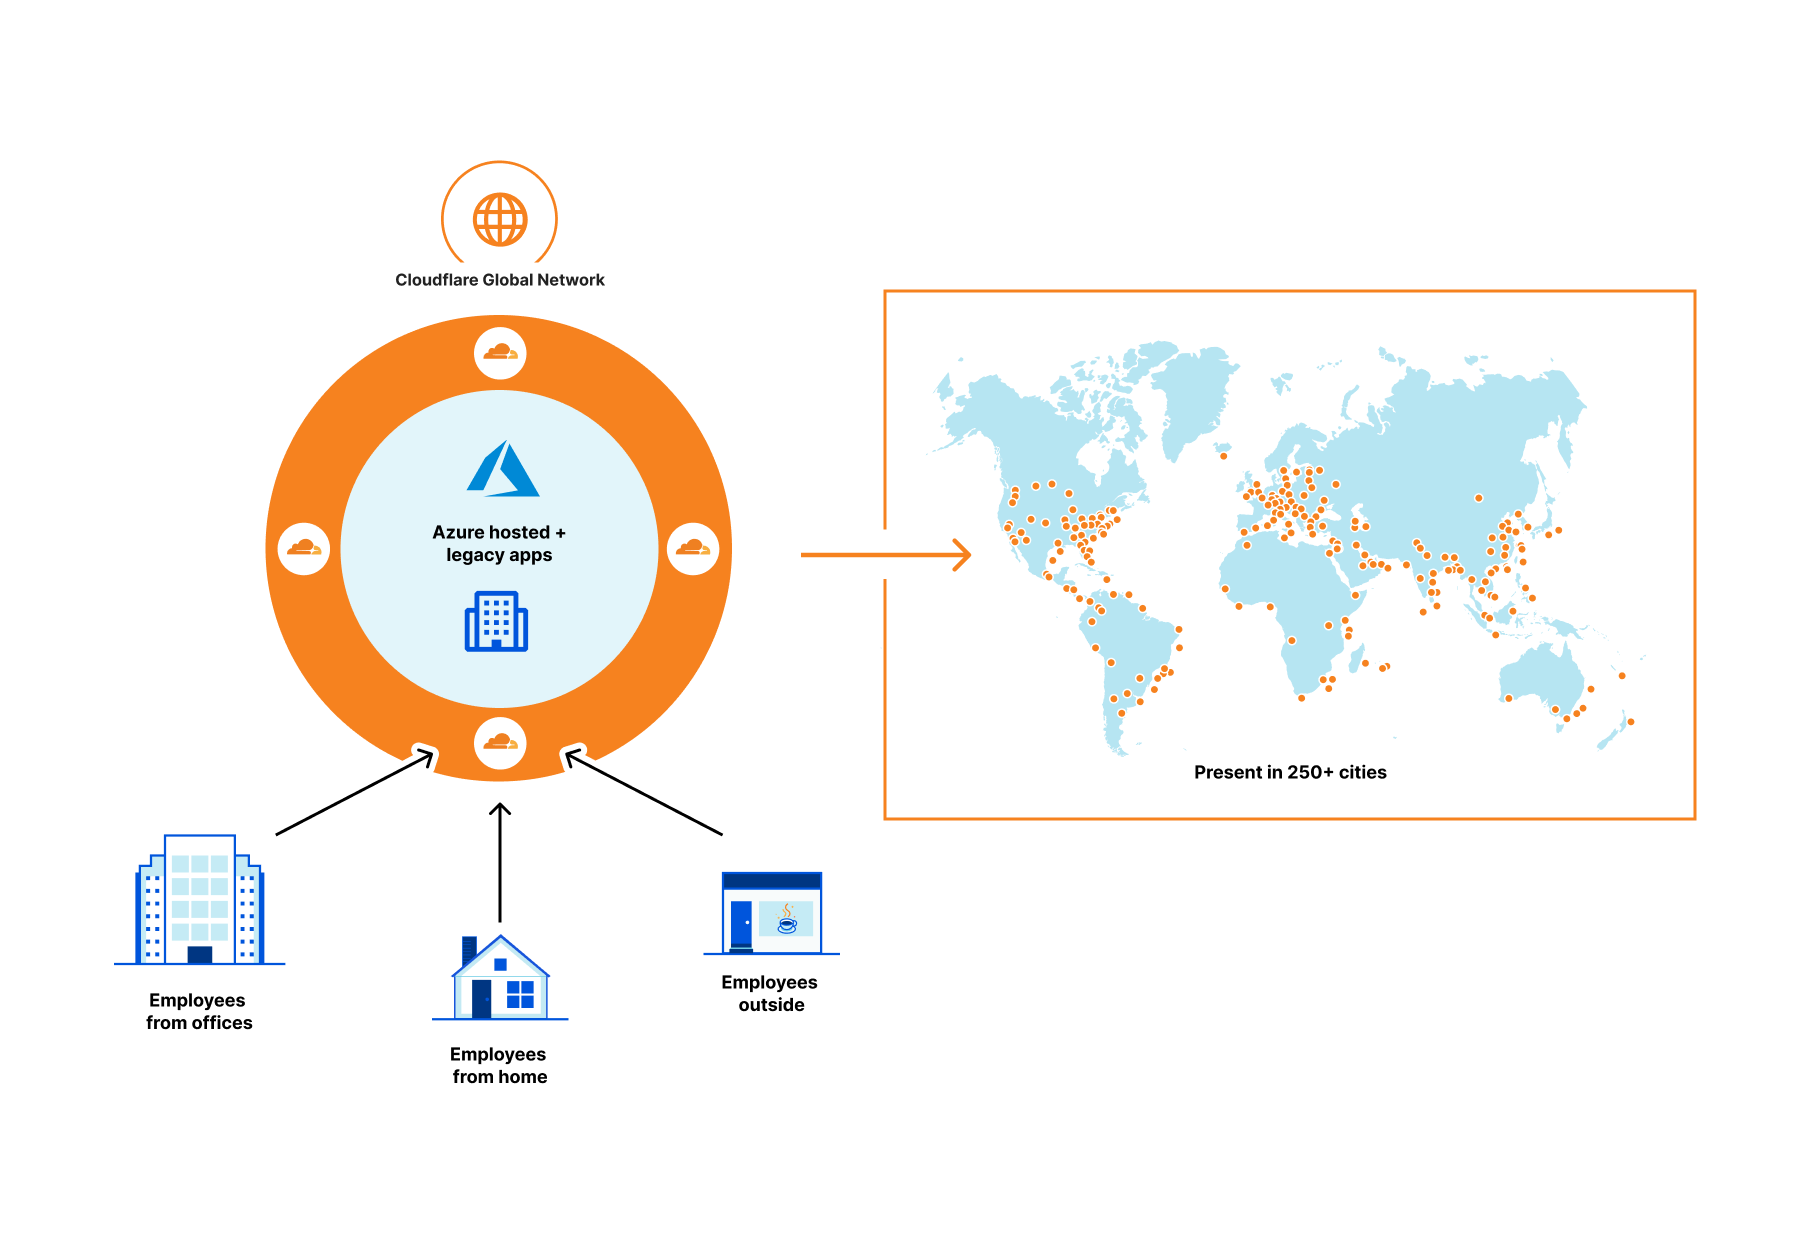
Cloudflare Access provides secure access to Azure hosted applications and on-premise applications. Also, it acts as an on-ramp to the world’s fastest network to Azure and the rest of the Internet. Users connect from their devices or offices via Cloudflare’s network in over 250 cities around the world. You can use Cloudflare Zero Trust on that global network to ensure that every request to every resource is evaluated for security, including user identity. We are excited to bring this secure global network on-ramp to Azure hosted applications and on-premise applications.

Also, performance is one of our key advantages in addition to security. Cloudflare serves over 32 million HTTP requests per second, on average, for the millions of customers who secure their applications on our network. When those applications do not run on our network, we can rely on our own global private backbone and our connectivity with over 10,000 networks globally to connect the user.

We are excited to bring this global security and performance perimeter network as our Cloudflare Zero Trust product for your Azure hosted applications and on-premises applications.

Cloudflare Access: a modern Zero Trust approach

Cloudflare’s Zero Trust solution Cloudflare Access provides a modern approach to authentication for internally managed applications. When corporate applications on Azure or on-premise are protected with Cloudflare Access, they feel like SaaS applications, and employees can log in to them with a simple and consistent flow. Cloudflare Access acts as a unified reverse proxy to enforce access control by making sure every request is authenticated, authorized, and encrypted.

Identity: Cloudflare Access integrates out of the box with all the major identity providers, including Azure Active Directory, allowing use of the policies and users you already created to provide conditional access to your web applications. For example, you can use Cloudflare Access to ensure that only company employees and no contractors can get to your internal kanban board, or you can lock down the SAP finance application hosted on Azure or on-premise.

Devices: You can use TLS with Client Authentication and limit connections only to devices with a unique client certificate. Cloudflare will ensure the connecting device has a valid client certificate signed by the corporate CA, and authenticate user credentials to grant access to an internal application.

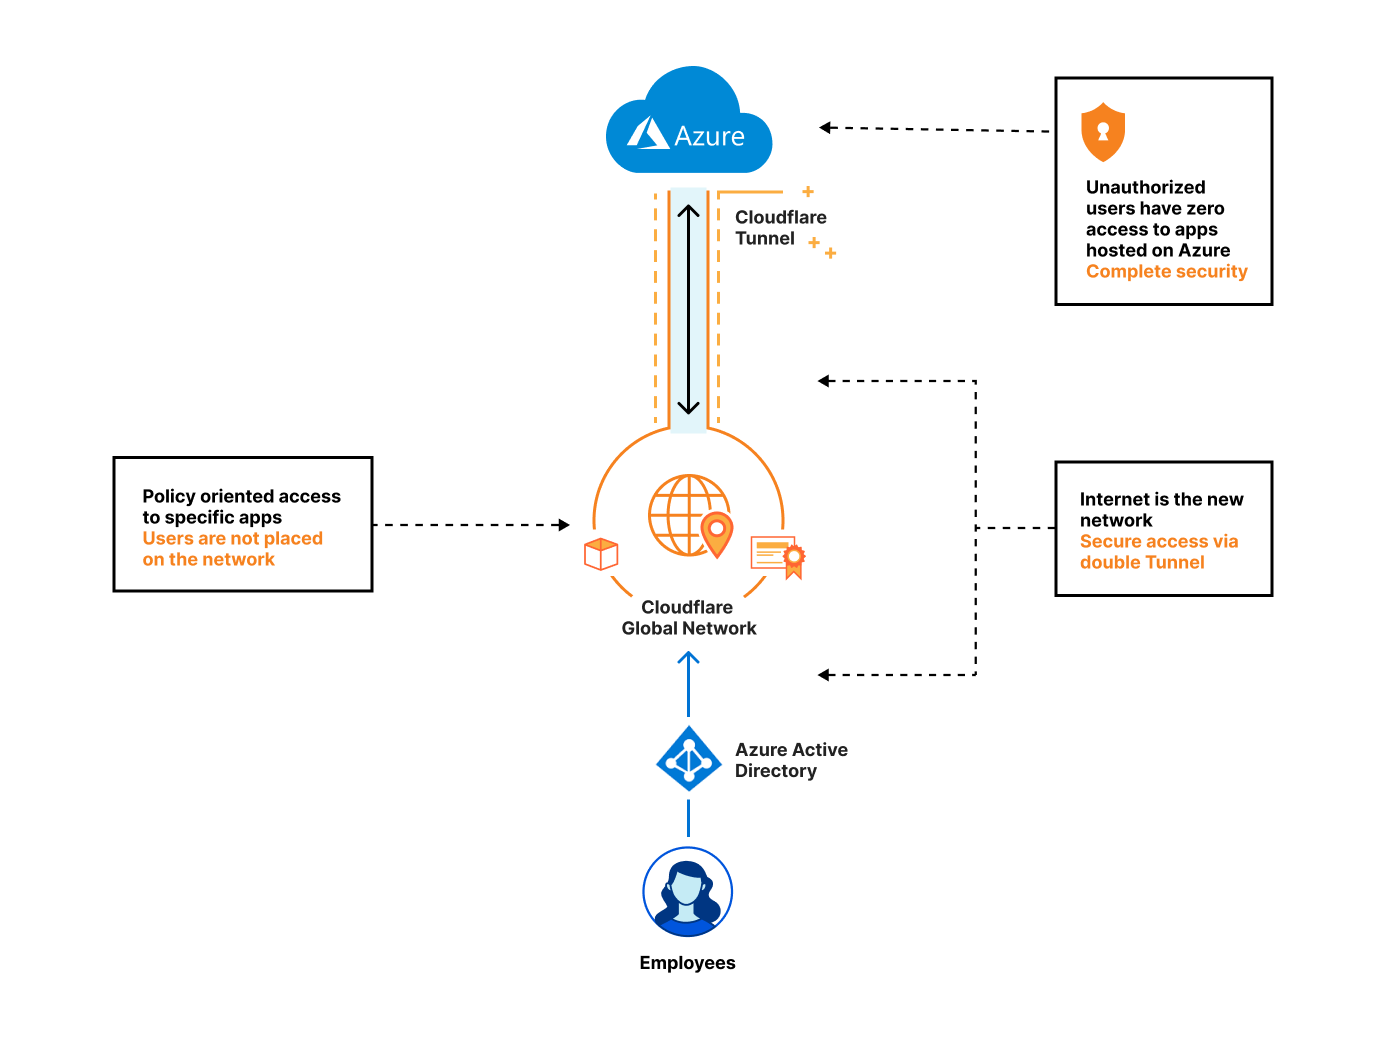
Additional security: Want to use Cloudflare Access in front of an internal application but don’t want to open up that application to the whole Internet? For additional security, you can combine Access with Cloudflare Tunnel. Cloudflare Tunnel will connect from your Azure environment directly to Cloudflare’s network, so there is no publicly accessible IP.

Cloudflare partners with Microsoft to protect joint customers with a Global Zero Trust Network

Secure both your legacy applications and Azure hosted applications via Azure AD and Cloudflare Access jointly

For on-premise legacy applications, we are excited to announce that Cloudflare is an Azure Active Directory secure hybrid access partner. Azure AD secure hybrid access enables customers to centrally manage access to their legacy on-premise applications using SSO authentication without incremental development. Starting today, joint customers can easily use Cloudflare Access solution as an additional layer of security with built-in performance, in front of their legacy applications.

Cloudflare partners with Microsoft to protect joint customers with a Global Zero Trust Network

Traditionally for on-premise applications, customers have to change their existing code or add additional layers of code to integrate Azure AD or Cloudflare Access–like capabilities. With the help of Azure Active Directory secure hybrid access, customers can integrate these capabilities seamlessly without much code changes. Once integrated, customers can take advantage of the below Azure AD features and more:

  1. Multi-factor authentication (MFA)
  2. Single sign-on (SSO)
  3. Passwordless authentication
  4. Unified user access management
  5. Azure AD Conditional Access and device trust

Very similarly, the Azure AD and Cloudflare Access combo can also be used to secure your Azure hosted applications. Cloudflare Access enables secure on-ramp to Azure hosted applications or on-premise applications via the below two integrations:

Cloudflare partners with Microsoft to protect joint customers with a Global Zero Trust Network

1. Cloudflare Access integration with Azure AD:

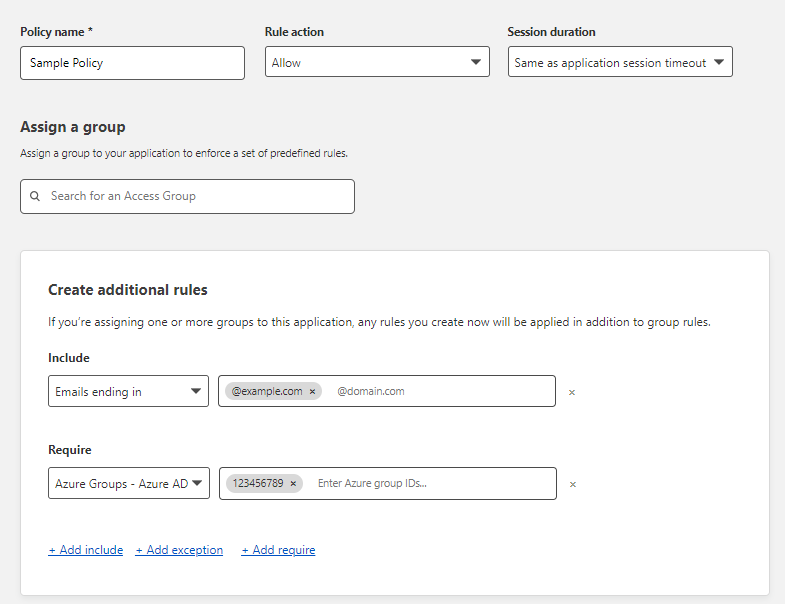
Cloudflare Access is a Zero Trust Network Access (ZTNA) solution that allows you to configure precise access policies across their applications. You can integrate Microsoft Azure Active Directory with Cloudflare Zero Trust and build rules based on user identity, group membership and Azure AD Conditional Access policies. Users will authenticate with their Azure AD credentials and connect to Cloudflare Access. Additional policy controls include Device Posture, Network, Location and more. Setup typically takes less than a few hours!

2. Cloudflare Tunnel integration with Azure:

Cloudflare Tunnel can expose applications running on the Microsoft Azure platform. See guide to install and configure Cloudflare Tunnel. Also, a prebuilt Cloudflare Linux image exists on the Azure Marketplace. To simplify the process of connecting Azure applications to Cloudflare’s network, deploy the prebuilt image to an Azure resource group. Cloudflare Tunnel is now available on Microsoft’s Azure marketplace.

“The hybrid work environment has accelerated the cloud transition and increased the need for CIOs everywhere to provide secure and performant access to applications for their employees. This is especially true for self-hosted applications. Cloudflare’s global network security perimeter via Cloudflare Access provides this additional layer of security together with Azure Active Directory to enable employees to get work done from anywhere securely and performantly.” said David Gregory, Principal Program Manager
– Microsoft Azure Active Directory

Conclusion

Over the last ten years, Cloudflare has built one of the fastest, most reliable, most secure networks in the world. You now have the ability to use that network as a global security and performance perimeter to your Azure hosted applications via the above integrations, and it is easy.

What’s next?

In the coming months, we will be further strengthening our integrations with Microsoft Azure allowing customers to better implement our SASE perimeter.

If you’re using Cloudflare Zero Trust products today and are interested in using this integration with Azure, please visit our above developer documentation to learn about how you can enable it. If you want to learn more or have additional questions, please fill out the form or get in touch with your Cloudflare CSM or AE, and we’ll be happy to help you.

A bridge to Zero Trust

Post Syndicated from Annika Garbers original https://blog.cloudflare.com/bridge-to-zero-trust/

A bridge to Zero Trust

A bridge to Zero Trust

Cloudflare One enables customers to build their corporate networks on a faster, more secure Internet by connecting any source or destination and configuring routing, security, and performance policies from a single control plane. Today, we’re excited to announce another piece of the puzzle to help organizations on their journey from traditional network architecture to Zero Trust: the ability to route traffic from user devices with our lightweight roaming agent (WARP) installed to any network connected with our Magic IP-layer tunnels (Anycast GRE, IPsec, or CNI). From there, users can upgrade to Zero Trust over time, providing an easy path from traditional castle and moat to next-generation architecture.

The future of corporate networks

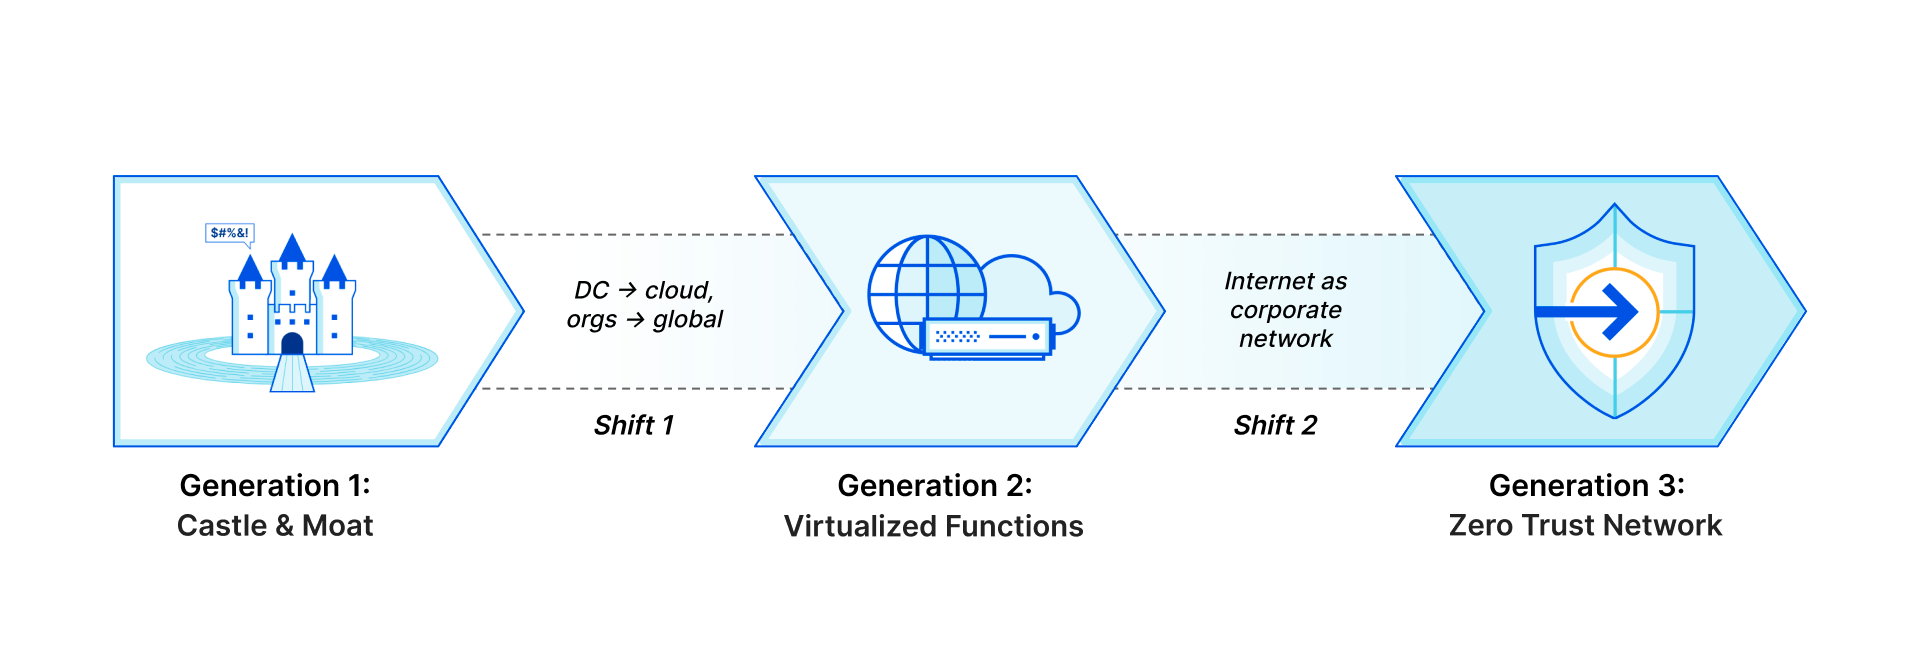
Customers we talk to describe three distinct phases of architecture for their corporate networks that mirror the shifts we’ve seen with storage and compute, just with a 10 to 20 year delay. Traditional networks (“Generation 1”) existed within the walls of a datacenter or headquarters, with business applications hosted on company-owned servers and access granted via private LAN or WAN through perimeter security appliances. As applications shifted to the cloud and users left the office, companies have adopted “Generation 2” technologies like SD-WAN and virtualized appliances to handle increasingly fragmented and Internet-dependent traffic. What they’re left with now is a frustrating patchwork of old and new technologies, gaps in visibility and security, and headaches for overworked IT and networking teams.

We think there’s a better future to look forward to:the architecture Gartner describes as SASE, where security and network functions shift from physical or virtual appliances to true cloud-native services delivered just milliseconds away from users and applications regardless of where they are in the world. This new paradigm will mean vastly more secure, more performant, and more reliable networks, creating better experiences for users and reducing total cost of ownership. IT will shift from being viewed as a cost center and bottleneck for business changes to a driver of innovation and efficiency.

A bridge to Zero Trust
Generation 1: Castle and Moat; Generation 2: Virtualized Functions; Generation 3: Zero Trust Network

But transformative change can’t happen overnight. For many organizations, especially those transitioning from legacy architecture, it’ll take months or years to fully embrace Generation 3. The good news: Cloudflare is here to help, providing a bridge from your current network architecture to Zero Trust, no matter where you are on your journey.

How do we get there?

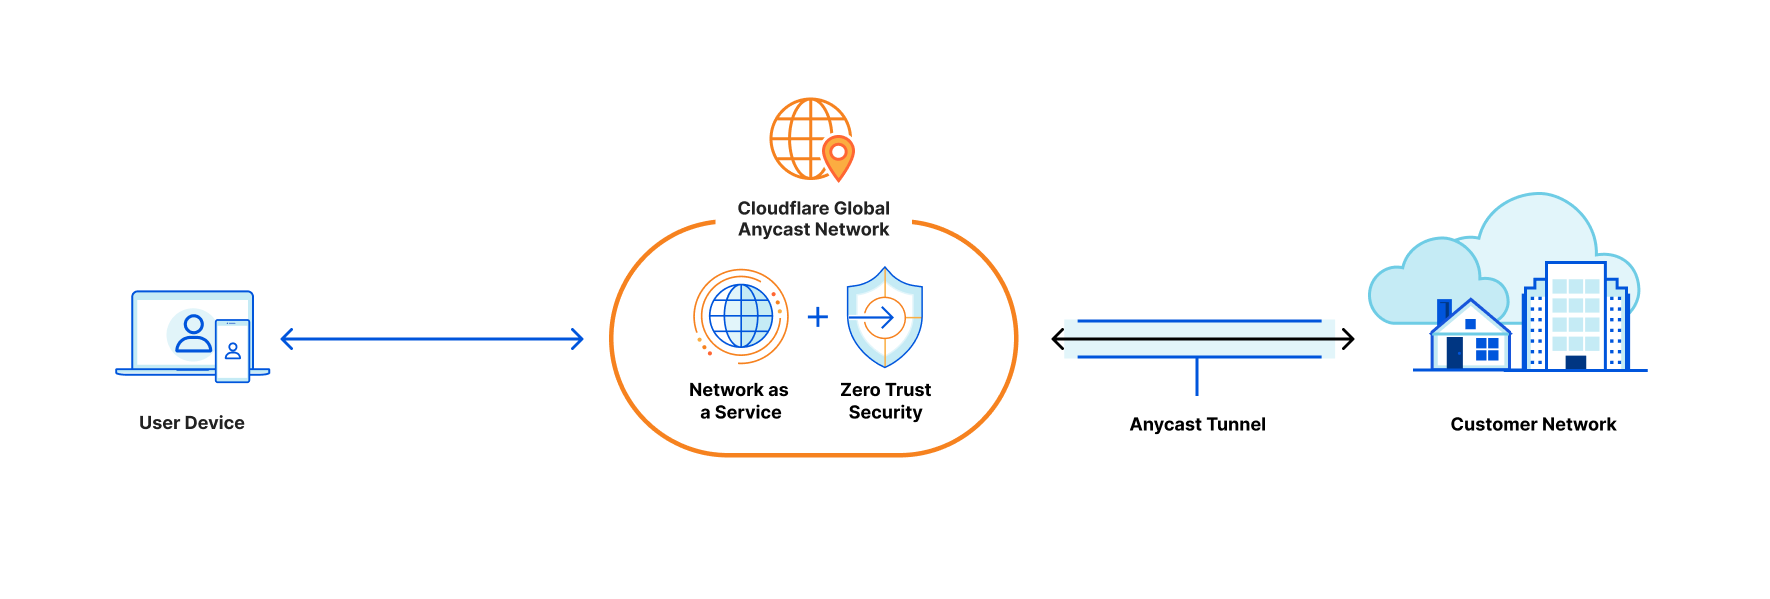
Cloudflare One, our combined Zero Trust network-as-a-service platform, allows customers to connect to our global network from any traffic source or destination with a variety of “on-ramps” depending on your needs. To connect individual devices, users can install the WARP client, which acts as a forward proxy to tunnel traffic to the closest Cloudflare location regardless of where users are in the world. Cloudflare Tunnel allows you to establish a secure, outbound-only connection between your origin servers and Cloudflare by installing a lightweight daemon.

Last year, we announced the ability to route private traffic from WARP-enrolled devices to applications connected with Cloudflare Tunnel, enabling private network access for any TCP or UDP applications. This is the best practice architecture we recommend for Zero Trust network access, but we’ve also heard from customers with legacy architecture that you want options to enable a more gradual transition.

For network-level (OSI Layer 3) connectivity, we offer standards-based GRE or IPsec options, with a Cloudflare twist: these tunnels are Anycast, meaning one tunnel from your network connects automatically to Cloudflare’s entire network in 250+ cities, providing redundancy and simplifying network management. Customers also have the option to leverage Cloudflare Network Interconnect, which enables direct connectivity to the Cloudflare network through a physical or virtual connection in over 1,600 locations worldwide. These Layer 1 through 3 on-ramps allow you to connect your public and private networks to Cloudflare with familiar technologies that automatically make all of your IP traffic faster and more resilient.

Now, traffic from WARP-enrolled devices can route automatically to any network connected with an IP-layer on-ramp. This additional “plumbing” for Cloudflare One increases the flexibility that users have to connect existing network infrastructure, allowing organizations to transition from traditional VPN architecture to Zero Trust with application-level connectivity over time.

A bridge to Zero Trust

How does it work?

Users can install the WARP client on any device to proxy traffic to the closest Cloudflare location. From there, if the device is enrolled in a Cloudflare account with Zero Trust and private routing enabled, its traffic will get delivered to the account’s dedicated, isolated network “namespace,” a logical copy of the Linux networking stack specific to a single customer. This namespace, which exists on every server in every Cloudflare data center, holds all the routing and tunnel configuration for a customer’s connected network.

Once traffic lands in a customer namespace, it’s routed to the destination network over the configured GRE, IPsec, or CNI tunnels. Customers can configure route prioritization to load balance traffic over multiple tunnels and automatically fail over to the healthiest possible traffic path from each Cloudflare location.

On the return path, traffic from customer networks to Cloudflare is also routed via Anycast to the closest Cloudflare location—but this location is different from that of the WARP session, so this return traffic is forwarded to the server where the WARP session is active. In order to do this, we leverage a new internal service called Hermes that allows data to be shared across all servers in our network. Just as our Quicksilver service propagates key-value data from our core infrastructure throughout our network, Hermes allows servers to write data that can be read by other servers. When a WARP session is established, its location is written to Hermes. And when return traffic is received, the WARP session’s location is read from Hermes, and the traffic is tunneled appropriately.

What’s next?

This on-ramp method is available today for all Cloudflare One customers. Contact your account team to get set up! We’re excited to add more functionality to make it even easier for customers to transition to Zero Trust, including layering additional security policies on top of connected network traffic and providing service discovery to help organizations prioritize applications to migrate to Zero Trust connectivity.

Managing Clouds – Cloudflare CASB and our not so secret plan for what’s next

Post Syndicated from Corey Mahan original https://blog.cloudflare.com/managing-clouds-cloudflare-casb/

Managing Clouds - Cloudflare CASB and our not so secret plan for what’s next

Managing Clouds - Cloudflare CASB and our not so secret plan for what’s next

Last month we introduced Cloudflare’s new API–driven Cloud Access Security Broker (CASB) via the acquisition of Vectrix. As a quick recap, Cloudflare’s CASB helps IT and security teams detect security issues in and across their SaaS applications. We look at both data and users in SaaS apps to alert teams to issues ranging from unauthorized user access and file exposure to misconfigurations and shadow IT.

I’m excited to share two updates since we announced the introduction of CASB functionality to Cloudflare Zero Trust. First, we’ve heard from Cloudflare customers who cannot wait to deploy the CASB and want to use it in more depth. Today, we’re outlining what we’re building next, based on that feedback, to give you a preview of what you can expect. Second, we’re opening the sign-up for our beta, and I’m going to walk through what will be available to new users as they are invited from the waitlist.

What’s next in Cloudflare CASB?

The vision for Cloudflare’s API–driven CASB is to provide IT and security owners an easy-to-use, one-stop shop to protect the security of their data and users across their fleet of SaaS tools. Our goal is to make sure any IT or security admin can go from creating a Zero Trust account for the first time to protecting what matters most in minutes.

Beyond that immediate level of visibility, we know the problems discovered by IT and security administrators still require time to find, understand, and resolve. We’re introducing three new features to the core CASB platform in the coming months to address each of those challenges.

New integrations (with more yet to come)

First, what are integrations? Integrations are what we call the method to grant permissions and connect SaaS applications (via API) to CASB for security scanning and management. Generally speaking, integrations are done following an OAuth 2.0 flow, however this varies between third-party SaaS apps. Aligning to our goal, we’ll always make sure that integration set up flows are as simple as possible and can be done in minutes.

As with most security strategies, protecting your most critical assets first becomes the priority. Integrations with Google Workspace and GitHub will be available in beta (request access here). We’ll soon follow with integrations to Zoom, Slack, and Okta before adding services like Microsoft 365 and Salesforce later this year. Working closely with customers will drive which applications we integrate with next.

SaaS asset management

On top of integrations, managing the various assets, or “digital nouns” like users, data, folders, repos, meetings, calendars, files, settings, recordings, etc. across services is tricky to say the least. Spreadsheets are hard to manage for tracking who has access to what or what files have been shared with whom.

This isn’t efficient and is ripe for human error. CASB SaaS asset management allows IT and security teams to view all of their data settings and user activity around said data from a single dashboard. Quickly being able to answer questions like; “did we disable the account for a user across these six services?” becomes a quick task instead of logging into each service and addressing individually.

Remediation guides + automated workflows

Detect, prevent, and fix. With detailed SaaS remediation guides, IT administrators can assign and tackle issues with the right team. By arming teams with what they need to know in context, it makes preventing issues from happening again seamless. In situations where action should be taken straight away, automated SaaS workflows provide the ability to solve SaaS security issues in one click. Need to remove sharing permissions from that file in OneDrive? A remediation button allows for action from anywhere, anytime.

Cloudflare Gateway + CASB

Combining products across the Zero Trust platform means solving complex problems through one seamless experience. Starting with the power of Gateway and CASB, customers will be able to take immediate action to wrangle in Shadow IT. In just a few clicks, a detected unauthorized SaaS application from the Gateway shadow IT report can go from being the wild west to a sanctioned and secure one with a CASB integration. This is just one example to highlight the many solutions we’re excited about that can be solved with the Zero Trust platform.

Managing Clouds - Cloudflare CASB and our not so secret plan for what’s next

Launching the Cloudflare CASB beta and what you can expect

In the CASB beta you can deploy popular integrations like Google Workspace on day one. You’ll also get direct access to our Product team to help shape what comes next. We’re excited to work closely with a number of early customers to align on which integrations and features matter most to them.

Getting started today with the Cloudflare CASB beta

Right now we’re working on making the out-of-band CASB product a seamless part of the Zero Trust platform. We’ll be sending out the first wave of beta invitations early next month – you can request access here.

We have some big ideas of what the CASB product can and will do. While this post highlights some exciting things to come, you can get started right now with Cloudflare’s Zero Trust platform by signing up here.

Why Vaccine Cards Are So Easily Forged

Post Syndicated from Bruce Schneier original https://www.schneier.com/blog/archives/2022/03/why-vaccine-cards-are-so-easily-forged.html

My proof of COVID-19 vaccination is recorded on an easy-to-forge paper card. With little trouble, I could print a blank form, fill it out, and snap a photo. Small imperfections wouldn’t pose any problem; you can’t see whether the paper’s weight is right in a digital image. When I fly internationally, I have to show a negative COVID-19 test result. That, too, would be easy to fake. I could change the date on an old test, or put my name on someone else’s test, or even just make something up on my computer. After all, there’s no standard format for test results; airlines accept anything that looks plausible.

After a career spent in cybersecurity, this is just how my mind works: I find vulnerabilities in everything I see. When it comes to the measures intended to keep us safe from COVID-19, I don’t even have to look very hard. But I’m not alarmed. The fact that these measures are flawed is precisely why they’re going to be so helpful in getting us past the pandemic.

Back in 2003, at the height of our collective terrorism panic, I coined the term security theater to describe measures that look like they’re doing something but aren’t. We did a lot of security theater back then: ID checks to get into buildings, even though terrorists have IDs; random bag searches in subway stations, forcing terrorists to walk to the next station; airport bans on containers with more than 3.4 ounces of liquid, which can be recombined into larger bottles on the other side of security. At first glance, asking people for photos of easily forged pieces of paper or printouts of readily faked test results might look like the same sort of security theater. There’s an important difference, though, between the most effective strategies for preventing terrorism and those for preventing COVID-19 transmission.

Security measures fail in one of two ways: Either they can’t stop a bad actor from doing a bad thing, or they block an innocent person from doing an innocuous thing. Sometimes one is more important than the other. When it comes to attacks that have catastrophic effects—say, launching nuclear missiles—we want the security to stop all bad actors, even at the expense of usability. But when we’re talking about milder attacks, the balance is less obvious. Sure, banks want credit cards to be impervious to fraud, but if the security measures also regularly prevent us from using our own credit cards, we would rebel and banks would lose money. So banks often put ease of use ahead of security.

That’s how we should think about COVID-19 vaccine cards and test documentation. We’re not looking for perfection. If most everyone follows the rules and doesn’t cheat, we win. Making these systems easy to use is the priority. The alternative just isn’t worth it.

I design computer security systems for a living. Given the challenge, I could design a system of vaccine and test verification that makes cheating very hard. I could issue cards that are as unforgeable as passports, or create phone apps that are linked to highly secure centralized databases. I could build a massive surveillance apparatus and enforce the sorts of strict containment measures used in China’s zero-COVID-19 policy. But the costs—in money, in liberty, in privacy—are too high. We can get most of the benefits with some pieces of paper and broad, but not universal, compliance with the rules.

It also helps that many of the people who break the rules are so very bad at it. Every story of someone getting arrested for faking a vaccine card, or selling a fake, makes it less likely that the next person will cheat. Every traveler arrested for faking a COVID-19 test does the same thing. When a famous athlete such as Novak Djokovic gets caught lying about his past COVID-19 diagnosis when trying to enter Australia, others conclude that they shouldn’t try lying themselves.

Our goal should be to impose the best policies that we can, given the trade-offs. The small number of cheaters isn’t going to be a public-health problem. I don’t even care if they feel smug about cheating the system. The system is resilient; it can withstand some cheating.

Last month, I visited New York City, where restrictions that are now being lifted were then still in effect. Every restaurant and cocktail bar I went to verified the photo of my vaccine card that I keep on my phone, and at least pretended to compare the name on that card with the one on my photo ID. I felt a lot safer in those restaurants because of that security theater, even if a few of my fellow patrons cheated.

This essay previously appeared in the Atlantic.

Бежанци и бюрокрация: Паразит ли е ДАБ?

Post Syndicated from Венелина Попова original https://toest.bg/bezhantsi-i-byurokratsiya-parazit-li-e-dab/

Беше добра, дори много добра идеята на Елисавета Белобрадова от парламентарната група на „Демократична България“ за изслушване в парламента да бъде поканена Петя Първанова, председателката на Държавната агенция за бежанците (ДАБ). За да застанем отново лице в лице с чиновническото безразличие, с което всеки от нас се е сблъсквал по един или друг повод неведнъж. И да чуем протоколното представяне на функциите и пълномощията на Агенцията по закон, както и абсурдни твърдения като това, че центровете ѝ в страната са в добро състояние и предлагат минималните според стандартите подкрепа и медицинска помощ на бежанците.

Първанова оправда бездействието на подчиненото ѝ ведомство с аргумента, че то няма ангажимент към украинските граждани, които влизат в България легално, ползват право на 90-дневен престой и не подават документи за международна закрила. Но не даде нито един смислен отговор на критиките на депутатката от „Демократична България“, свързани с отговорността на Агенцията да предложи на правителството работещи решения за управлението на бежанската криза. Депутати и от други парламентарни групи коментираха липсата на административен капацитет на ДАБ, а някои направо я нарекоха паразитна и напълно излишна структура в държавната администрация. Затова и поканата, отправена от Елисавета Белобрадова към Петя Първанова да подаде оставка, прозвуча като логичен завършек на това изслушване.

Освен въпросите на народните представители, повечето оставени без отговор от г-жа Първанова, има и други, които трябва да бъдат поставени публично. Eто и някои от по-съществените:

• Кое налага смяната на целия модел на временна закрила, при положение че той е добре разписан в Закона за убежището и бежанците?

• Изпълнява ли се разпоредбата на чл. 41, ал. 1, т. 5 от Закона за убежището и бежанците, която гласи, че „Държавната агенция за бежанците издава регистрационна карта на чужденец, на когото е предоставена временна закрила – за срока на закрилата“?

• Защо Петя Първанова и нейните заместници отказват да приемат бежанци от Украйна в регистрационните центрове на ДАБ и да им предоставят всички права по закон? Ако има основания за това, не трябва ли те да бъдат ясно и публично аргументирани?

• Има ли необходимост от изграждането на нови центрове, базирани на хуманен подход, каквито би трябвало да са и съществуващите досега?

• Защо с отпуснатите от МВР на Агенцията 100 щатни бройки за справяне с кризи не са създадени мобилни групи от специалисти, които с експертния си капацитет да съдействат за регистрацията и настаняването на украинските бежанци заедно с местните власти, гражданския сектор и бизнеса?

• Кой осъществява контрол върху правилното прилагане на материалните и процесуалните норми на закона при предоставяне на международна закрила? И има ли случаи, когато закрила получават лица, които не покриват критериите на закона?

• Назначени ли са без конкурси главният секретар на ДАБ (бивш щатен служител на ДС), директорите на дирекции „Социална дейност и адаптация“, „Управление на собствеността и обществени поръчки“, „Качество на процедурата за международна закрила“, както и ръководителят на Инспектората към ДАБ?

• Заема ли длъжността директор на дирекция „Международна дейност“ 70-годишен пенсионер от Министерството на отбраната? И назначена ли е без конкурс неговата съпруга като главен експерт в друга дирекция?

• На какво ниво е експертният капацитет на служителите в ДАБ? И само ниските заплати ли са причина да не се задържат кадрите, или най-качествените професионалисти си тръгват прогонени и огорчени от ръководството, защото са му неудобни?

• Практика ли са роднински назначения в регистрационните центрове на Агенцията в страната?

• В какво състояние са тези центрове и предлагат ли те базисни условия за живот, особено на децата, някои от тях – родени там? Остава ли истината за нехуманното третиране и погазването на човешките права на бежанците затворена зад стените на лагерите?

• Инциденти или практика са безредиците, сбиванията и заразите в бежанските лагери и защо се прави всичко възможно обществото да не научава за тях? Какво ги провокира – самата среда или понякога и персоналът?

• Защо ДАБ годишно излиза с общ брой решения за предоставяне на бежански или хуманитарен статут едва за половината от лицата, потърсили закрила, и какви са основанията за отказите по общ ред, за спрените и прекратените производства?

• Кои са причините за многобройните съдебни дела, спечелени от бежанците срещу ДАБ и завършващи с решения, в които е посочено, че въпросната институция не е оценила компетентно и задълбочено степента на уязвимост на конкретните лица или най-добрия интерес на децата?

Ето и няколко примера от практиката на Фондация „Мисия Криле“, една от неправителствените организации у нас, осигуряващи адвокатски услуги и водещи делата на бежанци, на които ДАБ е отказала статут:

Майка от Ирак подава четири поредни молби за международна закрила за себе си и за двете си деца, едното – родено в България. И всеки път тя получава отказ от Агенцията. Едва на четвъртия път, с помощта на неправителствени организации, които я подкрепят, успява да се защити пред съда и да получи положително съдебно решение за своето производство за международна закрила.

В друг от случаите жена, която е била изтезавана в родината си за това, че не иска да приеме исляма, получава отказ, въпреки че разказва подробно за извършените зверства над нея. Съдията уважава нейните доводи и зачита правото ѝ да потърси с детето си убежище в страната ни, но ДАБ обжалва решението пред Върховния административен съд, който трябва да се произнесе окончателно през април т.г.

Мъж с две смъртни присъда в родината си за това, че е приел християнската религия, е с отхвърлена молба за закрила въпреки представените документи. Основанията на държавния орган са, че е сътворил собствена бежанска история, която не е истинска. В съдебно заседание мъжът е подложен на абсурден тест за вяра от юридическия консултант на Агенцията и е принуден да показва белезите си от изтезанията в затвора пред съдията.

Сексуалната ориентация на друг мъж в страната му на произход се третира като криминално престъпление. Той е бил в затвора, преживял е изтезания и множество заплахи за живота си, но ДАБ отхвърля три поредни негови молби за получаване на закрила и предстои да бъде започната процедура за депортацията му.

Не се обърнахме към политическия кабинет на ДАБ, защото не очакваме да получим отговори оттам – поне не такива, които да удовлетворят обществения интерес към темата и нейната значимост. Но въпросите за микроклимата и стила на управление в тази структура на Министерския съвет, за нивото на административния ѝ капацитет, за подбора, назначаването и прогонването на кадри, за състоянието на бежанските лагери и отношението към хората, настанени там и очакващи понякога с години да получат закрила, за прилагането на корупционни практики по време на процедурата за предоставянето на статут и т.н. не могат просто да бъдат подминати с мълчание.

А в отговорите на тези въпроси сe крие истината защо за малцина от бягащите от войни и глад, преминали границата ни, България е само временна спирка в пътя им към обетованата земя на Европа. И защо само за три седмици от началото на войната в Украйна от влезлите на територията ни бежанци половината вече са си тръгнали.

Заглавна снимка: © Боряна Хорозова

Източник

През обектива на Биволъ Фоторепортаж: Бойко Борисов отведен в “Национална полиция”

Post Syndicated from Николай Марченко original https://bivol.bg/borisov_arrest.html

петък 18 март 2022


Бивши министри, депутати и активисти на ПП “Граждани за европейско развитие на България” (ГЕРБ) се събраха между 23 и 01:00 ч. в нощта на 17 срещу 18 март 2022 г.…

Сезонът на путлеристите*

Post Syndicated from Емилия Милчева original https://toest.bg/sezonut-na-putleristite/

Политическата сила, която трайно увеличава подкрепата си за последните три месеца, е „Възраждане“. В управляващата коалиция „Продължаваме промяната“, „Има такъв народ“ и БСП отчитат спад, а „Демократична България“ спира растежа през март. ГЕРБ и ДПС удържат. Това показва проучване на агенция „Тренд“, проведено по поръчка на в. „24 часа“ за периода 5–12 март 2022 г. сред 1007 пълнолетни лица.

Така най-кресливата, патетична и с прокремълски уклон група в българския парламент бележи ръст, който я изкачва по-близо до спадащите ИТН, ДБ и БСП. Да се притесняваме ли, че „Възраждане“ избуява, докато руски бомби разрушават жилищни сгради и болници в Украйна, а бежанският поток от жени, деца и възрастни хора приближава 3 милиона за три седмици?

Войната на Путин е увеличила негативното отношение към Русия на 40% от анкетираните българи, но не и на тези, които са привърженици на БСП и „Възраждане“. И макар 61% от респондентите да не оправдават руската агресия, а повече от две трети да подкрепят приема на украински бежанци, 77% не одобряват намеса на НАТО на страната на Украйна. Ето тази нива орат от „Възраждане“. На този терен ще лагерува и бъдещият политически проект, центриран около Стефан Янев – бивш генерал от натовска армия, бивш служебен премиер, бивш министър на отбраната, но несъмнено все още президентски кадър.

Заради войната и промяната на настроенията на преден план излизат друг тип пропагандни внушения, а бяло-синьо-червеното с двуглавия орел просто прозира зад тях. Проектират се клишета като „български национален интерес“, „опасност за България“, „външни интереси“ и др., чиято цел е да внушат алиенация от общностите, в които България е член – НАТО и ЕС. Затова и не се споменава България в контекста на съюзник и партньор в тях. НАТО неизменно е някаква чужда, имагинерна и лоша сила. С реториката си за напускане на Алианса Костадин Костадинов и „Възраждане“ не излизат от обувките на предшествениците си. Но и те ловко сменят интонацията. В декларация от името на парламентарната група Костадинов заяви тази седмица:

Българското правителство не е способно да прозре, че съюзниците ни правят всичко необходимо да ни водят към един военен конфликт, в който ние нямаме роля, който се води по източната границата на Алианса и заплашва да превърне България във фронтова линия. Отбраната на страната ни се предоставя в момента в ръцете на чужди войски и чужди генерали. 

Костадинов, уличен от Украйна като руски шпионин, питаше как предстоящата визита на шефа на Пентагона Лойд Остин в България подпомага националната сигурност.

В този дух са шлифовани и тезите на Янев – той не говори за излизане от Алианса, а за решения (на Алианса), които са вредни за България и несъвместими с българския национален интерес, а правителството, което ги налага, обслужва тези чужди и пагубни интереси. Прицелва се в електорат, който не е така радикален, но е умерено русофилски, а даже да не симпатизира особено на Москва, е против България да се замесва под каквато и да е форма в каквото и да е противостоене на Кремъл. (Тон за „неутралитета“ даде президентът Румен Радев.) „Бъдещата партия на Стефан Янев има потенциал, защото се позиционира в едно широко поле в българското общество – не толкова проатлантическо и не толкова проруско“, коментира по БНР и Евелина Славкова от „Тренд“.

Оказва се, че през всичките тези 18 години от приемането на България като член на НАТО нейният генералитет трайно я е придърпвал не просто встрани, а на изток. Това поведение е било в унисон с действията на правителствата ѝ, все едно кои, да се правят на атлантици, докато се покланят на кремълския Бащица. Тази пародия на евро-атлантическо партньорство можеше да продължи още дълго, но преломните времена, настъпили с войната в Украйна, изискаха да бъде сложен край на ерзацполитиката. Новият министър на отбраната, доскоро представител на България в Алианса, зае недвусмислена позиция по отношение на участието на натовски войски на българска територия. „Няма как да запълним дефицити, без да работим със съюзниците ни от НАТО на наша територия“, заяви Драгомир Заков в Брюксел.

Бившият вече военен министър Стефан Янев до последно отстояваше тезата, че нито един чужд (да се разбира натовски) крак няма да стъпи тук. Елементарно, предвид факта, че стъпва заради съвместни учения например. Неговият патрон в политиката – президентът Радев – несдържано и на висок глас поиска охраната на небето да е от български пилоти, със самолети на българската армия, и упорито отказва други. В момента годни да летят са едва 8 от общо 15 самолета МиГ-29, три от които са учебни. А за пилотите ни самият Радев беше констатирал, че нальотът им е крайно недостатъчен в момента. Ниския брой часове за летене отчете преди време и командирът на авиобаза „Граф Игнатиево“ – бригаден генерал Николай Русев, за 2021 г. Според минимума трябва да е 1000 часа годишно, а при българските летци е в пъти по-малко.

Но само преди пет години – през 2017 г., тези двама радетели на българщината и воини от българската армия са констатирали нейната частична боеспособност. В доклад, приет през април с.г., е отбелязано, че за първи път армията ни е в състояние само частично да изпълнява задълженията си за гарантиране на териториалната цялост и суверенитета на страната. Като служебен министър на отбраната тогава ген. Стефан Янев е посочил причините: „Основното – недофинансиране на армията последните години, което води до недостиг на личен състав от порядъка между 25 и 30% от необходимите хора в отбраната и въоръжените сили“. Потвърдил го е и президентът Радев:

Въоръжените сили са в състояние само частично да изпълняват задачите по мисиите, произтичащи от конституционните задължения по гарантиране на независимостта, суверенитета и териториалната цялост на страната. Причините са до болка познати – липса на съвременна техника и въоръжено оборудване, липса на средства за пълноценна бойна подготовка, нисък социален статус на военнослужещите и застрашителен отлив на личен състав. 

Нищо не се е променило в следващите пет години. Е как тогава да оставим на такава армия да пази българския суверенитет – това не вреди ли на българския национален интерес?!

Очевидно предстоят решения, които няма да се понравят на тези 77%, които не одобряват намеса на НАТО и респективно – замесване на България. Министърът на отбраната Драгомир Заков вече намекна, че ще има такива решения, които не печелят гласове. Българското правителство омекна под вътрешния натиск и не изпрати никаква военна техника, муниции и материали на Украйна – под натиска и на коалиционния партньор БСП, чиято лидерка Корнелия Нинова заяви, че няма да го допусне.

Така България остана малцинство в ЕС, заедно с Австрия, Кипър, Малта и Унгария, които също не изпратиха военна помощ. Все държави, в които руското влияние не е тайна за никого. Кипър, който се оказа убежище за руски пари, но също и място за продажба на „златни паспорти“ на руснаци, както и Малта – и двете държави са замесени в скандали за пране на пари с евразийски произход. Австрия, чието правителство падна преди две години заради корупционен скандал, който водеше към руски олигарх. Що се отнася до Унгария, нейният премиер Виктор Орбан се срещна през февруари т.г. за 12-ти път с руския президент Путин за 12-те години, откакто управлява държавата.

В тази „компания“ на държави, оказали скромна подкрепа на Украйна, се оказа и България. Но това не попречи на премиера Кирил Петков да каже, без да му мигне окото, че вицепрезидентката на САЩ Камала Харис му се обадила, за да му благодари за българската помощ за Украйна (думите са изречени на традиционната годишна среща на бизнеса с правителството, организирана от „Икономедиа“). В профила си във Facebook тя съобщи нещо различно от изявлението на Петков и идентичното правителствено прессъобщение.

Заради БСП бе оттеглена и номинацията на Тодор Тагарев за министър на отбраната. Преди Стефан Янев да бъде освободен от поста, в парламента мина разпоредбата в бюджета за т.г., с която 80 млн. лв. се дават за ремонт на старите руски изтребители МиГ. А президентът Радев за пореден път запита кога и къде ще се ремонтират самолетите (заради санкциите срещу Русия няма как да се дадат милионите отново на „Авионамс“).

България не е разрешила проблема с руската военна техника, но пък се справи с друг – обяви излизане от Международната инвестиционна банка, известна още като „банката на СИВ“. Полша я напусна още през 2000 г., а заради войната в Украйна Чехия и Румъния също съобщиха, че предприемат стъпки за излизане от МИБ. България е сред трите държави, които са най-големи акционери в банката – заедно с Русия и Унгария, но българското правителство обяви решението си да прекрати участието си в началото на март. Изпълнителен директор на банката е Николай Косов, известен с близостта си до Путин.

Любопитна подробност е, че точно преди да бъде одобрено новото правителство, на 12 декември, неделя, Стефан Янев свика извънредно заседание, на което служебното правителство реши България да увеличи вноската си в банката на СИВ с 42 млн. евро. Парламентът не успя да одобри това решение, но и без него не е ясно какво ще стане с вложените досега над 120 млн. евро.

С БСП в управлението, „Възраждане“ в парламента и Румен Радев в Президентството се създават добри условия за новия политически проект на Янев. Президентът се оказа плодовит баща на политически проекти. Зареди батериите на „Продължаваме промяната“, а сега – и на поредната генералска партия.

Но освен за появата на още „путлеристи“, войната в Украйна, санкциите за Русия и последващата международна изолация за режима в Кремъл може да се окажат възможност за България да прекрати своите зависимости от Москва – както енергийната, свързана с доставки на газ и ядрено гориво за АЕЦ „Козлодуй“, така и за ремонтите на руската военна техника. През тези зависимости се внасят корупция и политически шантаж.

Договорът за доставки на руски газ изтича в края на 2022 г. Вчера по bTV председателят на Съвета на директорите на „Булгаргаз“ Иван Топчийски обяви, че правителството има план да замени руския газ с други доставки от догодина (втечнен газ, азерски газ). Тези български намерения са и в контекста на европейските – съгласно плана RePowerEu за постигане на енергийна независимост на ЕС от руските суровини до 2030 г. Известни са и плановете през 2024 г., когато трябва да е новият търг за ядрено гориво за АЕЦ „Козлодуй“, да бъде избран друг, неруски доставчик.

Това са амбициозни намерения, чието изпълнение може да застраши стабилността на правителството. Но е време да се пристъпи към тях.

* Новият сленг роди термина „путлерист“, който съчетава в себе си последовател на Путин и Хитлер.
Заглавна снимка: Румен Радев и Стефан Янев при представянето на състава на служебното правителство на 16 септември 2021 г. © Министерски съвет на Република България

Източник

Message to the next generation of women disruptors in technology

Post Syndicated from Rajeswari Malladi original https://aws.amazon.com/blogs/architecture/message-to-the-next-generation-of-women-disruptors-in-technology/

“Just because something works, doesn’t mean it can’t be improved” – Princess Shuri, Black Panther (2018 film)

Princess Shuri’s character is inspirational – she is a masterful scientist, engineer, and inventor. But how many such Princess Shuris are around us today?

Women in tech today

As per the National Girls Collaborative project’s State of Girls and Women in STEM report, published on March 31, 2021, women constitute 29% of the STEM workforce. Women STEM professionals are concentrated in different fields than men. Out of that relatively small percentage of women, about 27% are in Computer and Mathematical science, and 16% are in Engineering. The Bureau of Labor Statistics (BLS) projects computer and information technology occupations will add about 667 K new jobs by 2030. So this is a growing field, and presents a great opportunity for women.

Why are such a small percentage of girls opting for Computer Science and Engineering? Studies have shown that gender stereotypes, male-dominated cultures, and fewer role models are some of the key factors as to why girls don’t choose technology as their primary career.

The choice to avoid tech careers seem to be made right around late middle school to early high school. In part, this is because there is not enough awareness about different career choices available in the technology sector. Young people often do not know what it means concretely to be an engineer, builder, or a technology professional. In this blog post, we share some thoughts that can help young girls or women like yourself seriously consider technology as your career.

The benefits of a career in technology and how to get started

Why choose a career in technology? Technology is integrated in many fields like healthcare, finance, the fashion industry, creative media, and others. There won’t be any field untouched by technology in the future. It offers an opportunity to work on the bleeding edge of innovation, the flexibility to work from anywhere. It gives you entrance into any field, and enables you to make a difference to millions of lives. As technologies like Artificial Intelligence (AI) develop, it is especially important for women to get involved to bring diverse viewpoints and help teams make better decisions.

We are calling out to all middle and high school girls to consider technology as a career choice. Join us in building an inclusive, accepting community in the technology sphere, and be at the forefront of innovation. You might be surrounded by students who may seem to know much more than you do and that can be scary sometimes. Don’t be intimidated! Don’t let it stop you from learning skills such as programming.

Treat learning how to program as another skill that you can pick up. Just as you learned to play a new instrument or a new language; with dedication, putting in the work, and sticking with it. Even if you think too much time has passed and others have passed you by, it is never too late to learn. There are many wonderful technologists who learned their first programming language in college, or later in life.

You can get started with beginner courses and tutorials available online – many are free. You already use tech with your phones, social media, and the internet – time to move from being the users of today’s technology, and become the builders of tomorrow’s technology!

Get support on your journey

It all starts with taking the first step. It can be as simple as joining a coding club like GirlsWhoCode, or using resources like Code.org. You don’t have to do it alone; encourage other girls to join. It is best that you start this in middle school and continue through high school. This will help you make steady progress and be able to network with other girls who are on the same journey as you. Find some local competitions, submit some ideas, participate as group, and have fun! Don’t be afraid of making mistakes, they are part of learning. Form a close mentor group that you can reach out to if you hit any hurdles. Master one skill before moving on the next, and think of these as discrete modules and layers. Set intermediate milestones, which will help you eventually reach the final goal.

Technology is a foundational skill just like math, reading or writing. Getting technology skills will help you in many ways, and offer you many paths to choose from. Careers in software development, user interface design and development, and program or project management are just a few. Think about how you can apply technology to the area that you are most passionate about.

Closing remarks

On this International Women’s Day, and Women’s History month, we want to give our heartfelt message to young minds that “Yes, you can”! No matter what career path you choose, you will come across technology in your respective fields. By learning the foundations, you will be able to leverage technology in your careers. Grow your network, find role models, dream big, and be fearless in achieving your dreams.

Good luck budding Princess Shuris. The tech world awaits you!

We’ve got more content for International Women’s Day!

For more than a week we’re sharing content created by women. Check it out!

Other ways to participate

Back up and restore Kafka topic data using Amazon MSK Connect

Post Syndicated from Rakshith Rao original https://aws.amazon.com/blogs/big-data/back-up-and-restore-kafka-topic-data-using-amazon-msk-connect/

You can use Apache Kafka to run your streaming workloads. Kafka provides resiliency to failures and protects your data out of the box by replicating data across the brokers of the cluster. This makes sure that the data in the cluster is durable. You can achieve your durability SLAs by changing the replication factor of the topic. However, streaming data stored in Kafka topics tends to be transient and typically has a retention time of days or weeks. You may want to back up the data stored in your Kafka topic long after its retention time expires for several reasons. For example, you might have compliance requirements that require you to store the data for several years. Or you may have curated synthetic data that needs to be repeatedly hydrated into Kafka topics before starting your workload’s integration tests. Or an upstream system that you don’t have control over produces bad data and you need to restore your topic to a previously well state.

Storing data indefinitely in Kafka topics is an option, but sometimes the use case calls for a separate copy. Tools such as MirrorMaker let you back up your data into another Kafka cluster. However, this requires another active Kafka cluster to be running as a backup, which increases compute costs and storage costs. A cost-effective and durable way of backing up the data of your Kafka cluster is to use an object storage service like Amazon Simple Storage Service (Amazon S3).

In this post, we walk through a solution that lets you back up your data for cold storage using Amazon MSK Connect. We restore the backed-up data to another Kafka topic and reset the consumer offsets based on your use case.

Overview of solution

Kafka Connect is a component of Apache Kafka that simplifies streaming data between Kafka topics and external systems like object stores, databases, and file systems. It uses sink connectors to stream data from Kafka topics to external systems, and source connectors to stream data from external systems to Kafka topics. You can use off-the-shelf connectors written by third parties or write your own connectors to meet your specific requirements.

MSK Connect is a feature of Amazon Managed Streaming for Apache Kafka (Amazon MSK) that lets you run fully managed Kafka Connect workloads. It works with MSK clusters and with compatible self-managed Kafka clusters. In this post, we use the Lenses AWS S3 Connector to back up the data stored in a topic in an Amazon MSK cluster to Amazon S3 and restore this data back to another topic. The following diagram shows our solution architecture.

To implement this solution, we complete the following steps:

  1. Back up the data using an MSK Connect sink connector to an S3 bucket.
  2. Restore the data using an MSK Connect source connector to a new Kafka topic.
  3. Reset consumer offsets based on different scenarios.

Prerequisites

Make sure to complete the following steps as prerequisites:

  1. Set up the required resources for Amazon MSK, Amazon S3, and AWS Identity and Access Management (IAM).
  2. Create two Kafka topics in the MSK cluster: source_topic and target_topic.
  3. Create an MSK Connect plugin using the Lenses AWS S3 Connector.
  4. Install the Kafka CLI by following Step 1 of Apache Kafka Quickstart.
  5. Install the kcat utility to send test messages to the Kafka topic.

Back up your topics

Depending on the use case, you may want to back up all the topics in your Kafka cluster or back up some specific topics. In this post, we cover how to back up a single topic, but you can extend the solution to back up multiple topics.

The format in which the data is stored in Amazon S3 is important. You may want to inspect the data that is stored in Amazon S3 to debug issues like the introduction of bad data. You can examine data stored as JSON or plain text by using text editors and looking in the time frames that are of interest to you. You can also examine large amounts of data stored in Amazon S3 as JSON or Parquet using AWS services like Amazon Athena. The Lenses AWS S3 Connector supports storing objects as JSON, Avro, Parquet, plaintext, or binary.

In this post, we send JSON data to the Kafka topic and store it in Amazon S3. Depending on the data type that meets your requirements, update the connect.s3.kcql statement and *.converter configuration. You can refer to the Lenses sink connector documentation for details of the formats supported and the related configurations. If the existing connectors don’t work for your use case, you can also write your own connector or extend existing connectors. You can partition the data stored in Amazon S3 based on fields of primitive types in the message header or payload. We use the date fields stored in the header to partition the data on Amazon S3.

Follow these steps to back up your topic:

  1. Create a new Amazon MSK sink connector by running the following command:
    aws kafkaconnect create-connector \
    --capacity "autoScaling={maxWorkerCount=2,mcuCount=1,minWorkerCount=1,scaleInPolicy={cpuUtilizationPercentage=10},scaleOutPolicy={cpuUtilizationPercentage=80}}" \
    --connector-configuration \
    "connector.class=io.lenses.streamreactor.connect.aws.s3.sink.S3SinkConnector, \
    key.converter.schemas.enable=false, \
    connect.s3.kcql=INSERT INTO <<S3 Bucket Name>>:my_workload SELECT * FROM source_topic PARTITIONBY _header.year\,_header.month\,_header.day\,_header.hour STOREAS \`JSON\` WITHPARTITIONER=KeysAndValues WITH_FLUSH_COUNT = 5, \
    aws.region=us-east-1, \
    tasks.max=2, \
    topics=source_topic, \
    schema.enable=false, \
    errors.log.enable=true, \
    value.converter=org.apache.kafka.connect.storage.StringConverter, \
    key.converter=org.apache.kafka.connect.storage.StringConverter " \
    --connector-name "backup-msk-to-s3-v1" \
    --kafka-cluster '{"apacheKafkaCluster": {"bootstrapServers": "<<MSK broker list>>","vpc": {"securityGroups": [ <<Security Group>> ],"subnets": [ <<Subnet List>> ]}}}' \
    --kafka-cluster-client-authentication "authenticationType=NONE" \
    --kafka-cluster-encryption-in-transit "encryptionType=PLAINTEXT" \
    --kafka-connect-version "2.7.1" \
    --plugins "customPlugin={customPluginArn=<< ARN of the MSK Connect Plugin >>,revision=1}" \
    --service-execution-role-arn " <<ARN of the IAM Role>> "

  2. Send data to the topic using kcat:
    ./kcat -b <<broker list>> -t source_topic -H "year=$(date +"%Y")" -H "month=$(date +"%m")" -H "day=$(date +"%d")" -H "hour=$(date +"%H")" -P
    {"message":"interesset eros vel elit salutatus"}
    {"message":"impetus deterruisset per aliquam luctus"}
    {"message":"ridens vocibus feugait vitae cras"}
    {"message":"interesset eros vel elit salutatus"}
    {"message":"impetus deterruisset per aliquam luctus"}
    {"message":"ridens vocibus feugait vitae cras"}

  3. Check the S3 bucket to make sure the data is being written.

MSK Connect publishes metrics to Amazon CloudWatch that you can use to monitor your backup process. Important metrics are SinkRecordReadRate and SinkRecordSendRate, which measure the average number of records read from Kafka and written to Amazon S3, respectively.

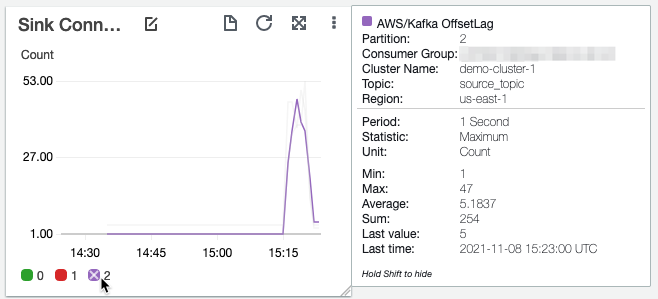
Also, make sure that the backup connector is keeping up with the rate at which the Kafka topic is receiving messages by monitoring the offset lag of the connector. If you’re using Amazon MSK, you can do this by turning on partition-level metrics on Amazon MSK and monitoring the OffsetLag metric of all the partitions for the backup connector’s consumer group. You should keep this as close to 0 as possible by adjusting the maximum number of MSK Connect worker instances. The command that we used in the previous step sets MSK Connect to automatically scale up to two workers. Adjust the --capacity setting to increase or decrease the maximum worker count of MSK Connect workers based on the OffsetLag metric.

Restore data to your topics

You can restore your backed-up data to a new topic with the same name in the same Kafka cluster, a different topic in the same Kafka cluster, or a different topic in a different Kafka cluster altogether. In this post, we walk through the scenario of restoring data that was backed up in Amazon S3 to a different topic, target_topic, in the same Kafka cluster. You can extend this to other scenarios by changing the topic and broker details in the connector configuration.

Follow these steps to restore the data:

  1. Create an Amazon MSK source connector by running the following command:
    aws kafkaconnect create-connector \
    --capacity "autoScaling={maxWorkerCount=2,mcuCount=1,minWorkerCount=1,scaleInPolicy={cpuUtilizationPercentage=10},scaleOutPolicy={cpuUtilizationPercentage=80}}"   \
    --connector-configuration \
        "connector.class=io.lenses.streamreactor.connect.aws.s3.source.S3SourceConnector, \
         key.converter.schemas.enable=false, \
         connect.s3.kcql=INSERT INTO target_topic SELECT * FROM <<S3 Bucket Name>>:my_workload PARTITIONBY _header.year\,_header.month\,_header.day\,_header.hour STOREAS \`JSON\` WITHPARTITIONER=KeysAndValues WITH_FLUSH_COUNT = 5 , \
         aws.region=us-east-1, \
         tasks.max=2, \
         topics=target_topic, \
         schema.enable=false, \
         errors.log.enable=true, \
         value.converter=org.apache.kafka.connect.storage.StringConverter, \
         key.converter=org.apache.kafka.connect.storage.StringConverter " \
    --connector-name "restore-s3-to-msk-v1" \
    --kafka-cluster '{"apacheKafkaCluster": {"bootstrapServers": "<<MSK broker list>>","vpc": {"securityGroups": [<<Security Group>>],"subnets": [ <<Subnet List>> ]}}}' \
    --kafka-cluster-client-authentication "authenticationType=NONE" \
    --kafka-cluster-encryption-in-transit "encryptionType=PLAINTEXT" \
    --kafka-connect-version "2.7.1" \
    --plugins "customPlugin={customPluginArn=<< ARN of the MSK Connect Plugin >>,revision=1}" \
    --service-execution-role-arn " <<ARN of the IAM Role>> "

The connector reads the data from the S3 bucket and replays it back to target_topic.

  1. Verify if the data is being written to the Kafka topic by running the following command:
    ./kafka-console-consumer.sh --bootstrap-server <<MSK broker list>> --topic target_topic --from-beginning

MSK Connect connectors run indefinitely, waiting for new data to be written to the source. However, while restoring, you have to stop the connector after all the data is copied to the topic. MSK Connect publishes the SourceRecordPollRate and SourceRecordWriteRate metrics to CloudWatch, which measure the average number of records polled from Amazon S3 and number of records written to the Kafka cluster, respectively. You can monitor these metrics to track the status of the restore process. When these metrics reach 0, the data from Amazon S3 is restored to the target_topic. You can get notified of the completion by setting up a CloudWatch alarm on these metrics. You can extend the automation to invoke an AWS Lambda function that deletes the connector when the restore is complete.

As with the backup process, you can speed up the restore process by scaling out the number of MSK Connect workers. Change the --capacity parameter to adjust the maximum and minimum workers to a number that meets the restore SLAs of your workload.

Reset consumer offsets

Depending on the requirements of restoring the data to a new Kafka topic, you may also need to reset the offsets of the consumer group before consuming or producing to them. Identifying the actual offset that you want to reset to depends on your specific business use case and involves manual work to identify this. You can use tools like Amazon S3 Select, Athena, or other custom tools to inspect the objects. The following screenshot demonstrates reading the records ending at offset 14 of partition 2 of topic source_topic using S3 Select.

After you identify the new start offsets for your consumer groups, you have to reset them on your Kafka cluster. You can do this using the CLI tools that come bundled with Kafka.

Existing consumer groups

If you want to use the same consumer group name after restoring the topic, you can do this by running the following command for each partition of the restored topic:

 ./kafka-consumer-groups.sh --bootstrap-server <<broker list>> --group <<consumer group>> --topic target_topic:<<partition>> --to-offset <<desired offset>> --reset-offsets --execute

Verify this by running the --describe option of the command:

./kafka-consumer-groups.sh --bootstrap-server <<broker list>> --group <<consumer group>>  --describe
TOPIC           PARTITION  CURRENT-OFFSET  LOG-END-OFFSET  LAG        ...
source_topic  0          211006          188417765       188206759  ...
source_topic  1          212847          192997707       192784860  ...
source_topic  2          211147          196410627       196199480  ...
target_topic  0          211006          188417765       188206759  ...
target_topic  1          212847          192997707       192784860  ...
target_topic  2          211147          196410627       196199480  ...

New consumer group

If you want your workload to create a new consumer group and seek to custom offsets, you can do this by invoking the seek method in your Kafka consumer for each partition. Alternatively, you can create the new consumer group by running the following code:

./kafka-console-consumer.sh --bootstrap-server <<broker list>> --topic target_topic --group <<consumer group>> --from-beginning --max-messages 1

Reset the offset to the desired offsets for each partition by running the following command:

./kafka-consumer-groups.sh --bootstrap-server <<broker list>> --group <<New consumer group>> --topic target_topic:<<partition>> --to-offset <<desired offset>> --reset-offsets --execute

Clean up

To avoid incurring ongoing charges, complete the following cleanup steps:

  1. Delete the MSK Connect connectors and plugin.
  2. Delete the MSK cluster.
  3. Delete the S3 buckets.
  4. Delete any CloudWatch resources you created.

Conclusion

In this post, we showed you how to back up and restore Kafka topic data using MSK Connect. You can extend this solution to multiple topics and other data formats based on your workload. Be sure to test various scenarios that your workloads may face and document the runbook for each of those scenarios.

For more information, see the following resources:


About the Author

Rakshith Rao is a Senior Solutions Architect at AWS. He works with AWS’s strategic customers to build and operate their key workloads on AWS.

Migrate your Amazon Redshift cluster to another AWS Region

Post Syndicated from Sindhura Palakodety original https://aws.amazon.com/blogs/big-data/migrate-your-amazon-redshift-cluster-to-another-aws-region/

Amazon Redshift is a fast, fully managed cloud data warehouse that makes it simple and cost-effective to analyze all your data using standard SQL and your existing business intelligence (BI) tools. Amazon Redshift uses SQL to analyze structured and semi-structured data across data warehouses, operational databases, and data lakes, using AWS designed hardware and machine learning (ML) to deliver the best price-performance at any scale.

Customers have reached out to us with a need to migrate their Amazon Redshift clusters from one AWS Region to another. Some of the common reasons include provisioning their clusters geographically closer to their user base to improve latency, for cost-optimization purposes by deploying their clusters in a Region where the pricing is lower, or for migrating clusters to a Region where the rest of their deployments are. This post provides a step-by-step approach to migrate your Amazon Redshift cluster to another Region using the snapshot functionality.

Overview of solution

This solution uses the cross-Region snapshot feature of Amazon Redshift to perform inter-Region migration. The idea is to take multiple manual snapshots of your Amazon Redshift cluster before the cutover deadline to ensure minimal data loss and to migrate the cluster to another Region within the defined maintenance window. You should plan for the maintenance window to be during a period of low or no write activity to minimize downtime. The time taken to copy over the snapshots depends on the size of the snapshot. Before the migration, it’s a good idea to estimate how much time it takes to copy over snapshots to the target Region by testing with similar or larger size datasets in your staging environments. This can help with your planning process.

After you copy the snapshots to the target Region, you can restore the latest snapshot to create a new Amazon Redshift cluster. Snapshots are incremental by nature and track changes to the cluster since the previous snapshot. The copy time is relative to the amount of data that has changed since the last snapshot.

When a snapshot is copied to another Region, it can also act as a standalone, which means that even if only the latest snapshot is copied to the target Region, the restored Amazon Redshift cluster still has all the data. For more information, refer to Amazon Redshift snapshots. Cross-Region snapshot functionality can also be useful for setting up disaster recovery for your Amazon Redshift cluster.

The following diagram illustrates the architecture for cross-Region migration within the same AWS account.

The solution includes the following steps:

  1. Configure cross-Region snapshots of the source Amazon Redshift cluster before the cutover deadline.
  2. Restore the latest snapshots to create a new Amazon Redshift cluster in the target Region.
  3. Point your applications to the new Amazon Redshift cluster.

For encrypted snapshots, there is an additional step of creating a new encryption key and performing a snapshot grant before you can copy the snapshot to the target Region.

Prerequisites

For the migration process, select a maintenance window during when there is low write activity, and be aware of the RTO and RPO requirements of the organization.

The following steps walk you through setting up an Amazon Redshift cluster in the source Region and populating it with a sample dataset. For this post, we use US West (Oregon) as the source Region and US East (N. Virginia) as the target Region. If you already have a source Amazon Redshift cluster, you can skip these prerequisite steps.

Create an Amazon Redshift cluster in the source Region

To create your cluster in the source Region, complete the following steps:

  1. Open the Amazon Redshift console in your source Region.
  2. Choose Clusters in the navigation pane and choose Clusters again on the menu.
  3. Choose Create cluster.
  4. For Cluster identifier, enter redshift-cluster-source.
  5. Select Production for cluster use.

This option allows you to select specific instance types and load the sample data of your choice. Note that you are charged for Amazon Redshift instances and storage for the entire time until you delete the cluster. For more information about pricing, see Amazon Redshift pricing.

  1. For Node type, choose your preferred node type.
  2. For Number of nodes, enter the number of nodes to use.

For this post, we use four dc2.large instances.

  1. Under Database configurations, enter a user name and password for the cluster.

As a best practice, change the default user name to a custom user name (for this post, mydataadmin) and follow the password guidelines.

To load the sample data from an external Amazon Simple Storage Service (Amazon S3) bucket to the source cluster, you need to create an AWS Identity and Access Management (IAM) role.

  1. Under Cluster permissions, on the Manage IAM roles drop-down menu, choose Create IAM role.
  2. Select Any S3 bucket and choose Create IAM role as default.
  3. For Additional configurations, turn Use defaults off.
  4. In the Network and security section, choose a VPC and cluster subnet group.

For more information about creating a cluster, refer to Creating a cluster in a VPC.

  1. Expand Database configurations.

We recommend using custom values instead of the defaults.

  1. For Database name, enter stagingdb.
  2. For Database port, enter 7839.
  3. For Encryption, select Disabled.

We enable encryption in a later step.

  1. Leave the other options as default and choose Create cluster.
  2. When the cluster is available, enable audit logging on the cluster.

Audit logging records information about connections and user activities in your database. This is useful for security as well as troubleshooting purposes.

To meet security best practices, you also create a new Amazon Redshift parameter group.

  1. Choose Configurations and Workload management to create your parameter group.
  2. Make sure that the parameters require_ssl and enable_user_activity_logging are set to true.
  3. On the Properties tab, choose the Edit menu in the Database configurations section and choose Edit parameter group.
  4. Associate the newly created parameter group to the Amazon Redshift cluster.

If this change prompts you to reboot, choose Reboot.

Load the sample dataset in the source Amazon Redshift cluster

When the cluster is ready, it’s time to load the sample dataset from the S3 bucket s3://redshift-immersionday-labs/data/. The following tables are part of the dataset:

  • REGION (5 rows)
  • NATION (25 rows)
  • CUSTOMER (15 million rows)
  • ORDERS (76 million rows)
  • PART (20 million rows)
  • SUPPLIER (1 million rows)
  • LINEITEM (600 million rows)
  • PARTSUPPLIER (80 million rows)

It’s a best practice for the Amazon Redshift cluster to access the S3 bucket via VPC gateway endpoints in order to enhance data loading performance, because the traffic flows through the AWS network, avoiding the internet.

Before we can load our data into Amazon S3, we need to enable a VPC endpoint via Amazon Virtual Private Cloud (Amazon VPC).

  1. On the Amazon VPC console, choose Endpoints.
  2. Choose Create endpoint.
  3. For Name tag, enter redshift-s3-vpc-endpoint.
  4. For Service category, select AWS services.
  5. Search for S3 and select the Gateway type endpoint.
  6. Choose the same VPC where your cluster is provisioned and select the route table.
  7. Leave everything else as default and choose Create endpoint.

Wait for the Gateway endpoint status to change to Available.

Next, you enable enhanced VPC routing.

  1. Open the Amazon Redshift console in the source Region.
  2. Choose your source cluster.
  3. On the Properties tab, in the Network and security settings section, choose Edit.
  4. For Enhanced VPC routing, select Enabled.
  5. Choose Save changes.

Wait for the cluster status to change to Available.

You need to create tables in order to load the sample data into the cluster. We recommend using the Amazon Redshift web-based query editor.

  1. On the Amazon Redshift console, choose Editor in the navigation pane and choose Query editor.

You can also use the new query editor V2.

  1. Choose Connect to database.
  2. Select Create new connection.
  3. Enter the database name and user name.
  4. Choose Connect.

For this post, we use the TPC data example from the Amazon Redshift Immersion Labs.

  1. Navigate to the Data Loading section of the Immersion Day Labs.
  2. Follow the instructions in the Create Tables section to create the tables in your source cluster.
  3. After you create the tables, follow the instructions in Loading Data section to load the data into the cluster.

Loading the data took approximately 17 minutes in the US West (Oregon) Region. This may vary depending on the Region and network bandwidth at that point in time.

After the data is loaded successfully into the source cluster, you can query it to make sure that you see the data in all the tables.

  1. Choose a table (right-click) and choose Preview data.
  2. Drop the customer table using the query DROP TABLE customer;.

We add the table back later to demonstrate incremental changes.

You can check the storage size to verify the size of the data loaded.

  1. Choose Clusters in the navigation pane.
  2. Choose your source cluster.
  3. Verify the storage size in the General information section, under Storage used.

Your source Amazon Redshift cluster is now loaded with a sample dataset and is ready to use.

Configure cross-Region snapshots in the source Region

To perform inter-Region migration, the first step is to configure cross-Region snapshots. The cross-Region snapshot feature enables you to copy over snapshots automatically to another Region.

  1. Open the Amazon Redshift console in the source Region.
  2. Select your Amazon Redshift cluster.
  3. On the Actions menu, choose Configure cross-region snapshot.
  4. For Copy snapshots, select Yes.
  5. For Destination Region, choose your target Region (for this post, us-east-1).
  6. Configure the manual snapshot retention period according to your requirements.
  7. Choose Save.

After the cross-Region snapshot feature is configured, any subsequent automated or manual snapshots are automatically copied to the target Region.

  1. To create a manual snapshot, choose Clusters in the navigation pane and choose Snapshots.
  2. Choose Create snapshot.
  3. For Cluster identifier, choose redshift-cluster-source.
  4. Adjust the snapshot retention period based on your requirements.
  5. Choose Create snapshot.

The idea is to take multiple snapshots until the cutover deadline so as to capture as much data as possible for minimal data loss based on your RTO and RPO requirements. The first snapshot creation took about 4 minutes for 28.9 GB of data, but subsequent snapshots are incremental in nature.

This snapshot gets automatically copied to the target Region from the source Region. You can open the Amazon Redshift console in the target Region to verify the copy.

As shown in the following screenshot, the snapshot of size 28.9 GB took around 44 minutes to get copied to the target Region because it’s the first snapshot containing all the data in the cluster. Depending on the Regions involved and the amount of data to copy, a cross-Region snapshot copy may take hours to complete.

Let’s now simulate incremental changes being made to the source cluster.

  1. Open the Amazon Redshift console in the source Region and open the query editor.
  2. Create a new table called customer in the cluster using the following query:
    create table customer (
      C_CUSTKEY bigint NOT NULL,
      C_NAME varchar(25),
      C_ADDRESS varchar(40),
      C_NATIONKEY bigint,
      C_PHONE varchar(15),
      C_ACCTBAL decimal(18,4),
      C_MKTSEGMENT varchar(10),
      C_COMMENT varchar(117))
    diststyle all;

  3. Load data into the customer table using the following command:
    copy customer from 's3://redshift-immersionday-labs/data/customer/customer.tbl.'
    iam_role default
    region 'us-west-2' lzop delimiter '|' COMPUPDATE PRESET;

  4. To create a manual snapshot containing incremental data, choose Clusters in the navigation pane, then choose Snapshots.
  5. Provide the necessary information and choose Create snapshot.

Because the cross-Region snapshot functionality is enabled, this incremental snapshot is automatically copied to the target Region. In the following example, the snapshot took approximately 11 minutes to copy to the target Region from the source Region. This time varies from Region to Region and is based on the amount of data being copied.

Restore snapshots to same or higher instance types in the target Region

When the latest snapshot is successfully copied to the target Region, you can restore the snapshot.

  1. Open the Amazon Redshift console in the target Region.
  2. On the Snapshots page, select your snapshot.
  3. On the Restore from snapshot menu, choose Restore to a provisioned cluster.
  4. For Cluster identifier, enter redshift-cluster-target.
  5. For Node type¸ you can use the same instance type or upgrade to a higher instance type.
  6. For Number of nodes, choose the number of nodes you need.

If you choose to upgrade your instance to RA3, refer to Upgrading to RA3 node types to determine the number of nodes you need.

For this post, we still use four nodes of the dc2.large instance type.

  1. Under Database configurations, for Database name¸ enter stagingdb.
  2. Leave the rest of the settings as default (or modify them per your requirements) and choose Restore cluster from snapshot.

A new Amazon Redshift cluster gets provisioned from the snapshot in the target Region.

Follow the same security best practices that you applied to the source cluster for the target cluster.

Point your applications to the new Amazon Redshift cluster

When the target cluster is available, configure your applications to connect to the new target Amazon Redshift endpoints. New clusters have a different Domain Name System (DNS) endpoint. This means that you must update all clients to refer to the new endpoint.

Inter-Region migration steps for encrypted data

If the data in your Amazon Redshift cluster is encrypted, you need to perform additional steps in your inter-Region migration. If data encryption is already enabled, you can skip to the steps for snapshot copy grant.

Enable data encryption in the source Amazon Redshift cluster

To enable data encryption in the source cluster, we use Amazon Key Management Service (AWS KMS).

  1. Open the AWS KMS console in the source Region.
  2. Create a KMS key called redshift-source-key.
  3. Enable key rotation.
  4. On the Amazon Redshift console (still in the source Region), select your cluster.
  5. If a cross-Region snapshot is enabled, choose Configure cross-region snapshot on the Actions menu.
  6. Select No and choose Save.
  7. On the Properties tab, in the Database configurations section, choose the Edit menu and choose Edit encryption.
  8. Select Use AWS Key Management Service (AWS KMS).
  9. Select Use key from current account and choose the key you created.
  10. Choose Save changes.

The time taken to encrypt the data is based on the amount of data present in the cluster.

If the data is encrypted, any subsequent snapshots are also automatically encrypted.

Snapshot copy grant

When you copy the encrypted snapshots to the target Region, the existing KMS key in the source Region doesn’t work in the target Region because KMS keys are specific to the Region where they’re created. You need to create another KMS key in the target Region and grant it access.

  1. Open the AWS KMS console in the target Region.
  2. If you don’t already have a KMS key to use, create a key called redshift-target-key.
  3. Enable key rotation.
  4. Open the Amazon Redshift console in the source Region.
  5. Select the cluster and on the Actions menu, choose Configure cross-region snapshot.
  6. For Copy snapshots, select Yes.
  7. For Choose a snapshot copy grant, choose Create new grant.
  8. For Snapshot copy grant name, enter redshift-target-grant.
  9. For KMS key ID, choose the key that you created for the grant.

If you don’t specify a key ID, the grant applies to your default key.

  1. Choose Save.

Any subsequent snapshots copied to the target Region are now encrypted with the key created in the target Region.

  1. After the snapshot is copied to the target Region, restore the cluster from the encrypted snapshot, following the steps from earlier in this post.

For more details on the encryption process, refer to Copying AWS KMS–encrypted snapshots to another AWS Region.

After you restore from the encrypted snapshot, the restored cluster is automatically encrypted with the key you created in the target Region.

Make sure that your applications point to the new cluster endpoint when the cluster is available.

Clean up

If you created any Amazon Redshift clusters or snapshots for testing purposes, you can delete these resources to avoid incurring any future charges.

For instructions on deleting the snapshots, refer to Deleting manual snapshots.

For instructions on deleting the Amazon Redshift cluster, refer to Deleting a cluster.

Conclusion

This post showed how to migrate your Amazon Redshift cluster to another Region using the cross-Region snapshot functionality. Amazon Redshift migration requires some prior planning depending on the Regions involved and the amount of data to copy over. Snapshot creation and copying may take a significant amount of time. The first snapshot contains all the data in the cluster and therefore it may take longer, but subsequent snapshots contain incremental changes and may take less time depending on the changes made. It’s a good idea to estimate how much time the snapshot copy takes by performing some tests in your staging environments with snapshots of a similar size or slightly larger than the ones in the production environment so you can plan for minimal data loss and meet RTO and RPO requirements.

For further details about the Amazon Redshift snapshot functionality, refer to Working with Snapshots.


About the Author

Sindhura Palakodety is a Solutions Architect at Amazon Web Services. She is passionate about helping customers build enterprise-scale Well-Architected solutions on the AWS platform and specializes in Containers and Data Analytics domains.

Best practices for right-sizing your Apache Kafka clusters to optimize performance and cost

Post Syndicated from Steffen Hausmann original https://aws.amazon.com/blogs/big-data/best-practices-for-right-sizing-your-apache-kafka-clusters-to-optimize-performance-and-cost/

Apache Kafka is well known for its performance and tunability to optimize for various use cases. But sometimes it can be challenging to find the right infrastructure configuration that meets your specific performance requirements while minimizing the infrastructure cost.

This post explains how the underlying infrastructure affects Apache Kafka performance. We discuss strategies on how to size your clusters to meet your throughput, availability, and latency requirements. Along the way, we answer questions like “when does it make sense to scale up vs. scale out?” We end with guidance on how to continuously verify the size of your production clusters.

We use performance tests to illustrate and explain the effect and trade-off of different strategies to size your cluster. But as usual, it’s important to not just blindly trust benchmarks you happen to find on the internet. We therefore not only show how to reproduce the results, but also explain how to use a performance testing framework to run your own tests for your specific workload characteristics.

Sizing Apache Kafka clusters

The most common resource bottlenecks for clusters from an infrastructure perspective are network throughput, storage throughput, and network throughput between brokers and the storage backend for brokers using network attached storage such as Amazon Elastic Block Store (Amazon EBS).

The remainder of the post explains how the sustained throughput limit of a cluster not only depends on the storage and network throughput limits of the brokers, but also on the number of brokers and consumer groups as well as the replication factor r. We derive the following formula (referred to as Equation 1 throughout this post) for the theoretical sustained throughput limit tcluster given the infrastructure characteristics of a specific cluster:

max(tcluster) <= min{
  max(tstorage) * #brokers/r,
  max(tEBSnetwork) * #brokers/r,
  max(tEC2network) * #brokers/(#consumer groups + r-1)
}

For production clusters, it’s a best practice to target the actual throughput at 80% of its theoretical sustained throughput limit. Consider, for instance, a three-node cluster with m5.12xlarge brokers, a replication factor of 3, EBS volumes with a baseline throughput of 1000 MB/sec, and two consumer groups consuming from the tip of the topic. Taking all these parameters into account, the sustained throughput absorbed by the cluster should target 800 MB/sec.

However, this throughput calculation is merely providing an upper bound for workloads that are optimized for high throughput scenarios. Regardless of how you configure your topics and the clients reading from and writing into these topics, the cluster can’t absorb more throughput. For workloads with different characteristics, like latency-sensitive or compute-intensive workloads, the actual throughput that can be absorbed by a cluster while meeting these additional requirements is often smaller.

To find the right configuration for your workload, you need to work backward from your use case and determine the appropriate throughput, availability, durability, and latency requirements. Then, use Equation 1 to obtain the initial sizing of your cluster based on your throughput, durability, and storage requirements. Verify this initial cluster sizing by running performance tests and then fine-tune the cluster size, cluster configuration, and client configuration to meet your other requirements. Lastly, add additional capacity for production clusters so they can still ingest the expected throughput even if the cluster is running at reduced capacity, for instance, during maintenance, scaling, or loss of a broker. Depending on your workload, you may even consider adding enough spare capacity to withstanding an event affecting all brokers of an entire Availability Zone.

The remainder of the post dives deeper into the aspects of cluster sizing. The most important aspects are as follows:

  • There is often a choice between either scaling out or scaling up to increase the throughput and performance of a cluster. Small brokers give you smaller capacity increments and have a smaller blast radius in case they become unavailable. But having many small brokers increases the time it takes for operations that require a rolling update to brokers to complete, and increases the likelihood for failure.
  • All traffic that producers are sending into a cluster is persisted to disk. Therefore, the underlying throughput of the storage volume can become the bottleneck of the cluster. In this case, it makes sense to either increase the volume throughput if possible or to add more volumes to the cluster.
  • All data persisted on EBS volumes traverses the network. Amazon EBS-optimized instances come with dedicated capacity for Amazon EBS I/O, but the dedicated Amazon EBS network can still become the bottleneck of the cluster. In this case, it makes sense to scale up brokers, because larger brokers have higher Amazon EBS network throughput.
  • The more consumer groups that are reading from the cluster, the more data that egresses over the Amazon Elastic Compute Cloud (Amazon EC2) network of the brokers. Depending on the broker type and size, the Amazon EC2 network can become the bottleneck of the cluster. In that case, it makes sense to scale up brokers, because larger brokers have higher Amazon EC2 network throughput.
  • For p99 put latencies, there is a substantial performance impact of enabling in-cluster encryption. Scaling up the brokers of a cluster can substantially reduce the p99 put latency compared to smaller brokers.
  • When consumers fall behind or need to reprocess historic data, the requested data may no longer reside in memory, and brokers need to fetch data from the storage volume. This causes non-sequential I/O reads. When using EBS volumes, it also causes additional network traffic to the volume. Using larger brokers with more memory or enabling compression can mitigate this effect.
  • Using the burst capabilities of your cluster is a very powerful way to absorb sudden throughput spikes without scaling your cluster, which takes time to complete. Burst capacity also helps in response to operational events. For instance, when brokers are undergoing maintenance or partitions need to be rebalanced within the cluster, they can use the burst performance to complete the operation faster.
  • Monitor or alarm on important infrastructure-related cluster metrics such as BytesInPerSec, ReplicationBytesInPerSec, BytesOutPerSec, and ReplicationBytesOutPerSec to receive notification when the current cluster size is no longer optimal for the current cluster size.

The remainder of the post provides additional context and explains the reasoning behind these recommendations.

Understanding Apache Kafka performance bottlenecks

Before we start talking about performance bottlenecks from an infrastructure perspective, let’s revisit how data flows within a cluster.

For this post, we assume that producers and consumers are behaving well and according to best practices, unless explicitly stated differently. For example, we assume the producers are evenly balancing the load between brokers, brokers host the same number of partitions, there are enough partitions to ingest the throughput, consumers consume directly from the tip of the stream, and so on. The brokers are receiving the same load and are doing the same work. We therefore just focus on Broker 1 in the following diagram of a data flow within a cluster.

Data flow within a Kafka cluster

The producers send an aggregate throughput of tcluster into the cluster. As the traffic evenly spreads across brokers, Broker 1 receives an incoming throughput of tcluster/3. With a replication factor of 3, Broker 1 replicates the traffic it directly receives to the two other brokers (the blue lines). Likewise, Broker 1 receives replication traffic from two brokers (the red lines). Each consumer group consumes the traffic that is directly produced into Broker 1 (the green lines). All traffic that arrives in Broker 1 from producers and replication traffic from other brokers is eventually persisted to storage volumes attached to the broker.

Accordingly, the throughput of the storage volume and the broker network are both tightly coupled with the overall cluster throughput and warrant a closer look.

Storage backend throughput characteristics

Apache Kafka has been designed to utilize large sequential I/O operations when writing data to disk. Producers are only ever appending data to the tip of the log, causing sequential writes. Moreover, Apache Kafka is not synchronously flushing to disk. Instead, Apache Kafka is writing to the page cache, leaving it up to the operating system to flush pages to disk. This results in large sequential I/O operations, which optimizes disk throughput.

For many practical purposes, the broker can drive the full throughput of the volume and is not limited by IOPS. We assume that consumers are reading from the tip of the topic. This implies that performance of EBS volumes is throughput bound and not I/O bound, and reads are served from the page cache.

The ingress throughput of the storage backend depends on the data that producers are sending directly to the broker plus the replication traffic the broker is receiving from its peers. For an aggregated throughput produced into the cluster of tcluster and a replication factor of r, the throughput received by the broker storage is as follows:

tstorage = tcluster/#brokers + tcluster/#brokers * (r-1)
        = tcluster/#brokers * r

Therefore, the sustained throughput limit of the entire cluster is bound by the following:

max(tcluster) <= max(tstorage) * #brokers/r

AWS offers different options for block storage: instance storage and Amazon EBS. Instance storage is located on disks that are physically attached to the host computer, whereas Amazon EBS is network attached storage.

Instance families that come with instance storage achieve high IOPS and disk throughput. For instance, Amazon EC2 I3 instances include NVMe SSD-based instance storage optimized for low latency, very high random I/O performance, and high sequential read throughput. However, the volumes are tied to brokers. Their characteristics, in particular their size, only depend on the instance family, and the volume size can’t be adapted. Moreover, when a broker fails and needs to be replaced, the storage volume is lost. The replacement broker then needs to replicate the data from other brokers. This replication causes additional load on the cluster in addition to the reduced capacity from the broker loss.

In contrast, the characteristics of EBS volumes can be adapted while they’re in use. You can use these capabilities to automatically scale broker storage over time rather than provisioning storage for peak or adding additional brokers. Some EBS volume types, such as gp3, io2, and st1, also allow you to adapt the throughput and IOPS characteristics of existing volumes. Moreover, the lifecycle of EBS volumes is independent of the broker—if a broker fails and needs to be replaced, the EBS volume can be reattached to the replacement broker. This avoids most of the otherwise required replication traffic.

Using EBS volumes is therefore often a good choice for many common Apache Kafka workloads. They provide more flexibility and enable faster scaling and recovery operations.

Amazon EBS throughput characteristics

When using Amazon EBS as the storage backend, there are several volume types to choose from. The throughput characteristics of the different volume types range between 128 MB/sec and 4000 MB/sec (for more information, refer to Amazon EBS volume types). You can even choose to attach multiple volumes to a broker to increase the throughput beyond what can be delivered by a single volume.

However, Amazon EBS is network attached storage. All data a broker is writing to an EBS volume needs to traverse the network to the Amazon EBS backend. Newer generation instance families, like the M5 family, are Amazon EBS-optimized instances with dedicated capacity for Amazon EBS I/O. But there are limits on the throughput and the IOPS that depend on the size of the instance and not only on the volume size. The dedicated capacity for Amazon EBS provides a higher baseline throughput and IOPS for larger instances. The capacity ranges between 81 MB/sec and 2375 MB/sec. For more information, refer to Supported instance types.

When using Amazon EBS for storage, we can adapt the formula for the cluster sustained throughput limit to obtain a tighter upper bound:

max(tcluster) <= min{
  max(tstorage) * #brokers/r,
  max(tEBSnetwork) * #brokers/r
}

Amazon EC2 network throughput

So far, we have only considered network traffic to the EBS volume. But replication and the consumer groups also cause Amazon EC2 network traffic out of the broker. The traffic that producers are sending into a broker is replicated to r-1 brokers. Moreover, every consumer group reads the traffic that a broker ingests. Therefore, the overall outgoing network traffic is as follows:

tEC2network = tcluster/#brokers * #consumer groups + tcluster/#brokers * (r–1)
          = tcluster/#brokers * (#consumer groups + r-1)

Taking this traffic into account finally gives us a reasonable upper bound for the sustained throughput limit of the cluster, which we have already seen in Equation 1:

max(tcluster) <= min{
  max(tstorage) * #brokers/r,
  max(tEBSnetwork) * #brokers/r,
  max(tEC2network) * #brokers/(#consumer groups + r-1)
}

For production workloads, we recommend keeping the actual throughput of your workload below 80% of the theoretical sustained throughput limit as it’s determined by this formula. Furthermore, we assume that all data producers sent into the cluster are eventually read by at least one consumer group. When the number of consumers is larger or equal than 1, the Amazon EC2 network traffic out of a broker is always higher than the traffic into the broker. We can therefore ignore data traffic into brokers as a potential bottleneck.

With Equation 1, we can verify if a cluster with a given infrastructure can absorb the throughput required for our workload under ideal conditions. For more information about the Amazon EC2 network bandwidth of m5.8xlarge and larger instances, refer to Amazon EC2 Instance Types. You can also find the Amazon EBS bandwidth of m5.4xlarge instances on the same page. Smaller instances use credit-based systems for Amazon EC2 network bandwidth and the Amazon EBS bandwidth. For the Amazon EC2 network baseline bandwidth, refer to Network performance. For the Amazon EBS baseline bandwidth, refer to Supported instance types.

Right-size your cluster to optimize for performance and cost

So, what do we take from this? Most importantly, keep in mind that that these results only indicate the sustained throughput limit of a cluster under ideal conditions. These results can give you a general number for the expected sustained throughput limit of your clusters. But you must run your own experiments to verify these results for your specific workload and configuration.

However, we can draw a few conclusions from this throughput estimation: adding brokers increases the sustained cluster throughput. Similarly, decreasing the replication factor increases the sustained cluster throughput. Adding more than one consumer group may reduce the sustained cluster throughput if the Amazon EC2 network becomes the bottleneck.

Let’s run a couple of experiments to get empirical data on practical sustained cluster throughput that also accounts for producer put latencies. For these tests, we keep the throughput within the recommended 80% of the sustained throughput limit of clusters. When running your own tests, you may notice that clusters can even deliver higher throughput than what we show.

Measure Amazon MSK cluster throughput and put latencies

To create the infrastructure for the experiments, we use Amazon Managed Streaming for Apache Kafka (Amazon MSK). Amazon MSK provisions and manages highly available Apache Kafka clusters that are backed by Amazon EBS storage. The following discussion therefore also applies to clusters that have not been provisioned through Amazon MSK, if backed by EBS volumes.

The experiments are based on the kafka-producer-perf-test.sh and kafka-consumer-perf-test.sh tools that are included in the Apache Kafka distribution. The tests use six producers and two consumer groups with six consumers each that are concurrently reading and writing from the cluster. As mentioned before, we make sure that clients and brokers are behaving well and according to best practices: producers are evenly balancing the load between brokers, brokers host the same number of partitions, consumers consume directly from the tip of the stream, producers and consumers are over-provisioned so that they don’t become a bottleneck in the measurements, and so on.

We use clusters that have their brokers deployed to three Availability Zones. Moreover, replication is set to 3 and acks is set to all to achieve a high durability of the data that is persisted in the cluster. We also configured a batch.size of 256 kB or 512 kB and set linger.ms to 5 milliseconds, which reduces the overhead of ingesting small batches of records and therefore optimizes throughput. The number of partitions is adjusted to the broker size and cluster throughput.

The configuration for brokers larger than m5.2xlarge has been adapted according to the guidance of the Amazon MSK Developer Guide. In particular when using provisioned throughput, it’s essential to optimize the cluster configuration accordingly.

The following figure compares put latencies for three clusters with different broker sizes. For each cluster, the producers are running roughly a dozen individual performance tests with different throughput configurations. Initially, the producers produce a combined throughput of 16 MB/sec into the cluster and gradually increase the throughput with every individual test. Each individual test runs for 1 hour. For instances with burstable performance characteristics, credits are depleted before starting the actual performance measurement.

Comparing throughput and put latencies of different broker sizes

For brokers with more than 334 GB of storage, we can assume the EBS volume has a baseline throughput of 250 MB/sec. The Amazon EBS network baseline throughput is 81.25, 143.75, 287.5, and 593.75 MB/sec for the different broker sizes (for more information, see Supported instance types). The Amazon EC2 network baseline throughput is 96, 160, 320, and 640 MB/sec (for more information, see Network performance). Note that this only considers the sustained throughput; we discuss burst performance in a later section.

For a three-node cluster with replication 3 and two consumer groups, the recommended ingress throughput limits as per Equation 1 is as follows.

Broker size Recommended sustained throughput limit
m5.large 58 MB/sec
m5.xlarge 96 MB/sec
m5.2xlarge 192 MB/sec
m5.4xlarge 200 MB/sec

Even though the m5.4xlarge brokers have twice the number of vCPUs and memory compared to m5.2xlarge brokers, the cluster sustained throughput limit barely increases when scaling the brokers from m5.2xlarge to m5.4xlarge. That’s because with this configuration, the EBS volume used by brokers becomes a bottleneck. Remember that we’ve assumed a baseline throughput of 250 MB/sec for these volumes. For a three-node cluster and replication factor of 3, each broker needs to write the same traffic to the EBS volume as is sent to the cluster itself. And because the 80% of the baseline throughput of the EBS volume is 200 MB/sec, the recommended sustained throughput limit of the cluster with m5.4xlarge brokers is 200 MB/sec.

The next section describes how you can use provisioned throughput to increase the baseline throughput of EBS volumes and therefore increase the sustained throughput limit of the entire cluster.

Increase broker throughput with provisioned throughput

From the previous results, you can see that from a pure throughput perspective there is little benefit to increasing the broker size from m5.2xlarge to m5.4xlarge with the default cluster configuration. The baseline throughput of the EBS volume used by brokers limits their throughput. However, Amazon MSK recently launched the ability to provision storage throughput up to 1000 MB/sec. For self-managed clusters you can use gp3, io2, or st1 volume types to achieve a similar effect. Depending on the broker size, this can substantially increase the overall cluster throughput.

The following figure compares the cluster throughput and put latencies of different broker sizes and different provisioned throughput configurations.

Comparing max sustained throughput of different brokers with and without provisioned throughput

For a three-node cluster with replication 3 and two consumer groups, the recommended ingress throughput limits as per Equation 1 are as follows.

Broker size Provisioned throughput configuration Recommended sustained throughput limit
m5.4xlarge – 200 MB/sec
m5.4xlarge 480 MB/sec 384 MB/sec
m5.8xlarge 850 MB/sec 680 MB/sec
m5.12xlarge 1000 MB/sec 800 MB/sec
m5.16xlarge 1000 MB/sec 800 MB/sec

The provisioned throughput configuration was carefully chosen for the given workload. With two consumer groups consuming from the cluster, it doesn’t make sense to increase the provisioned throughput of m4.4xlarge brokers beyond the 480 MB/sec. The Amazon EC2 network, not the EBS volume throughput, restricts the recommended sustained throughput limit of the cluster to 384 MB/sec. But for workloads with a different number of consumers, it can make sense to further increase or decrease the provisioned throughput configuration to match the baseline throughput of the Amazon EC2 network.

Scale out to increase cluster write throughput

Scaling out the cluster naturally increases the cluster throughput. But how does this affect performance and cost? Let’s compare the throughput of two different clusters: a three-node m5.4xlarge and a six-node m5.2xlarge cluster, as shown in the following figure. The storage size for the m5.4xlarge cluster has been adapted so that both clusters have the same total storage capacity and therefore the cost for these clusters is identical.

Comparing throughput of different cluster configurations

The six-node cluster has almost double the throughput of the three-node cluster and substantially lower p99 put latencies. Just looking at ingress throughput of the cluster, it can make sense to scale out rather than to scale up, if you need more that 200 MB/sec of throughput. The following table summarizes these recommendations.

Number of brokers Recommended sustained throughput limit
m5.large m5.2xlarge m5.4xlarge
3 58 MB/sec 192 MB/sec 200 MB/sec
6 115 MB/sec 384 MB/sec 400 MB/sec
9 173 MB/sec 576 MB/sec 600 MB/sec

In this case, we could have also used provisioned throughput to increase the throughput of the cluster. Compare, for instance, the sustained throughput limit of the six-node m5.2xlarge cluster in the preceding figure with that of the three-node m5.4xlarge cluster with provisioned throughput from the earlier example. The sustained throughput limit of both clusters is identical, which is caused by the same Amazon EC2 network bandwidth limit that usually grows proportional with the broker size.

Scale up to increase cluster read throughput

The more consumer groups are reading from the cluster, the more data egresses over the Amazon EC2 network of the brokers. Larger brokers have a higher network baseline throughput (up to 25 Gb/sec) and can therefore support more consumer groups reading from the cluster.

The following figure compares how latency and throughput changes for the different number of consumer groups for a three-node m5.2xlarge cluster.

Comparing the max sustained throughput of a cluster for different number of consumer groups

As demonstrated in this figure, increasing the number of consumer groups reading from a cluster decreases its sustained throughput limit. The more consumers that consumer groups are reading from the cluster, the more data that needs to egress from the brokers over the Amazon EC2 network. The following table summarizes these recommendations.

Consumer groups Recommended sustained throughput limit
m5.large m5.2xlarge m5.4xlarge
0 65 MB/sec 200 MB/sec 200 MB/sec
2 58 MB/sec 192 MB/sec 200 MB/sec
4 38 MB/sec 128 MB/sec 200 MB/sec
6 29 MB/sec 96 MB/sec 192 MB/sec

The broker size determines the Amazon EC2 network throughput, and there is no way to increase it other than scaling up. Accordingly, to scale the read throughput of the cluster, you either need to scale up brokers or increase the number of brokers.

Balance broker size and number of brokers

When sizing a cluster, you often have the choice to either scale out or scale up to increase the throughput and performance of a cluster. Assuming storage size is adjusted accordingly, the cost of those two options is often identical. So when should you scale out or scale up?

Using smaller brokers allows you to scale the capacity in smaller increments. Amazon MSK enforces that brokers are evenly balanced across all configured Availability Zones. You can therefore only add a number of brokers that are a multiple of the number of Availability Zones. For instance, if you add three brokers to a three-node m5.4xlarge cluster with provisioned throughput, you increase the recommended sustained cluster throughput limit by 100%, from 384 MB/sec to 768 MB/sec. However, if you add three brokers to a six-node m5.2xlarge cluster, you increase the recommended cluster throughput limit by 50%, from 384 MB/sec to 576 MB/sec.

Having too few very large brokers also increases the blast radius in case a single broker is down for maintenance or because of failure of the underlying infrastructure. For instance, for a three-node cluster, a single broker corresponds to 33% of the cluster capacity, whereas it’s only 17% for a six-node cluster. When provisioning clusters to best practices, you have added enough spare capacity to not impact your workload during these operations. But for larger brokers, you may need to add more spare capacity than required because of the larger capacity increments.

However, the more brokers are part of the cluster, the longer it takes for maintenance and update operations to complete. The service applies these changes sequentially to one broker at a time to minimize impact to the availability of the cluster. When provisioning clusters to best practices, you have added enough spare capacity to not impact your workload during these operations. But the time it takes to complete the operation is still something to consider because you need to wait for one operation to complete before you can run another one.

You need to find a balance that works for your workload. Small brokers are more flexible because they give you smaller capacity increments. But having too many small brokers increases the time it takes for maintenance operations to complete and increase the likelihood for failure. Clusters with fewer larger brokers complete update operations faster. But they come with larger capacity increments and a higher blast radius in case of broker failure.

Scale up for CPU intensive workloads

So far, we have we have focused on the network throughput of brokers. But there are other factors that determine the throughput and latency of the cluster. One of them is encryption. Apache Kafka has several layers where encryption can protect data in transit and at rest: encryption of the data stored on the storage volumes, encryption of traffic between brokers, and encryption of traffic between clients and brokers.

Amazon MSK always encrypts your data at rest. You can specify the AWS Key Management Service (AWS KMS) customer master key (CMK) that you want Amazon MSK to use to encrypt your data at rest. If you don’t specify a CMK, Amazon MSK creates an AWS managed CMK for you and uses it on your behalf. For data that is in-flight, you can choose to enable encryption of data between producers and brokers (in-transit encryption), between brokers (in-cluster encryption), or both.

Turning on in-cluster encryption forces the brokers to encrypt and decrypt individual messages. Therefore, sending messages over the network can no longer take advantage of the efficient zero copy operation. This results in additional CPU and memory bandwidth overhead.

The following figure shows the performance impact for these options for three-node clusters with m5.large and m5.2xlarge brokers.

Comparing put latencies for different encryption settings and broker sizes

For p99 put latencies, there is a substantial performance impact of enabling in-cluster encryption. As shown in the preceding graphs, scaling up brokers can mitigate the effect. The p99 put latency at 52 MB/sec throughput of an m5.large cluster with in-transit and in-cluster encryption is above 200 milliseconds (red and green dashed line in the left graph). Scaling the cluster to m5.2xlarge brokers brings down the p99 put latency at the same throughput to below 15 milliseconds (red and green dashed line in the right graph).

There are other factors that can increase CPU requirements. Compression as well as log compaction can also impact the load on clusters.

Scale up for a consumer not reading from the tip of the stream

We have designed the performance tests such that consumers are always reading from the tip of the topic. This effectively means that brokers can serve the reads from consumers directly from memory, not causing any read I/O to Amazon EBS. In contrast to all other sections of the post, we drop this assumption to understand how consumers that have fallen behind can impact cluster performance. The following diagram illustrates this design.

Illustration of cunsomers reading from page cache and storage

When a consumer falls behind or needs to recover from failure it reprocesses older messages. In that case, the pages holding the data may no longer reside in the page cache, and brokers need to fetch the data from the EBS volume. That causes additional network traffic to the volume and non-sequential I/O reads. This can substantially impact the throughput of the EBS volume.

In an extreme case, a backfill operation can reprocess the complete history of events. In that case, the operation not only causes additional I/O to the EBS volume, it also loads a lot of pages holding historic data into the page cache, effectively evicting pages that are holding more recent data. Consequently, consumers that are slightly behind the tip of the topic and would usually read directly from the page cache may now cause additional I/O to the EBS volume because the backfill operation has evicted the page they need to read from memory.

One option to mitigate these scenarios is to enable compression. By compressing the raw data, brokers can keep more data in the page cache before it’s evicted from memory. However, keep in mind that compression requires more CPU resources. If you can’t enable compression or if enabling compression can’t mitigate this scenario, you can also increase the size of the page cache by increasing the memory available to brokers by scaling up.

Use burst performance to accommodate traffic spikes

So far, we’ve been looking at the sustained throughput limit of clusters. That’s the throughput the cluster can sustain indefinitely. For streaming workloads, it’s important to understand baseline the throughput requirements and size accordingly. However, the Amazon EC2 network, Amazon EBS network, and Amazon EBS storage system are based on a credit system; they provide a certain baseline throughput and can burst to a higher throughput for a certain period based on the instance size. This directly translates to the throughput of MSK clusters. MSK clusters have a sustained throughput limit and can burst to a higher throughput for short periods.

The blue line in the following graph shows the aggregate throughput of a three-node m5.large cluster with two consumer groups. During the entire experiment, producers are trying to send data as quickly as possible into the cluster. So, although 80% of the sustained throughput limit of the cluster is around 58 MB/sec, the cluster can burst to a throughput well above 200 MB/sec for almost half an hour.

Throughput of a fully saturated cluster over time

Think of it this way: When configuring the underlying infrastructure of a cluster, you’re basically provisioning a cluster with a certain sustained throughput limit. Given the burst capabilities, the cluster can then instantaneously absorb much higher throughput for some time. For instance, if the average throughput of your workload is usually around 50 MB/sec, the three-node m5.large cluster in the preceding graph can ingress more than four times its usual throughput for roughly half an hour. And that’s without any changes required. This burst to a higher throughput is completely transparent and doesn’t require any scaling operation.

This is a very powerful way to absorb sudden throughput spikes without scaling your cluster, which takes time to complete. Moreover, the additional capacity also helps in response to operational events. For instance, when brokers are undergoing maintenance or partitions need to be rebalanced within the cluster, they can use burst performance to get brokers online and back in sync more quickly. The burst capacity is also very valuable to quickly recover from operational events that affect an entire Availability Zone and cause a lot of replication traffic in response to the event.

Monitoring and continuous optimization

So far, we have focused on the initial sizing of your cluster. But after you determine the correct initial cluster size, the sizing efforts shouldn’t stop. It’s important to keep reviewing your workload after it’s running in production to know if the broker size is still appropriate. Your initial assumptions may no longer hold in practice, or your design goals might have changed. After all, one of the great benefits of cloud computing is that you can adapt the underlying infrastructure through an API call.

As we have mentioned before, the throughput of your production clusters should target 80% of their sustained throughput limit. When the underlying infrastructure is starting to experience throttling because it has exceeded the throughput limit for too long, you need to scale up the cluster. Ideally, you would even scale the cluster before it reaches this point. By default, Amazon MSK exposes three metrics that indicate when this throttling is applied to the underlying infrastructure:

  • BurstBalance – Indicates the remaining balance of I/O burst credits for EBS volumes. If this metric starts to drop, consider increasing the size of the EBS volume to increase the volume baseline performance. If Amazon CloudWatch isn’t reporting this metric for your cluster, your volumes are larger than 5.3 TB and no longer subject to burst credits.
  • CPUCreditBalance – Only relevant for brokers of the T3 family and indicates the amount of available CPU credits. When this metric starts to drop, brokers are consuming CPU credits to burst beyond their CPU baseline performance. Consider changing the broker type to the M5 family.
  • TrafficShaping – A high-level metric indicating the number of packets dropped due to exceeding network allocations. Finer detail is available when the PER_BROKER monitoring level is configured for the cluster. Scale up brokers if this metric is elevated during your typical workloads.

In the previous example, we saw the cluster throughput drop substantially after network credits were depleted and traffic shaping was applied. Even if we didn’t know the maximum sustained throughput limit of the cluster, the TrafficShaping metric in the following graph clearly indicates that we need to scale up the brokers to avoid further throttling on the Amazon EC2 network layer.

Throttling of the broker network correlates with the cluster throughput drop

Amazon MSK exposes additional metrics that help you understand whether your cluster is over- or under-provisioned. As part of the sizing exercise, you have determined the sustained throughput limit of your cluster. You can monitor or even create alarms on the BytesInPerSec, ReplicationBytesInPerSec, BytesOutPerSec, and ReplicationBytesInPerSec metrics of the cluster to receive notification when the current cluster size is no longer optimal for the current workload characteristics. Likewise, you can monitor the CPUIdle metric and alarm when your cluster is under- or over-provisioned in terms of CPU utilization.

Those are only the most relevant metrics to monitor the size of your cluster from an infrastructure perspective. You should also monitor the health of the cluster and the entire workload. For further guidance on monitoring clusters, refer to Best Practices.

A framework for testing Apache Kafka performance

As mentioned before, you must run your own tests to verify if the performance of a cluster matches your specific workload characteristics. We have published a performance testing framework on GitHub that helps automate the scheduling and visualization of many tests. We have been using the same framework to generate the graphs that we have been discussing in this post.

The framework is based on the kafka-producer-perf-test.sh and kafka-consumer-perf-test.sh tools that are part of the Apache Kafka distribution. It builds automation and visualization around these tools.

For smaller brokers that are subject to bust capabilities, you can also configure the framework to first generate excess load over an extended period to deplete networking, storage, or storage network credits. After the credit depletion completes, the framework runs the actual performance test. This is important to measure the performance of clusters that can be sustained indefinitely rather than measuring peak performance, which can only be sustained for some time.

To run your own test, refer to the GitHub repository, where you can find the AWS Cloud Development Kit (AWS CDK) template and additional documentation on how to configure, run, and visualize the results of performance test.

Conclusion

We’ve discussed various factors that contribute to the performance of Apache Kafka from an infrastructure perspective. Although we’ve focused on Apache Kafka, we also learned about Amazon EC2 networking and Amazon EBS performance characteristics.

To find the right size for your clusters, work backward from your use case to determine the throughput, availability, durability, and latency requirements.

Start with an initial sizing of your cluster based on your throughput, storage, and durability requirements. Scale out or use provisioned throughput to increase the write throughput of the cluster. Scale up to increase the number of consumers that can consume from the cluster. Scale up to facilitate in-transit or in-cluster encryption and consumers that aren’t reading form the tip of the stream.

Verify this initial cluster sizing by running performance tests and then fine-tune the cluster size and configuration to match other requirements, such as latency. Add additional capacity for production clusters so that they can withstand the maintenance or loss of a broker. Depending on your workload, you may even consider withstanding an event affecting an entire Availability Zone. Finally, keep monitoring your cluster metrics and resize the cluster in case your initial assumptions no longer hold.


About the Author

Steffen Hausmann is a Principal Streaming Architect at AWS. He works with customers around the globe to design and build streaming architectures so that they can get value from analyzing their streaming data. He holds a doctorate degree in computer science from the University of Munich and in his free time, he tries to lure his daughters into tech with cute stickers he collects at conferences.


The collective thoughts of the interwebz