Cignpost Diagnostics, which trades as ExpressTest and offers £35 tests for holidaymakers, said it holds the right to analyse samples from seals to “learn more about human health” — and sell information on to third parties.
Individuals are required to give informed consent for their sensitive medical data to be used but customers’ consent for their DNA to be sold now as buried in Cignpost’s online documents.
Here at Zabbix, the security of our product is our top priority. It has come to our attention that two potential CVE issues have been highlighted in tech media outlets – CVE-2022-23131 and CVE-2022-23134.
The most critical issue – CVE-2022-23131, affects only Zabbix instances where SAML SSO authentication is in use. While CVE-2022-23134 Affects Zabbix 5.4.x releases older than Zabbix 5.4.9.
Zabbix is aware of the following vulnerabilities And they have since been fixed inZabbix version 5.4.9 and the stable release of Zabbix 6.0 LTS.
CVE-2022-23131 – Unsafe client-side session storage leading to authentication bypass/instance takeover via Zabbix Frontend with configured SAML
Affected versions: 5.4.0 – 5.4.8; 6.0.0alpha1
CVE-2022-23134 – Possible view of the setup pages by unauthenticated users if config file already exists
We urge everyone who is using the SAML SSO authentication features in your environment o update your Zabbix instance to one of the aforementioned versions where the security vulnerabilities have been resolved.
„Шоуто трябва да продължи“ – със заглавието на финалната песен от последния албум на Queen преди смъртта на Фреди Меркюри може да се обобщи същността на шоубизнеса. Още неизлезли от пандемията от COVID-19, виждаме началото на война, която ни засяга пряко. Ала колкото по-мрачни са перспективите, толкова по-силна е потребността за бягство от реалността под формата на забавление. Европа на 20-те и 30-те години на ХХ век знае най-добре. Затова не е учудващо, че вместо всекидневно да следят статистиките за смъртността от коронавируса или да се питат откъде са се появили танковете в Донбас, мнозина у нас се занимават с… един ерген и потенциалните му избранички. Впрочем няма пречка човек да обсъжда с еднаква по интензитет страст и това, и сериозните обществени проблеми.
Новото риалити шоу по bTV„Ергенът“ предизвика реакции дори у хора, които не са го гледали.
Концепцията му е следната – 22 жени се борят за сърцето на един мъж. Онези, които не получат от ергена роза, отпадат, докато не остане избраницата на главния герой. Получилата „специалната“ роза е фаворитката на ергена за конкретната серия. Борбата се провежда на екзотично-романтичен фон – в луксозен частен комплекс в Турция. Обстановката включва море, басейни, зеленина, вечерни светлини, местенца за усамотяване, дълги рокли, които повече показват, отколкото скриват. И разбира се, рози.
Сред тези хубости кандидатките прилагат разнообразни стратегии, за да се харесат на ергена. Дават му подаръци, борят се за време с него насаме или напротив – опитват се да направят така, че той да ги забележи и сам да ги повика. А някои се срамуват и не знаят какво да предприемат. Ергенът пък по сценарий уж се държи еднакво добре и „джентълменски“ с всички, но се старае да поддържа и интрига – на една дава „специалната“ роза, друга целува… В края на серията кандидатките се подреждат прави и чакат, някои буквално треперейки, дали ще получат роза. Ергенът до последно държи в напрежение най-треперещата и най-плачещата от тях.
Форматът впрочем не е родно откритие –
шоуто стартира в САЩ под името The Bachelor преди две десетилетия – през 2002 г. За да има някакъв джендър баланс, още на следващата година американската телевизия ABC поставя началото на вариант на риалитито, в който мъже се борят за една жена – The Bachelorette. В двата си варианта и с още няколко разклонения оригиналното предаване продължава и до днес, освен това като франчайз съществува в различни страни, а вече и у нас.
Ако bTV реши да излъчва и форма̀та, в който в центъра е жена, интересно как би се казвал той. Показателно за културата ни е, че в българския език липсва съвременно звучаща дума за женския аналог на ерген. Да си желан ерген е достойно за душата, да си неомъжена жена – недотам. „Мома“ звучи ретро и иронично, будейки асоциации със „стара мома“. А „девойка“ се свързва с възрастова група, която участничките в подобни шоута са надхвърлили.
Но да се върнем на реакциите след пилотния епизод на българското издание на „Ергенът“. Осъждащите риалитито от високи интелектуални и естетически позиции коментират преди всичко
външния вид, поведението и интелекта на кандидатките.
А определено има какво да се коментира. При някои участнички ефектите на пластичната хирургия са, да го кажем евфемистично, твърде забележими. Някои не знаят какво известно държавно предприятие има в Козлодуй. Една подарява на ергена червените си дантелени гащи, друга – икона. Една се смята за „българската Кари Брадшоу, ама по-успяла“, друга твърди, че Господ е от родния ѝ град. Изброяването на подобни примери може да продължи още дълго. Освен това всички твърдят, че имат високи критерии при избора на интимен партньор, а в същото време се борят за мъж, когото на практика не познават.
Участничките, разбира се, не са представителна извадка на жените в България. Не са и подбирани според общосподелени стандарти за женска красота и характер, друг въпрос е дали изобщо има такива в България. Нито репрезентативността, нито красотата, характерът или интелектът гарантират успеха на едно шоу. В медийна среда като българската, в която стандартите традиционно отстъпват пред популизма, решаващо за гледаемостта на едно риалити е да има интриги, скандали, карикатурни персонажи и поводи за възмущение. Ето защо, без да осъзнават, възмутените са хванати в клопката на шоуто. Критикувайки участничките, те всъщност правят безплатна реклама на „Ергенът“. По-важното е, че те
неволно възпроизвеждат сексизма, който е в основата на шоуто.
„Ергенът“ е нещо като съвременна версия на пазар за булки, в който участничките са сведени до стоки. Да намираш кусури на стоките не означава да отричаш принципа на съществуване на този пазар. Напротив, по този начин го утвърждаваш, просто искаш „по-качествени“ стоки.
Това обаче е само едната страна на медала. Ако възприемаме предаването единствено като форма на покупко-продажба на човешки същества, сериозният въпрос е не защо някои от участничките предизвикват подигравки, а защо има и кандидатки, които изглеждат читави. Защо толкова жени доброволно приемат да са част от тази игра, в която ще са гледани под лупа как си подливат вода една на друга и как треперят дали ще получат роза? Възможно е да има повече от един отговор.
От една страна, изборът на партньор често пъти е повече или по-малко пазар –
и в предмодерните времена, и в наши дни. Навремето се е гледало колко е имотен момъкът, колко е голяма зестрата на булката, а ако няма зестра – поне да е хубавка. Най-важно е било обаче родителите на двете страни да се разбират, защото те са уговаряли брака – не е било изключение младоженците дори да не се познават преди сватбата. А понякога, разказва Иван Хаджийски, булката дори са я омъжвали „за калпак“, ако младоженецът е имал работа далеч от дома.
Когато в модерния свят постепенно връзките започват да зависят от личния избор, някои успяват да си намерят партньор, без да се налага да прибягват до специални платформи за целта. За останалите има различни форми, които са повече или по-малко „пазарни“ – обяви във вестници, после – сайтове за запознанства, а днес – онлайн приложения, „бързи срещи“ и прочее. Общото при всички тях е, че потенциалните партньори се представят по най-привлекателния начин, на който са способни, след което се преценяват и отсяват взаимно – така, както човек си избира например апартамент. С тази разлика, че в случая и „апартаментът“ има думата. Една от героините от „Просто ей така…“ (продължението на „Сексът и градът“), която е брокерка на недвижими имоти, „листва“ в приложения за запознанства своя приятелка, защото през този сезон продажбите на имоти не вървят.
От друга страна, точно любовта ли търсят участничките в „Ергенът“?
Близко е до ума, че заявената идея на шоуто е трудноизпълнима на практика. Това, което гарантира забавление за публиката, в общия случай не е предпоставка за успешна връзка. От общо 25 издания на оригинала The Bachelor по ABC само две от фаворитките на мъжа са все още с него, като за втората е рано да се каже, тъй като предаването е приключило едва преди два месеца.
Вместо мъж на живота си обаче участничките ще получат известност, а някои от тях – вероятно и професионален тласък, телевизионна кариера и изобщо повече биографични шансове. Дали моралистично настроеният зрител одобрява подобна житейска стратегия, е отделен въпрос. Морализмът също може да е форма на сексизъм. Ако някои свободно могат да изберат да са секс работници, защо други да не се опитат да направят кариера, играейки влюбени по телевизията?
Ала докато всички търсят кусури на участничките, почти никой не коментира ергена.
Логично е – те са много, а той е един. Подбран е така, че да се харесва на възможно по-широк кръг от хора, за да бъде легитимна цел на женската борба. В страната, в която до неотдавна идеалът за човек на власт беше грубата мъжка сила, логично е идеалният ерген да е спортист. В същото време той трябва да е джентълмен и романтичен – качества, които избраният за тази роля фитнес инструктор Виктор Стоянов демонстрира. У него има дори нещо академично. Докато някои академично преподават, пишат книги и правят изследвания, Виктор Стоянов е бил състезател по академично гребане. Има и физическа травма, разделила го с този спорт, както и душевна травма – разбито сърце, което участничките да се надпреварват да излекуват.
Отвъд идентичността и поведението по сценарий ергенът си позволява да е малко по-игрив в Instagram, пускайки не съвсем джентълменски майтапи, в които свежда женския интелект до инструмент за сексуално удоволствие на мъжа. В някои страни с по-развита феминистка култура това би било скандално. Но не и у нас.
Би ли компенсирал сексизма вариантът на шоуто, в който мъже се борят за сърцето на жена?
Сексизмът е в третирането на представителите на един пол като обект. Ако жените се заменят с мъже, това не променя принципа. Не води и до преодоляване на джендър стереотипите. Показателно в тази връзка е, че за разлика от оригиналния The Bachelor, в женския вариант The Bachelorette от 18 издания 5 от двойките фаворити са още заедно (е, за последната, както и в мъжкия вариант, е още рано да се каже). Този факт може да се обясни със социалния натиск над жените да са по-сериозни в интимните си отношения. Докато за един мъж е допустимо просто да си „поиграе“ с жените. В The Bachelor не са прецедент случаите, когато ергенът на финала избира една кандидатка, а започва връзка с подгласничката ѝ.
Тъй като във всичките си варианти шоуто „Ергенът“ се основава на хетеронормативните джендър стереотипи, най-интересни са случаите, когато те се развиват не по сценарий. Колтън Ъндърууд например, участник и в женския вариант на шоуто като кандидат, и в мъжкия – като ергена, накрая се разкрива като гей. А две участнички, вместо да се борят за ергена, започват връзка помежду си.
При всичкия си сексизъм „Ергенът“ е полезно шоу –
не за друго, а защото изважда наяве собствените ни предразсъдъци и стереотипи. Как съдим другите, казва много за това що за хора сме ние самите. Послевкусът, който оставят такива предавания, може да се обобщи с този диалог от филма „Жените наистина плачат“:
– Много е гадно да си жена, много е гадно!
– Обаче знаеш ли кое е по-отвратителното?
– Да си мъж!
Заглавна снимка: Стопкадър от първия епизод на „Ергенът“ по bTV
Rapid7 is monitoring the escalating conflict in Ukraine, and we have provided a blog on the various attack vectors organizations may see, as well as guidance on mitigations and remediations.
To assist with your preparation and response efforts, Rapid7 is continuously integrating into our products the most up-to-date threat intelligence — both consumed and curated — which are monitoring for new attack vectors and intelligence in order to alert on attacker behaviors that are associated with various Advanced Persistent Threat (APT) groups within InsightIDR.
If you are a Managed Detection & Response (MDR) customer, our global SOC teams are monitoring your environment 24/7 with a high degree of diligence, and as standard procedure, any verified suspicious activity will be investigated and reported to you with expediency. Considering the current crisis, we have placed a special emphasis on the most relevant APT groups, and we are closely monitoring a wide breadth of sources to make use of any newly created and verified indicators.
Keeping software patched against known vulnerabilities is an important first line of defense against attackers. On January 11, 2022, the Cybersecurity & Infrastructure Security Agency (CISA) published Alert AA22-011A: Understanding and Mitigating Russian State-Sponsored Cyber Threats to US Critical Infrastructure, listing several vulnerabilities known to be exploited by Russian threat actors.
InsightVM and Nexpose have checks for the CVEs called out in this alert. These vulnerabilities are included in InsightVM’s Threat Feed Dashboard (see the Assets With Actively Targeted Vulnerabilities card and the Most Common Actively Targeted Vulnerabilities card), along with other vulnerabilities known to be exploited in the wild.
Now that Russia has begun its armed invasion of Ukraine, we should expect increasing risks of cybersecurity attacks and incidents, either as spillover from cyberattacks targeting Ukraine or direct attacks against actors supporting Ukraine.
Any state-sponsored Russian attacks aiming to support the Russian invasion of Ukraine, or to retaliate for US, NATO, or other foreign measures taken in response to the Russian invasion of Ukraine, are most likely to be destructive or disruptive in nature rather than aiming to steal data. This blog discusses the types of attacks organizations may see — including distributed denial of service (DDoS), website defacements, and the use of ransomware or destructive malware — and recommends steps for their mitigation or remediation.
As we have stated before, we do not believe organizations need to panic. But as per guidance from numerous governments, we do believe it is wise to be extra vigilant at this time. Rapid7 will continue to monitor the cybersecurity risks, both internally and for our Managed Detection and Response (MDR) customers as the situation evolves. We will post updates as relevant and suggest subscription to our blog to see them as they are posted.
Malware
One of the most concerning possibilities is the risk of a destructive malware attack on the US, NATO members, or other foreign countries. This could take the form of a direct attack or spillover from an attack on Ukraine, such as the 2017 NotPetya operation that targeted Ukraine and spread to other parts of the globe. Cybersecurity researchers have just discovered a new data wiping malware, dubbed HermeticWiper (AKA KillDisk.NCV), that infected hundreds of Ukrainian machines in the last two months. This seems to be a custom-written malware that corrupts the Master Boot Record (MBR), resulting in boot failure. This malware, like NotPetya, is intended to be destructive and will cripple the assets that it infects.
As always, the best malware prevention is to avoid infection in the first place — a risk we can minimize by ensuring that assets are up to date and use strong access controls, including multi-factor authentication. Additionally, it is crucial to have an incident response plan in place for the worst-case scenario, as well as a business continuity plan — including failover infrastructure if possible — for business-critical assets.
DDoS
There have already been reports of DDoS attacks on Ukrainian websites, and Russia has historically used DDoS in support of operations against other former Soviet republics, such as Georgia, in the past. Given this context, it is plausible that state-sponsored Russian actors would use DDoS if they choose to retaliate in response to measures taken against Russia for the invasion of Ukraine, such as sanctions or cyber operations from NATO countries.
While DDoS does not receive the same level of attention as some other forms of attack, it can still have significant impacts to business operations. DDoS mitigations can include reduction of attack surface area via Content Distribution Networks or load balancers, as well as the use of Access Control Lists and firewalls to drop traffic coming from attacker nodes.
Phishing campaigns
Russian state-sponsored actors are also well known for engaging in spear-phishing attacks, specifically with compromised valid accounts. Defenders should ensure strong spam filtering and attachment scanning is in place. Educating end users of the dangers of phishing and regularly running phishing campaigns will also help mitigate this issue.
State-sponsored, APT-style groups are not the only relevant threats. In times of crisis, it is common to see phishing attacks linking to malicious websites masquerading as news, aid groups, or other seemingly relevant content. Opportunistic scammers and other bad actors will attempt to take advantage of our human nature when curiosity, anxiety, and desire to help can make people less suspicious. Remain vigilant and avoid clicking unknown links or opening attachments — basic cyber hygiene that can be forgotten when emotions run high.
Brute-force attacks
According to a report from the NSA, CISA, FBI, and NCSC, “From mid-2019 through early 2021, Russian General Staff Main Intelligence Directorate (GRU) … conduct[ed] widespread, distributed, and anonymized brute-force access attempts against hundreds of government and private sector targets worldwide.” GRU used the discovered credentials to gain access into networks and further used known vulnerabilities such as CVE-2020-0688 and CVE-2020-17144 to increase access.
The best mitigation for these types of attacks is to enable MFA on all systems. Minimize externally facing systems and ensure externally facing systems are fully patched.
Defacement
Ukraine has also been experiencing website defacements, which provide attackers with an opportunity to spread messaging. Website defacement is typically associated with hacktivist activity, but state-sponsored Russian actors could pose as hacktivists in order to disguise Russian state involvement, and spread their strategic communication themes to international audiences by defacing Western websites.
Website defacement often occurs as a result of weak passwords for admin accounts, cross-site scripting, injection, file upload, or vulnerable plugins. This can be managed by limiting the level of access accounts have and enforcing strong passwords. Additionally, looking for places where scripts or iframes could be injected or where SQL injection could occur can help identify vulnerabilities to remediate.
Ransomware
Ransomware could also be used to disrupt foreign targets. Criminals based in Russia were believed to be behind the 2021 ransomware attack on Colonial Pipeline in the United States. Ransomware can have disruptive effects on targets, and the attackers could simply refrain from decrypting files, even if they receive ransom payments, in order to maximize and extend the disruptive impact on victims. Additionally, opportunistic attackers who are actually looking for ransoms will still be on the prowl, and are likely to take advantage of the chaos.
To this end, defenders should:
Evaluate asset and application configurations to ensure resilience
Double-check visibility into the functioning of business-critical assets
Assess incident response processes in the case of an incident
What else should you be doing?
The following activities are mission-critical in times of uncertainty, but they are also best practices in general.
Continuous monitoring: Reinforce cybersecurity measures and staff during nights, weekends, and holidays. Threat actors are known to target their victims when there are gaps in “eyes on glass.”
Incident response plan: Prepare a dedicated team with a detailed workflow and a contact person that will be available offline in case of a cybersecurity incident.
Back up data: Implement data backup procedures of the company networks and systems. Backup procedures should be conducted on a frequent, regular basis for immediate recovery. Also, be sure to store backups offline and check them regularly to ensure they have not been poisoned with malware.
Reduce opportunities for attackers: Identify exposures, vulnerabilities, and misconfigurations that can provide opportunities for attackers to gain a foothold in your environment, and apply relevant mitigations or patches. In particular, Russian operators are well known to exploit edge systems. The Cybersecurity and Infrastructure Security Agency (CISA) recently put out an alert listing 13 known vulnerabilities that Russian state-sponsored threat actors use to initially compromise networks. We recommend this as a starting point for focused patching and mitigation.
Stay informed: Follow the latest updates and recommendations provided by Rapid7, as well as governmental security entities in specific press releases/alerts from the Ukraine CERT, The Security Service of Ukraine (SSU), and the US CISA.
We expect the situation to be fluid over the coming days and weeks, and security guidance and threats may also evolve as the conflict develops. The measures suggested in this blog will continue to be relevant, and we plan to provide additional information as needed.
In the meantime, you can also check this blog to see how Rapid7 can help you prepare for and respond to cyber attacks. We also recommend organizations check their government’s cybersecurity website for guidance.
ISRG’s pragmatic, public-interest approach to Internet security has fundamentally changed the web at an astonishing scale and pace.
The Internet has considerable potential to help build a more just, equitable, and sustainable world for all people. Yet for everyone online—and indeed the billions not yet online—barriers to secure and privacy-respecting communication remain pervasive.
ISRG was founded in 2013 to find and eliminate these barriers. Today, we’re proud to announce a $1M grant from the Ford Foundation to continue our efforts.
Our first project, Let’s Encrypt, leverages technology whose foundation has existed for nearly three decades—TLS certificates for securely communicating information via HTTP. Yet even for people well-versed in technology, adopting TLS proved daunting.
Before Let’s Encrypt, the growth rate for HTTPS page loads merely puttered along. As recently as 2013, just 25% of websites used HTTPS. In order for the Internet to reach its full potential, this glaring risk to peoples’ security and privacy needed to be mitigated.
Let’s Encrypt changed the paradigm. Today 81% of website page loads use HTTPS. That means that you and the other 4.9 billion people online can leverage the Internet for your own pursuits with a greater degree of security and privacy than ever before.
But TLS adoption was just one hurdle. Much can be done to further improve the Internet’s most critical pieces of technology to be more secure; much can be done to further improve the privacy of everyone using the Internet today.
Building our efforts thanks to transformational support
Ford Foundation’s commitment recognizes that the Internet can be a technological tool to build a more just, equitable, and sustainable world, but that it will take organizations like ISRG to help build it.
“Ford Foundation is one of the most respected grantmaking institutions in the world,” Josh Aas, ISRG Executive Director, said. “We are proud that Ford believes in the impact we’ve created and the potential of our efforts to continue benefiting everyone using the Internet.”
This support, which began in 2021, will help ISRG continue to invest in Let’s Encrypt and our other projects, Prossimo and Divvi Up.
Launched in late 2020, Prossimo intends to move the Internet’s most critical security-sensitive software infrastructure to memory safe code. Society pays the price for these vulnerabilities with privacy violations, staggering financial losses, denial of public services (e.g., hospitals, power grids), and human rights violations. Meaningful effort will be required to bring about such change, but the Internet will be around for a long time. There is time for ambitious efforts to pay off.
Divvi Up is a system for privacy-preserving metrics analysis. With Divvi Up, organizations can analyze and share data to further their aims without sacrificing their users’ privacy. Divvi Up is currently used for COVID-19 Exposure Notification apps and has processed over 14 billion metrics to aid Public Health Authorities to better hone their app to be responsive to their local populations.
"ISRG’s pragmatic, public-interest approach to Internet security has fundamentally changed the web at an astonishing scale and pace,” Michael Brennan of the Ford Foundation said. "I believe their new projects have the same potential and I am eager to see what they turn their sights to next."
We’re grateful to Ford for their support of our efforts, and to all of you who have contributed time and resources to our projects. For more information on ISRG and our projects, take a read through our 2021 Annual Report. 100% of ISRG’s funding comes from contributed sources. If you or your organization are interested in helping advance our mission, consider becoming a sponsor, making a one-time contribution, or reaching out with your idea on how you can help financially support our mission at [email protected].
For the last three years, the Crypto Forum Research Group of the Internet Research Task Force (IRTF) has been working on specifying the next generation of (hybrid) public-key encryption (PKE) for Internet protocols and applications. The result is Hybrid Public Key Encryption (HPKE), published today as RFC 9180.
HPKE was made to be simple, reusable, and future-proof by building upon knowledge from prior PKE schemes and software implementations. It is already in use in a large assortment of emerging Internet standards, including TLS Encrypted Client Hello and Oblivious DNS-over-HTTPS, and has a large assortment of interoperable implementations, including one in CIRCL. This article provides an overview of this new standard, going back to discuss its motivation, design goals, and development process.
A primer on public-key encryption
Public-key cryptography is decades old, with its roots going back to the seminal work of Diffie and Hellman in 1976, entitled “New Directions in Cryptography.” Their proposal – today called Diffie-Hellman key exchange – was a breakthrough. It allowed one to transform small secrets into big secrets for cryptographic applications and protocols. For example, one can bootstrap a secure channel for exchanging messages with confidentiality and integrity using a key exchange protocol.
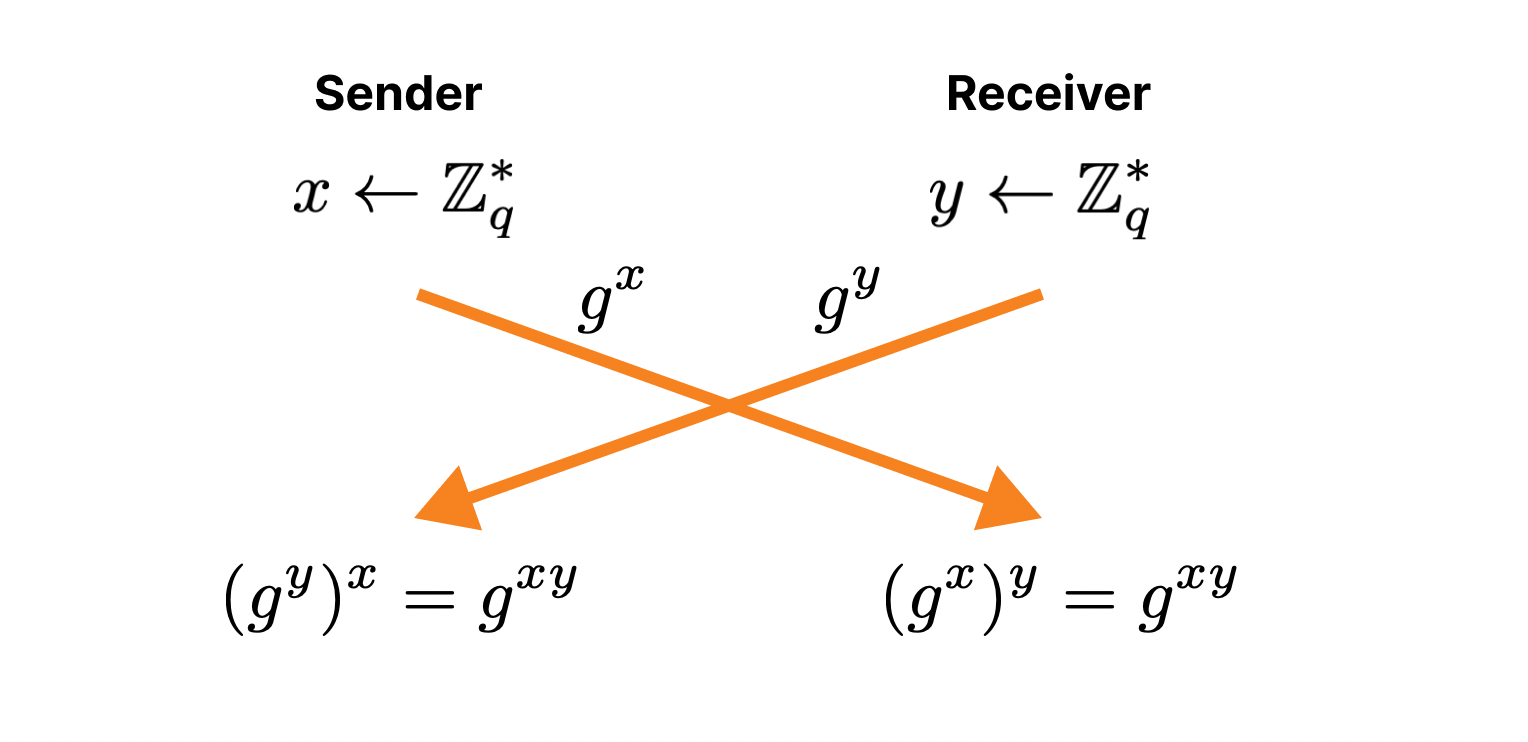
Unauthenticated Diffie-Hellman key exchange
In this example, Sender and Receiver exchange freshly generated public keys with each other, and then combine their own secret key with their peer’s public key. Algebraically, this yields the same value \(g^{xy} = (g^x)^y = (g^y)^x\). Both parties can then use this as a shared secret for performing other tasks, such as encrypting messages to and from one another.
The Transport Layer Security (TLS) protocol is one such application of this concept. Shortly after Diffie-Hellman was unveiled to the world, RSA came into the fold. The RSA cryptosystem is another public key algorithm that has been used to build digital signature schemes, PKE algorithms, and key transport protocols. A key transport protocol is similar to a key exchange algorithm in that the sender, Alice, generates a random symmetric key and then encrypts it under the receiver’s public key. Upon successful decryption, both parties then share this secret key. (This fundamental technique, known as static RSA, was used pervasively in the context of TLS. See this post for details about this old technique in TLS 1.2 and prior versions.)
At a high level, PKE between a sender and receiver is a protocol for encrypting messages under the receiver’s public key. One way to do this is via a so-called non-interactive key exchange protocol.
To illustrate how this might work, let \(g^y\) be the receiver’s public key, and let \(m\) be a message that one wants to send to this receiver. The flow looks like this:
The sender generates a fresh private and public key pair, \((x, g^x)\).
The sender computes \(g^{xy} = (g^y)^x\), which can be done without involvement from the receiver, that is, non-interactively.
The sender then uses this shared secret to derive an encryption key, and uses this key to encrypt m.
The sender packages up \(g^x\) and the encryption of \(m\), and sends both to the receiver.
The general paradigm here is called “hybrid public-key encryption” because it combines a non-interactive key exchange based on public-key cryptography for establishing a shared secret, and a symmetric encryption scheme for the actual encryption. To decrypt \(m\), the receiver computes the same shared secret \(g^{xy} = (g^x)^y\), derives the same encryption key, and then decrypts the ciphertext.
Conceptually, PKE of this form is quite simple. General designs of this form date back for many years and include the Diffie-Hellman Integrated Encryption System (DHIES) and ElGamal encryption. However, despite this apparent simplicity, there are numerous subtle design decisions one has to make in designing this type of protocol, including:
What type of key exchange protocol should be used for computing the shared secret? Should this protocol be based on modern elliptic curve groups like Curve25519? Should it support future post-quantum algorithms?
How should encryption keys be derived? Are there other keys that should be derived? How should additional application information be included in the encryption key derivation, if at all?
What type of encryption algorithm should be used? What types of messages should be encrypted?
How should sender and receiver encode and exchange public keys?
These and other questions are important for a protocol, since they are required for interoperability. That is, senders and receivers should be able to communicate without having to use the same source code.
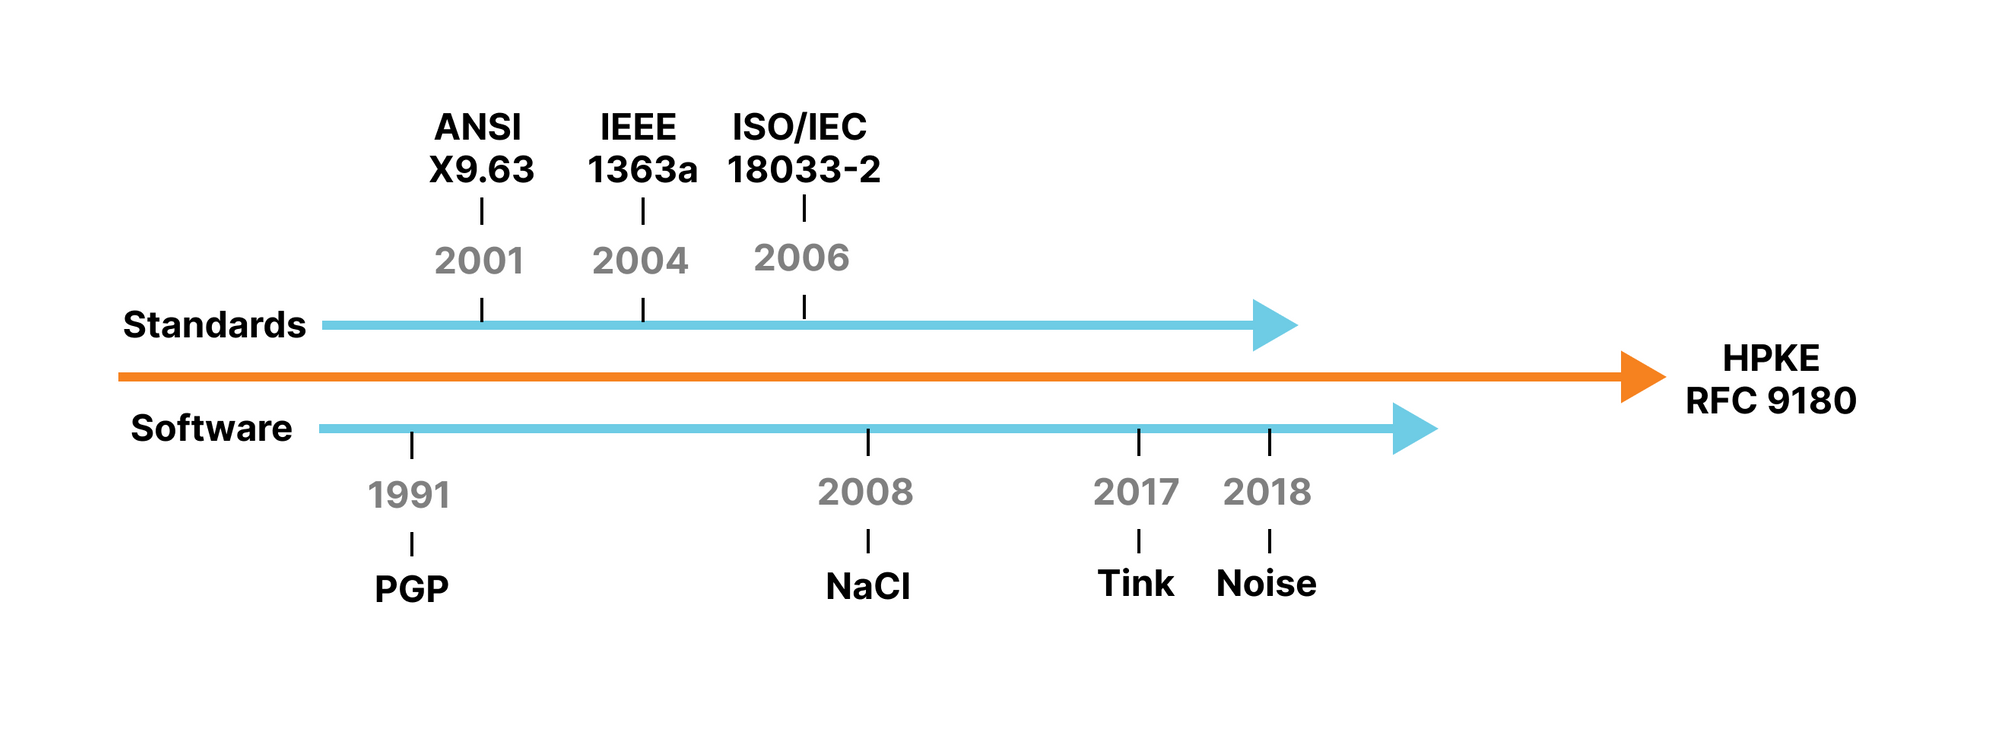
There have been a number of efforts in the past to standardize PKE, most of which focus on elliptic curve cryptography. Some examples of past standards include: ANSI X9.63 (ECIES), IEEE 1363a, ISO/IEC 18033-2, and SECG SEC 1.
Timeline of related standards and software
A paper by Martinez et al. provides a thorough and technical comparison of these different standards. The key points are that all these existing schemes have shortcomings. They either rely on outdated or not-commonly-used primitives such as RIPEMD and CMAC-AES, lack accommodations for moving to modern primitives (e.g., AEAD algorithms), lack proofs of IND-CCA2 security, or, importantly, fail to provide test vectors and interoperable implementations.
The lack of a single standard for public-key encryption has led to inconsistent and often non-interoperable support across libraries. In particular, hybrid PKE implementation support is fractured across the community, ranging from the hugely popular and simple-to-use NaCl box and libsodium box seal implementations based on modern algorithm variants like X-SalsaPoly1305 for authenticated encryption, to BouncyCastle implementations based on “classical” algorithms like AES and elliptic curves.
Despite the lack of a single standard, this hasn’t stopped the adoption of ECIES instantiations for widespread and critical applications. For example, the Apple and Google Exposure Notification Privacy-preserving Analytics (ENPA) platform uses ECIES for public-key encryption.
When designing protocols and applications that need a simple, reusable, and agile abstraction for public-key encryption, existing standards are not fit for purpose. That’s where HPKE comes into play.
Construction and design goals
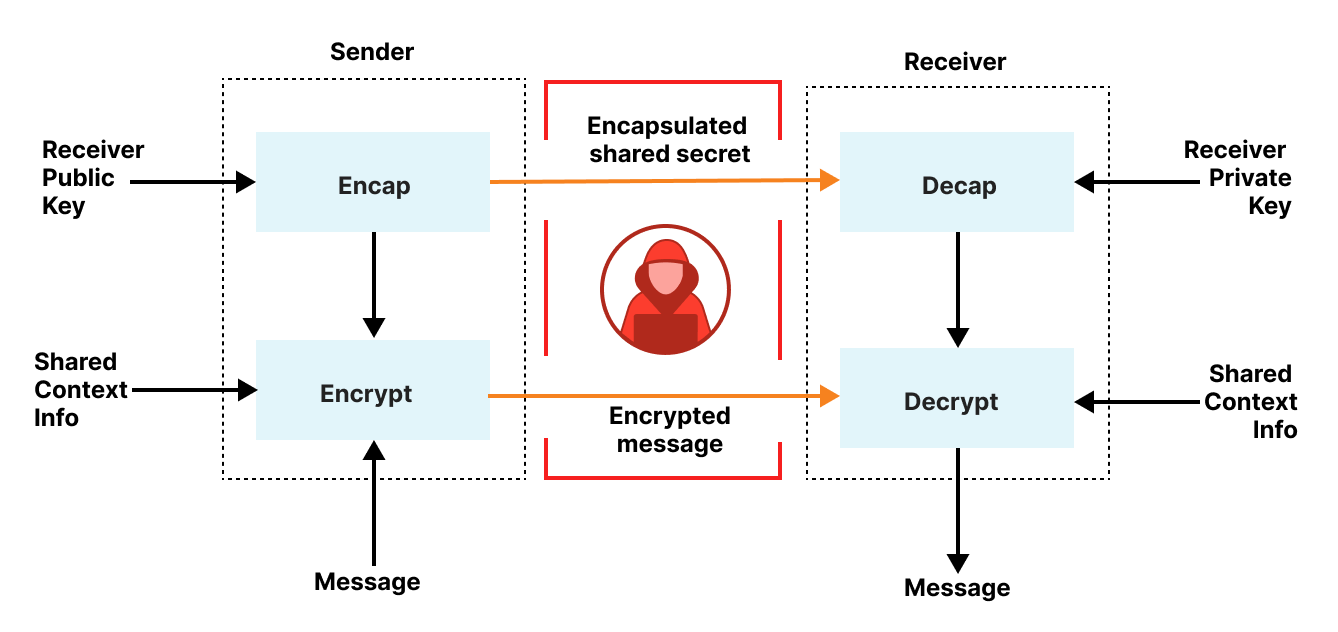
HPKE is a public-key encryption construction that is designed from the outset to be simple, reusable, and future-proof. It lets a sender encrypt arbitrary-length messages under a receiver’s public key, as shown below. You can try this out in the browser at Franziskus Kiefer’s blog post on HPKE!
HPKE overview
HPKE is built in stages. It starts with a Key Encapsulation Mechanism (KEM), which is similar to the key transport protocol described earlier and, in fact, can be constructed from the Diffie-Hellman key agreement protocol. A KEM has two algorithms: Encapsulation and Decapsulation, or Encap and Decap for short. The Encap algorithm creates a symmetric secret and wraps it for a public key such that only the holder of the corresponding private key can unwrap it. An attacker knowing this encapsulated key cannot recover even a single bit of the shared secret. Decap takes the encapsulated key and the private key associated with the public key, and computes the original shared secret. From this shared secret, HPKE computes a series of derived keys that are then used to encrypt and authenticate plaintext messages between sender and receiver.
This simple construction was driven by several high-level design goals and principles. We will discuss these goals and how they were met below.
Algorithm agility
Different applications, protocols, and deployments have different constraints, and locking any single use case into a specific (set of) algorithm(s) would be overly restrictive. For example, some applications may wish to use post-quantum algorithms when available, whereas others may wish to use different authenticated encryption algorithms for symmetric-key encryption. To accomplish this goal, HPKE is designed as a composition of a Key Encapsulation Mechanism (KEM), Key Derivation Function (KDF), and Authenticated Encryption Algorithm (AEAD). Any combination of the three algorithms yields a valid instantiation of HPKE, subject to certain security constraints about the choice of algorithm.
One important point worth noting here is that HPKE is not a protocol, and therefore does nothing to ensure that sender and receiver agree on the HPKE ciphersuite or shared context information. Applications and protocols that use HPKE are responsible for choosing or negotiating a specific HPKE ciphersuite that fits their purpose. This allows applications to be opinionated about their choice of algorithms to simplify implementation and analysis, as is common with protocols like WireGuard, or be flexible enough to support choice and agility, as is the approach taken with TLS.
Authentication modes
At a high level, public-key encryption ensures that only the holder of the private key can decrypt messages encrypted for the corresponding public key (being able to decrypt the message is an implicit authentication of the receiver.) However, there are other ways in which applications may wish to authenticate messages from sender to receiver. For example, if both parties have a pre-shared key, they may wish to ensure that both can demonstrate possession of this pre-shared key as well. It may also be desirable for senders to demonstrate knowledge of their own private key in order for recipients to decrypt the message (this functionally is similar to signing an encryption, but has some subtle and important differences).
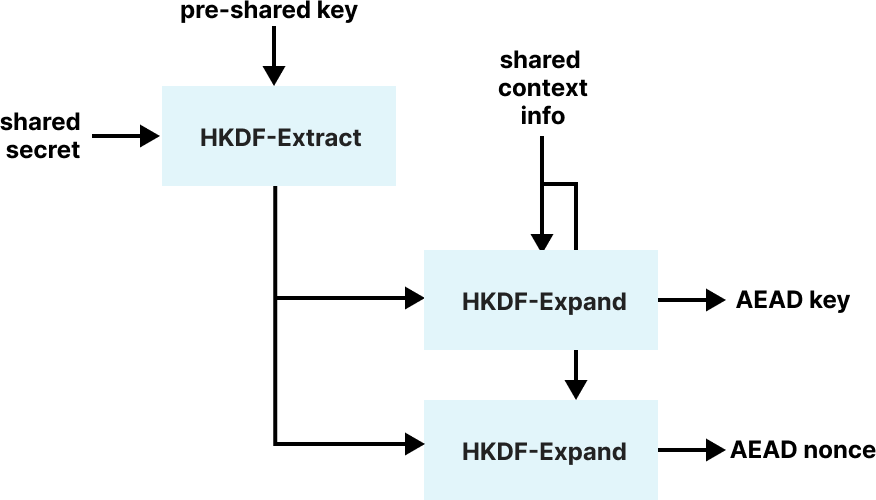
To support these various use cases, HPKE admits different modes of authentication, allowing various combinations of pre-shared key and sender private key authentication. The additional private key contributes to the shared secret between the sender and receiver, and the pre-shared key contributes to the derivation of the application data encryption secrets. This process is referred to as the “key schedule”, and a simplified version of it is shown below.
Simplified HPKE key schedule
These modes come at a price, however: not all KEM algorithms will work with all authentication modes. For example, for most post-quantum KEM algorithms there isn’t a private key authentication variant known.
Reusability
The core of HPKE’s construction is its key schedule. It allows secrets produced and shared with KEMs and pre-shared keys to be mixed together to produce additional shared secrets between sender and receiver for performing authenticated encryption and decryption. HPKE allows applications to build on this key schedule without using the corresponding AEAD functionality, for example, by exporting a shared application-specific secret. Using HPKE in an “export-only” fashion allows applications to use other, non-standard AEAD algorithms for encryption, should that be desired. It also allows applications to use a KEM different from those specified in the standard, as is done in the proposed TLS AuthKEM draft.
Interface simplicity
HPKE hides the complexity of message encryption from callers. Encrypting a message with additional authenticated data from sender to receiver for their public key is as simple as the following two calls:
// Create an HPKE context to send messages to the receiver
encapsulatedKey, senderContext = SetupBaseS(receiverPublicKey, ”shared application info”)

// AEAD encrypt the message using the context
ciphertext = senderContext.Seal(aad, message)
In fact, many implementations are likely to offer a simplified “single-shot” interface that does context creation and message encryption with one function call.
Notice that this interface does not expose anything like nonce (“number used once”) or sequence numbers to the callers. The HPKE context manages nonce and sequence numbers internally, which means the application is responsible for message ordering and delivery. This was an important design decision done to hedge against key and nonce reuse, whichcanbecatastrophic for security.
Consider what would be necessary if HPKE delegated nonce management to the application. The sending application using HPKE would need to communicate the nonce along with each ciphertext value for the receiver to successfully decrypt the message. If this nonce was ever reused, then security of the AEAD may fall apart. Thus, a sending application would necessarily need some way to ensure that nonces were never reused. Moreover, by sending the nonce to the receiver, the application is effectively implementing a message sequencer. The application could just as easily implement and use this sequencer to ensure in-order message delivery and processing. Thus, at the end of the day, exposing the nonce seemed both harmful and, ultimately, redundant.
Wire format
Another hallmark of HPKE is that all messages that do not contain application data are fixed length. This means that serializing and deserializing HPKE messages is trivial and there is no room for application choice. In contrast, some implementations of hybrid PKE deferred choice of wire format details, such as whether to use elliptic curve point compression, to applications. HPKE handles this under the KEM abstraction.
Development process
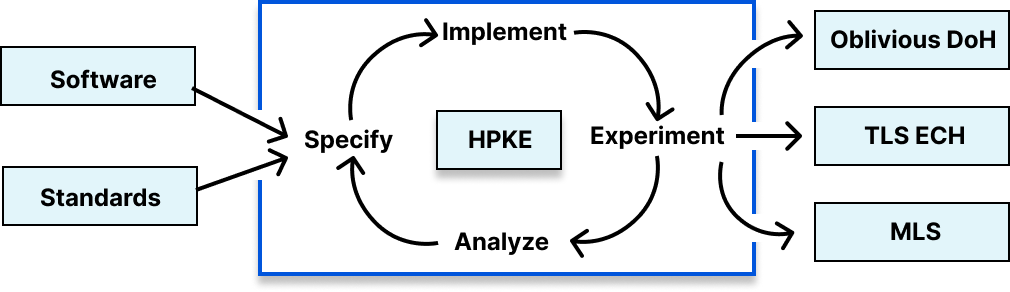
HPKE is the result of a three-year development cycle between industry practitioners, protocol designers, and academic cryptographers. In particular, HPKE built upon prior art relating to public-key encryption, iterated on a design and specification in a tight specification, implementation, experimentation, and analysis loop, with an ultimate goal towards real world use.
HPKE development process
This process isn’t new. TLS 1.3 and QUIC famously demonstrated this as an effective way of producing high quality technical specifications that are maximally useful for their consumers.
One particular point worth highlighting in this process is the value of interoperability and analysis. From the very first draft, interop between multiple, independent implementations was a goal. And since then, every revision was carefully checked by multiple library maintainers for soundness and correctness. This helped catch a number of mistakes and improved overall clarity of the technical specification.
From a formal analysis perspective, HPKE brought novel work to the community. Unlike protocol design efforts like those around TLS and QUIC, HPKE was simpler, but still came with plenty of sharp edges. As a new cryptographic construction, analysis was needed to ensure that it was sound and, importantly, to understand its limits. This analysis led to a number of important contributions to the community, including a formal analysis of HPKE, new understanding of the limits of ChaChaPoly1305 in a multi-user security setting, as well as a new CFRG specification documenting limits for AEAD algorithms. For more information about the analysis effort that went into HPKE, check out this companion blog by Benjamin Lipp, an HPKE co-author.
HPKE’s future
While HPKE may be a new standard, it has already seen a tremendous amount of adoption in the industry. As mentioned earlier, it’s an essential part of the TLS Encrypted Client Hello and Oblivious DoH standards, both of which are deployed protocols on the Internet today. Looking ahead, it’s also been integrated as part of the emerging Oblivious HTTP, Message Layer Security, and Privacy Preserving Measurement standards. HPKE’s hallmark is its generic construction that lets it adapt to a wide variety of application requirements. If an application needs public-key encryption with a key-committing AEAD, one can simply instantiate HPKE using a key-committing AEAD.
Moreover, there exists a huge assortment of interoperable implementations built on popular cryptographic libraries, including OpenSSL, BoringSSL, NSS, and CIRCL. There are also formally verified implementations in hacspec and F*; check out this blog post for more details. The complete set of known implementations is tracked here. More implementations will undoubtedly follow in their footsteps.
HPKE is ready for prime time. I look forward to seeing how it simplifies protocol design and development in the future. Welcome, RFC 9180.
Version
1.59.0 of the Rust language has been released. There are a number of
new features, including support for inline assembly (in unsafe blocks,
naturally), the ability to use tuples and slices on the left-hand side of
an assignment, const generic defaults, and more. Incremental compilation
is also disabled by default in this release to work around a known bug.
Стотици украинци, както и пресъединилите се към тях българи и руснаци се събраха пред Посолството на Руската Федерация в София в четвъртък, на 24 февруари 2022 г., видя “Биволъ” на…
Traditionally, many businesses archive physical formats of their business documents. These can be invoices, sales memos, purchase orders, vendor-related documents, and inventory documents. As more and more businesses are moving towards digitizing their business processes, it is becoming challenging to effectively manage these documents and perform business analytics on them. For example, in the Oil and Gas (O&G) industry, companies have numerous documents that are generated through the exploration and production lifecycle of an oil well. These documents can provide many insights that can help inform business decisions.
As documents are usually stored in a paper format, information retrieval can be time consuming and cumbersome. Even those available in a digital format may not have adequate metadata associated to efficiently perform search and build insights.
In this post, you will learn how to build a text extraction solution using Amazon Textract service. This will automatically extract text and data from scanned documents and upload into Amazon Simple Storage Service (S3). We will show you how to find insights and relationships in the extracted text using Amazon Comprehend. This data is indexed and populated into Amazon OpenSearch Service to search and visualize it in a Kibana dashboard.
Figure 1 illustrates a solution built with AWS, which extracts O&G well data information from PDF documents. This solution is serverless and built using AWS Managed Services. This will help you to decrease system maintenance overhead while making your solution scalable and reliable.
Figure 1. Automated form data extraction architecture
Following are the high-level steps:
Upload an image file or PDF document to Amazon S3 for analysis. Amazon S3 is a durable document storage used for central document management.
Amazon S3 event initiates the AWS Lambda function Fn-A. AWS Lambda has functional logic to call the Amazon Textract and Comprehend services and processing.
AWS Lambda function Fn-A invokes Amazon Textract to extract text as key-value pairs from image or PDF. Amazon Textract automatically extracts data from the scanned documents.
Amazon Textract sends the extracted keys from image/PDF to Amazon SNS.
Amazon SNS notifies Amazon SQS when text extraction is complete by sending the extracted keys to Amazon SQS.
Amazon SQS initiates AWS Lambda function Fn-B with the extracted keys.
AWS Lambda function Fn-B invokes Amazon Comprehend for the custom entity recognition. Comprehend uses custom-trained machine learning (ML) to find discrepancies in key names from Amazon Textract.
The data is indexed and loaded into Amazon OpenSearch, which indexes and visualizes the data.
Kibana processes the indexed data.
User accesses Kibana to search documents.
Steps illustrated with more detail:
1. User uploads the document for analysis to Amazon S3. Uploaded document can be an image file or a PDF. Here we are using the S3 console for document upload. Figure 2 shows the sample file used for this demo.
3. AWS Lambda function Fn-A invokes Amazon Textract. Amazon Textract uses artificial intelligence (AI) to read as a human would, by extracting text, layouts, tables, forms, and structured data with context and without configuration, training, or custom code.
4. Amazon Textract starts processing the file as it is uploaded. This process takes few minutes since the file is a multipage document.
5. Amazon SNS notifies Amazon Textract of completion. Amazon Textract processing works asynchronously, as we decouple our architecture using Amazon SQS. To configure Amazon SNS to send data to Amazon SQS:
Create an SNS topic. ‘AmazonTextract-SNS’ is the SNS topic that we created for this demo.
Then create an SQS queue. ‘AmazonTextract-SQS’ is the queue that we created for this demo.
To receive messages published to a topic, you must subscribe an endpoint to the topic. When you subscribe an endpoint to a topic, the endpoint begins to receive messages published to the associated topic. Figure 3 shows the SNS topic ‘AmazonTextract-SNS’ subscribed to Amazon SQS queue.
Figure 3. Amazon SNS configuration
Figure 4. Amazon SQS configuration
6. Configure SQS queue to initiate the AWS Lambda function Fn-B. This should happen upon receiving extracted data via SNS topic. Refer to this SQS tutorial to learn about SQS Lambda configuration. See Sample code for Lambda FunctionB.
7. AWS Lambda function Fn-B invokes Amazon Comprehend for the custom entity recognition.
Figure 5. Lambda FunctionB configuration in Amazon Comprehend
Configure Amazon Comprehend to create a custom entity recognition (text-job2) for the entities. These can be API Number, Lease_Number, Water_Depth, Well_Number, and can use the model created in previous step (well_no, well#, well num). For instructions on labeling your data, see Developing NER models with Amazon SageMaker Ground Truth and Amazon Comprehend.
Figure 6. Comprehend job
Now create an endpoint for the custom entity recognition for the Lambda function, to send the data to Amazon Comprehend service, as shown in Figure 7 and 8.
Figure 7. Comprehend endpoint creation
Copy the Amazon Comprehend endpoint ARN to include it in the Lambda function as an environment variable (see Figure 5).
Figure 8. Comprehend endpoint created successfully
8. Launch an Amazon OpenSearch domain. See Creating and managing Amazon OpenSearch Service domains. The data is indexed and populated into Amazon OpenSearch. The Amazon OpenSearch domain name is configured at Lambda FnB as an environment variable to push the extracted data to OpenSearch.
9. Kibana processes the indexed data from Amazon OpenSearch. Amazon OpenSearch data is populated on Kibana, shown in Figure 9.
Figure 9. Kibana dashboard showing Amazon OpenSearch data
10. Access Kibana for document search. The selected fields can be viewed as a table using filters, see Figure 10.
Figure 10. Kibana dashboard table view for selected fields
You can search the LEASE_NUMBER = OCS-031, as shown in Figure 11.
Figure 11. Kibana dashboard search on Lease Number
OR you can search all the information for the WATER_DEPTH = 60, see Figure 12.
Figure 12. Kibana dashboard search on Water Depth
Cleanup
Shut down OpenSearch domain
Delete the Comprehend endpoint
Clear objects from S3 bucket
Conclusion
Data is growing at an enormous pace in all industries. As we have shown, you can build an ML-based text extraction solution to uncover the unstructured data from PDFs or images. You can derive intelligence from diverse data sources by incorporating a data extraction and optimization function. You can gain insights into the undiscovered data, by leveraging managed ML services, Amazon Textract, and Amazon Comprehend.
The extracted data from PDFs or images is indexed and populated into Amazon OpenSearch. You can use Kibana to search and visualize the data. By implementing this solution, customers can reduce the costs of physical document storage, in addition to labor costs for manually identifying relevant information.
This solution will drive decision-making efficiency. We discussed the oil and gas industry vertical as an example for this blog. But this solution can be applied to any industry that has physical/scanned documents such as legal documents, purchase receipts, inventory reports, invoices, and purchase orders.
As a large data processing country, Germany is at the forefront of security and privacy regulation in Europe and sets the tone for other countries to follow. Analyzing and meeting the requirements to participate in Germany’s cloud security industry requires adherence to international, regional, and country-specific standards. Cloudflare is pleased to announce that we have taken appropriate organizational and technical precautions to prevent disruptions to the availability, integrity, authenticity, and confidentiality of Cloudflare’s production systems in accordance with BSI-KritisV. TÜViT, the auditing body tasked with auditing Cloudflare and providing the evidence to BSI every two years. Completion of this audit allows us to comply with the NIS Directive within Germany.
Why do cloud companies operating in Germany need to go through a BSI audit?
In 2019, Cloudflare registered as an Operator of Essential Services’ under the EU Directive on Security of Network and Information Systems (NIS Directive). The NIS Directive is cybersecurity legislation with the goal to enhance cybersecurity across the EU. Every member state has started to adopt national legislation for the NIS Directive and the criteria for compliance is set individually by each country. As an ‘Operator of Essential Services’ in Germany, Cloudflare is regulated by the Federal Office for Information Security (The BSI) and must adhere to the requirements set by The BSI.
What does the audit prove?
This audit includes a thorough review of Cloudflare’s security controls in the following areas:
Asset Management
Risk Analysis
Business Continuity and Disaster Recovery
Personnel and Organizational Security
Encryption
Network Security
Security Authentication
Incident Response
Vendor Security
Physical Security
In addition to an audit of Cloudflare’s security controls in the aforementioned areas, TÜViT also conducted a thorough review of Cloudflare’s Information Security Management System (ISMS).
By having these areas audited, German customers can rest assured that Cloudflare respects the requirements put forth by the governing bodies tasked with protecting their data.
Are there any additional German-specific audits on the horizon?
Yes. Cloudflare is currently undergoing an independent third-party audit for the Cloud Computing Compliance Criteria Catalog (C5) certification. The C5 was introduced by BSI Germany in 2016 and reviews operational security within cloud services. Industries that place a high level of importance on C5 include cloud computing and German federal agencies. Learn more here.
What other certifications does Cloudflare hold that demonstrate its dedication to privacy and security?
Different certifications measure different elements of a company’s security or privacy posture. Cloudflare has met the requirements of the following standards:
ISO 27001 – Cloudflare has been ISO 27001 certified since 2019. Customers can be assured that Cloudflare has a formal information security management program that adheres to a globally recognized standard.
SOC2 Type II – Cloudflare maintains SOC reports that include the security, confidentiality, and availability trust principles.
PCI DSS – Cloudflare engages with a QSA (Qualified Security Assessor) on an annual basis to evaluate us as a Level 1 Merchant and a Service Provider.
ISO 27701 – Cloudflare was one of the first companies in the industry to achieve ISO 27701 certification as both a data processor and controller. The certification provides assurance to our customers that we have a formal privacy program that is aligned to GDPR.
FedRAMP In Process – Cloudflare hit a major milestone by being listed on the FedRAMP Marketplace as ‘In Process’ for receiving an agency authorization at a moderate baseline. Once an Authorization to Operate (ATO) is granted, it will allow agencies and other cloud service providers to leverage our product and services in a public sector capacity.
Pro, Business, and Enterprise customers now have the ability to obtain a copy of Cloudflare’s certifications, reports, and overview through the Cloudflare Dashboard. For the latest information about our certifications and reports, please visit our Trust Hub.
An introduction to formal analysis and our proof of the security of KEMTLS
Good morning everyone, and welcome to another Post-Quantum–themed blog post! Today we’re going to look at something a little different. Rather than look into the past or future quantum we’re going to look as far back as the ‘80s and ‘90s, to try and get some perspective on how we can determine whether a protocol is or is not secure. Unsurprisingly, this question comes up all the time. Cryptographers like to build fancy new cryptosystems, but just because we, the authors, can’t break our own designs, it doesn’t mean they are secure: it just means we are not smart enough to break them.
One might at this point wonder why in a post-quantum themed blog post we are talking about security proofs. The reason is simple: the new algorithms that claim to be safe against quantum threats need proofs showing that they actually are safe. In this blog post, not only are we going to introduce how we go about proving a protocol is secure, we’re going to introduce the security proofs of KEMTLS, a version of TLS designed to be more secure against quantum computers, and give you a whistle-stop tour of the formal analysis we did of it.
Let’s go back for the moment to not being smart enough to break a cryptosystem. Saying “I tried very hard to break this, and couldn’t” isn’t a very satisfying answer, and so for many years cryptographers (and others) have been trying to find a better one. There are some obvious approaches to building confidence in your cryptosystem, for example you could try all previously known attacks, and see if the system breaks. This approach will probably weed out any simple flaws, but it doesn’t mean that some new attack won’t be found or even that some new twist on an old one won’t be discovered.
Another approach you can take is to offer a large prize to anyone who can break your new system; but to do that not only do you need a bigprize that you can afford to give away if you’re wrong, you can’t be sure that everyone would prefer your prize to, for example, selling an attack to cybercriminals, or even to a government.
Simply trying hard, and inducing other people to do so too still felt unsatisfactory, so in the late ‘80s researchers started trying to use mathematical techniques to prove that their protocol was secure. Now, if you aren’t versed in theoretical computer science you might not even have a clear idea of what it even means to “prove” a protocol is secure, let alone how you might go about it, so let’s start at the very beginning.
A proof
First things first: let’s nail down what we mean by a proof. At its most general level, a mathematical proof starts with some assumptions, and by making logical inferences it builds towards a statement. If you can derive your target statement from your initial assumptions then you can be sure that, if your assumptions are right, then your final statement is true.
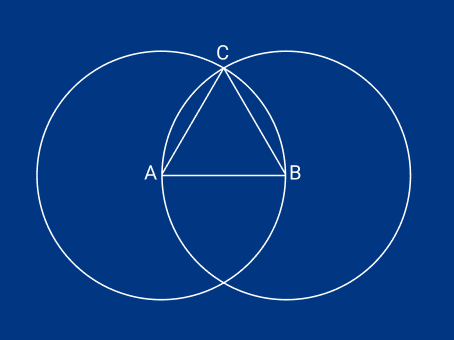
Euclid’s famous work, The Elements, a standard math textbook for over 2,000 years, is written in this style. Euclid gives five “postulates”, or assumptions, from which he can derive a huge portion of the geometry known in his day. Euclid’s first postulate, that you can draw a straight line between any two points, is never proven, but taken as read. You can take his first postulate, and his third, that you can draw a circle with any center and radius, and use it to prove his first proposition, that you can draw an equilateral triangle given any finite line. For the curious, you can find public-domain translations of Euclid’s work.
Euclid’s method of drawing an equilateral triangle based on the finite line AB, by drawing two circles around points A and B, with the radius AB. The intersection finds point C of the triangle. Original raster file uploader was Mcgill at en.wikibooks SVG: Beao, Public domain, via Wikimedia Commons.
Whilst it’s fairly easy to intuit how such geometry proofs work, it’s not immediately clear how one could prove something as abstract as the security of a cryptographic protocol. Proofs of protocols operate in a similar way. We build a logical argument starting from a set of assumptions. Security proofs, however, can be much, much bigger than anything in The Elements (for example, our proof of the security properties of KEMTLS, which we will talk about later, is nearly 500,000 lines long) and the only reason we are able to do such complex proofs is that we have something of an advantage over Euclid. We have computers. Using a mix of human-guided theorem proving and automated algorithms we can prove incredibly complex things, such as the security of protocols as the one we will discuss.
Now we know that a proof is a set of logical steps built from a set of assumptions, let’s talk a bit about how security proofs work. First, we need to work out how to describe the protocol in terms that we can reason about. Over the years researchers have come up with many ways for describing computer processes mathematically, most famously Alan Turing defined a-machines, which we now know as Turing Machines, which describe a computer program in an algebraic form. A protocol is slightly more complex than a single program. A protocol can be seen as a number of computers running a set of computer programs that interact with each other.
We’re going to use a class of techniques called process algebras to describe the interacting processes of a protocol. At its most basic level, algebra is the art of generalizing a statement by replacing specific values with general symbols. In standard algebra, these specific values are numbers, so for example we can write (cos 37)² + (sin 37)² = 1, which is true, but we can generalize it to (cos θ)² + (sin θ)² = 1, replacing the specific value, 37, with the symbol θ.
Now you might be wondering why it’s useful to replace things with symbols. The answer is it lets us solve entire classes of problems instead of solving each individual instance. When it comes to security protocols, this is especially important. We can’t possibly try every possible set of inputs to a protocol and check nothing weird happens to one of them. In fact, one of the assumptions we’re going to make when we prove KEMTLS secure is that trying every possible value for some inputs is impossible1. By representing the protocol symbolically, we can write a proof that applies to all possible inputs of the protocol.
Let’s go back to algebra. A process algebra is similar to the kind of algebra you might have learnt in high school: we represent a computer program with symbols for the specific values. We also treat functions symbolically. Rather than try and compute what happens when we apply a function f to a value x, we just create a new symbol f(x). An algebra also provides rules for manipulating expressions. For example, in standard algebra we can transformy + 5 = x² - x into y = x² - x - 5. A process algebra is the same: it not only defines a language to describe interacting processes, it also defines rules for how we can manipulate those expressions.
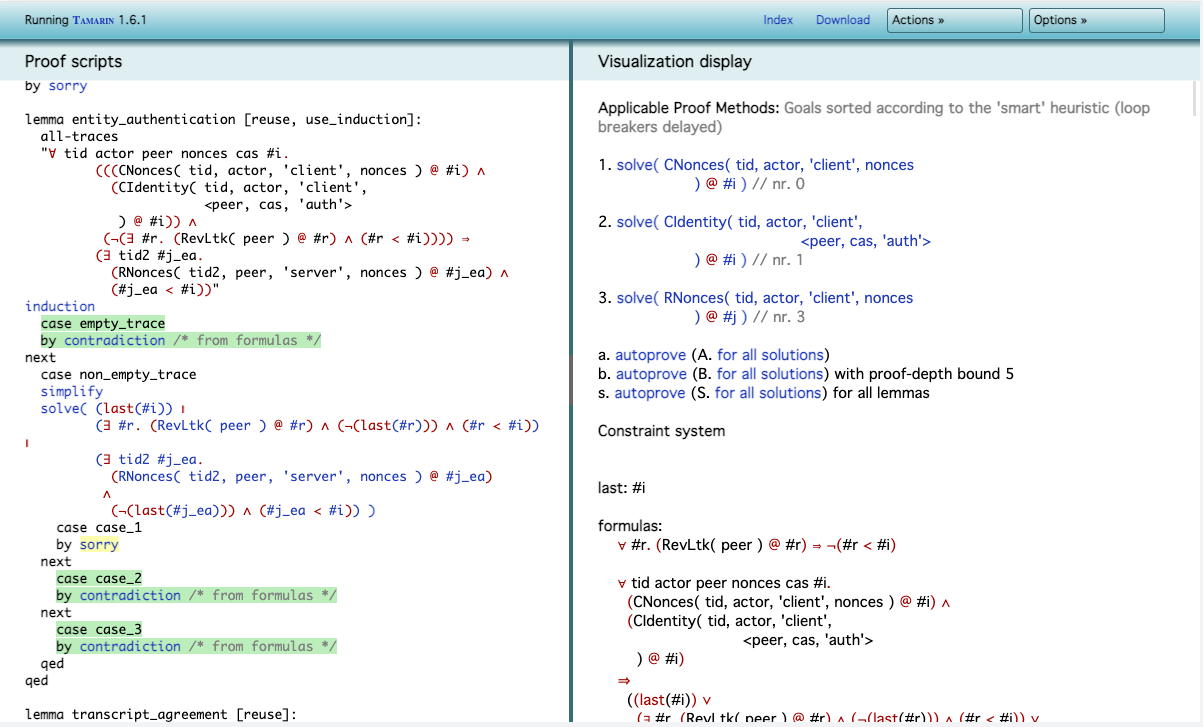
We can use tools, such as the one we use called Tamarin, to help us do this reasoning. Every protocol has its own rules for what transformations are allowed. It is very useful to have a tool, like Tamarin, to which we can tell these rules and allow it to do all the work of symbol manipulation. Tamarin does far, far more than that, though.
A rule, that we tell Tamarin, might look like this:
This rule is used to represent that a protocol participant has acquired a new public/private key pair. The rule has three parts:
The first part lists the preconditions. In this case, there is only one: we take a Fresh value called ~ltkA, the “long-term key of A”. This precondition is always met, because Tamarin always allows us to generate fresh values.
The third part lists the postconditions (what we get back when we apply the rule). Rather than operating on an initial statement, as in high-school algebra, Tamarin instead operates on what we call a model of “bag of facts”. Instead of starting with y + 5 = x² - x, we start with an empty “bag”, and from there, apply rules. These rules take facts out of the bag and put new ones in. In this case, we put in:
!Ltk($A, ~ltkA) which represents the private portion of the key, ~ltkA, and the name of the participant it was issued to, $A.
!Pk($A, pk(~ltkA)), which represents the public portion of the key, pk(~ltkA), and the participant was issued to, $A.
Out(pk(~ltkA)), which represents us publishing the public portion of the key, pk(~ltkA) to the network. Tamarin is based on the Dolev-Yao model, which assumes the attacker controls the network. Thus, this fact makes $A’s public key available to the attacker.
We can only apply a rule if the preconditions are met: the facts we need appear in the bag. By having rules for each step of the protocol, we can apply the rules in order and simulate a run of the protocol. But, as I’m sure you’ve noticed, we skipped the second part of the rule. The second part of the rule is where we list what we call actions.
We use actions to record what happened in a protocol run. In our example, we have the action GenLtk($A, ~ltkA). GenLtk means that a new Long-Term Key (LTK) has been Generated. Whenever we trigger the Register_pk rule, we note this with the two parameters:, $A, the party to whom the new key pair belongs; and ~ltkA, the private part of the generated key2.
If we simulate a single run of the protocol, we can record a list of all the actions executed and put them in a list. However, at any point in the protocol, there may be multiple rules that can be triggered. A list only captures a single run of a protocol, but we want to reason about all possible runs of the protocol. We can arrange our rules into a tree: every time we have multiple rules that could be executed, we give each one of them its own branch.
If we could write this entire tree, it would represent every possible run of the protocol. Because every possible run appears in this tree, if we can show that there are no “bad” runs on this tree, we can be sure that the protocol is “secure”. We put “bad” and “secure” in quotation marks here because we still haven’t actually defined what those terms actually mean.
But before we get to that, let’s quickly recap what we have so far. We have:
A protocol we want to prove.
A definition of protocol, as a number of computers running a set of computer programs that interact with each other.
A technique, process algebras, to describe the interacting processes of the protocol: this technique provides us with symbols and rules for manipulating them.
A tree that represents every possible run of the protocol.
We can reason about a protocol by looking at properties that our tree gives. As we are interested in cryptographic protocols, we would like to reason about its security. “Security” is a pretty abstract concept and its meaning changes in different contexts. In our case, to prove something is secure, we first have to say what our security goals are. One thing we might want to prove is, for example, that an attacker can never learn the encryption key of a session. We capture this idea with a reachability lemma.
A reachability lemma asks whether there is a path in the tree that leads to a specific state: can we “reach” this state? In this case, we ask: “can we reach a state where the attacker knows the session key?” If the answer is “no”, we are sure that our protocol has that property (an attacker never learns the session key), or at least that that property is true in our protocol model.
So, if we want to prove the security of a cryptographic protocol, we need to:
Define the goals of the security that is being proven.
Describe the protocol as an interacting process of symbols, rules, and expressions.
Build a tree of all the steps the protocol can take.
Check that the trees of protocol runs attain the goals of security we specified.
This process of creating a model of a program and writing rigorous proofs about that model is called “formal analysis”.
Writing formal proofs of protocol correctness has been very effective at finding and fixing all kinds of issues. During the design of TLS 1.3, for example, it uncovered a number of serious security flaws that were eventually fixed prior to standardization. However, something we need to be wary of with formal analysis is being over-reliant on its results. It’s very possible to be so taken with the rigour of the process and of its mathematical proofs, that the result gets overinterpreted. Not only can a mistake exist in a proof, even in a machine-checked one, the proof may not actually prove what you think it does. There are many examples of this: Needham-Schroeder had a proof of security written in the BAN logic, before Lowe found an attack on a case that the BAN logic did not cover.
In fact, the initial specification of the TLS 1.3 proof made the assumption that nobody uses the same certificate for both a client and a server, even though this is not explicitly disallowed in the specification. This gap led to the “Selfie” vulnerability where a client could be tricked into connecting to itself, potentially leading to resource exhaustion attacks.
Formal analysis of protocol designs also tells you nothing about whether a particular implementation correctly implements a protocol. In other blog posts, we will talk about this. Let’s now return to our core topic: the formal analysis of KEMTLS.
Proving KEMTLS’s security
Now that we have the needed notions, let’s get down to the nitty-gritty: we show you how we proved KEMTLS is secure. KEMTLS is a proposal to do authentication in TLS handshakes using key exchange (via key encapsulation mechanisms or KEMs). KEMTLS examines the trade-offs between post-quantum signature schemes and post-quantum key exchange, as we discussed in other blog posts.
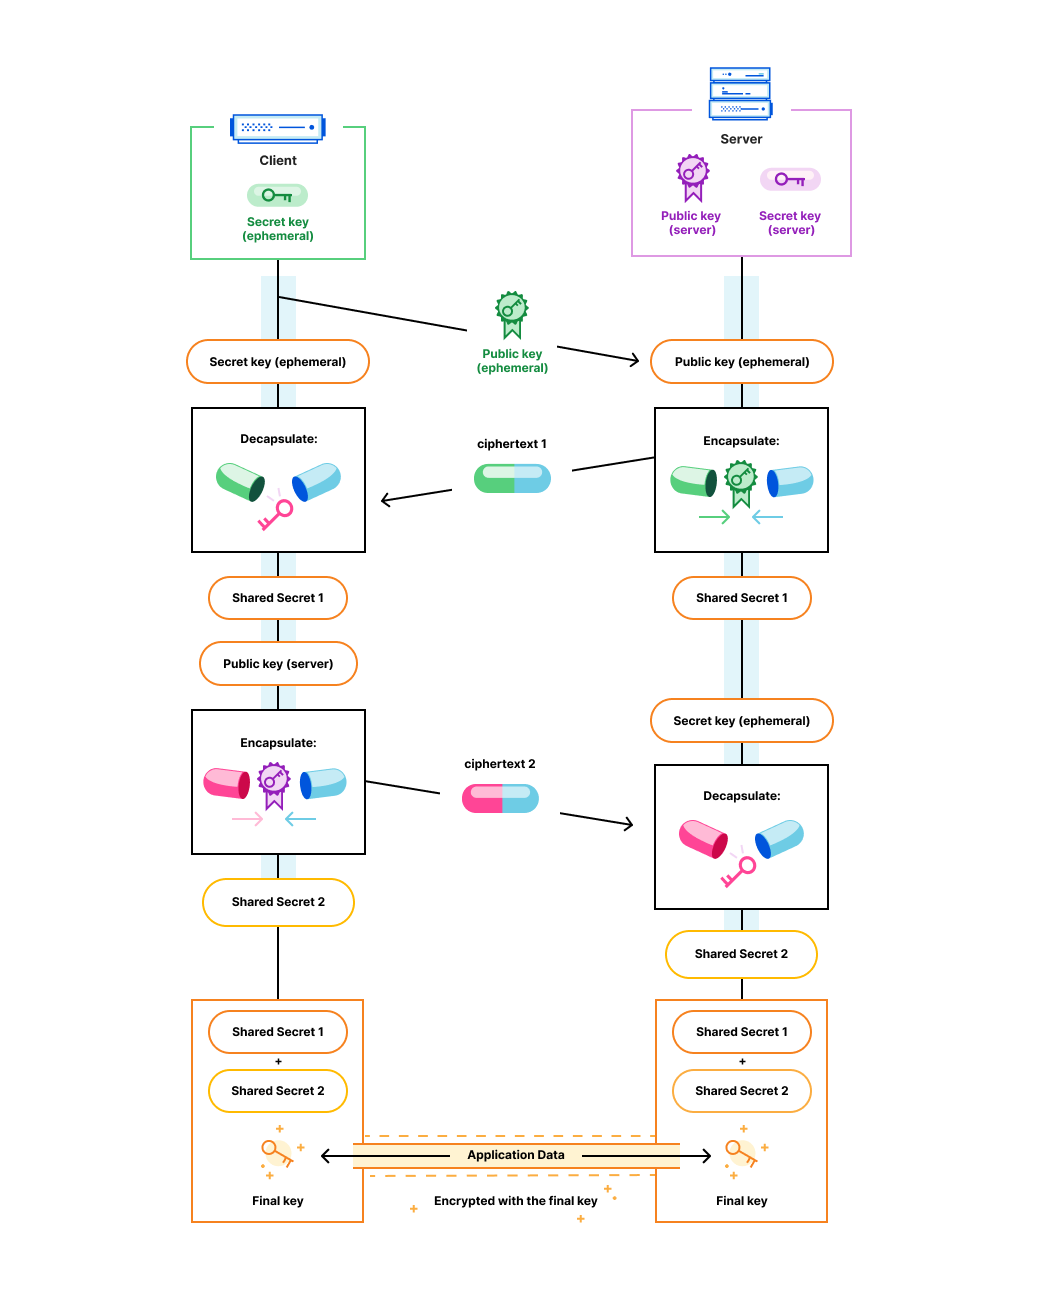
The main idea of KEMTLS is the following: instead of using a signature to prove that you have access to the private key that corresponds to the (signing) public key in the certificate presented, we derive a shared secret encapsulated to a (KEM) public key. The party that presented the certificate can only derive (decapsulate) it from the resulting encapsulation (often also called the ciphertext) if they have access to the correct private key; and only then can they read encrypted traffic. A brief overview of how this looks in the “traditional arrows on paper” form is given below.
Brief overview of the core idea of KEMTLS.
We want to show that the KEMTLS handshake is secure, no matter how an adversary might mess with, reorder, or even create new protocol messages. Symbolic analysis tools such as Tamarin or ProVerif are well suited to this task: as said, they allow us to consider every possible combination or manipulation of protocol messages, participants, and key information. We can then write lemmas about the behavior of the protocol.
Why prove it in Tamarin?
There exists a pen-and-paper proof of the KEMTLS handshake. You might ask: why should we still invest the effort of modeling it in a tool like Tamarin?
Pen-and-paper proofs are in theory fairly straightforward. However, they are very hard to get right. We need to carefully express the security properties of the protocol, and it is very easy to let assumptions lead you to write something that your model does not correctly cover. Verifying that a proof has been done correctly is also very difficult and requires almost as much careful attention as writing the proof itself. In fact, several mistakes in definitions of the properties of the model of the original KEMTLS proof were found, after the paper had been accepted and published at a top-tier security conference.
💡 For those familiar with these kinds of game-based proofs, another “war story”: while modeling the ephemeral key exchange, the authors of KEMTLS initially assumed all we needed was an IND-CPA secure KEM. After writing out all the simulations in pseudo code (which is not part of the proof or the paper otherwise!), it turned out that we needed an additional oracle to answer a single decapsulation query, resulting in requiring a weaker variant of IND-CCA security of our KEM (namely, IND-1CCA security). Using an “only” IND-CPA-secure KEM turned out to not be secure!
Part of the problem with pen-and-paper proofs is perhaps the human nature to read between the lines: we quickly figure out what is intended by a certain sentence, even if the intent is not strictly clarified. Computers do not allow that: to everyone’s familiar frustration whenever a computer has not done what you wanted, but just what you told it to do.
A benefit of computer code, though, is that all the effort is in writing the instructions. A carefully constructed model and proof result in an executable program: verifying should be as simple as being able to run it to the end. However, as always we need to:
Be very careful that we have modeled the right thing and,
Note that even the machine prover might have bugs: this second computer-assisted proof is a complement to, and not a replacement of, the pen-and-paper proof.
Another reason why computer proofs are interesting is because they give the ability to construct extensions. The “pre-distributed keys” extension of KEMTLS, for example, has been only proven on paper in isolation. Tamarin allows us to construct that extension in the same space as the main proof, which will help rule out any cross-functional attacks. With this, the complexity of the proof is increased exponentially, but Tamarin allows us to handle that just by using more computer power. Doing the same on paper requires very, very careful consideration.
One final reason we wanted to perform this computer analysis is because whilst the pen-and-paper proof was in the computational model, our computer analysis is in the symbolic model. Computational proofs attain “high resolution” proofs, giving very tight bounds on exactly how secure a protocol is. Symbolic models are “low resolution”: giving a binary yes/no answer on whether a protocol meets the security goals (with the assumption that the underlying cryptographic primitives are secure). This might sound like computational proofs are the best: their downside is that one has to simplify the model in other areas. The computational proof of KEMTLS, for example, does not model TLS message formats, which a symbolic model can.
Modeling KEMTLS in Tamarin
Before we can start making security claims and asking Tamarin to prove them, we first need to explain to Tamarin what KEMTLS is. As we mentioned earlier, Tamarin treats the world as a “bag of facts”. Keys, certificates, identities, and protocol messages are all facts. Tamarin can take those facts and apply rules to them to construct (or deconstruct) new facts. Executing steps in the KEMTLS protocol is, in a very literal sense, just another way to perform such transformations — and if everything is well-designed, the only “honest” way to reach the end state of the protocol.
We need to start by modeling the protocol. We were fortunate to be able to reuse the work of Cremers et al., who contributed their significant modeling talent to the TLS 1.3 standardization effort. They created a very complete model of the TLS 1.3 protocol, which showed that the protocol is generally secure. For more details, see their paper.
We modified the ephemeral key exchange by substituting the Diffie-Hellman operations in TLS 1.3 with the appropriate KEM operations. Similarly, we modified the messages that perform the certificate handling: instead of verifying a signature, we send back a KemEncapsulation message with the ciphertext. Let’s have a look at one of the changed rules. Don’t worry, it looks a bit scary, but we’re going to break it down for you. And also, don’t worry if you do not grasp all the details: we will cover the most necessary bits when they come up again, so you can also just skip to the next section “Modeling the adversary” instead.
rule client_recv_server_cert_emit_kex:
let
  // … snip
  ss = kemss($k, ~saseed)
  ciphertext = kemencaps($k, ss, certpk)
  // NOTE: the TLS model uses M4 preprocessor macros for notation
  // We also made some edits for clarity
in
  [
    State(C2d, tid, $C, $S, PrevClientState),
    In(senc{<'certificate', certpk>}hs_keys),
    !Pk($S, certpk),
    Fr(~saseed)
  ]
  --[
    C2d(tid),
    KemEncap($k, certpk, ss)
  ]->
  [
    State(C3, tid, $C, $S, ClientState),
    Out(senc{<'encaps', ciphertext>}hs_keyc)
  ]
This rule represents the client getting the server’s certificate and encapsulating a fresh key to it. It then sends the encapsulated key back to the server.
Note that the let … in part of the rule is used to assign expressions to variables. The real meat of the rule starts with the preconditions. As we can see, in this rule there are four preconditions that Tamarin needs to already have in its bag for this rule to be triggered:
The first precondition is State(C2d, …). This condition tells us that we have some client that has reached the stage C2d, which is what we call this stage in our representation. The remaining variables define the state of that client.
The second precondition is an In one. This is how Tamarin denotes messages received from the network. As we mentioned before, we assume that the network is controlled by the attacker. Until we can prove otherwise, we don’t know whether this message was created by the honest server, if it has been manipulated by the attacker, or even forged. The message contents, senc{<'certificate', certpk>}hs_keys, is symmetrically encrypted ( senc{}) under the server’s handshake key (we’ve slightly edited this message for clarity, and removed various other bits to keep this at least somewhat readable, but you can see the whole definition in our model).
The third precondition states the public key of the server, !Pk(S, certpk). This condition is preceded by a ! symbol, which means that it’s a permanent fact to be consumed many times. Usually, once a fact is removed from the bag, it is gone; but permanent facts remain. S is the name of the server, and certpk is the KEM public key.
The fourth precondition states the fresh random value, ~saseed.
The postconditions of this rule are a little simpler. We have:
State(C3, …), which represents that the client (which was at the start of the rule in state C2d) is now in state C3.
Out(senc{<'encaps', ciphertext>}hs_keyc), which represents the action of the client sending the encapsulated key to the network, encrypted under the client’s handshake key.
The four actions recorded in this rule are:
First, we record that the client with thread id tid reached the state C2d.
Second and third, we record that the client was running the protocol with various intermediate values. We use the phrase “running with” to indicate that although the client believes these values to be the correct, it can’t yet be certain that they haven’t been tampered with, so the client hasn’t committed yet to them.
Finally, we record the parameters we put into the KEM with the KemEncap action.
We modify and add such rules to the TLS 1.3 model, so we can run KEMTLS instead of TLS 1.3. For a sanity check, we need to make sure that the protocol can actually be executed: a protocol that can not run, can not leak your secrets. We use a reachability lemma to do that:
lemma exists_C2d:
    exists-trace
    "Ex tid #j. C2d(tid)@#j"
This was the first lemma that we asked Tamarin to prove. Because we’ve marked this lemma exists-trace, it does not need to hold in all traces, all runs of the protocol. It just needs one. This lemma asks if there exists a trace ( exists-trace), where there exists ( Ex ) a variable tid and a time #j (times are marked with #) at which action C2d(tid) is recorded. What this captures is that Tamarin could find a branch of the tree where the rule described above was triggered. Thus, we know that our model can be executed, at least as far as C2d.
Modeling the adversary
In the symbolic model, all cryptography is perfect: if the adversary does not have a particular key, they can not perform any deconstructions to, for example, decrypt a message or decapsulate a ciphertext. Although a proof with this default adversary would show the protocol to be secure against, for example, reordering or replaying messages, we want it to be secure against a slightly stronger adversary. Fortunately, we can model this adversary. Let’s see how.
Let’s take an example. We have a rule that honestly generates long-term keys (certificates) for participants:
This rule is very similar to the one we saw at the beginning of this blog post, but we’ve tweaked it to generate KEM public keys. It goes as follows: it generates a fresh value, and registers it as the actor $A’s long-term private key symbol !Ltk and $A’s public key symbol !Pk that we use to model our certificate infrastructure. It also sends ( Out ) the public key to the network such that the adversary has access to it.
The adversary can not deconstruct symbols like Ltk without rules to do so. Thus, we provide the adversary with a special Reveal query, that takes the !Ltk fact and reveals the private key:
Executing this rule registers the RevLtk($A) action, so that we know that $A’s certificate can no longer be trusted after RevLtk occurred.
Writing security lemmas
KEMTLS, like TLS, is a cryptographic handshake protocol. These protocols have the general goal to generate session keys that we can use to encrypt user’s traffic, preferably as quickly as possible. One thing we might want to prove is that these session keys are secret:
lemma secret_session_keys [/*snip*/]:
  "All tid actor peer kw kr aas #i.
      SessionKey(tid, actor, peer, <aas, 'auth'>, <kw, kr>)@#i &
      not (Ex #r. RevLtk(peer)@#r & #r < #i) &
      not (Ex tid3 esk #r. RevEKemSk(tid3, peer, esk)@#r & #r < #i) &
      not (Ex tid4 esk #r. RevEKemSk(tid4, actor, esk)@#r & #r < #i)
    ==> not Ex #j. K(kr)@#j"
This lemma states that if the actor has completed the protocol and the attacker hasn’t used one of their special actions, then the attacker doesn’t know the actor’s read key, kr. We’ll go through the details of the lemma in a moment, but first let’s address some questions you might have about this proof statement.
The first question that might arise is: “If we are only secure in the case the attacker doesn’t use their special abilities then why bother modeling those abilities?” The answer has two parts:
We do not restrict the attacker from using their abilities: they can compromise every key except the ones used by the participants in this session. If they managed to somehow make a different participant use the same ephemeral key, then this lemma wouldn’t hold, and we would not be able to prove it.
We allow the attacker to compromise keys used in this session after the session has completed. This means that what we are proving is: an attacker who recorded this session in the past and now has access to the long-term keys (by using their shiny new quantum computer, for example) can’t decrypt what happened in the session. This property is also known as forward secrecy.
The second question you might ask is: “Why do we only care about the read key?”. We only care about the read key because this lemma is symmetric, it holds for all actors. When a client and server have established a TLS session, the client’s read key is the server’s write key and vice versa. Because this lemma applies symmetrically to the client and the server, we prove that the attacker doesn’t know either of those keys.
Let’s return now to the syntax of this lemma.
This first line of this lemma is a “For all” statement over seven variables, which means that we are trying to prove that no matter what values these seven variables hold, the rest of the statement is true. These variables are:
the thread id tid,
a protocol participant, actor,
the person they think they’re talking to, peer,
the final read and write keys, kr and kw respectively,
the actor’s authentication status, aas,
and a time #i.
The next line of the lemma is about the SessionKey action. We record the SessionKey action when the client or the server thinks they have completed the protocol.
The next lines are about two attacker abilities: RevLtk, as discussed earlier; and RevEKemSk, which the attacker can use to reveal ephemeral secrets. The K(x) action means that the attacker learns (or rather, Knows) x. We, then, assert that if there does not Exist a RevEKemSk or RevLtk action on one of the keys used in the session, then there also does not exist a time when K(kr) (when the attacker learns the read key). Quod erat demonstrandum. Let’s run the proofs now.
Proving lemmas in Tamarin
Tamarin offers two methods to prove security lemmas: it has an autoprover that can try to find the solution for you, or you can do it manually. Tamarin sometimes has a hard time figuring out what is important for proving a particular security property, and so manual effort is sometimes unavoidable.
The manual prover interface allows you to select what goal Tamarin should pursue step by step. A proof quickly splits into separate branches: in the picture, you see that Tamarin has already been able to prove the branches that are green, leaving us to make a choice for case 1.
Screenshot from the Tamarin user interface, showing a prompt for the next step in a proof. The branches of the proof that are marked green have already been proven.
Sometimes whilst working in the manual interface, you realize that there are certain subgoals that Tamarin is trying to prove while working on a bigger lemma. By writing what we call a helper lemma we can give Tamarin a shortcut of sorts. Rather than trying to solve all the subgoals of one big lemma, we can split the proof into more digestible chunks. Tamarin can then later reuse these helper lemmas when trying to prove bigger lemmas; much like factoring out functions while programming. Sometimes this even allows us to make lemmas auto-provable. Other times we can extract the kinds of decisions we’re making and heuristics we’re manually applying into a separate “oracle” script: a script that interacts with Tamarin’s prover heuristics on our behalf. This can also automate proving tricky lemmas.
Once you realize how much easier certain things are to prove with helper lemmas, you can get a bit carried away. However, you quickly find that Tamarin is being “distracted” by one of the helper lemmas and starts going down long chains of irrelevant reasoning. When this happens, you can hide the helper lemma from the main lemma you’re trying to prove, and sometimes that allows the autoprover to figure out the rest.
Unfortunately, all these strategies require a lot of intuition that is very hard to obtain without spending a lot of time hands-on with Tamarin. Tamarin can sometimes be a bit unclear about what lemmas it’s trying to apply. We had to resort to tricks, like using unique, highly recognizable variable names in lemmas, such that we can reconstruct where a certain goal in the Tamarin interface is coming from.
While doing this work, auto-proving lemmas has been incredibly helpful. Each time you make a tiny change in either a lemma (or any of the lemmas that are reused by it) or in the whole model, you have to re-prove everything. If we needed to put in lots of manual effort each time, this project would be nowhere near done.
This was demonstrated by two bugs we found in one of the core lemmas of the TLS 1.3 model. It turned out that after completing the proof, some refactoring changes were made to the session_key_agreement lemma. These changes seemed innocent, but actually changed the meaning of the lemma, so that it didn’t make sense anymore (the original definition did cover the right security properties, so luckily this doesn’t cause a security problem). Unfortunately, this took a lot of our time to figure out. However, after a huge effort, we’ve done it. We have a proof that KEMTLS achieves its security goals.
Conclusions
Formal methods definitely have a place in the development of security protocols; the development process of TLS 1.3 has really demonstrated this. We think that any proposal for new security protocols should be accompanied by a machine-verified proof of its security properties. Furthermore, because many protocols are currently specified in natural language, formal specification languages should definitely be under consideration. Natural language is inherently ambiguous, and the inevitable differences in interpretation that come from that lead to all kinds of problems.
However, this work cannot be done by academics alone. Many protocols come out of industry who will need to do this for themselves. We would be the first to admit that the usability of these tools for non-experts is not all the way there yet — and industry and academia should collaborate on making these tools more accessible for everyone. We welcome and look forward to these collaborations in the future!
* The authors of this blog post were authors on these papers
…..
1Of course, trying every value isn’t technically impossible, it’s just infeasible, so we make the simplifying assumption that it’s impossible, and just say our proof only applies if the attacker can’t just try every value. Other styles of proof that don’t make that assumption are possible, but we’re not going to go into them. 2For simplicity, this representation assumes that the public portion of a key pair can be derived from the private part, which may not be true in practice. Usually this simplification won’t affect the analysis.
.NET 6 has many new features for .NET developers including support for C# 10 and F# 6. In addition to these features in .NET 6, this blog post explains new features added to the .NET Lambda experience. You can use these to improve diagnostics and performance and use new coding patterns.
Improved logging
Logging in .NET Lambda functions has been improved for .NET 6, providing better traceability, and control of what is being logged. If you prefer the style of logging in previous .NET managed runtimes, set the environment variable AWS_LAMBDA_HANDLER_LOG_FORMAT to Unformatted.
Request ID
One of the common requested features for the previous .NET Lambda runtime is adding the Lambda request ID to logs for better traceability. This is available in the .NET 6 runtime, making the .NET logging format similar to other Lambda runtimes.
Log levels
.NET 6 logging uses log levels. The ILambdaLogger is accessed from the ILambdaContext and has the following new logging APIs:
LogCritical(string message)
LogError(string message)
LogWarning(string message)
LogInformation(string message)
LogDebug(string message)
LogTrace(string message)
Log(LogLevel level, string message)
Levels for log messages are visible in Amazon CloudWatch Logs, like the request id. This makes it easier to filter and search the logs for particular types of messages, such as errors or warnings.
Console.WriteLine calls are written to CloudWatch Logs as an info level message; Console.Error.WriteLine calls are written as error level.
The following example shows using info messages for logging the fetched user object. It writes a warning message if the user is not found:
public APIGatewayProxyResponse Get(APIGatewayProxyRequest request, ILambdaContext context)
{
    User user = null;
    try
    {
        var id = request.PathParameters["id"];

        context.Logger.LogInformation($"Loading user {id}");
        user = FetchUser(id);
        context.Logger.LogInformation($"User: {user.Name}");
    }
    catch(Exception e)
    {
        context.Logger.LogWarning($"Unable to find user: {e.Message}");
    }

    ...

}
When the user cannot be fetched, this is the resulting log messages showing the log level and request id:
By default, info level messages or higher are written to CloudWatch Logs. You can adjust the level written to CloudWatch Logs using the AWS_LAMBDA_HANDLER_LOG_LEVEL environment variable. The value of the environment variable is set to the values of the LogLevel enum.
With this new filtering, you can instrument Lambda functions with additional logging using the debug and trace log levels. This allows you to turn on additional logging from Lambda functions for troubleshooting, without redeploying new code.
Using source generator for JSON serialization
C# 9 provides source generators, which allow code generation during compilation. This can reduce the use of reflection APIs and improve application startup time. .NET 6 updated the native JSON library System.Text.Json to use source generators, allowing JSON parsing without requiring reflection APIs.
When targeting .NET 6 support, you can take advantage of System.Text.Json’s source generator support to improve cold start performance. This is done using the Amazon.Lambda.Serialization.SystemTextJson package that handles the serialization of Lambda events and responses to .NET types.
To use the source generator, you must define a new empty class in your project that derives from System.Text.Json.Serialization.JsonSerializerContext. This class must be a partial class because the source generator adds code to this class to handle serialization. On the empty partial class, add the JsonSerializable attribute for each .NET type the source generator must generate the serialization code for.
Here is an example called HttpApiJsonSerializerContext that registers the Amazon API Gateway HTTP API event and response types to have the serialization code generated:
[JsonSerializable(typeof(APIGatewayHttpApiV2ProxyRequest))]
[JsonSerializable(typeof(APIGatewayHttpApiV2ProxyResponse))]
public partial class HttpApiJsonSerializerContext : JsonSerializerContext
{
}
Lambda functions using Amazon.Lambda.Serialization.SystemTextJson use the Amazon.Lambda.Core.LambdaSerializer attribute to register the serializer. Most commonly the DefaultLambdaJsonSerializer type is specified. To use the source generator, you must register SourceGeneratorLambdaJsonSerializer, passing the previously defined JsonSerializerContext subclass as the generic parameter.
Here is an example of registering the serializer using the HttpApiJsonSerializerContext type:
After these steps, Lambda uses the source-generated JSON serialization code to handle all of the serialization of Lambda events and responses. Reflection API calls are not used for serialization, improving the Lambda function’s cold start performance.
Below is a full example of an API Gateway-based Lambda function using the source generator.
using System.Collections.Generic;
using System.Net;
using System.Text.Json.Serialization;


using Amazon.Lambda.Core;
using Amazon.Lambda.APIGatewayEvents;
using Amazon.Lambda.Serialization.SystemTextJson;

[assembly: LambdaSerializer(typeof(SourceGeneratorLambdaJsonSerializer<SourceGeneratorExample.HttpApiJsonSerializerContext>))]

namespace SourceGeneratorExample;

[JsonSerializable(typeof(APIGatewayHttpApiV2ProxyRequest))]
[JsonSerializable(typeof(APIGatewayHttpApiV2ProxyResponse))]
public partial class HttpApiJsonSerializerContext : JsonSerializerContext
{
}


public class Functions
{
    public APIGatewayProxyResponse Get(APIGatewayHttpApiV2ProxyRequest request, ILambdaContext context)
    {
        context.Logger.LogInformation("Get Request");

        var response = new APIGatewayHttpApiV2ProxyResponse
        {
            StatusCode = (int)HttpStatusCode.OK,
            Body = "Hello AWS Serverless",
            Headers = new Dictionary<string, string> { { "Content-Type", "text/plain" } }
        };

        return response;
    }
}
Top-level statements
The new .NET 6 Lambda runtime adds support for writing Lambda functions using C# 9’s top-level statements feature. Top-level statements allow you to remove much of the initial boilerplate code for a .NET project.
In a typical hello world example:
using System;

namespace Application
{
    class Program
    {
        static void Main(string[] args)
        {
            Console.WriteLine(“Enjoying .NET 6 in AWS Lambda”);
        }
    }
}
With top-level statements, you can write this in one line, removing brackets, indentations, namespaces, and type declarations:
Console.WriteLine(“Enjoying .NET 6 in AWS Lambda”);
At a high level, the C# compiler generates the .NET assembly’s Main() method, with your top-level code within it.
Executable assemblies
With top-level statements, the Main() method has been generated by the compiler. This is different from the traditional way of writing .NET Lambda functions. Previously, a Lambda project is a class library and the Lambda function handler is set to the assembly, type, and method name that the Lambda runtime client invokes.
Here is an example of .NET Lambda function handler string:
And here is what the code for this function handler could look like:
using System.IO;
using System.Threading.Tasks;

using Amazon.Lambda.Core;
using Amazon.Lambda.S3Events;
using Amazon.S3;

// Assembly attribute to enable the Lambda function’s JSON input to be converted into a .NET class.
[assembly: LambdaSerializer(typeof(Amazon.Lambda.Serialization.SystemTextJson.DefaultLambdaJsonSerializer))]

namespace LambdaProject
{
    public class Function
    {
        IAmazonS3 _s3Client;

        public Function()
        {
            _s3Client = new AmazonS3Client();
        }

        public async Task FunctionHandler(S3Event evnt, IlambdaContext context)
        {
            foreach (var record in evnt.Records)
            {
                using var response = await _s3Client.GetObjectAsync(record.S3.Bucket.Name, record.S3.Object.Key);
                using var reader = new StreamReader(response.ResponseStream);
                // Run business logic on the text contexts of the S3 object
            }
        }
    }
}
Using reflection, the .NET Lambda runtime client uses the function handler string to identify the method to call in the .NET assembly.
When using top-level statements, you instead tell Lambda to run the assembly, which runs the top-level statements. To indicate that you want Lambda to run the assembly, set the Lambda function handler to the assembly name only. Using the previous example, the .NET Lambda function handler string is LambdaProject.
With the .NET assembly containing the Lambda function being run at startup, instead of the Lambda runtime client, your function code must start the Lambda runtime client so that Lambda events are sent to your code.
In the file that defines all of your top-level statements add to the end of the file the code to start the Lambda runtime client. The exact code is shown at the end of the example below.
This is a full example of a C# Lambda function using top-level statements that processes Lambda events:
using Amazon.Lambda.Core;
using Amazon.Lambda.RuntimeSupport;
using Amazon.Lambda.Serialization.SystemTextJson;
using Amazon.Lambda.S3Events;
using Amazon.S3;

// Code outside of the handler will be executed during Lambda initialization
var s3Client = new AmazonS3Client();

// The function handler that will be called for each Lambda event
var handler = async (S3Event evnt, ILambdaContext context) =>
{
    foreach(var record in evnt.Records)
    {
        using var response = await s3Client.GetObjectAsync(record.S3.Bucket.Name, record.S3.Object.Key);
        using var reader = new StreamReader(response.ResponseStream);
        // Run business logic on the text contexts of the S3 object
    }
};

// Build the Lambda runtime client passing in the handler to call for each
// event and the JSON serializer to use for translating Lambda JSON documents
// to .NET types.
await LambdaBootstrapBuilder.Create(handler, new DefaultLambdaJsonSerializer())
        .Build()
        .RunAsync();
ASP.NET Core minimal APIs
Since the first .NET Lambda runtime, you can run ASP.NET Core applications as Lambda functions using the Amazon.Lambda.AspNetCoreServer NuGet package.
.NET 6 introduces a new style of writing ASP.NET Core applications called Minimal APIs. These take advantage of C# 9’s top-level statement support simplifying the initialization of an ASP.NET Core application, allowing you to define an entire ASP.NET Core application in a single file.
To deploy an ASP.NET Core application using Minimal APIs to Lambda:
Add a call to AddAWSLambdaHosting in your application when the services are being defined for the application. The argument for AddAWSLambdaHosting is the event source for the Lambda function. This can be an API Gateway REST or HTTP API, or an Application Load Balancer.
When the ASP.NET Core project is run locally, AddAWSLambdaHosting does nothing, allowing the normal .NET Kestrel web server to handle the local experience. When running in Lambda, AddAWSLambdaHosting swaps out Kestrel with Amazon.Lambda.AspNetCoreServer allowing Lambda and API Gateway to act as the web server instead of Kestrel. Since Minimal APIs take advantage of top-level statements, AddAWSLambdaHosting also starts the Lambda runtime client.
This example shows a Minimal API ASP.NET Core application. There is one Lambda-specific line calling AddAWSLambdaHosting that configures the project for Lambda support:
using Amazon.S3;
using Microsoft.AspNetCore.Mvc;

var builder = WebApplication.CreateBuilder(args);

// Add Swagger/OpenAPI support
builder.Services.AddEndpointsApiExplorer();
builder.Services.AddSwaggerGen();

builder.Services.AddControllers();

// Add S3 service client to dependency injection container
builder.Services.AddAWSService<IAmazonS3>();

// Add AWS Lambda support.
builder.Services.AddAWSLambdaHosting(LambdaEventSource.HttpApi);

var app = builder.Build();

app.UseSwagger();
app.UseSwaggerUI();

// Add support for controllers defined in other files
app.MapControllers();

// Example GET route
app.MapGet("/document/{name}", async ([FromServices] IAmazonS3 s3Client, string name) =>
{
    using var response = await s3Client.GetObjectAsync(app.Configuration["S3Bucket"], name);
    using var reader = new StreamReader(response.ResponseStream);
    var content = await reader.ReadToEndAsync();

    // Run business logic on the text contexts of the S3 object

    return content;
});

app.Run();
You must deploy as an executable assembly so the function handler string is set to the assembly name only. For example, this is how the preceding ASP.NET Core application is defined in AWS CloudFormation:
Over the last few years, AWS has open sourced more components of Lambda to help the community contribute to the Lambda experience. For .NET, you can find all the AWS client libraries in the aws/aws-lambda-dotnet GitHub repository.
For .NET 6, the managed runtime now uses the open source Lambda runtime client from the aws/aws-lambda-dotnet repository. Previously, the open source Lambda runtime client was used for functions that used Lambda’s custom runtime or container-image based support.
Now you have a consistent and transparent Lambda runtime client experience in all environments whether that is the managed runtime, container images or using the Lambda runtime client for .NET custom runtimes. The switch from the previous runtime client to the open source runtime client is transparent as Lambda functions are migrated to .NET 6.
The open source Lambda runtime client has different performance characteristics than the .NET Core 3.1 Lambda runtime client. This is because the open source client uses all managed code, whereas the .NET Core 3.1 client uses a mix of managed and native code. In our testing, cold starts for basic “Hello, world!” functions may be slightly faster in .NET Core 3.1. However, for Lambda functions that do real world work, the testing shows a significant cold start improvement in .NET 6. For example, a .NET 6 Lambda function that uses the AWS .NET SDK to retrieve an item from DynamoDB showed a 25% performance improvement.
Migrating to .NET 6
To migrate existing .NET Lambda functions to the new .NET 6 runtime:
Open the csproj or fsproj file. Set the TargetFramework element to net6.0.
Open the aws-lambda-tools-defaults.json file, if it exists:
Set the function-runtime field to dotnet6
Set the framework field to net6.0. If you remove the field, the value is inferred from the project file.
If it exists, open the serverless.template file. For any AWS::Lambda::Function or AWS::Servereless::Function resource, set the Runtime property to dotnet6.
Update all Amazon.Lambda.* NuGet package references to the latest versions.
Conclusion
We are excited to add support for .NET 6 to Lambda. It’s fast to get started or migrate existing functions to .NET 6, with many new features in .NET 6 to take advantage of. Read the Lambda Developer Guide for more getting started information.
To provide feedback for .NET on AWS Lambda, contact the AWS .NET team on the .NET Lambda GitHub repository.
For more serverless learning resources, visit Serverless Land.
Postman is a platform for building and using APIs. API providers such as Backblaze can use Postman to build API documentation and provide a live environment for developers to experiment with those APIs. Today, you can interact with Backblaze B2 Cloud Storage via our new Postman Collection for the Backblaze S3 Compatible API.
Using the Backblaze S3 Compatible API
The Backblaze S3 Compatible API implements the most commonly used S3 operations, allowing applications to integrate with Backblaze B2 in exactly the same way they do with Amazon S3. Many of our Alliance Partners have used the S3 Compatible API in integrating their products and services with Backblaze B2. Often, integration is as simple as allowing the user to specify a custom endpoint, for example, https://s3.us-west-001.backblazeb2.com, alongside their API credentials in the S3 settings, and verifying that the application works as expected with Backblaze B2.
The Backblaze B2 Native API, introduced alongside Backblaze B2 back in 2015, provides a low-level interface to B2 Cloud Storage. We generally recommend that developers use the S3 Compatible API when writing new applications and integrations, as it is supported by a wider range of SDKs and libraries, and many developers already have experience with Amazon S3. You can use the Backblaze B2 web console or the B2 Native API to access functionality, such as application key management and lifecycle rules, that is not covered by the S3 Compatible API.
Most applications and scripts use one of the AWS SDKs or the S3 commands in the AWS CLI to access Backblaze B2. All of the SDKs, and the CLI, allow you to override the default Amazon S3 endpoint in favor of Backblaze B2. Sometimes, though, you might want to interact directly with Backblaze B2 via the S3 Compatible API, perhaps in debugging an issue, or just to better understand how the service works.
Exploring the Backblaze S3 Compatible API in Postman
In addition to reading the documentation, you can click the Run in Postman button on the top right of the page, log in to the Postman website or desktop app (creating a Postman account is free), and interact with the API.
Integrate With Backblaze B2
Whether you are backing up, archiving data, or serving content via the web, Backblaze B2 is an easy to use and, at a quarter of the cost of Amazon S3, cost-effective cloud object storage solution. If you’re not already using Backblaze B2, sign up now and try it out—your first 10GB of storage is free!
To provide the best experiences, we use technologies like cookies to store and/or access device information. Consenting to these technologies will allow us to process data such as browsing behavior or unique IDs on this site. Not consenting or withdrawing consent, may adversely affect certain features and functions.
Functional
Always active
The technical storage or access is strictly necessary for the legitimate purpose of enabling the use of a specific service explicitly requested by the subscriber or user, or for the sole purpose of carrying out the transmission of a communication over an electronic communications network.
Preferences
The technical storage or access is necessary for the legitimate purpose of storing preferences that are not requested by the subscriber or user.
Statistics
The technical storage or access that is used exclusively for statistical purposes.The technical storage or access that is used exclusively for anonymous statistical purposes. Without a subpoena, voluntary compliance on the part of your Internet Service Provider, or additional records from a third party, information stored or retrieved for this purpose alone cannot usually be used to identify you.
Marketing
The technical storage or access is required to create user profiles to send advertising, or to track the user on a website or across several websites for similar marketing purposes.