Post Syndicated from original https://xkcd.com/2564/

Post Syndicated from original https://xkcd.com/2564/
Post Syndicated from original https://lwn.net/Articles/880263/rss
File-integrity management for the Fedora distribution
has been the overarching theme of a number of different feature proposals
over the last year or so. In general, they have been met with skepticism,
particularly with regard to how well the features mesh with Fedora’s
goals, but also in how they will change the process of building RPM
packages. A new proposal that would allow systems to (optionally) perform remote
attestation is likewise encountering headwinds; there are several
different concerns being raised in the discussion of it.
Post Syndicated from Ilesh Garish original https://aws.amazon.com/blogs/big-data/federate-access-to-amazon-redshift-using-the-jdbc-browser-plugin-for-single-sign-on-authentication-with-microsoft-azure-active-directory/
Since 2020, Amazon Redshift has supported multi-factor authentication (MFA) to any SAML 2.0 compliant identity provider (IdP) in our JDBC and ODBC drivers. You can map the IdP user identity and group memberships in order to control authorization for database objects in Amazon Redshift. This simplifies administration by enabling you to manage user access in a central location, reducing the overhead of creating and maintaining users in the database in conjunction with the IdP.
Recently, we helped a customer who was building their data warehouse on Amazon Redshift and had the requirement of using Microsoft Azure Active Directory (Azure AD) as their corporate IdP with MFA. This post illustrates how to set up federation using Azure AD and AWS Identity and Access Management (IAM). Azure AD manages the users and provides federated access to Amazon Redshift using IAM.
This post assumes that you have the following:
dev)This post consists of the following three sections to implement the solution:
To set up an Azure Enterprise application to control Amazon Redshift access, complete the following steps:


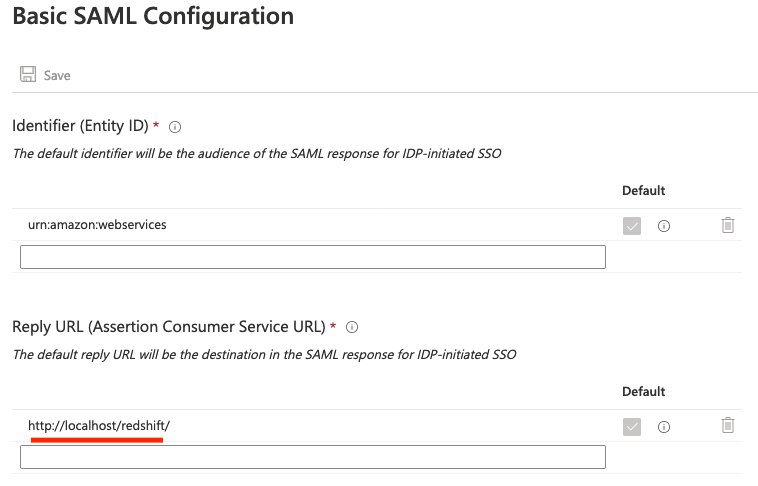
Redshift.
http://localhost/redshift/.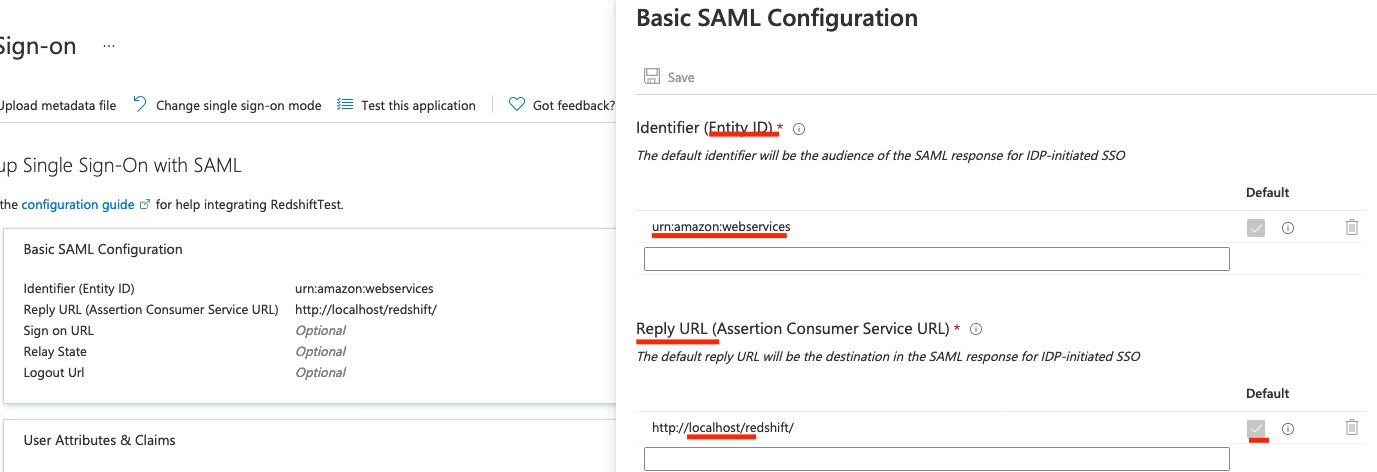
| Claim name | Value |
|---|---|
| Unique user identifier (name ID) | user.userprincipalname |
| https://aws.amazon.com/SAML/Attributes/Role | arn:aws:iam::111122223333:role/AzureSSO,arn:aws:iam::111122223333:saml-provider/AzureADProvider |
| https://aws.amazon.com/SAML/Attributes/RoleSessionName | user.userprincipalname |
| https://redshift.amazon.com/SAML/Attributes/AutoCreate | "true" |
| https://redshift.amazon.com/SAML/Attributes/DbGroups | user.assignedroles |
| https://redshift.amazon.com/SAML/Attributes/DbUser | user.userprincipalname |

Role.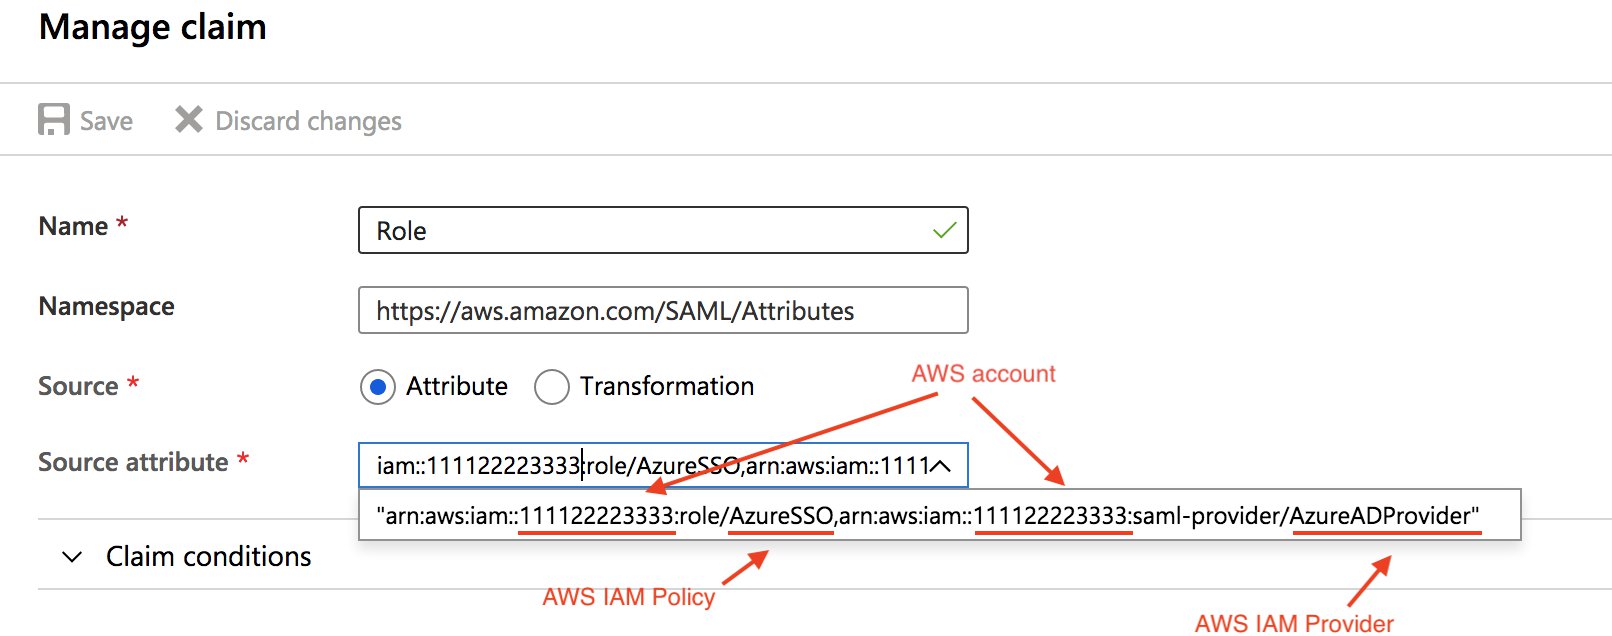
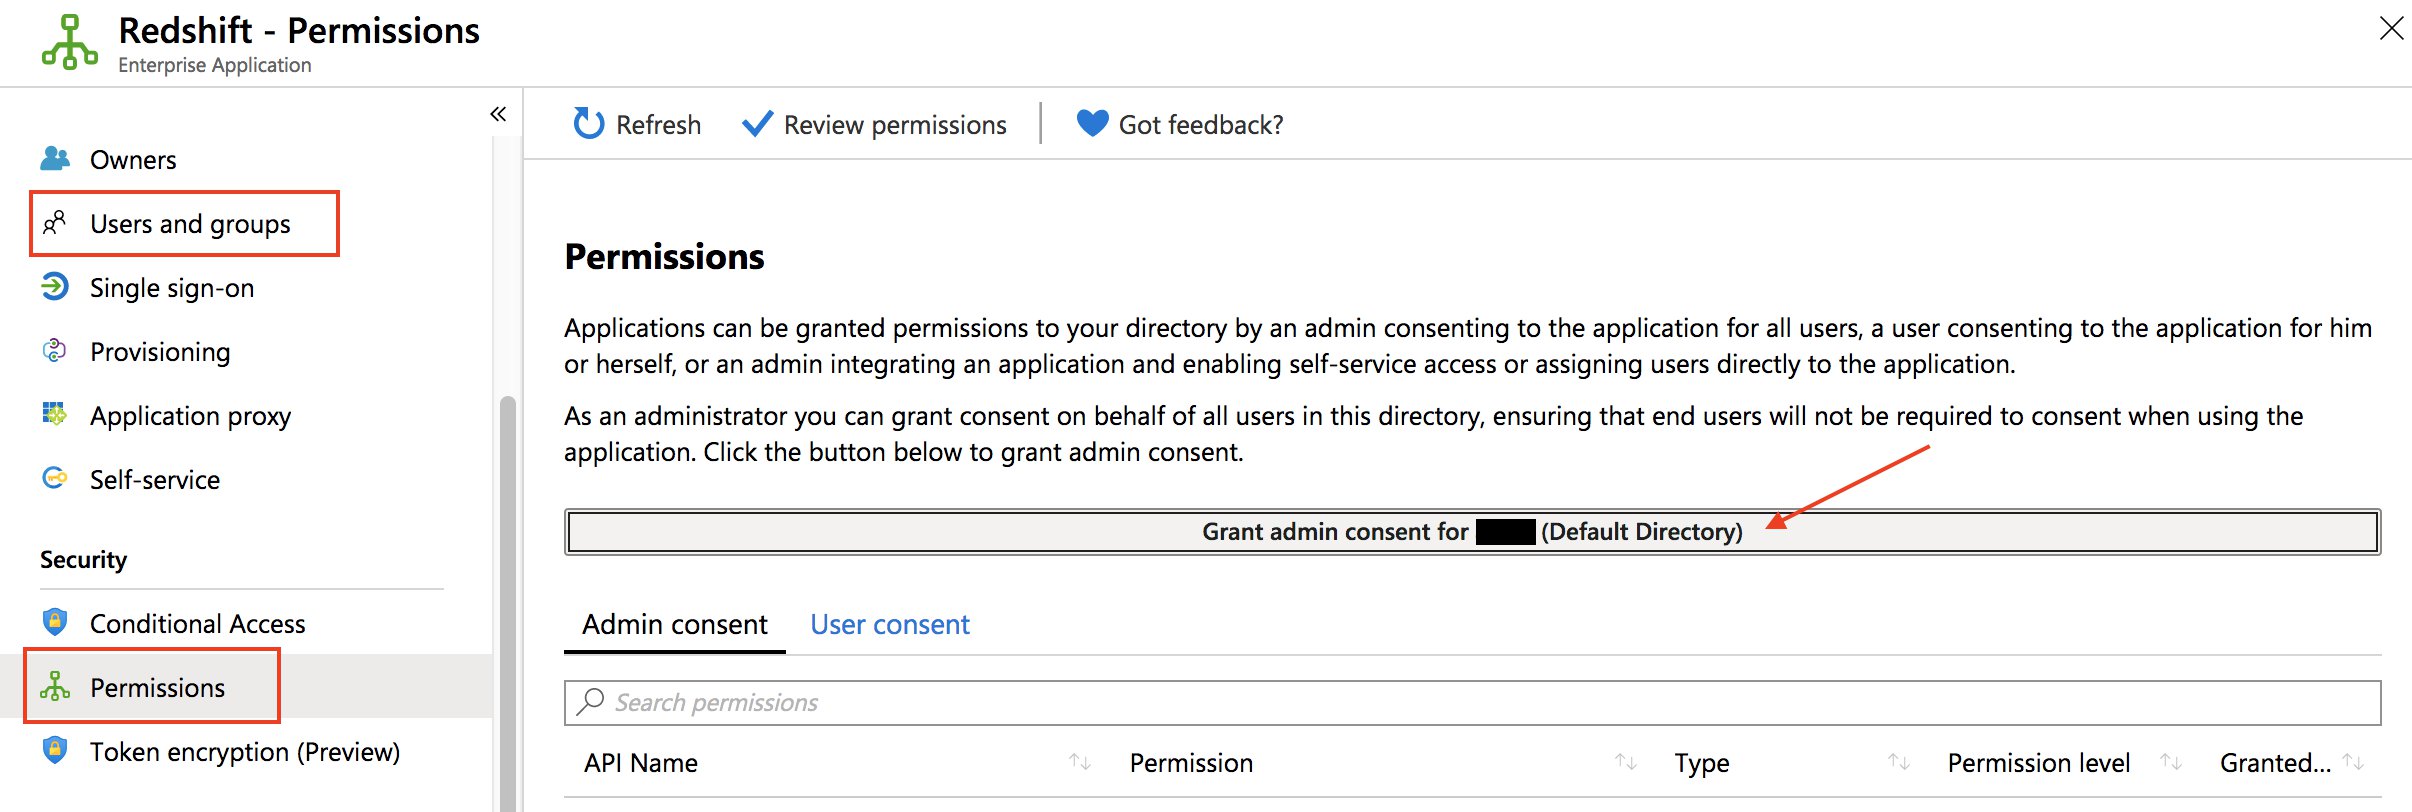
You need the metadata to configure the IAM IdP. Check your IdP for how to download this document, because every IdP handles this differently.
http://localhost/redshift/.
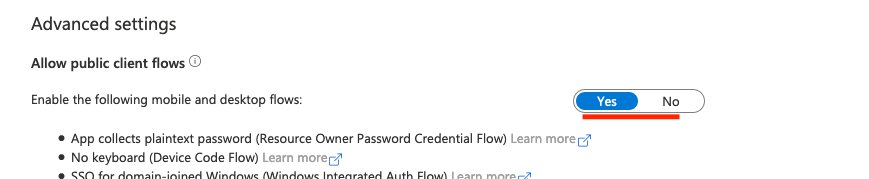


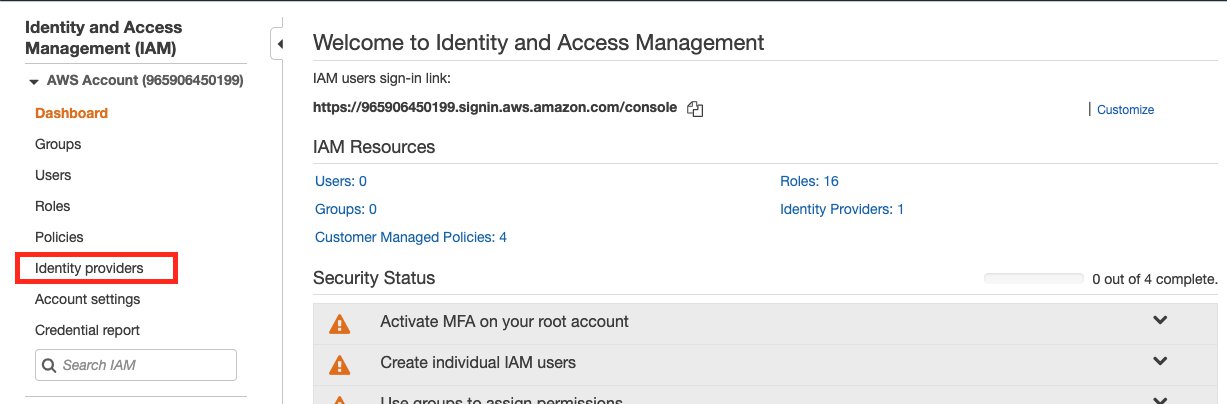
In this section, you configure IAM to allow Azure AD users to access Amazon Redshift resources and get temporary credentials.


Now you set up your policy. For detailed instructions, see Federate Database User Authentication Easily with IAM and Amazon Redshift.
You’re directed to the Create policy page, where you can choose the Visual editor tab for step-by-step policy creation or the JSON tab to edit the policy in one step.

In the preceding code, provide the following information:
us-west-1).* for all clusters under that account).dev; you can also enter * to allow access to all databases).aws iam get-role --role-name Your_Role_Name in the terminal).${redshift:DbUser} is replaced with whatever your IdP (Azure) specified for the SAML DbUser field for the user.The first statement allows users to grab temporary credentials from the cluster if:
dbname the user is trying to connect to is dev.DbUser specified in Azure.This all depends on your setup with IdP (Azure) configuration. If your employee’s email is [email protected], you need to set ${redshift:DbUser} to the super field that matches to the employee’s username johndoe and set the AWS SAML RoleSessionName field to be the super field that matches the employee’s email [email protected] to make this condition work.
If you set ${redshift:DbUser} to be the employee’s email, remove the @companyemail.com in the example code to match the RoleSessionName.
If you set the RoleSessionId to be just the employee’s username, remove the @companyemail.com in the example code to match the RoleSessionName.
In the Azure setup instructions, ${redshift:DbUser} and RoleSessionName are both set to the employee’s email, so you should remove @companyemail.com in the preceding code if you’re following these instructions closely. This post creates the user’s database username under their email and signs them in to AWS under this email.
The second statement allows users to create a database username under the specified conditions. In the preceding code, it restricts creation to ${redshift:DbUser}.
The third statement specifies what groups the user can join.
The final statement specifies what actions the user can perform on the resources. In the preceding code, users can call DescribeClusters to get cluster information, and IAM ListRoles to check which roles the user can assume. “Resource: “*” applies the preceding actions to any Amazon Redshift cluster the user has access to.

Lastly, we create the IAM role.


AzureTest).SAML:aud).http://localhost/redshift/.

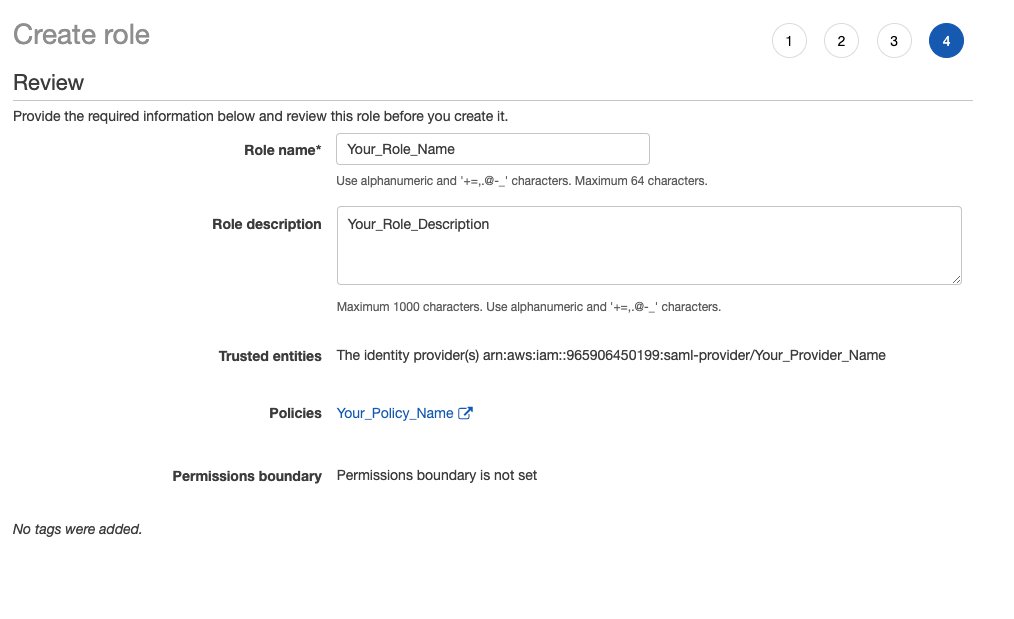
If you haven’t already, you’re now ready to create the Amazon Redshift cluster for the Azure AD users to connect to.
You can use any application that can take in a JDBC driver to connect using Azure SSO, or even use a language like Java to connect using a script. For this post, we use SQL Workbench/J, which is a common application to connect to JDBC and run queries.
Adding a folder is optional but helps keep things organized.
AzureAuth).
Creating a new profile in your profile group is optional but helps keep things organized.
Azure).

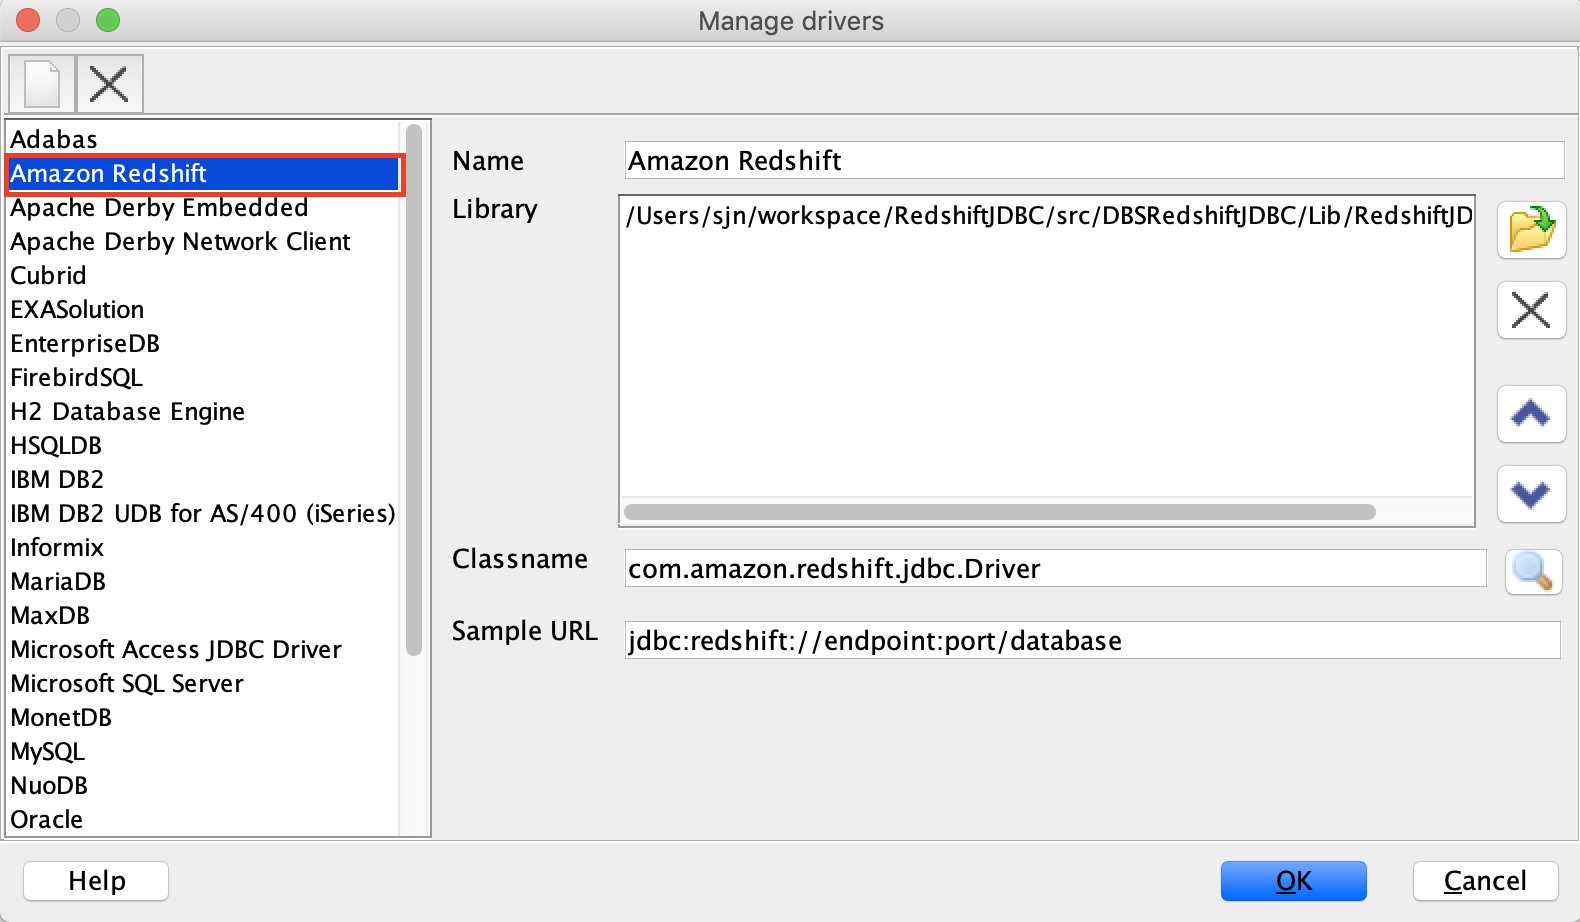

jdbc:redshift:iam://cluster-identifier:us-west-1/dev).
Alternatively, you can use the format jdbc:redshift:iam://<cluster-dns-here>:<cluster-port>/<your-DB-name-here>.
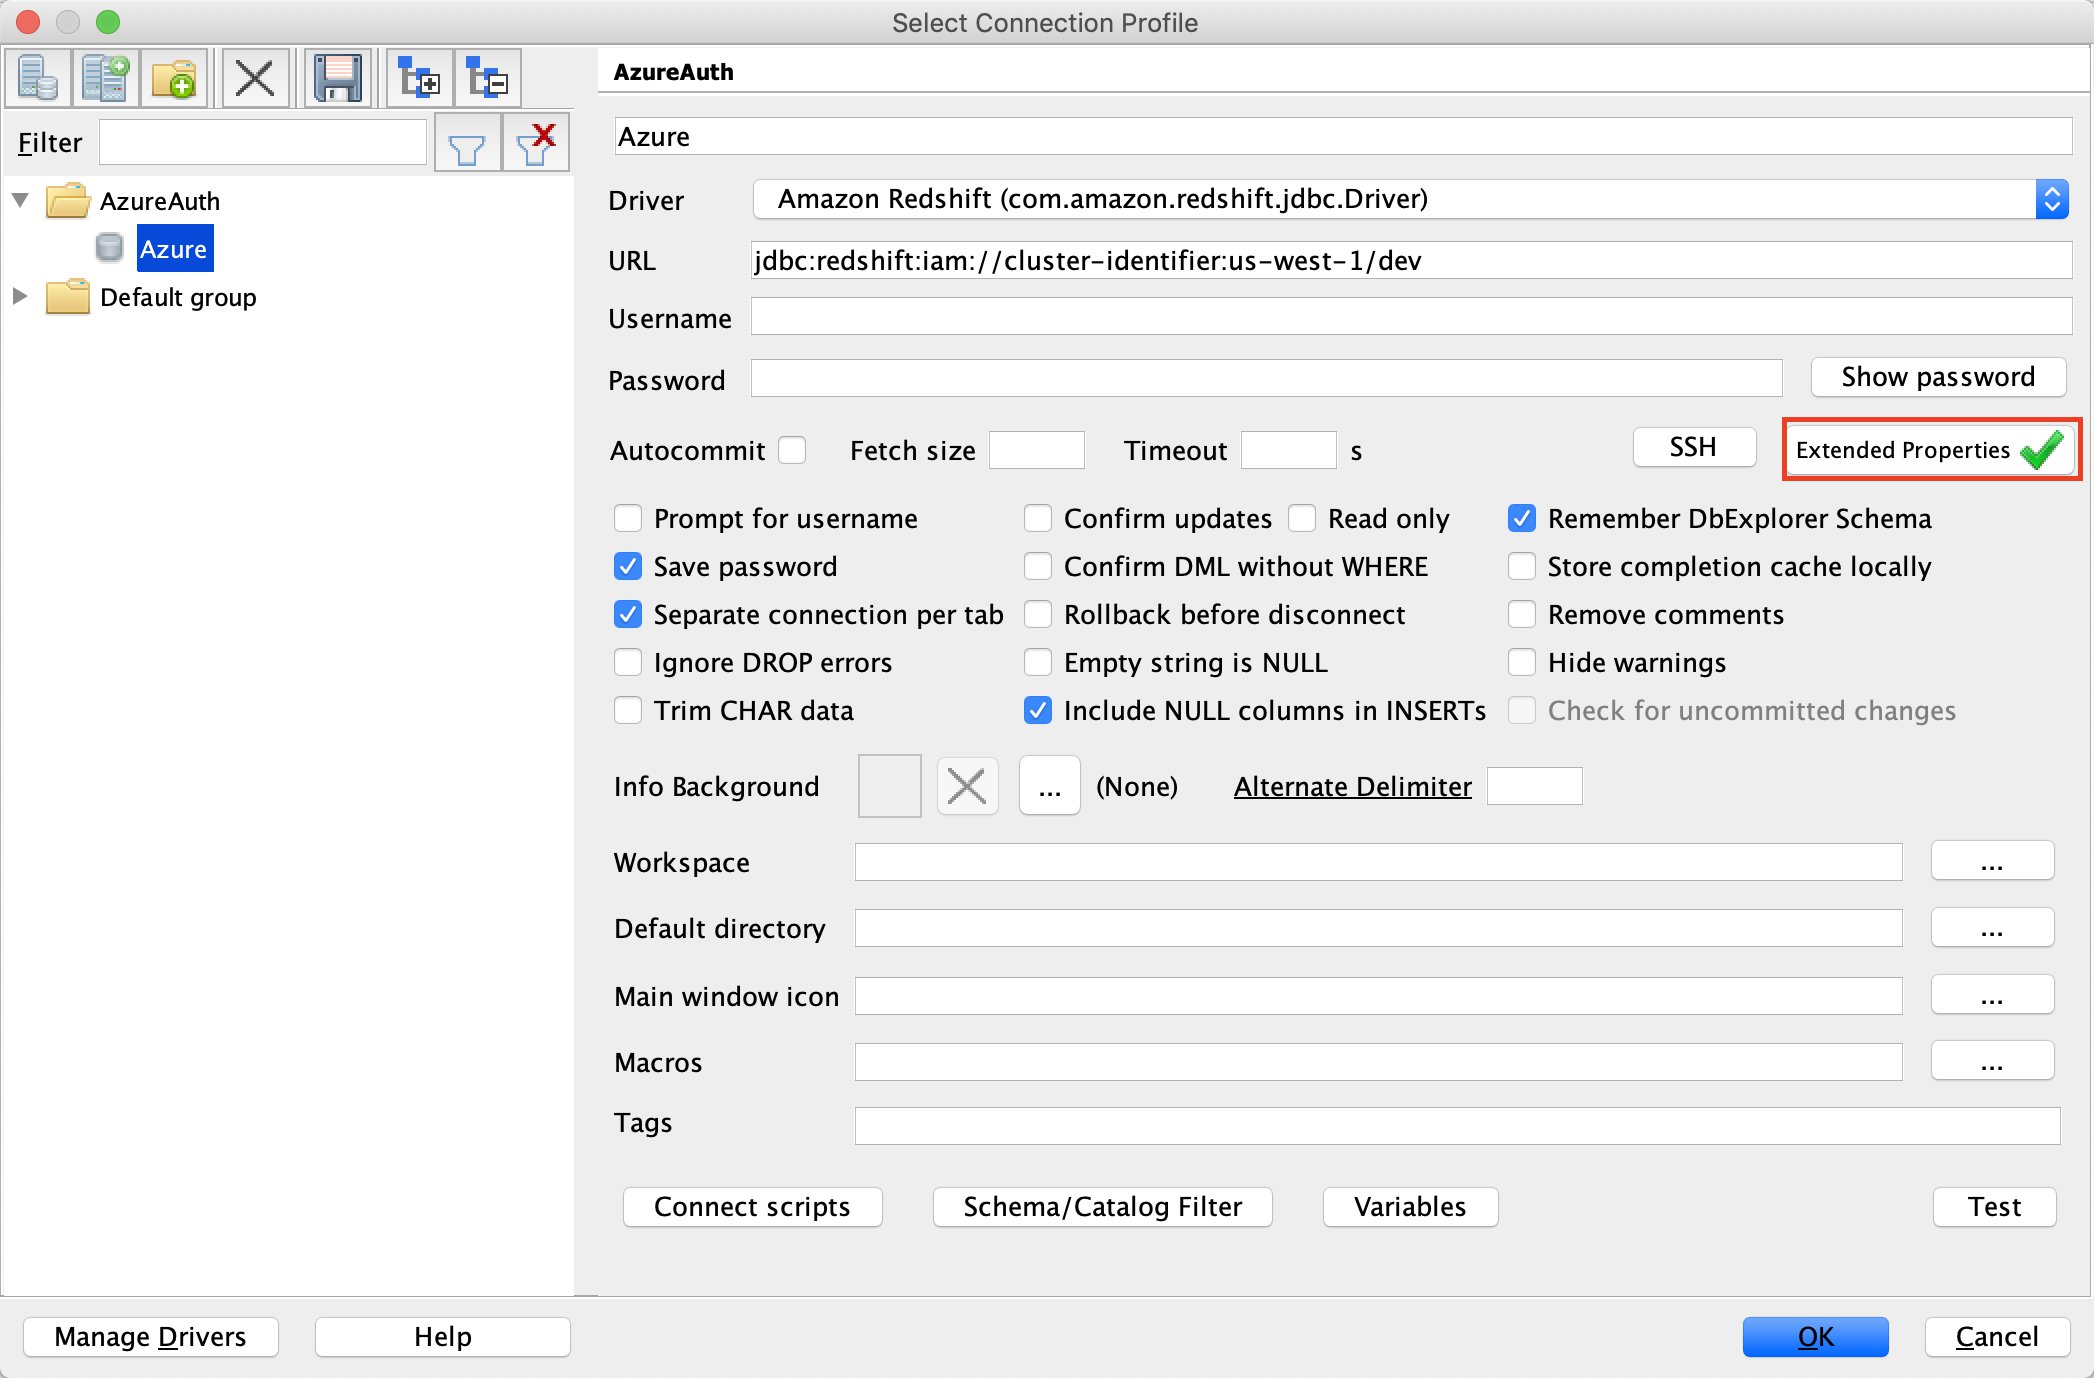
plugin_name with value com.amazon.redshift.plugin.BrowseAzureCredentialsProvider. This tells the driver what authentication method to choose. This should always be set to com.amazon.redshift.plugin.BrowserAzureCredentialsProvider.idp_tenant with the value of your IdP tenant. This is the tenant name of your company configured on your IdP (Azure). This value can either be the tenant name or the tenant unique ID with hyphens (preferred). If you use a tenant name, it could cause uncertainty when setting up the application.client_id with the value of your application client ID. This is the client ID with hyphens of the Amazon Redshift application you created when setting up your Azure SSO configurations.

The driver opens the default browser with the SSO sign-in page.

After you sign in, you’re redirected to localhost with a success message.

If something goes wrong, logging is the first call to start an investigation.
You can add an extended property with the following code:
Alternatively, use a connection string:
jdbc:redshift://<cluster_url>:<port>/<db>?DSILogLevel=6&LogPath=<any existing directory>

For an Unauthorized exception, check your authentication in Azure Portal, under Mobile and desktop applications.

For a PKX exception, first try to use the ssl=false extended property. The vanish exception means that the problem is in the SSL certificate between the cluster and client. If so, first try to use the latest driver and check if your cluster version is old. Then run your application with the “-Djavax.net.debug=all” key for JVM. This shows all the TLS traffic. Make sure the certification is there.

For the exception SAML error: Not authorized to perform sts:AssumeRoleWithSAML, you need to edit the IAM role trust relationship.
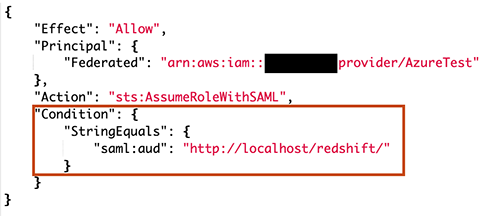
Change "StringEquals" to "StringLike" : { "saml:aud": "*" }, then save it and try again. Also check that saml:aud and replyURL in Azure are exactly the same. If they’re different, authentication fails and causes the same error.
Amazon Redshift makes it easy to integrate with third-party identity providers to provide centralized user management. In this post, we showed how to configure the Amazon Redshift browser-based plugin to use multi-factored authentication with Microsoft Azure Active Directory. You can follow these same steps to work with your SAML 2.0 compliant identity provider of choice.

Ilesh Garish is a Software Development Engineer at AWS. His role is to develop connectors for Amazon Redshift. Prior to AWS, he built database drivers for the Oracle RDBMS, TigerLogic XDMS, and OpenAccess SDK. He worked in the database internal technologies at San Francisco Bay Area startups.
 Brandon Schur is a Senior Database Engineer at AWS. He focuses on performance tuning for MPP databases, drivers & connectivity, and integrations with AWS services and partners.
Post Syndicated from Harshida Patel original https://aws.amazon.com/blogs/big-data/optimize-your-analytical-workloads-using-the-automatic-query-rewrite-feature-of-amazon-redshift-materialized-views/
Amazon Redshift materialized views enable you to significantly improve performance of complex queries that are frequently run as part of your extract, load, and transform (ELT), business intelligence (BI), or dashboarding applications. Materialized views precompute and store the result sets of the SQL query in the view definition. Materialized views speed up data access, because the query doesn’t need to rerun the computation each time the query runs, which also reduces the resource consumption.
Amazon Redshift has the ability to automatically rewrite your SQL queries that don’t explicitly reference existing materialized views to use an existing materialized view if it will improve performance. This feature is valuable and, in some cases, the only option for performance optimization. Consider packaged ISV apps or even just reports— users often don’t have access to the SQL to optimize. In some cases, even if they do have access, the code or script is so old that nobody is familiar with it and you don’t know what regressions even a small change might introduce.
In this post, we describe how the automatic query rewrite feature works and some scenarios where you could take advantage of this feature. For information about the materialized view feature itself, refer to Speed up your ELT and BI queries with Amazon Redshift materialized views and Creating materialized views in Amazon Redshift.
All examples in this post are run on an 8 node ra3.4xlarge cluster with the 3 TB TPC-DS cloud benchmark dataset.
Let’s look at three different scenarios where the automatic query rewrite feature could help: optimizing joins between two large tables, optimizing joins for tables that have multiple join paths, and optimizing table scans.
There are many situations where you have two large tables that are joined frequently. In this case, creating a materialized view that joins these two tables could help improve the performance of those queries. Materialized views precompute the join and store the results so subsequent runs only need to retrieve the saved results; no need to run the expensive JOINs each time. With automatic query rewrite, none of the end-user queries have to be modified to refer to the materialized view. When creating the explain plan for the query, Amazon Redshift replaces the join between the two tables with the materialized view.
By default, the automatic query rewrite uses a materialized view only if it’s up to date and reflects all changes from its base tables. This means that the query isn’t rewritten to use the materialized view if the base tables have more recent updates that aren’t yet reflected in the materialized view.
For example, consider the following SQL query. The query joins two tables: store_sales (8,639,936,081 rows) and customer (30,000,000 rows):
The query runs in 545,520 milliseconds; the following is the explain plan for the query:
Let’s create a materialized view that pre-computes the join between the store_sales and customer tables using the following SQL statement:
Let’s now rerun the original query:
The query runs much faster (46,493 milliseconds). This is because of the automatic query rewrite feature, which has rewritten the preceding query to use the newly created materialized view instead of joining both tables. The explain plan for this query shows this change:
The original query run also consumed 1,263 CPU seconds and read 45,013 blocks of data, whereas the query that ran after the creation of the materialized view only consumed 898 CPU seconds and read 29,256 blocks. That is a reduction of 29% in CPU consumption and 35% in blocks read.
The optimizer can also rewrite the following query to use the previously created materialized view, which includes the additional join to the customer_address table:
For large tables on Amazon Redshift, the ideal distribution style would be ‘KEY’, with the distribution key being the column that is used most frequently in the JOIN clause. There are situations where some large tables have multiple join paths. 50% of the queries may use a particular column to join to the table, and the other 50% of the queries may use a different column to join to the table. Both types of queries are important and have stringent performance requirements. In this case, you could pick one column as the distribution key for the table and then create a materialized view with the second column as the distribution key. This is possible because materialized views can have their own distribution and sort keys.
Here’s an example to illustrate how this works.
The web_sales table (2,159,968,881 rows) has the distribution key ws_order_number. This helps optimize a majority of the queries (70% of the joins to this table use ws_order_number as the join column). The remaining 30% use the column ws_bill_customer_sk to join to the table, as shown in the following SQL statement. This query took 12,790 milliseconds to run.
We can create the materialized view to help improve the performance of the remaining 30% of the queries. Note the DISTKEY keyword in the following code. We have defined a new distribution key for the materialized view (ws_bill_customer_sk):
Rerunning the following query returns rows much faster than before (7,715 milliseconds vs. 12,790 milliseconds):
Again, the explain plan of the query has changed; it now references the materialized view even though the SQL statement doesn’t explicitly reference the materialized view:
Table scans on Amazon Redshift are made efficient through the use of sort keys. Sort keys determine the order in which the columns are stored in the data blocks. Picking a column that appears frequently in your filtering conditions as a sort key can improve query performance significantly.
Compound sort keys with multiple columns can be defined on your table in case multiple columns are good candidates for sort keys. But in some situations where two or more high cardinality columns are sort key candidates, the compound sort key may not provide adequate performance. In these cases, a materialized view could be created with a different sort key to maintain that data in an alternate sorted order to help cater to a subset of the queries.
In the following example query, the web_sales table uses the column ws_sold_date_sk for the sort key, because this is the column that is used commonly for filtering rows. A smaller set of queries use ws_sales_price for filtering rows. Given that both ws_sold_date_sk and ws_sales_price are high cardinality columns with lots of unique values, a compound sort key with both columns may not be performant for all query patterns.
Let’s create the following materialized view and see how it can help improve the performance of the preceding query:
Running the following query returns rows much faster (5 milliseconds vs. 3,548 milliseconds) because the automatic query rewrite is using the materialized view:
The following is the new explain plan:
Materialized views on Amazon Redshift can be a powerful optimization tool if used appropriately. With automatic query rewrite, you can optimize queries without any impact to end-users or their queries. This allows you to create materialized views after the application has gone live. Some customers plan this as part of their performance-optimization strategy when building new apps. The real value is that you can optimize queries and workloads without needing to modify the source code or scripts, and you can benefit even with a partial match.
 Harshida Patel is a Specialist Sr. Solutions Architect, Analytics with AWS.
 Jeetesh Srivastva is a Sr. Manager, Specialist Solutions Architect at AWS. He specializes in Amazon Redshift and works with customers to implement scalable solutions using Amazon Redshift and other AWS Analytic services. He has worked to deliver on-premises and cloud-based analytic solutions for customers in banking and finance and hospitality industry verticals.
 Sain Das is an Analytics Specialist Solutions Architect at AWS and helps customers build scalable cloud solutions that help turn data into actionable insights.
 Somdeb Bhattacharjee is an Enterprise Solutions Architect at AWS.
Post Syndicated from Kris Normand original https://aws.amazon.com/blogs/security/automatically-resolve-security-hub-findings-for-resources-that-no-longer-exist/
In this post, you’ll learn how to automatically resolve AWS Security Hub findings for previously deleted Amazon Web Services (AWS) resources. By using an event-driven solution, you can automatically resolve findings for AWS and third-party service integrations.
Security Hub provides a comprehensive view of your security alerts and security posture across your AWS accounts. Security Hub provides a single place that aggregates, organizes, and prioritizes your security alerts (also called findings) from multiple AWS services and partner solutions. Security Hub lets you assign workflow statuses of NEW, NOTIFIED, SUPPRESSED, or RESOLVED to findings. These statuses help you understand the state of your security findings and identify which need attention. As AWS resources are spun up and down during the course of normal business activities, there might be findings in Security Hub for those resources. AWS Security Hub findings backed by AWS Config are automatically archived when AWS Config identifies that a resource has been deleted. However, for some AWS service integrations—such as Amazon GuardDuty and third-party partner products—findings aren’t automatically resolved or archived when a resource is deleted. This can result in orphaned findings for resources that no longer exist.
In this post, we show you how to use an event-driven architecture to automatically resolve findings for all providers—AWS and third-party—for resources that have been deleted. Automatically resolving these findings reduces alert fatigue by decreasing noise, allowing your security team to focus on investigating and remediating high fidelity findings.
A common use case for automatically resolving findings is for Amazon Elastic Compute Cloud (Amazon EC2) instances that are ephemeral in nature. For example, Amazon EC2 instances that are part of an Amazon EC2 Auto Scaling group. EC2 instances can scale to thousands of nodes multiple times a day depending on the workload. Without automatically resolving these findings, you could end up with one or more findings for each instance. By automatically resolving findings for the deleted resources, your teams can focus on investigating and remediating findings that affect active resources.
This solution assumes that you have Security Hub and AWS Config configured across all of your AWS accounts. Instructions for configuring Security Hub and its dependencies can be found in the Security Hub user guide. Ensure you have configured Security Hub to use a delegated administrator account, which centralizes findings from all member accounts.
In Security Hub, the investigation status of a finding is tracked using the workflow status attribute. The workflow status attribute for new findings is initially set to NEW. You can change the workflow status of a finding by either selecting it in the AWS Security Hub console, or by automating the change of workflow status by using the AWS Command Line Interface (AWS CLI) or Security Hub SDKs. The usual workflow for a finding, whether managed manually or through automation, is NEW, NOTIFIED, then RESOLVED or SUPPRESSED.
In this solution, we show you how to automatically set the workflow status to RESOLVED for all applicable findings when an EC2 instance, Amazon Simple Storage Service (Amazon S3) bucket, or an AWS Identity and Access Management (IAM) role is deleted. This event-driven solution uses Amazon EventBridge event patterns—which can be easily customized to meet your specific business needs—to invoke the resolution workflow on Delete or Terminate API calls. An EventBridge event bus is used to forward all Delete or Terminate API calls to your Security Hub delegated administrator account. Event patterns are used to filter for specific events and forward them to a target. With this solution, you filter for specific Delete and Terminate events, identified by the event name. The target for matching events is an AWS Lambda function. The invocation of this function includes context around the event which includes the metadata for the resource that was just deleted or terminated. This function queries the Security Hub GetFindings API for all findings for the resource with a status of NEW or NOTIFIED. The function then sets the workflow status to RESOLVED for all findings for the Amazon Resource Name (ARN) of the given resource by calling the BatchUpdateFindings Security Hub API.

Figure 1: Solution architecture overview
Figure 1 shows the deletion of an AWS resource in a Security Hub member account being forwarded to the EventBridge event bus in the Security Hub administrator account. The process flow is as follows:
In the Security Hub administrator account complete the following steps:
Note: You can also choose to specify a list of accounts to receive events from. For more information about configuring a resource policy see Managing event bus permissions in Permissions for Amazon EventBridge event buses.
In each Security Hub member account, deploy the CloudFormation template. You will need to specify the Security Hub administrator AWS account ID to deploy the stack.
Tip: CloudFormation StackSets can be used to deploy stacks across all accounts in your organization. For more information, see Working with AWS CloudFormation StackSets.
Note: With CloudFormation StackSets, the template isn’t deployed in the StackSet administrator account by default. The CloudFormation stack must be deployed separately in the StackSet administrator account.
Note: Security Hub now supports cross-Region aggregation of findings. If you have Security Hub cross-Region aggregation enabled. The solution in this post will work for findings in all aggregated regions.
Understanding and fixing the root cause for Security Hub findings will improve your security posture and reduce the number of future findings. As a best practice, you should periodically analyze the findings for resources that have been automatically resolved by this solution to identify trends so that your team can investigate and fix root causes. You can use the filter below in the Security Hub console to view all findings automatically resolved by this solution:

Figure 2: AWS Security Hub
Note: You can expand the solution to include other resource types based on your requirements, such as security groups, Amazon Relational Database Service (Amazon RDS) databases, and IAM users by updating the event pattern in the EventBridge rule and modifying the Lambda function code.
In this post, we showed how you can automatically resolve findings for deleted EC2, IAM and S3 resources by using the Security Hub GetFindings and BatchUpdateFindings API actions. We showed you how to configure EventBridge patterns and rules to initiate a Lambda function through a centralized event bus to address these findings for resources across your Organizations.
If you have feedback about this post, submit comments in the Comments section below. If you have questions about this post, start a new thread on the Security Hub forum. To start your 30-day free trial of Security Hub, visit AWS Security Hub.
Want more AWS Security how-to content, news, and feature announcements? Follow us on Twitter.
Post Syndicated from Jacob Roundy original https://blog.rapid7.com/2022/01/04/5-security-projects-that-are-giving-back/

Editor’s note: We had planned to publish our Hacky Holidays blog series throughout December 2021 – but then Log4Shell happened, and we dropped everything to focus on this major vulnerability that impacted the entire cybersecurity community worldwide. Now that it’s 2022, we’re feeling in need of some holiday cheer, and we hope you’re still in the spirit of the season, too. Throughout January, we’ll be publishing Hacky Holidays content (with a few tweaks, of course) to give the new year a festive start. So, grab an eggnog latte, line up the carols on Spotify, and let’s pick up where we left off.
While it’s always nice to receive gifts, the holiday season is more about giving – whether you’re buying something nice for the people you love or giving back to the community to help ensure others enjoy the holidays as much as you do.
Giving back is exactly what we’ll be focusing on in today’s Hacky Holidays post, as it’s a theme that truly resonates with those in the security industry. From white-hat hackers to those volunteering their time to make the internet a safer, more inclusive space, we’ve highlighted a few security-related projects that exemplify the spirit of giving back.
The Innocent Lives Foundation aims to identify child predators and help bring them to justice. They do this by leveraging the combined power of the information security community to create tools that unmask anonymous child predators online. Then, using the data from Open Source Intelligence and cutting-edge techniques, they build a path to capturing evidence and then pass on those details to law enforcement for them to recreate.
The Innocent Lives Foundation was first started by Chris Hadnagy, who joined us on an episode of our Security Nation podcast back in 2020. He worked on a few cases at Social-Engineer, LLC, that tracked and captured predators who trafficked and exploited children. When he saw the impact these crimes had on innocent people, he knew he had to do something about it. As a leader in the information security community, he chose to rally a group of security experts and professionals in the social engineering field to address these problems and prevent crimes against future victims.
The foundation is serving endangered children and building a world in which all children can live innocent lives. It’s difficult, emotionally taxing work, but it’s making the world a better place, and it’s the perfect example of giving back.
If you’d like to donate to the cause — it can cost up to $10,000 to produce one file to send to law enforcement, so donations are needed and welcomed — you can do so here. Aside from donating, there are numerous other ways to get involved, including reporting a case, sharing support online, or even volunteering your security skills when applications are opened.
Today, ransomware is rampant. This fact won’t surprise anyone working in the security industry, but many normal users around the world don’t know what ransomware is, how to defend against it, and what to do if they fall victim to a scam. That’s where No More Ransom comes into play.
No More Ransom is an initiative by the National High Tech Crime Unit of the Netherlands’ police, Europol’s European Cybercrime Centre, Kaspersky, and McAfee with a simple mission: to help victims of ransomware retrieve their encrypted data without paying criminals a single dime in the process.
The initiative aims to achieve this mission in two ways:
While it’s not always possible to regain access to files encrypted by or systems locked by ransomware, No More Ransom has helped many do exactly that with its repository. And by sharing simple, easy-to-follow cybersecurity advice, the initiative is creating a better informed world of users who understand how to prevent falling victim to ransomware in the first place.
In the 5 years of since its creation, the No More Ransom initiative has:
If you’d like to do your part, the No More Ransom project is always looking for new partners to spread their messaging, so if your organization wants to be more security-minded and give back to the security community in general, consider joining the list of many partners. If you ever fall victim to ransomware, you can also report the crime, which will help identify new types of ransomware and aid future prevention.
Established by the University of Texas at San Antonio, the Center for Infrastructure Assurance and Security (CIAS) conducts research into effective ways to engage students with cybersecurity principles through educational gaming — and as part of their work, they’re making cybersecurity relatable, fun, and engaging for kids.
The CIAS Gaming program targets 4 demographics: elementary school, middle school, high school, and colleges and universities. Their mission is to deliver quality research, training, competition, and exercise programs to advance community and organizational cybersecurity capabilities and collaboration.
Currently, the CIAS K-12 Program consists of a few educational tools. These include:
CIAS Gaming is shaping the future of cybersecurity by training the next generation in cybersecurity best practices. You can access and download these tools and games via the links above, or reach out directly to CIAS to learn more about taking part in their competitions or trainings.
The Alliance for Securing Democracy (ASD) is a nonpartisan initiative housed within the German Marshall Fund of the United States that aims to combat autocratic efforts to undermine and interfere in democratic institutions around the world. The ASD contributes research and analysis on how a range of tools, from cyberattacks and disinformation to support for extremism, are being used to weaken democracies. It also provides public dashboards to expose the effects of online influence networks and the themes being promoted by foreign powers to threaten democratic institutions.
The ASD is independently funded by more than 175 private individuals and small family foundations across the political spectrum. Its team brings together a diverse staff with expertise across industries, including technology and cybersecurity, to provide research, policy recommendations, and even analysis of key issues and threats. It also has a technical advisory committee that features experts on disinformation, cybersecurity, illicit finance, and more.
The ASD has conducted a significant amount of work in the area of cybersecurity. It also has compiled a toolbox to spread awareness on various techniques being used by malign actors. Such tools include:
In a more globalized and digitalized world, the work ASD is doing to protect the strength of free and open societies by shining a light on autocratic tactics, closing vulnerabilities in democratic systems, and imposing costs on those who undermine our institutions is more important than ever. You can reach them at [email protected] or donate to the cause.
Code for Social Good is a nonprofit organization that partners with other nonprofit companies to provide the technical help they need to achieve their missions for no cost. It’s all about volunteering to promote social good: Code for Social Good has built and fostered a volunteer community that promotes welfare by supporting nonprofits in need. And that global network consists of professionals from across the tech industry, including technical writers, coders, programmers, and more.
Whether you code for fun, experience, social good, or to make a better world, volunteering at Code for Social Good is a great way to give back. Anyone can sign up as a volunteer, and then, you can browse their list of projects. If you find one applicable to your skills, you can apply and wait for contact from the nonprofit. Nonprofits that need help can also post projects on the site and find volunteers to assist them.
As of this writing, Code for Social Good has 138 projects posted across 122 organizations based in 87 countries. The current volunteer community consists of 2,595 volunteers, and they’re always looking for more help. If you have some extra time, why not take a look and see if you can give back by volunteering your technical skills to a nonprofit in need.
Giving back is an important theme of the holidays and one that’s integral to the cybersecurity community. By giving back to the industry, we can encourage a healthy, flourishing practice that spreads awareness, leading to a better, safer, and brighter tomorrow.
If you’re looking for ways to give back, hopefully these examples inspire you to action. If you’d like to stay in the holiday spirit, check out the rest of our Hacky Holidays specials.
Post Syndicated from Ellen Crowley original https://aws.amazon.com/blogs/architecture/top-5-featured-architecture-content-from-december-2021/
The AWS Architecture Center provides new and notable reference architecture diagrams, vetted architecture solutions, AWS Well-Architected best practices, whitepapers, and more. This blog post features some of our best picks from December’s new and updated content.
This new pillar in the Well-Architected framework helps organizations learn, measure, and improve their workloads using environmental best practices for cloud computing. Did you know that the shared responsibility model also applies to sustainability? You can use the pillar to track your progress against best practices to support sustainability. Your development teams can also use this new pillar and Well-Architected best practices to support many sustainability use cases. These can include reducing the energy or resources required to run workloads and anticipate and adopt new and more efficient technology offerings.
Increasingly, customers expect to be able to ask questions and get assistance quickly and through various channels. The companies that embrace this the fastest see increases in customer engagement and satisfaction. This reference architecture shows physical and ecommerce retailers how to build a next generation customer contact center. It aims to simplify and transform their customer service channels with natural language processing and automation.

Retail Customer Service Contact Center Reference Architecture Diagram
When planning a cloud adoption strategy you are often faced with a number of complex decisions to stand up and scale a production-ready cloud environment. This whitepaper guides you through building and evolving your AWS Cloud environment based on a set of definitions, use cases, guidance, and automations.
This new lens is intended for those in technology roles, such as chief technology officers (CTOs), architects, developers, and operations team members. It provides AWS best practices and strategies to use when designing hybrid networking architectures. If you’re looking to build hybrid networking architectures to integrate your on-premises data center and AWS operations to support a broad spectrum of use cases, this lens will help set you up for success. It outlines three areas to consider when designing hybrid network connectivity for your workload: data layer, monitoring and configuration management, and security.
This Solutions Implementation helps buffer incoming user requests to your website during large bursts of traffic. It creates a cloud infrastructure designed to temporarily offload incoming traffic to your website, and it provides options to customize and integrate a virtual waiting room. The waiting room acts as a holding area for visitors to your website and allows traffic to pass through when there is enough capacity.
Looking for more new and updated content from this year? Check out the other posts in the Top 5 series!
Looking for more architecture content? AWS Architecture Center provides reference architecture diagrams, vetted architecture solutions, Well-Architected best practices, patterns, icons, and more!
Post Syndicated from Crosstalk Solutions original https://www.youtube.com/watch?v=cSevNQDCa18
Post Syndicated from Molly Clancy original https://www.backblaze.com/blog/getting-the-most-out-of-your-nas/
Who has the original copy of that report on their machine? Which hard drive has the footage from that shoot a few years ago? Are those photos from our vacation on the laptop, the external hard drive, or the sync service? If you’ve ever asked yourself a question like these, you have felt the pain of digital scatter. In today’s world, with as many devices as we use, it’s almost unavoidable.
Almost. When you start to feel the pain of digital scatter, either at work or at home, take it as a sign that it’s time to look into upgrading your data storage systems. One of the best ways to do that is investing in a NAS device.
As you start exploring more sophisticated data storage options than juggling external drives or managing sync services, understanding what you can do with a NAS system can help your decision making. This post explains what NAS is and all the different ways you can use NAS to supercharge your business or home office setup.
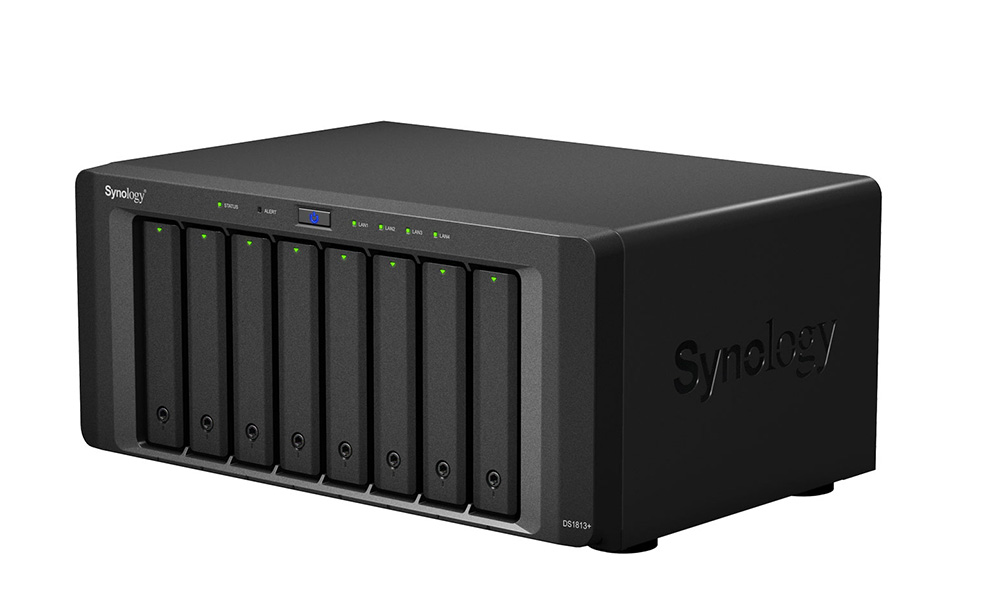
Network attached storage, or NAS, is a computer connected to a network that provides file-based data storage services to other devices on the network. It’s primarily used to expand storage capacity and enable file sharing across an organization or across devices in a home.
The primary strength of NAS is how simple it is to set up and deploy. NAS volumes appear to the user as network mounted volumes. The files to be served are typically contained on one or more hard drives in the system, often arranged in a RAID scheme. Generally, the more drive bays available within the NAS, the larger and more flexible storage options you have. The device itself is a network node—much like computers and other TCP/IP devices, all of which maintain their own IP address—and the NAS file service uses the Ethernet network to send and receive files.
NAS devices offer an easy way for multiple users in diverse locations to access data, which is valuable when users are collaborating on projects or sharing information. NAS provides good access controls and security to support collaboration, while also enabling someone who is not an IT professional to administer and manage access to the data via an onboard web server. It also offers good fundamental data resiliency through the use of redundant data structures—often RAID—making multiple drives appear like a single, large volume that can tolerate failure of a few of its individual drives.
The first two NAS use cases are fairly straightforward. They are exactly what NAS was built for:
But that’s not all NAS can do. With large storage capacity and a whole host of add-ons, NAS offers a lot of versatility. Here are a few additional use cases that you can take advantage of.
Small to medium-sized businesses find NAS useful for running shared business applications like customer relationship management software, human resources management software, messaging, and even office suites. Compared to expensive, server-based versions of these applications, companies can install and run open-source versions quickly and easily on NAS. Some NAS devices may have these features built in or available on a proprietary app store.
Most NAS devices give you the ability to access your data over the public internet in addition to accessing it through your private network, essentially functioning as a cloud service. If a NAS device manufacturer doesn’t already have a cloud application built in, there are a number of open-source cloud applications like Nextcloud or ownCloud.
Virtualization software providers, like VMware, support running their products on NAS. With proper configuration, including potentially adding RAM to your device, you can easily spin up virtual machines using NAS.
Many NAS devices offer developer packages, including apps for different programming languages and tools like Docker and Git Server. With these add-ons, you can turn your NAS into your own private lab for developing and testing applications before moving them to a server for production.
Although a NAS device is usually not designed to be a general-purpose server (it’s underpowered compared to a file server and comes with less robust access management capabilities), NAS vendors and third parties are increasingly offering other software to provide server-like functionality. For home use or for a small team, higher-end NAS devices can function as a file server.
Apps like Synology’s Surveillance Station allow you to set up a security camera system yourself using IP cameras rather than paying for a more expensive enterprise or home system. With a large storage capacity, NAS is perfect for storing large amounts of video footage.
NAS is a great place to store large media files, and apps like Plex allow you to stream directly to a device or smart TV in your home or business. You can consolidate video or audio files from your devices into one place and stream them anywhere.
Understanding the many use cases can help you see where NAS might fit into your business or make file sharing at home easier. There are many ways to make your NAS device work for you and ensure you get the most out of it in the process.
Do you have more questions about shopping for or buying a NAS? Check out our Complete NAS Guide. It provides comprehensive information on NAS and what it can do for your business, how to evaluate and purchase a NAS system, and how to deploy your NAS.
The post Getting the Most Out of Your NAS appeared first on Backblaze Blog | Cloud Storage & Cloud Backup.
Post Syndicated from original https://lwn.net/Articles/880334/rss
The Gentoo Linux project looks back at
2021.
The number of commits to the main ::gentoo repository has once more
clearly grown in 2021, from 104507 to 126920, i.e., by 21%. While
the number of commits by external contributors, 11775, has remained
roughly constant, this number now distributes across 435 unique
external authors compared to 391 last year.
Post Syndicated from original https://lwn.net/Articles/880332/rss
Version 1.22.0 of the NumPy scientific computing module is out.
“NumPy 1.22.0 is a big release featuring the work of 153
contributors spread over 609 pull requests. There have been many
improvements“. Those improvements include the “essentially
complete” annotation of the main namespace, a preliminary version of
the proposed Array API, and more.
Post Syndicated from original https://lwn.net/Articles/880327/rss
Security updates have been issued by Debian (salt and thunderbird), Red Hat (xorg-x11-server), and Scientific Linux (xorg-x11-server).
Post Syndicated from James Beswick original https://aws.amazon.com/blogs/compute/icymi-serverless-q4-2021/
Welcome to the 15th edition of the AWS Serverless ICYMI (in case you missed it) quarterly recap. Every quarter, we share all of the most recent product launches, feature enhancements, blog posts, webinars, Twitch live streams, and other interesting things that you might have missed!

In case you missed our last ICYMI, check out what happened last quarter here.
For developers using Amazon MSK as an event source, Lambda has expanded authentication options to include IAM, in addition to SASL/SCRAM. Lambda also now supports mutual TLS authentication for Amazon MSK and self-managed Kafka as an event source.
Lambda also launched features to make it easier to operate across AWS accounts. You can now invoke Lambda functions from Amazon SQS queues in different accounts. You must grant permission to the Lambda function’s execution role and have SQS grant cross-account permissions. For developers using container packaging for Lambda functions, Lambda also now supports pulling images from Amazon ECR in other AWS accounts. To learn about the permissions required, see this documentation.
The service now supports a partial batch response when using SQS as an event source for both standard and FIFO queues. When messages fail to process, Lambda marks the failed messages and allows reprocessing of only those messages. This helps to improve processing performance and may reduce compute costs.
Lambda launched content filtering options for functions using SQS, DynamoDB, and Kinesis as an event source. You can specify up to five filter criteria that are combined using OR logic. This uses the same content filtering language that’s used in Amazon EventBridge, and can dramatically reduce the number of downstream Lambda invocations.
Previously, you could consume Amazon S3 events in EventBridge via CloudTrail. Now, EventBridge receives events from the S3 service directly, making it easier to build serverless workflows triggered by activity in S3. You can use content filtering in rules to identify relevant events and forward these to 18 service targets, including AWS Lambda. You can also use event archive and replay, making it possible to reprocess events in testing, or in the event of an error.
The AWS Batch console has added support for visualizing Step Functions workflows. This makes it easier to combine these services to orchestrate complex workflows over business-critical batch operations, such as data analysis or overnight processes.
Additionally, Amazon Athena has also added console support for visualizing Step Functions workflows. This can help when building distributed data processing pipelines, allowing Step Functions to orchestrate services such as AWS Glue, Amazon S3, or Amazon Kinesis Data Firehose.
Synchronous Express Workflows now supports AWS PrivateLink. This enables you to start these workflows privately from within your virtual private clouds (VPCs) without traversing the internet. To learn more about this feature, read the What’s New post.
Amazon SNS announced support for token-based authentication when sending push notifications to Apple devices. This creates a secure, stateless communication between SNS and the Apple Push Notification (APN) service.
SNS also launched the new PublishBatch API which enables developers to send up to 10 messages to SNS in a single request. This can reduce cost by up to 90%, since you need fewer API calls to publish the same number of messages to the service.
Amazon SQS released an enhanced DLQ management experience for standard queues. This allows you to redrive messages from a DLQ back to the source queue. This can be configured in the AWS Management Console, as shown here.
The NoSQL Workbench for DynamoDB is a tool to simplify designing, visualizing and querying DynamoDB tables. The tools now supports importing sample data from CSV files and exporting the results of queries.
DynamoDB announced the new Standard-Infrequent Access table class. Use this for tables that store infrequently accessed data to reduce your costs by up to 60%. You can switch to the new table class without an impact on performance or availability and without changing application code.
AWS Amplify now allows developers to override Amplify-generated IAM, Amazon Cognito, and S3 configurations. This makes it easier to customize the generated resources to best meet your application’s requirements. To learn more about the “amplify override auth” command, visit the feature’s documentation.
Similarly, you can also add custom AWS resources using the AWS Cloud Development Kit (CDK) or AWS CloudFormation. In another new feature, developers can then export Amplify backends as CDK stacks and incorporate them into their deployment pipelines.
AWS Amplify UI has launched a new Authenticator component for React, Angular, and Vue.js. Aside from the visual refresh, this provides the easiest way to incorporate social sign-in in your frontend applications with zero-configuration setup. It also includes more customization options and form capabilities.
AWS launched AWS Amplify Studio, which automatically translates designs made in Figma to React UI component code. This enables you to connect UI components visually to backend data, providing a unified interface that can accelerate development.
You can now use custom domain names for AWS AppSync GraphQL endpoints. This enables you to specify a custom domain for both GraphQL API and Realtime API, and have AWS Certificate Manager provide and manage the certificate.
To learn more, read the feature’s documentation page.
October
November
December
AWS re:Invent was held in Las Vegas from November 29 to December 3, 2021. The Serverless DA team presented numerous breakouts, workshops and chalk talks. Rewatch all our breakout content:

We also launched an interactive serverless application at re:Invent to help customers get caffeinated!
Serverlesspresso is a contactless, serverless order management system for a physical coffee bar. The architecture comprises several serverless apps that support an ordering process from a customer’s smartphone to a real espresso bar. The customer can check the virtual line, place an order, and receive a notification when their drink is ready for pickup.

You can learn more about the architecture and download the code repo at https://serverlessland.com/reinvent2021/serverlesspresso. You can also see a video of the exhibit.

Weekly live virtual office hours. In each session we talk about a specific topic or technology related to serverless and open it up to helping you with your real serverless challenges and issues. Ask us anything you want about serverless technologies and applications.
YouTube: youtube.com/serverlessland
Twitch: twitch.tv/aws
October
November
December
The Serverless landing page has more information. The Lambda resources page contains case studies, webinars, whitepapers, customer stories, reference architectures, and even more Getting Started tutorials.
You can also follow the Serverless Developer Advocacy team on Twitter to see the latest news, follow conversations, and interact with the team.
Post Syndicated from The History Guy: History Deserves to Be Remembered original https://www.youtube.com/watch?v=4NN-fX9G0WE
Post Syndicated from Edgars Melveris original https://blog.zabbix.com/a-guide-to-migrating-to-zabbix-6-0-lts-by-edgars-melveris-zabbix-summit-online-2021/18569/
Upgrading to a new software version can be an intimidating process, especially if you are upgrading your Zabbix instance for the first time. In this blog post, we will take a look at the upgrade process itself, the necessary pre-requisites, and also what changes you can expect to the existing functionality when you’ve migrated to Zabbix 6.0 LTS.
The full recording of the speech is available on the official Zabbix Youtube channel.
The first step before performing the upgrade to a new Zabbix version is ensuring that your underlying infrastructure is ready for the upgrade process. There are some changes in Zabbix that you should be aware of and address before the upgrade. One of these changes is the list of supported database engines and their versions for Zabbix 6.0 LTS:
And if you’re using PostgreSQL + TimescaleDB or Zabbix proxies:
You may have noticed that we have increased the version requirements for the Zabbix backend databases. The reason for this is Zabbix utilizes the features that only these newer database versions provide, thus ensuring optimal Zabbix performance. If you’re using an unsupported database version, Zabbix will not start. There will be a configuration parameter to override this behavior, but that is not recommended since we cannot ensure that your Zabbix version will work without encountering any performance issues or crashes. A database upgrade to a supported version should be performed first before moving to Zabbix 6.0 LTS.
Zabbix supports all Linux distributions and many other Unix-like operating systems. Unfortunately, it is not feasible to provide Zabbix packages for each and every distribution out there. One of the major changes that were made back in Zabbix 5.2 – we no longer provide packages for RHEL/CentOS 7. This is because some of the libraries included in these distributions are outdated, and it becomes more and more complicated to build Zabbix on these OS versions. Though it is still possible to build Zabbix from sources if you provide the correct versions of the required libraries.
Some of the officially supported operating systems for Zabbix 6.0 LTS:
There are additional Zabbix deployment options:
Before upgrading between major Zabbix versions, it is very much recommended to do an environment review and take a look at the pending maintenance tasks for our environment and also do a health check. Some of the things that we should consider before performing the upgrade to Zabbix 6.0 LTS:
There are some changes in Zabbix 6.0 LTS that could potentially affect the upgrade process or your existing Zabbix workflows.
Below is a list of documentation pages related to API changes between versions 5.0 and 6.0:
Some of the more important API changes:
There are a couple of important changes that users should be aware of when migrating to Zabbix 6.0 LTS:
Next, let’s discuss the steps that you should take to perform the upgrade procedure in a correct and safe manner:
Let’s take a more in-depth look at the backup process and discuss the required steps with some examples:
Example MySQL database backup with history and trends tables ignored:
mysqldump -uroot -p --single-transaction --ignore-table=zabbix.history --ignore-table=zabbix.history_uint --ignoretable=zabbix.history_text --ignore-table=zabbix.history_log --ignore-table=zabbix.history_str --ignore-table=zabbix.trends --ignore-table=zabbix.trends_uint zabbix | gzip > zabbix_backup.sql.gz
At the very least, you should back up the configuration files located in:
There are multiple approaches to running Zabbix in docker. For this example, we will assume that you’re running Zabbix server and Zabbix frontend in docker and using the official Zabbix docker images with a MySQL backend database and apache web backend.
Stop the Zabbix server, frontend, and proxy containers:
docker stop my-zabbix-server
docker stop my-zabbix-frontend
Start the Zabbix 6.0 LTS container and point it at the same backend database:
docker run --name my-zabbix-server-6.0 -e DB_SERVER_HOST="some-mysql-server" -e
MYSQL_USER="some-user" -e MYSQL_PASSWORD="some-password" -d zabbix/zabbixserver-mysql:6.0-latest
Once again, an automatic DB schema upgrade will be started
Lastly, start the Zabbix frontend container:
docker run --name my-zabbix-web-apache-6.0 -e DB_SERVER_HOST="some-mysqlserver" -e MYSQL_USER="some-user" -e MYSQL_PASSWORD="some-password" -e ZBX_SERVER_HOST= "my-zabbix-server-6.0" -d zabbix/zabbix-web-apache-mysql:6.0-latest
If you’re using the official Zabbix packages, then the upgrade process will take a few more steps and can seem a bit more complicated. Let’s take a look at the required upgrade steps in detail. For our example, we will use a CentOS 8 OS distribution.
Install the Zabbix 6.0 LTS release package. This will add the necessary Zabbix 6.0 LTS repository information:
rpm -Uvh https://repo.zabbix.com/zabbix/6.0/rhel/8/x86_64/zabbix-release-6.0-1.el8.noarch.rpm
Clear the DNF package manager cache:
dnf clean all
Install all of the required packages:
dnf install zabbix-server-mysql zabbix-web zabbix-web-mysql zabbix-web-deps
zabbix-apache-conf zabbix-selinux-policy
Start Zabbix components and observe the log file. You should see that the database schema upgrade is in progress. Once it has finished, all of the internal Zabbix processes should be started without any issues:
17602:20210921:131335.333 completed 96% of database upgrade
17602:20210921:131335.355 completed 97% of database upgrade
17602:20210921:131335.379 completed 98% of database upgrade
17602:20210921:131335.606 completed 99% of database upgrade
17602:20210921:131335.711 completed 100% of database upgrade
17602:20210921:131335.711 database upgrade fully completed
17602:20210921:131335.804 server #0 started [main process]
17602:20210921:131335.808 server #2 started [configuration syncer #1]
17602:20210921:131335.810 server #1 started [service manager #1]
In addition, we are also required to update our Zabbix proxies. The procedure is very similar to what we did in our previous steps:
Install the Zabbix 6.0 LTS release package:
rpm -Uvh https://repo.zabbix.com/zabbix/6.0/rhel/8/x86_64/zabbix-release-6.0-1.el8.noarch.rpm
Clear the DNF package manager cache:
dnf clean all
Update the Zabbix proxy packages:
dnf update zabbix-proxy-mysql(pgsql, sqlite3)
For MySQL, PostgreSQL, and Oracle proxy backend databases, the DB schema is performed automatically.
For Zabbix proxies using SQLite3 backend databases, automatic database schema upgrade is not supported. We will simply have to remove the old SQLite3 database file – it will then be automatically recreated once we start the Zabbix proxy.
rm –rf /tmp/proxy.sqlite
After the upgrade to Zabbix 6.0 LTS, there are a few additional tasks that we should take care of. Let’s take a look at what needs to be done.
Zabbix 6.0 LTS backend database history table schema has been changed. These tables now contain primary keys. The upgrade or these history tables is not done automatically since it can cause additional downtime. Depending on the size of the database, executing the required changes can be extremely slow since every record in the history tables needs to be altered. In addition, duplicate entries in history tables could potentially cause this manual database schema upgrade to fail. There are multiple benefits to the history table schema changes:
For new Zabbix 6.0 LTS installations, this change will be included by default, while for the existing installations, it is recommended to thoroughly test the history table schema change procedure and evaluate the potential downtimes. The exact history table upgrade steps will be documented with the release of Zabbix 6.0 LTS.
There are some new Zabbix processes that have been added to Zabbix 6.0 LTS that yous should be aware of:
If you’ve performed a Zabbix upgrade before, you will be aware of the fact that Zabbix does not update your existing templates automatically since we assume there could be some custom changes performed by the end-users on said templates. Therefore, to see the aforementioned new processes in the Zabbix server internal monitoring graphs, you should download and import the latest Zabbix server template.
You can download the templates from the official Zabbix git page. You can read the release notes to see the full list of the updated templates and changes that have been performed on said templates.
You may also consider upgrading your Zabbix agents. This is not mandatory since Zabbix agents are backward compatible, so you can use an older version of Zabbix agents with Zabbix 6.0 LTS. All of the previous functionality will continue to function, but you may still consider updating the agents since the updates could contain some bug fixes or support for a brand new set of items.
Upgrading the Zabbix agent:
dnf install zabbix-agent
Upgrading the Zabbix agent 2:
dnf install zabbix-agent2
You may have noticed that in Zabbix 6.0 LTS, there are multiple new packages. Most of these packages are repackagings of some of the old components for better package management, but there are exceptions:
Q: Are my custom templates going to be affected in any way by the upgrade process?
A: Yes, all of your templates will continue to work. Any changes that we have made to trigger syntax, for example, will be automatically applied to your existing entities.
Q: How long will the migration process take? How can I estimate the downtime?
A: Unfortunately, it’s impossible to estimate a precise downtime duration without creating a QA copy of your existing Zabbix instance with the same exact hardware and checking the downtime duration there with a test upgrade. At the end of the day, this will depend not only on the size of the database but also on the size of individual tables, the version from which you are upgrading, and how optimized your software and hardware are.
Q: What about migrating from a very old version – say Zabbix 3.0 or older?
A: It should work, but there can be some caveats and additional pre-requisites required for the older version upgrades. I would recommend going through our previous Summit recordings since we have covered the upgrade process for older versions in previous years. Those should provide you a pre-requisite checklist that you can perform before upgrading to Zabbix 6.0 LTS.
The post A guide to migrating to Zabbix 6.0 LTS by Edgars Melveris / Zabbix Summit Online 2021 appeared first on Zabbix Blog.
Post Syndicated from Bozho original https://techblog.bozho.net/dont-reinvent-date-formats/
Microsoft Exchange has a bug that practically stops email. (The public sector is primarily using Exchange, so many of the institutions I’m responsible for as a minister, have their email “stuck”). The bug is described here, and fortunately, has a solution.
But let me say something simple and obvious: don’t reinvent date formats, please. When in doubt, use ISO 8601 or epoch millis (in UTC), or RFC 2822. Nothing else makes sense.
Certainly treating an int as a date is an abysmal idea (it doesn’t even save that much resources). 202201010000 is not a date format worth considering.
(As a side note, another advice – add automate tests for future timestamps. Sometiimes they catch odd behavior).
I’ll finish with Jon Skeet’s talk on dates, strings and numbers.
The post Don’t Reinvent Date Formats appeared first on Bozho's tech blog.
Post Syndicated from original https://lwn.net/Articles/878573/rss
It is 2022 already, and that can only mean one thing: it’s time for your
editor to make a (bigger) fool of himself by posting a set of
predictions for what may come in the new year. One should never pass up an
opportunity for a humbling experience, after all. There can be no doubt
that interesting things will happen this year; let’s see how many random
darts thrown in that direction can hit close to the mark.
Post Syndicated from Jesse Thompson original https://aws.amazon.com/blogs/security/how-to-configure-an-incoming-email-security-gateway-with-amazon-workmail/
This blog post will walk you through the steps needed to integrate Amazon WorkMail with an email security gateway. Configuring WorkMail this way can provide a versatile defense strategy for inbound email threats.
Amazon WorkMail is a secure, managed business email and calendar service. WorkMail leverages the email receiving capabilities of Amazon Simple Email Service (Amazon SES) to scan all incoming and outgoing email for spam, malware, and viruses to help protect your users from harmful email. AWS Lambda for Amazon WorkMail functions can tap into the capabilities of other AWS services to accomplish additional business objectives, such as controlling message delivery or message modification.
For many organizations, existing features and integrations with Amazon SES are sufficient for their spam, malware, and virus detection. Other organizations may need either a dedicated on-premise security solution, or have other reasons to use an additional inspection point in the overall mail flow. A number of commercial and community-supported tools include features like special encryption capabilities, data loss prevention (DLP) content inspection engines, and embedded-hyperlink transformation features to protect end-user mailboxes.
To implement this solution, you need:
Email security gateways function by handling the initial ingress of email via the Simple Mail Transport Protocol (SMTP). When email servers send messages to your domain’s email addresses, they look at your domain’s mail exchange (MX) record in the DNS. After processing an email message, the email security gateway delivers it to the downstream mailbox hosting service, such as WorkMail, by means of Amazon SES via SMTP. You can also optionally configure an AWS Lambda for Amazon WorkMail function to synchronously deliver messages into end-user junk email folders, or to take other actions.
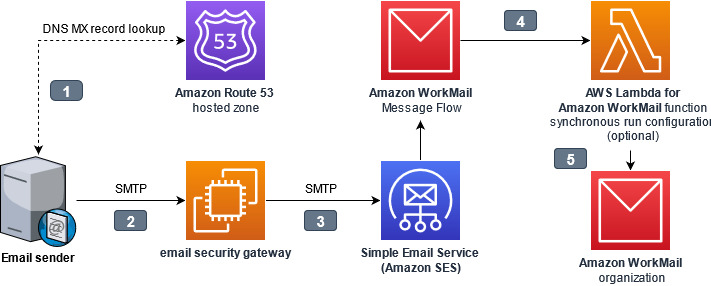
Figure 1. Interaction points while architecting an email security gateway
The interaction points are as follows:
The gateway assumes responsibility for inspecting incoming email, because the initial point of ingress is an important component of a multi-layer defense strategy against email-borne threats. The gateway could refuse or quarantine risky messages, it could modify the email subjects and body to add warnings visible to recipients, or it could append metadata to the email headers for downstream processing by an AWS Lambda function.
SMTP was built at a time when networking was less reliable than it is today, and consequently, it was designed to be able to allow any domain to store and later forward messages on behalf of other domains to mitigate connection problems. While that helped at the time, today it presents real problems in authenticating who truly sent a message: the owner of the domain, or just someone else claiming to be the owner? To overcome this issue, the messaging industry has adopted three protocols to help verify the authenticity of a message: SPF, DKIM, and DMARC. These protocols aren’t perfect, but understanding how to use them is important when adding new steps to your message processing workflow, because they can affect how you receive inbound mail.
Sender Policy Framework (SPF) permits domain owners to declare which SMTP servers are allowed to send email messages claiming to be from their domain. This establishes an identity relationship between the owner of the domain and the authorized party that controls the SMTP server. When SPF is used, a message can only be handed off directly from an authorized SMTP server; it cannot be relayed through a second, unauthorized server without changing the originating address.
DomainKeys Identified Mail (DKIM) permits domain owners to advertise a public key that a mail recipient’s system can use to verify the sender’s digital signature. This allows SMTP servers and other downstream applications to check the validity of the digital signature against the public key of the domain which had the matching private key to create the signature. DKIM signatures attached to messages can remain intact through intermediary SMTP servers, but if message contents (email body or email headers) are modified by intermediary servers, the final destination will find that the signature is no longer valid.
Domain-based Message Authentication, Reporting and Conformance (DMARC) permits domain owners to publish a policy telling receiving servers what to do when SPF or DKIM are not valid, such as if a message originated from an unauthorized server, or if it was tampered with after being sent. DMARC checks if a message matches what it knows about the sender via SPF and DKIM, a process known as alignment. The recipient’s server can then enforce the DMARC policy, for example by rejecting or quarantining non-aligned messages.
Amazon WorkMail normally performs DMARC enforcement for inbound messages, based on their alignment when they were received by Amazon SES. But when an email security gateway acts as an intermediary SMTP server between the original sender and WorkMail, that breaks the relationship with the SMTP servers authorized by SPF, and if the gateway modifies the message, that invalidates the DKIM signature. This is why it’s necessary for the SMTP server at the point of ingress to perform the evaluation of SPF, DKIM, and DMARC. The email security gateway at the border should be made responsible for enforcing DMARC on messages that don’t align, and WorkMail DMARC enforcement should be disabled.
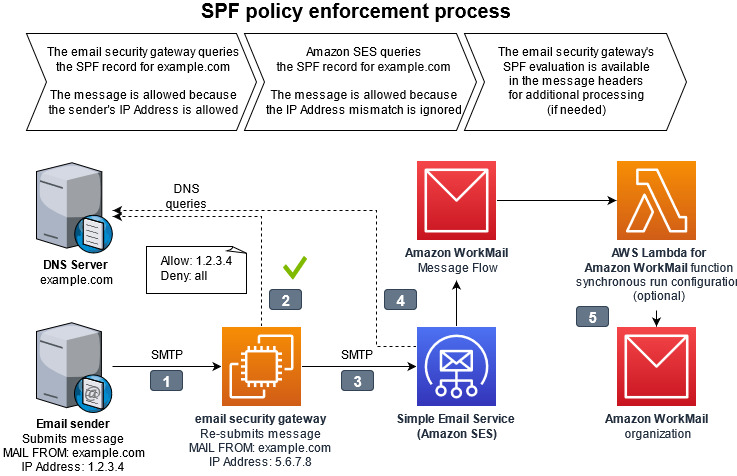
Figure 2. Diagram of SPF policy enforcement process. The full details of the interaction points are outlined below.
The interaction points for SPF policy enforcement are as follows:
Many email security vendors offer software as a service (SaaS) solutions. This offloads all management responsibilities to the software vendor’s platform. These solutions work as long as they support the email gateway features necessary for this solution as depicted in Figure 2 and described in the Why point of ingress email authentication is important section above.
If you wish to build and maintain your own email security gateway, you may deploy one available from the AWS Marketplace or add an open source application into your Amazon Virtual Private Cloud (Amazon VPC). You will need to remove port 25 restriction from your EC2 instance for the email security gateway within your Amazon VPC to send email to Amazon WorkMail.
Follow this procedure to configure your WorkMail organization and Amazon SES IP address filters to allow the email security gateway to process inbound email receiving.

Figure 3. Picture of the AWS WorkMail console showing the advanced configuration depicting Inbound DMARC enforcement disabled

Figure 4. Picture of the Amazon SES console showing example IP address filters to allow the email security gateway IP addresses and blocking every other IP Address

Figure 5. Picture of the Amazon Route 53 console showing that the DMS MX record for the domain needs to be configured with the IP address of the email security gateway

Figure 6. Picture showing the section of the MX record value to copy from the WorkMail console.
Some specifics of this configuration depend on which gateway you are using, how it is designed for high availability, and the type of features configured. Test your WorkMail integration with a non-production domain before changing your production domain.
It is normal for Amazon CloudWatch logs for WorkMail, as well as the individual message headers, to show that SPF fails for all messages which traverse the gateway. Configure the email security gateway to record its SPF evaluation in the message headers so that it remains available for troubleshooting and further processing.
WorkMail normally moves spam messages into the Junk E-mail folder within each recipient’s mailbox. To replicate this behavior for spam messages identified by the email security gateway, use AWS Lambda for Amazon WorkMail with a synchronous run configuration to run a function for every inbound message to a group of recipients.
By integrating an email security gateway and leveraging AWS Lambda for Amazon WorkMail, you will gain additional security and management control over your organization’s inbound email. To learn more, read the Amazon WorkMail FAQs and Amazon WorkMail documentation.
If you have feedback about this post, submit comments in the Comments section below.
Want more AWS Security news? Follow us on Twitter.
Post Syndicated from The Atlantic original https://www.youtube.com/watch?v=BTn60QHjTg8
Post Syndicated from Grant Fisher original https://aws.amazon.com/blogs/architecture/how-meshify-built-an-insurance-focused-iot-solution-on-aws/
The ability to analyze your Internet of Things (IoT) data can help you prevent loss, improve safety, boost productivity, and even develop an entirely new business model. This data is even more valuable, with the ever-increasing number of connected devices. Companies use Amazon Web Services (AWS) IoT services to build innovative solutions, including secure edge device connectivity, ingestion, storage, and IoT data analytics.
This post describes Meshify’s IoT sensor solution, built on AWS, that helps businesses and organizations prevent property damage and avoid loss for the property-casualty insurance industry. The solution uses real-time data insights, which result in fewer claims, better customer experience, and innovative new insurance products.
Through low-power, long-range IoT sensors, and dedicated applications, Meshify can notify customers of potential problems like rapid temperature decreases that could result in freeze damage, or rising humidity levels that could lead to mold. These risks can then be averted, instead of leading to costly damage that can impact small businesses and the insurer’s bottom line.
The three building blocks of this technical architecture are the edge portfolio, data ingestion, and data processing and analytics, shown in Figure 1.

Figure 1. Building blocks of Meshify’s technical architecture
Starting with the edge sensors, the Meshify edge portfolio covers two types of sensors:
For the LoRaWAN solution, aggregated sensor data at the Meshify gateway is sent to AWS using AWS IoT Core and Meshify’s REST service endpoints. AWS IoT Core is a managed cloud platform that lets IoT devices easily and securely connect using multiple protocols like HTTP, MQTT, and WebSockets. It expands its protocol coverage through a new fully managed feature called AWS IoT Core for LoRaWAN. This gives Meshify the ability to connect LoRaWAN wireless devices with the AWS Cloud. AWS IoT Core for LoRaWAN delivers a LoRaWAN network server (LNS) that provides gateway management using the Configuration and Update Server (CUPS) and Firmware Updates Over-The-Air (FUOTA) capabilities.
Initial processing of the data is done at the ingestion layer, using Meshify REST API endpoints and the Rules Engine of AWS IoT Core. Meshify applies filtering logic to route relevant events to Amazon Managed Streaming for Apache Kafka (Amazon MSK). Amazon MSK is an AWS streaming data service that manages Apache Kafka infrastructure and operations, streamlining the process of running Apache Kafka applications on AWS.
Meshify’s applications then consume the events from Amazon MSK per the configured topic subscription. They enrich and correlate the events with the records with a managed service, Amazon Relational Database Service (RDS). These applications run as scalable containers on another managed service, Amazon Elastic Kubernetes Service (EKS), which runs container applications.
In Figure 2, we illustrate the technical workflow from the ingestion of field events to their processing, enrichment, and persistence. Finally, we use these events to power risk avoidance decision-making.

Figure 2. Technical workflow for Meshify IoT architecture
Meshify first began work on the Meshify sensors and hosted platform in 2012. In the ensuing decade, Meshify has successfully created a platform to auto-scale upon demand with steady, predictable performance. This gave Meshify both the ability to use only the resources needed, and still have the capacity to handle unexpected voluminous data.
As the platform scaled, so did the volume of sensor data, operations and diagnostics data, and metadata from installations and deployments. Building an end-to-end data pipeline that integrates these different data sources and delivers co-related insights at low latency was time well spent.
In this post, we’ve shown how Meshify is using AWS services to power their suite of IoT sensors, software, and data platforms. Meshify’s most important architectural enhancements have involved the introduction of managed services, notably AWS IoT Core for LoRaWAN and Amazon MSK. These improvements have primarily focused on the data ingestion, data processing, and analytics stages.
Meshify continues to power the data revolution at the intersection of IoT and insurance at the edge, using AWS. Looking ahead, Meshify and HSB are excited at the prospect of scaling the relationship with AWS from cloud computing to the world of edge devices.
Learn more about how emerging startups and large enterprises are using AWS IoT services to build differentiated products.
Meshify is an IoT technology company and subsidiary of HSB, based in Austin, TX. Meshify builds pioneering sensor hardware, software, and data analytics solutions that protect businesses from property and equipment damage.