Post Syndicated from The History Guy: History Deserves to Be Remembered original https://www.youtube.com/watch?v=NNTvmYgeOvk
Tukey
Post Syndicated from xkcd.com original https://xkcd.com/3104/

Comic for 2025.06.17 – Isaac Newton
Post Syndicated from Explosm.net original https://explosm.net/comics/isaac-newton-2
New Cyanide and Happiness Comic
G6-PTZ Unboxing and Setup LIVE!
Post Syndicated from Crosstalk Solutions original https://www.youtube.com/watch?v=IrwG_w09K_s
Summer Reading: Learn Something Completely New
Post Syndicated from The Atlantic original https://www.youtube.com/shorts/khBVKuwC11w
[$] A parallel path for GPU restore in CRIU
Post Syndicated from daroc original https://lwn.net/Articles/1024747/
The fundamental concept of checkpoint/restore is elegant: capture a
process’s state and resurrect it later, perhaps elsewhere. Checkpointing
meticulously records a process’s memory, open files, CPU state, and more into a
snapshot. Restoration then reconstructs the process from this state. This
established technique faces new challenges with GPU-accelerated applications,
where low-latency restoration is crucial for
fault
tolerance, live migration, and
fast startups. Recently, the restore process for AMD GPUs has been redesigned to
eliminate substantial bottlenecks.
ICE Protests #lastweektonight
Post Syndicated from LastWeekTonight original https://www.youtube.com/watch?v=pW8PV6RiZmQ
Hyperscale Doesn’t Mean Hyper-Resilient
Post Syndicated from David Johnson original https://www.backblaze.com/blog/hyperscale-doesnt-mean-hyper-resilient/

Last week, a misconfiguration in Google Cloud’s API infrastructure led to a major global outage. Not long before that, IBM Cloud suffered its second significant disruption in a matter of weeks. The incidents impacted everything from enterprise infrastructure to consumer-facing apps—Gmail, Spotify, Cloudflare, and countless internal systems built on top of these platforms.
Understandably, much of the coverage has focused on what went wrong. But the more important question might be: Why does something like this ripple so far and wide in a system supposedly built for resilience?
Single points of failure in a multi-service world
One might assume that as cloud providers scale, their reliability scales with them. However, these outages reveal a critical distinction: the difference between data-layer resilience and control-plane fragility.
The problem is, that robust data layer can be rendered useless if the “front door” is locked. Hyperscale cloud platforms have grown so interdependent and complex that a fault in one layer can bring vast swaths of unrelated services to a halt. This is the risk of vertical integration: When one vendor provides compute, storage, networking, and identity, a simple bug or misconfiguration can cascade through thousands of applications, not because the applications are fragile, but because they’ve all tied themselves to the same operational backbone.
Redundancy, or the illusion of it?
In theory, cloud architecture encourages redundancy. But in practice, many companies—even those using multi-cloud strategies—tend to consolidate key services like authentication and orchestration with a single vendor. When that vendor’s services go down, it doesn’t matter that your data is replicated across three availability zones in the same data center. If you can’t log in to access it, your redundancy becomes purely theoretical.
After last week’s outages, some companies may re-evaluate their cloud strategy—but it’s not as easy as flipping a switch. True diversification is complex, requiring time, engineering resources, and a cultural shift toward designing for failure.
The reality: Fewer assumptions, more contingencies
The knee-jerk reaction to events like these is often to demand better SLAs, more transparency, or faster recovery times. Those are valid asks. But they might miss the deeper lesson: Assumptions about uptime and “X-nines” reliability are only helpful until the moment they aren’t. What users need are not just better guarantees, but clearer paths to self-determination when things break.
That might look like:
- Designing for graceful degradation. What can your service do when its cloud provider is partially offline?
- Reconsidering dependencies. Are you tying core logic to a provider’s proprietary APIs, or abstracting where possible?
- Asking harder questions during vendor selection. Not just, “Can it scale?” but “What happens when it fails?”
Case study: Sardius Media bakes in redundancy
Sardius Media, a global video platform, built cloud redundancy into its DNA. Every piece of media is replicated across multiple S3 compatible storage providers—including Backblaze B2—using a proprietary “race” mechanism that always delivers the fastest, most reliable storage experience for end users. This architecture keeps files available, resilient, and protected, even if one provider has an outage.
- No single point of failure: Content lives across multiple clouds
- Best performance: Requests race to the fastest provider in real time
- Durability, affordability, and global reach—Backblaze B2 wins the race up to 80% of the time globally
Sardius Media’s strategy proves that open, multi-provider storage isn’t just theory—it’s operational resilience in action.
What does that mean for you?
The answer isn’t to abandon the cloud, but to get smarter about how you use it. This means architecting systems that don’t just have data redundancy, but true operational independence.
Maybe that means replicating data to providers who specialize rather than consolidate. Or maybe it just means revisiting architectures that have become too reliant on invisible scaffolding.
What’s clear is this: reliability isn’t a feature you buy from the cloud. It’s a design philosophy that must be shared.
The post Hyperscale Doesn’t Mean Hyper-Resilient appeared first on Backblaze Blog | Cloud Storage & Cloud Backup
AWS re:Inforce roundup 2025: top announcements
Post Syndicated from AWS News Blog Team original https://aws.amazon.com/blogs/aws/aws-reinforce-roundup-2025-top-announcements/
At AWS re:Inforce 2025 (June 16-18, Philadelphia), AWS Vice President and Chief Information Security Officer Amy Herzog delivered the keynote address, announcing new security innovations. Throughout the event, AWS announced additional security capabilities focused on simplifying security at scale and enabling organizations to build more resilient applications in the cloud. Below is a comprehensive roundup of the major security launches and updates announced at this year’s conference.
Verify internal access to critical AWS resources with new IAM Access Analyzer capabilities
A new capability in AWS Identity and Access Management Access Analyzer helps security teams verify which principals within their AWS organization have access to critical resources like S3 buckets, DynamoDB tables, and RDS snapshots by using automated reasoning to evaluate multiple policies and provide findings through a unified dashboard.
AWS IAM now enforces MFA for root users across all account types
The new Multi-Factor Authentication enforcement prevents over 99% of password-related attacks. You can use a range of supported IAM MFA methods, including FIDO-certified security keys to harden access to your AWS accounts. AWS supports FIDO2 passkeys for a user-friendly MFA implementation and allows you to register up to 8 MFA devices per root and IAM user.
Improve your security posture using Amazon threat intelligence on AWS Network Firewall
This new Network Firewall managed rule group offers protection against active threats relevant to workloads in AWS. The feature uses the Amazon threat intelligence system MadPot to continuously track attack infrastructure, including malware hosting URLs, botnet command and control servers, and crypto mining pools, identifying indicators of compromise (IOCs) for active threats.
AWS Certificate Manager introduces exportable public SSL/TLS certificates to use anywhere
You can now use AWS Certificate Manager to issue exportable public certificates for your AWS, hybrid, or multicloud workloads that require secure TLS traffic termination.
AWS WAF simplified console experience
The new AWS WAF console experience reduces security configuration steps by up to 80% through pre-configured protection packs. Security teams can quickly implement comprehensive protection for specific application types, with consolidated security metrics and customizable controls through an intuitive interface.
Amazon CloudFront simplifies web application delivery and security with new user-friendly interface
Try the simplified console experience with Amazon CloudFront to accelerate and secure web applications within a few clicks by automating TLS certificate provisioning, DNS configuration, and security settings through an integrated interface with AWS WAF’s enhanced Rule Packs.
New AWS Shield feature discovers network security issues before they can be exploited (Preview)
Shield network security posture management automatically discovers and analyzes network resources across AWS accounts, prioritizes security risks based on AWS best practices, and provides actionable remediation recommendations to protect applications against threats like SQL injections and DDoS attacks.
Unify your security with the new AWS Security Hub for risk prioritization and response at scale (Preview)
AWS Security Hub has been enhanced to transform security signals into actionable insights, helping security teams prioritize and respond to critical issues at scale. This unified solution provides comprehensive visibility across your cloud environment while reducing the complexity of managing multiple security tools.
Amazon GuardDuty expands Extended Threat Detection coverage to Amazon EKS clusters
Amazon GuardDuty Extended Threat Detection now supports Amazon EKS clusters, helping you detect sophisticated multistage attacks by correlating security signals across Kubernetes audit logs, runtime behaviors, and AWS API activities. This enhancement automatically identifies critical attack sequences that might otherwise go unnoticed, enabling faster response to threats.
New categories for the AWS MSSP Competency
The AWS MSSP Competency (previously AWS Level 1 MSSP Competency) now includes new categories covering infrastructure security, workload security, application security, data protection, identity and access management, incident response, and cyber recovery. Partners provide 24/7 monitoring and incident response through dedicated Security Operations Centers.
Secure your Express application APIs in minutes with Amazon Verified Permissions
Amazon Verified Permissions announced the release of the verified-permissions-express-toolkit, an open-source package that allows developers to implement authorization for Express web application APIs in minutes using Amazon Verified Permissions.
Beyond compute: Shifting vulnerability detection left with Amazon Inspector code security
Amazon Inspector code security capabilities are now generally available, helping you secure applications before production by rapidly identifying and prioritizing security vulnerabilities and misconfigurations across application source code, dependencies, and infrastructure as code (IaC).
AWS Backup adds new Multi-party approval for logically air-gapped vaults
Multi-party approval for AWS Backup logically air-gapped vaults enables you to recover your backup data even when your AWS account is compromised, by leveraging authorization from a designated approval team of trusted individuals who can enable vault sharing with a recovery account.
[$] Enhancing screen-reader functionality in modern GNOME
Post Syndicated from jzb original https://lwn.net/Articles/1025127/
Accessibility features and the work that goes into developing those features
often tend to be overlooked and are poorly understood by all but the people who actually
depend on such features. At Fedora’s annual developer conference, Flock, Lukáš Tyrychtr sought to
improve understanding and raise awareness about accessibility with his session on accessibility
barriers and screen-reader functionality in GNOME. His talk provided rare insight
into the world of using and developing open-source software for visually-impaired
users—including landing important accessibility improvements in
the latest GNOME release.
Amazon GuardDuty expands Extended Threat Detection coverage to Amazon EKS clusters
Post Syndicated from Esra Kayabali original https://aws.amazon.com/blogs/aws/amazon-guardduty-expands-extended-threat-detection-coverage-to-amazon-eks-clusters/
Today, I’m happy to announce Amazon GuardDuty Extended Threat Detection with expanded coverage for Amazon Elastic Kubernetes Service (Amazon EKS), building upon the capabilities we introduced in our AWS re:Invent 2024 announcement of Amazon GuardDuty Extended Threat Detection: AI/ML attack sequence identification for enhanced cloud security.
Security teams managing Kubernetes workloads often struggle to detect sophisticated multistage attacks that target containerized applications. These attacks can involve container exploitation, privilege escalation, and unauthorized movement within Amazon EKS clusters. Traditional monitoring approaches might detect individual suspicious events, but often miss the broader attack pattern that spans across these different data sources and time periods.
GuardDuty Extended Threat Detection introduces a new critical severity finding type, which automatically correlates security signals across Amazon EKS audit logs, runtime behaviors of processes associated with EKS clusters, malware execution in EKS clusters, and AWS API activity to identify sophisticated attack patterns that might otherwise go unnoticed. For example, GuardDuty can now detect attack sequences in which a threat actor exploits a container application, obtains privileged service account tokens, and then uses these elevated privileges to access sensitive Kubernetes secrets or AWS resources.
This new capability uses GuardDuty correlation algorithms to observe and identify sequences of actions that indicate potential compromise. It evaluates findings across protection plans and other signal sources to identify common and emerging attack patterns. For each attack sequence detected, GuardDuty provides comprehensive details, including potentially impacted resources, timeline of events, actors involved, and indicators used to detect the sequence. The findings also map observed activities to MITRE ATT&CK® tactics and techniques and remediation recommendations based on AWS best practices, helping security teams understand the nature of the threat.
To enable Extended Threat Detection for EKS, you need at least one of these features enabled: EKS Protection or Runtime Monitoring. For maximum detection coverage, we recommend enabling both to enhance detection capabilities. EKS Protection monitors control plane activities through audit logs, and Runtime Monitoring observes behaviors within containers. Together, they create a complete view of your EKS clusters, enabling GuardDuty to detect complex attack patterns.
How it works
To use the new Amazon GuardDuty Extended Threat Detection for EKS clusters, go to the GuardDuty console to enable EKS Protection in your account. From the Region selector in the upper-right corner, select the Region where you want to enable EKS Protection. In the navigation pane, choose EKS Protection. On the EKS Protection page, review the current status and choose Enable. Select Confirm to save your selection.

After it’s enabled, GuardDuty immediately starts monitoring EKS audit logs from your EKS clusters without requiring any additional configuration. GuardDuty consumes these audit logs directly from the EKS control plane through an independent stream, which doesn’t affect any existing logging configurations. For multi-account environments, only the delegated GuardDuty administrator account can enable or disable EKS Protection for member accounts and configure auto-enable settings for new accounts joining the organization.
To enable Runtime Monitoring, choose Runtime Monitoring in the navigation pane. Under the Configuration tab, choose Enable to enable Runtime Monitoring for your account.

Now, you can view from the Summary dashboard the attack sequences and critical findings specifically related to Kubernetes cluster compromise. You can observe that GuardDuty identifies complex attack patterns in Kubernetes environments, such as credential compromise events and suspicious activities within EKS clusters. The visual representation of findings by severity, resource impact, and attack types gives you a holistic view of your Amazon EKS security posture. This means you can prioritize the most critical threats to your containerized workloads.

The Finding details page provides visibility into complex attack sequences targeting EKS clusters, helping you understand the full scope of potential compromises. GuardDuty correlates signals into a timeline, mapping observed behaviors to MITRE ATT&CK® tactics and techniques such as account manipulation, resource hijacking, and privilege escalation. This granular level of insight reveals exactly how attackers progress through your Amazon EKS environment. It identifies affected resources like EKS workloads and service accounts. The detailed breakdown of indicators, actors, and endpoints provides you with actionable context to understand attack patterns, determine impact, and prioritize remediation efforts. By consolidating these security insights into a cohesive view, you can quickly assess the severity of Amazon EKS security incidents, reduce investigation time, and implement targeted countermeasures to protect your containerized applications.

The Resources section of the Finding details page shows context about the specific assets affected during an attack sequence. This unified resource list provides you with visibility into the exact scope of the compromise—from the initial access to the targeted Kubernetes components. Because GuardDuty includes detailed attributes such as resource types, identifiers, creation dates, and namespace information, you can rapidly assess which components of your containerized infrastructure require immediate attention. This focused approach eliminates guesswork during incident response, so you can prioritize remediation efforts on the most critical affected resources and minimize the potential blast radius of Amazon EKS targeted attacks.

Now available
Amazon GuardDuty Extended Threat Detection with expanded coverage for Amazon EKS clusters provides comprehensive security monitoring across your Kubernetes environment. You can use this capability to detect sophisticated multistage attacks by correlating events across different data sources, identifying attack sequences that traditional monitoring might miss.
To start using this expanded coverage, enable EKS Protection in your GuardDuty settings and consider adding Runtime Monitoring for enhanced detection capabilities.
For more information about this new capability, refer to the Amazon GuardDuty Documentation.
A Military Parade in D.C.
Post Syndicated from The Atlantic original https://www.youtube.com/watch?v=5SRmXvxe3Ow
Secure your Express application APIs in minutes with Amazon Verified Permissions
Post Syndicated from Trevor Schiavone original https://aws.amazon.com/blogs/security/secure-your-express-application-apis-in-minutes-with-amazon-verified-permissions/
Today, Amazon Verified Permissions announced the release of @verifiedpermissions/authorization-clients-js, an open source package that developers can use to implement external fine-grained authorization for Express.js web application APIs in minutes when using Verified Permissions.
Express is a minimal and flexible Node.js web application framework that provides a robust set of features for web and mobile applications. By using this standardized integration with Verified Permissions, developers can externalize authorization using up to 90 percent less code compared to writing their own custom integrations, saving them time and effort and improving application security posture by reducing the amount of custom integration code.
Why externalize authorization?
Traditionally, developers implemented authorization within their application by embedding authorization logic directly into application code. This embedded authorization logic is designed to support a few permissions, but as applications evolve, there is often a need to incrementally update the embedded authorization logic to support more complex use cases, resulting in code that is complex and difficult to maintain. As code complexity increases, further evolving the security model and performing audits of permissions becomes more challenging, resulting in an application that becomes more difficult to maintain over its lifecycle.
By externalizing authorization, you can decouple authorization logic from your application. This yields multiple benefits including freeing up development teams to focus on application logic and simplifying software audits.
One approach to externalize authorization from your application code is to use Cedar. Cedar is an open source language and software development kit (SDK) for writing and enforcing authorization policies for your applications. You specify fine-grained permissions as Cedar policies, and your application authorizes access requests by calling the Cedar SDK. For example, if you’re building a pet store application, you can use the following Cedar policy to control that only a user with a jobLevel of employee can access the POST /pets API.
One option for using Cedar is to self-manage the implementation; you can find an example for this pattern in another post: Secure your application APIs in 5 minutes with Cedar.
Self-managed Cedar provides the benefits of externalizing authorization but requires ongoing operational management. Organizations are responsible for Cedar version upgrades, applying security patches, managing policies, and auditing authorizations. Another option for using Cedar is to use Verified Permissions. Verified Permissions removes these operational requirements by providing a managed service for Cedar. Verified Permissions manages scaling, simplifies policy governance by supporting centralized policy management, and logs policy changes and authorization requests to simplify auditing.
This post describes how web application developers can use the new Express package to simplify the integration of Express web applications with Verified Permissions. The step-by-step guide uses a sample Pet Store application to show how access to APIs can be restricted based on user groups. You can find the sample Pet Store application in the verifiedpermissions repository on GitHub.
Pet Store application API overview
The Pet Store application is used to manage a pet store. The pet store is built using Express with Node.js and exposes the APIs in the following table.
| API | Description |
| GET /api/pets | Returns the list of available pets |
| GET /api/pets/{petId} | Returns the specified pet found |
| POST /api/pets | Adds a pet to the pet store |
| PUT /api/pets/{petId} | Updates an existing pet |
| DELETE /api/pets/{petId} | Removes a pet from the pet store |
This application doesn’t allow all users to access all APIs. Instead, it enforces the following rules:
- Administrators: Full access to pets and management functions
- Employees: Can view, create, and update pets
- Customers: Can view pets and create new pets
Implementing authorization for the Pet Store APIs
Let’s walk through how to secure your application APIs using Verified Permissions and the new package for Express. The initial application, with no authorization, can be found in the start folder; use this to follow along with the post. You can find a completed version of the application in the finish folder.
When completed, you’ll have implemented the application architecture shown in Figure 1. A React frontend application that uses Amazon Cognito for authentication. The application then includes the identity token returned from Cognito as an authorization header to the Express backend APIs. The Express backend, using the new Verified Permissions authorization middleware package, calls Verified Permissions to authorize the user request.

Figure 1: Architecture of the Pet Store application
Prerequisites
Before you get started, make sure you have the following prerequisites in place.
Step 1: Set up the AWS CLI
Some of the commands require the AWS Command Line Interface (AWS CLI). See Installing or updating to the latest version of the AWS CLI and Configuring settings for the AWS CLI.
Step 2: Set up an OpenID Connect identity provider and a database
The Pet Store application uses an OpenID Connect (OIDC) identity provider to manage users. For this example, you use an Amazon Cognito user pool called PetStoreUserPool with three users, one Admin, one Employee, and one Customer.
The application also uses a Amazon DynamoDB database to store the pets.
You can set up Amazon Cognito and DynamoDB in your AWS account by running the following command in the /start directory.
The setup script will prompt you to set passwords for the three users (passwords must be at least 8 characters and require at least one number, one uppercase letter, and one lowercase letter).
Note the outputs of running this script because you’ll use them in step 5 of Integrate Verified Permissions.
Note: In your own applications, you can set up Amazon Cognito by following the instructions in Create a new application in the Amazon Cognito console, or you can bring your own OIDC identity provider.
Step 3 (optional): Run the application
Now that the infrastructure is set up, you can run the application. In two separate terminals, run the following commands in the /start directory:
Test the application by creating some pets.
Integrate Verified Permissions
With the prerequisites in place, the next step is to integrate Verified Permissions. Verified Permissions can be integrated into an Express application in six steps:
- Create a Verified Permissions policy store
- Add the Cedar and Verified Permissions authorization middleware packages
- Create and deploy a Cedar schema
- Create and deploy Cedar policies
- Connect the Verified Permissions policy store to your OIDC identity provider
- Update the application code to call Verified Permissions to authorize API access
The Verified Permissions integration happens with the Express web application backend. All commands in the section should be run in the /start/backend directory.
Step 1: Create a Verified Permissions policy store
- Create a policy store in Verified Permissions using the AWS CLI by running the following command
Example successful command output:
- Save the
policyStoreIdvalue from the command output to use in step 3.
Step 2: Add the Cedar and Verified Permissions authorization middleware packages
- Run the following command to add two new dependencies on
@verifiedpermissions/authorization-clientsand@cedar-policy/authorization-for-expressjs
Step 3: Create and deploy the Cedar schema
A Cedar schema defines the authorization model for an application, including the entity types in the application and the actions users are allowed to take. You attach your schema to your Verified Permissions policy stores, and when policies are added or modified, the service automatically validates the policies against the schema.
The @cedar-policy/authorization-for-expressjs package can analyze the OpenAPI specification of your application and generate a Cedar schema. Specifically, the paths object in the OpenAPI schema is required in your specification.
If you don’t have an OpenAPI spec, you can generate one using the tool of your choice. There are several open source libraries that you can use to do this for Express; you might need to add some code to your application, generate the OpenAPI spec, and then remove the code. Alternatively, some generative AI based tools such as the Amazon Q Developer CLI are effective at generating OpenAPI spec documents. Regardless of how you generate the spec, be sure to validate the correct output from the tool.
For the sample application an OpenAPI spec document has been included and is named openapi.json.
- Run the following command to generate the Cedar schema.
Example successful command output:
- Next, format the Cedar schema for use with the AWS CLI. The specific format required is described in the documentation Amazon Verified Permissions policy store schema. To format the Cedar schema run the following command.
Example successful command output:
- After the schema is formatted, run the following command to upload the schema to Verified Permissions. Note that you need to replace
<policy store id>with the actual policy store ID, which is provided as an output from the command in step 1.Example successful command output:
Step 4: Create and deploy Cedar policies
If no policies are configured, Cedar denies authorization requests. The next step is to create policies that will allow specific user groups access to specific resources. The Express framework integration helps bootstrap this process by generating example policies based on the previously generated schema. You can then then customize these policies based on your use cases.
- Run the following command to generate sample Cedar policies.
Example successful command output:
Two sample policies are generated in the
/policiesdirectory:policy_1.cedarandpolicy_2.cedar.policy_1.cedarprovides permissions for users in theadminuser group to perform any action on any resource.policy_2.cedarprovides more access to the individual actions defined in the Cedar schema with a place holder for a specific group.Note that if you specified an
operationIdin the OpenAPI specification, the action names defined in the Cedar Schema will use thatoperationIdinstead of the default<HTTP Method> /<PATH>format. In this case, make sure that the naming of your actions in your Cedar policies matches the naming of your actions in your Cedar schema.For example, if you want to call your action
AddPetinstead ofPOST /pets, you could set theoperationIdin your OpenAPI specification toAddPet. The resulting action in the Cedar policy would bePetStoreApp::Action::"AddPet"Create a third policy file called
policy_3.cedarand then replace the contents of each file with the following policies. Replace<userpoolId>in each policy with the Cognito User Pool Id copied earlier.Note: In a real use case, consider renaming your Cedar policy files based on their contents, for example,
allow_customer_group.cedar. - The policies need to be formatted so that they work with the AWS CLI for Verified Permissions. The specific format is described in the AWS CLI Verified Permissions documentation. Run the following command to format the policies.
Example successful command output:
The formatted policies will be output to the
backend/policies/json/directory. - After formatting the policies, run the following three commands, one for each policy, to upload them to Verified Permissions. The policy store ID is returned after completing step 2. Replace
<policy store id>with the actual policy store ID.Example successful command output:
Alternatively, you can also copy and paste Cedar policies into Verified Permissions in the AWS Management Console.
Step 5: Connect the Verified Permissions policy store to your OIDC identity provider
By default, the Verified Permissions authorizer middleware reads a JSON Web Token (JWT) provided within the authorizationheader of the API request to get user information. Verified Permissions can validate the token in addition to performing authorization policy evaluation.
- To do this, create an identity source in Verified Permissions policy store. To simplify formatting in the AWS CLI command, we’ve defined the identity source configuration in
identity-source-configuration.txtReplace the<userPoolArn>and<clientId>parameters in the following code block based on the outputs of running thesetup-infrastructure.sh scriptin Step 2 of the prerequisites. - After you update the file, run the following command to update the Verified Permissions policy store. Replace
<policy store id>with the actual policy store ID.
Example successful command output:
Step 6: Update the application code to call Verified Permissions to authorize API access
You now need to update the application to use the @verifiedpermissions/authorization-clients and @cedar-policy/authorization-for-expressjs dependencies. This will allow the application to call Verified Permissions to authorize the API requests.
- Add the dependencies and define the
CedarAuthorizerMiddlewareandAVPAuthorizerin the application by adding the following block of code to line 13 (directly after the import statements) ofbackend/app.ts. Replace<policystoreId>in the following code block with your actual Verified Permissions policy store ID. - Configure the Express application to use the authorization middleware that you just defined. To do this, add the following line of code to the end of the block of
app.use(..)statements that begin after the comment// Configure security and performance middleware(approximately line 48 depending on how you pasted the previous block of code).
You’ve now successfully set up authorization in your application by creating a Verified Permissions policy store, writing Cedar policies to define your authorization, and integrating your application with Verified Permissions.
Validating API security
You can use the frontend web application to verify that authorization has been applied to the APIs. In two separate terminals run the following commands in the /start directory
In a browser navigate to http://localhost:3001 and sign in with one of the Amazon Cognito users you created earlier. Validate that the permissions policies are working as expected:
- Administrators: Can view, create, update, and delete pets.
- Employees: Can view, create, and update pets.
- Customers: Can view pets and create new pets.
In the terminal for the Express application, you can see log output that provides additional details about the authorization decisions. For example, following an unauthorized action the terminal outputs the following:
Conclusion
The new @verifiedpermissions/authorization-clients-js package allows Express developers to integrate their application with Verified Permissions to decouple authorization logic from code. By decoupling your authorization logic and integrating your application with the Verified Permissions, you can improve developer productivity and simplify permissions and access audits.
To support analyzing and auditing permissions when writing cedar policies the open source Cedar project also recently open sourced the Cedar Analysis CLI to help developers perform policy analysis on their policies. You can learn more about this new tool in Introducing Cedar Analysis: Open Source Tools for Verifying Authorization Policies.
The framework packages are open source and available on GitHub under the Apache 2.0 license, with distribution through NPM. To learn more, see Amazon Verified Permissions and Cedar.
If you have feedback about this post, submit comments in the Comments section below.
Improve your security posture using Amazon threat intelligence on AWS Network Firewall
Post Syndicated from Amit Gaur original https://aws.amazon.com/blogs/security/improve-your-security-posture-using-amazon-threat-intelligence-on-aws-network-firewall/
Today, customers use AWS Network Firewall to safeguard their workloads against common security threats. However, they often have to rely on third-party threat feeds and scanners that have limited visibility in AWS workloads to protect against active threats. A self-managed approach to cloud security through traditional threat intelligence feeds and custom rules can result in delayed responses, leaving customers exposed to active threats that are relevant to AWS workloads. Customers are looking for an automated approach to analyzing threats and deploying mitigations across multiple enforcement points to establish consistent defenses and want a unified, AWS-native solution that can rapidly protect against active threats across their entire cloud infrastructure.
This post introduces active threat defense, a new Network Firewall managed rule group that offers protection against active threats relevant to workloads in AWS. Active threat defense uses the AWS global infrastructure visibility and extensive threat intelligence to deliver automated, intelligence-driven security measures. The feature uses the Amazon threat intelligence system MadPot, which continuously tracks attack infrastructure, including malware hosting URLs, botnet command and control servers, and crypto mining pools, identifying indicators of compromise (IOCs) for active threats.
Active threat defense comes as a rule group AttackInfrastructure, which protects against malicious network traffic by blocking communications with detected attack infrastructure. After the managed rule group is configured in your firewall policy, Network Firewall now automatically blocks suspicious traffic to malicious IPs, domains, and URLs for indicator categories such as command-and-control (C2s), malware staging hosts, sinkholes, out-of-band testing (OAST), and mining-pools. It implements comprehensive filtering of both inbound and outbound traffic for various protocols, including TCP, UDP, DNS, HTTPS, and HTTP, and uses specific, verified threat indicators to facilitate high accuracy and minimize false positives.
Network Firewall with active threat defense protects AWS workloads using the following mechanisms:
- Threat prevention: Automatically blocks malicious traffic using Amazon threat intelligence to identify and prevent active threats targeting workloads in AWS
- Rapid protection: Continuously updates Network Firewall rules based on newly discovered threats, enabling immediate protection against them
- Streamlined operations: Findings in GuardDuty marked with the threat list name “Amazon Active Threat Defense” can now be automatically blocked when active threat defense is enabled on Network Firewall
- Collective defense: Deep threat inspection (DTI) enables shared threat intelligence, improving protection for active threat defense managed rule group users
Figure 1 illustrates the use of the active threat defense managed rule group with Network Firewall. It shows the automatic creation of stateful rules in the AWS managed rule group using threat data collected from MadPot.

Figure 1: Network Firewall with active threat defense
Getting started
The active threat defense managed rule group can be enabled directly within Network Firewall using the AWS Management Console, AWS Command Line Interface (AWS CLI), or AWS SDK. You can then associate the managed rule group with the Network Firewall policy. The rule group receives regular updates with new threat indicators and signatures, while automatically removing inactive or aged-out signatures.
Prerequisites
To get started with Network Firewall with active threat defense, visit the Network Firewall console or see the AWS Network Firewall Developers Guide. Active threat defense is supported in all AWS Regions where Network Firewall is available today, including the AWS GovCloud (US) Regions and China Regions.
If this is your first time using Network Firewall, make sure to complete the following prerequisites. If you already have a firewall policy and a firewall, you can skip this section.
Set up the active threat defense managed rule group
With the prerequisites in place, you can set up and use the active threat defence managed rule group.
To set up the managed rule group:
- In the AWS Network Firewall console, choose Firewall policies in the navigation pane.
- Select an existing firewall policy or the policy that you created as part of the prerequisites.

Figure 2: Select the Network Firewall policy
- Scroll down to Stateful rule groups. On the right-hand side, choose Actions and select Add managed stateful rule groups.

Figure 3: Add a rule group
- On the Add managed stateful rule groups page, scroll down to active threat defense. Select the rule group AttackInfrastructure. Based on your requirements for Deep threat inspection, you can opt out if you don’t want Network Firewall to process service logs. Choose Add to policy.

Figure 4: Add the rule group to the policy
- You can verify on the next page the managed rule group was added to the policy.

Figure 5: Verify that the managed rule group was added to the policy


Pricing
For active threat defense pricing, see AWS Network Firewall pricing.
Considerations
The first consideration is to understand how Network Firewall is more effective in detecting and mitigating threats associated with HTTPS traffic when the TLS inspection feature is used alongside the active threat defense managed rule group. TLS inspection enables active threat defense to analyze the actual content of encrypted connections, allowing it to identify and block malicious URLs that might otherwise pass undetected. This process involves decrypting traffic, inspecting the contents for known malicious URL patterns or behaviors, and then re-encrypting the traffic if it’s deemed safe. For more information on the considerations on TLS inspection, see Considerations for TLS inspection. Organizations must balance the security benefits with potential latency introduction and make sure that they have proper controls in place to handle sensitive decrypted data.
Another consideration is the mitigation of false positives. When you use this managed rule group in your firewall policy, you can edit rule group alert settings to help identify false-positives as part of a mitigation strategy. For more information, see mitigating false-positives.
The final consideration is how the use of managed rule groups count against the limit of stateful rules for each policy. For more information, see AWS Network Firewall quotas and Setting rule group capacity in AWS Network Firewall.
Conclusion
In this post, you learned how to use the AWS Network Firewall active threat defense managed rule group to safeguard workloads against active threats.
If you have feedback about this post, submit comments in the Comments section below.
Nonprofit Network Design for under $1000 bucks!
Post Syndicated from Crosstalk Solutions original https://www.youtube.com/watch?v=qnNHFZfLLkY
How AWS is simplifying security at scale: Four keys to faster innovation from AWS re:Inforce 2025
Post Syndicated from Amy Herzog original https://aws.amazon.com/blogs/security/how-aws-is-simplifying-security-at-scale-four-keys-to-faster-innovation-from-aws-reinforce-2025/
When I began my career in security, most people accepted as fact that protecting systems came at the expense of productivity. That didn’t have to be true then, and it’s definitely not true now. The cloud, and specifically the AWS Cloud, is a big reason why. But as technology evolves and systems become more complex, operating at scale demands a fresh approach to security. We take our customers’ security seriously, and that means building guardrails that give organizations the confidence to innovate boldly and scale rapidly.
In my new role as AWS CISO, I see this playing out daily. As I meet with customers, their excitement about technologies like generative AI comes hand in hand with questions about securing complex environments and managing new types of risk. They’re excited about innovation, but they need confidence that their security foundations can keep pace with their ambitions. They want to move fast without compromising security.
Today at re:Inforce, I shared how AWS is working backward from these needs to fundamentally transform how security scales in the cloud. It all starts with a security foundation built on four key pillars: identity and access management, data and network security, monitoring and incident response, and the continuous work of migration, modernization, and patching. Organizations with mature security models across these pillars are the ones moving fastest. Across each of these areas, we’re focused on delivering security capabilities that help customers adopt new technologies and experiment with confidence.
Scaling identity for the cloud
As our customers rapidly scale their cloud operations, they’ve told us that managing identity and access across complex environments becomes increasingly challenging. They need solutions that can grow with their business while maintaining strong security. Identity and access management underpins every aspect of cloud security, and success in this area requires both rigorous authentication controls and comprehensive visibility into access permissions.
I was excited to announce new internal access findings for AWS IAM Access Analyzer today. This capability transforms how organizations manage access to sensitive data at scale, addressing the complexities our customers face as they grow. Using automated reasoning technology, it analyzes complex permission layers across diverse policy types, giving security teams comprehensive visibility into who within their organizations has access to what resources. With daily monitoring and notifications of new access granted, we’re helping teams implement least-privilege access with confidence in even the most complex environments. This provides our customers visibility to strengthen access controls on their critical resources while maintaining the agility their business demands as they scale in the cloud.
Empowering transformation through data and network security
Our customers are eager to transform their businesses, but they need confidence that their security can keep pace with rapid innovation. This is especially true when it comes to protecting their networks and data at scale. During the keynote, Noopur Davis, CISO of Comcast, shared how her organization protects their vast network and customer data while enabling rapid innovation. With millions of customers relying on their services, Comcast’s approach resonated with me: security shouldn’t just defend, it should enable transformation.
We’re delivering on this vision with new capabilities that simplify security at scale. Today, I announced that AWS Certificate Manager now allows you to export ACM-issued public certificates and their private keys for use inside or outside of AWS, giving you automated certificate management with the flexibility to help secure your workloads. We’re also expanding AWS Shield with enhanced network and application protection that performs a network security analysis to identify configuration issues and provides remediation recommendations. You can even use AWS generative AI powered assistant Amazon Q Developer to gain actionable insights using simple natural language. These innovations help teams protect their data and stay ahead of evolving threats even as their environments grow more complex.
Elevating threat detection and response
Our customers have shared their challenges in keeping pace with the evolving threat landscape, especially as they scale their cloud operations. While traditional automation helps manage growing complexity, AI represents an even more powerful opportunity to transform security operations. When implemented thoughtfully, AI dramatically improves our ability to spot complex attack patterns, reduce false positives, and automate responses at massive scale.
Today at re:Inforce, I announced two key security innovations: expanded capabilities in Amazon GuardDuty Extended Threat Detection and enhanced AWS Security Hub that directly address these needs. Together, these services help simplify security at scale. GuardDuty uses AWS-trained AI and machine learning (AI/ML) models to detect sophisticated multi-stage threats and provide actionable insights, while Security Hub prioritizes critical security issues by automatically analyzing and correlating security signals into clear, prioritized actions. This approach gives teams the confidence to scale their operations, knowing they can detect and respond to security risks efficiently across their entire AWS environment.
Accelerating the journey to better security
While advanced capabilities like AI and automation help strengthen security operations, the foundation matters most. Moving to the cloud represents a transformative opportunity to build on a fundamentally stronger security foundation than most organizations can ever hope to achieve with on-premises environments. When migrating to AWS, you reduce the need to manage physical infrastructure security while gaining access to built-in protections that are continuously updated and maintained.
Successful cloud adoption means going beyond simple lift-and-shift. Modernization is key to realizing these benefits. By moving solutions further up the stack to use managed services like AWS Lambda, Amazon Simple Storage Service (Amazon S3), or AWS Key Management Service (AWS KMS), you benefit from security controls that are built in rather than bolted on. These services are continuously patched and maintained by AWS, freeing your teams to focus on innovating for your customers. After all, the fastest path to better security is the one where core protections are already built in.
Partnering for security success
Security transformation isn’t a journey organizations need to take alone. Throughout my career, I’ve seen how the right partnerships can accelerate success, bringing fresh perspectives and deep expertise to complex challenges. Our security partners help customers across the four pillars we discussed today, from implementing identity solutions to modernizing security operations. They understand both the technical complexities and the business realities of scaling security in the cloud, often bringing valuable industry-specific experience that helps organizations move faster with confidence.
Looking ahead
As you scale your operations in the cloud, our goal is to give you the confidence to move quickly while maintaining strong security controls. When security scales naturally with your business, teams can focus on building what’s next instead of managing infrastructure.
To dive deeper into how AWS designs, builds, and operates security at unprecedented scale, I encourage you to join our Innovation Talks at re:Inforce. These hour-long sessions explore the key pillars of modern cloud security: secure foundations, resilient architectures, AI-powered innovations, and large-scale threat intelligence.
As I step into my role as AWS CISO, I’m energized by the opportunity ahead. For nearly 20 years, AWS has maintained a unique culture of security that enables us to innovate rapidly while shipping securely. As we navigate the landscape of generative AI and rapid technological change, earning your trust means not just keeping pace with innovation, but helping to make it even more successful. I couldn’t be more excited to carry this mission forward.
If you have feedback about this post, submit comments in the Comments section below.
Unify your security with the new AWS Security Hub for risk prioritization and response at scale (Preview)
Post Syndicated from Donnie Prakoso original https://aws.amazon.com/blogs/aws/unify-your-security-with-the-new-aws-security-hub-for-risk-prioritization-and-response-at-scale-preview/
AWS Security Hub has been a central place for you to view and aggregate security alerts and compliance status across Amazon Web Services (AWS) accounts. Today, we are announcing the preview release of the new AWS Security Hub which offers additional correlation, contextualization, and visualization capabilities. This helps you prioritize critical security issues, respond at scale to reduce risks, improve team productivity, and better protect your cloud environment.
Here’s a quick look at the new AWS Security Hub.

With this new enhancement, AWS Security Hub integrates security capabilities like Amazon GuardDuty, Amazon Inspector, AWS Security Hub Cloud Security Posture Management (CSPM), Amazon Macie, and other AWS security capabilities to help you gain visibility across your cloud environment through centralized management in a unified cloud security solution.
Getting started with the new AWS Security Hub
Let me walk you through how to get started with AWS Security Hub.
If you’re a new customer to AWS Security Hub, you need to navigate to the AWS Security Hub console to enable AWS security capabilities and capabilities and start assessing risk across your organization. You can learn more on the Documentation page.
After you have AWS Security Hub enabled, it will automatically consume data from supporting security capabilities you’ve enabled, such as Amazon GuardDuty, Amazon Inspector, Amazon Macie, and AWS Security Hub CSPM. You can navigate to the AWS Security Hub console to view these findings and benefit from insights created through correlation of findings across these capabilities.
As security risks are uncovered, they’re presented in a redesigned Security Hub summary dashboard. The new Security Hub summary dashboard provides a comprehensive, unified view of your AWS security posture. The dashboard organizes security findings into distinct categories, making it easier to identify and prioritize risks.
The new Exposure summary widget helps you identify and prioritize security exposures by analyzing resource relationships and signals from Amazon Inspector, AWS Security Hub CSPM, and Amazon Macie. These exposure findings are automatically generated and are a key part of the new solution, highlighting where your critical security exposures are located. You can learn more about exposure on the Documentation page.

AWS Security Hub now provides a Security coverage widget designed to help you identify potential coverage gaps. You can use this widget to identify where you’re missing coverage by the security capabilities that power Security Hub. This visibility helps you identify which capabilities, accounts, and features you need to address to improve your security coverage.

As you can see on the navigation menu, AWS Security Hub is organized into five key areas to streamline security management:
- Exposure: Provides visibility into all exposure findings, a security vulnerability or misconfiguration that could potentially expose an AWS resource or system to unauthorized access or compromise, generated by Security Hub, helping you identify resources that might be accessible from outside your environment
- Threats: Consolidates all threat findings generated by Amazon GuardDuty, showing potential malicious activities and intrusion attempts
- Vulnerabilities: Displays all vulnerabilities detected by Amazon Inspector, highlighting software flaws and configuration issues
- Posture management: Shows all posture management findings from AWS Security Hub Cloud Security Posture Management (CSPM), helping provide compliance with security best practices
- Sensitive data: Presents all sensitive data findings identified by Amazon Macie, helping you track and protect your sensitive information

When you navigate to the Exposure page, you’ll see findings grouped by title, with severity levels clearly indicated to help you focus on critical issues first.

To explore specific exposures, you can select any finding to see affected resources. The panel includes key information about the implicated resource, account, Region, and when the issue was detected.

In this panel, you’ll also find an attack path visualization that is particularly useful for understanding complex security relationships. For network exposure paths, you can see all components involved in the path—including virtual private clouds (VPCs), subnets, security groups, network access control lists (ACLs), and load balancers—helping you identify exactly where to implement security controls. The visualization also highlights Identity and Access Management (IAM) relationships, showing how permission configurations might allow privilege escalation or data access. Resources with multiple contributing traits are clearly marked so you can quickly identify which components represent the greatest risk.

The Threats dashboard provides actionable insights into potential malicious activities detected by Amazon GuardDuty, organizing findings by severity so you can quickly identify critical issues like unusual API calls, suspicious network traffic, or potential credential compromises. The dashboard includes GuardDuty Extended Threat Detection findings, with all “Critical” severity threats representing these Extended Threat Detections that require immediate attention.
Similarly, the Vulnerabilities dashboard from Amazon Inspector provides a comprehensive view of software vulnerabilities and network exposure risks. The dashboard highlights vulnerabilities with known exploits, packages requiring urgent updates, and resources with the highest numbers of vulnerabilities.

Another valuable new feature is the Resources view, which provides an inventory of all resources deployed in your organization covered by AWS Security Hub. You can use this view to quickly identify which resources have findings against them and filter by resource type or finding severity. Selecting any resource provides detailed configuration information without needing to pivot to other consoles, streamlining your investigation workflow.

The new Security Hub also offers integration capabilities to help you comprehensively monitor your cloud environments and connect with third-party security solutions. This gives you the flexibility to create a unified security solution tailored to your organization’s specific needs.

For example, with integration capability, when viewing a security finding, you can select the Create ticket option and choose your preferred ticketing integration.

Additional things to know
Here are a couple of things to note:
- Availability – During this preview period, the new AWS Security Hub is available in following AWS Regions: US East (N. Virginia, Ohio), US West (N. California, Oregon), Africa (Cape Town), Asia Pacific (Hong Kong, Jakarta, Mumbai, Osaka, Seoul, Singapore, Sydney, Tokyo), Canada (Central), Europe (Frankfurt, Ireland, London, Milan, Paris, Stockholm), Middle East (Bahrain), and South America (São Paulo).
- Pricing – The new AWS Security Hub is available at no additional charge during the preview period. However, you will still incur costs for the integrated capabilities including Amazon GuardDuty, Amazon Inspector, Amazon Macie, and AWS Security Hub CSPM.
- Integration with existing AWS security capabilities – Security Hub integrates with Amazon GuardDuty, Amazon Inspector, AWS Security Hub CSPM, and Amazon Macie, providing a comprehensive security posture without additional operational overhead.
- Enhanced data interoperability – The new Security Hub uses the Open Cybersecurity Schema Framework (OCSF), enabling seamless data exchange across your security capabilities with normalized data formats.
To learn more about the enhanced AWS Security Hub and join the preview, visit the AWS Security Hub product page.
Happy building!
— Donnie
Beyond compute: Shifting vulnerability detection left with Amazon Inspector code security capabilities
Post Syndicated from Nirali Desai original https://aws.amazon.com/blogs/security/shifting-vulnerability-detection-left-with-amazon-inspector-code-security-capabilities/
Since launch, Amazon Inspector has helped customers automate vulnerability management for their running workloads on Amazon Elastic Compute Cloud (Amazon EC2), container workloads, and AWS Lambda functions. Today, we’re taking a step forward into more proactive security with the latest addition to Amazon Inspector: code security capabilities. By using this powerful new feature you can get a proactive view of the security health of your code. With native integration to source code managers (SCM) such as GitHub and GitLab, Amazon Inspector helps you identify and prioritize security vulnerabilities and misconfigurations across your application source-code, dependencies, and infrastructure as code (IaC).
Even if you make no changes to your code, there can be vulnerabilities in libraries that it depends on, creating risks for you and your users. By scanning repositories, you can continually monitor the security of your code and its dependencies. With Amazon Inspector, you can define consistent security controls throughout your software development lifecycle, so your security and development teams can collaborate effectively while reducing risk and remediation costs.
Overview of Amazon Inspector code security capabilities
Amazon Inspector now provides three additional security analysis capabilities: static application security testing (SAST), software composition analysis (SCA), and infrastructure as code (IaC) scanning. To use these features, you must establish a connection with your SCM tool (as shown in Figure 1). If you use GitHub, you can get started by installing and configuring the Amazon Inspector App from the GitHub Marketplace, which enables automated code analysis and delivers security findings directly within pull requests. If you use a self-managed GitLab, implementation is straightforward using a personal access token with the necessary permissions.
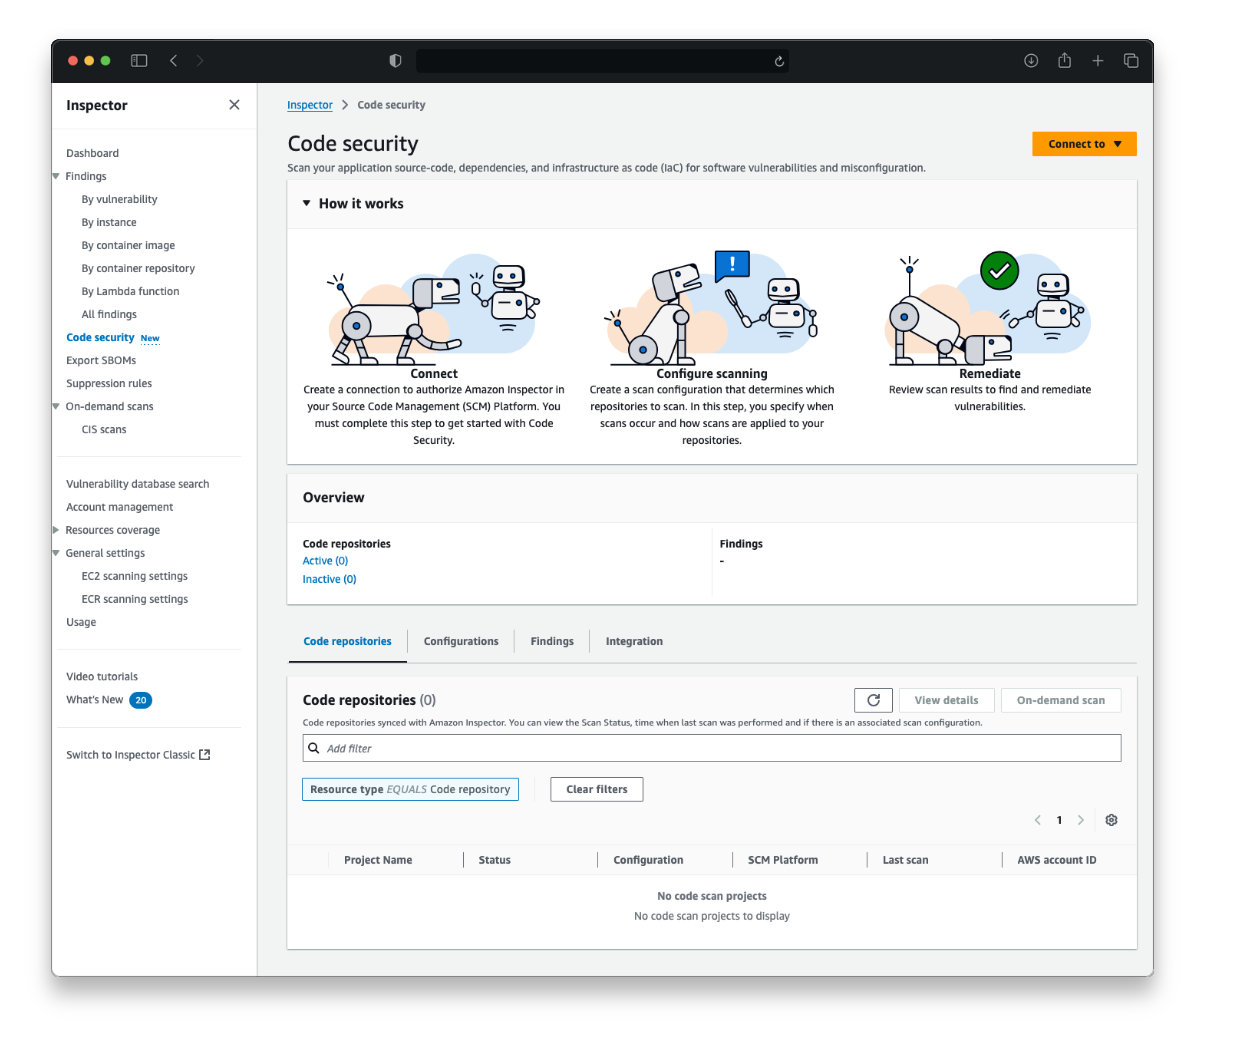
Figure 1: Code security landing page for Amazon Inspector
Static application security testing
Static application security testing (SAST) is the process of analyzing source code to identify insecure patterns or methods without needing to compile or execute the code. Amazon Inspector SAST scans analyze your source code to identify potential security vulnerabilities such as hardcoded secrets, cross-site scripting, or injection attacks across a wide range of programming languages including, JavaScript, Python, C#. The service also analyzes Bash shell scripts, extending security coverage beyond application code to include deployment and configuration scripts.
Software composition analysis
Software composition analysis (SCA) helps you understand and manage risks related to software dependencies. Every programming language has its own method of finding, importing, and updating contributed libraries. For example, PyPI for Python, NPM for NodeJS, and Cargo for Rust. Sometimes vulnerabilities are discovered in libraries distributed through the language-specific package distributions, or sometimes a library that you’re using depends on another library, and that dependency has the vulnerability. Amazon Inspector supports the major environments for Python, .Net, PHP, JavaScript, Java, Ruby, Rust, and Go. It automatically analyzes dependencies to identify known vulnerabilities and show you which code is affected. When vulnerabilities are detected, Amazon Inspector provides detailed information about the impact, available fixes, and upgrade paths to help you quickly remediate issues.
Infrastructure as code security
Just as applications are constructed from code, cloud infrastructure can be deployed and managed through code-based methods. Amazon Inspector now also analyzes IaC templates (as shown in Figure 2) to identify potential security misconfigurations, for example, the use of AWS Identity and Access Management (IAM) wildcards in action statements or disabled Glue Data Catalog encryption. This way identified risks can be fixed before the code is executed and the incorrect infrastructure is deployed. The new feature analyzes AWS CloudFormation, Terraform, and AWS CDK, helping you maintain secure infrastructure definitions throughout their development process. This capability helps make sure that security best practices are followed, and potential issues are caught before the infrastructure is deployed.
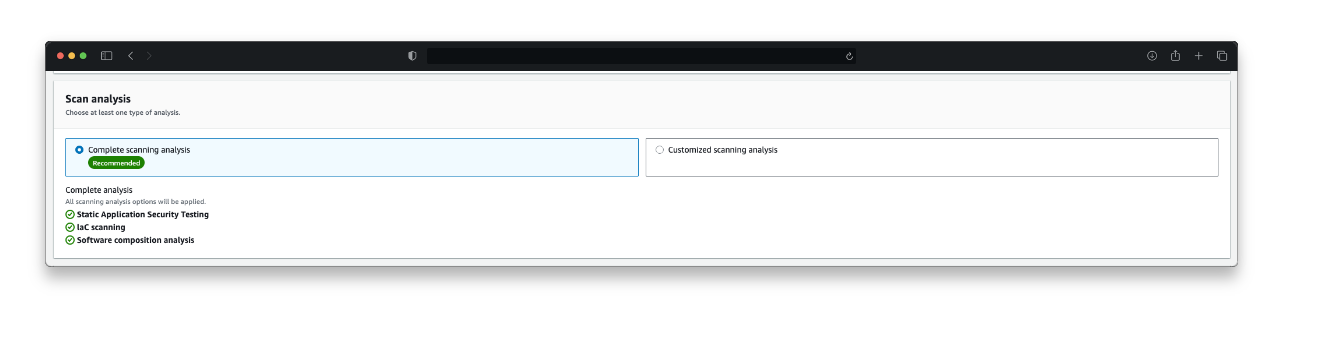
Figure 2: Amazon Inspector scan analysis configuration showing SAST, IaC, and SCA scan types
For the most up-to-date list of programming languages supported across Amazon Inspector code security capabilities, see the online documentation.
Improved security governance and visibility
Amazon Inspector lets you choose which scan types to run across which repositories (as shown in Figure 3). You can initiate a scan based on any of the following:
- On-demand: Initiates an immediate scan of the selected repository
- Change based: Initiates a scan on push to main branch, or on a pull request or merge request
- Scheduled: Initiates a scan weekly or monthly
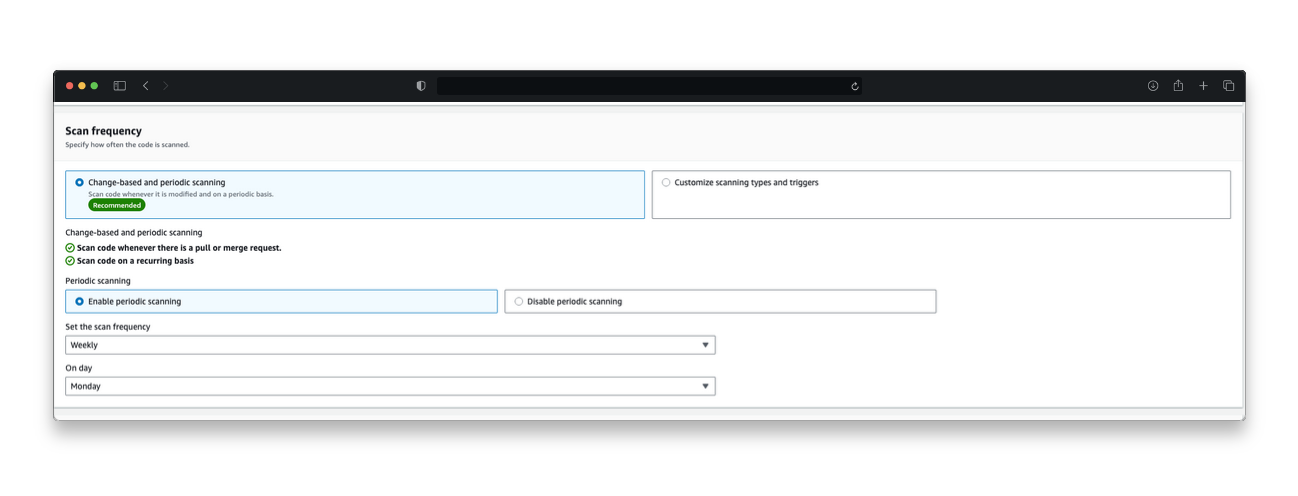
Figure 3: Overview of scan configurations
Amazon Inspector integrates code security findings into a unified dashboard that you can use to manage and enforce scanning policies across repositories using customizable scan configurations. As part of the integration workflow with the SCM platform, you can set up a default scan configuration that can be applied to existing or new repositories. Alternatively, you also have an option to create custom scan configurations that match specific existing repositories through inclusions tags.
Upon successful scheduled or event-based scans, Amazon Inspector generates detailed findings that pinpoint specific lines of code within repositories, including commit IDs and file locations where vulnerabilities are detected. Amazon Inspector empowers your security teams with customizable filtering through intelligent suppression rules. By using these options, you can tailor your security view to match your organization’s unique priorities, showing exactly what matters most to your team while preserving findings data for reporting and auditing. Through native Amazon EventBridge integration, these detailed security findings can be automatically routed into existing security workflows, enabling alerting and response capabilities.
Code fix recommendations
Amazon Inspector streamlines security remediation by providing specific code fix recommendations directly where developers work. The two-way integration with your SCM automatically suggests fixes as comments within pull requests (PRs) and merge requests (MRs) for Critical and High findings, alerting developers to the most important vulnerabilities to address without disrupting their workflow. Simultaneously, security teams benefit from a consolidated dashboard in the Amazon Inspector console that aggregates findings from scheduled or event-based scans across in-scope repositories. Each finding comes with tailored remediation guidance based on scan type (as shown in Figure 4): specific code suggestions for IAC and SAST findings, or recommended version upgrades and dependency update paths for SCA findings.
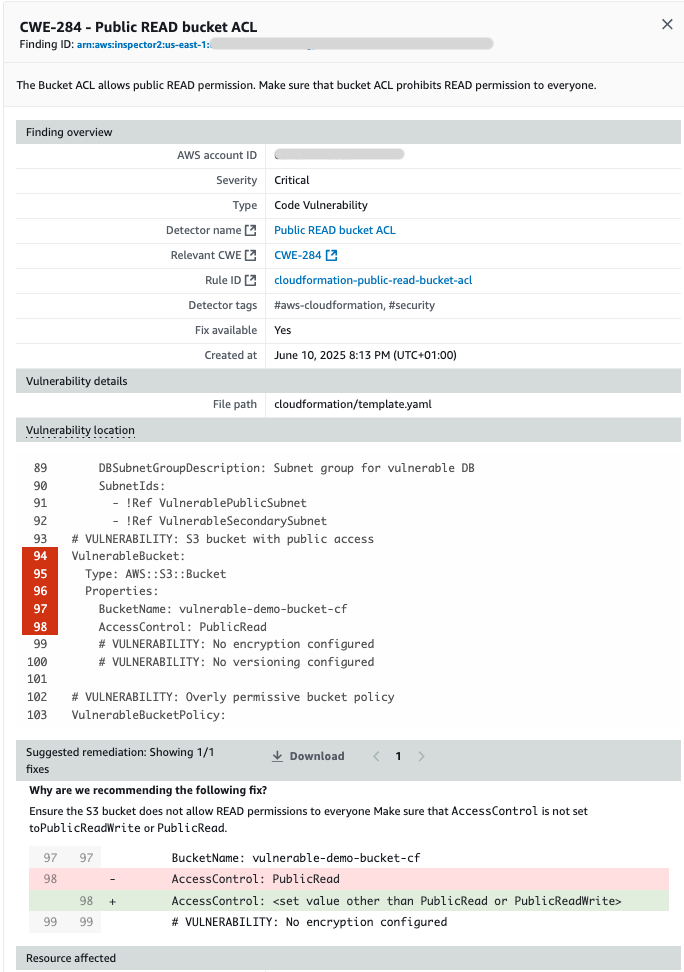
Figure 4: Code fix recommendation on a finding in the Amazon Inspector dashboard
Conclusion
These expanded security capabilities now deliver end-to-end visibility of the security health of your cloud applications, from initial code development through to production deployment. Security teams can use the unified dashboard in Amazon Inspector to track and manage vulnerabilities across repositories and application components, facilitating consistent security controls throughout the software lifecycle. Meanwhile, development teams receive immediate, actionable feedback within their source code repositories, creating a seamless security experience that bridges both security and development workflows. This approach is designed to help you maintain robust security practices while keeping development velocity high.
To get started with the new capabilities of Amazon Inspector, visit the Amazon Inspector console. For pricing details and implementation guidance, see documentation. These new features are now available in 10 AWS commercial Regions.
AWS Backup adds new Multi-party approval for logically air-gapped vaults
Post Syndicated from Veliswa Boya original https://aws.amazon.com/blogs/aws/aws-backup-adds-new-multi-party-approval-for-logically-air-gapped-vaults/
Today, we’re announcing the general availability of a new capability that integrates AWS Backup logically air-gapped vaults with Multi-party approval to provide access to your backups even when your AWS account is inaccessible due to inadvertent or malicious events. AWS Backup is a fully managed service that centralizes and automates data protection across AWS services and hybrid workloads. It provides core data protection features, ransomware recovery capabilities, and compliance insights and analytics for data protection policies and operations.
As a backup administrator, you use AWS Backup logically air-gapped vaults to securely share backups across accounts and organizations, logically isolate your backup storage, and support direct restore to help reduce recovery time following an inadvertent or malicious event. However, if a bad or unintended actor gains root access to your backup account or the management account of your organization, your backups suddenly become inaccessible, even though they’re still safely stored in the logically air-gapped vault. While traditional account recovery involved working through support channels, AWS Backup with Multi-party approval delivers immediate access to recovery tools, empowering you with faster resolution times and greater control over your recovery timeline.
Multi-party approval for AWS Backup logically air-gapped vaults adds an additional layer of protection for you to recover your application data even when your AWS account becomes completely inaccessible. Using Multi-party approval, you can create approval teams which consist of highly trusted individuals in your organization, then associate them with your logically air-gapped vault. If you get locked out of your AWS accounts due to inadvertent or malicious actions, you can request your own approval team to authorize sharing of your vault from any account, even those outside your AWS Organizations account. Once approved, you gain authorized access to your backups and can begin your recovery process.
How it works
Multi-party approval for AWS Backup logically air-gapped vaults combines the security of logically air-gapped vaults with the governance of Multi-party approval to create a recovery mechanism that works even when your AWS account is compromised. Here’s how it works:
1. Approval team creation
First, you create an approval team in your AWS Organizations management account. If the management account is new, first create an AWS Identity and Access Management (IAM) Identity Center instance before creating the approval team. The approval team consists of trusted individuals (IAM Identity Center users) who will be authorized to approve vault sharing requests. Each approver receives an invitation to join the approval team through a new Approval portal.

2. Vault association
When your approval team is active, you share it with accounts that own logically air-gapped vaults using AWS Resource Access Manager (AWS RAM) to safeguard against requests for approval from arbitrary accounts. Backup administrators can then associate this approval team with new or existing logically air-gapped vaults.
3. Protection against compromise
If your AWS account becomes compromised or inaccessible, you can request access to your backups from a different account (a clean recovery account). This request includes the Amazon Resource Name (ARN) of the logically air-gapped vault in the format arn:aws:backup:<region>:<account>:backup-vault:<name> and an optional vault name and comment.
4. Multi-party approval
The request is sent to the approval team, who review it through the approval portal. When the minimum required number of approvers authorize the request, the vault is automatically shared with the requesting account. All requests and approvals are comprehensively logged in AWS CloudTrail.
5. Recovery process
With access granted, you can immediately start restoring or copying your data in the new recovery account without waiting for your compromised account to be remediated.
This approach provides an entirely separate authentication path to access and recover your backups, completely independent of your AWS account credentials. Even if the bad actor has root access to your account, they can’t prevent the approval team-based recovery process.
1. Create a new logically air-gapped vault
To create a new logically air-gapped vault, provide a name, tags (optional), and vault lock properties.

2. Assign an approval team
When the vault has been created, choose Assign approval team to assign it with an existing approval team.

Choose an existing approval team from the drop-down menu then select Submit to finalize the assignment.

Now your approval team is assigned to your logically air-gapped vault.

Good to know
It’s essential to test your recovery process before an actual emergency:
- From a different AWS account, use the AWS Backup console or API to request sharing of your logically air-gapped vault by providing the vault ID and ARN.
- Request approval of your request from the approval team.
- Once approved, verify that you can access and restore backups from the vault in your testing account.
As a best practice, monitor the health of your approval team regularly using AWS Backup Audit Manager to ensure they have sufficient active participants to meet your approval threshold.
Multi-party approval for enhanced cloud governance
Today, we’re also announcing the general availability of a new capability that AWS account administrators can use to add Multi-party approval to their product offerings. As highlighted in this post, AWS Backup is the first service to integrate this capability. With Multi-party approval, administrators can enable application owners to guard sensitive service operations with a distributed review process.
Good to know
Multi-party approval provides several significant security advantages:
- Distributed decision-making, eliminating single points of failure
- Full auditability through AWS CloudTrail integration
- Protection against compromised credentials
- Formal governance for compliance-sensitive operations
- Consistent approval experience across integrated services
Now available
Multi-party approval is available today in all AWS Regions where AWS Organizations is available. Multi-party approval for AWS Backup logically air-gapped vaults is available in all AWS Regions where AWS Backup is available.
– Veliswa.
Home Assistant Automation Inspector: Find Errors & Fix Fast!
Post Syndicated from BeardedTinker original https://www.youtube.com/shorts/u43x0QGLZjk