Post Syndicated from The History Guy: History Deserves to Be Remembered original https://www.youtube.com/watch?v=vH7MOhXowBQ
Една година след трагедията в Нови Сад. Какво става в Сърбия?
Post Syndicated from Джорджа Спадони original https://www.toest.bg/edna-godina-sled-tragediyata-v-novi-sad-kakvo-stava-v-surbiya/

В един априлски следобед с петнайсетина италианци вървим между огромните блокове и по широките булеварди на Нови Белград. Водим обиколка из сръбската столица не само по класическите забележителности на града, но и по малко по-особени места – гробища, жилищни квартали и разбира се, из най-ярките примери за югославски архитектурен брутализъм, с които е осеян Белград.
Току-що сме се възхитили на кулата „Генекс“ и чакаме на светофара, за да пресечем улицата и да се насладим на още jugobeton. Преди да стъпим на пешеходната пътека, покрай нас профучава кола, откъдето се чуват несъмнено сръбски псувни. Jebite se, blokaderi! Към нас ли беше това?
След десетина минути стигаме до друга емблематична сграда – блок 28. От детската градина наблизо излизат две жени с количка. Наблюдават ни внимателно, загрижено. Питат ни уплашено и любезно дали възнамеряваме да блокираме нещо в района, дали ще се състои някаква blokada.
По това време вече от почти седем месеца през Сърбия преминава непрекъсната вълна от антиправителствени протести, по-мащабни и от тези, принудили преди 25 години президентa Слободан Милошевич да подаде оставка.
Всичко започва на 1 ноември 2024 г., петък
В сградата на железопътната гара в Нови Сад влизат и излизат хора. Редовна натоварена сутрин във втория по големина и значение град в страната. Студенти се прибират от университета за уикенда, роднини се срещат и сбогуват, приятели се чакат. В началото на юли същата година сградата е официално открита след тригодишен ремонт, направен според компетентните органи „в съответствие с европейските стандарти“.
В 11:52 ч. бетонната козирка над входа с дължина 48 метра изведнъж рухва. Загиват общо 14 души, сред тях и две деца. Ранени са около 30 души, двама от които по-късно умират.
Реакцията е незабавна, цялата държава е разтърсена. Пред гарата се събират хора, за да оставят цветя, да запалят свещи и да почетат с минута мълчание всяка жертва. Веднага се появяват и първите лозунги – Ruke su vam krvave, Korupcija ubija, Ostavke („Ръцете ви са окървавени“, „Корупцията убива“, „Оставки“). Главната причина за станалото според гражданите, излезли на улицата, е некачественото изпълнение на непрозрачно спечелените инфраструктурни проекти, което се дължи на тежката корупция в страната, ширеща се под погледа на президента Александър Вучич (бивш министър на информацията по времето на президента Милошевич, а по-късно и министър на отбраната, както и вицепремиер и премиер) и на неговата Сръбска прогресивна партия (Srpska napredna stranka, СПП), която управлява без прекъсване вече 13 години.
На 22 ноември студентите от Факултета по драматични изкуства спират движението в центъра на Белград за 15-минутно мълчание и са нападнати от симпатизанти на СПП, както показват по-късно видеозаписите. Тогава младите хора решават да окупират университетите, като в това начинание ги подкрепят и много от преподавателите им. Продължават да протестират всеки петък в 11:52, след което започват да организират събирания и акции пред различни институции и в други градове.
Забележително е решението да прекосят държавата пеша, за да говорят директно с хората, които живеят в провинцията, и да им разкажат за случващото се. През април една група стига с велосипеди до Страсбург, а през май друга бяга близо 2000 км до Брюксел.
Към студентите бързо се присъединяват учители, фермери, предприемачи, ветерани, адвокати, пенсионери – всички граждани, които искат да живеят в „работеща държава“. Протестите бързо стават масови с пикове от над 100 000 души на 22 декември, почти един милион на площад „Славия“ на 15 март 2025 г. (когато се твърди, че властите са използвали звуково оръдие за разпръскване на множеството) и около 140 000 на 28 юни 2025 г., и то само в Белград. Нови Сад, Ниш, Крагуевац, Ужице, Нови Пазар и други градове в страната се включват едновременно в протестите.
Исканията са за публикуване на пълната документация за ремонта на железопътната гара в Нови Сад и наказания за виновните за инцидента, довел до смъртта на толкова хора; установяване и наказване на нападателите на демонстрантите; отпадане на обвиненията срещу хората, арестувани по време на протестите, увеличаване на бюджета на университетите с 20% (което беше прието на 12 декември 2024 г.). През юни към тях се добави и искането за предсрочни избори с краен срок 28 юни.

Но нападенията над протестиращи не спират, демонстранти са задържани и заплашвани. След изтичането на ултиматума на студентите те подтикват протестиращите към гражданско неподчинение. Тогава ответната реакцията на режима на Вучич, идваща от полицията и от групировки, близки до властта, става все по-брутална. Но протестите продължават.
След почти една година от трагедията документацията относно ремонтите все още не е изцяло достъпна. Договорите не са публични. И няма виновни. Ясно е обаче, че проектът е изпълнен от водещия инвеститор в Сърбия през последните години – Китай.
От 2013 г. китайското правителство прилага глобална стратегия за сътрудничество, известна като „Един пояс – един път“, която включва инвестиции в около 70 страни и международни организации за развиването на сухопътни и морски инфраструктурни проекти. Сърбия е сред държавите с най-много привлечени проекти в Европа, като от години Китай прави сериозни инвестиции в строежа на пътища, в железниците, в енергетиката на страната.

Ремонтът на гарата в Нови Сад е изпълнен от държавния консорциум CRIC&CCCC, който се състои от дружествата China Railway International Group Co., Ltd и China Communications Construction Company, Ltd. Втората фирма е сред най-големите инженерни и строителни компании в света, оперира в повече от 150 страни и е била поставена под забрана от Световната банка. Сръбските власти твърдят, че обновлението на козирката не е било част от проекта за жп гарата. Не са посочени обаче други отговорни лица.
Реакциите на властта
В опит да се успокоят протестиращите още в първия месец след трагедията оставки подават министърът на строителството, транспорта и инфраструктурата Горан Весич и министърът на търговията Томислав Момирович. Месеци след това двамата са задържани по обвинения в корупция. През януари от постовете си се отказват също премиерът Милош Вучевич и кметът на Нови Сад Милан Джурич след брутално нападение над протестиращите в града от група членове на СПП.



Снимки: © Джорджа Спадони
До 15 март – деня, в който са предвидени големи протести „против корупцията, която убива“, контрамерките на Вучич се състоят основно в грубо омаловажаване на мащаба на демонстрациите и на намеренията на участниците в тях; в намеци за „цветна революция“; и разбира се, в масивна и безскрупулна кампания за оклеветяване на протестиращите в държавните медии, които управляващите контролират.
Няколко дни преди най-големия протест в Пионерския парк пред президентството и в непосредствена близост до парламента се появява палатков лагер, обитаван от „студенти, които искат да посещават лекции“, официално посрещани от самия Вучич. Ден след ден паркът става все по-претъпкан, а средната възраст на присъстващите и изключително примитивният начин, по който се изразяват, поставят под въпрос тяхната роля на „студенти“.
Когато журналист от независимата медия N1 успява да влезе под прикритие в лагера, установява, че всъщност това са хора, нарочно докарани от провинцията и от Република Сръбска, на които се плащат от 50 до 80 евро на ръка всеки ден, за да лагеруват. В този палатков лагер са забелязани и ветерани на „Червените барети“, водещи началото си от Сръбската доброволческа гвардия на Аркан, а по-късно влели се в специалните сили на Службата за държавна сигурност на Сърбия.
Медиите
Същевременно държавните медии, включително и Радио-телевизия на Сърбия (РТС), са обвинявани от протестиращите, че заемат позицията на правителството, докато журналистите от независимите медии са редовно заплашвани и нападани. През януари 2025 г. десетки хиляди студенти и граждани се събират пред сградата на РТС с искания за обективно отразяване на събитията. Тогава част от служителите на РТС излизат на балкона на сградата с плакати в подкрепа на студентите. На 1 март новините на РТС излъчват на живо протестите в Ниш преди речта на Вучич, който на следващия ден публично нарича кореспондентката на телевизията „идиотка“. Проправителствените таблоиди веднага започват да говорят за „държавен преврат“.

В средата на април тази година студентите блокираха двете студиа на РТС в Белград в знак на протест срещу това, че от ноември 2024 г. регулаторният орган на сръбските електронни медиите е без ръководство, както и че няма отразяване на групата студенти, отправили се на протестно шествие с велосипеди до Европейския парламент в Страсбург. Тогава служителите на РТС публично изискват промяна в редакционната политика. След обявяването на нов конкурс за медийния регулатор 14-дневната блокада приключва.
Почти една година след трагедията в Нови Сад
сръбските студенти продължават да действат по изключително смел и организиран начин. От една страна, вземат всяко решение по най-демократичния начин, като се събират в пленум, а от друга, нарочно нямат водеща публична фигура. Цялата комуникация минава през техните канали в социалните мрежи. За разлика от родителите си, те нямат личен опит от 90-те и не са изпитали горчивото разочарование, което ги последва.
През ноември 1996 г. улиците на Белград и на други градове се изпълват с хиляди студенти, след като Милошевич отказва да признае резултата на местните избори. В столицата на първия ред на шествието се вижда транспарант с надпис Beograd je svet („Белград е светът“) – въпреки репресивния и авторитарен режим градът не се предава на национализма и няма никакво намерение да изгуби космополитния дух, който винаги е бил характерен за него. Студентите протестират заедно с гражданите и опозиционната коалиция Zajedno, която включва и Демократическата партия (Demokratska stranka) на Зоран Джинджич. Репресиите на полицията са жестоки.
На 24 септември 2000 г., след няколко изменения в законодателството, се провеждат предсрочни президентски избори . Победата на кандидата на демократичната опозиционна коалиция DOS (Demokratska Opozicija Srbije) Воислав Кощуница, основен съперник на Милошевич, не е призната. Откриват се и нередности в избирателния процес. Това предизвиква обществено възмущение в цялата страна и хиляди граждани се събират в Белград. Милошевич заявява, че ще подаде оставка в края на мандата си – през юни 2001 г.
В рамките на няколко дни обаче положението в сръбската столица ескалира. На 5 октомври демонстрантите превземат сградата на РТС и подпалват парламента. Същия ден Милошевич подава оставка. Междувременно срещу него е повдигнато обвинение в Хага за престъпления срещу човечеството. През април 2001 г. е арестуван, а в края на юни е предаден на трибунала. Няколко месеца преди това Демократическата партия печели изборите и Джинджич става новият премиер. Избуява надеждата за демократично бъдеще за Сърбия, но и неприязънта сред националистите заради екстрадицията на бившия президент.

На 12 март 2003 г. Зоран Джинджич е убит от снайперист, докато влиза в правителствената сграда през служебния вход. Споменът за този момент е запечатан в паметта на много сърби, но не и на настоящите студенти. Вероятно на това се дължи и тяхната устойчивост, която продължава да вдъхновява страната.
Пред блок 28 в Нови Белград двете жени ни гледат и очакват отговор на въпроса дали ще има блокада. С колегата ми обясняваме, че тези хора са група туристи от Италия, които развеждаме из града. Тогава жените се усмихват широко. O, iz Italije! Kako divno, dobro nam došli! („О, от Италия! Колко хубаво, добре сте ни дошли!“) Групата пита за какво сме говорили, и ние се възползваме от случая, за да продължим да обсъждаме положението в страната. И италианските, както и много други чуждестранни медии почти не отразяват събитията в Сърбия.
В последния ден на обиколката, както обикновено, поискахме обратна връзка от гостите. Една двойка каза:
Признаваме, че дойдохме с много предразсъдъци за сърбите, защото последния път, когато при нас се е говорило за тях, беше във връзка с военни престъпления и други мрачни моменти, свързани с 90-те. И после пълна тишина. Сега осъзнаваме, че въпреки тишината тук няма единствено военнопрестъпници и пропаганда. Има и общество с будно гражданско съзнание, което се бори за демокрация. За това трябва да се знае въпреки тишината. Трябва да се знае, че Beograd je отново svet.
Apple’s Bug Bounty Program
Post Syndicated from Bruce Schneier original https://www.schneier.com/blog/archives/2025/10/apples-bug-bounty-program.html
Apple is now offering a $2M bounty for a zero-click exploit. According to the Apple website:
Today we’re announcing the next major chapter for Apple Security Bounty, featuring the industry’s highest rewards, expanded research categories, and a flag system for researchers to objectively demonstrate vulnerabilities and obtain accelerated awards.
- We’re doubling our top award to $2 million for exploit chains that can achieve similar goals as sophisticated mercenary spyware attacks. This is an unprecedented amount in the industry and the largest payout offered by any bounty program we’re aware of and our bonus system, providing additional rewards for Lockdown Mode bypasses and vulnerabilities discovered in beta software, can more than double this reward, with a maximum payout in excess of $5 million. We’re also doubling or significantly increasing rewards in many other categories to encourage more intensive research. This includes $100,000 for a complete Gatekeeper bypass, and $1 million for broad unauthorized iCloud access, as no successful exploit has been demonstrated to date in either category.
- Our bounty categories are expanding to cover even more attack surfaces. Notably, we’re rewarding one-click WebKit sandbox escapes with up to $300,000, and wireless proximity exploits over any radio with up to $1 million.
- We’re introducing Target Flags, a new way for researchers to objectively demonstrate exploitability for some of our top bounty categories, including remote code execution and Transparency, Consent, and Control (TCC) bypasses and to help determine eligibility for a specific award. Researchers who submit reports with Target Flags will qualify for accelerated awards, which are processed immediately after the research is received and verified, even before a fix becomes available.
Physics Paths
Post Syndicated from xkcd.com original https://xkcd.com/3155/

The FSF’s Librephone project
Post Syndicated from corbet original https://lwn.net/Articles/1041952/
The Free Software Foundation has announced the launch
of the Librephone project, which is aimed at the creation of a fully-free
operating system for mobile devices.
Practically, Librephone aims to close the last gaps between
existing distributions of the Android operating system and software
freedom. The FSF has hired experienced developer Rob Savoye
(DejaGNU, Gnash, OpenStreetMap, and more) to lead the technical
project. He is currently investigating the state of device firmware
and binary blobs in other mobile phone freedom projects,
prioritizing the free software work done by the not entirely free
software mobile phone operating system LineageOS.
Introducing Amazon EBS Volume Clones: Create instant copies of your EBS volumes
Post Syndicated from Sébastien Stormacq original https://aws.amazon.com/blogs/aws/introducing-amazon-ebs-volume-clones-create-instant-copies-of-your-ebs-volumes/
As someone that used to work at Sun Microsystems, where ZFS was invented, I’ve always loved working with storage systems that offer instant volume copies for my development and testing needs.
Today, I’m excited to share that AWS is bringing similar capabilities to Amazon Elastic Block Store (Amazon EBS) with the launch of Amazon EBS Volume Clones, a new capability that lets you create instant point-in-time copies of your EBS volumes within the same Availability Zone.
Many customers need to create copies of their production data to support development and testing activities in a separate nonproduction environment. Until now, this process required taking an EBS snapshot (stored in Amazon Simple Storage Service (Amazon S3)) and then creating a new volume from that snapshot. Although this approach works, the process creates operational overhead due to multiple steps.
With Amazon EBS Volume Clones, you can now create copies of your EBS volumes with a single API call or console click. The copied volumes are available within seconds and provide immediate access to your data with single-digit millisecond latency. This makes Volume Clones particularly useful for quickly setting up test environments with production data or creating temporary copies of databases for development purposes.
Let me show you how Volume Clones works
For this post, I created a small Amazon Elastic Compute Cloud (Amazon EC2) instance, with an attached volume. I created a file on the root file system with the command echo "Hello CopyVolumes" > hello.txt.
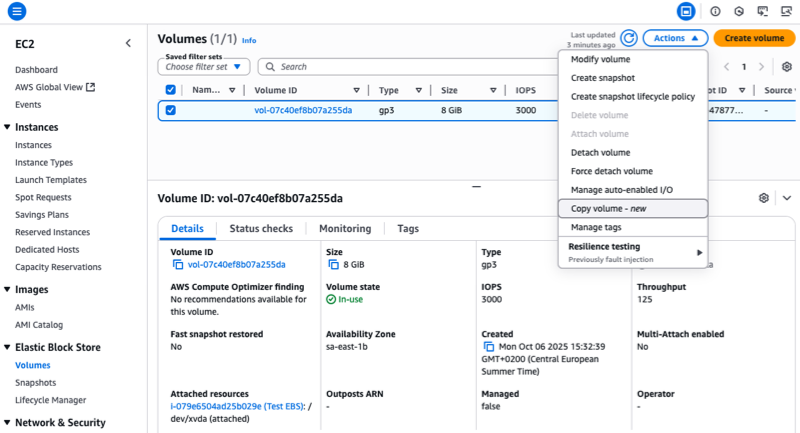
To initiate the copy, I open a browser on the AWS Management Console and I navigate to EC2, Elastic Block Store, Volumes. I select the volume I want to copy.
Note that, at the time of publication of this post, only encrypted volumes can be copied.
On the Actions menu, I choose the Copy Volume option.
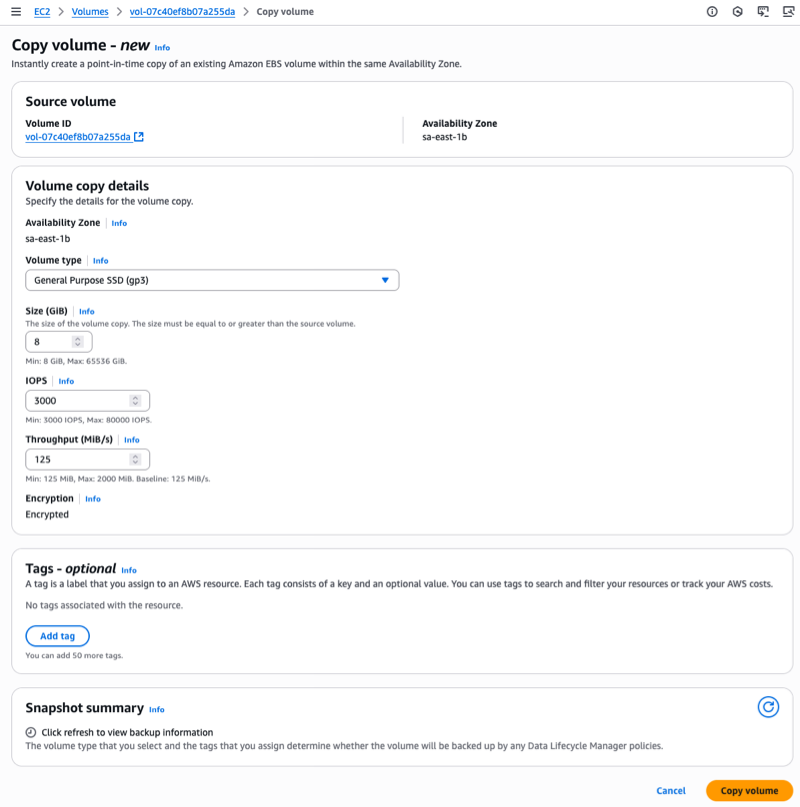
Next, I choose the details of the target volume. I can change the Volume type and adjust the Size, IOPS, and Throughput parameters. I choose Copy volume to start the Volume Clone operation.
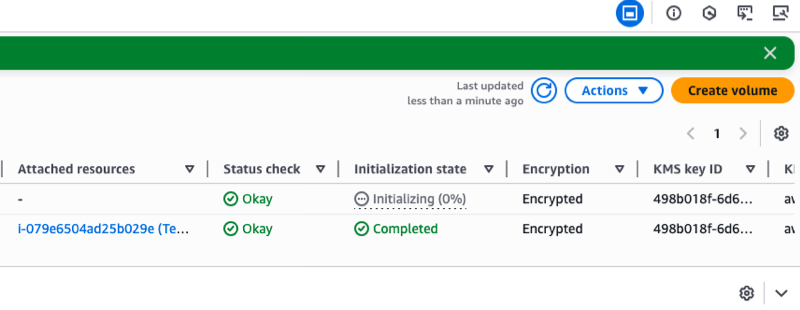
The copied volume enters the Creating state and becomes available within seconds. I can then attach it to an EC2 instance and start using it immediately.
Data blocks are copied from the source volume and written to the volume copy in the background. The volume remains in the Initializing state until the process is complete. I can monitor its progress with the describe-volume-status API. The initializing operation doesn’t affect the performance of the source volume. I can continue using it normally during the copy process.
I love that the copied volume is available immediately. I don’t need to wait for its initialization to complete. During the initialization phase, my copied volume delivers performance based on the lowest of: a baseline of 3,000 IOPS and 125 MiB/s, the source volume’s provisioned performance, or the copied volume’s provisioned performance.
After initialization is completed, the copied volume becomes fully independent of the source volume and delivers its full provisioned performance.
 Alternatively, I can use the AWS Command Line Interface (AWS CLI) to initiate the copy:
aws ec2 copy-volumes                          \
     --source-volume-id vol-1234567890abcdef0 \
     --size 500                               \
     --volume-type gp3
After the volume copy is created, I attach it to my EC2 instance and mount it. I can check the file I created at start is present.
First, I attach the volume from my laptop, using the attach-volume command:
aws ec2 attach-volume \
         --volume-id 'vol-09b700e3a23a9b4ad' \
         --instance-id 'i-079e6504ad25b029e'   \
         --device '/dev/sdb'
Then, I connect to the instance, and I type these commands:
$ sudo lsblk -f
NAME          FSTYPE FSVER LABEL UUID                                 FSAVAIL FSUSE% MOUNTPOINTS
nvme0n1
├─nvme0n1p1   xfs          /     49e26d9d-0a9d-4667-b93e-a23d1de8eacd    6.2G    22% /
└─nvme0n1p128 vfat   FAT16       3105-2F44                               8.6M    14% /boot/efi
nvme1n1
├─nvme1n1p1   xfs          /     49e26d9d-0a9d-4667-b93e-a23d1de8eacd
└─nvme1n1p128 vfat   FAT16       3105-2F44

$ sudo mount -t xfs /dev/nvme1n1p1 /data

$ df -h
Filesystem        Size  Used Avail Use% Mounted on
devtmpfs          4.0M     0  4.0M   0% /dev
tmpfs             924M     0  924M   0% /dev/shm
tmpfs             370M  476K  369M   1% /run
/dev/nvme0n1p1    8.0G  1.8G  6.2G  22% /
tmpfs             924M     0  924M   0% /tmp
/dev/nvme0n1p128   10M  1.4M  8.7M  14% /boot/efi
tmpfs             185M     0  185M   0% /run/user/1000
/dev/nvme1n1p1    8.0G  1.8G  6.2G  22% /data

$ cat /data/home/ec2-user/hello.txt
Hello CopyVolumes
Things to know
Volume Clones creates copies within the same Availability Zone as your source volume. You can create copies from encrypted volumes only, and the size of your copy must be equal to or greater than the source volume.
Volume Clones creates crash-consistent copies of your volumes, exactly like snapshots. For application consistency, you need to pause application I/O operations before creating the copy. For example, with PostgreSQL databases, you can use the pg_start_backup() and pg_stop_backup() functions to pause writes and create a consistent copy. At the operating system level on Linux with XFS, you can use the xfs_freeze command to temporarily suspend and resume access to the file system and ensure all cached updates are written to disk.
Although Volume Clones creates point-in-time copies, it complements rather than replaces EBS snapshots for backup purposes. EBS snapshots remain the recommended solution for data backup and protection against AZ-level and volume failures. Snapshots provide incremental backups to Amazon S3 with 11 nines of durability, compared to Volume Clones which maintains EBS volume durability (99.999% for io2, 99.9% for other volume types). Consider using Volume Clones specifically for test and development environment scenarios where you need instant access to volume copies.
Copied volumes exist independently of their source volumes and continue to incur standard EBS volume charges until you delete them. To manage costs effectively, implement governance rules to identify and remove copied volumes that are no longer needed for your development or testing activities.
Pricing and availability
Volume Clones supports all EBS volume types and works with volumes in the same AWS account and Availability Zone. This new capability is available in all AWS commercial Regions, selected Local Zones, and in the AWS GovCloud (US).
For pricing, you’re charged a one-time fee per GiB of data on the source volume at initiation and standard EBS pricing for the new volume.
I find Volume Clones particularly valuable for database workloads and continuous integration (CI) scenarios. For instance, you can quickly create a copy of your production database for testing new features or troubleshooting issues without impacting your production environment or waiting for data to hydrate from Amazon S3.
To get started with Amazon EBS Volume Clones, visit the Amazon EBS section on the console or check out the EBS documentation. I look forward to hearing how you use this capability to improve your development workflows.
Social Sh!7 Storm – Update
Post Syndicated from Matt Granger original https://www.youtube.com/shorts/mDuCqcSlUZg
Unpacking Cloudflare Workers CPU Performance Benchmarks
Post Syndicated from Kenton Varda original https://blog.cloudflare.com/unpacking-cloudflare-workers-cpu-performance-benchmarks/
On October 4, independent developer Theo Browne published a series of benchmarks designed to compare server-side JavaScript execution speed between Cloudflare Workers and Vercel, a competing compute platform built on AWS Lambda. The initial results showed Cloudflare Workers performing worse than Node.js on Vercel at a variety of CPU-intensive tasks, by a factor of as much as 3.5x.
We were surprised by the results. The benchmarks were designed to compare JavaScript execution speed in a CPU-intensive workload that never waits on external services. But, Cloudflare Workers and Node.js both use the same underlying JavaScript engine: V8, the open source engine from Google Chrome. Hence, one would expect the benchmarks to be executing essentially identical code in each environment. Physical CPUs can vary in performance, but modern server CPUs do not vary by anywhere near 3.5x.
On investigation, we discovered a wide range of small problems that contributed to the disparity, ranging from some bad tuning in our infrastructure, to differences between the JavaScript libraries used on each platform, to some issues with the test itself. We spent the week working on many of these problems, which means over the past week Workers got better and faster for all of our customers. We even fixed some problems that affect other compute providers but not us, such as an issue that made trigonometry functions much slower on Vercel. This post will dig into all the gory details.
It’s important to note that the original benchmark was not representative of billable CPU usage on Cloudflare, nor did the issues involved impact most typical workloads. Most of the disparity was an artifact of the specific benchmark methodology. Read on to understand why.
With our fixes, the results now look much more like we’d expect:

There is still work to do, but we’re happy to say that after these changes, Cloudflare now performs on par with Vercel in every benchmark case except the one based on Next.js. On that benchmark, the gap has closed considerably, and we expect to be able to eliminate it with further improvements detailed later in this post.
We are grateful to Theo for highlighting areas where we could make improvements, which will now benefit all our customers, and even many who aren’t our customers.
We wanted to run Theo’s test with no major design changes, in order to keep numbers comparable. Benchmark cases are nearly identical to Theo’s original test but we made a couple changes in how we ran the test, in the hopes of making the results more accurate:
-
Theo ran the test client on a laptop connected by a Webpass internet connection in San Francisco, against Vercel instances running in its sfo1 region. In order to make our results easier to reproduce, we chose instead to run our test client directly in AWS’s us-east-1 datacenter, invoking Vercel instances running in its iad1 region (which we understand to be in the same building). We felt this would minimize any impact from network latency. Because of this, Vercel’s numbers are slightly better in our results than they were in Theo’s.
-
We chose to use Vercel instances with 1 vCPU instead of 2. All of the benchmarks are single-threaded workloads, meaning they cannot take advantage of a second CPU anyway. Vercel’s CTO, Malte Ubl, had stated publicly on X that using single-CPU instances would make no difference in this test, and indeed, we found this to be correct. Using 1 vCPU makes it easier to reason about pricing, since both Vercel and Cloudflare charge for CPU time (
$0.128/hr for Vercel in iad1, and$0.072/hr for Cloudflare globally). -
We made some changes to fix bugs in the test, for which we submitted a pull request. More on this below.
Theo’s benchmarks covered a variety of frameworks, making it clear that no single JavaScript library could be at fault for the general problem. Clearly, we needed to look first at the Workers Runtime itself. And so we did, and we found two problems – not bugs, but tuning and heuristic choices which interacted poorly with the benchmarks as written.
Over the last year we shipped smarter routing that sends traffic to warm isolates more often. That cuts cold starts for large apps, which matters for frameworks with heavy initialization requirements like Next.js. The original policy optimized for latency and throughput across billions of requests, but was less optimal for heavily CPU-bound workloads for the same reason that such workloads cause performance issues in other platforms like Node.js: When the CPU is busy computing an expensive operation for one request, other requests sent to the same isolate must wait for it to finish before they can proceed.
The system uses heuristics to detect when requests are getting blocked behind each other, and automatically spin up more isolates to compensate. However, these heuristics are not precise, and the particular workload generated by Theo’s tests – in which a burst of expensive traffic would come from a single client – played poorly with our existing algorithm. As a result, the benchmarks showed much higher latency (and variability in latency) than would normally be expected.
It’s important to understand that, as a result of this problem, the benchmark was not really measuring CPU time. Pricing on the Workers platform is based on CPU time – that is, time spent actually executing JavaScript code, as opposed to time waiting for things. Time spent waiting for the isolate to become available makes the request take longer, but is not billed as CPU time against the waiting request. So, this problem would not have affected your bill.
After analyzing the benchmarks, we updated the algorithm to detect sustained CPU-heavy work earlier, then bias traffic so that new isolates spin up faster. The result is that Workers can more effectively and efficiently autoscale when different workloads are applied. I/O-bound workloads coalesce into individual already warm isolates while CPU-bound are directed so that they do not block each other. This change has already been rolled out globally and is enabled automatically for everyone. It should be pretty clear from the graph when the change was rolled out:

While this scheduling issue accounted for the majority of the disparity in the benchmark, we did find a minor issue affecting code execution performance during our testing.
The range of issues that we uncovered in the framework code in these benchmarks repeatedly pointed at garbage collection and memory management issues as being key contributors to the results. But, we would expect these to be an issue with the same frameworks running in Node.js as well. To see exactly what was going on differently with Workers and why it was causing such a significant degradation in performance, we had to look inwards at our own memory management configuration.
The V8 garbage collector has a huge number of knobs that can be tuned that directly impact performance. One of these is the size of the “young generation”. This is where newly created objects go initially. It’s a memory area that’s less compact, but optimized for short-lived objects. When objects have bounced around the “young space” for a few generations they get moved to the old space, which is more compact, but requires more CPU to reclaim.
V8 allows the embedding runtime to tune the size of the young generation. And it turns out, we had done so. Way back in June of 2017, just two months after the Workers project kicked off, we – or specifically, I, Kenton, as I was the only engineer on the project at the time – had configured this value according to V8’s recommendations at the time for environments with 512MB of memory or less. Since Workers defaults to a limit of 128MB per isolate, this seemed appropriate.
V8’s entire garbage collector has changed dramatically since 2017. When analyzing the benchmarks, it became apparent that the setting which made sense in 2017 no longer made sense in 2025, and we were now limiting V8’s young space too rigidly. Our configuration was causing V8’s garbage collection to work harder and more frequently than it otherwise needed to. As a result, we have backed off on the manual tuning and now allow V8 to pick its young space size more freely, based on its internal heuristics. This is already live on Cloudflare Workers, and it has given an approximately 25% boost to the benchmarks with only a small increase in memory usage. Of course, the benchmarks are not the only Workers that benefit: all Workers should now be faster. That said, for most Workers the difference has been much smaller.
The platform changes solved most of the problem. Following the changes, our testing showed we were now even on all of the benchmarks save one: Next.js.
Next.js is a popular web application framework which, historically, has not had built-in support for hosting on a wide range of platforms. Recently, a project called OpenNext has arisen to fill the gap, making Next.js work well on many platforms, including Cloudflare. On investigation, we found several missing optimizations and other opportunities to improve performance, explaining much of why the benchmark performed poorly on Workers.
When profiling the benchmark code, we noticed that garbage collection was dominating the timeline. From 10-25% of the request processing time was being spent reclaiming memory.


So we dug in and discovered that OpenNext, and in some cases Next.js and React itself, will often create unnecessary copies of internal data buffers at some of the worst times during the handling of the process. For instance, there’s one pipeThrough() operation in the rendering pipeline that we saw creating no less than 50 2048-byte Buffer instances, whether they are actually used or not.
We further discovered that on every request, the Cloudflare OpenNext adapter has been needlessly copying every chunk of streamed output data as it’s passed out of the renderer and into the Workers runtime to return to users. Given this benchmark returns a 5 MB result on every request, that’s a lot of data being copied!
In other places, we found that arrays of internal Buffer instances were being copied and concatenated using Buffer.concat for no other reason than to get the total number of bytes in the collection. That is, we spotted code of the form getBody().length. The function getBody() would concatenate a large number of buffers into a single buffer and return it, without storing the buffer anywhere. So, all that work was being done just to read the overall length. Obviously this was not intended, and fixing it was an easy win.
We’ve started opening a series of pull requests in OpenNext to fix these issues, and others in hot paths, removing some unnecessary allocations and copies:
We’re not done. We intend to keep iterating through OpenNext code, making improvements wherever they’re needed – not only in the parts that run on Workers. Many of these improvements apply to other OpenNext platforms. The shared goal of OpenNext is to make NextJS as fast as possible regardless of where you choose to run your code.
Much of the Next.js code was written to use Node.js’s APIs for byte streams. Workers, however, prefers the web-standard Streams API, and uses it to represent HTTP request and response bodies. This necessitates using adapters to convert between the two APIs. When investigating the performance bottlenecks, we found a number of examples where inefficient streams adapters are being needlessly applied. For example:
const stream = Readable.toWeb(Readable.from(res.getBody()))res.getBody() was performing a Buffer.concat(chunks) to copy accumulated chunks of data into a new Buffer, which was then passed as an iterable into a Node.js stream.Readable that was then wrapped by an adapter that returns a ReadableStream. While these utilities do serve a useful purpose, this becomes a data buffering nightmare since both Node.js streams and Web streams each apply their own internal buffers! Instead we can simply do:
const stream = ReadableStream.from(chunks);This returns a ReadableStream directly from the accumulated chunks without additional copies, extraneous buffering, or passing everything through inefficient adaptation layers.
In other places we see that Next.js and React make extensive use of ReadableStream to pass bytes through, but the streams being created are value-oriented rather than byte-oriented! For example,
const readable = new ReadableStream({
  pull(controller) {
    controller.enqueue(chunks.shift());
    if (chunks.length === 0) {
      controller.close();
    }
});  // Default highWaterMark is 1!
Seems perfectly reasonable. However, there’s an issue here. If the chunks are Buffer or Uint8Array instances, every instance ends up being a separate read by default. So if the chunk is only a single byte, or 1000 bytes, that’s still always two reads. By converting this to a byte stream with a reasonable high water mark, we can make it possible to read this stream much more efficiently:
const readable = new ReadableStream({
  type: 'bytes',
  pull(controller) {
    controller.enqueue(chunks.shift());
    if (chunks.length === 0) {
      controller.close();
    }
}, { highWaterMark: 4096 });
Now, the stream can be read as a stream of bytes rather than a stream of distinct JavaScript values, and the individual chunks can be coalesced internally into 4096 byte chunks, making it possible to optimize the reads much more efficiently. Rather than reading each individual enqueued chunk one at a time, the ReadableStream will proactively call pull() repeatedly until the highWaterMark is reached. Reads then do not have to ask the stream for one chunk of data at a time.
While it would be best for the rendering pipeline to be using byte streams and paying attention to back pressure signals more, our implementation can still be tuned to better handle cases like this.
The bottom line? We’ve got some work to do! There are a number of improvements to make in the implementation of OpenNext and the adapters that allow it to work on Cloudflare that we will continue to investigate and iterate on. We’ve made a handful of these fixes already and we’re already seeing improvements. Soon we also plan to start submitting patches to Next.js and React to make further improvements upstream that will ideally benefit the entire ecosystem.
Aside from buffer allocations and streams, one additional item stood out like a sore thumb in the profiles: JSON.parse() with a reviver function. This is used in both React and Next.js and in our profiling this was significantly slower than it should be. We built a microbenchmark and found that JSON.parse with a reviver argument recently got even slower when the standard added a third argument to the reviver callback to provide access to the JSON source context.
For those unfamiliar with the reviver function, it allows an application to effectively customize how JSON is parsed. But it has drawbacks. The function gets called on every key-value pair included in the JSON structure, including every individual element of an Array that gets serialized. In Theo’s NextJS benchmark, in any single request, it ends up being called well over 100,000 times!
Even though this problem affects all platforms, not just ours, we decided that we weren’t just going to accept it. After all, we have contributors to V8 on the Workers runtime team! We’ve upstreamed a V8 patch that can speed up JSON.parse() with revivers by roughly 33 percent. That should be in V8 starting with version 14.3 (Chrome 143) and can help everyone using V8, not just Cloudflare: Node.js, Chrome, Deno, the entire ecosystem. If you are not using Cloudflare Workers or didn’t change the syntax of your reviver you are currently suffering under the red performance bar.
We will continue to work with framework authors to reduce overhead in hot paths. Some changes belong in the frameworks, some belong in the engine, some in our platform.
We are engineers, and we like to solve engineering problems — whether our own, or for the broader community.
Theo’s benchmarks were actually posted in response to a different benchmark by another author which compared Cloudflare Workers against Vercel. The original benchmark focused on calling trigonometry functions (e.g. sine and cosine) in a tight loop. In this benchmark, Cloudflare Workers performed 3x faster than Node.js running on Vercel.
The author of the original benchmark offered this as evidence that Cloudflare Workers are just faster. Theo disagreed, and so did we. We expect to be faster, but not by 3x! We don’t implement math functions ourselves; these come with V8. We weren’t happy to just accept the win, so we dug in.
It turns out that Node.js is not using the latest, fastest path for these functions. Node.js can be built with either the clang or gcc compilers, and is written to support a broader range of operating systems and architectures than Workers. This means that Node.js’ compilation often ends up using a lowest-common denominator for some things in order to provide support for the broadest range of platforms. V8 includes a compile-time flag that, in some configurations, allows it to use a faster implementation of the trig functions. In Workers, mostly by coincidence, that flag is enabled by default. In Node.js, it is not. We’ve opened a pull request to enable the flag in Node.js so that everyone benefits, at least on platforms where it can be supported.
Assuming that lands, and once AWS Lambda and Vercel are able to pick it up, we expect this specific gap to go away, making these operations faster for everyone. This change won’t benefit our customers, since Cloudflare Workers already uses the faster trig functions, but a bug is a bug and we like making everything faster.
Even the best benchmarks have bias and tradeoffs. It’s difficult to create a benchmark that is truly representative of real-world performance, and all too easy to misinterpret the results of benchmarks that are not. We particularly liked Planetscale’s take on this subject.
These specific CPU-bound tests are not an ideal choice to represent web applications. Theo even notes this in his video. Most real-world applications on Workers and Vercel are bound by databases, downstream services, network, and page size. End user experience is what matters. CPU is one piece of that picture. That said, if a benchmark shows us slower, we take it seriously.
While the benchmarks helped us find and fix many real problems, we also found a few problems with the benchmarks themselves, which contributed to the apparent disparity in speed:
The benchmark is designed to be run on your laptop, from which it hits Cloudflare’s and Vercel’s servers over the Internet. It makes the assumption that latency observed from the client is a close enough approximation of server-side CPU time. The reasons are fair: As Theo notes, Cloudflare does not permit an application to measure its own CPU time, in order to prevent timing side channel attacks. Actual CPU time can be seen in logs after the fact, but gathering those may be a lot of work. It’s just easier to measure time from the client.
However, as Cloudflare and Vercel are hosted from different data centers, the network latency to each can be a factor in the benchmark, and this can skew the results. Typically, this effect will favor Cloudflare, because Cloudflare can run your Worker in locations spread across 330+ cities worldwide, and will tend to choose the closest one to you. Vercel, on the other hand, usually places compute in a central location, so latency will vary depending on your distance from that location.
For our own testing, to minimize this effect, we ran the benchmark client from a VM on AWS located in the same data center as our Vercel instances. Since Cloudflare is well-connected to every AWS location, we think this should have eliminated network latency from the picture. We chose AWS’s us-east-1 / Vercel’s iad1 for our test as it is widely seen as the default choice; any other choice could draw questions about cherry-picking.
Cloudflare’s servers aren’t all identical. Although we refresh them aggressively, there will always be multiple generations of hardware in production at any particular time. Currently, this includes generations 10, 11, and 12 of our server hardware.
Other cloud providers are no different. No cloud provider simply throws away all their old servers every time a new version becomes available.
Of course, newer CPUs run faster, even for single-threaded workloads. The differences are not as large as they used to be 20-30 years ago, but they are not nothing. As such, an application may get (a little bit) lucky or unlucky depending on what machine it is assigned to.
In cloud environments, even identical CPUs can yield different performance depending on circumstances, due to multitenancy. The server your application is assigned to is running many others as well. In AWS Lambda, a server may be running hundreds of applications; in Cloudflare, with our ultra-efficient runtime, a server may be running thousands. These “noisy neighbors” won’t share the same CPU core as your app, but they may share other resources, such as memory bandwidth. As a result, performance can vary.
It’s important to note that these problems create correlated noise. That is, if you run the test again, the application is likely to remain assigned to the same machines as before – this is true of both Cloudflare and Vercel. So, this noise cannot be corrected by simply running more iterations. To correct for this type of noise on Cloudflare, one would need to initiate requests from a variety of geographic locations, in order to hit different Cloudflare data centers and therefore different machines. But, that is admittedly a lot of work. (We are not familiar with how best to get an application to switch machines on Vercel.)
The Cloudflare version of the NextJS benchmark was not configured to use force-dynamic while the Vercel version was. This triggered curious behavior. Our understanding is that pages which are not “dynamic” should normally be rendered statically at build time. With OpenNext, however, it appears the pages are still rendered dynamically, but if multiple requests for the same page are received at the same time, OpenNext will only invoke the rendering once. Before we made the changes to fix our scheduling algorithm to avoid sending too many requests to the same isolate, this behavior may have somewhat counteracted that problem. Theo reports that he had disabled force-dynamic in the Cloudflare version specifically for this reason: with it on, our results were so bad as to appear outright broken, so he intentionally turned it off.
Ironically, though, once we fixed the scheduling issue, using “static” rendering (i.e. not enabling force-dynamic) hurt Cloudflare’s performance for other reasons. It seems that when OpenNext renders a “cacheable” page, streaming of the response body is inhibited. This interacted poorly with a property of the benchmark client: it measured time-to-first-byte (TTFB), rather than total request/response time. When running in dynamic mode – as the test did on Vercel – the first byte would be returned to the client before the full page had been rendered. The rest of the rendering would happen as bytes streamed out. But with OpenNext in non-dynamic mode, the entire payload was rendered into a giant buffer upfront, before any bytes were returned to the client.
Due to the TTFB behavior of the benchmark client, in dynamic mode, the benchmark actually does not measure the time needed to fully render the page. We became suspicious when we noticed that Vercel’s observability tools indicated more CPU time had been spent than the benchmark itself had reported.
One option would have been to change the benchmarks to use TTLB instead – that is, wait until the last byte is received before stopping the timer. However, this would make the benchmark even more affected by network differences: The responses are quite large, ranging from 2MB to 15MB, and so the results could vary depending on the bandwidth to the provider. Indeed, this would tend to favor Cloudflare, but as the point of the test is to measure CPU speed, not bandwidth, it would be an unfair advantage.
Once we changed the Cloudflare version of the test to use force-dynamic as well, matching the Vercel version, the streaming behavior then matched, making the request fair. This means that neither version is actually measuring the cost of rendering the full page to HTML, but at least they are now measuring the same thing.
As a side note, the original behavior allowed us to spot that OpenNext has a couple of performance bottlenecks in its implementation of the composable cache it uses to deduplicate rendering requests. While fixes to these aren’t going to impact the numbers for this particular set of benchmarks, we’re working on improving those pieces also.
The React SSR benchmark contained a more basic configuration error. React inspects the environment variable NODE_ENV to decide whether the environment is “production” or a development environment. Many Node.js-based environments, including Vercel, set this variable automatically in production. Many frameworks, such as OpenNext, automatically set this variable for Workers in production as well. However, the React SSR benchmark was written against lower-level React APIs, not using any framework. In this case, the NODE_ENV variable wasn’t being set at all.
And, unfortunately, when NODE_ENV is not set, React defaults to “dev mode”, a mode that contains extra debugging checks and is therefore much slower than production mode. As a result, the numbers for Workers were much worse than they should have been.
Arguably, it may make sense for Workers to set this variable automatically for all deployed workers, particularly when Node.js compatibility is enabled. We are looking into doing this in the future, but for now we’ve updated the test to set it directly.
Our improvements to the Workers Runtime are already live for all workers, so you do not need to change anything. Many apps will already see faster, steadier tail latency on compute heavy routes with less jitter during bursts. In places where garbage collection improved, some workloads will also use fewer billed CPU seconds.
We also sent Theo a pull request to update OpenNext with our improvements there, and with other test fixes.
But we’re far from done. We still have work to do to close the gap between OpenNext and Next.js on Vercel – but given the other benchmark results, it’s clear we can get there. We also have plans for further improvements to our scheduling algorithm, so that requests almost never block each other. We will continue to improve V8, and even Node.js – the Workers team employs multiple core contributors to each project. Our approach is simple: improve open source infrastructure so that everyone gets faster, then make sure our platform makes the most of those improvements.
And, obviously, we’ll be writing more benchmarks, to make sure we’re catching these kinds of issues ourselves in the future. If you have a benchmark that shows Workers being slower, send it to us with a repro. We will profile it, fix what we can upstream, and share back what we learn!
AWS Transfer Family SFTP connectors now support VPC-based connectivity
Post Syndicated from Betty Zheng (郑予彬) original https://aws.amazon.com/blogs/aws/aws-transfer-family-sftp-connectors-now-support-vpc-based-connectivity/
Many organizations rely on the Secure File Transfer Protocol (SFTP) as the industry standard for exchanging critical business data. Traditionally, securely connecting to private SFTP servers required custom infrastructure, manual scripting, or exposing endpoints to the public internet.
Today, AWS Transfer Family SFTP connectors now support connectivity to remote SFTP servers through Amazon Virtual Private Cloud (Amazon VPC) environments. You can transfer files between Amazon Simple Storage Service (Amazon S3) and private or public SFTP servers while applying the security controls and network configurations already defined in your VPC. This capability helps you integrate data sources across on-premises environments, partner-hosted private servers, or internet-facing endpoints, with the operational simplicity of a fully managed Amazon Web Services (AWS) service.
New capabilities with SFTP connectors
The following are the key enhancements:
- Connect to private SFTP servers – SFTP connectors can now reach endpoints that are only accessible within your AWS VPC connection. These include servers hosted in your VPC or a shared VPC, on-premises systems connected over AWS Direct Connect, and partner-hosted servers connected through VPN tunnels.
- Security and compliance – All file transfers are routed through the security controls already applied in your VPC, such as AWS Network Firewall or centralized ingress and egress inspection. Private SFTP servers remain private and don’t need to be exposed to the internet. You can also present static Elastic IP or bring your own IP (BYOIP) addresses to meet partner allowlist requirements.
- Performance and simplicity – By using your own network resources such as NAT gateways, AWS Direct Connect or VPN connections, connectors can take advantage of higher bandwidth capacity for large-scale transfers. You can configure connectors in minutes through the AWS Management Console, AWS Command Line Interface (AWS CLI), or AWS SDKs without building custom scripts or third-party tools.
How VPC- based SFTP connections work
SFTP connectors use Amazon VPC Lattice resources to establish secure connectivity through your VPC. Key constructs include a resource configuration and a resource gateway. The resource configuration represents the target SFTP server, which you specify using a private IP address or public DNS name. The resource gateway provides SFTP connector access to these configurations, enabling file transfers to flow through your VPC and its security controls.
The following architecture diagram illustrates how traffic flows between Amazon S3 and remote SFTP servers. 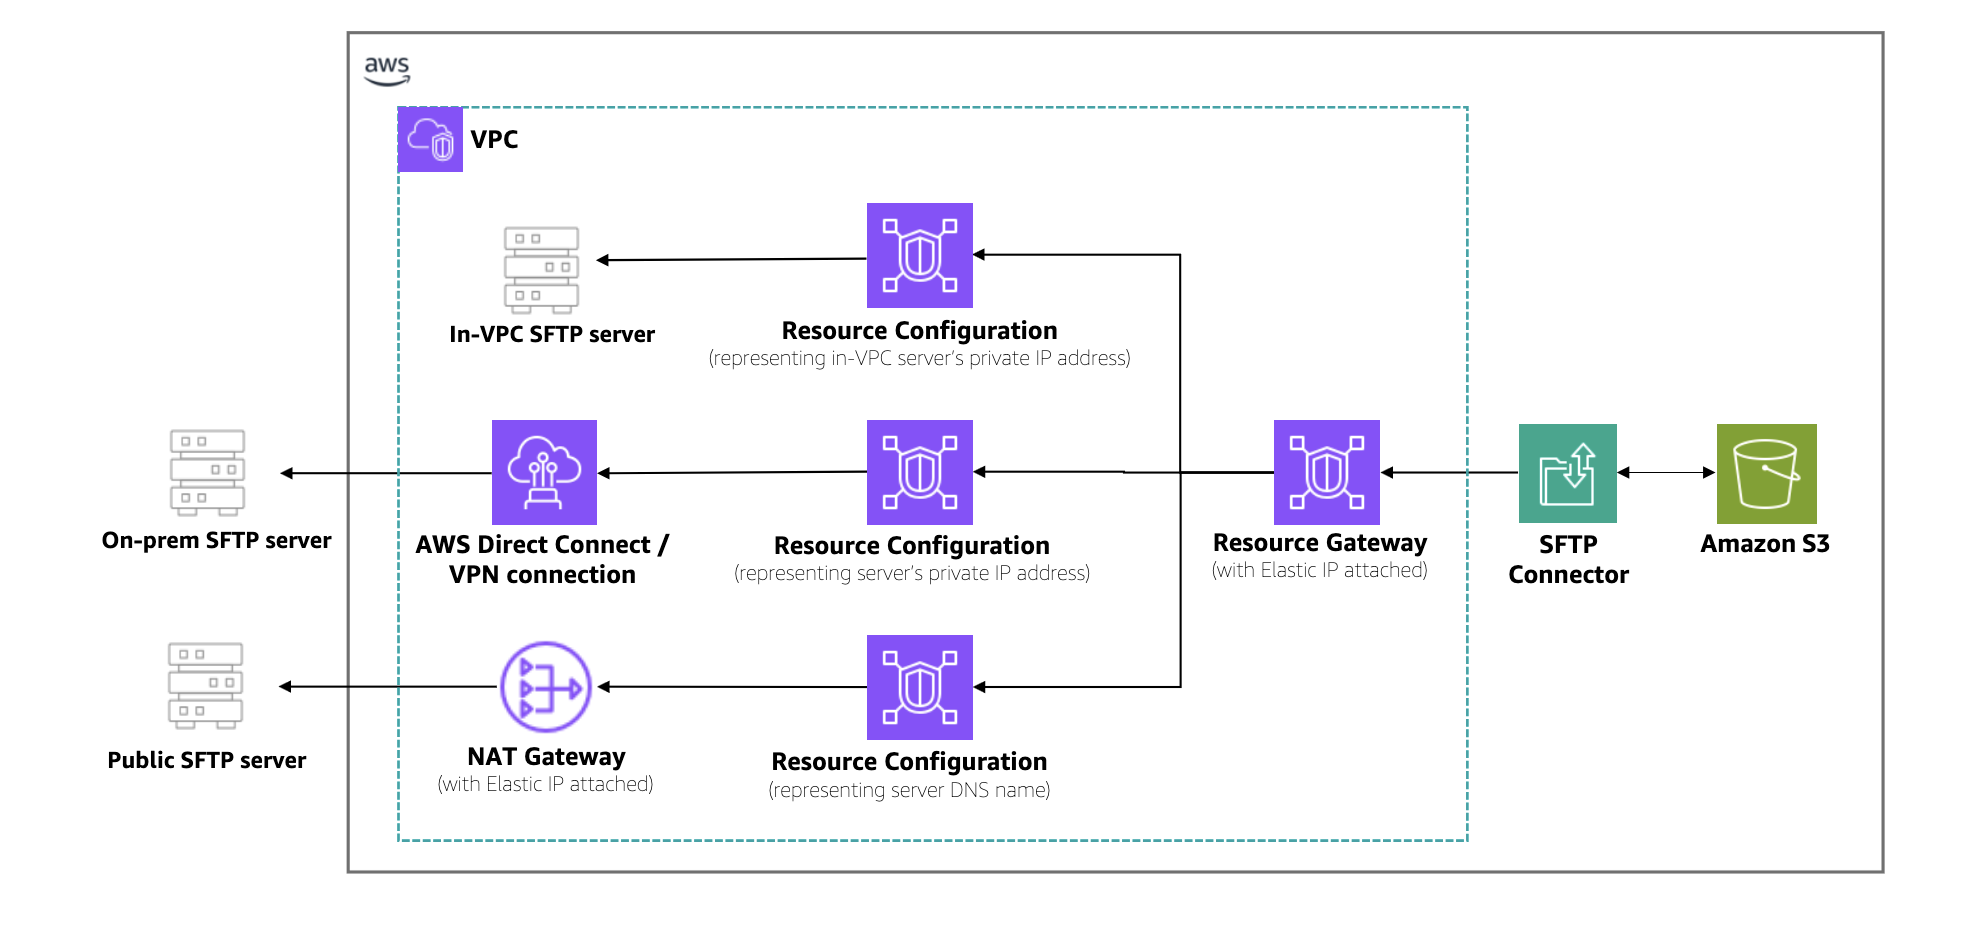 As shown in the architecture, traffic flows from Amazon S3 through the SFTP connector into your VPC. A resource gateway is the entry point that handles inbound connections from the connector to your VPC resources. Outbound traffic is routed through your configured egress path, using Amazon VPC NAT gateways with Elastic IPs for public servers or AWS Direct Connect and VPN connections for private servers. You can use existing IP addresses from your VPC CIDR range, simplifying partner server allowlists. Centralized firewalls in the VPC enforce security policies, and customer-owned NAT gateways provide higher bandwidth for large-scale transfers.
When to use this feature
With this capability, developers and IT administrators can simplify workflows while meeting security and compliance requirements across a range of scenarios:
- Hybrid environments – Transfer files between Amazon S3 and on-premises SFTP servers using AWS Direct Connect or AWS Site-to-Site VPN, without exposing endpoints to the internet.
- Partner integrations – Connect with business partners’ SFTP servers that are only accessible through private VPN tunnels or shared VPCs. This avoids building custom scripts or managing third-party tools, reducing operational complexity.
- Regulated industries – Route file transfers through centralized firewalls and inspection points in VPCs to comply with financial services, government, or healthcare security requirements.
- High-throughput transfers – Use your own network configurations such as NAT gateways, AWS Direct Connect, or VPN connections with Elastic IP or BYOIP to handle large-scale, high-bandwidth transfers while retaining IP addresses already on partner allowlists.
- Unified file transfer solution – Standardize on Transfer Family for both internal and external SFTP connectivity, reducing fragmentation across file transfer tools.
Start building with SFTP connectors
To begin transferring files with SFTP connectors through my VPC environment, I follow these steps:
First, I configure my VPC Lattice resources. In the Amazon VPC console, under PrivateLink and Lattice in the navigation pane, I choose Resource gateways, choose Create resource gateway to create one to act as the ingress point into my VPC. 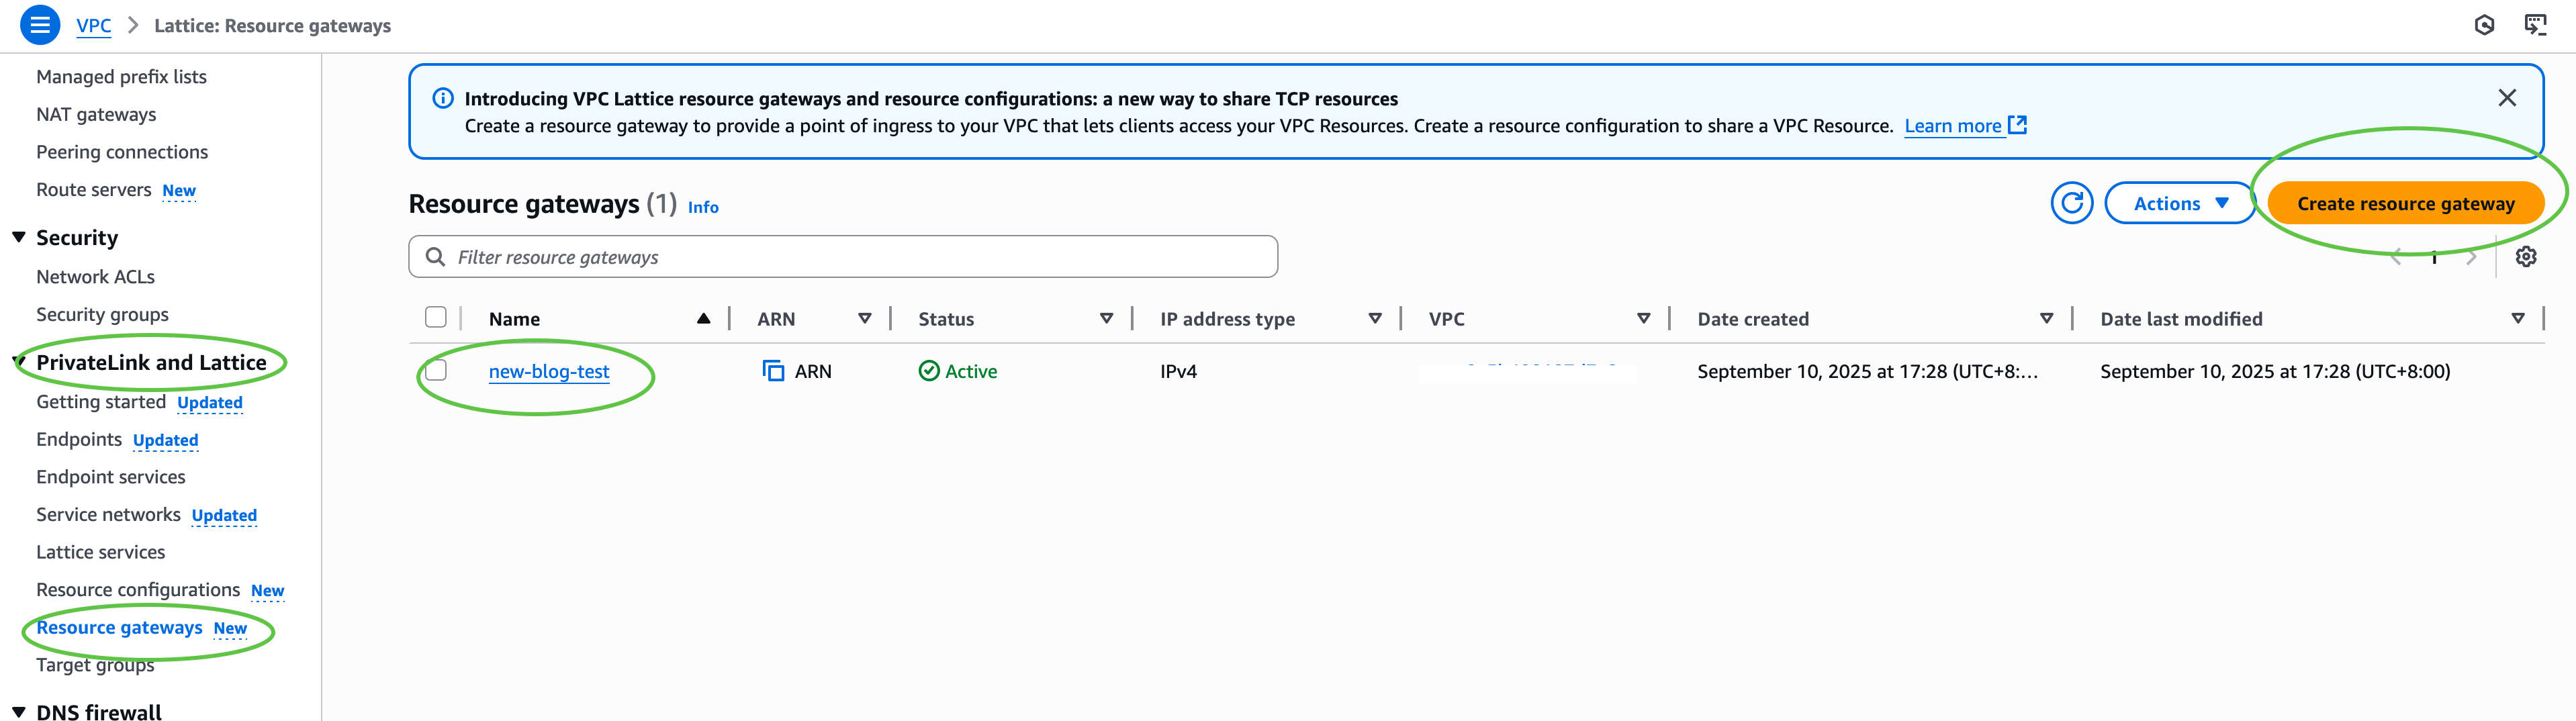 Next, under PrivateLink and Lattice in the navigation pane, I choose Resource configuration and choose Create resource configuration to create a resource configuration for my target SFTP server. Specify the private IP address or public DNS name, and the port (typically 22).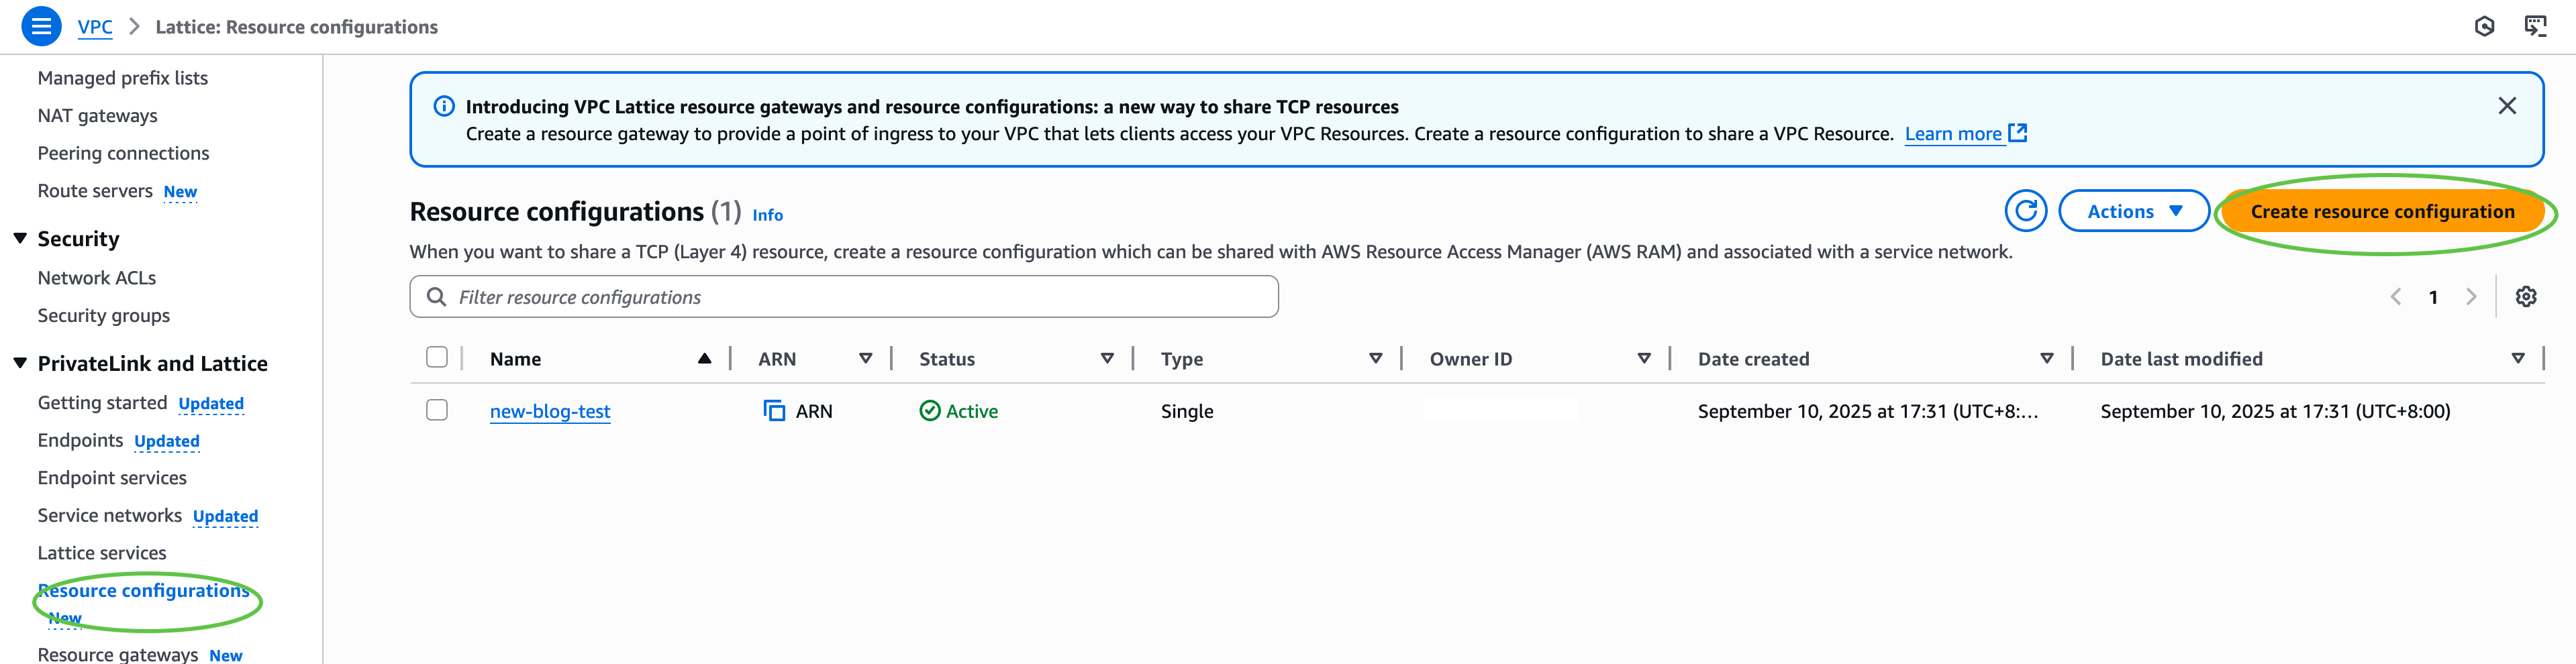
Then, I configure AWS Identity and Access Management (IAM) permissions. I ensure that the IAM role used for connector creation has transfer:* permissions, and VPC Lattice permissions (vpc-lattice:CreateServiceNetworkResourceAssociation, vpc-lattice:GetResourceConfiguration, vpc-lattice:AssociateViaAWSService). I update the trust policy on the IAM role to specify transfer.amazonaws.com as a trusted principal. This enables AWS Transfer Family to assume the role when creating and managing my SFTP connectors.
After that, I create an SFTP connector through the AWS Transfer Family console. I choose SFTP Connectors and then choose Create SFTP connector. 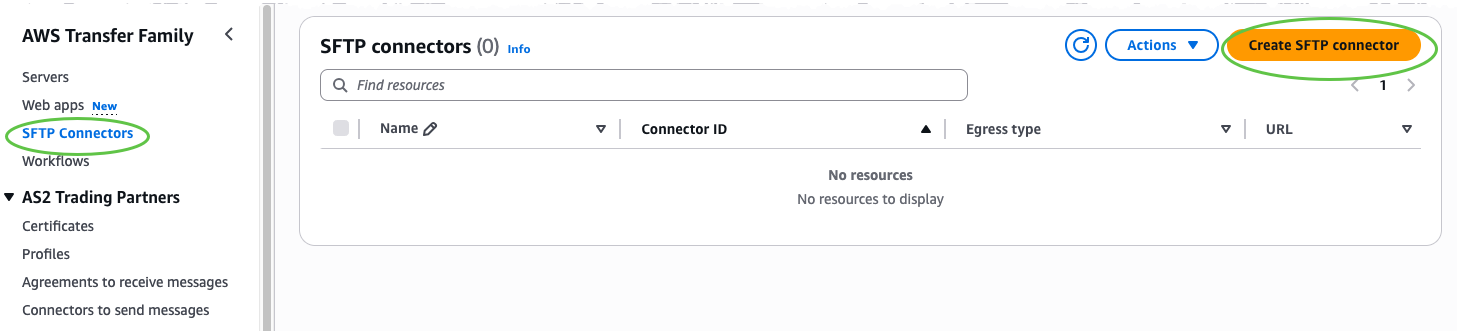 In the Connector configuration section, I select VPC Lattice as the egress type, then provide the Amazon Resource Name (ARN) of the Resource Configuration, Access role, and Connector credentials. Optionally, include a trusted host key for enhanced security, or override the default port if my SFTP server uses a nonstandard port.
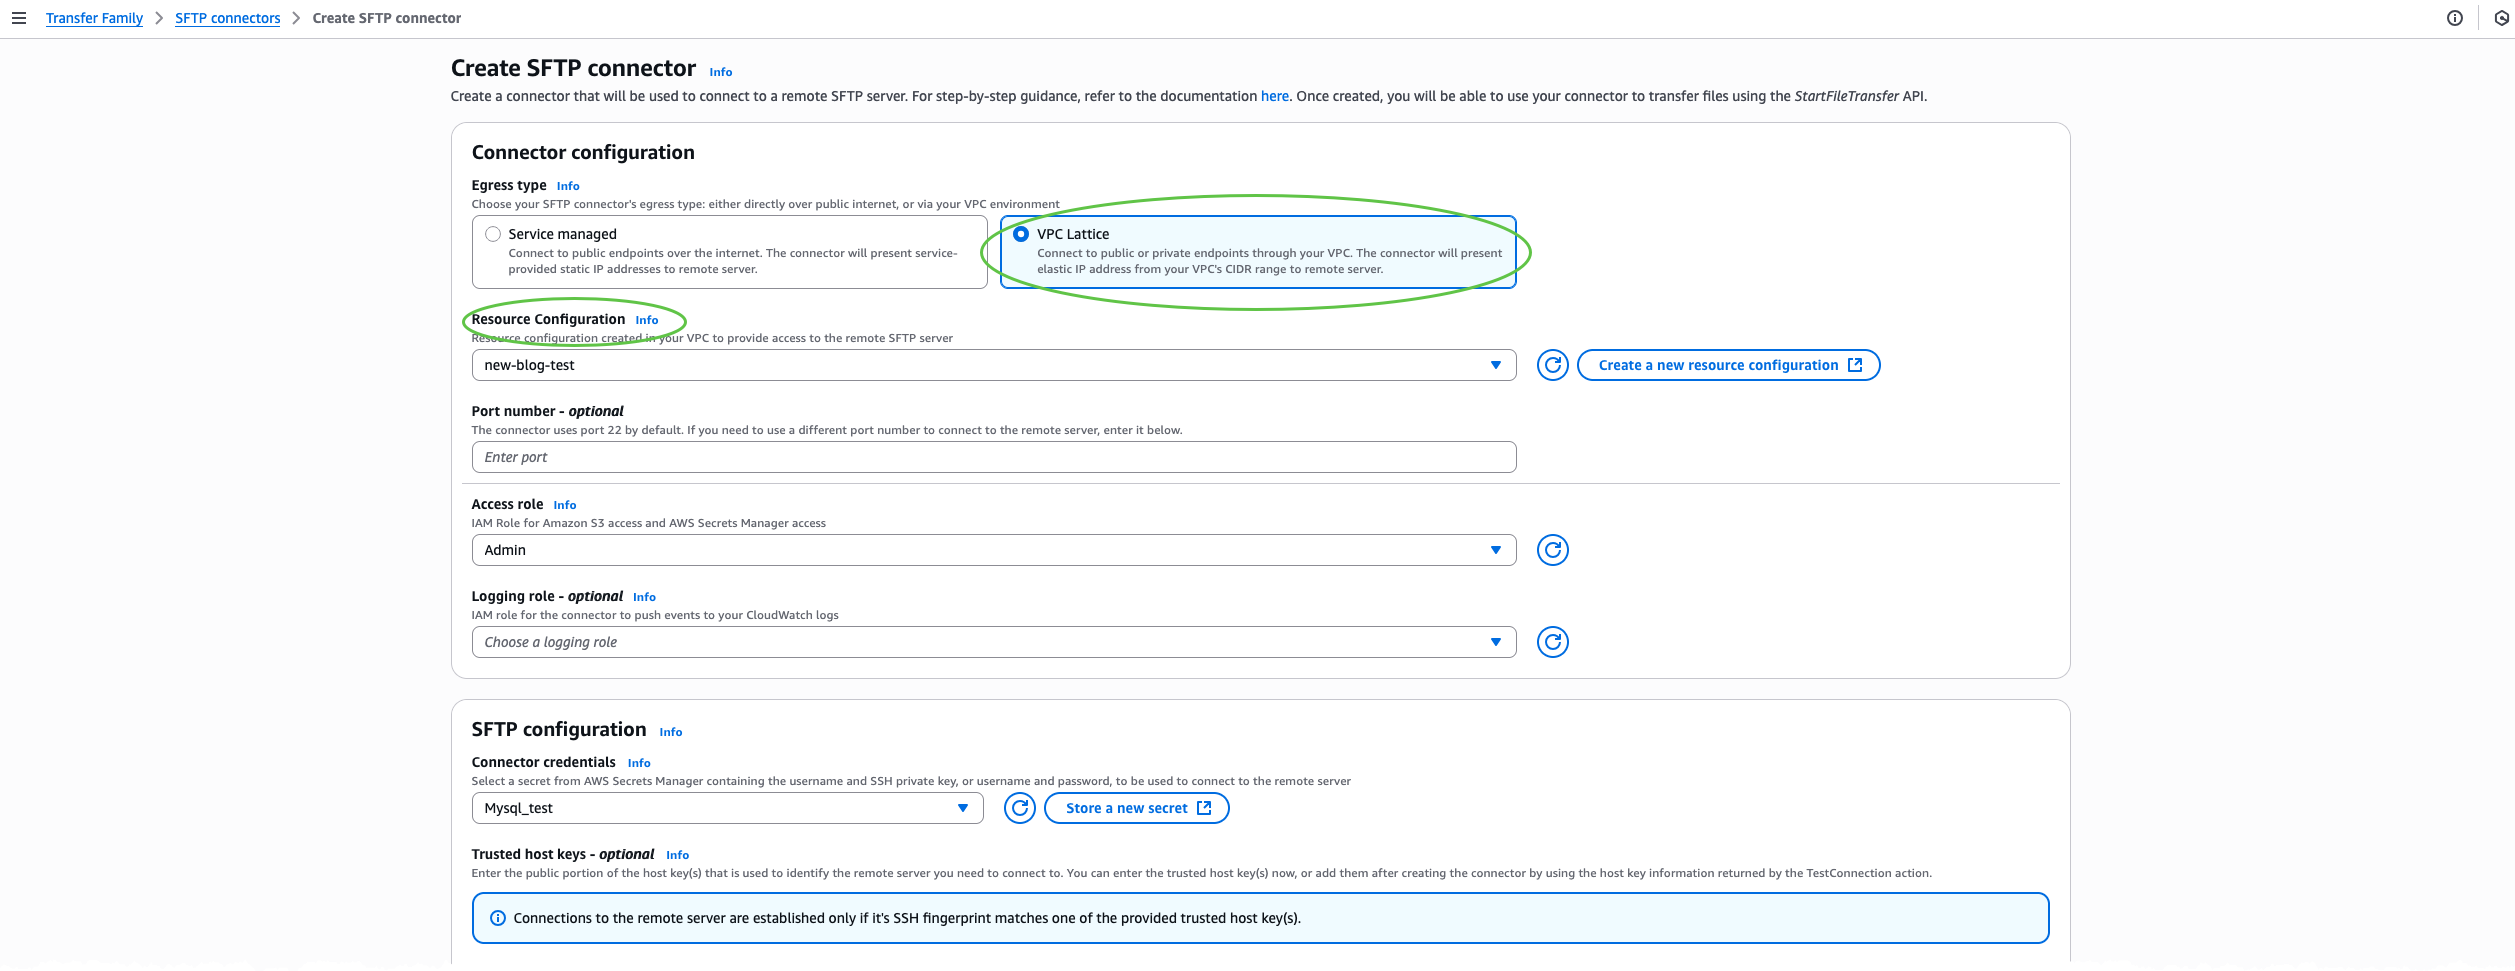 Next, I test the connection. On the Actions menu, I choose Test connection to confirm that the connector can reach the target SFTP server.
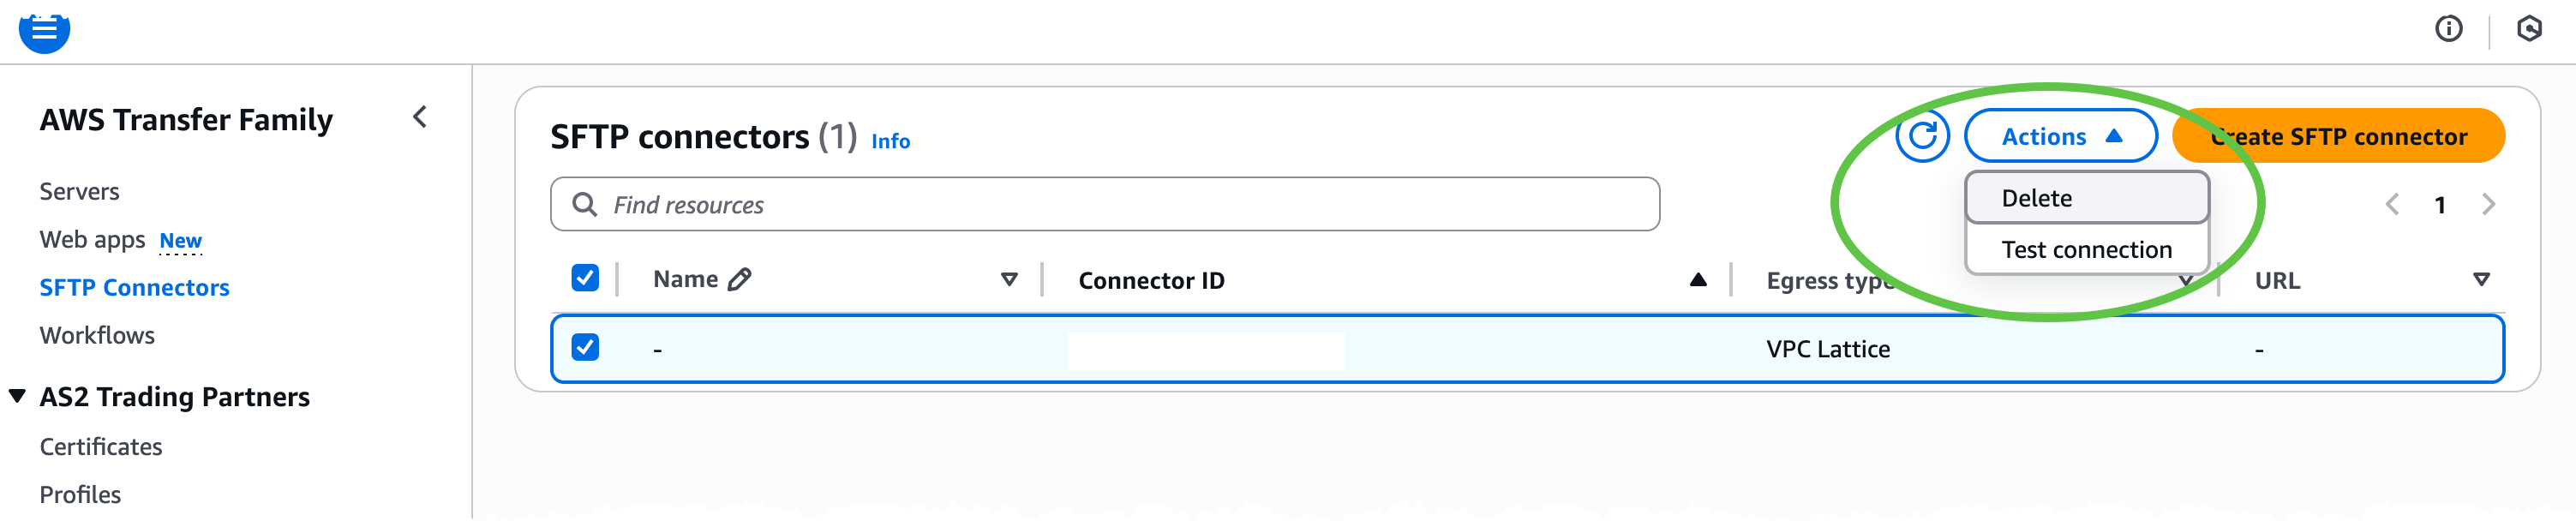 Finally, after the connector status is ACTIVE, I can begin file operations with my remote SFTP server programmatically by calling Transfer Family APIs such as
 StartDirectoryListing, StartFileTransfer, StartRemoteDelete, or StartRemoteMove. All traffic is routed through my VPC using my configured resources such as NAT gateways, AWS Direct Connect, or VPN connections together with my IP addresses and security controls.
For the complete set of options and advanced workflows, refer to the AWS Transfer Family documentation.
Now available
SFTP connectors with VPC-based connectivity are now available in 21 AWS Regions. Check the AWS Services by Region for the latest supported AWS Regions. You can now securely connect AWS Transfer Family SFTP connectors to private, on-premises, or internet-facing servers using your own VPC resources such as NAT gateways, Elastic IPs, and network firewalls.
— Betty
Securing AI agents with Amazon Bedrock AgentCore Identity
Post Syndicated from Abrom Douglas original https://aws.amazon.com/blogs/security/securing-ai-agents-with-amazon-bedrock-agentcore-identity/
By using Amazon Bedrock AgentCore, developers can build agentic workloads using a comprehensive set of enterprise-grade services that help quickly and securely deploy and operate AI agents at scale using any framework and model, hosted on Amazon Bedrock or elsewhere. AgentCore services are modular and composable, allowing them to be used together or independently. To get a high level overview of Amazon Bedrock AgentCore and all of the modular services, be sure to read the Introducing Amazon Bedrock AgentCore blog post.
In this post, I take a deeper look at AgentCore Identity, powered by Amazon Cognito, to introduce the identity and credential management features designed specifically for AI agents and automated workloads. AgentCore Identity provides secure, scalable agent identity and access management capabilities that are compatible with existing identity providers, avoiding the need for user migration or rebuilding authentication flows. Additionally, AgentCore Identity provides a token vault to help secure user access tokens and a native integration with AWS Secrets Manager to secure API keys and OAuth client credentials for external resources and tools, helps orchestrate standard OAuth flows, and centralizes AI agent identities to a secure central directory.
More specifically, here are some key features provided by AgentCore Identity:
- Centralized agent identity management – A unified directory feature that serves as the single source of truth for managing agent identities across your organization, providing each agent a unique identity and associated metadata. This provides each agent identity a distinct identifier using Amazon Resource Names (ARNs) and providing a central view of your agents whether they’re hosted in AWS, self-hosted, or using a hybrid deployment.
- Token vault – Securely store OAuth 2.0 Access and Refresh tokens, API keys, and OAuth 2.0 client secrets. Credentials are encrypted using AWS Key Management Service (AWS KMS) keys with support for customer-managed keys. The system implements strict access controls for credential retrieval, limiting access to individual agents only. For user-specific credentials such as OAuth 2.0 tokens, agents are restricted to accessing them solely on behalf of the associated user, maintaining least privilege and proper delegation mechanisms. When an expired access token is retrieved from the token vault and fails authorization with the resource server, the AI agent can use a secured refresh token to obtain and store a new access token. This allows a high security bar to be met, while improving the user experience by requiring less authentication requests to obtain new access tokens.
- OAuth 2.0 flow support – Provides native support for OAuth 2.0 client credentials grant, also known as two-legged OAuth (2LO), and authorization code grant, also known as three-legged OAuth (3LO). This includes built-in credential providers for popular services and support for custom integrations. The service handles OAuth 2.0 implementations while offering simple APIs for agents to access AWS resources and third-party services.
- Agent identity and access controls – Supports delegated authentication flow allowing agents to access resources using provided credentials while maintaining audit trails and access controls. Authorization decisions are based on the provided credentials during the delegation process.
- AgentCore SDK integration – Offers integration through declarative annotations that automatically handle credential retrieval and injection, reducing boilerplate code, and providing a seamless developer experience. The Bedrock AgentCore SDK provides automatic error handling for common scenarios such as token expiration and user consent requirements.
- Identity-aware authorization – Passes user context to agent code that allows the full access token to be forwarded to the agent code. AgentCore Identity first validates the token, then passes it to the agent where it can be decoded to obtain user context. In the case of passing an access token that does not have the full user context, the agent code can use it to call an OpenID Connect (OIDC) user info endpoint and retrieve user information. This can make sure agents get only the right access through dynamic decisions based on the user’s identity context, delivering enhanced security controls.
For full details on the features of AgentCore Identity, see the AgentCore developer guide.
Getting started with AgentCore Identity
There are several ways to get started with Amazon Bedrock AgentCore overall and more specifically with AgentCore Identity. You can follow the steps in Introducing Amazon Bedrock AgentCore: Securely deploy and operate AI agents at any scale for several AgentCore services, or you can navigate to the developer guide and follow along in the Getting started section for AgentCore Identity. Also, be sure to look into the Bedrock AgentCore Starter Toolkit GitHub repository and AgentCore Identity samples repository. Following the previous guides and samples will help you to get up and running quickly while using the Python Bedrock AgentCore SDK.
To start diving deeper into AgentCore Identity and how it can be used as a modular service, I’ll walk through an example use case involving a web application that uses AI agents. Using one of the features of the example application, the user can interact with an AI agent to help schedule meetings in their Google calendar. The AI agent will eventually be able to act on behalf of the authenticated human user. Let’s take a deeper look into this use case and better understand the end-to-end flow.
End-to-end flow example
The following sequence diagram (Figure 1) provides the details of an example end-to-end interaction between a human user signing in to a web application and interacting with an AI agent to perform actions on behalf of the human user. This shows how AgentCore Identity provides AI agent builders the identity primitives to create and secure AI agent identities, orchestrate a 3LO flow (following an authorization code grant flow), and securing temporary access tokens in the token vault for third-party OAuth resources, such as Google.
To help understand the end-to-end flow, I’ve broken this down into three different sub-flows. The first sub-flow is user authentication—in the example, the human user needs to first sign in to the web application. Amazon Cognito is used here, but you can use the identity provider of your choice. The second sub-flow is AI agent interaction—this is how the human user is interacting with the AI agent by way of the web application. This sub-flow also handles the orchestration between the human user and the AI agent, including consent, acquiring access tokens on behalf of the user, and securing them in the token vault. The third and last sub-flow is AI agent acting on behalf of user—as the name implies, these are the actions the AI agent is taking on behalf of the human user. This could include performing actions entirely within the application itself or by accessing external resource servers, such as Google Calendar in Figure 1.
Two prerequisites for the flow require setting up an OAuth 2.0 credential provider (Google is used for this flow) using the CreateOauth2CredentialProvider API, and creating your AI agent identity using the CreateWorkloadIdentity API.
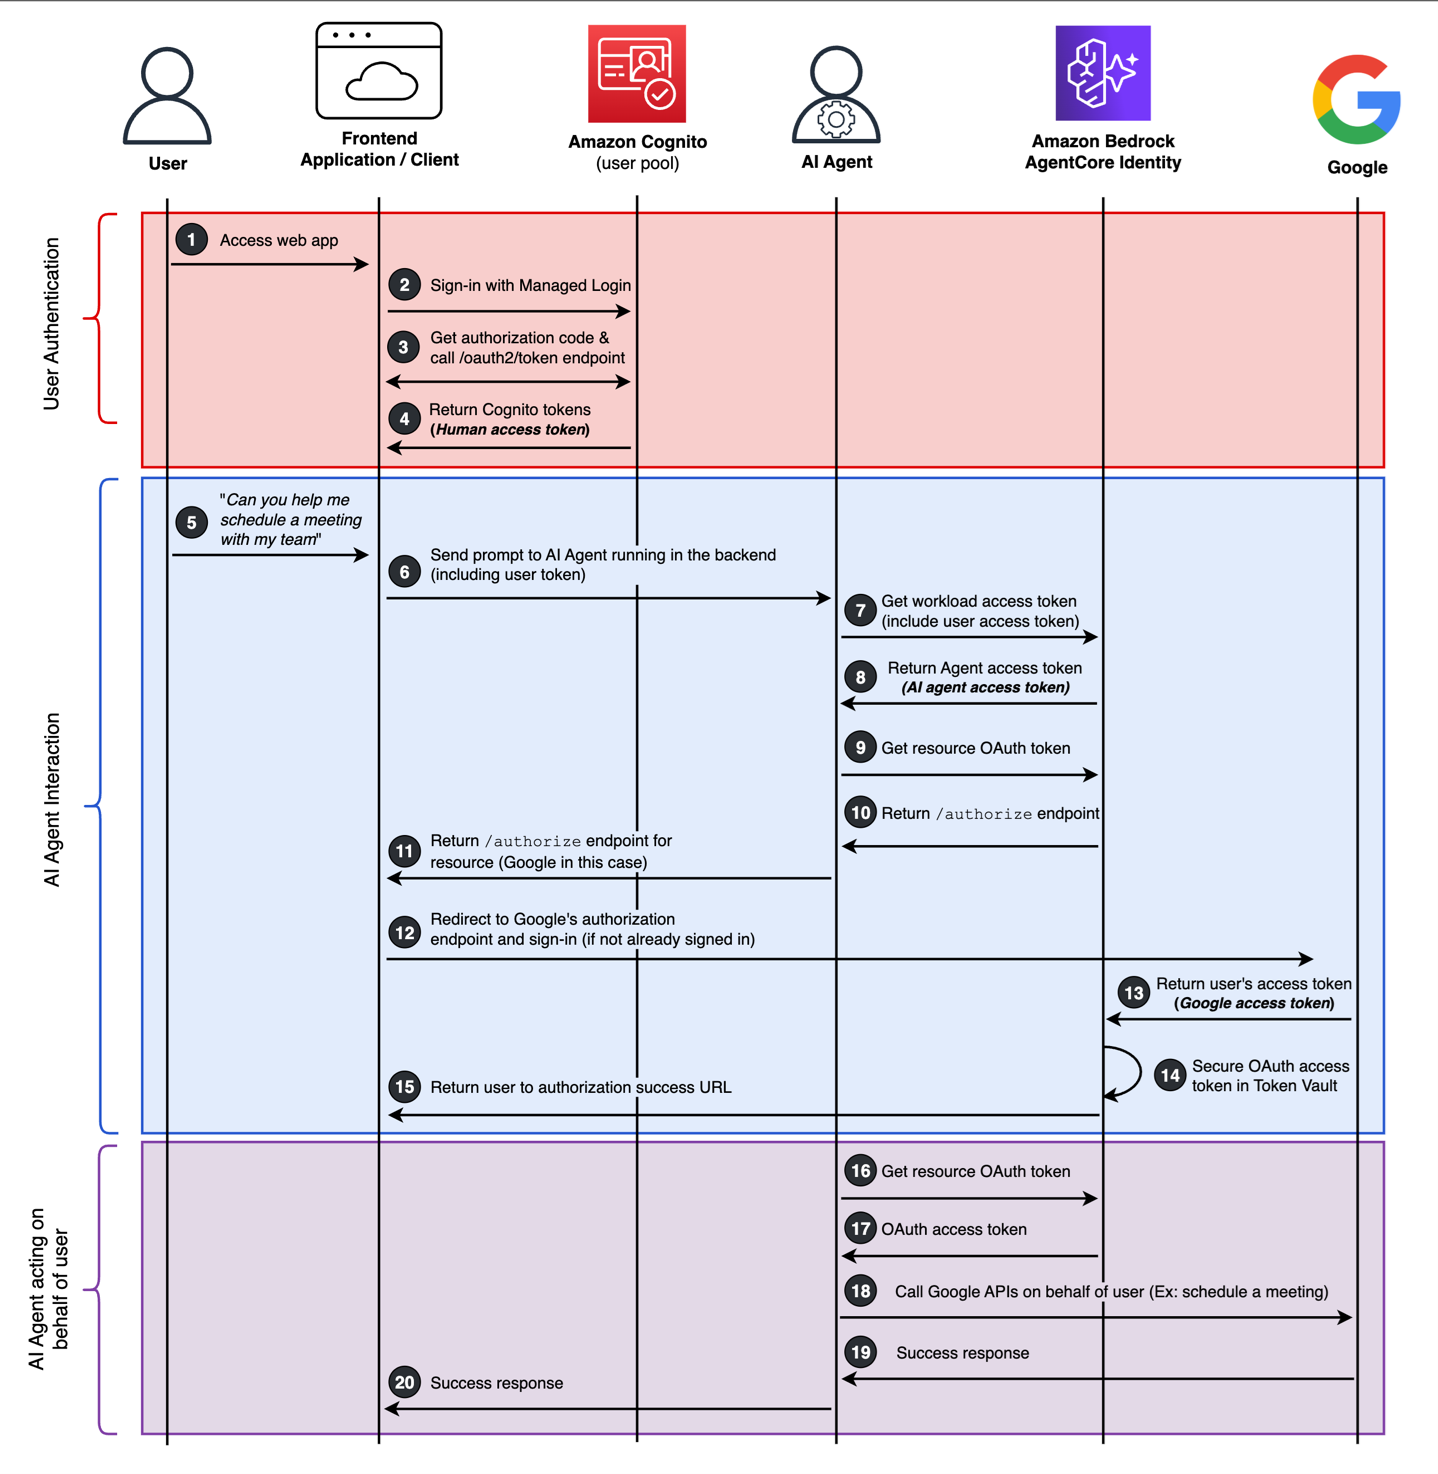
Figure 1: End-to-end flow showing an example of a human user securely interacting with an AI agent.
User authentication
- The user navigates to the web application.
- There are no existing sessions or tokens. The client will redirect the user to the Amazon Cognito managed login and the user signs in with their username and password, or uses a passwordless OTP or passkey.
- Amazon Cognito happens to be used in this flow with a local Cognito user account. This can also support federated login flows with third-party identity providers, including social, SAML, or OIDC providers.
- After successful authentication an authorization code is returned to the application, and this is used to call the /oauth2/token endpoint to get Cognito tokens.
- Amazon Cognito ID, access, and refresh tokens are returned to the client. I’ll refer to this access token as the human access token going forward.
AI agent interaction
- With the user signed in, they begin interacting with the AI agent through the web application and ask the AI agent to help with scheduling a meeting in their Google calendar.
- The prompt is sent to the backend where the AI agent is running along with the human access token.
- This could be using AgentCore Runtime and could use Amazon Bedrock to access various large language models (LLMs). The architecture could also be expanded to use Amazon Bedrock Knowledge Bases for a retrieval-augmented generation (RAG) solution.
- The AI agent will first obtain its own access token from AgentCore Identity. It will also provide the human access token as a request parameter. This is using the AgentCore Identity GetWorkloadAccessTokenForJWT API.
- When using the GetWorkloadAccessTokenForJWT API, AgentCore Identity will verify the human access token signature and verify the token is not expired.
- AgentCore Identity returns an access token for the AI agent, going forward I’ll call this the AI agent access token. Because the human access token was provided during the initial request to get the AI agent access token, the specific returned AI agent access token is bound to the human user’s identity.
- AgentCore Identity will derive the human user’s identity by combing the ISS and SUB claims within the human access token. You can learn more about obtaining credentials in the AgentCore Identity developer guide.
- The AI agent, using its own access token, will begin the process of obtaining a third, new access token from a third-party OAuth resource, which is Google in this flow. The AI agent will call the AgentCore Identity GetResourceOauth2Token API. Because this is the initial login flow and a human user is involved, an OAuth 2.0 authorization code grant flow will begin for the OAuth resource (that is, Google). This can be referred to as a 3LO flow.
- The goal of this process is to obtain a temporary access token to be used with Google calendar that will be secured in the token vault. It’s important to note that as long as this access token for Google remains active after the human user has given consent, it can continue to securely be retrieved and used by the AI agent from the token vault.
- The Google authorization URL will be generated by AgentCore identity service based on the pre-configured Google OAuth client.
- The Google authorization URL is sent to the client from the AI agent.
- The client will immediately redirect to Google’s authorization endpoint and begin the auth flow for the human user to sign in to Google.
- After a successful authentication with Google, an authorization code is returned to AgentCore Identity, and an access token is obtained following the OAuth 2.0 authorization code grant flow.
- The access token from Google for the user is secured in the token vault. I’ll call this third access token going forward the Google access token.
- Tokens are secured in the token vault under the agent identity ID and the user ID, this way the token is bound between the agent identity, the human identity, and the Google access token.
- As the authorization code grant completes its process to obtain a Google access token in the backend, the user will be redirected back to the frontend of the application. This is configured as the callback URL.
AI agent acting on behalf of the user
- The AI agent will call the GetResourceOauth2Token API again (same as step 9) and include the AI agent access token as the workloadIdentityToken request parameter.
- However, this time the Google access token is returned from the token vault. This provides an enhanced user experience by reducing consent fatigue and minimizing the number of authorization prompts.
- With the original context and intent of having the AI agent help schedule a meeting in Google calendar, the AI agent will call the Google Calendar APIs with the Google access token.
- The Google access token used by the AI agent will have the https://www.googleapis.com/auth/calendar.events scope, authorizing certain calendar actions.
- After actions are complete between the AI agent and Google calendar, success responses (or failures) will be returned to the AI agent.
- This could be an opportunity for the AI agent to perform other automated actions, such as updating a user record in the web application’s backend.
- After all actions of the AI agent are complete, a success response is returned to the frontend application.
The previous flow describes the entire end-to-end process starting from a human user needing to sign in to the web application and ending with an AI agent performing an automated action on behalf of the user. Three different access tokens were involved in this process, and the following is a summary of these access tokens.
- Human access token – This is issued by an Amazon Cognito user pool (or another identity provider). This access token is used to access the web application and is used to obtain the AI agent access token using the GetWorkloadAccessTokenForJWT API.
- AI agent access token –This is issued by AgentCore Identity. This access token is used by the AI agent to securely access the token vault.
- Google access token – This is issued by Google representing the human user. This access token is what’s secured in the token vault and can be securely retrieved by the AI agent access token.
Conclusion
Organizations are rapidly seeking opportunities to use AI agents to automate workflows and enhance user experiences, but this adoption can introduce security and compliance challenges that can’t be ignored. Organizations must make sure that AI agents can securely access resources on behalf of users while protecting sensitive credentials and maintaining compliance at scale. AgentCore Identity addresses these fundamental challenges by providing enterprise-grade security that protects user credentials and maintains strict access controls. This helps make sure that AI agents can only access what they need when they need it. The service integrates with existing identity systems, avoiding the need for complex migrations or rebuilding authentication flows. Its centralized management of AI agent identities reduces operational overhead and strengthens security posture. For organizations scaling their AI initiatives, these capabilities translate into faster time-to-market and reduced risk of unauthorized access. By implementing AgentCore Identity, organizations can confidently deploy AI agents with built-in OAuth support and secure token management, while lowering development and maintenance costs through streamlined security controls that scale with their business needs.
To learn more about building with AgentCore Identity in your organization, review some example use cases and visit the Getting started with AgentCore Identity section of the developer guide to explore prerequisites, SDK usage, best practices, and start building your first authenticated agent.
Use the comments section to leave feedback and engage about this post. If you have questions about this post, start a new thread on Amazon Bedrock AgentCore re:Post or contact AWS Support.
[$] The end of the 6.18 merge window
Post Syndicated from daroc original https://lwn.net/Articles/1041004/
The 6.18 merge window has come to an end, bringing with it a total of 11,974
non-merge commits, 3,499 of which came in after LWN’s
first-half summary.
The total is a little higher than the 6.17 merge window, which saw 11,404
non-merge commits. There are once again
a good number of changes and new features included in this release.
Securing applications with AWS Nitro Enclaves: TLS termination, TAP networking, and IMDSv2
Post Syndicated from David-Paul Dornseifer original https://aws.amazon.com/blogs/compute/securing-applications-with-aws-nitro-enclaves-tls-termination-tap-networking-and-imdsv2/
AWS Nitro Enclaves provide isolated environments that keep critical operations such as decryption and cryptographic key management secure from both from root user and external threats.
Many customers have applications that require end-to-end authentication using Transport Layer Security (TLS) and requiring control over TLS termination.
TLS termination refers to the process where encrypted TLS traffic is decrypted using the server’s private key, converting the secure encrypted communication back to plaintext for processing. TLS termination can be done directly within an enclave, helping to ensure that encrypted traffic is not exposed outside the trusted boundary.
This is particularly valuable for public-facing services such as anonymization proxies and Model Context Protocol (MCP) servers, where clients demand assurance that their communications are protected and the application’s integrity can be independently verified using cryptographic attestation in a remote fashion.
This post covers critical design and implementation decisions from the Build multi-party crypto wallets with AWS Nitro Enclaves workshop and the associated public GitHub repository.
Specifically, in this blog we explore patterns on how:
- you can build applications that are remotely verifiable by clients, including enclave-based TLS termination using Nitriding, an open-source framework built by Brave and AWS Nitro Enclaves.
- you can configure TAP networking devices for AWS Nitro Enclaves using gvproxy.
- your enclaves can access EC2 instance metadata service (IMDSv2) and fetch temporary AWS credentials.
- you can decrypt secrets via AWS Key Management Service (KMS) using cryptographic attestation and the Python Boto3 SDK.
Prerequisites and Deployment
This post builds on our workshop “Build multi-party crypto wallets with AWS Nitro Enclaves” which demonstrates a Shamir Secret Sharing (SSS) application. The SSS app securely splits cryptographic private keys into multiple shards, requiring a threshold number to reconstruct the original key, ideal for Nitro Enclaves as it prevents any single party from accessing the complete key while maintaining operational functionality.
To follow along hands-on, you’ll need to deploy the provided AWS Cloud Development Kit (CDK) stack from the workshop repository on GitHub. However, you can understand the concepts and architecture discussed in this post without deploying the solution yourself.
Solution architecture
The following diagram depicts the high-level architecture of the solution.
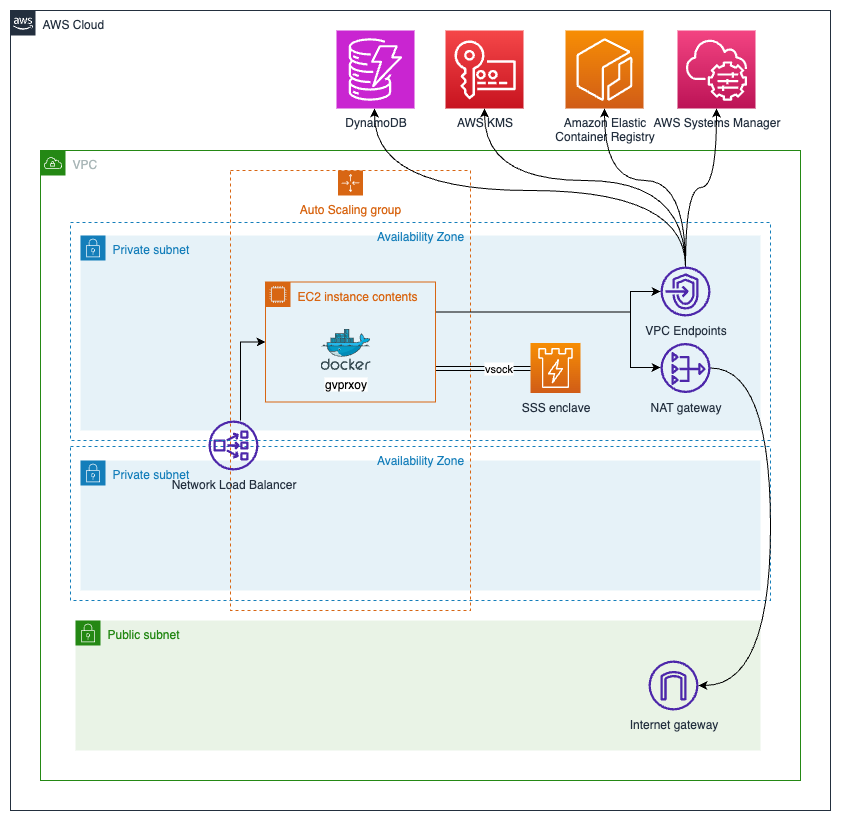
Before we dive deep into the application design, lets introduce the high-level components enclosed in the AWS Cloud Development Kit (AWS CDK) stack:
- A dedicated virtual private cloud (VPC) and private subnets are created. Internet access is only possible through a NAT gateway, avoiding public exposure of the Amazon Elastic Compute Cloud (EC2) instances.
- EC2 instances are placed in several private subnets and in different Availability Zones (AZ) using the auto-scaling group (ASG) to provide high availability. Network Load Balancer (NLB) is used to distribute the requests between different EC2 instances in the ASG. Each EC2 instance has one AWS Nitro enclave associated.
- AWS Key Management Service (AWS KMS) manages the symmetric key required for secure private key management using AWS Nitro Enclaves.
- Amazon DynamoDB is used to store the key shards for the Shamir Secret Sharing (SSS) solution.
Application design
During the AWS CDK deployment process (shown in the following figure), the following application will be built and deployed to the EC2 instance and the associated enclave. You can review the Python source code for the different components in the public GitHub repository.
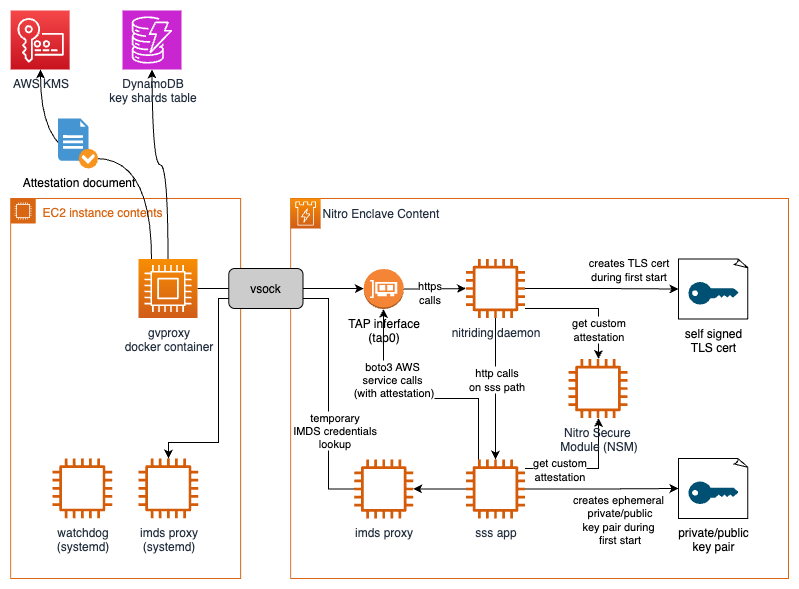
EC2 instance (left side)
- gvproxy: Proxy component that manages outbound and inbound TCP to vsock connections.
- watchdog: Systemd service that starts the enclave and makes sure it stays up and healthy.
- imds proxy: Systemd service that forwards
Instance Metadatacalls originating from vsock to169.254.169.254. This allows the enclave to request fresh IMDSv2 credentials.
Enclave (right side)
- TAP interface:
gvproxycounterpart. A fully routed network interface created bynitriding-daemonthat allows inbound and outbound traffic routing in the enclave. - imds proxy: IMDS proxy counterpart that allows the enclave to request credentials from its parent instance metadata service.
- nitriding-daemon: HTTPS service that terminates incoming HTTPS connections, responds to
attestationrequests, and forwards all/app*HTTP requests to thesss appHTTP listener. - SSS application: An SSS application that interacts with all AWS services such as AWS KMS or DynamoDB through
Boto3and provides key management and signing capabilities. - Nitro Secure Module: Enclave internal
/dev/nsmdevice that providesattestationand random number generator capabilities. Attestation private/public keys are managed by AWS.
Enclave based TLS termination and Remote Validation
Let’s now see how we can achieve TLS termination inside the enclave and allow remote clients to verify the enclaves code.
To do so, we are using Nitriding, a Go toolkit that simplifies running web applications inside AWS Nitro Enclaves without requiring networking stack changes. It uses gvproxy to create a tap0 interface, enabling controlled inbound and outbound traffic for the application inside the enclave.
Let’s have a look at the most important features nitriding offers.
TLS Termination: Nitriding generates an ephemeral private/public key pair on first launch, issuing a self-signed certificate for TLS. Furthermore, it supports Let’s Encrypt certificates for production use.
Application integration: Nitriding terminates TLS and forwards all /app* HTTP requests to the HTTP listener of the configured application. In the workshop these requests are forwarded to the SSS application.
Attestation endpoint: By default, nitriding exposes an /attestation endpoint that accepts a nonce value and returns a signed cryptographic attestation document.
This cryptographic attestation document includes hash measurements, also referred to as platform configuration registers (PCR), such as the hash of the enclave images (PCR0) or details about the parent EC2 instance (PCR4). For details on these measurements, refer to Where to get an enclave’s measurements.
The attestation document supports optional, customizable fields, namely nonce, public-key and user_data, which can be set individually for every attestation doc. For more information on the Nitro Enclaves attestation process and document structure, refer to Nitro Enclaves Attestation Process or check out the workshop sections about Customizing Attestation or document Validation.
Nitriding adds the nonce to the attestation document as a measure of freshness. Furthermore, the fingerprint (hash) of TLS certificate used by the enclave, is being added to the user_data field, as shown in the following sequence diagram.
This binds the certificate to the specific enclave instance.
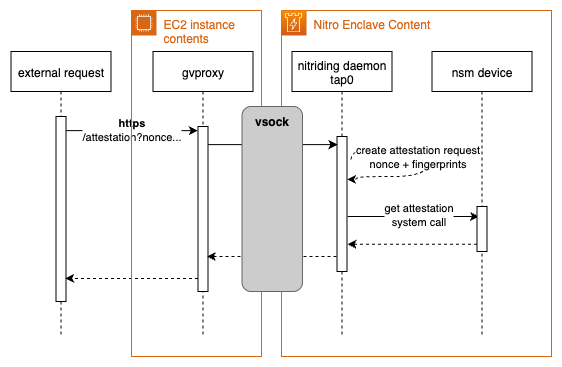
By comparing the TLS certificate fingerprint presented during the HTTPs connection and the fingerprint in the attestation document, you can prove the following aspects:
- The private key for TLS termination resides securely inside the enclave (in a trusted AWS environment).
- The enclave is running trusted code, as verified by the attestation’s PCR (Platform Configuration Register) measurements.
- The identity of the enclave is validated, whether the code is open source (allowing deterministic measurement through reproducible builds) or closed source (with measurements distributed by the provider). For more information on deterministic and reproducible builds, refer to Establishing verifiable security: Reproducible builds and AWS Nitro Enclaves.
Horizontal scaling
Let’s now have look into the scaling properties of a AWS Nitro Enclave based nitriding application and learn how we can improve the processing capacities of our application by scaling out horizontally.The provided CDK, by default, provisions a single EC2 instance with its associated enclave. As depicted in the preceding sequence diagram, nitriding generates a self-signed certificate at the start and uses it to terminate TLS connections. This approach is limited to a single worker because load balancing requests over several workers would introduce non-identical TLS certificates. Non-identical TLS certificates behind NLB can cause certificate mismatch errors and TLS handshake failures when clients are routed to different backend servers with certificates that don’t match (the expected domain name) or have different validation properties.There are different ways you can address this issue besides implementing your own cryptographic attestation-based method:
- Create a symmetric KMS key and associate it with your enclaves using AWS KMS condition keys for AWS Nitro Enclaves. Use AWS Certificate Manager (ACM) to create an exportable TLS certificate. Alternatively, generate a custom TLS certificate in a trusted environment. Encrypt all sensitive key material via AWS KMS and store the ciphertext in a database such as DynamoDB. Provide the encrypted TLS certificate to each enclave that requires access and use cryptographic attestation to decrypt the TLS certificate or key.
- Nitriding provides an enclave key synchronization mechanism based on AWS Nitro Enclaves cryptographic attestation. This mechanism supports Let’s Encrypt certificates out of the box so organizations can avoid all the operational and security challenges associated with self-signed certificates, particularly in context of web browsers.
Virtual Networking for Enclaves with Tap Interface
Now let’s deep dive into how nitriding provides tap0based networking (to the enclave) and learn how we can use tap0 networking without nitriding.
As mentioned previously, nitriding uses gvisor-tap-vsock package to provide tap0 based networking to the enclave.
gvisor-tap-vsock delivers a user-mode network stack for virtual machines (VMs) and containers, enabling secure, flexible connectivity between AWS Nitro Enclaves and external networks.
You can use gvisor-tap-vsock independently from nitriding if you only require tap0 networking without TLS termination and http forwarding capabilities. The setup remains the same as in the workshop; however instead of nitriding binary, you need to include the gvforwarder binary in the enclave Dockerfile. The build instructions can be found in Makefile.
After copying the binary into your Docker file, use a similar command in your enclave start.sh file to activate DNS resolution and start gvforwarder:
After you have started your enclave with gvforwarder you can manage port forwarding using the gvproxy process running on EC2 parent instances as done in the workshop.
IMDSv2 access from inside Enclaves
This section explores the requirement of accessing EC2 Instance Metadata Service Version 2 (IMDSv2) from inside an enclave and discusses different ways on how access can be provided.
Applications inside AWS Nitro Enclaves often need access to IMDSv2 to obtain temporary AWS credentials to interact with AWS services such as AWS KMS for decrypt operations. IMDSv2 is only accessible from within the associated EC2 instance and can be accessed at 169.254.169.254.You can enable IMDSv2 access for enclaves using one of the following two approaches:
Dedicated vsock proxy route (as done in the workshop)
Run a vsock proxy on the EC2 parent instance and one inside the enclave to provide access to IMDSv2 from inside the enclave. Apply the following configuration to your enclave to map 169.254.169.254 from inside the enclave to the endpoint on the parent instance:
This method is suitable if you do not need a tap interface in the enclave and want to tightly control outbound communication.
TAP interface with gvisor-tap-vsock
If your enclave uses a tap interface via gvisor, pass the -ec2-instance-metadata flag in the gvisor start command on the parent EC2 instance. This allows the host process to forward IMDSv2 traffic from the enclave (via tap0) to the metadata service. Ensure you are using gvisor-tap-vsock version v0.8.7 or newer for this feature.
Any of the EC2 parent instance or enclave related changes described in this section can be applied to an existing workshop CDK stack by rerunning the cdk deploy command as described here: Deploy the CDK application.
Encrypting and decrypting secrets inside AWS Nitro Enclaves using Python and Cryptographic Attestation
In this section we will go in depth on how KMS based decryption can be implemented inside enclaves in Python using AWS SDK for Python (Boto3).
Decryption, leverages the enclave’s unique cryptographic attestation feature unavailable directly on standard EC2 instances – ensuring enhanced security by verifying the enclave’s integrity.Encryption inside an enclave using the Boto3 SDK however mirrors the process outside the enclave, so it’s not detailed here.
High-Level Decryption Flow
The process for decrypting content inside a Nitro Enclave follows these streamlined steps:
- Ensure that the enclave has outbound networking configured.
- Generate an ephemeral RSA key pair.
- Request an attestation document that includes the public key.
- Create a KMS decrypt request with the ciphertext and attached attestation document.
- Receive and parse the resulting ciphertext_for_recipient in Cryptographic Message Syntax (CMS) format.
This flow enables secure decryption in Python, aligning with workshop examples for practical implementation.
Make sure that the tap0 network Interface is up and running and DNS has been configured
The Python code example discussed uses Boto3 SDK. Boto3 requires a fully routed network interface such as tap0 as described previously and access to AWS credentials. The credentials can be managed manually as done in the workshop or managed automatically by the SDK. See the previous section about managing AWS credentials.
Generate an ephemeral RSA key pair inside the enclave
Generate a fresh RSA private/public key pair for each session. This key is just used for the re-encryption schema and does not need persisted.
Request an attestation document included the public key
Use the Nitro Secure Module (NSM) to generate an attestation document that cryptographically proves enclave identity and includes the ephemeral public key.
AWS Nitro Enclaves SDK for C can be used along with Python to interact with the NSM device as done in the Validate a Nitro Enclave Attestation Document sample code repository.
Create an AWS KMS decrypt request including the ciphertext and attestation document
Send the attestation document as part of the Recipient parameter in the AWS KMS decrypt API call. AWS KMS will verify the attestation and encrypt the response for your enclave’s public key.
Receive and parse the ciphertext_for_recipient CMS document
AWS KMS returns a Cryptographic Message Syntax (CMS) structure containing the encrypted symmetric key and ciphertext. To decrypt, use the following steps:
- Load the private key from Step 2
- Parse the CMS structure
Use a library such as asn1crypto to extract the encrypted key, initialization vector (IV), and encrypted content.
- Decrypt the symmetric key
CMS uses private/public key cryptography to encrypt a symmetric key that is used for the payload. Use the enclave’s RSA private key to decrypt the symmetric key with OAEP padding.
- Decrypt the content with Advanced Encryption Standard (AES)
Use the decrypted symmetric key and IV to decrypt the content (typically using AES-CBC).
- Encode the content for transport
Encode the decrypted content as base64 for safe transport or further processing.
Cleanup
To avoid incurring future charges, delete the resources following the steps described in the workshop Cleanup section.
Conclusion
In this post, you learned how to use AWS Nitro Enclaves for building secure (public) applications using TLS termination, cryptographic attestation and TAP networking. The implementation includes practical examples using gvisor-tap-vsock tap networking, secure IMDSv2 access patterns and Python based CMS decrypt..
Ready to enhance your application security? Visit our GitHub repository and workshop to start building with AWS Nitro Enclaves today.
CBS & Bari Weiss #lastweektonight
Post Syndicated from LastWeekTonight original https://www.youtube.com/shorts/-6r-lAxhtv4
Upcoming Speaking Engagements
Post Syndicated from Bruce Schneier original https://www.schneier.com/blog/archives/2025/10/upcoming-speaking-engagements-49.html
This is a current list of where and when I am scheduled to speak:
- Nathan E. Sanders and I will be giving a book talk on Rewiring Democracy at the Harvard Kennedy School’s Ash Center in Cambridge, Massachusetts, USA, on October 22, 2025, at noon ET.
- Nathan E. Sanders and I will be speaking and signing books at the Cambridge Public Library in Cambridge, Massachusetts, USA, on October 22, 2025, at 6:00 PM ET. The event is sponsored by Harvard Bookstore.
- Nathan E. Sanders and I will give a virtual talk about our book Rewiring Democracy on October 23, 2025, at 1:00 PM ET. The event is hosted by Data & Society.
- I’m speaking at the Ted Rogers School of Management in Toronto, Ontario, Canada, on Thursday, October 29, 2025, at 1:00 PM ET.
- Nathan E. Sanders and I will give a virtual talk about our book Rewiring Democracy on November 3, 2025, at 2:00 PM ET. The event is hosted by the Boston Public Library.
- I’m speaking at the World Forum for Democracy in Strasbourg, France, November 5-7, 2025.
- I’m speaking and signing books at the University of Toronto Bookstore in Toronto, Ontario, Canada, on November 14, 2025. Details to come.
- Nathan E. Sanders and I will be speaking at the MIT Museum in Cambridge, Massachusetts, USA, on December 1, 2025, at 6:00 pm ET.
- Nathan E. Sanders and I will be speaking at a virtual event hosted by City Lights on the Zoom platform, on December 3, 2025, at 6:00 PM PT.
- I’m speaking and signing books at the Chicago Public Library in Chicago, Illinois, USA, on February 5, 2026. Details to come.
The list is maintained on this page.
Smart Robot Vacuum: Quiet or Loud? Home Assistant Integration! #shorts
Post Syndicated from BeardedTinker original https://www.youtube.com/shorts/Y5HPZVGvY08
NVIDIA DGX Spark Review The GB10 Machine is so Freaking Cool
Post Syndicated from Patrick Kennedy original https://www.servethehome.com/nvidia-dgx-spark-review-the-gb10-machine-is-so-freaking-cool/
In our NVIDIA DGX Spark review, we see how these Arm and NVIDIA Blackwell powered systems with 200GbE RDMA networking are just freaking cool
The post NVIDIA DGX Spark Review The GB10 Machine is so Freaking Cool appeared first on ServeTheHome.
Julia 1.12 released
Post Syndicated from jzb original https://lwn.net/Articles/1041916/
Version
1.12 of Julia has been released. Highlights of the release include
new
multi-threading features, new
tracing flags and macros, and an experimental
--trim feature. See the release
notes for a full list of new features, changes, and
improvements. LWN last covered Julia in
January.
Firefox 144.0 released
Post Syndicated from corbet original https://lwn.net/Articles/1041915/
Version
144.0 of the Firefox browser has been released. Changes this time
include improvements to tab-group and profile management, stronger
encryption for stored passwords, a “search image with Google Lens”
operation, and “Perplexity, an AI-powered answer engine built into the
“.
browser
This Is How Camera Bags SHOULD Be Designed
Post Syndicated from Matt Granger original https://www.youtube.com/watch?v=gpWzrW5wVvE
[$] The FSF considers large language models
Post Syndicated from corbet original https://lwn.net/Articles/1040888/
The Free Software Foundation’s Licensing and Compliance Lab
concerns itself with many aspects of software licensing, Krzysztof Siewicz
said at the beginning of his 2025 GNU Tools
Cauldron session. These include supporting projects that are facing
licensing challenges, collecting copyright assignments, and addressing GPL
violations. In this session, though, there was really only one topic that
the audience wanted to know about: the interaction between free-software
licensing and large language models (LLMs).