Post Syndicated from Thibault Meunier original https://blog.cloudflare.com/sometimes-i-cache/
HTTP caching is conceptually simple: if the response to a request is in the cache, serve it, and if not, pull it from your origin, put it in the cache, and return it. When the response is old, you repeat the process. If you are worried about too many requests going to your origin at once, you protect it with a cache lock: a small program, possibly distinct from your cache, that indicates if a request is already going to your origin. This is called cache revalidation.
In this blog post, we dive into how cache revalidation works, and present a new approach based on probability. For every request going to the origin, we simulate a die roll. If it’s 6, the request can go to the origin. Otherwise, it stays stale to protect our origin from being overloaded. To see how this is built and optimised, read on.
Let’s take the example of an online image library. When a client requests an image, the service first checks its cache to see if the resource is present. If it is, it returns it. If it is not, the image server processes the request, places the response into the cache for a day, and returns it. When the cache expires, the process is repeated.

Figure 1: Uncached request goes to the origin

Figure 2: Cached request stops at the cache
And this is where things get complex. The image of a cat might be quite popular. Let’s say it’s requested 10 times per second. Let’s also assume the image server cannot handle more than 1 request per second. After a day, the cache expires. 10 requests hit the service. Given there are no up-to-date items in cache, these 10 requests are going to go directly to the image server. This problem is known as cache stampede. When the image server sees these 10 requests all happening at the same time, it gets overloaded.

Figure 3: Image server overloaded upon cache expiration. This can happen to one or multiple users, across locations.
This all stops if the cache gets populated, as it can handle a lot more requests than the origin.

Figure 4: Cache is populated and can handle the load. The image server is healthy again.
In the following sections, we build this image service, see how it can prevent cache stampede with a cache lock, then dive into probabilistic cache revalidation, and its optimisation.
Let’s write this image service. We need an image, a server, and a cache. For the image we’re going to use a picture of my cat, Cloudflare Workers for the server, and the Cloudflare Cache API for caching.
Note to the reader: On purpose, we aren’t using Cloudflare KV or Cloudflare CDN Cache, because they already solve our cache validation problem by using a cache lock.
let cache = caches.default
const CACHE_KEY = new Request('https://cache.local/')
const CACHE_AGE_IN_S = 86_400 // 1 day

function cacheExpirationDate() {
  return new Date(Date.now() + 1000*CACHE_AGE_IN_S)
}

function fetchAndCache(ctx) {
  let response = await fetch('https://files.research.cloudflare.com/images/cat.jpg')
  response = new Response(
	await response.arrayBuffer(),
	{
  	  headers: {
  	    'Content-Type': response.headers.get('Content-Type'),
  	    'Expires': cacheExpirationDate().toUTCString(),
  	  },
	},
  )
  ctx.waitUntil(cache.put(CACHE_KEY, response.clone()))
  return response
}

export default {
  async fetch(request, env, ctx) {
	let cachedResponse = await cache.match(CACHE_KEY)
	if (cachedResponse) {
  	  return cachedResponse
	}
	return fetchAndCache(ctx)
  }
}
Codeblock 1: Image server with a non-collapsing cache
The image service is receiving 10 requests per second, and it caches images for a day. It’s reasonable to assume we would like to start revalidating the cache 5 minutes before it expires. The code evolves as follows:
let cache = caches.default
const CACHE_KEY = new Request('https://cache.local/')
const CACHE_AGE_IN_S = 86_400 // 1 day
const CACHE_REVALIDATION_INTERVAL_IN_S = 300

function cacheExpirationDate() {
  // Date constructor in workers takes Unix time in milliseconds
  // Date.now() returns time in milliseconds as well
  return new Date(Date.now() + 1000*CACHE_AGE_IN_S)
}

async function fetchAndCache(ctx) {
  let response = await fetch('https://files.research.cloudflare.com/images/cat.jpg')
  response = new Response(
	await response.arrayBuffer(),
	{
  	  headers: {
  	    'Content-Type': response.headers.get('Content-Type'),
  	    'Expires': cacheExpirationDate().toUTCString(),
  	  },
	},
  )
  ctx.waitUntil(cache.put(CACHE_KEY, response.clone()))
  return response
}

// Revalidation function added here
// This is were we are going to focus our effort: should the request be revalidated ?
function shouldRevalidate(expirationDate) {
  let remainingCacheTimeInS = (expirationDate.getTime() - Date.now()) / 1000

  return remainingCacheTimeInS <= CACHE_REVALIDATION_INTERVAL_IN_S
}

export default {
  async fetch(request, env, ctx) {
	let cachedResponse = await cache.match(CACHE_KEY)
	if (cachedResponse) {
       // revalidation happens only if the request was cached. Otherwise, the resource is fetched anyway
  	  if (shouldRevalidate()) {
    	    ctx.waitUntil(fetchAndCache(ctx))
  	  }
  	  return cachedResponse
	}
	return fetchAndCache(ctx)
  }
}
Codeblock 2: Image server with early-revalidation and a non-collapsing cache
That code works, and we can now revalidate 5 minutes in advance of cache expiration. However, instead of fetching the image from the origin server at expiration time, all requests are going to be made 5 minutes in advance, and that does not solve our cache stampede problem. This happens no matter if requests are coming to a single location or not, given the code above does not collapse requests.
To solve our cache stampede problem, we need the revalidation process to not send too many requests at the same time. Ideally, we would like only one request to be sent between expiration - 5min and expiration.
To make sure there is only one request at a time going to the origin server, the solution that’s usually deployed is a cache lock. The idea is that for a specific item, a cat picture in our case, requests to the origin try to obtain a lock. The request obtaining the lock can go to the origin, the others will serve stale content.
The lock has two methods: try_lock() and unlock.
* try_lock if the lock is free, take it and return true. If not, return false.
* unlock releases the lock.
Such a lock can be implemented as a Cloudflare RPC service:
import { WorkerEntrypoint } from 'cloudflare:workers'

class Lock extends WorkerEntryPoint {
  async try_lock(key) {
	let value = await this.ctx.storage.get(key)
	if (!value) {
  	  await this.ctx.storage.put(key, true)
  	  return true
	}
	return false
  }

  unlock() {
	return this.ctx.storage.delete(key)
  }
}
Codeblock 3: Lock service implemented with a Durable Object
That service can then be used as a cache lock.
// CACHE_LOCK is an instantiation of the above binding
// Assuming the above is deployed as a worker with name `lock`
// It can be bound in wrangler.toml as follows
// services = [ { binding = "CACHE_LOCK", service = "lock" } ]

const LOCK_KEY = "cat_image_service"

async function fetchAndCache(env, ctx) {
  let response = await fetch('...')
  ctx.waitUntil(env.CACHE_LOCK.unlock(LOCK_KEY))
  ...
}

function shouldRevalidate(env, expirationDate) {
  let remainingCacheTimeInS = (expirationDate.getTime() - Date.now()) / 1000

  // check if the expiry window is now, and then if the revalidation lock is available. if it is, take it
  return remainingCacheTimeInS <= CACHE_REVALIDATION_INTERVAL_IN_S && env.CACHE_LOCK.try_lock(LOCK_KEY)
}
Codeblock 4: Image server with early-revalidation and a cache using a cache-lock
Now you might say “Et voilà. No need for probabilities and mathematics. Peak engineering has triumphed.” And you might be right, in most cases. That’s why cache locks are so predominant: they are conceptually simple, deterministic for the same key, and scale well with predictable resource usage.
On the other hand, cache locks add latency and fallibility. To take ownership of a lock, cache revalidation has to contact the lock service. This service is shared across different processes, possibly different machines in different locations. Requests therefore take time. In addition, this service might be unavailable. Probabilistic cache revalidation does not suffer from these, given it does not reach out to an external service but rolls a die with the local randomness generator. It does so at the cost of not guaranteeing the number of requests going to the origin server: maybe zero for an extended period, maybe more than one. On average, this is going to be fine. But there can be border cases, similar to how one can roll a die 10 times and get 10 sixes. It’s unlikely, but not unrealistic, and certain services need that certainty. In the following sections, we dissect this approach.
A first approach is to reduce the number of requests going to the origin server. Instead of always sending a request to revalidate, we are going to send 1 out of 10. This means that instead of sending 10 requests per second when the cache is invalidated, we send 1 per second.
Because we don’t have a lock, we do that with probabilities. We set the probability of sending a request to the origin to be $p=\frac{1}{10}$. With a rate of 10 requests per second, after 1 second, the expectancy of a request being sent to the origin is $1-(1-p)^10=65\%$. We draw the evolution of the function $E(r, t)=1-(1-p)^{r \times t}$ representing the expectancy of a request being sent to the server over time. $r = 10$ and is the request rate.
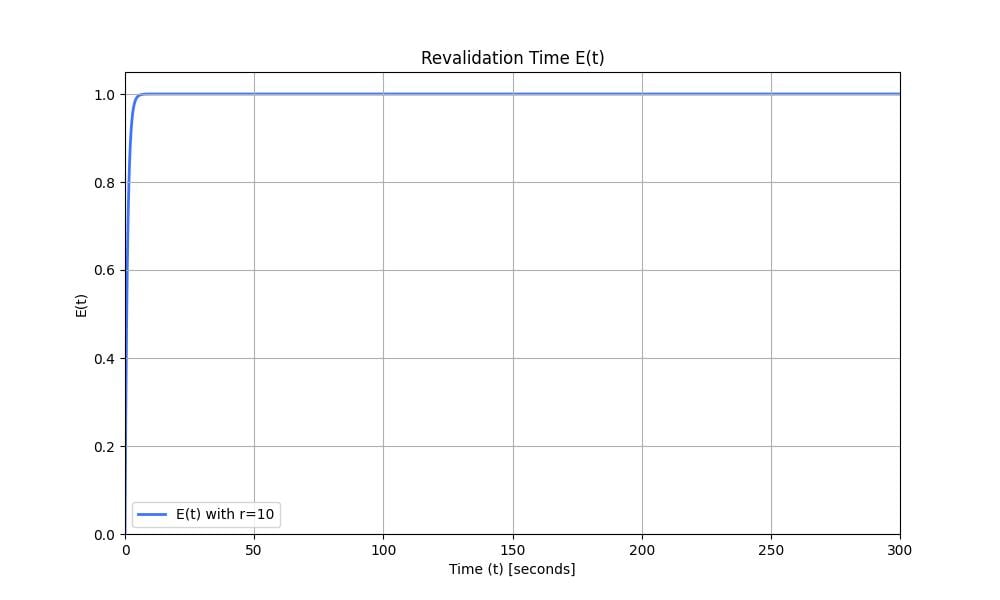
Figure 5: Revalidation time $E(t)$ with $r=10$ and $p=\frac{1}{10}$. At time $t$, $E(t)$ is the probability that an early revalidation occurred.
The graph moves very quickly towards $1$. This means we might still have space to reduce the number of requests going to our origin server. We can set a lower probability, such as $p_2=\frac{1}{500}$ (1 request every 5 seconds on average). The graph looks as follows:
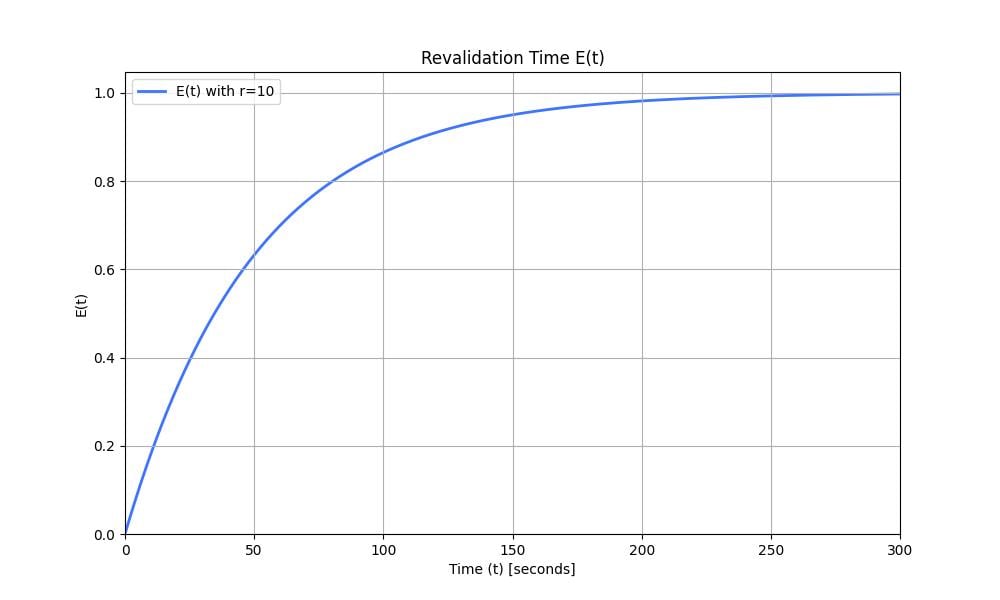
Figure 6: Revalidation time $E(t)$ with $r=10$ and $p=\frac{1}{500}$.
This looks great. Let’s implement it.
const CACHE_REVALIDATION_INTERVAL_IN_S = 300
const CACHE_REVALIDATION_PROBABILITY = 1/500

function shouldRevalidate(expirationDate) {
  let remainingCacheTimeInS = (expirationDate.getTime() - Date.now()) / 1000

  if (remainingCacheTimeInS > CACHE_REVALIDATION_INTERVAL_IN_S) {
	return false
  }
  if (remainingCacheTimeInS <= 0) {
	return true
  }
  return Math.random() < CACHE_REVALIDATION_PROBABILITY
}
Codeblock 5: Image server with early-revalidation and a probabilistic cache using uniform distribution
That’s it. If the cache is not close to expiration, we don’t revalidate. If the cache is expired, we revalidate. Otherwise, we revalidate based on a probability.
Until now, we assumed the picture of the cat received a stable request rate. However, for a real service, this does not necessarily hold. For instance, if instead of 10 requests per second, imagine the service receives only 1. The expectancy function does not look as good. After 5 minutes (300s), $E(r=1, t=300)=45\%$. On the other hand, if the image service is receiving 10,000 requests per second, $E(r=10000, t = 300) \approx 100\%$, but our server receives on average $10000 \times \frac{1}{500} = 20$ requests per second. It would be ideal to design a probability function that would adapt to the request rate.
That function would return a low probability when expiration time is far in the future, and increase over time such that the cache is revalidated before it expires. It would cap the request rate going to the origin server.
Let’s design the variation of probability $p$ over 5 minutes. When far from the expiration, the probability to revalidate should be low. This should help match the high request rate. For example, with a request rate of 10k requests per second, we would like the revalidation probability $p$ to be $\frac{1}{100000}$. This ensures the request rates seen by our server are going to be low on average, at about 1 request every 10 seconds. As time passes, we increase this probability to allow for revalidation even at a lower request rate.
|
Time to expiration $t$ (in s) |
Revalidation probability $p$ |
Target request rate $r$ (in rps) |
|
300 |
1/100000 |
10000 |
|
240 |
1/10000 |
1000 |
|
180 |
1/1000 |
100 |
|
120 |
1/100 |
10 |
|
60 |
1/10 |
1 |
|
0 |
1 |
– |
Table 1: Variation of revalidation probability over time
For each of these intervals, there is a high likelihood that a request rate $r$ will trigger a cache revalidation, and low likelihood that a lower request rate will trigger it. If it does, it’s ok.
We can update our revalidation function as follows:
const CACHE_REVALIDATION_INTERVAL_IN_S = 300
const CACHE_REVALIDATION_PROBABILITY_PER_MIN = [1/100_000, 1/10_000, 1/1000, 1/100, 1/10, 1]

function shouldRevalidate(expirationDate) {
  let remainingCacheTimeInS = (expirationDate.getTime() - Date.now()) / 1000

  if (remainingCacheTimeInS > CACHE_REVALIDATION_INTERVAL_IN_S) {
	return false
  }
  if (remainingCacheTimeInS <= 0) {
	return true
  }
  let currentMinute = Math.floor(remainingCacheTimeInS/60)
  return Math.random() < CACHE_REVALIDATION_PROBABILITY_PER_MIN[currentMinute]
}
Codeblock 6: Image server with early-revalidation and a probabilistic cache using piecewise uniform distribution
There seems to be a lot of decisions going on here. To solve this, we can reference an academic paper written by A Vattani, T Chierichetti, and K Lowenstein in 2015 called Optimal Probabilistic Cache Stampede Prevention. If you read it, you’ll recognise that what we have been discussing until now is close to what the paper presents. For instance, both the cache revalidation algorithm structure and the early revalidation function look similar.
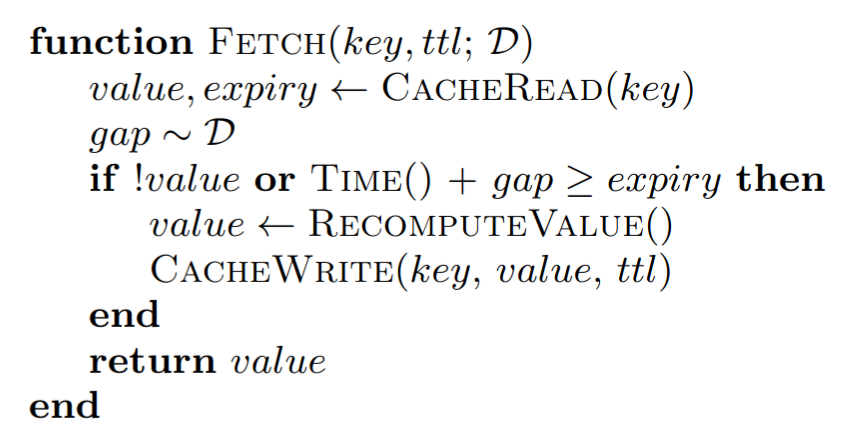
Figure 7: Probabilistic early expiration of a cache item as defined by Figure 2 of Optimal Probabilistic Cache Stampede Prevention paper. In our case, $\mathcal{D}=300$
One takeaway from the paper is that instead of discretization, with a probability from 0 to 60s, then from 60s to 120s, …, the probability function can be continuous. Instead of a fixed $p$, there is a function $p(t)$ of time $t$.
$p(t)=e^{-\lambda (expiry-t)}, \text{ with } expiry=300, \text{ and } t \in [0, 300]$
We call $\lambda$ the steepness parameter, and set it to $\frac{1}{300}$, $300$ being our early expiration gap.
The expectancy over time is $E(r, t)=1-e^{-rλt}$. This leads to the expectancy below for various request rates. You can note that when $r=1$, there is not a $100%$ chance that the request will be revalidated before expiry.
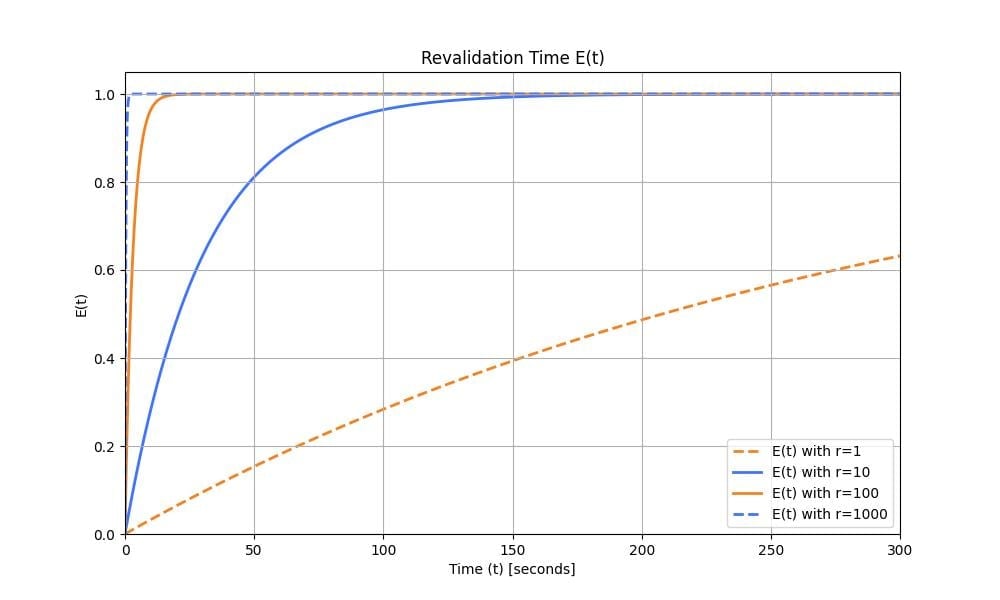
Figure 8: Revalidation time $E(t)$ for multiple $r$ with an exponential distribution.
This leads to the final code snippet:
const CACHE_REVALIDATION_INTERVAL_IN_S = 300
const REVALIDATION_STEEPNESS = 1/300

function shouldRevalidate(expirationDate) {
  let remainingCacheTimeInS = (expirationDate.getTime() - Date.now()) / 1000

  if (remainingCacheTimeInS > CACHE_REVALIDATION_INTERVAL_IN_S) {
	return false
  }
  if (remainingCacheTimeInS <= 0) {
	return true
  }
  // p(t) is evaluated here
  return Math.random() < Math.exp(-REVALIDATION_STEEPNESS*(CACHE_REVALIDATION_INTERVAL_IN_S-remainingCacheTimeInS)
}
Codeblock 7: Image server with early-revalidation and a probabilistic cache using exponential distribution
And that’s it. Given Date.now() has a granularity, and is not continuous, it would also be possible to discretise these functions, even though the gains are minimal. This is what we have done in a production worker implementation, where the number of requests is important. It is a service that benefits from caching for performance consideration, and that cannot use built-in stale-while-revalidate from within Cloudflare workers. Probabilistic cache stampede prevention is well-suited here, as no new component has to be built, and it performs well at different request rates.
We have seen how to solve cache stampede without a lock, its implementation, and why it is optimal. In the real world, you likely will not encounter this issue: either because it’s good enough to optimize your origin service to serve more requests, or because you can leverage a CDN cache. In fact, most HTTP caches provide an API that follows Cache Control, and likely have all the tools you need. This primitive is also built into certain products, such as Cloudflare KV.
If you have not done so, you can go and experiment with all the code snippets presented in this blog on the Cloudflare Workers Playground at cloudflareworkers.com.

