Transition of RubyGems Repository Ownership

Post Syndicated from jzb original https://lwn.net/Articles/1042480/

The Ruby community has experienced some turbulence
of late after Ruby Central took
control
of the GitHub repositories for a number of projects
including RubyGems
and Bundler. Those projects have historically been developed
separately
from Ruby itself. They are now being put under the
control of Ruby’s core team, according to Ruby creator Yukihiro
Matsumoto (a.k.a. “Matz”):

To provide the community with long-term stability and continuity,
the Ruby core team, led by Matz, has decided to assume stewardship of
these projects from Ruby Central. We will continue their development
in close collaboration with Ruby Central and the broader
community.

Ruby Central has also issued a statement.

[$] A brief history of RubyGems.org

Post Syndicated from jzb original https://lwn.net/Articles/1042131/

Ruby libraries and
applications are distributed via a packaging format called a gem. RubyGems.org has been the central
hosting service for gems since about 2010. This article is part one of
a two-part series on the RubyGems.org takeover by Ruby Central. Understanding the
history of RubyGems.org, and the contributor community behind it, is
vital to making sense of the current power
struggle
between Ruby Central and members of the Ruby
community who have maintained those services and tools for many
years.

Security updates for Friday

Post Syndicated from daroc original https://lwn.net/Articles/1042452/

Security updates have been issued by AlmaLinux (kernel and libssh), Debian (firefox-esr and pgpool2), Mageia (varnish & lighttpd), Red Hat (python3, python3.11, python3.12, python3.9, and python39:3.9), SUSE (expat, gstreamer-plugins-rs, kernel, openssl1, pgadmin4, python311-ldap, and squid), and Ubuntu (dotnet8, dotnet9, dotnet10 and mupdf).

Конграчулейшънс, Борисов 2.0

Post Syndicated from Емилия Милчева original https://www.toest.bg/congratulations-borisov-2-0/

Конграчулейшънс, Борисов 2.0

Лидерът на ГЕРБ Бойко Борисов е в 42-рата гестационна седмица и скоро ще (се) роди променена власт, която обаче едва ли ще издържи дълго след ремонта. Не и до изборите за президент и вицепрезидент следващата есен. 

Въпреки петъчните изявления, че никой от партията не иска избори, след 42-рата седмица вече е рисково и за „майката“, и за „бебето“ и всеки лекар би посъветвал за секцио по спешност. А Борисов и премиерът Росен Желязков предложиха разговори за укрепване на коалицията, в които освен ГЕРБ–СДС, БСП и „Има такъв народ“ ще включи и ДПС – Ново начало. Там ще се разберат как да узаконят съвместното съжителство с Пеевски.

Резултатите от докладите на областните координатори, кметовете и депутатите показват, че никой не иска да ходи на избори, включително и ГЕРБ.

Тежките отговорности

Егото на Борисов кърви. На партията и на неговия гръб тежат отговорностите на управлението, докато съюзниците във властта берат плодове и правят компоти. Дори сгромолясващата се по нанадолнището БСП получава 493 гласа повече спрямо 2023 г. на извънредните избори за общински съвет в Пазарджик. А ГЕРБ, вместо да получават шестици, са шестаци, защото са на шесто място, и разни хиени ръфат периферията и си проправят път към твърдото партийно ядро. Премиерът Росен Желязков е добре посрещнат на европейски форуми, а в България всички крила на опозицията плюс президента Радев нападат Борисов, че Пеевски му е стъпил на врата, и го ядосват с подигравчийски есемеси. Но в действителност му показват кой глозга ГЕРБ и не се насища.

Олигархът партиен лидер може да е спасение за стабилността, но „ковиден“ за ГЕРБ, тъй като умерените избиратели на партията не приемат този съюз. Не го приемат и някои представители на партийните кръгове. ГЕРБ може да разчита на клиентелисткия си електорат, но заради факта, че властта се споделя с повече политически сили, той също е намалял.

След като всички телевизии ретранслираха гибелния гняв на трикратния премиер и началник на първата политическа сила Бойко Методиев Борисов, държавата спря работа. Министър-председателят отмени заседанията на правителството, парламентът няма кворум и също не работи. Като че ли е обявен национален траур, а не антракт преди второ действие с договаряне и преразпределение на порции в изпълнителната власт. Зад кулисите тръгна „преформатирането“.

В понеделник, все едно че нищо не се е случило, държавата пак ще заработи след дългата пауза, в която нито една министерска или депутатска заплата не е била прекъсната. 

Конкуренцията настъпва

Лидерът на ГЕРБ ще изтръска некои от широкия си гръб, за да гарантира и зрелищата. Засега е изпаднал само директорът на Областната дирекция на МВР в Пазарджик старши комисар Даниел Бараков, иначе трябваше да е министърът на вътрешните работи Даниел Митов, който е и заместник-председател на ГЕРБ.

Каквото и да прави Борисов обаче, нито ще потуши напрежението в управляващата коалиция, нито ще възвърне доминацията му на политическата сцена. А през 2026 г. ще има сериозна конкуренция в лицето на нов партиен лидер – Румен Радев. Защо не и партньор? За разлика от Пеевски, водачът на ГЕРБ не влиза в остра конфронтация с Радев – макар да го нарече „проруска алтернатива“ във вулканичното си слово – и никак не са изключени контакти между двамата далеч от публичността.

Въпреки че всички все още са предпазливи в говоренето за предсрочните избори, никой вече не се съмнява, че настоящият президент има амбиции за изпълнителната власт.

Това означава, че ще напусне „Дондуков“ 2 доста по-рано от януари 2027 г., когато е клетвата на новите президент и вицепрезидент. За да го направи, е необходим взрив на социално напрежение, което да му утъпче пътя на спасител и да го издигне до първите места в социологическите проучвания.

Колко рано? Напролет или наесен? Бързината, с която Борисов поиска да бъде сменена председателката на 51-вото Народно събрание Наталия Киселова (БСП), означава, че може да са по-рано, и за да няма изненади, „домовата книга“ с кандидати за премиери трябва да бъде попълнена с „правилната“ селекция. Председателят на парламента е първият, който ще бъде поканен за служебен премиер при предсрочни избори. А освен че бе нарочена за смяна, Киселова бе и публично опозорена с обидния коментар на Бойко Борисов.

Киселова, където види празник на роза, на ягода, на череша, на слива, на джанка, на маруля – заминава там да се показва. Камо ли ако има мач, ако има нещо волейбол… то е чудо. Деветнайсет депутати или там колко има зад гърба си… Откъде накъде? Трябва да пита, преди да тръгне: имате ли против?

Въпреки това Киселова не може да стигне Бойко-Борисовата Цвета Караянчева, която „дари“ старите килими от парламента на театъра в Кърджали. 

Социалистите дадоха да се разбере, че нямат нищо против да жертват преподавателката по конституционно право. Председателят на БСП Атанас Зафиров, който е и вицепремиер, обяви, че са готови на всякакви разговори, за да запазят правителството. Никой не е и очаквал друго.

Засега не е ясно дали Киселова е „помилвана“ от отстраняване. Все пак беше единствената, чието име беше огласено от Бойко Борисов за незабавна смяна.

А Зафиров даде тон за калесването на ДПС – Ново начало, което за него не било официализирано.

Критика по същество срещу работата на госпожа Киселова аз не съм чул до момента. В същото време, ако се върви към преформатиране на това управление, към ново управленско мнозинство, формално, защото то съществува в момента това мнозинство, но не е официализирано, тогава е съвсем нормално този разговор да започне отначало, включително с позицията председател на НС.

Тоест няма против да се посместят на „Дондуков“ 1, за да пуснат в Министерския съвет и новите депесари.

Санкционираният за корупция от САЩ и Великобритания даже чака пред вратата. „Ако има нужда да споделим отговорността и на ГЕРБ им тежи това нещо, ние сме готови“, каза Пеевски на въпрос ще дадат ли министри. 

Щели да имат решение до понеделник, предполагам, че той изчаква Борисов, всичко е в ръцете на Борисов – дали ще хвърли държавата в бездната… Видяхте колко време подкрепяме този кабинет без нищо, само заради хората. Готови сме и така да продължим да го подкрепяме, готови сме и да споделим отговорността.

Но Европейската народна партия едва ли ще е съгласна с точно това споделяне на отговорности.

Тихо, тихо! Пре-фор-ма-ти-ра-не

„Преформатиране на управлението“ означава пренареждане на участниците и ролите във властта, без формално да се стига до оставка и нови избори. Иначе е известно като „ремонт на кабинета“, но „преформатиране“ звучи някак технократско, по-авторитетно и… трудоемко. Борисов и Пеевски с чукове в ръка скулптират масивния ръбест коалиционен блок, изчуквайки оттук-оттам някое бесепе или итънъ. За да бъде разбран от широката публика, лидерът на ГЕРБ нарича този процес „разсънването на будалата“. 

Борисов не чупи коалицията: „Няма да чупим коалицията, но и няма да стоим тук по този начин.“ Само пречупва партньорите, за да приемат решенията му.

Ако пусне Пеевски през парадния вход на властта, Борисов ще завърши легитимирането му, макар и да не успя да го избели чрез сваляне на санкциите по „Магнитски“. Е, поне опита. БСП са съгласни съжителството с Пеевски да се узакони, остава и ИТН да се произнесат. Засега мълчат. Лидерът Слави Трифонов има опит в развалянето на правителства. Ако реши, че участието в настоящия кабинет е лебедовата им песен във властта, може и да склони. Но може и да се престорят на бегачи на дълги разстояния и да откажат.

С „официален“ Пеевски обаче Борисов би подписал предсмъртното си писмо, а и самият Пеевски няма полза да убие своя гостоприемник. Без партия, на чийто гръб да тежи, той е никой въпреки маниакалното възвеличаване и контрола над съдебната власт. 

А за президента Румен Радев се откриват най-добрите мишени.

Ставаме свидетели как Борисов капитулира пред Пеевски и му предава властта. 

Преддверие на криза

Преформатирането обаче е преддверие на криза и предсрочни избори. От ПП–ДБ виждат две решения: или правителството на Желязков да поиска вот на доверие, или да преформатират правителството с нови лица. „Страната има нелегитимен център на власт – институциите, службите и съдебната система са пленени“, заяви съпредседателят на „Да, България“ Ивайло Мирчев и отбеляза, че това прави невъзможно провеждането на нормални, честни избори. По повод подкрепата, която Борисов поиска от ПП–ДБ, другият съпредседател – Божидар Божанов, коментира, че завладяната държава и ролята на Пеевски в нея са фундаменталните проблеми на политическата система в България:

Ако Борисов не беше тотално приклещен от Пеевски, вече щеше да е представил план за пълното му изолиране от властта.

Лидерът на „Възраждане“ Костадин Костадинов смята, че Борисов е уплашен, и определя речта му като „зов за помощ“. 

Ако беше разгневен, във вторник щеше да е напуснал правителството. Примирено е избрал ролята на Ахмед Доган… Ако намери достатъчно смелост в себе си, ще отиде на избори. Собствената му партия иска избори.

Според Костадинов Борисов и Пеевски са в „смъртоносна схватка за надмощие и оцеляване“, но това няма да продължава вечно, защото ГЕРБ няма как да се примири с ролята си на втора цигулка.

Предвид двете особено трудни задачи пред управляващите – бюджет 2026 и подготовката за еврозоната от 1 януари, кандидатите за властта са се поснишили. Така де, като ГЕРБ са поели отговорността, да си я носят заедно с оглозганите кокали!

Да се остави процесът по въвеждане на еврото в ръцете на служебно правителство е безразсъдно и безотговорно. Смените на няколко министри сега биха разредили напрежението, но няма да се решат структурните слабости на бюджета за догодина, за които предупреждават бизнес и анализатори.

Без структурни мерки ще има дефицити и бюджетът ще катастрофира. Трябва да имаме дефицит, не по-голям от 2% от БВП… България може да стане първата държава в еврозоната, която в първата си година няма да има растеж.

Любомир Дацов, член на Фискалния съвет и бивш заместник-министър на финансите

До края на годината бюджетът за 2026-та ще изглежда нарисуван много добре. Това не означава, че ще бъде полезен. Знаем кой със сигурност ще спечели – хората на висша държавна длъжност, особено т.нар. органи за сигурност. Ако вземете бюджета на съдебната система, особено прокуратурата, той е увеличен два пъти за три години.

Красен Станчев, Институт за пазарна икономика

Дори гуверньорът на БНБ Димитър Радев наруши традиционното за централен банкер мълчание, за да предупреди, че ако бюджет 2026 прилича на тазгодишния, идва криза, а България се отдалечава от модела на пазарна икономика, защото растежът идва от държавните заплати, а не от частния сектор.

„Преформатирането“ няма да реши нито един от тези значими проблеми. Гражданите нямат нужда от моноспектаклите на Борисов (който сигурно е проумял, че повече никога няма да бъде премиер), а от големия разговор за модернизацията на държавата и от законност и справедливост. Този език Борисов не го говори, Пеевски още по-малко.

Тоест разговаряме – епизод 2

Post Syndicated from Владислав Севов original https://www.toest.bg/toest-razgovaryame-epizod-2/

Тоест разговаряме – епизод 2

В разговора с Емилия Милчева стъпихме на нейното кредо за бавна журналистика и основната роля на въпроса „Защо?“. Говорихме за банализираната корупция и културата „имам човек“… Важна тема бяха и протестите – лекуват ли системата и има ли опасност да са в помощ на „други играчи“. Гражданските сдружения и участието им в политиката, нуждата политиците да търсят жива връзка с избирателите, регулаторните комисии и възможните подходи към работата им по същество, а не като „бухалки“ – на такива теми посветихме частта със зрителски въпроси. Завършихме с личното „защо“ на Емилия Милчева към професията и предстоящите ѝ планове – книгата с работно заглавие „Колелото на късмета“ и документалния подкаст за т.нар. Възродителния процес.

Гледайте целия разговор в нашия YouTube канал:

Може да го чуете и като аудиозапис в SoundCloud:


Злодей ли е Пеевски?

Лесно е да се мисли в категориите „черно и бяло“, „добър и лош“ – удобно е предимно от пропагандна гледна точка. Да, той е злодей, защото носи отговорност за една порочна система. Но не цялата отговорност. Част от нея носим и всички ние, които с бездействие или с това, че очакваме и искаме да бъдем корумпирани, съдействаме за нея.

Той е злодей, защото е символ на определен модел на власт – чрез страх и мрежи от интереси. Но той не е аномалия, а резултат от начина, по който българската политическа и икономическа среда „възнаграждава“ бруталните играчи, а съдебната система се страхува да им търси отговорност. Зад гърба на Пеевски се крият много „пеевчета“ – и което е още по-страшно, ние не познаваме техните лица. Те може да са възпитани, мили, красиви, но в същността си да са Пеевски.

Злодеи в демокрацията няма – има неработещи институции, които позволяват на един човек да концентрира власт, без да носи отговорност, и да злоупотребява с нея, както намери за добре.

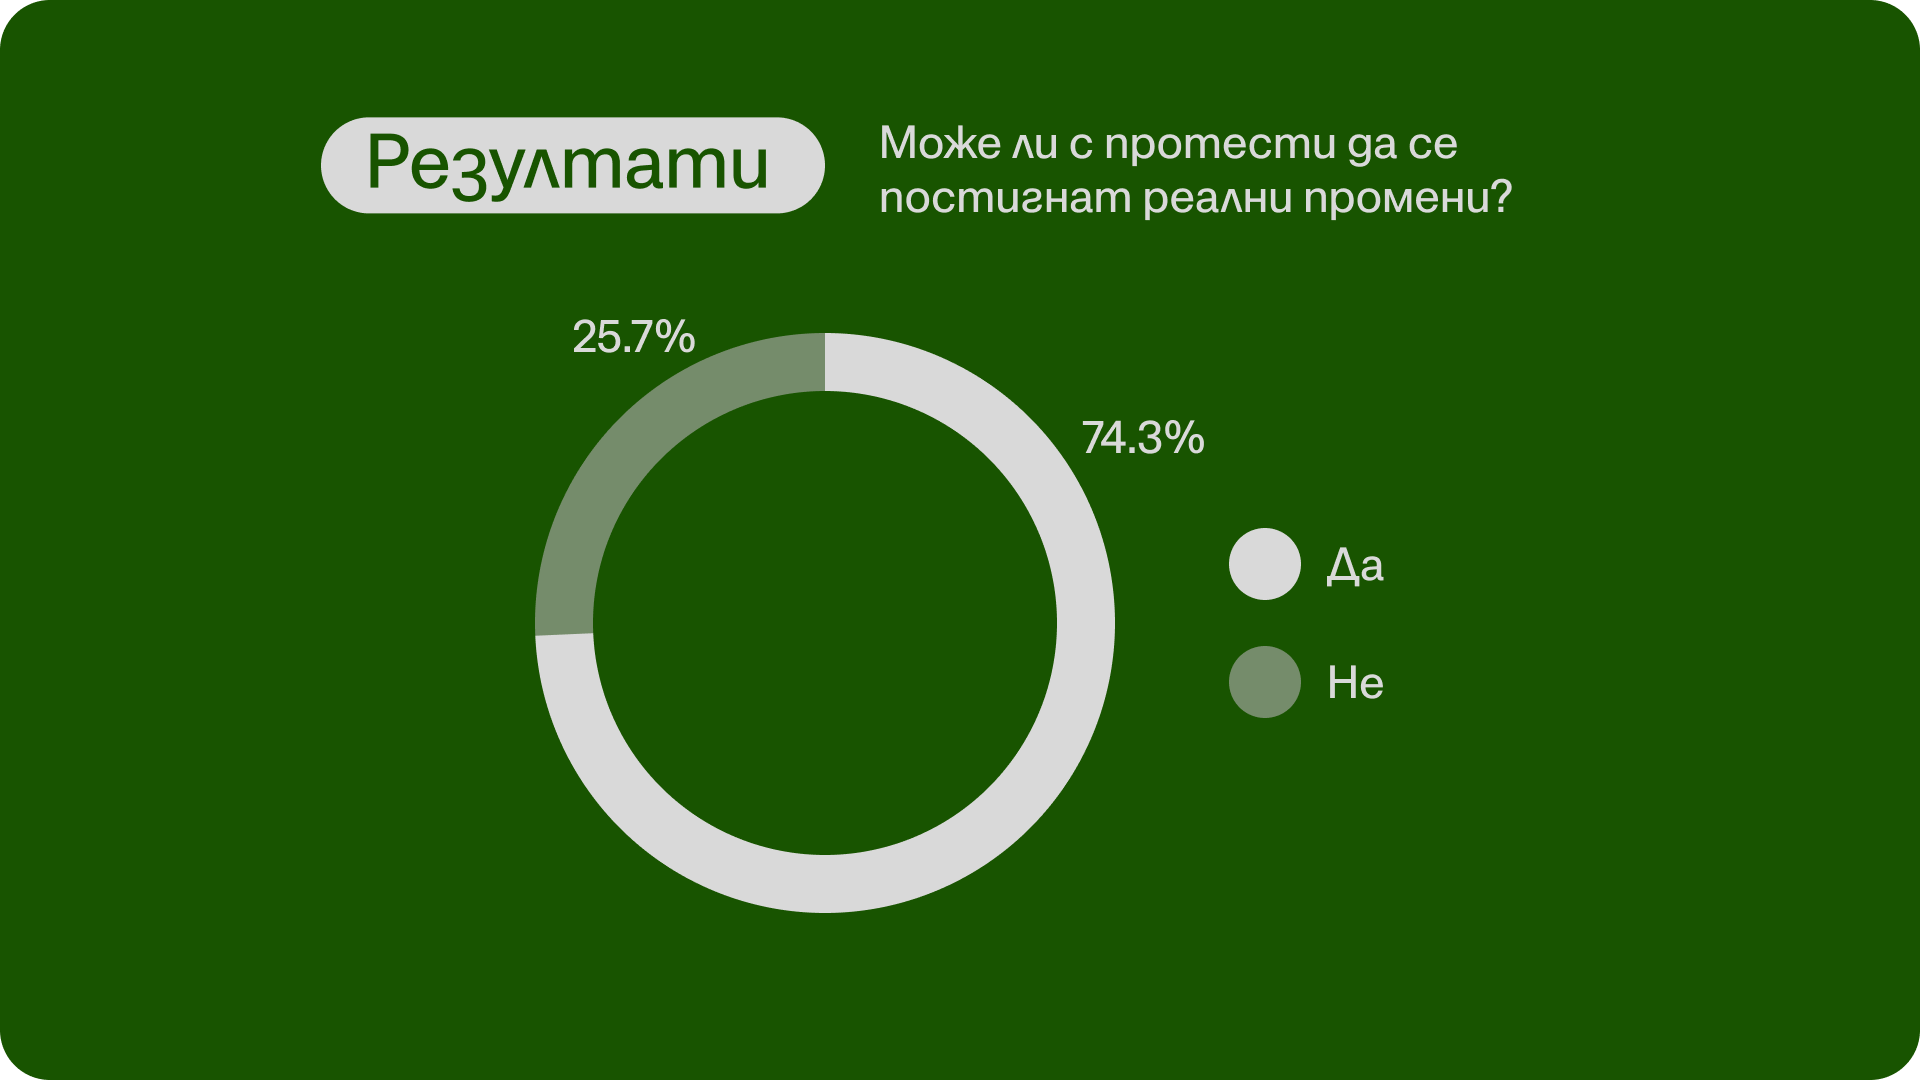
Преди срещата ви помолихме да отговорите на кратката ни анкета. Ето и резултатите от нея:

Тоест разговаряме – епизод 2

Емилия Милчева е редовна коментаторка на политическите процеси в България, от 2018 г. е авторка на анализи в „Тоест“ и на репортажи за българската редакция на „Дойче Веле“. Журналистка, която не се задоволява с „какво“ – винаги търси „защо“. В текстовете ѝ няма ефектни фрази, а точен поглед върху онова, което често остава под повърхността. Вярва в критичния ум, любопитството и щипката лудост.

Следващата среща на „Тоест разговаряме“ ще бъде с Павлина Върбанова, водещата на рубриката „Порция език“, и ще се проведе на 1 ноември 2025 г., събота, от 16:00 ч. на живо в YouTube Live.


В „Тоест разговаряме“ всеки месец ви срещаме с автори, които познавате добре от анализите или от рубриките им в „Тоест“, но този път ще ги видите и чуете в по-личен и непосредствен формат. Във видеоразговорите, предавани на живо, активно участие имате и вие, нашата публика – със своите въпроси, коментари и включване в тематичната анкета. Водещ на поредицата е Владислав Севов, дългогодишен телевизионен журналист и съосновател на „Тоест“.

Тоест разговаряме – епизод 2

„Тоест разговаряме“ е поредица, подкрепена от Институт „Отворено общество – София“ и съфинансирана от Европейския съюз в рамките на проекта Media Resilience. Изразените възгледи и мнения са само и изцяло на техните автори и не отразяват непременно възгледите и мненията на Европейския съюз, на Европейската изпълнителна агенция за образование и култура (EACEA) или на Институт „Отворено общество – София“ (ИООС). Нито Европейският съюз, нито EACEA, нито ИООС могат да бъдат държани отговорни за тях.

A Surprising Amount of Satellite Traffic Is Unencrypted

Post Syndicated from Bruce Schneier original https://www.schneier.com/blog/archives/2025/10/a-surprising-amount-of-satellite-traffic-is-unencrypted.html

Here’s the summary:

We pointed a commercial-off-the-shelf satellite dish at the sky and carried out the most comprehensive public study to date of geostationary satellite communication. A shockingly large amount of sensitive traffic is being broadcast unencrypted, including critical infrastructure, internal corporate and government communications, private citizens’ voice calls and SMS, and consumer Internet traffic from in-flight wifi and mobile networks. This data can be passively observed by anyone with a few hundred dollars of consumer-grade hardware. There are thousands of geostationary satellite transponders globally, and data from a single transponder may be visible from an area as large as 40% of the surface of the earth.

Full paper. News article.

Гласовете на Америка – брой 9

Post Syndicated from Йоанна Елми original https://www.toest.bg/glasovete-na-amerika-broy-9/

Гласовете на Америка – брой 9

„Американците искат умереност и баланс както в живота си, така и у лидерите, които водят държавата – не конфликти и поляризация. Ние не сме нация от фанатици, твърдо решени да превърнат „другите във врагове“. Ние сме общество, което всеки път, когато е било изправено пред криза, рано или късно е намирало общ път напред в името на споделеното ни наследство“, казва политологът Алън Улф, автор на книгата „В крайна сметка една нация. Какво всъщност мислят американците за Бог, държавата, семейството, расизма, помощите, имиграцията, хомосексуалността, работата, дясното, лявото и един за друг“ (One Nation, After All: What Americans Really Think About God, Country, Family, Racism, Welfare, Immigration, Homosexuality, Work, The Right, The Left and Each Other). 

През 2006 г. Улф е един от интелектуалците, които спорят по въпроса има ли, или няма културни войни. На пръв поглед абсурден почти 20 години по-късно, въпросът продължава да е все така актуален във време, в което очевидно неморалното или неправилното лесно се пречупват през призмата на определена културно-политическа идеология и стават основателни, искани, оправдани. Независимо дали говорим за дебати за бъдещето на платформата TikTok в САЩ, за подкрепата за улесняване на пътя на висококвалифицирани имигранти до американско гражданство, или за митата (които дори спечелиха на Тръмп акронима TACO – от Trump Always Chickens Out, или „Тръмп винаги го хваща шубето“), подкрепата или опозицията по даден въпрос обикновено сравнително бързо се разделят по идеологическа линия – докато партията/президентът не промени мнението си. 

Що е то „културна война“? 

Както всяка друга война, и културната цели власт. Словосъчетанието е буквална заемка от немски (Kulturkampf) и набира популярност през 70-те години на XIX в., когато губещата влияние и власт Католическа църква под водачеството на папа Пий IX се изправя срещу зараждащата се идеология на националната държава, в случая Кралство Прусия под властта на Ото фон Бисмарк. Ценностите на Просвещението – не само национализмът, но и секуларизмът, либерализмът и научният реализъм – са в директен конфликт с църковната власт, която от векове държи контрола над държавните работи, образованието и вярата, простичко казано – над обществения ред. 

Пренареждането на обществото от монархия, в която кралят е божи избраник, подкрепян от църквата, към национална държава настъпва не само през зараждането на нови идеологии, методи на мислене и навици, но и с възникването на нова, по-заможна търговска и гражданска класа на фона на обедняването на монархиите и църквата.

Процесът е хем съпоставим с настоящето, хем трудно разбираем от днешна гледна точка: живеем във време, в което държавата и националната принадлежност като обединител на обществото са поставени под въпрос, а корпорации и частни лица имат много по-голям капитал от БВП на множество държави, което им позволява да упражняват и много по-голяма власт, включително през медиите. В такива времена се зараждат нови идеологии и нови идеи как трябва да живеем заедно. Какво точно кристализира накрая, показва само времето. 

В опита си да опази влиянието си Католическата църква се опитва да наложи по-строг контрол над сфери като брака, семейството, образованието. Основават се асоциации, вестници, училища, групи и ордени, които насърчават определени религиозни практики. Католическата пропаганда – включително и за ежедневни събития – се разпространява чрез местни и национални органи из цяла Западна Европа. Папите издават енциклики (папски послания до всички католици), в които заклеймяват либерализма, свободата на пресата, свободата на религиите, разделението между църквата и държавата, гражданския брак, идеята, че народът може да бъде суверен и др. Църквата издава и дълги списъци със забранени книги. Ако ви звучи познато, има причина. От своя страна зараждащият се европейски либерализъм приема църковните догми като война срещу модерната държава, науката и духовната свобода. 

Културната война: на Западния фронт нищо ново

През 1991 г. излиза от печат книгата „Културните войни. Борбата за значението на Америка“ (Culture wars: the struggle to define America) от Джеймс Хънтър, професор във Вирджинския университет. Тезата му е, че е налице война между „традиционалисти“ и „прогресивисти“ – първите поддържат морални идеали, наследени от миналото, а вторите се стремят към промяна и гъвкавост. Тези различни гледни точки са в основата на все по-нажежени дискусии по теми като абортите, сексуалността, образованието и ролята на религиозните институции в обществото. Дебатите се водят от различни групи и проникват чак до нивото на институциите, поради което все по-често се поставя под въпрос какви всъщност са ценностите на САЩ и как трябва да бъде „подредено“ американското общество.

Няколко години по-късно излиза и книгата на Алън Улф, който изказва противоположна теза: ако изобщо има културна война, повечето американци (обикновените хора) изобщо не се вълнуват от нея:

Американците вярват както в традиционните религиозни ценности, така и в правото на лична свобода, така че невинаги е лесно да се каже кое от двете е по-важно за тях. 

Още през 80-те години на миналия век Хънтър забелязва сходни тактики при леви и десни активисти, които се занимават с редица ключови въпроси: аборти, гей права, пушене и протести срещу ядреното оръжие. Според него много от конфликтите се разиграват на местно ниво, без връзка помежду си, но разделителните линии са едни и същи, със силно сходство между използваните културни символи и реторика. 

Според Улф пък става въпрос за процес, който се движи отгоре надолу: политическите партии робуват на все по-екстремни идеологии, позволявайки на най-шумните активисти да задават тона. Въпреки че консервативната партия по онова време е силна, казва Улф, те се възприемат като по-слабата страна, тъй като политическите им победи не успяват да променят поведението и навиците на повечето хора.

Парадоксалното е, че Америка се движи все по-надясно политически, но все по-наляво в културно отношение. Огромна мотивация за консерваторите са гневът и разочарованието от моралния упадък на страната. Но те трябва да се обърнат навътре, интроспективно, и да разберат, че политиката, дори консервативната, няма да им помогне, ако бракът им е нещастен, децата им се бунтуват, а политическата им воля е слаба“, пише Улф. 

Във вакуума се раждат и чудовища 

За Съединените щати десетилетието след края на Студената война е период на спокойствие и успех, но и на затвърждаване и осъзнаване на дълбоките културни промени. Успешното брандиране и проектиране на образа на „свободния свят“ в света след Втората световна война води до желание у много американци мечтата да се превърне в реалност.

Отражение на това са достигналите апогея си през 60-те и 70-те години движения за правата на жените, на работниците, на гей хората и на чернокожите. Тези движения водят до много съществени законови промени (американките могат да отворят своя собствена банкова сметка едва през 1974 г. например). Именно в такъв контекст контракултурата на 60-те и 70-те създава знакова музика, литература и изобщо изкуство, което бързо превзема света (и така до днес).

Всяка реакция има контрареакция: в случая с историята това са избирането на Ричард Никсън и Роналд Рейгън, през чиито мандати се наблюдава връщане на махалото към „традициите“ според широкото им разбиране; но след като гражданските свободи вече са придобити, тяхното ограничаване се оказва трудно. Поне засега. 

Всеки герой се нуждае от антигерой. Към края на 90-те години Близкият изток и Китай стават възможни злодеи по различни, понякога обективни причини. Но още преди атаките на 11 септември американските консервативни движения започват да виждат достоен враг вътре в самата държава – собствените си съграждани с различни политически и културни възгледи, които консерваторите смятат за пагубни за обществената тъкан. 

За какво всъщност се воюва? 

Към разговора за културните войни се присъединява и политологът Морис Фиорина от Станфорд. Той изтъква, че американската политическа система е мажоритарна – мнозинството (победителите) определя политики, които малцинството (загубилите) понася, но за сметка на това пазарната икономика дава свобода и многообразие на културата. Музиката, книгите и филмите, които се харесват на обществото например, може да не отговарят на представите на управляващото мнозинство (в САЩ редовно продължават опитите за забрана и канселиране на книги и друго изкуство). Резултатът е, че предпочитанията, моралните възгледи и вярванията на обикновените хора може да не получават непременно изражение в политическия живот, но със сигурност могат да бъдат разчетени в популярната култура и изведени от нея. 

„Политическият елит съвсем естествено вярва в собствената си важност, но тя е преувеличена“, смята Фиорина. Културните войни между елита могат да доведат до обща поляризация, казва още той, но по-вероятният резултат е хората просто да се отвратят от политиката още повече и да престанат да се интересуват от нея.

Освен това политологът подчертава, че културните войни често пренебрегват значението на по-традиционни разделителни линии, например икономическите: неравенствата и бедността, както и разликата във финансовото положение на демократичните и консервативните избиратели продължават да нарастват и да са основен фактор в американската политика. 

Културата почти винаги води до политика, но не и обратното, казва Фиорина. Придвижването на политиката вдясно и на културата вляво означава, че културните консерватори губят в по-важната битка, защото търсят политически решения на дълбоко културни проблеми. Какво е политическото решение на липсата на морал? На порнографията и вулгарността? На липсата на обноски и на емпатия? Разбира се, че тези въпроси нямат отговор, те нямат политически решения и ако консерваторите продължат да преследват такива, рано или късно ще се провалят. Политологът подчертава и че самите консервативни гласоподаватели са далеч от „традицията“: те сменят религията си (вицепрезидентът Джей Ди Ванс стана католик през 2019 г.), населеното си място, развеждат се, женят се отново (президентът Тръмп има три брака и множество документирани изневери) и т.н. 

Надеждата умира последна 

Културните войни са сигурен симптом за остра социална криза: пренареждане на политическите и финансовите слоеве, дълбоки промени в ценностите и в мисленето на обществата, загуба на сигурни структури (религия, държава) и страх от несигурното бъдеще. Две десетилетия по-късно дебатът на Улф и Хънтър е основополагащ за разбирането на реалността, в която живее Америка – и като резултат светът, включително България, тъй като, подобно на всичко останало, културните войни също са предмет на износ и на експлоатация от източници на дезинформация. 

Въпрос е и доколко културните войни отразяват мисленето на американците извън конкретните казуси, около които се разиграват.

Редица проучвания показват, че американците всъщност изразяват съгласие по множество важни проблеми, като здравеопазването, неравенствата и престрелките в училищата например.

Несъгласията идват тогава, когато започне търсенето на решения, и често се експлоатират за политически ползи. Фактът, че републиканците в момента управляват и трите клона на изпълнителната и законодателната власт – Конгреса, Камарата на представителите и президентството, както и че Върховният съд има консервативно мнозинство, все още не е довел до „Великата Америка“, която бе обещана. Напротив, основните проблеми остават същите (както ще разискваме по-подробно в следващия брой). Въпреки пропагандата, въпреки насилието, въпреки невярната информация, реалността си остава същата – както винаги се случва. 

Накрая Улф и Хънтър постигат съгласие поне за едно: ако има разлики между американците, те са политически, не културни или религиозни. Американците ценят едни и същи основни ценности – толерантност, плурализъм и индивидуалност.

Надеждата е – казва Улф – да бъде постигнато надграждане върху този консенсус между обикновените хора като противоотрова за екстремизма, който характеризира толкова голяма част от управляващия елит. 

И двамата смятат за най-важно, че американците все още вярват в значимостта на демокрацията. Несъгласията са породени от същината ѝ – здравата демокрация по условие дава пространство за различия и несъгласия. Това, разбира се, са думи от отминало десетилетие. Работата по уронването на вярата в демократичната държава тече усилено. Дали основите ще устоят, е въпрос, който всички си задаваме поне веднъж седмично. 

Т.Е. от Е.Т. – епизод 27

Post Syndicated from Тоест original https://www.toest.bg/t-e-ot-e-t-epizod-27/

Т.Е. от Е.Т. – епизод 27

Борисовият стендъп, кабинетът за снимки на Пеевски плюс Иво Сиромахов, МОН и Венета Райкова – всичко в този ред.


Следете видеорубриката на Елена Телбис за „Тоест“ и във Facebook, Instagram и TikTok.

Load Balancing Monitor Groups: Multi-Service Health Checks for Resilient Applications

Post Syndicated from Noah Crouch original https://blog.cloudflare.com/load-balancing-monitor-groups-multi-service-health-checks-for-resilient/

Modern applications are not monoliths. They are complex, distributed systems where availability depends on multiple independent components working in harmony. A web server might be running, but if its connection to the database is down or the authentication service is unresponsive, the application as a whole is unhealthy. Relying on a single health check is like knowing the “check engine” light is not on, but not knowing that one of your tires has a puncture. It’s great your engine is going, but you’re probably not driving far.

As applications grow in complexity, so does the definition of “healthy.” We’ve heard from customers, big and small, that they need to validate multiple services to consider an endpoint ready to receive traffic. For example, they may need to confirm that an underlying API gateway is healthy and that a specific ‘/login’ service is responsive before routing users there. Until now, this required building custom, synthetic services to aggregate these checks, adding operational overhead and another potential point of failure.

Today, we are introducing Monitor Groups for Cloudflare Load Balancing. This feature provides a new way to create sophisticated, multi-service health assessments directly on our platform. With Monitor Groups, you can bundle multiple health monitors into a single logical entity, define which components are critical, and use an aggregated health score to make more intelligent and resilient failover decisions.

This new capability, available via the API for our Enterprise customers, removes the need for custom health aggregation services and provides a far more accurate picture of your application’s true availability. In the near future this feature will be available in the Dashboard for all Load Balancing users, not just Enterprise!

How Monitor Groups Work

Monitor Groups function as a superset of monitors. Once you have created your monitors they can be bundled into a single unit – the Monitor Group! When you attach a Monitor Group to an endpoint pool, the health of each endpoint in that pool is determined by aggregating the results of all enabled monitors within the group. These settings, defined within the ‘members’ array of a monitor group, give you granular control over how the collective health is determined.

// Structure for a single monitor within a group
{
  "description": "Test Monitor Group",
  "members": [
    {
      "monitor_id": "string",
      "enabled": true,
      "monitoring_only": false,
      "must_be_healthy": true
    },
    {
      "monitor_id": "string",
      "enabled": true,
      "monitoring_only": false,
      "must_be_healthy": true
    }
  ]
}

Here’s what each property does:

  • Critical Monitors (must_be_healthy): You can designate a monitor as critical. If a monitor with this setting fails its health check against an endpoint, that endpoint is immediately marked as unhealthy. This provides a definitive override for essential services, regardless of the status of other monitors in the group.

  • Observational Probes (monitoring_only): Mark a monitor as “monitoring only” to receive alerts and data without it affecting a pool’s health status or traffic steering. This is perfect for testing new checks or observing non-critical dependencies without impacting production traffic.

  • Quorum-Based Health: In the absence of a failure from a critical monitor, an endpoint’s health is determined by a quorum of all other active monitors. An endpoint is considered globally unhealthy only if more than 50% of its assigned monitors report it as unhealthy. This system prevents an endpoint from being prematurely marked as unhealthy due to a transient failure from a single, non-critical monitor.

You can add up to five monitors to a group.

A diagram showing three health monitors (HTTP, TCP, and Database) combined into a single Monitor Group. The group is attached to a Cloudflare Load Balancing pool, which assesses the health of three origin servers.

A Globally Distributed Perspective

The power of Monitor Groups is amplified by the scale of Cloudflare’s global network. Health checks aren’t performed from a handful of static locations; they can be configured to execute from data centers in over 300 cities across the globe. While you can configure monitoring from every data center simultaneously (‘All Datacenters’ mode), we recommend a more targeted approach for most applications. Choosing a few diverse regions, like Western North America and Eastern Europe, or using the ‘All Regions’ setting provides a robust, global perspective on your application’s health while reducing the volume of health monitoring traffic sent to your origins. This creates a distributed consensus on application health, preventing a localized network issue from triggering a false positive and causing an unnecessary global failover. Your application’s health is determined not by a single perspective, but by a global one. 

This same principle elevates Dynamic Steering when used in conjunction with Monitor Groups. The latency for a Monitor Group isn’t just a single RTT measurement. It’s a holistic performance score, averaged from, potentially, hundreds of points of presence, across all the critical services you’ve defined. This means your load balancer steers traffic based on a true, globally-aware understanding of your application’s performance.

For load balancers using Dynamic Steering and a Monitor Group, the latency used to make steering decisions is now calculated as the average Round Trip Time (RTT) of all active, non-monitoring-only members in the group. This provides a more stable and representative performance metric. Rather than relying on the latency of a single service, Dynamic Steering can now make decisions based on the collective performance of all critical components, ensuring traffic is sent to the endpoint that is truly the most performant overall.

Health Aggregation in Action

Let’s walk through an example to see how Cloudflare aggregates health signals from a Monitor Group to determine the overall health of a single endpoint. In this scenario, our application has three key components we need to check: a public-facing /health endpoint, another service running on a specific TCP port, and a database dependency. Privacy and security are paramount, so, to monitor the database without exposing it to the public Internet, you would securely connect it to Cloudflare using a Cloudflare Tunnel, allowing our health checks to reach it securely.

Setup

  • Health Monitors in the Group:

    • HTTP check for /health (must_be_healthy: true)

    • TCP check for Port 3000 connectivity (must_be_healthy: false)

    • DB check for database health (must_be_healthy: false)

  • Health Check Regions:

    • Western North America (3 data centers)

    • Eastern North America (3 data centers)

  • Quorum Threshold: An endpoint is considered healthy if more than 50% of checking data centers report it as UP.

First, Cloudflare determines the health from the perspective of each individual data center. If the critical monitor fails, that data center’s result is definitively DOWN. Otherwise, the result is based on the majority status of the remaining monitors.

Here are the results from our six data centers:


[image description: A table showing health check results from six data centers across two regions. One of the six data centers report a “DOWN” status because the critical HTTP monitor failed. The other five report “UP” because the critical monitor passed and a majority of the remaining monitors were healthy.]

Finally, the results from all six checking data centers are combined to determine the final, global health status for the endpoint.

  • Global Result: 5 out of the 6 total data centers (83%) report the endpoint as UP.

  • Conclusion: Because 83% is greater than the 50% quorum threshold, the endpoint is considered globally healthy and will continue to receive traffic.

This multi-layered quorum system provides incredible resilience, ensuring that failover decisions are based on a comprehensive and geographically distributed consensus.

Getting Started with Monitor Groups

Monitor Groups are now available via the API for all customers with an Enterprise Cloudflare Load Balancing subscription and will be made available to self-serve customers in the near future. To get started with building more sophisticated health checks for your applications today, check out our developer documentation. 

To create a monitor group, you can use a POST request to the new /load_balancers/monitor_groups endpoint.

POST accounts/{account_id}/load_balancers/monitor_groups
{
  "description": "Monitor group for checkout service",
  "members": [
    {
      "monitor_id": "string",
      "must_be_healthy": true,
	"enabled": true
    },
    {
      "monitor_id": "string",
      "monitoring_only": false,
	"enabled": true
    }
  ]
}

Once created, you can attach the group to a pool by referencing its ID in the monitor_group field of the pool object. 

What’s Next

We are continuing to build a seamless platform experience that simplifies traffic management for both internal and external applications. Looking ahead, Monitor Groups will be making its way into the Dashboard for all users soon! We are also working on more flexible role-based access controls and even more advanced load-based load balancing capabilities to give you the granular control you need to manage your most complex applications.

AMD Helios MI450 Rack at OCP Summit with a Different Version from Meta

Post Syndicated from Patrick Kennedy original https://www.servethehome.com/amd-helios-mi450-rack-at-ocp-summit-with-a-different-version-from-meta/

At OCP Summit 2025, we saw the AMD Helios rack along with Meta’s Helios rack which was very different swapping power, networking, and more

The post AMD Helios MI450 Rack at OCP Summit with a Different Version from Meta appeared first on ServeTheHome.

Zero downtime blue/green deployments with Amazon API Gateway

Post Syndicated from Biswanath Mukherjee original https://aws.amazon.com/blogs/compute/zero-downtime-blue-green-deployments-with-amazon-api-gateway/

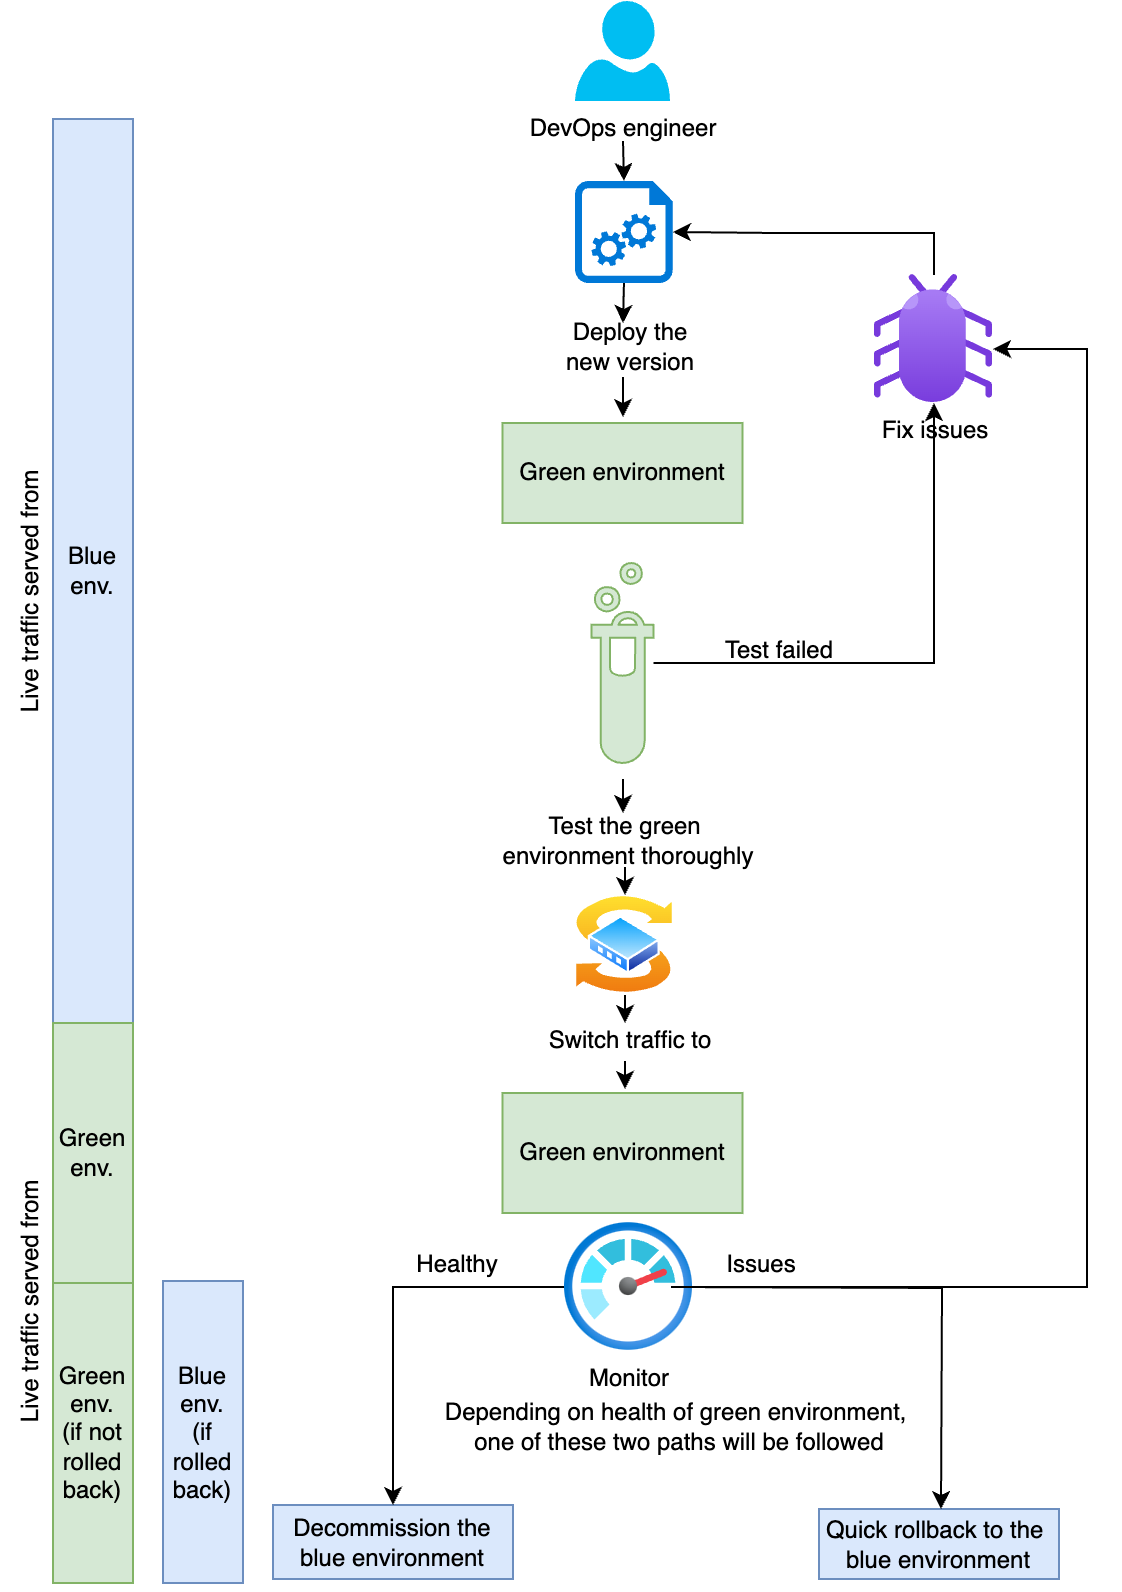
Modern applications require deployment strategies that minimize downtime and reduce risk. Blue/green deployment is a strategy that reduces downtime and risk by running two identical production environments called “blue” and “green”. At any given time, only one environment serves live production traffic while the other remains idle. This strategy provides immediate fallback to the previous stable version if issues arise after the new deployment. Let’s say a company is deploying a new version of its application. The following diagram shows the blue/green deployment strategy they are using.

Complete blue/green deployment strategy, including testing, monitoring, and conditional rollback procedures

As shown in the preceding diagram, current production traffic is served by the blue environment. During deployment of the new version of the application, the following sequence of activities happens:

  1. Deploy the new version of the application: Deploy the new version to the green environment.
  2. Test thoroughly: Test the new version in the green environment by invoking the API invoke URL from API Gateway. This does not affect production traffic, which continues to be served by the blue environment.
  3. Switch traffic: After you have thoroughly tested the green environment, redirect all production traffic from the blue to the green environment.
  4. Monitor and take any necessary action: Continue to monitor the green environment as it serves production traffic. Keep the blue environment ready for immediate rollback to the previous stable version, in case any issues arise in the green environment. At this point, one of two possible outcomes happens:
    1. If you identify any issues with the green environment in production, roll back to the previous stable version of the blue environment and fix the green environment before retrying.
    2. If you observe no issues with the green environment, decommission the blue environment. The green environment is now the new blue environment, the environment with stable production version of the application serving live traffic.

In this post, you learn how to implement blue/green deployments by using Amazon API Gateway for your APIs. For this post, we use AWS Lambda functions on the backend. However, you can follow the same strategy for other backend implementations of the APIs. All the required infrastructure is deployed by using AWS Serverless Application Model (AWS SAM).

Solution overview

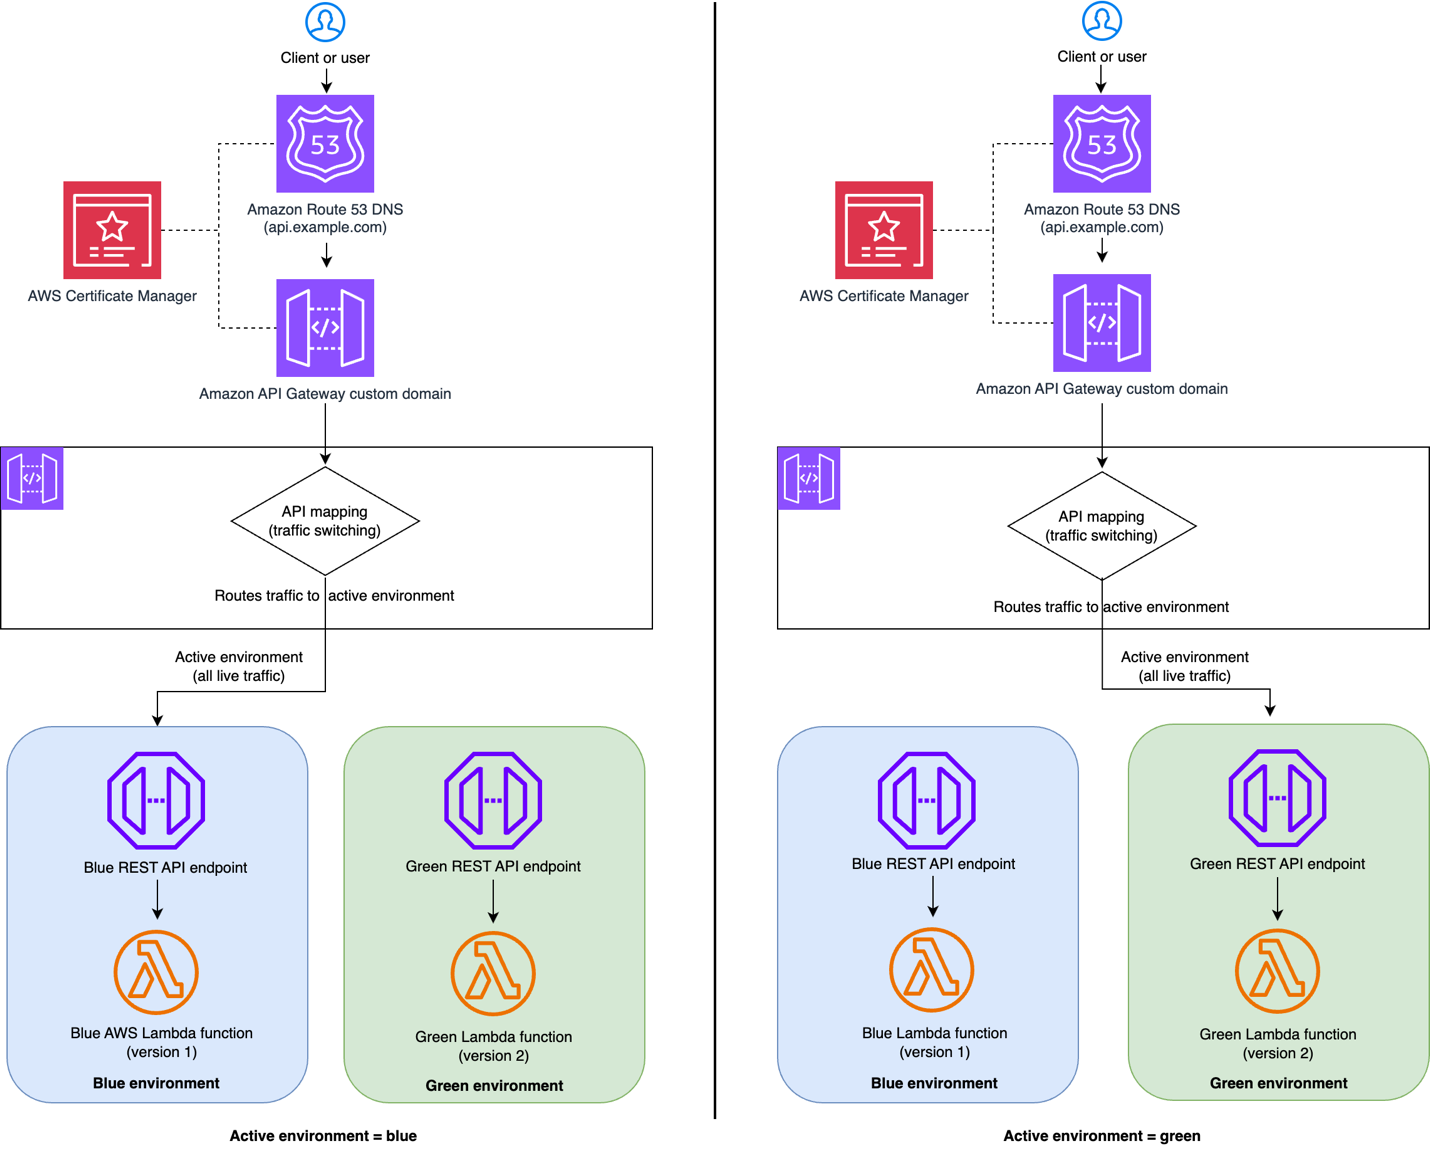
As you follow along with this post, you will implement the following blue/green deployment architecture by using API Gateway custom domain API mapping. You use API mappings to connect API stages to a custom domain name. After you create a domain name and configure DNS records, you use API mappings to send traffic to your APIs through your custom domain name.

AWS serverless architecture showing blue /green deployment using Amazon API Gateway custom domain

As shown in the preceding diagram, the blue/green deployment architecture includes four primary AWS services – Amazon Route 53, Amazon API Gateway, AWS Lambda functions, and AWS Certificate Manager (ACM). When you send a request to the API, the Route 53 resolves the domain to the API Gateway custom domain. API Gateway handles HTTPS termination by using a configured ACM certificate. API Gateway examines the incoming request path and headers to route the request to the active environment.

You first set up the blue environment along with the Route 53 DNS configuration, API Gateway custom domain mapping, ACM and test it with Route 53 URL. This is your production environment serving live traffic. After that, deploy a new version of the application in the green environment and test it by invoking the API invoke URL from API Gateway while live traffic is still being served from the blue environment. Then, switch the traffic from the blue environment to the green environment by using API Gateway custom domain API mapping. This ensures that there is no change in the external (client-facing) API custom domain URL. Live traffic is now served by the green environment. If you observe any issues during this time, you can quickly roll back to the blue environment and fix the green environment. If the green environment is stable, you can decommission the blue environment.

This post uses two separate regional API endpoints to simulate blue/green environments and traffic routing between them but you can this same architectural pattern using single API endpoint with two stages representing blue and green environments.

Prerequisites

Complete the following prerequisites before you start setting up the solution:

Set up and test the solution

Note that this is a sample project to understand the concept and not for direct usage in production. The sample project contains three APIs.

  • Health GET API to know the current health of the environment and which environment the request was served from.
  • Pets GET API to get the list of available pets.
  • Order POST API to place a pet order.

Follow the steps below to setup blue/green deployment and test it.

  1. Clone the repository and navigate to the directory (all commands run from here)
    Clone the GitHub repository in a new folder and navigate to the stacks folder.

    git clone https://github.com/aws-samples/sample-blue-green-deployment-with-api-gateway.git
    cd sample-blue-green-deployment-with-api-gateway/stacks

  2. Deploy the blue environment
    You will first setup the blue environment. Run the following commands to deploy the blue environment:

    sam build -t blue-stack.yaml
    sam deploy -g -t blue-stack.yaml

    Enter the following details:

    • Stack name: The CloudFormation stack name (for example, blue-green-api-blue)
    • AWS Region: A supported AWS Region (for example, us-east-1)
    • BlueLambdaFunction has no authentication. Is this okay?: y
    • SAM configuration file: blue-samconfig.toml

    Keep everything else set to their default values. You will use the SAM deploy output for the subsequent steps. Going forward, you can run the following command to deploy the blue environment resources:

    sam build -t blue-stack.yaml
    sam deploy -t blue-stack.yaml --config-file blue-samconfig.toml

  3. Test the blue environment

    Run the following commands to test the blue environment after replacing ApiEndpoint with BlueApiEndpoint from the SAM deploy output in each case. First, test Health check API to know the health of the environment. Run the following command.

    curl --request GET \ 
    --url https://<ApiEndpoint>/health

    Sample response:

    {
      "status": "healthy", 
      "environment": "blue", 
      "version": "v1.0.0", 
      "timestamp": "2025-09-05T13:11:11.248267Z"
    }

    Second, test the pets GET API request to get the list of available pets. Run the following command.

    curl --request GET \ 
    --url https://<ApiEndpoint>/pets

    Sample response:

    {
      "environment": "blue",
      "version": "v1.0.0",
      "pets": [
        {
          "id": 1,
          "name": "Buddy",
          "category": "dog",
          "status": "available"
        },
        {
          "id": 2,
          "name": "Whiskers",
          "category": "cat",
          "status": "available"
        },
        {
          "id": 3,
          "name": "Charlie",
          "category": "bird",
          "status": "pending"
        }
      ]
    }

    Now, test create order POST API to place an order for a pet:

    curl --request POST \
      --url https://<ApiEndpoint>/orders \
      --header 'content-type: application/json' \
      --data '{
      "id": 1,
      "name": "Buddy"
    }'

    Expected response:

    {
      "confirmationNumber": "ORD-3251C0F4", 
      "environment": "blue",
      "version": "v1.0.0",
      "timestamp": "2025-09-05T13:16:04.703666Z", 
      "data": 
      {
        "id": 1, 
        "name": "Buddy", 
        "status": "ordered"
      }
    }
    

    Check that the response contains the environment attribute set to blue and the version attribute set to v1.0.0

  4. Deploy API Gateway custom domain pointing to the blue environment

    Run the following commands to deploy Amazon API Gateway custom domain with API mapping pointing to the blue environment created in the previous step.

    sam build -t custom-domain-stack.yaml
    sam deploy -g -t custom-domain-stack.yaml

    Enter the following details:

    • Stack name: (for example, blue-green-api-custom-domain)
    • AWS Region: A supported AWS Region (for example, us-east-1)
    • PublicHostedZoneId: The Route 53 public hosted zone ID (for example, ABXXXXXXXXXXXXXXXXXYZ)
    • CustomDomainName: The Route 53 domain name (for example, api.example.com)
    • CertificateArn: The ACM certificate ARN (for example, arn:aws:acm:us-east-1:123456789012:certificate/abc123)
    • ActiveApiId: The value of the BlueApiId output from the blue-stack deployment
    • ActiveApiStage: The value of the BlueApiStage output from the blue-stack deployment
    • SAM configuration file: custom-domain-samconfig.toml

    Keep everything else to their default values. You will use the SAM deploy output for the subsequent steps. At this point the production (live) traffic is routed to blue environment.

  5. Test the production (live) traffic which is routed to blue environment

    Follow the test method mentioned in step 3 to test the production environment, but replace ApiEndpoint with CustomDomainUrl. Check that the production environment response contains the environment attribute set to blue and the version attribute set to v1.0.0

  6. Deploy the green environment

    You will now deploy the v2.0.0 of the application on green environment. Run the following commands to deploy the green environment:

    sam build -t green-stack.yaml
    sam deploy -g -t green-stack.yaml

    Enter the following details:

    • Stack name: (for example, blue-green-api-green)
    • AWS Region: Select the same Region as the blue environment (for example, us-east-1)
    • GreenLambdaFunction has no authentication. Is this okay?: y
    • SAM configuration file: green-samconfig.toml

    Keep everything else to default values. You will use the SAM deploy output for the subsequent steps. Going forward, you can run the following commands to deploy the green environment.

    sam build -t green-stack.yaml
    sam deploy -t green-stack.yaml --config-file green-samconfig.toml
    

  7. Test the green environment
    Follow the test method shown in step 3 to test the production environment, but replace ApiEndpoint with GreenApiEndpoint. Validate that the response contains the environment attribute set to green and the version attribute set to v2.0.0
  8. Switch the live traffic to the green environment
    Run the following command to switch live traffic to the green environment:

    sam deploy -g -t custom-domain-stack.yaml  --config-file custom-domain-samconfig.toml

    Enter the following details:

    • Stack name: Keep it as it is.
    • AWS Region: Keep it as it is.
    • PublicHostedZoneId: Keep it as it is.
    • CustomDomainName: Keep it as it is.
    • CertificateArn: Keep it as it is.
    • ActiveApiId: The value of GreenApiEndpoint output from the green-stack deployment
    • ActiveApiStage: The value of GreenApiStage output from the green-stack deployment
    • SAM configuration file: Keep it as it is.

    Keep everything else at their default values.

  9. Test the production environment (now green) again

    Follow the test method shown in step 3 to test the production environment (now green) again, and be sure to replace ApiEndpoint with CustomDomainUrl from SAM deploy output. Validate that the response now contains the environment attribute set to green and the version attribute set to v2.0.0. Note that it may take a minute or two for the change to be seen due to local DNS caching, during this time some of the traffic may be still served from the blue environment. After switching the live traffic to the green environment, if there is an issue, you can switch the live traffic back to the blue environment and fix the green environment. Depending on whether you need to roll back to the previous stable blue environment or decommission the blue environment when you no longer need it, follow either step 10 or 11.

  10. (Option 1) Roll back to the blue environment, if necessary
    Run the following command to roll back to the blue environment, if necessary.

    sam deploy -g -t custom-domain-stack.yaml  --config-file custom-domain-samconfig.toml

    Enter the following details:

    • Stack name: Keep it as it is.
    • AWS Region: Keep it as it is.
    • PublicHostedZoneId: Keep it as it is.
    • CustomDomainName: Keep it as it is.
    • CertificateArn: Keep it as it is.
    • ActiveApiId: Value of BlueApiEndpoint output from the blue-stack deployment.
    • ActiveApiStage: The value of BlueApiStage output from the blue-stack deployment.
    • SAM configuration file: Keep it as it is.

    Keep everything else to their default values. Live traffic is switched to the blue environment. You can confirm that by following step 3.

  11. (Option 2) Decommission the blue environment when you no longer need it
    Run the following command to decommission (delete) the blue environment when you no longer need it. Replace blue-stack-name with your blue deployment stack name:

    sam delete --stack-name <blue-stack-name> --no-prompts

Clean up

To avoid costs, remove all resources created along this post once you’re done.

Run the following command after replacing the <placeholder> variables to delete the resources you deployed for this post’s solution:

# Delete all stacks (in reverse order)
# Delete custom domain
sam delete --stack-name <api-custom-domain-stack-name> --no-prompts
# Delete green stack
sam delete --stack-name <green-stack-name> --no-prompts
# Delete blue stack, if already not deleted in step 10
sam delete --stack-name <blue-stack-name> --no-prompts

Conclusion

Blue/green deployments with API Gateway provide a robust, scalable solution for zero-downtime deployments that deliver significant technical and operational advantages. This post’s solution architecture enables traffic switching at the API Gateway level while maintaining complete isolation between the blue and green environments to prevent interference. The solution offers immediate rollback capabilities for quick issue resolution and supports comprehensive testing through production-like validation before any traffic switching occurs.

Following this solution you can build a solid foundation for production blue/green deployments for your serverless microservice architecture that maintains the flexibility to adapt to your specific requirements while ensuring reliability, scalability, and operational excellence. To learn more about serverless architectures see Serverless Land.

Stream mainframe data to AWS in near real time with Precisely and Amazon MSK

Post Syndicated from Supreet Padhi original https://aws.amazon.com/blogs/big-data/stream-mainframe-data-to-aws-in-near-real-time-with-precisely-and-amazon-msk/

This is a guest post by Supreet Padhi, Technology Architect, and Manasa Ramesh, Technology Architect at Precisely in partnership with AWS.

Enterprises rely on mainframes to run mission-critical applications and store essential data, enabling real-time operations that help achieve business objectives. These organizations face a common challenge: how to unlock the value of their mainframe data in today’s cloud-first world while maintaining system stability and data quality. Modernizing these systems is critical for competitiveness and innovation.

The digital transformation imperative has made mainframe data integration with cloud services a strategic priority for enterprises worldwide. Organizations that can seamlessly bridge their mainframe environments with modern cloud platforms gain significant competitive advantages through improved agility, reduced operational costs, and enhanced analytics capabilities. However, implementing such integrations presents unique technical challenges that require specialized solutions. Some of the challenges include converting EBCDIC data to ASCII, where the handling of data types is unique to the mainframe, such as binary data and COMP data. Data stored in Virtual Storage Access Method (VSAM) files can be quite complex due to practices to store multiple different record types in a single file. To address these challenges, Precisely—a global leader in data integrity, serving over 12,000 customers—has partnered with Amazon Web Services (AWS) to enable real-time synchronization between mainframe systems and Amazon Relational Database Service (Amazon RDS). For more on this collaboration, check out our previous blog post: Unlock Mainframe Data with Precisely Connect and Amazon Aurora.

In this post, we introduce an alternative architecture to synchronize mainframe data to the cloud using Amazon Managed Streaming for Apache Kafka (Amazon MSK) for greater flexibility and scalability. This event-driven approach provides additional possibilities for mainframe data integration and modernization strategies.

A key enhancement in this solution is the use of the AWS Mainframe Modernization – Data Replication for IBM z/OS Amazon Machine Image (AMI) available in AWS Marketplace, which simplifies deployment and reduces implementation time.

Real-time processing and event-driven architecture benefits

Real-time processing makes data actionable within seconds rather than waiting for batch processing cycles. For example, financial institutions such as Global Payments have leveraged this solution to modernize mission-critical banking operations, including payments processing. By migrating these operations to the AWS Cloud, they enhanced user experience, improved scalability and maintainability, while enabling advanced fraud detection – all without impacting the performance of existing mainframe systems. Change data capture (CDC) enables this by identifying database changes and delivering them in real time to cloud environments.

CDC offers two key advantages for mainframe modernization:

  • Incremental data movement – Eliminates disruptive bulk extracts by streaming only changed data to cloud targets, minimizing system impact and ensuring data currency
  • Real-time synchronization – Keeps cloud applications in sync with mainframe systems, enabling immediate insights and responsive operations

Solution overview

In this post, we provide a detailed implementation guide for streaming mainframe data changes from DB2z through AWS Mainframe Modernization – Data Replication for IBM z/OS AMI to Amazon MSK and then applying those changes to Amazon Relational Database Service (Amazon RDS) for PostgreSQL using MSK Connect with the Confluent JDBC Sink Connector.

By introducing Amazon MSK into architecture and streamlining deployment through the AWS Marketplace AMI, we create new possibilities for data distribution, transformation, and consumption that expand upon our previously demonstrated direct replication approach. This streaming-based architecture offers several additional benefits:

  • Simplified deployment – Accelerate implementation using the preconfigured AWS Marketplace AMI
  • Decoupled systems – Separate the concern of data extraction from data consumption, allowing both sides to scale independently
  • Multi-consumer support – Enable multiple downstream applications and services to consume the same data stream according to their own requirements
  • Extensibility – Create a foundation that can be extended to support additional mainframe data sources such as IMS and VSAM, as well as additional AWS targets using MSK Connect sink connectors

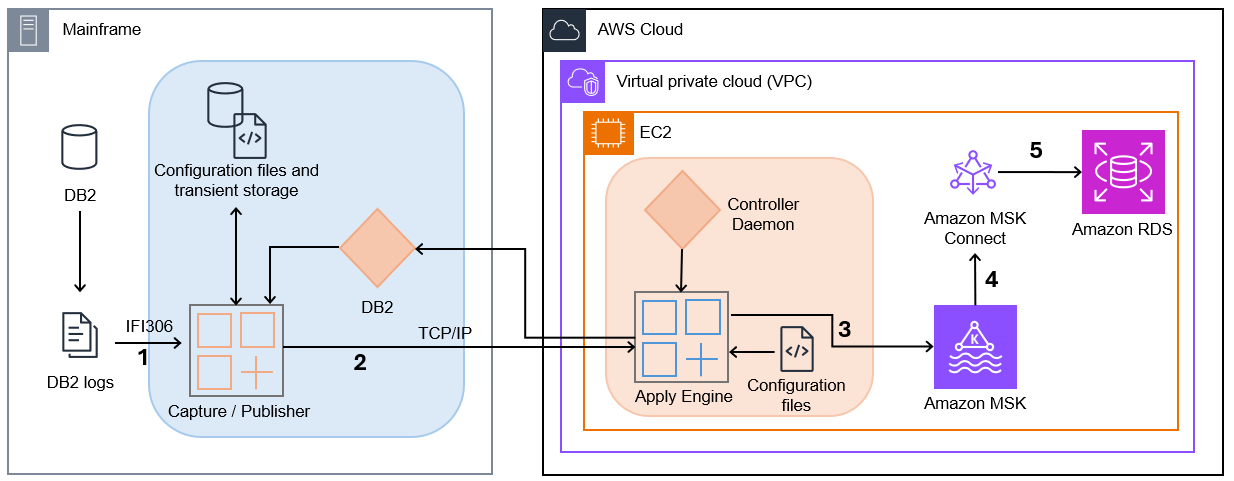
The following diagram illustrates the solution architecture.

Precisely MSK architecture diagram

  1. Capture/Publisher – Connect CDC Capture/Publisher captures Db2 changes from Db2 logs using IFI 306 Read and communicates captured data changes to a target engine through TCP/IP.
  2. Controller Daemon – The Controller Daemon authenticates all connection requests, managing secure communication between the source and target environments.
  3. Apply Engine – The Apply Engine is a multifaceted and multifunctional component in the target environment. It receives the changes from the Publisher agent and applies the changed data to the target Amazon MSK.
  4. Connect CDC Single Message Transform (SMT) – Performs all necessary data filtering, transformation, and augmentation required by the sink connector.
  5. JDBC Sink Connector – As data arrives, an instance of the JDBC Sink Connector along with Apache Kafka writes the data to target tables in Amazon RDS.

This architecture provides a clean separation between the data capture process and the data consumption process, allowing each to scale independently. The use of MSK as an intermediary enables multiple systems to consume the same data stream, opening possibilities for complex event processing, real-time analytics, and integration with other AWS services.

Prerequisites

To complete the solution, you need the following prerequisites:

  1. Install AWS Mainframe Modernization – Data Replication for IBM z/OS
  2. Have access to Db2z on mainframe from AWS using your approved connectivity between AWS and your mainframe

Solution walkthrough

The following code content shouldn’t be deployed to production environments without additional security testing.

Configure the AWS Mainframe Modernization Data Replication with Precisely AMI on Amazon EC2

Follow the steps defined at Precisely AWS Mainframe Modernization Data Replication. Upon the initial launch of the AMI, use the following command to connect to the Amazon Elastic Compute Cloud (Amazon EC2) instance:

ssh -i ami-ec2-user.pem ec2-user@$AWS_AMI_HOST

Configure the serverless cluster

To create an Amazon Aurora PostgreSQL-Compatible Edition Serverless v2 cluster, complete the following steps:

  1. Create a DB cluster by using the following AWS Command Line Interface (AWS CLI) command. Replace the placeholder strings with values that correspond to your cluster’s subnet and subnet group IDs.
    aws rds create-db-cluster \
       --db-cluster-identifier cdc-serverless-pg-cluster \
       --engine aurora-postgresql \
       --serverless-v2-scaling-configuration MinCapacity=1,MaxCapacity=2 \
       --master-username connectcdcuser \
       --manage-master-user-password \
       --db-subnet-group-name "<subnet-security-group-id>" \
       --vpc-security-group-ids "<cluster-security-group-id>"

  2. Verify the status of the cluster by using the following command:
    aws rds describe-db-clusters --db-cluster-identifier cdc-serverless-pg-cluster

  3. Add a writer DB instance to the Aurora cluster:
    aws rds create-db-instance \
       --db-cluster-identifier cdc-serverless-pg-cluster \
       --db-instance-identifier cdc-serverless-pg-instance \
       --db-instance-class db.serverless \
       --engine aurora-postgresql

  4. Verify the status of the writer instance:
    aws rds describe-db-instances --db-instance-identifier cdc-serverless-pg-instance

Create a database in the PostgreSQL cluster

After your Aurora Serverless v2 cluster is running, you need to create a database for your replicated mainframe data. Follow these steps:

  1. Install the psql client:
    sudo yum install postgresql16

  2. Retrieve the password from secret manager:
    aws secretsmanager get-secret-value --secret-id '<cdc-serverless-pg-cluster-secret ARN>' --query 'SecretString' --output text

  3. Create a new database in PostgreSQL:
    PGPASSWORD="password" psql --host=<DATABASE-HOST> --username=connectcdcuser --dbname=postgres -c "CREATE DATABASE dbcdc"

Configure the serverless MSK cluster

To create a serverless MSK cluster, complete the following steps:

  1. Copy the following JSON and paste it into a new file create-msk-serverless-cluster.json. Replace the placeholder strings with values that correspond to your cluster’s subnet and security group IDs.
       {
         "VpcConfigs": [
           {
             "subnets": [
               "<cluster-subnet-1>",
               "<cluster-subnet-2>",
               "<cluster-subnet-3>"
             ],
             "securityGroups": ["<cluster-security-group-id>"]
           }
         ],
         "ClientAuthentication": {
           "Sasl": {
             "Iam": {
               "Enabled": true
             }
           }
         }
       }

  2. Invoke the following AWS CLI command in the folder where you saved the JSON file in the previous step:
    aws kafka create-cluster-v2 --cluster-name pgsqlmsk --serverless file://create-msk-serverless-cluster.json

  3. Verify cluster status by invoking the following AWS CLI command:
    aws kafka list-clusters-v2 --cluster-type-filter SERVERLESS

  4. Get the bootstrap broker address by invoking the following AWS CLI command:
    aws kafka get-bootstrap-brokers --cluster-arn "<msk-serverless-cluster-arn>"

  5. Define the environment variable to store the bootstrap servers of the MSK cluster and locally install Kafka in the path environment variable:
    export BOOTSTRAP_SERVERS=<kafka_bootstrap_servers_with_ports>

Create a topic on the MSK cluster

To create a Kafka topic, you need to install the Kafka CLI first. Follow these steps:

  1. Download the binary distribution of Apache Kafka and extract the archive in folder kafka:
    wget https://dlcdn.apache.org/kafka/3.9.0/kafka_2.13-3.9.0.tgz
       tar -xzf kafka_2.13-3.9.0.tgz
       ln -sfn kafka_2.13-3.9.0 kafka

  2. To use IAM to authenticate with the MSK cluster, download the Amazon MSK Library for IAM and copy to the local Kafka library directory as shown in the following code. For complete instructions, refer to Configure clients for IAM access control.
    wget https://github.com/aws/aws-msk-iam-auth/releases/download/v2.3.1/aws-msk-iam-auth-2.3.1-all.jar
    cp aws-msk-iam-auth-2.3.1-all.jar kafka/libs

  3. In the directory, create a file to configure a Kafka client to use IAM authentication for the Kafka console producer and consumers:
    security.protocol=SASL_SSL
       sasl.mechanism=AWS_MSK_IAM
       sasl.jaas.config=software.amazon.msk.auth.iam.IAMLoginModule required; sasl.client.callback.handler.class=software.amazon.msk.auth.iam.IAMClientCallbackHandler

  4. Create the Kafka topic, which you defined in the connector config:
    kafka/bin/kafka-topics.sh --create --bootstrap-server $BOOTSTRAP_SERVERS --command-config kafka/config/client-config.properties --partitions 1 --topic pgsql-sink-topic

Configure the MSK Connect plugin

Next, create a custom plugin available in the AMI at /opt/precisely/di/packages/sqdata-msk_connect_1.0.1.zip which contains the following:

  • JDBC Sink Connector from Confluent
  • MSK Config provider
  • AWS Mainframe Modernization – Data Repication for IBM z/OS Custom SMT

Follow these steps:

  1. Invoke the following to upload the .zip file to an S3 bucket to which you have access:
    aws s3 cp /opt/precisely/di/packages/sqdata-msk_connect_1.0.1.zip s3://<bucket>/

  2. Copy the following JSON and paste it into a new file create-custom-plugin.json. Replace the placeholder strings with values that correspond to your bucket.
    {
         "contentType": "ZIP",
         "description": "jdbc sink connector",
         "location": {
           "s3Location": {
             "bucketArn": "arn:aws:s3:::<bucket>",
             "fileKey": "sqdata-msk_connect_1.0.1.zip"
           }
         },
         "name": "jdbc-sink-connector"
       }

  3. Invoke the following AWS CLI command in the folder where you saved the JSON file in the previous step:
    aws kafkaconnect create-custom-plugin --cli-input-json file://create-custom-plugin.json

  4. Verify plugin status by invoking the following AWS CLI command:
    aws kafkaconnect list-custom-plugins

Configure the JDBC Sink Connector

To configure the JDBC Sink Connector, follow these steps:

  1. Copy the following JSON and paste it into a new file create-connector.json. Replace the placeholder strings with appropriate values:
    {
         "connectorConfiguration": {
           "connector.class": "io.confluent.connect.jdbc.JdbcSinkConnector",
           "connection.url": "jdbc:postgresql://<postgresql-endpoint>
    /dbcdc?currentSchema=public",
           "config.providers": "secretsmanager",
           "config.providers.secretsmanager.class": "com.amazonaws.kafka.config.providers.SecretsManagerConfigProvider",
           "connection.user": "${secretsmanager:MySecret-1234:username}",
           "connection.password": "${secretsmanager:MySecret-1234:password}",
           "config.providers.secretsmanager.param.region": "<region>",
           "tasks.max": "1",
           "topics": "pgsql-sink-topic",
           "insert.mode": "upsert",
           "delete.enabled": "true",
           "pk.mode": "record_key",
           "auto.evolve": "true",
           "auto.create": "true",
           "value.converter": "org.apache.kafka.connect.storage.StringConverter",
           "key.converter": "org.apache.kafka.connect.storage.StringConverter",
           "transforms": "ConnectCDCConverter",
           "transforms.ConnectCDCConverter.type": "com.precisely.kafkaconnect.ConnectCDCConverter",
           "transforms.ConnectCDCConverter.cdc.multiple.tables.enabled": "true",
           "transforms.ConnectCDCConverter.cdc.source.table.name.ignore.schema": "true"
         },
         "connectorName": "pssql-sink-connector",
         "kafkaCluster": {
           "apacheKafkaCluster": {
             "bootstrapServers": "<msk-bootstrap-servers-string>",
             "vpc": {
               "subnets": [
                 "<cluster-subnet-1>",
                 "<cluster-subnet-2>",
                 "<cluster-subnet-3>"
               ],
               "securityGroups": ["<cluster-security-group-id>"]
             }
           }
         },
         "capacity": {
           "provisionedCapacity": {
             "mcuCount": 1,
             "workerCount": 1
           }
         },
         "kafkaConnectVersion": "3.7.x",
         "serviceExecutionRoleArn": "<arn-of-a-role-that-msk-connect-can-assume>",
         "plugins": [
           {
             "customPlugin": {
               "customPluginArn": "<arn-of-custom-plugin-that-contains-connector-code>",
               "revision": 1
             }
           }
         ],
         "kafkaClusterEncryptionInTransit": {"encryptionType": "TLS"},
         "kafkaClusterClientAuthentication": {"authenticationType": "IAM"},
         "logDelivery": {
           "workerLogDelivery": {
             "cloudWatchLogs": {
               "enabled": true,
               "logGroup": "<loggroup>"
             }
           }
         }
       }

  2. Invoke the following AWS CLI command in the folder where you saved the JSON file in the previous step:
    aws kafkaconnect create-connector --cli-input-json file://create-connector.json

  3. Verify connector status by invoking the following AWS CLI command:
    aws kafkaconnect list-connectors

Set up Db2 Capture/Publisher on Mainframe

To establish the Db2 Capture/Publisher on the mainframe for capturing changes to the DEPT table, follow these structured steps that build upon our previous blog post, Unlock Mainframe Data with Precisely Connect and Amazon Aurora:

  1. Prepare the source table. Before configuring the Capture/Publisher, ensure the DEPT source table exists on your mainframe Db2 system. The table definition should match the structure defined at \$SQDATA_VAR_DIR/templates/dept.ddl. If you need to create this table on your mainframe, use the DDL from this file as a reference to ensure compatibility with the replication process.
  2. Access the Interactive System Productivity Facility (ISPF) interface. Sign in to your mainframe system and access the AWS Mainframe Modernization – Data Repication for IBM z/OS ISPF panels through the supplied ISPF application menu. Select option 3 (CDC) to access the CDC configuration panels, as demonstrated in our previous blog post.
  3. Add source tables for capture:
    1. From the CDC Primary Option Menu, choose option 2 (Define Subscriptions).
    2. Choose option 1 (Define Db2 Tables) to add source tables.
    3. On the (Add DB2 Source Table to CAB File panel), enter a wildcard value (%) or the specific table name DEPT in the (Table Name) field.
    4. Press Enter to display the list of available tables.
    5. Type S next to the DEPT table to select it for replication, then press Enter to confirm.

This process is like the table selection process shown in figure 3 and figure 4 of our previous post but now focuses specifically on the DEPT table structure.

With the completion of both the Db2 Capture/Publisher setup on the mainframe and the AWS environment configuration (Amazon MSK, Apply Engine, and MSK Connect JDBC Sink Connector), you now have a fully functional pipeline ready to capture data changes from the mainframe and stream them to the MSK topic. Inserts, updates, or deletions to the DEPT table on the mainframe will be automatically captured and pushed to the MSK topic in near real time. From there, the MSK Connect JDBC Sink Connector and the custom SMT will process these messages and apply the changes to the PostgreSQL database on Amazon RDS, completing the end-to-end replication flow.

Configure Apply Engine for Amazon MSK integration

Configure the AWS side components to receive data from the mainframe and forward it to Amazon MSK. Follow these steps to define and manage a new CDC pipeline from DB2 z/OS to Amazon MSK:

  1. Use the following command to switch to the connect user:
    sudo su connect

  2. Create the apply engine directories:
    mkdir -p \$SQDATA_VAR_DIR/apply/DB2ZTOMSK/ddl
         connect> mkdir -p \$SQDATA_VAR_DIR/apply/DB2ZTOMSK/scripts

  3. Copy the sample script from dept.ddl:
    cp \$SQDATA_VAR_DIR/templates/dept.ddl \$SQDATA_VAR_DIR/apply/DB2ZTOMSK/ddl/

  4. Copy the following content and paste it in a new file $SQDATA_VAR_DIR/apply/DB2ZTOMSK/scripts/DB2ZTOMSK.sqd. Replace the placeholder strings with values that correspond to the DB2z endpoint:
    -----------------------------------------------------------------------
       Name: DB2TOKAF: Z/OS DB2 To Kafka
       -----------------------------------------------------------------------
       SUBSTITUTION PARMS USED IN THIS SCRIPT:
       ---------------------------------------------------------------------
       JOBNAME DB2TOKAFKA;
       -----------------------------
       TABLE DESCRIPTIONS
       ---------------------------
       BEGIN GROUP SOURCE_TABLES;
       DESCRIPTION Db2SQL /var/precisely/di/sqdata/apply/DB2ZTOMSK/ddl/dept.ddl AS DEPT KEY IS DEPTNO;
       END GROUP;
       -------------------------------------------------------------
       DATASTORE SECTION
       -------------------------------------------------------------
       SOURCE DATASTORE
       DATASTORE cdc://<DB2z endpoint with port>/dbcg/DBCG_TBTSS388T6 OF UTSCDC AS CDCIN DESCRIBED BY GROUP SOURCE_TABLES;
       -- TARGET DATASTORE
       DATASTORE kafka:///pgsql-sink-topic/table_key OF JSON AS TARGET KEY IS DEPTNO DESCRIBED BY GROUP SOURCE_TABLES;
       ---------------------------------
       PROCESS INTO TARGET
       SELECT { REPLICATE(TARGET) } FROM CDCIN;

  5. Create the working directory:
    mkdir -p /var/precisely/di/sqdata_logs/apply/DB2ZTOMSK

  6. Add the following to $SQDATA_DAEMON_DIR/cfg/sqdagents.cfg:
    [DB2ZTOMSK]
       type=engine
       program=sqdata
       args=/var/precisely/di/sqdata/apply/DB2ZTOMSK/scripts/DB2ZTOMSK.prc --log-level=8
       working_directory=/var/precisely/di/sqdata_logs/apply/DB2ZTOMSK
       stdout_file=stdout.txt
       stderr_file=stderr.txt
       auto_start=0
       comment=Apply Engine for MSK from Db2z

  7. After the preceding code is added to the sqdagents.cfg section, reload for the changes to take effect:
    sqdmon reload

  8. Validate the apply engine job script by using the SQData parse command to create the compiled file expected by the SQData engine:
    sqdparse $SQDATA_VAR_DIR/apply/DB2ZTOMSK/scripts/DB2ZTOMSK.sqd $SQDATA_VAR_DIR/apply/DB2ZTOMSK/scripts/DB2ZTOMSK.prc

    The following is an example of the output that you get when you invoke the command successfully:

    SQDC042I mounting/running sqdparse with arguments:
    SQDC041I args[0]:sqdparse
    SQDC041I args[1]:/var/precisely/di/sqdata/apply/DB2ZTOMSK/scripts/DB2ZTOMSK.sqd
    SQDC041I args[2]:/var/precisely/di/sqdata/apply/DB2ZTOMSK/scripts/DB2ZTOMSK.prc
    SQDC000I *******************************************************
    SQDC021I sqdparse Version 5.0.1-rel (Linux-x86_64)
    SQDC022I Build-id 4f2d7c16728aa2e40c610db7d5a6e373476a9889
    SQDC023I (c) 2001, 2025 Syncsort Incorporated. All rights reserved.
    SQDC000I *******************************************************
    SQDC000I
    SQD0000I 2025-03-31 00:59:10
    >>> Start Preprocessed /var/precisely/di/sqdata/apply/DB2ZTOMSK/scripts/DB2ZTOMSK.sqd
    000001 ----------------------------------------------------------------------
    000002 -- Name: DB2TOKAF:  Z/OS DB2 To Kafka
    000003 ----------------------------------------------------------------------
    000004 --  SUBSTITUTION PARMS USED IN THIS SCRIPT:
    000005 ----------------------------------------------------------------------
    000006
    000007 JOBNAME DB2TOKAFKA;
    000008
    000009 ----------------------------
    000010 -- TABLE DESCRIPTIONS
    000011 ----------------------------
    000012 BEGIN GROUP SOURCE_TABLES;
    000013 DESCRIPTION Db2SQL /var/precisely/di/sqdata/apply/DB2ZTOMSK/ddl/dept.ddl  AS DEPT
    000014 KEY IS DEPTNO;
    000015 END GROUP;
    000016
    000017 ------------------------------------------------------------
    000018 --       DATASTORE SECTION
    000019 ------------------------------------------------------------
    000020
    000021 -- SOURCE DATASTORE
    000022 DATASTORE /var/precisely/di/sqdata/apply/DB2ZTOMSK/scripts/DB0A.ENGINE3.DEPT.COPY
    000023           OF UTSCDC
    000024           AS CDCIN
    000025           DESCRIBED BY GROUP SOURCE_TABLES;
    000026
    000027 -- TARGET DATASTORE
    000028 DATASTORE 
    000029           OF JSON
    000030           AS TARGET
    000031           KEY IS DEPTNO
    000032           DESCRIBED BY GROUP SOURCE_TABLES;
    000033
    000034 ----------------------------------
    000035
    000036 PROCESS INTO TARGET
    000037 SELECT
    000038 {
    000039     REPLICATE(TARGET)
    000040 }
    000041 FROM CDCIN;
    <<< End Preprocessed /var/precisely/di/sqdata/apply/DB2ZTOMSK/scripts/DB2ZTOMSK.sqd
    >>> Start Preprocessed /var/precisely/di/sqdata/apply/DB2ZTOMSK/ddl/dept.ddl
    000001 CREATE TABLE DEPARTMENT
    000002 (
    000003    DEPTNO char(3) NOT NULL,
    000004    DEPTNAME varchar(36) NOT NULL,
    000005    MGRNO char(6),
    000006    ADMRDEPT char(3) NOT NULL,
    000007    LOCATION char(16),
    000008    CONSTRAINT PK_DEPTNO PRIMARY KEY (DEPTNO)
    000009 ) ;
    <<< End Preprocessed /var/precisely/di/sqdata/apply/DB2ZTOMSK/ddl/dept.ddl
    Number of Data Stores...................: 2
    Data Store..............................: /var/precisely/di/sqdata/apply/DB2ZTOMSK/scripts/DB0A.ENGINE3.DEPT.COPY
      Alias.................................: CDCIN
      Type..................................: UTS Change Data Capture
      Number of Records.....................: 1
        Record Name.........................: DEPARTMENT
        Record Description Alias............: DEPT
        Record Description Length...........: 72
        Number of Fields....................: 5
          ................................... TYPE            OFF   LEN   XLEN  EXT
          ................................... ---------- ----- ----- ----- -----
          DEPTNO............................: CHAR(3)             0     3     3
          DEPTNAME..........................: VARCHAR(36)         3    38    38
          MGRNO.............................: CHAR(6)             7     6     6
          ADMRDEPT..........................: CHAR(3)            14     3     3
          LOCATION..........................: CHAR(16)           17    16    16
    Data Store..............................: 
      Alias.................................: TARGET
      Type..................................: JSON
      Number of Records.....................: 1
        Record Name.........................: DEPARTMENT
        Record Description Alias............: DEPT
        Record Description Length...........: 70
        Number of Fields....................: 5
          ................................... TYPE            OFF   LEN   XLEN  EXT
          ................................... ---------- ----- ----- ----- -----
          DEPTNO............................: CHAR(3)             0     3     3
          DEPTNAME..........................: VARCHAR(36)         3    38    38
          MGRNO.............................: CHAR(6)            41     6     6
          ADMRDEPT..........................: CHAR(3)            47     3     3
          LOCATION..........................: CHAR(16)           50    16    16
    Section.................................: SQDSTP000
      Number of steps.......................: 1
    SQDC017I sqdparse(pid=4023) terminated successfully

  9. Copy the following content and paste it in a new file /var/precisely/di/sqdata_logs/apply/DB2ZTOMSK/sqdata_kafka_producer.conf. Replace the placeholder strings with values that correspond to your bootstrap server and AWS Region.
    metadata.broker.list=<kafka_bootstrap_servers_with_ports>
         security.protocol=SASL_SSL
         sasl.mechanism=OAUTHBEARER
         sasl.oauthbearer.config="extension_AWSMSKCB=python3,/usr/lib64/python3.9/site-packages/aws_msk_iam_sasl_signer/cli.py,--region,<region>"
         sasl.oauthbearer.method="default"

  10. Start the apply engine using the controller daemon by using the following command:
    sqdmon start ///DB2ZTOMSK

  11. Monitor the apply engine through the controller daemon by using the following command:
    sqdmon display ///DB2ZTOMSK --format=details

    The following is an example of the output that you get when you invoke the command successfully:

    Engine..................................: DB2ZTOMSK
    version.................................: 5.0.1-rel (Linux-x86_64)
    git.....................................: f021c29a84c1a99f59144288aeeb2cb8fa494485
    jobname.................................: DB2TOKAFKA
    parsed..................................: 20250320172610278108
    started.................................: 2025-03-20.17.47.23.444474
    started (UTC)...........................: 2025-03-20.17.47.23.444474 (1742492843444)
    updated (UTC)...........................: 2025-03-20.17.47.25.901018 (1742492845901)
    Input Datastore.........................: /var/precisely/di/sqdata/apply/DB2ZTOMSK/scripts/DB0A.ENGINE3.DEPT.COPY
    Alias...................................: CDCIN
    Type....................................: UTS Change Data Capture
      Records Read..........................: 14
      Records Selected......................: 14
      Bytes Read............................: 2892
    Output Datastore........................: kafka:///pgsql-sink-topic/table_key
    Alias...................................: TARGET
    Type....................................: JSON
      Records Inserted......................: 14
      Records Updated.......................: 0
      Records Deleted.......................: 0
      Formatted bytes.......................: 3458
      Unformatted bytes.....................: 448
    Total Output Formatted bytes............: 3458
    Total Output Unformatted bytes..........: 448
    SQDC017I sqdmon(pid=123540) terminated successfully

    Logs can also be found at /var/precisely/di/sqdata_logs/apply/DB2ZTOMSK.

Verify data in the MSK topic

Invoke the Kafka CLI command to verify the JSON data in the MSK topic:

kafka/bin/kafka-console-consumer.sh --bootstrap-server $BOOTSTRAP_SERVERS --consumer.config kafka/config/client-config.properties --topic pgsql-sink-topic --from-beginning --property print.key=true

Verify data in the PostgreSQL database

Invoke the following command to verify the data in the PostgreSQL database:

PGPASSWORD="password" psql --host=<DATABASE-HOST> --username=<user> --dbname=<database> -c "select * from \"DEPT\""

With these steps completed, you’ve successfully set up end-to-end data replication from DB2z to RDS for PostgreSQL, using AWS Mainframe Modernization – Data Replication for IBM z/OS AMI, Amazon MSK, MSK Connect, and the Confluent JDBC Sink Connector.

Cleanup

When you’re finished testing this solution, you can clean up the resources to avoid incurring additional charges. Follow these steps in sequence to ensure proper cleanup.

Step 1: Delete the MSK Connect components

Follow these steps:

  1. List existing connectors:
    aws kafkaconnect list-connectors

  2. Delete the sink connector:
    aws kafkaconnect delete-connector --connector-arn "<arn-of-connector>"

  3. List custom plugins:
    aws kafkaconnect list-custom-plugins

  4. Delete the custom plugin:
    aws kafkaconnect delete-custom-plugin --custom-plugin-arn "<arn-of-custom-plugin>"

Step 2: Delete the MSK cluster

Follow these steps:

  1. List MSK clusters:
    aws kafka list-clusters-v2 --cluster-type-filter SERVERLESS

  2. Delete the MSK serverless cluster:
    aws kafka delete-cluster --cluster-arn "<arn-of-msk-serverless-cluster>"

Step 3: Delete the Aurora resources

Follow these steps:

  1. Delete the Aurora DB instance:
    aws rds delete-db-instance --db-instance-identifier cdc-serverless-pg-instance --skip-final-snapshot

  2. Delete the Aurora DB cluster:
    aws rds delete-db-cluster --db-cluster-identifier cdc-serverless-pg-cluster --skip-final-snapshot.

Conclusion

By capturing changed data from DB2z and streaming it to AWS targets, organizations can modernize their legacy mainframe data stores, enabling operational insights and AI initiatives. Businesses can use this solution to take advantage of cloud-based applications with mainframe data to provide scalability, cost-efficiency, and enhanced performance.

The integration of AWS Mainframe Modernization – Data Replication for IBM z/OS AMI with Amazon MSK and RDS for PostgreSQL provides an enhanced framework for real-time data synchronization that maintains data integrity. This architecture can be extended to support additional mainframe data sources such as VSAM and IMS, as well as other AWS targets. Organizations can then tailor their data integration strategy to specific business needs. Data consistency and latency challenges can be effectively managed through AWS and Precisely’s monitoring capabilities. By adopting this architecture, organizations keep their mainframe data continually available for analytics, machine learning (ML), and other advanced applications.Streaming mainframe data to AWS in near real time represents a strategic step toward modernizing legacy systems while unlocking new opportunities for innovation, with data transfers occurring in subseconds. With Precisely and AWS, organizations can effectively navigate their modernization journey and maintain their competitive advantage.

Learn more about AWS Mainframe Modernization – Data Replication for IBM z/OS AMI in the Precisely documentation. AWS Mainframe Modernization Data Replication is available for purchase in AWS Marketplace. For more information about the solution or to see a demonstration, contact Precisely.


About the authors

Supreet Padhi

Supreet Padhi

Supreet is a Technology Architect at Precisely. He has been with Precisely for more than 14 years, with specialty in streaming data use cases and technology, with emphasis on data warehouse architecture. He is responsible for research and development in areas such as Change Data Capture (CDC), streaming ETL, metadata management, and VectorDBs.

Manasa Ramesh

Manasa Ramesh

Manasa is a Technology Architect at Precisely, with over 15 years of experience in software development. She has worked on several innovation-driven projects in Metadata Management, Data Governance and Data Integration space. She is currently responsible for research, design and development of metadata discovery framework.

Tamara Astakhova

Tamara Astakhova

Tamara is a Sr. Partner Solutions Architect in Data and Analytics at AWS, brings over two decades of expertise in architecting and developing large-scale data analytics systems. In her current role, she collaborates with strategic partners to design and implement sophisticated AWS-optimized architectures. Her deep technical knowledge and experience make her an invaluable resource in helping organizations transform their data infrastructure and analytics capabilities.

Monitor, analyze, and manage capacity usage from a single interface with Amazon EC2 Capacity Manager

Post Syndicated from Esra Kayabali original https://aws.amazon.com/blogs/aws/monitor-analyze-and-manage-capacity-usage-from-a-single-interface-with-amazon-ec2-capacity-manager/

Today, I’m happy to announce Amazon EC2 Capacity Manager, a centralized solution to monitor, analyze, and manage capacity usage across all accounts and AWS Regions from a single interface. This service aggregates capacity information with hourly refresh rates and provides prioritized optimization opportunities, streamlining capacity management workflows that previously required custom automation or manual data collection from multiple AWS services.

Organizations using Amazon Elastic Compute Cloud (Amazon EC2) at scale operate hundreds of instance types across multiple Availability Zones and accounts, using On-Demand Instances, Spot Instances, and Capacity Reservations. This complexity means customers currently access capacity data through various AWS services including the AWS Management Console, Cost and Usage Reports, Amazon CloudWatch, and EC2 describe APIs. This distributed approach can create operational overhead through manual data collection, context switching between tools, and the need for custom automation to aggregate information for capacity optimization analysis.

EC2 Capacity Manager helps you overcome these operational complexities by consolidating all capacity data into a unified dashboard. You can now view cross-account and cross-Region capacity metrics for On-Demand Instances, Spot Instances, and Capacity Reservations across all commercial AWS Regions from a single location, eliminating the need to build custom data collection tools or navigate between multiple AWS services.

This consolidated visibility can help you discover cost savings by highlighting underutilized Capacity Reservations, analyzing usage patterns across instance types, and providing insights into Spot Instance interruption patterns. By having access to comprehensive capacity data in one place, you can make more informed decisions about rightsizing your infrastructure and optimizing your EC2 spending.

Let me show you the capabilities of EC2 Capacity Manager in detail.

Getting started with EC2 Capacity Manager
On the AWS Management Console, I navigate to Amazon EC2 and select Capacity Manager from the navigation pane. I enable EC2 Capacity Manager through the service settings. The service aggregates historical data from the previous 14 days during initial setup.

The main Dashboard displays capacity utilization across all instance types through a comprehensive overview section that presents key metrics at a glance. The capacity overview cards for Reservations, Usage, and Spot show trend indicators and percentage changes to help you identify capacity patterns quickly. You can apply filtering through the date filter controls, which include date range selection, time zone configuration, and interval settings.

You can select different units to analyze data by vCPUs, instance counts, or estimated costs to understand resource consumption patterns. Estimated costs are based on published On-Demand rates and do not include Savings Plans or other discounts. This pricing reference helps you compare the relative impact of underutilized capacity across different instance types—for example, 100 vCPU hours of unused p5 reservations represents a larger cost impact than 100 vCPU hours of unused t3 reservations.

The dashboard includes detailed Usage metrics with both total usage visualization and usage over time charts. The total usage section shows the breakdown between reserved usage, unreserved usage, and Spot usage. The usage over time chart provides visualization that tracks capacity trends over time, helping you identify usage patterns and peak demand periods.

Under Reservation metrics, Reserved capacity trends visualizes used and unused reserved capacity across the selected period, showing the proportion of reserved vCPU hours that remain unutilized compared with those actively consumed, helping you track reservation efficiency patterns and identify periods of consistent low utilization. This visibility can help you reduce costs by identifying underutilized reservations and helping you to make informed decisions about capacity adjustments.

The Unused capacity section lists underutilized capacity reservations by instance type and Availability Zone combinations, displaying specific utilization percentages and instance types across different Availability Zones. This prioritized list helps you identify potential savings with direct visibility into unused capacity costs.

The Usage tab provides detailed historical trends and usage statistics across all AWS Regions for Spot Instances, On-Demand Instances, Capacity Reservations, Reserved Instances, and Savings Plans. Dedicated Hosts usage is not included. The Dimension filter helps you group by and filter capacity data by Account ID, Region, Instance Family, Availability Zone, and Instance Type, creating custom views that reveal usage patterns across your accounts and AWS Organizations. This helps you analyze specific configurations and compare performance across accounts or Regions.

The Aggregations section provides a comprehensive usage table across EC2 and Spot Instances. You can select different units to analyze data by vCPUs, instance counts, or estimated costs to understand resource consumption patterns. The table shows instance family breakdowns with total usage statistics, reserved usage hours, unreserved usage hours, and Spot usage data. Each row includes a View breakdown action for a detailed analysis.

The Capacity usage or estimated cost trends section visualizes usage trends, reserved usage, unreserved usage, and Spot usage. You can filter the displayed data and adjust the unit of measurement to view historical patterns. These filtering and analysis tools help you identify usage trends, compare costs across dimensions, and make informed decisions for capacity planning and optimization.

When you choose View breakdown from the Aggregations table, you access detailed Usage breakdown based on the dimension filters you selected. This breakdown view shows usage patterns for individual instance types within the selected family and Availability Zone combinations, helping you identify specific optimization opportunities.

The Reservations tab displays capacity reservation utilization with automated analysis capabilities that generate prioritized lists of optimization opportunities. Similar to the Usage tab, you can apply dimension filters by Account ID, Region, Instance Family, Availability Zone, and Instance Type along with additional options related to the reservation details. On each of the tabs you can drill down to see data for individual line items. For reservations specifically, you can view specific reservations and access detailed information about On-Demand Capacity Reservations (ODCRs), including utilization history, configuration parameters, and current status. When the ODCR exists in the same account as Capacity Manager, you can modify reservation parameters directly from this interface, eliminating the need to navigate to separate EC2 console sections for reservation management.

The Statistics section provides summary metrics, including total reservations count, overall utilization percentage, reserved capacity totals, used and unused capacity volumes, average scheduled reservations, and counts of accounts, instance families, and Regions with reservations.

This consolidated view helps you understand reservation distribution and utilization patterns across your infrastructure. For example, you might discover that your development accounts consistently show 30% reservation utilization while production accounts exceed 95%, indicating an opportunity to redistribute or modify reservations. Similarly, you could identify that specific instance families in certain Regions have sustained low utilization rates, suggesting candidates for reservation adjustments or workload optimization. These insights help you make data-driven decisions about reservation purchases, modifications, or cancellations to better align your reserved capacity with actual usage patterns.

The Spot tab focuses on Spot Instance usage and displays the amount of time your Spot instances run before being interrupted. This analysis of Spot Instance usage patterns helps you identify optimization opportunities for Spot Instance workloads. You can use Spot placement score recommendations to improve workload flexibility.

For organizations requiring data export capabilities, Capacity Manager includes data exports to Amazon Simple Storage Service (Amazon S3) buckets for capacity analysis. You can view and manage your data exports through the Data exports tab, which helps you create new exports, monitor delivery status, and configure export schedules to analyze capacity data outside the AWS Management Console.

Data exports extend your analytical capabilities by storing capacity data beyond the 90-day retention period available through the console and APIs. This extended retention enables long-term trend analysis and historical capacity planning. You can also integrate exported data with existing analytics workflows, business intelligence tools, or custom reporting systems to incorporate EC2 capacity metrics into broader infrastructure analysis and decision-making processes.

The Settings section provides configuration options for AWS Organizations integration, enabling centralized capacity management across multiple accounts. Organization administrators can enable enterprise-wide capacity visibility or delegate access to specific accounts while maintaining appropriate permissions and access controls.

Now available
EC2 Capacity Manager eliminates the operational overhead of collecting and analyzing capacity data from multiple sources. The service provides automated optimization opportunities, centralized multi-account visibility, and direct access to capacity management tools. You can reduce manual analysis time while improving capacity utilization and cost optimization across your EC2 infrastructure.

Amazon EC2 Capacity Manager is available at no additional cost. To begin using Amazon EC2 Capacity Manager, visit the Amazon EC2 console or access the service APIs. The service is available in all commercial AWS Regions.

To learn more, visit the EC2 Capacity Manager documentation.

— Esra

The collective thoughts of the interwebz