Post Syndicated from BeardedTinker original https://www.youtube.com/watch?v=yKA7GNUTHkA
Седмицата (1–6 април)
Post Syndicated from Боряна Телбис original https://www.toest.bg/sedmitsata-1-6-april/

Тази седмица започна с Международния ден на шегата и лъжата – 1 април. Моето еретично предложение е да го ползваме за национален празник, след като не постигаме консенсус между 3 март, 24 май и 6 септември (защото единият, както знаете, е настоящият ни национален празник, а другите се споменаваха като възможни варианти). Е, аз вкарвам в надпреварата и 1 април – ден, в който можем да сме себе си, както се казва по риалити форматите.
Просто много се лъже в тази държава. А и сме големи шегаджии, няма как да не ви е направило впечатление. Шегаджийството е един вид институционално застъпено. И човек като си пусне новините или като, не дай боже, се зачете в новинарски сайтове, му става едно забавно, смешно и в същото време остава и с известна доза съспенс в сърцето и душата, защото това, дето го чете, може и да е шега или лъжа с цел забавление, но може и да е истина… Просто в тази държава винаги трябва да сме нащрек. Минутка невнимание – и се е сменило правителството.
Тази седмица баш така стана. И вече имаме предложен служебен кабинет. Ще има още малко ритуални танци преди самите избори през юни. Стъпка напред, две назад, ча-ча-ча и някой и друг компромат, разкритие или обида със звън на фламенко китара в далечината за драматизъм – ей така си ги представям следващите два месеца. Емилия Милчева в текста си „Всичко е избори. Другото чака“ прави обзор именно на тази „рекламна пауза“ преди отиването ни до урните.
Дали предстоящите избори ще са оценка за (не)свършеното до момента от партиите, или просто ще отидем да гласуваме, защото така трябва, ще видим през юни. Повечето политици не изглеждат като хора, които се трогват от обществената оценка. Не можем да кажем същото обаче за оценките, които образователната ни система поставя на учениците. В текста си „Оценките – (не)нужното зло“ Донка Дойчева-Попова засяга темите за изпитването като опит за унижение и за оценката като наказание. Колкото и умни реформи да измислим и да приложим, ако има повече човечност, образователната ни система ще се гордее с много по-добри резултати, смята тя.
Ако темата за промяната в образованието ви интересува, запазете датата 13 април, когато от 10:00 до 19:00 ще се състои първото издание на форума „Образованието – каквото и да е или какво да е?“, организиран от родителската медия „Майко Мила“ и Националната мрежа за децата. Събитието е с вход свободен и ще се проведе в „Топлоцентрала“. Предвидено е и целодневно онлайн излъчване на живо на дискусионните панели. Форумът ще завърши с прожекция на документалния филм „Ние сме тези, които чакахме“. Повече за темите и гостите може да откриете в страницата на събитието.
Бихме могли да си представим „Цялото наше безумство“ като заглавие на филм или научно изследване за образователната ни система, но всъщност това е страхотният роман на малайската авторка Ши-Ли Коу. За него ни разказва тази седмица в рубриката „На второ четене“ Антония Апостолова. Действието в романа се развива в Малайзия (ако още не сте прочели за пътешествието на Петя Кокудева из тази страна, може да го направите тук), която сигурно ви се струва много далечна и географски, и културно, обаче се оказва, че не е точно така.
За общото в културата на различните балкански страни, за войната, за литературата като спасение, за простичкия факт, че всички сме „малки, глупави и уязвими човешки същества“ разговаря Йовко Ламбрев със словенския писател Горан Войнович, смятан за едно от най-талантливите пера на своето поколение. Войнович е у нас като гост на тазгодишните „Литературни срещи“. Публиката може да се срещне с него днес, 6 април, от 19:30 ч. в зала 1 на РЦСИ „Топлоцентрала“ в София. Ще си позволя един цитат от интервюто на Йовко с Войнович:
Аз не само съм съгласен с хората, които твърдят, че живеем във времена на прекъсвания, но бих добавил, че общуването ни – или това, което все още възприемаме като общуване – всъщност е само купчина прекъсвания и нищо повече. И това е лингвистичен проблем, защото говорим за послания, които ни правят слепи да видим, че по-голямата част от тези съобщения всъщност изобщо не са такива – повечето са реклами, все едно дали на вещи, или на хора.
В тотален противовес на горното и тъкмо защото животът е изтъкан от противоречия, ще направя една препоръка, която като нищо ще ви прозвучи като „прекъсване за реклама“: гледайте моноспектакъла на Елена Телбис Prima Facie. Нямам намерение да правя рецензия на постановката, защото и не мога. Само ще кажа, че това е един от най-смислените и въздействащи съвременни драматургични текстове, които съм виждала поставени на българска сцена. Авторката му Сузи Милър е бивша адвокатка, която в течение на юридическата си практика осъзнава колко често жертвите на престъпление попадат в задънените улици на правосъдната система, и създава изключителен текст за отчаяното търсене на справедливост, когато сме най-уязвими и безпомощни. Тема, която засяга всеки един от нас. Неслучайно в момента се играе в цяла Европа. Следващите представления са на 12 и 18 април, а билети може да намерите тук.
И с това тазседмичният бюлетин приключва.
Желая ви приятен „Тоест“!
Comic for 2024.04.06 – You Got A Friend
Post Syndicated from Explosm.net original https://explosm.net/comics/you-got-a-friend
New Cyanide and Happiness Comic
YuLinca 2G06110GS 5-port 2.5GbE 1-port 10G Switch Review
Post Syndicated from Rohit Kumar original https://www.servethehome.com/yulinca-2g06110gs-5-port-2-5gbe-1-port-10g-switch-review/
In our YuLinca 2G06110GS review, we see how this 5-port 2.5GbE and 1-port 10GbE SFP+ model compares to other fanless switches
The post YuLinca 2G06110GS 5-port 2.5GbE 1-port 10G Switch Review appeared first on ServeTheHome.
Friday Squid Blogging: SqUID Bots
Post Syndicated from Bruce Schneier original https://www.schneier.com/blog/archives/2024/04/friday-squid-blogging-squid-bots.html
They’re AI warehouse robots.
As usual, you can also use this squid post to talk about the security stories in the news that I haven’t covered.
Read my blog posting guidelines here.
Metasploit Weekly Wrap-Up 04/05/2024
Post Syndicated from Alan David Foster original https://blog.rapid7.com/2024/04/05/metasploit-weekly-wrap-up-04-05-2024/
New ESC4 Templates for AD CS
Metasploit added capabilities for exploiting the ESC family of flaws in AD CS in Metasploit 6.3. The ESC4 technique in particular has been supported for some time now thanks to the ad_cs_cert_templates module which enables users to read and write certificate template objects. This facilitates the exploitation of ESC4 which is a misconfiguration in the access controls of the LDAP object, allowing an attacker to tamper with them. This is typically used by an attacker to modify a certificate template object they are capable of modifying to make it susceptible to ESC1. Metasploit offers a premade template for ESC1 that a user could select to perform this attack.
This attack workflow was expanded on this week with two new templates for ESC2 and ESC3. These new templates allow Metasploit users that are concerned about ESC1 being detected with alternative options for exploitation. Additionally, the premade templates can be edited, to for example restrict permissions to a particular SID by changing the SDDL text of the ntSecurityDescriptor.
New module content (2)
WatchGuard XTM Firebox Unauthenticated Remote Command Execution
Authors: Charles Fol (Ambionics Security), Dylan Pindur (AssetNote), Misterxid, and h00die-gr3y [email protected]
Type: Exploit
Pull request: #18915 contributed by h00die-gr3y
Path: linux/http/watchguard_firebox_unauth_rce_cve_2022_26318
AttackerKB reference: CVE-2022-26318
Description: This PR adds a module for a buffer overflow at the administration interface of WatchGuard Firebox and XTM appliances. The appliances are built from a cherrypy python backend sending XML-RPC requests to a C binary called wgagent using pre-authentication endpoint /agent/login. This vulnerability impacts Fireware OS before 12.7.2_U2, 12.x before 12.1.3_U8, and 12.2.x through 12.5.x before 12.5.9_U2. Successful exploitation results in remote code execution as user nobody.
Jenkins CLI Ampersand Replacement Arbitrary File Read
Authors: Vozec, Yaniv Nizry, binganao, h00die, and h4x0r-dz
Type: Auxiliary
Pull request: #18764 contributed by h00die
Path: gather/jenkins_cli_ampersand_arbitrary_file_read
AttackerKB reference: CVE-2024-23897
Description: This PR adds a new module to exploit CVE-2024-23897, an unauthorized arbitrary (first 2 lines) file read on Jenkins versions prior to 2.442 or for the LTS stream, versions prior to 2.426.3.
Enhancements and features (4)
- #18906 from zeroSteiner – This PR adds support for leveraging the ESC4 attack on misconfigured AD-CS servers to introduce ESC2 and ESC3.
- #18933 from sjanusz-r7 – Updates the new SQL session types to correctly remember previous commands that the user has entered.
- #19003 from ArchiMoebius – Updates msfvenom and payload generation to support formatting payloads as a Zig buffer.
- #19014 from cgranleese-r7 – Adds an initial set of acceptance tests for MySQL modules and session types.
Bugs fixed (3)
- #18935 from zeroSteiner – This PR fixes a common user mistake when authenticating with LDAP modules. Now, users can specify either the USERNAME (user) and DOMAIN (domain.local) datastore options or the original format of just the USERNAME in the UPN format ([email protected]). This fix updates the LDAP library.
- #19007 from dwelch-r7 – Fixes a regression that affected
exploit/multi/http/log4shell_header_injectionmodule which stopped the module from running successfully. - #19021 from cgranleese-r7 – Updates the
admin/mysql/mysql_enummodule to work with newer versions of MySQL.
Documentation
You can find the latest Metasploit documentation on our docsite at docs.metasploit.com.
Get it
As always, you can update to the latest Metasploit Framework with msfupdate
and you can get more details on the changes since the last blog post from
GitHub:
If you are a git user, you can clone the Metasploit Framework repo (master branch) for the latest.
To install fresh without using git, you can use the open-source-only Nightly Installers or the
commercial edition Metasploit Pro
[$] A look at the 2024 Debian Project Leader election
Post Syndicated from jzb original https://lwn.net/Articles/967981/
The nominations have closed and campaigning is underway to see who
will be the next Debian
Project Leader (DPL). This year, two
candidates are campaigning for the position Jonathan Carter has
held for four eventful years: Sruthi Chandran and
Andreas Tille. Topics that have emerged so far include how the
prospective DPLs would spend project money, their opinions on handling
controversial topics, and project diversity.
Cloudflare acquires Baselime to expand serverless application observability capabilities
Post Syndicated from Boris Tane original https://blog.cloudflare.com/cloudflare-acquires-baselime-expands-observability-capabilities
Today, we’re thrilled to announce that Cloudflare has acquired Baselime.
The cloud is changing. Just a few years ago, serverless functions were revolutionary. Today, entire applications are built on serverless architectures, from compute to databases, storage, queues, etc. — with Cloudflare leading the way in making it easier than ever for developers to build, without having to think about their architecture. And while the adoption of serverless has made it simple for developers to run fast, it has also made one of the most difficult problems in software even harder: how the heck do you unravel the behavior of distributed systems?
When I started Baselime 2 years ago, our goal was simple: enable every developer to build, ship, and learn from their serverless applications such that they can resolve issues before they become problems.
Since then, we built an observability platform that enables developers to understand the behaviour of their cloud applications. It’s designed for high cardinality and dimensionality data, from logs to distributed tracing with OpenTelemetry. With this data, we automatically surface insights from your applications, and enable you to quickly detect, troubleshoot, and resolve issues in production.
In parallel, Cloudflare has been busy the past few years building the next frontier of cloud computing: the connectivity cloud. The team is building primitives that enable developers to build applications with a completely new set of paradigms, from Workers to D1, R2, Queues, KV, Durable Objects, AI, and all the other services available on the Cloudflare Developers Platform.
This synergy makes Cloudflare the perfect home for Baselime. Our core mission has always been to simplify and innovate around observability for the future of the cloud, and Cloudflare’s ecosystem offers the ideal ground to further this cause. With Cloudflare, we’re positioned to deeply integrate into a platform that tens of thousands of developers trust and use daily, enabling them to quickly build, ship, and troubleshoot applications. We believe that every Worker, Queue, KV, Durable Object, AI call, etc. should have built-in observability by default.
That’s why we’re incredibly excited about the potential of what we can build together and the impact it will have on developers around the world.
To give you a preview into what’s ahead, I wanted to dive deeper into the 3 core concepts we followed while building Baselime.
High Cardinality and Dimensionality
Cardinality and dimensionality are best described using examples. Imagine you’re playing a board game with a deck of cards. High cardinality is like playing a game where every card is a unique character, making it hard to remember or match them. And high dimensionality is like each card has tons of details like strength, speed, magic, aura, etc., making the game’s strategy complex because there’s so much to consider.
This also applies to the data your application emits. For example, when you log an HTTP request that makes database calls.
- High cardinality means that your logs can have a unique
userIdorrequestId(which can take millions of distinct values). Those are high cardinality fields. - High dimensionality means that your logs can have thousands of possible fields. You can record each HTTP header of your request and the details of each database call. Any log can be a key-value object with thousands of individual keys.
The ability to query on high cardinality and dimensionality fields is key to modern observability. You can surface all errors or requests for a specific user, compute the duration of each of those requests, and group by location. You can answer all of those questions with a single tool.
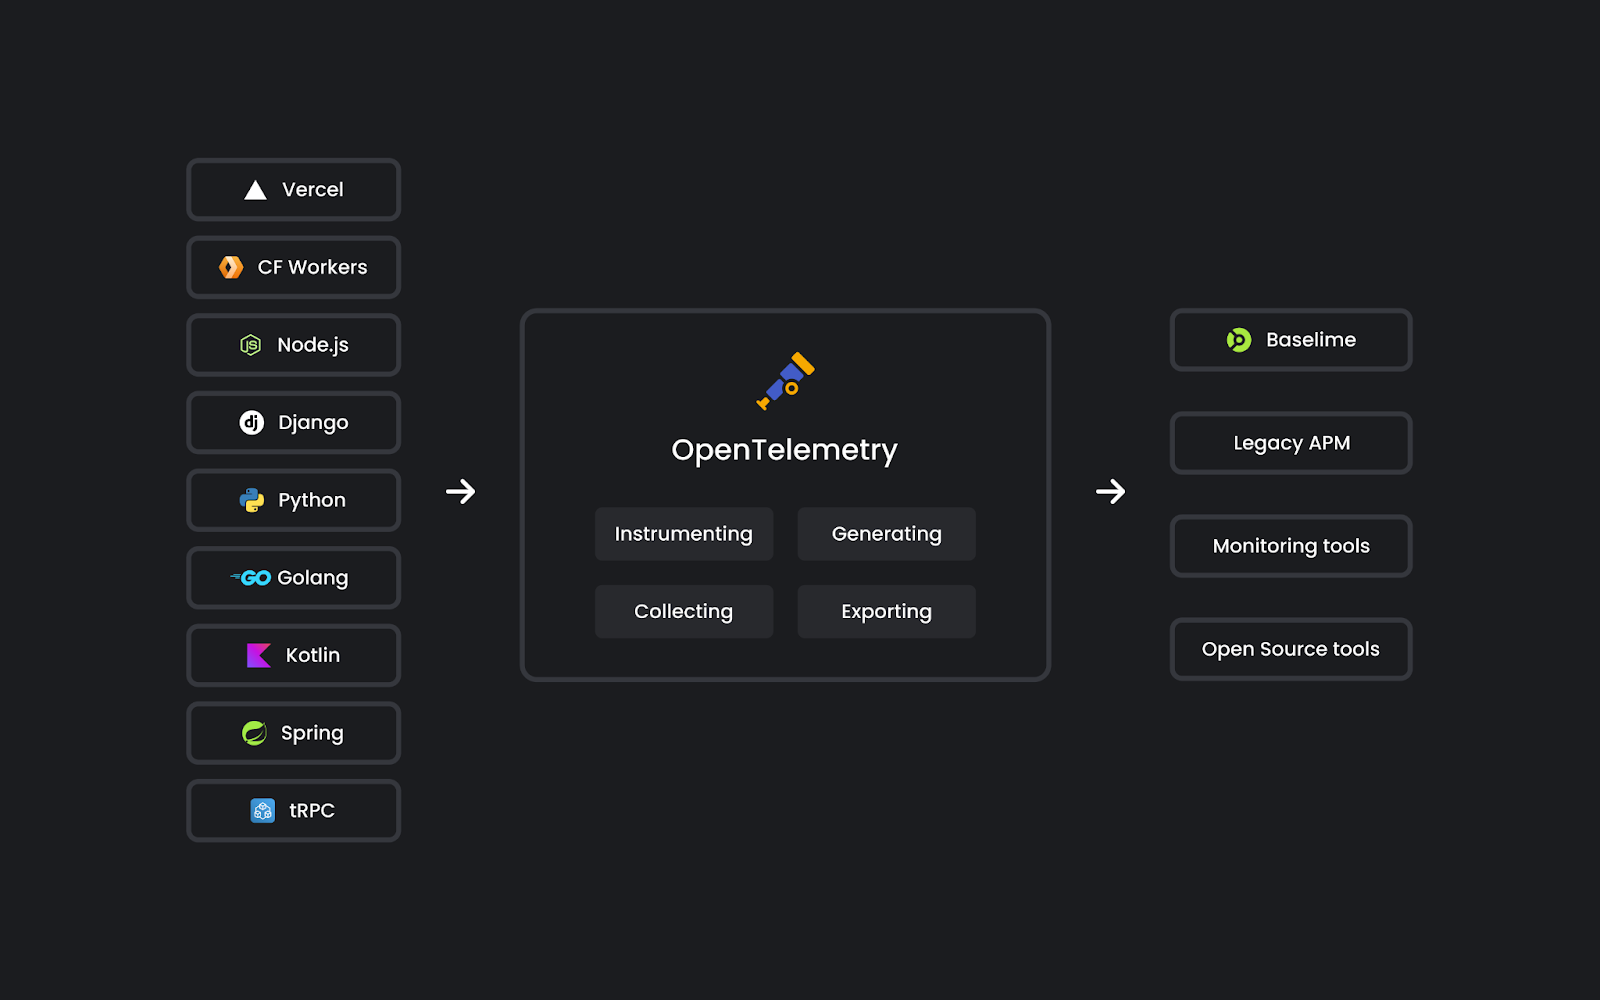
OpenTelemetry
OpenTelemetry provides a common set of tools, APIs, SDKs, and standards for instrumenting applications. It is a game-changer for debugging and understanding cloud applications. You get to see the big picture: how fast your HTTP APIs are, which routes are experiencing the most errors, or which database queries are slowest. You can also get into the details by following the path of a single request or user across your entire application.
Baselime is OpenTelemetry native, and it is built from the ground up to leverage OpenTelemetry data. To support this, we built a set of OpenTelemetry SDKs compatible with several serverless runtimes.
Cloudflare is building the cloud of tomorrow and has developed workerd, a modern JavaScript runtime for Workers. With Cloudflare, we are considering embedding OpenTelemetry directly in the Workers’ runtime. That’s one more reason we’re excited to grow further at Cloudflare, enabling more developers to understand their applications, even in the most unconventional scenarios.
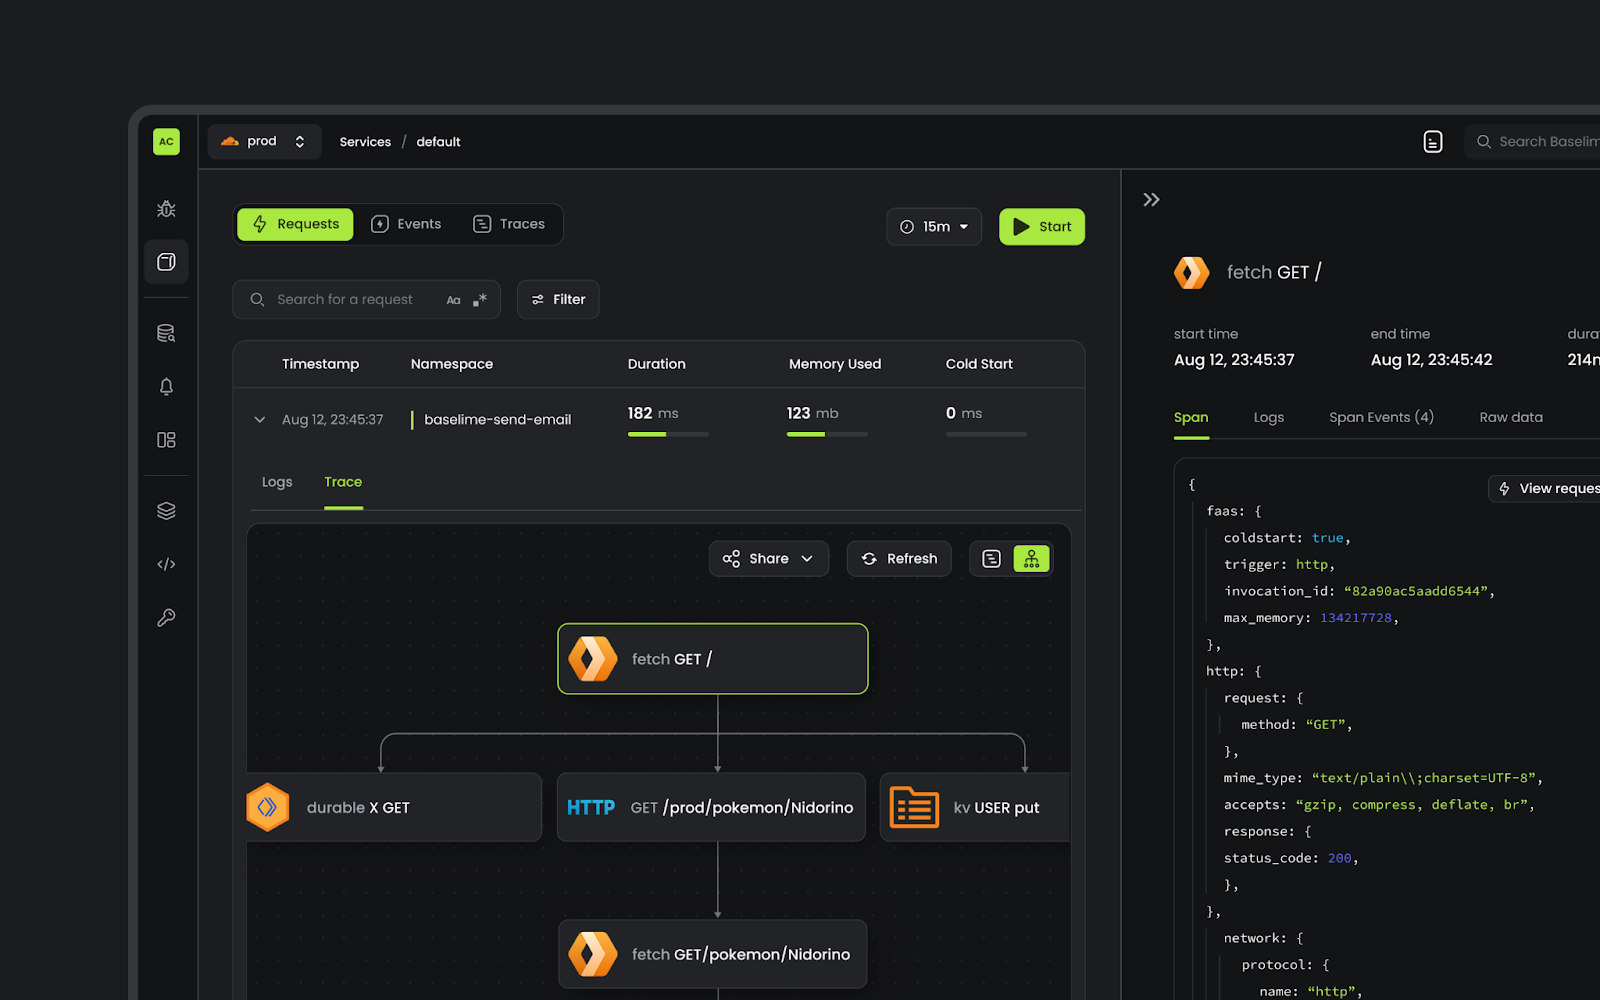
Developer Experience
Observability without action is just storage. I have seen too many developers pay for tools to store logs and metrics they never use, and the key reason is how opaque these tools are.
The crux of the issue in modern observability isn’t the technology itself, but rather the developer experience. Many tools are complex, with a significant learning curve. This friction reduces the speed at which developers can identify and resolve issues, ultimately affecting the reliability of their applications. Improving developer experience is key to unlocking the full potential of observability.
We built Baselime to be an exploratory solution that surfaces insights to you rather than requiring you to dig for them. For example, we notify you in real time when errors are discovered in your application, based on your logs and traces. You can quickly search through all of your data with full-text search, or using our powerful query engine, which makes it easy to correlate logs and traces for increased visibility, or ask our AI debugging assistant for insights on the issue you’re investigating.
It is always possible to go from one insight to another, asking questions about the state of your app iteratively until you get to the root cause of the issue you are troubleshooting.
Cloudflare has always prioritised the developer experience of its developer platform, especially with Wrangler, and we are convinced it’s the right place to solve the developer experience problem of observability.
What’s next?
Over the next few months, we’ll work to bring the core of Baselime into the Cloudflare ecosystem, starting with OpenTelemetry, real-time error tracking, and all the developer experience capabilities that make a great observability solution. We will keep building and improving observability for applications deployed outside Cloudflare because we understand that observability should work across providers.
But we don’t want to stop there. We want to push the boundaries of what modern observability looks like. For instance, directly connecting to your codebase and correlating insights from your logs and traces to functions and classes in your codebase. We also want to enable more AI capabilities beyond our debugging assistant. We want to deeply integrate with your repositories such that you can go from an error in your logs and traces to a Pull Request in your codebase within minutes.
We also want to enable everyone building on top of Large Language Models to do all your LLM observability directly within Cloudflare, such that you can optimise your prompts, improve latencies and reduce error rates directly within your cloud provider. These are just a handful of capabilities we can now build with the support of the Cloudflare platform.
Thanks
We are incredibly thankful to our community for its continued support, from day 0 to today. With your continuous feedback, you’ve helped us build something we’re incredibly proud of.
To all the developers currently using Baselime, you’ll be able to keep using the product and will receive ongoing support. Also, we are now making all the paid Baselime features completely free.
Baselime products remain available to sign up for while we work on integrating with the Cloudflare platform. We anticipate sunsetting the Baselime products towards the end of 2024 when you will be able to observe all of your applications within the Cloudflare dashboard. If you’re interested in staying up-to-date on our work with Cloudflare, we will release a signup link in the coming weeks!
We are looking forward to continuing to innovate with you.
OpenBSD 7.5 released
Post Syndicated from corbet original https://lwn.net/Articles/968584/
OpenBSD 7.5 has been released. The list of changes and improvements is, as
usual, long; it includes the pinsyscalls() functionality covered
here in January.
Eclipse Foundation announces collaboration for CRA compliance
Post Syndicated from daroc original https://lwn.net/Articles/968566/
The Eclipse Foundation, the organization
behind the Eclipse IDE and many other software projects, announced
a collaboration between several different open-source-software foundations to
create a specification describing secure software development best practices.
This work is motivated by the European Union’s Cyber Resilience Act (CRA).
The leading open source communities and foundations have for
years developed and practised secure software development
processes. These are processes that have often defined or set
industry best practices around things such as coordinated
disclosure, peer review, and release processes. These processes
have been documented by each of these communities, albeit
sometimes using different terminology and approaches. We
hypothesise that the cybersecurity process technical
documentation that already exists amongst the open source
communities can provide a useful starting point for developing
the cybersecurity processes required for regulatory compliance.
(Thanks to Martin Michlmayr.)
FFmpeg 7.0 released
Post Syndicated from corbet original https://lwn.net/Articles/968565/
Version 7.0 of the
FFmpeg audio/video toolkit is out. “The most noteworthy changes for
“.
most users are a native VVC decoder (currently experimental, until more
fuzzing is done), IAMF support, or a multi-threaded ffmpeg CLI tool
There’s also the usual list of new formats and codecs, and a few deprecated
features have been removed.
Security updates for Friday
Post Syndicated from daroc original https://lwn.net/Articles/968561/
Security updates have been issued by Debian (cockpit), Mageia (python-pygments), Red Hat (nodejs), Slackware (httpd and nghttp2), SUSE (avahi, gradle, gradle-bootstrap, and squid), and Ubuntu (xorg-server, xwayland).
Cloudflare acquires PartyKit to allow developers to build real-time multi-user applications
Post Syndicated from Sunil Pai original https://blog.cloudflare.com/cloudflare-acquires-partykit

We’re thrilled to announce that PartyKit, an open source platform for deploying real-time, collaborative, multiplayer applications, is now a part of Cloudflare. This acquisition marks a significant milestone in our journey to redefine the boundaries of serverless computing, making it more dynamic, interactive, and, importantly, stateful.
Defining the future of serverless compute around state
Building real-time applications on the web have always been difficult. Not only is it a distributed systems problem, but you need to provision and manage infrastructure, databases, and other services to maintain state across multiple clients. This complexity has traditionally been a barrier to entry for many developers, especially those who are just starting out.
We announced Durable Objects in 2020 as a way of building synchronized real time experiences for the web. Unlike regular serverless functions that are ephemeral and stateless, Durable Objects are stateful, allowing developers to build applications that maintain state across requests. They also act as an ideal synchronization point for building real-time applications that need to maintain state across multiple clients. Combined with WebSockets, Durable Objects can be used to build a wide range of applications, from multiplayer games to collaborative drawing tools.
In 2022, PartyKit began as a project to further explore the capabilities of Durable Objects and make them more accessible to developers by exposing them through familiar components. In seconds, you could create a project that configured behavior for these objects, and deploy it to Cloudflare. By integrating with popular libraries such as Yjs (the gold standard in collaborative editing) and React, PartyKit made it possible for developers to build a wide range of use cases, from multiplayer games to collaborative drawing tools, into their applications.
Building experiences with real-time components was previously only accessible to multi-billion dollar companies, but new computing primitives like Durable Objects on the edge make this accessible to regular developers and teams. With PartyKit now under our roof, we’re doubling down on our commitment to this future — a future where serverless is stateful.
We’re excited to give you a preview into our shared vision for applications, and the use cases we’re excited to simplify together.
Making state for serverless easy
Unlike conventional approaches that rely on external databases to maintain state, thereby complicating scalability and increasing costs, PartyKit leverages Cloudflare’s Durable Objects to offer a seamless model where stateful serverless functions can operate as if they were running on a single machine, maintaining state across requests. This innovation not only simplifies development but also opens up a broader range of use cases, including real-time computing, collaborative editing, and multiplayer gaming, by allowing thousands of these “machines” to be spun up globally, each maintaining its own state. PartyKit aims to be a complement to traditional serverless computing, providing a more intuitive and efficient method for developing applications that require stateful behavior, thereby marking the “next evolution” of serverless computing.
Simplifying WebSockets for Real-Time Interaction
WebSockets have revolutionized how we think about bidirectional communication on the web. Yet, the challenge has always been about scaling these interactions to millions without a hitch. Cloudflare Workers step in as the hero, providing a serverless framework that makes real-time applications like chat services, multiplayer games, and collaborative tools not just possible but scalable and efficient.
Powering Games and Multiplayer Applications Without Limits
Imagine building multiplayer platforms where the game never lags, the collaboration is seamless, and video conferences are crystal clear. Cloudflare’s Durable Objects morph the stateless serverless landscape into a realm where persistent connections thrive. PartyKit’s integration into this ecosystem means developers now have a powerhouse toolkit to bring ambitious multiplayer visions to life, without the traditional overheads.
This is especially critical in gaming — there are few areas where low-latency and real-time interaction matter more. Every millisecond, every lag, every delay defines the entire experience. With PartyKit’s capabilities integrated into Cloudflare, developers will be able to leverage our combined technologies to create gaming experiences that are not just about playing but living the game, thanks to scalable, immersive, and interactive platforms.
The toolkit for building Local-First applications
The Internet is great, and increasingly always available, but there are still a few situations where we are forced to disconnect — whether on a plane, a train, or a beach.
The premise of local-first applications is that work doesn’t stop when the Internet does. Wherever you left off in your doc, you can keep working on it, assuming the state will be restored when you come back online. By storing data on the client and syncing when back online, these applications offer resilience and responsiveness that’s unmatched. Cloudflare’s vision, enhanced by PartyKit’s technology, aims to make local-first not just an option but the standard for application development.
What’s next for PartyKit users?
Users can expect their existing projects to continue working as expected. We will be adding more features to the platform, including the ability to create and use PartyKit projects inside existing Workers and Pages projects. There will be no extra charges to use PartyKit for commercial purposes, other than the standard usage charges for Cloudflare Workers and other services. Further, we’re going to expand the roadmap to begin working on integrations with popular frameworks and libraries, such as React, Vue, and Angular. We’re deeply committed to executing on the PartyKit vision and roadmap, and we’re excited to see what you build with it.
The Beginning of a New Chapter
The acquisition of PartyKit by Cloudflare isn’t just a milestone for our two teams; it’s a leap forward for developers everywhere. Together, we’re not just building tools; we’re crafting the foundation for the next generation of Internet applications. The future of serverless is stateful, and with PartyKit’s expertise now part of our arsenal, we’re more ready than ever to make that future a reality.
Welcome to the Cloudflare team, PartyKit. Look forward to building something remarkable together.
Blazing fast development with full-stack frameworks and Cloudflare
Post Syndicated from Igor Minar original https://blog.cloudflare.com/blazing-fast-development-with-full-stack-frameworks-and-cloudflare
Hello web developers! Last year we released a slew of improvements that made deploying web applications on Cloudflare much easier, and in response we’ve seen a large growth of Astro, Next.js, Nuxt, Qwik, Remix, SolidStart, SvelteKit, and other web apps hosted on Cloudflare. Today we are announcing major improvements to our integration with these web frameworks that makes it easier to develop sophisticated applications that use our D1 SQL database, R2 object store, AI models, and other powerful features of Cloudflare’s developer platform.
In the past, if you wanted to develop a web framework-powered application with D1 and run it locally, you’d have to build a production build of your application, and then run it locally using `wrangler pages dev`. While this worked, each of your code iterations would take seconds, or tens of seconds for big applications. Iterating using production builds is simply too slow, pulls you out of the flow, and doesn’t allow you to take advantage of all the DX optimizations that framework authors have put a lot of hard work into. This is changing today!
Our goal is to integrate with web frameworks in the most natural way possible, without developers having to learn and adopt significant workflow changes or custom APIs when deploying their app to Cloudflare. Whether you are a Next.js developer, a Nuxt developer, or prefer another framework, you can now keep on using the blazing fast local development workflow familiar to you, and ship your application on Cloudflare.
All full-stack web frameworks come with a local development server (dev server) that is custom tailored to the framework and often provides an excellent development experience, with only one exception — they don’t natively support some important features of Cloudflare’s development platform, especially our storage solutions.
So up until recently, you had to make a tough choice. You could use the framework-specific dev server to develop your application, but forgo access to many of Cloudflare’s features. Alternatively, you could take full advantage of Cloudflare’s platform including various resources like D1 or R2, but you would have to give up using the framework specific developer tooling. In that case, your iteration cycle would slow down, and it would take seconds rather than milliseconds for you to see results of your code changes in the browser. But not anymore! Let’s take a look.
Let’s build an application
Let’s create a new application using C3 — our create-cloudflare CLI. We could use any npm client of our choice (pnpm anyone?!?), but to keep things simple in this post, we’ll stick with the default npm client. To get started, just run:
$ npm create cloudflare@latest
Provide a name for your app, or stick with the randomly generated one. Then select the “Website or web app” category, and pick a full-stack framework of your choice. We support many: Astro, Next.js, Nuxt, Qwik, Remix, SolidStart, and SvelteKit.
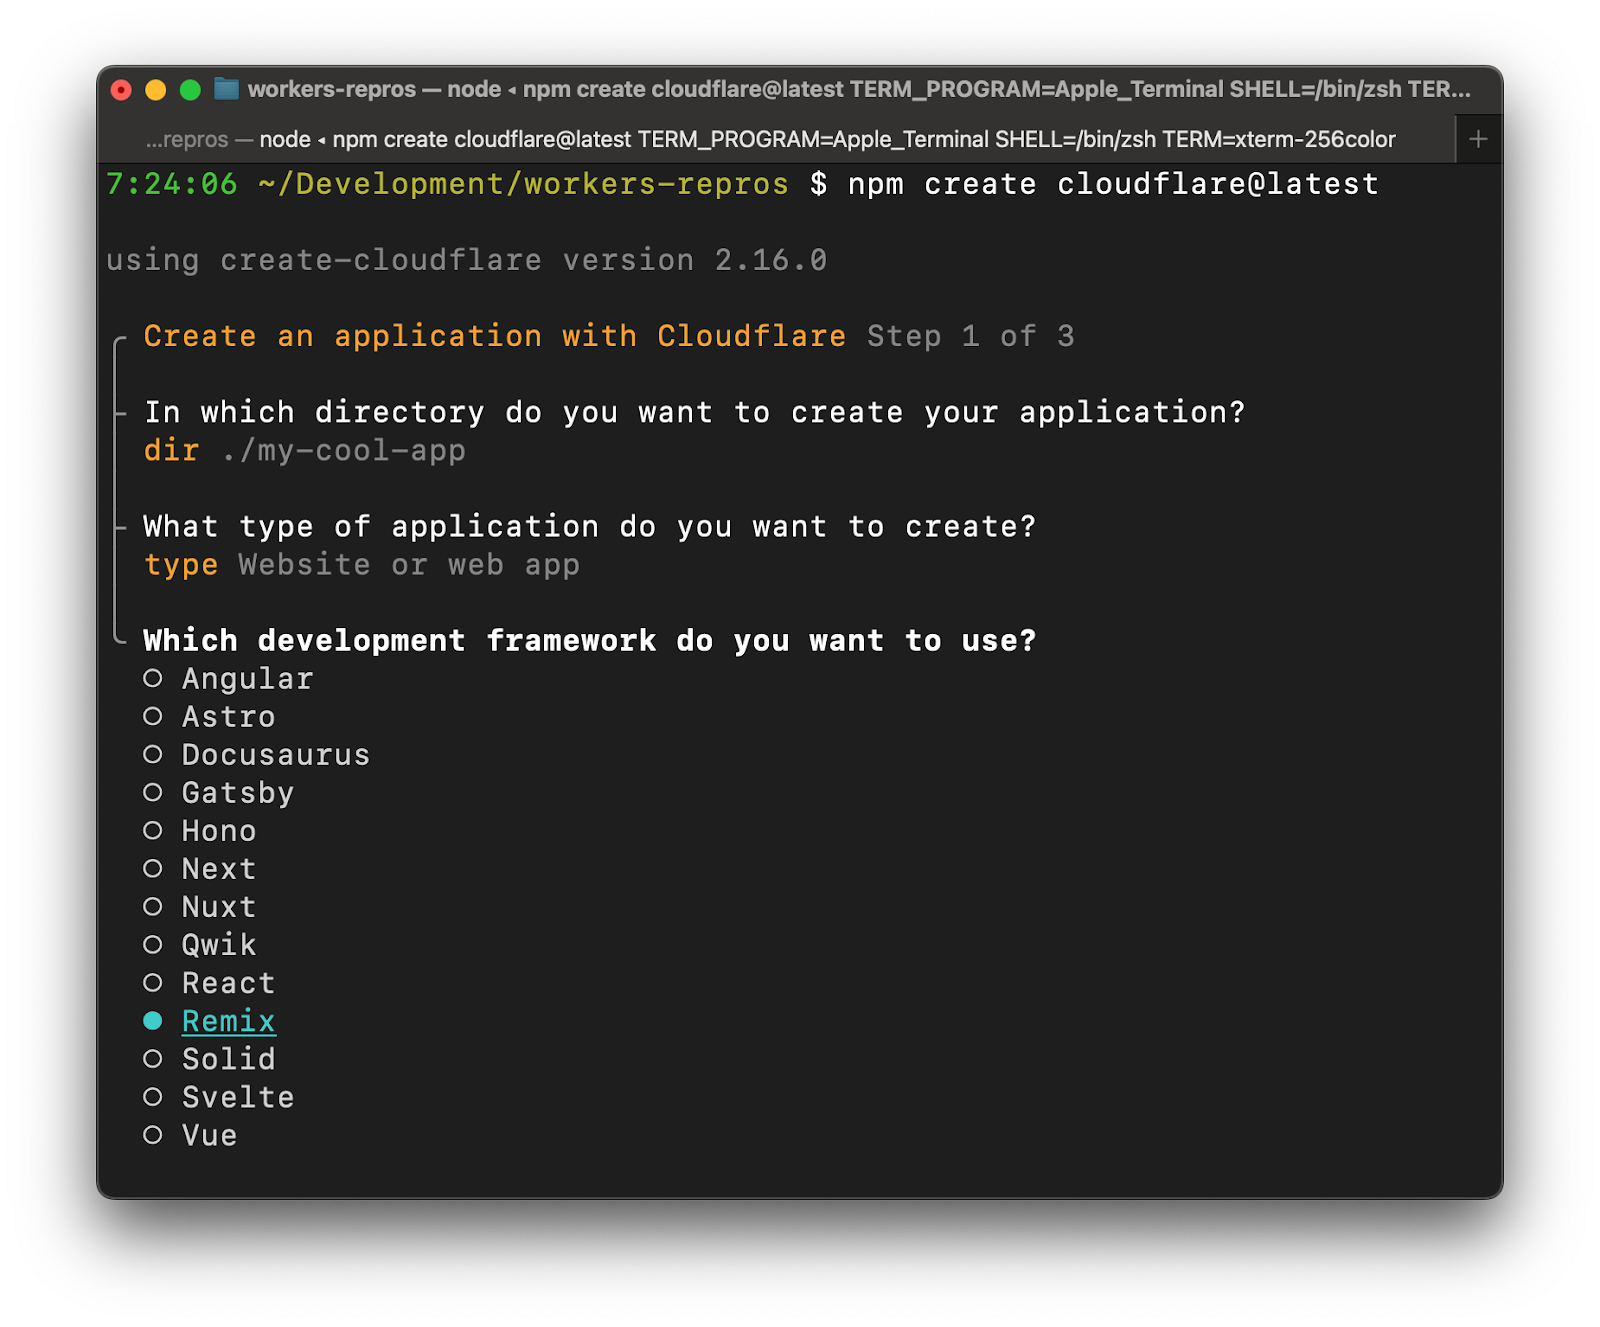
Since C3 delegates the application scaffolding to the latest version of the framework-specific CLI, you will scaffold the application exactly as the framework authors intended without missing out on any of the framework features or options. C3 then adds to your application everything necessary for integrating and deploying to Cloudflare so that you don’t have to configure it yourself.
With our application scaffolded, let’s get it to display a list of products stored in a database with just a few steps. First, we add the configuration for our database to our wrangler.toml config file:
[[d1_databases]]
binding = "DB"
database_name = "blog-products-db"
database_id = "XXXXXXXXXXXXXXXX"
Yes, that’s right! You can now configure your bound resources via the wrangler.toml file, even for full-stack apps deployed to Pages. We’ll share much more about configuration enhancements to Pages in a dedicated announcement.
Now let’s create a simple schema.sql file representing our database schema:
CREATE TABLE products(product_id INTEGER PRIMARY KEY, name TEXT, price INTEGER);
INSERT INTO products (product_id, name, price) VALUES (1, 'Apple', 250), (2, 'Banana', 100), (3, 'Cherry', 375);
And initialize our database:
$ npx wrangler d1 execute blog-products-db --local --file schema.sql
Notice that we used the –local flag of wrangler d1 execute to apply the changes to our local D1 database. This is the database that our dev server will connect to.
Next, if you use TypeScript, let TypeScript know about your database by running:
$ npm run build-cf-types
This command is preconfigured for all full-stack applications created via C3 and executes wrangler types to update the interface of Cloudflare’s environment containing all configured bindings.
We can now start the dev server provided by your framework via a handy shortcut:
$ npm run dev
This shortcut will start your framework’s dev server, whether it’s powered by next dev, nitro, or vite.
Now to access our database and list the products, we can now use a framework specific approach. For example, in a Next.js application that uses the App router, we could update app/api/hello/route.ts with the following:
const db = getRequestContext().env.DB;
 const productsResults = await db.prepare('SELECT * FROM products').all();
 return Response.json(productsResults.results);
Or in a Nuxt application, we can create a server/api/hello.ts file and populate it with:
export default defineEventHandler(async ({ context }) => {
   const db = context.cloudflare.env.DB;
   const productsResults = await db.prepare('SELECT * FROM products').all();
   return productsResults.results;
 });
Assuming that the framework dev server is running on port 3000, you can test the new API route in either framework by navigating to http://localhost:3000/api/hello. For simplicity, we picked API routes in these examples, but the same applies to any UI-generating routes as well.
Each web framework has its own way to define routes and pass contextual information about the request throughout the application, so how you access your databases, object stores, and other resources will depend on your framework. You can read our updated full-stack framework guides to learn more:
Now that you know how to access Cloudflare’s resources in the framework of your choice, everything else you know about your framework remains the same. You can now develop your application locally, using the development server optimized for your framework, which often includes support for hot module replacement (HMR), custom dev tools, enhanced debugging support and more, all while still benefiting from Cloudflare-specific APIs and features. Win-win!
What has actually changed to enable these development workflows?
To decrease the development latency and preserve the custom framework-specific experiences, we needed to enable web frameworks and their dev servers to integrate with wrangler and miniflare in a seamless, almost invisible way.
Miniflare is a key component in this puzzle. It is our local simulator for Cloudflare-specific resources, which is powered by workerd, our JavaScript (JS) runtime. By relying on workerd, we ensure that Cloudflare’s JavaScript APIs run locally in a way that faithfully simulates our production environment. The trouble is that framework dev servers already rely on Node.js to run the application, so bringing another JS runtime into the mix breaks many assumptions in how these dev servers have been architected.
Our team however came up with an interesting approach to bridging the gap between these two JS runtimes. We call it the getPlatformProxy() API, which is now part of wrangler and is super-powered by miniflare’s magic proxy. This API exposes a JS proxy object that behaves just like the usual Workers env object containing all bound resources. The proxy object enables code from Node.js to transparently invoke JavaScript code running in workerd, as well access Cloudflare-specific runtime APIs.
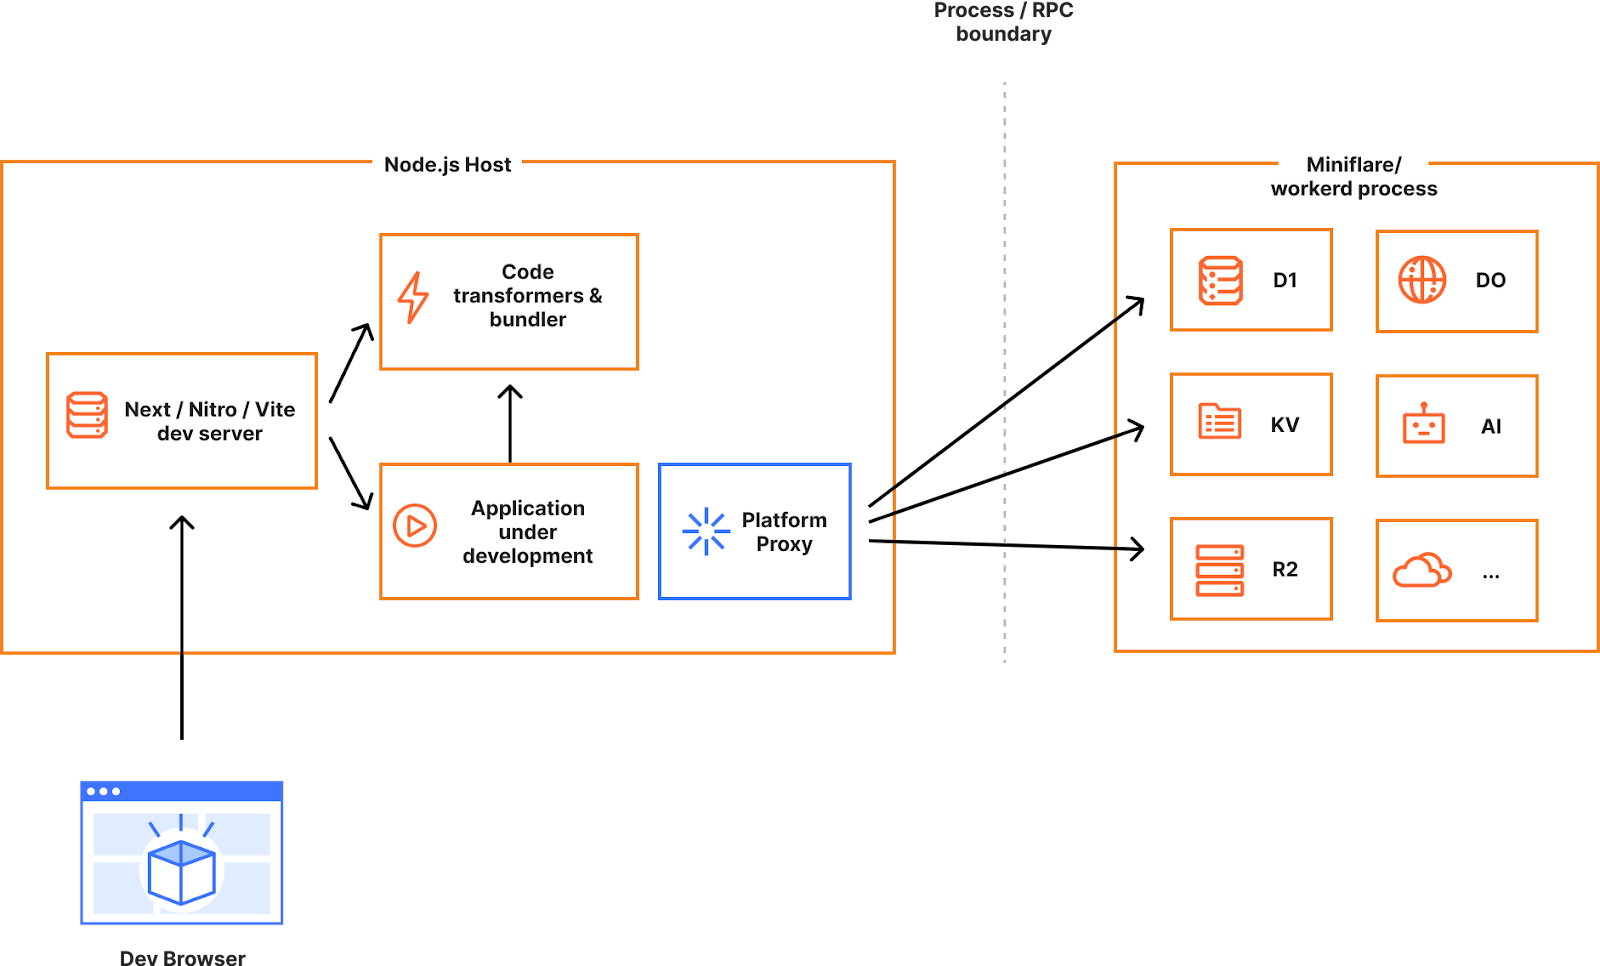
With this bridge between the Node.js and workerd runtimes, your application can now access Cloudflare simulators for D1, R2, KV and other storage solutions directly while running in a dev server powered by Node.js. Or you could even write an Node.js script to do the same:
 import {getPlatformProxy} from 'wrangler';


 const {env} = getPlatformProxy();
 console.dir(env);
 const db = env.DB;


 // Now let’s execute a DB query that runs in a local D1 db
 // powered by miniflare/workerd and access the result from Node.js
 const productsResults = await db.prepare('SELECT * FROM products').all();
 console.log(productsResults.results);
With the getPlatformProxy() API available, the remaining work was all about updating all framework adapters, plugins, and in some cases frameworks themselves to make use of this API. We are grateful for the support we received from framework teams on this journey, especially Alex from Astro, pi0 from Nuxt, Pedro from Remix, Ryan from Solid, Ben and Rich from Svelte, and our collaborator on the next-on-pages project, James Anderson.
Future improvements to development workflows with Vite
While the getPlatformProxy() API is a good solution for many scenarios, we can do better. If we could run the entire application in our JS runtime rather than Node.js, we could even more faithfully simulate the production environment and reduce developer friction and production surprises.
In the ideal world, we’d like you to develop against the same runtime that you deploy to in production, and this can only be achieved by integrating workerd directly into the dev servers of all frameworks, which is not a small feat considering the number of frameworks out there and the differences between them.
We however got a bit lucky. As we kicked off this effort, we quickly realized that Vite, a popular dev server used by many full-stack frameworks, was gaining increasingly greater adoption. In fact, Remix switched over to Vite just recently and confirmed the popularity of Vite as the common foundation for web development today.
If Vite had first-class support for running a full-stack application in an alternative JavaScript runtime, we could enable anyone using Vite to develop their applications locally with complete access to the Cloudflare developer platform. No more framework specific custom integrations and workarounds — all the features of a full-stack framework, Vite, and Cloudflare accessible to all developers.
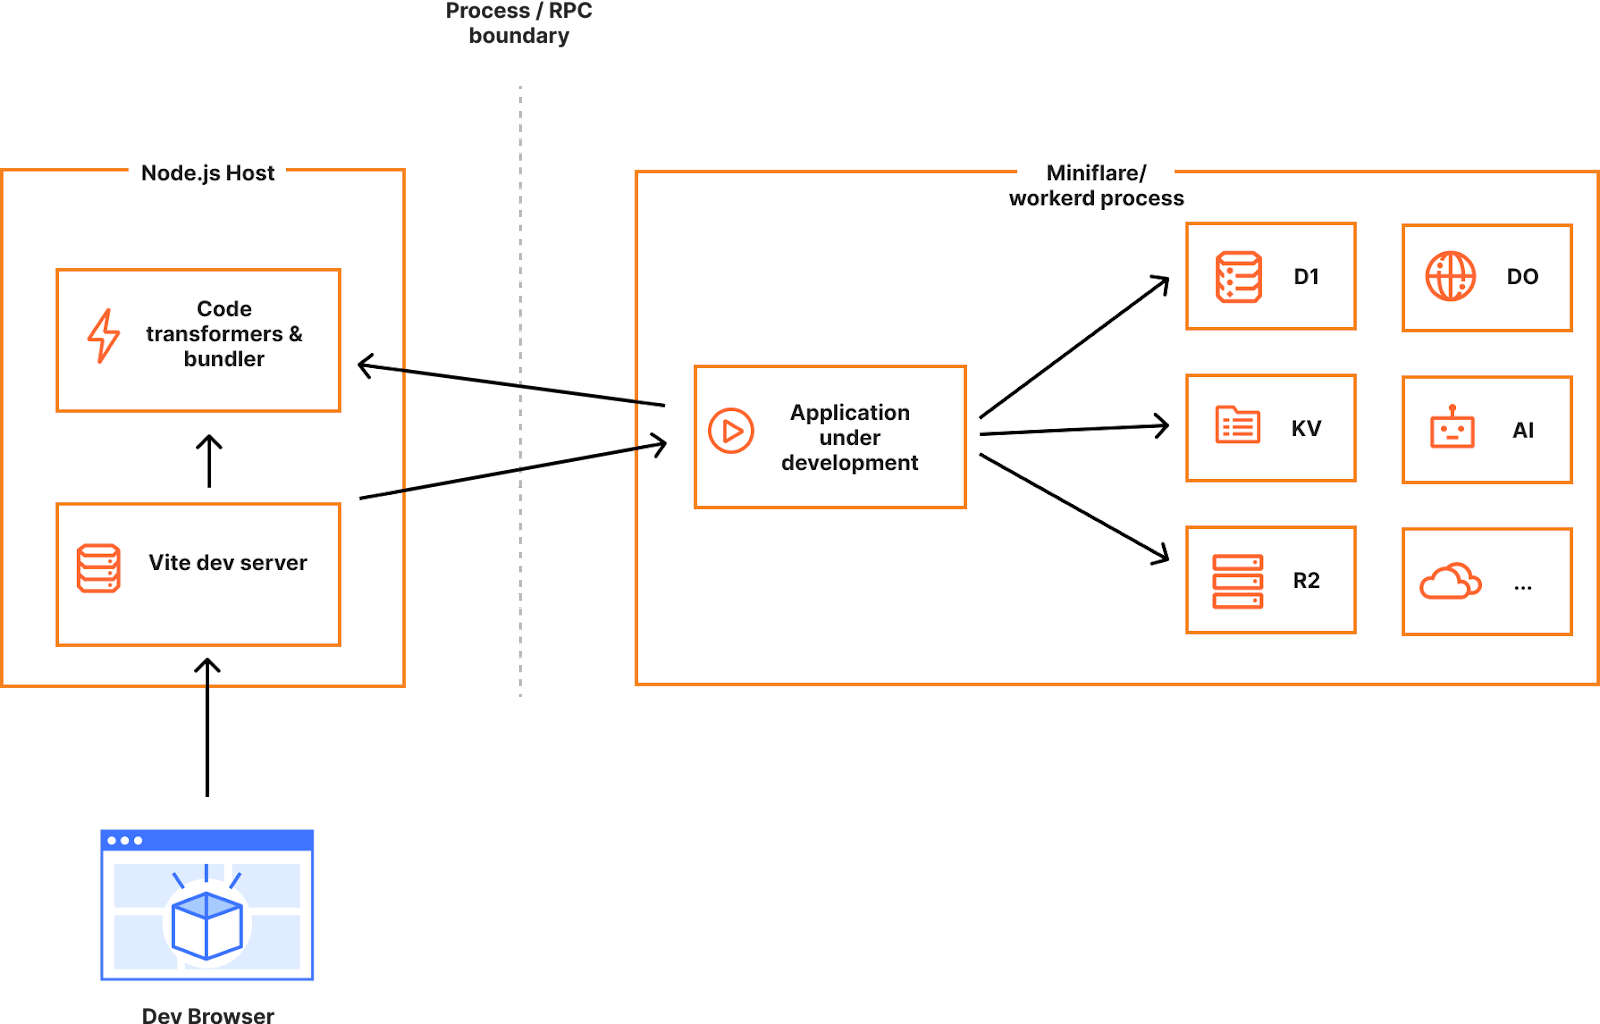
Sounds too good to be true? Maybe. We are very stoked to be working with the Vite team on the Vite environments proposal, which could enable just that. This proposal is still evolving, so stay tuned for updates.
What will you build today?
We aim to make Cloudflare the best development platform for web developers. Making it quick and easy to develop your application with frameworks and tools you are already familiar with is a big part of our story. Start your journey with us by running a single command:
$ npm create cloudflare@latest
We’ve added JavaScript-native RPC to Cloudflare Workers
Post Syndicated from Kenton Varda original https://blog.cloudflare.com/javascript-native-rpc

Cloudflare Workers now features a built-in RPC (Remote Procedure Call) system enabling seamless Worker-to-Worker and Worker-to-Durable Object communication, with almost no boilerplate. You just define a class:
export class MyService extends WorkerEntrypoint {
  sum(a, b) {
    return a + b;
  }
}
And then you call it:
let three = await env.MY_SERVICE.sum(1, 2);
No schemas. No routers. Just define methods of a class. Then call them. That’s it.
But that’s not it
This isn’t just any old RPC. We’ve designed an RPC system so expressive that calling a remote service can feel like using a library – without any need to actually import a library! This is important not just for ease of use, but also security: fewer dependencies means fewer critical security updates and less exposure to supply-chain attacks.
To this end, here are some of the features of Workers RPC:
- For starters, you can pass Structured Clonable types as the params or return value of an RPC. (That means that, unlike JSON, Dates just work, and you can even have cycles.)
- You can additionally pass functions in the params or return value of other functions. When the other side calls the function you passed to it, they make a new RPC back to you.
- Similarly, you can pass objects with methods. Method calls become further RPCs.
- RPC to another Worker (over a Service Binding) usually does not even cross a network. In fact, the other Worker usually runs in the very same thread as the caller, reducing latency to zero. Performance-wise, it’s almost as fast as an actual function call.
- When RPC does cross a network (e.g. to a Durable Object), you can invoke a method and then speculatively invoke further methods on the result in a single network round trip.
- You can send a byte stream over RPC, and the system will automatically stream the bytes with proper flow control.
- All of this is secure, based on the object-capability model.
- The protocol and implementation are fully open source as part of workerd.
Workers RPC is a JavaScript-native RPC system. Under the hood, it is built on Cap’n Proto. However, unlike Cap’n Proto, Workers RPC does not require you to write a schema. (Of course, you can use TypeScript if you like, and we provide tools to help with this.)
In general, Workers RPC is designed to “just work” using idiomatic JavaScript code, so you shouldn’t have to spend too much time looking at docs. We’ll give you an overview in this blog post. But if you want to understand the full feature set, check out the documentation.
Why RPC? (And what is RPC anyway?)
Remote Procedure Calls (RPC) are a way of expressing communications between two programs over a network. Without RPC, you might communicate using a protocol like HTTP. With HTTP, though, you must format and parse your communications as an HTTP request and response, perhaps designed in REST style. RPC systems try to make communications look like a regular function call instead, as if you were calling a library rather than a remote service. The RPC system provides a “stub” object on the client side which stands in for the real server-side object. When a method is called on the stub, the RPC system figures out how to serialize and transmit the parameters to the server, invoke the method on the server, and then transmit the return value back.
The merits of RPC have been subject to a great deal of debate. RPC is often accused of committing many of the fallacies of distributed computing.
But this reputation is outdated. When RPC was first invented some 40 years ago, async programming barely existed. We did not have Promises, much less async and await. Early RPC was synchronous: calls would block the calling thread waiting for a reply. At best, latency made the program slow. At worst, network failures would hang or crash the program. No wonder it was deemed “broken”.
Things are different today. We have Promise and async and await, and we can throw exceptions on network failures. We even understand how RPCs can be pipelined so that a chain of calls takes only one network round trip. Many large distributed systems you likely use every day are built on RPC. It works.
The fact is, RPC fits the programming model we’re used to. Every programmer is trained to think in terms of APIs composed of function calls, not in terms of byte stream protocols nor even REST. Using RPC frees you from the need to constantly translate between mental models, allowing you to move faster.
Example: Authentication Service
Here’s a common scenario: You have one Worker that implements an application, and another Worker that is responsible for authenticating user credentials. The app Worker needs to call the auth Worker on each request to check the user’s cookie.
This example uses a Service Binding, which is a way of configuring one Worker with a private channel to talk to another, without going through a public URL. Here, we have an application Worker that has been configured with a service binding to the Auth worker.
Before RPC, all communications between Workers needed to use HTTP. So, you might write code like this:
// OLD STYLE: HTTP-based service bindings.
export default {
  async fetch(req, env, ctx) {
    // Call the auth service to authenticate the user's cookie.
    // We send it an HTTP request using a service binding.

    // Construct a JSON request to the auth service.
    let authRequest = {
      cookie: req.headers.get("Cookie")
    };

    // Send it to env.AUTH_SERVICE, which is our service binding
    // to the auth worker.
    let resp = await env.AUTH_SERVICE.fetch(
        "https://auth/check-cookie", {
      method: "POST",
      headers: {
        "Content-Type": "application/json; charset=utf-8",
      },
      body: JSON.stringify(authRequest)
    });

    if (!resp.ok) {
      return new Response("Internal Server Error", {status: 500});
    }

    // Parse the JSON result.
    let authResult = await resp.json();

    // Use the result.
    if (!authResult.authorized) {
      return new Response("Not authorized", {status: 403});
    }
    let username = authResult.username;

    return new Response(`Hello, ${username}!`);
  }
}
Meanwhile, your auth server might look like:
// OLD STYLE: HTTP-based auth server.
export default {
  async fetch(req, env, ctx) {
    // Parse URL to decide what endpoint is being called.
    let url = new URL(req.url);
    if (url.pathname == "/check-cookie") {
      // Parse the request.
      let authRequest = await req.json();

      // Look up cookie in Workers KV.
      let cookieInfo = await env.COOKIE_MAP.get(
          hash(authRequest.cookie), "json");

      // Construct the response.
      let result;
      if (cookieInfo) {
        result = {
          authorized: true,
          username: cookieInfo.username
        };
      } else {
        result = { authorized: false };
      }

      return Response.json(result);
    } else {
      return new Response("Not found", {status: 404});
    }
  }
}
This code has a lot of boilerplate involved in setting up an HTTP request to the auth service. With RPC, we can instead express this as a function call:
// NEW STYLE: RPC-based service bindings
export default {
  async fetch(req, env, ctx) {
    // Call the auth service to authenticate the user's cookie.
    // We invoke it using a service binding.
    let authResult = await env.AUTH_SERVICE.checkCookie(
        req.headers.get("Cookie"));

    // Use the result.
    if (!authResult.authorized) {
      return new Response("Not authorized", {status: 403});
    }
    let username = authResult.username;

    return new Response(`Hello, ${username}!`);
  }
}
And the server side becomes:
// NEW STYLE: RPC-based auth server.
import { WorkerEntrypoint } from "cloudflare:workers";

export class AuthService extends WorkerEntrypoint {
  async checkCookie(cookie) {
    // Look up cookie in Workers KV.
    let cookieInfo = await this.env.COOKIE_MAP.get(
        hash(cookie), "json");

    // Return result.
    if (cookieInfo) {
      return {
        authorized: true,
        username: cookieInfo.username
      };
    } else {
      return { authorized: false };
    }
  }
}
This is a pretty nice simplification… but we can do much more!
Let’s get fancy! Or should I say… classy?
Let’s say we want our auth service to do a little more. Instead of just checking cookies, it provides a whole API around user accounts. In particular, it should let you:
- Get or update the user’s profile info.
- Send the user an email notification.
- Append to the user’s activity log.
But, these operations should only be allowed after presenting the user’s credentials.
Here’s what the server might look like:
import { WorkerEntrypoint, RpcTarget } from "cloudflare:workers";

// `User` is an RPC interface to perform operations on a particular
// user. This class is NOT exported as an entrypoint; it must be
// received as the result of the checkCookie() RPC.
class User extends RpcTarget {
  constructor(uid, env) {
    super();

    // Note: Instance members like these are NOT exposed over RPC.
    // Only class (prototype) methods and properties are exposed.
    this.uid = uid;
    this.env = env;
  }

  // Get/set user profile, backed by Worker KV.
  async getProfile() {
    return await this.env.PROFILES.get(this.uid, "json");
  }
  async setProfile(profile) {
    await this.env.PROFILES.put(this.uid, JSON.stringify(profile));
  }

  // Send the user a notification email.
  async sendNotification(message) {
    let addr = await this.env.EMAILS.get(this.uid);
    await this.env.EMAIL_SERVICE.send(addr, message);
  }

  // Append to the user's activity log.
  async logActivity(description) {
    // (Please excuse this somewhat problematic implementation,
    // this is just a dumb example.)
    let timestamp = new Date().toISOString();
    await this.env.ACTIVITY.put(
        `${this.uid}/${timestamp}`, description);
  }
}

// Now we define the entrypoint service, which can be used to
// get User instances -- but only by presenting the cookie.
export class AuthService extends WorkerEntrypoint {
  async checkCookie(cookie) {
    // Look up cookie in Workers KV.
    let cookieInfo = await this.env.COOKIE_MAP.get(
        hash(cookie), "json");

    if (cookieInfo) {
      return {
        authorized: true,
        user: new User(cookieInfo.uid, this.env),
      };
    } else {
      return { authorized: false };
    }
  }
}
Now we can write a Worker that uses this API while displaying a web page:
export default {
  async fetch(req, env, ctx) {
    // `using` is a new JavaScript feature. Check out the
    // docs for more on this:
    // https://developers.cloudflare.com/workers/runtime-apis/rpc/lifecycle/
    using authResult = await env.AUTH_SERVICE.checkCookie(
        req.headers.get("Cookie"));
    if (!authResult.authorized) {
      return new Response("Not authorized", {status: 403});
    }

    let user = authResult.user;
    let profile = await user.getProfile();

    await user.logActivity("You visited the site!");
    await user.sendNotification(
        `Thanks for visiting, ${profile.name}!`);

    return new Response(`Hello, ${profile.name}!`);
  }
}
Finally, this worker needs to be configured with a service binding pointing at the AuthService class. Its wrangler.toml may look like:
name = "app-worker"
main = "./src/app.js"

# Declare a service binding to the auth service.
[[services]]
binding = "AUTH_SERVICE"    # name of the binding in `env`
service = "auth-service"    # name of the worker in the dashboard
entrypoint = "AuthService"  # name of the exported RPC class
Wait, how?
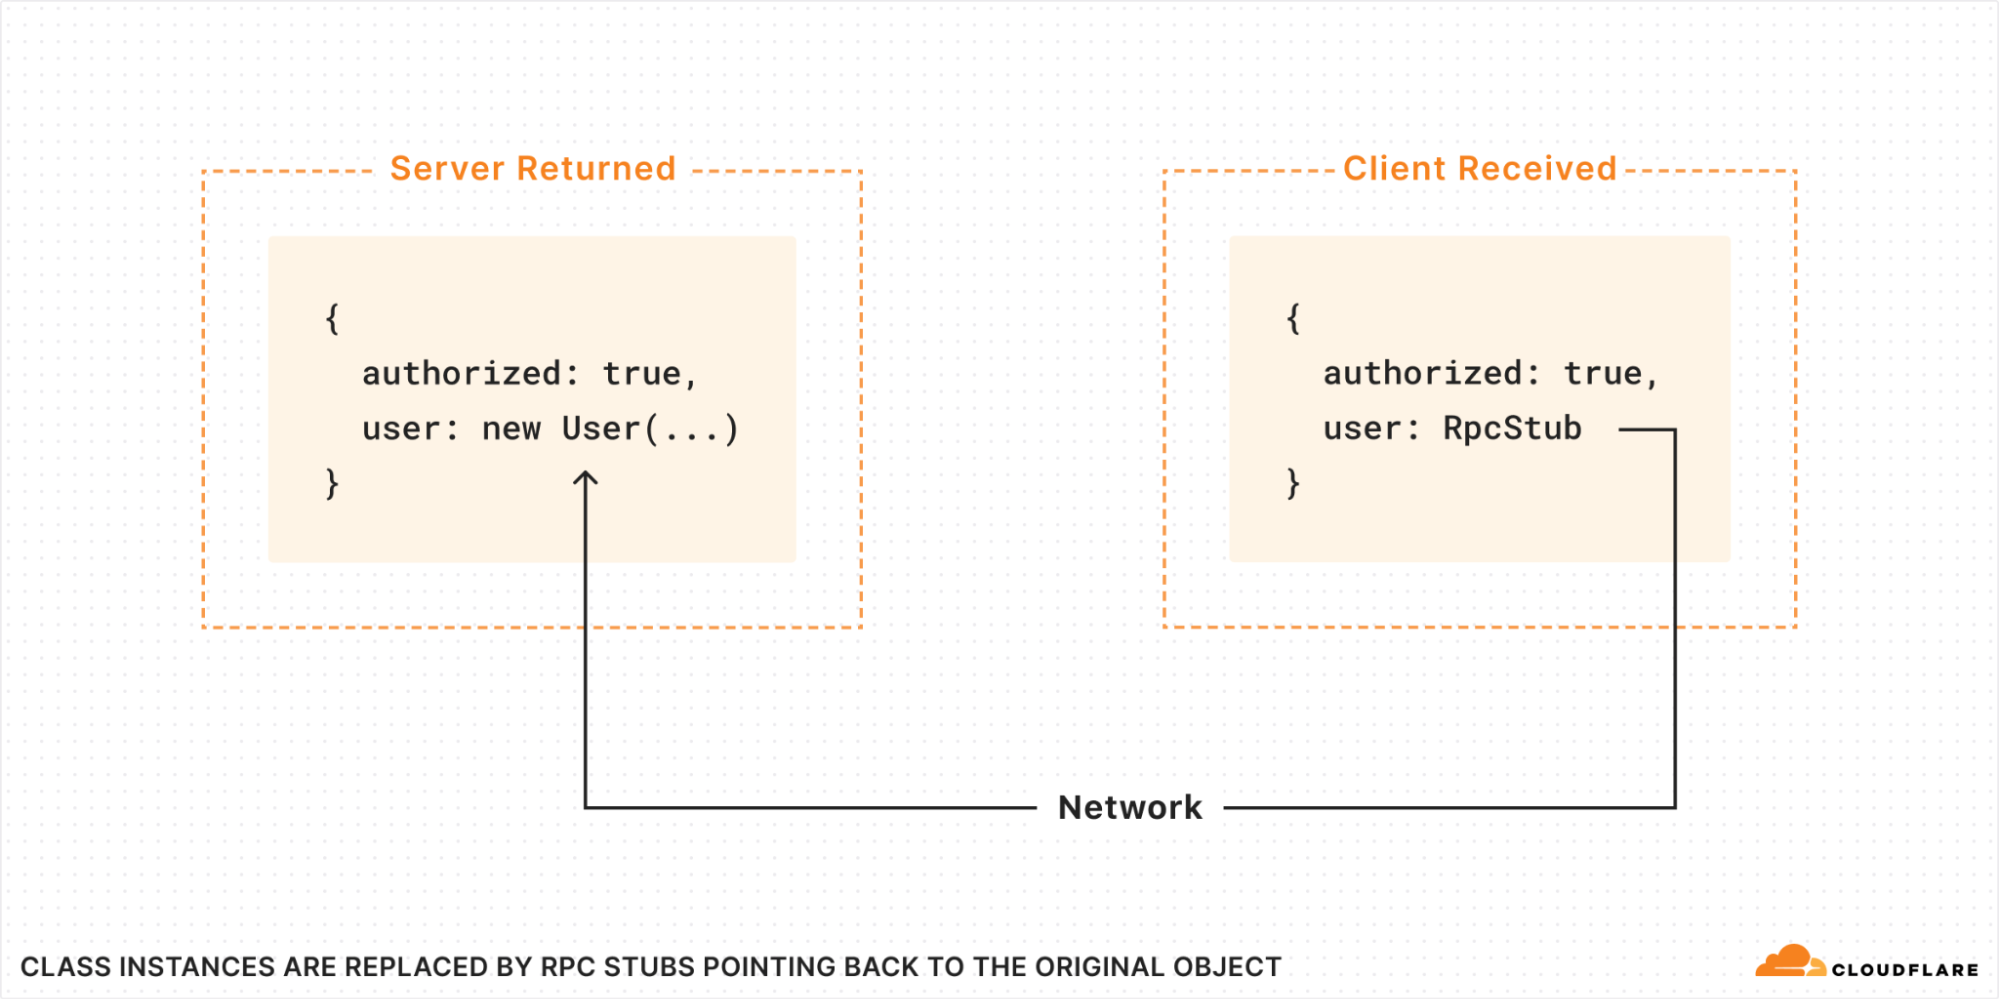
What exactly happened here? The Server created an instance of the class User and returned it to the client. It has methods that the client can then just call? Are we somehow transferring code over the wire?
No, absolutely not! All code runs strictly in the isolate where it was originally loaded. What actually happens is, when the return value is passed over RPC, all class instances are replaced with RPC stubs. The stub, when called, makes a new RPC back to the server, where it calls the method on the original User object that was created there:
But then you might ask: how does the RPC stub know what methods are available? Is a list of methods passed over the wire?
In fact, no. The RPC stub is a special object called a “Proxy“. It implements a “wildcard method”, that is, it appears to have an infinite number of methods of every possible name. When you try to call a method, the name you called is sent to the server. If the original object has no such method, an exception is thrown.
Did you spot the security?
In the above example, we see that RPC is easy to use. We made an object! We called it! It all just felt natural, like calling a local API! Hooray!
But there’s another extremely important property that the AuthService API has which you may have missed: As designed, you cannot perform any operation on a user without first checking the cookie. This is true despite the fact that the individual method calls do not require sending the cookie again, and the User object itself doesn’t store the cookie.
The trick is, the initial checkCookie() RPC is what returns a User object in the first place. The AuthService API does not provide any other way to obtain a User instance. The RPC client cannot create a User object out of thin air, and cannot call methods of an object without first explicitly receiving a reference to it.
This is called capability-based security: we say that the User reference received by the client is a “capability”, because receiving it grants the client the ability to perform operations on the user. The getProfile() method grants this capability only when the client has presented the correct cookie.
Capability-based security is often like this: security can be woven naturally into your APIs, rather than feel like an additional concern bolted on top.
More security: Named entrypoints
Another subtle but important detail to call out: in the above example, the auth service’s RPC API is exported as a named class:
export class AuthService extends WorkerEntrypoint {
And in our wrangler.toml for the calling worker, we had to specify an “entrypoint”, matching the class name:
entrypoint = "AuthService" # name of the exported RPC class
In the past, service bindings would bind to the “default” entrypoint, declared with export default {. But, the default entrypoint is also typically exposed to the Internet, e.g. automatically mapped to a hostname under workers.dev (unless you explicitly turn that off). It can be tricky to safely assume that requests arriving at this entrypoint are in any way trusted.
With named entrypoints, this all changes. A named entrypoint is only accessible to Workers which have explicitly declared a binding to it. By default, only Workers on your own account can declare such bindings. Moreover, the binding must be declared at deploy time; a Worker cannot create new service bindings at runtime.
Thus, you can trust that requests arriving at a named entrypoint can only have come from Workers on your account and for which you explicitly created a service binding. In the future, we plan to extend this pattern further with the ability to lock down entrypoints, audit which Workers have bindings to them, tell the callee information about who is calling at runtime, and so on. With these tools, there is no need to write code in your app itself to authenticate access to internal APIs; the system does it for you.
What about type safety?
Workers RPC works in an entirely dynamically-typed way, just as JavaScript itself does. But just as you can apply TypeScript on top of JavaScript in general, you can apply it to Workers RPC.
The @cloudflare/workers-types package defines the type Service<MyEntrypointType>, which describes the type of a service binding. MyEntrypointType is the type of your server-side interface. Service<MyEntrypointType> applies all the necessary transformations to turn this into a client-side type, such as converting all methods to async, replacing functions and RpcTargets with (properly-typed) stubs, and so on.
It is up to you to share the definition of MyEntrypointType between your server app and its clients. You might do this by defining the interface in a separate shared TypeScript file, or by extracting a .d.ts type declaration file from your server code using tsc --declaration.
With that done, you can apply types to your client:
import { WorkerEntrypoint } from "cloudflare:workers";

// The interface that your server-side entrypoint implements.
// (This would probably be imported from a .d.ts file generated
// from your server code.)
declare class MyEntrypointType extends WorkerEntrypoint {
  sum(a: number, b: number): number;
}

// Define an interface Env specifying the bindings your client-side
// worker expects.
interface Env {
  MY_SERVICE: Service<MyEntrypointType>;
}

// Define the client worker's fetch handler with typed Env.
export default <ExportedHandler<Env>> {
  async fetch(req, env, ctx) {
    // Now env.MY_SERVICE is properly typed!
    const result = await env.MY_SERVICE.sum(1, 2);
    return new Response(result.toString());
  }
}
RPC to Durable Objects
Durable Objects allow you to create a “named” worker instance somewhere on the network that multiple other workers can then talk to, in order to coordinate between them. Each Durable Object also has its own private on-disk storage where it can store state long-term.
Previously, communications with a Durable Object had to take the form of HTTP requests and responses. With RPC, you can now just declare methods on your Durable Object class, and call them on the stub. One catch: to opt into RPC, you must declare your Durable Object class with extends DurableObject, like so:
import { DurableObject } from "cloudflare:workers";

export class Counter extends DurableObject {
  async increment() {
    // Increment our stored value and return it.
    let value = await this.ctx.storage.get("value");
    value = (value || 0) + 1;
    this.ctx.storage.put("value", value);
    return value;
  }
}
Now we can call it like:
let stub = env.COUNTER_NAMEPSACE.get(id);
let value = await stub.increment();
TypeScript is supported here too, by defining your binding with type DurableObjectNamespace<ServerType>:
interface Env {
  COUNTER_NAMESPACE: DurableObjectNamespace<Counter>;
}
Eliding awaits with speculative calls
When talking to a Durable Object, the object may be somewhere else in the world from the caller. RPCs must cross the network. This takes time: despite our best efforts, we still haven’t figured out how to make information travel faster than the speed of light.
When you have a complex RPC interface where one call returns an object on which you wish to make further method calls, it’s easy to end up with slow code that makes too many round trips over the network.
// Makes three round trips.
let foo = await stub.foo();
let baz = await foo.bar.baz();
let corge = await baz.qux[3].corge();
Workers RPC features a way to avoid this: If you know that a call will return a value containing a stub, and all you want to do with it is invoke a method on that stub, you can skip awaiting it:
// Same thing, only one round trip.
let foo = stub.foo();
let baz = foo.bar.baz();
let corge = await baz.qux[3].corge();
Whoa! How does this work?
RPC methods do not return normal promises. Instead, they return special RPC promises. These objects are “custom thenables“, which means you can use them in all the ways you’d use a regular Promise, like awaiting it or calling .then() on it.
But an RPC promise is more than just a thenable. It is also a proxy. Like an RPC stub, it has a wildcard property. You can use this to express speculative RPC calls on the eventual result, before it has actually resolved. These speculative calls will be sent to the server immediately, so that they can begin executing as soon as the first RPC has finished there, before the result has actually made its way back over the network to the client.
This feature is also known as “Promise Pipelining”. Although it isn’t explicitly a security feature, it is commonly provided by object-capability RPC systems like Cap’n Proto.
The future: Custom Bindings Marketplace?
For now, Service Bindings and Durable Objects only allow communication between Workers running on the same account. So, RPC can only be used to talk between your own Workers.
But we’d like to take it further.
We have previously explained why Workers environments contain live objects, also known as “bindings”. But today, only Cloudflare can add new binding types to the Workers platform – like Queues, KV, or D1. But what if anyone could invent their own binding type, and give it to other people?
Previously, we thought this would require creating a way to automatically load client libraries into the calling Workers. That seemed scary: it meant using someone’s binding would require trusting their code to run inside your isolate. With RPC, there’s no such trust. The binding only sees exactly what you explicitly pass to it. It cannot compromise the rest of your Worker.
Could Workers RPC provide the basis for a “bindings marketplace”, where people can offer rich JavaScript APIs to each other in an easy and secure way? We’re excited to explore and find out.
Try it now
Workers RPC is available today for all Workers users. To get started, check out the docs.
Browser Rendering API GA, rolling out Cloudflare Snippets, SWR, and bringing Workers for Platforms to all users
Post Syndicated from Tanushree Sharma original https://blog.cloudflare.com/browser-rendering-api-ga-rolling-out-cloudflare-snippets-swr-and-bringing-workers-for-platforms-to-our-paygo-plans
Browser Rendering API is now available to all paid Workers customers with improved session management
In May 2023, we announced the open beta program for the Browser Rendering API. Browser Rendering allows developers to programmatically control and interact with a headless browser instance and create automation flows for their applications and products.
At the same time, we launched a version of the Puppeteer library that works with Browser Rendering. With that, developers can use a familiar API on top of Cloudflare Workers to create all sorts of workflows, such as taking screenshots of pages or automatic software testing.
Today, we take Browser Rendering one step further, taking it out of beta and making it available to all paid Workers’ plans. Furthermore, we are enhancing our API and introducing a new feature that we’ve been discussing for a long time in the open beta community: session management.
Session Management
Session management allows developers to reuse previously opened browsers across Worker’s scripts. Reusing browser sessions has the advantage that you don’t need to instantiate a new browser for every request and every task, drastically increasing performance and lowering costs.
Before, to keep a browser instance alive and reuse it, you’d have to implement complex code using Durable Objects. Now, we’ve simplified that for you by keeping your browsers running in the background and extending the Puppeteer API with new session management methods that give you access to all of your running sessions, activity history, and active limits.
Here’s how you can list your active sessions:
const sessions = await puppeteer.sessions(env.RENDERING);
console.log(sessions);
[
   {
      "connectionId": "2a2246fa-e234-4dc1-8433-87e6cee80145",
      "connectionStartTime": 1711621704607,
      "sessionId": "478f4d7d-e943-40f6-a414-837d3736a1dc",
      "startTime": 1711621703708
   },
   {
      "sessionId": "565e05fb-4d2a-402b-869b-5b65b1381db7",
      "startTime": 1711621703808
   }
]
We have added a Worker script example on how to use session management to the Developer Documentation.
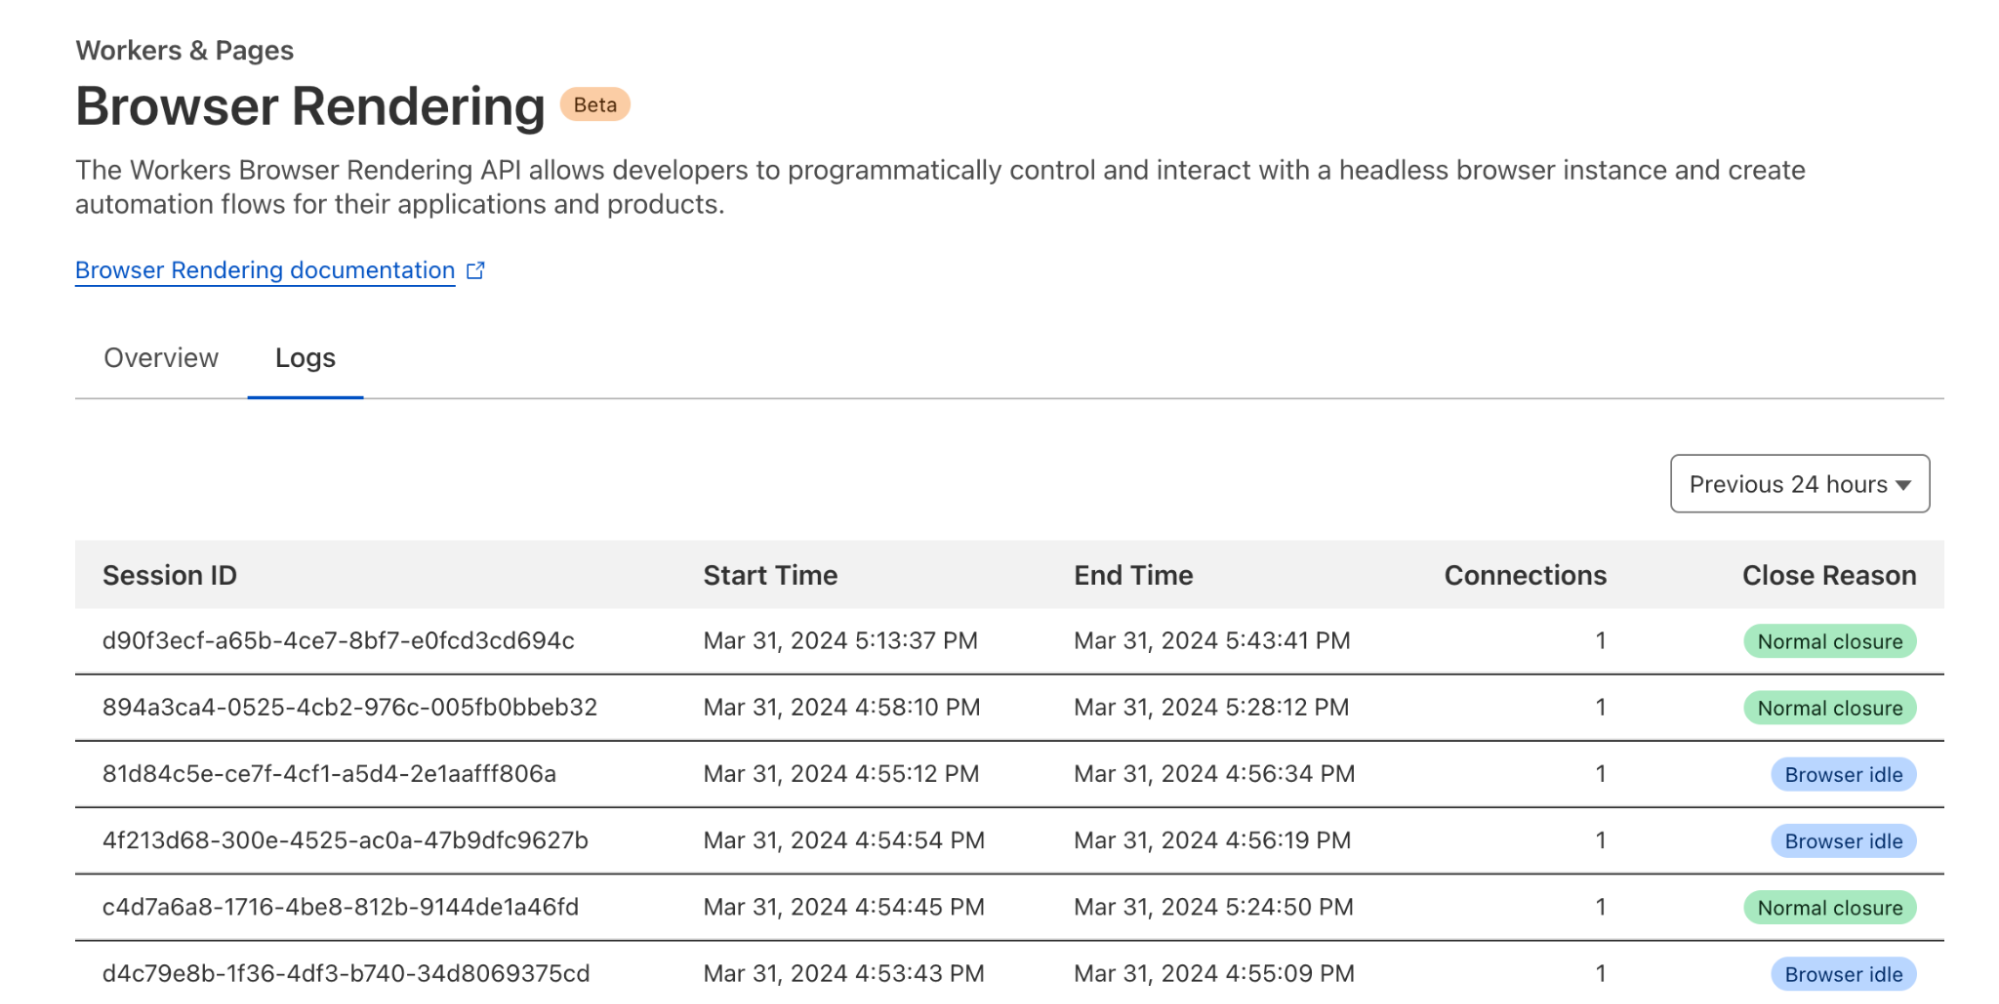
Analytics and logs
Observability is an essential part of any Cloudflare product. You can find detailed analytics and logs of your Browser Rendering usage in the dashboard under your account’s Worker & Pages section.
Browser Rendering is now available to all customers with a paid Workers plan. Each account is limited to running two new browsers per minute and two concurrent browsers at no cost during this period. Check our developers page to get started.
We are rolling out access to Cloudflare Snippets
Powerful, programmable, and free of charge, Snippets are the best way to perform complex HTTP request and response modifications on Cloudflare. What was once too advanced to achieve using Rules products is now possible with Snippets. Since the initial announcement during Developer Week 2022, the promise of extending out-of-the-box Rules functionality by writing simple JavaScript code is keeping the Cloudflare community excited.
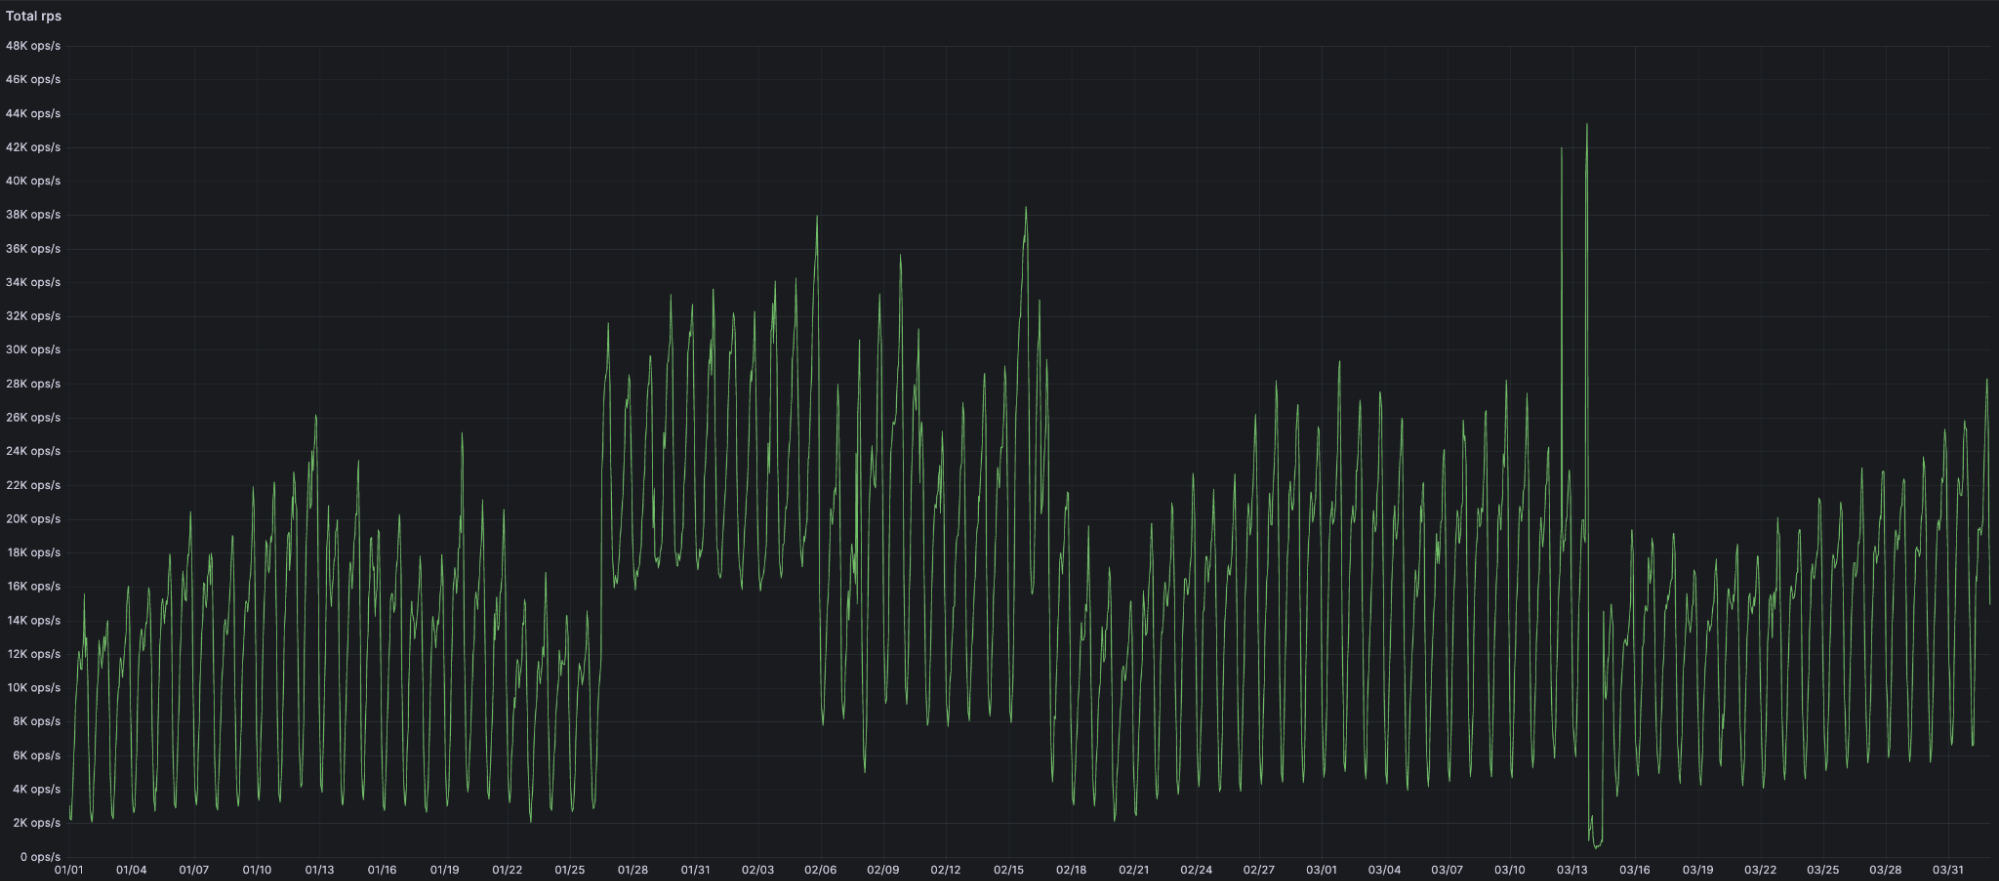
During the first 3 months of 2024 alone, the amount of traffic going through Snippets increased over 7x, from an average of 2,200 requests per second in early January to more than 17,000 in March.
However, instead of opening the floodgates and letting millions of Cloudflare users in to test (and potentially break) Snippets in the most unexpected ways, we are going to pace ourselves and opt for a phased rollout, much like the newly released Gradual Rollouts for Workers.
In the next few weeks, 5% of Cloudflare users will start seeing “Snippets” under the Rules tab of the zone-level menu in their dashboard. If you happen to be part of the first 5%, snip into action and try out how fast and powerful Snippets are even for advanced use cases like dynamically changing the date in headers or A / B testing leveraging the `math.random` function. Whatever you use Snippets for, just keep one thing in mind: this is still an alpha, so please do not use Snippets for production traffic just yet.
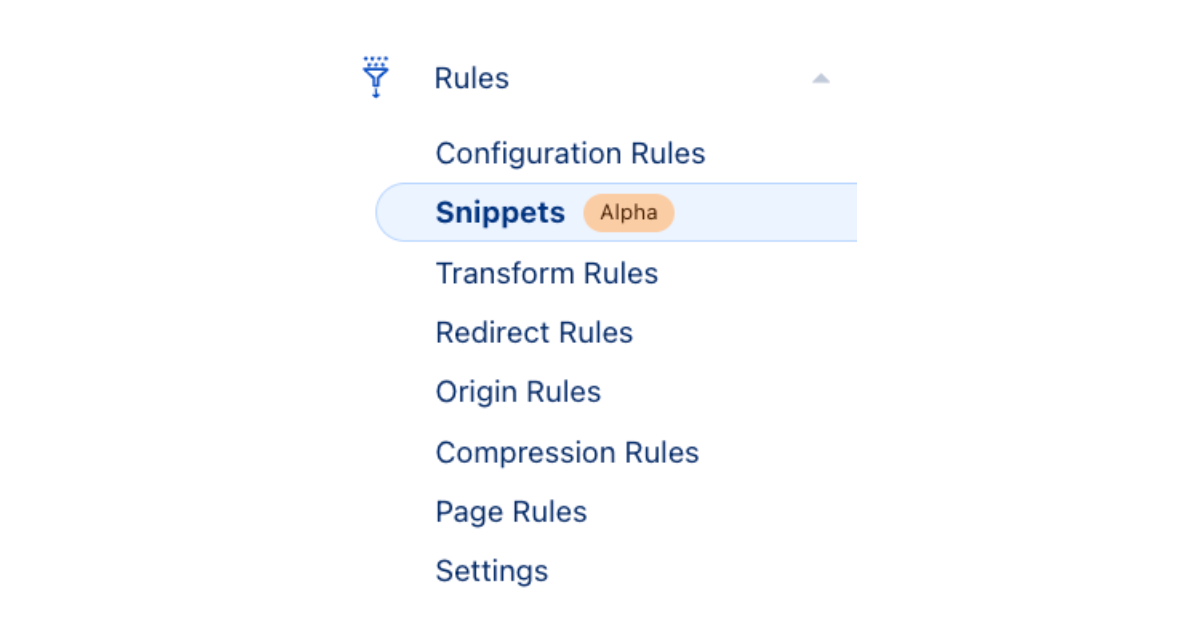
Until then, keep your eyes out for the new Snippets tab in the Cloudflare dashboard and learn more how powerful and flexible Snippets are at the developer documentation in the meantime.
Coming soon: asynchronous revalidation with stale-while-revalidate
One of the features most requested by our customers is the asynchronous revalidation with stale-while-revalidate (SWR) cache directive, and we will be bringing this to you in the second half of 2024. This functionality will be available by design as part of our new CDN architecture that is being built using Rust with performance and memory safety at top of mind.
Currently, when a client requests a resource, such as a web page or an image, Cloudflare checks to see if the asset is in cache and provides a cached copy if available. If the file is not in the cache or has expired and become stale, Cloudflare connects to the origin server to check for a fresh version of the file and forwards this fresh version to the end user. This wait time adds latency to these requests and impacts performance.
Stale-while-revalidate is a cache directive that allows the expired or stale version of the asset to be served to the end user while simultaneously allowing Cloudflare to check the origin to see if there’s a fresher version of the resource available. If an updated version exists, the origin forwards it to Cloudflare, updating the cache in the process. This mechanism allows the client to receive a response quickly from the cache while ensuring that it always has access to the most up-to-date content. Stale-while-revalidate strikes a balance between serving content efficiently and ensuring its freshness, resulting in improved performance and a smoother user experience.
Customers who want to be part of our beta testers and “cache” in on the fun can register here, and we will let you know when the feature is ready for testing!
Coming on April 16, 2024: Workers for Platforms for our pay-as-you-go plan
Today, we’re excited to share that on April 16th, Workers for Platforms will be available to all developers through our new $25 pay-as-you-go plan!
Workers for Platforms is changing the way we build software – it gives you the ability to embed personalization and customization directly into your product. With Workers for Platforms, you can deploy custom code on behalf of your users or let your users directly deploy their own code to your platform, without you or your users having to manage any infrastructure. You can use Workers for Platforms with all the exciting announcements that have come out this Developer Week – it supports all the bindings that come with Workers (including Workers AI, D1 and Durable Objects) as well as Python Workers.
Here’s what some of our customers – ranging from enterprises to startups – are building on Workers for Platforms:
- Shopify Oxygen is a hosting platform for their Remix-based eCommerce framework Hydrogen, and it’s built on Workers for Platforms! The Hydrogen/Oxygen combination gives Shopify merchants control over their buyer experience without the restrictions of generic storefront templates.
- Grafbase is a data platform for developers to create a serverless GraphQL API that unifies data sources across a business under one endpoint. They use Workers for Platforms to give their developers the control and flexibility to deploy their own code written in JavaScript/TypeScript or WASM.
- Triplit is an open-source database that syncs data between server and browser in real-time. It allows users to build low latency, real-time applications with features like relational querying, schema management and server-side storage built in. Their query and sync engine is built on top of Durable Objects, and they’re using Workers for Platforms to allow their customers to package custom Javascript alongside their Triplit DB instance.
Tools for observability and platform level controls
Workers for Platforms doesn’t just allow you to deploy Workers to your platform – we also know how important it is to have observability and control over your users’ Workers. We have a few solutions that help with this:
- Custom Limits: Set CPU time or subrequest caps on your users’ Workers. Can be used to set limits in order to control your costs on Cloudflare and/or shape your own pricing and packaging model. For example, if you run a freemium model on your platform, you can lower the CPU time limit for customers on your free tier.
- Tail Workers: Tail Worker events contain metadata about the Worker, console.log() messages, and capture any unhandled exceptions. They can be used to provide your developers with live logging in order to monitor for errors and troubleshoot in real time.
- Outbound Workers: Get visibility into all outgoing requests from your users’ Workers. Outbound Workers sit between user Workers and the fetch() requests they make, so you get full visibility over the request before it’s sent out to the Internet.
Pricing
We wanted to make sure that Workers for Platforms was affordable for hobbyists, solo developers, and indie developers. Workers for Platforms is part of a new $25 pay-as-you-go plan, and it includes the following:
| Included Amounts | |
|---|---|
| Requests | 20 million requests/month +$0.30 per additional million |
| CPU time | 60 million CPU milliseconds/month +$0.02 per additional million CPU milliseconds |
| Scripts | 1000 scripts +0.02 per additional script/month |
Workers for Platforms will be available to purchase on April 16, 2024!
The Workers for Platforms will be available to purchase under the Workers for Platforms tab on the Cloudflare Dashboard on April 16, 2024.
In the meantime, to learn more about Workers for Platforms, check out our starter project and developer documentation.
Unreal Tournament 2004 20 Years Later: An LGR Retrospective
Post Syndicated from LGR original https://www.youtube.com/watch?v=abmiv22Q7xA
Community Update: empowering startups building on Cloudflare and creating an inclusive community
Post Syndicated from Ricky Robinett original https://blog.cloudflare.com/2024-community-update

With millions of developers around the world building on Cloudflare, we are constantly inspired by what you all are building with us. Every Developer Week, we’re excited to get your hands on new products and features that can help you be more productive, and creative, with what you’re building. But we know our job doesn’t end when we put new products and features in your hands during Developer Week. We also need to cultivate welcoming community spaces where you can come get help, share what you’re building, and meet other developers building with Cloudflare.
We’re excited to close out Developer Week by sharing updates on our Workers Launchpad program, our latest Developer Challenge, and the work we’re doing to ensure our community spaces – like our Discord and Community forums – are safe and inclusive for all developers.
Helping startups go further with Workers Launchpad

In late 2022, we initiated the $2 billion Workers Launchpad Funding Program aimed at aiding the more than one million developers who use Cloudflare’s Developer Platform. This initiative particularly benefits startups that are investing in building on Cloudflare to propel their business growth.
The Workers Launchpad Program offers a variety of resources to help builders scale faster and reach more customers. The program includes, but is not limited to:
- Fostering a community of like-minded founders
- Facilitating introductions to the Launchpad’s VC partner network of 40+ leading investors
- Company-building support and mentorship through virtual Founders Bootcamp sessions
- Organizing technical office hours with our engineers
- Access to preview upcoming Cloudflare products and Product Managers
- Culminating in a Demo Day, for participants to share their stories globally with investors and prospective customers.
So far, 50 amazing startups from 13 countries have successfully graduated from the Workers Launchpad program. We finished up Cohort #1 in March 2023, and Cohort #2 wrapped up August 2023.
Meet Cohort #3 of the Workers Launchpad!
Since the end of Cohort #2, we have received hundreds of new applications from startups across the globe. Startup applicants showcased incredible tools and software across a variety of industries, including AI, SaaS, Supply Chain, Media, Gaming, Hospitality, and Developer Productivity. While we were encouraged by this wave of applicants’ ability to build amazing technology, there were a few that stood out that are leveraging Cloudflare’s Developer Suite to scale their business.
With that being said, we would like to introduce you to the 29 startups that have been chosen to participate in Cohort #3 of Workers Launchpad:
Below, you will find a brief summary of what problems these startups are looking to solve:
| Autoblocks AI | Evaluation & testing platform to improve AI product quality. |
|---|---|
| BEAM (By Mass Luminosity) | A next-gen live streaming platform that elevates creator-viewer interactions to the next level. |
| BentoML | Run any AI model in your cloud. |
| bohr.io | An easy and fast development platform. |
| Cloneable | Provides low/no-code tools to build and deploy applications to any device, instantly. |
| CleverEV | Manage EV charging infrastructure and experience for clients. |
| Dulia | Managed edge powered serverless AI platform. |
| Erxes | Open-source experience operating system empowering businesses. |
| Exporio | AI-first A/B testing and personalization platform. |
| Helicone | GenAI observability platform built for developers. |
| Houdini | An end-to-end solution for building and deploying GraphQL applications. |
| Intelligage | Humanize your AI for customers. |
| Langbase | Ship hyper-personalized AI apps in seconds — any LLM, any data, any developer. |
| Milkshake | Create websites via mobile within minutes. |
| Nadrama | Kubernetes PaaS in your cloud account, in minutes. |
| NuxtHub (by NuxtLabs) | Build full-stack applications on Cloudflare with zero configuration. |
| Panaptico | High performance networking fabrics for specialized workloads. |
| Playroom | Platform for game developers to build multiplayer games in minutes. |
| Puzzle Labs | P2P, prompt-first knowledge base for teams to collaborate with AI. |
| Resilis | Intelligent edge caching for REST APIs. |
| Scrappi | A better way to collect, create and collaborate. |
| Starlight Labs | AI native game studio. |
| T4 Stack | Ship feature parity on universal apps. |
| TextCortex AI | AI copilot platform to leverage the power of easy customization and integration. |
| Toothless | Build GenAI-powered workflow automation and internal tools in minutes. |
| Unfetch | Generate and run scripts with AI to complete tasks within seconds. |
| Unkey | Redefines API management for developers. Add authentication, analytics, and rate-limiting to your APIs in minutes. |
| Unnug | Transformative cloud compiler with an emphasis on user on-premises, cloud, and edge resources. |
| Wope | AI-powered marketing agent that leverages Gen AI to optimize businesses’ online presence and drive more traffic. |
The Cloudflare team is looking forward to working with Cohort #3 participants and sharing what they are building on Cloudflare. To follow along with Cohort #3 of Workers Launchpad, follow @CloudflareDev and join our Developer Discord server.
Are you a startup and interested in joining Cohort #4? Apply here!
AI developer challenge

Now that Workers AI is GA, we’re excited to see what our community can build. We’ve teamed up with our friends at DEV who will be running an AI Developer challenge, which officially launched on Wednesday, April 3, and runs until Sunday, April 14, 2024, when submissions close.
For this challenge, you will build a Workers AI application that makes use of AI task types from Cloudflare’s growing catalog of Open Models. Apps will be evaluated on innovation, creativity, and demonstration of underlying technology with prizes awarded by DEV for the best overall app, as well as projects leveraging multiple models and tasks. For more information and details on how to participate, including DEV’s rules and requirements, head over to the official challenge page.
Creating an inclusive community
Our community has been growing really fast over the past year, so fast that it’s becoming more difficult to welcome each new member that joins our Discord server every day, and Developer Week has always been one of the main drivers of this growth.
When you come into the Cloudflare developer community, it’s important to us that you’re entering a space that is safe and welcoming. Even though we already have rules for the server and community forums, we needed guidelines for our community programs, so that’s why we’ve created a new Code of Conduct that promotes inclusivity, respect, and will help us create a better community for everyone.
Do you want to be part of this and help us create a more inclusive and helpful community? Then please share your feedback and tell us what you would like to see improved in our community and our Discord server in this thread.
The Great Onion Scandal
Post Syndicated from The History Guy: History Deserves to Be Remembered original https://www.youtube.com/watch?v=aIaBowKg6tU
The Ultimate Review: Testing the SLZB-06M from SmartLight
Post Syndicated from BeardedTinker original https://www.youtube.com/watch?v=9PhLqveokck