The Complete Guide to Ransomware Recovery and Prevention

Post Syndicated from original https://www.backblaze.com/blog/complete-guide-ransomware/

An image with a laptop connected to a saline drip with the words "The Complete Guide to Ransomware"

This post has been updated since it was originally published. Unfortunately, ransomware continues to proliferate. We’ve updated the post to reflect the current state of ransomware and to help individuals and businesses protect their data.

Ransomware is one of the biggest cybersecurity threats that businesses and organizations face today. Cybercriminals use these malicious attacks to encrypt an organization’s data and systems, holding them hostage and demanding a ransom for the encryption key. In the best case scenario, you can quickly restore from backups, but it’s a harrowing experience even when you’re well prepared. That’s why it makes sense to assume it’s not a question of if, but when, and plan accordingly.

With attacks becoming increasingly sophisticated and widespread, it’s crucial for businesses to have a comprehensive plan for ransomware prevention and recovery. In this guide, we’ll cover best practices for recovering your data and systems in the event of an attack, as well as proactive measures to strengthen your defenses against ransomware.

This post is a part of our ongoing coverage of ransomware. Take a look at our other posts for more information on how businesses can defend themselves against a ransomware attack, and more.

The ransomware threat

The statistics paint a cautionary picture—ransomware attacks are only getting more common. According to a 2023 Ransomware Market Report, global ransomware costs are predicted to reach $265 billion annually by 2031, up from $20 billion in 2021. 

After a brief downturn in both incidents and payments in 2022, ransomware surged back in 2023. Ransomware complaints rose to over 2,825, marking an 18% increase from the previous year. And payments exceeded $1 billion, a 96% increase from the previous year, representing the highest number ever observed. What’s more, 59% of organizations were hit by ransomware in the last year, according to Sophos’ State of Ransomware 2024 report.

Cyber criminals are continuously evolving their strategies, with the FBI noting new trends such as deploying multiple ransomware variants against the same victim and employing data destruction tactics to intensify pressure on victims to negotiate.

Ransomware by the numbers

According to the Coveware Q1 2024 Quarterly Report, the ransomware landscape saw some notable shifts in ransom demand tactics. The report states that in the first quarter of 2024, the average ransom payment continued a downward trajectory, decreasing by 32% from Q4 2023 to $381,980. However, the median ransom payment increased by 25% to $250,000.

Coveware analysts suggest this divergence is driven by fewer companies paying exorbitant ransoms, which has a compounding effect on lowering the average payment amount. Concurrently, many ransomware groups are deliberately setting more reasonable initial ransom demands, aiming to keep victims engaged in negotiations rather than deterring them outright with astronomical figures. This new approach of “reasonably” priced ransoms is an intentional tactic to increase the likelihood of victims paying.

A line graph depicting the average ransomware payment and the median ransomware payment by quarter.

The same Coveware report provides insights into the widespread impact of ransomware across various industries. Healthcare emerged as the most targeted sector at 18.7%, followed closely by professional services at 17.8%. The public sector, including government and educational institutions, was also heavily impacted at 11.2%.

Other notable industries affected were consumer services (10.3%), retail (5.6%), financial services, and food & staples retail (both 4.7%). The data illustrates that ransomware is a pervasive threat cutting across diverse sectors, from critical infrastructure like healthcare to consumer businesses and technology firms.

No industry seems immune, as even traditionally less digitized fields like materials (6.5%), capital goods (2.8%), and automobile manufacturing (3.7%) suffered attacks. This underscores the need for robust cybersecurity measures and ransomware readiness plans across diverse organizations, regardless of their primary domain of operations.

A pie chart depicting industries impacted by ransomware for Q1 2024.

Ransomware also remains a significant threat across businesses of all sizes. However, small and medium sized businesses (SMBs) continue to bear the brunt of these attacks. A staggering 71.8% of impacted companies had between 11 and 1,000 employees, clearly demonstrating SMBs as a prime target for cybercriminals deploying ransomware.

While no organization is immune, the data highlights SMBs’ vulnerability, likely due to limited cybersecurity resources and staffing compared to larger enterprises. This highlights the critical need for SMBs to prioritize ransomware preparedness and implement robust security measures proportionate to the risks they face.

Simultaneously, the following chart indicates that ransomware groups are also setting their sights on major corporations, with 1.9% of impacted companies having over 100,000 employees. No sector can afford to be complacent about the pervasive ransomware threat landscape.

A pie chart depicting ransomware impacted companies by size (employee count).

Ransomware as a service (Raas)

Ransomware as a service (RaaS) has emerged as a game changer in the world of cybercrime, revolutionizing the ransomware landscape and amplifying the scale and reach of malicious attacks. The RaaS business model allows even novice cybercriminals to access and deploy ransomware with relative ease, leading to a surge in the frequency and sophistication of ransomware attacks worldwide. 

Traditionally, ransomware attacks required a high level of technical expertise and resources, limiting their prevalence to skilled cybercriminals or organized cybercrime groups. However, the advent of RaaS platforms has lowered the barrier to entry, making ransomware accessible to a broader range of individuals with nefarious intent. These platforms provide aspiring cybercriminals with ready-made ransomware toolkits, complete with user-friendly interfaces, step-by-step instructions, and even customer support. In essence, RaaS operates on a subscription or profit sharing model, allowing criminals to distribute ransomware and share the ransom payments with the RaaS operators.

The rise of RaaS has led to a proliferation of ransomware attacks, with cybercriminals exploiting the anonymity of the dark web to collaborate, share resources, and launch large scale campaigns. The RaaS model not only facilitates the distribution of ransomware, but it also provides criminals with analytics dashboards to track the performance of their campaigns, enabling them to optimize their strategies for maximum profit.

New strains and increased complexity

One of the most significant impacts of RaaS is the exponential growth in the number and variety of ransomware strains. RaaS platforms continuously evolve and introduce new ransomware variants, making it increasingly challenging for cybersecurity experts to develop effective countermeasures. The availability of these diverse strains allows cybercriminals to target different industries, geographical regions, and vulnerabilities, maximizing their chances of success.

The profitability of RaaS has attracted a new breed of cybercriminals, leading to an underground economy where specialized roles have emerged. Ransomware developers create and sell their malicious code on RaaS platforms, while affiliates or “distributors” spread the ransomware through various means, such as phishing emails, exploit kits, or compromised websites. This division of labor allows criminals to focus on their specific expertise, while RaaS operators facilitate the monetization process and collect a share of the ransoms.

Ransomware commoditization

The impact of RaaS extends beyond the immediate financial and operational consequences for targeted entities. The widespread availability of ransomware toolkits has also resulted in a phenomenon known as “ransomware commoditization,” where cybercriminals compete to offer their services at lower costs or even engage in price wars. This competition drives innovation and the continuous evolution of ransomware, making it a persistent and ever-evolving threat.

To combat the growing influence of RaaS, organizations and individuals require a multilayered approach to cybersecurity. Furthermore, organizations should prioritize data backups and develop comprehensive incident response plans to ensure quick recovery in the event of a ransomware attack. Regularly testing backup restoration processes is essential to maintain business continuity and minimize the impact of potential ransomware incidents.

RaaS has profoundly transformed the ransomware landscape, democratizing access to malicious tools and fueling the rise of cybercrime. The ease of use, scalability, and profitability of RaaS platforms have contributed to a surge in ransomware attacks across industries and geographic locations.

By staying vigilant and adopting robust cybersecurity measures, organizations can better protect themselves against the evolving threat posed by RaaS and ensure resilience in the face of potential ransomware incidents.

How does ransomware work?

A ransomware attack starts when a machine on your network becomes infected with malware. Cybercriminals have a variety of methods for infecting your machine, whether it’s an attachment in an email, a link sent via spam, or even through sophisticated social engineering campaigns. As users become more savvy to these attack vectors, cybercriminals’ strategies evolve. Once that malicious file has been loaded onto an endpoint, it spreads to the network, locking every file it can access behind strong encryption controlled by cybercriminals.

Types of ransomware, in addition to the traditional encryption model, include:

  • Non-encrypting ransomware or lock screens, which restrict access to files and data, but do not encrypt them.
  • Ransomware that encrypts a drive’s master boot record (MBR) or Microsoft’s NTFS, which prevents victims’ computers from being booted up in a live operating system (OS) environment.
  • Leakware or extortionware, which steals compromising or damaging data that the attackers then threaten to release if ransom is not paid. This type is on the rise—In 2023, 91% of ransomware attacks involved some sort of data exfiltration.
  • Mobile device ransomware which infects cell phones through drive-by downloads or fake apps.

What happens during a typical attack?

Threat actors have a lot of tools at their disposal to infiltrate systems, gather reconnaissance, and execute their mission. In cybersecurity parlance, these are called tactics, techniques, and procedures (TTPs). Without digging into too much detail, the typical lifecycle of a ransomware attack is as follows:

  1. Initial compromise: Ransomware gains entry through various means such as exploiting known software vulnerabilities, using phishing emails or even physical media like thumb drives, brute-force attacks, and others. It then installs itself on a single endpoint or network device, granting the attacker remote access.
  2. Secure key exchange: Once installed, the ransomware communicates with the perpetrator’s central command and control server, triggering the generation of cryptographic keys required to lock the system securely.
  3. Encryption: With the cryptographic lock established, the ransomware initiates the encryption process, targeting files both locally and across the network, rendering them inaccessible without the decryption keys.
  4. Extortion: Having gained secure and impenetrable access to your files, the ransomware displays an explanation of the next steps, including the ransom amount, instructions for payment, and the consequences of noncompliance.
  5. Recovery options: At this stage, the victim can attempt to remove infected files and systems, restore from a clean backup, or some may consider paying the ransom. 

It’s never advised to pay the ransom. According to Veeam’s 2024 Ransomware Trends Report, one in three organizations could not recover their data after paying the ransom. There’s no guarantee the decryption keys will work, and paying the ransom only further incentivizes cybercriminals to continue their attacks. 

An illustration of a skull and crossbones in a pointillist style.

Who gets attacked?

Data has shown that ransomware attacks target firms of all sizes, and no business—from SMBs to large corporations—is immune. Attacks are on the rise in every sector and in every size of business. That said, small to medium-sized businesses are particularly vulnerable, as they may not have the resources needed to shore up their defenses and are often viewed as “easy targets” by cybercriminals. 

Recent attacks where cybercriminals leaked sensitive photos of patients in a medical facility prove that no organization is out of bounds and no victim is off-limits. These attempts indicate that organizations which often have weaker controls and out-of-date or unsophisticated IT systems should take extra precautions to protect themselves and their data (especially their backup data!).

According to Veeam’s report, backup repositories are a prime target for bad actors. In fact, backup repositories are targeted in 96% of attacks, with bad actors successfully affecting the backup repositories in 76% of cases.

The U.S. consistently ranks highest in ransomware attacks, followed by the U.K. and Germany. Windows computers are the main targets, but ransomware strains exist for Macintosh and Linux, as well.

The unfortunate truth is that ransomware has become so widespread that most companies will certainly experience some degree of a ransomware or malware attack. The best they can do is be prepared and understand the best ways to minimize the impact of ransomware.

Backup repositories are targeted in 96% of attacks.

How to combat ransomware

So, you’ve been attacked by ransomware. Depending on your industry and legal requirements (which are ever-changing), you may be obligated to report the attack immediately. Otherwise, your footing should be one of damage control. What should you do next?

  1. Isolate the infection. Swiftly isolate the infected endpoint from the rest of your network and any shared storage to halt the spread of the ransomware.
  2. Identify the infection. With numerous ransomware strains in existence, it’s crucial to accurately identify the specific type you’re dealing with. Conduct scans of messages, files, and utilize identification tools to gain a clearer understanding of the infection.
  3. Report the incident. While legal obligations may vary, it is advisable to report the attack to the relevant authorities. Their involvement can provide invaluable support and coordination for countermeasures.
  4. Evaluate your options. Assess the available courses of action to address the infection. Consider the most suitable approach based on your specific circumstances.
  5. Restore and rebuild. Utilize secure backups, trusted program sources, and reliable software to restore the infected systems or set up a new system from scratch.

1. Isolate the infection

Depending on the strain of ransomware you’ve been hit with, you may have little time to react. Fast-moving strains can spread from a single endpoint across networks, locking up your data as it goes, before you even have a chance to contain it.

The first step, even if you just suspect that one computer may be infected, is to isolate it from other endpoints and storage devices on your network. Disable Wi-Fi, disable Bluetooth, and unplug the machine from both any local area network (LAN) or storage device it might be connected to. This not only contains the spread but also keeps the ransomware from communicating with the attackers. 

Know that you may be dealing with more than just one “patient zero.” The ransomware could have entered your system through multiple vectors, particularly if someone has observed your patterns before they attacked your company. It may already be laying dormant on another system. Until you can confirm, treat every connected and networked machine as a potential host to ransomware.

2. Identify the infection

Just as there are bad guys spreading ransomware, there are good guys helping you fight it. Sites like ID Ransomware and the No More Ransom! Project help identify which strain you’re dealing with. And knowing what type of ransomware you’ve been infected with will help you understand how it propagates, what types of files it typically targets, and what options, if any, you have for removal and disinfection. You’ll also get more information if you report the attack to the authorities (which you really should).

3. Report to the authorities

It’s understood that sometimes it may not be in your business’s best interest to report the incident. Maybe you don’t want the attack to be public knowledge. Maybe the potential downside of involving the authorities (lost productivity during investigation, etc.) outweighs the amount of the ransom. But reporting the attack is how you help everyone avoid becoming victimized and help combat the spread and efficacy of ransomware attacks in the future. With every attack reported, the authorities get a clearer picture of who is behind attacks, how they gain access to your system, and what can be done to stop them. 

You can file a report with the FBI at the Internet Crime Complaint Center.

There are other ways to report ransomware, as well.

4. Evaluate your options

The good news is, you have options. The bad news is that the most obvious option, paying up, is a terrible idea.

Simply giving into cybercriminals’ demands may seem attractive to some, especially in those previously mentioned situations where paying the ransom is less expensive than the potential loss of productivity. Cybercriminals are counting on this.

However, paying the ransom only encourages attackers to strike other businesses or individuals like you. Paying the ransom not only fosters a criminal environment but also leads to civil penalties—and you might not even get your data back.

The other option is to try and remove it, or to start over.

5. Restore and rebuild—or start fresh

There are several sites and software packages that can potentially remove the ransomware from your system, including the No More Ransom! Project. Other options can be found, as well.

Whether you can successfully and completely remove an infection is up for debate. A working decryptor doesn’t exist for every known ransomware. The nature of the beast is that every time a good guy comes up with a decryptor, a bad guy writes new ransomware. To be safe, you’ll want to follow up by either restoring your system or starting over entirely.

Why starting over using your backups is the better idea

The surest way to confirm ransomware has been removed from a system is by doing a complete wipe of all storage devices and reinstalling everything from scratch. Formatting the hard disks in your system will ensure that no remnants of the ransomware remain.

To effectively combat the ransomware that has infiltrated your systems, it is crucial to determine the precise date of infection by examining file dates, messages, and any other pertinent information. Keep in mind that the ransomware may have been dormant within your system before becoming active and initiating significant alterations. By identifying and studying the specific characteristics of the ransomware that targeted your systems, you can gain valuable insights into its functionality, enabling you to devise the most effective strategy for restoring your systems to their optimal state.

A concerning 63% of organizations hastily restore directly back into compromised production environments without adequate scanning during recovery, risking re-introduction of the threat.

Select a backup or backups that were made prior to the date of the initial ransomware infection. If you’ve been following a sound backup strategy, you should have copies of all your documents, media, and important files right up to the time of the infection. With both local and off-site backups, you should be able to use backup copies that you know weren’t connected to your network after the time of attack, and hence, protected from infection. However, it is recommended to use a secure quarantine environment for testing before bringing production systems back online to ensure there is no dormant ransomware present in the data before restoring to production systems.

How Object Lock protects your backups

Object Lock functionality for backups allows you to store objects using a write once, read many (WORM) model, meaning that after it’s written, data cannot be modified. Using Object Lock, no one can encrypt, tamper with, or delete your protected data for a specified period of time, creating a solid line of defense against ransomware attacks.

Object Lock creates a virtual air gap for your data. The term “air gap” comes from the world of LTO tape. When backups are written to tape, the tapes are then physically removed from the network, creating a literal gap of air between backups and production systems. In the event of a ransomware attack, you could just pull the tapes from the previous day to restore systems. Object Lock does the same thing, but it all happens in the cloud. Instead of physically isolating data, Object Lock virtually isolates the data.

Object Lock is valuable in a few different use cases:

  1. To replace an LTO tape system: Most folks looking to migrate from tape are concerned about maintaining the security of the air gap that tape provides. With Object Lock, you can create a backup that’s just as secure as air-gapped tape without the need for expensive physical infrastructure.
  2. To protect and retain sensitive data: If you work in an industry that has strong compliance requirements—for instance, if you’re subject to HIPAA regulations or if you need to retain and protect data for legal reasons—Object Lock allows you to easily set appropriate retention periods to support regulatory compliance.
  3. As part of a disaster recovery (DR) and business continuity plan: The last thing you want to worry about in the event you are attacked by ransomware is whether your backups are safe. Being able to restore systems from backups stored with Object Lock can help you minimize downtime and interruptions, comply with cyber insurance requirements, and achieve recovery time objectives (RTO) easier. By making critical data immutable, you can quickly and confidently restore uninfected data from your backups, deploy them, and return to business without interruption.

Ransomware attacks can be incredibly disruptive. By adopting the practice of creating immutable, air-gapped backups using Object Lock functionality, you can significantly increase your chances of achieving a successful recovery. This approach brings you one step closer to regaining control over your data and mitigating the impact of ransomware attacks.

So, why not just run a system restore?

While it might be tempting to rely solely on a system restore point to restore your system’s functionality, it is not the best solution for eliminating the underlying virus or ransomware responsible for the initial problem. Malicious software tends to hide within various components of a system, making it impossible for system restore to eradicate all instances. 

Another critical concern is that ransomware has the capability to infect and encrypt local backups. If a computer is infected with ransomware, there is a high likelihood that your local backup solution will also suffer from data encryption, just like everything else on the system.

With a good backup solution that is isolated from your local computers, you can easily obtain the files you need to get your system working again. This will also give you the flexibility to determine which files to restore from a particular date and how to obtain the files you need to restore your system.

Initial compromise TTPs: Human attack vectors

Often, the weak link in your security protocol is the ever-elusive X factor of human error. Cybercriminals know this and exploit it through social engineering. In the context of information security, social engineering is the use of deception to manipulate individuals into divulging confidential or personal information that may be used for fraudulent purposes. In other words, the weakest point in your system is usually somewhere between the keyboard and the chair.

Common human attack vectors include:

1. Phishing

Phishing uses seemingly legitimate emails to trick people into clicking on a link or opening an attachment, unwittingly delivering the malicious payload. The email might be sent to one person or many within an organization, but sometimes the emails are targeted to help them seem more credible. This targeting takes a little more time on the attackers’ part, but the research into individual targets can make their email seem even more legitimate, not to mention the assistance of generative AI models like ChatGPT. They might disguise their email address to look like the message is coming from someone the sender knows, or they might tailor the subject line to look relevant to the victim’s job. This highly personalized method is called “spear phishing.”

2. SMSishing

As the name implies, SMSishing uses text messages to get recipients to navigate to a site or enter personal information on their device. Common approaches use authentication messages or messages that appear to be from a financial or other service provider. Even more insidiously, some SMSishing ransomware variants attempt to propagate themselves by sending themselves to all contacts in the device’s contact list.

3. Vishing

In a similar manner to email and SMS, vishing uses voicemail to deceive the victim, leaving a message with instructions to call a seemingly legitimate number which is actually spoofed. Upon calling the number, the victim is coerced into following a set of instructions which are ostensibly to fix some kind of problem. In reality, they are being tricked into installing ransomware on their own computer. Like so many other methods of phishing, vishing has become increasingly sophisticated with the spread of AI, with recent, successful deepfakes leveraging vishing to duplicate the voices of company higher-ups—to the tune of $25 million. And like spear phishing, it has become highly targeted.

4. Social media

Social media can be a powerful vehicle to convince a victim to open a downloaded image from a social media site or take some other compromising action. The carrier might be music, video, or other active content that, once opened, infects the user’s system.

5. Instant Messaging

Between them, IM services like WhatsApp, Facebook Messenger, Telegram, and Snapchat have more than four billion users, making them an attractive channel for ransomware attacks. These messages can seem to come from trusted contacts and contain links or attachments that infect your machine and sometimes propagate across your contact list, furthering the spread.

Ransomware is more about manipulating vulnerabilities in human psychology than the adversary’s technological sophistication.”

—James Scott, Institute for Critical Infrastructure Technology

Initial compromise TTPs: Machine attack vectors

The other type of attack vector is machine to machine. Humans are involved to some extent, as they might facilitate the attack by visiting a website or using a computer, but the attack process is automated and doesn’t require any explicit human cooperation to invade your computer or network.

1. Drive-by

The drive-by vector is particularly malicious, since all a victim needs to do is visit a website carrying malware within the code of an image or active content. As the name implies, all you need to do is cruise by and you’re a victim.

2. Known system vulnerabilities

Cybercriminals learn the vulnerabilities of specific systems and exploit those vulnerabilities to break in and install ransomware on the machine. This happens most often to systems that are not patched with the latest security releases.

3. Malvertising

Malvertising is like drive-by, but uses ads to deliver malware. These ads might be placed on search engines or popular social media sites in order to reach a large audience. A common host for malvertising is adults-only sites.

4. Network propagation

Once a piece of ransomware is on your system, it can scan for file shares and accessible computers and spread itself across the network or shared system. Companies without adequate security might have their company file server and other network shares infected as well. From there, the malware will propagate as far as it can until it runs out of accessible systems or meets security barriers.

5. Propagation through shared services

Online services such as file sharing or syncing services can be used to propagate ransomware. If the ransomware ends up in a shared folder on a home machine, the infection can be transferred to an office or to other connected machines. If the service is set to automatically sync when files are added or changed, as many file sharing services are, then a malicious virus can be widely propagated in just milliseconds.

It’s important to be careful and consider the settings you use for systems that automatically sync, and to be cautious about sharing files with others unless you know exactly where they came from.

Prevention best practices

Security experts suggest several precautionary measures for preventing a ransomware attack.

  1. Use antivirus and antimalware software or other security policies to block known payloads from launching.
  2. Make frequent, comprehensive backups of all important files and isolate them from local and open networks.
  3. Immutable backup options such as Object Lock offer users a way to maintain truly air-gapped backups. The data is fixed, unchangeable, and cannot be deleted within the time frame set by the end user. 
  4. Keep offline data backups stored in locations that are air gapped or inaccessible from any potentially infected computer, such as on disconnected external storage drives or in the cloud, which prevents the ransomware from accessing them.
  5. Keep your security up-to-date through trusted vendors of your OS and applications. Remember to patch early and patch often to close known vulnerabilities in operating systems, browsers, and web plugins.
  6. Consider deploying security software to protect endpoints, email servers, and network systems from infection.
  7. Segment your networks to keep critical computers isolated and to prevent the spread of ransomware in case of an attack. Turn off unneeded network shares.
  8. Operate on the principle of least privilege. Turn off admin rights for users who don’t require them. Give users the lowest system permissions they need to do their work.
  9. Restrict write permissions on file servers as much as possible.
  10. Educate yourself and your employees in best practices to keep ransomware out of your systems. Update everyone on the latest email phishing scams and human engineering aimed at turning victims into abettors.

It’s clear that the best way to respond to a ransomware attack is to avoid having one in the first place. Other than that, making sure your valuable data is backed up and unreachable to a ransomware infection will ensure that your downtime and data loss will be minimal if you ever fall prey to an attack.

Have you endured a ransomware attack or have a strategy to keep you from becoming a victim? Please let us know in the comments.

➔ Download The Complete Guide to Ransomware E-book

Ransomware FAQS

What is a ransomware attack?

A ransomware attack is a type of cyberattack where cybercriminals or groups gain access to a computer system or network and encrypt valuable files or data, making them inaccessible to the owner. The attackers then demand a ransom, usually in the form of cryptocurrency, in exchange for providing the decryption key to unlock the files. Attackers may also extort victims by exfiltrating and threatening to leak sensitive data. Ransomware attacks can cause significant financial losses, operational disruptions, and potential data breaches if the ransom is not paid or effective countermeasures are not implemented.

How do I prevent ransomware attacks?

Preventing ransomware requires a proactive approach to cybersecurity and cyber resilience. Implement robust security measures, including regularly updating software and operating systems, utilizing strong and unique passwords, and deploying reputable antivirus and antimalware software. Train employees about how to identify phishing and social engineering tactics. Regularly back up critical data to cloud storage, implement tools like Object Lock to create immutability, and test your restoration processes. Lastly, stay informed about the latest threats and security best practices to fortify your defenses against ransomware.

How does ransomware work?

Ransomware gains entry through various means such as phishing emails, physical media like thumb drives, or alternative methods. It then installs itself on one or more endpoints or network devices, granting the attacker access. Once installed, the ransomware communicates with the perpetrator’s central command and control server, triggering the generation of cryptographic keys required to lock the system securely. With the cryptographic lock established, the ransomware initiates the encryption process, targeting files both locally and across the network, and renders them inaccessible without the decryption keys. 

How does ransomware spread?

Common ransomware attack vectors include malicious email attachments or links, where users unknowingly download or execute the ransomware payload. It can also spread through exploit kits that target vulnerabilities in software or operating systems. Ransomware may propagate through compromised websites, drive-by downloads, or via malicious ads. Additionally, attackers can utilize brute force attacks to gain unauthorized access to systems and deploy ransomware.

How do I recover from a ransomware attack?

First, contain the infection. Isolate the infected endpoint from the rest of your network and any shared storage. Next, identify the infection. With numerous ransomware strains in existence, it’s crucial to accurately identify the specific type you’re dealing with. Conduct scans of messages, files, and utilize identification tools to gain a clearer understanding of the infection. Report the incident. While legal obligations may vary, it is advisable to report the attack to the relevant authorities. Their involvement can provide invaluable support and coordination for countermeasures. Then, assess the available courses of action to address the infection. If you have a solid backup strategy in place, you can utilize secure backups to restore and rebuild your environment.

The post The Complete Guide to Ransomware Recovery and Prevention appeared first on Backblaze Blog | Cloud Storage & Cloud Backup

Alcion supports their multi-tenant platform with Amazon OpenSearch Serverless

Post Syndicated from Zack Rossman original https://aws.amazon.com/blogs/big-data/alcion-supports-their-multi-tenant-platform-with-amazon-opensearch-serverless/

This is a guest blog post co-written with Zack Rossman from Alcion.

Alcion, a security-first, AI-driven backup-as-a-service (BaaS) platform, helps Microsoft 365 administrators quickly and intuitively protect data from cyber threats and accidental data loss. In the event of data loss, Alcion customers need to search metadata for the backed-up items (files, emails, contacts, events, and so on) to select specific item versions for restore. Alcion uses Amazon OpenSearch Service to provide their customers with accurate, efficient, and reliable search capability across this backup catalog. The platform is multi-tenant, which means that Alcion requires data isolation and strong security so as to ensure that tenants can only search their own data.

OpenSearch Service is a fully managed service that makes it easy to deploy, scale, and operate OpenSearch in the AWS Cloud. OpenSearch is an Apache-2.0-licensed, open-source search and analytics suite, comprising OpenSearch (a search, analytics engine, and vector database), OpenSearch Dashboards (a visualization and utility user interface), and plugins that provide advanced capabilities like enterprise-grade security, anomaly detection, observability, alerting, and much more. Amazon OpenSearch Serverless is a serverless deployment option that makes it simple to use OpenSearch without configuring, managing, and scaling OpenSearch Service domains.

In this post, we share how adopting OpenSearch Serverless enabled Alcion to meet their scale requirements, reduce their operational overhead, and secure their tenants’ data by enforcing tenant isolation within their multi-tenant environment.

OpenSearch Service managed domains

For the first iteration of their search architecture, Alcion chose the managed domains deployment option in OpenSearch Service and was able to launch their search functionality in production in less than a month. To meet their security, scale, and tenancy requirements, they stored data for each tenant in a dedicated index and used fine-grained access control in OpenSearch Service to prevent cross-tenant data leaks. As their workload evolved, Alcion engineers tracked OpenSearch domain utilization via the provided Amazon CloudWatch metrics, making changes to increase storage and optimize their compute resources.

The team at Alcion used several features of OpenSearch Service managed domains to improve their operational stance. They introduced index aliases, which provide a single alias name to access (read and write) multiple underlying indexes. They also configured Index State Management (ISM) policies to help them control their data lifecycle by rolling indexes over based on index size. Together, the ISM policies and index aliases were necessary to scale indexes for large tenants. Alcion also used index templates to define the shards per index (partitioning) of their data so as to automate their data lifecycle and improve the performance and stability of their domains.

The following architecture diagram shows how Alcion configured their OpenSearch managed domains.

The following diagram shows how Microsoft 365 data was indexed to and queried from tenant-specific indexes. Alcion implemented request authentication by providing the OpenSearch primary user credentials with each API request.

OpenSearch Serverless overview and tenancy model options

OpenSearch Service managed domains provided a stable foundation for Alcion’s search functionality, but the team needed to manually provision resources to the domains for their peak workload. This left room for cost optimizations because Alcion’s workload is bursty—there are large variations in the number of search and indexing transactions per second, both for a single customer and taken as a whole. To reduce costs and operational burden, the team turned to OpenSearch Serverless, which offers auto-scaling capability.

To use OpenSearch Serverless, the first step is to create a collection. A collection is a group of OpenSearch indexes that work together to support a specific workload or use case. The compute resources for a collection, called OpenSearch Compute Units (OCUs), are shared across all collections in an account that share an encryption key. The pool of OCUs is automatically scaled up and down to meet the demands of indexing and search traffic.

The level of effort required to migrate from an OpenSearch Service managed domain to OpenSearch Serverless was manageable thanks to the fact that OpenSearch Serverless collections support the same OpenSearch APIs and libraries as OpenSearch Service managed domains. This allowed Alcion to focus on optimizing the tenancy model for the new search architecture. Specifically, the team needed to decide how to partition tenant data within collections and indexes while balancing security and total cost of ownership. Alcion engineers, in collaboration with the OpenSearch Serverless team, considered three tenancy models:

  • Silo model: Create a collection for each tenant
  • Pool model: Create a single collection and use a single index for multiple tenants
  • Bridge model: Create a single collection and use a single index per tenant

All three design choices had benefits and trade-offs that had to be considered for designing the final solution.

Silo model: Create a collection for each tenant

In this model, Alcion would create a new collection whenever a new customer onboarded to their platform. Although tenant data would be cleanly separated between collections, this option was disqualified because the collection creation time meant that customers wouldn’t be able to back up and search data immediately after registration.

Pool model: Create a single collection and use a single index for multiple tenants

In this model, Alcion would create a single collection per AWS account and index tenant-specific data in one of many shared indexes belonging to that collection. Initially, pooling tenant data into shared indexes was attractive from a scale perspective because this led to the most efficient use of index resources. But after further analysis, Alcion found that they would be well within the per-collection index quota even if they allocated one index for each tenant. With that scalability concern resolved, Alcion pursued the third option because siloing tenant data into dedicated indexes results in stronger tenant isolation than the shared index model.

Bridge model: Create a single collection and use a single index per tenant

In this model, Alcion would create a single collection per AWS account and create an index for each of the hundreds of tenants managed by that account. By assigning each tenant to a dedicated index and pooling these indexes in a single collection, Alcion reduced onboarding time for new tenants and siloed tenant data into cleanly separated buckets.

Implementing role-based access control for supporting multi-tenancy

OpenSearch Serverless offers a multi-point, inheritable set of security controls, covering data access, network access, and encryption. Alcion took full advantage of OpenSearch Serverless data access policies to implement role-based access control (RBAC) for each tenant-specific index with the following details:

  • Allocate an index with a common prefix and the tenant ID (for example, index-v1-<tenantID>)
  • Create a dedicated AWS Identity and Access Management (IAM) role that is used to sign requests to the OpenSearch Serverless collection
  • Create an OpenSearch Serverless data access policy that grants document read/write permissions within a dedicated tenant index to the IAM role for that tenant
  • OpenSearch API requests to a tenant index are signed with temporary credentials belonging to the tenant-specific IAM role

The following is an example OpenSearch Serverless data access policy for a mock tenant with ID t-eca0acc1-12345678910. This policy grants the IAM role document read/write access to the dedicated tenant access.

[
    {
        "Rules": [
            {
                "Resource": [
                    "index/collection-searchable-entities/index-v1-t-eca0acc1-12345678910"
                ],
                "Permission": [
                    "aoss:ReadDocument",
                    "aoss:WriteDocument",
                ],
                "ResourceType": "index"
            }
        ],
        "Principal": [
            "arn:aws:iam::12345678910:role/OpenSearchAccess-t-eca0acc1-1b9f-4b3f-95d6-12345678910"
        ],
        "Description": "Allow document read/write access to OpenSearch index belonging to tenant t-eca0acc1-1b9f-4b3f-95d6-12345678910"
    }
] 

The following architecture diagram depicts how Alcion implemented indexing and searching for Microsoft 365 resources using the OpenSearch Serverless shared collection approach.

The following is the sample code snippet for sending an API request to an OpenSearch Serverless collection. Notice how the API client is initialized with a signer object that signs requests with the same IAM principal that is linked to the OpenSearch Serverless data access policy from the previous code snippet.

package alcion

import (
	"context"
	"encoding/json"
	"strings"

	"github.com/aws/aws-sdk-go-v2/aws"
	"github.com/aws/aws-sdk-go-v2/config"
	"github.com/aws/aws-sdk-go-v2/credentials/stscreds"
	"github.com/aws/aws-sdk-go-v2/service/sts"
	"github.com/opensearch-project/opensearch-go/v2"
	"github.com/opensearch-project/opensearch-go/v2/opensearchapi"
	"github.com/opensearch-project/opensearch-go/v2/signer"
	awssignerv2 "github.com/opensearch-project/opensearch-go/v2/signer/awsv2"
	"github.com/pkg/errors"
)

const (
	// Scope the API request to the AWS OpenSearch Serverless service
	aossService = "aoss"

	// Mock values
	indexPrefix        = "index-v1-"
	collectionEndpoint = "<https://kfbr3928z4y6vot2mbpb.us-east-1.aoss.amazonaws.com>"
	tenantID           = "t-eca0acc1-1b9f-4b3f-95d6-b0b96b8c03d0"
	roleARN            = "arn:aws:iam::1234567890:role/OpenSearchAccess-t-eca0acc1-1b9f-4b3f-95d6-b0b96b8c03d0"
)

func CreateIndex(ctx context.Context, tenantID string) (*opensearchapi.Response, error) {

	sig, err := createRequestSigner(ctx)
	if err != nil {
		return nil, errors.Wrapf(err, "error creating new signer for AWS OSS")
	}

	cfg := opensearch.Config{
		Addresses: []string{collectionEndpoint},
		Signer:    sig,
	}

	aossClient, err := opensearch.NewClient(cfg)
	if err != nil {
		return nil, errors.Wrapf(err, "error creating new OpenSearch API client")
	}

  body, err := getSearchBody()
  if err != nil {
    return nil, errors.Wrapf(err, "error getting search body")
  }

	req := opensearchapi.SearchRequest{
		Index: []string{indexPrefix + tenantID},
		Body:  body,
	}

	return req.Do(ctx, aossClient)
}

func createRequestSigner(ctx context.Context) (signer.Signer, error) {

	awsCfg, err := config.LoadDefaultConfig(ctx)
	if err != nil {
		return nil, errors.Wrapf(err, "error loading default config")
	}

	stsClient := sts.NewFromConfig(awsCfg)
	provider := stscreds.NewAssumeRoleProvider(stsClient, roleARN)

	awsCfg.Credentials = aws.NewCredentialsCache(provider)
	return awssignerv2.NewSignerWithService(awsCfg, aossService)
}

func getSearchBody() (*strings.Reader, error) {
	// Match all documents, page size = 10
	query := map[string]interface{}{
		"size": 10,
	}

	queryJson, err := json.Marshal(query)
  if err != nil {
    return nil, err
  }

	return strings.NewReader(string(queryJson)), nil
} 

Conclusion

In May of 2023, Alcion rolled out its search architecture based on the shared collection and dedicated index-per-tenant model in all production and pre-production environments. The team was able to tear out complex code and operational processes that had been dedicated to scaling OpenSearch Service managed domains. Furthermore, thanks to the auto scaling capabilities of OpenSearch Serverless, Alcion has reduced their OpenSearch costs by 30% and expects the cost profile to scale favorably.

In their journey from managed to serverless OpenSearch Service, Alcion benefited in their initial choice of OpenSearch Service managed domains. In migrating forward, they were able to reuse the same OpenSearch APIs and libraries for their OpenSearch Serverless collections that they used for their OpenSearch Service managed domain. Additionally, they updated their tenancy model to take advantage of OpenSearch Serverless data access policies. With OpenSearch Serverless, they were able to effortlessly adapt to their customers’ scale needs while ensuring tenant isolation.

For more information about Alcion, visit their website.


About the Authors

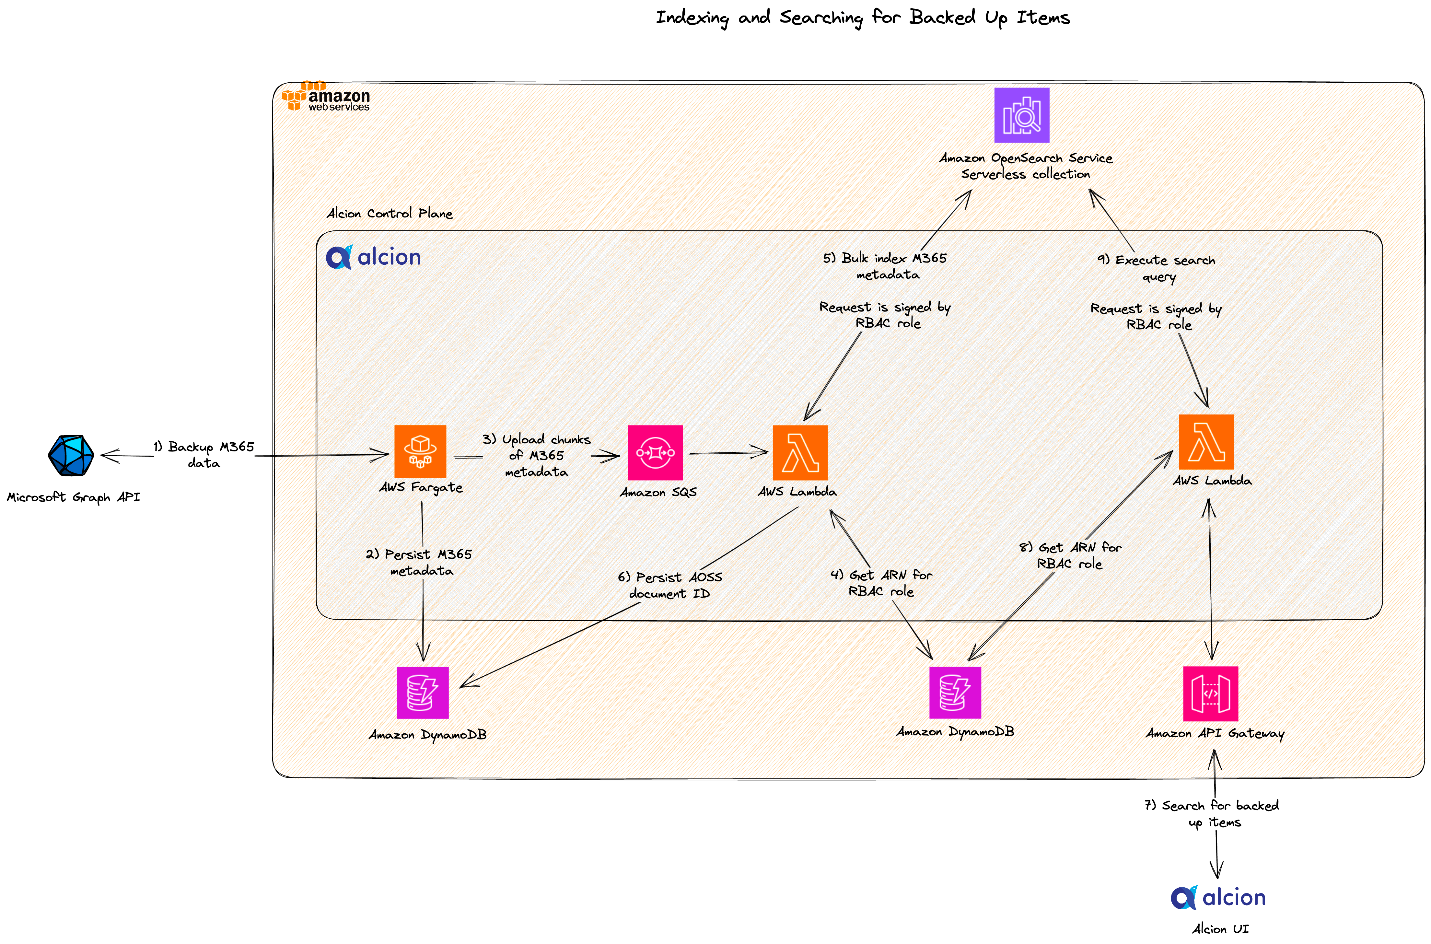
Zack Rossman is a Member of Technical Staff at Alcion. He is the tech lead for the search and AI platforms. Prior to Alcion, Zack was a Senior Software Engineer at Okta, developing core workforce identity and access management products for the Directories team.

Niraj Jetly is a Software Development Manager for Amazon OpenSearch Serverless. Niraj leads several data plane teams responsible for launching Amazon OpenSearch Serverless. Prior to AWS, Niraj led several product and engineering teams as CTO, VP of Engineering, and Head of Product Management for over 15 years. Niraj is a recipient of over 15 innovation awards, including being named CIO of the year in 2014 and top 100 CIO in 2013 and 2016. A frequent speaker at several conferences, he has been quoted in NPR, WSJ, and The Boston Globe.

Jon Handler is a Senior Principal Solutions Architect at Amazon Web Services based in Palo Alto, CA. Jon works closely with OpenSearch and Amazon OpenSearch Service, providing help and guidance to a broad range of customers who have search and log analytics workloads that they want to move to the AWS Cloud. Prior to joining AWS, Jon’s career as a software developer included 4 years of coding a large-scale, ecommerce search engine. Jon holds a Bachelor of the Arts from the University of Pennsylvania and a Master of Science and a PhD in Computer Science and Artificial Intelligence from Northwestern University.

Configure monitoring, limits, and alarms in Amazon Redshift Serverless to keep costs predictable

Post Syndicated from Satesh Sonti original https://aws.amazon.com/blogs/big-data/configure-monitoring-limits-and-alarms-in-amazon-redshift-serverless-to-keep-costs-predictable/

Amazon Redshift Serverless makes it simple to run and scale analytics in seconds. It automatically provisions and intelligently scales data warehouse compute capacity to deliver fast performance, and you pay only for what you use. Just load your data and start querying right away in the Amazon Redshift Query Editor or in your favorite business intelligence (BI) tool. Redshift Serverless measures data warehouse capacity in Redshift Processing Units (RPUs), and you can configure base RPUs anywhere between 8–512. You can start with your preferred RPU capacity or defaults and adjust anytime later.

In this post, we share how you can monitor your workloads running on Redshift Serverless through three approaches: the Redshift Serverless console, Amazon CloudWatch, and system views. We also show how to set up guardrails via alerts and limits for Redshift Serverless to keep your costs predictable.

Method 1: Monitor through the Redshift Serverless console

You can view all user queries, including Data Manipulation Language (DML) statements, Data Definition Language (DDL) statements, and Data Control Language (DCL), through the Redshift Serverless console. You can also view the RPU consumption to run these workloads on a single page. You can also apply filters based on time, database, users, and type of queries.

Prerequisites for monitoring access

A superuser has access to monitor all workloads and resource consumption by default. If other users need monitoring access through the Redshift Serverless console, then the superuser can provide necessary access by performing the following steps:

  1. Create a policy with necessary privileges and assign this policy to required users or roles.
  2. Grant query monitoring permission to the user or role.

For more information, refer to Granting access to monitor queries.

Query monitoring

In this section, we walk through the Redshift Serverless console to see query history, database performance, and resource usage. We also go through monitoring options and how to set filters to narrow down results using filter attributes.

  1. On the Redshift Serverless console, under Monitoring in the navigation pane, choose Query and database monitoring.
  2. Open the workgroup you want to monitor.
  3. In the Metric filters section, expand Additional filtering options.
  4. You can set filters for time range, aggregation time interval, database, query category, SQL, and users.

Query and database monitoring

Two tabs are available, Query history and Database performance. Use the Query history tab for obtaining details at a per-query level, and the Database performance tab for reviewing performance aggregated across queries. Both these tabs are filtered based off the selections you made.

Under Query history, you will see the Query runtime graph. Use this graph to look into query concurrency (queries that are running in the same time frame). You can choose a query to view more query run details, for example, queries that took longer to run than you expected.

Query runtime monitoring dashbaord

In the Queries and loads section, you can see all queries by default, but you can also filter by status to view completed, running, and failed queries.

Query history screen

Navigate to the Database Performance tab in the Query and database monitoring section to view the following:

  • Queries completed per second – Average number of queries completed per second
  • Queries duration –Average amount of time to complete a query
  • Database connections – Number of active database connections
  • Running and Queued queries – Total number of running and queued queries at a Resource monitoring

To monitor your resources, complete the following steps:

  1. On the Redshift Serverless console, choose Resource monitoring under Monitoring in the navigation pane.

The default workgroup will be selected by default, but you can choose the workgroup you would like to monitor.

  1. In the Metric filters section, expand Additional filtering options.
  2. Choose a 1-minute time interval (for example) and review the results.

You can also try different ranges to see the results.

Screen to apply metric filters

On the RPU capacity used graph, you can see how Redshift Serverless is able to scale RPUs in a matter of minutes. This gives a visual representation of peaks and lows in your consumption over your chosen period of time.

RPU capacity consumption

You also see the actual compute usage in terms of RPU-seconds for the workload you ran.
RPU Seconds consumed

Method 2: Monitor metrics in CloudWatch

Redshift Serverless publishes serverless endpoint performance metrics to CloudWatch. The Amazon Redshift CloudWatch metrics are data points for operational monitoring. These metrics enable you to monitor performance of your serverless workgroups (compute) and usage of namespaces (data). CloudWatch allows you to centrally monitor your serverless endpoints in one AWS account, or also cross-account and cross-Region.

  • On the CloudWatch console, under Metrics in the navigation pane, choose All metrics.
  • On the Browse tab, choose AWS/Redshift-Serverless to get to a collection of metrics for Redshift Serverless usage.

Redshift Serverless in Amazon CloudWatch

  • Choose Workgroup to view workgroup-related metrics.

Workgroups and Namespaces

From the list, you can check your particular workgroup and the metrics available (in this example, ComputeSeconds and ComputeCapacity). You should see the graph is updated and charting your data.

Redshift Serverless Workgroup Metrics

  • To name the graph, choose the pencil icon next to the graph title and enter a graph name (for example, dataanalytics-serverless), then choose Apply.

Rename CloudWatch Graph

  • On the Browse tab, choose AWS/Redshift-Serverless and choose Namespace this time.
  • Select the namespace you want to monitor and the metrics of interest.

Redshift Serverless Namespace Metrics

You can add additional metrics to your graph. To centralize monitoring, you can add these metrics to an existing CloudWatch dashboard or a new dashboard.

  • On the Actions menu, choose Add to dashboard.

Redshift Serverless Namespace Metrics

Method 3: Granular monitoring using system views

System views in Redshift Serverless are used to monitor workload performance and RPU usage at a granular level over a period of time. These query monitoring system views have been simplified to include monitoring for DDL, DML, COPY, and UNLOAD queries. For a complete list of system views and their uses, refer to Monitoring views.

SQL Notebook

You can download the SQL notebook with most used system views queries. These queries help to answer most frequently asked monitoring questions listed below.

  • How to monitor queries based on status?
  • How to monitor specific query elapsed time breakdown details?
  • How to monitor workload breakdown by query count, and percentile run time?
  • How to monitor detailed steps involved in query execution?
  • How to monitor Redshift serverless usage cost by day?
  • How to monitor data loads (copy commands)?
  • How to monitor number of sessions, and connections?

You can import this in Query Editor V2.0 and run the queries connecting to the Redshift Serverless workgroup you would like to monitor.

Set limits to control costs

When you are creating your serverless endpoint, the base capacity is defaulted to 128 RPUs. However, you can change it at creation time or later via the Redshift Serverless console.

  1. On the details page of your serverless workgroup, choose the Limits tab.
  2. In the Base capacity section, choose Edit.
  3. You can specify Base capacity from 8–512 RPUs, in increments of 8.

Each RPU provides 16 GB memory, so the lowest base 8 RPU is compute with 128 GB memory, and highest base 512 RPU is compute with 8 TB memory.

Edit base RPU capacity

Usage limits

To configure usage capacity limits to limit your overall Redshift Serverless bill, complete the following steps:

  1. In the Usage limits section, choose Manage usage limits.
  2. To control RPU usage, set the maximum RPU-hours by frequency. You can set Frequency to Daily, Weekly, and Monthly.
  3. For Usage limit (RPU hours), enter your preferred value.
  4. For Action, choose Alert, Log to system table, or Turn off user queries.

Set RPU usage limit

Optionally, you can select an existing Amazon Simple Notification Service (Amazon SNS) topic or create a new SNS topic, and subscribe via email to this SNS topic to be notified when usage limits have been met.

Query monitoring rules for Redshift Serverless

To prevent wasteful resource utilization and runaway costs caused by poorly rewritten queries, you can implement query monitoring rules via query limits on your Redshift Serverless workgroup. For more information, refer to WLM query monitoring rules. The query monitoring rules in Redshift Serverless stop queries that meet the limit that has been set up in the rule. To receive notifications and automate notifications on Slack, refer to Automate notifications on Slack for Amazon Redshift query monitoring rule violations.

To set up query limits, complete the following steps:

  1. On the Redshift Serverless console, choose Workgroup configuration in the navigation pane.
  2. Choose a workgroup to monitor.
  3. On the workgroup details page, under Query monitoring rules, choose Manage query limits.

You can add up to 10 query monitoring rules to each serverless workgroup.

Set query limits

The serverless workgroup will go to a Modifying state each time you add or remove a limit.

Let’s take an example where you have to create a serverless workgroup for your dashboards. You know that dashboard queries typically complete in under a minute. If any dashboard query takes more than a minute, it could indicate a poorly written query or a query that hasn’t been tested well, and has incorrectly been released to production.

For this use case, we set a rule with Limit type as Query execution time and Limit (seconds) as 60.

Set required limit

The following screenshot shows the Redshift Serverless metrics available for setting up query monitoring rules.

Query Monitoring Metrics on CloudWatch

Configure alarms

Alarms are very useful because they enable you to make proactive decisions about your Redshift Serverless endpoint. Any usage limits that you set up will automatically show as alarms on the Redshift Serverless console, and are created as CloudWatch alarms.

Additionally, you can set up one or more CloudWatch alarms on any of the metrics listed in Amazon Redshift Serverless metrics.

For example, setting an alarm for DataStorage over a threshold value would keep track of the storage space that your serverless namespace is using for your data.

To create an alarm for your Redshift Serverless instance, complete the following steps:

  1. On the Redshift Serverless console, under Monitoring in the navigation pane, choose Alarms.
  2. Choose Create alarm.

Set Alarms from console

  1. Choose your level of metrics to monitor:
    • Workgroup
    • Namespace
    • Snapshot storage

If we select Workgroup, we can choose from the workgroup-level metrics shown in the following screenshot.

Workgroup Level Metrics

The following screenshot shows how we can set up alarms at the namespace level along with various metrics that are available to use.

Namespace Level Metrics

The following screenshot shows the metrics available at the snapshot storage level.

Snapshot level metrics

If you are starting new, then please start with most commonly used metrics listed below. Please also Create a billing alarm to monitor your estimated AWS charges.

  • ComputeSeconds
  • ComputeCapacity
  • DatabaseConnections
  • EstimatedCharges
  • DataStorage
  • QueriesFailed

Notifications

After you define your alarm, provide a name and a description, and choose to enable notifications.

Amazon Redshift uses an SNS topic to send alarm notifications. For instructions to create an SNS topic, refer to Creating an Amazon SNS topic. You must subscribe to the topic to receive the messages published to it. For instructions, refer to Subscribing to an Amazon SNS topic.

You can also monitor event notifications to be aware of the changes in your Redshift Serverless Datawarehouse. Please refer Amazon Redshift Serverless event notifications with Amazon EventBridge for further details.

Clean up

To clean up your resources, delete the workgroup and namespace you used for trying the monitoring approaches discussed in this post.

Cleanup

Conclusion

In this post, we covered how to perform monitoring activities on Redshift Serverless through the Redshift Serverless console, system views, and CloudWatch, and how to keep costs predictable. Try the monitoring approaches discussed in this post and let us know your feedback in the comments.


About the Authors

Satesh Sonti is a Sr. Analytics Specialist Solutions Architect based out of Atlanta, specialized in building enterprise data platforms, data warehousing, and analytics solutions. He has over 17 years of experience in building data assets and leading complex data platform programs for banking and insurance clients across the globe.

Harshida Patel is a Specialist Principal Solutions Architect, Analytics with AWS.

Raghu Kuppala is an Analytics Specialist Solutions Architect experienced working in the databases, data warehousing, and analytics space. Outside of work, he enjoys trying different cuisines and spending time with his family and friends.

Ashish Agrawal is a Sr. Technical Product Manager with Amazon Redshift, building cloud-based data warehouses and analytics cloud services. Ashish has over 24 years of experience in IT. Ashish has expertise in data warehouses, data lakes, and platform as a service. Ashish has been a speaker at worldwide technical conferences.

Enable data analytics with Talend and Amazon Redshift Serverless

Post Syndicated from Tamara Astakhova original https://aws.amazon.com/blogs/big-data/enable-data-analytics-with-talend-and-amazon-redshift-serverless/

This is a guest post co-written with Cameron Davie from Talend.

Today, in order to accelerate and scale data analytics, companies are looking for an approach to minimize infrastructure management and predict computing needs for different types of workloads, including spikes and ad hoc analytics.

The integration of Talend Cloud and Talend Stitch with Amazon Redshift Serverless can help you achieve successful business outcomes without data warehouse infrastructure management.

In this post, we demonstrate how Talend easily integrates with Redshift Serverless to help you accelerate and scale data analytics with trusted data.

About Redshift Serverless

Redshift Serverless makes it simple to run and scale analytics without having to manage your data warehouse infrastructure. Data scientists, developers, and data analysts can access meaningful insights and build data-driven applications with zero maintenance. Redshift Serverless automatically provisions and intelligently scales data warehouse capacity to deliver fast performance for even the most demanding and unpredictable workloads, and you pay only for what you use. You can load your data and start querying in your favorite business intelligence (BI) tools, build machine learning (ML) models in SQL, or combine your data with third-party data for new insights because Redshift Serverless seamlessly integrates with your data landscape. Existing Amazon Redshift customers can migrate their Redshift clusters to Redshift Serverless using the Amazon Redshift console or API without making changes to their applications and have the advantage of using this capability.

About Talend

Talend is an AWS ISV Partner with the Amazon Redshift Ready Product designation and AWS Competencies in both Data and Analytics and Migration. Talend Cloud combines data integration, data integrity, and data governance in a single, unified platform that makes it easy to collect, transform, clean, govern, and share your data. Talend Stitch is fully managed, scalable service that helps replicate data into your cloud data warehouse and quickly access analytics to make better, faster decisions.

Solution overview

The integration of Talend with Amazon Redshift adds new features and capabilities. As of this writing, Talend has 14 distinct native connectivity and configuration components for Amazon Redshift, which are fully documented in the Talend Help Center.

From the Talend Studio interface, there are no differences or changes required to support or access a Redshift Serverless instance or provisioned cluster.

In the following sections, we detail the steps to integrate the Talend Studio interface with Redshift Serverless.

Prerequisites

To complete the integration, you need a Redshift Serverless data warehouse. For setup instructions, see the Getting Started Guide. You also need a Talend Cloud account and Talend Studio. For setup instructions, see the Talend Cloud installation guide.

Integrate Talend Studio with Redshift Serverless

In the Talend Studio interface, you first create and establish a connection to Redshift Serverless. Then you add an output component to standard loading from your desired source into your Redshift Serverless data warehouse, using the established connection. The alternative step is to use a bulk loading component to load large amounts of data directly to your Redshift Serverless data warehouse, using the tRedshiftBulkExec component. Complete the following steps:

  1. Configure a tRedshiftConnection component to connect to Redshift Serverless:
    • For Database, choose Amazon Redshift.
    • Leave the values for Property Type and Driver version as default.
    • For Host, enter the Redshift Serverless endpoint’s host URL.
    • For Port, enter 5349.
    • For Database, enter your database name.
    • For Schema, enter your preferred schema.
    • For Username and Password, enter your user name and password, respectively.

Follow security best practices by using a strong password policy and regular password rotation to reduce the risk of password-based attacks or exploits.

For more information on how to connect to a database, refer to tDBConnection.

After you create the connection object, you can add an output component to your Talend Studio job. The output component defines that the data being processed in the job’s workflow will land in Redshift Serverless. The following examples show standard output and bulk loading output.

  1. Add a tRedshiftOutput database component.

tRedshiftOutput database component

  1. Configure the tRedshiftOutput database component to write, update, make changes to the connected Redshift Serverless data warehouse.
  2. When using the tRedshiftOutput component, select Use an existing component and choose the connection you created.

This step makes sure that this component is pre-configured.

tDBOutput component

For more information on how to set up a tDBOutput component, see tDBOutput.

  1. Alternatively, you can configure a tRedshiftBulkExec database component to run the insert operations on the connected Redshift Serverless data warehouse.

Using the tRedshiftBulkExec database component allows you to mass load data files directly from Amazon Simple Storage Service (Amazon S3) into Redshift Serverless as tables. The following screenshot illustrates that Talend is able to use connection information in a job across multiple components, saving time and effort when establishing connections to both Amazon Redshift and Amazon S3.

  1. When using the tRedshiftBulkExec component, select Use an existing component for Database settings and choose the connection you created.

This makes sure that this component is preconfigured.

  1. For S3 Setting, select Use an existing S3 connection and enter your existing connection that you will configure separately.

tDBBulkExec component

For more information on how to set up a tDBBulkExec component, see tDBBulkExec.

As well as Talend Cloud for enterprise-level data transformation needs, you could also use Talend Stitch to handle data ingestion and data replication to Redshift Serverless. All configuration for ingestion or replicating data from your desired sources to Redshift Serverless is done in a single input screen.

  1. Provide the following parameters:
    • For Display Name, enter your preferred display name for this connection.
    • For Description, enter a description of the connection. This is optional.
    • For Host, enter the Redshift Serverless endpoint’s host URL.
    • For Port, enter 5349.
    • For Database, enter your database name.
    • For Username and Password, enter your user name and password, respectively.

All support documents and information (including diagrams, steps, and screenshots) can be found in the Talend Cloud and Talend Stitch documentation.

Summary

In this post, we demonstrated how the integration of Talend with Redshift Serverless helps you quickly integrate multiple data sources into a fully managed, secure platform and immediately enable business-wide analytics.

Check out AWS Marketplace and sign up for a free trial with Talend. For more information about Redshift Serverless, refer to the Getting Started Guide.


About the Authors

Tamara Astakhova is a Sr. Partner Solutions Architect in Data and Analytics at AWS. She has over 18 years of experience in the architecture and development of large-scale data analytics systems. Tamara is working with strategic partners helping them build complex AWS-optimized architectures.

Cameron Davie is a Principal Solutions Engineer for the Tech Alliances team. He oversees the technical responsibilities of Talend’s most strategic ISV partnerships. Cameron has been with Talend for 6 years in this role, working directly as the primary technical resource for partners such as AWS, Snowflake, and more. Cameron’s role at Talend is primarily focused on technical enablement and evangelism. This includes showcasing key capabilities of our partners’ solution internally as well as demonstrating Talend’s core technical capabilities with the technical sellers at Talend’s strategic ISV partners. Cameron is a veteran of ISV partnerships and enterprise software, with over 23 years of experience. Before Talend, he spent 14 years at SAP on their OEM/Embedded Solutions partnership team.

Maneesh Sharma is a Senior Database Engineer at AWS with more than a decade of experience designing and implementing large-scale data warehouse and analytics solutions. He collaborates with various Amazon Redshift Partners and customers to drive better integration.

[$] A discussion on Linux in space

Post Syndicated from original https://lwn.net/Articles/938779/

There was something of a space theme that pervaded the Embedded Linux
Conference (ELC) portion of the 2023 Embedded
Open Source Summit
(EOSS), which is an umbrella event for various
sub-conferences related to embedded open-source development. That may
partly be because one of the organizers of EOSS (and ELC), Tim Bird,
described himself as “a bit of a space junkie”; he made that observation
during a panel session that he led on embedded Linux in space. Bird and
four panelists discussed various aspects of the use of Linux in
space-related systems, including where it has been used, the
characteristics and challenges of aerospace deployments, certification of
Linux for aerospace use, and more.

Security updates for Tuesday

Post Syndicated from original https://lwn.net/Articles/939179/

Security updates have been issued by Debian (python-git and renderdoc), Red Hat (edk2, kernel, kernel-rt, and kpatch-patch), Slackware (kernel), SUSE (firefox, libcap, openssh, openssl-1_1, python39, and zabbix), and Ubuntu (cinder, ironic, nova, python-glance-store, python-os-brick, frr, graphite-web, and openssh).

Intel APX Advanced Performance Extensions and AVX10 For Next-Gen CPUs

Post Syndicated from Cliff Robinson original https://www.servethehome.com/intel-apx-advanced-performance-extensions-and-avx10-for-next-gen-cpus/

Intel has a new AVX10 ISA to unify next-gen vector compute for P-cores and E-cores as well as Intel APX Advanced Performance Extensions

The post Intel APX Advanced Performance Extensions and AVX10 For Next-Gen CPUs appeared first on ServeTheHome.

New York Using AI to Detect Subway Fare Evasion

Post Syndicated from Bruce Schneier original https://www.schneier.com/blog/archives/2023/07/new-york-using-ai-to-detect-subway-fare-evasion.html

The details are scant—the article is based on a “heavily redacted” contract—but the New York subway authority is using an “AI system” to detect people who don’t pay the subway fare.

Joana Flores, an MTA spokesperson, said the AI system doesn’t flag fare evaders to New York police, but she declined to comment on whether that policy could change. A police spokesperson declined to comment.

If we spent just one-tenth of the effort we spend prosecuting the poor on prosecuting the rich, it would be a very different world.

От А1 с любов

Post Syndicated from Йовко Ламбрев original https://www.toest.bg/from-a1-with-love/

От А1 с любов

22 май 2023 г. Налагаше се да бъда в движение из града през почти целия ден, а в същото време трябваше да поддържам активна комуникация по телефона и в чата с колегите по различни теми и проекти. Всичко щеше да бъде наред, ако изведнъж в късния следобед телефоните им не замлъкнаха. Нямах телефонна връзка и с никого от мениджмънта на компанията. Намерихме се чрез служебния чат, където стана ясно, че мобилният оператор „А1 България“ едностранно и без да посочи конкретна причина, просто е спрял телефоните на всички, включени в групата на фирмата.

Над два месеца по-късно проблемът още няма решение, нито пък от А1 са дали рационално обяснение, в което да не прозира опит за натиск от позицията на силата. Разпитвайки наоколо, попаднах и на други подобни случаи, което предполага, че

всичко това може би не е случайно, а прилича на установена търговска практика.

Заех се да пиша този текст по няколко причини. Като служител на една от засегнатите компании имах възможност да наблюдавам развоя на казуса съвсем отблизо. Освен това, разравяйки фактите, попаднах на стряскащо идентични случаи с други дългогодишни клиенти на мобилния оператор. А съм наясно, че тъй като телекомите са едни от най-големите рекламодатели, примери за техни скандални практики трудно ще получат отразяване в по-големите медии.

Случаят с „Новарто“

„Новарто“ е българска ИТ компания, която от 15 години е клиент на „A1 България“. Досега двете дружества не са имали никакви юридически или други спорове.

Тази година ръководството на „Новарто“ решава да смени мобилния оператор, вместо да поднови договора си с А1. Фирмата подготвя заявлението за пренос на номерата, но изчаква да наближи крайният срок на договора, който изтича на 4 юни. Междувременно от „Новарто“ споделят с обслужващия търговец на А1, че разглеждат и други оферти.

На 22 май в 16:09 ч. управителят на „Новарто“ Борислав Минков получава имейл от Димитър С. Димитров, мениджър „Големи клиенти“ в „A1 България“. Той го уведомява, че считано от същия ден, договорът за мобилните услуги се прекратява едностранно от телекома на основание Раздел 9 от Общите условия на „А1 България“. Петдесет и девет минути по-късно, в 17:08 ч., всички SIM карти от фирмената група на „Новарто“ се превръщат в непотребни парченца пластмаса. А служителите заедно с мениджърите на компанията остават недостъпни по телефона за колегите, клиентите и бизнес партньорите си, както и за семействата и приятелите си.

Цитираният Раздел 9 от Общите условия на „А1 България“, разписан в над две страници, обхваща всички различни хипотези, при които договорът за мобилни услуги може да бъде прекратен от клиента или от оператора. Иначе казано, в позоваването на целия раздел няма полезна конкретика, която да изясни

защо едностранно и с едночасово предизвестие се прекратява договор, който фактически не е изтекъл.

При това развитие „Новарто“ изисква от новия си мобилен оператор да задейства веднага подготвеното заявление за пренос на номерата. За съжаление, това се оказва закъснял ход – наближава краят на работното време, а на следващия ден A1 отказва преноса, обосновавайки се с прекратения договор заради нарушени Общи условия.

Обичайната процедура за пренос на номера от един телеком към друг изисква клиентът да заяви това при новия си оператор, който служебно препраща заявката към стария. Той от своя страна следва да уведоми клиента си, че номерът или номерата му са заявени за пренос (прави се, за да се избегнат евентуални опити за злоупотреба) и че може да дължи някакви неустойки (за предсрочно прекратяване на договора, за невърнати устройства и др.). Обикновено преносът се осъществява в рамките на няколко дни.

В конкретния случай старият оператор („A1 България“) предсрочно прекратява договора, изпреварвайки заявлението за пренос.

Така, когато такова заявление постъпи, той вече може да твърди, че клиентът няма активен договор, и на това основание да откаже преноса. Негативният ефект е двоен – клиентът остава без комуникации за неопределен период, а същевременно не може да премести номерата си към друг оператор.

Представете си, че сте търговска фирма, която приема поръчки по телефона, и в един момент никой не може да се свърже с вас. А дори да вземете нови телефонни номера, имате стотици клиенти, които трябва да уведомите за това. Или както споделя Борислав Минков, телефонът или имейлът само на пръв поглед са някаква поредица от букви и цифри, а в действителност са жива връзка с бизнес партньорите ти. Когато някой ти отнеме тази връзка, той не просто възпрепятства бизнеса ти, а ограничава човешкото ти общуване – защото зад всеки телефонен номер всъщност стои човек.

Юридически доказването на вреди и пропуснати ползи е трудно упражнение, но Минков добавя и втори план за размисъл, защото, случайно или не,

както „A1 България“, така и „Новарто“ са партньори на немския софтуерен гигант SAP – и в този смисъл се явяват конкуренти.

Факт, за който Минков се надява, че ще заинтересува Комисията за защита на конкуренцията.

Жалба от страна на „Новарто“ е подадена също в Комисията за регулиране на съобщенията, изпратено е и писмо до оглавяващия отдела за вътрешен одит в Telekom Austria Group – компанията майка на „A1 България“.

От името на „Тоест“ се обърнах към г-жа Илияна Захариева, директор „Корпоративни комуникации“, със следните въпроси:

  1. Каква е причината за едностранното предсрочно прекратяване на услугите по упоменатия договор с „Новарто“ ООД?
  2. Счита ли „А1 България“ за добра търговска практика едностранното предсрочно прекратяване на услуги по действащ договор, без детайлно и аргументирано посочване на причина за това?
  3. Как ще коментирате страничния ефект на това едностранно предсрочно прекратяване, който води до невъзможност клиентът Ви да ползва услугите от Вас, нито да може да пренесе номерата си при друг мобилен оператор?

Г-жа Захариева не отговори на въпросите ми, но потвърди, че от „A1 България“ са запознати със случая, който тя определи като частен казус, и обясни, че поради тази причина не може да коментира детайли, без да сподели данни за сметките, задълженията и транзакциите на „Новарто“. Тя повтори, че договорът е прекратен едностранно, на основание нарушаване на Общите условия – отново без друга конкретика.

Официалната позиция по случая от страна на „A1 България“, получена над месец след жалбата на „Новарто“, повтаря за пореден път всичко известно дотук. Добавен е обаче един детайл. Операторът претендира, че компанията „Новарто“ поне три пъти е просрочила плащания на дължими фактури.

От А1 с любов

Борислав Минков не отрича, че е открил няколко фактури, на които „Новарто“ е просрочила плащанията, но е категоричен, че са били неволни забавяния с не повече от два-три дни, а не системно поведение. И това е за целия период от 15 години, през които двете компании са имали търговски взаимоотношения. Минков задава и следния очевиден въпрос:

Ако това е било системно нарушение от наша страна, защо A1 никога не са реагирали? Защо досега не са прекратили отношенията си с нас, а го правят едва когато научиха, че ще ги сменим?

Междувременно в конферентен разговор с въпросния мениджър „Големи клиенти“ Димитър С. Димитров и с регионалния мениджър Иван С. Иванов, проведен в първите дни след прекратяването на договора, Минков получава предложение „да преподпише с A1 и да забравят за случилото се“. Или „да компенсира A1 с друг двугодишен договор, който да им възстанови загубения оборот“. Той отказва.

В крайна сметка „Новарто“ подписва нов договор с друг оператор, прежалвайки старите си номера. Това, естествено, води до сътресения в бизнеса и комуникациите, докато всички контрагенти научат новите телефонни номера на служителите, които работят с тях. Процесът отнема време и не е лесен.

На 7 юли „Новарто“ получава отговор и на жалбата си до Комисията за регулиране на съобщенията, която заявява, че „A1 България“ е отказала преноса на номерата в съответствие с регулаторните изисквания (чл. 36, ал. 1, т. 1 от Функционалните спецификации), тъй като преди подаване на заявлението за преносимост номерата са били деактивирани, тоест несъществуващи.

От А1 с любов

КРС подчертава и че „няма правомощия да се намесва в разрешаване на договорни и имуществени спорове“, а в конкретния случай – „да се произнесе дали договорът е прекратен законосъобразно от A1, или не“.

От А1 с любов

Дали от „A1 България“ не разчитат именно на това?

Те формално изпълняват регулаторните изисквания, но си позволяват търговски практики, граничещи с изнудване, защото разчитат, че клиентите им ще се огънат, осъзнавайки колко трудно ще е да защитят правата си, освен по съдебен път. Въпреки че това е скъп и бавен процес, Борислав Минков е категоричен, че ще съди „A1 България“. И не е сам в това си намерение.

И още от същото

Месец след случая с „Новарто“ разговарям с Николай Александриев, управител на транспортната компания „Никми Транс“, и историята, която той споделя, е сякаш копирана под индиго. По думите му, неговата фирма е клиент на „A1 България“ от поне 15 години и никога през това време не са имали нагласата да сменят своя мобилен оператор. Александриев твърди, че месечните им сметки към A1 са били между 2500 и 3500 лв., което включва услуги за мобилна телефония, интернет, телевизия и GPS контрол на превозните им средства.

С годините обаче договорът им с А1 започва да изглежда все по-неизгоден, особено в сравнение с предложенията на други телекоми. „И въпреки това – споделя с мен Николай Александриев – аз им казах, че не искам да сменям оператора, а искам да ми предложат това, което бих получил другаде.“ Обещават му го, но връщат проектодоговор, в който това не личи. „Дадох го на мои служители да го прочетат, да не би аз нещо да пропускам“, отбелязва Александриев с неприкрита ирония.

Обажда им се, че предложението не е каквото е очаквал, провеждат среща в офиса му на 26 юни, около 16 ч., и получава уверения от своя акаунт мениджър, че ще говорят отново на следващия ден. На 27 юни обаче, в 9:02 ч., Александриев получава SMS, че всички договори и услуги се прекратяват едностранно от „А1 България“.

Камионите ми са по Европа и останах без комуникация с шофьорите. Добре че повечето имаха и лични телефони. Обадих се от друг телефон на акаунт мениджъра ни Стоян, който ми обясни, че причината за прекратяването е, защото не сме подписали договора. Майка ми, която е служителка във фирмата, също го намира по Viber и той ѝ казва същото: „Подпишете си договора и веднага ще ви бъдат пуснати услугите.“

„Договорът ви беше ли вече изтекъл?“, питам г-н Александриев. „Да, беше изтекъл, но имам клауза, според която той се превръща в безсрочен, а не се прекратява.“ Питам го и дали има официално становище все пак на какво основание операторът прави това. „Поради неплатени фактури – отговаря той, – но срокът ми за плащане е до 29 юни, а това се случва на 27-ми.“

Разговорът ни приключва с категорична декларация от негова страна, че ще води дело срещу „А1 България“.

Докато разнищвах двата случая, се запознах и с друг човек, вече пенсионер, оттеглил се от бизнеса, но преди две-три години преминал през много подобна ситуация. Неговият разказ потвърждава, че

тези практики на „А1 България“ не са нови.

Разговарях с Кирил Паскалев по телефона, а случаят е свързан с фирмата, която е представлявал – „Майнинг Конструкшън Къмпани“. Един ден услугите, които „A1 България“ предоставя на компанията, са спрени, а на Паскалев му е обяснено, че ще бъдат подновени само ако преподпише нов договор с нови условия. Те са по-неизгодни от тези, на които фирмата му е била досега. Паскалев подписва договора, за да спаси номерата си, и веднага след като услугите са възстановени, подава искане за пренос към друг оператор, след което плаща и неустойка на „A1 България“ за прекратения толкова скоро нов договор. Откупил се скъпо, но за фирмата било много важно да запази номерата, с които е известна на клиентите си.

Задънена улица

Успях да стигна до тези няколко случая без особени усилия. Имам и премълчани истории, които потърпевшите не желаят да споделят публично, защото все още са в някакви взаимоотношения с A1 и не искат допълнителни проблеми. Вероятно и други като тях са преглътнали и премълчали, защото се оказва, че един телеком е в състояние да спре комуникациите, а така – и бизнеса на свои клиенти, позовавайки се на изсмукани от пръстите причини. С едничката цел да запази месечните си обороти. И може да превърне тази лоша търговска практика в модел.

Потърпевшите компании не могат да разчитат на Комисията за защита на потребителите, защото договорите им с други контрагенти са търговски взаимоотношения. Комисията за регулиране на съобщенията се ограничава до контрола върху техническите и функционалните спецификации. А за да се сезира Комисията за защита на конкуренцията, е нужна специална ситуация, свързана с директен конкурент.

Така за фирмите остава да разчитат единствено на съда, където процедурата е бавна, развръзката ще отнеме месеци или години, а те през това време трябва да работят, тоест да разполагат със средства за комуникация с клиентите си и служителите си. Не могат и да претендират за хипотетични нанесени вреди, макар те да са очевидни – всички юристи, с които „Тоест“ се консултира, потвърдиха, че трудно се признават пропуснати ползи, защото съдът изисква реални измерими доказателства.

Всичко това е известно на телекомите.

Остава единствено моралният компас дали да се възползват от това „пазарно предимство“.

Цитираните в материала казуси са свързани с A1, защото първият случай ме провокира да потърся и други, но това съвсем не означава, че същите похвати не може да се използват и от други телекоми. Източник на „Тоест“, обвързан с A1, но пожелал анонимност, твърди, че тези и подобни практики са привнесени от друг оператор заедно с хора от висшия мениджмънт, които са преминали от единия отбор в другия.

„Съгласно действащата регулация – пише Слав Димов, мениджър „Жалби“ в A1 – в случая не е допустимо деактивираните номера да се пренесат към друг доставчик.“ Това е повече от признание, че в действащата регулация е намерена много удобна вратичка: едностранно, с един имейл или SMS, в рамките на час или дори незабавно прекратяваш договора с клиента (правомерно или не – после ще спорим в съда, ако изобщо стигнем дотам); той не може да си пренесе номерата към друг оператор, защото са деактивирани, тоест несъществуващи; така поставяш клиента пред дилемата да загуби номерата си, а оттам – и връзката с клиентите си, или да преподпише с теб при каквито условия определиш.

Наложително е тази вратичка спешно да бъде затворена. Ако ни пука за бизнеса на всички ни.

How Cloudflare is staying ahead of the AMD Zen vulnerability known as “Zenbleed”

Post Syndicated from Derek Chamorro original http://blog.cloudflare.com/zenbleed-vulnerability/

How Cloudflare is staying ahead of the AMD Zen vulnerability known as “Zenbleed”

How Cloudflare is staying ahead of the AMD Zen vulnerability known as “Zenbleed”

Google Project Zero revealed a new flaw in AMD's Zen 2 processors in a blog post today. The 'Zenbleed' flaw affects the entire Zen 2 product stack, from AMD's EPYC data center processors to the Ryzen 3000 CPUs, and can be exploited to steal sensitive data stored in the CPU, including encryption keys and login credentials. The attack can even be carried out remotely through JavaScript on a website, meaning that the attacker need not have physical access to the computer or server.

Cloudflare’s network includes servers using AMD’s Zen line of CPUs. We have patched our entire fleet of potentially impacted servers with AMD’s microcode to mitigate this potential vulnerability. While our network is now protected from this vulnerability, we will continue to monitor for any signs of attempted exploitation of the vulnerability and will report on any attempts we discover in the wild. To better understand the Zenbleed vulnerability, read on.

Background

Understanding how a CPU executes programs is crucial to comprehending the attack's workings. The CPU works with an arithmetic processing unit called the ALU. The ALU is used to perform mathematical tasks. Operations like addition, multiplication, and floating-point calculations fall under this category. The CPU's clock signal controls the application-specific digital circuitry that the ALU uses to carry out these functions.

For data to reach  the ALU, it has to pass through a series of storage systems. These include secondary memory, primary memory, cache memory, and CPU registers. Since the registers of the CPU are the target of this attack, we will go into a little more depth. Depending on the design of the computer, the CPU registers can store either 32 or 64 bits of information. The ALU can access the data in these registers and complete the operation.

As the demands on CPUs have increased, there has been a need for faster ways to perform calculations. Advanced Vector Extensions (or AVX) were developed to speed up the processing of large data sets by applications. AVX are extensions to the x86 instruction set architecture, which are relevant to x86-based CPUs from Intel and AMD. With the help of compatible software and the extra instruction set, compatible processors could handle more complex tasks. The primary motivation for developing this instruction set was to speed up operations associated with data compression, image processing, and cryptographic computations.

The vector data used by AVX instructions is stored in 16 YMM registers, each of which is 256 bits in size. The Y-register in the XMM register set is where the 128-bit values are stored, hence the name. Instructions from the arithmetic, logic, and trigonometry families of the AVX standard all make use of the YMM registers. They can also be used to keep masks, data that is used to filter out certain vector components.

Vectorized operations can be executed with great efficiency using the YMM registers. Applications that process large amounts of data stand to gain significantly from them, but they are increasingly the focus of malicious activity.

The attack

Speculative execution attacks have previously been used to compromise CPU registers. These are an attack variant that takes advantage of the speculative execution capabilities of modern CPUs. Computer processors use a method called speculative execution to speed up processing times. A CPU will execute an instruction speculatively if it has no way of knowing whether or not it will be executed. If it turns out that the CPU was unable to carry out the instruction, it will simply discard the data.

Because of their potential use for storing private information, AVX registers are especially susceptible to these kinds of attacks. Cryptographic keys and passwords, for instance, could be accessed by an attacker via a speculative execution attack on the AVX registers.

As mentioned above, Project Zero discovered a vulnerability in AMD's Zen 2-architecture-based CPUs, wherein data from another process and/or thread could be stored in the YMM registers, a 256-bit series of extended registers, potentially allowing an attacker access to sensitive information. This vulnerability is caused by a register not being written to 0 correctly under specific microarchitectural circumstances. Although this error is associated with speculative execution, it is not a side channel vulnerability.

This attack works by manipulating register files to force a mispredicted command. First, there is a trigger to XMM Register Merge Optimization2, which ironically is a hardware mitigation that can be used to protect against speculative execution attacks, followed by a register remapping (a technique used in computer processor design to resolve name conflicts between physical registers and logical registers) and then a mispredicted instruction call to vzeroupper, an instruction that is used to zero the upper half of the YMM and ZMM registers.

Since the register file is shared by all the processes running on the same physical core, this exploit can be used to eavesdrop on even the most fundamental system operations by monitoring the data being transferred between the CPU and the rest of the computer.

Fixing the bleed

Because of the exact timing for this to successfully execute, this vulnerability, CVE-2023-20593, is classified with a CVSS score of 6.5 (Medium). AMD's mitigation is implemented via the MSR register, which turns off a floating point optimization that otherwise would have allowed a move operation.

The following microcode updates have applied to our entire server fleet that contain potentially affected AMD Zen processors. We have seen no evidence of the bug being exploited and were able to patch our entire network within hours of the vulnerability’s disclosure. We will continue to monitor traffic across our network for any attempts to exploit the bug and report on our findings.

AWS Week in Review – Redshift+Forecast, CodeCatalyst+GitHub, Lex Analytics, Llama 2, and Much More – July 24, 2023

Post Syndicated from Jeff Barr original https://aws.amazon.com/blogs/aws/aws-week-in-review-redshiftforecast-codecatalystgithub-lex-analytics-llama-2-and-much-more-july-24-2023/

Summer is in full swing here in Seattle and we are spending more time outside and less at the keyboard. Nevertheless, the launch machine is running at full speed and I have plenty to share with you today. Let’s dive in and take a look!

Last Week’s Launches
Here are some launches that caught my eye:

Amazon Redshift – Amazon Redshift ML can now make use of an integrated connection to Amazon Forecast. You can now use SQL statements of the form CREATE MODEL to create and train forecasting models from your time series data stored in Redshift, and then use these models to make forecasts for revenue, inventory, demand, and so forth. You can also define probability metrics and use them to generate forecasts. To learn more, read the What’s New and the Developer’s Guide.

Amazon CodeCatalyst – You can now trigger Amazon CodeCatalyst workflows from pull request events in linked GitHub repositories. The workflows can perform build, test, and deployment operations, and can be triggered when the pull requests in the linked repositories are opened, revised, or closed. To learn more, read Using GitHub Repositories with CodeCatalyst.

Amazon Lex – You can now use the Analytics on Amazon Lex dashboard to review data-driven insights that will help you to improve the performance of your Lex bots. You get a snapshot of your key metrics, and the ability to drill down for more. You can use conversational flow visualizations to see how users navigate across intents, and you can review individual conversations to make qualitative assessments. To learn more, read the What’s New and the Analytics Overview.

Llama2 Foundation Models – The brand-new Llama 2 foundation models from Meta are now available in Amazon SageMaker JumpStart. The Llama 2 model is available in three parameter sizes (7B, 13B, and 70B) with pretrained and fine-tuned variations. You can deploy and use the models with a few clicks in Amazon SageMaker Studio, and you can also use the SageMaker Python SDK (code and docs) to access them programmatically. To learn more, read Llama 2 Foundation Models from Meta are Now Available in Amazon SageMaker JumpStart and the What’s New.

X in Y – We launched some existing services and instances types in additional AWS Regions:

For a full list of AWS announcements, be sure to keep an eye on the What’s New at AWS page.

Other AWS News
Here are some additional blog posts and news items that you might find interesting:

AWS Open Source News and Updates – My colleague Ricardo has published issue 166 of his legendary and highly informative AWS Open Source Newsletter!

CodeWhisperer in Action – My colleague Danilo wrote an interesting post to show you how to Reimagine Software Development With CodeWhisperer as Your AI Coding Companion.

News Blog Survey – If you have read this far, please consider taking the AWS Blog Customer Survey. Your responses will help us to gauge your satisfaction with this blog, and will help us to do a better job in the future. This survey is hosted by an external company, so the link does not lead to our web site. AWS handles your information as described in the AWS Privacy Notice.

CDK Integration Tests – The AWS Application Management Blog wrote a post to show you How to Write and Execute Integration Tests for AWS CDK Applications.

Event-Driven Architectures – The AWS Architecture Blog shared some Best Practices for Implementing Event-Driven Architectures in Your Organization.

Amazon Connect – The AWS Contact Center Blog explained how to Manage Prompts Programmatically with Amazon Connect.

Rodents – The AWS Machine Learning Blog showed you how to Analyze Rodent Infestation Using Amazon SageMaker Geospatial Capabilities.

Secrets Migration – The AWS Security Blog published a two-part series that discusses migrating your secrets to AWS Secrets Manager (Part 1: Discovery and Design, Part 2: Implementation).

Upcoming AWS Events
Check your calendar and sign up for these AWS events:

AWS Storage Day – Join us virtually on August 9th to learn about how to prepare for AI/ML, deliver holistic data protection, and optimize storage costs for your on-premises and cloud data. Register now.

AWS Global Summits – Attend the upcoming AWS Summits in New York (July 26), Taiwan (August 2 & 3), São Paulo (August 3), and Mexico City (August 30).

AWS Community Days – Attend upcoming AWS Community Days in The Philippines (July 29-30), Colombia (August 12), and West Africa (August 19).

re:InventRegister now for re:Invent 2023 in Las Vegas (November 27 to December 1).

That’s a Wrap
And that’s about it for this week. I’ll be sharing additional news this coming Friday on AWS on Air – tune in and say hello!

Jeff;

Zenbleed: an AMD Zen 2 speculative vulnerability

Post Syndicated from original https://lwn.net/Articles/939099/

Tavis Ormandy reports
on a vulnerability that he has found in “all Zen 2 class processors
from AMD. (Wayback Machine link as the original site is overloaded.) It can
allow local attackers to recover data used in string
operations; “If you remove the first word from the string ‘hello world’,
what should the result be? This is the story of how we discovered that the
answer could be your root password!
” The report has lots of details,
including an exploit; AMD has released a microcode
update
to address the problem.

We now know that basic operations like strlen, memcpy and strcmp will use
the vector registers – so we can effectively spy on those operations
happening anywhere on the system! It doesn’t matter if they’re happening in
other virtual machines, sandboxes, containers, processes, whatever!

This works because the register file is shared by everything on the same
physical core. In fact, two hyperthreads even share the same physical
register file.

[$] Randomness for kmalloc()

Post Syndicated from original https://lwn.net/Articles/938637/

The kernel’s address-space layout randomization is intended to make life
harder for attackers by changing the placement of kernel text and data at
each boot. With this randomization, an attacker cannot know ahead of time
where a vulnerable target will be found on any given system. There are
techniques, though, that can be effective without knowing precisely where a
given object is stored. As a way of hardening systems against such
attacks, the kernel will be gaining yet another form of randomization.

Debian adds RISC-V as an official architecture

Post Syndicated from original https://lwn.net/Articles/939095/

The Debian project is now
supporting 64-bit RISC-V systems
as an official architecture. Some
work remains to be done, though:

However before you rush to update your sources.list file, I want to
warn you that the archive is currently almost empty, and that only
the sid and experimental suites are available. The procedure is to
rebootstrap the port within the official archive, which means we
won’t import the full debian-ports archive.

The collective thoughts of the interwebz