Нервната и имунната система са еднакво значими за оцеляването на организма. Традиционно се е смятало, че са независими една от друга, а взаимодействията помежду им са свързани главно с проявата на мозъчни заболявания. Пример е множествената склероза, при която имунната система атакува мозъчната тъкан. Въпреки това увеличаващите се научни доказателства и дори нашите собствени преживявания подсказват, че между тези две системи има активен диалог.
Напредъкът в молекулярната биология значително обогатява знанията ни за човешката физиология. Молекулярната биология е в центъра на прогресивното развитие на генетиката и омикстехнологиите (анализ на ДНК, РНК, белтъци и метаболити). Преди няколко десетилетия изследването на експресията и функциите на дадена молекула в различни физиологични системи (освен в тази, в която е установена) е било рядкост. В днешно време сигналните пътища в клетките често се изследват при различни физиологични системи с използването на едни и същи лабораторни техники. Размиването на границите между дисциплините е основният резултат от този научен подход. Въпреки това той е сравнително нов. Доказателство и пример е развитието на научните изследвания при невроимунитета.
Изследването на невронно-имунните взаимодействия започва с психосоматичния подход: психологическите фактори и емоциите влияят на проявата и развитието на болестни състояния като алергии, язва на стомаха, рак, автоимунни заболявания, инфекции. Вторият подход е „биоповеденчески“: експериментални стресови фактори влияят на имунната система. При този подход се смята, че имунната система може да бъде модулирана и от условни стимули. Третият подход е основан на междуклетъчната комуникация: клетките на имунната система експресират невротрансмитерни рецептори и хипофизни пептиди. Той е последван от невроанатомичния подход: инервирането на далака и другите лимфоидни органи се осъществява посредством автономна нервна система. Последният подход разглежда ефектите на имунните фактори върху невроендокринната система.
Поведението и имунната система
Изследванията на физиологичните стресови фактори при човека, водещи до предразположеност към тежки инфекции – бактериални, алергични, автоимунни и ракови заболявания – или до трудно възстановяване след тях, включват промени в механизмите на имунологичната защита. Смъртта на близък човек от семейството например е смятана за силен стресов момент в живота, който се свързва с депресия и повишен риск от заболеваемост и смъртност.
Голяма част от тези заболявания са с имунологичен характер. Промените във функциите на имунната система се дължат, от една страна, на връзката между психологическите фактори и от друга – на промяна в податливостта на развитие на дадено заболяване или влошаването му. Промяната в имунната реактивност – например пониженото ниво на лимфопролиферативния отговор към стимулиране с митогени (малки протеини или пептиди, които предизвикват клетъчно делене) или нарушената активност на клетките „натурални убийци“ (NK клетки) – е установена при хора, преминали през тежка загуба на близък. Други изследвания сочат, че понижаването на имунитета е свързано също с раздяла или развод.
Въпреки че гореспоменатите житейски събития, логично, са стресиращи, промяна във функциите на имунната система може да настъпи и при хора, преминаващи през по-леки стресови ситуации, които обикновено са неизбежна част от живота. Например промени в имунитета са установени при студенти по медицина, на които им предстоят изпити, и при футболисти преди важен мач. Нивото на безпокойство по време на сесия при студентите е значително по-високо в сравнение с другите периоди от учебната година.
Установено е, че при студентите по медицина, които са в сесия, нивото на активността на NK клетките и процентът на хелперните Т-лимфоцити намаляват. При студенти, серопозитивни за Епщайн-Бар вирус (EBV), e повишен титърът на анти-EBV антителата, което означава, че вирусът се размножава в по-големи количества. Това се обяснява с понижен клетъчен отговор на латентния вирус по време на изпитните периоди. На участвалите в изследването студенти са направени и личностни тестове, чрез които е изяснено, че други събития в личния им живот не са имали подобно влияние.
Ролята на имунната система при развитието на централната нервна система и стареенето на организма
Въпреки че знанията за влиянието на имунитета върху невронната активност са се увеличили значително през последното десетилетие, разбирането на учените за обратния процес – как мозъкът влияе върху периферната имунна активност – е много по-ограничено.
Част от молекулите, които играят роля и при нервната, и при имунната система, са ключови за мониторинга и отговора на промените във вътрешната и външната среда. HLA гените от клас I са основни участници в представянето на антигени. Тяхната експресия е установена в невроните, в областта на аксоните, дендритите и синапсите и в глиалните клетки, особено в началните постнатални стадии на развитието. Накратко, те участват в усъвършенстването на пластичността на зрителната система и двигателното обучение в малкия мозък.
Все още предстои да се изясни дали HLA молекулите от клас I имат специфични функции и дали голямото им разнообразие (полиморфизъм) е свързано с развитието на централната нервна система (ЦНС) и когнитивните функции при определени заболявания, като аутизъм и шизофрения. Друг неизяснен въпрос е дали HLA молекулите от клас I наистина представят антигени в ЦНС и ако е така, какъв тип антигени са представени и дали са съществени за образуването на специфични невронни мрежи.
Стареенето е свързано с промени от имунен характер, които водят до клинични прояви. Например когато един човек остарява, се увеличава податливостта на определени инфекции и активността на много ваксини се понижава. Тези клинични характеристики на стареенето са придружени от общо понижаване на защитните имунни отговори, известни като „имунно стареене“. Стареенето е свързано и с ниска степен на постоянно възпаление, което съществува без явна инфекция. Имунното стареене и описаното възпаление са взаимнозависими процеси и настъпват с напредване на възрастта поради редица фактори, включително латентни инфекции, метаболитни промени и др.
Роля на невроимунологията при алцхаймер
Болестта на Алцхаймер е често срещано невродегенеративно заболяване, като най-големият рисков фактор за проявата му е стареенето. Невродегенеративните маркери включват два патологични белтъка, които се натрупват в мозъка: амилоид бета и тау. Смята се, че освен тях има и други маркери, които могат да регулират развитието на заболяването и проявата на клиничните симптоми. Един от тях е аполпопротеин Е (ApoE). Той има имуномодулаторна активност. Смята се, че изоформата ApoE4 има роля при развитието на заболяването, като лимитира пречистването на бета-амилоидните плаки от мозъка.
Перспективи и бъдещи насоки
В продължение на няколко десетилетия нервната и имунната система са изследвани независимо една от друга, но сега се знае, че те комуникират и че тази комуникация служи за физиологичното адаптиране и в здраво състояние, и при развитие на дадено заболяване. Въпреки това все още има сериозни празнини в изясняването на сложната комуникация. Голяма част от техниките, необходими за разплитането на тези въпроси (например РНК секвениране), и анализът на огромните бази данни започват да стават по-достъпни. Така учените имат уникална възможност да изяснят какъв е терапевтичният капацитет на мозъка.
Version
3.0 of Cython (described
as “a programming language that makes writing C
extensions for the Python language as easy as Python itself“) has been
released. Changes include support for Python through 3.11 (but 2.6 support
was dropped), the implementation of a number of PEPs, initial support for
the CPython limited API, better exception handling, and more.
The 2023 sambaXP conference was held May 10 and 11 in Goettingen, Germany. Videos
of the talks held there have now been posted on YouTube; topics covered
include an io_uring update, fuzzing, passwordless services, GPL compliance,
and much more.
Customers use Amazon Managed Workflows for Apache Airflow (Amazon MWAA) to run Apache Airflow at scale in the cloud. They want to use their existing login solutions developed using OpenID Connect (OIDC) providers with Amazon MWAA; this allows them to provide a uniform authentication and single sign-on (SSO) experience using their adopted identity providers (IdP) across AWS services. For ease of use for end-users of Amazon MWAA, organizations configure a custom domain endpoint to their Apache Airflow UI endpoint. For teams operating and managing multiple Amazon MWAA environments, securing and customizing each environment is a repetitive but necessary task. Automation through infrastructure as code (IaC) can alleviate this heavy lifting to achieve consistency at scale.
This post describes how you can integrate your organization’s existing OIDC-based IdPs with Amazon MWAA to grant secure access to your existing Amazon MWAA environments. Furthermore, you can use the solution to provision new Amazon MWAA environments with the built-in OIDC-based IdP integrations. This approach allows you to securely provide access to your new or existing Amazon MWAA environments without requiring AWS credentials for end-users.
Overview of Amazon MWAA environments
Managing multiple user names and passwords can be difficult—this is where SSO authentication and authorization comes in. OIDC is a widely used standard for SSO, and it’s possible to use OIDC SSO authentication and authorization to access Apache Airflow UI across multiple Amazon MWAA environments.
When you provision an Amazon MWAA environment, you can choose public or private Apache Airflow UI access mode. Private access mode is typically used by customers that require restricting access from only within their virtual private cloud (VPC). When you use public access mode, the access to the Apache Airflow UI is available from the internet, in the same way as an AWS Management Console page. Internet access is needed when access is required outside of a corporate network.
Regardless of the access mode, authorization to the Apache Airflow UI in Amazon MWAA is integrated with AWS Identity and Access Management (IAM). All requests made to the Apache Airflow UI need to have valid AWS session credentials with an assumed IAM role that has permissions to access the corresponding Apache Airflow environment. For more details on the permissions policies needed to access the Apache Airflow UI, refer to Apache Airflow UI access policy: AmazonMWAAWebServerAccess.
Different user personas such as developers, data scientists, system operators, or architects in your organization may need access to the Apache Airflow UI. In some organizations, not all employees have access to the AWS console. It’s fairly common that employees who don’t have AWS credentials may also need access to the Apache Airflow UI that Amazon MWAA exposes.
In addition, many organizations have multiple Amazon MWAA environments. It’s common to have an Amazon MWAA environment setup per application or team. Each of these Amazon MWAA environments can be run in different deployment environments like development, staging, and production. For large organizations, you can easily envision a scenario where there is a need to manage multiple Amazon MWAA environments. Organizations need to provide secure access to all of their Amazon MWAA environments using their existing OIDC provider.
Solution Overview
The solution architecture integrates an existing OIDC provider to provide authentication for accessing the Amazon MWAA Apache Airflow UI. This allows users to log in to the Apache Airflow UI using their OIDC credentials. From a system perspective, this means that Amazon MWAA can integrate with an existing OIDC provider rather than having to create and manage an isolated user authentication and authorization through IAM internally.
The solution architecture relies on an Application Load Balancer (ALB) setup with a fully qualified domain name (FQDN) with public (internet) or private access. This ALB provides SSO access to multiple Amazon MWAA environments. The user-agent (web browser) call flow for accessing an Apache Airflow UI console to the target Amazon MWAA environment includes the following steps:
The user-agent resolves the ALB domain name from the Domain Name System (DNS) resolver.
The user-agent sends a login request to the ALB path /aws_mwaa/aws-console-sso with a set of query parameters populated. The request uses the required parameters mwaa_env and rbac_role as placeholders for the target Amazon MWAA environment and the Apache Airflow role-based access control (RBAC) role, respectively.
Once it receives the request, the ALB redirects the user-agent to the OIDC IdP authentication endpoint. The user-agent authenticates with the OIDC IdP with the existing user name and password.
If user authentication is successful, the OIDC IdP redirects the user-agent back to the configured ALB with a redirect_url with the authorization code included in the URL.
The ALB uses the authorization code received to obtain the access_token and OpenID JWT token with openid email scope from the OIDC IdP. It then forwards the login request to the Amazon MWAA authenticator AWS Lambda function with the JWT token included in the request header in the x-amzn-oidc-data parameter.
The Lambda function verifies the JWT token found in the request header using ALB public keys. The function subsequently authorizes the authenticated user for the requested mwaa_env and rbac_role stored in an Amazon DynamoDB table. The use of DynamoDB for authorization here is optional; the Lambda code function is_allowed can be customized to use other authorization mechanisms.
The Amazon MWAA authenticator Lambda function redirects the user-agent to the Apache Airflow UI console in the requested Amazon MWAA environment with the login token in the redirect URL. Additionally, the function provides the logout functionality.
Amazon MWAA public network access mode
For the Amazon MWAA environments configured with public access mode, the user agent uses public routing over the internet to connect to the ALB hosted in a public subnet.
The following diagram illustrates the solution architecture with a numbered call flow sequence for internet network reachability.
Amazon MWAA private network access mode
For Amazon MWAA environments configured with private access mode, the user agent uses private routing over a dedicated AWS Direct Connect or AWS Client VPN to connect to the ALB hosted in a private subnet.
The following diagram shows the solution architecture for Client VPN network reachability.
Automation through infrastructure as code
To make setting up this solution easier, we have released a pre-built solution that automates the tasks involved. The solution has been built using the AWS Cloud Development Kit (AWS CDK) using the Python programming language. The solution is available in our GitHub repository and helps you achieve the following:
Set up a secure ALB to provide OIDC-based SSO to your existing Amazon MWAA environment with default Apache Airflow Admin role-based access.
Create new Amazon MWAA environments along with an ALB and an authenticator Lambda function that provides OIDC-based SSO support. With the customization provided, you can define the number of Amazon MWAA environments to create. Additionally, you can customize the type of Amazon MWAA environments created, including defining the hosting VPC configuration, environment name, Apache Airflow UI access mode, environment class, auto scaling, and logging configurations.
The solution offers a number of customization options, which can be specified in the cdk.context.json file. Follow the setup instructions to complete the integration to your existing Amazon MWAA environments or create new Amazon MWAA environments with SSO enabled. The setup process creates an ALB with an HTTPS listener that provides the user access endpoint. You have the option to define the type of ALB that you need. You can define whether your ALB will be public facing (internet accessible) or private facing (only accessible within the VPC). It is recommended to use a private ALB with your new or existing Amazon MWAA environments configured using private UI access mode.
The following sections describe the specific implementation steps and customization options for each use case.
Prerequisites
Before you continue with the installation steps, make sure you have completed all prerequisites and run the setup-venv script as outlined within the README.md file of the GitHub repository.
Integrate to a single existing Amazon MWAA environment
If you’re integrating with a single existing Amazon MWAA environment, follow the guides in the Quick start section. You must specify the same ALB VPC as that of your existing Amazon MWAA VPC. You can specify the default Apache Airflow RBAC role that all users will assume. The ALB with an HTTPS listener is configured within your existing Amazon MWAA VPC.
Integrate to multiple existing Amazon MWAA environments
To connect to multiple existing Amazon MWAA environments, specify only the Amazon MWAA environment name in the JSON file. The setup process will create a new VPC with subnets hosting the ALB and the listener. You must define the CIDR range for this ALB VPC such that it doesn’t overlap with the VPC CIDR range of your existing Amazon MWAA VPCs.
For integrating with Amazon MWAA environments configured using private access mode, there are additional steps that need to be configured. These include configuring VPC peering and subnet routes between the new ALB VPC and the existing Amazon MWAA VPC. Additionally, you need to configure network connectivity from your user-agent to the private ALB endpoint resolved by your DNS domain.
Create new Amazon MWAA environments
You can configure the new Amazon MWAA environments you want to provision through this solution. The cdk.context.json file defines a dictionary entry in the MwaaEnvironments array. Configure the details that you need for each of the Amazon MWAA environments. The setup process creates an ALB VPC, ALB with an HTTPS listener, Lambda authorizer function, DynamoDB table, and respective Amazon MWAA VPCs and Amazon MWAA environments in them. Furthermore, it creates the VPC peering connection between the ALB VPC and the Amazon MWAA VPC.
If you want to create Amazon MWAA environments with private access mode, the ALB VPC CIDR range specified must not overlap with the Amazon MWAA VPC CIDR range. This is required for the automatic peering connection to succeed. It can take between 20–30 minutes for each Amazon MWAA environment to finish creating.
When the environment creation processes are complete, run the post-deployment configuration steps. One of the steps here is to add authorization records to the created DynamoDB table for your users. You need to define the Apache Airflow rbac_role for each of your end-users, which the Lambda authorizer function matches to provide the requisite access.
Verify access
Once you’ve completed with the post-deployment steps, you can log in to the URL using your ALB FQDN. For example, If your ALB FQDN is alb-sso-mwaa.example.com, you can log in to your target Amazon MWAA environment, named Env1, assuming a specific Apache Airflow RBAC role (such as Admin), using the following URL: https://alb-sso-mwaa.example.com/aws_mwaa/aws-console-sso?mwaa_env=Env1&rbac_role=Admin. For the Amazon MWAA environments that this solution created, you need to have appropriate Apache Airflow rbac_role entries in your DynamoDB table.
The solution also provides a logout feature. To log out from an Apache Airflow console, use the normal Apache Airflow console logout. To log out from the ALB, you can, for example, use the URL https://alb-sso-mwaa.example.com/logout.
Clean up
Follow the readme documented steps in the section Destroy CDK stacks in the GitHub repo, which shows how to clean up the artifacts created via the AWS CDK deployments. Remember to revert any manual configurations, like VPC peering connections, that you might have made after the deployments.
Conclusion
This post provided a solution to integrate your organization’s OIDC-based IdPs with Amazon MWAA to grant secure access to multiple Amazon MWAA environments. We walked through the solution that solves this problem using infrastructure as code. This solution allows different end-user personas in your organization to access the Amazon MWAA Apache Airflow UI using OIDC SSO.
Ajay Vohra is a Principal Prototyping Architect specializing in perception machine learning for autonomous vehicle development. Prior to Amazon, Ajay worked in the area of massively parallel grid-computing for financial risk modeling.
Jaswanth Kumar is a customer-obsessed Cloud Application Architect at AWS in NY. Jaswanth excels in application refactoring and migration, with expertise in containers and serverless solutions, coupled with a Masters Degree in Applied Computer Science.
Aneel Murari is a Sr. Serverless Specialist Solution Architect at AWS based in the Washington, D.C. area. He has over 18 years of software development and architecture experience and holds a graduate degree in Computer Science. Aneel helps AWS customers orchestrate their workflows on Amazon Managed Apache Airflow (MWAA) in a secure, cost effective and performance optimized manner.
Parnab Basak is a Solutions Architect and a Serverless Specialist at AWS. He specializes in creating new solutions that are cloud native using modern software development practices like serverless, DevOps, and analytics. Parnab works closely in the analytics and integration services space helping customers adopt AWS services for their workflow orchestration needs.
Color plays a crucial role in visualizations. It conveys meaning, captures attention, and enhances aesthetics. You can quickly grasp important information when key insights and data points pop with color. However, it’s important to use color judiciously to enhance readability and ensure correct interpretation. Color should also be accessible and consistent to enable users to establish visual patterns and comprehend data effectively.
In line with data visualization best practices, Amazon QuickSight is announcing the launch of field-based coloring options, which provides a fresh approach to configuring colors across visuals in addition to the visual-level color settings. With field-based colors, you can now enjoy the following benefits:
Consistent coloring across visuals using the same Color field
The ability to assign custom colors to dimension values at the field level
The ability to persist default color consistency during visual interactions, such as filtering and sorting
Consistent coloring experience across visuals
At present, users in QuickSight can either assign colors to their charts using themes or the on-visual menu. In addition to these options, the launch of field-based coloring allows authors to specify colors on a per-field basis, simplifying the process of setting colors and ensuring consistency across all visuals that use the same field. The following example shows that, before this feature was available, both charts using the color field Ship region displayed different colors across the field values.
With the implementation of field colors, authors now have the capability to maintain consistent color schemes across visuals that utilize the same field. This is achieved by defining distinct colors for each field value, which ensures uniformity throughout. In contrast to the previous example, both charts now showcase consistent colors for the Ship region field.
Consistent coloring experience with visual interaction
In the past, the default coloring logic used to be based on the sorting order, which means that colors would stay the same for a given sort order. However, this caused inconsistency because the same values could display different colors when the sorting order changed or when they were filtered. The following example shows that the colors for each segment field (Online, In-Store, and Catalog) on the donut chart differ from the colors on the bar chart after sorting.
The assigned colors persist and remain unchanged during any visual interaction, such as sorting or filtering, by defining field-based colors. Notice that, after sorting the donut chart another way, the legend order changes, but the colors remain the same.
How to customize field colors
In this section, we demonstrate the various ways you can customize field colors.
Edit field color
There are two ways to add or edit field-based color:
Fields list pane – Select the field in your analysis and choose Edit field colors from the context menu. This allows you to choose your own colors for each value.
On-visual menu – To define or modify colors another way, you can simply select the legend or the desired data point. Access the context menu and choose Edit field colors. This opens the Edit field colors pane, which is filtered to display the selected value and allows for easy and convenient color customization.
Note the following considerations:
Colors defined at a visual level override field-based colors.
You can assign colors to a maximum of 50 values per field. If you want more than 50, you’ll need to reset a previously assigned color to continue.
Reset visual color
If your visuals have colors assigned through the on-visual menu, the field-based colors aren’t visible. This is because on-visual colors take precedence over the field-based color settings. However, you can easily reset the visual-based colors to reveal the underlying field-based colors in such cases.
Reset field colors
If you want to change the color of a specific value, simply choose the reset icon next to the edited color. Alternatively, if you want to reset all colors, choose Reset colors at the bottom. This restores all edited values to their default color assignment.
Unused color (stale color assignment)
When values that you’ve assigned colors to no longer appear in data, QuickSight labels the values as unused. You can view the unused color assignments and choose to delete them if you’d like.
Conclusion
Field-based coloring options in QuickSight simplify the process of achieving consistent and visually appealing visuals. The persistence of default colors during interactions, such as filtering and sorting, enhances the user experience. Start using field-based coloring today for consistent coloring experience and to enable better comparisons and pattern recognition for effective data interpretation and decision-making.
About the author
Bhupinder Chadha is a senior product manager for Amazon QuickSight focused on visualization and front end experiences. He is passionate about BI, data visualization and low-code/no-code experiences. Prior to QuickSight he was the lead product manager for Inforiver, responsible for building a enterprise BI product from ground up. Bhupinder started his career in presales, followed by a small gig in consulting and then PM for xViz, an add on visualization product.
Many customers use Amazon EC2 Auto Scaling groups as part of their resilience and scaling architecture for their workloads. With Auto Scaling groups, you can scale and deploy rapidly by using Amazon Machine Images (AMIs). However, AMIs within your environment can quickly become outdated as new vulnerabilities are discovered. A security best practice is to perform routine vulnerability assessments of your AMIs to identify whether newfound vulnerabilities apply to them. If you identify a vulnerability, you can update the AMI with the appropriate security patches, test the AMI in lower environments, and deploy the updated AMI in your environment. At this time, Amazon Inspector only supports scanning of running EC2 instances.
If you use customer managed keys to encrypt Amazon Elastic Block Store (Amazon EBS) volumes and you have a default EC2 configuration set to encrypt EBS volumes, you will need to configure additional key policy permissions. For the customer managed key that encrypts EBS volumes, add the following example policy statement to the key policy. Make sure to replace <111122223333> with your own AWS account ID.
{
            "Sid": "Allow use of the key by AMI Scanner State Machine",
            "Effect": "Allow",
            "Principal": {
                "AWS": "arn:aws:iam:: <111122223333>:role/service-role/AMIScanner-Statemachine-role"
            },
            "Action": [
                "kms:Encrypt",
                "kms:Decrypt",
                "kms:ReEncrypt*",
                "kms:GenerateDataKey*",
                "kms:DescribeKey"
            ],
            "Resource": "*"
        },
The solution in this blog post requires that you activate Amazon Inspector in your AWS account. If you haven’t activated Amazon Inspector yet, learn more about the free trial and pricing, and follow the steps in the Amazon Inspector documentation to set up the service and start monitoring your account. Alternatively, you can activate Amazon Inspector by using the AWS Command Line Interface (AWS CLI) and this GitHub example.
Solution overview and architecture
In this solution, you will use the follow AWS services and features:
Task orchestration
AWS Step Functions state machine workflows are used in this solution to verify that conditions are successfully validated before moving to the next task. This helps ensure that the Amazon Inspector scanning of the temporary instance launched in the first state machine is completed before the second state machine starts. This can help reduce the overall cost of the solution and can help prevent the first state machine from reaching state transition limitations.
Lambda functions handle the logic for retrieving AMIs to be scanned, launching temporary instances, creating Amazon EventBridge rules, tagging AMIs, and exporting Amazon Inspector reports to Amazon S3.
AMI tagging
To use this solution, you need to tag the AMIs that Amazon Inspector will scan, because a Lambda function will use these tags to start the solution orchestration. For this post, we use the tag InspectorScan with a value of true. With AMI tagging, you can configure automated processes as part of your deployment pipelines to implement the tagging.
Storage of exported Amazon Inspector findings
Amazon S3 helps you store the exported Amazon Inspector findings report and use them in a standardized format for multiple use cases across AWS services, or use Amazon Athena to query the reports, which we will cover later in the post. Each scanned report is stored in the S3 bucket and is named in the form AMI-NAME/guid.JSON or AMI-NAME/guid.CSV, depending on the export format that you specify.
You can also use S3 event notifications to alert different operational teams that there are Amazon Inspector scan results that require review.
Encryption of Amazon Inspector findings reports
AWS Key Management Service (AWS KMS) is used to encrypt the findings report. The AWS KMS key used must be a customer managed, symmetric KMS encryption key, and importantly, the key must be in the same AWS Region as the S3 bucket that you configured to store the report. The solution in this post creates a new KMS key, as well as a key policy that is configured to grant permissions for Amazon Inspector to use the key.
Event tracking and scheduling
This solution uses an Amazon EventBridge rule to listen for completed Amazon Inspector scan events for each temporary EC2 instance launch. When the EventBridge rule finds a matched event, the rule passes the required parameters and invokes the second Step Functions state machine. The event pattern used in this solution uses the following format:
You can schedule the AMI scanning by using an EventBridge rule that invokes a Lambda function that runs on a schedule. The Lambda function uses a cron expression to occur weekly. You can configure this parameter according to your requirements. Initially, this rule will be disabled to allow you to configure and enable the rule at a later stage.
Amazon SNS sends notifications during the AMI scanning solution process. From the SNS topic, you can configure different subscriptions, depending on your preferred use case and environment. An example of a subscription could be a shared mailbox email address for the security team or incident ticketing system.
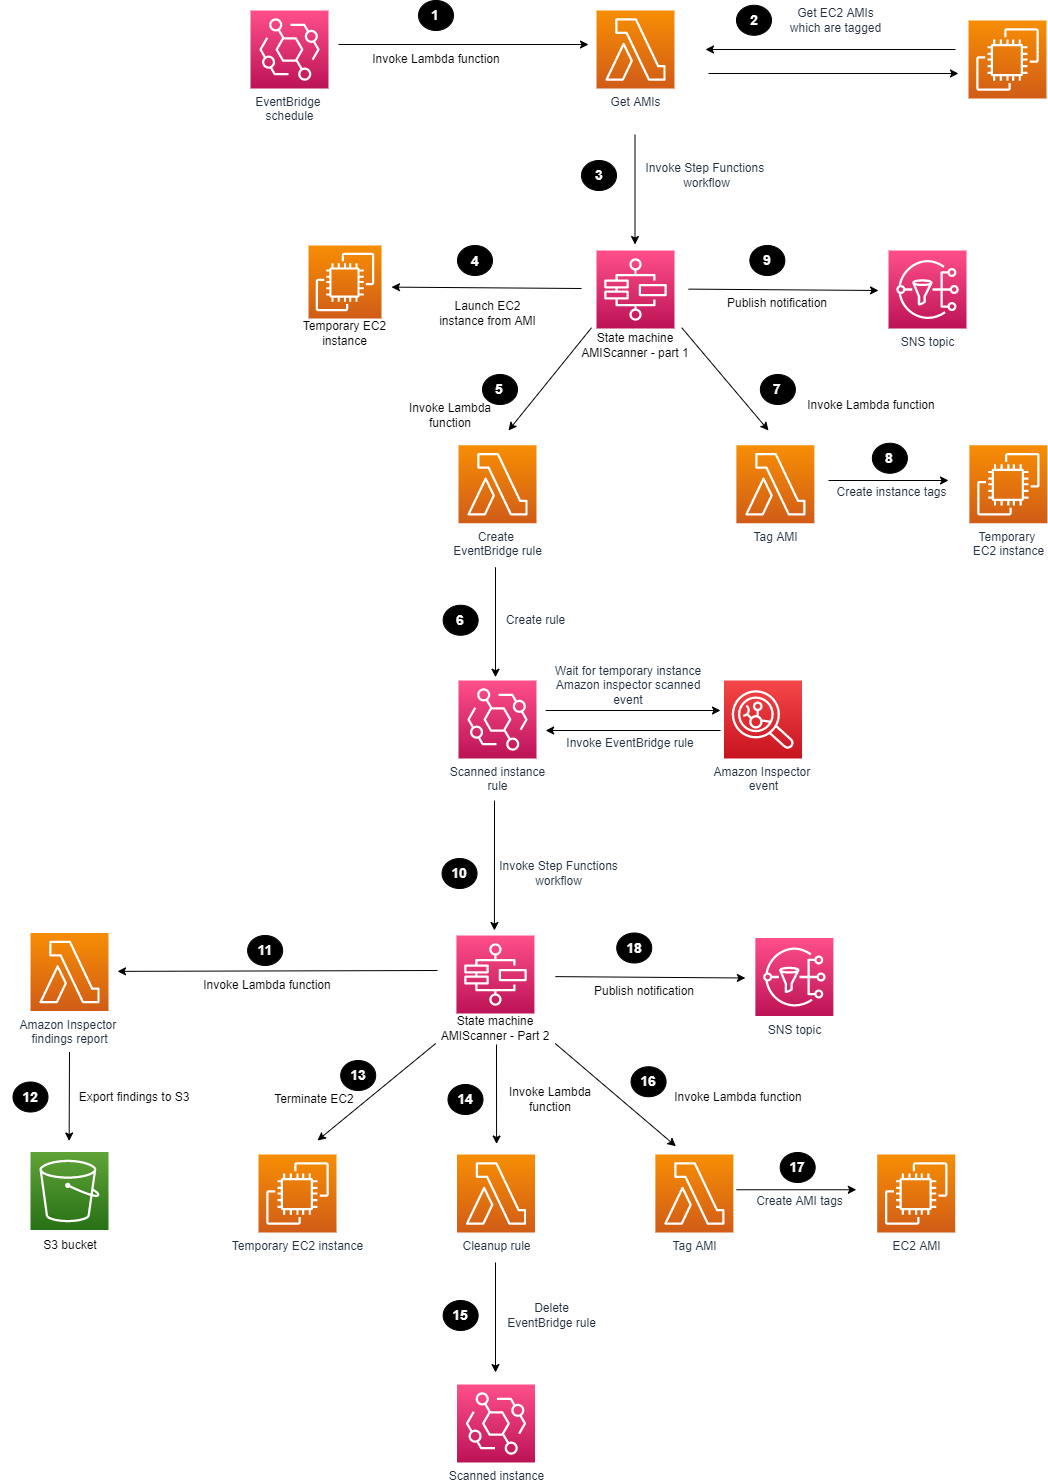
Figure 1 shows the solution architecture.
Figure 1: Amazon Inspector scanning of an AMI
The high-level workflow of the solution is as follows:
You can use EventBridge to create a scheduled rule to invoke a Lambda function. You can set the rule for daily, weekly, or monthly, depending on your use case.
The Lambda function searches for AMIs with the appropriate tags and passes these as parameters to the Step Functions workflow.
The first Step Functions state machine is invoked for each AMI to be scanned.
The first Step Functions workflow deploys a temporary EC2 instance from the AMI that is defined.
A Lambda function is invoked to create an EventBridge rule.
An EventBridge rule is created to listen for the successful Amazon Inspector scanned event of the temporary EC2 instance.
A Lambda function is invoked to tag the EC2 instance.
The temporary EC2 instance is tagged, showing Amazon Inspector that scanning is in progress.
The first Step Functions workflow sends a notification to an SNS topic.
The EventBridge rule parses the required parameters and invokes the second Step Functions state machine.
A Lambda function is invoked to generate an Amazon Inspector report and export the findings to an S3 bucket.
The scanned Amazon Inspector AMI results are saved to an S3 bucket.
The Step Functions workflow terminates the temporary EC2 instance that can reduce cost and clean up the process.
A Lambda function is invoked to delete the temporary EventBridge rule.
The temporary EventBridge rule and targets are deleted.
A Lambda function is invoked to tag the AMI.
The scanned AMI is updated with tagging metadata.
The second Step Functions workflow sends a final notification to an SNS topic.
Deploy the solution
The solution will be deployed with the scheduled rule in Amazon EventBridge disabled to allow you to create your tagging strategy and to familiarize yourself with the solution. Later in this post, we’ll cover how to enable the Amazon EventBridge scheduled rule.
Choose the following Launch Stack button to launch a CloudFormation stack in your account. Note that the stack will launch in the N. Virginia (us-east-1) Region. To deploy this solution into other AWS Regions, download the solution’s CloudFormation template, modify it, and deploy it to the selected Region.
Make sure that you configure the following parameters in the CloudFormation template so that it deploys successfully:
AMITagName — The AMI tag name to check if the AMI should be scanned by Amazon Inspector.
AMITagValue — The AMI tag value to check if the AMI should be scanned by Amazon Inspector.
InspectorReportFormat — The report format, which can be either CSV or JSON.
InstanceSubnetID — The subnet ID to launch the temporary EC2 instance into.
InstanceType — The instance type to deploy the AMI to for temporary scanning purposes.
KmsKeyAdministratorRole — The existing IAM role that needs to have administrator access to the KMS key created for the solution. This key provides access to encrypt and decrypt the Amazon Inspector report.
S3ReportBucketName — The name of the S3 bucket to be created.
SnsTopic — The name of the new SNS topic to be created. This name defines the SNS topic that notifications are published to.
Review the stack name and the parameters for the template.
On the Quick create stack screen, scroll to the bottom and select I acknowledge that AWS CloudFormation might create IAM resources.
Choose Create stack. The deployment of the CloudFormation stack will take 3–4 minutes.
After the CloudFormation stack has deployed successfully, you can use the deployed solution.
Step 2: Manually run the first Step Functions workflow
The first Step Functions state machine requires parameters to be passed in; the SingleAMI Lambda function accomplishes this. You can start the Lambda function by creating a test event and passing the correct JSON text and parameters. The following parameters are available in the output section of the CloudFormation stack that the solution deployed:
AmiId — The ID of the AMI to be used for deploying the EC2 instance. This is the EC2 AMI to be scanned.
EC2InstanceProfile — The Amazon Resource Name (ARN) of the EC2 instance profile that the CloudFormation stack created.
InstanceType — The type of EC2 instance to use for deployment.
KmsKeyName — The ARN of the KMS key to be used for encrypting and decrypting the Amazon Inspector report that the CloudFormation stack created.
S3Bucket — The name of the S3 bucket to which the Amazon Inspector reports will be exported. The S3 bucket was created previously by the CloudFormation stack.
S3ReportFormat — The report format that Amazon Inspector will use to export the findings report; either the JSON or the CSV format is valid.
SnsTopc — The ARN of the SNS topic to which notifications will be sent. This SNS topic was created previously by the CloudFormation stack.
StateMachineArn — The ARN of the first Step Functions state machine, which the Lambda function will run first.
SubnetId — The ID of the VPC subnet to which the EC2 instance will be attached and launched into. This is a required parameter and could be a subnet that is created specifically for this scanning purpose.
The following is an example parameter configuration and JSON that you can use to run the Lambda function. Make sure to replace each <user input placeholder> with your own information.
After the first state machine is finished, the EventBridge rule listens for the successful Amazon Inspector scan event. An SNS notification is sent, similar to the following.
{"AWS Inspector AMI Scan status":"EC2 instance","For AMI":"ami-abcdef01234567890","Temporarily launched AMI using instance":"i-abcdef01234567890"}
After Amazon Inspector has finished scanning the EC2 instance, and the second state machine completes successfully, the Amazon Inspector finding report appears in the S3 bucket and notifications appear on the SNS topic that was created. The following is an example of an SNS notification.
{"AWS Inspector AMI Scan completed":"Successfully","For AMI":"ami-abcdef01234567890","AWS Inspector report located at S3 Bucket":"DOC-EXAMPLE-BUCKET-111122223333","Temporarily launched AMI using instance":"i-abcdef01234567890"}
Enable scheduled scanning
You can enable the EventBridge scheduled rule to handle multiple AMIs and automatic scheduling. The scheduled rule invokes a Lambda function on a scheduled basis that identifies AMIs with the appropriate tags and passes parameters to the Step Functions workflow.
To enable the rule
In the EventBridge rules console, navigate to AMIScanner-ScheduledSolutionTask, and choose Enable.
With Amazon Athena, you can run SQL queries on raw data that is stored in S3 buckets. The Amazon Inspector reports are exported to S3, and you can query the data and create tables by using AWS Glue crawlers. To make sure that AWS Glue can crawl the S3 data, you need to add the role that you create for AWS Glue to the AWS KMS key permissions, so that AWS Glue can decrypt the S3 data. The following is an example policy JSON that you can update. Make sure to replace the AWS account ID <111122223333> and S3 bucket name <DOC-EXAMPLE-BUCKET-111122223333> with your own information.
{
"Sid": "Allow the AWS Glue crawler usage of the KMS key",
"Effect": "Allow",
"Principal": {
"AWS": "arn:aws:iam::<111122223333>:role/service-role/AWSGlueServiceRole-S3InspectorReports"
},
"Action": [
"kms:Decrypt",
"kms:GenerateDataKey*"
],
"Resource": "arn:aws:s3:::<DOC-EXAMPLE-BUCKET-111122223333>"
},
After an AWS Glue Data Catalog has been built, you can run the crawler on a scheduled basis to help keep the catalog up to date with the latest Amazon Inspector findings as they are exported into the S3 bucket.
Using Amazon Athena, you can run queries against the Amazon Inspector reports to generate output data that is relevant to your environment. For example, to list the AMIs that are affected by high-severity findings, you can run the following SQL query. Make sure to replace <DOC-EXAMPLE-BUCKET-111122223333> with your own information.
SELECT DISTINCT partition_0 from "<DOC-EXAMPLE-BUCKET-111122223333>" where severity='HIGH'
To further extend this solution, you can also use Amazon QuickSight to visualize the data by connecting to the AWS Glue table and producing dashboards for consumption.
Conclusion
By performing security assessments of your AMIs on a regular basis, you can gain greater visibility and control over the security of your EC2 instances that are created from those AMIs. In this blog post, you learned how to set up AMI vulnerability assessments, and how the results of these continuous vulnerability assessments can help you keep your environment up to date with security patches. For additional hands-on walkthroughs for Amazon Inspector, see Amazon Inspector workshops. You can find the code for this blog post in the inspector-ami-scanning-solution GitHub repository.
If you have feedback about this post, submit comments in the Comments section below. If you have questions about this post, contact AWS Support.
Want more AWS Security news? Follow us on Twitter.
Think for a second about that Android device in your hand. Maybe it’s a smartphone, maybe it’s a tablet. Whether it’s a Samsung, Google, or Motorola, it still has Android in its DNA. But more important than its DNA is the data stored in its memory.
You probably don’t think about how much irreplaceable data is in there—treasured photos, important documentation, passwords, bank information, the list goes on. But you might want to give it a few minutes of your time because, as smart as your phone is, it’s also remarkably fragile. A trip down the stairs or a dip in the toilet and your phone is toast, taking with it all of that important data. Opening one wrong email or clicking one wrong link could be all it takes for ransomware to infiltrate your data.
In cases like these, the best solution is an ounce of prevention: Getting all those important files backed up before disaster strikes.
Before we get your Droid all backed up and ready to roll, it’s important to understand why you should back up, why syncing isn’t enough, how different phones offer different means of backup, and why a 3-2-1 backup strategy should be your ultimate goal.
And since we’re talking Androids, we’ll obviously be spending a little time in a galaxy far, far away.
“Important to Back Up Your Data, It Is.” – Master Yoda, Probably
In order to understand the importance of backing up your Android, it might help to picture perhaps two of the most famous droids in cinematic history, and in fact the characters who inspired your phone’s name: R2-D2 and C-3PO.
(Seriously, Lucasfilm registered the trademark on the word “droid” in 1977 and has licensed it to both Motorola and Verizon. If you’re reading this, Disney, please don’t sue.)
If you recall the movie “The Force Awakens,” you’ll remember the sub-plot about the search for Luke Skywalker, who had gone into hiding. As the film opens, plucky little droid BB-8 obtained part of the map that could locate him. However, the rest of the map was locked away in R2-D2’s memory units, rendering BB-8’s map useless. Since R2-D2 was mysteriously shut down for purposes of advancing the movie’s plot, that data was unobtainable and thus required a whole film’s worth of daring adventure to restore.
Protection against data loss: Maybe your phone gets dropped into a pond or maybe it gets blasted by TIE fighters. Either way, without a proper backup that data is deader than Greedo.
Easy Upgrading: Jedi Master Qui-Gonn Jinn once said there’s always a bigger fish. Likewise, there’s always a shinier, newer Android device. When you upgrade, you can pull all your old data from your backup and get started with ease.
Protecting against ransomware, malware, and viruses: Even your phone is susceptible to attacks from cybercriminals who can lock up your data and demand payment to restore it. Backing it up is like sending your vital data blasting out through an escape pod just as the Empire descends for retrieval later.
I Have a Syncing Feeling About This
Fortunately, Princess Leia and company seem to have learned their lesson about proper backups by the time of “Rise of Skywalker,” since they had a backup ready for C-3PO. After wiping his hard drive so that the protocol droid could bypass his programming and read the Sith language found on an ancient knife (yes, the plot was that ridiculous), 3PO was able to restore his memories thanks to a backup he’d entrusted to R2.
Had they chosen to merely sync C-3PO’s internal data, he would have been stuck remembering nothing of the Star Wars saga except for “Rise of Skywalker,” which would be a tragic fate for anyone.
With syncing, data is maintained in one form across devices or platforms. This has its usefulness, especially when you can edit something on your phone or tablet and see those changes on your laptop, for example, but also has drawbacks that make it a poor substitute for backing up. Among them:
Limited coverage of what gets synced: Syncing will often focus on specific verticals within data, such as photos, contacts, or calendars. For example, when you make changes to a contact in your phone or device, Google will automatically update that contact in the cloud. But it won’t necessarily automatically update your call or text message history.
Overwriting or deleting data: If C-3PO had been set to sync his data with R2-D2, once it was deleted in his shiny golden head it would be deleted across all backups, and all of the data would have been lost before you could say “Utini.” If you delete your data from your phone, it gets deleted from whatever service you’re using to sync devices.
Vulnerability to ransomware: If you click a malicious link and your device gets zapped with ransomware, your sync service will automatically synchronize the corrupted files.
These Aren’t the Droids You’re Looking For
It’s all well and good to hear about backing up fictional droids, but what about the actual Android device in your hand? Thankfully, it’s somehow even simpler in our galaxy than it is in one where people have actual spaceships.
Both Google and Samsung have backup programs for their respective devices, and we’ll explain a third option where you manage the backups.
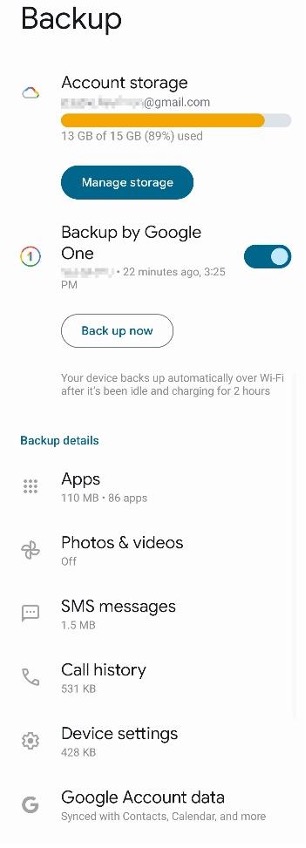
Google One
Native to Google’s Pixel devices, but also found on nearly every Android device since it was introduced in 2021, Google One offers a backup service analogous to iCloud, with 15GB of free storage tied to your Google account.
Sorry, potential stalkers. I remembered to blur my email address.
Pros: Works automatically. Backs up apps, phone history, text messages, photos, contacts, and assorted calendar information associated with your account. It can also load data automatically onto a new device when you sign in with your Google account.
Cons: You have to pick and choose what gets backed up. Yes, this is a con. This level of control might seem nice, but again, we’d recommend you just back up everything. Honestly, the more granular you get with what gets backed up, the more likely you are to forget to back up something you might need. It also operates more like a sync than a backup, so accidental erasure is still a risk. To truly back up your data and keep it safe, you’ll need to keep a third copy of the data somewhere (we’ll explain that later). Also, if you get close to maxing out your storage, ready yourself for endless reminders to buy more storage across all of your devices.
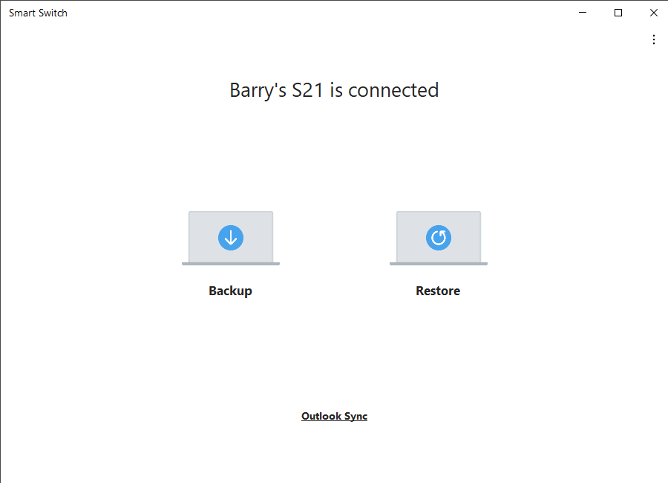
Samsung Smart Switch
As the heavy hitter in the Android space, Samsung wasn’t about to let its Galaxy devices go without a built-in backup solution. Samsung’s Smart Switch comes pre-loaded on every Galaxy device. While it’s designed for moving data from one Galaxy to another, it can also create a backup to your Mac or PC using the Smart Switch app.
Yeah, I’m still using an S21. Don’t @ me.
Backing Up Through Your Mac or PC
Of course, one of the great advantages of the Android operating system is its ability to play nice with pretty much every other operating system, unlike its Apple counterpart. Simply plug your charging cable into an available USB slot and your phone will essentially act like an external hard drive. On a Windows machine, this will show up like a separate hard drive nested under your PC in file explorer. On a Mac, you’ll need to take the extra step of downloading Android File Transfer.
Pros: Functions essentially like an external drive, meaning you can track down individual files or whole folders for targeted backup.
Cons: Android’s file structure can often make individual files difficult to track down. Transfer times can often drag on to the point of absurdity.
How to Back Up Your Life
The guides in this series help you protect your content across many different platforms. We’re working on developing this list—please comment below if you’d like to see another platform covered.
“Come On Buddy, We’re Not Out of This Yet.” – Han Solo, Shortly After Backing Up His Phone, Probably
Now that you have your data safely backed up and secured against any accidental destruction, loss, or damage to your Android, you might think you’re safe. But the cornerstone of any good backup strategy rests on not one, not two, but three pillars.
If you really need to be told why this is important, we’ve covered it here. But suffice to say, a 3-2-1 strategy relies on a trio of separate, redundant backups. One copy of your data stays on your Android device. Another copy of your data is stored on a separate on-premises device, such as your PC or an external hard drive (or, if available, a convenient R2-model astromech). Finally, a third copy stays off-premises—preferably in the cloud—to avoid the possibility of theft, fire, or total planetary destruction via Death Star.
If you’re a Backblaze Computer Backup user, that last step is taken care of. Backblaze backs up your entire computer, including any Android backups you saved to your Mac or PC.
By maintaining three redundant copies of important data—two on local devices and a third in a separate location—you are comprehensively protected against data loss. You may not be carrying around plans for the Empire’s new battle station, but the precious memories locked away on your Android device are just as important as protecting them.
May the force be with you (and again, Disney, please don’t sue).
On Tuesday, July 18, Citrix published a security bulletin warning users of three new vulnerabilities affecting NetScaler ADC and NetScaler Gateway. Of the three vulnerabilities, CVE-2023-3519 is the most severe—successful exploitation allows unauthenticated attackers to execute code remotely on vulnerable target systems that are configured as a Gateway.
CVE-2023-3466: Reflected XSS vulnerability—successful exploitation requires the victim to access an attacker-controlled link in the browser while being on a network with connectivity to the NetScaler IP (NSIP)
CVE-2023-3467: Allows for privilege escalation to root administrator (nsroot)
CVE-2023-3519: Unauthenticated remote code execution—NOTE that the appliance must be configured as a Gateway (VPN virtual server, ICA Proxy, CVPN, RDP Proxy) OR AAA virtual server
CVE-2023-3519 is known to be exploited in the wild. This product line is a popular target for attackers of all skill levels, and we expect that exploitation will increase quickly. Rapid7 strongly recommends updating to a fixed version on an emergency basis, without waiting for a typical patch cycle to occur.See the Citrix advisory for more information.
Affected Products
According to Citrix, the following supported versions of NetScaler ADC and NetScaler Gateway are affected by the vulnerabilities:
NetScaler ADC and NetScaler Gateway 13.1 before 13.1-49.13
NetScaler ADC and NetScaler Gateway 13.0 before 13.0-91.13
NetScaler ADC 13.1-FIPS before 13.1-37.159
NetScaler ADC 12.1-FIPS before 12.1-65.36
NetScaler ADC 12.1-NDcPP before 12.65.36
The advisory notes that NetScaler ADC and NetScaler Gateway version 12.1 is End Of Life (EOL) and is vulnerable. Citrix recommends that customers who are using an EOL version upgrade their appliances to one of the supported fixed versions below.
All three CVEs are remediated in the following fixed product versions:
NetScaler ADC and NetScaler Gateway 13.1-49.13 and later releases
NetScaler ADC and NetScaler Gateway 13.0-91.13 and later releases of 13.0
NetScaler ADC 13.1-FIPS 13.1-37.159 and later releases of 13.1-FIPS
NetScaler ADC 12.1-FIPS 12.1-65.36 and later releases of 12.1-FIPS
NetScaler ADC 12.1-NDcPP 12.1-65.36 and later releases of 12.1-NDcPP
Mitigation guidance
Patches are available for vulnerable versions of NetScaler ADC and NetScaler Gateway and should be applied on an emergency basis. For more information, see Citrix’s advisory.
Rapid7 customers
Our engineering team is investigating vulnerability check implementation options for InsightVM and Nexpose customers. We will update this blog with further information by 2 PM ET.
This is part two of the two-part guest series on extending Simple Email Services with advanced functionality. Find part one here.
quirion, founded in 2013, is an award-winning German robo-advisor with more than 1 billion Euro under management. At quirion, we send out five thousand emails a day to more than 60,000 customers.
Managing many email templates can be challenging
We chose Amazon Simple Email Service (SES) because it is an easy-to-use and cost-effective email platform. In particular, we benefit from email templates in SES, which ensure a consistent look and feel of our communication. These templates come with a styled and personalized HTML email body, perfect for transactional emails. However, managing many email templates can be challenging. Several templates share common elements, such as the company’s logo, name or imprint. Over time, some of these elements may change. If they are not updated across all templates, the result is an inconsistent set of templates. To overcome this problem, we created an application to extend the SES template functionality with an interface for creating and managing nested templates.
Solution: compose email from nested templates using AWS Lambda
The solution we built is fully serverless, which means we do not have to manage the underlying infrastructure. We use AWS Cloud Development Kit (AWS CDK) to deploy the architecture.
The figure below describes the architecture diagram for the proposed solution.
The entry point to the application is an API Gateway that routes requests to a Lambda function. A request consists of an HTML file that represents a part of an email template and metadata that describes the structure of the template.
The Lambda function is the key component of the application. It takes the HTML file and the metadata and stores them in a S3 Bucket and a DynamoDB table.
Depending on the metadata, it takes an existing template from storage, inserts the HTML from the request into it and creates a SES email template.
The solution is simplified for this blog post and is used to show the possibilities of SES. We will not discuss the code of the Lambda function as there are several ways to implement it depending on your preferred programming language.
Prerequisites
An AWS Account that provides access to AWS services.
An Amazon Simple Email Service (Amazon SES) verified identity. You can create and verify a sending identity by following the steps described in the documentation.
Step 1: Use the AWS CDK to deploy the application To download and deploy the application run the following commands:
$ git clone https://github.com/quirionit/aws-ses-examples.git
$ cd aws-ses-examples/projects/go-src
$ go mod tidy
$ cd ../../projects/template-api
$ npm install
$ cdk deploy
Step 2: Create nested email templates
To create a nested email template, complete the following steps:
On the AWS Console, choose the API Gateway.
You should see an API with a name that includes SesTemplateApi.
Click on the name and note the Invoke URL from the details page.
In your terminal, navigate to aws-ses-examples/projects/template-api/files and run the following command. Note that you must use your gateway’s Invoke URL.
The request triggers the Lambda function, which creates a template in DynamoDB and S3. In addition, the Lambda function uses the properties of the request to decide when and how to create a template in SES. With “isWrapper=true” the template is marked as a template that wraps another template and therefore no template is created in SES. “child=content” specifies the entry point for the child template that is used within m-full.html. It also uses FIRSTNAME and LASTNAME as replacement tags for personalization.
In your terminal, run the following command to create a SES email template that uses the template created in step 4 as a wrapper.
Step 3: Analyze the result
On the AWS Console, choose DynamoDB.
From the sidebar, choose Tables.
Select the table with the name that includes SesTemplateTable.
Choose Explore table items. It should now return two new items. The table stores the metadata that describes how to create a SES email template. Creating an email template in SES is initiated when an element’s Child attribute is empty or null. This is the case for the item with the name order-confirmation. It uses the BucketKey attribute to identify the required HTML stored in S3 and the Parent attribute to determine the metadata from the parent template. The Variables attribute is used to describe the placeholders that are used in the template.
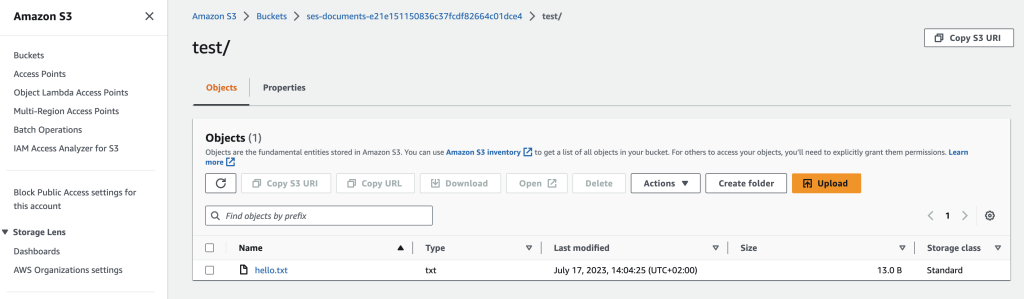
On the AWS Console, choose S3.
Select the bucket with the name that starts with ses-email-templates.
Select the template/ folder. It should return two objects. The m-full.html contains the structure and the design of an email template and is used with the order-confirmation.html which contains the content.
On the AWS Console, choose the Amazon Simple Email Service.
From the sidebar, choose Email templates. It should return the following template.
Step 4: Send an email with the created template
Open the send-order-confirmation.json file from aws-ses-examples/projects/template-api/files in a text editor.
Set a verified email address as Source and ToAddresses and save the file.
Navigate your terminal to aws-ses-examples/projects/template-api/files and run the following command: aws ses send-templated-email --cli-input-json file://send-order-confirmation.json
As a result, you should get an email.
Step 5: Cleaning up
Navigate your terminal to aws-ses-examples/projects/template-api.
Delete all resources with cdk destroy.
Delete the created SES email template with: aws ses delete-template --template-name order-confirmation
Next Steps
There are several ways to extend this solution’s functionality, including the ones below:
If you send an email that contains invalid personalization content, Amazon SES might accept the message, but won’t be able to deliver it. For this reason, if you plan to send personalized email, you should configure Amazon SES to send Rendering Failure event notifications.
The Amazon SES template feature does not support sending attachments, but you can add the functionality yourself. See part one of this blog series for instructions.
When you create a new Amazon SES account, by default your emails are sent from IP addresses that are shared with other SES users. You can also use dedicated IP addresses that are reserved for your exclusive use. This gives you complete control over your sender reputation and enables you to isolate your reputation for different segments within email programs.
Conclusion
In this blog post, we explored how to use Amazon SES with email templates to easily create complex transactional emails. The AWS CLI was used to trigger SES to send an email, but that could easily be replaced by other AWS services like Step Functions. This solution as a whole is a fully serverless architecture where we don’t have to manage the underlying infrastructure. We used the AWS CDK to deploy a predefined architecture and analyzed the deployed resources.
About the authors
Mark Kirchner is a backend engineer at quirion AG. He uses AWS CDK and several AWS services to provide a cloud backend for a web application used for financial services. He follows a full serverless approach and enjoys resolving problems with AWS.
Dominik Richter is a Solutions Architect at Amazon Web Services. He primarily works with financial services customers in Germany and particularly enjoys Serverless technology, which he also uses for his own mobile apps.
The content and opinions in this post are those of the third-party author and AWS is not responsible for the content or accuracy of this post.
This is part one of the two-part guest series on extending Simple Email Services with advanced functionality. Find part two here.
quirion is an award-winning German robo-advisor, founded in 2013, and with more than 1 billion euros under management. At quirion, we send out five thousand emails a day to more than 60,000 customers.
We chose Amazon Simple Email Service (SES) because it is an easy-to-use and cost-effective email platform. In particular, we benefit from email templates in SES, which ensure a consistent look and feel of our communication. These templates come with a styled and personalized HTML email body, perfect for transactional emails. Sometimes it is necessary to add attachments to an email, which is currently not supported by the SES template feature. To overcome this problem, we created a solution to use the SES template functionality and add file attachments.
Solution: orchestrate different email sending options using AWS Step Functions
The solution we built is fully serverless, which means we do not have to manage the underlying infrastructure. We use AWS Cloud Development Kit (AWS CDK) to deploy the architecture and analyze the resources.
The solution extends SES to send attachments using email templates. SES offers three possibilities for sending emails:
Simple — A standard email message. When you create this type of message, you specify the sender, the recipient, and the message body, and Amazon SES assembles the message for you.
Raw — A raw, MIME-formatted email message. When you send this type of email, you have to specify all of the message headers, as well as the message body. You can use this message type to send messages that contain attachments. The message that you specify has to be a valid MIME message.
Templated — A message that contains personalization tags. When you send this type of email, Amazon SES API v2 automatically replaces the tags with values that you specify.
In this post, we will combine the Raw and the Templated options.
The figure below describes the architecture diagram for the proposed solution.
The entry point to the application is an EventBridge event bus that routes incoming events to a Step Function workflow.
An event consists of the personalization parameters, the sender and recipient addresses, the template name and optionally the document-related properties such as a reference to the S3 bucket in which the document is stored. Depending on whether the event contains document-related properties, the Step Function workflow decides how the email is prepared and sent.
In case the event does not contain document-related properties, it uses the SendEmail action to send a templated email. The action requires the template name and the data to replace the personalization tags.
If the event contains document-related properties, the raw sending option of the SendEmail action must be used. If we also want to use an email template, we need to use that as a raw MIME message. So, we use the TestRenderEmailTemplate action to get the raw MIME message from the template and use a Lambda function to get and add the document. The Lambda function then triggers SES to send the email.
The solution is simplified for this blog post and is used to show the possibilities of SES. We will not discuss the code of the lambda function as there are several ways to implement it depending on your preferred programming language.
Prerequisites
An AWS Account that provides access to AWS services.
An Amazon Simple Email Service (Amazon SES) verified identity. You can create and verify a sending identity by following the steps described in the documentation.
To download and deploy the application run the following commands:
$ git clone [email protected]:quirionit/aws-ses-examples.git
$ cd aws-ses-examples/projects/go-src
$ go mod tidy
$ cd ../../projects/email-sender
$ npm install
$ cdk deploy
Step 2: Create a SES email template
In your terminal, navigate to aws-ses-examples/projects/email-sender and run:
aws ses create-template --cli-input-json file://files/hello_doc.json
Step 3: Upload a sample document to S3
To upload a document to S3, complete the following steps:
On the AWS Console, choose the S3.
Select the bucket with the name that starts with ses-documents.
Copy and save the bucket name for later.
Create a new folder called test.
Upload the hello.txt from aws-ses-examples/projects/email-sender/files into the folder.
Step 4: Trigger sending an email using Amazon EventBridge
To trigger sending an email, complete the following steps:
On the AWS Console, choose the Amazon EventBridge.
Select Event busses from the sidebar.
Select Send events.
Create an event as the following image shows. You can copy the Event detail from aws-ses-examples/projects/email-sender/files/event.json. Don’t forget to replace the sender, recipient and bucket with your values.
As a result of sending the event, you should receive an email with the document attached.
To send an email without attachment, edit the event as follows:
Step 5: Analyze the result
On the AWS Console, choose Step Functions.
Select the state machine with the name that includes EmailSender.
You should see two Succeeded executions. If you select them the dataflows should look like this:
You can select each step of the dataflows and analyze the inputs and outputs.
Step 6: Cleaning up
Navigate your terminal to aws-ses-examples/projects/email-sender.
Delete all resources with cdk destroy.
Delete the created SES email template with:
aws ses delete-template --template-name HelloDocument
Next Steps
There are several ways to extend this solution’s functionality, see some of them below:
If you send an email that contains invalid personalization content, Amazon SES might accept the message, but won’t be able to deliver it. For this reason, if you plan to send personalized email, you should configure Amazon SES to send Rendering Failure event notifications.
You can create nested templates to share common elements, such as the company’s logo, name or imprint. See part two of this blog series for instructions.
When you create a new Amazon SES account, by default your emails are sent from IP addresses that are shared with other SES users. You can also use dedicated IP addresses that are reserved for your exclusive use. This gives you complete control over your sender reputation and enables you to isolate your reputation for different segments within email programs.
Conclusion
In this blog post, we explored how to use Amazon SES to send attachments using email templates. We used an Amazon EventBridge to trigger a Step Function that chooses between sending a raw or templated SES email. This solution uses a full serverless architecture without having to manage the underlying infrastructure. We used the AWS CDK to deploy a predefined architecture and analyzed the deployed resources.
About the authors
Mark Kirchner is a backend engineer at quirion AG. He uses AWS CDK and several AWS services to provide a cloud backend for a web application used for financial services. He follows a full serverless approach and enjoys resolving problems with AWS.
Dominik Richter is a Solutions Architect at Amazon Web Services. He primarily works with financial services customers in Germany and particularly enjoys Serverless technology, which he also uses for his own mobile apps.
The content and opinions in this post are those of the third-party author and AWS is not responsible for the content or accuracy of this post.
In a session at the 2023 Real Time Linux Summit, Thomas Gleixner answered
questions about the realtime feature of the kernel, its status, and the Real-Time Linux
project’s plans for the future. The talk was billed as a “Q&A about PREEMPT_RT” with a caveat: “anything except printk() and
documentation”. As might be guessed, the first two questions were on just
those topics, but there were plenty of other questions (and answers) too.
The summit was
held in conjunction with the inaugural Embedded
Open Source Summit in Prague, Czechia at the end of June.
Security updates have been issued by Fedora (java-1.8.0-openjdk), Red Hat (bind, bind9.16, curl, edk2, java-1.8.0-ibm, kernel, kernel-rt, and kpatch-patch), SUSE (iniparser, installation-images, java-1_8_0-ibm, kernel, libqt5-qtbase, nodejs16, openvswitch, and ucode-intel), and Ubuntu (linux-oem-6.0 and linux-xilinx-zynqmp).
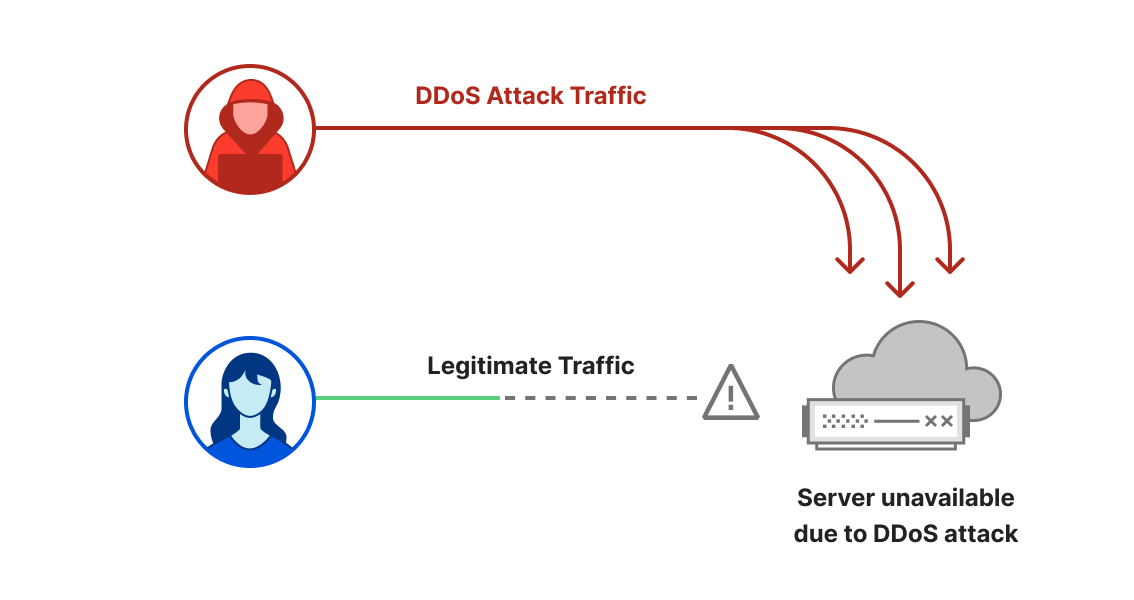
Welcome to the second DDoS threat report of 2023. DDoS attacks, or distributed denial-of-service attacks, are a type of cyber attack that aims to disrupt websites (and other types of Internet properties) to make them unavailable for legitimate users by overwhelming them with more traffic than they can handle — similar to a driver stuck in a traffic jam on the way to the grocery store.
We see a lot of DDoS attacks of all types and sizes and our network is one of the largest in the world spanning more than 300 cities in over 100 countries. Through this network we serve over 63 million HTTP requests per second at peak and over 2 billion DNS queries every day. This colossal amount of data gives us a unique vantage point to provide the community access to insightful DDoS trends.
For our regular readers, you might notice a change in the layout of this report. We used to follow a set pattern to share our insights and trends about DDoS attacks. But with the landscape of DDoS threats changing as DDoS attacks have become more powerful and sophisticated, we felt it's time for a change in how we present our findings. So, we'll kick things off with a quick global overview, and then dig into the major shifts we're seeing in the world of DDoS attacks.
Reminder: an interactive version of this report is also available on Cloudflare Radar. Furthermore, we’ve also added a new interactive component that will allow you to dive deeper into attack activity in each country or region.
New interactive Radar graph to shed light on local DDoS activity
The DDoS landscape: a look at global patterns
The second quarter of 2023 was characterized by thought-out, tailored and persistent waves of DDoS attack campaigns on various fronts, including:
Multiple DDoS offensives orchestrated by pro-Russian hacktivist groups REvil, Killnet and Anonymous Sudan against Western interest websites.
An increase in deliberately engineered and targeted DNS attacks alongside a 532% surge in DDoS attacks exploiting the Mitel vulnerability (CVE-2022-26143). Cloudflare contributed to disclosing this zero-day vulnerability last year.
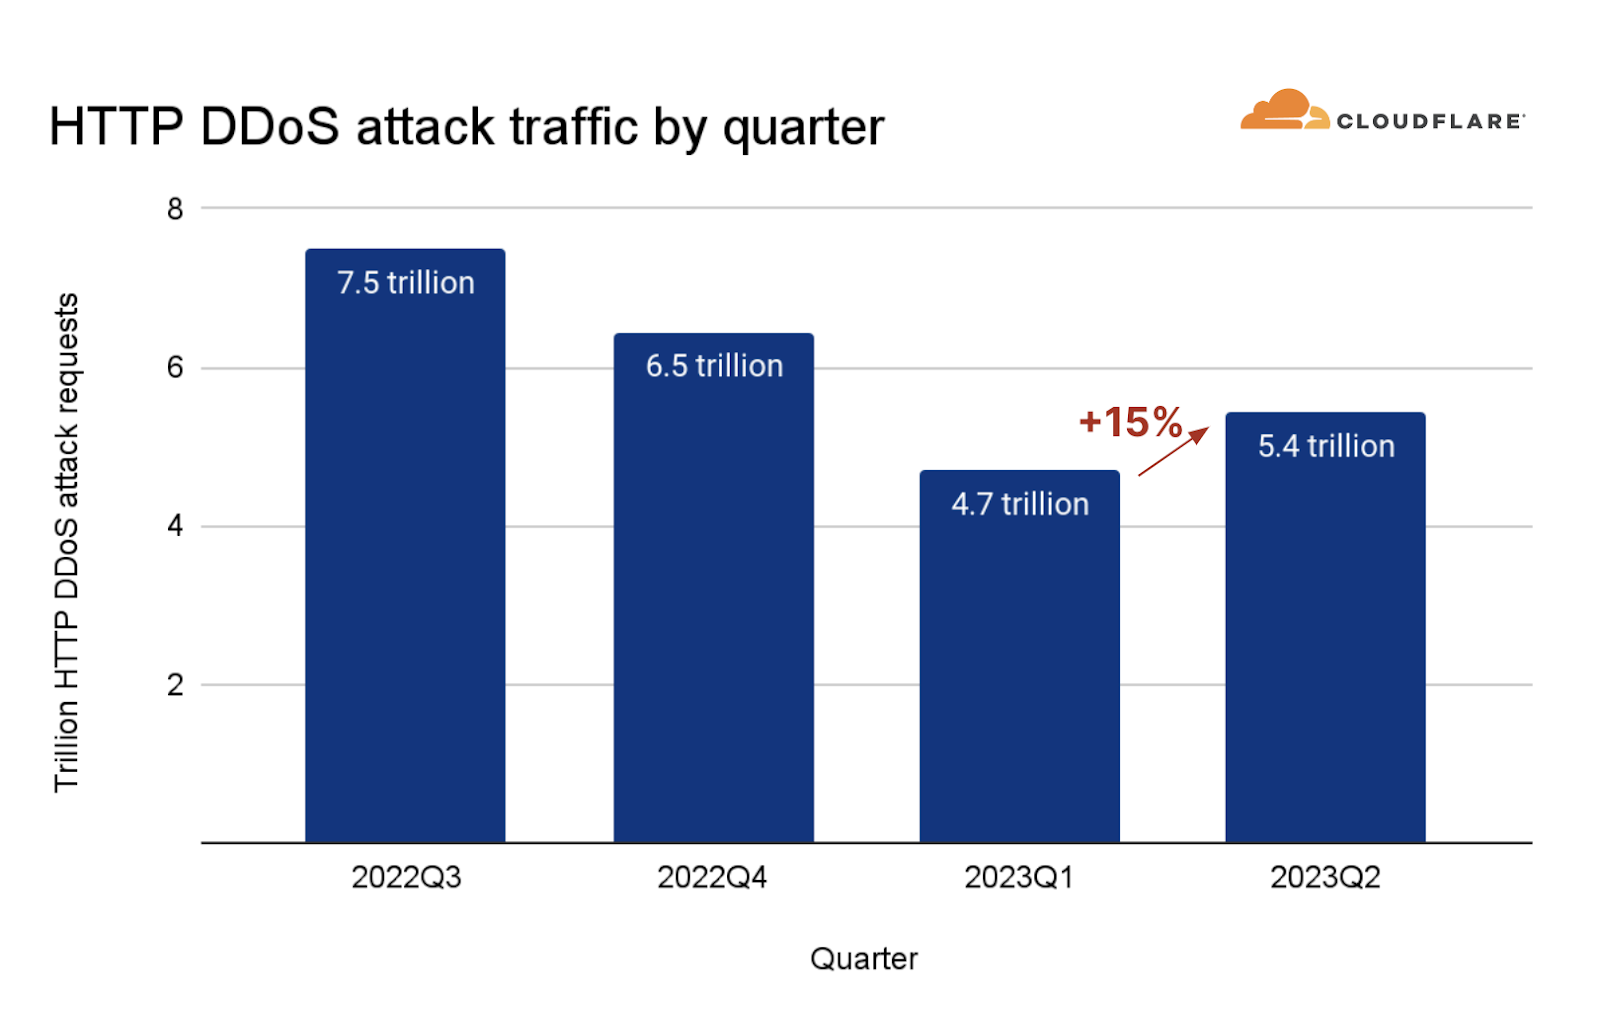
Attacks targeting Cryptocurrency companies increased by 600%, as a broader 15% increase in HTTP DDoS attacks was observed. Of these, we’ve noticed an alarming escalation in attack sophistication which we will cover more in depth.
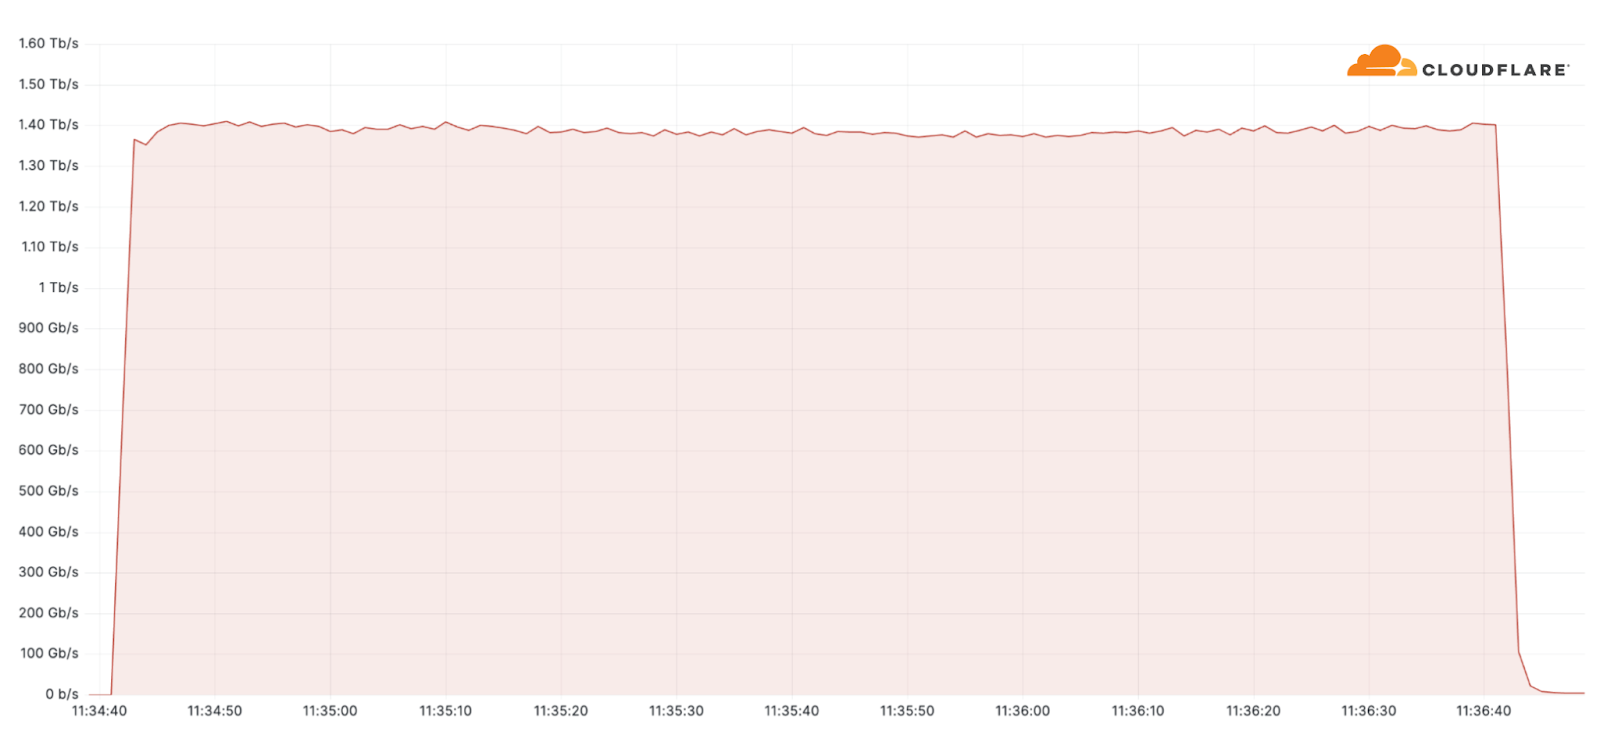
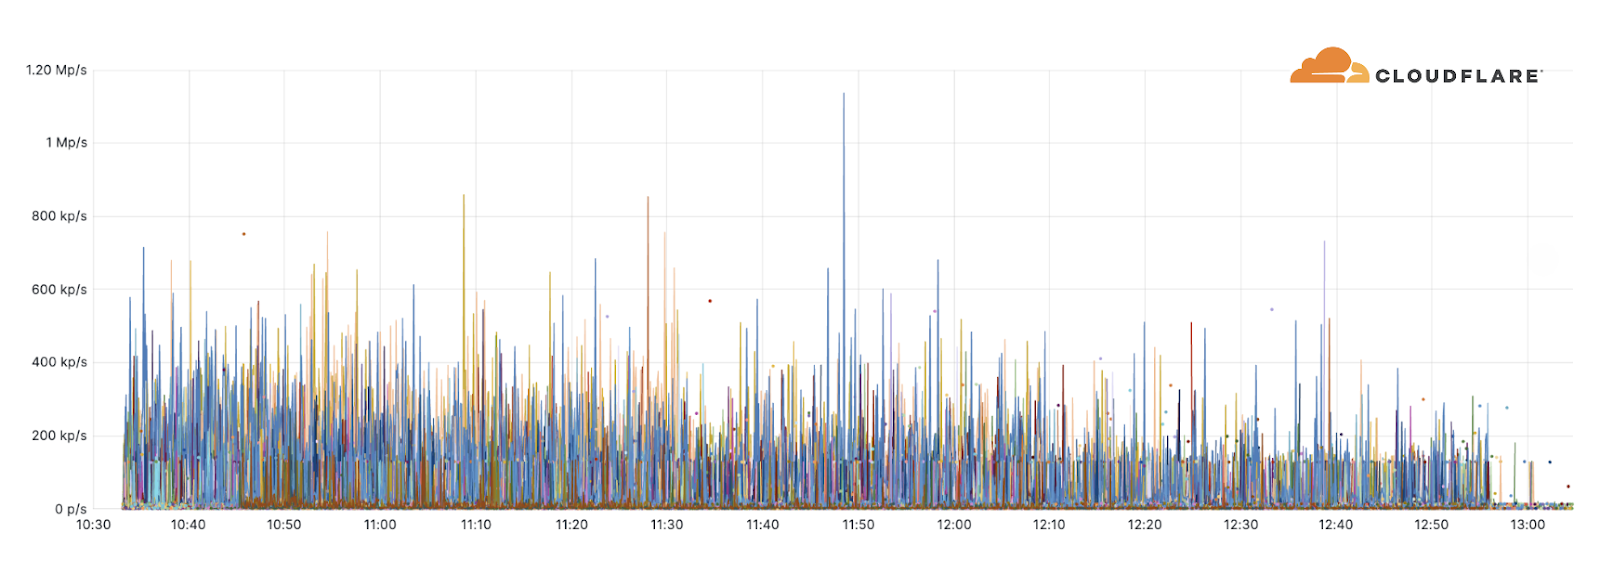
Additionally, one of the largest attacks we’ve seen this quarter was an ACK flood DDoS attack which originated from a Mirai-variant botnet comprising approximately 11K IP addresses. The attack targeted an American Internet Service Provider. It peaked at 1.4 terabit per seconds (Tbps) and was automatically detected and mitigated by Cloudflare’s systems.
Despite general figures indicating an increase in overall attack durations, most of the attacks are short-lived and so was this one. This attack lasted only two minutes. However, more broadly, we’ve seen that attacks exceeding 3 hours have increased by 103% QoQ.
Now having set the stage, let’s dive deeper into these shifts we’re seeing in the DDoS landscape.
Mirai botnet attacks an American Service Provider, peaks at 1.4 Tbps
Hacktivist alliance dubbed “Darknet Parliament” aims at Western banks and SWIFT network
On June 14, Pro-Russian hacktivist groups Killnet, a resurgence of REvil and Anonymous Sudan announced that they have joined forces to execute “massive” cyber attacks on the Western financial system including European and US banks, and the US Federal Reserve System. The collective, dubbed “Darknet Parliament”, declared its first objective was to paralyze SWIFT (Society for Worldwide Interbank Financial Telecommunication). A successful DDoS attack on SWIFT could have dire consequences because it's the main service used by financial institutions to conduct global financial transactions.
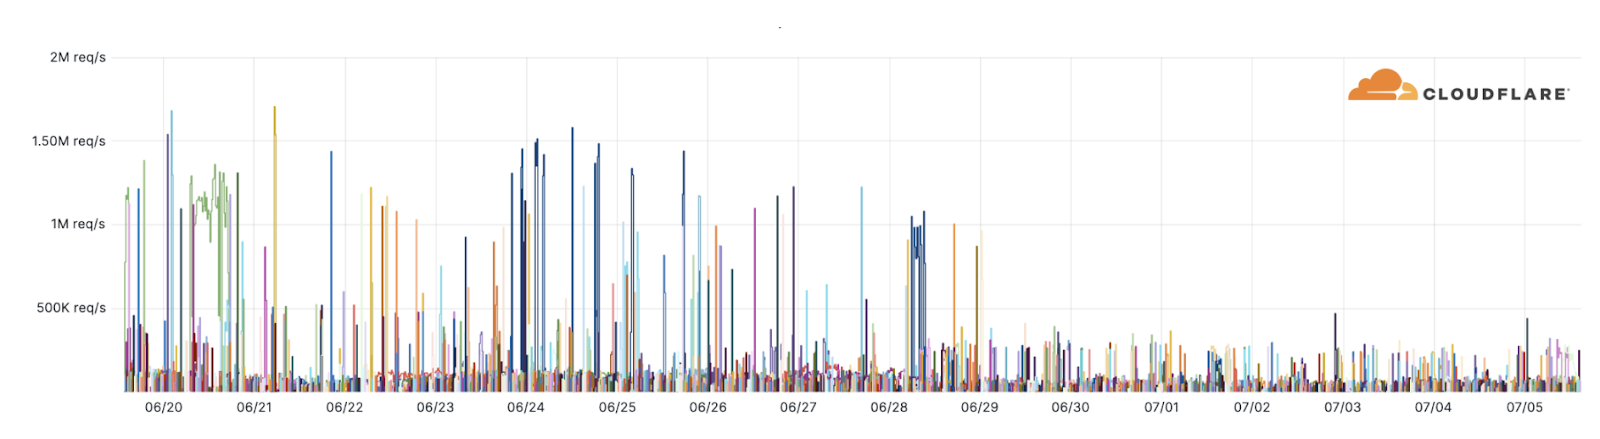
Beyond a handful of publicized events such as the Microsoft outage which was reported by the media, we haven’t observed any novel DDoS attacks or disruptions targeting our customers. Our systems have been automatically detecting and mitigating attacks associated with this campaign. Over the past weeks, as many as 10,000 of these DDoS attacks were launched by the Darknet Parliament against Cloudflare-protected websites (see graph below).
REvil, Killnet and Anonymous Sudan attacks
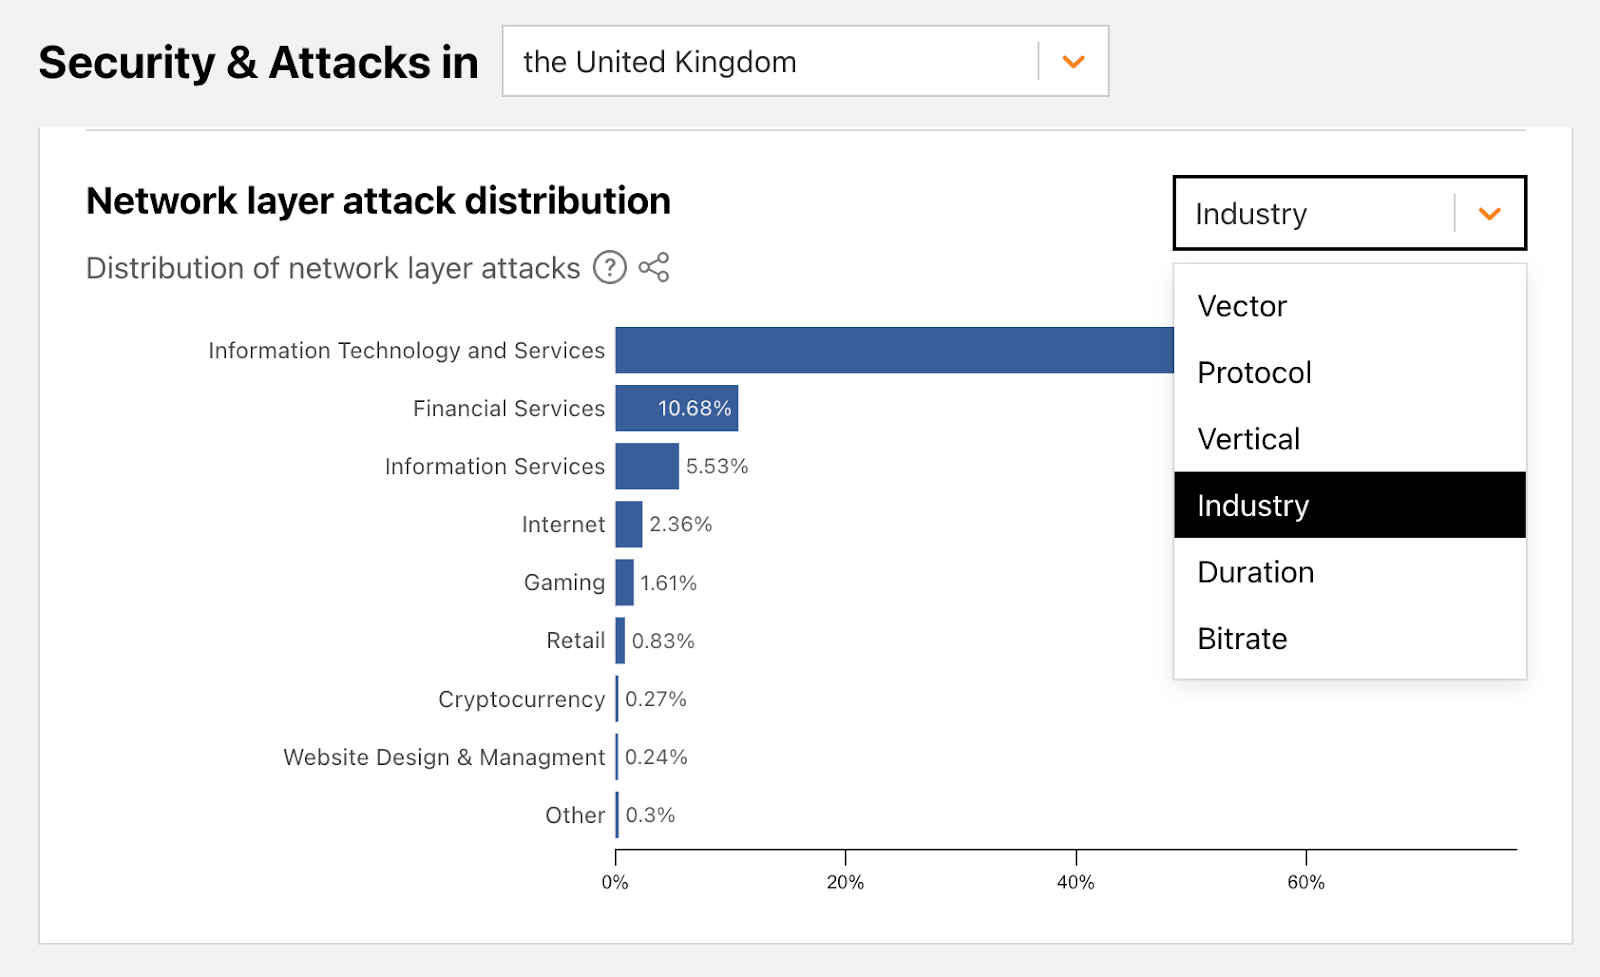
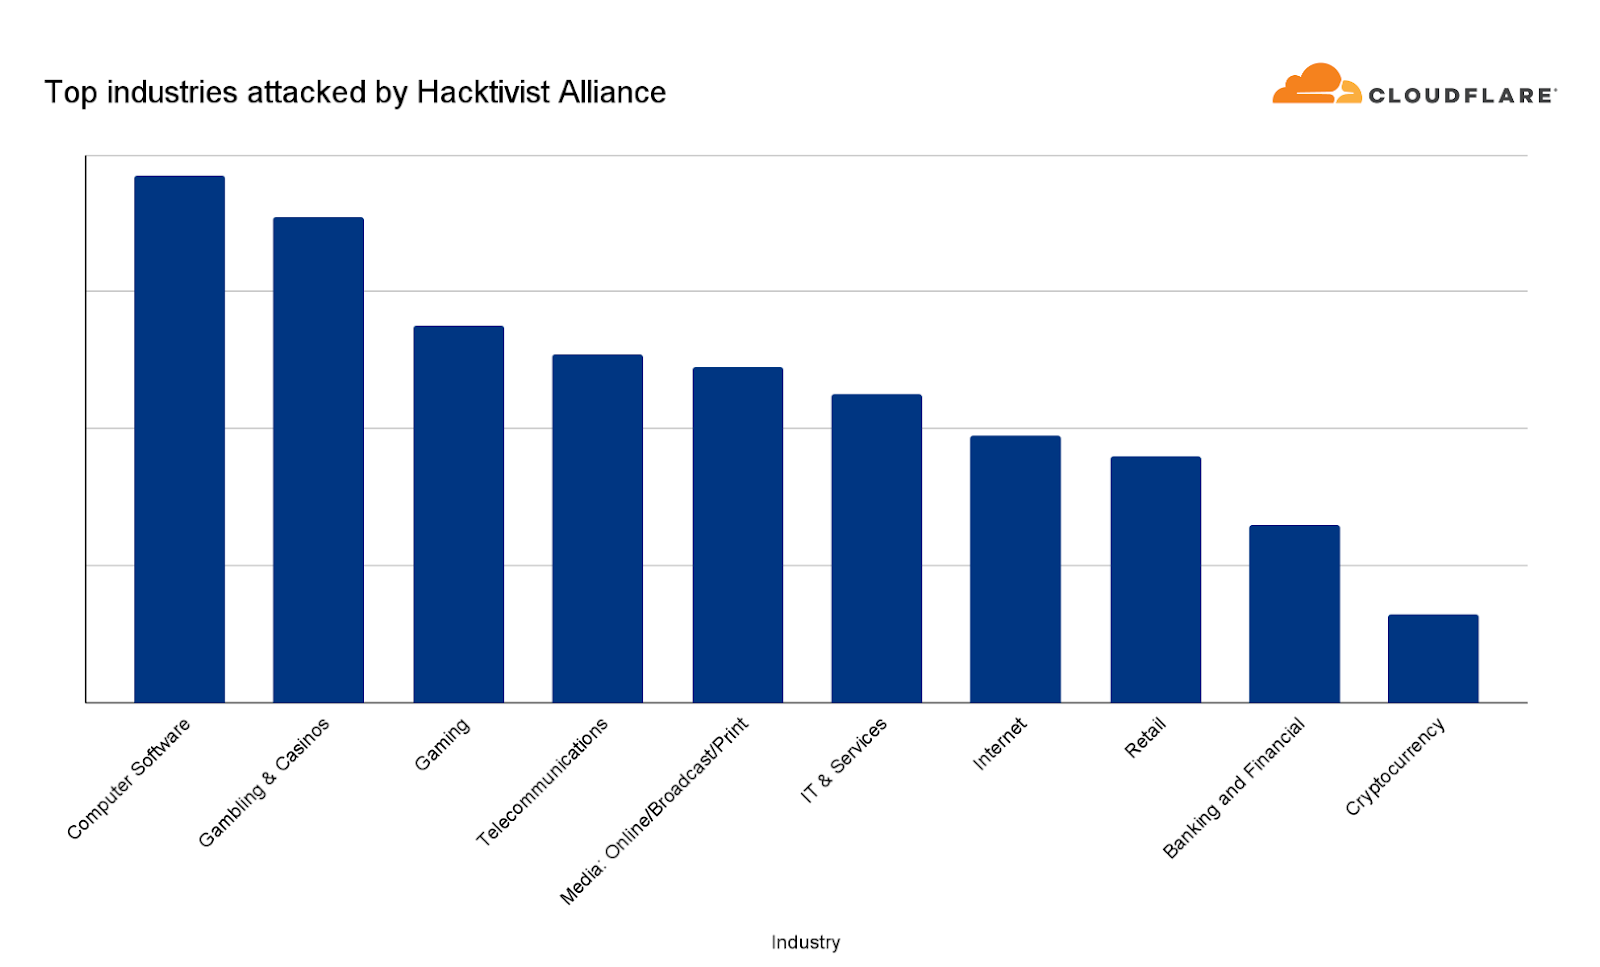
Despite the hacktivists’ statements, Banking and Financial Services websites were only the ninth most attacked industry — based on attacks we’ve seen against our customers as part of this campaign.
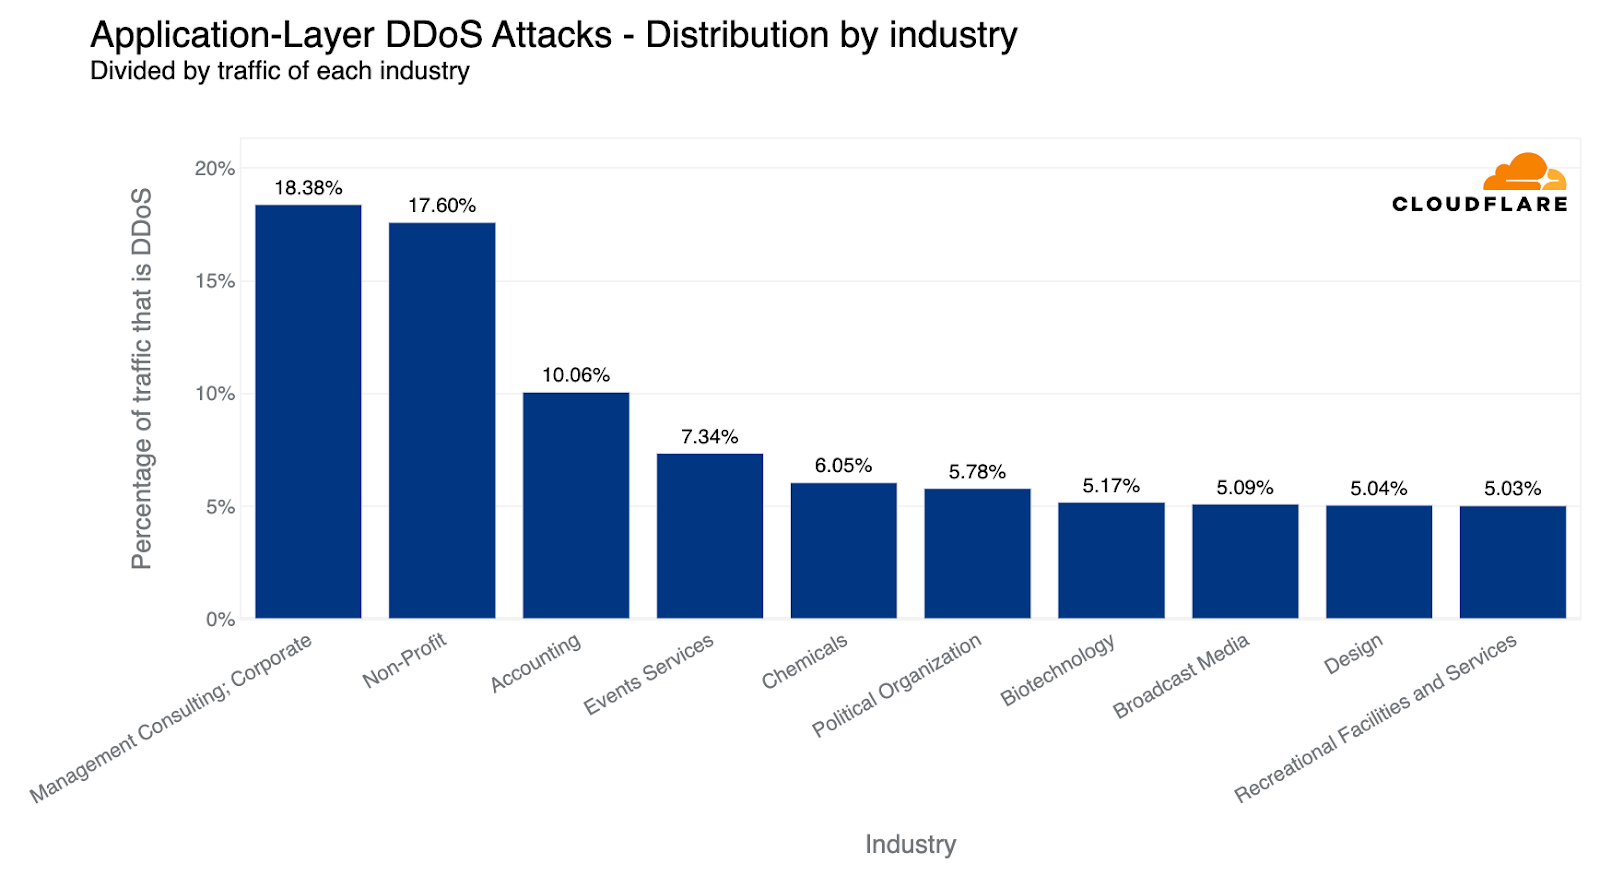
Top industries attacked by the REvil, Killnet and Anonymous Sudan attack campaign
The most attacked industries were Computer Software, Gambling & Casinos and Gaming. Telecommunications and Media outlets came in fourth and fifth, respectively. Overall, the largest attack we witnessed in this campaign peaked at 1.7 million requests per second (rps) and the average was 65,000 rps.
For perspective, earlier this year we mitigated the largest attack in recorded history peaking at 71 million rps. So these attacks were very small compared to Cloudflare scale, but not necessarily for an average website. Therefore, we shouldn’t underestimate the damage potential on unprotected or suboptimally configured websites.
Sophisticated HTTP DDoS attacks
An HTTP DDoS attack is a DDoS attack over the Hypertext Transfer Protocol (HTTP). It targets HTTP Internet properties such as websites and API gateways. Over the past quarter, HTTP DDoS attacks increased by 15% quarter-over-quarter (QoQ) despite a 35% decrease year-over-year (YoY).
Illustration of an HTTP DDoS attack
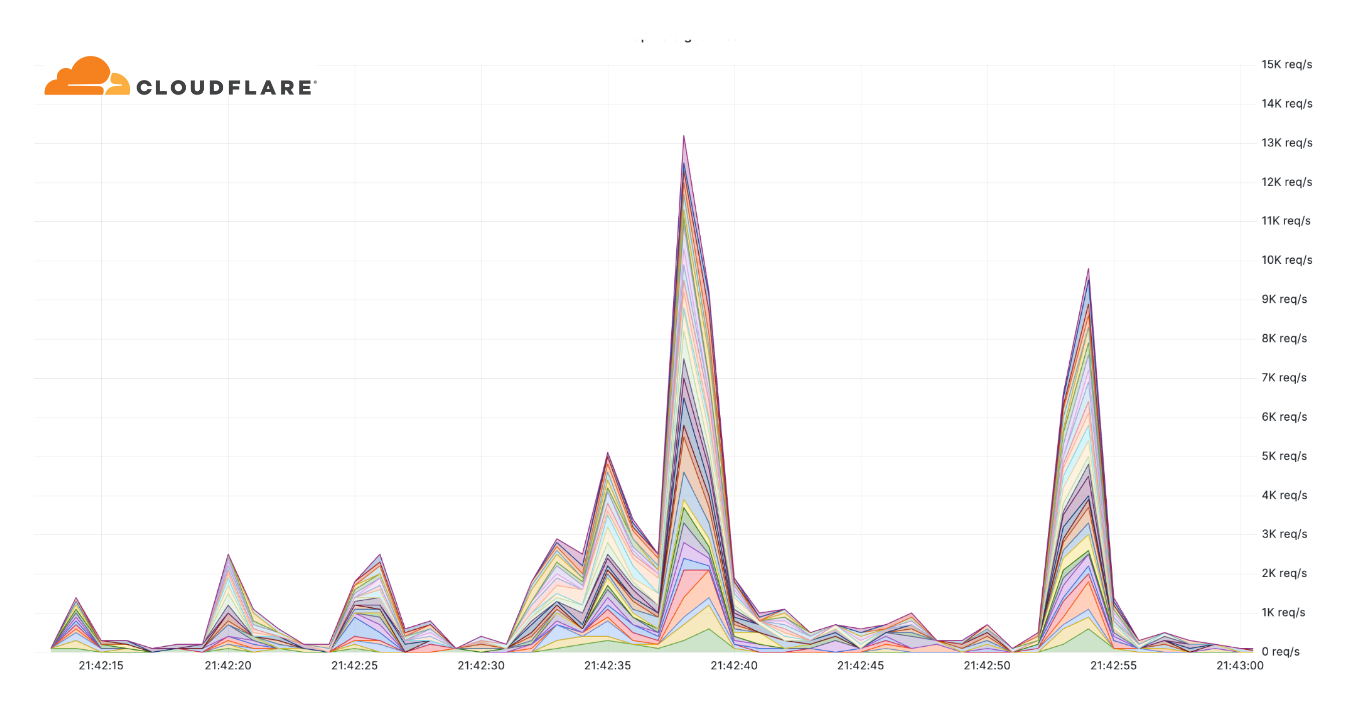
Additionally, we've observed an alarming uptick in highly-randomized and sophisticated HTTP DDoS attacks over the past few months. It appears as though the threat actors behind these attacks have deliberately engineered the attacks to try and overcome mitigation systems by adeptly imitating browser behavior very accurately, in some cases, by introducing a high degree of randomization on various properties such as user agents and JA3 fingerprints to name a few. An example of such an attack is provided below. Each different color represents a different randomization feature.
Example of a highly randomized HTTP DDoS attack
Furthermore, in many of these attacks, it seems that the threat actors try to keep their attack rates-per-second relatively low to try and avoid detection and hide amongst the legitimate traffic.
This level of sophistication has previously been associated with state-level and state-sponsored threat actors, and it seems these capabilities are now at the disposal of cyber criminals. Their operations have already targeted prominent businesses such as a large VoIP provider, a leading semiconductor company, and a major payment & credit card provider to name a few.
Protecting websites against sophisticated HTTP DDoS attacks requires intelligent protection that is automated and fast, that leverages threat intelligence, traffic profiling and Machine Learning/statistical analysis to differentiate between attack traffic and user traffic. Moreover, even increasing caching where applicable can help reduce the risk of attack traffic impacting your origin. Read more about DDoS protection best practices here.
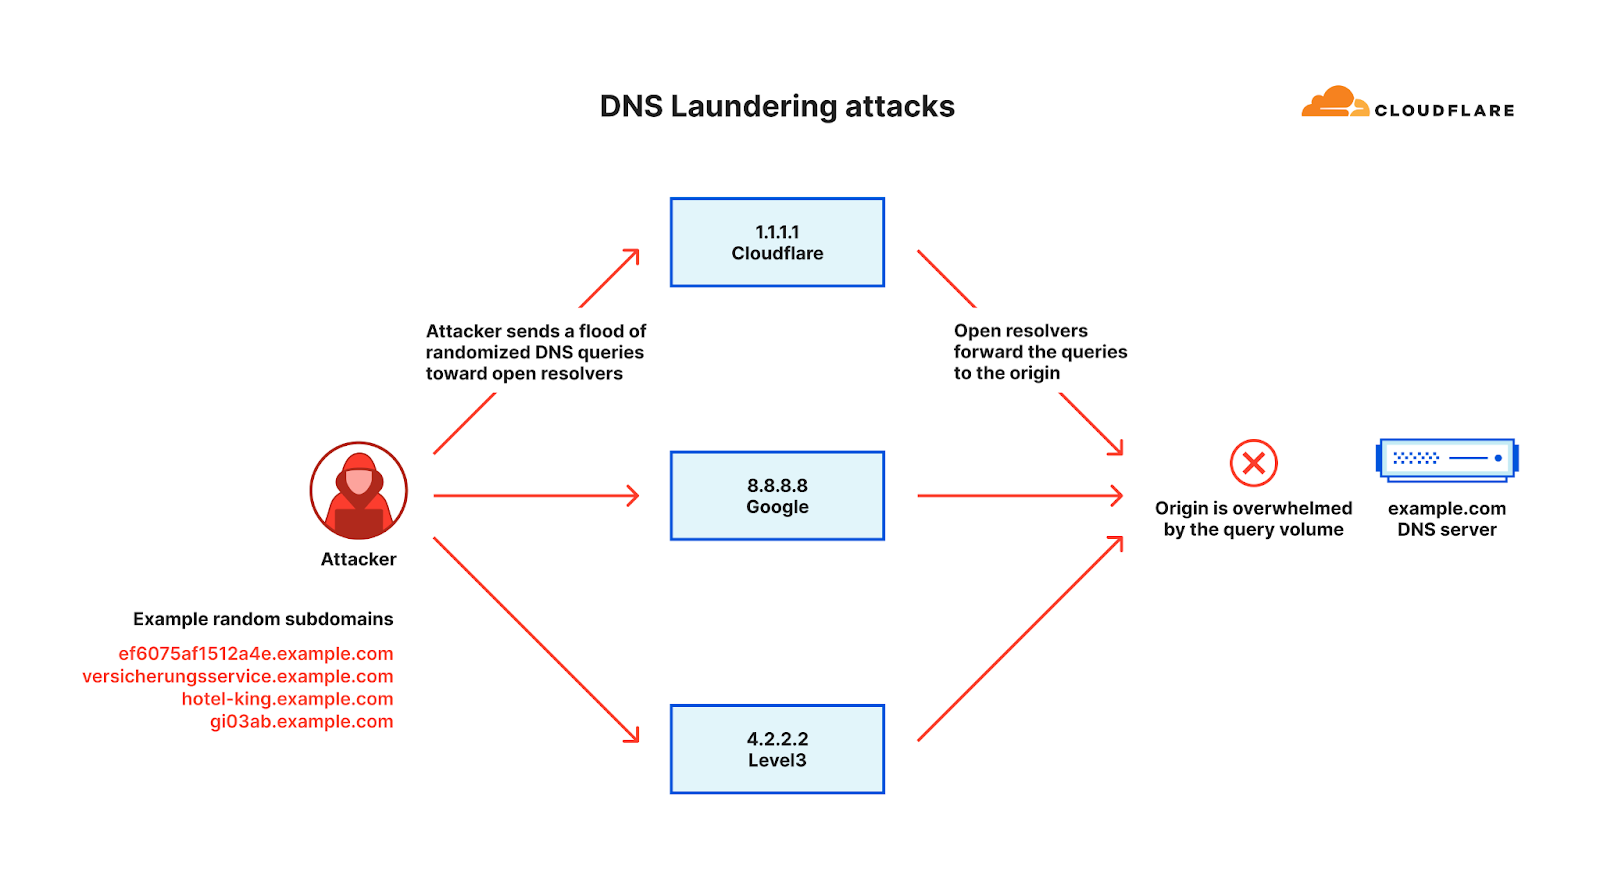
DNS Laundering DDoS attacks
The Domain Name System, or DNS, serves as the phone book of the Internet. DNS helps translate the human-friendly website address (e.g. www.cloudflare.com) to a machine-friendly IP address (e.g. 104.16.124.96). By disrupting DNS servers, attackers impact the machines’ ability to connect to a website, and by doing so making websites unavailable to users.
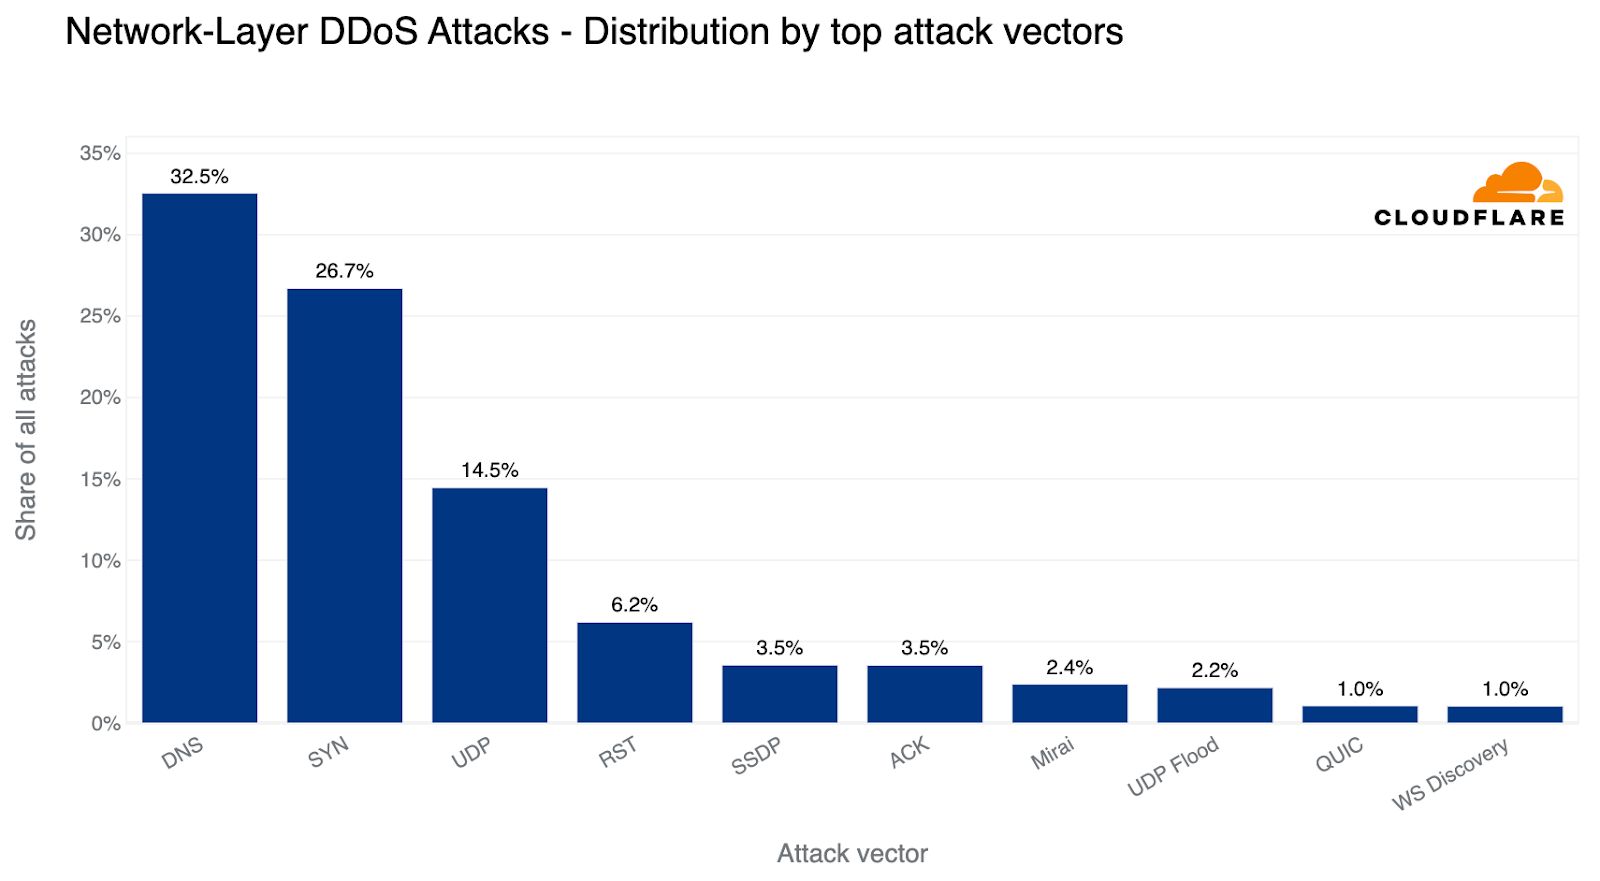
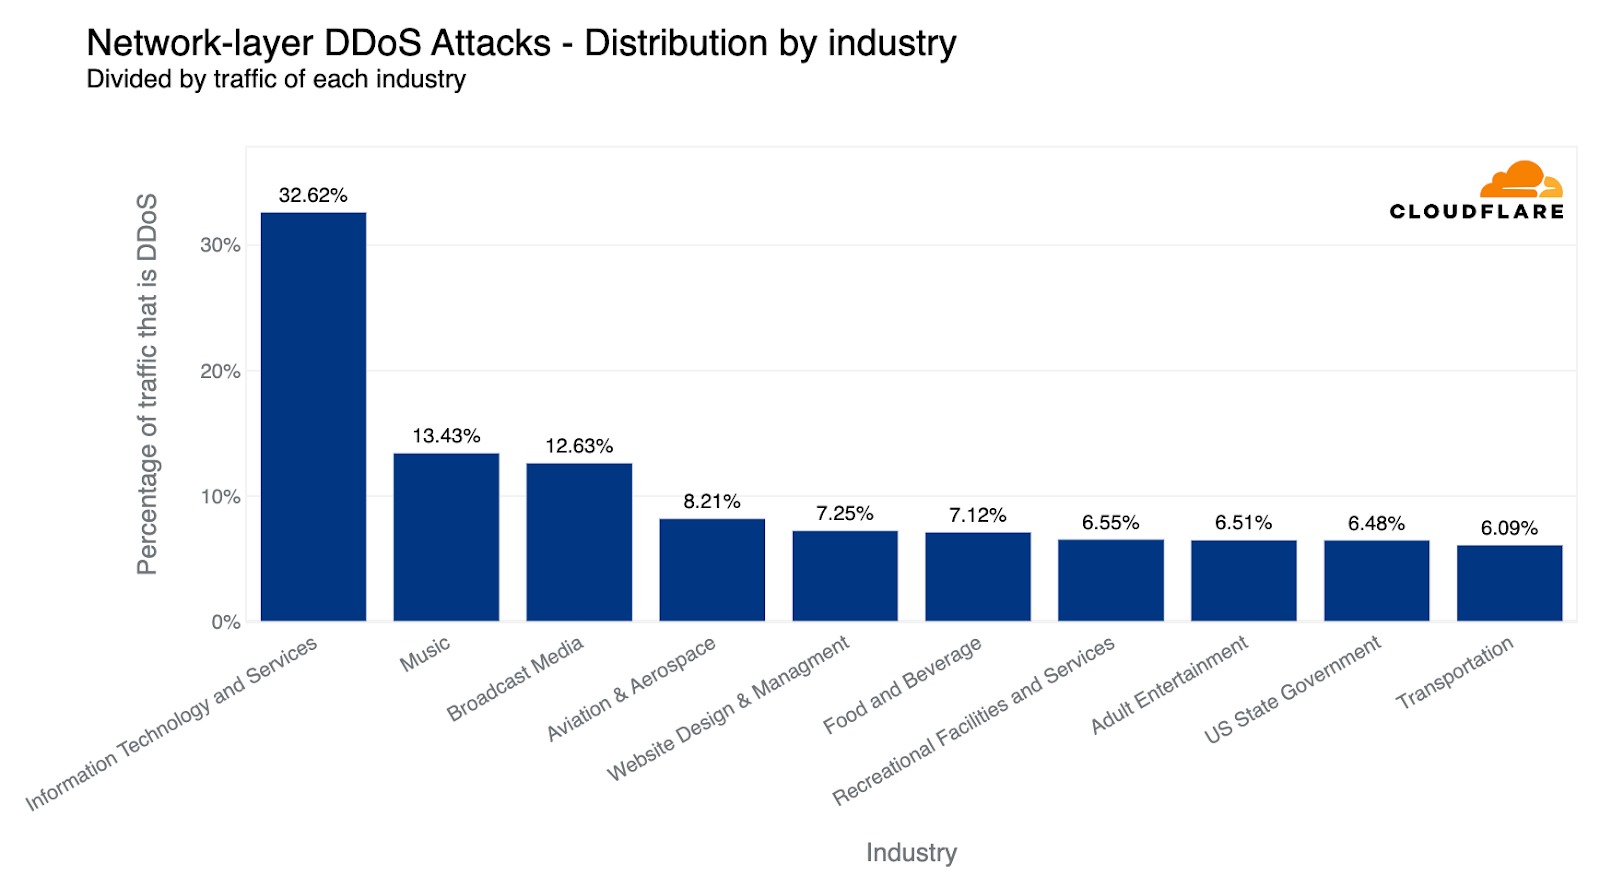
Over the past quarter, the most common attack vector was DNS-based DDoS attacks — 32% of all DDoS attacks were over the DNS protocol. Amongst these, one of the more concerning attack types we’ve seen increasing is the DNS Laundering attack which can pose severe challenges to organizations that operate their own authoritative DNS servers.
Top DDoS attack vectors in 2023 Q2
The term “Laundering” in the DNS Laundering attack name refers to the analogy of money laundering, the devious process of making illegally-gained proceeds, often referred to as "dirty money," appear legal. Similarly, in the DDoS world, a DNS Laundering attack is the process of making bad, malicious traffic appear as good, legitimate traffic by laundering it via reputable recursive DNS resolvers.
In a DNS Laundering attack, the threat actor will query subdomains of a domain that is managed by the victim’s DNS server. The prefix that defines the subdomain is randomized and is never used more than once or twice in such an attack. Due to the randomization element, recursive DNS servers will never have a cached response and will need to forward the query to the victim’s authoritative DNS server. The authoritative DNS server is then bombarded by so many queries until it cannot serve legitimate queries or even crashes all together.
Illustration of a DNS Laundering DDoS attack
From the protection point of view, the DNS administrators can’t block the attack source because the source includes reputable recursive DNS servers like Google’s 8.8.8.8 and Cloudflare’s 1.1.1.1. The administrators also cannot block all queries to the attacked domain because it is a valid domain that they want to preserve access to legitimate queries.
The above factors make it very challenging to distinguish legitimate queries from malicious ones. A large Asian financial institution and a North American DNS provider are amongst recent victims of such attacks. An example of such an attack is provided below.
Example of a DNS Laundering DDoS attack
Similar to the protection strategies outlined for HTTP applications, protecting DNS servers also requires a precise, fast, and automated approach. Leveraging a managed DNS service or a DNS reverse proxy such as Cloudflare’s can help absorb and mitigate the attack traffic. For those more sophisticated DNS attacks, a more intelligent solution is required that leverages statistical analysis of historical data to be able to differentiate between legitimate queries and attack queries.
The rise of the Virtual Machine Botnets
As we’ve previously disclosed, we are witnessing an evolution in botnet DNA. The era of VM-based DDoS botnets has arrived and with it hyper-volumetric DDoS attacks. These botnets are comprised of Virtual Machines (VMs, or Virtual Private Servers, VPS) rather than Internet of Things (IoT) devices which makes them so much more powerful, up to 5,000 times stronger.
Illustration of an IoT botnet compared with a VM Botnet
Because of the computational and bandwidth resources that are at the disposal of these VM-based botnets, they’re able to generate hyper-volumetric attacks with a much smaller fleet size compared to IoT-based botnets.
These botnets have executed one largest recorded DDoS attacks including the 71 million request per second DDoS attack. Multiple organizations including an industry-leading gaming platform provider have already been targeted by this new generation of botnets.
Cloudflare has proactively collaborated with prominent cloud computing providers to combat these new botnets. Through the quick and dedicated actions of these providers, significant components of these botnets have been neutralized. Since this intervention, we have not observed any further hyper-volumetric attacks yet, a testament to the efficacy of our collaboration.
While we already enjoy a fruitful alliance with the cybersecurity community in countering botnets when we identify large-scale attacks, our goal is to streamline and automate this process further. We extend an invitation to cloud computing providers, hosting providers, and other general service providers to join Cloudflare’s free Botnet Threat Feed. This would provide visibility into attacks originating within their networks, contributing to our collective efforts to dismantle botnets.
“Startblast”: Exploiting Mitel vulnerabilities for DDoS attacks
This exploit operates by reflecting traffic off vulnerable servers, amplifying it in the process, with a factor as high as 220 billion percent. The vulnerability stems from an unauthenticated UDP port exposed to the public Internet, which could allow malicious actors to issue a 'startblast' debugging command, simulating a flurry of calls to test the system.
As a result, for each test call, two UDP packets are sent to the issuer, enabling an attacker to direct this traffic to any IP and port number to amplify a DDoS attack. Despite the vulnerability, only a few thousand of these devices are exposed, limiting the potential scale of attack, and attacks must run serially, meaning each device can only launch one attack at a time.
Top industries targeted by Startblast DDoS attacks
Overall, in the past quarter, we’ve seen additional emerging threats such as DDoS attacks abusing the TeamSpeak3 protocol. This attack vector increased by a staggering 403% this quarter.
TeamSpeak, a proprietary voice-over-Internet Protocol (VoIP) that runs over UDP to help gamers talk with other gamers in real time. Talking instead of just chatting can significantly improve a gaming team’s efficiency and help them win. DDoS attacks that target TeamSpeak servers may be launched by rival groups in an attempt to disrupt their communication path during real-time multiplayer games and thus impact their team’s performance.
DDoS hotspots: The origins of attacks
Overall, HTTP DDoS attacks increased by 15% QoQ despite a 35% decrease YoY. Additionally, network-layer DDoS attacks decreased this quarter by approximately 14%.
HTTP DDoS attack requests by quarter
In terms of total volume of attack traffic, the US was the largest source of HTTP DDoS attacks. Three out of every thousand requests we saw were part of HTTP DDoS attacks originating from the US. China came in second place and Germany in third place.
Top source countries of HTTP DDoS attacks (percentage of attack traffic out of the total traffic worldwide)
Some countries naturally receive more traffic due to various factors such as market size, and therefore more attacks. So while it’s interesting to understand the total amount of attack traffic originating from a given country, it is also helpful to remove that bias by normalizing the attack traffic by all traffic to a given country.
When doing so, we see a different pattern. The US doesn’t even make it into the top ten. Instead, Mozambique, Egypt and Finland take the lead as the source countries of the most HTTP DDoS attack traffic relative to all of their traffic. Almost a fifth of all HTTP traffic originating from Mozambique IP addresses were part of DDoS attacks.
Top source countries of HTTP DDoS attacks (percentage of attack traffic out of the total traffic per country)
Using the same calculation methodology but for bytes, Vietnam remains the largest source of network-layer DDoS attacks (aka L3/4 DDoS attacks) for the second consecutive quarter — and the amount even increased by 58% QoQ. Over 41% of all bytes that were ingested in Cloudflare’s Vietnam data centers were part of L3/4 DDoS attacks.
Top source countries of L3/4 DDoS attacks (percentage of attack traffic out of the total traffic per country)
Industries under attack: examining DDoS attack targets
When examining HTTP DDoS attack activity in Q2, Cryptocurrency websites were targeted with the largest amount of HTTP DDoS attack traffic. Six out of every ten thousand HTTP requests towards Cryptocurrency websites behind Cloudflare were part of these attacks. This represents a 600% increase compared to the previous quarter.
After Crypto, Gaming and Gambling websites came in second place as their attack share increased by 19% QoQ. Marketing and Advertising websites not far behind in third place with little change in their share of attacks.
Top industries targeted by HTTP DDoS attacks (percentage of attack traffic out of the total traffic for all industries)
However, when we look at the amount of attack traffic relative to all traffic for any given industry, the numbers paint a different picture. Last quarter, Non-profit organizations were attacked the most — 12% of traffic to Non-profits were HTTP DDoS attacks. Cloudflare protects more than 2,271 Non-profit organizations in 111 countries as part of Project Galileo which celebrated its ninth anniversary this year. Over the past months, an average of 67.7 million cyber attacks targeted Non-profits on a daily basis.
Overall, the amount of DDoS attacks on Non-profits increased by 46% bringing the percentage of attack traffic to 17.6%. However, despite this growth, the Management Consulting industry jumped to the first place with 18.4% of its traffic being DDoS attacks.
Top industries targeted by HTTP DDoS attacks (percentage of attack traffic out of the total traffic per industry)
When descending the layers of the OSI model, the Internet networks that were most targeted belonged to the Information Technology and Services industry. Almost every third byte routed to them were part of L3/4 DDoS attacks.
Surprisingly enough, companies operating in the Music industry were the second most targeted industry, followed by Broadcast Media and Aviation & Aerospace.
Top industries targeted by L3/4 DDoS attacks (percentage of attack traffic out of the total traffic per industry)
Top attacked industries: a regional perspective
Cryptocurrency websites experienced the highest number of attacks worldwide, while Management Consulting and Non-profit sectors were the most targeted considering their total traffic. However, when we look at individual regions, the situation is a bit different.
Top industries targeted by HTTP DDoS attacks by region
Africa
The Telecommunications industry remains the most attacked industry in Africa for the second consecutive quarter. The Banking, Financial Services and Insurance (BFSI) industry follows as the second most attacked. The majority of the attack traffic originated from Asia (35%) and Europe (25%).
Asia
For the past two quarters, the Gaming and Gambling industry was the most targeted industry in Asia. In Q2, however, the Gaming and Gambling industry dropped to second place and Cryptocurrency took the lead as the most attacked industry (~50%). Substantial portions of the attack traffic originated from Asia itself (30%) and North America (30%).
Europe
For the third consecutive quarter, the Gaming & Gambling industry remains the most attacked industry in Europe. The Hospitality and Broadcast Media industries follow not too far behind as the second and third most attacked. Most of the attack traffic came from within Europe itself (40%) and from Asia (20%).
Latin America
Surprisingly, half of all attack traffic targeting Latin America was aimed at the Sporting Goods industry. In the previous quarter, the BFSI was the most attacked industry. Approximately 35% of the attack traffic originated from Asia, and another 25% originated from Europe.
Middle East
The Media & Newspaper industries were the most attacked in the Middle East. The vast majority of attack traffic originated from Europe (74%).
North America
For the second consecutive quarter, Marketing & Advertising companies were the most attacked in North America (approximately 35%). Manufacturing and Computer Software companies came in second and third places, respectively. The main sources of the attack traffic were Europe (42%) and the US itself (35%).
Oceania
This quarter, the Biotechnology industry was the most attacked. Previously, it was the Health & Wellness industry. Most of the attack traffic originated from Asia (38%) and Europe (25%).
Countries and regions under attack: examining DDoS attack targets
When examining the total volume of attack traffic, last quarter, Israel leaped to the front as the most attacked country. This quarter, attacks targeting Israeli websites decreased by 33% bringing it to the fourth place. The US takes the lead again as the most attacked country, followed by Canada and Singapore.
Top countries and regions targeted by HTTP DDoS attacks (percentage of attack traffic out of the total traffic for all countries and regions)
If we normalize the data per country and region and divide the attack traffic by the total traffic, we get a different picture. Palestine jumps to the first place as the most attacked country. Almost 12% of all traffic to Palestinian websites were HTTP DDoS attacks.
Top countries and regions targeted by HTTP DDoS attacks (percentage of attack traffic out of the total traffic per country and region)
Last quarter, we observed a striking deviation at the network layer, with Finnish networks under Cloudflare's shield emerging as the primary target. This surge was likely correlated with the diplomatic talks that precipitated Finland's formal integration into NATO. Roughly 83% of all incoming traffic to Finland comprised cyberattacks, with China a close second at 68% attack traffic.
This quarter, however, paints a very different picture. Finland has receded from the top ten, and Chinese Internet networks behind Cloudflare have ascended to the first place. Almost two-thirds of the byte streams towards Chinese networks protected by Cloudflare were malicious. Following China, Switzerland saw half of its inbound traffic constituting attacks, and Turkey came third, with a quarter of its incoming traffic identified as hostile.
Top countries and regions targeted by L3/4 DDoS attacks (percentage of attack traffic out of the total traffic per country and region)
Ransom DDoS attacks
Occasionally, DDoS attacks are carried out to extort ransom payments. We’ve been surveying Cloudflare customers over three years now, and have been tracking the occurrence of Ransom DDoS attack events.
High level comparison of Ransomware and Ransom DDoS attacks
Unlike Ransomware attacks, where victims typically fall prey to downloading a malicious file or clicking on a compromised email link which locks, deletes or leaks their files until a ransom is paid, Ransom DDoS attacks can be much simpler for threat actors to execute. Ransom DDoS attacks bypass the need for deceptive tactics such as luring victims into opening dubious emails or clicking on fraudulent links, and they don't necessitate a breach into the network or access to corporate resources.
Over the past quarter, reports of Ransom DDoS attacks decreased. One out of ten respondents reported being threatened or subject to Ransom DDoS attacks.
Wrapping up: the ever-evolving DDoS threat landscape
In recent months, there's been an alarming escalation in the sophistication of DDoS attacks. And even the largest and most sophisticated attacks that we’ve seen may only last a few minutes or even seconds — which doesn’t give a human sufficient time to respond. Before the PagerDuty alert is even sent, the attack may be over and the damage is done. Recovering from a DDoS attack can last much longer than the attack itself — just as a boxer might need a while to recover from a punch to the face that only lasts a fraction of a second.
Security is not one single product or a click of a button, but rather a process involving multiple layers of defense to reduce the risk of impact. Cloudflare's automated DDoS defense systems consistently safeguard our clients from DDoS attacks, freeing them up to focus on their core business operations. These systems are complemented by the vast breadth of Cloudflare capabilities such as firewall, bot detection, API protection and even caching which can all contribute to reducing the risk of impact.
The DDoS threat landscape is evolving and increasingly complex, demanding more than just quick fixes. Thankfully, with Cloudflare's multi-layered defenses and automatic DDoS protections, our clients are equipped to navigate these challenges confidently. Our mission is to help build a better Internet, and so we continue to stand guard, ensuring a safer and more reliable digital realm for all.
Methodologies
How we calculate Ransom DDoS attack insights
Cloudflare’s systems constantly analyze traffic and automatically apply mitigation when DDoS attacks are detected. Each attacked customer is prompted with an automated survey to help us better understand the nature of the attack and the success of the mitigation. For over two years, Cloudflare has been surveying attacked customers. One of the questions in the survey asks the respondents if they received a threat or a ransom note. Over the past two years, on average, we collected 164 responses per quarter. The responses of this survey are used to calculate the percentage of Ransom DDoS attacks.
How we calculate geographical and industry insights
Source country At the application-layer, we use the attacking IP addresses to understand the origin country of the attacks. That is because at that layer, IP addresses cannot be spoofed (i.e., altered). However, at the network layer, source IP addresses can be spoofed. So, instead of relying on IP addresses to understand the source, we instead use the location of our data centers where the attack packets were ingested. We’re able to get geographical accuracy due to our large global coverage in over 285 locations around the world.
Target country For both application-layer and network-layer DDoS attacks, we group attacks and traffic by our customers’ billing country. This lets us understand which countries are subject to more attacks.
Target industry For both application-layer and network-layer DDoS attacks, we group attacks and traffic by our customers’ industry according to our customer relations management system. This lets us understand which industries are subject to more attacks.
Total volume vs. percentage For both source and target insights, we look at the total volume of attack traffic compared to all traffic as one data point. Additionally, we also look at the percentage of attack traffic towards or from a specific country, to a specific country or to a specific industry. This gives us an “attack activity rate” for a given country/industry which is normalized by their total traffic levels. This helps us remove biases of a country or industry that normally receives a lot of traffic and therefore a lot of attack traffic as well.
How we calculate attack characteristics To calculate the attack size, duration, attack vectors and emerging threats, we bucket attacks and then provide the share of each bucket out of the total amount for each dimension. On the new Radar component, these trends are calculated by number of bytes instead. Since attacks may vary greatly in number of bytes from one another, this could lead to trends differing between the reports and the Radar component.
General disclaimer and clarification
When we describe ‘top countries’ as the source or target of attacks, it does not necessarily mean that that country was attacked as a country, but rather that organizations that use that country as their billing country were targeted by attacks. Similarly, attacks originating from a country does not mean that that country launched the attacks, but rather that the attack was launched from IP addresses that have been mapped to that country. Threat actors operate global botnets with nodes all over the world, and in many cases also use Virtual Private Networks and proxies to obfuscate their true location. So if anything, the source country could indicate the presence of exit nodes or botnet nodes within that country.
The collective thoughts of the interwebz
Manage Consent
To provide the best experiences, we use technologies like cookies to store and/or access device information. Consenting to these technologies will allow us to process data such as browsing behavior or unique IDs on this site. Not consenting or withdrawing consent, may adversely affect certain features and functions.
Functional
Always active
The technical storage or access is strictly necessary for the legitimate purpose of enabling the use of a specific service explicitly requested by the subscriber or user, or for the sole purpose of carrying out the transmission of a communication over an electronic communications network.
Preferences
The technical storage or access is necessary for the legitimate purpose of storing preferences that are not requested by the subscriber or user.
Statistics
The technical storage or access that is used exclusively for statistical purposes.The technical storage or access that is used exclusively for anonymous statistical purposes. Without a subpoena, voluntary compliance on the part of your Internet Service Provider, or additional records from a third party, information stored or retrieved for this purpose alone cannot usually be used to identify you.
Marketing
The technical storage or access is required to create user profiles to send advertising, or to track the user on a website or across several websites for similar marketing purposes.


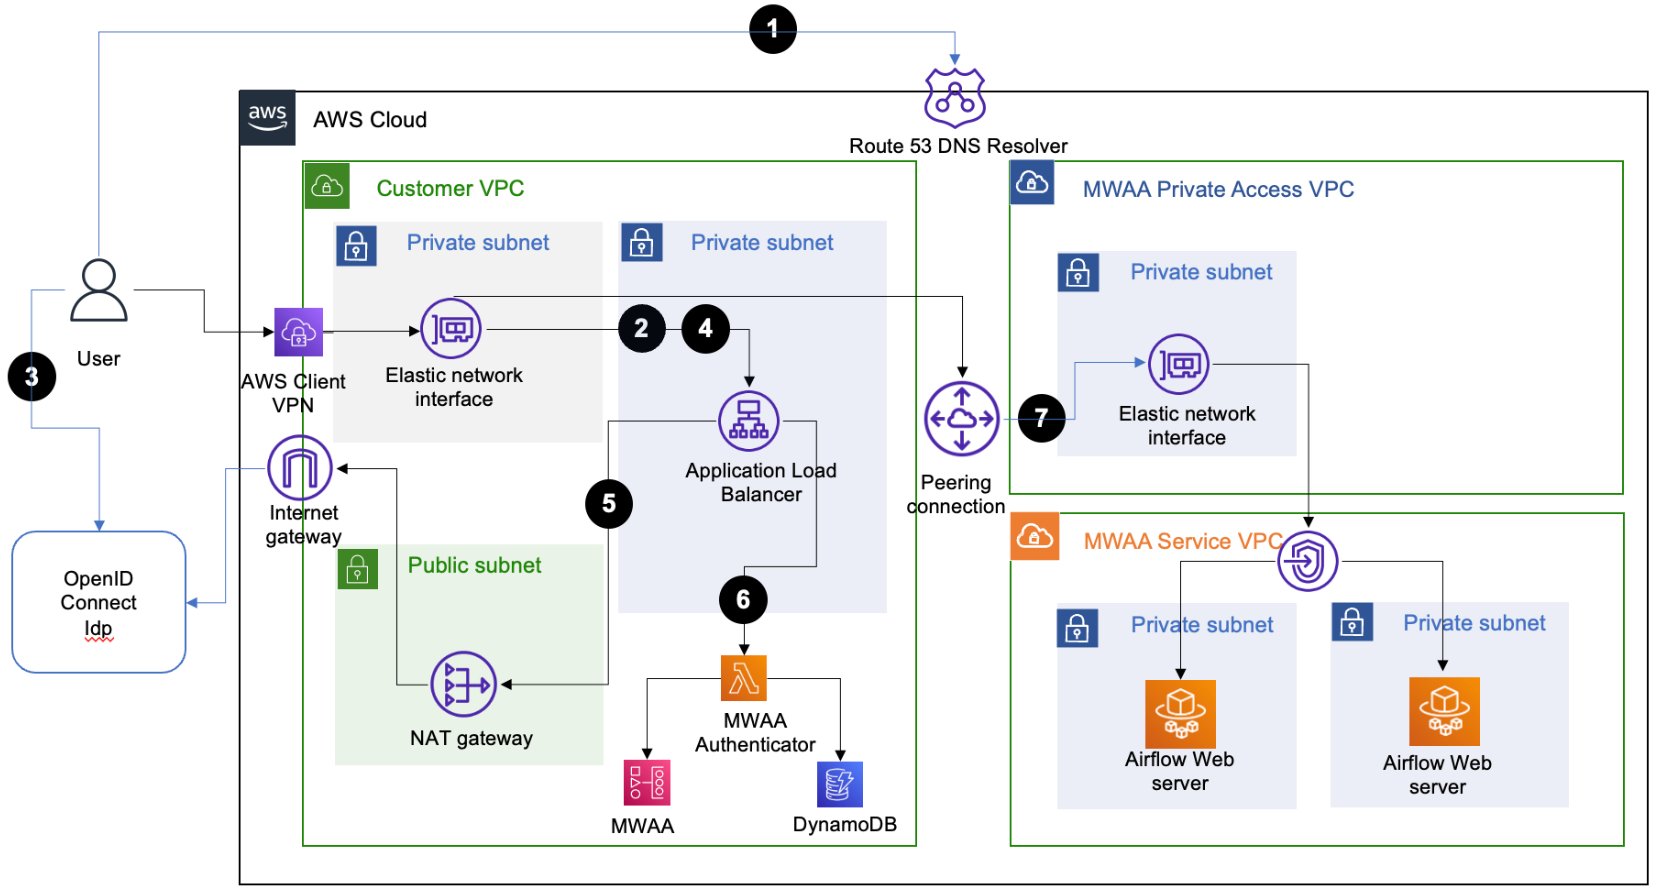
 Ajay Vohra is a Principal Prototyping Architect specializing in perception machine learning for autonomous vehicle development. Prior to Amazon, Ajay worked in the area of massively parallel grid-computing for financial risk modeling.
 Jaswanth Kumar is a customer-obsessed Cloud Application Architect at AWS in NY. Jaswanth excels in application refactoring and migration, with expertise in containers and serverless solutions, coupled with a Masters Degree in Applied Computer Science.
 Aneel Murari is a Sr. Serverless Specialist Solution Architect at AWS based in the Washington, D.C. area. He has over 18 years of software development and architecture experience and holds a graduate degree in Computer Science. Aneel helps AWS customers orchestrate their workflows on Amazon Managed Apache Airflow (MWAA) in a secure, cost effective and performance optimized manner.
 Parnab Basak is a Solutions Architect and a Serverless Specialist at AWS. He specializes in creating new solutions that are cloud native using modern software development practices like serverless, DevOps, and analytics. Parnab works closely in the analytics and integration services space helping customers adopt AWS services for their workflow orchestration needs.

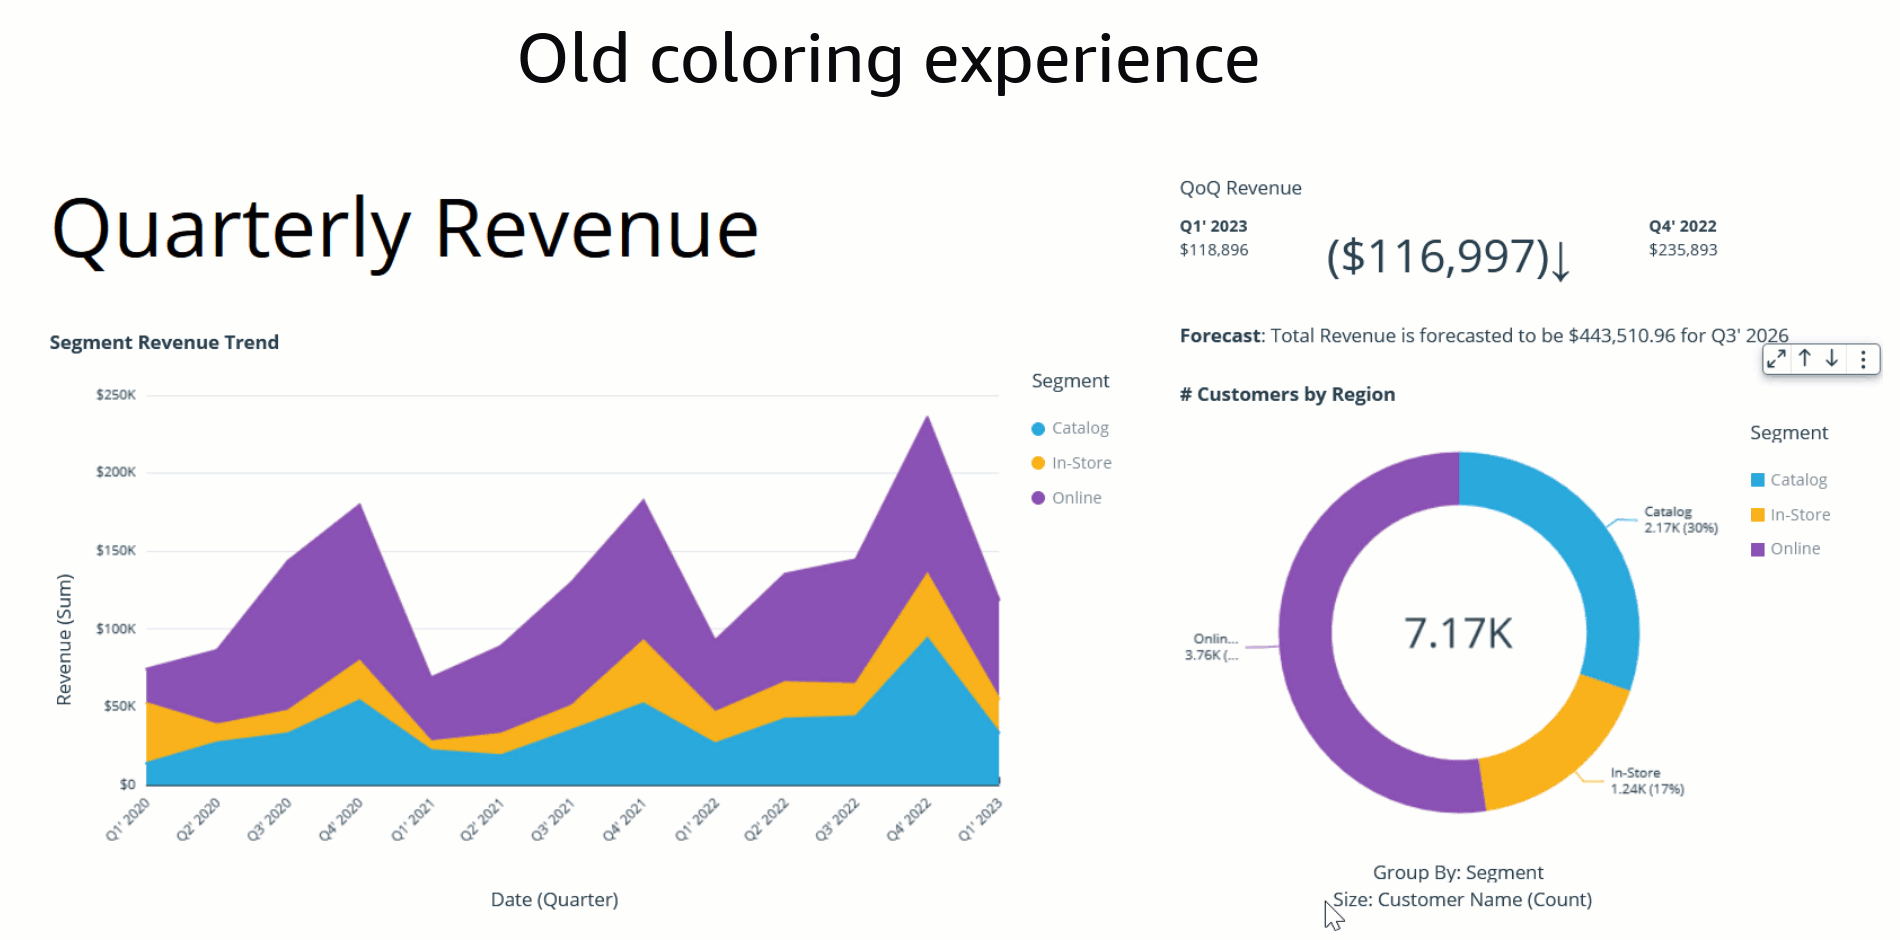
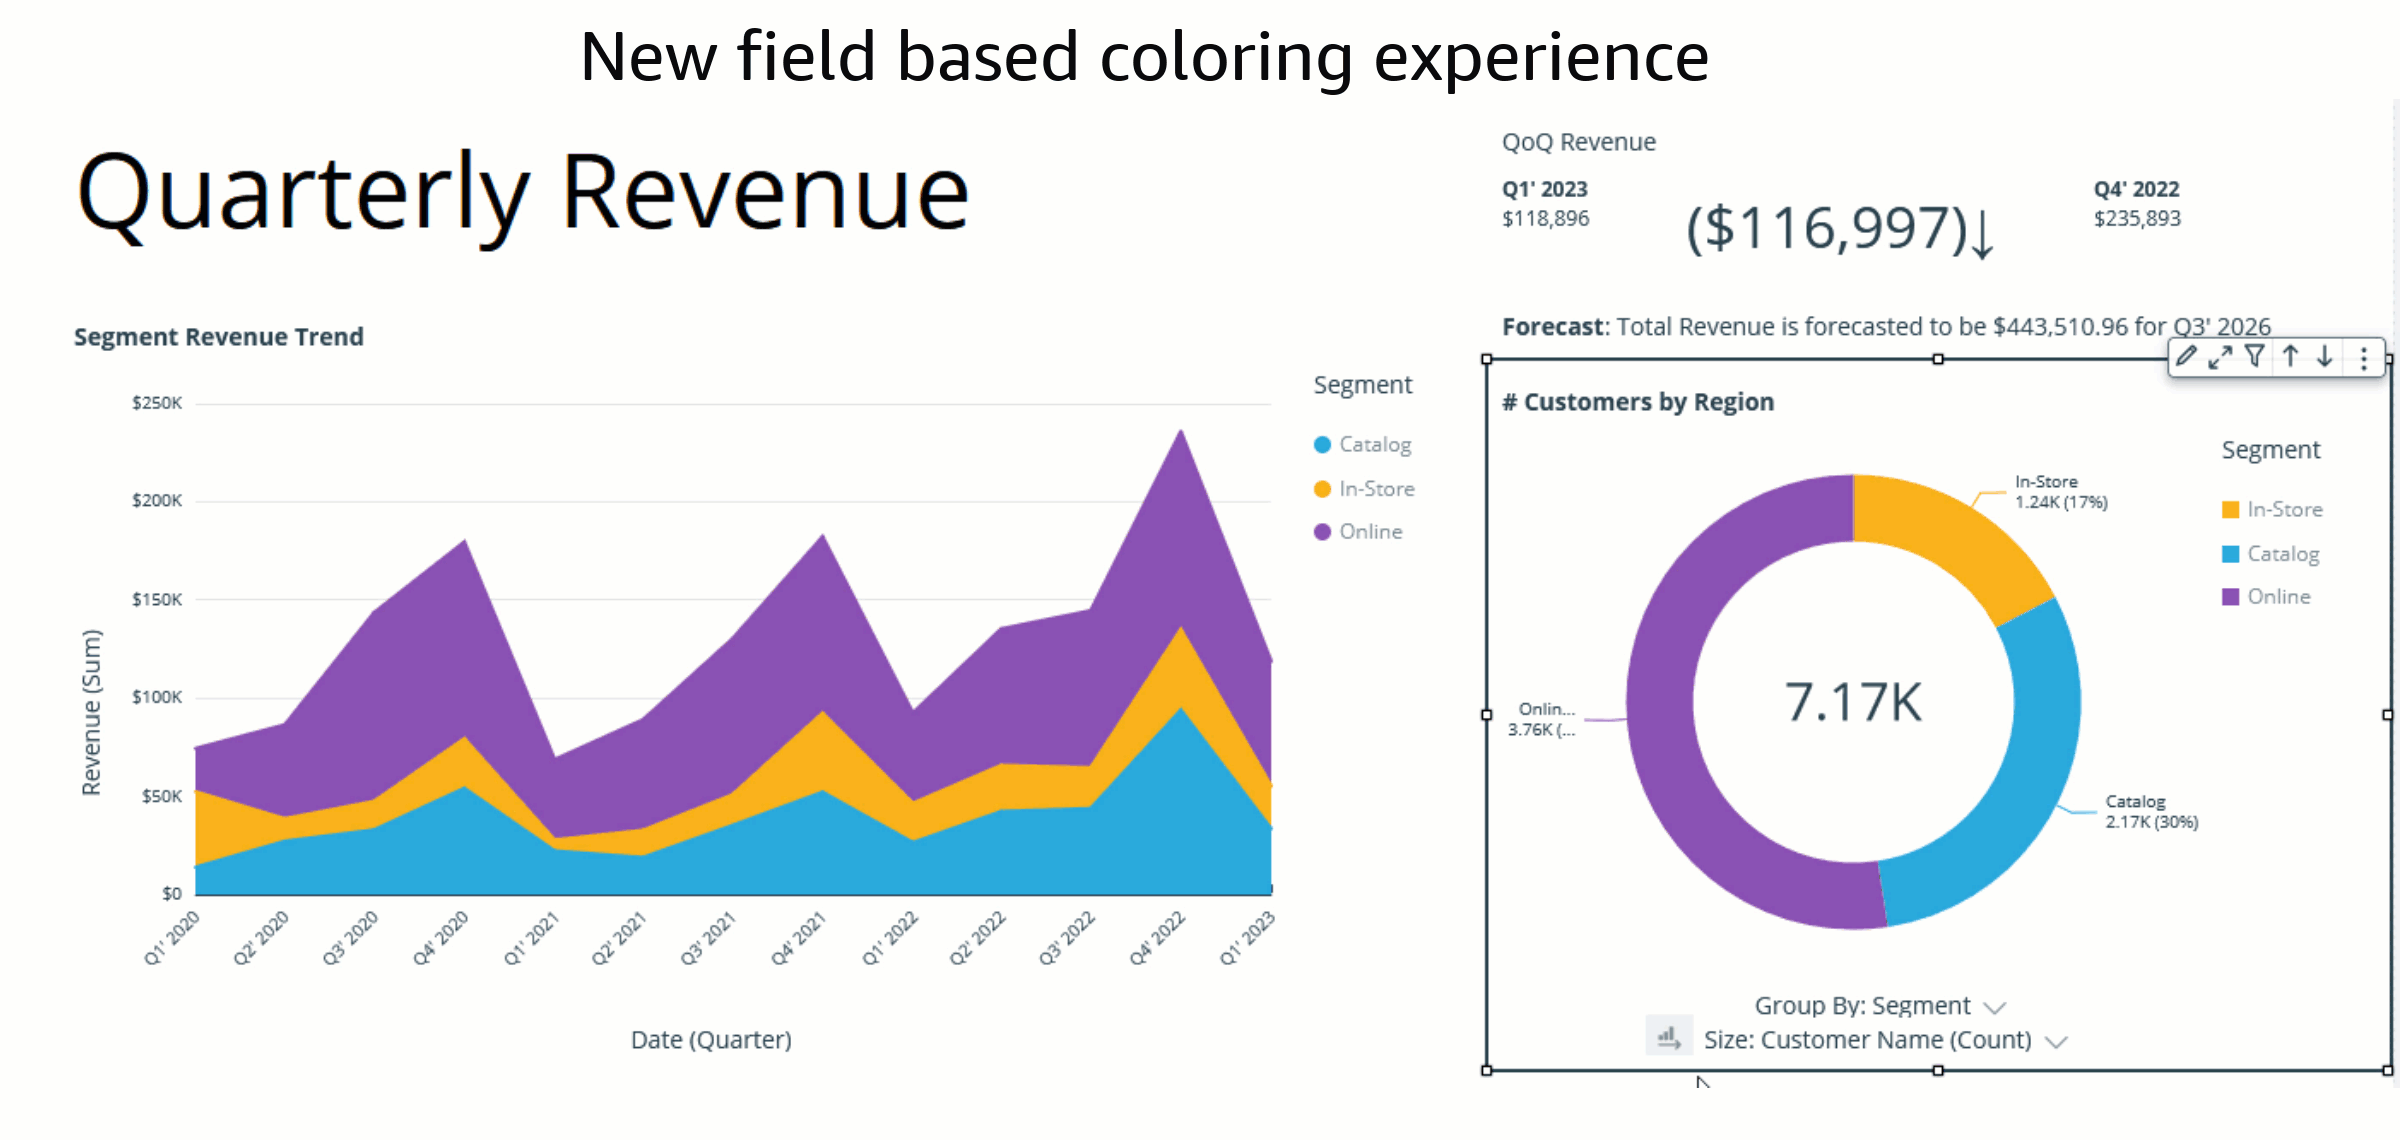


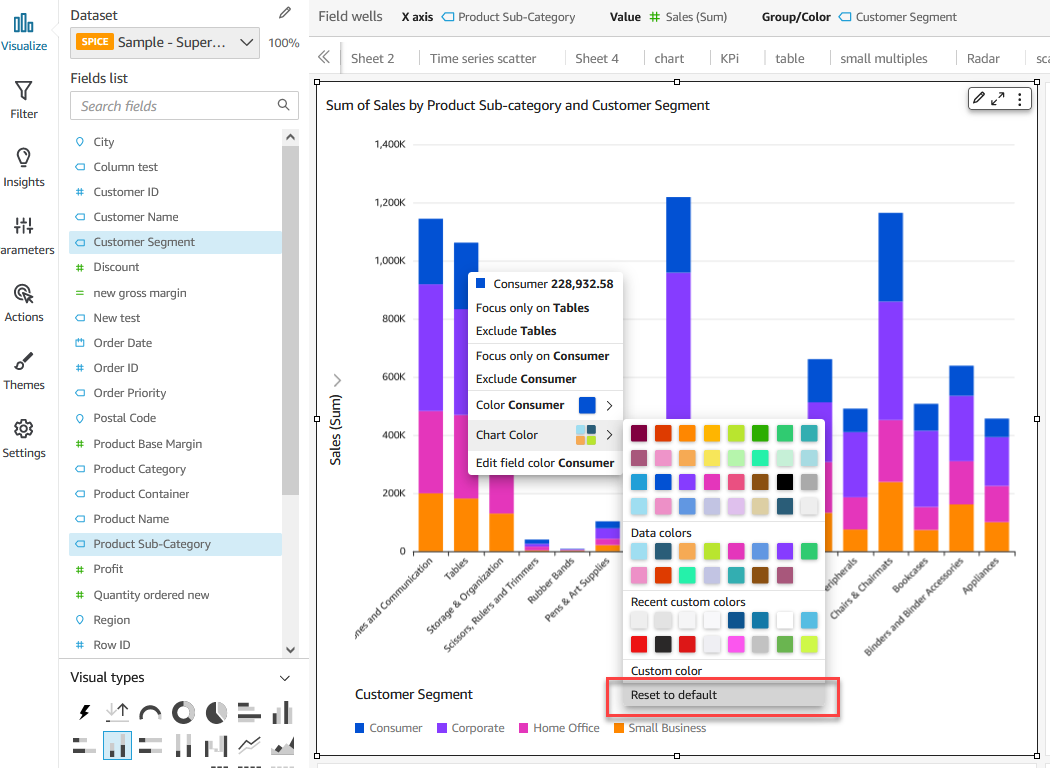
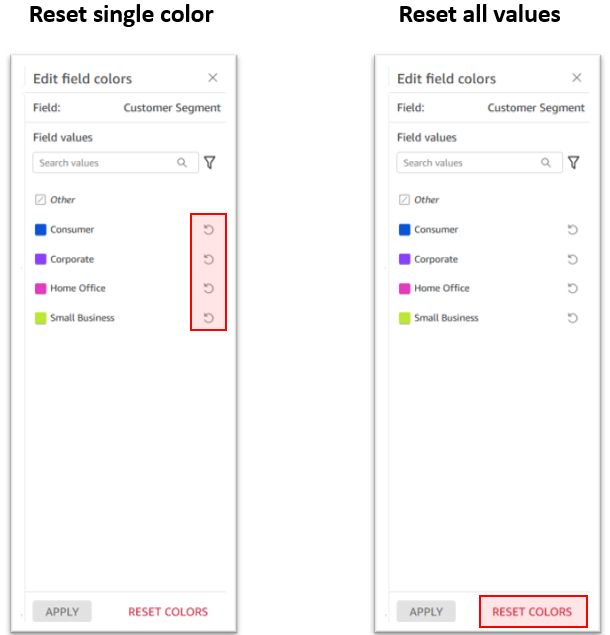

 Bhupinder Chadha is a senior product manager for Amazon QuickSight focused on visualization and front end experiences. He is passionate about BI, data visualization and low-code/no-code experiences. Prior to QuickSight he was the lead product manager for Inforiver, responsible for building a enterprise BI product from ground up. Bhupinder started his career in presales, followed by a small gig in consulting and then PM for xViz, an add on visualization product.