Version 1.2.0

Post Syndicated from NTPsec Project Blog original https://blog.ntpsec.org/2020/10/06/version-1.2.0.html

version 1.2.0

The NTPsec Project is pleased to announce the tagging of version 1.2.0

The minor version bump is to indicate official official support of
RFC8915 “Network Time Security for the Network Time Protocol” which
was released 2020-09-30.

For other changes since the previous release, please consult
the project NEWS.adoc file
at https://gitlab.com/NTPsec/ntpsec/-/blob/master/NEWS.adoc

Getting this release

You can clone the git repo
from https://gitlab.com/NTPsec/ntpsec.git
and you can download the release tarballs with sums and signatures
from ftp://ftp.ntpsec.org/pub/releases/

This release is signed with the GPG key id
E57235D22764129FA4F2F4D17F52608ED0E49D76
which is a new key.

About today

On this day in 1783, Benjamin Hanks received a patent for a
self-winding clock he planned to install in the Old Dutch Church in
Kingston, New York, supposedly making it the first public clock in
what became the New York City metropolitan area.

Is your cloud hosting backup plan ready for 2021?

Post Syndicated from Ross Krumbeck original https://www.anchor.com.au/blog/2020/10/is-your-cloud-hosting-backup-plan-ready-for-2021/

Most businesses have a whole array of backup plans in place. A backup plan for when staff members call in sick, a backup plan for recouping damaged or lost stock, a backup plan for emergency expenses… but what about a backup plan for their cloud hosting services?


All too often, backing up one’s website or application, particularly when housed on cloud hosting, is a task left a little more neglected than it should be. This can be due to it being put in the “too hard” basket, or the “something to eventually get around to” basket, or simply from being overlooked due to a business believing that they have a plan in place, but never actually testing that it works. Staff turnover can also play a part. If the staff member or team, who initially set up your backup plan has since moved on, it can be a chaotic experience to unravel the plan when disaster suddenly strikes.


In particular, if a business conducts significant online trade, unexpected downtime of their websites or applications can mean heavy losses. In 2015, one of Anchor’s larger e-commerce customers transacted more than $100 million dollars in revenue through their Magento store. Crunching those numbers means a single hour of downtime equals a potential revenue loss of around $11,415. It should really go without saying, if a website or application is a critical part of a businesses income stream, they should be taking every precaution to guard against outages in the same way they protect themselves against any other challenges.


We must always keep in mind that no technology is completely fail-proof. Even cloud services are not exempt from experiencing occasional outages and unavoidable technical challenges, especially if not regularly maintained and managed by AWS-qualified professionals.


As we continue to wade our way through 2020, reliance on the digital world has become far heavier and more demanding than ever before. According to research published by Synergy Research Group, spending on cloud services has continued to rise during the pandemic, passing $30 billion in the second quarter of 2020 – a massive increase of $7.5 billion when compared to the second quarter of 2019. As more and more businesses turn to cloud services to continue their survival, the greater the need for a focus on preparing for downtime.


As we swiftly approach the Christmas shopping period, loss of profits in the event of an outage could be far worse should they strike during the busiest time for online sales. Realistically, the real cost could be four or five times your ‘business as usual’ number. If you add to that the reputational damage to your brand, the financial impacts keep growing.


Fortunately, every cloud provider offers some form of Service Level Agreement (SLA), including an uptime guarantee, and AWS is no different. SLAs and guarantees set out to give us confidence in the resilience of the network, infrastructure and services while describing how we may be compensated should an unscheduled outage occur. But even a 99.5% uptime guarantee means your website or app can be offline for nearly 22 minutes each and every month without compensation – and that can add up to a lot of lost sales for a busy online business.


With that being the case, the best thing you can do is ensure you are well prepared to get back online as quickly as possible. As well as ensuring that you have a disaster recovery plan in place, it’s just as important to regularly test it too. Relying on a cloud provider’s uptime guarantee is never an alternative to taking the necessary steps to ensure your deployment is highly available. It’s worth investing a little more to protect your bottom line.


To add a further complication, there are several conditions that may prevent you from claiming any SLA compensation. If you aren’t aware of these conditions, it’s entirely possible (even likely in many cases!) that you may have already voided any SLA protections.


If you’d like to know more about ensuring your business is eligible for SLA protections, you can download our free eBook here.


If your business doesn’t have a professional backup plan in place for your cloud hosting services, or you haven’t thoroughly tested that your existing plan works lately, our cloud experts can assist you in ensuring that your business backup plan is ready for the busy Christmas period, as well as future-proofed for 2021 – because after the way things have gone in 2020, who knows what’s in store for us next!


The post Is your cloud hosting backup plan ready for 2021? appeared first on AWS Managed Services by Anchor.

How to run 3D interactive applications with NICE DCV in AWS Batch

Post Syndicated from Ben Peven original https://aws.amazon.com/blogs/compute/how-to-run-3d-interactive-applications-with-nice-dcv-in-aws-batch/

This post is contributed by Alberto Falzone, Consultant, HPC and Roberto Meda, Senior Consultant, HPC.

High Performance Computing (HPC) workflows across industry verticals such as Design and Engineering, Oil and Gas, and Life Sciences often require GPU-based 3D/OpenGL rendering. Setting up drivers and applications for these types of workflows can require significant effort.

Similar GPU intensive workloads, such as AI/ML, are heavily using containers to package software stacks and reduce the complexity of installing and setting up the required binaries and scripts to download and run a simple container image. This approach is rarely used in the visualization of previously mentioned pre- and post-processing steps due to the complexity of using a graphical user interface within a container.

This post describes how to reduce the complexity of installing and configuring a GPU accelerated application while maintaining performance by using NICE DCV. NICE DCV is a high-performance remote display protocol that provides customers with a secure way to deliver remote desktops and application streaming from any cloud or data center to any device, over varying network conditions.

With remote server-side graphical rendering, and optimized streaming technology over network, huge volume data can be analyzed easily without moving or downloading on client, saving on data transfer costs.

Services and solution overview

This post provides a step-by-step guide on how to build a container able to run accelerated graphical applications using NICE DCV, and setup AWS Batch to run it. Finally, I will showcase how to submit an AWS Batch job that will provision the compute environment (CE) that contains a set of managed or unmanaged compute resources that are used to run jobs, launch the application in a container, and how to connect to the application with NICE DCV.

Services

Before reviewing the solution, below are the AWS services and products you will use to run your application:

  • AWS Batch (AWS Batch) plans, schedules, and runs batch workloads on Amazon Elastic Container Service (ECS), dynamically provisioning the defined CE with Amazon EC2
  • Amazon Elastic Container Registry (Amazon ECR) is a fully managed Docker container registry that simplifies how developers store, manage, and deploy Docker container images. In this example, you use it to register the Docker image with all the required software stack that will be used from AWS Batch to submit batch jobs.
  • NICE DCV (NICE DCV) is a high-performance remote display protocol that delivers remote desktops and application streaming from any cloud or data center to any device, over varying network conditions. With NICE DCV and Amazon EC2, customers can run graphics-intensive applications remotely on G3/G4 EC2 instances, and stream the results to client machines not provided with a GPU.
  • AWS Secrets Manager (AWS Secrets Manager) helps you to securely encrypt, store, and retrieve credentials for your databases and other services. Instead of hardcoding credentials in your apps, you can make calls to Secrets Manager to retrieve your credentials whenever needed.
  • AWS Systems Manager (AWS Systems Manager) gives you visibility and control of your infrastructure on AWS, and provides a unified user interface so you can view operational data from multiple AWS services. It also allows you to automate operational tasks across your AWS resources. Here it is used to retrieve a public parameter.
  • Amazon Simple Notification Service (Amazon SNS) enables applications, end-users, and devices to instantly send and receive notifications from the cloud. You can send notifications by email to the user who has created a valid and verified subscription.

Solution

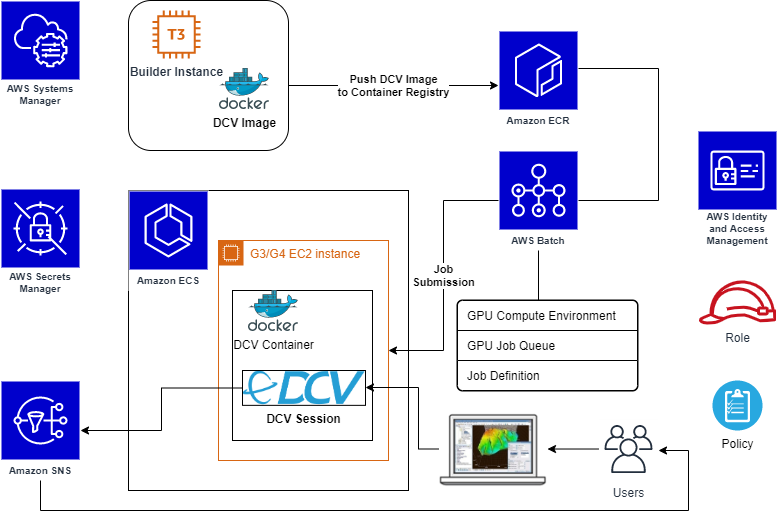
The goal of this solution is to run an interactive Linux desktop session in a single Amazon ECS container, with support for GPU rendering, and connect remotely through NICE DCV protocol. AWS Batch will dynamically provision EC2 instances, with or without GPU (e.g. G3/G4 instances).

Solution scheme

You will build and register the DCV Container image to be used for the DCV Desktop Sessions. In AWS Batch, we will set up a managed CE starting from the Amazon ECS GPU-optimized AMI, which comes with the NVIDIA drivers and Amazon ECS agent already installed. Also, you will use Amazon Secrets Manager to safely store user credentials and Amazon SNS to automatically notify the user that the interactive job is ready.

Tutorial

As a Computational Fluid Dynamics (CFD) visualization application example you will use Paraview.

This blog post goes through the following steps:

  1. Prepare required components
    • Launch temporary EC2 instance to build a DCV container image
    • Store user’s credentials and notification data
    • Create required roles
  2. Build DCV container image
  3. Create a repository on Amazon ECR
    • Push the DCV container image
  4. Configure AWS Batch
    • Create a managed CE
    • Create a related job queue
    • Create its Job Definition
  5. Submit a batch job
  6. Connect to the interactive desktop session using NICE DCV
    • Run the Paraview application to visualize results of a job simulation

Prerequisites

  • An Amazon Linux 2 instance as a Docker host, launched from the latest Amazon ECS GPU-optimized AMI
  • In order to connect to desktop sessions, inbound DCV port must be opened (by default DCV port is 8443)
  • AWS account credentials with the necessary access permissions
  • AWS Command Line Interface (CLI) installed and configured with the same AWS credentials
  • To easily install third-party/open source required software, assume that the Docker host has outbound internet access allowed

Step 1. Required components

In this step you’ll create a temporary EC2 instance dedicated to a Docker image, and create the IAM policies required for the next steps. Next create the secrets in AWS Secrets Manager service to store sensible data like credentials and SNS topic ARN, and apply and verify the required system settings.

1.1 Launch the temporary EC2 instance for Docker image building

Launch the EC2 instance that becomes your Docker host from the Amazon ECS GPU-optimized AMI. Retrieve its AMI ID. For cost saving, you can use one of t3* family instance type for this stage (e.g. t3.medium).

1.2 Store user credentials and notification data

As an example of avoiding hardcoded credentials or keys into scripts used in next stages, we’ll use AWS Secrets Manager to safely store final user’s OS credentials and other sensible data.

  • In the AWS Management Console select Secrets Manager, create a new secret, select type Other type of secrets, and specify key pair. Store the user login name as a key, e.g.: user001, and the password as value, then name the secret as Run_DCV_in_Batch, or alternatively you can use the commands. Note xxxxxxxxxx is your chosen password.

aws secretsmanager  create-secret --secret-id Run_DCV_in_Batch
aws secretsmanager put-secret-value --secret-id Run_DCV_in_Batch --secret-string '{"user001":"xxxxxxxxxx"}'

  • Create an SNS Topic to send email notifications to the user when a DCV session is ready for connection:
  • In the AWS Management Console select Secrets Manager service to create a new secret named DCV_Session_Ready_Notification, with type other type of secrets and key pair values. Store the string sns_topic_arn as a key and the SNS Topic ARN as value:

aws secretsmanager  create-secret --secret-id DCV_Session_Ready_Notification
aws secretsmanager put-secret-value --secret-id DCV_Session_Ready_Notification --secret-string '{"sns_topic_arn":"<put here your SNS Topic ARN>"}'

1.3 Create required role and policy

To simplify, define a single role named dcv-ecs-batch-role gathering all the necessary policies. This role will be associated to the EC2 instance that launches from an AWS Batch job submission, so it is included inside the CE definition later.

To allow DCV sessions, push images into Amazon ECR and AWS Batch operations, create the role and include the following AWS managed and custom policies:

  • AmazonEC2ContainerRegistryFullAccess
  • AmazonEC2ContainerServiceforEC2Role
  • SecretsManagerReadWrite
  • AmazonSNSFullAccess
  • AmazonECSTaskExecutionRolePolicy

To reach the NICE DCV licenses stored in Amazon S3 (see licensing the NICE DCV server for more details), define a custom policy named DCVLicensePolicy (the following policy is for eu-west-1 Region, you might also use us-east-1):

{
    "Version": "2012-10-17",
    "Statement": [
        {
            "Effect": "Allow",
            "Action": "s3:GetObject",
            "Resource": "arn:aws:s3:::dcv-license.eu-west-1/*"
        }
    ]
}

create role

Note: If needed, you can add additional policies to allow the copy data from/to S3 bucket.

Update the Trust relationships of the same role in order to allow the Amazon ECS tasks execution and use this role from the AWS Batch Job definition as well:

{
  "Version": "2012-10-17",
  "Statement": [
    {
      "Effect": "Allow",
      "Principal": {
        "Service": "ec2.amazonaws.com"
      },
      "Action": "sts:AssumeRole"
    },
    {
      "Effect": "Allow",
      "Principal": {
        "Service": "ecs-tasks.amazonaws.com"
      },
      "Action": "sts:AssumeRole"
    }
  ]
}

Trusted relationships and Trusted entities

1.4 Create required Security Group

In the AWS Management Console, access EC2, and create a Security Group, named dcv-sg, that is open to DCV sessions and DCV clients by enabling tcp port 8443 in Inbound.

Step 2. DCV container image

Now you will build a container that provides OpenGL acceleration via NICE DCV. You’ll write the Dockerfile starting from Amazon Linux 2 base image, and add DCV with its related requirements.

2.1 Define the Dockerfile

The base software packages in the Dockerfile will contain: NVIDIA libraries, X server and GNOME desktop and some external scripts to manage the DCV service startup and email notification for the user.

Starting from the base image just pulled, our Dockerfile does install all required (and optional) system tools and libraries, desktop manager packages, manage the Prerequisites for Linux NICE DCV Servers , Install the NICE DCV Server on Linux and Paraview application for 2D/3D data visualization.

The final contents of the Dockerfile is available here; in the same repository, you can also find scripts that manage the DCV service system script, the notification message sent to the User, the creation of local User at startup and the run script for the DCV container.

2.2 Build Dockerfile

Install required tools both to unpack archives and perform command on AWS:

sudo yum install -y unzip awscli

Download the Git archive within the EC2 instance, and unpack on a temporary directory:

curl -s -L -o - https://github.com/aws-samples/aws-batch-using-nice-dcv/archive/latest.tar.gz | tar zxvf -

From inside the folder containing aws-batch-using-nice-dcv.dockerfile, let’s build the Docker image:

docker build -t dcv -f aws-batch-using-nice-dcv.dockerfile .

The first time it takes a while since it has to download and install all the required packages and related dependencies. After the command completes, check it has been built and tagged correctly with the command:

docker images

Step 3. Amazon ECR configuration

In this step, you’ll push/archive our newly built DCV container AMI into Amazon ECR. Having this image in Amazon ECR allows you to use it inside Amazon ECS and AWS Batch.

3.1 Push DCV image into Amazon ECR repository

Set a desired name for your new repository, e.g. dcv, and push your latest dcv image into it. The push procedure is described in Amazon ECR by selecting your repository, and clicking on the top-right button View push commands.

Install the required tool to manage content in JSON format:

sudo yum install -y jq

Amazon ECR push commands to run include:

  • Login command to authenticate your Docker client to Amazon ECS registry. Using the AWS CLI:

AWS_REGION="$(curl -s http://169.254.169.254/latest/dynamic/instance-identity/document | jq -r .region)"
eval $(aws ecr get-login --no-include-email --region "${AWS_REGION}") Note: If you receive an “Unknown options: –no-include-email” error when using the AWS CLI, ensure that you have the latest version installed. Learn more.

  • Create the repository:

aws ecr create-repository --repository-name=dcv —region "${AWS_REGION}"DCV_REPOSITORY=$(aws ecr describe-repositories --repository-names=dcv --region "${AWS_REGION}"| jq -r '.repositories[0].repositoryUri')

  • Tag the image to push the image to the Amazon ECR repository:

docker build -t "${DCV_REPOSITORY}:$(date +%F)" -f aws-batch-using-nice-dcv.dockerfile .

  • Push command:

docker push "${DCV_REPOSITORY}:$(date +%F)"

Step 4. AWS Batch configuration

The final step is to set up AWS Batch to manage your DCV containers. The link to all previous steps is the use of our DCV container image inside the AWS Batch CE.

4.1 Compute environment

Create an AWS Batch CE using othe newly created AMI.

  • Log into the AWS Management Console, select AWS Batch, select ‘get started’, and skip the wizard on next page.
  • Choose Compute Environments on the left, and click on Create Environment.
  • Specify all your desired settings, e.g.:
      • Managed type
      • Name: DCV-GPU-CE
      • Service role: AWSBatchServiceRole
      • Instance role: dcv-ecs-batch-role
  • Since you want OpenGL acceleration, choose an instance type with GPU (e.g. g4dn.xlarge).
  • Choose an allocation strategy. In this example I choose BEST_FIT_PROGRESSIVE
  • Assign the security group dcv-sg, created previously at step 1.4 that keeps DCV port 8443 open.
  • Add a Nametag with the value e.g. “DCV-GPU-Batch-Instance”; to assign it to the EC2 instances started by AWS Batch automatically, so you can recognize it if needed.

4.2 Job Queue

Time to create a Job Queue for DCV with your preferred settings.

  • Select Job Queues from the left menu, then select Create queue (naming, for instance, e.g. DCV-GPU-Queue)
  • Specify a required Priority integer value.
  • Associate to this queue the CE you defined in the previous step (e.g. DCV-GPU-CE).

4.3 Job Definition

Now, we create a Job Definition by selecting the related item in the left menu, and select Create. 

We’ll use, listed per section:

  • Job Definition name (e.g. DCV-GPU-JD)
  • Execution timeout to 1h: 3600
  • Parameter section:
    • Add the Parameter named command with value: --network=host
      • Note: This parameter is required and equivalent to specify the same option to the docker run.Learn more.
  • Environment section:
    • Job role: dcv-ecs-batch-role
    • Container image: Use the ECR repository previously created, e.g. dkr.ecr.eu-west-1.amazonaws.com/dcv. If you don’t remember the Amazon ECR image URI, just return to Amazon ECR -> Repository -> Images.
    • vCPUs: 8
      • Note: Value equal to the vCPUs of the chosen instance type (in this example: gdn4.2xlarge), having one job per node to avoid conflicts on usage of TCP ports required by NICE DCV daemons.
    • Memory (MiB): 2048
  • Security section:
    • Check Privileged
    • Set user root (run as root)
  • Environment Variables section:
    • DISPLAY: 0
    • NVIDIA_VISIBLE_DEVICES: 0
    • NVIDIA_ALL_CAPABILITIES: all

Note: Amazon ECS provides a GPU-optimized AMI that comes ready with pre-configured NVIDIA kernel drivers and a Docker GPU runtime, learn more; the variables above make available the required graphic device(s) inside the container.

4.4 Create and submit a Job

We can finally, create an AWS Batch job, by selecting Batch → Jobs → Submit Job.
Let’s specify the job queue and job definition defined in the previous steps. Leave the command filed as pre-filled from job definition.

Running DCV job on AWS Batch

4.5 Connect to sessions

Once the job is in RUNNING state, go to the AWS Batch dashboard, you can get the IP address/DNS in several ways as noted in How do I get the ID or IP address of an Amazon EC2 instance for an AWS Batch job. For example, assuming the tag Name set on CE is DCV-GPU-Batch-Instance:

aws ec2 describe-instances --filters Name=instance-state-name,Values=running Name=tag:Name,Values="DCV-GPU-Batch-Instance" --query "Reservations[].Instances[].{id: InstanceId, tm: LaunchTime, ip: PublicIpAddress}" | jq -r 'sort_by(.tm) | reverse | .[0]' | jq -r .ip

Note: It could be required to add the EC2 policy to the list of instances in the IAM role. If the AWS SNS Topic is properly configured, as mentioned in subsection 1.2, you receive the notification email message with the URL link to connect to the interactive graphical DCV session.

Email from SNS

Finally, connect to it:

  • https://<ip address>:8443

Note: You might need to wait for the host to report as running on EC2 in AWS Management Console.

Below is a NICE DCV session running inside a container using the web browser, or equivalently the NICE DCV native client as well, running Paraview visualization application. It shows the basic elbow results coming from an external OpenFoam simulation, which data has been previously copied over from an S3 bucket; and the dcvgltest as well:

DCV Client connected to a running session

Cleanup

Once you’ve finished running the application, avoid incurring future charges by navigating to the AWS Batch console and terminate the job, set CE parameter Minimum vCPUs and Desired vCPUs equal to 0. Also, navigate to Amazon EC2 and stop the temporary EC2 instance used to build the Docker image.

For a full cleanup of all of the configurations and resources used, delete: the job definition, the job queue and the CE (AWS Batch), the Docker image and ECR Repository (Amazon ECR), the role dcv-ecs-batch-role (Amazon IAM), the security group dcv-sg (Amazon EC2), the Topic DCV_Session_Ready_Notification (AWS SNS), and the secret Run_DCV_in_Batch (Amazon Secrets Manager).

Conclusion

This blog post demonstrates how AWS Batch enables innovative approaches to run HPC workflows including not only batch jobs, but also pre-/post-analysis steps done through interactive graphical OpenGL/3D applications.

You are now ready to start interactive applications with AWS Batch and NICE DCV on G-series instance types with dedicated 3D hardware. This allows you to take advantage of graphical remote rendering on optimized infrastructure without moving data to save costs.
Python 3.9 released

Post Syndicated from original https://lwn.net/Articles/833550/rss

Version 3.9 of the Python programming language has been released. The changelog, “What’s New in Python 3.9” document, and our recent article have lots more information on the release.
Maintenance releases for the 3.9 series will follow at regular bi-monthly intervals starting in
late November of 2020.

OK, boring! Where is Python 4?

Not so fast! The next release after 3.9 will be 3.10. It will be an incremental improvement over
3.9, just as 3.9 was over 3.8, and so on.”

[$] Getting KDE onto commercial hardware

Post Syndicated from original https://lwn.net/Articles/833153/rss

At Akademy 2020, the
annual KDE conference that was held virtually this year, KDE developer Nate
Graham delivered a talk entitled “Visions of the Future” (YouTube video) about the
possible future of KDE on commercial products. Subtitled “Plasma sold on
retail hardware — lots of it”, the session concentrated on ways to
make KDE applications (and the Plasma desktop) the default
environment on hardware
sold to the general public. The proposal includes creating an
official KDE distribution with a hardware certification program and
directly paying developers.

U-Boot v2020.10 released

Post Syndicated from original https://lwn.net/Articles/833547/rss

U-Boot (the Universal Boot Loader) v2020.10 is out. “With this release
we have a number of “please migrate to DM” warnings that are now 1 year
past their warning date, and well past 1 year of those warnings being
printed. It’s getting up there on my TODO list to see if removing
features or boards in these cases is easier.

Automating deployment of Amazon Redshift ETL jobs with AWS CodeBuild, AWS Batch, and DBT

Post Syndicated from Megah Fadhillah original https://aws.amazon.com/blogs/big-data/automating-deployment-of-amazon-redshift-etl-jobs-with-aws-codebuild-aws-batch-and-dbt/

Data has become an essential part of every business, and its volume, velocity, and variety continue to increase. This has resulted in more complex ETL jobs with interdependencies between each other. There is also a critical need to be agile and automate the workflow—from changing the ETL jobs due to business requirements to deploying it into production. Failure to do so increases the time to value and cost of operations.

In this post, we show you how to automate the deployment of Amazon Redshift ETL jobs using AWS Batch and AWS CodeBuild. AWS Batch allows you to run your data transformation jobs without having to install and manage batch computing software or server clusters. CodeBuild is a fully managed continuous integration service that builds your data transformation project into a Docker image run in AWS Batch. This deployment automation can help you shorten the time to value. These two services are also fully managed and incur fees only when run, which optimizes costs.

We also introduce a third-party tool for the ETL jobs: DBT, which enables data analysts and engineers to write data transformation queries in a modular manner without having to maintain the execution order manually. It compiles all code into raw SQL queries that run against your Amazon Redshift cluster to use existing computing resources. It also understands dependencies within your queries and runs them in the correct order. DBT code is a combination of SQL and Jinja (a templating language); therefore, you can express logic such as if statements, loops, filters, and macros in your queries. For more information, see DBT Documentation.

Solution overview

The following illustration shows the architecture of the solution:

The steps in this workflow are as follows:

  1. A data analyst pushes their DBT project into a GitHub repo.
  2. CodeBuild is triggered and builds a Docker image from the DBT project. It reads Amazon Redshift and GitHub credentials from AWS Secrets Manager. The image is stored in Amazon Elastic Container Registry (Amazon ECR).
  3. Amazon CloudWatch Events submits an AWS Batch job on a scheduled basis to run the Docker image located in Amazon ECR.
  4. The AWS Batch job runs the DBT project against the Amazon Redshift cluster. When the job is finished, AWS Batch automatically terminates your Amazon Elastic Compute Cloud (Amazon EC2) resources so there is no further charge.
  5. If the DBT job fails, Amazon Simple Notification Service (Amazon SNS) notifies the data analyst via email.

Consequent commits pushed to the GitHub repo trigger CodeBuild, and the new version of the code is used the next time the ETL job is scheduled to run.

All code used in this post is available in the GitHub repo.

Prerequisites

You need the following items to complete the steps in this post:

  • An AWS account with permissions to manage these services.
    • You need to use Region us-east-1.
  • An empty GitHub repo. You use this to store the DBT project later.

Setting up the Amazon Redshift cluster

Your first step is to set up an Amazon Redshift cluster for the ETL jobs. The AWS CloudFormation template provided in this post deploys an Amazon Redshift cluster and creates the tables with the required data. The tables are created in the public schema.

You can use Amazon Redshift Query Editor to verify that the tables have been created in the public schema. The Amazon Redshift credentials are as follows:

  • Username awsuser
  • Password Available in Secrets Manager with the name redshift-creds
  • Database name dev

Deploying the automation pipeline

Now that we have the Amazon Redshift cluster, we’re ready to deploy the automation pipeline. The following stack builds the rest of our architecture and schedules the DBT job.

You must provide the following parameters for the CloudFormation template:

  • GithubRepoUrl – The GitHub repo URL of the DBT project; for example, https://GitHub.com/mygit/dbt-batch.git.
  • GithubToken – Your GitHub personal token. If you don’t have a token, you can create one. Make sure the token scope contains both admin:repo_hook and repo.
  • JobFrequency – The frequency of the DBT job in cron format. Time is in UTC time zone. For example, 0 4 * * ? * runs the job every day at 4:00 UTC.
  • MonitoringEmail – The email address that receives monitoring alerts.
  • RedshiftStackName – The name of the CloudFormation stack where we deployed the Amazon Redshift cluster.
  • RedshiftSchema – The name of the schema with your data inside Amazon Redshift cluster.
  • GithubType – Whether you’re using public GitHub (github.com) or GitHub Enterprise from your company.

This template creates a CodeBuild project with a webhook configured to trigger a build whenever there is a change in the GitHub repo. The template also creates an AWS Batch job queue, job definition, compute environment, and CloudWatch event that is scheduled according to the JobFrequency parameter. The AWS Batch job runs the command dbt run –profiles-dir . to start the DBT jobs (for more information, see dbt run). Finally, the SNS topic for data job failures is also set up.

After the template is complete, you receive an email from [email protected] to confirm your subscription for the error topic. Choose Confirm subscription.

Setting up your DBT project in GitHub

You can download the DBT project repository that we provided for this post.

Push this project to your GitHub repo that you specified when deploying the CloudFormation stack. Ensure that your repository has the same folder structure as the sample; it’s required for CodeBuild and AWS Batch to run correctly.

This repository contains the generic DBT project (inside /src/dbt-project) with some wrappers for the automation. In this section, we further examine the files in the provided repository.

Dockerfile

In the /src/ folder, Dockerfile configures how the Docker image is built. Here, it installs the DBT library.

DBT project

The DBT project is located in /src/dbt-project. The profiles.yml file contains the connection details to the Amazon Redshift cluster, and CodeBuild configures the placeholder values.

In the models/example/ folder, you can see two queries that run against the tables we created earlier: top_customers.sql and top_nations.sql. In DBT, each .sql file corresponds to a DBT model. We specify in both models that the query results are materialized as new tables. See the following screenshot.

You can also see that the top_nations model uses the result of the top_customers model using the ref function on line 9. This is sufficient for DBT to understand the dependencies and to run the top_customers model prior to top_nations.

Buildspec.yml

Inside the /config folder, the buildspec.yml file specifies the configuration the CodeBuild project uses. On line 3, we take the Amazon Redshift credentials from Secrets Manager ($REDSHIFT_USER_SECRET and $REDSHIFT_PASSWORD_SECRET resolve to redshift-creds:username and redshift-creds:password, respectively). It also replaces the placeholders in profiles.yml with the value from Secrets Manager and the CloudFormation stack. Finally, it runs docker build, which uses the Dockerfile in the /src/ folder.

Testing the ETL Job

To test the pipeline, we push a Git commit to trigger the build.

  1. In the DBT project repository, we modify the top_nations.sql file. We also want to select the n_comment column from nation table and include it in the group by clause.

The new top_nations.sql looks like the following screenshot.

  1. Commit and push the change to the repository with the following commands:
    1. git commit -am “update top_nations”
    2. git push
  2. On the CodeBuild console, choose the DBT build project.

You should see that a build is currently running. When the build is complete, we trigger the AWS Batch job using a CloudWatch event.

  1. On the CloudWatch console, under Events, choose Rules.
  2. Search for the rule that contains CronjobEvent.
  3. Select that rule and from the Actions drop-down menu, choose Edit.
  4. For testing purposes, you can change the cron expression temporarily so that the job is triggered 2–3 minutes from now. For example, if the current time is 15:04 GMT, you can put 6 15 * * ? * so that it runs at 15:06 GMT.
  5. Choose Configure details.
  6. Choose Update rule.
  7. On the AWS Batch console, choose Jobs.

You can see the progress of your job; it has the status submitted, running, or succeeded.

  1. When the job is successful, go to the Amazon Redshift Query Editor.

In the public schema, you should now see two new tables: top_customers and top_nations. These are the results of the DBT queries.

Cleaning up

To avoid additional charges, delete the resources used in this post.

  1. On the Amazon ECR console, choose the repository named dbt-batch-processing-job-repository and delete the images within it.
  2. On the AWS CloudFormation console, delete the two stacks we created.
  3. In GitHub, delete the personal token that was created for this project. To find your tokens, complete the following:
    1. Choose your profile photo.
    2. In Settings, choose Developer settings.
    3. Choose Personal access tokens.

Conclusion

This post demonstrates how to implement a pipeline to automate deploying and running your ETL jobs. This pipeline allows you to reduce time to market because it automates the integration of changes in your ETL jobs. Thanks to the managed services available in AWS, you can also implement this pipeline without having to maintain servers, thus reducing operational costs. You can set up the process using CloudFormation templates, which allows you to replicate the pipeline in multiple environments consistently.

We also introduce you to a third-party data transformation tool, DBT, which helps implement ETL jobs by managing dependencies between queries. Because DBT code combines SQL and Jinja, you can develop your queries in plain SQL or combine with Jinja to express more complex logic, such as if statements and loops.

If you have any questions or suggestions, leave your feedback in the comment section. If you need any further assistance to optimize your Amazon Redshift implementation, contact your AWS account team or a trusted AWS partner.


About the Authors

Megah Fadhillah is a big data consultant at AWS. She helps customers develop big data and analytics solutions to accelerate their business outcomes. Outside of work, Megah enjoys watching movies and baking.


Amine El Mallem is a DevOps consultant in Professional Services at Amazon Web Services. He works with customers to design, automate, and build solutions on AWS for their business needs.


On Risk-Based Authentication

Post Syndicated from Bruce Schneier original https://www.schneier.com/blog/archives/2020/10/on-risk-based-authentication.html

Interesting usability study: “More Than Just Good Passwords? A Study on Usability and Security Perceptions of Risk-based Authentication“:

Abstract: Risk-based Authentication (RBA) is an adaptive security measure to strengthen password-based authentication. RBA monitors additional features during login, and when observed feature values differ significantly from previously seen ones, users have to provide additional authentication factors such as a verification code. RBA has the potential to offer more usable authentication, but the usability and the security perceptions of RBA are not studied well.

We present the results of a between-group lab study (n=65) to evaluate usability and security perceptions of two RBA variants, one 2FA variant, and password-only authentication. Our study shows with significant results that RBA is considered to be more usable than the studied 2FA variants, while it is perceived as more secure than password-only authentication in general and comparably se-cure to 2FA in a variety of application types. We also observed RBA usability problems and provide recommendations for mitigation.Our contribution provides a first deeper understanding of the users’perception of RBA and helps to improve RBA implementations for a broader user acceptance.

Paper’s website. I’ve blogged about risk-based authentication before.

Security updates for Monday

Post Syndicated from original https://lwn.net/Articles/833539/rss

Security updates have been issued by Debian (libvirt, snmptt, squid3, and xen), Fedora (chromium, libproxy, mumble, samba, and xawtv), openSUSE (bcm43xx-firmware, dpdk, grafana, nodejs12, python-pip, xen, and zabbix), Oracle (thunderbird), Red Hat (cockpit-ovirt, imgbased, redhat-release-virtualization-host, redhat-virtualization-host and qemu-kvm-rhev), and SUSE (perl-DBI).

Building resilient serverless patterns by combining messaging services

Post Syndicated from James Beswick original https://aws.amazon.com/blogs/compute/building-resilient-no-code-serverless-patterns-by-combining-messaging-services/

In “Choosing between messaging services for serverless applications”, I explain the features and differences between the core AWS messaging services. Amazon SQS, Amazon SNS, and Amazon EventBridge provide queues, publish/subscribe, and event bus functionality for your applications. Individually, these are robust, scalable services that are fundamental building blocks of serverless architectures.

However, you can also combine these services to solve specific challenges in distributed architectures. By doing this, you can use specific features of each service to build sophisticated patterns with little code. These combinations can make your applications more resilient and scalable, and reduce the amount of custom logic and architecture in your workload.

In this blog post, I highlight several important patterns for serverless developers. I also show how you use and deploy these integrations with the AWS Serverless Application Model (AWS SAM).

Examples in this post refer to code that can be downloaded from this GitHub repo. The README.md file explains how to deploy and run each example.

SNS to SQS: Adding resilience and throttling to message throughput

SNS has a robust retry policy that results in up to 100,010 delivery attempts over 23 days. If a downstream service is unavailable, it may be overwhelmed by retries when it comes back online. You can solve this issue by adding an SQS queue.

Adding an SQS queue between the SNS topic and its subscriber has two benefits. First, it adds resilience to message delivery, since the messages are durably stored in a queue. Second, it throttles the rate of messages to the consumer, helping smooth out traffic bursts caused by the service catching up with missed messages.

To build this in an AWS SAM template, you first define the two resources, and the SNS subscription:

  MySqsQueue:
    Type: AWS::SQS::Queue

  MySnsTopic:
    Type: AWS::SNS::Topic
    Properties:
      Subscription:
        - Protocol: sqs
          Endpoint: !GetAtt MySqsQueue.Arn

Finally, you provide permission to the SNS topic to publish to the queue, using the AWS::SQS::QueuePolicy resource:

  SnsToSqsPolicy:
    Type: AWS::SQS::QueuePolicy
    Properties:
      PolicyDocument:
        Version: "2012-10-17"
        Statement:
          - Sid: "Allow SNS publish to SQS"
            Effect: Allow
            Principal: "*"
            Resource: !GetAtt MySqsQueue.Arn
            Action: SQS:SendMessage
            Condition:
              ArnEquals:
                aws:SourceArn: !Ref MySnsTopic
      Queues:
        - Ref: MySqsQueue

To test this, you can publish a message to the SNS topic and then inspect the SQS queue length using the AWS CLI:

aws sns publish --topic-arn "arn:aws:sns:us-east-1:123456789012:sns-sqs-MySnsTopic-ABC123ABC" --message "Test message"
aws sqs get-queue-attributes --queue-url "https://sqs.us-east-1.amazonaws.com/123456789012/sns-sqs-MySqsQueue- ABC123ABC " --attribute-names ApproximateNumberOfMessages

This results in the following output:

CLI output

Another usage of this pattern is when you want to filter messages in architectures using an SQS queue. By placing the SNS topic in front of the queue, you can use the message filtering capabilities of SNS. This ensures that only the messages you need are published to the queue. To use message filtering in AWS SAM, use the AWS:SNS:Subcription resource:

  QueueSubcription:
    Type: 'AWS::SNS::Subscription'
    Properties:
      TopicArn: !Ref MySnsTopic
      Endpoint: !GetAtt MySqsQueue.Arn
      Protocol: sqs
      FilterPolicy:
        type:
        - orders
        - payments 
      RawMessageDelivery: 'true'

EventBridge to SNS: combining features of both services

Both SNS and EventBridge have different characteristics in terms of targets, and integration with broader features. This table compares the major differences between the two services:

Amazon SNS Amazon EventBridge
Number of targets 10 million (soft) 5
Limits 100,000 topics. 12,500,000 subscriptions per topic. 100 event buses. 300 rules per event bus.
Input transformation No Yes – see details.
Message filtering Yes – see details. Yes, including IP address matching – see details.
Format Raw or JSON JSON
Receive events from AWS CloudTrail No Yes
Targets HTTP(S), SMS, SNS Mobile Push, Email/Email-JSON, SQS, Lambda functions 15 targets including AWS LambdaAmazon SQSAmazon SNSAWS Step FunctionsAmazon Kinesis Data StreamsAmazon Kinesis Data Firehose.
SaaS integration No Yes – see integration partners.
Schema Registry integration No Yes – see details.
Dead-letter queues supported Yes No
Public visibility Can create public topics Cannot create public buses
Cross-Region You can subscribe your AWS Lambda functions to an Amazon SNS topic in any Region. Targets must be same Region. You can publish across Region to another event bus.

In this pattern, you configure an SNS topic as a target of an EventBridge rule:

SNS topic as a target for an EventBridge rule

In the AWS SAM template, you declare the resources in the preceding diagram as follows:

Resources:
  MySnsTopic:
    Type: AWS::SNS::Topic

  EventRule: 
    Type: AWS::Events::Rule
    Properties: 
      Description: "EventRule"
      EventPattern: 
        account: 
          - !Sub '${AWS::AccountId}'
        source:
          - "demo.cli"
      Targets: 
        - Arn: !Ref MySnsTopic
          Id: "SNStopic"

The default bus already exists in every AWS account, so there is no need to declare it. For the event bus to publish matching events to the SNS topic, you define permissions using the AWS::SNS::TopicPolicy resource:

  EventBridgeToToSnsPolicy:
    Type: AWS::SNS::TopicPolicy
    Properties: 
      PolicyDocument:
        Statement:
        - Effect: Allow
          Principal:
            Service: events.amazonaws.com
          Action: sns:Publish
          Resource: !Ref MySnsTopic
      Topics: 
        - !Ref MySnsTopic       

EventBridge has a limit of five targets per rule. In cases where you must send events to hundreds or thousands of targets, publishing to SNS first and then subscribing those targets to the topic works around this limit. Both services have different targets, and this pattern allows you to deliver EventBridge events to SMS, HTTP(s), email and SNS mobile push.

You can transform and filter the message using these services, often without needing an AWS Lambda function. SNS does not support input transformation but you can do this in an EventBridge rule. Message filtering is possible in both services but EventBridge provides richer content filtering capabilities.

AWS CloudTrail can log and monitor activity across services in your AWS account. It can be a useful source for events, allowing you to respond dynamically to objects in Amazon S3 or react to changes in your environment, for example. This natively integrates with EventBridge, allowing you to ingest events at scale from dozens of services.

Using EventBridge enables you to source events from outside your AWS account, offering integrations with a list of software as a service (SaaS) providers. This capability allows you to receive events from your accounts with SaaS providers like Zendesk, PagerDuty, and Auth0. These events are delivered to a partner event bus in your account, and can then be filtered and routed to an SNS topic.

Additionally, this pattern allows you to deliver events to Lambda functions in other AWS accounts and in other AWS Regions. You can invoke Lambda from SNS topics in other Regions and accounts. It’s also possible to make SNS topics publicly read-only, making them extensible endpoints that other third parties can consume from. SNS has comprehensive access control, which you can incorporate into this pattern.

Cross-account publishing

EventBridge to SQS: Building fault-tolerant microservices

EventBridge can route events to targets such as microservices. In the case of downstream failures, the service retries events for up to 24 hours. For workloads where you need a longer period of time to store and retry messages, you can deliver the events to an SQS queue in each microservice. This durably stores those events until the downstream service recovers. Additionally, this pattern protects the microservice from large bursts of traffic by throttling the delivery of messages.

Fault-tolerant microservices architecture

The resources declared in the AWS SAM template are similar to the previous examples, but it uses the AWS::SQS::QueuePolicy resource to grant the appropriate permission to EventBridge:

  EventBridgeToToSqsPolicy:
    Type: AWS::SQS::QueuePolicy
    Properties:
      PolicyDocument:
        Statement:
        - Effect: Allow
          Principal:
            Service: events.amazonaws.com
          Action: SQS:SendMessage
          Resource:  !GetAtt MySqsQueue.Arn
      Queues:
        - Ref: MySqsQueue

Conclusion

You can combine these services in your architectures to implement patterns that solve complex challenges, often with little code required. This blog post shows three examples that implement message throttling and queueing, integrating SNS and EventBridge, and building fault tolerant microservices.

To learn more building decoupled architectures, see this Learning Path series on EventBridge. For more serverless learning resources, visit https://serverlessland.com.

Имах шанс да помогна на прилеп

Post Syndicated from original https://yurukov.net/blog/2020/prilep/

В събота се оказа, че си имаме гостенин. На балкона ни се беше наместил един прилеп. В първия момент се стреснахме, защото бяхме чували, че са опасни. Още повече, че имах подобна среща с гълъб преди доста години, която не свърши много добре. Този обаче си лежеше на стола вместо да виси от някъде, както очаквах. Не знаехме какво да правим и го оставихме така с надеждата, че ще си излети вечерта.

Пуснах няколко снимки в социалките с шега, че ще го сготвим на супа като препратка с теориите, че коронавирусът е тръгнал именно така. Така няколко души коментираха, че най-вероятно е ранен щом се държи така странно и ме насочиха към Bat World Bulgaria. Писах им съобщение, звъннаха ми скоро след това и проведохме кратък разговор за прилепите и какво се прави в такива случаи.

Накратко казано, всички прилепи в България са защитени. Затова не трябва да се нараняват, убиват, местят, хващат или гонят. Намират се на много места в градовете, но не ги забелязваме, защото са активни късно вечер. Не са опасни – нито изпражненията им, нито самите те. Няма вид в България, който се храни с кръв, така че не пренасят бяс. Всъщност, заради непрестанните кампании по имунизация на дивите животни и домашните любимци, в последните 20 години няма нито един случай на бяс в България. Определени видове в южна Азия са носители и то най-често сред одраскваскване. Тези тук се хранят с насекоми и така всъщност са полезни, защото ни пазят от комари, мухи и други подобни.

Ако намерите прилеп като този, за който има съмнение, че е ранен, може да го хванете и занесете във втеринарна клиника. За целта препоръчвам да пишете съобщение на Bat World Bulgaria или фондация Дивите Животни, за да ви дадат инструкции. В моя случай ми казаха да използвам кърпа или стар чорап като ръкавица и така да го хвана. Въобще не беше доволен и не спря да съска и цъка през цялото време. После го вкарах в кутия за обувки, на която бях направил предварително малки дупки. Внимавате, защото някои кутии за обувки имат по-големи процепи, през които може да излязат прилепите.

След това занесох прилепа така опакован и цъкащ до клиниката на Добро Хрумване в Изток. Там ми записаха личните данни (защото все пак съм хванал диво животно) и ми дадоха номер, с който да получа информация за пациента. Вечерта ми отговориха, че е добре и са го пуснали на свобода.

Цялото това нещо ми отне половин час в неделя. Случайно се оказа, че точно това е и Денят за защита на животните. По този повод дарих малка сума на организацията. Освен, че помага за лечението на тези полезни животни, работи и за образоване на хора като мен. Първият ми импулс определено не беше това, което описах по-горе, но се радвам, че ми обясниха какво да правя и за какво да внимавам. Затова ако срещнете прилеп, не се притеснявайте, не вярвайте на информацията във форумите и статии за други страни, а пишете на Bat World, за да ви помогнат.

The post Имах шанс да помогна на прилеп first appeared on Блогът на Юруков.

Know When You’ve Been DDoS’d

Post Syndicated from Omer Yoachimik original https://blog.cloudflare.com/announcing-ddos-alerts/

Know When You’ve Been DDoS’d

Know When You’ve Been DDoS’d

Today we’re announcing the availability of DDoS attack alerts. The alerts are available for free for all Cloudflare’s customers on paid plans.

Unmetered DDoS protection

Last week we celebrated Cloudflare’s 10th birthday in what we call Birthday Week. Every year, on each day of Birthday Week, we announce a new product with the goal of helping make the Internet a better place — one that is safer and faster. To do that, over the years we’ve democratized many products that were previously only available to large enterprises by making them available for free (or at very low cost) to all. For example, on Cloudflare’s 7th birthday in 2017, we announced free unmetered DDoS protection as part of every Cloudflare product and every plan, including the free plan.

DDoS attacks aim to take down websites or online services and make them unavailable to the public. We wanted to make sure that every organization and every website is available and accessible, regardless if they can or can’t afford enterprise-grade DDoS protection. This has been a core part of our mission. We’ve been heavily investing in our DDoS protection capabilities over the last 10 years, and we will continue to do so in the future.

Real-time DDoS attack alerts

I’ve recently published a few blogs that provide a look under the hood of our DDoS protection systems. These systems run autonomously, they detect and mitigate attacks without any human intervention. As was the case with the 654 Gbps attack in July, and the 754 Mpps attack in June. We’ve been successful at blocking DDoS attacks and also providing our users with important analytics and insights about the attacks, but our customers also want to be notified in real-time when they are targeted by DDoS attacks.

So today, we’re excited to announce the availability of DDoS alerts. The current delivery methods by Cloudflare plan type are listed in the table below. Additional delivery methods will be made available in the future.

Delivery methods by plan

Delivery method Plan
Free Pro Business Enterprise
Email
PagerDuty

There are two types of DDoS alerts: HTTP DDoS alerts and L3/4 DDoS alerts. Whether you are eligible to one or both depends on the Cloudflare services that you are subscribed to. The table below lists the alert types by the Cloudflare service.

Alert types by service

Alert type Service
WAF/CDN Spectrum Spectrum BYOIP Magic Transit
HTTP DDoS alerts
L3/4 DDoS alerts Coming soon Coming soon

Creating a DDoS alert policy

In order to receive alerts on DDoS attacks that target your Cloudflare-protected Internet property, you must first create a notification policy. That’s fast and easy:

  1. Log in to your Cloudflare account dashboard: https://dash.cloudflare.com
  2. In the Account Home page, navigate to the Notifications tab
  3. In the Notifications card, click Create
  4. Give your notification a name, add an optional description, and the email addresses of the recipients.
Know When You’ve Been DDoS’d

If you are on the Business plan or higher, you’ll need to connect to PagerDuty before creating the alert policy. Once you’ve done so, you’ll have the option to send the alert to your PagerDuty service.

Receive the alert, view the attack, and give feedback

When developing and designing the alert template, we interviewed many of our customers to understand what information is important to them, what would make the alert useful and easy to understand. We’ve intentionally made the alert short. The email subject is also straightforward: DDoS Attack Detected, and it will only be sent from our official email address: [email protected][dot]com. Add this email to your list of trusted email addresses to assure you don’t miss the alerts.

The alert includes the following information:

  1. A short description of what happened
  2. The date and time the attack was initially detected and mitigated by our systems
  3. The attack type
  4. The max rate of the attack when the alert was triggered
  5. The attack target

The attack may be ongoing when you receive the alert and so we also include a link to view the attack in the Cloudflare dashboard and also a link to provide feedback on the protection and visibility.

Know When You’ve Been DDoS’d

We’d love to get your feedback!

We’d love your feedback on our DDoS protection solution. When you receive a DDoS alert, you’ll be provided with a link to submit your feedback. Measuring user satisfaction helps us build better products. Your feedback helps us measure user satisfaction for Cloudflare’s DDoS protection and the attack analytics that we provide in the dashboard. User satisfaction rates are one of the main Key Performance Indicators (KPIs) for our DDoS protection service that we monitor closely. So give your feedback, and help us make DDoS protection better for everyone.

Not a Cloudflare customer yet? Sign up to get started.

The collective thoughts of the interwebz

By continuing to use the site, you agree to the use of cookies. more information

The cookie settings on this website are set to "allow cookies" to give you the best browsing experience possible. If you continue to use this website without changing your cookie settings or you click "Accept" below then you are consenting to this.

Close