How Blueshift integrated their customer data environment with Amazon Redshift to unify and activate customer data for marketing

Post Syndicated from Vijay Chitoor original https://aws.amazon.com/blogs/big-data/how-blueshift-integrated-their-customer-data-environment-with-amazon-redshift-to-unify-and-activate-customer-data-for-marketing/

This post was co-written with Vijay Chitoor, Co-Founder & CEO, and Mehul Shah, Co-Founder and CTO from the Blueshift team, as the lead authors.

Blueshift is a San Francisco-based startup that helps marketers deliver exceptional customer experiences on every channel, delivering relevant personalized marketing. Blueshift’s SmartHub Customer Data Platform (CDP) empowers marketing teams to activate their first-party customer data to drive 1:1 personalization on owned (email, mobile) and paid (Google, Facebook, and so on) website and customer (CX) channels.

In this post, Blueshift’s founding team discuss how they used Amazon Redshift Data API to integrate data from their customer’s Amazon Redshift data warehouse with their CDP environment to help marketers activate their enterprise data and drive growth for their businesses.

Business need

In today’s omnichannel world, marketing teams at modern enterprises are being tasked with engaging customers on multiple channels. To successfully deliver intelligent customer engagement, marketers need to operate with a 360 degree view of their customers that takes into account various types of data, including customer behavior, demographics, consent and preferences, transactions, data from human assisted and digital interactions, and more. However, unifying this data and making it actionable for marketers is often a herculean task. Now, for the first time, with the integration of Blueshift with Amazon Redshift, companies can use more data than ever for intelligent cross-channel engagement.

Amazon Redshift is a fast, fully managed cloud data warehouse. Tens of thousands of customers use Amazon Redshift as their analytics infrastructure. Users such as data analysts, database developers, and data scientists use SQL to analyze their data in Amazon Redshift data warehouses. Amazon Redshift provides a web-based query editor in addition to supporting connectivity via ODBC/JDBC or the Redshift Data API.

Blueshift aims at empowering business users to unlock data in such data warehouses and activate audiences with personalized journeys for segmentation, 1:1 messaging, website, mobile, and paid media use cases. Moreover, Blueshift can help combine this data in Amazon Redshift data warehouses with real-time website and mobile data for real-time profiles and activation, enabling this data to be used by marketers in these businesses.

Although the data in Amazon Redshift is incredibly powerful, marketers are unable to use it in it’s original form for customer engagement for a variety of reasons. Firstly, querying the data requires knowledge of query languages like SQL, which marketers aren’t necessarily adept at. Furthermore, marketers need to combine the data in the warehouse with additional sources of data that are critical for customer engagement, including real-time events (for example, a website page viewed by a customer), as well as channel-level permissions and identity.

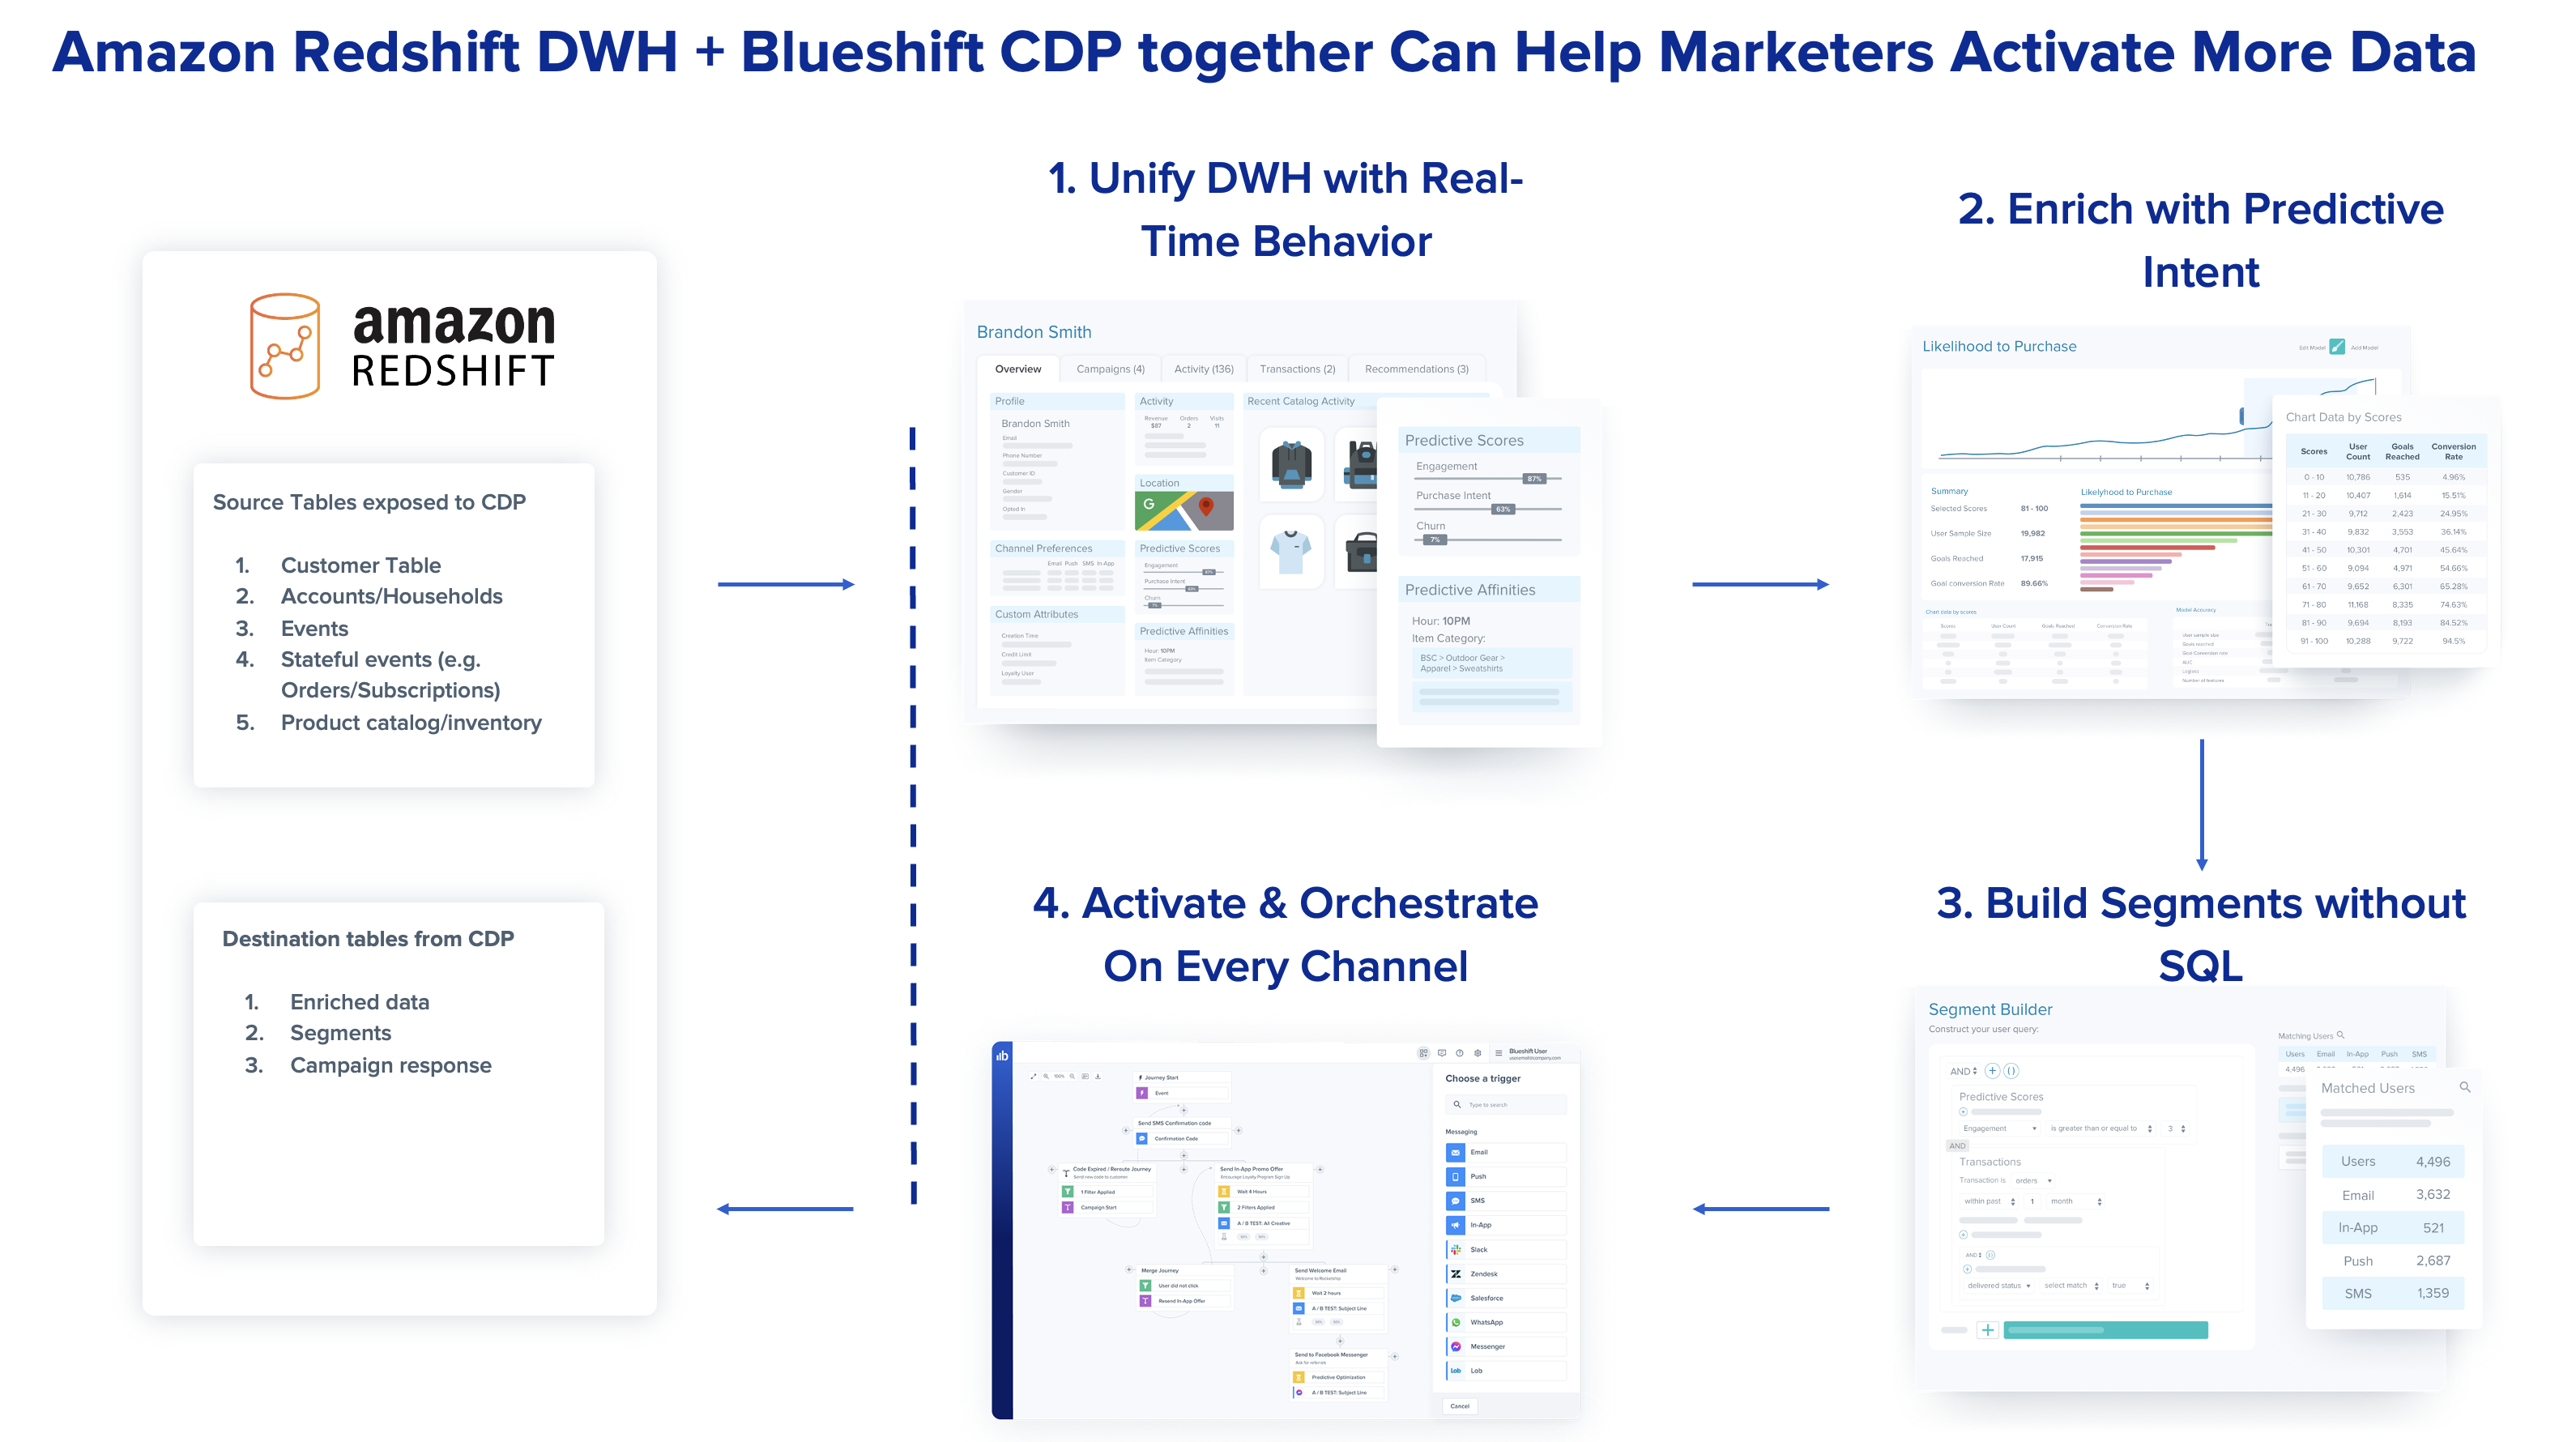
With the new integration, Blueshift customers can ingest multidimensional data tables from Amazon Redshift (for example, a customer table, transactions table, and product catalog table) into Blueshift to build a single customer view that is accessible by marketers. The bi-directional integration also ensures that predictive data attributes computed in Blueshift, as well as campaign engagement data from Blueshift, are written back into Amazon Redshift tables, enabling technology and analytics teams to have a comprehensive view of the data.

In this post, we describe how Blueshift integrates with Amazon Redshift. We highlight the bi-directional integration with data flowing from a customer’s Amazon Redshift data warehouse to Blueshift’s CDP environment and vice versa. These mechanisms are facilitated through the use of the Redshift Data API.

Solution overview

The integration between the two environments is achieved through a connector. We discuss the connector’s core components in this section. Blueshift uses a hybrid approach using Redshift S3 UNLOAD, Redshift S3 COPY, and the Redshift Data API to simplify the integration between Blueshift and Amazon Redshift, thereby facilitating the data needs to empower marketing teams. The following flow diagram shows the overview of the solution.

Blueshift uses container technology to ingest and process data. The data ingestion and egress containers are scaled up and down depending on the amount of data being processed. One of the key design tenets was to simplify the design by not having to manage connections or active connection pools. The Redshift Data API supports a HTTP-based SQL interface without the need for actively managing connections. As depicted in the process flow, the Redshift Data API lets you access data from Amazon Redshift with various types of traditional, cloud-native, containerized, serverless web service-based applications and event-driven applications. The Blueshift application includes a mix of programming languages, including Ruby (for the customer-facing dashboard), Go (for container workloads), and Python (for data science workloads). The Redshift Data API supports bindings in Python, Go, Java, Node.js, PHP, Ruby, and C++, which makes it simple for developer teams to integrate quickly.

With the Redshift Data API integration in place in Blueshift’s application, IT users from Blueshift customers can set up and validate the data connection, and subsequently Blueshift’s business users (marketers) can seamlessly extract value from data by developing insights and putting those insights into action for the customer data housed in AWS Redshift seamlessly. Therefore, the process developed by Blueshift using the Redshift Data API significantly lowers the barrier for entry for new users without needing data warehousing experience or ongoing IT dependencies for the business user.

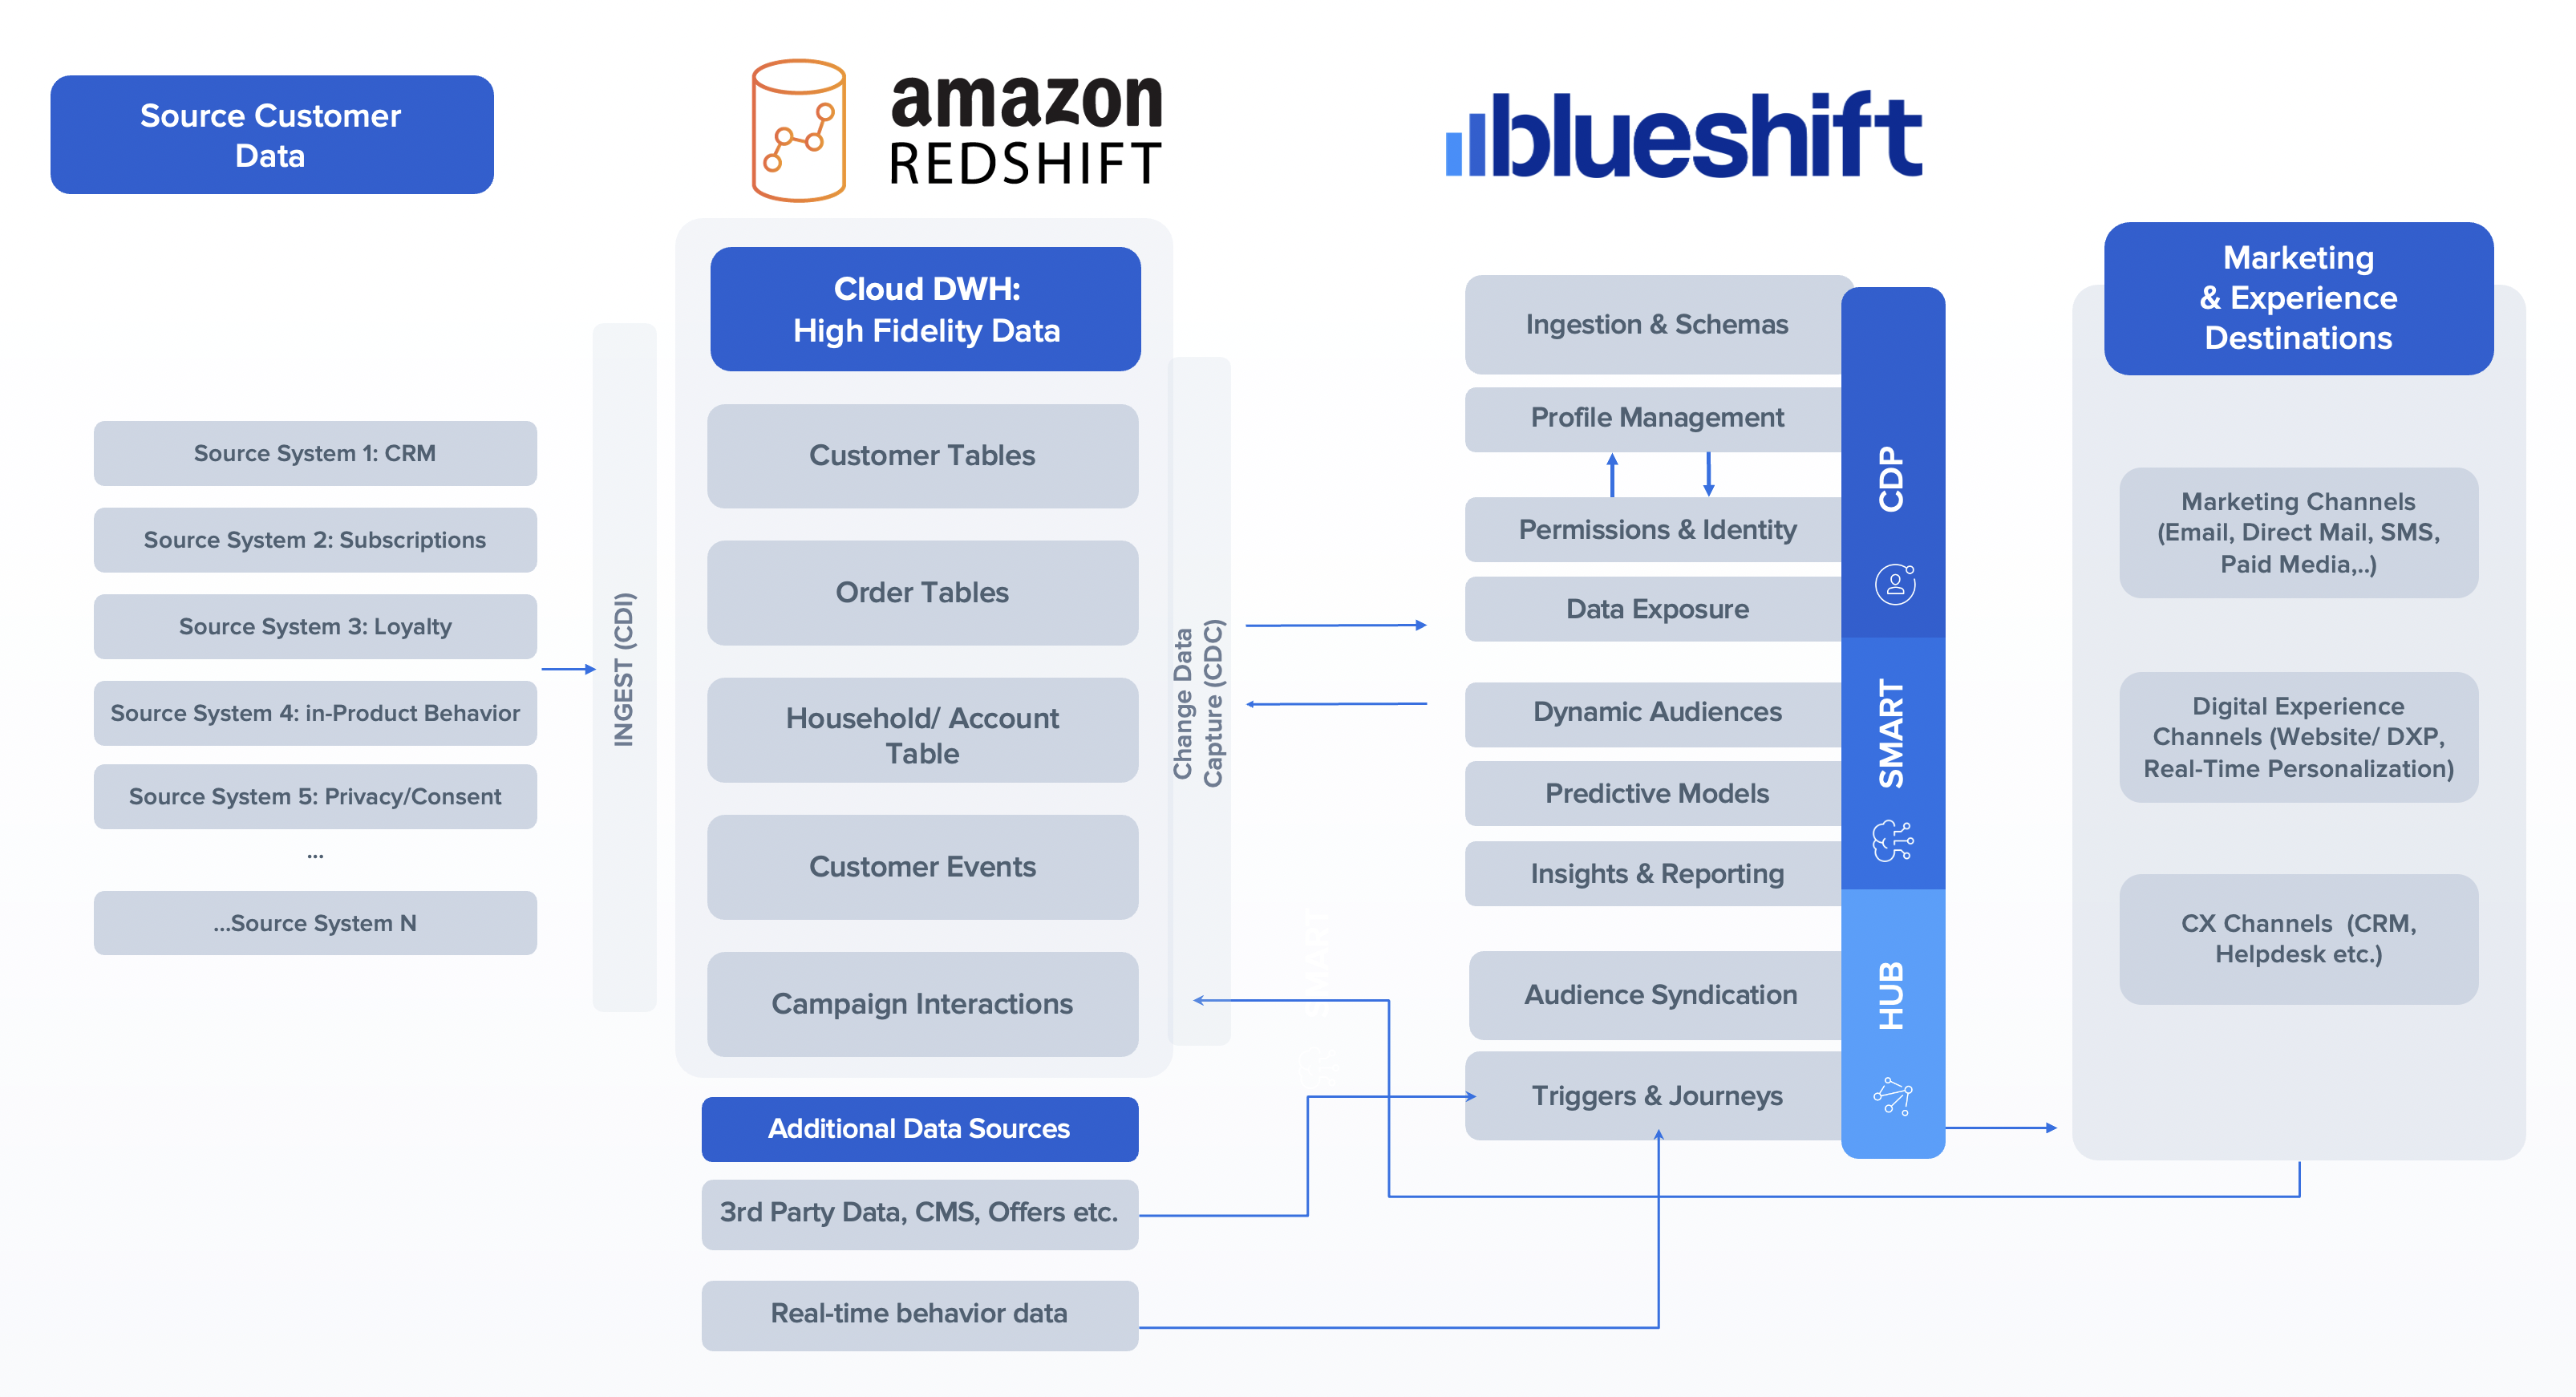
The solution architecture depicted in the following figure shows how the various components of the CDP environment and Amazon Redshift integrate to provide the the end-to-end solution.

shows how the various components of the CDP environment and Amazon Redshift integrate to provide the the end-to-end solution

Prerequisites

In this section, we describe the requirements of the integration solution between the two infrastructures. A typical data implementation with customers involves data from Amazon Redshift ingesting into the Blueshift CDP environment. This ingestion mechanism must accommodate different data types, such as the following:

  • Customer CRM data (user identifiers and various CRM fields). A typical range for data volume to be supported for this data type is 50–500 GB ingested once initially.
  • Real-time behavior or events data (for example, playing or pausing a movie).
  • Transactions data, such as subscription purchases. Typical data volumes ingested daily for events and transactions are in the 500 GB – 1 TB range.
  • Catalog content (for example, a list of shows or movies for discovery), which is typically about 1 GB in size ingested daily.

The integration also needs to support Blueshift’s CDP platform environment to export data to Amazon Redshift. This includes data such as campaign activities like emails being viewed, which can run into tens of TB, and segment or user exports to support a list of users that are part of a segment definition, typically 50–500 GB exported daily.

Integrate Amazon Redshift with data applications

Amazon Redshift provides several ways to quickly integrate data applications.

For the initial data loads, Blueshift uses Redshift S3 UNLOAD to dump Amazon Redshift data into Amazon Simple Storage Service (Amazon S3). Blueshift natively uses Amazon S3 as a persistent object store and supports bulk ingestion and export from Amazon S3. Data loads from Amazon S3 are ingested in parallel and cut down on data load times, enabling Blueshift clients to quickly onboard.

For incremental data ingestion, Blueshift data import jobs track the last time an import was run, and import new rows of data that have been added or updated since the previous import ran. Blueshift stays in sync with changes (updates or inserts) to the Amazon Redshift data warehouse using the Redshift Data API. Blueshift uses the last_updated_at column in Amazon Redshift tables to determine new or updated rows and subsequently ingest those using the Redshift Data API. Blueshift’s data integration cron job syncs data in near-real time using the Redshift Data API by polling for updates on a regular cadence (for example, every 10 minutes, hourly, or daily). The cadence can be tuned depending on data freshness requirements.

The following table summarizes the integration types.

Integration type Integration mechanism Advantage
Initial data ingestion from Amazon Redshift to Blueshift Redshift S3 UNLOAD command Initial data is exported from Amazon Redshift via Amazon S3 to allow faster parallel loads into Blueshift using the Amazon Redshift UNLOAD command.
Incremental data ingestion from Amazon Redshift to Blueshift Redshift Data API Incremental data changes are synchronized using the Redshift Data API in near-real time.
Data export from Blueshift to Amazon Redshift Redshift S3 COPY command Blueshift natively stores campaign activity and segment data in Amazon S3, which is loaded into Amazon Redshift using the Redshift S3 COPY command.

Redshift supports numerous out-of-the-box mechanisms to provide data access. Blueshift was able to cut down the data onboarding time for clients by using a hybrid approach of integrating with Amazon Redshift with Redshift S3 UNLOAD, the Redshift Data API, and Redshift S3 COPY. Blueshift is able to cut down the initial data load time, as well as be updated in near-real time with changes in Amazon Redshift and vice versa.

Conclusion

In this post, we showed how Blueshift integrated with the Redshift Data API to ingest customer data. This integration was seamless and demonstrated how straightforward the Redshift Data API makes integration with external applications, such as Blueshift’s CDP environment for marketing, with Amazon Redshift. The outlined use cases in this post are just a few examples of how to use the Redshift Data API to simplify interactions between users and Amazon Redshift clusters.

Now go build and integrate Amazon Redshift with Blueshift.


About the authors

Vijay Chittoor is the CEO & co-founder of Blueshift. Vijay has a wealth of experience in AI, marketing technology and e-commerce domains. Vijay was previously the co-founder & CEO of Mertado (acquired by Groupon to become Groupon Goods), and an early team member at Kosmix (acquired by Walmart to become @WalmartLabs). A former consultant with McKinsey & Co., Vijay is a graduate of Harvard Business School’s MBA Program. He also holds Bachelor’s and Master’s degrees in Electrical Engineering from the Indian Institute of Technology, Bombay.

Mehul Shah is co-Founder & CTO at Blueshift. Previously, he was a co-founder & CTO at Mertado, which was acquired by Groupon to become Groupon Goods. Mehul was an early employee at Kosmix that was acquired by Walmart to become @WalmartLabs. Mehul is a Y Combinator alumni and a graduate of University of Southern California. Mehul is a co-inventor of 12+ patents, and coaches a middle school robotics team.

Manohar Vellala is a Senior Solutions Architect at AWS working with digital native customers on their cloud native journey. He is based in San Francisco Bay Area and is passionate about helping customers build modern applications that can take the full advantage of the cloud. Prior to AWS he worked at H2O.ai where he helped customers build ML models. His interests are Storage, Data Analytics and AI/ML.

Prashant Tyagi joined AWS in September 2020, where he now manages the solutions architecture team focused on enabling digital native businesses. Prashant worked previously at ThermoFisher Scientific, and GE Digital where he held roles as Sr. Director for their Digital Transformation initiatives. Prashant has enabled digital transformation for customers in the Life Sciences and other industry verticals. He has experience in IoT, Data Lakes and AI/ML technical domains. He lives in the bay area in California.

[$] Bugs and fixes in the kernel history

Post Syndicated from original https://lwn.net/Articles/914632/

Each new kernel release fixes a lot of bugs, but each release also
introduces new bugs of its own. That leads to a fundamental
question: is the kernel community fixing bugs more quickly than it is adding
them? The answer is less than obvious but, if it could be found, it
would give an important indication of the long-term future of the kernel
code base. While digging into the kernel’s revision history cannot give a
definitive answer to that question, it can provide some hints as to what
that answer might be.

Webinar: 2023 Cybersecurity Industry Predictions

Post Syndicated from Tom Caiazza original https://blog.rapid7.com/2022/12/08/webinar-2023-cybersecurity-industry-predictions/

Webinar: 2023 Cybersecurity Industry Predictions

With 2022 rapidly coming to a close, this is the time of year where it makes sense to take a step back and look at the year in cybersecurity, and make a few critical predictions for what the industry could face in the year ahead.

In order to give the security community some insight into where we’ve been and where we are going, Rapid7 has put together a webinar featuring some of Rapid7’s leading thinkers on the subject — and an important voice from a valued customer — to discuss some of the lessons learned and give their take on what 2023 will look like.

Featured in the webinar are Jason Hart, Rapid7’s Chief Technology Officer for EMEA; Simon Goldsmith, InfoSec Director at OVO Energy, the United Kingdom’s third largest energy retailer; Raj Samani, Senior Vice President and Chief Scientist at Rapid7; and Rapid7’s Vice President of Sales for APAC, Rob Dooley.

2022 – “A Challenging Year”

It may seem like the pace of critical vulnerabilities has only increased in 2022, and to our panel, it feels that way because it has. Whereas in years past, the cybersecurity industry would deal with a major vulnerability once a quarter or so (Heartbleed came to mind for some on our panel), this year it seemed like those vulnerabilities were coming to the fore nearly every week. Many of those vulnerabilities appeared to be actively exploited, raising the urgency for security teams to address them as quickly as possible.

This puts the onus on security teams to not only sift through the noise to find the signal (a spot where automation can be key), it also requires expert analysis all at a pace that the industry really hasn’t seen before.

For some, the fast pace of these vulnerabilities were an opportunity to test the mettle of their security operations. Even if their organizations weren’t a victim of those attacks, they can serve as “a lesson learned” putting their incident response plans through their paces. This gives them the confidence to perform well during an actual attack and evangelizes the need for strong vulnerability management across their entire organization, not just within their security teams.

Prediction 1: Information Sharing and the Ever-Expanding Attack Landscape

To give some context for this first prediction, it is important to express that zero-day attacks are on the rise, the time to exploitation is getting shorter, and the social media giants — often a critical component of security community vulnerability information sharing — are becoming less and less reliable.

But the desire for the community to publish and share information about vulnerabilities is still strong. This form of asymmetry between threat actors and the security community has long existed and there is still the inherent risk of transparency on one side benefiting those who seek opacity on the other. Information sharing between the community will be as critical as ever, especially as the reliable avenues for sharing that information dwindle in the coming months.

The way to combat this is by operationalizing cybersecurity — moving away from the binary approach of “patch or don’t patch” — and instead incorporating stronger context through a better understanding of past attack trends in order to prioritize actions and cover your organization from the actual risks.

Another key component is instituting better security hygiene across the organization. What Simon Goldsmith called “controlling the controllables.” This also includes tech stack modernization and the other infrastructural improvements organizations can take to put them in a better position to repel and ultimately respond to an ever more present threat across their networks.

Prediction 2: Cybersecurity Budgets and the Security Talent Shortage

At the same time that threat actors are making it harder on security teams across nearly every industry, the stakes are getting higher for those that are caught up in a breach. Governments are levying hefty fines for organizations that suffer data breaches and there is a real shortage of well-rounded security talent in the newest generation of security professionals.

In some cases this is due to an increase in specialization, but to harken back to the previous prediction, there is some level of “controlling the controllables” at play wherein organizations need to better nurture security talent. There are perennial components to the talent churn and shortfalls (i.e., reduced budgets, a lack of buy-in across the organization, etc.). However, there are more ways in which organizations can bolster their security teams.  

Focusing on diversity and inclusion within your security team is one way to improve not only the morale of your security team, but the efficacy that comes from having wide-ranging viewpoints and expertise present on a team all working together.

Another way to strengthen your team is to help them get out of the cybersecurity bubble. Finding ways to work across teams will not only increase the amount of expertise thrown at a particular problem, but will open avenues for innovation that may not have been considered by a completely siloed infosec team. This means opening up communication with engineering or development teams, and often bringing in a managed services partner to help boost the number of smart voices singing together.

Finally, move beyond the search for the mythical unicorn and acknowledge that experience and expertise count just as much or more than having the right certifications on paper. This should mean fostering career development for more junior team members, engaging current teammates in ways that make the work they do more of a passion and less of a grind, and also ensuring that your team’s culture is an asset working to bring everyone together.

Prediction 3: Operationalizing Security

The gap between technical stakeholders and the business leaders within organizations is getting wider, and will continue to do so, if changes aren’t made to the ways in which the two sides of the house understand each other.

Part of this disconnect comes from the question of “whether or not we’re safe.” In cybersecurity, there are no absolutes; despite compliance with all best practices, there will always be some level of risk. And security operations can often fall into the trap of asking for more funding to better identify more risk, identifying that risk, and then asking for more money to address it. This is not a sustainable approach to closing the understanding gap.

Stakeholders outside of the SOC should understand the ways in which security teams reduce risk through clear metrics and KPIs that demonstrate just how much improvement is being made in infosec, thus justifying the investment. This operationalization of security — the demonstration of improvements — is critical.

Another component of this disconnect lies in which parts of the organization are responsible for different security actions and ensuring they are working together clearly, cohesively, and most importantly, predictably. Protection Level Agreements can go a long way in ensuring that vulnerabilities are handled within a certain amount of time. This requires security teams to provide the relevant information about the vulnerability and how to remediate it to other stakeholders within a predictable window after the vulnerability is identified, so that team can take the steps necessary to remediate it.

Conclusion: Uniting Cybersecurity

It may seem that this blog post (and its sister webinar) offer up doom, gloom, and tons of FUD. And while that’s not entirely untrue, there is a silver lining. The commonality between all three of these predictions is the concept of uniting cybersecurity. Security is integrated within every component of an organization and each group should understand what goals the security operation is striving for, how they will get there, how they themselves are accountable for moving that goal forward, and how that success will ultimately be measured. The cybersecurity community has an opportunity, and maybe even a mandate, to help bring these changes to their organizations as it will be one of the most critical components of a safer, cybersecurity operation.  

All of these points (and so many more) are eloquently made on the webinar available here.

Обществена инфраструктура в дигиталната ера [презентация]

Post Syndicated from Bozho original https://blog.bozho.net/blog/3997

Преди два месеца говорих на конференцията OpenFest за това как (ще) изглежда обществената инфраструктура в дигиталната ера. Лекцията развива моя публикация в техническия блог за това как отворените програмни интерфейси трябва да бъдат водещи при изграждането на информационните системи на държавата.

Материалът Обществена инфраструктура в дигиталната ера [презентация] е публикуван за пръв път на БЛОГодаря.

Security updates for Thursday

Post Syndicated from original https://lwn.net/Articles/917398/

Security updates have been issued by Debian (dlt-daemon, jqueryui, and virglrenderer), Fedora (firefox, vim, and woff), Oracle (kernel and nodejs:18), Red Hat (java-1.8.0-ibm and redhat-ds:11), Slackware (python3), SUSE (buildah, matio, and osc), and Ubuntu (heimdal and postgresql-9.5).

Leaked Signing Keys Are Being Used to Sign Malware

Post Syndicated from Bruce Schneier original https://www.schneier.com/blog/archives/2022/12/leaked-signing-keys-are-being-used-to-sign-malware.html

A bunch of Android OEM signing keys have been leaked or stolen, and they are actively being used to sign malware.

Łukasz Siewierski, a member of Google’s Android Security Team, has a post on the Android Partner Vulnerability Initiative (AVPI) issue tracker detailing leaked platform certificate keys that are actively being used to sign malware. The post is just a list of the keys, but running each one through APKMirror or Google’s VirusTotal site will put names to some of the compromised keys: Samsung, LG, and Mediatek are the heavy hitters on the list of leaked keys, along with some smaller OEMs like Revoview and Szroco, which makes Walmart’s Onn tablets.

This is a huge problem. The whole system of authentication rests on the assumption that signing keys are kept secret by the legitimate signers. Once that assumption is broken, all bets are off:

Samsung’s compromised key is used for everything: Samsung Pay, Bixby, Samsung Account, the phone app, and a million other things you can find on the 101 pages of results for that key. It would be possible to craft a malicious update for any one of these apps, and Android would be happy to install it overtop of the real app. Some of the updates are from today, indicating Samsung has still not changed the key.

Пауза за основен ремонт 

Post Syndicated from Тоест original https://toest.bg/toest-pauza/

Скъпи читатели, приятели и дарители,

„Тоест“ излиза в пауза до 1 февруари 2023 г. 

Изминалите три години бяха трудни за всички ни. Здравна криза, икономическа несигурност, бомбардировки на един хвърлей от нашите граници, поредица от нестихващи вътрешнополитически кризи. Всичко това – в съчетание със засилена дезинформация и нарастващо обществено разделение. На този фон „Тоест“ не само оцеля, но и се е запътил към петата си годишнина. Време е за равносметка. И за по-съществени промени.

Нов сайт

От три години не сме променяли нищо в сайта на „Тоест“ – нито в дизайна му, нито по отношение на функционалността и сигурността му. Дошло е времето (ако разширим метафората от заглавието) не просто за основен ремонт, а за нова къща. И понеже я строим със собствени усилия и средства, се налага да ѝ отделим нужното време и внимание. 

Реорганизация

Ще използваме тази пауза и за преструктуриране и разширяване на екипа. Заемането на няколко роли от един и същ човек е типично явление за малките организации с нисък бюджет, но е лоша практика и неминуемо води до некачествено изпълнение на някоя от ролите (оставяме настрана изтощението и демотивацията на самия човек). След паузата ще се радваме да ви представим двама нови редактори, както и специалист по маркетинг и комуникация, който ще ни помогне да подобрим общуването с нашата аудитория и да я разширим.

Привличане на нови автори и разширяване на темите

Осъзнаваме, че в последно време и особено през последната година доста свихме кръга от автори и теми, а с това – и количеството материали в „Тоест“. След внезапната загуба на ключова фигура в нашия екип – Марин Бодаков – зейна пропаст не само в сърцата ни. Много разчитахме на него в работния процес. Изникнеше ли тема, той или бързо я разработваше сам, или намираше кой да го направи. Заедно с това изтощението от последните три години на пандемия, война и разделение оставиха своя отпечатък у всички ни.

Това, разбира се, не бива да ни отказва. През 2023 г. планираме да разширим темите и форматите на съдържанието в „Тоест“ и да привлечем нови автори – не само настоящи и бъдещи журналисти, но и експерти от различни сфери, които да хвърлят светлина върху специфичните проблеми в областите си на компетентност и така да поставят началото на един смислен обществен дебат – цел на „Тоест“ от самото начало. Искрено вярваме, че задълбоченото разбиране на актуалните процеси в гражданското общество е път към укрепване на демократичния диалог и цялостно подобряване на средата. Ако и вие припознавате тези ценности и искате да се присъедините към нас като автори или да ни подскажете интересна тема, много ще се радваме да ни пишете на [email protected].

Смяна на модела на финансиране

След близо пет години финансиране изцяло от читателски дарения стигнахме до извода, че този модел е крайно недостатъчен за устойчивото съществуване на една медия, била тя и скромна. В случая не говорим за малък недостиг и за нужда от плавен растеж на приходите, а за значително (многократно) увеличение. Във футъра на нашия сайт има постоянен линк към месечните ни отчети – за целия период от създаването на медията до момента. Може да видите, че сме се издържали с 3000–4000 лв. на месец – колкото средно са пристигали по сметките ни. Каквото не е достигало, сме компенсирали с доброволен труд на основния екип, помощ от приятели и крайно пестеливо харчене за всичко извън създаването на съдържание.

Няма как да продължим по този начин. Ако искаме да работим професионално, структурирано и с хоризонт за развитие, се налага да потърсим и други форми на финансиране извън краудфъндинга.

*

Логично е, че всички изброени дотук цели и задачи са взаимносвързани и взаимнозависими, но първите крачки са направени. През 2023 г. очаквайте една подобрена версия на „Тоест“. Петата годишнина на медията на 1 февруари ще е чудесен повод за ново начало. Дотогава ни стискайте палци!

Искрено ваши,
Екипът на „Тоест“

Източник

Пауза за основен ремонт

Post Syndicated from Тоест original https://www.toest.bg/toest-pauza/

Пауза за основен ремонт

Скъпи читатели, приятели и дарители,

„Тоест“ излиза в пауза до 1 февруари 2023 г.

Изминалите три години бяха трудни за всички ни. Здравна криза, икономическа несигурност, бомбардировки на един хвърлей от нашите граници, поредица от нестихващи вътрешнополитически кризи. Всичко това – в съчетание със засилена дезинформация и нарастващо обществено разделение. На този фон „Тоест“ не само оцеля, но и се е запътил към петата си годишнина. Време е за равносметка. И за по-съществени промени.

Нов сайт

От три години не сме променяли нищо в сайта на „Тоест“ – нито в дизайна му, нито по отношение на функционалността и сигурността му. Дошло е времето (ако разширим метафората от заглавието) не просто за основен ремонт, а за нова къща. И понеже я строим със собствени усилия и средства, се налага да ѝ отделим нужното време и внимание.

Реорганизация

Ще използваме тази пауза и за преструктуриране и разширяване на екипа. Заемането на няколко роли от един и същ човек е типично явление за малките организации с нисък бюджет, но е лоша практика и неминуемо води до некачествено изпълнение на някоя от ролите (оставяме настрана изтощението и демотивацията на самия човек). След паузата ще се радваме да ви представим двама нови редактори, както и специалист по маркетинг и комуникация, който ще ни помогне да подобрим общуването с нашата аудитория и да я разширим.

Привличане на нови автори и разширяване на темите

Осъзнаваме, че в последно време и особено през последната година доста свихме кръга от автори и теми, а с това – и количеството материали в „Тоест“. След внезапната загуба на ключова фигура в нашия екип – Марин Бодаков – зейна пропаст не само в сърцата ни. Много разчитахме на него в работния процес. Изникнеше ли тема, той или бързо я разработваше сам, или намираше кой да го направи. Заедно с това изтощението от последните три години на пандемия, война и разделение оставиха своя отпечатък у всички ни.

Това, разбира се, не бива да ни отказва. През 2023 г. планираме да разширим темите и форматите на съдържанието в „Тоест“ и да привлечем нови автори – не само настоящи и бъдещи журналисти, но и експерти от различни сфери, които да хвърлят светлина върху специфичните проблеми в областите си на компетентност и така да поставят началото на един смислен обществен дебат – цел на „Тоест“ от самото начало. Искрено вярваме, че задълбоченото разбиране на актуалните процеси в гражданското общество е път към укрепване на демократичния диалог и цялостно подобряване на средата. Ако и вие припознавате тези ценности и искате да се присъедините към нас като автори или да ни подскажете интересна тема, много ще се радваме да ни пишете на editors[@]toest.bg.

Смяна на модела на финансиране

След близо пет години финансиране изцяло от читателски дарения стигнахме до извода, че този модел е крайно недостатъчен за устойчивото съществуване на една медия, била тя и скромна. В случая не говорим за малък недостиг и за нужда от плавен растеж на приходите, а за значително (многократно) увеличение. Във футъра на нашия сайт има постоянен линк към месечните ни отчети – за целия период от създаването на медията до момента. Може да видите, че сме се издържали с 3000–4000 лв. на месец – колкото средно са пристигали по сметките ни. Каквото не е достигало, сме компенсирали с доброволен труд на основния екип, помощ от приятели и крайно пестеливо харчене за всичко извън създаването на съдържание.

Няма как да продължим по този начин. Ако искаме да работим професионално, структурирано и с хоризонт за развитие, се налага да потърсим и други форми на финансиране извън краудфъндинга.

*

Логично е, че всички изброени дотук цели и задачи са взаимносвързани и взаимнозависими, но първите крачки са направени. През 2023 г. очаквайте една подобрена версия на „Тоест“. Петата годишнина на медията на 1 февруари ще е чудесен повод за ново начало. Дотогава ни стискайте палци!

Искрено ваши,
Екипът на „Тоест“

Пауза за основен ремонт

Post Syndicated from Тоест original https://www.toest.bg/toest-pauza/

Пауза за основен ремонт

Скъпи читатели, приятели и дарители,

„Тоест“ излиза в пауза до 1 февруари 2023 г.

Изминалите три години бяха трудни за всички ни. Здравна криза, икономическа несигурност, бомбардировки на един хвърлей от нашите граници, поредица от нестихващи вътрешнополитически кризи. Всичко това – в съчетание със засилена дезинформация и нарастващо обществено разделение. На този фон „Тоест“ не само оцеля, но и се е запътил към петата си годишнина. Време е за равносметка. И за по-съществени промени.

Нов сайт

От три години не сме променяли нищо в сайта на „Тоест“ – нито в дизайна му, нито по отношение на функционалността и сигурността му. Дошло е времето (ако разширим метафората от заглавието) не просто за основен ремонт, а за нова къща. И понеже я строим със собствени усилия и средства, се налага да ѝ отделим нужното време и внимание.

Реорганизация

Ще използваме тази пауза и за преструктуриране и разширяване на екипа. Заемането на няколко роли от един и същ човек е типично явление за малките организации с нисък бюджет, но е лоша практика и неминуемо води до некачествено изпълнение на някоя от ролите (оставяме настрана изтощението и демотивацията на самия човек). След паузата ще се радваме да ви представим двама нови редактори, както и специалист по маркетинг и комуникация, който ще ни помогне да подобрим общуването с нашата аудитория и да я разширим.

Привличане на нови автори и разширяване на темите

Осъзнаваме, че в последно време и особено през последната година доста свихме кръга от автори и теми, а с това – и количеството материали в „Тоест“. След внезапната загуба на ключова фигура в нашия екип – Марин Бодаков – зейна пропаст не само в сърцата ни. Много разчитахме на него в работния процес. Изникнеше ли тема, той или бързо я разработваше сам, или намираше кой да го направи. Заедно с това изтощението от последните три години на пандемия, война и разделение оставиха своя отпечатък у всички ни.

Това, разбира се, не бива да ни отказва. През 2023 г. планираме да разширим темите и форматите на съдържанието в „Тоест“ и да привлечем нови автори – не само настоящи и бъдещи журналисти, но и експерти от различни сфери, които да хвърлят светлина върху специфичните проблеми в областите си на компетентност и така да поставят началото на един смислен обществен дебат – цел на „Тоест“ от самото начало. Искрено вярваме, че задълбоченото разбиране на актуалните процеси в гражданското общество е път към укрепване на демократичния диалог и цялостно подобряване на средата. Ако и вие припознавате тези ценности и искате да се присъедините към нас като автори или да ни подскажете интересна тема, много ще се радваме да ни пишете на [email protected].

Смяна на модела на финансиране

След близо пет години финансиране изцяло от читателски дарения стигнахме до извода, че този модел е крайно недостатъчен за устойчивото съществуване на една медия, била тя и скромна. В случая не говорим за малък недостиг и за нужда от плавен растеж на приходите, а за значително (многократно) увеличение. Във футъра на нашия сайт има постоянен линк към месечните ни отчети – за целия период от създаването на медията до момента. Може да видите, че сме се издържали с 3000–4000 лв. на месец – колкото средно са пристигали по сметките ни. Каквото не е достигало, сме компенсирали с доброволен труд на основния екип, помощ от приятели и крайно пестеливо харчене за всичко извън създаването на съдържание.

Няма как да продължим по този начин. Ако искаме да работим професионално, структурирано и с хоризонт за развитие, се налага да потърсим и други форми на финансиране извън краудфъндинга.

*

Логично е, че всички изброени дотук цели и задачи са взаимносвързани и взаимнозависими, но първите крачки са направени. През 2023 г. очаквайте една подобрена версия на „Тоест“. Петата годишнина на медията на 1 февруари ще е чудесен повод за ново начало. Дотогава ни стискайте палци!

Искрено ваши,
Екипът на „Тоест“

Alex Kim: Why I joined Cloudflare

Post Syndicated from Alex Kim original https://blog.cloudflare.com/alex-kim-why-i-joined-cloudflare/

Alex Kim: Why I joined Cloudflare

Alex Kim: Why I joined Cloudflare

I am excited to announce that as of November 1, I have joined Cloudflare as Country Manager of South Korea to help build a better Internet and to expand Cloudflare’s growing customer, partner, and local teams in Korea. We just opened a new entity (after making Seoul our 23rd data center, more than 10 years ago)  and I am the first official employee of Cloudflare Korea LLC in Seoul, which is truly a great moment and privilege for me.

A little about me

I was born in Korea and was educated in Korea until middle school, then I decided to move to Toronto, Canada to study film making to become a movie director. I finished high school and obtained a university degree in Toronto, during which I had the opportunity to be exposed to various cultures, as well as learn and become well-versed in the English language. I think it was a great time to learn how diverse people in the world are. My dream of becoming a movie director has changed over time for many reasons, but I think it is no coincidence that I have a job where I have to produce results while collaborating and orchestrating with many people, much like a movie director.

In my career of about 18 years, I have had various experiences, including pre-sales, support, consultant, and field sales, starting with Java programmer. The lesson from this variety of experiences is that if you work with a sense of ownership all the time, you can be the best in the field, and you can get the best compliments from your customers.

I’ve worked in a small company where the whole company has been agile, and I’ve worked in large companies like SAP, Dell, Autodesk, and Akamai, working with many teams. New technology and the best technology are important, but I also learned that the most important thing is the environment where people can work together and have fun, because people make the results after all.

Besides work, I love music. I didn’t become a movie director, which was my childhood dream, but I relieve my stress by playing the piano and composing songs. In the past, I made a rock song for one of the companies I worked for, and when an opportunity presented itself,  we had a program where all the employees jumped in and sang my composition together. Unfortunately, I have not had enough time to make a lot of songs now, but if I have a chance, I would love to make a Cloudflare song and hope I can sing it together with my new colleagues.

Why Cloudflare

Korea has one of the highest smartphone and Internet penetration rates in the world. Korea is also one of the countries with the fastest Internet speeds in the world. On the other hand, the pace of cloud transformation, that is making such a big difference to so many companies, is still lagging behind. The reason is that there are many government regulations on public enterprises and finance industries. Fortunately, as the government has recently moved to ease many regulations, the pace of cloud transformation is expected to accelerate in the future.

As cloud transitions accelerate, enterprises need to pay attention to security, and few companies will be able to deploy security as easily and securely in a cloud environment as Cloudflare.

Korea is a country where the economy grows only when it exports a lot. Many startups and chaebol (conglomerate) companies often grow future-oriented industries such as metaverse in Korea first and then expand their business abroad. For customers leading this global industry, Cloudflare will act like a safe highway in an Internet environment. I’ve come to Cloudflare to be part of this meaningful work.

In addition, Cloudflare Korea has just been launched. Even though we’ve had a presence here through our data center for the last 10 years, there are still many companies that we still need to build relationships with. I want to spread the value of Cloudflare to the Korean market quickly and become a Supercloud evangelist. I would also like to help Korean customers — organizations and businesses across multiple industries — achieve great success and ensure they have the right technology and Internet infrastructure. In the next few years, I will work hard to establish Cloudflare as the most trusted cloud security company in Korea, as well as contribute to expanding the business and creating jobs in the country.

The vision for the future…

As the first Country Manager of Cloudflare Korea, I am very excited  to work for a company with unlimited growth potential. As the global economy slows down, customers will gravitate towards products and solutions that are more valuable and price competitive. I’m looking forward to meeting and working with more customers that will benefit from all that Cloudflare has to offer.

One of the biggest reasons I chose Cloudflare is that Cloudflare has big dreams and visions. In particular, I think the emergence of R2 will provide an extremely cost-effective solution to enterprises’ egress cost concerns, especially in economically challenging times.

In addition, Cloudflare is investing heavily to become the number one Zero Trust player. The VPN market is huge, and it has a lot of challenges (including user experience, speed, and security), and Zero Trust is still in its infancy but already showing its true potential. Cloudflare, which understands and invests in these huge markets, knows where to go in the marketplace.

Finally, the Supercloud is also an area that only Cloudflare can realize. Cloud security and Zero Trust are indispensable areas of the future, and I am very happy to join this futuristic company.

How dynamic data masking support in Amazon Redshift helps achieve data privacy and compliance

Post Syndicated from Rohit Vashishtha original https://aws.amazon.com/blogs/big-data/how-dynamic-data-masking-support-in-amazon-redshift-helps-achieve-data-privacy-and-compliance/

Amazon Redshift is a fully managed, petabyte-scale, massively parallel data warehouse that offers simple operations and high performance. It makes it fast, simple, and cost-effective to analyze all your data using standard SQL and your existing business intelligence (BI) tools. Today, Amazon Redshift is the most widely used cloud data warehouse.

Dynamic data masking (DDM) support (preview) in Amazon Redshift enables you to simplify the process of protecting sensitive data in your Amazon Redshift data warehouse. You can now use DDM to protect data based on your job role or permission rights and level of data sensitivity through a SQL interface. DDM support (preview) in Amazon Redshift enables you to hide, obfuscate, or pseudonymize column values within the tables in your data warehouse without incurring additional storage costs. It is configurable to allow you to define consistent, format-preserving, and irreversible masked data values.

DDM support (preview) in Amazon Redshift provides a native feature to support your need to mask data for regulatory or compliance requirements, or to increase internal privacy standards. Compared to static data masking where underlying data at rest gets permanently replaced or redacted, DDM support (preview) in Amazon Redshift enables you to temporarily manipulate the display of sensitive data in transit at query time based on user privilege, leaving the original data at rest intact. You control access to data through masking policies that apply custom obfuscation rules to a given user or role. That way, you can respond to changing privacy requirements without altering the underlying data or editing SQL queries.

With DDM support (preview) in Amazon Redshift, you can do the following:

  • Define masking policies that apply custom obfuscation policies (for example, masking policies to handle credit card, PII entries, HIPAA or GDPR needs, and more)
  • Transform the data at query time to apply masking policies
  • Attach masking policies to roles or users
  • Attach multiple masking policies with varying levels of obfuscation to the same column in a table and assign them to different roles with priorities to avoid conflicts
  • Implement cell-level masking by using conditional columns when creating your masking policy
  • Use masking policies to partially or completely redact data, or hash it by using user-defined functions (UDFs)

Here’s what our customers have to say on DDM support(private beta) in Amazon Redshift:

“Baffle delivers data-centric protection for enterprises via a data security platform that is transparent to applications and unique to data security. Our mission is to seamlessly weave data security into every data pipeline. Previously, to apply data masking to an Amazon Redshift data source, we had to stage the data in an Amazon S3 bucket. Now, by utilizing the Amazon Redshift Dynamic Data Masking capability, our customers can protect sensitive data throughout the analytics pipeline, from secure ingestion to responsible consumption reducing the risk of breaches.”

-Ameesh Divatia, CEO & co-founder of Baffle

“EnergyAustralia is a leading Australian energy retailer and generator, with a mission to lead the clean energy transition for customers in a way that is reliable, affordable and sustainable for all. We enable all corners of our business with Data & Analytics capabilities that are used to optimize business processes and enhance our customers’ experience. Keeping our customers’ data safe is a top priority across our teams. In the past, this involved multiple layers of custom built security policies that could make it cumbersome for analysts to find the data they require. The new AWS dynamic data masking feature will significantly simplify our security processes so we continue to keep customer data safe, while also reducing the administrative overhead.”

-William Robson, Data Solutions Design Lead, EnergyAustralia

Use case

For our use case, a retail company wants to control how they show credit card numbers to users based on their privilege. They also don’t want to duplicate the data for this purpose. They have the following requirements:

  • Users from Customer Service should be able to view the first six digits and the last four digits of the credit card for customer verification
  • Users from Fraud Prevention should be able to view the raw credit card number only if it’s flagged as fraud
  • Users from Auditing should be able to view the raw credit card number
  • All other users should not be able to view the credit card number

Solution overview

The solution encompasses creating masking policies with varying masking rules and attaching one or more to the same role and table with an assigned priority to remove potential conflicts. These policies may pseudonymize results or selectively nullify results to comply with retailers’ security requirements. We refer to multiple masking policies being attached to a table as a multi-modal masking policy. A multi-modal masking policy consists of three parts:

  • A data masking policy that defines the data obfuscation rules
  • Roles with different access levels depending on the business case
  • The ability to attach multiple masking policies on a user or role and table combination with priority for conflict resolution

The following diagram illustrates how DDM support (preview) in Amazon Redshift policies works with roles and users for our retail use case.

For a user with multiple roles, the masking policy with the highest attachment priority is used. For example, in the following example, Ken is part of the Public and FrdPrvnt role. Because the FrdPrvnt role has a higher attachment priority, card_number_conditional_mask will be applied.

Prerequisites

To implement this solution, you need to complete the following prerequisites:

  1. Have an AWS account.
  2. Have an Amazon Redshift cluster provisioned with DDM support (preview) or a serverless workgroup with DDM support (preview).
    1. Navigate to the provisioned or serverless Amazon Redshift console and choose Create preview cluster.
    2. In the create cluster wizard, choose the preview track.
  3. Have Superuser privilege, or the sys:secadmin role on the Amazon Redshift data warehouse created in step 2.

Preparing the data

To set up our use case, complete the following steps:

  1. On the Amazon Redshift console, choose Query editor v2 in Explorer.
    If you’re familiar with SQL Notebooks, you can download the Jupyter notebook for the demonstration, and import it to quickly get started.
  2. Create the table and populate contents.
  3. Create users.
    -- 1- Create the credit cards table
    CREATE TABLE credit_cards (
    customer_id INT,
    is_fraud BOOLEAN,
    credit_card TEXT
    );
    -- 2- Populate the table with sample values
    INSERT INTO credit_cards
    VALUES
    (100,'n', '453299ABCDEF4842'),
    (100,'y', '471600ABCDEF5888'),
    (102,'n', '524311ABCDEF2649'),
    (102,'y', '601172ABCDEF4675'),
    (102,'n', '601137ABCDEF9710'),
    (103,'n', '373611ABCDEF6352')
    ;
    --run GRANT to grant SELECT permission on the table
    GRANT SELECT ON credit_cards TO PUBLIC;
    --create four users
    CREATE USER Kate WITH PASSWORD '1234Test!';
    CREATE USER Ken  WITH PASSWORD '1234Test!';
    CREATE USER Bob  WITH PASSWORD '1234Test!';
    CREATE USER Jane WITH PASSWORD '1234Test!';

Implement the solution

To satisfy the security requirements, we need to make sure that each user sees the same data in different ways based on their granted privileges. To do that, we use user roles combined with masking policies as follows:

  1. Create user roles and grant different users to different roles:
    -- 1. Create User Roles
    CREATE ROLE cust_srvc_role;
    CREATE ROLE frdprvnt_role;
    CREATE ROLE auditor_role;
    -- note that public role exist by default.
    
    -- Grant Roles to Users
    GRANT ROLE cust_srvc_role to Kate;
    GRANT ROLE frdprvnt_role  to Ken;
    GRANT ROLE auditor_role   to Bob;
    -- note that regualr_user is attached to public role by default.

  2. Create masking policies:
    -- 2. Create Masking policies
    
    -- 2.1 create a masking policy that fully masks the credit card number
    CREATE MASKING POLICY Mask_CC_Full
    WITH (credit_card VARCHAR(256))
    USING ('XXXXXXXXXXXXXXXX');
    
    --2.2- Create a scalar SQL user-defined function(UDF) that partially obfuscates credit card number, only showing the first 6 digits and the last 4 digits
    CREATE FUNCTION REDACT_CREDIT_CARD (text)
      returns text
    immutable
    as $$
      select left($1,6)||'XXXXXX'||right($1,4)
    $$ language sql;
    
    
    --2.3- create a masking policy that applies the REDACT_CREDIT_CARD function
    CREATE MASKING POLICY Mask_CC_Partial
    WITH (credit_card VARCHAR(256))
    USING (REDACT_CREDIT_CARD(credit_card));
    
    -- 2.4- create a masking policy that will display raw credit card number only if it is flagged for fraud 
    CREATE MASKING POLICY Mask_CC_Conditional
    WITH (is_fraud BOOLEAN, credit_card VARCHAR(256))
    USING (CASE WHEN is_fraud 
                     THEN credit_card 
                     ELSE Null 
           END);
    
    -- 2.5- Create masking policy that will show raw credit card number.
    CREATE MASKING POLICY Mask_CC_Raw
    WITH (credit_card varchar(256))
    USING (credit_card);

  3. Attach the masking policies on the table or column to the user or role:
    -- 3. ATTACHING MASKING POLICY
    -- 3.1- make the Mask_CC_Full the default policy for all users
    --    all users will see this masking policy unless a higher priority masking policy is attached to them or their role
    
    ATTACH MASKING POLICY Mask_CC_Full
    ON credit_cards(credit_card)
    TO PUBLIC;
    
    -- 3.2- attach Mask_CC_Partial to the cust_srvc_role role
    --users with the cust_srvc_role role can see partial credit card information
    ATTACH MASKING POLICY Mask_CC_Partial
    ON credit_cards(credit_card)
    TO ROLE cust_srvc_role
    PRIORITY 10;
    
    -- 3.3- Attach Mask_CC_Conditional masking policy to frdprvnt_role role
    --    users with frdprvnt_role role can only see raw credit card if it is fraud
    ATTACH MASKING POLICY Mask_CC_Conditional
    ON credit_cards(credit_card)
    USING (is_fraud, credit_card)
    TO ROLE frdprvnt_role
    PRIORITY 20;
    
    -- 3.4- Attach Mask_CC_Raw masking policy to auditor_role role
    --    users with auditor_role role can see raw credit card numbers
    ATTACH MASKING POLICY Mask_CC_Raw
    ON credit_cards(credit_card)
    TO ROLE auditor_role
    PRIORITY 30;

Test the solution

Let’s confirm that the masking policies are created and attached.

  1. Check that the masking policies are created with the following code:
    -- 1.1- Confirm the masking policies are created
    SELECT * FROM svv_masking_policy;

  2. Check that the masking policies are attached:
    -- 1.2- Verify attached masking policy on table/column to user/role.
    SELECT * FROM svv_attached_masking_policy;

    Now we can test that different users can see the same data masked differently based on their roles.

  3. Test that the Customer Service agents can only view the first six digits and the last four digits of the credit card number:
    -- 1- Confirm that customer service agent can only view the first 6 digits and the last 4 digits of the credit card number
    SET SESSION AUTHORIZATION Kate;
    SELECT * FROM credit_cards;

  4. Test that the Fraud Prevention users can only view the raw credit card number when it’s flagged as fraud:
    -- 2- Confirm that Fraud Prevention users can only view fraudulent credit card number
    SET SESSION AUTHORIZATION Ken;
    SELECT * FROM credit_cards;

  5. Test that Auditor users can view the raw credit card number:
    -- 3- Confirm the auditor can view RAW credit card number
    SET SESSION AUTHORIZATION Bob;
    SELECT * FROM credit_cards;

  6. Test that general users can’t view any digits of the credit card number:
    -- 4- Confirm that regular users can not view any digit of the credit card number
    SET SESSION AUTHORIZATION Jane;
    SELECT * FROM credit_cards;

Modify the masking policy

To modify an existing masking policy, you must detach it from the role first and then drop and recreate it.

In our use case, the business changed direction and decided that Customer Service agents should only be allowed to view the last four digits of the credit card number.

  1. Detach and drop the policy:
    --reset session authorization to the default
    RESET SESSION AUTHORIZATION;
    --detach masking policy from the credit_cards table
    DETACH MASKING POLICY Mask_CC_Partial
    ON                    credit_cards(credit_card)
    FROM ROLE             cust_srvc_role;
    -- Drop the masking policy
    DROP MASKING POLICY Mask_CC_Partial;
    -- Drop the function used in masking
    DROP FUNCTION REDACT_CREDIT_CARD (TEXT);

  2. Recreate the policy and reattach the policy on the table or column to the intended user or role.Note that this time we created a scalar Python UDF. It’s possible to create a SQL, Python, and Lambda UDF based on your use case.
    -- Re-create the policy and re-attach it to role
    
    -- Create a user-defined function that partially obfuscates credit card number, only showing the last 4 digits
    CREATE FUNCTION REDACT_CREDIT_CARD (credit_card TEXT) RETURNS TEXT IMMUTABLE AS $$
        import re
        regexp = re.compile("^([0-9A-F]{6})[0-9A-F]{5,6}([0-9A-F]{4})")
        match = regexp.search(credit_card)
        if match != None:
            last = match.group(2)
        else:
            last = "0000"
        return "XXXXXXXXXXXX{}".format(last)
    $$ LANGUAGE plpythonu;
    
    --Create a masking policy that applies the REDACT_CREDIT_CARD function
    CREATE MASKING POLICY Mask_CC_Partial
    WITH (credit_card VARCHAR(256))
    USING (REDACT_CREDIT_CARD(credit_card));
    
    -- attach Mask_CC_Partial to the cust_srvc_role role
    -- users with the cust_srvc_role role can see partial credit card information
    ATTACH MASKING POLICY Mask_CC_Partial
    ON credit_cards(credit_card)
    TO ROLE cust_srvc_role
    PRIORITY 10;

  3. Test that Customer Service agents can only view the last four digits of the credit card number:
    -- Confirm that customer service agent can only view the last 4 digits of the credit card number
    SET SESSION AUTHORIZATION Kate;
    SELECT * FROM credit_cards;

Clean up

When you’re done with the solution, clean up your resources:

  1. Detach the masking policies from the table:
    -- Cleanup
    --reset session authorization to the default
    RESET SESSION AUTHORIZATION;
    
    --1.	Detach the masking policies from table
    DETACH MASKING POLICY Mask_CC_Full
    ON credit_cards(credit_card)
    FROM PUBLIC;
    DETACH MASKING POLICY Mask_CC_Partial
    ON credit_cards(credit_card)
    FROM ROLE cust_srvc_role;
    DETACH MASKING POLICY Mask_CC_Conditional
    ON credit_cards(credit_card)
    FROM ROLE frdprvnt_role;
    DETACH MASKING POLICY Mask_CC_Raw
    ON credit_cards(credit_card)
    FROM ROLE auditor_role;

  2. Drop the masking policies:
    -- 2.	Drop the masking policies 
    DROP MASKING POLICY Mask_CC_Full;
    DROP MASKING POLICY Mask_CC_Partial;
    DROP MASKING POLICY Mask_CC_Conditional;
    DROP MASKING POLICY Mask_CC_Raw;

  3. Revoke and drop each user and role:
    -- 3.	Revoke/Drop - role/user 
    REVOKE ROLE cust_srvc_role from Kate;
    REVOKE ROLE frdprvnt_role  from Ken;
    REVOKE ROLE auditor_role   from Bob;
    
    DROP ROLE cust_srvc_role;
    DROP ROLE frdprvnt_role;
    DROP ROLE auditor_role;
    
    DROP USER Kate;
    DROP USER Ken;
    DROP USER Bob;
    DROP USER Jane;

  4. Drop the function and table:
    -- 4.	Drop function and table 
    DROP FUNCTION REDACT_CREDIT_CARD (credit_card TEXT);
    DROP TABLE credit_cards;

Considerations and best practices

Consider the following:

  • Always create a default policy attached to the public user. If you create a new user, they will always have a minimum policy attached. It will enforce the intended security posture.
  • Remember that DDM policies in Amazon Redshift always follow invoker permissions convention, not definer (for more information, refer to Security and privileges for stored procedures ). That being said, the masking policies are applicable based on the user or role running it.
  • For best performance, create the masking functions using a scalar SQL UDF, if possible. The performance of scalar UDFs typically goes by the order of SQL to Python to Lambda, in that order. Generally, SQL UDF outperforms Python UDFs and the latter outperforms scalar Lambda UDFs.
  • DDM policies in Amazon Redshift are applied ahead of any predicate or join operations. For example, if you’re running a join on a masked column (per your access policy) to an unmasked column, the join will lead to a mismatch. That’s an expected behavior.
  • Always detach a masking policy from all users or roles before dropping it.
  • As of this writing, the solution has the following limitations:
    • You can apply a mask policy on tables and columns and attach it to a user or role, but groups are not supported.
    • You can’t create a mask policy on views, materialized views, and external tables.
    • The DDM support (preview) in Amazon Redshift is available in following regions: US East (Ohio), US East (N. Virginia), US West (Oregon), Asia Pacific (Tokyo), Europe (Ireland), and Europe (Stockholm).

Performance benchmarks

Based on various tests performed on TPC-H datasets, we’ve found built-in functions to be more performant as compared to functions created externally using scalar Python or Lambda UDFs.

Expand the solution

You can take this solution further and set up a masking policy that restricts SSN and email address access as follows:

  • Customer Service agents accessing pre-built dashboards may only view the last four digits of SSNs and complete email addresses for correspondence
  • Analysts cannot view SSNs or email addresses
  • Auditing services may access raw values for SSNs as well as email addresses

For more information, refer to Use DDM support (preview) in Amazon Redshift for E-mail & SSN Masking.

Conclusion

In this post, we discussed how to use DDM support (preview) in Amazon Redshift to define configuration-driven, consistent, format-preserving, and irreversible masked data values. With DDM support (preview) in Amazon Redshift, you can control your data masking approach using familiar SQL language. You can take advantage of the Amazon Redshift role-based access control capability to implement different levels of data masking. You can create a masking policy to identify which column needs to be masked, and you have the flexibility of choosing how to show the masked data. For example, you can completely hide all the information of the data, replace partial real values with wildcard characters, or define your own way to mask the data using SQL expressions, Python, or Lambda UDFs. Additionally, you can apply a conditional masking based on other columns, which selectively protects the column data in a table based on the values in one or more columns.

We encourage you to create your own user defined functions for various use-cases and accomplish desired security posture using dynamic data masking support in Amazon Redshift.


About the Authors

Rohit Vashishtha is a Senior Analytics Specialist Solutions Architect at AWS based in Dallas, TX. He has more than 16 years of experience architecting, building, leading, and maintaining big data platforms. Rohit helps customers modernize their analytic workloads using the breadth of AWS services and ensures that customers get the best price/performance with the utmost security and data governance.

Ahmed Shehata is a Senior Analytics Specialist Solutions Architect at AWS based on Toronto. He has more than two decades of experience helping customers modernize their data platforms. Ahmed is passionate about helping customers build efficient, performant, and scalable analytic solutions.

Variyam Ramesh is a Senior Analytics Specialist Solutions Architect at AWS based in Charlotte, NC. He is an accomplished technology leader helping customers conceptualize, develop, and deliver innovative analytic solutions.

Yanzhu Ji is a Product Manager in the Amazon Redshift team. She has experience in product vision and strategy in industry-leading data products and platforms. She has outstanding skill in building substantial software products using web development, system design, database, and distributed programming techniques. In her personal life, Yanzhu likes painting, photography, and playing tennis.

James Moore is a Technical Lead at Amazon Redshift focused on SQL features and security. His work over the last 10 years has spanned distributed systems, machine learning, and databases. He is passionate about building scalable software that enables customers to solve real-world problems.

Simplify data ingestion from Amazon S3 to Amazon Redshift using auto-copy

Post Syndicated from Jason Pedreza original https://aws.amazon.com/blogs/big-data/simplify-data-ingestion-from-amazon-s3-to-amazon-redshift-using-auto-copy/

Amazon Redshift is a fast, scalable, secure, and fully managed cloud data warehouse that makes it simple and cost-effective to analyze your data using standard SQL and your existing business intelligence (BI) tools. Tens of thousands of customers today rely on Amazon Redshift to analyze exabytes of data and run complex analytical queries, making it the most widely used cloud data warehouse.

Data ingestion is the process of getting data to Amazon Redshift. You can leverage one of the many zero-ETL integration methods to make data available in Amazon Redshift directly. However, if your data is in your Amazon S3 bucket, then you can simply load data from Amazon Simple Storage Service (Amazon S3) to Amazon Redshift using the COPY command. A COPY command is the most efficient way to load a table from S3 because it uses the Amazon Redshift’s massively parallel processing (MPP) architecture to read and load data in parallel.

Amazon Redshift launched auto-copy support to simplify data loading from Amazon S3 into Amazon Redshift. You can now setup continuous file ingestion rules to track your Amazon S3 paths and automatically load new files without the need for additional tools or custom solutions. This also enables end users to have the latest data available in Amazon Redshift shortly after the source data is available.

This post shows you how to build automatic file ingestion pipelines in Amazon Redshift when source files are located on Amazon S3 by using a simple SQL command. In addition, we show you how to enable auto-copy using auto-copy jobs, how to monitor jobs, considerations, and best practices.

Overview of the auto-copy feature in Amazon Redshift

The auto-copy feature in Amazon Redshift leverages the S3 event integration to automatically load data into Amazon Redshift and simplifies automatic data loading from Amazon S3 with a simple SQL command. You can enable Amazon Redshift auto-copy by creating auto-copy jobs. A auto-copy job is a database object that stores, automates, and reuses the COPY statement for newly created files that land in the S3 folder.

The following diagram illustrates this process.

S3 event integration and auto-copy jobs have the following benefits:

  • Users can now load data from Amazon S3 automatically without having to build a pipeline or using an external framework
  • auto-copy jobs offer automatic and incremental data ingestion from an Amazon S3 location without the need to implement a custom solution
  • This functionality comes at no additional cost
  • Existing COPY statements can be converted into auto-copy jobs by appending the JOB CREATE <job_name> parameter
  • It keeps track of loaded files and minimizes data duplication.
  • It can be quickly set up using a simple SQL statement using your choice of JDBC/ODBC clients.
  • It has automatic error handling of bad quality data files.
  • It has a mechanism to load-once for each file. This means that there is no need to generate explicit manifest files.

Prerequisites

To get started with auto-copy, you need the following prerequisites:

  • An AWS account
  • An encrypted Amazon Redshift provisioned cluster or Amazon redshift serverless workgroup
  • An Amazon S3 bucket
  • Add following to the Amazon S3 bucket policy
    {
        "Version": "2012-10-17",
        "Statement": [
            {
                "Sid": "Auto-Copy-Policy-01",
                "Effect": "Allow",
                "Principal": {
                    "Service":"redshift.amazonaws.com"
                        
                    
                },
                "Action": [
                    "s3:GetBucketNotification",
                    "s3:PutBucketNotification",
                    "s3:GetBucketLocation"
                ],
                "Resource": "arn:aws:s3:::<<your-s3-bucket-name>>",
                "Condition": {
                    "StringEquals": {
                        "aws:SourceArn": "arn:aws:redshift:<region-name>:<aws-account-id>:integration:*",
                        "aws:SourceAccount": "<aws-account-id>"
                    }
                }
            }
        ]
    }

Set up Amazon S3 event Integration

An Amazon S3 event integration facilitates seamless and automated data ingestion from S3 buckets into an Amazon Redshift data warehouse, streamlining the process of transferring and storing data for analytical purposes

  1. Sign in to the AWS Management Console and Navigate to Amazon Redshift home page. Under Integrations section choose S3 event integrations

  2. Choose Create S3 event integration

  3. Enter Integration name and Description, choose Next

  4. Choose Browse S3 buckets, a dialog box pops up, select the Amazon S3 bucket and choose Continue

  5. Amazon S3 bucket is selected. Choose Next
  6. Choose Browse Redshift data warehouse

  7. Choose the Amazon Redshift data warehouse and choose Continue

  8. Then Amazon Redshift resource policy needs access to S3 event integration. In case of Resource policy error, check Fix it for me and choose Next

  9. Add Tags as required and choose Next

  10. Review changes and choose Create S3 event integration
  11. An S3 event integration is created. Wait until the status of S3 event integration is Active

Set up auto-copy jobs

In this section, we demonstrate how to automate data loading of files from Amazon S3 into Amazon Redshift. With the existing COPY syntax, we add the JOB CREATE parameter to perform a one-time setup for automatic file ingestion. See the following code:

COPY <table-name>
FROM 's3://<s3-object-path>'
[COPY PARAMETERS...]
JOB CREATE <job-name> [AUTO ON | OFF];

Auto ingestion is enabled by default on auto-copy jobs. Files already present at the S3 location will not be visible to the auto-copy job. Only files added after JOB creation are tracked by Amazon Redshift.

Automate ingestion from a single data source

With a auto-copy job, you can automate ingestion from a single data source by creating one job and specifying the path to the S3 objects that contain the data. The S3 object path can reference a set of folders that have the same key prefix.

In this example, we have multiple files that are being loaded on a daily basis containing the sales transactions across all the stores in the US. For this we can create a store_sales folder in the bucket.

The following code creates the store_sales table:

DROP TABLE IF EXISTS public.store_sales;
CREATE TABLE IF NOT EXISTS public.store_sales
(
  ss_sold_date_sk int4,            
  ss_sold_time_sk int4,     
  ss_item_sk int4 not null,      
  ss_customer_sk int4,           
  ss_cdemo_sk int4,              
  ss_hdemo_sk int4,         
  ss_addr_sk int4,               
  ss_store_sk int4,           
  ss_promo_sk int4,           
  ss_ticket_number int8 not null,        
  ss_quantity int4,           
  ss_wholesale_cost numeric(7,2),          
  ss_list_price numeric(7,2),              
  ss_sales_price numeric(7,2),
  ss_ext_discount_amt numeric(7,2),             
  ss_ext_sales_price numeric(7,2),              
  ss_ext_wholesale_cost numeric(7,2),           
  ss_ext_list_price numeric(7,2),               
  ss_ext_tax numeric(7,2),                 
  ss_coupon_amt numeric(7,2), 
  ss_net_paid numeric(7,2),   
  ss_net_paid_inc_tax numeric(7,2),             
  ss_net_profit numeric(7,2),
  primary key (ss_item_sk, ss_ticket_number)
 ) 
DISTKEY (ss_item_sk) 
SORTKEY (ss_sold_date_sk);

Next, we create the auto-copy job to automatically load the gzip-compressed files into the store_sales table:

COPY store_sales
FROM 's3://aws-redshift-s3-auto-copy-demo/store_sales'
IAM_ROLE 'arn:aws:iam::**********:role/Redshift-S3'
gzip delimiter '|' EMPTYASNULL
region 'us-east-1'
JOB CREATE job_store_sales AUTO ON;

Each day’s sales transactions are loaded to their own folder in Amazon S3.

Now upload the files for transaction sold on 2002-12-31. Each folder contains multiple gzip-compressed files.

Since the auto-copy job is already created, it automatically loads the gzip-compressed files located in the S3 object path specified in the COPY command to the store_sales table.

Let’s run a query to get the daily total of sales transactions across all the stores in the US:

SELECT ss_sold_date_sk, count(1)
  FROM store_sales
GROUP BY ss_sold_date_sk;

The output shown comes from the transactions sold on 2002-12-31.

The following day, incremental sales transactions data are loaded to a new folder in the same S3 object path.

As new files arrive to the same S3 object path, the auto-copy job automatically loads the unprocessed files to the store_sales table in an incremental fashion.

All new sales transactions for 2003-01-01 are automatically ingested, which can be verified by running the following query:

SELECT ss_sold_date_sk, count(1)
  FROM store_sales
GROUP BY ss_sold_date_sk;

Automate ingestion from multiple data sources

We can also load an Amazon Redshift table from multiple data sources. When using a pub/sub pattern where multiple S3 buckets populate data to an Amazon Redshift table, you have to maintain multiple data pipelines for each source/target combination. With new parameters in the COPY command, this can be automated to handle data loads efficiently.

In the following example, the Customer_1 folder has Green Cab Company sales data, and the Customer_2 folder has Red Cab Company sales data. We can use the COPY command with the JOB parameter to automate this ingestion process.

The following screenshot shows sample data stored in files. Each folder has similar data but for different customers.

The target for these files in this example is the Amazon Redshift table cab_sales_data.

Define the target table cab_sales_data:

DROP TABLE IF EXISTS cab_sales_data;
CREATE TABLE IF NOT EXISTS cab_sales_data
(
  vendorid                VARCHAR(4),
  pickup_datetime         TIMESTAMP,
  dropoff_datetime        TIMESTAMP,
  store_and_fwd_flag      VARCHAR(1),
  ratecode                INT,
  pickup_longitude        FLOAT4,
  pickup_latitude         FLOAT4,
  dropoff_longitude       FLOAT4,
  dropoff_latitude        FLOAT4,
  passenger_count         INT,
  trip_distance           FLOAT4,
  fare_amount             FLOAT4,
  extra                   FLOAT4,
  mta_tax                 FLOAT4,
  tip_amount              FLOAT4,
  tolls_amount            FLOAT4,
  ehail_fee               FLOAT4,
  improvement_surcharge   FLOAT4,
  total_amount            FLOAT4,
  payment_type            VARCHAR(4),
  trip_type               VARCHAR(4)
)
DISTSTYLE EVEN
SORTKEY (passenger_count,pickup_datetime);

You can define two auto-copy jobs as shown in the following code to handle and monitor the ingestion of sales data belonging to different customers, in our case Customer_1 and Customer_2. These jobs monitor the Customer_1 and Customer_2 folders and load new files that are added here.

COPY public.cab_sales_data
FROM 's3://aws-redshift-s3-auto-copy-demo/Customer_1'
IAM_ROLE 'arn:aws:iam::**********:role/Redshift-S3'
DATEFORMAT 'auto'
IGNOREHEADER 1
DELIMITER ','
IGNOREBLANKLINES
REGION 'us-east-1'
JOB CREATE job_green_cab AUTO ON;

COPY public.cab_sales_data
FROM 's3:// aws-redshift-s3-auto-copy-demo/Customer_2'
IAM_ROLE 'arn:aws:iam::**********:role/Redshift-S3'
DATEFORMAT 'auto'
IGNOREHEADER 1
DELIMITER ','
IGNOREBLANKLINES
REGION 'us-east-1'
JOB CREATE job_red_cab AUTO ON;

After setting up the two jobs, we can upload the relevant files into their respective folders. This will make sure that the data is loaded efficiently as soon as the files arrive. Each customer is assigned its own vendorid, as shown in the following output:

SELECT vendorid,
       sum(passenger_count) as total_passengers 
  FROM cab_sales_data
GROUP BY vendorid;

result 1

Manually run a auto-copy job

There might be scenarios wherein the auto-copy job needs to be paused, meaning it needs to stop looking for new files, for example, to fix a corrupted data pipeline at the data source.

In that case, either use the auto-copy job ALTER command to set AUTO to OFF or create a new auto-copy job with AUTO OFF. Once this is set, auto copy will no longer look for new files.

If necessary, users can manually invoke auto-copy job which will do the work and ingest if new files are found.

auto-copy job RUN <auto-copy job Name>

You can disable “AUTO ON” in the existing auto-copy job using the following command:

auto-copy job ALTER <auto-copy job Name> AUTO OFF

The following table compares the syntax and data duplication between a regular copy statement and the new auto-copy job

. Copy Auto-copy job
Syntax COPY <table-name>
FROM 's3://<s3-object-path>'
[COPY PARAMETERS...]
COPY <table-name>
FROM 's3://<s3-object-path>'
[COPY PARAMETERS...]
JOB CREATE <job-name>;
Data Duplication If it is run multiple times against the same S3 folder, it will load the data again, resulting in data duplication. It will not load the same file twice, preventing data duplication.

Error handling and monitoring for auto-copy jobs

auto-copy jobs continuously monitor the S3 folder specified during job creation and perform ingestion whenever new files are created. New files created under the S3 folder are loaded exactly once to avoid data duplication.

By default, if there are data or format issues with the specific files, the auto-copy job will fail to ingest the files with a load error and log details to the system tables. The auto-copy job will remain AUTO ON with new data files and will continue to ignore previously failed files.

Amazon Redshift provides the following system tables for users to monitor or troubleshoot auto-copy jobs as needed:

  • List auto-copy jobs – Use SYS_COPY_JOB to list the auto-copy jobs stored in the database:
SELECT * 
  FROM sys_copy_job;

  • Get a summary of a auto-copy job – Use the SYS_LOAD_HISTORY view to get the aggregate metrics of a auto-copy job operation by specifying the copy_job_id. It shows the aggregate metrics of the files that have been processed by a auto-copy job.
SELECT *
  FROM sys_load_history
 WHERE copy_job_id = 274978;

  • Get details of a auto-copy job – Use STL_LOAD_COMMITS to get the status and details of each file that was processed by a auto-copy job:
SELECT *
  FROM stl_load_commits
 WHERE copy_job_id = 274978
ORDER BY curtime ASC;

  • Get exception details of a auto-copy job – Use STL_LOAD_ERRORS to get the details of files that failed to ingest from a auto-copy job:
SELECT   query,
    slice,
    starttime , 
    filename,
    line_number,
    colname,
    type,
    err_code,
    err_reason,
    copy_job_id,
    raw_line,
    raw_field_value
  FROM stl_load_errors
 WHERE copy_job_id = 274978;

Auto-copy job best practices

In an auto-copy job, when a new file is detected and ingested (automatically or manually), Amazon Redshift stores the file name and doesn’t run this specific job when a new file is created with the same file name.

The following are the recommended best practices when working with files using the auto-copy job:

  • Use unique file names for each file in a auto-copy job (for example, 2022-10-15-batch-1.csv). However, you can use the same file name as long as it’s from different auto-copy jobs:
    • job_customerA_saless3://redshift-blogs/sales/customerA/2022-10-15-sales.csv
    • job_customerB_saless3://redshift-blogs/sales/customerB/2022-10-15-sales.csv
  • Do not update file contents. Do not overwrite existing files. Changes in existing files will not be reflected to the target table. The auto-copy job doesn’t pick up updated or overwritten files, so make sure they’re renamed as new file names for the auto-copy job to pick up.
  • Run regular COPY statements (not a job) if you need to ingest a file that was already processed by your auto-copy job. (COPY statement without a JOB CREATE syntax doesn’t track loaded files.) For example, this is helpful in scenarios where you don’t have control of the file name and the initial file received failed. The following figure shows a typical workflow in this case.

  • Delete and recreate your auto-copy job if you want to reset file tracking history and start over. You can drop auto-copy job using following command.
    auto-copy job DROP <auto-copy job Name>

auto-copy job considerations

Here are the main things to consider when using auto-copy:

For additional details on other considerations for auto-copy, refer to the AWS documentation.

Customer feedback

GE Aerospace is a global provider of jet engines, components, and systems for commercial and military aircraft. The company has been designing, developing, and manufacturing jet engines since World War I.

“GE Aerospace uses AWS analytics and Amazon Redshift to enable critical business insights that drive important business decisions. With the support for auto-copy from Amazon S3, we can build simpler data pipelines to move data from Amazon S3 to Amazon Redshift. This accelerates our data product teams’ ability to access data and deliver insights to end users. We spend more time adding value through data and less time on integrations.”

Alcuin Weidus Sr Principal Data Architect at GE Aerospace

Conclusion

This post demonstrated how to automate data ingestion from Amazon S3 to Amazon Redshift using the auto-copy feature. This new functionality helps make Amazon Redshift data ingestion easier than ever, and will allow SQL users to get access to the most recent data using a simple SQL command.

Users can begin ingesting data to Redshift from Amazon S3 with simple SQL commands and gain access to the most up-to-date data without the need for third-party tools or custom implementation.


About the authors

Tahir Aziz is an Analytics Solution Architect at AWS. He has worked with building data warehouses and big data solutions for over 15+ years. He loves to help customers design end-to-end analytics solutions on AWS. Outside of work, he enjoys traveling and cooking.

Omama Khurshid is an Acceleration Lab Solutions Architect at Amazon Web Services. She focuses on helping customers across various industries build reliable, scalable, and efficient solutions. Outside of work, she enjoys spending time with her family, watching movies, listening to music, and learning new technologies.

Raza Hafeez is a Senior Product Manager at Amazon Redshift. He has over 13 years of professional experience building and optimizing enterprise data warehouses and is passionate about enabling customers to realize the power of their data. He specializes in migrating enterprise data warehouses to AWS Modern Data Architecture.

Jason Pedreza is an Analytics Specialist Solutions Architect at AWS with data warehousing experience handling petabytes of data. Prior to AWS, he built data warehouse solutions at Amazon.com. He specializes in Amazon Redshift and helps customers build scalable analytic solutions.

Nita Shah is an Analytics Specialist Solutions Architect at AWS based out of New York. She has been building data warehouse solutions for over 20 years and specializes in Amazon Redshift. She is focused on helping customers design and build enterprise-scale well-architected analytics and decision support platforms.

Eren Baydemir, a Technical Product Manager at AWS, has 15 years of experience in building customer-facing products and is currently focusing on data lake and file ingestion topics in the Amazon Redshift team. He was the CEO and co-founder of DataRow, which was acquired by Amazon in 2020.

Eesha Kumar is an Analytics Solutions Architect with AWS. He works with customers to realize the business value of data by helping them build solutions using the AWS platform and tools.

Satish Sathiya is a Senior Product Engineer at Amazon Redshift. He is an avid big data enthusiast who collaborates with customers around the globe to achieve success and meet their data warehousing and data lake architecture needs.

 Hangjian Yuan is a Software Development Engineer at Amazon Redshift. He’s passionate about analytical databases and focuses on delivering cutting-edge streaming experiences for customers.

About Anomalous Data Transfer detection in InsightIDR

Post Syndicated from Dina Durutlic original https://blog.rapid7.com/2022/12/07/about-anomalous-data-transfer-detection-in-insightidr/

About Anomalous Data Transfer detection in InsightIDR

By Shivangi Pandey

Shivangi is a Senior Product Manager for D&R at Rapid7.

Data exfiltration is an unauthorized movement or transfer of data occurring on an organization’s network. This can occur when a malicious actor gains access to a corporation’s network with the intention of stealing or leaking data.

Data exfiltration can also be carried out by inside actors moving data outside of the network accidentally, by uploading corporate files to their personal cloud – or deliberately to leak information that harms the organization.

Identifying this cyber risk is integral to securing your organization’s network.

Of course, attackers use multiple methods

Some use phishing scams to trick users into inputting personal login information into spoofed domains so that they can use the appropriate credentials to infiltrate the network. Once on to the network, the malicious actor can send the files they were searching for outside of their network using remote desktop, SSH, etc.

Another method? Ignoring security controls of a network. For example, employees may download unauthorized software for ease of use, but unintentionally allow a third party to gain access to sensitive information that was not meant to leave the network. People may use personal accounts and devices for work related tasks just because it’s easy. A malicious inside actor can also circumvent security controls to leak information outside of the network.

With many organizations moving to a hybrid model of work, it’s more important than ever to prevent data exfiltration, intended or unintended. This can be done by educating your employees of appropriate conduct when it comes to data usage and data sharing within and outside of your network. Education about common attack vectors attackers may use to steal their credentials will also help your employees keep your network secure. Additionally, education around what devices can access your network will make it easier to monitor whether a data breach is about to occur. Finally, assigning certain privileges based on employee functions will help.

Being able to detect data exfiltration is incredibly important for an organization’s environment and essential to your organization’s security posture. One of our new detections, Anomalous Data Transfer, provides you with the visibility into possible occurrences of data exfiltration within your network.

Rapid7s approach for detecting Anomalous Data Transfers

Anomalous Data Transfer is an InsightIDR detection which utilizes network flow data, produced by the Insight Network Sensor, to identify and mark unusual transfers of data and behavior. The detection identifies anomalously large transfers of data sent by assets out of a network, and outputs data exfiltration alerts

The model dynamically derives a baseline for each asset based on its active periods over 30 days, and each hour, will output network activity that is anomalously high as compared to that baseline as a candidate for further investigation. This process effectively acts as a filter, reducing millions of network connections into a few candidate alerts to bring to the attention of a security analyst.

Further contextual information is included in each candidate alert to help a security team make informed decisions about how to investigate the possible occurrence of data exfiltration.

The user has the ability to tune exceptions for which anomalous data transfer alerts are shown by going into Managed Detections. The user can tune exception rules for Anomalous Data Transfer with the following attributes: Organization, Certificate, and Source IP/Subnet. This allows for the analysts to focus on alerts that are well tailored to their organization’s environment.

CVE-2022-4261: Rapid7 Nexpose Update Validation Issue (FIXED)

Post Syndicated from Tod Beardsley original https://blog.rapid7.com/2022/12/07/cve-2022-4261-rapid7-nexpose-update-validation-issue-fixed/

CVE-2022-4261: Rapid7 Nexpose Update Validation Issue (FIXED)

On November 14, 2022, Rapid7’s product engineering team discovered that the mechanism used to validate the source of an update file was unreliable. This failure involving the internal cryptographic validation of received updates was designated as CVE-2022-4261, and is an instance of CWE-494. Rapid7’s estimate of the CVSSv3.1 base rating for this vulnerability for most environments is 4.4 (Medium). This issue is resolved in the regular December 7, 2022 release.

Product Description

Rapid7 Nexpose is an on-premise vulnerability scanner, used by many enterprises around the world to assess and manage the vulnerability exposures present in their networks. You can read more about Nexpose at our website.

Note that CVE-2022-4261 only affects the on-premise Nexpose product, and does not affect InsightVM.

Credit

This issue was discovered by Rapid7 Principal Software Engineer Emmett Kelly and validated by the Rapid7 Nexpose product team. It is being disclosed in accordance with Rapid7’s vulnerability disclosure policy.

Exploitation

Exploitation of this issue is complex, and requires an attacker already in a privileged position in the network. By understanding these complications, we believe our customers will be better able to make appropriate judgements on the risk of delaying this update, perhaps due to established change control procedures.

In order to exploit CVE-2022-4261, an attacker would first need to be in a position to provide a malicious update to Nexpose, either through a privileged position on the network, on the local computer that runs Nexpose (with sufficient privileges to initiate an update), or by convincing a Nexpose administrator to apply a maliciously-crafted update through social engineering. Once applied, the update could introduce new functionality to Nexpose that would benefit the attacker.

Impact

Given the requirement of a privileged position on the network or local machine, exploiting CVE-2022-4261, in most circumstances, is academic. Such an adversary is likely to already have many other (and often easier) choices when it comes to leveraging this position to cause trouble on the target network. In the case of a local machine compromise (which is the most likely attack scenario), the attacker could use this position to instead create a fairly permanent ingress avenue to the internal network and exercise the usual lateral movement options documented as ATT&CK technique T1557.

Remediation

Disabling automatic updates completely removes the risk of exploitation of CVE-2022-4261. That said, most Nexpose administrators already employ Nexpose’s automated updates, and should apply updates either on their already established automated schedules or as soon as it’s convenient to do so.

Nexpose administrators that are especially concerned that they will be targeted during their next update, or who believe they have already been compromised by persistent attackers, should disable automatic updates and use the documented Managing Updates without an Internet Connection procedure to fix this issue, after manually validating the authenticity of the update package.

Fixing an update system with an update is always fairly complex, given the chicken-and-egg nature of the problem being addressed, as well as the risks involved in using an update system to fix an update system. So, it is out of an abundance of caution that we are publishing this advisory today to ensure that customers who rely on automatic updates are made plainly aware of this issue and can plan accordingly.

Disclosure Timeline

  • Mon, Nov 14, 2022: Issue discovered by Emett Kelly, and validated by the Nexpose product team.
  • Thu, Dec 1, 2022: CVE-2022-4261 reserved by Rapid7.
  • Wed, Dec 7, 2022 : This disclosure and update 6.6.172 released.

How to secure your SaaS tenant data in DynamoDB with ABAC and client-side encryption

Post Syndicated from Jani Muuriaisniemi original https://aws.amazon.com/blogs/security/how-to-secure-your-saas-tenant-data-in-dynamodb-with-abac-and-client-side-encryption/

If you’re a SaaS vendor, you may need to store and process personal and sensitive data for large numbers of customers across different geographies. When processing sensitive data at scale, you have an increased responsibility to secure this data end-to-end. Client-side encryption of data, such as your customers’ contact information, provides an additional mechanism that can help you protect your customers and earn their trust.

In this blog post, we show how to implement client-side encryption of your SaaS application’s tenant data in Amazon DynamoDB with the Amazon DynamoDB Encryption Client. This is accomplished by leveraging AWS Identity and Access Management (IAM) together with AWS Key Management Service (AWS KMS) for a more secure and cost-effective isolation of the client-side encrypted data in DynamoDB, both at run-time and at rest.

Encrypting data in Amazon DynamoDB

Amazon DynamoDB supports data encryption at rest using encryption keys stored in AWS KMS. This functionality helps reduce operational burden and complexity involved in protecting sensitive data. In this post, you’ll learn about the benefits of adding client-side encryption to achieve end-to-end encryption in transit and at rest for your data, from its source to storage in DynamoDB. Client-side encryption helps ensure that your plaintext data isn’t available to any third party, including AWS.

You can use the Amazon DynamoDB Encryption Client to implement client-side encryption with DynamoDB. In the solution in this post, client-side encryption refers to the cryptographic operations that are performed on the application-side in the application’s Lambda function, before the data is sent to or retrieved from DynamoDB. The solution in this post uses the DynamoDB Encryption Client with the Direct KMS Materials Provider so that your data is encrypted by using AWS KMS. However, the underlying concept of the solution is not limited to the use of the DynamoDB Encryption Client, you can apply it to any client-side use of AWS KMS, for example using the AWS Encryption SDK.

For detailed information about using the DynamoDB Encryption Client, see the blog post How to encrypt and sign DynamoDB data in your application. This is a great place to start if you are not yet familiar with DynamoDB Encryption Client. If you are unsure about whether you should use client-side encryption, see Client-side and server-side encryption in the Amazon DynamoDB Encryption Client Developer Guide to help you with the decision.

AWS KMS encryption context

AWS KMS gives you the ability to add an additional layer of authentication for your AWS KMS API decrypt operations by using encryption context. The encryption context is one or more key-value pairs of additional data that you want associated with AWS KMS protected information.

Encryption context helps you defend against the risks of ciphertexts being tampered with, modified, or replaced — whether intentionally or unintentionally. Encryption context helps defend against both an unauthorized user replacing one ciphertext with another, as well as problems like operational events. To use encryption context, you specify associated key-value pairs on encrypt. You must provide the exact same key-value pairs in the encryption context on decrypt, or the operation will fail. Encryption context is not secret, and is not an access-control mechanism. The encryption context is a means of authenticating the data, not the caller.

The Direct KMS Materials Provider used in this blog post transparently generates a unique data key by using AWS KMS for each item stored in the DynamoDB table. It automatically sets the item’s partition key and sort key (if any) as AWS KMS encryption context key-value pairs.

The solution in this blog post relies on the partition key of each table item being defined in the encryption context. If you encrypt data with your own implementation, make sure to add your tenant ID to the encryption context in all your AWS KMS API calls.

For more information about the concept of AWS KMS encryption context, see the blog post How to Protect the Integrity of Your Encrypted Data by Using AWS Key Management Service and EncryptionContext. You can also see another example in Exercise 3 of the Busy Engineer’s Document Bucket Workshop.

Attribute-based access control for AWS

Attribute-based access control (ABAC) is an authorization strategy that defines permissions based on attributes. In AWS, these attributes are called tags. In the solution in this post, ABAC helps you create tenant-isolated access policies for your application, without the need to provision tenant specific AWS IAM roles.

If you are new to ABAC, or need a refresher on the concepts and the different isolation methods, see the blog post How to implement SaaS tenant isolation with ABAC and AWS IAM.

Solution overview

If you are a SaaS vendor expecting large numbers of tenants, it is important that your underlying architecture can cost effectively scale with minimal complexity to support the required number of tenants, without compromising on security. One way to meet these criteria is to store your tenant data in a single pooled DynamoDB table, and to encrypt the data using a single AWS KMS key.

Using a single shared KMS key to read and write encrypted data in DynamoDB for multiple tenants reduces your per-tenant costs. This may be especially relevant to manage your costs if you have users on your organization’s free tier, with no direct revenue to offset your costs.

When you use shared resources such as a single pooled DynamoDB table encrypted by using a single KMS key, you need a mechanism to help prevent cross-tenant access to the sensitive data. This is where you can use ABAC for AWS. By using ABAC, you can build an application with strong tenant isolation capabilities, while still using shared and pooled underlying resources for storing your sensitive tenant data.

You can find the solution described in this blog post in the aws-dynamodb-encrypt-with-abac GitHub repository. This solution uses ABAC combined with KMS encryption context to provide isolation of tenant data, both at rest and at run time. By using a single KMS key, the application encrypts tenant data on the client-side, and stores it in a pooled DynamoDB table, which is partitioned by a tenant ID.

Solution Architecture

Figure 1: Components of solution architecture

Figure 1: Components of solution architecture

The presented solution implements an API with a single AWS Lambda function behind an Amazon API Gateway, and implements processing for two types of requests:

  1. GET request: fetch any key-value pairs stored in the tenant data store for the given tenant ID.
  2. POST request: store the provided key-value pairs in the tenant data store for the given tenant ID, overwriting any existing data for the same tenant ID.

The application is written in Python, it uses AWS Lambda Powertools for Python, and you deploy it by using the AWS CDK.

It also uses the DynamoDB Encryption Client for Python, which includes several helper classes that mirror the AWS SDK for Python (Boto3) classes for DynamoDB. This solution uses the EncryptedResource helper class which provides Boto3 compatible get_item and put_item methods. The helper class is used together with the KMS Materials Provider to handle encryption and decryption with AWS KMS transparently for the application.

Note: This example solution provides no authentication of the caller identity. See chapter “Considerations for authentication and authorization” for further guidance.

How it works

Figure 2: Detailed architecture for storing new or updated tenant data

Figure 2: Detailed architecture for storing new or updated tenant data

As requests are made into the application’s API, they are routed by API Gateway to the application’s Lambda function (1). The Lambda function begins to run with the IAM permissions that its IAM execution role (DefaultExecutionRole) has been granted. These permissions do not grant any access to the DynamoDB table or the KMS key. In order to access these resources, the Lambda function first needs to assume the ResourceAccessRole, which does have the necessary permissions. To implement ABAC more securely in this use case, it is important that the application maintains clear separation of IAM permissions between the assumed ResourceAccessRole and the DefaultExecutionRole.

As the application assumes the ResourceAccessRole using the AssumeRole API call (2), it also sets a TenantID session tag. Session tags are key-value pairs that can be passed when you assume an IAM role in AWS Simple Token Service (AWS STS), and are a fundamental core building block of ABAC on AWS. When the session credentials (3) are used to make a subsequent request, the request context includes the aws:PrincipalTag context key, which can be used to access the session’s tags. The chapter “The ResourceAccessRole policy” describes how the aws:PrincipalTag context key is used in IAM policy condition statements to implement ABAC for this solution. Note that for demonstration purposes, this solution receives the value for the TenantID tag directly from the request URL, and it is not authenticated.

The trust policy of the ResourceAccessRole defines the principals that are allowed to assume the role, and to tag the assumed role session. Make sure to limit the principals to the least needed for your application to function. In this solution, the application Lambda function is the only trusted principal defined in the trust policy.

Next, the Lambda function prepares to encrypt or decrypt the data (4). To do so, it uses the DynamoDB Encryption Client. The KMS Materials Provider and the EncryptedResource helper class are both initialized with sessions by using the temporary credentials from the AssumeRole API call. This allows the Lambda function to access the KMS key and DynamoDB table resources, with access restricted to operations on data belonging only to the specific tenant ID.

Finally, using the EncryptedResource helper class provided by the DynamoDB Encryption Library, the data is written to and read from the DynamoDB table (5).

Considerations for authentication and authorization

The solution in this blog post intentionally does not implement authentication or authorization of the client requests. Instead, the requested tenant ID from the request URL is passed as the tenant identity. Your own applications should always authenticate and authorize tenant requests. There are multiple ways you can achieve this.

Modern web applications commonly use OpenID Connect (OIDC) for authentication, and OAuth for authorization. JSON Web Tokens (JWTs) can be used to pass the resulting authorization data from client to the application. You can validate a JWT when using AWS API Gateway with one of the following methods:

  1. When using a REST or a HTTP API, you can use a Lambda authorizer
  2. When using a HTTP API, you can use a JWT authorizer
  3. You can validate the token directly in your application code

If you write your own authorizer code, you can pick a popular open source library or you can choose the AWS provided open source library. To learn more about using a JWT authorizer, see the blog post How to secure API Gateway HTTP endpoints with JWT authorizer.

Regardless of the chosen method, you must be able to map a suitable claim from the user’s JWT, such as the subject, to the tenant ID, so that it can be used as the session tag in this solution.

The ResourceAccessRole policy

A critical part of the correct operation of ABAC in this solution is with the definition of the IAM access policy for the ResourceAccessRole. In the following policy, be sure to replace <region>, <account-id>, <table-name>, and <key-id> with your own values.

{
    "Version": "2012-10-17",
    "Statement": [
        {
            "Effect": "Allow",
            "Action": [
                "dynamodb:DescribeTable",
                "dynamodb:GetItem",
                "dynamodb:PutItem"
            ],
            "Resource": [
                "arn:aws:dynamodb:<region>:<account-id>:table/<table-name>",
           ],
            "Condition": {
                "ForAllValues:StringEquals": {
                    "dynamodb:LeadingKeys": [
                        "${aws:PrincipalTag/TenantID}"
                    ]
                }
            }
        },
        {
            "Effect": "Allow",
            "Action": [
                "kms:Decrypt",
                "kms:GenerateDataKey",
            ],
            "Resource": "arn:aws:kms:<region>:<account-id>:key/<key-id>",
            "Condition": {
                "StringEquals": {
                    "kms:EncryptionContext:tenant_id": "${aws:PrincipalTag/TenantID}"
                }
            }
        }
    ]
}

The policy defines two access statements, both of which apply separate ABAC conditions:

  1. The first statement grants access to the DynamoDB table with the condition that the partition key of the item matches the TenantID session tag in the caller’s session.
  2. The second statement grants access to the KMS key with the condition that one of the key-value pairs in the encryption context of the API call has a key called tenant_id with a value that matches the TenantID session tag in the caller’s session.

Warning: Do not use a ForAnyValue or ForAllValues set operator with the kms:EncryptionContext single-valued condition key. These set operators can create a policy condition that does not require values you intend to require, and allows values you intend to forbid.

Deploying and testing the solution

Prerequisites

To deploy and test the solution, you need the following:

Deploying the solution

After you have the prerequisites installed, run the following steps in a command line environment to deploy the solution. Make sure that your AWS CLI is configured with your AWS account credentials. Note that standard AWS service charges apply to this solution. For more information about pricing, see the AWS Pricing page.

To deploy the solution into your AWS account

  1. Use the following command to download the source code:
    git clone https://github.com/aws-samples/aws-dynamodb-encrypt-with-abac
    cd aws-dynamodb-encrypt-with-abac

  2. (Optional) You will need an AWS CDK version compatible with the application (2.37.0) to deploy. The simplest way is to install a local copy with npm, but you can also use a globally installed version if you already have one. To install locally, use the following command to use npm to install the AWS CDK:
    npm install [email protected]

  3. Use the following commands to initialize a Python virtual environment:
    python3 -m venv demoenv
    source demoenv/bin/activate
    python3 -m pip install -r requirements.txt

  4. (Optional) If you have not used AWS CDK with this account and Region before, you first need to bootstrap the environment:
    npx cdk bootstrap

  5. Use the following command to deploy the application with the AWS CDK:
    npx cdk deploy

  6. Make note of the API endpoint URL https://<api url>/prod/ in the Outputs section of the CDK command. You will need this URL for the next steps.
    Outputs:
    DemoappStack.ApiEndpoint4F160690 = https://<api url>/prod/

Testing the solution with example API calls

With the application deployed, you can test the solution by making API calls against the API URL that you captured from the deployment output. You can start with a simple HTTP POST request to insert data for a tenant. The API expects a JSON string as the data to store, so make sure to post properly formatted JSON in the body of the request.

An example request using curl -command looks like:

curl https://<api url>/prod/tenant/<tenant-name> -X POST --data '{"email":"<[email protected]>"}'

You can then read the same data back with an HTTP GET request:

curl https://<api url>/prod/tenant/<tenant-name>

You can store and retrieve data for any number of tenants, and can store as many attributes as you like. Each time you store data for a tenant, any previously stored data is overwritten.

Additional considerations

A tenant ID is used as the DynamoDB table’s partition key in the example application in this solution. You can replace the tenant ID with another unique partition key, such as a product ID, as long as the ID is consistently used in the IAM access policy, the IAM session tag, and the KMS encryption context. In addition, while this solution does not use a sort key in the table, you can modify the application to support a sort key with only a few changes. For more information, see Working with tables and data in DynamoDB.

Clean up

To clean up the application resources that you deployed while testing the solution, in the solution’s home directory, run the command cdk destroy.

Then, if you no longer plan to deploy to this account and Region using AWS CDK, you can also use the AWS CloudFormation console to delete the bootstrap stack (CDKToolKit).

Conclusion

In this post, you learned a method for simple and cost-efficient client-side encryption for your tenant data. By using the DynamoDB Encryption Client, you were able to implement the encryption with less effort, all while using a standard Boto3 DynamoDB Table resource compatible interface.

Adding to the client-side encryption, you also learned how to apply attribute-based access control (ABAC) to your IAM access policies. You used ABAC for tenant isolation by applying conditions for both the DynamoDB table access, as well as access to the KMS key that is used for encryption of the tenant data in the DynamoDB table. By combining client-side encryption with ABAC, you have increased your data protection with multiple layers of security.

You can start experimenting today on your own by using the provided solution. If you have feedback about this post, submit comments in the Comments section below. If you have questions on the content, consider submitting them to AWS re:Post

Want more AWS Security news? Follow us on Twitter.

Jani Muuriaisniemi

Jani is a Principal Solutions Architect at Amazon Web Services based out of Helsinki, Finland. With more than 20 years of industry experience, he works as a trusted advisor with a broad range of customers across different industries and segments, helping the customers on their cloud journey.

The collective thoughts of the interwebz