Tag Archives: CICD Pipeline

Best practices for managing Terraform State files in AWS CI/CD Pipeline

Post Syndicated from Arun Kumar Selvaraj original https://aws.amazon.com/blogs/devops/best-practices-for-managing-terraform-state-files-in-aws-ci-cd-pipeline/

Introduction

Today customers want to reduce manual operations for deploying and maintaining their infrastructure. The recommended method to deploy and manage infrastructure on AWS is to follow Infrastructure-As-Code (IaC) model using tools like AWS CloudFormation, AWS Cloud Development Kit (AWS CDK) or Terraform.

One of the critical components in terraform is managing the state file which keeps track of your configuration and resources. When you run terraform in an AWS CI/CD pipeline the state file has to be stored in a secured, common path to which the pipeline has access to. You need a mechanism to lock it when multiple developers in the team want to access it at the same time.

In this blog post, we will explain how to manage terraform state files in AWS, best practices on configuring them in AWS and an example of how you can manage it efficiently in your Continuous Integration pipeline in AWS when used with AWS Developer Tools such as AWS CodeCommit and AWS CodeBuild. This blog post assumes you have a basic knowledge of terraform, AWS Developer Tools and AWS CI/CD pipeline. Let’s dive in!

Challenges with handling state files

By default, the state file is stored locally where terraform runs, which is not a problem if you are a single developer working on the deployment. However if not, it is not ideal to store state files locally as you may run into following problems:

  • When working in teams or collaborative environments, multiple people need access to the state file
  • Data in the state file is stored in plain text which may contain secrets or sensitive information
  • Local files can get lost, corrupted, or deleted

Best practices for handling state files

The recommended practice for managing state files is to use terraform’s built-in support for remote backends. These are:

Remote backend on Amazon Simple Storage Service (Amazon S3): You can configure terraform to store state files in an Amazon S3 bucket which provides a durable and scalable storage solution. Storing on Amazon S3 also enables collaboration that allows you to share state file with others.

Remote backend on Amazon S3 with Amazon DynamoDB: In addition to using an Amazon S3 bucket for managing the files, you can use an Amazon DynamoDB table to lock the state file. This will allow only one person to modify a particular state file at any given time. It will help to avoid conflicts and enable safe concurrent access to the state file.

There are other options available as well such as remote backend on terraform cloud and third party backends. Ultimately, the best method for managing terraform state files on AWS will depend on your specific requirements.

When deploying terraform on AWS, the preferred choice of managing state is using Amazon S3 with Amazon DynamoDB.

AWS configurations for managing state files

  1. Create an Amazon S3 bucket using terraform. Implement security measures for Amazon S3 bucket by creating an AWS Identity and Access Management (AWS IAM) policy or Amazon S3 Bucket Policy. Thus you can restrict access, configure object versioning for data protection and recovery, and enable AES256 encryption with SSE-KMS for encryption control.
  1. Next create an Amazon DynamoDB table using terraform with Primary key set to LockID. You can also set any additional configuration options such as read/write capacity units. Once the table is created, you will configure the terraform backend to use it for state locking by specifying the table name in the terraform block of your configuration.
  1. For a single AWS account with multiple environments and projects, you can use a single Amazon S3 bucket. If you have multiple applications in multiple environments across multiple AWS accounts, you can create one Amazon S3 bucket for each account. In that Amazon S3 bucket, you can create appropriate folders for each environment, storing project state files with specific prefixes.

Now that you know how to handle terraform state files on AWS, let’s look at an example of how you can configure them in a Continuous Integration pipeline in AWS.

Architecture

Architecture on how to use terraform in an AWS CI pipeline

Figure 1: Example architecture on how to use terraform in an AWS CI pipeline

This diagram outlines the workflow implemented in this blog:

  1. The AWS CodeCommit repository contains the application code
  2. The AWS CodeBuild job contains the buildspec files and references the source code in AWS CodeCommit
  3. The AWS Lambda function contains the application code created after running terraform apply
  4. Amazon S3 contains the state file created after running terraform apply. Amazon DynamoDB locks the state file present in Amazon S3

Implementation

Pre-requisites

Before you begin, you must complete the following prerequisites:

Setting up the environment

  1. You need an AWS access key ID and secret access key to configure AWS CLI. To learn more about configuring the AWS CLI, follow these instructions.
  2. Clone the repo for complete example: git clone https://github.com/aws-samples/manage-terraform-statefiles-in-aws-pipeline
  3. After cloning, you could see the following folder structure:
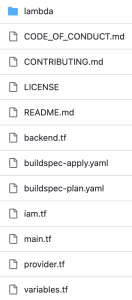
AWS CodeCommit repository structure

Figure 2: AWS CodeCommit repository structure

Let’s break down the terraform code into 2 parts – one for preparing the infrastructure and another for preparing the application.

Preparing the Infrastructure

  1. The main.tf file is the core component that does below:
      • It creates an Amazon S3 bucket to store the state file. We configure bucket ACL, bucket versioning and encryption so that the state file is secure.
      • It creates an Amazon DynamoDB table which will be used to lock the state file.
      • It creates two AWS CodeBuild projects, one for ‘terraform plan’ and another for ‘terraform apply’.

    Note – It also has the code block (commented out by default) to create AWS Lambda which you will use at a later stage.

  1. AWS CodeBuild projects should be able to access Amazon S3, Amazon DynamoDB, AWS CodeCommit and AWS Lambda. So, the AWS IAM role with appropriate permissions required to access these resources are created via iam.tf file.
  1. Next you will find two buildspec files named buildspec-plan.yaml and buildspec-apply.yaml that will execute terraform commands – terraform plan and terraform apply respectively.
  1. Modify AWS region in the provider.tf file.
  1. Update Amazon S3 bucket name, Amazon DynamoDB table name, AWS CodeBuild compute types, AWS Lambda role and policy names to required values using variable.tf file. You can also use this file to easily customize parameters for different environments.

With this, the infrastructure setup is complete.

You can use your local terminal and execute below commands in the same order to deploy the above-mentioned resources in your AWS account.

terraform init
terraform validate
terraform plan
terraform apply

Once the apply is successful and all the above resources have been successfully deployed in your AWS account, proceed with deploying your application. 

Preparing the Application

  1. In the cloned repository, use the backend.tf file to create your own Amazon S3 backend to store the state file. By default, it will have below values. You can override them with your required values.
bucket = "tfbackend-bucket" 
key    = "terraform.tfstate" 
region = "eu-central-1"
  1. The repository has sample python code stored in main.py that returns a simple message when invoked.
  1. In the main.tf file, you can find the below block of code to create and deploy the Lambda function that uses the main.py code (uncomment these code blocks).
data "archive_file" "lambda_archive_file" {
    ……
}

resource "aws_lambda_function" "lambda" {
    ……
}
  1. Now you can deploy the application using AWS CodeBuild instead of running terraform commands locally which is the whole point and advantage of using AWS CodeBuild.
  1. Run the two AWS CodeBuild projects to execute terraform plan and terraform apply again.
  1. Once successful, you can verify your deployment by testing the code in AWS Lambda. To test a lambda function (console):
    • Open AWS Lambda console and select your function “tf-codebuild”
    • In the navigation pane, in Code section, click Test to create a test event
    • Provide your required name, for example “test-lambda”
    • Accept default values and click Save
    • Click Test again to trigger your test event “test-lambda”

It should return the sample message you provided in your main.py file. In the default case, it will display “Hello from AWS Lambda !” message as shown below.
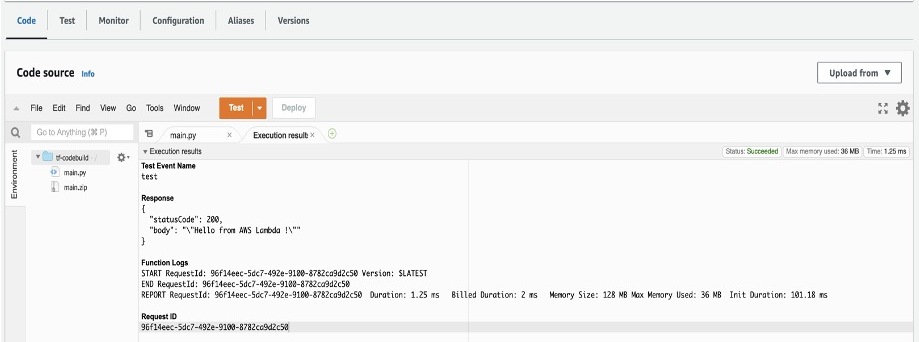
Sample Amazon Lambda function response

Figure 3: Sample Amazon Lambda function response

  1. To verify your state file, go to Amazon S3 console and select the backend bucket created (tfbackend-bucket). It will contain your state file.
Amazon S3 bucket with terraform state file

Figure 4: Amazon S3 bucket with terraform state file

  1. Open Amazon DynamoDB console and check your table tfstate-lock and it will have an entry with LockID.
Amazon DynamoDB table with LockID

Figure 5: Amazon DynamoDB table with LockID

Thus, you have securely stored and locked your terraform state file using terraform backend in a Continuous Integration pipeline.

Cleanup

To delete all the resources created as part of the repository, run the below command from your terminal.

terraform destroy

Conclusion

In this blog post, we explored the fundamentals of terraform state files, discussed best practices for their secure storage within AWS environments and also mechanisms for locking these files to prevent unauthorized team access. And finally, we showed you an example of how efficiently you can manage them in a Continuous Integration pipeline in AWS.

You can apply the same methodology to manage state files in a Continuous Delivery pipeline in AWS. For more information, see CI/CD pipeline on AWS, Terraform backends types, Purpose of terraform state.

Arun Kumar Selvaraj

Arun Kumar Selvaraj is a Cloud Infrastructure Architect with AWS Professional Services. He loves building world class capability that provides thought leadership, operating standards and platform to deliver accelerated migration and development paths for his customers. His interests include Migration, CCoE, IaC, Python, DevOps, Containers and Networking.

Manasi Bhutada

Manasi Bhutada is an ISV Solutions Architect based in the Netherlands. She helps customers design and implement well architected solutions in AWS that address their business problems. She is passionate about data analytics and networking. Beyond work she enjoys experimenting with food, playing pickleball, and diving into fun board games.

How to add notifications and manual approval to an AWS CDK Pipeline

Post Syndicated from Jehu Gray original https://aws.amazon.com/blogs/devops/how-to-add-notifications-and-manual-approval-to-an-aws-cdk-pipeline/

A deployment pipeline typically comprises several stages such as dev, test, and prod, which ensure that changes undergo testing before reaching the production environment. To improve the reliability and stability of release processes, DevOps teams must review Infrastructure as Code (IaC) changes before applying them in production. As a result, implementing a mechanism for notification and manual approval that grants stakeholders improved access to changes in their release pipelines has become a popular practice for DevOps teams.

Notifications keep development teams and stakeholders informed in real-time about updates and changes to deployment status within release pipelines. Manual approvals establish thresholds for transitioning a change from one stage to the next in the pipeline. They also act as a guardrail to mitigate risks arising from errors and rework because of faulty deployments.

Please note that manual approvals, as described in this post, are not a replacement for the use of automation. Instead, they complement automated checks within the release pipeline.

In this blog post, we describe how to set up notifications and add a manual approval stage to AWS Cloud Development Kit (AWS CDK) Pipeline.

Concepts

CDK Pipeline

CDK Pipelines is a construct library for painless continuous delivery of CDK applications. CDK Pipelines can automatically build, test, and deploy changes to CDK resources. CDK Pipelines are self-mutating which means as application stages or stacks are added, the pipeline automatically reconfigures itself to deploy those new stages or stacks. Pipelines need only be manually deployed once, afterwards, the pipeline keeps itself up to date from the source code repository by pulling the changes pushed to the repository.

Notifications

Adding notifications to a pipeline provides visibility to changes made to the environment by utilizing the NotificationRule construct. You can also use this rule to notify pipeline users of important changes, such as when a pipeline starts execution. Notification rules specify both the events and the targets, such as Amazon Simple Notification Service (Amazon SNS) topic or AWS Chatbot clients configured for Slack which represents the nominated recipients of the notifications. An SNS topic is a logical access point that acts as a communication channel while Chatbot is an AWS service that enables DevOps and software development teams to use messaging program chat rooms to monitor and respond to operational events.

Manual Approval

In a CDK pipeline, you can incorporate an approval action at a specific stage, where the pipeline should pause, allowing a team member or designated reviewer to manually approve or reject the action. When an approval action is ready for review, a notification is sent out to alert the relevant parties. This combination of notifications and approvals ensures timely and efficient decision-making regarding crucial actions within the pipeline.

Solution Overview

The solution explains a simple web service that is comprised of an AWS Lambda function that returns a static web page served by Amazon API Gateway. Since Continuous Deployment and Continuous Integration (CI/CD) are important components to most web projects, the team implements a CDK Pipeline for their web project.

There are two important stages in this CDK pipeline; the Pre-production stage for testing and the Production stage, which contains the end product for users.

The flow of the CI/CD process to update the website starts when a developer pushes a change to the repository using their Integrated Development Environment (IDE). An Amazon CloudWatch event triggers the CDK Pipeline. Once the changes reach the pre-production stage for testing, the CI/CD process halts. This is because a manual approval gate is between the pre-production and production stages. So, it becomes a stakeholder’s responsibility to review the changes in the pre-production stage before approving them for production. The pipeline includes an SNS notification that notifies the stakeholder whenever the pipeline requires manual approval.

After approving the changes, the CI/CD process proceeds to the production stage and the updated version of the website becomes available to the end user. If the approver rejects the changes, the process ends at the pre-production stage with no impact to the end user.

The following diagram illustrates the solution architecture.


This diagram shows the CDK pipeline process in the solution and how applications or updates are deployed using AWS Lambda Function to end users.

Figure 1. This image shows the CDK pipeline process in our solution and how applications or updates are deployed using AWS Lambda Function to end users.

Prerequisites

For this walkthrough, you should have the following prerequisites:

Add notification to the pipeline

In this tutorial, perform the following steps:

  • Add the import statements for AWS CodeStar notifications and SNS to the import section of the pipeline stack py
import aws_cdk.aws_codestarnotifications as notifications
import aws_cdk.pipelines as pipelines
import aws_cdk.aws_sns as sns
import aws_cdk.aws_sns_subscriptions as subs
  • Ensure the pipeline is built by calling the ‘build pipeline’ function.

pipeline.build_pipeline()

  • Create an SNS topic.

topic = sns.Topic(self, "MyTopic1")

  • Add a subscription to the topic. This specifies where the notifications are sent (Add the stakeholders’ email here).

topic.add_subscription(subs.EmailSubscription("[email protected]"))

  • Define a rule. This contains the source for notifications, the event trigger, and the target .

rule = notifications.NotificationRule(self, "NotificationRule", )

  • Assign the source the value pipeline.pipeline The first pipeline is the name of the CDK pipeline(variable) and the .pipeline is to show it is a pipeline(function).

source=pipeline.pipeline,

  • Define the events to be monitored. Specify notifications for when the pipeline starts, when it fails, when the execution succeeds, and finally when manual approval is needed.
events=["codepipeline-pipeline-pipeline-execution-started", "codepipeline-pipeline-pipeline-execution-failed","codepipeline-pipeline-pipeline-execution-succeeded", 
"codepipeline-pipeline-manual-approval-needed"],
  • For the complete list of supported event types for pipelines, see here
  • Finally, add the target. The target here is the topic created previously.

targets=[topic]

The combination of all the steps becomes:

pipeline.build_pipeline()
topic = sns.Topic(self, "MyTopic1")
topic.add_subscription(subs.EmailSubscription("[email protected]"))
rule = notifications.NotificationRule(self, "NotificationRule",
source=pipeline.pipeline,
events=["codepipeline-pipeline-pipeline-execution-started", "codepipeline-pipeline-pipeline-execution-failed","codepipeline-pipeline-pipeline-execution-succeeded", 
"codepipeline-pipeline-manual-approval-needed"],
targets=[topic]
)

Adding Manual Approval

  • Add the ManualApprovalStep import to the aws_cdk.pipelines import statement.
from aws_cdk.pipelines import (
CodePipeline,
CodePipelineSource,
ShellStep,
ManualApprovalStep
)
  • Add the ManualApprovalStep to the production stage. The code must be added to the add_stage() function.
 prod = WorkshopPipelineStage(self, "Prod")
        prod_stage = pipeline.add_stage(prod,
            pre = [ManualApprovalStep('PromoteToProduction')])

When a stage is added to a pipeline, you can specify the pre and post steps, which are arbitrary steps that run before or after the contents of the stage. You can use them to add validations like manual or automated gates to the pipeline. It is recommended to put manual approval gates in the set of pre steps, and automated approval gates in the set of post steps. So, the manual approval action is added as a pre step that runs after the pre-production stage and before the production stage .

  • The final version of the pipeline_stack.py becomes:
from constructs import Construct
import aws_cdk as cdk
import aws_cdk.aws_codestarnotifications as notifications
import aws_cdk.aws_sns as sns
import aws_cdk.aws_sns_subscriptions as subs
from aws_cdk import (
    Stack,
    aws_codecommit as codecommit,
    aws_codepipeline as codepipeline,
    pipelines as pipelines,
    aws_codepipeline_actions as cpactions,
    
)
from aws_cdk.pipelines import (
    CodePipeline,
    CodePipelineSource,
    ShellStep,
    ManualApprovalStep
)


class WorkshopPipelineStack(cdk.Stack):
    def __init__(self, scope: Construct, id: str, **kwargs) -> None:
        super().__init__(scope, id, **kwargs)
        
        # Creates a CodeCommit repository called 'WorkshopRepo'
        repo = codecommit.Repository(
            self, "WorkshopRepo", repository_name="WorkshopRepo",
            
        )
        
        #Create the Cdk pipeline
        pipeline = pipelines.CodePipeline(
            self,
            "Pipeline",
            
            synth=pipelines.ShellStep(
                "Synth",
                input=pipelines.CodePipelineSource.code_commit(repo, "main"),
                commands=[
                    "npm install -g aws-cdk",  # Installs the cdk cli on Codebuild
                    "pip install -r requirements.txt",  # Instructs Codebuild to install required packages
                    "npx cdk synth",
                ]
                
            ),
        )

        
         # Create the Pre-Prod Stage and its API endpoint
        deploy = WorkshopPipelineStage(self, "Pre-Prod")
        deploy_stage = pipeline.add_stage(deploy)
    
        deploy_stage.add_post(
            
            pipelines.ShellStep(
                "TestViewerEndpoint",
                env_from_cfn_outputs={
                    "ENDPOINT_URL": deploy.hc_viewer_url
                },
                commands=["curl -Ssf $ENDPOINT_URL"],
            )
    
        
        )
        deploy_stage.add_post(
            pipelines.ShellStep(
                "TestAPIGatewayEndpoint",
                env_from_cfn_outputs={
                    "ENDPOINT_URL": deploy.hc_endpoint
                },
                commands=[
                    "curl -Ssf $ENDPOINT_URL",
                    "curl -Ssf $ENDPOINT_URL/hello",
                    "curl -Ssf $ENDPOINT_URL/test",
                ],
            )
            
        )
        
        # Create the Prod Stage with the Manual Approval Step
        prod = WorkshopPipelineStage(self, "Prod")
        prod_stage = pipeline.add_stage(prod,
            pre = [ManualApprovalStep('PromoteToProduction')])
        
        prod_stage.add_post(
            
            pipelines.ShellStep(
                "ViewerEndpoint",
                env_from_cfn_outputs={
                    "ENDPOINT_URL": prod.hc_viewer_url
                },
                commands=["curl -Ssf $ENDPOINT_URL"],
                
            )
            
        )
        prod_stage.add_post(
            pipelines.ShellStep(
                "APIGatewayEndpoint",
                env_from_cfn_outputs={
                    "ENDPOINT_URL": prod.hc_endpoint
                },
                commands=[
                    "curl -Ssf $ENDPOINT_URL",
                    "curl -Ssf $ENDPOINT_URL/hello",
                    "curl -Ssf $ENDPOINT_URL/test",
                ],
            )
            
        )
        
        # Create The SNS Notification for the Pipeline
        
        pipeline.build_pipeline()
        
        topic = sns.Topic(self, "MyTopic")
        topic.add_subscription(subs.EmailSubscription("[email protected]"))
        rule = notifications.NotificationRule(self, "NotificationRule",
            source = pipeline.pipeline,
            events = ["codepipeline-pipeline-pipeline-execution-started", "codepipeline-pipeline-pipeline-execution-failed", "codepipeline-pipeline-manual-approval-needed", "codepipeline-pipeline-manual-approval-succeeded"],
            targets=[topic]
            )


When a commit is made with git commit -am "Add manual Approval" and changes are pushed with git push, the pipeline automatically self-mutates to add the new approval stage.

Now when the developer pushes changes to update the build environment or the end user application, the pipeline execution stops at the point where the approval action was added. The pipeline won’t resume unless a manual approval action is taken.

Image showing the CDK pipeline with the added Manual Approval action on the AWS Management Console

Figure 2. This image shows the pipeline with the added Manual Approval action.

Since there is a notification rule that includes the approval action, an email notification is sent with the pipeline information and approval status to the stakeholder(s) subscribed to the SNS topic.

Image showing the SNS email notification sent when the pipeline starts

Figure 3. This image shows the SNS email notification sent when the pipeline starts.

After pushing the updates to the pipeline, the reviewer or stakeholder can use the AWS Management Console to access the pipeline to approve or deny changes based on their assessment of these changes. This process helps eliminate any potential issues or errors and ensures only changes deemed relevant are made.

Image showing the review action on the AWS Management Console that gives the stakeholder the ability to approve or reject any changes.

Figure 4. This image shows the review action that gives the stakeholder the ability to approve or reject any changes. 

If a reviewer rejects the action, or if no approval response is received within seven days of the pipeline stopping for the review action, the pipeline status is “Failed.”

Image showing when a stakeholder rejects the action

Figure 5. This image depicts when a stakeholder rejects the action.

If a reviewer approves the changes, the pipeline continues its execution.

Image showing when a stakeholder approves the action

Figure 6. This image depicts when a stakeholder approves the action.

Considerations

It is important to consider any potential drawbacks before integrating a manual approval process into a CDK pipeline. one such consideration is its implementation may delay the delivery of updates to end users. An example of this is business hours limitation. The pipeline process might be constrained by the availability of stakeholders during business hours. This can result in delays if changes are made outside regular working hours and require approval when stakeholders are not immediately accessible.

Clean up

To avoid incurring future charges, delete the resources. Use cdk destroy via the command line to delete the created stack.

Conclusion

Adding notifications and manual approval to CDK Pipelines provides better visibility and control over the changes made to the pipeline environment. These features ideally complement the existing automated checks to ensure that all updates are reviewed before deployment. This reduces the risk of potential issues arising from bugs or errors. The ability to approve or deny changes through the AWS Management Console makes the review process simple and straightforward. Additionally, SNS notifications keep stakeholders updated on the status of the pipeline, ensuring a smooth and seamless deployment process.

Jehu Gray

Jehu Gray is an Enterprise Solutions Architect at Amazon Web Services where he helps customers design solutions that fits their needs. He enjoys exploring whats possible with IaC such as CDK.

Abiola Olanrewaju

Abiola Olanrewaju is an Enterprise Solutions Architect at Amazon Web Services where he helps customers design and implement scalable solutions that drive business outcomes. He has a keen interest in Data Analytics, Security and Automation.

Serge Poueme

Serge Poueme is a Solutions Architect on the AWS for Games Team. He started his career as a software development engineer and enjoys building new products. At AWS, Serge focuses on improving Builders Experience for game developers and optimize servers hosting using Containers. When he is not working he enjoys playing Far Cry or Fifa on his XBOX

Implementing automatic drift detection in CDK Pipelines using Amazon EventBridge

Post Syndicated from DAMODAR SHENVI WAGLE original https://aws.amazon.com/blogs/devops/implementing-automatic-drift-detection-in-cdk-pipelines-using-amazon-eventbridge/

The AWS Cloud Development Kit (AWS CDK) is a popular open source toolkit that allows developers to create their cloud infrastructure using high level programming languages. AWS CDK comes bundled with a construct called CDK Pipelines that makes it easy to set up continuous integration, delivery, and deployment with AWS CodePipeline. The CDK Pipelines construct does all the heavy lifting, such as setting up appropriate AWS IAM roles for deployment across regions and accounts, Amazon Simple Storage Service (Amazon S3) buckets to store build artifacts, and an AWS CodeBuild project to build, test, and deploy the app. The pipeline deploys a given CDK application as one or more AWS CloudFormation stacks.

With CloudFormation stacks, there is the possibility that someone can manually change the configuration of stack resources outside the purview of CloudFormation and the pipeline that deploys the stack. This causes the deployed resources to be inconsistent with the intent in the application, which is referred to as “drift”, a situation that can make the application’s behavior unpredictable. For example, when troubleshooting an application, if the application has drifted in production, it is difficult to reproduce the same behavior in a development environment. In other cases, it may introduce security vulnerabilities in the application. For example, an AWS EC2 SecurityGroup that was originally deployed to allow ingress traffic from a specific IP address might potentially be opened up to allow traffic from all IP addresses.

CloudFormation offers a drift detection feature for stacks and stack resources to detect configuration changes that are made outside of CloudFormation. The stack/resource is considered as drifted if its configuration does not match the expected configuration defined in the CloudFormation template and by extension the CDK code that synthesized it.

In this blog post you will see how CloudFormation drift detection can be integrated as a pre-deployment validation step in CDK Pipelines using an event driven approach.

Services and frameworks used in the post include CloudFormation, CodeBuild, Amazon EventBridge, AWS Lambda, Amazon DynamoDB, S3, and AWS CDK.

Solution overview

Amazon EventBridge is a serverless AWS service that offers an agile mechanism for the developers to spin up loosely coupled, event driven applications at scale. EventBridge supports routing of events between services via an event bus. EventBridge out of the box supports a default event bus for each account which receives events from AWS services. Last year, CloudFormation added a new feature that enables event notifications for changes made to CloudFormation-based stacks and resources. These notifications are accessible through Amazon EventBridge, allowing users to monitor and react to changes in their CloudFormation infrastructure using event-driven workflows. Our solution leverages the drift detection events that are now supported by EventBridge. The following architecture diagram depicts the flow of events involved in successfully performing drift detection in CDK Pipelines.

Architecture diagram

Architecture diagram

The user starts the pipeline by checking code into an AWS CodeCommit repo, which acts as the pipeline source. We have configured drift detection in the pipeline as a custom step backed by a lambda function. When the drift detection step invokes the provider lambda function, it first starts the drift detection on the CloudFormation stack Demo Stack and then saves the drift_detection_id along with pipeline_job_id in a DynamoDB table. In the meantime, the pipeline waits for a response on the status of drift detection.

The EventBridge rules are set up to capture the drift detection state change events for Demo Stack that are received by the default event bus. The callback lambda is registered as the intended target for the rules. When drift detection completes, it triggers the EventBridge rule which in turn invokes the callback lambda function with stack status as either DRIFTED or IN SYNC. The callback lambda function pulls the pipeline_job_id from DynamoDB and sends the appropriate status back to the pipeline, thus propelling the pipeline out of the wait state. If the stack is in the IN SYNC status, the callback lambda sends a success status and the pipeline continues with the deployment. If the stack is in the DRIFTED status, callback lambda sends failure status back to the pipeline and the pipeline run ends up in failure.

Solution Deep Dive

The solution deploys two stacks as shown in the above architecture diagram

  1. CDK Pipelines stack
  2. Pre-requisite stack

The CDK Pipelines stack defines a pipeline with a CodeCommit source and drift detection step integrated into it. The pre-requisite stack deploys following resources that are required by the CDK Pipelines stack.

  • A Lambda function that implements drift detection step
  • A DynamoDB table that holds drift_detection_id and pipeline_job_id
  • An Event bridge rule to capture “CloudFormation Drift Detection Status Change” event
  • A callback lambda function that evaluates status of drift detection and sends status back to the pipeline by looking up the data captured in DynamoDB.

The pre-requisites stack is deployed first, followed by the CDK Pipelines stack.

Defining drift detection step

CDK Pipelines offers a mechanism to define your own step that requires custom implementation. A step corresponds to a custom action in CodePipeline such as invoke lambda function. It can exist as a pre or post deployment action in a given stage of the pipeline. For example, your organization’s policies may require its CI/CD pipelines to run a security vulnerability scan as a prerequisite before deployment. You can build this as a custom step in your CDK Pipelines. In this post, you will use the same mechanism for adding the drift detection step in the pipeline.

You start by defining a class called DriftDetectionStep that extends Step and implements ICodePipelineActionFactory as shown in the following code snippet. The constructor accepts 3 parameters stackName, account, region as inputs. When the pipeline runs the step, it invokes the drift detection lambda function with these parameters wrapped inside userParameters variable. The function produceAction() adds the action to invoke drift detection lambda function to the pipeline stage.

Please note that the solution uses an SSM parameter to inject the lambda function ARN into the pipeline stack. So, we deploy the provider lambda function as part of pre-requisites stack before the pipeline stack and publish its ARN to the SSM parameter. The CDK code to deploy pre-requisites stack can be found here.

export class DriftDetectionStep
    extends Step
    implements pipelines.ICodePipelineActionFactory
{
    constructor(
        private readonly stackName: string,
        private readonly account: string,
        private readonly region: string
    ) {
        super(`DriftDetectionStep-${stackName}`);
    }

    public produceAction(
        stage: codepipeline.IStage,
        options: ProduceActionOptions
    ): CodePipelineActionFactoryResult {
        // Define the configuraton for the action that is added to the pipeline.
        stage.addAction(
            new cpactions.LambdaInvokeAction({
                actionName: options.actionName,
                runOrder: options.runOrder,
                lambda: lambda.Function.fromFunctionArn(
                    options.scope,
                    `InitiateDriftDetectLambda-${this.stackName}`,
                    ssm.StringParameter.valueForStringParameter(
                        options.scope,
                        SSM_PARAM_DRIFT_DETECT_LAMBDA_ARN
                    )
                ),
                // These are the parameters passed to the drift detection step implementaton provider lambda
                userParameters: {
                    stackName: this.stackName,
                    account: this.account,
                    region: this.region,
                },
            })
        );
        return {
            runOrdersConsumed: 1,
        };
    }
}

Configuring drift detection step in CDK Pipelines

Here you will see how to integrate the previously defined drift detection step into CDK Pipelines. The pipeline has a stage called DemoStage as shown in the following code snippet. During the construction of DemoStage, we declare drift detection as the pre-deployment step. This makes sure that the pipeline always does the drift detection check prior to deployment.

Please note that for every stack defined in the stage; we add a dedicated step to perform drift detection by instantiating the class DriftDetectionStep detailed in the prior section. Thus, this solution scales with the number of stacks defined per stage.

export class PipelineStack extends BaseStack {
    constructor(scope: Construct, id: string, props?: StackProps) {
        super(scope, id, props);

        const repo = new codecommit.Repository(this, 'DemoRepo', {
            repositoryName: `${this.node.tryGetContext('appName')}-repo`,
        });

        const pipeline = new CodePipeline(this, 'DemoPipeline', {
            synth: new ShellStep('synth', {
                input: CodePipelineSource.codeCommit(repo, 'main'),
                commands: ['./script-synth.sh'],
            }),
            crossAccountKeys: true,
            enableKeyRotation: true,
        });
        const demoStage = new DemoStage(this, 'DemoStage', {
            env: {
                account: this.account,
                region: this.region,
            },
        });
        const driftDetectionSteps: Step[] = [];
        for (const stackName of demoStage.stackNameList) {
            const step = new DriftDetectionStep(stackName, this.account, this.region);
            driftDetectionSteps.push(step);
        }
        pipeline.addStage(demoStage, {
            pre: driftDetectionSteps,
        });

Demo

Here you will go through the deployment steps for the solution and see drift detection in action.

Deploy the pre-requisites stack

Clone the repo from the GitHub location here. Navigate to the cloned folder and run script script-deploy.sh You can find detailed instructions in README.md

Deploy the CDK Pipelines stack

Clone the repo from the GitHub location here. Navigate to the cloned folder and run script script-deploy.sh. This deploys a pipeline with an empty CodeCommit repo as the source. The pipeline run ends up in failure, as shown below, because of the empty CodeCommit repo.

First run of the pipeline

Next, check in the code from the cloned repo into the CodeCommit source repo. You can find detailed instructions on that in README.md  This triggers the pipeline and pipeline finishes successfully, as shown below.

Pipeline run after first check in

The pipeline deploys two stacks DemoStackA and DemoStackB. Each of these stacks creates an S3 bucket.

CloudFormation stacks deployed after first run of the pipeline

Demonstrate drift detection

Locate the S3 bucket created by DemoStackA under resources, navigate to the S3 bucket and modify the tag aws-cdk:auto-delete-objects from true to false as shown below

DemoStackA resources

DemoStackA modify S3 tag

Now, go to the pipeline and trigger a new execution by clicking on Release Change

Run pipeline via Release Change tab

The pipeline run will now end in failure at the pre-deployment drift detection step.

Pipeline run after Drift Detection failure

Cleanup

Please follow the steps below to clean up all the stacks.

  1. Navigate to S3 console and empty the buckets created by stacks DemoStackA and DemoStackB.
  2. Navigate to the CloudFormation console and delete stacks DemoStackA and DemoStackB, since deleting CDK Pipelines stack does not delete the application stacks that the pipeline deploys.
  3. Delete the CDK Pipelines stack cdk-drift-detect-demo-pipeline
  4. Delete the pre-requisites stack cdk-drift-detect-demo-drift-detection-prereq

Conclusion

In this post, I showed how to add a custom implementation step in CDK Pipelines. I also used that mechanism to integrate a drift detection check as a pre-deployment step. This allows us to validate the integrity of a CloudFormation Stack before its deployment. Since the validation is integrated into the pipeline, it is easier to manage the solution in one place as part of the overarching pipeline. Give the solution a try, and then see if you can incorporate it into your organization’s delivery pipelines.

About the author:

Damodar Shenvi Wagle

Damodar Shenvi Wagle is a Senior Cloud Application Architect at AWS Professional Services. His areas of expertise include architecting serverless solutions, CI/CD, and automation.

Deploy container applications in a multicloud environment using Amazon CodeCatalyst

Post Syndicated from Pawan Shrivastava original https://aws.amazon.com/blogs/devops/deploy-container-applications-in-a-multicloud-environment-using-amazon-codecatalyst/

In the previous post of this blog series, we saw how organizations can deploy workloads to virtual machines (VMs) in a hybrid and multicloud environment. This post shows how organizations can address the requirement of deploying containers, and containerized applications to hybrid and multicloud platforms using Amazon CodeCatalyst. CodeCatalyst is an integrated DevOps service which enables development teams to collaborate on code, and build, test, and deploy applications with continuous integration and continuous delivery (CI/CD) tools.

One prominent scenario where multicloud container deployment is useful is when organizations want to leverage AWS’ broadest and deepest set of Artificial Intelligence (AI) and Machine Learning (ML) capabilities by developing and training AI/ML models in AWS using Amazon SageMaker, and deploying the model package to a Kubernetes platform on other cloud platforms, such as Azure Kubernetes Service (AKS) for inference. As shown in this workshop for operationalizing the machine learning pipeline, we can train an AI/ML model, push it to Amazon Elastic Container Registry (ECR) as an image, and later deploy the model as a container application.

Scenario description

The solution described in the post covers the following steps:

  • Setup Amazon CodeCatalyst environment.
  • Create a Dockerfile along with a manifest for the application, and a repository in Amazon ECR.
  • Create an Azure service principal which has permissions to deploy resources to Azure Kubernetes Service (AKS), and store the credentials securely in Amazon CodeCatalyst secret.
  • Create a CodeCatalyst workflow to build, test, and deploy the containerized application to AKS cluster using Github Actions.

The architecture diagram for the scenario is shown in Figure 1.

Solution architecture diagram

Figure 1 – Solution Architecture

Solution Walkthrough

This section shows how to set up the environment, and deploy a HTML application to an AKS cluster.

Setup Amazon ECR and GitHub code repository

Create a new Amazon ECR and a code repository. In this case we’re using GitHub as the repository but you can create a source repository in CodeCatalyst or you can choose to link an existing source repository hosted by another service if that service is supported by an installed extension. Then follow the application and Docker image creation steps outlined in Step 1 in the environment creation process in exposing Multiple Applications on Amazon EKS. Create a file named manifest.yaml as shown, and map the “image” parameter to the URL of the Amazon ECR repository created above.

apiVersion: apps/v1
kind: Deployment
metadata:
  name: multicloud-container-deployment-app
  labels:
    app: multicloud-container-deployment-app
spec:
  selector:
    matchLabels:
      app: multicloud-container-deployment-app
  replicas: 2
  template:
    metadata:
      labels:
        app: multicloud-container-deployment-app
    spec:
      nodeSelector:
        "beta.kubernetes.io/os": linux
      containers:
      - name: ecs-web-page-container
        image: <aws_account_id>.dkr.ecr.us-west-2.amazonaws.com/<my_repository>
        imagePullPolicy: Always
        ports:
            - containerPort: 80
        resources:
          limits:
            memory: "100Mi"
            cpu: "200m"
      imagePullSecrets:
          - name: ecrsecret
---
apiVersion: v1
kind: Service
metadata:
  name: multicloud-container-deployment-service
spec:
  type: LoadBalancer
  ports:
  - port: 80
    targetPort: 80
  selector:
    app: multicloud-container-deployment-app

Push the files to Github code repository. The multicloud-container-app github repository should look similar to Figure 2 below

Files in multicloud container app github repository 

Figure 2 – Files in Github repository

Configure Azure Kubernetes Service (AKS) cluster to pull private images from ECR repository

Pull the docker images from a private ECR repository to your AKS cluster by running the following command. This setup is required during the azure/k8s-deploy Github Actions in the CI/CD workflow. Authenticate Docker to an Amazon ECR registry with get-login-password by using aws ecr get-login-password. Run the following command in a shell where AWS CLI is configured, and is used to connect to the AKS cluster. This creates a secret called ecrsecret, which is used to pull an image from the private ECR repository.

kubectl create secret docker-registry ecrsecret\
 --docker-server=<aws_account_id>.dkr.ecr.us-west-2.amazonaws.com/<my_repository>\
 --docker-username=AWS\
 --docker-password= $(aws ecr get-login-password --region us-west-2)

Provide ECR URI in the variable “–docker-server =”.

CodeCatalyst setup

Follow these steps to set up CodeCatalyst environment:

Configure access to the AKS cluster

In this solution, we use three GitHub Actions – azure/login, azure/aks-set-context and azure/k8s-deploy – to login, set the AKS cluster, and deploy the manifest file to the AKS cluster respectively. For the Github Actions to access the Azure environment, they require credentials associated with an Azure Service Principal.

Service Principals in Azure are identified by the CLIENT_ID, CLIENT_SECRET, SUBSCRIPTION_ID, and TENANT_ID properties. Create the Service principal by running the following command in the azure cloud shell:

az ad sp create-for-rbac \
    --name "ghActionHTMLapplication" \
    --scope /subscriptions/<SUBSCRIPTION_ID>/resourceGroups/<RESOURCE_GROUP> \
    --role Contributor \
    --sdk-auth

The command generates a JSON output (shown in Figure 3), which is stored in CodeCatalyst secret called AZURE_CREDENTIALS. This credential is used by azure/login Github Actions.

JSON output stored in AZURE-CREDENTIALS secret

Figure 3 – JSON output

Configure secrets inside CodeCatalyst Project

Create three secrets CLUSTER_NAME (Name of AKS cluster), RESOURCE_GROUP(Name of Azure resource group) and AZURE_CREDENTIALS(described in the previous step) as described in the working with secret document. The secrets are shown in Figure 4.

Secrets in CodeCatalyst

Figure 4 – CodeCatalyst Secrets

CodeCatalyst CI/CD Workflow

To create a new CodeCatalyst workflow, select CI/CD from the navigation on the left and select Workflows (1). Then, select Create workflow (2), leave the default options, and select Create (3) as shown in Figure 5.

Create CodeCatalyst CI/CD workflow

Figure 5 – Create CodeCatalyst CI/CD workflow

Add “Push to Amazon ECR” Action

Add the Push to Amazon ECR action, and configure the environment where you created the ECR repository as shown in Figure 6. Refer to adding an action to learn how to add CodeCatalyst action.

Create ‘Push to ECR’ CodeCatalyst Action

Figure 6 – Create ‘Push to ECR’ Action

Select the Configuration tab and specify the configurations as shown in Figure7.

Configure ‘Push to ECR’ CodeCatalyst Action

Figure 7 – Configure ‘Push to ECR’ Action

Configure the Deploy action

1. Add a GitHub action for deploying to AKS as shown in Figure 8.

Github action to deploy to AKS

Figure 8 – Github action to deploy to AKS

2. Configure the GitHub action from the configurations tab by adding the following snippet to the GitHub Actions YAML property:

- name: Install Azure CLI
  run: pip install azure-cli
- name: Azure login
  id: login
  uses: azure/[email protected]
  with:
    creds: ${Secrets.AZURE_CREDENTIALS}
- name: Set AKS context
  id: set-context
  uses: azure/aks-set-context@v3
  with:
    resource-group: ${Secrets.RESOURCE_GROUP}
    cluster-name: ${Secrets.CLUSTER_NAME}
- name: Setup kubectl
  id: install-kubectl
  uses: azure/setup-kubectl@v3
- name: Deploy to AKS
  id: deploy-aks
  uses: Azure/k8s-deploy@v4
  with:
    namespace: default
    manifests: manifest.yaml
    pull-images: true

Github action configuration for deploying application to AKS

Figure 9 – Github action configuration

3. The workflow is now ready and can be validated by choosing ‘Validate’ and then saved to the repository by choosing ‘Commit’.
We have implemented an automated CI/CD workflow that builds the container image of the application (refer Figure 10), pushes the image to ECR, and deploys the application to AKS cluster. This CI/CD workflow is triggered as application code is pushed to the repository.

Automated CI/CD workflow

Figure 10 – Automated CI/CD workflow

Test the deployment

When the HTML application runs, Kubernetes exposes the application using a public facing load balancer. To find the external IP of the load balancer, connect to the AKS cluster and run the following command:

kubectl get service multicloud-container-deployment-service

The output of the above command should look like the image in Figure 11.

Output of kubectl get service command

Figure 11 – Output of kubectl get service

Paste the External IP into a browser to see the running HTML application as shown in Figure 12.

HTML application running successfully in AKS

Figure 12 – Application running in AKS

Cleanup

If you have been following along with the workflow described in the post, you should delete the resources you deployed so you do not continue to incur charges. First, delete the Amazon ECR repository using the AWS console. Second, delete the project from CodeCatalyst by navigating to Project settings and choosing Delete project. There’s no cost associated with the CodeCatalyst project and you can continue using it. Finally, if you deployed the application on a new AKS cluster, delete the cluster from the Azure console. In case you deployed the application to an existing AKS cluster, run the following commands to delete the application resources.

kubectl delete deployment multicloud-container-deployment-app
kubectl delete services multicloud-container-deployment-service

Conclusion

In summary, this post showed how Amazon CodeCatalyst can help organizations deploy containerized workloads in a hybrid and multicloud environment. It demonstrated in detail how to set up and configure Amazon CodeCatalyst to deploy a containerized application to Azure Kubernetes Service, leveraging a CodeCatalyst workflow, and GitHub Actions. Learn more and get started with your Amazon CodeCatalyst journey!

If you have any questions or feedback, leave them in the comments section.

About Authors

Picture of Pawan

Pawan Shrivastava

Pawan Shrivastava is a Partner Solution Architect at AWS in the WWPS team. He focusses on working with partners to provide technical guidance on AWS, collaborate with them to understand their technical requirements, and designing solutions to meet their specific needs. Pawan is passionate about DevOps, automation and CI CD pipelines. He enjoys watching MMA, playing cricket and working out in the gym.

Picture of Brent

Brent Van Wynsberge

Brent Van Wynsberge is a Solutions Architect at AWS supporting enterprise customers. He accelerates the cloud adoption journey for organizations by aligning technical objectives to business outcomes and strategic goals, and defining them where needed. Brent is an IoT enthusiast, specifically in the application of IoT in manufacturing, he is also interested in DevOps, data analytics and containers.

Picture of Amandeep

Amandeep Bajwa

Amandeep Bajwa is a Senior Solutions Architect at AWS supporting Financial Services enterprises. He helps organizations achieve their business outcomes by identifying the appropriate cloud transformation strategy based on industry trends, and organizational priorities. Some of the areas Amandeep consults on are cloud migration, cloud strategy (including hybrid & multicloud), digital transformation, data & analytics, and technology in general.

Picture of Brian

Brian Beach

Brian Beach has over 20 years of experience as a Developer and Architect. He is currently a Principal Solutions Architect at Amazon Web Services. He holds a Computer Engineering degree from NYU Poly and an MBA from Rutgers Business School. He is the author of “Pro PowerShell for Amazon Web Services” from Apress. He is a regular author and has spoken at numerous events. Brian lives in North Carolina with his wife and three kids.

Integrate GitHub monorepo with AWS CodePipeline to run project-specific CI/CD pipelines

Post Syndicated from Vivek Kumar original https://aws.amazon.com/blogs/devops/integrate-github-monorepo-with-aws-codepipeline-to-run-project-specific-ci-cd-pipelines/

AWS CodePipeline is a continuous delivery service that enables you to model, visualize, and automate the steps required to release your software. With CodePipeline, you model the full release process for building your code, deploying to pre-production environments, testing your application, and releasing it to production. CodePipeline then builds, tests, and deploys your application according to the defined workflow either in manual mode or automatically every time a code change occurs. A lot of organizations use GitHub as their source code repository. Some organizations choose to embed multiple applications or services in a single GitHub repository separated by folders. This method of organizing your source code in a repository is called a monorepo.

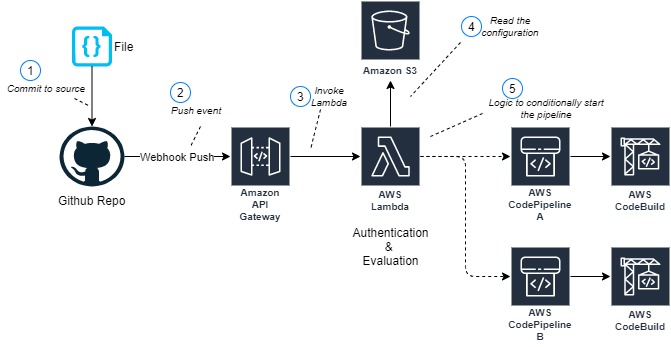
This post demonstrates how to customize GitHub events that invoke a monorepo service-specific pipeline by reading the GitHub event payload using AWS Lambda.


Solution overview

With the default setup in CodePipeline, a release pipeline is invoked whenever a change in the source code repository is detected. When using GitHub as the source for a pipeline, CodePipeline uses a webhook to detect changes in a remote branch and starts the pipeline. When using a monorepo style project with GitHub, it doesn’t matter which folder in the repository you change the code, CodePipeline gets an event at the repository level. If you have a continuous integration and continuous deployment (CI/CD) pipeline for each of the applications and services in a repository, all pipelines detect the change in any of the folders every time. The following diagram illustrates this scenario.


GitHub monorepo folder structure


This post demonstrates how to customize GitHub events that invoke a monorepo service-specific pipeline by reading the GitHub event payload using Lambda. This solution has the following benefits:

  • Add customizations to start pipelines based on external factors – You can use custom code to evaluate whether a pipeline should be triggered. This allows for further customization beyond polling a source repository or relying on a push event. For example, you can create custom logic to automatically reschedule deployments on holidays to the next available workday.
  • Have multiple pipelines with a single source – You can trigger selected pipelines when multiple pipelines are listening to a single GitHub repository. This lets you group small and highly related but independently shipped artifacts such as small microservices without creating thousands of GitHub repos.
  • Avoid reacting to unimportant files – You can avoid triggering a pipeline when changing files that don’t affect the application functionality (such as documentation, readme, PDF, and .gitignore files).

In this post, we’re not debating the advantages or disadvantages of a monorepo versus a single repo, or when to create monorepos or single repos for each application or project.


Sample architecture

This post focuses on controlling running pipelines in CodePipeline. CodePipeline can have multiple stages like test, approval, and deploy. Our sample architecture considers a simple pipeline with two stages: source and build.


Github monorepo - CodePipeline Sample Architecture

This solution is made up of following parts:

  • An Amazon API Gateway endpoint (3) is backed by a Lambda function (5) to receive and authenticate GitHub webhook push events (2)
  • The same function evaluates incoming GitHub push events and starts the pipeline on a match
  • An Amazon Simple Storage Service (Amazon S3) bucket (4) stores the CodePipeline-specific configuration files
  • The pipeline contains a build stage with AWS CodeBuild


Normally, after you create a CI/CD pipeline, it automatically triggers a pipeline to release the latest version of your source code. From then on, every time you make a change in your source code, the pipeline is triggered. You can also manually run the last revision through a pipeline by choosing Release change on the CodePipeline console. This architecture uses the manual mode to run the pipeline. GitHub push events and branch changes are evaluated by the Lambda function to avoid commits that change unimportant files from starting the pipeline.


Creating an API Gateway endpoint

We need a single API Gateway endpoint backed by a Lambda function with the responsibility of authenticating and validating incoming requests from GitHub. You can authenticate requests using HMAC security or GitHub Apps. API Gateway only needs one POST method to consume GitHub push events, as shown in the following screenshot.


Creating an API Gateway endpoint


Creating the Lambda function

This Lambda function is responsible for authenticating and evaluating the GitHub events. As part of the evaluation process, the function can parse through the GitHub events payload, determine which files are changed, added, or deleted, and perform the appropriate action:

  • Start a single pipeline, depending on which folder is changed in GitHub
  • Start multiple pipelines
  • Ignore the changes if non-relevant files are changed

You can store the project configuration details in Amazon S3. Lambda can read this configuration to decide what needs to be done when a particular folder is matched from a GitHub event. The following code is an example configuration:

{

    "GitHubRepo": "SampleRepo",

    "GitHubBranch": "main",

    "ChangeMatchExpressions": "ProjectA/.*",

    "IgnoreFiles": "*.pdf;*.md",

    "CodePipelineName": "ProjectA - CodePipeline"

}

For more complex use cases, you can store the configuration file in Amazon DynamoDB.

The following is the sample Lambda function code in Python 3.7 using Boto3:

def lambda_handler(event, context):

    import json
    modifiedFiles = event["commits"][0]["modified"]
    #full path
    for filePath in modifiedFiles:
        # Extract folder name
        folderName = (filePath[:filePath.find("/")])
        break

    #start the pipeline
    if len(folderName)>0:
        # Codepipeline name is foldername-job. 
        # We can read the configuration from S3 as well. 
        returnCode = start_code_pipeline(folderName + '-job')

    return {
        'statusCode': 200,
        'body': json.dumps('Modified project in repo:' + folderName)
    }
    

def start_code_pipeline(pipelineName):
    client = codepipeline_client()
    response = client.start_pipeline_execution(name=pipelineName)
    return True

cpclient = None
def codepipeline_client():
    import boto3
    global cpclient
    if not cpclient:
        cpclient = boto3.client('codepipeline')
    return cpclient
   

Creating a GitHub webhook

GitHub provides webhooks to allow external services to be notified on certain events. For this use case, we create a webhook for a push event. This generates a POST request to the URL (API Gateway URL) specified for any files committed and pushed to the repository. The following screenshot shows our webhook configuration.

Creating a GitHub webhook2

Conclusion

In our sample architecture, two pipelines monitor the same GitHub source code repository. A Lambda function decides which pipeline to run based on the GitHub events. The same function can have logic to ignore unimportant files, for example any readme or PDF files.

Using API Gateway, Lambda, and Amazon S3 in combination serves as a general example to introduce custom logic to invoke pipelines. You can expand this solution for increasingly complex processing logic.


About the Author

Vivek Kumar

Vivek is a Solutions Architect at AWS based out of New York. He works with customers providing technical assistance and architectural guidance on various AWS services. He brings more than 23 years of experience in software engineering and architecture roles for various large-scale enterprises.


Gaurav-Sharma

Gaurav is a Solutions Architect at AWS. He works with digital native business customers providing architectural guidance on AWS services.


Nitin-Aggarwal

Nitin is a Solutions Architect at AWS. He works with digital native business customers providing architectural guidance on AWS services.


Building end-to-end AWS DevSecOps CI/CD pipeline with open source SCA, SAST and DAST tools

Post Syndicated from Srinivas Manepalli original https://aws.amazon.com/blogs/devops/building-end-to-end-aws-devsecops-ci-cd-pipeline-with-open-source-sca-sast-and-dast-tools/

DevOps is a combination of cultural philosophies, practices, and tools that combine software development with information technology operations. These combined practices enable companies to deliver new application features and improved services to customers at a higher velocity. DevSecOps takes this a step further, integrating security into DevOps. With DevSecOps, you can deliver secure and compliant application changes rapidly while running operations consistently with automation.

Having a complete DevSecOps pipeline is critical to building a successful software factory, which includes continuous integration (CI), continuous delivery and deployment (CD), continuous testing, continuous logging and monitoring, auditing and governance, and operations. Identifying the vulnerabilities during the initial stages of the software development process can significantly help reduce the overall cost of developing application changes, but doing it in an automated fashion can accelerate the delivery of these changes as well.

To identify security vulnerabilities at various stages, organizations can integrate various tools and services (cloud and third-party) into their DevSecOps pipelines. Integrating various tools and aggregating the vulnerability findings can be a challenge to do from scratch. AWS has the services and tools necessary to accelerate this objective and provides the flexibility to build DevSecOps pipelines with easy integrations of AWS cloud native and third-party tools. AWS also provides services to aggregate security findings.

In this post, we provide a DevSecOps pipeline reference architecture on AWS that covers the afore-mentioned practices, including SCA (Software Composite Analysis), SAST (Static Application Security Testing), DAST (Dynamic Application Security Testing), and aggregation of vulnerability findings into a single pane of glass. Additionally, this post addresses the concepts of security of the pipeline and security in the pipeline.

You can deploy this pipeline in either the AWS GovCloud Region (US) or standard AWS Regions. As of this writing, all listed AWS services are available in AWS GovCloud (US) and authorized for FedRAMP High workloads within the Region, with the exception of AWS CodePipeline and AWS Security Hub, which are in the Region and currently under the JAB Review to be authorized shortly for FedRAMP High as well.

Services and tools

In this section, we discuss the various AWS services and third-party tools used in this solution.

CI/CD services

For CI/CD, we use the following AWS services:

  • AWS CodeBuild – A fully managed continuous integration service that compiles source code, runs tests, and produces software packages that are ready to deploy.
  • AWS CodeCommit – A fully managed source control service that hosts secure Git-based repositories.
  • AWS CodeDeploy – A fully managed deployment service that automates software deployments to a variety of compute services such as Amazon Elastic Compute Cloud (Amazon EC2), AWS Fargate, AWS Lambda, and your on-premises servers.
  • AWS CodePipeline – A fully managed continuous delivery service that helps you automate your release pipelines for fast and reliable application and infrastructure updates.
  • AWS Lambda – A service that lets you run code without provisioning or managing servers. You pay only for the compute time you consume.
  • Amazon Simple Notification Service – Amazon SNS is a fully managed messaging service for both application-to-application (A2A) and application-to-person (A2P) communication.
  • Amazon Simple Storage Service – Amazon S3 is storage for the internet. You can use Amazon S3 to store and retrieve any amount of data at any time, from anywhere on the web.
  • AWS Systems Manager Parameter Store – Parameter Store gives you visibility and control of your infrastructure on AWS.

Continuous testing tools

The following are open-source scanning tools that are integrated in the pipeline for the purposes of this post, but you could integrate other tools that meet your specific requirements. You can use the static code review tool Amazon CodeGuru for static analysis, but at the time of this writing, it’s not yet available in GovCloud and currently supports Java and Python (available in preview).

  • OWASP Dependency-Check – A Software Composition Analysis (SCA) tool that attempts to detect publicly disclosed vulnerabilities contained within a project’s dependencies.
  • SonarQube (SAST) – Catches bugs and vulnerabilities in your app, with thousands of automated Static Code Analysis rules.
  • PHPStan (SAST) – Focuses on finding errors in your code without actually running it. It catches whole classes of bugs even before you write tests for the code.
  • OWASP Zap (DAST) – Helps you automatically find security vulnerabilities in your web applications while you’re developing and testing your applications.

Continuous logging and monitoring services

The following are AWS services for continuous logging and monitoring:

Auditing and governance services

The following are AWS auditing and governance services:

  • AWS CloudTrail – Enables governance, compliance, operational auditing, and risk auditing of your AWS account.
  • AWS Identity and Access Management – Enables you to manage access to AWS services and resources securely. With IAM, you can create and manage AWS users and groups, and use permissions to allow and deny their access to AWS resources.
  • AWS Config – Allows you to assess, audit, and evaluate the configurations of your AWS resources.

Operations services

The following are AWS operations services:

  • AWS Security Hub – Gives you a comprehensive view of your security alerts and security posture across your AWS accounts. This post uses Security Hub to aggregate all the vulnerability findings as a single pane of glass.
  • AWS CloudFormation – Gives you an easy way to model a collection of related AWS and third-party resources, provision them quickly and consistently, and manage them throughout their lifecycles, by treating infrastructure as code.
  • AWS Systems Manager Parameter Store – Provides secure, hierarchical storage for configuration data management and secrets management. You can store data such as passwords, database strings, Amazon Machine Image (AMI) IDs, and license codes as parameter values.
  • AWS Elastic Beanstalk – An easy-to-use service for deploying and scaling web applications and services developed with Java, .NET, PHP, Node.js, Python, Ruby, Go, and Docker on familiar servers such as Apache, Nginx, Passenger, and IIS. This post uses Elastic Beanstalk to deploy LAMP stack with WordPress and Amazon Aurora MySQL. Although we use Elastic Beanstalk for this post, you could configure the pipeline to deploy to various other environments on AWS or elsewhere as needed.

Pipeline architecture

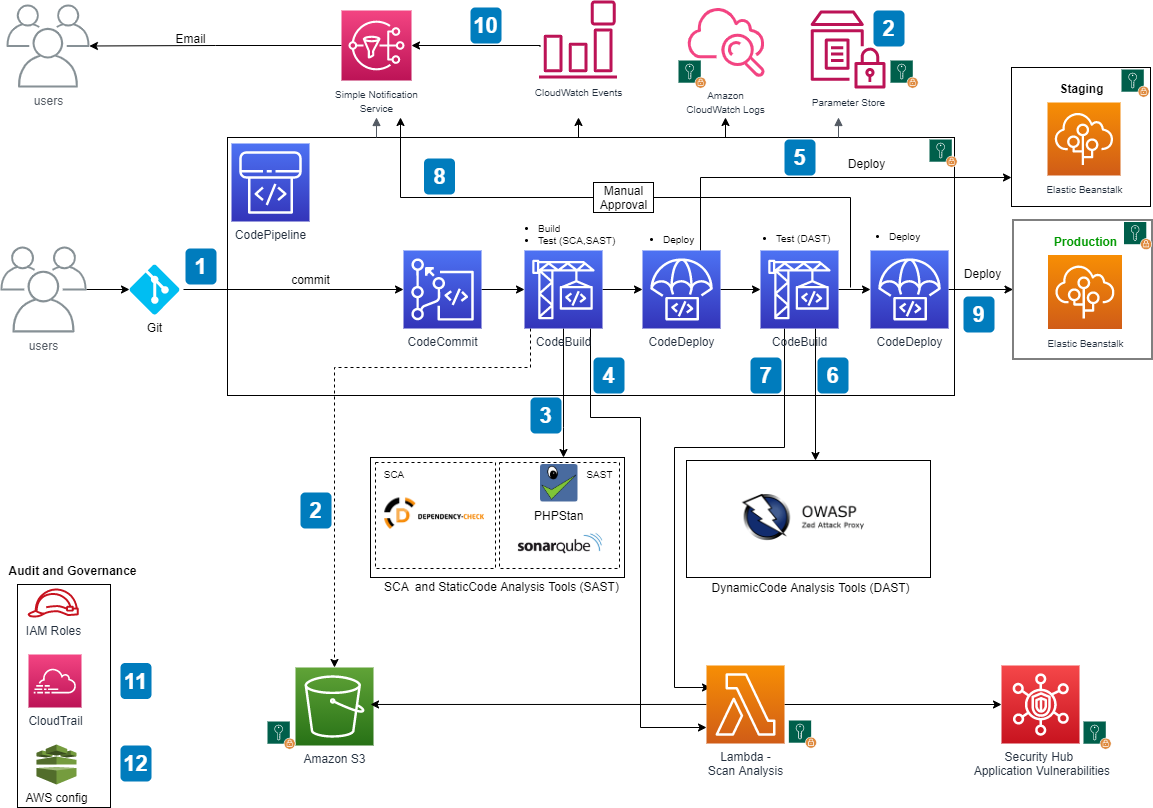
The following diagram shows the architecture of the solution.

AWS DevSecOps CICD pipeline architecture

AWS DevSecOps CICD pipeline architecture


The main steps are as follows:

  1. When a user commits the code to a CodeCommit repository, a CloudWatch event is generated which, triggers CodePipeline.
  2. CodeBuild packages the build and uploads the artifacts to an S3 bucket. CodeBuild retrieves the authentication information (for example, scanning tool tokens) from Parameter Store to initiate the scanning. As a best practice, it is recommended to utilize Artifact repositories like AWS CodeArtifact to store the artifacts, instead of S3. For simplicity of the workshop, we will continue to use S3.
  3. CodeBuild scans the code with an SCA tool (OWASP Dependency-Check) and SAST tool (SonarQube or PHPStan; in the provided CloudFormation template, you can pick one of these tools during the deployment, but CodeBuild is fully enabled for a bring your own tool approach).
  4. If there are any vulnerabilities either from SCA analysis or SAST analysis, CodeBuild invokes the Lambda function. The function parses the results into AWS Security Finding Format (ASFF) and posts it to Security Hub. Security Hub helps aggregate and view all the vulnerability findings in one place as a single pane of glass. The Lambda function also uploads the scanning results to an S3 bucket.
  5. If there are no vulnerabilities, CodeDeploy deploys the code to the staging Elastic Beanstalk environment.
  6. After the deployment succeeds, CodeBuild triggers the DAST scanning with the OWASP ZAP tool (again, this is fully enabled for a bring your own tool approach).
  7. If there are any vulnerabilities, CodeBuild invokes the Lambda function, which parses the results into ASFF and posts it to Security Hub. The function also uploads the scanning results to an S3 bucket (similar to step 4).
  8. If there are no vulnerabilities, the approval stage is triggered, and an email is sent to the approver for action.
  9. After approval, CodeDeploy deploys the code to the production Elastic Beanstalk environment.
  10. During the pipeline run, CloudWatch Events captures the build state changes and sends email notifications to subscribed users through SNS notifications.
  11. CloudTrail tracks the API calls and send notifications on critical events on the pipeline and CodeBuild projects, such as UpdatePipeline, DeletePipeline, CreateProject, and DeleteProject, for auditing purposes.
  12. AWS Config tracks all the configuration changes of AWS services. The following AWS Config rules are added in this pipeline as security best practices:
  13. CODEBUILD_PROJECT_ENVVAR_AWSCRED_CHECK – Checks whether the project contains environment variables AWS_ACCESS_KEY_ID and AWS_SECRET_ACCESS_KEY. The rule is NON_COMPLIANT when the project environment variables contains plaintext credentials.
  14. CLOUD_TRAIL_LOG_FILE_VALIDATION_ENABLED – Checks whether CloudTrail creates a signed digest file with logs. AWS recommends that the file validation be enabled on all trails. The rule is noncompliant if the validation is not enabled.

Security of the pipeline is implemented by using IAM roles and S3 bucket policies to restrict access to pipeline resources. Pipeline data at rest and in transit is protected using encryption and SSL secure transport. We use Parameter Store to store sensitive information such as API tokens and passwords. To be fully compliant with frameworks such as FedRAMP, other things may be required, such as MFA.

Security in the pipeline is implemented by performing the SCA, SAST and DAST security checks. Alternatively, the pipeline can utilize IAST (Interactive Application Security Testing) techniques that would combine SAST and DAST stages.

As a best practice, encryption should be enabled for the code and artifacts, whether at rest or transit.

In the next section, we explain how to deploy and run the pipeline CloudFormation template used for this example. Refer to the provided service links to learn more about each of the services in the pipeline. If utilizing CloudFormation templates to deploy infrastructure using pipelines, we recommend using linting tools like cfn-nag to scan CloudFormation templates for security vulnerabilities.

Prerequisites

Before getting started, make sure you have the following prerequisites:

Deploying the pipeline

To deploy the pipeline, complete the following steps: Download the CloudFormation template and pipeline code from GitHub repo.

  1. Log in to your AWS account if you have not done so already.
  2. On the CloudFormation console, choose Create Stack.
  3. Choose the CloudFormation pipeline template.
  4. Choose Next.
  5. Provide the stack parameters:
    • Under Code, provide code details, such as repository name and the branch to trigger the pipeline.
    • Under SAST, choose the SAST tool (SonarQube or PHPStan) for code analysis, enter the API token and the SAST tool URL. You can skip SonarQube details if using PHPStan as the SAST tool.
    • Under DAST, choose the DAST tool (OWASP Zap) for dynamic testing and enter the API token, DAST tool URL, and the application URL to run the scan.
    • Under Lambda functions, enter the Lambda function S3 bucket name, filename, and the handler name.
    • Under STG Elastic Beanstalk Environment and PRD Elastic Beanstalk Environment, enter the Elastic Beanstalk environment and application details for staging and production to which this pipeline deploys the application code.
    • Under General, enter the email addresses to receive notifications for approvals and pipeline status changes.

CF Deploymenet - Passing parameter values

CloudFormation deployment - Passing parameter values

CloudFormation template deployment

After the pipeline is deployed, confirm the subscription by choosing the provided link in the email to receive the notifications.

The provided CloudFormation template in this post is formatted for AWS GovCloud. If you’re setting this up in a standard Region, you have to adjust the partition name in the CloudFormation template. For example, change ARN values from arn:aws-us-gov to arn:aws.

Running the pipeline

To trigger the pipeline, commit changes to your application repository files. That generates a CloudWatch event and triggers the pipeline. CodeBuild scans the code and if there are any vulnerabilities, it invokes the Lambda function to parse and post the results to Security Hub.

When posting the vulnerability finding information to Security Hub, we need to provide a vulnerability severity level. Based on the provided severity value, Security Hub assigns the label as follows. Adjust the severity levels in your code based on your organization’s requirements.

  • 0 – INFORMATIONAL
  • 1–39 – LOW
  • 40– 69 – MEDIUM
  • 70–89 – HIGH
  • 90–100 – CRITICAL

The following screenshot shows the progression of your pipeline.

CodePipeline stages

CodePipeline stages

SCA and SAST scanning

In our architecture, CodeBuild trigger the SCA and SAST scanning in parallel. In this section, we discuss scanning with OWASP Dependency-Check, SonarQube, and PHPStan. 

Scanning with OWASP Dependency-Check (SCA)

The following is the code snippet from the Lambda function, where the SCA analysis results are parsed and posted to Security Hub. Based on the results, the equivalent Security Hub severity level (normalized_severity) is assigned.

Lambda code snippet for OWASP Dependency-check

Lambda code snippet for OWASP Dependency-check

You can see the results in Security Hub, as in the following screenshot.

SecurityHub report from OWASP Dependency-check scanning

SecurityHub report from OWASP Dependency-check scanning

Scanning with SonarQube (SAST)

The following is the code snippet from the Lambda function, where the SonarQube code analysis results are parsed and posted to Security Hub. Based on SonarQube results, the equivalent Security Hub severity level (normalized_severity) is assigned.

Lambda code snippet for SonarQube

Lambda code snippet for SonarQube

The following screenshot shows the results in Security Hub.

SecurityHub report from SonarQube scanning

SecurityHub report from SonarQube scanning

Scanning with PHPStan (SAST)

The following is the code snippet from the Lambda function, where the PHPStan code analysis results are parsed and posted to Security Hub.

Lambda code snippet for PHPStan

Lambda code snippet for PHPStan

The following screenshot shows the results in Security Hub.

SecurityHub report from PHPStan scanning

SecurityHub report from PHPStan scanning

DAST scanning

In our architecture, CodeBuild triggers DAST scanning and the DAST tool.

If there are no vulnerabilities in the SAST scan, the pipeline proceeds to the manual approval stage and an email is sent to the approver. The approver can review and approve or reject the deployment. If approved, the pipeline moves to next stage and deploys the application to the provided Elastic Beanstalk environment.

Scanning with OWASP Zap

After deployment is successful, CodeBuild initiates the DAST scanning. When scanning is complete, if there are any vulnerabilities, it invokes the Lambda function similar to SAST analysis. The function parses and posts the results to Security Hub. The following is the code snippet of the Lambda function.

Lambda code snippet for OWASP-Zap

Lambda code snippet for OWASP-Zap

The following screenshot shows the results in Security Hub.

SecurityHub report from OWASP-Zap scanning

SecurityHub report from OWASP-Zap scanning

Aggregation of vulnerability findings in Security Hub provides opportunities to automate the remediation. For example, based on the vulnerability finding, you can trigger a Lambda function to take the needed remediation action. This also reduces the burden on operations and security teams because they can now address the vulnerabilities from a single pane of glass instead of logging into multiple tool dashboards.

Conclusion

In this post, I presented a DevSecOps pipeline that includes CI/CD, continuous testing, continuous logging and monitoring, auditing and governance, and operations. I demonstrated how to integrate various open-source scanning tools, such as SonarQube, PHPStan, and OWASP Zap for SAST and DAST analysis. I explained how to aggregate vulnerability findings in Security Hub as a single pane of glass. This post also talked about how to implement security of the pipeline and in the pipeline using AWS cloud native services. Finally, I provided the DevSecOps pipeline as code using AWS CloudFormation. For additional information on AWS DevOps services and to get started, see AWS DevOps and DevOps Blog.


Srinivas Manepalli is a DevSecOps Solutions Architect in the U.S. Fed SI SA team at Amazon Web Services (AWS). He is passionate about helping customers, building and architecting DevSecOps and highly available software systems. Outside of work, he enjoys spending time with family, nature and good food.