Tag Archives: Amazon Cognito

How to implement password-less authentication with Amazon Cognito and WebAuthn

Post Syndicated from Mahmoud Matouk original https://aws.amazon.com/blogs/security/how-to-implement-password-less-authentication-with-amazon-cognito-and-webauthn/

In this blog post, I show you how to offer a password-less authentication experience to your customers. To do this, you’ll allow physical security keys or platform authenticators (like finger-print scanners) to be used as the authentication factor to your web or mobile applications that use Amazon Cognito user pools for authentication.

An Amazon Cognito user pool is a user directory that Amazon Web Services (AWS) customers use to manage their customer identities. Web Authentication (WebAuthn) is a W3C standard that lets users authenticate to web applications using public-key cryptography. Using public-key cryptography enables you to implement a stronger authentication mechanism that’s less dependent on passwords.

Mobile and web applications can use WebAuthn together with browser and device support for the Client-To-Authenticator-Protocol (CTAP) to implement Fast ID Online (FIDO) authentication. To learn more about the flow of WebAuthn and CTAP, visit the FIDO Alliance.

How it works

Amazon Cognito user pools allow you to build a custom authentication flow that uses AWS Lambda functions to authenticates users based on one or more challenge/response cycles. You can use this flow to implement password-less authentication that is based on custom challenges. To use this flow to implement FIDO authentication, you need to create credentials during the registration phase and reference these credentials in the user’s profile. You can then validate these credentials during the authentication phase in a custom challenge.

During registration, a new set of credentials that are bound to your application (relying party), are created through a FIDO authenticator. For example, a platform authenticator with a biometric sensor or a roaming authenticator like a physical security key. The private key of this credential set remains on the authenticator, the public key, together with a credential identifier are saved in a custom attribute that’s part of the user profile in Amazon Cognito.

During authentication, a Cognito custom authentication flow will be used to implement authentication through a custom challenge. The application prompts the user to sign in using the authenticator that they used during registration. Response from the authenticator is then passed as a challenge response to Amazon Cognito and verified using the stored public key.

In this password-less flow, the private key has never left the physical device, the authenticator also validates that relying party in authentication request matches the relying party that was used to create the credentials. This combination provides a more secured authentication flow that uses stronger credentials, protects user from phishing and provides better user experience.

About the demo project

This blog post and the diagrams below explain a scenario that uses FIDO as the only authentication factor, to implement password-less authentication. To help with implementation details, I created a project to demonstrate WebAuthn integration with Amazon Cognito that provides sample code for three scenarios:

  • A scenario that uses FIDO as the only factor (password-less)
  • A scenario that uses FIDO as a second factor (with password)
  • A scenario that lets users sign-in with only a password

This project is only a demonstration and shouldn’t be used as-is in production environments. When using FIDO as authentication factor, it is a best practice to allow users to register multiple authenticators and you need to implement an account recovery workflow in case of a lost authenticator.

Implementing FIDO Authentication

Let’s take a deeper dive into the design and components involved in implementing this solution. To deploy this project in your development environment, follow the instructions in the WebAuthn integration with Amazon Cognito project.

Creating and configuring user pool

The first step is to create a Cognito user pool and triggers that orchestrate a custom authentication flow. You do that by deploying the CloudFormation stack that will create all resources as explained in the demo project.

Few implementation details to note about the user pool:

  • The template creates a user pool, app client, triggers, and Lambda functions to use for custom authentication.
  • The template creates a custom attribute called publicKeyCred. This is the custom attribute that holds a base64 encoded representation of the credential identifier and public key for the user’s authenticator.
  • The app client defines what authentication flows are allowed. You can limit allowed flows according to your use-case. To support FIDO authentication, you must allow CUSTOM_AUTH flow.
  • The app client has “write” permissions to the custom attribute publicKeyCred but not “read” permissions. This allows your application to write the attribute during registration or profile updates but excludes this attribute from the user’s id_token. Since this attribute is considered back-end data that is only used during authentication, it doesn’t need to be part of user profile in the id_token.

User registration flow

The registration flow needs to create credentials using the authenticator and store the public-key in user’s profile. Let’s take a closer look at the sequence of calls and involved components to implement this flow.
 

Figure 1: WebAuthn user registration process

Figure 1: WebAuthn user registration process

  1. The user navigates to your application, www.example.com (relying party), and creates an account. A request is sent to the relying party to build a credentials options object and send it back to the browser. (in the demo project, this starts in the createCredentials function in webauthn-client.js and creates the credentials options object by making a call to createCredRequest in authn.js)
  2. The browser uses built-in WebAuthn APIs to create the new credentials with an available authenticator using the credentials options object that was created in first step. This is done by making a call to navigator.credentials.create API (this API is available in browsers and platforms that support FIDO and WebAuthn).
  3. The user experience in this step depends on the OS, browser, and the authenticator. For example, the browser could prompt the user to attach a security key or, on devices that support it, to use a biometric scanner.
     
    Figure 2: User registration and browser alert to use an authenticator in Firefox

    Figure 2: User registration and browser alert to use an authenticator in Firefox

  4. The user interacts with an authenticator (by touching a security key or scanning finger on a touch-id device), which generates new credentials bound to the relying party and returns a response object to the browser.
  5. The browser sends a credential response object to the relying party to parse and validate the response on the server-side. The credential identifier and public key are extracted from the credential response. At this step, your application can also check additional authenticator data and use it to make authentication decisions. For example, your application can check if the authenticator was able to verify user identity through PIN or biometrics (UV flag) or only user presence (UP flag) was verified by authenticator. In the demo project, this is still part of createCredentials function and server-side parsing and validation is done in parseCredResponse that is implemented in authn.js
  6. To complete the user registration, the browser passes the profile attributes that have been collected during registration through Amazon Cognito APIs as custom attributes. This step is performed in signUp function in webauthn-client.js

At the conclusion of this process, a new user will be created in Amazon Cognito and the custom attribute “publicKeyCred” will be populated with a base64 encoded string that includes a credential identifier and the public key generated by the authenticator. This attribute is not considered secret or sensitive data, it rather includes the public key that will be used to verify the authenticator response during subsequent authentications.

User authentication flow

The following diagram describes the custom authentication flow to implement password-less authentication.
 

Figure 3: WebAuthn user authentication process

Figure 3: WebAuthn user authentication process

  1. The user provides their user name and selects the sign-in button, script (running in browser) starts the sign-in process using Amazon Cognito InitiateAuth API passing the user name and indicating that authentication flow is CUSTOM_AUTH. In the demo project, this part is performed in the signIn function in webauthn-client.js.
  2. The Amazon Cognito service passes control to the Define Auth Challenge Lambda trigger. The trigger then determines that this is the first step in the authentication and returns CUSTOM_CHALLENGE as the next challenge to the user.
  3. Control then moves to Create Auth Challenge Lambda trigger to create the custom challenge. This trigger creates a random challenge (a 64 bytes random string), extracts the credential identifier from the user profile (the value passed initially during the sign-up process) combines them and returns them as a custom challenge to the client. This is performed in CreateAuthChallenge Lambda function.
  4. The browser then prompts the user to activate an authenticator. At this stage, the authenticator verifies that credentials exist for the identifier and that the relying party matches the one that is bound to the credentials. This is implemented by making a call to navigator.credentials.get API that is available in browsers and devices that support FIDO2 and WebAuthn.
     
    Figure 4: Authentication and browser prompt to use a registered authenticator

    Figure 4: Authentication and browser prompt to use a registered authenticator

  5. If credentials exist and the relying party is verified, the authenticator requests a user attention or verification. Depending on the type of authenticator, user verification through biometrics or a PIN code is performed and the credentials response is passed back to the browser.
     
    Figure 5: Authentication examples from different browsers and platforms

    Figure 5: Authentication examples from different browsers and platforms

  6. The signIn function continues the sign-in process by calling respondToAuthChallenge API and sending the credentials response to Amazon Cognito.
  7. Amazon Cognito sends the response to the Verify Auth Challenge Lambda trigger. This trigger extracts the public key from the user profile, parses and validates the credentials response, and if the signature is valid, it responds with success. This is performed in VerifyAuthChallenge Lambda trigger.
  8. Lastly, Amazon Cognito sends the control again to Define Auth Challenge to determine the next step. If the results from Verify Auth Challenge indicate a successful response, authentication succeeds and Amazon Cognito responds with ID, access, and refresh tokens.

Conclusion

When building customer facing applications, you as the application owner and developer need to balance security with usability. Reducing the risk of account take-over and phishing is based on using strong credentials, strong second-factors, and minimizing the role of passwords. The flexibility of Amazon Cognito custom authentication flow integrated with WebAuthn offer a technical path to make this possible in addition to offering better user experience to your customers.

Check out the WebAuthn with Amazon Cognito project for code samples and deployment steps, deploy this in your development environment to see this integration in action and go build an awesome password-less experience in your application.

If you have feedback about this post, submit comments in the Comments section below. If you have questions about this post, start a new thread on the Amazon Cognito forum or contact AWS Support.

Want more AWS Security how-to content, news, and feature announcements? Follow us on Twitter.

Author

Mahmoud Matouk

Mahmoud is a Senior Solutions Architect with the Amazon Cognito team. He helps AWS customers build secure and innovative solutions for various identity and access management scenarios.

How to configure Duo multi-factor authentication with Amazon Cognito

Post Syndicated from Mahmoud Matouk original https://aws.amazon.com/blogs/security/how-to-configure-duo-multi-factor-authentication-with-amazon-cognito/

Adding multi-factor authentication (MFA) reduces the risk of user account take-over, phishing attacks, and password theft. Adding MFA while providing a frictionless sign-in experience requires you to offer a variety of MFA options that support a wide range of users and devices. Let’s see how you can achieve that with Amazon Cognito and Duo Multi-Factor Authentication (MFA).

Amazon Cognito user pools are user directories that are used by Amazon Web Services (AWS) customers to manage the identities of their customers and to add sign-in, sign-up and user management features to their customer-facing web and mobile applications. Duo Security is an APN Partner that provides unified access security and multi-factor authentication solutions.

In this blog post, I show you how to use Amazon Cognito custom authentication flow to integrate Duo Multi-Factor Authentication (MFA) into your sign-in flow and offer a wide range of MFA options to your customers. Some second factors available through Duo MFA are mobile phone SMS passcodes, approval of login via phone call, push-notification-based approval on smartphones, biometrics on devices that support it, and security keys that can be attached via USB.

How it works

Amazon Cognito user pools enable you to build a custom authentication flow that authenticates users based on one or more challenge/response cycles. You can use this flow to integrate Duo MFA into your authentication as a custom challenge.

Duo Web offers a software development kit to make it easier for you to integrate your web applications with Duo MFA. You need an account with Duo and an application to protect (which can be created from the Duo admin dashboard). When you create your application in the Duo admin dashboard, note the integration key (ikey), secret key (skey), and API hostname. These details, together with a random string (akey) that you generate, are the primary factors used to integrate your Amazon Cognito user pool with Duo MFA.

Note: ikey, skey, and akey are referred to as Duo keys.

Duo MFA will be integrated into the sign-in flow as a custom challenge. To do that, you need to generate a signed challenge request using Duo APIs and use it to load Duo MFA in an iframe and request the user’s second factor. When the challenge is answered by the user, a signed response is returned to your application and sent to Amazon Cognito for verification. If the response is valid then the MFA challenge is successful.

Let’s take a closer look at the sequence of calls and components involved in this flow.

Implementation details

In this section, I walk you through the end-to-end flow of integrating Duo MFA with Amazon Cognito using a custom authentication flow. To help you with this integration, I built a demo project that provides deployment steps and sample code to create a working demo in your environment.

Create and configure a user pool

The first step is to create the AWS resources needed for the demo. You can do that by deploying the AWS CloudFormation stack as described in the demo project.

A few implementation details to be aware of:

  • The template creates an Amazon Cognito user pool, application client, and AWS Lambda triggers that are used for the custom authentication.
  • The template also accepts ikey, skey, and akey as inputs. For security, the parameters are masked in the AWS CloudFormation console. These parameters are stored in a secret in AWS Secrets Manager with a resource policy that allows relevant Lambda functions read access to that secret.
  • Duo keys are loaded from secrets manager at the initialization of create auth challenge and verify auth challenge Lambda triggers to be used to create sign-request and verify sign-response.

Authentication flow

Figure 1: User authentication process for the custom authentication flow

Figure 1: User authentication process for the custom authentication flow

The preceding sequence diagram (Figure 1) illustrates the sequence of calls to sign in a user, which are as follows:

  1. In your application, the user is presented with a sign-in UI that captures their user name and password and starts the sign-in flow. A script—running in the browser—starts the sign-in process using the Amazon Cognito authenticateUser API with CUSTOM_AUTH set as the authentication flow. This validates the user’s credentials using Secure Remote Password (SRP) protocol and moves on to the second challenge if the credentials are valid.

    Note: The authenticateUser API automatically starts the authentication process with SRP. The first challenge that’s sent to Amazon Cognito is SRP_A. This is followed by PASSWORD_VERIFIER to verify the user’s credentials.

  2. After the SRP challenge step, the define auth challenge Lambda trigger will return CUSTOM_CHALLENGE and this will move control to the create auth challenge trigger.
  3. The create auth challenge Lambda trigger creates a Duo signed request using the Duo keys plus the username and returns the signed request as a challenge to the client. Here is a sample code of what create auth challenge should look like:
    <JavaScript>
    
    exports.handler = async (event) => {
    
        //load duo keys from secrets manager and store them in global variables
    
        if(ikey == null || skey == null || akey == null){ 
          const promise = new Promise(function(resolve, reject) {
              secretsManagerClient.getSecretValue({SecretId: secretName}, function(err, data) {
                    if (err) {throw err; }
                    else {
                        if ('SecretString' in data) {
                            secret = JSON.parse(data.SecretString);
                            ikey = secret['duo-ikey'];
                            skey = secret['duo-skey'];
                            akey = secret['duo-akey'];
                        }
                    }
                    resolve();
                });
            })
            
            await promise; 
        }
    
        
        var username = event.userName;
        var sig_request = duo_web.sign_request(ikey, skey, akey, username);
        
        event.response.publicChallengeParameters = {
            sig_request: sig_request
        };
        
        return event;
    };
    

  4. The client initializes the Duo Web library with the signed request and displays Duo MFA in an iframe to request a second factor from the user. To initialize the Duo library, you need the api_hostname that is generated for your application in the Duo dashboard, the sign-request that was received as a challenge, and a callback function to invoke after the MFA step is completed by the user. This is done on the client side as follows:
    <JavaScript>
          //render Duo MFA iframe
          $("#duo-mfa").html('<iframe id="duo_iframe" title="Two-Factor Authentication" </iframe>');
            
          Duo.init({
            'host': api_hostname,
            'sig_request': challengeParameters.sig_request,
            'submit_callback': mfa_callback
          });
    

  5. Through the Duo iframe, the user can set up their MFA preferences and respond to an MFA challenge. After successful MFA setup, a signed response from the Duo Web library will be returned to the client and passed to the callback function that was provided in Duo.init call.
     
    Figure 2: The first time a user signs in, Duo MFA displays a Start setup screen

    Figure 2: The first time a user signs in, Duo MFA displays a Start setup screen

  6. The client sends the Duo signed response to the Amazon Cognito service as a challenge response.
  7. Amazon Cognito sends the response to the verify auth challenge Lambda trigger, which uses Duo keys and username to verify the response.
    <JavaScript>
    const duo_web = require('duo_web');
    exports.handler = async (event) => {
    
        //load duo keys from secrets manager and store them in global variables
        
        var username = event.userName;
        
        //-------get challenge response
        const sig_response = event.request.challengeAnswer;
        const verificationResult = duo_web.verify_response(ikey, skey, akey, sig_response);
        
        if (verificationResult === username) {
            event.response.answerCorrect = true;
        } else {
            event.response.answerCorrect = false;
        }
        return event;
    };
    

  8. Validation results and current state are passed once again to the define auth challenge Lambda trigger. If the user response is valid, then the Duo MFA challenge is successful. You can then decide to introduce additional challenges to the user or issue tokens and complete the authentication process.

Conclusion

As you build your mobile or web application, keep in mind that using multi-factor authentication is an effective and recommended approach to protect your customers from account take-over, phishing, and the risks of weak or compromised passwords. Making multi-factor authentication easy for your customers enables you to offer authentication experience that protects their accounts but doesn’t slow them down.

Visit the security pillar of AWS Well-Architected Framework to learn more about AWS security best practices and recommendations.

In this blog post, I showed you how to integrate Duo MFA with an Amazon Cognito user pool. Visit the demo application and review the code samples in it to learn how to integrate this with your application.

If you have feedback about this post, submit comments in the Comments section below. If you have questions about this post, start a new thread on the Amazon Cognito forum or contact AWS Support.

Want more AWS Security how-to content, news, and feature announcements? Follow us on Twitter.

Author

Mahmoud Matouk

Mahmoud is a Senior Solutions Architect with the Amazon Cognito team. He helps AWS customers build secure and innovative solutions for various identity and access management scenarios.

How to add authentication to a single-page web application with Amazon Cognito OAuth2 implementation

Post Syndicated from George Conti original https://aws.amazon.com/blogs/security/how-to-add-authentication-single-page-web-application-with-amazon-cognito-oauth2-implementation/

In this post, I’ll be showing you how to configure Amazon Cognito as an OpenID provider (OP) with a single-page web application.

This use case describes using Amazon Cognito to integrate with an existing authorization system following the OpenID Connect (OIDC) specification. OIDC is an identity layer on top of the OAuth 2.0 protocol to enable clients to verify the identity of users. Amazon Cognito lets you add user sign-up, sign-in, and access control to your web and mobile apps quickly and easily. Some key reasons customers select Amazon Cognito include:

  • Simplicity of implementation: The console is very intuitive; it takes a short time to understand how to configure and use Amazon Cognito. Amazon Cognito also has key out-of-the-box functionality, including social sign-in, multi-factor authentication (MFA), forgotten password support, and infrastructure as code (AWS CloudFormation) support.
  • Ability to customize workflows: Amazon Cognito offers the option of a hosted UI where users can sign-in directly to Amazon Cognito or sign-in via social identity providers such as Amazon, Google, Apple, and Facebook. The Amazon Cognito hosted UI and workflows help save your team significant time and effort.
  • OIDC support: Amazon Cognito can securely pass user profile information to an existing authorization system following the ODIC authorization code flow. The authorization system uses the user profile information to secure access to the app.

Amazon Cognito overview

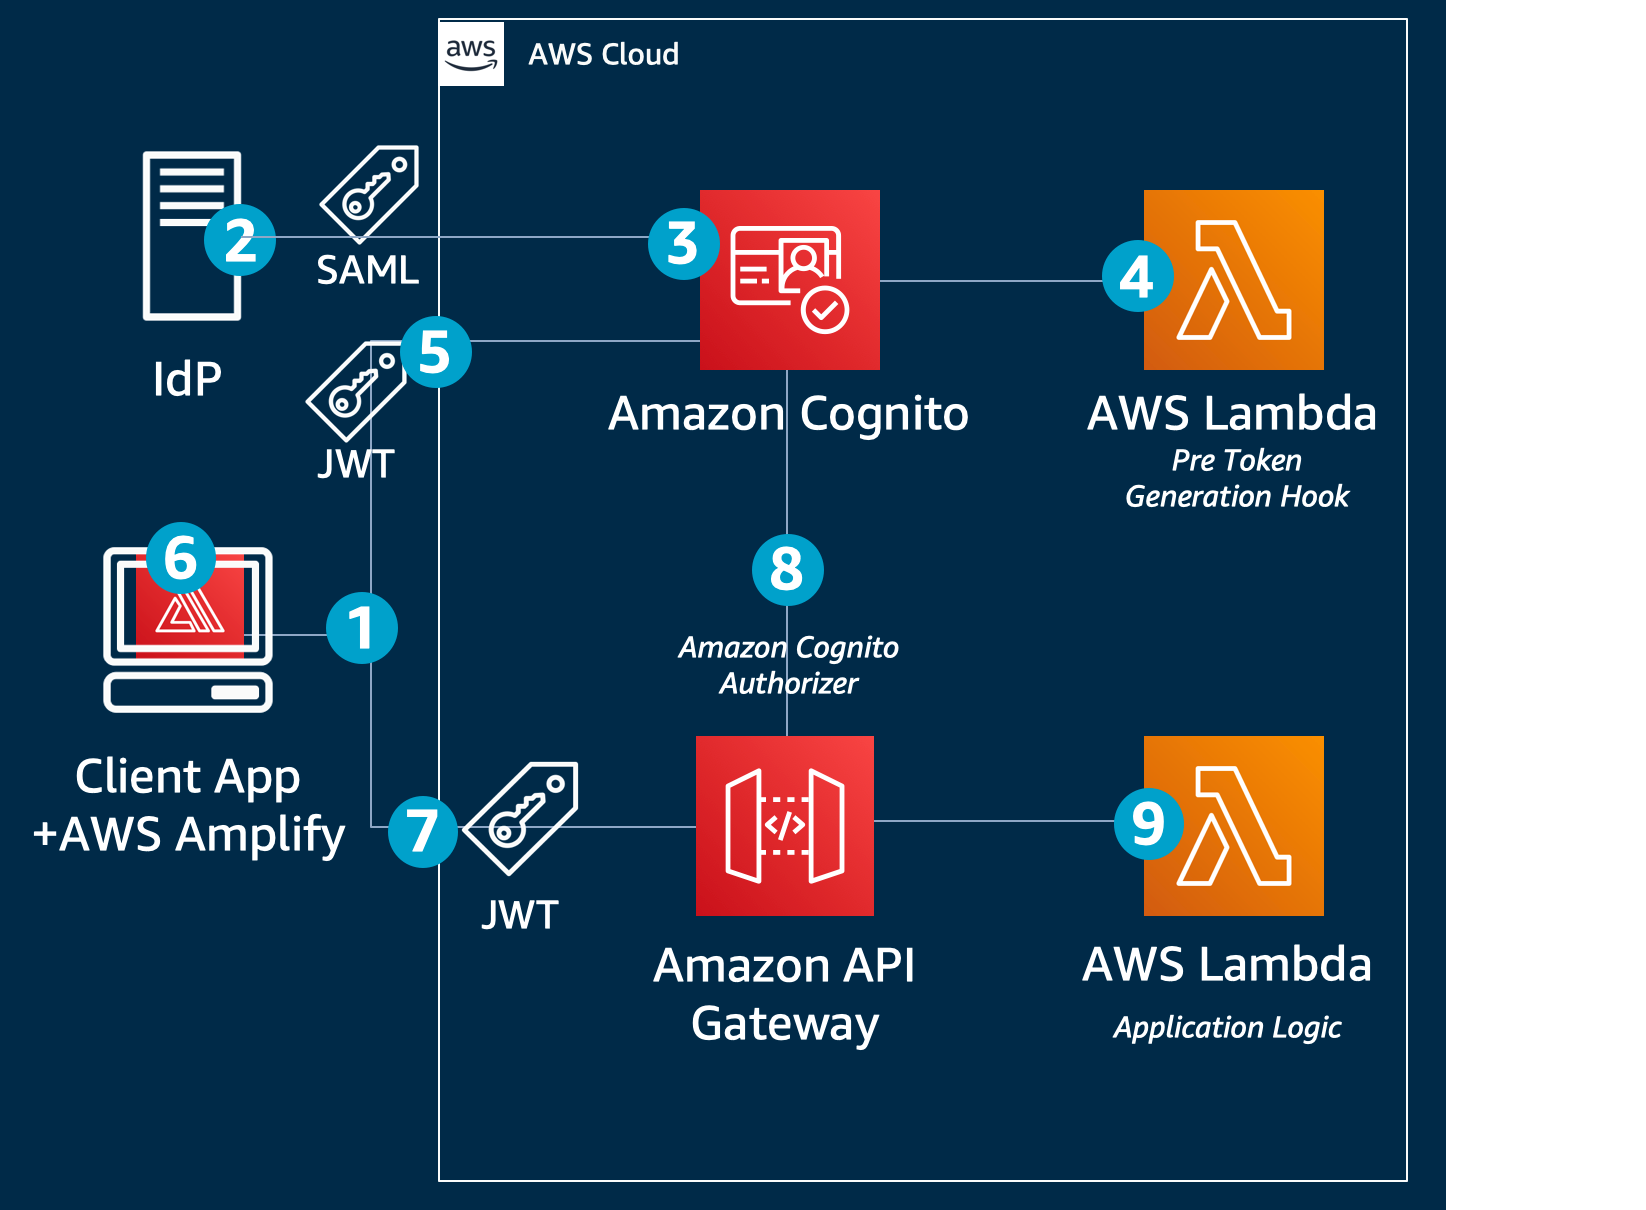
Amazon Cognito follows the OIDC specification to authenticate users of web and mobile apps. Users can sign in directly through the Amazon Cognito hosted UI or through a federated identity provider, such as Amazon, Facebook, Apple, or Google. The hosted UI workflows include sign-in and sign-up, password reset, and MFA. Since not all customer workflows are the same, you can customize Amazon Cognito workflows at key points with AWS Lambda functions, allowing you to run code without provisioning or managing servers. After a user authenticates, Amazon Cognito returns standard OIDC tokens. You can use the user profile information in the ID token to grant your users access to your own resources or you can use the tokens to grant access to APIs hosted by Amazon API Gateway. You can also exchange the tokens for temporary AWS credentials to access other AWS services.

Figure 1: Amazon Cognito sign-in flow

Figure 1: Amazon Cognito sign-in flow

OAuth 2.0 and OIDC

OAuth 2.0 is an open standard that allows a user to delegate access to their information to other websites or applications without handing over credentials. OIDC is an identity layer on top of OAuth 2.0 that uses OAuth 2.0 flows. OAuth 2.0 defines a number of flows to manage the interaction between the application, user, and authorization server. The right flow to use depends on the type of application.

The client credentials flow is used in machine-to-machine communications. You can use the client credentials flow to request an access token to access your own resources, which means you can use this flow when your app is requesting the token on its own behalf, not on behalf of a user. The authorization code grant flow is used to return an authorization code that is then exchanged for user pool tokens. Because the tokens are never exposed directly to the user, they are less likely to be shared broadly or accessed by an unauthorized party. However, a custom application is required on the back end to exchange the authorization code for user pool tokens. For security reasons, we recommend the Authorization Code Flow with Proof Key Code Exchange (PKCE) for public clients, such as single-page apps or native mobile apps.

The following table shows recommended flows per application type.

Application CFlow Description
Machine Client credentials Use this flow when your application is requesting the token on its own behalf, not on behalf of the user
Web app on a server Authorization code grant A regular web app on a web server
Single-page app Authorization code grant PKCE An app running in the browser, such as JavaScript
Mobile app Authorization code grant PKCE iOS or Android app

Securing the authorization code flow

Amazon Cognito can help you achieve compliance with regulatory frameworks and certifications, but it’s your responsibility to use the service in a way that remains compliant and secure. You need to determine the sensitivity of the user profile data in Amazon Cognito; adhere to your company’s security requirements, applicable laws and regulations; and configure your application and corresponding Amazon Cognito settings appropriately for your use case.

Note: You can learn more about regulatory frameworks and certifications at AWS Services in Scope by Compliance Program. You can download compliance reports from AWS Artifact.

We recommend that you use the authorization code flow with PKCE for single-page apps. Applications that use PKCE generate a random code verifier that’s created for every authorization request. Proof Key for Code Exchange by OAuth Public Clients has more information on use of a code verifier. In the following sections, I will show you how to set up the Amazon Cognito authorization endpoint for your app to support a code verifier.

The authorization code flow

In OpenID terms, the app is the relying party (RP) and Amazon Cognito is the OP. The flow for the authorization code flow with PKCE is as follows:

  1. The user enters the app home page URL in the browser and the browser fetches the app.
  2. The app generates the PKCE code challenge and redirects the request to the Amazon Cognito OAuth2 authorization endpoint (/oauth2/authorize).
  3. Amazon Cognito responds back to the user’s browser with the Amazon Cognito hosted sign-in page.
  4. The user signs in with their user name and password, signs up as a new user, or signs in with a federated sign-in. After a successful sign-in, Amazon Cognito returns the authorization code to the browser, which redirects the authorization code back to the app.
  5. The app sends a request to the Amazon Cognito OAuth2 token endpoint (/oauth2/token) with the authorization code, its client credentials, and the PKCE verifier.
  6. Amazon Cognito authenticates the app with the supplied credentials, validates the authorization code, validates the request with the code verifier, and returns the OpenID tokens, access token, ID token, and refresh token.
  7. The app validates the OpenID ID token and then uses the user profile information (claims) in the ID token to provide access to resources.(Optional) The app can use the access token to retrieve the user profile information from the Amazon Cognito user information endpoint (/userInfo).
  8. Amazon Cognito returns the user profile information (claims) about the authenticated user to the app. The app then uses the claims to provide access to resources.

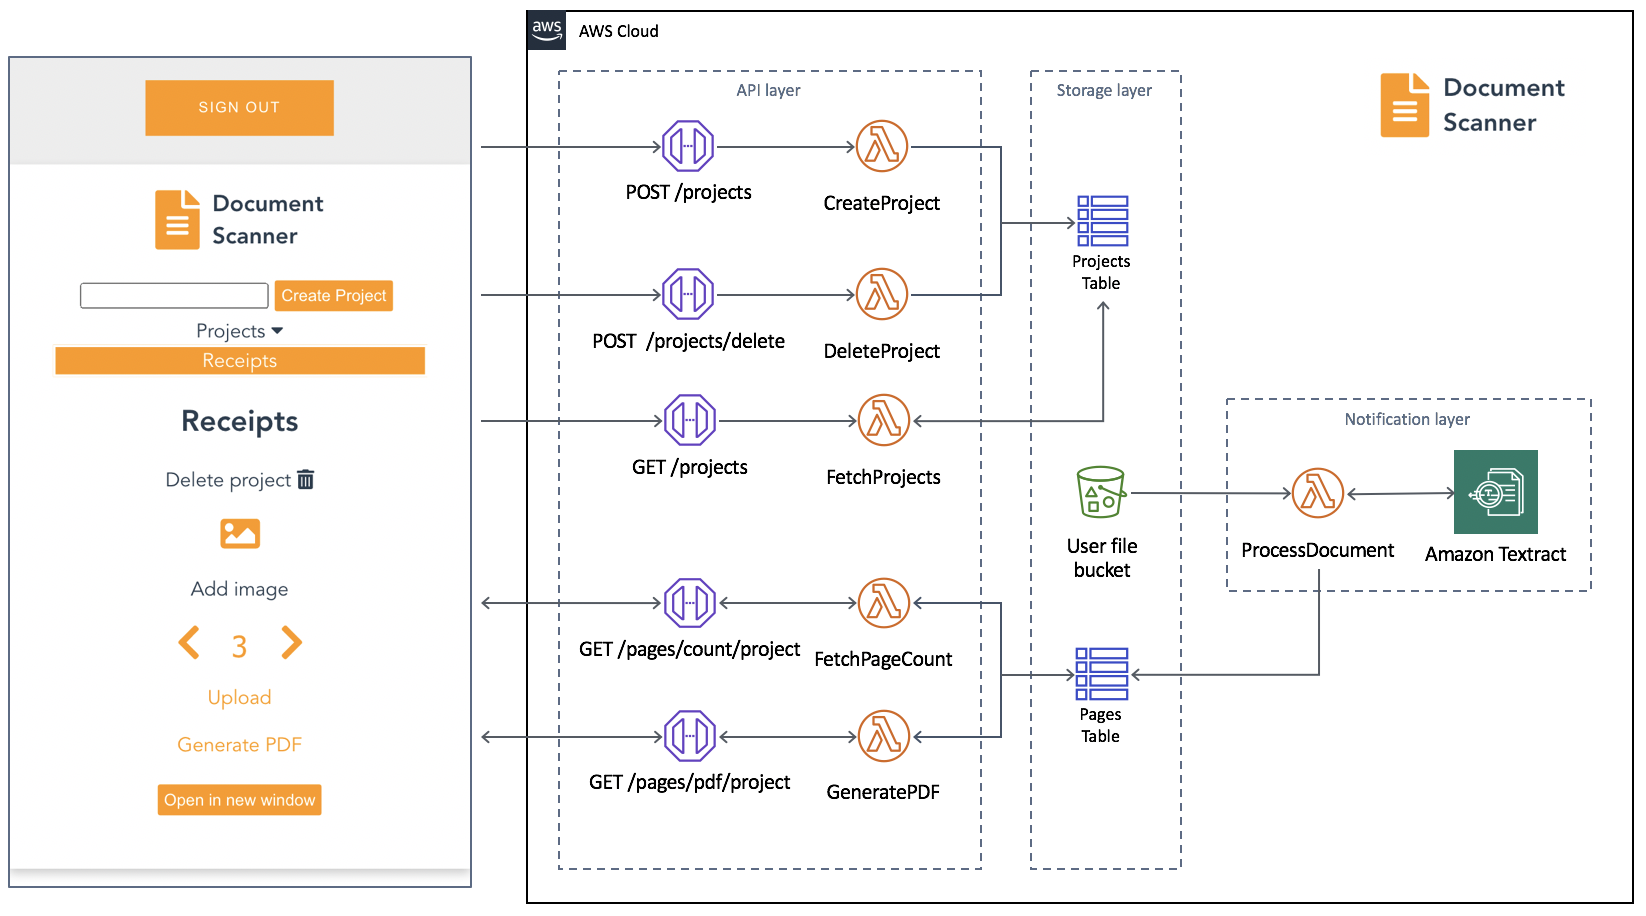
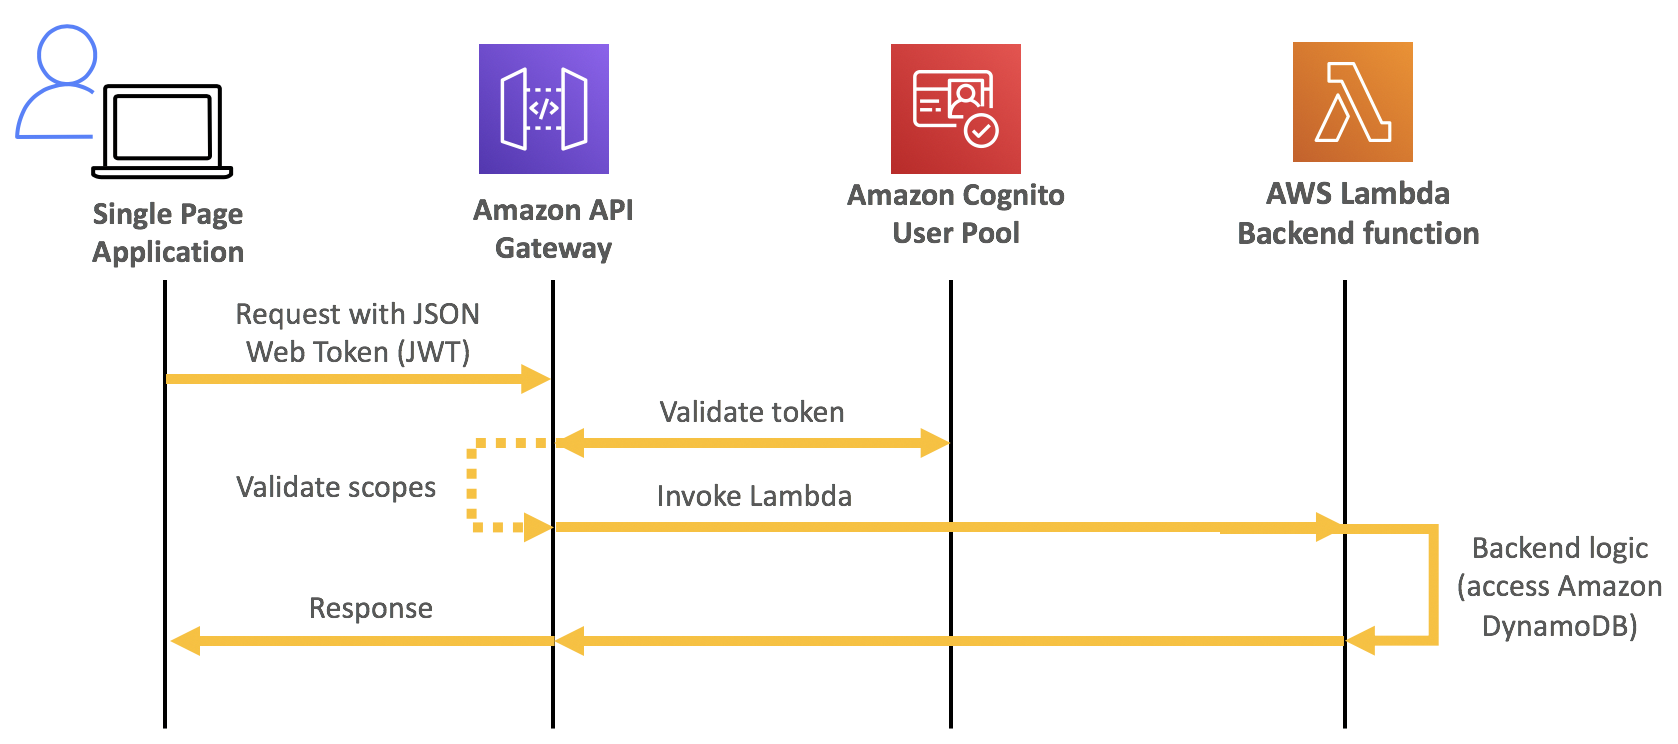
The following diagram shows the authorization code flow with PKCE.

Figure 2: Authorization code flow

Figure 2: Authorization code flow

Implementing an app with Amazon Cognito authentication

Now that you’ve learned about Amazon Cognito OAuth implementation, let’s create a working example app that uses Amazon Cognito OAuth implementation. You’ll create an Amazon Cognito user pool along with an app client, the app, an Amazon Simple Storage Service (Amazon S3) bucket, and an Amazon CloudFront distribution for the app, and you’ll configure the app client.

Step 1. Create a user pool

Start by creating your user pool with the default configuration.

Create a user pool:

  1. Go to the Amazon Cognito console and select Manage User Pools. This takes you to the User Pools Directory.
  2. Select Create a user pool in the upper corner.
  3. Enter a Pool name, select Review defaults, and select Create pool.
  4. Copy the Pool ID, which will be used later to create your single-page app. It will be something like region_xxxxx. You will use it to replace the variable YOUR_USERPOOL_ID in a later step.(Optional) You can add additional features to the user pool, but this demonstration uses the default configuration. For more information see, the Amazon Cognito documentation.

The following figure shows you entering the user pool name.

Figure 3: Enter a name for the user pool

Figure 3: Enter a name for the user pool

The following figure shows the resulting user pool configuration.

Figure 4: Completed user pool configuration

Figure 4: Completed user pool configuration

Step 2. Create a domain name

The Amazon Cognito hosted UI lets you use your own domain name or you can add a prefix to the Amazon Cognito domain. This example uses an Amazon Cognito domain with a prefix.

Create a domain name:

  1. Sign in to the Amazon Cognito console, select Manage User Pools, and select your user pool.
  2. Under App integration, select Domain name.
  3. In the Amazon Cognito domain section, add your Domain prefix (for example, myblog).
  4. Select Check availability. If your domain isn’t available, change the domain prefix and try again.
  5. When your domain is confirmed as available, copy the Domain prefix to use when you create your single-page app. You will use it to replace the variable YOUR_COGNITO_DOMAIN_PREFIX in a later step.
  6. Choose Save changes.

The following figure shows creating an Amazon Cognito hosted domain.

Figure 5: Creating an Amazon Cognito hosted UI domain

Figure 5: Creating an Amazon Cognito hosted UI domain

Step 3. Create an app client

Now create the app client user pool. An app client is where you register your app with the user pool. Generally, you create an app client for each app platform. For example, you might create an app client for a single-page app and another app client for a mobile app. Each app client has its own ID, authentication flows, and permissions to access user attributes.

Create an app client:

  1. Sign in to the Amazon Cognito console, select Manage User Pools, and select your user pool.
  2. Under General settings, select App clients.
  3. Choose Add an app client.
  4. Enter a name for the app client in the App client name field.
  5. Uncheck Generate client secret and accept the remaining default configurations.

    Note: The client secret is used to authenticate the app client to the user pool. Generate client secret is unchecked because you don’t want to send the client secret on the URL using client-side JavaScript. The client secret is used by applications that have a server-side component that can secure the client secret.

  6. Choose Create app client as shown in the following figure.

    Figure 6: Create and configure an app client

    Figure 6: Create and configure an app client

  7. Copy the App client ID. You will use it to replace the variable YOUR_APPCLIENT_ID in a later step.

The following figure shows the App client ID which is automatically generated when the app client is created.

Figure 7: App client configuration

Figure 7: App client configuration

Step 4. Create an Amazon S3 website bucket

Amazon S3 is an object storage service that offers industry-leading scalability, data availability, security, and performance. We use Amazon S3 here to host a static website.

Create an Amazon S3 bucket with the following settings:

  1. Sign in to the AWS Management Console and open the Amazon S3 console.
  2. Choose Create bucket to start the Create bucket wizard.
  3. In Bucket name, enter a DNS-compliant name for your bucket. You will use this in a later step to replace the YOURS3BUCKETNAME variable.
  4. In Region, choose the AWS Region where you want the bucket to reside.

    Note: It’s recommended to create the Amazon S3 bucket in the same AWS Region as Amazon Cognito.

  5. Look up the region code from the region table (for example, US-East [N. Virginia] has a region code of us-east-1). You will use the region code to replace the variable YOUR_REGION in a later step.
  6. Choose Next.
  7. Select the Versioning checkbox.
  8. Choose Next.
  9. Choose Next.
  10. Choose Create bucket.
  11. Select the bucket you just created from the Amazon S3 bucket list.
  12. Select the Properties tab.
  13. Choose Static website hosting.
  14. Choose Use this bucket to host a website.
  15. For the index document, enter index.html and then choose Save.

Step 5. Create a CloudFront distribution

Amazon CloudFront is a fast content delivery network service that helps securely deliver data, videos, applications, and APIs to customers globally with low latency and high transfer speeds—all within a developer-friendly environment. In this step, we use CloudFront to set up an HTTPS-enabled domain for the static website hosted on Amazon S3.

Create a CloudFront distribution (web distribution) with the following modified default settings:

  1. Sign into the AWS Management Console and open the CloudFront console.
  2. Choose Create Distribution.
  3. On the first page of the Create Distribution Wizard, in the Web section, choose Get Started.
  4. Choose the Origin Domain Name from the dropdown list. It will be YOURS3BUCKETNAME.s3.amazonaws.com.
  5. For Restrict Bucket Access, select Yes.
  6. For Origin Access Identity, select Create a New Identity.
  7. For Grant Read Permission on Bucket, select Yes, Update Bucket Policy.
  8. For the Viewer Protocol Policy, select Redirect HTTP to HTTPS.
  9. For Cache Policy, select Managed-Caching Disabled.
  10. Set the Default Root Object to index.html.(Optional) Add a comment. Comments are a good place to describe the purpose of your distribution, for example, “Amazon Cognito SPA.”
  11. Select Create Distribution. The distribution will take a few minutes to create and update.
  12. Copy the Domain Name. This is the CloudFront distribution domain name, which you will use in a later step as the DOMAINNAME value in the YOUR_REDIRECT_URI variable.

Step 6. Create the app

Now that you’ve created the Amazon S3 bucket for static website hosting and the CloudFront distribution for the site, you’re ready to use the code that follows to create a sample app.

Use the following information from the previous steps:

  1. YOUR_COGNITO_DOMAIN_PREFIX is from Step 2.
  2. YOUR_REGION is the AWS region you used in Step 4 when you created your Amazon S3 bucket.
  3. YOUR_APPCLIENT_ID is the App client ID from Step 3.
  4. YOUR_USERPOOL_ID is the Pool ID from Step 1.
  5. YOUR_REDIRECT_URI, which is https://DOMAINNAME/index.html, where DOMAINNAME is your domain name from Step 5.

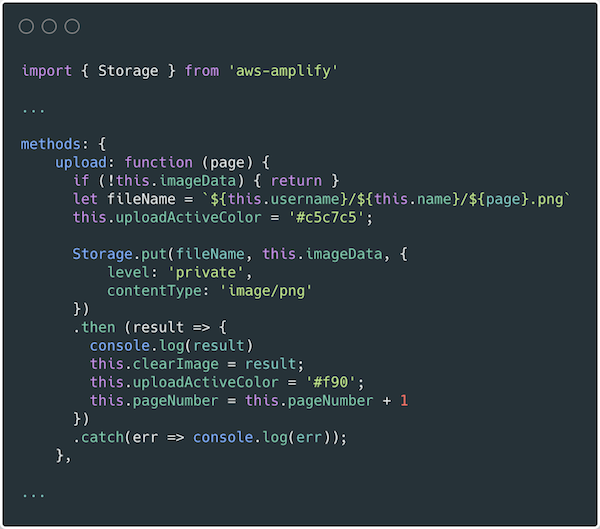
Create userprofile.js

Use the following text to create the userprofile.js file. Substitute the preceding pre-existing values for the variables in the text.

var myHeaders = new Headers();
myHeaders.set('Cache-Control', 'no-store');
var urlParams = new URLSearchParams(window.location.search);
var tokens;
var domain = "YOUR_COGNITO_DOMAIN_PREFIX";
var region = "YOUR_REGION";
var appClientId = "YOUR_APPCLIENT_ID";
var userPoolId = "YOUR_USERPOOL_ID";
var redirectURI = "YOUR_REDIRECT_URI";

//Convert Payload from Base64-URL to JSON
const decodePayload = payload => {
  const cleanedPayload = payload.replace(/-/g, '+').replace(/_/g, '/');
  const decodedPayload = atob(cleanedPayload)
  const uriEncodedPayload = Array.from(decodedPayload).reduce((acc, char) => {
    const uriEncodedChar = ('00' + char.charCodeAt(0).toString(16)).slice(-2)
    return `${acc}%${uriEncodedChar}`
  }, '')
  const jsonPayload = decodeURIComponent(uriEncodedPayload);

  return JSON.parse(jsonPayload)
}

//Parse JWT Payload
const parseJWTPayload = token => {
    const [header, payload, signature] = token.split('.');
    const jsonPayload = decodePayload(payload)

    return jsonPayload
};

//Parse JWT Header
const parseJWTHeader = token => {
    const [header, payload, signature] = token.split('.');
    const jsonHeader = decodePayload(header)

    return jsonHeader
};

//Generate a Random String
const getRandomString = () => {
    const randomItems = new Uint32Array(28);
    crypto.getRandomValues(randomItems);
    const binaryStringItems = randomItems.map(dec => `0${dec.toString(16).substr(-2)}`)
    return binaryStringItems.reduce((acc, item) => `${acc}${item}`, '');
}

//Encrypt a String with SHA256
const encryptStringWithSHA256 = async str => {
    const PROTOCOL = 'SHA-256'
    const textEncoder = new TextEncoder();
    const encodedData = textEncoder.encode(str);
    return crypto.subtle.digest(PROTOCOL, encodedData);
}

//Convert Hash to Base64-URL
const hashToBase64url = arrayBuffer => {
    const items = new Uint8Array(arrayBuffer)
    const stringifiedArrayHash = items.reduce((acc, i) => `${acc}${String.fromCharCode(i)}`, '')
    const decodedHash = btoa(stringifiedArrayHash)

    const base64URL = decodedHash.replace(/\+/g, '-').replace(/\//g, '_').replace(/=+$/, '');
    return base64URL
}

// Main Function
async function main() {
  var code = urlParams.get('code');

  //If code not present then request code else request tokens
  if (code == null){

    // Create random "state"
    var state = getRandomString();
    sessionStorage.setItem("pkce_state", state);

    // Create PKCE code verifier
    var code_verifier = getRandomString();
    sessionStorage.setItem("code_verifier", code_verifier);

    // Create code challenge
    var arrayHash = await encryptStringWithSHA256(code_verifier);
    var code_challenge = hashToBase64url(arrayHash);
    sessionStorage.setItem("code_challenge", code_challenge)

    // Redirtect user-agent to /authorize endpoint
    location.href = "https://"+domain+".auth."+region+".amazoncognito.com/oauth2/authorize?response_type=code&state="+state+"&client_id="+appClientId+"&redirect_uri="+redirectURI+"&scope=openid&code_challenge_method=S256&code_challenge="+code_challenge;
  } else {

    // Verify state matches
    state = urlParams.get('state');
    if(sessionStorage.getItem("pkce_state") != state) {
        alert("Invalid state");
    } else {

    // Fetch OAuth2 tokens from Cognito
    code_verifier = sessionStorage.getItem('code_verifier');
  await fetch("https://"+domain+".auth."+region+".amazoncognito.com/oauth2/token?grant_type=authorization_code&client_id="+appClientId+"&code_verifier="+code_verifier+"&redirect_uri="+redirectURI+"&code="+ code,{
  method: 'post',
  headers: {
    'Content-Type': 'application/x-www-form-urlencoded'
  }})
  .then((response) => {
    return response.json();
  })
  .then((data) => {

    // Verify id_token
    tokens=data;
    var idVerified = verifyToken (tokens.id_token);
    Promise.resolve(idVerified).then(function(value) {
      if (value.localeCompare("verified")){
        alert("Invalid ID Token - "+ value);
        return;
      }
      });
    // Display tokens
    document.getElementById("id_token").innerHTML = JSON.stringify(parseJWTPayload(tokens.id_token),null,'\t');
    document.getElementById("access_token").innerHTML = JSON.stringify(parseJWTPayload(tokens.access_token),null,'\t');
  });

    // Fetch from /user_info
    await fetch("https://"+domain+".auth."+region+".amazoncognito.com/oauth2/userInfo",{
      method: 'post',
      headers: {
        'authorization': 'Bearer ' + tokens.access_token
    }})
    .then((response) => {
      return response.json();
    })
    .then((data) => {
      // Display user information
      document.getElementById("userInfo").innerHTML = JSON.stringify(data, null,'\t');
    });
  }}}
  main();

Create the verifier.js file

Use the following text to create the verifier.js file.

var key_id;
var keys;
var key_index;

//verify token
async function verifyToken (token) {
//get Cognito keys
keys_url = 'https://cognito-idp.'+ region +'.amazonaws.com/' + userPoolId + '/.well-known/jwks.json';
await fetch(keys_url)
.then((response) => {
return response.json();
})
.then((data) => {
keys = data['keys'];
});

//Get the kid (key id)
var tokenHeader = parseJWTHeader(token);
key_id = tokenHeader.kid;

//search for the kid key id in the Cognito Keys
const key = keys.find(key =>key.kid===key_id)
if (key === undefined){
return "Public key not found in Cognito jwks.json";
}

//verify JWT Signature
var keyObj = KEYUTIL.getKey(key);
var isValid = KJUR.jws.JWS.verifyJWT(token, keyObj, {alg: ["RS256"]});
if (isValid){
} else {
return("Signature verification failed");
}

//verify token has not expired
var tokenPayload = parseJWTPayload(token);
if (Date.now() >= tokenPayload.exp * 1000) {
return("Token expired");
}

//verify app_client_id
var n = tokenPayload.aud.localeCompare(appClientId)
if (n != 0){
return("Token was not issued for this audience");
}
return("verified");
};

Create an index.html file

Use the following text to create the index.html file.

<!doctype html>

<html lang="en">
<head>
<meta charset="utf-8">

<title>MyApp</title>
<meta name="description" content="My Application">
<meta name="author" content="Your Name">
</head>

<body>
<h2>Cognito User</h2>

<p style="white-space:pre-line;" id="token_status"></p>

<p>Id Token</p>
<p style="white-space:pre-line;" id="id_token"></p>

<p>Access Token</p>
<p style="white-space:pre-line;" id="access_token"></p>

<p>User Profile</p>
<p style="white-space:pre-line;" id="userInfo"></p>
<script language="JavaScript" type="text/javascript"
src="https://kjur.github.io/jsrsasign/jsrsasign-latest-all-min.js">
</script>
<script src="js/verifier.js"></script>
<script src="js/userprofile.js"></script>
</body>
</html>

Upload the files into the Amazon S3 Bucket you created earlier

Upload the files you just created to the Amazon S3 bucket that you created in Step 4. If you’re using Chrome or Firefox browsers, you can choose the folders and files to upload and then drag and drop them into the destination bucket. Dragging and dropping is the only way that you can upload folders.

  1. Sign in to the AWS Management Console and open the Amazon S3 console.
  2. In the Bucket name list, choose the name of the bucket that you created earlier in Step 4.
  3. In a window other than the console window, select the index.html file to upload. Then drag and drop the file into the console window that lists the destination bucket.
  4. In the Upload dialog box, choose Upload.
  5. Choose Create Folder.
  6. Enter the name js and choose Save.
  7. Choose the js folder.
  8. In a window other than the console window, select the userprofile.js and verifier.js files to upload. Then drag and drop the files into the console window js folder.

    Note: The Amazon S3 bucket root will contain the index.html file and a js folder. The js folder will contain the userprofile.js and verifier.js files.

Step 7. Configure the app client settings

Use the Amazon Cognito console to configure the app client settings, including identity providers, OAuth flows, and OAuth scopes.

Configure the app client settings:

  1. Go to the Amazon Cognito console.
  2. Choose Manage your User Pools.
  3. Select your user pool.
  4. Select App integration, and then select App client settings.
  5. Under Enabled Identity Providers, select Cognito User Pool.(Optional) You can add federated identity providers. Adding User Pool Sign-in Through a Third-Party has more information about how to add federation providers.
  6. Enter the Callback URL(s) where the user is to be redirected after successfully signing in. The callback URL is the URL of your web app that will receive the authorization code. In our example, this will be the Domain Name for the CloudFront distribution you created earlier. It will look something like https://DOMAINNAME/index.html where DOMAINNAME is xxxxxxx.cloudfront.net.

    Note: HTTPS is required for the Callback URLs. For this example, I used CloudFront as a HTTPS endpoint for the app in Amazon S3.

  7. Next, select Authorization code grant from the Allowed OAuth Flows and OpenID from Allowed OAuth Scopes. The OpenID scope will return the ID token and grant access to all user attributes that are readable by the client.
  8. Choose Save changes.

Step 8. Show the app home page

Now that the Amazon Cognito user pool is configured and the sample app is built, you can test using Amazon Cognito as an OP from the sample JavaScript app you created in Step 6.

View the app’s home page:

  1. Open a web browser and enter the app’s home page URL using the CloudFront distribution to serve your index.html page created in Step 6 (https://DOMAINNAME/index.html) and the app will redirect the browser to the Amazon Cognito /authorize endpoint.
  2. The /authorize endpoint redirects the browser to the Amazon Cognito hosted UI, where the user can sign in or sign up. The following figure shows the user sign-in page.

    Figure 8: User sign-in page

    Figure 8: User sign-in page

Step 9. Create a user

You can use the Amazon Cognito user pool to manage your users or you can use a federated identity provider. Users can sign in or sign up from the Amazon Cognito hosted UI or from a federated identity provider. If you configured a federated identity provider, users will see a list of federated providers that they can choose from. When a user chooses a federated identity provider, they are redirected to the federated identity provider sign-in page. After signing in, the browser is directed back to Amazon Cognito. For this post, Amazon Cognito is the only identity provider, so you will use the Amazon Cognito hosted UI to create an Amazon Cognito user.

Create a new user using Amazon Cognito hosted UI:

  1. Create a new user by selecting Sign up and entering a username, password, and email address. Then select the Sign up button. The following figure shows the sign up screen.

    Figure 9: Sign up with a new account

    Figure 9: Sign up with a new account

  2. The Amazon Cognito sign up workflow will verify the email address by sending a verification code to that address. The following figure shows the prompt to enter the verification code.

    Figure 10: Enter the verification code

    Figure 10: Enter the verification code

  3. Enter the code from the verification email in the Verification Code text box.
  4. Select Confirm Account.

Step 10. Viewing the Amazon Cognito tokens and profile information

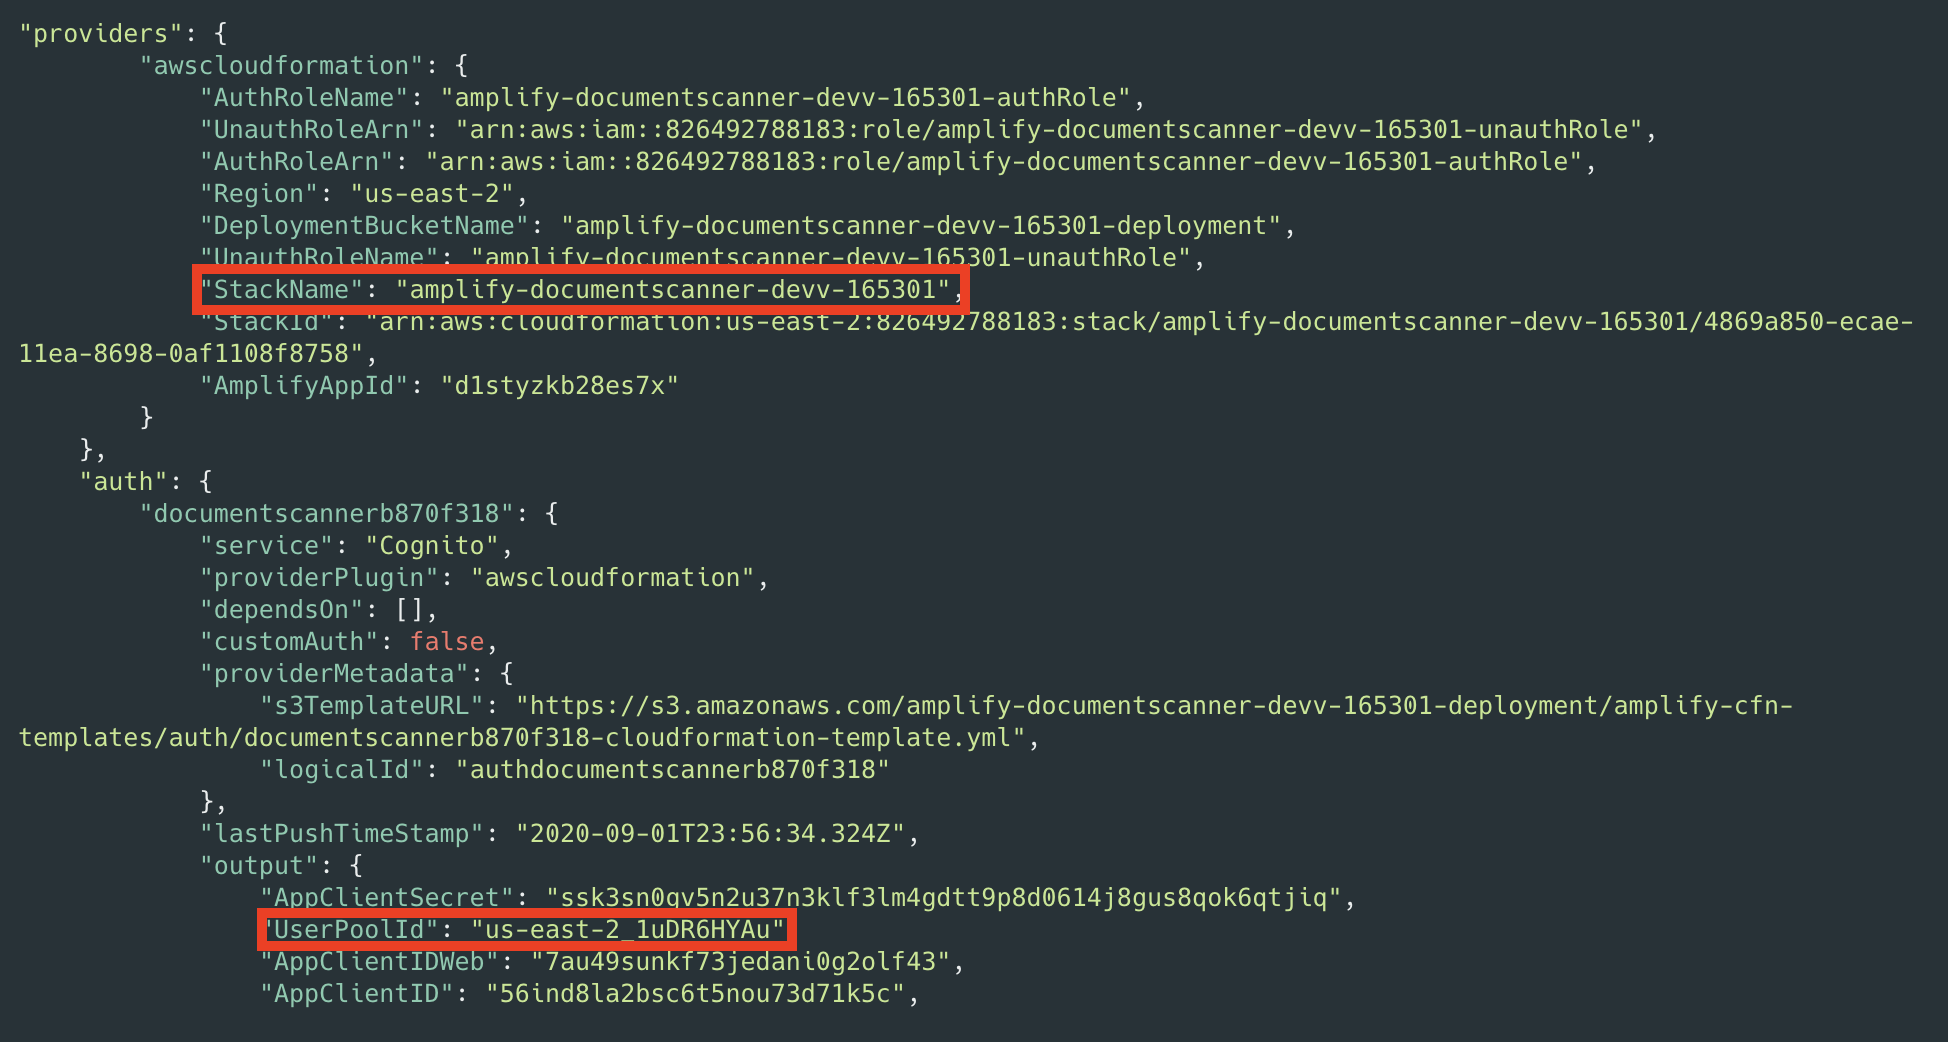
After authentication, the app displays the tokens and user information. The following figure shows the OAuth2 access token and OIDC ID token that are returned from the /token endpoint and the user profile returned from the /userInfo endpoint. Now that the user has been authenticated, the application can use the user’s email address to look up the user’s account information in an application data store. Based on the user’s account information, the application can grant/restrict access to paid content or show account information like order history.

Figure 11: Token and user profile information

Figure 11: Token and user profile information

Note: Many browsers will cache redirects. If your browser is repeatedly redirecting to the index.html page, clear the browser cache.

Summary

In this post, we’ve shown you how easy it is to add user authentication to your web and mobile apps with Amazon Cognito.

We created a Cognito User Pool as our user directory, assigned a domain name to the Amazon Cognito hosted UI, and created an application client for our application. Then we created an Amazon S3 bucket to host our website. Next, we created a CloudFront distribution for our Amazon S3 bucket. Then we created our application and uploaded it to our Amazon S3 website bucket. From there, we configured the client app settings with our identity provider, OAuth flows, and scopes. Then we accessed our application and used the Amazon Cognito sign-in flow to create a username and password. Finally, we logged into our application to see the OAuth and OIDC tokens.

Amazon Cognito saves you time and effort when implementing authentication with an intuitive UI, OAuth2 and OIDC support, and customizable workflows. You can now focus on building features that are important to your core business.

If you have feedback about this post, submit comments in the Comments section below. If you have questions about this post, start a new thread on the Amazon Cognito forum or contact AWS Support.

Want more AWS Security how-to content, news, and feature announcements? Follow us on Twitter.

Author

George Conti

George is a Solution Architect for the AWS Financial Services team. He is passonate about technology and helping Financial Services Companies build solutions with AWS Services.

Role-based access control using Amazon Cognito and an external identity provider

Post Syndicated from Eran Medan original https://aws.amazon.com/blogs/security/role-based-access-control-using-amazon-cognito-and-an-external-identity-provider/

Amazon Cognito simplifies the development process by helping you manage identities for your customer-facing applications. As your application grows, some of your enterprise customers may ask you to integrate with their own Identity Provider (IdP) so that their users can sign-on to your app using their company’s identity, and have role-based access-control (RBAC) based on their company’s directory group membership.

For your own workforce identities, you can use AWS Single Sign-On (SSO) to enable single sign-on to your cloud applications or AWS resources.

For your customers who would like to integrate your application with their own IdP, you can use Amazon Cognito user pools’ external identity provider integration.

In this post, you’ll learn how to integrate Amazon Cognito with an external IdP by deploying a demo web application that integrates with an external IdP via SAML 2.0. You will use directory groups (for example, Active Directory or LDAP) for authorization by mapping them to Amazon Cognito user pool groups that your application can read to make access decisions.

Architecture

The demo application is implemented using Amazon Cognito, AWS Amplify, Amazon API Gateway, AWS Lambda, Amazon DynamoDB, Amazon Simple Storage Service (S3), and Amazon CloudFront to achieve a serverless architecture. You will make use of infrastructure-as-code by using AWS CloudFormation and the AWS Cloud Development Kit (CDK) to model and provision your cloud application resources, using familiar programming languages.

The following diagram shows an overview of this architecture and the steps in the login flow, which should help clarify what you are going to deploy.
 

Figure 1: Architecture Diagram

Figure 1: Architecture Diagram

First visit

When a user visits the web application at the first time, the flow is as follows:

  1. The client side of the application (also referred to as the front end) uses the AWS Amplify JavaScript library (Amplify.js) to simplify authentication and authorization. Using Amplify, the application detects that the user is unauthenticated and redirects to Amazon Cognito, which then sends a SAML request to the IdP.
  2. The IdP authenticates the user and sends a SAML response back to Amazon Cognito. The SAML response includes common attributes and a multi-value attribute for group membership.
  3. Amazon Cognito handles the SAML response, and maps the SAML attributes to a just-in-time user profile. The SAML groups attribute is mapped to a custom user pool attribute named custom:groups.
  4. An AWS Lambda function named PreTokenGeneration reads the custom:groups custom attribute and converts it to a JSON Web Token (JWT) claim named cognito:groups. This associates the user to a group, without creating a group.

    This attribute conversion is optional and implemented to demo how you can use Pre Token Generation Lambda trigger to customize your JWT token claims, mapping the IdP groups to the attributes your application recognizes. You can also use this trigger to make additional authorization decisions. For example, if user is a member of multiple groups, you may choose to map only one of them.

  5. Amazon Cognito returns the JWT tokens to the front end.
  6. The Amplify client library stores the tokens and handles refreshes.
  7. The front end makes a call to a protected API in Amazon API Gateway.
  8. API Gateway uses an Amazon Cognito user pools authorizer to validate the JWT’s signature and expiration. If this is successful, API Gateway passes the JWT to the application’s Lambda function (also referred to as the backend).
  9. The backend application code reads the cognito:groups claim from the JWT and decides if the action is allowed. If the user is a member of the right group then the action is allowed, otherwise the action is denied.

We will go into more detail about these steps after describing a bit more about the implementation details.

For more information about JWT tokens and claims, see Introduction to JSON Web Tokens.

Prerequisites

The following are the prerequisites for the solution described in this post:

Cost estimate

For an account under the 12-month Free Tier period, there should be no cost associated with running this example. However, to avoid any unexpected costs you should terminate the example stack after it’s no longer needed. For more information, see AWS Free Tier and AWS Pricing.

Running the demo application

In this part, you will go over the steps to setup and run the demo application. All the example code in this solution can be found on the amazon-cognito-example-for-external-idp code repository on GitHub.

To deploy the application without an IdP integration

  1. Open a bash-compatible command-line terminal and navigate to a directory of your choice. For Windows users: install Git for Windows and open Git BASH from the start menu.
  2. To get the code from the GitHub repository, enter the following:
    git clone https://github.com/aws-samples/amazon-cognito-example-for-external-idp 
    cd amazon-cognito-example-for-external-idp
    

  3. The template env.sh.template contains configuration settings for the application that you will modify later when you configure the IdP. To copy env.sh.template to env.sh, enter the following:
    cp env.sh.template env.sh

    Figure 2: Cloning the example repository and copying the template configuration file

    Figure 2: Cloning the example repository and copying the template configuration file

  4. The install.sh script will install the AWS CDK toolkit with the dependencies and will configure and bootstrap your environment:
    ./install.sh
    

    Figure 3: Installing dependencies

    Figure 3: Installing dependencies

    You may get prompted to agree to sending Angular analytics. You will also get notified if there are package vulnerabilities. If this is the case run npm audit –fix –prod in all subdirectories to resolve them.

  5. Once the environment has been successfully bootstrapped you need to deploy the CloudFormation stack:
    ./deploy.sh 
    

    Figure 4: Deploying the CloudFormation stack

    Figure 4: Deploying the CloudFormation stack

  6. You will be prompted to accept the IAM changes. These changes will allow API gateway service to call the demo application lambda function (APIFunction), Amazon Cognito to invoke Pre-Token Generation lambda function, demo application lambda function to access DynamoDB user’s table (used to implement user’s global sign out), and more. You’ll need to review these changes according to your current security approval level and confirm them to continue.

    Under Do you wish to deploy these changes (y/n)?, type y and press Enter.

    Figure 5: Reviewing and confirming changes

    Figure 5: Reviewing and confirming changes

  7. A few moments after deploying the application’s CloudFormation stack, the terminal displays the IdP settings, which should look like the following:
     
    Figure 6: IdP settings

    Figure 6: IdP settings

    Make a note of these values; you will use them later to configure the IdP.

Configure the IdP

Every IdP is different, but there are some common steps you will need to follow. To configure the IdP, do the following:

  1. Provide the IdP with the values for the following two properties, which you made note of in the previous section:
    • Single sign on URL / Assertion Consumer Service URL / ACS URL:
      https://<domainPrefix>.auth.<region>.amazoncognito.com/saml2/idpresponse
      

    • Audience URI / SP Entity ID / Entity ID:
      urn:amazon:cognito:sp:<yourUserPoolID>
      

  2. Configure the field mapping for the SAML response in the IdP. Map the first name, last name, email, and groups (as a multivalue attribute) into SAML response attributes with the names firstName, lastName, email, and groups, respectively.

    Recommended: Filter the mapped groups to only those that are relevant to the application (for example, by a prefix filter). There is a 2,048-character limit on the custom attribute, so filtering avoids exceeding the character limit, and also avoids passing irrelevant information to the application.

  3. In the IdP, create two demo groups called pet-app-users and pet-app-admins, and create two demo users, for example, [email protected] and [email protected], and then assign one to each group, respectively.

See the following specific instructions for some popular IdPs, or see the documentation for your customer’s specific IdP:

Get the IdP SAML metadata URL or file

Get the metadata URL or file from the IdP: you will use this later to configure your Cognito user pool integration with the IdP. For more information, see Integrating Third-Party SAML Identity Providers with Amazon Cognito User Pools.

To update the application with the SAML metadata URL or file

The following will configure the SAML IdP in the Amazon Cognito User Pool using the IdP metadata above:

  1. Using your favorite text editor, open the env.sh file.
  2. Uncomment the line starting with # export IDENTITY_PROVIDER_NAME (remove the # sign).
  3. Uncomment the line starting with # export IDENTITY_PROVIDER_METADATA.
  4. If you have a metadata URL from the IdP, enter it following the = sign:
    export IDENTITY_PROVIDER_METADATA=REPLACE_WITH_URL
    

    Or, if you downloaded the metadata as a file, enter $(cat path/to/downloaded-metadata.xml):

    export IDENTITY_PROVIDER_METADATA=$(cat REPLACE_WITH_PATH)
    

    Figure 7: Editing the identity provider metadata in the env.sh configuration file

    Figure 7: Editing the identity provider metadata in the env.sh configuration file

To re-deploy the application

  1. Run ./diff.sh to see the changes to the CloudFormation stack (added metadata URL).
     
    Figure 8: Run ./diff.sh

    Figure 8: Run ./diff.sh

  2. Run ./deploy.sh to deploy the update.

To launch the UI

There is both an Angular version and a React version of the same UI, both have the same functionality. You can use either version depending on your preference.

  1. Start the front end application with your chosen version of the UI with one of the following:
    • React: cd ui-react && npm start
    • Angular: cd ui-angular && npm start
  2. To simulate a new session, in your web browser, open a new window in private browsing or incognito mode, then for the URL, enter http://localhost:3000. You should see a screen similar to the following:
     
    Figure 9: Private browsing sign-in screen

    Figure 9: Private browsing sign-in screen

  3. Choose Single Sign On to be taken to the IdP’s sign-in page, where you will sign in if needed. After you are authenticated by the IdP, you’ll be redirected back to the application.

    If you have multiple IdPs, or if you have both internal and external users that will authenticate directly with the user pool, you can choose the Sign In / Sign Up button instead. This redirects you to the Amazon Cognito hosted UI sign in page, rather than taking you directly to the IdP. For more information, see Using the Amazon Cognito Hosted UI for Sign-Up and Sign-In.

  4. Using a new private browsing session (to clear any state), sign in with the user associated with the group pet-app-users and create some sample entries. Then, sign out. Open another private browsing session, and sign in with the user associated with the pet-app-admins group. Notice that you can see the other user’s entries. Now, create a few entries as an admin, then sign out. Open another new private browsing session, sign in again as the pet-app-users user, and notice that you can’t see the entries created by the admin user.
     
    Figure 10: Example view for a user who is only a member of the pet-app-users group

    Figure 10: Example view for a user who is only a member of the pet-app-users group


    Figure 11: Example view for a user who is also a member of the pet-app-admins group

    Figure 11: Example view for a user who is also a member of the pet-app-admins group

Implementation

Next, review the details of what each part of the demo application does, so that you can modify it and use it as a starting point for your own application.

Infrastructure

Take a look at the code in the cdk.ts file—a sample CDK file that creates the infrastructure. You can find it in the amazon-cognito-example-for-external-idp/cdk/src directory in the cloned GitHub repo. The key resources it creates are the following:

  1. A Cognito user pool (new cognito.UserPool…). This is where the just-in-time provisioning created users who federate in from the IdP. It also creates a custom attribute named groups, which you can see as custom:groups in the console.
     
    Figure 12: Custom attribute named groups

    Figure 12: Custom attribute named groups

  2. IdP integration which provides the mapping between the attributes in the SAML assertion from the IdP and Amazon Cognito attributes. For more information, see Specifying Identity Provider Attribute Mappings for Your User Pool.
    (new cognito.CfnUserPoolIdentityProvider…).
  3. An authorizer (new apigateway.CfnAuthorizer…). The authorizer is linked to an API resource method (authorizer: {authorizerId: cfnAuthorizer.ref}).

    It ensures that the user must be authenticated and must have a valid JWT token to make API calls to this resource. It uses Lambda proxy integration to intercept requests.

  4. The PreTokenGeneration Lambda trigger, which is used for the mapping between a user’s Active Directory or LDAP groups (passed on the SAML response from the IdP) to user pool groups (const preTokenGeneration = new lambda.Function…). For the PreTokenGeneration Lambda trigger code used in this solution, see the index.ts file on GitHub.

The application

Backend

The example application in this solution uses a serverless backend, but you can modify it to use Amazon Elastic Compute Cloud (Amazon EC2), Amazon Elastic Container Service (Amazon ECS), Amazon Elastic Kubernetes Service (Amazon EKS), AWS Fargate, AWS Elastic Beanstalk, or even an on-premises server as the backend. To configure your API gateway to point to a server-based application, see Set up HTTP Integrations in API Gateway or Set up API Gateway Private Integrations.

Middleware

Take a look at the code in the express.js sample in the app.ts file on GitHub. You’ll notice some statements starting with app.use. These are interceptors that are invoked for all requests.

app.use(eventContext());

app.use(authorizationMiddleware({
  authorizationHeaderName: authorizationHeaderName,
  supportedGroups: [adminsGroupName, usersGroupName],
  forceSignOutHandler: forceSignOutHandler,
  allowedPaths: ["/"],
}));

Some explanation:

  1. eventContext: the example application in this solution uses AWS Serverless Express which allows you to run the Express framework for Node.js directly on AWS Lambda.
  2. authorizationMiddleware is a helper middleware that does the following:
    1. It enriches the express.js request object with several syntactic sugars such as req.groups and req.username (a shortcut to get the respective claims from the JWT token).
    2. It ensures that the currently logged in user is a member of at least one of the supportedGroups provided. If not, it will return a 403 response.

Endpoints

Still in the Express.js app.ts file on GitHub, take a closer look at one of the API’s endpoints (GET /pets).

app.get("/pets", async (req: Request, res: Response) => {

  if (req.groups.has(adminsGroupName)) {
    // if the user has the admin group, we return all pets
    res.json(await storageService.getAllPets());
  } else {
    // else, just owned pets (middleware ensure that the user has at least one group)
    res.json(await storageService.getAllPetsByOwner(req.username));
  }
});

With the groups claim information, your application can now make authorization decisions based on the user’s role (show all items if they are an admin, otherwise just items they own). Having this logic as part of the application also allows you to unit test your authorization logic, and run it locally, or offline, before deploying it.

Front end

The front end can be built in your framework of choice. You can start with the sample UIs provided for either React or Angular. In both, the AWS Amplify client library handles the integration with Amazon Cognito and API Gateway for you. For more information about AWS Amplify, see the Amplify Framework page on GitHub.

Note: You can use AWS Amplify to create the infrastructure in a wizard-like way, without writing CloudFormation. In our example, because we used the AWS CDK for the infrastructure, we needed a configuration file to point Amplify to the created infrastructure.

The following are some notable files, and explanations of what they do:

  • generateConfig.ts reads the CloudFormation stack output parameters, and creates a file named autoGenConfig.js, which looks like the following:
    // this file is auto generated, do not edit it directly
    export default {
      cognitoDomain: "youruniquecognitodomain.auth.region.amazoncognito.com",
      region: "region",
      cognitoUserPoolId: "youruserpoolid",
      cognitoUserPoolAppClientId: "yourusepoolclientid",
      apiUrl: "https://yourapigwapiid.execute-api.region.amazonaws.com/prod/",
    };
    

    The file generateConfig.ts is triggered after calling ./deploy.sh, or ./config-ui.sh.

  • APIService.ts: calls the backend API, passing the user’s token. For example, calling the GET/pets API:
    public async getAllPets(): Promise<Pet[]> {
      const authorizationHeader = await this.getAuthorizationHeader();
      return await this.api.get(REST_API_NAME, '/pets', {headers: authorizationHeader});
    }
    

Step-by-step example

Now that you have an understanding of the solution, we will take you through a step-by-step example. You can see how everything works together in sequence, and how the tokens are passing between Cognito, your demo application, and the API gateway.

  1. Create a new browser session by starting a private/incognito session.
  2. Launch the UI by using the Angular example from the To launch the UI section:
    cd ui-angular && npm start
    

  3. Open the developer tools in your browser. In most browsers, you can do this by pressing F12 (in Chrome and FireFox in Windows), or Option+Command+i (Chrome, Firefox, or Safari on a Mac).
  4. In the developer tools panel, navigate to the Network tab, and ensure that it is in recording mode and logs are persisting. For more details for various browsers, see How to View a SAML Response in Your Browser for Troubleshooting.
  5. When the page loads, the following happens behind the scenes in the front end (example code available for either Angular or React):
    1. Using Amplify.js, AWS Amplify checks if the user is currently logged in
      let cognitoUser = await Auth.currentAuthenticatedUser();
      

      Because this is a new browsing session, the user is not logged in, and the Sign In / Sign Up and Single Sign On buttons will appear.

    2. Choose Single Sign On, and AWS Amplify will redirect the browser to the IdP.
      Auth.federatedSignIn(idpName)
      

  6. In the IdP sign-in page, sign in as one of the users created earlier (e.g. [email protected] or [email protected]).
  7. In the Network tab of your browser’s developer tools panel, locate the request to Amazon Cognito’s /saml2/idresponse endpoint.
  8. The following is an example using Chrome, but you can do it similarly using other browsers. In the Form Data section, you can see the SAMLResponse field that was sent back from the IdP after you authenticated.
     
    Figure 13: Inspecting the SAML response

    Figure 13: Inspecting the SAML response

  9. Copy the SAMLResponse value (drag to select the area marked in green above, and make sure you don’t include the RelayState field).
  10. At the command line, use the following example to decode the SAMLResponse value. Be sure to replace SAMLResponse by pasting the text copied in the previous step:
    echo "SAMLResponse" | base64 --decode > saml_response.xml 
    

  11. Open the saml_response.xml file, and look at the part that starts with <saml2:Attribute Name="groups". This is the attribute that contains the groups that your user belongs to, according to the IdP. For more ways to inspect and troubleshoot the SAML response, see How to View a SAML Response in Your Browser for Troubleshooting.
  12. Amazon Cognito applies the mapping defined in the CloudFormation stack to these attributes. For example, the IdP SAML response attribute named groups is mapped to the user pool custom attribute named custom:groups.
    • In order to modify the mapping, edit your local copy of the cdk.ts file.
    • In order to view the mapped attribute for a user, do the following:
      1. Sign into the AWS Management Console using the same account you used for the demo setup.
      2. Select Manage User Pools.
      3. Select the pool you created for this demo and choose Users and groups.
      4. Search for the user account you just signed in with, and choose its username.

        As you can see in the following example, the custom:groups claim is set automatically. (the custom: prefix is added to all custom attributes automatically):

    Figure 14: Mapped user attributes

    Figure 14: Mapped user attributes

  13. The PreTokenGeneration Lambda function then reads the mapped custom:groups attribute value, parses it, and converts it to an array; and then stores it in the cognito:groups claim. In order to customize the mapping, edit the Lambda function’s code in your local copy of the index.ts file and run ./deploy.sh to redeploy your application.
  14. Now that the front end has the JWT token, when the page loads, it will request to load all the items (a call to a protected API, passing the token in the form of an authorization header).
  15. Look at the Network tab again, under the GET request that starts with pets.

    Under Request Headers, look at the authorization header. The long value you see is the encoded token passed as part of the request. The following is an example of how the decoded JWT will look:

    {
      "cognito:groups": [
        "pet-app-users",
        "pet-app-admins"
      ], // <- this is what the PreTokenGeneration lambda added
      
      "cognito:username": "IdP_Alice",
      "custom:groups": "[pet-app-users, pet-app-admins]", //what we got via SAML
      "email": "[email protected]"
      …
    
    }
    

  16. Optionally, if you’d like to modify or add new requests to a new API paths, edit your local copy of the APIService.ts file by using one of the following examples.
    • Sending the request with the authorization header:
      public async getAllPets(): Promise<Pet[]> {
        const authorizationHeader = await this.getAuthorizationHeader();
        return await this.api.get(REST_API_NAME, '/pets', 
          {headers: authorizationHeader});
      }
      

    • The authorization header is obtained using this helper function:
      private async getAuthorizationHeader() {
        const session = await this.auth.currentSession();
        const idToken = session.getIdToken().getJwtToken();
        return {Authorization: idToken}
      }
      

  17. After the previous request is sent to Amazon API Gateway, the Amazon Cognito user pool authorizer validated the JWT token based on the token signature, to ensure that it was not tampered with, and that it was still valid. You can see the way the authorizer is setup in the cdk.ts file on GitHub.
  18. Based on which user you signed-in with previously, you’ll either see all items, or only items you own. How does it work? As mentioned earlier, the backend application code reads the groups claim from the validated token and decides if the action is allowed. If the user is a member of a specific group or has a specific attribute, allow; else, deny. The relevant code that makes that decision can be seen in the Express.js example app file in the app.ts file on GitHub.

Customizing the application

The following are some important issues to consider when customizing the app to your needs:

  • If you modify the app client, do not add the aws.cognito.signin.user.admin scope to it. The aws.cognito.signin.user.admin scope grants access to Amazon Cognito User Pool API operations that require access tokens, such as UpdateUserAttributes and VerifyUserAttribute. The demo application makes authorization decisions based on the custom:group attribute populated from the IdP. Because the IdP is the single source of truth for its users, they should not be able to modify any attribute, particularly the custom:groups attribute.
  • We recommend that you do not change the mapped attribute after the stack is deployed. The reason is that the attribute gets persisted in the user profile after it is mapped. For example, if you first map groups to custom:groups, and a user signs in, then later you change the mapping of groups to custom:groups2, the next time the user signs in, their profile will have both attributes: custom:groups (with the last value it was mapped to it) as well as custom:groups2 (with the current value). To avoid having to clear old mapped attributes, we recommend not changing the mapping after it is created.
  • This solution utilizes Amazon Cognito’s OAuth 2.0 flows to provide federated sign-in from an external IdP (and optionally also sign-in directly with the user pool via the hosted UI in case you would like to support both use cases). It is not applicable for non OAuth 2.0 flows (e.g. the custom UI), for example, using InititateAuth/SRP.

Conclusion

You can integrate your application with your customer’s IdP of choice for authentication and authorization for your application, without integrating with LDAP, or Active Directory directly. Instead, you can map read-only, need-to-know information from the IdP to the application. By using Amazon Cognito, you can normalize the structure of the JWT token, so that you can add multiple IdPs, social login providers, and even regular username and password-based users (stored in user pools). And you can do all this without changing any application code. Amazon API Gateway’s native integration with Amazon Cognito user pools authorizer streamlines your validation of the JWT integrity, and after it has been validated, you can use it to make authorization decisions in your application’s backend. Using this example, you can focus on what differentiates your application, and let AWS do the undifferentiated heavy lifting of identity management for your customer-facing applications.

For all the code examples described in this post, see the amazon-cognito-example-for-external-idp code repository on GitHub.

If you have feedback about this post, submit comments in the Comments section below. If you have questions about this post, start a new thread on the Amazon Cognito forum or contact AWS Support.

Want more AWS Security how-to content, news, and feature announcements? Follow us on Twitter.

Author

Eran Medan

Eran is a Software Development Manager based in Atlanta and leads the AWS Jam team, which uses Amazon Cognito and other services mentioned in this post to run their service. Other than jamming on AWS, Eran likes to jam on his guitar or fly airplanes in virtual reality.

Yuri Duchovny

Yuri is a New York-based Solutions Architect specializing in cloud security, identity, and compliance. He supports cloud transformations at large enterprises, helping them make optimal technology and organizational decisions. Prior to his AWS role, Yuri’s areas of focus included application and networking security, DoS, and fraud protection. Outside of work, he enjoys skiing, sailing, and traveling the world.

Building a serverless document scanner using Amazon Textract and AWS Amplify

Post Syndicated from Moheeb Zara original https://aws.amazon.com/blogs/compute/building-a-serverless-document-scanner-using-amazon-textract-and-aws-amplify/

This guide demonstrates creating and deploying a production ready document scanning application. It allows users to manage projects, upload images, and generate a PDF from detected text. The sample can be used as a template for building expense tracking applications, handling forms and legal documents, or for digitizing books and notes.

The frontend application is written in Vue.js and uses the Amplify Framework. The backend is built using AWS serverless technologies and consists of an Amazon API Gateway REST API that invokes AWS Lambda functions. Amazon Textract is used to analyze text from uploaded images to an Amazon S3 bucket. Detected text is stored in Amazon DynamoDB.

An architectural diagram of the application.

An architectural diagram of the application.

Prerequisites

You need the following to complete the project:

Deploy the application

The solution consists of two parts, the frontend application and the serverless backend. The Amplify CLI deploys all the Amazon Cognito authentication, and hosting resources for the frontend. The backend requires the Amazon Cognito user pool identifier to configure an authorizer on the API. This enables an authorization workflow, as shown in the following image.

A diagram showing how an Amazon Cognito authorization workflow works

A diagram showing how an Amazon Cognito authorization workflow works

First, configure the frontend. Complete the following steps using a terminal running on a computer or by using the AWS Cloud9 IDE. If using AWS Cloud9, create an instance using the default options.

From the terminal:

  1. Install the Amplify CLI by running this command.
    npm install -g @aws-amplify/cli
  2. Configure the Amplify CLI using this command. Follow the guided process to completion.
    amplify configure
  3. Clone the project from GitHub.
    git clone https://github.com/aws-samples/aws-serverless-document-scanner.git
  4. Navigate to the amplify-frontend directory and initialize the project using the Amplify CLI command. Follow the guided process to completion.
    cd aws-serverless-document-scanner/amplify-frontend
    
    amplify init
  5. Deploy all the frontend resources to the AWS Cloud using the Amplify CLI command.
    amplify push
  6. After the resources have finishing deploying, make note of the StackName and UserPoolId properties in the amplify-frontend/amplify/backend/amplify-meta.json file. These are required when deploying the serverless backend.

Next, deploy the serverless backend. While it can be deployed using the AWS SAM CLI, you can also deploy from the AWS Management Console:

  1. Navigate to the document-scanner application in the AWS Serverless Application Repository.
  2. In Application settings, name the application and provide the StackName and UserPoolId from the frontend application for the UserPoolID and AmplifyStackName parameters. Provide a unique name for the BucketName parameter.
  3. Choose Deploy.
  4. Once complete, copy the API endpoint so that it can be configured on the frontend application in the next section.

Configure and run the frontend application

  1. Create a file, amplify-frontend/src/api-config.js, in the frontend application with the following content. Include the API endpoint and the unique BucketName from the previous step. The s3_region value must be the same as the Region where your serverless backend is deployed.
    const apiConfig = {
    	"endpoint": "<API ENDPOINT>",
    	"s3_bucket_name": "<BucketName>",
    	"s3_region": "<Bucket Region>"
    };
    
    export default apiConfig;
  2. In a terminal, navigate to the root directory of the frontend application and run it locally for testing.
    cd aws-serverless-document-scanner/amplify-frontend
    
    npm install
    
    npm run serve

    You should see an output like this:

  3. To publish the frontend application to cloud hosting, run the following command.
    amplify publish

    Once complete, a URL to the hosted application is provided.

Using the frontend application

Once the application is running locally or hosted in the cloud, navigating to it presents a user login interface with an option to register. The registration flow requires a code sent to the provided email for verification. Once verified you’re presented with the main application interface.

Once you create a project and choose it from the list, you are presented with an interface for uploading images by page number.

On mobile, it uses the device camera to capture images. On desktop, images are provided by the file system. You can replace an image and the page selector also lets you go back and change an image. The corresponding analyzed text is updated in DynamoDB as well.

Each time you upload an image, the page is incremented. Choosing “Generate PDF” calls the endpoint for the GeneratePDF Lambda function and returns a PDF in base64 format. The download begins automatically.

You can also open the PDF in another window, if viewing a preview in a desktop browser.

Understanding the serverless backend

An architecture diagram of the serverless backend.

An architecture diagram of the serverless backend.

In the GitHub project, the folder serverless-backend/ contains the AWS SAM template file and the Lambda functions. It creates an API Gateway endpoint, six Lambda functions, an S3 bucket, and two DynamoDB tables. The template also defines an Amazon Cognito authorizer for the API using the UserPoolID passed in as a parameter:

Parameters:
  UserPoolID:
    Type: String
    Description: (Required) The user pool ID created by the Amplify frontend.

  AmplifyStackName:
    Type: String
    Description: (Required) The stack name of the Amplify backend deployment. 

  BucketName:
    Type: String
    Default: "ds-userfilebucket"
    Description: (Required) A unique name for the user file bucket. Must be all lowercase.  


Globals:
  Api:
    Cors:
      AllowMethods: "'*'"
      AllowHeaders: "'*'"
      AllowOrigin: "'*'"

Resources:

  DocumentScannerAPI:
    Type: AWS::Serverless::Api
    Properties:
      StageName: Prod
      Auth:
        DefaultAuthorizer: CognitoAuthorizer
        Authorizers:
          CognitoAuthorizer:
            UserPoolArn: !Sub 'arn:aws:cognito-idp:${AWS::Region}:${AWS::AccountId}:userpool/${UserPoolID}'
            Identity:
              Header: Authorization
        AddDefaultAuthorizerToCorsPreflight: False

This only allows authenticated users of the frontend application to make requests with a JWT token containing their user name and email. The backend uses that information to fetch and store data in DynamoDB that corresponds to the user making the request.

Two DynamoDB tables are created. A Project table, which tracks all the project names by user, and a Pages table, which tracks pages by project and user. The DynamoDB tables are created by the AWS SAM template with the partition key and range key defined for each table. These are used by the Lambda functions to query and sort items. See the documentation to learn more about DynamoDB table key schema.

ProjectsTable:
    Type: AWS::DynamoDB::Table
    Properties: 
      AttributeDefinitions: 
        - 
          AttributeName: "username"
          AttributeType: "S"
        - 
          AttributeName: "project_name"
          AttributeType: "S"
      KeySchema: 
        - AttributeName: username
          KeyType: HASH
        - AttributeName: project_name
          KeyType: RANGE
      ProvisionedThroughput: 
        ReadCapacityUnits: "5"
        WriteCapacityUnits: "5"

  PagesTable:
    Type: AWS::DynamoDB::Table
    Properties: 
      AttributeDefinitions: 
        - 
          AttributeName: "project"
          AttributeType: "S"
        - 
          AttributeName: "page"
          AttributeType: "N"
      KeySchema: 
        - AttributeName: project
          KeyType: HASH
        - AttributeName: page
          KeyType: RANGE
      ProvisionedThroughput: 
        ReadCapacityUnits: "5"
        WriteCapacityUnits: "5"

When an API Gateway endpoint is called, it passes the user credentials in the request context to a Lambda function. This is used by the CreateProject Lambda function, which also receives a project name in the request body, to create an item in the Project Table and associate it with a user.

The endpoint for the FetchProjects Lambda function is called to retrieve the list of projects associated with a user. The DeleteProject Lambda function removes a specific project from the Project table and any associated pages in the Pages table. It also deletes the folder in the S3 bucket containing all images for the project.

When a user enters a Project, the API endpoint calls the FetchPageCount Lambda function. This returns the number of pages for a project to update the current page number in the upload selector. The project is retrieved from the path parameters, as defined in the AWS SAM template:

FetchPageCount:
    Type: AWS::Serverless::Function
    Properties:
      Handler: app.handler
      Runtime: python3.8
      CodeUri: lambda_functions/fetchPageCount/
      Policies:
        - DynamoDBCrudPolicy:
            TableName: !Ref PagesTable
      Environment:
        Variables:
          PAGES_TABLE_NAME: !Ref PagesTable
      Events:
        GetResource:
          Type: Api
          Properties:
            RestApiId: !Ref DocumentScannerAPI
            Path: /pages/count/{project+}
            Method: get  

The template creates an S3 bucket and two AWS IAM managed policies. The policies are applied to the AuthRole and UnauthRole created by Amplify. This allows users to upload images directly to the S3 bucket. To understand how Amplify works with Storage, see the documentation.

The template also sets an S3 event notification on the bucket for all object create events with a “.png” suffix. Whenever the frontend uploads an image to S3, the object create event invokes the ProcessDocument Lambda function.

The function parses the object key to get the project name, user, and page number. Amazon Textract then analyzes the text of the image. The object returned by Amazon Textract contains the detected text and detailed information, such as the positioning of text in the image. Only the raw lines of text are stored in the Pages table.

import os
import json, decimal
import boto3
import urllib.parse
from boto3.dynamodb.conditions import Key, Attr

client = boto3.resource('dynamodb')
textract = boto3.client('textract')

tableName = os.environ.get('PAGES_TABLE_NAME')

def handler(event, context):

  table = client.Table(tableName)

  print(table.table_status)
 
  key = urllib.parse.unquote(event['Records'][0]['s3']['object']['key'])
  bucket = event['Records'][0]['s3']['bucket']['name']
  project = key.split('/')[3]
  page = key.split('/')[4].split('.')[0]
  user = key.split('/')[2]
  
  response = textract.detect_document_text(
    Document={
        'S3Object': {
            'Bucket': bucket,
            'Name': key
        }
    })
    
  fullText = ""
  
  for item in response["Blocks"]:
    if item["BlockType"] == "LINE":
        fullText = fullText + item["Text"] + '\n'
  
  print(fullText)

  table.put_item(Item= {
    'project': user + '/' + project,
    'page': int(page), 
    'text': fullText
    })

  # print(response)
  return

The GeneratePDF Lambda function retrieves the detected text for each page in a project from the Pages table. It combines the text into a PDF and returns it as a base64-encoded string for download. This function can be modified if your document structure differs.

Understanding the frontend

In the GitHub repo, the folder amplify-frontend/src/ contains all the code for the frontend application. In main.js, the Amplify VueJS modules are configured to use the resources defined in aws-exports.js. It also configures the endpoint and S3 bucket of the serverless backend, defined in api-config.js.

In components/DocumentScanner.vue, the API module is imported and the API is defined.

API calls are defined as Vue methods that can be called by various other components and elements of the application.

In components/Project.vue, the frontend uses the Storage module for Amplify to upload images. For more information on how to use S3 in an Amplify project see the documentation.

Conclusion

This blog post shows how to create a multiuser application that can analyze text from images and generate PDF documents. This guide demonstrates how to do so in a secure and scalable way using a serverless approach. The example also shows an event driven pattern for handling high volume image processing using S3, Lambda, and Amazon Textract.

The Amplify Framework simplifies the process of implementing authentication, storage, and backend integration. Explore the full solution on GitHub to modify it for your next project or startup idea.

To learn more about AWS serverless and keep up to date on the latest features, subscribe to the YouTube channel.

#ServerlessForEveryone