If your decentralized application (dApp) must interact directly with AWS services like Amazon S3 or Amazon API Gateway, you must authorize your users by granting them temporary AWS credentials. This solution uses Amazon Cognito in combination with your users’ digital wallet to obtain valid Amazon Cognito identities and temporary AWS credentials for your users. It also demonstrates how to use Amazon API Gateway to secure and proxy API calls to third-party Web3 APIs.
In this blog, you will build a fully serverless decentralized application (dApp) called “NFT Gallery”. This dApp permits users to look up their own non-fungible token (NFTs) or any other NFT collections on the Ethereum blockchain using one of the following two Web3 providers HTTP APIs: Alchemy or Moralis. These APIs help integrate Web3 components in any web application without Blockchain technical knowledge or access.
Solution overview
The user interface (UI) of your dApp is a single-page application (SPA) written in JavaScript using ReactJS, NextJS, and Tailwind CSS.
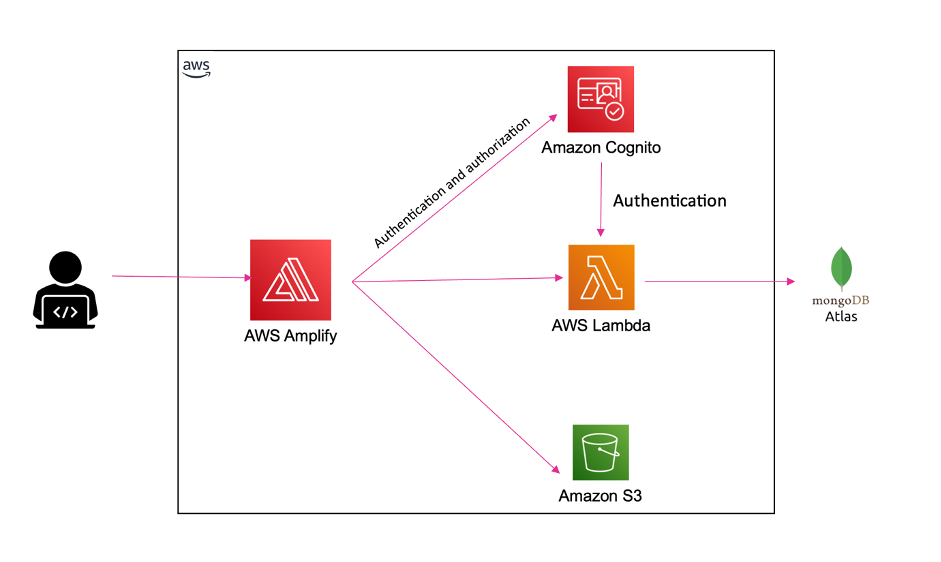
The dApp interacts with Amazon Cognito for authentication and authorization, and with Amazon API Gateway to proxy data from the backend Web3 providers’ APIs.
Architecture diagram
Figure 1. Architecture diagram showing authentication and API request proxy solution for Web3
You’ll use AWS SAM as your framework to define, build, and deploy your backend resources. AWS SAM is built on top of AWS CloudFormation and enables developers to define serverless components using a simpler syntax.
backend: contains the AWS SAM Template template.yaml. Examine the template.yaml file for more information about the resources deployed in this project.
dapp: contains the code for the dApp
1. Go to the backend folder and copy the prod.parameters.example file to a new file called prod.parameters. Edit it to add your Alchemy and Moralis API keys.
3. You can now deploy the SAM Template by running the following command (review the sam deploy Developer Guide).
sam deploy --parameter-overrides $(cat prod.parameters) --capabilities CAPABILITY_NAMED_IAM --guided --confirm-changeset
4. SAM will ask you some questions and will generate a samconfig.toml containing your answers.
You can edit this file afterwards as desired. Future deployments will use the .toml file and can be run using sam deploy. Don’t commit the samconfig.toml file to your code repository as it contains private information.
Your CloudFormation stack should be deployed after a few minutes. The Outputs should show the resources that you must reference in your web application located in the dapp folder.
Run the dApp
You can now run your dApp locally.
1. Go to the dapp folder and copy the .env.example file to a new file named .env. Edit this file to add the backend resources values needed by the dApp. Follow the instructions in the .env.example file.
2. Run the following command to install the JavaScript dependencies:
yarn
3. Start the development web server locally by running:
You can access your dApp from the internet with the URL of the CloudFront distribution. It is visible in your CloudFormation stack Output tab in the AWS Management Console, or as output of the sam deploy command.
For now, your S3 bucket is empty. Build the dApp for production and upload the code to the S3 bucket by running these commands:
cd dapp yarn build cd out aws s3 sync . s3://${BUCKET_NAME}
Replace ${BUCKET_NAME} by the name of your S3 bucket.
Automate deployment using SAM Pipelines
SAM Pipelines automatically generates deployment pipelines for serverless applications. If changes are committed to your Git repository, it automates the deployment of your CloudFormation stack and dApp code.
With SAM Pipeline, you can choose a Git provider like AWS CodeCommit, and a build environment like AWS CodePipeline to automatically provision and manage your deployment pipeline. It also supports GitHub Actions.
Host your dApp using Interplanetary File System (IPFS)
IPFS is a good solution to host dApps in a decentralized way. IPFS Gateway can serve as Origin to your CloudFront distribution and serve IPFS content over HTTP.
dApps are often hosted on IPFS to increase trust and transparency. With IPFS, your web application source code and assets are not tied to a DNS name and a specific HTTP host. They will live independently on the IPFS network.
Your dApp is usable by both authenticated and unauthenticated users. Unauthenticated users can look up NFT collections while authenticated users can also look up their own NFTs.
In your dApp, there is no login/password combination or Identity Provider (IdP) in place to authenticate your users. Instead, users connect their digital wallet to the web application.
You can create a custom authentication flow by implementing an Amazon Cognito custom authentication challenge, which uses AWS Lambda triggers. This challenge requires your users to sign a generated message using their digital wallet. If the signature is valid, it confirms that the user owns this wallet address. The wallet address is then used as a user identifier in the Amazon Cognito user pool.
Figure 2 details the Amazon Cognito authentication process. Three Lambda functions are used to perform the different authentication steps.
Figure 2. Amazon Cognito authentication process
To define the authentication success conditions, the Amazon Cognito user pool calls the “Define auth challenge” Lambda function (defineAuthChallenge.js).
To generate the challenge, Amazon Cognito calls the “Create auth challenge” Lambda function (createAuthChallenge.js). In this case, it generates a random message for the user to sign. Amazon Cognito forwards the challenge to the dApp, which prompts the user to sign the message using their digital wallet and private key. The dApp then returns the signature to Amazon Cognito as a response.
To verify if the user’s wallet effectively signed the message, Amazon Cognito forwards the user’s response to the “Verify auth challenge response” Lambda function (verifyAuthChallengeResponse.js). If True, then Amazon Cognito authenticates the user and creates a new identity in the user pool with the wallet address as username.
Finally, Amazon Cognito returns a JWT Token to the dApp containing multiple claims, one of them being cognito:username, which contains the user’s wallet address. These claims will be passed to your AWS Lambda event and Amazon API Gateway mapping templates allowing your backend to securely identify the user making those API requests.
Authorization
Amazon API Gateway offers multiple ways of authorizing access to an API route. This example showcases three different authorization methods:
AWS_IAM: Authorization with IAM Roles. IAM roles grant access to specific API routes or any other AWS resources. The IAM Role assumed by the user is granted by Amazon Cognito identity pool.
COGNITO_USER_POOLS: Authorization with Amazon Cognito user pool. API routes are protected by validating the user’s Amazon Cognito token.
NONE: No authorization. API routes are open to the public internet.
API Gateway backend integrations
HTTP proxy integration
The HTTP proxy integration method allows you to proxy HTTP requests to another API. The requests and responses can passthrough as-is, or you can modify them on the fly using Mapping Templates.
This method is a cost-effective way to secure access to any third-party API. This is because your third-party API keys are stored in your API Gateway and not on the frontend application.
You can also activate caching on API Gateway to reduce the amount of API calls made to the backend APIs. This will increase performance, reduce cost, and control usage.
Inspect the GetNFTsMoralisGETMethod and GetNFTsAlchemyGETMethod resources in the SAM template to understand how you can use Mapping Templates to modify the headers, path, or query string of your incoming requests.
Lambda proxy integration
API Gateway can use AWS Lambda as backend integration. Lambda functions enable you to implement custom code and logic before returning a response to your dApp.
In the backend/src folder, you will find two Lambda functions:
getNFTsMoralisLambda.js: Calls Moralis API and returns raw response
getNFTsAlchemyLambda.js: Calls Alchemy API and returns raw response
To access your authenticated user’s wallet address from your Lambda function code, access the cognito:username claim as follows:
var wallet_address = event.requestContext.authorizer.claims["cognito:username"];
Using Amplify Libraries in the dApp
The dApp uses the AWS Amplify Javascript Libraries to interact with Amazon Cognito user pool, Amazon Cognito identity pool, and Amazon API Gateway.
With Amplify Libraries, you can interact with the Amazon Cognito custom authentication flow, get AWS credentials for your frontend, and make HTTP API calls to your API Gateway endpoint.
The Amplify Auth library is used to perform the authentication flow. To sign up, sign in, and respond to the Amazon Cognito custom challenge, use the Amplify Auth library. Examine the ConnectButton.js and user.js files in the dapp folder.
To make API calls to your API Gateway, you can use the Amplify API library. Examine the api.js file in the dApp to understand how you can make API calls to different API routes. Note that some are protected by AWS_IAM authorization and others by COGNITO_USER_POOL.
Based on the current authentication status, your users will automatically assume the CognitoAuthorizedRole or CognitoUnAuthorizedRole IAM Roles referenced in the Amazon Cognito identity pool. AWS Amplify will automatically use the credentials associated with your AWS IAM Role when calling an API route protected by the AWS_IAM authorization method.
Amazon Cognito identity pool allows anonymous users to assume the CognitoUnAuthorizedRole IAM Role. This allows secure access to your API routes or any other AWS services you configured, even for your anonymous users. Your API routes will then not be publicly available to the internet.
Cleaning up
To avoid incurring future charges, delete the CloudFormation stack created by SAM. Run the sam delete command or delete the CloudFormation stack in the AWS Management Console directly.
Conclusion
In this blog, we’ve demonstrated how to use different AWS managed services to run and deploy a decentralized web application (dApp) on AWS. We’ve also shown how to integrate securely with Web3 providers’ APIs, like Alchemy or Moralis.
You can use Amazon Cognito user pool to create a custom authentication challenge and authenticate users using a cryptographically signed message. And you can secure access to third-party APIs, using API Gateway and keep your secrets safe on the backend.
Finally, you’ve seen how to host a single-page application (SPA) using Amazon S3 and Amazon CloudFront as your content delivery network (CDN).
With Amazon Cognitouser pools, you can configure third-party SAML identity providers (IdPs) so that users can log in by using the IdP credentials. The Amazon Cognito user pool manages the federation and handling of tokens returned by a configured SAML IdP. It uses the public certificate of the SAML IdP to verify the signature in the SAML assertion returned by the IdP. Public certificates have an expiry date, and an expired public certificate will result in a SAML user federation failing because it can no longer be used for signature verification. To avoid user authentication failures, you must monitor and rotate SAML public certificates before expiration.
You can configure SAML IdPs in an Amazon Cognito user pool by using a SAML metadata document or a URL that points to the metadata document. If you use the SAML metadata document option, you must manually upload the SAML metadata. If you use the URL option, Amazon Cognito downloads the metadata from the URL and automatically configures the SAML IdP. In either scenario, if you don’t rotate the SAML certificate before expiration, users can’t log in using that SAML IdP.
In this blog post, I will show you how to monitor SAML certificates that are about to expire or already expired in an Amazon Cognito user pool by using an AWS Lambda function initiated by an Amazon EventBridge rule.
Solution overview
In this section, you will learn how to configure a Lambda function that checks the validity period of the SAML IdP certificates in an Amazon Cognito user pool, logs the findings to AWS Security Hub, and sends out an Amazon Simple Notification Service (Amazon SNS) notification with the list of certificates that are about to expire or have already expired. This Lambda function is invoked by an EventBridge rule that uses a rate or cron expression and runs on a defined schedule. For example, if the rate expression is defined as 1 day, the EventBridge rule initiates the Lambda function once each day. Figure 1 shows an overview of this process.
Figure 1: Lambda function initiated by EventBridge rule
As shown in Figure 1, this process involves the following steps:
Gets the list of SAML IdPs and corresponding X509 certificates.
Verifies if the X509 certificates are about to expire or already expired based on the dates in the certificate.
Based on the results of step 2, the Lambda function logs the findings in AWS Security Hub. Each finding shows the SAML certificate that is about to expire or is already expired.
Based on the results of step 2, the Lambda function publishes a notification to the Amazon SNS topic with the certificate expiration details. For example, if CERT_EXPIRY_DAYS=60, the details of SAML certificates that are going to expire within 60 days or are already expired are published in the SNS notification.
Amazon SNS sends messages to the subscribers of the topic, such as an email address.
Prerequisites
For this setup, you will need to have the following in place:
In this section, we will walk you through how to deploy the Lambda function and configure an EventBridge rule that invokes the Lambda function.
Step 1: Create the Node.js Lambda package
Open a command line terminal or shell.
Create a folder named saml-certificate-expiration-monitoring.
Install the fast-xml-parser module by running the following command:
cd saml-certificate-expiration-monitoring
npm install fast-xml-parser
Create a file named index.js and paste the following content in the file.
const AWS = require('aws-sdk');
const { X509Certificate } = require('crypto');
const { XMLParser} = require("fast-xml-parser");
const https = require('https');

exports.handler = async function(event, context, callback) {

    const cognitoUPID = process.env.COGNITO_UPID;
    const expiryDays = process.env.CERT_EXPIRY_DAYS;
    const snsTopic = process.env.SNS_TOPIC_ARN;
    const postToSh = process.env.ENABLE_SH_MONITORING; //Enable security hub monitoring
    var securityhub = new AWS.SecurityHub({apiVersion: '2018-10-26'});

    var shParams = {
      Findings: []
    };

    AWS.config.apiVersions = {
      cognitoidentityserviceprovider: '2016-04-18',
    };

    // Initialize CognitoIdentityServiceProvider.
    const cognitoidentityserviceprovider = new AWS.CognitoIdentityServiceProvider();

    let listProvidersParams = {
      UserPoolId: cognitoUPID /* required */
    };

    let hasNext = true;
    const providerNames = [];

    while (hasNext) {
      const listProvidersResp = await cognitoidentityserviceprovider.listIdentityProviders(listProvidersParams).promise();
      listProvidersResp['Providers'].forEach(function(provider) {
            if(provider.ProviderType == 'SAML') {
              providerNames.push(provider.ProviderName);
            }
        });

      listProvidersParams.NextToken = listProvidersResp.NextToken;
      hasNext = !!listProvidersResp.NextToken; //Keep iterating if there are more pages
    }

    let describeIdentityProviderParams = {
      UserPoolId: cognitoUPID /* required */
    };

    //Initialize the options for fast-xml-parser
    //Parse KeyDescriptor as an array
    const alwaysArray = [
      "EntityDescriptor.IDPSSODescriptor.KeyDescriptor"
    ];
    const options = {
      removeNSPrefix: true,
      isArray: (name, jpath, isLeafNode, isAttribute) => {
        if( alwaysArray.indexOf(jpath) !== -1) return true;
      },
      ignoreDeclaration: true
    };
    const parser = new XMLParser(options);

    let certExpMessage = '';
    const today = new Date();

    if(providerNames.length == 0) {
      console.log("There are no SAML providers in this Cognito user pool. ID : " + cognitoUPID);
    }

    for (let provider of providerNames) {
      describeIdentityProviderParams.ProviderName = provider;
      const descProviderResp = await cognitoidentityserviceprovider.describeIdentityProvider(describeIdentityProviderParams).promise();
      let xml = '';
      //Read SAML metadata from Cognito if the file is available. Else, read the SAML metadata from URL
      if('MetadataFile' in descProviderResp.IdentityProvider.ProviderDetails) {
        xml = descProviderResp.IdentityProvider.ProviderDetails.MetadataFile;
      } else {
        let metadata_promise = getMetadata(descProviderResp.IdentityProvider.ProviderDetails.MetadataURL);
		    xml = await metadata_promise;
      }
      let jObj = parser.parse(xml);
      if('EntityDescriptor' in jObj) {
        //SAML metadata can have multiple certificates for signature verification.
        for (let cert of jObj['EntityDescriptor']['IDPSSODescriptor']['KeyDescriptor']) {
          let certificate = '-----BEGIN CERTIFICATE-----\n'
          + cert['KeyInfo']['X509Data']['X509Certificate']
          + '\n-----END CERTIFICATE-----';
          let x509cert = new X509Certificate(certificate);
          console.log("------ Provider : " + provider + "-------");
          console.log("Cert Expiry: " + x509cert.validTo);
          const diffTime = Math.abs(new Date(x509cert.validTo) - today);
          const diffDays = Math.ceil(diffTime / (1000 * 60 * 60 * 24));
          console.log("Days Remaining: " + diffDays);
          if(diffDays <= expiryDays) {

            certExpMessage += 'Provider name: ' + provider + ' SAML certificate (serialnumber : '+ x509cert.serialNumber + ') expiring in ' + diffDays + ' days \n';

            if(postToSh === 'true') {
              //Log finding for security hub
              logFindingToSh(context, shParams,
              'Provider name: ' + provider + ' SAML certificate is expiring in ' + diffDays + ' days. Please contact the Identity provider to rotate the certificate.',
              x509cert.fingerprint, cognitoUPID, provider);
            }
          }
        }
      }
    }
    //Send a SNS message if a certificate is about to expire or already expired
    if(certExpMessage) {
      console.log("SAML certificates expiring within next " + expiryDays + " days :\n");
      console.log(certExpMessage);
      certExpMessage = "SAML certificates expiring within next " + expiryDays + " days :\n" + certExpMessage;
      // Create publish parameters
      let snsParams = {
        Message: certExpMessage, /* required */
        TopicArn: snsTopic
      };
      // Create promise and SNS service object
      let publishTextPromise = await new AWS.SNS({apiVersion: '2010-03-31'}).publish(snsParams).promise();
      console.log(publishTextPromise);

      if(postToSh === 'true') {
        console.log("Posting the finding to SecurityHub");
        let shPromise = await securityhub.batchImportFindings(shParams).promise();
        console.log("shPromise : " + JSON.stringify(shPromise));
      }

    } else {
      console.log("No certificates are expiring within " + expiryDays + " days");
    }
};

function getMetadata(url) {
	return new Promise((resolve, reject) => {
		https.get(url, (response) => {
			let chunks_of_data = [];

			response.on('data', (fragments) => {
				chunks_of_data.push(fragments);
			});

			response.on('end', () => {
				let response_body = Buffer.concat(chunks_of_data);
				resolve(response_body.toString());
			});

			response.on('error', (error) => {
				reject(error);
			});
		});
	});
}

function logFindingToSh(context, shParams, remediationMsg, certFp, cognitoUPID, provider) {
  const accountID = context.invokedFunctionArn.split(':')[4];
  const region = process.env.AWS_REGION;
  const sh_product_arn = `arn:aws:securityhub:${region}:${accountID}:product/${accountID}/default`;
  const today = new Date().toISOString();

  shParams.Findings.push(
        {
      SchemaVersion: "2018-10-08",
      AwsAccountId: `${accountID}`, /* required */
      CreatedAt: `${today}`, /* required */
      UpdatedAt: `${today}`,
      Title: 'SAML Certificate expiration',
      Description: 'SAML certificate expiry', /* required */
      GeneratorId: `${context.invokedFunctionArn}`, /* required */
      Id: `${cognitoUPID}:${provider}:${certFp}`, /* required */
      ProductArn: `${sh_product_arn}`, /* required */
      Severity: {
          Original: '89.0',
          Label: 'HIGH'
      },
      Types: [
                "Software and Configuration Checks/AWS Config Analysis"
      ],
      Compliance: {Status: 'WARNING'},
      Resources: [ /* required */
        {
          Id: `${cognitoUPID}`, /* required */
          Type: 'AWSCognitoUserPool', /* required */
          Region: `${region}`,
          Details : {
            Other: {
                       "IdPIdentifier" : `${provider}`
            }
          }
        }
      ],
      Remediation: {
                Recommendation: {
                    Text: `${remediationMsg}`,
                    Url: `https://console.aws.amazon.com/cognito/v2/idp/user-pools/${cognitoUPID}/sign-in/identity-providers/details/${provider}`
                }
      }
    }
  );
}
To create the deployment package for a .zip file archive, you can use a built-in .zip file archive utility or other third-party zip file utility. If you are using Linux or Mac OS, run the following command.
zip -r saml-certificate-expiration-monitoring.zip .
Step 2: Create an Amazon SNS topic
Create a standard Amazon SNS topic named saml-certificate-expiration-monitoring-topic for the Lambda function to use to send out notifications, as described in Creating an Amazon SNS topic.
Copy the Amazon Resource Name (ARN) for Amazon SNS. Later in this post, you will use this ARN in the AWS Identity and Access Management (IAM) policy and Lambda environment variable configuration.
After you create the Amazon SNS topic, create email subscribers to this topic.
Step 3: Configure the IAM role and policies and deploy the Lambda function
In the IAM documentation, review the section Creating policies on the JSON tab. Then, using those instructions, use the following template to create an IAM policy named lambda-saml-certificate-expiration-monitoring-function-policy for the Lambda role to use. Replace <REGION> with your Region, <AWS-ACCT-NUMBER> with your AWS account ID, <SNS-ARN> with the Amazon SNS ARN from Step 2: Create an Amazon SNS topic, and <USER_POOL_ID> with your Amazon Cognito user pool ID that you want to monitor.
After the policy is created, create a role for the Lambda function to use the policy, by following the instructions in Creating a role to delegate permissions to an AWS service. Choose Lambda as the service to assume the role and attach the policy lambda-saml-certificate-expiration-monitoring-function-policy that you created in step 1 of this section. Specify a role named lambda-saml-certificate-expiration-monitoring-function-role, and then create the role.
If you make code changes after uploading, deploy the Lambda function.
Step 4: Create an EventBridge rule
Follow the instructions in creating an Amazon EventBridge rule that runs on a schedule to create a rule named saml-certificate-expiration-monitoring-rule. You can use a rate expression of 24 hours to initiate the event. This rule will invoke the Lambda function once per day.
Create an environment variable called CERT_EXPIRY_DAYS. This specifies how much lead time, in days, you want to have before the certificate expiration notification is sent.
Create an environment variable called COGNITO_UPID. This identifies the Amazon Cognito user pool ID that needs to be monitored.
Create an environment variable called ENABLE_SH_MONITORING and set it to true or false. If you set it to true, the Lambda function will log the findings in AWS Security Hub.
Configure a test event for the Lambda function by using the default template and name it TC1, as shown in Figure 2.
Figure 2: Create a Lambda test case
Run the TC1 test case to test the Lambda function. To make sure that the Lambda function ran successfully, check the Amazon CloudWatchlogs. You should see the console log messages from the Lambda function. If ENABLE_SH_MONITORING is set to true in the Lambda environment variables, you will see a list of findings in AWS Security Hub for certificates with an expiry of less than or equal to the value of the CERT_EXPIRY_DAYS environment variable. Also, an email will be sent to each subscriber of the Amazon SNS topic.
Cleanup
To avoid future charges, delete the following resources used in this post (if you don’t need them) and disable AWS Security Hub.
Lambda function
EventBridge rule
CloudWatch logs associated with the Lambda function
Amazon SNS topic
IAM role and policy that you created for the Lambda function
Conclusion
An Amazon Cognito user pool with hundreds of SAML IdPs can be challenging to monitor. If a SAML IdP certificate expires, users can’t log in using that SAML IdP. This post provides the steps to monitor your SAML IdP certificates and send an alert to Amazon Cognito user pool administrators when a certificate is about to expire so that you can proactively work with your SAML IdP administrator to rotate the certificate. Now that you’ve learned the benefits of monitoring your IdP certificates for expiration, I recommend that you implement these, or similar, controls to make sure that you’re notified of these events before they occur.
If you have feedback about this post, submit comments in the Comments section below. If you have questions about this post, start a new thread on the Amazon Cognito re:Post or contact AWS Support.
Want more AWS Security news? Follow us on Twitter.
This is a guest post co-written with Jonatan Selsing and Moses Arthur from Novo Nordisk.
This is the second post of a three-part series detailing how Novo Nordisk, a large pharmaceutical enterprise, partnered with AWS Professional Services to build a scalable and secure data and analytics platform. The first post of this series describes the overall architecture and how Novo Nordisk built a decentralized data mesh architecture, including Amazon Athena as the data query engine. The third post will show how end-users can consume data from their tool of choice, without compromising data governance. This will include how to configure Okta, AWS Lake Formation, and a business intelligence tool to enable SAML-based federated use of Athena for an enterprise BI activity.
When building a scalable data architecture on AWS, giving autonomy and ownership to the data domains are crucial for the success of the platform. By providing the right mix of freedom and control to those people with the business domain knowledge, your business can maximize value from the data as quickly and effectively as possible. The challenge facing organizations, however, is how to provide the right balance between freedom and control. At the same time, data is a strategic asset that needs to be protected with the highest degree of rigor. How can organizations strike the right balance between freedom and control?
In this post, you will learn how to build decentralized governance with Lake Formation and AWS Identity and Access Management (IAM) using attribute-based access control (ABAC). We discuss some of the patterns we use, including Amazon Cognito identity pool federation using ABAC in permission policies, and Okta-based SAML federation with ABAC enforcement on role trust policies.
Solution overview
In the first post of this series, we explained how Novo Nordisk and AWS Professional Services built a modern data architecture based on data mesh tenets. This architecture enables data governance on distributed data domains, using an end-to-end solution to create data products and providing federated data access control. This post dives into three elements of the solution:
How IAM roles and Lake Formation are used to manage data access across data domains
How data access control is enforced at scale, using a group membership mapping with an ABAC pattern
How the system maintains state across the different layers, so that the ecosystem of trust is configured appropriately
From the end-user perspective, the objective of the mechanisms described in this post is to enable simplified data access from the different analytics services adopted by Novo Nordisk, such as those provided by software as a service (SaaS) vendors like Databricks, or self-hosted ones such as JupyterHub. At the same time, the platform must guarantee that any change in a dataset is immediately reflected at the service user interface. The following figure illustrates at a high level the expected behavior.
Following the layer nomenclature established in the first post, the services are created and managed in the consumption layer. The domain accounts are created and managed in the data management layer. Because changes can occur from both layers, continuous communication in both directions is required. The state information is kept in the virtualization layer along with the communication protocols. Additionally, at sign-in time, the services need information about data resources required to provide data access abstraction.
Managing data access
The data access control in this architecture is designed around the core principle that all access is encapsulated in isolated IAM role sessions. The layer pattern that we described in the first post ensures that the creation and curation of the IAM role policies involved can be delegated to the different data management ecosystems. Each data management platform integrated can use their own data access mechanisms, with the unique requirement that the data is accessed via specific IAM roles.
To illustrate the potential mechanisms that can be used by data management solutions, we show two examples of data access permission mechanisms used by two different data management solutions. Both systems utilize the same trust policies as described in the following sections, but have a completely different permission space.
Example 1: Identity-based ABAC policies
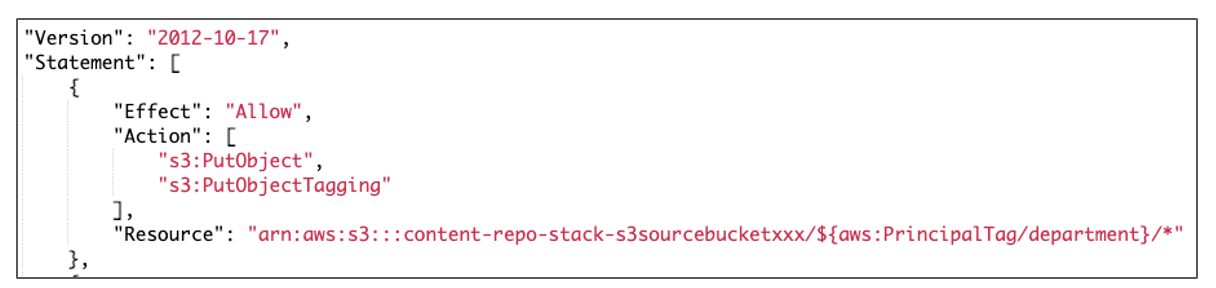
The first mechanism we discuss is an ABAC role that provides access to a home-like data storage area, where users can share within their departments and with the wider organization in a structure that mimics the organizational structure. Here, we don’t utilize the group names, but instead forward user attributes from the corporate Active Directory directly into the permission policy through claim overrides. We do this by having the corporate Active Directory as the identity provider (IdP) for the Amazon Cognito user pool and mapping the relevant IdP attributes to user pool attributes. Then, in the Amazon Cognito identity pool, we map the user pool attributes to session tags to use them for access control. Custom overrides can be included in the claim mapping, through the use of a pre token generation Lambda trigger. This way, claims from AD can be mapped to Amazon Cognito user pool attributes and then ultimately used in the Amazon Cognito identity pool to control IAM role permissions. The following is an example of an IAM policy with sessions tags:
This role is then embedded in the analytics layer (together with the data domain roles) and assumed on behalf of the user. This enables users to mix and match between data domains—as well as utilizing private and public data paths that aren’t necessarily tied to any data domain. For more examples of how ABAC can be used with permission policies, refer to How to scale your authorization needs by using attribute-based access control with S3.
Example 2: Lake Formation name-based access controls
In the data management solution named Novo Nordisk Enterprise Datahub (NNEDH), which we introduced in the first post, we use Lake Formation to enable standardized data access. The NNEDH datasets are registered in the Lake Formation Data Catalog as databases and tables, and permissions are granted using the named resource method. The following screenshot shows an example of these permissions.
In this approach, data access governance is delegated to Lake Formation. Every data domain in NNEDH has isolated permissions synthesized by NNEDH as the central governance management layer. This is a similar pattern to what is adopted for other domain-oriented data management solutions. Refer to Use an event-driven architecture to build a data mesh on AWS for an example of tag-based access control in Lake Formation.
These patterns don’t exclude implementations of peer-to-peer type data sharing mechanisms, such as those that can be achieved using AWS Resource Access Manager (AWS RAM), where a single IAM role session can have permissions that span across accounts.
Delegating role access to the consumption later
The following figure illustrates the data access workflow from an external service.
The workflow steps are as follows:
A user authenticates on an IdP used by the analytics tool that they are trying to access. A wide range of analytics tools are supported by Novo Nordisk platform, such as Databricks and JupyterHub, and the IdP can be either SAML or OIDC type depending on the capabilities of the third-party tool. In this example, an Okta SAML application is used to sign into a third-party analytics tool, and an IAM SAML IdP is configured in the data domain AWS account to federate with the external IdP. The third post of this series describes how to set up an Okta SAML application for IAM role federation on Athena.
The SAML assertion obtained during the sign-in process is used to request temporary security credentials of an IAM role through the AssumeRole operation. In this example, the SAML assertion is used onAssumeRoleWithSAMLoperation. For OpenID Connect-compatible IdPs, the operationAssumeRoleWithWebIdentitymust be used with the JWT. The SAML attributes in the assertion or the claims in the token can be generated at sign-in time, to ensure that the group memberships are forwarded, for the ABAC policy pattern described in the following sections.
The analytics tool, such as Databricks or JupyterHub, abstracts the usage of the IAM role session credentials in the tool itself, and data can be accessed directly according to the permissions of the IAM role assumed. This pattern is similar in nature to IAM passthrough as implemented by Databricks, but in Novo Nordisk it’s extended across all analytics services. In this example, the analytics tool accesses the data lake on Amazon Simple Storage Service (Amazon S3) through Athena queries.
As the data mesh pattern expands across domains covering more downstream services, we need a mechanism to keep IdPs and IAM role trusts continuously updated. We come back to this part later in the post, but first we explain how role access is managed at scale.
Attribute-based trust policies
In previous sections, we emphasized that this architecture relies on IAM roles for data access control. Each data management platform can implement its own data access control method using IAM roles, such as identity-based policies or Lake Formation access control. For data consumption, it’s crucial that these IAM roles are only assumable by users that are part of Active Directory groups with the appropriate entitlements to use the role. To implement this at scale, the IAM role’s trust policy uses ABAC.
When a user authenticates on the external IdP of the consumption layer, we add in the access token a claim derived from their Active Directory groups. This claim is propagated by theAssumeRoleoperation into the trust policy of the IAM role, where it is compared with the expected Active Directory group. Only users that belong to the expected groups can assume the role. This mechanism is illustrated in the following figure.
Translating group membership to attributes
To enforce the group membership entitlement at the role assumption level, we need a way to compare the required group membership with the group memberships that a user comes with in their IAM role session. To achieve this, we use a form of ABAC, where we have a way to represent the sum of context-relevant group memberships in a single attribute. A single IAM role session tag value is limited to 256 characters. The corresponding limit for SAML assertions is 100,000 characters, so for systems where a very large number of either roles or group-type mappings are required, SAML can support a wider range of configurations.
In our case, we have opted for a compression algorithm that takes a group name and compresses it to a 4-character string hash. This means that, together with a group-separation character, we can fit 51 groups in a single attribute. This gets pushed down to approximately 20 groups for OIDC type role assumption due to the PackedPolicySize, but is higher for a SAML-based flow. This has shown to be sufficient for our case. There is a risk that two different groups could hash to the same character combination; however, we have checked that there are no collisions in the existing groups. To mitigate this risk going forward, we have introduced guardrails in multiples places. First, before adding new groups entitlements in the virtualization layer, we check if there’s a hash collision with any existing group. When a duplicated group is attempted to be added, our service team is notified and we can react accordingly. But as stated earlier, there is a low probability of clashes, so the flexibility this provides outweighs the overhead associated with managing clashes (we have not had any yet). We additionally enforce this at SAML assertion creation time as well, to ensure that there are no duplicated groups in the users group list, and in cases of duplication, we remove both entirely. This means malicious actors can at most limit the access of other users, but not gain unauthorized access.
Enforcing audit functionality across sessions
As mentioned in the first post, on top of governance, there are strict requirements around auditability of data accesses. This means that for all data access requests, it must be possible to trace the specific user across services and retain this information. We achieve this by setting (and enforcing) a source identity for all role sessions and make sure to propagate enterprise identity to this attribute. We use a combination of Okta inline hooks and SAML session tags to achieve this. This means that the AWS CloudTrail logs for an IAM role session have the following information:
On the IAM role level, we can enforce the required attribute configuration with the following example trust policy. This is an example for a SAML-based app. We support the same patterns through OpenID Connect IdPs.
We now go through the elements of an IAM role trust policy, based on the following example:
ThePrincipalstatement should point to the list of apps that are served through the consumption layer. These can be Azure app registrations, Okta apps, or Amazon Cognito app clients. This means that SAML assertions (in the case of SAML-based flows) minted from these applications can be used to run the operationAssumeRoleWithSamlif the remaining elements are also satisfied.
TheActionstatement includes the required permissions for theAssumeRolecall to succeed, including adding the contextual information to the role session.
In the first condition, the audience of the assertion needs to be targeting AWS.
In the second condition, there are twoStringLikerequirements:
A requirement on the source identity as the naming convention to follow at Novo Nordisk (users must come with enterprise identity, following our audit requirements).
Theaws:RequestTag/GroupHashneeds to bexxxx, which represents the hashed group name mentioned in the upper section.
Lastly, we enforce that sessions can’t be started without setting the source identity.
This policy enforces that all calls are from recognized services, include auditability, have the right target, and enforces that the user has the right group memberships.
Building a central overview of governance and trust
In this section, we discuss how Novo Nordisk keeps track of the relevant group-role relations and maps these at sign-in time.
Entitlements
In Novo Nordisk, all accesses are based on Active Directory group memberships. There is no user-based access. Because this pattern is so central, we have extended this access philosophy into our data accesses. As mentioned earlier, at sign-in time, the hooks need to be able to know which roles to assume for a given user, given this user’s group membership. We have modeled this data in Amazon DynamoDB, where just-in-time provisioning ensures that only the required user group memberships are available. By building our application around the use of groups, and by having the group propagation done by the application code, we avoid having to make a more general Active Directory integration, which would, for a company the size of Novo Nordisk, severely impact the application, simply due to the volume of users and groups.
The DynamoDB entitlement table contains all relevant information for all roles and services, including role ARNs and IdP ARNs. This means that when users log in to their analytics services, the sign-in hook can construct the required information for the Roles SAML attribute.
When new data domains are added to the data management layer, the data management layer needs to communicate both the role information and the group name that gives access to the role.
Single sign-on hub for analytics services
When scaling this permission model and data management pattern to a large enterprise such as Novo Nordisk, we ended up creating a large number of IAM roles distributed across different accounts. Then, a solution is required to map and provide access for end-users to the required IAM role. To simplify user access to multiple data sources and analytics tools, Novo Nordisk developed a single sign-on hub for analytics services. From the end-user perspective, this is a web interface that glues together different offerings in a unified system, making it a one-stop tool for data and analytics needs. When signing in to each of the analytical offerings, the authenticated sessions are forwarded, so users never have to reauthenticate.
Common for all the services supported in the consumption layer is that we can run a piece of application code at sign-in time, allowing sign-in time permissions to be calculated. The hooks that achieve this functionality can, for instance, be run by Okta inline hooks. This means that each of the target analytics services can have custom code to translate relevant contextual information or provide other types of automations for the role forwarding.
The sign-in flow is demonstrated in the following figure.
The workflow steps are as follows:
A user accesses an analytical service such as Databricks in the Novo Nordisk analytics hub.
The service uses Okta as the SAML-based IdP.
Okta invokes an AWS Lambda-based SAML assertion inline hook.
The hook uses the entitlement database, converting application-relevant group memberships into role entitlements.
Relevant contextual information is returned from the entitlement database.
The Lambda-based hook adds new SAML attributes to the SAML assertion, including the hashed group memberships and other contextual information such as source identity.
A modified SAML assertion is used to sign users in to the analytical service.
The user can now use the analytical tool with active IAM role sessions.
Synchronizing role trust
The preceding section gives an overview of how federation works in this solution. Now we can go through how we ensure that all participating AWS environments and accounts are in sync with the latest configuration.
From the end-user perspective, the synchronization mechanism must ensure that every analytics service instantiated can access the data domains assigned to the groups that the user belongs to. Also, changes in data domains—such as granting data access to an Active Directory group—must be effective immediately to every analytics service.
Two event-based mechanisms are used to maintain all the layers synchronized, as detailed in this section.
Synchronize data access control on the data management layer with changes to services in the consumption layer
As describe in the previous section, the IAM roles used for data access are created and managed by the data management layer. These IAM roles have a trust policy providing federated access to the external IdPs used by the analytics tools of the consumption layer. It implies that for every new analytical service created with a different IDP, the IAM roles used for data access on data domains must be updated to trust this new IdP.
Using NNEDH as an example of a data management solution, the synchronization mechanism is demonstrated in the following figure.
Taking as an example a scenario where a new analytics service is created, the steps in this workflow are as follows:
A user with access to the administration console of the consumption layer instantiates a new analytics service, such as JupyterHub.
A job running on AWS Fargate creates the resources needed for this new analytics service, such as an Amazon Elastic Compute Cloud (Amazon EC2) instance for JupyterHub, and the IdP required, such as a new SAML IdP.
When the IdP is created in the previous step, an event is added in an Amazon Simple Notification Service (Amazon SNS) topic with its details, such as name and SAML metadata.
In the NNEDH control plane, a Lambda job is triggered by new events on this SNS topic. This job creates the IAM IdP, if needed, and updates the trust policy of the required IAM roles in all the AWS accounts used as data domains, adding the trust on the IdP used by the new analytics service.
In this architecture, all the update steps are event-triggered and scalable. This means that users of new analytics services can access their datasets almost instantaneously when they are created. In the same way, when a service is removed, the federation to the IdP is automatically removed if not used by other services.
Propagate changes on data domains to analytics services
Changes to data domains, such as the creation of a new S3 bucket used as a dataset, or adding or removing data access to a group, must be reflected immediately on analytics services of the consumption layer. To accomplish it, a mechanism is used to synchronize the entitlement database with the relevant changes made in NNEDH. This flow is demonstrated in the following figure.
Taking as an example a scenario where access to a specific dataset is granted to a new group, the steps in this workflow are as follows:
Using the NNEDH admin console, a data owner approves a dataset sharing request that grants access on a dataset to an Active Directory group.
In the AWS account of the related data domain, the dataset components such as the S3 bucket and Lake Formation are updated to provide data access to the new group. The cross-account data sharing in Lake Formation uses AWS RAM.
An event is added in an SNS topic with the current details about this dataset, such as the location of the S3 bucket and the groups that currently have access to it.
In the virtualization layer, the updated information from the data management layer is used to update the entitlement database in DynamoDB.
These steps make sure that changes on data domains are automatically and immediately reflected on the entitlement database, which is used to provide data access to all the analytics services of the consumption layer.
Limitations
Many of these patterns rely on the analytical tool to support a clever use of IAM roles. When this is not the case, the platform teams themselves need to develop custom functionality at the host level to ensure that role accesses are correctly controlled. This, for example, includes writing custom authenticators for JupyterHub.
Conclusion
This post shows an approach to building a scalable and secure data and analytics platform. It showcases some of the mechanisms used at Novo Nordisk and how to strike the right balance between freedom and control. The architecture laid out in the first post in this series enables layer independence, and exposes some extremely useful primitives for data access and governance. We make heavy use of contextual attributes to modulate role permissions at the session level, which provide just-in-time permissions. These permissions are propagated at a scale, across data domains. The upside is that a lot of the complexity related to managing data access permission can be delegated to the relevant business groups, while enabling the end-user consumers of data to think as little as possible about data accesses and focus on providing value for the business use cases. In the case of Novo Nordisk, they can provide better outcomes for patients and acceleration innovation.
The next post in this series describes how end-users can consume data from their analytics tool of choice, aligned with the data access controls detailed in this post.
About the Authors
Jonatan Selsing is former research scientist with a PhD in astrophysics that has turned to the cloud. He is currently the Lead Cloud Engineer at Novo Nordisk, where he enables data and analytics workloads at scale. With an emphasis on reducing the total cost of ownership of cloud-based workloads, while giving full benefit of the advantages of cloud, he designs, builds, and maintains solutions that enable research for future medicines.
Hassen Riahi is a Sr. Data Architect at AWS Professional Services. He holds a PhD in Mathematics & Computer Science on large-scale data management. He works with AWS customers on building data-driven solutions.
Alessandro Fior is a Sr. Data Architect at AWS Professional Services. He is passionate about designing and building modern and scalable data platforms that accelerate companies to extract value from their data.
Moses Arthur comes from a mathematics and computational research background and holds a PhD in Computational Intelligence specialized in Graph Mining. He is currently a Cloud Product Engineer at Novo Nordisk, building GxP-compliant enterprise data lakes and analytics platforms for Novo Nordisk global factories producing digitalized medical products.
Anwar Rizal is a Senior Machine Learning consultant based in Paris. He works with AWS customers to develop data and AI solutions to sustainably grow their business.
Kumari Ramar is an Agile certified and PMP certified Senior Engagement Manager at AWS Professional Services. She delivers data and AI/ML solutions that speed up cross-system analytics and machine learning models, which enable enterprises to make data-driven decisions and drive new innovations.
August 13, 2018: Date this post was first published, on the Front-End Web and Mobile Blog. We updated the CloudFormation template, provided additional clarification on implementation steps, and revised to account for the new Amazon Cognito UI.
User authentication and authorization can be challenging when you’re building web and mobile apps. The challenges include handling user data and passwords, token-based authentication, federating identities from external identity providers (IdPs), managing fine-grained permissions, scalability, and more.
In this blog post, we will show you how to federate identities from Windows Server Active Directory to authenticate users into your web app by using AWS services. The main AWS service that we’ll use for this purpose is Amazon Cognito.
With Amazon Cognito user pools, you can add user sign-up and sign-in to your mobile and web apps by using a secure and scalable user directory. In addition, you can federate users from a SAML IdP with Amazon Cognito user pools, map these users to a user directory, and get standard authentication tokens from a user pool after the user authenticates with a SAML IdP.
This post explains how to integrate Amazon Cognito user pools with Microsoft Active Directory Federation Services (AD FS) to obtain JSON web tokens (JWTs) in your web app—which in turn can be used for downstream authentication. To demonstrate the complete authentication flow, we’ve created a simple REST API that’s built on Amazon API Gateway. The REST API retrieves data from an Amazon DynamoDB table with the help of an AWS Lambda function. We’ll use the JWT tokens that are vended from user pools to authenticate to the REST API, which is hosted on API Gateway.
A benefit of using Amazon Cognito user pools to federate users from a SAML provider is that a user pool supports SAML 2.0 post-binding endpoints. This helps eliminate the need for client-side parsing of the SAML assertion response, and the user pool directly receives the SAML response from your IdP through a user agent.
As part of the SAML federation feature, the user pool acts as a service provider on behalf of your application. The user pool becomes a single point of identity management for your application, and your application doesn’t need to integrate with multiple SAML IdPs.
Solution overview
Figure 1 shows the authentication flow that we present throughout this blog post.
Figure 1: Authentication flow with Amazon Cognito user pool
As shown in the figure, the authentication flow involves the following steps:
The app starts the sign-up and sign-in process by directing the user to the Cognito user pools hosted web UI. For a mobile app, you can use a web view to show the hosted web UI. For this post, you will use a web app that is hosted on Amazon Simple Storage Service (Amazon S3) fronted by Amazon CloudFront.
The Amazon Cognito user pool determines the appropriate IdP based on your configuration. For AD FS, the IdP is determined by the metadata file or metadata endpoint URL from your SAML IdP. For example, if you use AD FS, the metadata URL looks like the following: https://<yourservername>/FederationMetadata/2007-06/FederationMetadata.xml
The user is redirected to the IdP—in this case, Active Directory.
The IdP authenticates the user if necessary. If the IdP recognizes that the user has an active session, then the IdP skips the authentication to provide a single sign-on experience.
The IdP sends the SAML assertion to Amazon Cognito.
The user’s profile is created in the user pool.
After verifying the SAML assertion and collecting the user attributes (claims) from the assertion, Amazon Cognito returns OIDC tokens (ID, access, and refresh tokens) to the app for the user who is now signed in.
The app then makes a GET request to API Gateway, passing along the JWT token for authorization. If authorized, the request is forwarded to Lambda for data retrieval from DynamoDB.
Installation and configuration walkthrough
To build the authentication flow that we described in the previous section, complete the following steps.
Step 1: Install Active Directory and AD FS
Step 2: Create an Amazon Cognito user pool
Step 3: Configure Active Directory and AD FS
Step 4: Complete the Amazon Cognito configuration
Step 5: Deploy and configure the web app
Step 1: Install Active Directory and AD FS
You will need to set up Active Directory and AD FS. For instructions on how to install both with an AWS CloudFormation template, see Enabling Federation to AWS Using Windows Active Directory, ADFS, and SAML 2.0. To complete the walkthrough in this blog post, you will need to have a working Active Directory service and AD FS service, and a user created within Active Directory. For this walkthrough, we created a user named bob with an email address of [email protected].
If you have an existing user pool, in the left navigation pane, choose User pools and then choose Create user pool to create a new user pool for this walkthrough.
If you don’t have an existing user pool, you will see a landing page. Keep the dropdown list as default and choose Create user pool.
In the Configure sign-in experience section, for Cognito user pool sign-in options, select Email, and then choose Next.
In the Configure security requirements section, under Multi-factor authentication, select No MFA, leave the other fields as default, and then choose Next.
In the Configure sign-up experience section, under Attribute verification and user account confirmation, deselect Allow Cognito to automatically send messages to verifyandconfirm, and choose Next.
In the Configure message delivery section, under Email, select Send email with Cognito, leave the other fields as default, and then choose Next.
In the Integrate your app section, enter a user pool name, select Use the Cognito Hosted UI, and create a domain name using a Cognito domain.
In the Initial app client section as shown in Figure 2, for App client name, enter SAML-IdP; and for Allowed callback URLs, enter https://localhost. Then choose Next.
Figure 2: Set up the initial app client to create the Cognito user pool
In the Review and create section, review all settings, and then scroll to the bottom of the page and choose Create user pool.
Step 3: Configure Active Directory and AD FS
Now that you’ve created an Amazon Cognito user pool, you need to set up Amazon Cognito as a relying party in the SAML identity provider (in this case, AD FS). After you configure AD FS, you will return to Amazon Cognito to complete the final configurations for the application to work.
Connect to the Windows Server instance where you installed AD FS as an administrator through the remote desktop protocol (RDP).
Open the AD FS 2.0 console.
To make sure that the user you created in Step 1 has an email address, in the user property window for your user, choose General. Figure 3 shows our user named bob in Active Directory with an email address of [email protected].
Figure 3: User properties of bob in the Active Directory
Determine the Uniform Resource Name (URN) for the Amazon Cognito user pool. The form of the URN is urn:amazon:cognito:sp:<user-pool-id>. You can find the user pool ID in the General settings tab.
Configure AD FS as follows to work with the Amazon Cognito user pool:
Go to Trust Relationships > Relying Party Trusts > Add relying party trusts. This will start a wizard.
Select Enter data about the relying party manually.
Enter a display name for the relying party configuration.
On the next screen, do not configure a certificate.
Enable support for the SAML 2.0 single sign-on service URL.
Add the Amazon Cognito user pool URN as the relying party trust identifier.
Configure the SAML POST binding. The SAML 2.0 post-binding endpoint (also known as the assertion consumer URL) for the Amazon Cognito user pool is https://<domain-prefix>.auth.<<region>.amazoncognito.com/saml2/idpresponse. You configured this as the domain name in Step 2.6.
Select Permit all users to access this relying party.
Choose Finish.
Navigate to Trust Relationships > Relying Party Trusts. You should see that the URN of Amazon Cognito is configured as the relying party, as shown in Figure 4:
Figure 4: Amazon Cognito trusted as the relying party
In a SAML federation, the IdP can pass various attributes about the user, the authentication method, or other points of context to the service provider (in this case, Amazon Cognito) in the form of SAML attributes. In AD FS, claim rules are used to assemble these required attributes using a combination of Active Directory lookups, simple transformations, and regular expression-based custom rules. In this example, you will configure two claim rules: Name ID and E-Mail.
The Edit Claim Rules window should already be open. If it isn’t, select your relying party trust from the Trust Relationships > Relying Party Trusts screen, and then, in the Actions tab on the right side, choose Edit Claim Rules.
On the Configure Claim Rule page, enter the following values for each configuration element, and then choose OK.
Claim rule name: Name ID
Incoming claim type: Windows account name
Outgoing claim type: Name ID
Outgoing name ID format: Persistent identifier
Repeat the preceding steps for the E-mail claim:
Claim rule name: Email
Attribute Directory: Active Directory
LDAP Attributes: Email Addresses
Outgoing Claim Type:Email Address
Before leaving the AD FS configuration, download the metadata file for the AD FS. The metadata URL for AD FS looks like the following: https://<servername>/FederationMetadata/2007-06/FederationMetadata.xmlM. The metadata file describes the endpoint of your SAML IdP (the AD FS service) to the service provider (Amazon Cognito).
Select the Amazon Cognito user pool that you created earlier, navigate to Sign-in experience > Federated identity provider sign-in, and choose Add identity provider, as shown in Figure 5.
Figure 5: Add a federated identity provider in the Amazon Cognito console
Choose SAML as the identity provider.
As shown in Figure 6, enter a name for your identity provider, choose Select file, and then upload the FederationMetadata.xml file that you downloaded at the end of Step 3.
Figure 6: Set up SAML federation with the user pool
Provide the SAML attribute to map attributes between your SAML provider and your user pool as follows:
For User pool attribute, select email.
For SAML attribute, enter http://schemas.xmlsoap.org/ws/2005/05/identity/claims/emailaddress
These mappings map the claims from the SAML assertion from AD FS to the user pool attributes. You configured an E-mail claim in AD FS, so you need to map this with the appropriate attribute in the user pool.
Choose Add identity provider.
Step 5: Deploy and configure a web app
To reduce the number of steps required for this walkthrough, we have provided a CloudFormation template that you can use to complete the deployment, which deploys the architecture shown in Figure 7:
Figure 7: Web app architecture deployed by the CloudFormation template
This architecture is essentially the same as step 8 from the authentication flow diagram (Figure 1) earlier in this post. In Figure 7, we have added Amazon S3 and Amazon CloudFront to the diagram, which is where your static website is hosted. Complete the following steps for this walkthrough:
Step 5.1: Create the AWS CloudFormation stack
Step 5.2: Manually integrate Amazon Cognito user pools with API Gateway
Step 5.3: Update the configuration for Amazon Cognito
Step 5.4: Update the configuration for the client-side application and upload to Amazon S3
Step 5.5: Insert a row into a DynamoDB table to help you test the application
Step 5.1: Create the AWS CloudFormation stack
Let’s deploy this infrastructure:
Download the code repository, which includes the CloudFormation template named prerequisites.yaml and the sample code for a web app named DataManager.
Navigate to the CloudFormation console in the Region where you deployed the user pool, and choose Create Stack.
To upload the template to Amazon S3, choose Browse and select prerequisites.yaml in the folder where you downloaded it.
Provide a Stack name and a unique Bucket name.
Note: S3 bucket names should not contain uppercase characters.
Choose Next, and select I acknowledge that AWS CloudFormation might create IAM resources with custom names.
Choose Create and then wait for the resources to be deployed.
Note: If the deployment fails with the error message API: s3:CreateBucket Access Denied, review the IAM permissions available for the IAM user or the role used and make sure that the s3:CreateBucket permission has been granted.
Step 5.2: Manually integrate the Amazon Cognito user pool with API Gateway
Open the API Gateway console. You should see that an API named DataManager has been created by CloudFormation, as shown in Figure 8:
Figure 8: APIs in the API Gateway console
Under APIs, choose DataManager, and then choose Authorizers.
Choose Create new Authorizer, and then populate the relevant details:
For Name, enter SamlAuthorizer (Make sure that the name of the user pool is the same as the one that you created).
For Type, select Cognito.
For Cognito user pool, enter Samlfederation.
For Token source, enter Authorization.
With this configuration, you use the user pools authorizer to authenticate Get requests to your Rest API that’s hosted on API Gateway. In the dropdown for Cognito User Pool, add the user pool that you created in Step 2: Create an Amazon Cognito user pool. Choose Create.
Navigate back to APIs > Resources, choose GET, and then choose Method Request.
To add the authorizer that you just created, under Settings, in the Authorization dropdown, choose your authorizer. Remember to save the setting by choosing the small tick symbol on the right side. If you don’t see the Cognito authorizer, just wait for several minutes for updates from API Gateway.
Figure 9: Add the Cognito authorizer for the API GET method
Step 5.3: Update the configuration for Amazon Cognito
Now you need to update the Amazon Cognito configuration based on the CloudFront distribution that you deployed using the CloudFormation template in Step 5.1.
Navigate to the CloudFormation console and locate the CloudFormation stack that was deployed. As shown in Figure 10, in the Outputs tab, copy the values for CloudfrontEndpoint and DataManagerApiInvokeUrl because you will need them later.
Figure 10: Outputs of the CloudFormation template deployment
Navigate to the Amazon Cognito console and go to your user pool. Choose the App integration tab, scroll to the bottom of the page, and for App client name, choose the App client that you added during user pool creation.
On the page for your App client, in the Hosted UI section, choose Edit, and then do the following:
For both the Allowed callback URLs and Allowed sign-out URLs, enter the CloudFront endpoint.
For OAuth grant types, select Implicit grant.
For OpenID Connect scopes, select Email and OpenID.
Figure 11: Configure the hosted UI for the app client
The Amazon Cognito hosted UI provides an OAuth 2.0 compliant authorization server. It includes the default implementation of end user flows, such as registration and authentication. Because the application interacts with Amazon Cognito through an OAuth 2.0 implicit flow, which requires a redirect, the website needs to use HTTPS.
Note: In a production scenario, instead of implicit flow, an authorization code grant is the preferred method in the OAuth 2.0 framework because it’s more secure.
To have an HTTPS endpoint for the Amazon S3 static website, you can use the CloudFront distribution that was deployed by the CloudFormation template in Step 5.1.
When one of your users successfully logs in to the Active Directory infrastructure, the user is automatically redirected to the callback URL. In this case, this is a CloudFront distribution URL with an Amazon Cognito ID token, access token, and refresh token.
Step 5.4: Update the configuration for your client-side application, and upload it to Amazon S3
Navigate to the code that you previously cloned in Step 5.1, and perform the following steps:
With a file manager, navigate to the folder where the cloned content is located. Open the DataManager directory.
Open the js folder. Using a text editor, open the config.js file.
From the Amazon Cognito console, copy the client app application ID as the value of the userPoolClientId property. You can find the application ID in the App clients menu of the Amazon Cognito console.
Change the value of the Region property to the Region that you are using (for example, us-east-2)
While you are still in the Amazon Cognito console, open the Domain name page, and copy the custom prefix into the value for the authDomainPrefix property.
Open the CloudFormation console and choose the stack that was created in Step 5.1. With the stack selected, open the Outputs tab.
Copy the value of the CloudfrontEndpoint output variable to the redirect_uri property.
Copy the value of the DataManagerApiInvokeUrl output variable to the invokeUri property.
Step 5.5: Insert a row into the DynamoDB table to help test your application
The CloudFormation template that you used in Step 5.1 created a DynamoDB table that you can use to test your application. Now you need to add a row to the table (as shown in the Items returned section of Figure 12), so that you can get some results when you test your application. To add a row, in the left menu, choose Tables > Update settings to find the table, and then choose Actions > Create item.
The Lambda function that retrieves data from the ADFSSecretData DynamoDB table only retrieves data from rows where the email matches the one used to log in to Active Directory. To achieve this, you pass the event.requestContext.authorizer.claims.email.object within the Lambda function. This object contains the email that you used to log in to Active Directory.
Figure 12: Search result of DynamoDB table
Now you’re ready to test the application.
Open the CloudFront URL in your browser and choose Enter. This should immediately take you to the web app landing page. From there, you’re automatically redirected to the Amazon Cognito hosted UI. You should see a screen similar to the following that says Sign in with your corporate ID:
Figure 13: Cognito hosted UI sign-in page
After you choose your SAML provider, you are redirected to your AD FS infrastructure that shows a login screen similar to the following:
Figure 14: AD FS sign-in page
Note: If there’s an error, make sure that there’s a mapping in the host file for your AD FS server, with the appropriate hostname or public IP address of the EC2 instance where the AD FS infrastructure is hosted
On the login screen, for Username, enter the user’s email address (in our example, that’s Bob’s email address), and for Password, enter the password that you defined in Active Directory, as shown in Figure 14. If the login is successful, you’re redirected back to the web app with a valid ID and access tokens.
Figure 15: Sample web app home page
Choose Refresh to see the data that you stored in DynamoDB.
Figure 16: Retrieval of the data from DynamoDB
Summary
In this walkthrough, you federated users from AD FS, and successfully authenticated those users to our REST API that’s hosted on API Gateway.
The SAML federation feature in Amazon Cognito helps you set up and integrate your apps with multiple SAML IdPs. By using the SAML federation capabilities of Amazon Cognito, your apps don’t need to handle the type of SAML IdP that they are interacting with. Amazon Cognito takes care of it on behalf of your application.
This article was originally written by Adrian Hall, who was an AWS Solutions Architect when he wrote it.
If you have feedback about this post, submit comments in the Comments section below. If you have questions about this post, contact AWS Support.
Want more AWS Security news? Follow us on Twitter.
Unstructured data can make up to 80 percent of data in the day-to-day business of financial organizations. For example, these organizations typically store and read PDFs and images for claim processing, underwriting, and know your customer (KYC). Organizations need to make this ingested data accessible and searchable across different entities while logically separating data access according to role requirements.
In this two-part series, we use AWS services to build an end-to-end content repository for storing and processing unstructured data with the following features:
Dynamic access control-based logic over unstructured data
Multilingual semantic search capabilities
In part 1, we build the architectural foundation for the content repository, including the resource access control logic and a web UI to upload and list documents.
Solution overview
The content repository includes four building blocks:
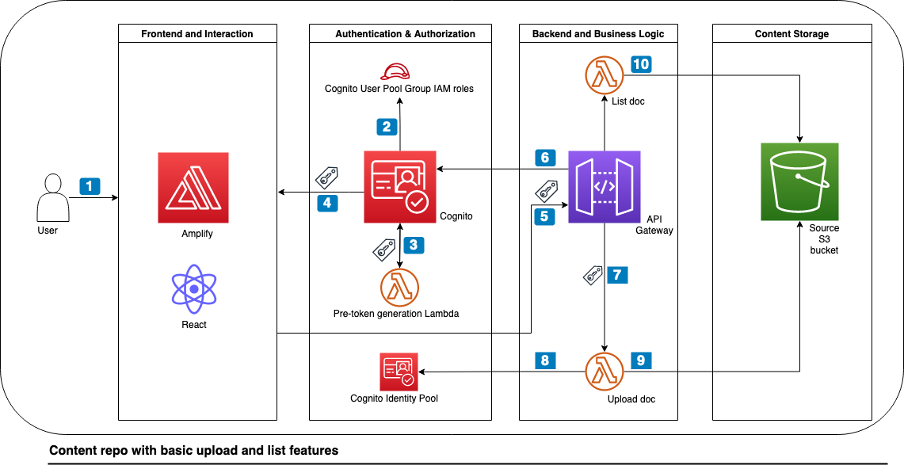
Frontend and interaction: For this function, we use AWS Amplify, which is a set of purpose-built tools and features to help frontend web and mobile developers quickly build full-stack applications on AWS. The React application uses the AWS Amplify authentication feature to quickly set up a complete authentication flow integrated into Amazon Cognito. Amplify also hosts the frontend application.
Authentication and authorization: Implementing dynamic resource access control with a combination of roles and attributes is fundamental to your content repository security. Amazon Cognito provides a managed, scalable user directory, user sign-up and sign-in flows, and federation capabilities through third-party identity providers. We use Amazon Cognito user pools as the source of user identity for the content repository. You can work with user pool groups to represent different types of user collection, and you can manage their permissions using a group-associated AWS Identity and Access Management (IAM) role.
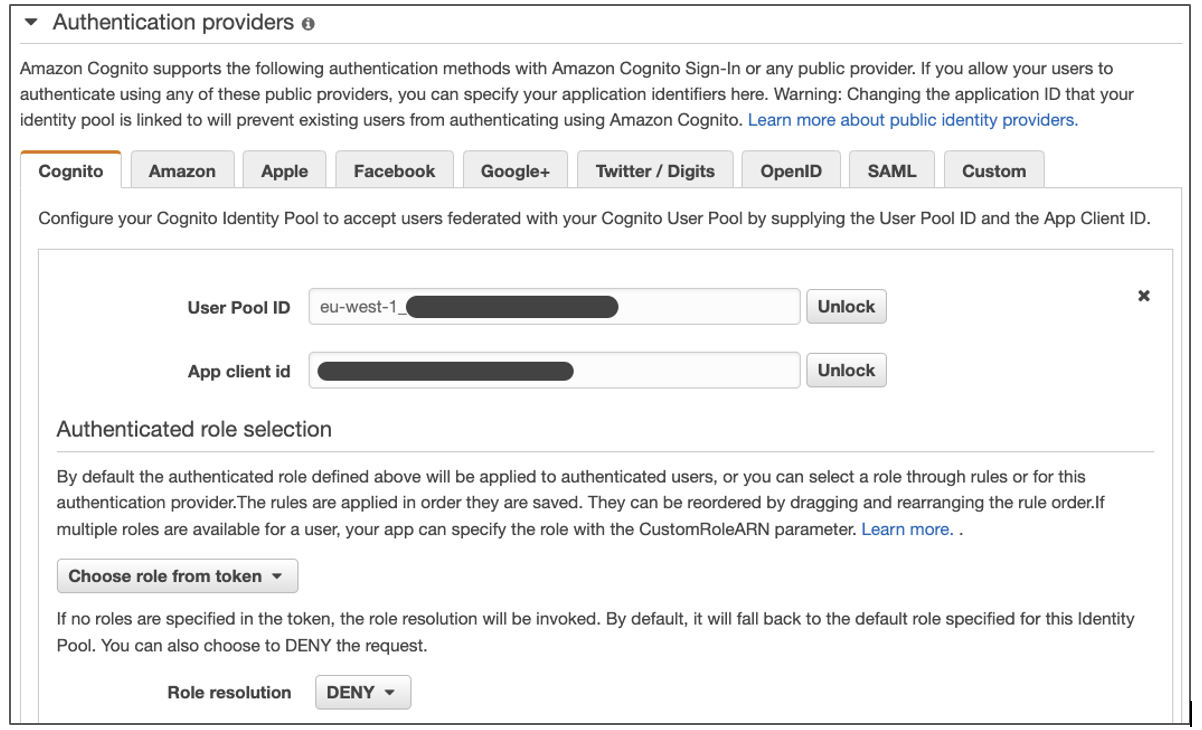
Users authenticate against the Amazon Cognito user pool. The web app will exchange the user pool tokens for AWS credentials through an Amazon Cognito identity pool in the content repository. You can complement the IAM role-based authorization model by mapping your relevant attributes to principal tags that will be evaluated as part of IAM permission policies. This allows a dynamic and flexible authorization strategy. For use cases that need federation with third-party identity providers, you can base your user collection on existing user group attributes, such as Active Directory group membership.
Backend and business logic: Authenticated users are redirected to the Amazon API Gateway. API Gateway provides managed publishing for application programming interfaces (APIs) that act as the repository’s “front door.” API Gateway also interacts with the repository’s backend through RESTful APIs. This makes the business logic of the content repository extensible for future use cases, such as transcription and translation. We use AWS Lambda as a serverless, event-driven compute service to run specific business logic code, such as uploading a document to the content repository.
Content storage: Amazon Simple Storage Service (Amazon S3) provides virtually unlimited scalability and high durability. With Amazon S3, you can cost-effectively store unstructured documents in their native formats and make it accessible in a secure and scalable way. Enriching the uploaded documents with tags simplifies data governance with fine-grained access control.
Technical architecture
The technical architecture of the content repository with these four components can be found in Figure 1.
Figure 1. Technical architecture of the content repository
Let’s explore the architecture step by step.
The frontend uses the Amplify JS library to add the authentication UI component to your React app, allowing authenticated users to sign in.
Once the user provides their sign-in credentials, they are redirected to Amazon Cognito user pools to be authenticated.
Once the authentication is successful, Amazon Cognito invokes a pre-token generation Lambda function. This function customizes the identity (ID) token with a new claim called department. This new claim is the Amazon Cognito group name from the cognito:preferred_role claim.
Amazon Cognito returns the identity, access, and refresh token in JSON format to the frontend.
The Amplify client library stores the tokens and handles refreshes using the refresh token while the React frontend application calls the API Gateway with the ID token. Note: Usually, you would use the access token to grant access to authorized resources. For this architecture, we use the ID token because we have enriched it with the custom claim during step 3.
API Gateway uses its native integration with Amazon Cognito and validates the ID token’s signature and expiration using Amazon Cognito user pool authorizer. For more complex authorization scenarios, you can use API Gateway Lambda authorizer with the AWS JSON Web Token (JWT) Verify library for verifying JWTs signed by Amazon Cognito.
After successful validation, API Gateway passes the ID token to the backend Lambda function, which can verify and authorize upon it for access control.
Upon document upload action, the backend Lambda function calls the Amazon Cognito identity pool to exchange the ID token for the temporary AWS credentials associated with the cognito:preferred_role claim.
The document upload Lambda function returns a pre-signed URL with the custom department claim in the Amazon S3 path prefix as well as the object tag. The Amazon S3 pre-signed URL is used for the document upload from the frontend application directly to Amazon S3.
Upon document list action, similar to step 8, the backend Lambda function exchanges the ID token for the temporary AWS credentials. The Lambda function returns only the documents based on the user’s preferred group and associated custom department claim.
Prerequisites
You must have the following prerequisites for this solution:
Once you deploy the CDK stacks in your AWS account, follow these steps:
1. Access the frontend application:
a. Copy the amplifyHostedAppUrl value shown in the AWS CDK output from the content-repo-stack.
b. Use the URL with your web browser to access the frontend application.
c. A temporary page displays until the automated build and deployment of the React application completes after 4-5 minutes.
2. Application sign-in and role-based access control (RBAC):
a. The React webpage prompts you to sign in and then change the temporary password.
b. The content repository provides two demo users with credentials as part of the demo-data-stack in the AWS CDK output. In this walkthrough, we use the sales-user user, which belongs to the sales department group to validate RBAC.
3. Upload a document to the content repository:
a. Authenticate as sales-user.
b. Select upload to upload your first document to the content repository.
c. The repository provides sample documents in the assets sub-folder.
4. List your uploaded document:
a. Select list to show the uploaded sales content.
b. To verify the dynamic access control, repeat steps 2 and 3 for the marketing-user user, which belongs to the marketing department group.
c. Sign-in to the AWS Management Console and navigate to the Amazon S3 bucket with the prefix content-repo-stack-s3sourcebucket to confirm that all the uploaded content exists.
Implementation notes
Frontend deployment and cross-origin access
The content-repo-stack contains an AwsCustomResource construct. This construct uses the Amplify API to start the release job of the Amplify hosted frontend application. The preBuild step of the Amplify application build specification dynamically configures its backend for the Amazon Cognito-based authentication. The required Amazon Cognito configuration parameters are retrieved from the AWS Systems Manager Parameter Store during build time. Similarly, the Amplify application postBuild step updates the Amazon S3 cross-origin resource sharing (CORS) rule for the Amazon S3 bucket to only allow cross-origin access from the Amplify-hosted URL of the frontend application.
Application sign-in and access control
The Amazon Cognito identity pool configuration is set to Choose role from token for authenticated users, as in Figure 2. This setup permits authenticated users to pass the roles in the ID token that the Amazon Cognito user pool assigned. Backend Lambda functions use the roles that appear in the cognito:roles and cognito:preferred_role claims in the ID token for RBAC.
Figure 2. Amazon Cognito identity pool configuration – using tokens to assign roles to authenticated users
In the attributes for access control section, we configured a custom mapping from the augmented department token claim to a tag key, as in Figure 3. The backend logic uses the tag key to match the PrincipalTag condition in IAM policies to control access to AWS resources.
Figure 3. Amazon Cognito identity pool configuration – custom mapping from claim names to tag keys
Document upload
The presigned_url.py Lambda function generates a pre-signed Amazon S3 URL using the department token claim as the key. This function automatically organizes the uploaded document into a logical structure in the Amazon S3 source bucket. Accordingly, the cognito:preferred_role used for the Amazon S3 client credentials in the Lambda function has a permission policy using the PrincipalTag department to dynamically limit access to the Amazon S3 key, as in Figure 4.
Figure 4. Permission policy using PrincipalTag to upload documents to Amazon S3
Document listing
The list functionality only shows the uploaded content belonging to the preferred group of authenticated Amazon Cognito user pool user. To only list the files that a specific user (for example, sales-user) has access to, use the PrincipalTag s3:prefix condition, as in Figure 5.
Figure 5. Permission policy using s3:prefix condition with session tags to list documents
Cleanup
In the backend-cdk subdirectory, delete the deployed resources:
cdk destroy --all
Conclusion
In this blog, we demonstrated how to build a content repository with an easy-to-use web application for unstructured data that ingests documents while maintaining dynamic access control for users within departments. These steps provide a foundation to build your own content repository to store and process documents. As next steps, based on your organization’s security requirements, you can implement more complex access control use cases by balancing IAM role and principal tags. For example, you can use Amazon Cognito user pool custom attributes for additional dimensions such as document “clearance” with optional modification in the pre-token generation Lambda.
In the next part of this blog series, we will enrich the content repository with multi-lingual semantic search features while maintaining the access control fundamentals we’ve already implemented. For additional information on how you can build a solution to search for information across multiple scanned documents, PDFs, and images with compliance capabilities, please refer our Document Understanding Solution from AWS Solutions Library.
This post is written by Madhu Singh (Solutions Architect), and Krupanidhi Jay (Solutions Architect).
Lambda function URLs is a dedicated HTTPs endpoint for a AWS Lambda function. You can configure a function URL to have two methods of authentication: IAM and NONE. IAM authentication means that you are restricting access to the function URL (and in-turn access to invoke the Lambda function) to certain AWS principals (such as roles or users). Authentication type of NONE means that the Lambda function URL has no authentication and is open for anyone to invoke the function.
This blog shows how to use Lambda function URLs with an authentication type of NONE and use custom authorization logic as part of the function code, and to only allow requests that present valid Amazon Cognito credentials when invoking the function. You also learn ways to protect Lambda function URL against common security threats like DDoS using AWS WAF and Amazon CloudFront.
Lambda function URLs provides a simpler way to invoke your function using HTTP calls. However, it is not a replacement for Amazon API Gateway, which provides advanced features like request validation and rate throttling.
Solution overview
There are four core components in the example.
1. A Lambda function with function URLs enabled
At the core of the example is a Lambda function with the function URLs feature enabled with the authentication type of NONE. This function responds with a success message if a valid authorization code is passed during invocation. If not, it responds with a failure message.
2. Amazon Cognito User Pool
Amazon Cognito user pools enable user authentication on websites and mobile apps. You can also enable publicly accessible Login and Sign-Up pages in your applications using Amazon Cognito user pools’ feature called the hosted UI.
In this example, you use a user pool and the associated Hosted UI to enable user login and sign-up on the website used as entry point. This Lambda function validates the authorization code against this Amazon Cognito user pool.
3. CloudFront distribution using AWS WAF
CloudFront is a content delivery network (CDN) service that helps deliver content to end users with low latency, while also improving the security posture for your applications.
AWS WAF is a web application firewall that helps protect your web applications or APIs against common web exploits and bots and AWS Shield is a managed distributed denial of service (DDoS) protection service that safeguards applications running on AWS. AWS WAF inspects the incoming request according to the configured Web Access Control List (web ACL) rules.
Adding CloudFront in front of your Lambda function URL helps to cache content closer to the viewer, and activating AWS WAF and AWS Shield helps in increasing security posture against multiple types of attacks, including network and application layer DDoS attacks.
4. Public website that invokes the Lambda function
The example also creates a public website built on React JS and hosted in AWS Amplify as the entry point for the demo. This website works both in authenticated mode and in guest mode. For authentication, the website uses Amazon Cognito user pools hosted UI.
Solution architecture
This shows the architecture of the example and the information flow for user requests.
In the request flow:
The entry point is the website hosted in AWS Amplify. In the home page, when you choose “sign in”, you are redirected to the Amazon Cognito hosted UI for the user pool.
Upon successful login, Amazon Cognito returns the authorization code, which is stored as a cookie with the name “code”. The user is redirected back to the website, which has an “execute Lambda” button.
When the user choose “execute Lambda”, the value from the “code” cookie is passed in the request body to the CloudFront distribution endpoint.
The AWS WAF web ACL rules are configured to determine whether the request is originating from the US or Canada IP addresses and to determine if the request should be allowed to invoke Lambda function URL origin.
Allowed requests are forwarded to the CloudFront distribution endpoint.
CloudFront is configured to allow CORS headers and has the origin set to the Lambda function URL. The request that CloudFront receives is passed to the function URL.
This invokes the Lambda function associated with the function URL, which validates the token.
The function code does the following in order:
Exchange the authorization code in the request body (passed as the event object to Lambda function) to access_token using Amazon Cognito’s token endpoint (check the documentation for more details).
Amazon Cognito user pool’s attributes like user pool URL, Client ID and Secret are retrieved from AWS Systems Manager Parameter Store (SSM Parameters).
These values are stored in SSM Parameter Store at the time these resources are deployed via AWS CDK (see “how to deploy” section)
The access token is then verified to determine its authenticity.
If valid, the Lambda function returns a message stating user is authenticated as <username> and execution was successful.
If either the authorization code was not present, for example, the user was in “guest mode” on the website, or the code is invalid or expired, the Lambda function returns a message stating that the user is not authorized to execute the function.
The webpage displays the Lambda function return message as an alert.
Getting started
Pre-requisites:
Before deploying the solution, please follow the README from the GitHub repository and take the necessary steps to fulfill the pre-requisites.
Deploy the sample solution
1. From the code directory, download the dependencies:
$ npm install
2. Start the deployment of the AWS resources required for the solution:
$ cdk deploy
Note:
optionally pass in the –profile argument if needed
The deployment can take up to 15 minutes
3. Once the deployment completes, the output looks similar to this:
Open the amplifyAppUrl from the output in your browser. This is the URL for the demo website. If you don’t see the “Welcome to Compute Blog” page, the Amplify app is still building, and the website is not available yet. Retry in a few minutes. This website works either in an authenticated or unauthenticated state.
Test the authenticated flow
To test the authenticated flow, choose “Sign In”.
2. In the sign-in page, choose on sign-up (for the first time) and create a user name and password.
3. To use an existing an user name and password, enter those credentials and choose login.
4. Upon successful sign-in or sign up, you are redirected back to the webpage with “Execute Lambda” button.
5. Choose this button. In a few seconds, an alert pop-up shows the logged in user and that the Lambda execution is successful.
Testing the unauthenticated flow
1. To test the unauthenticated flow, from the Home page, choose “Continue”.
2. Choose “Execute Lambda” and in a few seconds, you see a message that you are not authorized to execute the Lambda function.
Testing the geo-block feature of AWS WAF
1. Access the website from a Region other than US or Canada. If you are physically in the US or Canada, you may use a VPN service to connect to a Region other than US or Canada.
2. Choose the “Execute Lambda” button. In the Network trace of browser, you can see the call to invoke Lambda function was blocked with Forbidden response.
3. To try either the authenticated or unauthenticated flow again, choose “Return to Home Page” to go back to the home page with “Sign In” and “Continue” buttons.
Cleaning up
To delete the resources provisioned, run the cdk destroy command from the AWS CDK CLI.
Conclusion
In this blog, you create a Lambda function with function URLs enabled with NONE as the authentication type. You then implemented a custom authentication mechanism as part of your Lambda function code. You also increased the security of your Lambda function URL by setting it as Origin for the CloudFront distribution and using AWS WAF Geo and IP limiting rules for protection against common web threats, like DDoS.
For more serverless learning resources, visit Serverless Land.
In part 1, you learn if it is possible to migrate a non-serverless web application to a serverless environment without changing much code. You learn different tools that can help you in this process, like Lambda Web Adaptor and AWS Amplify. By the end, you have migrated an application into a serverless environment.
However, if you test the migrated app, you find two issues. The first one is that the user session is not sticky. Every time you log in, you are logged out unexpectedly from the application. The second one is that when you create a new product, you cannot upload new images of that product.
This final post analyzes each of the problems in detail and shows solutions. In addition, it analyzes the cost and performance of the solution.
Authentication and authorization migration
The original application handled the authentication and authorization by itself. There is a user directory in the database, with the passwords and emails for each of the users. There are APIs and middleware that take care of validating that the user is logged in before showing the application. All the logic for this is developed inside the Node.js/Express application.
However, with the current migrated application every time you log in, you are logged out unexpectedly from the application. This is because the server code is responsible for handling the authentication and the authorization of the users, and now our server is running in an AWS Lambda function and functions are stateless. This means that there will be one function running per request—a request can load all the products in the landing page, get the details for a product, or log in to the site—and if you do something in one of these functions, the state is not shared across.
To solve this, you must remove the authentication and authorization mechanisms from the function and use a service that can preserve the state across multiple invocations of the functions.
There are many ways to solve this challenge. You can add a layer of authentication and session management with a database like Redis, or build a new microservice that is in charge of authentication and authorization that can handle the state, or use an existing managed service for this.
Because of the migration requirements, we want to keep the cost as low as possible, with the fewest changes to the application. The better solution is to use an existing managed service to handle authentication and authorization.
This demo uses Amazon Cognito, which provides user authentication and authorization to AWS resources in a managed, pay as you go way. One rapid approach is to replace all the server code with calls to Amazon Cognito using the AWS SDK. But this adds complexity that can be replaced completely by just invoking Amazon Cognito APIs from the React application.
For example, when a new user is registered, the application creates the user in the Amazon Cognito user pool directory, as well as in the application database. But when a user logs in to the web app, the application calls Amazon Cognito API directly from the AWS Amplify application. This way minimizes the amount of code needed.
In the original application, all authenticated server APIs are secured with a middleware that validates that the user is authenticated by providing an access token. With the new setup that doesn’t change, but the token is generated by Amazon Cognito and then it can be validated in the backend.
You can see how this is implemented step by step in this video.
Storage migration
In the original application, when a new product is created, a new image is uploaded to the Node.js/Express server. However, now the application resides in a Lambda function. The code (and files) that are part of that function cannot change, unless the function is redeployed. Consequently, you must separate the user storage from the server code.
For doing this, there are a couple of solutions: using Amazon Elastic File System (EFS) or Amazon S3. EFS is a file storage, and you can use that to have a dynamic storage where you upload the new images. Using EFS won’t change much of the code, as the original implementation is using a directory inside the server as EFS provides. However, using EFS adds more complexity to the application, as functions that use EFS must be inside an Amazon Virtual Private Cloud (Amazon VPC).
Using S3 to upload your images to the application is simpler, as it only requires that an S3 bucket exists. For doing this, you must refactor the application, from uploading the image to the application API to use the AWS Amplify library that uploads and gets images from S3.
An important benefit of using S3 is that you can also use Amazon CloudFront to accelerate the retrieval of the images from the cloud. In this way, you can speed up the loading time of your page. You can see how this is implemented step by step in this video.
How much does this application cost?
If you deploy this application in an empty AWS account, most of the usage of this application is covered by the AWS Free Tier. Serverless services, like Lambda and Amazon Cognito, have a forever free tier that gives you the benefits in pricing for the lifetime of hosting the application.
AWS Lambda—With 100 requests per hour, an average 10ms invocation and 1GB of memory configured, it costs 0 USD per month.
Amazon S3—Using S3 standard, hosting 1 GB per month and 10k PUT and GET requests per month costs 0.07 USD per month. This can be optimized using S3 Intelligent-Tiering.
Amazon Cognito—Provides 50,000 monthly active users for free.
AWS Amplify—If you build your client application once a week, serve 3 GB and store 1 GB per month, this costs 0.87 USD.
The total monthly cost of this application is approximately 2.11 USD.
Performance analysis
After you migrate the application, you can run a page speed insight tool, to measure this application’s performance. This tool provides results mostly about the front end and the experience that the user perceives. The results are displayed in the following image. The performance of this website is good, according to the insight tool performance score – it responds quickly and the user experience is good.
After the application is migrated to a serverless environment, you can do some refactoring to improve further the overall performance. One alternative is whenever a new image is uploaded, it gets resized and formatted into the correct next-gen format automatically using the event driven capabilities that S3 provides. Another alternative is to use Lambda on Edge to serve the right image size for the device, as it is possible to format the images on the fly when serving them from a distribution.
You can run load tests for understanding how your backend and database will perform. For this, you can use Artillery, an open-source library that allows you to run load tests. You can run tests with the expected maximum load your site will get and ensure that your site can handle it.
For example, you can configure a test that sends 30 requests per seconds to see how your application reacts:
This test is performed on the backend APIs, not only testing your backend but also your integration with the MongoDB. After running it, you can see how the Lambda function performs on the Amazon CloudWatch dashboard.
Running this load test helps you understand the limitations of your system. For example, if you run a test with too many concurrent users, you might see that the number of throttles in your function increases. This means that you need to lift the limit of invocations of the functions you can have at the same time.
Or when increasing the requests per second, you may find that the MongoDB cluster starts throttling your requests. This is because you are using the free tier and that has a set number of connections. You might need a larger cluster or to migrate your database to another service that provides a large free tier, like Amazon DynamoDB.
Conclusion
In this two-part article, you learn if it is possible to migrate a non-serverless web application to a serverless environment without changing much code. You learn different tools that can help you in this process, like AWS Lambda Web Adaptor and AWS Amplify, and how to solve some of the typical challenges that we have, like storage and authentication.
After the application is hosted in a fully serverless environment, it can scale up and down to meet your needs. This web application is also performant once the backend is hosted in a Lambda function.
If you need, from here you can start using the strangler pattern to refactor the application to take advantage of the benefits of event-driven architecture.
To see all the steps of the migration, there is a playlist that contains all the tutorials for you to follow.
For more serverless learning resources, visit Serverless Land.
Customers migrating to the cloud often want to get the benefits of serverless architecture. But what is the best approach and is it possible? There are many strategies to do a migration, but lift and shift is often the fastest way to get to production with the migrated workload.
You might also wonder if it’s possible to lift and shift an existing application that runs in a traditional environment to serverless. This blog post shows how to do this for a Mongo, Express, React, and Node.js (MERN) stack web app. However, the discussions presented in this post apply to other stacks too.
Why do a lift and shift migration?
Lift and shift, or sometimes referred to as rehosting the application, is moving the application with as few changes as possible. Lift and shift migrations often allow you to get the new workload in production as fast as possible. When migrating to serverless, lift and shift can bring a workload that is not yet in the cloud or in a serverless environment to use managed and serverless services quickly.
Migrating a non-serverless workload to serverless with lift and shift might not bring all the serverless benefits right away, but it enables the development team to refactor, using the strangler pattern, the parts of the application that might benefit from what serverless technologies offer.
Why migrate a web app to serverless?
Web apps hosted in a serverless environment benefit most from the capability of serverless applications to scale automatically and for paying for what you use.
Imagine that you have a personal web app with little traffic. If you are hosting in a serverless environment, you don’t pay a fixed price to have the servers up and running. Your web app has only a few requests and the rest of the time is idle.
This benefit applies to the opposite case. For an owner of a small ecommerce site running on a server, imagine if a social media influencer with millions of followers recommends one of their products. Suddenly, thousands of requests arrive and make the site unavailable. If the site is hosted on a serverless platform, the application will scale to the traffic that it receives.
Requirements for migration
Before starting a migration, it is important to define the nonfunctional requirements that you need the new application to have. These requirements help when you must make architectural decisions during the migration process.
These are the nonfunctional requirements of this migration:
Environment that scales to zero and scales up automatically.
Pay as little as possible for idle time.
Configure as little infrastructure as possible.
Automatic high availability of the application.
Minimal changes to the original code.
Application overview
This blog post guides you on how to migrate a MERN application. The original application is hosted in two different servers: One contains the Mongo database and another contains the Node/js/Express and ReactJS applications.
This demo application simulates a swag ecommerce site. The database layer stores the products, users, and the purchases history. The server layer takes care of the ecommerce business logic, hosting the product images, and user authentication and authorization. The web layer takes care of all the user interaction and communicates with the server layer using REST APIs.
These are the changes that you must make to migrate to a serverless environment:
Database migration: Migrate the database from on-premises to MongoDB Atlas.
Backend migration: Migrate the NodeJS/Express application from on-premises to an AWS Lambda function.
Web app migration: Migrate the React web app from on-premises to AWS Amplify.
Authentication migration: Migrate the custom-built authentication to use Amazon Cognito.
The following image shows the proposed solution for the migrated application:
Database migration
The database is already in a MongoDB vanilla container that has all the data for this application. As MongoDB is the database engine for our stack, their recommended solution to migrate to serverless is to use MongoDB Atlas. Atlas provides a database cluster in the cloud that scales automatically and you pay for what you use.
To get started, create a new Atlas cluster, then migrate the data from the existing database to the serverless one. To migrate the data, you can first dump all the content of the database to a dump folder and then restore it to the cloud:
After doing that, your data is now in the cloud. The next step is to change the configuration string in the server to point to the new database. To see this in action, check this video that shows a walkthrough of the migration.
Backend migration
Migrating the Node.js/Express backend is the most challenging of the layers to migrate to a serverless environment, as the server layer is a Node.js application that runs in a server.
One option for this migration is to use AWS Fargate. Fargate is a serverless container service that allows you to scale automatically and you pay as you go. Another option is to use AWS AppRunner, a container service that auto scales and you also pay as you go. However, neither of these options align with our migration requirements, as they don’t scale to zero.
Another option for the lift and shift migration of this Node.js application is to use Lambda with the AWS Lambda Web Adapter. The AWS Lambda Web Adapter is an open-source project that allows you to build web applications with familiar frameworks, like Express.js, Flask, SpringBoot, and run it on Lambda. You can learn more about this project in its GitHub repository.
Using this project, you can create a new Lambda function that has the Express/NodeJS application as the function code. You can lift and shift all the code into the function. If you want a step-by-step tutorial on how to do this, check out this video.
The next step is to create an HTTP endpoint for the server application. There are three options for doing this: API Gateway, Application Load Balancer (ALB) , or to use Lambda Function URLs. All the options are compatible with Lambda Web Adapter and can solve the challenge for you.
For this demo, choose function URLs, as they are simple to configure and one function URL forwards all routes to the Express server. API Gateway and ALB require more configuration and have separate costs, while the cost of function URLs is included in the Lambda function.
Web app migration
The final layer to migrate is the React application. The best way to migrate the web layer and to adhere to the migration requirements is to use AWS Amplify to host it. AWS Amplify is a fully managed service that provides many features like hosting web applications and managing the CICD process for the web app. It provides client libraries to connect to different AWS resources, and many other features.
Migrating the React application is as simple as creating a new Amplify application in your AWS account and uploading the React application to a code repository like GitHub. This AWS Amplify application is connected to a GitHub branch, and when there is a new commit in this branch, AWS Amplify redeploys the code.
The Amplify application receives configuration parameters like the function URL endpoint (the server URL) using environmental variables.
If you want to see a step-by-step guide on how to make your web layer serverless, you can check this video.
Next steps
However, if you test this migrated app, you will find two issues. The first one is that the user session is not sticky. Every time you log in, you are logged out unexpectedly from the application. The second one is that when you create a new product, you cannot upload new images of that product.
In part two, I analyze each of the problems in detail and find solutions. These issues arise because of the stateless and immutable characteristics of this solution. The next part of this article explains how to solve these issues, also it analyzes costs and performance of the solution.
Conclusion
In this article, you learn if it is possible to migrate a non-serverless web application to a serverless environment without changing much code. You learn different tools that can help you in this process, like the AWS Lambda Web Adaptor and AWS Amplify.
If you want to see the migration in action and learn all the steps for this, there is a playlist that contains all the tutorials for you to follow and learn how this is possible.
For more serverless learning resources, visit Serverless Land.
The web application client-server pattern is widely adopted. The access control allows only authorized clients to access the backend server resources by authenticating the client and providing granular-level access based on who the client is.
This post focuses on three solution architecture patterns that prevent unauthorized clients from gaining access to web application backend servers. There are multiple AWS services applied in these architecture patterns that meet the requirements of different use cases.
OAuth 2.0 authentication code flow
Figure 1 demonstrates the fundamentals to all the architectural patterns discussed in this post. The blog Understanding Amazon Cognito user pool OAuth 2.0 grants describes the details of different OAuth 2.0 grants, which can vary the flow to some extent.
Figure 1. A typical OAuth 2.0 authentication code flow
The architecture patterns detailed in this post use Amazon Cognito as the authorization server, and Amazon Elastic Compute Cloud instance(s) as resource server. The client can be any front-end application, such as a mobile application, that sends a request to the resource server to access the protected resources.
Figure 2. Application Load Balancer integration with Amazon Cognito
ALB can be used to authenticate clients through the user pool of Amazon Cognito:
The client sends HTTP request to ALB endpoint without authentication-session cookies.
ALB redirects the request to Amazon Cognito authentication endpoint. The client is authenticated by Amazon Cognito.
The client is directed back to the ALB with the authentication code.
The ALB uses the authentication code to obtain the access token from the Amazon Cognito token endpoint and also uses the access token to get client’s user claims from Amazon Cognito UserInfo endpoint.
The ALB prepares the authentication session cookie containing encrypted data and redirects client’s request with the session cookie. The client uses the session cookie for all further requests. The ALB validates the session cookie and decides if the request can be passed through to its targets.
The validated request is forwarded to the backend instances with the ALB adding HTTP headers that contain the data from the access token and user-claims information.
The backend server can use the information in the ALB added headers for granular-level permission control.
The key takeaway of this pattern is that the ALB maintains the whole authentication context by triggering client authentication with Amazon Cognito and prepares the authentication-session cookie for the client. The Amazon Cognito sign-in callback URL points to the ALB, which allows the ALB access to the authentication code.
The pattern demonstrated in Figure 3 offloads the work of authenticating clients to Amazon API Gateway.
Figure 3. Amazon API Gateway integration with Amazon Cognito
API Gateway can support both REST and HTTP API. API Gateway has integration with Amazon Cognito, whereas it can also have control access to HTTP APIs with a JSON Web Token (JWT) authorizer, which interacts with Amazon Cognito. The ALB can be integrated with API Gateway. The client is responsible for authenticating with Amazon Cognito to obtain the access token.
The client starts authentication with Amazon Cognito to obtain the access token.
The client sends REST API or HTTP API request with a header that contains the access token.
The API Gateway is configured to have:
Amazon Cognito user pool as the authorizer to validate the access token in REST API request, or
A JWT authorizer, which interacts with the Amazon Cognito user pool to validate the access token in HTTP API request.
After the access token is validated, the REST or HTTP API request is forwarded to the ALB, and:
The API Gateway can route HTTP API to private ALB via a VPC endpoint.
If a public ALB is used, the API Gateway can route both REST API and HTTP API to the ALB.
API Gateway cannot directly route REST API to a private ALB. It can route to a private Network Load Balancer (NLB) via a VPC endpoint. The private ALB can be configured as the NLB’s target.
The key takeaways of this pattern are:
API Gateway has built-in features to integrate Amazon Cognito user pool to authorize REST and/or HTTP API request.
An ALB can be configured to only accept the HTTP API requests from the VPC endpoint set by API Gateway.
Pattern 3
Amazon CloudFront is able to trigger AWS Lambda functions deployed at AWS edge locations. This pattern (Figure 4) utilizes a feature of Lambda@Edge, where it can act as an authorizer to validate the client requests that use an access token, which is usually included in HTTP Authorization header.
Figure 4. Using Amazon CloudFront and AWS Lambda@Edge with Amazon Cognito
The client can have an individual authentication flow with Amazon Cognito to obtain the access token before sending the HTTP request.
The client starts authentication with Amazon Cognito to obtain the access token.
The client sends a HTTP request with Authorization header, which contains the access token, to the CloudFront distribution URL.
The Lambda function extracts the access token from the Authorization header, and validates the access token with Amazon Cognito. If the access token is not valid, the request is denied.
If the access token is validated, the request is authorized and forwarded by CloudFront to the ALB. CloudFront is configured to add a custom header with a value that can only be shared with the ALB.
The ALB sets a listener rule to check if the incoming request has the custom header with the shared value. This makes sure the internet-facing ALB only accepts requests that are forwarded by CloudFront.
The Lambda function also updates CloudFront for the added custom header and ALB for the shared value in the listener rule.
The key takeaways of this pattern are:
By default, CloudFront will remove the authorization header before forwarding the HTTP request to its origin. CloudFront needs to be configured to forward the Authorization header to the origin of the ALB. The backend server uses the access token to apply granular levels of resource access permission.
The use of Lambda@Edge requires the function to sit in us-east-1 region.
The CloudFront-added custom header’s value is kept as a secret that can only be shared with the ALB.
Conclusion
The architectural patterns discussed in this post are token-based web access control methods that are fully supported by AWS services. The approach offloads the OAuth 2.0 authentication flow from the backend server to AWS services. The services managed by AWS can provide the resilience, scalability, and automated operability for applying access control to a web application.
In Part 1 of this two-part series, we shared an overview of some of the most important 2021 Amazon Web Services (AWS) Security service and feature launches. In this follow-up, we’ll dive deep into additional launches that are important for security professionals to be aware of and understand across all AWS services. There have already been plenty in the first half of 2022, so we’ll highlight those soon, as well.
AWS Identity
You can use AWS Identity Services to build Zero Trust architectures, help secure your environments with a robust data perimeter, and work toward the security best practice of granting least privilege. In 2021, AWS expanded the identity source options, AWS Region availability, and support for AWS services. There is also added visibility and power in the permission management system. New features offer new integrations, additional policy checks, and secure resource sharing across AWS accounts.
AWS Single Sign-On
For identity management, AWS Single Sign-On (AWS SSO) is where you create, or connect, your workforce identities in AWS once and manage access centrally across your AWS accounts in AWS Organizations. In 2021, AWS SSO announced new integrations for JumpCloud and CyberArk users. This adds to the list of providers that you can use to connect your users and groups, which also includes Microsoft Active Directory Domain Services, Okta Universal Directory, Azure AD, OneLogin, and Ping Identity.
For access management, there have been a range of feature launches with AWS Identity and Access Management (IAM) that have added up to more power and visibility in the permissions management system. Here are some key examples.
IAM made it simpler to relate a user’s IAM role activity to their corporate identity. By setting the new source identity attribute, which persists through role assumption chains and gets logged in AWS CloudTrail, you can find out who is responsible for actions that IAM roles performed.
IAM added support for policy conditions, to help manage permissions for AWS services that access your resources. This important feature launch of service principal conditions helps you to distinguish between API calls being made on your behalf by a service principal, and those being made by a principal inside your account. You can choose to allow or deny the calls depending on your needs. As a security professional, you might find this especially useful in conjunction with the aws:CalledVia condition key, which allows you to scope permissions down to specify that this account principal can only call this API if they are calling it using a particular AWS service that’s acting on their behalf. For example, your account principal can’t generally access a particular Amazon Simple Storage Service (Amazon S3) bucket, but if they are accessing it by using Amazon Athena, they can do so. These conditions can also be used in service control policies (SCPs) to give account principals broader scope across an account, organizational unit, or organization; they need not be added to individual principal policies or resource policies.
Another very handy new IAM feature launch is additional information about the reason for an access denied error message. With this additional information, you can now see which of the relevant access control policies (for example, IAM, resource, SCP, or VPC endpoint) was the cause of the denial. As of now, this new IAM feature is supported by more than 50% of all AWS services in the AWS SDK and AWS Command Line Interface, and a fast-growing number in the AWS Management Console. We will continue to add support for this capability across services, as well as add more features that are designed to make the journey to least privilege simpler.
IAM Access Analyzer also launched the ability to generate fine-grained policies based on analyzing past AWS CloudTrail activity. This feature provides a great new capability for DevOps teams or central security teams to scope down policies to just the permissions needed, making it simpler to implement least privilege permissions. IAM Access Analyzer launched further enhancements to expand policy checks, and the ability to generate a sample least-privilege policy from past activity was expanded beyond the account level to include an analysis of principal behavior within the entire organization by analyzing log activity stored in AWS CloudTrail.
AWS Resource Access Manager
AWS Resource Access Manager (AWS RAM) helps you securely share your resources across unrelated AWS accounts within your organization or organizational units (OUs) in AWS Organizations. Now you can also share your resources with IAM roles and IAM users for supported resource types. This update enables more granular access using managed permissions that you can use to define access to shared resources. In addition to the default managed permission defined for each shareable resource type, you now have more flexibility to choose which permissions to grant to whom for resource types that support additional managed permissions. Additionally, AWS RAM added support for global resource types, enabling you to provision a global resource once, and share that resource across your accounts. A global resource is one that can be used in multiple AWS Regions; the first example of a global resource is found in AWS Cloud WAN, currently in preview as of this publication. AWS RAM helps you more securely share an AWS Cloud WAN core network, which is a managed network containing AWS and on-premises networks. With AWS RAM global resource sharing, you can use the Cloud WAN core network to centrally operate a unified global network across Regions and accounts.
AWS Directory Service
AWS Directory Service for Microsoft Active Directory, also known as AWS Managed Microsoft Active Directory (AD), was updated to automatically provide domain controller and directory utilization metrics in Amazon CloudWatch for new and existing directories. Analyzing these utilization metrics helps you quantify your average and peak load times to identify the need for additional domain controllers. With this, you can define the number of domain controllers to meet your performance, resilience, and cost requirements.
Amazon Cognito
Amazon Cognitoidentity pools (federated identities) was updated to enable you to use attributes from social and corporate identity providers to make access control decisions and simplify permissions management in AWS resources. In Amazon Cognito, you can choose predefined attribute-tag mappings, or you can create custom mappings using the attributes from social and corporate providers’ access and ID tokens, or SAML assertions. You can then reference the tags in an IAM permissions policy to implement attribute-based access control (ABAC) and manage access to your AWS resources. Amazon Cognito also launched a new console experience for user pools and now supports targeted sign out through refresh token revocation.
Governance, control, and logging services
There were a number of important releases in 2021 in the areas of governance, control, and logging services.
This approach provides a powerful new middle ground between the older security models of prevention (which provide developers only an access denied message, and often can’t distinguish between an acceptable and an unacceptable use of the same API) and a detect and react model (when undesired states have already gone live). The Cfn-Guard 2.0 model gives builders the freedom to build with IaC, while allowing central teams to have the ability to reject infrastructure configurations or changes that don’t conform to central policies—and to do so with completely custom error messages that invite dialog between the builder team and the central team, in case the rule is unnuanced and needs to be refined, or if a specific exception needs to be created.
For example, a builder team might be allowed to provision and attach an internet gateway to a VPC, but the team can do this only if the routes to the internet gateway are limited to a certain pre-defined set of CIDR ranges, such as the public addresses of the organization’s branch offices. It’s not possible to write an IAM policy that takes into account the CIDR values of a VPC route table update, but you can write a Cfn-Guard 2.0 rule that allows the creation and use of an internet gateway, but only with a defined and limited set of IP addresses.
AWS Systems Manager Incident Manager
An important launch that security professionals should know about is AWS Systems Manager Incident Manager. Incident Manager provides a number of powerful capabilities for managing incidents of any kind, including operational and availability issues but also security issues. With Incident Manager, you can automatically take action when a critical issue is detected by an Amazon CloudWatch alarm or Amazon EventBridge event. Incident Manager runs pre-configured response plans to engage responders by using SMS and phone calls, can enable chat commands and notifications using AWS Chatbot, and runs automation workflows with AWS Systems Manager Automation runbooks. The Incident Manager console integrates with AWS Systems Manager OpsCenter to help you track incidents and post-incident action items from a central place that also synchronizes with third-party management tools such as Jira Service Desk and ServiceNow. Incident Manager enables cross-account sharing of incidents using AWS RAM, and provides cross-Region replication of incidents to achieve higher availability.
Amazon Simple Storage Service (Amazon S3) is one of the most important services at AWS, and its steady addition of security-related enhancements is always big news. Here are the 2021 highlights.
Access Points aliases
Amazon S3 introduced a new feature, Amazon S3 Access Points aliases. With Amazon S3 Access Points aliases, you can make the access points backwards-compatible with a large amount of existing code that is programmed to interact with S3 buckets rather than access points.
To understand the importance of this launch, we have to go back to 2019 to the launch of Amazon S3 Access Points. Access points are a powerful mechanism for managing S3 bucket access. They provide a great simplification for managing and controlling access to shared datasets in S3 buckets. You can create up to 1,000 access points per Region within each of your AWS accounts. Although bucket access policies remain fully enforced, you can delegate access control from the bucket to its access points, allowing for distributed and granular control. Each access point enforces a customizable policy that can be managed by a particular workgroup, while also avoiding the problem of bucket policies needing to grow beyond their maximum size. Finally, you can also bind an access point to a particular VPC for its lifetime, to prevent access directly from the internet.
With the 2021 launch of Access Points aliases, Amazon S3 now generates a unique DNS name, or alias, for each access point. The Access Points aliases look and acts just like an S3 bucket to existing code. This means that you don’t need to make changes to older code to use Amazon S3 Access Points; just substitute an Access Points aliases wherever you previously used a bucket name. As a security team, it’s important to know that this flexible and powerful administrative feature is backwards-compatible and can be treated as a drop-in replacement in your various code bases that use Amazon S3 but haven’t been updated to use access point APIs. In addition, using Access Points aliases adds a number of powerful security-related controls, such as permanent binding of S3 access to a particular VPC.
S3 Bucket Keys were launched at the end of 2020, another great launch that security professionals should know about, so here is an overview in case you missed it. S3 Bucket Keys are data keys generated by AWS KMS to provide another layer of envelope encryption in which the outer layer (the S3 Bucket Key) is cached by S3 for a short period of time. This extra key layer increases performance and reduces the cost of requests to AWS KMS. It achieves this by decreasing the request traffic from Amazon S3 to AWS KMS from a one-to-one model—one request to AWS KMS for each object written to or read from Amazon S3—to a one-to-many model using the cached S3 Bucket Key. The S3 Bucket Key is never stored persistently in an unencrypted state outside AWS KMS, and so Amazon S3 ultimately must always return to AWS KMS to encrypt and decrypt the S3 Bucket Key, and thus, the data. As a result, you still retain control of the key hierarchy and resulting encrypted data through AWS KMS, and are still able to audit Amazon S3 returning periodically to AWS KMS to refresh the S3 Bucket Keys, as logged in CloudTrail.
Returning to our review of 2021, S3 Bucket Keys gained the ability to use Amazon S3 Inventory and Amazon S3 Batch Operations automatically to migrate objects from the higher cost, slightly lower-performance SSE-KMS model to the lower-cost, higher-performance S3 Bucket Keys model.
To understand this launch, we need to go in time to the origins of Amazon S3, which is one of the oldest services in AWS, created even before IAM was launched in 2011. In those pre-IAM days, a storage system like Amazon S3 needed to have some kind of access control model, so Amazon S3 invented its own: Amazon S3 access control lists (ACLs). Using ACLs, you could add access permissions down to the object level, but only with regard to access by other AWS account principals (the only kind of identity that was available at the time), or public access (read-only or read-write) to an object. And in this model, objects were always owned by the creator of the object, not the bucket owner.
After IAM was introduced, Amazon S3 added the bucket policy feature, a type of resource policy that provides the rich features of IAM, including full support for all IAM principals (users and roles), time-of-day conditions, source IP conditions, ability to require encryption, and more. For many years, Amazon S3 access decisions have been made by combining IAM policy permissions and ACL permissions, which has served customers well. But the object-writer-is-owner issue has often caused friction. The good news for security professionals has been that a deny by either type of access control type overrides an allow by the other, so there were no security issues with this bi-modal approach. The challenge was that it could be administratively difficult to manage both resource policies—which exist at the bucket and access point level—and ownership and ACLs—which exist at the object level. Ownership and ACLs might potentially impact the behavior of only a handful of objects, in a bucket full of millions or billions of objects.
With the features released in 2021, Amazon S3 has removed these points of friction, and now provides the features needed to reduce ownership issues and to make IAM-based policies the only access control system for a specified bucket. The first step came in 2020 with the ability to make object ownership track bucket ownership, regardless of writer. But that feature applied only to newly-written objects. The final step is the 2021 launch we’re highlighting here: the ability to disable at the bucket level the evaluation of all existing ACLs—including ownership and permissions—effectively nullifying all object ACLs. From this point forward, you have the mechanisms you need to govern Amazon S3 access with a combination of S3 bucket policies, S3 access point policies, and (within the same account) IAM principal policies, without worrying about legacy models of ACLs and per-object ownership.
Additional database and storage service features
AWS Backup Vault Lock
AWS Backup added an important new additional layer for backup protection with the availability of AWS Backup Vault Lock. A vault lock feature in AWS is the ability to configure a storage policy such that even the most powerful AWS principals (such as an account or Org root principal) can only delete data if the deletion conforms to the preset data retention policy. Even if the credentials of a powerful administrator are compromised, the data stored in the vault remains safe. Vault lock features are extremely valuable in guarding against a wide range of security and resiliency risks (including accidental deletion), notably in an era when ransomware represents a rising threat to data.
ACM Private CA achieved FedRAMP authorization for six additional AWS Regions in the US.
Additional certificate customization now allows administrators to tailor the contents of certificates for new use cases, such as identity and smart card certificates; or to securely add information to certificates instead of relying only on the information present in the certificate request.
Additional capabilities were added for sharing CAs across accounts by using AWS RAM to help administrators issue fully-customized certificates, or revoke them, from a shared CA.
Integration with Kubernetes provides a more secure certificate authority solution for Kubernetes containers.
Online Certificate Status Protocol (OCSP) provides a fully-managed solution for notifying endpoints that certificates have been revoked, without the need for you to manage or operate infrastructure yourself.
Network and application protection
We saw a lot of enhancements in network and application protection in 2021 that will help you to enforce fine-grained security policies at important network control points across your organization. The services and new capabilities offer flexible solutions for inspecting and filtering traffic to help prevent unauthorized resource access.
AWS WAF
AWS WAF launched AWS WAF Bot Control, which gives you visibility and control over common and pervasive bots that consume excess resources, skew metrics, cause downtime, or perform other undesired activities. The Bot Control managed rule group helps you monitor, block, or rate-limit pervasive bots, such as scrapers, scanners, and crawlers. You can also allow common bots that you consider acceptable, such as status monitors and search engines. AWS WAF also added support for custom responses, managed rule group versioning, in-line regular expressions, and Captcha. The Captcha feature has been popular with customers, removing another small example of “undifferentiated work” for customers.
AWS Shield Advanced
AWS Shield Advanced now automatically protects web applications by blocking application layer (L7) DDoS events with no manual intervention needed by you or the AWS Shield Response Team (SRT). When you protect your resources with AWS Shield Advanced and enable automatic application layer DDoS mitigation, Shield Advanced identifies patterns associated with L7 DDoS events and isolates this anomalous traffic by automatically creating AWS WAF rules in your web access control lists (ACLs).
Amazon CloudFront
In other edge networking news, Amazon CloudFront added support for response headers policies. This means that you can now add cross-origin resource sharing (CORS), security, and custom headers to HTTP responses returned by your CloudFront distributions. You no longer need to configure your origins or use custom Lambda@Edge or CloudFront Functions to insert these headers.
Following Route 53 Resolver’s much-anticipated launch of DNS logging in 2020, the big news for 2021 was the launch of its DNS Firewall capability. Route 53 Resolver DNS Firewall lets you create “blocklists” for domains you don’t want your VPC resources to communicate with, or you can take a stricter, “walled-garden” approach by creating “allowlists” that permit outbound DNS queries only to domains that you specify. You can also create alerts for when outbound DNS queries match certain firewall rules, allowing you to test your rules before deploying for production traffic. Route 53 Resolver DNS Firewall launched with two managed domain lists—malware domains and botnet command and control domains—enabling you to get started quickly with managed protections against common threats. It also integrated with Firewall Manager (see the following section) for easier centralized administration.
AWS Network Firewall and Firewall Manager
Speaking of AWS Network Firewall and Firewall Manager, 2021 was a big year for both. Network Firewall added support for AWS Managed Rules, which are groups of rules based on threat intelligence data, to enable you to stay up to date on the latest security threats without writing and maintaining your own rules. AWS Network Firewall features a flexible rules engine enabling you to define firewall rules that give you fine-grained control over network traffic. As of the launch in late 2021, you can enable managed domain list rules to block HTTP and HTTPS traffic to domains identified as low-reputation, or that are known or suspected to be associated with malware or botnets. Prior to that, another important launch was new configuration options for rule ordering and default drop, making it simpler to write and process rules to monitor your VPC traffic. Also in 2021, Network Firewall announced a major regional expansion following its initial launch in 2020, and a range of compliance achievements and eligibility including HIPAA, PCI DSS, SOC, and ISO.
Elastic Load Balancing now supports forwarding traffic directly from Network Load Balancer (NLB) to Application Load Balancer (ALB). With this important new integration, you can take advantage of many critical NLB features such as support for AWS PrivateLink and exposing static IP addresses for applications that still require ALB.
The AWS Networking team also made Amazon VPC private NAT gateways available in both AWS GovCloud (US) Regions. The expansion into the AWS GovCloud (US) Regions enables US government agencies and contractors to move more sensitive workloads into the cloud by helping them to address certain regulatory and compliance requirements.
Compute
Security professionals should also be aware of some interesting enhancements in AWS compute services that can help improve their organization’s experience in building and operating a secure environment.
Amazon Elastic Compute Cloud (Amazon EC2) launched the Global View on the console to provide visibility to all your resources across Regions. Global View helps you monitor resource counts, notice abnormalities sooner, and find stray resources. A few days into 2022, another simple but extremely useful EC2 launch was the new ability to obtain instance tags from the Instance Metadata Service (IMDS). Many customers run code on Amazon EC2 that needs to introspect about the EC2 tags associated with the instance and then change its behavior depending on the content of the tags. Prior to this launch, you had to associate an EC2 role and call the EC2 API to get this information. That required access to API endpoints, either through a NAT gateway or a VPC endpoint for Amazon EC2. Now, that information can be obtained directly from the IMDS, greatly simplifying a common use case.
Amazon EC2 launched sharing of Amazon Machine Images (AMIs) with AWS Organizations and Organizational Units (OUs). Previously, you could share AMIs only with specific AWS account IDs. To share AMIs within AWS Organizations, you had to explicitly manage sharing of AMIs on an account-by-account basis, as they were added to or removed from AWS Organizations. With this new feature, you no longer have to update your AMI permissions because of organizational changes. AMI sharing is automatically synchronized when organizational changes occur. This feature greatly helps both security professionals and governance teams to centrally manage and govern AMIs as you grow and scale your AWS accounts. As previously noted, this feature was also added to EC2 Image Builder. Finally, Amazon Data Lifecycle Manager, the tool that manages all your EBS volumes and AMIs in a policy-driven way, now supports automatic deprecation of AMIs. As a security professional, you will find this helpful as you can set a timeline on your AMIs so that, if the AMIs haven’t been updated for a specified period of time, they will no longer be considered valid or usable by development teams.
Looking ahead
In 2022, AWS continues to deliver experiences that meet administrators where they govern, developers where they code, and applications where they run. We will continue to summarize important launches in future blog posts. If you’re interested in learning more about AWS services, join us for AWS re:Inforce, the AWS conference focused on cloud security, identity, privacy, and compliance. AWS re:Inforce 2022 will take place July 26–27 in Boston, MA. Registration is now open. Register now with discount code SALxUsxEFCw to get $150 off your full conference pass to AWS re:Inforce. For a limited time only and while supplies last. We look forward to seeing you there!
To stay up to date on the latest product and feature launches and security use cases, be sure to read the What’s New with AWS announcements (or subscribe to the RSS feed) and the AWS Security Blog.
If you have feedback about this post, submit comments in the Comments section below. If you have questions about this post, contact AWS Support.
Want more AWS Security news? Follow us on Twitter.
With Amazon Cognito, you can quickly add user sign-up, sign-in, and access control to your web and mobile applications. After a user signs in successfully, Cognito generates an identity token for user authorization. The service provides a pre token generation trigger, which you can use to customize identity token claims before token generation. In this blog post, we’ll demonstrate how to perform fine-grained authorization, which provides additional details about an authenticated user by using claims that are added to the identity token. The solution uses a pre token generation trigger to add these claims to the identity token.
Scenario
Imagine a web application that is used by a construction company, where engineers log in to review information related to multiple projects. We’ll look at two different ways of designing the architecture for this scenario: a standard design and a more optimized design.
Standard architecture
A sample standard architecture for such an application is shown in Figure 1, with labels for the various workflow steps:
The user interface is implemented by using ReactJS (a JavaScript library for building user interfaces).
AWS Lambda functions exist to implement business logic.
The AWS Lambda CheckUserAccess function (5) checks whether the user has authorization to call the AWS Lambda functions (4).
The project information is stored in an Amazon DynamoDB database.
Figure 1: Lambda functions that need the user’s projectID call the GetProjectID Lambda function
In this scenario, because the user has access to information from several projects, several backend functions use calls to the CheckUserAccess Lambda function (step 5 in Figure 1) in order to serve the information that was requested. This will result in multiple calls to the function for the same user, which introduces latency into the system.
Optimized architecture
This blog post introduces a new optimized design, shown in Figure 2, which substantially reduces calls to the CheckUserAccess API endpoint:
The user logs in.
Amazon Cognito makes a single call to the PretokenGenerationLambdaFunction-pretokenCognito function.
The PretokenGenerationLambdaFunction-pretokenCognito function queries the Project ID from the DynamoDB table and adds that information to the Identity token.
DynamoDB delivers the query result to the PretokenGenerationLambdaFunction-pretokenCognito function.
This Identity token is passed in the authorization header for making calls to the Amazon API Gateway endpoint.
Information in the identity token claims is used by the Lambda functions that contain business logic, for additional fine-grained authorization. Therefore, the CheckUserAccess function (7) need not be called.
The improved architecture is shown in Figure 2.
Figure 2. Get the projectID and inset it in a custom claim in the Identity token
The benefits of this approach are:
The number of calls to get the Project ID from the DynamoDB table are reduced, which in turn reduces overall latency.
The dependency on the CheckUserAccess Lambda function is removed from the business logic. This reduces coupling in the architecture, as depicted in the diagram.
In the code sample provided in this post, the user interface is run locally from the user’s computer, for simplicity.
Code sample
You can download a zip file that contains the code and the AWS CloudFormation template to implement this solution. The code that we provide to illustrate this solution is described in the following sections.
Prerequisites
Before you deploy this solution, you must first do the following:
The code provided with this post installs the following infrastructure in your AWS account.
Resource
Description
Amazon Cognito user pool
The users, added by the addUserInfo.py script, are added to this pool. The client ID is used to identify the web client that will connect to the user pool. The user pool domain is used by the web client to request authentication of the user.
Policies used for running the Lambda function and connecting to the DynamoDB database.
Lambda function for the pre token generation trigger
A Lambda function to add custom claims to the Identity token.
DynamoDB table with user information
A sample database to store user information that is specific to the application.
Deploy the solution
In this section, we describe how to deploy the infrastructure, save the trigger configuration, add users to the Cognito user pool, and run the web application.
To deploy the solution infrastructure
Download the zip file to your machine. The readme.md file in the addclaimstoidtoken folder includes a table that describes the key files in the code.
Change the directory to addclaimstoidtoken. cd addclaimstoidtoken
Review stackInputs.json. Change the value of the userPoolDomainName parameter to a random unique value of your choice. This example uses pretokendomainname as the Amazon Cognito domain name; you should change it to a unique domain name of your choice.
Deploy the infrastructure by running the following Python script. python3 setup_pretoken.py
After the CloudFormation stack creation is complete, you should see the details of the infrastructure created as depicted in Figure 3.
Figure 3: Details of infrastructure
Now you’re ready to add users to your Amazon Cognito user pool.
To add users to your Cognito user pool
To add users to the Cognito user pool and configure the DynamoDB store, run the Python script from the addclaimstoidtoken directory. python3 add_user_info.py
This script adds one user. It will prompt you to provide a username, email, and password for the user.
Note: Because this is sample code, advanced features of Cognito, like multi-factor authentication, are not enabled. We recommend enabling these features for a production application.
The addUserInfo.py script performs two actions:
Adds the user to the Cognito user pool.
Figure 4: User added to the Cognito user pool
Adds sample data to the DynamoDB table.
Figure 5: Sample data added to the DynamoDB table named UserInfoTable
Now you’re ready to run the application to verify the custom claim addition.
To run the web application
Change the directory to the pre-token-web-app directory and run the following command. cd pre-token-web-app
This directory contains a ReactJS web application that displays details of the identity token. On the terminal, run the following commands to run the ReactJS application. npm install npm start
This should open http://localhost:8081 in your default browser window that shows the Login button.
Figure 6: Browser opens to URL http://localhost:8081
Choose the Login button. After you do so, the Cognito-hosted login screen is displayed. Log in to the website with the user identity you created by using the addUserInfo.py script in step 1 of the To add users to your Cognito user pool procedure.
Figure 7: Input credentials in the Cognito-hosted login screen
When the login is successful, the next screen displays the identity and access tokens in the URL. You can reveal the token details to verify that the custom claim has been added to the token by choosing the Show Token Detail button.
Figure 8: Token details displayed in the browser
What happened behind the scenes?
In this web application, the following steps happened behind the scenes:
When you ran the npm start command on the terminal command line, that ran the react-scripts start command from package.json. The port number (8081) was configured in the pre-token-web-app/.env file. This opened the web application that was defined in app.js in the default browser at the URL http://localhost:8081.
The Login button is configured to navigate to the URL that was defined in the constants.js file. The constants.js file was generated during the running of the setup_pretoken.py script. This URL points to the Cognito-hosted default login user interface.
When you provided the login information (username and password), Amazon Cognito authenticated the user. Before generating the set of tokens (identity token and access token), Cognito first called the pre-token-generation Lambda trigger. This Lambda function has the code to connect to the DynamoDB database. The Lambda function can then access the project information for the user that is stored in the userInfo table. The Lambda function read this project information and added it to the identity token that was delivered to the web application.
After a successful login, Amazon Cognito redirected to the URL that was specified in the App Client Settings section, and added the token to the URL.
The webpage detected the token in the URL and displayed the Show Token Detail button. When you selected the button, the webpage read the token in the URL, decoded the token, and displayed the information in the relevant text boxes.
Notice that the Decoded ID Token box shows the custom claim named projects that displays the projectID that was added by the PretokenGenerationLambdaFunction-pretokenCognito trigger.
How to use the sample code in your application
We recommend that you use this sample code with the following modifications:
The code provided does not implement the API Gateway and Lambda functions that consume the custom claim information. You should implement the necessary Lambda functions and read the custom claim for the event object. This event object is a JSON-formatted object that contains authorization data.
The projectId of the user is available in the token. Therefore, when the token is passed by the Authorization trigger to the back end, this custom claim information can be used to perform actions specific to the project for that user. For example, getting all of that user’s work items that are related to the project.
Because the token is valid for one hour, the information in the custom claim information is available to the user interface during that time.
You can use the AWS Amplify library to simplify the communication between your web application and Amazon Cognito. AWS Amplify can handle the token retention and refresh token mechanism for the web application. This also removes the need for the token to be displayed in the URL.
If you’re using Amazon Cognito to manage your users and authenticate them, using the Amazon Cognito user pool to control access to your API is easier, because you don’t have to write the authentication code in your authorizer.
If you decide to use Lambda authorizers, note the following important information from the topic Steps to create an API Gateway Lambda authorizer: “In production code, you may need to authenticate the user before granting authorization. If so, you can add authentication logic in the Lambda function as well by calling an authentication provider as directed in the documentation for that provider.”
Lambda authorizer is recommended if the final authorization (not just token validity) decision is made based on custom claims.
Conclusion
In this blog post, we demonstrated how to implement fine-grained authorization based on data stored in the back end, by using claims stored in an identity token that is generated by the Amazon Cognito pre token generation trigger. This solution can help you achieve a reduction in latency and improvement in performance.
In Part 1 of this blog series, we demonstrated why tiering and throttling become necessary at scale for multi-tenant REST APIs, and explored tiering strategy and throttling with Amazon API Gateway.
In this post, Part 2, we will examine tenant isolation strategies at scale with API Gateway and extend the sample code from Part 1.
Enhancing the sample code
To enable this functionality in the sample code (Figure 1), we will make manual changes. First, create one API key for the Free Tier and five API keys for the Basic Tier. Currently, these API keys are private keys for your Amazon Cognito login, but we will make a further change in the backend business logic that will promote them to pooled resources. Note that all of these modifications are specific to this sample code’s implementation; the implementation and deployment of a production code may be completely different (Figure 1).
Figure 1. Cloud architecture of the sample code
Next, in the business logic for thecreateKey(), find the AWS Lambda function in lambda/create_key.js. It appears like this:
The getPoolForPlanId() function does a search for a pool of keys associated with the usage plan. If there is a pool, we “create” a kind of reference to the pooled resource, rather than a completely new key that is created by the API Gateway service directly. The lambda/api_key_pools.js should be empty.
exports.apiKeyPools = [];
In effect, all usage plans were considered as siloed keys up to now. To change that, populate the data structure with values from the six API keys that were created manually. You will have to look up the IDs of the API keys and usage plans that were created in API Gateway (Figures 2 and 3). Using the AWS console to navigate to API Gateway is the most intuitive.
Figure 2. A view of the AWS console when inspecting the ID for the Basic usage plan
Figure 3. A view of the AWS Console when looking up the API key value (not the ID)
When done, your code in lambda/api_key_pools.js should be the following, but instead of ellipses (…), the IDs for the user plans and API keys specific to your environment will appear.
After making the code changes, run cdk deploy from the command line to update the Lambda functions. This change will only affect key creation and deletion because of the system implementation. Updates affect only the user’s specific reference to the key, not the underlying resource managed by API Gateway.
When the web application is run now, it will look similar to before—tenants should not be aware what tiering strategy they have been assigned to. The only way to notice the difference would be to create two Free Tier keys, test them, and note that the value of the X-API-KEY header is unchanged between the two.
Now, you have a virtually unlimited number of users who can have API keys in the Free or Basic Tier. By keeping the Premium Tier siloed, you are subject to the 10,000-API-key maximum (less any keys allocated for the lower tiers). You may consider additional techniques to continue to scale, such as replicating your service in another AWS account.
Other production considerations
The sample code is minimal, and it illustrates just one aspect of scaling a Software-as-a-service (SaaS) application. There are many other aspects be considered in a production setting that we explore in this section.
The throttled endpoint, GET /api rely only on API key for authorization for demonstration purpose. For any production implementation consider authentication options for your REST APIs. You may explore and extend to require authentication with Cognito similar to /admin/* endpoints in the sample code.
One API key for Free Tier access and five API keys for Basic Tier access are illustrative in a sample code but not representative of production deployments. Number of API keys with service quota into consideration, business and technical decisions may be made to minimize noisy neighbor effect such as setting blast radius upper threshold of 0.1% of all users. To satisfy that requirement, each tier would need to spread users across at least 1,000 API keys. The number of keys allocated to Basic or Premium Tier would depend on market needs and pricing strategies. Additional allocations of keys could be held in reserve for troubleshooting, QA, tenant migrations, and key retirement.
In the planning phase of your solution, you will decide how many tiers to provide, how many usage plans are needed, and what throttle limits and quotas to apply. These decisions depend on your architecture and business.
To define API request limits, examine the system API Gateway is protecting and what load it can sustain. For example, if your service will scale up to 1,000 requests per second, it is possible to implement three tiers with a 10/50/40 split: the lowest tier shares one common API key with a 100 request per second limit; an intermediate tier has a pool of 25 API keys with a limit of 20 requests per second each; and the highest tier has a maximum of 10 API keys, each supporting 40 requests per second.
Metrics play a large role in continuously evolving your SaaS-tiering strategy (Figure 4). They provide rich insights into how tenants are using the system. Tenant-aware and SaaS-wide metrics on throttling and quota limits can be used to: assess tiering in-place, if tenants’ requirements are being met, and if currently used tenant usage profiles are valid (Figure 5).
Figure 4. Tiering strategy example with 3 tiers and requests allocation per tier
Figure 5. An example SaaS metrics dashboard
API Gateway provides options for different levels of granularity required, including detailed metrics, and execution and access logging to enable observability of your SaaS solution. Granular usage metrics combined with underlying resource consumption leads to managing optimal experience for your tenants with throttling levels and policies per method and per client.
Cleanup
To avoid incurring future charges, delete the resources. This can be done on the command line by typing:
cd ${TOP}/cdk
cdk destroy

cd ${TOP}/react
amplify delete
${TOP} is the topmost directory of the sample code. For the most up-to-date information, see the README.md file.
Conclusion
In this two-part blog series, we have reviewed the best practices and challenges of effectively guarding a tiered multi-tenant REST API hosted in AWS API Gateway. We also explored how throttling policy and quota management can help you continuously evaluate the needs of your tenants and evolve your tiering strategy to protect your backend systems from being overwhelmed by inbound traffic.
Many software-as-a-service (SaaS) providers adopt throttling as a common technique to protect a distributed system from spikes of inbound traffic that might compromise reliability, reduce throughput, or increase operational cost. Multi-tenant SaaS systems have an additional concern of fairness; excessive traffic from one tenant needs to be selectively throttled without impacting the experience of other tenants. This is also known as “the noisy neighbor” problem. AWS itself enforces some combination of throttling and quota limits on nearly all its own service APIs. SaaS providers building on AWS should design and implement throttling strategies in all of their APIs as well.
In this two-part blog series, we will explore tiering and throttling strategies for multi-tenant REST APIs and review tenant isolation models with hands-on sample code. In part 1, we will look at why a tiering and throttling strategy is needed and show how Amazon API Gateway can help by showing sample code. In part 2, we will dive deeper into tenant isolation models as well as considerations for production.
We selected Amazon API Gateway for this architecture since it is a fully managed service that helps developers to create, publish, maintain, monitor, and secure APIs. First, let’s focus on how Amazon API Gateway can be used to throttle REST APIs with fine granularity using Usage Plans and API Keys. Usage Plans define the thresholds beyond which throttling should occur. They also enable quotas, which sets a maximum usage per a day, week, or month. API Keys are identifiers for distinguishing traffic and determining which Usage Plans to apply for each request. We limit the scope of our discussion to REST APIs because other protocols that API Gateway supports — WebSocket APIs and HTTP APIs — have different throttling mechanisms that do not employ Usage Plans or API Keys.
SaaS providers must balance minimizing cost to serve and providing consistent quality of service for all tenants. They also need to ensure one tenant’s activity does not affect the other tenants’ experience. Throttling and quotas are a key aspect of a tiering strategy and important for protecting your service at any scale. In practice, this impact of throttling polices and quota management is continuously monitored and evaluated as the tenant composition and behavior evolve over time.
Architecture Overview
Figure 1 – Architecture of the sample code
To get a firm foundation of the basics of throttling and quotas with API Gateway, we’ve provided sample code in AWS-Samples on GitHub. Not only does it provide a starting point to experiment with Usage Plans and API Keys in the API Gateway, but we will modify this code later to address complexity that happens at scale. The sample code has two main parts: 1) a web frontend and, 2) a serverless backend. The backend is a serverless architecture using Amazon API Gateway, AWS Lambda, Amazon DynamoDB, and Amazon Cognito. As Figure I illustrates, it implements one REST API endpoint, GET /api, that is protected with throttling and quotas. There are additional APIs under the /admin/* resource to provide Read access to Usage Plans, and CRUD operations on API Keys.
All these REST endpoints could be tested with developer tools such as curl or Postman, but we’ve also provided a web application, to help you get started. The web application illustrates how tenants might interact with the SaaS application to browse different tiers of service, purchase API Keys, and test them. The web application is implemented in React and uses AWS Amplify CLI and SDKs.
Prerequisites
To deploy the sample code, you should have the following prerequisites:
An AWS CLI profile with permissions to deploy the architecture
For clarity, we’ll use the environment variable, ${TOP}, to indicate the top-most directory in the cloned source code or the top directory in the project when browsing through GitHub.
Detailed instructions on how to install the code are in ${TOP}/INSTALL.md file in the code. After installation, follow the ${TOP}/WALKTHROUGH.md for step-by-step instructions to create a test key with a very small quota limit of 10 requests per day, and use the client to hit that limit. Search for HTTP 429: Too Many Requests as the signal your client has been throttled.
Figure 2: The web application (with browser developer tools enabled) shows that a quick succession of API calls starts returning an HTTP 429 after the quota for the day is exceeded.
Responsibilities of the Client to support Throttling
The Client must provide an API Key in the header of the HTTP request, labelled, “X-Api-Key:”. If a resource in API Gateway has throttling enabled and that header is missing or invalid in the request, then API Gateway will reject the request.
Important: API Keys are simple identifiers, not authorization tokens or cryptographic keys. API keys are for throttling and managing quotas for tenants only and not suitable as a security mechanism. There are many ways to properly control access to a REST API in API Gateway, and we refer you to the AWS documentation for more details as that topic is beyond the scope of this post.
Clients should always test for the response to any network call, and implement logic specific to an HTTP 429 response. The correct action is almost always “try again later.” Just how much later, and how many times before giving up, is application dependent. Common approaches include:
Retry – With simple retry, client retries the request up to defined maximum retry limit configured
Exponential backoff – Exponential backoff uses progressively larger wait time between retries for consecutive errors. As the wait time can become very long quickly, maximum delay and a maximum retry limits should be specified.
Jitter – Jitter uses a random amount of delay between retry to prevent large bursts by spreading the request rate.
AWS SDK is an example client-responsibility implementation. Each AWS SDK implements automatic retry logic that uses a combination of retry, exponential backoff, jitter, and maximum retry limit.
SaaS Considerations: Tenant Isolation Strategies at Scale
While the sample code is a good start, the design has an implicit assumption that API Gateway will support as many API Keys as we have number of tenants. In fact, API Gateway has a quota on available per region per account. If the sample code’s requirements are to support more than 10,000 tenants (or if tenants are allowed multiple keys), then the sample implementation is not going to scale, and we need to consider more scalable implementation strategies.
This is one instance of a general challenge with SaaS called “tenant isolation strategies.” We highly recommend reviewing this white paper ‘SasS Tenant Isolation Strategies‘. A brief explanation here is that the one-resource-per-customer (or “siloed”) model is just one of many possible strategies to address tenant isolation. While the siloed model may be the easiest to implement and offers strong isolation, it offers no economy of scale, has high management complexity, and will quickly run into limits set by the underlying AWS Services. Other models besides siloed include pooling, and bridged models. Again, we recommend the whitepaper for more details.
Figure 3- Tiered multi-tenant architectures often employ different tenant isolation strategies at different tiers. Our example is specific to API Keys, but the technique generalizes to storage, compute, and other resources.
In this example, we implement a range of tenant isolation strategies at different tiers of service. This allows us to protect against “noisy-neighbors” at the highest tier, minimize outlay of limited resources (namely, API-Keys) at the lowest tier, and still provide an effective, bounded “blast radius” of noisy neighbors at the mid-tier.
A concrete development example helps illustrate how this can be implemented. Assume three tiers of service: Free, Basic, and Premium. One could create a single API Key that is a pooled resource among all tenants in the Free Tier. At the other extreme, each Premium customer would get their own unique API Key. They would protect Premium tier tenants from the ‘noisy neighbor’ effect. In the middle, the Basic tenants would be evenly distributed across a set of fixed keys. This is not complete isolation for each tenant, but the impact of any one tenant is contained within “blast radius” defined.
In production, we recommend a more nuanced approach with additional considerations for monitoring and automation to continuously evaluate tiering strategy. We will revisit these topics in greater detail after considering the sample code.
Conclusion
In this post, we have reviewed how to effectively guard a tiered multi-tenant REST API hosted in Amazon API Gateway. We also explored how tiering and throttling strategies can influence tenant isolation models. In Part 2 of this blog series, we will dive deeper into tenant isolation models and gaining insights with metrics.
If you’d like to know more about the topic, the AWS Well-Architected SaaS Lens Performance Efficiency pillar dives deep on tenant tiers and providing differentiated levels of performance to each tier. It also provides best practices and resources to help you design and reduce impact of noisy neighbors your SaaS solution.
Location data is subjected to heavy scrutiny by security experts. Knowing the current position of a person, vehicle, or asset can provide industries with many benefits, whether to understand where a current delivery is, how many people are inside a venue, or to optimize routing for a fleet of vehicles. This blog post explains how Amazon Web Services (AWS) helps keep location data secured in transit and at rest, and how you can leverage additional security features to help keep information safe and compliant.
The General Data Protection Regulation (GDPR) defines personal data as “any information relating to an identified or identifiable natural person (…) such as a name, an identification number, location data, an online identifier or to one or more factors specific to the physical, physiological, genetic, mental, economic, cultural or social identity of that natural person.” Also, many companies wish to improve transparency to users, making it explicit when a particular application wants to not only track their position and data, but also to share that information with other apps and websites. Your organization needs to adapt to these changes quickly to maintain a secure stance in a competitive environment.
On June 1, 2021, AWS made Amazon Location Service generally available to customers. With Amazon Location, you can build applications that provide maps and points of interest, convert street addresses into geographic coordinates, calculate routes, track resources, and invoke actions based on location. The service enables you to access location data with developer tools and to move your applications to production faster with monitoring and management capabilities.
In this blog post, we will show you the features that Amazon Location provides out of the box to keep your data safe, along with best practices that you can follow to reach the level of security that your organization strives to accomplish.
Data control and data rights
Amazon Location relies on global trusted providers Esri and HERE Technologies to provide high-quality location data to customers. Features like maps, places, and routes are provided by these AWS Partners so solutions can have data that is not only accurate but constantly updated.
AWS anonymizes and encrypts location data at rest and during its transmission to partner systems. In parallel, third parties cannot sell your data or use it for advertising purposes, following our service terms. This helps you shield sensitive information, protect user privacy, and reduce organizational compliance risks. To learn more, see the Amazon Location Data Security and Control documentation.
Integrations
Operationalizing location-based solutions can be daunting. It’s not just necessary to build the solution, but also to integrate it with the rest of your applications that are built in AWS. Amazon Location facilitates this process from a security perspective by integrating with services that expedite the development process, enhancing the security aspects of the solution.
Encryption
Amazon Location uses AWS owned keys by default to automatically encrypt personally identifiable data. AWS owned keys are a collection of AWS Key Management Service (AWS KMS) keys that an AWS service owns and manages for use in multiple AWS accounts. Although AWS owned keys are not in your AWS account, Amazon Location can use the associated AWS owned keys to protect the resources in your account.
If customers choose to use their own keys, they can benefit from AWS KMS to store their own encryption keys and use them to add a second layer of encryption to geofencing and tracking data.
Authentication and authorization
Amazon Location also integrates with AWS Identity and Access Management (IAM), so that you can use its identity-based policies to specify allowed or denied actions and resources, as well as the conditions under which actions are allowed or denied on Amazon Location. Also, for actions that require unauthenticated access, you can use unauthenticated IAM roles.
As an extension to IAM, Amazon Cognito can be an option if you need to integrate your solution with a front-end client that authenticates users with its own process. In this case, you can use Cognito to handle the authentication, authorization, and user management for you. You can use Cognito unauthenticated identity pools with Amazon Location as a way for applications to retrieve temporary, scoped-down AWS credentials. To learn more about setting up Cognito with Amazon Location, see the blog post Add a map to your webpage with Amazon Location Service.
Limit the scope of your unauthenticated roles to a domain
When you are building an application that allows users to perform actions such as retrieving map tiles, searching for points of interest, updating device positions, and calculating routes without needing them to be authenticated, you can make use of unauthenticated roles.
When using unauthenticated roles to access Amazon Location resources, you can add an extra condition to limit resource access to an HTTP referer that you specify in the policy. The aws:referer request context value is provided by the caller in an HTTP header, and it is included in a web browser request.
The following is an example of a policy that allows access to a Map resource by using the aws:referer condition, but only if the request comes from the domain example.com.
Encrypt tracker and geofence information using customer managed keys with AWS KMS
When you create your tracker and geofence collection resources, you have the option to use a symmetric customer managed key to add a second layer of encryption to geofencing and tracking data. Because you have full control of this key, you can establish and maintain your own IAM policies, manage key rotation, and schedule keys for deletion.
After you create your resources with customer managed keys, the geometry of your geofences and all positions associated to a tracked device will have two layers of encryption. In the next sections, you will see how to create a key and use it to encrypt your own data.
Create an AWS KMS symmetric key
First, you need to create a key policy that will limit the AWS KMS key to allow access to principals authorized to use Amazon Location and to principals authorized to manage the key. For more information about specifying permissions in a policy, see the AWS KMS Developer Guide.
To create the key policy
Create a JSON policy file by using the following policy as a reference. This key policy allows Amazon Location to grant access to your KMS key only when it is called from your AWS account. This works by combining the kms:ViaService and kms:CallerAccount conditions. In the following policy, replace us-west-2 with your AWS Region of choice, and the kms:CallerAccount value with your AWS account ID. Adjust the KMS Key Administrators statement to reflect your actual key administrators’ principals, including yourself. For details on how to use the Principal element, see the AWS JSON policy elements documentation.
Tip: AWS CLI will consider the Region you defined as the default during the configuration steps, but you can override this configuration by adding –region<your region> at the end of each command line in the following command. Also, make sure that your user has the appropriate permissions to perform those actions.
To create the symmetric key
Now, create a symmetric key on AWS KMS by running the create-key command and passing the policy file that you created in the previous step.
Create an Amazon Location tracker and geofence collection resources
To create an Amazon Location tracker resource that uses AWS KMS for a second layer of encryption, run the following command, passing the key ID from the previous step.
By following these steps, you have added a second layer of encryption to your geofence collection and tracker.
Data retention best practices
Trackers and geofence collections are stored and never leave your AWS account without your permission, but they have different lifecycles on Amazon Location.
Trackers store the positions of devices and assets that are tracked in a longitude/latitude format. These positions are stored for 30 days by the service before being automatically deleted. If needed for historical purposes, you can transfer this data to another data storage layer and apply the proper security measures based on the shared responsibility model.
Geofence collections store the geometries you provide until you explicitly choose to delete them, so you can use encryption with AWS managed keys or your own keys to keep them for as long as needed.
Asset tracking and location storage best practices
After a tracker is created, you can start sending location updates by using the Amazon Location front-end SDKs or by calling the BatchUpdateDevicePosition API. In both cases, at a minimum, you need to provide the latitude and longitude, the time when the device was in that position, and a device-unique identifier that represents the asset being tracked.
Protecting device IDs
This device ID can be any string of your choice, so you should apply measures to prevent certain IDs from being used. Some examples of what to avoid include:
First and last names
Facility names
Documents, such as driver’s licenses or social security numbers
Emails
Addresses
Telephone numbers
Latitude and longitude precision
Latitude and longitude coordinates convey precision in degrees, presented as decimals, with each decimal place representing a different measure of distance (when measured at the equator).
Amazon Location supports up to six decimal places of precision (0.000001), which is equal to approximately 11 cm or 4.4 inches at the equator. You can limit the number of decimal places in the latitude and longitude pair that is sent to the tracker based on the precision required, increasing the location range and providing extra privacy to users.
Figure 1 shows a latitude and longitude pair, with the level of detail associated to decimals places.
Figure 1: Geolocation decimal precision details
Position filtering
Amazon Location introduced position filtering as an option to trackers that enables cost reduction and reduces jitter from inaccurate device location updates.
DistanceBased filtering ignores location updates wherein devices have moved less than 30 meters (98.4 ft).
TimeBased filtering evaluates every location update against linked geofence collections, but not every location update is stored. If your update frequency is more often than 30 seconds, then only one update per 30 seconds is stored for each unique device ID.
AccuracyBased filtering ignores location updates if the distance moved was less than the measured accuracy provided by the device.
By using filtering options, you can reduce the number of location updates that are sent and stored, thus reducing the level of location detail provided and increasing the level of privacy.
Logging and monitoring
Amazon Location integrates with AWS services that provide the observability needed to help you comply with your organization’s security standards.
To record all actions that were taken by users, roles, or AWS services that access Amazon Location, consider using AWS CloudTrail. CloudTrail provides information on who is accessing your resources, detailing the account ID, principal ID, source IP address, timestamp, and more. Moreover, Amazon CloudWatch helps you collect and analyze metrics related to your Amazon Location resources. CloudWatch also allows you to create alarms based on pre-defined thresholds of call counts. These alarms can create notifications through Amazon Simple Notification Service (Amazon SNS) to automatically alert teams responsible for investigating abnormalities.
Conclusion
At AWS, security is our top priority. Here, security and compliance is a shared responsibility between AWS and the customer, where AWS is responsible for protecting the infrastructure that runs all of the services offered in the AWS Cloud. The customer assumes the responsibility to perform all of the necessary security configurations to the solutions they are building on top of our infrastructure.
In this blog post, you’ve learned the controls and guardrails that Amazon Location provides out of the box to help provide data privacy and data protection to our customers. You also learned about the other mechanisms you can use to enhance your security posture.
Start building your own secure geolocation solutions by following the Amazon Location Developer Guide and learn more about how the service handles security by reading the security topics in the guide.
If you have feedback about this post, submit comments in the Comments section below. If you have questions about this blog post, start a new thread on Amazon Location Service forum or contact AWS Support.
Want more AWS Security news? Follow us on Twitter.
This post was co-written with Geoff Baskwill, member of the Architecture Enabling Team at Trend Micro. At Trend Micro, we use AWS technologies to build secure solutions to help our customers improve their security posture.
We’ll build on the idea of passing calls to Amazon Cognito through a lightweight proxy. This pattern allows you to augment identity flows in your system with additional processing without having to change the client or the backend. For example, you can use the proxy layer to protect public clients as explained in the original post. You can also use this layer to apply additional fraud detection logic to prevent fraudulent sign up, propagate events to downstream systems for monitoring or enhanced logging, and replicate certain events to another AWS Region (for example, to build high availability and multi-Region capabilities).
The solution in the original post used Amazon CloudFront, Lambda@Edge, and AWS WAF to implement protection of public clients, and hinted that there are multiple ways to do it. In this post, we explore one of these alternatives by using Amazon API Gateway and a proxy AWS Lambda function to implement the proxy to Amazon Cognito. This alternative offers improved performance and full access to request and response elements.
Solution overview
The focus of this solution is to protect public clients of the Amazon Cognito user pool.
The workflow is shown in Figure 1 and works as follows:
Configure the client application (mobile or web client) to use the API Gateway endpoint as a proxy to an Amazon Cognito regional endpoint. You also create an application client in Amazon Cognito with a secret. This means that any unauthenticated API call must have the secret hash.
Use a Lambda function to add a secret hash to the relevant incoming requests before passing them on to the Amazon Cognito endpoint. This function can also be used for other purposes like logging, propagation of events, or additional validation.
In the Lambda function, you must have the app client secret to be able to calculate the secret hash and add it to the request. We recommend that you keep the secret in AWS Secrets Manager and cache it for the lifetime of the function.
Use AWS WAF with API Gateway to enforce rate limiting, implement allow and deny lists, and apply other rules according to your security requirements.
Clients that send unauthenticated API calls to the Amazon Cognito endpoint directly are blocked and dropped because of the missing secret.
Not shown: You may want to set up a custom domain and certificate for your API Gateway endpoint.
Figure 1. A proxy solution to the Amazon Cognito regional endpoint
Deployment steps
You can use the following AWS CloudFormation template to deploy this proxy pattern for your existing Amazon Cognito user pool.
Note: This template references a Lambda code package from a bucket in the us-east-1 Region. For that reason, the template can be only created in us-east-1. If you need to create the proxy solution in another Region, download the template and Lambda code package, update the template to reference another Amazon Simple Storage Service (Amazon S3) bucket that you own in the desired Region, and upload the code package to that S3 bucket. Then you can deploy your modified template in the desired Region.
This template requires the user pool ID as input and will create several resources in your AWS account to support the following proxy pattern:
A new application client with a secret will be added to your Amazon Cognito user pool
The secret will be stored in Secrets Manager and will be read from the proxy Lambda function
The proxy Lambda function will be used to intercept Amazon Cognito API calls and attach client-secret to applicable requests
The API Gateway project provides the custom proxy endpoint that is used as the Amazon Cognito endpoint in your client applications
An AWS WAF WebACL provides firewall protection to the API Gateway endpoint. The WebACL includes placeholder rules for Allow and Deny lists of IPs. It also includes a rate limiting rule that will block requests from IP addresses that exceed the number of allowed requests within a five-minute period (rate limit value is provided as input to the template)
Several helper resources will also be created like Lambda functions, necessary AWS IAM policies, and roles to allow the solution to function properly
After you create a successful stack, you can find the endpoint URL in the outputs section of your CloudFormation stack. This is the URL we use in the next section with client applications.
Note: The template and code has been simplified for demonstration purposes. If you plan to deploy this solution in production, make sure to review these resources for compliance with your security and performance requirements. For example, you might need to enable certain logs or log encryption or use a customer managed key for encryption.
Integrating your client with proxy solution
Integrate the client application with the proxy by changing the endpoint in your client application to use the endpoint URL for the proxy API Gateway. The endpoint URL and application client ID are located in the Outputs section of the CloudFormation stack.
Next, edit your client-side code to forward calls to Amazon Cognito through the proxy endpoint and use the new application client ID. For example, if you’re using the Identity SDK, you should change this property as follows.
If you’re using AWS Amplify, change the endpoint in the aws-exports.js file by overriding the property aws_cognito_endpoint. Or, if you configure Amplify Auth in your code, you can provide the endpoint as follows.
If you have a mobile application that uses the Amplify mobile SDK, override the endpoint in your configuration as follows (don’t include AppClientSecret parameter in your configuration).
Note that the Endpoint value contains the domain name only, not the full URL. This feature is available in the latest releases of the iOS and Android SDKs.
"CognitoUserPool": { "Default": { "AppClientId": "<APP-CLIENT-ID>", "Endpoint": "<APIGATEWAY-DOMAIN-NAME>", "PoolId": "<USER-POOL-ID>", "Region": "<REGION>" } } WARNING: If you do an amplify push or amplify pull operation, the Amplify CLI overwrites customizations to the awsconfiguration.json and amplifyconfiguration.json files. You must manually re-apply the Endpoint customization and remove the AppClientSecret if you use the CLI to modify your cloud backend.
When to use this pattern
The same guidance for using this pattern applies as in the original post.
You may prefer this solution if you are familiar with API Gateway or if you want to take advantage of the following:
Use CloudWatch metrics from API Gateway to monitor the behavior and health of your Amazon Cognito user pool.
Find and examine logs from your Lambda proxy function in the Region where you have deployed this solution.
Deploy your proxy function into an Amazon Virtual Private Cloud (Amazon VPC) and access sensitive data or services in the Amazon VPC or through Amazon VPC endpoints.
Have full access to request and response in the proxy Lambda function
Extend the proxy features
Now that you are intercepting all of the API requests to Amazon Cognito, add features to your identity layer:
Emit events using Amazon EventBridge when user data changes. You can do this when the proxy function receives mutating actions like UpdateUserAttribute (among others) and Amazon Cognito processes the request successfully.
Implement more complex rate limiting than what AWS WAF supports, like per-user rate limits regardless of where IP address requests are coming from. This can also be extended to include fraud detection, request input validation, and integration with third-party security tools.
Build a geo-redundant user pool that transparently mitigates regional failures by replicating mutating actions to an Amazon Cognito user pool in another Region.
Limitations
This solution has the same limitations highlighted in the original post. Keep in mind that resourceful authenticated users can still make requests to the Amazon Cognito API directly using the access token they obtained from authentication. If you want to prevent this from happening, adjust the proxy to avoid returning the access token to clients or return an encrypted version of the token.
Conclusion
In this post, we explored an alternative solution that implements a thin proxy to Amazon Cognito endpoint. This allows you to protect your application against unwanted requests and enrich your identity flows with additional logging, event propagation, validations, and more.
This post is written by: Bill Chan, Enterprise Solutions Architect
According to a report from Grand View Research, “the global application server market size was valued at USD 15.84 billion in 2020 and is expected to expand at a compound annual growth rate (CAGR) of 13.2% from 2021 to 2028.” The report also suggests that Java based application servers “accounted for the largest share of around 50% in 2020.” This means that many organizations continue to rely on Java application server capabilities to deliver middleware services that underpin the web applications running their transactional, content management and business process workloads.
The maturity of the application server technology also means that many of these web applications were built on traditional three-tier web architectures running in on-premises data centers. And as organizations embark on their journey to cloud, the question arises as to what is the best approach to migrate these applications?
There are seven common migration strategies when moving applications to the cloud, including:
Retain – keeping applications running as is and revisiting the migration at a later stage
Retire – decommissioning applications that are no longer required
Repurchase – switching from existing applications to a software-as-a-service (SaaS) solution
Rehost – moving applications as is (lift and shift), without making any changes to take advantage of cloud capabilities
Relocate – moving applications as is, but at a hypervisor level
Replatform – moving applications as is, but introduce capabilities that take advantage of cloud-native features
Refactor – re-architect the application to take full advantage of cloud-native features
This blog focuses on the ‘replatform’ strategy, which suits customers who have large investments in application server technologies and the business case for re-architecting doesn’t stack up. By re-platforming their applications into the cloud, customers can benefit from the flexibility of a ‘pay-as-you-go’ model, dynamically scale to meet demand and provision infrastructure as code. Additionally, customers can increase the speed and agility to modernize existing applications and build new cloud-native applications to deliver better customer experiences.
In this post, we walk through the steps to replatform a simple contact management Java application running on an open-source Tomcat application server, along with modernization aspects that include:
Deploying a Tomcat web application with automatic scaling capabilities
Integrating Tomcat with Redis cache (using Redisson Session Manager for Tomcat)
Integrating Tomcat with Amazon Cognito for authentication (using Boyle Software’s OpenID Connect Authenticator for Tomcat)
Delegating user log in and sign up to Amazon Cognito
Overview of solution
The solution is comprised of the following components:
A VPC across two Availability Zones
Two public subnets, two private app subnets, and two private DB subnets
An Internet Gateway attached to the VPC
A public route table routing internet traffic to the Internet Gateway
Two private route tables routing traffic internally within the VPC
A frontend web server application Elastic Load Balancing that routes traffic to the Apache Web Servers
An Auto Scaling group that launches additional Apache Web Servers based on defined scaling policies. Each instance of the web server is based on a launch template, which defines the same configuration for each new web server.
A hosted zone in Amazon Route 53 with a domain name that routes to the frontend web server Elastic Load Balancing
An application Elastic Load Balancing that routes traffic to the Tomcat application servers
An Auto Scaling group that launches additional Tomcat Application Servers based on defined scaling policies. Each instance of the Tomcat application server is based on a launch template, which defines the same configuration and software components for each new application server
A Redis cache cluster with a primary and replica node to store session data after the user has authenticated, making your application servers stateless
A Redis open-source Java client, with a Tomcat Session Manager implementation to store authenticated user session data in Redis cache
A MySQL Amazon Relational Database Service (Amazon RDS) Multi-AZ deployment for MySQL RDS to store the contact management and role access tables
An Amazon Simple Storage Service (Amazon S3) bucket to store the application and framework artifacts, images, scripts and configuration files that are referenced by any new Tomcat application server instances provisioned by automatic scaling
Amazon Cognito with a sign-up Lambda function to register users and insert a corresponding entry in the user account tables. Cognito acts as an identity provider and performs the user authentication using an OpenID Connect Authenticator Java component
Walkthrough
The following steps overviews how to deploy the blog solution:
Clone and build the Sample Web Application and AWS Signup Lambda Maven projects from GitHub repository
Deploy the CloudFormation template (java-webapp-infra.yaml) to create the AWS networking infrastructure and the CloudFormation template (java-webapp-rds.yaml) to create the database instance
Update and build the sample web application and signup Lambda function
Upload the packages into your S3 bucket
Deploy the CloudFormation template (java-webapp-components.yaml) to create the blog solution components
Update the solution configuration files and upload them into your S3 bucket
Run a script to provision the underlying database tables
Validate the web application, session cache and automatic scaling functionality
Clean up resources
Prerequisites
For this walkthrough, you should have the following prerequisites:
An Amazon Elastic Compute Cloud (Amazon EC2) key pair (required for authentication). For more details, see Amazon EC2 key pairs
A Java Integrated Development Environment (IDE) such as Eclipse or NetBeans. AWS also offers a cloud-based IDE that lets you write, run and debug code in your browser without having to install files or configure your development machine, called AWS Cloud9. I will show how AWS Cloud9 can be used as part of a DevOps solution in a subsequent post
A valid domain name and SSL certificate for the deployed web application. To validate the OAuth 2.0 integration, Cognito requires the URL that the user is redirected to after successful sign-in to be HTTPS. Refer to a configuring a user pool app client for more details
Note: the solution was validated in the preceding versions and therefore, the launch template created for the CloudFormation solution stack refers to these specific JARs. If you decide to use different versions, then the ‘java-webapp-components.yaml’ will need to be updated to reflect the new versions. Alternatively, you can externalize the parameters in the template.
Clone the GitHub repository to your local machine
This repository contains the sample code for the Java web application and post confirmation sign-up Lambda function. It also contains the CloudFormation templates required to set up the AWS infrastructure, SQL script to create the supporting database and configuration files for the web server, Tomcat application server and Redis cache.
Deploy infrastructure CloudFormation template
Log in to the AWS Management Console and open the CloudFormation service.
2. Create the infrastructure stack using the java-webapp-infra.yaml template (located in the ‘config’ directory of the repo).
3. Infrastructure stack outputs:
Deploy database CloudFormation template
Log in to the AWS Management Console and open the CloudFormation service.
Create the infrastructure stack using the java-webapp-rds.yaml template (located in the ‘config’ directory of the repo).
Database stack outputs.
Update and build sample web application and signup Lambda function
Import the ‘sample-webapp’ and ‘aws-signup-lambda’ Maven projects from the repository into your IDE.
Update the sample-webapp’s UserDAO class to reflect the RDSEndpoint, DBUserName, and DBPassword from the previous step:”
// Externalize and update jdbcURL, jdbcUsername, jdbcPassword parameters specific to your environment
	private String jdbcURL = "jdbc:mysql://<RDSEndpoint>:3306/webappdb?useSSL=false";
	private String jdbcUsername = "<DBUserName>";
	private String jdbcPassword = "<DBPassword>";
To build the ‘sample-webapp’ Maven project, use the standard ‘clean install’ goals.
Update the aws-signup-lambda’s signupHandler class to reflect RDSEndpoint, DBUserName, and DBPassword from the solution stack:
// Update with your database connection details
		String jdbcURL = "jdbc:mysql://<RDSEndpoint>:3306/webappdb?useSSL=false";
		String jdbcUsername = "<DBUserName>";
		String jdbcPassword = "<DBPassword>";
To build the aws-signup-lambda Maven project, use the ‘package shade:shade’ goals to include all dependencies in the package.
Two packages are created in their respective target directory: ‘sample-webapp.war’ and ‘create-user-lambda-1.0.jar’
Upload the packages into your S3 bucket
Log in to the AWS Management Console and open the S3 service.
Select the bucket created by the infrastructure CloudFormation template in an earlier step.
3. Create a ‘config’ and ‘lib’ folder in the bucket.
4. Upload the ‘sample-webapp.war’ and ‘create-user-lambda-1.0.jar’ created an earlier step (along with the downloaded packages from the pre-requisites section) into the ‘lib’ folder of the bucket. The ‘lib’ folder should look like this:
Note: the solution was validated in the preceding versions and therefore, the launch template created for the CloudFormation solution stack refers to these specific package names.
Deploy the solution components CloudFormation template
1. Log in to the AWS Management Console and open the CloudFormation service (if you aren’t already logged in from the previous step).
2. Create the web application solution stack using the ‘java-webapp-components.yaml’ template (located in the ‘config’ directory of the repo).
3. Guidance on the different template input parameters:
a. BastionSGSource – default is 0.0.0.0/0, but it is recommended to restrict this to your allowed IPv4 CIDR range for additional security
b. BucketName – the bucket name created as part of the infrastructure stack. This blog uses the bucket name is ‘chanbi-java-webapp-bucket’
c. CallbackURL – the URL that the user is redirected to after successful sign up/sign in is composed of your domain name (blog.example.com), the application root (sample-webapp), and the authentication form action ‘j_security_check’. As noted earlier, this needs to be over HTTPS
d. CreateUserLambdaKey – the S3 object key for the signup Lambda package. This blog uses the key ‘lib/create-user-lambda-1.0.jar’
e. DBUserName – the database user name for the MySQL RDS. Make note of this as it will be required in a subsequent step
f. DBUserPassword – the database user password. Make note of this as it will be required in a subsequent step
g. KeyPairName – the key pair to use when provisioning the EC2 instances. This key pair was created in the pre-requisite step
h. WebALBSGSource – the IPv4 CIDR range allowed to access the web app. Default is 0.0.0.0/0
i. The remaining parameters are import names from the infrastructure stack. Use default settings
4. After successful stack creation, you should see the following java web application solution stack output:
Update configuration files
The GitHub repository’s ‘config’ folder contains the configuration files for the web server, Tomcat application server and Redis cache, which needs to be updated to reflect the parameters specific to your stack output in the previous step.
Update the virtual hosts in ‘httpd.conf’ to proxy web traffic to the internal app load balancer. Use the value defined by the key ‘AppALBLoadBalancerDNS’ from the stack output.
Update JDBC resource for the ‘webappdb’ in the ‘context.xml, with the values defined by the RDSEndpoint, DBUserName, and DBPassword from the solution components CloudFormation stack:
Log in to the AWS Management Console and open the Amazon Cognito service. Select ‘Manage User Pools’ and you will notice that a ‘java-webapp-pool’ has been created by the solution components CloudFormation stack. Select the ‘java-webapp-pool’ and make note of the ‘Pool Id’, ‘App client id’ and ‘App client secret’.
5. Update ‘Valve’ configuration in the ‘context.xml’, with the ‘Pool Id’, ‘App client id’ and ‘App client secret’ values from the previous step. The Cognito IDP endpoint specific to your Region can be found here. The host base URI needs to be replaced with the domain for your web application.
6. Update the ‘address’ parameter in ‘redisson.yaml’ with Redis cluster endpoint. Use the value defined by the key ‘RedisClusterEndpoint’ from the solution components CloudFormation stack output.
b. tomcat.service – allows Tomcat to run as a service
c. uninstall-sample-webapp.sh – removes the sample web application
Upload configuration files into your S3 bucket
Upload the configuration files from the previous step into the ‘config’ folder of the bucket. The ‘config’ folder should look like this:
Update the Auto Scaling groups
Auto Scaling groups manage the provisioning and removal of the web and application instances in our solution. To start an instance of the web server, update the Auto Scaling group’s desired capacity (1), minimum capacity (1) and maximum capacity (2) as shown in the following image:
2. To start an instance of the application server, update the Auto Scaling group’s desired capacity (1), minimum capacity (1) and maximum capacity (2) for as shown in the following image:
The web and application scaling groups will show a status of “Updating capacity” (as shown in the following image) as the instances start up.
After web and application servers have started, an instance will appear under ‘Instance management’ with a ‘Healthy’ status for each Auto Scaling group (as shown in the following image).
Run the database script webappdb_create_tables.sql
The database script creates the database and underlying tables required by the web application. As the database server resides in the DB private subnet and is only accessible from the application server instance, we need to first connect (via SSH) to the bastion host (using public IPv4 DNS), and from there we can connect (via SSH) to the application server instance (using its private IPv4 address). This will in turn allow us to connect to the database instance and run the database script. Refer to connecting to your Linux instance using SSH for more details. Instance details are located under the ‘Instances’ view (as shown in the following image).
2. Transfer the database script webappdb_create_tables.sql to the application server instance via the Bastion Host. Refer to transferring files using a client for details.
3. Once connected to the application server via SSH, execute the command to connect to the database instance:
mysql -h <RDSEndpoint> -P 3306 -u <DBUserName> -p
4. Enter the DB user password used when creating the database instance. You will be presented with the MySQL prompt after successful login:
Welcome to the MariaDB monitor.  Commands end with ; or \g.
Your MySQL connection id is 300
Server version: 8.0.23 Source distribution

Copyright (c) 2000, 2018, Oracle, MariaDB Corporation Ab and others.

Type 'help;' or '\h' for help. Type '\c' to clear the current input statement.

MySQL [(none)]>
5. Run the command to run the database script webappdb_create_tables.sql:
source /home/ec2-user/webappdb_create_tables.sql
Add an HTTPS listener to the external web load balancer
Log in to the AWS Management Console and select Load Balancers as part of the EC2 service
Add a HTTPS listener on port 443 for the web load balancer. The default action for the listener is to forward traffic to the web instance target group. Refer to create an HTTPS listener for your Application Load Balancer for more details.
Reference the SSL certificate for your domain. In the following example, I have used a certificate from AWS Certificate Manager (ACM) for my domain. You also have the option of using a certificate from Identity Access Management or importing your own certificate.
Update your DNS to route traffic from the external web load balancer
In this example, I use Amazon Route 53 as the Domain Name Server (DNS) service, but the steps will be similar when using your own DNS service.
In your browser, access the following https://<yourdomain.example.com>/sample-webapp
Select “Amazon Cognito” to authenticate using Cognito as the Identity Provider (IdP). You will be redirected to the login page for your Cognito domain.
Select the “Sign up” to create a new user and enter your email and password. Note the password strength requirements that can be configured as part of the user pool’s policies.
An email with the verification code will be sent to the sign-up email address. Enter the code on the verification code screen.
After successful confirmation, you will be re-directed to the authenticated landing page for the web application.
The simple web application allows you to add, edit, and delete contacts as shown in the following image.
Validate the session data on Redis
Follow the steps outlined in connecting to nodes for details on connecting to your Redis cache cluster. You will need to connect to your application server instance (via the bastion host) to perform this as the Redis cache is only accessible from the private subnet.
After successfully installing the Redis client, search for your authenticated user session key in the cluster by running the command (from within the ‘redis-stable’ directory):
You should see an output with your Tomcat authenticated session (if you can’t, perform another login via the Cognito login screen):
# Scanning the entire keyspace to find biggest keys as well as
# average sizes per key type.  You can use -i 0.1 to sleep 0.1 sec
# per 100 SCAN commands (not usually needed).

[00.00%] Biggest hash   found so far '"redisson:tomcat_session:AE647D93F2BECEFEE07B5B42C435E3DE"' with 8 fields
Amazon EC2 Auto Scaling provides several ways for you to scale instances in your Auto Scaling group such as scaling manually as we did in an earlier step. But you also have the option to scale dynamically to meet changes in demand (such as maintaining CPU Utilization at 50%), predictively scale in advance of daily and weekly patterns in traffic flows, or scale based on a scheduled time. Refer to scaling the size of your Auto Scaling group for more details.
We will create a scheduled action to provision another application server instance.
As per our scheduled action, at 11.30 am, an additional application server instance is started.
Under instance management, you will see an additional instance in ‘Pending’ state as it starts.
To test the stateless nature of your application, you can manually stop the original application server instance and observe that your end-user experience is unaffected i.e. you are not prompted to re-authenticate and can continue using the application as your session data is stored in Redis ElastiCache and not tied to the original instance.
Cleaning up
To avoid incurring future charges, remove the resources by deleting the java-webapp-components, java-webapp-rds and java-webapp-infra CloudFormation stacks.
Conclusion
Customers with significant investments in Java application server technologies have options to migrate to the cloud without requiring a complete re-architecture of their applications. In this blog, we’ve shown an approach to modernizing Java applications running on Tomcat Application Server in AWS. And in doing so, take advantage of cloud-native features such as automatic scaling, provisioning infrastructure as code, and leveraging managed services (such as ElastiCache for Redis and Amazon RDS) to make our application stateless. We also demonstrated modernization features such as authentication and user provisioning via an external IdP (Amazon Cognito). For more information on different re-platforming patterns refer to the AWS Prescriptive Guidance on Migration.
QsrSoft is a software as a service (SaaS) company that develops solutions for clients in the restaurant, hospitality, and retail industries to help them achieve operational excellence. QsrSoft has provided these services for more than two decades and now services over 14,000 locations. QsrSoft started using AWS in 2015 and fully migrated all their workloads to AWS by 2016. QsrSoft can innovate rapidly with AWS and use best-in class technologies for cloud-native solutions for their customers.
In QsrSoft’s target industries, it is important to have a way to focus and motivate employees on common objectives. It can be hard to stay on top of ongoing activities and inspire a team towards operational goals. Through client engagement and data collection, QsrSoft identified this as a pressing business challenge that could be solved with technology. After attending an AWS Digital Innovation Program workshop, QsrSoft conceptualized a digital huddle board that connects teams through gamification, communication, recognition, and excellence in shift management. To bring QsrSoft TV to market in the shortest possible time, QsrSoft decided to build using the AWS serverless suite of services.
QsrSoft successfully lowered the barrier of entry when installing a digital huddle board. Using commodity hardware from Amazon devices such as Fire TV Sticks and Fire Smart TVs, QsrSoft released the product as an app in the Amazon App store. Clients can use existing TV screens when rolling out QsrSoft TV, and only have to plug in a Fire TV Stick and pair it with a five-digit code. This blog post describes QsrSoft TV’s architecture and the AWS services employed in building it.
QsrSoft TV architecture
Building on top of their existing microservices architecture and AWS Amplify, a team of three developers brought QsrSoft TV to market in three months. The solution relies heavily on serverless technologies on AWS. Traditionally, in developing a new product, QsrSoft would need to engage several specialized technical resources. Using the fully managed experience of serverless technologies, QsrSoft can focus on delivering business value for the use case. AWS takes care of managing the technology’s hosting and implementation. With serverless, you only pay for what you use, which makes it possible to correlate your costs with the success of your solution.
Figure 1 illustrates the architecture of this solution:
Figure 1. Architecture diagram of QsrSoft TV solution
Digital huddle board app
The customer-facing component of the solution is the application, which runs on Fire devices in restaurants. AWS Amplify is a service that streamlines development of both web applications and native apps. The app is derived from a single-page application (SPA) developed with Vue.js. AWS Amplify provides features such as integrated authentication, CI/CD, and Web Preview. It also provides GraphQL-based endpoints to access Amazon DynamoDB using AWS AppSync. This enables the QsrSoft development team to function autonomously without dependency on the operations or data integration teams. You can connect to the different Amplify backends from the AWS Management Console or with command line interface (CLI) commands. With the Amplify CLI, you can use default categories for the backends or use the AWS Cloud Development Kit (CDK) to customize them.
GraphQL based API layer
The heart of QsrSoft TV is the API that provides the application with its core functionality. QsrSoft built an AWS AppSync endpoint to power QsrSoft TV’s business logic. AWS Amplify provides an easy way to create a secure AWS AppSync API endpoint through integrated authentication and transport layer security (TLS) for in-transit encryption. The development team can first model the data visually in Amplify Studio. Amplify then creates the queries, subscriptions, and mutations. With a single click from the Studio, you can deploy this model to an AWS AppSync API endpoint. The use of annotations permitted the dev team to customize the model further for the application’s needs, such as indexing by key attributes, authorization, and model relationships. This feature of Amplify Studio saved the development team up to 50% of the total API development effort.
Continuous automated deployments and releases
AWS Amplify abstracts the need for a dedicated operations team. This is enabled by AWS Amplify’s fully managed deployment and hosting for full-stack web applications. The development team connected Amplify to the GitHub repository, and in minutes had a complete CI/CD pipeline in place. There was no need to configure any pipelines or handcraft any YAML files. QsrSoft uses Amplify Web Previews, which enabled the product team and beta testers to preview multiple changes and experiments without releasing code to production. While Amplify deployed the Vue.js application, QsrSoft used fastlane to automate the deployment of the Fire TV application into the Amazon App Store. fastlane is an open-source tool that automates tasks like code signing and releasing the Fire TV binary to the Amazon App Store. This enabled QsrSoft to stay true to its automated deployments and infrastructure as code (IaC) practices.
Simplified password-less authentication
With this command line statement, amplify add auth, QsrSoft laid the groundwork for securing their TV application. Behind the scenes, Amplify uses Amazon Cognito to set up a user pool for the app users. QsrSoft TV provides a password-less login experience to the users, by abstracting the need to log in using a username and password. Instead, you use a five-digit code to pair the Fire TV app with a specific location. Amazon Cognito enables this by securing the app with JSON web tokens (JWT).
Automatic data synchronization
The development team focused on data modeling using the visual tools built into Amplify Studio. Amplify provided an AWS AppSync endpoint, so the developers could use GraphQL to interact with Amplify DataStore. Since the data models in the Amplify Studio support DataStore, the development team can now support an app that works offline. Offline mode is vital to any enterprise application, and it engages QsrSoft TV’s users even during an internet outage. Amplify is used to create an AWS AppSync backend with Amazon DynamoDB tables that match the schema created at the application. As the app interacts with the local DataStore, it starts an instance of its Sync Engine, which publishes the data changes by the application to the DynamoDB backend. An additional AWS Lambda-based backend called QORM, aggregates information from QsrSoft’s custom data warehouse implementation based on Amazon S3 and Amazon Aurora.
The scaling and performance provided by DynamoDB and Lambda allowed QsrSoft to scale without extensive planning, as the number of installs increased. This fully serverless application stack is cost-effective and enables QsrSoft to innovate freely. QsrSoft TV onboarded 100 locations in the first week. QsrSoft projects 7,000+ installs in the first year.
Conclusion
AWS is constantly innovating on behalf of our customers like QsrSoft. By leveraging serverless technologies on AWS, QsrSoft accelerated the go-to-market time for QsrSoft TV. Serverless on AWS provides a low barrier to entry for innovation-focused organizations who want to bring an idea to life quickly to provide business value to their customers.
Amazon Fire devices enable software vendors to make their applications available for large-scale distribution. Fire devices are today being used by several thousand households and workplaces worldwide. Many industries can benefit from developing apps for Amazon Fire devices that can be used on large displays and television screens.
This blog post was co-authored by Vinodh Kumar Rathnasabapathy, Senior Manager of Software Engineering, UnitedHealth Group.
Engineers who use Amazon Cognito for machine-to-machine authentication select a primary Region where they deploy their application infrastructure and the Amazon Cognito authorization endpoint. Amazon Cognito is a highly available service in single Region deployments with a published service-level agreement (SLA) target of 99.9%. The UnitedHealth Group (UHG) team needed a solution that would enable them to build and deploy their applications in multiple Regions to achieve higher availability targets. A multi-Region application architecture would also allow UHG engineers to failover to a secondary Region in the event that their application experienced issues in the primary Region.
At UHG, Federated Data Services (FDS) is a business-critical customer-facing application, which requires 99.95% availability and disaster recovery features. The FDS engineering team needed their Amazon Cognito infrastructure to be highly available in case of any service events in AWS Regions, along with having greater flexibility of switching between Regions.
The FDS engineering team worked on a custom solution using existing AWS services to fulfill their availability and recovery requirements. This solution not only serves the purpose of their current business needs but also provides recovery in case of any future disaster.
Overview of the solution
In this solution, we select two AWS Regions which will include the primary Region and the failover Region. Amazon Cognito app clients (including client ID and client secret pair) are created in both Regions and stored in an Amazon DynamoDB table. Client applications are given the client ID and client secret of the primary Region. Optionally, an application-generated ID and secret can be provided to the client to conceal the actual Amazon Cognito client ID and client secret. The process is as follows:
The client application (machine) initiates an authentication request by sending the Amazon Cognito app client ID and client secret to an Amazon Route 53 domain record.
Route 53 routes authentication requests to the in-Region Amazon API Gateway utilizing a Simple routing policy. From there, API Gateway shuts down the TLS connection using AWS Certificate Manager (ACM), and serves as a proxy for the authentication request to AWS Lambda.
AWS Lambda verifies the client ID and client secret, and uses them to look up the in-Region client ID and client secret.
Lambda uses preconfigured environment variables to request the appropriate Region from DynamoDB.
AWS Lambda then passes the returned app client credentials to the in-Region Amazon Cognito deployment. Amazon Cognito verifies the client ID and client secret, and returns an access token to the Lambda function.
The client application (machine) can now use this token to access downstream applications.
The client authentication process in the secondary (failover) Region is the same, with one exception. In the secondary Region, the Lambda environment variables retrieve app client credentials from the DynamoDB database for the secondary Region Amazon Cognito instance.
To initiate a failover between Regions, the Route 53 domain record needs to be pointed to the secondary Region API Gateway Regional endpoint. The downstream application’s Amazon Cognito configuration files must also be updated to point to the secondary Region Amazon Cognito instance. Alerts can be enabled using Amazon CloudWatch alarms to notify system operators of issues that may warrant a failover (a manual process to help system operators decide when to failover). The entire failover process takes just a couple of seconds for DNS to switch over and for the application to start accepting tokens from the secondary Region. This failover process could be automated based on generated alerts.
This architecture is suitable for a hot standby, active-passive type of application deployment. It is important to note that independent Amazon Cognito environments are being used in each Region, so you will need to set up your application to failover to the secondary Region for authentication. For example, your backend should be able to accept and validate access tokens from both primary and secondary Amazon Cognito user pools. To learn more about disaster recovery options in AWS, visit Disaster recovery options in the cloud.
Architecture overview
Figure 1 shows you how to build a multi-Region machine-to-machine architecture using Amazon Cognito, which uses DynamoDB global tables to perform the data replication. A Lambda function is utilized to retrieve the credentials for the active Region that the application is operating in, and a Regional Amazon Cognito endpoint returns the required token.
The Route53 domain record for the authentication proxy service is given to the client application and pointed at the API Gateway Regional endpoint. The client passes primary Region app client credentials to the API Gateway.
API Gateway passes Lambda the client ID and client secret pair.
Lambda does a lookup in DynamoDB to verify the client ID and client secret. After the identity is confirmed, Lambda uses Region-based environment variables to identify if the client should be using the primary Region or secondary Region for authenticating to Amazon Cognito. Lambda retrieves the Region-based client ID and client secret from DynamoDB.
Lambda passes the Region-based app ID and secret to Amazon Cognito, which verifies the client ID and client secret, and returns an access token to the Lambda function.
Lambda passes the access token from the Regional Amazon Cognito environment back to the client to be used against Region-based backend applications.
Prerequisites
For this walkthrough, you should have the following prerequisites:
Note: Ensure that you are following your organization’s security best practices while deploying this architecture.
Implementation
This implementation will focus on the Lambda logic that is used to retrieve user credentials based on Lambda environment variables. We will share snippets of the Lambda function code so you can create the logic necessary to enable multi-Region application architecture using Amazon Cognito app clients. In addition to the Lambda function, you will also need to create and configure the following resources using security implementation designated by your organization:
DynamoDB table with fields primaryClientID, primaryClientSecret, secondaryClientID, and secondaryClientSecret.
Because this table is used to store secrets, make sure encryption is enabled and you follow Security Best Practices for Amazon DynamoDB and your organization’s security best practices.
Enable DynamoDB global tables.
API Gateway Regional endpoint with TLS encryption using ACM.
Route53 domain record routing traffic to Regional API Gateway.
Downstream application configuration pointing at the Regional Amazon Cognito endpoint.
IAM role that grants access from Lambda to DynamoDB.
Now let’s configure our Lambda function using Node.js language. Within the Lambda console create a new Lambda function that you will author from scratch. Select the Node.js runtime and change the runtime Lambda execution role to the IAM role that you have created for Lambda. Next, we will walk through the Lambda function code and configuration.
Attach your new IAM role as a Lambda runtime role that will grant your Lambda function access to the DynamoDB table.
Within the Lambda configuration environment variables, create several key-value variables in the Lambda function. The following are the environmental variables we will add.
Pass the access token from the Regional Amazon Cognito environment back to the client to be used against Region-based backend applications.
let access_token = await authService.getJwtToken(client_credentials);

  response.send(access_token);
New app client creation
You need to implement this Lambda function in both the primary and secondary Regions. Modify the environmental variables in the secondary Region with the secondary Region’s information.
To enroll a new client in this multi-Region architecture using Amazon Cognito we will go through the process as shown in the following illustration.
Figure 2. Creating a new app client
You need to create a new:
App ID and secret in Amazon Cognito in the primary Region.
App ID and secret in Amazon Cognito in the secondary Region.
Item in DynamoDB table consisting of the Amazon Cognito credentials created: primaryClientID, primaryClientSecret, secondaryClientID, and secondaryClientSecret.
Failover process
In this blog post we are creating a hot standby, active-passive type of application deployment. You will need to ensure your application is configured to be able to use either the primary Region Amazon Cognito or the secondary Region Amazon Cognito environment. The process to failover between Regions consists of the following:
Start application backend in the secondary Region.
Reconfigure the application backend Amazon Cognito identity provider YAML file to point at the secondary Region Amazon Cognito identity provider.
Modify the Route 53 domain record to point client applications at the secondary Region API Gateway Regional endpoint.
Cleaning up
In order to avoid unnecessary charges, please be sure to clean up any resources that were built as part of this architecture that are no longer in use.
Conclusion
In this blog post, we presented a solution that allows you to failover Amazon Cognito app clients from one AWS Region to another Region. The benefits of this architecture will allow you to have greater flexibility for running your Amazon Cognito app clients in the Region that is best suited for your use case. With this solution you now have the capability to failover Amazon Cognito app clients to a different AWS Region in the event of application or system errors.
Several variants of this solution can be implemented using the provided Lambda failover logic. You can store App ID and secret in AWS Secrets Manager. To learn more, see How to replicate secrets in AWS Secrets Manager to multiple Regions. You can also automate the failover process between primary and secondary Regions. To accomplish this, you will need to evaluate events which should cause a failover in your environment. Later, build the appropriate automation to failover your downstream application to the secondary Region Amazon Cognito deployment.
Amazon Cognito can be used for machine authentication as per the limits posted in Quotas in Amazon Cognito. Review the limits of number of app clients per user pool and the other applicable rate limits (for example, client credentials rate limits) and verify that these limits meet the needs of your application.
Optum’s Story
UnitedHealth Group (UHG) is the health and well-being company responsible for over 150 million lives globally. Optum, a part of UnitedHealth Group, is a health services business serving the healthcare marketplace, including payers, care providers, employers, governments, life sciences companies and consumers, through its OptumHealth, OptumInsight, OptumRx, and OptumServe businesses.
Federated Data Services (FDS) is the power behind the scenes that enables interoperability and secure transmission of personally identifiable information. It protects health information between lines of businesses, technology systems, applications, members and providers. With FDS, data is centralized, making it easier to share and retrieve by other systems. This assures businesses get a flexible and scalable solution that adapts to changes in technology and business needs.
Codacy is a DevOps insights company based in Lisbon, Portugal. Since its launch in 2012, Codacy has helped software development and engineering teams reduce defects, keep technical debt in check, and ship better code, faster.
Codacy’s latest product, Pulse, is a service that helps understand and improve the performance of software engineering teams. This includes measuring metrics such as deployment frequency, lead time for changes, or mean time to recover. Codacy’s main platform is built on top of AWS products like Amazon Elastic Kubernetes Service (EKS), but they have taken Pulse one step further with AWS serverless.
Codacy had three clear requirements for their initial Pulse prototype.
The solution must enable the development team to iterate quickly and have minimal time-to-market (TTM) to validate the idea.
The solution must be easily scalable and match the demands of both startups and large enterprises alike. This was of special importance, as Codacy wanted to onboard Pulse with some of their existing customers. At the time, these customers already had massive amounts of information.
The solution must be cost-effective, particularly during the early stages of the product development.
Enter AWS serverless
Codacy could have built Pulse on top of Amazon EC2 instances. However, this brings the undifferentiated heavy lifting of having to provision, secure, and maintain the instances themselves.
AWS serverless technologies are fully managed services that abstract the complexity of infrastructure maintenance away from developers and operators, so they can focus on building products.
Serverless applications also scale elastically and automatically behind the scenes, so customers don’t need to worry about capacity provisioning. Furthermore, these services are highly available by design and span multiple Availability Zones (AZs) within the Region in which they are deployed. This gives customers higher confidence that their systems will continue running even if one Availability Zone is impaired.
AWS serverless technologies are cost-effective too, as they are billed per unit of value, as opposed to billing per provisioned capacity. For example, billing is calculated by the amount of time a function takes to complete or the number of messages published to a queue, rather than how long an EC2 instance runs. Customers only pay when they are getting value out of the services, for example when serving an actual customer request.
Overview of Pulse’s solution architecture
An event is generated when a developer performs a specific action as part of their day-to-day tasks, such as committing code or merging a pull request. These events are the foundational data that Pulse uses to generate insights and are thus processed by multiple Pulse components called modules.
Let’s take a detailed look at a few of them.
Ingestion module
Figure 1. Pulse ingestion module architecture
Figure 1 shows the ingestion module, which is the entry point of events into the Pulse platform and is built on AWS serverless applications as follows:
The ingestion API is exposed to customers using Amazon API Gateway. This defines REST, HTTP, and WebSocket APIs with sophisticated functionality such as request validation, rate limiting, and more.
The actual business logic of the API is implemented as AWS Lambda functions. Lambda can run custom code in a fully managed way. You only pay for the time that the function takes to run, in 1-millisecond increments. Lambda natively supports multiple languages, but customers can also bring their own runtimes or container images as needed.
API requests are authorized with keys, which are stored in Amazon DynamoDB, a key-value NoSQL database that delivers single-digit millisecond latency at any scale. API Gateway invokes a Lambda function that validates the key against those stored in DynamoDB (this is called a Lambda authorizer.)
While API Gateway provides a default domain name for each API, Codacy customizes it with Amazon Route 53, a service that registers domain names and configures DNS records. Route 53 offers a service level agreement (SLA) of 100% availability.
Events are stored in raw format in Pulse’s data lake, which is built on top of AWS’ object storage service, Amazon Simple Storage Service (S3). With Amazon S3, you can store massive amounts of information at low cost using simple HTTP requests. The data is highly available and durable.
Whenever a new event is ingested by the API, a message is published in Pulse’s message bus. (More information later in this post.)
Events module
Figure 2. Pulse events module architecture
The events module handles the aggregation and storage of events for actual consumption by customers, see Figure 2:
Events are consumed from the message bus and processed with a Lambda function, which stores them in Amazon Redshift.
Amazon Redshift is AWS’ managed data warehouse, and enables Pulse’s users to get insights and metrics by running analytical (OLAP) queries with the highest performance.
These metrics are exposed to customers via another API (the public API), which is also built on API Gateway.
The business logic for this API is implemented using Lambda functions, like the Ingestion module.
Message bus
Figure 3. Message bus architecture
We mentioned earlier that Pulse’s modules communicate messages with each other via the “message bus.” When something occurs at a specific component, a message (event) is published to the bus. At the same time, developers create subscriptions for each module that should receive these messages. This is known as the publisher/subscriber pattern (pub/sub for short), and is a fundamental piece of event-driven architectures.
With the message bus, you can decouple all modules from each other. In this way, a publisher does not need to worry about how many or who their subscribers are, or what to do if a new one arrives. This is all handled by the message bus.
Pulse’s message bus is built like this, shown in Figure 3:
Events are published via Amazon Simple Notification Service (SNS), using a construct called a topic. Topics are the basic unit of message publication and consumption. Components are subscribed to this topic, and you can filter out unwanted messages.
Developers configure Amazon SNS subscriptions to have the events sent to a queue, which provides a buffering layer from which workers can process messages. At the same time, queues also ensure that messages are not lost if there is an error. In Pulse’s case, these queues are implemented with Amazon Simple Queue Service (SQS).
Other modules
There are other parts of Pulse architecture that also use AWS serverless. For example, user authentication and sign-up are handled by Amazon Cognito, and Pulse’s frontend application is hosted on Amazon S3. This app is served to customers worldwide with low latency using Amazon CloudFront, a content delivery network.
Summary and next steps
By using AWS serverless, Codacy has been able to reduce the time required to bring Pulse to market by staying focused on developing business logic, rather than managing servers. Furthermore, Codacy is confident they can handle Pulse’s growth, as this serverless architecture will scale automatically according to demand.
The IoT (Internet of Things) has accelerated digital transformation for many industries. Companies can now offer smarter home devices, remote patient monitoring, connected and autonomous vehicles, smart consumer devices, and many more products. The enormous volume of data emitted from IoT devices can be used to improve performance, efficiency, and develop new service and business models. This can help you build better relationships with your end consumers. But you’ll need an efficient and affordable way to test your IoT backend services without incurring significant capex by deploying test devices to generate this data.
IoT Device Simulator (IDS) is an AWS Solution that manufacturing companies can use to simulate data, test device integration, and improve the performance of their IoT backend services. The solution enables you to create hundreds of IoT devices with unique attributes and properties. You can simulate data without configuring and managing physical devices.
An intuitive UI to create and manage devices and simulations
IoT Device Simulator comes with an intuitive user interface that enables you to create and manage device types for data simulation. The solution also provides you with a pre-built autonomous car device type to simulate a fleet of connected vehicles. Once you create devices, you can create simulations and generate data (see Figure 1.)
Figure 1. The landing page UI enables you to create devices and simulation
Create devices and simulate data
With IDS, you can create multiple device types with varying properties and data attributes (see Figure 2.) Each device type has a topic where simulation data is sent. The supported data types are object, array, sinusoidal, location, Boolean, integer, float, and more. Refer to this full list of data types. Additionally, you can import device types via a specific JSON format or use the existing automotive demo to pre-populate connected vehicles.
Figure 2. Create multiple device types and their data attributes
Create and manage simulations
With IDS, you can create simulations with one device or multiple device types (see Figure 3.) In addition, you can specify the number of devices to simulate for each device type and how often data is generated and sent.
Figure 3. Create simulations for multiple devices
You can then run multiple simulations (see Figure 4) and use the data generated to test your IoT backend services and infrastructure. In addition, you have the flexibility to stop and restart the simulation as needed.
Figure 4. Run and stop multiple simulations
You can view the simulation in real time and observe the data messages flowing through. This way you can ensure that the simulation is working as expected (see Figure 5.) You can stop the simulation or add a new simulation to the mix at any time.
Figure 5. Observe your simulation in real time
IoT Device Simulator architecture
Figure 6. IoT Device Simulator architecture
The AWS CloudFormation template for this solution deploys the following architecture, shown in Figure 6:
AWS Lambda serves as the solution’s microservices and routes API requests.
Amazon DynamoDB stores simulation and device type information.
AWS Step Functions include an AWS Lambda simulator function to simulate devices and send messages.
An Amazon S3 bucket stores pre-defined routes that are used for the automotive demo (which is a pre-built example in the solution).
AWS IoT Core serves as the endpoint to which messages are sent.
Amazon Location Service provides the map display showing the location of automotive devices for the automotive demo.
The IoT Device Simulator console is hosted on an Amazon S3 bucket, which is accessed via Amazon CloudFront. It uses Amazon Cognito to manage access. API calls, such as retrieving or manipulating information from the databases or running simulations, are routed through API Gateway. API Gateway calls the microservices, which will call the relevant service.
For example, when creating a new device type, the request is sent to API Gateway, which then routes the request to the microservices Lambda function. Based on the request, the microservices Lambda function recognizes that it is a request to create a device type and saves the device type to DynamoDB.
Running a simulation
When running a simulation, the microservices Lambda starts a Step Functions workflow. First, the request contains information about the simulation to be run, including the unique device type ID. Then, using the unique device type ID, Step Functions retrieves all the necessary information about each device type to run the simulation. Once all the information has been retrieved, the simulator Lambda function is run. The simulator Lambda function uses the device type information, including the message payload template. The Lambda function uses this template to build the message sent to the IoT topic specified for the device type.
When running a custom device type, the simulator generates random information based on the values provided for each attribute. For example, when the automotive simulation is run, the simulation runs a series of calculations to simulate an automobile moving along a series of pre-defined routes. Pre-defined routes are created and stored in an S3 bucket, when the solution is launched. The simulation retrieves the routes at random each time the Lambda function runs. Automotive demo simulations also show a map generated from Amazon Location Service and display the device locations as they move.
The simulator exits once the Lambda function has completed or has reached the fifteen-minute execution limit. It then passes all the necessary information back to the Step Function. Step Functions then enters a choice state and restarts the Lambda function if it has not yet surpassed the duration specified for the simulation. It then passes all the pertinent information back to the Lambda function so that it can resume where it left off. The simulator Lambda function also checks DynamoDB every thirty seconds to see if the user has manually stopped the simulation. If it has, it will end the simulation early. Once the simulation is complete, the Step Function updates the DynamoDB table.
The solution enables you to launch hundreds of devices to test backend infrastructure in an IoT workflow. The solution contains an Import/Export feature to share device types. Exporting a device type generates a JSON file that represents the device type. The JSON file can then be imported to create the same device type automatically. The solution allows the viewing of up to 100 messages while the solution is running. You can also filter the messages by topic and device and see what data each device emits.
Conclusion
IoT Device Simulator is designed to help customers test device integration and IoT backend services more efficiently without incurring capex for physical devices. This solution provides an intuitive web-based graphic user interface (GUI) that enables customers to create and simulate hundreds of connected devices. It is not necessary to configure and manage physical devices or develop time-consuming scripts. Although we’ve illustrated an automotive application in this post, this simulator can be used for many different industries, such as consumer electronics, healthcare equipment, utilities, manufacturing, and more.
To provide the best experiences, we use technologies like cookies to store and/or access device information. Consenting to these technologies will allow us to process data such as browsing behavior or unique IDs on this site. Not consenting or withdrawing consent, may adversely affect certain features and functions.
Functional
Always active
The technical storage or access is strictly necessary for the legitimate purpose of enabling the use of a specific service explicitly requested by the subscriber or user, or for the sole purpose of carrying out the transmission of a communication over an electronic communications network.
Preferences
The technical storage or access is necessary for the legitimate purpose of storing preferences that are not requested by the subscriber or user.
Statistics
The technical storage or access that is used exclusively for statistical purposes.The technical storage or access that is used exclusively for anonymous statistical purposes. Without a subpoena, voluntary compliance on the part of your Internet Service Provider, or additional records from a third party, information stored or retrieved for this purpose alone cannot usually be used to identify you.
Marketing
The technical storage or access is required to create user profiles to send advertising, or to track the user on a website or across several websites for similar marketing purposes.
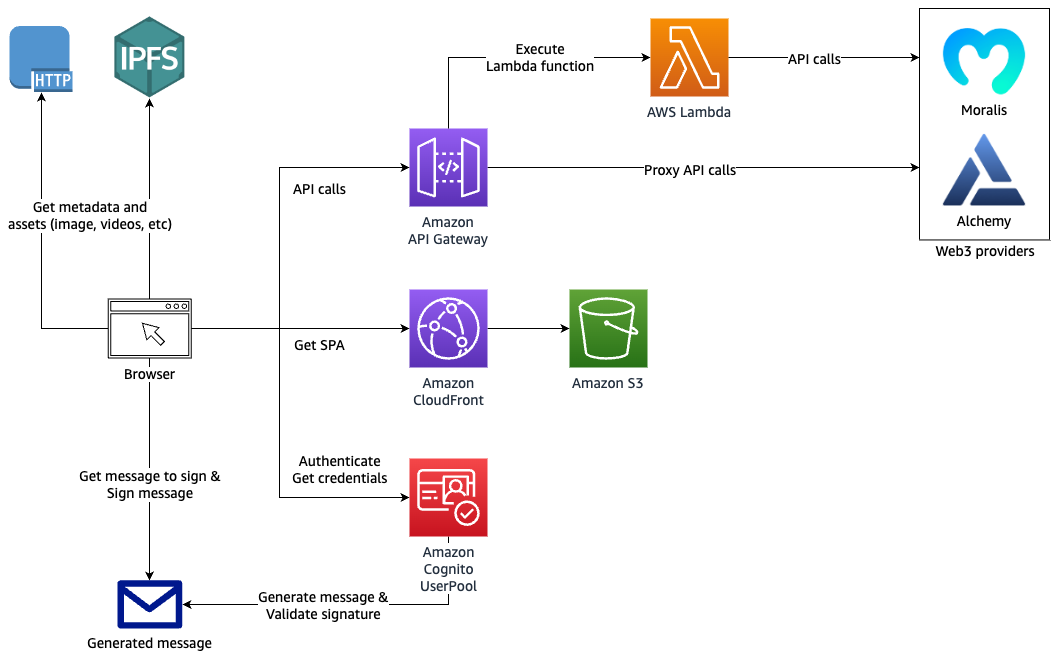

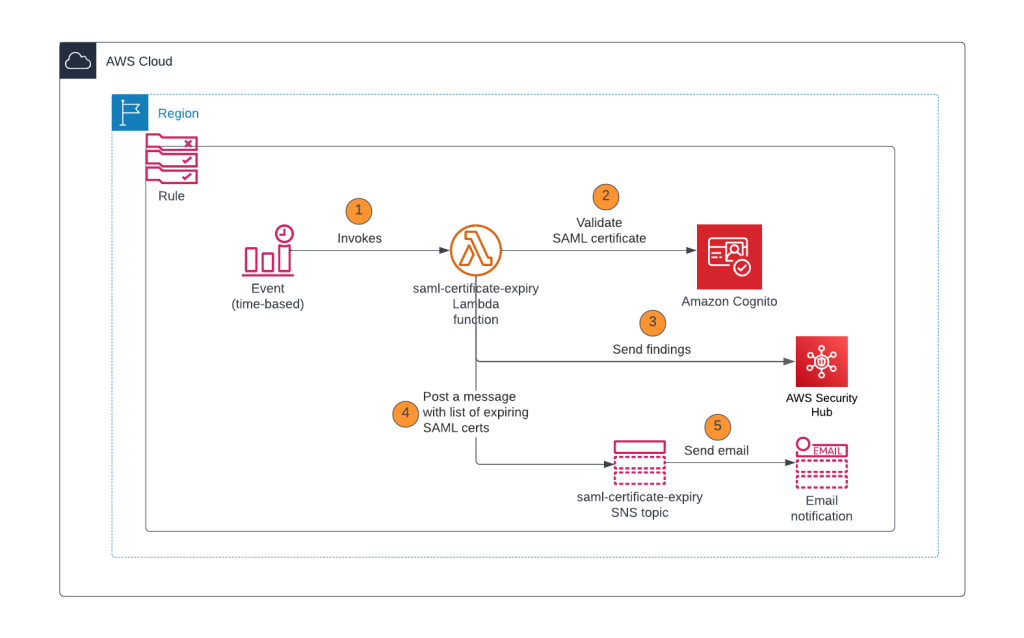

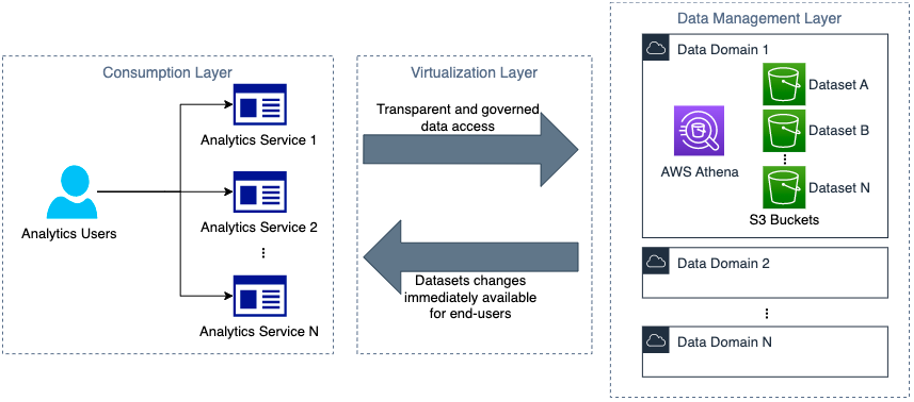
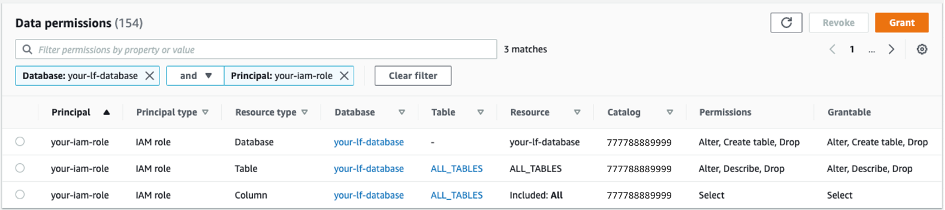

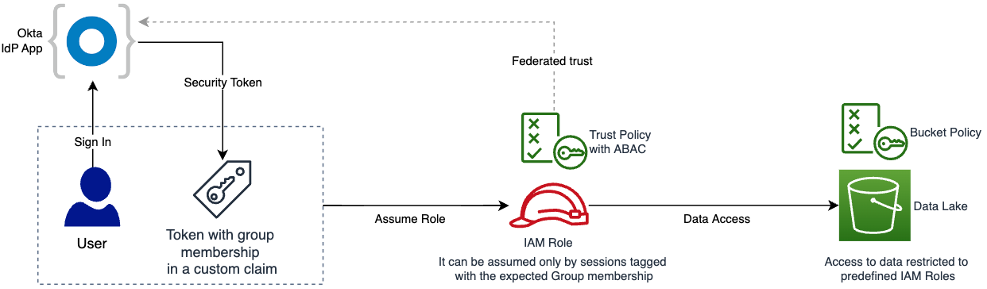
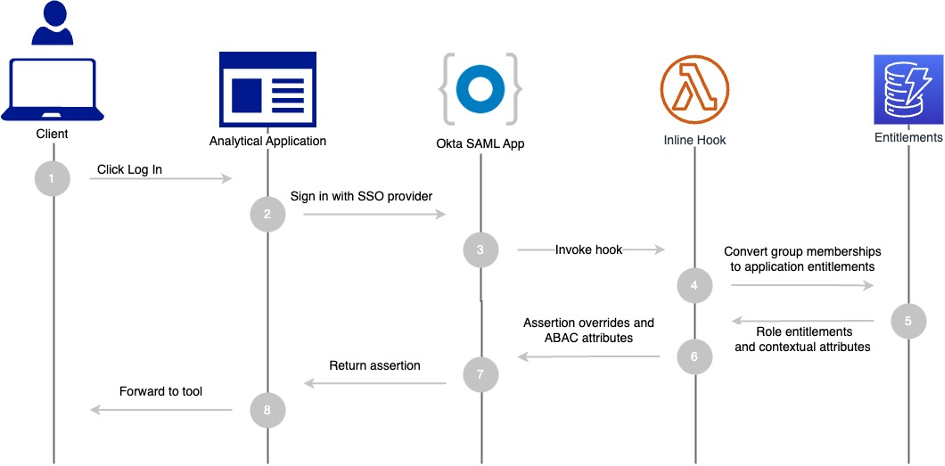
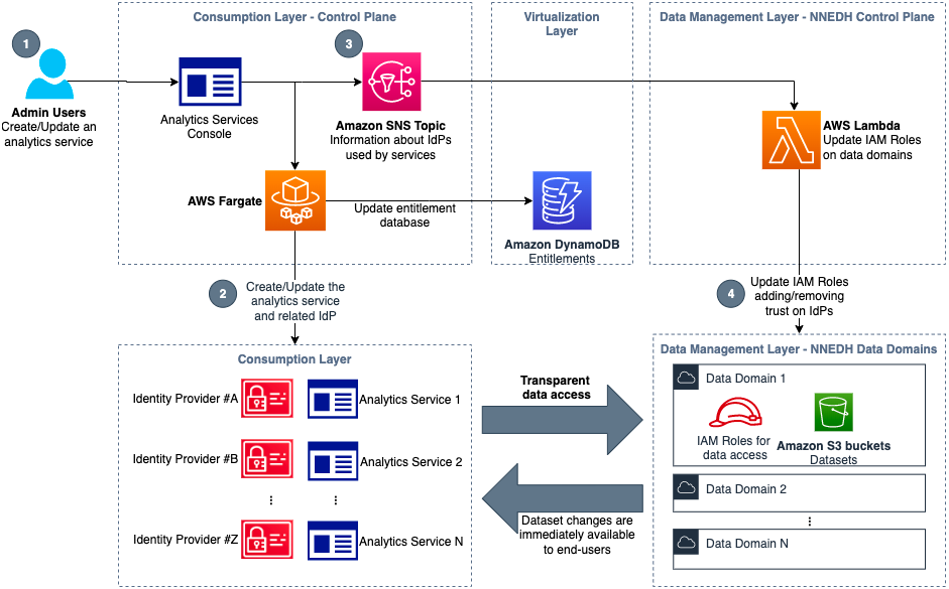
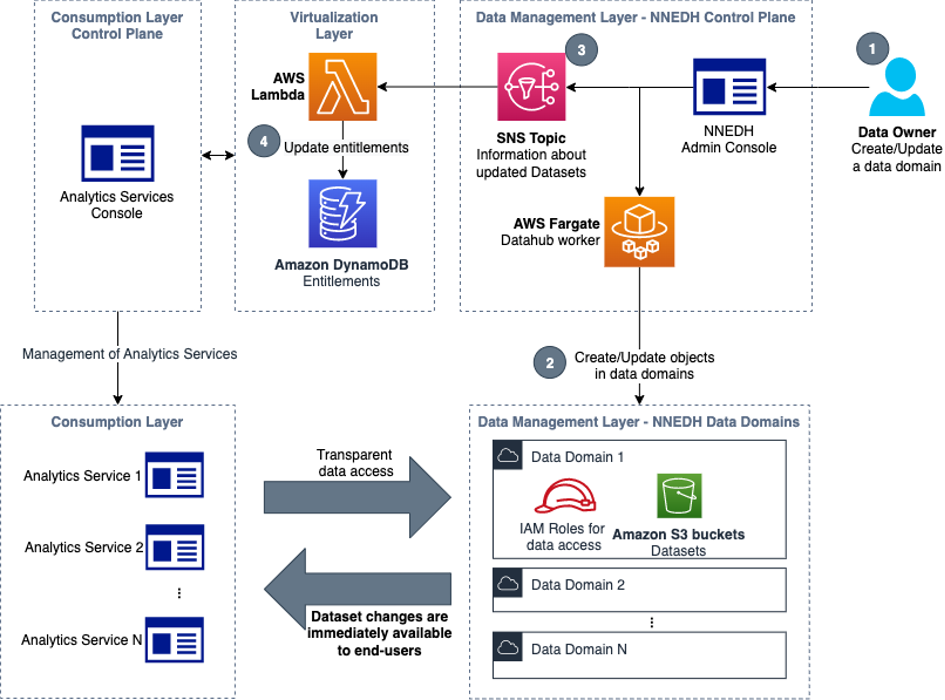
 Jonatan Selsing is former research scientist with a PhD in astrophysics that has turned to the cloud. He is currently the Lead Cloud Engineer at Novo Nordisk, where he enables data and analytics workloads at scale. With an emphasis on reducing the total cost of ownership of cloud-based workloads, while giving full benefit of the advantages of cloud, he designs, builds, and maintains solutions that enable research for future medicines.
 Hassen Riahi is a Sr. Data Architect at AWS Professional Services. He holds a PhD in Mathematics & Computer Science on large-scale data management. He works with AWS customers on building data-driven solutions.
 Alessandro Fior is a Sr. Data Architect at AWS Professional Services. He is passionate about designing and building modern and scalable data platforms that accelerate companies to extract value from their data.