Post Syndicated from original https://xkcd.com/2661/

Post Syndicated from original https://xkcd.com/2661/
Post Syndicated from Maitreya Ranganath original https://aws.amazon.com/blogs/security/how-to-detect-suspicious-activity-in-your-aws-account-by-using-private-decoy-resources/
As customers mature their security posture on Amazon Web Services (AWS), they are adopting multiple ways to detect suspicious behavior and notify response teams or workflows to take action. One example is using Amazon GuardDuty to monitor AWS accounts and workloads for malicious activity and deliver detailed security findings for visibility and remediation. Another tactic is to deploy decoys, also called honeypots, as an effective way to detect suspicious behavior.
In this blog post, we’ll show how you can create low-cost private decoy AWS resources in your AWS accounts and configure them to generate alerts when they are accessed. These decoy resources appear legitimate but don’t contain any useful or sensitive data and typically are not accessed in the normal course of business by your users and systems. Any attempt to access them is a clear signal of suspicious activity that should be investigated. You can use data sources like AWS CloudTrail, services like Amazon Detective, and your own security incident and event monitoring (SIEM) systems to investigate the activity further. This post is aimed at experienced AWS users and security professionals.
Imagine that an unauthorized user has obtained credentials for your account. This could also be an insider, malicious or careless, using their valid credentials inappropriately. The unauthorized user might use these credentials to invoke AWS API calls to list resources in your account. As the next step, they might try to access resources that are commonly used to store sensitive data—such as objects in Amazon Simple Storage Service (Amazon S3) buckets, secrets in AWS Secrets Manager, or items in Amazon DynamoDB. They might also try to elevate their privileges by assuming other Identity and Access Management (IAM) roles in your account. In your role as a security professional, your task is to detect this suspicious behaviour and take actions in response. One approach is to learn the baseline of activities of the IAM users and roles in your account and flag any deviations from the learned baseline—this is the approach taken by GuardDuty when it generates findings such as Discovery:IAMUser/AnomalousBehavior.
This post focuses on another approach of creating private decoy resources in your account that are intended to look legitimate, but don’t have any useful or sensitive data and are not exposed publicly. These decoys are designed to alert you about suspicious activities that could indicate AWS credentials exposure or account compromise. You can use the decoys in conjunction with other techniques, such as creating deception environments and public and private honeypots to better detect suspicious activity in your accounts and applications.
In an ACM Queue article titled Lamboozling Attackers: A New Generation of Deception, Kelly Shortridge and Ryan Petrich introduced the Fidelity-Isolation-Cost (FIC) trilemma that “captures the most important dimensions of designing deception systems: fidelity, isolation, and cost.” Using their definition of the FIC trilemma, we see that decoy AWS resources can be well suited to designing deception systems:
The following table shows examples of private decoy AWS resources that are high-fidelity, high-isolation, low-cost and are suitable to be deployed in an account that has sensitive data or applications. The table also lists the CloudTrail event fields that provide the source and name for accesses to each resource. You can use these CloudTrail events to create corresponding Amazon EventBridge rules that will generate alerts and notifications.
| Private decoy resource | CloudTrail event source | CloudTrail event names | Considerations |
| S3 bucket and S3 objects with dummy data | s3.amazonaws.com | GetObject HeadObject |
Ensure that the S3 objects do not contain any sensitive data.
S3 data events must be enabled in CloudTrail for the decoy S3 bucket |
| IAM role that should never be assumed | sts.amazonaws.com | AssumeRole | Ensure that the IAM policies attached to this role allow access only to decoy resources and no other data or resources.
Ensure that the IAM role’s trust policy only trusts principals in the same account to assume the role. |
| Secrets Manager secret (See Note at end of table) | kms.amazonaws.com | Decrypt | Ensure that the secret value does not contain any sensitive data. |
| AWS Systems Manager Parameter Store parameter (See Note at end of table) | kms.amazonaws.com | Decrypt | Ensure that the parameter value does not contain any sensitive data. |
| DynamoDB table that contains items with dummy data | dynamodb.amazonaws.com | BatchExecuteStatement BatchGetItem BatchWriteItem DeleteItem ExecuteStatement ExecuteTransaction GetItem PutItem Query Scan TransactGetItems TransactWriteItems UpdateItem |
Ensure that the item does not have any sensitive data.
DynamoDB data events must be enabled in CloudTrail for the decoy DynamoDB table. |
Note: When CloudTrail Management API events are sent to EventBridge, read-only events such as Get*, List*, and Describe* are filtered out and not processed. In order to get findings for secrets and Systems Manager parameters that are being accessed, you need to alert on GetSecretValue and GetParameter API calls. Since these are not processed by EventBridge, you can instead use the fact that secrets and secure string parameters are encrypted by using AWS Key Management Service (AWS KMS), and match on the corresponding AWS KMS Decrypt API calls. This means that successful calls from an unauthorized user to GetSecretValue and GetParameter are able to be matched and alerted on.
Notifications from matching EventBridge rules can be sent to an AWS Lambda function that generates custom findings in Security Hub. These findings can then be sent to downstream systems that you might have configured in your environment, such as your SIEM system or an automated response workflow in your Security Orchestration, Automation, and Response system. Figure 1 shows this workflow.

Figure 1: Accesses to decoy resources automatically create custom Security Hub findings
We’ve provided an AWS CloudFormation template that you can use to deploy the solution. The template creates the following private decoy AWS resources in your account:
In addition, the CloudFormation template deploys the following resources in your account to detect accesses to the decoys and send custom findings to Security Hub:
The prerequisites to deploying the solution are as follows:
After you have the prerequisites set up, you can launch the CloudFormation template to deploy the private decoys.
To launch the template
![]()
Note: The stack will launch in the N. Virginia (us-east-1) Region. To deploy this solution into other AWS Regions, download the solution’s CloudFormation template, modify it, and deploy it to the selected Region. In order to get maximum coverage for detecting suspicious activity, we recommend that you deploy the solution into your key production accounts and Regions.
The CloudFormation template will use the stack name as part of the naming of the resources that are created. We recommend that you use your organization’s existing naming conventions for stack names, and not make reference to decoy resources, because this could alert any unauthorized user to the real purpose of the resources they’re attempting to access.

Figure 2: Specify stack details

Figure 3: CloudFormation stack outputs
This solution has been designed to keep costs as low as possible, by using services that have no associated costs (such as IAM roles or any parameters stored in Systems Manager Parameter Store), and keeping the use of paid for services (such as S3 and DynamoDB) to a minimum.
Deploying the solution as outlined in this blog post should result in a cost of less than $1 per month for a single account deployment, however please refer to the AWS Pricing Calculator where you can create a pricing estimate based on your deployment using the most up-to-date pricing information.
In normal circumstances, after you configure the decoys, there will be no attempted access to these resources, and no findings will be sent to Security Hub in your account. To test that the configuration is working as expected, you can issue the following commands from a device that has programmatic access to your account where the private decoy resources have been deployed. To run each command, replace the bracketed, italicized text with your own information. You can find the details for each of the resources in the outputs section of the CloudFormation stack after it has been deployed successfully.
S3 object access
IAM role assumption
Secrets Manager access
Parameter Store access
DynamoDB table scan
An example of what these test-generated findings looks like is shown in Figure 4.

Figure 4: Security Hub findings
Consider the following as you deploy decoy AWS resources:
In this post, we discussed the advantages of using private decoy AWS resources to detect suspicious activities within your account and how these decoys can complement your existing security solutions. You learned how to create private decoys, set up alerting, and ingest (and test) these alerts as custom findings into Security Hub for central visibility across your AWS environment. The solution deployment included a set of common resources as private decoys; however, the necessary code and templates can be found in our GitHub repository, and you can extend and customize these to add other resources that you want to include in your accounts.
If you would also like to learn about using CloudTrail as another method of detecting unexpected behavior within your accounts, see the blog post Using CloudTrail to identify unexpected behaviors in individual workloads for more information.
If you have feedback about this post, submit comments in the Comments section below. If you have questions about this post, contact AWS Support.
Want more AWS Security news? Follow us on Twitter.
Post Syndicated from Crosstalk Solutions original https://www.youtube.com/watch?v=cXmznlysz-M
Post Syndicated from Laura Debney original https://www.backblaze.com/blog/keeping-passwords-secret-and-your-data-safe/

Even if you’ve heard about the 3.27 billion email and password combinations made public on an English language hacker forum in 2020, you may not have heard the worst of it.
Anyone could buy the list for $2 a download.
You’d think that was the scariest part of what became known as the Compilation of Many Breaches (COMB) leak–but it’s not.
The scariest and most preventable part of this breach is that people reuse their passwords and cybercriminals know it.
You may have read Backblaze’s post about credential stuffing attacks. Briefly, it’s a brute force attack using credentials from a list like COMB to unlock an account, most likely with a weak and common password like 123456 or “passwort” (if you’re German).
Is there a better reason than COMB to stop reusing passwords for multiple devices, apps and websites? That alone should do it, but if you need more reasons, they are legion.
There’s no denying how hard it can be to remember 12 to 15 pieces of information in length. After all, our telephone numbers are only seven digits long by design–which happens to be the length of any sequence of numbers we humans can easily recall.
While we each have responsibility for implementing password best practices, the COMB attacks show us that personal password protection isn’t enough. Cloud service providers (CSP) are also responsible for protecting the data entrusted to them. Backblaze uses a sophisticated security approach to protect access.
Regardless, user verification is just more effective with strong passwords, so here are a few tips on keeping your password secret and your data safe.
First and foremost, a password is a secret authenticator, according to the National Institute of Standards and Technology (NIST). They have a lot to say about the strength of passwords by complexity, length, and manner of creation. We’ll get into details a little later.
The string of letters, numbers, and symbols used in a password can’t be easy to guess or forget. This is tougher to achieve than it sounds, and typically users choose short, memorable passwords for convenience.
If you want to eliminate the possibility of being the next victim of credential stuffing, here are some things you shouldn’t do:
The reality is that hackers can (and have) released accurate email and password combinations, and the best way to render that old information utterly useless is never to use those passwords again. (Also, stop adding a “2” at the end of “Password1.” You’re not fooling anyone.)
You should know that verifying a digital identity with an email and a password isn’t as straightforward as presenting your photo ID at the airport. And, password authentication isn’t as safe as it once was, thanks to cybercrimes resulting in lists like COMB. In light of the security risks hackers pose, new authentication guidelines were created to help CSPs ensure the authenticity of a user.
There are three types of authenticators.
CSPs or verifiers can employ different combinations of authenticators to achieve different levels of assurance that will ultimately help to reduce successful cybersecurity attacks. The different combinations of authenticators create an authentication assurance level (AAL). For example, when you log in, a CSP might use a combination of your password and a code generated by an authenticator app.
A strong password is essential to each authentication level. Each AAL meets the recommended privacy controls and relies on something that only you know and is difficult to estimate. Cyber criminals only need to guess one reused email and password combination to make a costly mess of things for you or your business.
This may sound too simplistic, but the NIST (SP 800-63-3 Appendix A) qualifies a password’s strength by its length. In the case of brute force attacks, shorter passwords are too easy to uncover before rate limitings results in a lockout. Passwords of sufficient length reduce the success of credential stuffing or denial-of-service attacks. The NIST recommends that CSPs allow passwords or password phrases of almost any length so long as it doesn’t demand excessive time to disguise with a salting of random letters, numbers, and hashing algorithm.
The next thing to consider when creating a strong password is complexity. That said, the NIST recommends that password complexity not impede memorability, which would defeat the purpose of using a password to authenticate something you know. Too complex of a password leads people to writing down passwords or storing them in unsafe places rather than forgetting them. This vulnerability has to be addressed when CSPs provide instructions for creating passwords for users.
Unfortunately, analysis of breached data reveals that combining complexity and length isn’t a foolproof deterrent. However, a sufficiently long password is harder to guess, and an adequately complex one will improve the masking efforts like salting and hashing.
One more way to ensure you’re using a strong password is to use a tool to randomly generate one based on a set of standards, like length, type of character, readability, etc.. Randomly produced passwords are harder to brute force attack or guess. While there are a few different places you can find a random password generator, we love password managers like BitWarden, 1Password, and LastPass, which generate, organize, and secure passwords.
Remember that breached data can provide insights into what an old password might be for the same account or similar type because cybercriminals know that we are creatures of habit. Not only that, but some facts are immutable. A great example is when you always select the same challenge question. If that data has been breached, it’s likely known to cybercriminals; also, your mother’s maiden name is not going to change. As another layer, you can use randomly generated answers to security questions the same way you use randomly generated passwords, meaning those answers won’t be able to be reused (or easily gleaned from dumb Facebook quizzes).
Next, let’s get into how you can keep hackers from guessing your strong passwords.
To review, strong passwords are long, complex, and secret. These days you can take advantage of a password generator and save it to your password manager. However, there are times you need to come up with a strong password.
Consider these two steps for making a password strong:
Step one: Use a memorable phrase that’s 12 to 15 characters long (e.g. she sells seashells).
Step two: Lightly salt your version with some random characters (e.g. sHe sellz seasHells).
A few ideas for memorable phrases are to use a song lyric, a poetic verse or a line from a movie.
Pro Tip: When you lightly salt your memorable phrase, try not to use @ for the letter ‘a’ or the number zero for the letter ‘o’.
Avoid being predictable. Also, avoid the temptation to use sensitive information like your child’s birthdate or your first and last name or 12345678. Trust me, using this type of information is uber common worldwide.
Another way to check that you’re using a unique password is by culling breached data records. According to Troy Hunt’s pwned.com site, the password Qwerty was used 71,219 times before I typed it into Have I Been Pwned Password API. As Hunt points out, the NIST recommends that CSPs compare user-generated passwords with unacceptable ones. A blocklist should have passwords from previous breaches and predictable options that include the service name, like using the password ‘G000gle’ for your Gmail account.
In the battle against brute force attacks from hackers that can compute ridiculous numbers of hashes without rate limiting, users play a critical role in protecting your data with strong passwords.
Here are a few other ways to keep your data safer:
The good news is that even as cybercriminals get more ingenious, new and innovative tools have been created to make personal data security easier than ever. And, as data nerds ourselves, Backblaze takes your cybersecurity seriously. Check out some of the ways we secure your data here.
The post Keeping Passwords Secret and Your Data Safe appeared first on Backblaze Blog | Cloud Storage & Cloud Backup.
Post Syndicated from Mostafa Safipour original https://aws.amazon.com/blogs/big-data/set-up-federated-access-to-amazon-athena-for-microsoft-ad-fs-users-using-aws-lake-formation-and-a-jdbc-client/
Tens of thousands of AWS customers choose Amazon Simple Storage Service (Amazon S3) as their data lake to run big data analytics, interactive queries, high-performance computing, and artificial intelligence (AI) and machine learning (ML) applications to gain business insights from their data. On top of these data lakes, you can use AWS Lake Formation to ingest, clean, catalog, transform, and help secure your data and make it available for analysis and ML. Once you have setup your data lake, you can use Amazon Athena which is an interactive query service that makes it easy to analyze data in Amazon Simple Storage Service (Amazon S3) using standard SQL.
With Lake Formation, you can configure and manage fine-grained access control to new or existing databases, tables, and columns defined in the AWS Glue Data Catalog for data stored in Amazon S3. After you set access permissions using Lake Formation, you can use analytics services such as Amazon Athena, Amazon Redshift, and Amazon EMR without needing to configure policies for each service.
Many of our customers use Microsoft Active Directory Federation Services (AD FS) as their identity provider (IdP) while using cloud-based services. In this post, we provide a step-by-step walkthrough of configuring AD FS as the IdP for SAML-based authentication with Athena to query data stored in Amazon S3, with access permissions defined using Lake Formation. This enables end-users to log in to their SQL client using Active Directory credentials and access data with fine-grained access permissions.
To build the solution, we start by establishing trust between AD FS and your AWS account. With this trust in place, AD users can federate into AWS using their AD credentials and assume permissions of an AWS Identity and Access Management (IAM) role to access AWS resources such as the Athena API.
To create this trust, you add AD FS as a SAML provider into your AWS account and create an IAM role that federated users can assume. On the AD FS side, you add AWS as a relying party and write SAML claim rules to send the right user attributes to AWS (specifically Lake Formation) for authorization purposes.
The steps in this post are structured into the following sections:
The following diagram provides an overview of the solution architecture.

The flow for the federated authentication process is as follows:
StartQueryExecution.GetDataAccess). Lake Formation assumes the IAM role associated with the data lake location and returns temporary credentials.For our use case, we use two sample tables:
c_name, c_phone, c_address)We also have data consumer users who are members of the following teams:
To demonstrate this use case, we create two users called CustomerOpsUser and FinanceUser and three AD groups for different access patterns: data-customer (customer information access excluding PII attributes), data-customer-pii (full customer information access including PII attributes), and data-order (order information access). By adding the users to these three groups, we can grant the right level of access to different tables and columns.
To follow along with this walkthrough, you must meet the following prerequisites:
To set up your SAML provider, complete the following steps:
adfs-saml-provider.Now you’re ready to create a new IAM role.
adfs-saml-provider).SAML:aud and https://signin.aws.amazon.com/saml.AthenaFullAccess.If the Amazon S3 location for your Athena query results doesn’t start with aws-athena-query-results, add another policy to allow users write query results into your Amazon S3 location. For more information, see Specifying a Query Result Location Using the Athena Console and Writing IAM Policies: How to Grant Access to an Amazon S3 Bucket.
adfs-data-access.SAML-based federation has two participant parties: the IdP (Active Directory) and the relying party (AWS), which is the service or application that wants to use authentication from the IdP.
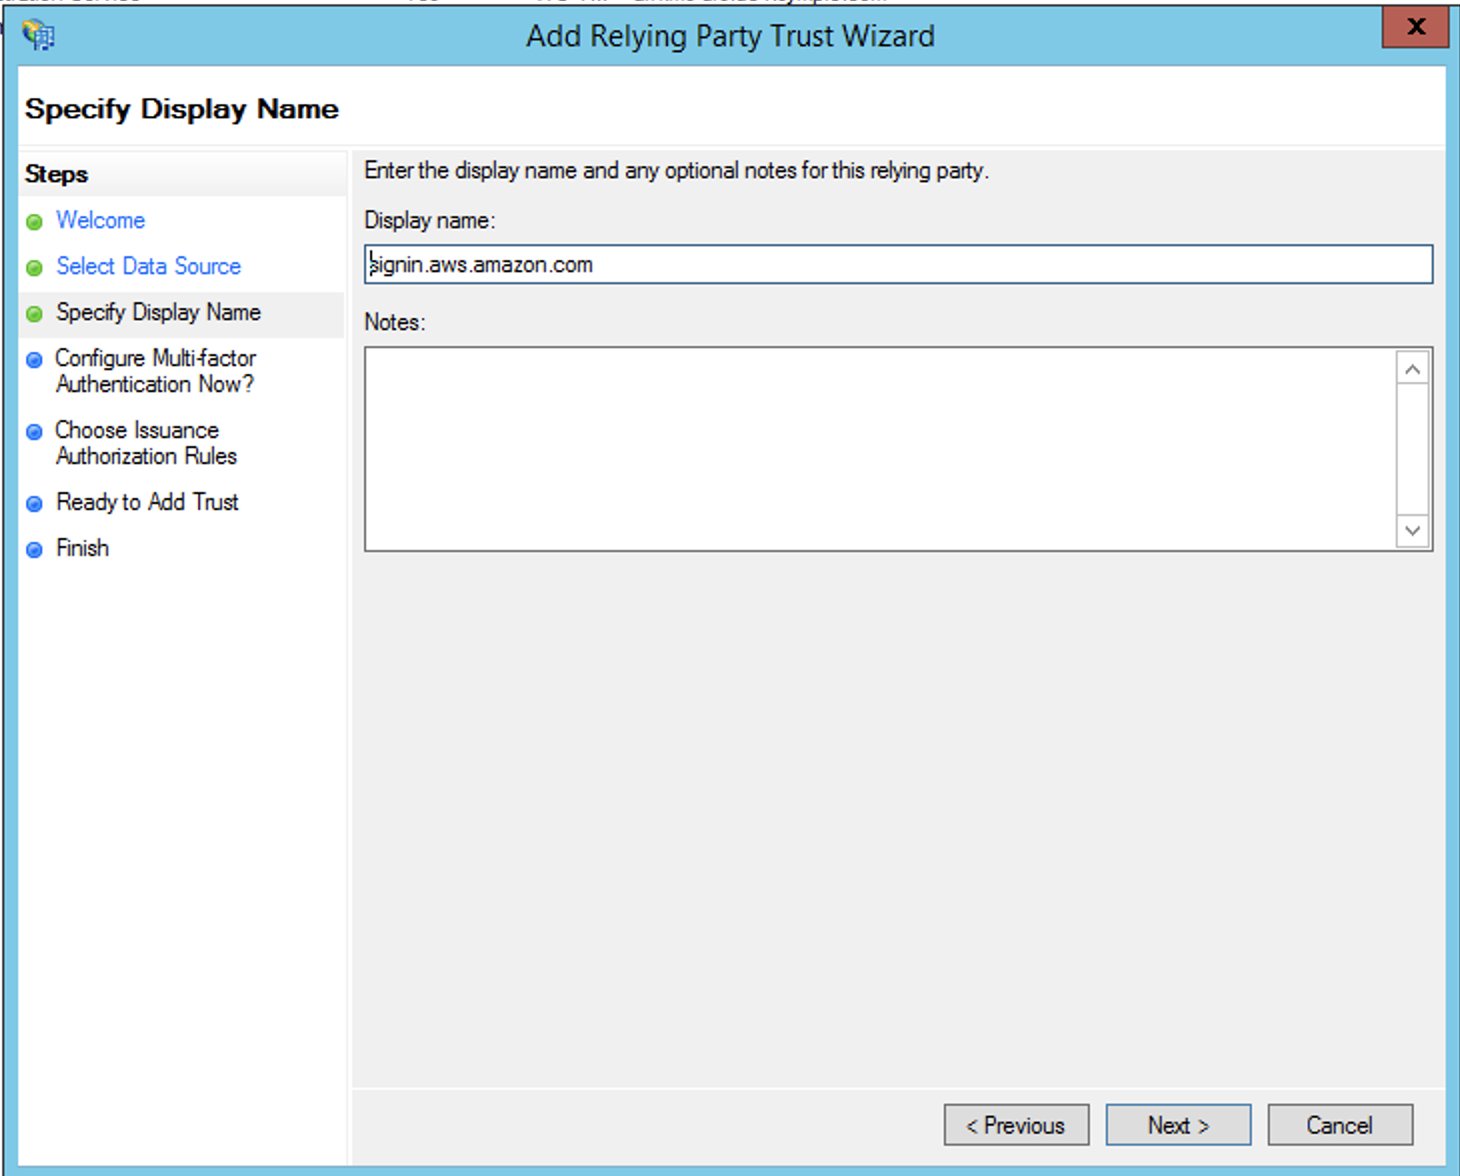
To configure AD FS, you first add a relying party trust, then you configure SAML claim rules for the relying party. Claim rules are the way that AD FS forms a SAML assertion sent to a relying party. The SAML assertion states that the information about the AD user is true, and that it has authenticated the user.
To create your relying party in AD FS, complete the following steps:

https://signin.aws.amazon.com/static/saml-metadata.xml.The metadata XML file is a standard SAML metadata document that describes AWS as a relying party.

For increased security, we recommend that you configure multi-factor authentication to help protect your AWS resources. We don’t enable multi-factor authentication for this post because we’re using a sample dataset.

This allows all users in Active Directory to use AD FS with AWS as a relying party. You should consider your security requirements and adjust this configuration accordingly.

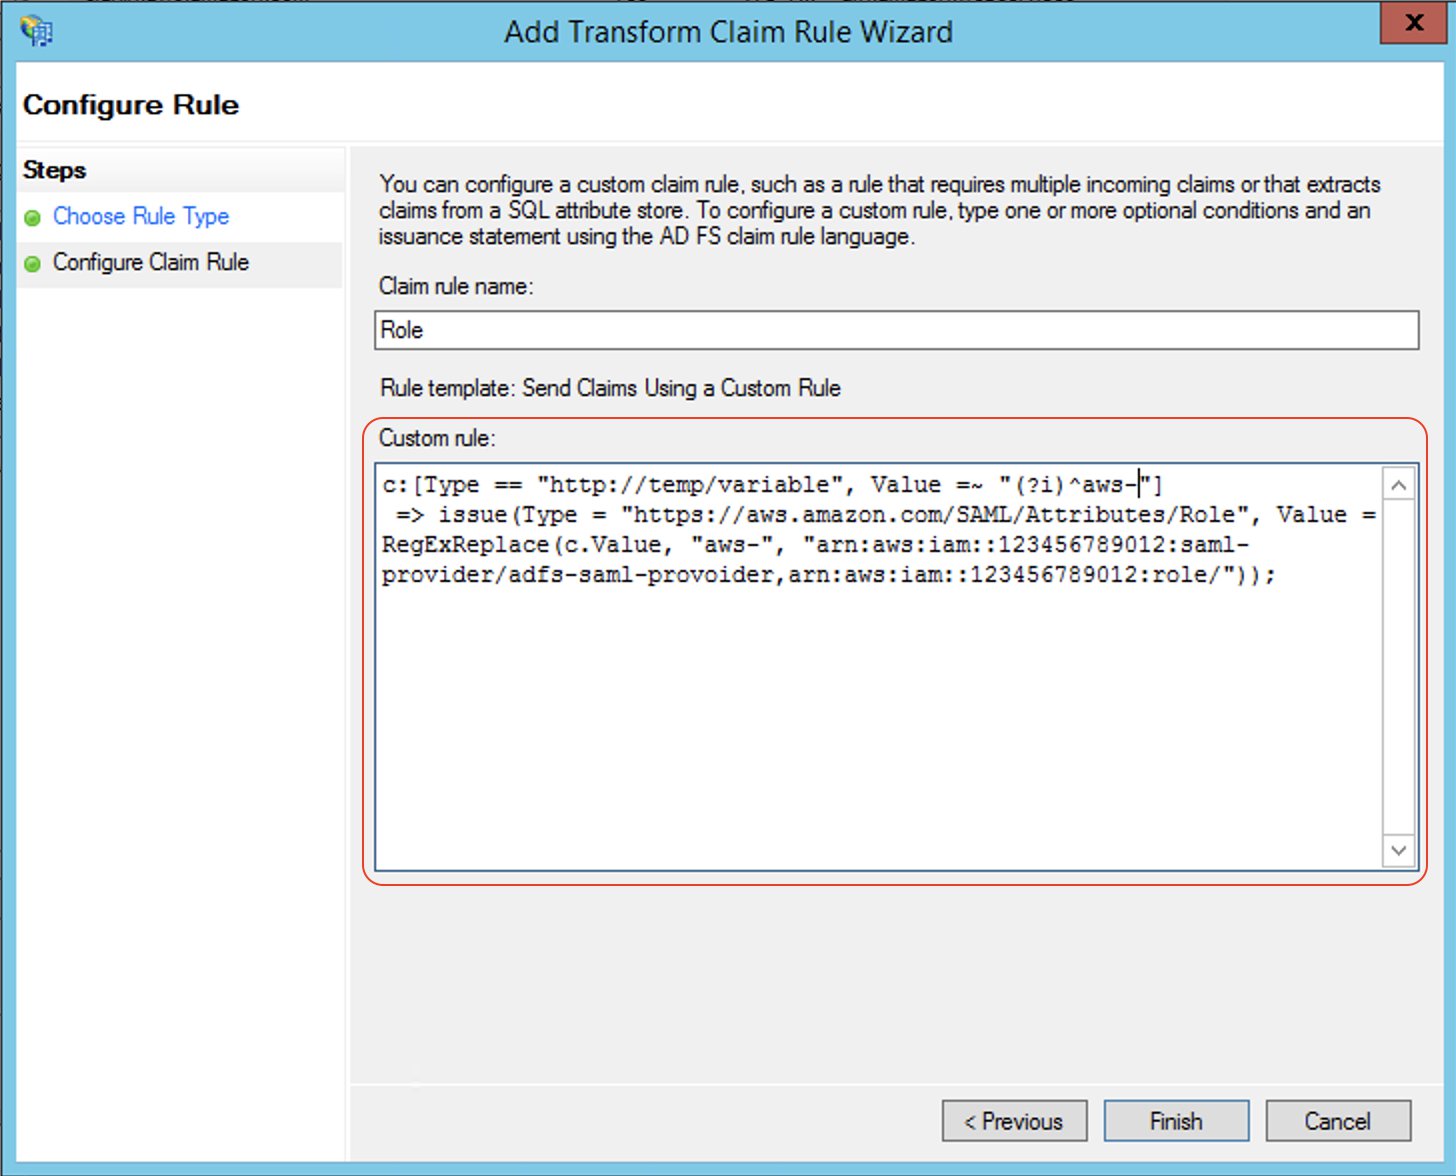
You create two sets of claim rules in this post. The first set (rules 1–4) contains AD FS claim rules that are required to assume an IAM role based on AD group membership. These are the rules that you also create if you want to establish federated access to the AWS Management Console. The second set (rules 5–6) are claim rules that are required for Lake Formation fine-grained access control.
To create AD FS claim rules, complete the following steps:

NameID:

RoleSessionName:
E-Mail-Addresses and outgoing claim type https://aws.amazon.com/SAML/Attributes/RoleSessionName.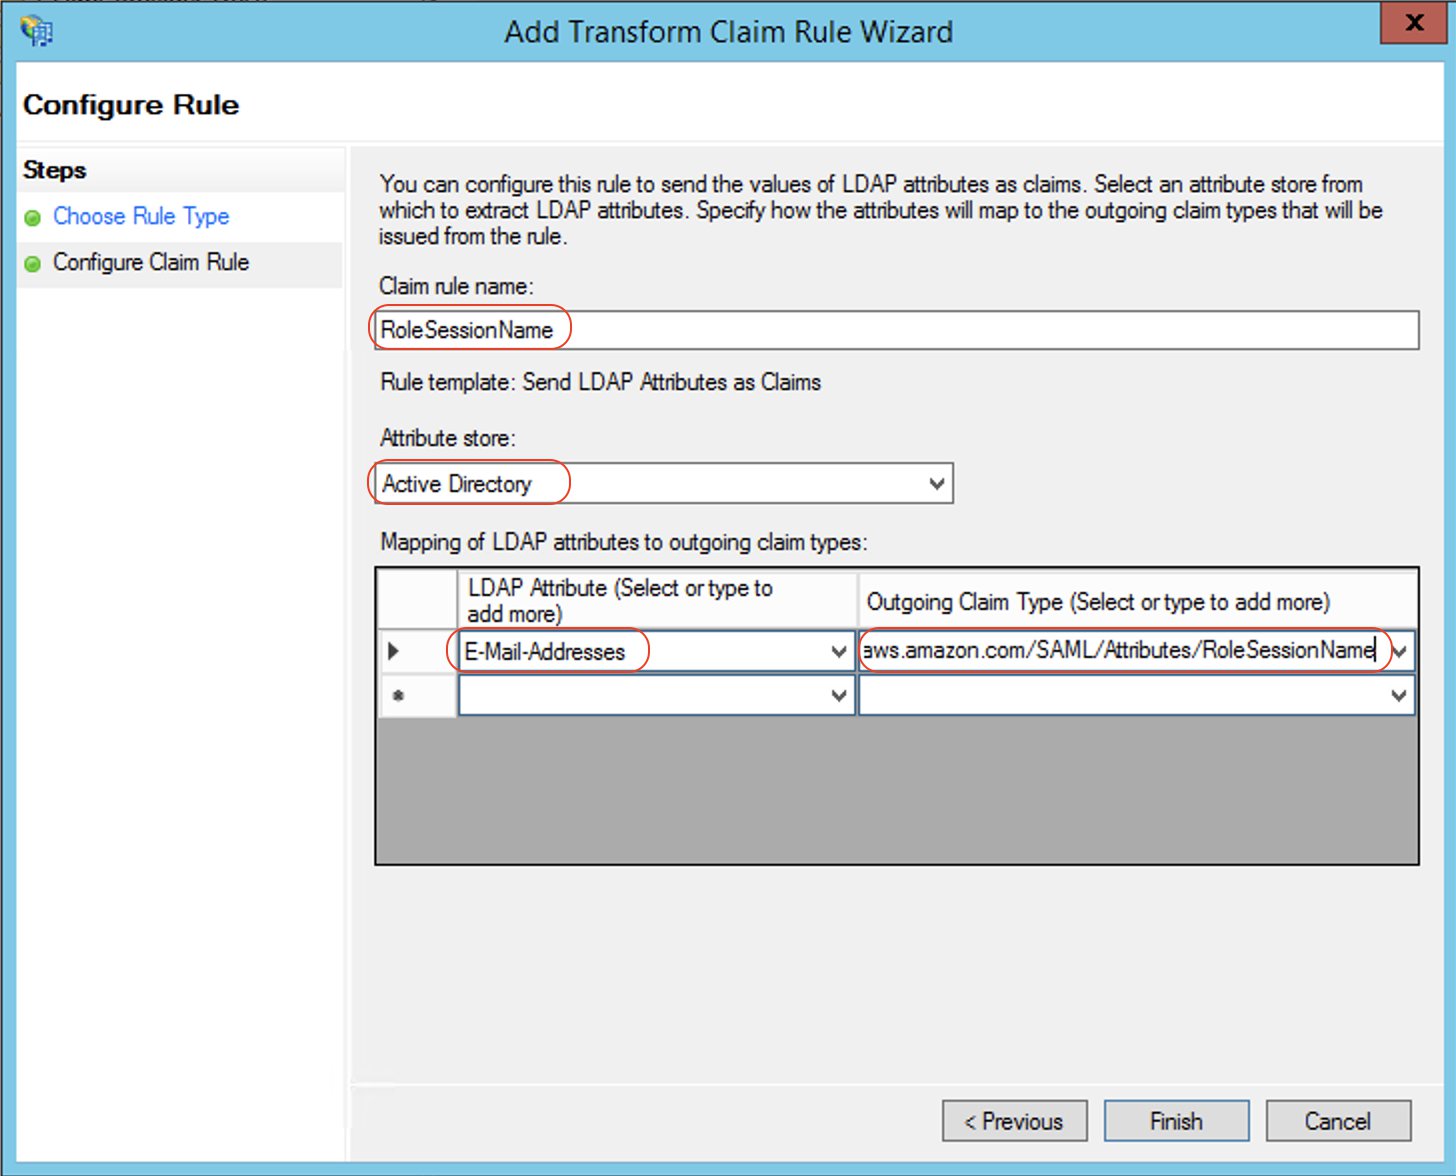
Get AD Groups:
Roles:
Claim rules 5 and 6 allow Lake Formation to make authorization decisions based on user name or the AD group membership of the user.
LF-UserName, which passes the user name and SAML assertion to Lake Formation:
User-Principal-Name and outgoing claim type https://lakeformation.amazon.com/SAML/Attributes/Username.
LF-Groups, which passes data and analytics-related AD groups that the user is a member of, along with the SAML assertion to Lake Formation:
The preceding rule snippet filters AD group names starting with data-. This is an arbitrary naming convention; you can adopt your preferred naming convention for AD groups that are related to data lake access.
In this section, we create two AD users and required AD groups to demonstrate varying levels of access to the data.
You create two AD users: FinanceUser and CustomerOpsUser. Each user corresponds to an individual who is a member of the Finance or Customer business units. The following table summarizes the details of each user.
| FinanceUser | CustomerOpsUser | |
| First Name | FinanceUser | CustomerOpsUser |
| User logon name | [email protected] | [email protected] |
| [email protected] | [email protected] |
To create your users, complete the following steps:


FinanceUser.FinanceUser.[email protected].
We choose this option for simplicity, but in real-world scenarios, newly created users must change their password for security reasons.
[email protected].Adding an email is mandatory because it’s used as the RoleSessionName value in the SAML assertion.

CustomerOpsUser.Create the following AD groups to represent three different access patterns and also the ability to assume an IAM role:
customer tablecustomer table, including PII columnslineorder tableadfs-data-access IAM role when logging in to AWSTo create the groups, complete the following steps:
data-customer.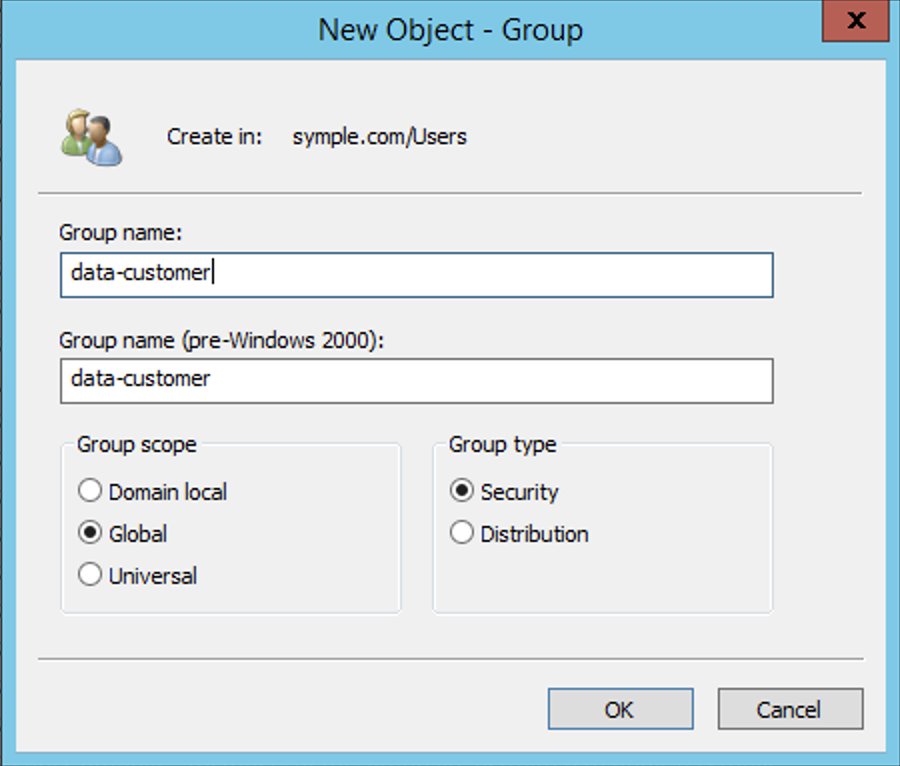
Now you add your newly created users to their appropriate groups, as detailed in the following table.
| User | Group Membership | Description |
| CustomerOpsUser | data-customer-pii data-order aws-adfs-data-access |
Sees all customer information including PII and their orders |
| FinanceUser | data-customer data-order aws-adfs-data-access |
Sees only non-PII customer data and orders |
Complete the following steps:
FinanceUser.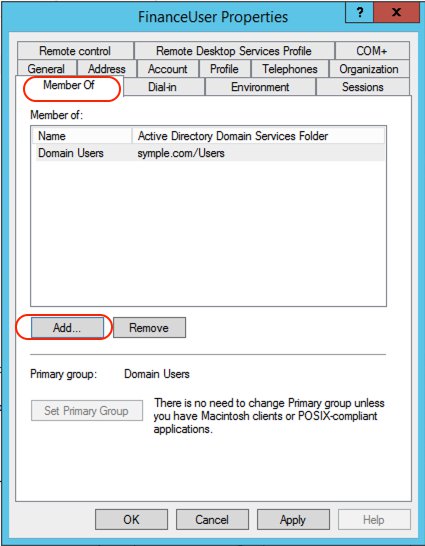
CustomerOpsUser.In this step, you copy data files to an S3 bucket in your AWS account by running the following AWS Command Line Interface (AWS CLI) commands. For more information on how to set up the AWS CLI, refer to Configuration Basics.
These commands copy the files that contain data for customer and lineorder tables. Replace <BUCKET NAME> with the name of an S3 bucket in your AWS account.
For this post, we use the default settings for storing data and logging access requests within Amazon S3. You can enhance the security of your sensitive data with the following methods:
Additionally, Lake Formation is integrated with CloudTrail, a service that provides a record of actions taken by a user, role, or AWS service in Lake Formation. CloudTrail captures all Lake Formation API calls as events and is enabled by default when you create a new AWS account. When activity occurs in Lake Formation, that activity is recorded as a CloudTrail event along with other AWS service events in event history. For audit and access monitoring purposes, all federated user logins are logged via CloudTrail under the AssumeRoleWithSAML event name. You can also view specific user activity based on their user name in CloudTrail.
To create a database and tables in the Data Catalog, open the query editor on the Athena console and enter the following DDL statements. Replace <BUCKET NAME> with the name of the S3 bucket in your account.
Verify that tables are created and you can see the data:
Lake Formation uses a combination of Lake Formation permissions and IAM permissions to achieve fine-grained access control. The recommended approach includes the following:

Earlier in the walkthrough, you created the IAM role adfs-data-access and attached the AWS managed IAM policy AthenaFullAccess to it. This policy has all the permissions required for the purposes of this post.
For more information, see the Data Analyst Permissions section in Lake Formation Personas and IAM Permissions Reference.
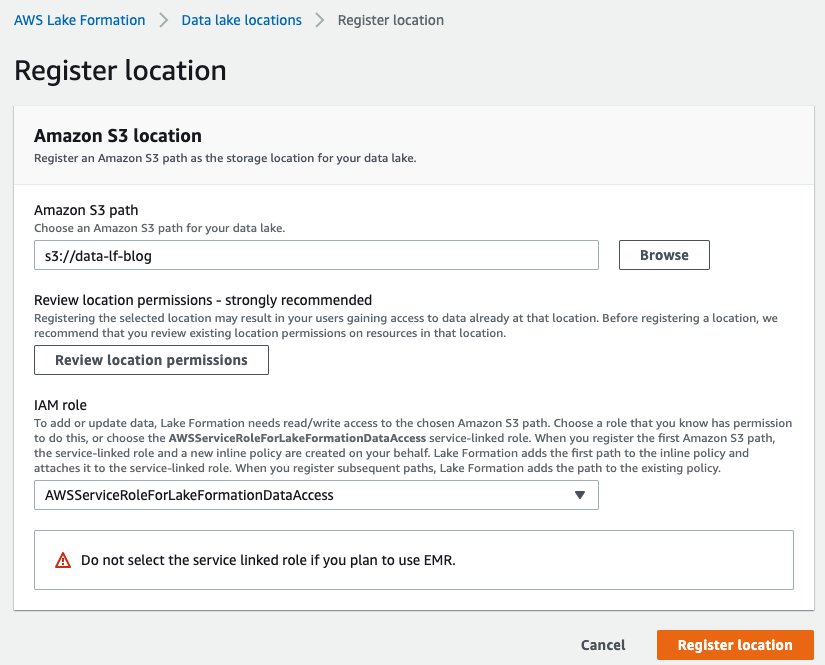
The mechanism to govern access to an Amazon S3 location using Lake Formation is to register a data lake location. Complete the following steps:
AWSServiceRoleForLakeFormationDataAccess.In this step, you specify an IAM service-linked role, which Lake Formation assumes when it grants temporary credentials to integrated AWS services that access the data in this location. This role and its permissions are managed by Lake Formation and can’t be changed by IAM principals.
Now that you have registered the Amazon S3 path, you can give AD groups appropriate permissions to access tables and columns in the salesdata database. The following table summarizes the new permissions.
| Database and Table | AD Group Name | Table Permissions | Data Permissions |
| salesdata.customer | data-customer | Select | c_city, c_custkey, c_mktsegment, c_nation, and c_region |
| salesdata.customer | data-customer-pii | Select | All data access |
| salesdata.lineorder | data-order | Select | All data access |
salesdata database.customer table and on the Actions menu, choose View permissions.
You should see following existing permissions. These entries allow the current data lake administrator to access the table and all its columns.
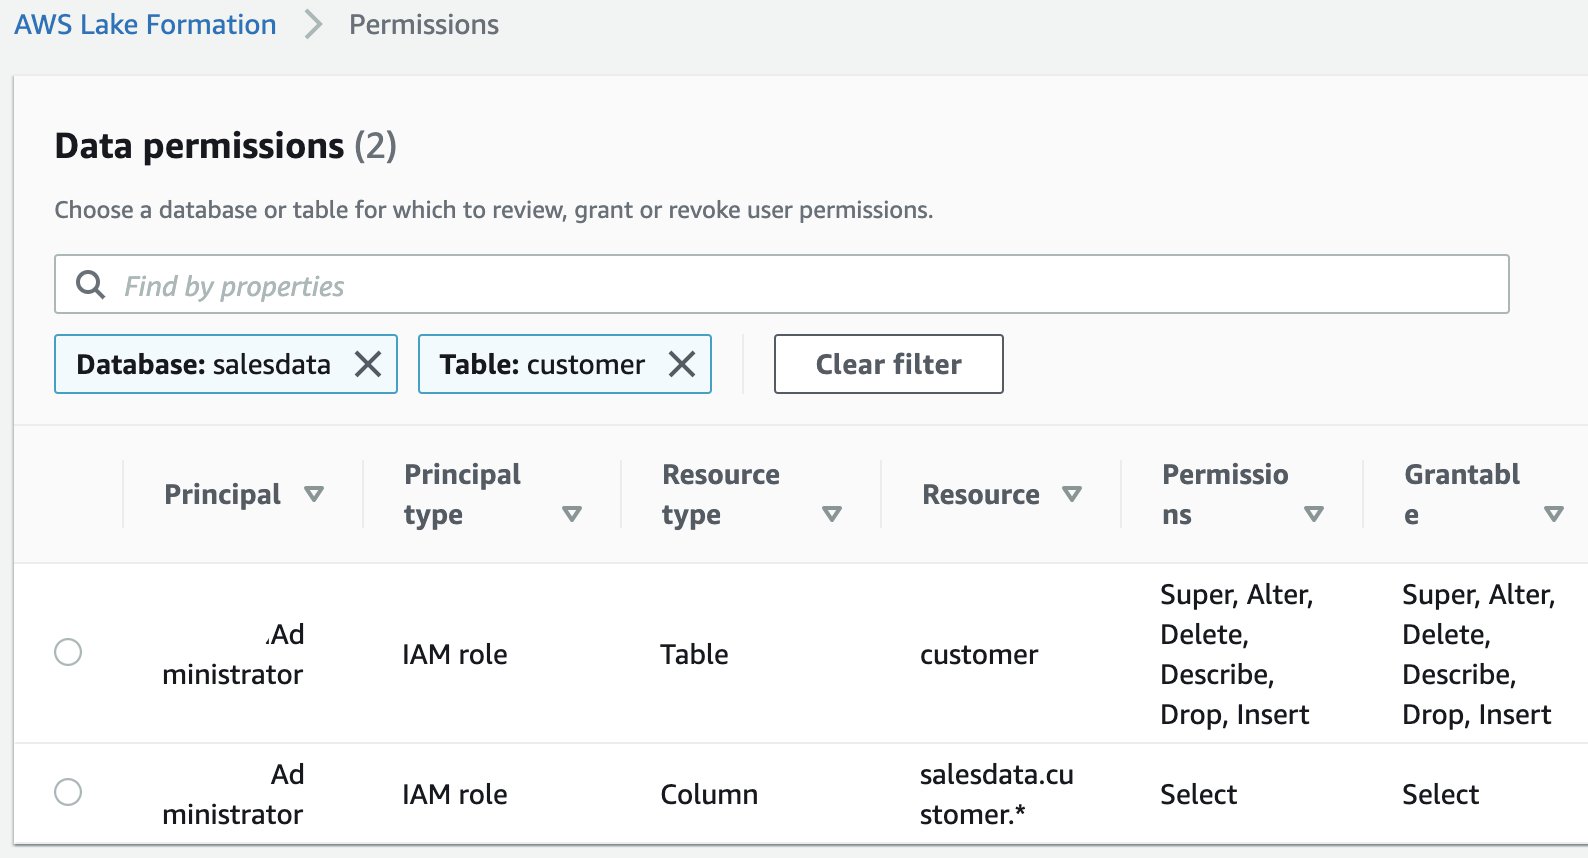
arn:aws:iam::<AWS ACCOUNT NUMBER>:saml-provider/adfs-saml-provider:group/data-customer.To get this value, get the ARN of the SAML provider from the IAM console and append :group/data-customer to the end of it.
salesdata database.customer table.
c_city, c_custkey, c_mktsegment, c_nation, and c_region.
You have now allowed members of the AD group data-customer to have access to columns of the customer table that don’t include PII.
customer table and data-customer-pii group with all data access.lineorder table and data-order group with all data access.In this post, we use SQL Workbench to access Athena through AD authentication and verify the Lake Formation permissions you created in the previous section.
To set up the SQL client, complete the following steps:
Athena JDBC Driver.
You’re now ready to create connections in SQL Workbench for your users.
To create your connections, complete the following steps:
Athena-FinanceUser.For this post, we used a self-signed certificate with AD FS. This certificate is not trusted by the client, therefore authentication doesn’t succeed. This is why the SSL_Insecure attribute is set to true to allow authentication despite the self-signed certificate. In real-world setups, you would use valid trusted certificates and can remove the SSL_Insecure attribute.
Athena-CustomerOpsUser and repeat the earlier steps with CustomerOpsUser in the connection URL string.
Now we can verify permissions for FinanceUser. In the SQL Workbench Statement window, run the following SQL SELECT statement:
Verify that only non-PII columns are returned from the customer table.

As you see in the preceding screenshots, FinanceUser only has access to non-PII columns of the customer table and full access to (all columns) of the lineorder table. This allows FinanceUser, for example, to run aggregate and summary queries based on market segment or location of customers without having access to their personal information.
Run a similar query for CustomerOpsUser. You should be able to see all columns, including columns containing PII, in the customer table.
This post demonstrated how to configure your data lake permissions using Lake Formation for AD users and groups. We configured AD FS 3.0 on your Active Directory and used it as an IdP to federate into AWS using SAML. This post also showed how you can integrate your Athena JDBC driver to AD FS and use your AD credentials directly to connect to Athena.
Integrating your Active Directory with the Athena JDBC driver gives you the flexibility to access Athena from business intelligence tools you’re already familiar with to analyze the data in your Amazon S3 data lake. This enables you to have a consistent central permission model that is managed through AD users and their group memberships.
 Mostafa Safipour is a Solutions Architect at AWS based out of Sydney. Over the past decade he has helped many large organizations in the ANZ region build their data, digital, and enterprise workloads on AWS.
 Praveen Kumar is a Specialist Solution Architect at AWS with expertise in designing, building, and implementing modern data and analytics platforms using cloud-native services. His areas of interests are serverless technology, streaming applications, and modern cloud data warehouses.
Post Syndicated from Margaret Wei original https://blog.rapid7.com/2022/08/18/360-degree-xdr-and-attack-surface-coverage-with-rapid7/

Today’s already resource-constrained security teams are tasked with protecting more as environments sprawl and alerts pile up, while attackers continue to get stealthier and add to their arsenal. To be successful against bad actors, security teams need to be proactive against evolving attacks in their earliest stages and ready to detect and respond to advanced threats that make it past defenses (because they will).
Rapid7’s external threat intelligence solution, Threat Command, reduces the noise of numerous threat feeds and external sources, and prioritizes and alerts on the most relevant threats to your organization. When used alongside InsightIDR, Rapid7’s next-gen SIEM and XDR, and InsightConnect, Rapid7’s SOAR solution, you’ll unlock a complete view of your internal and external attack surface with unmatched signal to noise.
Leverage InsightIDR, Threat Command, and InsightConnect to:
The power of InsightIDR and Threat Command doesn’t end there. We added another layer to our threat intelligence earlier this year when we integrated Threat Command’s Threat Library into InsightIDR to give more visibility into new indicators of compromise (IOCs) and continued strength around signal to noise.
All IOCs related to threat actors tracked in Threat Command are automatically applied to customer data sent to InsightIDR, which means you automatically get current and future coverage as new IOCs are found by the research team. Alongside InsightIDR’s variety of detection types — User Behavior Analytics (UBA), Attacker Behavior Analytics (ABA), and custom detections — you’re covered against all infiltrations, from lateral movement to unique attacker behaviors and everything in between. The impact? Your team is never behind on emerging threats to your organization.
Strong signal to noise is taken a step further with automation, so teams can not only identify threats quickly but respond immediately. The expanded integration between InsightConnect and InsightIDR allows you to respond to any alert being generated in your environment. With this, you can easily create and map InsightConnect workflows to any ABA, UBA, or custom detection rule, so tailored response actions can be initiated as soon as there is a new detection.
See something suspicious that didn’t trip a detection? You can invoke on-demand automation with integrated Quick Actions from any page in InsightIDR.
With Rapid7, you’ll achieve sophisticated detection and response outcomes with greater efficiency and efficacy — no matter where you and your team are on your security journey. Stay up to date on the latest from InsightIDR, Threat Command, and InsightConnect as we continue to up-level our cross-product integrations to bring you the most comprehensive XDR solution.
Additional reading:
Post Syndicated from original https://lwn.net/Articles/904776/
There was a time when care had to be taking when buying hardware if the
goal was to run Linux on it. The situation has improved considerably in
recent decades, and unsupported hardware is more the exception than the
rule. That has, for many years, been especially true of Intel hardware;
that company has made a point of ensuring that its offerings work with
Linux. So it is a bit surprising that the IPU6 image processor shipped
with Alder Lake CPUs
lacks support in Linux, and is unlikely to get it anytime soon. The
problem highlighted here goes beyond just Intel, though.
Post Syndicated from original https://lwn.net/Articles/905088/
The Document Foundation has announced the release of LibreOffice 7.4 Community, which is the community-supported version of the open-source office suite. Version 7.4 comes with new features for the suite as a whole (WebP and EMZ/WMZ support, …), the Writer word-processor (better change tracking and hyphenation settings, …), the Calc spreadsheet (16K columns, …), and more. “Development is now focused on interoperability with Microsoft’s proprietary file formats, and many new features are targeted at users migrating from MS Office
“. More information can be found in the release notes.
Post Syndicated from original https://lwn.net/Articles/905075/
Version 5.1.0
of the Krita painting program is out. “Krita 5.1 comes with a ton of
”
smaller improvements and technical polish. This release sees updates to
usability across the board, improved file format handling, and a whole lot
of changes to the selection and fill tools.
Post Syndicated from original https://lwn.net/Articles/905071/
Version
1.8 of the Julia language has been released. Changes include typed
globals, a new default thread scheduler, some new profiling tools, and
more.
Post Syndicated from original https://lwn.net/Articles/905072/
Security updates have been issued by Debian (chromium, epiphany-browser, freecad, and schroot), Fedora (freeciv, microcode_ctl, qemu, and rsync), Oracle (httpd), SUSE (aws-efs-utils, python-ansi2html, python-py, python-pytest-html, python-pytest-metadata, python-pytest-rerunfailures, python-coverage, python-oniconfig, python-unittest-mixins, bluez, curl, gnutls, kernel, ntfs-3g_ntfsprogs, podman, and ucode-intel), and Ubuntu (zlib).
Post Syndicated from Bruce Schneier original https://www.schneier.com/blog/archives/2022/08/usb-rubber-ducky-attack-tool.html
The USB Rubber Ducky is getting better and better.
Already, previous versions of the Rubber Ducky could carry out attacks like creating a fake Windows pop-up box to harvest a user’s login credentials or causing Chrome to send all saved passwords to an attacker’s webserver. But these attacks had to be carefully crafted for specific operating systems and software versions and lacked the flexibility to work across platforms.
The newest Rubber Ducky aims to overcome these limitations. It ships with a major upgrade to the DuckyScript programming language, which is used to create the commands that the Rubber Ducky will enter into a target machine. While previous versions were mostly limited to writing keystroke sequences, DuckyScript 3.0 is a feature-rich language, letting users write functions, store variables, and use logic flow controls (i.e., if this… then that).
That means, for example, the new Ducky can run a test to see if it’s plugged into a Windows or Mac machine and conditionally execute code appropriate to each one or disable itself if it has been connected to the wrong target. It also can generate pseudorandom numbers and use them to add variable delay between keystrokes for a more human effect.
Perhaps most impressively, it can steal data from a target machine by encoding it in binary format and transmitting it through the signals meant to tell a keyboard when the CapsLock or NumLock LEDs should light up. With this method, an attacker could plug it in for a few seconds, tell someone, “Sorry, I guess that USB drive is broken,” and take it back with all their passwords saved.
Post Syndicated from original https://lwn.net/Articles/904453/
The LWN.net Weekly Edition for August 18, 2022 is available.
Post Syndicated from Rapid7 original https://blog.rapid7.com/2022/08/18/security-nation-jen-and-tod-on-hacker-summer-camp-2022/
![]()
In this episode of Security Nation, Tod and Jen chat about their experience at this year’s Hacker Summer Camp, the multi-event lineup of cybersecurity conferences in Las Vegas that includes BSides, Black Hat, and DEF CON. Tod gives us his highlights from the virtual sessions, and Jen recounts her jam-packed week of presentations (which resulted in a somewhat diminished ability to use her voice for this recording).
No Rapid Rundown this week, since our Vegas wrap-up overlaps with much of the latest security news, making it a Rapid Rundown in itself!
Learn more about some of our favorite presentations from the Vegas conferences, including:
Like the show? Want to keep Jen and Tod in the podcasting business? Feel free to rate and review with your favorite podcast purveyor, like Apple Podcasts.
Post Syndicated from original https://lwn.net/Articles/904960/
On August 8, the US government sanctioned
the Tornado Cash
cryptocurrency
mixer for money laundering. The sanction means that no US citizen or
company can interact with Tornado Cash in any way, all assets of the
organization are to be reported so that they can be seized, and more. But
at the core of Tornado Cash is a chunk of open-source code for “smart contracts”
that run in the Ethereum blockchain; that
code was “seized” as well. There
are some disturbing implications here for our communities.
Post Syndicated from James Beswick original https://aws.amazon.com/blogs/compute/using-custom-consumer-group-id-support-for-the-aws-lambda-event-sources-for-msk-and-self-managed-kafka/
This post is written by Adam Wagner, Principal Serverless Specialist SA.
AWS Lambda already supports Amazon Managed Streaming for Apache Kafka (MSK) and self-managed Apache Kafka clusters as event sources. Today, AWS adds support for specifying a custom consumer group ID for the Lambda event source mappings (ESMs) for MSK and self-managed Kafka event sources.
With this feature, you can create a Lambda ESM that uses a consumer group that has already been created. This enables you to use Lambda as a Kafka consumer for topics that are replicated with MirrorMaker v2 or with consumer groups you create to start consuming at a particular offset or timestamp.
This blog post shows how to use this feature to enable Lambda to consume a Kafka topic starting at a specific timestamp. This can be useful if you must reprocess some data but don’t want to reprocess all of the data in the topic.
In this example application, a client application writes to a topic on the MSK cluster. It creates a consumer group that points to a specific timestamp within that topic as the starting point for consuming messages. A Lambda ESM is created using that existing consumer group that triggers a Lambda function. This processes and writes the messages to an Amazon DynamoDB table.

To get started, create an MSK cluster and a client Amazon EC2 instance from which to create topics and publish messages. If you don’t already have an MSK cluster, follow this blog on setting up an MSK cluster and using it as an event source for Lambda.
export MSKBOOTSTRAP='b-1.mskcluster.oy1hqd.c23.kafka.us-east-1.amazonaws.com:9094,b-2.mskcluster.oy1hqd.c23.kafka.us-east-1.amazonaws.com:9094,b-3.mskcluster.oy1hqd.c23.kafka.us-east-1.amazonaws.com:9094'./bin/kafka-topics.sh --create --bootstrap-server $MSKBOOT --replication-factor 3 --partitions 3 --topic demoTopic01#!/usr/bin/env python3
import json
import time
from random import randint
from uuid import uuid4
from kafka import KafkaProducer
BROKERS = ['b-1.mskcluster.oy1hqd.c23.kafka.us-east-1.amazonaws.com:9094',
'b-2.mskcluster.oy1hqd.c23.kafka.us-east-1.amazonaws.com:9094',
'b-3.mskcluster.oy1hqd.c23.kafka.us-east-1.amazonaws.com:9094']
TOPIC = 'demoTopic01'
producer = KafkaProducer(bootstrap_servers=BROKERS, security_protocol='SSL',
value_serializer=lambda x: json.dumps(x).encode('utf-8'))
def create_record(sequence_num):
number = randint(1000000,10000000)
record = {"id": sequence_num, "record_timestamp": int(time.time()), "random_number": number, "producer_id": str(uuid4()) }
print(record)
return record
def publish_rec(seq):
data = create_record(seq)
producer.send(TOPIC, value=data).add_callback(on_send_success).add_errback(on_send_error)
producer.flush()
def on_send_success(record_metadata):
print(record_metadata.topic, record_metadata.partition, record_metadata.offset)
def on_send_error(excp):
print('error writing to kafka', exc_info=excp)
for num in range(1,10000000):
publish_rec(num)
time.sleep(0.5)
python3 -m venv venv
source venv/bin/activate
pip3 install kafka-python

./bin/kafka-consumer-groups.sh --command-config client.properties --bootstrap-server $MSKBOOTSTRAP --topic demoTopic01 --group specificTimeCG --to-datetime 2022-08-10T16:00:00.000 --reset-offsets --executespecificTimeCG is the consumer group ID used when creating the Lambda ESM. Listing the consumer groups on the cluster shows the new group:
./bin/kafka-consumer-groups.sh --list --command-config client.properties --bootstrap-server $MSKBOOTSTRAP
aws lambda create-event-source-mapping --region us-east-1 --event-source-arn arn:aws:kafka:us-east-1:0123456789:cluster/demo-us-east-1/78a8d1c1-fa31-4f59-9de3-aacdd77b79bb-23 --function-name msk-consumer-demo-ProcessMSKfunction-IrUhEoDY6X9N --batch-size 3 --amazon-managed-kafka-event-source-config '{"ConsumerGroupId":"specificTimeCG"}' --topics demoTopic01The event source in the Lambda console or CLI shows the starting position set to TRIM_HORIZON. However, if you specify a custom consumer group ID that already has existing offsets, those offsets take precedent.

Converting the record timestamp of the earliest record in DynamoDB, 1660147212, to a human-readable date shows that the first record was created on 2022-08-10T16:00:12.
In this example, the consumer group is created before the Lambda ESM so that you can specify the timestamp to start from.
If you create an ESM and specify a custom consumer group ID that does not exist, it is created. This is a convenient way to create a new consumer group for an ESM with an ID of your choosing.
Deleting an ESM does not delete the consumer group, regardless of whether it is created before, or during, the ESM creation.
To create the event source mapping with a custom consumer group using an AWS Serverless Application Model (AWS SAM) template, use the following snippet:
Events:
  MyMskEvent:
    Type: MSK
    Properties:
      Stream: !Sub arn:aws:kafka:${AWS::Region}:012345678901:cluster/ demo-us-east-1/78a8d1c1-fa31-4f59-9de3-aacdd77b79bb-23
      Topics:
        - "demoTopic01"
      ConsumerGroupId: specificTimeCG
This example uses the custom consumer group ID feature when consuming a Kafka topic from an MSK cluster. In addition to MSK clusters, this feature also supports self-managed Kafka clusters. These could be clusters running on EC2 instances or managed Kafka clusters from a partner such as Confluent.
This post shows how to use the new custom consumer group ID feature of the Lambda event source mapping for Amazon MSK and self-managed Kafka. This feature can be used to consume messages with Lambda starting at a specific timestamp or offset within a Kafka topic. It can also be used to consume messages from a consumer group that is replicated from another Kafka cluster using MirrorMaker v2.
For more serverless learning resources, visit Serverless Land.
Post Syndicated from BP Yau original https://aws.amazon.com/blogs/big-data/amazon-redshift-data-sharing-best-practices-and-considerations/
Amazon Redshift is a fast, fully managed cloud data warehouse that makes it simple and cost-effective to analyze all your data using standard SQL and your existing business intelligence (BI) tools. Amazon Redshift data sharing allows for a secure and easy way to share live data for reading across Amazon Redshift clusters. It allows an Amazon Redshift producer cluster to share objects with one or more Amazon Redshift consumer clusters for read purposes without having to copy the data. With this approach, workloads isolated to different clusters can share and collaborate frequently on data to drive innovation and offer value-added analytic services to your internal and external stakeholders. You can share data at many levels, including databases, schemas, tables, views, columns, and user-defined SQL functions, to provide fine-grained access controls that can be tailored for different users and businesses that all need access to Amazon Redshift data. The feature itself is simple to use and integrate into existing BI tools.
In this post, we discuss Amazon Redshift data sharing, including some best practices and considerations.
Now that we have the necessary background on data sharing and how it works, let’s look at a few best practices across streams that can help improve workloads while using data sharing.
In this section, we share some best practices for security when using Amazon Redshift data sharing.
INCLUDE NEW is a very useful setting while adding a schema to a data share (ALTER DATASHARE). If set to TRUE, this automatically adds all the objects created in the future in the specified schema to the data share automatically. This might not be ideal in cases where you want to have fine-grained control on objects being shared. In these cases, leave the setting at its default of FALSE.
To achieve fine-grained access control for data sharing, you can create late-binding views or materialized views on shared objects on the consumer, and then share the access to these views to users on consumer cluster, instead of giving full access on the original shared objects. This comes with its own set of considerations, which we explain later in this post.
Amazon Redshift provides an efficient way to audit all the activity and changes with respect to a data share using system views. We can use the following views to check these details:
In this section, we discuss best practices related to performance.
Materialized views (MVs) provide a powerful route to precompute complex aggregations for use cases where high throughput is needed, and you can directly share a materialized view object via data sharing as well.
For materialized views built on tables where there are frequent write operations, it’s ideal to create the materialized view object on the producer itself and share the view. This method gives us the opportunity to centralize the management of the view on the producer cluster itself.
For slowly changing data tables, you can share the table objects directly and build the materialized view on the shared objects directly on the consumer. This method gives us the flexibility of creating a customized view of data on each consumer according to your use case.
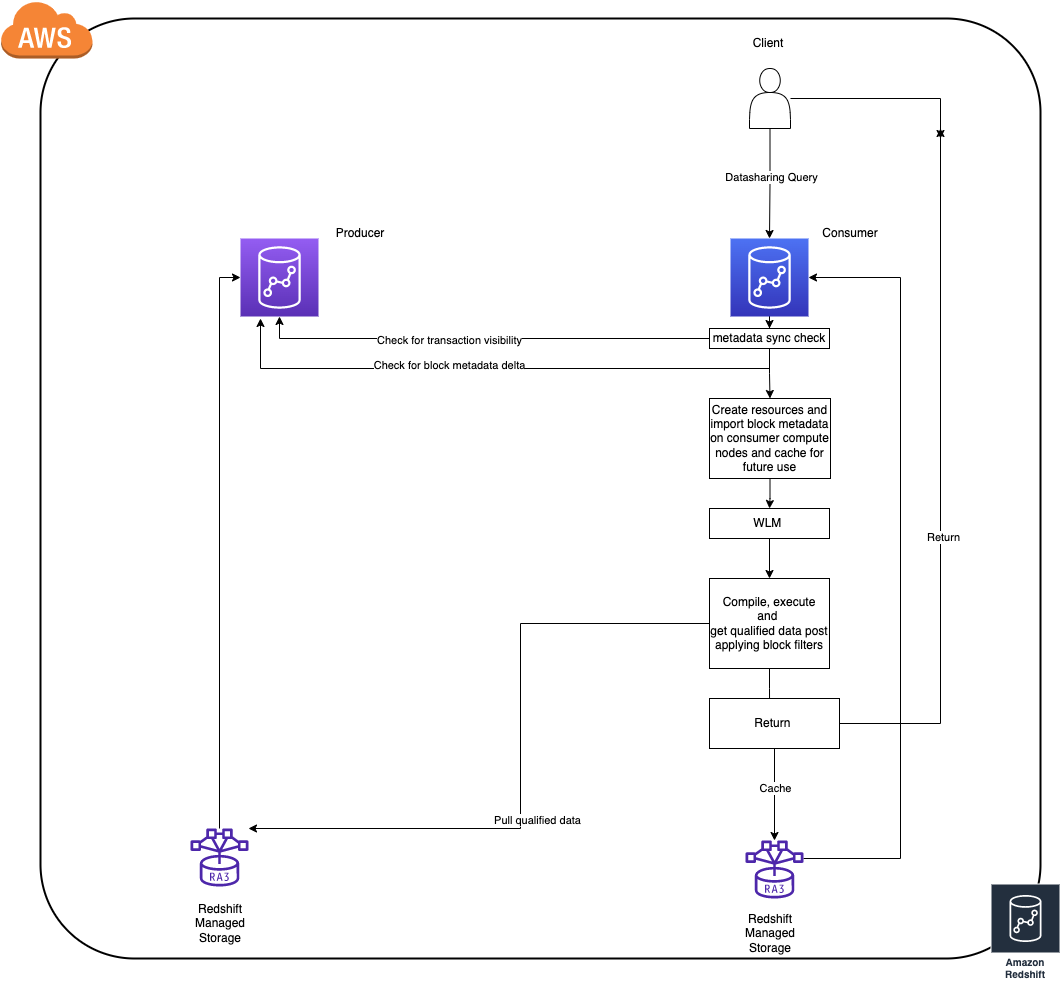
This can help optimize the block metadata download and caching times in the data sharing query lifecycle. This also helps in materialized view refreshes because, as of this writing, Redshift doesn’t support incremental refresh for MVs built on shared objects.
Data sharing is supported even if the producer and consumer are in different Regions. There are a few differences we need to consider while implementing a share across Regions:
There are many system views that help with fetching the list of shared objects a user has access to. Some of these include all the objects from the database that you’re currently connected to, including objects from all the other databases that you have access to on the cluster, including external objects. The views are as follows:
We suggest using very restrictive filtering while querying these views because a simple select * will result in an entire catalog read, which isn’t ideal. For example, take the following query:
This query will try to collect metadata for all the shared and local objects, making it very heavy in terms of metadata scans, especially for shared objects.
The following is a better query for achieving a similar result:
This is a good practice to follow for all metadata views and tables; doing so allows seamless integration into several tools. You can also use the SVV_DATASHARE* system views to exclusively see shared object-related information.
In this section, we discuss the dependencies between the producer and consumer.
Queries on the consumer cluster will have no impact in terms of performance or activity on the producer cluster. This is why we can achieve true workload isolation using data sharing.
Data sharing seamlessly integrates even if both the producer and the consumer are encrypted using different AWS Key Management Service (AWS KMS) keys. There are sophisticated, highly secure key exchange protocols to facilitate this so you don’t have to worry about encryption at rest and other compliance dependencies. The only thing to make sure is that both the producer and consumer are in a homogeneous encryption configuration.
A data sharing query on the consumer can’t impact the transaction semantics on the producer. All the queries involving shared objects on the consumer cluster follow read-committed transaction consistency while checking for visible data for that transaction.
If there is a scheduled manual VACUUM operation in use for maintenance activities on the producer cluster on shared objects, you should use VACUUM recluster whenever possible. This is especially important for large objects because it has optimizations in terms of the number of data blocks the utility interacts with, which results in less block metadata churn compared to a full vacuum. This benefits the data sharing workloads by reducing the block metadata sync times.
In this section, we discuss additional add-on features for data sharing in Amazon Redshift.
Amazon Redshift recently announced the preview for streaming ingestion using Amazon Kinesis Data Streams. This eliminates the need for staging the data and helps achieve low-latency data access. The data generated via streaming on the Amazon Redshift cluster is exposed using a materialized view. You can share this as any other materialized view via a data share and use it to set up low-latency shared data access across clusters in minutes.
Amazon Redshift data sharing queries can utilize concurrency scaling to improve the overall throughput of the cluster. You can enable concurrency scaling on the consumer cluster for queues where you expect a heavy workload to improve the overall throughput when the cluster is experiencing heavy load.
For more information about concurrency scaling, refer to Data sharing considerations in Amazon Redshift.
Amazon Redshift Serverless clusters are ready for data sharing out of the box. A serverless cluster can also act as a producer or a consumer for a provisioned cluster. The following are the supported permutations with Redshift Serverless:
Amazon Redshift data sharing gives you the ability to fan out and scale complex workloads without worrying about workload isolation. However, like any system, not having the right optimization techniques in place could pose complex challenges in the long term as the systems grow in scale. Incorporating the best practices listed in this post presents a way to mitigate potential performance bottlenecks proactively in various areas.
Try data sharing today to unlock the full potential of Amazon Redshift, and please don’t hesitate to reach out to us in case of further questions or clarifications.
 BP Yau is a Sr Product Manager at AWS. He is passionate about helping customers architect big data solutions to process data at scale. Before AWS, he helped Amazon.com Supply Chain Optimization Technologies migrate its Oracle data warehouse to Amazon Redshift and build its next generation big data analytics platform using AWS technologies.
 Sai Teja Boddapati is a Database Engineer based out of Seattle. He works on solving complex database problems to contribute to building the most user friendly data warehouse available. In his spare time, he loves travelling, playing games and watching movies & documentaries.
Post Syndicated from Andreas Terwellen original https://aws.amazon.com/blogs/security/aws-cybervadis-report-now-available-for-due-diligence-on-third-party-suppliers/
At Amazon Web Services (AWS), we’re continuously expanding our compliance programs to provide you with more tools and resources to perform effective due diligence on AWS. We’re excited to announce the availability of the AWS CyberVadis report to help you reduce the burden of performing due diligence on your third-party suppliers.
With the increase in adoption of cloud products and services across multiple sectors and industries, AWS is a critical component of customers’ third-party environments. Regulated customers, such as those in the financial services sector, are held to high standards by regulators and auditors when it comes to exercising effective due diligence on third parties.
Many customers use third-party cyber risk management (TPCRM) services such as CyberVadis to better manage risks from their evolving third-party environments and to drive operational efficiencies. To help with such efforts, AWS has completed the CyberVadis assessment of its security posture. CyberVadis security analysts perform the assessment and validate the results annually.
CyberVadis is a comprehensive third-party risk assessment process that combines the speed and scalability of automation with the certainty of analyst validation. The CyberVadis cybersecurity rating methodology assesses the maturity of a company’s information security management system (ISMS) through its policies, implementation measures, and results.
CyberVadis integrates responses from AWS with analytics and risk models to provide an in-depth view of the AWS security posture. The CyberVadis methodology maps to major international compliance standards, including the following:
Customers can download the AWS CyberVadis report at no additional cost. For details on how to access the report, see our AWS CyberVadis report page.
As always, we value your feedback and questions. Reach out to the AWS Compliance team through the Contact Us page. If you have feedback about this post, submit comments in the Comments section below. To learn more about our other compliance and security programs, see AWS Compliance Programs.
Want more AWS Security news? Follow us on Twitter.
Post Syndicated from Sébastien Stormacq original https://aws.amazon.com/blogs/aws/aws-trusted-advisor-new-priority-capability/
AWS Trusted Advisor is a service that continuously analyzes your AWS accounts and provides recommendations to help you to follow AWS best practices and AWS Well-Architected guidelines. Trusted Advisor implements a series of checks. These checks identify ways to optimize your AWS infrastructure, improve security and performance, reduce costs, and monitor service quotas.
Today, we are making available to all Enterprise Support customers a new capability for AWS Trusted Advisor: Trusted Advisor Priority. It gives you prioritized and context-driven recommendations manually curated by your AWS account team, based on their knowledge of your environment and the machine-generated checks from AWS Services.
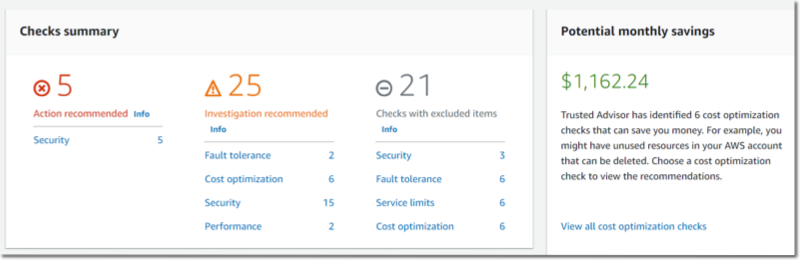
Trusted Advisor implements over 200 checks in five categories: cost optimization, performance, security, fault tolerance, and service limits. Here is a view of the current Trusted Advisor dashboard.
The list of checks available on your account depends on your level of support. When you have AWS Basic Support, available to all customers, or AWS Developer Support, you have access to core security and service limits checks. When you have AWS Business Support or AWS Enterprise Support, you have access to all checks.
The new Priority capability gives you a prioritized view of critical risks. It shows prioritized, contextual recommendations and actionable insights based on your business outcomes and what’s important to you. It also surfaces risks proactively identified by your AWS account team to alert and address critical cloud risks stemming from deviations from AWS best practices. It is designed to help you: IT leaders, technical decisions makers, and members of a Cloud Center of Excellence.
The account team takes advantage of their understanding of your production accounts and business-critical workloads. By working with you, they identify what’s important to you, and the outcomes or goals you wish to achieve. For example, they know about your business viewpoint whether it is exiting a data center by the end of the year, launching a new product, expanding to a new geography, or migrating a workload to the cloud.
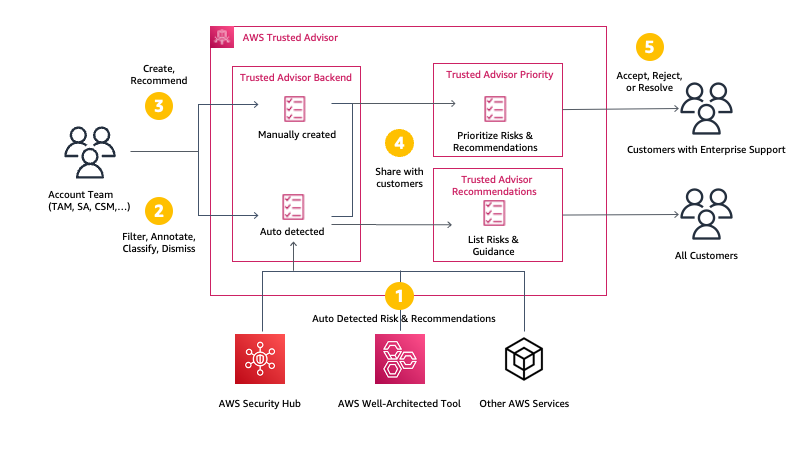
Trusted Advisor uses multiple sources to define the priorities. On one side, it uses signals from other AWS services, such as AWS Compute Optimizer, Amazon GuardDuty, or VPC Flow Logs. On the other side, it uses context manually curated by your AWS account team (Account Manager, Technical Account Manager, Solutions Architect, Customer Solutions Manager, and others) and the knowledge they have about your production accounts, business-critical applications and critical workloads. You will be guided to opportunities to take advantage of AWS Support engagements like a Cost Optimization workshop when the account team believes there are opportunities to reduce costs, a deep dive with a service team, or an Infrastructure Event Management for an upcoming workload migration.
You will be alerted to risks in your deployments on AWS, using sources such as the AWS Well-Architected framework. We will highlight and bring to attention any open high risk issues (HRIs) from recently conducted Well-Architected reviews. We also run campaigns to proactively identify, alert, and reduce single points of failures, such as single Availability Zone deployments. This verifies that you don’t have a single point of failures for production applications that are used for mission-critical processes, that drive significant revenue, or have regulated availability requirements. Trusted Advisor helps you to detect, raise awareness, and provide prescriptive guidance.
Here is a diagram to visualize my mental model for Trusted Advisor Priority:
Trusted Advisor Priority works with AWS Organizations: it aggregates all recommendations from member accounts in your management account or designed delegated administrator. You may delegate access to Trusted Advisor Priority to a maximum of five other AWS accounts. Trusted Advisor Priority comes with a new AWS Identity and Access Management (IAM) policy to help you manage access to the capability. Finally, you can also configure to receive daily and weekly email digests of all prioritized notifications to the alternate contacts you set up in the management account or each delegated admin account.
Let’s See Trusted Advisor Priority in Action
I open the AWS Management Console and navigate to Trusted Advisor. I notice a new navigation entry on the left menu. It is the default view for Enterprise Support customers.
The Trusted Advisor Priority main screen summarizes the number of Pending response and In progress recommendations. It shares some time-related statistics on the right side of the screen. I can start to look at the Active prioritized recommendations list on the bottom half of the screen.
Recommendations are divided into two panels: Active and Closed. The Active tab includes recommendations that have been surfaced to you and which you are actively working on. The Closed tab includes recommendations that have been resolved. All account team prioritized recommendations are presented with a series of searchable and sortable columns. I see the recommendation name, status, source, category, and age.
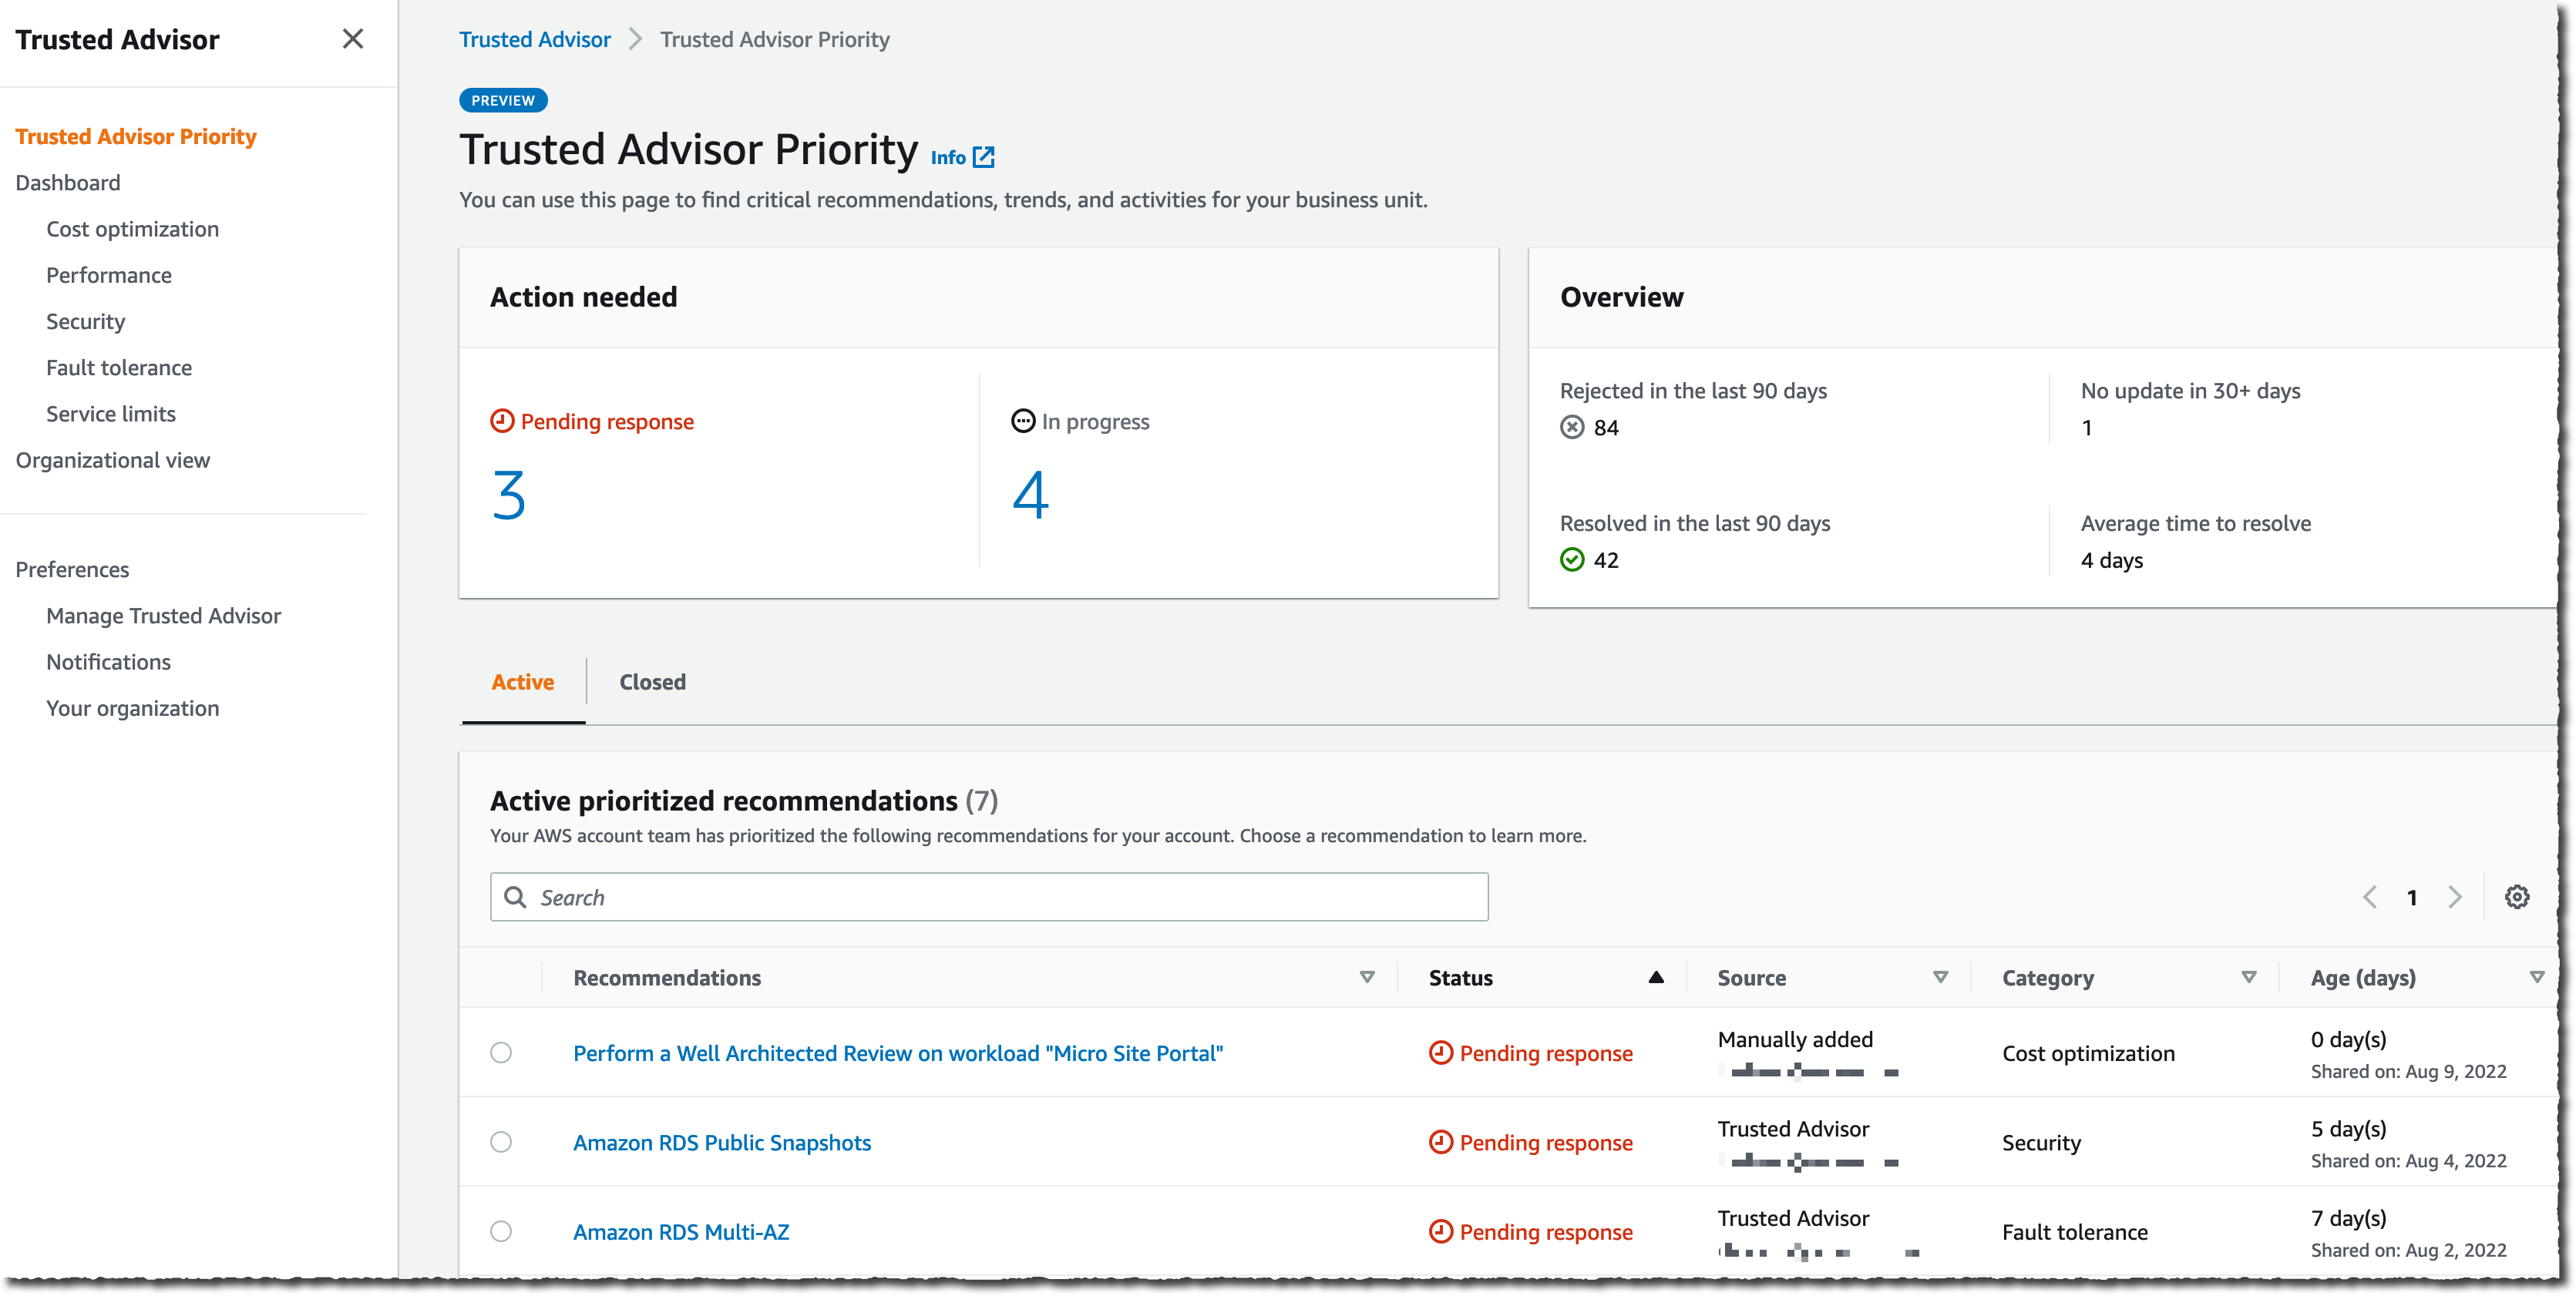
The list gives me details about the category, the age, and the status of the recommendations. The Source column distinguishes between auto-detected and manually identified opportunities. The Category column shows the category from Trusted Advisor (cost optimization, performance, security, fault tolerance, and service limits). The Age column shows me how long it’s been since the recommendation was first shared. This helps with tracking the time to resolution for each of these items.

I can select any recommendation to drill down into the details. In this example, I select the second one: Amazon RDS Public Snapshots. This is a recommendation in the Security category.
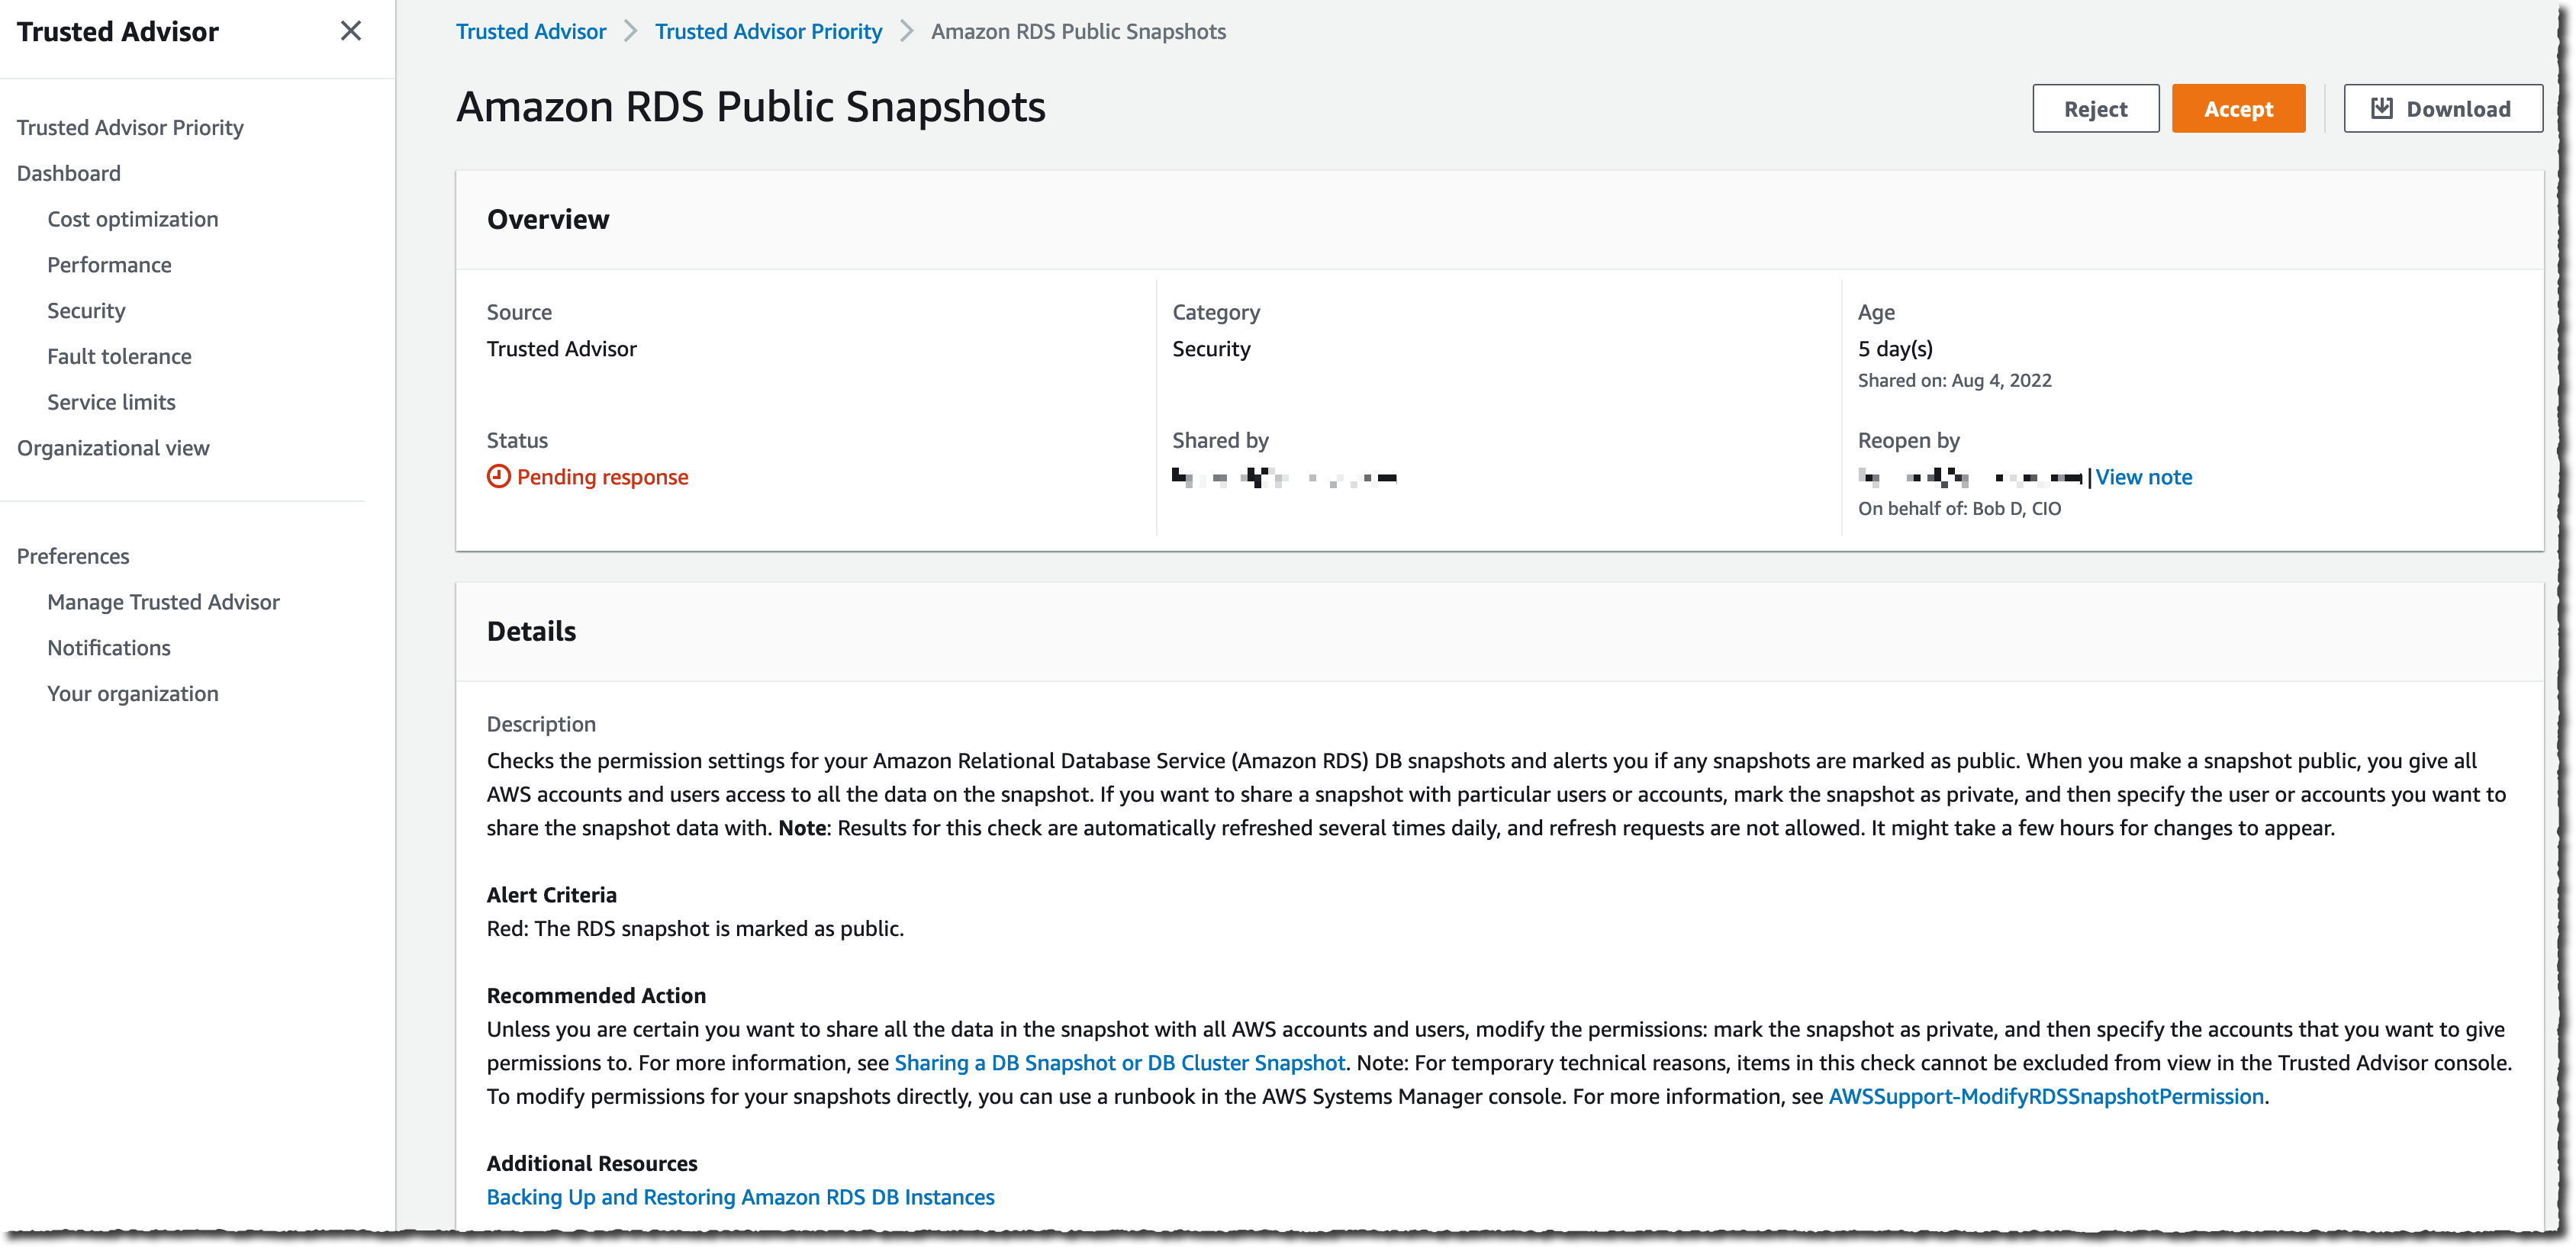
Recommendations are actionable, and they give you a real course of action to respond to the issue. In this case, it suggests modifying the snapshot configuration and removing the public flag that makes the database snapshot available to all AWS customers.
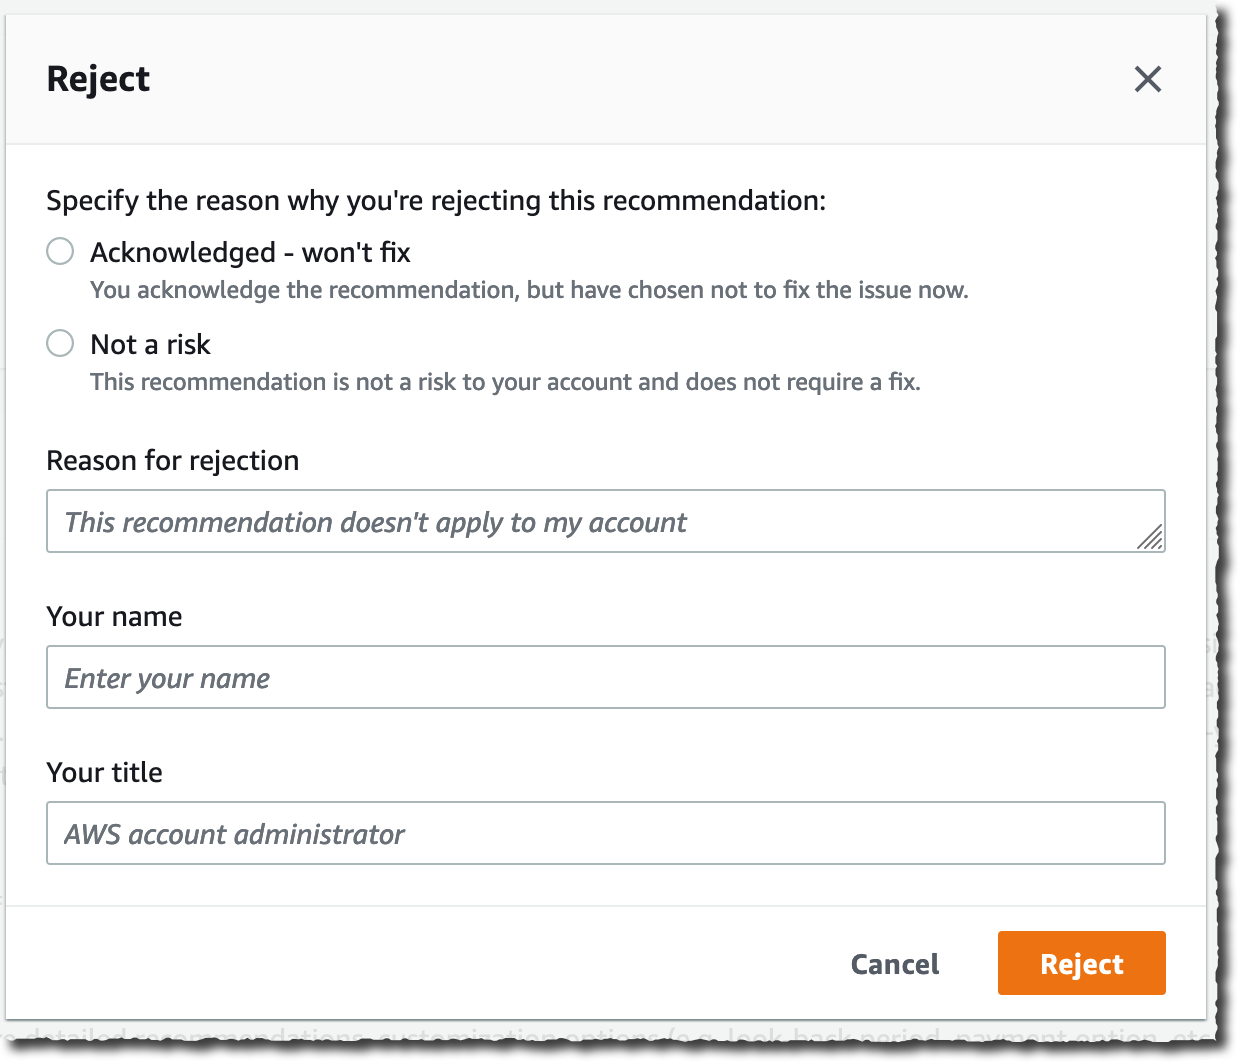
Trusted Advisor Priority provides a closed-loop feedback mechanism where I have the ability to accept or reject a recommendation if I don’t think the issue is relevant to my account.
The information is aggregated at an Organizations level. When you are using Organizations to group accounts to reflect your business units, the recommendations are aggregated and present an overall risk posture across your business units.
As an infrastructure manager, I can either Accept the recommendation and take action or Reject it because it is not a risk or it is something I will not fix and want to remove the recommendation from my list.
 |
 |
Pricing and Availability
AWS Trusted Advisor Priority is available in all commercial AWS Regions where Trusted Advisor is available now, except the two AWS Regions in China. It is available at no additional cost for Enterprise Support customers.
Trusted Advisor Priority will not replace your Technical Account Manager or Solution Architect. They are key in providing tailored guidance and working with you through all phases of managing your cloud applications. Trusted Advisor Priority provides anytime access to tailored, context-aware, risk-mitigating recommendations and insights from your account team and optimizes your engagement with AWS. It will not reduce your access to your account team in any way but rather will make it easier for you to collaborate with them on your most important priorities.
You can start to use Trusted Advisor Priority today.
And now, go build!
Post Syndicated from Bhupinder Chadha original https://aws.amazon.com/blogs/big-data/part-1-new-row-and-column-interactivity-options-for-tables-and-pivot-tables-in-amazon-quicksight/
Amazon QuickSight is a fully-managed, cloud-native business intelligence (BI) service that makes it easy to create and deliver insights to everyone in your organization. You can make your data come to life with rich interactive charts and create beautiful dashboards to share with thousands of users, either directly within a QuickSight application, or embedded in web apps and portals.
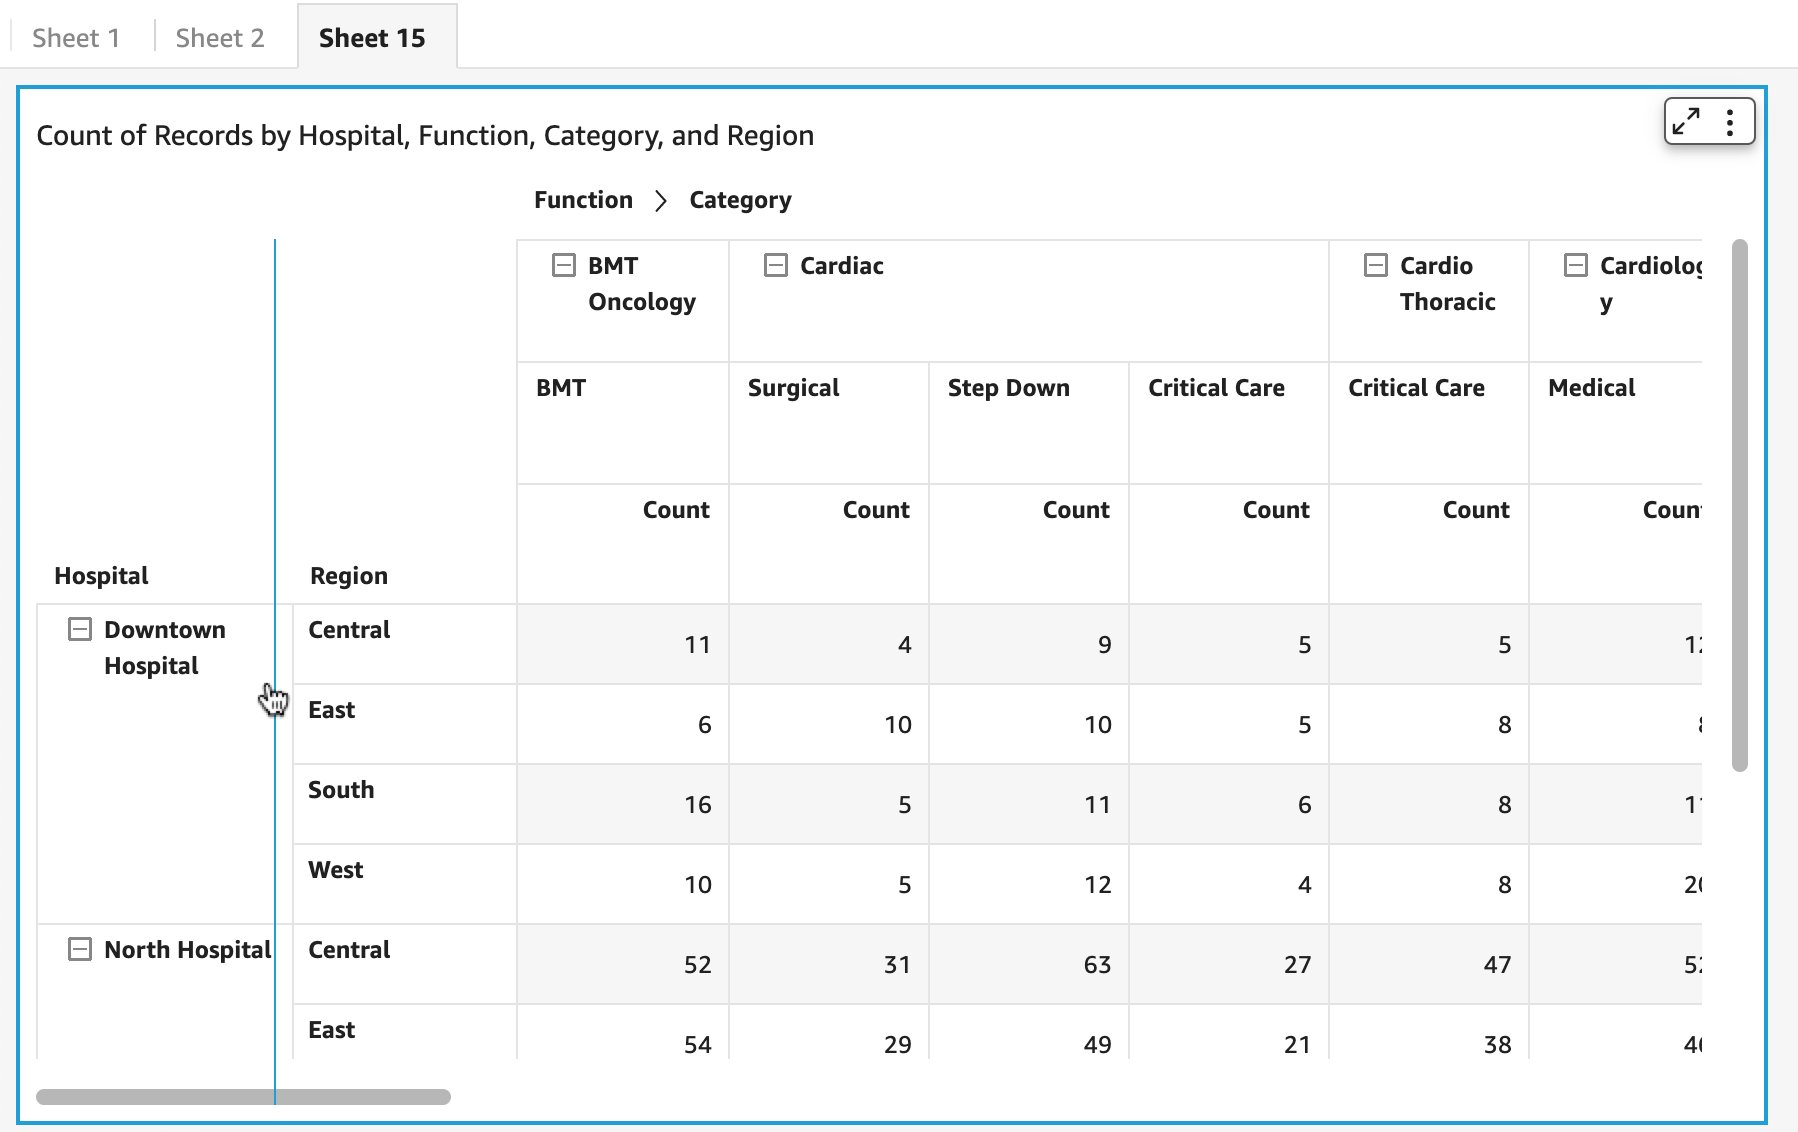
In 2021, as part of table and pivot table customization, we launched the ability for authors to resize row height in tables and pivot tables. Now, we are extending this capability to readers, along with other row and column interactions, such as altering column width and header height for both tables and pivot tables using a drag handler, for consistency between row and column interactions and an improved user experience. Apart from the format pane settings, authors can make quick changes to column, row, and header width for both parent and child nodes by simply dragging the cell, column, or row to the desired setting using the drag handler.
The following are the different interactions that both readers and authors can perform, some of which were already available for tables.
You can modify row height using the drag handler for cells, row headers, or column headers.
The following screenshot illustrates how to alter the row height by dragging from any cell in the table or pivot table.
For row headers, you can only resize row height by dragging the last element (child node), which gets aggregated to define the row height for the parent node.
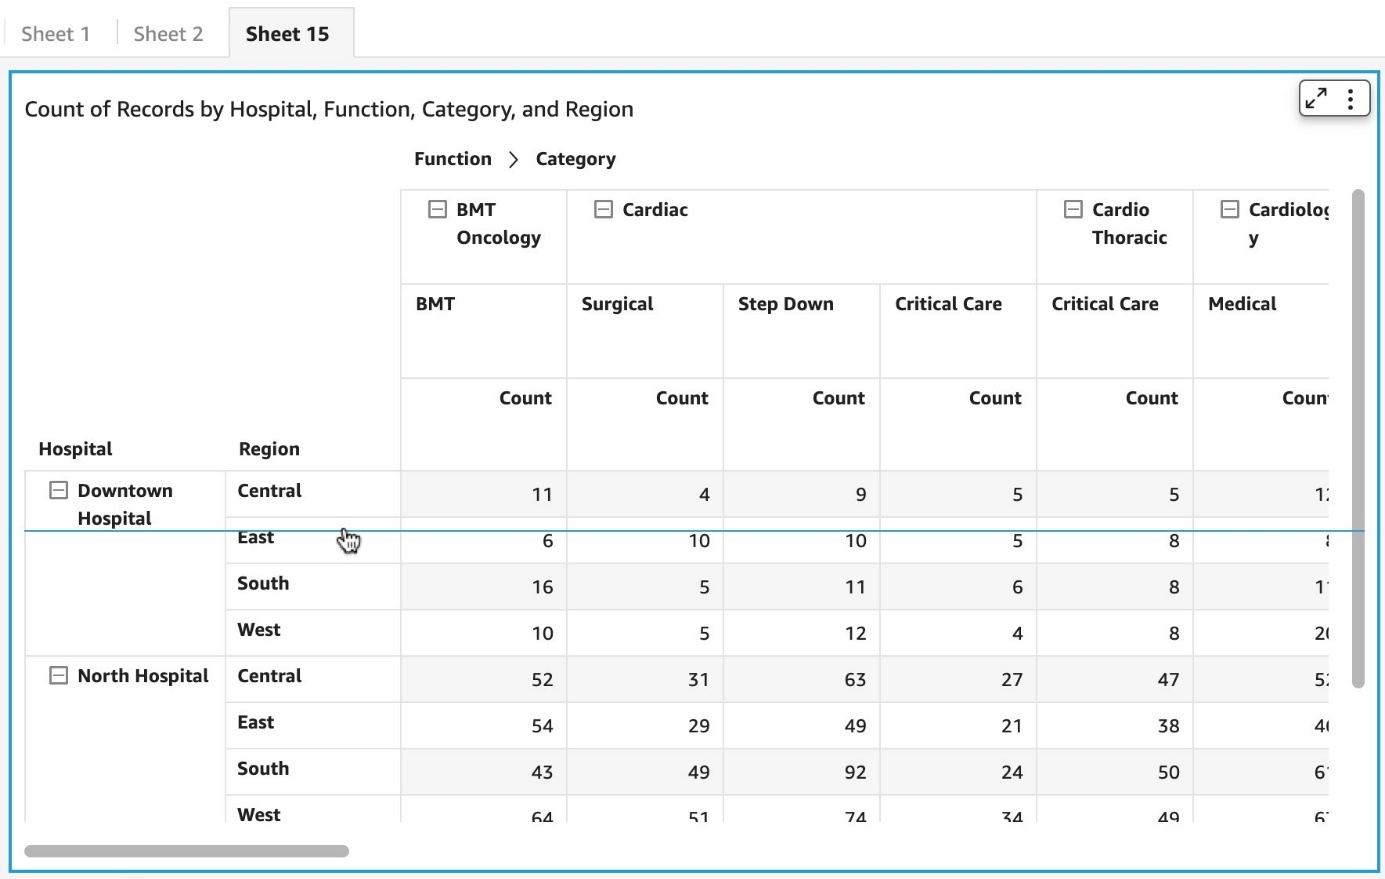
You can resize the height of the column headers at any level such that you can have different heights at each level for better aesthetics.
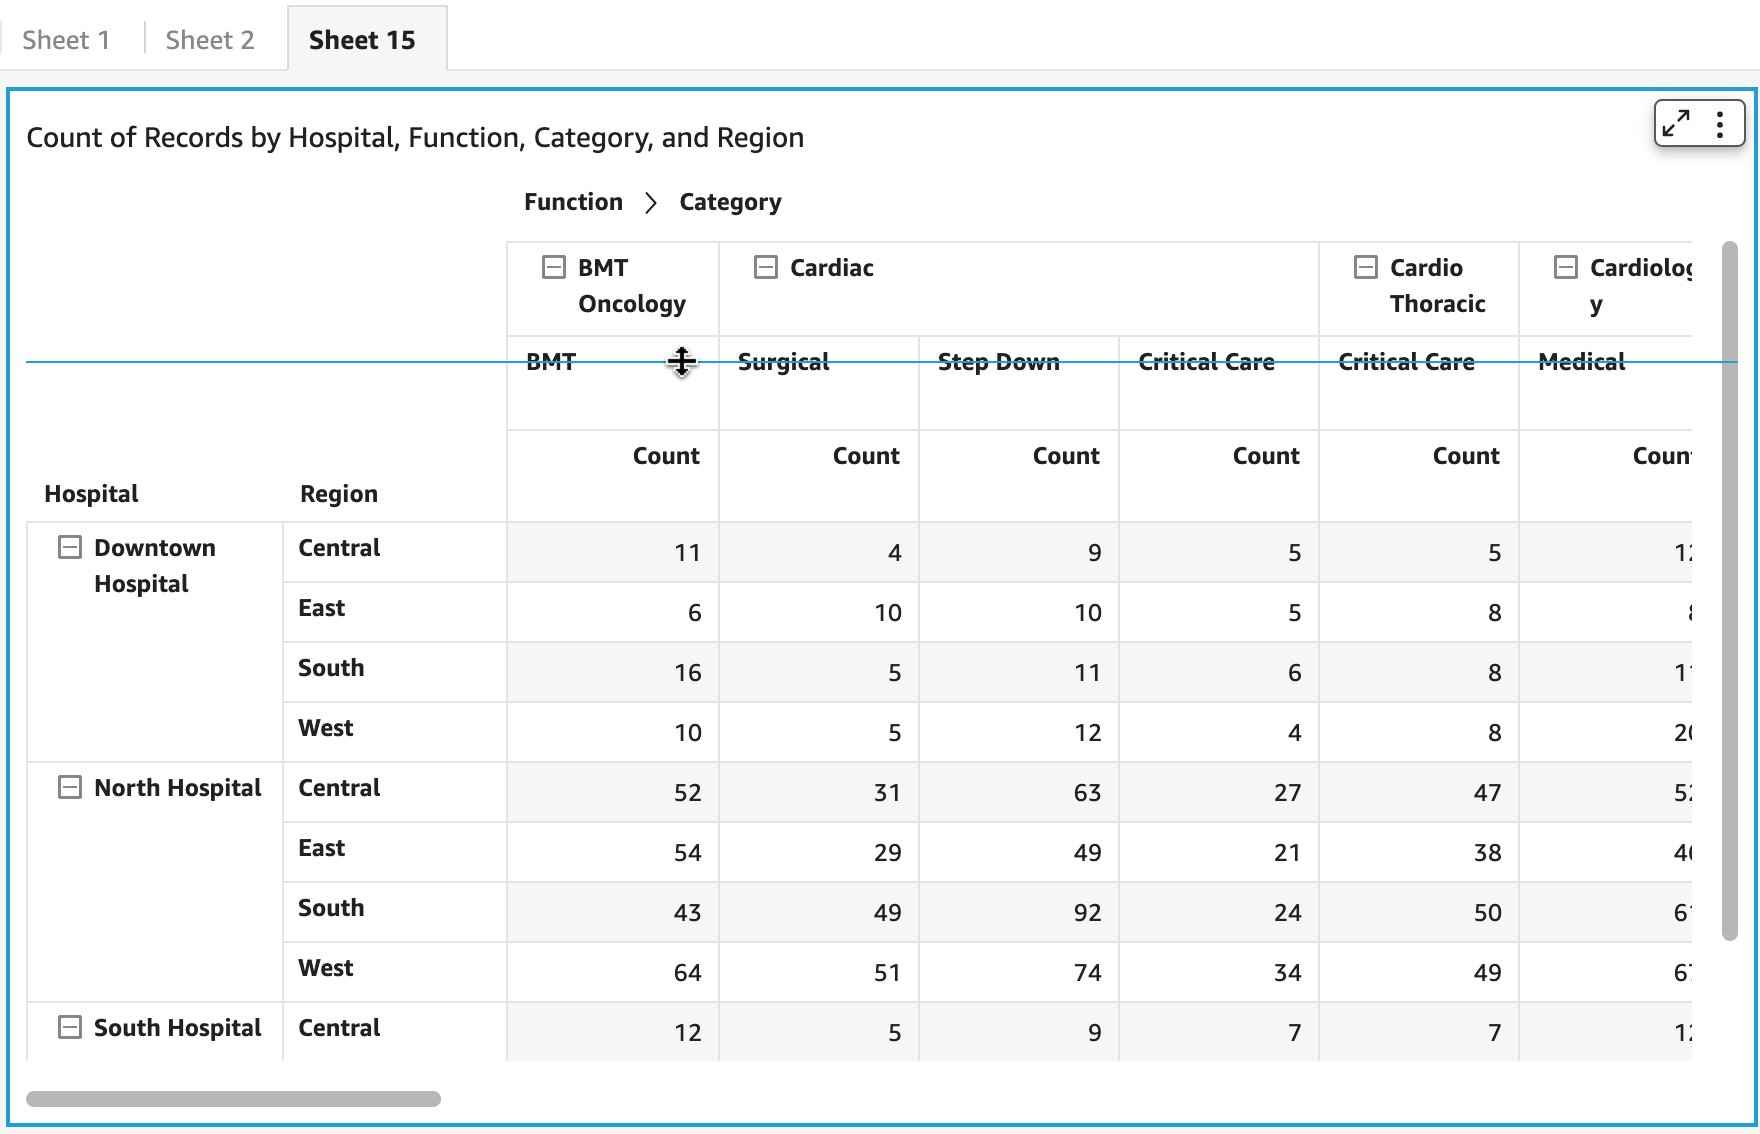
You can also use the drag handler to modify column width for row headers, column headers, or cells.
You can alter column width for any field assigned to rows, as shown in the following screenshot.
You can alter column width for column dimension members both from the parent or leaf node in the case of hierarchy, or column field or values headers in the absence of a column hierarchy.
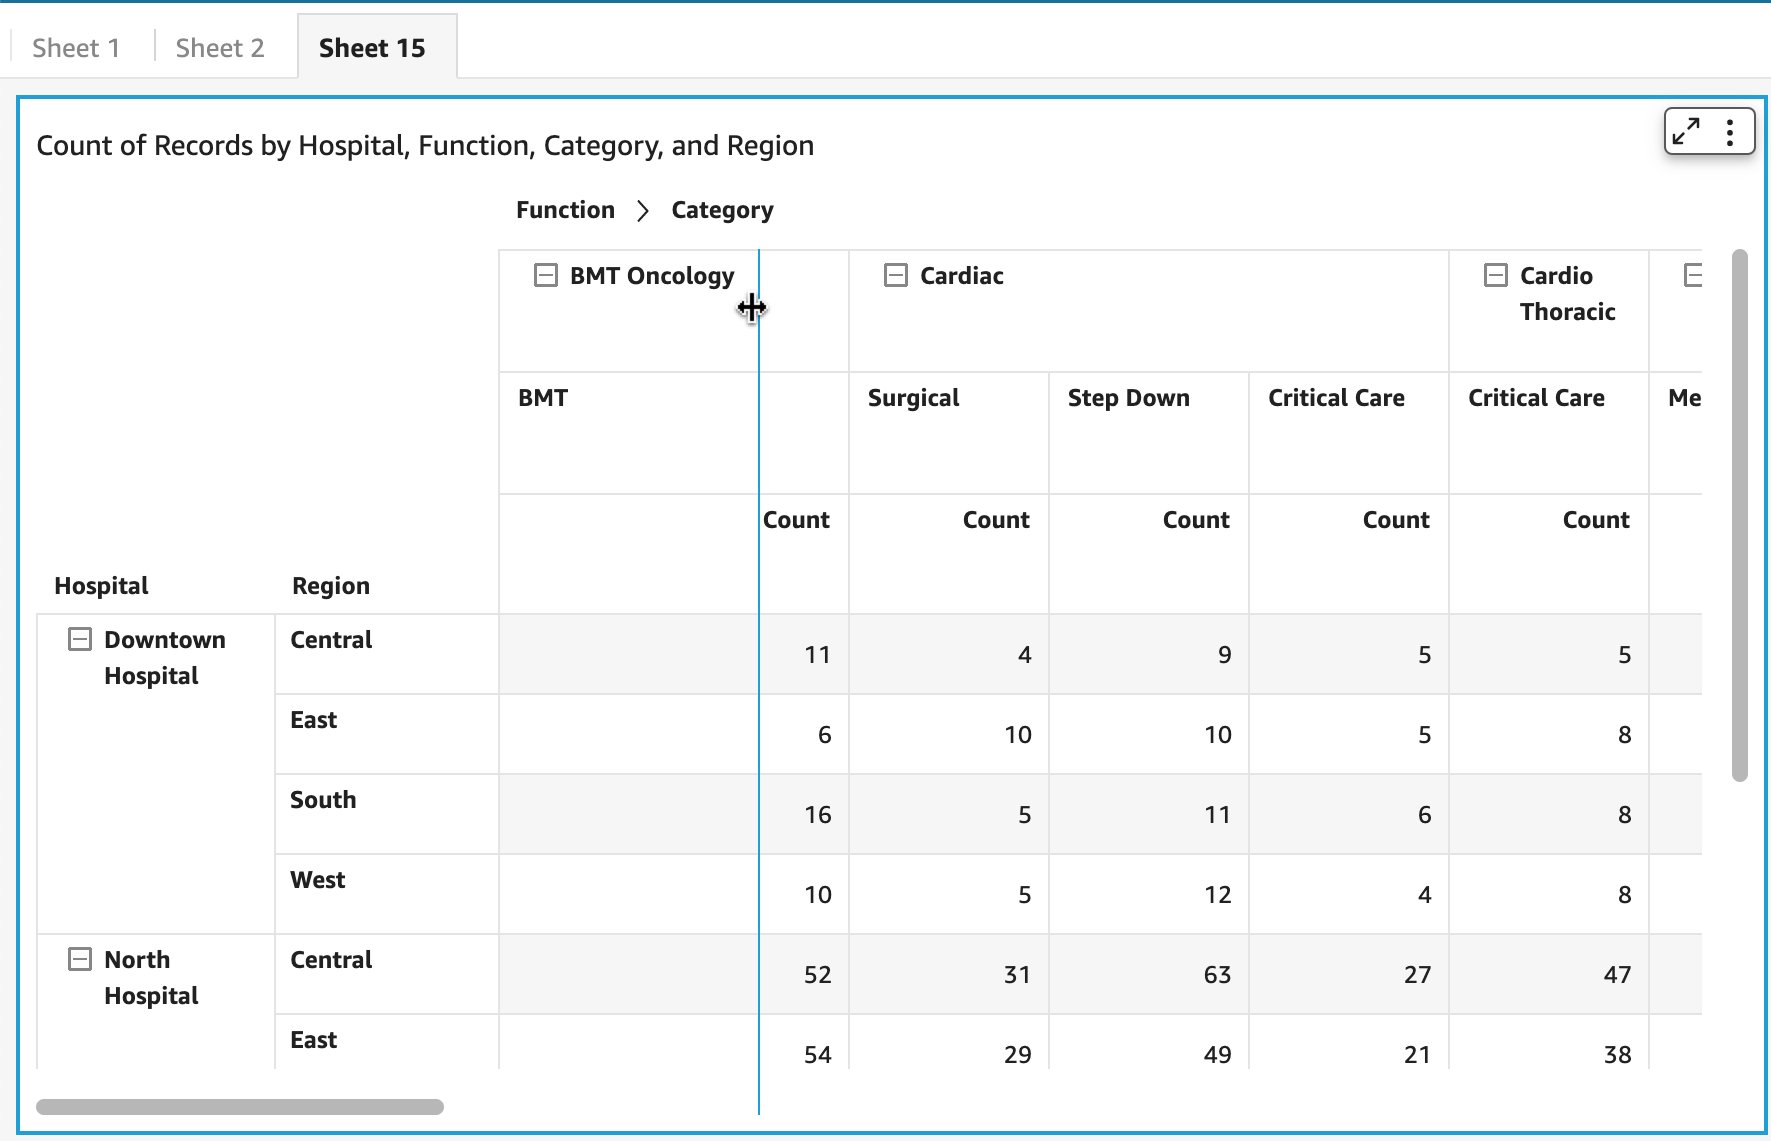
You now have complete flexibility to resize column width from cells. Depending on which cell, the corresponding column width is adjusted.
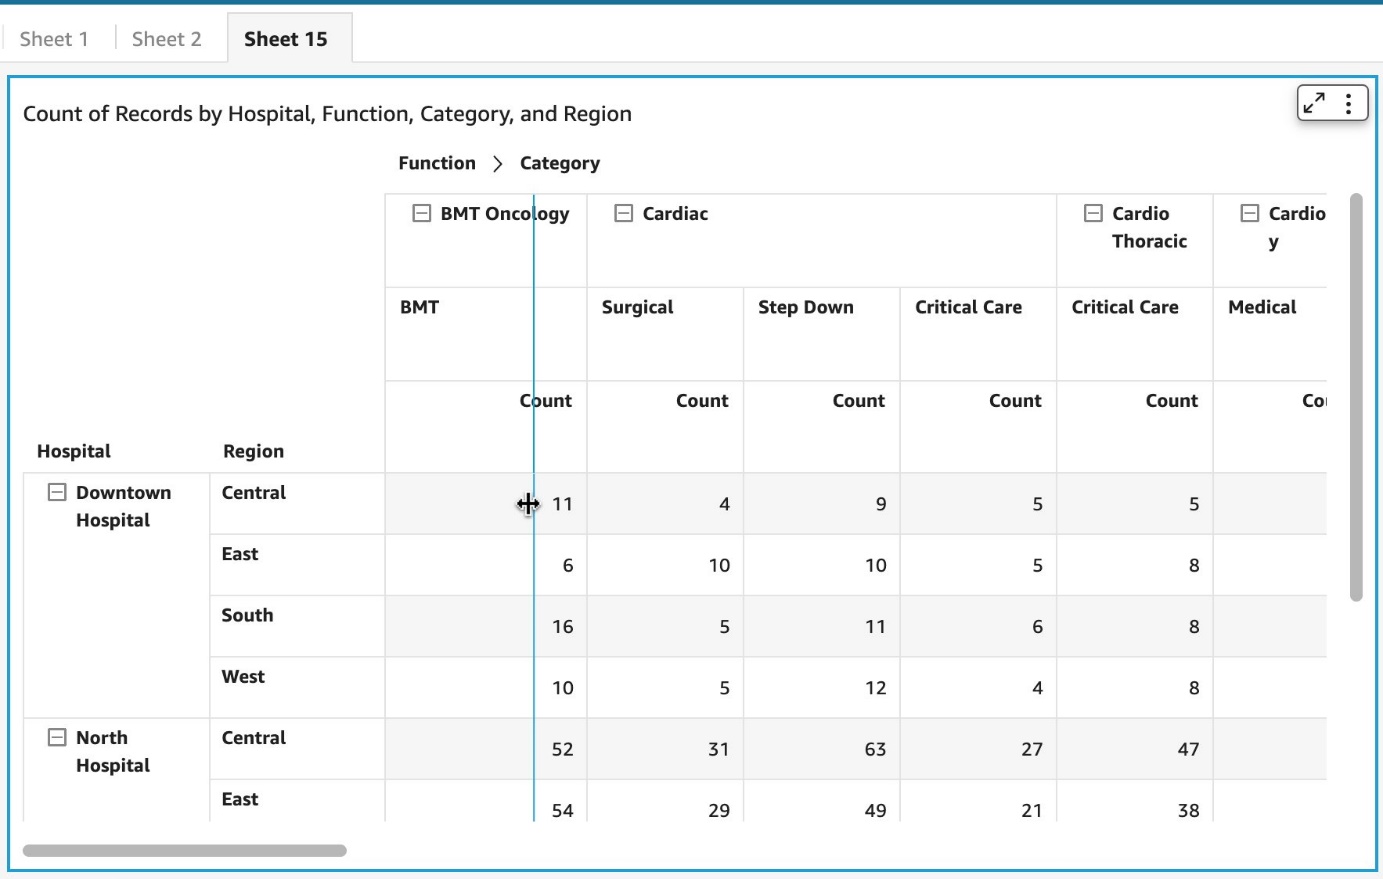
A few things to note about this new feature:
With the introduction of a drag handler, authors and readers can now quickly alter column width, row height, and header height for tables and pivot tables. This provides a consistent behavior and improved user interaction for both the personas and visuals. To learn more about table and pivot table formatting options, refer to Formatting tables and pivot tables in Amazon QuickSight.
Try out the new feature and share your feedback and questions in the comments section.
 Bhupinder Chadha is a senior product manager for Amazon QuickSight focused on visualization and front end experiences. He is passionate about BI, data visualization and low-code/no-code experiences. Prior to QuickSight he was the lead product manager for Inforiver, responsible for building a enterprise BI product from ground up. Bhupinder started his career in presales, followed by a small gig in consulting and then PM for xViz, an add on visualization product.