Data is essential for businesses to make informed decisions, improve operations, and innovate. Integrating data from different sources can be a complex and time-consuming process. AWS offers AWS Glue to help you integrate your data from multiple sources on serverless infrastructure for analysis, machine learning (ML), and application development. AWS Glue provides different authoring experiences for you to build data integration jobs. One of the most common options is the notebook. Data scientists tend to run queries interactively and retrieve results immediately to author data integration jobs. This interactive experience can accelerate building data integration pipelines.
Today, we are excited to announce that AWS Glue Studio notebooks now support Amazon CodeWhisperer for AWS Glue users to improve your experience and help boost development productivity. Now, in your Glue Studio notebook, you can write a comment in natural language (in English) that outlines a specific task, such as “Create a Spark DataFrame from a json file.”. Based on this information, CodeWhisperer recommends one or more code snippets directly in the notebook that can accomplish the task. You can quickly accept the top suggestion, view more suggestions, or continue writing your own code.
This post demonstrates how the user experience on AWS Glue Studio notebook has been changed with the Amazon CodeWhisperer integration.
Prerequisites
Before going forward with this tutorial, you need to complete the following prerequisites:
Configure an AWS Identity and Access Management (IAM) role to interact with Amazon CodeWhisperer. Attach the following policy to your IAM role for the AWS Glue Studio notebook:
Let’s get started. Create a new AWS Glue Studio notebook job by completing the following steps:
On the AWS Glue console, choose Notebooks under ETL jobs in the navigation pane.
Select Jupyter Notebook and choose Create.
For Job name, enter codewhisperer-demo.
For IAM Role, select your IAM role that you configured as a prerequisite.
Choose Start notebook.
A new notebook is created with sample cells.
At the bottom, there is a menu named CodeWhisperer. By choosing this menu, you can see the shortcuts and several options, including disabling auto-suggestions.
Let’s try your first recommendation by Amazon CodeWhisperer. Note that this post contains examples of recommendations, but you may see different code snippets recommended by Amazon CodeWhisperer.
Add a new cell and enter your comment to describe what you want to achieve. After you press Enter, the recommended code is shown.
If you press Tab, then code is chosen. If you press arrow keys, then you can select other recommendations. You can learn more in User actions.
Now let’s read a JSON file from Amazon Simple Storage Service (Amazon S3). Enter the following code comment into a notebook cell and press Enter:
# Create a Spark DataFrame from a json file
CodeWhisperer will recommend a code snippet similar to the following:
+----------+--------------------+----------+-----------+------+----------+--------------------+--------------------+--------------------+--------------------+--------------------+------------------+--------------------+----------------+
|birth_date|     contact_details|death_date|family_name|gender|given_name|                  id|         identifiers|               image|              images|               links|              name|         other_names|       sort_name|
+----------+--------------------+----------+-----------+------+----------+--------------------+--------------------+--------------------+--------------------+--------------------+------------------+--------------------+----------------+
|1944-10-15|                null|      null|    Collins|  male|   Michael|0005af3a-9471-4d1...|[{C000640, biogui...|https://theunited...|[{https://theunit...|[{Wikipedia (de),...|       Mac Collins|[{bar, Mac Collin...|Collins, Michael|
|1969-01-31|[{fax, 202-226-07...|      null|   Huizenga|  male|      Bill|00aa2dc0-bfb6-441...|[{Bill Huizenga, ...|https://theunited...|[{https://theunit...|[{Wikipedia (de),...|     Bill Huizenga|[{da, Bill Huizen...|  Huizenga, Bill|
|1959-09-28|[{phone, 202-225-...|      null|    Clawson|  male|    Curtis|00aca284-9323-495...|[{C001102, biogui...|https://theunited...|[{https://theunit...|[{Wikipedia (comm...|      Curt Clawson|[{bar, Curt Claws...| Clawson, Curtis|
|1930-08-14|                null|2001-10-26|    Solomon|  male|    Gerald|00b73df5-4180-441...|[{S000675, biogui...|https://theunited...|[{https://theunit...|[{Wikipedia (de),...|    Gerald Solomon|[{null, Gerald B....| Solomon, Gerald|
|1960-05-28|[{fax, 202-225-42...|      null|     Rigell|  male|    Edward|00bee44f-db04-4a7...|[{R000589, biogui...|https://theunited...|[{https://theunit...|[{Wikipedia (de),...|   E. Scott Rigell|[{null, Scott Rig...|  Rigell, Edward|
|1951-05-20|[{twitter, MikeCr...|      null|      Crapo|  male|   Michael|00f8f12d-6e27-4a2...|[{Mike Crapo, bal...|https://theunited...|[{https://theunit...|[{Wikipedia (da),...|        Mike Crapo|[{da, Mike Crapo,...|  Crapo, Michael|
|1926-05-12|                null|      null|      Hutto|  male|      Earl|015d77c8-6edb-4ed...|[{H001018, biogui...|https://theunited...|[{https://theunit...|[{Wikipedia (de),...|        Earl Hutto|[{null, Earl Dewi...|     Hutto, Earl|
|1937-11-07|                null|2015-11-19|      Ertel|  male|     Allen|01679bc3-da21-482...|[{E000208, biogui...|https://theunited...|[{https://theunit...|[{Wikipedia (de),...|       Allen Ertel|[{null, Allen E. ...|    Ertel, Allen|
|1916-09-01|                null|2007-11-24|     Minish|  male|    Joseph|018247d0-2961-423...|[{M000796, biogui...|https://theunited...|[{https://theunit...|[{Wikipedia (de),...|     Joseph Minish|[{bar, Joseph Min...|  Minish, Joseph|
|1957-08-04|[{phone, 202-225-...|      null|    Andrews|  male|    Robert|01b100ac-192e-4b5...|[{A000210, biogui...|https://theunited...|[{https://theunit...|[{Wikipedia (de),...| Robert E. Andrews|[{null, Rob Andre...| Andrews, Robert|
|1957-01-10|[{fax, 202-225-57...|      null|     Walden|  male|      Greg|01bc21bf-8939-487...|[{Greg Walden, ba...|https://theunited...|[{https://theunit...|[{Wikipedia (comm...|       Greg Walden|[{bar, Greg Walde...|    Walden, Greg|
|1919-01-17|                null|1987-11-29|      Kazen|  male|   Abraham|02059c1e-0bdf-481...|[{K000025, biogui...|https://theunited...|[{https://theunit...|[{Wikipedia (de),...|Abraham Kazen, Jr.|[{null, Abraham K...|  Kazen, Abraham|
|1960-01-11|[{fax, 202-225-67...|      null|     Turner|  male|   Michael|020aa7dd-54ef-435...|[{Michael R. Turn...|https://theunited...|[{https://theunit...|[{Wikipedia (comm...| Michael R. Turner|[{null, Mike Turn...| Turner, Michael|
|1942-06-28|                null|      null|      Kolbe|  male|     James|02141651-eca2-4aa...|[{K000306, biogui...|https://theunited...|[{https://theunit...|[{Wikipedia (de),...|         Jim Kolbe|[{ca, Jim Kolbe, ...|    Kolbe, James|
|1941-03-08|[{fax, 202-225-79...|      null|  Lowenthal|  male|      Alan|0231c6ef-6e92-49b...|[{Alan Lowenthal,...|https://theunited...|[{https://theunit...|[{Wikipedia (de),...| Alan S. Lowenthal|[{null, Alan Lowe...| Lowenthal, Alan|
|1952-01-09|[{fax, 202-225-93...|      null|    Capuano|  male|   Michael|0239032f-be5c-4af...|[{Michael Capuano...|https://theunited...|[{https://theunit...|[{Wikipedia (de),...|Michael E. Capuano|[{null, Mike Capu...|Capuano, Michael|
|1951-10-19|[{fax, 202-225-56...|      null|   Schrader|  male|      Kurt|0263f619-eff8-4e1...|[{Kurt Schrader, ...|https://theunited...|[{https://theunit...|[{Wikipedia (de),...|     Kurt Schrader|[{bar, Kurt Schra...|  Schrader, Kurt|
|1947-06-13|[{fax, 202-225-69...|      null|     Nadler|  male|   Jerrold|029e793d-ec40-4a1...|[{N000002, biogui...|https://theunited...|[{https://theunit...|[{Wikipedia (de),...|    Jerrold Nadler|[{ca, Jerrold Nad...| Nadler, Jerrold|
|1970-02-03|[{fax, 202-225-82...|      null|     Graves|  male|       Tom|02b621fc-0523-449...|[{Tom Graves, bal...|https://theunited...|[{https://theunit...|[{Wikipedia (de),...|        Tom Graves|[{bar, Tom Graves...|     Graves, Tom|
|1932-05-09|                null|      null|   McMillan|  male|      John|03018f7c-f866-419...|[{M000566, biogui...|https://theunited...|[{https://theunit...|[{Wikipedia (de),...|     John McMillan|[{null, Alex McMi...|  McMillan, John|
+----------+--------------------+----------+-----------+------+----------+--------------------+--------------------+--------------------+--------------------+--------------------+------------------+--------------------+----------------+
only showing top 20 rows
As you can see from the result, you can quickly utilize the code snippet recommended by Amazon CodeWhisperer.
Examples of code recommendations
In this section, we provide additional examples of code recommendations. Note that these are just our examples, and different code snippets may be suggested by Amazon CodeWhisperer.
Add a column with a calculation
In extract, transform, and load (ETL) use cases, it’s common to add new columns from existing columns. When we need to add columns to our Spark DataFrame, we can articulate with a high level of detail to Amazon CodeWhisperer what type of column we need added and its respective attributes:
# Add age column to a given person DataFrame
# age is calculated from current date and birth_date. When death_date is not null, then use death_date to calculate age
Amazon CodeWhisperer will recommend a code snippet similar to the following:
def add_age_column(df):
    # Use current date to calculate age
    current_date = current_timestamp()
    # Use birth_date column to calculate age
    df = df.withColumn("age", datediff(current_date, df.birth_date) / 365)
    # Use death_date column to calculate age
    df = df.withColumn("age", when(df.death_date.isNull(), df.age).otherwise(datediff(df.death_date, df.birth_date) / 365))
    return df
It can be utilized as follows:
df = add_age_column(df)
df.show()
The preceding code returns the following output:
+----------+--------------------+----------+-----------+------+----------+--------------------+--------------------+--------------------+--------------------+--------------------+------------------+--------------------+----------------+------------------+--------------------+
|birth_date|     contact_details|death_date|family_name|gender|given_name|                  id|         identifiers|               image|              images|               links|              name|         other_names|       sort_name|               age|        current_date|
+----------+--------------------+----------+-----------+------+----------+--------------------+--------------------+--------------------+--------------------+--------------------+------------------+--------------------+----------------+------------------+--------------------+
|1944-10-15|                null|      null|    Collins|  male|   Michael|0005af3a-9471-4d1...|[{C000640, biogui...|https://theunited...|[{https://theunit...|[{Wikipedia (de),...|       Mac Collins|[{bar, Mac Collin...|Collins, Michael| 78.71506849315068|2023-06-14 06:12:...|
|1969-01-31|[{fax, 202-226-07...|      null|   Huizenga|  male|      Bill|00aa2dc0-bfb6-441...|[{Bill Huizenga, ...|https://theunited...|[{https://theunit...|[{Wikipedia (de),...|     Bill Huizenga|[{da, Bill Huizen...|  Huizenga, Bill|  54.4027397260274|2023-06-14 06:12:...|
|1959-09-28|[{phone, 202-225-...|      null|    Clawson|  male|    Curtis|00aca284-9323-495...|[{C001102, biogui...|https://theunited...|[{https://theunit...|[{Wikipedia (comm...|      Curt Clawson|[{bar, Curt Claws...| Clawson, Curtis| 63.75342465753425|2023-06-14 06:12:...|
|1930-08-14|                null|2001-10-26|    Solomon|  male|    Gerald|00b73df5-4180-441...|[{S000675, biogui...|https://theunited...|[{https://theunit...|[{Wikipedia (de),...|    Gerald Solomon|[{null, Gerald B....| Solomon, Gerald| 71.24931506849315|2023-06-14 06:12:...|
|1960-05-28|[{fax, 202-225-42...|      null|     Rigell|  male|    Edward|00bee44f-db04-4a7...|[{R000589, biogui...|https://theunited...|[{https://theunit...|[{Wikipedia (de),...|   E. Scott Rigell|[{null, Scott Rig...|  Rigell, Edward|63.087671232876716|2023-06-14 06:12:...|
|1951-05-20|[{twitter, MikeCr...|      null|      Crapo|  male|   Michael|00f8f12d-6e27-4a2...|[{Mike Crapo, bal...|https://theunited...|[{https://theunit...|[{Wikipedia (da),...|        Mike Crapo|[{da, Mike Crapo,...|  Crapo, Michael| 72.11780821917809|2023-06-14 06:12:...|
|1926-05-12|                null|      null|      Hutto|  male|      Earl|015d77c8-6edb-4ed...|[{H001018, biogui...|https://theunited...|[{https://theunit...|[{Wikipedia (de),...|        Earl Hutto|[{null, Earl Dewi...|     Hutto, Earl| 97.15616438356165|2023-06-14 06:12:...|
|1937-11-07|                null|2015-11-19|      Ertel|  male|     Allen|01679bc3-da21-482...|[{E000208, biogui...|https://theunited...|[{https://theunit...|[{Wikipedia (de),...|       Allen Ertel|[{null, Allen E. ...|    Ertel, Allen| 78.08493150684932|2023-06-14 06:12:...|
|1916-09-01|                null|2007-11-24|     Minish|  male|    Joseph|018247d0-2961-423...|[{M000796, biogui...|https://theunited...|[{https://theunit...|[{Wikipedia (de),...|     Joseph Minish|[{bar, Joseph Min...|  Minish, Joseph|  91.2904109589041|2023-06-14 06:12:...|
|1957-08-04|[{phone, 202-225-...|      null|    Andrews|  male|    Robert|01b100ac-192e-4b5...|[{A000210, biogui...|https://theunited...|[{https://theunit...|[{Wikipedia (de),...| Robert E. Andrews|[{null, Rob Andre...| Andrews, Robert|  65.9041095890411|2023-06-14 06:12:...|
|1957-01-10|[{fax, 202-225-57...|      null|     Walden|  male|      Greg|01bc21bf-8939-487...|[{Greg Walden, ba...|https://theunited...|[{https://theunit...|[{Wikipedia (comm...|       Greg Walden|[{bar, Greg Walde...|    Walden, Greg| 66.46849315068494|2023-06-14 06:12:...|
|1919-01-17|                null|1987-11-29|      Kazen|  male|   Abraham|02059c1e-0bdf-481...|[{K000025, biogui...|https://theunited...|[{https://theunit...|[{Wikipedia (de),...|Abraham Kazen, Jr.|[{null, Abraham K...|  Kazen, Abraham| 68.91232876712328|2023-06-14 06:12:...|
|1960-01-11|[{fax, 202-225-67...|      null|     Turner|  male|   Michael|020aa7dd-54ef-435...|[{Michael R. Turn...|https://theunited...|[{https://theunit...|[{Wikipedia (comm...| Michael R. Turner|[{null, Mike Turn...| Turner, Michael|63.465753424657535|2023-06-14 06:12:...|
|1942-06-28|                null|      null|      Kolbe|  male|     James|02141651-eca2-4aa...|[{K000306, biogui...|https://theunited...|[{https://theunit...|[{Wikipedia (de),...|         Jim Kolbe|[{ca, Jim Kolbe, ...|    Kolbe, James| 81.01643835616439|2023-06-14 06:12:...|
|1941-03-08|[{fax, 202-225-79...|      null|  Lowenthal|  male|      Alan|0231c6ef-6e92-49b...|[{Alan Lowenthal,...|https://theunited...|[{https://theunit...|[{Wikipedia (de),...| Alan S. Lowenthal|[{null, Alan Lowe...| Lowenthal, Alan| 82.32328767123288|2023-06-14 06:12:...|
|1952-01-09|[{fax, 202-225-93...|      null|    Capuano|  male|   Michael|0239032f-be5c-4af...|[{Michael Capuano...|https://theunited...|[{https://theunit...|[{Wikipedia (de),...|Michael E. Capuano|[{null, Mike Capu...|Capuano, Michael| 71.47671232876712|2023-06-14 06:12:...|
|1951-10-19|[{fax, 202-225-56...|      null|   Schrader|  male|      Kurt|0263f619-eff8-4e1...|[{Kurt Schrader, ...|https://theunited...|[{https://theunit...|[{Wikipedia (de),...|     Kurt Schrader|[{bar, Kurt Schra...|  Schrader, Kurt|  71.7013698630137|2023-06-14 06:12:...|
|1947-06-13|[{fax, 202-225-69...|      null|     Nadler|  male|   Jerrold|029e793d-ec40-4a1...|[{N000002, biogui...|https://theunited...|[{https://theunit...|[{Wikipedia (de),...|    Jerrold Nadler|[{ca, Jerrold Nad...| Nadler, Jerrold| 76.05479452054794|2023-06-14 06:12:...|
|1970-02-03|[{fax, 202-225-82...|      null|     Graves|  male|       Tom|02b621fc-0523-449...|[{Tom Graves, bal...|https://theunited...|[{https://theunit...|[{Wikipedia (de),...|        Tom Graves|[{bar, Tom Graves...|     Graves, Tom|53.394520547945206|2023-06-14 06:12:...|
|1932-05-09|                null|      null|   McMillan|  male|      John|03018f7c-f866-419...|[{M000566, biogui...|https://theunited...|[{https://theunit...|[{Wikipedia (de),...|     John McMillan|[{null, Alex McMi...|  McMillan, John| 91.15890410958905|2023-06-14 06:12:...|
+----------+--------------------+----------+-----------+------+----------+--------------------+--------------------+--------------------+--------------------+--------------------+------------------+--------------------+----------------+------------------+--------------------+
only showing top 20 rows
Sort and extract records
You can use Amazon CodeWhisperer for sorting data and extracting records within a Spark DataFrame as well:
# Show top 5 oldest persons from DataFrame
# Use age column
Amazon CodeWhisperer will recommend a code snippet similar to the following:
We can also use Amazon CodeWhisperer to create a code snippet for transformation in SQL and create a new table from the SQL query results (CTAS) like so:
# Generate CTAS query by selecting all the records in a table with grouping by a given column
Amazon CodeWhisperer will recommend a code snippet similar to following:
def generate_ctas_query_with_group_by(table_name, group_by_col):
    ctas_query = "CREATE TABLE " + table_name + " AS SELECT * FROM " + table_name + " GROUP BY " + group_by_col
    return ctas_query
Conclusion
In this post, we demonstrated how AWS Glue Studio notebook integration with Amazon CodeWhisperer helps you build data integration jobs faster. This integration is available today in US East (N. Virginia). You can start using the AWS Glue Studio notebook with Amazon CodeWhisperer to accelerate building your data integration jobs. To get started with AWS Glue, visit AWS Glue.
Learn more
To learn more about using AWS Glue notebooks and Amazon CodeWhisperer, check out the following video.
About the authors
Noritaka Sekiyama is a Principal Big Data Architect on the AWS Glue team. He works based in Tokyo, Japan. He is responsible for building software artifacts to help customers. In his spare time, he enjoys cycling with his road bike.
Gal Heyne is a Product Manager for AWS Glue with a strong focus on AI/ML, data engineering, and BI, and is based in California. She is passionate about developing a deep understanding of customers’ business needs and collaborating with engineers to design easy-to-use data products. In her spare time, she enjoys playing card games.
As organizations grow, the records that contain information about customers, businesses, or products tend to be increasingly fragmented and siloed across applications, channels, and data stores. Because information can be gathered in different ways, there is also the issue of different but equivalent data, such as for street addresses (“5th Avenue” and “5th Ave”). As a consequence, it’s not easy to link related records together to create a unified view and gain better insights.
For example, companies want to run advertising campaigns to reach consumers across multiple applications and channels with personalized messaging. Companies often have to deal with disparate data records that contain incomplete or conflicting information, creating a difficult matching process.
In the retail industry, companies have to reconcile, across their supply chain and stores, products that use multiple and different product codes, such as stock keeping units (SKUs), universal product codes (UPCs), or proprietary codes. This prevents them from analyzing information quickly and holistically.
One way to address this problem is to build bespoke data resolution solutions such as complex SQL queries interacting with multiple databases, or train machine learning (ML) models for record matching. But these solutions take months to build, require development resources, and are costly to maintain.
To help you with that, today we’re introducing AWS Entity Resolution, an ML-powered service that helps you match and link related records stored across multiple applications, channels, and data stores. You can get started in minutes configuring entity resolution workflows that are flexible, scalable, and can seamlessly connect to your existing applications.
AWS Entity Resolution offers advanced matching techniques, such as rule-based matching and machine learning models, to help you accurately link related sets of customer information, product codes, or business data codes. For example, you can use AWS Entity Resolution to create a unified view of your customer interactions by linking recent events (such as ad clicks, cart abandonment, and purchases) into a unique entity ID, or better track products that use different codes (like SKUs or UPCs) across your stores.
With AWS Entity Resolution, you can improve matching accuracy and protect data security while minimizing data movement because it reads records where they already live. Let’s see how that works in practice.
Using AWS Entity Resolution As part of my analytics platform, I have a comma-separated values (CSV) file containing one million fictitious customers in an Amazon Simple Storage Service (Amazon S3) bucket. These customers come from a loyalty program but can have applied through different channels (online, in store, by post), so it’s possible that multiple records relate to the same customer.
I use an AWS Glue crawler to automatically determine the content of the file and keep the metadata table updated in the data catalog so that it’s available for my analytics jobs. Now, I can use the same setup with AWS Entity Resolution.
To create a matching workflow, I first need to define my data with a schema mapping.
I choose Create schema mapping, enter a name and description, and select the option to import the schema from AWS Glue. I could also define a custom schema using a step-by-step flow or a JSON editor.
I select the AWS Glue database and table from the two dropdowns to import columns and pre-populate the input fields.
I select the Unique ID from the dropdown. The unique ID is the column that can distinctly reference each row of my data. In this case, it’s the loyalty_id in the CSV file.
I select the input fields that are going to be used for matching. In this case, I choose the columns from the dropdown that can be used to recognize if multiple records are related to the same customer. If some columns aren’t required for matching but are required in the output file, I can optionally add them as pass-through fields. I choose Next.
I map the input fields to their input type and match key. In this way, AWS Entity Resolution knows how to use these fields to match similar records. To continue, I choose Next.
Now, I use grouping to better organize the data I need to compare. For example, the First name, Middle name, and Last name input fields can be grouped together and compared as a Full name.
I also create a group for the Address fields.
I choose Next and review all configurations. Then, I choose Create schema mapping.
Now that I’ve created the schema mapping, I choose Matching workflows from the navigation pane and then Create matching workflow.
I enter a name and a description. Then, to configure the input data, I select the AWS Glue database and table and the schema mapping.
To give the service access to the data, I select a service role that I configured previously. The service role gives access to the input and output S3 buckets and the AWS Glue database and table. If the input or output buckets are encrypted, the service role can also give access to the AWS Key Management Service (AWS KMS) keys needed to encrypt and decrypt the data. I choose Next.
I have the option to use a rule-based or ML-powered matching method. Depending on the method, I can use a manual or automatic processing cadence to run the matching workflow job. For now, I select Machine learning matching and Manual for the Processing cadence, and then choose Next.
I configure an S3 bucket as the output destination. Under Data format, I select Normalized data so that special characters and extra spaces are removed, and data is formatted to lowercase.
I use the default Encryption settings. For Data output, I use the default so that all input fields are included. For security, I can hide fields to exclude them from output or hash fields I want to mask. I choose Next.
I review all settings and choose Create and run to complete the creation of the matching workflow and run the job for the first time.
After a few minutes, the job completes. According to this analysis, of the 1 million records, only 835 thousand are unique customers. I choose View output in Amazon S3 to download the output files.
In the output files, each record has the original unique ID (loyalty_id in this case) and a newly assigned MatchID. Matching records, related to the same customers, have the same MatchID. The ConfidenceLevel field describes the confidence that machine learning matching has that the corresponding records are actually a match.
I can now use this information to have a better understanding of customers who are subscribed to the loyalty program.
Availability and Pricing AWS Entity Resolution is generally available today in the following AWS Regions: US East (Ohio, N. Virginia), US West (Oregon), Asia Pacific (Seoul, Singapore, Sydney, Tokyo), and Europe (Frankfurt, Ireland, London).
With AWS Entity Resolution, you pay only for what you use based on the number of source records processed by your workflows. Pricing doesn’t depend on the matching method, whether it’s machine learning or rule-based record matching. For more information, see AWS Entity Resolution pricing.
Using AWS Entity Resolution, you gain a deeper understanding of how data is linked. That helps you deliver new insights, enhance decision making, and improve customer experiences based on a unified view of their records.
P.S. We’re focused on improving our content to provide a better customer experience, and we need your feedback to do so. Please take this quick survey to share insights on your experience with the AWS Blog. Note that this survey is hosted by an external company, so the link does not lead to our website. AWS handles your information as described in the AWS Privacy Notice.
We are pleased to announce the preview release of the vector engine for Amazon OpenSearch Serverless. The vector engine provides a simple, scalable, and high-performing similarity search capability in Amazon OpenSearch Serverless that makes it easy for you to build modern machine learning (ML) augmented search experiences and generative artificial intelligence (AI) applications without having to manage the underlying vector database infrastructure. This post summarizes the features and functionalities of our vector engine.
Using augmented ML search and generative AI with vector embeddings
Organizations across all verticals are rapidly adopting generative AI for its ability to handle vast datasets, generate automated content, and provide interactive, human-like responses. Customers are exploring ways to transform the end-user experience and interaction with their digital platform by integrating advanced conversational generative AI applications such as chatbots, question and answer systems, and personalized recommendations. These conversational applications enable you to search and query in natural language and generate responses that closely resemble human-like responses by accounting for the semantic meaning, user intent, and query context.
ML-augmented search applications and generative AI applications use vector embeddings, which are numerical representations of text, image, audio, and video data to generate dynamic and relevant content. The vector embeddings are trained on your private data and represent the semantic and contextual attributes of the information. Ideally, these embeddings can be stored and managed close to your domain-specific datasets, such as within your existing search engine or database. This enables you to process a user’s query to find the closest vectors and combine them with additional metadata without relying on external data sources or additional application code to integrate the results. Customers want a vector database option that is simple to build on and enables them to move quickly from prototyping to production so they can focus on creating differentiated applications. The vector engine for OpenSearch Serverless extends OpenSearch’s search capabilities by enabling you to store, search, and retrieve billions of vector embeddings in real time and perform accurate similarity matching and semantic searches without having to think about the underlying infrastructure.
Exploring the vector engine’s capabilities
Built on OpenSearch Serverless, the vector engine inherits and benefits from its robust architecture. With the vector engine, you don’t have to worry about sizing, tuning, and scaling the backend infrastructure. The vector engine automatically adjusts resources by adapting to changing workload patterns and demand to provide consistently fast performance and scale. As the number of vectors grows from a few thousand during prototyping to hundreds of millions and beyond in production, the vector engine will scale seamlessly, without the need for reindexing or reloading your data to scale your infrastructure. Additionally, the vector engine has separate compute for indexing and search workloads, so you can seamlessly ingest, update, and delete vectors in real time while ensuring that the query performance your users experience remains unaffected. All the data is persisted in Amazon Simple Storage Service (Amazon S3), so you get the same data durability guarantees as Amazon S3 (eleven nines). Even though we are still in preview, the vector engine is designed for production workloads with redundancy for Availability Zone outages and infrastructure failures.
The vector engine for OpenSearch Serverless is powered by the k-nearest neighbor (kNN) search feature in the open-source OpenSearch Project, proven to deliver reliable and precise results. Many customers today are using OpenSearch kNN search in managed clusters for offering semantic search and personalization in their applications. With the vector engine, you can get the same functionality with the simplicity of a serverless environment. The vector engine supports the popular distance metrics such as Euclidean, cosine similarity, and dot product, and can accommodate 16,000 dimensions, making it well-suited to support a wide range of foundational and other AI/ML models. You can also store diverse fields with various data types such as numeric, boolean, date, keyword, geopoint for metadata, and text for descriptive information to add more context to the stored vectors. Colocating the data types reduces the complexity and maintainability and avoids data duplication, version compatibility challenges, and licensing issues, effectively simplifying your application stack. Because the vector engine supports the same OpenSearch open-source suite APIs, you can take advantage of its rich query capabilities, such as full text search, advanced filtering, aggregations, geo-spatial query, nested queries for faster retrieval of data, and enhanced search results. For example, if your use case requires you to find the results within 15 miles of the requestor, the vector engine can do this in a single query, eliminating the need for maintaining two different systems and then combining the results through application logic. With support for integration with LangChain, Amazon Bedrock, and Amazon SageMaker, you can easily integrate your preferred ML and AI system with the vector engine.
The vector engine supports a wide range of use cases across various domains, including image search, document search, music retrieval, product recommendation, video search, location-based search, fraud detection, and anomaly detection. We also anticipate a growing trend for hybrid searches that combine lexical search methods with advanced ML and generative AI capabilities. For example, when a user searches for a “red shirt” on your e-commerce website, semantic search helps expand the scope by retrieving all shades of red, while preserving the tuning and boosting logic implemented on the lexical (BM25) search. With OpenSearch filtering, you can further enhance the relevance of your search results by providing users with options to refine their search based on size, brand, price range, and availability in nearby stores, allowing for a more personalized and precise experience. The hybrid search support in the vector engine enables you to query vector embeddings, metadata, and descriptive information within a single query call, making it easy to provide more accurate and contextually relevant search results without building complex application code.
You can get started in minutes with the vector engine by creating a specialized vector search collection under OpenSearch Serverless using the AWS Management Console, AWS Command Line Interface (AWS CLI), or the AWS software development kit (AWS SDK). Collections are a logical grouping of indexed data that works together to support a workload, while the physical resources are automatically managed in the backend. You don’t have to declare how much compute or storage is needed or monitor the system to make sure it’s running well. OpenSearch Serverless applies different sharding and indexing strategies for the three available collection types: time series, search, and vector search. The vector engine’s compute capacity used for data ingestion, and search and query are measured in OpenSearch Compute Units (OCUs). One OCU can handle 4 million vectors for 128 dimensions or 500K for 768 dimensions at 99% recall rate. The vector engine is built on OpenSearch Serverless, which is a highly available service and requires a minimum of 4 OCUs (two OCUs for the ingest including primary and standby, and two OCUs for the search with two active replicas across Availability Zones) for that first collection in an account. All subsequent collections using the same AWS Key Management Service (AWS KMS) key can share those OCUs.
Get started with vector embeddings
To get started using vector embeddings using the console, complete the following steps:
Create a new collection on the OpenSearch Serverless console.
Provide a name and optional description.
Currently, vector embeddings are supported exclusively by vector search collections; therefore, for Collection type, select Vector search.
Next, you must configure the security policies, which includes encryption, network, and data access policies.
We are introducing the new Easy create option, which streamlines the security configuration for faster onboarding. All the data in the vector engine is encrypted in transit and at rest by default. You can choose to bring your own encryption key or use the one provided by the service that is dedicated for your collection or account. You can choose to host your collection on a public endpoint or within a VPC. The vector engine supports fine-grained AWS Identity and Access Management (IAM) permissions so that you can define who can create, update, and delete encryption, network, collections, and indexes, thereby enabling organizational alignment.
With the security settings in place, you can finish creating the collection.
After the collection is successfully created, you can create the vector index. At this point, you can use the API or the console to create an index. An index is a collection of documents with a common data schema and provides a way for you to store, search, and retrieve your vector embeddings and other fields. The vector index supports up to 1,000 fields.
To create the vector index, you must define the vector field name, dimensions, and the distance metric.
The vector index supports up to 16,000 dimensions and three types of distance metrics: Euclidean, cosine, and dot product.
Once you have successfully created the index, you can use OpenSearch’s powerful query capabilities to get comprehensive search results.
The following example shows how easily you can create a simple property listing index with the title, description, price, and location details as fields using the OpenSearch API. By using the query APIs, this index can efficiently provide accurate results to match your search requests, such as “Find me a two-bedroom apartment in Seattle that is under $3000.”
From preview to GA and beyond
Today, we are excited to announce the preview of the vector engine, making it available for you to begin testing it out immediately. As we noted earlier, OpenSearch Serverless was designed to provide a highly available service to power your enterprise applications, with independent compute resources for index and search and built-in redundancy.
We recognize that many of you are in the experimentation phase and would like a more economical option for dev-test. Prior to GA, we plan to offer two features that will enable us to reduce the cost of your first collection. The first is a new dev-test option that enables you to launch a collection with no active standby or replica, reducing the entry cost by 50%. The vector engine still provides durability guarantees because it persists all the data in Amazon S3. The second is to initially provision a 0.5 OCU footprint, which will scale up as needed to support your workload, further lowering costs if your initial workload is in the tens of thousands to low-hundreds of thousands of vectors (depending on the number of dimensions). Between these two features, we will reduce the minimum OCUs needed to power your first collection from 4 OCUs down to 1 OCU per hour.
We are also working on features that will allow us to achieve workload pause and resume capabilities in the coming months, which is particularly useful for the vector engine because many of these use cases don’t require continuous indexing of the data.
Lastly, we are diligently focused on optimizing the performance and memory usage of the vector graphs, including improving caching, merging and more.
While we work on these cost reductions, we will be offering the first 1400 OCU-hours per month free on vector collections until the dev-test option is made available. This will enable you to test the vector engine preview for up to two weeks every month at no cost, based on your workload.
Summary
The vector engine for OpenSearch Serverless introduces a simple, scalable, and high-performing vector storage and search capability that makes it straightforward for you to quickly store and query billions of vector embeddings generated from a variety of ML models, such as those provided by Amazon Bedrock, with response times in milliseconds.
The preview release of vector engine for OpenSearch Serverless is now available in eight Regions globally: US East (Ohio), US East (N. Virginia), US West (Oregon), Asia Pacific (Singapore), Asia Pacific (Sydney), Asia Pacific (Tokyo), Europe (Frankfurt), and Europe (Ireland).
We are the excited about the future ahead and your feedback will play a vital role in guiding the progress of this product. We encourage you to try out the vector engine for OpenSearch Serverless and share your use cases, questions, and feedback in the comments section.
In the coming weeks, we will be publishing a series of posts to provide you with detailed guidance on how to integrate the vector engine with LangChain, Amazon Bedrock, and SageMaker. To learn more about the vector engine’s capabilities, refer to our Getting Started with Amazon OpenSearch Serverless documentation
About the authors
Pavani Baddepudi is a Principal Product Manager for Search Services at AWS and the lead PM for OpenSearch Serverless. Her interests include distributed systems, networking, and security. When not working, she enjoys hiking and exploring new cuisines.
Carl Meadows is Director of Product Management at AWS and is responsible for Amazon Elasticsearch Service, OpenSearch, Open Distro for Elasticsearch, and Amazon CloudSearch. Carl has been with Amazon Elasticsearch Service since before it was launched in 2015. He has a long history of working in the enterprise software and cloud services spaces. When not working, Carl enjoys making and recording music.
This April, Swami Sivasubramanian, Vice President of Data and Machine Learning at AWS, announced Amazon Bedrock and Amazon Titan models as part of new tools for building with generative AI on AWS. Amazon Bedrock, currently available in preview, is a fully managed service that makes foundation models (FMs) from Amazon and leading AI startups—such as AI21 Labs, Anthropic, Cohere, and Stability AI—available through an API.
Today, I’m excited to announce the preview of agents for Amazon Bedrock, a new capability for developers to create fully managed agents in a few clicks. Agents for Amazon Bedrock accelerate the delivery of generative AI applications that can manage and perform tasks by making API calls to your company systems. Agents extend FMs to understand user requests, break down complex tasks into multiple steps, carry on a conversation to collect additional information, and take actions to fulfill the request.
Using agents for Amazon Bedrock, you can automate tasks for your internal or external customers, such as managing retail orders or processing insurance claims. For example, an agent-powered generative AI e-commerce application can not only respond to the question, “Do you have this jacket in blue?” with a simple answer but can also help you with the task of updating your order or managing an exchange.
For this to work, you first need to give the agent access to external data sources and connect it to existing APIs of other applications. This allows the FM that powers the agent to interact with the broader world and extend its utility beyond just language processing tasks. Second, the FM needs to figure out what actions to take, what information to use, and in which sequence to perform these actions. This is possible thanks to an exciting emerging behavior of FMs—their ability to reason. You can show FMs how to handle such interactions and how to reason through tasks by building prompts that include definitions and instructions. The process of designing prompts to guide the model towards desired outputs is known as prompt engineering.
Introducing Agents for Amazon Bedrock Agents for Amazon Bedrock automate the prompt engineering and orchestration of user-requested tasks. Once configured, an agent automatically builds the prompt and securely augments it with your company-specific information to provide responses back to the user in natural language. The agent is able to figure out the actions required to automatically process user-requested tasks. It breaks the task into multiple steps, orchestrates a sequence of API calls and data lookups, and maintains memory to complete the action for the user.
With fully managed agents, you don’t have to worry about provisioning or managing infrastructure. You’ll have seamless support for monitoring, encryption, user permissions, and API invocation management without writing custom code. As a developer, you can use the Bedrock console or SDK to upload the API schema. The agent then orchestrates the tasks with the help of FMs and performs API calls using AWS Lambda functions.
Primer on Advanced Reasoning and ReAct You can help FMs to reason and figure out how to solve user-requested tasks with a reasoning technique called ReAct (synergizing reasoning and acting). Using ReAct, you can structure prompts to show an FM how to reason through a task and decide on actions that help find a solution. The structured prompts include a sequence of question-thought-action-observation examples.
The question is the user-requested task or problem to solve. The thought is a reasoning step that helps demonstrate to the FM how to tackle the problem and identify an action to take. The action is an API that the model can invoke from an allowed set of APIs. The observation is the result of carrying out the action. The actions that the FM is able to choose from are defined by a set of instructions that are prepended to the example prompt text. Here is an illustration of how you would build up a ReAct prompt:
The good news is that Bedrock performs the heavy lifting for you! Behind the scenes, agents for Amazon Bedrock build the prompts based on the information and actions you provide.
Now, let me show you how to get started with agents for Amazon Bedrock.
Create an Agent for Amazon Bedrock Let’s assume you’re a developer at an insurance company and want to provide a generative AI application that helps the insurance agency owners automate repetitive tasks. You create an agent in Bedrock and integrate it into your application.
To get started with the agent, open the Bedrock console, select Agents in the left navigation panel, then choose Create Agent.
Select a foundation model from Bedrock that fits your use case. Here, you provide an instruction to your agent in natural language. The instruction tells the agent what task it’s supposed to perform and the persona it’s supposed to assume. For example, “You are an agent designed to help with processing insurance claims and managing pending paperwork.”
Add action groups. An action is a task that the agent can perform automatically by making API calls to your company systems. A set of actions is defined in an action group. Here, you provide an API schema that defines the APIs for all the actions in the group. You also must provide a Lambda function that represents the business logic for each API. For example, let’s define an action group called ClaimManagementActionGroup that manages insurance claims by pulling a list of open claims, identifying outstanding paperwork for each claim, and sending reminders to policy holders. Make sure to capture this information in the action group description. The business logic for my action group is captured in the Lambda function InsuranceClaimsLambda. This AWS Lambda function implements methods for the following API calls: open-claims, identify-missing-documents, and send-reminders.Here’s a short extract from my OrderManagementLambda:
import json
import time

def open_claims():
    ...

def identify_missing_documents(parameters):
    ...

def send_reminders():
    ...

def lambda_handler(event, context):
    responses = []

    for prediction in event['actionGroups']:
        response_code = ...
        action = prediction['actionGroup']
        api_path = prediction['apiPath']

        if api_path == '/claims':
            body = open_claims()
        elif api_path == '/claims/{claimId}/identify-missing-documents':
			parameters = prediction['parameters']
            body = identify_missing_documents(parameters)
        elif api_path == '/send-reminders':
            body =  send_reminders()
        else:
            body = {"{}::{} is not a valid api, try another one.".format(action, api_path)}

        response_body = {
            'application/json': {
                'body': str(body)
            }
        }

        action_response = {
            'actionGroup': prediction['actionGroup'],
            'apiPath': prediction['apiPath'],
            'httpMethod': prediction['httpMethod'],
            'httpStatusCode': response_code,
            'responseBody': response_body
        }

        responses.append(action_response)

    api_response = {'response': responses}

    return api_response
Note that you also must provide an API schema in the OpenAPI schema JSON format. Here’s what my API schema file insurance_claim_schema.json looks like:
{"openapi": "3.0.0",
    "info": {
        "title": "Insurance Claims Automation API",
        "version": "1.0.0",
        "description": "APIs for managing insurance claims by pulling a list of open claims, identifying outstanding paperwork for each claim, and sending reminders to policy holders."
    },
    "paths": {
        "/claims": {
            "get": {
                "summary": "Get a list of all open claims",
                "description": "Get the list of all open insurance claims. Return all the open claimIds.",
                "operationId": "getAllOpenClaims",
                "responses": {
                    "200": {
                        "description": "Gets the list of all open insurance claims for policy holders",
                        "content": {
                            "application/json": {
                                "schema": {
                                    "type": "array",
                                    "items": {
                                        "type": "object",
                                        "properties": {
                                            "claimId": {
                                                "type": "string",
                                                "description": "Unique ID of the claim."
                                            },
                                            "policyHolderId": {
                                                "type": "string",
                                                "description": "Unique ID of the policy holder who has filed the claim."
                                            },
                                            "claimStatus": {
                                                "type": "string",
                                                "description": "The status of the claim. Claim can be in Open or Closed state"
                                            }
                                        }
                                    }
                                }
                            }
                        }
                    }
                }
            }
        },
        "/claims/{claimId}/identify-missing-documents": {
            "get": {
                "summary": "Identify missing documents for a specific claim",
                "description": "Get the list of pending documents that need to be uploaded by policy holder before the claim can be processed. The API takes in only one claim id and returns the list of documents that are pending to be uploaded by policy holder for that claim. This API should be called for each claim id",
                "operationId": "identifyMissingDocuments",
                "parameters": [{
                    "name": "claimId",
                    "in": "path",
                    "description": "Unique ID of the open insurance claim",
                    "required": true,
                    "schema": {
                        "type": "string"
                    }
                }],
                "responses": {
                    "200": {
                        "description": "List of documents that are pending to be uploaded by policy holder for insurance claim",
                        "content": {
                            "application/json": {
                                "schema": {
                                    "type": "object",
                                    "properties": {
                                        "pendingDocuments": {
                                            "type": "string",
                                            "description": "The list of pending documents for the claim."
                                        }
                                    }
                                }
                            }
                        }

                    }
                }
            }
        },
        "/send-reminders": {
            "post": {
                "summary": "API to send reminder to the customer about pending documents for open claim",
                "description": "Send reminder to the customer about pending documents for open claim. The API takes in only one claim id and its pending documents at a time, sends the reminder and returns the tracking details for the reminder. This API should be called for each claim id you want to send reminders for.",
                "operationId": "sendReminders",
                "requestBody": {
                    "required": true,
                    "content": {
                        "application/json": {
                            "schema": {
                                "type": "object",
                                "properties": {
                                    "claimId": {
                                        "type": "string",
                                        "description": "Unique ID of open claims to send reminders for."
                                    },
                                    "pendingDocuments": {
                                        "type": "string",
                                        "description": "The list of pending documents for the claim."
                                    }
                                },
                                "required": [
                                    "claimId",
                                    "pendingDocuments"
                                ]
                            }
                        }
                    }
                },
                "responses": {
                    "200": {
                        "description": "Reminders sent successfully",
                        "content": {
                            "application/json": {
                                "schema": {
                                    "type": "object",
                                    "properties": {
                                        "sendReminderTrackingId": {
                                            "type": "string",
                                            "description": "Unique Id to track the status of the send reminder Call"
                                        },
                                        "sendReminderStatus": {
                                            "type": "string",
                                            "description": "Status of send reminder notifications"
                                        }
                                    }
                                }
                            }
                        }
                    },
                    "400": {
                        "description": "Bad request. One or more required fields are missing or invalid."
                    }
                }
            }
        }
    }
}
When a user asks your agent to complete a task, Bedrock will use the FM you configured for the agent to identify the sequence of actions and invoke the corresponding Lambda functions in the right order to solve the user-requested task.
In the final step, review your agent configuration and choose Create Agent.
Congratulations, you’ve just created your first agent in Amazon Bedrock!
Deploy an Agent for Amazon Bedrock To deploy an agent in your application, you must create an alias. Bedrock then automatically creates a version for that alias.
In the Bedrock console, select your agent, then select Deploy, and choose Create to create an alias.
Provide an alias name and description and choose whether to create a new version or use an existing version of your agent to associate with this alias.
This saves a snapshot of the agent code and configuration and associates an alias with this snapshot or version. You can use the alias to integrate the agent into your applications.
Now, let’s test the insurance agent! You can do this right in the Bedrock console.
Let’s ask the agent to “Send reminder to all policy holders with open claims and pending paper work.” You can see how the FM-powered agent is able to understand the user request, break down the task into steps (collect the open insurance claims, lookup the claim IDs, send reminders), and perform the corresponding actions.
Agents for Amazon Bedrock can help you increase productivity, improve your customer service experience, or automate DevOps tasks. I’m excited to see what use cases you will implement!
Learn the Fundamentals of Generative AI If you’re interested in the fundamentals of generative AI and how to work with FMs, including advanced prompting techniques and agents, check out this this new hands-on course that I developed with AWS colleagues and industry experts in collaboration with DeepLearning.AI:
P.S. We’re focused on improving our content to provide a better customer experience, and we need your feedback to do so. Please take this quick survey to share insights on your experience with the AWS Blog. Note that this survey is hosted by an external company, so the link does not lead to our website. AWS handles your information as described in the AWS Privacy Notice.
This post is written by Micah Walter, Senior Solutions Architect, Yanko Bolanos, Senior Solutions Architect, and Ramesh Mathikumar, Senior DevOps Consultant.
This blog post describes our plans to improve performance and streamline the user experience for customers writing AWS Lambda functions using Go.
Today, customers using Go with Lambda can either use the go1.x runtime, or use the provided.al2 runtime. Going forward, we plan to deprecate the go1.x runtime in line with the end-of-life of Amazon Linux 1, currently scheduled for December 31, 2023.
Customers using the go1.x runtime should migrate their functions to the provided.al2 runtime to continue to benefit from the latest runtime updates and security patches. Customers who deploy Go functions using container images who are currently using the go1.x base container image should similarly migrate to the provided.al2 base image.
Using the provided.al2 runtime offers several benefits over the go1.x runtime. First, it supports running Lambda functions on AWS Graviton2 processors, offering up to 34% better price-performance compared to functions running on x86_64 processors. Second, it offers a streamlined implementation with a smaller deployment package and faster function invoke path. Finally, this change aligns Go with other languages that also compile to native code such as Rust or C++, which also run on the provided.al2 runtime.
This migration does not require any code changes. The only changes relate to how you build your deployment package and configure your function. This blog post outlines the steps required to update your build scripts and tooling to use the provided.al2 runtime for your Go functions.
There is a difference in Lambda billing between the go1.x runtime and the provided.al2 runtime. With the go1.x runtime, Lambda does not bill for time spent during function initialization (cold start), whereas with the provided.al2 runtime Lambda includes function initialization time in the billed function duration. Since Go functions typically initialize very quickly, and since Lambda reduces the number of initializations by re-using function execution environments for multiple function invokes, in practice the difference in your Lambda bill should be very small.
Compiling for the provided.al2 runtime
In order to run a compiled Go application on Lambda, you must compile your code for Linux. While the go1.x runtime allows you to use any executable name, the provided.al2 runtime requires you to use bootstrap as the executable name. On macOS and Linux, here’s the simplest form of the build command:
GOARCH=amd64 GOOS=linux go build -o bootstrap main.go
This build command creates a Go binary file called bootstrap compatible with the x86_64 instruction set for Lambda. To compile for AWS Graviton processors, set GOARCH=arm64 in the preceding command.
The final step is to compress this binary into a ZIP file deployment package, ready to deploy to Lambda:
zip myFunction.zip bootstrap
For users compiling on Windows, Go supports compiling for Linux without using a Linux virtual machine or build container. However, Lambda uses POSIX file permissions, which must be set correctly. Lambda provides a helper tool which builds a deployment package that is valid for Lambda—see the Lambda documentation for details. Existing users of this tool should update to the latest version to make sure their build scripts are up-to-date.
Removing the RPC dependency
The go1.x runtime uses two processes within the Lambda execution environment to route requests to your handler function. The first process, which is included in the runtime, retrieves function invocation requests from the Lambda runtime API, and uses RPC to pass the invoke to the second process. This second process runs the executable which you deploy, and comprises the aws-lambda-go package and your function code. The aws-lambda-go package receives the RPC request and executes your function.
The following runtime architecture diagram for the go1.x runtime shows the runtime client process calling the runtime API to retrieve a function invocation and using RPC to call a separate process containing the function code.
Go functions deployed to the provided.al2 runtime use a simpler, single-process architecture. When building the Go executable, you include the same aws-lambda-go package as before. However, in this case the aws-lambda-go package acts as the runtime client, retrieving invocation requests from the runtime API directly.
The following runtime architecture diagram shows a Go function running on the provided.al2 runtime. A single process retrieves the function invocation from the runtime API and executes the function code.
Removing the additional process and RPC hop streamlines the function execution path, resulting in faster invokes. You can also remove the RPC component from the aws-lambda-go package, giving a smaller binary size and faster code loading during cold starts. To remove the RPC dependency, add the lambda.norpc tag to your build command:
GOARCH=amd64 GOOS=linux go build -tags lambda.norpc -o bootstrap main.go
Creating a new Lambda function
Once your deployment package is ready, you can create a new Lambda function using the provided.al2 runtime using the Lambda console:
Migrating existing functions
If you have existing Lambda functions that use the go1.x runtime, you can migrate these functions by following these steps:
Recompile your binary using the preceding commands, making sure to name your binary bootstrap.
If you are using the same instruction set architecture, open the runtime settings and switch the runtime to “Provide your own bootstrap on Amazon Linux 2”.
Upload the new version of your binary as a zip file.
Note: The handler value is not used by the provided.al2 runtime, nor the aws-lambda-go library, and may be set to any value. We recommend the setting the value to bootstrap to help with migrating between go1.x and provided.al2.
To switch instruction set architecture to Graviton (arm64), save your changes, and then re-open the runtimes settings to make the architecture change.
The following Dockerfile uses a two-stage build to avoid unnecessary layers and files in your final image. The first stage of the process builds the application. This stage installs Go, downloads the dependencies for the code, and compiles the binary. The second stage copies the executable to a new container without the dependencies of the build process.
Create a Dockerfile in your project directory:
FROM public.ecr.aws/lambda/provided:al2 as build
# install compiler
RUN yum install -y golang
RUN go env -w GOPROXY=direct
# cache dependencies
ADD go.mod go.sum ./
RUN go mod download
# build
ADD . .
RUN go build -tags lambda.norpc -o /main
# copy artifacts to a clean image
FROM public.ecr.aws/lambda/provided:al2
COPY --from=build /main /main
ENTRYPOINT [ "/main" ]
Build your Docker image with the Docker build command:
docker build -t hello-world .
Authenticate the Docker CLI to your Amazon ECR registry:
Tag and push your image to the Amazon ECR registry:
docker tag hello-world:latest 123456789012.dkr.ecr.us-east-1.amazonaws.com/hello-world:latest

docker push 123456789012.dkr.ecr.us-east-1.amazonaws.com/hello-world:latest
You can now create or update your Go Lambda function to use the new container image.
Changes to tooling
To migrate your functions from the go1.x runtime to the provided.al2 runtime, you must make configuration changes to your build scripts or CI/CD configurations. Here are some common examples.
Makefiles and build scripts
If you use Makefiles or custom build scripts to build Go functions, you must modify to ensure the executable file is named bootstrap when deploying to the provided.al2 runtime.
Here is an example Makefile which compiles the main.go file into an executable called bootstrap in the bin folder. It also creates a zip file, which you can deploy to Lambda using the console or via the AWS CLI.
GOARCH=arm64 GOOS=linux go build -tags lambda.norpc -o ./bin/bootstrap
(cd bin && zip -FS bootstrap.zip bootstrap)
CloudFormation
If you deploy your Lambda functions using AWS CloudFormation templates, change the Handler and Runtime settings under Properties:
If you use the AWS Serverless Application Model (AWS SAM) to build and deploy your Go functions, make the same changes to the Handler and Runtime settings as for CloudFormation. You must also add the BuildMethod:
Resources:
  HelloWorldFunction:
    Type: AWS::Serverless::Function
    Metadata:
      BuildMethod: go1.x
    Properties:
      CodeUri: hello-world/ # folder where your main program resides
      Handler: bootstrap
      Runtime: provided.al2
      Architectures:
        - x86_64
Cloud Development Kit (CDK)
If you use the AWS Cloud Development Kit (AWS CDK), you can compile your Go executable and place it under a folder in your project. Next, specify the location by using awslambda.Code_FromAsset, and AWS CDK packages the binary into a zip file and uploads it.
// Go CDK
awslambda.NewFunction(stack, jsii.String("HelloHandler"), &awslambda.FunctionProps{
    Code:         awslambda.Code_FromAsset(jsii.String("lambda"), nil), //folder where bootstrap executable is located
    Runtime:      awslambda.Runtime_PROVIDED_AL2(),
    Handler:      jsii.String("bootstrap"), // Handler named bootstrap
    Architecture: awslambda.Architecture_ARM_64(),
})
Taking this further, AWS CDK can perform build commands as part of your AWS CDK build process by using the native AWS CDK bundling functionality. With the bundling parameter, AWS CDK can perform steps before staging the files in the cloud assembly. Instead of placing the binary file, place the Go code in a folder and use the Bundling option to compile the code in a Docker container.
This example uses the golang:1.20.1 Docker image. After compilation, AWS CDK creates a zip file with the binary and creates the Lambda function:
Lambda is deprecating the go1.x runtime in line with Amazon Linux 1 end-of-life, scheduled for December 31, 2023. Customers using Go with Lambda should migrate their functions to the provided.al2 runtime. Benefits include support for AWS Graviton2 processors with better price-performance, and a streamlined invoke path with faster performance.
For more serverless learning resources, visit Serverless Land.
Leveraging vast unstructured data poses challenges, particularly for global businesses needing cross-language data search. In Part 1 of this blog series, we built the architectural foundation for the content repository. The key component of Part 1 was the dynamic access control-based logic with a web UI to upload documents.
In Part 2, we extend the content repository with multilingual semantic search capabilities while maintaining the access control logic from Part 1. This allows users to ingest documents in content repository across multiple languages and then run search queries to get reference to semantically similar documents.
Solution overview
Building on the architectural foundation from Part 1, we introduce four new building blocks to extend the search functionality.
Optical character recognition (OCR) workflow: To automatically identify, understand, and extract text from ingested documents, we use Amazon Textract and a sample review dataset of .png format documents (Figure 1). We use Amazon Textract synchronous application programming interfaces (APIs) to capture key-value pairs for the reviewid and reviewBody attributes. Based on your specific requirements, you can choose to capture either the complete extracted text or parts the text.
Figure 1. Sample document for ingestion
Embedding generation: To capture the semantic relationship between the text, we use a machine learning (ML) model that maps words and sentences to high-dimensional vector embeddings. You can use Amazon SageMaker, a fully-managed ML service, to build, train, and deploy your ML models to production-ready hosted environments. You can also deploy ready-to-use pre-trained models from multiple avenues such as SageMaker JumpStart. For this blog post, we use the open-source pre-trained universal-sentence-encoder-multilingual model from TensorFlow Hub. The model inference endpoint deployed to a SageMaker endpoint generates embeddings for the document text and the search query. Figure 2 is an example of n-dimensional vector that is generated as the output of the reviewBody attribute text provided to the embeddings model.
Figure 2. Sample embedding representation of the value of reviewBody
Embedding ingestion: To make the embeddings searchable for the content repository users, you can use the k-Nearest Neighbor (k-NN) search feature of Amazon OpenSearch Service. The OpenSearch k-NN plugin provides different methods. For this blog post, we use the Approximate k-NN search approach, based on the Hierarchical Navigable Small World (HNSW) algorithm. HNSW uses a hierarchical set of proximity graphs in multiple layers to improve performance when searching large datasets to find the “nearest neighbors” for the search query text embeddings.
Semantic search: We make the search service accessible as an additional backend logic on Amazon API Gateway. Authenticated content repository users send their search query using the frontend to receive the matching documents. The solution maintains end-to-end access control logic by using the user’s enriched Amazon Cognito provided identity (ID) token claim with the department attribute to compare it with the ingested documents.
Technical architecture
The technical architecture includes two parts:
Implementing multilingual semantic search functionality: Describes the processing workflow for the document that the user uploads; makes the document searchable.
Running input search query: Covers the search workflow for the input query; finds and returns the nearest neighbors of the input text query to the user.
Part 1. Implementing multilingual semantic search functionality
Our previous blog post discussed blocks A through D (Figure 3), including user authentication, ID token enrichment, Amazon Simple Storage Service (Amazon S3) object tags for dynamic access control, and document upload to the source S3 bucket. In the following section, we cover blocks E through H. The overall workflow describes how an unstructured document is ingested in the content repository, run through the backend OCR and embeddings generation process and finally the resulting vector embedding are stored in OpenSearch service.
Figure 3. Technical architecture for implementing multilingual semantic search functionality
The OCR workflow extracts text from your uploaded documents.
The document transformation AWS Lambda function subscribed to the Amazon SQS queue invokes an Amazon Textract API call to extract the text.
The document transformation Lambda function makes an inference request to the encoder model hosted on SageMaker. In this example, the Lambda function submits the reviewBody attribute to the encoder model to generate the embedding.
The document transformation Lambda function writes an output file in the transformed S3 bucket. The text file consists of:
The reviewid and reviewBody attributes extracted from Step 1
An additional reviewBody_embeddings attribute from Step 2 Note: The workflow tags the output file with the same S3 object tags as the source document for downstream access control.
The transformed S3 bucket sends an event notification to invoke the indexing Lambda function.
The indexing Lambda function reads the text file content. Then indexing Lambda function makes an OpenSearch index API call along with source document tag as one of the indexing attributes for access control.
Part 2. Running user-initiated search query
Next, we describe how the user’s request produces query results (Figure 4).
Figure 4. Search query lifecycle
The user enters a search string in the web UI to retrieve relevant documents.
Based on the active sign-in session, the UI passes the user’s ID token to the search endpoint of the API Gateway.
The API Gateway uses Amazon Cognito integration to authorize the search API request.
Once validated, the search API endpoint request invokes the search document Lambda function.
The search document function sends the search query string as the inference request to the encoder model to receive the embedding as the inference response.
The search document function uses the embedding response to build an OpenSearch k-NN search query. The HNSW algorithm is configured with the Lucene engine and its filter option to maintain the access control logic based on the custom department claim from the user’s ID token. The OpenSearch query returns the following to the query embeddings:
Top three Approximate k-NN
Other attributes, such as reviewid and reviewBody
The workflow sends the relevant query result attributes back to the UI.
Prerequisites
You must have the following prerequisites for this solution:
Appropriate AWS credentials for interacting with resources in your AWS account.
Walkthrough
Setup
The following steps deploy two AWS CDK stacks into your AWS account:
content-repo-search-stack (blog-content-repo-search-stack.ts) creates the environment detailed in Figure 3, except for the SageMaker endpoint, which you create in a spearate step.
demo-data-stack (userpool-demo-data-stack.ts) deploys sample users, groups, and role mappings.
In the navigation menu, select Notebook, then Notebookinstances.
Choose Create notebook instance.
Under the Notebook instance settings, enter content-repo-notebook as the notebook instance name, and leave other defaults as-is.
Under the Permissions and encryption section (Figure 5), you need to set the IAM role section to the role with the prefix content-repo-search-stack. In case you don’t see this role automatically populated, select it from the drop-down. Leave the rest of the defaults, and choose Create notebook instance.
Figure 5. Notebook permissions
The notebook creation status changes to Pending before it’s available for use within 3-4 minutes.
Once the notebook is in the Available status, choose Open Jupyter.
Choose the Upload button and upload the create-sagemaker-endpoint.ipynb file in the backend-cdk folder of the root of the blog repository.
Open the create-sagemaker-endpoint.ipynb notebook. Select the option Run All from the Cell menu (Figure 6). This might take up to 10 minutes.
Figure 6. Run create-sagemaker-endpoint notebook cells
After all the cells have successfully run, verify that the AWS Systems Manager parameter sagemaker-endpoint is updated with the value of the SageMaker endpoint name. An example of value as the output of the cell is in Figure 7. In case you don’t see the output, check if the preceding steps were run correctly.
Figure 7. SSM parameter updated with SageMaker endpoint
Verify in the SageMaker console that the inference endpoint with the prefix tensorflow-inference has been deployed and is set to status InService.
Upload sample data to the content repository:
Update the S3_BUCKET_NAME variable in the upload_documents_to_S3.sh script in the root folder of the blog repository with the s3SourceBucketName from the AWS CDK output of the content-repo-search-stack.
Run upload_documents_to_S3.sh script to upload 150 sample documents to the content repository. This takes 5-6 minutes. During this process, the uploaded document triggers the workflow described in the Implementing multilingual semantic search functionality.
Using the search service
At this stage, you have deployed all the building blocks for the content repository in your AWS account. Next, as part of the upload sample data to the content repository, you pushed a limited corpus of 150 sample documents (.png format). Each document is in one of the four different languages – English, German, Spanish and French. With the added multilingual search capability, you can query in one language and receive semantically similar results across different languages while maintaining the access control logic.
Access the frontend application:
Copy the amplifyHostedAppUrl value of the AWS CDK output from the content-repo-search-stack shown in the terminal.
Enter the URL in your web browser to access the frontend application.
A temporary page displays until the automated build and deployment of the React application completes after 4-5 minutes.
Sign into the application:
The content repository provides two demo users with credentials as part of the demo-data-stack in the AWS CDK output. Copy the password from the terminal associated with the sales-user, which belongs to the sales department.
Follow the prompts from the React webpage to sign in with the sales-user and change the temporary password.
Enter search queries and verify results. The search action invokes the workflow described in Running input search query. For example:
Enter works well as the search query. Note the multilingual output and the semantically similar results (Figure 8).
Figure 8. Positive sentiment multilingual search result for the sales-user
Enter bad quality as the search query. Note the multilingual output and the semantically similar results (Figure 9).
Figure 9. Negative sentiment multi-lingual search result for the sales-user
Sign out as the sales-user with the Log Out button on the webpage.
Sign in using the marketing-user credentials to verify access control:
Follow the sign in procedure in step 2 but with the marketing-user.
This time with works well as search query, you find different output. This is because the access control only allows marketing-user to search for the documents that belong to the marketing department (Figure 10).
Figure 10. Positive sentiment multilingual search result for the marketing-user
Cleanup
In the backend-cdk subdirectory of the cloned repository, delete the deployed resources: cdk destroy --all.
In this blog, we enriched the content repository with multi-lingual semantic search features while maintaining the access control fundamentals that we implemented in Part 1. The building blocks of the semantic search for unstructured documents—Amazon Textract, Amazon SageMaker, and Amazon OpenSearch Service—set a foundation for you to customize and enhance the search capabilities for your specific use case. For example, you can leverage the fast developments in Large Language Models (LLM) to enhance the semantic search experience. You can replace the encoder model with an LLM capable of generating multilingual embeddings while still maintaining the OpenSearch service to store and index data and perform vector search.
Seems that there is a deliberate backdoor in the twenty-year-old TErrestrial Trunked RAdio (TETRA) standard used by police forces around the world.
The European Telecommunications Standards Institute (ETSI), an organization that standardizes technologies across the industry, first created TETRA in 1995. Since then, TETRA has been used in products, including radios, sold by Motorola, Airbus, and more. Crucially, TETRA is not open-source. Instead, it relies on what the researchers describe in their presentation slides as “secret, proprietary cryptography,” meaning it is typically difficult for outside experts to verify how secure the standard really is.
The researchers said they worked around this limitation by purchasing a TETRA-powered radio from eBay. In order to then access the cryptographic component of the radio itself, Wetzels said the team found a vulnerability in an interface of the radio.
[…]
Most interestingly is the researchers’ findings of what they describe as the backdoor in TEA1. Ordinarily, radios using TEA1 used a key of 80-bits. But Wetzels said the team found a “secret reduction step” which dramatically lowers the amount of entropy the initial key offered. An attacker who followed this step would then be able to decrypt intercepted traffic with consumer-level hardware and a cheap software defined radio dongle.
Looks like the encryption algorithm was intentionally weakened by intelligence agencies to facilitate easy eavesdropping.
Specifically on the researchers’ claims of a backdoor in TEA1, Boyer added “At this time, we would like to point out that the research findings do not relate to any backdoors. The TETRA security standards have been specified together with national security agencies and are designed for and subject to export control regulations which determine the strength of the encryption.”
And I would like to point out that that’s the very definition of a backdoor.
Why aren’t we done with secret, proprietary cryptography? It’s just not a good idea.
Окончателното узаконяване на скандалните и незаконосъобразни решения на министрите на околната среда и водите и туризма на ГЕРБ и служебните кабинети на президента Румен Радев по повод разрешаването на строителство…
Има вещества, които, приемани редовно в определени дози, престават да действат на организма. За да продължават да имат ефект, повишаването на дозата в някои случаи не помага, дори напротив – може да навреди. Този феномен се нарича резистентност. По същия начин някои общества развиват резистентност към омразата, дискриминацията и насилието.
Увеличение на дозата антисемитизъм
Напоследък все повече хора в България, макар и съвсем не всички, започнаха да забелязват, че в страната има антисемитизъм. Повод за това станаха прояви, по един или друг начин свързани с „Възраждане“ – като се почне от надписа „Jude“ („евреи“), придружен с шестоъгълна звезда, на витрината на магазинче за бира и се стигне до кампанията, демонизираща основателя на Атлантическия клуб в България и бивш външен министър Соломон Паси, който е евреин.
В група на „Възраждане“ в Telegram беше разпространен колаж, на който се вижда как хора в нацистки униформи дърпат човек с лицето на Паси, облечен в затворнически дрехи. Въпреки че от „Възраждане“ отрекоха отговорността за колажа да е тяхна и се заканиха да съдят всеки, който твърди обратното, на Facebook страниците на партията и на председателя ѝ Костадин Костадинов постовете срещу Соломон Паси ставаха все по-агресивни, а някои от коментарите под тях – буквално подсъдни.
Ето избрани откъси от коментарите под само един пост (оригиналният правопис е запазен):
– „Еврейна е паразит,,всички до един в Аушвиц!“ – „С.ПАСИ МАХНИ СЕ ОТ ПОЛИТИКАТА НА БЪЛГАРИЯ, МНОГО ВИ МОЛЯ НА ЕВРЕИТЕ ЗА ДА НЯМА 2РИ ХОЛОКОСТ“ – „На времето фюрера правеше сапуни от тях. Малко им е било!“ – „става за полилеи“ – „да от кожата му ще е идеален полилей“
Антисемитизмът в България не си е отивал
Дотук се стигна, защото в продължение на десетилетия българските институции и общество отказват да разпознаят системните прояви на антисемитизъм. А когато той все пак бъде посочен с пръст, срещу него не се предприемат адекватни мерки.
Един от последните случаи преди изстъпленията, вдъхновени от „Възраждане“, беше участието в столичния Панаир на книгата на издателство „Еделвайс“, публикуващо нацистка и антисемитска литература. След протестно писмо на еврейската организация „Шалом“ от Асоциация „Българска книга“ си измиха ръцете, внасяйки сигнал в прокуратурата, и… „Еделвайс“ си остана на Панаира.
Случаят с Панаира на книгата не е прецедент. В България откровено нацистка и антисемитска литература може да се намери и по книжарниците. Да не говорим за сувенирите с нацистка тематика (редом до тези със сърп и чук, Путин и Тодор Живков), които хвърлят западните туристи в шок, освен ако не са неонацисти. „Луковмарш“ пък, макар през последните години да е забранен на теория, все се провежда под някаква форма – ако не като шествие, то като бдение.
Да не забравяме и всекидневния антисемитски фонов шум, с който толкова сме свикнали, че рядко го забелязваме. Например демонизирането на „Отворено общество“ с аргумента, че основателят на организацията Джордж Сорос е евреин. Или казването на „Цукерберг“ по адрес на собственика на Facebook Марк Зукърбърг, за да се подчертае еврейският му произход. Или стереотипизиращи вицове за евреи, използване на изрази, наследени от по-стари поколения, като „какво се въртиш като обран евреин“, или обидни квалификации, като „чифут“…
Преди Костадинов беше Сидеров
Костадин Костадинов е политик, който добре знае какво прави, и внимателно премерва действията си. Той само „пуска фитила“ и оставя други да сеят антисемитизъм, отричайки собствената си отговорност или отговорността на партията си за последствията. Изглежда, Костадинов си е взел поука от безславния залез на Волен Сидеров, който си казваше в прав текст всичко, което му е на сърцето и в главата, и в резултат успя да се омаскари до пълното си маргинализиране.
Ала нека заради безславния залез на Сидеров не забравяме впечатляващия му възход на националистическата сцена. На втория тур на президентските избори през 2006 г. за него гласуваха близо една четвърт от отишлите до урните – 24,1%. На първия тур от изборите за президент през 2021 г. за Костадинов дават гласа си по-малко от 4% – 3,98.
В началото на новото хилядолетие, още преди да основе партия „Атака“, Волен Сидеров публикува две книги с откровено антисемитско съдържание: „Бумерангът на злото“ (2002 г.) и „Властта на мамона“ (2004 г.). Освен че в тях обяснява какво „зло“ са евреите, той прави внушения, че те се били договорили с Хитлер, и отрича Холокоста.
Заради антисемитските твърдения на Сидеров срещу него е подаден групов иск в Софийския районен съд по Закона за защита от дискриминация. Съдът разделя иска на осем отделни дела и постановява, че нито основателят на „Атака“ е проявил дискриминация, нито има доказателства, че думите му са повлияли негативно на евреите. Така се произнася и по-горната съдебна инстанция, а Върховният касационен съд дори не намира основания да се занимава с делото.
Две от участничките в колективния иск – Габриела Бехар и Катрин Гутман, завеждат дело в Европейския съд по правата на човека в Страсбург. През 2021 г. печелят на първа инстанция.
Списъкът ми е по-безобиден от списъка ти
Наскоро в България нашумя украинският сайт „Миротворец“, в който се публикуват списъци с „врагове на Украйна“, включващи и имена на български журналисти и политици. Това доведе до среща на външната министърка Мария Габриел с посланичката на Украйна, както и до решение българските служби да проучат „Миротворец“. Съюзът на българските журналисти (СБЖ) публикува декларация, в която се казва, че сайтът „застрашава правата и сигурността на много хора, включително и европейски граждани“. Посолството на Украйна излезе с позиция, че сайтът е независим и не е свързан с държавните институции.
Същевременно в българоезичния интернет поне от 2004 г. циркулират варианти на списък с евреи – „врагове на народа“, и нито институциите, нито съсловни организации като СБЖ изглеждат притеснени от този факт, макар там да присъстват имената на много журналисти. По хигиенни съображения „Тоест“ не слага линкове към публикациите, съдържащи различни версии на списъка, но те лесно могат да бъдат намерени.
В „Пипалата на злото в България“ – дълго 136 стандартни страници писание с неизвестно авторство и хаотична структура, но с претенцията да е книга – имената на „враговете на българската нация“, както са определени евреите, обаче са сортирани с впечатляващ педантизъм. Започва се с комунистически активисти преди 1944 г. (разделени на множество видове), минава се през функционерите по времето на социализма, също с подвидове, за да се стигне до времето след 1989 г. Там вече диференциацията става съвсем детайлна – например при журналистите се уточнява в коя конкретна медия работят (bTV е определена като „еврейска телевизия“), има подробна информация за евреите във всякакви видове изкуства, в науката – дали са в БАН, университет и т.н., изброяват се евреи инженери и с всевъзможни други професии.
Детайлната структура обаче не означава фактологична вярност. „Вероятно са гледали в телефонния указател за имена, които могат да минат за еврейски“, каза пред „Тоест“ лице, чиято майка присъства в списъка. Въпросната жена не е еврейка, не е била активна в социално-политическия живот на България, нито в науката или изкуството, но е с чуждестранен произход и носи немски звучащо име. В списъка има и известни личности, на които се приписва еврейски произход, без те да имат такъв, включително и с български имена.
В по-късни варианти на списъка са включени и „самоопределящите се като евреи“, както и хора, за които се твърди, че имат близки евреи. Впрочем интересна е логиката, според която самоопределянето като евреин те прави такъв, а самоопределянето като македонец – не.
Списъкът продължава да се препубликува тук и там и след като някои от „героите“ в него, представени като зло в съвременна България, вече не са между живите. В блог пост от 2020 г. например за починалия през 2018 г. правозащитник Емил Коен се казва: „Смъртен враг на България!“
Неслучилото се покаяние
Твърде високият праг на поносимост към антисемитизма в България (както и към други форми на омраза) е свързан не на последно място с липсата на адекватни институционални реакции. По-дълбоката причина обаче, с която може да се обясни и въпросната липса, е, че българското общество така и никога не е осъзнало собствената си отговорност към съдбата на евреите в България.
Според официализирания исторически канон България е спасила своите евреи, а вината за съдбата на неспасените 11 343 евреи от т.нар. новоприсъединени български територии се хвърля върху независещи от България фактори. Изследвания като „Депортирането на евреите от Вардарска Македония, Беломорска Тракия и Пирот“ на Румен Аврамов и Надя Данова, в които въпросът за отговорността излиза от реториката, а на него се отговаря с документални свидетелства, така и не получават обществения отзвук, който заслужават.
Друга книга на Румен Аврамов – „Спасение“ и падение. Микроикономика на държавния антисемитизъм в България 1940–1944 г.“ – повдига сериозни въпроси за фактологическата вярност на тезата, че българският народ еднозначно е бил на страната на евреите, а единствено неколцина лоши политици са им създавали проблеми. От документите, които е проучил Аврамов, ясно се вижда как немалко българи са извличали лична изгода от антисемитското законодателство, например като са предавали съседите си евреи, за да могат да се настанят в имотите им, след като „враговете на народа“ са били изселени. Или пък са вземали за себе си вещи, конфискувани от еврейски домове.
В официалната българска историография народът е представен като неизменно невинен и страдащ, винаги обект на интервенции от страна на властта и великите личности, освен когато страданията му са толкова непоносими, че се вдигне на въстание. Както иронизира Георги Рупчев в стихотворението си „Спомен за репетиции“, „положението на народа е винаги тежко“.
При такъв доминиращ исторически разказ няма как да се развие чувствителност за отговорността на обществото и на конкретния човек. Виновен за антисемитизма преди 1944 г. ни е бил режимът на Хитлер. Антисемитските нагласи и политически послания по времето на социализма (които сами по себе си са сериозна тема) дори не сме ги забелязвали. А за посттоталитарния антисемитизъм са ни виновни я Сидеров, я Костадинов, я някой друг.
В степента, в която допускаме антисемитизма (както впрочем и всяка форма на омраза), той е и наш проблем. Личен. Няма как в България да се води ефективна борба с него, без да сме осъзнали това.
It’ll be a full house as the AWS Summit gets underway in New York City on Wednesday, July 26, 2023. The cloud event has something for everyone including a keynote, breakout sessions, opportunities to network, and of course, to learn about the latest exciting AWS product announcements.
Today, we’re sharing a selection of announcements to get the fun started. We’ll also share major updates from Wednesday’s keynote, so check back for more exciting news to come soon.
AWS Glue Studio now supports Amazon Redshift Serverless Before this launch, developers using Glue Studio only had access to Redshift tables in Redshift clusters. Now, those same developers can connect to Redshift Serverless tables directly without manual configuration.
At the beginning of the year, I started working out with a trainer who wanted me to start tracking my food, but I’ve always been super against tracking my meals because it just doesn’t work for me. Instead of tracking my meals however, I decided to build an application that automagically tells me the nutritional information of any recipe. But to do that I needed some pretty complex natural language parsing capabilities so I figured this would be a great opportunity for me to play around with OpenAI and get to use GitHub Copilot a little bit more to help me build the app quickly.
GitHub Copilot is a great example of a product that takes advantage of Large Language Models (LLM) to solve problems for people and improve their productivity. In this blog,I’ll take you through how I created my own application that finds the nutritional information for any recipe using OpenAI’s GPT-3.5-turbo model, GitHub Copilot, Next.js, React, and Material UI.
Let’s dig right into the tutorial.
1. Create a repository and install dependencies
To get started, let’s create a new repository from the GitHub Codespaces Next.js template to get up and running quickly. Go to this repository, and make a copy. To do so, click on the green “Use this template” button then select “Create a new repository” and name your repository whatever you like. I called mine “mealmetrics-copilot.”
Now, clone the repository to your local machine, and open up the repository in your preferred code editor. I’m using VS Code.
Open up your terminal and cd into the project so we can install a few needed dependencies. In your terminal run the following command:
npm i express openai dotenv @material-ui/core @material-ui/icons
Then, install the following as a dev dependency:
npm i --save-dev nodemon
Once everything installs successfully, we’re ready to start building the server, but first, let’s grab our api key from OpenAI.
2. Getting your OpenAI API key
Go to OpenAI’s developer login page and create a new account or sign in if you already have one. Once you’ve logged in, click your name in the upper right hand corner and select “view API keys.” Click the “Create a new secret key” button. From there you can name your apikey, click the green button to generate the key and then copy the apikey and save it in a secure location (such as a password manager).
Save your apikey in a .env file in vscode at the root of the project and add .env to the gitignore file.
3. Install GitHub Copilot extension
We’ll be using GitHub Copilot as our assistant to build this application. If you’re not familiar with GitHub Copilot, read this blog post to learn more.
In your code editor of choice, go to your extensions panel and search for GitHub Copilot—I’m using VSCode and this is what that looks like.
Click the install button then click the login button to authenticate your access. Once that’s done, you’ll be ready to get started and follow along!
4. Building the server
Now that we have our apikey, have installed dependencies, and have GitHub Copilot in our code editor, let’s dig into building the application!
The first thing we’re going to do is build a simple server with Express.js (if you prefer to use Fastify, NestJS, Koa or something else, feel free to use them!).
In the pages folder, create a folder called api and then a file called server.js. This is where we’ll add our prompting information for GitHub Copilot. Let’s add our first prompt as a comment in the server.js file that says the following:
Create a server with the following specifications:

1. import express and dotenv node modules
3. create the server with express and name it app
4. use port 8080 as default port
5. enable body parser to accept json data
6. state which port the server is listening to and log it to the console
Hit the enter key and GitHub Copilot will start generating suggestions to build the server. To accept the suggestions, hit the tab key. Take a look at this video to see what accepting suggestions look like.
We can update the package.json file to include the script devserver: "nodemon pages/api/server.js then run the command in our terminal using npm run devserver. You’ll see that the server has started!
After we build the simple server, let’s move on to making this a bit more complex by building the controller for our app.
Let’s create a new file in the api folder called generateInfo.js and add the following comment in the file:
Create a controller with the following specifications:

1. import the Configuration class and the OpenAIApi class from the openai npm module
2. create a new configuration object that includes the api key and uses the Configuration class from the openai module
3. create a new instance of the OpenAIApi class and pass in the configuration object
4. create an async function called generateInfo that accepts a request and response object as parameters
5. use try to make a request to the OpenAI completetion api and return the response
6. use catch to catch any errors and return the error include a message to the user
7. export the generateInfo function as a module
As you’ll notice, I’m being very explicit in my instructions to GitHub Copilot. One thing to always remember when working with LLMs is that the magic is in the prompt—the clearer you are in your instructions, the better the results you’ll get.
Hit enter on your keyboard and then hit tab to accept the recommendations that GitHub Copilot provides. In the image below, you’ll notice that Copilot’s suggestions are gray.
Accept the suggestion by hitting tab on your keyboard and let’s do some cleaning up.
Remember, GitHub Copilot is our assistant, so we still need to ensure that the suggestions it provides meet our requirements.
Since we’re building a gpt-3 application, we’ll be using the completion API from OpenAI and the gpt-3.5-turbo model to generate nutritional information for us.
If you look at the suggestion above, we were provided with the davinci engine and parameters that are not needed for this project—we also need the messages parameter to send requests with the 3.5-turbo model.
We also want to add the recipe prompt, create a function called recipe that represents the recipe a user inputs and also update the completion object sent to OpenAI. The keys we’ll be using are max_tokens, prompt, model, temperature and n. Learn more about these parameters by reading OpenAI’s api docs.
Let’s also update the error message to include 401 just in case our api key is invalid. So, let’s make these updates.
1. Add recipe prompt
Create a new folder called data at the root of your project, then create a file called prompt.json. This will contain a part of the recipe prompt that we’ll send to OpenAI. Add the following script to the prompt.json file:
{
"recipePrompt": "I want you to act as a Nutrition Facts Generator. I will provide you with a recipe and your role is to generate nutrition facts for that recipe. You should use your knowledge of nutrition science, nutrition facts labels and other relevant information to generate nutritional information for the recipe. Add each nutrition fact to a new line. I want you to only reply with the nutrition fact. Do not provide any other information. My first request is: "
}
Then import the recipePrompt to the generateInfo.js file and update the main function to grab the recipe submitted by the user.
// add the prompt to the top of the file
const { recipePrompt } = require('../../data/recipe.json');

// update this function to include the recipe before the try
const generateInfo = async(req, res) => {
const { recipe } = req.body
}
2. Update the completion function and response
Now, let’s update the try to look a bit more like what we want.
Now, let’s create the router and test this out in Postman. Create a new file called router.js and start typing to allow GitHub Copilot to assist you while typing.
As you can see, GitHub Copilot offered suggestions while I was typing and I hit the tab button to accept the suggestions. Add the newly created router to the server.js file and test the route in postman. Add the following to your server.js file.
app.use('/openai', require('./router'));
Now, let’s test the route in postman with a POST request—make sure your server is still running!
Go to the URL below and add any recipe to the body of the request:
URL: http://localhost:8080/openai/generateinfo

RECIPE:
{
"recipe": "1 cup of all purpose flour, sifted 1 1/2 teaspoon baking powder 1/4 teaspoon salt 2 Tablespoon granulated sugar 1/2 Tablespoon unsalted butter, room temperature Approximately 1/3 cup water"
}
You should receive a successful response that looks like this:
Here is the data that we submitted to OpenAI that generated that successful response:
data: '{"model":"text-davinci-003","prompt":"I want you to act as a Nutrition Facts Generator. I will provide you with a recipe and your role is to generate nutrition facts for that recipe. You should use your knowledge of nutrition science, nutrition facts labels and other relevant information to generate nutritional information for the recipe. Add each nutrition fact to a new line. I want you to only reply with the nutrition fact. Do not provide any other information. My first request is: 1 cup of all purpose flour, sifted 1 1/2 teaspoon baking powder 1/4 teaspoon salt 2 Tablespoon granulated sugar 1/2 Tablespoon unsalted butter, room temperature Approximately 1/3 cup water","max_tokens":200,"temperature":0.5,"n":1}',
As you can see, both the prompt script and the recipe entered in the request body was sent to OpenAI, which generated the nutritional data for this Jamaican fried dumpling recipe.
Now, let’s create the frontend of the application to display the info on the web.
5. Building the frontend app
We’ll be using React for the frontend. Delete all the code in the index.js file that currently exists in the project. Then, in a comment, instruct GitHub Copilot to build a simple text area.
Create a text area with the following specifications:
1. a H1 with the text "Find Nutrition Facts for any recipe"
2. a text area for users to upload recipe
3. a button for users to submit the entered recipe
4. a section at the bottom to display nutrition facts
5. Get the data from this link: http://localhost:8080/openai/generateinfo
6. Name the component RecipeInfo
GitHub Copilot quickly generated the code for us.
Let’s hit tab to accept the suggestion and run npm run dev in your terminal to see the app on the web. When you go to localhost:3000, you’ll see the following displayed on the web.
Admittedly, it’s not the most beautiful thing, but we were able to spin this up very quickly.
In less than one minute we completed a functional frontend mvp of our application with GitHub Copilot.
Let’s enter the recipe we have into the text box and see the response that we get back.
And we have our first error—which is not surprising since we didn’t validate the code that was provided. Let’s look into the console and see if we have any additional details.
Seems it’s a CORS issue—classic. Let’s ask GitHub Copilot how to resolve this.
Add the following questions as a comment anywhere in your file:
q: how do I resolve the CORS error?
q: how do I add Access-Control-Allow-Origin to the header?
The question and response should look something like this:
We can also ask GitHub Copilot Chat how to resolve CORS errors and it gives us a seamless response.
Let’s install the cors middleware and add it to the server.js file.
const cors = require("cors");

// Allow cross-origin requests (CORS)
app.use(cors());
Now, let’s try fetching nutritional data again and see what happens.
And we have another error. Progress!
This time there’s no need to debug with GitHub Copilot since we’re being told that the data being returned is an object with the keys success and data. Let’s change the name of the response function to recipeInfo and update the nutrition state to receive recipeInfo.data.
Let’s try sending the recipe again and hope for a successful response.
Success!
We just created a GPT-3 app in record time with GitHub Copilot, React, Next.js, and OpenAI. Now that we have the data that we need, let’s make the application more beautiful with Material UI.
6. Styling the app with Material UI
In this section, we’ll be using a GitHub Copilot X feature in technical preview for individuals and in public beta for organizations – Copilot Chat–to improve the appearance of our application. You must have GitHub Copilot access to be on the Copilot Chat’s waitlist which is currently open. Sign up today if you haven’t yet!
Let’s ask GitHub Copilot chat how we can implement material-ui into the application:
Let’s go ahead and implement the suggestions and see what happens, and also ask GitHub Copilot chat to implement a header for us.
After we implement the header, new text area and center the content, this is what the app is looking like.
Ok, we’re getting somewhere.
Let’s make a few more updates with the assistance of GitHub Copilot Chat. I’ve included the prompt/questions I asked:
Make the text area larger and implement Material UI
update the component to use material ui with the content centered and the buttoned positioned below the text area. use Grid from material ui and any other components needed.
Add the paper component from Material UI to elevate the look and feel of the app
add the Paper component from material ui to the text area highlighted
Add a second button that clears the text area + facts after a recipe is submitted
add a button to the app to clear the text in the textarea
Add a loader while waiting for the data to load
add a loader to the highlighted code that checks if the data is loading. If the data is loading, then display the text "Nutrition Facts" and loader, if there is an error, display the error message otherwise, display nothing
Add a theme with custom primary and secondary colors
how do I create a custom theme with material ui and where do I create the custom theme?
Prevent the text area from going over the paper component from Material UI
in the highlihghted code how do I prevent the text area line from going over the paper component?
Add a new component—footer
Create a footer component with the following specifications:
1. The footer must be fixed at the bottom of the page
2. Use the Paper component from Material UI
3. Use the Typography component from Material UI
3. The text must say "Made with ❤ by LadyKerr & GitHub Copilot" and "Powered by OpenAI"
4. The text "GitHub Copilot" must be a link to https://copilot.github.com/ that opens in a new tab with alt text " GitHub Copilot"
5. The text "OpenAI" must be a link to https://openai.com/ that opens in a new tab with alt text "openai api"
Ask GitHub Copilot chat to make the changes above and, once it’s done, your application should be looking and functioning like this:
Now, let’s create a new component that splits each nutrition fact onto a new line. Create a new file called NutritionFacts.js in the components folder, and write the following as a comment so GitHub Copilot can get to work.
Create a component with the following specifications:
1. the component must split the received string data at /n/n or /n and return a Typography component for each string
2. the component must set a unique key for each Typography component
3. the component must return a div with the Typography components
4. the component must return null if the data is not a string
5. Name the component NutritionFacts
6. Use the Paper Component from Material UI
7. Add text above the data that says "Here are the nutrition facts for your recipe:"
From this prompt, GitHub Copilot generated the following code.
import React from "react";
import { Typography, Paper } from "@material-ui/core";

const NutritionFacts = ({ data }) => {
if (typeof data !== "string") {
return null;
}
const nutritionFacts = data.split(/\n\n|\n/);
return (

Here are the nutrition facts for your recipe:

{nutritionFacts.map((fact, index) => (
{fact}
))}
);
};

export default NutritionFacts;
Brilliant! Let’s import this component into our main index.js file and test the application to see if each fact was split on to a new line as expected.
And it did. Our app is functioning as expected.
Now, let’s move the code for the header into a new file in the components folder called Header.js. Once everything is updated, the final application looks like this and returns the nutritional data for any recipe.
So, there we have it!
We just built an application using GitHub Copilot, OpenAI, React, Next.js, and GitHub Copilot Chat. The next step would be to deploy the application on GitHub Pages and deploy your server on a service like Azure.
You can see the full code here—feel free to clone or fork the project and make it your own. This was a fun little project to build and I hope you learned something new and feel inspired to create your own GPT-3 app!
This post has been updated since it was originally published. Unfortunately, ransomware continues to proliferate. We’ve updated the post to reflect the current state of ransomware and to help individuals and businesses protect their data.
Ransomware is one of the biggest cybersecurity threats that businesses and organizations face today. Cybercriminals use these malicious attacks to encrypt an organization’s data and systems, holding them hostage and demanding a ransom for the encryption key. In the best case scenario, you can quickly restore from backups, but it’s a harrowing experience even when you’re well prepared. That’s why it makes sense to assume it’s not a question of if, but when, and plan accordingly.
With attacks becoming increasingly sophisticated and widespread, it’s crucial for businesses to have a comprehensive plan for ransomware prevention and recovery. In this guide, we’ll cover best practices for recovering your data and systems in the event of an attack, as well as proactive measures to strengthen your defenses against ransomware.
This post is a part of our ongoing coverage of ransomware. Take a look at our other posts for more information on how businesses can defend themselves against a ransomware attack, and more.
The statistics paint a cautionary picture—ransomware attacks are only getting more common. According to a 2023 Ransomware Market Report, global ransomware costs are predicted to reach $265 billion annually by 2031, up from $20 billion in 2021.
After a brief downturn in both incidents and payments in 2022, ransomware surged back in 2023. Ransomware complaints rose to over 2,825, marking an 18% increase from the previous year. And payments exceeded $1 billion, a 96% increase from the previous year, representing the highest number ever observed. What’s more, 59% of organizations were hit by ransomware in the last year, according to Sophos’ State of Ransomware 2024 report.
Cyber criminals are continuously evolving their strategies, with the FBI noting new trends such as deploying multiple ransomware variants against the same victim and employing data destruction tactics to intensify pressure on victims to negotiate.
Ransomware by the numbers
According to the Coveware Q1 2024 Quarterly Report, the ransomware landscape saw some notable shifts in ransom demand tactics. The report states that in the first quarter of 2024, the average ransom payment continued a downward trajectory, decreasing by 32% from Q4 2023 to $381,980. However, the median ransom payment increased by 25% to $250,000.
Coveware analysts suggest this divergence is driven by fewer companies paying exorbitant ransoms, which has a compounding effect on lowering the average payment amount. Concurrently, many ransomware groups are deliberately setting more reasonable initial ransom demands, aiming to keep victims engaged in negotiations rather than deterring them outright with astronomical figures. This new approach of “reasonably” priced ransoms is an intentional tactic to increase the likelihood of victims paying.
The same Coveware report provides insights into the widespread impact of ransomware across various industries. Healthcare emerged as the most targeted sector at 18.7%, followed closely by professional services at 17.8%. The public sector, including government and educational institutions, was also heavily impacted at 11.2%.
Other notable industries affected were consumer services (10.3%), retail (5.6%), financial services, and food & staples retail (both 4.7%). The data illustrates that ransomware is a pervasive threat cutting across diverse sectors, from critical infrastructure like healthcare to consumer businesses and technology firms.
No industry seems immune, as even traditionally less digitized fields like materials (6.5%), capital goods (2.8%), and automobile manufacturing (3.7%) suffered attacks. This underscores the need for robust cybersecurity measures and ransomware readiness plans across diverse organizations, regardless of their primary domain of operations.
Ransomware also remains a significant threat across businesses of all sizes. However, small and medium sized businesses (SMBs) continue to bear the brunt of these attacks. A staggering 71.8% of impacted companies had between 11 and 1,000 employees, clearly demonstrating SMBs as a prime target for cybercriminals deploying ransomware.
While no organization is immune, the data highlights SMBs’ vulnerability, likely due to limited cybersecurity resources and staffing compared to larger enterprises. This highlights the critical need for SMBs to prioritize ransomware preparedness and implement robust security measures proportionate to the risks they face.
Simultaneously, the following chart indicates that ransomware groups are also setting their sights on major corporations, with 1.9% of impacted companies having over 100,000 employees. No sector can afford to be complacent about the pervasive ransomware threat landscape.
Ransomware as a service (Raas)
Ransomware as a service (RaaS) has emerged as a game changer in the world of cybercrime, revolutionizing the ransomware landscape and amplifying the scale and reach of malicious attacks. The RaaS business model allows even novice cybercriminals to access and deploy ransomware with relative ease, leading to a surge in the frequency and sophistication of ransomware attacks worldwide.
Traditionally, ransomware attacks required a high level of technical expertise and resources, limiting their prevalence to skilled cybercriminals or organized cybercrime groups. However, the advent of RaaS platforms has lowered the barrier to entry, making ransomware accessible to a broader range of individuals with nefarious intent. These platforms provide aspiring cybercriminals with ready-made ransomware toolkits, complete with user-friendly interfaces, step-by-step instructions, and even customer support. In essence, RaaS operates on a subscription or profit sharing model, allowing criminals to distribute ransomware and share the ransom payments with the RaaS operators.
The rise of RaaS has led to a proliferation of ransomware attacks, with cybercriminals exploiting the anonymity of the dark web to collaborate, share resources, and launch large scale campaigns. The RaaS model not only facilitates the distribution of ransomware, but it also provides criminals with analytics dashboards to track the performance of their campaigns, enabling them to optimize their strategies for maximum profit.
New strains and increased complexity
One of the most significant impacts of RaaS is the exponential growth in the number and variety of ransomware strains. RaaS platforms continuously evolve and introduce new ransomware variants, making it increasingly challenging for cybersecurity experts to develop effective countermeasures. The availability of these diverse strains allows cybercriminals to target different industries, geographical regions, and vulnerabilities, maximizing their chances of success.
The profitability of RaaS has attracted a new breed of cybercriminals, leading to an underground economy where specialized roles have emerged. Ransomware developers create and sell their malicious code on RaaS platforms, while affiliates or “distributors” spread the ransomware through various means, such as phishing emails, exploit kits, or compromised websites. This division of labor allows criminals to focus on their specific expertise, while RaaS operators facilitate the monetization process and collect a share of the ransoms.
Ransomware commoditization
The impact of RaaS extends beyond the immediate financial and operational consequences for targeted entities. The widespread availability of ransomware toolkits has also resulted in a phenomenon known as “ransomware commoditization,” where cybercriminals compete to offer their services at lower costs or even engage in price wars. This competition drives innovation and the continuous evolution of ransomware, making it a persistent and ever-evolving threat.
To combat the growing influence of RaaS, organizations and individuals require a multilayered approach to cybersecurity. Furthermore, organizations should prioritize data backups and develop comprehensive incident response plans to ensure quick recovery in the event of a ransomware attack. Regularly testing backup restoration processes is essential to maintain business continuity and minimize the impact of potential ransomware incidents.
RaaS has profoundly transformed the ransomware landscape, democratizing access to malicious tools and fueling the rise of cybercrime. The ease of use, scalability, and profitability of RaaS platforms have contributed to a surge in ransomware attacks across industries and geographic locations.
By staying vigilant and adopting robust cybersecurity measures, organizations can better protect themselves against the evolving threat posed by RaaS and ensure resilience in the face of potential ransomware incidents.
How does ransomware work?
A ransomware attack starts when a machine on your network becomes infected with malware. Cybercriminals have a variety of methods for infecting your machine, whether it’s an attachment in an email, a link sent via spam, or even through sophisticated social engineering campaigns. As users become more savvy to these attack vectors, cybercriminals’ strategies evolve. Once that malicious file has been loaded onto an endpoint, it spreads to the network, locking every file it can access behind strong encryption controlled by cybercriminals.
Types of ransomware, in addition to the traditional encryption model, include:
Non-encrypting ransomware or lock screens, which restrict access to files and data, but do not encrypt them.
Ransomware that encrypts a drive’s master boot record (MBR) or Microsoft’s NTFS, which prevents victims’ computers from being booted up in a live operating system (OS) environment.
Leakware or extortionware, which steals compromising or damaging data that the attackers then threaten to release if ransom is not paid. This type is on the rise—In 2023, 91% of ransomware attacks involved some sort of data exfiltration.
Mobile device ransomware which infects cell phones through drive-by downloads or fake apps.
What happens during a typical attack?
Threat actors have a lot of tools at their disposal to infiltrate systems, gather reconnaissance, and execute their mission. In cybersecurity parlance, these are called tactics, techniques, and procedures (TTPs). Without digging into too much detail, the typical lifecycle of a ransomware attack is as follows:
Initial compromise: Ransomware gains entry through various means such as exploiting known software vulnerabilities, using phishing emails or even physical media like thumb drives, brute-force attacks, and others. It then installs itself on a single endpoint or network device, granting the attacker remote access.
Secure key exchange: Once installed, the ransomware communicates with the perpetrator’s central command and control server, triggering the generation of cryptographic keys required to lock the system securely.
Encryption: With the cryptographic lock established, the ransomware initiates the encryption process, targeting files both locally and across the network, rendering them inaccessible without the decryption keys.
Extortion: Having gained secure and impenetrable access to your files, the ransomware displays an explanation of the next steps, including the ransom amount, instructions for payment, and the consequences of noncompliance.
Recovery options: At this stage, the victim can attempt to remove infected files and systems, restore from a clean backup, or some may consider paying the ransom.
It’s never advised to pay the ransom. According to Veeam’s 2024 Ransomware Trends Report, one in three organizations could not recover their data after paying the ransom. There’s no guarantee the decryption keys will work, and paying the ransom only further incentivizes cybercriminals to continue their attacks.
Who gets attacked?
Data has shown that ransomware attacks target firms of all sizes, and no business—from SMBs to large corporations—is immune. Attacks are on the rise in every sector and in every size of business. That said, small to medium-sized businesses are particularly vulnerable, as they may not have the resources needed to shore up their defenses and are often viewed as “easy targets” by cybercriminals.
Recent attacks where cybercriminals leaked sensitive photos of patients in a medical facility prove that no organization is out of bounds and no victim is off-limits. These attempts indicate that organizations which often have weaker controls and out-of-date or unsophisticated IT systems should take extra precautions to protect themselves and their data (especially their backup data!).
According to Veeam’s report, backup repositories are a prime target for bad actors. In fact, backup repositories are targeted in 96% of attacks, with bad actors successfully affecting the backup repositories in 76% of cases.
The U.S. consistently ranks highest in ransomware attacks, followed by the U.K. and Germany. Windows computers are the main targets, but ransomware strains exist for Macintosh and Linux, as well.
The unfortunate truth is that ransomware has become so widespread that most companies will certainly experience some degree of a ransomware or malware attack. The best they can do is be prepared and understand the best ways to minimize the impact of ransomware.
Backup repositories are targeted in 96% of attacks.
How to combat ransomware
So, you’ve been attacked by ransomware. Depending on your industry and legal requirements (which are ever-changing), you may be obligated to report the attack immediately. Otherwise, your footing should be one of damage control. What should you do next?
Isolate the infection. Swiftly isolate the infected endpoint from the rest of your network and any shared storage to halt the spread of the ransomware.
Identify the infection. With numerous ransomware strains in existence, it’s crucial to accurately identify the specific type you’re dealing with. Conduct scans of messages, files, and utilize identification tools to gain a clearer understanding of the infection.
Report the incident. While legal obligations may vary, it is advisable to report the attack to the relevant authorities. Their involvement can provide invaluable support and coordination for countermeasures.
Evaluate your options. Assess the available courses of action to address the infection. Consider the most suitable approach based on your specific circumstances.
Restore and rebuild. Utilize secure backups, trusted program sources, and reliable software to restore the infected systems or set up a new system from scratch.
1. Isolate the infection
Depending on the strain of ransomware you’ve been hit with, you may have little time to react. Fast-moving strains can spread from a single endpoint across networks, locking up your data as it goes, before you even have a chance to contain it.
The first step, even if you just suspect that one computer may be infected, is to isolate it from other endpoints and storage devices on your network. Disable Wi-Fi, disable Bluetooth, and unplug the machine from both any local area network (LAN) or storage device it might be connected to. This not only contains the spread but also keeps the ransomware from communicating with the attackers.
Know that you may be dealing with more than just one “patient zero.” The ransomware could have entered your system through multiple vectors, particularly if someone has observed your patterns before they attacked your company. It may already be laying dormant on another system. Until you can confirm, treat every connected and networked machine as a potential host to ransomware.
2. Identify the infection
Just as there are bad guys spreading ransomware, there are good guys helping you fight it. Sites like ID Ransomware and the No More Ransom! Project help identify which strain you’re dealing with. And knowing what type of ransomware you’ve been infected with will help you understand how it propagates, what types of files it typically targets, and what options, if any, you have for removal and disinfection. You’ll also get more information if you report the attack to the authorities (which you really should).
3. Report to the authorities
It’s understood that sometimes it may not be in your business’s best interest to report the incident. Maybe you don’t want the attack to be public knowledge. Maybe the potential downside of involving the authorities (lost productivity during investigation, etc.) outweighs the amount of the ransom. But reporting the attack is how you help everyone avoid becoming victimized and help combat the spread and efficacy of ransomware attacks in the future. With every attack reported, the authorities get a clearer picture of who is behind attacks, how they gain access to your system, and what can be done to stop them.
The good news is, you have options. The bad news is that the most obvious option, paying up, is a terrible idea.
Simply giving into cybercriminals’ demands may seem attractive to some, especially in those previously mentioned situations where paying the ransom is less expensive than the potential loss of productivity. Cybercriminals are counting on this.
However, paying the ransom only encourages attackers to strike other businesses or individuals like you. Paying the ransom not only fosters a criminal environment but also leads to civil penalties—and you might not even get your data back.
The other option is to try and remove it, or to start over.
5. Restore and rebuild—or start fresh
There are several sites and software packages that can potentially remove the ransomware from your system, including the No More Ransom! Project. Other options can be found, as well.
Whether you can successfully and completely remove an infection is up for debate. A working decryptor doesn’t exist for every known ransomware. The nature of the beast is that every time a good guy comes up with a decryptor, a bad guy writes new ransomware. To be safe, you’ll want to follow up by either restoring your system or starting over entirely.
Why starting over using your backups is the better idea
The surest way to confirm ransomware has been removed from a system is by doing a complete wipe of all storage devices and reinstalling everything from scratch. Formatting the hard disks in your system will ensure that no remnants of the ransomware remain.
To effectively combat the ransomware that has infiltrated your systems, it is crucial to determine the precise date of infection by examining file dates, messages, and any other pertinent information. Keep in mind that the ransomware may have been dormant within your system before becoming active and initiating significant alterations. By identifying and studying the specific characteristics of the ransomware that targeted your systems, you can gain valuable insights into its functionality, enabling you to devise the most effective strategy for restoring your systems to their optimal state.
A concerning 63% of organizations hastily restore directly back into compromised production environments without adequate scanning during recovery, risking re-introduction of the threat.
Select a backup or backups that were made prior to the date of the initial ransomware infection. If you’ve been following a sound backup strategy, you should have copies of all your documents, media, and important files right up to the time of the infection. With both local and off-site backups, you should be able to use backup copies that you know weren’t connected to your network after the time of attack, and hence, protected from infection. However, it is recommended to use a secure quarantine environment for testing before bringing production systems back online to ensure there is no dormant ransomware present in the data before restoring to production systems.
How Object Lock protects your backups
Object Lock functionality for backups allows you to store objects using a write once, read many (WORM) model, meaning that after it’s written, data cannot be modified. Using Object Lock, no one can encrypt, tamper with, or delete your protected data for a specified period of time, creating a solid line of defense against ransomware attacks.
Object Lock creates a virtual air gap for your data. The term “air gap” comes from the world of LTO tape. When backups are written to tape, the tapes are then physically removed from the network, creating a literal gap of air between backups and production systems. In the event of a ransomware attack, you could just pull the tapes from the previous day to restore systems. Object Lock does the same thing, but it all happens in the cloud. Instead of physically isolating data, Object Lock virtually isolates the data.
Object Lock is valuable in a few different use cases:
To replace an LTO tape system: Most folks looking to migrate from tape are concerned about maintaining the security of the air gap that tape provides. With Object Lock, you can create a backup that’s just as secure as air-gapped tape without the need for expensive physical infrastructure.
To protect and retain sensitive data: If you work in an industry that has strong compliance requirements—for instance, if you’re subject to HIPAA regulations or if you need to retain and protect data for legal reasons—Object Lock allows you to easily set appropriate retention periods to support regulatory compliance.
As part of a disaster recovery (DR) and business continuity plan: The last thing you want to worry about in the event you are attacked by ransomware is whether your backups are safe. Being able to restore systems from backups stored with Object Lock can help you minimize downtime and interruptions, comply with cyber insurance requirements, and achieve recovery time objectives (RTO) easier. By making critical data immutable, you can quickly and confidently restore uninfected data from your backups, deploy them, and return to business without interruption.
Ransomware attacks can be incredibly disruptive. By adopting the practice of creating immutable, air-gapped backups using Object Lock functionality, you can significantly increase your chances of achieving a successful recovery. This approach brings you one step closer to regaining control over your data and mitigating the impact of ransomware attacks.
So, why not just run a system restore?
While it might be tempting to rely solely on a system restore point to restore your system’s functionality, it is not the best solution for eliminating the underlying virus or ransomware responsible for the initial problem. Malicious software tends to hide within various components of a system, making it impossible for system restore to eradicate all instances.
Another critical concern is that ransomware has the capability to infect and encrypt local backups. If a computer is infected with ransomware, there is a high likelihood that your local backup solution will also suffer from data encryption, just like everything else on the system.
With a good backup solution that is isolated from your local computers, you can easily obtain the files you need to get your system working again. This will also give you the flexibility to determine which files to restore from a particular date and how to obtain the files you need to restore your system.
Initial compromise TTPs: Human attack vectors
Often, the weak link in your security protocol is the ever-elusive X factor of human error. Cybercriminals know this and exploit it through social engineering. In the context of information security, social engineering is the use of deception to manipulate individuals into divulging confidential or personal information that may be used for fraudulent purposes. In other words, the weakest point in your system is usually somewhere between the keyboard and the chair.
Common human attack vectors include:
1. Phishing
Phishing uses seemingly legitimate emails to trick people into clicking on a link or opening an attachment, unwittingly delivering the malicious payload. The email might be sent to one person or many within an organization, but sometimes the emails are targeted to help them seem more credible. This targeting takes a little more time on the attackers’ part, but the research into individual targets can make their email seem even more legitimate, not to mention the assistance of generative AI models like ChatGPT. They might disguise their email address to look like the message is coming from someone the sender knows, or they might tailor the subject line to look relevant to the victim’s job. This highly personalized method is called “spear phishing.”
2. SMSishing
As the name implies, SMSishing uses text messages to get recipients to navigate to a site or enter personal information on their device. Common approaches use authentication messages or messages that appear to be from a financial or other service provider. Even more insidiously, some SMSishing ransomware variants attempt to propagate themselves by sending themselves to all contacts in the device’s contact list.
3. Vishing
In a similar manner to email and SMS, vishing uses voicemail to deceive the victim, leaving a message with instructions to call a seemingly legitimate number which is actually spoofed. Upon calling the number, the victim is coerced into following a set of instructions which are ostensibly to fix some kind of problem. In reality, they are being tricked into installing ransomware on their own computer. Like so many other methods of phishing, vishing has become increasingly sophisticated with the spread of AI, with recent, successful deepfakes leveraging vishing to duplicate the voices of company higher-ups—to the tune of $25 million. And like spear phishing, it has become highly targeted.
4. Social media
Social media can be a powerful vehicle to convince a victim to open a downloaded image from a social media site or take some other compromising action. The carrier might be music, video, or other active content that, once opened, infects the user’s system.
5. Instant Messaging
Between them, IM services like WhatsApp, Facebook Messenger, Telegram, and Snapchat have more than four billion users, making them an attractive channel for ransomware attacks. These messages can seem to come from trusted contacts and contain links or attachments that infect your machine and sometimes propagate across your contact list, furthering the spread.
Ransomware is more about manipulating vulnerabilities in human psychology than the adversary’s technological sophistication.”
—James Scott, Institute for Critical Infrastructure Technology
Initial compromise TTPs: Machine attack vectors
The other type of attack vector is machine to machine. Humans are involved to some extent, as they might facilitate the attack by visiting a website or using a computer, but the attack process is automated and doesn’t require any explicit human cooperation to invade your computer or network.
1. Drive-by
The drive-by vector is particularly malicious, since all a victim needs to do is visit a website carrying malware within the code of an image or active content. As the name implies, all you need to do is cruise by and you’re a victim.
2. Known system vulnerabilities
Cybercriminals learn the vulnerabilities of specific systems and exploit those vulnerabilities to break in and install ransomware on the machine. This happens most often to systems that are not patched with the latest security releases.
3. Malvertising
Malvertising is like drive-by, but uses ads to deliver malware. These ads might be placed on search engines or popular social media sites in order to reach a large audience. A common host for malvertising is adults-only sites.
4. Network propagation
Once a piece of ransomware is on your system, it can scan for file shares and accessible computers and spread itself across the network or shared system. Companies without adequate security might have their company file server and other network shares infected as well. From there, the malware will propagate as far as it can until it runs out of accessible systems or meets security barriers.
5. Propagation through shared services
Online services such as file sharing or syncing services can be used to propagate ransomware. If the ransomware ends up in a shared folder on a home machine, the infection can be transferred to an office or to other connected machines. If the service is set to automatically sync when files are added or changed, as many file sharing services are, then a malicious virus can be widely propagated in just milliseconds.
It’s important to be careful and consider the settings you use for systems that automatically sync, and to be cautious about sharing files with others unless you know exactly where they came from.
Prevention best practices
Security experts suggest several precautionary measures for preventing a ransomware attack.
Use antivirus and antimalware software or other security policies to block known payloads from launching.
Make frequent, comprehensive backups of all important files and isolate them from local and open networks.
Immutable backup options such as Object Lock offer users a way to maintain truly air-gapped backups. The data is fixed, unchangeable, and cannot be deleted within the time frame set by the end user.
Keep offline data backups stored in locations that are air gapped or inaccessible from any potentially infected computer, such as on disconnected external storage drives or in the cloud, which prevents the ransomware from accessing them.
Keep your security up-to-date through trusted vendors of your OS and applications. Remember to patch early and patch often to close known vulnerabilities in operating systems, browsers, and web plugins.
Consider deploying security software to protect endpoints, email servers, and network systems from infection.
Segment your networks to keep critical computers isolated and to prevent the spread of ransomware in case of an attack. Turn off unneeded network shares.
Operate on the principle of least privilege. Turn off admin rights for users who don’t require them. Give users the lowest system permissions they need to do their work.
Restrict write permissions on file servers as much as possible.
Educate yourself and your employees in best practices to keep ransomware out of your systems. Update everyone on the latest email phishing scams and human engineering aimed at turning victims into abettors.
It’s clear that the best way to respond to a ransomware attack is to avoid having one in the first place. Other than that, making sure your valuable data is backed up and unreachable to a ransomware infection will ensure that your downtime and data loss will be minimal if you ever fall prey to an attack.
Have you endured a ransomware attack or have a strategy to keep you from becoming a victim? Please let us know in the comments.
Ransomware FAQS
What is a ransomware attack?
A ransomware attack is a type of cyberattack where cybercriminals or groups gain access to a computer system or network and encrypt valuable files or data, making them inaccessible to the owner. The attackers then demand a ransom, usually in the form of cryptocurrency, in exchange for providing the decryption key to unlock the files. Attackers may also extort victims by exfiltrating and threatening to leak sensitive data. Ransomware attacks can cause significant financial losses, operational disruptions, and potential data breaches if the ransom is not paid or effective countermeasures are not implemented.
How do I prevent ransomware attacks?
Preventing ransomware requires a proactive approach to cybersecurity and cyber resilience. Implement robust security measures, including regularly updating software and operating systems, utilizing strong and unique passwords, and deploying reputable antivirus and antimalware software. Train employees about how to identify phishing and social engineering tactics. Regularly back up critical data to cloud storage, implement tools like Object Lock to create immutability, and test your restoration processes. Lastly, stay informed about the latest threats and security best practices to fortify your defenses against ransomware.
How does ransomware work?
Ransomware gains entry through various means such as phishing emails, physical media like thumb drives, or alternative methods. It then installs itself on one or more endpoints or network devices, granting the attacker access. Once installed, the ransomware communicates with the perpetrator’s central command and control server, triggering the generation of cryptographic keys required to lock the system securely. With the cryptographic lock established, the ransomware initiates the encryption process, targeting files both locally and across the network, and renders them inaccessible without the decryption keys.
How does ransomware spread?
Common ransomware attack vectors include malicious email attachments or links, where users unknowingly download or execute the ransomware payload. It can also spread through exploit kits that target vulnerabilities in software or operating systems. Ransomware may propagate through compromised websites, drive-by downloads, or via malicious ads. Additionally, attackers can utilize brute force attacks to gain unauthorized access to systems and deploy ransomware.
How do I recover from a ransomware attack?
First, contain the infection. Isolate the infected endpoint from the rest of your network and any shared storage. Next, identify the infection. With numerous ransomware strains in existence, it’s crucial to accurately identify the specific type you’re dealing with. Conduct scans of messages, files, and utilize identification tools to gain a clearer understanding of the infection. Report the incident. While legal obligations may vary, it is advisable to report the attack to the relevant authorities. Their involvement can provide invaluable support and coordination for countermeasures. Then, assess the available courses of action to address the infection. If you have a solid backup strategy in place, you can utilize secure backups to restore and rebuild your environment.
This is a guest blog post co-written with Zack Rossman from Alcion.
Alcion, a security-first, AI-driven backup-as-a-service (BaaS) platform, helps Microsoft 365 administrators quickly and intuitively protect data from cyber threats and accidental data loss. In the event of data loss, Alcion customers need to search metadata for the backed-up items (files, emails, contacts, events, and so on) to select specific item versions for restore. Alcion uses Amazon OpenSearch Service to provide their customers with accurate, efficient, and reliable search capability across this backup catalog. The platform is multi-tenant, which means that Alcion requires data isolation and strong security so as to ensure that tenants can only search their own data.
OpenSearch Service is a fully managed service that makes it easy to deploy, scale, and operate OpenSearch in the AWS Cloud. OpenSearch is an Apache-2.0-licensed, open-source search and analytics suite, comprising OpenSearch (a search, analytics engine, and vector database), OpenSearch Dashboards (a visualization and utility user interface), and plugins that provide advanced capabilities like enterprise-grade security, anomaly detection, observability, alerting, and much more. Amazon OpenSearch Serverless is a serverless deployment option that makes it simple to use OpenSearch without configuring, managing, and scaling OpenSearch Service domains.
In this post, we share how adopting OpenSearch Serverless enabled Alcion to meet their scale requirements, reduce their operational overhead, and secure their tenants’ data by enforcing tenant isolation within their multi-tenant environment.
OpenSearch Service managed domains
For the first iteration of their search architecture, Alcion chose the managed domains deployment option in OpenSearch Service and was able to launch their search functionality in production in less than a month. To meet their security, scale, and tenancy requirements, they stored data for each tenant in a dedicated index and used fine-grained access control in OpenSearch Service to prevent cross-tenant data leaks. As their workload evolved, Alcion engineers tracked OpenSearch domain utilization via the provided Amazon CloudWatch metrics, making changes to increase storage and optimize their compute resources.
The team at Alcion used several features of OpenSearch Service managed domains to improve their operational stance. They introduced index aliases, which provide a single alias name to access (read and write) multiple underlying indexes. They also configured Index State Management (ISM) policies to help them control their data lifecycle by rolling indexes over based on index size. Together, the ISM policies and index aliases were necessary to scale indexes for large tenants. Alcion also used index templates to define the shards per index (partitioning) of their data so as to automate their data lifecycle and improve the performance and stability of their domains.
The following architecture diagram shows how Alcion configured their OpenSearch managed domains.
The following diagram shows how Microsoft 365 data was indexed to and queried from tenant-specific indexes. Alcion implemented request authentication by providing the OpenSearch primary user credentials with each API request.
OpenSearch Serverless overview and tenancy model options
OpenSearch Service managed domains provided a stable foundation for Alcion’s search functionality, but the team needed to manually provision resources to the domains for their peak workload. This left room for cost optimizations because Alcion’s workload is bursty—there are large variations in the number of search and indexing transactions per second, both for a single customer and taken as a whole. To reduce costs and operational burden, the team turned to OpenSearch Serverless, which offers auto-scaling capability.
To use OpenSearch Serverless, the first step is to create a collection. A collection is a group of OpenSearch indexes that work together to support a specific workload or use case. The compute resources for a collection, called OpenSearch Compute Units (OCUs), are shared across all collections in an account that share an encryption key. The pool of OCUs is automatically scaled up and down to meet the demands of indexing and search traffic.
The level of effort required to migrate from an OpenSearch Service managed domain to OpenSearch Serverless was manageable thanks to the fact that OpenSearch Serverless collections support the same OpenSearch APIs and libraries as OpenSearch Service managed domains. This allowed Alcion to focus on optimizing the tenancy model for the new search architecture. Specifically, the team needed to decide how to partition tenant data within collections and indexes while balancing security and total cost of ownership. Alcion engineers, in collaboration with the OpenSearch Serverless team, considered three tenancy models:
Silo model: Create a collection for each tenant
Pool model: Create a single collection and use a single index for multiple tenants
Bridge model: Create a single collection and use a single index per tenant
All three design choices had benefits and trade-offs that had to be considered for designing the final solution.
Silo model: Create a collection for each tenant
In this model, Alcion would create a new collection whenever a new customer onboarded to their platform. Although tenant data would be cleanly separated between collections, this option was disqualified because the collection creation time meant that customers wouldn’t be able to back up and search data immediately after registration.
Pool model: Create a single collection and use a single index for multiple tenants
In this model, Alcion would create a single collection per AWS account and index tenant-specific data in one of many shared indexes belonging to that collection. Initially, pooling tenant data into shared indexes was attractive from a scale perspective because this led to the most efficient use of index resources. But after further analysis, Alcion found that they would be well within the per-collection index quota even if they allocated one index for each tenant. With that scalability concern resolved, Alcion pursued the third option because siloing tenant data into dedicated indexes results in stronger tenant isolation than the shared index model.
Bridge model: Create a single collection and use a single index per tenant
In this model, Alcion would create a single collection per AWS account and create an index for each of the hundreds of tenants managed by that account. By assigning each tenant to a dedicated index and pooling these indexes in a single collection, Alcion reduced onboarding time for new tenants and siloed tenant data into cleanly separated buckets.
Implementing role-based access control for supporting multi-tenancy
OpenSearch Serverless offers a multi-point, inheritable set of security controls, covering data access, network access, and encryption. Alcion took full advantage of OpenSearch Serverless data access policies to implement role-based access control (RBAC) for each tenant-specific index with the following details:
Allocate an index with a common prefix and the tenant ID (for example, index-v1-<tenantID>)
Create an OpenSearch Serverless data access policy that grants document read/write permissions within a dedicated tenant index to the IAM role for that tenant
OpenSearch API requests to a tenant index are signed with temporary credentials belonging to the tenant-specific IAM role
The following is an example OpenSearch Serverless data access policy for a mock tenant with ID t-eca0acc1-12345678910. This policy grants the IAM role document read/write access to the dedicated tenant access.
The following architecture diagram depicts how Alcion implemented indexing and searching for Microsoft 365 resources using the OpenSearch Serverless shared collection approach.
The following is the sample code snippet for sending an API request to an OpenSearch Serverless collection. Notice how the API client is initialized with a signer object that signs requests with the same IAM principal that is linked to the OpenSearch Serverless data access policy from the previous code snippet.
In May of 2023, Alcion rolled out its search architecture based on the shared collection and dedicated index-per-tenant model in all production and pre-production environments. The team was able to tear out complex code and operational processes that had been dedicated to scaling OpenSearch Service managed domains. Furthermore, thanks to the auto scaling capabilities of OpenSearch Serverless, Alcion has reduced their OpenSearch costs by 30% and expects the cost profile to scale favorably.
In their journey from managed to serverless OpenSearch Service, Alcion benefited in their initial choice of OpenSearch Service managed domains. In migrating forward, they were able to reuse the same OpenSearch APIs and libraries for their OpenSearch Serverless collections that they used for their OpenSearch Service managed domain. Additionally, they updated their tenancy model to take advantage of OpenSearch Serverless data access policies. With OpenSearch Serverless, they were able to effortlessly adapt to their customers’ scale needs while ensuring tenant isolation.
For more information about Alcion, visit their website.
About the Authors
Zack Rossman is a Member of Technical Staff at Alcion. He is the tech lead for the search and AI platforms. Prior to Alcion, Zack was a Senior Software Engineer at Okta, developing core workforce identity and access management products for the Directories team.
Niraj Jetly is a Software Development Manager for Amazon OpenSearch Serverless. Niraj leads several data plane teams responsible for launching Amazon OpenSearch Serverless. Prior to AWS, Niraj led several product and engineering teams as CTO, VP of Engineering, and Head of Product Management for over 15 years. Niraj is a recipient of over 15 innovation awards, including being named CIO of the year in 2014 and top 100 CIO in 2013 and 2016. A frequent speaker at several conferences, he has been quoted in NPR, WSJ, and The Boston Globe.
Jon Handler is a Senior Principal Solutions Architect at Amazon Web Services based in Palo Alto, CA. Jon works closely with OpenSearch and Amazon OpenSearch Service, providing help and guidance to a broad range of customers who have search and log analytics workloads that they want to move to the AWS Cloud. Prior to joining AWS, Jon’s career as a software developer included 4 years of coding a large-scale, ecommerce search engine. Jon holds a Bachelor of the Arts from the University of Pennsylvania and a Master of Science and a PhD in Computer Science and Artificial Intelligence from Northwestern University.
The collective thoughts of the interwebz
Manage Consent
To provide the best experiences, we use technologies like cookies to store and/or access device information. Consenting to these technologies will allow us to process data such as browsing behavior or unique IDs on this site. Not consenting or withdrawing consent, may adversely affect certain features and functions.
Functional
Always active
The technical storage or access is strictly necessary for the legitimate purpose of enabling the use of a specific service explicitly requested by the subscriber or user, or for the sole purpose of carrying out the transmission of a communication over an electronic communications network.
Preferences
The technical storage or access is necessary for the legitimate purpose of storing preferences that are not requested by the subscriber or user.
Statistics
The technical storage or access that is used exclusively for statistical purposes.The technical storage or access that is used exclusively for anonymous statistical purposes. Without a subpoena, voluntary compliance on the part of your Internet Service Provider, or additional records from a third party, information stored or retrieved for this purpose alone cannot usually be used to identify you.
Marketing
The technical storage or access is required to create user profiles to send advertising, or to track the user on a website or across several websites for similar marketing purposes.


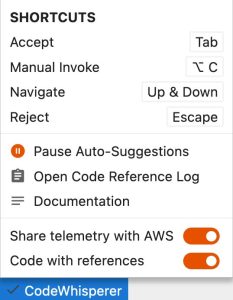

 Noritaka Sekiyama is a Principal Big Data Architect on the AWS Glue team. He works based in Tokyo, Japan. He is responsible for building software artifacts to help customers. In his spare time, he enjoys cycling with his road bike.
 Gal Heyne is a Product Manager for AWS Glue with a strong focus on AI/ML, data engineering, and BI, and is based in California. She is passionate about developing a deep understanding of customers’ business needs and collaborating with engineers to design easy-to-use data products. In her spare time, she enjoys playing card games.


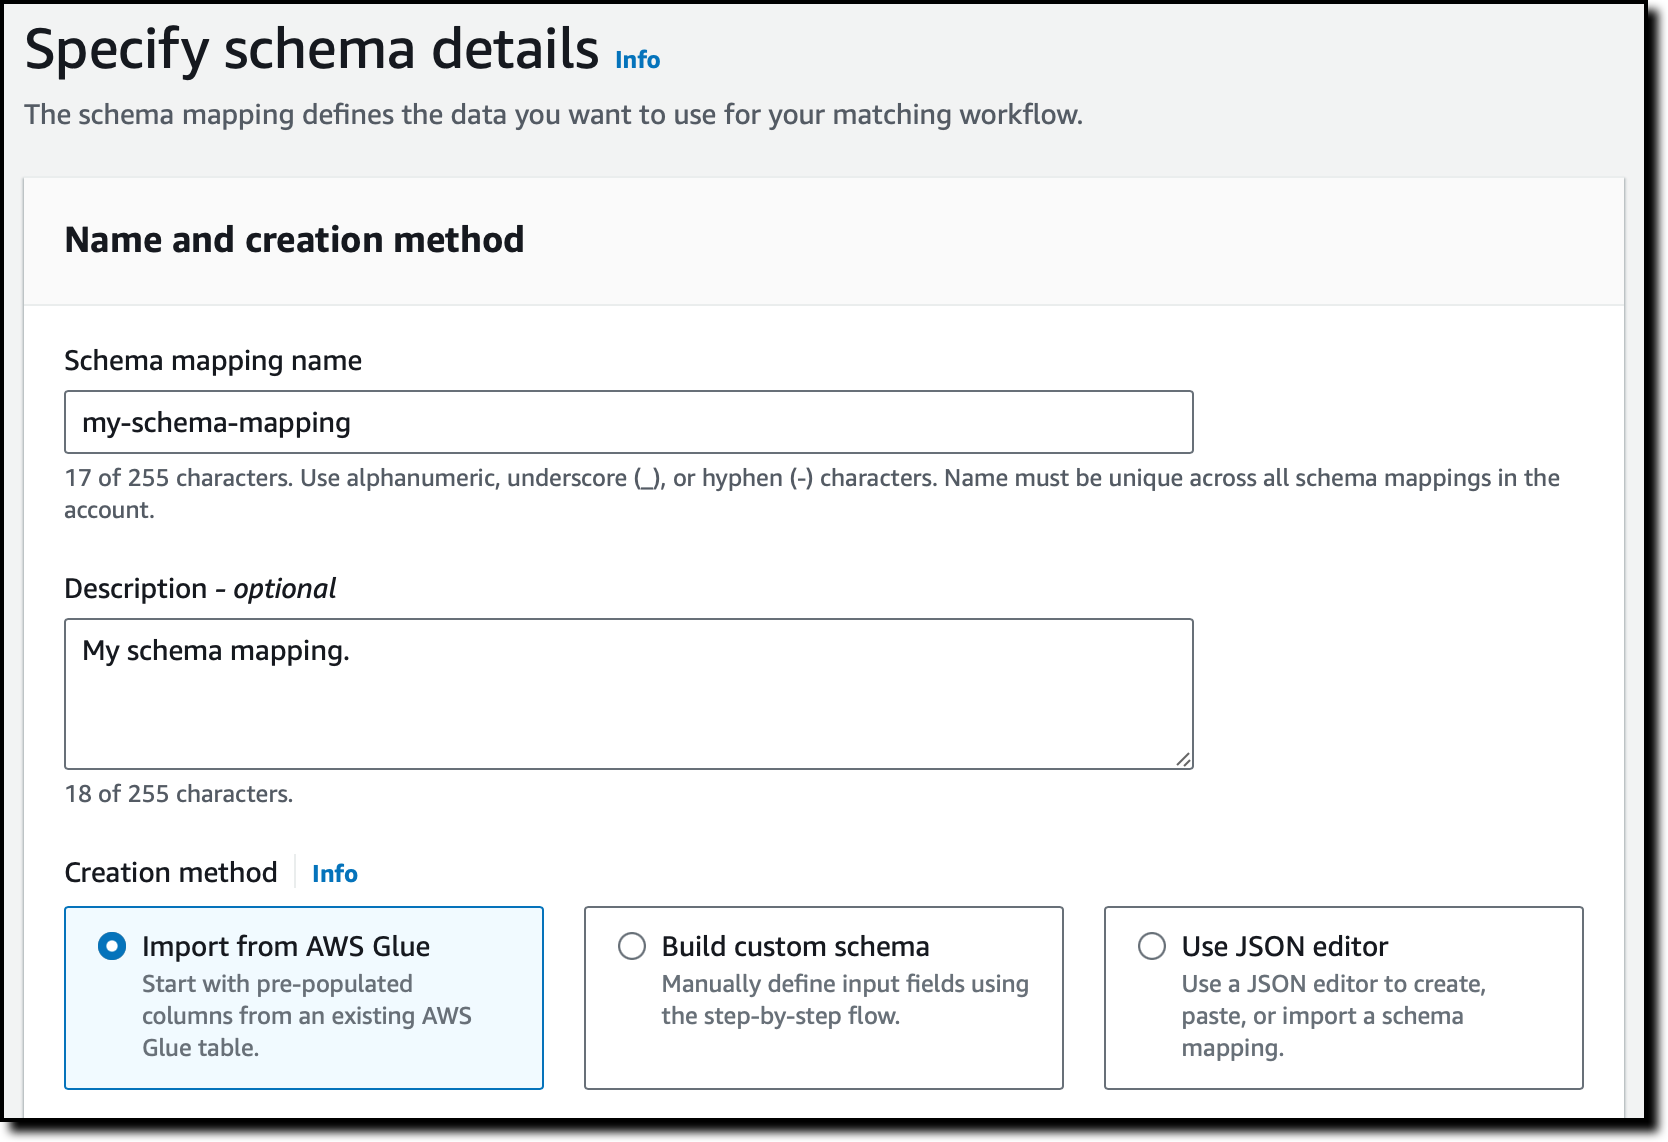
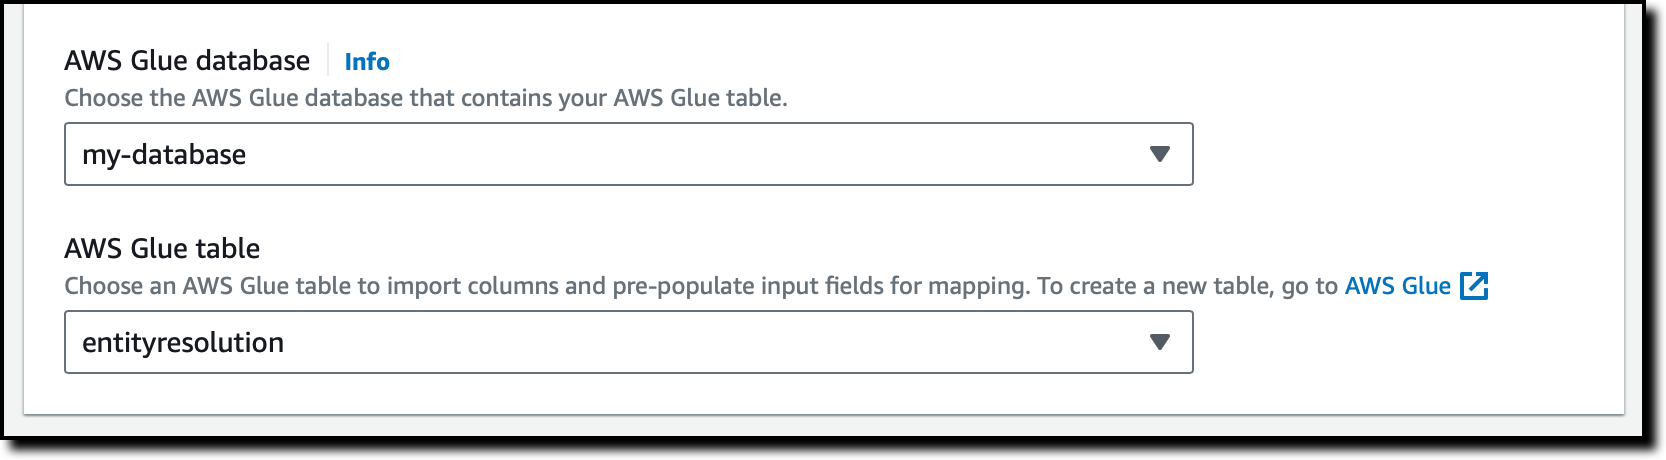


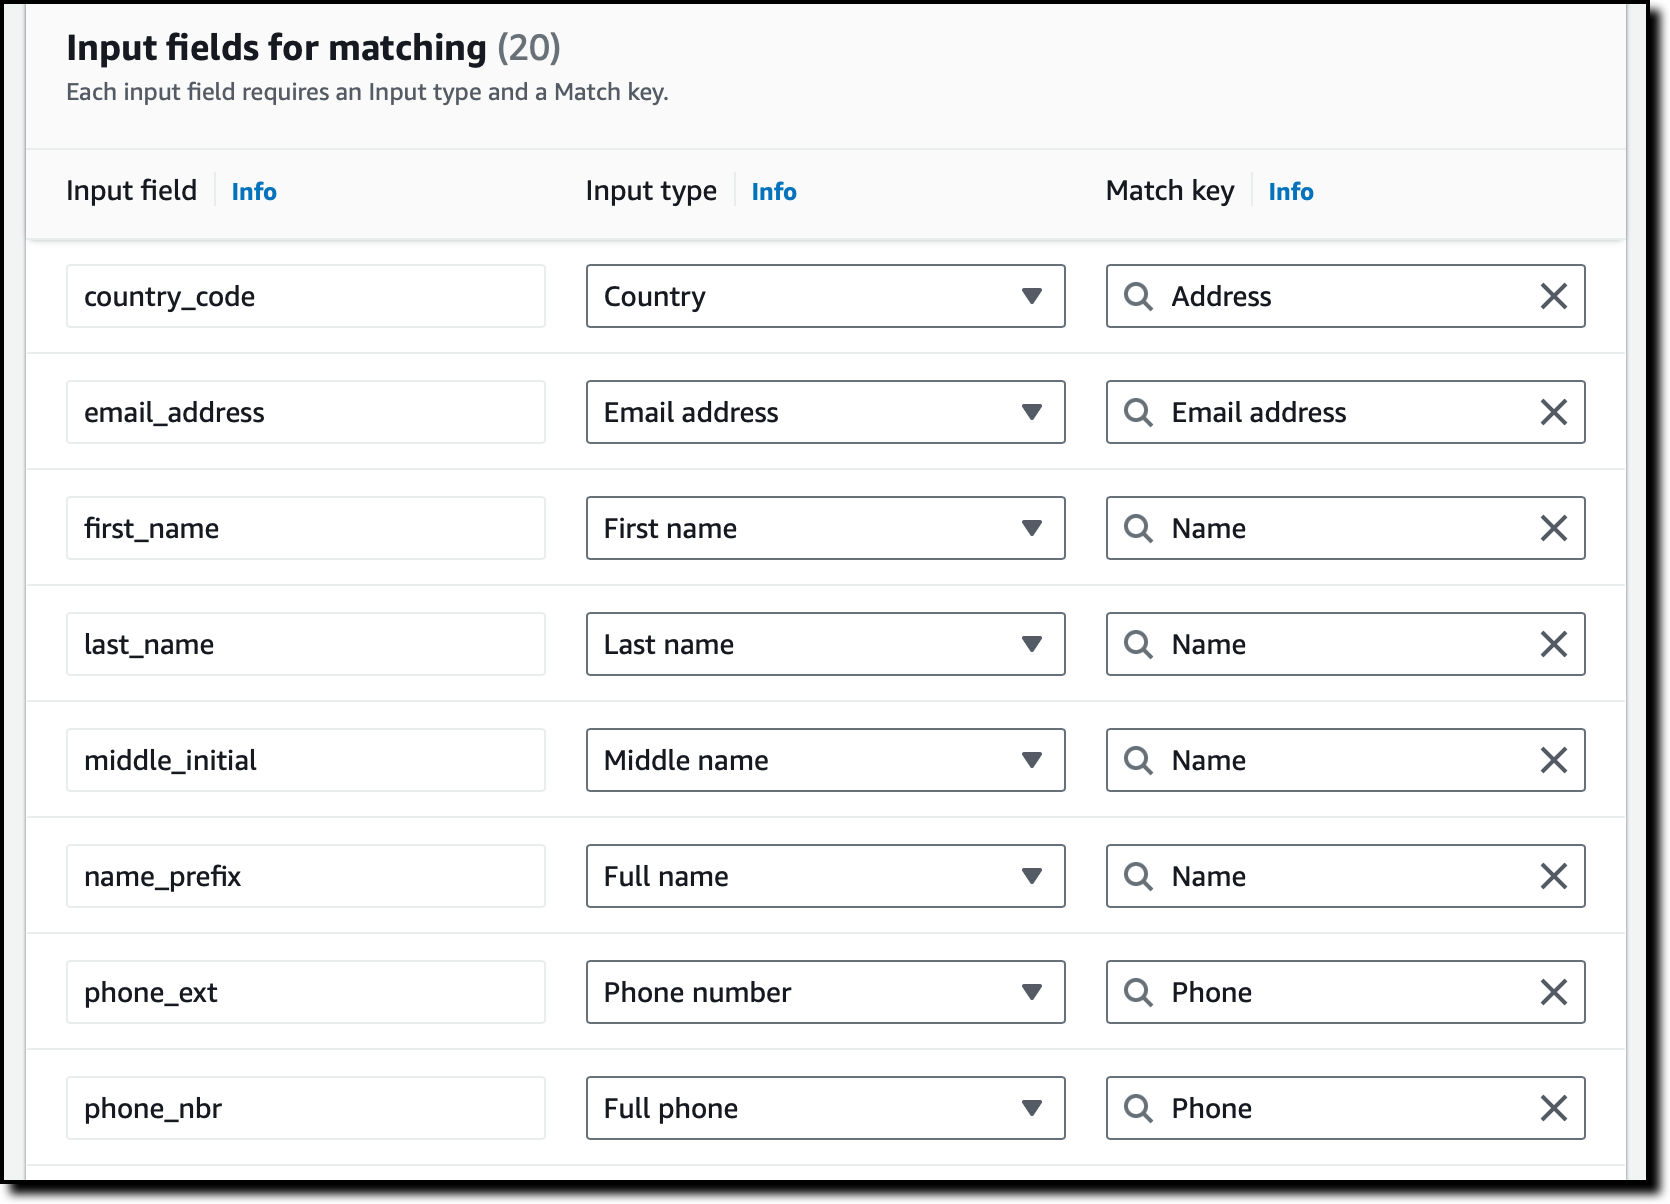


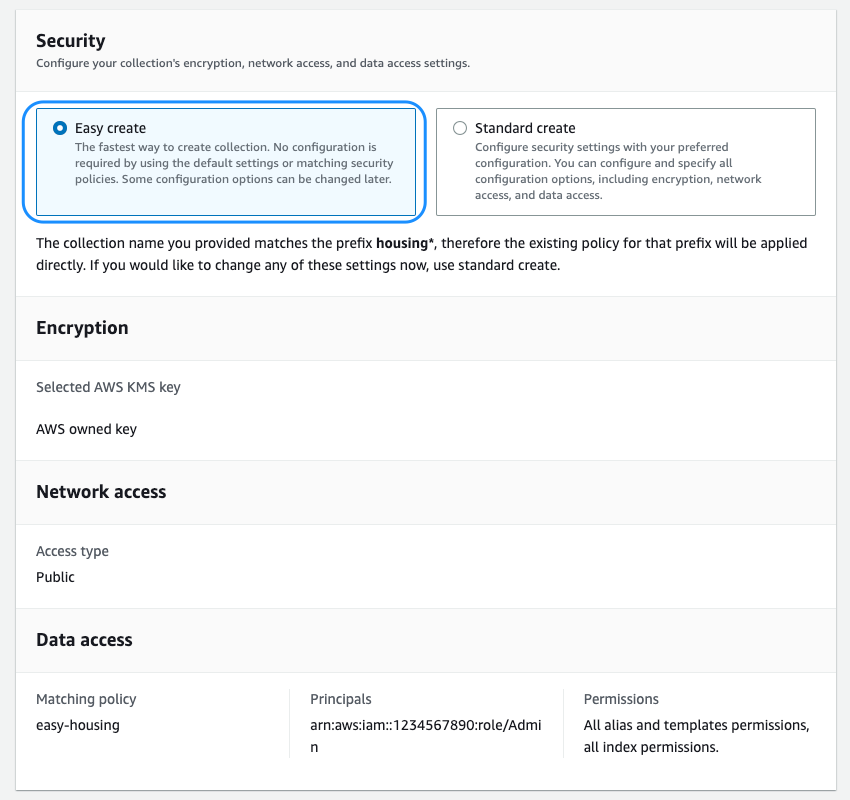
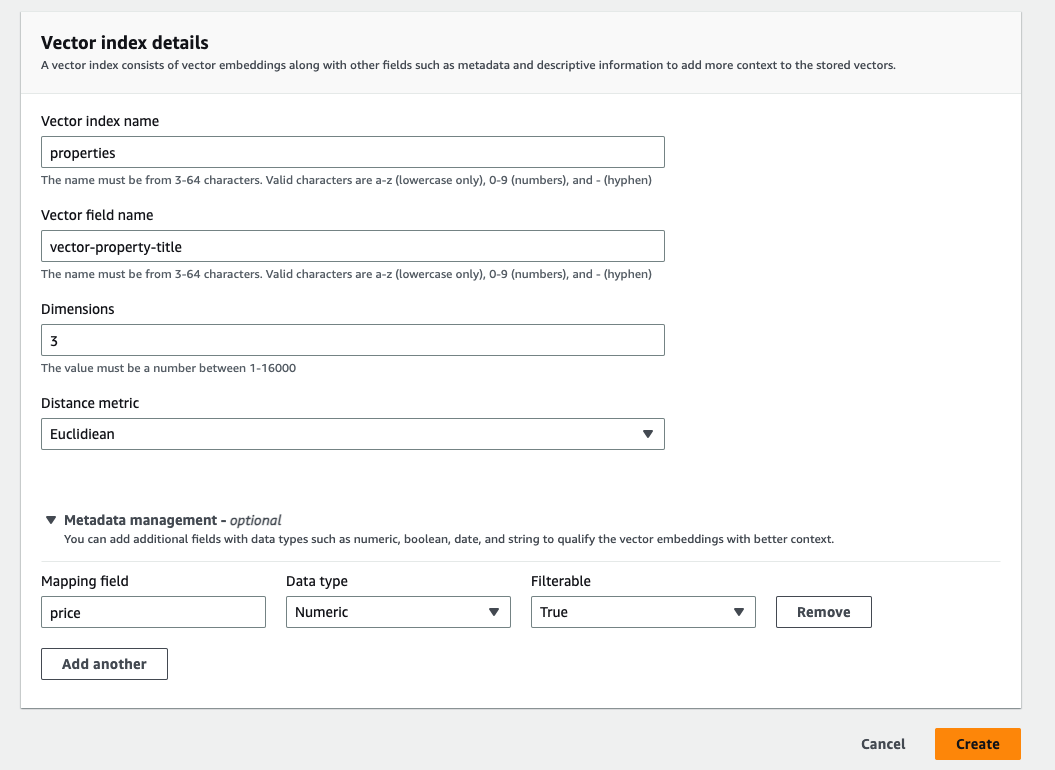
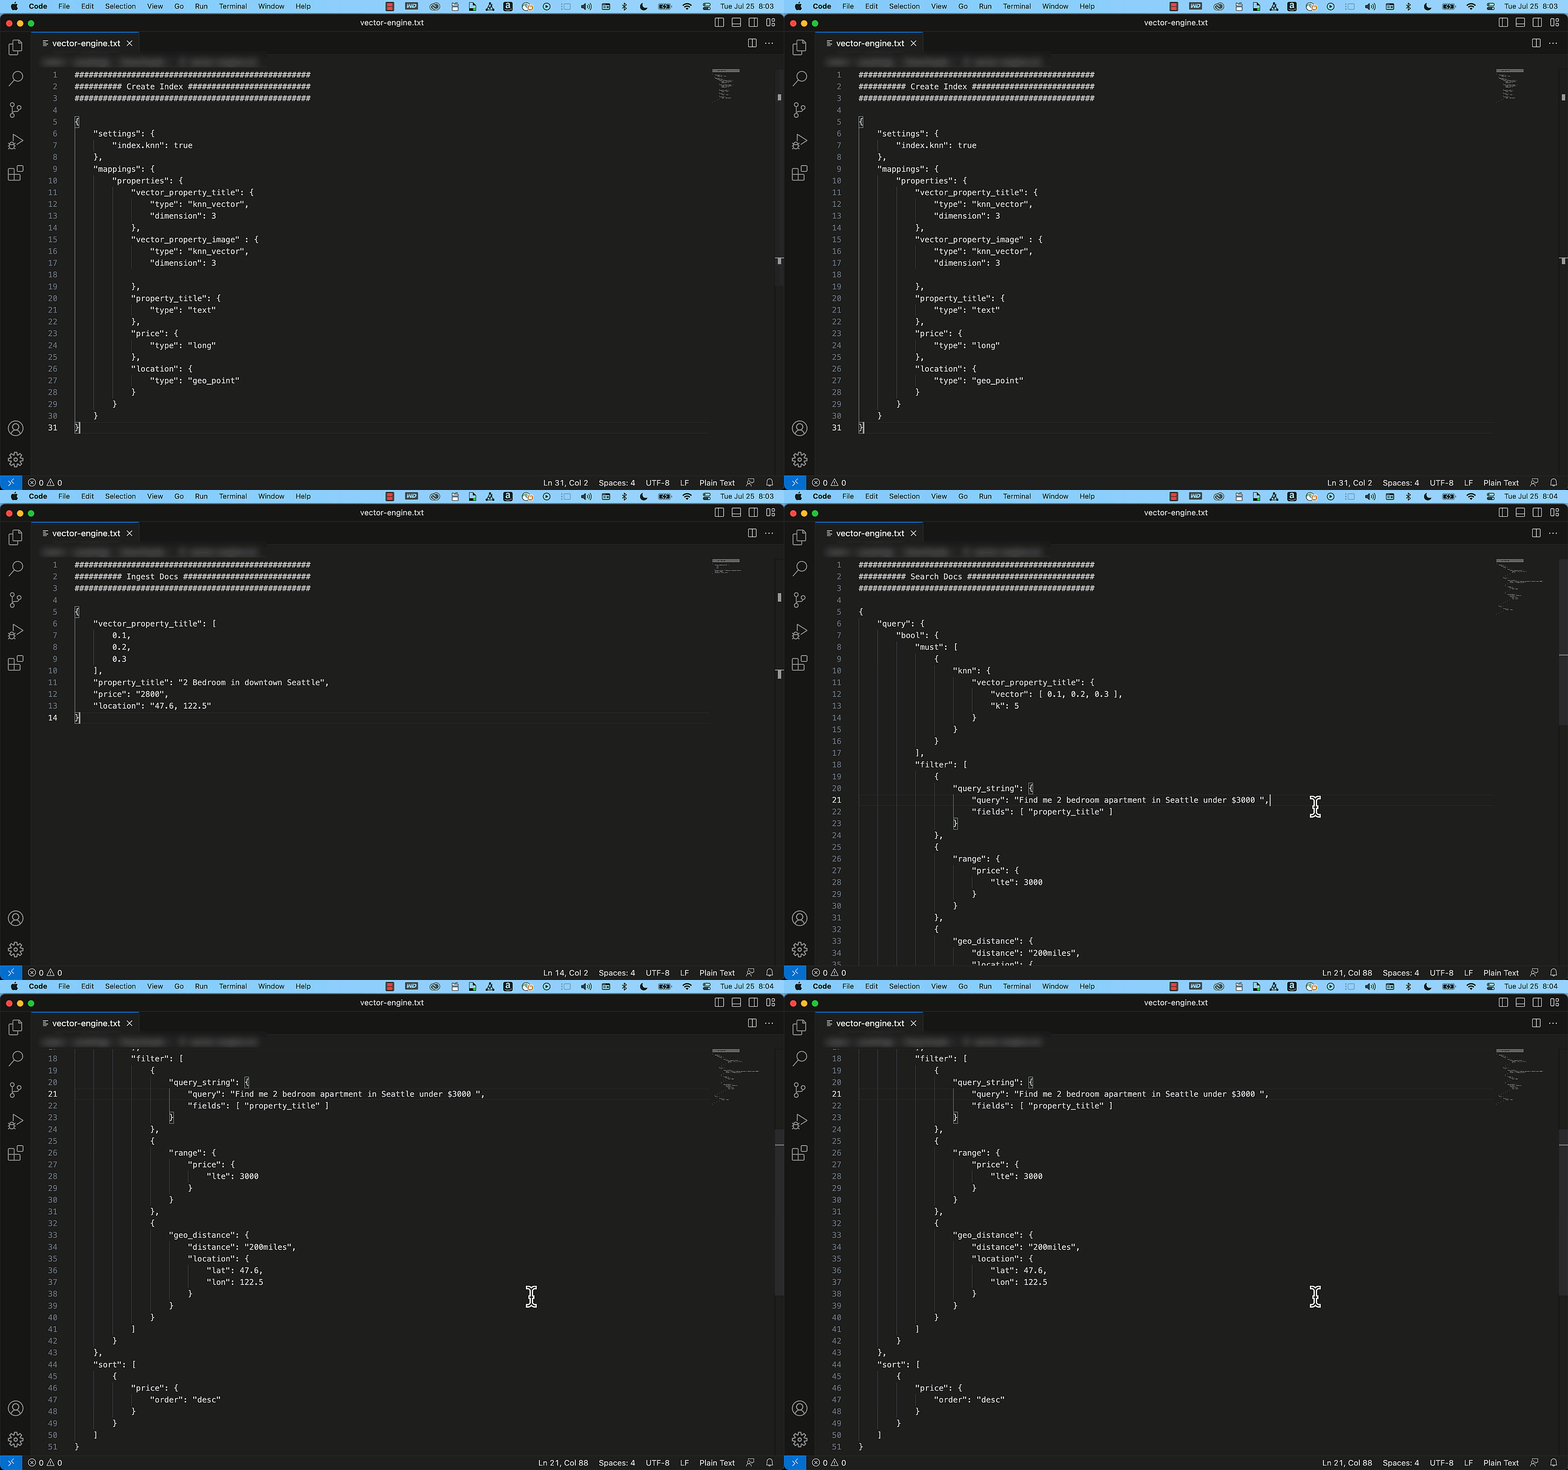
 Pavani Baddepudi is a Principal Product Manager for Search Services at AWS and the lead PM for OpenSearch Serverless. Her interests include distributed systems, networking, and security. When not working, she enjoys hiking and exploring new cuisines.
 Carl Meadows is Director of Product Management at AWS and is responsible for Amazon Elasticsearch Service, OpenSearch, Open Distro for Elasticsearch, and Amazon CloudSearch. Carl has been with Amazon Elasticsearch Service since before it was launched in 2015. He has a long history of working in the enterprise software and cloud services spaces. When not working, Carl enjoys making and recording music.
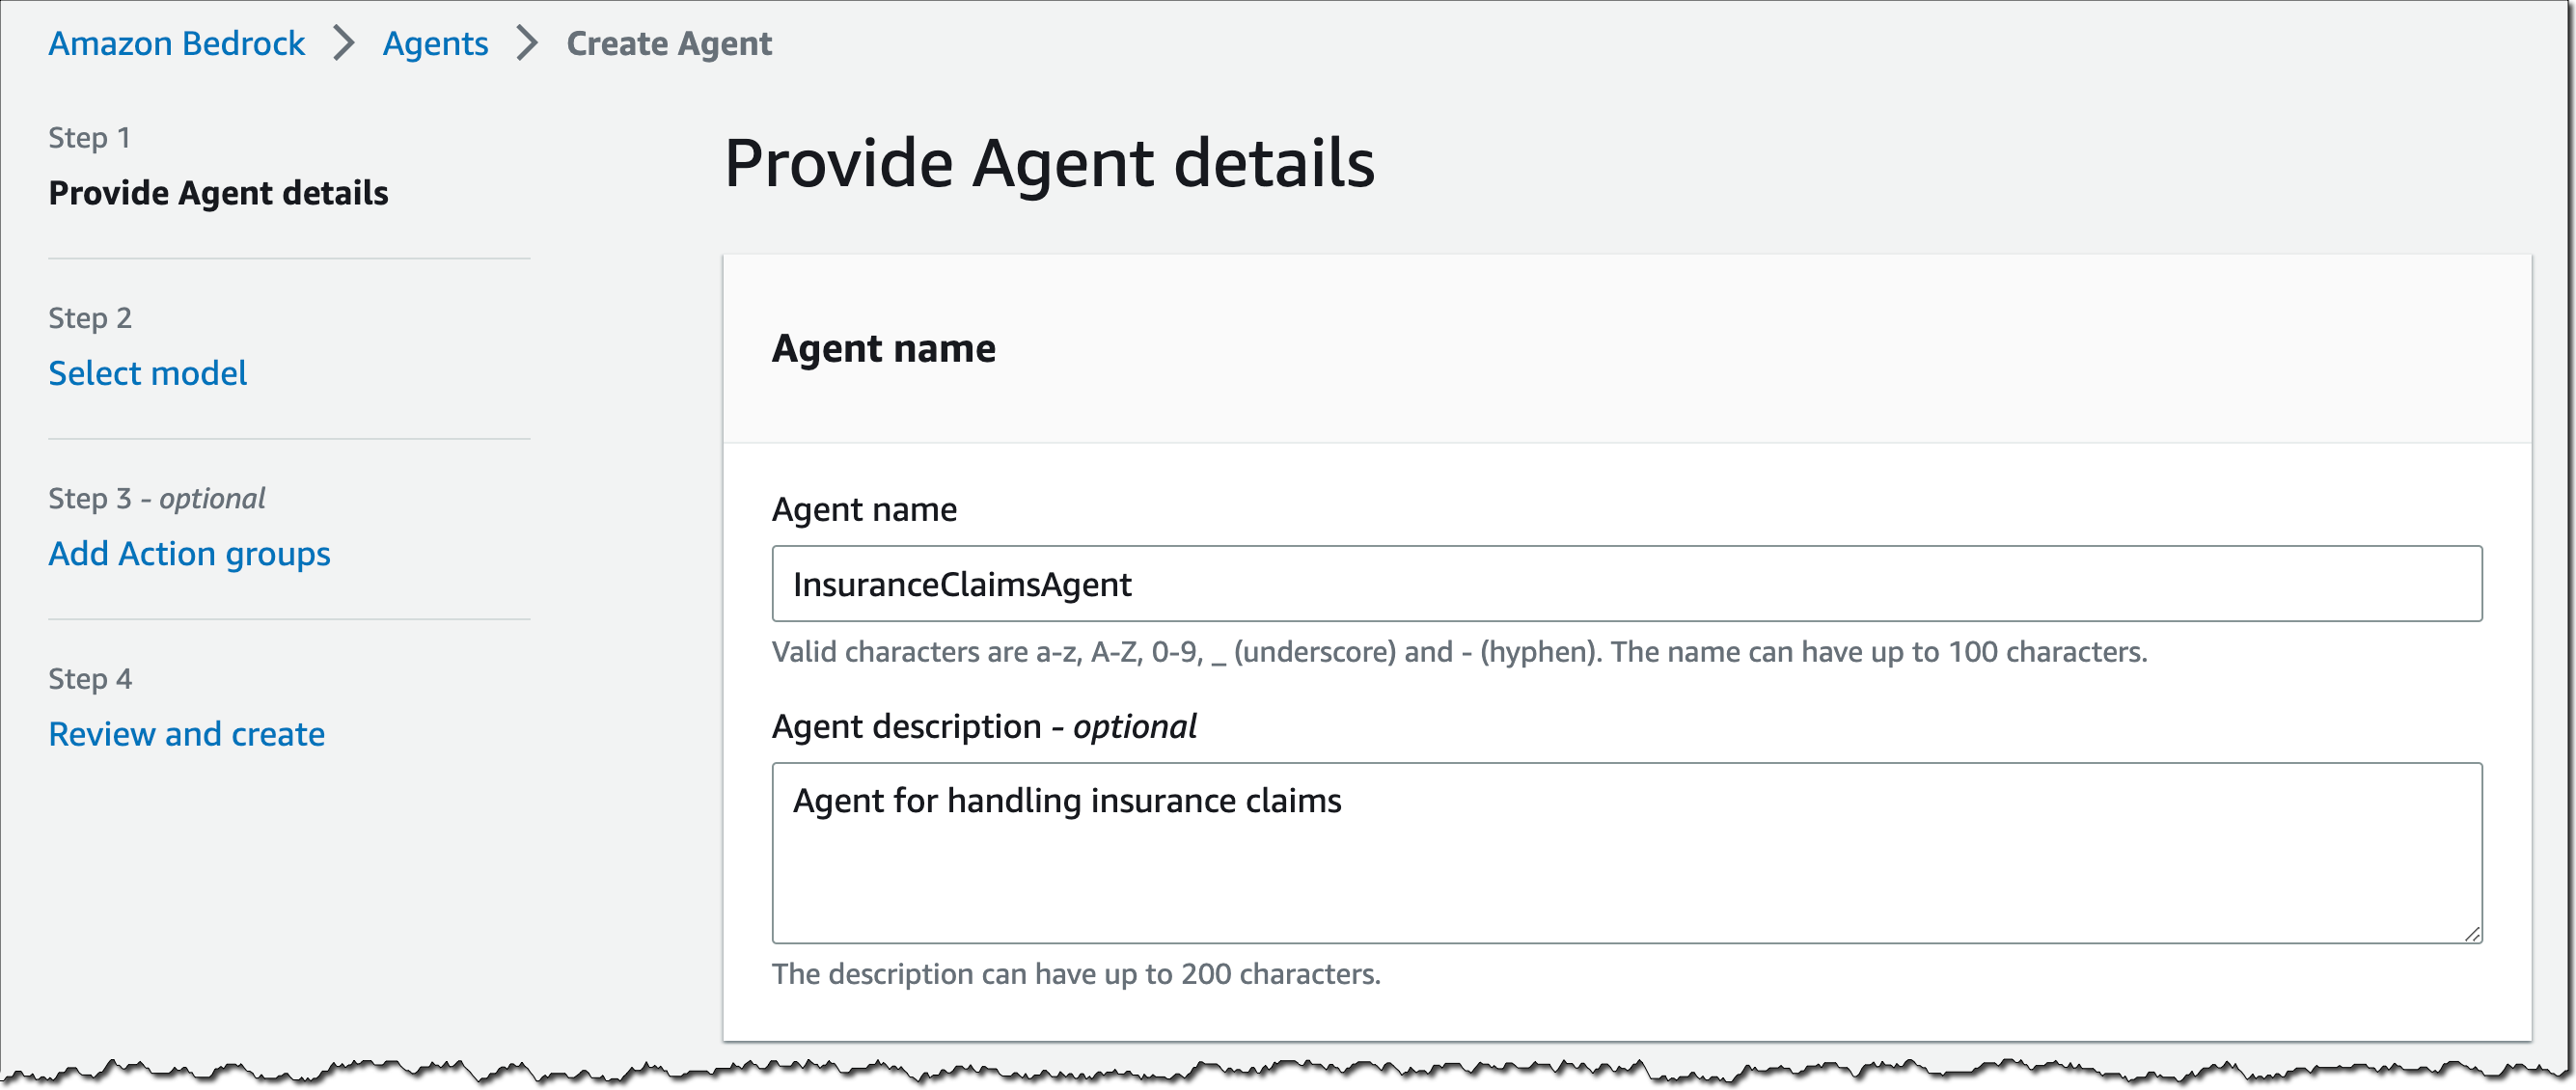
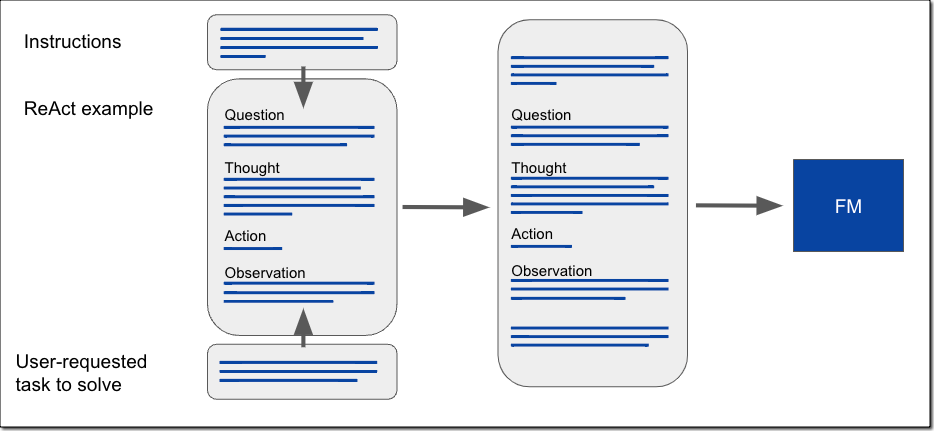
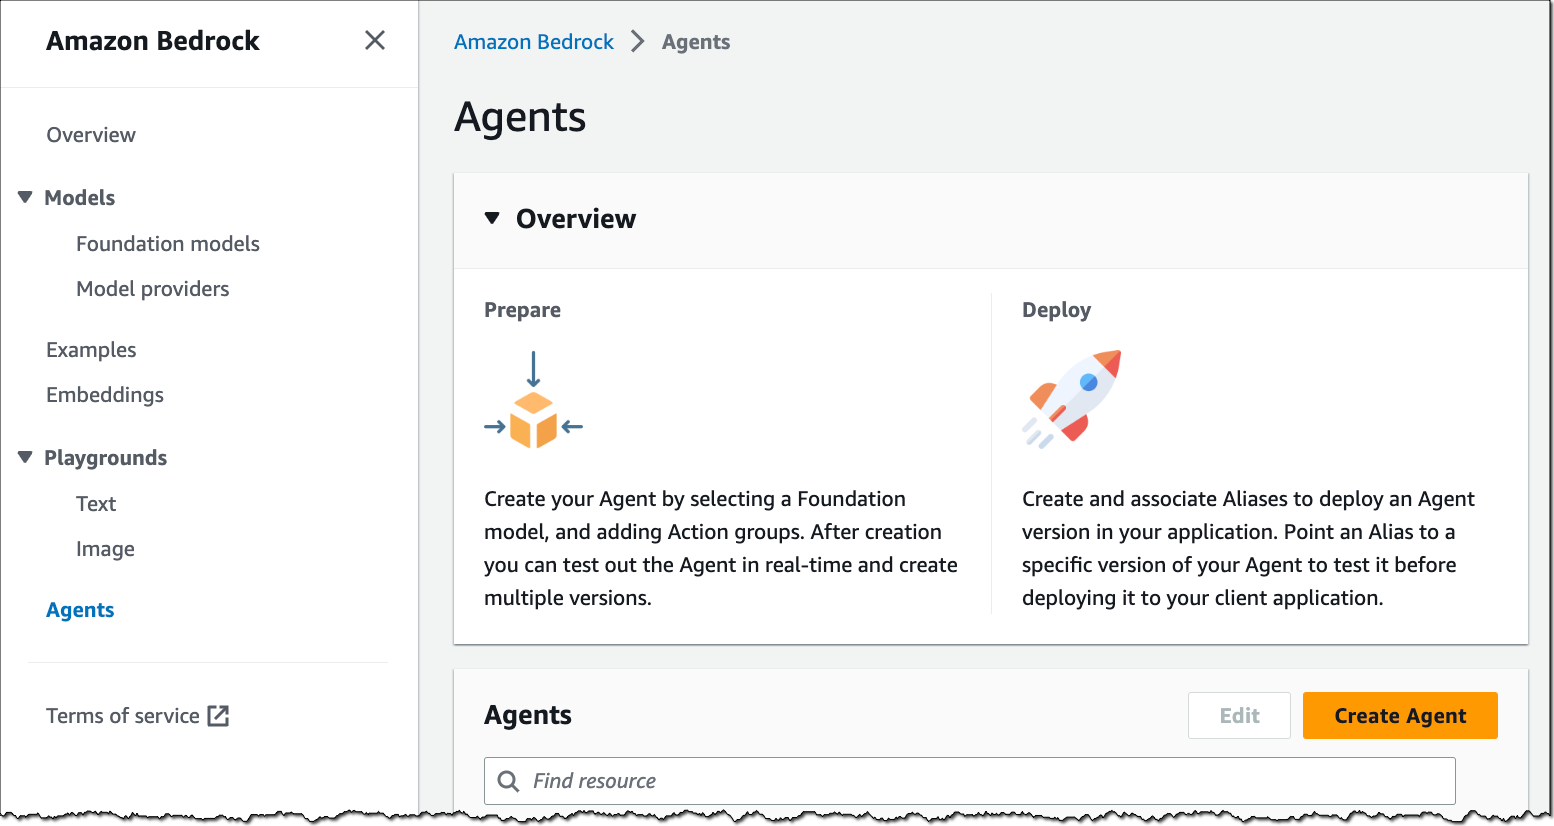


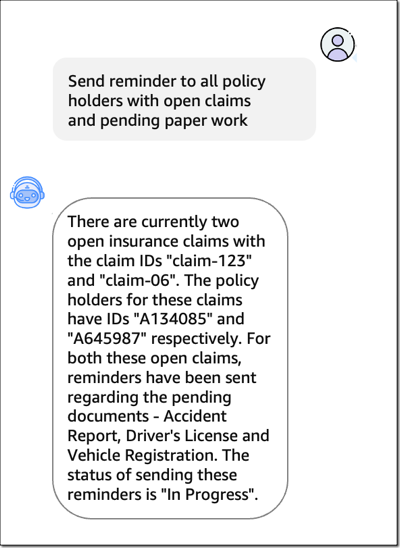








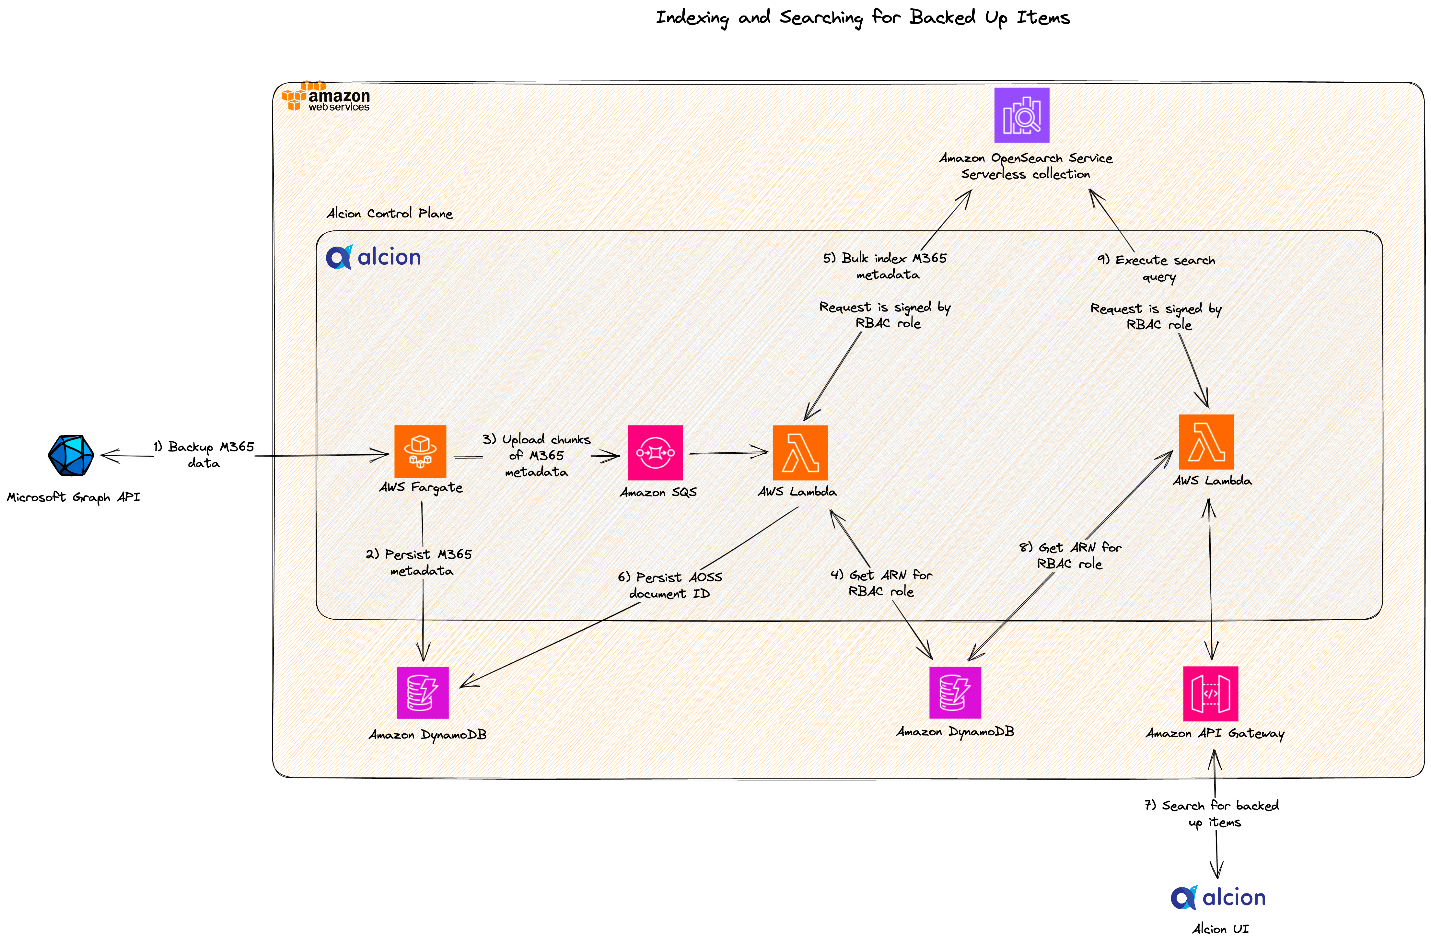
 Zack Rossman is a Member of Technical Staff at Alcion. He is the tech lead for the search and AI platforms. Prior to Alcion, Zack was a Senior Software Engineer at Okta, developing core workforce identity and access management products for the Directories team.
 Niraj Jetly is a Software Development Manager for Amazon OpenSearch Serverless. Niraj leads several data plane teams responsible for launching Amazon OpenSearch Serverless. Prior to AWS, Niraj led several product and engineering teams as CTO, VP of Engineering, and Head of Product Management for over 15 years. Niraj is a recipient of over 15 innovation awards, including being named CIO of the year in 2014 and top 100 CIO in 2013 and 2016. A frequent speaker at several conferences, he has been quoted in NPR, WSJ, and The Boston Globe.
 Jon Handler is a Senior Principal Solutions Architect at Amazon Web Services based in Palo Alto, CA. Jon works closely with OpenSearch and Amazon OpenSearch Service, providing help and guidance to a broad range of customers who have search and log analytics workloads that they want to move to the AWS Cloud. Prior to joining AWS, Jon’s career as a software developer included 4 years of coding a large-scale, ecommerce search engine. Jon holds a Bachelor of the Arts from the University of Pennsylvania and a Master of Science and a PhD in Computer Science and Artificial Intelligence from Northwestern University.