Post Syndicated from BeardedTinker original https://www.youtube.com/watch?v=5-xD7Brs6Xc
Asustor ASW205T Review 5-port 2.5GbE Switch
Post Syndicated from Bryan Young original https://www.servethehome.com/asustor-asw205t-review-5-port-2-5gbe-switch/
The Asustor ASW205T is a 5-port 2.5GbE switch. In our review, we see the unique feature of this switch compared to others we have tested
The post Asustor ASW205T Review 5-port 2.5GbE Switch appeared first on ServeTheHome.
The Power Behind What We Buy, What We Do, and Who We Want to Be | Marcus Collins | Talks at Google
Post Syndicated from Talks at Google original https://www.youtube.com/watch?v=uXYc3DZRe5s
Бездната се взира в политиците. ГЕРБ&co
Post Syndicated from Емилия Милчева original https://www.toest.bg/bezdnata-se-vzira-v-polititsite-gerb-co/

Нищо не е договорено, докато всичко не е договорено. Лидерът на ГЕРБ Бойко Борисов често употребява тази фраза и наскоро пак повтори европейския принцип. Преговорите за правителство, без да е връчен мандат от президента 33 дни след изборите, продължават. Те все повече заприличват на кампания по надлъгване, за да си прехвърлят Черeн Петър – метафората за политическото себесъхранение, добила популярност при предишната провалена въртележка с мандати.
Но макар ситуацията да изглежда отново безнадеждна, този път политиците ще положат повече усилия да сглобят някакво правителство с кратък срок на годност. Не са забравили съдбата, сполетяла „Има такъв народ“ (ИТН) – партията, която от победител на избори, след провалите с двата си проектокабинета, изпадна от стълбицата на медалистите.
Усещат, че бездната се взира в тях*, но трудно ще намерят желаещи за обречена власт, затова и кабинетът най-вероятно ще е слаб, като за отбиване на номер. След местните избори може да се мисли за друг, с нова конфигурация в зависимост от резултатите и от това доколко е пробит монополът на ГЕРБ в местната власт.
Президентът – от „няма да бави“ към „няма да бърза“
Кога ще връчите първия мандат за съставяне на кабинет (на ГЕРБ–СДС – б.а.), питат журналистите президента Румен Радев при всяка публична изява. За три седмици обаче неговата позиция се превъртя от „няма да бави“ до „няма да бърза“.
49-тото Народно събрание има нужда от време, за да се приемат най-важните закони и решения […] Парламентът не може да си позволи лукса да не приеме критично важни закони, дори и да няма правителство,
каза Радев преди десетина дни.
Има предвид приемането на бюджет за тази година и на законите, необходими за втория транш от 724 млн. евро по Плана за възстановяване и устойчивост (ПВУ). Така хем се проявява като загрижен държавник, хем се стреми да осигури комфорт за още едно служебно правителство и неговите разходи. Настоящото на Гълъб Донев разпределя и първия транш от близо 1,4 млрд. евро по ПВУ, получени в края на декември.
Но преди да обсъдят държавния бюджет и бюджетите на държавното обществено осигуряване, НЗОК и на съдебната власт, вече внесени в парламента, политическите сили трябва да определят състава на комисиите и председателите им. Как обаче да го направят, след като не са споделили и разпределили изпълнителната власт? Затова бюджетът чака – и президентът изчаква, а Борисов му пожелава да е жив и здрав, „защото дълго ще управлява и е последното спасение на българите в момента“.
В крайна сметка се намери поредното нестандартно решение – комисиите започват работа с председателите от предходния парламент. Депутатите от „Български възход“ ще бъдат заместени от „Има такъв народ“.
Вече няма как без бюджет
Всички са наясно, че в година на (местни) избори няма как да не бъде приет бюджет. Държавата не може да кара повече с миналогодишния. Ще се раздават 2 милиарда за проекти на общините, бизнесът си чака парите по договорите за строителство, също и болниците. Служебният кабинет е предвидил увеличение от 910 млн. за бюджета на НЗОК, от което над 500 млн. са за лечебните заведения – те ще разполагат с 47% от парите на Касата – 7,027 млрд. лв. за 2023 г.
Първоначално ГЕРБ–СДС и ПП–ДБ се разбраха да постигнат 3% дефицит в бюджета, но не и как – щом като не искат да вдигат данъци, нито пък да премахват данъчни преференции. Но след като няма да бъдат съюзници, остава неясно какво се случва с общите цели – трите процента и законодателната програма. „Джентълменското споразумение“ за ротация на председателското място на 49-тото НС е денонсирано. А точно то даде фалшивите надежди, че е възможен кабинет – въпреки обета на ПП–ДБ, че няма да участва или да подкрепи правителство на ГЕРБ. До обща управленска програма така и не се стигна, затова пък всяка от коалициите осмя и иронизира тази на конкурента – било заради екселските таблици, било заради плавателния канал Русе–Варна, проект от времето на социализма.
Манежен тръс
Макар да повтарят, че като победители в изборите ГЕРБ носят отговорността да предложат кабинет, ПП–ДБ все пак избързаха и представиха първо своя, след като Борисов го поиска с аргумента да преценят могат ли да го подкрепят. Няма как. От „Промяната“ отхвърлиха възможността съставът му да бъде предоговорен. В проектоправителството блестят знакови лица на „Промяната“ – Асен Василев (другият съпредседател Кирил Петков публично заяви, че се отказва), Николай Денков и Даниел Лорер, както и други от парламентарната група, и недотам познати лица от втория ешелон на „Демократична България“.
Партньорът на „Промяната“ демонстрира резигнация и към преговорите, и към селекцията за правителство, независимо от публичните уверения, че всичко в коалицията е наред. Разлом преди местните избори обаче не е възможен. На тях ПП–ДБ се надяват на пробив в София и в още няколко големи града, дълго управлявани от ГЕРБ, и да са в опозиция при евентуален кабинет на ГЕРБ–СДС ще им е от полза за кампанията.
Борисов им обърна гръб след провала на преговорите и показа вариации на план Б: правителство на малцинството или пък споделено от ГЕРБ с други партии в 49-тия парламент (ДПС, БСП, ИТН). Вариантът е да излъчат министри, но без да има коалиционно споразумение с тях, за да не сбъдне „мокрите сънища на ПП–ДБ“. От преговорите дотук ГЕРБ имат най-големи сходства във възгледите с ДПС. „Възраждане“, разбира се, отказаха, за да не последват печалната безславна участ на всички предишни националисти партньори на Бойко Борисов – „Атака“, РЗС, НФСБ, „Воля“, ВМРО. Обаче бяха констатирани сходства между прокремълската формация и евроатлантиците от ГЕРБ в енергетиката и… правосъдната реформа.
В края на деня, в който Борисов се срещна и разговаря с останалите политически сили, от „Продължаваме промяната“ поискаха разговор с ГЕРБ по управленската програма, което, разбира се, е само повод. Даниел Лорер даде най-дипломатичната формулировка:
Имаше голяма доза емоции при обявяването на състава на кабинета на акад. Денков. Това, че обявихме толкова рано, го отчитам като грешка, и то преди да бъде финализирана програмата… Има много голямо сходство между програмите на ПП–ДБ и ГЕРБ–СДС. Гласовете на ГЕРБ ще са ключови при приемане на състава на правителство с втория мандат.
Но на следващата сутрин никой отново не помръдна от позициите си – партията на Борисов настоява за кабинет с първия мандат, коалицията ПП–ДБ държи на правителство с втория.
В крайна сметка всички искат да се покажат конструктивни. Борисов е в новия си образ на диалогичен и разумен политик с опит, който прави всичко в името на стабилността. Кирил Петков и Асен Василев пък са политици, ненарушаващи принципите си и идентичността си на анти-ГЕРБ борци, честни към избирателите си.
Подготвя се нов кръг преговори.
Но бездната се взира във всички политици.
*Перифраза на ницшеанското „Ако твърде дълго се взираш в бездната, бездната започва да се взира в теб.“
Трансгранично партньорство CNN-Румъния сътрудничи с Биволъ за отразяването на атентата срещу Гешев
Post Syndicated from Николай Марченко original https://bivol.bg/cnn-romania-geshev.html
петък 5 май 2023

Водещата румънска новинарска телевизия Antena 3 – CNN (Букурещ) и специалният й пратеник Кристи Попович се базираха на коментарите и разследванията на “Биволъ” при отразяването си от София на атентата…
[$] The end of the accounting search
Post Syndicated from original https://lwn.net/Articles/925782/
Some things, it seems, just cannot be hurried. Back in 2007, your editor
first started considering alternatives to
the proprietary accounting system that had been used by LWN since the
beginning. That search became more urgent
in 2012, and returned in 2017 with a
focused effort to find something better. But another five years
passed before some sort of conclusion was reached. It has finally happened,
though; LWN is no longer using proprietary software for its accounting
needs.
Web Summit Rio 2023: Building an app in 18 minutes with GitHub Copilot X
Post Syndicated from Thomas Dohmke original https://github.blog/2023-05-05-web-summit-rio-2023-building-an-app-in-18-minutes-with-github-copilot-x/
| Missed GitHub CEO Thomas Dohmke’s Web Summit Rio 2023 talk? Read his remarks and get caught up on everything GitHub Copilot X. |
Hello, Rio! I’m Thomas, and I’m a developer. I’ve been looking forward to this for some time, about a year. When I first planned this talk, I wanted to talk about the future of artificial intelligence and applications. But then I thought, why not show you the full power live on stage. Build something with code.
I’ve been a developer my entire adult life. I’ve been coding since 1989. But as CEO, I haven’t been able to light up my contribution graph in a while. Like all of you, like every developer, my energy, my creativity every day is finite. And all the distractions of life—from the personal to the professional—from morning to night, gradually zaps my creative energy.
When I wake up, I’m at my most creative and sometimes I have a big, light bulb idea. But as soon as the coffee is poured, the distractions start. Slack messages and emails flood in. I have to review a document before a customer presentation. And then I hear my kids yell as their football flew over the fence. And, of course, they want me to go over to our neighbors’ and get it.
Then…I sit back down, I am in wall-to-wall meetings. And by the time the sun comes down, that idea I had in the morning—it’s gone! It’s midnight and I can’t even keep my eyes open. To be honest, in all this, I usually don’t even want to get started because the perception of having to do all the mundane tasks, all the boilerplate work that comes with coding, stops me in my tracks. And I know this is true for so many developers.
The point is: boilerplate sucks! All busywork in life, but especially repetitive work is a barrier between us and what we want to achieve. Every day, building endless boilerplate prevents developers from creating a new idea that will change the world. But with AI, these barriers are about to be shattered.
@ashtom just created and deployed a snake game using GitHub Copilot in 15 minutes
“The point is: Boilerplate sucks. It is just the barrier between us and what we want to achieve.” pic.twitter.com/FDzAb4fPjA
— Art Yavorsky
(@yavorsky_) May 3, 2023

 (@yavorsky_)
You’ve likely seen the memes about the 10x developer. It’s a common internet joke—people have claimed the 10x developer many times. With GitHub Copilot and now Copilot X, it’s time for us to redefine this! It isn’t that developers need to strive to be 10x, it’s that every developer deserves to be made 10 times more productive. With AI at every step, we will truly create without captivity. With AI at every step, we will realize the 10x developer.
Imagine: 10 days of work, done in one day. 10 hours of work, done in one hour. 10 minutes of work, done with a single prompt command. This will allow us to amplify our truest self-expression. It will help a new generation of developers learn and build as fast as their minds. And because of this, we’ll emerge into a new spring of digital creativity, where every light bulb idea we have when we open our eyes for the day can be fully realized no matter what life throws at us.

This morning I woke up, and I wanted to build something. I wanted to build my own snake game, originally created back in 1976. It’s a classic. So, 15 minutes are left on my timer. And I’m going to build this snake game. Let’s bring up Copilot X and get going!
See how you can 10x your developer superpowers. Discover GitHub Copilot X.
Congratulations to @ashtom CEO of @github , for his fantastic presentation at #WebSummitRio showcasing the amazing capabilities of #GitHubCopilot. It's rare to see a CEO with such technical prowess, building a functional app and even a snake game live in just 18 minutes.
— Kamila Paschoal (@PaschoalKamila) May 3, 2023
Comic for 2023.05.05 – Married
Post Syndicated from Explosm.net original https://explosm.net/comics/married
New Cyanide and Happiness Comic
Security updates for Friday
Post Syndicated from original https://lwn.net/Articles/931050/
Security updates have been issued by Debian (chromium, evolution, and odoo), Fedora (java-11-openjdk), Oracle (samba), Red Hat (libreswan and samba), Slackware (libssh), SUSE (amazon-ssm-agent, apache2-mod_auth_openidc, cmark, containerd, editorconfig-core-c, ffmpeg, go1.20, harfbuzz, helm, java-11-openjdk, java-1_8_0-ibm, liblouis, podman, and vim), and Ubuntu (linux-aws, linux-aws-hwe, linux-intel-iotg, and linux-oem-6.1).
Why I’m Not So Alarmed About AI And Jobs
Post Syndicated from Bozho original https://techblog.bozho.net/why-im-not-so-alarmed-about-ai-and-jobs/
With the advances in large language models (e.g. ChatGPT), referred to as AI, concerns are rising about a sweeping loss of jobs because of the new tools. Some claim jobs will be completely replaced, others claim that jobs will be cut because of a significant increase in efficiency. Labour parties and unions are organizing conferences about the future of jobs, universal basic income, etc.
These concerns are valid and these debates should be held. I’m addressing this post to the more extreme alarmists and not trying to diminish the rapid changes that these technological advances are bringing. We have to think about regulations, ethical AI and safeguards. And the recent advances are pushing us in that direction, which is good.
But in technology we often live the phrase “when you have a hammer, everything looks like a nail”. The blockchain revolution didn’t happen, and so I think we are a bit more eager than warranted about the recent advances in AI. Let me address three aspects:
First – automation. The claim is, AI will swiftly automate a lot of jobs and many people with fall out of the labour market. The reality is that GPT/LLMs should be integrated in existing business processes. If regular automation hasn’t already killed those jobs, AI won’t do it so quickly. If an organization doesn’t use automation already for boilerplate tasks, it won’t overnight automate them with AI. Let me remind you that RPA (Robotic process automation) solutions have been advertised as AI. They really “kill” jobs in the enterprise. They’ve been around for nearly two decades and we haven’t heard a large alarmed choir about RPA. I’m aware there is a significant difference in LLMs and RPA, but the idea that a piece of technology will swiftly lead to staff reduction across industries is not something I agree with.
Second – efficiency. Especially in software development, where products like Copilot are already production-ready, it seems that with the increase of efficiency, there may be staff reduction. But if a piece of software used to be built for 6 months before AI, it will be built for, say, 3 months with AI. Note that code writing speed is not the only aspect of software development – other overhead and blockers will continue to exist – requirement clarifications, customer feedback, architecture decisions, operational and scalability issues, etc., so increase in efficiency is unlikely to be orders of magnitude. AT the same time, there is a shortage of software developers. With the advances of AI, there will be less of a shortage, meaning more software can be built within the same timeframe.
For outsourcing this means that the price per hour or per finished product may increase because of AI (speed is also a factor in pricing). A company will be able to service more customers for a given time. And there’s certainly a lot of demand for digital transformation. For product companies this increase in efficiency will mean faster time-to-market for the product and new features. Which will make product companies more competitive. In both cases, AI is unlikely to kills jobs in the near future.
Sure, ChatGPT can write a website. You can create a free website with site-builders even today. And this hasn’t killed web developers. It just makes the easiest websites cheaper. By the way, building software once and maintaining it are completely different things. Even if ChatGPT can build a website, maintenance is going to be tough through prompts.
At the same time, AI will put more intellectual pressure on junior developers, who are typically given the boilerplate work, which is going to be more automatable. But on the other hand AI will improve the training process of those junior developers. Companies may have to put more effort in training developers, and career paths may have to be adjusted, but it’s unlikely that the demand for software developers will drop.
Third, there is a claim that generative AI will kill jobs in the creative professions. Ever since I wrote an algorthmic music generator, I’ve been saying that it will not. Sure, composers of elevator music will be eventually gone. But poets, for example, won’t. ChatGPT is rather bad at poetry. It can’t actually write proper poetry. It seems to know just the AABB rhyme scheme, it ignores instructions on meter (“use dactylic tetrameter” doesn’t seem to mean anything to it). With image and video generation, the problem with unrealistic hands and fingers (and similar ones) doesn’t seem to be going away with larger models (even though the latest version of Midjourney is neatly going around it). It will certainly require post-editing. Will it make certain industries more efficient? Yes, which will allow them to produce more content for a given time. Will there be enough demand? I can’t say. The market will decide.
LLMs and AI will be change things. It will improve efficiency. It will disrupt some industries. And we have to debate this. But we still have time.
The post Why I’m Not So Alarmed About AI And Jobs appeared first on Bozho's tech blog.
Кадри от непрочетената Норвегия
Post Syndicated from Стела Джелепова original https://www.toest.bg/kadri-ot-neprochetenata-norvegiya/

В последното десетилетие често говорим за бум на норвежката и изобщо на скандинавската литература в България. Пропускаме обаче да отбележим, че бумът е в рамките на един-единствен жанр – т.нар. nordic noir. Схемата е ясна: циничен, но брилянтен детектив на средна възраст, обикновено депресиран, алкохолизиран, разведен и с отчуждена дъщеря (или две), разрешава поредица зловещи престъпления, зад които прозира уж истинското лице на скандинавското общество – всичко това на фона на мрачно време, сурови пейзажи и като цяло отчайващо съществуване.
Качеството варира, сюжетите – не особено, но пък заплетената фабула, семейните драми и простичкият език (нека го наречем „пестелив“) се оказват достатъчни да спечелят на тези книги толкова голяма популярност, че да изтикат на задните редове в книжарниците и на дъното на списъците на литературните агенти всяка друга скандинавска продукция.
А такава има. Романи, пиеси, поезия, детски книги –
скандинавските автори се изявяват навсякъде и са високоценени по цял свят.
В България също не липсват изпипани издания на немалко от сериозните произведения, но те не се радват на гласовита реклама и достигат до твърде ограничена публика – всъщност дори по-ограничена, отколкото е обичайно за високата литература от например англоезичните или испаноезичните страни.
За разлика от правените по калъп криминалета, при които трудно можеш да различиш шведските от норвежките, датските, финландските, исландските, че дори и фарьорските автори, по-съдържателната литература е едновременно универсална и силно представителна за собствената си култура. Ето защо вместо да поставя под общ знаменател няколко твърде специфични страни, тук предпочетох да се спра единствено на три творби от Норвегия, които заслужават най-после да стигнат и до българския читател.
Кнут Хамсун, „По обраслите с трева пътеки“
В края на 30-те години на миналия век Кнут Хамсун (ако трябва да сме точни, Кнют Хамсюн) е гордостта на норвежкия народ – баща на модерния роман, пионер в психологическата литература, носител на Нобелова награда, вдъхновение за писатели като Томас Ман, Франц Кафка, Стефан Цвайг, Ърнест Хемингуей.
Само няколко години по-късно, през 1945-а, същият този любимец на цяла Норвегия е арестуван, вкаран в лудница и изправен пред съда. Сънародниците му го заклеймяват и настояват за смъртна присъда, книгите му изчезват от книжарниците. Причината е, че по време на войната, вече много възрастен, усамотен в имението си и донякъде загубил връзка със света, той открито заявява подкрепата си за Германия. Предполага се, че основна роля за това играе съпругата му, яростна защитничка на нацизма, а той самият не е съвсем наясно какво се върши нито в Европа, нито в окупирана Норвегия.
И така, докато е под полицейски надзор, вече 90-годишен, Хамсун пише последната си книга – „По обраслите с трева пътеки“ (1949). Тя е отчасти роман, отчасти памфлет, дневник от тези тежки години, апология на един човек на преклонна възраст и до голяма степен протест срещу заключението на съда, че „умствените му способности са трайно намалени“.
За разлика от немалко други книги на Кнут Хамсун, „По обраслите с трева пътеки“ така и не излиза на български – нито в превод от норвежки, нито през друг език. Тя обаче е централна за неговото творчество: в нея, напълно неочаквано за този късен период, се пробужда духът от ранните му романи, изпълнени с
преклонение пред природата, абсурдистки хумор и смели полети на фантазията, при които границите между реалност и фикция се размиват.
Това може да не е идеалната книга, с която да се срещнеш за първи път с Хамсун, но българският читател има достъп до неговото творчество вече повече от век¹ и липсата ѝ в преводната ни литература е осезаема. Нещо повече, днес тази книга е особено актуална. Разкрива ни мислите на човек с огромен интелект и забележителен принос към световната култура, който по една или друга причина е избрал грешната страна в огромен цивилизационен конфликт и е платил за това.
Туре Ренберг, „Толак на Ингеборг“
Отново със старец, изгубил връзка с времето, в което живее, се срещаме в този кратък нов роман. Туре Ренберг е един от младите гласове в норвежката литература. Известен е с ярките си портрети на обикновени и необикновени хора и преди всичко на норвежки мъже.
Старият мелничар Толак е изпълнен с ярост към света, който вече е неразбираем за него, към децата си, които са избрали града пред семейството, към съседите, които тормозят храненика му – местния идиот Уду, и които отдавна са престанали да възприемат самия Толак като отделна личност, а гледат на него единствено като на някакъв придатък към жена му Ингеборг. Затова и за тях той е единствено „Толак на Ингеборг“. Но Ингеборг е изчезнала безследно преди години, Толак е съвсем сам с Уду, смъртта му наближава и той заставя сина си и дъщеря си да се върнат у дома за последен път, за да сподели с тях голяма тайна.
Романът „Толак на Ингеборг“ е продължител на една дълга норвежка традиция за герои аутсайдери,
живеещи незначителния си живот някъде накрай света, жертва на тесногръдието на околните, но и самите те недотам приятни и будещи съчувствие. На български имаме възможност да четем най-забележителния предшественик на Туре Ренберг, който също като него пише на нюноршк (втория официален писмен език в Норвегия) – Таряй Весос.
С наболялата тема за човека от отиващия си някогашен свят, който не може да намери мястото си в днешния и му остава единствено да се съпротивлява, яростно и до смърт (не задължително своята), романът на Ренберг определено би намерил място на рафтовете в българските книжарници и в домашните ни библиотеки.
Йойвин Римберай, „Соларис, коригиран“
При публикуването си през 2004 г. поемата „Соларис, коригиран“ предизвиква същински фурор и е обявена за
една от най-оригиналните творби на столетието, включена в класацията на 25-те най-велики норвежки произведения на всички времена.
Представлява драматичен монолог от 800 стиха, в който героят е механик в роботизиран град на дъното на морето край някогашните нефтени платформи. Годината е 2480-а и той живее във високотехнологично общество, белязано от класови различия и контролирано от частна корпорация. Земята, съсипана от екологични катастрофи, е станала необитаема. Необичайно за научната фантастика, героят не е нито бунтар, нито забележителен ум, а прост работник с ясни и конкретни мечти за спокоен живот.
Оригиналността на поемата обаче идва не толкова от историята, колкото от езика. Римберай конструира свой собствен, основан на диалекта на родния му град Ставангер („нефтената столица на Норвегия“), комбиниран с елементи от староскандинавски, датски, нидерландски, английски и шотландски германски – тоест езиците на всички страни с участие в нефтената индустрия на Северна Европа.
Всъщност Римберай създава един бъдещ език на постиндустриалното население по бреговете на Северно море. Препратките са както към хибридния говор, използван от работниците на първите норвежки нефтени платформи, така и към изменящия се под влиянието на интернет книжовен норвежки от началото на ХХI век, а и на т.нар. евроанглийски, говорен от работещите в институциите на Европейския съюз по същото време.
Поемата „Соларис, коригиран“ е преведена на няколко езика, сред тях английски и нидерландски. Интересно би било да я видим на български – както за да имаме достъп на роден език до едно от най-оригиналните произведения на този век, така и от любопитство какъв подход ще избере евентуалният преводач.
¹ Преводи през руски, немски и френски се появяват още в края на XIX в., а първият превод директно от норвежки идва през 1992 г., дело на Антония Бучуковска. Най-сериозният пропуск в представянето на Хамсуновото творчество в България, освен „По обраслите с трева пътеки“, остава липсата на превод от оригинала на епичния му роман „Благодатта на земята“, за който получава Нобелова награда.
Two Wrecks: USS Abner Read
Post Syndicated from The History Guy: History Deserves to Be Remembered original https://www.youtube.com/watch?v=tJZNFPcdMNs
Статукво на ръба
Post Syndicated from Александър Нуцов original https://www.toest.bg/statukvo-na-ruba/

Ескалацията на напрежението в Судан разруши крехкия политически баланс в страната и обезпокои международната общност. Раздираната от конфликти северноафриканска страна рискува да се превърне в арена на широкомащабна гражданска война. По различни данни, боевете между суданските въоръжени сили Sudanese Armed Forces (SAF) и паравоенната милиция Rapid Support Forces (RSF) до този момент са отнели живота на стотици души.
По оценка на ООН обаче реалният брой на жертвите вероятно е много по-висок. Хаосът е съпътстван от хуманитарна криза, като голяма част от населението в столицата Хартум и други градове няма достъп до електричество и вода. Има недостиг на хранителни продукти и пособия за нормалното функциониране на болници и други социални учреждения. Цените на храни и продукти от първа необходимост достигат екстремни стойности, а мародерството и плячкосванията допълват общата картина. Нараства броят на вътрешно разселените хора, както и на онези, които търсят сигурно убежище в съседни страни, като Чад, Централноафриканската република, Южен Судан, Египет и Етиопия.
Генерали, милиции и опозиции
Непосредствените актьори са редовната армия на Судан (SAF) начело с генерал Абдел Фатах ал-Бурхан и паравоенната милиция (RSF) под командването на генерал Мохамед Хамдан Дагало, познат като Хемедти. Макар и доскоро неизвестен за широката публика, Ал-Бурхан има сериозен военен опит и през годините се изкачва в йерархията на суданската армия до позицията на един от най-влиятелните генерали. Участва в гражданската война в Дарфур, преминава през различни военни постове и е повишен в генерал-инспектор на суданската армия. Надзирава и разгръщането на суданските сили в подкрепа на ръководената от Саудитска Арабия коалиция срещу бунтовниците в Йемен.
За разлика от Ал-Бурхан, който произхожда от влиятелните кръгове в Хартум, Хемедти е родом от Дарфур и има много по-голямо влияние в суданската периферия. В миналото ръководи паравоенната организация „Джанджауид“, известна с извършените зверства срещу цивилното население в Дарфур. Отцепници от нея формират ядрото и на създадената през 2013 г. организация RSF начело с Хемедти. Тя също се слави с лошо име след обвиненията за извършени военни престъпления и престъпления срещу човечеството в Дарфур и Йемен. Хемедти затвърждава позицията си на една от най-влиятелните фигури в Судан през 2017 г., когато използва RSF, за да поеме контрола върху търговията със злато – най-големия експортен бизнес в страната.
Друг ключов, макар и косвен актьор е разнородната по състав коалиция „Сили за свобода и промяна“ – Forces for Freedom and Change (FFC), съставена от опозиционни политически партии, граждански организации, активисти, профсъюзи и бивши бунтовнически групи. Тя се превръща в двигател на протестите срещу бившия президент Омар ал-Башир. FFC е широкоспектърна цивилна опозиция – контрапункт на военните и на влиянието им върху властовите структури, както и на опитите за налагане на ислямистка, недемократична управленска идеология. Участниците в коалицията са различни по произход, профил и идеология. Като главен инициатор за въвеждане на цивилно управление FFC влияе значително върху отношенията между Ал-Бурхан и Хемедти и върху динамиката на политическите отношения в Судан.
Крехка споделена власт
През 2019 г. дългогодишният президент на Судан Омар ал-Башир е свален от власт след най-масовите граждански протести в новата история на страната. Суданците излизат на улицата заради тежките условия на живот, окаяното състояние на икономиката и непосилната инфлация. Ал-Башир произлиза от военните кръгове и след успешен преврат завзема властта през 1989 г. Той е лидер на ислямистката, проарабска политическа формация National Congress Party, управлява по авторитарен модел и затвърждава политико-икономическото влияние на арабските елити. Международният наказателен съд го обвинява в престъпления срещу човечеството и във военни престъпления, извършени по време на войната в Дарфур, въпреки че Судан не е страна по Римския статут.
През април 2019 г. FFC засилва протестния натиск върху Ал-Башир и срещу него се обръщат службите за сигурност, генералите от армията и RSF. Президентът е отстранен на 11 април, с което започва дългото противоборство между цивилните и военните кръгове относно бъдещия модел на управление. Освен кой ще управлява, за враждуващите страни от изключителна важност е как ще се извърши преходът от диктатура към демократична, цивилна форма на управление, каква ще е структурата на армията и службите, каква ще е системата на съдебната власт, доколко военните ще бъде ограничени и подчинени на цивилното правителство и т.н. Военната хунта създава Преходен военен съвет с председател Ал-Бурхан и зам.-председател Хемедти и инициира преговори с FFC.
Предвижда се създаване на преходно правителство с тригодишен мандат до провеждане на избори, законодателно тяло и т.нар. Суверенен съвет с контролни функции върху преходния процес. Според анализ на International Crisis Group споразумението пропада заради разрив сред военните. Това води до поредица от граждански протести, брутално потушени от армията и паравоенните. След нови масови демонстрации и силен международен натиск военните и цивилната опозиция възобновяват преговорите и сключват политическо и конституционно споразумение. Ал-Бурхан и Хемедти са назначени за председател и зам.-председател на Суверенния съвет, а за министър-председател на преходното правителство е избран видният судански икономист Абдала Хамдок. Преходният период трябва да приключи с провеждането на свободни избори 39 месеца след споразумението, подписано на 17 август 2019 г.
На 25 октомври 2021 г. крехкият модел на споделена власт между военните и цивилната опозиция става жертва на нов преврат. Военните свалят Хамдок от власт и арестуват част от министрите и видни представители на цивилните кръгове. В отговор следват нови масови протести, които принуждават Ал-Бурхан да подпише споразумение и да реабилитира Хамдок на премиерския пост. Той обаче подава оставка в началото на 2022 г. заради огромното влияние на армията върху управленските структури, с което военните затвърждават надмощието си в управлението на страната. Статуквото трае до декември, когато Ал-Бурхан, Хемедти и FFC приемат рамково споразумение за създаване на преходно правителство, което да проведе избори и да положи основите на бъдещата цивилна власт.
Колониалното наследство и пътят на реформите
Кое доведе до избухването на въоръжени действия между двамата най-влиятелни генерали няколко месеца след подписването на споразумението? Отговорът се крие в съдържанието на споразумението, което засилва обществените разделения. Първо, преговорната рамка изключва от дебата важни обществени групи – такива например са т.нар. Комитети за съпротива (Resistance Committees), които са твърди застъпници за демокрация, играят ключова роля за организацията на протестите и се обявяват против споразумението и преговорите с военната хунта. Това води до разрив в цивилната опозиция и дистанциране на част от водещите ѝ елементи.
Вторият разрив е между цивилната опозиция и военните по отношение на достъпа до съдебната власт и състава и структурата на институциите за сигурност. Докато Комитетите за съпротива и протестиращите граждани настояват за строго правосъдие спрямо висшите генерали, отговорни за зверствата и престъпленията срещу цивилното население, Ал-Бурхан и Хемедти трудно биха предали контрола върху съдебните органи и службите на независимо правителство. След свалянето на Ал-Башир през 2019 г. страховете от подобен развой съпътстват действията им. Затова подчиняването на армията и службите за сигурност на едно демократично избрано правителство би било трудно осъществимо, без Ал-Бурхан и/или Хемедти да получат водещи постове в сектора и да запазят влиянието си.
Третият разрив е между оглавяваната от Ал-Бурхан редовна суданска армия (SAF) и ръководените от Хемедти паравоенни сили (RSF). Основният проблем се крие в заложената в споразумението реформа, според която RSF трябва да се интегрира в редовната суданска армия. Спорните въпроси тук са три: какъв да е преходният период за извършване на интеграцията, как да се осъществи и кой ще води командването на военните сили по време на интеграционния процес и след приключването му.
С други думи, от реформата зависят бъдещите отношения между Ал-Бурхан и Хемедти – тоест достъпът им до властови, политически, икономически и военни ресурси. Рамковото споразумение обаче не постановява конкретен времеви хоризонт и структура на бъдещото командване. Според последния анализ на International Crisis Group Хемедти и FFC настояват за десетгодишен период на интеграция, докато Ал-Бурхан се застъпва за двугодишна рамка, за да възпре нарастващата мощ на RSF в дългосрочен план. Борбата за надмощие между Ал-Бурхан и Хемедти е сред водещите причини за избухването на конфликта.
Друг важен фактор според доклада е вътрешният натиск върху Ал-Бурхан от армейски генерали, които са против всякакви отстъпки пред Хемедти. Това води до четвърти разрив – между хардлайнерите и умерените крила в армията. Тази вътрешна динамика не е маловажна, защото ограничава възможните ходове на Ал-Бурхан и влияе върху вземането на крайни решения.
Раздорът между Ал-Бурхан и Хемедти назрява в продължение на няколко години. Недоверието между двамата генерали и динамичната конюнктура карат Хемедти да се дистанцира в публични изяви, позиционирайки се като радетел за демокрация и цивилно управление. Така той противопоставя своя образ на този на Ал-Бурхан, който се свързва с авторитарното минало, както и с ислямистките кръгове около бившия президент Омар ал-Башир. От това следва да спечели поне частично доверието на цивилната опозиция и международните актьори. И Хемедти, и Ал-Бурхан обаче трудно ще получат индулгенция от гражданите заради извършените престъпления.
Дълбоките структурни предпоставки за конфликта са свързани с колониалното наследство на Судан – властови, икономически и социални неравенства, които маргинализират големи обществени групи от политическия и икономическия живот на страната. Разломът между столицата Хартум (и централната част на Судан) и суданската периферия по отношение на инфраструктурата и икономическото развитие, както и съсредоточаването на властови ресурси в ръцете на малобройните арабски елити създават нужните условия за нестихващите конфликти след обявяването на суданската независимост през 1956 г.
Опростенческите разделения на расов и религиозен принцип – например между арабския ислямски Север и африканския християнски Юг (преди отцепването на Южен Судан като самостоятелна държава) – не обясняват същността на конфликтите. Етническите, религиозни и племенни разделения не причиняват конфликтите сами по себе си, а ги катализират. Те се използват от различни актьори за мобилизация и консолидация на сили в борбата си за власт, ресурси и влияние.
В този смисъл бившият президент Омар ал-Башир утвърди практиката паравоенни проправителствени милиции като RSF и „Джанджауид“ да бъдат използвани за потушаване на многобройните бунтовнически въстания в периферията. Подходът му доведе до сегашните структурни предизвикателства, защото подобни военни образувания придобиват мощ и ресурси, които им позволяват да се конкурират със силите на редовната армия. Това създава пречки пред евентуалната интеграция на паравоенните в редиците на армията и води до сблъсък на интереси.
За да се върви към устойчив мир, рискът от нова пълномащабна и продължителна гражданска война трябва да премине. Необходимо е примирие, което да върне водещите актьори на масата за преговори, за да се подновят дебатите за преходно правителство, което да адресира наболелите политически въпроси. Международната общност не пести усилия в тази насока. Южносуданският президент Салва Киир успешно посредничи за едноседмично примирие между двете враждуващи страни. От ключово значение ще са и усилията на ООН, регионалните организации Африкански съюз и Междуправителствен орган за развитие (IGAD), както и на четворката посредници – Саудитска Арабия, Обединените арабски емирства, САЩ и Великобритания.
Commemorative Plaque
Post Syndicated from original https://xkcd.com/2772/

Get details on security finding changes with the new Finding History feature in Security Hub
Post Syndicated from Nicholas Jaeger original https://aws.amazon.com/blogs/security/get-details-on-security-finding-changes-with-the-new-finding-history-feature-in-security-hub/
In today’s evolving security threat landscape, security teams increasingly require tools to detect and track security findings to protect their organizations’ assets. One objective of cloud security posture management is to identify and address security findings in a timely and effective manner. AWS Security Hub aggregates, organizes, and prioritizes security alerts and findings from various AWS services and supported security solutions from the AWS Partner Network.
As the volume of findings increases, tracking the changes and actions that have been taken on each finding becomes more difficult, as well as more important to perform timely and effective investigations. In this post, we will show you how to use the new Finding History feature in Security Hub to track and understand the history of a security finding.
Updates to findings occur when finding providers update certain fields, such as resource details, by using the BatchImportFindings API. You, as a user, can update certain fields, such as workflow status, in the AWS Management Console or through the BatchUpdateFindings API. Ticketing, incident management, security information and event management (SIEM), and automatic remediation solutions can also use the BatchUpdateFindings API to update findings. This new capability highlights these various changes and when they occurred so that you don’t need to investigate this yourself.
Finding History
The new Finding History feature in Security Hub helps you understand the state of a finding by providing an immutable history of changes within the finding details. By using this feature, you can track the history of each finding, including the before and after values of the fields that were changed, who or what made the changes, and when the changes were made. This simplifies how you operate on a finding by giving you visibility into the changes made to a finding over time, alongside the rest of the finding details, which removes the need for separate tooling or additional processes. This feature is available at no additional cost in AWS Regions where Security Hub is available, and appears by default for new or updated findings. Finding History is also available through the Security Hub APIs.
To try out this new feature, open the Security Hub console, select a finding, and choose the History tab. There you will see a chronological list of changes that have been made to the finding. The transparency of the finding history helps you quickly assess the status of the finding, understand actions already taken, and take the necessary actions to mitigate risk. For example, upon resolving a finding, you can add a note to the finding to indicate why you resolved it. Both the resolved status and note will appear in the history.
In the following example, the finding was updated and then resolved with an explanatory note left by the person that reviewed the finding. With Finding History, you can see the previous updates and events in the finding’s History tab.

Figure 1: Finding History shows recent updates to the finding
In addition, you can still view the current state of the finding in its Details tab.

Figure 2: Finding Details shows the record of a security check or security-related detection
Conclusion
With the new Finding History feature in Security Hub, you have greater visibility into the activity and updates on each finding, allowing for more efficient investigation and response to potential security risks. Next time that you start work to investigate and respond to a security finding in Security Hub, begin by checking the finding history.
If you have feedback about this post, submit comments in the Comments section below. If you have questions about this post, start a new thread on the AWS Security, Identity, & Compliance re:Post or contact AWS Support.
Want more AWS Security news? Follow us on Twitter.
Twitter’s e2ee DMs are better than nothing
Post Syndicated from original https://mjg59.dreamwidth.org/66791.html
Elon Musk appeared on an interview with Tucker Carlson last month, with one of the topics being the fact that Twitter could be legally compelled to hand over users’ direct messages to government agencies since they’re held on Twitter’s servers and aren’t encrypted. Elon talked about how they were in the process of implementing proper encryption for DMs that would prevent this – “You could put a gun to my head and I couldn’t tell you. That’s how it should be.”
tl;dr – in the current implementation, while Twitter could subvert the end-to-end nature of the encryption, it could not do so without users being notified. If any user involved in a conversation were to ignore that notification, all messages in that conversation (including ones sent in the past) could then be decrypted. This isn’t ideal, but it still seems like an improvement over having no encryption at all. More technical discussion follows.
For context: all information about Twitter’s implementation here has been derived from reverse engineering version 9.86.0 of the Android client and 9.56.1 of the iOS client (the current versions at time of writing), and the feature hasn’t yet launched. While it’s certainly possible that there could be major changes in the protocol between now launch, Elon has asserted that they plan to launch the feature this week so it’s plausible that this reflects what’ll ship.
For it to be impossible for Twitter to read DMs, they need to not only be encrypted, they need to be encrypted with a key that’s not available to Twitter. This is what’s referred to as “end-to-end encryption”, or e2ee – it means that the only components in the communication chain that have access to the unencrypted data are the endpoints. Even if the message passes through other systems (and even if it’s stored on other systems), those systems do not have access to the keys that would be needed to decrypt the data.
End-to-end encrypted messengers were initially popularised by Signal, but the Signal protocol has since been incorporated into WhatsApp and is probably much more widely used there. Millions of people per day are sending messages to each other that pass through servers controlled by third parties, but those third parties are completely unable to read the contents of those messages. This is the scenario that Elon described, where there’s no degree of compulsion that could cause the people relaying messages to and from people to decrypt those messages afterwards.
But for this to be possible, both ends of the communication need to be able to encrypt messages in a way the other end can decrypt. This is usually performed using AES, a well-studied encryption algorithm with no known significant weaknesses. AES is a form of what’s referred to as a symmetric encryption, one where encryption and decryption are performed with the same key. This means that both ends need access to that key, which presents us with a bootstrapping problem. Until a shared secret is obtained, there’s no way to communicate securely, so how do we generate that shared secret? A common mechanism for this is something called Diffie Hellman key exchange, which makes use of asymmetric encryption. In asymmetric encryption, an encryption key can be split into two components – a public key and a private key. Both devices involved in the communication combine their private key and the other party’s public key to generate a secret that can only be decoded with access to the private key. As long as you know the other party’s public key, you can now securely generate a shared secret with them. Even a third party with access to all the public keys won’t be able to identify this secret. Signal makes use of a variation of Diffie-Hellman called Extended Triple Diffie-Hellman that has some desirable properties, but it’s not strictly necessary for the implementation of something that’s end-to-end encrypted.
Although it was rumoured that Twitter would make use of the Signal protocol, and in fact there are vestiges of code in the Twitter client that still reference Signal, recent versions of the app have shipped with an entirely different approach that appears to have been written from scratch. It seems simple enough. Each device generates an asymmetric keypair using the NIST P-256 elliptic curve, along with a device identifier. The device identifier and the public half of the key are uploaded to Twitter using a new API endpoint called /1.1/keyregistry/register. When you want to send an encrypted DM to someone, the app calls /1.1/keyregistry/extract_public_keys with the IDs of the users you want to communicate with, and gets back a list of their public keys. It then looks up the conversation ID (a numeric identifier that corresponds to a given DM exchange – for a 1:1 conversation between two people it doesn’t appear that this ever changes, so if you DMed an account 5 years ago and then DM them again now from the same account, the conversation ID will be the same) in a local database to retrieve a conversation key. If that key doesn’t exist yet, the sender generates a random one. The message is then encrypted with the conversation key using AES in GCM mode, and the conversation key is then put through Diffie-Hellman with each of the recipients’ public device keys. The encrypted message is then sent to Twitter along with the list of encrypted conversation keys. When each of the recipients’ devices receives the message it checks whether it already has a copy of the conversation key, and if not performs its half of the Diffie-Hellman negotiation to decrypt the encrypted conversation key. One it has the conversation key it decrypts it and shows it to the user.
What would happen if Twitter changed the registered public key associated with a device to one where they held the private key, or added an entirely new device to a user’s account? If the app were to just happily send a message with the conversation key encrypted with that new key, Twitter would be able to decrypt that and obtain the conversation key. Since the conversation key is tied to the conversation, not any given pair of devices, obtaining the conversation key means you can then decrypt every message in that conversation, including ones sent before the key was obtained.
(An aside: Signal and WhatsApp make use of a protocol called Sesame which involves additional secret material that’s shared between every device a user owns, hence why you have to do that QR code dance whenever you add a new device to your account. I’m grossly over-simplifying how clever the Signal approach is here, largely because I don’t understand the details of it myself. The Signal protocol uses something called the Double Ratchet Algorithm to implement the actual message encryption keys in such a way that even if someone were able to successfully impersonate a device they’d only be able to decrypt messages sent after that point even if they had encrypted copies of every previous message in the conversation)
How’s this avoided? Based on the UI that exists in the iOS version of the app, in a fairly straightforward way – each user can only have a single device that supports encrypted messages. If the user (or, in our hypothetical, a malicious Twitter) replaces the device key, the client will generate a notification. If the user pays attention to that notification and verifies with the recipient through some out of band mechanism that the device has actually been replaced, then everything is fine. But, if any participant in the conversation ignores this warning, the holder of the subverted key can obtain the conversation key and decrypt the entire history of the conversation. That’s strictly worse than anything based on Signal, where such impersonation would simply not work, but even in the Twitter case it’s not possible for someone to silently subvert the security.
So when Elon says Twitter wouldn’t be able to decrypt these messages even if someone held a gun to his head, there’s a condition applied to that – it’s true as long as nobody fucks up. This is clearly better than the messages just not being encrypted at all in the first place, but overall it’s a weaker solution than Signal. If you’re currently using Twitter DMs, should you turn on encryption? As long as the limitations aren’t too limiting, definitely! Should you use this in preference to Signal or WhatsApp? Almost certainly not. This seems like a genuine incremental improvement, but it’d be easy to interpret what Elon says as providing stronger guarantees than actually exist.
 comments
Migrating Critical Traffic At Scale with No Downtime — Part 1
Post Syndicated from Netflix Technology Blog original https://netflixtechblog.com/migrating-critical-traffic-at-scale-with-no-downtime-part-1-ba1c7a1c7835
Migrating Critical Traffic At Scale with No Downtime — Part 1
Shyam Gala, Javier Fernandez-Ivern, Anup Rokkam Pratap, Devang Shah
Hundreds of millions of customers tune into Netflix every day, expecting an uninterrupted and immersive streaming experience. Behind the scenes, a myriad of systems and services are involved in orchestrating the product experience. These backend systems are consistently being evolved and optimized to meet and exceed customer and product expectations.
When undertaking system migrations, one of the main challenges is establishing confidence and seamlessly transitioning the traffic to the upgraded architecture without adversely impacting the customer experience. This blog series will examine the tools, techniques, and strategies we have utilized to achieve this goal.
The backend for the streaming product utilizes a highly distributed microservices architecture; hence these migrations also happen at different points of the service call graph. It can happen on an edge API system servicing customer devices, between the edge and mid-tier services, or from mid-tiers to data stores. Another relevant factor is that the migration could be happening on APIs that are stateless and idempotent, or it could be happening on stateful APIs.
We have categorized the tools and techniques we have used to facilitate these migrations in two high-level phases. The first phase involves validating functional correctness, scalability, and performance concerns and ensuring the new systems’ resilience before the migration. The second phase involves migrating the traffic over to the new systems in a manner that mitigates the risk of incidents while continually monitoring and confirming that we are meeting crucial metrics tracked at multiple levels. These include Quality-of-Experience(QoE) measurements at the customer device level, Service-Level-Agreements (SLAs), and business-level Key-Performance-Indicators(KPIs).
This blog post will provide a detailed analysis of replay traffic testing, a versatile technique we have applied in the preliminary validation phase for multiple migration initiatives. In a follow-up blog post, we will focus on the second phase and look deeper at some of the tactical steps that we use to migrate the traffic over in a controlled manner.
Replay Traffic Testing
Replay traffic refers to production traffic that is cloned and forked over to a different path in the service call graph, allowing us to exercise new/updated systems in a manner that simulates actual production conditions. In this testing strategy, we execute a copy (replay) of production traffic against a system’s existing and new versions to perform relevant validations. This approach has a handful of benefits.
- Replay traffic testing enables sandboxed testing at scale without significantly impacting production traffic or user experience.
- Utilizing cloned real traffic, we can exercise the diversity of inputs from a wide range of devices and device application software versions in production. This is particularly important for complex APIs that have many high cardinality inputs. Replay traffic provides the reach and coverage required to test the ability of the system to handle infrequently used input combinations and edge cases.
- This technique facilitates validation on multiple fronts. It allows us to assert functional correctness and provides a mechanism to load test the system and tune the system and scaling parameters for optimal functioning.
- By simulating a real production environment, we can characterize system performance over an extended period while considering the expected and unexpected traffic pattern shifts. It provides a good read on the availability and latency ranges under different production conditions.
- Provides a platform to ensure that essential operational insights, metrics, logging, and alerting are in place before migration.
Replay Solution
The replay traffic testing solution comprises two essential components.
- Traffic Duplication and Correlation: The initial step requires the implementation of a mechanism to clone and fork production traffic to the newly established pathway, along with a process to record and correlate responses from the original and alternative routes.
- Comparative Analysis and Reporting: Following traffic duplication and correlation, we need a framework to compare and analyze the responses recorded from the two paths and get a comprehensive report for the analysis.
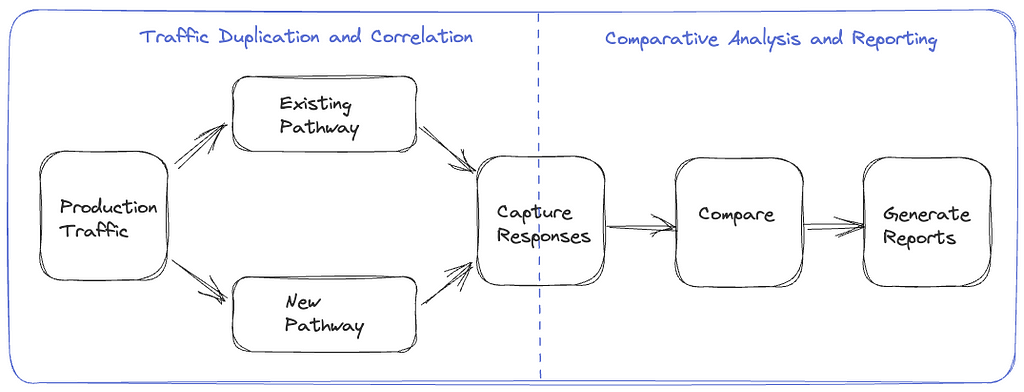
We have tried different approaches for the traffic duplication and recording step through various migrations, making improvements along the way. These include options where replay traffic generation is orchestrated on the device, on the server, and via a dedicated service. We will examine these alternatives in the upcoming sections.
Device Driven
In this option, the device makes a request on the production path and the replay path, then discards the response on the replay path. These requests are executed in parallel to minimize any potential delay on the production path. The selection of the replay path on the backend can be driven by the URL the device uses when making the request or by utilizing specific request parameters in routing logic at the appropriate layer of the service call graph. The device also includes a unique identifier with identical values on both paths, which is used to correlate the production and replay responses. The responses can be recorded at the most optimal location in the service call graph or by the device itself, depending on the particular migration.

The device-driven approach’s obvious downside is that we are wasting device resources. There is also a risk of impact on device QoE, especially on low-resource devices. Adding forking logic and complexity to the device code can create dependencies on device application release cycles that generally run at a slower cadence than service release cycles, leading to bottlenecks in the migration. Moreover, allowing the device to execute untested server-side code paths can inadvertently expose an attack surface area for potential misuse.
Server Driven
To address the concerns of the device-driven approach, the other option we have used is to handle the replay concerns entirely on the backend. The replay traffic is cloned and forked in the appropriate service upstream of the migrated service. The upstream service calls the existing and new replacement services concurrently to minimize any latency increase on the production path. The upstream service records the responses on the two paths along with an identifier with a common value that is used to correlate the responses. This recording operation is also done asynchronously to minimize any impact on the latency on the production path.
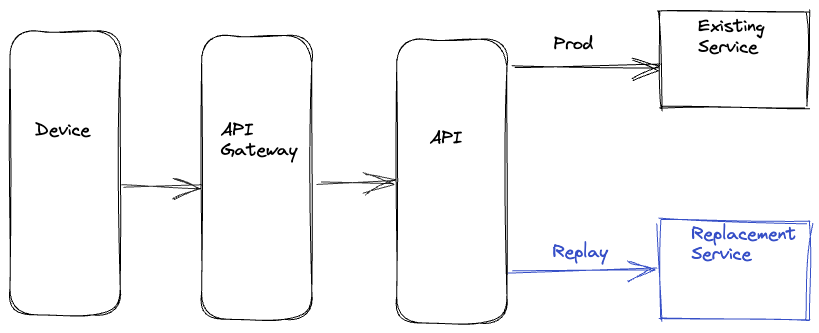
The server-driven approach’s benefit is that the entire complexity of replay logic is encapsulated on the backend, and there is no wastage of device resources. Also, since this logic resides on the server side, we can iterate on any required changes faster. However, we are still inserting the replay-related logic alongside the production code that is handling business logic, which can result in unnecessary coupling and complexity. There is also an increased risk that bugs in the replay logic have the potential to impact production code and metrics.
Dedicated Service
The latest approach that we have used is to completely isolate all components of replay traffic into a separate dedicated service. In this approach, we record the requests and responses for the service that needs to be updated or replaced to an offline event stream asynchronously. Quite often, this logging of requests and responses is already happening for operational insights. Subsequently, we use Mantis, a distributed stream processor, to capture these requests and responses and replay the requests against the new service or cluster while making any required adjustments to the requests. After replaying the requests, this dedicated service also records the responses from the production and replay paths for offline analysis.
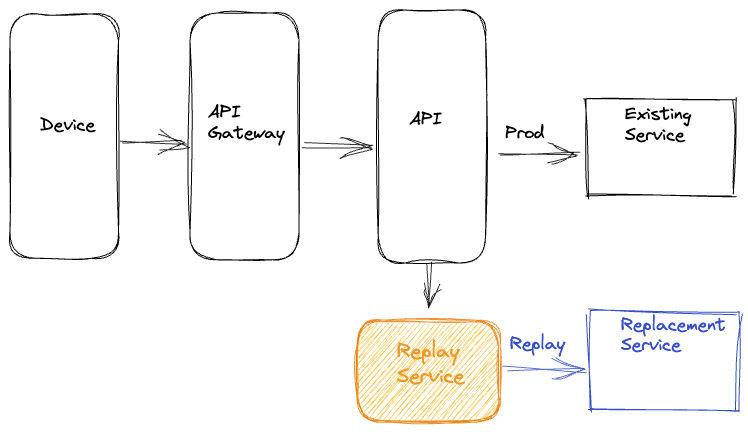
This approach centralizes the replay logic in an isolated, dedicated code base. Apart from not consuming device resources and not impacting device QoE, this approach also reduces any coupling between production business logic and replay traffic logic on the backend. It also decouples any updates on the replay framework away from the device and service release cycles.
Analyzing Replay Traffic
Once we have run replay traffic and recorded a statistically significant volume of responses, we are ready for the comparative analysis and reporting component of replay traffic testing. Given the scale of the data being generated using replay traffic, we record the responses from the two sides to a cost-effective cold storage facility using technology like Apache Iceberg. We can then create offline distributed batch processing jobs to correlate & compare the responses across the production and replay paths and generate detailed reports on the analysis.
Normalization
Depending on the nature of the system being migrated, the responses might need some preprocessing before being compared. For example, if some fields in the responses are timestamps, those will differ. Similarly, if there are unsorted lists in the responses, it might be best to sort them before comparing. In certain migration scenarios, there may be intentional alterations to the response generated by the updated service or component. For instance, a field that was a list in the original path is represented as key-value pairs in the new path. In such cases, we can apply specific transformations to the response on the replay path to simulate the expected changes. Based on the system and the associated responses, there might be other specific normalizations that we might apply to the response before we compare the responses.
Comparison
After normalizing, we diff the responses on the two sides and check whether we have matching or mismatching responses. The batch job creates a high-level summary that captures some key comparison metrics. These include the total number of responses on both sides, the count of responses joined by the correlation identifier, matches and mismatches. The summary also records the number of passing/ failing responses on each path. This summary provides an excellent high-level view of the analysis and the overall match rate across the production and replay paths. Additionally, for mismatches, we record the normalized and unnormalized responses from both sides to another big data table along with other relevant parameters, such as the diff. We use this additional logging to debug and identify the root cause of issues driving the mismatches. Once we discover and address those issues, we can use the replay testing process iteratively to bring down the mismatch percentage to an acceptable number.
Lineage
When comparing responses, a common source of noise arises from the utilization of non-deterministic or non-idempotent dependency data for generating responses on the production and replay pathways. For instance, envision a response payload that delivers media streams for a playback session. The service responsible for generating this payload consults a metadata service that provides all available streams for the given title. Various factors can lead to the addition or removal of streams, such as identifying issues with a specific stream, incorporating support for a new language, or introducing a new encode. Consequently, there is a potential for discrepancies in the sets of streams used to determine payloads on the production and replay paths, resulting in divergent responses.
A comprehensive summary of data versions or checksums for all dependencies involved in generating a response, referred to as a lineage, is compiled to address this challenge. Discrepancies can be identified and discarded by comparing the lineage of both production and replay responses in the automated jobs analyzing the responses. This approach mitigates the impact of noise and ensures accurate and reliable comparisons between production and replay responses.
Comparing Live Traffic
An alternative method to recording responses and performing the comparison offline is to perform a live comparison. In this approach, we do the forking of the replay traffic on the upstream service as described in the `Server Driven` section. The service that forks and clones the replay traffic directly compares the responses on the production and replay path and records relevant metrics. This option is feasible if the response payload isn’t very complex, such that the comparison doesn’t significantly increase latencies or if the services being migrated are not on the critical path. Logging is selective to cases where the old and new responses do not match.

Load Testing
Besides functional testing, replay traffic allows us to stress test the updated system components. We can regulate the load on the replay path by controlling the amount of traffic being replayed and the new service’s horizontal and vertical scale factors. This approach allows us to evaluate the performance of the new services under different traffic conditions. We can see how the availability, latency, and other system performance metrics, such as CPU consumption, memory consumption, garbage collection rate, etc, change as the load factor changes. Load testing the system using this technique allows us to identify performance hotspots using actual production traffic profiles. It helps expose memory leaks, deadlocks, caching issues, and other system issues. It enables the tuning of thread pools, connection pools, connection timeouts, and other configuration parameters. Further, it helps in the determination of reasonable scaling policies and estimates for the associated cost and the broader cost/risk tradeoff.
Stateful Systems
We have extensively utilized replay testing to build confidence in migrations involving stateless and idempotent systems. Replay testing can also validate migrations involving stateful systems, although additional measures must be taken. The production and replay paths must have distinct and isolated data stores that are in identical states before enabling the replay of traffic. Additionally, all different request types that drive the state machine must be replayed. In the recording step, apart from the responses, we also want to capture the state associated with that specific response. Correspondingly in the analysis phase, we want to compare both the response and the related state in the state machine. Given the overall complexity of using replay testing with stateful systems, we have employed other techniques in such scenarios. We will look at one of them in the follow-up blog post in this series.
Summary
We have adopted replay traffic testing at Netflix for numerous migration projects. A recent example involved leveraging replay testing to validate an extensive re-architecture of the edge APIs that drive the playback component of our product. Another instance included migrating a mid-tier service from REST to gRPC. In both cases, replay testing facilitated comprehensive functional testing, load testing, and system tuning at scale using real production traffic. This approach enabled us to identify elusive issues and rapidly build confidence in these substantial redesigns.
Upon concluding replay testing, we are ready to start introducing these changes in production. In an upcoming blog post, we will look at some of the techniques we use to roll out significant changes to the system to production in a gradual risk-controlled way while building confidence via metrics at different levels.
Migrating Critical Traffic At Scale with No Downtime — Part 1 was originally published in Netflix TechBlog on Medium, where people are continuing the conversation by highlighting and responding to this story.
Single sign-on with Amazon Redshift Serverless with Okta using Amazon Redshift Query Editor v2 and third-party SQL clients
Post Syndicated from Maneesh Sharma original https://aws.amazon.com/blogs/big-data/single-sign-on-with-amazon-redshift-serverless-with-okta-using-amazon-redshift-query-editor-v2-and-third-party-sql-clients/
Amazon Redshift Serverless makes it easy to run and scale analytics in seconds without the need to set up and manage data warehouse clusters. With Redshift Serverless, users such as data analysts, developers, business professionals, and data scientists can get insights from data by simply loading and querying data in the data warehouse.
Customers use their preferred SQL clients to analyze their data in Redshift Serverless. They want to use an identity provider (IdP) or single sign-on (SSO) credentials to connect to Redshift Serverless to reuse existing using credentials and avoid additional user setup and configuration. When you use AWS Identity and Access Management (IAM) or IdP-based credentials to connect to a serverless data warehouse, Amazon Redshift automatically creates a database user for the end-user. You can simplify managing user privileges by using role-based access control. Admins can use a database-role mapping for SSO with the IAM roles that users are assigned to get their database privileges automatically. With this integration, organizations can simplify user management because they no longer need to create users and map them to database roles manually. You can define the mapped database roles as a principal tag for the IdP groups or IAM role, so Amazon Redshift database roles and users who are members of those IdP groups are granted to the database roles automatically.
In this post, we focus on Okta as the IdP and provide step-by-step guidance to integrate Redshift Serverless with Okta using the Amazon Redshift Query Editor V2 and with SQL clients like SQL Workbench/J. You can use this mechanism with other IdP providers such as Azure Active Directory or Ping with any applications or tools using Amazon’s JDBC/ODBC/Python driver.
Solution overview
The following diagram illustrates the authentication flow of Okta with Redshift Serverless using federated IAM roles and automatic database-role mapping.

The workflow contains the following steps:
- Either the user chooses an IdP app in their browser, or the SQL client initiates a user authentication request to the IdP (Okta).
- Upon a successful authentication, Okta submits a request to the AWS federation endpoint with a SAML assertion containing the PrincipalTags.
- The AWS federation endpoint validates the SAML assertion and invokes the AWS Security Token Service (AWS STS) API AssumeRoleWithSAML. The SAML assertion contains the IdP user and group information that is stored in the RedshiftDbUser and RedshiftDbRoles principal tags, respectively. Temporary IAM credentials are returned to the SQL client or, if using the Query Editor v2, the user’s browser is redirected to the Query Editor v2 console using the temporary IAM credentials.
- The temporary IAM credentials are used by the SQL client or Query Editor v2 to call the Redshift Serverless GetCredentials API. The API uses the principal tags to determine the user and database roles that the user belongs to. An associated database user is created if the user is signing in for the first time and is granted the matching database roles automatically. A temporary password is returned to the SQL client.
- Using the database user and temporary password, the SQL client or Query Editor v2 connects to Redshift Serverless. Upon login, the user is authorized based on the Amazon Redshift database roles that were assigned in Step 4.
To set up the solution, we complete the following steps:
- Set up your Okta application:
- Create Okta users.
- Create groups and assign groups to users.
- Create the Okta SAML application.
- Collect Okta information.
- Set up AWS configuration:
- Create the IAM IdP.
- Create the IAM role and policy.
- Configure Redshift Serverless role-based access.
- Federate to Redshift Serverless using the Query Editor V2.
- Configure the SQL client (for this post, we use SQL Workbench/J).
- Optionally, implement MFA with SQL Client and Query Editor V2.
Prerequisites
You need the following prerequisites to set up this solution:
- An AWS account. If you don’t have one, you can sign up for one.
- An Redshift Serverless data warehouse. For setup instructions, see Getting started with Amazon Redshift Serverless.
- The latest Redshift Serverless JDBC SDK driver-dependent libraries (download the libraries and unzip the JDBC JAR zipped folder).
- An Okta account that has an active subscription. You need an admin role to set up the application on Okta. If you’re new to Okta, you can sign up for a free trial or sign up for a developer account.
- A SQL client such as SQL Workbench/J.
Set up Okta application
In this section, we provide the steps to configure your Okta application.
Create Okta users
To create your Okta users, complete the following steps:
- Sign in to your Okta organization as a user with administrative privileges.
- On the admin console, under Directory in the navigation pane, choose People.
- Choose Add person.
- For First Name, enter the user’s first name.
- For Last Name, enter the user’s last name.
- For Username, enter the user’s user name in email format.
- Select I will set password and enter a password.
- Optionally, deselect User must change password on first login if you don’t want the user to change their password when they first sign in. Choose Save.

Create groups and assign groups to users
To create your groups and assign them to users, complete the following steps:
- Sign in to your Okta organization as a user with administrative privileges.
- On the admin console, under Directory in the navigation pane, choose Groups.
- Choose Add group.
- Enter a group name and choose Save.
- Choose the recently created group and then choose Assign people.
- Choose the plus sign and then choose Done.
- Repeat Steps 1–6 to add more groups.
In this post, we create two groups: sales and finance.

Create an Okta SAML application
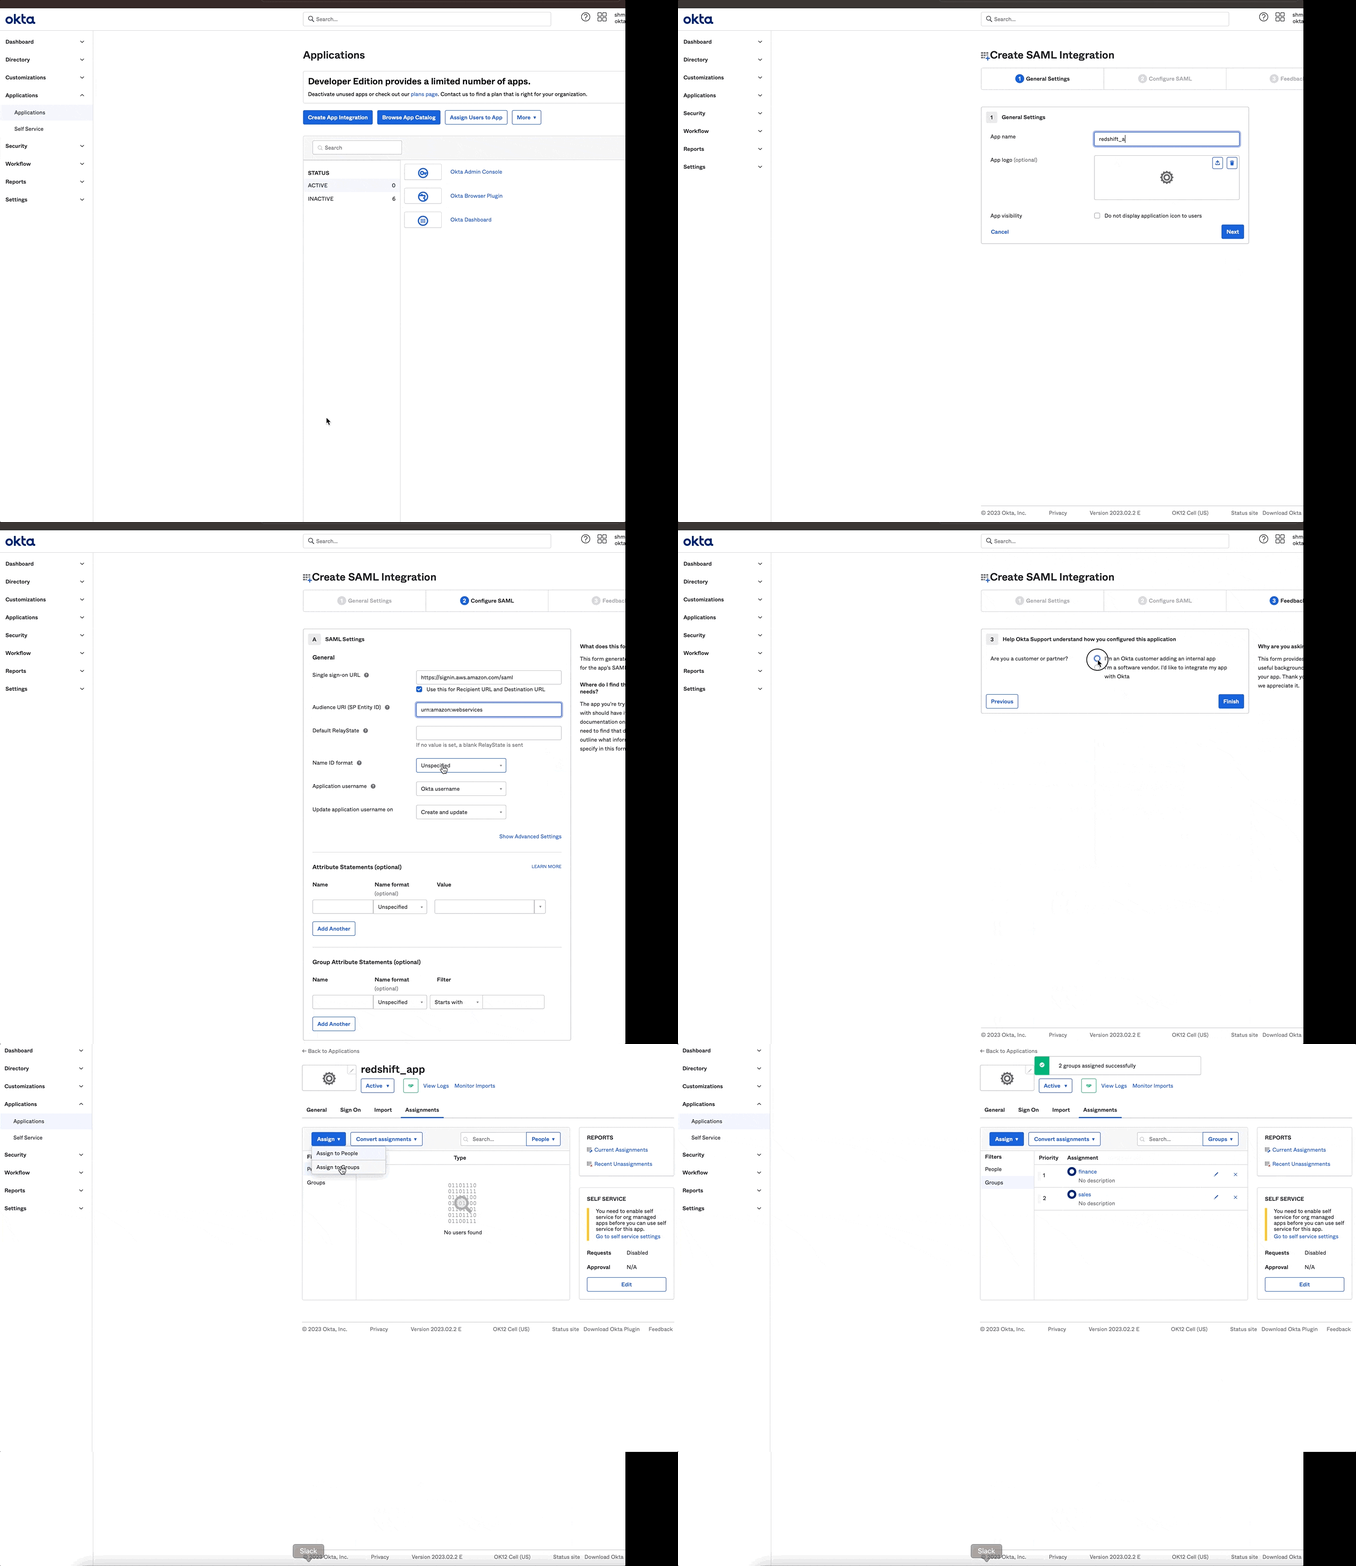
To create your Okta SAML application, complete the following steps:
- Sign in to your Okta organization as a user with administrative privileges.
- On the admin console, under Applications in the navigation pane, choose Applications.
- Choose Create App Integration.
- Select SAML 2.0 as the sign-in method and choose Next.
- Enter a name for your app integration (for example,
redshift_app) and choose Next. - Enter following values in the app and leave the rest as is:
- For Single Sign On URL, enter https://signin.aws.amazon.com/saml.
- For Audience URI (SP Entity ID), enter
urn:amazon:webservices. - For Name ID format, enter
EmailAddress.
- Choose Next.
- Choose I’m an Okta customer adding an internal app followed by This is an internal app that we have created.
- Choose Finish.
- Choose Assignments and then choose Assign.
- Choose Assign to groups and then select Assign next to the groups that you want to add.
- Choose Done.
Set up Okta advanced configuration
After you create the custom SAML app, complete the following steps:
- On the admin console, navigate to General and choose Edit under SAML settings.
- Choose Next.
- Set Default Relay State to the Query Editor V2 URL, using the format
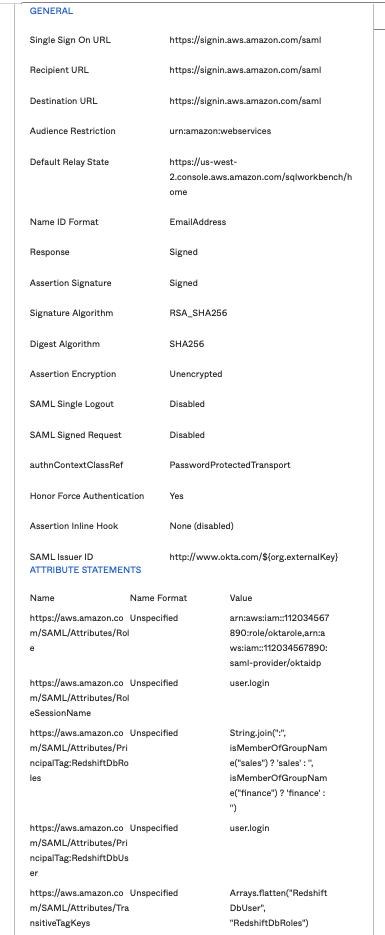
https://<region>.console.aws.amazon.com/sqlworkbench/home. For this post, we usehttps://us-west-2.console.aws.amazon.com/sqlworkbench/home. - Under Attribute Statements (optional), add the following properties:
- Provide the IAM role and IdP in comma-separated format using the Role attribute. You’ll create this same IAM role and IdP in a later step when setting up AWS configuration.
- Set
user.loginforRoleSessionName. This is used as an identifier for the temporary credentials that are issued when the role is assumed. - Set the DB roles using
PrincipalTag:RedshiftDbRoles. This uses the Okta groups to fill the principal tags and map them automatically with the Amazon Redshift database roles. Its value must be a colon-separated list in the format role1:role2. - Set
user.loginforPrincipalTag:RedshiftDbUser. This uses the user name in the directory. This is a required tag and defines the database user that is used by Query Editor V2. - Set the transitive keys using
TransitiveTagKeys. This prevents users from changing the session tags in case of role chaining.
The preceding tags are forwarded to the GetCredentials API to get temporary credentials for your Redshift Serverless instance and map automatically with Amazon Redshift database roles. The following table summarizes their attribute statements configuration.
| Name | Name Format | Format | Example |
| https://aws.amazon.com/SAML/Attributes/Role | Unspecified | arn:aws:iam::<yourAWSAccountID>:role/role-name,arn:aws:iam:: <yourAWSAccountID>:saml-provider/provider-name |
arn:aws:iam::112034567890:role/oktarole,arn:aws:iam::112034567890:saml-provider/oktaidp |
| https://aws.amazon.com/SAML/Attributes/RoleSessionName | Unspecified | user.login |
user.login |
| https://aws.amazon.com/SAML/Attributes/PrincipalTag:RedshiftDbRoles | Unspecified | String.join(":", isMemberOfGroupName("group1") ? 'group1' : '', isMemberOfGroupName("group2") ? 'group2' : '') |
String.join(":", isMemberOfGroupName("sales") ? 'sales' : '', isMemberOfGroupName("finance") ? 'finance' : '') |
| https://aws.amazon.com/SAML/Attributes/PrincipalTag:RedshiftDbUser | Unspecified | user.login |
user.login |
| https://aws.amazon.com/SAML/Attributes/TransitiveTagKeys | Unspecified | Arrays.flatten("RedshiftDbUser", "RedshiftDbRoles") |
Arrays.flatten("RedshiftDbUser", "RedshiftDbRoles") |
- After you add the attribute claims, choose Next followed by Finish.
Your attributes should be in similar format as shown in the following screenshot.
Collect Okta information
To gather your Okta information, complete the following steps:
- On the Sign On tab, choose View SAML setup instructions.

- For Identity Provider Single Sign-on URL, Use this URL when connecting with any third-party SQL client such as SQL Workbench/J.
- Use the IdP metadata in block 4 and save the metadata file in .xml format (for example,
metadata.xml).


Set up AWS configuration
In this section, we provide the steps to configure your IAM resources.
Create the IAM IdP
To create your IAM IdP, complete the following steps:
- On the IAM console, under Access management in the navigation pane, choose Identity providers.
- Choose Add provider.
- For Provider type¸ select SAML.
- For Provider name¸ enter a name.
- Choose Choose file and upload the metadata file (.xml) you downloaded earlier.
- Choose Add provider.

Create the IAM Amazon Redshift access policy
To create your IAM policy, complete the following steps:
- On the IAM console, choose Policies.
- Choose Create policy.
- On the Create policy page, choose the JSON tab.
- For the policy, enter the JSON in following format:
The workgroup ARN is available on the Redshift Serverless workgroup configuration page.
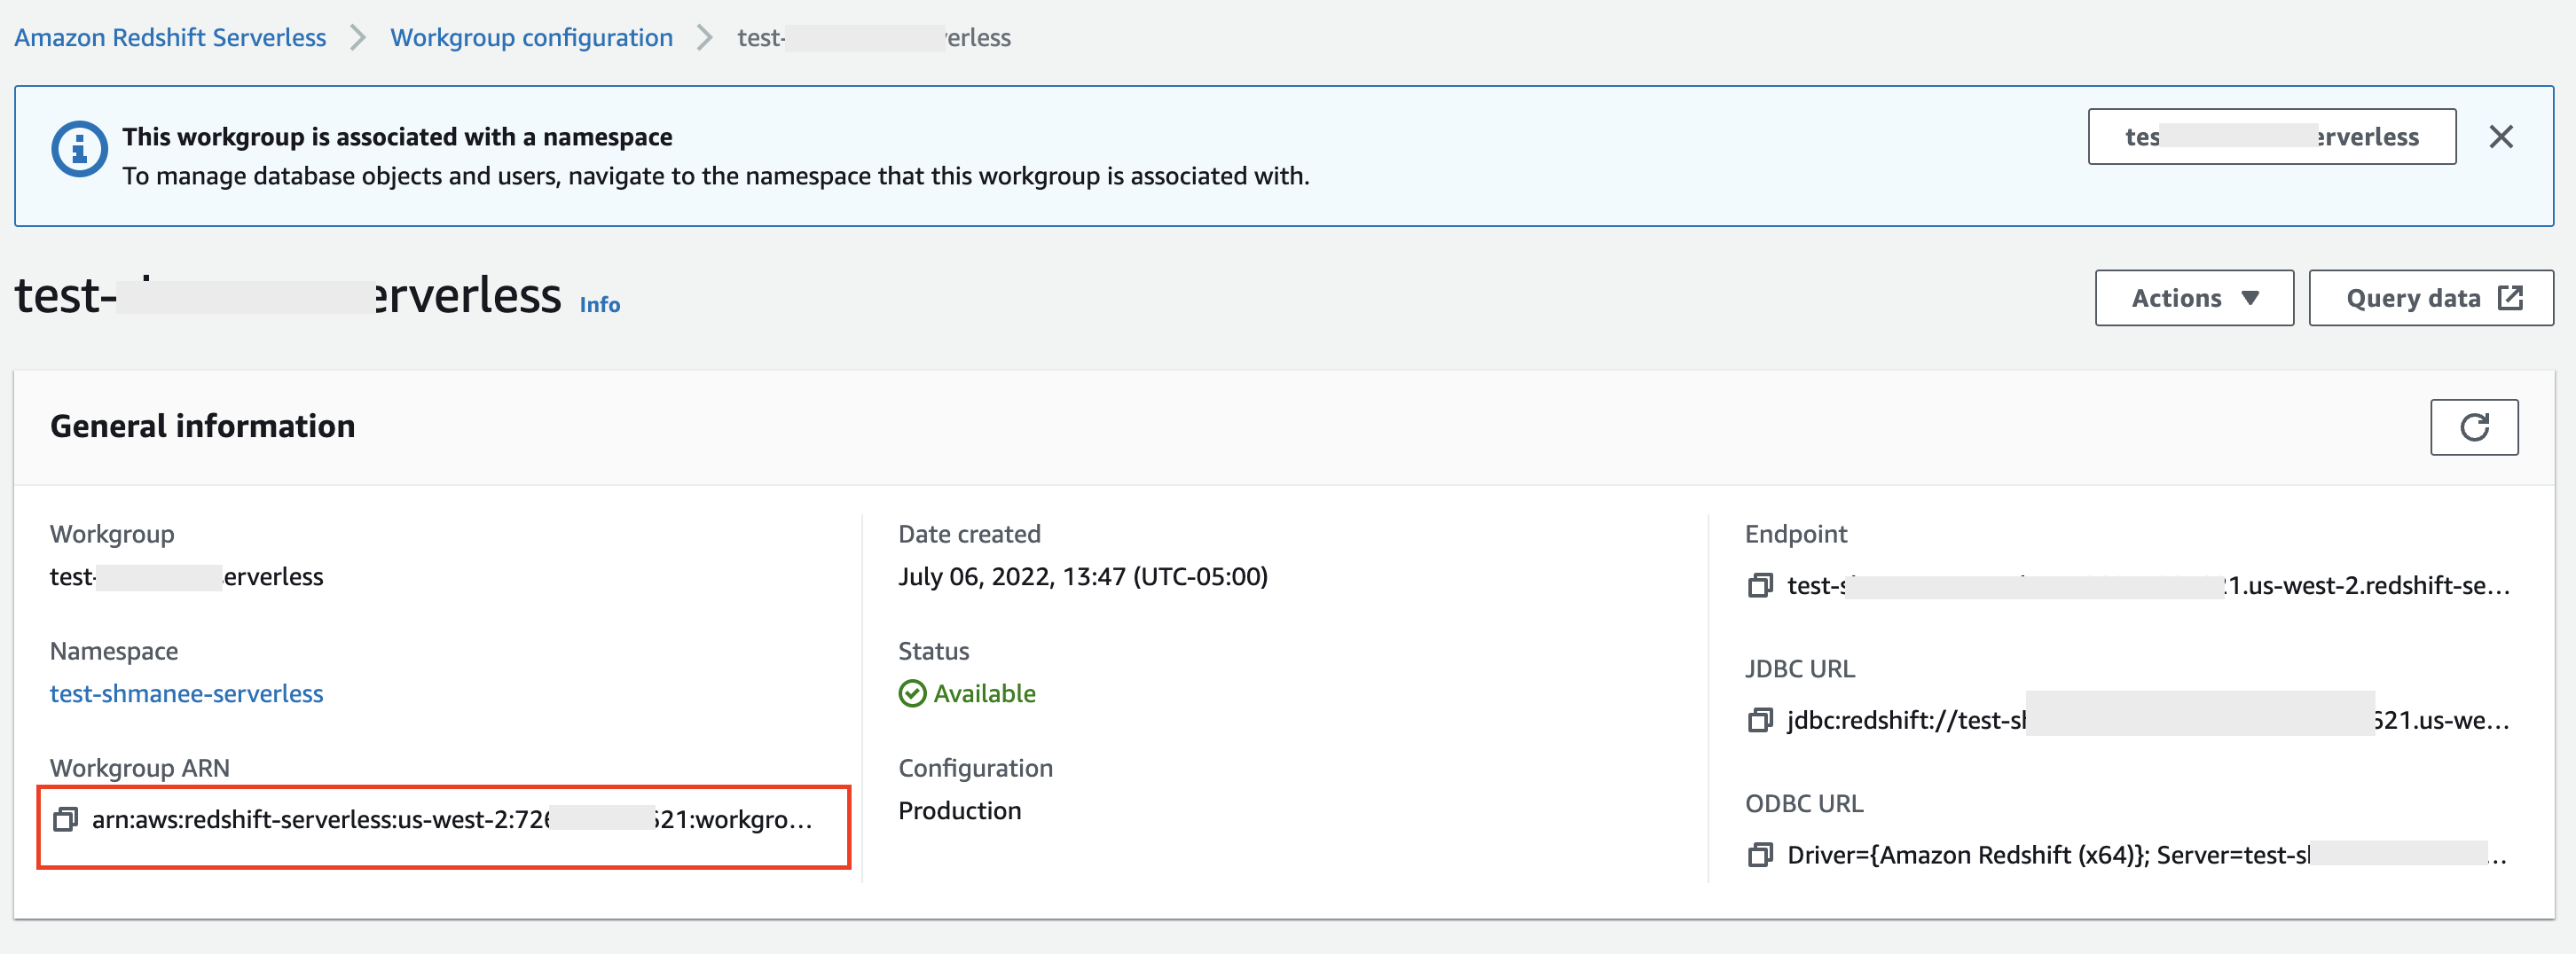
The following example policy includes only a single Redshift Serverless workgroup; you can modify the policy to include multiple workgroups in the Resource section:
- Choose Next: Tags.
- Choose Next: Review.
- In the Review policy section, for Name, enter the name of your policy; for example, OktaRedshiftPolicy.
- For Description, you can optionally enter a brief description of what the policy does.
- Choose Create policy.
Create the IAM role
To create your IAM role, complete the following steps:
- On the IAM console, choose Roles in the navigation pane.
- Choose Create role.
- For Trusted entity type, select SAML 2.0 federation.
- For SAML 2.0-based provider, choose the IdP you created earlier.
- Select Allow programmatic and AWS Management Console access.
- Choose Next.
- Choose the policy you created earlier.
- Also, add the policy
AmazonRedshiftQueryEditorV2ReadSharing. - Choose Next.
- In the Review section, for Role Name, enter the name of your role; for example,
oktarole. - For Description, you can optionally enter a brief description of what the role does.
- Choose Create role.
- Navigate to the role that you just created and choose Trust Relationships.
- Choose Edit trust policy and choose
TagSessionunder Add actions for STS.

When using session tags, trust policies for all roles connected to the IdP passing tags must have the sts:TagSession permission. For roles without this permission in the trust policy, the AssumeRole operation fails.
- Choose Update policy.
The following screenshot shows the role permissions.
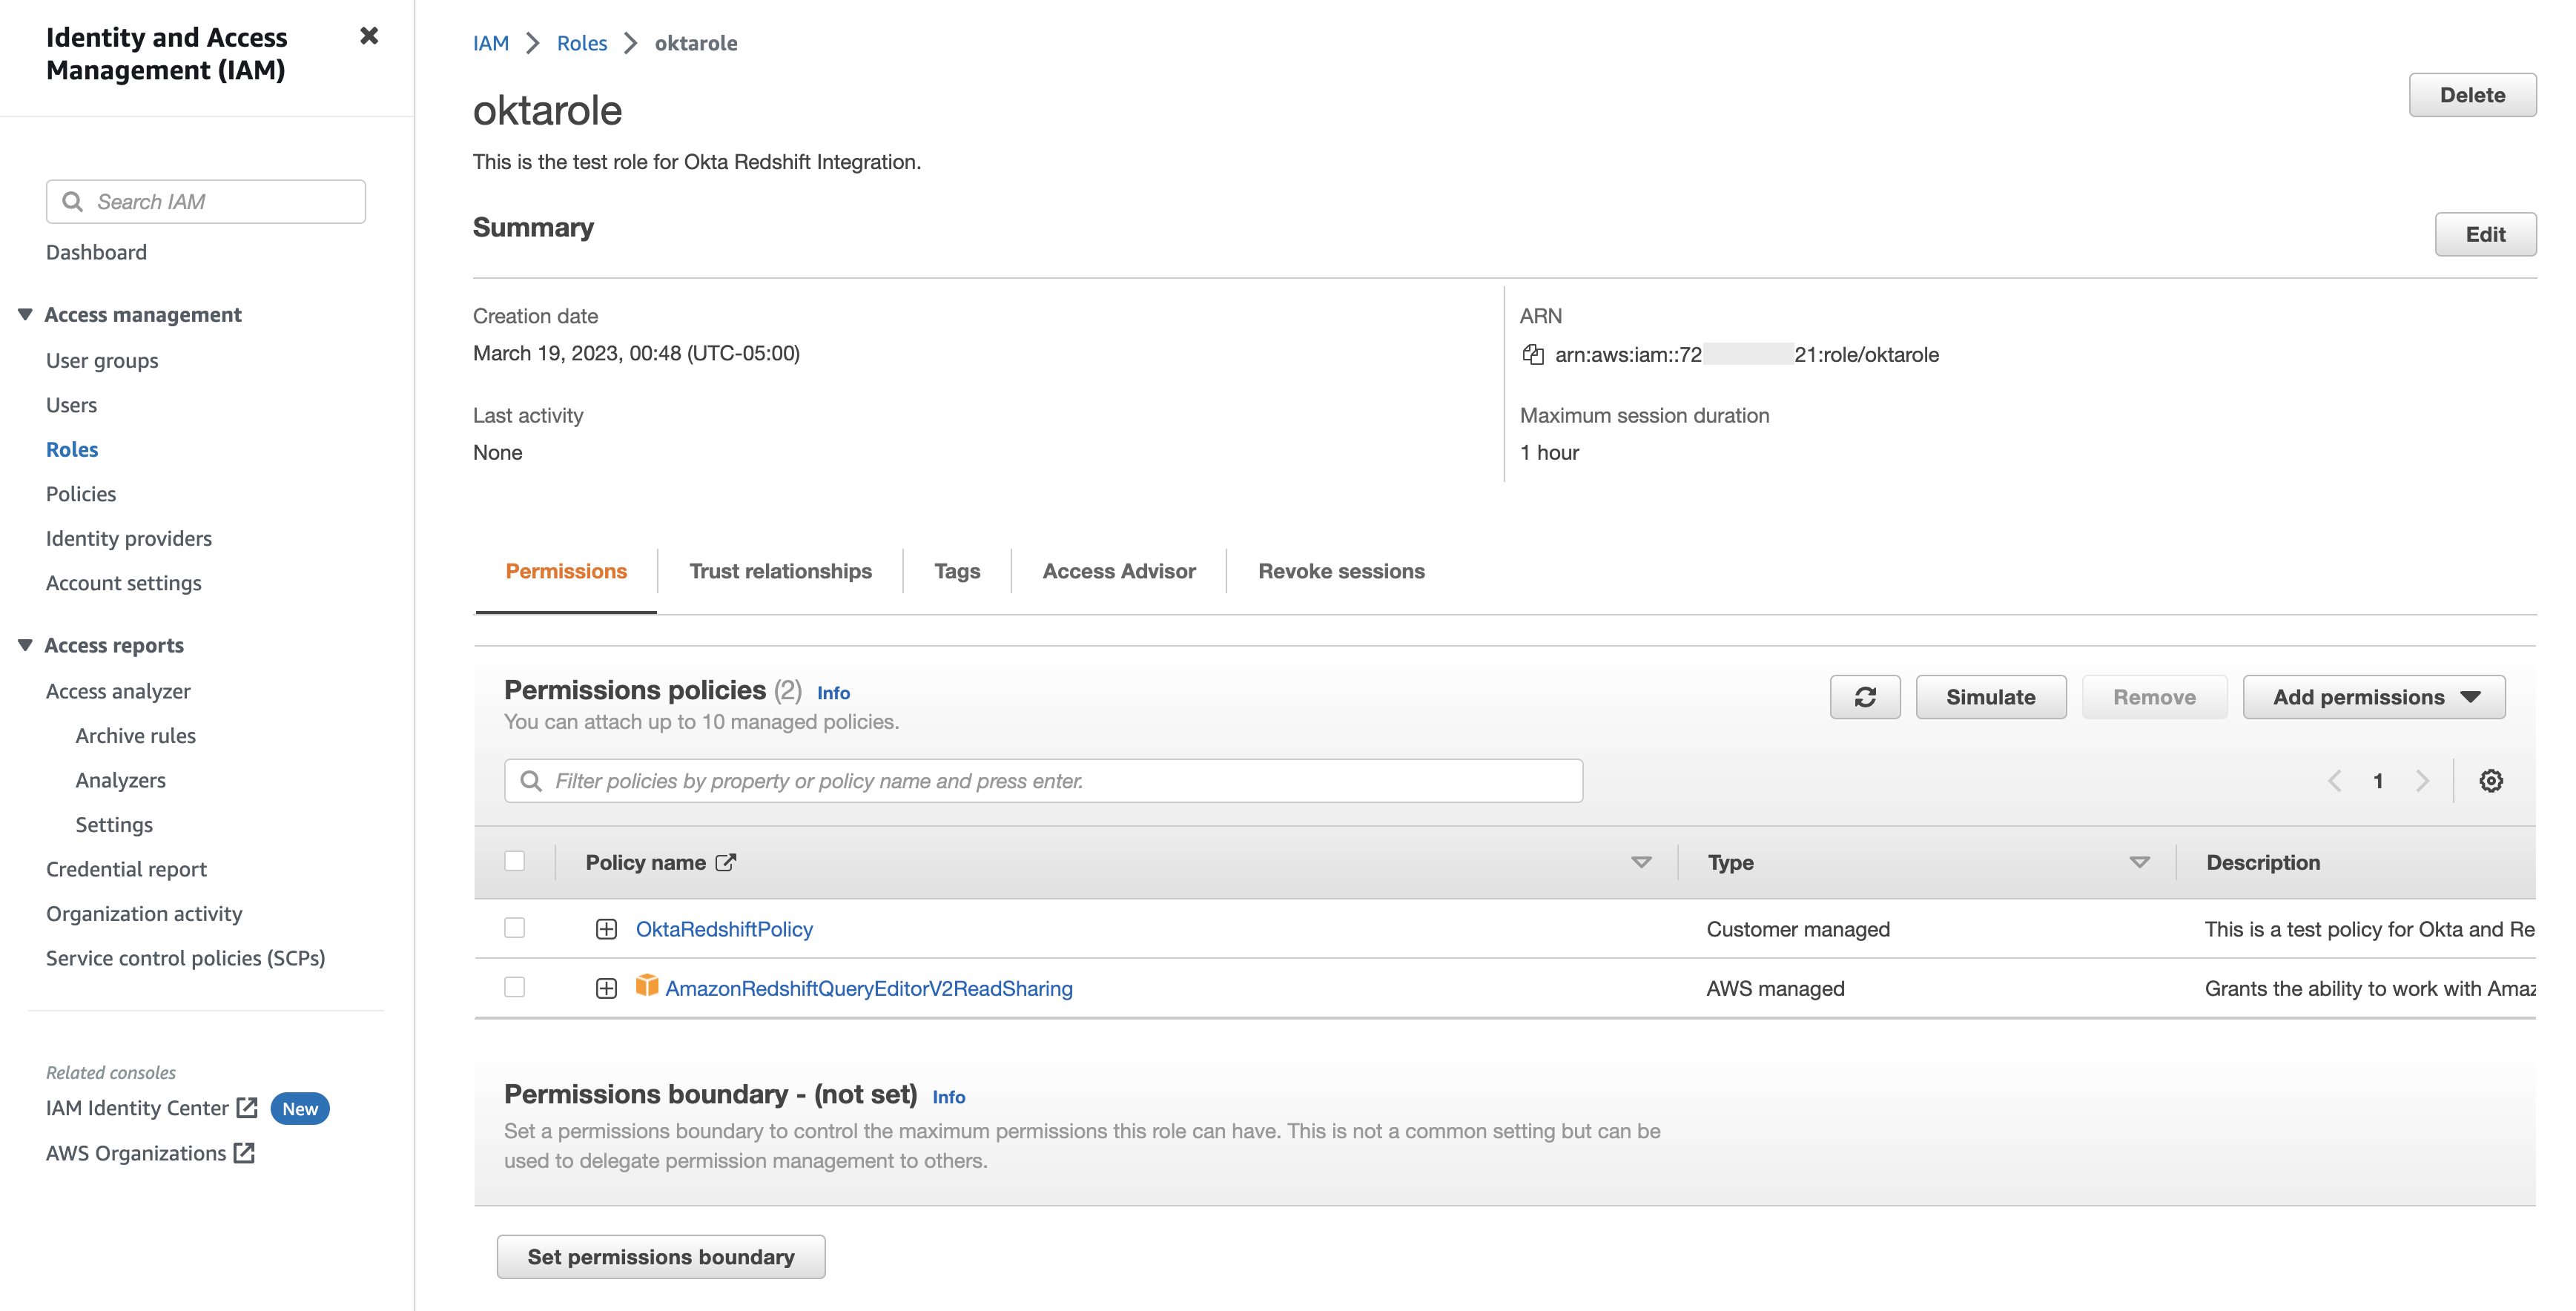
The following screenshot shows the trust relationships.
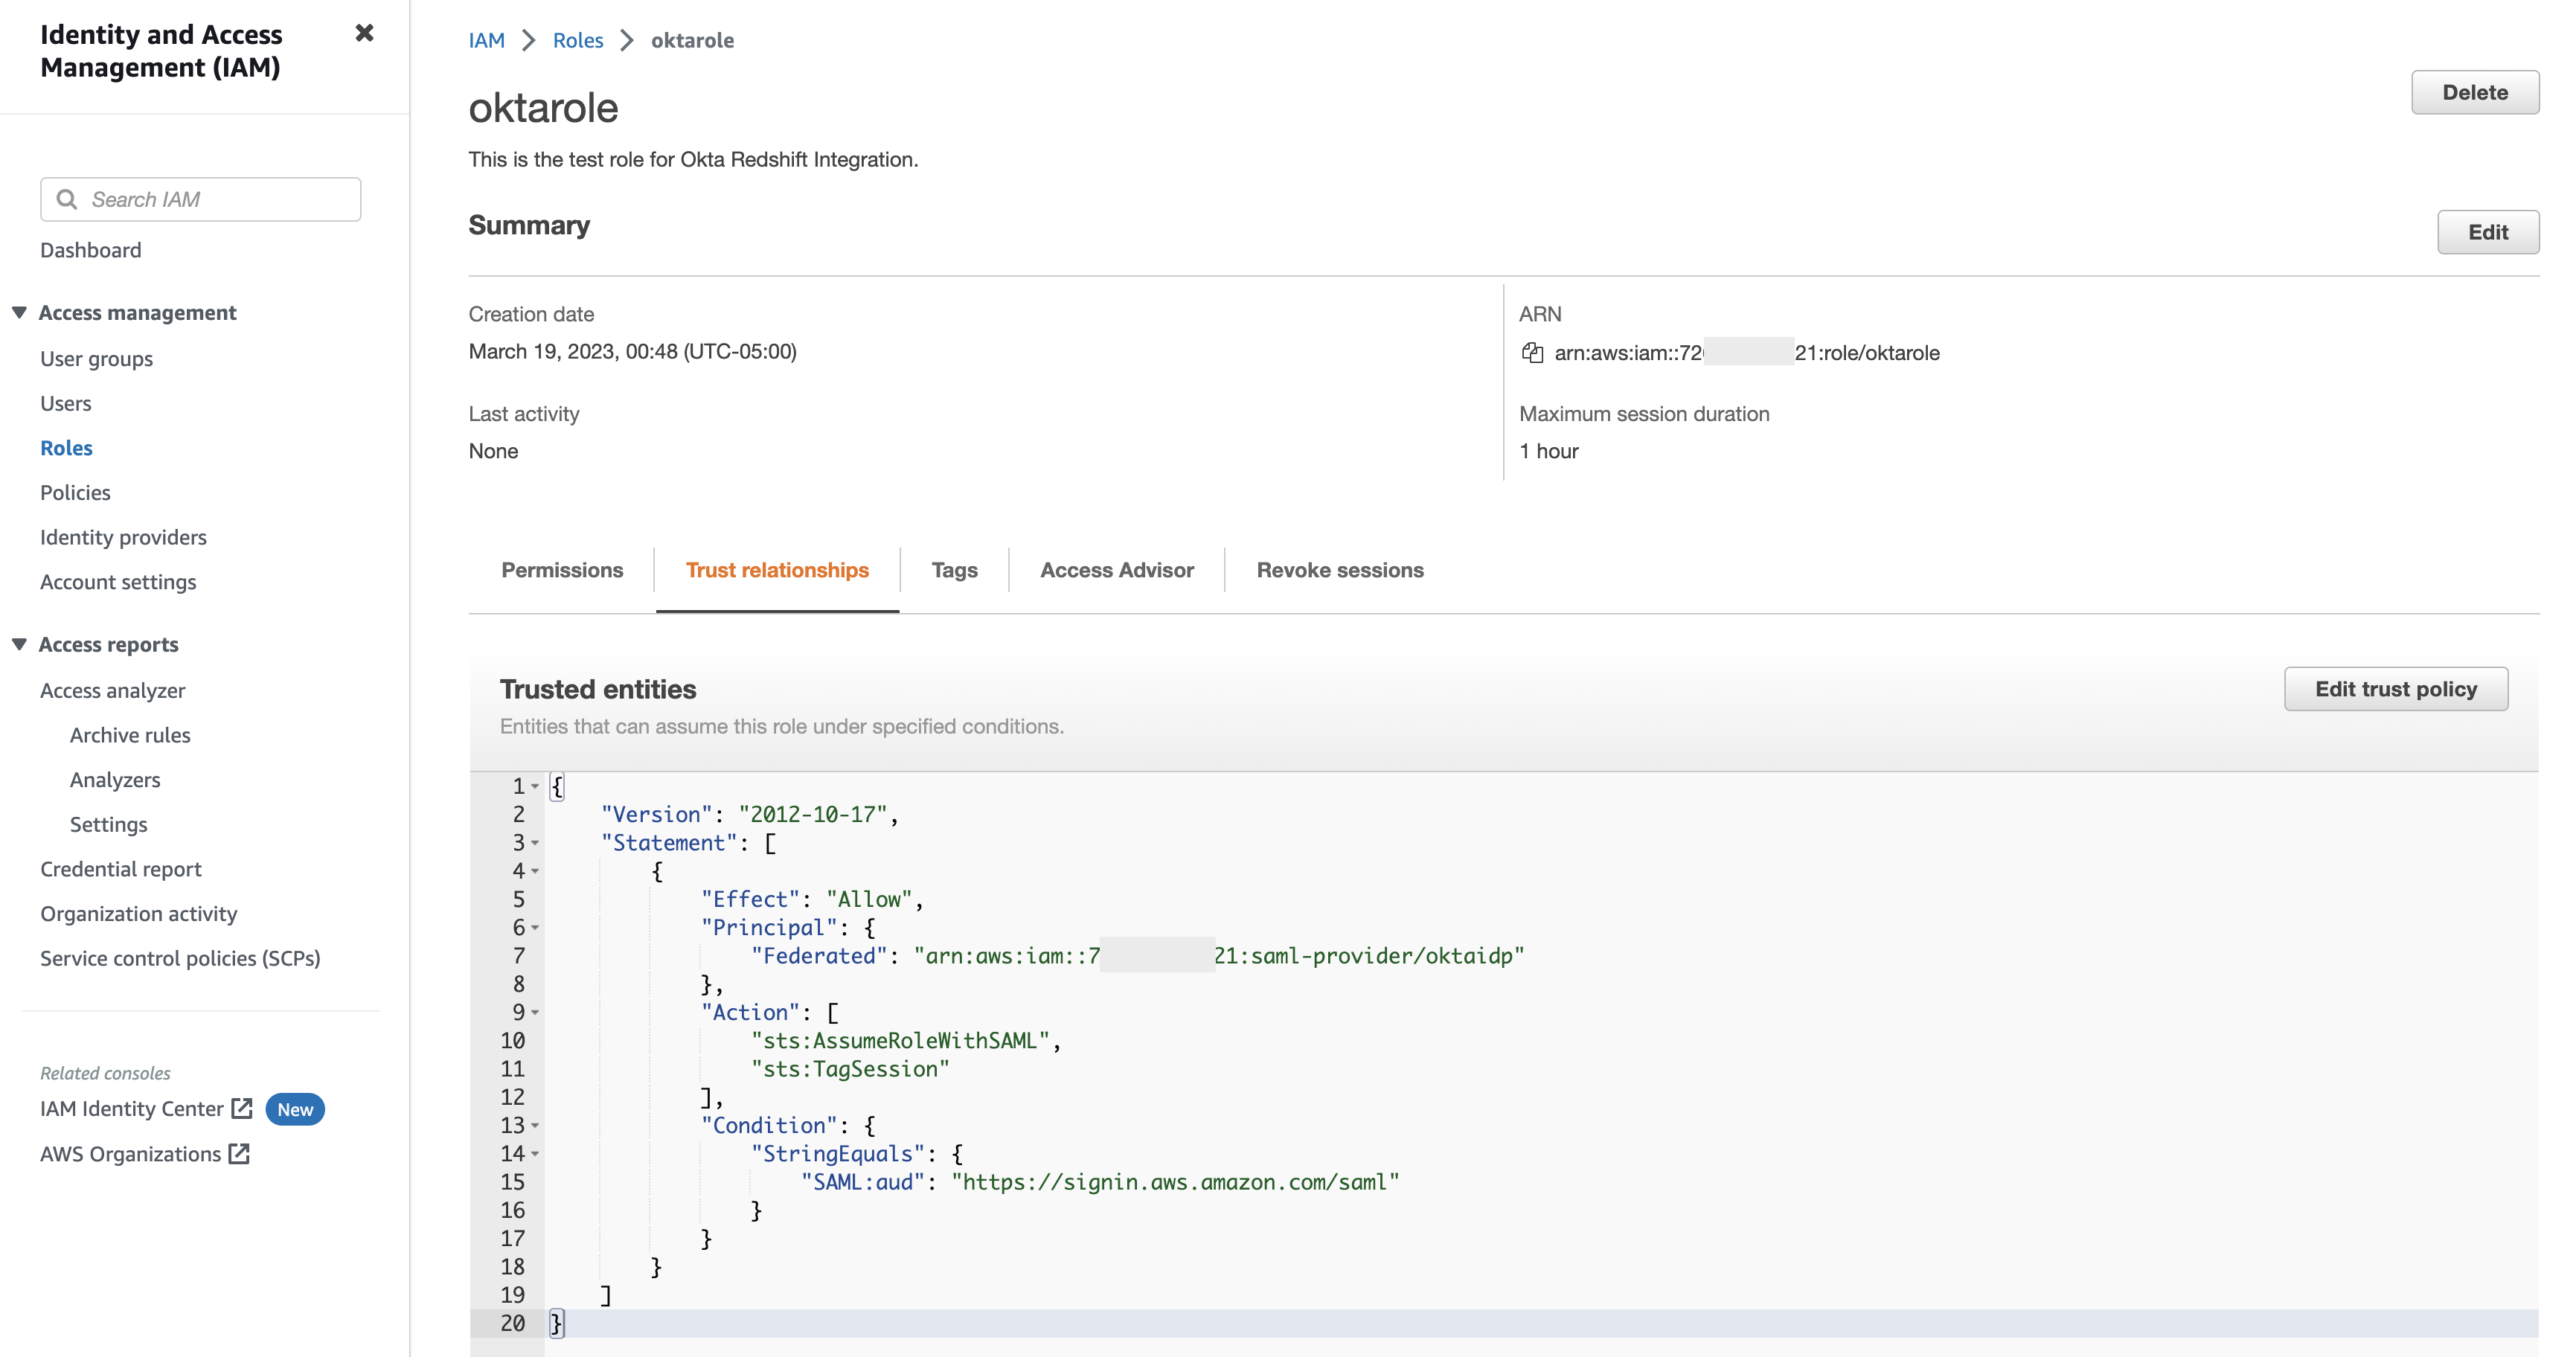
Update the advanced Okta Role Attribute
Complete the following steps:
- Switch back to Okta.com.
- Navigate to the application which you created earlier.
- Navigate to General and click Edit under SAML settings.
- Under Attribute Statements (optional), update the value for the attribute – https://aws.amazon.com/SAML/Attributes/Role, using the actual role and identity provider arn values from the above step. For example,
arn:aws:iam::123456789012:role/oktarole,arn:aws:iam::123456789012:saml-provider/oktaidp.
Configure Redshift Serverless role-based access
In this step, we create database roles in Amazon Redshift based on the groups that you created in Okta. Make sure the role name matches with the Okta Group name.
Amazon Redshift roles simplify managing privileges required for your end-users. In this post, we create two database roles, sales and finance, and grant them access to query tables with sales and finance data, respectively. You can download this sample SQL Notebook and import into Redshift Query Editor v2 to run all cells in the notebook used in this example. Alternatively, you can copy and enter the SQL into your SQL client.
The following is the syntax to create a role in Redshift Serverless:
For example:
Create the sales and finance database schema:
Create the tables:
The following is the syntax to grant permission to the Redshift Serverless role:
Grant relevant permission to the role as per your requirements. In the following example, we grant full permission to the role sales on sales_schema and only select permission on finance_schema to the role finance:
Federate to Redshift Serverless using Query Editor V2
The RedshiftDbRoles principal tag and DBGroups are both mechanisms that can be used to integrate with an IdP. However, federating with the RedshiftDbRoles principal has some clear advantages when it comes to connecting with an IdP because it provides automatic mapping between IdP groups and Amazon Redshift database roles. Overall, RedshiftDbRoles is more flexible, easier to manage, and more secure, making it the better option for integrating Amazon Redshift with your IdP.
Now you’re ready to connect to Redshift Serverless using the Query Editor V2 and federated login:
- Use the SSO URL you collected earlier and log in to your Okta account with your user credentials. For this demo, we log in with user Ethan.
- In the Query Editor v2, choose your Redshift Serverless instance (right-click) and choose Create connection.
- For Authentication, select Federated user.
- For Database, enter the database name you want to connect to.
- Choose Create Connection.
User Ethan will be able to access sales_schema tables. If Ethan tries to access the tables in finance_schema, he will get a permission denied error.

Configure the SQL client (SQL Workbench/J)
To set up SQL Workbench/J, complete the following steps:
- Create a new connection in SQL Workbench/J and choose Redshift Serverless as the driver.
- Choose Manage drivers and add all the files from the downloaded AWS JDBC driver pack .zip file (remember to unzip the .zip file).
- For Username and Password, enter the values that you set in Okta.

- Capture the values for
app_id,app_name, andidp_hostfrom the Okta app embed link, which can be found on the General tab of your application.

- Set the following extended properties:
- For app_id, enter the value from app embed link (for example,
0oa8p1o1RptSabT9abd0/avc8k7abc32lL4izh3b8). - For app_name, enter the value from app embed link (for example,
dev-123456_redshift_app_2). - For idp_host, enter the value from app embed link (for example,
dev-123456.okta.com). - For plugin_name, enter
com.amazon.redshift.plugin.OktaCredentialsProvider. The following screenshot shows the SQL Workbench/J extended properties.

- Choose OK.
- Choose Test from SQL Workbench/J to test the connection.
- When the connection is successful, choose OK.
- Choose OK to sign in with the users created.
- For app_id, enter the value from app embed link (for example,


User Ethan will be able to access the sales_schema tables. If Ethan tries to access the tables in the finance_schema, he will get a permission denied error.

Congratulations! You have federated with Redshift Serverless and Okta with SQL Workbench/J using RedshiftDbRoles.
[Optional] Implement MFA with SQL Client and Query Editor V2
Implementing MFA poses an additional challenge because the nature of multi-factor authentication is an asynchronous process between initiating the login (the first factor) and completing the login (the second factor). The SAML response will be returned to the appropriate listener in each scenario; the SQL Client or the AWS console in the case of QEV2. Depending on which login options you will be giving your users, you may need an additional Okta application. See below for the different scenarios:
- If you are ONLY using QEV2 and not using any other SQL client, then you can use MFA with Query Editor V2 with the above application. There are no changes required in the custom SAML application which we have created above.
- If you are NOT using QEV2 and only using third party SQL client (SQL Workbench/J etc), then you need to modify the above custom SAML app as mentioned below.
- If you want to use QEV2 and third-party SQL Client with MFA, then you need create an additional custom SAML app as mentioned below.
Prerequisites for MFA
Each identity provider (IdP) has step for enabling and managing MFA for your users. In the case of Okta, see the following guides on how to enable MFA using the Okta Verify application and by defining an authentication policy.
- Add Okta Verify as an authenticator
- Create an authentication policy
- Add an authentication policy rule
Steps to create/update SAML application which supports MFA for a SQL Client
- If creating a second app, follow all the steps which are described under section 1 (Create Okta SAML application).
- Open the custom SAML app and select General.
- Select Edit under SAML settings
- Click Next in General Settings
- Under General, update the Single sign-on URL to http://localhost:7890/redshift/
- Select Next followed by Finish.
Below is the screenshot from the MFA App after making above changes:

Configure SQL Client for MFA
To set up SQL Workbench/J, complete the following steps:
- Follow all the steps which are described under (Configure the SQL client (SQL Workbench/J))
- Modify your connection updating the extended properties:
- login_url – Get the Single Sign-on URL as shown in section -Collect Okta information. (For example,
https://dev-123456.okta.com/app/dev-123456_redshiftapp_2/abc8p6o5psS6xUhBJ517/sso/saml) - plugin_name –
com.amazon.redshift.plugin.BrowserSamlCredentialsProvider

- login_url – Get the Single Sign-on URL as shown in section -Collect Okta information. (For example,
- Choose OK
- Choose OK from SQL Workbench/J. You’re redirected to the browser to sign in with your Okta credentials.
- After that, you will get prompt for MFA. Choose either Enter a code or Get a push notification.

- Once authentication is successful, log in to be redirected to a page showing the connection as successful.

- With this connection profile, run the following query to return federated user name.




Troubleshooting
If your connection didn’t work, consider the following:
- Enable logging in the driver. For instructions, see Configure logging.
- Make sure to use the latest Amazon Redshift JDBC driver version.
- If you’re getting errors while setting up the application on Okta, make sure you have admin access.
- If you can authenticate via the SQL client but get a permission issue or can’t see objects, grant the relevant permission to the role, as detailed earlier in this post.
Clean up
When you’re done testing the solution, clean up the resources to avoid incurring future charges:
- Delete the Redshift Serverless instance by deleting both the workgroup and the namespace.
- Delete the IAM roles, IAM IdPs, and IAM policies.
Conclusion
In this post, we provided step-by-step instructions to integrate Redshift Serverless with Okta using the Amazon Redshift Query Editor V2 and SQL Workbench/J with the help of federated IAM roles and automatic database-role mapping. You can use a similar setup with any other SQL client (such as DBeaver or DataGrip) or business intelligence tool (such as Tableau Desktop). We also showed how Okta group membership is mapped automatically with Redshift Serverless roles to use role-based authentication seamlessly.
For more information about Redshift Serverless single sign-on using database roles, see Defining database roles to grant to federated users in Amazon Redshift Serverless.
About the Authors
 Maneesh Sharma is a Senior Database Engineer at AWS with more than a decade of experience designing and implementing large-scale data warehouse and analytics solutions. He collaborates with various Amazon Redshift Partners and customers to drive better integration.
 Debu Panda is a Senior Manager, Product Management at AWS. He is an industry leader in analytics, application platform, and database technologies, and has more than 25 years of experience in the IT world.
 Mohamed Shaaban is a Senior Software Engineer in Amazon Redshift and is based in Berlin, Germany. He has over 12 years of experience in the software engineering. He is passionate about cloud services and building solutions that delight customers. Outside of work, he is an amateur photographer who loves to explore and capture unique moments.
 Rajiv Gupta is Sr. Manager of Analytics Specialist Solutions Architects based out of Irvine, CA. He has 20+ years of experience building and managing teams who build data warehouse and business intelligence solutions.
 Amol Mhatre is a Database Engineer in Amazon Redshift and works on Customer & Partner engagements. Prior to Amazon, he has worked on multiple projects involving Database & ERP implementations.
 Ning Di is a Software Development Engineer at Amazon Redshift, driven by a genuine passion for exploring all aspects of technology.
 Harsha Kesapragada is a Software Development Engineer for Amazon Redshift with a passion to build scalable and secure systems. In the past few years, he has been working on Redshift Datasharing, Security and Redshift Serverless.
How Encored Technologies built serverless event-driven data pipelines with AWS
Post Syndicated from Younggu Yun original https://aws.amazon.com/blogs/big-data/how-encored-technologies-built-serverless-event-driven-data-pipelines-with-aws/
This post is a guest post co-written with SeonJeong Lee, JaeRyun Yim, and HyeonSeok Yang from Encored Technologies.
Encored Technologies (Encored) is an energy IT company in Korea that helps their customers generate higher revenue and reduce operational costs in renewable energy industries by providing various AI-based solutions. Encored develops machine learning (ML) applications predicting and optimizing various energy-related processes, and their key initiative is to predict the amount of power generated at renewable energy power plants.
In this post, we share how Encored runs data engineering pipelines for containerized ML applications on AWS and how they use AWS Lambda to achieve performance improvement, cost reduction, and operational efficiency. We also demonstrate how to use AWS services to ingest and process GRIB (GRIdded Binary) format data, which is a file format commonly used in meteorology to store and exchange weather and climate data in a compressed binary form. It allows for efficient data storage and transmission, as well as easy manipulation of the data using specialized software.
Business and technical challenge
Encored is expanding their business into multiple countries to provide power trading services for end customers. The amount of data and the number of power plants they need to collect data are rapidly increasing over time. For example, the volume of data required for training one of the ML models is more than 200 TB. To meet the growing requirements of the business, the data science and platform team needed to speed up the process of delivering model outputs. As a solution, Encored aimed to migrate existing data and run ML applications in the AWS Cloud environment to efficiently process a scalable and robust end-to-end data and ML pipeline.
Solution overview
The primary objective of the solution is to develop an optimized data ingestion pipeline that addresses the scaling challenges related to data ingestion. During its previous deployment in an on-premises environment, the time taken to process data from ingestion to preparing the training dataset exceeded the required service level agreement (SLA). One of the input datasets required for ML models is weather data supplied by the Korea Meteorological Administration (KMA). In order to use the GRIB datasets for the ML models, Encored needed to prepare the raw data to make it suitable for building and training ML models. The first step was to convert GRIB to the Parquet file format.
Encored used Lambda to run an existing data ingestion pipeline built in a Linux-based container image. Lambda is a compute service that lets you run code without provisioning or managing servers. Lambda runs your code on a high-availability compute infrastructure and performs all of the administration of the compute resources, including server and operating system maintenance, capacity provisioning and automatic scaling, and logging. AWS Lambda is triggered to ingest and process GRIB data files when they are uploaded to Amazon Simple Storage Service (Amazon S3). Once the files are processed, they are stored in Parquet format in the other S3 bucket. Encored receives GRIB files throughout the day, and whenever new files arrive, an AWS Lambda function runs a container image registered in Amazon Elastic Container Registry (ECR). This event-based pipeline triggers a customized data pipeline that is packaged in a container-based solution. Leveraging Amazon AWS Lambda, this solution is cost-effective, scalable, and high-performing.Encored uses Python as their preferred language.
The following diagram illustrates the solution architecture.
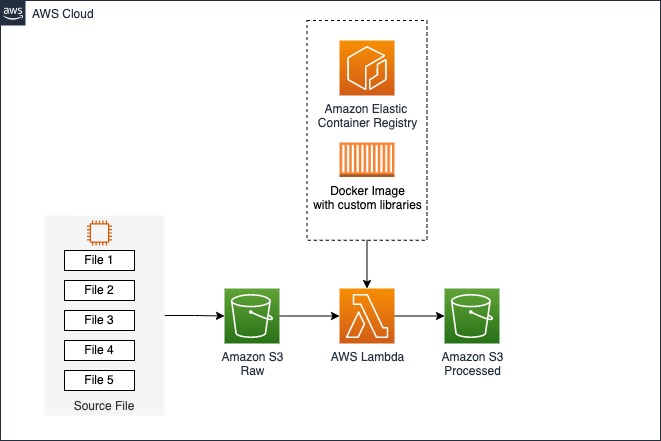
For data-intensive tasks such as extract, transform, and load (ETL) jobs and ML inference, Lambda is an ideal solution because it offers several key benefits, including rapid scaling to meet demand, automatic scaling to zero when not in use, and S3 event triggers that can initiate actions in response to object-created events. All this contributes to building a scalable and cost-effective data event-driven pipeline. In addition to these benefits, Lambda allows you to configure ephemeral storage (/tmp) between 512–10,240 MB. Encored used this storage for their data application when reading or writing data, enabling them to optimize performance and cost-effectiveness. Furthermore, Lambda’s pay-per-use pricing model means that users only pay for the compute time in use, making it a cost-effective solution for a wide range of use cases.
Prerequisites
For this walkthrough, you should have the following:
- An AWS account
- The AWS Command Line Interface (AWS CLI) installed
- The Docker CLI
- Your function codes
Build your application required for your Docker image
The first step is to develop an application that can ingest and process files. This application reads the bucket name and object key passed from a trigger added to Lambda function. The processing logic involves three parts: downloading the file from Amazon S3 into ephemeral storage (/tmp), parsing the GRIB formatted data, and saving the parsed data to Parquet format.
The customer has a Python script (for example, app.py) that performs these tasks as follows:
Prepare a Docker file
The second step is to create a Docker image using an AWS base image. To achieve this, you can create a new Dockerfile using a text editor on your local machine. This Dockerfile should contain two environment variables:
LAMBDA_TASK_ROOT=/var/taskLAMBDA_RUNTIME_DIR=/var/runtime
It’s important to install any dependencies under the ${LAMBDA_TASK_ROOT} directory alongside the function handler to ensure that the Lambda runtime can locate them when the function is invoked. Refer to the available Lambda base images for custom runtime for more information.
Build a Docker image
The third step is to build your Docker image using the docker build command. When running this command, make sure to enter a name for the image. For example:
docker build -t process-grib .
In this example, the name of the image is process-grib. You can choose any name you like for your Docker image.
Upload the image to the Amazon ECR repository
Your container image needs to reside in an Amazon Elastic Container Registry (Amazon ECR) repository. Amazon ECR is a fully managed container registry offering high-performance hosting, so you can reliably deploy application images and artifacts anywhere. For instructions on creating an ECR repository, refer to Creating a private repository.
The first step is to authenticate the Docker CLI to your ECR registry as follows:
The second step is to tag your image to match your repository name, and deploy the image to Amazon ECR using the docker push command:
Deploy Lambda functions as container images
To create your Lambda function, complete the following steps:
- On the Lambda console, choose Functions in the navigation pane.
- Choose Create function.
- Choose the Container image option.
- For Function name, enter a name.
- For Container image URI, provide a container image. You can enter the ECR image URI or browse for the ECR image.
- Under Container image overrides, you can override configuration settings such as the entry point or working directory that are included in the Dockerfile.
- Under Permissions, expand Change default execution role.
- Choose to create a new role or use an existing role.
- Choose Create function.
Key considerations
To handle a large amount of data concurrently and quickly, Encored needed to store GRIB formatted files in the ephemeral storage (/tmp) that comes with Lambda. To achieve this requirement, Encored used tempfile.NamedTemporaryFile, which allows users to create temporary files easily that are deleted when no longer needed. With Lambda, you can configure ephemeral storage between 512 MB–10,240 MB for reading or writing data, allowing you to run ETL jobs, ML inference, or other data-intensive workloads.
Business outcome
Hyoseop Lee (CTO at Encored Technologies) said, “Encored has experienced positive outcomes since migrating to AWS Cloud. Initially, there was a perception that running workloads on AWS would be more expensive than using an on-premises environment. However, we discovered that this was not the case once we started running our applications on AWS. One of the most fascinating aspects of AWS services is the flexible architecture options it provides for processing, storing, and accessing large volumes of data that are only required infrequently.”
Conclusion
In this post, we covered how Encored built serverless data pipelines with Lambda and Amazon ECR to achieve performance improvement, cost reduction, and operational efficiency.
Encored successfully built an architecture that will support their global expansion and enhance technical capabilities through AWS services and the AWS Data Lab program. Based on the architecture and various internal datasets Encored has consolidated and curated, Encored plans to provide renewable energy forecasting and energy trading services.
Thanks for reading this post and hopefully you found it useful. To accelerate your digital transformation with ML, AWS is available to support you by providing prescriptive architectural guidance on a particular use case, sharing best practices, and removing technical roadblocks. You’ll leave the engagement with an architecture or working prototype that is custom fit to your needs, a path to production, and deeper knowledge of AWS services. Please contact your AWS Account Manager or Solutions Architect to get started. If you don’t have an AWS Account Manager, please contact Sales.
To learn more about ML inference use cases with Lambda, check out the following blog posts:
- Machine learning inference at scale using AWS serverless
- Deploy a machine learning inference data capture solution on AWS Lambda
These resources will provide you with valuable insights and practical examples of how to use Lambda for ML inference.
About the Authors
 SeonJeong Lee is the Head of Algorithms at Encored. She is a data practitioner who finds peace of mind from beautiful codes and formulas.
 JaeRyun Yim is a Senior Data Scientist at Encored. He is striving to improve both work and life by focusing on simplicity and essence in my work.
 HyeonSeok Yang is the platform team lead at Encored. He always strives to work with passion and spirit to keep challenging like a junior developer, and become a role model for others.
 Younggu Yun works at AWS Data Lab in Korea. His role involves helping customers across the APAC region meet their business objectives and overcome technical challenges by providing prescriptive architectural guidance, sharing best practices, and building innovative solutions together.
Build efficient, cross-Regional, I/O-intensive workloads with Dask on AWS
Post Syndicated from Patrick O'Connor original https://aws.amazon.com/blogs/big-data/build-efficient-cross-regional-i-o-intensive-workloads-with-dask-on-aws/
Welcome to the era of data. The sheer volume of data captured daily continues to grow, calling for platforms and solutions to evolve. Services such as Amazon Simple Storage Service (Amazon S3) offer a scalable solution that adapts yet remains cost-effective for growing datasets. The Amazon Sustainability Data Initiative (ASDI) uses the capabilities of Amazon S3 to provide a no-cost solution for you to store and share climate science workloads across the globe. Amazon’s Open Data Sponsorship Program allows organizations to host free of charge on AWS.
Over the last decade, we’ve seen a surge in data science frameworks coming to fruition, along with mass adoption by the data science community. One such framework is Dask, which is powerful for its ability to provision an orchestration of worker compute nodes, thereby accelerating complex analysis on large datasets.
In this post, we show you how to deploy a custom AWS Cloud Development Kit (AWS CDK) solution that extends Dask’s functionality to work inter-Regionally across Amazon’s global network. The AWS CDK solution deploys a network of Dask workers across two AWS Regions, connecting into a client Region. For more information, refer to Guidance for Distributed Computing with Cross Regional Dask on AWS and the GitHub repo for open-source code.
After deployment, the user will have access to a Jupyter notebook, where they can interact with two datasets from ASDI on AWS: Coupled Model Intercomparison Project 6 (CMIP6) and ECMWF ERA5 Reanalysis. CMIP6 focuses on the sixth phase of global coupled ocean-atmosphere general circulation model ensemble; ERA5 is the fifth generation of ECMWF atmospheric reanalyses of the global climate, and the first reanalysis produced as an operational service.
This solution was inspired by work with a key AWS customer, the UK Met Office. The Met Office was founded in 1854 and is the national meteorological service for the UK. They provide weather and climate predictions to help you make better decisions to stay safe and thrive. A collaboration between the Met Office and EUMETSAT, detailed in Data Proximate Computation on a Dask Cluster Distributed Between Data Centres, highlights the growing need to develop a sustainable, efficient, and scalable data science solution. This solution achieves this by bringing compute closer to the data, rather than forcing the data to come closer to compute resources, which adds cost, latency, and energy.
Solution overview
Each day, the UK Met Office produces up to 300 TB of weather and climate data, a portion of which is published to ASDI. These datasets are distributed across the world and hosted for public use. The Met Office would like to enable consumers to make the more of their data to help inform critical decisions on addressing issues such as better preparation for climate change-induced wildfires and floods, and reducing food insecurity through better crop yield analysis.
Traditional solutions in use today, particularly with climate data, are time consuming and unsustainable, replicating datasets cross Regions. Unnecessary data transfer on the petabyte scale is costly, slow, and consumes energy.
We estimated that if this practice were adopted by the Met Office users, the equivalent of 40 homes’ daily power consumption could be saved every day, and they could also reduce the transfer of data between regions.
The following diagram illustrates the solution architecture.

The solution can be broken into three major segments: client, workers, and network. Let’s dive into each and see how they come together.
Client
The client represents the source Region where data scientists connect. This Region (Region A in the diagram) contains an Amazon SageMaker notebook, an Amazon OpenSearch Service domain, and a Dask scheduler as key components. System administrators have access to the built-in Dask dashboard exposed via an Elastic Load Balancer.
Data scientists have access to the Jupyter notebook hosted on SageMaker. The notebook is able to connect and run workloads on the Dask scheduler. The OpenSearch Service domain stores metadata on the datasets connected at the Regions. Notebook users can query this service to retrieve details such as the correct Region of Dask workers without needing to know the data’s Regional location beforehand.
Worker
Each of the worker Regions (Regions B and C in the diagram) is comprised of an Amazon Elastic Container Service (Amazon ECS) cluster of Dask workers, an Amazon FSx for Lustre file system, and a standalone Amazon Elastic Compute Cloud (Amazon EC2) instance. FSx for Lustre allows Dask workers to access and process Amazon S3 data from a high-performance file system by linking your file systems to S3 buckets. It provides sub-millisecond latencies, up to hundreds of GBs/s of throughput, and millions of IOPS. A key feature of Lustre is that only the file system’s metadata is synced. Lustre manages the balance of files to be loaded in and kept warm, based on demand.
Worker clusters scale based on CPU usage, provision additional workers in extended periods of demand, and scale down as resources become idle.
Each night at 0:00 UTC, a data sync job prompts the Lustre file system to resync with the attached S3 bucket, and pulls an up-to-date metadata catalog of the bucket. Subsequently, the standalone EC2 instance pushes these updates into OpenSearch Service respective to that Region’s index. OpenSearch Service provides the necessary information to the client as to which pool of workers should be called upon for a particular dataset.
Network
Networking forms the crux of this solution, utilizing Amazon’s internal backbone network. By using AWS Transit Gateway, we’re able to connect each of the Regions to each other without needing to traverse the public internet. Each of the workers are able to connect dynamically into the Dask scheduler, allowing data scientists to run inter-regional queries through Dask.
Prerequisites
The AWS CDK package uses the TypeScript programming language. Follow the steps in Getting Started for AWS CDK to set up your local environment and bootstrap your development account (you’ll need to bootstrap all Regions specified in the GitHub repo).
For a successful deployment, you’ll need Docker installed and running on your local machine.
Deploy the AWS CDK package
Deploying an AWS CDK package is straightforward. After you install the prerequisites and bootstrap your account, you can proceed with downloading the code base.
- Download the GitHub repository:
- Install node modules:
- Deploy the AWS CDK:
The stack can take over an hour and a half to deploy.
Code walkthrough
In this section, we inspect some of the key features of the code base. If you’d like to inspect the full code base, refer to the GitHub repository.
Configure and customize your stack
In the file bin/variables.ts, you’ll find two variable declarations: one for the client and one for workers. The client declaration is a dictionary with a reference to a Region and CIDR range. Customizing these variables will change both the Region and CIDR range of where client resources will deploy.
The worker variable copies this same functionality; however, it’s a list of dictionaries to accommodate adding or subtracting datasets the user wishes to include. Additionally, each dictionary contains the added fields of dataset and lustreFileSystemPath. Dataset is used to specify the connecting S3 URI for Lustre to connect to. The lustreFileSystemPath variable is used as a mapping for how the user wants that dataset to map locally on the worker file system. See the following code:
Dynamically publish the scheduler IP
A challenge inherent to the cross-Regional nature of this project was maintaining a dynamic connection between the Dask workers and the scheduler. How could we publish an IP address, which is capable of changing, across AWS Regions? We were able to accomplish this through the use of AWS Cloud Map and associate-vpc-with-hosted-zone. The service abstracts allowing AWS to manage this DNS namespace privately. See the following code:
Jupyter notebook UI
The Jupyter notebook hosted on SageMaker provides scientists with a ready-made environment for deployment to easily connect and experiment on the loaded datasets. We used a lifecycle configuration script to provision the notebook with a preconfigured developer environment and example code base. See the following code:
Dask worker nodes
When it comes to the Dask workers, greater customizability is provided, more specifically on instance type, threads per container, and scaling alarms. By default, the workers provision on instance type m5d.4xlarge, mount to the Lustre file system on launch, and subdivide its workers and threads dynamically to ports. All this is optionally customizable. See the following code:
Performance
To assess performance, we use a sample computation and plotting of air temperature at 2 meters based on the difference between CMIP6 prediction for a month and ERA5 mean air temperature for 10 years. We set a benchmark of two workers in each Region and assess the difference in time reduction as additional workers were added. In theory, as the solution scales, there should be a productive material difference in reducing overall time.
The following table summarizes our dataset details.
| Dataset | Variables | Disk Size | Xarray Dataset Size | Region |
| ERA5 | 2011–2020 (120 netcdf files) | 53.5GB | 364.1 GB | us-east-1 |
| CMIP6 | 1.13GB | 0.11 GB | us-west-2 |
The following table shows the results collected, showcasing the time (in seconds) for each computation and prediction in three stages in computing CMIP6 prediction, ERA5, and difference.
| . | . | Number of Workers | |||
| Compute | Region | 2(CMIP) + 2(ERA) | 2(CMIP) + 4(ERA) | 2(CMIP) + 8(ERA) |
2(CMIP) + 12(ERA) |
CMIP6 (predicted_tas_regridded) |
us-west-2 | 11.8 | 11.5 | 11.2 | 11.6 |
ERA5 (historic_temp_regridded) |
us-east-1 | 1512 | 711 | 427 | 202 |
Difference (propogated pool) |
us-west-2 and us-east-1 | 1527 | 906 | 469 | 251 |
The following graph visualizes the performance and scale.
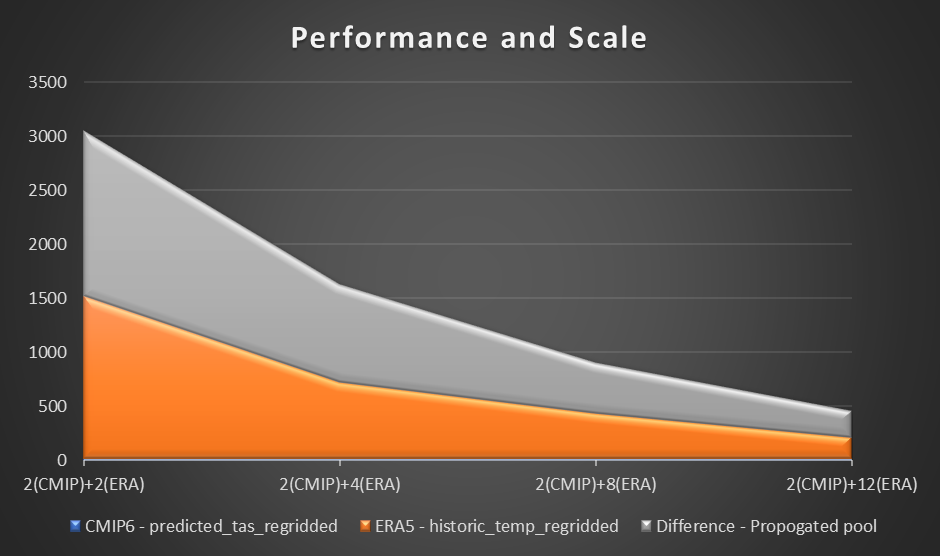
From our experiment, we observed a linear improvement on computation for the ERA5 dataset as the number of workers increased. As the numbers of workers increased, computation times were at times halved.
Jupyter notebook
As part of the solution launch, we deploy a preconfigured Jupyter notebook to help test the cross-Regional Dask solution. The notebook demonstrates the removed worry of needing to know the Regional location of datasets, instead querying a catalog through a series of Jupyter notebooks running in the background.
To get started, follow the instructions in this section.
The code for the notebooks can be found in lib/SagemakerCode with the primary notebook being ux_notebook.ipynb. This notebook calls upon other notebooks, triggering helper scripts. ux_notebook is designed to be the entry point for scientists, without the need for going elsewhere.
To get started, open this notebook in SageMaker after you have deployed the AWS CDK. The AWS CDK creates a notebook instance with all of the files in the repository loaded and backed up to an AWS CodeCommit repository.
To run the application, open and run the first cell of ux_notebook. This cell runs the get_variables notebook in the background, which prompts you for an input for the data you would like to select. We include an example; however, note that questions will only appear after the previous option has been selected. This is intentional in limiting the drop-down choices and is optionally configurable by editing the get_variables notebook.
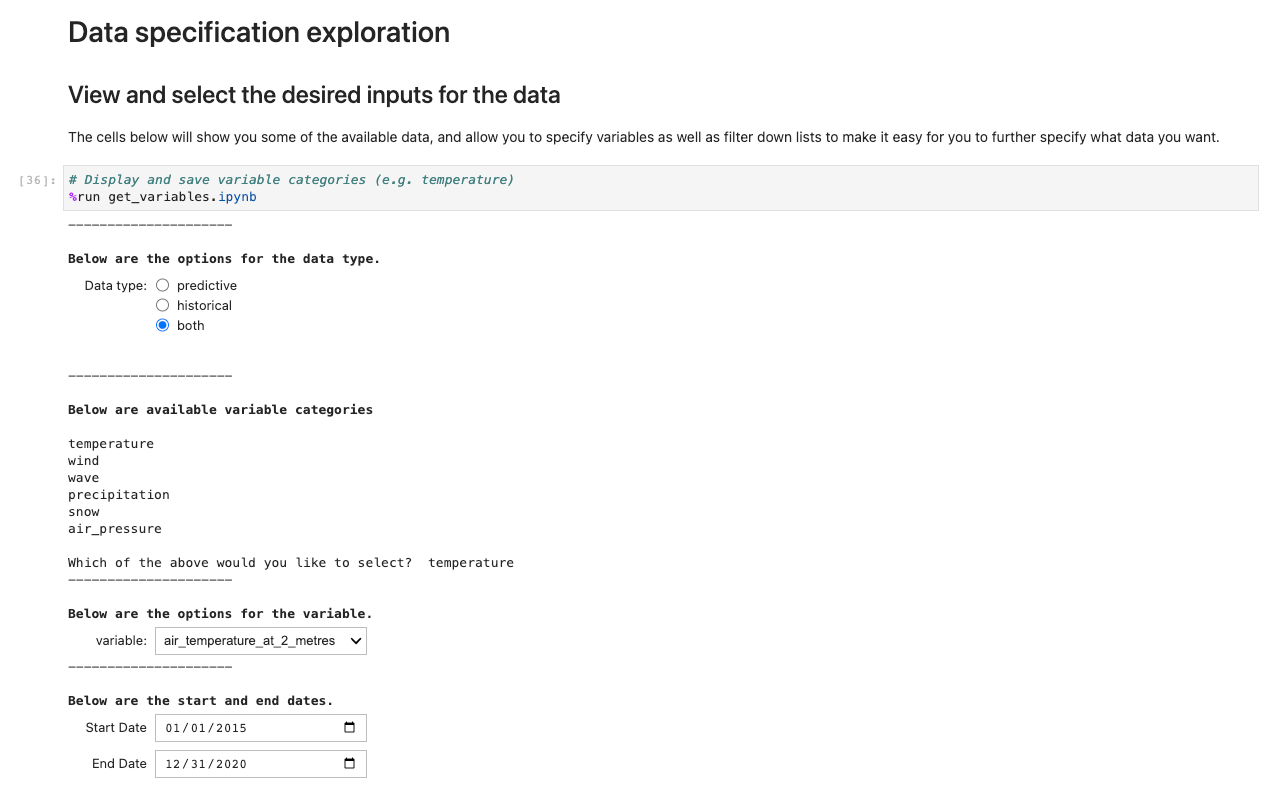
The preceding code stores variables globally so that other notebooks can retrieve and load your selection of choices. For demonstration, the next cell should output the save variables from before.
Next, a prompt for further data specifications appears. This cell refines the data you’re after by presenting the IDs of tables in human-readable format. Users select as if it were a form, but the titles map to tables in the background that help the system retrieve the appropriate datasets.
After you have stored all your choices and selection cells, load the data into the Regions by running the cell in the Getting the data set section. The %%capture command will suppress unnecessary outputs from the get_data notebook. Note you may remove this to inspect outputs from the other notebooks. Data is then retrieved in the backend.
While other notebooks are being run in the background, the only touchpoint for the user is the ux_notebook. This is to abstract the tedious process of importing data into a format any user is able to follow with ease.
With the data now loaded, we can start interacting with it. The following cells are examples of calculations you may run on weather data. Using xarrays, we import, calculate, and then plot those datasets.
Our sample illustrates a plot of predictive data retrieving data, running the computation, and plotting the results in under 7.5 seconds—orders of magnitude faster than a typical approach.
Under the hood
The notebooks get_catalog_input and get_variables use the library ipywidgets to display widgets such as drop-downs and multi-box selections. These options are saved globally using the %%store command so that they can be accessed from the ux_notebook. One of the options prompts you on whether you want historical data, predictive data, or both. This variable is passed to the get_data notebook to determine which subsequent notebooks to run.
The get_data notebook first retrieves the shared OpenSearch Service domain saved to AWS Systems Manager Parameter Store. This domain allows our notebook to run a query on collecting information that will indicate where the selected datasets are stored Regionally. With those datasets located Regionally, the notebook will make a connection attempt to the Dask scheduler, passing the information collected from OpenSearch Service. The Dask scheduler in turn will be able to call on workers in the correct Regions.
How to customize and continue development
These notebooks are meant to be an example of how you can create a way for users to interface and interact with the data. The notebook in this post serves as an illustration for what’s possible, and we invite you to continue building upon the solution to further improve user engagement. The core part of this solution is the backend technology, but without some mechanism to interact with that backend, users won’t realize the full potential of the solution.
Clean up
To avoid incurring future charges, delete the resources. Let’s destroy our deployed solution with the following command:
Conclusion
This post showcases the extension of Dask inter-Regionally on AWS, and a possible integration with public datasets on AWS. The solution was built as a generic pattern, and further datasets can be loaded in to accelerate high I/O analyses on complex data.
Data is transforming every field and every business. However, with data growing faster than most companies can keep track of, collecting data and getting value out of that data is challenging. A modern data strategy can help you create better business outcomes with data. AWS provides the most complete set of services for the end-to-end data journey to help you unlock value from your data and turn it into insight.
To learn more about the various ways to use your data on the cloud, visit the AWS Big Data Blog. We further invite you to comment with your thoughts on this post, and whether this is a solution you plan on trying out.
About the Authors
 Patrick O’Connor is a WWSO Prototyping Engineer based in London. He is a creative problem-solver, adaptable across a wide range of technologies, such as IoT, serverless tech, 3D spatial tech, and ML/AI, along with a relentless curiosity on how technology can continue to evolve everyday approaches.
 Chakra Nagarajan is a Principal Machine Learning Prototyping SA with 21 years of experience in machine learning, big data, and high-performance computing. In his current role, he helps customers solve real-world complex business problems by building prototypes with end-to-end AI/ML solutions in cloud and edge devices. His ML specialization includes computer vision, natural language processing, time series forecasting, and personalization.
 Val Cohen is a senior WWSO Prototyping Engineer based in London. A problem solver by nature, Val enjoys writing code to automate processes, build customer obsessed tools, and create infrastructure for various applications for her global customer base. Val has experience across a wide variety of technologies, such as front-end web development, backend work, and AI/ML.
 Niall Robinson is Head of product futures at the UK Met Office. He and his team explore new ways the Met Office can provide value through product innovation and strategic partnerships. He’s had a varied career, leading a multidisciplinary informatics R&D team, academic research in data science, and field scientist along with climate modeler expertise.