Tag Archives: Customer Enablement

Your MySQL 5.7 and PostgreSQL 11 databases will be automatically enrolled into Amazon RDS Extended Support

Post Syndicated from Channy Yun original https://aws.amazon.com/blogs/aws/your-mysql-5-7-and-postgresql-11-databases-will-be-automatically-enrolled-into-amazon-rds-extended-support/

Today, we are announcing that your MySQL 5.7 and PostgreSQL 11 database instances running on Amazon Aurora and Amazon Relational Database Service (Amazon RDS) will be automatically enrolled into Amazon RDS Extended Support starting on February 29, 2024.

This will help avoid unplanned downtime and compatibility issues that can arise with automatically upgrading to a new major version. This provides you with more control over when you want to upgrade the major version of your database.

This automatic enrollment may mean that you will experience higher charges when RDS Extended Support begins. You can avoid these charges by upgrading your database to a newer DB version before the start of RDS Extended Support.

What is Amazon RDS Extended Support?
In September 2023, we announced Amazon RDS Extended Support, which allows you to continue running your database on a major engine version past its RDS end of standard support date on Amazon Aurora or Amazon RDS at an additional cost.

Until community end of life (EoL), the MySQL and PostgreSQL open source communities manage common vulnerabilities and exposures (CVE) identification, patch generation, and bug fixes for the respective engines. The communities release a new minor version every quarter containing these security patches and bug fixes until the database major version reaches community end of life. After the community end of life date, CVE patches or bug fixes are no longer available and the community considers those engines unsupported. For example, MySQL 5.7 and PostgreSQL 11 are no longer supported by the communities as of October and November 2023 respectively. We are grateful to the communities for their continued support of these major versions and a transparent process and timeline for transitioning to the newest major version.

With RDS Extended Support, Amazon Aurora and RDS takes on engineering the critical CVE patches and bug fixes for up to three years beyond a major version’s community EoL. For those 3 years, Amazon Aurora and RDS will work to identify CVEs and bugs in the engine, generate patches and release them to you as quickly as possible. Under RDS Extended Support, we will continue to offer support, such that the open source community’s end of support for an engine’s major version does not leave your applications exposed to critical security vulnerabilities or unresolved bugs.

You might wonder why we are charging for RDS Extended Support rather than providing it as part of the RDS service. It’s because the engineering work for maintaining security and functionality of community EoL engines requires AWS to invest developer resources for critical CVE patches and bug fixes. This is why RDS Extended Support is only charging customers who need the additional flexibility to stay on a version past community EoL.

RDS Extended Support may be useful to help you meet your business requirements for your applications if you have particular dependencies on a specific MySQL or PostgreSQL major version, such as compatibility with certain plugins or custom features. If you are currently running on-premises database servers or self-managed Amazon Elastic Compute Cloud (Amazon EC2) instances, you can migrate to Amazon Aurora MySQL-Compatible Edition, Amazon Aurora PostgreSQL-Compatible Edition, Amazon RDS for MySQL, Amazon RDS for PostgreSQL beyond the community EoL date, and continue to use these versions these versions with RDS Extended Support while benefiting from a managed service. If you need to migrate many databases, you can also utilize RDS Extended Support to split your migration into phases, ensuring a smooth transition without overwhelming IT resources.

In 2024, RDS Extended Support will be available for RDS for MySQL major versions 5.7 and higher, RDS for PostgreSQL major versions 11 and higher, Aurora MySQL-compatible version 2 and higher, and Aurora PostgreSQL-compatible version 11 and higher. For a list of all future supported versions, see Supported MySQL major versions on Amazon RDS and Amazon Aurora major versions in the AWS documentation.

Community major version RDS/Aurora version Community end of life date End of RDS standard support date Start of RDS Extended Support pricing End of RDS Extended Support
MySQL 5.7 RDS for MySQL 5.7 October 2023 February 29, 2024 March 1, 2024 February 28, 2027
Aurora MySQL 2 October 31, 2024 December 1, 2024
PostgreSQL 11 RDS for PostgreSQL 11 November 2023 March 31, 2024 April 1, 2024 March 31, 2027
Aurora PostgreSQL 11 February 29, 2024

RDS Extended Support is priced per vCPU per hour. Learn more about pricing details and timelines for RDS Extended Support at Amazon Aurora pricing, RDS for MySQL pricing, and RDS for PostgreSQL pricing. For more information, see the blog posts about Amazon RDS Extended Support for MySQL and PostgreSQL databases in the AWS Database Blog.

Why are we automatically enrolling all databases to Amazon RDS Extended Support?
We had originally informed you that RDS Extended Support would provide the opt-in APIs and console features in December 2023. In that announcement, we said that if you decided not to opt your database in to RDS Extended Support, it would automatically upgrade to a newer engine version starting on March 1, 2024. For example, you would be upgraded from Aurora MySQL 2 or RDS for MySQL 5.7 to Aurora MySQL 3 or RDS for MySQL 8.0 and from Aurora PostgreSQL 11 or RDS for PostgreSQL 11 to Aurora PostgreSQL 15 and RDS for PostgreSQL 15, respectively.

However, we heard lots of feedback from customers that these automatic upgrades may cause their applications to experience breaking changes and other unpredictable behavior between major versions of community DB engines. For example, an unplanned major version upgrade could introduce compatibility issues or downtime if applications are not ready for MySQL 8.0 or PostgreSQL 15.

Automatic enrollment in RDS Extended Support gives you additional time and more control to organize, plan, and test your database upgrades on your own timeline, providing you flexibility on when to transition to new major versions while continuing to receive critical security and bug fixes from AWS.

If you’re worried about increased costs due to automatic enrollment in RDS Extended Support, you can avoid RDS Extended Support and associated charges by upgrading before the end of RDS standard support.

How to upgrade your database to avoid RDS Extended Support charges
Although RDS Extended Support helps you schedule your upgrade on your own timeline, sticking with older versions indefinitely means missing out on the best price-performance for your database workload and incurring additional costs from RDS Extended Support.

MySQL 8.0 on Aurora MySQL, also known as Aurora MySQL 3, unlocks support for popular Aurora features, such as Global Database, Amazon RDS Proxy, Performance Insights, Parallel Query, and Serverless v2 deployments. Upgrading to RDS for MySQL 8.0 provides features including up to three times higher performance versus MySQL 5.7, such as Multi-AZ cluster deployments, Optimized Reads, Optimized Writes, and support for AWS Graviton2 and Graviton3-based instances.

PostgreSQL 15 on Aurora PostgreSQL supports the Aurora I/O Optimized configuration, Aurora Serverless v2, Babelfish for Aurora PostgreSQL, pgvector extension, Trusted Language Extensions for PostgreSQL (TLE), and AWS Graviton3-based instances as well as community enhancements. Upgrading to RDS for PostgreSQL 15 provides features such as Multi-AZ DB cluster deployments, RDS Optimized Reads, HypoPG extension, pgvector extension, TLEs for PostgreSQL, and AWS Graviton3-based instances.

Major version upgrades may make database changes that are not backward-compatible with existing applications. You should manually modify your database instance to upgrade to the major version. It is strongly recommended that you thoroughly test any major version upgrade on non-production instances before applying it to production to ensure compatibility with your applications. For more information about an in-place upgrade from MySQL 5.7 to 8.0, see the incompatibilities between the two versions, Aurora MySQL in-place major version upgrade, and RDS for MySQL upgrades in the AWS documentation. For the in-place upgrade from PostgreSQL 11 to 15, you can use the pg_upgrade method.

To minimize downtime during upgrades, we recommend using Fully Managed Blue/Green Deployments in Amazon Aurora and Amazon RDS. With just a few steps, you can use Amazon RDS Blue/Green Deployments to create a separate, synchronized, fully managed staging environment that mirrors the production environment. This involves launching a parallel green environment with upper version replicas of your production databases lower version. After validating the green environment, you can shift traffic over to it. Then, the blue environment can be decommissioned. To learn more, see Blue/Green Deployments for Aurora MySQL and Aurora PostgreSQL or Blue/Green Deployments for RDS for MySQL and RDS for PostgreSQL in the AWS documentation. In most cases, Blue/Green Deployments are the best option to reduce downtime, except for limited cases in Amazon Aurora or Amazon RDS.

For more information on performing a major version upgrade in each DB engine, see the following guides in the AWS documentation.

Now available
Amazon RDS Extended Support is now available for all customers running Amazon Aurora and Amazon RDS instances using MySQL 5.7, PostgreSQL 11, and higher major versions in AWS Regions, including the AWS GovCloud (US) Regions beyond the end of the standard support date in 2024. You don’t need to opt in to RDS Extended Support, and you get the flexibility to upgrade your databases and continued support for up to 3 years.

Learn more about RDS Extended Support in the Amazon Aurora User Guide and the Amazon RDS User Guide. For pricing details and timelines for RDS Extended Support, see Amazon Aurora pricing, RDS for MySQL pricing, and RDS for PostgreSQL pricing.

Please send feedback to AWS re:Post for Amazon RDS and Amazon Aurora or through your usual AWS Support contacts.

Channy

Increase collaboration and securely share cloud knowledge with AWS re:Post Private

Post Syndicated from Sébastien Stormacq original https://aws.amazon.com/blogs/aws/increase-collaboration-and-securely-share-cloud-knowledge-with-aws-repost-private/

Today we’re launching AWS re:Post Private, a fully managed knowledge service to accelerate cloud adoption, improve productivity, and drive innovation. re:Post Private allows organizations to increase collaboration and access knowledge resources built for your cloud community. It includes curated collections of technical content and training materials from AWS. The content is tailored specifically for your organization’s use cases, along with private discussion and collaboration forums for the members of your organization and your AWS account team.

As its name implies, you can think of it as a private version of AWS re:Post, with private content and access limited to people that belong to your organization and your AWS Account team.

Organizations of all sizes and verticals are increasingly moving their operations to the cloud. To ensure cloud adoption success, organizations must have the right skills and structure in place. The optimal way to achieve this is by setting up a centralized cloud center of excellence (CCOE). A CCOE is a centralized governance function for the organization and acts in a consultative role for central IT, business-unit IT, and cloud service consumers in the business. According to Gartner, a CCOE has three pillars: governance, brokerage, and community. The community pillar establishes the cloud community of practice (COP) that brings together stakeholders and facilitates cloud collaboration. It helps organizations adapt themselves for cloud adoption by promoting COP member interaction and facilitating cloud-related training and skills development.

AWS re:Post Private facilitates the creation, structure, and management of an internal cloud community of practice. It allows you to build a custom knowledge base that is searchable, reusable, and scalable. It allows community members to post private questions and answers and publish articles. It combines the benefits of traditional forums, such as community discussion and collaboration, with the benefits of an integrated information experience.

AWS re:Post Private is a fully managed service: there is no need to operate complex knowledge management and collaboration technologies or to develop custom solutions.

AWS re:Post Private also facilitates your interactions with AWS Support. You can create a support case directly from your private re:Post, and you can convert case resolution to reusable knowledge visible to all in your organization.

You choose in which AWS Region re:Post Private stores your data and who has access. All data at rest and in transit is encrypted using industry-standard algorithms. Your administrator chooses between using AWS-managed encryption keys or keys you manage and control.

Your organization’s Technical Account Managers are automatically added to your private re:Post. You can select other persons to invite among your organization and AWS teams, such as your AWS Solutions Architect. Only your private re:Post administrators need an AWS account. All other users can federate from your organization’s identity provider, such as Microsoft Active Directory.

Let’s see how to create a re:Post Private
To get started with AWS re:Post Private, as an administrator, I point my browser to the re:Post section of the AWS Management Console. I select Create private re:Post and enter the information needed to create a private re:Post for my organization, my team, or my project.

AWS re:Post Private - create 1

I can choose the Data encryption parameters and whether or not I enable Service access for Support case integration. When I’m ready, I select Create this re:Post.

AWS re:Post Private - create 2

Once the private re:Post is created, I can grant access to users and groups. User and group information comes from AWS IAM Identity Center and your identity provider. Invited users receive an email inviting them to connect to the private re:Post and create their profile.

That’s pretty much it for the administrator part. Once the private re:Post is created, I receive an endpoint name that I can share with the rest of my organization.

Let’s see how to use re:Post Private
As a member of the organization, I navigate to re:Post Private using the link I received from the administrator. I authenticate with the usual identity service of my organization, and I am redirected to the re:Post Private landing page.

On the top menu, I can select a tab to view the contents for Questions, Community Articles, Selections, Tags, Topics, Community Groups, or My Dashboard. This should be familiar if you already use the public knowledge service AWS re:Post that adopted a similar structure.

AWS re:Post Private - Landing page 1

Further down on the page, I see the popular topics and the top contributors in my organization.I also have access to Questions and Community Groups. I can search the available content by keyword, tags, author, and so on.

AWS re:Post Private - Landing page 2

AWS re:Post Private - Landing page 3

Pricing and availability
You can create your organization’s AWS re:Post Private in the following AWS Regions: US West (Oregon) and Europe (Frankfurt).

AWS re:Post Private is available to customers having an AWS Enterprise or Enterprise On-Ramp support plan. re:Post Private offers a free tier that allows you to explore and try out standard capabilities for six months. There is no limit on the number of users in the free tier, and content storage is limited to 10 GB. When you reach the free storage limit, the plan is converted to the paid standard tier.

With AWS re:Post Private Standard tier, you only pay for what you use. We charge based on the number of users per month. Please visit the re:Post Private pricing page for more information.

Get started today and activate AWS re:Post Private for your organization.

— seb

How Encored Technologies built serverless event-driven data pipelines with AWS

Post Syndicated from Younggu Yun original https://aws.amazon.com/blogs/big-data/how-encored-technologies-built-serverless-event-driven-data-pipelines-with-aws/

This post is a guest post co-written with SeonJeong Lee, JaeRyun Yim, and HyeonSeok Yang from Encored Technologies.

Encored Technologies (Encored) is an energy IT company in Korea that helps their customers generate higher revenue and reduce operational costs in renewable energy industries by providing various AI-based solutions. Encored develops machine learning (ML) applications predicting and optimizing various energy-related processes, and their key initiative is to predict the amount of power generated at renewable energy power plants.

In this post, we share how Encored runs data engineering pipelines for containerized ML applications on AWS and how they use AWS Lambda to achieve performance improvement, cost reduction, and operational efficiency. We also demonstrate how to use AWS services to ingest and process GRIB (GRIdded Binary) format data, which is a file format commonly used in meteorology to store and exchange weather and climate data in a compressed binary form. It allows for efficient data storage and transmission, as well as easy manipulation of the data using specialized software.

Business and technical challenge

Encored is expanding their business into multiple countries to provide power trading services for end customers. The amount of data and the number of power plants they need to collect data are rapidly increasing over time. For example, the volume of data required for training one of the ML models is more than 200 TB. To meet the growing requirements of the business, the data science and platform team needed to speed up the process of delivering model outputs. As a solution, Encored aimed to migrate existing data and run ML applications in the AWS Cloud environment to efficiently process a scalable and robust end-to-end data and ML pipeline.

Solution overview

The primary objective of the solution is to develop an optimized data ingestion pipeline that addresses the scaling challenges related to data ingestion. During its previous deployment in an on-premises environment, the time taken to process data from ingestion to preparing the training dataset exceeded the required service level agreement (SLA). One of the input datasets required for ML models is weather data supplied by the Korea Meteorological Administration (KMA). In order to use the GRIB datasets for the ML models, Encored needed to prepare the raw data to make it suitable for building and training ML models. The first step was to convert GRIB to the Parquet file format.

Encored used Lambda to run an existing data ingestion pipeline built in a Linux-based container image. Lambda is a compute service that lets you run code without provisioning or managing servers. Lambda runs your code on a high-availability compute infrastructure and performs all of the administration of the compute resources, including server and operating system maintenance, capacity provisioning and automatic scaling, and logging. AWS Lambda is triggered to ingest and process GRIB data files when they are uploaded to Amazon Simple Storage Service (Amazon S3). Once the files are processed, they are stored in Parquet format in the other S3 bucket. Encored receives GRIB files throughout the day, and whenever new files arrive, an AWS Lambda function runs a container image registered in Amazon Elastic Container Registry (ECR). This event-based pipeline triggers a customized data pipeline that is packaged in a container-based solution. Leveraging Amazon AWS Lambda, this solution is cost-effective, scalable, and high-performing.Encored uses Python as their preferred language.

The following diagram illustrates the solution architecture.

Lambda-data-pipeline

For data-intensive tasks such as extract, transform, and load (ETL) jobs and ML inference, Lambda is an ideal solution because it offers several key benefits, including rapid scaling to meet demand, automatic scaling to zero when not in use, and S3 event triggers that can initiate actions in response to object-created events. All this contributes to building a scalable and cost-effective data event-driven pipeline. In addition to these benefits, Lambda allows you to configure ephemeral storage (/tmp) between 512–10,240 MB. Encored used this storage for their data application when reading or writing data, enabling them to optimize performance and cost-effectiveness. Furthermore, Lambda’s pay-per-use pricing model means that users only pay for the compute time in use, making it a cost-effective solution for a wide range of use cases.

Prerequisites

For this walkthrough, you should have the following:

Build your application required for your Docker image

The first step is to develop an application that can ingest and process files. This application reads the bucket name and object key passed from a trigger added to Lambda function. The processing logic involves three parts: downloading the file from Amazon S3 into ephemeral storage (/tmp), parsing the GRIB formatted data, and saving the parsed data to Parquet format.

The customer has a Python script (for example, app.py) that performs these tasks as follows:

import os
import tempfile
import boto3
import numpy as np
import pandas as pd
import pygrib

s3_client = boto3.client('s3')
def handler(event, context):
    try:
        # Get trigger file name
        bucket_name = event["Records"][0]["s3"]["bucket"]["name"]
        s3_file_name = event["Records"][0]["s3"]["object"]["key"]

        # Handle temp files: all temp objects are deleted when the with-clause is closed
        with tempfile.NamedTemporaryFile(delete=True) as tmp_file:
            # Step1> Download file from s3 into temp area
            s3_file_basename = os.path.basename(s3_file_name)
            s3_file_dirname = os.path.dirname(s3_file_name)
            local_filename = tmp_file.name
            s3_client.download_file(
                Bucket=bucket_name,
                Key=f"{s3_file_dirname}/{s3_file_basename}",
                Filename=local_filename
            )

            # Step2> Parse – GRIB2 
            grbs = pygrib.open(local_filename)
            list_of_name = []
            list_of_values = []
            for grb in grbs:
                list_of_name.append(grb.name)
                list_of_values.append(grb.values)
            _, lat, lon = grb.data()
            list_of_name += ["lat", "lon"]
            list_of_values += [lat, lon]
            grbs.close()

            dat = pd.DataFrame(
                np.transpose(np.stack(list_of_values).reshape(len(list_of_values), -1)),
                columns=list_of_name,
            )

        # Step3> To Parquet
        s3_dest_uri = S3path
        dat.to_parquet(s3_dest_uri, compression="snappy")

    except Exception as err:
        print(err)

Prepare a Docker file

The second step is to create a Docker image using an AWS base image. To achieve this, you can create a new Dockerfile using a text editor on your local machine. This Dockerfile should contain two environment variables:

  • LAMBDA_TASK_ROOT=/var/task
  • LAMBDA_RUNTIME_DIR=/var/runtime

It’s important to install any dependencies under the ${LAMBDA_TASK_ROOT} directory alongside the function handler to ensure that the Lambda runtime can locate them when the function is invoked. Refer to the available Lambda base images for custom runtime for more information.

FROM public.ecr.aws/lambda/python:3.8

# Install the function's dependencies using file requirements.txt
# from your project folder.

COPY requirements.txt  .
RUN pip3 install -r requirements.txt --target "${LAMBDA_TASK_ROOT}"

# Copy function code
COPY app.py ${LAMBDA_TASK_ROOT}

# Set the CMD to your handler (could also be done as a parameter override outside of the Dockerfile)
CMD [ "app.handler" ]

Build a Docker image

The third step is to build your Docker image using the docker build command. When running this command, make sure to enter a name for the image. For example:

docker build -t process-grib .

In this example, the name of the image is process-grib. You can choose any name you like for your Docker image.

Upload the image to the Amazon ECR repository

Your container image needs to reside in an Amazon Elastic Container Registry (Amazon ECR) repository. Amazon ECR is a fully managed container registry offering high-performance hosting, so you can reliably deploy application images and artifacts anywhere. For instructions on creating an ECR repository, refer to Creating a private repository.

The first step is to authenticate the Docker CLI to your ECR registry as follows:

aws ecr get-login-password --region ap-northeast-2 | docker login --username AWS --password-stdin 123456789012.dkr.ecr.ap-northeast-2.amazonaws.com 

The second step is to tag your image to match your repository name, and deploy the image to Amazon ECR using the docker push command:

docker tag  hello-world:latest 123456789012.dkr.ecr. ap-northeast-2.amazonaws.com/hello-world:latest
docker push 123456789012.dkr.ecr. ap-northeast-2.amazonaws.com/hello-world:latest     

Deploy Lambda functions as container images

To create your Lambda function, complete the following steps:

  1. On the Lambda console, choose Functions in the navigation pane.
  2. Choose Create function.
  3. Choose the Container image option.
  4. For Function name, enter a name.
  5. For Container image URI, provide a container image. You can enter the ECR image URI or browse for the ECR image.
  6. Under Container image overrides, you can override configuration settings such as the entry point or working directory that are included in the Dockerfile.
  7. Under Permissions, expand Change default execution role.
  8. Choose to create a new role or use an existing role.
  9. Choose Create function.

Key considerations

To handle a large amount of data concurrently and quickly, Encored needed to store GRIB formatted files in the ephemeral storage (/tmp) that comes with Lambda. To achieve this requirement, Encored used tempfile.NamedTemporaryFile, which allows users to create temporary files easily that are deleted when no longer needed. With Lambda, you can configure ephemeral storage between 512 MB–10,240 MB for reading or writing data, allowing you to run ETL jobs, ML inference, or other data-intensive workloads.

Business outcome

Hyoseop Lee (CTO at Encored Technologies) said, “Encored has experienced positive outcomes since migrating to AWS Cloud. Initially, there was a perception that running workloads on AWS would be more expensive than using an on-premises environment. However, we discovered that this was not the case once we started running our applications on AWS. One of the most fascinating aspects of AWS services is the flexible architecture options it provides for processing, storing, and accessing large volumes of data that are only required infrequently.”

Conclusion

In this post, we covered how Encored built serverless data pipelines with Lambda and Amazon ECR to achieve performance improvement, cost reduction, and operational efficiency.

Encored successfully built an architecture that will support their global expansion and enhance technical capabilities through AWS services and the AWS Data Lab program. Based on the architecture and various internal datasets Encored has consolidated and curated, Encored plans to provide renewable energy forecasting and energy trading services.

Thanks for reading this post and hopefully you found it useful. To accelerate your digital transformation with ML, AWS is available to support you by providing prescriptive architectural guidance on a particular use case, sharing best practices, and removing technical roadblocks. You’ll leave the engagement with an architecture or working prototype that is custom fit to your needs, a path to production, and deeper knowledge of AWS services. Please contact your AWS Account Manager or Solutions Architect to get started. If you don’t have an AWS Account Manager, please contact Sales.

To learn more about ML inference use cases with Lambda, check out the following blog posts:

These resources will provide you with valuable insights and practical examples of how to use Lambda for ML inference.


About the Authors

leeSeonJeong Lee is the Head of Algorithms at Encored. She is a data practitioner who finds peace of mind from beautiful codes and formulas.

yimJaeRyun Yim is a Senior Data Scientist at Encored. He is striving to improve both work and life by focusing on simplicity and essence in my work.

yangHyeonSeok Yang is the platform team lead at Encored. He always strives to work with passion and spirit to keep challenging like a junior developer, and become a role model for others.

youngguYounggu Yun works at AWS Data Lab in Korea. His role involves helping customers across the APAC region meet their business objectives and overcome technical challenges by providing prescriptive architectural guidance, sharing best practices, and building innovative solutions together.

Choose Korean in AWS Support as Your Preferred Language

Post Syndicated from Channy Yun original https://aws.amazon.com/blogs/aws/choose-korean-in-aws-support-as-your-preferred-language/

Today, we are announcing the general availability of AWS Support in Korean as your preferred language, in addition to English, Japanese, and Chinese.

As the number of customers speaking Korean grows, AWS Support is invested in providing the best support experience possible. You can now communicate with AWS Support engineers and agents in Korean when you create a support case at the AWS Support Center.

Now all customers can receive account and billing support in Korean by email, phone, and live chat at no additional cost during the supported hours. Per your Support plan, customers subscribed to Enterprise, Enterprise On-Ramp, or Business Support plans can receive personalized technical support 24 hours a day and 7 days a week in Korean. Customers subscribed to the Developer Support plan can receive technical support during business hours generally defined as 9:00 AM to 6:00 PM in the customer country as set in My Account console, excluding holidays and weekends. These times may vary in countries with multiple time zones.

We also added the localized user interface of the AWS Support Center in Korean, in addition to Japanese and Chinese. AWS Support Center will be displayed in the language you select from the dropdown of available languages in Unified Settings of your AWS Account.

Here is a new AWS Support Center page in Korean:

You can also access customer service, AWS documentation, technical papers, and support forums in Korean.

Getting Started with Your Supported Language in AWS Support
To get started with AWS Support in your supported language, create a Support case in AWS Support Center. In the final step in creating a Support case, you can choose a supported language, such as English, Chinese (中文), Korean (한국어), or Japanese (日本語) as your Preferred contact language.

When you choose Korean, the customized contact options will be shown by your support plan.

For example, in the case of Basic Support plan customers, you can choose Web to get support via email, Phone, or Live Chat when available. AWS customers with account and billing inquiries can receive support in Korean from our customer service representatives with proficiency in Korean at no additional cost during business hours defined as 09:00 AM to 06:00 PM Korean Standard Time (GMT+9), excluding holidays and weekends.

If you get technical support per your Support plan, you may choose Web, Phone, or Live Chat depending on your Support plan to get in touch with support staff with proficiency in Korean, in addition to English, Japanese, and Chinese.

Here is a screen in Korean to get technical support in the Enterprise Support plan:

When you create a support case in your preferred language, the case will be routed to support staff with proficiency in the language indicated in your preferred language selection. To learn more, see Getting started with AWS Support in the AWS documentation.

Now Available
AWS Support in Korean is now available today, in addition to English, Japanese, and Chinese. Give it a try, learn more about AWS Support, and send feedback to your usual AWS Support contacts.

Channy

This article was translated into Korean (한국어) in the AWS Korea Blog.

New – AWS Support App in Slack to Manage Support Cases

Post Syndicated from Channy Yun original https://aws.amazon.com/blogs/aws/new-aws-support-app-in-slack-to-manage-support-cases/

ChatOps speeds up software development and operations by enabling DevOps teams to use chat clients and chatbots to communicate and run tasks. DevOps engineers have increasingly moved their monitoring, system management, continuous integration (CI), and continuous delivery (CD) workflows to chat applications in order to streamline activities in a single place and enable better collaboration within organizations.

For example, AWS Chatbot enables ChatOps for AWS to monitor and respond to operational events. AWS Chatbot processes AWS service notifications from Amazon Simple Notification Service (Amazon SNS) and forwards them to your Slack channel or Amazon Chime chat rooms so teams can analyze and act on them immediately, regardless of location. However, AWS Support customers had to switch applications from Slack to the AWS Support Center console to access and engage with AWS Support, moving them away from critical operation channels where essential group communications take place.

Today we are announcing the new AWS Support App, which enables you to directly manage your technical, billing, and account support cases, increase service quotas in Slack, and initiate a live chat with AWS Support engineers in Slack channels. You can then search for, respond to, and participate in group chats with AWS Support engineers to resolve support cases from your Slack channels.

With the AWS Support App in Slack, you can integrate AWS Support into your team workflows to improve collaboration. When creating, updating, or monitoring a support case status, your team members keep up to date in real time. They can also easily search previous cases to find recommendations and solutions and instantly share those details with all team members without having to switch applications.

Configuring the AWS Support App in Slack
The AWS Support App in Slack is now available to all customers with Business, Enterprise On-ramp, or Enterprise Support at no additional charge. If you have a Basic or Developer plan, you can upgrade your support plan.

For connecting your Slack workspace and channel for your organization, you should have access to add apps to your Slack workspace and an AWS Identity and Access Management (IAM) user or role with the required permissions. To learn more, see examples of IAM policies to manage access.

To get started with the AWS Support App in Slack, visit the AWS Support Center console and choose Authorize workspace.

When prompted to give permissions to access your Slack workspace, you can select your workspace to connect and choose Allow.

Now you can see your workspace on the Slack configuration page. To add more workspaces, choose Add workspace and repeat this step. You can add up to five workspaces to your account.

After you authorize your Slack workspace, you can add your Slack channels by choosing Add channel. You can add up to 20 channels for a single account. A single Slack channel can have up to 100 AWS accounts.

Choose the workspace name that you previously authorized, the Slack channel ID included in the channel link and the value that looks like C01234A5BCD where you invited the AWS Support App by /invite @awssupport command, the IAM role that you created for the AWS Support App.

You can also set notifications for how to get notified about cases and choose at least one of the options in New and reopened cases, Case correspondences, or Resolved cases for notification types. If you select High-severity cases, you can get notified for only cases that affect a production system or higher by the severity levels.

After adding a new channel, you can now open the Slack channel and manage support cases and live chats with AWS Support engineers.

Managing Support Cases in the Slack Channel
After you add your Slack workspace and channel, you can create, search, resolve, and reopen your support case in your Slack channel.

In your Slack channel, when you enter /awssupport create-case command, you can create a support case to specify the subject, description, issue type, service, category, severity, and contact method — either email and Slack notifications or live chat in Slack.

If you choose Live chat in Slack, you can enter the names of other members. AWS Support App will create a new chat channel for the created support case and will automatically add you, the members that you specified, and AWS Support engineers.

After reviewing the information you provided, you can create a support case. You can also choose Share to channel to share the search results with the channel.

In your Slack channel, when you enter the /awssupport search-case command, you can search support cases for a specific AWS account, data range, and case status, such as open or resolved.

You can choose See details to see more information about a case. When you see details for a support case, you can resolve or reopen specific support cases directly.

Initiating Live Chat Sessions with AWS Support Engineers
If you chose the live chat option when you created your case, the AWS Support App creates a chat channel for you and an AWS Support engineer. You can use this chat channel to communicate with a support engineer and any others that you invited to the live chat.

To join a live chat session with AWS Support, navigate to the channel name that the AWS Support App created for you. The live channel name contains your support case ID, such as awscase-1234567890. Anyone who joins your live chat channel can view details about this specific support case. We strongly recommend that you only add users that require access to your support cases.

When a support engineer joins the channel, you can chat with a support engineer about your support case and upload any file attachments to the channel. The AWS Support App automatically saves your files and chat log to your case correspondence.

To stop chatting with the support agent, choose End chat or enter the /awssupport endchat command. The support agent will leave the channel and the AWS Support App will stop recording the live chat. You can find the chat history attached to the case correspondence for this support case. If the issue has been resolved, you can choose Resolve case from the pinned message to show the case details in the chat channel or enter the /awssupport resolve command.

When you manage support cases or join live chats for your account in the Slack channel, you can view the case correspondences to determine whether the case has been updated in the Slack channel. You can also audit the Support API calls the application made on behalf of users via logs in AWS CloudTrail. To learn more, see Logging AWS Support API calls using AWS CloudTrail.

Requesting Service Quota Increases
In your Slack channel, when you enter the /awssupport service-quota-increase command, you can request to increase the service quota for a specific AWS account, AWS Region, service name, quota name, and requested value for the quota increase.

Now Available
The AWS Support App in Slack is now available to all customers with Business, Enterprise On-ramp, or Enterprise Support at no additional charge. If you have a Basic or Developer plan, you can upgrade your support plan. To learn more, see Manage support cases with the AWS Support App or contact your usual AWS Support contacts.

Channy

How Belcorp decreased cost and improved reliability in its big data processing framework using Amazon EMR managed scaling

Post Syndicated from Diego Benavides original https://aws.amazon.com/blogs/big-data/how-belcorp-decreased-cost-and-improved-reliability-in-its-big-data-processing-framework-using-amazon-emr-managed-scaling/

This is a guest post by Diego Benavides and Luis Bendezú, Senior Data Architects, Data Architecture Direction at Belcorp.

Belcorp is one of the main consumer packaged goods (CPG) companies providing cosmetics products in the region for more than 50 years, allocated to around 13 countries in North, Central, and South America (AMER). Born in Peru and with its own product factory in Colombia, Belcorp always stayed ahead of the curve and adapted its business model according to customer needs and strengthened its strategy with technological trends, providing each time a better customer experience. Focused on this, Belcorp began to implement its own data strategy encouraging the use of data for decision-making. Based on this strategy, the Belcorp data architecture team designed and implemented a data ecosystem allowing business and analytics teams to consume functional data that they use to generate hypotheses and insights that are materialized in better marketing strategies or novel products. This post aims to detail a series of continuous improvements carried out during 2021 in order to reduce the number of platform incidents reported at the end of 2020, optimize SLAs required by the business, and be more cost-efficient when using Amazon EMR, resulting in up to 30% savings for the company.

To stay ahead of the curve, stronger companies have built a data strategy that allows them to improve main business strategies, or even create new ones, using data as a main driver. As one of the main consumer packaged goods (CPG) companies in the region, Belcorp is not an exception—in recent years we have been working to implement data-driven decision-making.

We know that all good data strategy is aligned to business objectives and based on main business use cases. Currently, all our team efforts are focused on the final consumers, and almost all business initiatives are related to hyper-personalization, pricing, and customer engagement.

To support these initiatives, the data architecture department provides data services like data integration, only one source of truth, data governance and data quality frameworks, data availability, data accessibility, and optimized time to market, according to business requirements like other big companies. To provide minimal capabilities to support all these services, we needed a scalable, flexible, and cost-efficient data ecosystem. Belcorp started this adventure a couple of years ago using AWS services like Amazon Elastic Compute Cloud (Amazon EC2), AWS Lambda, AWS Fargate, Amazon EMR, Amazon DynamoDB, and Amazon Redshift, which currently feed our main analytical solutions with data.

As we were growing, we had to continually improve our architecture design and processing framework in regards to data volume and more complex data solution requirements. We also had to adopt quality and monitoring frameworks in order to guarantee data integrity, data quality, and service level agreements (SLAs). As you can expect, it’s not an easy task, and requires its own strategy. At the beginning of 2021 and due to critical incidents we were finding, operational stability was affected, directly impacting business outcomes. Billing was also impacted, due to more new complex workloads being included, which caused an unexpected increase in platform costs. In response, we decided to focus on three challenges:

  • Operational stability
  • Cost-efficiency
  • Service level agreements

This post details some action points we carried out during 2021 over Belcorp’s data processing framework based on Amazon EMR. We also discuss how these actions helped us face the challenges previously mentioned, and also provide economic savings to Belcorp, which was the data architecture team’s main contribution to the company.

Overview of solution

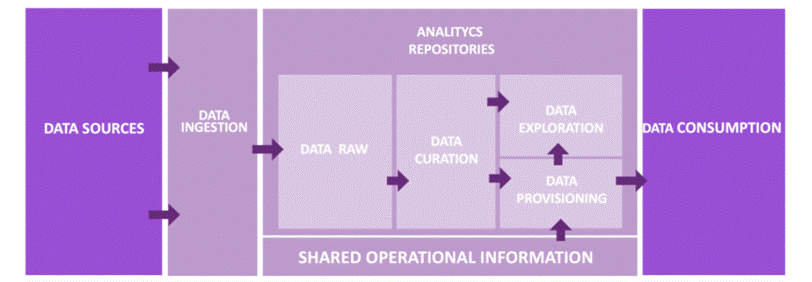
Belcorp’s data ecosystem is composed by seven key capability pillars (as shown in the following diagram) that define our architectural design and give us more or less technological flexible options. Our data platform can be classified as a part of the second generation of data platforms, as mentioned by Zhamak Dehghani in How to Move Beyond a Monolithic Data Lake to a Distributed Data Mesh. In fact, it has all the limitations and restrictions of a Lakehouse approach as mentioned in the paper Lakehouse: A New Generation of Open Platforms that Unify Data Warehousing and Advanced Analytics .

Belcorp’s data platform supports two main use cases. On one side, it provides data to be consumed using visualization tools, encouraging self-service. On the other side, it provides functional data to end-users, like data scientists or data analysts, through distributed data warehouses and object storage more suited to advanced analytical practices.

The following reference design explains the main two layers in charge of providing functional data for these use cases. The data processing layer is composed of two sub-layers. The first is Belcorp’s Data Lake Integrator, which is a built-in, in-house Python solution with a set of API REST services in charge of organizing all the data workloads and data stages inside the analytics repositories. It also works as a point of control to distribute resources to be allocated for each Amazon EMR Spark job. The processing sub-layer is mainly composed of the EMR cluster, which is in charge of orchestrating, tracking, and maintaining all the Spark jobs developed using a Scala framework.

For the persistent repository layer, we use Amazon Simple Storage Service (Amazon S3) object storage as a data repository for analytics workloads, where we have designed a set of data stages that have operational and functional purposes based on the reference architecture design. Discussing the repository design in more depth is out of scope for this post, but we must note that it covers all the common challenges related to data availability, data accessibility, data consistency, and data quality. In addition, it achieves all Belcorp’s needs required by its business model, despite all limitations and restrictions we inherit by the design previously mentioned.

We can now move our attention to the main purpose of this post.

As we mentioned, we experienced critical incidents (some of which existed before) and unexpected cost increases at the beginning of 2021, which motivated us to take action. The following table lists some of the main issues that attracted our attention.

Reported Incidents Impact
Delay in Spark jobs on Amazon EMR Core workloads take a long time
Delay in Amazon EMR nodes auto scaling Workloads take a long time
Increase in Amazon EMR computational usage per node Unexpected cost increase
Lost resource containers Workloads process a huge data crash
Overestimated memory and CPUs Unexpected cost increase

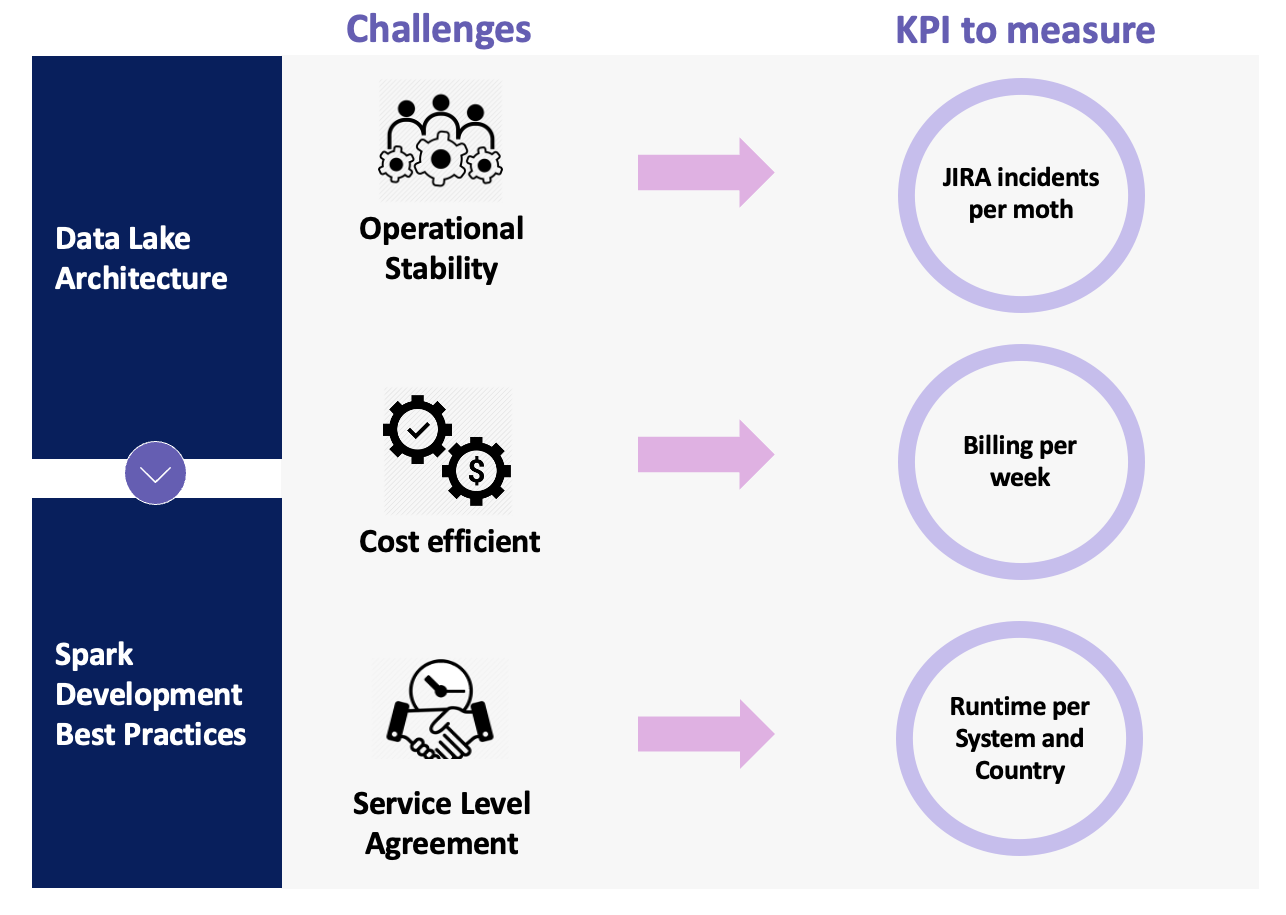
To face these issues, we decided to change strategies and started to analyze each issue in order to identify the cause. We defined two action lines based on three challenges that the leaders wanted us to work on. The following figure summarizes these lines and challenges.

The data lake architecture action line refers to all the architectural gaps and deprecated features that we determined as part of the main problems that were generating the incidents. The Spark development best practices action line is related to the developed Spark data solution that had been causing instability due to bad practices during the development lifecycle. Focusing on these action lines, our leaders defined three challenges in order to decrease the number of incidents and guarantee the quality of the service we provide: operational stability, cost-efficiency, and SLAs.

Based on these challenges, we defined three KPIs to measure the success of the project. Jira incidents allow us to validate that our changes are having a positive impact; billing per week shows the leaders that part of the changes we applied will gradually optimize cost; and runtime provides the business users with a better time to market.

Next, we defined the next steps and how to measure progress. Based on our monitoring framework, we determined that almost all incidents that arose were related to the data processing and persistent repository layers. Then we had to decide how to solve them. We could make reactive fixes in order to achieve operational stability and not have an impact on business, or we could change our usual way of working, analyze each issue, and provide a final solution to optimize our framework. As you can guess, we decided to change our way of working.

We performed a preliminary analysis to determine the main impacts and challenges. We then proposed the following actions and improvements based on our action lines:

  • Data lake architecture – We redesigned the EMR cluster; we’re now using core and task nodes
  • Spark development best practices – We optimized Spark parameters (RAM memory, cores, CPUs, and executor number)

In the next section, we explain in detail the actions and improvements proposed in order to achieve our goals.

Actions and improvements

As we mentioned in the previous section, the analysis made by the architecture team resulted in a list of actions and improvements that would help us face three challenges: operational stability, a cost-efficient data ecosystem, and SLAs.

Before going further, it’s a good time to provide more details about the Belcorp data processing framework. We built it based on Apache Spark using the Scala programming language. Our data processing framework is a set of scalable, parameterizable, and reusable Scala artifacts that provide development teams with a powerful tool to implement complex data pipelines, achieving the most complex business requirements using Apache Spark technology. Through the Belcorp DevOps framework, we deploy each artifact to several non-production environments. Then we promote into production, where the EMR cluster launches all the routines using the Scala artifacts that reference each conceptual area inside the analytical platform. This part of the cycle provides the teams with some degree of flexibility and agility. However, we forgot, for a moment, the quality of the software we were developing using Apache Spark technology.

In this section, we dive into the actions and improvements we applied in order to optimize the Belcorp data processing framework and improve the architecture.

Redesigning the EMR cluster

The current design and implementation of the Belcorp data lake is not the first version. We’re currently in version 2.0, and from the beginning of the first implementation until now, we’ve tried different EMR cluster designs to implement the data processing layer. Initially, we used a fixed cluster with four nodes (as shown in the following figure), but when the auto scaling capability was launched and Belcorp’s data workloads increased, we decided to move it there to optimize resource usage and costs. However, an auto scaled EMR cluster has different options too. You can choose between core and task nodes with a minimal and maximum number of each. In addition, you can select On-Demand or Spot Instances. You can also implement an optimized allocation strategy using EMR instance fleets to reduce the probability of Spot Instance loss. For more information about Amazon EMR resources allocation strategies, see Spark enhancements for elasticity and resiliency on Amazon EMR and Optimizing Amazon EMR for resilience and cost with capacity-optimized Spot Instances.

We tested all these capabilities, but we found some problems.

First, although AWS offers many capabilities and functionalities around Amazon EMR, if you don’t have some degree of knowledge about the technology that you want to use, you may encounter many issues as the use cases arise. As we mentioned, we decided to use the Apache Spark data processing engine through Amazon EMR as a part of Belcorp data ecosystem, but we faced many issues. Whenever an incident appeared, it motivated the data architect team in charge to fix it, as a part of the operational and support tasks. Almost all these reactive fixes were related to changing Amazon EMR configuration to try different alternatives in order to efficiently solve these incidents.

We figured out that almost all incidents were related to resource allocation, so we tested many configuration options such as instance types, increasing the number of nodes, customized rules for auto scaling, and fleet strategies. This last option was used to reduce node loss. At the end of 2020, we validated that an EMR cluster with automatic scaling enabled with a minimum capacity of three On-Demand core nodes 24/7 and the ability to scale up to 25 On-Demand core nodes provided us with a stable data processing platform. At the beginning of 2021, more complex Spark jobs were deployed as a part of the data processing routines inside the EMR cluster, causing operational instability again. In addition, the billing was increasing unexpectedly, which alerted leaders whose team needed to redesign the EMR cluster in order to keep healthy operational stability and optimize the costs.

We soon realized that it was possible to reduce up to 40% of the current billing using Spot Instances, instead of keeping all core nodes in On-Demand consumption. Another infrastructure optimization that we wanted to apply was to replace a number of core nodes with task nodes, because almost all Belcorp data workloads are memory-intensive and use Amazon S3 to read the source data and write the result dataset. The question here was how to do that without losing the benefits of the current design. To answer this question, we had the guidance of the AWS Account Team and our AWS Analytics and Big Data Specialist SA, in order to clarify questions about the following:

  • Apache Spark implementation in Amazon EMR
  • Core and task node best practices for production environments
  • Spot Instance behavior in Amazon EMR

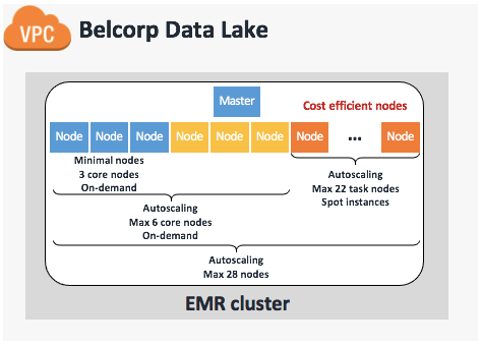
We definitely recommend addressing these three main points before applying any changes because, according to our previous experience, making modifications in the dark can lead to costly and underperforming Amazon EMR implementation. With that in mind, we redesigned the EMR cluster to utilize EMR managed scaling, which automatically resizes your cluster for best performance at the lowest possible cost. We defined a maximum of 28 capacity units with three On-Demand core nodes always on (24/7) in order to support data workloads during the day. We then set an auto scaling limit of six On-Demand cores in order to provide minimal HDFS capabilities to support the remaining 22 task nodes composed of Spot Instances. This final configuration is based on advice from AWS experts that we have at least one core node to support six task nodes, keeping a 1:6 ratio. The following table summarizes our cluster design.

Cluster Scaling Policy Amazon EMR Managed Scaling Enabled
Minimum node units (MinimumCapacityUnits) 3
Maximum node units (a) 28
On-demand limit (MaximumOnDemandCapacityUnits) 6
Maximum core nodes (MaximumCoreCapacityUnits) 6
Instance type m4.10xlarge
Number of primary nodes 1
Primary node instance type m4.4xlarge

The following figure illustrates our updated and current cluster design.

Tuning Spark parameters

As any good book about Apache Spark can tell you, Spark parameter tuning is the main topic you need to look into before deploying a Spark application in production.

Adjusting Spark parameters is the task of setting up the resources (CPUs, memory, and the number of executors) to each Spark application. In this post, we don’t focus on driver instance resources; we focus on the executors because that’s the main issue we found inside Belcorp’s implementation.

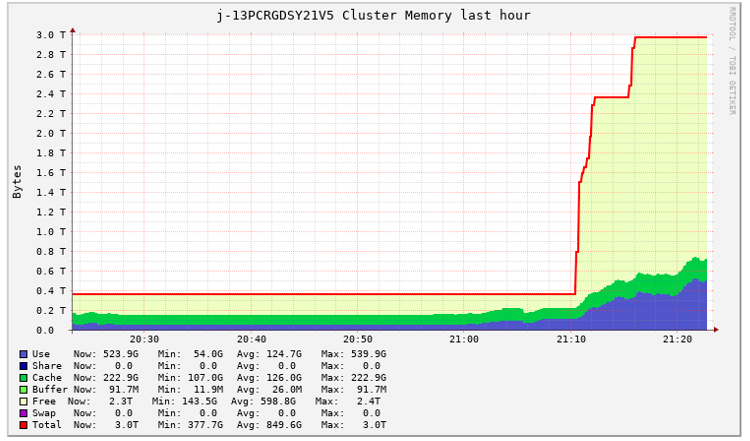
After we applied improvements around join operation and cache strategies in Spark application development, we realized that some of those applications were assigned with overestimated resources in the EMR cluster. That means Spark applications assigned resources, but only 30% of the resources were used. The following Ganglia report illustrates the overestimation of resource allocation for one Spark application job, which we captured during one of our tests.

A big consequence of this behavior was the massive deployment of EMR nodes that weren’t being properly utilized. That means that numerous nodes were provisioned because of the auto scaling feature required by a Spark application submit, but much of the resources of these nodes were kept free. We show a basic example of this later in this section.

With this evidence, we began to suspect that we needed to adjust the Spark parameters of some of our Spark applications.

As we mentioned in previous sections, as part of the Belcorp data ecosystem, we built a Data Pipelines Integrator, which has the main responsibility of maintaining centralized control of the runs of each Spark application. To do that, it uses a JSON file containing the Spark parameter configuration and performs each spark-submit using Livy service, as shown in the following example code:

'/usr/lib/spark/bin/spark-submit' '--class' 'LoadToFunctional' '--conf' 'spark.executor.instances=62' '--conf' 'spark.executor.memory=17g' '--conf' 'spark.yarn.maxAppAttempts=2' '--conf' 'spark.submit.deployMode=cluster' '--conf' 'spark.master=yarn' '--conf' 'spark.executor.cores=5' 's3://<bucket-name>/FunctionalLayer.jar' '--system' 'CM' '--country' 'PE' '--current_step' 'functional' '--attempts' '1' '--ingest_attributes' '{"FileFormat": "zip", "environment": "PRD", "request_origin": "datalake_integrator", "next_step": "load-redshift"}' '--fileFormat' 'zip' '--next_step' 'load-redshift'

This JSON file contains the Spark parameter configuration of each Spark application related to an internal system and country we submit to the EMR cluster. In the following example, CM is the name of the system and PE is the country code that the data comes from:

"systems" : {
  "CM" : {
    "PE" : { 
      "params" : {"executorCores": 15, "executorMemory": "45g", "numExecutors": 50 },
      "conf" : { "spark.sql.shuffle.partitions" :120 }
    }
}

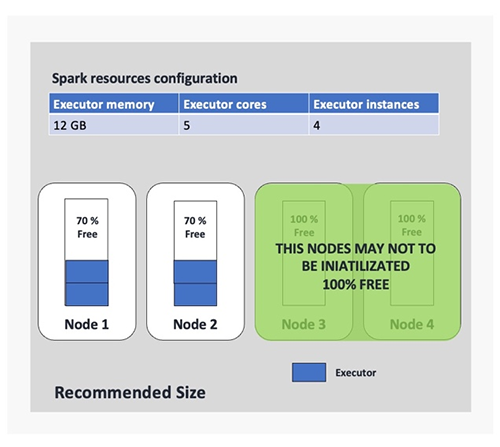
The problem with this approach is that as we add more applications, the management of these configuration files becomes more complex. In addition, we had a lot of Spark applications set up with a default configuration that was defined a long time ago when workloads were less expensive. So, it was expected that some things would change. One example of a Spark application with uncalibrated parameters is shown in the following figure (we use four executor instances only for the example). In this example, we realized we were allocating executors with a lot of resources without following any of the Spark best practices. This was causing the provisioning of fat executors (using Spark slang) allocating each of those in at least one node. That means that if we define a Spark application to be submitted using 10 executors, we require at least 10 nodes of the cluster and use 10 nodes for only one run, which was very expensive for us.

When you deal with Spark parameter tuning challenges, it’s always a good idea to follow expert advice. Perhaps one of the most important pieces of advice is related to the number of executor cores you should use in one Spark application. Experts suggest that an executor should have up to four or five cores. We were familiar with this restriction because we formerly developed Spark applications in the Hadoop ecosystem because of Hadoop File Systems I/O restrictions. That is, if we have more cores configured for one executor, we perform more I/O operations in a single HDFS data node, and it’s well known that HDFS degrades due to high concurrency. This constraint isn’t a problem if we use Amazon S3 as storage, but the suggestion remains due to the overload of the JVM. Remember, while you have more operational tasks, like I/O operations, the JVM of each executor has more work to do, so the JVM is degraded.

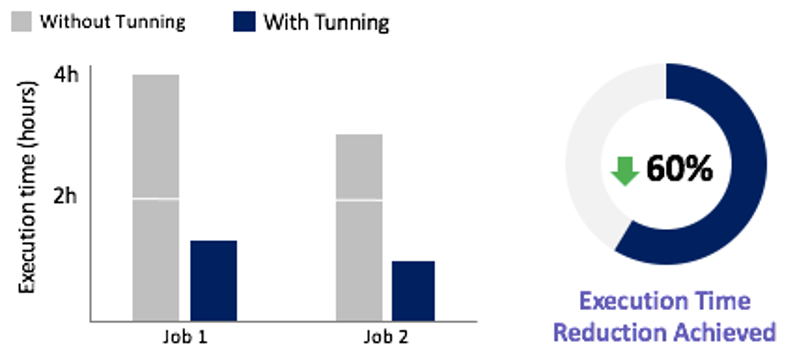
With these facts and previous findings, we realized that for some of our Spark applications, we were using only 30% of the assigned resources. We needed to recalibrate the Spark job parameters in order to allocate only the best-suited resources and significantly reduce the overuse of EMR nodes. The following figure provides an example of the benefits of this improvement, where we can observe a 50% of node reduction based on our earlier configuration.

We used the following optimized parameters to optimize the Spark application related to the CM system:

"systems" : {
  "CM" : {
    "PE" : { 
      "params" : {"executorCores": 5, "executorMemory": "17g", "numExecutors": 62 },
      "conf" : { "spark.sql.shuffle.partitions" :120 }
    }
}

Results

In this post, we wanted to share the success story of our project to improve the Belcorp data ecosystem, based on two lines of actions and three challenges defined by leaders using AWS data technologies and in-house platforms.

We were clear about our objectives from the beginning based on the defined KPIs, so we’ve been able to validate that the number of JIRA incidents reported at the end of May 2021 had a notable reduction. The following figures shows a reduction of up to 75% in respect to previous months, highlighting March as a critical peak.

Based on this incident reduction, we figured out that almost all Spark job routines running in the EMR cluster benefitted from a runtime optimization, including the two most complex Spark jobs, with a reduction up to 60%, as shown in the following figure.

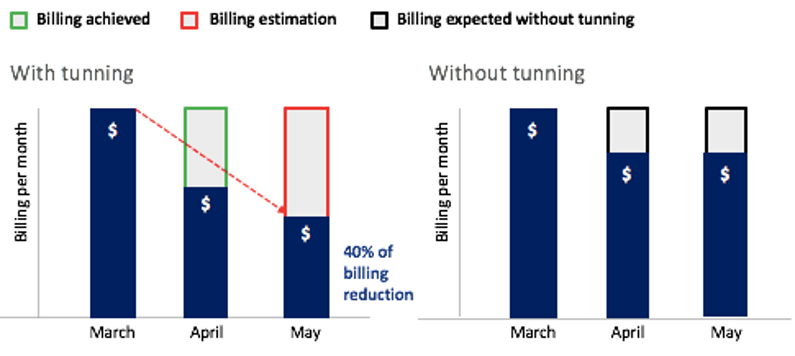
Perhaps the most important contribution of the improvements made by the team is directly related to the billing per week. For example, Amazon EMR redesigning, the join operation improvements, cache best practices applied, and Spark parameter tuning—all of these produced a notable reduction in the use of cluster resources. As we know, Amazon EMR calculates billing based on the time that the cluster nodes have been on, regardless of whether they do any work. So, when we optimized EMR cluster usage, we optimized the costs we were generating as well. As shown in the following figure, only in 2 months, between March and May, we achieved a billing reduction of up to 40%. We estimate that we will save up to 26% of the annual billing that would have been generated without the improvements.

Conclusion and next steps

The data architecture team is in charge of the Belcorp data ecosystem’s continuous improvements, and we’re always being challenged to achieve a best-in-class architecture, craft better architectural solution designs, optimize cost, and create the most automated, flexible, and scalable frameworks.

At the same time, we’re thinking about the future of this data ecosystem—how we can adapt to new business needs, generate new business models, and address current architectural gaps. We’re working now on the next generation of the Belcorp data platform, based on novel approaches like data products, data mesh, and lake houses. We believe these new approaches and concepts are going to help us to cover our current architectural gaps in the second generation of our data platform design. Additionally, it’s going to help us better organize the business and development teams in order to obtain greater agility during the development cycle. We’re thinking of data solutions as a data product, and providing teams with a set of technological components and automated frameworks they can use as building blocks.

Acknowledgments

We would like to thank our leaders, especially Jose Israel Rico, Corporate Data Architecture Director, and Venkat Gopalan, Chief Technology, Data and Digital Officer, who inspire us to be customer centric, insist on the highest standards, and support every technical decision based on a stronger knowledge of the state of the art.


About the Authors

Diego Benavides is the Senior Data Architect of Belcorp in charge of the design, implementation, and the continuous improvement of the Global and Corporate Data Ecosystem Architecture. He has experience working with big data and advanced analytics technologies across many industry areas like telecommunication, banking, and retail.

Luis Bendezú works as a Senior Data Engineer at Belcorp. He’s in charge of continuous improvements and implementing new data lake features using a number of AWS services. He also has experience as a software engineer, designing APIs, integrating many platforms, decoupling applications, and automating manual jobs.

Mar Ortiz is a bioengineer who works as a Solutions Architect Associate at AWS. She has experience working with cloud compute and diverse technologies like media, databases, compute, and distributed architecture design.

Raúl Hugo is an AWS Sr. Solutions Architect with more than 12 years of experience in LATAM financial companies and global telco companies as a SysAdmin, DevOps engineer, and cloud specialist.

AWS IQ expansion: Connect with Experts and Consulting Firms based in the UK and France

Post Syndicated from Alex Casalboni original https://aws.amazon.com/blogs/aws/aws-iq-expansion-experts-uk-france/

AWS IQ launched in 2019 and has been helping customers worldwide engage thousands of AWS Certified third-party experts and consulting firms for on-demand project work. Whether you need to learn about AWS, plan your project, setup new services, migrate existing applications, or optimize your spend, AWS IQ connects you with experts and consulting firms who can help. You can share your project objectives with a description, receive responses within the AWS IQ application, approve permissions and budget, and will be charged directly through AWS billing.

Until yesterday, experts had to reside in the United States to offer their hands-on help on AWS IQ. Today, I’m happy to announce that AWS Certified experts and consulting firms based in the UK and France can participate in AWS IQ.

If you are an AWS customer based in the UK or France and need to connect with local AWS experts, now you can reach out to a wider pool of experts and consulting firms during European business hours. When creating a new project, you can now indicate a preferred expert location.

As an AWS Certified expert you can now view the buyer’s preferred expert location to ensure the right fit. AWS IQ simplifies finding relevant opportunities and it helps you access a customer’s AWS environment securely. It also takes care of billing so more time is spent on solving customer problems, instead of administrative tasks. Your payments will be disbursed by AWS Marketplace in USD towards a US bank account. If you don’t already have a US bank account, you may be able to obtain one through third-party services such as Hyperwallet.

AWS IQ User Interface Update
When you create a new project request, you can select a Preferred expert or firm location: Anywhere, France, UK, or US.

Check out Jeff Barr’s launch article to learn more about the full request creation process.

You can also work on the same project with multiple experts from different locations.

When browsing experts and firms, you will find their location under the company name and reviews.

Available Today
AWS IQ is available for customers anywhere in the world (except China) for all sorts of project work, delivered by AWS experts in the United States, the United Kingdom, and France. Get started by creating your project request on iq.aws.amazon.com. Here you can discover featured experts or browse experts for a specific service such as Amazon Elastic Compute Cloud (EC2) or DynamoDB.

If you’re interested in getting started as an expert, check out AWS IQ for Experts. Your profile will showcase your AWS Certifications as well as the ratings and reviews from completed projects.

I’m excited about the expansion of AWS IQ for experts based in the UK and France, and I’m looking forward to further expansions in the future.

Alex