Papa Johns is spying on people’s buying activities to predict when they are low on food:
The pizza chain recently tapped NBCUniversal, Instacart and the dentsu-owned media agency Carat for help reaching consumers when they’re low on groceries—and thus more likely to be swayed by a mouth-watering ad. The idea is to reach hungry consumers by “knowing what is in their fridge without being too creepy,” said Carrie Drinkwater, chief investment officer at Carat.
To achieve that goal, NBCU and Instacart created a custom audience of shoppers who regularly purchase grocery staples on Instacart, such as eggs, milk, meat and produce. Based on that data, Papa Johns can determine which days of the week certain consumers are likely to run out of groceries and serve them an ad on NBCU streaming content accordingly. The brand served custom creatives to consumers based on their food preferences—such as whether they buy meat regularly—with QR codes and calls to action such as, “Light on groceries?” or “Empty fridge?”
Back in 2012, we learned (from Target and its campaign that detects when someone is pregnant) that the trick is to hide the knowledge in other, wrong, information. So the way for Papa John’s to not be “too creepy” is to deliberately get it wrong sometimes.
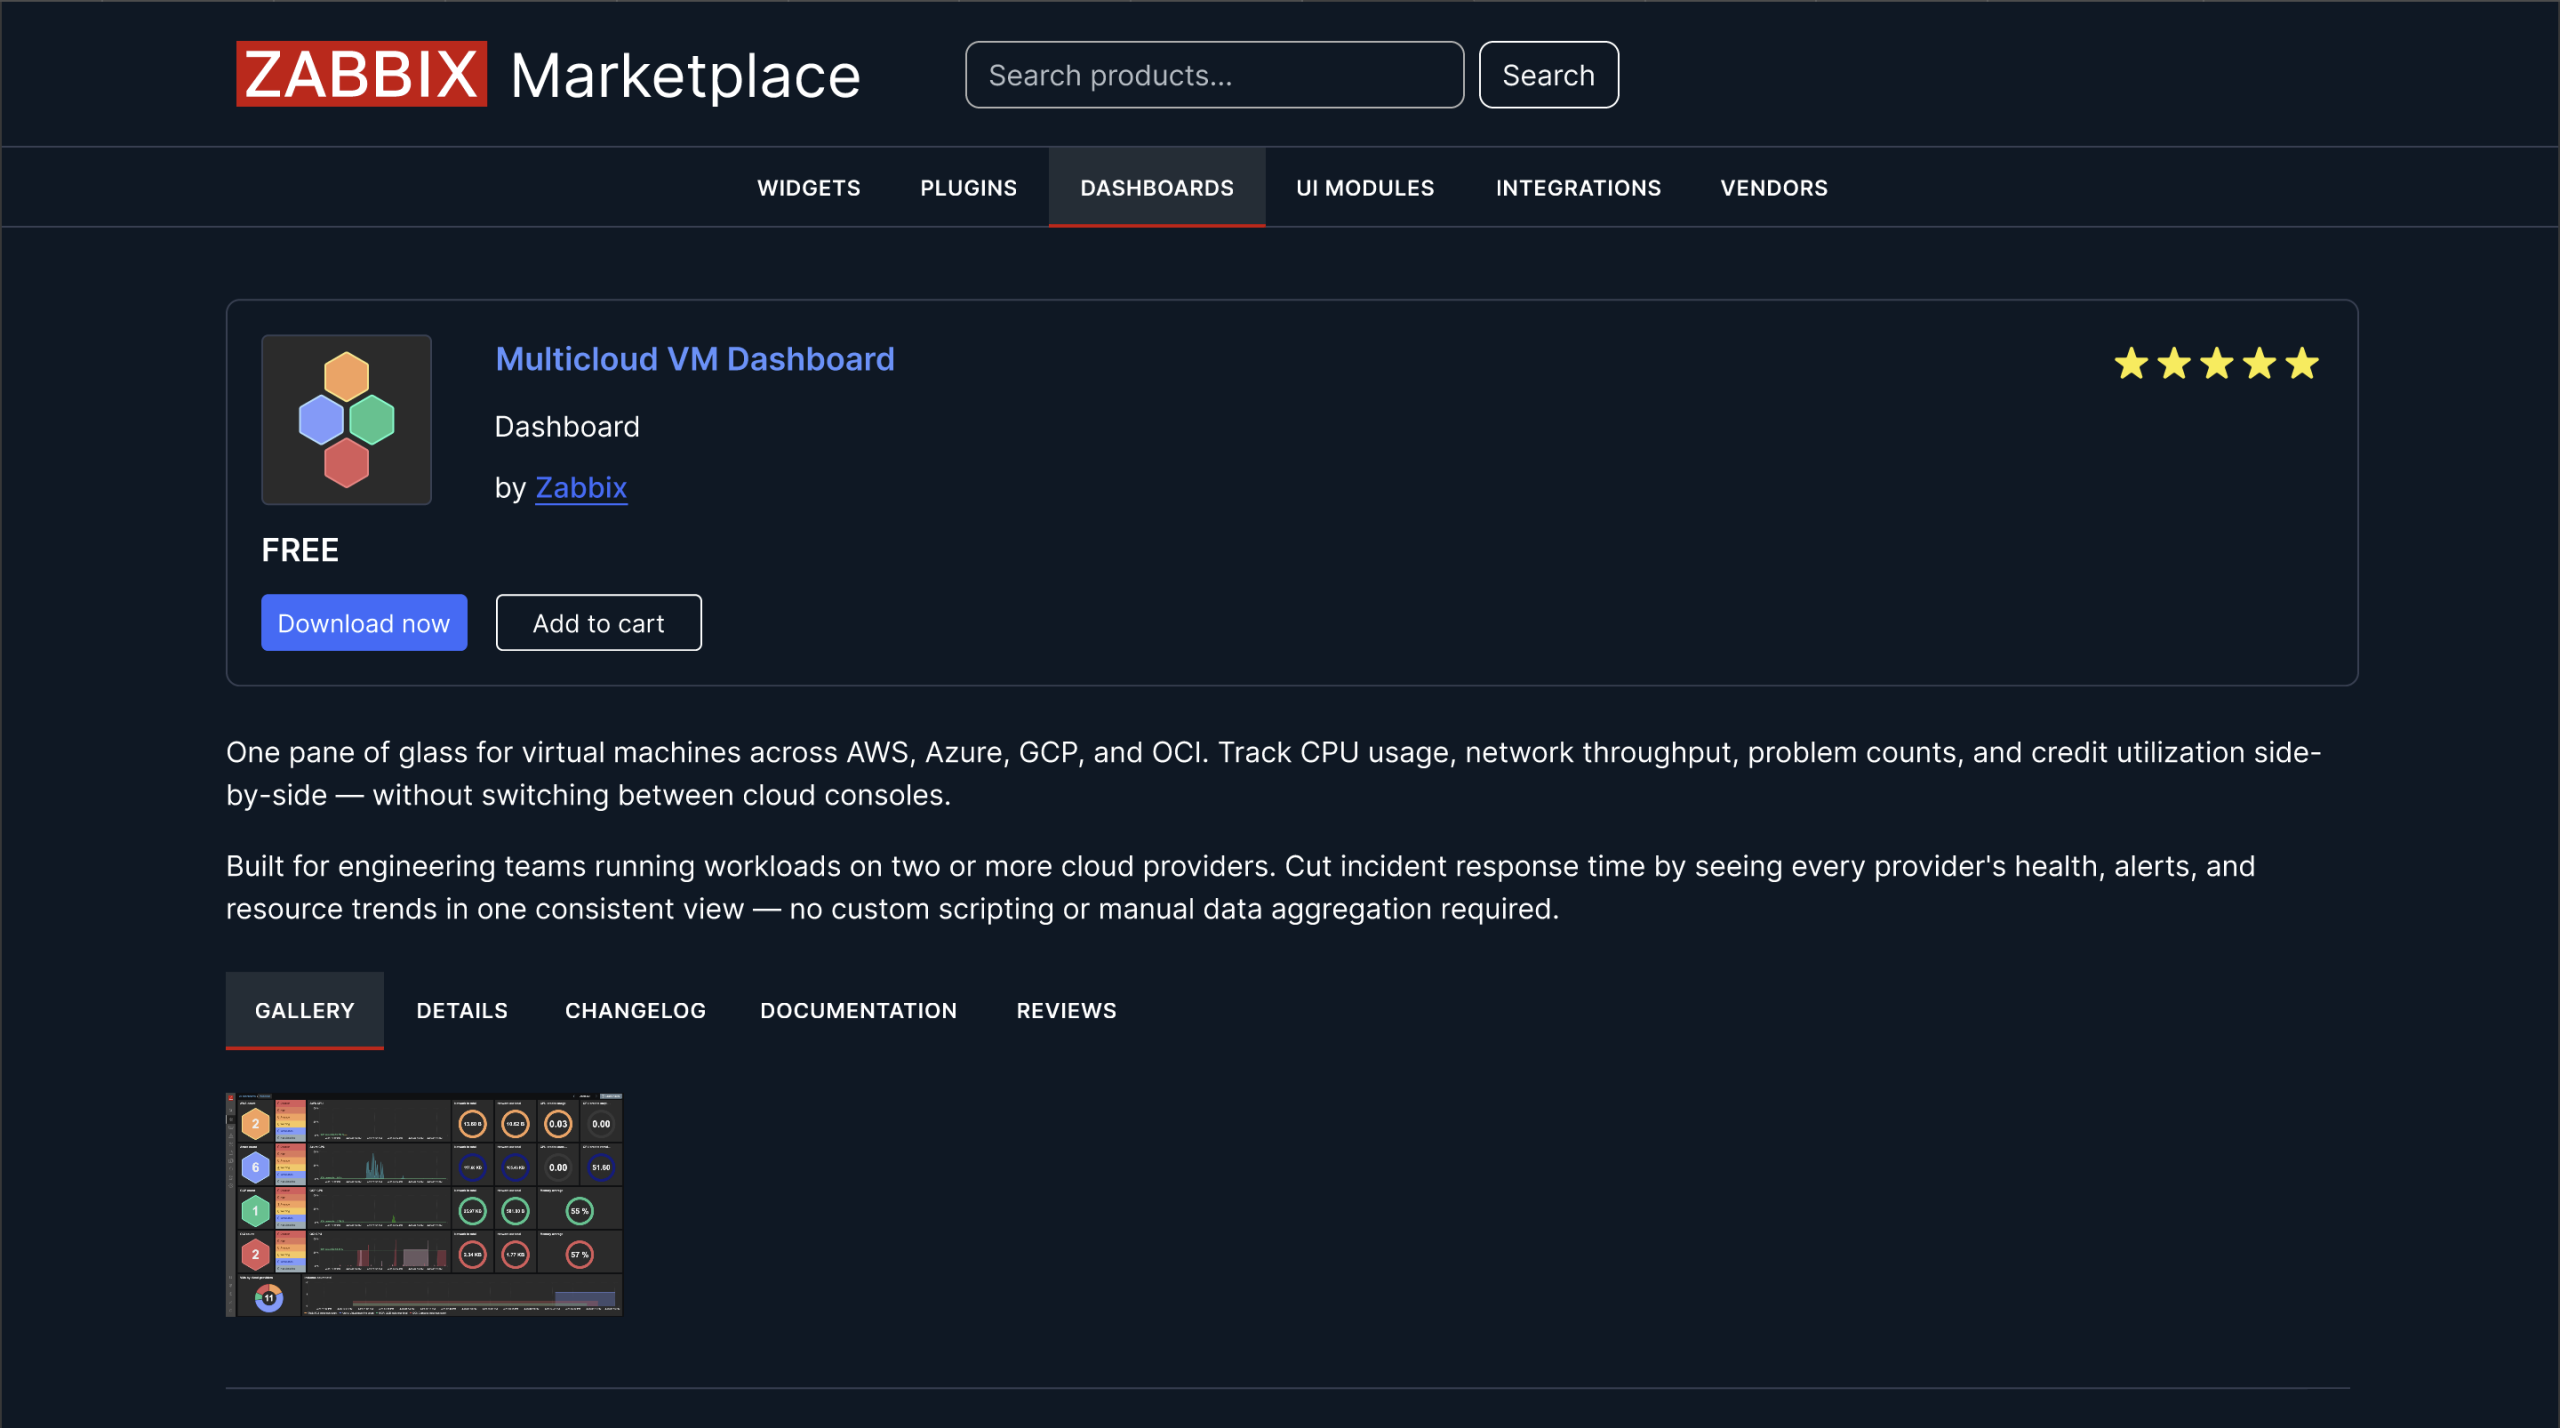
What if extending Zabbix was as easy as browsing an app store? Zabbix Marketplace is a new, centralized hub built to help users quickly discover integrations, extensions, templates, and observability solutions.
Zabbix users will soon be able to access a growing catalog of ready-to-use solutions created by the global Zabbix community and our official technology partners, accelerating deployment and simplifying complex monitoring challenges.
At the same time, Marketplace will help solution creators reach a wider audience by making both commercial subscription-based offerings and free open source solutions easier to publish and promote, while giving Zabbix users faster access to tools that solve real operational challenges.
Think of Marketplace as a one-stop shop for integrations, extensions, templates, dashboards, visualization components, automation tools, and incident response enhancements that extend the capabilities of Zabbix across cloud infrastructure, applications, IoT, enterprise environments, and third-party systems. It will focus on several key extension categories, including:
Widgets. Custom visualization components and dashboard enhancements will provide new ways to display metrics, alerts, and operational data.
UI Modules. Frontend extensions add functionality, simplify workflows, and tailor the Zabbix interface for specific use cases and industries.
Webhooks. Ready-to-use integrations for notifications, ticketing systems, messaging platforms, and incident management tools.
Plugins and integrations. Extensions that will connect Zabbix with external platforms, cloud services, infrastructure tools, DevOps pipelines, and observability ecosystems.
How will Zabbix Marketplace work?
Our goal is to create a trusted, reliable ecosystem where developers, technology partners, system integrators, and community contributors can publish solutions that help organizations customize and expand their Zabbix environments faster and with less effort.
Designed with a clean and intuitive interface inspired by the familiar Zabbix documentation and frontend experience, Marketplace will be immediately accessible to both experienced users and Zabbix newcomers. Meanwhile, a rich visual browsing experience with screenshots, previews, detailed descriptions, and installation guidance will help users quickly evaluate solutions.
Security, transparency, and usability are also important priorities for Marketplace. We’re working toward a submission and review process that helps us guarantee that extensions will meet quality and compatibility standards while remaining simple for contributors to publish and maintain.
While the exact commercial model is still being finalized, the integrations portfolio will remain as is and we are actively exploring revenue-sharing approaches that support sustainable development, ongoing maintenance, and long-term support for high-quality integrations and extensions.
Stay tuned – more details as well as previews and early announcements are coming soon! And if you’ve already got an idea for a Zabbix-based solution, we’re definitely ready to hear about it. Fill out this form to register your interest and be among the first companies featured on Zabbix Marketplace!
Original content is the lifeblood of conversations and curiosities. Imagine a world without it: we could find a thousand ways to regurgitate the same material that’s already been created, but we would witness the decline of fresh ideas and arguments.
Website owners fuel the ecosystem of ideas, news, and interesting tidbits, but they face the increasingly complex challenge of managing traffic to their websites and being paid for their content. While some bot traffic is clearly malicious, it isn’t always obvious when a particular AI crawler is helping or harming your business. To answer this, site owners need granular, reliable data to differentiate between traffic that provides value, and traffic that strains resources while eroding the foundation of their business model: actual humans consuming their content.
At Cloudflare, we hold a core belief: website owners have the right to control access to their content. We want to help website owners maintain their high-quality content and regulate AI traffic.
To provide much-needed clarity and help website owners take control, we’re excited to announce the new Attribution Business Insights dashboard — designed with business decision-makers and publishers in mind.
The new economics of the Internet
For decades, the business model of the Internet relied on a straightforward, unspoken agreement: website owners allowed search engines to crawl their content and, in return, search engines sent readers back to their pages. This symbiotic relationship, where traditional search engines operated with a balanced “crawl-to-referral” ratio, generated the pageviews needed to sustain advertising, affiliate revenue, and subscriptions. Search index crawlers would scan your content a couple of times for each referral sent, so making your website available to crawlers had a clear pipeline to additional revenue. We can think of this as the SEO (Search Engine Optimization) era.
Today, the explosive rise of AI crawlers and agents has broken this contract, plunging the digital publishing industry into an unprecedented crisis. The Internet is risking a transition into a “zero-click” ecosystem where AI chatbots scrape original content to synthesize instant answers — completely bypassing the original sources. We’ve already seen a marked shift from the SEO-only world into an AEO (Answer Engine Optimization) world, and now conversations around GEO (Generative Engine Optimization) are taking center stage.
The imbalance of this new reality is made clear by the crawl-to-referral ratios we see across the Internet today. While traditional search engines had a more balanced ratio of crawls to legitimate visitors referred, major AI crawlers operate on a drastically different, extractive scale. Bots from leading AI companies have been observed with a range of crawl-to-referral ratios: we noted ratios of 118:1 up to nearly 50,000:1 around the time of our Content Independence Day in 2025. In other words, an AI crawler might have crawled your premium content tens of thousands of times just to send back a single visitor. This ratio is fundamentally unfair.
For publishers, this creates a double hit: first, they’re losing out on the crucial referral traffic, ad impressions, and direct audience relationships that fund content creation and journalism. Second, they’re forced to bear the rising infrastructure costs of hosting and serving content to automated bots that offer no commercial value in return. The era in which it makes sense to allow all crawlers in the hopes of being discovered is over.
Introducing Attribution Business Insights
We want website owners to have the facts — the cold, hard numbers to understand which bots are helping their business and which bots are harming it. We also want to make this analysis easier than ever, which is why we’ve designed Attribution Business Insights to cut the noise, focusing on the details that our customers have told us are most important.
Today, the Attribution Business Insights dashboard is available to all Cloudflare Bot Management customers. The new dashboard is designed to deliver a targeted view of bot traffic flowing to your website; unlike traditional analytics tools that may require extensive manual filtering, this dashboard provides you with key insights right away.
We set out to answer the most pressing questions for site owners today: How should you think about AI traffic on your websites? What is the value of different audiences — including humans, non-AI bots, and AI bots? And most importantly, what is your data being used for?
The new Attribution Business Insights dashboard view, which includes insights about bot traffic overall, a site-wide crawl-to-referral ratio, and the distribution of AI bot traffic vs. organic traffic.
To answer these questions, the dashboard displays a powerful array of data and insights:
Bot traffic to content pages: View your overall bot vs. human traffic, as well as the volume of all bots successfully accessing content.
Crawl-to-referral ratios: See your site-wide crawl-to-referral ratio on the scale of 24 hours, seven days, or 30 days. You can also see crawl-to-referral ratios per bot operator (per company that owns one or more bots).
Top bots breakdown: A list of top bots by volume, including their country of origin, bandwidth they take up on your website, and whether you’re currently blocking or allowing them.
You shouldn’t have to be a security expert to understand how AI crawlers affect your business. If website owners want to spend just a few minutes ingesting the high-level insights, they can walk away with a clear temperature check of the effectiveness of their content security policy.
For those who want to do a little more digging to understand how AI companies are making use of their content — or collect information to guide how they want their relationships with AI companies to develop — we show a more granular view organized by bot operator.
Breakdown of bot activity on a website, with important details for each bot such as type, crawl-to-referral ratio, and current action.
By having a consolidated view of companies seeking to access content on your website, you can develop a better baseline of crawler activity. We want this data to equip our customers to step into any business conversation with the facts on their side. Tell Company1 that their crawl volume is twenty times that of Company4’s, and that Company4 is already compensating you for content. Revisit the way that Company2 licenses your content based on their recent activity. This new dashboard propels business conversations to move forward.
How does this new layer of visibility tie into the existing tools you have to protect your website from abuse? In line with other features of Bot Management, the action step still happens in Security rules. To avoid adding noise to the control plane, Attribution Business Insights is intended to be a hub for thoughtful, filtered analytics, rather than another place to take action. This dashboard serves as a central source of information, allowing you to investigate before then taking an action in the same rule engine that governs other abuse mitigations. We also want to be loud and clear about inviting business decision-makers into this dashboard, acknowledging that conversations around AI traffic have a wider set of stakeholders than only security-specialized users.
What’s next
The Attribution Business Insights dashboard is the next critical step in providing website owners with the transparency and control they need to manage evolving AI bot threats, and more broadly, shape the new dynamics of the Internet. We’re already investigating the next iteration with close publishing partners to create a visibility plane that covers security from the perspective of the website owner with valuable, original content to share.
A sneak preview below includes a new view to dissect crawler activity per-article to reveal the appetite that AI companies have for different pieces of content, different campaigns, and so on.
Breakdown of most popular articles, according to traffic volume. Shows key metrics such as AI bot traffic vs. other bot traffic vs. human traffic, both direct and from a referral.
Visibility is the first piece, and there’s more to come to empower website owners to take control of their content in this new age. We encourage all customers of Cloudflare Bot Management — especially those driving business conversations — to access this today for a fresh take on analytics.
AWS CloudFormation helps you model and provision cloud infrastructure as code using JSON or YAML templates, or through tools like the AWS Cloud Development Kit (CDK). Whether you create stacks directly, use change sets for preview, or deploy through CI/CD pipelines and AI agents, fast feedback on template errors is critical to development velocity.
Previously, CloudFormation introduced pre-deployment validation during change set creation, catching property syntax errors, resource name conflicts, and S3 bucket emptiness constraints before execution.
Today, we are announcing that pre-deployment validation now runs automatically on every CreateStack and UpdateStack operation, so every deployment path benefits from pre-deployment checks with no configuration required. We are also introducing three new validation checks (Service Quotas limit exceeded, AWS Config Recorder conflicts, and ECR repository delete readiness), a new DisableValidation parameter for operation-level control, and the cdk validate command that leverages CloudFormation pre-deployment validation as part of the CDK developer experience.
In this blog post, we will walk you through how these capabilities work in practice. You will learn how to:
Catch property syntax errors and resource name conflicts on CreateStack and UpdateStack before any resources are provisioned
Review new WARN-mode validations (service quotas, Config Recorder, ECR delete readiness) during change set creation
Use cdk validate to get a validation report with construct-level source tracing
Control validation behavior with the DisableValidation parameter when you need to skip checks
Key Capabilities
Pre-deployment validation on all stack operations: Property syntax validation and resource name conflict detection (Resource Already Exists) now run in hard-fail mode on CreateStack and UpdateStack, in addition to CreateChangeSet. Errors are caught before any resources are provisioned.
Three new validation types: Service Quota validation, AWS Config Recorder conflict detection, and ECR Repository delete readiness checks are now available as warnings during change set creation.
CDK validate command: The cdk validate command leverages CloudFormation pre-deployment validation and provides a report with construct-level source tracing that maps errors back to your CDK code.
DisableValidation parameter: Operation-level control to skip pre-deployment validation when you need to prioritize deployment speed or bypass a known issue.
How It Works
Understanding Validation Modes
CloudFormation pre-deployment validation operates in two modes that determine how validation failures are handled:
FAIL mode stops the stack operation when validation detects errors, ensuring problematic templates cannot proceed to deployment. This applies to property syntax errors and resource name conflicts on CreateStack, UpdateStack, and CreateChangeSet operations.
WARN mode allows the operation to proceed despite validation findings, providing warnings that you can review and address before execution. This applies to service quota limits, AWS Config Recorder conflicts, and ECR repository delete readiness checks on CreateChangeSet.
What happens when validation fails:
CreateStack: Operation stops before any resources are provisioned.
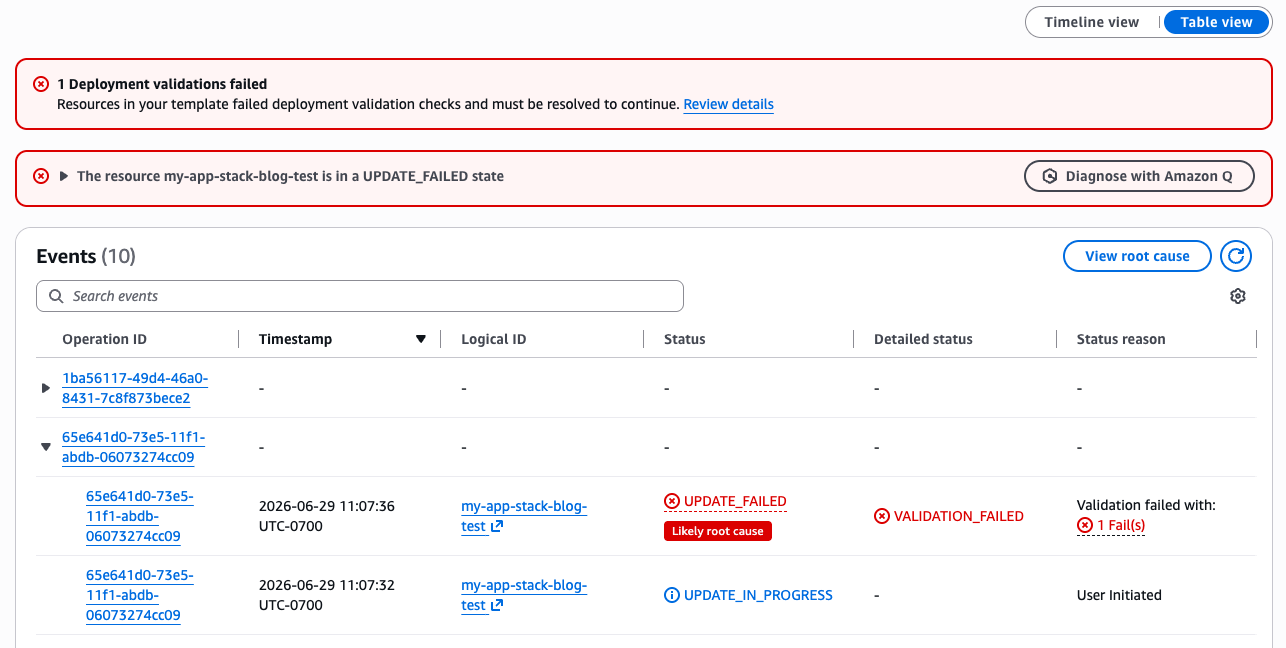
UpdateStack: Operation stops, stack remains in its current state with no resources modified.
CreateChangeSet: Change set is not executable. Change set status shows FAILED.
The following scenarios demonstrate how pre-deployment validation works across different stack operations.
Scenario 1: Property Validation on CreateStack
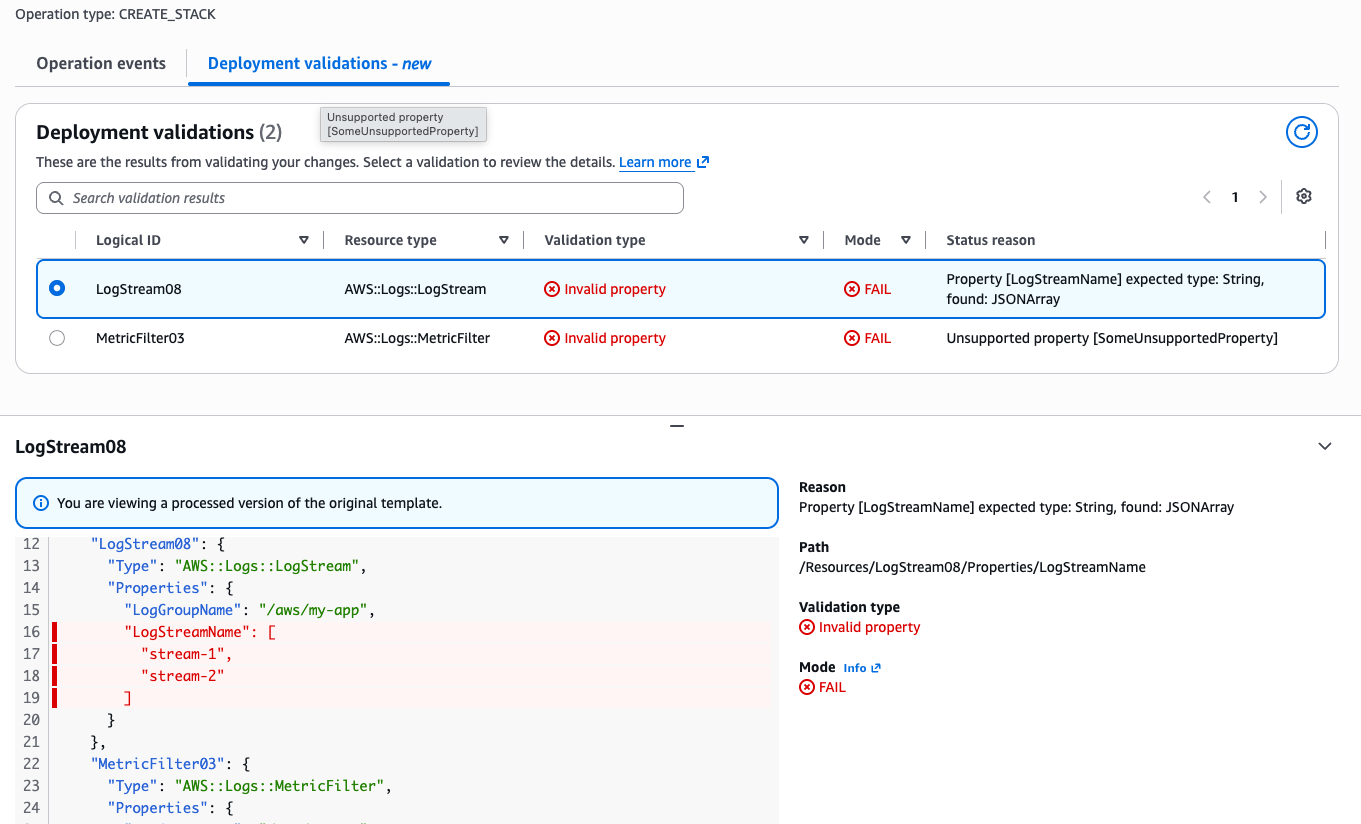
CloudFormation evaluates each resource property definition before provisioning begins. The following template contains several common resource property errors:
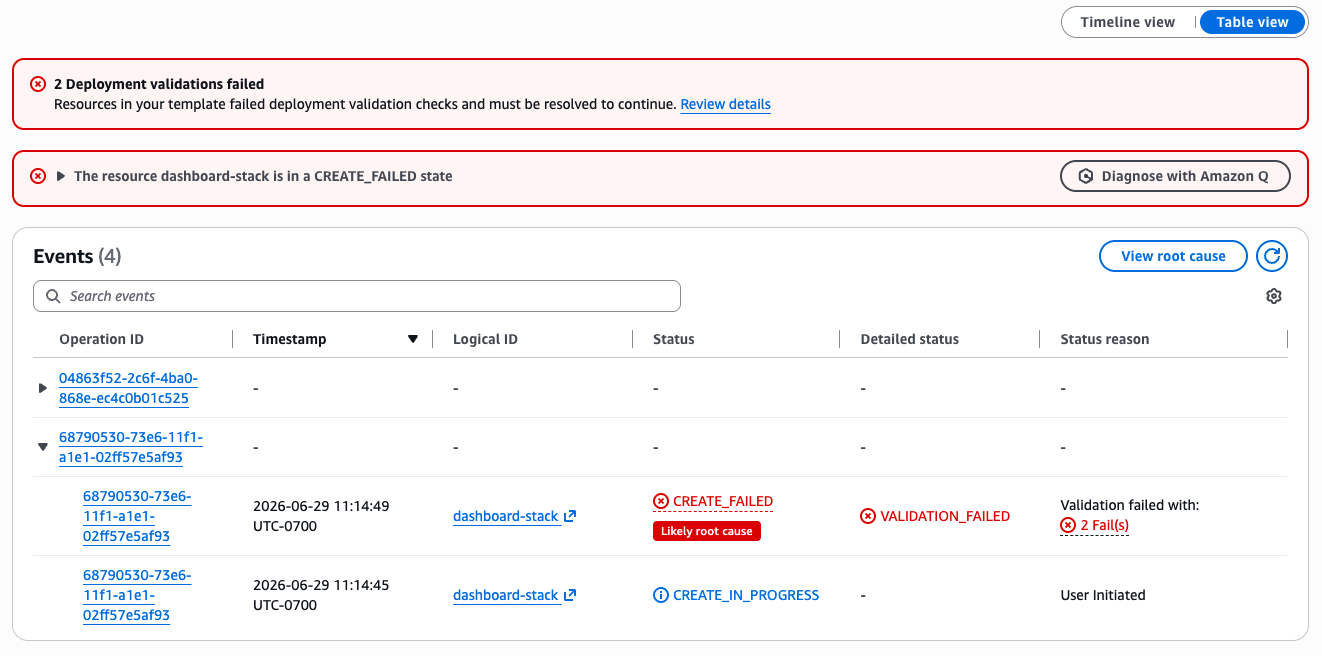
The stack creation stopped before any resources were provisioned. Each validation error includes the logical resource ID, resource type, and a precise status reason describing the property issue.
In the CloudFormation console, navigate to your stack’s Events tab and click the operation ID (or the link in the banner or status reason column) to open the Operation view page. The page will open directly on the Deployment validations tab to see the validation results table:
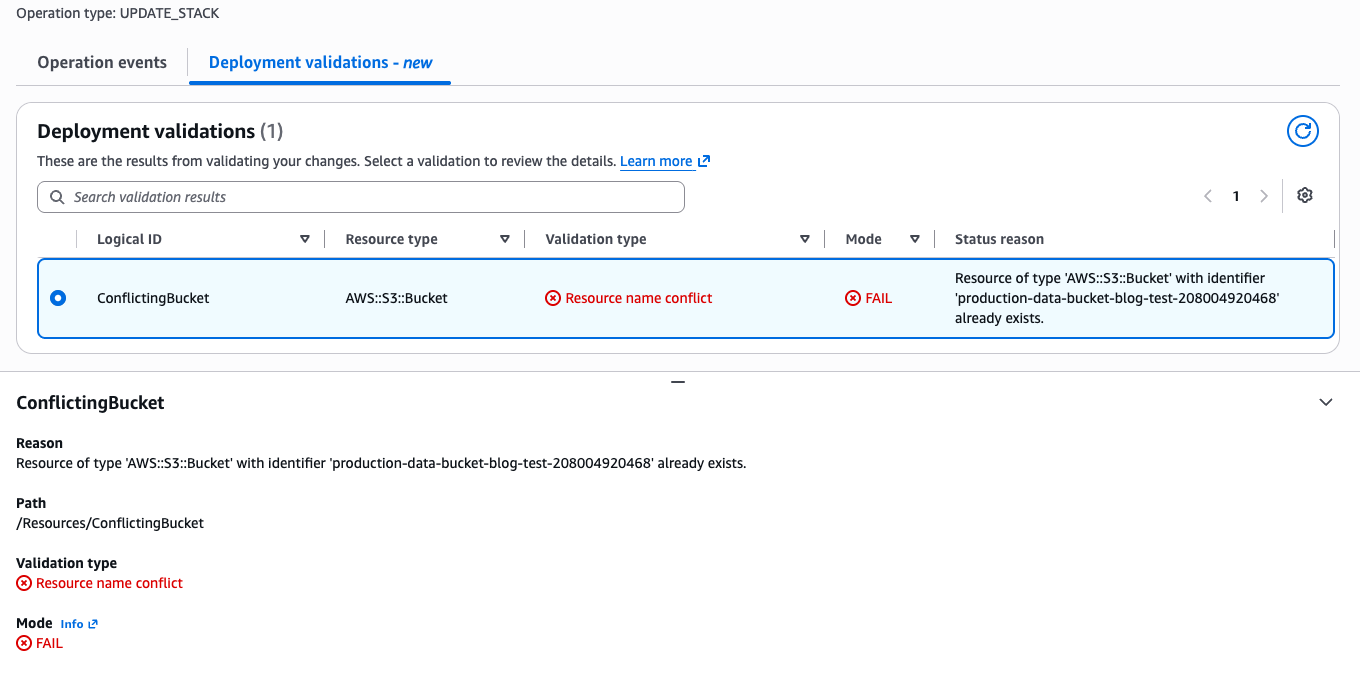
Resource name conflict detection (RAE) identifies when your template specifies a resource name that already exists in your account. This validation now runs on CreateStack and UpdateStack operations in addition to CreateChangeSet.
Template (update-bucket.yaml)
AWSTemplateFormatVersion: "2010-09-09"
Description: Update stack adding a bucket with a conflicting name

Resources:
  ExistingFunction:
    Type: "AWS::Lambda::Function"
    Properties:
      FunctionName: "my-existing-function"
      Runtime: "python3.12"
      Handler: "index.handler"
      Role: !Sub "arn:aws:iam::${AWS::AccountId}:role/lambda-role"
      Code:
        ZipFile: |
          def handler(event, context):
              return {"statusCode": 200}

  ConflictingBucket:
    Type: "AWS::S3::Bucket"
    Properties:
      BucketName: "production-data-bucket"   # Already exists in the account
The update stops before any resources are modified. You can either rename the resource in your template or remove the existing resource that causes the conflict.
The deployment validation view below provide moe detail about the error, include status reason and path to the resource.
Figure 3: Resource Name Conflict on UpdateStack
Scenario 3: Service Quota Warning on CreateChangeSet
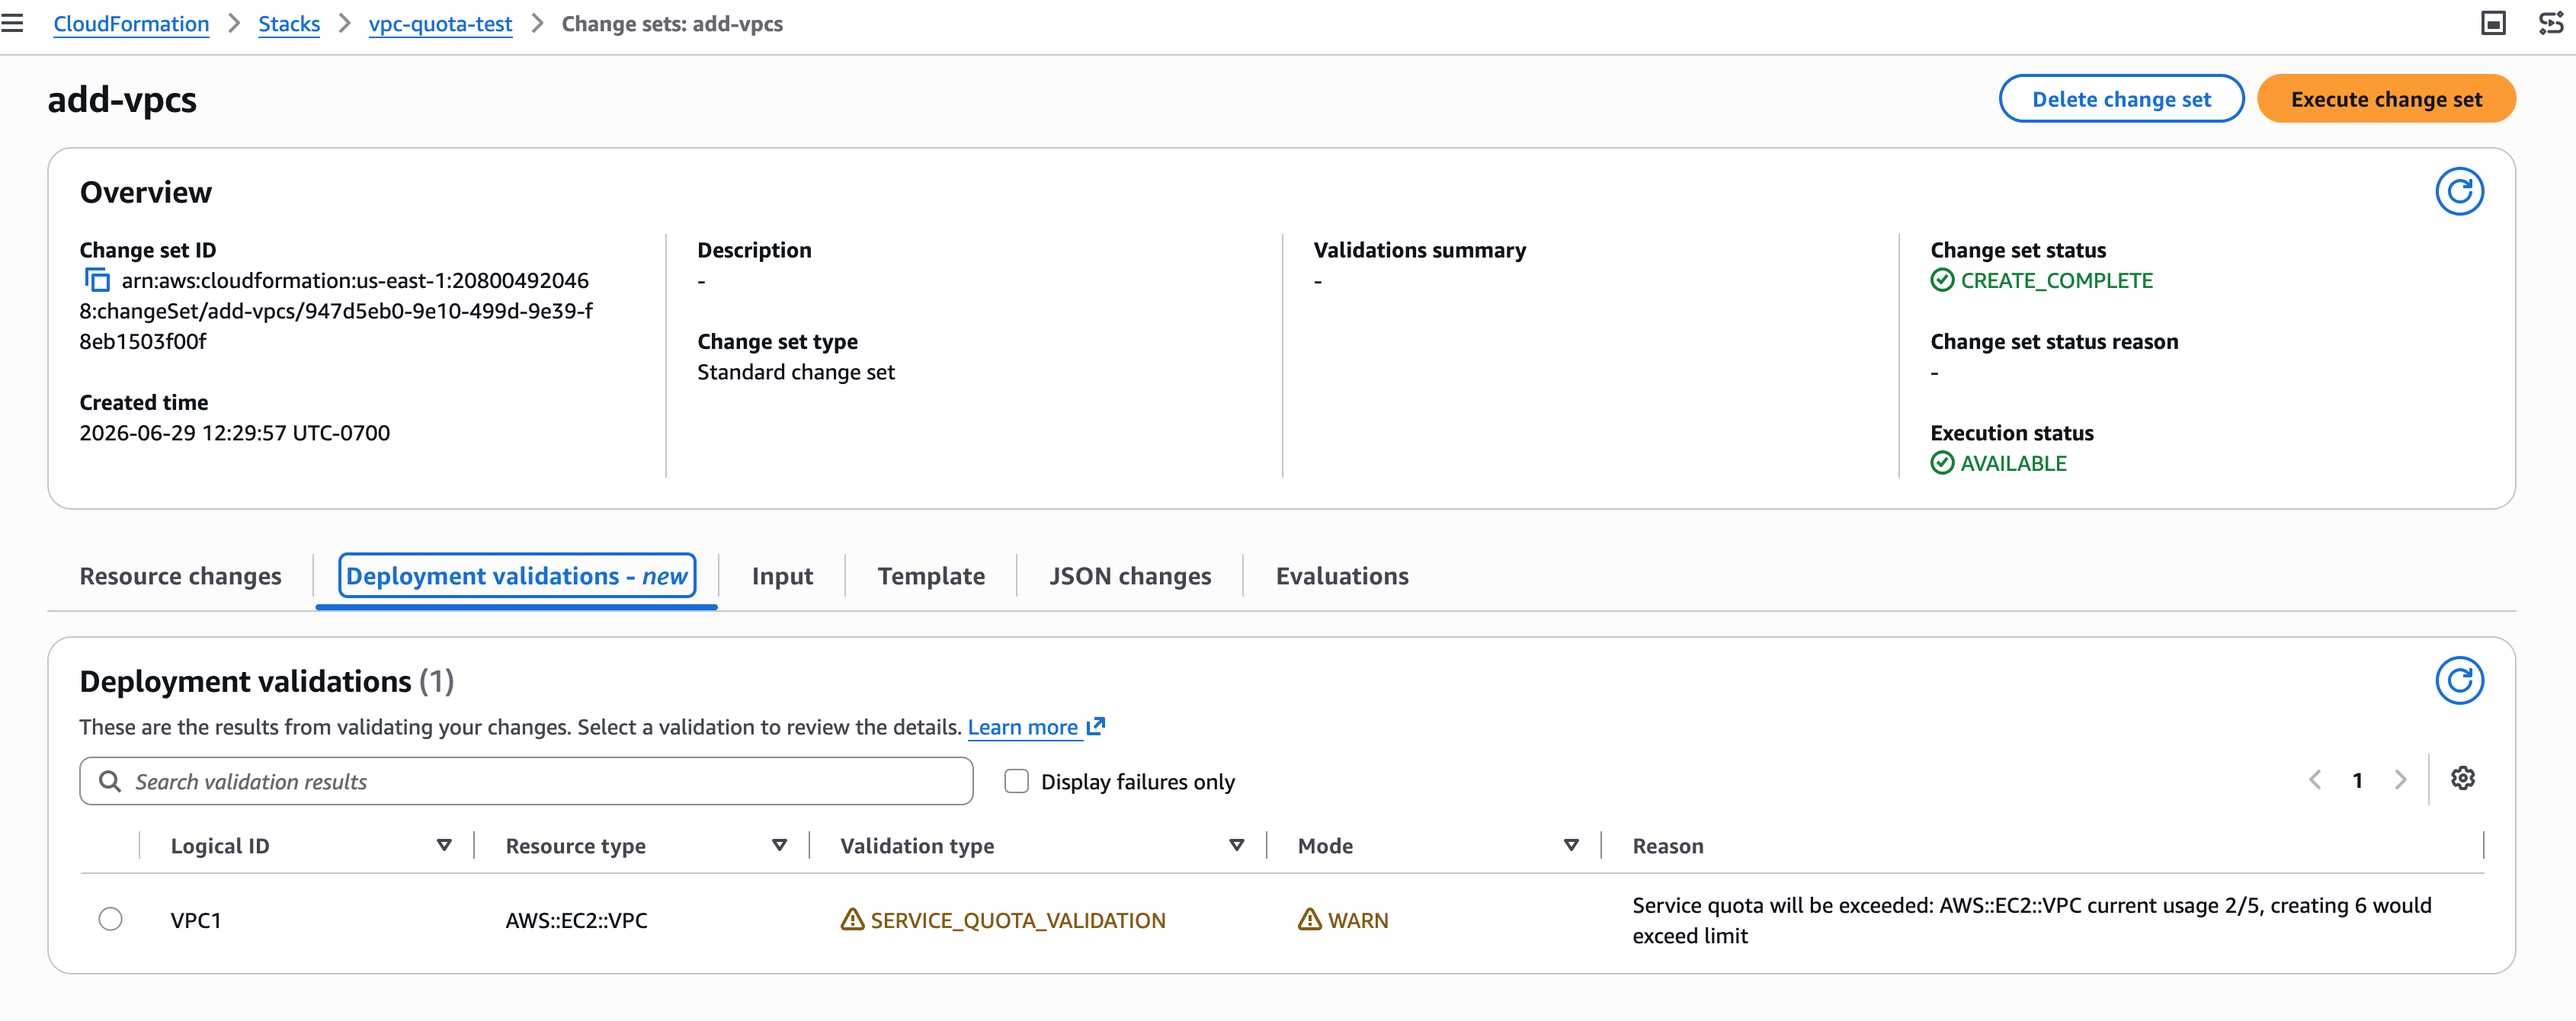
Service Quota validation is one of three new warning-mode validations available during change set creation. It checks whether creating or updating resources would exceed your AWS service quotas.
Because this validation operates in WARN mode, the change set is created successfully. You can review the warning, request a quota increase through the Service Quotas console, and then proceed with execution. The two other new warning validations (AWS Config Recorder conflict detection and ECR Repository delete readiness) follow the same pattern.
Figure 4: Service Quota Warning on CreateChangeSet
Scenario 4: CDK Validate Experience
The cdk validate command provides a unified validation experience that combines multiple validation sources into a single report with construct-level source tracing. Under the hood, cdk validate synthesizes your CDK app, creates a change set to invoke server-side pre-deployment validation, collects the results via DescribeEvents, and produces a report that maps errors back to your CDK source code with construct-level tracing.
Each error traces back to the specific construct and source file location in your CDK code, not just the CloudFormation logical resource ID. This construct-level tracing is what makes cdk validate uniquely valuable: you see the exact line in your code that needs to change.
Scenario 5: Controlling Validation with DisableValidation
Pre-deployment validation is enabled by default on all stack operations. If you need to skip validation for a specific operation, use the DisableValidation parameter.
When to disable validation:
When you have already validated your template through other means (cdk validate, cfn-lint, CI/CD checks)
When you need to minimize operation latency for time-sensitive deployments
Important: Disabling validation means common errors will not be caught until resource provisioning is attempted. Use this option only when you understand the trade-off between deployment speed and early error detection.
AI Agents and Automated Workflows
Pre-deployment validation gives AI agents and automation tools the fast feedback loop they need to self-correct. When an agent provisions infrastructure and the template has an error, validation returns a structured error in seconds rather than waiting minutes for a full provision-and-rollback cycle to complete. The agent can parse the error, fix the template, and retry immediately.
With cdk validate, agents get construct-level source tracing that maps errors directly to the line of CDK code that needs to change, enabling fully automated fix-and-retry loops without human intervention.
To get started with the agent experience, install the CloudFormation agent skill from the AWS Agent Toolkit. This skill gives AI agents the ability to create stacks, validate templates, and iterate on errors using pre-deployment validation feedback.
Getting Started
Pre-deployment validation runs automatically on all CreateStack, UpdateStack, and CreateChangeSet operations with no configuration required. To start benefiting:
Create or update a stack as you normally would. Validation runs automatically.
Review validation results using the DescribeEvents API, the CloudFormation Console Events tab (click the operation ID, then the Deployment validations tab), or the cdk validate command.
Fix identified issues in your template and retry the operation.
Optionally disable validation using --disable-validation for specific operations
Required IAM permissions for validation checks
Validation on CreateStack and UpdateStack (property syntax validation and resource name conflict detection) requires no additional IAM permissions beyond what is needed for the stack operation itself. For the new validation checks available during change set creation, your IAM role needs the following additional permissions:
Service Quota Check:
cloudwatch:GetMetricData
lambda:GetAccountSettings
servicequotas:GetServiceQuota
ec2:DescribeSecurityGroups
iam:GetAccountSummary
Config Recorder Check:
config:ListConfigurationRecorders
S3 Bucket Empty Check:
s3:ListBucketV2
ECR Repository Delete Readiness Check:
ecr:ListImages
If these permissions are not granted, the corresponding validation checks will be skipped without blocking the operation.
For CDK users:
# Run unified validation before deploying
cdk validate
Best Practices
Use cdk validate as your primary pre-deployment check. It leverages CloudFormation pre-deployment validation in a single command, giving you comprehensive coverage before any deployment is attempted.
Place CreateChangeSet as the first pipeline stage. For pipelines that use change sets, this ensures pre-deployment validation fires at the pipeline entry point. CDK Pipelines integrates this by default.
Let validation run by default. The few seconds of validation time pay for themselves by preventing full provision-and-rollback cycles that take minutes or longer.
Use DisableValidation intentionally. Reserve it for cases where you have already validated through other means or need to bypass a known false positive. Do not disable validation globally.
Integrate validation into PR/CI workflows. Run cdk validate or cfn-lint as part of your pull request checks to catch errors before code is merged, preventing invalid templates from reaching deployment pipelines.
Monitor validation warnings. WARN-mode validations (service quota, Config Recorder, ECR delete readiness) indicate potential issues that may cause failures at execution time. Address them proactively.
Conclusion
Pre-deployment validation on all stack operations represents a significant step forward in CloudFormation’s shift-left validation strategy. By catching common deployment errors in seconds before any resources are provisioned, this capability eliminates unnecessary rollback cycles and accelerates development workflows across the board.
Combined with the cdk validate command, which provides a unified validation experience with construct-level tracing, and the DisableValidation parameter for operation-level control, teams now have a complete toolkit for managing the trade-off between validation coverage and deployment speed. AI agents and automated pipelines benefit from structured, machine-readable feedback that enables immediate self-correction, turning what were once multi-minute debugging cycles into second-level iteration loops.
Pre-deployment validation is available in all AWS Regions where CloudFormation is supported. No configuration or opt-in is required. To learn more, visit the Validate stack deployments User Guide.
Today, we’re announcing AWS CloudFormation Express mode, a new deployment mode that accelerates deployments for developers and AI tools iterating on infrastructure. Express mode accelerates deployments by completing when CloudFormation confirms resource configuration is applied, rather than waiting for extended stabilization checks. This reduces deployment time by up to 4 times for iterative development workflows and production scenarios.
How it works Every CloudFormation deployment performs stabilization checks after resource configuration is applied. These checks serve an important purpose when you need to confirm resources can serve traffic before shifting load.
However, many workflows do not require full stabilization to proceed. Express mode benefits two primary use cases: iterative development workflows and production scenarios where you are comfortable with eventual stabilization. These use cases include iterating on infrastructure configurations during development, testing individual components of your application, and AI-assisted infrastructure development that benefits from sub-minute feedback loops.
With Express mode, CloudFormation completes deployments when resource configuration is applied, without waiting for stabilization checks. Resources continue becoming operational in the background. CloudFormation automatically retries dependent resources that encounter transient failures during provisioning within the same stack, without requiring any customer intervention. This built-in resilience handles timing issues between resources as they stabilize. Express mode changes when the deployment completes, not how resources are provisioned.
For example, when I create an Amazon Simple Queue Service (SQS) queue with a dead letter queue (DLQ), Standard mode takes 64 seconds, but Express mode completes in up to 10 seconds. In the case of deleting an AWS Lambda function with network interface attachment, Standard mode takes 20–30 minutes, but Express mode completes in up to 10 seconds based on my benchmarking test.
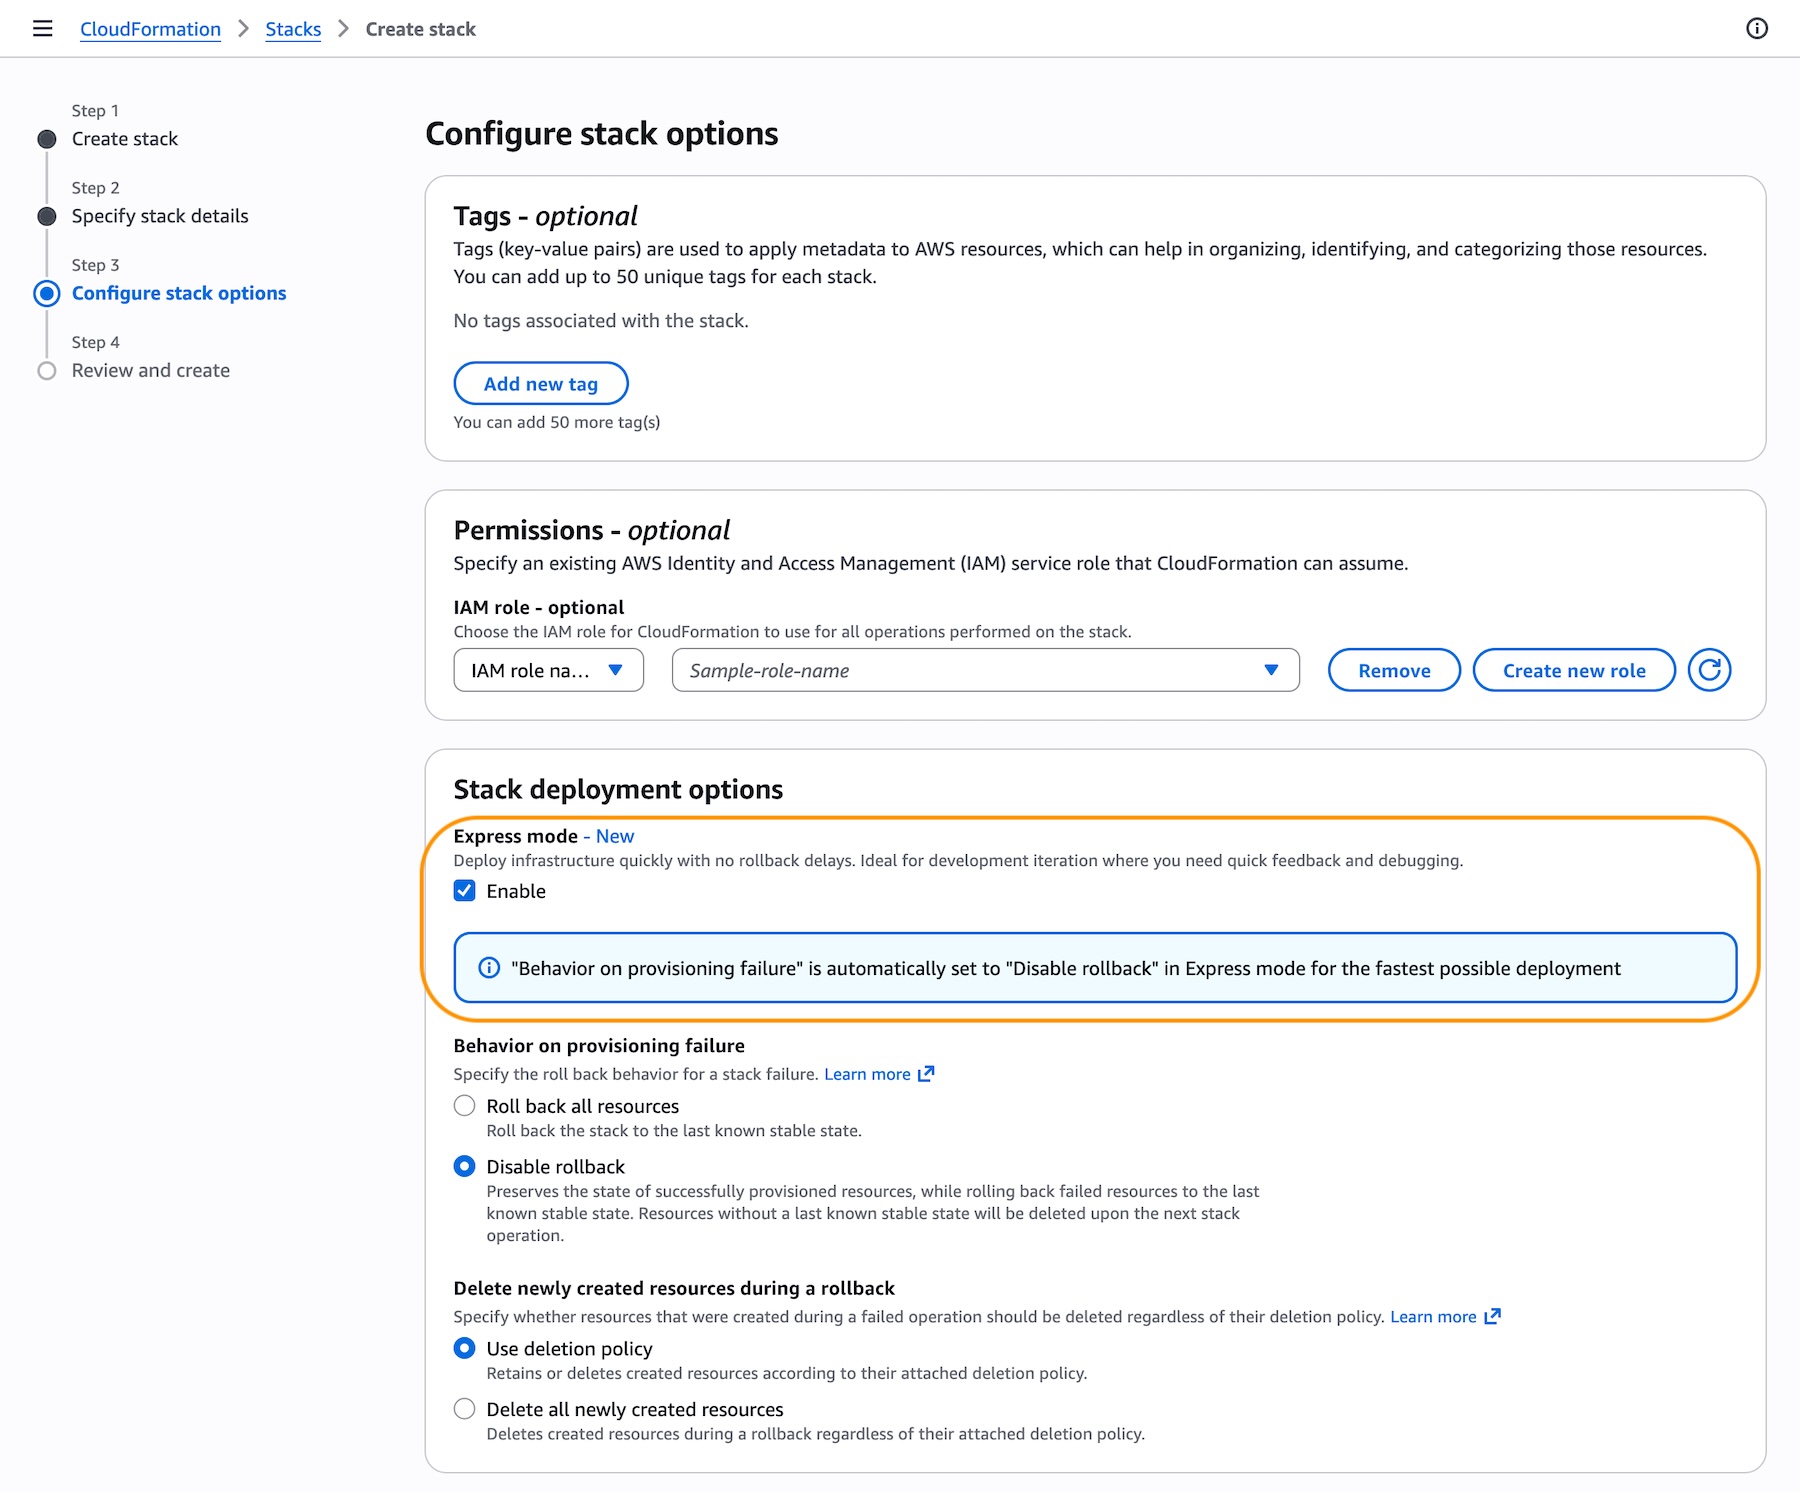
Get started with CloudFormation Express mode When you create a CloudFormation stack in the AWS Management Console, choose Enable in the Express mode under Stack deployment options.
Activate Express mode by setting the --deployment-config parameter to EXPRESS when creating, updating, or deleting stacks. No template changes are required. Express mode disables rollback by default for the fastest iteration experience. To re-enable rollback, set disableRollback to false in the deployment-config for production environments, or implement monitoring/cleanup mechanisms for failed deployments.
For example, use the Express mode when you build infrastructure incrementally, adding resources one at a time. Ensure your IAM role templates follow the principle of least privilege.
For AWS CDK, activate Express mode with the cdk deploy --express command when you deploy your CDK stack. This command retrieves your generated CloudFormation template and deploys it through the CloudFormation Express mode, which provisions your resources as part of a CloudFormation stack.
Express mode works with all existing CloudFormation templates and supports all CloudFormation features including change sets and nested stacks. When you enable Express mode on a parent stack, all nested stacks also use Express mode. If you need resources to be fully operational before proceeding with traffic or testing, continue using the default deployment behavior, which performs stabilization checks before completing.
Now available AWS CloudFormation Express mode is available today in all AWS commercial Regions at no additional cost. For Regional availability and a future roadmap, visit the AWS Capabilities by Region. If you want to call APIs, search documentation, find regional availability, and check troubleshooting about this new feature, try using the AWS MCP Server and plugins with your preferred AI tool. To learn more, visit the CloudFormation documentation.
Start accelerating your deployments today, and send feedback to AWS re:Post for AWS CloudFormation or through your usual AWS Support contacts.
When you run compute-intensive workloads like real-time analytics, batch processing, video encoding, scientific modeling, or CPU-based machine learning inference, every percentage point of performance matters. You need instances that deliver higher throughput per vCPU, faster memory access, and more network bandwidth, all while keeping your costs in check.
Today I am happy to announce the general availability of Amazon Elastic Compute Cloud (Amazon EC2) C9g and C9gd instances, powered by AWS Graviton5 processors. C9g instances are compute-optimized and deliver up to 25% higher performance per vCPU compared to previous-generation C8g instances. They feature the fastest memory of any processor instance in the cloud, with DDR5 8800MT/s DIMMs, 5x more L3 cache, and up to 3x higher packet-processing performance compared to Graviton4-based instances. The faster memory and larger caches mean your workloads spend less time waiting on data, translating into higher throughput for in-memory analytics, faster agentic loops, and more responsive real-time applications.
C9g instances are ideal for batch jobs, video encoding pipelines, or distributed analytics that can utilize Amazon Elastic Block Store (Amazon EBS) for storage. It is also a natural fit for agentic AI workloads, where concurrent environments and CPU-bound reasoning steps benefit from Graviton5’s higher core count and larger caches. As AI shifts from answering questions to taking actions, running code, and orchestrating multi-step tasks, the demand for CPU compute is growing, and C9g instances are built for this shift.
Some workloads also need fast local storage alongside that compute power. Choose C9gd when your application benefits from high-speed, low-latency local NVMe SSD storage, for example scratch space during HPC simulations, temporary caches for ML inference, or local buffers for ad-serving engines.
C9g and C9gd instances at a glance C9g and C9gd instances are available in 11 sizes ranging from medium to 48xlarge, plus a bare metal option. They offer up to 15% higher network bandwidth and 20% higher EBS bandwidth on average across sizes compared to the previous generation, with the largest 48xlarge size delivering up to 100 Gbps of network bandwidth and up to 72 Gbps of EBS bandwidth, a 2x increase.
C9g
vCPUs
Memory (GiB)
Network Bandwidth (Gbps)
EBS Bandwidth (Gbps)
medium
1
2
Up to 15
Up to 12
large
2
4
Up to 15
Up to 12
xlarge
4
8
Up to 15
Up to 12
2xlarge
8
16
Up to 17
Up to 12
4xlarge
16
32
Up to 17
Up to 12
8xlarge
32
64
17
12
12xlarge
48
96
25
18
16xlarge
64
128
34
24
24xlarge
96
192
50
36
48xlarge
192
384
100
72
metal-48xl
192
384
100
72
C9gd instances add local NVMe SSD storage with up to 30% higher storage performance compared to previous-generation local storage instances.
C9gd
vCPUs
Memory (GiB)
Instance Storage (GB)
Network Bandwidth (Gbps)
EBS Bandwidth (Gbps)
medium
1
2
1 x 59
Up to 15
Up to 12
large
2
4
1 x 118
Up to 15
Up to 12
xlarge
4
8
1 x 237
Up to 15
Up to 12
2xlarge
8
16
1 x 474
Up to 17
Up to 12
4xlarge
16
32
1 x 950
Up to 17
Up to 12
8xlarge
32
64
1 x 1900
17
12
12xlarge
48
96
3 x 950
25
18
16xlarge
64
128
1 x 3800
34
24
24xlarge
96
192
3 x 1900
50
36
48xlarge
192
384
3 x 3800
100
72
metal-48xl
192
384
3 x 3800
100
72
Both families are well-suited for high-performance computing (HPC), batch processing, gaming, video encoding, scientific modeling, distributed analytics, CPU-based machine learning inference, and ad serving.
Here are some additional capabilities:
Instance Bandwidth Configuration (IBC) lets you adjust the allocation of bandwidth between Amazon EBS and Amazon VPC networking by up to 25%, helping you optimize performance for workloads with specific bandwidth requirements such as databases and caching.
ENA Express support for enhanced networking.
Up to 128 EBS volumes can be attached to virtual instances.
Support for Savings Plans, On-Demand, Spot Instances, Dedicated Instances, and Dedicated Hosts.
Nitro Isolation Engine C9g and C9gd instances are the first compute optimized Amazon EC2 instances to feature the AWS Nitro Isolation Engine, a new capability of the AWS Nitro System. The Nitro Isolation Engine is a purpose-built component of the Nitro Hypervisor, implemented in Rust, that enforces isolation between virtual machines. It mediates all access to VM memory, CPU register state, and I/O devices through a minimal set of APIs.
To learn more about the Nitro Isolation Engine, visit the blog post. For details on the formal verification results, including scope and assumptions, see our technical white paper.
Now available Amazon EC2 C9g and C9gd instances are now available in US East (Ohio, N. Virginia), US West (Oregon), and Europe (Frankfurt). Additional regions will follow.
If you manage TLS certificates for your applications, you know the challenge: certificates expire, and when they do, your customers see errors or your service goes down. As certificate validity periods get shorter (the Certification Authority (CA)/Browser Forum mandates reduced maximum validity to 100 days starting March 2027, and to 47 days by 2029), manual renewal processes become untenable. You need automation.
Automatic Certificate Management Environment (ACME) is an open protocol for requesting, renewing, and revoking TLS certificates without human intervention. It’s the same protocol behind Let’s Encrypt, and it’s supported by dozens of clients across every platform.
Today we’re announcing ACME support for public certificates in AWS Certificate Manager (ACM). ACM now provides a fully managed ACME server endpoint that works with any ACMEv2-compatible client, such as Certbot, cert-manager for Kubernetes, acme.sh, or any other client you already use. You can issue public TLS certificates from Amazon Trust Services through the standard ACME protocol.
Before today, if you wanted automated certificate management using the ACME protocol, you relied on external certificate authorities alongside ACM, leading to a fragmented visibility experience. Some certificates lived in ACM, others were managed externally with no central dashboard. PKI administrators had limited ability to control who could request certificates or which domains were allowed.
With ACME support in ACM, you can now set up one or more managed ACME endpoint that allows you to centrally manage and monitor ACME certificate usage across your organization.
As a PKI administrator, you get centralized controls that go beyond basic certificate issuance. You can bind IAM roles to ACME accounts for fine-grained access control over which domains each client can request. You can define domain scopes at the endpoint level to enforce organization-wide policies. And you get centralized monitoring and visibility in the same place: AWS CloudTrail logs every certificate request for auditability, Amazon CloudWatch tracks operational metrics, and ACM sends expiry notifications when certificates are approaching renewal. Using ACM, your PKI team can search all certificates, whether issued through the ACM console, an API call, or ACME.
How it works To get started, you first set up a dedicated ACME endpoint, configure authorization controls using External Account Binding (EAB), validate which domains the endpoint can issue certificates for, and point your existing ACME clients to the new endpoint.
The domain validation step is important: it separates who can set up certificate issuance from who can request certificates. The PKI administrator validates domains once at the endpoint level, using DNS credentials that stay with the admin. Application owners who need certificates never touch DNS. They register with an EAB credential, and the endpoint enforces which domains and scopes they’re allowed to request. This means you can distribute certificate automation broadly across your organization without distributing DNS keys along with it.
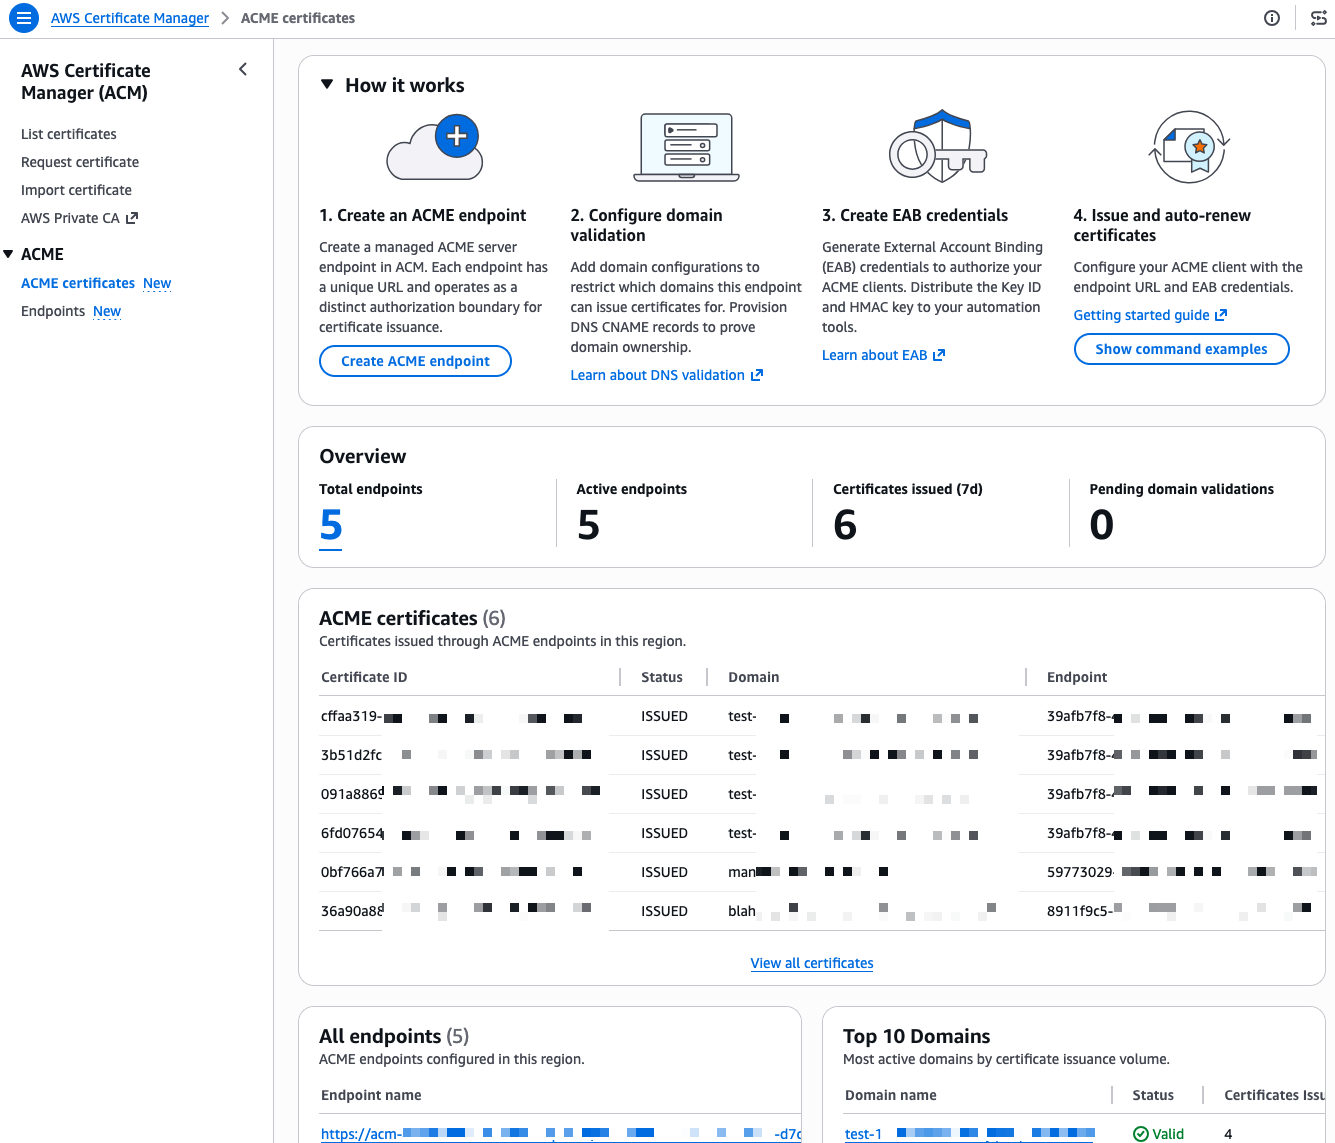
I start this demo from the ACME certificates page in the AWS Certificate Manager console.
I already have a few endpoints and certificates in this account, I walk you through creating a new one from scratch. First, I select Create ACME endpoint.
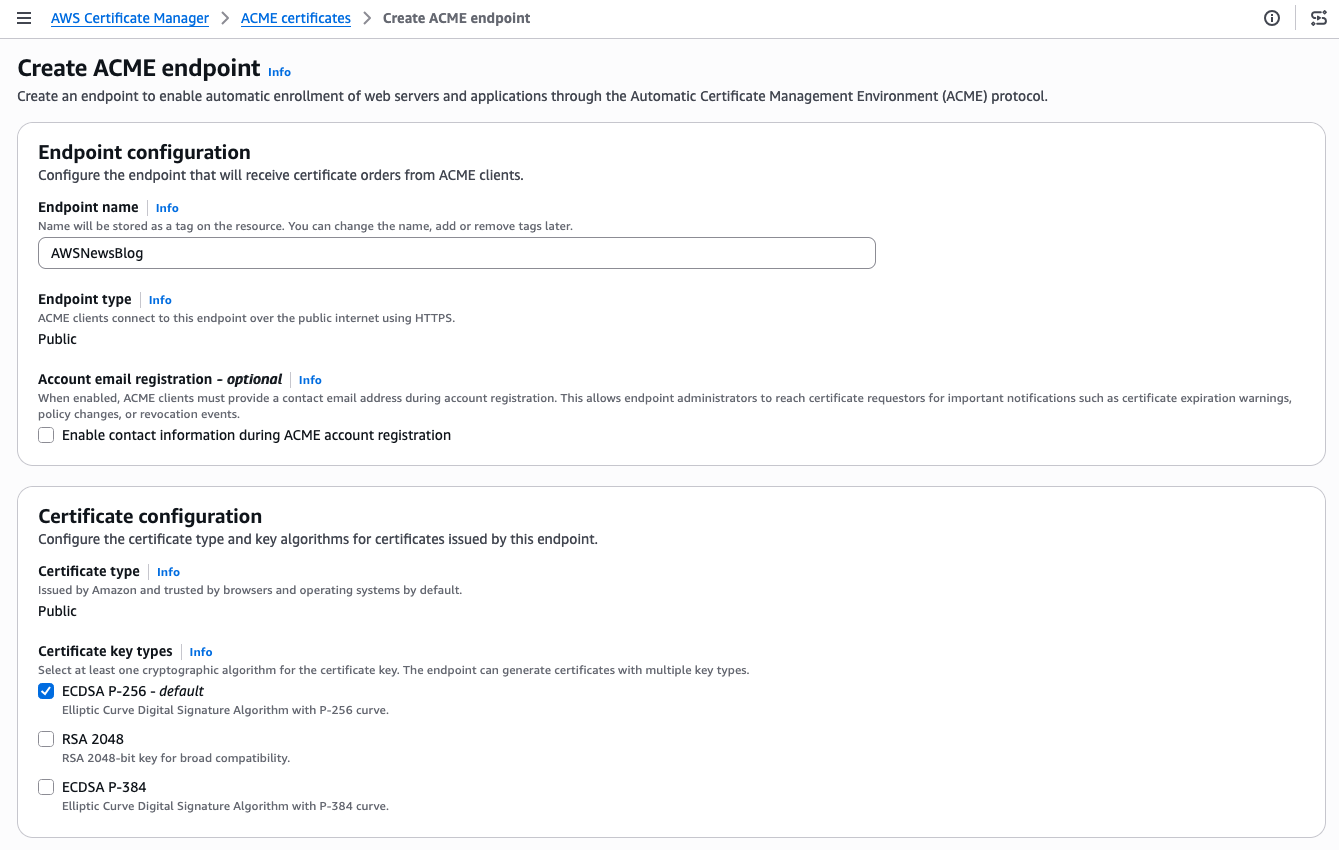
I give my endpoint a name. The Endpoint type is Public. ACME clients will connect over the public internet. The Certificate type is Public. The certificate will be issued by Amazon Trust Services and trusted by browsers and operating systems by default. For the certificate key type, I keep the default ECDSA P-256. RSA 2048 and ECDSA P-384 are also available if your clients require them.
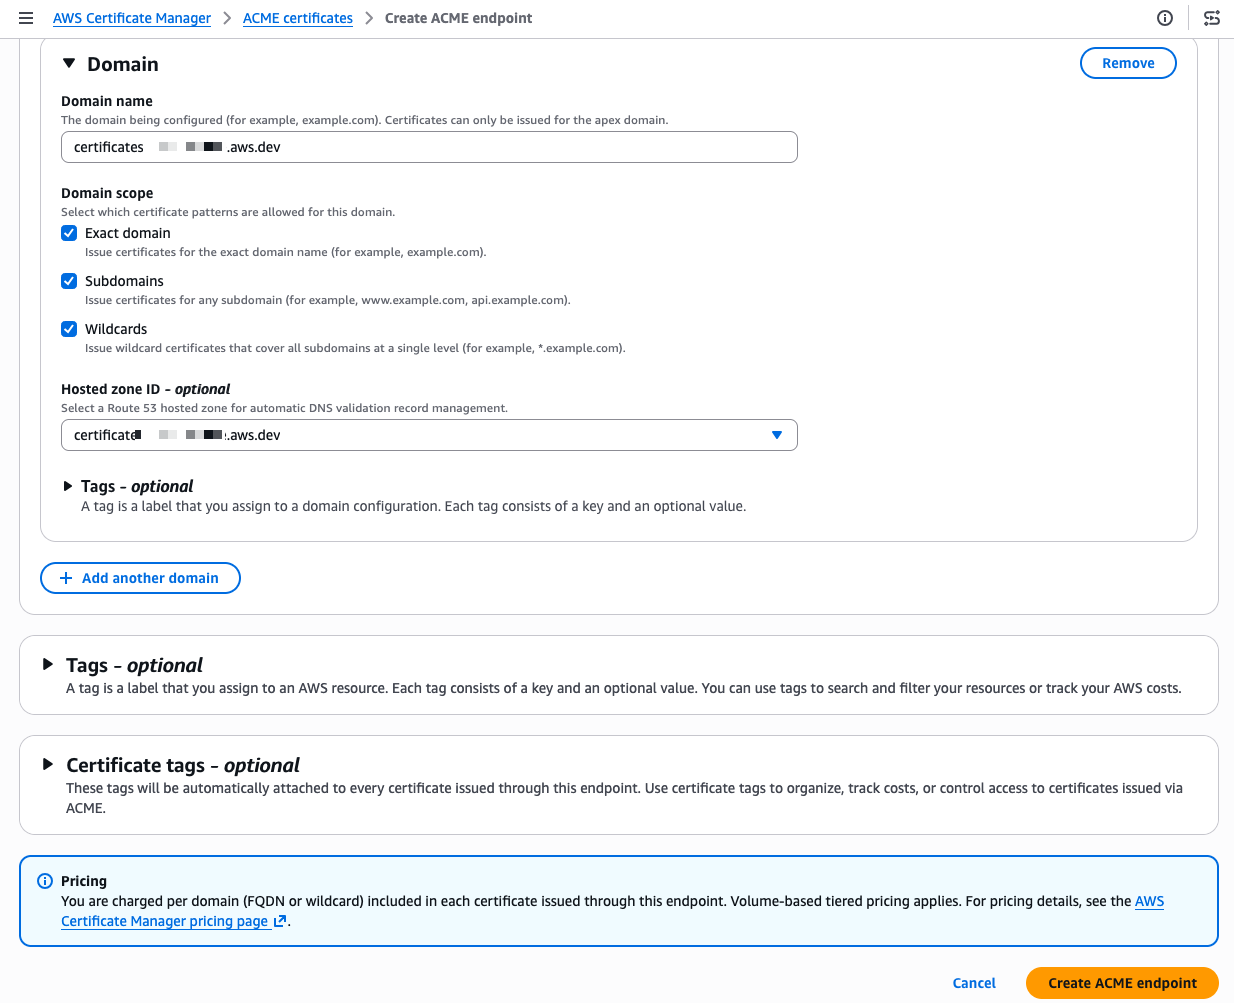
Scrolling down, I configure the domain. I enter my domain name and select the domain scope. The scope controls exactly what certificate patterns your ACME clients are allowed to request for this domain. If I check only Exact domain, clients can only request certificates for that specific domain name. Adding Subdomains allows certificates for any subdomain (for example, api.example.com or dev.example.com). Adding Wildcards allows wildcard certificates (*.example.com). By leaving a scope unchecked, you prevent any client using this endpoint from requesting that type of certificate, even if their ACME request is otherwise valid. For a production endpoint, you might enable only Exact domain and Subdomains while leaving Wildcards unchecked to enforce a stricter security posture.
I also select my Amazon Route 53 hosted zone from the drop down menu. ACM then automatically creates the DNS CNAME records needed for domain validation, so I don’t have to do it manually. When my domain is hosted outside of Route 53, I manually create the provided CNAME record at my DNS provider instead. This is a meaningful difference from typical ACME setups where each client handles its own domain verification independently.
These centralized controls give PKI administrators a single place to authenticate domains, restrict which certificate types (ECDSA or RSA) clients can request, and further limit wildcard issuance. Having these governance capabilities built in means you don’t need to purchase a separate certificate lifecycle management product or invest in building a custom policy layer yourself, both of which come at significant cost and operational overhead.
I select Create ACME endpoint
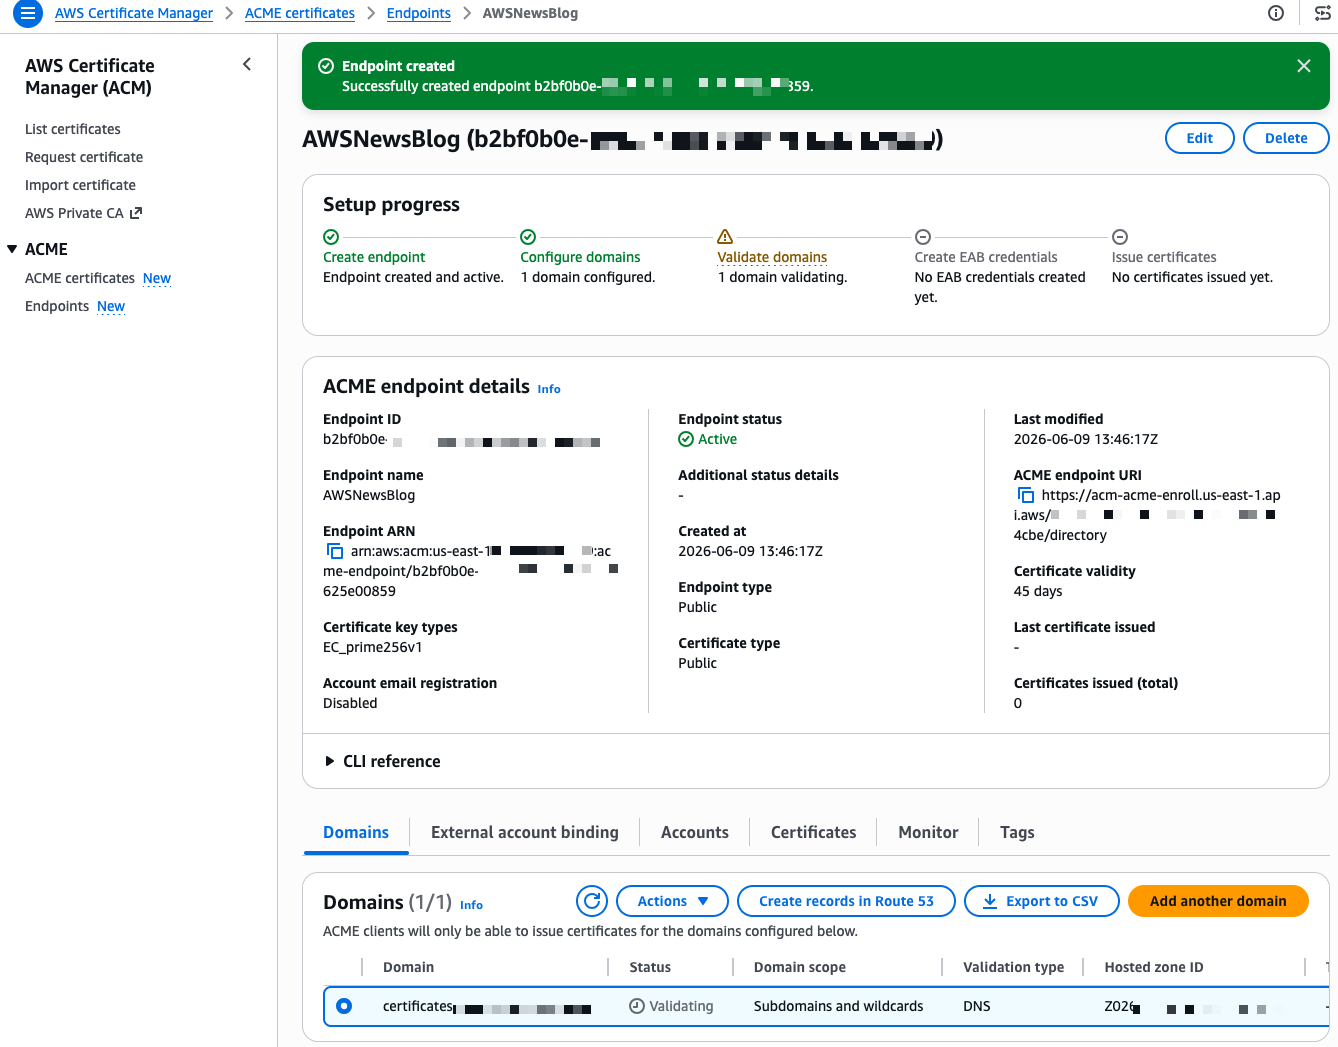
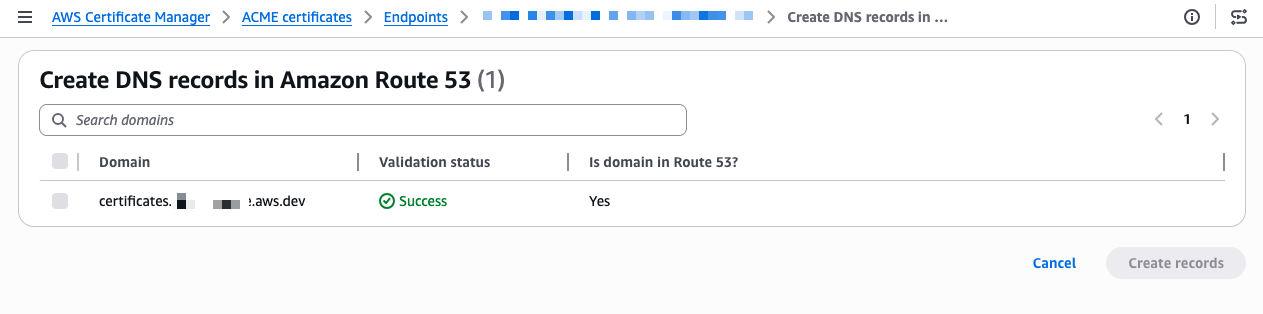
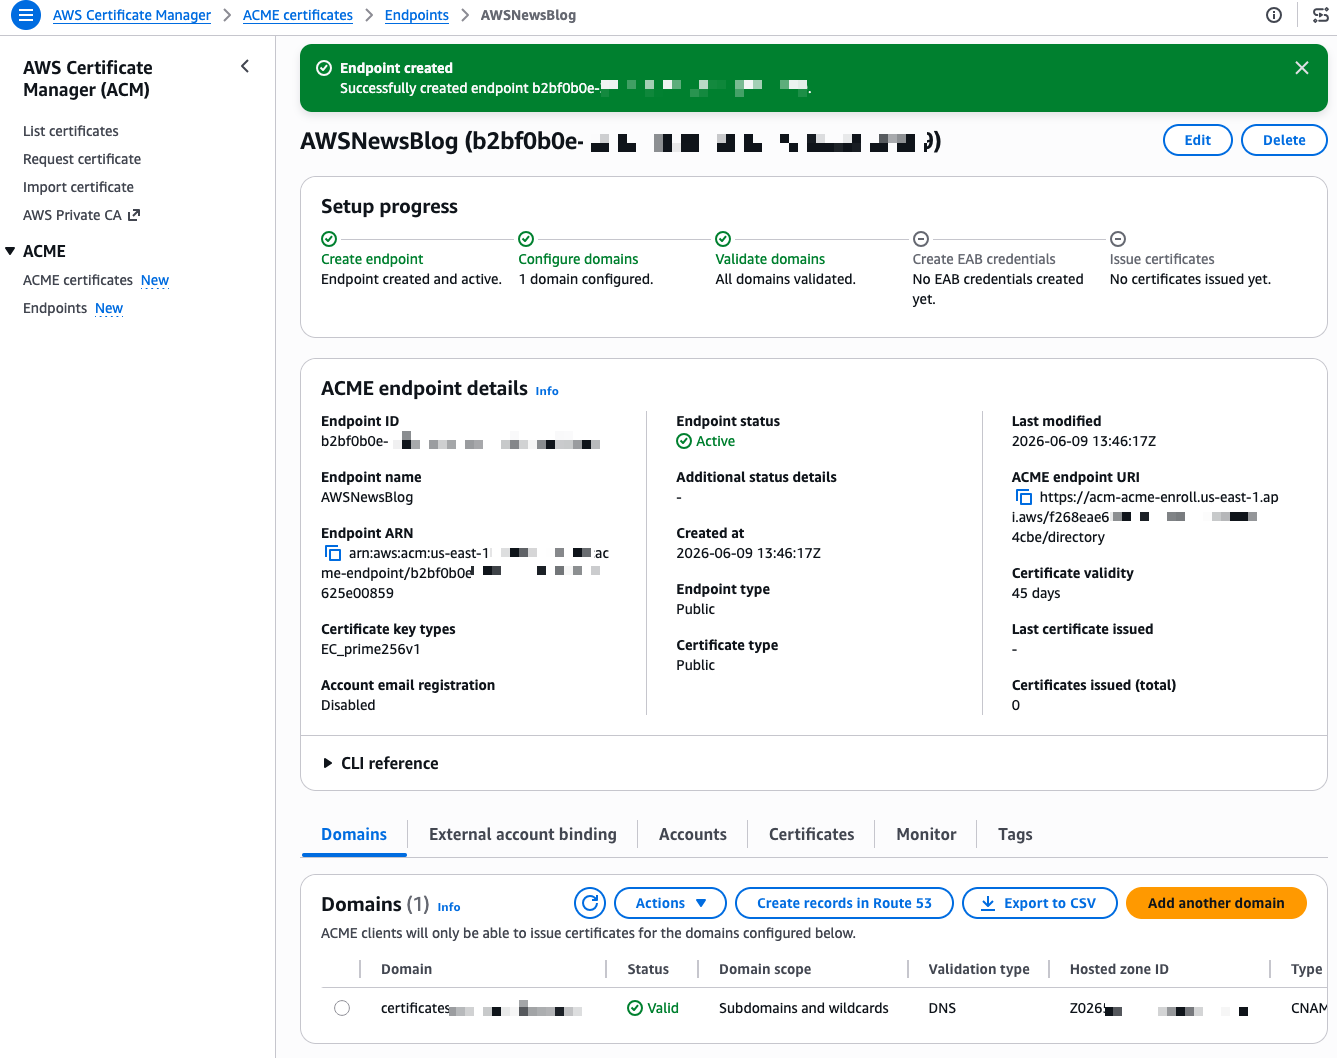
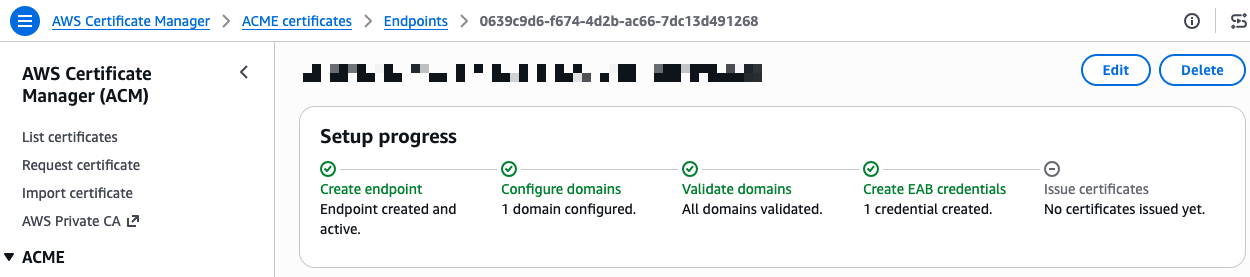
After a few seconds, the endpoint is created. The console shows a Setup progress tracker with the next steps. My domain shows a “Validating” status. The validation method is DNS validation, where ACM verifies that you control the domain by checking for a specific CNAME record. Because I selected my Route 53 hosted zone during creation, I select Create records in Route 53 to let ACM handle the DNS validation automatically.
The validation completes in a few seconds and the status changes to Success.
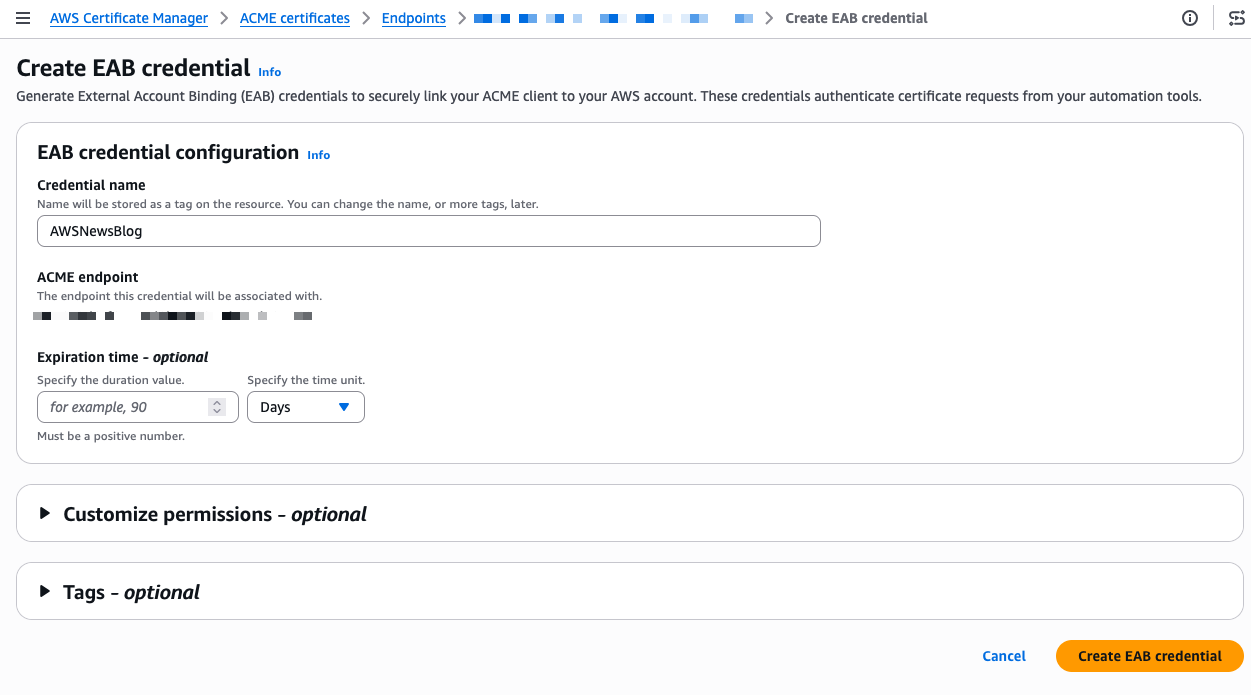
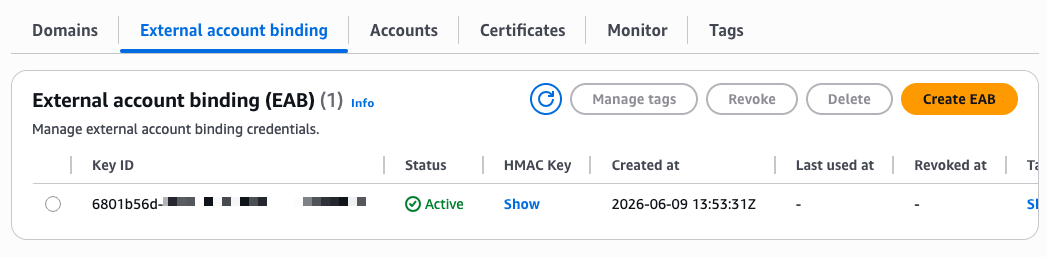
Now I need to create External Account Binding (EAB) credentials. EAB credentials are a key identifier and HMAC key pair that lets your ACME client register an account with the ACME server. Once registered, the client generates its own asymmetric key pair, which is then used to authenticate all subsequent certificate requests. On the endpoint details page, I select the External account binding tab, then select Create EAB. I give the credential a name and optionally set an expiration time, ideally no longer than needed to complete client registration.
After I select Create EAB credential, the console shows the Key ID and HMAC Key. I note these values because I need them to configure my ACME client. The setup progress now shows four green checkmarks.
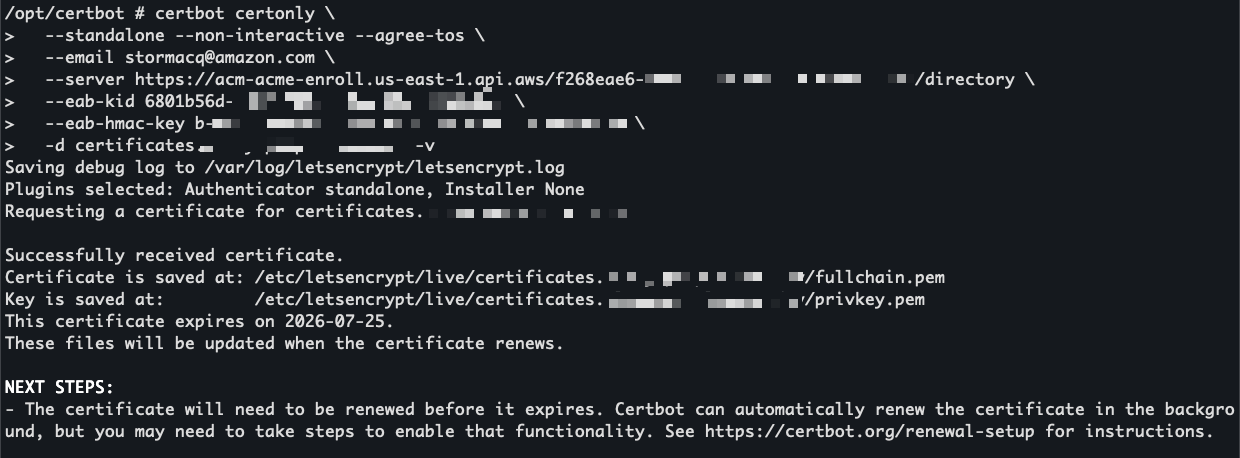
I’m ready to request a certificate. On the endpoint details page, I expand the CLI reference section. The console provides ready-to-use command examples for both Certbot and acme.sh. I copy the Certbot command and run it inside a container using the certbot/certbot image.
I replace the placeholders with my endpoint URL, EAB credentials, and domain name. The --eab-kid and --eab-hmac-key arguments are how Certbot registers with your ACME endpoint using the External Account Binding credentials I generated earlier. Each ACME client has its own syntax for this step, so check your client’s documentation for the exact flags.
Certbot contacts the ACME endpoint and returns a valid certificate signed by Amazon Trust Services.
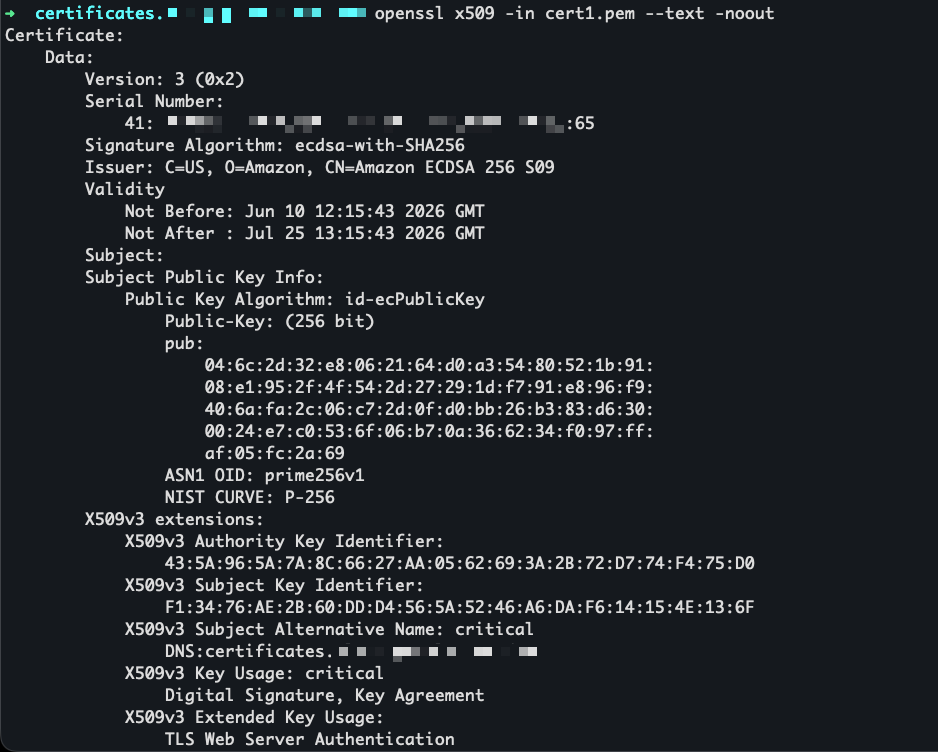
I use openssl to view the certificate before installing it.
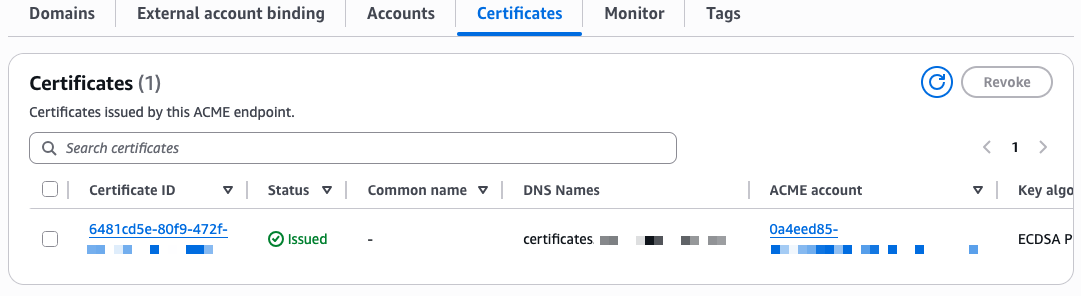
The certificate is now visible in the ACM console under the ACME certificates tab, alongside any certificates issued through the console or API.
Availability and pricing ACME support in AWS Certificate Manager is available today in all commercial AWS Regions and will be available in AWS GovCloud (US), the China Regions, and the AWS European Sovereign Cloudpartitions at a later date.
Pricing is per domain included in each certificate at the time of issuance, with a different price for fully qualified domain names and wildcards. Volume tiers are calculated based on total domain occurrences across all certificates issued per month in your AWS account. For details, see the ACM pricing page.
Dee Harris has published a summary
of the recent “fireside chat” featuring Creative Commons founders Hal
Abelson, Lawrence (Larry) Lessig, Molly Van Houweling, and Glenn Otis
Brown. The chat was to mark the 25th anniversary
of Creative Commons and included a look back at its history as
well as a look at the landscape today:
Twenty-five years ago, a small group of people made a bet. They
believed that if you gave creators a simple set of tools and licenses
in language that a lawyer, a machine, and a human could all read,
millions of people might choose to share their work with the world
instead of locking it down.
With HBM in short supply, AMD’s next-generation of adaptive SoCs will be switching from HBM to LPDDR5X memory. The Versal Premium Gen 2 Memory on Package chips target the same compact form factor, but with a 15+ year projected lifecycle
Lisp-like languages have historically led the world in metaprogramming and
flexibility. While many modern languages have adopted the idea of macros,
Lisp-like languages such as
Racket have continued pushing the envelope,
attempting to make macros as easy as possible to incorporate into everyday
programs. On the other hand, Lisp’s minimal, parenthesis-based syntax can be hard
to adapt to — to the point that Lisp is sometimes said to stand
for “Lots of Irritating Silly Parentheses”.
Rhombus is a new programming
language that aims to have the best of both worlds, marrying Racket’s
metaprogramming capabilities to a simple Python-like syntax and reasonable
standard-library defaults.
The Financial Times has a good article on how AI is changing the capabilities of video surveillance, with information from both Israel/Iran and Russia.
I wrote about this sort of thing a few years ago, how AI enables mass spying in the way that computers and networks enabled mass surveillance. The interesting development in the article is that AI allows people to ask natural language questions about video footage to AIs—and AIs can answer them.
In contrast with older tools restricted to a few dozen preset searches, these new tools allow an almost unlimited range of enquiries by enabling language-based searches on video.
That lets intelligence officers hunt through massive streams of videos using simple search terms, such as two men handing a bag to each other; a person who has changed their appearance, or has changed clothes multiple times in a day; or a vehicle that has recently been painted over, or has driven past the same spot several times in a short period.
“This is the holy grail of surveillance,” said a European official whose country uses the technology on its cities. “We are able to look for behaviour, not objects it has created a world of new possibilities.”
The collective thoughts of the interwebz
Manage Consent
To provide the best experiences, we use technologies like cookies to store and/or access device information. Consenting to these technologies will allow us to process data such as browsing behavior or unique IDs on this site. Not consenting or withdrawing consent, may adversely affect certain features and functions.
Functional
Always active
The technical storage or access is strictly necessary for the legitimate purpose of enabling the use of a specific service explicitly requested by the subscriber or user, or for the sole purpose of carrying out the transmission of a communication over an electronic communications network.
Preferences
The technical storage or access is necessary for the legitimate purpose of storing preferences that are not requested by the subscriber or user.
Statistics
The technical storage or access that is used exclusively for statistical purposes.The technical storage or access that is used exclusively for anonymous statistical purposes. Without a subpoena, voluntary compliance on the part of your Internet Service Provider, or additional records from a third party, information stored or retrieved for this purpose alone cannot usually be used to identify you.
Marketing
The technical storage or access is required to create user profiles to send advertising, or to track the user on a website or across several websites for similar marketing purposes.