Create, Train and Deploy Multi Layer Perceptron (MLP) models using Amazon Redshift ML

Post Syndicated from Anuradha Karlekar original https://aws.amazon.com/blogs/big-data/create-train-and-deploy-multi-layer-perceptron-mlp-models-using-amazon-redshift-ml/

Amazon Redshift is a fully managed and petabyte-scale cloud data warehouse which is being used by tens of thousands of customers to process exabytes of data every day to power their analytics workloads. Amazon Redshift comes with a feature called Amazon Redshift ML which puts the power of machine learning in the hands of every data warehouse user, without requiring the users to learn any new programming language, ML concepts or ML tools. Redshift ML abstracts all the intricacies that are involved in the traditional ML approach around data warehouse which traditionally involved repetitive, manual steps to move data back and forth between the data warehouse and ML tools for running long, complex, iterative ML workflow.

Redshift ML uses Amazon SageMaker Autopilot and Amazon SageMaker Neo in the background to make it easy for SQL users such as data analysts, data scientists, BI experts and database developers to create, train, and deploy machine learning (ML) models using familiar SQL commands and then use these models to make predictions on new data for use cases such as customer churn prediction, basket analysis for sales prediction, manufacturing unit lifetime value prediction, and product recommendations. Redshift ML makes the model available as SQL function within the Amazon Redshift data warehouse so you can easily use it in queries and reports.

Amazon Redshift ML supports supervised learning, including regression, binary classification, multi-class classification, and unsupervised learning using K-Means. You can optionally specify XGBoost, MLP, and linear learner model types, which are supervised learning algorithms used for solving either classification or regression problems, and provide a significant increase in speed over traditional hyperparameter optimization techniques. Amazon Redshift ML also supports bring-your-own-model to either import existing SageMaker models that are built using algorithms supported by SageMaker Autopilot, which can be used for local inference; or for the unsupported algorithms, one can alternatively invoke remote SageMaker endpoints for remote inference.

In this blog post, we show you how to use Redshift ML to solve binary classification problem using the Multi Layer Perceptron (MLP) algorithm, which explores different training objectives and chooses the best solution from the validation set.

A multilayer perceptron (MLP) is a deep learning method which deals with training multi-layer artificial neural networks, also called Deep Neural Networks. It is a feedforward artificial neural network that generates a set of outputs from a set of inputs. An MLP is characterized by several layers of input nodes connected as a directed graph between the input and output layers. MLP uses backpropagation for training the network. MLP is widely used for solving problems that require supervised learning as well as research into computational neuroscience and parallel distributed processing. It is also used for speech recognition, image recognition and machine translation.

As far as MLP usage with Redshift ML (powered by Amazon SageMaker Autopilot) is concerned, it supports tabular data as of now.

Solution Overview

To use the MLP algorithm, you need to provide inputs or columns representing dimensional values and also the label or target, which is the value you’re trying to predict.

With Redshift ML, you can use MLP on tabular data for regression, binary classification or multiclass classification problems. What is more unique about MLP is, is that the output function of MLP can be a linear or a continuous function as well. It need not be a straight line like the general regression model provides.

In this solution, we use binary classification to detect frauds based upon the credit cards transaction data. The difference between classification models and MLP is that logistic regression uses a logistic function, while perceptrons use a step function. Using the multilayer perceptron model, machines can learn weight coefficients that help them classify inputs. This linear binary classifier is highly effective in arranging and categorizing input data into different classes, allowing probability-based predictions and classifying items into multiple categories. Multilayer Perceptrons have the advantage of learning non-linear models and the ability to train models in real-time.

For this solution, we first ingest the data into Amazon Redshift, we then distribute it for model training and validation, then use Amazon Redshift ML specific queries for model creation and thereby create and utilize the generated SQL function for being able to finally predict the fraudulent transactions.

Prerequisites

To get started, we need an Amazon Redshift cluster or an Amazon Redshift Serverless endpoint and an AWS Identity and Access Management (IAM) role attached that provides access to SageMaker and permissions to an Amazon Simple Storage Service (Amazon S3) bucket.

For an introduction to Redshift ML and instructions on setting it up, see Create, train, and deploy machine learning models in Amazon Redshift using SQL with Amazon Redshift ML.

To create a simple cluster with a default IAM role, see Use the default IAM role in Amazon Redshift to simplify accessing other AWS services.

Data Set Used

In this post, we use the Credit Card Fraud detection data to create, train and deploy MLP model which can be used further to identify fraudulent transactions from the newly captured transaction records.

The dataset contains transactions made by credit cards in September 2013 by European cardholders.
This dataset presents transactions that occurred in two days, where we have 492 frauds out of 284,807 transactions. The dataset is highly unbalanced, the positive class (frauds) account for 0.172% of all transactions.

It contains only numerical input variables which are the result of a Principal Component Analysis transformation. Due to confidentiality issues, the original features and more background information about the data is not provided. Features V1, V2, … V28 are the principal components obtained with PCA, the only features which have not been transformed with PCA are ‘Time’ and ‘Amount’. Feature ‘Time’ contains the seconds elapsed between each transaction and the first transaction in the dataset. The feature ‘Amount’ is the transaction Amount. Feature ‘Class’ is the response variable and it takes value 1 in case of fraud and 0 otherwise.

Here are sample records:

Prepare the data

Load the credit card dataset into Amazon Redshift using the following SQL. You can use the Amazon Redshift query editor v2 or your preferred SQL tool to run these commands.

Alternately we have provided a notebook you may use to execute all the sql commands that can be downloaded here. You will find instructions in this blog on how to import and use notebooks.

To create the table, use the following command:

CREATE TABLE creditcardsfrauds (
    txtime integer,
    v1 float8,
    v2 float8,
    v3 float8,
    v4 float8,
    v5 float8,
    v6 float8,
    v7 float8,
    v8 float8,
    v9 float8,
    v10 float8,
    v11 float8,
    v12 float8,
    v13 float8,
    v14 float8,
    v15 float8,
    v16 float8,
    v17 float8,
    v18 float8,
    v19 float8,
    v20 float8,
    v21 float8,
    v22 float8,
    v23 float8,
    v24 float8,
    v25 float8,
    v26 float8,
    v27 float8,
    v28 float8,
    amount float8,
    class integer
);

Load the data

To load data into Amazon Redshift, use the following COPY command:

COPY creditcardsfrauds
FROM 's3://redshift-ml-blog-mlp/creditcard.csv' 
IAM_ROLE default
CSV QUOTE as '\"' delimiter ',' IGNOREHEADER 1 maxerror 100
REGION 'us-east-1';

Before creating the model, we want to divide our data into two sets by splitting 80% of the dataset for training and 20% for validation, which is a common practice in ML. The training data is input to the ML model to identify the best possible algorithm for the model. After the model is created, we use the validation data to validate the model accuracy.

So, in ‘creditcardsfrauds’ table, we check the distribution of data based upon ‘txtime’ value and identify the cutoff for around 80% of the data to train the model.

With this, the highest txtime value comes to 120954 (based upon the distribution of txtime’s min, max, ranking by window function and ceil(count(*)*0.80) values)), based upon which we consider the transaction records having ‘txtime’ field value less than 120954 for creating training data. We then validate the accuracy of that model by seeing if it correctly identifies the fraudulent transactions by predicting its ‘class’ attribute on the remaining 20% of the data.

This distribution for 80% cutoff need not always be based upon ordered time. It can be picked up randomly as well, based upon the use case under consideration.

Create a model in Redshift ML

To create the model, use the following command:

 CREATE model creditcardsfrauds_mlp
FROM (select * from creditcardsfrauds where txtime < 120954)
TARGET class 
FUNCTION creditcardsfrauds_mlp_fn
IAM_ROLE default
MODEL_TYPE MLP
SETTINGS (
      S3_BUCKET '<<your-amazon-s3-bucket-name>>’,
      MAX_RUNTIME 9600
);

Here, in the settings section of the command, you need to set up an S3_BUCKET which is used to export the data that is sent to SageMaker and store model artifacts.

S3_BUCKET setting is a required parameter of the command, whereas MAX_RUNTIME is an optional one which specifies the maximum amount of time to train. The default value of this parameter is 90 minutes (5400 seconds), however you can override it by explicitly specifying it in the command, just like we have done it here by setting it to run for 9600 seconds.

The preceding statement initiates an Amazon SageMaker Autopilot process in the background to automatically build, train, and tune the best ML model for the input data. It then uses Amazon SageMaker Neo to deploy that model locally in the Amazon Redshift cluster or Amazon Redshift Serverless as a user-defined function (UDF).

You can use the SHOW MODEL command in Amazon Redshift to track the progress of your model creation, which should be in the READY state within the max_runtime parameter you defined while creating the model.

To check the status of the model, use the following command:
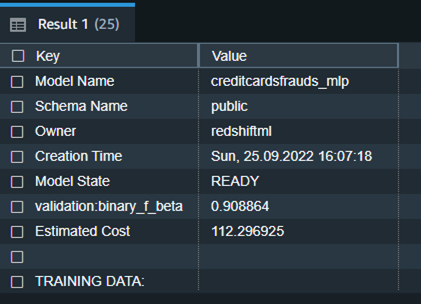
show model creditcardsfrauds_mlp;

We notice from the preceding table that the F1-score for the training data is 0.908, which shows very good performance accuracy.

To elaborate, F1-score is the harmonic mean of precision and recall. It combines precision and recall into a single number using the following formula:

Where, Precision means: Of all positive predictions, how many are really positive?

And Recall means: Of all real positive cases, how many are predicted positive?

F1 scores can range from 0 to 1, with 1 representing a model that perfectly classifies each observation into the correct class and 0 representing a model that is unable to classify any observation into the correct class. So higher F1 scores are better.

The following is the detailed tabular outcome for the preceding command after model training was done.

Model Name creditcardsfrauds_mlp
Schema Name public
Owner redshiftml
Creation Time Sun, 25.09.2022 16:07:18
Model State READY
validation:binary_f_beta 0.908864
Estimated Cost 112.296925
TRAINING DATA: .
Query SELECT * FROM CREDITCARDSFRAUDS WHERE TXTIME < 120954
Target Column CLASS
PARAMETERS: .
Model Type mlp
Problem Type BinaryClassification
Objective F1
AutoML Job Name redshiftml-20221118035728881011
Function Name creditcardsfrauds_mlp_fn
. creditcardsfrauds_mlp_fn_prob
Function Parameters txtime v1 v2 v3 v4 v5 v6 v7 v8 v9 v10 v11 v12 v13 v14 v15 v16 v17 v18 v19 v20 v21 v22 v23 v24 v25 v26 v27 v28 amount
Function Parameter Types int4 float8 float8 float8 float8 float8 float8 float8 float8 float8 float8 float8 float8 float8 float8 float8 float8 float8 float8 float8 float8 float8 float8 float8 float8 float8 float8 float8 float8 float8
IAM Role default
S3 Bucket redshift-ml-blog-mlp
Max Runtime 54000

Redshift ML now supports Prediction Probabilities for binary classification models. For classification problem in machine learning, for a given record, each label can be associated with a probability that indicates how likely this record really belongs to the label. With option to have probabilities along with the label, customers could use the classification results when confidence based on chosen label is higher than a certain threshold value returned by the model

Prediction probabilities are calculated by default for binary classification models and an additional function is created while creating model without impacting performance of the ML model.

In above snippet, you will notice that predication probabilities enhancements have added another function as a suffix (_prob) to model function with a name ‘creditcardsfrauds_mlp_fn_prob’ which could be used to get prediction probabilities.

Additionally, you can check the model explainability to understand which inputs contributed effectively to derive the prediction.

Model explainability helps to understand the cause of prediction by answering questions such as:

  • Why did the model predict a negative outcome such as blocking of credit card when someone travels to a different country and withdraws a lot of money in different currency?
  • How does the model make predictions? Lots of data for credit cards can be put in a tabular format and as per MLP process where a fully connected neural network of several layers is involved, we can tell which input feature actually contributed to the model output and its magnitude.
  • Why did the model make an incorrect prediction? E.g. Why is the card blocked even though the transaction is legitimate?
  • Which features have the largest influence on the behavior of the model? Is it just based upon the location where the credit card is swiped, or even the time of the day and unusual credit consumption that is influencing the prediction?

Run the following SQL command to retrieve the values from the explainability report:

SELECT json_table.report.explanations.kernel_shap.label0.global_shap_values 
FROM (select explain_model('creditcardsfrauds_mlp') as report) as json_table;

In the preceding screenshot, we have only selected the column that projects shapley values from the response returned by the explain_model function. If you notice the response of the query, the values in every json object show the contribution of different features in terms of influencing the prediction. E.g. from the preceding snippet, v14 feature is influencing the prediction the most and txtime feature does not really play any significant role in predicting ‘class’.

Model validation

Now let’s run the prediction query and validate the accuracy of the model on the validation dataset:

FROM (
  SELECT 
      CASE WHEN class =  
      creditcardsfrauds_mlp_fn(txtime,v1,v2,v3,v4,v5,v6,v7,v8,v9,v10,v11,v12,v13,v14,v15,v16,v17,v18,v19,v20,v21,v22,v23,v24,v25,v26,v27,v28,amount) 
      THEN 'PredictedMatchesActual' 
      else 'NoMatch' 
      END as actualvspredicted
    FROM creditcardsfrauds 
    WHERE txtime >= 120954
) 
group by actualvspredicted

We can observe here that Redshift ML is able to identify 99.88 percent of the transactions correctly as fraudulent or non-fraudulent.

Now you can continue to use this SQL function creditcardsfrauds_mlp_fn for local inference in any part of the SQL query while analyzing, visualizing or reporting the newly arriving as well as existing data!
--CREATE A STAGING TABLE TO HOLD NEWLY ARRIVING DATA FROM THE SOURCE WHICH WILL NOT CONAIN THE CLASS COLUMN - AS IT IS TO BE PREDICTED
DROP TABLE creditcardsfrauds_staging;
CREATE TABLE creditcardsfrauds_staging as (select * from creditcardsfrauds limit 0);
Alter table creditcardsfrauds_staging drop column class;

--LETS CONSIDER ONLY ONE RECORD HERE WHICH HAS NEWLY ARRIVED
insert into creditcardsfrauds_staging values(174965,-39999.11383160738512,0.58586417180689,-5.39973021073242,1.81709247345531,-0.840618465991056,-2.94354779071974,-2.20800192003372,1.05873267723056,-1.63233334974982,-5000.24598383776964,11.93351953683592,-53046479695456,-1.12745457501155,-666666.41662797597451,0.141237234328704,-2.54949823633632,-4.61471706851594,-10.47813794126038,-0.0354803664667244,0.306270740368093,0.583275998701341,-0.269208637986581,-0.456107772584008,-0.183659129549716,-0.328167759255761,0.606115810329683,0.884875539542905,-0.253700318894381,-2450000000);

--USE THE FUNCTION TO PREDICT THE VALUE OF CLASS
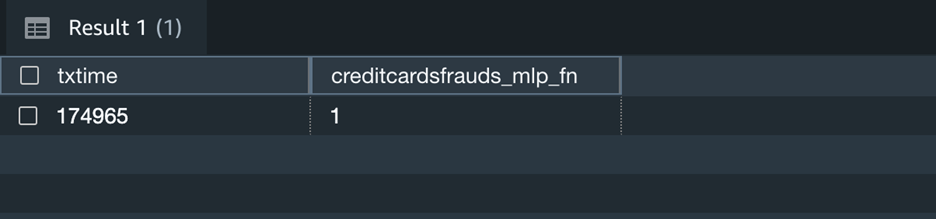
SELECT txtime, creditcardsfrauds_mlp_fn(txtime,v1,v2,v3,v4,v5,v6,v7,v8,v9,v10,v11,v12,v13,v14,v15,v16,v17,v18,v19,v20,v21,v22,v23,v24,v25,v26,v27,v28,amount)
FROM creditcardsfrauds_staging;

Here the output 1 means that the newly captured transaction is fraudulent as per the inference.

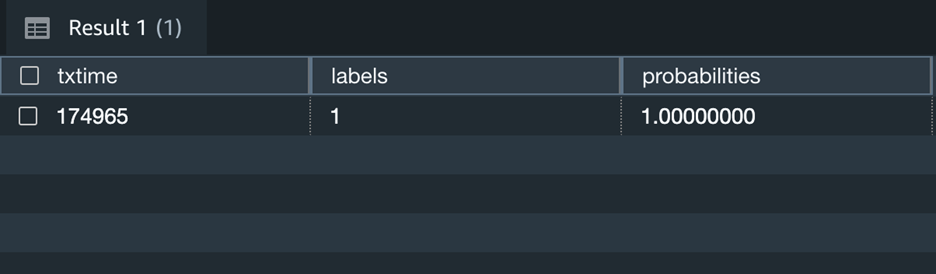
Additionally, you can change the above query to include prediction probabilities of label output for the above scenario and decide if you still like to use the prediction by the model.
--USE THE FUNCTION TO PREDICT THE VALUE OF CLASS ALONG WITH THE PROBABILITY
Select txtime, predictedActive.labels[0], predictedActive.probabilities[0] 
from (
SELECT txtime, creditcardsfrauds_mlp_fn_prob(txtime,v1,v2,v3,v4,v5,v6,v7,v8,v9,v10,v11,v12,v13,v14,v15,v16,v17,v18,v19,v20,v21,v22,v23,v24,v25,v26,v27,v28,amount)as predictedACtive
FROM creditcardsfrauds_staging ) temp

The above screenshot shows that this transaction has 100% likelihood of being fraudulent.

Clean up

To avoid incurring future charges, you can stop the Redshift cluster when not being used. You can even terminate the Redshift cluster altogether if you have run the exercise in this blog post just for experimental purpose. If you are instead using serverless version of Redshift, it will not cost you anything, until it is used. However, like mentioned before, you will have to stop or terminate the cluster if you are using a provisioned version of Redshift.

Conclusion

Redshift ML makes it easy for users of all levels to create, train, and tune models using SQL interface. In this post, we walked you through how to use the MLP algorithm to create binary classification model. You can then use those models to make predictions using simple SQL commands and gain valuable insights.

To learn more about RedShift ML, visit Amazon Redshift ML.


About the authors

Anuradha Karlekar is a Solutions Architect at AWS working majorly for Partners and Startups. She has over 15 years of IT experience extensively in full stack development, deployment, building data ETL pipelines and visualizations. She is passionate about data analytics and text search. Outside work – She is a travel enthusiast!

Phil Bates is a Senior Analytics Specialist Solutions Architect at AWS with over 25 years of data warehouse experience.

Abhishek Pan is a Solutions Architect-Analytics working at AWS India. He engages with customers to define data driven strategy, provide deep dive sessions on analytics use cases & design  scalable and performant Analytical applications. He has over 11 years of experience and is passionate about Databases, Analytics and solving customer problems with help of cloud solutions. An avid traveller and tries to capture world through my lenses

Debu Panda is a Senior Manager, Product Management at AWS, is an industry leader in analytics, application platform, and database technologies, and has more than 25 years of experience in the IT world. Debu has published numerous articles on analytics, enterprise Java, and databases and has presented at multiple conferences such as re:Invent, Oracle Open World, and Java One. He is lead author of the EJB 3 in Action (Manning Publications 2007, 2014) and Middleware Management (Packt).

Secure your database credentials with AWS Secrets Manager and encrypt data with AWS KMS in Amazon QuickSight

Post Syndicated from Srikanth Baheti original https://aws.amazon.com/blogs/big-data/secure-your-database-credentials-with-aws-secrets-manager-and-encrypt-data-with-aws-kms-in-amazon-quicksight/

Amazon QuickSight is a fully managed, cloud-native business intelligence (BI) service that makes it easy to connect to your data, create interactive dashboards, and share them with tens of thousands of users, either directly within a QuickSight application, or embedded in web apps and portals.

Let’s consider AnyCompany, which owns healthcare facilities across the country. The central IT team of AnyCompany is responsible for setting up and maintaining IT infrastructure and services for all the facilities in each state. Because AnyCompany is in the healthcare industry and holds sensitive data, they want to store their database credentials safely and don’t want to share them with individuals in the reporting or BI teams. Additionally, they need to encrypt their data at rest using their own encryption key instead of service-managed keys to satisfy their regulatory requirements. AnyCompany is able to audit access of their SPICE (the QuickSight robust in-memory calculation engine) datasets. In an unlikely case of a security incident, AnyCompany is in full control to immediately lock down access to their data by universally revoking access to their AWS Key Management Service (AWS KMS) keys. QuickSight is one of the services used by AnyCompany, and central IT needs to be able to set up these security measures.

QuickSight Enterprise Edition now supports storing database credentials in AWS Secrets Manager, a feature that allows you to put these credentials in Secrets Manager and not share with every BI user for data source creation. Secrets Manager is a secret storage service that you can use to protect database credentials, API keys, and other secret information. Using a key helps you ensure that the secret can’t be compromised by someone examining your code, because the secret isn’t stored in the code.

Additionally, QuickSight supports account administrators to use their own customer managed key (CMK) to encrypt and manage datasets in SPICE, through integration with AWS KMS. AWS KMS lets you create, manage, and control cryptographic keys across your applications and more than 100 AWS services. With AWS KMS, you can encrypt data across your AWS workloads, digitally sign data, encrypt within your applications using the AWS Encryption SDK, and generate and verify message authentication codes (MACs). Using a QuickSight SPICE CMK enables QuickSight users to revoke access to SPICE datasets with one click, and maintain an auditable log that tracks how SPICE datasets are accessed.

Both features help increase the level of security and transparency, give you more control over QuickSight, and help satisfy security requirements by company and government agency policies.

In this post, we walk you through the steps to use these features.

Solution overview

To enable both features (storing of database credentials in Secrets Manager and using KMS keys for encryption), we require an administrator of the QuickSight account. In the following sections, we walk you through the high-level steps to implement this solution:

  1. Enable Secrets Manager integration from the QuickSight management console.
  2. Create or update a data source with secret credentials using the QuickSight API.
  3. Create a dataset using the data source you created.
  4. Enable KMS keys from the QuickSight management console.
  5. Audit CMK usage and dataset access in AWS CloudTrail.
  6. Revoke access to CMK-encrypted datasets.

Prerequisites

Make sure you have the following prerequisites:

  • A QuickSight subscription with Enterprise Edition
  • A secret in Secrets Manager with your database credentials
  • KMS keys to encrypt data in SPICE

Enable Secrets Manager integration

With this integration, you no longer need to manually enter data source credentials; you can store them in Secrets Manager and manage access via Secrets Manager. You can also rotate the keys and credentials in one place instead of updating all the data sources. Complete the following steps to enable the integration:

  1. Sign in to your QuickSight account.
  2. On the user name drop-down menu, choose Manage QuickSight.
    Manage Quicksight
  3. Choose Security & permissions in the navigation pane.
  4. Under QuickSight access to AWS services, choose Manage.
    Security & Permissions
  5. From the list of services, choose Select secrets under AWS Secrets Manager.
    QuickSight access to AWS services
  6. Select the appropriate secret from the list of secrets and choose Finish.
    Finish

QuickSight creates an AWS Identity and Access Management (IAM) role called aws-quicksight-secretsmanager-role-v0 in your account. It grants users in the account read-only access to the specified secrets and looks similar to the following code:

Identity and Access Management

Create a data source with secret credentials using the QuickSight API

At the time of this writing, creation of data sources using the stored secret in Secrets Manager is only available through the CreateDatasource public API.

The following code is an example API call to create a data source in QuickSight. This example uses the create-data-source API operation. You can also use the update-data-source operation to update an existing data source. For more information, see CreateDataSource and UpdateDataSource.

aws quicksight create-data-source --aws-account-id AWSACCOUNTID \ --data-source-id DATASOURCEID \ --name NAME \ --type MYSQL \ --permissions '[{"Principal": "arn:aws:quicksight:region:accountID:user/namespace/username", "Actions": ["quicksight:DeleteDataSource", "quicksight:DescribeDataSource", "quicksight:DescribeDataSourcePermissions", "quicksight:PassDataSource", "quicksight:UpdateDataSource", "quicksight:UpdateDataSourcePermissions"]}]' \    --data-source-parameters='{"MySQLParameters":{"Database": "database", "Host":"hostURL", "Port":"port"}}' \ --credentials='{"SecretArn":"arn:aws:secretsmanager:region:accountID:secret:secretname"}' \ --region us-west-2

In the preceding call, QuickSight authorizes secretsmanager:GetSecretValue access to the secret based on the API caller’s IAM policy, not the IAM service role’s policy. The IAM service role acts on the account level and is used when an analysis or dashboard is viewed by a user. It can’t be used to authorize secret access when a user creates or updates the data source.

We get the following response:

{
   "Arn": "string",
   "CreationStatus": "string",
   "DataSourceId": "string",
   "RequestId": "string"
}

In the initial response, the creation status is CREATION_IN_PROGRESS. To check if the data source was successfully created, use the DescribeDatasource API to receive a description of the data source:

aws quicksight describe-data-source --aws-account-id AWSACCOUNTID \ --data-source-id DATASOURCEID

A successful API call returns the data source object that includes status and data source details:

{
   "Status": integer,
   "DataSource":{
      "Arn": "string",
 "DataSourceId": "string",
   	 "Name": "string"
   	 "Type": "string"
   	 "Status": "string"
   	 "CreatedTime": "string"
   	 "LastUpdatedTime": "string"
   	 "DataSourceParameters": {
       }
   	 "VpcConnectionProperties": {
 "VpcConnectionArn":"string"
  }
	 "SslProperties": {
            "DisableSsl": boolean
        },
       "SecretArn": "string"
}
     "RequestId": "string"
}

Create a dataset using the new data source

For instructions on creating a new SPICE dataset using the data source you just created, refer to Creating a dataset using an existing data source.

Enable KMS keys

To enable KMS keys, complete the following steps:

  1. On the QuickSight start page, choose Manage QuickSight.
    Managing QuickSight
  2. Choose KMS keys in the navigation pane.
  3. Choose Manage.
    Manage
  4. On the KMS Keys page, choose Select key.
    Select Key
  5. In the Select key pop-up box, on the Key menu, choose the key that you want to add.
    Key Menu

If your key isn’t on the list, you can manually enter the key’s ARN.

  1. Choose Use as default encryption key for all new SPICE datasets in this QuickSight account to set the selected key as your default key.

A blue badge appears next to the default key to indicate its status.

When you choose a default key, all new SPICE datasets that are created in the Region that hosts your QuickSight account are encrypted with the default key.

Default Key

  1. Optionally, add more keys by repeating the previous steps.

Although you can add as many keys as you want, you can only have one default key at one time.

  1. Optionally, change or remove CMKs by changing or deleting the default key for all new SPICE datasets.

For existing datasets, you need to perform a full refresh after changing or deleting the default key to take effect.

Audit CMK usage and dataset access in CloudTrail

When a key is used (for example, when a CMK-encrypted SPICE dataset is accessed), an audit log is created in CloudTrail. You can use the log to track the key’s usage. For more information, see Logging operations with AWS CloudTrail. If you need to know which key a SPICE dataset is encrypted by, you can find this information in CloudTrail. Complete the following steps:

  1. On the CloudTrail console, navigate to your CloudTrail log.
  2. Locate the CMK usage (CMK-encrypted SPICE dataset access), using the following search arguments:
    1. The event name (eventName) is GenerateDataKey or Decrypt.
    2. The eventTime denotes when the CMK is used (a CMK-encrypted SPICE dataset is accessed).
    3. The request parameters (requestParameters) contain the QuickSight ARN for the dataset.
    4. The request parameters (requestParameters) contain the KMS ARN (keyId) of the CMK.

See the following code:

{
    "eventVersion": "1.08",
    "userIdentity": {
        "type": "AWSService",
        "invokedBy": "quicksight.amazonaws.com"
    },
    "eventTime": "2022-10-26T00:06:06Z",
    "eventSource": "kms.amazonaws.com",
    "eventName": "Decrypt",
    "awsRegion": "us-west-2",
    "sourceIPAddress": "quicksight.amazonaws.com",
    "userAgent": "quicksight.amazonaws.com",
    "requestParameters": {
        "constraints": {
            "encryptionContextSubset": {
                "aws:quicksight:arn": "arn:aws:quicksight:us-west-2:111122223333:dataset/12345678-1234-1234-1234-123456789012"
            }
        },
        "keyId": "arn:aws:kms:us-west-2:111122223333:key/87654321-4321-4321-4321-210987654321",
        "encryptionAlgorithm": "SYMMETRIC_DEFAULT"
    },
....
}

Now we can verify the CMK that’s currently used by a SPICE dataset.

  1. In your CloudTrail log, locate the most recent grant events for the SPICE dataset using the following search arguments:
    1. The event name (eventName) contains Grant.
    2. The request parameters (requestParameters) contain the QuickSight ARN for the dataset.

See the following code:

{
    "eventVersion": "1.08",
    "userIdentity": {
        "type": "AWSService",
        "invokedBy": "quicksight.amazonaws.com"
    },
    "eventTime": "2022-10-26T00:11:08Z",
    "eventSource": "kms.amazonaws.com",
    "eventName": "CreateGrant",
    "awsRegion": "us-west-2",
    "sourceIPAddress": "quicksight.amazonaws.com",
    "userAgent": "quicksight.amazonaws.com",
    "requestParameters": {
        "constraints": {
            "encryptionContextSubset": {
                "aws:quicksight:arn": "arn:aws:quicksight:us-west-2:111122223333:dataset/12345678-1234-1234-1234-123456789012"
            }
        },
        "retiringPrincipal": "quicksight.amazonaws.com",
        "keyId": "arn:aws:kms:us-west-2:111122223333:key/87654321-4321-4321-4321-210987654321",
        "granteePrincipal": "quicksight.amazonaws.com",
        "operations": [
            "Encrypt",
            "Decrypt",
            "DescribeKey",
            "GenerateDataKey"
        ]
    },
....
}

Depending on the event type, one of the following applies:

  • CreateGrant – You can find the most recently used CMK in the key ID (keyID) for the last CreateGrant event for the SPICE dataset
  • RetireGrant – If latest CloudTrail event of the SPICE dataset is RetireGrant, there is no key ID and the SPICE dataset is no longer CMK encrypted

Revoke access to CMK-encrypted datasets

You can revoke access to your CMK-encrypted SPICE datasets. When you revoke access to a key that is used to encrypt a dataset, access to the dataset is denied until you undo the revoke. The following method is one example of how you can revoke access:

  1. On the AWS KMS console, choose Customer managed keys in the navigation pane.
  2. Select the key that you want to turn off.
  3. On the Key actions menu, choose Disable.

After you revoke access by using any method, it can take up to 15 minutes for the SPICE dataset to become inaccessible.

Sample implementation

The following code shows a sample CreateDatasource API call for creating a QuickSight data source:

aws quicksight create-data-source --aws-account-id <AccountID> --data-source-id hospitaldataASM --name hospipataldataASM --type POSTGRESQL --credentials={\"SecretArn\":\"arn:aws:secretsmanager:us-east-1:<AccountiD>:secret:<SecretID>\"} --data-source-parameters={\"PostgreSqlParameters\":{\"Database\":\"postgres\",\"Host\":\"xxxx.xxxxxx.us-east-1.rds.amazonaws.com\",\"Port\":5432}} --vpc-connection-properties={\"VpcConnectionArn\":\"arn:aws:quicksight:us-east-1:<AccountID>:vpcConnection/<vpcConnectionName>\"} --permissions="Principal=arn:aws:quicksight:us-east-1:380249061054:user/default/<username>,Actions=quicksight:DescribeDataSource,quicksight:DescribeDataSourcePermissions,quicksight:PassDataSource,quicksight:UpdateDataSourcePermissions,quicksight:DeleteDataSource,quicksight:UpdateDataSource"

We get the following response:

Response

To monitor the status of the new data source, run the DescribeDataSource API:

aws quicksight describe-data-source --aws-account-id <AccountId> \     --data-source-id hospitaldataASM

aws quicksight describe-data-source –aws-account-id <AccountId> \ –data-source-id hospitaldataASM

We get the following response:

Response 2

To validate the KMS keys used, navigate to CloudTrail logs, as shown in the following code:

Cloud Trails Log

Finally, audit the CMK usage (dataset access) via CloudTrail logs. And in the unlikely case of a security incident, access to data can be locked down universally by revoking access to the KMS keys.

Clean up

Clean up the resources created as part of this post with the following steps:

  1. To remove the Secrets Manager integration, update the data source with regular service-level credentials.
  2. Remove the secret from the QuickSight admin console.
  3. On the QuickSight start page, choose Manage QuickSight.
  4. Choose KMS keys in the navigation pane.
  5. Choose Manage.
  6. Choose the Actions menu (three dots) on the row of the default key, then choose Delete.
  7. In the pop-up box that appears, choose Remove.

Conclusion

This post showcased the new features released in QuickSight to secure database credentials through integration with Secrets Manager and AWS KMS. We also demonstrated how to set up customer managed keys to enable encryption of data at rest in QuickSight SPICE, track key usage history using CloudTrail, and lock down access to data by revoking access to KMS keys.

Try out QuickSight support for Secrets Manager and AWS KMS integration to secure your credentials and data with QuickSight, and share your feedback and questions in the comments. For more information, refer to Key management and Using AWS Secrets Manager secrets instead of database credentials in Amazon QuickSight.


About the authors

Srikanth Baheti is a Specialized World Wide Sr. Solution Architect for Amazon QuickSight. He started his career as a consultant and worked for multiple private and government organizations. Later he worked for PerkinElmer Health and Sciences & eResearch Technology Inc, where he was responsible for designing and developing high traffic web applications, highly scalable and maintainable data pipelines for reporting platforms using AWS services and Serverless computing.

Raji Sivasubramaniam is a Sr. Solutions Architect at AWS, focusing on Analytics. Raji is specialized in architecting end-to-end Enterprise Data Management, Business Intelligence and Analytics solutions for Fortune 500 and Fortune 100 companies across the globe. She has in-depth experience in integrated healthcare data and analytics with wide variety of healthcare datasets including managed market, physician targeting and patient analytics.

Chaos experiments using AWS Step Functions and AWS Fault Injection Simulator

Post Syndicated from James Beswick original https://aws.amazon.com/blogs/compute/chaos-experiments-using-aws-step-functions-and-aws-fault-injection-simulator/

This post is written by Arunsingh Jeyasingh Jacob, Senior Solutions Architect, and Sindhura Palakodety, Senior Solutions Architect.

To run business-critical applications at scale, it is important to determine the resiliency of the application. Chaos experiments induce controlled failures into a distributed application to gain confidence in the application behavior. The learnings from these experiments can be fed into a continuous feedback cycle to improve the resiliency.

In 2021, AWS launched AWS Fault Injection Simulator (FIS). This is a fully managed service for running Fault Injection experiments on AWS. It makes it easier to improve an application’s performance, observability, and resiliency. With Fault Injection Simulator, AWS customers can quickly set up experiments using pre-built templates that generate the desired disruptions.

Overview

This post uses AWS Step Functions to create and run AWS Fault Injection Simulator (FIS) experiments. You are encouraged to perform these experiments in a test account. Do not use the example in a production environment without making appropriate code changes.

The demo-fis-stepfunctions code deployed in this post is used to build the Step Functions state machine for FIS experiments.

There are two Step Functions workflows that are deployed. One is for chaos testing Amazon EC2 workloads and the other one is for Amazon ECS workloads.

The Step Functions workflow for EC2 workloads

The following Step Functions workflow shows an EC2 chaos experiment to stress CPU utilization, and stop and terminate EC2 instances.

Step Functions workflow for Amazon EC2 Fault Injection Experiments

EC2 experiment templates

This workflow runs through FIS experiment template creation followed by the execution of the FIS experiment. The FIS experiment template contains one or more actions to run on specified targets during an experiment. By creating a template, you are not running experiments against any workload, but creating a definition for the experiment.

The EC2 experiment templates created in this workflow are:

  • EC2CPUStressExperimentTemplate
  • EC2StopExperimentTemplate
  • EC2TerminateExperimentTemplate

These are the terms used in the FIS experiment template:

  • Actions: While creating an experimentation template, you must define an action once during an experiment.
  • Targets: A target is one or more AWS resources on which an action is performed by AWS Fault Injection Simulator (AWS FIS) during an experiment. For example, defining which instances to stress CPUs based on the tags.
  • Filters: Resource filters are queries that identify target resources according to specific attributes.
  • IAM role: This IAM role is assumed by FIS to perform the actions mentioned in the template. The Step Functions role must pass permissions to this FIS role.
  • Client token: The Step Functions execution fails if a client token is not passed.
  • Selection mode: Run experiments on all the resources matching the target criteria or specify the number of resources. For example, the EC2CPUStressExperimentTemplate targets one resource in random.

The ‘EC2CPUStressExperimentTemplate’ code defines how to stop EC2 instances with the tag ‘FISAction: CPUStress’:

{
   "Targets": {
      "CPUStressInstances": {
         "ResourceType": "aws:ec2:instance",
         "ResourceTags": {
            "FISAction": "CPUStress"
         },
         "Filters": [
            {
               "Path": "VpcId",
               "Values": [
                  "${VpcID}"
               ]
            }
         ],
         "SelectionMode": "COUNT(1)"
      }
   }
}

Targets can also be filtered using parameters like Amazon VPC ID. You can change the Step Functions definition by modifying the targets, actions, and filters.

EC2 FIS experiments

FIS experiment uses the experiment template definition during the state execution, and targets the appropriate resources.

  1. There are three EC2 FIS experiments created as a part of the workflow:1. CPUStressInstances: This runs after the ‘EC2CPUStressExperimentTemplate’ state. In this state, AWS Systems Manager (SSM) attempts to add CPU stress on the target instance with the tag “FISAction: CPUStress”. You can monitor the metric in the Amazon CloudWatch dashboard, and take actions using Amazon CloudWatch alarms.
    Monitoring the CPU utilization using Amazon CloudWatch
  2. StopInstances: Here, the target instances enter the ‘stopping’ state. Based on the template definition, all the EC2 instances with the tag “FISAction:Stop” in the filtered VPC are stopped.
  3.  TerminateInstances: This terminates the target instances with the tag “FISAction:Terminate” in the filtered VPC.

The Step Functions workflow for Amazon ECS workloads

The following Step Functions workflow shows an FIS experiment to stop ECS tasks:

Step Functions workflow for Amazon ECS Fault Injection experiment

  • Amazon ECS experiment template: The ECSStopTaskExperimentTemplate state is created in this workflow. This FIS template defines the action to be run during the experiment.
  • Amazon ECS experiments: After creating the experiment template, the ECSStopTask state runs the FIS experiment.
  • ECSStopTask: FIS targets all the Amazon ECS tasks with the tag “FISAction: StopECSTask” and stops the tasks.

After the FIS experiment state is initiated, the status of the experiment can be polled before proceeding to the next state. The FIS experiments have multiple states like pending, initiating, running, completed, stopping, stopped, and failed.

The choice state in the workflow checks for the ‘running’ state by polling the status using FIS: GetExperiment API. A ‘failed’ status will result in the workflow failure. You can also design the workflow by introducing wait times between the experiments or by including flow activities like parallel.

Deploying with the AWS Serverless Application Model

This example has the following prerequisites:

  1. Create an AWS account if you don’t have one already.
  2. A valid existing VPC with subnets.
  3. A local install of Git CLI.
  4. A local install of AWS SAM CLI to build and deploy the sample code.

After installation, follow these steps to deploy the example:

  1. Clone the sample code:
    git clone https://github.com/aws-samples/aws-stepfunctions-examples.git
    cd sam/demo-fis-stepfunctions/
    
  2. Modify the templates as needed. You can also edit the state machine code from the AWS Management Console after you deploy this code.
  3. Build and deploy the code:
    sam build 
    sam deploy --guided
    

To learn more, visit the AWS SAM deployment documentation. This launches an AWS CloudFormation stack that creates the state machine, AWS IAM roles and CloudWatch log group. The next step is to run the state machines.

Running the Step Functions workflows

The AWS SAM deployment creates two Step Functions state machines in the deployed AWS Region: FISTest-aws-region-StateMachineFIS and FISTest-aws-region-StateMachineECSFIS.

Before running the state machine FISTest-aws-region-StateMachineFIS, create three EC2 instances with the tags “FISAction: CPUStress”, “FISAction:Stop” and “FISAction:Terminate” respectively.

  1. Navigate to the Step Functions console.
  2. Choose FISTest-aws-region-StateMachineFIS then Start execution.

As the workflow progresses, CPU Utilization spikes in one Amazon EC2 instance. The other Amazon EC2 instances are stopped and terminated.

To run chaos experiments on an ECS cluster, you can either use an existing ECS cluster or create a new cluster. To create an ECS cluster:

  1. Navigate to the ECS console.
  2. Choose Get Started.
  3. Choose sample-app and follow the instructions to deploy. Wait for the cluster to be created.
  4. Choose the sample cluster, then choose Tasks.
  5. Choose the running tasks and add the tag “FISAction: StopECSTask”

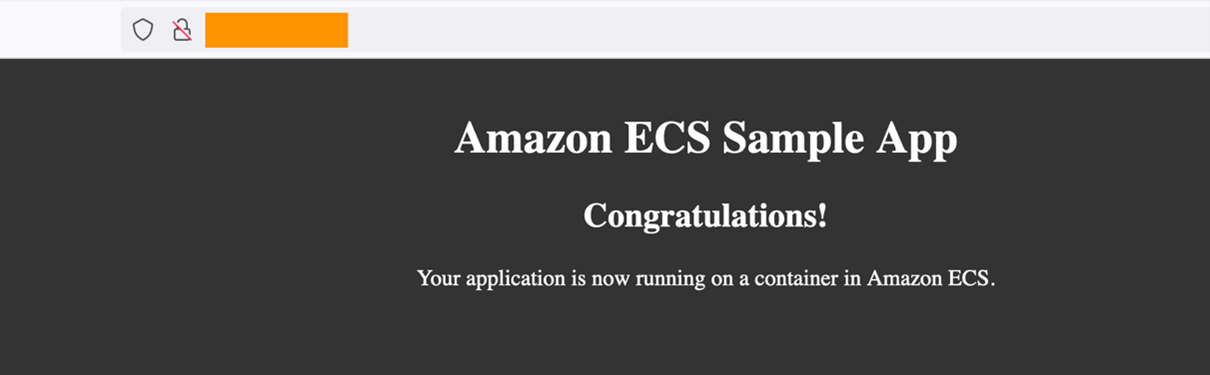
From the browser, the public IP assigned to the task takes you to the sample application.

Amazon ECS Sample Application

  1. Navigate to the Step Functions console.
  2. Choose FISTest-aws-region-StateMachineECSFIS, then Start execution.
  3. The workflow transitions to Wait during the execution.

Execution - FIS Step Functions workflow for ECS experiment

Once the execution is complete, the webpage momentarily becomes unavailable until a new task comes up. The public IP address and ARN of the task changes. The task status of the stopped tasks now shows “Task stopped by AWS FIS”.

ECS Task stopped by AWS FIS Experiment

To perform an FIS experiment against an existing ECS cluster, add the Resource Tags value “FISAction: StopECSTask” to your ECS tasks before running the workflows.

{
   "Targets": {
      "ecsfargatetask": {
         "ResourceType": "aws:ecs:task",
         "ResourceTags": {
            "FISAction": "StopECSTask"
         },
         "SelectionMode": "ALL"
      }
   }
}

Cleanup

If you have deployed the code using AWS SAM, delete the resources:

sam delete –stack-name <STACK_NAME>

Refer to this documentation for further information.

Conclusion

This blog post describes how to use Step Functions to orchestrate Fault Injection Simulator (FIS) experiments for EC2 and ECS workloads. Using the workflow in this post as an example, you can build state machines for more AWS FIS experiments. Step Functions, AWS FIS, and other services can be combined to build resiliency workflows, and test your application against your resiliency goals.

To learn more about AWS FIS and Step Functions, visit:

For more Step Functions resources, visit the Serverless Workflows Collection.

[$] Troubles with triaging syzbot reports

Post Syndicated from original https://lwn.net/Articles/917762/

A report from the syzbot
kernel fuzz-testing robot does not usually spawn a
vitriolic mailing-list thread, but that is just what happened recently.
While the invective is regrettable, the underlying issue is important. The
dispute revolves around how best to report bugs
to affected subsystems and, ultimately, how not to waste maintainers’ time.

New – Bring ML Models Built Anywhere into Amazon SageMaker Canvas and Generate Predictions

Post Syndicated from Antje Barth original https://aws.amazon.com/blogs/aws/new-bring-ml-models-built-anywhere-into-amazon-sagemaker-canvas-and-generate-predictions/

Amazon SageMaker Canvas provides business analysts with a visual interface to solve business problems using machine learning (ML) without writing a single line of code. Since we introduced SageMaker Canvas in 2021, many users have asked us for an enhanced, seamless collaboration experience that enables data scientists to share trained models with their business analysts with a few simple clicks.

Today, I’m excited to announce that you can now bring ML models built anywhere into SageMaker Canvas and generate predictions.

New – Bring Your Own Model into SageMaker Canvas
As a data scientist or ML practitioner, you can now seamlessly share models built anywhere, within or outside Amazon SageMaker, with your business teams. This removes the heavy lifting for your engineering teams to build a separate tool or user interface to share ML models and collaborate between the different parts of your organization. As a business analyst, you can now leverage ML models shared by your data scientists within minutes to generate predictions.

Let me show you how this works in practice!

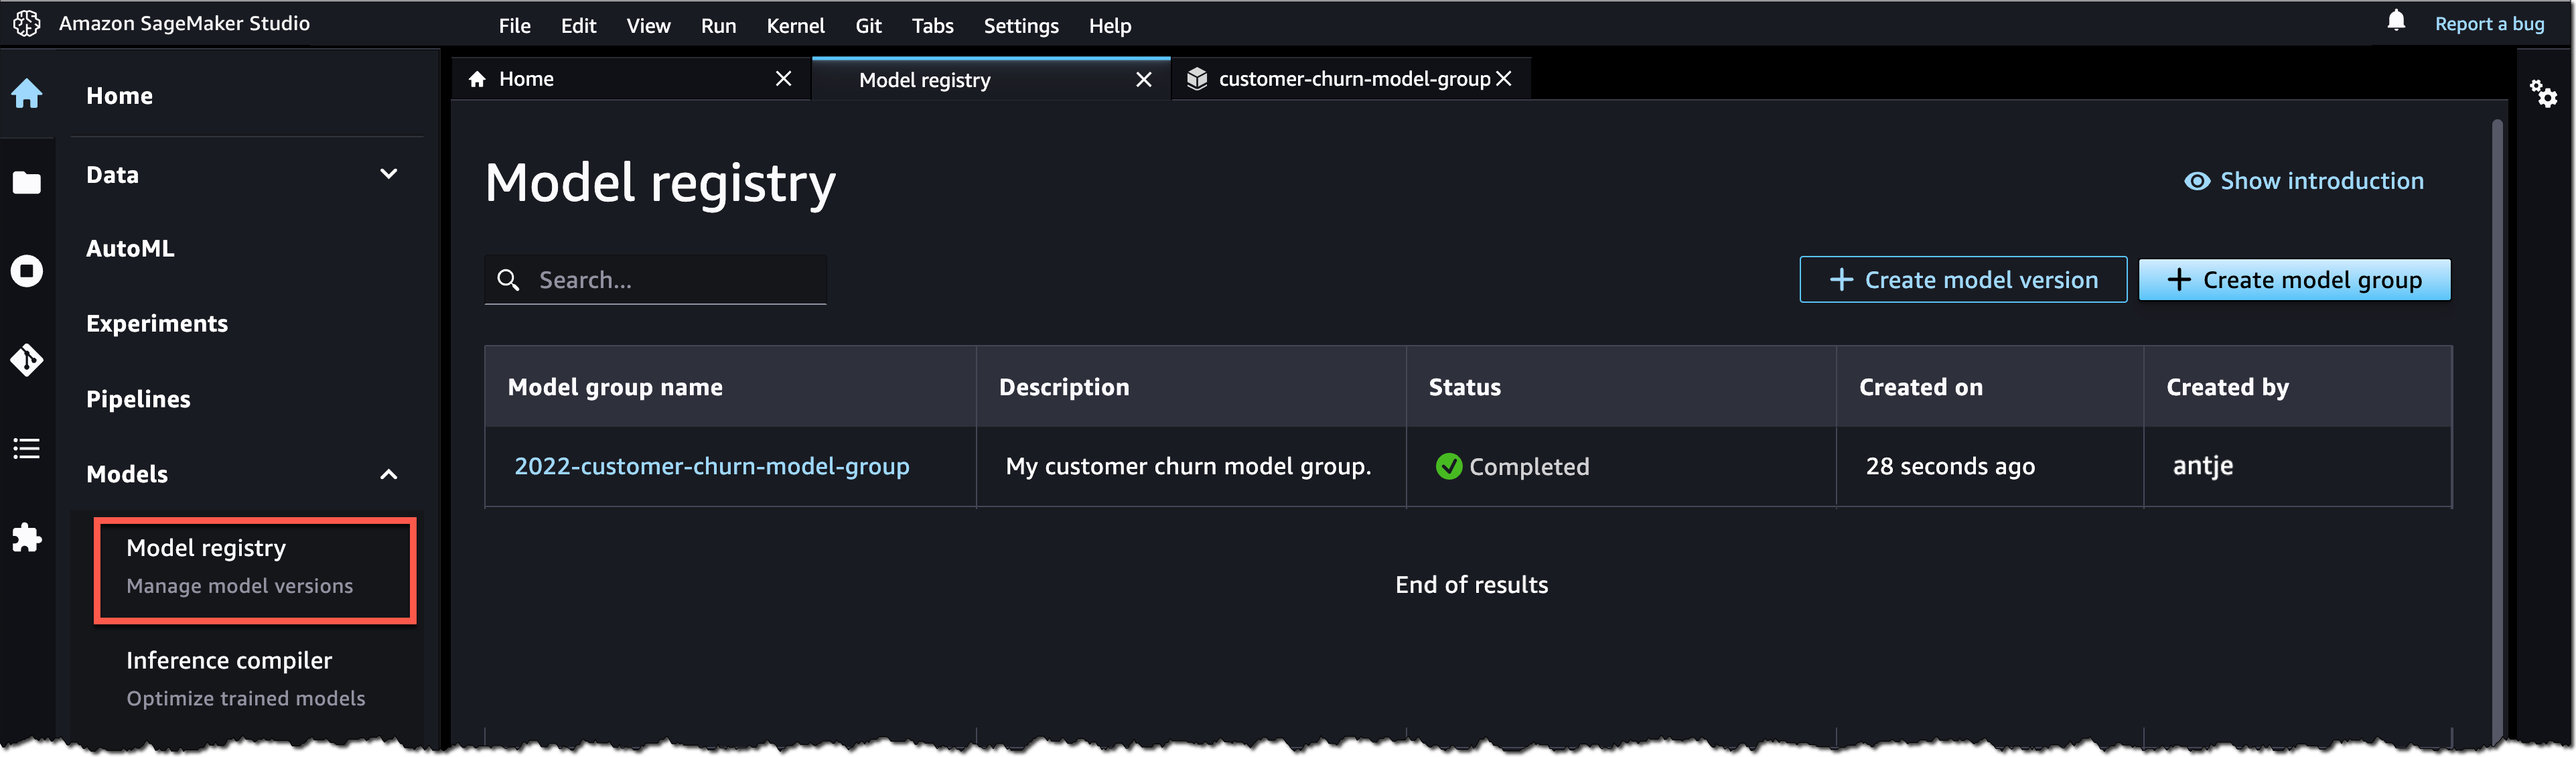
In this example, I share an ML model that has been trained to identify customers that are potentially at risk of churning with my marketing analyst. First, I register the model in the SageMaker model registry. SageMaker model registry lets you catalog models and manage model versions. I create a model group called 2022-customer-churn-model-group and then select Create model version to register my model.

Amazon SageMaker Model Registry

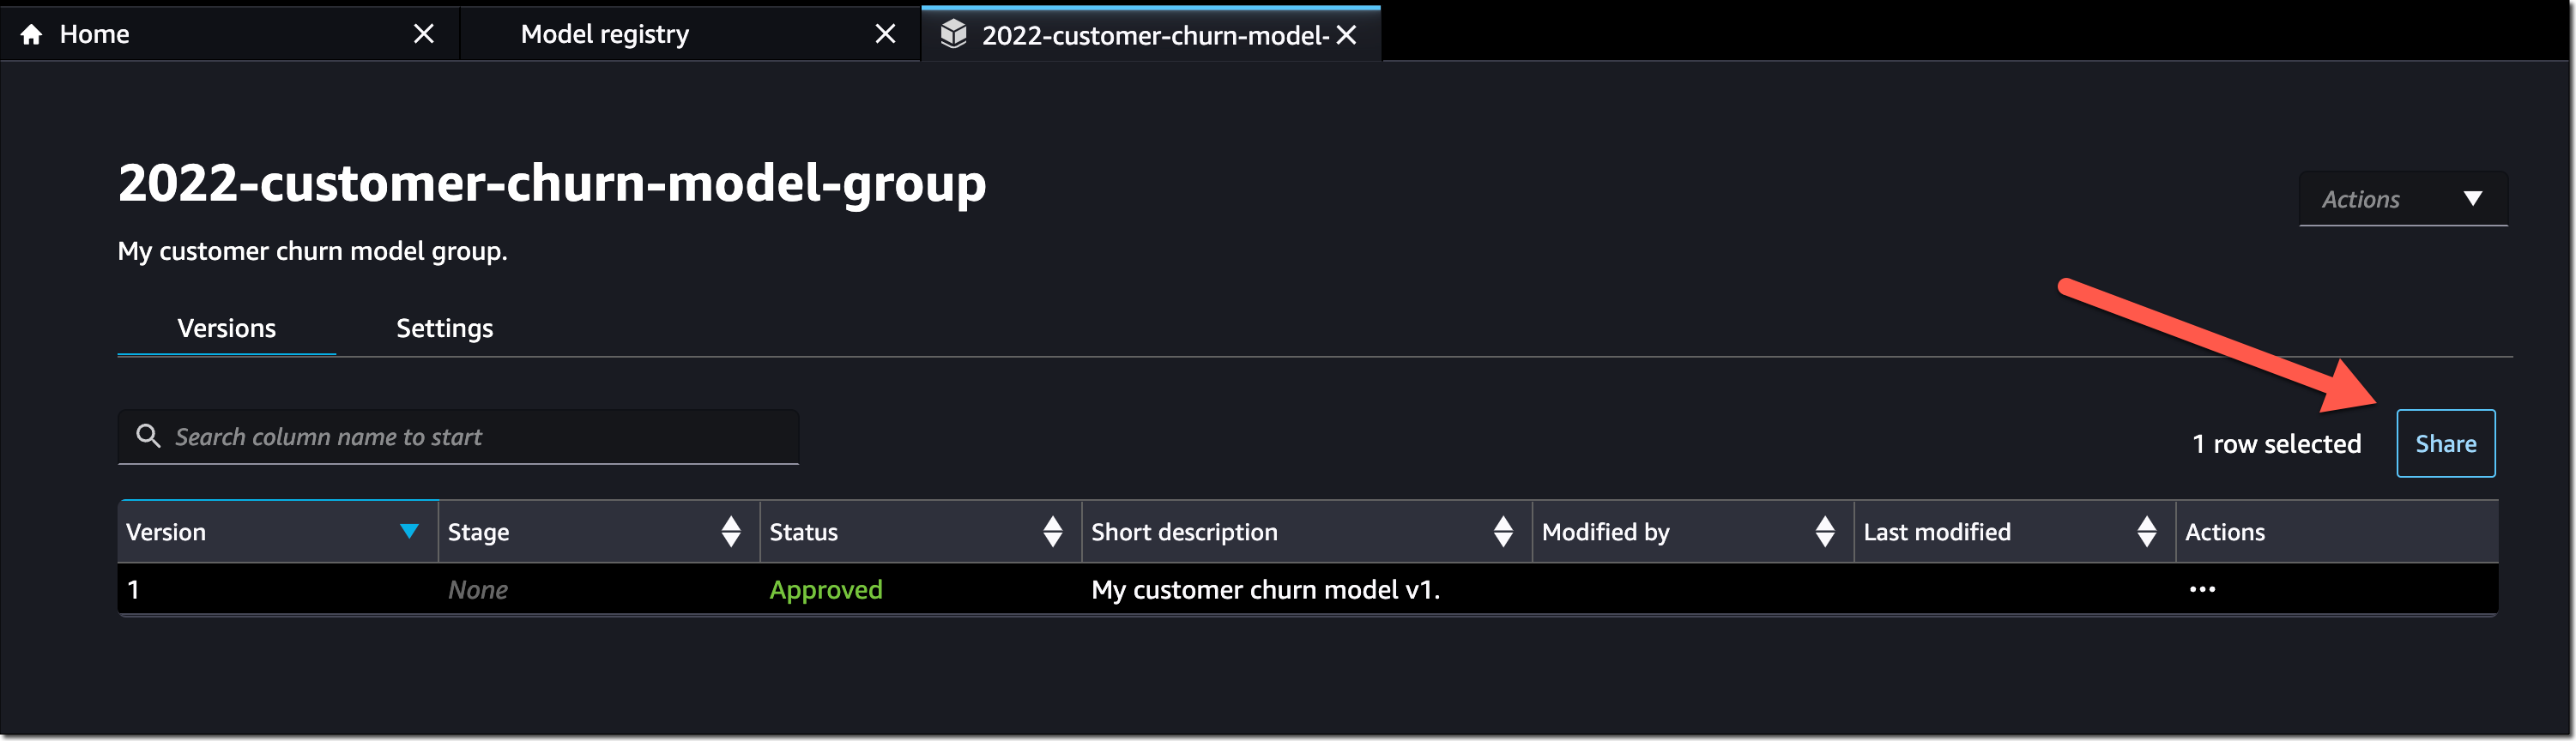
To register your model, provide the location of the inference image in Amazon ECR, as well as the location of your model.tar.gz file in Amazon S3. You can also add model endpoint recommendations and additional model information. Once you’ve registered your model, select the model version and select Share.

Amazon SageMaker Studio - Share models from model registry with SageMaker Canvas users

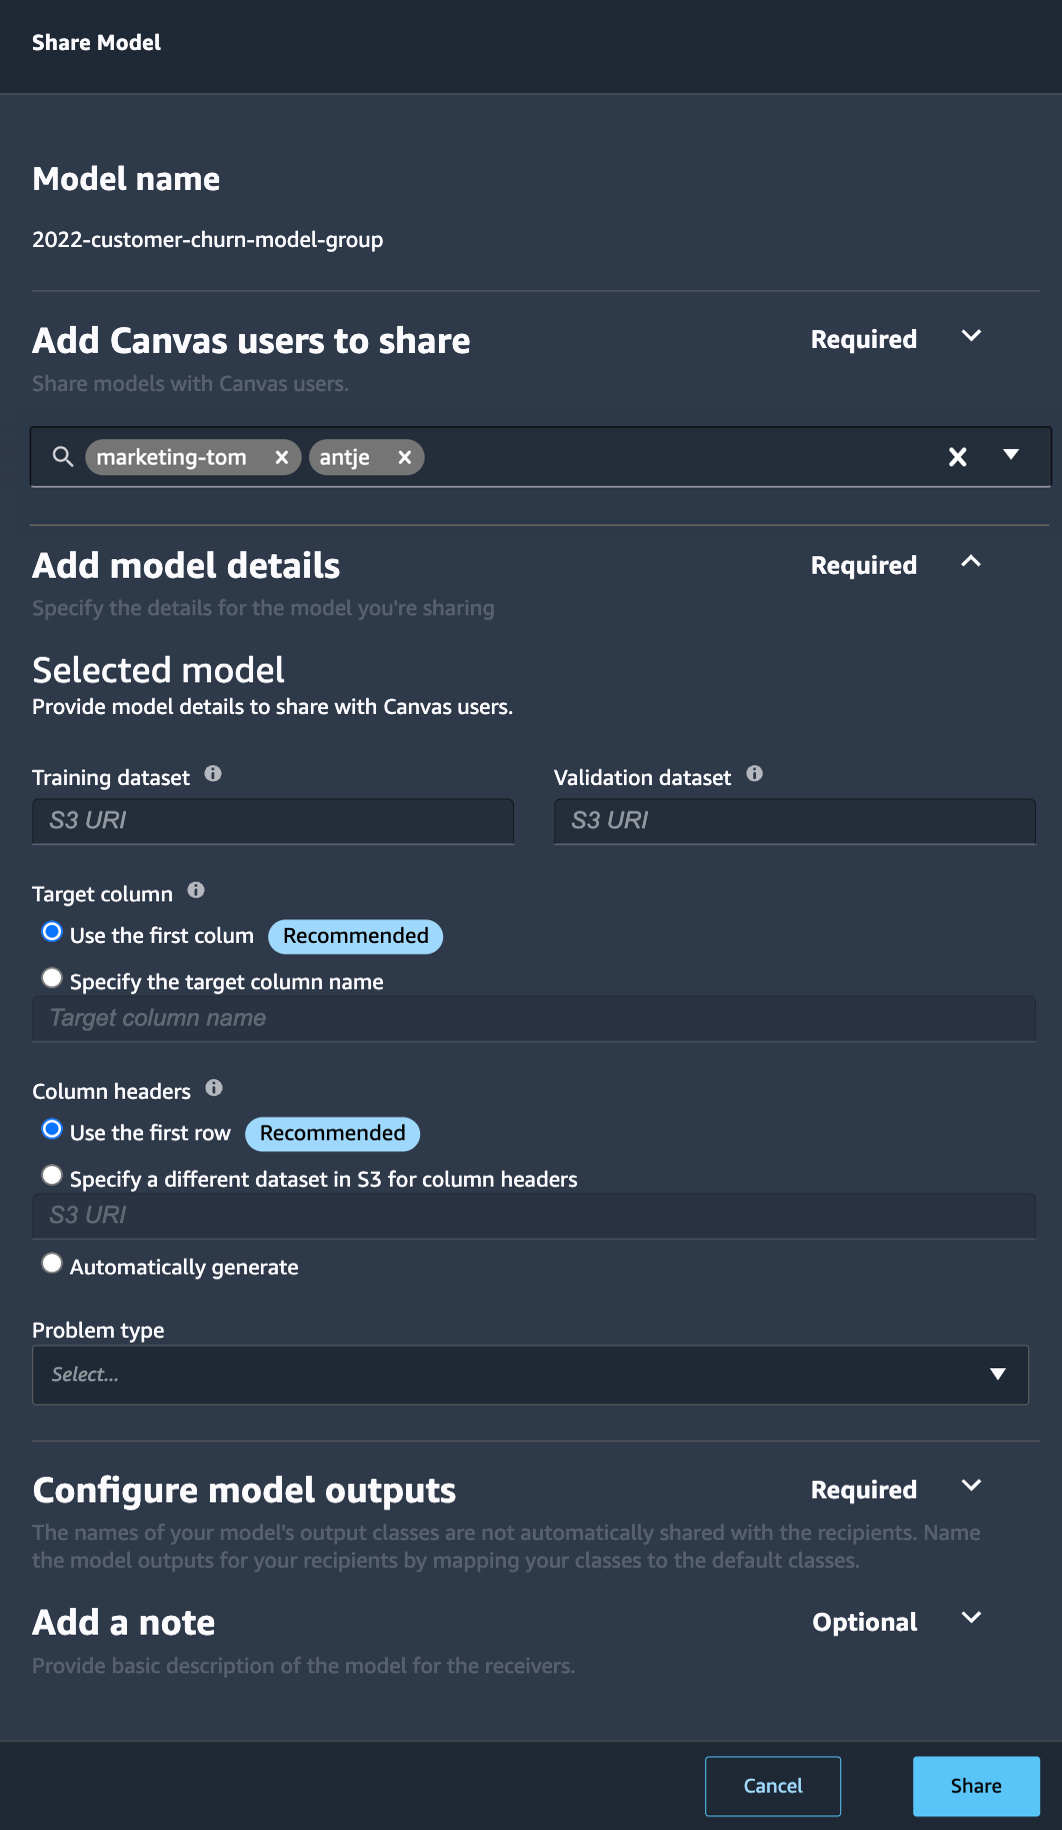
You can now choose the SageMaker Canvas user profile(s) within the same SageMaker domain you want to share your model with. Then, provide additional model details, such as information about training and validation datasets, the ML problem type, and model output information. You can also add a note for the SageMaker Canvas users you share the model with.

Amazon SageMaker Studio - Share a model from Model Registry with SageMaker Canvas users

Similarly, you can now also share models trained in SageMaker Autopilot and models available in SageMaker JumpStart with SageMaker Canvas users.

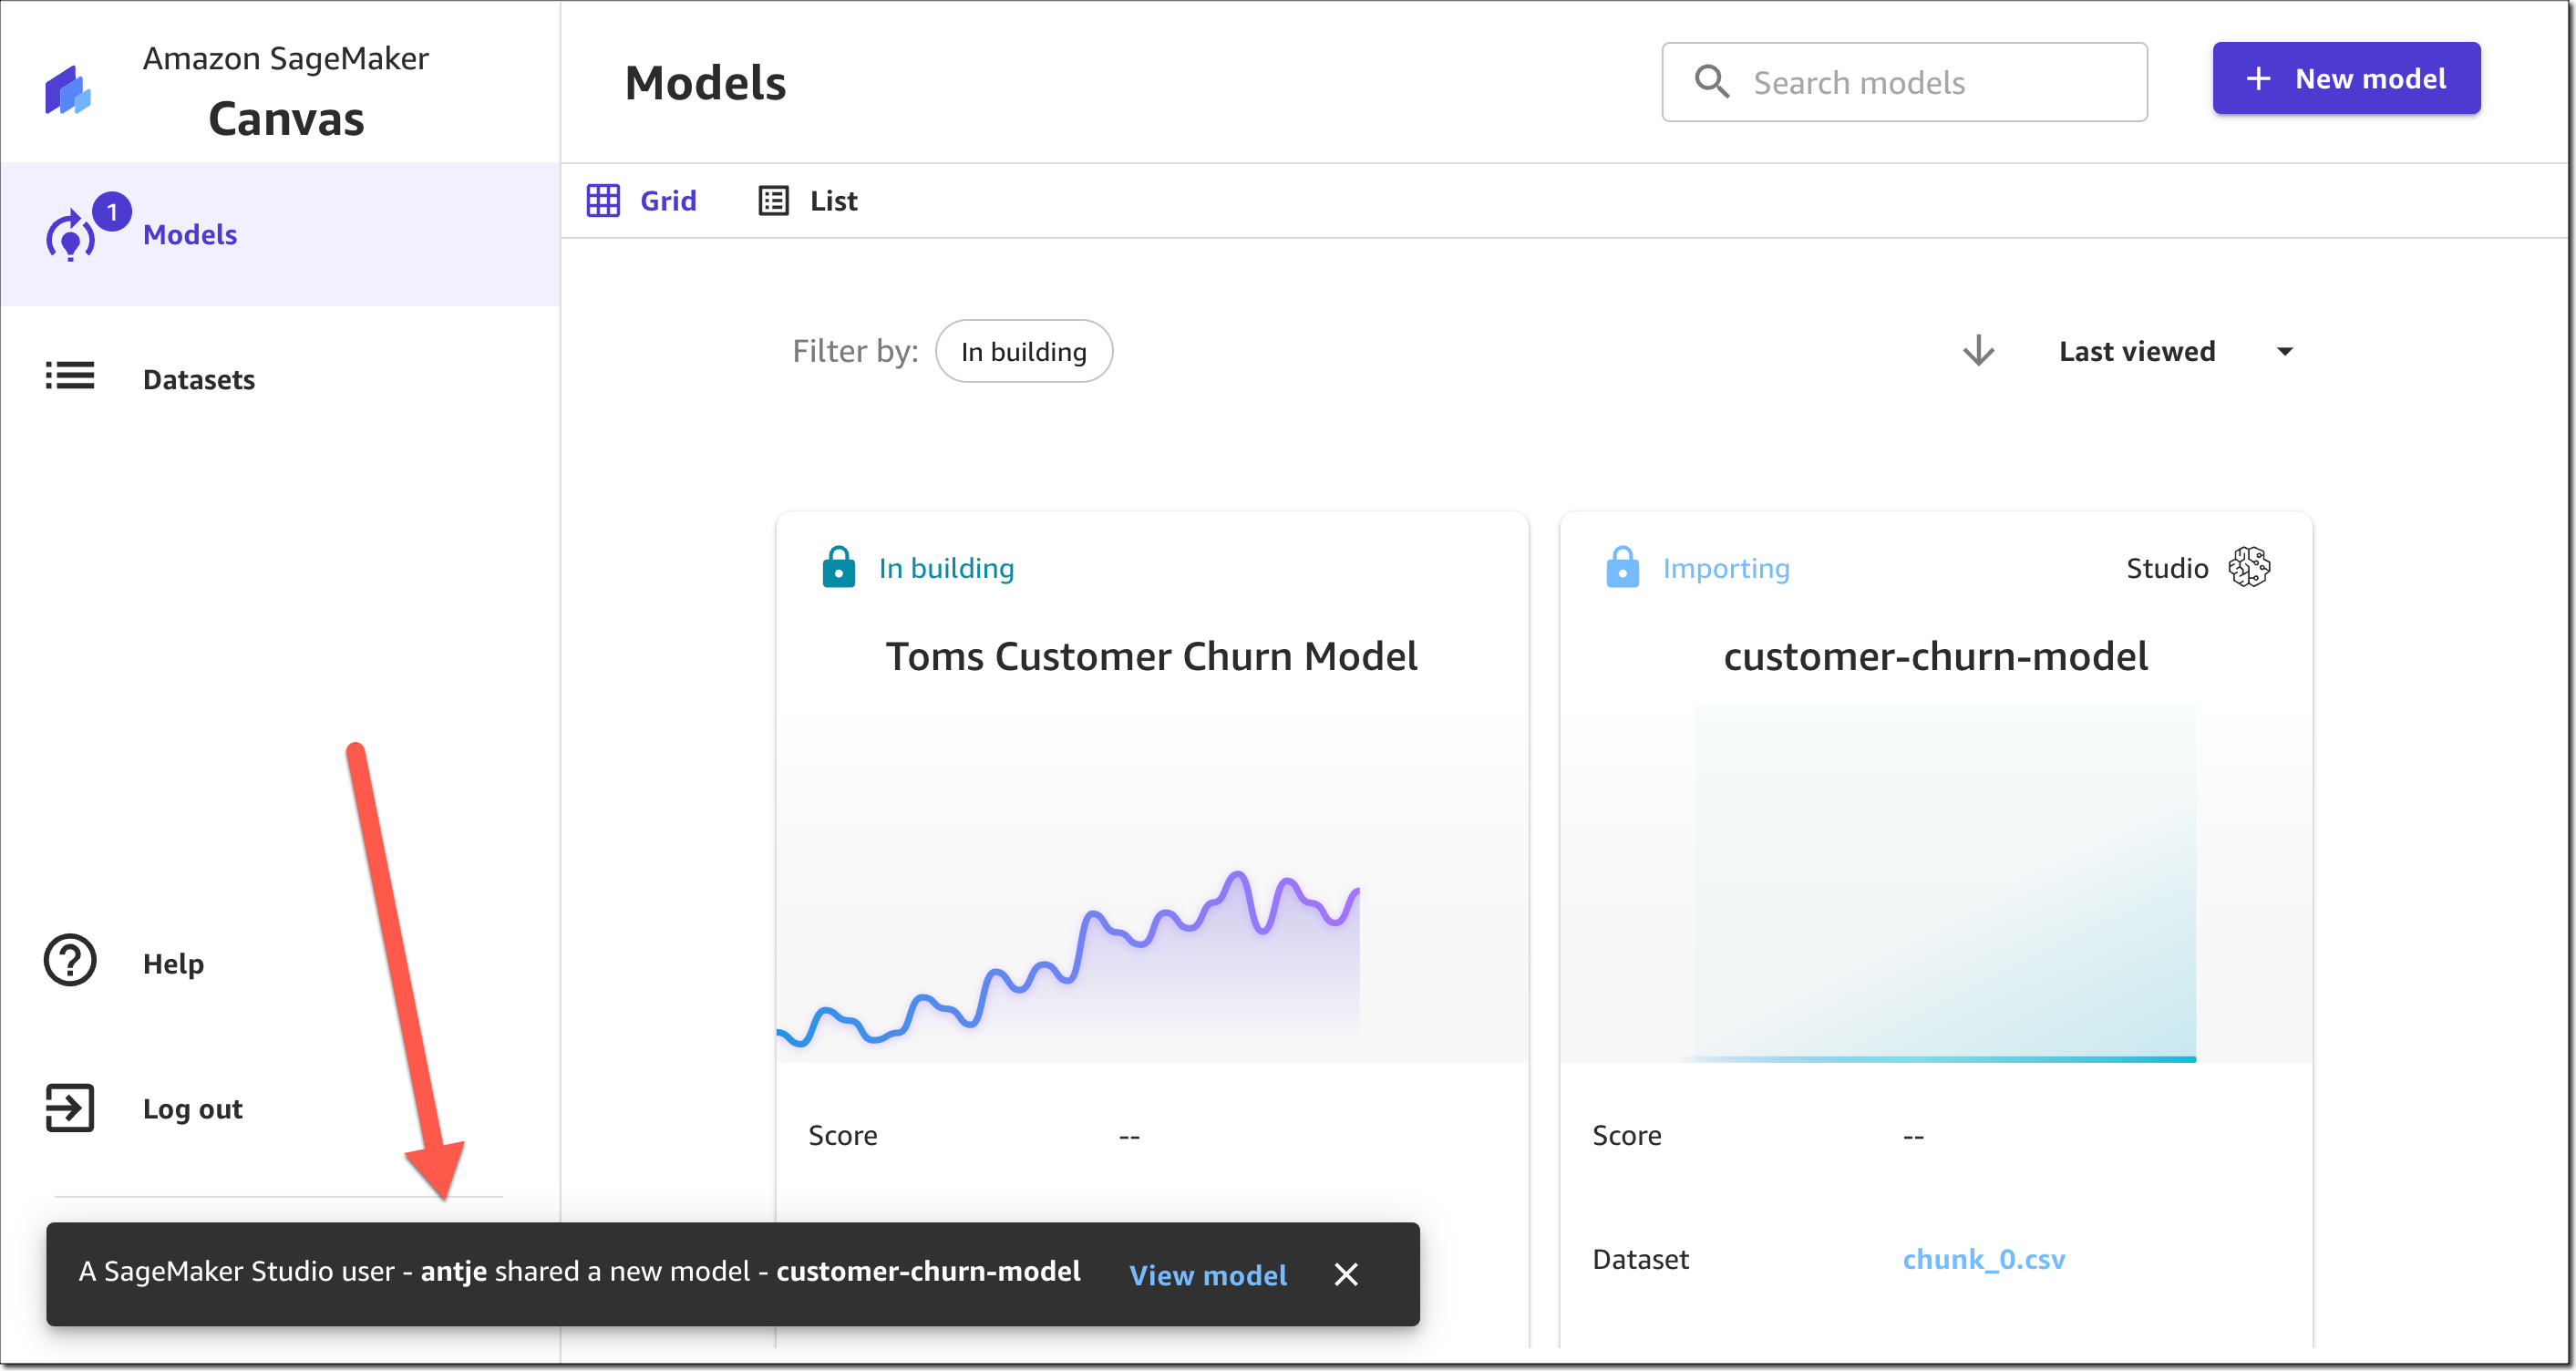
The business analysts will receive an in-app notification in SageMaker Canvas that a model has been shared with them, along with any notes you added.

Amazon SageMaker Canvas - Received model from SageMaker Studio

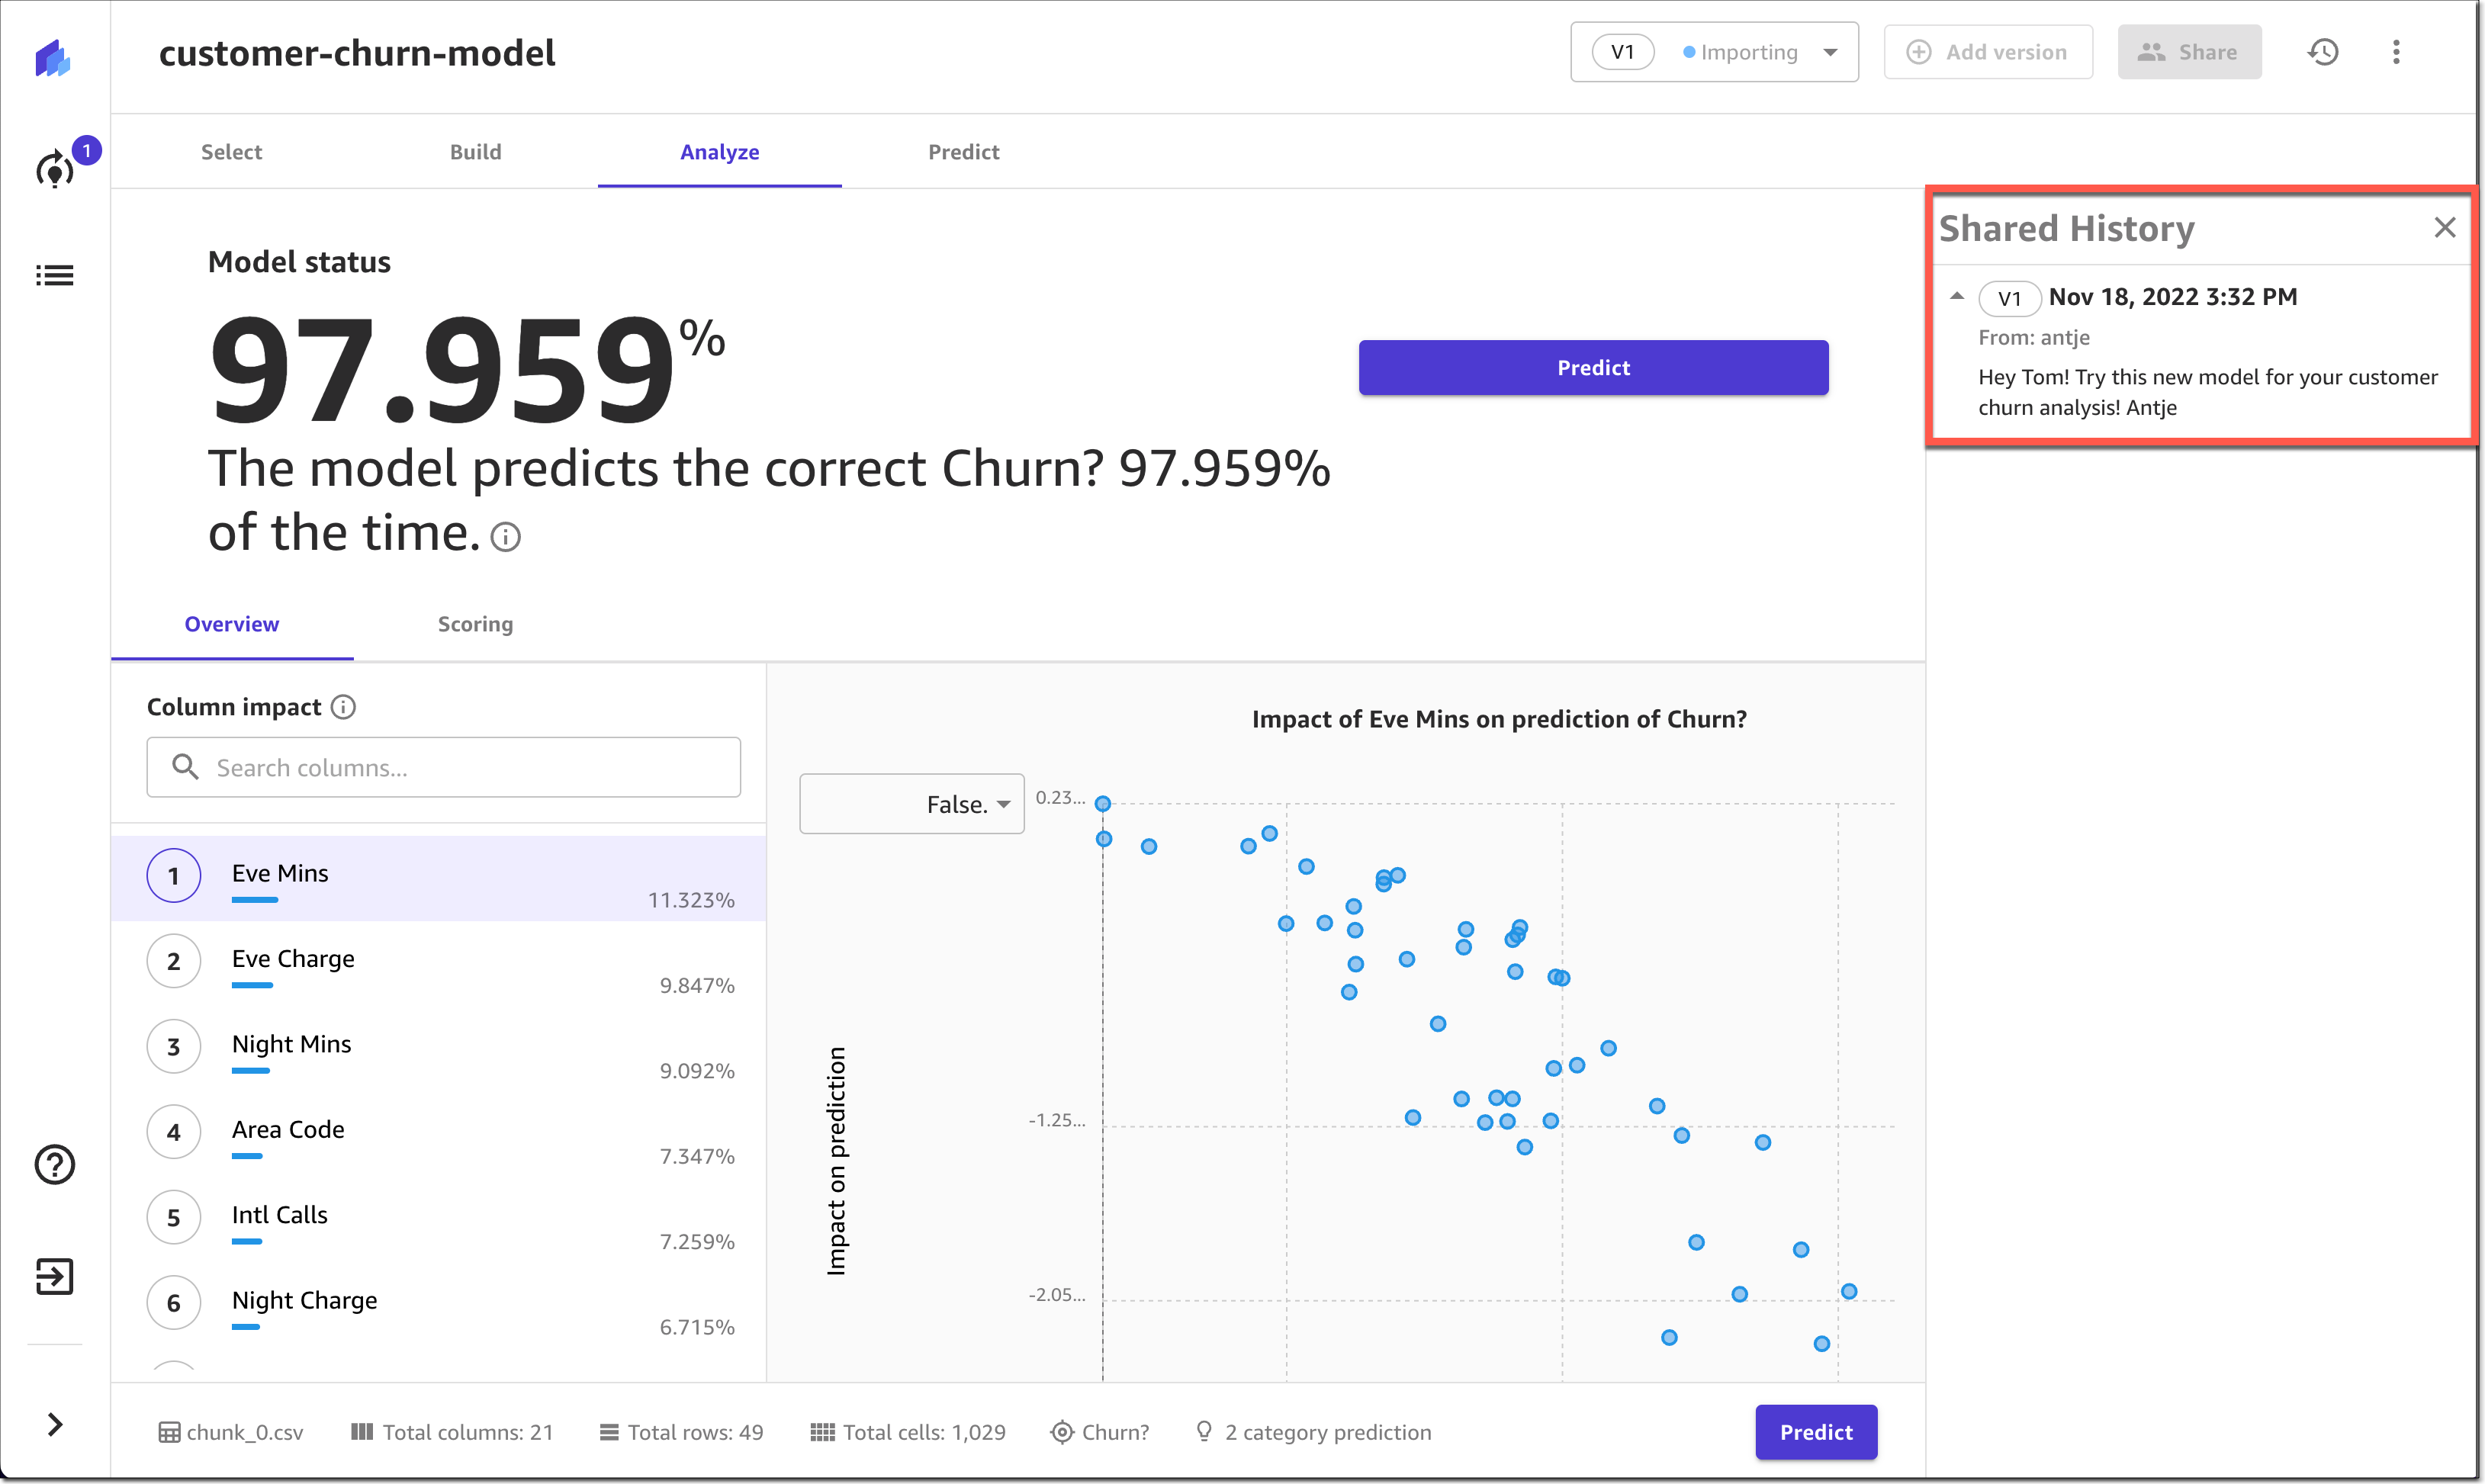
My marketing analyst can now open, analyze, and start using the model to generate ML predictions in SageMaker Canvas.

Amazon SageMaker Canvas - Imported model from SageMaker Studio

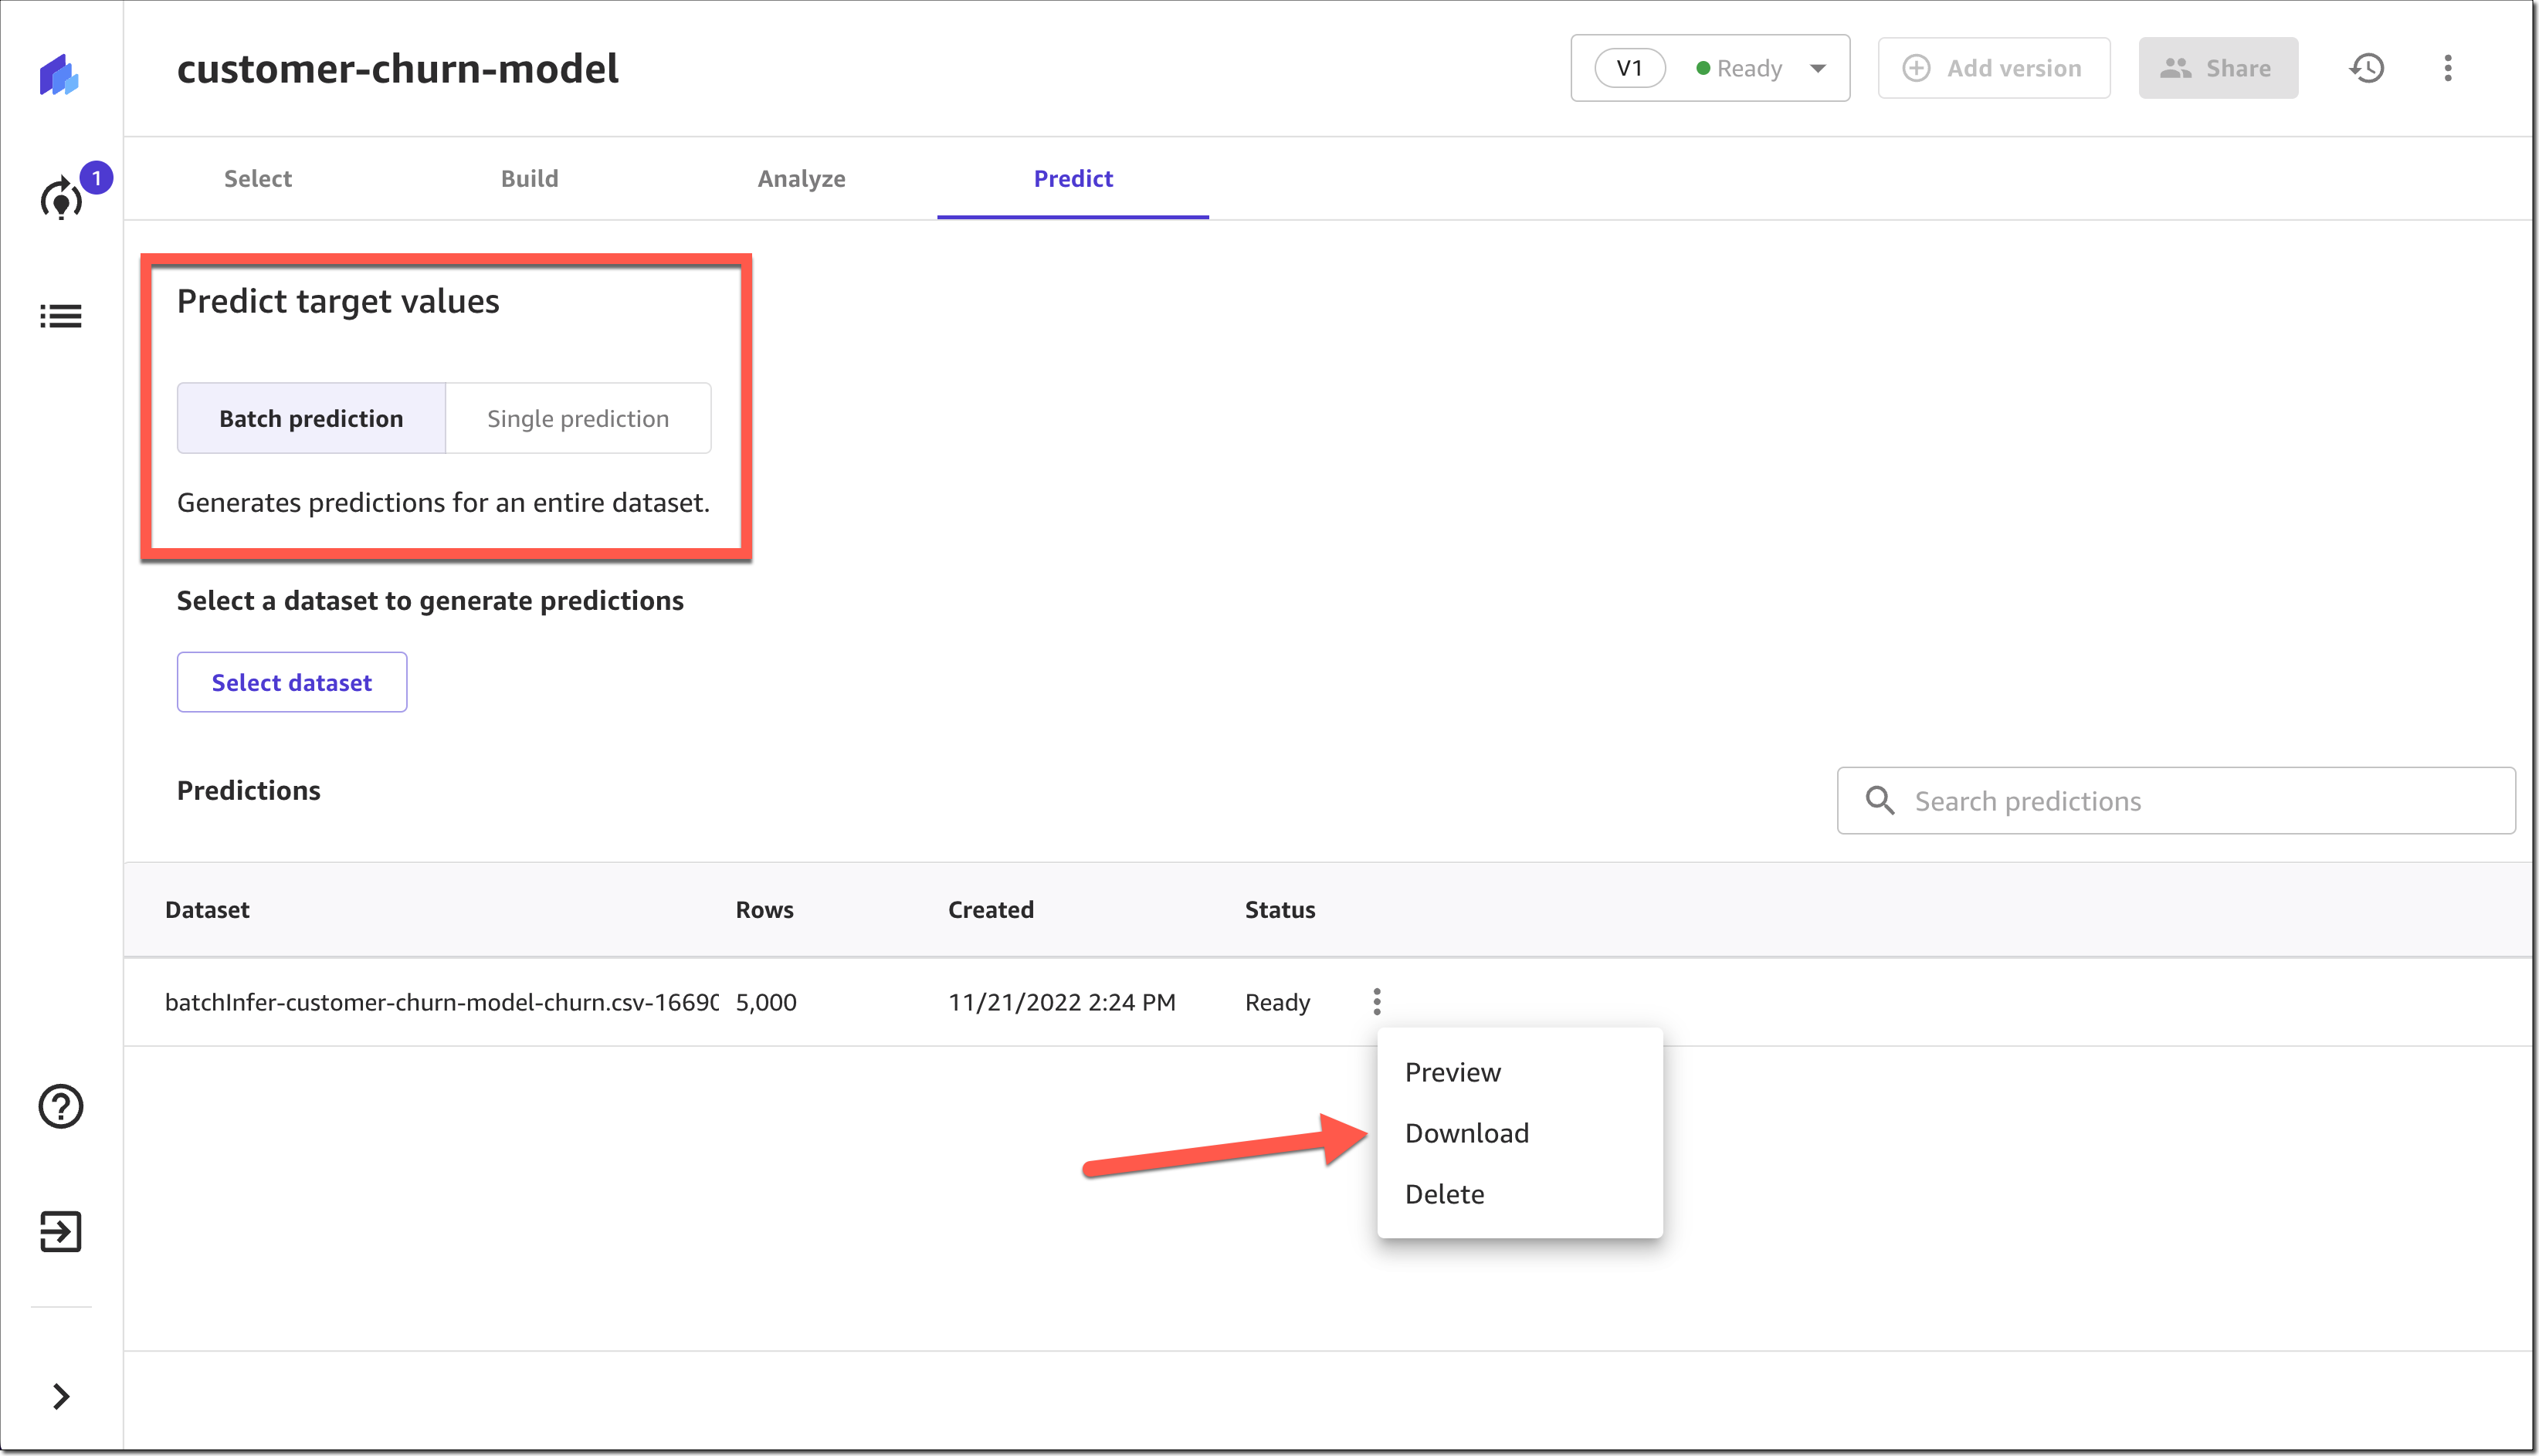
Select Batch prediction to generate ML predictions for an entire dataset or Single prediction to create predictions for a single input. You can download the results in a .csv file.

Amazon SageMaker Canvas - Generate Predictions

New – Improved Model Sharing and Collaboration from SageMaker Canvas with SageMaker Studio Users
We also improved the sharing and collaboration capabilities from SageMaker Canvas with data science and ML teams. As a business analyst, you can now select which SageMaker Studio user profile(s) you want to share your standard-build models with.

Your data scientists or ML practitioners will receive a similar in-app notification in SageMaker Studio once a model has been shared with them, along with any notes from you. In addition to just reviewing the model, SageMaker Studio users can now also, if needed, update the data transformations in SageMaker Data Wrangler, retrain the model in SageMaker Autopilot, and share back the updated model. SageMaker Studio users can also recommend an alternate model from the list of models in SageMaker Autopilot.

Once SageMaker Studio users share back a model, you receive another notification in SageMaker Canvas that an updated model has been shared back with you. This collaboration between business analysts and data scientists will help democratize ML across organizations by bringing transparency to automated decisions, building trust, and accelerating ML deployments.

Now Available
The enhanced, seamless collaboration capabilities for Amazon SageMaker Canvas, including the ability to bring your ML models built anywhere, are available today in all AWS Regions where SageMaker Canvas is available with no changes to the existing SageMaker Canvas pricing.

Start collaborating and bring your ML model to Amazon SageMaker Canvas today!

— Antje

Cloudflare achieves FedRAMP authorization to secure more of the public sector

Post Syndicated from Aron Nakazato original https://blog.cloudflare.com/cloudflare-achieves-fedramp-authorization/

Cloudflare achieves FedRAMP authorization to secure more of the public sector

This post is also available in Deutsch, Français and Español.

Cloudflare achieves FedRAMP authorization to secure more of the public sector

We are excited to announce our public sector suite of services, Cloudflare for Government, has achieved FedRAMP Moderate Authorization. The Federal Risk and Authorization Management Program (“FedRAMP”) is a US-government-wide program that provides a standardized approach to security assessment, authorization, and continuous monitoring for cloud products and services. FedRAMP Moderate Authorization demonstrates Cloudflare’s continued commitment to customer trust, and Cloudflare for Government’s ability to secure and protect US public sector organizations.

Key differentiators

We believe public sector customers deserve the same experience as any other customer — so rather than building a separate platform, we leveraged our existing platform for Cloudflare for Government. Cloudflare’s platform protects and accelerates any Internet application without adding hardware, installing software, or changing a line of code. It’s also one of the largest and fastest global networks on the planet.

One of the things that distinguishes Cloudflare for Government from other FedRAMP cloud providers is the number of data centers we have in scope, with each able to run our full stack of FedRAMP Authorized services locally, with a single control plane on our private backbone. Networking and security services can only improve the user experience if they are run as close to the user as possible, even if the user doesn’t live on an east or west coast hub. While other cloud service providers may only have a handful of data centers within their FedRAMP environment, Cloudflare for Government includes over 30 of our US-based data centers. This provides Cloudflare for Government customers with the same speed, availability, and security that non-highly regulated customers have come to expect from us.

Cloudflare for Government services

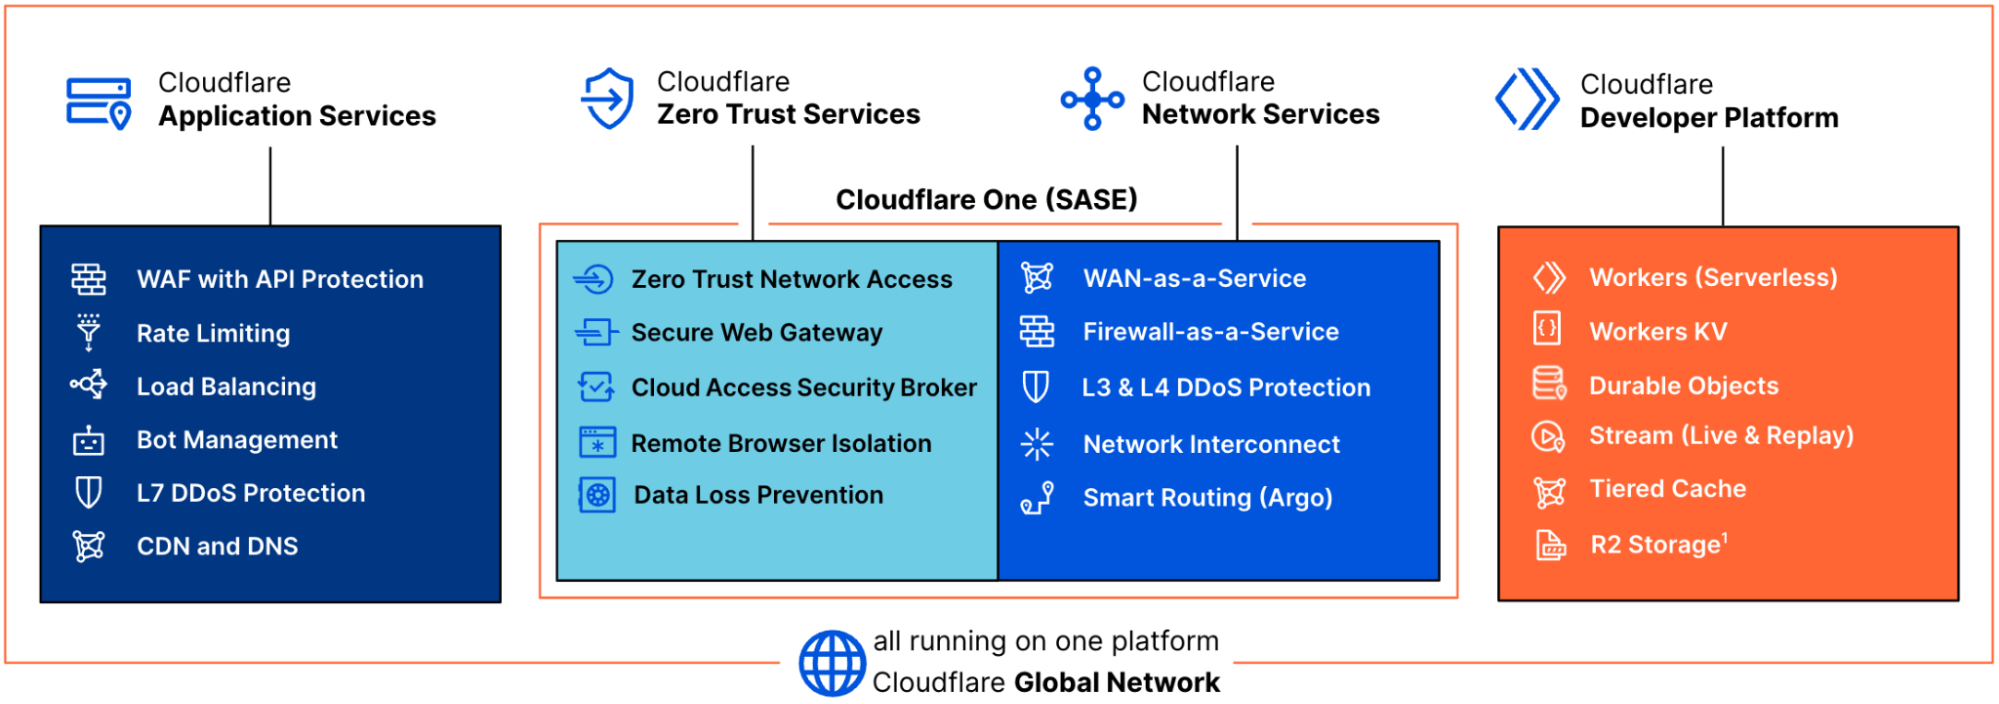
Cloudflare for Government is a suite of services for U.S. government and public sector agencies, delivered from our global, highly resilient cloud network with built-in security and performance.

Cloudflare achieves FedRAMP authorization to secure more of the public sector

Application services

Web Application Firewall with API protection provides an intelligent, integrated and scalable solution to protect your critical web applications. Rate Limiting protects against denial of service attacks, brute force login attempts, and other abusive behavior that targets the application layer. Load Balancing improves application performance and availability by steering traffic from unhealthy origin servers and dynamically distributing it to the most available and responsive server pools.

Bot Management manages good and bad bots in real-time, helps prevent credential stuffing, content scraping, content spam, inventory hoarding, credit card stuffing, and application DDoS. CDN provides ultra-fast static and dynamic content delivery over our global network; it offers users the ability to exercise precise control over how content is cached, helps reduce bandwidth costs and take advantage of built-in unmetered DDoS protections. Enterprise grade DNS offers the fastest response time, unparalleled redundancy, and advanced security with built-in DDoS mitigation and DNSSEC.

Zero trust

Zero Trust Network Access creates secure boundaries for applications by allowing access to resources after verifying identity, context, and policy adherence for each specific request. Remote Browser Isolation provides a fast and reliable solution for remote browsing by running all browser code in the cloud. Secure Web Gateway protects users and data by inspecting user traffic, filtering and blocking malicious content, and identifying compromised devices.

Network services

Cloudflare for Government can replace your legacy WAN architecture with Cloudflare’s WAN-as-a-Service which provides expansive connectivity, cloud-based security, performance and control. L3/4 DDoS can protect your websites, applications, and network — Cloudflare blocks an average of 87 billion threats per day! Network Interconnect enables you to directly connect your on-premise networks and cloud hosted environments to Cloudflare for Government.

Developer platform

Workers provides a serverless execution environment that allows you to create entirely new applications or augment existing ones without configuring or maintaining infrastructure. Workers KV is a global, low-latency, key-value data store. It supports exceptionally high read volumes with low-latency, making it possible to build highly dynamic APIs and websites which respond as quickly as a cached static file would. Durable Objects provides low-latency coordination and consistent storage for the Workers platform through two features: global uniqueness and a transactional storage API.

What’s next for Cloudflare for Government

Our achievement of FedRAMP Moderate for our Cloudflare for Government suite of products is the first step in our journey to help secure government entities. As you may have read earlier this week, our focus hasn’t been only with the US public sector. Our Zero Trust products are being leveraged to protect critical infrastructure in Japan, Australia, Germany, Portugal, and the UK. We’re also securing organizations qualified under Project Galileo and Athenian with our Cloudflare One Zero Trust suite at no cost.  We will expand the Cloudflare for Government suite to allow governments all over the world to have the opportunity to use our services to protect their assets and users.

We aim to help agencies build stronger cybersecurity, without compromising the customer experience of the government services that all US citizens rely on. We invite all our Cloudflare for Government public and private partners to learn more about our capabilities and work with us to develop solutions to the rapidly evolving security demands required in complex environments. Please reach out to us at [email protected] with any questions.

For more information on Cloudflare’s FedRAMP status, please visit the FedRAMP Marketplace.

Building a healthcare data pipeline on AWS with IBM Cloud Pak for Data

Post Syndicated from Eduardo Monich Fronza original https://aws.amazon.com/blogs/architecture/building-a-healthcare-data-pipeline-on-aws-with-ibm-cloud-pak-for-data/

Healthcare data is being generated at an increased rate with the proliferation of connected medical devices and clinical systems. Some examples of these data are time-sensitive patient information, including results of laboratory tests, pathology reports, X-rays, digital imaging, and medical devices to monitor a patient’s vital signs, such as blood pressure, heart rate, and temperature.

These different types of data can be difficult to work with, but when combined they can be used to build data pipelines and machine learning (ML) models to address various challenges in the healthcare industry, like the prediction of patient outcome, readmission rate, or disease progression.

In this post, we demonstrate how to bring data from different sources, like Snowflake and connected health devices, to form a healthcare data lake on Amazon Web Services (AWS). We also explore how to use this data with IBM Watson to build, train, and deploy ML models. You can learn how to integrate model endpoints with clinical health applications to generate predictions for patient health conditions.

Solution overview

The main parts of the architecture we discuss are (Figure 1):

  1. Using patient data to improve health outcomes
  2. Healthcare data lake formation to store patient health information
  3. Analyzing clinical data to improve medical research
  4. Gaining operational insights from healthcare provider data
  5. Providing data governance to maintain the data privacy
  6. Building, training, and deploying an ML model
  7. Integration with the healthcare system
Data pipeline for the healthcare industry using IBM CP4D on AWS

Figure 1. Data pipeline for the healthcare industry using IBM CP4D on AWS

IBM Cloud Pak for Data (CP4D) is deployed on Red Hat OpenShift Service on AWS (ROSA). It provides the components IBM DataStage, IBM Watson Knowledge Catalogue, IBM Watson Studio, IBM Watson Machine Learning, plus a wide variety of connections with data sources available in a public cloud or on-premises.

Connected health devices, on the edge, use sensors and wireless connectivity to gather patient health data, such as biometrics, and send it to the AWS Cloud through Amazon Kinesis Data Firehose. AWS Lambda transforms the data that is persisted to Amazon Simple Storage Service (Amazon S3), making that information available to healthcare providers.

Amazon Simple Notification Service (Amazon SNS) is used to send notifications whenever there is an issue with the real-time data ingestion from the connected health devices. In case of failures, messages are sent via Amazon SNS topics for rectifying and reprocessing of failure messages.

DataStage performs ETL operations and move patient historical information from Snowflake into Amazon S3. This data, combined with the data from the connected health devices, form a healthcare data lake, which is used in IBM CP4D to build and train ML models.

The pipeline described in architecture uses Watson Knowledge Catalogue, which provides data governance framework and artifacts to enrich our data assets. It protects sensitive patient information from unauthorized access, like individually identifiable information, medical history, test results, or insurance information.

Data protection rules define how to control access to data, mask sensitive values, or filter rows from data assets. The rules are automatically evaluated and enforced each time a user attempts to access a data asset in any governed catalog of the platform.

After this, the datasets are published to Watson Studio projects, where they are used to train ML models. You can develop models using Jupyter Notebook, IBM AutoAI (low-code), or IBM SPSS modeler (no-code).

For the purpose of this use case, we used logistic regression algorithm for classifying and predicting the probability of an event, such as disease risk management to assist doctors in making critical medical decisions. You can also build ML models using algorithms like Classification, Random Forest, and K-Nearest Neighbor. These are widely used to predict disease risk.

Once the models are trained, they are exposed as endpoints with Watson Machine Learning and integrated with the healthcare application to generate predictions by analyzing patient symptoms.

The healthcare applications are a type of clinical software that offer crucial physiological insights and predict the effects of illnesses and possible treatments. It provides built-in dashboards that display patient information together with the patient’s overall metrics for outcomes and treatments. This can help healthcare practitioners gain insights into patient conditions. It also can help medical institutions prioritize patients with more risk factors and curate clinical and behavioral health plans.

Finally, we are using IBM Security QRadar XDR SIEM to collect, process, and aggregate Amazon Virtual Private Cloud (Amazon VPC) flow logs, AWS CloudTrail logs, and IBM CP4D logs. QRadar XDR uses this information to manage security by providing real-time monitoring, alerts, and responses to threats.

Healthcare data lake

A healthcare data lake can help health organizations turn data into insights. It is centralized, curated, and securely stores data on Amazon S3. It also enables you to break down data silos and combine different types of analytics to gain insights. We are using the DataStage, Kinesis Data Firehose, and Amazon S3 services to build the healthcare data lake.

Data governance

Watson Knowledge Catalogue provides an ML catalogue for data discovery, cataloging, quality, and governance. We define policies in Watson Knowledge Catalogue to enable data privacy and overall access to and utilization of this data. This includes sensitive data and personal information that needs to be handled through data protection, quality, and automation rules. To learn more about IBM data governance, please refer to Running a data quality analysis (Watson Knowledge Catalogue).

Build, train, and deploy the ML model

Watson Studio empowers data scientists, developers, and analysts to build, run, and manage AI models on IBM CP4D.

In this solution, we are building models using Watson Studio by:

  1. Promoting the governed data from Watson Knowledge Catalogue to Watson Studio for insights
  2. Using ETL features, such as built-in search, automatic metadata propagation, and simultaneous highlighting, to process and transform large amounts of data
  3. Training the model, including model technique selection and application, hyperparameter setting and adjustment, validation, ensemble model development and testing; algorithm selection; and model optimization
  4. Evaluating the model based on metric evaluation, confusion matrix calculations, KPIs, model performance metrics, model quality measurements for accuracy and precision
  5. Deploying the model on Watson Machine Learning using online deployments, which create an endpoint to generate a score or prediction in real time
  6. Integrating the endpoint with applications like health applications, as demonstrated in Figure 1

Conclusion

In this blog, we demonstrated how to use patient data to improve health outcomes by creating a healthcare data lake and analyzing clinical data. This can help patients and healthcare practitioners make better, faster decisions and prioritize cases. We also discussed how to build an ML model using IBM Watson and integrate it with healthcare applications for health analysis.

Additional resources

Cloud Audit: Compliance + Automation

Post Syndicated from Aaron Wells original https://blog.rapid7.com/2022/12/14/cloud-audit-compliance-automation/

Setting your own standard

Cloud Audit: Compliance + Automation

Today’s regulatory environment is incredibly fractured and extensive. Depending on the industry—and the part of the world your business and/or security organization resides in—you may be subject to several regulatory compliance standards. Adding to the complexity, there is overlap among many of the standards, and they all require considerable resources to implement properly.

This can be a difficult endeavor, to say the least. That’s why many companies have dedicated compliance personnel to (as much as possible) push workloads and resources to adherence to cloud security standards. It’s important to build a plan to keep up with changing regulations and determine what exactly they mean for your environment.

From there, you can specify how to incorporate those changes and automate cloud posture management processes so you can act fast in the wake of an incident or breach. Deploying a cloud security posture management (CSPM) can ease the administrative burden associated with staying in compliance.

Complex compliance frameworks

There’s no reason to think your organization needs to go about all this compliance confusion on its own, even with skilled in-house personnel. There are regulations you’ll need to adhere to explicitly, but oftentimes regulatory bodies don’t offer a solution to track and enforce adherence to standards. It can be difficult to build that compliance framework from scratch.

That’s why it’s important to engage a CSPM tool that can be used to build in checks/compliance standards that align to one or more regulations—as noted above, it’s often a combination of many. It’s also likely you’ll want to supplement with additional checks not covered in the regulatory frameworks. A capable solution like InsightCloudSec can help you accomplish that.

For example, The European Union’s General Data Protection Regulation (GDPR) requires organizations to incorporate data protection by design, including default security features. To this point, InsightCloudSec can help to enforce security rules throughout the CI/CD build process to prevent misconfigurations from ever happening and govern IaC security.

A pre-configured solution can erase the complexity of setting up your own compliance framework and alert system, and help you keep up with the speed of this type of regulatory pace. The key is knowing if the solution you’re getting is up to date with the current standard in the location in which it’s required.

When choosing a solution, look for one that delivers out-of-the-box policies that hold cloud security to high standards, so your controls are tight and contain failsafes. For example, a standard like the Cloud Security Alliance Cloud Controls Matrix (CSA CCM) helps you create and fortify those checks so that your customers or users have confidence that you’re putting cloud security at the forefront. The InsightCloudSec CSA CCM compliance pack provides:  

  • Detailed guidance of security concepts across 13 domains—all of which follow Cloud Security Alliance best practices.
  • Alignment with many other security standards like PCI DSS, NIST, and NERC CIP.
  • Dozens of out-of-the-box policies that map back to specific directives within CSA CCM, all of which are available to use right away so you can remediate violations in real time.

A few questions to keep in mind when considering a solution that aligns to the above criteria:

  • Does the solution allow you to export and/or easily report on compliance data?
  • Does the solution offer the ability to customize frameworks or build custom policies?
  • Does the solution allow you to exempt certain resources from compliance requirements to minimize false positives?

Automating enforcement

Real-time visibility is the key to automating with confidence, which is a critical factor in staying compliant. Given the complexity of today’s hybrid and multi-cloud environments, keeping up with the sheer number of risk signals is nearly impossible without automation. Automation can help you safeguard customer data and avoid risk by catching misconfigurations before they go live and continuously auditing your environment.

As aptly noted in Rapid7’s Trust in the Cloud report, automation must be tuned to internal risk factors like trustworthiness of developers and engineers in day-to-day maintenance, trust in automation to set guardrails in your environments, and your organization’s ability to consistently and securely configure cloud environments. Continuous monitoring, enforcement, reporting—and, oh yeah, flexibility—are keys to success in  the automated-compliance game.

Automated cloud compliance with InsightCloudSec

It can be very easy for things to fall between the cracks when your team is attempting to both innovate and manually catch and investigate each alert. Implementing automation with a solution like InsightCloudSec, which offers more than 30 pre-built compliance packs available out-of-the-box, allows your teams to establish standards and policies around cloud access and resource configuration. By establishing a common definition of “good” and automating enforcement with your organizational standards, InsightCloudSec frees your teams to focus on eliminating risk in your cloud environments.

Get started now with the 2022 edition of The Complete Cloud Security Buyer’s Guide from Rapid7. In this guide, you’ll learn more about tactics to help you make your case for more cloud security at your company. Plus, you’ll get a handy checklist to use when looking into a potential solution.

You can also read the previous entry in this blog series here.

More bots, more trees

Post Syndicated from Adam Martinetti original https://blog.cloudflare.com/more-bots-more-trees/

More bots, more trees

More bots, more trees

Once a year, we pull data from our Bot Fight Mode to determine the number of trees we can donate to our partners at One Tree Planted. It’s part of the commitment we made in 2019 to deter malicious bots online by redirecting them to a challenge page that requires them to perform computationally intensive, but meaningless tasks. While we use these tasks to drive up the bill for bot operators, we account for the carbon cost by planting trees.

This year when we pulled the numbers, we saw something exciting. While the number of bot detections has gone significantly up, the time bots spend in the Bot Fight Mode challenge page has gone way down. We’ve observed that bot operators are giving up quickly, and moving on to other, unprotected targets. Bot Fight Mode is getting smarter at detecting bots and more efficient at deterring bot operators, and that’s a win for Cloudflare and the environment.

What’s changed?

We’ve seen two changes this year in the Bot Fight Mode results. First, the time attackers spend in Bot Fight Mode challenges has reduced by 166%. Many bot operators are disconnecting almost immediately now from Cloudflare challenge pages. We expect this is because they’ve noticed the sharp cost increase associated with our CPU intensive challenge and given up. Even though we’re seeing individual bot operators give up quickly, Bot Fight Mode is busier than ever. We’re issuing six times more CPU intensive challenges per day compared to last year, thanks to a new detection system written using Cloudflare’s ruleset engine, detailed below.

How did we do this?

When Bot Fight Mode launched, we highlighted one of our core detection systems:

“Handwritten rules for simple bots that, however simple, get used day in, day out.”

Some of them are still very simple. We introduce new simple rules regularly when we detect new software libraries as they start to source a significant amount of traffic. However, we started to reach the limitations of this system. We knew there were sophisticated bots out there that we could identify easily, but they shared enough overlapping traits with good browser traffic that we couldn’t safely deploy new rules to block them safely without potentially impacting our customers’ good traffic as well.

To solve this problem, we built a new rules system written on the same highly performant Ruleset Engine that powers the new WAF, Transform Rules, and Cache Rules, rather than the old Gagarin heuristics engine that was fast but inflexible. This new framework gives us the flexibility we need to write highly complex rules to catch more elusive bots without the risk of interfering with legitimate traffic. The data gathered by these new detections are then labeled and used to train our Machine Learning engine, ensuring we will continue to catch these bots as their operators attempt to adapt.

What’s next?

We’ve heard from Bot Fight Mode customers that they need more flexibility. Website operators now expect a significant percentage of their legitimate traffic to come from automated sources, like service to service APIs. These customers are waiting to enable Bot Fight Mode until they can tell us what parts of their website it can run on safely. In 2023, we will give everyone the ability to write their own flexible Bot Fight Mode rules, so that every Cloudflare customer can join the fight against bots!

Update: Mangroves, Climate Change & economic development

More bots, more trees
Source: One Tree Planted

We’re also pleased to report the second tree planting project from our 2021 bot activity is now complete! Earlier this year, Cloudflare contributed 25,000 trees to a restoration project at Victoria Park in Nova Scotia.

For our second project, we donated 10,000 trees to a much larger restoration project on the eastern shoreline of Kumirmari island in the Sundarbans of West Bengal, India. In total, the project included more than 415,000 trees along 7.74 hectares of land in areas that have been degraded or deforested. The types of trees planted included Bain, Avicennia officianalis, Kalo Bain, and eight others.

The Sundarbans are located on the delta of the Ganges, Brahmaptura, and Meghna rivers on the Bay of Bengal, and are home to one of the world’s largest mangrove forests. The forest is not only a UNESCO World Heritage site, but also home to 260 bird species as well as a number of threatened species like the Bengal tiger, the estuarine crocodile, and Indian python. According to One Tree Planted, the Sundarbans are currently under threat from rising sea levels, increasing salinity in the water and soil, cyclonic storms, and flooding.

The Intergovernmental Panel on Climate Change (IPCC) has found that mangroves are critical to mitigating greenhouse gas (GHG) emissions and protecting coastal communities from extreme weather events caused by climate change. The Sundarbans mangrove forest is one of the world’s largest carbon sinks (an area that absorbs more carbon than it emits). One study suggested that coastal mangrove forests sequester carbon at a rate of two to four times that of a mature tropical or subtropical forest region.

One of the most exciting parts of this project was its focus on hiring and empowering local women. According to One Tree Planted, 75 percent of those involved in the project were women, including 85 women employed to monitor and manage the planting site over a five-month period. Participants also received training in the seed collection process with the goal of helping local residents lead mangrove planting from start to finish in the future.

More bots stopped, more trees planted!

Thanks to every Cloudflare customer who’s enabled Bot Fight Mode so far. You’ve helped make the Internet a better place by stopping malicious bots, and you’ve helped make the planet a better place by reforesting the Earth on bot operators’ dime. The more domains that use Bot Fight Mode, the more trees we can plant, so sign up for Cloudflare and activate Bot Fight Mode today!

How we’re making Cloudflare’s infrastructure more sustainable

Post Syndicated from Rebecca Weekly original https://blog.cloudflare.com/extending-the-life-of-hardware/

How we’re making Cloudflare’s infrastructure more sustainable

How we’re making Cloudflare’s infrastructure more sustainable

Whether you are building a global network or buying groceries, some rules of sustainable living remain the same: be thoughtful about what you get, make the most out of what you have, and try to upcycle your waste rather than throwing it away. These rules are central to Cloudflare — we take helping build a better Internet seriously, and we define this as not just having the most secure, reliable, and performant network — but also the most sustainable one.

With incredible growth of the Internet, and the increased usage of Cloudflare’s network, even linear improvements to sustainability in our hardware today will result in exponential gains in the future. We want to use this post to outline how we think about the sustainability impact of the hardware in our network, and what we’re doing to continually mitigate that impact.

Sustainability in the realm of servers

The total carbon footprint of a server is approximately 6 tons of Carbon Dioxide equivalent (CO2eq) when used in the US. There are four parts to the carbon footprint of any computing device:

  1. The embodied emissions: source materials and production
  2. Packing and shipping
  3. Use of the product
  4. End of life.

The emissions from the actual operations and use of a server account for the vast majority of the total life-cycle impact. The secondary impact is embodied emissions (which is the carbon footprint from the creation of the device in the first place), which is about 10% overall.

Use of Product Emissions

It’s difficult to reduce the total emissions for the operation of servers. If there’s a workload that needs computing power, the server will complete the workload and use the energy required to complete it. What we can do, however, is consistently seek to improve the amount of computing output per kilo of CO2 emissions — and the way we do that is to consistently upgrade our hardware to the most power-efficient designs. As we switch from one generation of server to the next, we often see very large increases in computing output, at the same level of power consumption. In this regard, given energy is a large cost for our business, our incentives of reducing our environmental impact are naturally aligned to our business model.

Embodied Emissions

The other large category of emissions — the embodied emissions — are a domain where we actually have a lot more control than the use of the product. Reminder from before: the embodied carbon means the sources of emissions generated outside of equipments’ operation. How can we reduce the embodied emissions involved in running a fleet of servers? Turns out, there are a few ways: modular design, relying on open vs proprietary standards to enable reuse, and recycling.

Modular Design

The first big opportunity is through modular system design. Modular systems are a great way of reducing embodied carbon, as they result in fewer new components and allow for parts that don’t have efficiency upgrades to be leveraged longer. Modular server design is essentially decomposing functions of the motherboard onto sub-boards so that the server owner can selectively upgrade the components that are required for their use cases.

How much of an impact can modular design have? Well, if 30% of the server is delivering meaningful efficiency gains (usually CPU and memory, sometimes I/O), we may really need to upgrade those in order to meet efficiency goals, but creating an additional 70% overhead in embodied carbon (i.e. the rest of the server, which often is made up of components that do not get more efficient) is not logical. Modular design allows us to upgrade the components that will improve the operational efficiency of our data centers, but amortize carbon in the “glue logic” components over the longer time periods for which they can continue to function.

Previously, many systems providers drove ridiculous and useless changes in the peripherals (custom I/Os, outputs that may not be needed for a specific use case such as VGA for crash carts we might not use given remote operations, etc.), which would force a new motherboard design for every new CPU socket design. By standardizing those interfaces across vendors, we can now only source the components we need, and reuse a larger percentage of systems ourselves. This trend also helps with reliability (sub-boards are more well tested), and supply assurance (since standardized subcomponent boards can be sourced from more vendors), something all of us in the industry have had top-of-mind given global supply challenges of the past few years.

Standards-based Hardware to Encourage Re-use

But even with modularity, components need to go somewhere after they’ve been deprecated — and historically, this place has been a landfill. There is demand for second-hand servers, but many have been parts of closed systems with proprietary firmware and BIOS, so repurposing them has been costly or impossible to integrate into new systems. The economics of a circular economy are such that service fees for closed firmware and BIOS support as well as proprietary interconnects or ones that are not standardized can make reuse prohibitively expensive. How do you solve this? Well, if servers can be supported using open source firmware and BIOS, you dramatically reduce the cost of reusing the parts — so that another provider can support the new customer.

Recycling

Beyond that, though, there are parts failures, or parts that are simply no longer economical to be run, even in the second hand market. Metal recycling can always be done, and some manufacturers are starting to invest in programs there, although the energy investment for extracting the usable elements sometimes doesn’t make sense. There is innovation in this domain, Zhan, et al. (2020) developed an environmentally friendly and efficient hydrothermal-buffering technique for the recycling of GaAs-based ICs, achieving gallium and arsenic recovery rates of 99.9 and 95.5% respectively. Adoption is still limited — most manufacturers are discussing water recycling and renewable energy vs. full-fledged recycling of metals — but we’re closely monitoring the space to take advantage of any further innovation that happens.

What Cloudflare is Doing To Reduce Our Server Impact

It is great to talk about these concepts, but we are doing this work today. I’d describe them as being under two main banners: taking steps to reduce embodied emissions through modular and open standards design, and also using the most power-efficient solutions for our workloads.

Gen 12: Walking the Talk

Our next generation of servers, Gen 12, will be coming soon. We’re emphasizing modular-driven design, as well as a focus on open standards, to enable reuse of the components inside the servers.

A modular-driven design

Historically, every generation of server here at Cloudflare has required a massive redesign. An upgrade to a new CPU required a new motherboard, power supply, chassis, memory DIMMs, and BMC. This, in turn, might mean new fans, storage, network cards, and even cables. However, many of these components are not changing drastically from generation to generation: these components are built using older manufacturing processes, and leverage interconnection protocols that do not require the latest speeds.

To help illustrate this, let’s look at our Gen 11 server today: a single socket server is ~450W of power, with the CPU and associated memory taking about 320W of that (potentially 360W at peak load). All the other components on that system (mentioned above) are ~100W of operational power (mostly dominated by fans, which is why so many companies are exploring alternative cooling designs), so they are not where the optimization efforts or newer ICs will greatly improve the system’s efficiency. So, instead of rebuilding all those pieces from scratch for every new server and generating that much more embodied carbon, we are reusing them as often as possible.

By disaggregating components that require changes for efficiency reasons from other system-level functions (storage, fans, BMCs, programmable logic devices, etc.), we are able to maximize reuse of electronic components across generations. Building systems modularly like this significantly reduces our embodied carbon footprint over time. Consider how much waste would be eliminated if you were able to upgrade your car’s engine to improve its efficiency without changing the rest of the parts that are working well, like the frame, seats, and windows. That’s what modular design is enabling in data centers like ours across the world.

A Push for Open Standards, Too

We, as an industry, have to work together to accelerate interoperability across interfaces, standards, and vendors if we want to achieve true modularity and our goal of a 70% reduction in e-waste. We have begun this effort by leveraging standard add-in-card form factors (OCP 2.0 and 3.0 NICs, Datacenter Secure Control Module for our security and management modules, etc.) and our next server design is leveraging Datacenter Modular Hardware System, an open-source design specification that allows for modular subcomponents to be connected across common buses (regardless of the system manufacturer). This technique allows us to maintain these components over multiple generations without having to incur more carbon debt on parts that don’t change as often as CPUs and memory.

In order to enable a more comprehensive circular economy, Cloudflare has made extensive and increasing use of open-source solutions, like OpenBMC, a requirement for all of our vendors, and we work to ensure fixes are upstreamed to the community. Open system firmware allows for greater security through auditability, but the most important factor for sustainability is that a new party can assume responsibility and support for that server, which allows systems that might otherwise have to be destroyed to be reused. This ensures that (other than data-bearing assets, which are destroyed based on our security policy) 99% of hardware used by Cloudflare is repurposed, reducing the number of new servers that need to be built to fulfill global capacity demand. Further details about the specifics of how that happens – and how you can join our vision of reducing e-waste – you can find in this blog post.

Using the most power-efficient solutions for our workloads

The other big way we can push for sustainability (in our hardware) while responding to our exponential increase in demand without wastefully throwing more servers at the problem is simple in concept, and difficult in practice: testing and deploying more power-efficient architectures and tuning them for our workloads. This means not only evaluating the efficiency of our next generation of servers and networking gear, but also reducing hardware and energy waste in our fleet.

Currently, in production, we see that Gen 11 servers can handle about 25% more requests than Gen 10 servers for the same amount of energy. This is about what we expected when we were testing in mid-2021, and is exciting to see given that we continue to launch new products and services we couldn’t test at that time.

System power efficiency is not as simple a concept as it used to be for us. Historically, the key metric for assessing efficiency has been requests per second per watt. This metric allowed for multi-generational performance comparisons when qualifying new generations of servers, but it was really designed with our historical core product suite in mind.

We want – and, as a matter of scaling, require – our global network to be an increasingly intelligent threat detection mechanism, and also a highly performant development platform for our customers. As anyone who’s looked at a benchmark when shopping for a new computer knows, fast performance in one domain (traditional benchmarks such as SpecInt_Rate, STREAM, etc.) does not necessarily mean fast performance in another (e.g. AI inference, video processing, bulk object storage). The validation testing process for our next generation of server needs to take all of these workloads and their relative prevalence into account — not just requests. The deep partnership between hardware and software that Cloudflare can have is enabling optimization opportunities that other companies running third party code cannot pursue. I often say this is one of our superpowers, and this is the opportunity that makes me most excited about my job every day.

The other way we can be both sustainable and efficient is by leveraging domain-specific accelerators. Accelerators are a wide field, and we’ve seen incredible opportunities with application-level ones (see our recent announcement on AV1 hardware acceleration for Cloudflare Stream) as well as infrastructure accelerators (sometimes referred to as Smart NICs). That said, adding new silicon to our fleet is only adding to the problem if it isn’t as efficient as the thing it’s replacing, and a node-level performance analysis often misses the complexity of deployment in a fleet as distributed as ours, so we’re moving quickly but cautiously.

Moving Forward: Industry Standard Reporting

We’re pushing by ourselves as hard as we can, but there are certain areas where the industry as a whole needs to step up.

In particular: there is a woeful lack of standards about emissions reporting for server component manufacturing and operation, so we are engaging with standards bodies like the Open Compute Project to help define sustainability metrics for the industry at large. This post explains how we are increasing our efficiency and decreasing our carbon footprint generationally, but there should be a clear methodology that we can use to ensure that you know what kind of businesses you are supporting.

The Greenhouse Gas (GHG) Protocol initiative is doing a great job developing internationally accepted GHG accounting and reporting standards for business and to promote their broad adoption. They define scope 1 emissions to be the “direct carbon accounting of a reporting company’s operations” which is somewhat easy to calculate, and quantify scope 3 emissions as “the indirect value chain emissions.” To have standardized metrics across the entire life cycle of generating equipment, we need the carbon footprint of the subcomponents’ manufacturing process, supply chains, transportation, and even the construction methods used in building our data centers.

Ensuring embodied carbon is measured consistently across vendors is a necessity for building industry-standard, defensible metrics.

Helping to build a better, greener, Internet

The carbon impact of the cloud has a meaningful impact on the Earth–by some accounts, the ICT footprint will be 21% of global energy demand by 2030. We’re absolutely committed to keeping Cloudflare’s footprint on the planet as small as possible. If you’ve made it this far through, and you’re interested in contributing to building the most global, efficient, and sustainable network on the Internet — the Hardware Systems Engineering team is hiring. Come join us.

How we redesigned our offices to be more sustainable

Post Syndicated from Caroline Quick original https://blog.cloudflare.com/sustainable-office-design/

How we redesigned our offices to be more sustainable

How we redesigned our offices to be more sustainable

At Cloudflare, we are working hard to ensure that we are making a positive impact on the surrounding environment, with the goal of building the most sustainable network. At the same time, we want to make sure that the positive changes that we are making are also something that our local Cloudflare team members can touch and feel, and know that in each of our actions we are having a positive impact on the environment around us. This is why we make sustainability one of the underlying goals of the design, construction, and operations of our global office spaces.

To make this type of pervasive change we have focused our efforts in three main areas: working with sustainable construction materials, efficient operations, and renewable energy purchasing (using clean sources like sunlight and wind). We believe that sustainable design goes far beyond just purchasing recycled and regenerative products. If you don’t operate your space with efficiency and renewables in mind, we haven’t fully accounted for all of our environmental impact.

Sustainability in office design & construction

How we redesigned our offices to be more sustainable
“The Retreat” in the San Francisco Cloudflare office, featuring preserved moss and live plants‌‌

Since 2020, we have been redefining how our teams work together, and how work takes place in physical spaces. You may have read last year about how we are thinking about the future of work at Cloudflare – and the experimentation that we are doing within our physical environments. Sustainable and healthy spaces are a major element to this concept.

We are excited to highlight a few of the different products and concepts that are currently being used in the development of our workplaces – both new locations and in the reimagination of our existing spaces. While experimenting with the way that our teams work together in person, we also consider our new and updated spaces a sort of sustainability learning lab. As we get more and more data on these different systems, we plan to expand these concepts to other global locations as we continue to think through the future of the in-office experience at Cloudflare.

How we redesigned our offices to be more sustainable
An example of sustainable acoustic baffles as seen in our San Francisco office

Baffling baffles, fishing nets and more

It’s our goal to have the products, furniture, and systems that make up our offices be sustainable in a way that is pleasantly (and surprisingly) pervasive. Their materials, construction, and transportation should have either a minimal, or regenerative, impact on the environment or the waste stream while also meeting high performance standards. A great example of this is the acoustic sound baffling used in our recent San Francisco and London redesign and currently being installed at our newest office, which is under construction.

If you’ve ever worked in an open office, you know that effective sound management is critical, regardless of if the space is for collaborative or focus work. In order to help with this challenge, we use a substantial number of acoustic baffles to help significantly reduce sound transfer. Traditionally, baffles are made out of tightly woven synthetic fibers. Unfortunately, a majority of baffles on the market today generate new plastic in the waste stream.

We chose to move away from traditional baffles by installing FilaSorb acoustic baffles by AcouFelt. The fibers in FilaSorb are made from post-consumer plastic beverage bottles diverted from landfills. Every square foot of our FilaSorb felt contains the regenerated fibers made from over 10, 20oz recycled bottles. Each panel has a useful life of over twenty years, and at the end of its life the panel can be recycled again.

The International Institute of Living Futures has certified that this product is acceptable for the Living Building Challenge, which is the most rigorous regenerative building standard in the world.

Similarly to FilaSorb, we also installed BAUX Acoustic Wood Wool paneling to provide additional sound dampening and a vibrant acoustic wall treatment. Designed using a process that focuses on recarbonation, BAUX Wood Wool panels absorb over 6.9 kg per meter squared of carbon dioxide. That’s a little over 70% of the total measured CO2 released during the entire manufacturing life cycle of the panel. Beyond their acoustic benefits, Wood Wool panels resist heat and are ideal insulators. This enables us to use less energy in heating and cooling to maintain a stable temperature in fluctuating weather.

How we redesigned our offices to be more sustainable
Interface’s Net Effect Carpet Collection uses discarded fishing nets in their construction

Flooring is also a significant focus of our design team. We wanted to find a high wearing material that had brilliant color that also had strong regenerative properties across the full manufacturing lifecycle. We were very fortunate to have found Interface’s Net Effect Collection. Interface is one of the few fully certified carbon-neutral flooring materials providers.

Their Net Effect collection is made with 100% recycled content nylon, including postconsumer nylon from discarded fishing nets gathered through their Net-Works® partnership. Net-Works provides a source of income for small fishing villages in the Philippines while cleaning up their beaches and waters. The collected nets are sold to Aquafil, who, in turn, converts them into yarn for Interface carpet tile.

Furniture in landfills? Oh, my!

One shocking stat specifically has stood out to our team over the past two and half years as we have been rethinking our office spaces. 8.5 million tons of office furniture ends up in the landfill per year. That number was before the global pandemic completely redefined how companies think about their real estate footprints and shuttered a massive amount of office space in the United States. Major US cities like San Francisco and New York City still have commercial office vacancy rates upwards of 30% at the time of publishing. To do our part to keep furniture out of landfills, we are ensuring that we are reusing (and in some cases completely repurposing) our existing furniture portfolio as much as possible in every one of our projects.

We have taken it a step further to include our employees working from home. We commonly lend out office chairs and other unused office furniture to home office workers so that they don’t have to purchase new office furniture.

Sustainability in Office Operations

How we redesigned our offices to be more sustainable
Rainwater harvesting system at our San Francisco office

We haven’t just been thinking about how our construction materials can have a more positive impact on the environment. We’ve also been incredibly focused on trialing a number of different sustainable operations concepts within our spaces.

For instance, we have installed a 500 gallon rainwater harvesting system above our outdoor bike storage in our San Francisco office, designed to support our internal gray water needs. We understand the importance of natural light and plants within our spaces to help encourage the health and wellbeing of our teammates, thus we have a vast amount of plants in our San Francisco office. While we chose our plants for their low water consumption, they still require water. Our rain water capture system provides the water for all of our plants.

Additionally, we are focused on cultural changes amongst our staff to reduce our waste streams (which was no small feat amongst our die-hard LaCroix fans!). We have adopted Bevi sparkling and flavored water dispensing machines alongside traditional soda fountains to fully remove bottled water from our facilities. We also shifted to bulk snacks to further reduce the packaging entering recycling centers and landfills.

How we redesigned our offices to be more sustainable

Renewable energy purchasing

Our San Francisco office is also giving us direct on the ground exposure to the complexities of renewable power sourcing in a shared grid environment. In order to guarantee we are using all renewable energy, we purchase our power through Pacific Gas and Electric’s Supergreen Service. But we don’t just stop there. To ensure that our energy usage is totally based on renewable power, we take our efforts a step further and separately purchase renewable energy as if we didn’t already have sustainable power.

Coming soon: bees!

How we redesigned our offices to be more sustainable

We are just getting started on our sustainability journey at Cloudflare. Over the next few years, we will continue to design, develop, and deploy a variety of different solutions to help make our offices as regenerative as possible. To leave you with a taste of where we are headed in 2023, I am excited to introduce you to a project that we are all very excited about: EntroBees. As you have likely heard, the global bee population has dropped dramatically, and a quarter of the bee species are at risk of extinction. We want to do our part to help encourage bees to thrive in urban environments.

Slated for installation at one of our global office locations, EntroBees will be fully managed onsite honey bee colonies. These colonies will provide a much-needed habitat for urban bees, produce honey for our local employees, and also serve as an additional source of entropy for our LavaRand system that provides the source of randomness for Cloudflare’s entire encryption system.

Historical emissions offsets (and Scope 3 sneak preview)

Post Syndicated from Patrick Day original https://blog.cloudflare.com/historical-emissions-offsets-and-scope-3-sneak-preview/

Historical emissions offsets (and Scope 3 sneak preview)

Historical emissions offsets (and Scope 3 sneak preview)

In July 2021, Cloudflare committed to removing or offsetting the historical emissions associated with powering our network by 2025. Earlier this year, after a comprehensive analysis of our records, we determined that our network has emitted approximately 31,284 metric tons (MTs) of carbon dioxide equivalent (CO2e) since our founding.

Today, we are excited to announce our first step toward offsetting our historical emissions by investing in 6,060 MTs’ worth of reforestation carbon offsets as part of the Pacajai Reduction of Emissions from Deforestation and forest Degradation (REDD+) Project in the State of Para, Brazil.

Generally, REDD+ projects attempt to create financial value for carbon stored in forests by using market approaches to compensate landowners for not clearing or degrading forests. From 2007 to 2016, approximately 13% of global carbon emissions from anthropogenic sources were the result of land use change, including deforestation and forest degradation. REDD+ projects are considered a low-cost policy mechanism to reduce emissions and promote co-benefits of reducing deforestation, including biodiversity conservation, sustainable management of forests, and conservation of existing carbon stocks. REDD projects were first recognized as part of the 11th Conference of the Parties (COP) of the United Nations Framework Convention on Climate Change in 2005, and REDD+ was further developed into a broad policy initiative and incorporated in Article 5 of the Paris Agreement.

The Pacajai Project is a Verra verified REDD+ project designed to stop deforestation and preserve local ecosystems. Specifically, to implement sustainable forest management and support socioeconomic development of riverine communities in Para, which is located in Northern Brazil near the Amazon River. The goal of the project is to train village families in land use stewardship to protect the rainforest, as well as agroforestry techniques that will help farmers transition to crops with smaller footprints to reduce the need to burn and clear large sections of adjacent forest.

If you follow sustainability initiatives at Cloudflare, including on this blog, you may know that we have also committed to purchasing renewable energy to account for our annual energy consumption. So how do all of these commitments and projects fit together? What is the difference between renewable energy (credits) and carbon offsets? Why did we choose offsets for our historical emissions? Great questions; here is a quick recap.

Cloudflare sustainability commitments

Last year, Cloudflare announced two sustainability commitments. First we committed to powering our operations with 100% renewable energy. Meaning, each year we will purchase the same amount of zero emissions energy (wind, solar, etc.) as we consume in all of our data centers and facilities around the world. Matching our energy consumption annually with renewable energy purchases ensures that under carbon accounting standards like the Greenhouse Gas Protocol (GHG), Cloudflare’s annual net emissions (or “market-based emissions”) from purchased electricity will be zero. This is important because it accounts for about 99.9% of Cloudflare’s 2021 emissions.

Renewable energy purchases help make sure Cloudflare accounts for its emissions from purchased electricity moving forward; however, it does not address emissions we generated prior to our first renewable energy purchase in 2018 (what we are calling “historical emissions”).

To that end, our second commitment was to “remove or offset all of our historical emissions resulting from powering our network by 2025.” For this initiative, we purposefully chose to use carbon removals or offsets, like the Pacajai REDD+ Project, rather than more renewable energy purchases (also called renewable energy credits, renewable energy certificates, or RECs).

Renewable energy vs. offsets and removals

Renewable energy certificates (RECs) and carbon offsets are both used by organizations to help mitigate their emissions footprint, but they are fundamentally different instruments.

Renewable energy certificates are created by renewable energy generators, like wind and solar farms, and represent a unit (e.g. 1 megawatt-hour) of low or zero emissions energy delivered to a local power grid. Individuals, organizations, and governments are able to purchase those units of energy, and legally claim their environmental benefits, even if the actual power they consume is from the standard electrical grid.

Historical emissions offsets (and Scope 3 sneak preview)
Source: U.S. Environmental Protection Agency, Offsets and RECs: What’s the Difference?

A carbon offset, according to the World Resources Institute (WRI), is “a unit of carbon dioxide-equivalent (CO2e) that is reduced, avoided, or sequestered.” Offsets can include a wide variety of projects, including reforestation, procurement of more efficient cookstoves in developing nations, avoidance of methane from municipal solid waste sites, and purchasing electric and hybrid vehicles for public transportation.

Carbon removals are a type of carbon offsets that involve actual removal of an amount of carbon from the atmosphere. According to WRI, carbon removal projects include “natural strategies like tree restoration and agricultural soil management; high-tech strategies like direct air capture and enhanced mineralization; and hybrid strategies like enhanced root crops, bioenergy with carbon capture and storage, and ocean-based carbon removal.”

As the climate crisis accelerates, carbon removals are an increasingly important part of global net zero efforts. For example, a recent analysis by the U.S. National Academy of Sciences and the Intergovernmental Panel on Climate Change (IPCC) found that even with rapid investment in emissions reductions (like increasing renewable energy supply), the United States must remove 2 gigatons of CO2 per year by midcentury to reach net zero.

Historical emissions offsets (and Scope 3 sneak preview)
Source: World Resources Institute, Carbon Removal

RECs, offsets, and removals are all important tools for individuals, organizations, and governments to help lower their emissions footprint, and each has a specific purpose. As the U.S. Environmental Protection Agency puts it, “think of offsets and RECs as two tools in your sustainability tool box — like a hammer and a saw.” For example, RECs can only be used to account for emissions from an organization’s purchased electricity (Scope 2 emissions). Whereas offsets can be used to account for emissions from combustion engines and other direct emissions (Scope 1), purchased electricity (Scope 2), or carbon emitted by others, including supply chain and logistics emissions (Scope 3). In addition, some sustainability initiatives, like the Science Based Targets Initiative (SBTi) Net-Zero Standard, require the use of removals rather than other types of offsets.

Why did Cloudflare choose offsets or removals to account for its historical emissions?

We decided on a combination of offsets and removals for two reasons. The first reason is technical and relates to RECs and vintage years. Every REC produced by a renewable generator must include the date and time it was delivered to the local electrical grid. So, for example, RECs associated with renewable energy generation by a wind facility during the 2022 calendar year are considered 2022 vintage. Most green energy or renewable energy standards require organizations to purchase RECs from the same vintage year as the energy they are seeking to offset. Therefore, finding RECs to account for energy used by our network in 2012 or 2013 would be difficult, if not impossible, and purchasing current year RECs would be inconsistent with most standards.

The second reason we chose offsets and removals is that it gives us more flexibility to support different types of projects. As mentioned above, offset projects can be incredibly diverse and can be purchased all over the world. This gives Cloudflare the opportunity to support a variety of carbon reduction, avoidance, and sequestration projects that also contribute to other sustainable development goals like decent work and economic growth, gender equality and reduced inequalities, and life on land and below water.

How did we calculate historical emissions?

Once we decided how we planned to offset our historical emissions, we needed to determine how much to offset. Earlier this year our Infrastructure team led a comprehensive review of all historical asset records to create an annual picture of what hardware we deployed, the number of servers, the energy consumption of each model and configuration, and total energy consumption.

We also cross-checked our hardware deployment records with a review of all of our blog posts and other public statements documenting our network growth over the years. It was actually a pretty interesting exercise. Not only to see the cover art from some of our early blogs (our New Jersey data center announcement is a favorite), but more importantly to relive the amazing growth of our network, step by step, from three data centers in 2010 to more than 275 cities in over 100 countries! Pretty cool.

Finally, we converted those annual energy totals to emissions using a global average emissions factor from the International Energy Agency (IEA).

Energy (kWh) x Emissions Factor (gCO2e/kWh) = Carbon Emissions (gCO2e)

In total, we estimated that based on total power consumption, our network produced 31,284 MTs of CO2e prior to our first renewable energy purchase in 2018. We are proud to invest in offsets to mitigate the first 6,060 MTs this year; only 25,224 MTs to go.

Scope 3 emissions — sneak preview

Now that we have a firm understanding, reporting, and accounting for our current and past Scope 1 and Scope 2 emissions — we think it is time to focus on Scope 3.

Cloudflare published its first company-wide emissions inventory in 2020. Since then, we have focused our reporting and mitigating on our Scope 1 and Scope 2 emissions, as required under the GHG Protocol. However, although Scope 3 emissions reporting remains optional, we think it is an increasingly important part of all organizations’ responsibility to understand their total carbon footprint.

To that end, earlier this year we started a comprehensive internal assessment of all of our potential Scope 3 emissions sources. Like most things at Cloudflare we are starting with our network. Everything from embodied carbon in the hardware we buy, to shipping and logistics for moving our data center and server equipment around the world, to how we decommission and responsibly dispose of our assets.

Developing processes to quantify those emissions is one of our top objectives for 2023, and we plan to have more information to share soon. Stay tuned!

A more sustainable end-of-life for your legacy hardware appliances with Cloudflare and Iron Mountain

Post Syndicated from May Ma original https://blog.cloudflare.com/sustainable-end-of-life-hardware/

A more sustainable end-of-life for your legacy hardware appliances with Cloudflare and Iron Mountain

A more sustainable end-of-life for your legacy hardware appliances with Cloudflare and Iron Mountain

Today, as part of Cloudflare’s Impact Week, we’re excited to announce an opportunity for Cloudflare customers to make it easier to decommission and dispose of their used hardware appliances sustainably. We’re partnering with Iron Mountain to offer preferred pricing and discounts for Cloudflare customers that recycle or remarket legacy hardware through its service.

Replacing legacy hardware with Cloudflare’s network

Cloudflare’s products enable customers to replace legacy hardware appliances with our global network. Connecting to our network enables access to firewall (including WAF and Network Firewalls, Intrusion Detection Systems, etc), DDoS mitigation, VPN replacement, WAN optimization, and other networking and security functions that were traditionally delivered in physical hardware. These are served from our network and delivered as a service. This creates a myriad of benefits for customers including stronger security, better performance, lower operational overhead, and none of the headaches of traditional hardware like capacity planning, maintenance, or upgrade cycles. It’s also better for the Earth: our multi-tenant SaaS approach means more efficiency and a lower carbon footprint to deliver those functions.

But what happens with all that hardware you no longer need to maintain after switching to Cloudflare?

A more sustainable end-of-life for your legacy hardware appliances with Cloudflare and Iron Mountain

The life of a hardware box

The life of a hardware box begins on the factory line at the manufacturer. These are then packaged, shipped and installed at the destination infrastructure where they provide processing power to run front-end products or services, and routing network traffic. Occasionally, if the hardware fails to operate, or its performance declines over time, it will get fixed or will be returned for replacement under the warranty.

When none of these options work, the hardware box is considered end-of-life and it “dies”. This hardware must be decommissioned by being disconnected from the network, and then physically removed from the data center for disposal.

The useful lifespan of hardware depends on the availability of newer generations of processors which help realize critical efficiency improvements around cost, performance, and power. In general, the industry standard of hardware decommissioning timeline is between three and six years after installation. There are additional benefits to refreshing these physical assets at the lower end of the hardware lifespan spectrum, keeping your infrastructure at optimal performance.

In the instance where the hardware still works, but is replaced by newer technologies, it would be such a waste to discard this gear. Instead, there could be recoverable value in this outdated hardware. And simply tossing unwanted hardware into the trash indiscriminately, which will eventually become part of the landfill, causes devastating consequences as these electronic devices contain hazardous materials like lithium, palladium, lead, copper and cobalt or mercury, and those could contaminate the environment. Below, we explain sustainable alternatives and cost-beneficial practices one can pursue to dispose of your infrastructure hardware.

Option 1: Remarket / Reuse

For hardware that still works, the most sustainable route is to sanitize it of data, refurbish, and resell it in the second-hand market at a depreciated cost. Some IT asset disposition firms would also repurpose used hardware to maximize its market value. For example, harvesting components from a device to build part of another product and selling that at a higher price. For working parts that have very little resale value, companies can also consider reusing them to build a spare parts inventory for replacing failed parts later in the data centers.

The benefits of remarket and reuse are many. It helps maximize a hardware’s return of investment by including any reclaimed value at end-of-life stage, offering financial benefits to the business. And it reduces discarded electronics, or e-waste and their harmful efforts on our environment, helping socially responsible organizations build a more sustainable business. Lastly, it provides alternatives to individuals and organizations that cannot afford to buy new IT equipment.

Option 2: Recycle

For used hardware that is not able to be remarketed, it is recommended to engage an asset disposition firm to professionally strip it of any valuable and recyclable materials, such as precious metal and plastic, before putting it up for physical destruction. Similar to remarketing, recycling also reduces environmental impact, and cuts down the amount of raw materials needed to manufacture new products.

A key factor in hardware recycling is a secure chain of custody. Meaning, a supplier has the right certification, preferably its own fleet and secure facilities to properly and securely process the equipment.

Option 3: Destroy

From a sustainable point of view, this route should only be used as a last resort. When hardware does not operate as it is intended to, and has no remarketed nor recycled value, an asset disposition supplier would remove all the asset tags and information from it in preparation for a physical destruction. Depending on disposal policies, some companies would choose to sanitize and destroy all the data bearing hardware, such as SSD or HDD, for security reasons.

To further maximize recycling value and reduce e-waste, it is recommended to keep security policy up to date on discarded IT equipment and explore the option of reusing working devices after a professional data wiping as much as possible.

At Cloudflare, we follow an industry-standard capital depreciation timeline, which culminates in recycling actions through the engagement of IT asset disposition partners including Iron Mountain. Through these partnerships, besides data bearing hardware which follows the security policy to be sanitized and destroyed, approximately 99% of the rest decommissioned IT equipment from Cloudflare is sold or recycled.

Partnering with Iron Mountain to make sustainable goals more accessible

Hardware discomission can be a burden on a business, from operational strain to complex processes, a lack of streamlined execution to the risk of a data breach. Our experience shows that partnering with an established firm like Iron Mountain who is specialized in IT asset disposition would help kick-start one’s hardware recycling journey.

Iron Mountain has more than two decades of experience working with Hyperscale technology and data centers. A market leader in decommissioning, data security and remarketing capabilities. It has a wide footprint of facilities to support their customers’ sustainability goals globally.

Today, Iron Mountain has generated more than US$1.5 billion through value recovery and has been continually developing new ways to sell mass volumes of technology for their best use. Other than their end-to-end decommission offering, there are two additional value adding services that Iron Mountain provides to their customers that we find valuable. They offer a quarterly survey report which presents insights in the used market, and a sustainability report that measures the environmental impact based on total hardware processed with their customers.

Get started today

Get started today with Iron Mountain on your hardware recycling journey and sign up from here. After receiving the completed contact form, Iron Mountain will consult with you on the best solution possible. It has multiple programs to support including revenue share, fair market value, and guaranteed destruction with proper recycling. For example, when it comes to reselling used IT equipment, Iron Mountain would propose an appropriate revenue split, namely how much percentage of sold value will be shared with the customer, based on business needs. Iron Mountain’s secure chain of custody with added solutions such as redeployment, equipment retrieval programs, and onsite destruction can ensure it can tailor the solution that works best for your company’s security and environmental needs.

And in collaboration with Cloudflare, Iron Mountain offers additional two percent on your revenue share of the remarketed items and a five percent discount on the standard fees for other IT asset disposition services if you are new to Iron Mountain and choose to use these services via the link in this blog.

Independent report shows: moving to Cloudflare can cut your carbon footprint

Post Syndicated from Patrick Day original https://blog.cloudflare.com/independent-report-shows-moving-to-cloudflare-cuts-your-carbon-footprint/

Independent report shows: moving to Cloudflare can cut your carbon footprint

This post is also available in 简体中文, Français and Español.

Independent report shows: moving to Cloudflare can cut your carbon footprint

In July 2021, Cloudflare described that although we did not start out with the goal to reduce the Internet’s environmental impact, that has changed. Our mission is to help build a better Internet, and clearly a better Internet must be sustainable.

As we continue to hunt for efficiencies in every component of our network hardware, every piece of software we write, and every Internet protocol we support, we also want to understand in terms of Internet architecture how moving network security, performance, and reliability functions like those offered by Cloudflare from on-premise solutions to the cloud affects sustainability.

To that end, earlier this year we commissioned a study from the consulting firm Analysys Mason to evaluate the relative carbon efficiency of network functions like firewalls, WAF, SD-WAN, DDoS protection, content servers, and others that are provided through Cloudflare against similar on-premise solutions.

Although the full report will not be available until next year, we are pleased to share that according to initial findings:

Cloudflare Web Application Firewall (WAF) “generates up to around 90% less carbon than on-premises appliances at low-medium traffic demand.”

Needless to say, we are excited about the possibilities of these early findings, and look forward to the full report which early indications suggest will show more ways in which moving to Cloudflare will help reduce your infrastructure’s carbon footprint. However, like most things at Cloudflare, we see this as only the beginning.

Fixing the Internet’s energy/emissions problem

The Internet has a number of environmental impacts that need to be addressed, including raw material extraction, water consumption by data centers, and recycling and e-waste, among many others. But, none of those are more urgent than energy and emissions.

According to the United Nations, energy generation is the largest contributor to greenhouse gas emissions, responsible for approximately 35% of global emissions. If you think about all the power needed to run servers, routers, switches, data centers, and Internet exchanges around the world, it’s not surprising that the Boston Consulting Group found that 2% of all carbon output, about 1 billion metric tons per year, is attributable to the Internet.

Conceptually, reducing emissions from energy consumption is relatively straightforward — transition to zero emissions energy sources, and use energy more efficiently in order to speed that transition.  However, practically, applying those concepts to a geographically distributed, disparate networks and systems like the global Internet is infinitely more difficult.

To date, much has been written about improving efficiency or individual pieces of network hardware (like Cloudflare’s deployment of more efficient Arm CPUs) and the power usage efficiency or “PUE” of hyperscale data centers. However, we think there are significant efficiency gains to be made throughout all layers of the network stack, as well as the basic architecture of the Internet itself. We think this study is the first step in investigating those underexplored areas.

How is the study being conducted?

Because the final report is still being written, we’ll have more information about its methodology upon publication. But, here is what we know so far.

To estimate the relative carbon savings of moving enterprise network functions, like those offered by Cloudflare, to the cloud, the Analysys Mason team is evaluating a wide range of enterprise network functions. These include firewalls, WAF, SD-WAN, DDoS protection, and content servers. For each function they are modeling a variety of scenarios, including usage, different sizes and types of organizations, and different operating conditions.

Information relating to the power and capacity of each on-premise appliance is being sourced from public data sheets from relevant vendors. Information on Cloudflare’s energy consumption is being compiled from internal datasets of total power usage of Cloudflare servers, and the allocation of CPU resources and traffic between different products.

Final report — coming soon!

According to the Analysys Mason team, we should expect the final report sometime in early 2023. Until then, we do want to mention again that the initial WAF results described above may be subject to change as the project continues, and assumptions and methodology are refined. Regardless, we think these are exciting developments and look forward to sharing the full report soon!

Sign up for Cloudflare today!

Independent report shows: moving to Cloudflare can cut your carbon footprint

Security updates for Wednesday

Post Syndicated from original https://lwn.net/Articles/917839/

Security updates have been issued by Debian (pngcheck), Fedora (qemu), Mageia (admesh, busybox, emacs, libarchive, netkit-telnet, ruby, rxvt-unicode, and shadowutils), Oracle (bcel and kernel), Red Hat (389-ds-base, bcel, dbus, firefox, grub2, kernel, kernel-rt, kpatch-patch, thunderbird, and usbguard), Scientific Linux (bcel), SUSE (containerd, firefox, grafana, java-1_8_0-openjdk, libtpms, net-snmp, and wireshark), and Ubuntu (pillow).

Everything Open call for proposals

Post Syndicated from original https://lwn.net/Articles/917792/

Everything Open is,
seemingly, the future form of the conference once known as linux.conf.au;
see this
page
for a discussion of the reasoning behind the change. The
inaugural event will be held March 14 to 16 in Melbourne,
Australia, and the call for
proposals
has gone out now, with a deadline of January 15.
“Our aim is to create a deeply technical conference where we bring
together industry leaders and experts on a wide range of subjects.
”

The collective thoughts of the interwebz