Post Syndicated from Bruce Schneier original https://www.schneier.com/blog/archives/2026/05/smart-glasses-for-the-authorities.html
ICE is developing its own version of smart glasses, with facial recognition tied to various databases.
Post Syndicated from Bruce Schneier original https://www.schneier.com/blog/archives/2026/05/smart-glasses-for-the-authorities.html
ICE is developing its own version of smart glasses, with facial recognition tied to various databases.
Post Syndicated from The Atlantic original https://www.youtube.com/watch?v=rw0vgBrMGd8
Post Syndicated from corbet original https://lwn.net/Articles/1071568/
The
7.0.4,
6.18.27, and
6.12.86
stable kernels have been released; each contains another set of important
fixes.
Post Syndicated from Grab Tech original https://engineering.grab.com/enchancing-flink-shadow-testing
Ensuring the reliability of Apache Flink deployments in Grab is crucial for the availability of our business-critical, real-time applications. While all applications are tested in a staging environment before getting promoted to the production environment, there is still a class of issues that can only surface when deploying in the production environment, e.g.:
When an application faces such issues upon deployment in production, our in-house deployment system automatically rolls it back after 10 minutes of observation, leading to a downtime of the application for about the same duration.
In this article, we will describe how Grab’s data streaming team (Coban) has enriched the traditional deployment pipeline for Flink applications with a Shadow Testing stage that eliminates this downtime during deployment failures, enhancing the availability of our Flink applications during this critical moment of their lifecycle.
Shadow Testing is a testing technique whereby a new version of an application (Shadow) is deployed in parallel with the current version of the application (Main), but without impacting it. It involves replicating production data to the new version of the application and comparing its behavior with the current version of the application to identify potential issues and regressions.
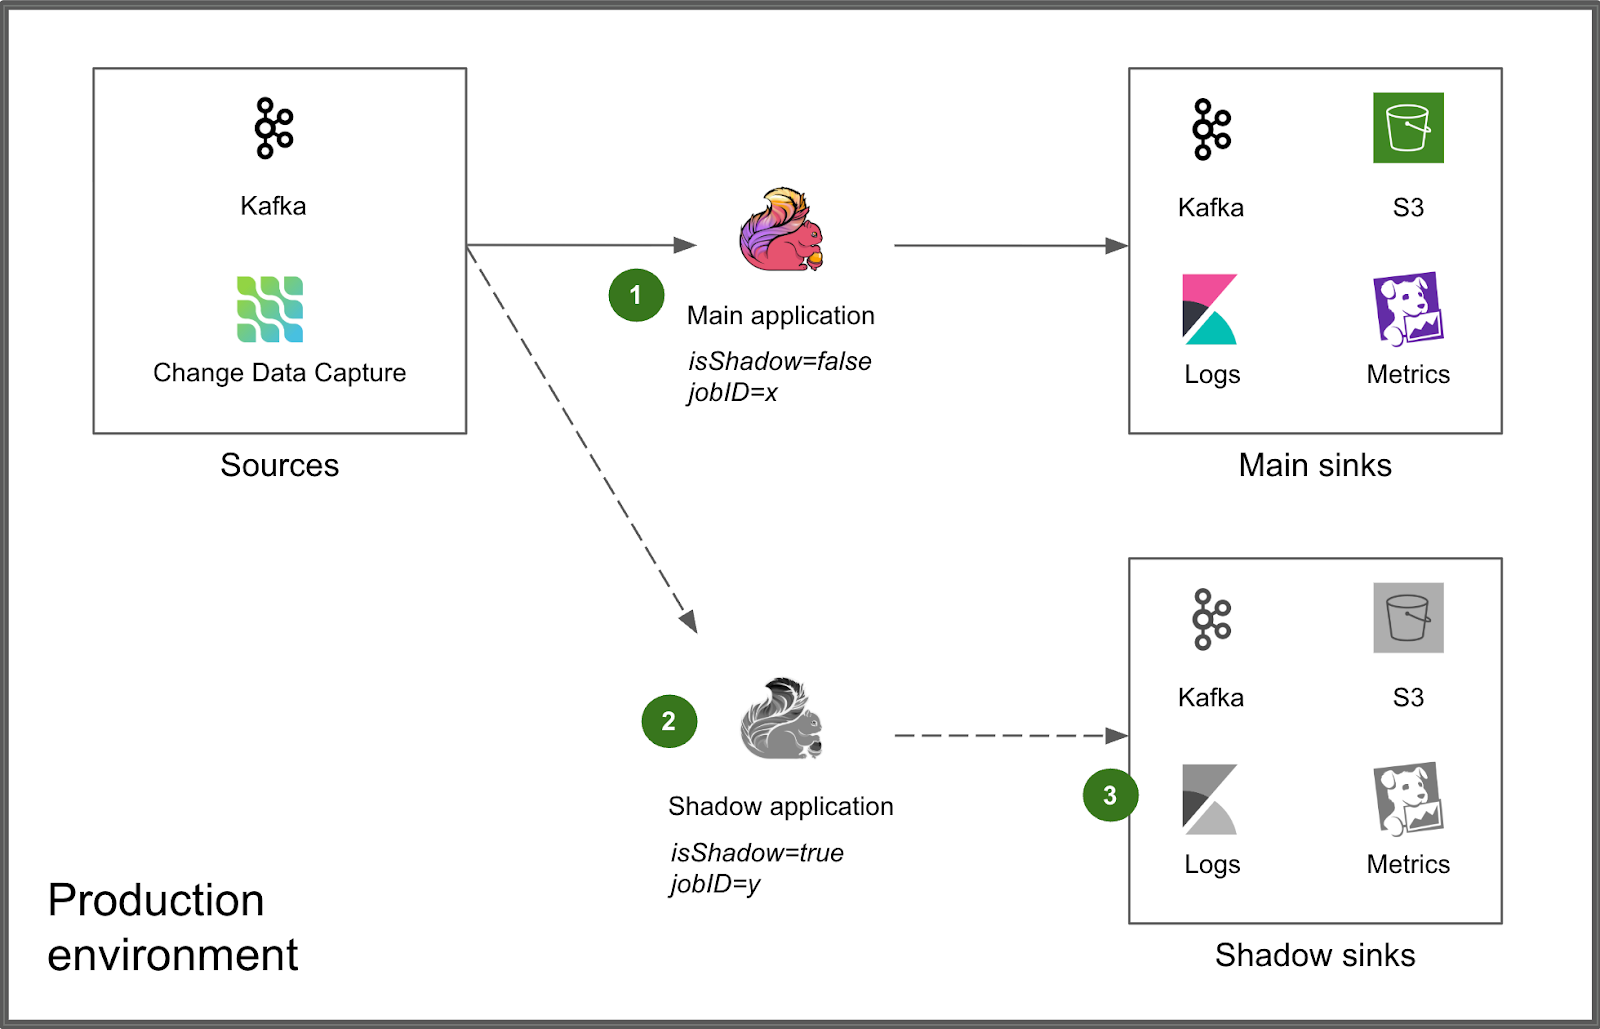
We integrated Shadow Testing directly into the production environment, alongside the Main application (1). The Shadow application is deployed next to it via the same deployment process (2). An environment variable isShadow=true as well as a distinct jobID are injected for runtime differentiation, enabling the Shadow application to produce its results to distinct, isolated sinks that do not interfere with those of the Main application (3).
Shadow Testing is embedded within our normal Flink deployment pipeline to make it a seamless experience for the users of our platform.
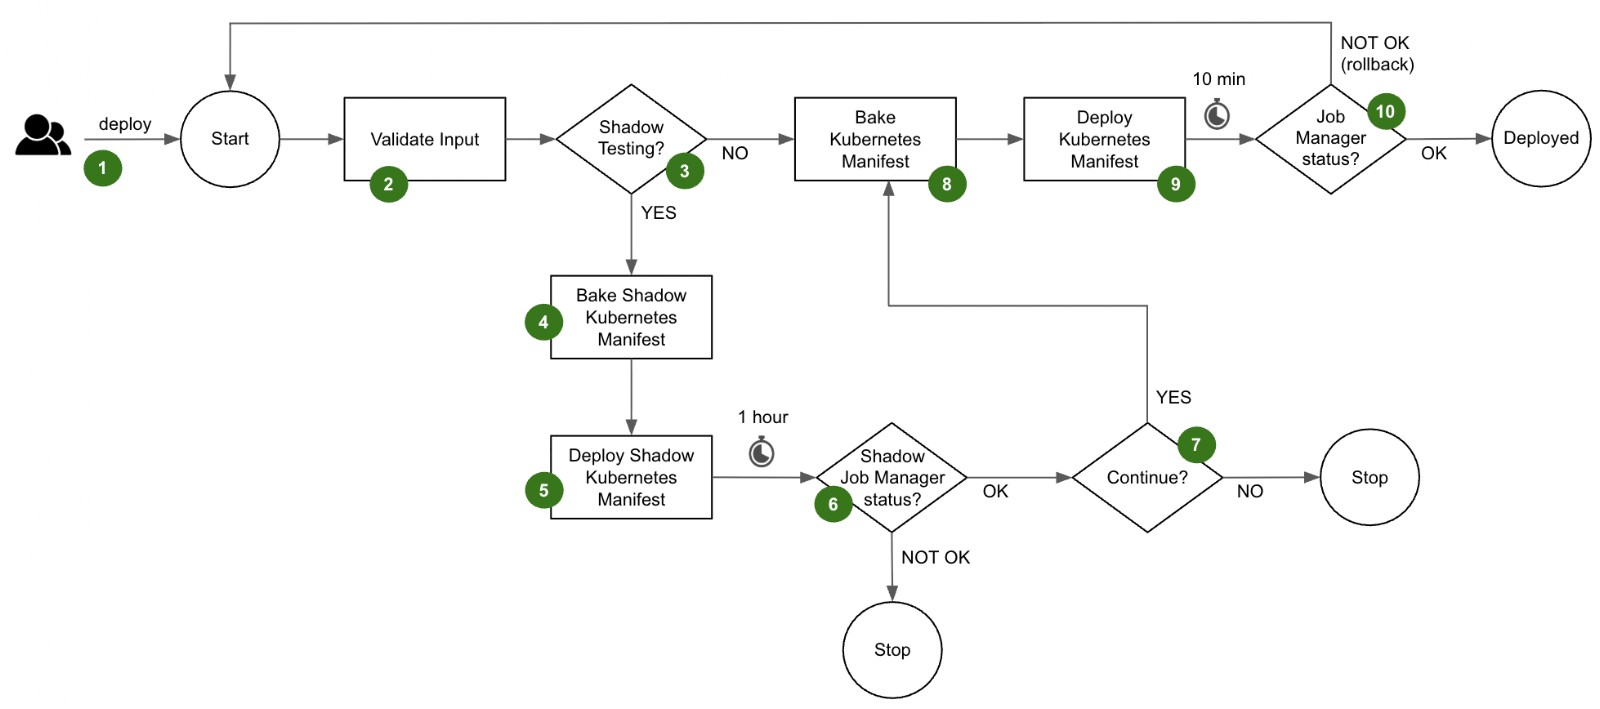
The deployment flow is as follows.
isShadow is injected and set to true. It instructs the Shadow application to produce its results to the shadow sinks.isShadow is set to false.During the deployment, the user can leverage our standard observability stack to monitor the behavior of the Shadow application. For example, in the case of an Apache Kafka sink, they can compare the number of messages produced by the Main and Shadow applications.
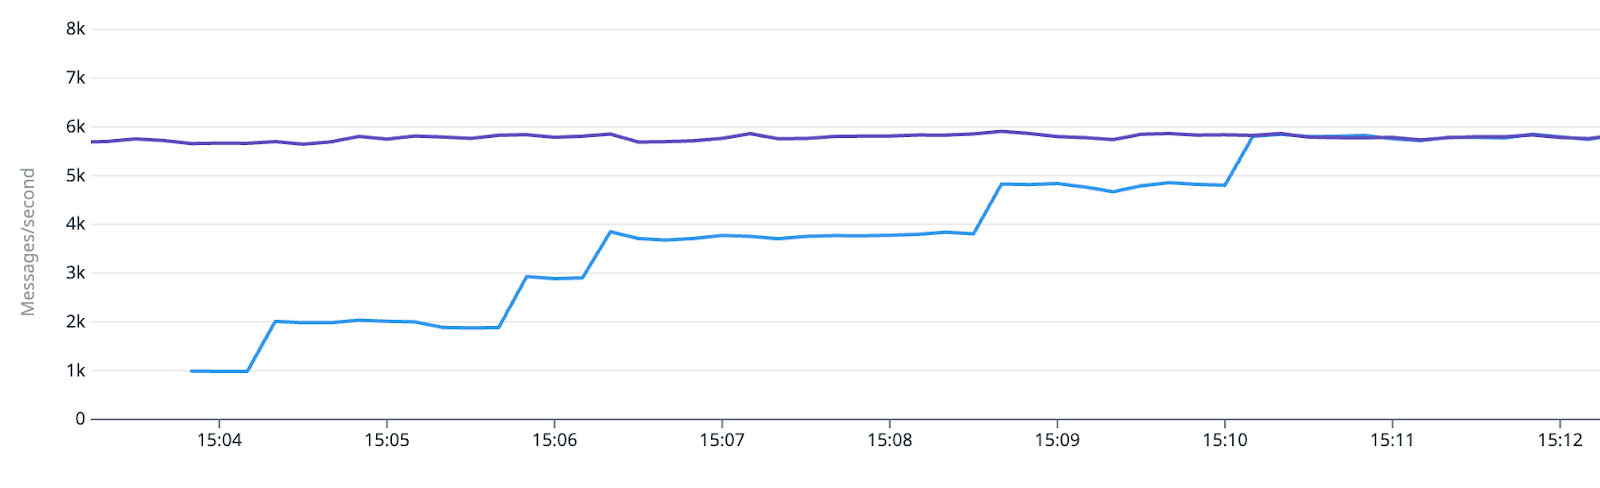
Besides, our standard Datadog dashboard that comes with each application can conveniently be toggled to view the metrics of the respective Shadow application.
Our standard sink and source connectors, provided by our platform, ensure the absence of interference with the Main application during Shadow Testing. For example, Kafka source connectors use distinct consumer group IDs, while the various sink connectors direct the data to dedicated shadow sinks.
The Flink application evaluates the isShadow environment variable to set up the connectors at runtime.
if (isShadow){
    // Shadow Testing operation
}
else {
    // Normal operation
}
The following table shows how some typical connectors are dynamically configured if isShadow=true:
| Type | Connector | Dynamic configuration |
|---|---|---|
| Source | Kafka | The consumer group ID for the Shadow application is suffixed with -shadow. This is crucial so as to consume a full copy of the data stream without interfering with the Main application. Main application: consumerGroup = <application_name> Shadow application: consumerGroup = <application_name>-shadow |
| Source | Change Data Capture | The Server ID range of Debezium is shifted to the next non-overlapping range of the same size. This enables the Shadow application to get a full copy of the database binlog stream without interfering with the Main application. Note that the misleading Server ID naming is because Debezium acts as a pseudo-replica of the database server. Main application: serverId = 1001-2000 Shadow application: serverId = 2001 – 3000 |
| Sink | Kafka | The cluster endpoint is replaced with that of a Kafka cluster dedicated to Shadow Testing, set up with auto.create.topics.enable=true and 8h retention. Main application: brokers = <flink-kafka>:9092 Shadow application: brokers = <flink-kafka-shadow>:9092 |
| Sink | S3 | The S3 bucket name is replaced with that of a bucket dedicated to Shadow Testing, set up with a 7-day retention lifecycle policy. Main application: s3://<flink-s3>/<application_name> Shadow application: s3://<flink-s3-shadow>/<application_name> |
| Sink | Metrics | The StatsD prefix configuration is overridden. A shadow. prefix is added. Main application: flink.<application_name>.<metric_name> Shadow application: shadow.flink.<application_name>.<metric_name> |
| Sink | Logs | The Shadow Kubernetes manifest prefixes the Shadow application name with shadow-. The resulting name becomes available as a field in Kibana, enabling discriminated filtering. This tweak is done at the Kubernetes manifest level, not at the Flink application level. Main application: app_name = <application_name> Shadow application: app_name = shadow-<application_name> |
Our Shadow Testing framework represents a meaningful step forward in enhancing the reliability of our Flink applications during deployment. By leveraging and enriching the existing components of our platform, we have created a robust system that enables our users to confidently increase their Deployment Frequency and reduce their Change Failure Rate.
To drive wider adoption, we intend to support more source and sink connectors. By expanding the range of supported connectors, we could empower teams to leverage Shadow Testing across a broader spectrum of applications.
For connectors that are less frequently used, we consider implementing a no-op approach combined with metrics collection to expose a minimal set of actionable data points.
We will remain focused on making Shadow Testing accessible, scalable, and adaptable to various applications. Stay tuned as we continue to push the boundaries of innovation and deliver solutions that enhance reliability and efficiency across our systems.
Grab is Southeast Asia’s leading superapp, serving over 900 cities across eight countries (Cambodia, Indonesia, Malaysia, Myanmar, the Philippines, Singapore, Thailand, and Vietnam). Through a single platform, millions of users access mobility, delivery, and digital financial services, including ride-hailing, food delivery, payments, lending, and digital banking via GXS Bank and GXBank. Founded in 2012, Grab’s mission is to drive Southeast Asia forward by creating economic empowerment for everyone while delivering sustainable financial performance and positive social impact.
Powered by technology and driven by heart, our mission is to drive Southeast Asia forward by creating economic empowerment for everyone. If this mission speaks to you, join our team today!
Post Syndicated from corbet original https://lwn.net/Articles/1070466/
Inside this week’s LWN.net Weekly Edition:
Post Syndicated from The Atlantic original https://www.youtube.com/shorts/ic6GRXPtVtk
Post Syndicated from The Atlantic original https://www.youtube.com/shorts/iBlEiYYt8L4
Post Syndicated from Cliff Robinson original https://www.servethehome.com/pci-sig-pcie-8-0-specification-draft-0-5-released/
The PCI-SIG PCIe 8.0 specification draft 0.5 is now out, getting us another step closer to 1TB/s PCIe Gen8 x16 links in servers
The post PCI-SIG PCIe 8.0 Specification Draft 0.5 Released appeared first on ServeTheHome.
Post Syndicated from Abdul Javid original https://aws.amazon.com/blogs/security/new-compliance-guide-available-iso-iec-420012023-on-aws/
We have released our latest compliance guide, ISO/IEC 42001:2023 on AWS, which provides practical guidance for organizations designing and operating an Artificial Intelligence Management System (AIMS) using AWS services.
As organizations deploy AI and generative AI workloads in the cloud, aligning with globally recognized standards such as ISO/IEC 42001:2023 becomes an important step toward strengthening AI governance, risk management, and responsible AI practices. This guide helps cloud architects, AI/ML engineers, security teams, compliance leaders, and DevOps practitioners understand how to implement and operate ISO 42001-aligned controls using AWS services while applying the AWS Shared Responsibility Model for AI.
The guide explains how organizations can integrate AWS services into their AIMS to support the requirements defined in ISO 42001:2023 clauses 4–10 and the Annex A control specific to AI systems. It also highlights how AWS AI services, security capabilities, monitoring, and automation can help customers maintain visibility over AI systems, improve operational consistency, and prepare audit-ready evidence.
While AWS provides a secure and compliant cloud infrastructure with built-in responsible AI capabilities, customers remain responsible for defining their AIMS scope, implementing controls, and demonstrating conformity during certification audits.
Use this guide to map ISO 42001 clauses and Annex A controls to your AWS environment, automate evidence collection, and reduce the effort involved in preparing for a certification audit.
Download: ISO/IEC 42001:2023 on AWS Compliance Guide
For further assistance, contact AWS Security Assurance Services
If you have feedback about this post, please submit comments in the Comments section below.
Post Syndicated from LastWeekTonight original https://www.youtube.com/shorts/P_U9chBI4sQ
Post Syndicated from Sebastiaan Neuteboom original https://blog.cloudflare.com/de-tld-outage-dnssec/
On May 5, 2026, at roughly 19:30 UTC, DENIC, the registry operator for the .de country-code top-level domain (TLD), started publishing incorrect DNSSEC signatures for the .de zone. Any validating DNS resolver receiving these signatures was required by the DNSSEC specification to reject them and return SERVFAIL to clients, including 1.1.1.1, the public DNS resolver operated by Cloudflare.
The country-code top-level domain for Germany, .de, is one of the largest on the Internet. On Cloudflare Radar, it consistently ranks among the most broadly queried TLDs globally. An outage at this level of the DNS hierarchy has the potential to make millions of domains unreachable.
In this post, we’ll walk through what we saw, the impact of these events, and how we applied temporary mitigations while DENIC resolved the issue.

DNSSEC (Domain Name System Security Extensions) adds cryptographic authentication to DNS. When a zone is signed with DNSSEC, each set of records is accompanied by a digital signature known as an RRSIG record that lets a resolver verify the records haven’t been tampered with. Unlike encrypted DNS protocols, such as DNS over TLS (DoT) and DNS over HTTPs (DoH), DNSSEC is about integrity, not privacy. The records are visible, but their authenticity can be proven.
What makes DNSSEC unique is that the signatures travel together with the records they protect. This means integrity can be verified regardless of how many caches or hops a response has passed through. A cached record is just as verifiable as a fresh one.
DNSSEC is built on a chain of trust. Starting at the root zone, whose trust anchor is hard-coded into the resolvers, each zone delegates trust to child zones via Delegation Signer (DS) records. A DS record in the parent zone contains a cryptographic hash of a public key in the child zone. When a resolver validates example.de it verifies the chain: root trusts .de, .de trusts example.de. A break anywhere in that chain causes validation to fail for everything below it, which is why a misconfiguration at a TLD like .de affects every domain under it.
Zones typically use two types of keys: a Zone Signing Key (ZSK), used to sign the zone’s records, and a Key Signing Key (KSK), used to sign the ZSK itself. The KSK’s public key is what the parent zone’s DS record points to, anchoring the chain of trust. Rotating a ZSK is relatively straightforward: generate a new key, re-sign the zone’s records, and wait for caches to expire. Rotating a KSK is more involved, because the parent’s DS record must also be updated, often requiring coordination with a registrar or registry.

During a key rotation, there is a critical window where the old key is being phased out and the new one phased in. If the signatures published in the zone are made with a key that resolvers cannot verify against the zone’s published DNSKEY records, whether because the signing step failed, the timing was wrong, or the new key wasn’t fully distributed yet, resolvers have no choice but to reject the responses and return SERVFAIL.
On May 5, 2026, at roughly 19:30 UTC, DENIC, the operator for the .de TLD, started publishing incorrect DNSSEC signatures for the .de zone. Any validating resolver receiving these records was required by the DNSSEC specification to reject them and return SERVFAIL. 1.1.1.1 was no exception.
The graph below shows the response codes 1.1.1.1 returned for .de queries during the incident.

After the immediate spike in SERVFAILs at 19:30 UTC, it climbed steadily over the following three hours as cached records slowly started expiring. As each domain’s cached records expired and resolvers went back to DENIC for fresh copies, they got back broken signatures and started failing.
Also visible is a large increase in query volume. This is typical during DNS incidents, as clients retry failed queries, often three or more times, inflating the raw numbers. The SERVFAIL rate looks more alarming than the actual user impact, as many of those queries represent the same user retrying the same domain.

What might be surprising is that the NOERROR rate stayed relatively stable throughout the incident. That’s “serve stale” at work, which we’ll cover in the next section.
Recursive resolvers cache the records they receive from authoritative nameservers for the duration of each record’s TTL (Time-to-Live). While a record is cached, the resolver serves it directly without going back to the authoritative nameserver. When the TTL expires, the resolver fetches a fresh copy and re-caches it.
During the outage, freshly requested records ended up resolving to SERVFAIL. The DNSSEC signatures were broken and the resolver correctly rejected them. But many .de records were still sitting in cache from before the incident began. Rather than immediately discarding those and returning SERVFAIL to users, 1.1.1.1 continued serving them past their TTL. This is called “serving stale.”
1.1.1.1 implements RFC 8767, which formalizes this behavior. When upstream resolution fails, a resolver may continue serving expired cached records rather than returning an error. This significantly cushions the impact of an upstream outage, buying time for operators to respond.
The result is visible in the graph below, which shows response codes for .de queries during the incident excluding the stale-served responses. Without stale-served responses, the NOERROR rate drops steadily from 19:30 onward. These represent queries that users received good answers for only because their record was still in cache.

While the issue was largely out of our own control, and serve stale was doing its job, there was still a legitimate impact for a lot of users. Luckily, there were some actions we were able to take to improve the situation.
RFC 7646 defines the concept of a Negative Trust Anchor (NTA). In normal DNSSEC operation, a validating resolver maintains a set of trust anchors: public keys at the root of the chain of trust. Each DNS zone signed with DNSSEC has a trust anchor, and every child zone builds its own trust anchor upon it. When the cryptographic signatures linking the chain together are broken, responses will be rejected and result in SERVFAIL. An NTA is an explicit exception. It tells the resolver to treat a specific zone as if it were unsigned, bypassing validation for names under that zone.
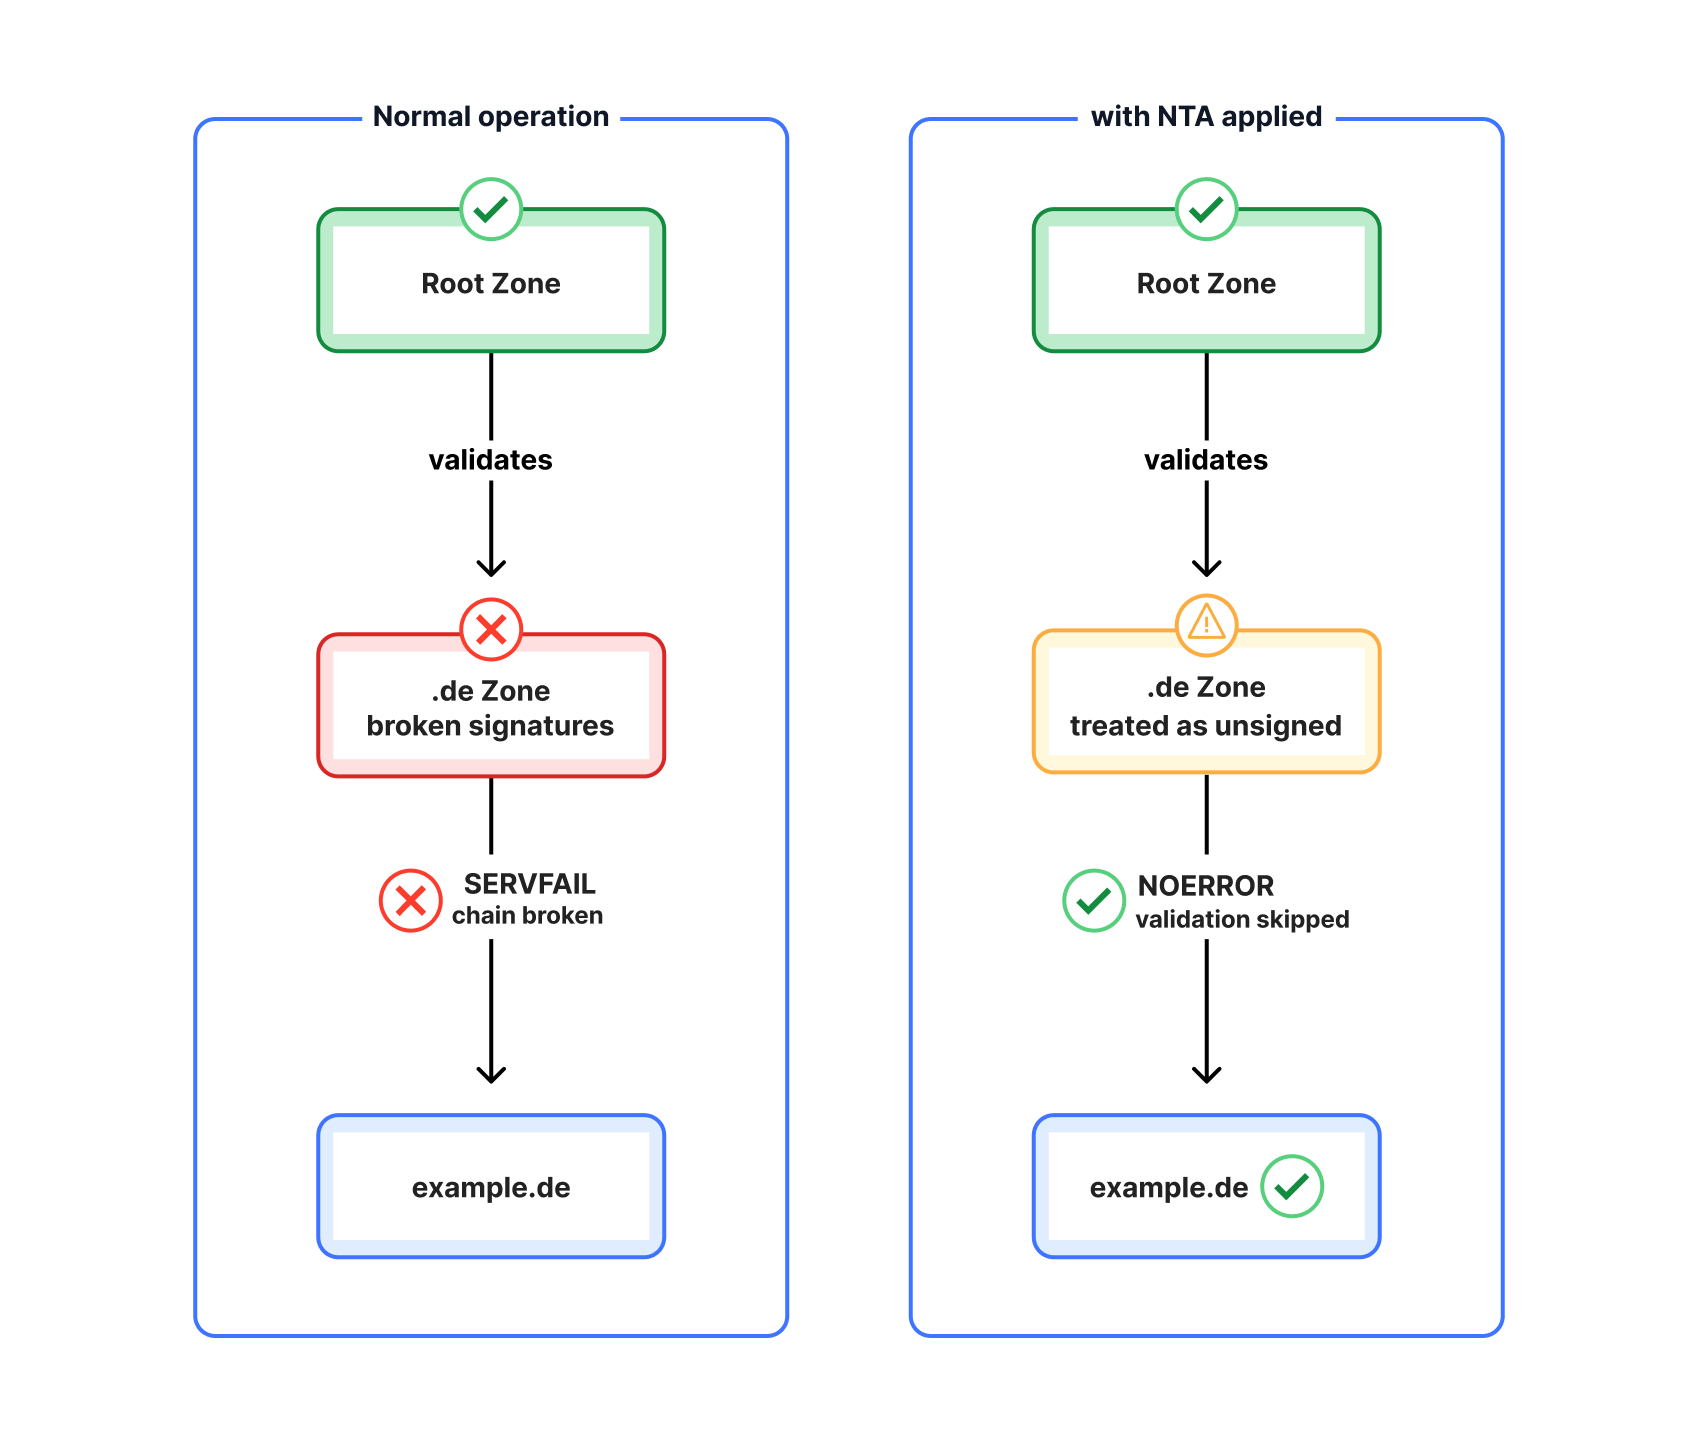
NTAs exist precisely for these types of incidents. When a TLD operator publishes broken signatures, every DNSSEC-validating resolver is forced to return SERVFAIL for every domain under that TLD. Not because of anything wrong with those domains themselves, but because their parent zone is misconfigured. Continuing to return SERVFAIL in that situation provides no security value: the failure is already known, public, and being fixed. RFC 7646 explicitly names TLD misconfiguration as the primary use case for NTAs.
For 1.1.1.1 we have our own resolver referred to as Big Pineapple, which also powers 1.1.1.1 for Families, Gateway DNS, DNS Firewall, and more. At this time, we have not implemented a native NTA mechanism. Instead, we used an existing override rule mechanism to mark .de as an insecure zone, which causes all .de queries to be resolved as if they don’t have DNSSEC enabled. This is functionality equivalent to an NTA, though it is not formally defined in any RFC.
The decision to bypass DNSSEC is a deliberate tradeoff. Without DNSSEC validation, .de domains become vulnerable to genuine attacks for the duration of the incident. During incidents like this, we weighed this as acceptable because the signing failure was widespread, publicly confirmed, and affected every validating resolver on the Internet equally. As it was put in our internal incident room: “There is no user of 1.1.1.1 resolving a .de name right now who would prefer a SERVFAIL over an unvalidated response.”
We rolled out our mitigation at 22:17 UTC, which marked the end of impact for 1.1.1.1. We communicated this with fellow DNS operators in the DNS-OARC Mattermost.
While all Internet users can access our 1.1.1.1 resolver, we have a particular responsibility to customers using our CDN platform services. Those with .de origin names were also affected by this outage.
Cloudflare operates a separate internal resolver for origin resolution, distinct from our publicly available 1.1.1.1 service. To mitigate impact we applied a similar NTA for .de on the internal resolver service, restoring origin connectivity for affected customers.
Before our mitigation, queries that couldn’t be served from cache received a SERVFAIL response from 1.1.1.1. Each SERVFAIL included an Extended DNS Error (EDE) code, defined in RFC 8914, which gives clients more detail about what went wrong.
Some resolvers returned EDE 6 (DNSSEC Bogus) with a descriptive message pointing directly at the broken signature. This is the correct behavior:
EDE: 6 (DNSSEC Bogus): RRSIG with malformed signature found for example.de/nsec3 (keytag=33834)
1.1.1.1, on the other hand, returned EDE 22 (No Reachable Authority), which on the surface suggests a connectivity problem with the upstream nameservers rather than a DNSSEC validation failure.
The cause is a bug in how we propagate DNSSEC EDE codes up from our trust chain verifier. When the verifier detects a bogus signature it creates the DNSSEC Bogus EDE code, but this is never inserted into the response. Instead, the outer layer of the resolver sees a problem with recursive resolution with no error code and falls back to reporting “No Reachable Authority.” This obscures the underlying DNSSEC cause.
We’re aware that this isn’t helpful for 1.1.1.1 users and will be fixing our responses to surface the DNSSEC errors.
DNS is a critical part of the request chain for most Internet communication. It would be easy to come to the conclusion that this outage and the mitigations applied means DNSSEC has failed as a technology. However, any technology that is misconfigured will risk breaking for users that rely on it. Leaving critical fiber cables exposed on the seabed for sharks to chew on does not invalidate the important role underwater cables pose in today’s Internet communications. It only highlights that we’ve sometimes failed to accurately protect it. The same applies here. DNSSEC serves a critical role in ensuring that we can rely on the DNS answers without tampering by malicious actors.
No one likes to have serious incidents. These things, unfortunately, happen to everyone who operates critical infrastructure at scale. When they do, the DNS community tends to show up for each other.
Incidents like this also highlight why relationships between operators matter. DNS is a decentralized system, no single organization controls all of it, and keeping it running reliably depends on mutual trust and open lines of communication between registries, resolver operators, and the broader community. Forums like DNS-OARC provide exactly this: shared mailing lists and chat rooms where operators can coordinate quickly across organizational boundaries when something goes wrong.
DENIC has published a short blog post about the incident where they state: “The outage is linked to a routine, scheduled key rollover. During this process, non-validatable signatures were generated and distributed. As a precautionary measure, future rollovers have been suspended until the exact technical causes have been identified.”
We’re sure we’ll hear more when their own analysis is ready.
This incident highlights a structural reality of the DNS hierarchy: when a registry at the TLD level fails, every domain under that TLD is affected simultaneously, regardless of where it’s hosted or which resolver is used. This isn’t unique to DNSSEC; the same is true if a TLD’s nameservers become unreachable. The hierarchy that makes the global DNS work is also what makes failures at the top propagate downward.
There is no simple fix for this. What the industry can do is respond quickly and consistently when it happens. In this incident, resolver operators across the Internet independently applied Negative Trust Anchors within an hour, restoring resolution while DENIC worked to fix the zone. Operational practices, industry communication channels like DNS-OARC, and features like serve stale all reduce the impact, even if they can’t eliminate the underlying dependency.
We also came away with some points to improve for ourselves. We will be working on our EDE errors to better surface DNSSEC errors.
We look forward to DENIC’s post-incident report and appreciate the transparency they showed throughout.
If you want to learn more about how DNSSEC works, visit our page How does DNSSEC work? And you can always follow real-time DNS trends and TLD data on Cloudflare Radar.
Post Syndicated from Йовко Ламбрев original https://yovko.net/coffee-bratislava-prague/

Не съм сигурен точно колко пъти съм посещавал Прага досега, но в Братислава съм бил само веднъж и то преди доста години. А тогава, от една страна още не се бях заровил надълбоко в темата кафе, а от друга – третата вълна още не се беше надигнала.
Към настоящия момент и в двете столици буквално през ъгъл могат да се открият по-малки или по-големи местенца, които предлагат напитки от специално кафе, изпечено на място или от някой местен или регионален пекар. Големите брандове почти отсъстват, а Costa и Starbucks напълно заслужено са се поизпразнили и изглежда, че разчитат предимно на заблудени туристи. Не знам защо някой в днешно време трябва да си причинява Starbucks, наистина!? Let them die… Please!
Времето заделено за Братислава от сегашната ни разходка из района беше само два дни и нямаше как да обиколя всички кафенета от дългия ми предварителен списък, но се постарах. Доколкото ми е известно (а и според GoogleMaps) в словашката столица кафенетата от новата вълна вече надхвърлят сто. Само на улицата, на която бяхме отседнали имаше две Caffe4U и SweetBeens, за които не бях и чувал. Пробвах само второто, а мисля, че първото е по-интересното от двете, но нямаше как да изпия толкова кафе, колкото ми се искаше.
Това, което прави впечатление в Братислава е, че дори и най-малките местенца залагат на много висок клас оборудване – почти навсякъде еспресо машините са La Marzocco или Victoria Arduino и поне тези, които посетих задължително имаха по една EK43. Честно е да кажа и че не навсякъде знаеха какво да правят с тях. Сервираха ми и един-два доста разочароващи шота.
Другото, което прави впечатление е, че почти навсякъде се предлага batch brew (у нас е рядка екзотика, дори в много специализираните места, но ние нямаме и такава традиция в кафепиенето). Там навсякъде сервират поне един, а много често и два вида (от различни кафета). А още по-любопитното е, че чаша batch brew винаги е по-скъпа от еспресо, докато за мен логиката – и пазарната, и времеемката – е точно обратната.
Ако скоро ви се отвори път към Братислава (все още има ненормално евтини полети на WizzAir от Пловдив и Варна) съветът ми е да пробвате задължително black. (заради кафето) и Kauka (заради перфекционизма и обслужването). Ако сте ранобудни – има кафене, което се казва 6:57 a.m. (познайте защо), но е толкова малко, че дори отвън има едва три малки столчета, но за сметка на това си има вярна публика, която чинно чака да си вземе кафе за из път към офиса.
Kauka не предлагат свое кафе, но селекцията им от кафе зърна е безупречна. Приготвят всяка напитка с абсурдна прецизност и мястото им е от тези, които се харесват на младежката публика. Аз малко поостарях, за да се радвам на неудобен соц стол и стени от неуютен гол бетон. Иначе Kauka бяха избрани за най-доброто кафе място на Словакия за 2025 година от (по)читателите и (по)следователите на проекта European Coffee Trip – една доста субективна и непредставителна класация, но няма много по-меродавни, та все е нещо. За по-предната година бяха отличени Kaviareň Vták, но аз не успях да ги включа в програмата си.
Kauka ни посрещнаха и изпратиха с най-приветливото отношение и обслужване сред всички в Братислава.
А black. вече са enterprise… и това вероятно си е било тяхна цел от самата им поява, но към към днешна дата ми се стори, че малко са неглижирали кафенето си (всъщност оказа се, че поддържат две локации в Братислава) за сметка на печенето на кафе за други кафенета и за корпоративните офиси на някои по-големи компании, които са им клиенти. Иначе в оригиналното им кафене на Gorkého получих чудесна напитка от отлично кафе, но обслужването от момичето зад бара беше леко хаотично и в началото даже леко троснато, но се подобри рязко, като си понакупих няколко пакета кафе и други неща.
И понеже аз лично не се срамувам да пробвам и блендове, и двата им бленда се оказаха разкошни. Единият – за еспресо – е наречен black sheep, а този за филтър… juicy pussy. Момчешки стартъп са си black. – простено им е. Нищо, че вече трябва да са попораснали…

И макар Братислава да вдигна много сериозно кафеената летва… Прага без засилка я прескочи. А напоследък се твърди, че кафе столицата на Чехия не е Прага, а Бърно, но макар че го бяхме планирали първоначално в графика, накрая отпадна от програмата ни, та не мога да потвърдя този факт от първа ръка.
Но не съжалявам по никакъв начин – винаги ми е приятно да се върна в Прага, а някъде от около 12-13 години поне не го бях правил. А пък и в чешката столица освен локалните кафенета и пекари на специално кафе, силно присъствие имат и много други от Европа или по-далеч. Но за това малко по-късно.
Иначе огромната разлика между кафе преживяването в Братислава и Прага е… приветливостта. Не искам да генерализирам, че всички баристи в Словакия са по-дръпнати, но със сигурност общото ми впечатление е за осезаемо по-хладно и дистанцирано обслужване, с по-малко внимание към детайлите и с по-малко мерак и сърце. Докато впечатленията ми от Чехия са в другия полюс и не мога да не призная, че предпочитанията ми са за тях.
И… разбира се, в Прага открихме кафе маратона с Acid. Даже понеже пристигнахме късно следобедно и квартирата ни се оказа съвсем наблизо, се появи известен риск да ходим да пробваме някое кафе още след вечеря. Но удавихме това намерение с бира.
Acid също са почитатели на индустриалната и бруталистка неуютност на голия бетон, но пък имат приятна градинка навън. И разбира се, феноменално добро и много различно кафе. За хората с по-традиционен вкус към кафето, може би Acid са малко по-трудни за харесване, но… наистина си струва да опитате, по дяволите. Изборът на кафе за вкъщи при тях не е твърде голям – те не залагат на разнообразие – но мисля, че си купих най-екстравагантното, което беше налично към момента.
Добро впечатление ми направиха и напитките в Ye's kafe studio, където се ползват и предлагат кафета от берлинските пекари Bonanza и популярните DAK от Амстердам (които всъщност са канадци, но това е друга тема).
Bonanza Coffee Roasters са едни от първите пекари от новата вълна в Европа (от 2006 година), а миналата година спечелиха приза за Best Independent Coffee Shop in Europe в друга субективна и непредставителна класация на European Coffee Symposium, но пък сред конкуренцията на Friedhats и други като тях.
Чудесно плътно и интересно еспресо пих в Dos Mundos Cafe (това в Прага 7, защото имат и втора локация). Те пекат свои кафета.
Останах разочарован от onesip (в Прага 1) – и от обслужването, и от кафето (и там пих еспресо – не че беше лошо, но… просто нищо особено) и от… липсата на тоалетна. Но пък специално дизайнатата им еспресо машина беше много красива, факт! И съм сигурен, че може повече.



Част от интересните кафета, които си домъкнах от Прага
И накрая… нямаше как да не мина през Kofio – това е популярен чешки електронен магазин за кафе и аксесоари, предлагащ голямо разнообразие от кафета на пекари от целия свят. Имат и няколко магазинчета в Прага. Снимката по-долу е от едната им локация, тази до co-working пространството Vnitroblock, където btw също се предлага чудесно и добро кафе. Момичето зад щанда в Kofio ми се извини два пъти, много притеснено, че изборът им бил твърде оредял след дългия уикенд на 1-3 май…

У нас, мисля че единствени Drekka са прегърнали идеята да запознават публиката с кафета на пекари от различни места по света. Повечето хора, които се занимават със специално кафе в България предлагат единствено своето си кафе. Разбира се, нищо лошо няма в последното, но ключово за развитието на един бранш (а и философия на третата вълна) е споделянето и колективните усилия на всички по веригата от фермата… до чашата. И публика, и вкус се възпитават с разнообразие, съпоставяне и избор.
Е, заглавието подвежда, че ще напиша нещо и за бирата… но, няма да е сега. Тя си заслужава отделно време и внимание. Особено чешката. Където също има нова вълна, но и старата още пази ниво.
Отделихме ѝ нужното време и внимание. Вярвайте ми!
Наздраве!
Post Syndicated from Mazrim Mehrtens original https://aws.amazon.com/blogs/big-data/build-streaming-applications-on-amazon-managed-service-for-apache-flink-with-ai-assisted-guidance/
Building production-ready Apache Flink applications requires learning a complex ecosystem. The learning curve is steep for newcomers, and even experienced Flink developers encounter complexity when scaling applications or troubleshooting production issues. With the new Kiro Power and Agent Skill for Amazon Managed Service for Apache Flink, you can get AI-assisted guidance for building, improving, and migrating streaming applications directly in your development environment, with recommendations that are grounded in best practices.
The Managed Service for Apache Flink Kiro Power and Agent Skill helps you navigate challenges across the Flink application lifecycle. For new development, the tool provides contextual guidance on application architecture, state management patterns, and connector selection. For existing application improvements, it analyzes your existing code to identify performance bottlenecks, reliability risks, and opportunities for improvement. If you’re upgrading from Apache Flink 1.x to 2.x, it detects compatibility issues and provides targeted refactoring steps to modernize your applications.
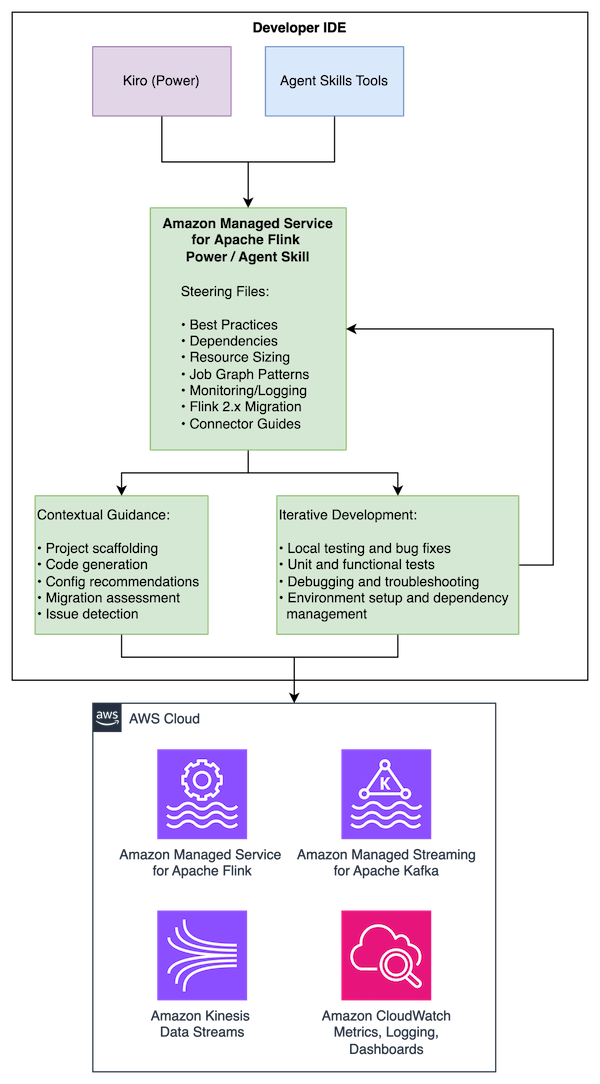
In this post, we walk through installing the Power and Skill, using Amazon Kinesis Data Streams to build a Kinesis Data Stream-to-Kinesis Data Stream streaming pipeline, and migrating an existing application to Flink 2.2. You can follow along with this use case to see how the Managed Service for Apache Flink Kiro Power can help you build a resilient, performant application grounded in best practices.
The Managed Service for Apache Flink Power/Skill works across multiple AI development tools, providing the same comprehensive guidance in each:
The Power/Skill provides guidance across the development lifecycle:
The content is maintained in a single repository with use case specific entry points that are dynamically loaded depending on your needs.
To use the tool, you need:
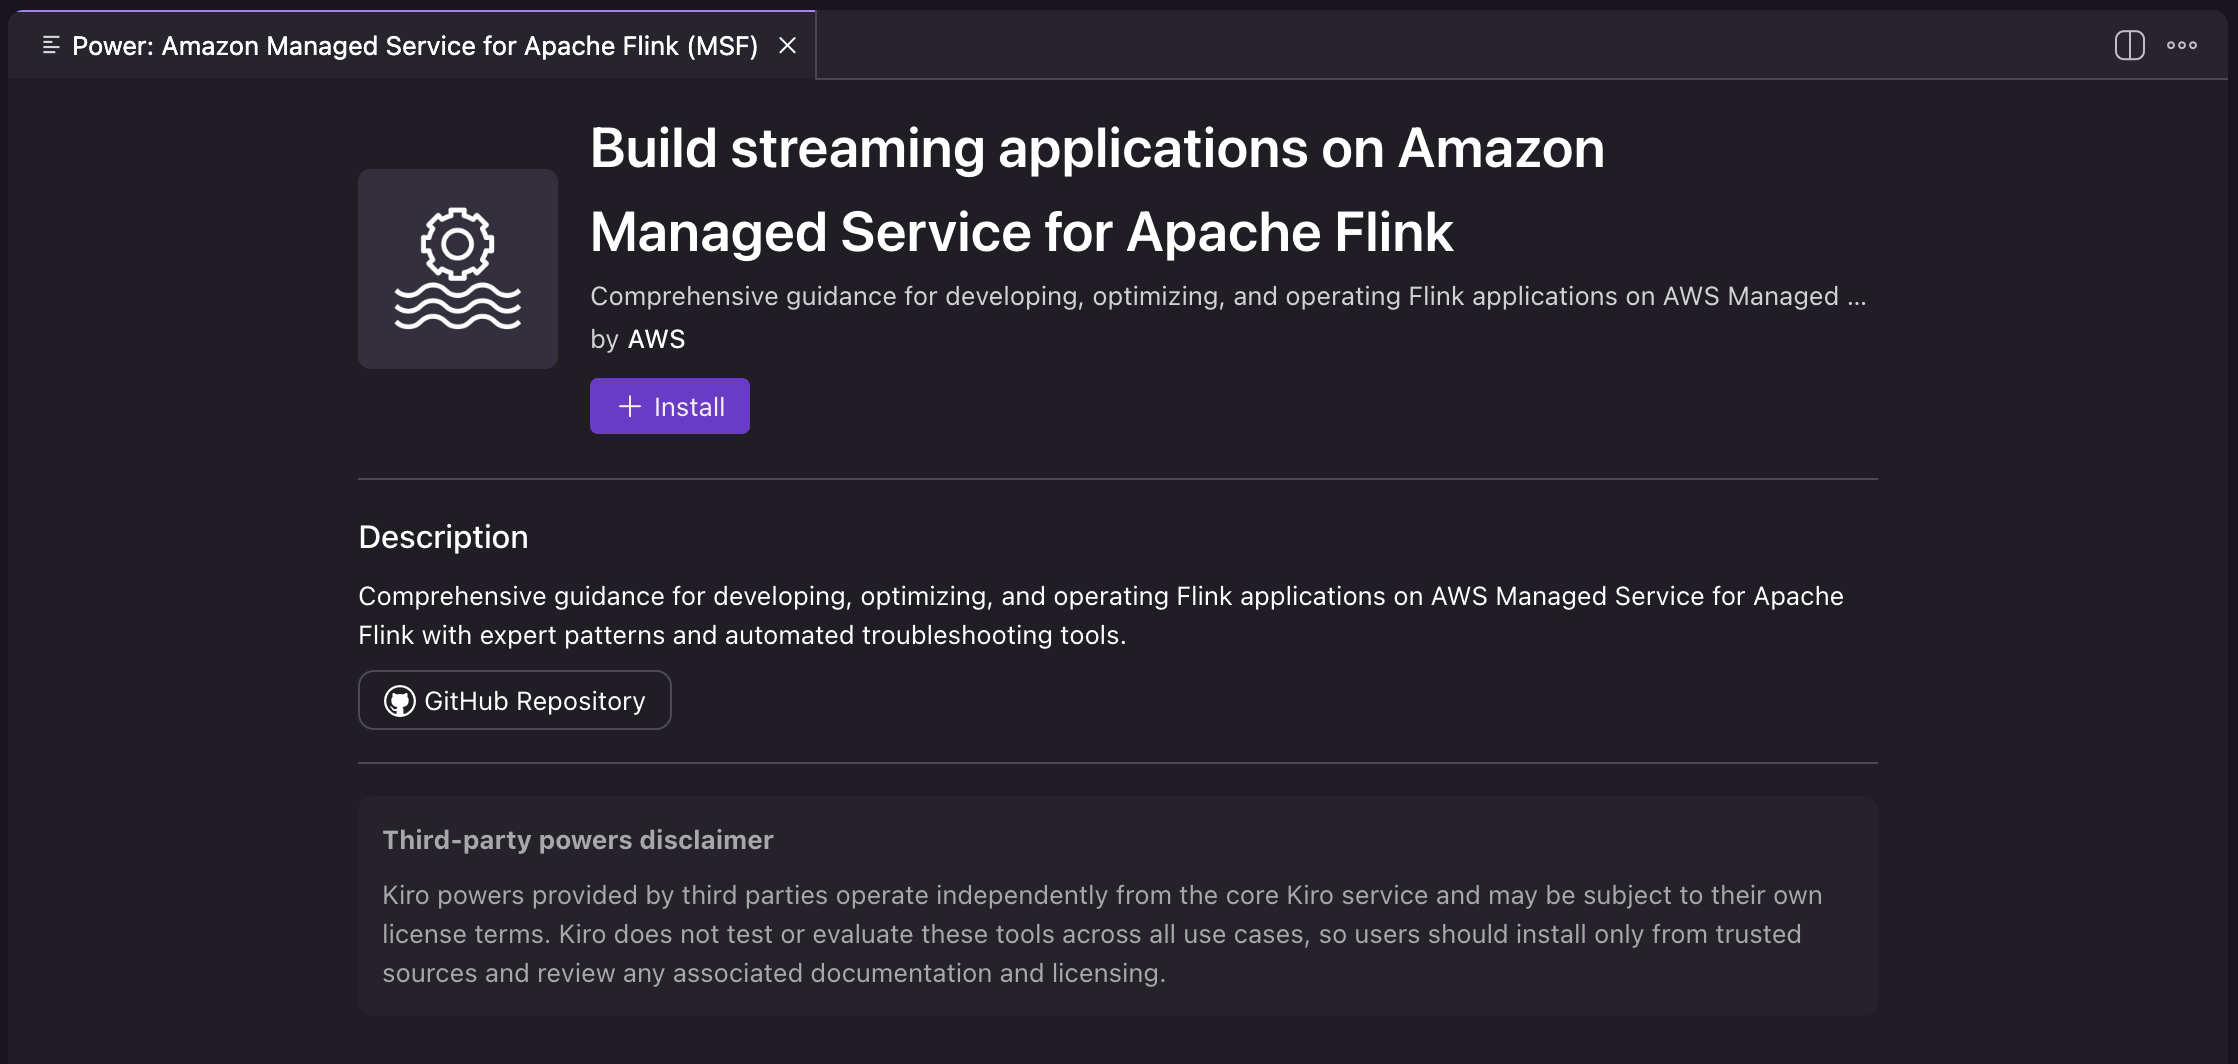
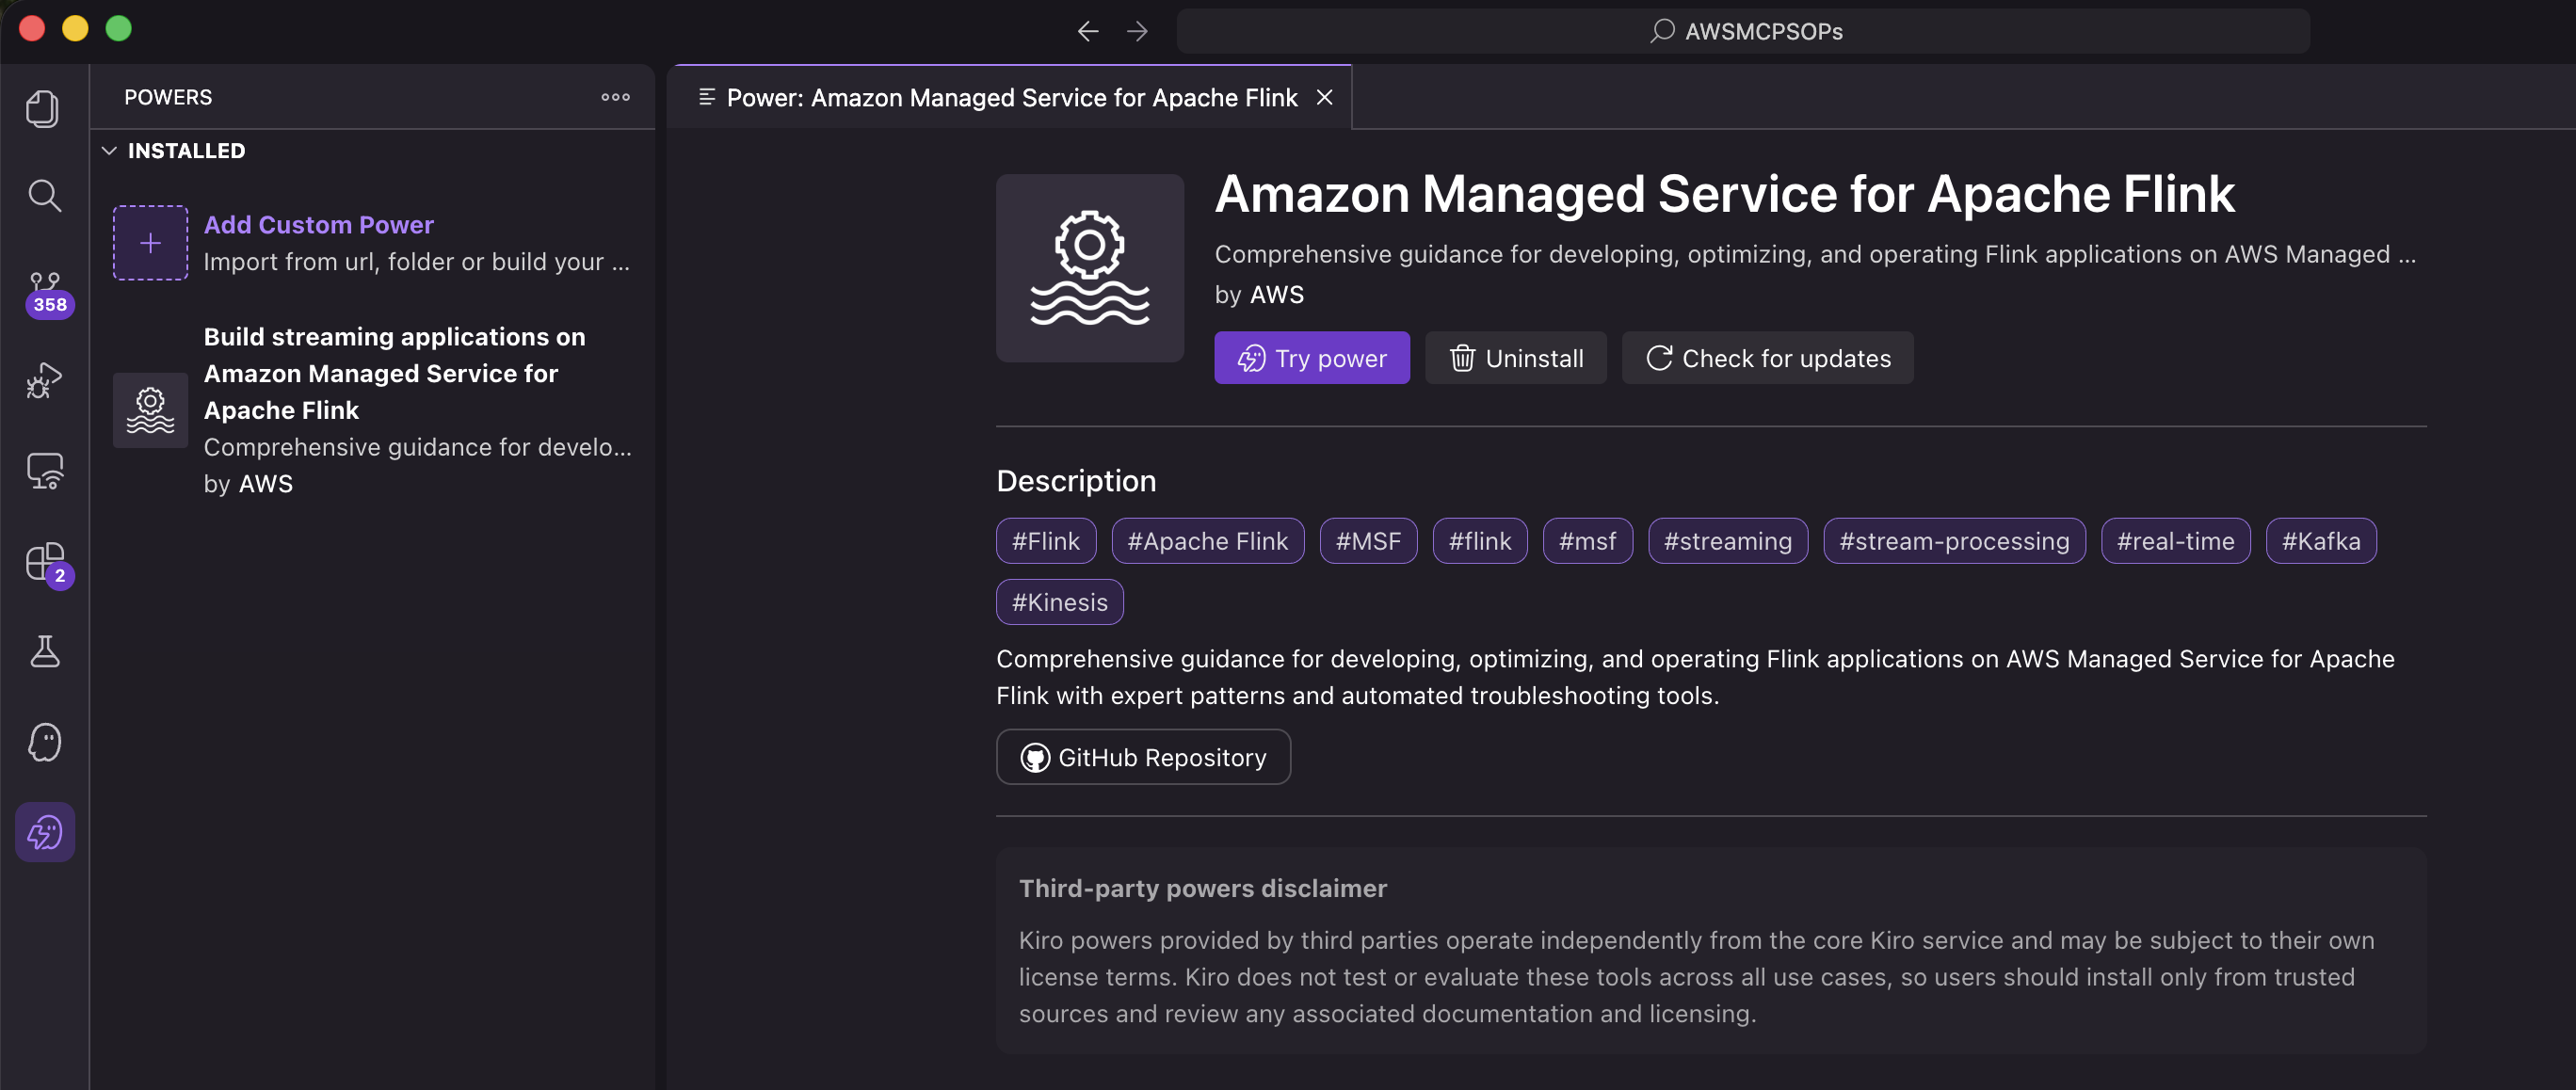
The Power is now installed and automatically activates when you work on Flink-related development activities.
Agent Skills are discovered automatically by compatible tools through the SKILL.md file. Installation varies by tool:
Per-project installation (available in one project):
Personal installation (available across projects):
To verify the installation, interact with the skill in your preferred tool. In Claude Code, you can invoke it with /flink. In Cursor, type / in Agent chat and search for flink. For more information about Agent Skills, see the Agent Skills documentation.
Rather than listing best practices, the Power/Skill actively guides you through making the right architectural decisions at each stage of development.
The following walkthrough demonstrates building a Flink application that reads from Amazon Kinesis Data Streams, analyzes events, and writes to another Kinesis stream. To follow along, run the same prompts in your Kiro IDE or other development tool. In the following prompts, we focus on local development and don’t create AWS resources. However, if you prompt the agent to create and deploy AWS resources, they will incur additional costs.
In the Kiro IDE, we can open a new chat in Vibe mode and prompt: “Help me build a Flink application that reads from Kinesis, processes events with windowed aggregations, and writes results to another Kinesis stream”:
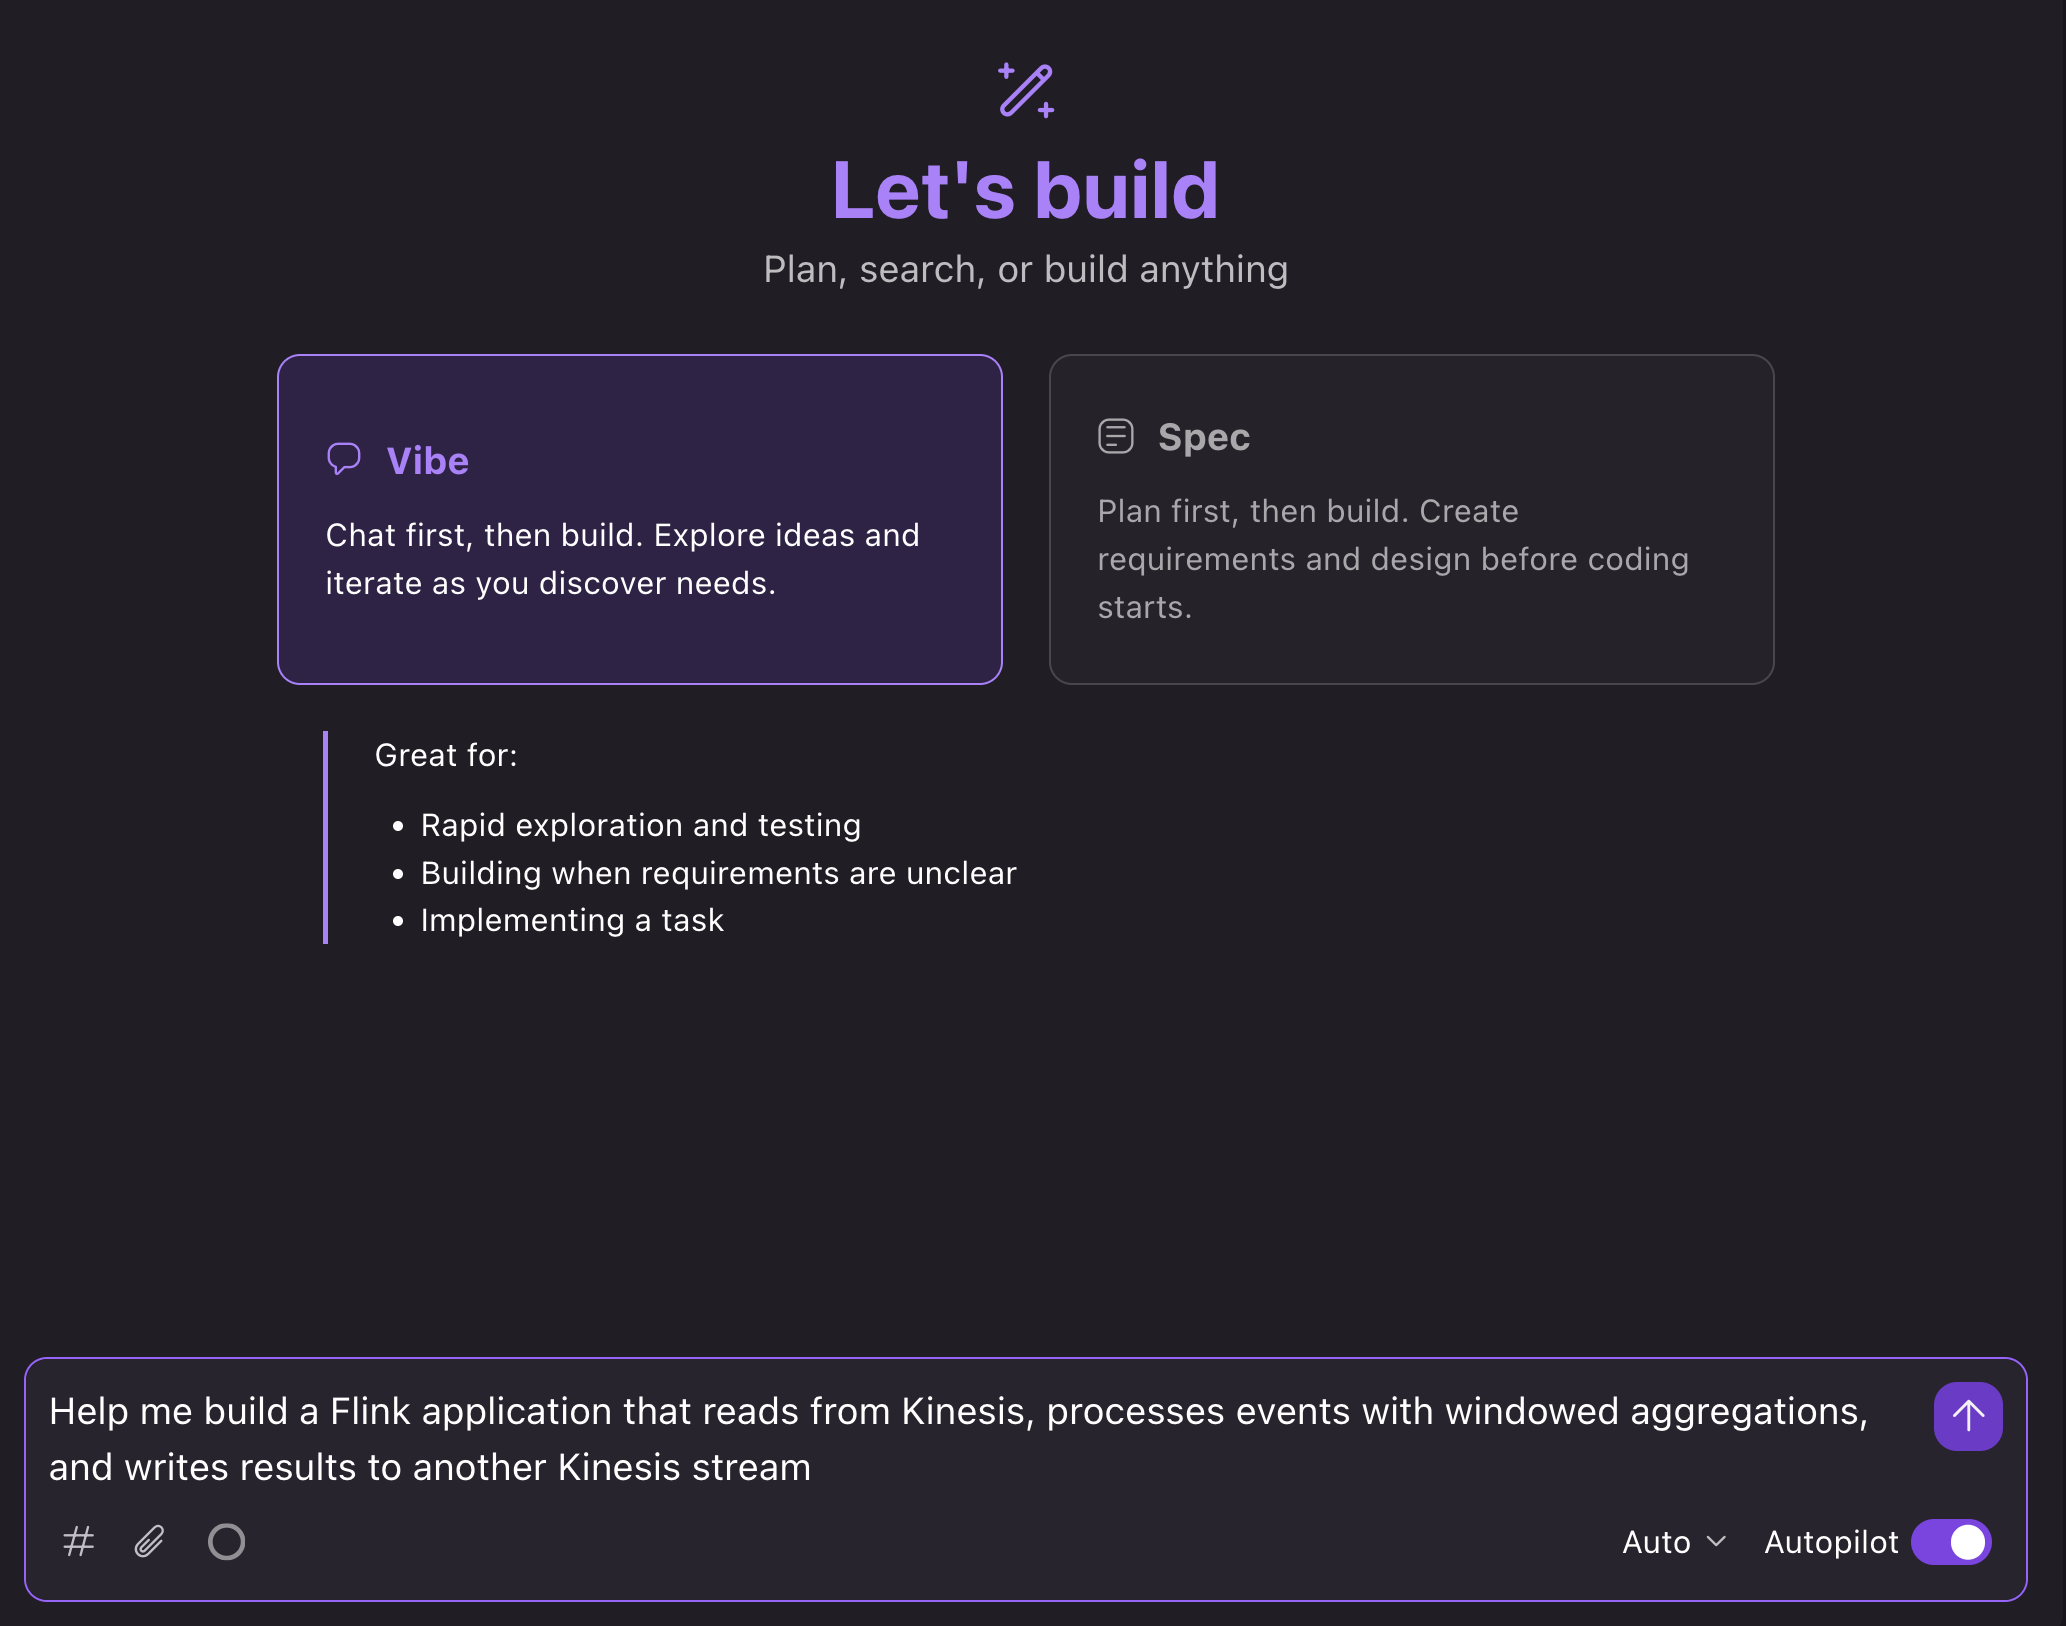
The AI assistant loads relevant guidance and walks you through the development process:
1. Confirm project requirements and details
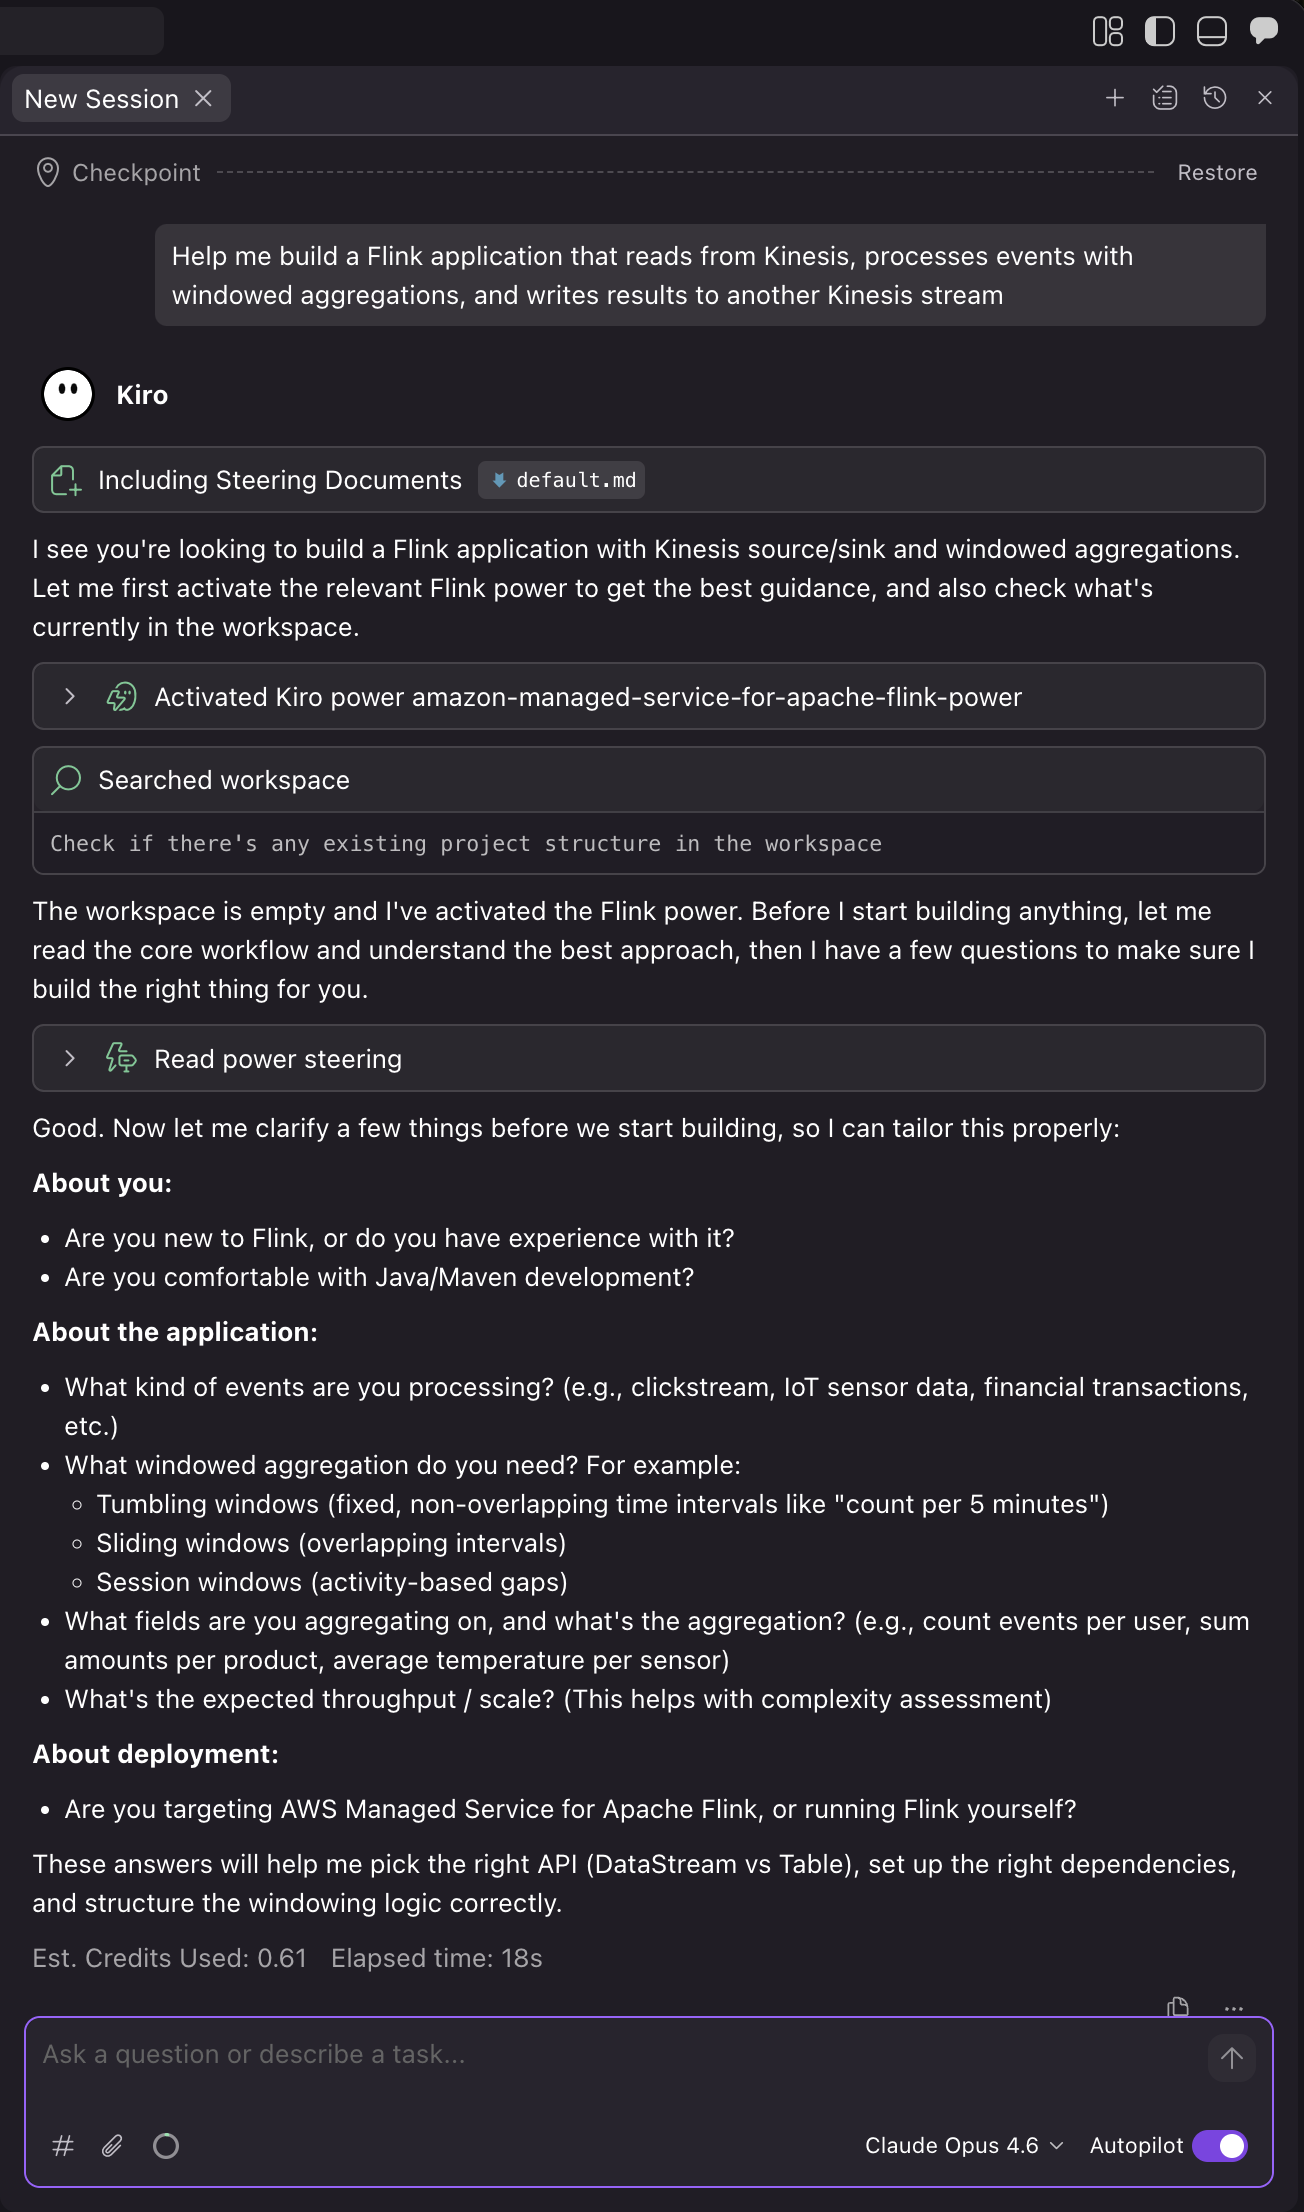
Kiro automatically loads the Power based on the context of your prompt. The assistant then asks you questions about your use case to make sure that it builds the right application for your needs:
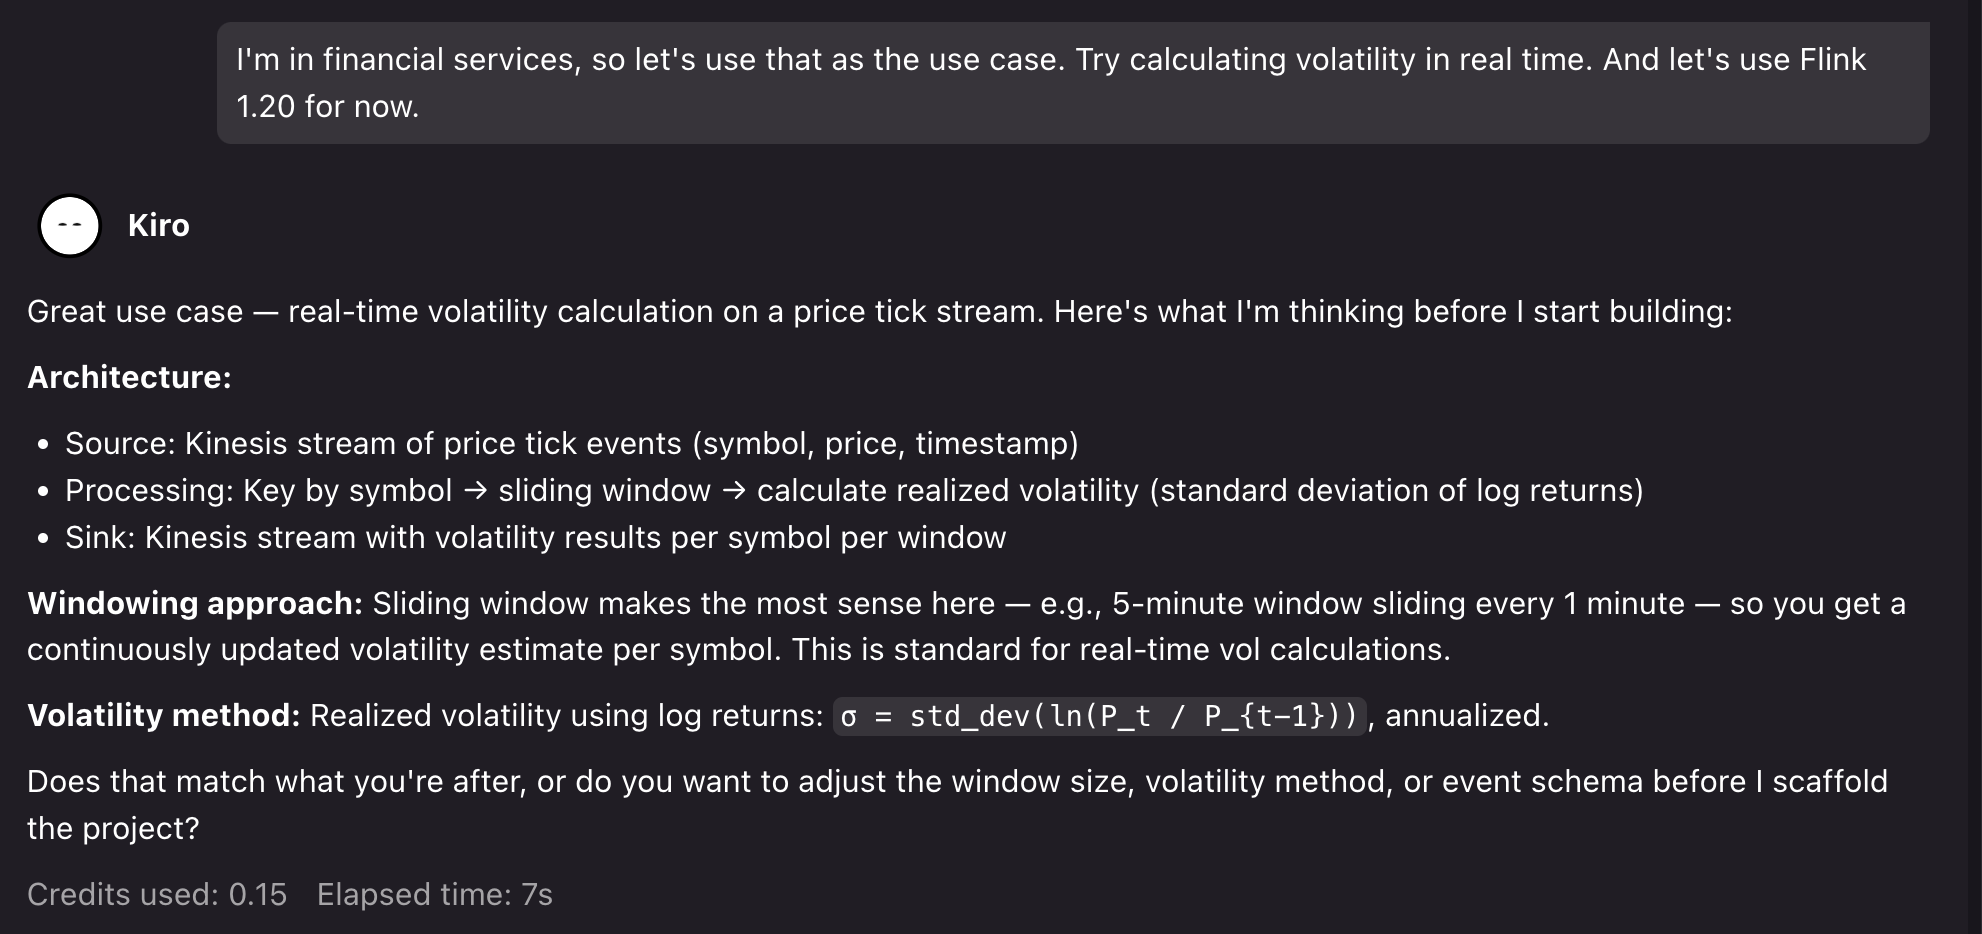
For the demo, we can prompt for a financial services use case: “I’m in financial services, so let’s use that as the use case. Try calculating volatility in real-time. And let’s use Flink 1.20 for now.”.
Kiro then confirms its assumptions and asks to proceed:
2. Project setup
After we confirm, Kiro generates a project with Flink 1.20 dependencies, Kinesis connectors, and proper scope configuration for Managed Service for Apache Flink deployment. The assistant creates the application structure with proper configuration separation between local development and Managed Service for Apache Flink service-level settings. Then, it creates a Kinesis source with proper deserialization and the sink with partitioning strategy, and windowed aggregation logic with proper state management, TTL configuration, and error handling.
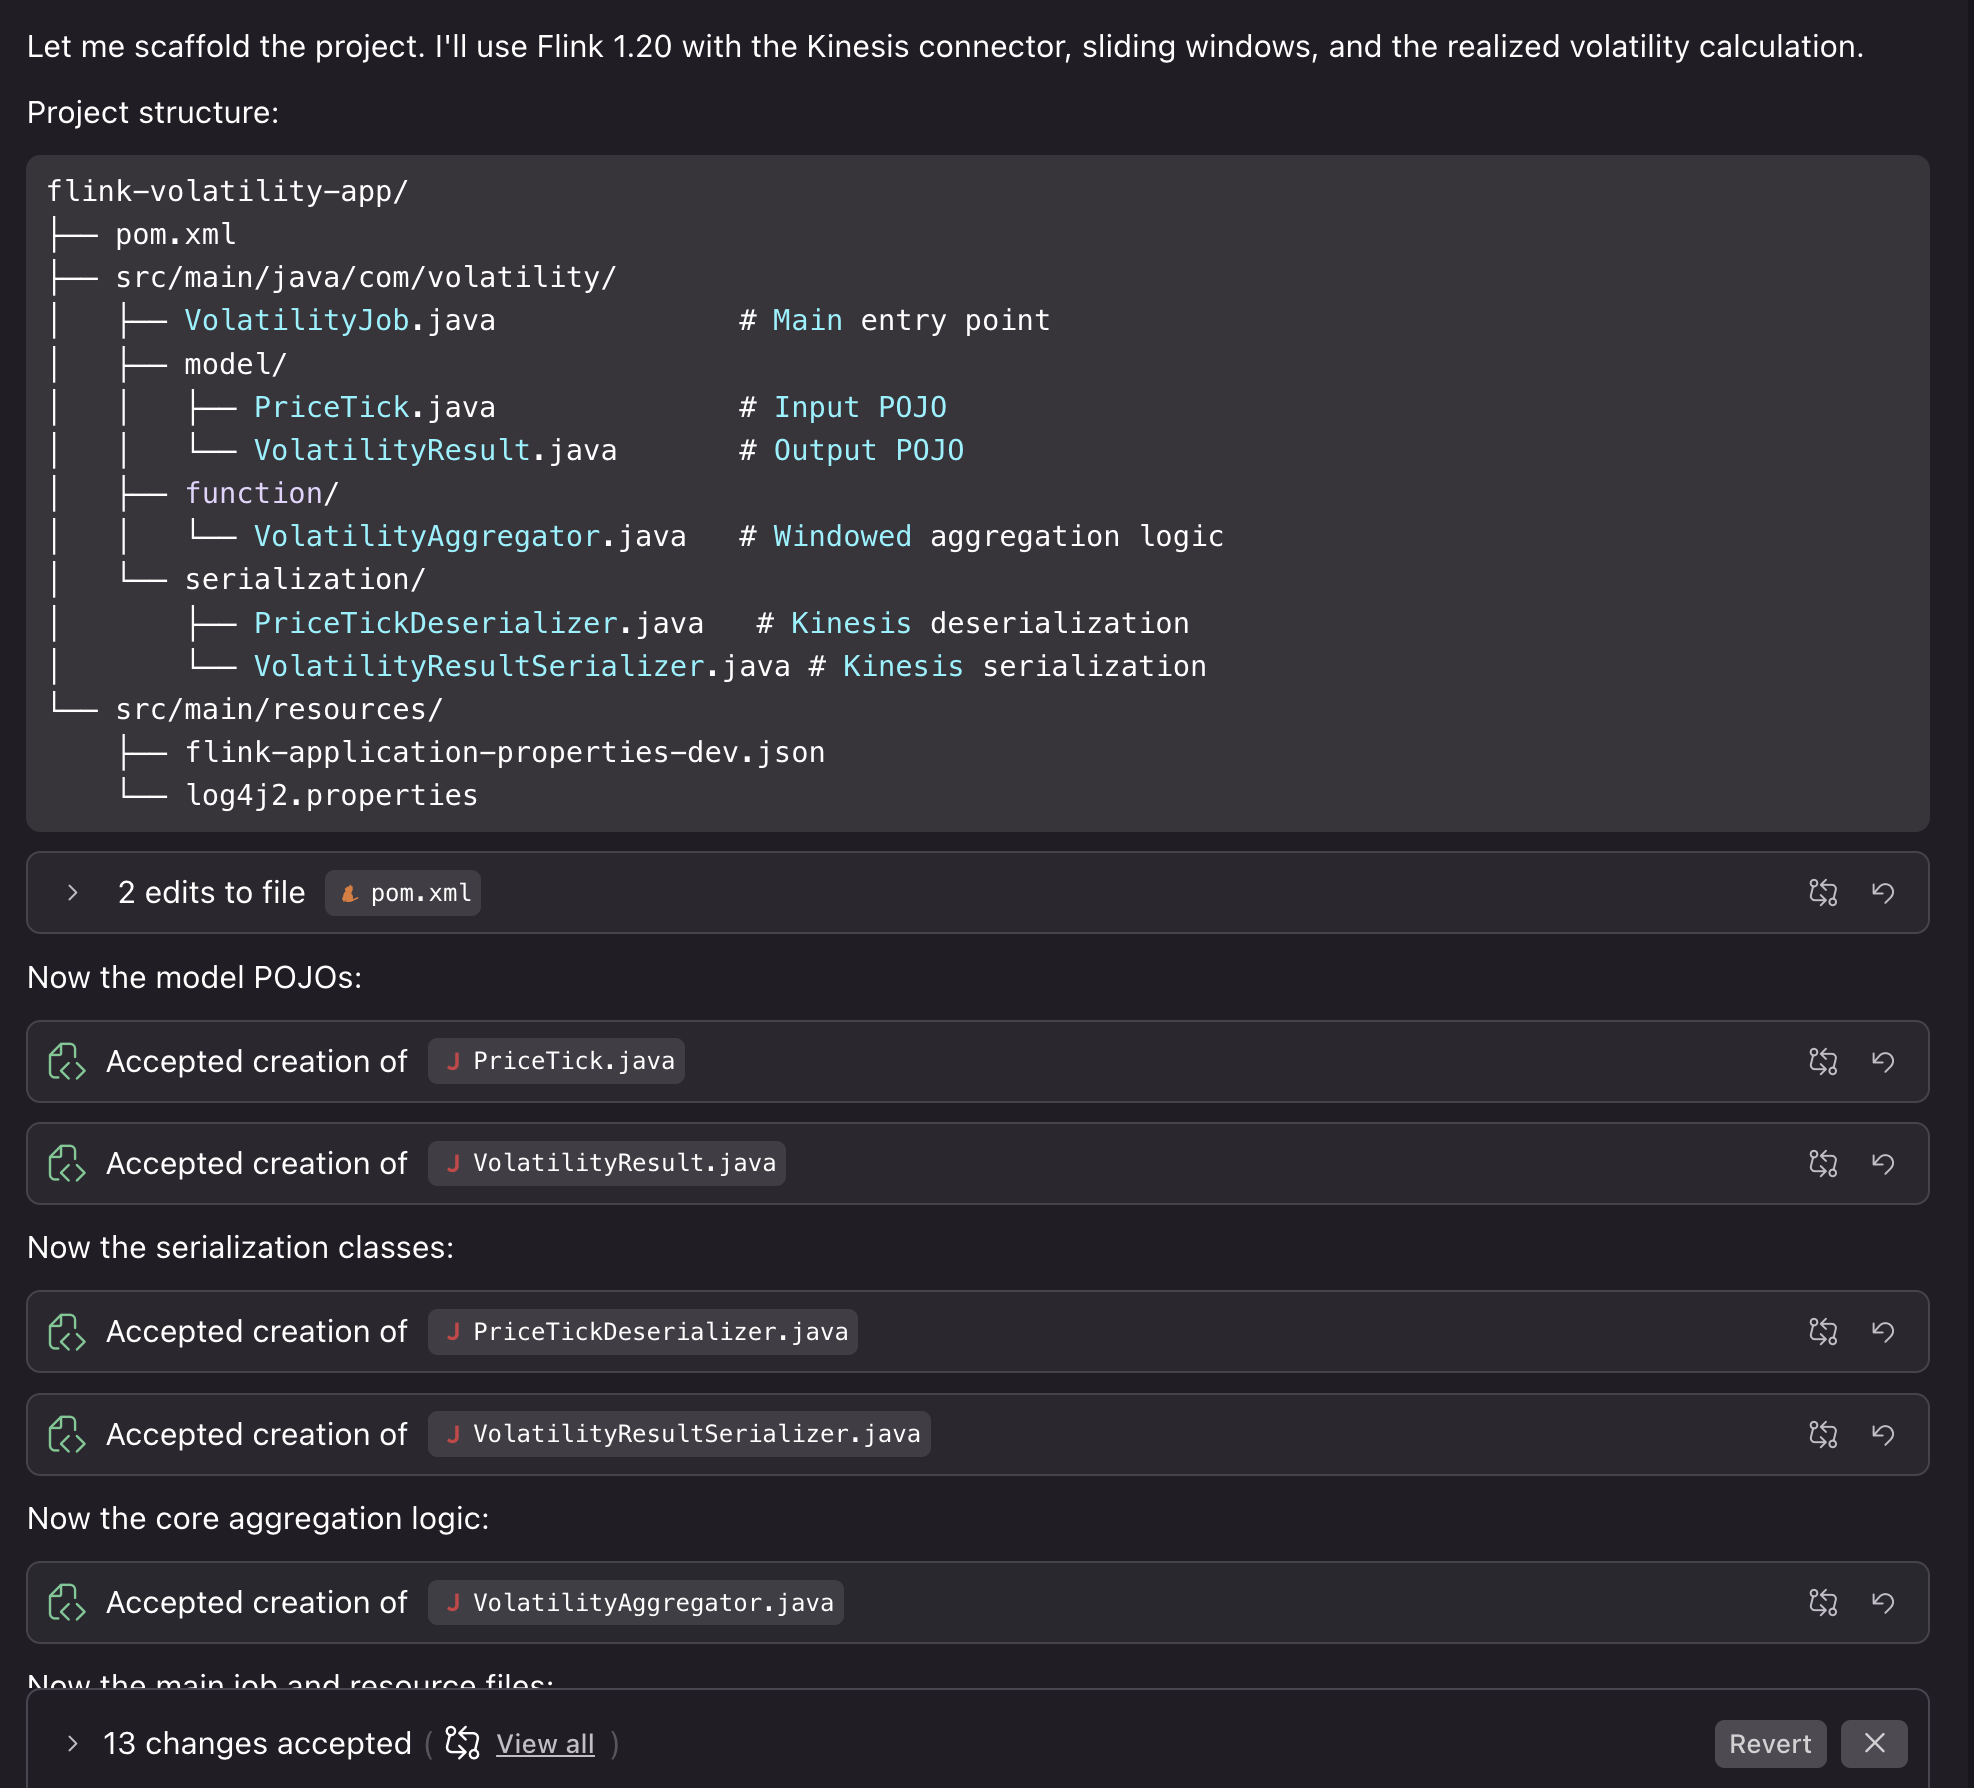
Kiro also compiles the code to verify that it builds correctly. We can then proceed by asking Kiro to help us with running the application locally for testing.
3. Testing the project locally
You can run the application locally to test the results. We can prompt: “Can we run this locally using something like LocalStack to test deploying the job and also see some example results?”
Kiro creates the necessary Docker resources, testing scripts, and deployment steps to run the application locally with synthetic resources. If it encounters bugs or detects issues during the local testing process, it fixes them so that your deployment runs smoothly:
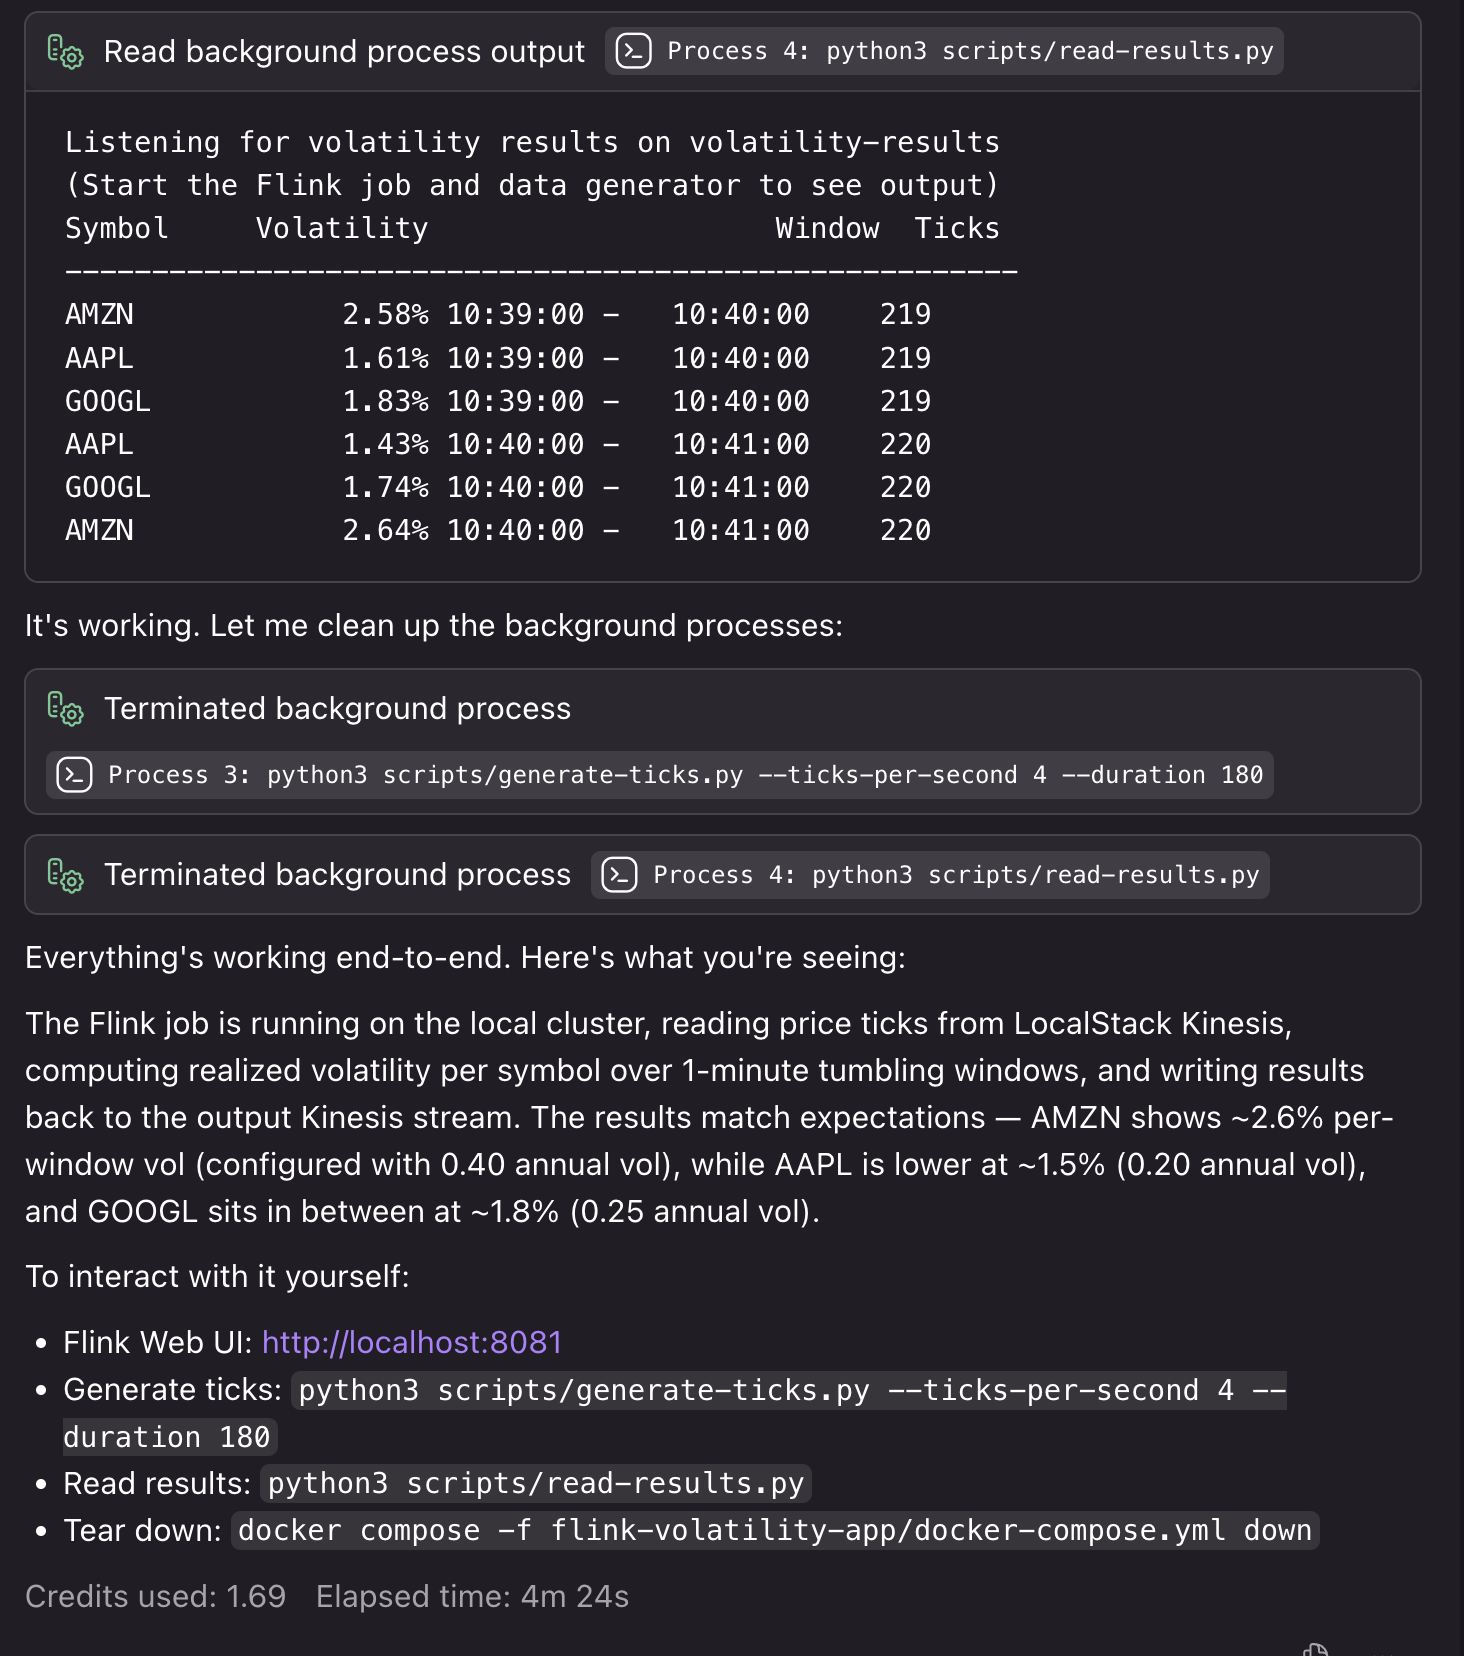
We can also access our local Flink UI to view our application:
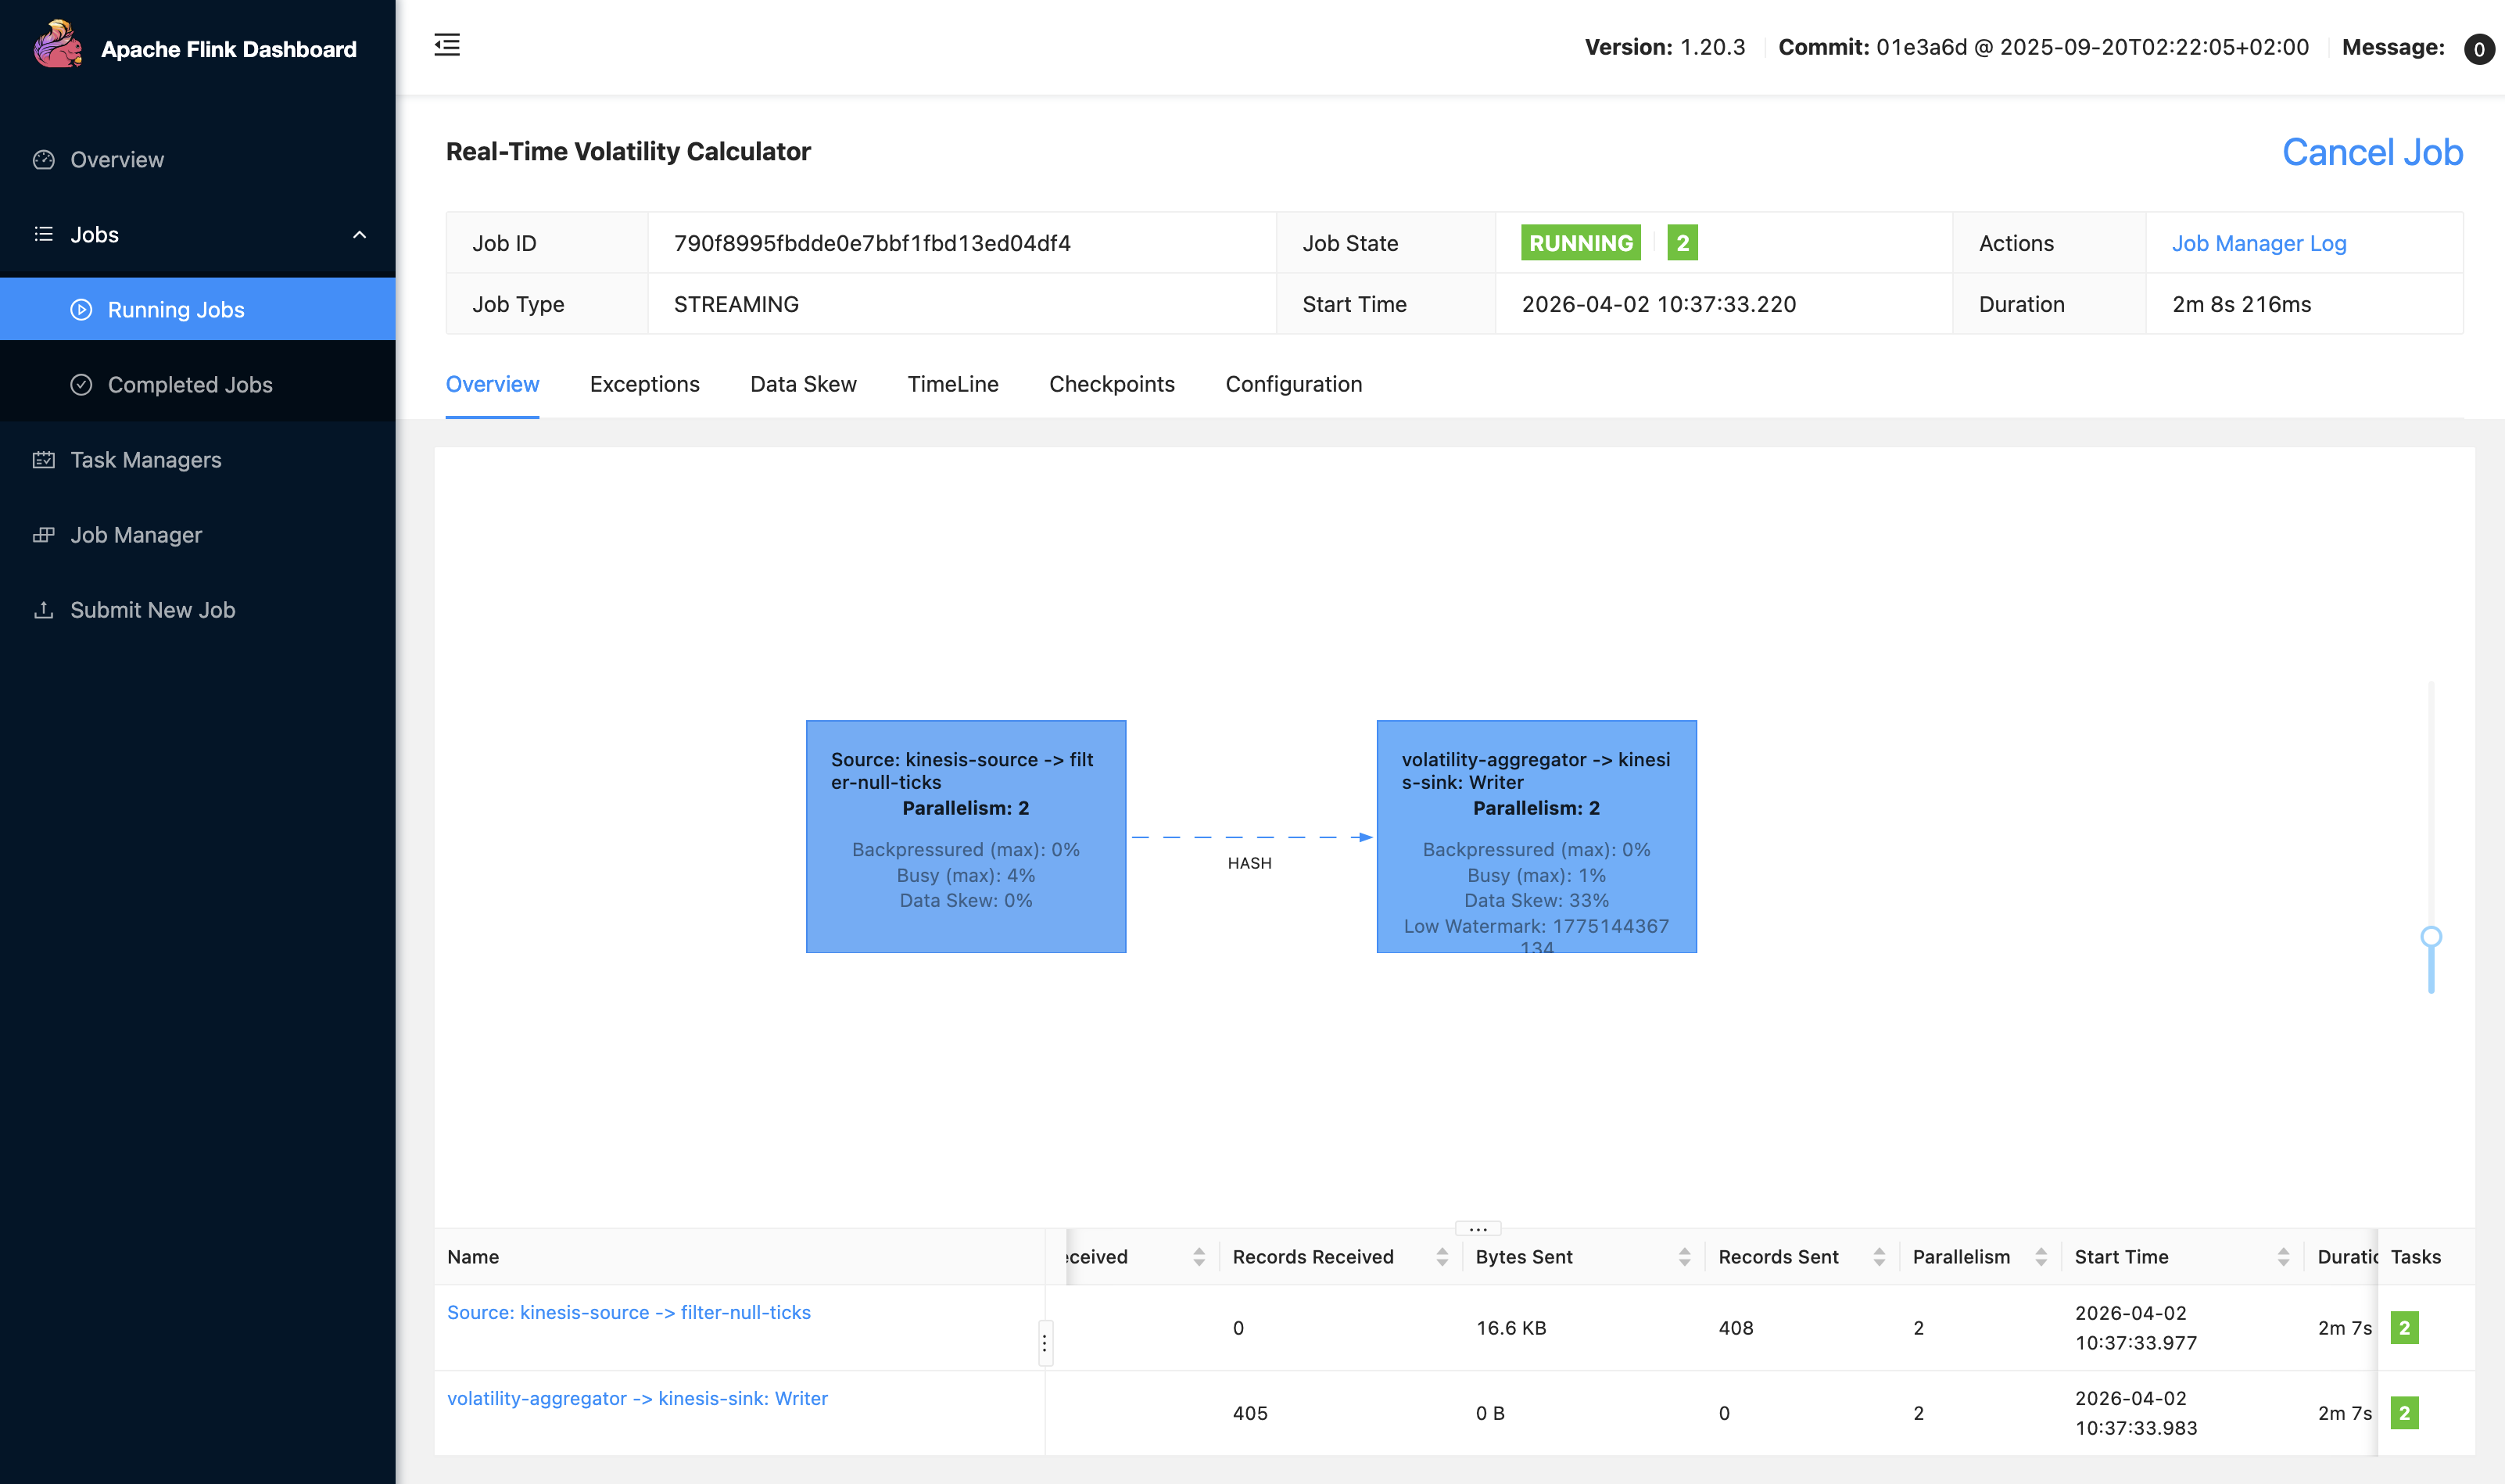
4. Deploying the application to Managed Service for Apache Flink
Now that our application is running and generating results end-to-end, we can use the Power for other tasks. For example, you can get guidance on KPU allocation and parallelism settings based on your expected throughput, configure monitoring with CloudWatch metrics, logging, and dashboards for operational visibility, or set up infrastructure as code (IaC) for deploying in Managed Service for Apache Flink. We can prompt: “This is great! Can you help me deploy this application to Managed Service for Apache Flink? I’d like to use CloudFormation for deployment.”
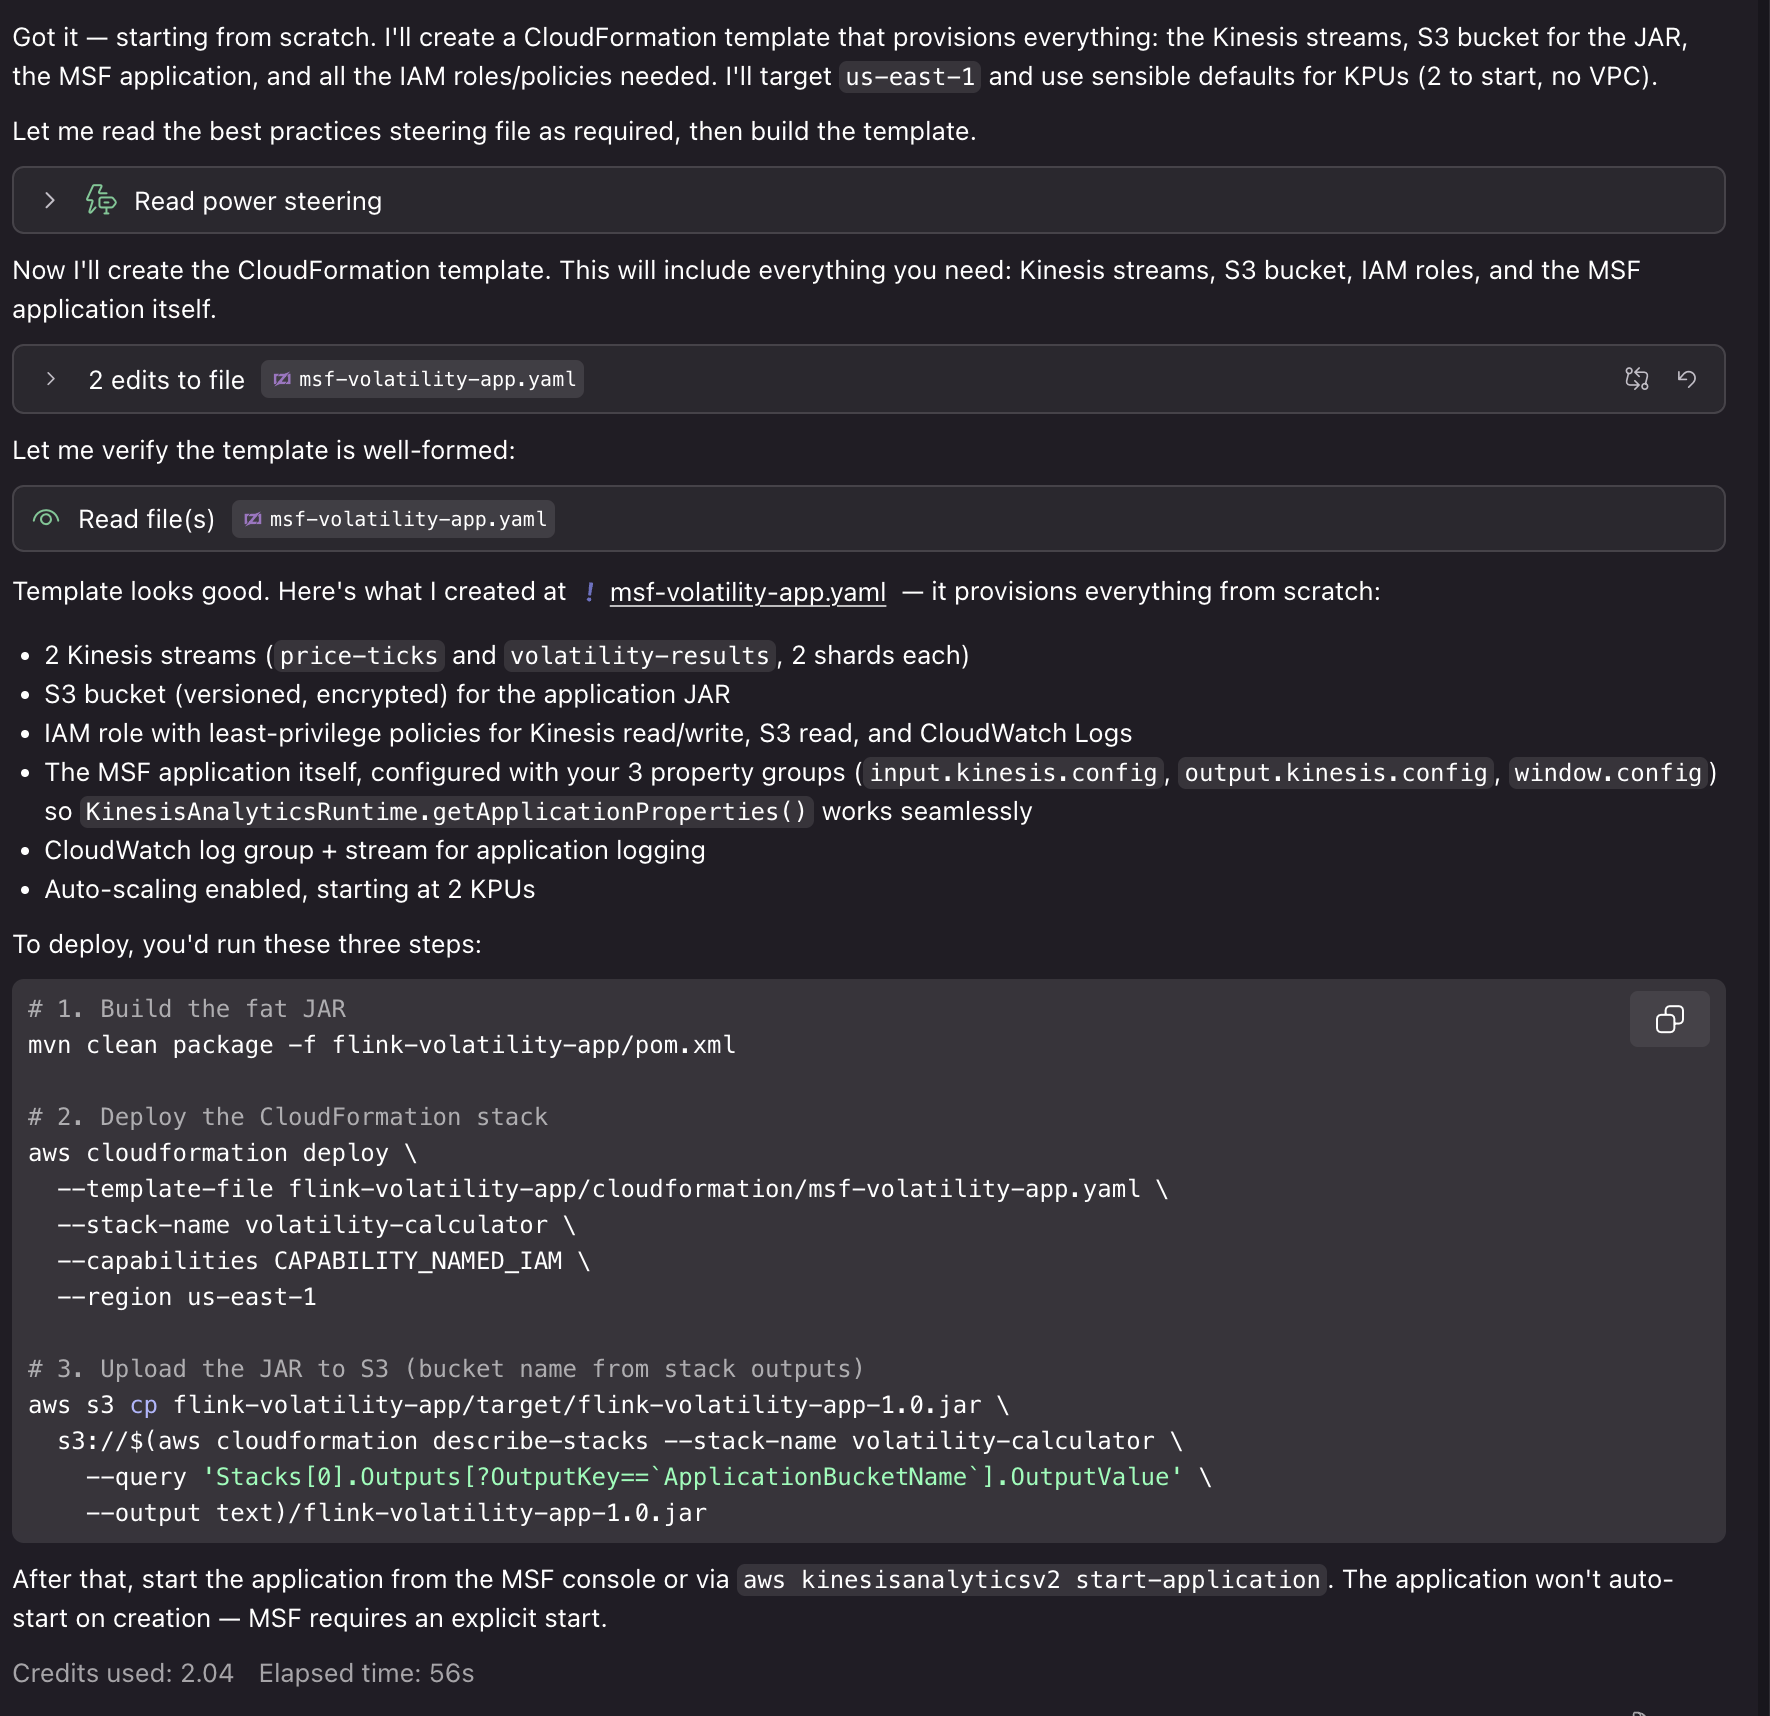
Using the generated AWS CloudFormation templates and deployment scripts, we can deploy our application to AWS with associated resources for Kinesis Data Streams, Amazon S3 buckets for application JAR files, CloudWatch log groups, and IAM roles. Deploying these resources requires IAM credentials with associated permissions and will incur cost for the associated resource usage.
In a traditional workflow, you build your application, deploy to Managed Service for Apache Flink, then discover performance issues or configuration problems in production. You spend time debugging checkpoint failures, serialization errors, or resource bottlenecks.With the Power/Skill, the AI assistant catches these issues during development. When you need complex aggregation and processing logic, it helps you to do so in a way that uses resources efficiently with Flink’s scaling model. When you create an application bug that would cause a crash in production, it helps you identify it early with local end-to-end testing. The Power is configured with guidance and best practices to help with the development process from start to finish.
The Managed Service for Apache Flink Kiro Power and Agent Skill provide contextual advice specific to your situation. For new developers, it walks through the complete workflow from project setup to deployment, explaining Managed Service for Apache Flink-specific concepts along the way. For migration projects, it analyzes your existing code for Flink 2.2 compatibility issues and provides targeted refactoring guidance. The following example shows how the tool helps with the complex task of migrating from Flink 1.x to 2.2.
We can ask Kiro to help us upgrade our project from the previous example to Flink 2.2: “I need to migrate my Flink 1.x application to 2.2. Can you help me identify compatibility issues?”
The assistant loads the Managed Service for Apache Flink Kiro Power and analyzes our code to identify potential issues:
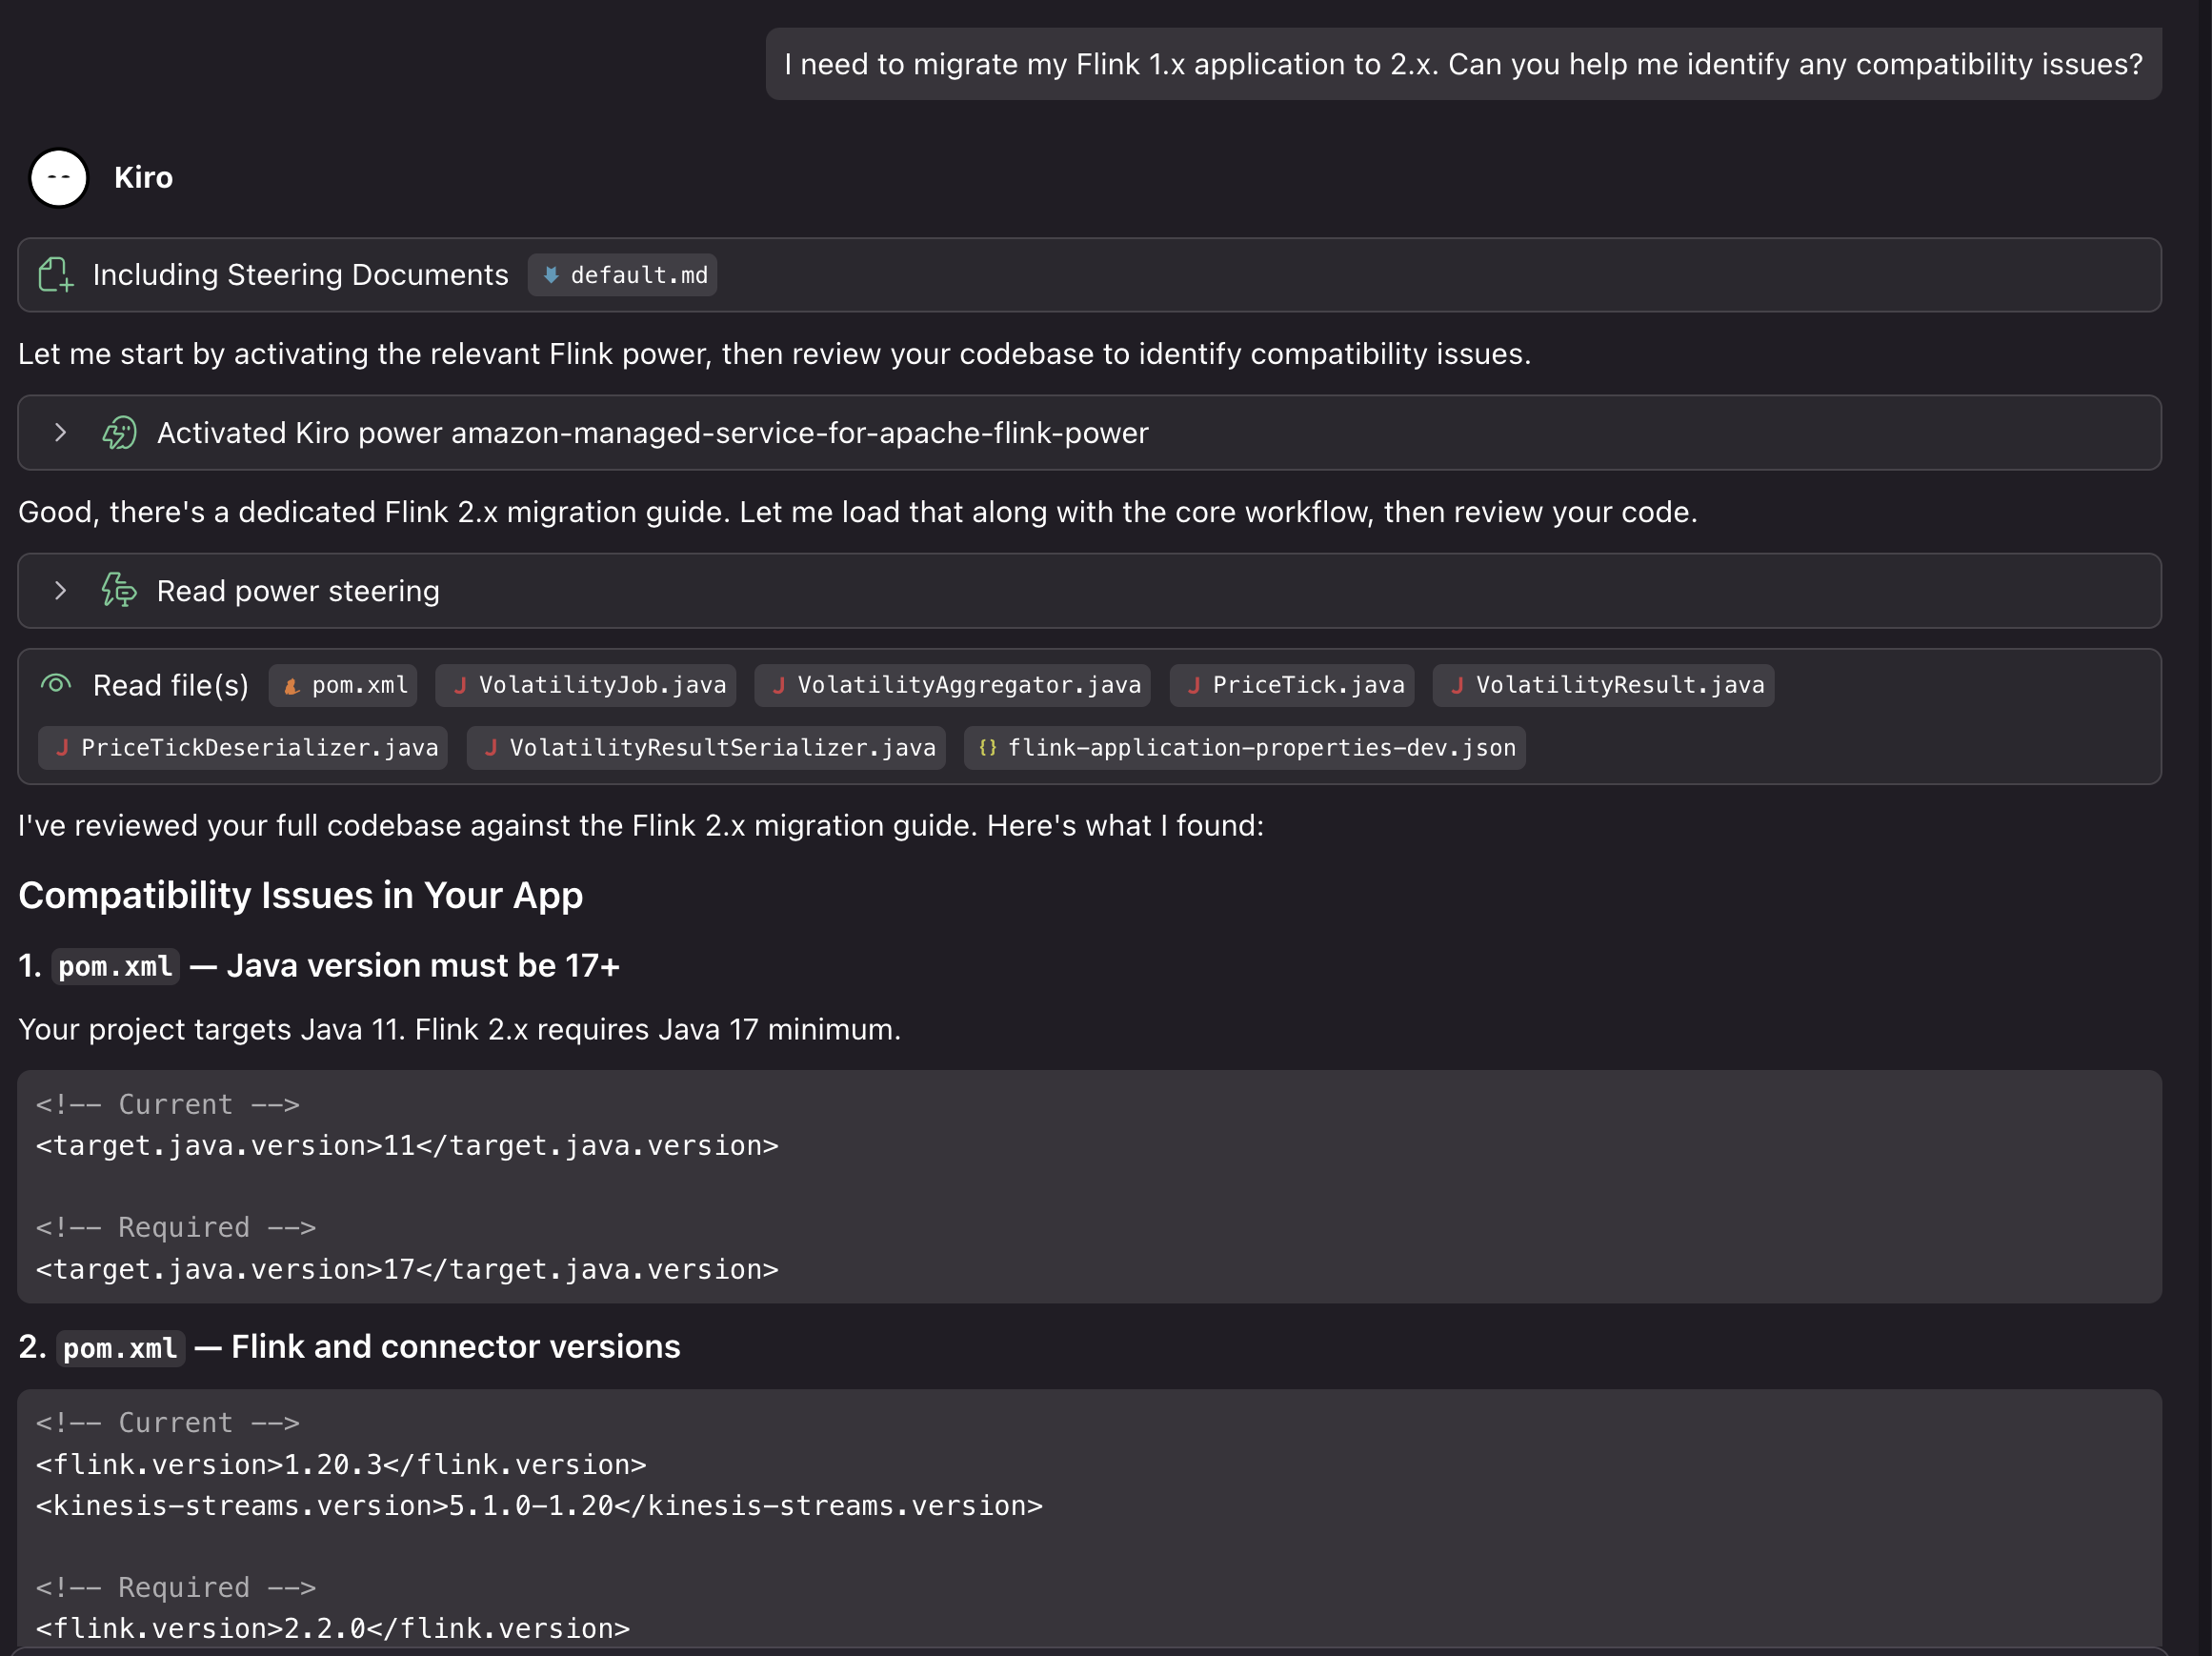
In this case, using our generated project on Flink 1.20, Kiro identified the following compatibility issues for the upgrade:
It also verified that some parts of the project are already Flink 2.2 compatible. The project uses the new Source Sink V2 APIs, the logging is 2.2 ready, the POJOs with no collection fields are state migration safe, and there are no Kryo registrations or TimeCharacteristic usage.
We can then ask Kiro to provide a step-by-step migration plan, both for updating the code and deploying to Managed Service for Apache Flink: “Can you help me update the application for Flink 2.2, and help me figure out the steps to upgrade my running Managed Service for Apache Flink application?”
Kiro evaluates the entire application code base. It evaluates it against the Power’s migration guidance and best practices, and provides a comprehensive analysis of the breaking changes, risks, and potential issues that would arise in the upgrade. After we approve the changes, Kiro then proceeds to make the necessary updates to make our application compatible with Flink 2.2 and provide us with a step-by-step upgrade process for the running application:
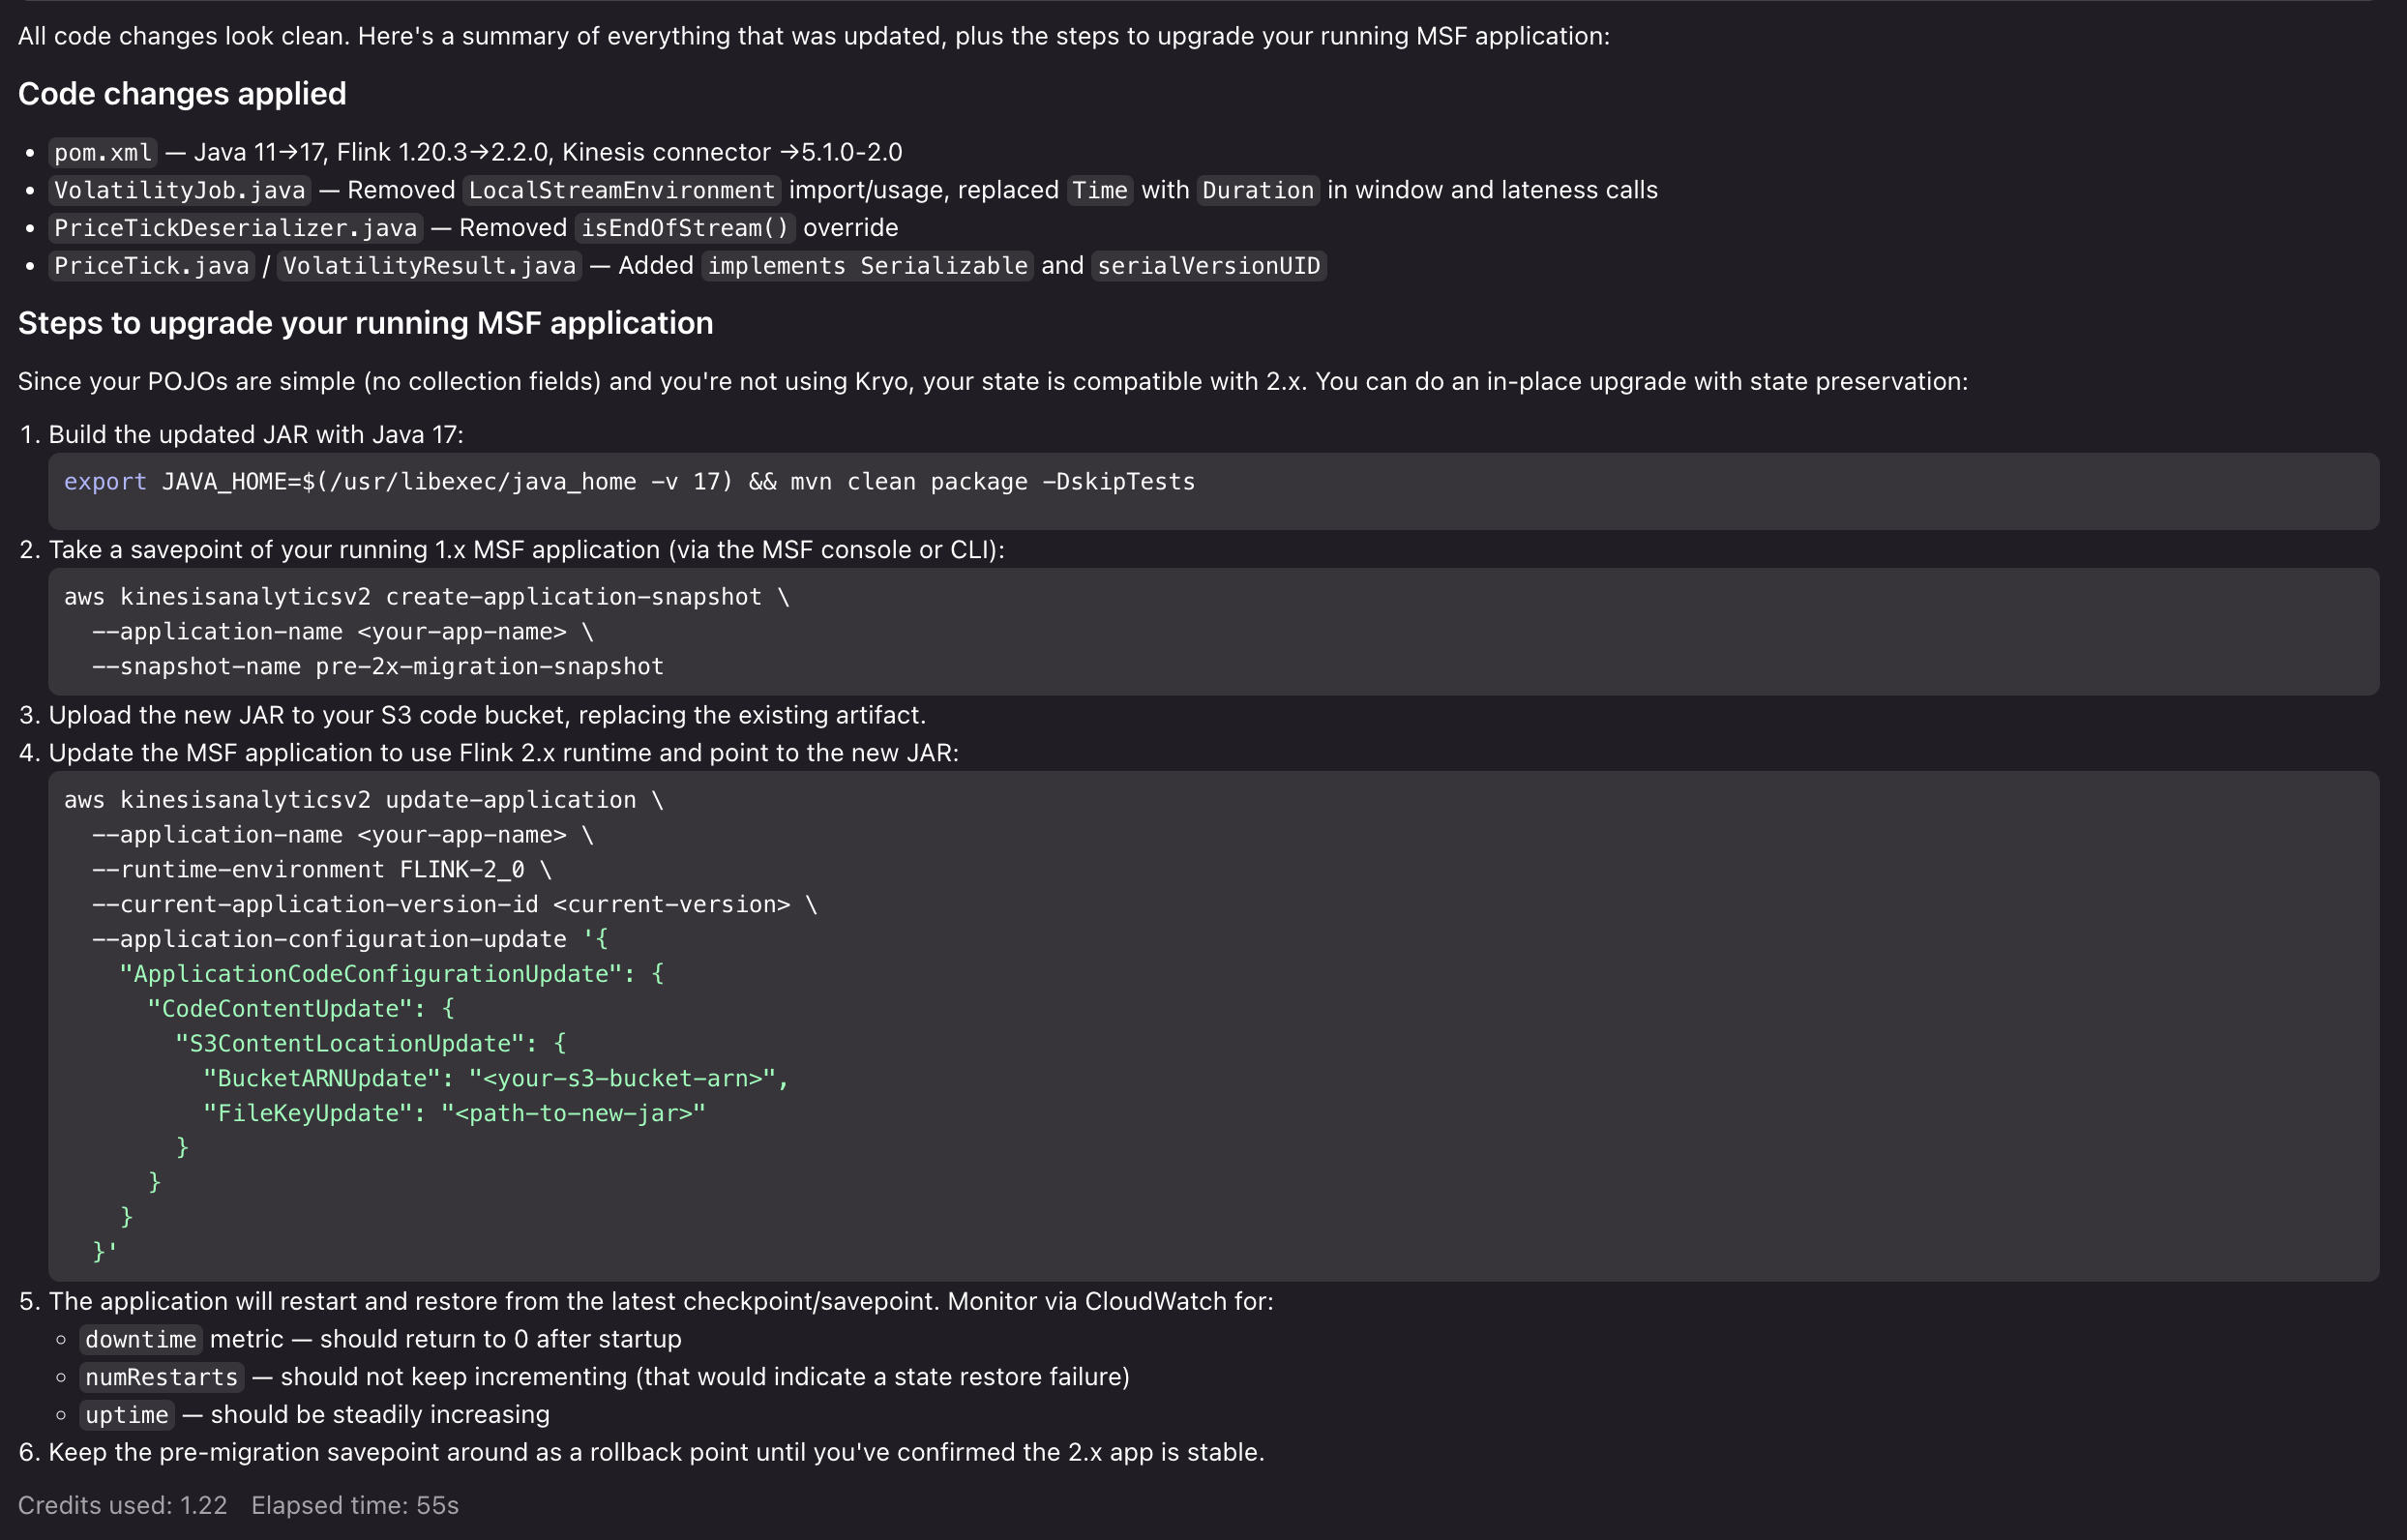
Now that Kiro has prepared the application for Flink 2.2, highlighted migration risks, and provided us with a clear path to execute the upgrade, you can test the upgrade process with confidence. From here, we can proceed to run our Flink 2.2 application locally, test the upgrade process in a development environment in Managed Service for Apache Flink, and then execute the upgrade in our production environment. If we run into issues, we can return to the Kiro Power to get advice, resolve issues, and unblock our upgrade.
To remove the Power/Skill installation:
For Kiro:
For Agent Skills:
In this post, we showed you how the Kiro Power and Agent Skill for Amazon Managed Service for Apache Flink brings AI-assisted development to stream processing. You can use the tool to overcome Flink’s learning curve, build applications following Managed Service for Apache Flink best practices, and migrate to Flink 2.2 with confidence. To get started, choose the path that fits your workflow:
We welcome your feedback. Report issues or request features through GitHub Issues, or contribute improvements via pull requests.
Post Syndicated from Ali Alemi original https://aws.amazon.com/blogs/big-data/migrating-tls-clients-managed-by-third-party-certificate-authorities-from-self-managed-apache-kafka-to-amazon-msk/
Amazon Managed Streaming for Apache Kafka (Amazon MSK) is a fully managed streaming data service that handles Apache Kafka infrastructure and operations, so developers and DevOps managers can run Apache Kafka applications on AWS. Migrating to Amazon MSK requires no application code changes because Amazon MSK uses fully open source Apache Kafka, allowing existing applications and tools to work seamlessly. Amazon MSK with Express brokers streamlines Kafka management by providing up to 3x more throughput, 20x faster scaling, and 180x faster recovery with virtually unlimited storage, delivering resiliency and elasticity for mission-critical workloads.
Amazon MSK supports multiple authentication methods to secure client connections to Kafka clusters. These methods include:
When customers manage their own Kafka clusters and adopt mTLS, they typically rely on a third-party managed certificate authority (CA) to sign and verify both client and server certificates. This establishes a trust relationship where the CA acts as the trusted intermediary that validates the identity of both parties in the communication. When customers migrate their workloads to Amazon MSK, they must make sure that client certificates are signed by a CA that’s recognized and trusted by the MSK cluster. Amazon MSK recommends customers to use AWS Private Certificate Authority to create a private CA within AWS that MSK trusts. The migration path typically requires customers to either:
In this post, we provide an approach to reuse your existing client certificates without reissuing them through AWS Certificate Manager (ACM) Private Certificate Authority. This solution enables an accelerated migration path by using your current third-party CA infrastructure. This removes the complexity and operational overhead of certificate re-issuance while maintaining the security posture that you’ve established with your existing mTLS implementation.
This approach involves four key steps to reuse your existing client certificates when migrating to Amazon MSK:
1. Create an Intermediate Certificate Using Your Third-Party CA
First, you generate an intermediate certificate authority (CA) certificate using your existing third-party CA infrastructure. This intermediate certificate acts as a bridge between your current certificate management system and AWS.
2. Import the Intermediate Certificate into AWS Certificate Manager as a Private CA
Next, you import this intermediate certificate into AWS Certificate Manager (ACM) as a Private Certificate Authority (PCA). This step establishes the intermediate CA within the AWS environment, making it recognizable to AWS services.
3. Integrate Amazon MSK with the PCA created from your Intermediate Certificate
You then configure your Amazon MSK cluster to use the ACM Private CA that contains your imported intermediate certificate. This integration enables Amazon MSK to recognize and trust certificates signed by your certificate authority.
4. Establish trust through common Certificate Authority
This approach works because both the AWS Private CA and your existing client certificates share the same root of trust—they’re both signed by your third-party CA. When Amazon MSK validates client certificates, it can trace the certificate chain back through the intermediate certificate in AWS Private CA to your trusted third-party CA, establishing a complete chain of trust without requiring certificate reissuance.This solution maintains your existing security architecture while enabling seamless migration to Amazon MSK, so your clients can continue using their current certificates without interruption.
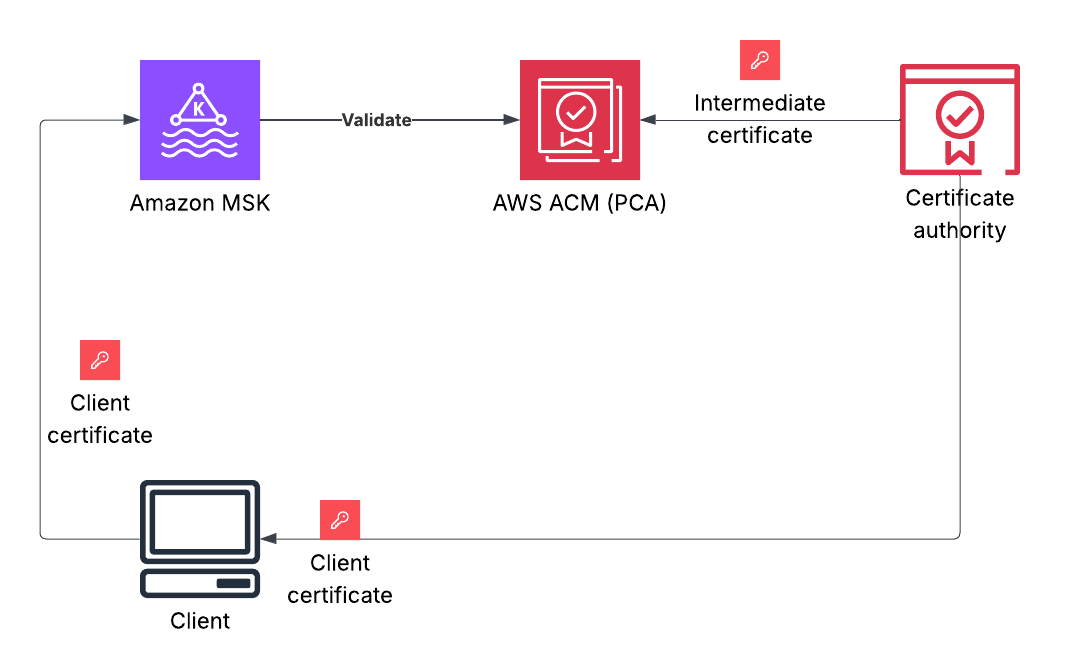
Figure 1: Architecture diagram showing the integration of third-party Certificate Authority with Amazon MSK through AWS Certificate Manager Private CA
In real-world scenarios, you already have a certificate authority that has issued certificates for your clients. For the purpose of this post, we use a code sample to create a self-signed certificate authority (using OpenSSL) to demonstrate the implementation steps. If you already have an existing certificate authority, you don’t need to create a root CA. You can generate an intermediate CA (Step 2) using your third-party CA and continue following the steps from where you import the intermediate CA certificate into AWS ACM as a Private Certificate Authority.
Cloning the repository
To clone the repository, complete the following steps:
git clone https://github.com/aws-samples/msk-third-party-mtls
cd ./msk-third-party-mtls/openssl
make the script executable first:
You will be prompted to set up a password for the private key and the certificate. Here is an example of an output
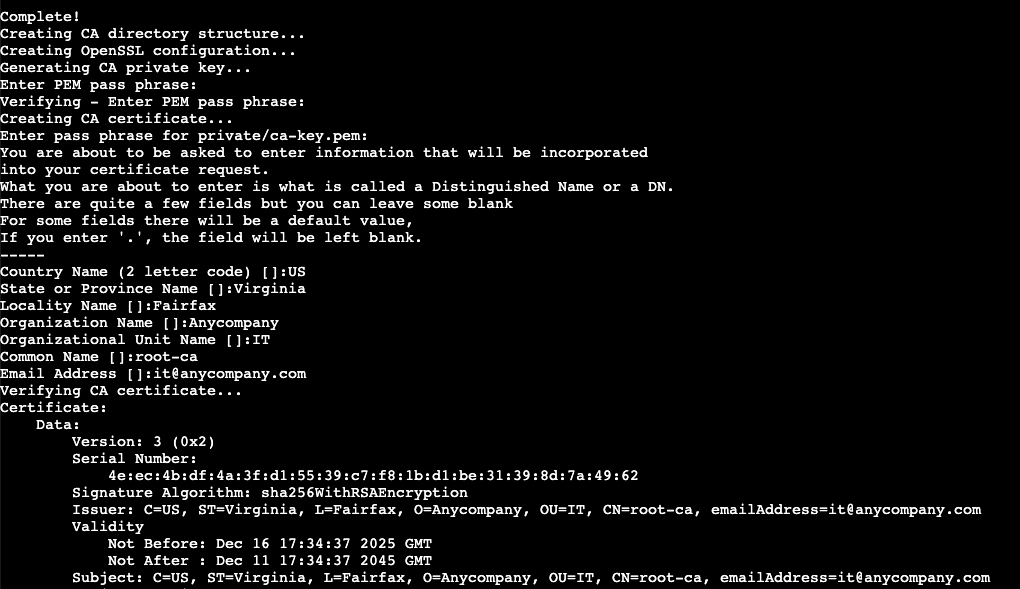
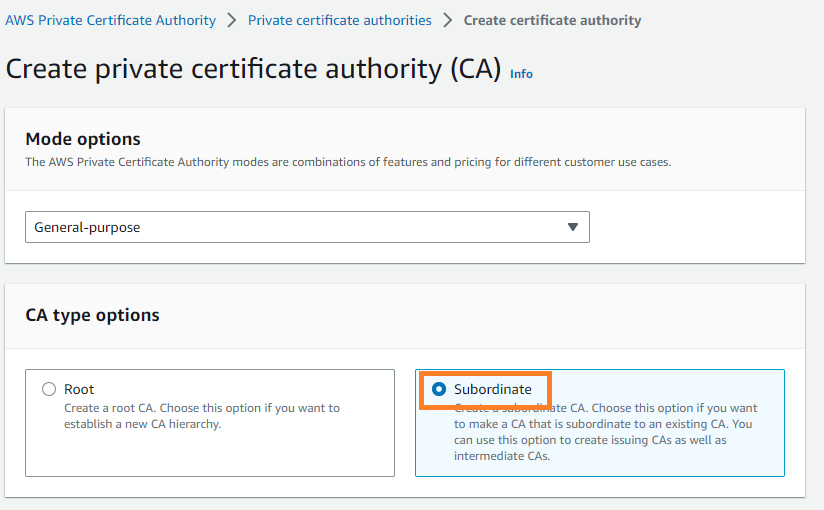
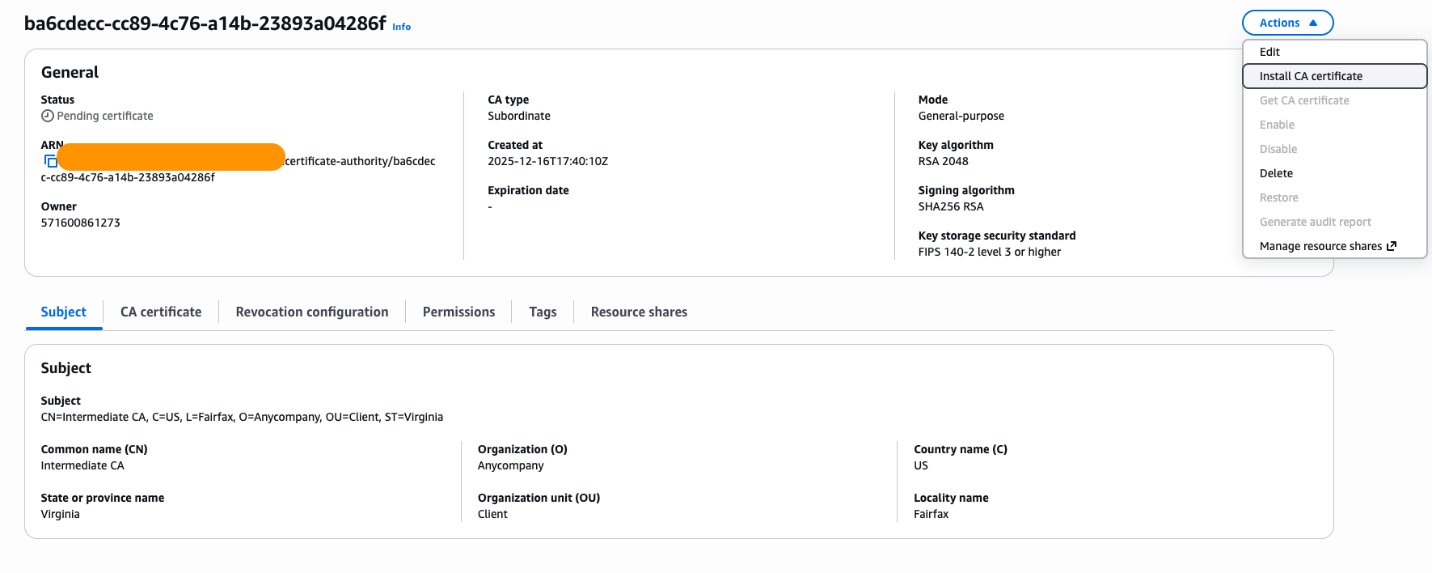
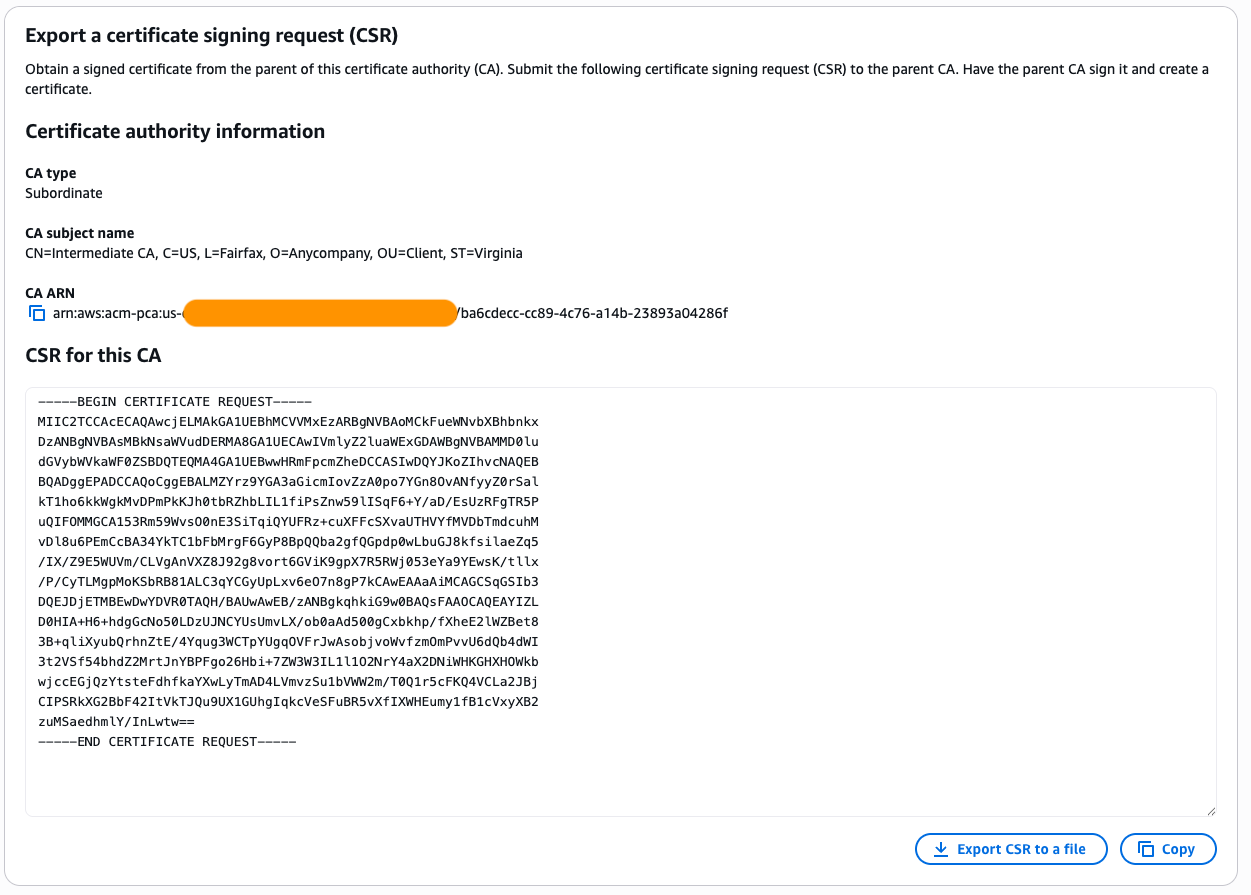
./sign-acm-ca.sh in the code example.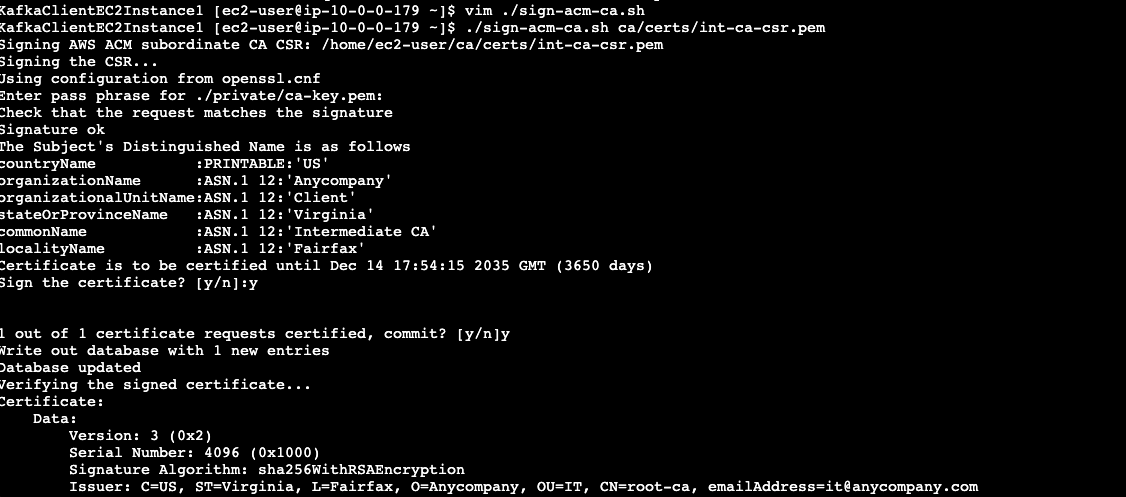
Note: AWS Private CA retains the private key internally. You only sign their CSR and import the resulting certificate back to the AWS Private CA.
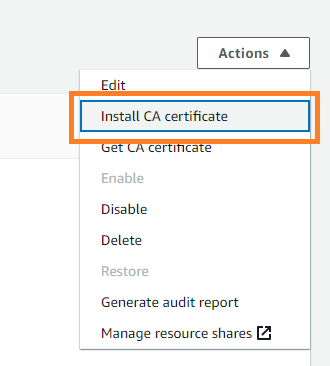

Importing the certificate into AWS Certificate Manager
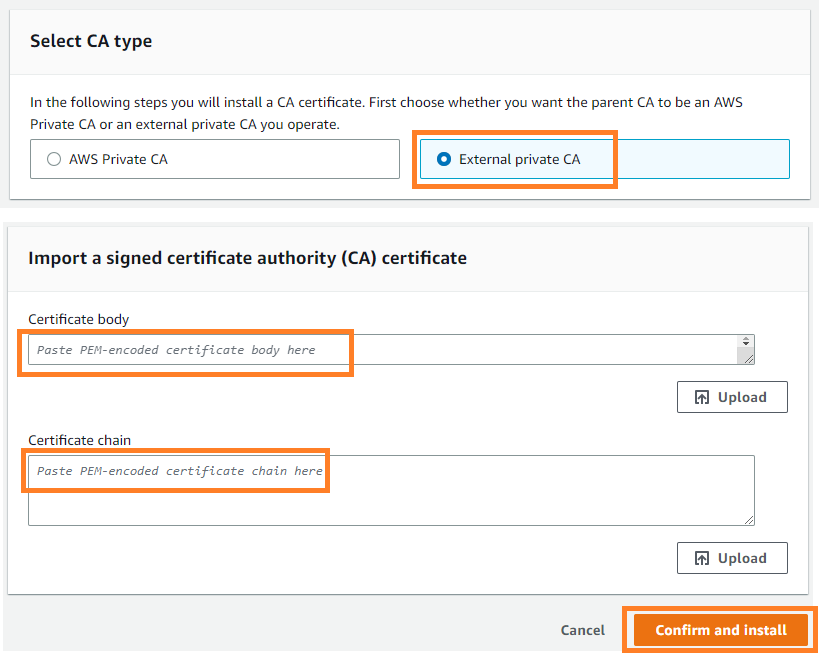
Open both files in a text editor:
acm-subordinate-ca-cert.pemacm-ca-chain.pemDo the following in the Certificate body field in AWS ACM:
acm-subordinate-ca-cert.pem file and paste it into the text box.acm-ca-chain.pem file.Important: The certificate chain shouldn’t include the subordinate CA certificate itself—only the certificates above it in the chain (the root CA).
You should see the AWS Private CA turns into active state.
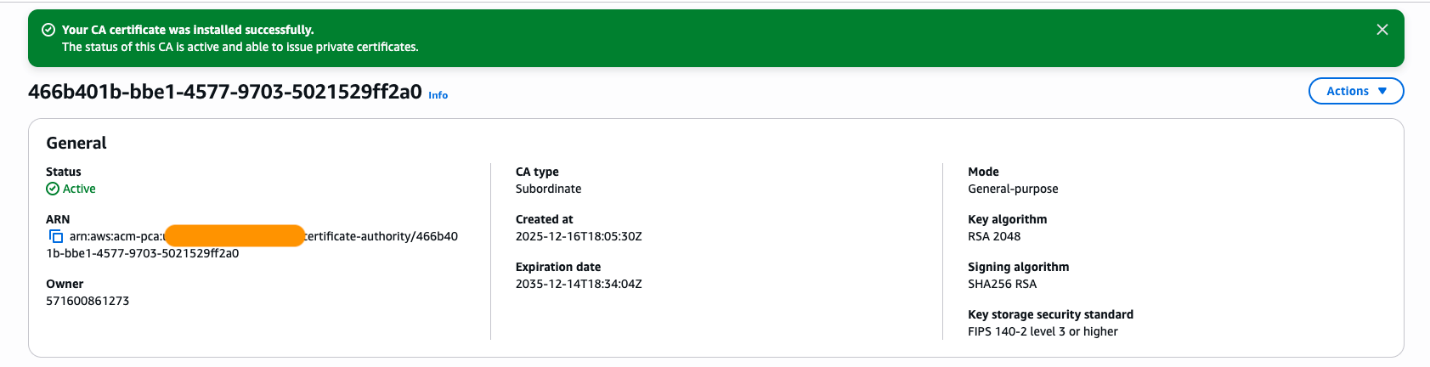
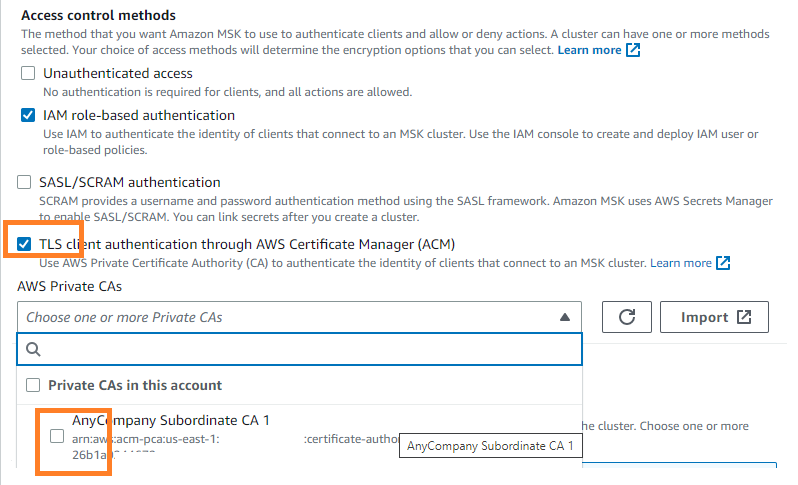
Run the certificate generation script
Execute the following command, replacing <client-name> with a descriptive name for your client (this will be used in the certificate filename):./generate-client-cert.sh <client-name>
Example:
./generate-client-cert.sh kafka-admin
Enter distinguished name information
When prompted, enter the distinguished name (DN) options. These should match your root CA settings except for the Common Name (CN):
Verify certificate files
After the certificate is generated, verify that the files were created successfully by running:ls ~/ca/certsYou should see files with your client name, including:
<client-name>.key (private key)<client-name>.crt (certificate)<client-name>.p12 (PKCS12 keystore)Create Kafka client properties file
Create a new properties file for your Kafka client (for example, kafka-tls-client.properties) based on the provided kafka-admin-ssl.properties example file. Update the file paths to reference your newly generated client certificate files.
Example configuration:
To test the Kafka client connection, do the following.
Set environment variables
First, set the required environment variables for your Kafka installation and MSK cluster:
Note: Replace <your-msk-bootstrap-servers> with your actual Amazon MSK cluster bootstrap server endpoints (for example, b-1.mycluster.abc123.kafka.us-east-1.amazonaws.com:9094,b-2.mycluster.abc123.kafka.us-east-1.amazonaws.com:9094)
Run the Kafka list topics command
Execute the following command to verify that your client can successfully connect to Amazon MSK using mutual TLS authentication:
What this test does:
Expected result: If successful, you should see a list of topics in your Kafka cluster (or an empty list if no topics exist yet).

If the connection fails, check:
To troubleshoot certificate issues and verify which certificates are involved in the TLS handshake, enable Java SSL debug mode:
What this debug mode shows:
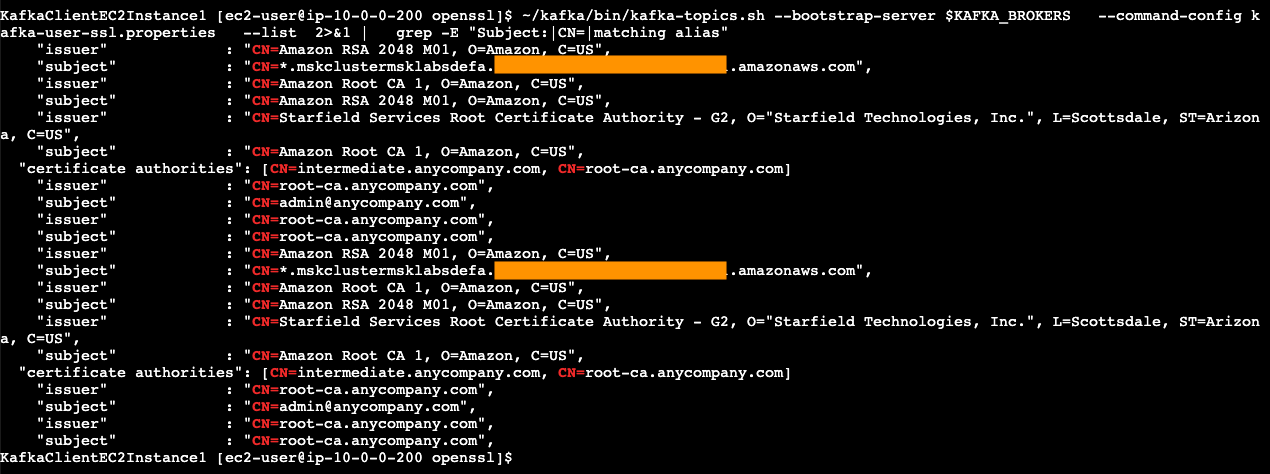
When this is helpful:
Look for lines containing:
To disable debug mode after troubleshooting, simply unset the environment variable:
unset KAFKA_OPTS
This post presents a solution for migrating TLS clients from self-managed Apache Kafka to Amazon MSK while reusing existing third-party CA-signed certificates. The approach removes the need for certificate reissuance by instead creating an intermediate CA from the existing third-party CA, importing it into AWS Certificate Manager as a Private CA, and integrating it with Amazon MSK. This maintains the established chain of trust through the common certificate authority, enabling seamless migration without operational disruption while preserving the existing security architecture and mTLS implementation. To read more about the Amazon MSK security model, see Security in Amazon MSK.
Post Syndicated from Technology Connextras original https://www.youtube.com/watch?v=oEruzTKteRE
Post Syndicated from Technology Connextras original https://www.youtube.com/watch?v=AtaG0PQYeVQ
Post Syndicated from Sébastien Stormacq original https://aws.amazon.com/blogs/aws/the-aws-mcp-server-is-now-generally-available/
I have been building with AI agents and MCP tools for a while now, and one question kept coming up: how do you give an agent real, authenticated access to AWS without handing it the keys to the kingdom? Today, there is an answer.
I’m happy to announce the general availability of the AWS MCP Server, a managed remote Model Context Protocol (MCP) server that gives AI agents and coding assistants secure, authenticated access to all AWS services through a small, fixed set of tools.
The AWS MCP Server is part of the Agent Toolkit for AWS, a suite of tooling that includes the MCP Server, skills, and plugins that help coding agents build more effectively and efficiently on AWS.
AI coding agents are already useful for many tasks, but they run into real trouble when working with AWS at any meaningful depth. Without access to current AWS documentation, agents rely on training data that may be months out of date and may not know about services like Amazon S3 Vectors, Amazon Aurora DSQL, or Amazon Bedrock AgentCore. When asked to build infrastructure, they tend to reach for the AWS Command Line Interface (AWS CLI) rather than AWS Cloud Development Kit (AWS CDK) or AWS CloudFormation, and they produce AWS Identity and Access Management (IAM) policies that are far broader than necessary. The result is infrastructure that works in a demo but is not production-ready.
The AWS MCP Server addresses this through a compact set of tools that do not consume your model’s context window. The call_aws tool executes any of the 15,000+ AWS API operations using your existing IAM credentials. When we will launch new APIs, they will be supported within days. The search_documentation and read_documentation tools retrieve current AWS documentation and best practices at query time, so the agent always works from up-to-date information.
With general availability, we are introducing several new capabilities. The AWS MCP Server now supports IAM context keys, so you no longer need a separate IAM permission to use the server and can express fine-grained access in a standard IAM policy. Documentation retrieval no longer requires authentication. We have also reduced the number of tokens required per interaction, which matters for complex, multi-step workflows.
Also new, the run_script tool lets the agent write a short Python script that runs server-side in a sandboxed environment. The sandbox inherits your IAM permissions but has no network access, so you can give an agent the ability to process data without giving it access to your local file system or a shell. When an agent needs to call multiple APIs and combine the results, making them one at a time is slow and burns context. With run_script, the agent chains API calls, filters responses, and computes results in a single round-trip, which is both faster and more context-efficient.
The most significant addition is the transition from Agent SOPs to Skills. Skills provide curated guidance and best practices for the tasks where agents most commonly make mistakes. This helps agents complete work faster, using validated best practices, with fewer errors and fewer tokens — all of which saves you time and money. Skills are contributed and maintained by AWS service teams. This keeps the tool list short and predictable, which reduces hallucination and keeps the agent focused.
For enterprise customers, the AWS MCP Server provides a clear separation between human and agent permissions. You can use IAM policies or Service Control Policies to specify that a given user can perform mutating operations while the MCP server is restricted to read-only actions. Amazon CloudWatch metrics published under the AWS-MCP namespace let you observe MCP server calls separately from direct human calls, giving you the audit trail that compliance teams require. Amazon CloudTrail captures all API calls for a complete record.
Let’s see it in action
For this demo, I chose to use Claude Code, but I can use the AWS MCP Server with any AI agent that supports MCP, which is basically all tools available today: Kiro CLI, Kiro, Cursor, Codex, and more. I configure Claude Code to use the Anthropic Opus 4.6 model.
Opus 4.6 has a knowledge cutoff date in May 2025. It means it doesn’t know anything that happened after May last year. I ask a question about an AWS service that was introduced recently: Amazon S3 Vectors, launched in preview in July 2025 and that went GA in December 2025.
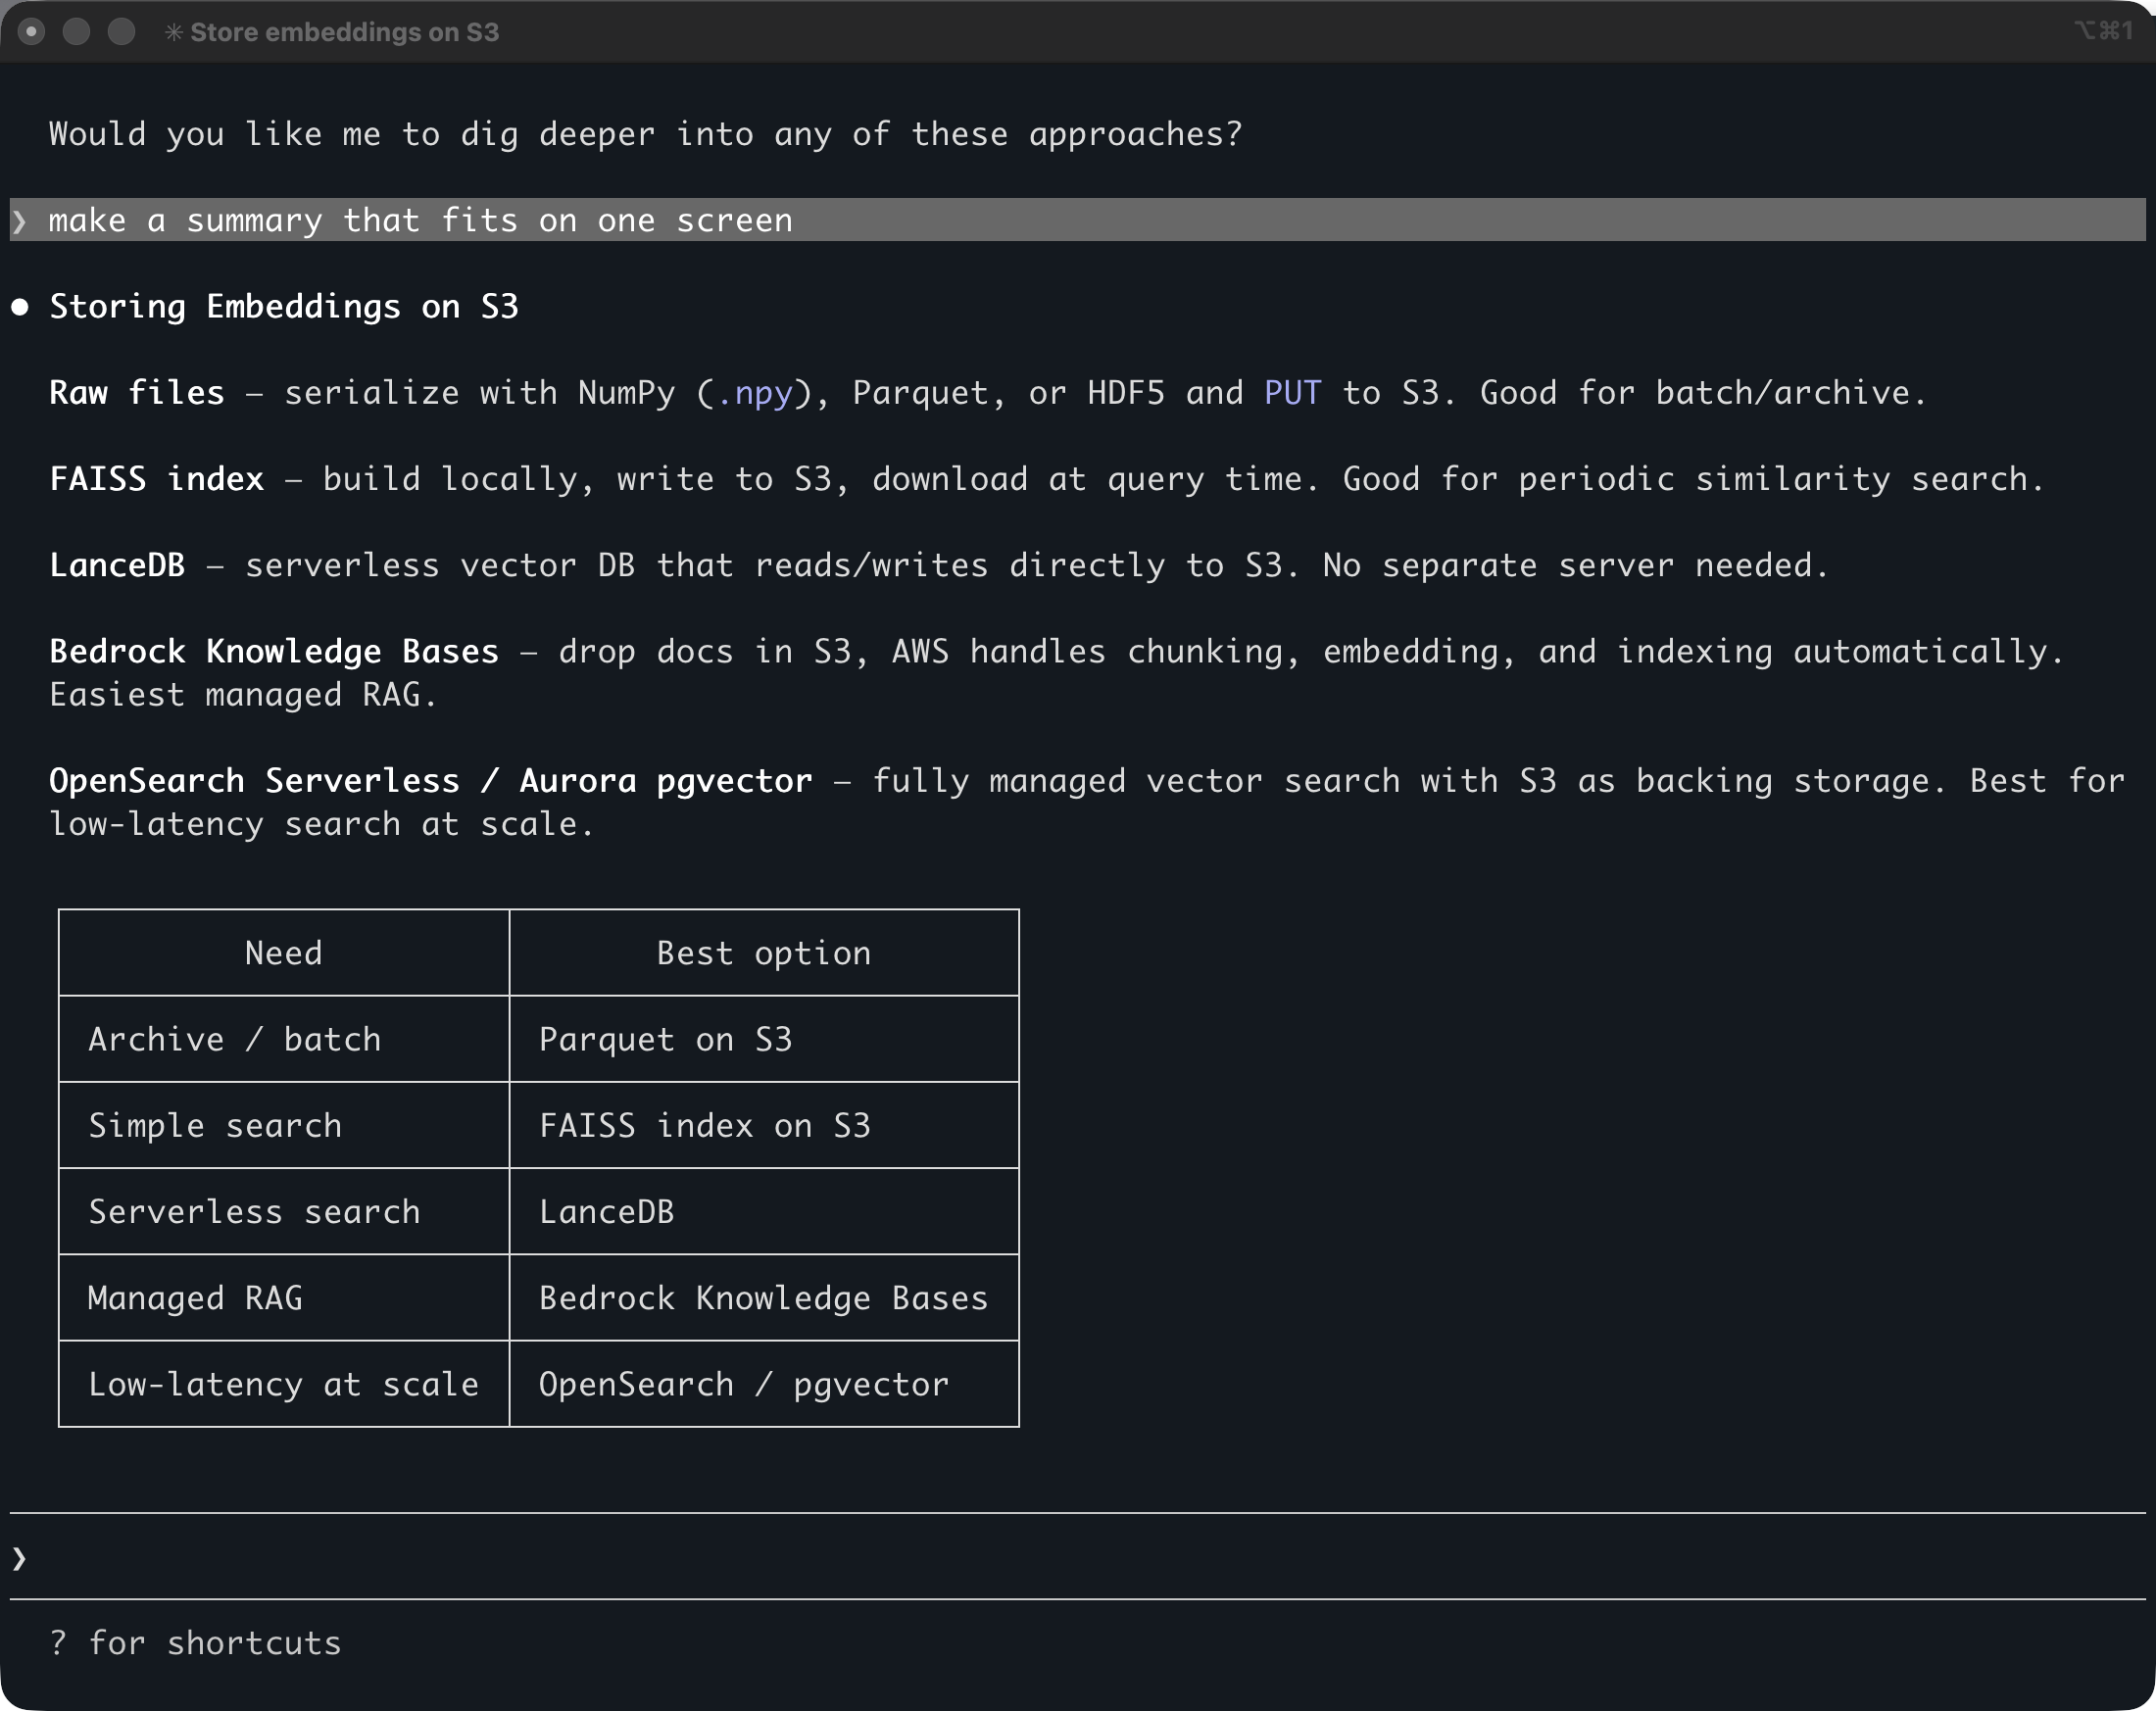
The question is “how to store embedding on S3″. (embedding is a kind of vector)
It gives me five solutions, all correct, but none using S3 Vectors as I asked. Note that this answer comes from the Opus 4.6 model, not from Claude Code. Any AI tool using the same model will return similar answers because S3 Vectors wasn’t announced at the time the model was trained.
Let’s now try with the AWS MCP Server.
The AWS MCP Server uses AWS Identity and Access Management (IAM) and IAM SigV4 authentication. To use my local AWS credentials configuration over MCP, which only supports OAuth 2.1, I configure my AI coding agent to call the AWS MCP Server through a proxy. The MCP Proxy for AWS is an open source proxy that runs on my machine and bridges the world of IAM authentication to OAuth.
I add the MCP configuration with this command:
claude mcp add-json aws-mcp --scope user \
   '{"command":"uvx","args":["mcp-proxy-for-aws@latest","https://aws-mcp.us-east-1.api.aws/mcp","--metadata","AWS_REGION=us-west-2"]}'
Let’s analyze the JSON configuration:
uvx mcp-proxy-for-aws is the command to launch the proxy; the rest of the arguments are parameters passed to the proxy.https://aws-mcp.us-east-1.api.aws/mcp is one of the two regional endpoints for the AWS MCP Server. The proxy will forward Claude Code’s requests to that endpoint.--metadata are passed to the proxy target. Here, it tells the AWS MCP Server to use the US West (Oregon) Region.I start Claude Code and I type /mcp to verify the AWS MCP Server is correctly installed and can use my credentials.
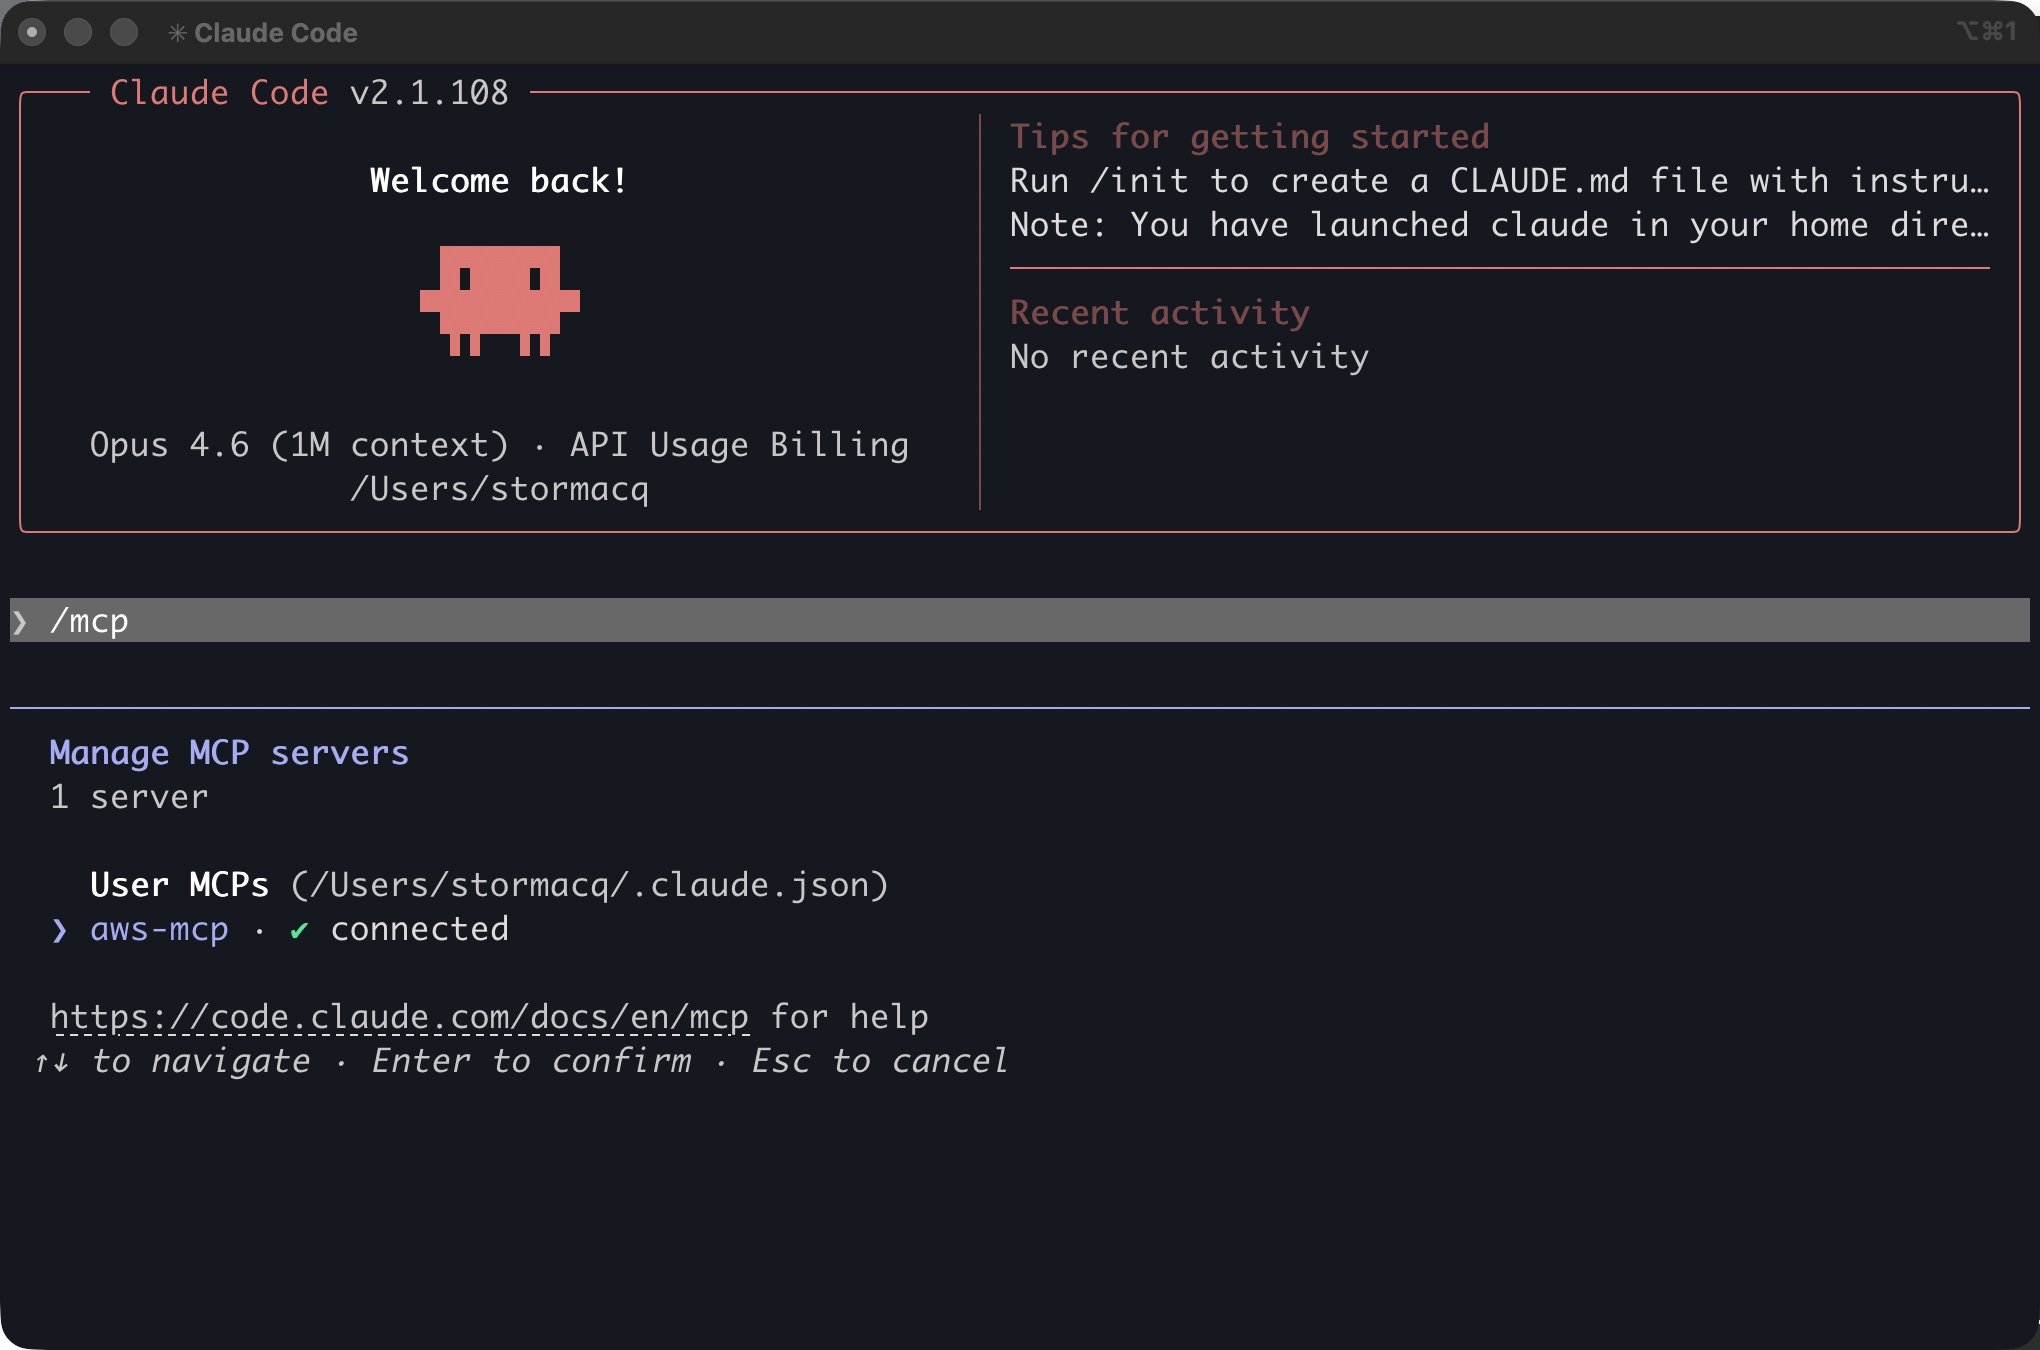
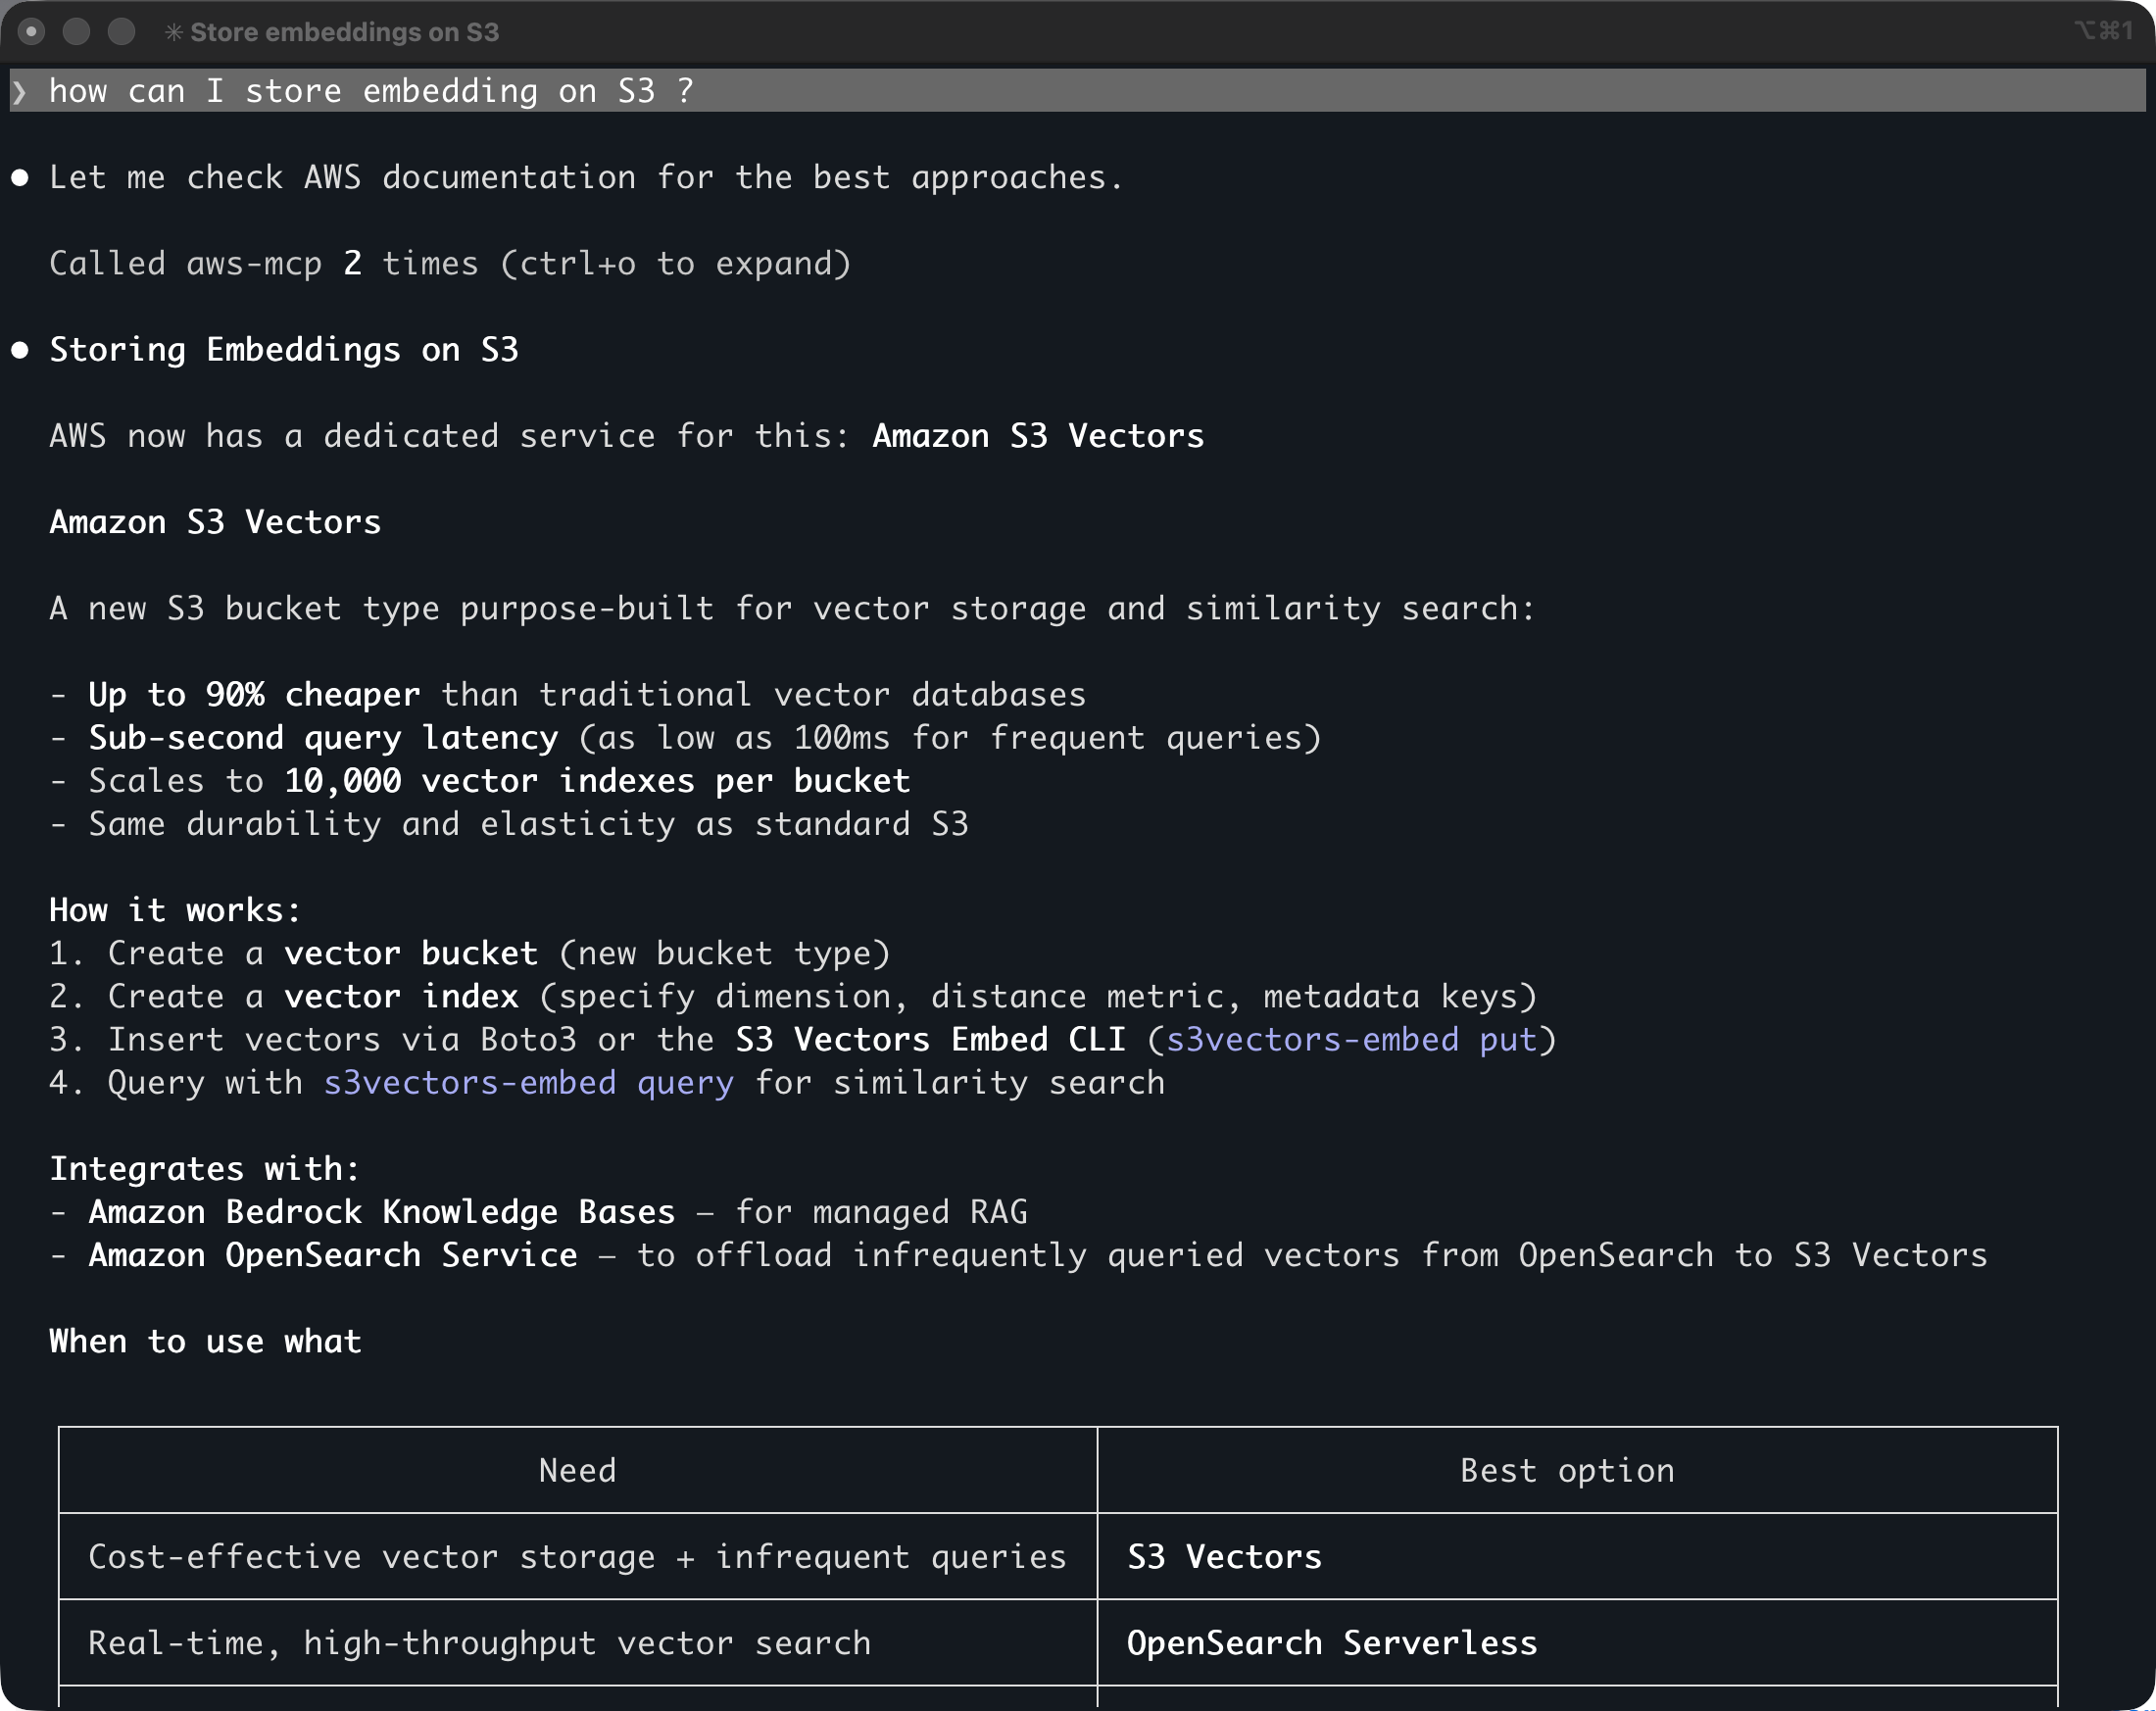
I ask the same question: “how can I store embedding on S3”.
This time, Claude Code knows it has a tool it can use to answer the question. It asks me permission to invoke the aws___search_documentation tool. After a few seconds, I receive a correct answer: “AWS now has a dedicated service for this: Amazon S3 Vectors …”
Pricing and availability
The AWS MCP Server is available today in the US East (N. Virginia) and Europe (Frankfurt) AWS Regions and can make API calls to any Region. There is no additional charge for the AWS MCP server itself. You pay only for the AWS resources you create and any applicable data transfer costs.
The AWS MCP Server works with Claude Code, Kiro, Cursor, and any MCP-compatible client. To get started, see the AWS MCP Server User Guide.
I have been waiting for something like this since I started using MCP tools in my AI agents early last year. The combination of current documentation, authenticated API access, and sandboxed script execution in a single server changes what an agent can actually do on AWS. I am curious what you build with it. Let me know in the comments.
Post Syndicated from The Atlantic original https://www.youtube.com/watch?v=XdN8okkbF94
Post Syndicated from BeardedTinker original https://www.youtube.com/watch?v=H6B9g3S0zh0
Post Syndicated from jzb original https://lwn.net/Articles/1070698/
Predictions that LLM tools would cause a surge in reports of security vulnerabilities
have, unquestionably, borne out. As expected, maintainers are having to wade
through more security reports than ever before; in addition, LLM tools are
disrupting traditional-coordinated disclosure practices as well. The method of Copy Fail‘s disclosure, in particular, left
vendors, projects, and users scrambling. In addition, maintainers are seeing
parallel discovery of the same security flaws within the embargo window. Both
of these developments mean that coordinated security disclosures may become a
thing of the past.