Today we are starting a campaign to support every school and library in the UK to set up a free Code Club to make sure that all young people can develop the skills and knowledge they need to thrive in the age of AI.
Over the past decade, Code Club has provided more than 2 million young people with the opportunity to learn how to build their own apps, games, animations, websites, robots, and so much more.
We know that getting hands-on, practical experience of building real projects with technology works. Independent evaluations have shown that attending a Code Club not only helps young people develop their programming skills, but also builds wider life skills such as confidence, resilience, problem-solving, and communication. All of which we know are essential if they are going to thrive in a world where AI is ubiquitous.
Right now, there are over 2,000 Code Clubs meeting in schools and libraries all over the UK, organised by an amazing community of teachers, educators, and volunteers from all walks of life. We want to see that number grow.
You don’t need technical skills to mentor at a Code Club. The Raspberry Pi Foundation provides free, self-guided projects that help young people learn how to create with different technologies. We have over 200 Code Club Projects on our website, all of which are developed by expert educators, based on evidence of how young people learn, and rigorously tested; so we know that they are effective.
That includes a set of projects that support the safe exploration of AI technologies, helping young people understand how AI works, its possibilities and limitations.
We also provide training and support to help you set up and run your Code Club, all of which is available at no charge.
I can promise you that the hour you spend in a Code Club will be the highlight of your week. I always come away from Code Club inspired and optimistic about what young people can achieve if we give them a sense of agency over technology.
You don’t have to take my word for it: here’s Janine, a Computer Science teacher and long-time Code Club mentor from Stoke-on-Trent sharing her experience.
Janine Kirk is a Computer Science Teacher at The King’s Church of England Academy in Stoke-on-Trent, UK, who has been running a Code Club for over ten years. She has been inspired by the campaign for a Code Club in every school and library in the UK, to set up clubs in six other schools in her multi-academy trust.
Setting up a Code Club is really easy as a teacher, as you can just tag it onto the end of your school day, or during lunch. The website is clear and easy to use — and once you have signed up, you have access to additional resources to promote your club. Code Club gives time and space to explore coding in a completely different way than in a classroom. For me, it’s about seeing what programs really inspire students: it gives an insight into how students like to code, ideas of preferred coding language, and tasks they keep coming back to. Running a Code Club has also allowed me to build relationships with students outside of the classroom environment, and all of this spills into my lessons and improves my teaching practice.
For students, Code Club is a great space where they can collaborate and work on their chosen tasks. Students often comment on how they look forward to Code Club and how they have continued their projects at home. It also allows students much more variety in enrichment activity, as Code Club is often popular with students who are neurodivergent. It’s amazing to see the children grow in confidence and friendship as they find likeminded students to support each other.
My students really love the certificates they can earn. We have been inspired by the excellent activities that revamp the old ways of teaching programming and give them a really nice spin. In fact, I have used the resources in computer science lessons too, as they are often much more visual and fun for the students to create.
Since joining Code Club I have felt part of a community. I receive regular updates, and attending events such as the Clubs Conference really helps inspire creative ways to teach coding. As a computing teacher in a secondary school, you are often part of a very small team — but Code Club has allowed me to feel part of something bigger, and I know that should I need support, they are always there with friendly advice. It really is the best thing that I have done in my career.
Since Let’s Encrypt started issuing certificates in 2015, people have repeatedly requested the ability to get certificates for IP addresses, an option that only a few certificate authorities have offered. Until now, they’ve had to look elsewhere, because we haven’t provided that feature.
Today, we’ve issued our first certificate for an IP address, as we announced we would in January. As with other new certificate features on our engineering roadmap, we’ll now start gradually rolling out this option to more and more of our subscribers.
Some Background on IP Address Certs
IP addresses are the underlying numerical addresses used on the Internet. Every device on the Internet has one (though, in modern practice, it might be shared with other devices, like when an entire home network shares a single public IP address). The Internet infrastructure uses them to route communications to their proper destination. IP addresses come in two forms, IPv4 and IPv6, and generally look like 54.215.62.21 (IPv4) or 2600:1f1c:446:4900::65 (IPv6).
Most Internet users rarely see or refer to IP addresses directly. Instead, they almost always use domain names like letsencrypt.org to refer to Internet services. The domain name system (DNS) is a part of the Internet infrastructure that’s responsible for allowing software to find the IP addresses associated with a particular domain name. For instance, your web browser can use DNS to find out that the service https://letsencrypt.org/ (Let’s Encrypt’s own website) is provided from the IP addresses 54.215.62.21 and 2600:1f1c:446:4900::65, among several others. This probably happened behind the scenes before you started reading this article! Your web browser needed to know our IP address in order to actually connect to our site and fetch this article.
Because we overwhelmingly tend to think and talk about Internet services in terms of domain names, those are the identifiers that are normally listed in certificates like those that Let’s Encrypt provides to our subscribers. Since you know us as “letsencrypt.org” and not as, say, “54.215.62.21,” it makes the most sense for our domain name to be on our certificate. After all, that’s what you’ll want your web browser to check against. This also gives Internet services more flexibility to be hosted in multiple locations, or to change where they’re hosted, without necessarily needing separate certificates for each server.
In principle, there’s no reason that a certificate couldn’t be issued for an IP address rather than a domain name, and in fact the technical and policy standards for certificates have always allowed this, with a handful of certificate authorities offering this service on a small scale. In Let’s Encrypt’s case, we’ve preferred to wait until some other pieces, like short-lived certs, were in place before we made this option available for our subscribers.
Why IP Address Certs Are Less Common
First and foremost, it’s because Internet users usually know services by domain names, not by IP addresses, and because IP addresses can easily change “behind the scenes” with no prior notice. For instance, a popular site could switch from one cloud hosting company to a different one, and update its DNS records to point at the new host. Most users wouldn’t ever notice the change at all, even though the site’s underlying IP addresses would be completely different.
Second, because IP addresses can change so easily, the sense of “ownership” one might have for them—or that a certificate authority might be able to attest to—tends to be weaker than for a domain name. If you’re hosting something in your house on a residential broadband connection, your Internet service provider most likely doesn’t guarantee that your IP address will stay the same over time. (That is, most home Internet users have a “dynamic IP address” from their ISPs, rather than a “static IP address.”) In that case, you have to contend with the possibility that that address may change often, possibly without warning, and that your old address may be assigned to somebody else.
Third, most Internet service operators don’t expect that end users will ever intentionally connect to their sites directly by IP address. In some cases, when an IP address is shared by different websites or different devices, connecting by IP address alone wouldn’t even work properly. In that case, there’s not much benefit to obtaining a certificate for the IP address!
How Let’s Encrypt Subscribers May Use IP Address Certs
Most current subscribers should be fine with their existing domain name certs and won’t need IP address certs. Subscribers who have a use for an IP address cert are typically already aware of that. A few use cases that we’re aware of include:
A default page for hosting providers, in case someone pastes a server’s IP address into a browser instead of an individual site name (right now, this normally produces an error in the browser).
A way to access your website if you don’t have a domain name at all (at some cost in reliability and convenience compared to getting a domain name).
Securing DNS over HTTPS (DoH) or other infrastructure services. Having a certificate makes it much easier for DoH servers to prove their identities to clients. That could make it more feasible for DoH users or clients to enforce a requirement for a valid publicly-trusted certificate when connecting to DoH servers.
Securing remote access to some home devices (like network-attached storage servers and Internet-of-things devices) even without a domain name.
Securing ephemeral connections within cloud hosting infrastructure, like connections between one back-end cloud server and another, or ephemeral connections to administer new or short-lived back-end servers via HTTPS—as long as those servers have at least one public IP address available.
How To Get an IP Address Cert
IP address certificates are available right now in Staging. They should be generally available in Prod later in 2025, at the same time that short-lived certificates become generally available. Prior to general availability we may allow list issuance for a limited number of partners who can provide us with feedback.
Many Let’s Encrypt client applications should already be able to request certificates for IP addresses, although there can be minor technical changes required to support this in some client software.
As a matter of policy, Let’s Encrypt certificates that cover IP addresses must be short-lived certs, valid for only about six days. As such, your ACME client must support the draft ACME Profiles specification, and you must configure it to request the shortlived profile. And, probably not surprisingly, you can’t use the DNS challenge method to prove your control over an IP address; only the http-01 and tls-alpn-01 methods can be used.
If your client software requests an IP address cert with details that aren’t compatible with these policies, the order will be rejected by the ACME server. In this case, your client application may need to be updated or reconfigured. Feel free to ask for help on the Let’s Encrypt community forum if you encounter any problems, either as a client application developer or as an end user.
AWS Certificate Manager (ACM) simplifies the provisioning, management, and deployment of public and private TLS certificates for AWS services and your on-premises and hybrid applications. To further enhance the flexibility of ACM for diverse workloads, we’re introducing a powerful new capability: ACM exportable public certificates. You can use this capability to export public TLS certificates and associated private keys from ACM, which can be used to secure workloads on Amazon Elastic Compute Cloud (Amazon EC2) instances, Amazon Elastic Kubernetes Service (Amazon EKS) pods, on-premises servers, or servers hosted with other cloud providers. The capability supports public certificates that are newly created in your AWS account
In this post, we show you how to automate the export and distribution of public exportable certificates across a diverse infrastructure. We walk you through creating workflows that automatically deliver certificates to multiple destinations including EC2 instances and virtual machines in hybrid environments. We explore how this automation works, its benefits, and provide a step-by-step guide to get started. Additionally, we explore how you can use integration with Amazon EventBridge to trigger automatic certificate exports when certificates are issued or renewed, streamlining certificate deployment across heterogeneous environments and significantly reducing management overhead.
Background: ACM and certificate management
ACM is a managed service that removes the complexity of purchasing, uploading, and renewing TLS certificates. It provides public certificates at no additional cost for AWS services integrated with ACM such as Elastic Load Balancing (ELB), Amazon CloudFront, and Amazon API Gateway. ACM also supports importing third-party public certificates and issuing private certificates through AWS Private Certificate Authority. Prior to this release, ACM public certificates were designed for AWS services integrated with ACM such as CloudFront, providing seamless TLS encryption for those services. For use cases involving third-party content delivery networks (CDNs) or workloads terminating TLS on EC2 instances, customers typically sourced certificates from other providers or imported them into ACM for centralized management. Customers have told us that they would like to use ACM for these use cases, extending its simplicity and scalability to a wider range of environments. The new ACM exportable public certificates capability fulfills this need, enabling you to export ACM-managed public certificates for use with your custom workloads while maintaining centralized management and automated renewals.
With ACM you can now request a public certificate, validate domain ownership, and export the certificate for use with software that terminates TLS such as Apache, NGINX, or Microsoft IIS. ACM handles certificate renewals, reducing the risk of expirations that can disrupt your applications.
How it works: ACM public certificate issuance and renewal
To use ACM exportable public certificates, you need to understand how to automate certificate management using the issuance and renewal processes. In this section, we describe these processes and their automation capabilities, which are critical for deploying and maintaining certificates.
ACM public certificate issuance
Issuing an ACM public certificate involves the following steps:
Request a certificate: In the AWS Management Console for ACM, or the AWS Command Line Interface (AWS CLI) or API, initiate a certificate request by specifying the domain names you want to secure (for example, example.com or *.example.com).
Validate domain ownership: ACM requires that you prove control over the domain. If the domain is hosted on Amazon Route 53, you can request that ACM validate the domain ownership. For domains hosted outside AWS, you can use DNS validation (adding a CNAME record) or email validation (responding to emails sent to domain contacts).
Certificate issuance: After the domain ownership has been validated, ACM issues the certificate, which includes the public key, private key, and certificate chain.
Associate the certificate with an integrated AWS service: See Services integrated with ACM for information about associating the certificate with an integrated AWS service.
Export the certificate: With the new capability you can now export the public certificate, private key, and certificate chain using the ACM console, AWS CLI, or API for use on servers that aren’t integrated with ACM.
Bind to application: Install the exported certificate on your server (for example, Apache or NGINX) to enable TLS termination.
With the launch of this new capability, you can now control the future exportability of public certificates that you create in ACM.
To create an exportable public certificate, use the ACM console to create a new public certificate. To get started, choose Request certificate in the ACM console and on the Request public certificate page, under Allow export, select Enable export. If you select Disable export, the private key for this certificate will be disallowed for exporting from ACM, which cannot be changed after certificate issuance.
Figure 1: Request a public certificate and enable export
After creating your certificate with the Enable export option selected and completing domain ownership validation, you can proceed with the export process, as shown in Figure 2. To export your certificate, select it from the list of certificates, choose More actions, and select Export.
Figure 2: Export a certificate
ACM public certificate renewal
ACM automates the process of certificate renewal, which includes:
Renewal initiation: ACM automatically initiates renewal 60 days before a certificate expires.
Domain revalidation: ACM revalidates domain ownership using the same method as the initial issuance (DNS or email).
Certificate update: Upon successful revalidation, ACM issues a new certificate with the same Amazon Resource Name (ARN) with updated validity dates.
When a certificate is renewed in ACM, the service automatically sends an EventBridge event to notify you that the new certificate is available. If the renewal fails, ACM sends notifications to both the AWS Health Dashboard and EventBridge. To stay informed about these certificate events, you can create EventBridge rules that monitor for specific certificate-related events. You can configure these rules to send notifications to an Amazon Simple Notification Service Amazon (SNS) topic so that interested parties receive timely updates about their certificate status.
New EventBridge schema fields: Following successful ACM certificate renewal, the ACM Certificate Available event now includes an exportable field that indicates with TRUE|FALSE whether the public certificate is ready to be exported.
Export and update: You can export the renewed certificate and update it on your servers manually or using EventBridge targets such as AWS Systems Manager Automation documents triggered by EventBridge rules. For more information, see Event bus targets in Amazon EventBridge.
You can use EventBridge rules to monitor specific events and route them to one or more targets (such as Amazon SNS topics, AWS Lambda functions, or other AWS services) for processing. For example, when domain validation fails because of DNS configuration issues, ACM generates an ACM Certificate Renewal Action RequiredEventBridge event. By creating an EventBridge rule that targets an SNS topic, you can subscribe to receive email alerts and take necessary corrective actions.
Automating deployment of renewed certificates using EventBridge
The certificate renewal process helps make sure that your TLS certificates remain valid without manual intervention, but updating certificates across diverse environments can still require effort. When ACM renews a certificate, it generates an EventBridge event. You can configure EventBridge rules to trigger targets based on this event, such as:
Send notifications: Route the event to Amazon SNS to send email or SMS notifications to administrators.
Automate certificate deployment: Trigger Lambda functions or Systems Manager Automation documents to retrieve the renewed certificate using the ACM API and update it on your servers.
Monitor renewal failures: Configure alerts based on ACM certificate renewal failure events. These events can be directly routed to notification channels to inform you about issues such as domain validation errors.
To set this up, create an EventBridge rule to match the ACM renewal event, specify a target, (such as an SNS topic or Lambda function). This automation minimizes manual intervention, helping to facilitate seamless certificate updates across your infrastructure.
Solution overview
In the section, we describe two workflows. The first demonstrates an automated process for exporting existing ACM public certificates and installing them on target EC2 instances or virtual machines. The second workflow is triggered when public certificates are automatically renewed by ACM when they become available in ACM, followed by updating these certificates on downstream EC2 instances and virtual machines. While this solution uses EC2 instances and virtual machines as the target systems, the same methods can be applied to refresh public certificates at scale across various types of systems.
Prerequisites
To extend this automated public certificate export and update process to:
Add TargetTagKey tags to EC2 instances and virtual machines where you want to deploy renewed certificates. The automation uses these tags to identify target instances.
The ExportCertificate API requires a certificate passphrase for operation. To maintain security best practices, we recommend storing passwords in encrypted form using password vaults instead of plain text storage. Our implementation uses AWS Secrets Manager to securely store these sensitive credentials. The solution also uses Amazon DynamoDB to maintain certificate metadata, which includes a reference to the corresponding secret name stored in Secrets Manager. For added security, the DynamoDB table’s data is automatically encrypted at rest using AWS Key Management Service (AWS KMS).
ACM certificate export
Figure 3: ACM certificate issuance and export workflow
The workflow shown in Figure 3 demonstrates an automated process for exporting existing public ACM certificates through an API-driven process and deploying them to downstream systems.
The process begins when a user makes a request to an API Gateway endpoint, providing essential parameters including the CertificateArn to identify the certificate you want to export, CertName for certificate identification, and TargetTagKey and TargetTagValue for identifying the target EC2 instances where you want this certificate to be installed. The following is an example of the payload sent to API Gateway:
Upon receiving the request, API Gateway triggers an AWS Step Functions workflow containing multiple orchestrated states.
The initial state executes a Lambda function named acm-Export, which generates a passphrase for the private key.
The acm-Export lambda function also securely stores the generated passphrase in Secrets Manager and uses the generated passphrase to export the ACM certificate.
After completing the acm-Export function, the Step Functions workflow invokes the Lambda ssm-run function.
This function performs two operations: it checks the certificate’s existence in DynamoDB (which serves as an inventory tracking system) and manages record-keeping. When the function encounters an existing certificateARN, it updates the record with the current CertExpiryDate and LastExportedDate timestamp values. For certificates being exported for the first time, the Lambda function creates a new record in DynamoDB if no matching entry exists. This new record captures the certificate’s metadata, including its details and tracking information. Figure 4 shows how this metadata is structured in a DynamoDB table entry in the console.
Figure 4: Certificate metadata in a DynamoDB table
Following the metadata verification step in DynamoDB, the Lambda function also initiates running a custom Systems Manager document called Install-ACMCertificate. This document handles the installation of newly exported public certificates onto specified EC2 instances. The same Systems Manager document can be used for certificate installation or updates onto on-premises servers, providing flexibility in certificate deployment.
When the Systems Manager document execution succeeds, it deploys the newly exported public certificates to EC2 instances matching the TargetTagKey. By default, on Linux servers, certificates are stored in /etc/ssl/certs and /etc/ssl/private, though these paths can be customized in the Systems Manager document.
After successfully running this Systems Manager document, the Step Functions workflow then advances to its next state, which triggers another Lambda function named Statuscheck. This function monitors the execution status of the previously initiated Systems Manager document. The Step Functions workflow concludes its execution after it confirms the successful installation of certificates on the targeted EC2 instances.
ACM certificate renewal and export
Figure 5: ACM certificate and renewal process
When a certificate is within 60 days of expiring, ACM automatically begins the renewal process. When ACM successfully completes a certificate renewal, it generates an event in EventBridge as shown in the following example:
The workflow illustrated in Figure 5 showcases an automated system for exporting existing public ACM certificates using an API-driven process and deploying them to downstream systems.
The solution uses an EventBridge rule that watches for certificate renewal notifications and triggers the acm-renew Lambda function in response. The function begins its execution by receiving the certificate ARN from the ACM event. Using this ARN as a lookup key, it queries a DynamoDB table to retrieve the associated certificate metadata. From this query, it extracts essential certificate details including the Certificate Name and the TargetTag Key-Value pairs that identify which resources need the updated certificate. These details are needed for the subsequent certificate deployment process and help make sure that the updates are applied to the correct systems.
This information is then formatted into a payload and used to trigger a Step Functions workflow. This Step Functions workflow follows the same process described in the ACM Certificate Export section.
Steps 3 through 9 follow the process described in the ACM Certificate Export section. Upon successful completion of step 9, the Step Functions workflow concludes its execution. At this point, the renewed public certificate has been successfully installed on the targeted EC2 instances, completing the automated certificate export and installation process.
Detailed instructions for downloading the solution, executing it, validating the certificate export, and deploying it to your AWS account are available on GitHub.
Pricing and availability
ACM exportable public certificates are available in AWS commercial Regions, AWS GovCloud (US) Regions, and China Regions and follow a pay-as-you go pricing model, with no upfront commitments. You pay only for the certificates you export. Public certificates for AWS Services integrated with ACM such as ELB, CloudFront, and API Gateway remain available at no additional cost. For detailed pricing, see AWS Certificate Manager pricing.
Conclusion
The ACM exportable public certificates capability empowers customers to secure diverse workloads with a unified, managed certificate solution. By enabling certificate exports for EC2, containers, on-premises servers and other cloud providers, ACM simplifies TLS management, while offering centralized control, automated renewals and cost-effective pricing. Get started today by exploring this feature in the ACM console and streamline your certificate management workflows.
If you have feedback about this post, submit comments in the Comments section below. If you have questions about this post, contact AWS Support.
While tens of thousands of customers are successfully using Amazon DynamoDBglobal tables with eventual consistency, we’re seeing emerging needs for even stronger resilience. Many organizations find that the DynamoDB multi-Availability Zone architecture and eventually consistent global tables meet their requirements, but critical applications like payment processing systems and financial services demand more.
For these applications, customers require a zero Recovery Point Objective (RPO) during rare Region-wide events, meaning you can direct your app to read the latest data from any Region. Your multi-Region applications always need to access the same data regardless of location.
Starting today, you can use a new Amazon DynamoDB global tables capability that provides multi-Region strong consistency (MRSC), enabling zero RPO. This capability, first announced as a preview at AWS re:Invent 2024, simplifies building highly resilient global applications.
Here’s how you can enable MRSC starting with an existing empty DynamoDB table:
With MRSC, DynamoDB now offers you the highest level of resilience for your applications. If application processing is interrupted in a Region, you can redirect traffic to another Region containing a MRSC replica and know that you’ll be processing the latest data.
Getting started Let me walk you through how you can use this new capability.
To start using MRSC, I need to create a global table from an existing DynamoDB table that doesn’t contain any data. I navigate to my existing table, select the Global tables tab and select Create replica.
The MRSC availability architecture requires three AWS Regions. I can configure MRSC with either three full replicas or with two replicas and a witness. A witness contains only replicated change data to provide the required availability without maintaining a full copy of my table data.
The following screenshot shows how I configure MRSC with two replicas and a witness. To configure MRSC with three full replicas instead, I can clear Configure Region 2 as Witness.
If I need to update my existing table programmatically, I can use the Amazon Q CLI to generate the required command with the following prompt:
> Hey Q! Update my existing DynamoDB table called "demo-mrsc" in us-east-1 with multi-Region strong consistency across us-east-2 with witness in us-west-2 Regions
Shortly after, Q CLI will respond back with following command:
> To update your DynamoDB table with multi-Region strong consistency, you'll need to use the update-table command with the appropriate parameters. Here's how you would do it:

aws dynamodb update-table \
    --table-name demo-mrsc \
    --replica-updates '[{"Create": {"RegionName": "us-east-2"}}]' \
    --global-table-witness-updates '[{"Create": {"RegionName": "us-west-2"}}]' \
    --multi-region-consistency STRONG \
    --region us-east-1
After it’s finished processing, I can check the status of my MRSC global table. I can see I have a witness configured for my DynamoDB global table. A witness reduces costs while still providing the resilience benefits of multi-Region strong consistency.
Then, in my application, I can use ConsistentRead to read data with strong consistency. Here’s a Python example:
import boto3

# Configure the DynamoDB client for your region
dynamodb = boto3.resource('dynamodb', region_name='us-east-2')
table = dynamodb.Table('demo-mrsc')

pk_id = "demo#test123"

# Read with strong consistency across regions
response = table.get_item(
    Key={
        'PK': pk_id
    },
    ConsistentRead=True
)

print(response)
For operations that require the strongest resilience, I can use ConsistentRead=True. For less critical operations where eventual consistency is acceptable, I can omit this parameter to improve performance and reduce costs.
Additional things to know Here are a couple of things to note:
Availability – The Amazon DynamoDB multi-Region strong consistency capability is available in following AWS Regions: US East (Ohio, N. Virginia), US West (Oregon), Asia Pacific (Osaka, Seoul, Tokyo), and Europe (Frankfurt, Ireland, London, Paris)
Pricing – Multi-Region strong consistency pricing follows the existing global tables pricing structure. DynamoDB recently reduced global tables pricing by up to 67 percent, making this highly resilient architecture more affordable than ever. Visit Amazon DynamoDB lowers pricing for on-demand throughput and global tables in the AWS Database Blog to learn more.
Learn more about how you can achieve the highest level of application resilience, enable your applications to be always available and always read the latest data regardless of the Region by visiting Amazon DynamoDB global tables.
The Amazon Redshift integration with AWS Lambda provides the capability to create Amazon Redshift Lambda user-defined functions (UDFs). This capability delivers flexibility, enhanced integrations, and security for functions defined in Lambda that can be run through SQL queries. Amazon Redshift Lambda UDFs offer many advantages:
Enhanced integration – You can connect to external services or APIs from within your UDF logic, enabling richer data enrichment and operational workflows.
Multiple Python runtimes – Lambda UDFs benefit from Lambda function support for multiple Python runtimes depending on specific use cases. In addition, the new versions and security patches are available within a month of their official release.
Independent scaling – Lambda UDFs use Lambda compute resources, so heavy compute or memory-intensive tasks don’t impact query performance or resource concurrency within Amazon Redshift.
Isolation and security – You can isolate custom code execution in a separate service boundary. This simplifies maintenance, monitoring, budgeting, and permission management.
Because Lambda UDFs provide these significant advantages in integration, flexibility, scalability, and security, we will be ending support for Python UDFs in Amazon Redshift. We recommend that you migrate your existing Python UDFs to Lambda UDFs by June 30, 2026.
October 30, 2025 – Creation of new Python UDFs will no longer be supported (existing functions can still be invoked)
June 30, 2026 – Execution of existing Python UDFs will be suspended
In this post, we walk you through how to migrate your existing Python UDFs to Lambda UDFs, set up monitoring and cost evaluations, and review key considerations for a smooth transition.
Solution overview
You can create UDFs for tasks such as tokenization, encryption and decryption, or data science functionality like the Levenshtein distance calculation. For this post, we provide examples for customers who have Python UDFs in place, demonstrating how to replace them with Lambda UDFs.
The Levenshtein function, also known as the Levenshtein distance or edit distance, is a string metric used to measure the difference between two sequences of characters. Although this functionality was previously implemented using Python UDFs using the Python library in Amazon Redshift, Lambda provides a more efficient and scalable solution. This post demonstrates how to migrate from Python UDFs to Lambda UDFs for calculating Levenshtein distances.
Run the following script to list existing Python UDFs:
SELECT
    p.proname,
    p.pronargs,
    t.typname,
    n.nspname,
    l.lanname,
    pg_get_functiondef(p.oid)
FROM
    pg_proc p,
    pg_language l,
    pg_type t,
    pg_namespace n
WHERE
    p.prolang = l.oid
    and p.prorettype = t.oid
    and l.lanname = 'plpythonu'
    and p.pronamespace = n.oid
    and nspname not in ('pg_catalog', 'information_schema')
ORDER BY
    proname;
The following is our existing Python UDF definition for Levenshtein distance:
create or replace function fn_levenshtein_distance(a varchar, b varchar) returns integer as
$$

def levenshtein_distance(a, len_a, b, len_b):
    d = [[0] * (len_b + 1) for i in range(len_a + 1)]

    for i in range(1, len_a + 1):
        d[i][0] = i

    for j in range(1, len_b + 1):
        d[0][j] = j

    for j in range(1, len_b + 1):
        for i in range(1, len_a + 1):
            if a[i - 1] == b[j - 1]:
                cost = 0
            else:
                cost = 1
            d[i][j] = min(d[i - 1][j] + 1,      # deletion
                          d[i][j - 1] + 1,      # insertion
                          d[i - 1][j - 1] + cost) # substitution

    return d[len_a][len_b]

def distance(a, b):
    len_a, len_b = len(a), len(b)
    if len_a == len_b:
        return 0
    elif len_a == 0:
        return len_b
    elif len_b == 0:
        return len_a
    else:
        return levenshtein_distance(a, len_a, b, len_b)

return distance(a, b)
$$ immutable;
Convert the Python UDF function to a Lambda UDF
You can simplify converting your Python UDF to a Lambda UDF using Amazon Q Developer, a generative AI-powered assistant. It handles code transformation, packaging, and integration logic, accelerating migration and improving scalability. Integrated with popular developer tools like VS Code, JetBrains, and others, Amazon Q streamlines workflows so teams can modernize analytics using serverless architectures with minimal effort.
Amazon Q Developer code suggestions are based on large language models (LLMs) trained on billions of lines of code, including open source and Amazon code. Always review a code suggestion before accepting it, and you might need to edit it to make sure that it does exactly what you intended.
Convert @python-udf.py Redshift Python UDF to Redshift Lambda UDF which batch processes data in the arguments array in a loop and returns json dump at the end. Refer to @lambda-context.py for reference and additional guidance on Lambda UDF.
Create a Lambda function
Complete the following steps to create a Lambda function:
On the Lambda console, choose Functions in the navigation pane.
Choose Create function.
Choose Author from scratch.
For Function name, enter a custom name (for example, levenshtein_distance_func).
For Runtime, choose your code environment. (The examples in this post are compatible with Python 3.12.)
For Architecture, select your system architecture. (The examples in this post are compatible with x86_64.)
For Execution role, select Create a new role with basic Lambda permissions.
Choose Create function.
Choose Code and add the following code:
import json

def lambda_handler(event, context):
    t1 = event['arguments']
    resp = [None]*len(t1)

    for i, x in enumerate(t1):
        if x[0] is not None and x[1] is not None:
            resp[i] = distance(x[0], x[1])

    ret = dict()
    ret['results'] = resp
    return json.dumps(ret)

def levenshtein_distance(a, len_a, b, len_b):
    d = [[0] * (len_b + 1) for i in range(len_a + 1)]

    for i in range(1, len_a + 1):
        d[i][0] = i

    for j in range(1, len_b + 1):
        d[0][j] = j

    for j in range(1, len_b + 1):
        for i in range(1, len_a + 1):
            if a[i - 1] == b[j - 1]:
                cost = 0
            else:
                cost = 1
            d[i][j] = min(d[i - 1][j] + 1,      # deletion
                          d[i][j - 1] + 1,      # insertion
                          d[i - 1][j - 1] + cost) # substitution

    return d[len_a][len_b]

def distance(a, b):
    len_a, len_b = len(a), len(b)
    if len_a == len_b and a == b:
        return 0
    elif len_a == 0:
        return len_b
    elif len_b == 0:
        return len_a
    else:
        return levenshtein_distance(a, len_a, b, len_b)
Choose configuration and update Timeout to 1 minute.
CREATE or REPLACE EXTERNAL FUNCTION
fn_lambda_levenshtein_distance(a varchar, b varchar) returns int
lambda 'levenshtein_distance_func' IAM_ROLE default
STABLE
;
Test the solution
To test the solution, run the following script using the Python UDF:
SELECT c_customer_sk, c_customer_id, fn_levenshtein_distance(c_first_name, c_last_name) as distance
FROM customer
WHERE c_customer_sk in (1,2,3,4,5,31);
The following table shows our output.
Run the same script using the Lambda UDF:
SELECT c_customer_sk, c_customer_id, fn_lambda_levenshtein_distance(c_first_name, c_last_name) as distance
FROM customer
WHERE c_customer_sk in (1,2,3,4,5,31);
The results of both UDFs match.
Replace the Python UDF with the Lambda UDF
You can use the following steps in preproduction for testing:
Revoke access for the Python UDF:
REVOKE execute on function fn_levenshtein_distance(varchar, varchar) from <group_name> or <role_name>
Grant access to the Lambda UDF:
grant execute on function fn_lambda_levenshtein_distance(varchar, varchar) to <group_name> or <role_name>
After full testing of the Lambda UDF has been performed, you can drop the Python UDF.
Rename the Lambda UDF fn_lambda_levenshtein_distance to fn_levenshtein_distance so the end-user and application code doesn’t need to change:
ALTER FUNCTION fn_lambda_levenshtein_distance(varchar, varchar)
     RENAME TO fn_levenshtein_distance;
Validate with the following query:
SELECT c_customer_sk, c_customer_id, fn_levenshtein_distance(c_first_name, c_last_name) as distance
FROM customer
WHERE c_customer_sk in (1,2,3,4,5,31);
Cost evaluation
To evaluate the cost of the Lambda UDF, complete the following steps:
Run the following script to create a table using a SELECT query, which uses the Lambda UDF:
DROP TABLE IF EXISTS customer_lambda;
CREATE TABLE customer_lambda as
SELECT c_customer_sk, c_customer_id, fn_levenshtein_distance(c_first_name, c_last_name) as distance
FROM customer;
Use following query to find the cost of the Lambda UDF for the specific duration you selected:
parse @message /Duration:\s*(?<@duration_ms>\d+\.\d+)\s*ms\s*Billed\s*Duration:\s*(?<@billed_duration_ms>\d+)\s*ms\s*Memory\s*Size:\s*(?<@memory_size_mb>\d+)\s*MB/
| filter @message like /REPORT RequestId/
| stats sum(@billed_duration_ms * @memory_size_mb * 1.6279296875e-11 + 2.0e-7) as @cost_dollars_total
For this example, we used the us-east-1 Region using ARM-based instances. For more details on Lambda pricing by Region and the Free Tier limit, see AWS Lambda pricing.
Choose Summarize results.
The cost of this Lambda UDF invocation was $0.02329 for 30 million rows.
Monitor Lambda UDFs
Monitoring Lambda UDFs involves tracking both the Lambda function’s performance and the impact on the Redshift query execution. Because UDFs execute externally, a dual approach is necessary.
CloudWatch metrics and logs for Lambda functions
CloudWatch provides comprehensive monitoring for Lambda functions, such as the following key metrics:
Invocations – Tracks the number of times the Lambda function is called, indicating UDF usage frequency
Duration – Measures execution time, helping identify performance bottlenecks
Errors – Counts failed invocations, which is critical for detecting issues in UDF logic
Throttles – Indicates when Lambda limits invocations due to concurrency caps, which can delay query results
Logs – CloudWatch Logs capture detailed execution output, including errors and custom log messages, aiding in debugging
Alarms – Configures alarms for high error rates (for example, Errors > 0) or excessive duration (for example, Duration > 1 second) to receive proactive notifications
Redshift query performance
Within Amazon Redshift, system views provide comprehensive insights into Lambda UDF performance and errors:
SYS_QUERY_HISTORY – Identifies queries that have called your Lambda UDFs by filtering with the UDF name in the query_text column. This helps track usage patterns and execution frequency.
SYS_QUERY_DETAIL – Provides granular execution metrics for queries involving Lambda UDFs, helping identify performance bottlenecks at the step level.
Performance aggregation – Generates summary reports of Lambda UDF performance metrics, including execution count, average duration, and maximum duration to track performance trends over time.
The following table summarizes the monitoring tools available.
Monitoring Tool
Purpose
Key Metrics/Views
CloudWatch Metrics
Track Lambda function performance
Invocations, Duration, Errors, Throttles
CloudWatch Logs
Debug Lambda execution issues
Error messages, custom logs
SYS_QUERY_HISTORY
Track Lambda UDF usage patterns
Query execution times, status, user information, query text
SYS_QUERY_DETAIL
Analyze Lambda UDF performance
Step-level execution details, resource utilization, query plan information
Performance Summary Reports
Track UDF performance trends
Execution count, average/maximum duration, total elapsed time
Monitoring approach for Lambda UDFs in Amazon Redshift
For analyzing individual queries, you can use the following code to track how your Lambda UDFs are being used across your organization:
SELECT * FROM sys_query_history
WHERE query_text LIKE '%your_lambda_udf_name%'
ORDER BY start_time DESC
LIMIT 20;
This helps you do the following:
Identify frequent users
Monitor execution patterns
Track usage trends
Detect unauthorized access
You can also create comprehensive monitoring by using query history to monitor performance metrics at the user level:
SELECT
    usename,
    DATE_TRUNC('day', start_time) as day,
    COUNT(*) as query_count,
    AVG(DATEDIFF(microsecond, start_time, end_time))/1000000.0 as avg_duration_seconds,
    MAX(DATEDIFF(microsecond, start_time, end_time))/1000000.0 as max_duration_seconds
FROM sys_query_history q
JOIN pg_user u ON q.user_id = u.usesysid
WHERE query_text LIKE '%your_lambda_udf_name%'
AND user_id > 1
GROUP BY usename, day
ORDER BY usename, query_count DESC;
Additionally, you can generate weekly performance reports using the following aggregation query:
SELECT
    'your_lambda_udf_name' AS function_name,
    COUNT(DISTINCT q.query_id) AS execution_count,
    AVG(DATEDIFF(millisecond, q.start_time, q.end_time)) AS avg_duration_ms,
    MAX(DATEDIFF(millisecond, q.start_time, q.end_time)) AS max_duration_ms,
    SUM(q.elapsed_time) / 1000000 AS total_elapsed_time_sec
FROM
    sys_query_history q
WHERE
    q.query_text LIKE '%your_lambda_udf_name%'
GROUP BY
    function_name
ORDER BY
    execution_count DESC;
Considerations
To maximize the benefits of Lambda UDFs, consider the following aspects to optimize performance, provide reliability, secure data, and manage costs. If you have Python UDFs that don’t use Python libraries, consider whether they are candidates to convert to SQL UDFs.
The following are key performance considerations:
Batching – Amazon Redshift batches multiple rows into a single Lambda invocation to reduce call frequency, improving efficiency. Make sure the Lambda function handles batched inputs efficiently. For more details, see Accessing external components using Amazon Redshift Lambda UDFs.
Parallel invocations – Redshift cluster slices invoke Lambda functions in parallel, enhancing performance for large datasets. Design functions to support concurrent executions.
Cold starts – Lambda functions might experience cold start delays, particularly if infrequently used. Languages like Python or Node.js typically have faster startup times than Java, reducing latency.
Function optimization – Optimize Lambda code for quick execution, minimizing resource usage and latency. For example, avoid unnecessary computations or external API calls.
Consider the following error handling methods:
Robust lambda logic – Implement comprehensive error handling in the Lambda function to manage exceptions gracefully. Return clear error messages in the JSON response, as specified in the Amazon Redshift-Lambda interface. For more details, see Scalar Lambda UDFs.
Error propagation – Lambda errors can cause Redshift query failures. Monitor SYS_QUERY_HISTORY for query-level issues and CloudWatch Logs for detailed Lambda errors.
JSON interface – The Lambda function must return a JSON object with success, error_msg, num_records, and results fields. Use proper formatting to avoid query disruptions.
Clean up
Complete the following steps to clean up your resources:
Delete the Redshift provisioned or serverless endpoint.
Delete the Lambda function.
Delete the IAM roles you created.
Conclusion
Lambda UDFs unlock a new level of flexibility, performance, and maintainability for extending Amazon Redshift. By decoupling custom logic from the warehouse engine, teams can scale independently, adopt modern runtimes, and integrate external systems.
If you’re currently using Python UDFs in Amazon Redshift, it’s time to explore the benefits of migrating to Lambda UDFs. With the generative AI capabilities of Amazon Q Developer, you can automate much of this transformation and accelerate your modernization journey. To learn more, refer to the Lambda UDF examples GitHub repo and Data Tokenization with Amazon Redshift and Protegrity.
About the authors
Raks Khare is a Senior Analytics Specialist Solutions Architect at AWS based out of Pennsylvania. He helps customers across varying industries and regions architect data analytics solutions at scale on the AWS platform. Outside of work, he likes exploring new travel and food destinations and spending quality time with his family.
Ritesh Kumar Sinha is an Analytics Specialist Solutions Architect based out of San Francisco. He has helped customers build scalable data warehousing and big data solutions for over 16 years. He loves to design and build efficient end-to-end solutions on AWS. In his spare time, he loves reading, walking, and doing yoga.
Yanzhu Ji is a Product Manager in the Amazon Redshift team. She has experience in product vision and strategy in industry-leading data products and platforms. She has outstanding skill in building substantial software products using web development, system design, database, and distributed programming techniques. In her personal life, Yanzhu likes painting, photography, and playing tennis.
Harshida Patel is a Analytics Specialist Principal Solutions Architect, with AWS.
Today, we’re announcing the general availability of Amazon Elastic Compute Cloud (Amazon EC2) C8gn network optimized instances powered by AWS Graviton4 processors and the latest 6th generation AWS Nitro Card. EC2 C8gn instances deliver up to 600Gbps network bandwidth, the highest bandwidth among EC2 network optimized instances.
You can use C8gn instances to run the most demanding network intensive workloads, such as security and network virtual appliances (virtual firewalls, routers, load balancers, proxy servers, DDoS appliances), data analytics, and tightly-coupled cluster computing jobs.
EC2 C8gn instances specifications C8gn instances provide up to 192 vCPUs and 384 GiB memory, and offer up to 30 percent higher compute performance compared Graviton3-based EC2 C7gn instances.
If you’re using C7gn instances now, you will have straightforward experience migrating network intensive workloads to C8gn instances because the new instances offer similar vCPU and memory ratios. To learn more, check out the collection of Graviton resources to help you start migrating your applications to Graviton instance types.
Now available Amazon EC2 C8gn instances are available today in US East (N. Virginia) and US West (Oregon) Regions. Two metal instance sizes are only available in US East (N. Virginia) Region. These instances can be purchased as On-Demand, Savings Plan, Spot instances, or as Dedicated instances and Dedicated hosts.
A change
proposal to end support for 32-bit x86 (i686) applications on the
x86_64 architecture with the Fedora 44 release has been withdrawn
after significant pushback. As proposed, the change could have
had a significant impact on gamers, compiler development, and the Bazzite project, which uses Fedora as a
base for a gaming-focused distribution. While i686 gets a reprieve for
now, the question still lingers: who is going to keep the necessary
i686 packages in working order when few upstream maintainers or
volunteer packagers care about the architecture?
Every time I visit Seattle, the first thing that greets me at the airport is Mount Rainier. Did you know that the most innovative project at Amazon Web Services (AWS) is named after this mountain?
Project Rainier is a new project to create what is expected to be the world’s most powerful computer for training AI models across multiple data centers in the United Stages. Anthropic will develop the advanced versions of its Claude models with five times more computing power than its current largest training cluster.
The key technology powering Project Rainier is AWS custom-designed Trainium2 chips, which are specialized for the immense data processing required to train complex AI models. Thousands of these Trainium2 chips will be connected in a new type of Amazon EC2 UltraServer and EC2 UltraCluster architecture that allows ultra-fast communication and data sharing across the massive system.
Learn about the AWS vertical integration of Project Rainer, where it designs every component of the technology stack from chips to software, allows it to optimize the entire system for maximum efficiency and reliability.
Last week’s launches Here are some launches that got my attention:
Amazon S3 access for Amazon FSx for OpenZFS – You can access and analyze your FSx for OpenZFS file data through Amazon S3 Access Points, enabling seamless integration with AWS AI/ML, and analytics services without moving your data out of the file system. You can treat your FSx for OpenZFS data as if it were stored in S3, making it accessible through the S3 API for various applications including Amazon Bedrock, Amazon SageMaker, AWS Glue, and other S3 based cloud-native applications.
Amazon S3 with sort and z-order compaction for Apache Iceberg tables – You can optimize query performance and reduce costs with new sort and z-order compaction. With S3 Tables, sort compaction automatically organizes data files based on defined column orders, while z-order compaction can be enabled through the maintenance API for efficient multicolumn queries.
Amazon CloudWatch investigations – You can accelerate your operational troubleshooting in AWS environments using the Amazon CloudWatch AI-powered investigation feature, which helps identify anomalies, surface related signals, and suggest remediation steps. This capability can be initiated through CloudWatch data widgets, multiple AWS consoles, CloudWatch alarm actions, or Amazon Q chat and enables team collaboration and integration with Slack and Microsoft Teams.
Amazon Bedrock Guardrails Standard tier – You can enhance your AI content safety measures using the new Standard tier. It offers improved content filtering and topic denial capabilities across up to 60 languages, better detection of variations including typos, and stronger protection against prompt attacks. This feature lets you configure safeguards to block harmful content, prevent model hallucinations, redact personally identifiable information (PII), and verify factual claims through automated reasoning checks.
Amazon Route 53 Resolver endpoints for private hosted zone – You can simplify DNS management across AWS and on-premises infrastructure using the new Route 53 DNS delegation feature for private hosted zone subdomains, which works with both inbound and outbound Resolver endpoints. You can delegate subdomain authority between your on-premises infrastructure and Route 53 Resolver cloud service using name server records, eliminating the need for complex conditional forwarding rules.
Amazon Q Developer CLI for Java transformation – You can automate and scale Java application upgrades using the new Amazon Q Developer Java transformation command line interface (CLI). This feature perform upgrades from Java versions 8, 11, 17, or 21 to versions 17 or 21 directly from the command line. This tool offers selective transformation options so you can choose specific steps from transformation plans and customize library upgrades.
New AWS IoT Device Management managed integrations – You can simplify Internet of Things (IoT) device management across multiple manufacturers and protocols using the new managed integrations feature, which provides a unified interface for controlling devices whether they connect directly, through hubs or third-party clouds. The feature includes pre-built cloud-to-cloud (C2C) connectors, device data model templates, and SDKs that support ZigBee, Z-Wave, and Wi-Fi protocols, while you can still create custom connectors and data models.
For a full list of AWS announcements, be sure to keep an eye on the What’s New with AWS? page.
Create your own MCP server with C# and .NET with Amazob Q CLI – You’ll use Amazon Q CLI as an MCP client to configure your local development environment for building and testing C# MCP servers, enhancing your ability to create, iterate, and refine AI-powered applications.
Upcoming AWS events Check your calendars and sign up for these upcoming AWS events:
AWS re:Invent – Register now to get a head start on choosing your best learning path, booking travel and accommodations, and bringing your team to learn, connect, and have fun. If you’re an early-career professional, you can apply to the All Builders Welcome Grant program, which is designed to remove financial barriers and create diverse pathways into cloud technology.
AWS NY Summits – You can gain insights from Swami’s keynote featuring the latest cutting-edge AWS technologies in compute, storage, and generative AI. My News Blog team is also preparing some exciting news for you. If you’re unable to attend in person, you can still participate by registering for the global live stream. Also, save the date for these upcoming Summits in July and August near your city.
AWS Builders Online Series – If you’re based in one of the Asia Pacific time zones, join and learn fundamental AWS concepts, architectural best practices, and hands-on demonstrations to help you build, migrate, and deploy your workloads on AWS.
AWS Glue 5.0 now supports Full-Table Access (FTA) control in Apache Spark based on your policies defined in AWS Lake Formation. This new feature enables read and write operations from your AWS Glue 5.0 Spark jobs on Lake Formation registered tables when the job role has full table access. This level of control is ideal for use cases that need to comply with security regulations at the table level. In addition, you can now use Spark capabilities including Resilient Distributed Datasets (RDDs), custom libraries, and user-defined functions (UDFs) with Lake Formation tables. This capability enables Data Manipulation Language (DML) operations including CREATE, ALTER, DELETE, UPDATE, and MERGE INTO statements on Apache Hive and Iceberg tables from within the same Apache Spark application. Data teams can run complex, interactive Spark applications through Amazon SageMaker Unified Studio in compatibility mode while maintaining the table-level security boundaries provided by Lake Formation. This simplifies security and governance of your data lakes.
In this post, we show you how to enforce FTA control on AWS Glue 5.0 through Lake Formation permissions.
How access control works on AWS Glue
AWS Glue 5.0 supports two features that achieve access control through Lake Formation:
Full-Table Access (FTA) control
Fine-grained access control (FGAC)
At a high level, FTA supports access control at the table level whereas FGAC can support access control at the table, row, column, and cell levels. To support more granular access control, FGAC uses a tight security model based on user/system space isolation. By maintaining this extra level of security, only a subset of Spark core classes are allowlisted. Additionally, there is extra setup for enabling FGAC, such as passing the --enable-lakeformation-fine-grained-access parameter to the job. For more information about FGAC, see Enforce fine-grained access control on data lake tables using AWS Glue 5.0 integrated with AWS Lake Formation.
While this level of granular control is essential for organizations that need to comply with data governance, security regulations, or deal with sensitive data, it’s excessive for organizations that only need table level access control. To provide customers with a way to enforce table level access without the performance, cost, and setup overhead introduced by the tighter security model in FGAC, AWS Glue introduced FTA. Let’s dive into FTA, the main topic of this post.
How Full-Table Access (FTA) works in AWS Glue
Until AWS Glue 4.0, Lake Formation-based data access worked through GlueContext class, the utility class provided by AWS Glue. With the launch of AWS Glue 5.0, Lake Formation-based data access is available through native Spark SQL and Spark DataFrames.
With this launch, when you have full table access to your tables through Lake Formation permissions, you don’t need to enable fine-grained access mode for your AWS Glue jobs or sessions. This eliminates the need to spin up a system driver and system executors, because they’re designed to allow fine-grained access, resulting in lower performance overhead and lower cost. In addition, although Lake Formation fine-grained access mode supports read operations, FTA supports not only read operations, but also write operations through CREATE, ALTER, DELETE, UPDATE, and MERGE INTO commands.
Migrate an AWS Glue 4.0 GlueContext FTA job to AWS Glue 5.0 native Spark FTA
The high-level steps to enable the Spark native FTA feature are documented in Using AWS Glue with AWS Lake Formation for Full Table Access. However, in this section, we will go through an end-to-end example of how to migrate an AWS Glue 4.0 job that uses FTA through GlueContext to read an Iceberg table to an AWS Glue 5.0 job that uses Spark native FTA.
Prerequisites
Before you get started, make sure that you have the following prerequisites:
AWS Glue job execution role with AWS managed policy AWSGlueServiceRole attached and lakeformation:GetDataAccess permission. Be sure to include the AWS Glue service in the trust policy.
The required permissions to perform the following actions:
Lake Formation set up in the account and a Lake Formation administrator role or a similar role to follow along with the instructions in this post. To learn more about setting up permissions for a data lake administrator role, see Create a data lake administrator.
For this post, we use the us-east-1 AWS Region, but you can integrate it in your preferred Region if the AWS services included in the architecture are available in that Region.
You will walk through setting up test data and an example AWS Glue 4.0 job using GlueContext, but if you already have these and are only interested in how to migrate, proceed to Migrate an AWS Glue 4.0 GlueContext FTA job to AWS Glue 5.0 native Spark FTA. With the prerequisites in place, you’re ready start the implementation steps.
Create an S3 bucket and upload a sample data file
To create an S3 bucket for the raw input datasets and Iceberg table, complete the following steps:
On the AWS Management Console for Amazon S3, choose Buckets in the navigation pane.
Choose Create bucket.
Enter the bucket name (for example, glue5-fta-demo-${AWS_ACCOUNT_ID}-${AWS_REGION_CODE}), and leave the remaining fields as default.
Choose Create bucket.
On the bucket details page, choose Create folder.
Create two subfolders: raw-csv-input and iceberg-datalake.
Upload the LOAD00000001.csv file into the raw-csv-input folder of the bucket.
Create an AWS Glue database and AWS Glue tables
To create input and output sample tables in the Data Catalog, complete the following steps:
On the Athena console, navigate to the query editor.
Run the following queries in sequence (provide your S3 bucket name):
-- Create database for the demo
CREATE DATABASE glue5_fta_demo;

-- Create external table in input CSV files. Replace the S3 path with your bucket name
CREATE EXTERNAL TABLE glue5_fta_demo.raw_csv_input(
 op string,
 product_id bigint,
 category string,
 product_name string,
 quantity_available bigint,
 last_update_time string)
ROW FORMAT DELIMITED FIELDS TERMINATED BY ','
STORED AS INPUTFORMAT 'org.apache.hadoop.mapred.TextInputFormat'
OUTPUTFORMAT 'org.apache.hadoop.hive.ql.io.HiveIgnoreKeyTextOutputFormat'
LOCATION 's3:///raw-csv-input/'
TBLPROPERTIES (
  'areColumnsQuoted'='false',
  'classification'='csv',
  'columnsOrdered'='true',
  'compressionType'='none',
  'delimiter'=',',
  'typeOfData'='file');

-- Create output Iceberg table with partitioning. Replace the S3 bucket name with your bucket name
CREATE TABLE glue5_fta_demo.iceberg_datalake WITH (
  table_type='ICEBERG',
  format='parquet',
  write_compression = 'SNAPPY',
  is_external = false,
  partitioning=ARRAY['category', 'bucket(product_id, 16)'],
  location='s3:///iceberg-datalake/'
) AS SELECT * FROM glue5_fta_demo.raw_csv_input;
Run the following query to validate the raw CSV input data:
SELECT * FROM glue5_fta_demo.raw_csv_input;The following screenshot shows the query result:
Run the following query to validate the Iceberg table data:
SELECT * FROM glue5_fta_demo.iceberg_datalake;The following screenshot shows the query result:
This step used DDL to create table definitions. Alternatively, you can use a Data Catalog API, the AWS Glue console, the Lake Formation console, or an AWS Glue crawler.
The next step is to configure Lake Formation permissions on the iceberg_datalake table.
Configure Lake Formation permissions
To validate the capability, you need to define FTA permissions for the iceberg_datalake Data Catalog table you created. To start, enable read access to iceberg_datalake.
To configure Lake Formation permissions for the iceberg_datalake table, complete the following steps:
On the Lake Formation console, choose Data lake locations under Administration in the navigation pane.
Choose Register location.
For Amazon S3 path, enter the path of your S3 bucket to register the location.
The next step is to grant table permissions on the iceberg_datalake table to the AWS Glue job role.
On the Lake Formation console, choose Data permissions under Permissions in the navigation pane.
Choose Grant.
For Principals, choose IAM users and roles.
For IAM users and roles, choose your IAM role that is going to be used on an AWS Glue job.
For LF-Tags or catalog resources, choose Named Data Catalog resources.
For Catalogs, choose your account ID (the default catalog).
For Databases, choose glue5_fta_demo.
For Tables, choose iceberg_datalake.
For Table permissions, choose Select and Describe.
For Data permissions, choose All data access.
Next, create the AWS Glue PySpark job to process the input data.
Query the Iceberg table through an AWS Glue 4.0 job using GlueContext and DataFrames
Next, create a sample AWS Glue 4.0 job to load data from the iceberg_datalake table. You will use this sample job as a source of migration. Complete the following steps:
On the AWS Glue console, choose ETL jobs in the navigation pane.
For Create job, choose Script Editor.
For Engine, choose Spark.
For Options, choose Start fresh.
Choose Create script.
For Script, replace the following parameters:
Replace aws_region with your Region.
Replace aws_account_id with your AWS account ID.
Replace warehouse_path with your Amazon S3 warehouse path for the Iceberg table.
When the job is complete, on the Run details tab, choose Output logs.
You’re redirected to the Amazon CloudWatch console to validate the output.
The output table is shown in the following screenshot. You see the same output that you saw in Athena when you verified that the Iceberg table was populated. This is because the AWS Glue job execution role has full table access from the Lake Formation permissions that you granted:
If you were to run this same AWS Glue job with another IAM role that wasn’t granted access to the table in Lake Formation, you would see an error Insufficient Lake Formation permission(s) on iceberg_datalake. Use the following steps to replicate this behavior:
Create a new IAM role that’s identical to the AWS Glue job execution role you already used, but don’t grant permissions to this clone in Lake Formation.
Change the role in the AWS Glue console for glue-fta-demo-iceberg to the new cloned role.
Rerun the job. You should see the error.
For the purposes of this post, change the role back to the original job execution role that’s registered in Lake Formation so you can use it in the next steps.
You now have an FTA setup in AWS Glue 4.0 that uses GlueContext DataFrames for an Iceberg table. You saw how roles that are granted permission in Lake Formation can read, and how roles that aren’t granted permission in Lake Formation cannot read. In the next section, we show you how to migrate from AWS Glue 4.0 GlueContext FTA to AWS Glue 5.0 native Spark FTA.
Migrate an AWS Glue 4.0 GlueContext FTA job to AWS Glue 5.0 native Spark FTA
The Lake Formation permission granting experience is identical regardless of the AWS Glue version and Spark data structures used. Therefore, assuming you have a working Lake Formation setup for your AWS Glue 4.0 job, you don’t need to modify those permissions during migration. Here are the migration steps using the AWS Glue 4.0 example from the previous sections:
Allow third-party query engines to access data without the IAM session tag validation in Lake Formation. Follow the step-by-step guide in Application integration for full table access.
You shouldn’t need to change the job runtime role if you have AWS Glue 4.0 FTA working (see the example permissions in the prerequisites). The main IAM permission to verify is that the AWS Glue job execution role has lakeformation:GetDataAccess.
Modify the Spark session configurations in the script. Verify that the following Spark configurations are present:
Update the script so that GlueContext DataFrames are changed to native Spark DataFrames. For example, the updated script for the previous AWS Glue 4.0 job would now look like:
To verify that roles that don’t have Lake Formation permissions granted for them aren’t able to access the Iceberg table, you can repeat the same exercise you did in AWS Glue 4.0 and reuse the clone job execution role to rerun the job. You should see the error message: AnalysisException: Insufficient Lake Formation permission(s) on glue5_fta_demo
You’ve completed the migration and now have an FTA setup in AWS Glue 5.0 that uses native Spark and reads from an Iceberg table. You saw that roles that are granted permission in Lake Formation can read and that roles that aren’t granted permission in Lake Formation cannot read.
Clean up
Complete the following steps to clean up your resources:
Delete the AWS Glue job glue-fta-demo-iceberg.
Delete the Lake Formation permissions.
Delete the bucket that you created for the input datasets, which might have a name similar to glue5-fta-demo-${AWS_ACCOUNT_ID}-${AWS_REGION_CODE}.
Conclusion
This post explained how you can enable Spark native FTA in AWS Glue 5.0 jobs that will enforce access control defined using Lake Formation grant commands. For previous AWS Glue versions, you needed to integrate AWS Glue DataFrames to enforce FTA in AWS Glue jobs or migrate to AWS Glue 5.0 FGAC, which has relatively limited functionality. With this release, if you don’t need fine-grained control, you can enforce FTA through Spark DataFrame or Spark SQL for more flexibility and performance. This capability is currently supported for Iceberg and Hive tables.
This feature can save you effort and encourage portability while migrating Spark scripts to different serverless environments such as AWS Glue and Amazon EMR.
About the authors
Layth Yassin is a Software Development Engineer on the AWS Glue team. He’s passionate about tackling challenging problems at a large scale, and building products that push the limits of the field. Outside of work, he enjoys playing/watching basketball, and spending time with friends and family.
Noritaka Sekiyama is a Principal Big Data Architect on the AWS Glue team. He is also the author of the book Serverless ETL and Analytics with AWS Glue. He is responsible for building software artifacts to help customers. In his spare time, he enjoys cycling with his road bike.
Kartik Panjabi is a Software Development Manager on the AWS Glue team. His team builds generative AI features for the Data Integration and distributed system for data integration.
Matt Su is a Senior Product Manager on the AWS Glue team. He enjoys helping customers uncover insights and make better decisions using their data with AWS Analytics services. In his spare time, he enjoys skiing and gardening.
Linus has released 6.16-rc4 for testing.
“Despite a fairly large merge window, things continue to look fairly
calm on the rc front“.
The collective thoughts of the interwebz
Manage Consent
To provide the best experiences, we use technologies like cookies to store and/or access device information. Consenting to these technologies will allow us to process data such as browsing behavior or unique IDs on this site. Not consenting or withdrawing consent, may adversely affect certain features and functions.
Functional
Always active
The technical storage or access is strictly necessary for the legitimate purpose of enabling the use of a specific service explicitly requested by the subscriber or user, or for the sole purpose of carrying out the transmission of a communication over an electronic communications network.
Preferences
The technical storage or access is necessary for the legitimate purpose of storing preferences that are not requested by the subscriber or user.
Statistics
The technical storage or access that is used exclusively for statistical purposes.The technical storage or access that is used exclusively for anonymous statistical purposes. Without a subpoena, voluntary compliance on the part of your Internet Service Provider, or additional records from a third party, information stored or retrieved for this purpose alone cannot usually be used to identify you.
Marketing
The technical storage or access is required to create user profiles to send advertising, or to track the user on a website or across several websites for similar marketing purposes.


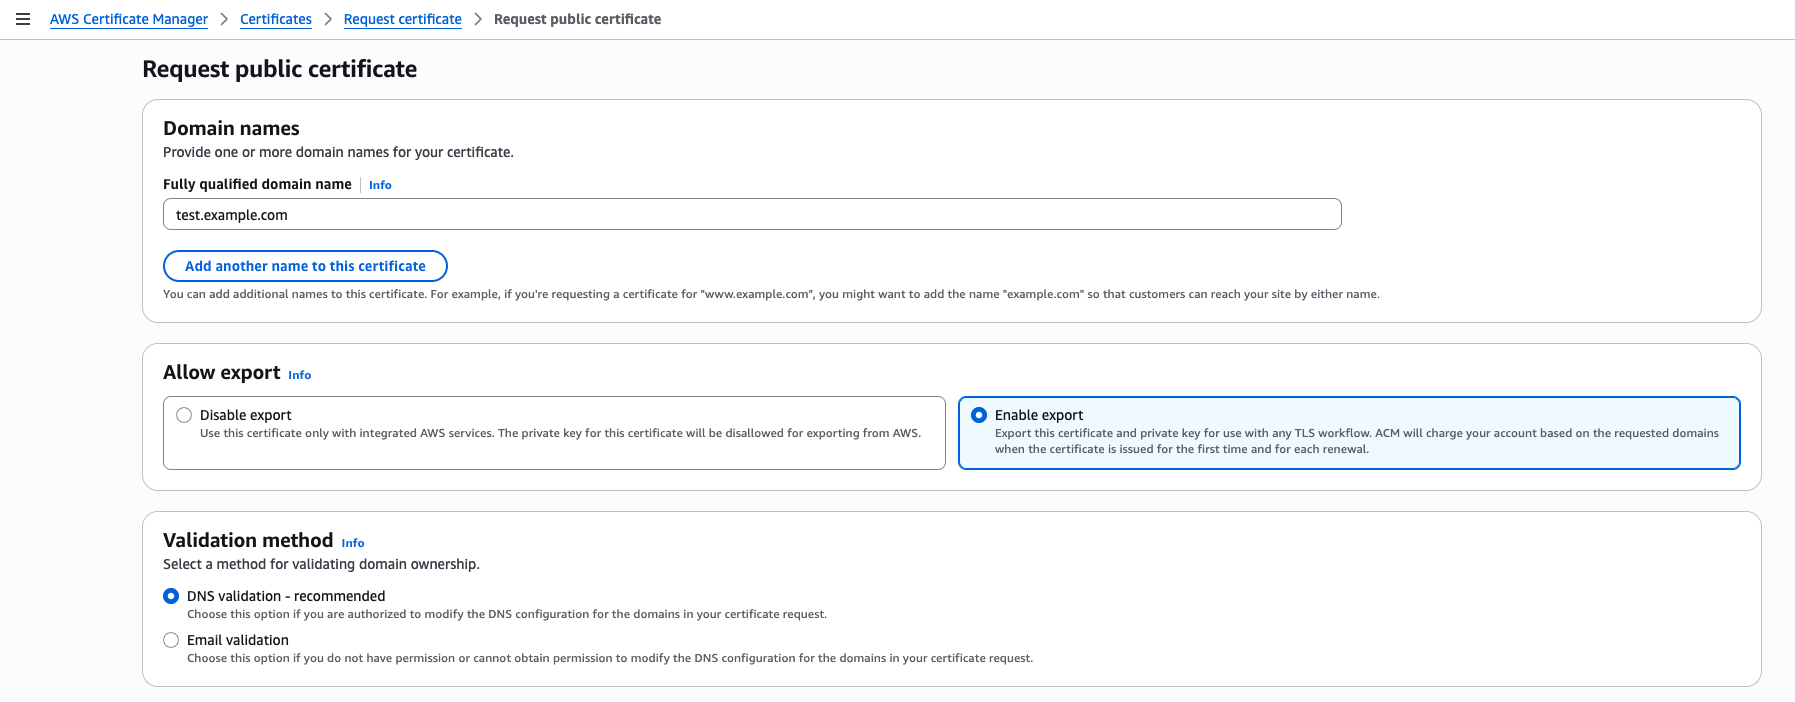

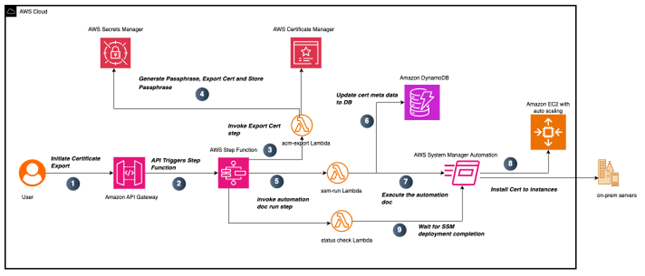

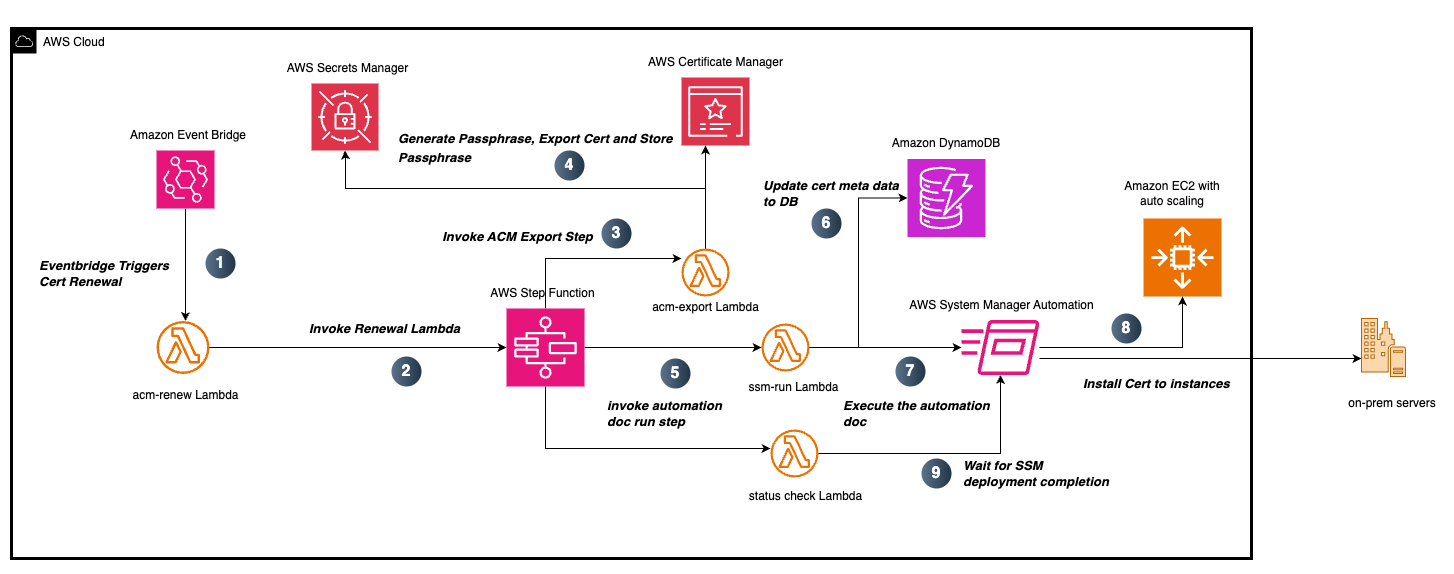


 Raks Khare is a Senior Analytics Specialist Solutions Architect at AWS based out of Pennsylvania. He helps customers across varying industries and regions architect data analytics solutions at scale on the AWS platform. Outside of work, he likes exploring new travel and food destinations and spending quality time with his family.
 Ritesh Kumar Sinha is an Analytics Specialist Solutions Architect based out of San Francisco. He has helped customers build scalable data warehousing and big data solutions for over 16 years. He loves to design and build efficient end-to-end solutions on AWS. In his spare time, he loves reading, walking, and doing yoga.
 Yanzhu Ji is a Product Manager in the Amazon Redshift team. She has experience in product vision and strategy in industry-leading data products and platforms. She has outstanding skill in building substantial software products using web development, system design, database, and distributed programming techniques. In her personal life, Yanzhu likes painting, photography, and playing tennis.
 Harshida Patel is a Analytics Specialist Principal Solutions Architect, with AWS.


 Layth Yassin is a Software Development Engineer on the AWS Glue team. He’s passionate about tackling challenging problems at a large scale, and building products that push the limits of the field. Outside of work, he enjoys playing/watching basketball, and spending time with friends and family.
 Noritaka Sekiyama is a Principal Big Data Architect on the AWS Glue team. He is also the author of the book
  Kartik Panjabi is a Software Development Manager on the AWS Glue team. His team builds generative AI features for the Data Integration and distributed system for data integration.
 Matt Su is a Senior Product Manager on the AWS Glue team. He enjoys helping customers uncover insights and make better decisions using their data with AWS Analytics services. In his spare time, he enjoys skiing and gardening.