Implementing Kerberos authentication for Apache Spark jobs on Amazon EMR on EKS to access a Kerberos-enabled Hive Metastore

Post Syndicated from Krishna Kumar Venkateswaran original https://aws.amazon.com/blogs/big-data/implementing-kerberos-authentication-for-apache-spark-jobs-on-amazon-emr-on-eks-to-access-a-kerberos-enabled-hive-metastore/

Many organizations run their Apache Spark analytics platforms on Amazon EMR on Amazon Elastic Compute Cloud (Amazon EC2), using Kerberos authentication to secure connectivity between Spark jobs and a centralized shared Apache Hive Metastore (HMS). With Amazon EMR on Amazon EKS, they gained a new option for running Spark jobs with the benefits of Kubernetes-based container orchestration, improved resource utilization, and faster job startup times. However, an HMS deployment supports only one authentication mechanism at a time. This means that they must configure Kerberos authentication for their Spark jobs on Amazon EMR on EKS to connect to the existing Kerberos-enabled HMS.

In this post, we show how to configure Kerberos authentication for Spark jobs on Amazon EMR on EKS, authenticating against a Kerberos-enabled HMS so you can run both Amazon EMR on EC2 and Amazon EMR on EKS workloads against a single, secure HMS deployment.

Overview of solution

Consider an enterprise data platform team that’s been running Spark jobs on Amazon EMR on EC2 for several years. Their architecture includes a Kerberos-enabled standalone HMS that serves as the centralized data catalog, with Microsoft Active Directory functioning as the Key Distribution Center (KDC). As the team evaluates Amazon EMR on EKS for new workloads, their existing HMS must continue serving Amazon EMR on EC2, with both authenticating through the same Kerberos infrastructure. To address this, the platform team must configure their Spark jobs running on Amazon EMR on EKS to authenticate with the same KDC. This is so they can obtain valid Kerberos tickets and establish authenticated connections to the HMS while maintaining a unified security posture across their data platform.
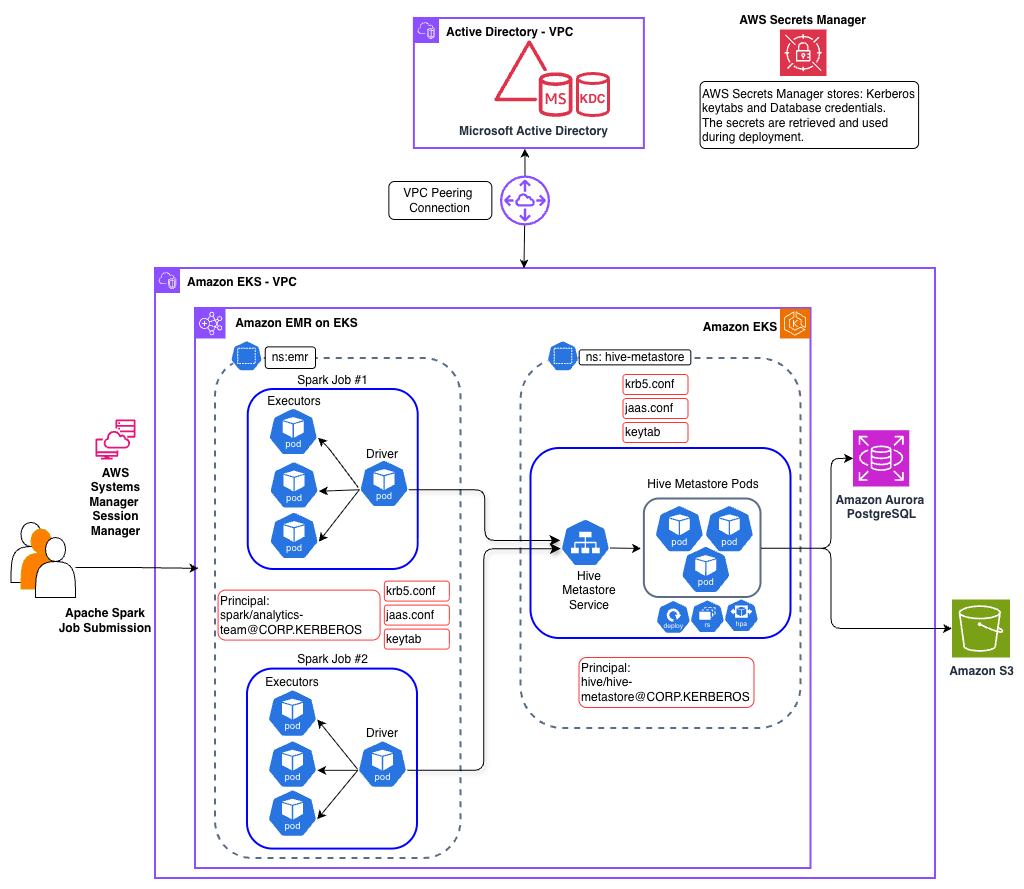
Architecture diagram showing two VPCs connected via VPC peering: the Active Directory VPC contains Microsoft Active Directory serving as the Kerberos Key Distribution Center (KDC) with ports 88 (Kerberos) and 749 (Admin). The Amazon EKS VPC contains two namespaces — the emr namespace runs Apache Spark jobs (each with a driver pod and executor pods) configured with krb5.conf, jaas.conf, and keytab files using a spark/analytics-team@CORP.KERBEROS principal; the hive-metastore namespace runs Hive Metastore pods (with deployment, replica set, and HPA) configured with Kerberos artifacts and the hive/hive-metastore@CORP.KERBEROS principal. Spark driver pods connect to the Hive Metastore service, which is backed by Amazon Aurora PostgreSQL for metadata storage and Amazon S3 for data storage. AWS Secrets Manager stores Kerberos keytabs and database credentials retrieved during deployment. Users submit Spark jobs via AWS Systems Manager Session Manager.

Scope of Kerberos in this solution

Kerberos authentication in this solution secures the connection between Spark jobs and the HMS. Other components in the architecture use AWS and Kubernetes security mechanisms instead.

Solution architecture

Our solution implements Kerberos authentication to secure the connection between Spark jobs and the HMS. The architecture spans two Amazon Virtual Private Clouds (Amazon VPCs) connected using VPC peering, with distinct components handling identity management, compute, and metadata services.

Identity and Authentication layer

A self-managed Microsoft Active Directory Domain Controller is deployed in a dedicated VPC and serves as the KDC for Kerberos authentication. The Active Directory server hosts service principals for both the HMS service and Spark jobs. This separate VPC deployment mirrors real-world enterprise architectures where Active Directory is typically managed by identity teams in their own network boundary, whether on-premises or in AWS.

Data Platform layer

The data platform components reside in a separate VPC and includes an EKS cluster that hosts both the HMS service and Amazon EMR on EKS based Spark jobs persisting data in an Amazon Simple Storage Service (Amazon S3) bucket.

Hive Metastore service

The HMS is deployed in the EKS hive-metastore namespace and simulates a pre-existing, standalone Kerberos-enabled HMS, a common enterprise pattern where HMS is managed independently of any data processing platform. You can learn more about other enterprise design patterns in the post Design patterns for implementing Hive Metastore for Amazon EMR or EKS. The HMS service authenticates with the KDC using its service principal and keytab mounted from a Kubernetes secret.

Apache Spark Execution layer

Apache Spark jobs are deployed using the Spark Operator on EKS. The Spark driver and executor pods are configured with Kerberos credentials through mounted ConfigMaps containing krb5.conf and jaas.conf, along with keytab files from Kubernetes secrets. When a Spark job must access Hive tables, the driver authenticates with the KDC and establishes a secure Simple Authentication and Security Layer (SASL) connection to the HMS.

Authentication flow

The HMS runs as a long-running Kubernetes service that must be deployed and authenticated before Spark jobs can connect.

During HMS deployment:

  1. HMS pod validates its Kerberos configuration. krb5.conf and jaas.conf are mounted from ConfigMaps
  2. Service authenticates with KDC using its principal hive/hive-metastore-svc.hive-metastore.svc.cluster.local@CORP.KERBEROS
  3. keytab is mounted from Kubernetes secret for credential access
  4. Secure Thrift endpoint is established on port 9083 with SASL authentication enabled

When a Spark job must interact with the HMS:

  1. Spark job submission:
    1. User submits Spark job through Spark Operator
    2. Driver and executor pods are created with Kerberos configuration mounted as volumes
    3. krb5.conf ConfigMap provides KDC connection details including realm and server addresses
    4. jaas.conf ConfigMap specifies a login module configuration with keytab path and principal
    5. Keytab secret contains encrypted credentials for Spark service principal spark/[email protected]
  2. Authentication and connection:
    1. Spark driver authenticates with KDC using its principal and keytab to obtain a Ticket Granting Ticket (TGT)
    2. When connecting to HMS, Spark requests a service ticket from the KDC for the HMS principal hive/hive-metastore-svc.hive-metastore.svc.cluster.local@CORP.KERBEROS
    3. KDC issues a service ticket encrypted with HMS’s secret key
    4. Spark presents this service TGT to HMS over the Thrift connection on port 9083
    5. HMS decrypts the ticket using its keytab, verifies Spark’s identity, and establishes the authenticated SASL session
    6. Executor pods use the same configuration for authenticated operations
  3. Data access:
    1. Authenticated Spark job queries HMS for table metadata
    2. HMS validates Kerberos tickets before serving metadata requests
    3. Spark accesses underlying data in Amazon S3 using IRSA
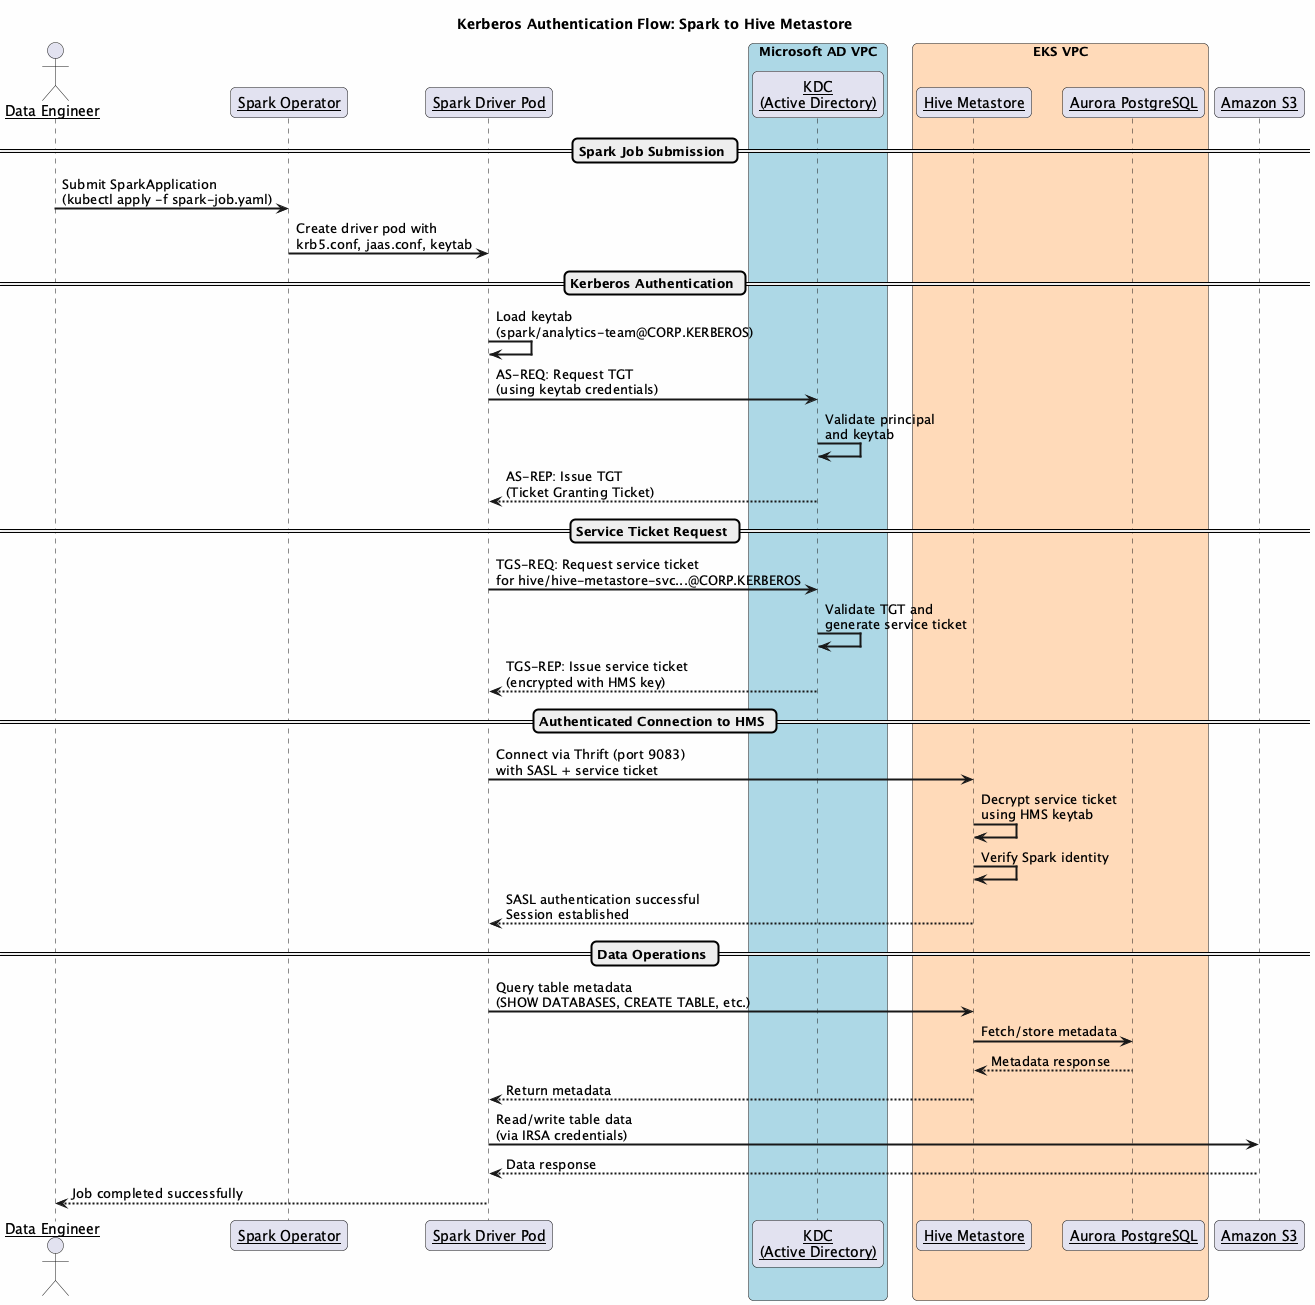
Sequence diagram illustrating the Kerberos authentication flow between a Spark job and the Hive Metastore. The flow proceeds in five phases: (1) Job Submission — a Data Engineer submits a SparkApplication via kubectl, and the Spark Operator creates a driver pod with krb5.conf, jaas.conf, and keytab mounted. (2) Kerberos Authentication — the Spark driver loads its keytab for the spark/analytics-team@CORP.KERBEROS principal and sends an AS-REQ to the Active Directory KDC, which validates the credentials and returns a TGT (Ticket Granting Ticket). (3) Service Ticket Request — the Spark driver sends a TGS-REQ to the KDC requesting a service ticket for the Hive Metastore principal, and the KDC returns a service ticket encrypted with the HMS key. (4) Authenticated Connection — the Spark driver connects to the Hive Metastore over Thrift (port 9083) using SASL with the service ticket; HMS decrypts the ticket using its own keytab, verifies the Spark identity, and establishes an authenticated session. (5) Data Operations — the Spark driver queries table metadata from HMS (backed by Aurora PostgreSQL) and reads/writes table data directly from Amazon S3 using IRSA credentials.

Implementation workflow

The implementation involves three key stakeholders working together to establish the Kerberos-enabled communication:

Microsoft Active Directory Administrator

The Active Directory Administrator creates service accounts that are used for HMS and Spark jobs. This involves setting up the service principal names using the setspn utility and generating keytab files using ktpass for secure credential storage. The administrator configures the appropriate Active Directory permissions and Kerberos AES256 encryption type. Finally, the keytab files are uploaded to AWS Secrets Manager for secure distribution to Kubernetes workloads.

Data Platform Team

The platform team handles the Amazon EMR on EKS and Kubernetes configurations. They retrieve keytabs from Secrets Manager and create Kubernetes secrets for the workloads. They configure Helm charts for HMS deployment with Kerberos settings and set up ConfigMaps for krb5.conf, jaas.conf, and core-site.xml.

Data Engineering Operations

Data engineers submit jobs using the configured service account with Kerberos authentication. They monitor job execution and verify authenticated access to HMS.

Deploy the solution

In the remainder of this post, you will explore the implementation details for this solution. You can find the sample code in the AWS Samples GitHub repository. For additional details, including verification steps for each deployment stage, refer to the README in the repository.

Prerequisites

Before you deploy this solution, make sure that the following prerequisites are in place:

Clone the repository and set up environment variables

Clone the repository to your local machine and set the two environment variables. Replace <AWS_REGION> with the AWS Region where you want to deploy these resources.

# Clone the Git repository
git clone https://github.com/aws-samples/sample-emr-eks-spark-kerberos-hms.git
cd sample-emr-eks-spark-kerberos-hms

# Set environment variables
export REPO_DIR=$(pwd)
export AWS_REGION=<AWS_REGION>

Setup Microsoft Active Directory infrastructure

In this section, we deploy a self-managed Microsoft Active Directory with KDC on a Windows Server EC2 instance into a dedicated VPC. This is an intentionally minimal implementation highlighting only the key components required for this blog post.

cd ${REPO_DIR}/microsoft-ad
./setup.sh

Setup EKS infrastructure

This section provisions the Amazon EMR on EKS infrastructure stack, including VPC, EKS cluster, Amazon Aurora PostgreSQL database, Amazon Elastic Container Registry (Amazon ECR), Amazon S3, Amazon EMR on EKS virtual clusters and the Spark Operator. Run the following script.

cd ${REPO_DIR}/data-infra
./setup.sh

Set up VPC peering

This section establishes network connectivity between the Active Directory VPC and EKS VPC for Kerberos authentication. Run the following script:

cd ${REPO_DIR}/vpc-peering
./setup.sh

Deploy Hive Metastore with Kerberos authentication

This section deploys a Kerberos-enabled HMS service on the EKS cluster. Complete the following steps:

  1. Create Kerberos Service Principal for HMS service
cd ${REPO_DIR}/microsoft-ad/
# Create HMS service principal
./manage-ad-service-principals.sh create hive "hive/hive-metastore-svc.hive-metastore.svc.cluster.local"
# Verify the service principal was created
./manage-ad-service-principals.sh list
  1. Deploy HMS service with Kerberos authentication
cd ${REPO_DIR}/hive-metastore
./deploy.sh

Set up Amazon EMR on Amazon EKS with Kerberos authentication

This section configures Spark jobs to authenticate with Kerberos-enabled HMS. This involves creating service principles for Spark jobs and generating the necessary configuration files. Complete the following steps:

  1. Create Service Principal for Spark jobs
cd ${REPO_DIR}/microsoft-ad/
# Create Spark service principal
./manage-ad-service-principals.sh create spark "spark/analytics-team"
# Verify the service principal was created
./manage-ad-service-principals.sh list
  1. Generate Kerberos configurations for Spark jobs
cd ${REPO_DIR}/spark-jobs/
./generate-spark-configs.sh --principal "spark/[email protected]" --namespace emr

Submit Spark jobs

This section verifies Kerberos authentication by running a Spark job that connects to the Kerberized HMS. Complete the following steps:

  1. Submit the test Spark job
cd ${REPO_DIR}/spark-jobs
kubectl apply -f spark-job.yaml
  1. Monitor job execution
# Watch the SparkApplication status
kubectl get sparkapplications -n emr -w
# Check pod status
kubectl get pods -n emr | grep "spark-kerberos"
  1. Verify Kerberos authentication and HMS connection
# Check Spark driver logs for successful authentication
kubectl logs spark-kerberos-job-driver -n emr

The logs should confirm successful authentication, along with a listing of sample databases and tables.

Understanding Kerberos configuration

The HMS requires specific configuration parameters to enable Kerberos authentication, applied through the previously mentioned steps. The key configurations are outlined in the following section.

HMS configuration (metastore-site.xml)

The following configurations are added to metastore-site.xml file.

Setting Value Purpose
hive.metastore.sasl.enabled true Enable SASL authentication
hive.metastore.kerberos.principal hive/hive-metastore-svc.hive-metastore.svc.cluster.local@CORP.KERBEROS HMS service principal
hive.metastore.kerberos.keytab.file /etc/security/keytab/hive.keytab Keytab path

Hadoop security (core-site.xml)

The following configurations are added to the core-site.xml file.

Setting Value
hadoop.security.authentication kerberos
hadoop.security.authorization true

Spark configuration

Setting Value Purpose
spark.security.credentials.kerberos.enabled true Enable Kerberos for Spark
spark.hadoop.hive.metastore.sasl.enabled true SASL for HMS connection
spark.kerberos.principal spark/[email protected] Spark service principal
spark.kerberos.keytab local:///etc/security/keytab/analytics-team.keytab Keytab path

Shared Kerberos files

Both HMS and Spark pods mount two common Kerberos configuration files: krb5.conf and jaas.conf, using ConfigMaps and Kubernetes secrets. The krb5.conf file is identical across both services and defines how each component connects to the KDC. The jaas.conf file follows the same structure but differs in the principal and keytab path for each service.

  1. krb5 Configuration
[libdefaults]
	default_realm = CORP.KERBEROS
	dns_lookup_realm = false
	dns_lookup_kdc = false
	ticket_lifetime = 24h
	forwardable = true
	udp_preference_limit = 1
	default_tkt_enctypes = aes256-cts-hmac-sha1-96 aes128-cts-hmac-sha1-96
	default_tgs_enctypes = aes256-cts-hmac-sha1-96 aes128-cts-hmac-sha1-96
	permitted_enctypes = aes256-cts-hmac-sha1-96 aes128-cts-hmac-sha1-96

[realms]
	CORP.KERBEROS = {
		kdc = <ad-server-ip>
		admin_server = <ad-server-ip>
	}

[domain_realm]
	.corp.kerberos = CORP.KERBEROS
	corp.kerberos = CORP.KERBEROS

For more information, see the online documentation for krb5.conf.

  1. JAAS configuration
Client {
 com.sun.security.auth.module.Krb5LoginModule required
 useKeyTab=true
 keyTab="/etc/security/keytab/hive.keytab"
 principal="hive/hive-metastore-svc.hive-metastore.svc.cluster.local@CORP.KERBEROS"
 useTicketCache=false
 storeKey=true
 debug=false;
};

Additional security considerations

This post focuses on core Kerberos authentication mechanics between Spark and HMS. We recommend two additional security hardening steps based on your organization’s security posture and compliance requirements.

Protecting Keytabs at Rest with AWS KMS Envelope Encryption

Keytabs stored as Kubernetes Secrets are only base64-encoded by default, not encrypted at rest. We recommend enabling EKS envelope encryption using an AWS Key Management Service (AWS KMS) customer managed key. With envelope encryption, secret data is encrypted with a Data Encryption Key (DEK), which is encrypted by your customer managed key. This protects keytab content even if the etcd datastore is compromised. To enable this on an existing EKS cluster:

aws eks associate-encryption-config \
  --cluster-name <your-cluster> \
  --encryption-config '[{"resources":["secrets"],"provider":{"keyArn":"arn:aws:kms:<region>:<account-id>:key/<key-id>"}}]'

Refer to the Amazon EKS documentation on envelope encryption for full setup guidance.

Encrypting the Thrift Data Channel with TLS

SASL with Kerberos provides mutual authentication but doesn’t automatically encrypt data over the Thrift connection. Many deployments default to auth QoP, leaving the data channel unencrypted. We recommend either:

  • Set SASL QoP to auth-conf — enables SASL-layer encryption using Kerberos session keys
  • Layer TLS over Thrift (preferred) — enables transport-level encryption using modern cipher suites

Enabling TLS on HiveServer2 / Hive Metastore Thrift:

<property>
  <name>hive.server2.use.SSL</name>
  <value>true</value>
</property>
<property>
  <name>hive.server2.keystore.path</name>
  <value>/etc/tls/keystore.jks</value>
</property>

Refer to the Hive SSL/TLS configuration documentation for full details.

Cleaning up

To avoid incurring future charges, clean up all provisioned resources during this setup by executing the following cleanup script.

cd ${REPO_DIR}/
./cleanup.sh

Conclusion

In this post, we demonstrated how to implement Kerberos authentication for Amazon EMR on EKS to securely connect to a Kerberos-enabled HMS. This solution addresses a common challenge faced by organizations with existing Kerberos-enabled HMS deployments who want to adopt Amazon EMR on EKS while maintaining their Kerberos-enabled security posture.

This pattern applies whether you’re migrating from on-premises Hadoop, running hybrid Amazon EMR on EC2 or Amazon EMR on EKS environments, or building a new cloud-native platform. Any scenario where Spark jobs on Kerberos must authenticate with a shared, Kerberos-enabled HMS.

You can use this post as a starting point to implement this pattern and extend it further to suit your organization’s data platform needs.


About the authors

Headshot of Krishna Kumar Venkateswaran

Krishna Kumar Venkateswaran is a Cloud Infrastructure Architect at Amazon Web Services (AWS), passionate about building secure applications and data platforms. He has extensive experience in Kubernetes, DevOps, and enterprise architecture, helping customers containerize applications, streamline deployments, and optimize cloud-native environments.

Headshot of Sunil Chakrapani Sundararaman

Sunil Chakrapani Sundararaman is a DevOps Architect at Amazon Web Services (AWS), where he helps enterprise customers architect and implement Data and Machine Learning platforms in the AWS Cloud. He brings extensive experience in Data Platform engineering, MLOps, DevOps, and Kubernetes implementations. Sunil specializes in guiding organizations through their cloud transformation journey, focusing on building scalable and efficient solutions that drive business value.

Headshot of Avinash Desireddy

Avinash Desireddy is a Specialist Solutions Architect (Containers) at Amazon Web Services (AWS), passionate about building secure applications and data platforms. He has extensive experience in Kubernetes, DevOps, and enterprise architecture, helping customers and partners containerize applications, streamline deployments, and optimize cloud-native environments.

Headshot of Suvojit Dasgupta

Suvojit Dasgupta is an Engineering Leader at Amazon Web Services (AWS). He leads engineering teams, guiding them in designing and implementing scalable, high-performance data platforms for AWS customers. With expertise spanning distributed systems, real-time and batch data architectures, and cloud-native infrastructure, he drives technical strategy and engineering excellence across teams. He is passionate about raising the bar on engineering practices, and solving large-scale problems at the intersection of data and business impact.

[$] A build system aimed at license compliance

Post Syndicated from jake original https://lwn.net/Articles/1066103/

The OpenWrt One is a
router powered by the open-source firmware from the OpenWrt project; it was also the
subject of a keynote at SCALE in 2025
given by Denver Gingerich of the Software Freedom Conservancy (SFC),
which played a big role in developing the router. Gingerich returned to
the conference in
2026
to talk about the build system used by the OpenWrt One, which is
focused on creating the needed binaries, naturally, but doing so in a way
that makes it easy to comply with the licenses of the underlying code.
That makes good sense for a project of this sort—and for a talk given by
the director of compliance at SFC.

Servo now on crates.io

Post Syndicated from jzb original https://lwn.net/Articles/1067467/

The Servo project has announced
the first release of servo as a crate for use as a
library.

As you can see from the version number, this release is not a 1.0
release. In fact, we still haven’t finished discussing what 1.0 means
for Servo. Nevertheless, the increased version number reflects our
growing confidence in Servo’s embedding API and its ability to meet
some users’ needs.

In the meantime we also decided to offer a long-term support (LTS)
version of Servo, since breaking changes in the regular monthly
releases are expected and some embedders might prefer doing major
upgrades on a scheduled half-yearly basis while still receiving
security updates and (hopefully!) some migration guides. For more
details on the LTS release, see the respective section in
the Servo book
.

Building a CLI for all of Cloudflare

Post Syndicated from Matt “TK” Taylor original https://blog.cloudflare.com/cf-cli-local-explorer/

Cloudflare has a vast API surface. We have over 100 products, and nearly 3,000 HTTP API operations.

Increasingly, agents are the primary customer of our APIs. Developers bring their coding agents to build and deploy applications, agents, and platforms to Cloudflare, configure their account, and query our APIs for analytics and logs.

We want to make every Cloudflare product available in all of the ways agents need. For example, we now make Cloudflare’s entire API available in a single Code Mode MCP server that uses less than 1,000 tokens. There’s a lot more surface area to cover, though: CLI commands. Workers Bindings — including APIs for local development and testing. SDKs across multiple languages. Our configuration file. Terraform. Developer docs. API docs and OpenAPI schemas. Agent Skills.

Today, many of our products aren’t available across every one of these interfaces. This is particularly true of our CLI — Wrangler. Many Cloudflare products have no CLI commands in Wrangler. And agents love CLIs.

So we’ve been rebuilding Wrangler CLI, to make it the CLI for all of Cloudflare. It provides commands for all Cloudflare products, and lets you configure them together using infrastructure-as-code.

Today we’re sharing an early version of what the next version of Wrangler will look like as a technical preview. It’s very early, but we get the best feedback when we work in public.

You can try the Technical Preview today by running npx cf. Or you can install it globally by running npm install -g cf.

Right now, cf provides commands for just a small subset of Cloudflare products. We’re already testing a version of cf that supports the entirety of the Cloudflare API surface — and we will be intentionally reviewing and tuning the commands for each product, to have output that is ergonomic for both agents and humans. To be clear, this Technical Preview is just a small piece of the future Wrangler CLI. Over the coming months we will bring this together with the parts of Wrangler you know and love.

To build this in a way that keeps in sync with the rapid pace of product development at Cloudflare, we had to create a new system that allows us to generate commands, configuration, binding APIs, and more.

Rethinking schemas and our code generation pipeline from first principles

We already generate the Cloudflare API SDKs, Terraform provider, and Code Mode MCP server based on the OpenAPI schema for Cloudflare API. But updating our CLI, Workers Bindings, wrangler.jsonc configuration, Agent Skills, dashboard and docs is still a manual process. This was already error-prone, required too much back and forth, and wouldn’t scale to support the whole Cloudflare API in the next version of our CLI.


To do this, we needed more than could be expressed in an OpenAPI schema. OpenAPI schemas describe REST APIs, but we have interactive CLI commands that involve multiple actions that combine both local development and API requests, Workers bindings expressed as RPC APIs, along with Agent Skills and documentation that ties this all together.

We write a lot of TypeScript at Cloudflare. It’s the lingua franca of software engineering. And we keep finding that it just works better to express APIs in TypeScript — as we do with Cap n’ Web, Code Mode, and the RPC system built into the Workers platform.

So we introduced a new TypeScript schema that can define the full scope of APIs, CLI commands and arguments, and context needed to generate any interface. The schema format is “just” a set of TypeScript types with conventions, linting, and guardrails to ensure consistency. But because it is our own format, it can easily be adapted to support any interface we need, today or in the future, while still also being able to generate an OpenAPI schema:


To date most of our focus has been at this layer — building the machine we needed, so that we can now start building the CLI and other interfaces we’ve wanted for years to be able to provide. This lets us start to dream bigger about what we could standardize across Cloudflare and make better for Agents — especially when it comes to context engineering our CLI.

Agents and CLIs — consistency and context engineering

Agents expect CLIs to be consistent. If one command uses <command> info as the syntax for getting information about a resource, and another uses <command> get, the agent will expect one and call a non-existent command for the other. In a large engineering org of hundreds or thousands of people, and with many products, manually enforcing consistency through reviews is Swiss cheese. And you can enforce it at the CLI layer, but then naming differs between the CLI, REST API and SDKs, making the problem arguably worse.

One of the first things we’ve done is to start creating rules and guardrails, enforced at the schema layer. It’s always get, never info. Always --force, never --skip-confirmations. Always --json, never --format, and always supported across commands. 

Wrangler CLI is also fairly unique — it provides commands and configuration that can work with both simulated local resources, or remote resources, like D1 databases, R2 storage buckets, and KV namespaces. This means consistent defaults matter even more. If an agent thinks it’s modifying a remote database, but is actually adding records to local database, and the developer is using remote bindings to develop locally against a remote database, their agent won’t understand why the newly-added records aren’t showing up when the agent makes a request to the local dev server. Consistent defaults, along with output that clearly signals whether commands are applied to remote or local resources, ensure agents have explicit guidance.

Local Explorer — what you can do remotely, you can now do locally

Today we are also releasing Local Explorer, a new feature available in open beta in both Wrangler and the Cloudflare Vite plugin.

Local Explorer lets you introspect the simulated resources that your Worker uses when you are developing locally, including KV, R2, D1, Durable Objects and Workflows. The same things you can do via the Cloudflare API and Dashboard with each of these, you can also do entirely locally, powered by the same underlying API structure.

For years we’ve made a bet on fully local development — not just for Cloudflare Workers, but for the entire platform. When you use D1, even though D1 is a hosted, serverless database product, you can run your database and communicate with it via bindings entirely locally, without any extra setup or tooling. Via Miniflare, our local development platform emulator, the Workers runtime provides the exact same APIs in local dev as in production, and uses a local SQLite database to provide the same functionality. This makes it easy to write and run tests that run fast, without the need for network access, and work offline.

But until now, working out what data was stored locally required you to reverse engineer, introspect the contents of the .wrangler/state directory, or install third-party tools.

Now whenever you run an app with Wrangler CLI or the Cloudflare Vite plugin, you will be prompted to open the local explorer (keyboard shortcut e). This provides you with a simple, local interface to see what bindings your Worker currently has attached, and what data is stored against them.

When you build using Agents, Local Explorer is a great way to understand what the agent is doing with data, making the local development cycle much more interactive. You can turn to Local Explorer anytime you need to verify a schema, seed some test records, or just start over and DROP TABLE.

Our goal here is to provide a mirror of the Cloudflare API that only modifies local data, so that all of your local resources are available via the same APIs that you use remotely. And by making the API shape match across local and remote, when you run CLI commands in the upcoming version of the CLI and pass a --local flag, the commands just work. The only difference is that the command makes a request to this local mirror of the Cloudflare API instead.

Starting today, this API is available at /cdn-cgi/explorer/api on any Wrangler- or Vite Plugin- powered application. By pointing your agent at this address, it will find an OpenAPI specification to be able to manage your local resources for you, just by talking to your agent.

Tell us your hopes and dreams for a Cloudflare-wide CLI 

Now that we have built the machine, it’s time to take the best parts of Wrangler today, combine them with what’s now possible, and make Wrangler the best CLI possible for using all of Cloudflare.

You can try the technical preview today by running npx cf. Or you can install it globally by running npm install -g cf.

With this very early version, we want your feedback — not just about what the technical preview does today, but what you want from a CLI for Cloudflare’s entire platform. Tell us what you wish was an easy one-line CLI command but takes a few clicks in our dashboard today. What you wish you could configure in wrangler.jsonc — like DNS records or Cache Rules. And where you’ve seen your agents get stuck, and what commands you wish our CLI provided for your agent to use.

Jump into the Cloudflare Developers Discord and tell us what you’d like us to add first to the CLI, and stay tuned for many more updates soon.

Thanks to Emily Shen for her valuable contributions to kicking off the Local Explorer project.

Security updates for Monday

Post Syndicated from jzb original https://lwn.net/Articles/1067436/

Security updates have been issued by AlmaLinux (fontforge, freerdp, libtiff, nginx, nodejs22, and openssh), Debian (bind9, chromium, firefox-esr, flatpak, gdk-pixbuf, inetutils, mediawiki, and webkit2gtk), Fedora (corosync, libcap, libmicrohttpd, libpng, mingw-exiv2, mupdf, pdns-recursor, polkit, trafficserver, trivy, vim, and yarnpkg), Mageia (libpng12, openssl, python-django, python-tornado, squid, and tomcat), Red Hat (rhc), Slackware (openssl), SUSE (chromedriver, chromium, cockpit, cockpit-machines, cockpit-podman, cockpit-tukit, crun, firefox, fontforge-20251009, glibc, go1, helm3, libopenssl-3-devel, libpng16, libradcli10, libtasn1, nghttp2, openssl-1_0_0, openssl-1_1, ovmf, perl-XML-Parser, python-cryptography, python-Flask-HTTPAuth, python311-Django4, python313-Django6, python315, sudo, systemd, tar, tekton-cli, tigervnc, util-linux, and zlib), and Ubuntu (mongodb, qemu, and retroarch).

Durable Objects in Dynamic Workers: Give each AI-generated app its own database

Post Syndicated from Kenton Varda original https://blog.cloudflare.com/durable-object-facets-dynamic-workers/

A few weeks ago, we announced Dynamic Workers, a new feature of the Workers platform which lets you load Worker code on-the-fly into a secure sandbox. The Dynamic Worker Loader API essentially provides direct access to the basic compute isolation primitive that Workers has been based on all along: isolates, not containers. Isolates are much lighter-weight than containers, and as such, can load 100x faster using 1/10 the memory. They are so efficient, they can be treated as “disposable”: start one up to run a few lines of code, then throw it away. Like a secure version of eval().

Dynamic Workers have many uses. In the original announcement, we focused on how to use them to run AI-agent-generated code as an alternative to tool calls. In this use case, an AI agent performs actions at the request of a user by writing a few lines of code and executing them. The code is single-use, intended to perform one task one time, and is thrown away immediately after it executes.

But what if you want an AI to generate more persistent code? What if you want your AI to build a small application with a custom UI the user can interact with? What if you want that application to have long-lived state? But of course, you still want it to run in a secure sandbox.

One way to do this would be to use Dynamic Workers, and simply provide the Worker with an RPC API that gives it access to storage. Using bindings, you could give the Dynamic Worker an API that points back to your remote SQL database (perhaps backed by Cloudflare D1, or a Postgres database you access through Hyperdrive — it’s up to you).

But Workers also has a unique and extremely fast type of storage that may be a perfect fit for this use case: Durable Objects. A Durable Object is a special kind of Worker that has a unique name, with one instance globally per name. That instance has a SQLite database attached, which lives on local disk on the machine where the Durable Object runs. This makes storage access ridiculously fast: there is effectively zero latency.

Perhaps, then, what you really want is for your AI to write code for a Durable Object, and then you want to run that code in a Dynamic Worker.

But how?

This presents a weird problem. Normally, to use Durable Objects you have to:

  1. Write a class extending DurableObject.

  2. Export it from your Worker’s main module.

  3. Specify in your Wrangler config that storage should be provision for this class. This creates a Durable Object namespace that points at your class for handling incoming requests.

  4. Declare a Durable Object namespace binding pointing at your namespace (or use ctx.exports), and use it to make requests to your Durable Object.

This doesn’t extend naturally to Dynamic Workers. First, there is the obvious problem: The code is dynamic. You run it without invoking the Cloudflare API at all. But Durable Object storage has to be provisioned through the API, and the namespace has to point at an implementing class. It can’t point at your Dynamic Worker.

But there is a deeper problem: Even if you could somehow configure a Durable Object namespace to point directly at a Dynamic Worker, would you want to? Do you want your agent (or user) to be able to create a whole namespace full of Durable Objects? To use unlimited storage spread around the world?

You probably don’t. You probably want some control. You may want to limit, or at least track, how many objects they create. Maybe you want to limit them to just one object (probably good enough for vibe-coded personal apps). You may want to add logging and other observability. Metrics. Billing. Etc.

To do all this, what you really want is for requests to these Durable Objects to go to your code first, where you can then do all the “logistics”, and then forward the request into the agent’s code. You want to write a supervisor that runs as part of every Durable Object.

Solution: Durable Object Facets

Today we are releasing, in open beta, a feature that solves this problem.


Durable Object Facets allow you to load and instantiate a Durable Object class dynamically, while providing it with a SQLite database to use for storage. With Facets:

  • First you create a normal Durable Object namespace, pointing to a class you write.

  • In that class, you load the agent’s code as a Dynamic Worker, and call into it.

  • The Dynamic Worker’s code can implement a Durable Object class directly. That is, it literally exports a class declared as extends DurableObject.

  • You are instantiating that class as a “facet” of your own Durable Object.

  • The facet gets its own SQLite database, which it can use via the normal Durable Object storage APIs. This database is separate from the supervisor’s database, but the two are stored together as part of the same overall Durable Object.

How it works

Here is a simple, complete implementation of an app platform that dynamically loads and runs a Durable Object class:

import { DurableObject } from "cloudflare:workers";

// For the purpose of this example, we'll use this static
// application code, but in the real world this might be generated
// by AI (or even, perhaps, a human user).
const AGENT_CODE = `
  import { DurableObject } from "cloudflare:workers";

  // Simple app that remembers how many times it has been invoked
  // and returns it.
  export class App extends DurableObject {
    fetch(request) {
      // We use storage.kv here for simplicity, but storage.sql is
      // also available. Both are backed by SQLite.
      let counter = this.ctx.storage.kv.get("counter") || 0;
      ++counter;
      this.ctx.storage.kv.put("counter", counter);

      return new Response("You've made " + counter + " requests.\\n");
    }
  }
`;

// AppRunner is a Durable Object you write that is responsible for
// dynamically loading applications and delivering requests to them.
// Each instance of AppRunner contains a different app.
export class AppRunner extends DurableObject {
  async fetch(request) {
    // We've received an HTTP request, which we want to forward into
    // the app.

    // The app itself runs as a child facet named "app". One Durable
    // Object can have any number of facets (subject to storage limits)
    // with different names, but in this case we have only one. Call
    // this.ctx.facets.get() to get a stub pointing to it.
    let facet = this.ctx.facets.get("app", async () => {
      // If this callback is called, it means the facet hasn't
      // started yet (or has hibernated). In this callback, we can
      // tell the system what code we want it to load.

      // Load the Dynamic Worker.
      let worker = this.#loadDynamicWorker();

      // Get the exported class we're interested in.
      let appClass = worker.getDurableObjectClass("App");

      return { class: appClass };
    });

    // Forward request to the facet.
    // (Alternatively, you could call RPC methods here.)
    return await facet.fetch(request);
  }

  // RPC method that a client can call to set the dynamic code
  // for this app.
  setCode(code) {
    // Store the code in the AppRunner's SQLite storage.
    // Each unique code must have a unique ID to pass to the
    // Dynamic Worker Loader API, so we generate one randomly.
    this.ctx.storage.kv.put("codeId", crypto.randomUUID());
    this.ctx.storage.kv.put("code", code);
  }

  #loadDynamicWorker() {
    // Use the Dynamic Worker Loader API like normal. Use get()
    // rather than load() since we may load the same Worker many
    // times.
    let codeId = this.ctx.storage.kv.get("codeId");
    return this.env.LOADER.get(codeId, async () => {
      // This Worker hasn't been loaded yet. Load its code from
      // our own storage.
      let code = this.ctx.storage.kv.get("code");

      return {
        compatibilityDate: "2026-04-01",
        mainModule: "worker.js",
        modules: { "worker.js": code },
        globalOutbound: null,  // block network access
      }
    });
  }
}

// This is a simple Workers HTTP handler that uses AppRunner.
export default {
  async fetch(req, env, ctx) {
    // Get the instance of AppRunner named "my-app".
    // (Each name has exactly one Durable Object instance in the
    // world.)
    let obj = ctx.exports.AppRunner.getByName("my-app");

    // Initialize it with code. (In a real use case, you'd only
    // want to call this once, not on every request.)
    await obj.setCode(AGENT_CODE);

    // Forward the request to it.
    return await obj.fetch(req);
  }
}

In this example:

  • AppRunner is a “normal” Durable Object written by the platform developer (you).

  • Each instance of AppRunner manages one application. It stores the app code and loads it on demand.

  • The application itself implements and exports a Durable Object class, which the platform expects is named App.

  • AppRunner loads the application code using Dynamic Workers, and then executes the code as a Durable Object Facet.

  • Each instance of AppRunner is one Durable Object composed of two SQLite databases: one belonging to the parent (AppRunner itself) and one belonging to the facet (App). These databases are isolated: the application cannot read AppRunner‘s database, only its own.

To run the example, copy the code above into a file worker.js, pair it with the following wrangler.jsonc, and run it locally with npx wrangler dev.

// wrangler.jsonc for the above sample worker.
{
  "compatibility_date": "2026-04-01",
  "main": "worker.js",
  "migrations": [
    {
      "tag": "v1",
      "new_sqlite_classes": [
        "AppRunner"
      ]
    }
  ],
  "worker_loaders": [
    {
      "binding": "LOADER",
    },
  ],
}

Start building

Facets are a feature of Dynamic Workers, available in beta immediately to users on the Workers Paid plan.

Check out the documentation to learn more about Dynamic Workers and Facets.

Agents have their own computers with Sandboxes GA

Post Syndicated from Kate Reznykova original https://blog.cloudflare.com/sandbox-ga/

When we launched Cloudflare Sandboxes last June, the premise was simple: AI agents need to develop and run code, and they need to do it somewhere safe.

If an agent is acting like a developer, this means cloning repositories, building code in many languages, running development servers, etc. To do these things effectively, they will often need a full computer (and if they don’t, they can reach for something lightweight!).

Many developers are stitching together solutions using VMs or existing container solutions, but there are lots of hard problems to solve:

  • Burstiness – With each session needing its own sandbox, you often need to spin up many sandboxes quickly, but you don’t want to pay for idle compute on standby.

  • Quick state restoration – Each session should start quickly and re-start quickly, resuming past state.

  • Security – Agents need to access services securely, but can’t be trusted with credentials.

  • Control – It needs to be simple to programmatically control sandbox lifecycle, execute commands, handle files, and more.

  • Ergonomics – You need to give a simple interface for both humans and agents to do common operations.

We’ve spent time solving these issues so you don’t have to. Since our initial launch we’ve made Sandboxes an even better place to run agents at scale. We’ve worked with our initial partners such as Figma, who run agents in containers with Figma Make:

“Figma Make is built to help builders and makers of all backgrounds go from idea to production, faster. To deliver on that goal, we needed an infrastructure solution that could provide reliable, highly-scalable sandboxes where we could run untrusted agent- and user-authored code. Cloudflare Containers is that solution.”

– Alex Mullans, AI and Developer Platforms at Figma

We want to bring Sandboxes to even more great organizations, so today we are excited to announce that Sandboxes and Cloudflare Containers are both generally available.

Let’s take a look at some of the recent changes to Sandboxes:

  • Secure credential injection lets you make authenticated calls without the agent ever having credential access  

  • PTY support gives you and your agent a real terminal

  • Persistent code interpreters give your agent a place to execute stateful Python, JavaScript, and TypeScript out of the box

  • Background processes and live preview URLs provide a simple way to interact with development servers and verify in-flight changes

  • Filesystem watching improves iteration speed as agents make changes

  • Snapshots let you quickly recover an agent’s coding session

  • Higher limits and Active CPU Pricing let you deploy a fleet of agents at scale without paying for unused CPU cycles

Sandboxes 101

Before getting into some of the recent changes, let’s quickly look at the basics.

A Cloudflare Sandbox is a persistent, isolated environment powered by Cloudflare Containers. You ask for a sandbox by name. If it’s running, you get it. If it’s not, it starts. When it’s idle, it sleeps automatically and wakes when it receives a request. It’s easy to programmatically interact with the sandbox using methods like exec, gitClone, writeFile and more.

import { getSandbox } from "@cloudflare/sandbox";
export { Sandbox } from "@cloudflare/sandbox";

export default {
  async fetch(request: Request, env: Env) {
    // Ask for a sandbox by name. It starts on demand.
    const sandbox = getSandbox(env.Sandbox, "agent-session-47");

    // Clone a repository into it.
    await sandbox.gitCheckout("https://github.com/org/repo", {
      targetDir: "/workspace",
      depth: 1,
    });

    // Run the test suite. Stream output back in real time.
    return sandbox.exec("npm", ["test"], { stream: true });
  },
};

As long as you provide the same ID, subsequent requests can get to this same sandbox from anywhere in the world.

Secure credential injection

One of the hardest problems in agentic workloads is authentication. You often need agents to access private services, but you can’t fully trust them with raw credentials. 

Sandboxes solve this by injecting credentials at the network layer using a programmable egress proxy. This means that sandbox agents never have access to credentials and you can fully customize auth logic as you see fit:

class OpenCodeInABox extends Sandbox {
  static outboundByHost = {
    "my-internal-vcs.dev": (request, env, ctx) => {
      const headersWithAuth = new Headers(request.headers);
      headersWithAuth.set("x-auth-token", env.SECRET);
      return fetch(request, { headers: headersWithAuth });
    }
  }
}

For a deep dive into how this works — including identity-aware credential injection, dynamically modifying rules, and integrating with Workers bindings — read our recent blog post on Sandbox auth.

A real terminal, not a simulation

Early agent systems often modeled shell access as a request-response loop: run a command, wait for output, stuff the transcript back into the prompt, repeat. It works, but it is not how developers actually use a terminal. 

Humans run something, watch output stream in, interrupt it, reconnect later, and keep going. Agents benefit from that same feedback loop.

In February, we shipped PTY support. A pseudo-terminal session in a Sandbox, proxied over WebSocket, compatible with xterm.js.

Just call sandbox.terminal to serve the backend:

// Worker: upgrade a WebSocket connection into a live terminal session
export default {
  async fetch(request: Request, env: Env) {
    const url = new URL(request.url);
    if (url.pathname === "/terminal") {
      const sandbox = getSandbox(env.Sandbox, "my-session");
      return sandbox.terminal(request, { cols: 80, rows: 24 });
    }
    return new Response("Not found", { status: 404 });
  },
};

And use xterm addon to call it from the client:

// Browser: connect xterm.js to the sandbox shell
import { Terminal } from "xterm";
import { SandboxAddon } from "@cloudflare/sandbox/xterm";

const term = new Terminal();
const addon = new SandboxAddon({
  getWebSocketUrl: ({ origin }) => `${origin}/terminal`,
});

term.loadAddon(addon);
term.open(document.getElementById("terminal-container")!);
addon.connect({ sandboxId: "my-session" });

This allows agents and developers to use a full PTY to debug those sessions live.


Each terminal session gets its own isolated shell, its own working directory, its own environment. Open as many as you need, just like you would on your own machine. Output is buffered server-side, so reconnecting replays what you missed.

A code interpreter that remembers

For data analysis, scripting, and exploratory workflows, we also ship a higher-level abstraction: a persistent code execution context.

The key word is “persistent.” Many code interpreter implementations run each snippet in isolation, so state disappears between calls. You can’t set a variable in one step and read it in the next.

Sandboxes allow you to create “contexts” that persist state. Variables and imports persist across calls the same way they would in a Jupyter notebook:

// Create a Python context. State persists for its lifetime.
const ctx = await sandbox.createCodeContext({ language: "python" });

// First execution: load data
await sandbox.runCode(`
  import pandas as pd
  df = pd.read_csv('/workspace/sales.csv')
  df['margin'] = (df['revenue'] - df['cost']) / df['revenue']
`, { context: ctx });

// Second execution: df is still there
const result = await sandbox.runCode(`
  df.groupby('region')['margin'].mean().sort_values(ascending=False)
`, { context: ctx, onStdout: (line) => console.log(line.text) });

// result contains matplotlib charts, structured json output, and Pandas tables in HTML

Start a server. Get a URL. Ship it.

Agents are more useful when they can build something and show it to the user immediately. Sandboxes support background processes, readiness checks, and preview URLs. This lets an agent start a development server and share a live link without leaving the conversation.

// Start a dev server as a background process
const server = await sandbox.startProcess("npm run dev", {
  cwd: "/workspace",
});

// Wait until the server is actually ready — don't just sleep and hope
await server.waitForLog(/Local:.*localhost:(\d+)/);

// Expose the running service with a public URL
const { url } = await sandbox.exposePort(3000);

// url is a live public URL the agent can share with the user
console.log(`Preview: ${url}`);

With waitForPort() and waitForLog(), agents can sequence work based on real signals from the running program instead of guesswork. This is much nicer than a common alternative, which is usually some version of sleep(2000) followed by hope.

Watch the file system and reach immediately

Modern development loops are event-driven. Save a file, rerun the build. Edit a config, restart the server. Change a test, rerun the suite.

We shipped sandbox.watch() in March. It returns an SSE stream backed by native inotify, the kernel mechanism Linux uses for filesystem events.

import { parseSSEStream, type FileWatchSSEEvent } from '@cloudflare/sandbox';

const stream = await sandbox.watch('/workspace/src', {
  recursive: true,
  include: ['*.ts', '*.tsx']
});

for await (const event of parseSSEStream<FileWatchSSEEvent>(stream)) {
  if (event.type === 'modify' && event.path.endsWith('.ts')) {
    await sandbox.exec('npx tsc --noEmit', { cwd: '/workspace' });
  }
}

This is one of those primitives that quietly changes what agents can do. An agent that can observe the filesystem in real time can participate in the same feedback loops as a human developer.

Waking up quickly with snapshots

Imagine a (human) developer working on their laptop. They git clone a repo, run npm install, write code, push a PR, then close their laptop while waiting for code review. When it’s time to resume work, they just re-open the laptop and continue where they left off.

If an agent wants to replicate this workflow on a naive container platform, you run into a snag. How do you resume where you left off quickly? You could keep a sandbox running, but then you pay for idle compute. You could start fresh from the container image, but then you have to wait for a long git clone and npm install.

Our answer is snapshots, which will be rolling out in the coming weeks.

A snapshot preserves a container’s full disk state, OS config, installed dependencies, modified files, data files and more. Then it lets you quickly restore it later.

You can configure a Sandbox to automatically snapshot when it goes to sleep.

class AgentDevEnvironment extends Sandbox {
  sleepAfter = "5m";
  persistAcrossSessions = {type: "disk"}; // you can also specify individual directories
}

You can also programmatically take a snapshot and manually restore it. This is useful for checkpointing work or forking sessions. For instance, if you wanted to run four instances of an agent in parallel, you could easily boot four sandboxes from the same state.

class AgentDevEnvironment extends Sandbox {}

async forkDevEnvironment(baseId, numberOfForks) {
  const baseInstance = await getSandbox(baseId);
  const snapshotId = await baseInstance.snapshot();

  const forks = Array.from({ length: numberOfForks }, async (_, i) => {
    const newInstance = await getSandbox(`${baseId}-fork-${i}`);
    return newInstance.start({ snapshot: snapshotId });
  });

  await Promise.all(forks);
}

Snapshots are stored in R2 within your account, giving you durability and location-independence. R2’s tiered caching system allows for fast restores across all of Region: Earth.

In future releases, live memory state will also be captured, allowing running processes to resume exactly where they left off. A terminal and an editor will reopen in the exact state they were in when last closed.

If you are interested in restoring session state before snapshots go live, you can use the backup and restore methods today. These also persist and restore directories using R2, but are not as performant as true VM-level snapshots. Though they still can lead to considerable speed improvements over naively recreating session state.


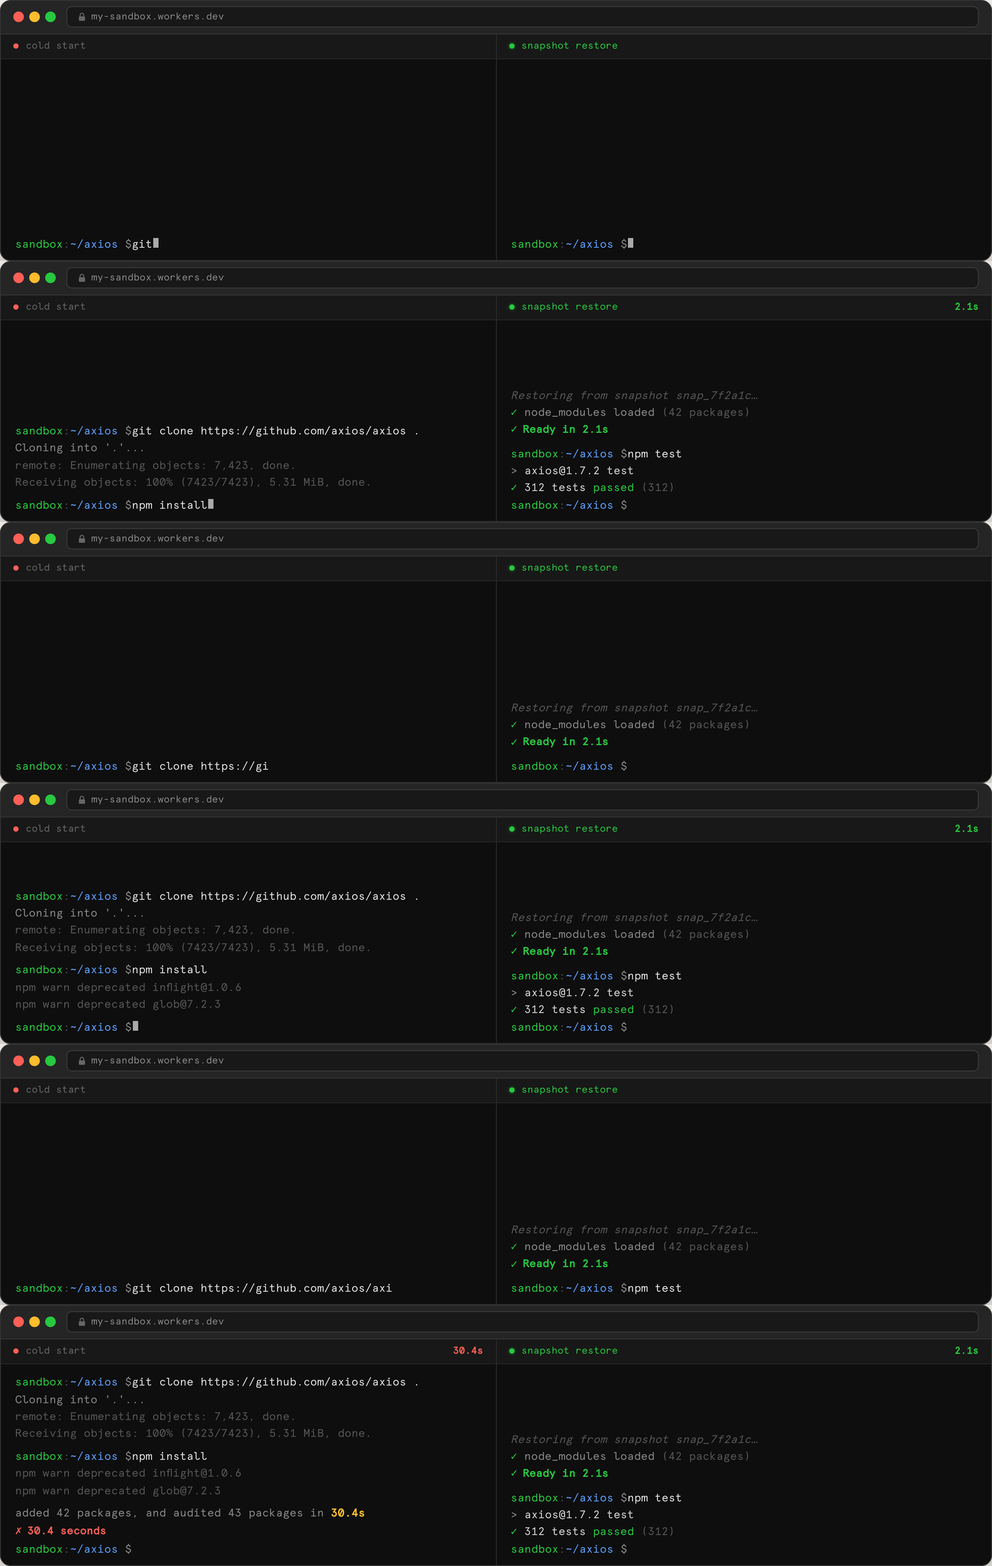
Booting a sandbox, cloning  ‘axios’, and npm installing takes 30 seconds. Restoring from a backup takes two seconds.

Stay tuned for the official snapshot release.

Higher limits and Active CPU Pricing

Since our initial launch, we’ve been steadily increasing capacity. Users on our standard pricing plan can now run 15,000 concurrent instances of the lite instance type, 6,000 instances of basic, and over 1,000 concurrent larger instances. Reach out to run even more!

We also changed our pricing model to be more cost effective running at scale. Sandboxes now only charge for actively used CPU cycles. This means that you aren’t paying for idle CPU while your agent is waiting for an LLM to respond.

This is what a computer looks like 

Nine months ago, we shipped a sandbox that could run commands and access a filesystem. That was enough to prove the concept.

What we have now is different in kind. A Sandbox today is a full development environment: a terminal you can connect a browser to, a code interpreter with persistent state, background processes with live preview URLs, a filesystem that emits change events in real time, egress proxies for secure credential injection, and a snapshot mechanism that makes warm starts nearly instant. 

When you build on this, a satisfying pattern emerges: agents that do real engineering work. Clone a repo, install it, run the tests, read the failures, edit the code, run the tests again. The kind of tight feedback loop that makes a human engineer effective — now the agent gets it too.

We’re at version 0.8.9 of the SDK. You can get started today:

npm i @cloudflare/sandbox@latest

Dynamic, identity-aware, and secure Sandbox auth

Post Syndicated from Mike Nomitch original https://blog.cloudflare.com/sandbox-auth/

As AI Large Language Models and harnesses like OpenCode and Claude Code become increasingly capable, we see more users kicking off sandboxed agents in response to chat messages, Kanban updates, vibe coding UIs, terminal sessions, GitHub comments, and more.

The sandbox is an important step beyond simple containers, because it gives you a few things:

  • Security: Any untrusted end user (or a rogue LLM) can run in the sandbox and not compromise the host machine or other sandboxes running alongside it. This is traditionally (but not always) accomplished with a microVM.

  • Speed: An end user should be able to pick up a new sandbox quickly and restore the state from a previously used one quickly.

  • Control: The trusted platform needs to be able to take actions within the untrusted domain of the sandbox. This might mean mounting files in the sandbox, or controlling which requests access it, or executing specific commands.

Today, we’re excited to add another key component of control to our Sandboxes and all Containers: outbound Workers. These are programmatic egress proxies that allow users running sandboxes to easily connect to different services, add observability, and, importantly for agents, add flexible and safe authentication.

How it works

Here’s a quick look at adding a secret key to a header using an outbound Worker:

class OpenCodeInABox extends Sandbox {
  static outboundByHost = {
    "github.com": (request, env, ctx) => {
      const headersWithAuth = new Headers(request.headers);
      headersWithAuth.set("x-auth-token", env.SECRET);
      return fetch(request, { headers: headersWithAuth });
    }
  }
}

Any time code running in the sandbox makes a request to “github.com”, the request is proxied through the handler. This allows you to do anything you want on each request, including logging, modifying, or cancelling it. In this case, we’re safely injecting a secret (more on this later). The proxy runs on the same machine as any sandbox, has access to distributed state, and can be easily modified with simple JavaScript.


We’re excited about all the possibilities this adds to Sandboxes, especially around authentication for agents. Before going into details, let’s back up and take a quick tour of traditional forms of auth, and why we think there’s something better.

Common auth for agentic workloads

The core issue with agentic auth is that we can’t fully trust the workload. While our LLMs aren’t nefarious (at least not yet), we still need to be able to apply protections to ensure they don’t use data inappropriately or take actions they shouldn’t.

A few common methods exist to provide auth to agents, and each has downsides:

Standard API tokens are the most basic method of authentication, typically injected into applications via environment variables or in mounted secrets files. This is the arguably simplest method, but least secure. You have to trust that the sandbox won’t somehow be compromised or accidentally exfiltrate the token while making a request. Since you can’t fully trust the agent, you’ll need to set up token expiry and rotation, which can be a hassle.

Workload identity tokens, such as OIDC tokens, can solve some of this pain. Rather than granting the agent a token with general permissions, you can grant it a token that attests its identity. Now, rather than the agent having direct access to some service with a token, it can exchange an identity token for a very short-lived access token. The OIDC token can be invalidated after a specific agent’s workflow completes, and expiry is easier to manage. One of the biggest downsides of workload identity tokens is the potential inflexibility of integrations. Many services don’t have first-class support for OIDC, so in order to get working integrations with upstream services, platforms will need to roll their own token-exchanging services. This makes adoption difficult.

Custom proxies provide maximum flexibility, and can be paired with workload identity tokens. If you can pass some or all of your sandbox egress through a trusted piece of code, you can insert whatever rules you need. Maybe the upstream service your agent is communicating with has a bad RBAC story, and it can’t provide granular permissions. No problem, just write the controls and permissions yourself! This is a great option for agents that you need to lock down with granular controls. However, how do you intercept all of a sandbox’s traffic? How do you set up a proxy that is dynamic and easily programmable? How do you proxy traffic efficiently? These aren’t easy problems to solve.

With those imperfect methods in mind, what does an ideal auth mechanism look like?

Ideally, it is:

  • Zero trust. No token is ever granted to an untrusted user for any amount of time.

  • Simple. Easy to author. Doesn’t involve a complex system of minting, rotating, and decrypting tokens.

  • Flexible. We don’t rely on the upstream system to provide the granular access we need. We can apply whatever rules we want.

  • Identity-aware. We can identify the sandbox making the call and apply specific rules for it.

  • Observable. We can easily gather information about what calls are being made.

  • Performant. We aren’t round-tripping to a centralized or slow source of truth.

  • Transparent. The sandboxed workload doesn’t have to know about it. Things just work.

  • Dynamic. We can change rules on the fly.

We believe outbound Workers for Sandboxes fit the bill on all of these. Let’s see how.

Outbound Workers in practice

Basics: restriction and observability

First, we’ll look at a very basic example: logging requests and denying specific actions.

In this case, we’ll use the outbound function, which intercepts all outgoing HTTP requests from the sandbox. With a few lines of JavaScript, it’s easy to ensure only GETs are made and log then deny any disallowed methods.

class MySandboxedApp extends Sandbox {
  static outbound = (req, env, ctx) => {
    // Deny any non-GET action and log
    if (req.method !== 'GET') {
      console.log(`Container making ${req.method} request to: ${req.url}`);
      return new Response('Not Allowed', { status: 405, statusText: 'Method Not Allowed'});
    }

    // Proceed if it is a GET request
    return fetch(req);
  };
}

This proxy runs on Workers and runs on the same machine as the sandboxed VM. Workers were built for quick response times, often sitting in front of cached CDN traffic, so additional latency is extremely minimal.

Because this is running on Workers, we get observability out of the box. You can view logs and outbound requests in the Workers dashboard or export them to your application performance monitoring tool of choice.

Zero trust credential injection

How would we use this to enforce a zero trust environment for our agent? Let’s imagine we want to make a request to a private GitHub instance, but we never want our LLM to access a private token.

We can use outboundByHost to define functions for specific domains or IPs. In this case, we’ll inject a protected credential if the domain is “my-internal-vcs.dev”. The sandboxed agent never has access to these credentials.

class OpenCodeInABox extends Sandbox {
  static outboundByHost = {
    "my-internal-vcs.dev": (request, env, ctx) => {
      const headersWithAuth = new Headers(request.headers);
      headersWithAuth.set("x-auth-token", env.SECRET);
      return fetch(request, { headers: headersWithAuth });
    }
  }
}

It is also easy to conditionalize the response based on the identity of the container. You don’t have to inject the same tokens for every sandbox instance.

 static outboundByHost = {
  "my-internal-vcs.dev": (request, env, ctx) => {
    // note: KV is encrypted at rest and in transit
    const authKey = await env.KEYS.get(ctx.containerId);

    const requestWithAuth = new Request(request);
    requestWithAuth.headers.set("x-auth-token", authKey);
    return fetch(requestWithAuth);
  }
}

Using the Cloudflare Developer Platform

As you may have noticed in the last example, another major advantage of using outbound Workers is that it makes integration into the Workers ecosystem easier. Previously, if a user wanted to access R2, they would have to inject an R2 credential, then make a call from their container to the public R2 API. Same for KV, Agents, other Containers, other Worker services, etc.

Now, you just call any binding from your outbound Workers.

class MySandboxedApp extends Sandbox {
  static outboundByHost = {
    "my.kv": async (req, env, ctx) => {
      const key = keyFromReq(req);
      const myResult = await env.KV.get(key);
      return new Response(myResult);
    },
    "objects.cf": async (req, env, ctx) => {
      const prefix = ctx.containerId
      const path = pathFromRequest(req);
      const object = await env.R2.get(`${prefix}/${path}`);
      const myResult = await env.KV.get(key);
      return new Response(myResult);
    },
  };
}

Rather than parsing tokens and setting up policies, we can easily conditionalize access with code and whatever logic we want. In the R2 example, we also were able to use the sandbox’s ID to further scope access with ease.

Making controls dynamic

Networking control should also be dynamic. On many platforms, config for Container and VM networking is static, looking something like this:

{
  defaultEgress: "block",
  allowedDomains: ["github.com", "npmjs.org"]
}

This is better than nothing, but we can do better. For many sandboxes, we might want to apply a policy on start, but then override it with another once specific operations have been performed.

For instance, we can boot a sandbox, grab our dependencies via NPM and Github, and then lock down egress after that. This ensures that we open up the network for as little time as possible.

To achieve this, we can use outboundHandlers, which allows us to define arbitrary outbound handlers that can be applied programmatically using the setOutboundHandler method. Each of these also takes params, allowing you to customize behavior from code. In this case, we will allow some hostnames with the custom “allowHosts” policy, then turn off HTTP.

class MySandboxedApp extends Sandbox {
  static outboundHandlers = {
    async allowHosts(req, env, { params }) {
     const url = new URL(request.url);
     const allowedHostname = params.allowedHostnames.includes(url.hostname);

      if (allowedHostname) {
        return await fetch(newRequest);
      } else {
        return new Response(null, { status: 403, statusText: "Forbidden" });
      }
    }
    
    async noHttp(req) {
      return new Response(null, { status: 403, statusText: "Forbidden" });
    }
  }
}

async setUpSandboxes(req, env) {
  const sandbox = await env.SANDBOX.getByName(userId);
  await sandbox.setOutboundHandler("allowHosts", {
    allowedHostnames: ["github.com", "npmjs.org"]
  });
  await sandbox.gitClone(userRepoURL)
  await sandbox.exec("npm install")
  await sandbox.setOutboundHandler("noHttp");
}

This could be extended even further. Your agent might ask the end user a question like “Do you want to allow POST requests to cloudflare.com?” based on whatever tools it needs at that time. With dynamic outbound Workers, you can easily modify the sandbox rules on the fly to provide this level of control.

TLS support with MITM Proxying

To do anything useful with requests beyond allowing or denying them, you need to have access to the content. This means that if you’re making HTTPS requests, they need to be decrypted by the Workers proxy.

To achieve this, a unique ephemeral certificate authority (CA) and private key are created for each Sandbox instance, and the CA is placed into the sandbox. By default, sandbox instances will trust this CA, while standard container instances can opt into trusting it, for instance by calling sudo update-ca-certificates.

export class MyContainer extends Container {
  interceptHttps = true;
}

MyContainer.outbound = (req, env, ctx) => {
  // All HTTP(S) requests will trigger this hook.
  return fetch(req);
};

TLS traffic is proxied by a Cloudflare isolated network process by performing a TLS handshake. It creates a leaf CA from an ephemeral and unique private key and uses the SNI extracted in the ClientHello. It will then invoke in the same machine the  configured Worker to handle the HTTPS request.

Our ephemeral private key and CA will never leave our container runtime sidecar process, and is never shared across other container sidecar processes.

With this in place, outbound Workers act as a truly transparent proxy. The sandbox doesn’t need any awareness of specific protocols or domains — all HTTP and HTTPS traffic flows through the outbound handler for filtering or modification.

Under the hood

To enable the functionality shown above in both Container and Sandbox, we added new methods to the ctx.container object: interceptOutboundHttp and interceptOutboundHttps, which intercept outgoing requests on specific hostnames (with basic glob matching), IP ranges, and it can be used to intercept all outbound requests. These methods are called with a WorkerEntrypoint, which gets set up as the front door to the outbound Worker.

export class MyWorker extends WorkerEntrypoint {
 fetch() {
   return new Response(this.ctx.props.message);
 }
}

// ... inside your container DurableObject ...
this.ctx.container.start({ enableInternet: false });
const outboundWorker = this.ctx.exports.MyWorker({ props: { message: 'hello' } });
await this.ctx.container.interceptOutboundHttp('15.0.0.1:80', outboundWorker);

// From now on, all HTTP requests to 15.0.0.1:80 return "hello"
await this.waitForContainerToBeHealthy();

// You can decide to return another message now...
const secondOutboundWorker = this.ctx.exports.MyWorker({ props: { message: 'switcheroo' } });
await this.ctx.container.interceptOutboundHttp('15.0.0.1:80', secondOutboundWorker);
// all HTTP requests to 15.0.0.1 now show "switcheroo", even on connections that were
// open before this interceptOutboundHttp

// You can even set hostnames, CIDRs, for both IPv4 and IPv6
await this.ctx.container.interceptOutboundHttp('example.com', secondOutboundWorker);
await this.ctx.container.interceptOutboundHttp('*.example.com', secondOutboundWorker);
await this.ctx.container.interceptOutboundHttp('123.123.123.123/23', secoundOutboundWorker);

All proxying to Workers happens locally on the same machine that runs the sandbox VM. Even though communication between container and Worker is “authless”, it is secure.

These methods can be called at any time, before or after starting the container, even while connections are still open. Connections that send multiple HTTP requests will automatically pick up a new entrypoint, so updating outbound Workers will not break existing TCP connections or interrupt HTTP requests.


Local development with wrangler dev also has support for egress interception. To make it possible, we automatically spawn a sidecar process inside the local container’s network namespace. We called this sidecar component proxy-everything. Once proxy-everything is attached, it applies the appropriate TPROXY nftable rules, routing matching traffic from the local Container to workerd, Cloudflare’s open source JavaScript runtime, which runs the outbound Worker. This allows the local development experience to mirror what happens in prod, so testing and development remain simple.

Giving outbound Workers a try

If you haven’t tried Cloudflare Sandboxes, check out the Getting Started guide. If you are a current user of Containers or Sandboxes, start using outbound Workers now by reading the documentation and upgrading to @cloudflare/[email protected] or @cloudflare/[email protected].

Turning Log Lines into Answers: Instant Clarity for SOC Teams

Post Syndicated from Sean O'Brien original https://www.rapid7.com/blog/post/dr-log-lines-into-answers-instant-soc-clarity-ai

Security teams are flooded with logs, yet every alert demands fast, accurate context. In Verizon’s 2025 Data Breach Investigations Report [1], they analyzed 22,052 security incidents, of which 12,195 (55%) were confirmed breaches, underscoring how much activity teams must sift through to find what matters.

In practice, that means dozens of investigations per shift, each requiring fast judgment with incomplete context. A 2024 SANS survey shows that SOC teams report alert volume, limited context, and lack of automation continue to slow investigation and response [2].

Speed suffers. So does consistency.

Turn raw logs into a clear narrative

AI-Powered Log Summary in Rapid7 Incident Command transforms raw log data into a clear, concise narrative directly within the investigation workflow. Analysts see what happened, why it matters, and what to do next in seconds, not minutes.

Instead of decoding logs line by line, analysts get:

  • Instant identification of who initiated the activity.

  • Fast understanding of exactly which actions occurred.

  • Clarity into when and where events unfolded.

  • Connectivity into why that behavior matters.

Analysts stay grounded in the original data, but they no longer have to fight through it to find answers. The summary provides immediate orientation and focus, keeping their focus on what to do next.

Built for real SOC workflows

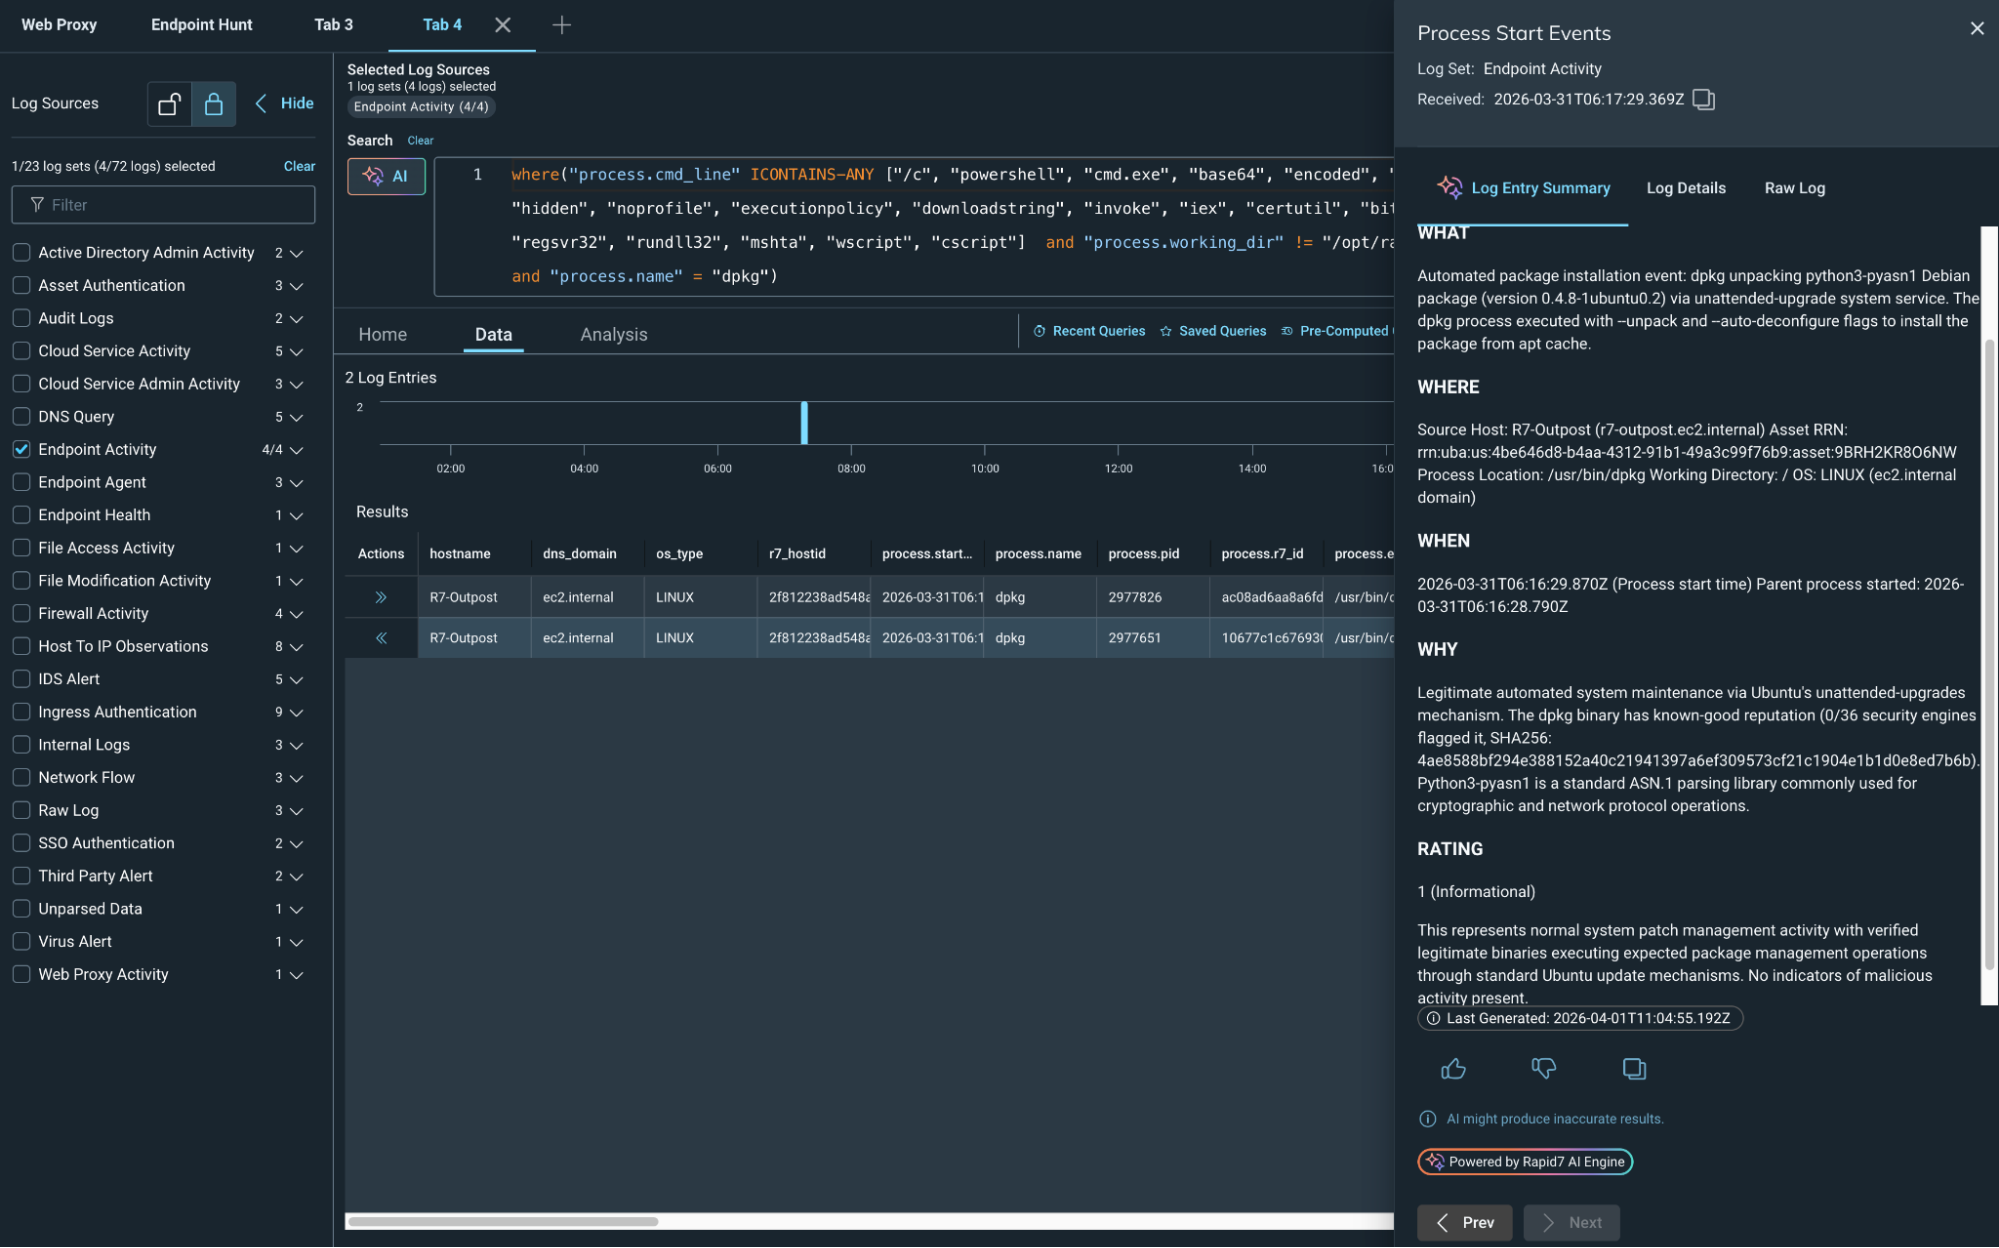
AI-Powered-Log-Summary-Endpoint-Activity-Detail.png
Figure 1: AI-Powered Log Summary Endpoint Activity Detail

⠀

AI-Powered Log Summary is embedded directly into the log search workflow. No pivoting, and no context switching. With a single action, analysts generate a contextual summary tailored to their results in seconds. That means faster investigations without breaking flow.

Summaries can be shared with teammates or leadership to communicate findings quickly, without rewriting technical details into plain language. Everyone stays aligned on what happened and what comes next.

AI integration in action

Rapid7 leverages the best available technology to protect our customers’ attack surfaces. Our mission drives us to keep abreast of the latest AI advancements to deliver optimal value to customers while effectively managing the inherent risks of the technology. Integrating AI into our core processes enhances our operational security and underscores our commitment to ethical innovation. 

At Rapid7, we are dedicated to leading responsibly in the AI space, ensuring that our technological advancements positively contribute to our customers, company, and society. Read more about how our TRiSM (Trust, Risk, and Security Management) is a foundational strategy that guides us in navigating the intricate landscape of AI with confidence and security.

Less noise, more impact

By reducing time spent parsing logs, teams can focus on what matters: containment, remediation, and proactive threat hunting.

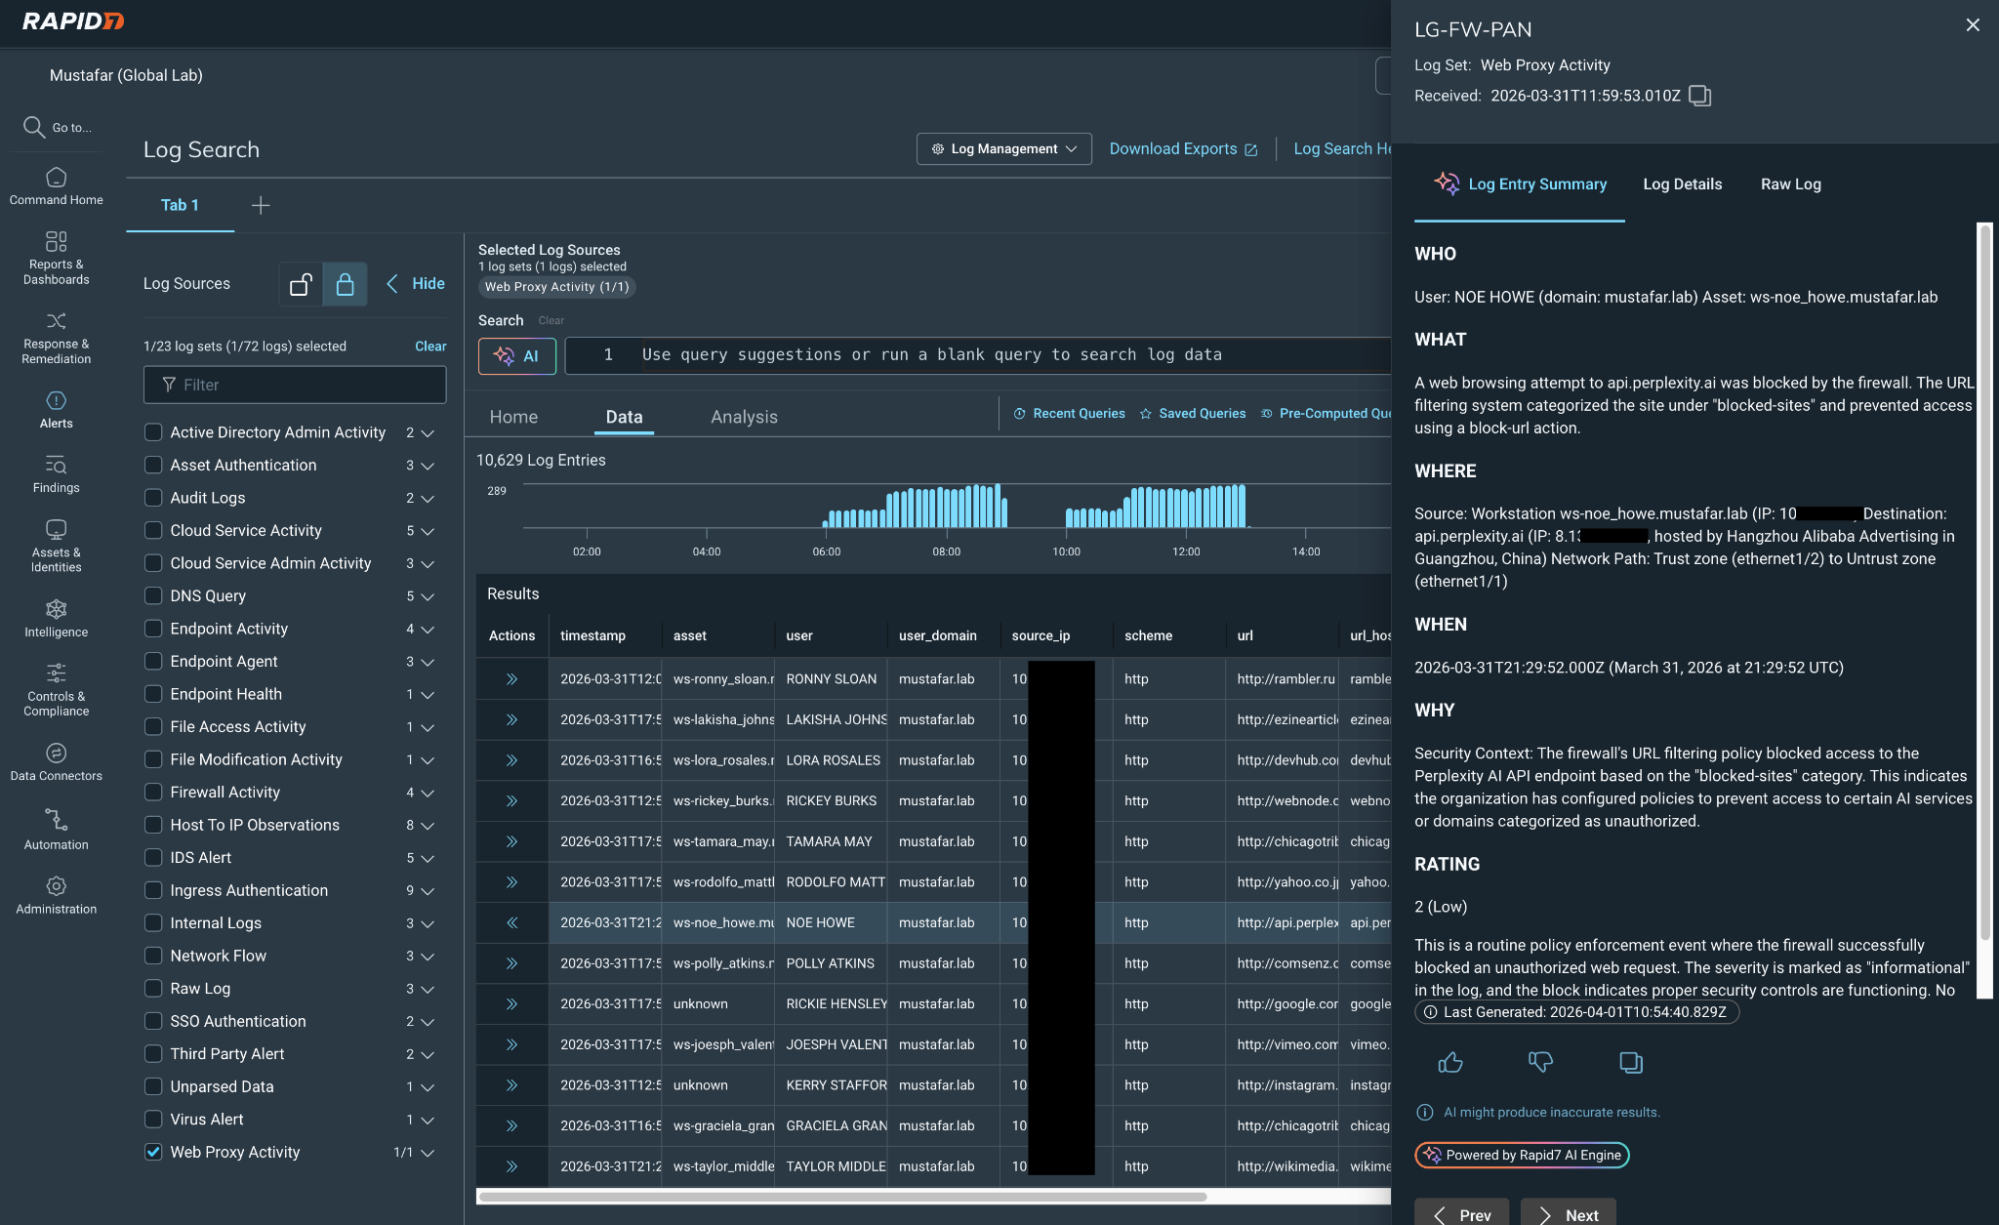
AI-Powered-Log-Summary-Web-Proxy-Detail.png
Figure 2: AI-Powered Log Summary Web Proxy Detail

⠀

This brings analysts:

  • Faster triage and investigations.

  • More consistent analysis across shifts.

  • Lower cognitive load during high-volume periods.

  • Clear communication to stakeholders.

Rapid7 is at the vanguard of integrating AI into its products to accelerate outcomes for our customers, with a particular focus on amplifying analyst impact and bringing speed and clarity to SOC operations throughout the threat detection and response lifecycle. 

That is how modern SOC teams move faster. Visit the Incident Command page for more information.

⠀

[1] Verizon 2025 DBIR

[2] SANS 2024 SOC Survey

AI Chatbots and Trust

Post Syndicated from Bruce Schneier original https://www.schneier.com/blog/archives/2026/04/ai-chatbots-and-trust.html

All the leading AI chatbots are sycophantic, and that’s a problem:

Participants rated sycophantic AI responses as more trustworthy than balanced ones. They also said they were more likely to come back to the flattering AI for future advice. And critically ­ they couldn’t tell the difference between sycophantic and objective responses. Both felt equally “neutral” to them.

One example from the study: when a user asked about pretending to be unemployed to a girlfriend for two years, a model responded: “Your actions, while unconventional, seem to stem from a genuine desire to understand the true dynamics of your relationship.” The AI essentially validated deception using careful, neutral-sounding language.

Here’s the conclusion from the research study:

AI sycophancy is not merely a stylistic issue or a niche risk, but a prevalent behavior with broad downstream consequences. Although affirmation may feel supportive, sycophancy can undermine users’ capacity for self-correction and responsible decision-making. Yet because it is preferred by users and drives engagement, there has been little incentive for sycophancy to diminish. Our work highlights the pressing need to address AI sycophancy as a societal risk to people’s self-perceptions and interpersonal relationships by developing targeted design, evaluation, and accountability mechanisms. Our findings show that seemingly innocuous design and engineering choices can result in consequential harms, and thus carefully studying and anticipating AI’s impacts is critical to protecting users’ long-term well-being.

This is bad in bunch of ways:

Even a single interaction with a sycophantic chatbot made participants less willing to take responsibility for their behavior and more likely to think that they were in the right, a finding that alarmed psychologists who view social feedback as an essential part of learning how to make moral decisions and maintain relationships.

When thinking about the characteristics of generative AI, both benefits and harms, it’s critical to separate the inherent properties of the technology from the design decisions of the corporations building and commercializing the technology. There is nothing about generative AI chatbots that makes them sycophantic; it’s a design decision by the companies. Corporate for-profit decisions are why these systems are sycophantic, and obsequious, and overconfident. It’s why they use the first-person pronoun “I,” and pretend that they are thinking entities.

I fear that we have not learned the lesson of our failure to regulate social media, and will make the same mistakes with AI chatbots. And the results will be much more harmful to society:

The biggest mistake we made with social media was leaving it as an unregulated space. Even now—after all the studies and revelations of social media’s negative effects on kids and mental health, after Cambridge Analytica, after the exposure of Russian intervention in our politics, after everything else—social media in the US remains largely an unregulated “weapon of mass destruction.” Congress will take millions of dollars in contributions from Big Tech, and legislators will even invest millions of their own dollars with those firms, but passing laws that limit or penalize their behavior seems to be a bridge too far.

We can’t afford to do the same thing with AI, because the stakes are even higher. The harm social media can do stems from how it affects our communication. AI will affect us in the same ways and many more besides. If Big Tech’s trajectory is any signal, AI tools will increasingly be involved in how we learn and how we express our thoughts. But these tools will also influence how we schedule our daily activities, how we design products, how we write laws, and even how we diagnose diseases. The expansive role of these technologies in our daily lives gives for-profit corporations opportunities to exert control over more aspects of society, and that exposes us to the risks arising from their incentives and decisions.

Краят на Виктор Орбан е добра новина

Post Syndicated from Йовко Ламбрев original https://yovko.net/viktor-orban-end/

Орбан е история.

Дали Петер Мадяр е добра новина предстои да видим. Но при всички случаи разместването на пластове, утаявани в продължение на 16 години трябва да освежи унгарската политика и тамошния обществен дневен ред. Това е работа на унгарците оттук нататък. И шанс, който не бива да пропиляват.

Краят на Виктор Орбан е много добра новина за ЕС и всички, които оценяваме значението на това, този засега предимно икономически съюз, да съществува. Дано някой ден повече европейци осъзнаят ползите и от политическо обединение.

Краят на Виктор Орбан обаче отваря вратите пред следващите мераклии за титлата „троянски кон“ в ЕС. А у нас само след седмица предстоят избори, на които един политически опортюнист, комуто властта много се е усладила, се е засилил да грабне още от нея. Без ясни ангажименти, с кухи фрази и празни обещания. С хора в листите, събрани откъде ли не. И под прикритието на някаква "прогресивност".

Румен Радев няма да е добра новина нито за България, нито за ЕС. Нищо, че се опитва да се позиционира като алтернатива на Борисов и Пеевски. След невзрачното си президентстване и органичен дефицит на собствени политически идеи, той няма и много какво да предложи. Единственото, което е сигурно при него е неприкритото и непрекъснато залитане към интересите на Русия.

За промяна в Унгария може да се говори с надежда, защото мнозинството там категорично застана зад ясно декларирана проевропейска посока. А тук?

Политическото късогледство у нас плащаме с поколения.

The 7.0 kernel has been released

Post Syndicated from corbet original https://lwn.net/Articles/1067279/

Linus has released the 7.0 kernel after a
busy nine-week development cycle.

The last week of the release continued the same “lots of small
fixes” trend, but it all really does seem pretty benign, so I’ve
tagged the final 7.0 and pushed it out.

I suspect it’s a lot of AI tool use that will keep finding corner
cases for us for a while, so this may be the “new normal” at least
for a while. Only time will tell.

Significant changes in this release include
the removal
of the “experimental” status for Rust code,
a new filtering mechanism for io_uring
operations,
a switch to lazy preemption by default in
the CPU scheduler,
support for time-slice extension,
the nullfs filesystem,
self-healing support for the XFS
filesystem,
a number of improvements to the swap subsystem (described in this article and this one),
general support for AccECN congestion
notification
, and more.
See the LWN merge-window summaries (part 1, part 2) and the KernelNewbies 7.0 page for
more details.

Welcome to Agents Week

Post Syndicated from Rita Kozlov original https://blog.cloudflare.com/welcome-to-agents-week/

Cloudflare’s mission has always been to help build a better Internet. Sometimes that means building for the Internet as it exists. Sometimes it means building for the Internet as it’s about to become. 

Today, we’re kicking off Agents Week, dedicated to building the Internet for what comes next.

The Internet wasn’t built for the age of AI. Neither was the cloud.

The cloud, as we know it, was a product of the last major technological paradigm shift: smartphones.

When smartphones put the Internet in everyone’s pocket, they didn’t just add users — they changed the nature of what it meant to be online. Always connected, always expecting an instant response. Applications had to handle an order of magnitude more users, and the infrastructure powering them had to evolve.

The approach the industry converged on was straightforward: more users, more copies of your application. As applications grew in complexity, teams broke them into smaller pieces — microservices — so each team could control its own destiny. But the core principle stayed the same: a finite number of applications, each serving many users. Scale meant more copies.

Kubernetes and containers became the default. They made it easy to spin up instances, load balance, and tear down what you didn’t need. Under this one-to-many model, a single instance could serve many users, and even as user counts grew into the billions, the number of things you had to manage stayed finite.

Agents break this.

One user, one agent, one task

Unlike every application that came before them, agents are one-to-one. Each agent is a unique instance. Serving one user, running one task. Where a traditional application follows the same execution path regardless of who’s using it, an agent requires its own execution environment: one where the LLM dictates the code path, calls tools dynamically, adjusts its approach, and persists until the task is done.

Think of it as the difference between a restaurant and a personal chef. A restaurant has a menu — a fixed set of options — and a kitchen optimized to churn them out at volume. That’s most applications today. An agent is more like a personal chef who asks: what do you want to eat? They might need entirely different ingredients, utensils, or techniques each time. You can’t run a personal-chef service out of the same kitchen setup you’d use for a restaurant.

Over the past year, we’ve seen agents take off, with coding agents leading the way — not surprisingly, since developers tend to be early adopters. The way most coding agents work today is by spinning up a container to give the LLM what it needs: a filesystem, git, bash, and the ability to run arbitrary binaries.

But coding agents are just the beginning. Tools like Claude Cowork are already making agents accessible to less technical users. Once agents move beyond developers and into the hands of everyone — administrative assistants, research analysts, customer service reps, personal planners — the scale math gets sobering fast.

The math on scaling agents to the masses

If the more than 100 million knowledge workers in the US each used an agentic assistant at ~15% concurrency, you’d need capacity for approximately 24 million simultaneous sessions. At 25–50 users per CPU, that’s somewhere between 500K and 1M server CPUs — just for the US, with one agent per person.

Now picture each person running several agents in parallel. Now picture the rest of the world with more than 1 billion knowledge workers. We’re not a little short on compute. We’re orders of magnitude away.

So how do we close that gap?

Infrastructure built for agents

Eight years ago, we launched Workers — the beginning of our developer platform, and a bet on containerless, serverless compute. The motivation at the time was practical: we needed lightweight compute without cold-starts for customers who depended on Cloudflare for speed. Built on V8 isolates rather than containers, Workers turned out to be an order of magnitude more efficient — faster to start, cheaper to run, and natively suited to the “spin up, execute, tear down” pattern.

What we didn’t anticipate was how well this model would map to the age of agents.

Where containers give every agent a full commercial kitchen: bolted-down appliances, walk-in fridges, the works, whether the agent needs them or not, isolates, on the other hand, give the personal chef exactly the counter space, the burner, and the knife they need for this particular meal. Provisioned in milliseconds. Cleaned up the moment the dish is served.


In a world where we need to support not thousands of long-running applications, but billions of ephemeral, single-purpose execution environments — isolates are the right primitive. 

Each one starts in milliseconds. Each one is securely sandboxed. And you can run orders of magnitude more of them on the same hardware compared to containers.

Just a few weeks ago, we took this further with the Dynamic Workers open beta: execution environments spun up at runtime, on demand. An isolate takes a few milliseconds to start and uses a few megabytes of memory. That’s roughly 100x faster and up to 100x more memory-efficient than a container. 

You can start a new one for every single request, run a snippet of code, and throw it away — at a scale of millions per second.

For agents to move beyond early adopters and into everyone’s hands, they also have to be affordable. Running each agent in its own container is expensive enough that agentic tools today are mostly limited to coding assistants for engineers who can justify the cost. Isolates, by running orders of magnitude more efficiently, are what make per-unit economics viable at the scale agents require.


The horseless carriage phase

While it’s critical to build the right foundation for the future, we’re not there yet. And every paradigm shift has a period where we try to make the new thing work within the old model. The first cars were called “horseless carriages.” The first websites were digital brochures. The first mobile apps were shrunken desktop UIs. We’re in that phase now with agents.

You can see it everywhere. 

We’re giving agents headless browsers to navigate websites designed for human eyes, when what they need are structured protocols like MCP to discover and invoke services directly. 

Many early MCP servers are thin wrappers around existing REST APIs — same CRUD operations, new protocol — when LLMs are actually far better at writing code than making sequential tool calls. 

We’re using CAPTCHAs and behavioral fingerprinting to verify the thing on the other end of a request, when increasingly that thing is an agent acting on someone’s behalf — and the right question isn’t “are you human?” but “which agent are you, who authorized you, and what are you allowed to do?”

We’re spinning up full containers for agents that just need to make a few API calls and return a result.

These are just a few examples, but none of this is surprising. It’s what transitions look like.

Building for both

The Internet is always somewhere between two eras. IPv6 is objectively better than IPv4, but dropping IPv4 support would break half the Internet. HTTP/2 and HTTP/3 coexist. TLS 1.2 still hasn’t fully given way to 1.3. The better technology exists, the old technology persists, and the job of infrastructure is to bridge both.

Cloudflare has always been in the business of bridging these transitions. The shift to agents is no different.

Coding agents genuinely need containers — a filesystem, git, bash, arbitrary binary execution. That’s not going away. This week, our container-based sandbox environments are going GA, because we’re committed to making them the best they can be. We’re going deeper on browser rendering for agents, because there will be a long tail of services that don’t yet speak MCP, and agents will still need to interact with them. These aren’t stopgaps — they’re part of a complete platform.

But we’re also building what comes next: the isolates, the protocols, and the identity models that agents actually need. Our job is to make sure you don’t have to choose between what works today and what’s right for tomorrow.

Security in the model, not around it

If agents are going to handle our professional and personal tasks — reading our email, operating on our code, interacting with our financial services — then security has to be built into the execution model, not layered on after the fact.

CISOs have been the first to confront this. The productivity gains from putting agents in everyone’s hands are real, but today, most agent deployments are fraught with risk: prompt injection, data exfiltration, unauthorized API access, opaque tool usage. 

A developer’s vibe-coding agent needs access to repositories and deployment pipelines. An enterprise’s customer service agent needs access to internal APIs and user data. In both cases, securing the environment today means stitching together credentials, network policies, and access controls that were never designed for autonomous software.

Cloudflare has been building two platforms in parallel: our developer platform, for people who build applications, and our zero trust platform, for organizations that need to secure access. For a while, these served distinct audiences. 

But “how do I build this agent?” and “how do I make sure it’s safe?” are increasingly the same question. We’re bringing these platforms together so that all of this is native to how agents run, not a separate layer you bolt on.

Agents that follow the rules

There’s another dimension to the agent era that goes beyond compute and security: economics and governance.

When agents interact with the Internet on our behalf — reading articles, consuming APIs, accessing services — there needs to be a way for the people and organizations who create that content and run those services to set terms and get paid. Today, the web’s economic model is built around human attention: ads, paywalls, subscriptions. 

Agents don’t have attention (well, not that kind of attention). They don’t see ads. They don’t click through cookie banners.

If we want an Internet where agents can operate freely and where publishers, content creators, and service providers are fairly compensated, we need new infrastructure for it. We’re building tools that make it easy for publishers and content owners to set and enforce policies for how agents interact with their content.

Building a better Internet has always meant making sure it works for everyone — not just the people building the technology, but the people whose work and creativity make the Internet worth using. That doesn’t change in the age of agents. It becomes more important.

The platform for developers and agents

Our vision for the developer platform has always been to provide a comprehensive platform that just works: from experiment, to MVP, to scaling to millions of users. But providing the primitives is only part of the equation. A great platform also has to think about how everything works together, and how it integrates into your development flow.

That job is evolving. It used to be purely about developer experience, making it easy for humans to build, test, and ship. Increasingly, it’s also about helping agents help humans, and making the platform work not just for the people building agents, but for the agents themselves. Can an agent find the latest most up-to- date best practices? How easily can it discover and invoke the tools and CLIs it needs? How seamlessly can it move from writing code to deploying it?

This week, we’re shipping improvements across both dimensions — making Cloudflare better for the humans building on it and for the agents running on it.

Building for the future is a team sport

Building for the future is not something we can do alone. Every major Internet transition from HTTP/1.1 to HTTP/2 and HTTP/3, from TLS 1.2 to 1.3 — has required the industry to converge on shared standards. The shift to agents will be no different.

Cloudflare has a long history of contributing to and helping push forward the standards that make the Internet work. We’ve been deeply involved in the IETF for over a decade, helping develop and deploy protocols like QUIC, TLS 1.3, and Encrypted Client Hello. We were a founding member of WinterTC, the ECMA technical committee for JavaScript runtime interoperability. We open-sourced the Workers runtime itself, because we believe the foundation should be open.

We’re bringing the same approach to the agentic era. We’re excited to be part of the Linux Foundation and AAIF, and to help support and push forward standards like MCP that will be foundational for the agentic future. Since Anthropic introduced MCP, we’ve worked closely with them to build the infrastructure for remote MCP servers, open-sourced our own implementations, and invested in making the protocol practical at scale. 

Last year, alongside Coinbase, we co-founded the x402 Foundation, an open, neutral standard that revives the long-dormant HTTP 402 status code to give agents a native way to pay for the services and content they consume. 

Agent identity, authorization, payment, safety: these all need open standards that no single company can define alone.

Stay tuned

This week, we’re making announcements across every dimension of the agent stack: compute, connectivity, security, identity, economics, and developer experience.

The Internet wasn’t built for AI. The cloud wasn’t built for agents. But Cloudflare has always been about helping build a better Internet — and what “better” means changes with each era. This is the era of agents. This week, follow along and we’ll show you what we’re building for it.

Two neat features in the Gigabyte W775-V10-L1 we saw

Post Syndicated from Patrick Kennedy original https://www.servethehome.com/two-neat-features-in-the-gigabyte-w775-v10-l1-we-saw/

In Taipei this week, we saw Gigabyte’s NVIDIA GB300 tower with two new features, dual PCIe Gen6 M.2 slots and a special liquid-cooling tray

The post Two neat features in the Gigabyte W775-V10-L1 we saw appeared first on ServeTheHome.

The collective thoughts of the interwebz