Conill: Rethinking sudo with object capabilities

Post Syndicated from corbet original https://lwn.net/Articles/1050370/

Ariadne Conill is
exploring
a capability-based approach to privilege escalation on Linux
systems.

Inspired by the object-capability model, I’ve been working on a
project named capsudo. Instead of
treating privilege escalation as a temporary change of identity,
capsudo reframes it as a mediated interaction with a service called
capsudod that holds specific authority, which may range
from full root privileges to a narrowly scoped set of capabilities
depending on how it is deployed.

Седмицата (8–13 декември)

Post Syndicated from Йовко Ламбрев original https://www.toest.bg/sedmitsata-8-13-dekemvri/

Седмицата (8–13 декември)

Едва ли може да има друга новина на седмицата освен тази, че след изключително силна и многобройна протестна вълна в цялата страна премиерът Росен Желязков депозира оставката на воденото от него правителство.

Протестите бяха реакция срещу неадекватния проектобюджет, но и срещу политическата арогантност, както сам призна и министър-председателят в оставка. Задържането на опозиционни политици без доказателства за вина в продължение на месеци възмути мнозина. А хората постигнаха този впечатляващ успех, защото преоткриха формулата на обединените усилия. Опозицията, разбира се, захрани протеста с хора и енергия, но и успя да напипа общите мотиви хората да останат заедно на площадите. Естествено бе и прицелването върху дуото Борисов–Пеевски, което така или иначе отдавна се е комплектувало като архивраг на поне две поколения будни българи.

Това е ситуация, в която не сме били от 1997 г. насам. Изкуствено въведените от пропагандата разделения и плашила: българи/турци, либерали/консерватори, европейци/националисти, чрез които ДПС и „Атака“ (условно) се подхранваха един друг, бяха заличени. Защото всички сме български граждани, свободни хора, обичащи семействата си, българи в Европа. Не знам дали си давате сметка какъв потенциал е това.

Владимир Йончев, OFFNews

Това, което мен лично ме жегна много силно тези дни, още преди оставката да стане факт, бе констатация на младежи в едно телевизионно студио. Те тъжно споделиха, че целият им съзнателен живот е белязан от факта, че Борисов и Пеевски са запушили държавата и бъдещето пред страната. Не знам как моето поколение може да заличи този грях…

Седмицата (8–13 декември)
10 декември 2025, Пловдив © Димитър Цанков Димитров

Но след като коалицията на политическата самонадеяност и арогантност, състояща се от ГЕРБ на Бойко Борисов, БСП на Атанас Зафиров и ИТН на Слави Трифонов, с (уж неофициалната) подкрепа от ДПС – Ново начало на Делян Пеевски е вече история, на ход е Емилия Милчева с очакванo трезв и на моменти дори болезнен обзор на ситуацията и на възможните посоки на развитие на събитията оттук нататък. Защото най-трудното тепърва предстои. След оставката. И след предсрочните избори.

За саркастичен поглед върху събитията от седмицата, разбира се, разчитаме на Елена Телбис. И този път тя е във вихъра си, заредена с оптимизъм и приятни усещания насред парламентарната криза.

На друг бюджет – на новия бюджет на Европейския съюз – пък е посветен материалът на Анахит Хачикян тази седмица. Така наречената многогодишна финансова рамка покрива период от седем години (2028–2034) и предизвикателството е не само да се предвидят достатъчно средства за всички области, за които е известно, че е нужно финансиране – трябва да има и достатъчно запас за извънредни разходи, които е трудно да се предвидят и разпознаят като критични от днешна гледна точка.

През отминалата седмица с радост посрещнахме новината, че Българският хелзинкски комитет връчва отличието „Човек на годината“ на Боян Юруков за активната му дейност по анализирането и публикуването на данни в полза на обществото. Сигурен съм, че сред номинираните е имало и други достойни за отличието, но Боян отдавна заслужава неговите усилия да бъдат забелязани и отразени подобаващо. Честито!

За съжаление обаче, неприятно развитие има по друга тема, която в „Тоест“ отдавна следим отблизо. Буквално в последните дни на своя мандат датското председателство на Съвета на ЕС успя да съгласува компромисен вариант на силно противоречивия Регламент за борба със сексуалното насилие над деца (CSAR), добил известност като #chatcontrol, който допуска автоматичното сканиране на личната ни комуникация. Компромисът се състои в това, че прилагането на Регламента няма да бъде задължително, а ще бъде приемано от отделните държави на доброволен принцип. Само Чехия, Италия, Нидерландия и Полша са възразили срещу този абсурд. А най-разочароваща е промяната на позицията на Германия.

Опасенията не са само, че институциите си запазват правото на всеки три години да определят кои услуги са „високорискови“, и да вменяват на доставчиците задължение за сканиране на съобщенията. Заедно с това се отварят вратите пред американски технологични гиганти, като Meta или Google, да проверяват безразборно личните ни съобщения без никакви първоначални основания. При това ползвайки алгоритми, за които е известно, че допускат ужасно много грешки.

Това е все едно да се отваря превантивно всяко писмо, за да се види дали случайно не съдържа нещо за незаконна дейност.

Същевременно всички държави (дори тези извън ЕС), ратифицирали Европейската конвенция за правата на човека, имат законодателство, което защитава тайната на кореспонденцията.

Чл. 34. (1) Свободата и тайната на кореспонденцията и на другите съобщения са неприкосновени.
(2) Изключения от това правило се допускат само с разрешение на съдебната власт, когато това се налага за разкриване или предотвратяване на тежки престъпления.

Конституция на Република България

Най-циничното е, че проектът съдържа изключение от сканиране на съобщенията на органите за сигурност, на политиците, на организации, които използват собствени платформи за комуникация, както и на представители на органи на властта (по преценка на държавите членки).

Иначе казано, ще сканират безогледно нашите писма и съобщения, но техните остават неприкосновени.

Сега на ход е Европейският парламент. В негова власт е да спре това безумие, а в наша – да убедим представителите си да гласуват против новата версия на Регламента.

Другият голям срам от последните дни е и т.нар. Стратегия за национална сигурност на САЩ на Доналд Тръмп. Ако сте се почувствали объркани от заглавията, коментарите и интерпретациите по тази тема, Йоанна Елми прави дисекция на документа и тезите в него в десетия брой на бюлетина си „Гласовете на Америка“:

Ако трябва да обобщим Стратегията за национална сигурност на втората администрация на Тръмп в няколко думи, те биха били: личности над принципи и пари над всичко, откровено заявено като държавна политика.

Светла Енчева сама признава в статията си „Мила родино, ти си ергенски рай“, че си е причинила целия сезон на въпросното популярно риалити заради лекомислено обещание, че след като е отбелязала началото му със статия, трябва да напише и друга след финала му. И докато е страдала, гледайки епизод след епизод, все повече се е убеждавала, че шоуто е добро приближение на състоянието, в което се намира държавата ни.

Светла Енчева ще бъде и поредният събеседник на Владислав Севов в петия епизод на видеопоредицата ни „Тоест разговаряме“ – ще излъчим на живо техния разговор днес от 16:00 часа. Дотогава все още може да завършите изречението „Равните права са…“ и да зададете въпрос на Светла в нашата кратка анкета.

Зареденото с обществена напрегнатост ежедневие този път не подмина дори рубриката „Порция език“ на Павлина Върбанова. В текста ѝ, разбира се, отново става дума за правопис и етимология, но този път Павлина е провокирана от една диалектна дума, която характеропатиите на политическия ни елит вкараха в активно обращение в последните дни. Прочетете повече в статията „За мършляка – безпристрастно“.

Съзнавам, че вече е крайно време да ви оставя да се наслаждавате на уикенда си, но искам да препоръчам още нещо за четене – лекцията на унгарския писател Ласло Краснахоркаи, тазгодишния нобелов лауреат за литература. Нека помислим заедно с него за лошите думи, новите ангели и бунта. Все актуални теми, нали?

И наистина накрая… да напомня, че „Тоест“ разчита на подкрепата на читателите си, за да оцелее като свободна медия, която акцентира върху важните неща. Затова, ако и за вас е важно екипът ни да продължи със своята мисия, следвайки установените принципи за почтена и независима журналистика, подкрепете ни.

Приятно четене!

[$] The state of the kernel Rust experiment

Post Syndicated from corbet original https://lwn.net/Articles/1050174/

The ability to write kernel code in Rust was explicitly added as an
experiment — if things did not go well, Rust would be removed again. At
the 2025 Maintainers Summit, a session was held to evaluate the state of
that experiment, and to decide whether the time had come to declare the
result to be a success. The (arguably unsurprising) conclusion was that
the experiment is indeed a success, but there were some interesting points
made along the way.

How Bayer transforms Pharma R&D with a cloud-based data science ecosystem using Amazon SageMaker

Post Syndicated from Avinash Erupaka original https://aws.amazon.com/blogs/big-data/how-bayer-transforms-pharma-rd-with-a-cloud-based-data-science-ecosystem-using-amazon-sagemaker/

This post was written with Avinash Erupaka from Bayer (IT PH, Drug Innovation platform)

How can pharmaceutical companies unlock the full potential of their data to drive breakthrough innovations? Bayer, a global leader in health and nutrition, is dedicated to tackling the pressing challenges of our time, including a growing and aging population and the strain on our planet’s ecosystems. Its mission of “Health for All, Hunger for None” drives its commitment to addressing societal and environmental needs through groundbreaking research. Bayer is focused on developing innovative solutions that make a tangible difference in the world and value for its customers, employees, and stakeholders. Headquartered in Leverkusen, Germany, Bayer operates across 80 countries and is pioneering a data science ecosystem that transforms how research teams access, analyze, and derive insights from complex scientific data.

By harnessing the power of data, analytics, artificial intelligence and machine learning (AI/ML), and generative AI, Bayer is creating a cloud-based Pharma R&D Data Science Ecosystem (DSE) on AWS that powers cutting-edge technologies and concepts with robust data management. In doing so, R&D teams can fully realize the potential of unified data and analytics.

In this post, we discuss how Bayer used the next generation of SageMaker to build a solution that unified data ingestion, storage, analytics, and AI/ML workflows. Built on data mesh principles, Bayer’s DSE integrates advanced data ingestion, storage, analytics, and ML workflows to enable agile experimentation and scalable insight generation. It democratizes access to analytics, fosters cross-Region collaboration, and provides flexible integration of structured, semi-structured, and unstructured data.

Challenges in pharmaceutical research

In pharmaceutical research, data has become the most critical asset for driving innovation. However, managing this data effectively presents unprecedented challenges and traditional data management approaches are becoming increasingly inadequate for complex, global research initiatives. Many pharma R&D organization face a complex ecosystem of data and analytics related obstacles that hinder scientific discovery and operational efficiency:

  • Siloed datasets – Research datasets are siloed across domains, limiting reuse and slowing discovery.
  • Multiple data modalities – Clinical trial data (structured), real-world evidence (semi-structured), and genomic files (unstructured) existed in isolation, complicating integration and analysis.
  • Inflexible ingestion capabilities – Systems that support batch processing (such as trial data), real-time data streams (for example, from lab equipment), and event-driven ingestion (such as regulatory updates).
  • Rising R&D costs – Disparate technologies and disconnected systems create operational inefficiencies and increased licensing and maintenance costs.
  • Inconsistent landscape to fully use ML – The absence of a unified data architecture and standardized, domain-agnostic MLOps workflows mean that data and analytics innovation is often ad hoc and non-repeatable. Teams lack a streamlined way to scale successful patterns, resulting in redundant efforts, longer development cycles, and missed opportunities for cross-domain synergy.
  • Disconnected architectures – Software solutions are not integrated into the wider unified ecosystem, resulting in silos, redundancies, and inefficiencies.

Recognizing these systemic challenges, Bayer embarked on a transformative journey. DSE is not just a technological solution, but a strategic reimagining of how research data and analytics could be used across a global organization. By bringing together cutting-edge technologies, standardized frameworks, a collaborative data mesh, and lakehouse architecture, Bayer set out to help researchers and engineers accelerate pharmaceutical innovation.

Finding a solution with the next generation of SageMaker

Bayer envisioned a unified data science ecosystem that would provide the following:

  • A unified collaborative development experience for all data scientists regardless of their location or specialization
  • Seamless access to both structured and unstructured data through a consistent interface
  • Built-in governance and compliance controls appropriate for pharmaceutical research
  • Scalable compute resources to handle the most complex analytical workloads

Bayer conducted a comprehensive evaluation of various solutions before selecting the next generation of SageMaker as the cornerstone of their new data science ecosystem. Although other options had merits, Bayer prioritized the following capabilities:

  • Access to multimodal data – Essential for genomics, proteomics, and advanced biomarker research
  • Centralized asset marketplace – Central hub to discover and reuse data, features, models, and other enterprise assets
  • Integrated tooling ecosystem – Streamlined access to key tools like Git, ETL, MLflow, and generative AI application builders in one place
  • Multi-domain and cross-Region support – Critical for global research collaboration
  • Price-performance – Necessary for sustainable, long-term scaling

The capabilities of Amazon SageMaker Unified Studio and Amazon SageMaker Catalog aligned with Bayer’s vision of decentralized mesh execution combined with centralized discovery and governance. They enabled teams to work with their preferred tools, such as Jupyter Notebooks or workflow builders, while maintaining discoverability and reusability of assets.

Solution overview

This section describes the key features and architecture of Bayer’s DSE built on SageMaker. The DSE solution addresses the identified challenges through a multi-layered architecture:

  • Breaking down data silos – Multimodal data ingestion capabilities of the solution break down data silos by enabling unified storage, processing of structured, semi-structured, and unstructured data through batch, streaming, and event-driven pipelines.
  • Handling diverse data modalities – A hybrid lakehouse architecture, built on Amazon Simple Storage Service (Amazon S3), Apache Iceberg, and Amazon Redshift, provides a flexible foundation for handling diverse data modalities and maturities while providing data consistency and accessibility.
  • Reducing costs through standardization – To address rising R&D costs and operational inefficiencies, pre-wired analytical workbenches offer standardized templates and integrated development environments (IDEs) that reduce redundancy and accelerate workflow development.
  • Unlocking AI/ML with Amazon SageMaker AI and Amazon Bedrock – Advanced AI/ML capabilities, powered by Amazon SageMaker AI and Amazon Bedrock, create a standardized, domain-agnostic MLOps environment that enables repeatable innovation and cross-domain synergy.
  • Managing tools ecosystem with end-to-end observability – Robust governance and observability features provide compliance and system reliability while integrating previously disconnected tools into a unified, well-monitored ecosystem that breaks down architectural silos and promotes efficient resource utilization.

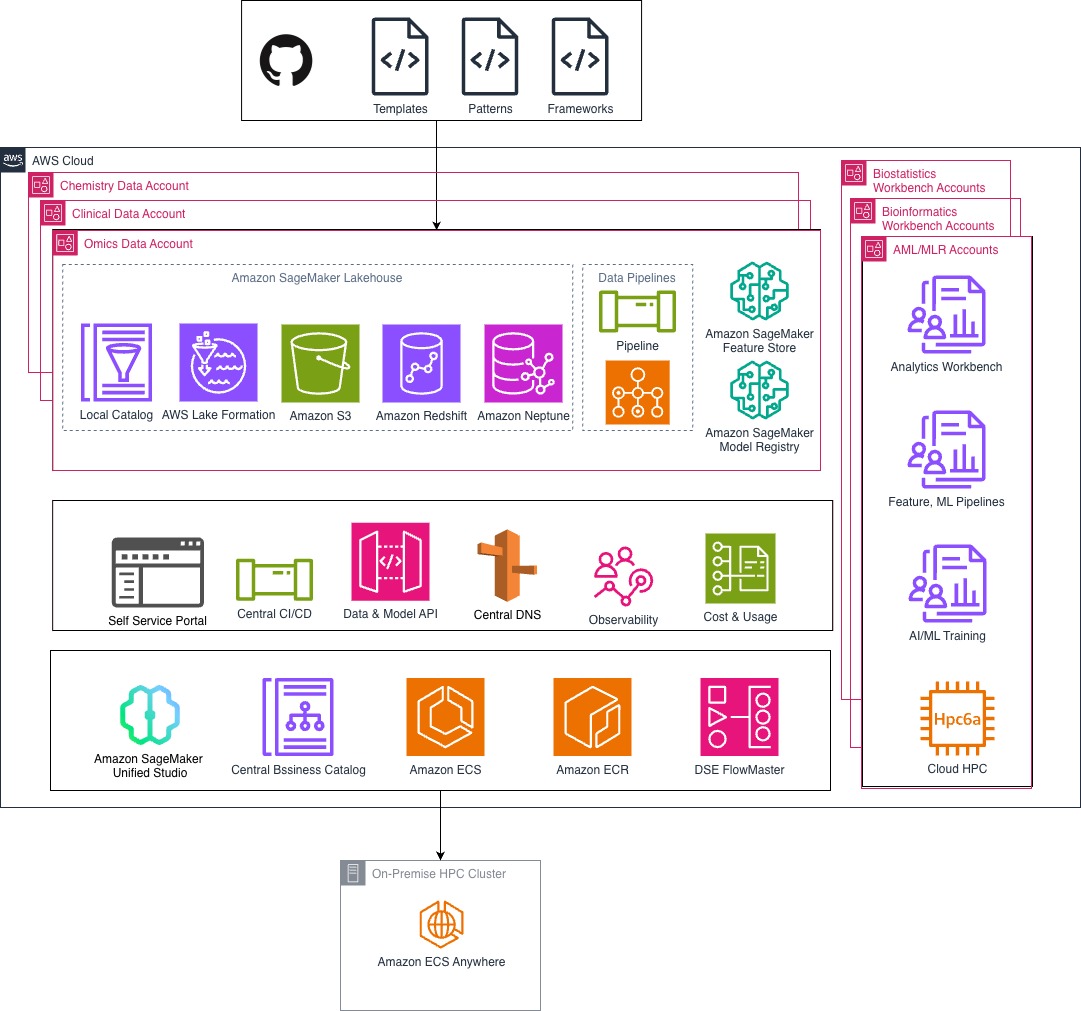
The DSE architecture implements data mesh principles where data domains (omics, regulatory, clinical trials) are treated as products, with ownership and management responsibilities assigned to domain experts. These domains are decentralized for execution but remain discoverable and reusable through SageMaker Catalog. At the core of the architecture is a hybrid mesh lakehouse architecture that combines Amazon S3 and Iceberg, providing the flexibility to handle both structured and unstructured data efficiently. SageMaker Unified Studio provides an analytical layer where researchers can access the full suite of tools needed for their work. The following diagram illustrates this architecture.

architecture diagram showing Bayer's data science ecosystem

Impact

The first phase of Bayer’s DSE confirmed the next generation of SageMaker as a powerful foundation for their R&D DSE—designed to balance decentralized innovation with centralized governance through a scalable data mesh architecture. With this solution, Bayer can catalog and manage multimodal data assets—including structured and unstructured data, ML features, models, and custom scientific assets—with context-rich metadata across diverse Pharma R&D domains. Bayer is now positioned to onboard over 300 TB of biomarker data and integrate siloed omics, clinical, and chemistry data repositories into a cohesive environment. With integrated tools like JupyterLab Spaces, MLflow, and SageMaker AI Studio, the DSE platform is laying the groundwork for a comprehensive, GxP-aware ML workbench—paving the way to operationalize over 25 high-value ML use cases and support more than 100 data scientists across the organization.

“The Data Science Ecosystem is vital for developing our medicines,” says Daniel Gusenleitner, Mission Lead for the R&D Data Science Ecosystem. “It enhances our business workflows with advanced analytics, helping us accelerate the search for new treatments. By integrating data from the entire research and development process, we improve the chances of technical success and ensure our efforts are efficient. Unlocking our data also facilitates target discovery, leading to groundbreaking advancements in patient care.”

Next steps

Bayer has successfully begun their Data Science Ecosystem on the next generation of Amazon SageMaker and is working to onboard the first use case of advanced biomarker research. Building on the strong foundation, Bayer is also accelerating the evolution of the DSE solution with the following key enhancements:

  • Federated catalogs and cross-domain integration – Enabling search and reuse of data assets across therapeutic areas and business units
  • Advanced ontology and semantic layer – Enriching metadata with domain knowledge to support AI-based search, discovery, and reasoning
  • Adoption of generative and agentic AI workflows – Driving novel drug discovery and accelerating hypothesis generation

Conclusion

By leveraging the next generation of Amazon SageMaker to build their cloud-based Data Science Ecosystem, Bayer is creating a foundation for faster, more efficient research and discovery. Amazon SageMaker is unifying diverse data types, enabling global collaboration, and standardizing ML workflows to help position Bayer at the forefront of data-driven innovation.

To learn more and get started with the next generation of SageMaker, refer to Amazon SageMaker or the AWS console.


About the Authors

Avinash Erupaka

Avinash Erupaka

Avinash is a Principal Engineering Lead at Bayer’s Drug Innovation platform. With deep experience across pharmaceuticals, crop science, and consumer health, he has led large-scale transformations spanning cloud platforms, AI/ML, and data infrastructure. Avinash brings a unique blend of technical depth and business acumen, having worked across the life sciences value chain—from research to manufacturing. He holds a Master’s in Engineering and an Executive MBA, and is passionate about building scalable, reusable solutions to accelerate scientific discovery.

Modood Alvi

Modood Alvi

Modood was a Senior Solutions Architect at AWS. Modood is passionate about digital transformation and is committed to helping large enterprise customers across the globe accelerate their adoption of and migration to the cloud. Modood brings more than a decade of experience in software development, having held a variety of technical roles within companies like SAP and Porsche Digital. Modood earned his Diploma in Computer Science from the University of Stuttgart.

Radhika Kashyap

Radhika Kashyap

Radhika is a Senior Customer Solutions Manager at AWS. Radhika brings over a decade of experience in technical program management and works with AWS customers to accelerate their journey to the cloud. She holds a master’s degree in management information systems and a bachelor’s degree in information technology.

Friday Squid Blogging: Giant Squid Eating a Diamondback Squid

Post Syndicated from Bruce Schneier original https://www.schneier.com/blog/archives/2025/12/friday-squid-blogging-giant-squid-eating-a-diamondback-squid.html

I have no context for this video—it’s from Reddit—but one of the commenters adds some context:

Hey everyone, squid biologist here! Wanted to add some stuff you might find interesting.

With so many people carrying around cameras, we’re getting more videos of giant squid at the surface than in previous decades. We’re also starting to notice a pattern, that around this time of year (peaking in January) we see a bunch of giant squid around Japan. We don’t know why this is happening. Maybe they gather around there to mate or something? who knows! but since so many people have cameras, those one-off monster-story encounters are now caught on video, like this one (which, btw, rips. This squid looks so healthy, it’s awesome).

When we see big (giant or colossal) healthy squid like this, it’s often because a fisher caught something else (either another squid or sometimes an antarctic toothfish). The squid is attracted to whatever was caught and they hop on the hook and go along for the ride when the target species is reeled in. There are a few colossal squid sightings similar to this from the southern ocean (but fewer people are down there, so fewer cameras, fewer videos). On the original instagram video, a bunch of people are like “Put it back! Release him!” etc, but he’s just enjoying dinner (obviously as the squid swims away at the end).

As usual, you can also use this squid post to talk about the security stories in the news that I haven’t covered.

Blog moderation policy.

Implementing HTTP Strict Transport Security (HSTS) across AWS services

Post Syndicated from Abhishek Avinash Agawane original https://aws.amazon.com/blogs/security/implementing-http-strict-transport-security-hsts-across-aws-services/

Modern web applications built on Amazon Web Services (AWS) often span multiple services to deliver scalable, performant solutions. However, customers encounter challenges when implementing a cohesive HTTP Strict Transport Security (HSTS) strategy across these distributed architectures.

Customers face fragmented security implementation challenges because different AWS services require distinct approaches to HSTS configuration, leading to inconsistent security postures.Applications using Amazon API Gateway for APIs, Amazon CloudFront for content delivery, and Application load balancers for web traffic lack unified HSTS policies, leading to complex multi-service environments. Security scanners flag missing HSTS headers, but remediation guidance is scattered across service-specific documentation, causing security compliance gaps.

HSTS is a web security policy mechanism that protects websites against protocol downgrade attacks and cookie hijacking. When properly implemented, HSTS instructs browsers to interact with applications exclusively through HTTPS connections, providing critical protection against man-in-the-middle issues.

This post provides a comprehensive approach to implementing HSTS across key AWS services that form the foundation of modern cloud applications:

  1. Amazon API Gateway: Secure REST and HTTP APIs with centralized header management
  2. Application Load Balancer: Infrastructure-level HSTS enforcement for web applications
  3. Amazon CloudFront: Edge-based security header delivery for global content

By following the implementation steps in this post, you can establish a unified HSTS strategy that aligns with AWS Well-Architected Framework security principles while maintaining optimal application performance.

Understanding HSTS security and its benefits

HTTP Strict Transport Security is a web security policy mechanism that helps protect websites against protocol downgrade attacks and cookie hijacking. When a web server declares HSTS policy through the Strict-Transport-Security header, compliant browsers automatically convert HTTP requests to HTTPS for the specified domain. This enforcement occurs at the browser level, providing protection even before the initial request reaches your infrastructure.

HSTS enforcement applies specifically to web browser clients. Most programmatic clients (such as SDKs, command line tools, or application-to-application communication) don’t enforce HSTS policies. For comprehensive security, configure your applications and infrastructure to only use HTTPS connections regardless of client type rather than relying solely on HSTS for protocol enforcement.

HTTP to HTTPS redirection enforcement on the server ensures future requests reach your applications over encrypted connections. However, it leaves a security gap during the initial browser request. Understanding this gap helps explain why client-side HSTS serves as an essential security layer in modern web applications.

For example, when users access web applications, the typical flow with redirects configured is as follows:

  1. User enters example.com in their browser.
  2. Browser sends an HTTP request to http://example.com.
  3. Server responds with HTTP 301/302 redirect to https://example.com.
  4. Browser follows redirection and establishes HTTPS connection

The initial HTTP request in step 2 creates an opportunity for protocol downgrade issues. An unauthorized party positioned between the user and your infrastructure can intercept this request and respond with content that appears legitimate while maintaining an insecure connection. This technique, known as SSL stripping, can occur even when your server-side AWS infrastructure is properly configured with HTTPS redirects.

HSTS addresses this security gap by moving security enforcement to the browser level. After a browser receives an HSTS policy, it automatically converts HTTP requests to HTTPS before sending them over the network:

  1. User enters example.com in browser.
  2. Browser automatically converts to HTTPS due to stored HSTS policy.
  3. Browser sends HTTPS request directly to https://example.com.
  4. No initial HTTP request removes the opportunity for interception.

This browser-level enforcement provides protection that complements your AWS infrastructure security configurations, creating defense in depth against protocol downgrade issues.

Although current browsers warn about insecure connections, HSTS provides programmatic enforcement. This prevents unauthorized parties from exploiting the security gap because they can’t forge valid HTTPS certificates for protected domains.

The security benefits of HSTS extend beyond simple protocol enforcement. HSTS helps prevent protocol downgrade issues after HSTS policy is established in the browser. It mitigates against man-in-the-middle issues, preventing unauthorized parties from intercepting communications. It also helps prevent unauthorized session access to protect against credential theft and unintended session access.
HSTS requires HTTPS connections and removes the option to bypass certificate warnings.

This post focuses exclusively on implementing the HTTP Strict-Transport-Security header. Although the examples include additional security headers for completeness, detailed configuration of those headers is beyond the scope of this post.

Key use cases for HSTS implementation

HSTS protects scenarios that HTTP redirects miss. For example, when legacy systems serve mixed content, or when SSO flows redirect users between providers, HSTS keeps connections encrypted throughout.

Applications serving both modern HTTPS content and legacy HTTP resources face protocol downgrade risks. When users access example.com/app that loads resources from legacy.example.com, HSTS prevents browsers from making initial HTTP requests to any subdomain, eliminating the vulnerability window during resource loading.

SSO implementations redirecting users between identity providers and applications create multiple HTTP request opportunities. Due to HSTS, authentication tokens and session data remain encrypted throughout the entire SSO flow, preventing credential interception during provider redirects.

Microservices architectures using API Gateway often involve service-to-service communication and client redirects. HSTS protects API endpoints from protocol downgrade during initial client connections, which means that API keys and authentication headers are not transmitted over HTTP.

Applications using CloudFront with multiple origin servers face security challenges when origins change or fail over. HSTS prevents browsers from falling back to HTTP when accessing cached content or during origin failover scenarios, maintaining encryption even during infrastructure changes.

From an AWS Well-Architected perspective, implementing HSTS demonstrates adherence to the defense in depth principle by adding an additional layer of security at the application protocol level. This approach complements other AWS security services and features, creating a comprehensive security posture that helps to protect data both in transit and at rest.

Implementing HSTS with Amazon API Gateway

Amazon API Gateway lacks built-in features to enable HSTS for the API resources. There are several different ways to configure HSTS headers in HTTP APIs and REST APIs.
For HTTP APIs, you can configure response parameter mapping to set HSTS headers when it’s invoked using a default endpoint or custom domain.

To configure response parameter mapping:

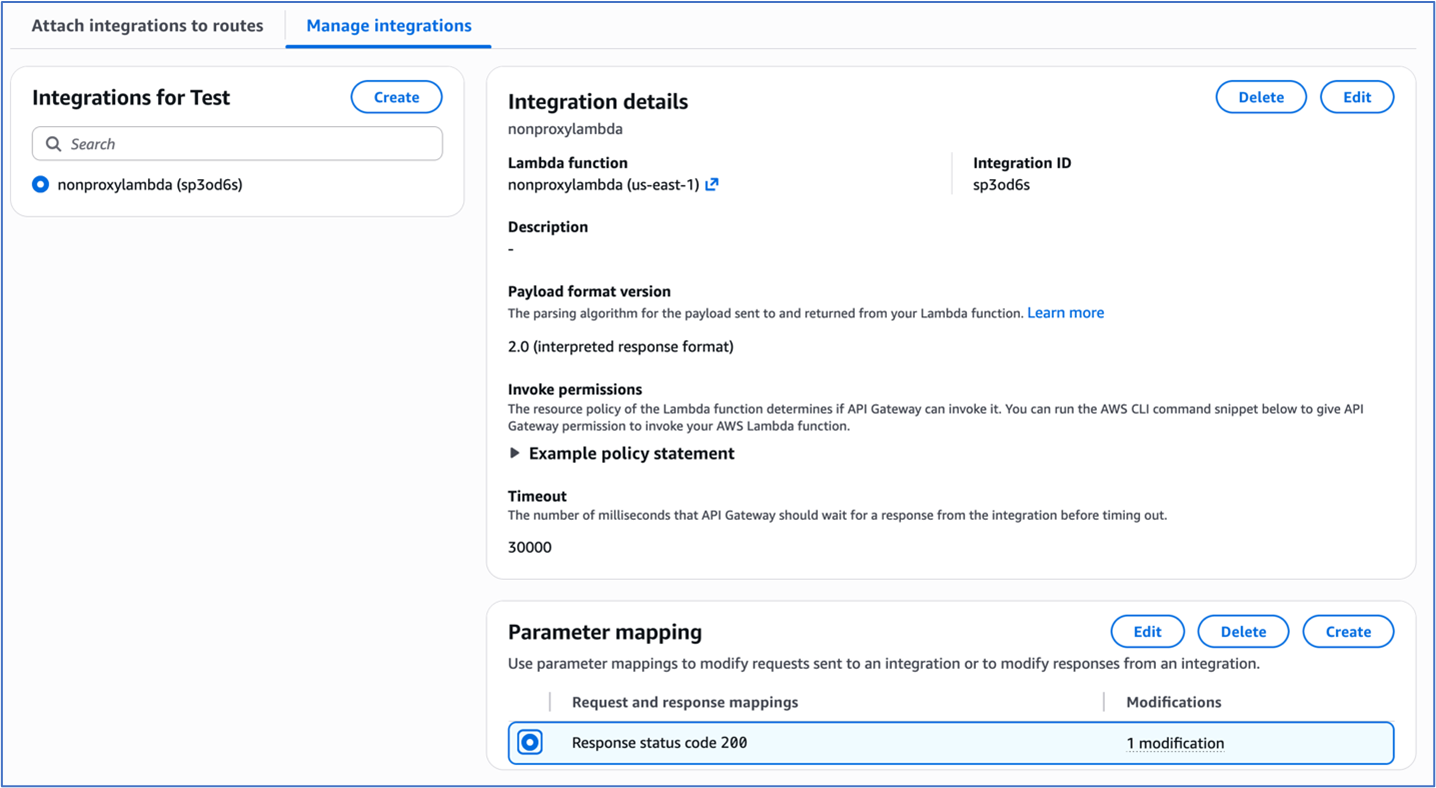
  1. Navigate to your desired HTTP API’s route configuration in the AWS API Gateway console
  2. Access the route’s integration settings under Manage integrations tab.
Figure 1: Integration settings of the HTTP Api

Figure 1: Integration settings of the HTTP Api

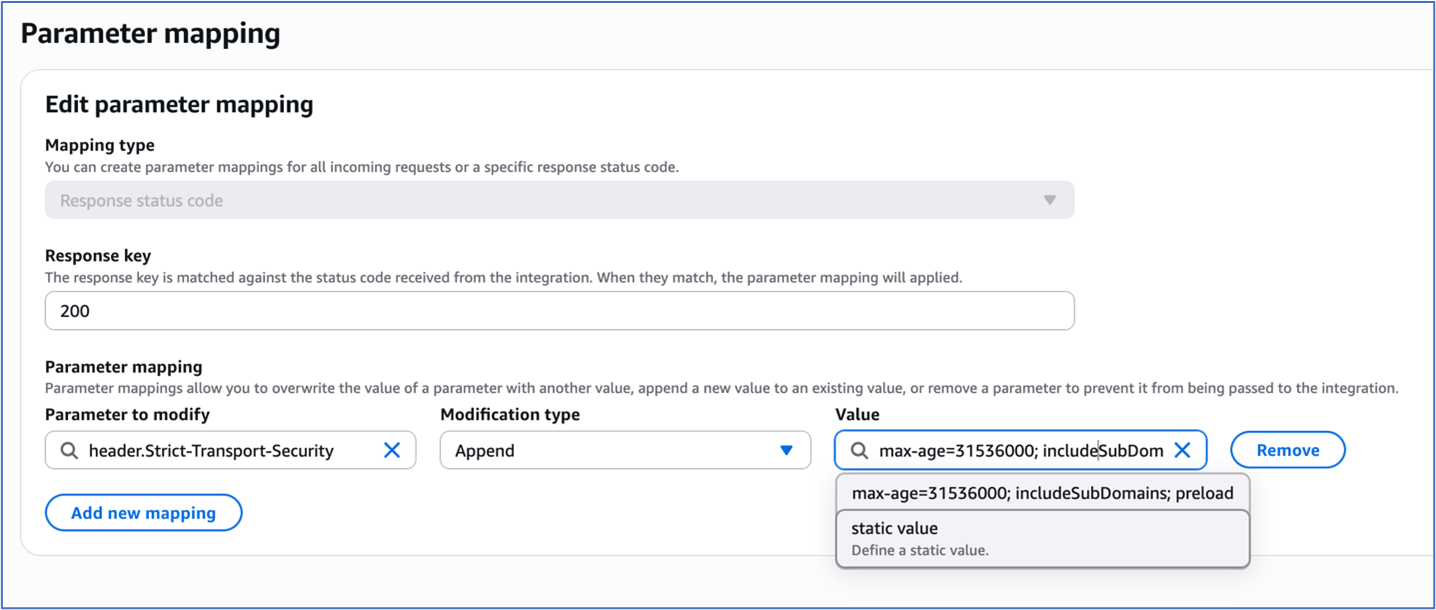
  1. To configure parameter mapping, under Response key, enter 200.
  2. Under Modification type, select Append in the dropdown menu.
  3. Under “Parameter to modify”, enter header.Strict-Transport-Security
  4. Under Value, enter max-age=31536000; includeSubDomains; preload.
Figure 2: Parameter Mapping for the HTTP Api integration

Figure 2: Parameter Mapping for the HTTP Api integration

REST APIs in Amazon API Gateway offer more granular control over HSTS implementation through both proxy and non-proxy integration patterns.

For proxy integrations, the backend service assumes responsibility for HSTS header generation. For example, an AWS Lambda proxy integration must return the HSTS headers in its response as shown in the following code example:

import json 
def lambda_handler(event, context):     
	return {         
        'statusCode': 200,         
        'headers': {             
            'Strict-Transport-Security': 'max-age=31536000; includeSubDomains; preload'         
        },         
        'body': json.dumps('Secure response with HSTS headers')     
    }

For non-proxy integrations, the HSTS headers must be returned by the Rest API by implementing one of two methods, either mapping templates or method response.

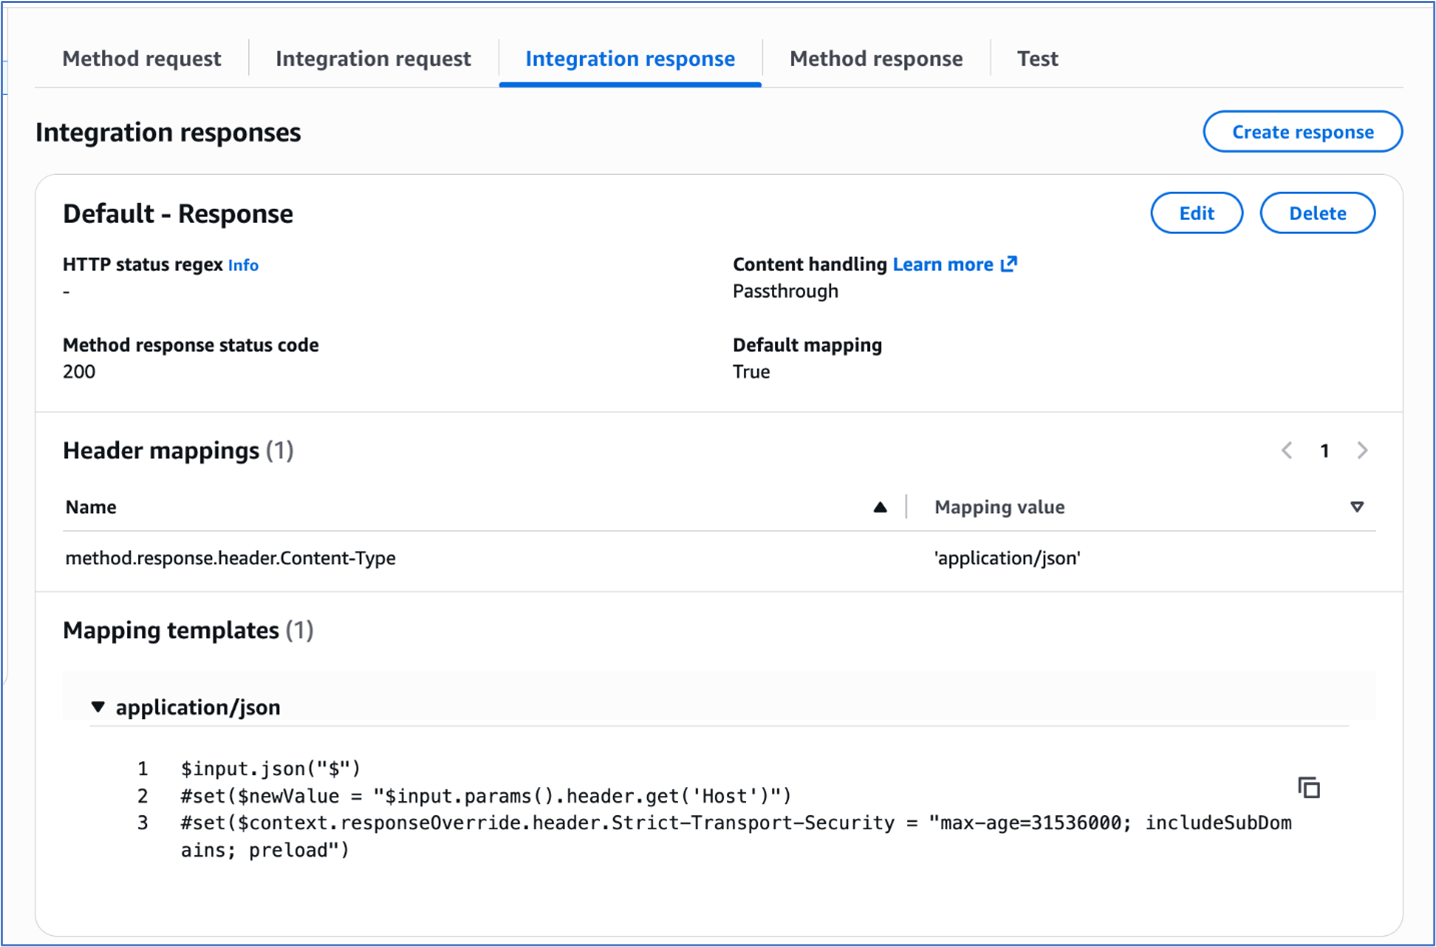
In the mapping templates method, the mapping template is used to configure the HSTS headers. The Velocity Template Language (VTL) for the mapping template is used for dynamic header generation. To implement this method:

  1. Navigate to the desired REST API and click on the method for the desired resource.
  2. Under the ‘Integration response’ tab, use the following mapping template to set the response headers:
$input.json("$") 
#set($newValue = "$input.params().header.get('Host')") 
#set($context.responseOverride.header.Strict-Transport-Security 
= "max-age=31536000; includeSubDomains; preload")

Figure 3: Adding mapping template to integration response of the Rest Api

Figure 3: Adding mapping template to integration response of the Rest Api

The ‘Method response’ tab provides declarative configuration through explicit header mapping in the configuration. To implement this method:

  1. Navigate to your desired REST API and select the method for the desired resource.
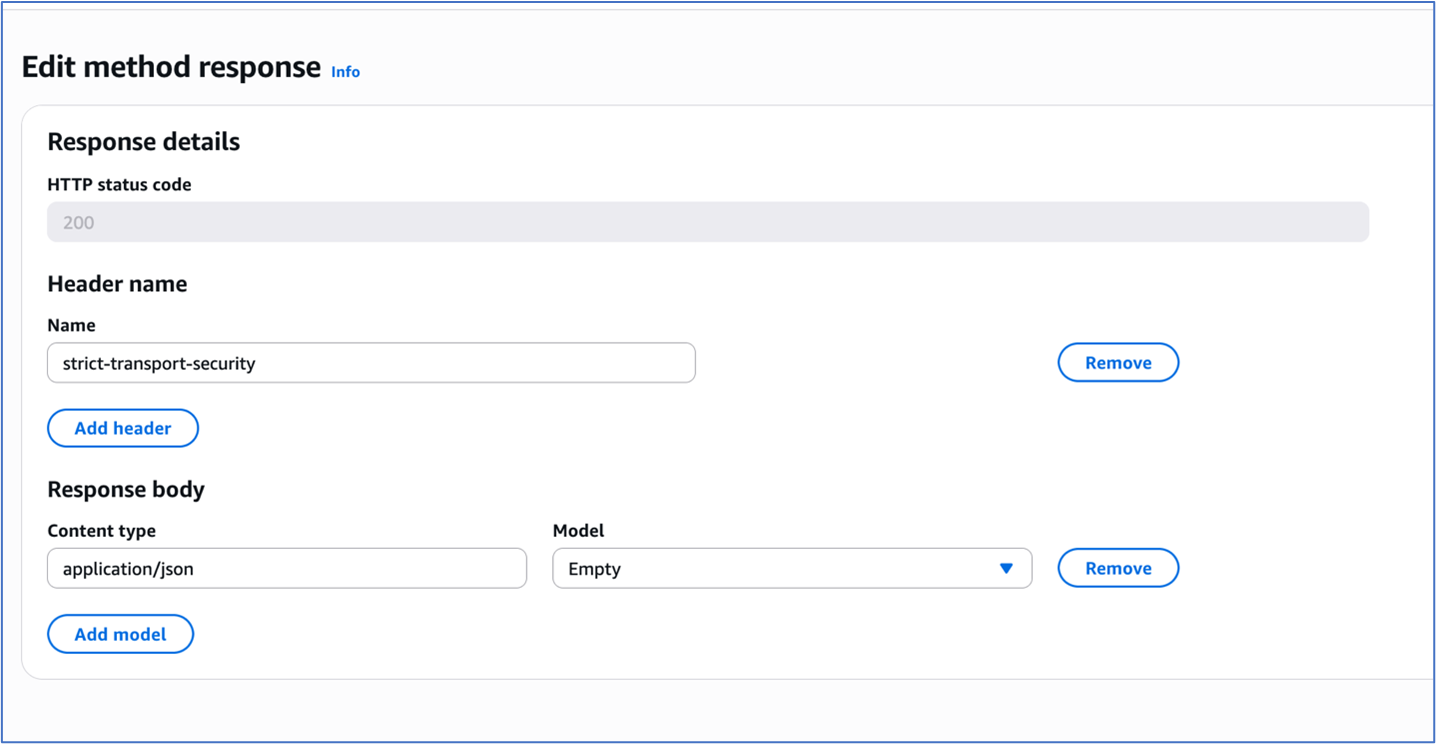
  2. Choose Method response and under Header name, add the HSTS header strict-transport-security.
Figure 4: Method response of the Rest Api

Figure 4: Method response of the Rest Api

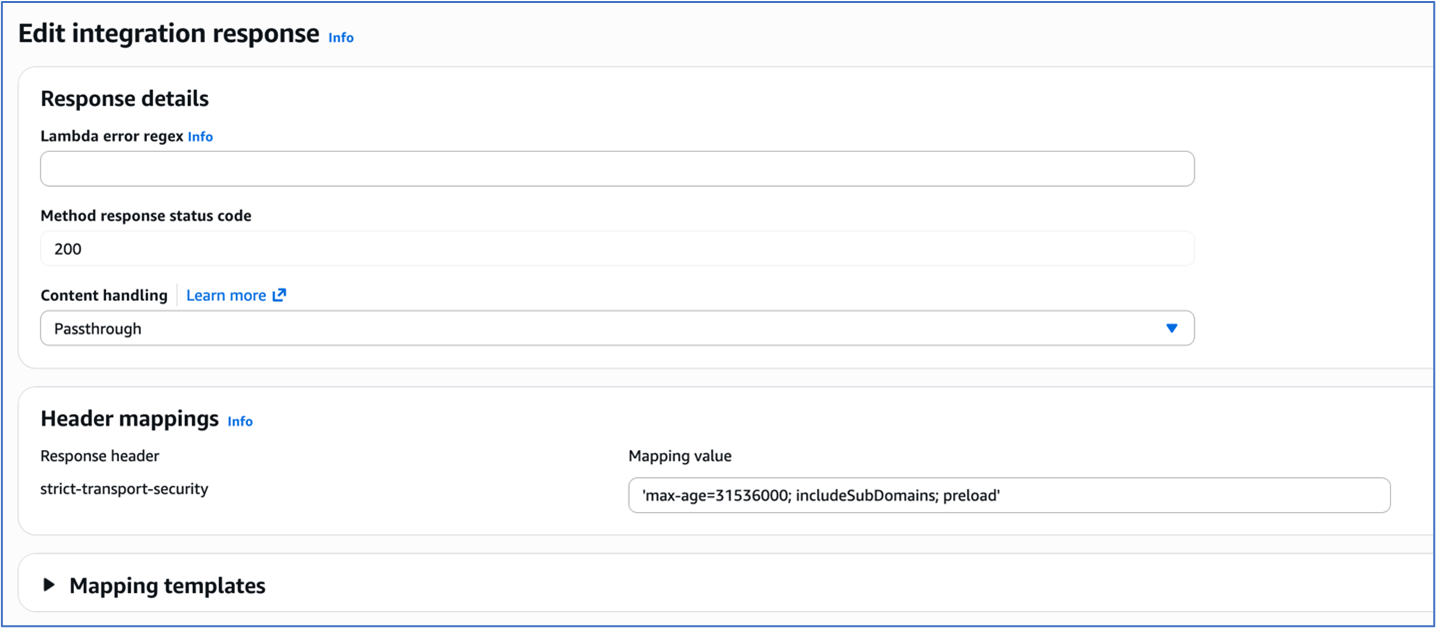
3. Choose Integration response and under Header mappings, enter the HSTS header strict-transport-security. Add the Mapping value for the header as max-age=31536000; includeSubDomains; preload.

Figure 5: Integration response of the Rest Api

Figure 5: Integration response of the Rest Api

To test and validate, use the following command:

Verify HSTS implementation for both HTTP API and REST API using curl with response headers logged:

curl -i https://your-api-gateway-url.execute-
api.region.amazonaws.com/stage/resource

The expected response should include:

HTTP/2 200 

date: Tue, 20 Sep 2025 16:34:35 GMT 
content-type: application/json 
content-length: 3 
x-amzn-requestid: 76543210-9aaa-4bbb-accc-987654321012
strict-transport-security: max-age=31536000; includeSubDomains; preload 
x-amz-apigw-id: ABCDEFGHIJKLMNO

Implementing HSTS with AWS Application Load Balancers

Application Load Balancers now provide built-in support for HTTP response header modification, including HSTS headers. This lets you enforce consistent security policies across all your services from a single point, reducing development effort and ensuring uniform protection regardless of which backend technologies you’re using.

Prerequisites and infrastructure requirements

Before implementing HSTS with load balancers, ensure your infrastructure meets these requirements:

  • Functional HTTPS listener – The ALB listener must be configured with HTTPS correctly.
  • Valid certificates – The ALB listener must have proper TLS certificate chain in AWS Certificate Manager and validation.
  • Application Load Balancer – The header modification feature for the ALB must be enabled for the listener since it is turned off by default.

Configuration

Application Load Balancers support direct HSTS header injection through the response header modification feature. This approach provides centralized security policy enforcement without requiring individual application configuration.

To enable HTTP header modification for your Application Load Balancer:

  1. Open the Amazon Elastic Compute Cloud (Amazon EC2) console and navigate to Load Balancers.
  2. Select your Application Load Balancer.
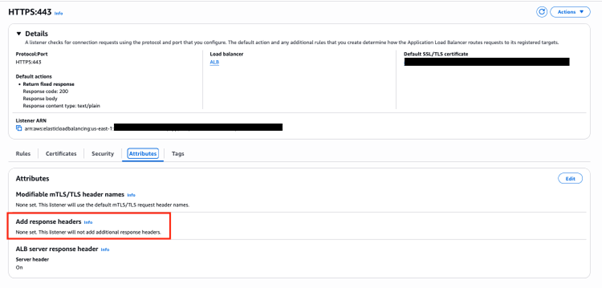
  3. On the Listeners and rules tab, select the HTTPS listener.
  4. On the Attributes tab, choose Edit.
    Figure 6: ALB HTTPS listener Attributes configuration

    Figure 6: ALB HTTPS listener Attributes configuration

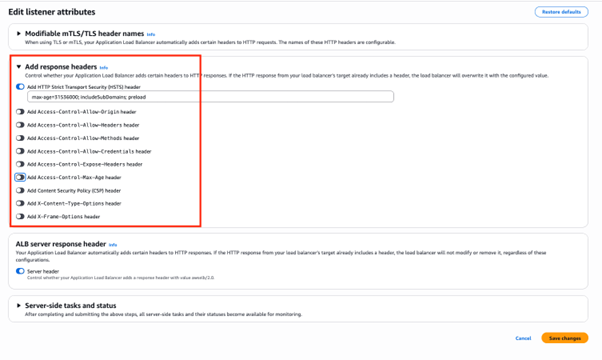
  5. Expand the Add response headers section.
  6. Select Add HTTP Strict Transport Security (HSTS) header.
  7. To configure the header value, enter max-age=31536000; includeSubDomains; preload.
  8. Choose Save changes.
Figure 7: Add response headers in attributes configuration of the ALB HTTPS listener

Figure 7: Add response headers in attributes configuration of the ALB HTTPS listener

Header modification behavior

When ALB header modification is enabled:

  • Header addition – If the backend response doesn’t include the specified header, ALB adds it with the configured value
  • Header override – If the backend response includes the header, ALB replaces the existing value with the configured value
  • Centralized control – Responses from the load balancer include the configured security headers, ensuring consistent policy enforcement

To test and validate, use the following command:
curl -I https://my-loadbalancer-1234567890.us-west-2.elb.amazonaws.com

The following code example shows the expected response headers:

HTTP/2 200
date: Tue, 23 Sep 2025 16:34:35 GMT
strict-transport-security: max-age=31536000; includeSubDomains; preload

Header value constraints:

  • Maximum header value size – 1 KB
  • Supported characters – Alphanumeric (a-z, A-Z, 0-9) and special characters (_ :;.,/’?!(){}[]@<>=-+*#&`|~^%)
  • Empty values revert to default behavior (no header modification)

When implementing header modifications, there are several operational considerations to keep in mind. Header modification must be explicitly enabled on each listener where you want the functionality to work. Once enabled, any changes you configure will apply to all responses that come from the load balancer, affecting every request processed through that listener. Application Load Balancer performs basic input validation on the headers you configure, but it has limited capability for header-specific validation, so you should ensure your header configurations follow proper formatting and standards.

This built-in Application Load Balancer capability significantly simplifies HSTS implementation by eliminating the need for backend application modifications while providing centralized security policy enforcement across your entire application infrastructure.

Implementing HSTS with Amazon CloudFront

Amazon CloudFront provides built-in support for HTTP security headers, including HSTS, through response headers policies. This feature enables centralized security header management at the CDN edge, providing consistent policy enforcement across cached and non-cached content.

Response headers policy configuration

You can use the CloudFront response headers policy feature to configure security headers that are automatically added to responses served by your distribution. You can use managed response headers policies that include predefined values for the most common HTTP security headers. Or, you can create a custom response header policy with custom security headers and values that you can add to the required CloudFront behavior.

To configure security headers:

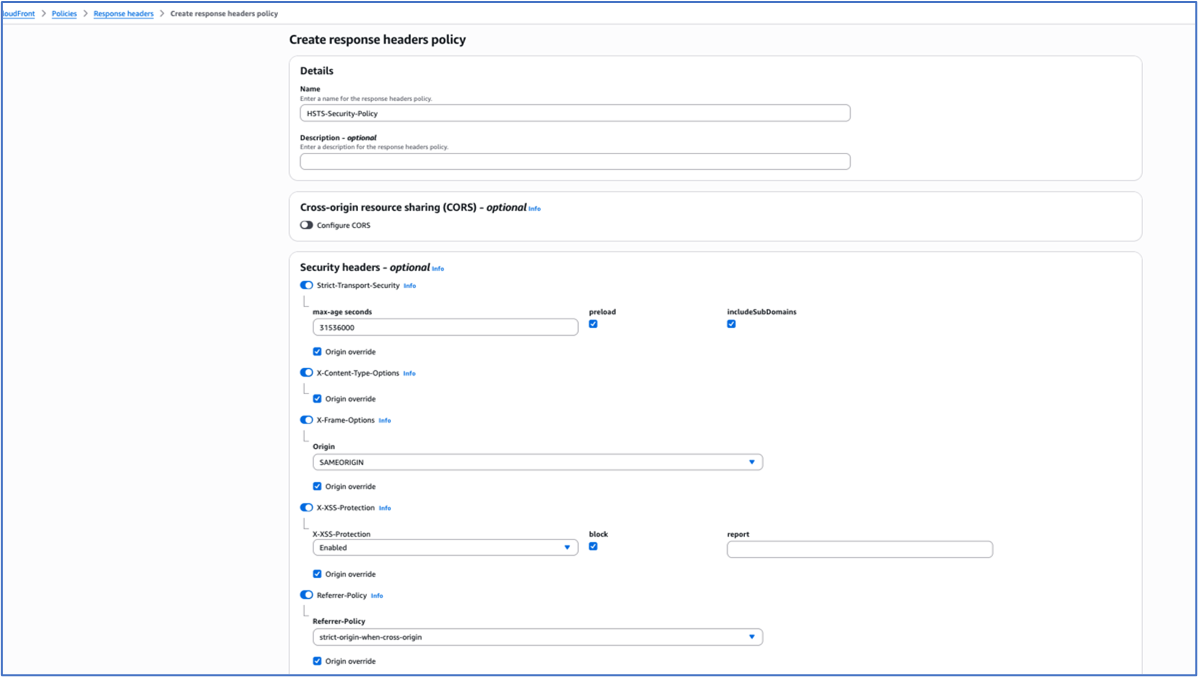
  1. On the CloudFront console, navigate to Policies and then Response headers.
  2. Choose Create response headers policy.
  3. Configure policy settings:
    • Name – HSTS-Security-Policy
    • Description – HSTS and security headers for web applications
  4. Under Security headers, configure:
    • Strict Transport Security – Select
    • Max age – 31,536,000 seconds (1 year)
    • Preload – Select (optional)
    • IncludeSubDomains – Select (optional)
  5. Add additional security headers:

    • X-Content-Type-Options
    • X-Frame-Options – Select Origin as “SAMEORIGIN”
    • Referrer-Policy – Select “strict-origin-when-cross-origin”
    • X-XSS-Protection – Select “Enabled”, Tick “Block”
    • Choose Create.
Figure 8: Configuring response header policy for the Cloudfront distribution

Figure 8: Configuring response header policy for the Cloudfront distribution

To attach the policy to the distribution:

  1. Navigate to your CloudFront distribution.
  2. Select the Behaviors tab.
  3. Edit the default behavior (or create a new one).
  4. Under Response headers policy, select your created policy.
  5. Choose Save changes.
Figure 9: Selecting the response headers policy

Figure 9: Selecting the response headers policy

Header override behavior:
CloudFront response headers policies provide origin override functionality that controls how headers are managed between the origin and CloudFront. When origin override is enabled, CloudFront will replace existing headers that come from the origin server. Conversely, when origin override is disabled, CloudFront will only add the policy-defined headers if those same headers are not already present in the origin response, preserving the original headers from the source.

To test and validate, use the following command:

curl -I https://your-cloudfront-domain.cloudfront.net

The following code example shows the expected response headers:

HTTP/2 200 
date: Tue, 23 Sep 2025 16:34:35 GMT 
strict-transport-security: max-age=31536000; includeSubDomains; preload 
x-content-type-options: nosniff 
x-frame-options: SAMEORIGIN 
referrer-policy: strict-origin-when-cross-origin 
x-xss-protection: 1; mode=block 
x-cache: Hit from cloudfront

Using CloudFront has several advantages. It offers consistent header application across all content types and centralized security policy management. Edge-level enforcement reduces latency, and no origin server modifications are required. AWS edge locations offer global policy distribution.

Security considerations and best practices

Implementing HSTS requires careful consideration of several security implications and operational requirements.

The max-age directive determines how long browsers will enforce HTTPS-only access. The duration guidelines are as follows:

  • 300 seconds (5 minutes) – Safe for experimentation during initial testing phase.
  • 86,400 seconds (1 day) – For short-term commitment such as development environments.
  • 259,2000 seconds (30 days) – For medium-term validation such as staging environments.
  • 31,536,000 seconds (1 year) – For long-term commitment such as production environments.

We recommend that you start with shorter max-age values during initial implementation and gradually increase them as you gain confidence in your HTTPS infrastructure stability.

The includeSubDomains directive extends HSTS enforcement to all subdomains. It offers several benefits, including comprehensive protection across the entire domain hierarchy, prevention of subdomain-based attacks, and simplified security policy management.

Requirements for using this directive include:

  • Subdomains should support HTTPS to use this directive effectively.
  • Subdomains should have valid SSL certificates.
  • You must maintain a consistent security policy across domain hierarchy.

Consider implementing HSTS preloading for maximum security coverage:

Strict-Transport-Security: max-age=31536000; includeSubDomains; preload

Preloading benefits include protection for first-time visitors, browser-level enforcement before network requests, and maximizing security coverage.

The following are some preloading considerations:

  • It requires submission to browser preload lists.
  • It’s difficult to reverse because removal takes months.
  • It requires long-term commitment to HTTPS infrastructure.

For more information, see:

Conclusion

Implementing HSTS across AWS services provides a robust foundation for securing web applications against protocol downgrade attacks and enabling encrypted communications. By using the built-in capabilities of API Gateway, CloudFront, and Application Load Balancers, organizations can create comprehensive security policies that align with AWS Well-Architected Framework principles.

If you have feedback about this post, submit comments in the Comments section below. If you have questions about this post, contact AWS Support.


Abhishek Avinash Agawane

Abhishek is a Security Consultant at Amazon Web Services with more than 8 years of industry experience. He helps organizations architect resilient, secure, and efficient cloud environments, guiding them through complex challenges and large-scale infrastructure transformations. He has helped numerous organizations enhance their cloud operations through targeted optimizations, robust architectures, and best-practice implementations.

Dell Pro Max 18 Plus Review a HUGE Laptop with a NVIDIA RTX Pro 5000 Blackwell GPU

Post Syndicated from Patrick Kennedy original https://www.servethehome.com/dell-pro-max-18-plus-review-a-huge-laptop-with-a-nvidia-rtx-pro-5000-blackwell-gpu-intel/

In our Dell Pro Max 18 Plus review, we see how this huge system with lots of performance through its NVIDIA RTX Pro 5000 Blackwell performs

The post Dell Pro Max 18 Plus Review a HUGE Laptop with a NVIDIA RTX Pro 5000 Blackwell GPU appeared first on ServeTheHome.

Metasploit Wrap-Up 12/12/2025

Post Syndicated from Spencer McIntyre original https://www.rapid7.com/blog/post/pt-metasploit-wrap-up-12-12-2025

React2shell Module

As you may have heard, on December 3, 2025, the React team announced a critical Remote Code Execution (RCE) vulnerability in servers using the React Server Components (RSC) Flight protocol. The vulnerability, tracked as CVE-2025-55182, carries a CVSS score of 10.0 and is informally known as “React2Shell”. It allows attackers to achieve prototype pollution during deserialization of RSC payloads by sending specially crafted multipart requests with “proto”, “constructor”, or “prototype” as module names. We’re happy to announce that community contributor vognik submitted an exploit module for React2Shell which landed earlier this week and is included in this week’s release.

MSSQL Improvements

Over the past couple of weeks Metasploit has made a couple of key improvements to the framework’s MSSQL attack capabilities. The first (PR 20637) is a new NTLM relay module, auxiliary/server/relay/smb_to_mssql, which enables users to start a malicious SMB server that will relay authentication attempts to one or more target MSSQL servers. When successful, the Metasploit operator will have an interactive session to the MSSQL server that can be used to run interactive queries, or MSSQL auxiliary modules.

Building on this work, it became clear that users would need to interact with MSSQL servers that required encryption as many do in hardened environments. To achieve that objective, issue 18745 was closed by updating Metasploits MSSQL protocol library to offer better encryption support. Now, Metasploit users can open interactive sessions to servers that offer and even require encrypted connections. This functionality is available automatically in the auxiliary/scanner/mssql/mssql_login and new auxiliary/server/relay/smb_to_mssql modules.

New module content (5)

Magento SessionReaper

Authors: Blaklis, Tomais Williamson, and Valentin Lobstein [email protected] 

Type: Exploit

Pull request: #20725 contributed by Chocapikk 

Path:multi/http/magento_sessionreaper

AttackerKB reference: CVE-2025-54236

Description: This adds a new exploit module for CVE-2025-54236 (SessionReaper), a critical vulnerability in Magento/Adobe Commerce that allows unauthenticated remote code execution. The vulnerability stems from improper handling of nested deserialization in the payment method context, combined with an unauthenticated file upload endpoint.

Unauthenticated RCE in React and Next.js

Authors: Lachlan Davidson, Maksim Rogov, and maple3142

Type: Exploit

Pull request: #20760 contributed by sfewer-r7 

Path: multi/http/react2shell_unauth_rce_cve_2025_55182 

AttackerKB reference: CVE-2025-66478

Description: This adds an exploit for CVE-2025-55182 which is an unauthenticated RCE in React. This vulnerability has been referred to as React2Shell.

WordPress King Addons for Elementor Unauthenticated Privilege Escalation to RCE

Authors: Peter Thaleikis and Valentin Lobstein [email protected] 

Type: Exploit

Pull request: #20746 contributed by Chocapikk 

Path: multi/http/wp_king_addons_privilege_escalation 

AttackerKB reference: CVE-2025-8489

Description: This adds an exploit module for CVE-2025-8489, an unauthenticated privilege escalation vulnerability in the WordPress King Addons for Elementor plugin (versions 24.12.92 to 51.1.14). The vulnerability allows unauthenticated attackers to create administrator accounts by specifying the user_role parameter during registration, enabling remote code execution through plugin upload.

Linux Reboot

Author: bcoles [email protected] 

Type: Payload (Single)

Pull request: #20682 contributed by bcoles 

Path:linux/loongarch64/reboot

Description: This extends our payloads support to a new architecture, LoongArch64. The first payload introduced for this new architecture is the reboot payload, which will cause the target system to restart once triggered.

Enhanced Modules (2)

Modules which have either been enhanced, or renamed:

Enhancements and features (1)

  • #20704 from dwelch-r7 – The module auxiliary/scanner/ssh/ssh_login_pubkey has been removed. Its functionality has been moved into auxiliary/scanner/ssh/ssh_login.

Documentation

You can find the latest Metasploit documentation on our docsite at docs.metasploit.com.

Get it

As always, you can update to the latest Metasploit Framework with msfupdate and you can get more details on the changes since the last blog post from GitHub:

If you are a git user, you can clone the Metasploit Framework repo (master branch) for the latest. To install fresh without using git, you can use the open-source-only Nightly Installers or the commercial edition Metasploit Pro

Building zero trust generative AI applications in healthcare with AWS Nitro Enclaves

Post Syndicated from Nathan Pogue original https://aws.amazon.com/blogs/compute/building-zero-trust-generative-ai-applications-in-healthcare-with-aws-nitro-enclaves/

In healthcare, generative AI is transforming how medical professionals analyze data, summarize clinical notes, and generate insights to improve patient outcomes. From automating medical documentation to assisting in diagnostic reasoning, large language models (LLMs) have the potential to augment clinical workflows and accelerate research. However, these innovations also introduce significant privacy, security, and intellectual property challenges.

Healthcare data often contains Protected Health Information (PHI), which is governed by strict regulations and compliance frameworks. At the same time, organizations or researchers who have invested substantial time and compute resources into training medical LLMs must protect their proprietary model architectures, weights, and fine-tuned datasets. Traditional deployment models necessitate mutual trust between the model publisher and the healthcare data provider — trust that sensitive data won’t be leaked, and that the model itself won’t be copied, tampered with, or exfiltrated. The absence of a secure and verifiable trust model between model publishers and consumers remains one of the main barriers to scaling generative AI in regulated medical environments.

To address this concern, both parties need a secure environment to publish and consume models without exposing data or intellectual property. Amazon Web Services (AWS) Nitro Enclaves provide isolated, attested, and cryptographically verified compute environments that help protect sensitive workloads. Model owners can encrypt their LLMs with AWS Key Management Service (AWS KMS) and allow only verified Nitro Enclaves to decrypt and run them, making sure that the model can’t be accessed outside the Nitro Enclave. Healthcare organizations and consumers can use this to process sensitive data within their own AWS environment entirely within the Nitro Enclave, helping keep PHI private and contained. Hardware-based attestation provides proof that the Nitro Enclave is running trusted code, so that both sides can exchange information with confidence.

In this post, we demonstrate how to deploy a publicly available foundational model (FM) using Nitro Enclaves for isolated, more secure compute, AWS KMS for model encryption, Amazon Simple Storage Service (Amazon S3) for storing model artifacts and images, and Amazon Simple Queue Service (Amazon SQS) for securely delivering queries, enabling private, privacy-preserving inferences while helping protect both model intellectual property and sensitive patient data.

Solution overview

This solution outlines how to build a more secure end-to-end pipeline that enables zero trust medical LLM publication and inference with Nitro Enclaves. This post demonstrates a guide for setting up an Amazon Elastic Compute Cloud (Amazon EC2) instance with Nitro Enclaves enabled, downloading and encrypting a publicly available FM to an S3 bucket with an AWS KMS key, sending medical text and image-based queries to an SQS queue for processing, and storing results in an Amazon DynamoDB table.

This project is intended solely for educational and demonstration purposes and isn’t suitable for production or clinical use. Its outputs aren’t validated for clinical accuracy and must not be used for patient care or medical decision-making. Before any real-world deployment, make sure that you implement comprehensive security, privacy, and compliance safeguards. These include health data protection controls, secrets management, and regulatory validation. Furthermore, you must consult the appropriate clinical, legal, and security experts.

For demonstration purposes, this solution is deployed in a single AWS account. Ideally, in production, it would be deployed across separate AWS accounts: one for the model owner and one for the model consumer. The model owner can use cross-account AWS Identity and Access Management (IAM) permissions and encrypted model sharing through AWS KMS to securely provide access to their model without exposing the underlying weights or logic. At the same time, the consumer can run sensitive inferences within their own environment, maintaining strict data privacy and zero trust principles. In a real-world implementation, the model provider should also establish a robust entitlement and licensing framework to manage customer access, enabling fine-grained control over who can invoke the model, track usage, and support license revocation to immediately remove permissions from specific customers when necessary.

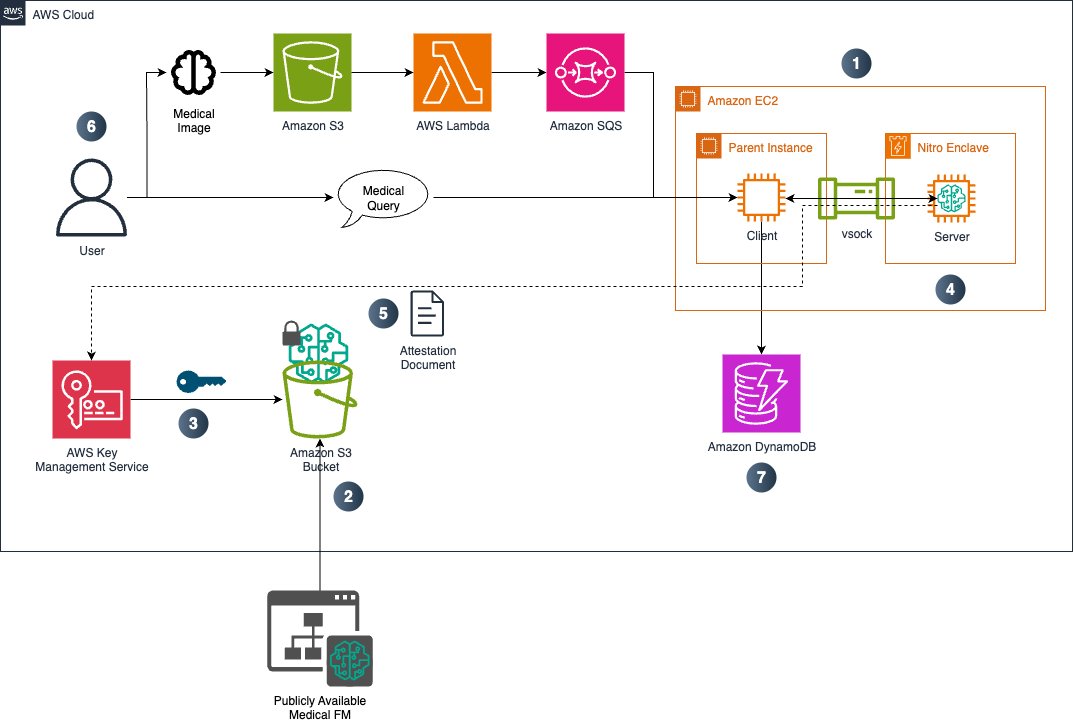
The following diagram shows the solution architecture:

Scope of solution

The steps of the solution include:

  1. Amazon EC2 setup: An EC2 instance is launched with Nitro Enclaves and Trusted Platform Module (TPM) enabled. For this project, a c7i.12xlarge instance with a 150 GB Amazon EBS volume is used to provide the necessary compute resources for running LLMs.
  2. Public FM download: A publicly available FM is retrieved from Hugging Face and stored in an S3 bucket within the model consumer’s AWS account.
  3. Model encryption: The model is encrypted using AWS KMS envelope encryption. Only a Nitro Enclave presenting a valid attestation document can request the decryption key from AWS KMS, which helps prevent unauthorized access to the model weights outside the Nitro Enclave.
  4. Nitro Enclave setup: A Docker image containing the llama.cpp inference runtime is built and deployed inside the Nitro Enclave.
  5. Model decryption and setup: When the Nitro Enclave launched, it requests decryption of the model artifacts using its attestation credentials. Then, the model can be securely decrypted inside the memory of the Nitro Enclave and loaded by the llama.cpp server. This means that the decrypted model weights aren’t visible outside of the Nitro Enclave boundary.
  6. Medical query: Users can submit either text or image-based queries to the model. Queries are sent through vsock, a secure communication channel from the client application to the model server inside the Nitro Enclave. Image queries necessitate that users upload images to an S3 bucket. The upload event triggers an SQS queue, which signals the Amazon EC2 parent to fetch and send the image to the Nitro Enclave image for the medical LLM to process with its multimodal capabilities.
  7. Message history: Each interaction, including the user’s prompt and the model’s response, is logged to a DynamoDB table. This provides a persistent conversation history that enables traceability and auditing while keeping PHI securely stored within the consumer’s account. If necessary, the DynamoDB table can be encrypted and sealed for another layer of security and privacy.

About Google MedGemma 4B

Google MedGemma is a family of medically-optimized LLMs built on Gemma 3, with 4B and 27B parameter variants supporting both text and multimodal versions for medical image inputs. The 4B model offers efficiency and strong performance for multimodal tasks such as report generation and medical Q&A, while the 27B models excel at more demanding scenarios, such as electronic health record interpretation and complex longitudinal data analysis.

MedGemma models are well-suited for automated radiology report generation, clinical triage and documentation, patient education, medical image pre-interpretation, and medical education systems. The 4B model is ideal for portable or resource-constrained deployments, whereas the 27B multimodal delivers maximal performance.

In this project, MedGemma 4B serves as a reference medical LLM, showing how domain-adapted fine-tuning can enhance a model’s ability to interpret, reason about, and respond to complex medical queries. It also provides a foundation for exploring the safe and effective use of LLMs in healthcare applications, while being securely deployed within a Nitro Enclave. However, you can choose to deploy your own medical FM if needed. This is a deeper overview on the 4B model.

Prerequisites

To implement the proposed solution, make sure that you have the following:

  • The AWS Command Line Interface (AWS CLI) installed on your machine to create the EC2 instance.
  • AWS permissions with access to EC2 c7i.12xlarge instances and Nitro Enclaves.
  • Knowledge of Amazon S3, AWS KMS, Amazon SQS, AWS Lambda, and DynamoDB.
  • Basic knowledge of Nitro Enclaves and healthcare data security.
  • The GitHub repository cloned to your local machine.

Environment setup

The following sections outline how to set up your environment for this solution.

Create S3 buckets

In this solution, you create two S3 buckets: one for the model artifacts and one for the image inputs.

To create the S3 buckets

  1. Sign in to the Amazon S3 console, choose Create bucket, and follow the prompts to create a new S3 bucket.
  2. For the model artifact bucket, give it a unique name (for example AWSACCOUNTNUMBER-medgemma-model) in the same Region you use for the other project resources.
  3. Repeat the same process for the image bucket (for example AWSACCOUNTNUMBER-medgemma-image-inputs).
  4. Update the S3_BUCKET_NAME variable with your model bucket name in envelope_encrypt_model.sh and run.sh.

Create an SQS queue

When images are uploaded to the S3 image bucket, they are sent to an SQS queue for processing in sequential order by the model running in the Nitro Enclave.

To create an SQS queue

  1. Sign in to the Amazon SQS console, choose Create queue, and follow the prompts to create a new SQS queue.
  2. Choose Standard Queue, provide a name, leave the rest as default, and choose Create queue.
  3. Replace the SQS_QUEUE_URL variable in image_processor.py and lambda_function.py (in the client and assets folder, respectively) with your URL.

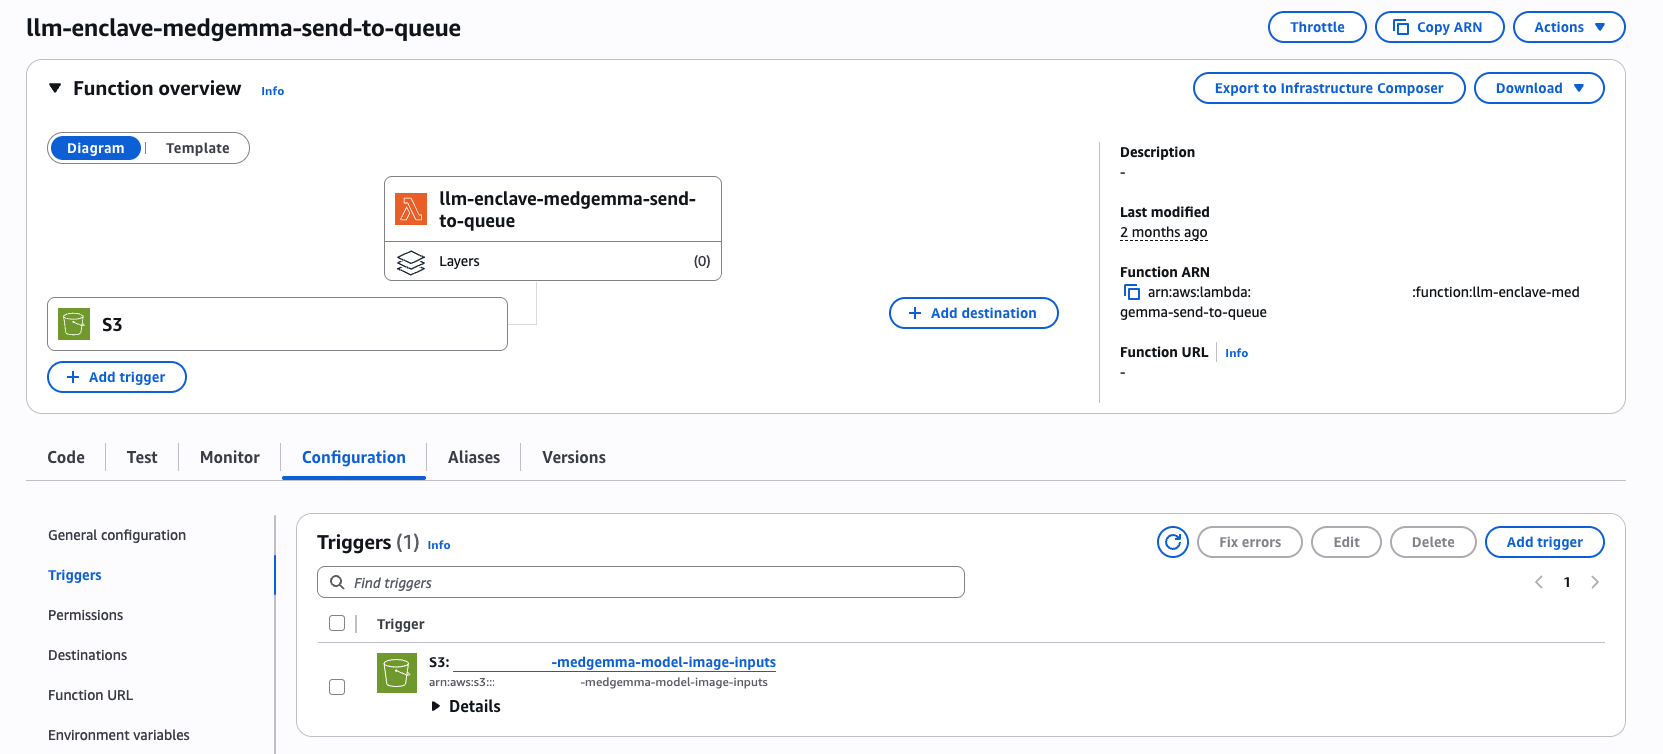
Create a Lambda function

For image-based queries, MedGemma 4B expects images encoded in base64 format to be passed in the prompt. To convert the images to this format, a Lambda function is invoked using an Amazon S3 trigger when an image is uploaded to the bucket.

To create a Lambda function

  1. Sign in to the Lambda console, choose Create function, and follow the prompts to create a new Lambda function from scratch.
  2. Choose a name, choose a Python runtime (for example Python 3.13), and paste in the Lambda function code from the assets folder.
  3. Next, update the Lambda function’s IAM role in Permissions under the Configuration tab with access to your S3 image bucket and the SQS queue that you created with inline policy permissions. Attach the following policies:
    1. Amazon S3 policy:
      {
       "Version": "2012-10-17",
       "Statement": [
           {
               "Sid": "Statement1",
               "Effect": "Allow",
               "Action": [
                   "s3:*"
               ],
               "Resource": [
                   "arn:aws:s3:::<IMAGE_BUCKET_NAME>",
                   "arn:aws:s3:::<IMAGE_BUCKET_NAME>/*"
               ]
           }
       ]
      }

    2. Amazon SQS policy:
      {
       "Version": "2012-10-17",
       "Statement": [
           {
               "Sid": "VisualEditor0",
               "Effect": "Allow",
               "Action": "sqs:ListQueues",
               "Resource": "*"
           },
           {
               "Sid": "VisualEditor1",
               "Effect": "Allow",
               "Action": "sqs:*",
              "Resource": "arn:aws:sqs:<REGION>:<ACCOUNT_NUMBER>:<QUEUE_NAME>"
           }
       ]
      }

  4. Finally, within the Lambda Designer, add a trigger, choose Amazon S3, and choose your image bucket. You should see the following example when the trigger is enabled.

AWS Lambda configuration interface showing S3 bucket trigger setup for medical image processing workflow

Create a DynamoDB table

When the queries have been processed by the model for inference, the prompts and responses are logged to a DynamoDB table for auditing and message history purposes.

To create a DynamoDB table

  1. Sign in to the DynamoDB console, choose Create table, and follow the prompts to create a new DynamoDB table.
  2. Give it a partition key named ID as a String type.
  3. Replace the TABLE_NAME variable with the table name and REGION variable with your AWS Region in direct_query.py and image_processor.py files.

Create an AWS KMS key

An AWS KMS key is used to envelope-encrypt the model artifacts before they are uploaded to the S3 model bucket. During encryption, the AWS KMS key policy is configured with conditions that restrict decryption to only those Nitro Enclaves presenting a valid attestation document. This attestation includes platform configuration registers (PCR) hashes that represent the measured state of the Nitro Enclave, which covers the signed Nitro Enclave image, runtime, and configuration. When the Nitro Enclave is launched, it generates an attestation document signed by the Amazon EC2 Nitro hypervisor, proving that its PCR values match the expected trusted measurements defined in the AWS KMS key policy. The key is released only if these PCR hashes align and the attestation is verified by AWS KMS, allowing the Nitro Enclave to decrypt and load the model securely in memory.

To create an AWS KMS key

  1. Sign in to the AWS KMS console, choose Create key, and follow the prompts to create a new AWS KMS key.
  2. Choose Symmetric as the key type and Encrypt and decrypt for the key usage. Make the alias AppKmsKey. Leave the default settings and choose Finish.
  3. Replace the REGION variable in vsock-proxy.yaml in the client folder with your AWS Region.

Create an EC2 instance

Now that the necessary resources are set up, you can proceed to launch the EC2 instance and create the Nitro Enclave image. For this solution, a c7i.12xlarge instance with a 150 GB EBS volume is provisioned.

To launch an EC2 instance with Nitro Enclaves enabled

  1. Within the GitHub repository on your local machine, run ./create_ec2.sh to create the EC2 instance.
cd scripts 
chmod +x create_ec2.sh 
./create_ec2.sh

  1. The script launches an EC2 instance called MedGemmaNitroEnclaveDemo. When the instance is running, you must create an IAM policy and add it to the Amazon EC2 IAM role with necessary permissions to the resources created previously.
  2. Sign in to the IAM console and navigate to Policies, choose Create policy, choose JSON, and paste the following policy, making sure that you update the bucket, queue URL, AWS Region, account number, and table variables:
{
  "Version": "2012-10-17",
  "Statement": [
    {
      "Sid": "s3modelbucket",
      "Effect": "Allow",
      "Action": [
        "s3:*"
      ],
      "Resource": [
        "arn:aws:s3:::<MODEL_BUCKET_NAME>",
        "arn:aws:s3:::<MODEL_BUCKET_NAME>/*"
      ]
    },
    {
      "Sid": "dynamodb",
      "Effect": "Allow",
      "Action": [
        "dynamodb:*"
      ],
      "Resource": [
        "arn:aws:dynamodb:<REGION>:<ACCOUNT_NUMBER>:table/<TABLE_NAME>"
      ]
    },
    {
      "Sid": "sqslist",
      "Effect": "Allow",
      "Action": "sqs:ListQueues",
      "Resource": "*"
    },
    {
      "Sid": "sqsqueue",
      "Effect": "Allow",
      "Action": "sqs:*",
      "Resource": "arn:aws:sqs:<REGION>:<ACCOUNT_NUMBER>:<QUEUE_NAME>"
    }
  ]
}
  1. Give it a name (for example enclave-permissions) and choose Create policy.
  2. Navigate to Roles, choose Create role, choose EC2 as the AWS service for the Trusted entity type, then choose your policy that you created under Add permissions.
  3. Update your EC2 instance to use the role by going to the Security setting under the Actions dropdown, then modifying its IAM role.
  4. You can upload the modified repository to your EC2 instance using SCP. Alternatively, you can transfer the repository through rsync
rsync -avz -e "ssh -i /path/to/directory/sample-for-secure-medical-llm-inference-with-nitro-enclaves/nitro-enclave-key.pem" --exclude='*.pem' /path/to/directory/sample-for-secure-medical-llm-inference-with-nitro-enclaves/ ec2-user@<PUBLIC_IP>:~ 
cd sample-for-secure-medical-llm-inference-with-nitro-enclaves
  1. Make the scripts executable (in client, server and scripts).
chmod +x *.sh

Nitro Enclave setup

With Amazon EC2 loaded with the necessary scripts, you can begin building the Nitro Enclave image. During this process, the Docker container is converted into an Enclave Image File (EIF), which generates cryptographic measurements (PCR hashes) that uniquely identify the code and configuration of the enclave. These measurements are embedded into the AWS KMS key policy, creating a hardware-attested trust boundary that makes sure only this specific, unmodified Nitro Enclave can decrypt and access the model weights.

  1. Run the complete setup script, which sets up the client on the EC2 parent instance and the server running within the Nitro Enclave. You can observe the different scripts in the client, server, and scripts folders.
sudo ./run_complete_setup.sh
  1. The various scripts run to download the MedGemma 4B model, encrypt the model with the AWS KMS key, build a Docker image to run a llama.cpp server, start a Nitro Enclave, and decrypt and run the model. This process takes approximately 10 minutes.
  2. When the Nitro Enclave is running, it runs in debug mode so that you can observe the various startup logs outputted. Wait until llama.cpp server logs are outputted that indicate the server is ready and listening.

Inference examples

When the model is decrypted and running on the llama.cpp server within the Nitro Enclave, you can begin to invoke the model with either image or text-based queries. Open a new terminal session in your EC2 instance. You can navigate to the client folder to run the scripts for queries.

Image-based queries

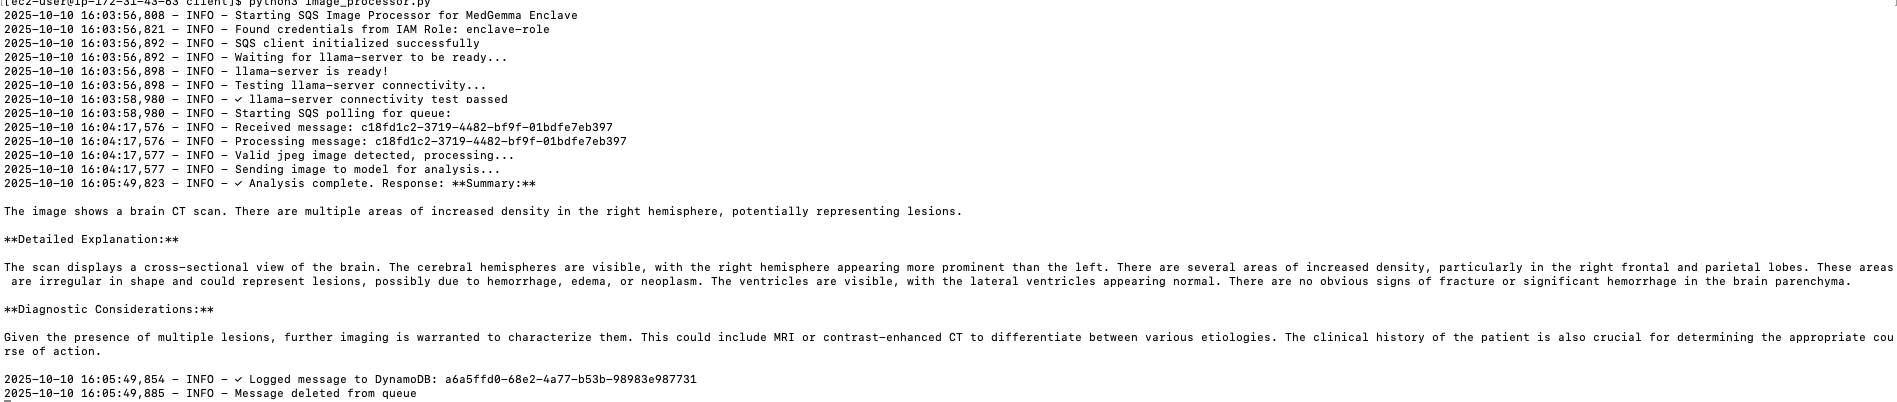
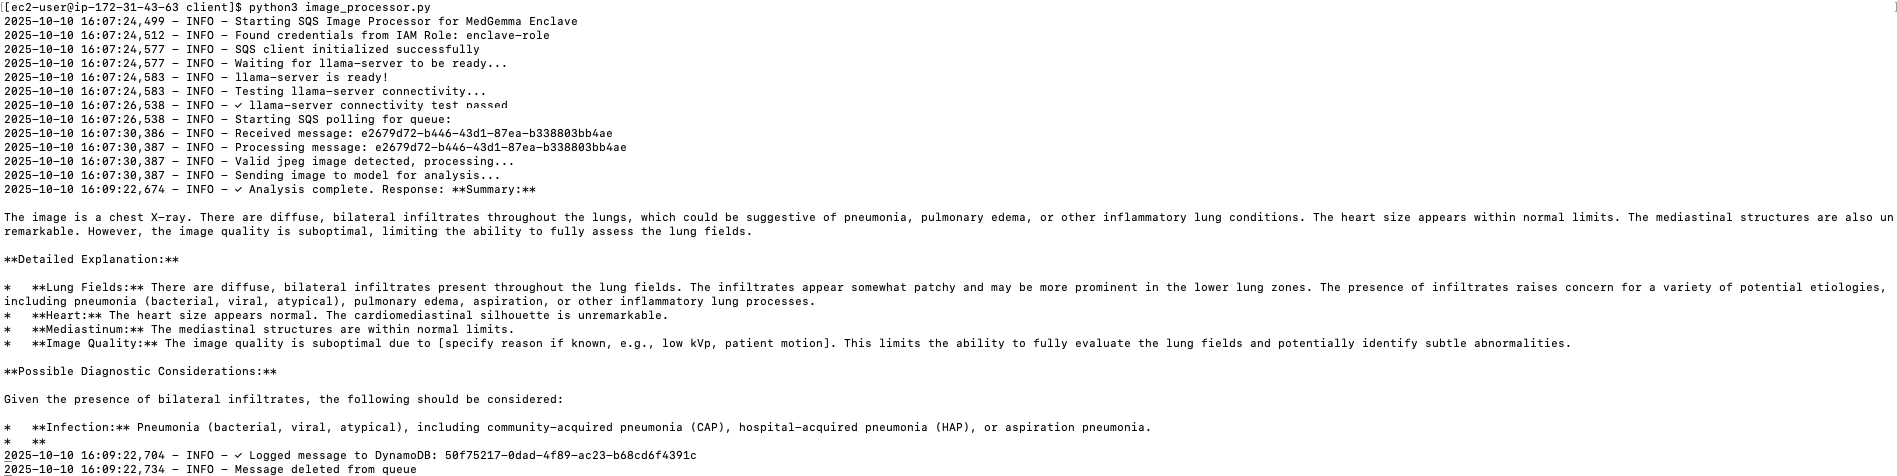
For inference on medical images, upload an image to your Amazon S3 image bucket. When it is uploaded, run python3 image_processor.py to pass the image from the SQS queue to the Nitro Enclave for processing. The following are examples of image inputs and model outputs.

Brain CT scan:

Medical brain CT scan image showing anatomical structures in grayscale

Case courtesy of Dr Henry Knipe, Radiopaedia.org, rID: 46289

Model response:Complete processing log showing secure medical image analysis pipeline from upload through diagnostic outputChest X-ray:

Chest X-ray image in AP sitting position

Model response:Model inference logs showing automated chest X-ray analysis with detailed radiological findings and considerationsText-based queries

For inference on text-queries, run python3 direct_query.py "<YOUR_MEDICAL_QUERY>" to invoke the model. The following are examples of text-based inputs and model outputs.

Basic usage:

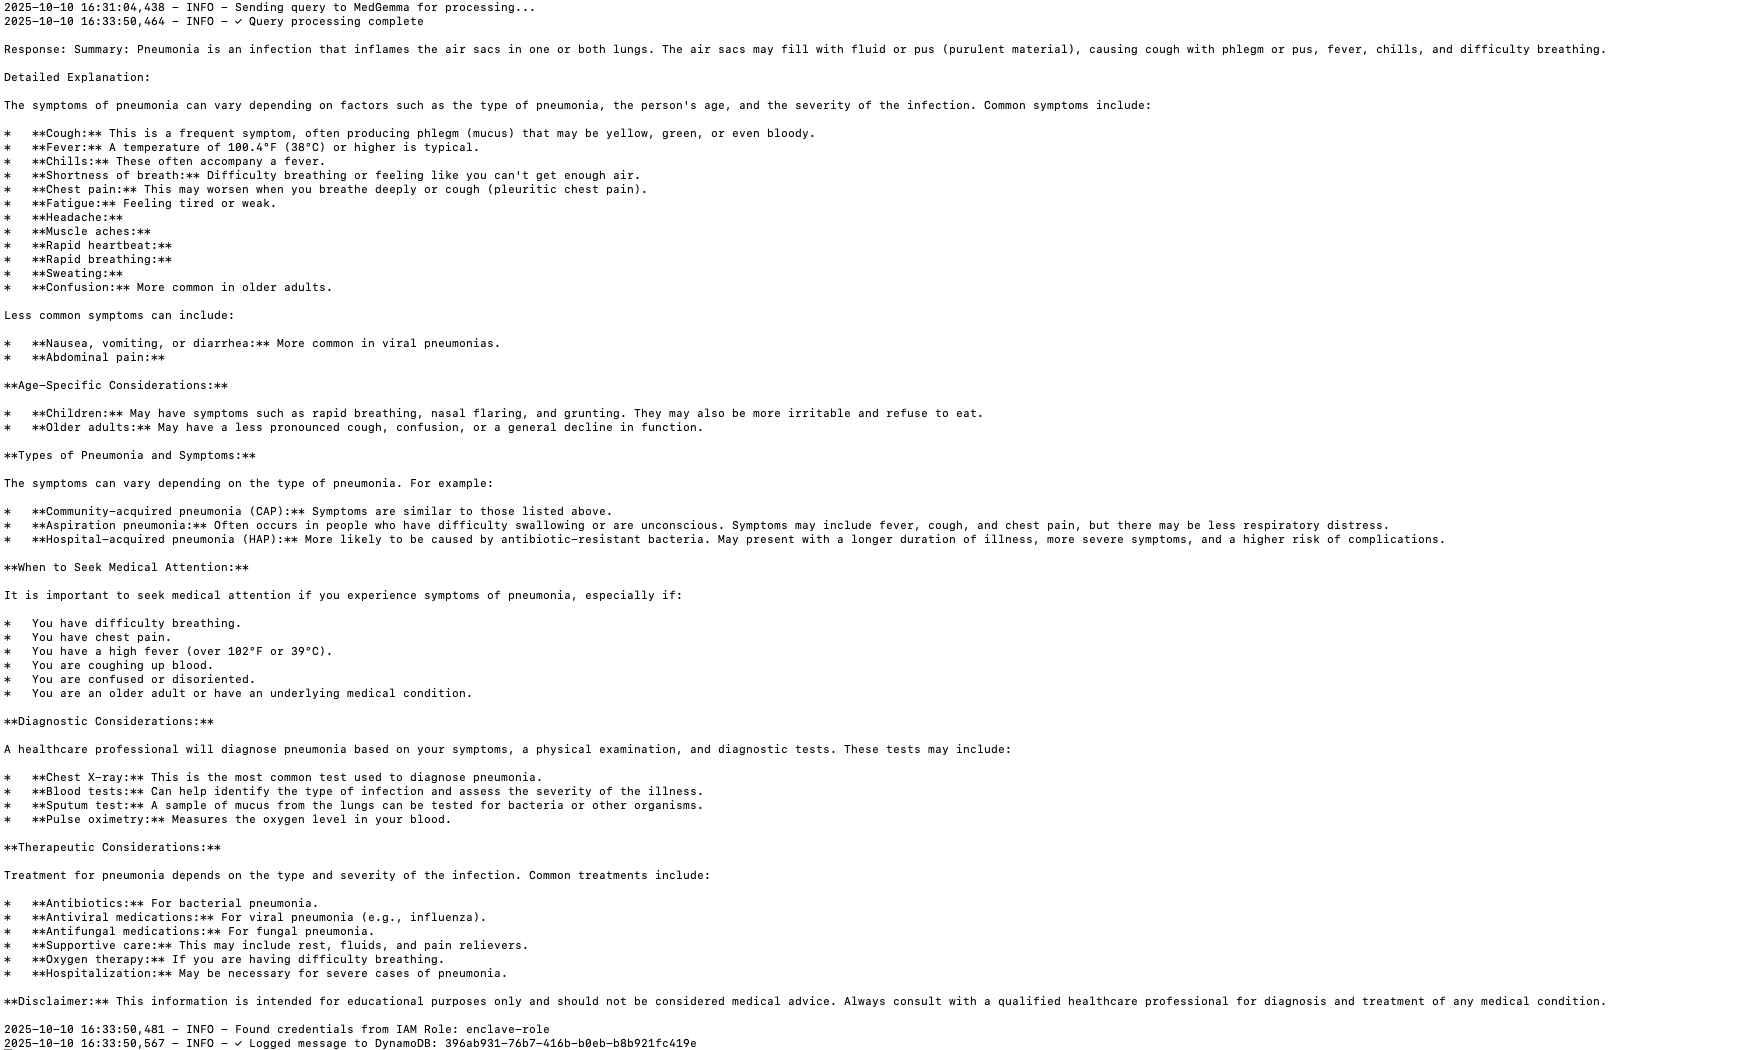
python3 direct_query.py "What are the symptoms of pneumonia?"

Model response:Model inference output describing pneumonia symptoms, diagnosis, and treatment optionsLab result interpretation:

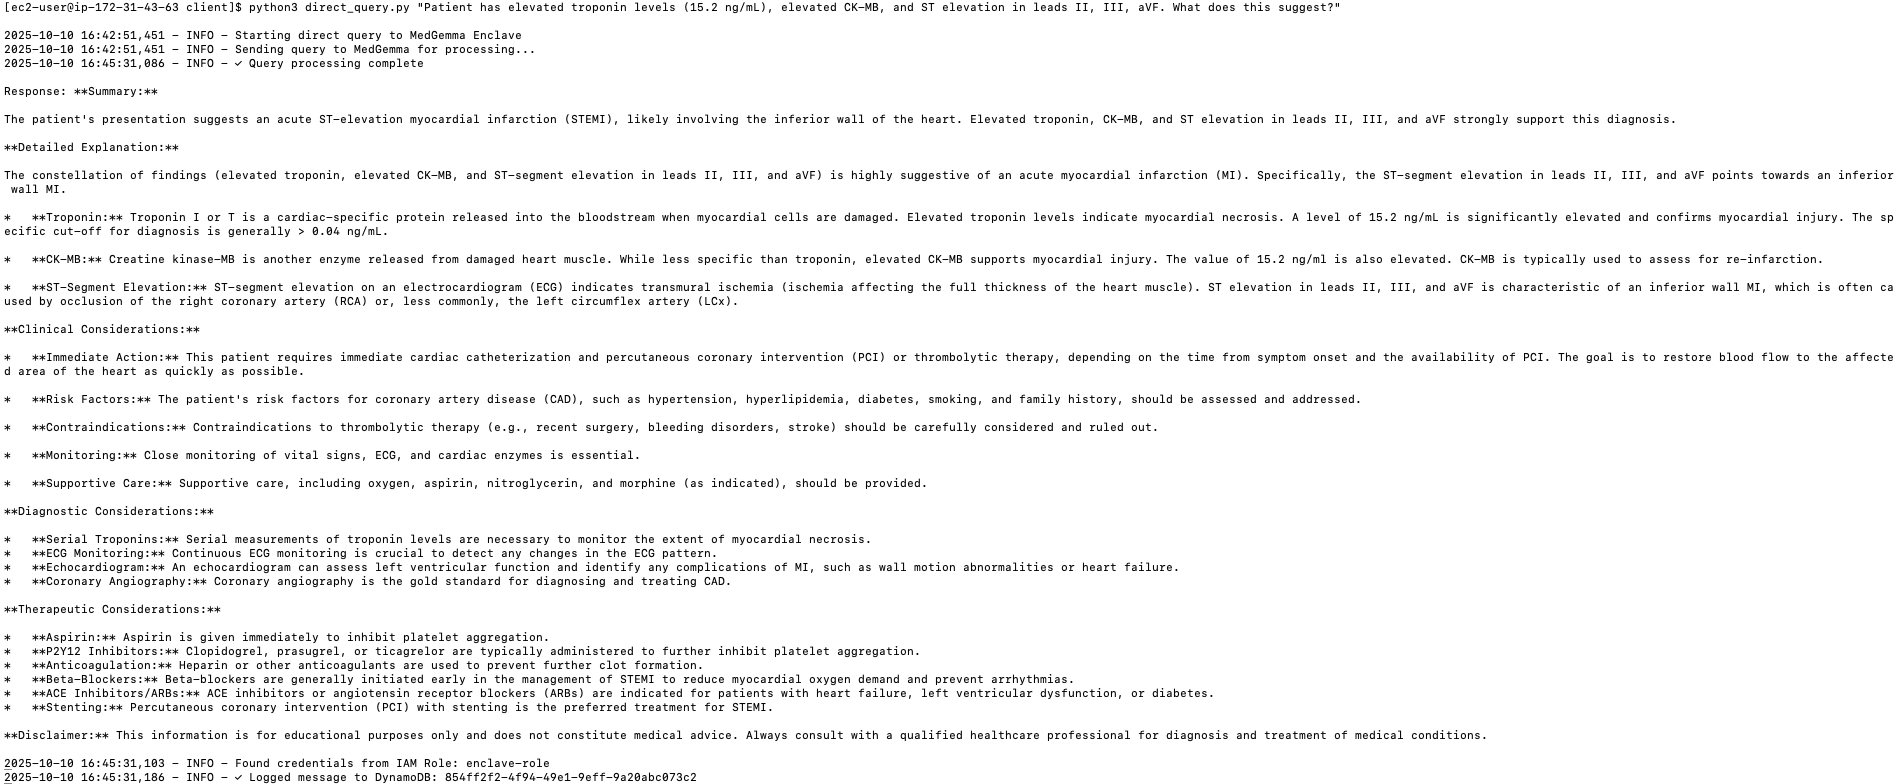
python3 direct_query.py "Patient has elevated troponin levels (15.2 ng/mL), elevated CK-MB, and ST elevation in leads II, III, aVF. What does this suggest?"

Model response:Model inference output analyzing cardiac lab results and ECG findings

Cleaning up

To avoid incurring future charges, delete the resources used in this solution:

  1. Stop and terminate the EC2 instance.
  2. Empty and delete the S3 buckets.
  3. Delete the DynamoDB table.
  4. Delete the SQS queue.
  5. Delete the AWS KMS Key.
  6. Delete the Lambda function.

Conclusion

You can combine the isolation and attestation capabilities of AWS Nitro Enclaves, the encryption controls of AWS KMS, and the scalability of services such as Amazon S3, Amazon SQS, and Amazon DynamoDB to build a more secure, zero trust pipeline for deploying generative AI models in healthcare. Using Google MedGemma 4B as your reference medical LLM, you can enable privacy-preserving inference where both PHI and model intellectual property remain protected. For more information, consult the following resources:

Lifecycle Rules: Now Supported Through S3-Compatible APIs

Post Syndicated from Bala Krishna Gangisetty original https://www.backblaze.com/blog/lifecycle-rules-now-supported-through-s3-compatible-apis/

A decorative image showing a cloud, gears, and an alarm notification.

Managing object lifecycles is one of the simplest ways to control storage costs, keep buckets organized, and automate data hygiene. Backblaze B2 has supported lifecycle rules for years through our B2 Native APIs and the web application. Today, we’re expanding that support by adding S3 compatible lifecycle rule APIs, making it easier for you to use S3 tools and workflows to manage your data on Backblaze B2 (check out the docs: S3 Put Lifecycle Configuration, S3 Get Lifecycle Configuration, S3 Delete Lifecycle Configuration). This provides you with more flexibility and control over object management—all with Backblaze’s signature simplicity and affordability.

New survey: The Hidden Cost of Cloud Storage

We surveyed over 400 IT decision makers and one thing stood out. Surprise charges affect almost everyone. Learn what’s driving them—and how to avoid them.

Download the Report

What’s new

You can now create, edit, and manage lifecycle rules on B2 Cloud Storage using standard S3 compatible APIs, including:

Lifecycle rules can be applied to:

  • Entire buckets
  • Specific prefixes (e.g., logs/, images/monkeys/)
  • Nested folders with overlapping logic (e.g., animals/ and animals/cows/)

Why this matters

1. Seamless migrations from AWS

If you’re moving workloads from AWS S3, you can bring your existing lifecycle configurations with minimal changes. This reduces work while migrating your workloads to Backblaze B2.

2. More flexibility for complex data structures 

With support for nested and overlapping prefixes, you can apply precise expiration rules to different datasets with overlapping prefixes in the same bucket. Whether you’re managing rapidly changing logs or long-term archives, lifecycle rules allow more controlled, automated retention.

3. Increased functionality for multi-cloud architectures 

For teams looking to capitalize on multi-cloud architecture, this means more seamless integration up and down the stack.

4. Cost optimization

We apply the most cost-saving configuration for you in case of overlapping rules.

How it works

S3 compatible lifecycle rules define automated actions based on object age or status. With Backblaze B2, you can use rules to:

  • Delete objects after a set number of days
  • Hide objects after a set number of days
  • Expire noncurrent versions
  • Delete multipart uploads that are incomplete for a set number of days
  • Set multiple rules for nested prefixes for granular control

For example:

<LifecycleConfiguration>
<Rule>
<ID>DeleteTempFiles</ID>
<Status>Enabled</Status>
<Filter>
<Prefix>temp/</Prefix>
</Filter>
<Expiration>
<Days>30</Days>
</Expiration>
</Rule>
</LifecycleConfiguration>

This configuration automatically hides objects under temp/ after 30 days.

Example use cases

  1. Automated cleanup for short-lived objects: Temporary files, build artifacts, or test data can expire automatically after a given retention period.
  2. Compliance-driven policies: Organizations with strict retention and deletion requirements can enforce rules consistently across buckets.
  3. Automated cleanup of incomplete multipart uploads: Save money by removing partial upload fragments that were never completed due to network interruptions, client failures, or abandoned sessions automatically. 
  4. Tiered retention for nested prefixes: Allow broad retention for the general dataset while enforcing a faster cleanup cycle for a particular subset that changes more frequently or has lower long-term value. For example, you can apply a 30-day expiration rule to all objects under the prefix temp/, while assigning a shorter 7-day expiration rule to the more specific prefix temp/webserver/. 

How it complements existing B2 Lifecycle Rules

Backblaze continues to support lifecycle rules through the B2 Native API, which many customers use today. The new S3 compatible support offers an additional path for lifecycle automation, especially for customers with S3 style infrastructure or tooling.

Although both S3 compatible and B2 Native lifecycle rules can coexist, we strongly recommend using a single method depending on your workflow preferences to manage lifecycle rules. 

Getting started

You can begin using lifecycle rules today through:

  • S3 compatible SDKs
  • S3 CLI tools
  • Direct API calls

Refer to Backblaze S3 Compatible API documentation for more details, specifically:

Most customers can apply their existing AWS lifecycle rules directly, without modification. 

Availability

S3 compatible lifecycle rules are now available. 

Wrapping up

Lifecycle rules help automate routine object cleanup and give teams predictable control over object retention. With the addition of S3 compatible lifecycle APIs, Backblaze B2 makes it even easier for customers to bring their existing S3 workflows to our platform while continuing to use the lifecycle management strategies they already trust.

Get started with Backblaze today by signing up for an account or contacting Sales. 

The post Lifecycle Rules: Now Supported Through S3-Compatible APIs appeared first on Backblaze Blog | Cloud Storage & Cloud Backup

Meet digital sovereignty needs with AWS Dedicated Local Zones expanded services

Post Syndicated from Max Peterson original https://aws.amazon.com/blogs/security/meet-digital-sovereignty-needs-with-aws-dedicated-local-zones-expanded-services/

At Amazon Web Services (AWS), we continue to invest in and deliver digital sovereignty solutions to help customers meet their most sensitive workload requirements. To address the regulatory and digital sovereignty needs of public sector and regulated industry customers, we launched AWS Dedicated Local Zones in 2023, with the Government Technology Agency of Singapore (GovTech Singapore) as our first customer.

Today, we’re excited to announce expanded service availability for Dedicated Local Zones, giving customers more choice and control without compromise. In addition to the data residency, sovereignty, and data isolation benefits they already enjoy, the expanded service list gives customers additional options for compute, storage, backup, and recovery.

Dedicated Local Zones are AWS infrastructure fully managed by AWS, built for exclusive use by a customer or community, and placed in a customer-specified location or data center. They help customers across the public sector and regulated industries meet security and compliance requirements for sensitive data and applications through a private infrastructure solution configured to meet their needs. Dedicated Local Zones can be operated by local AWS personnel and offer the same benefits of AWS Local Zones, such as elasticity, scalability, and pay-as-you-go pricing, with added security and governance features.

Since being launched, Dedicated Local Zones have supported a core set of compute, storage, database, containers, and other services and features for local processing. We continue to innovate and expand our offerings based on what we hear from customers to help meet their unique needs.

More choice and control without compromise

The following new services and capabilities deliver greater flexibility for customers to run their most critical workloads while maintaining strict data residency and sovereignty requirements.

New generation instance types

To support complex workloads in AI and high-performance computing, customers can now use newer generation instance types, including Amazon Elastic Compute Cloud (Amazon EC2) generation 7 with accelerated computing capabilities.

AWS storage options

AWS storage options provide two storage classes including Amazon Simple Storage Service (Amazon S3) Express One Zone, which offers high-performance storage for customers’ most frequently accessed data, and Amazon S3 One Zone-Infrequent Access, which is designed for data that is accessed less frequently and is ideal for backups.

Advanced block storage capabilities are delivered through Amazon Elastic Block Store (Amazon EBS) gp3 and io1 volumes, which customers can use to store data within a specific perimeter to support critical data isolation and residency requirements. By using the latest AWS general purpose SSD volumes (gp3), customers can provision performance independently of storage capacity with an up to 20% lower price per gigabyte than existing gp2 volumes. For intensive, latency-sensitive transactional workloads, such as enterprise databases, provisioned IOPS SSD (io1) volumes provide the necessary performance and reliability.

Backup and recovery capabilities

We have added backup and recovery capabilities through Amazon EBS Local Snapshots, which provides robust support for disaster recovery, data migration, and compliance. Customers can create backups within the same geographical boundary as EBS volumes, helping meet data isolation requirements. Customers can also create AWS Identity and Access Management (IAM) policies for their accounts to enable storing snapshots within the Dedicated Local Zone. To automate the creation and retention of local snapshots, customers can use Amazon Data Lifecycle Manager (DLM).

Customers can use local Amazon Machine Images (AMIs) to create and register AMIs while maintaining underlying local EBS snapshots within Dedicated Local Zones, helping achieve adherence to data residency requirements. By creating AMIs from EC2 instances or registering AMIs using locally stored snapshots, customers maintain complete control over their data’s geographical location.

Dedicated Local Zones meet the same high AWS security standards and sovereign-by-design principles that apply to AWS Regions and Local Zones. For instance, the AWS Nitro System provides the foundation with hardware- and software-level security. This is complemented by AWS Key Management Service (AWS KMS) and AWS Certificate Manager (ACM) for encryption management, Amazon Inspector, Amazon GuardDuty, and AWS Shield to help protect workloads, and AWS CloudTrail for audit logging of user and API activity across AWS accounts.

Continued innovation with GovTech Singapore

One of GovTech Singapore’s key focuses is on the nation’s digital government transformation and enhancing the public sector’s engineering capabilities. Our collaboration with GovTech Singapore involved configuring their Dedicated Local Zones with specific services and capabilities to support their workloads and meet stringent regulatory requirements. This architecture addresses data isolation and security requirements and ensures consistency and efficiency across Singapore Government cloud environments.

With the availability of the new AWS services with Dedicated Local Zones, government agencies can simplify operations and meet their digital sovereignty requirements more effectively. For instance, agencies can use Amazon Relational Database Service (Amazon RDS) to create new databases rapidly. Amazon RDS in Dedicated Local Zones helps simplify database management by automating tasks such as provisioning, configuring, backing up, and patching. This collaboration is just one example of how AWS innovates to meet customer needs and configures Dedicated Local Zones based on specific requirements.

Chua Khi Ann, Director of GovTech Singapore’s Government Digital Products division, who oversees the Cloud Programme, shared:
“The deployment of Dedicated Local Zones by our Government on Commercial Cloud (GCC) team, in collaboration with AWS, now enables Singapore government agencies to host systems with confidential data in the cloud. By leveraging cloud-native services like advanced storage and compute, we can achieve better availability, resilience, and security of our systems, while reducing operational costs compared to on-premises infrastructure.”

Get started with Dedicated Local Zones

AWS understands that every customer has unique digital sovereignty needs, and we remain committed to offering customers the most advanced set of sovereignty controls and security features available in the cloud. Dedicated Local Zones are designed to be customizable, resilient, and scalable across different regulatory environments, so that customers can drive ongoing innovation while meeting their specific requirements.

Ready to explore how Dedicated Local Zones can support your organization’s digital sovereignty journey? Visit AWS Dedicated Local Zones to learn more.

TAGS: AWS Digital Sovereignty Pledge, Digital Sovereignty, Security Blog, Sovereign-by-design, Public Sector, Singapore, AWS Dedicated Local Zones

Max Peterson
Max Peterson

Max is the Vice President of AWS Sovereign Cloud. He leads efforts to help public sector organizations modernize their missions with the cloud while meeting necessary digital sovereignty requirements. Max previously oversaw broader digital sovereignty efforts at AWS and served as the VP of AWS Worldwide Public Sector with a focus on empowering government, education, healthcare, and nonprofit organizations to drive rapid innovation.
Stéphane Israël
Stéphane Israël

Stéphane is the Managing Director of the AWS European Sovereign Cloud and Digital Sovereignty. He is responsible for the management and operations of the AWS European Sovereign Cloud GmbH, including infrastructure, technology, and services, and leads broader worldwide digital sovereignty efforts at AWS. Prior to AWS, he was the CEO of Arianespace, where he oversaw numerous successful space missions, including the launch of the James Webb Space Telescope.

The collective thoughts of the interwebz