Post Syndicated from The Atlantic original https://www.youtube.com/shorts/lpIoPWacXLM
Visualizing Target Relabeling Rules in Prometheus 3.8.0
Post Syndicated from Julius Volz (@juliusv) original https://prometheus.io/blog/2025/12/02/visualizing-target-relabeling-rules-in-the-prometheus-ui/
Prometheus’ target relabeling feature allows you to adjust the labels of a discovered target or even drop the target entirely. Relabeling rules, while powerful, can be hard to understand and debug. Your rules have to match the expected labels that your service discovery mechanism returns, and getting any step wrong could label your target incorrectly or accidentally drop it.
To help you figure out where things go wrong (or right), Prometheus 3.8.0 just added a relabeling visualizer to the Prometheus server’s web UI that allows you to inspect how each relabeling rule is applied to a discovered target’s labels. Let’s take a look at how it works!
Using the relabeling visualizer
If you head to any Prometheus server’s “Service discovery” page (for example: https://demo.promlabs.com/service-discovery), you will now see a new “show relabeling” button for each discovered target:
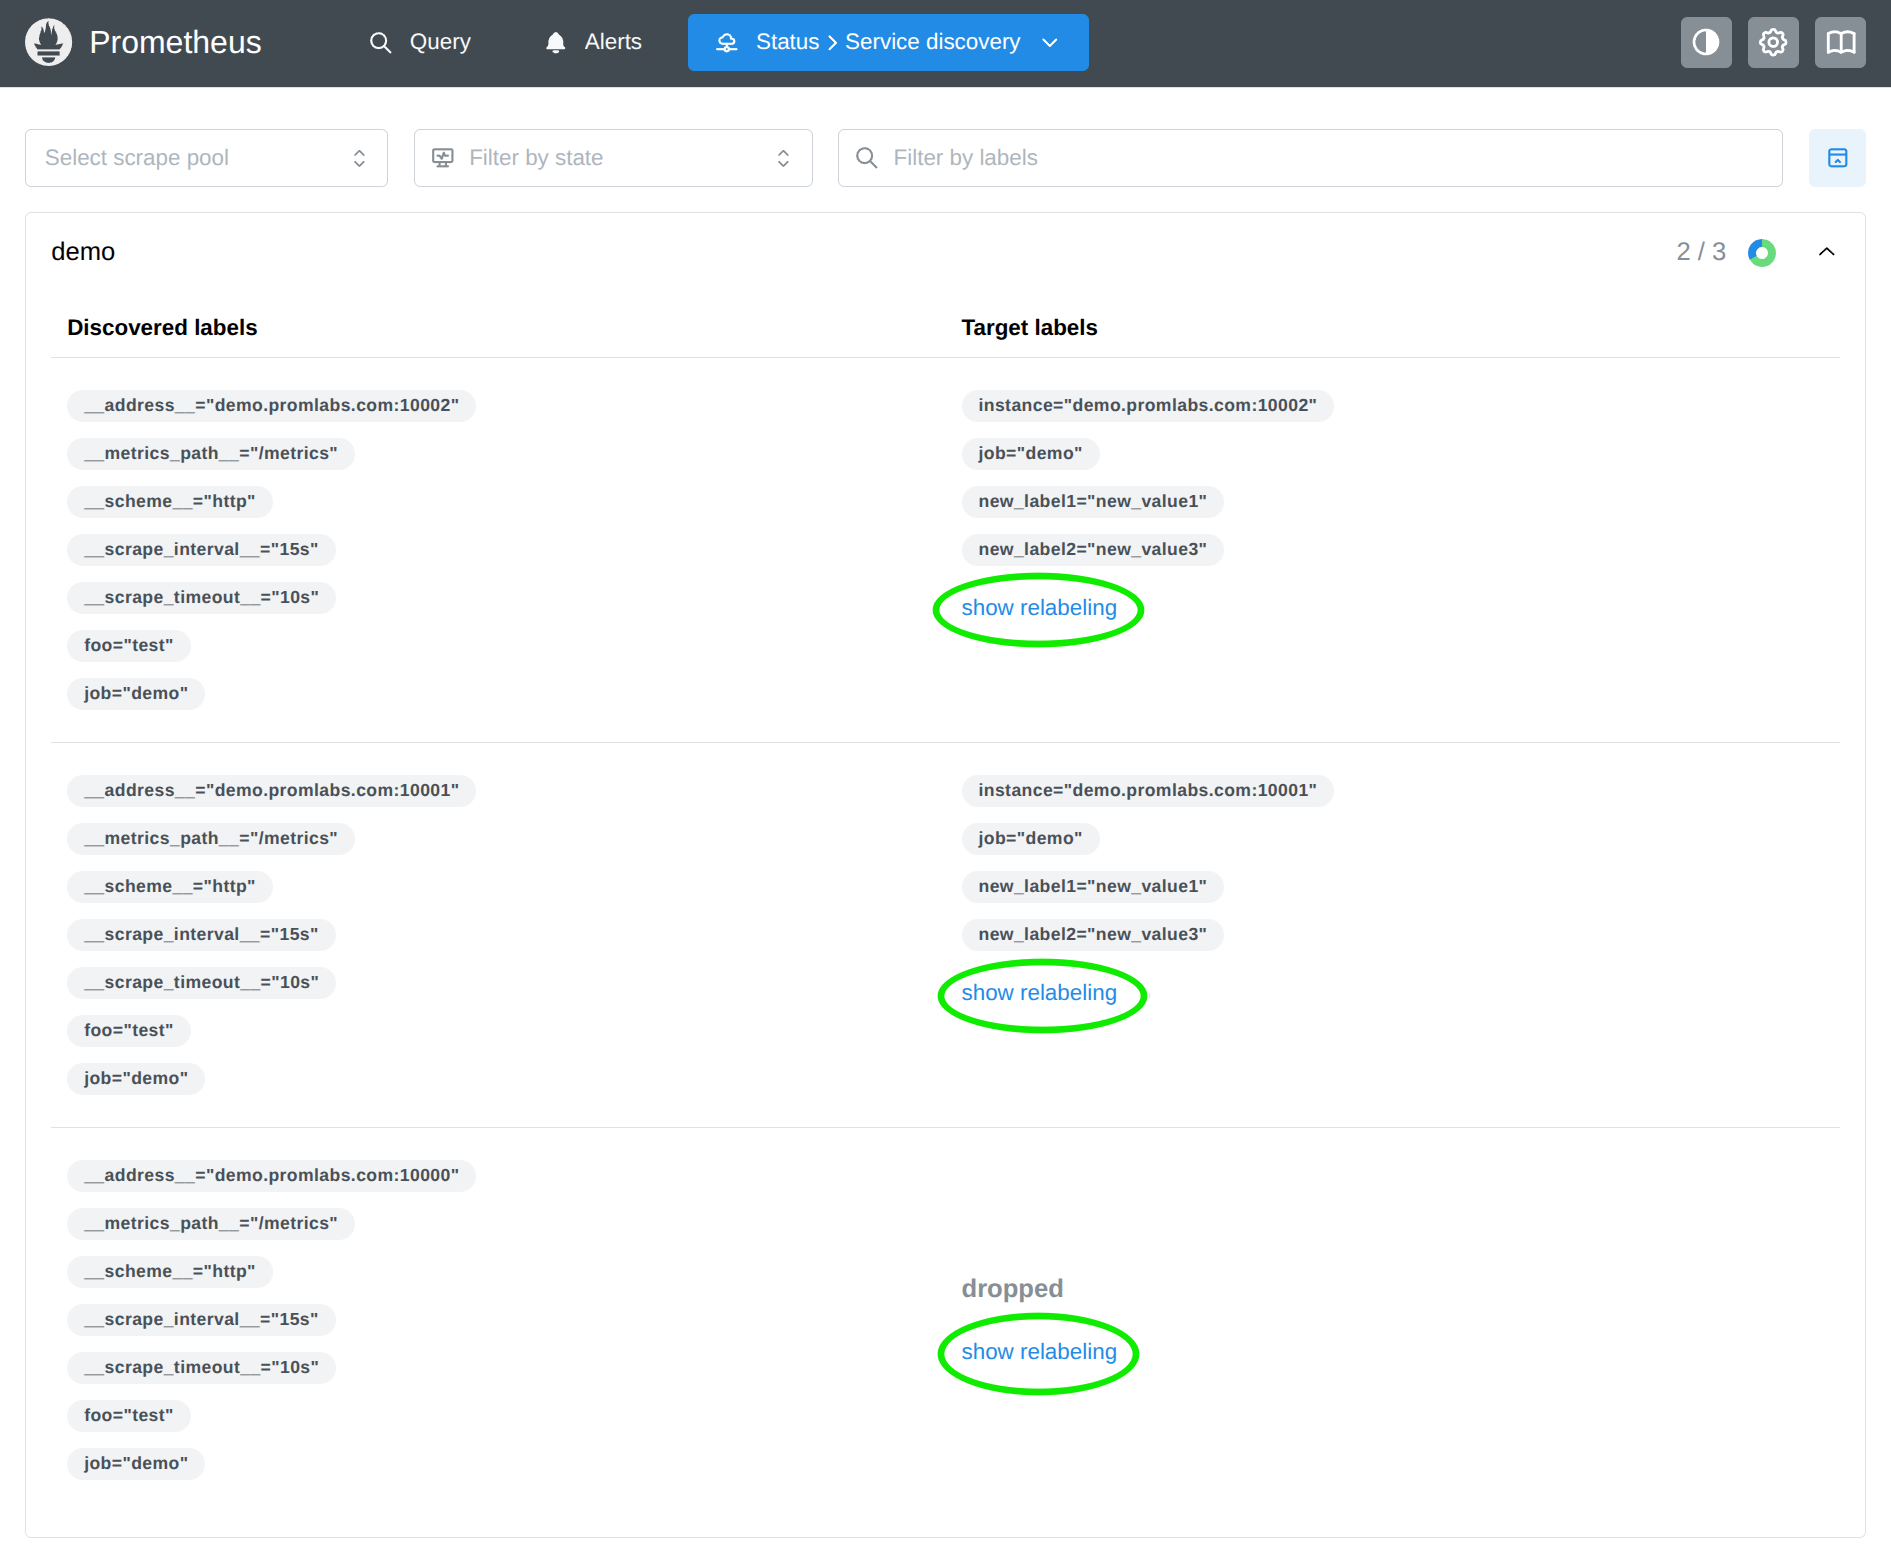
Clicking this button shows you how each relabeling rule is applied to that particular target in sequence:
The visualizer shows you:
- The initial labels of the target as discovered by the service discovery mechanism.
- The details of each relabeling rule, including its action type and other parameters.
- How the labels change after each relabeling rule is applied, with changes, additions, and deletions highlighted in color.
- Whether the target is ultimately kept or dropped after all relabeling rules have been applied.
- The final output labels of the target if it is kept.
To debug your relabeling rules, you can now read this diagram from top to bottom and find the exact step where the labels change in an unexpected way or where the target gets dropped. This should help you identify misconfigurations in your relabeling rules more easily.
Conclusion
The new relabeling visualizer in the Prometheus server’s web UI is a powerful tool to help you understand and debug your target relabeling configurations. By providing a step-by-step view of how each relabeling rule affects a target’s labels, it makes it easier to identify and fix issues in your setup. Update your Prometheus servers to 3.8.0 now to give it a try!
Decreasing Certificate Lifetimes to 45 Days
Post Syndicated from Let's Encrypt original https://letsencrypt.org/2025/12/02/from-90-to-45.html
Let’s Encrypt will be reducing the validity period of the certificates we issue. We currently issue certificates valid for 90 days, which will be cut in half to 45 days by 2028.
This change is being made along with the rest of the industry, as required by the CA/Browser Forum Baseline Requirements, which set the technical requirements that we must follow. All publicly-trusted Certificate Authorities like Let’s Encrypt will be making similar changes. Reducing how long certificates are valid for helps improve the security of the internet, by limiting the scope of compromise, and making certificate revocation technologies more efficient.
We are also reducing the authorization reuse period, which is the length of time after validating domain control that we allow certificates to be issued for that domain. It is currently 30 days, which will be reduced to 7 hours by 2028.
Timeline of Changes
To minimize disruption, Let’s Encrypt will roll this change out in multiple stages. We will use ACME Profiles to allow you control over when these changes take effect. They are configured in your ACME client. For more information, see our blog post announcing them.
Changes will be deployed to our staging environment approximately one month before the production dates below.
- May 13, 2026: Let’s Encrypt will switch our tlsserver ACME profile to issue 45-day certificates. This profile is opt-in and can be used by early adopters and for testing.
- February 10, 2027: Let’s Encrypt will switch our default classic ACME profile to issuing 64-day certificates with a 10-day authorization reuse period. This will affect all users who have not opted into the tlsserver or shortlived (6-day) profiles.
- February 16, 2028: We will further update the classic profile to issue 45-day certificates with a 7 hour authorization reuse period.
These dates are when the change takes effect for new certificates, so Let’s Encrypt users will see the reduced certificate validity period at their next renewal after these dates.
Action Required
Most users of Let’s Encrypt who automatically issue certificates will not have to make any changes. However, you should verify that your automation is compatible with certificates that have shorter validity periods.
To ensure your ACME client renews on time, we recommend using ACME Renewal Information (ARI). ARI is a feature we’ve introduced to help clients know when they need to renew their certificates. Consult your ACME client’s documentation on how to enable ARI, as it differs from client to client. If you are a client developer, check out this integration guide.
If your client doesn’t support ARI yet, ensure it runs on a schedule that is compatible with 45-day certificates. For example, renewing at a hardcoded interval of 60 days will no longer be sufficient. Acceptable behavior includes renewing certificates at approximately two thirds of the way through the current certificate’s lifetime.
Manually renewing certificates is not recommended, as it will need to be done more frequently with shorter certificate lifetimes.
We also recommend that you make sure your systems have sufficient monitoring in place to alert appropriately if certificates aren’t renewed when expected. There are many available options, some of which are documented on our Monitoring Service Options page.
Making Automation Easier with a new DNS Challenge Type
For many of our users, the hardest part of automatically issuing certificates is proving domain control. Reducing certificate lifetimes and the authorization reuse period will make users need to demonstrate control more often.
All validation methods today require that the ACME client have live access to your infrastructure, either to serve the correct HTTP-01 token, perform the right TLS-ALPN-01 handshake, or update the right DNS-01 TXT record. For a long time, people have wanted a way to run an ACME client without granting it access to these sensitive systems.
These challenges are why we are working with our partners at the CA/Browser Forum and IETF to standardize a new validation method called DNS-PERSIST-01. The key advantage of this new method is that the DNS TXT entry used to demonstrate control does not have to change every renewal.
This means you can set up the DNS entry once and begin automatically renewing certificates without needing a way to automatically update DNS. This should allow even more people to automate their certificate renewals. It will also reduce reliance on authorization reuse, since the DNS records can stay unchanged without any further ACME client involvement.
We expect DNS-PERSIST-01 to be available in 2026, and will have more to announce soon.
Keep Up to Date
Additional updates, reminders, and other changes will be shared on our technical updates mailing list. Subscribe to keep up-to-date with these and all other upcoming changes. If you have any questions, please ask on our community forum. If you want to read more about the work happening at Let’s Encrypt and our other projects, check out our Annual Report, which was published today.
[$] Checked-size array parameters in C
Post Syndicated from corbet original https://lwn.net/Articles/1046840/
There are many possible programmer mistakes that are not caught by the
minimal checks specified by the C language; among those is passing an array
of the wrong size to a function. A recent attempt to add some safety
around array parameters within the crypto layer involved the use of some
clever tricks, but it turns out that clever tricks are unnecessary in this
case. There is an obscure C feature that can cause this checking to
happen, and it is already in use in a few places within the kernel.
The NVIDIA GB10 ConnectX-7 200GbE Networking is Really Different
Post Syndicated from Patrick Kennedy original https://www.servethehome.com/the-nvidia-gb10-connectx-7-200gbe-networking-is-really-different/
We jump into the NVIDIA GB10 ConnectX-7 networking and see why 200GbE speeds take more effort to achieve than you might think
The post The NVIDIA GB10 ConnectX-7 200GbE Networking is Really Different appeared first on ServeTheHome.
AWS Transform for mainframe introduces Reimagine capabilities and automated testing functionality
Post Syndicated from Channy Yun (윤석찬) original https://aws.amazon.com/blogs/aws/aws-transform-for-mainframe-introduces-reimagine-capabilities-and-automated-testing-functionality/
In May, 2025, we launched AWS Transform for mainframe, the first agentic AI service for modernizing mainframe workloads at scale. The AI-powered mainframe agent accelerates mainframe modernization by automating complex, resource-intensive tasks across every phase of modernization—from initial assessment to final deployment. You can streamline the migration of legacy mainframe applications, including COBOL, CICS, DB2, and VSAM to modern cloud environments—cutting modernization timelines from years to months.
Today, we’re announcing enhanced capabilities in AWS Transform for mainframe that include AI-powered analysis features, support for the Reimagine modernization pattern, and testing automation. These enhancements solve two critical challenges in mainframe modernization: the need to completely transform applications rather than merely move them to the cloud, and the extensive time and expertise required for testing.
- Reimagining mainframe modernization – This is a new AI-driven approach that completely reimagines the customer’s application architecture using modern patterns or moving from batch process to real-time functions. By combining the enhanced business logic extraction with new data lineage analysis and automated data dictionary generation from the legacy source code through AWS Transform, customers transform monolithic mainframe applications written in languages like COBOL into more modern architectural styles, like microservices.
- Automated testing – Customers can use new automated test plan generation, test data collection scripts, and test case automation scripts. AWS Transform for mainframe also provides functional testing tools for data migration, results validation, and terminal connectivity. These AI-powered capabilities work together to accelerate testing timelines and improve accuracy through automation.
Let’s learn more about reimagining mainframe modernization and automated testing capabilities.
How to reimagine mainframe modernization
We recognize that mainframe modernization is not a one-size-fits-all proposition. Whereas tactical approaches focus on augmentation and maintaining existing systems, strategic modernization offers distinct paths: Replatform, Refactor, Replace, or the new Reimagine.
In the Reimagine pattern, AWS Transform AI-powered analysis combines mainframe system analysis with organizational knowledge to create detailed business and technical documentation and architecture recommendations. This helps preserve critical business logic while enabling modern cloud-native capabilities.
AWS Transform provides new advanced data analysis capabilities that are essential for successful mainframe modernization, including data lineage analysis and automated data dictionary generation. These features work together to define the structure and meaning to accompany the usage and relationships of mainframe data. Customers gain complete visibility into their data landscape, enabling informed decision-making for modernization. Their technical teams can confidently redesign data architectures while preserving critical business logic and relationships.
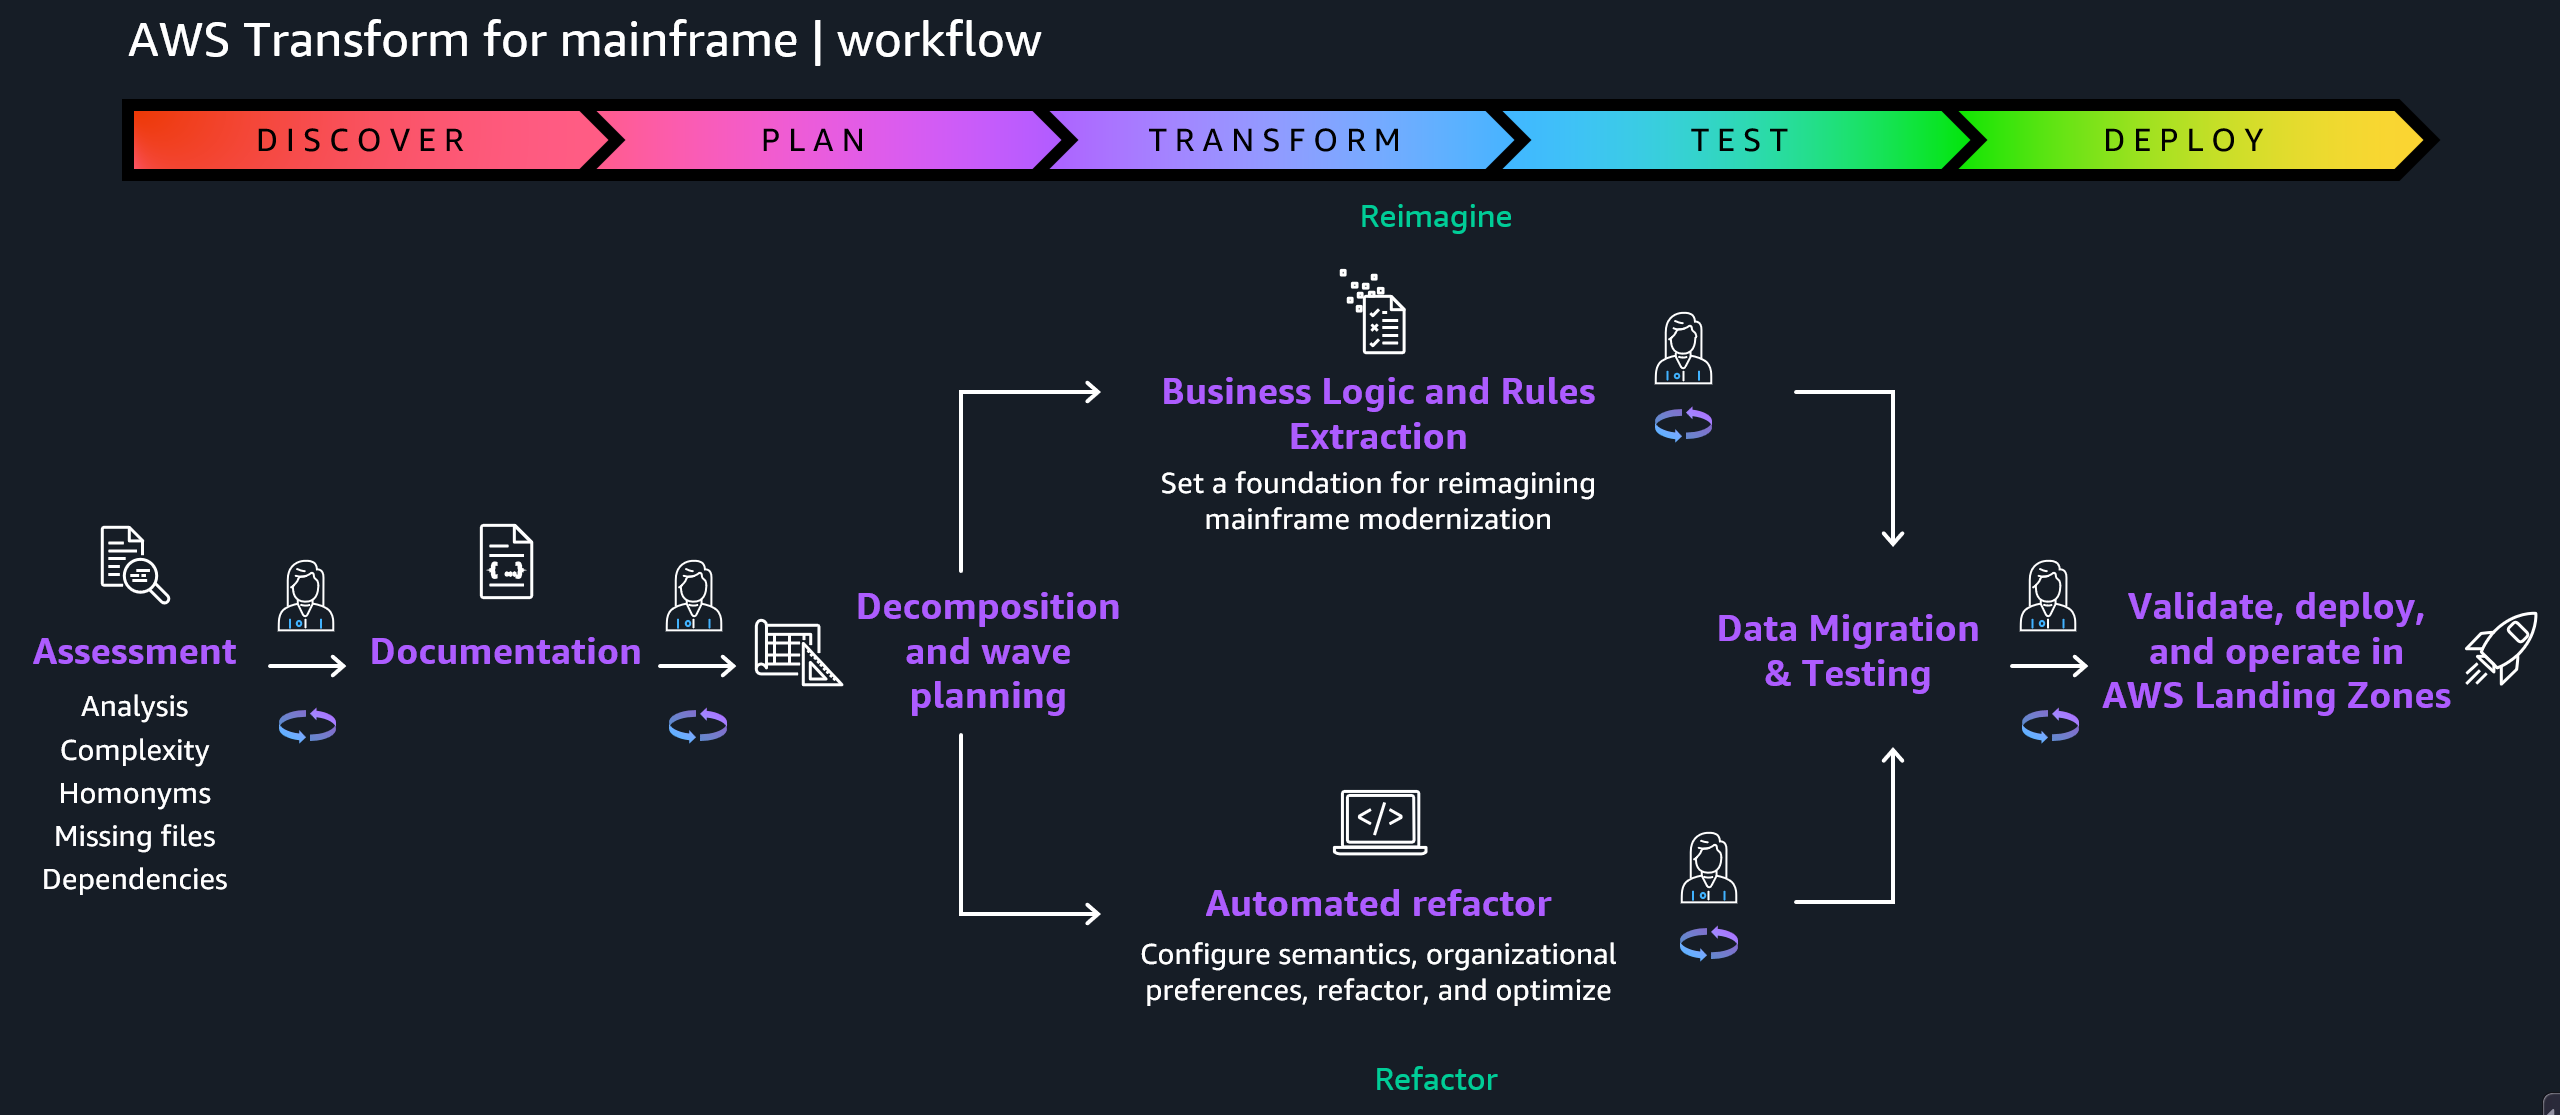
The Reimagining strategy follows the principle of human in the loop validation, which means that AI-generated application specifications and code such as AWS Transform and Kiro are continuously validated by domain experts. This collaborative approach between AI capabilities and human judgment significantly reduces transformation risk while maintaining the speed advantages of AI-powered modernization.
The pathway has a three-phase methodology to transform legacy mainframe applications into cloud-native microservices:
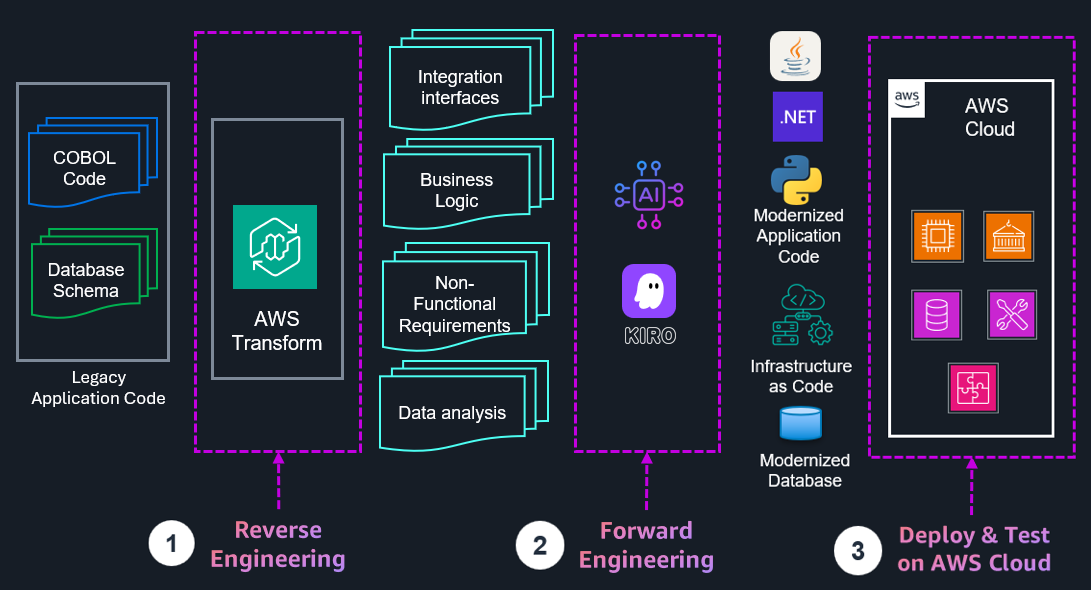
- Reverse engineering to extract business logic and rules from existing COBOL or job control language (JCL) code using AWS Transform for mainframe.
- Forward engineering to generate microservice specification, modernized source code, infrastructure as code (IaC), and modernized database.
- Deploy and test to deploy the generated microservices to Amazon Web Services (AWS) using IaC and to test the functionality of the modernized application.
Although microservices architecture offers significant benefits for mainframe modernization, it’s crucial to understand that it’s not the best solution for every scenario. The choice of architectural patterns should be driven by the specific requirements and constraints of the system. The key is to select an architecture that aligns with both current needs and future aspirations, recognizing that architectural decisions can evolve over time as organizations mature their cloud-native capabilities.
The flexible approach supports both do-it-yourself and partner-led development, so you can use your preferred tools while maintaining the integrity of your business processes. You get the benefits of modern cloud architecture while preserving decades of business logic and reducing project risk.
Automated testing in action
The new automated testing feature supports IBM z/OS mainframe batch application stack at launch, which helps organizations address a wider range of modernization scenarios while maintaining consistent processes and tooling.
Here are the new mainframe capabilities:
- Plan test cases – Create test plans from mainframe code, business logic, and scheduler plans.
- Generate test data collection scripts – Create JCL scripts for data collection from your mainframe to your test plan.
- Generate test automation scripts – Generate execution scripts to automate testing of modernized applications running in the target AWS environment.
To get started with automated testing, you should set up a workspace, assign a specific role to each user, and invite them to onboard your workspace. To learn more, visit Getting started with AWS Transform in the AWS Transform User Guide.
Choose Create job in your workspace. You can see all types of supported transformation jobs. For this example, I select the Mainframe Modernization job to modernize mainframe applications.
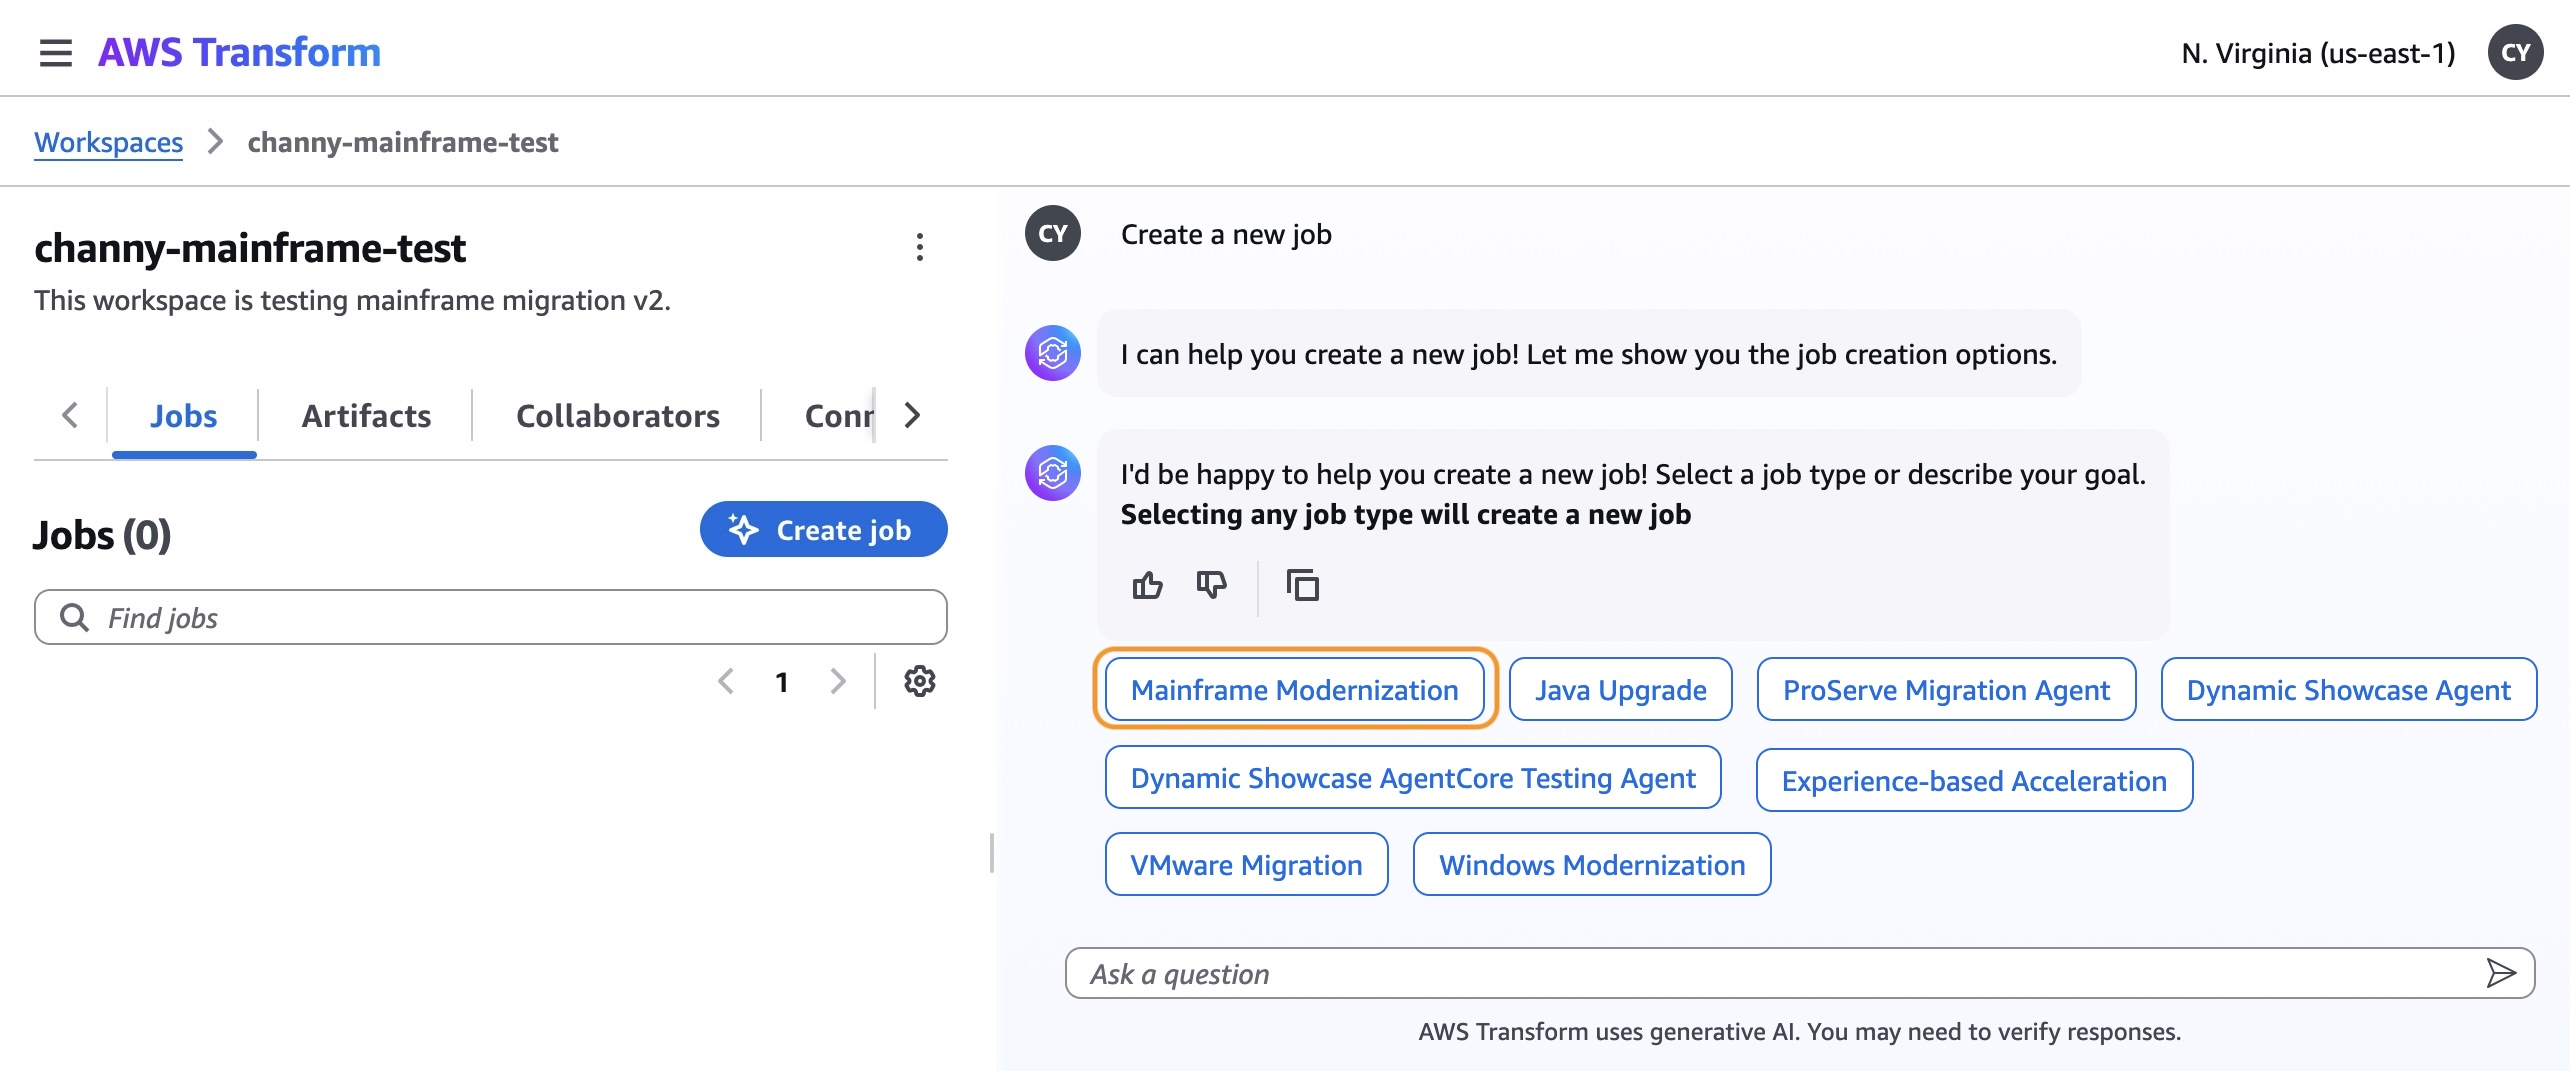
After a new job is created, you can kick off modernization for tests generation. This workflow is sequential and it is a place for you to answer the AI agent’s questions, providing the necessary input. You can add your collaborators and specify resource location where the codebase or documentation is located in your Amazon Simple Storage Service (Amazon S3) bucket.
I use a sample application for a credit card management system as the mainframe banking case with the presentation (BMS screens), business logic (COBOL) and data (VSAM/DB2), including online transaction processing and batch jobs.
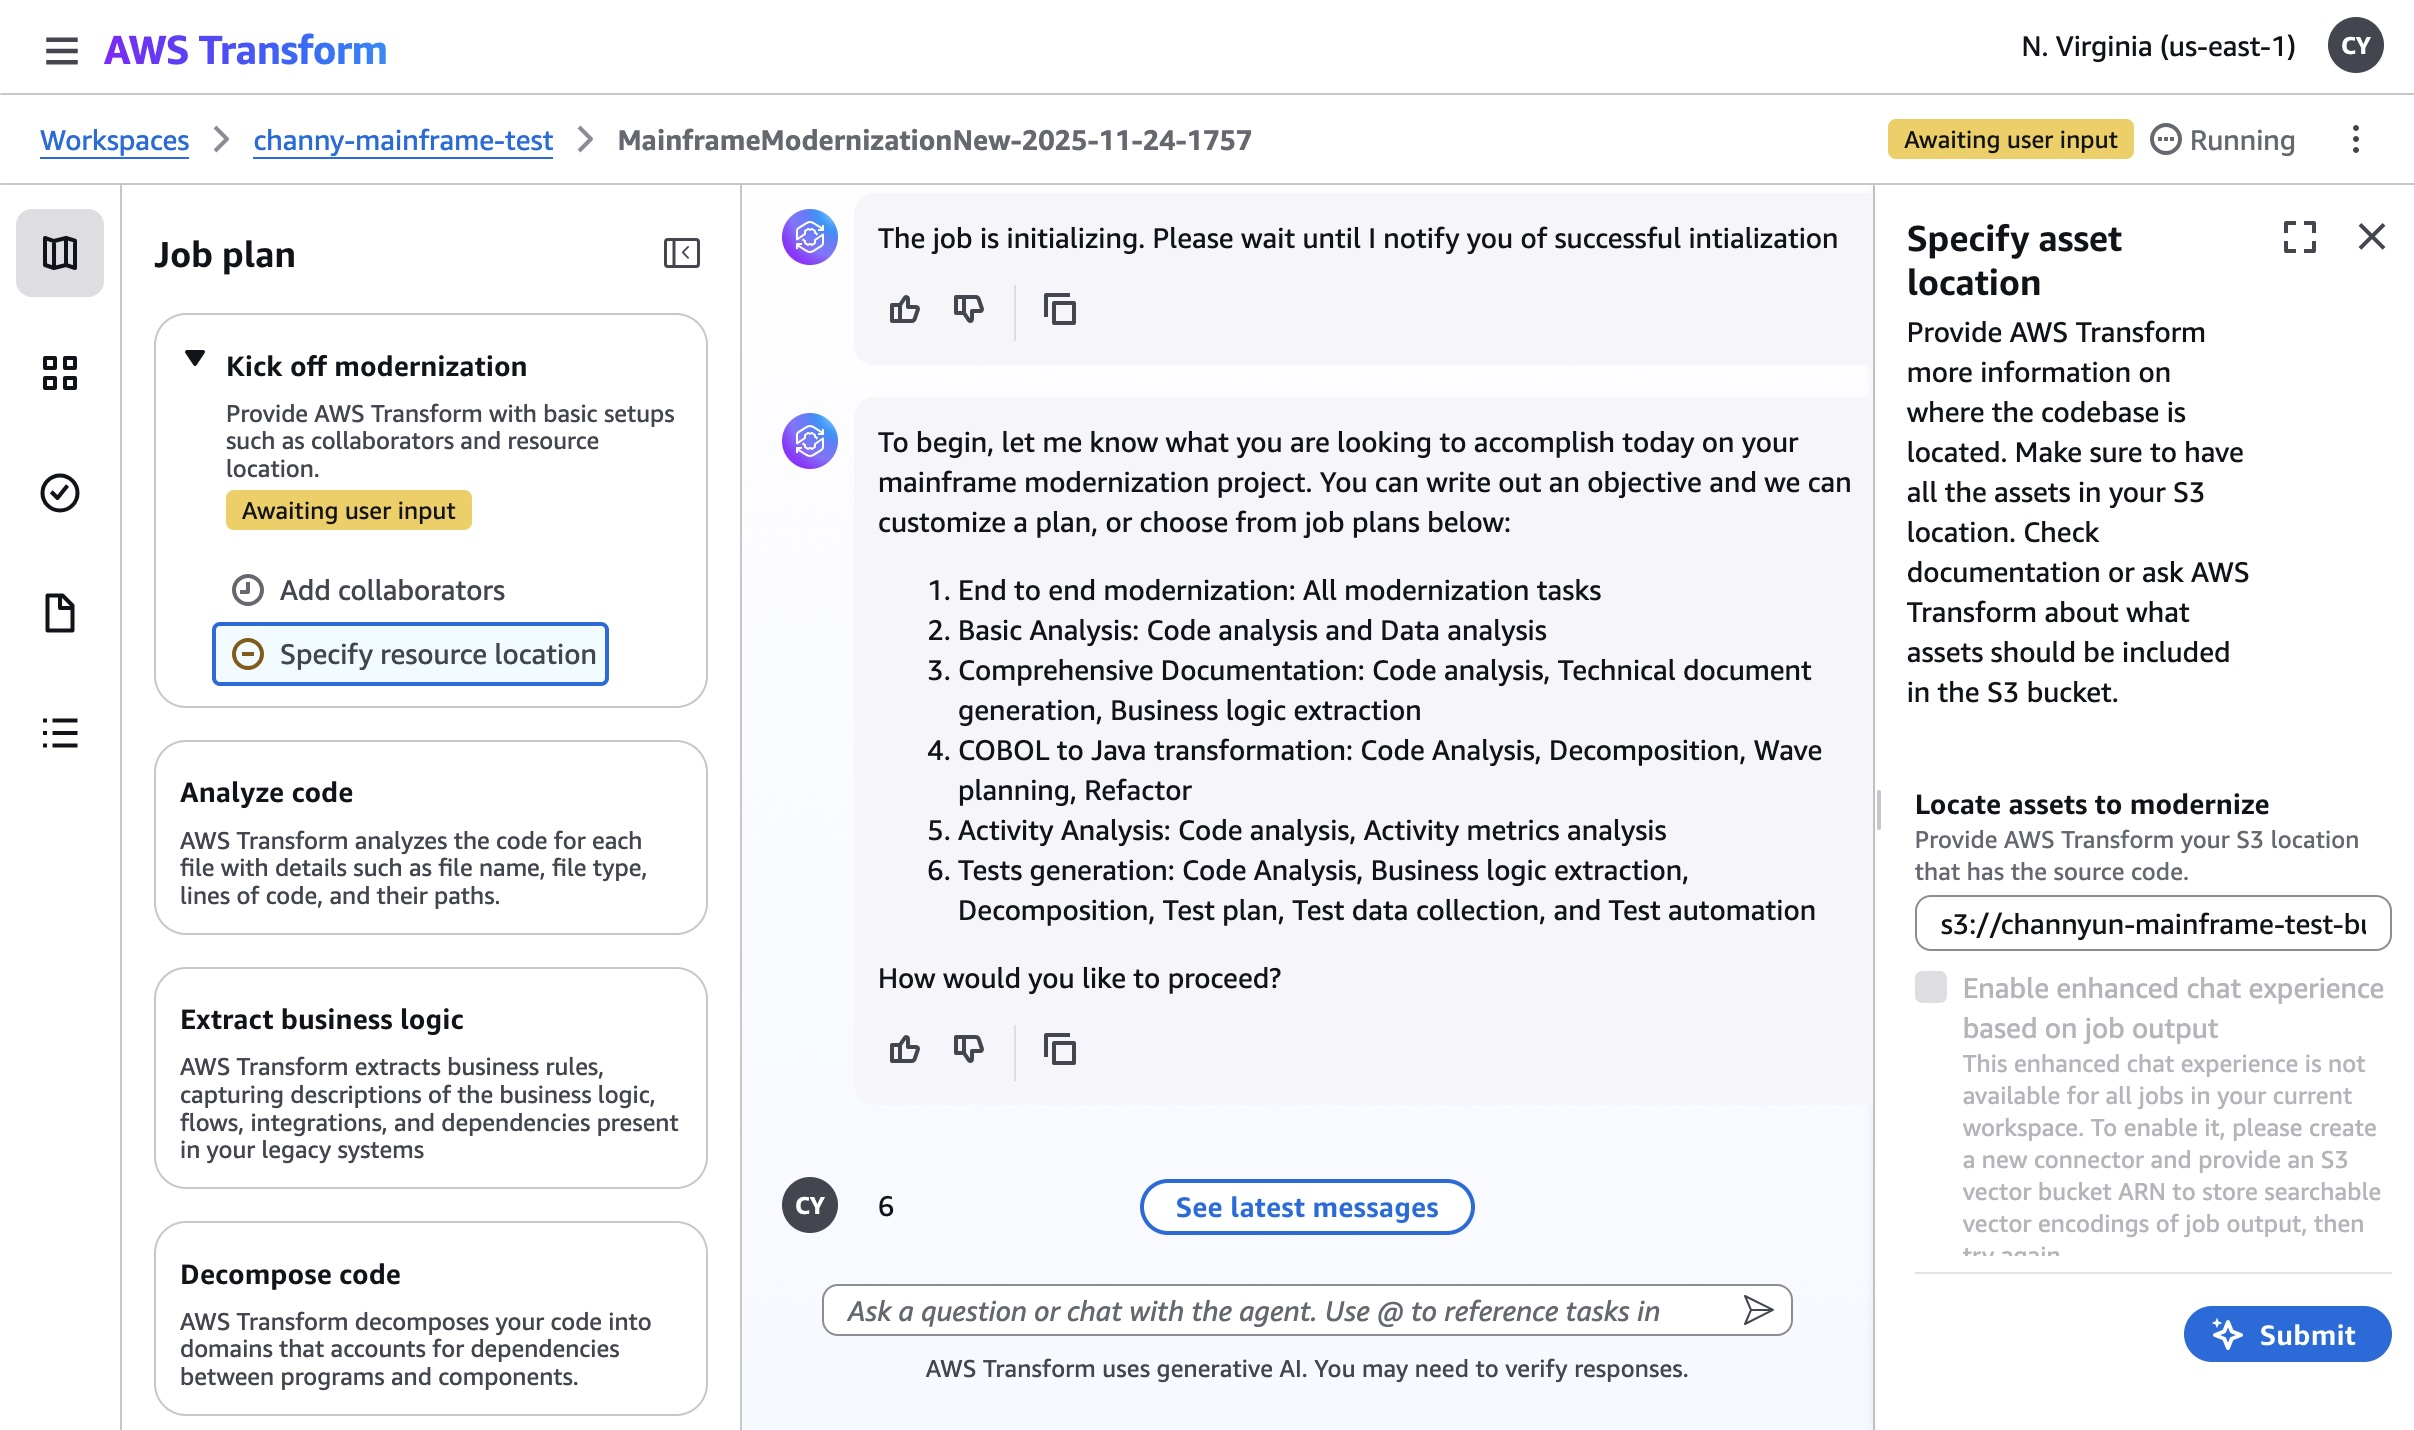
After finishing the steps of analyzing code, extracting business logic, decomposing code, planning migration wave, you can experience new automated testing capabilities such as planning test cases, generating test data collection scripts, and test automation scripts.
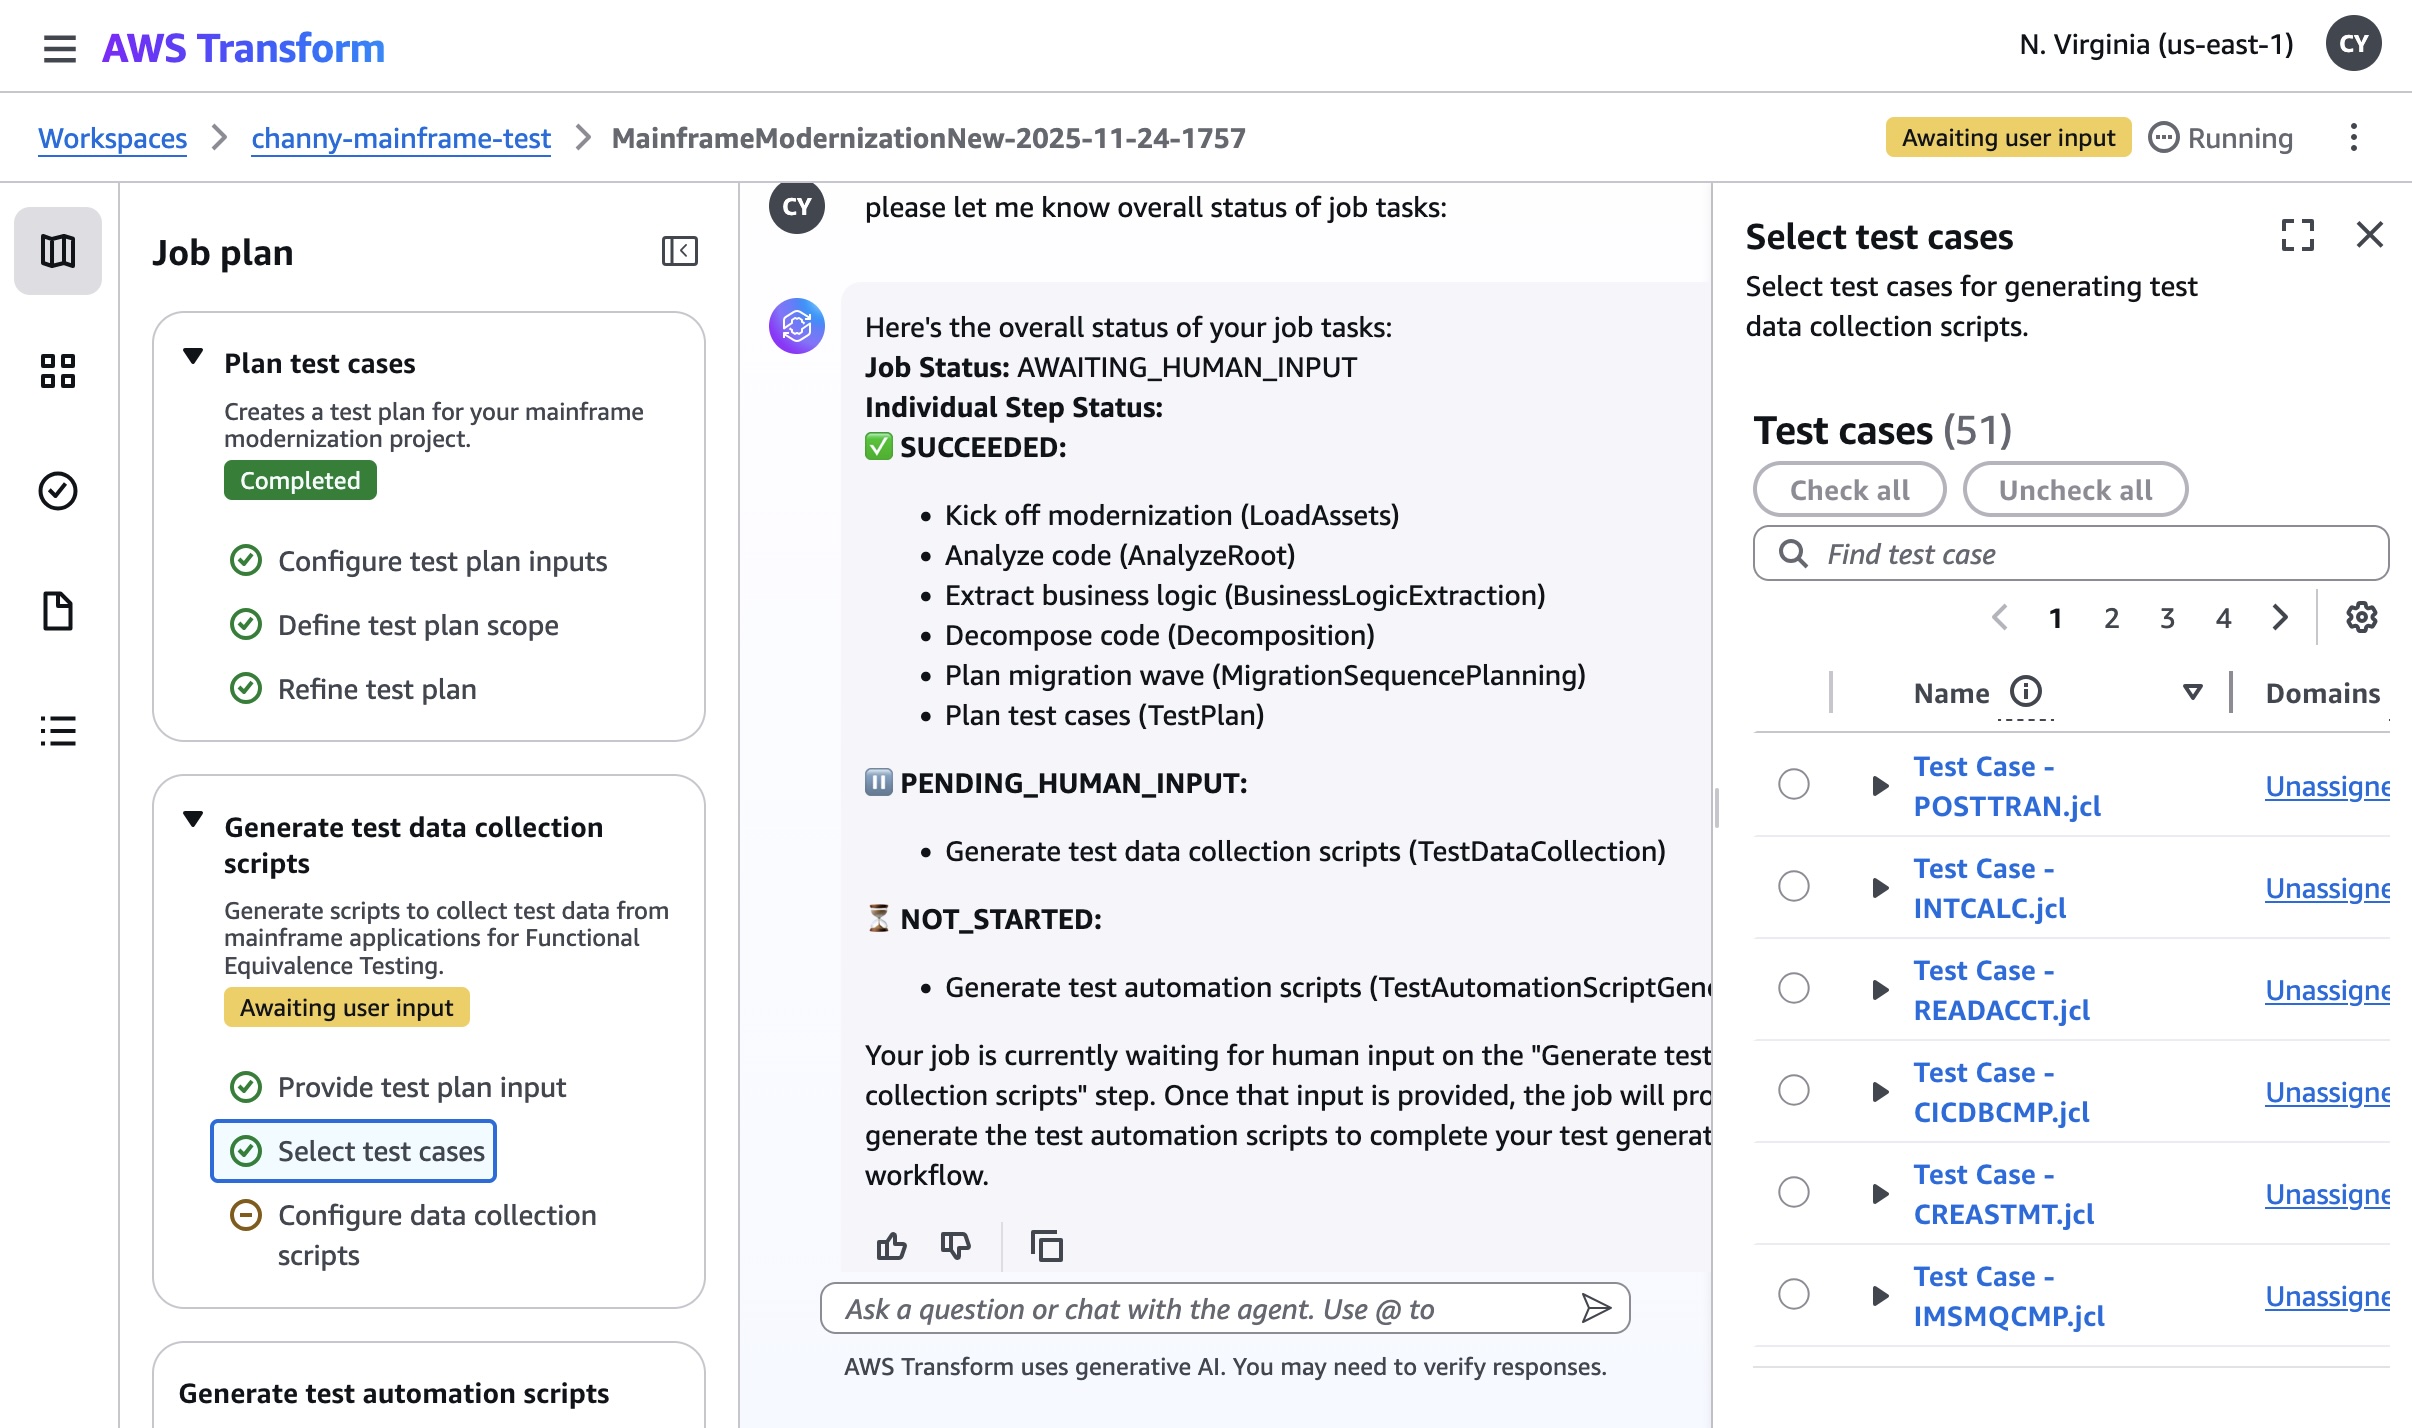
The new testing workflow creates a test plan for your modernization project and generates test data collection scripts. You will have three planning steps:
- Configure test plan inputs – You can link your test plan to your other job files. The test plan is generated based on analyzing the mainframe application code and can provide more details optionally using the extracted business logic, the technical documentation, the decomposition, and using a scheduler plan.
- Define test plan scope – You can define the entry point, the specific program where the application’s execution flow begins. For example, the JCL for a batch job. In the test plan, each functional test case is designed to start the execution from a specific entry point.
- Refine test plan – A test plan is made up of sequential test cases. You can reorder them, add new ones, merge multiple cases, or split one into two on the test case detail page. Batch test cases are composed of a sequence of JCLs following the scheduler plan.
Generating test data collection scripts collects test data from mainframe applications for functional equivalence testing. This step actively generates JCL scripts that will help you gather test data from the sample application’s various data sources (such as VSAM files or DB2 databases) for use in testing the modernized application. The step is designed to create automated scripts that can extract test data from VSAM datasets, query DB2 tables for sample data, collect sequential data sets, and generate data collection workflows. After this step is completed, you’ll have comprehensive test data collection scripts ready to use.
To learn more about automated testing, visit Modernization of mainframe applications in the AWS Transform User Guide.
Now available
The new capabilities in AWS Transform for mainframe are available today in all AWS Regions where AWS Transform for mainframe is offered. For Regional availability and future roadmap, visit the AWS Capabilities by Region. Currently, we offer our core features—including assessment and transformation—at no cost to AWS customers. To learn more, visit AWS Transform Pricing page.
Give it a try in the AWS Transform console. To learn more, visit the AWS Transform for mainframe product page and send feedback to AWS re:Post for AWS Transform for mainframe or through your usual AWS Support contacts.
— Channy
AWS Transform announces full-stack Windows modernization capabilities
Post Syndicated from Prasad Rao original https://aws.amazon.com/blogs/aws/aws-transform-announces-full-stack-windows-modernization-capabilities/
Earlier this year in May, we announced the general availability of AWS Transform for .NET, the first agentic AI service for modernizing .NET applications at scale. During the early adoption period of the service, we received valuable feedback indicating that, in addition to .NET application modernization, you would like to modernize SQL Server and legacy UI frameworks. Your applications typically follow a three-tier architecture—presentation tier, application tier, and database tier—and you need a comprehensive solution that can transform all of these tiers in a coordinated way.
Today, based on your feedback, we’re excited to announce AWS Transform for full-stack Windows modernization, to offload complex, tedious modernization work across the Windows application stack. You can now identify application and database dependencies and modernize them in an orchestrated way through a centralized experience.
AWS Transform accelerates full-stack Windows modernization by up to five times across application, UI, database, and deployment layers. Along with porting .NET Framework applications to cross-platform .NET, it migrates SQL Server databases to Amazon Aurora PostgreSQL-Compatible Edition with intelligent stored procedure conversion and dependent application code refactoring. For validation and testing, AWS Transform deploys applications to Amazon Elastic Compute Cloud (Amazon EC2) Linux or Amazon Elastic Container Service (Amazon ECS), and provides customizable AWS CloudFormation templates and deployment configurations for production use. AWS Transform has also added capabilities to modernize ASP.NET Web Forms UI to Blazor.
There is much to explore, so in this post I’ll provide the first look at AWS Transform for full-stack Windows modernization capabilities across all layers.
Create a full-stack Windows modernization transformation job
AWS Transform connects to your source code repositories and database servers, analyzes application and database dependencies, creates modernization waves, and orchestrates full-stack transformations for each wave.
To get started with AWS Transform, I first complete the onboarding steps outlined in the getting started with AWS Transform user guide. After onboarding, I sign in to the AWS Transform console using my credentials and create a job for full-stack Windows modernization.


After creating the job, I complete the prerequisites. Then, I configure the database connector for AWS Transform to securely access SQL Server databases running on Amazon EC2 and Amazon Relational Database Service (Amazon RDS). The connector can connect to multiple databases within the same SQL Server instance.
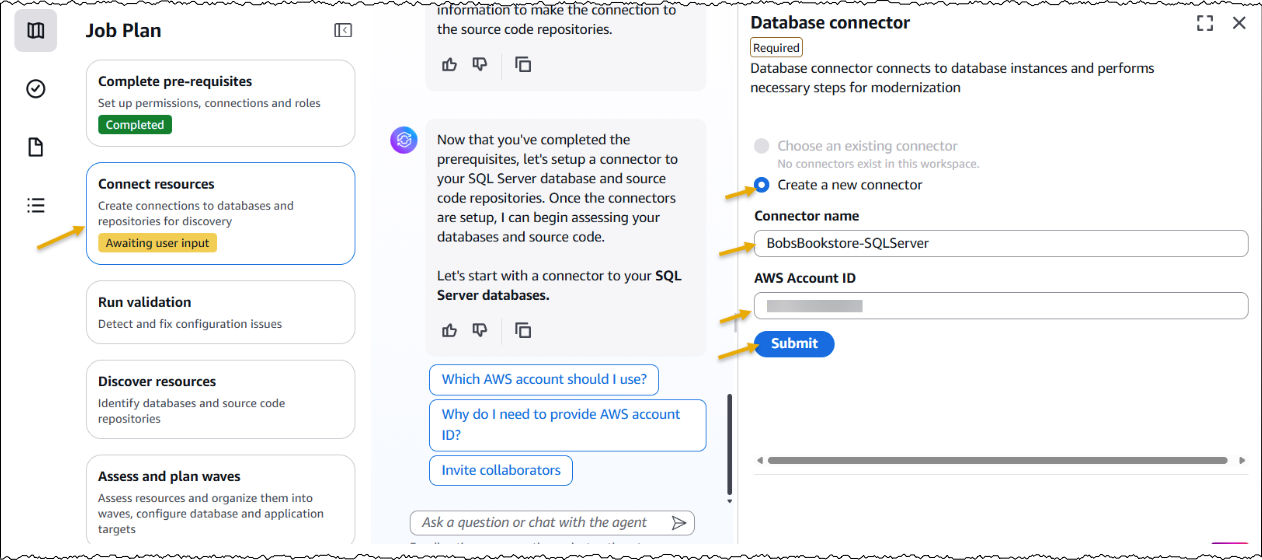
Next, I set up a connector to connect to my source code repositories.
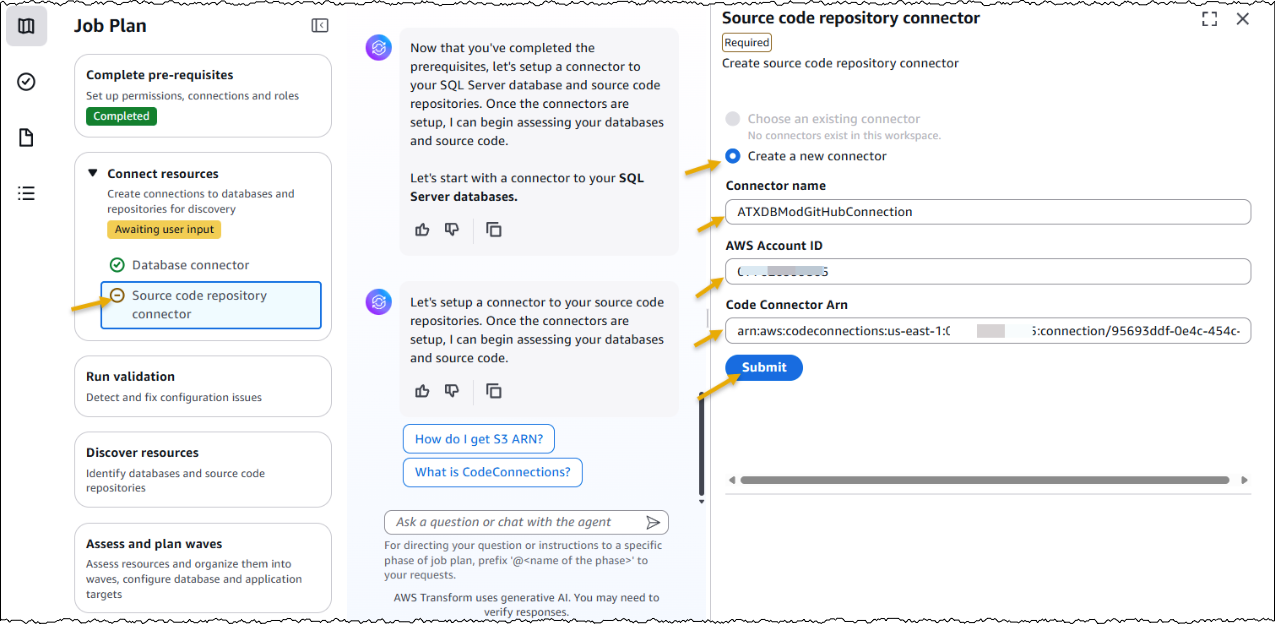
Furthermore, I have the option to choose if I would like AWS Transform to deploy the transformed applications. I choose Yes and provide the target AWS account ID and AWS Region for deploying the applications. The deployment option can be configured later as well.
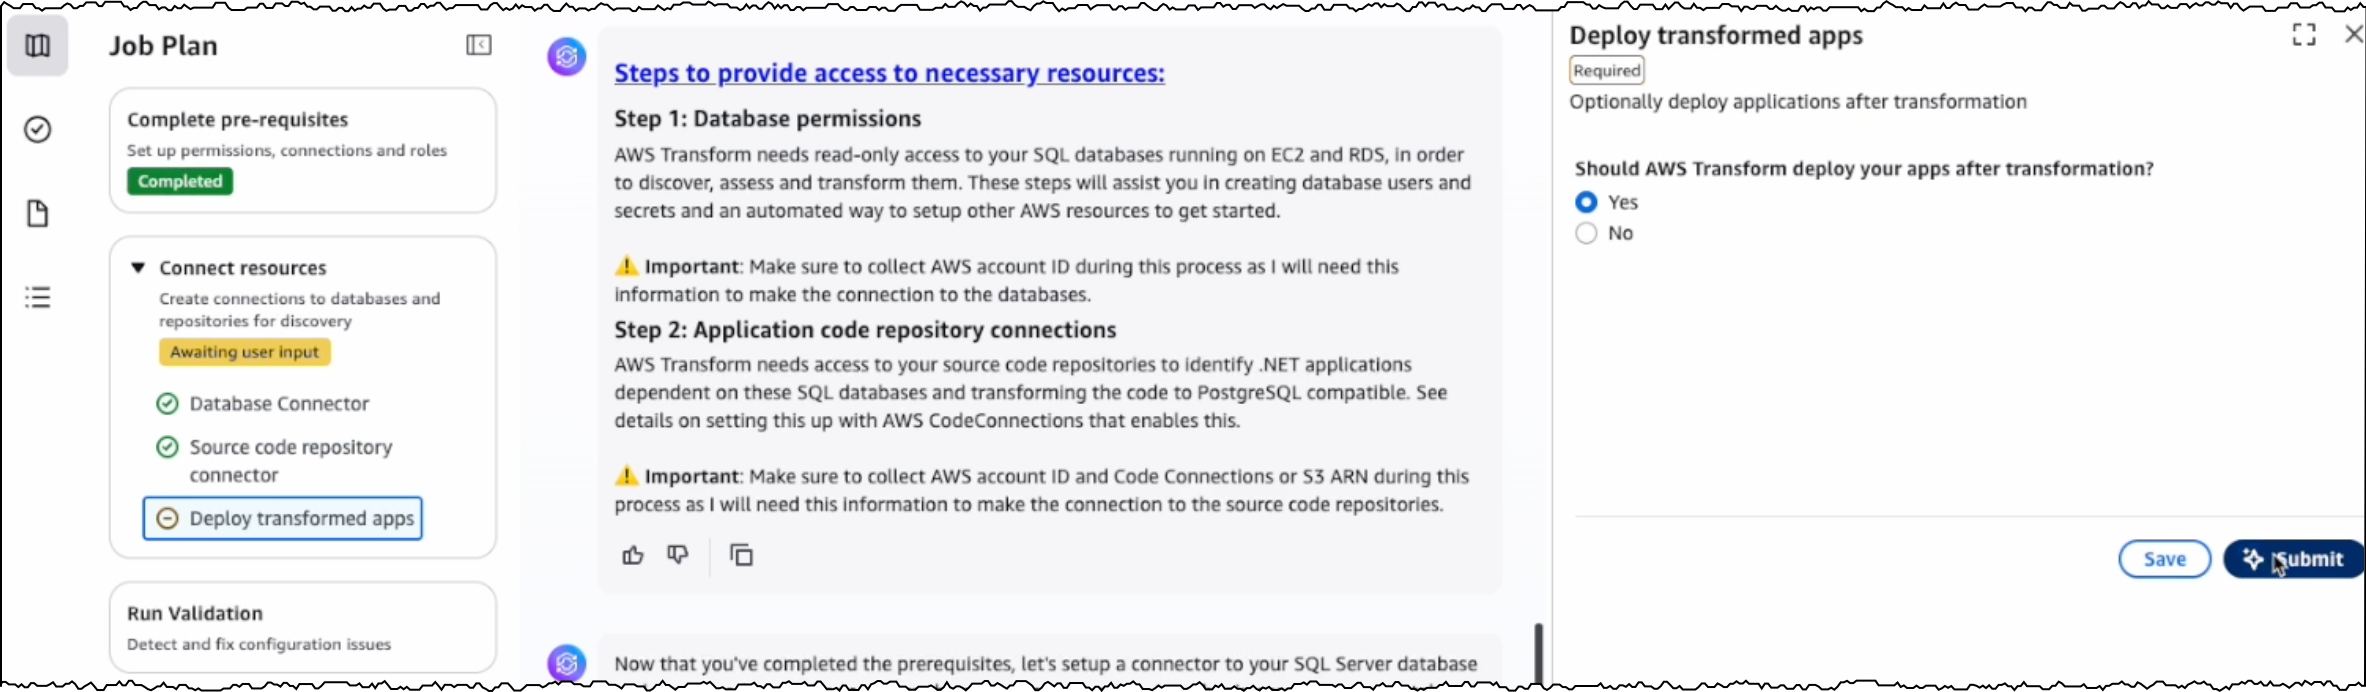
After the connectors are set up, AWS Transform connects to the resources and runs the validation to verify IAM roles, network settings, and related AWS resources.
After the successful validation, AWS Transform discovers databases and their associated source code repositories. It identifies dependencies between databases and applications to create waves for transforming related components together. Based on this analysis, AWS Transform creates a wave-based transformation plan.

Assessing database and dependent applications
For the assessment, I review the databases and source code repositories discovered by AWS Transform and choose the appropriate branches for code repositories. AWS Transform scans these databases and source code repositories, then presents a list of databases along with their dependent .NET applications and transformation complexity.
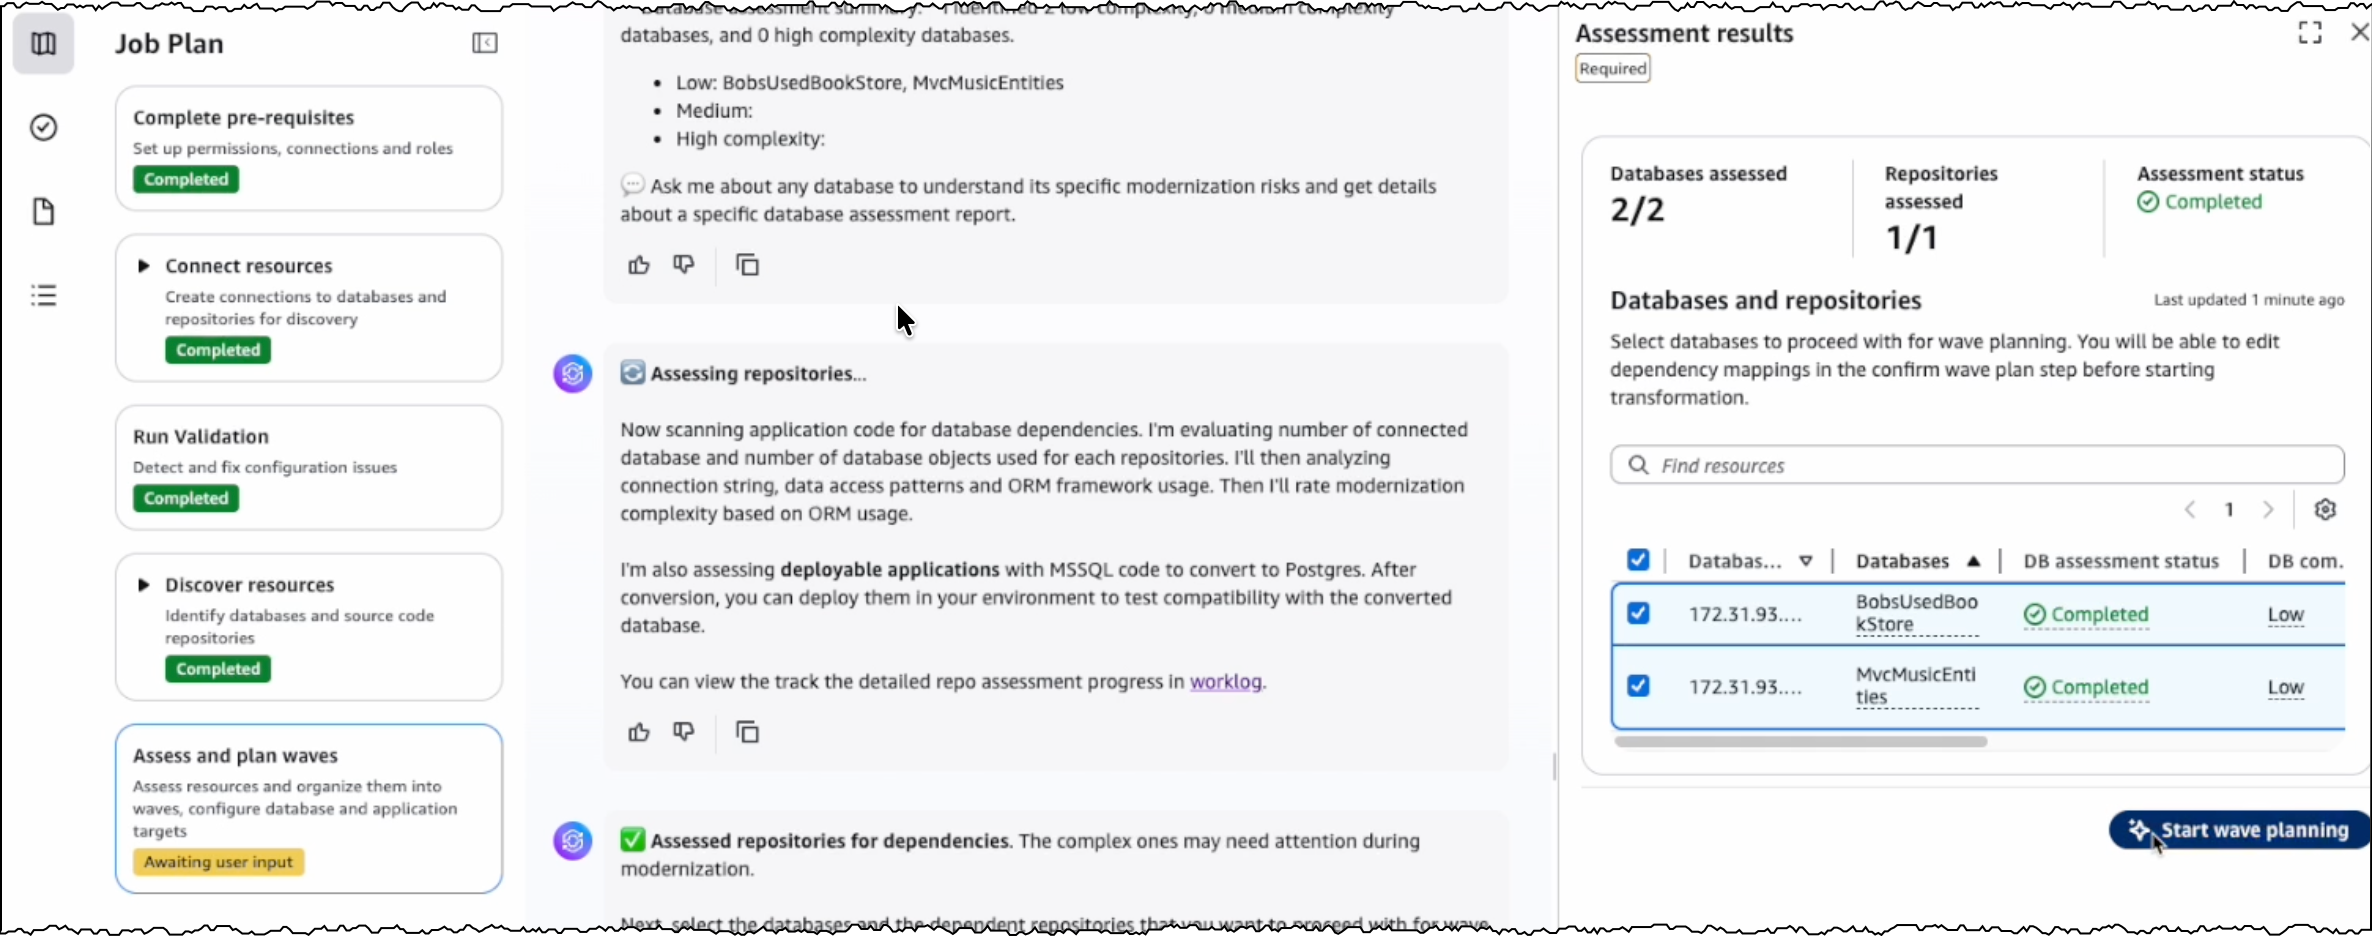
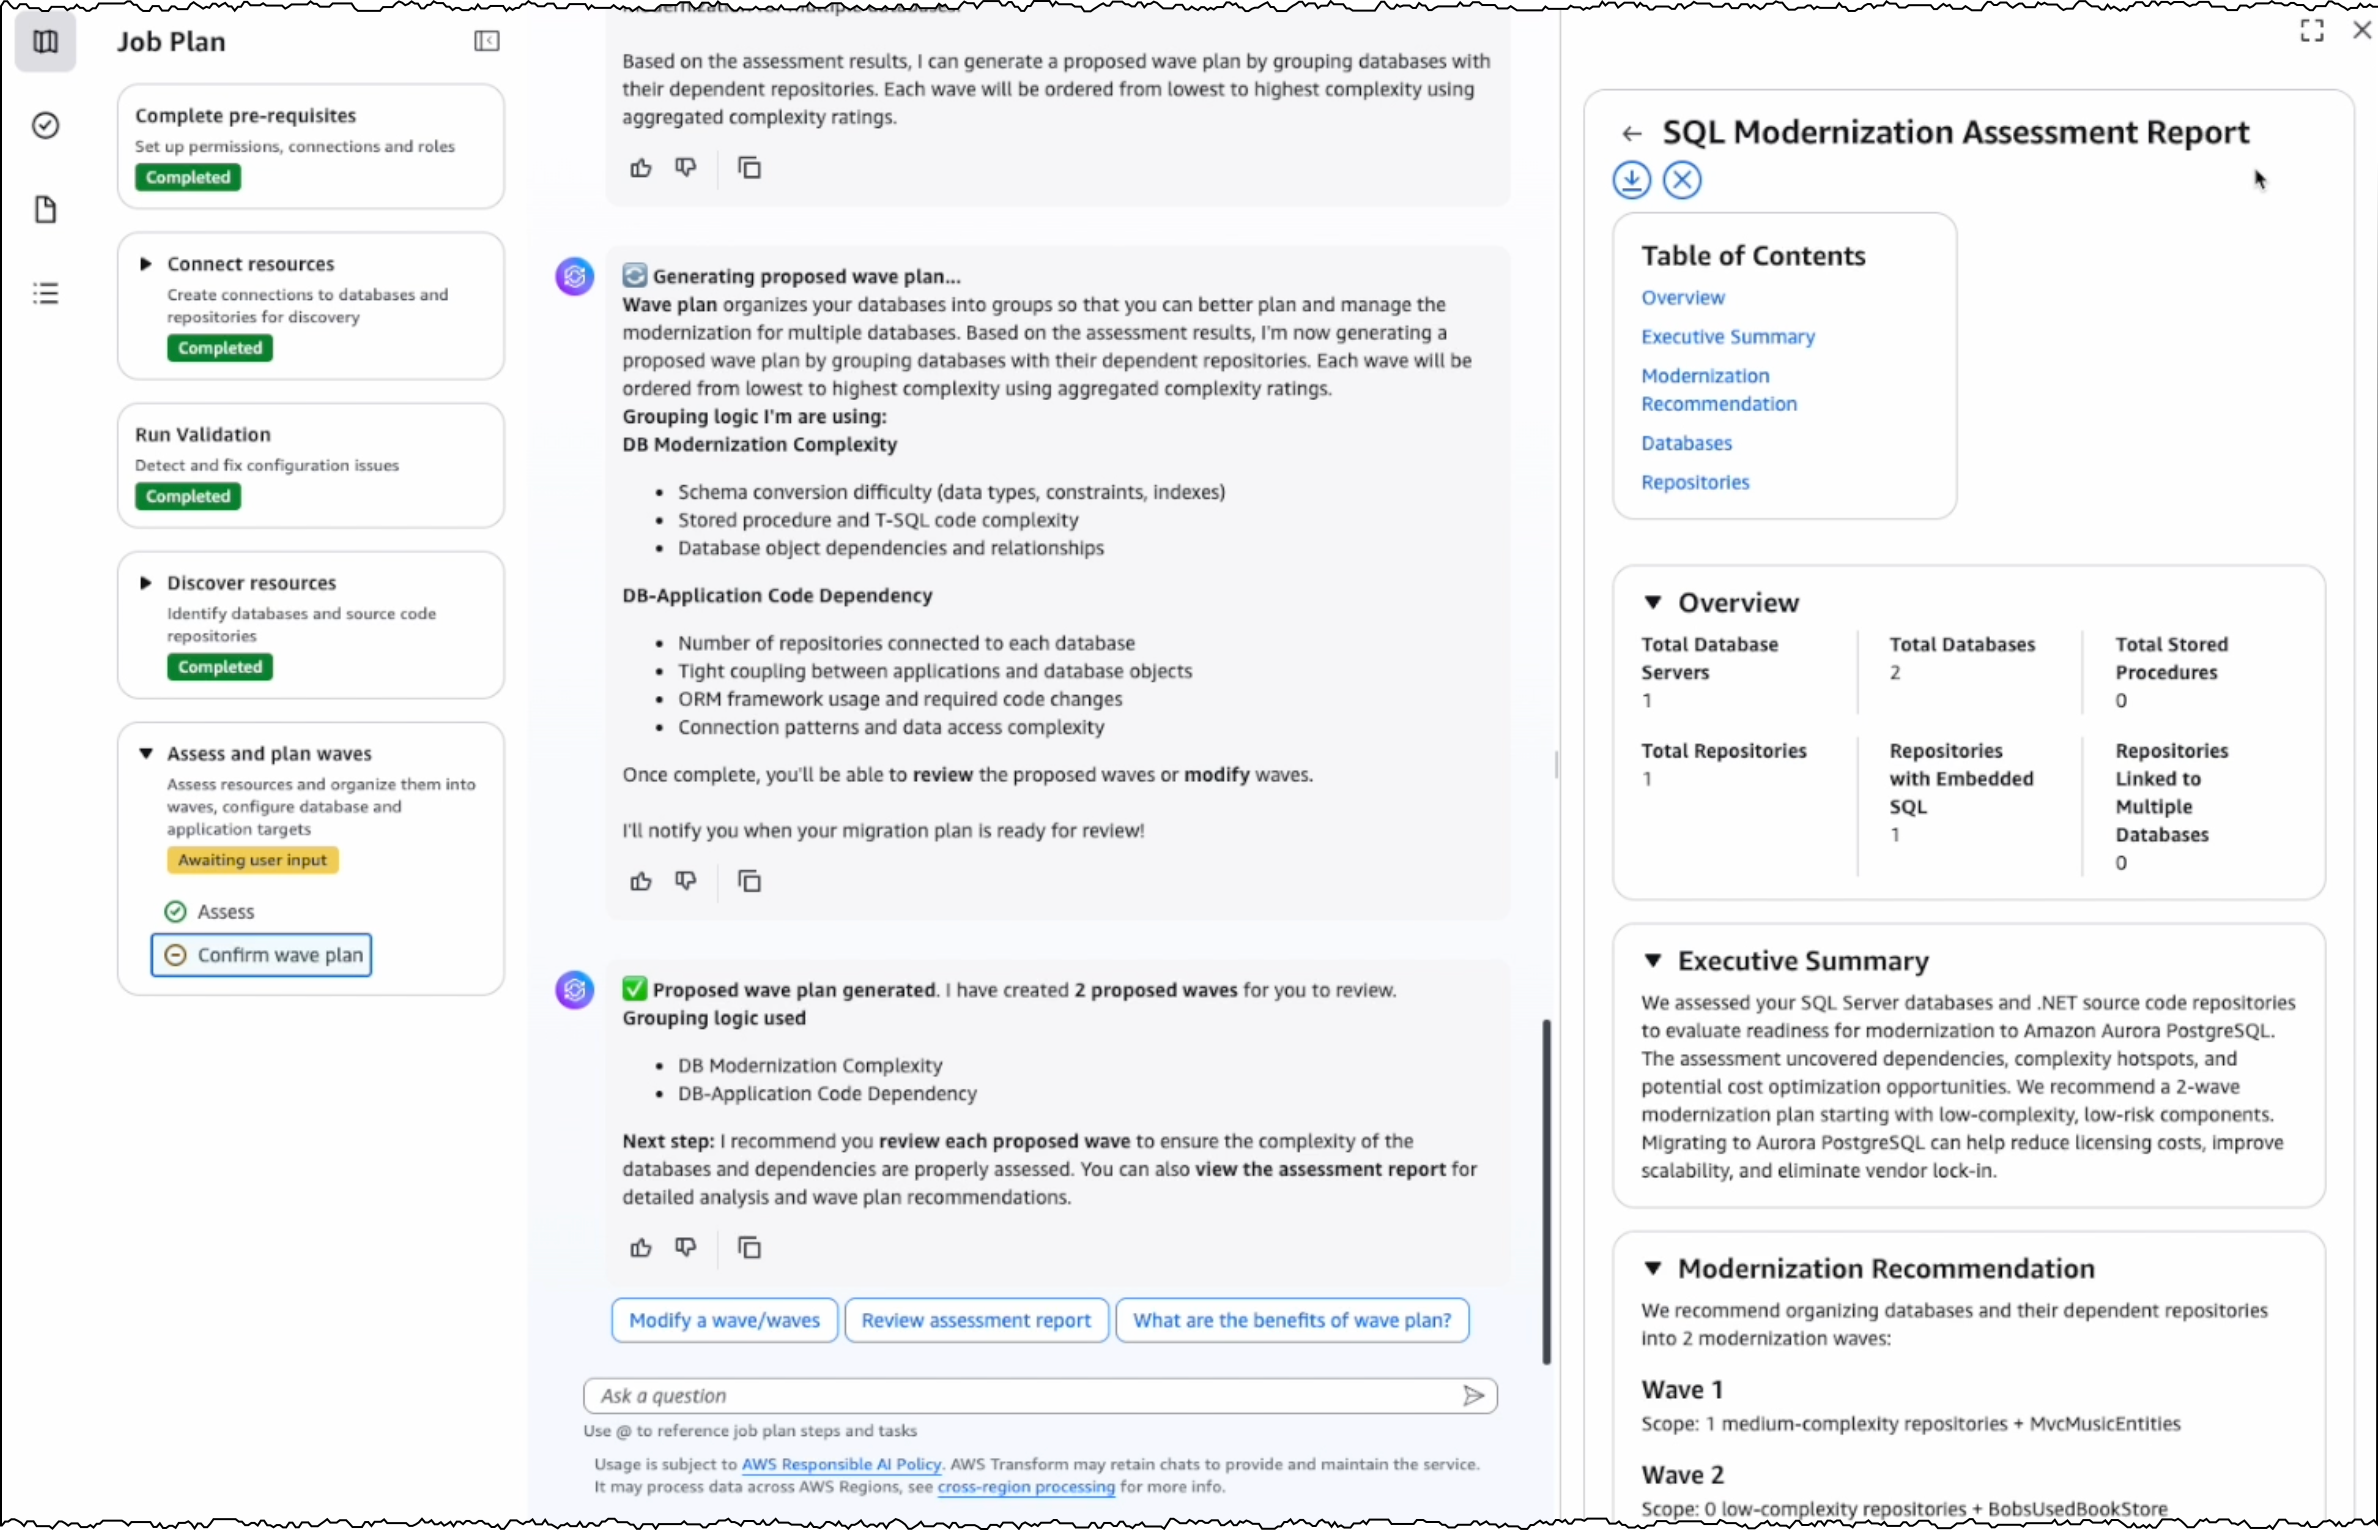
I choose the target databases and repositories for modernization. AWS Transform analyzes these selections and generates a comprehensive SQL Modernization Assessment Report with a detailed wave plan. I download the report to review the proposed modernization plan. The report includes an executive summary, wave plan, dependencies between databases and code repositories, and complexity analysis.
Wave transformation at scale
The wave plan generated by AWS Transform consists of four steps for each wave. First, it converts the SQL Server schema to PostgreSQL. Second, it migrates the data. Third, it transforms the dependent .NET application code to make it PostgreSQL compatible. Finally, it deploys the application for testing.
Before converting the SQL Server schema, I can either create a new PostgreSQL database or choose an existing one as the target database.
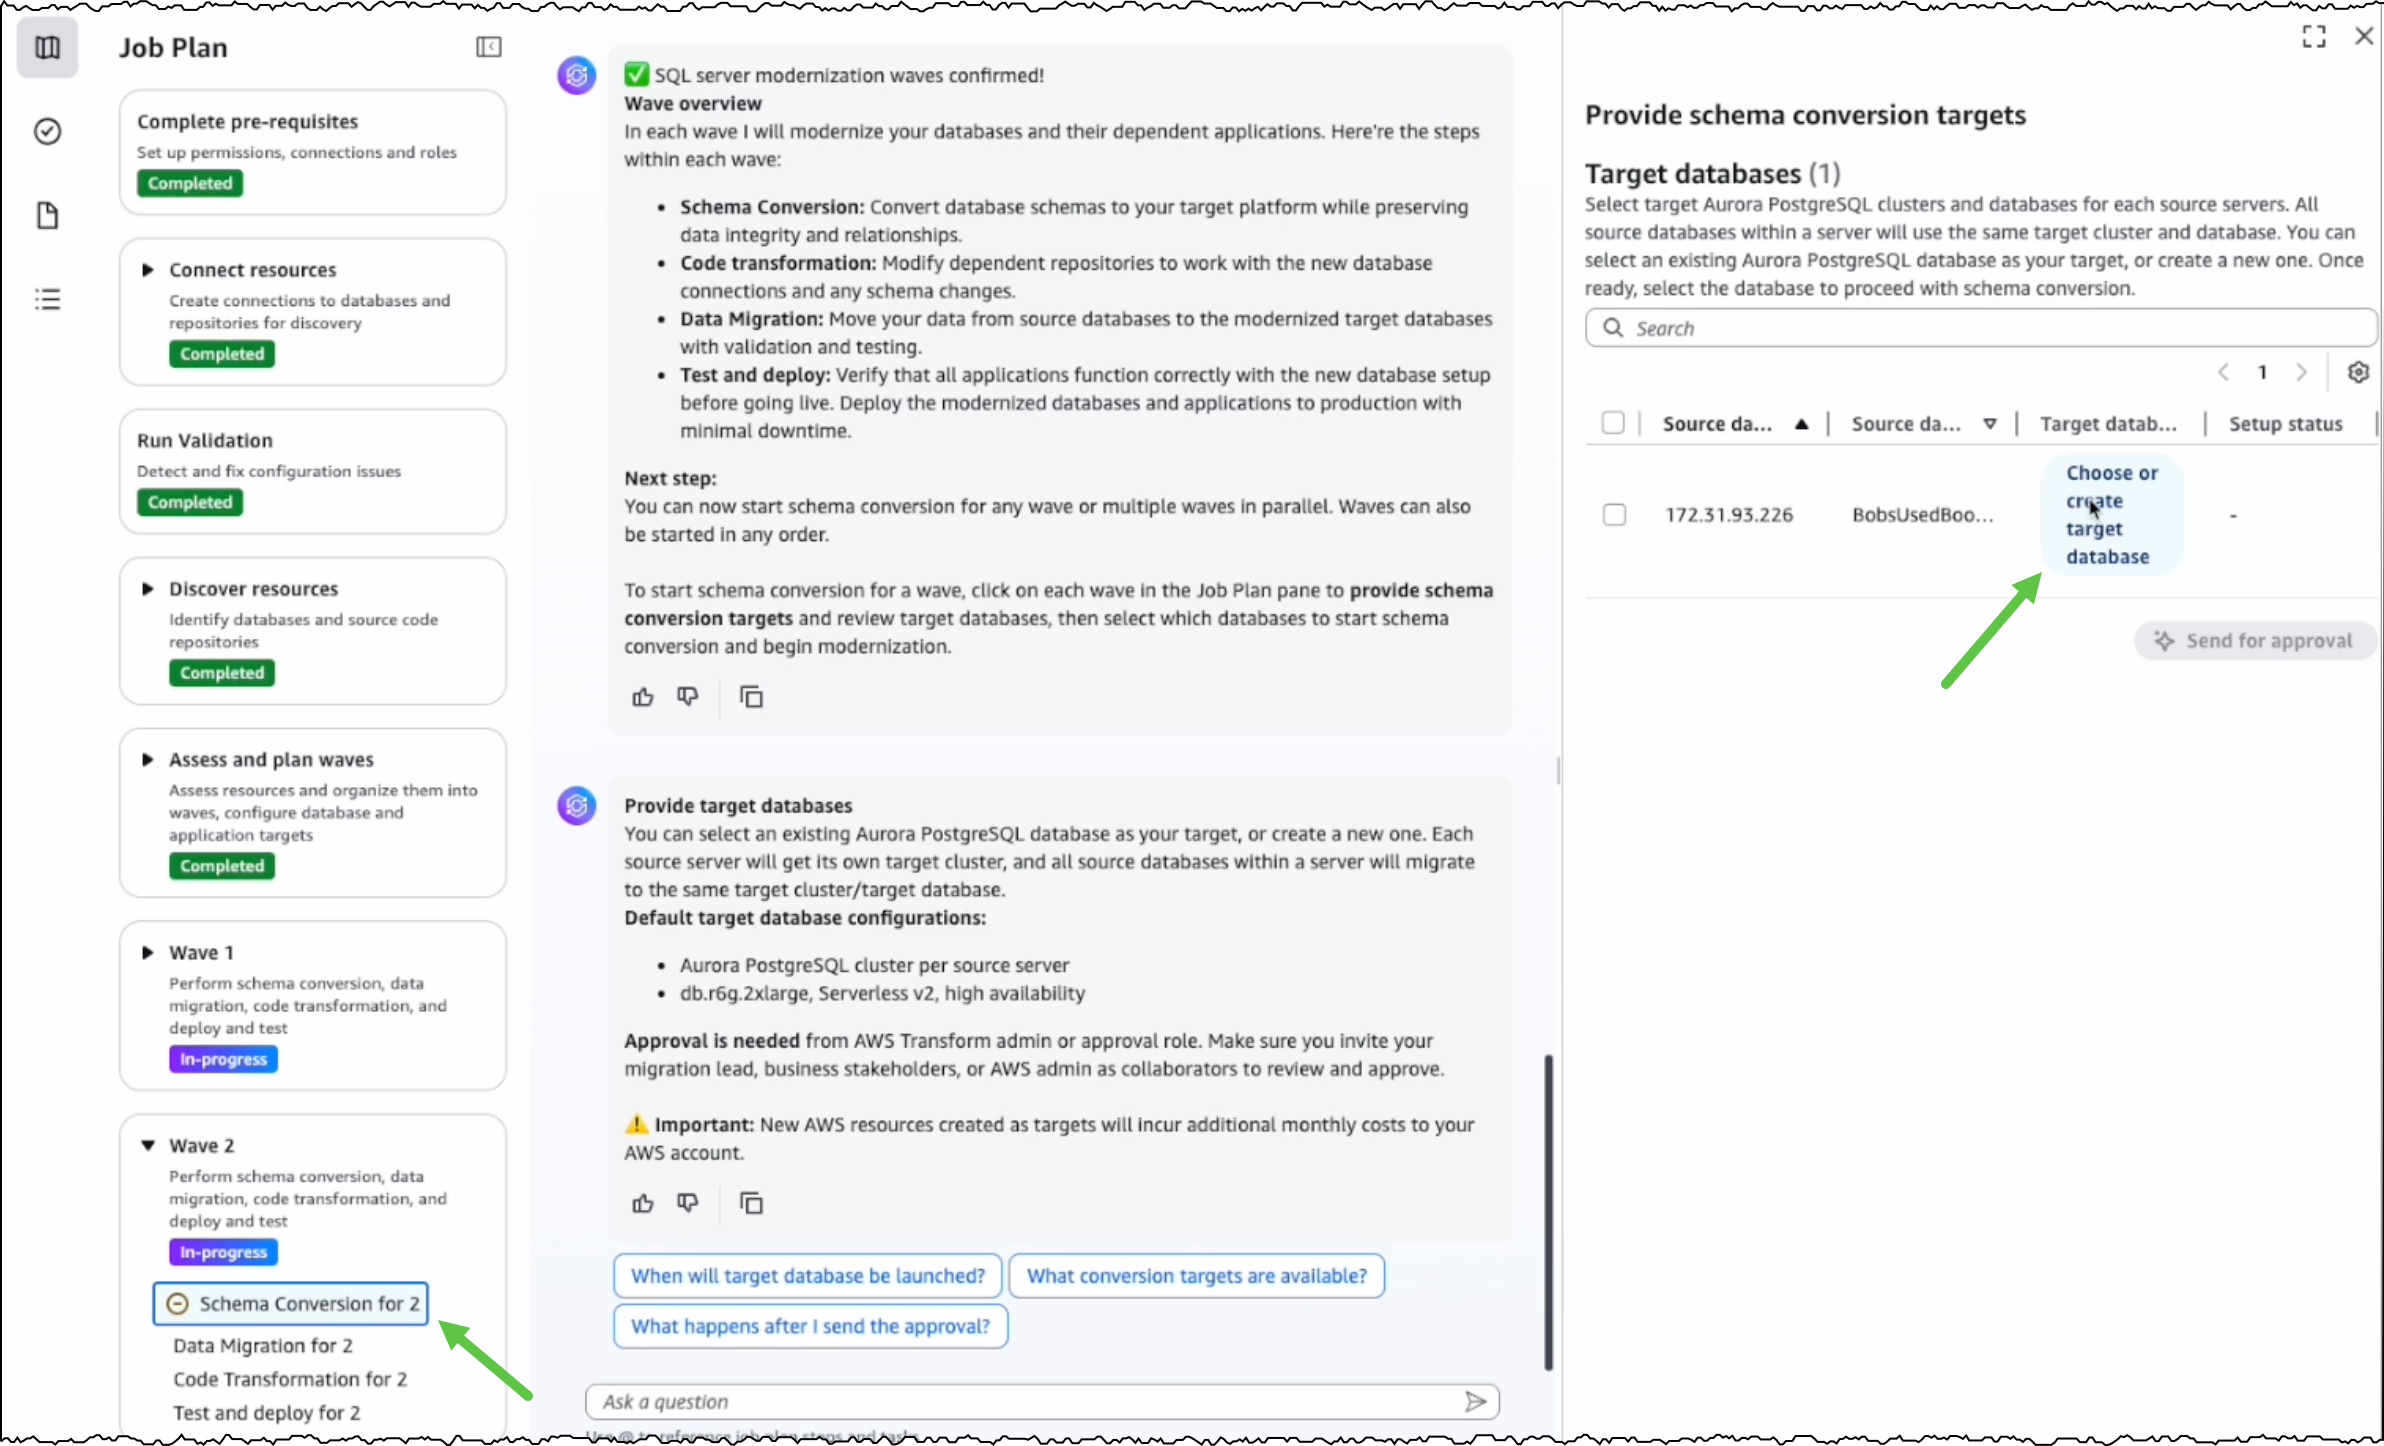
After I choose the source and target databases, AWS Transform generates conversion reports for my review. AWS Transform converts the SQL Server schema to PostgreSQL-compatible structures, including tables, indexes, constraints, and stored procedures.

For any schema that AWS Transform can’t automatically convert, I can manually address them in the AWS Database Migration Service (AWS DMS) console. Alternatively, I can fix them in my preferred SQL editor and update the target database instance.
After completing schema conversion, I have the option to proceed with data migration, which is an optional step. AWS Transform uses AWS DMS to migrate data from my SQL Server instance to the PostgreSQL database instance. I can choose to perform data migration later, after completing all transformations, or work with test data by loading it into my target database.
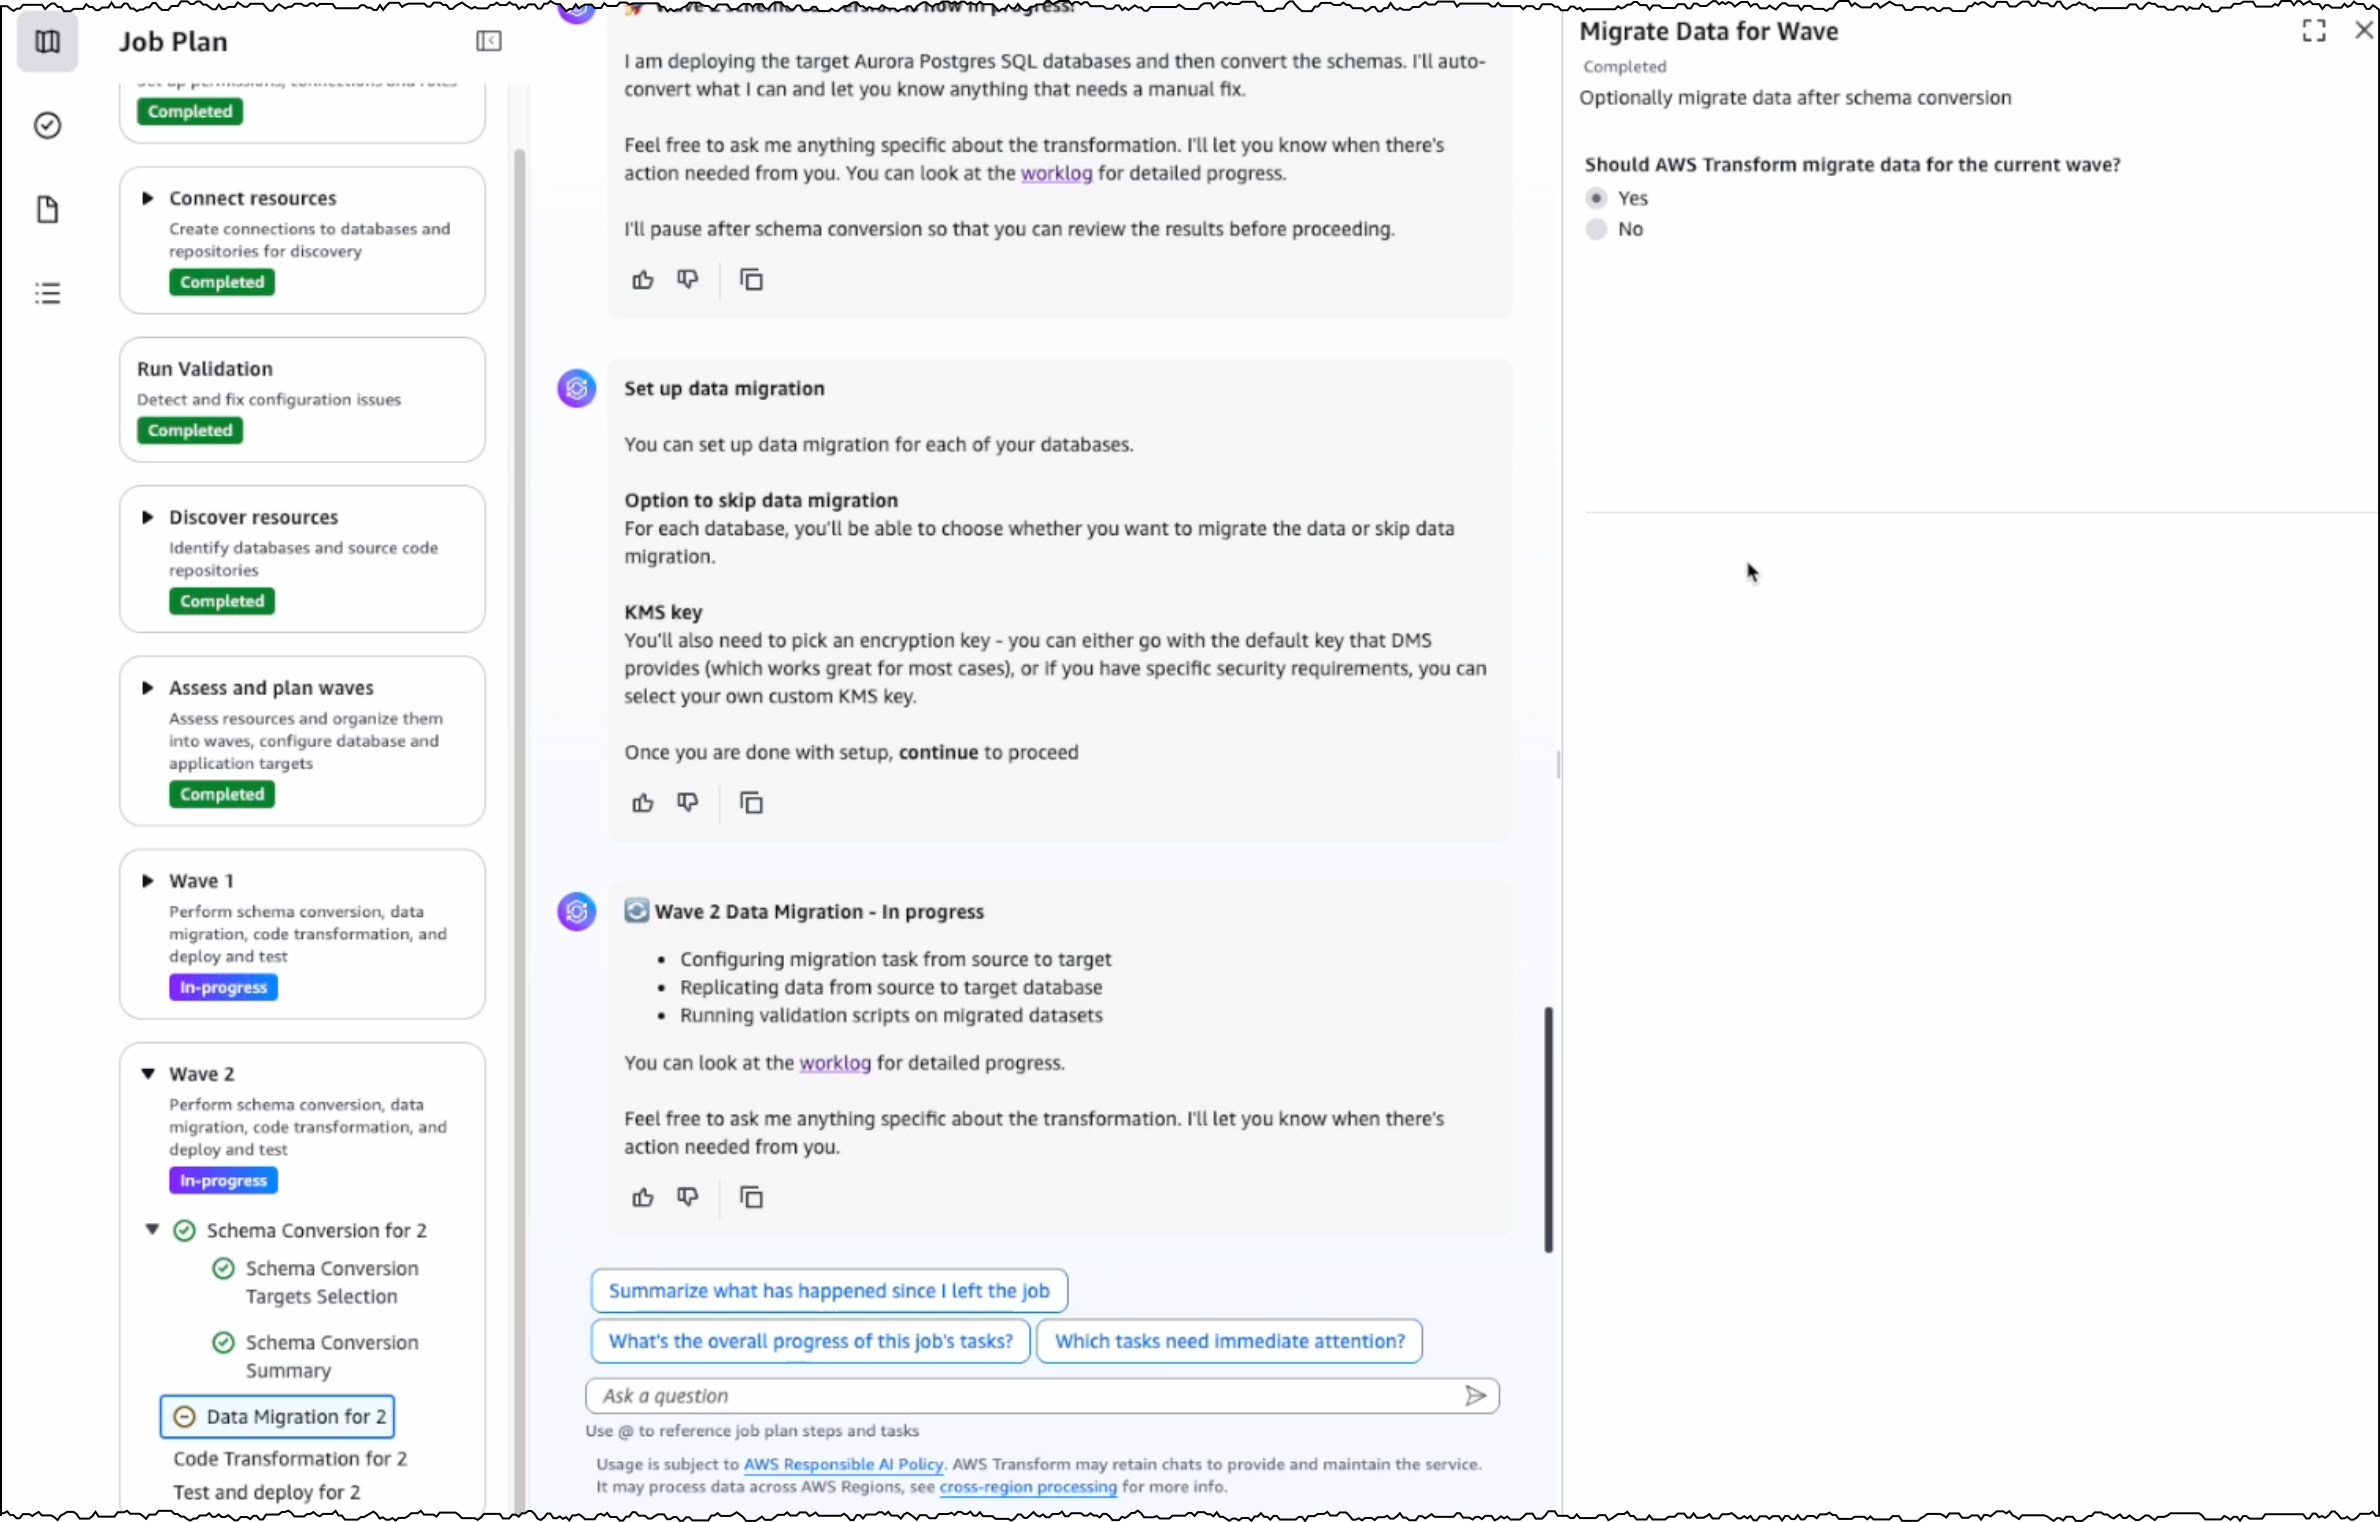
The next step is code transformation. I specify a target branch for AWS Transform to upload the transformed code artifacts. AWS Transform updates the codebase to make the application compatible with the converted PostgreSQL database.
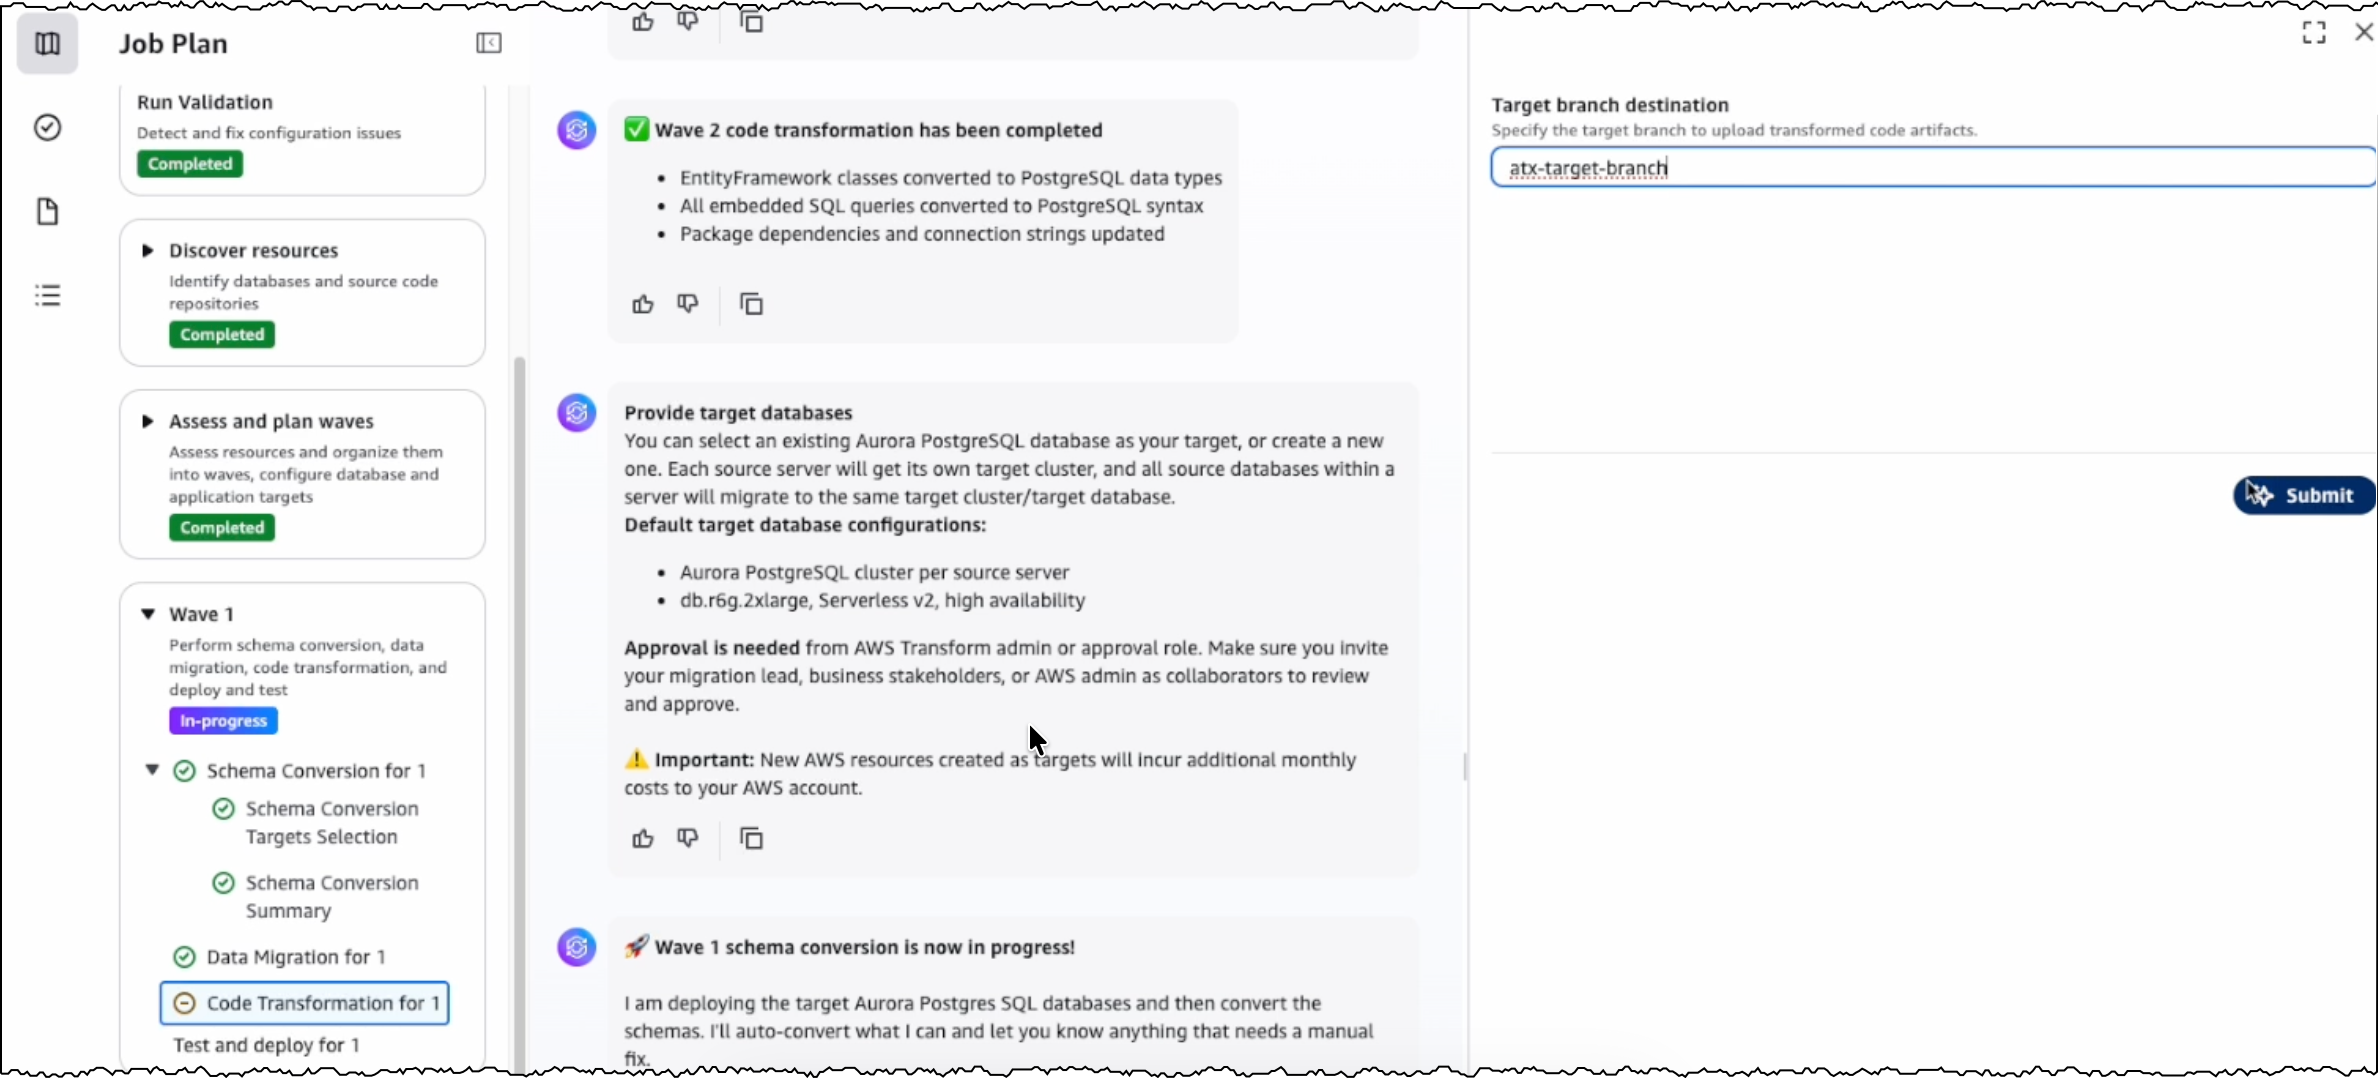
With this release, AWS Transform for full-stack Windows modernization supports only codebases in .NET 6 or later. For codebases in .NET Framework 3.1+, I first use AWS Transform for .NET to port them to cross-platform .NET. I’ll expand on this in a following section.
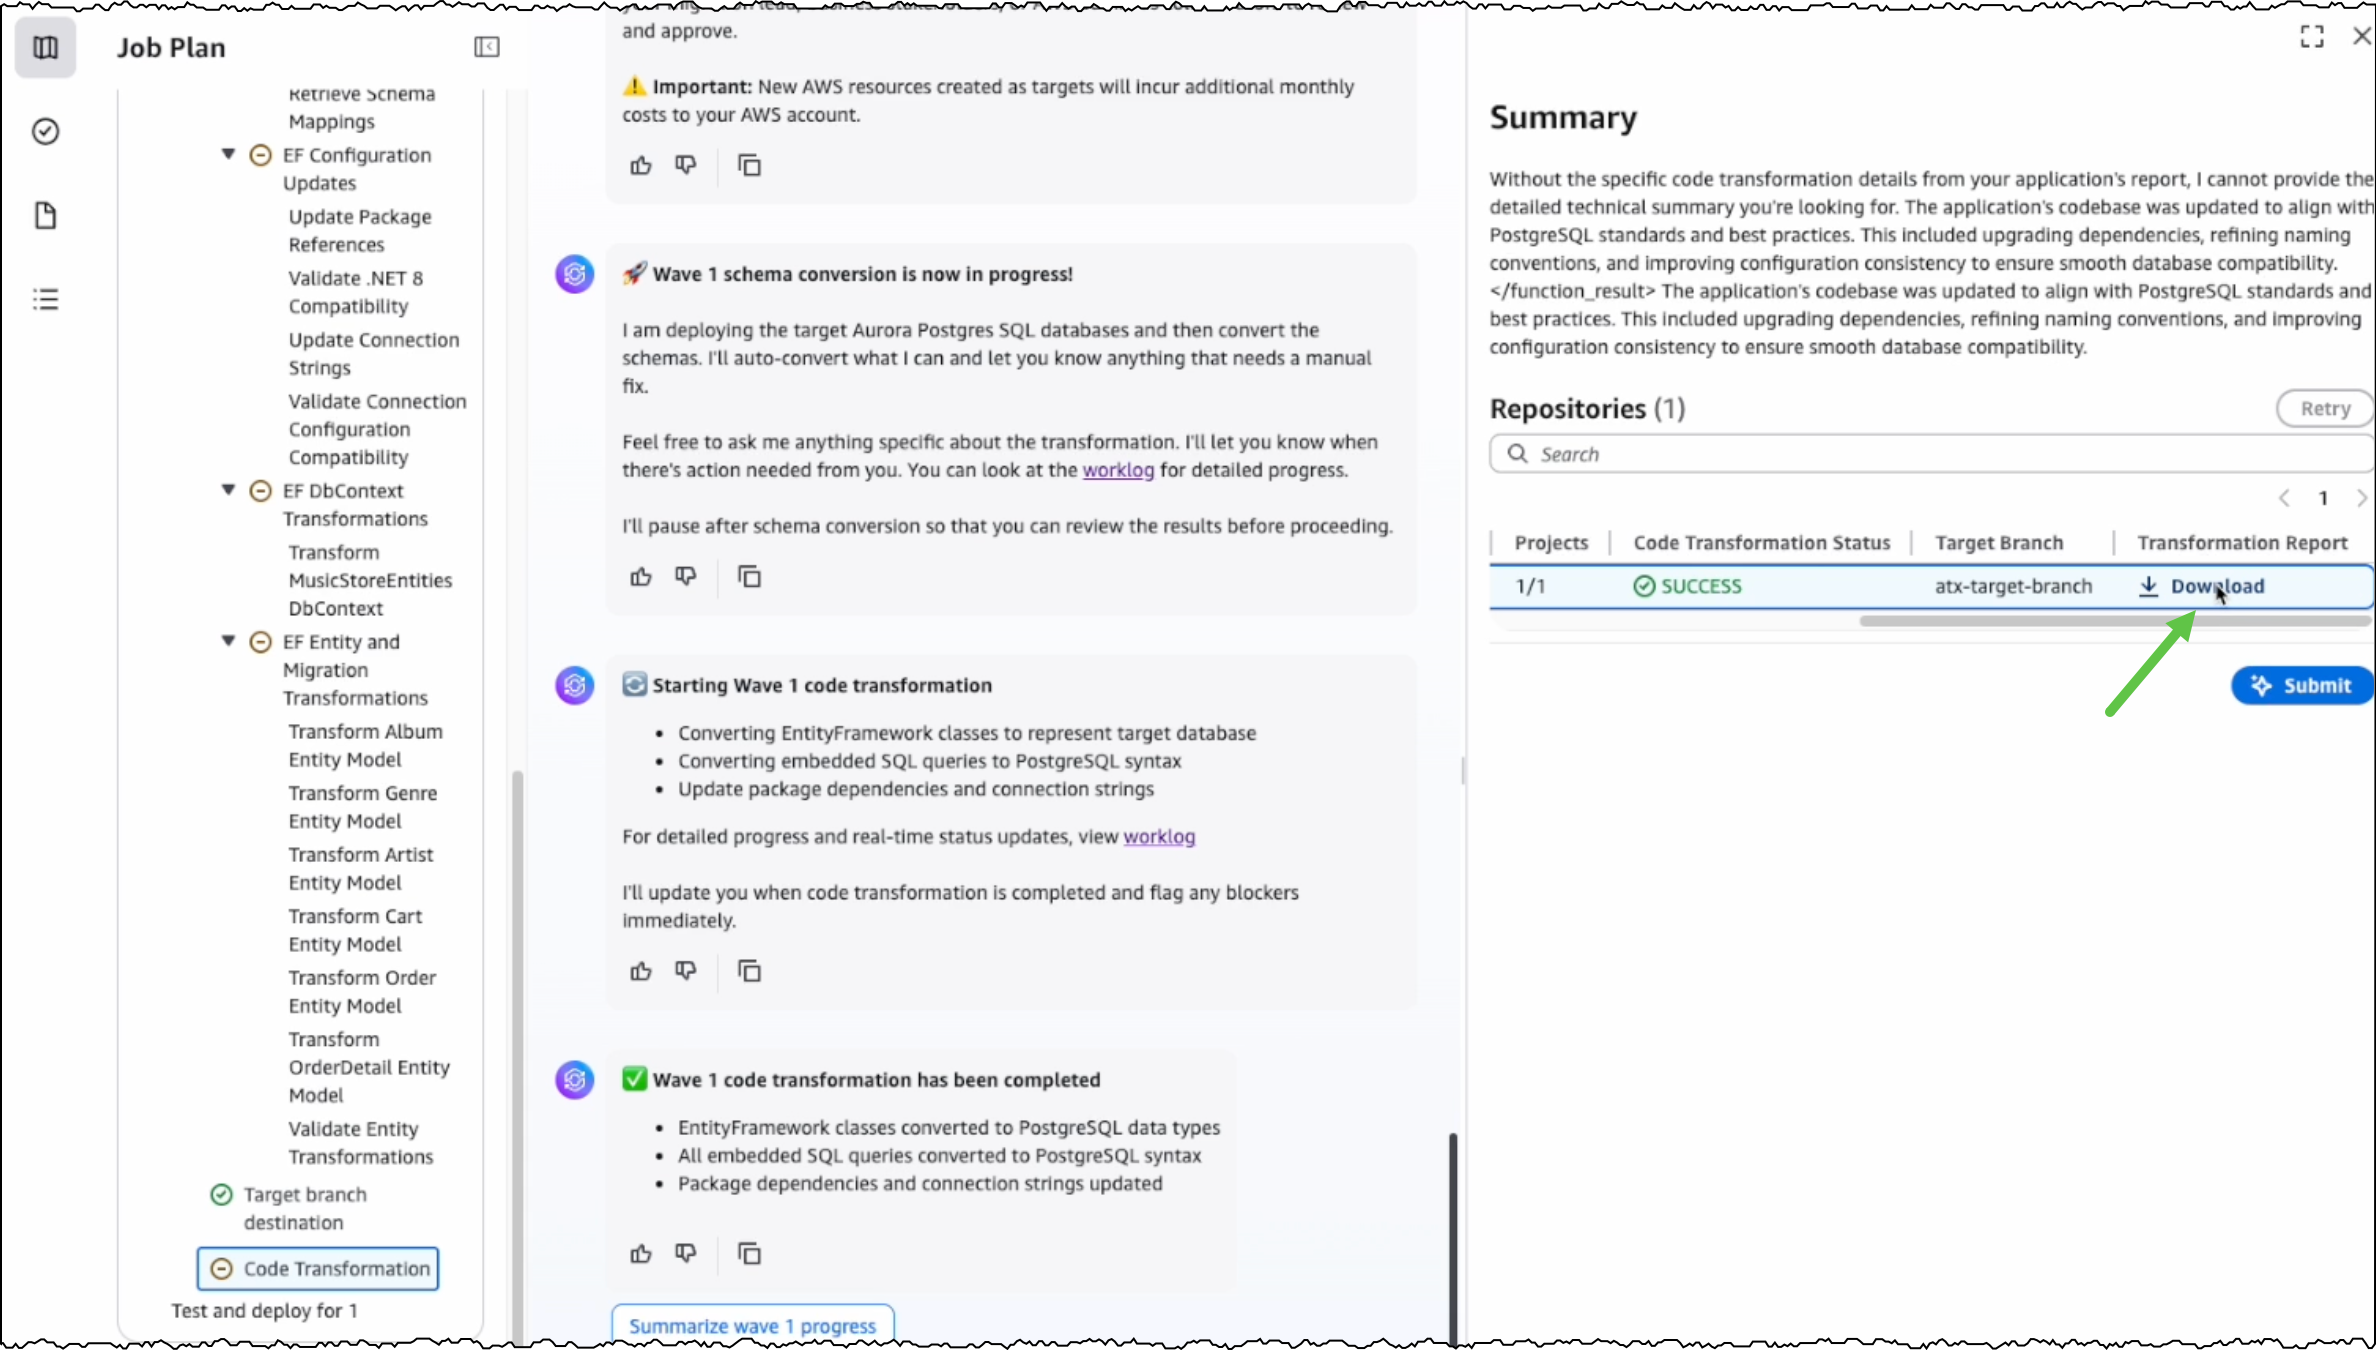
After the conversion is completed, I can view the source and target branches along with their code transformation status. I can also download and review the transformation report.
Modernizing .NET Framework applications with UI layer
One major feature we’re releasing today is the modernization of UI frameworks from ASP.NET Web Forms to Blazor. This is added to existing support for modernizing model-view-controller (MVC) Razor views to ASP.NET Core Razor views.
As mentioned previously, if I have a .NET application in legacy .NET Framework, then I continue using AWS Transform for .NET to port it to cross-platform .NET. For legacy applications with UIs built on ASP.NET Web Forms, AWS Transform now modernizes the UI layer to Blazor along with porting the backend code.
AWS Transform for .NET converts ASP.NET Web Forms projects to Blazor on ASP.NET Core, facilitating the migration of ASP.NET websites to Linux. The UI modernization feature is enabled by default in AWS Transform for .NET on both the AWS Transform web console and Visual Studio extension.
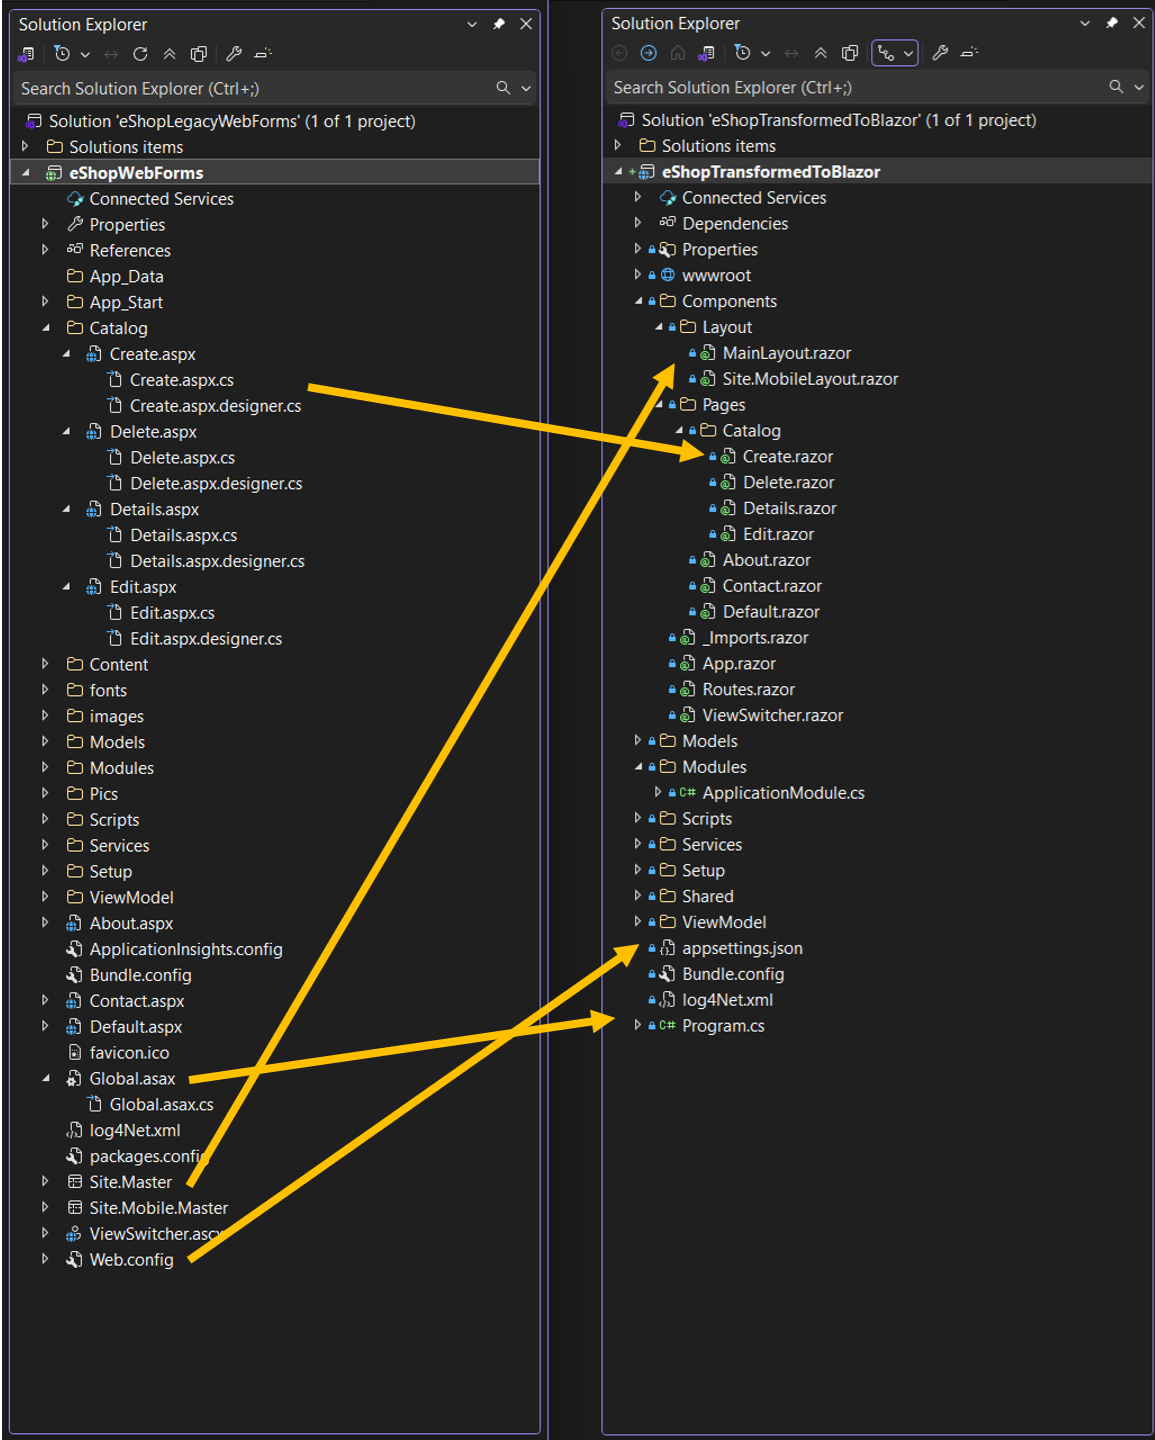
During the modernization process, AWS Transform handles the conversion of ASPX pages, ASCX custom controls, and code-behind files, implementing them as server-side Blazor components rather than web assembly. The following project and file changes are made during the transformation:
| From | To | Description |
| *.aspx, *.ascx | *.razor | .aspx pages and .ascx custom controls become .razor files |
| Web.config | appsettings.json | Web.config settings become appsettings.json settings |
| Global.asax | Program.cs | Global .asax code becomes Program.cs code |
| *.master | *layout.razor | Master files become layout.razor files |
Other new features in AWS Transform for .NET
Along with UI porting, AWS Transform for .NET has added support for more transformation capabilities and enhanced developer experience. These new features include the following:
- Port to .NET 10 and .NET Standard – AWS Transform now supports porting to .NET 10, the latest Long-Term Support (LTS) release, which was released on November 11, 2025. It also supports porting class libraries to .NET Standard, a formal specification for a set of APIs that are common across all .NET implementations. Furthermore, AWS Transform is now available with AWS Toolkit for Visual Studio 2026.
- Editable transformation report – After the assessment is complete, you can now view and customize the transformation plan based on your specific requirements and preferences. For example, you can update package replacement details.
- Real-time transformation updates with estimated remaining time – Depending on the size and complexity of the codebase, AWS Transform can take some time to complete the porting. You can now track transformation updates in real-time along with the estimated remaining time.
- Next steps markdown – After the transformation is complete, AWS Transform now generates a next steps markdown file with the remaining tasks to complete the porting. You can use this as a revised plan to repeat the transformation with AWS Transform or use AI code-companions to complete the porting.
Things to know
Some more things to know are:
- AWS Regions – AWS Transform for full-stack Windows modernization is generally available today in the US East (N. Virginia) Region. For Regional availability and future roadmap, visit the AWS Capabilities by Region.
- Pricing – Currently, there is no added charge for Windows modernization features of AWS Transform. Any resources you create or continue to use in your AWS account using the output of AWS Transform are billed according to their standard pricing. For limits and quotas, refer to the AWS Transform User Guide.
- SQL Server versions supported – AWS Transform supports the transformation of SQL Server versions from 2008 R2 through 2022, including all editions (Express, Standard, and Enterprise). SQL Server must be hosted on Amazon RDS or Amazon EC2 in the same Region as AWS Transform.
- Entity Framework versions supported – AWS Transform supports the modernization of Entity Framework versions 6.3 through 6.5 and Entity Framework Core 1.0 through 8.0.
- Getting started – To get started, visit AWS Transform for full-stack Windows modernization User Guide.
– Prasad
Introducing AWS Transform custom: Crush tech debt with AI-powered code modernization
Post Syndicated from Matheus Guimaraes original https://aws.amazon.com/blogs/aws/introducing-aws-transform-custom-crush-tech-debt-with-ai-powered-code-modernization/
Technical debt is one of the most persistent challenges facing enterprise development teams today. Studies show that organizations spend 20% of their IT budget on technical debt instead of advancing new capabilities. Whether it’s upgrading legacy frameworks, migrating to newer runtime versions, or refactoring outdated code patterns, these essential but repetitive tasks consume valuable developer time that could be spent on innovation.
Today, we’re excited to announce AWS Transform custom, a new agent that fundamentally changes how organizations approach modernization at scale. This intelligent agent combines pre-built transformations for Java, Node.js, and Python upgrades with the ability to define custom transformations. By learning specific transformation patterns and automating them across entire codebases, customers using AWS Transform custom have achieved up to 80% reduction in execution time in many cases, freeing developers to focus on innovation.
You can define transformations using your documentation, natural language descriptions, and code samples. The service then applies these specific patterns consistently across hundreds or thousands of repositories, improving its effectiveness through both explicit feedback and implicit signals like developers’ manual fixes within your transformation projects.
AWS Transform custom offers both CLI and web interfaces to suit different modernization needs. You can use the CLI to define transformations through natural language interactions and execute them on local codebases, either interactively or autonomously. You can also integrate it into code modernization pipelines or workflows, making it ideal for machine-driven automation. Meanwhile, the web interface provides comprehensive campaign management capabilities, helping teams track and coordinate transformation progress across multiple repositories at scale.
Language and framework modernization
AWS Transform supports runtime upgrades without the need to provide additional information, understanding not only the syntax changes required but also the subtle behavioral differences and optimization opportunities that come with newer versions. The same intelligent approach applies to Node.js, Python and Java runtime upgrades, and even extends to infrastructure-level transitions, such as migrating workloads from x86 processors to AWS Graviton.
It also navigates framework modernization with sophistication. When organizations need to update their Spring Boot applications to take advantage of newer features and security patches, AWS Transform custom doesn’t merely update version numbers but understands the cascading effects of dependency changes, configuration updates, and API modifications.
For teams facing more dramatic shifts, such as migrating from Angular to React, AWS Transform custom can learn the patterns of component translation, state management conversion, and routing logic transformation that make such migrations successful.
Infrastructure and enterprise-scale transformations
The challenge of keeping up with evolving APIs and SDKs becomes particularly acute in cloud-based environments where services are continuously improving. AWS Transform custom supports AWS SDK updates across a broad spectrum of programming languages that enterprises use including Java, Python, and JavaScript. The service understands not only the mechanical aspects of API changes, but also recognizes best practices and optimization opportunities available in newer SDK versions.
Infrastructure as Code transformations represent another critical capability, especially as organizations evaluate different tooling strategies. Whether you’re converting AWS Cloud Development Kit (AWS CDK) templates to Terraform for standardization purposes, or updating AWS CloudFormation configurations to access new service features, AWS Transform custom understands the declarative nature of these tools and can maintain the intent and structure of your infrastructure definitions.
Beyond these common scenarios, AWS Transform custom excels at addressing the unique, organization-specific code patterns that accumulate over years of development. Every enterprise has its own architectural conventions, utility libraries, and coding standards that need to evolve over time. It can learn these custom patterns and help refactor them systematically so that institutional knowledge and best practices are applied consistently across the entire application portfolio.
AWS Transform custom is designed with enterprise development workflows in mind, enabling center of excellence teams and system integrators to define and execute organization-wide transformations while application developers focus on reviewing and integrating the transformed code. DevOps engineers can then configure integrations with existing continuous integration and continuous delivery (CI/CD) pipelines and source control systems. It also includes pre-built transformations for Java, Node.js and Python runtime updates which can be particularly useful for AWS Lambda functions, along with transformations for AWS SDK modernization to help teams get started immediately.
Getting started
AWS Transform makes complex code transformations manageable through both pre-built and custom transformation capabilities. Let’s start by exploring how to use an existing transformation to address a common modernization challenge: upgrading AWS Lambda functions due to end-of-life (EOL) runtime support.
For this example, I’ll demonstrate migrating a Python 3.8 Lambda function to Python 3.13, as Python 3.8 reached EOL and is no longer receiving security updates. I’ll use the CLI for this demo, but I encourage you to also explore the web interface’s powerful campaign management capabilities.
First, I use the command atx custom def list to explore the available transformation definitions. You can also access this functionality through a conversational interface by typing only atx instead of issuing the command directly, if you prefer.

This command displays all available transformations, including both AWS-managed defaults and any existing custom transformations created by users in my organization. AWS-managed transformations are identified by the AWS/ prefix, indicating they’re maintained and updated by AWS. In the results, I can see several options such as AWS/java-version-upgrade for Java runtime modernization, AWS/python-boto2-to-boto3-migration for updating Python AWS SDK usage, AWS/nodejs-version-upgrade for Node.js runtime updates.
For my Python 3.8 to 3.13 migration, I’ll use the AWS/python-version-upgrade transformation.
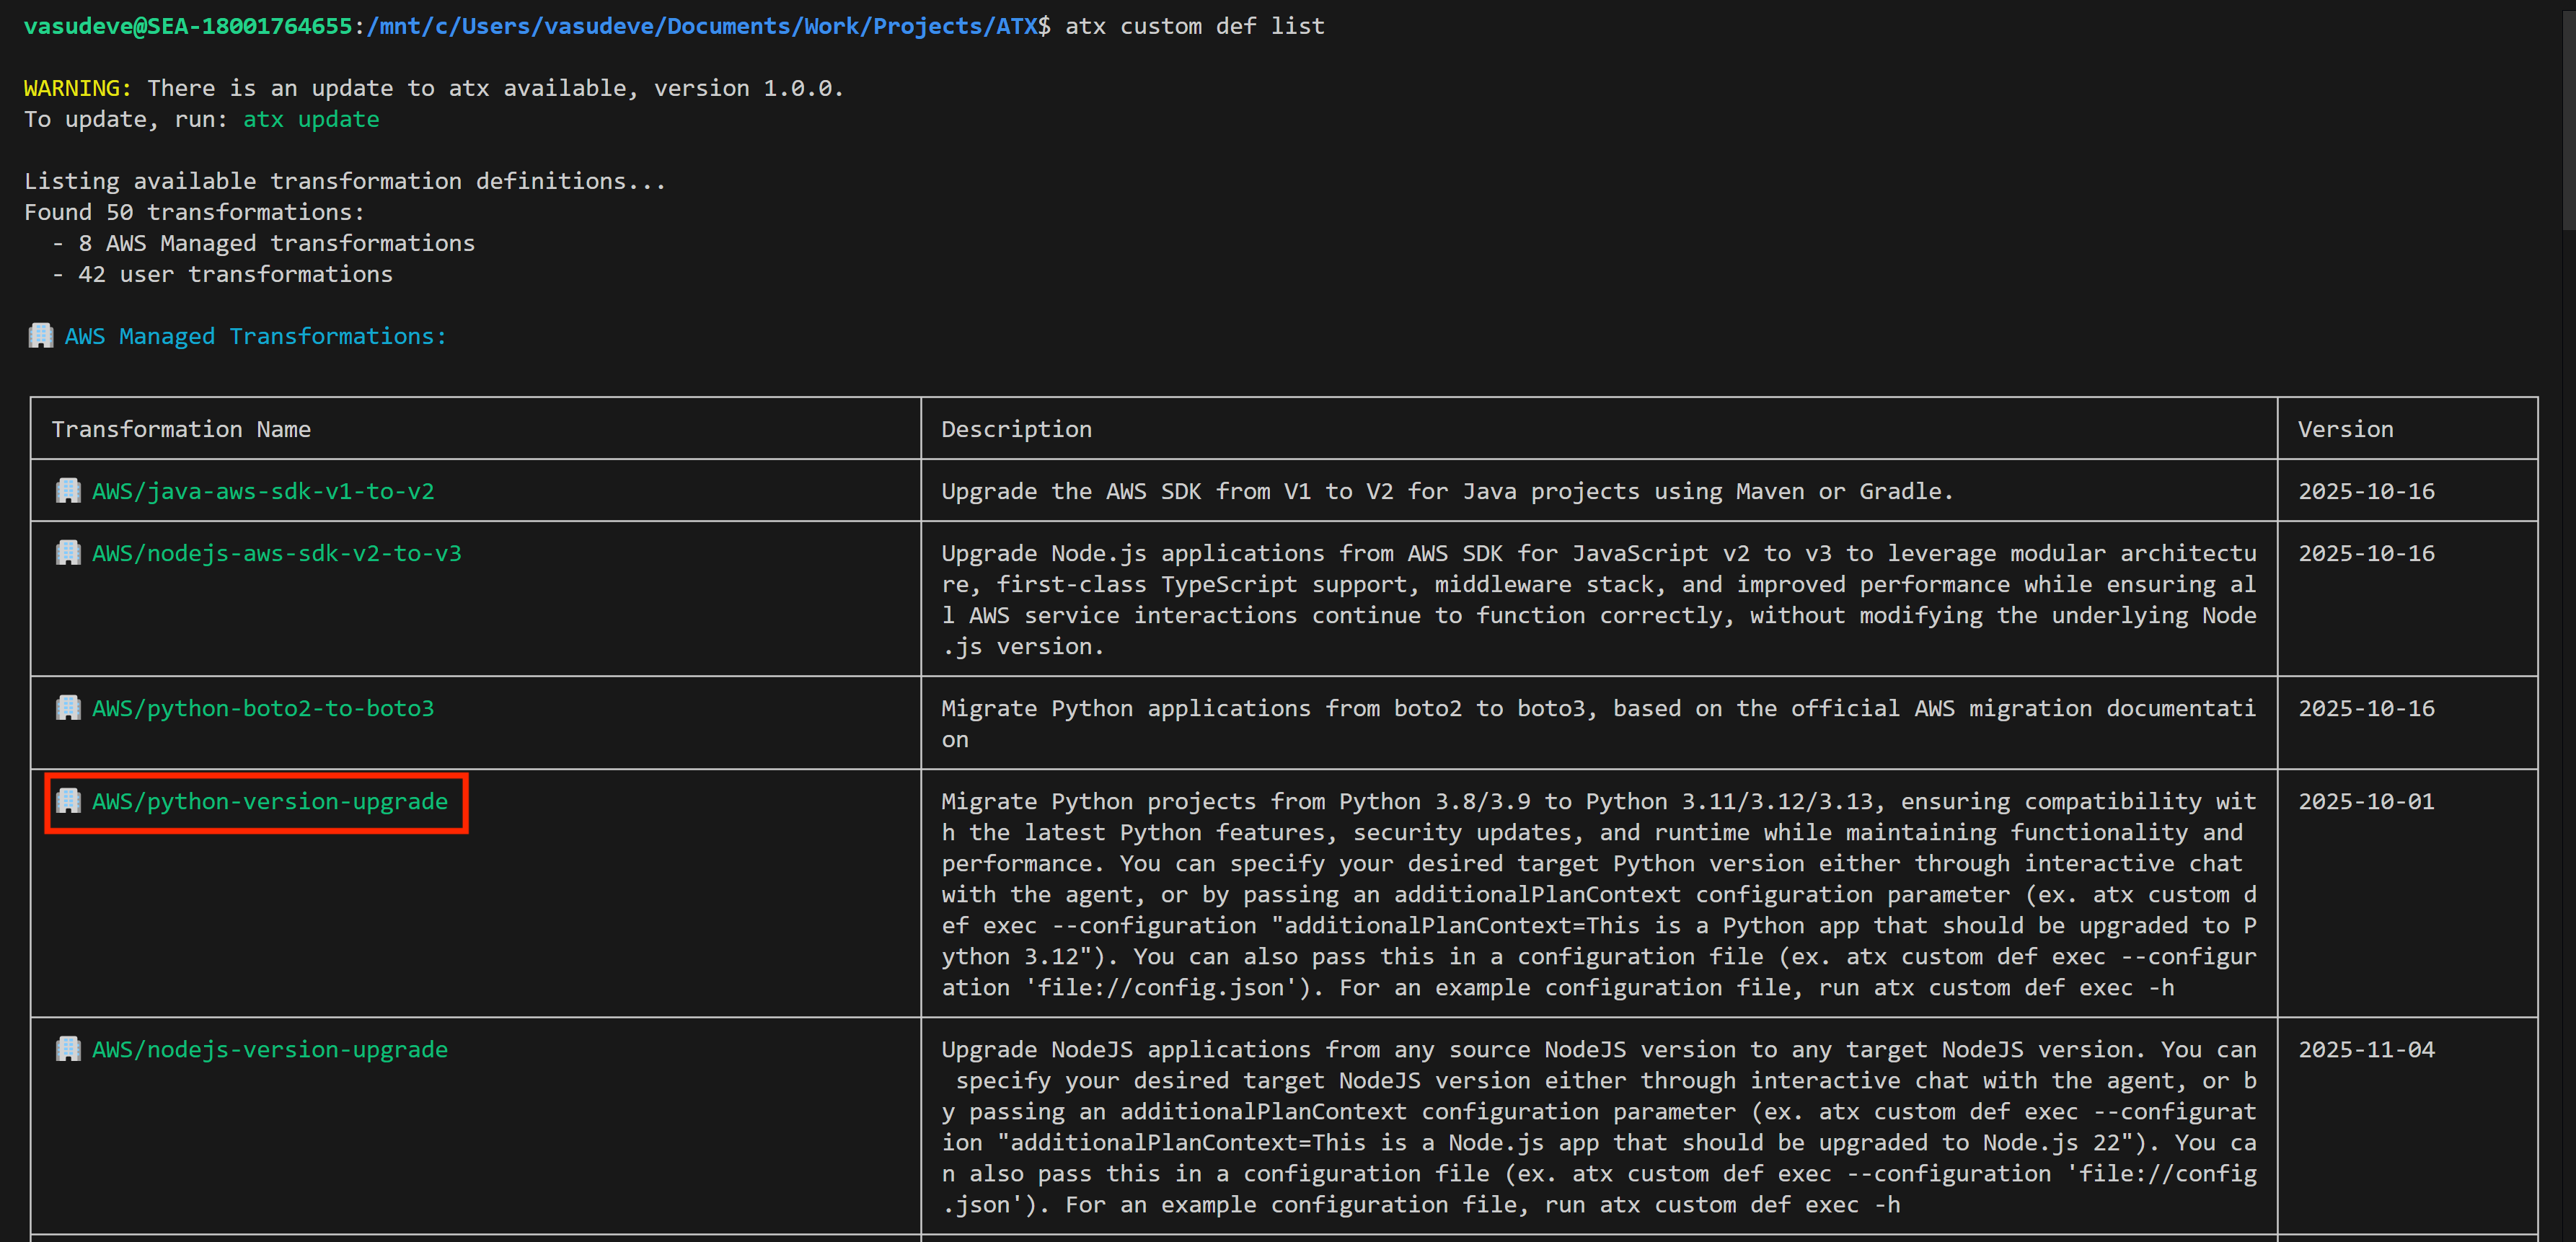
You run a migration by using the atx custom def exec command. Please consult the documentation for more details about the command and all its options. Here, I run it against my project repository specifying the transformation name. I also add pytest to run unit tests for validation. More importantly, I use the additionalPlanContext section in the --configuration input to specify which Python version I want to upgrade to. For reference, here’s the command I have for my demo (I’ve used multiple lines and indented it here for clarity):
atx custom def exec
-p /mnt/c/Users/vasudeve/Documents/Work/Projects/ATX/lambda/todoapilambda
-n AWS/python-version-upgrade
-C "pytest"
--configuration
    "additionalPlanContext= The target Python version to upgrade to is Python 3.13"
-x -t
AWS Transform then starts the migration process. It analyzes my Lambda function code, identifies Python 3.8-specific patterns, and automatically applies the necessary changes for Python 3.13 compatibility. This includes updating syntax for deprecated features, modifying import statements, and adjusting any version-specific behaviors.
After execution, it provides a comprehensive summary including a report on dependencies updated in requirements.txt with Python 3.13-compatible package versions, instances of deprecated syntax replaced with current equivalents, updated runtime configuration notes for AWS Lambda deployment, suggested test cases to validate the migration, and more. It also provides a body of evidence that serve as proof of success.

The migrated code lives in a local branch so you can review and merge when satisfied. Alternatively, you can keep providing feedback and reiterating until yo’re happy that the migration is fully complete and meets your expectations.
This automated process changes what would typically require hours of manual work into a streamlined, consistent upgrade that maintains code quality while maintaining compatibility with the newer Python runtime.
Creating a new custom transformation
While AWS-managed transformations handle common scenarios effectively, you can also create custom transformations tailored to your organization’s specific needs. Let’s explore how to create a custom transformation to see how AWS Transform learns from your specific requirements.
I type atx to initialize the atx cli and start the process.
The first thing it asks me is if I want to use one of the existing transformations or create a new one. I choose to create a new one. Notice that from here on the whole conversation takes place using natural language, not commands. I typed new one but I could have typed I want to create a new one and it would’ve understood it exactly the same.

It then prompts me to provide more information about the kind of transformation I’d like to perform. For this demo, I’m going to migrate an Angular application, so I type angular 16 to 19 application migration which prompts the CLI to search for all transformations available for this type of migration. In my case, my team has already created and made available a few Angular migrations, so it shows me those. However, it warns me that none of them is an exact match to my specific request for migrating from Angular 16 to 19. It then asks if I’d like to select from one of the existing transformations listed or create a custom one.
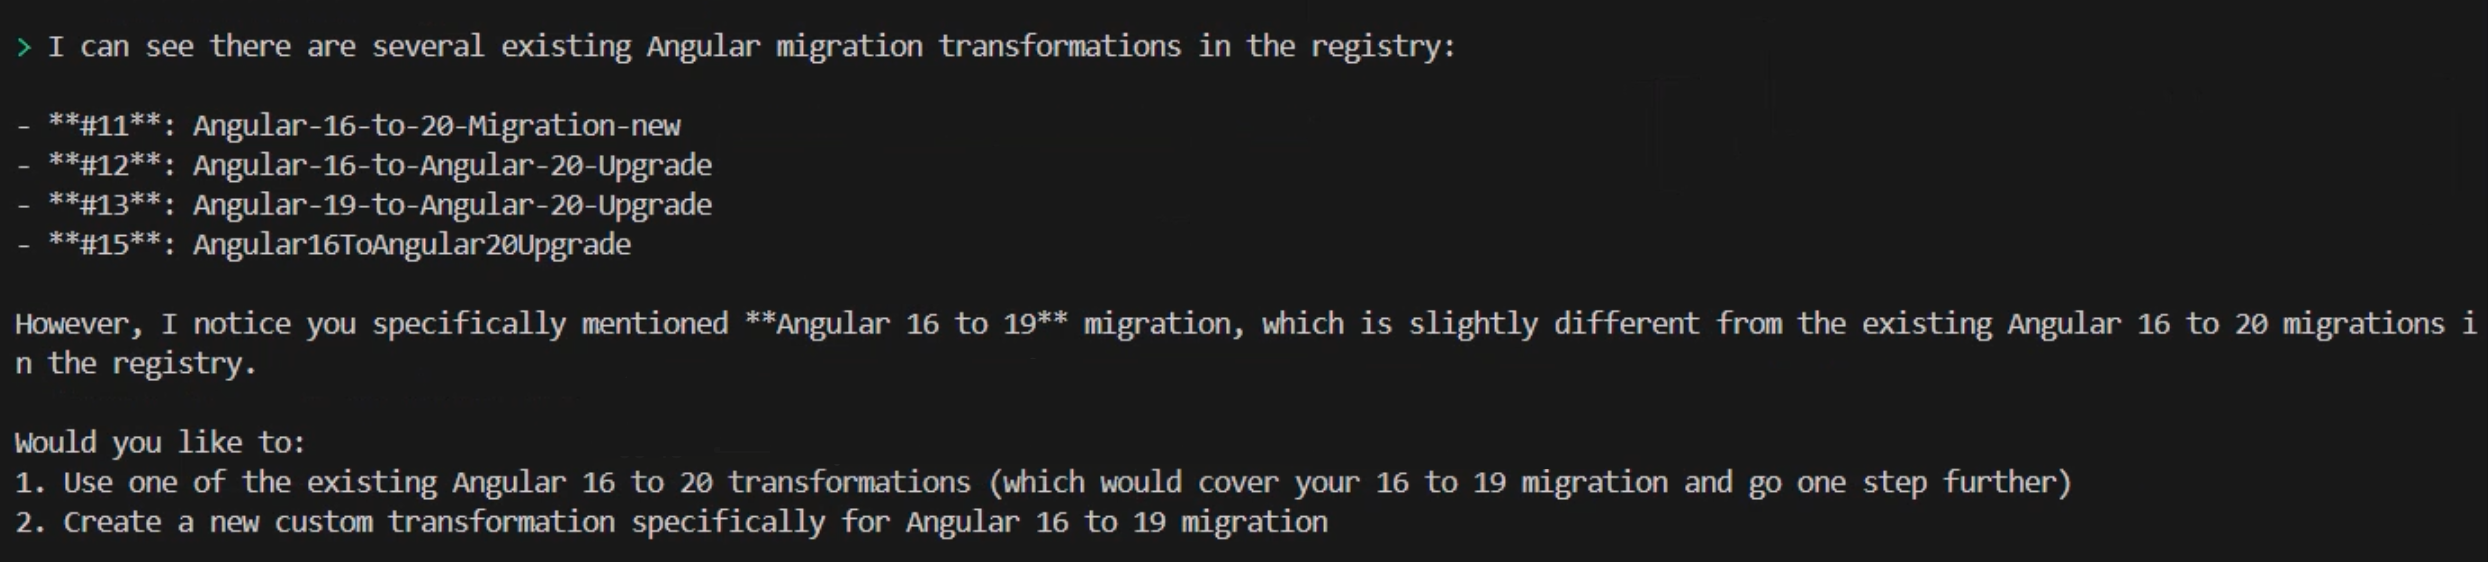
I choose to create a custom one by continuing to use natural language and typing create a new one as a command. Again, this could be any variation of that statement provided that you indicate your intentions clearly. It follows by asking me a few questions including whether I have any useful documentation, example code or migration guides that I can provide to help customize the transformation plan.

For this demo, I’m only going to rely on AWS Transform to provide me with good defaults. I type I don't have these details. Follow best practices. and the CLI responds by telling me that it will create a comprehensive transformation definition for migrating Angular 16 to Angular 19. Of course, I relied on the pre-trained data to generate results based on best practices. As usual, the recommendation is to provide as much information and relevant data as possible at this stage of the process for better results. However, you don’t need to have all the data upfront. You can keep on providing data at any time› as you iterate through the process of creating the custom transformation definition.
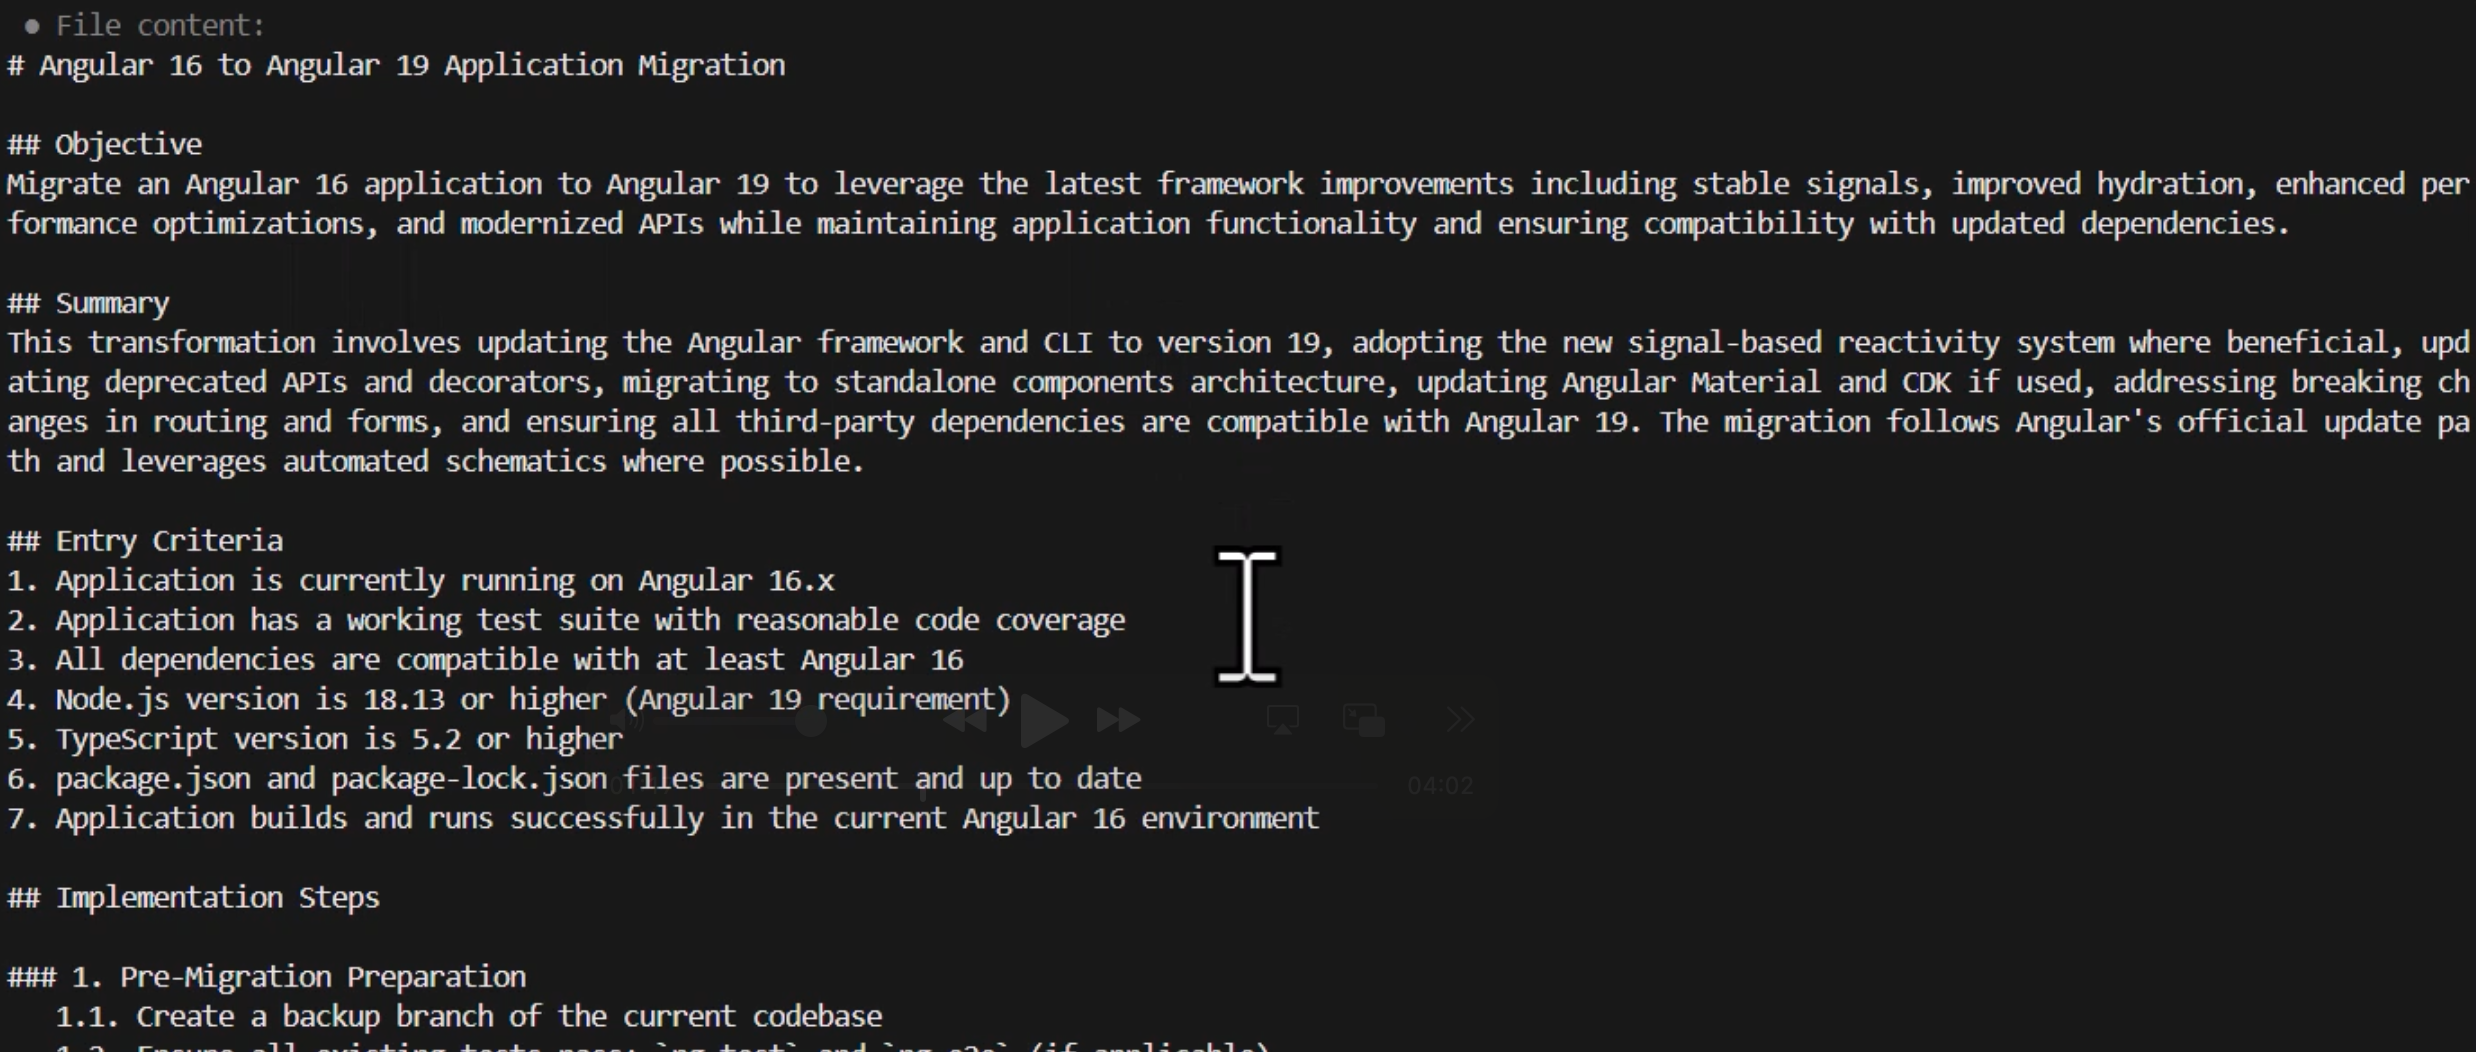
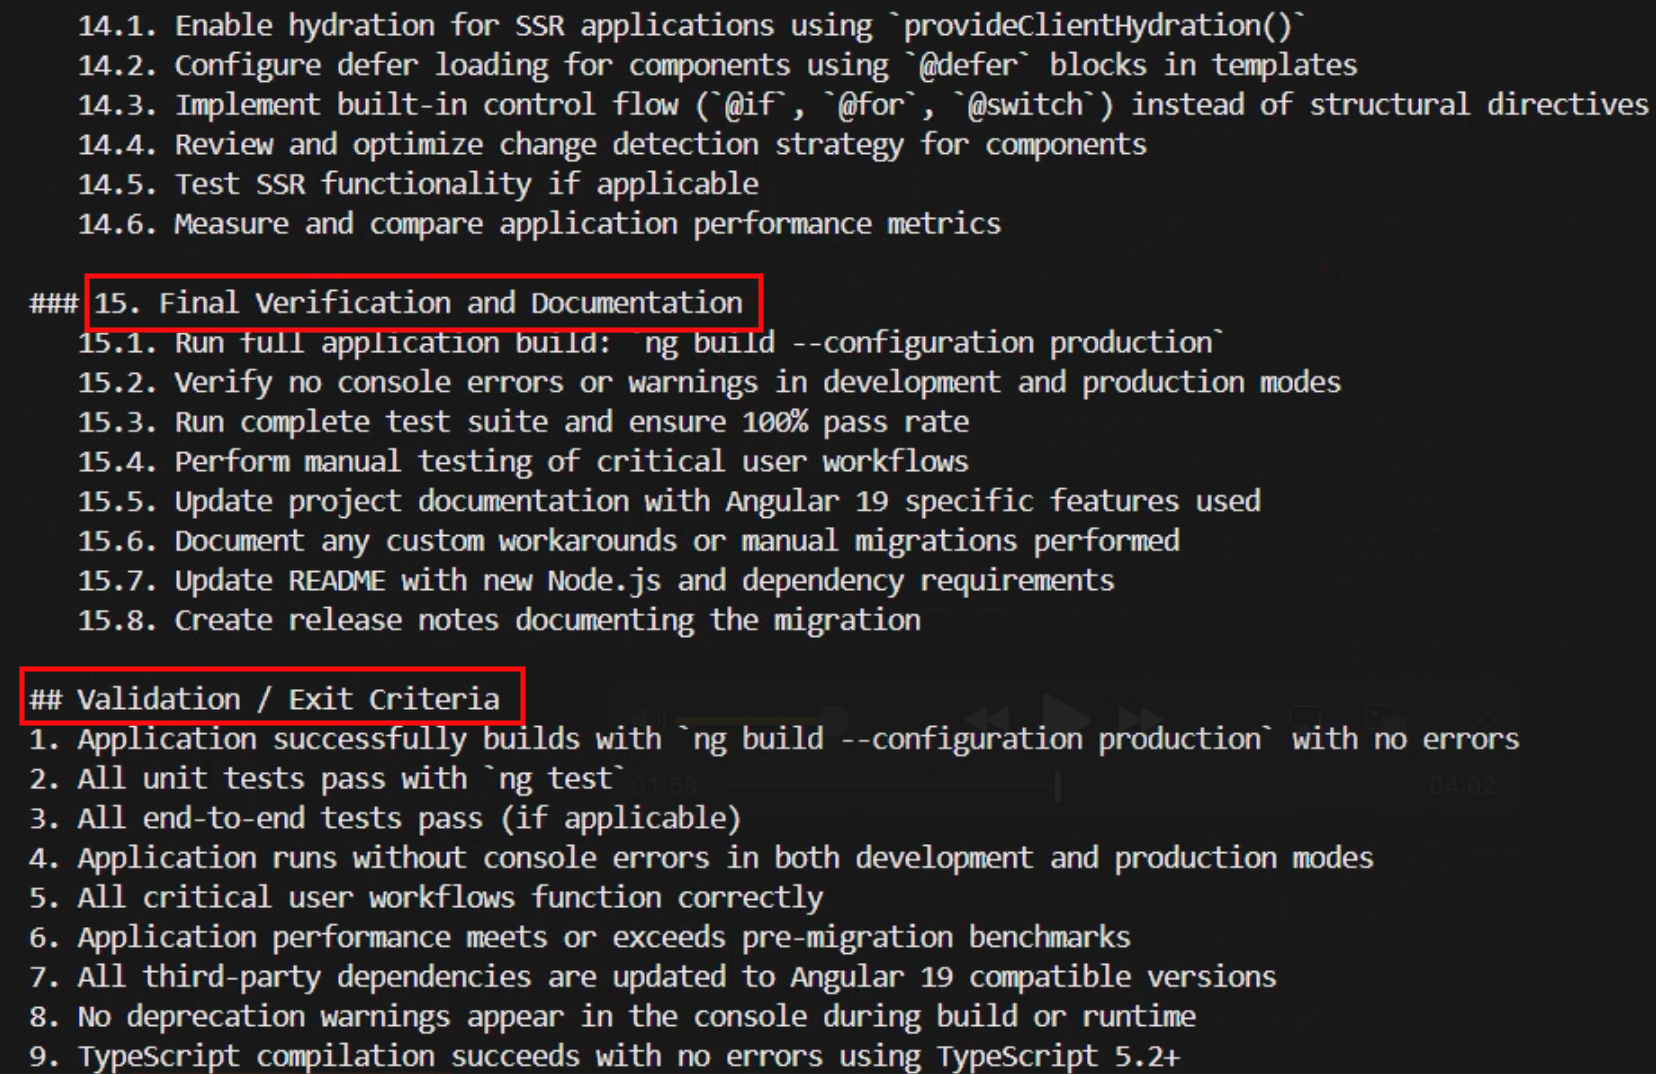
The transformation definition is generated as a markup file containing a summary and a comprehensive sequence of implementation steps grouped logically into phases such as premigration preparation, processing and partitioning, static dependency analysis, searching and applying specific transformation rules, and step-by-step migration and iterative validation.
It’s interesting to see that AWS Transform opted for the best practice of doing incremental framework updates creating steps for migrating the application first to 17 then 18 then 19 instead of trying to go directly from 16 to 19 to minimize issues.
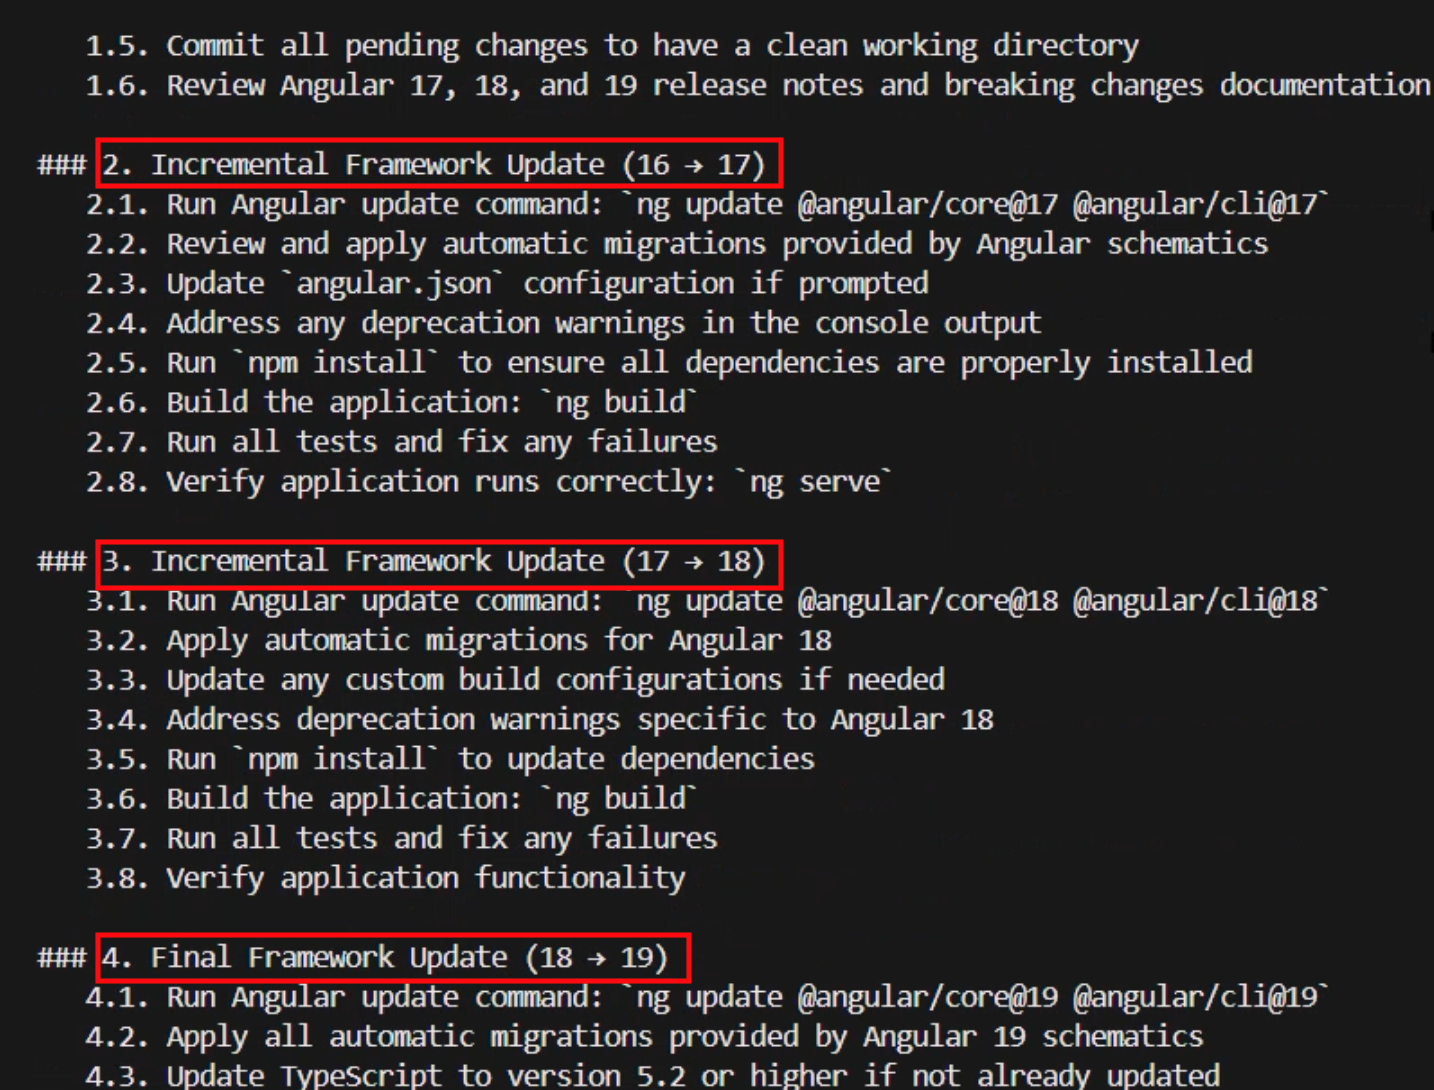
Note that the plan includes various stages of testing and verification to confirm that the various phases can be concluded with confidence. At the very end, it also includes a final validation stage listing exit criteria that performs a comprehensive set of tests against all aspects of the application that will be used to accept the migration as successfully complete.
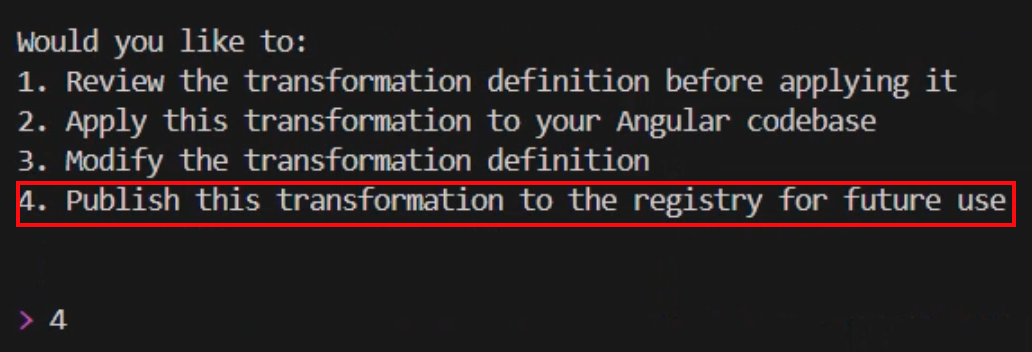
After the transformation definition is created, AWS Transform asks me about what I would like to do next. I can choose to review or modify the transformation definition and I can reiterate through this process as much as I need until I arrive at one that I’m satisfied with. I can also choose to already apply this transformation definition to an Angular codebase. However, first I want to make this transformation available to my team members as well as myself so we can all use it again in the future. So, I choose option 4 to publish this transformation to the registry.
This custom transformation needs a name and a description of its objective which is displayed when users browse the registry. AWS Transforms automatically extracts those from context for me and asks me if I would like to modify them before going ahead. I like the sensible default of “Angular-16-to-19-Migration”, and the objective is clearly stated, so I choose to accept the suggestions and publish it by answering with yes, looks good.

Now that the transformation definition is created and published, I can use it and run it multiple times against any code repository. Let’s apply the transformation to a code repository with a project written in Angular 16. I now choose option 1 from the follow-up prompt and the CLI asks me for the path in my file system to the application that I want to migrate and, optionally, the build command that it should use.
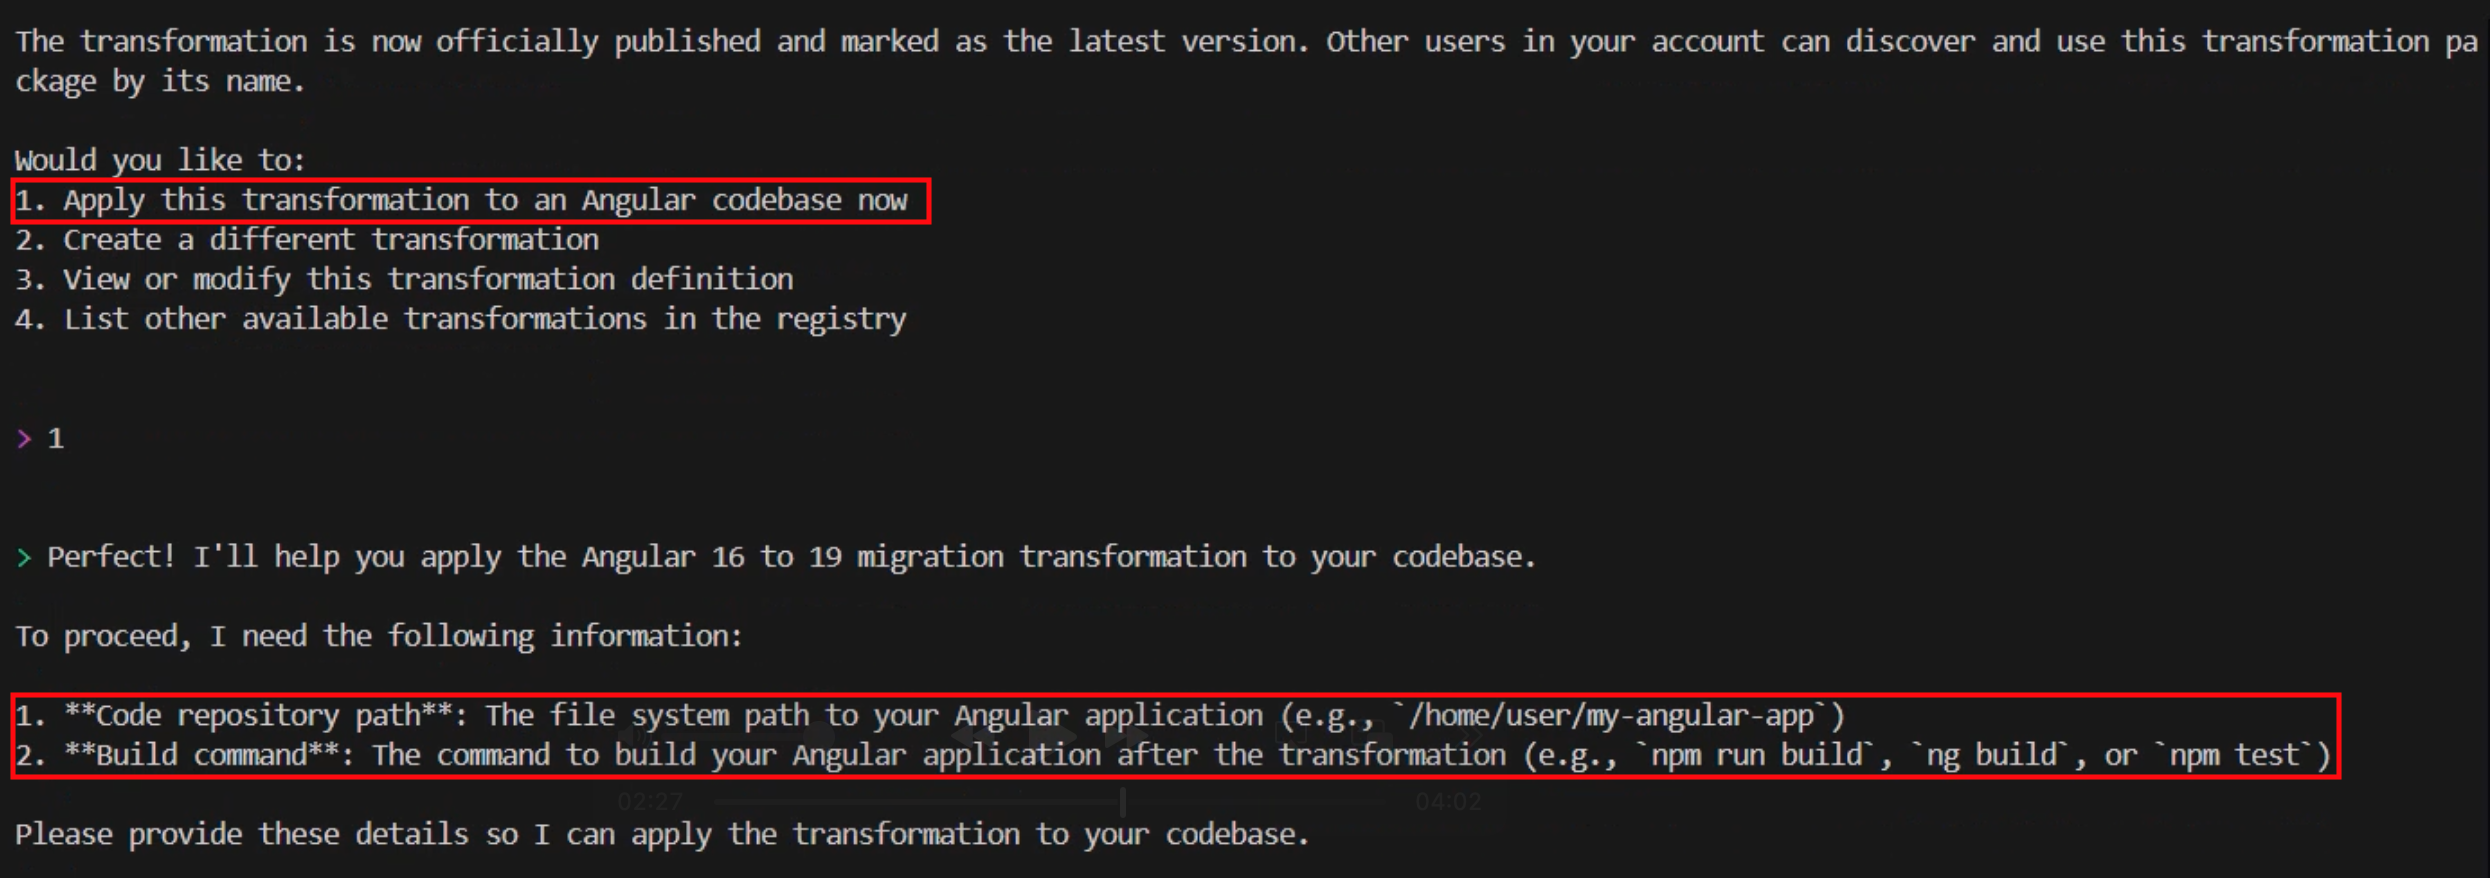
After I provide that information, AWS Transform proceeds to analyze the code base and formulate a thorough step-by-step transformation plan based on the definition created earlier. After it’s done, it creates a JSON file containing the detailed migration plan specifically designed for applying our transformation definition to this code base. Similar to the process of creating the transformation definition, you can review and iterate through this plan as much as you need, providing it with feedback and adjusting it to any specific requirements you might have.
When I’m ready to accept the plan, I can use natural language to tell AWS Transform that we can start the migration process. I type looks good, proceed and watch the progress in my shell as it starts executing the plan and making the changes to my code base one step at a time.
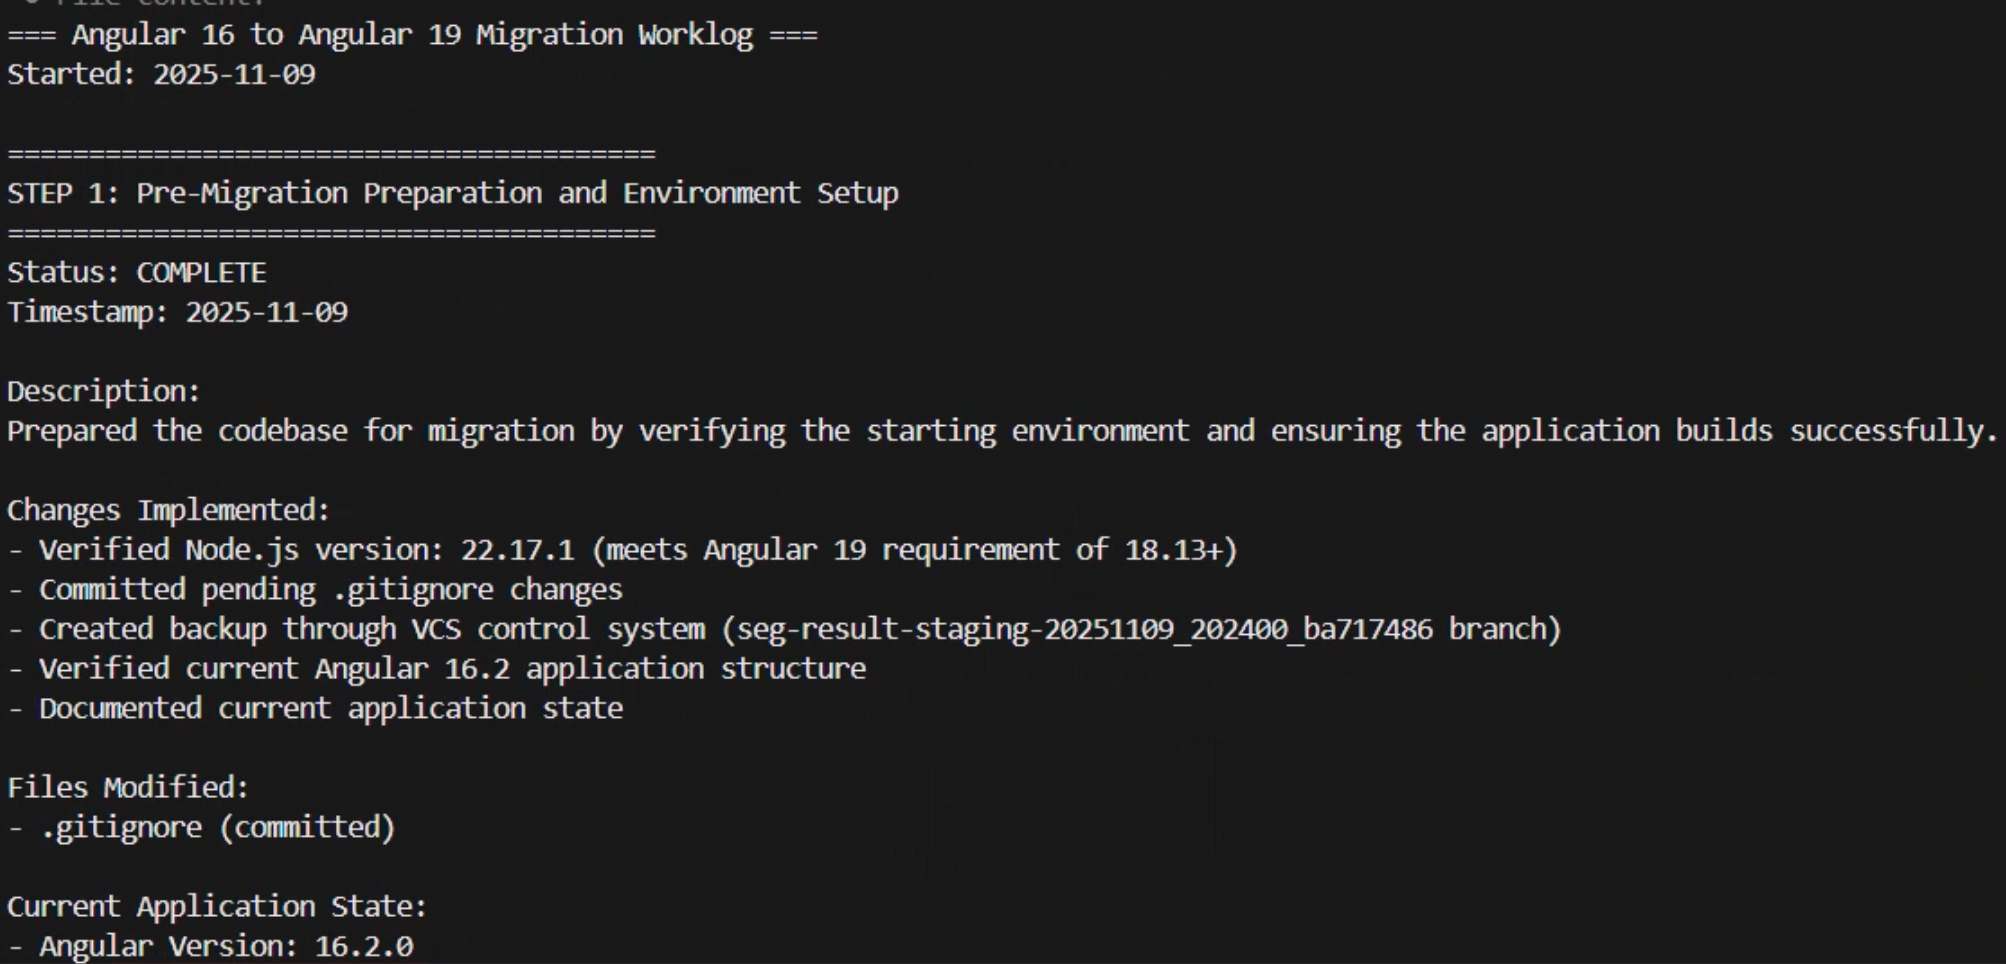
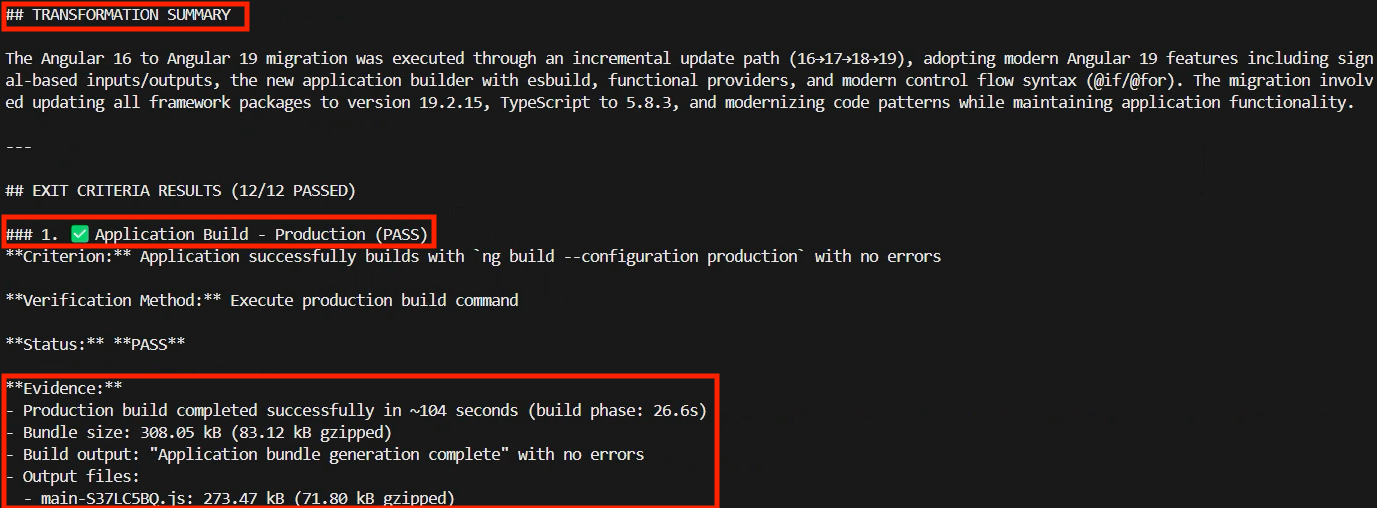
The time it takes will vary depending on the complexity of the application. In my case, it took a few minutes to complete. After it has finished, it provides me with a transformation summary and the status of each one of the exit criteria that were included in the final verification phase of the plan alongside all the evidence to support the reported status. For example, the Application Build – Production criteria was listed as passed and some of the evidence provided included the incremental Git commits, the time that it took to complete the production build, the bundle size, the build output message, and the details about all the output files created.
Conclusion
AWS Transform represents a fundamental shift in how organizations approach code modernization and technical debt. The service helps to transform what was at one time a fragmented, team-by-team effort into a unified, intelligent capability that eliminates knowledge silos, keeping your best practices and institutional knowledge available as scalable assets across the entire organization. This helps to accelerate modernization initiatives while freeing developers to spend more time on innovation and driving business value instead of focusing on repetitive maintenance and modernization tasks.
Things to know
AWS Transform custom is now generally available. Visit the get started guide to start your first transformation campaign or check out the documentation to learn more about setting up custom transformation definitions.
[$] Some 6.18 development statistics
Post Syndicated from corbet original https://lwn.net/Articles/1046966/
Linus Torvalds released
the 6.18 kernel as expected on November 30, closing the last full
development cycle of 2025. It was another busy cycle, featuring a record
number of developers. The time has come for a look at where the code came
from for this kernel release, but also for the year-long long-term-support
cycle which has also reached its conclusion with this release.
Maya Ackerman | Creative Machines: AI, Art & Us | Talks at Google
Post Syndicated from Talks at Google original https://www.youtube.com/watch?v=mxPgcNbSacI
Smart Home Chores: Make Chores Fun for Kids & Get Family Rewards! #shorts
Post Syndicated from BeardedTinker original https://www.youtube.com/shorts/76ZDkh8dGz8
Security updates for Monday
Post Syndicated from jzb original https://lwn.net/Articles/1048817/
Security updates have been issued by AlmaLinux (bind9.18, cups, gimp, ipa, kernel, libssh, mingw-expat, openssl, pcs, sssd, tigervnc, and valkey), Debian (gnome-shell-extension-gsconnect, mistral-dashboard, pagure, python-mistralclient, pytorch, qtbase-opensource-src, sogo, tryton-server, and unbound), Fedora (cef, drupal7, glib2, linux-firmware, migrate, pack, pgadmin4, rnp, and unbound), Slackware (libxslt), SUSE (cpp-httplib, curl, glib2, grub2, kernel, libcoap-devel, libcryptopp, libwireshark19, postgresql15, and postgresql17), and Ubuntu (edk2).
Three stable kernels for Monday
Post Syndicated from jzb original https://lwn.net/Articles/1048755/
Greg Kroah-Hartman has announced the release of the 6.17.10, 6.12.60, and 6.6.118 stable kernels. As usual, each
contains a number of important fixes throughout the tree. Users are
advised to upgrade.
Cool: A History of Mint
Post Syndicated from The History Guy: History Deserves to Be Remembered original https://www.youtube.com/watch?v=nR_1E6nFhtE
Banning VPNs
Post Syndicated from Bruce Schneier original https://www.schneier.com/blog/archives/2025/12/banning-vpns.html
This is crazy. Lawmakers in several US states are contemplating banning VPNs, because…think of the children!
As of this writing, Wisconsin lawmakers are escalating their war on privacy by targeting VPNs in the name of “protecting children” in A.B. 105/S.B. 130. It’s an age verification bill that requires all websites distributing material that could conceivably be deemed “sexual content” to both implement an age verification system and also to block the access of users connected via VPN. The bill seeks to broadly expand the definition of materials that are “harmful to minors” beyond the type of speech that states can prohibit minors from accessing potentially encompassing things like depictions and discussions of human anatomy, sexuality, and reproduction.
The EFF link explains why this is a terrible idea.
Comic for 2025.12.01 – Casper 2
Post Syndicated from Explosm.net original https://explosm.net/comics/casper-2
New Cyanide and Happiness Comic
Why Replicate is joining Cloudflare
Post Syndicated from Andreas Jansson original https://blog.cloudflare.com/why-replicate-joining-cloudflare/
We’re happy to announce that as of today Replicate is officially part of Cloudflare.
When we started Replicate in 2019, OpenAI had just open sourced GPT-2, and few people outside of the machine learning community paid much attention to AI. But for those of us in the field, it felt like something big was about to happen. Remarkable models were being created in academic labs, but you needed a metaphorical lab coat to be able to run them.
We made it our mission to get research models out of the lab into the hands of developers. We wanted programmers to creatively bend and twist these models into products that the researchers would never have thought of.
We approached this as a tooling problem. Just like tools like Heroku made it possible to run websites without managing web servers, we wanted to build tools for running models without having to understand backpropagation or deal with CUDA errors.
The first tool we built was Cog: a standard packaging format for machine learning models. Then we built Replicate as the platform to run Cog models as API endpoints in the cloud. We abstracted away both the low-level machine learning, and the complicated GPU cluster management you need to run inference at scale.
It turns out the timing was just right. When Stable Diffusion was released in 2022 we had mature infrastructure that could handle the massive developer interest in running these models. A ton of fantastic apps and products were built on Replicate, apps that often ran a single model packaged in a slick UI to solve a particular use case.
Since then, AI Engineering has matured into a serious craft. AI apps are no longer just about running models. The modern AI stack has model inference, but also microservices, content delivery, object storage, caching, databases, telemetry, etc. We see many of our customers building complex heterogenous stacks where the Replicate models are one part of a higher-order system across several platforms.
This is why we’re joining Cloudflare. Replicate has the tools and primitives for running models. Cloudflare has the best network, Workers, R2, Durable Objects, and all the other primitives you need to build a full AI stack.
The AI stack lives entirely on the network. Models run on data center GPUs and are glued together by small cloud functions that call out to vector databases, fetch objects from blob storage, call MCP servers, etc. “The network is the computer” has never been more true.
At Cloudflare, we’ll now be able to build the AI infrastructure layer we have dreamed of since we started. We’ll be able to do things like run fast models on the edge, run model pipelines on instantly-booting Workers, stream model inputs and outputs with WebRTC, etc.
We’re proud of what we’ve built at Replicate. We were the first generative AI serving platform, and we defined the abstractions and design patterns that most of our peers have adopted. We’ve grown a wonderful community of builders and researchers around our product.
Top announcements of AWS re:Invent 2025
Post Syndicated from AWS News Blog Team original https://aws.amazon.com/blogs/aws/top-announcements-of-aws-reinvent-2025/
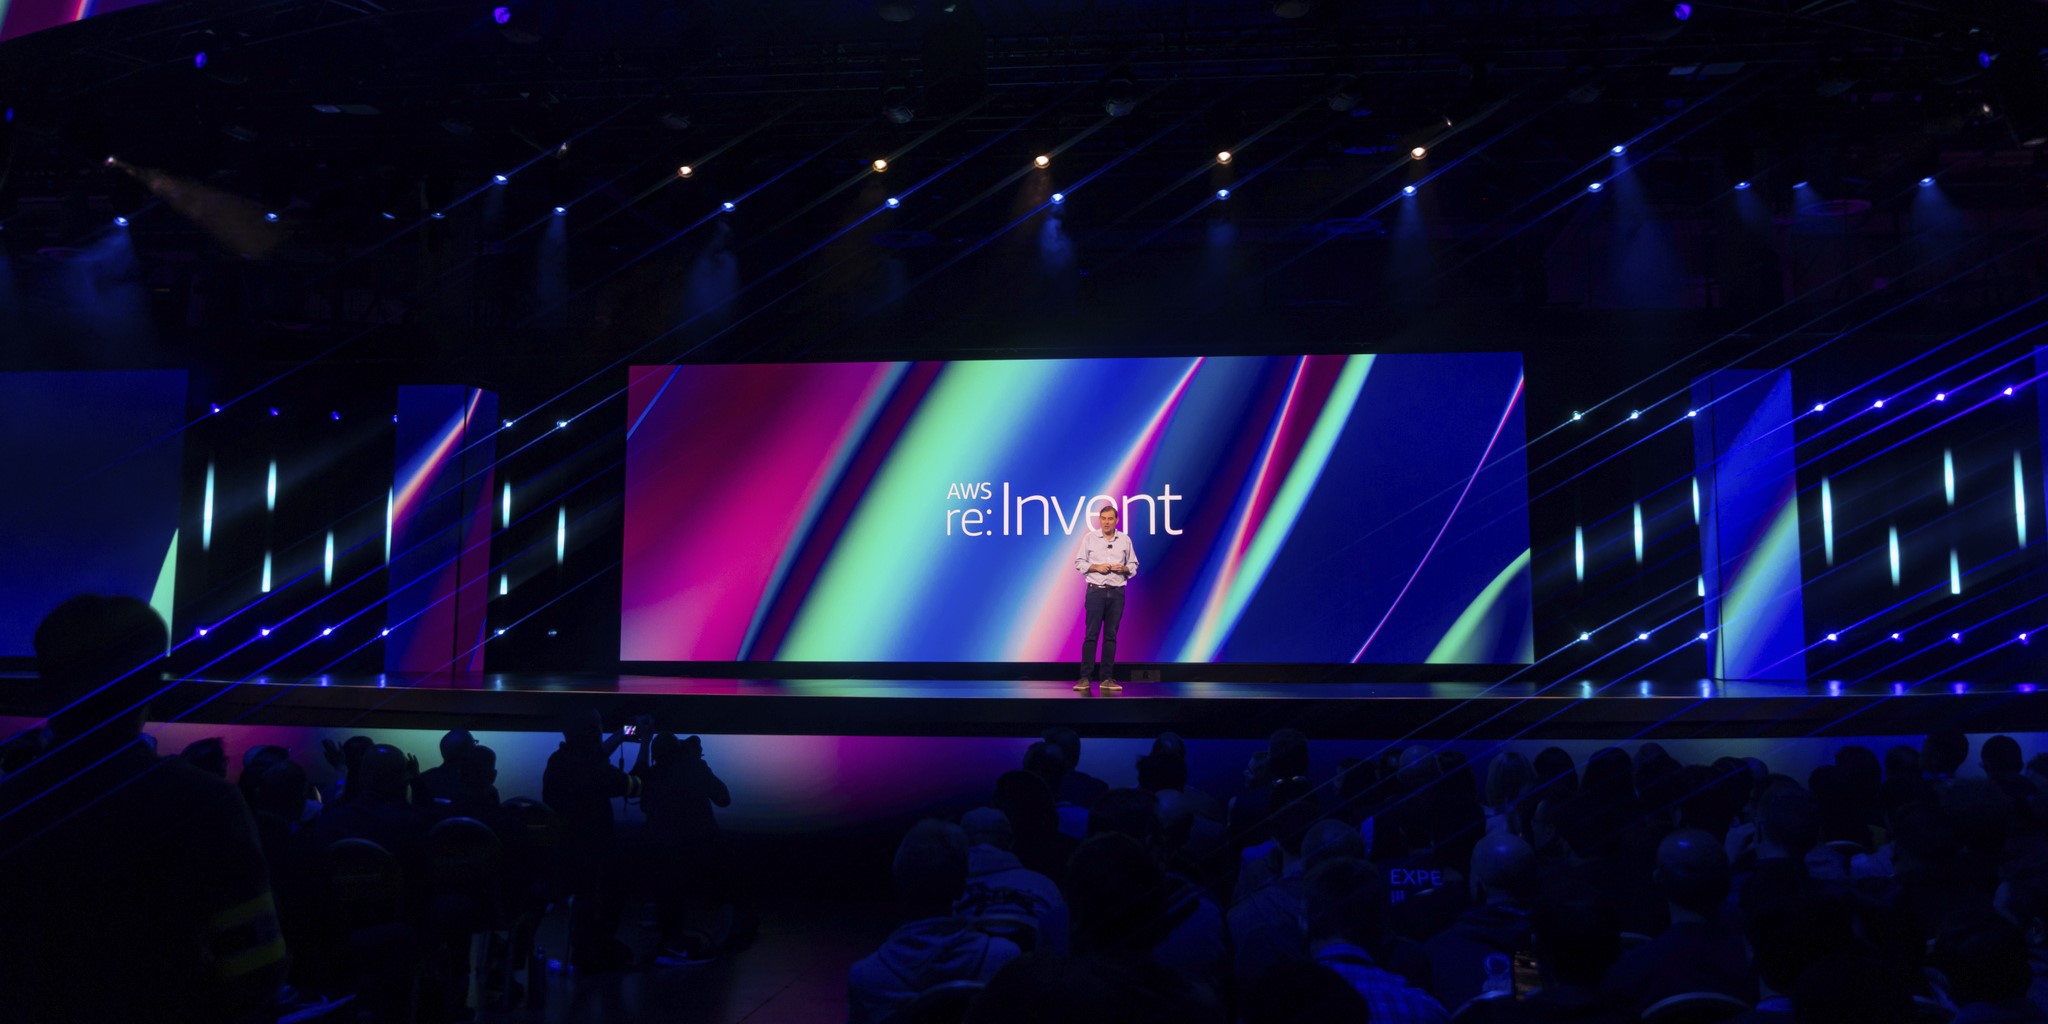 We’re rounding up the most exciting and impactful announcements from AWS re:Invent 2025, which takes place November 30-December 4 in Las Vegas. This guide highlights the innovations that will help you build, scale, and transform your business in the cloud.
We’ll update this roundup throughout re:Invent with our curation of the major announcements from each keynote session and more. To see the complete list of all AWS launches, visit What’s New with AWS.
(This post was updated Nov. 30, 2025.)
Analytics
AWS Clean Rooms launches privacy-enhancing dataset generation for ML model training
Train ML models on sensitive collaborative data by generating synthetic datasets that preserve statistical patterns while protecting individual privacy through configurable noise levels and protection against re-identification.
Compute
Introducing AWS Lambda Managed Instances: Serverless simplicity with EC2 flexibility
Run Lambda functions on EC2 compute while maintaining serverless simplicity—enabling access to specialized hardware and cost optimizations through EC2 pricing models, with AWS handling all infrastructure management.
Containers
Announcing Amazon EKS Capabilities for workload orchestration and cloud resource management
Streamline Kubernetes development with fully managed platform capabilities that handle workload orchestration and cloud resource management, eliminating infrastructure maintenance while providing enterprise-grade reliability and security.
Networking & Content Delivery
Introducing Amazon Route 53 Global Resolver for secure anycast DNS resolution (preview)
Simplify hybrid DNS management with a unified service that resolves public and private domains globally through secure, anycast-based resolution while reducing operational overhead and maintaining consistent security controls.
Partner Network
AWS Partner Central now available in AWS Management Console
Access Partner Central directly through the AWS Console to streamline your journey from customer to Partner—manage solutions, opportunities, and marketplace listings in one unified interface with enterprise-grade security.
Security, Identity, & Compliance
Simplify IAM policy creation with IAM Policy Autopilot, a new open source MCP server for builders
Speed up AWS development with an open source tool that analyzes your code to generate valid IAM policies, providing AI coding assistants with up-to-date AWS service knowledge and reliable permission recommendations.
Introducing Amazon Route 53 Global Resolver for secure anycast DNS resolution (preview)
Post Syndicated from Esra Kayabali original https://aws.amazon.com/blogs/aws/introducing-amazon-route-53-global-resolver-for-secure-anycast-dns-resolution-preview/
Today, we’re announcing Amazon Route 53 Global Resolver, a new Amazon Route 53 service that provides secure and reliable DNS resolution globally for queries from anywhere (preview). You can use Global Resolver to resolve DNS queries to public domains on the internet and private domains associated with Route 53 private hosted zones. Route 53 Global Resolver offers network administrators a unified solution to resolve queries from authenticated clients and sources in on-premises data centers, branch offices, and remote locations through globally distributed anycast IP addresses. This service includes built-in security controls including DNS traffic filtering, support for encrypted queries, and centralized logging to help organizations reduce operational overhead while maintaining compliance with security requirements.
Organizations with hybrid deployments face operational complexity when managing DNS resolution across distributed environments. Resolving public internet domains and private application domains often requires maintaining split DNS infrastructure, which increases cost and administrative burden especially when replicating to multiple locations. Network administrators must configure custom forwarding solutions, deploy Route 53 Resolver endpoints for private domain resolution, and implement separate security controls across different locations. Additionally, they must configure and maintain multi-Region failover strategies for Route 53 Resolver endpoints and provide consistent security policy enforcement across all Regions while testing failover scenarios.
Route 53 Global Resolver has key capabilities that address these challenges. The service resolves both public internet domains and Route 53 private hosted zones, eliminating the need for separate split-DNS forwarding. It provides DNS resolution through multiple protocols, including DNS over UDP (Do53), DNS-over-HTTPS (DoH), and DNS-over-TLS (DoT). Each deployment provides a single set of common IPv4 and IPv6 anycast IP addresses that route queries to the nearest AWS Region, reducing latency for distributed client populations.
Route 53 Global Resolver provides integrated security features equivalent to Route 53 Resolver DNS Firewall. Administrators can configure filtering rules using AWS Managed Domain Lists that provide flexible controls with lists classified by DNS threats (malware, spam, phishing) or web content (adult sites, gambling, social networking) that might not be safe for work or create custom domain lists by importing domains from a file. Advanced threat protection detects and blocks domain generation algorithm (DGA) patterns and DNS tunneling attempts. For encrypted DNS traffic, Route 53 Global Resolver supports DoH and DoT protocols to protect queries from unauthorized access during transit.
Route 53 Global Resolver only accepts traffic from known clients that need to authenticate with the Resolver. For Do53, DoT, and DoH connections, administrators can configure IP and CIDR allowlists. For DoH and DoT connections, token-based authentication provides granular access control with customizable expiration periods and revocation capabilities. Administrators can assign tokens to specific client groups or individual devices based on organizational requirements.
Route 53 Global Resolver supports DNSSEC validation to verify the authenticity and integrity of DNS responses from public nameservers. It also includes EDNS Client Subnet support, which forwards client subnet information to enable more accurate geographic-based DNS responses from content delivery networks.
Getting started with Route 53 Global Resolver
This walkthrough shows how to configure Route 53 Global Resolver for an organization with offices on the US East and West coasts that needs to resolve both public domains and private applications hosted in Route 53 private hosted zones. To configure Route 53 Global Resolver, go to the AWS Management Console, choose Global resolvers from the navigation pane, and choose Create global resolver.
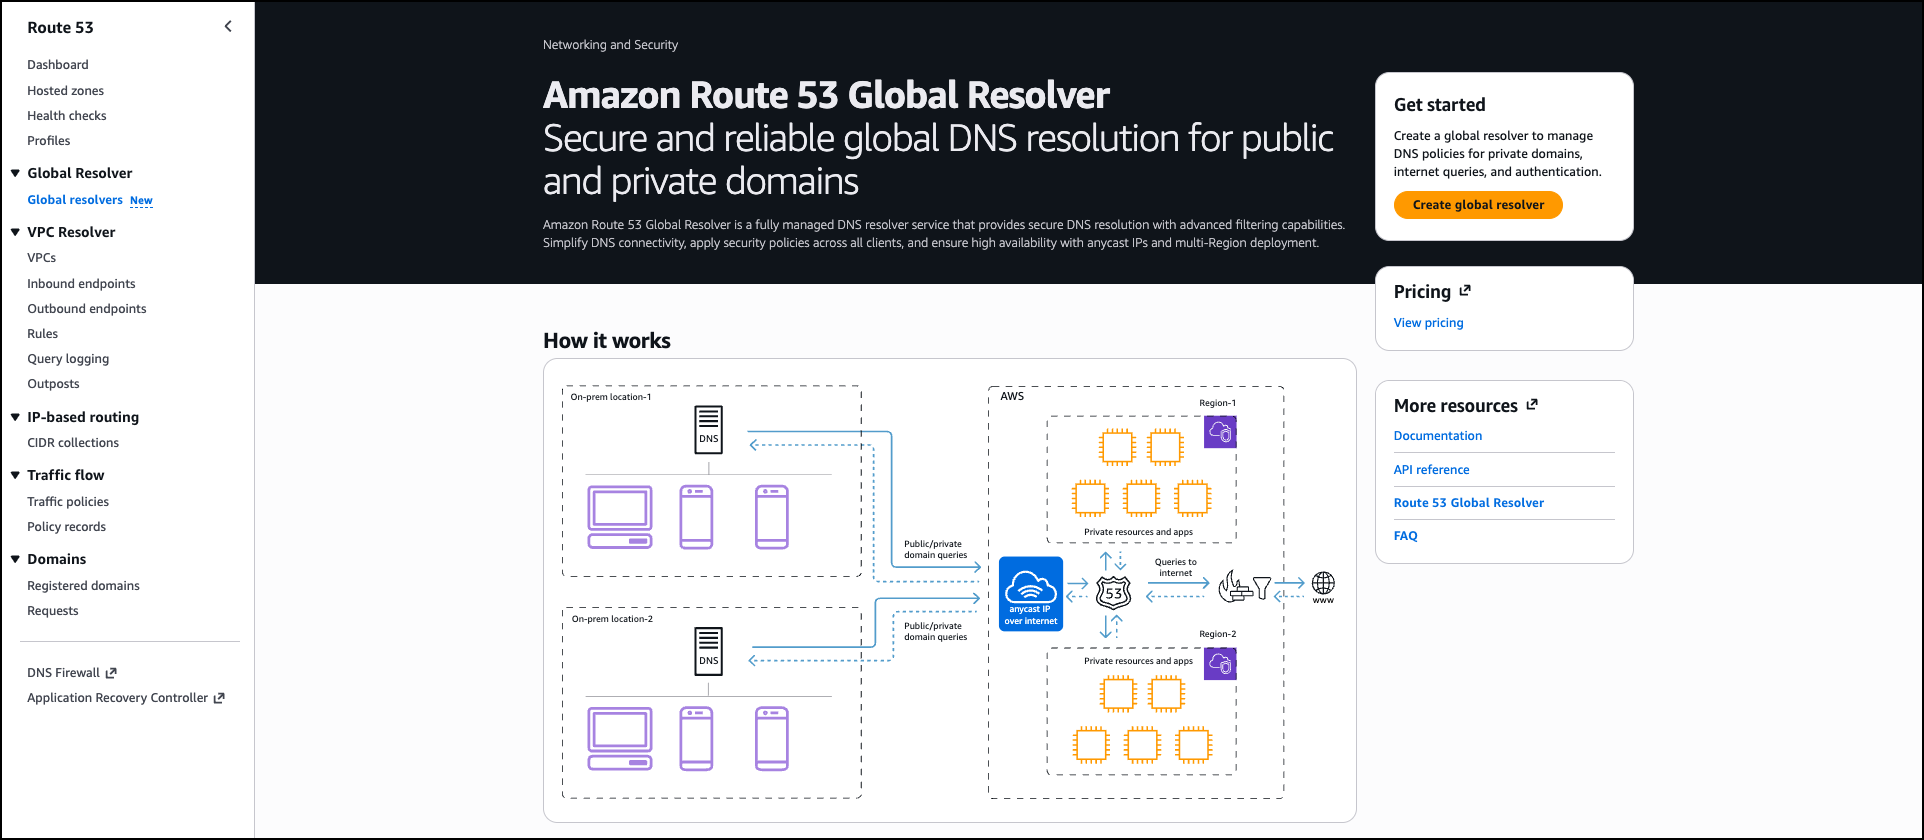
In the Resolver details section, enter a Resolver name such as corporate-dns-resolver. Add an optional description like DNS resolver for corporate offices and remote clients. In the Regions section, choose the AWS Regions where you want the resolver to operate, such as US East (N. Virginia) and US West (Oregon). The anycast architecture routes DNS queries from your clients to the nearest selected Region.
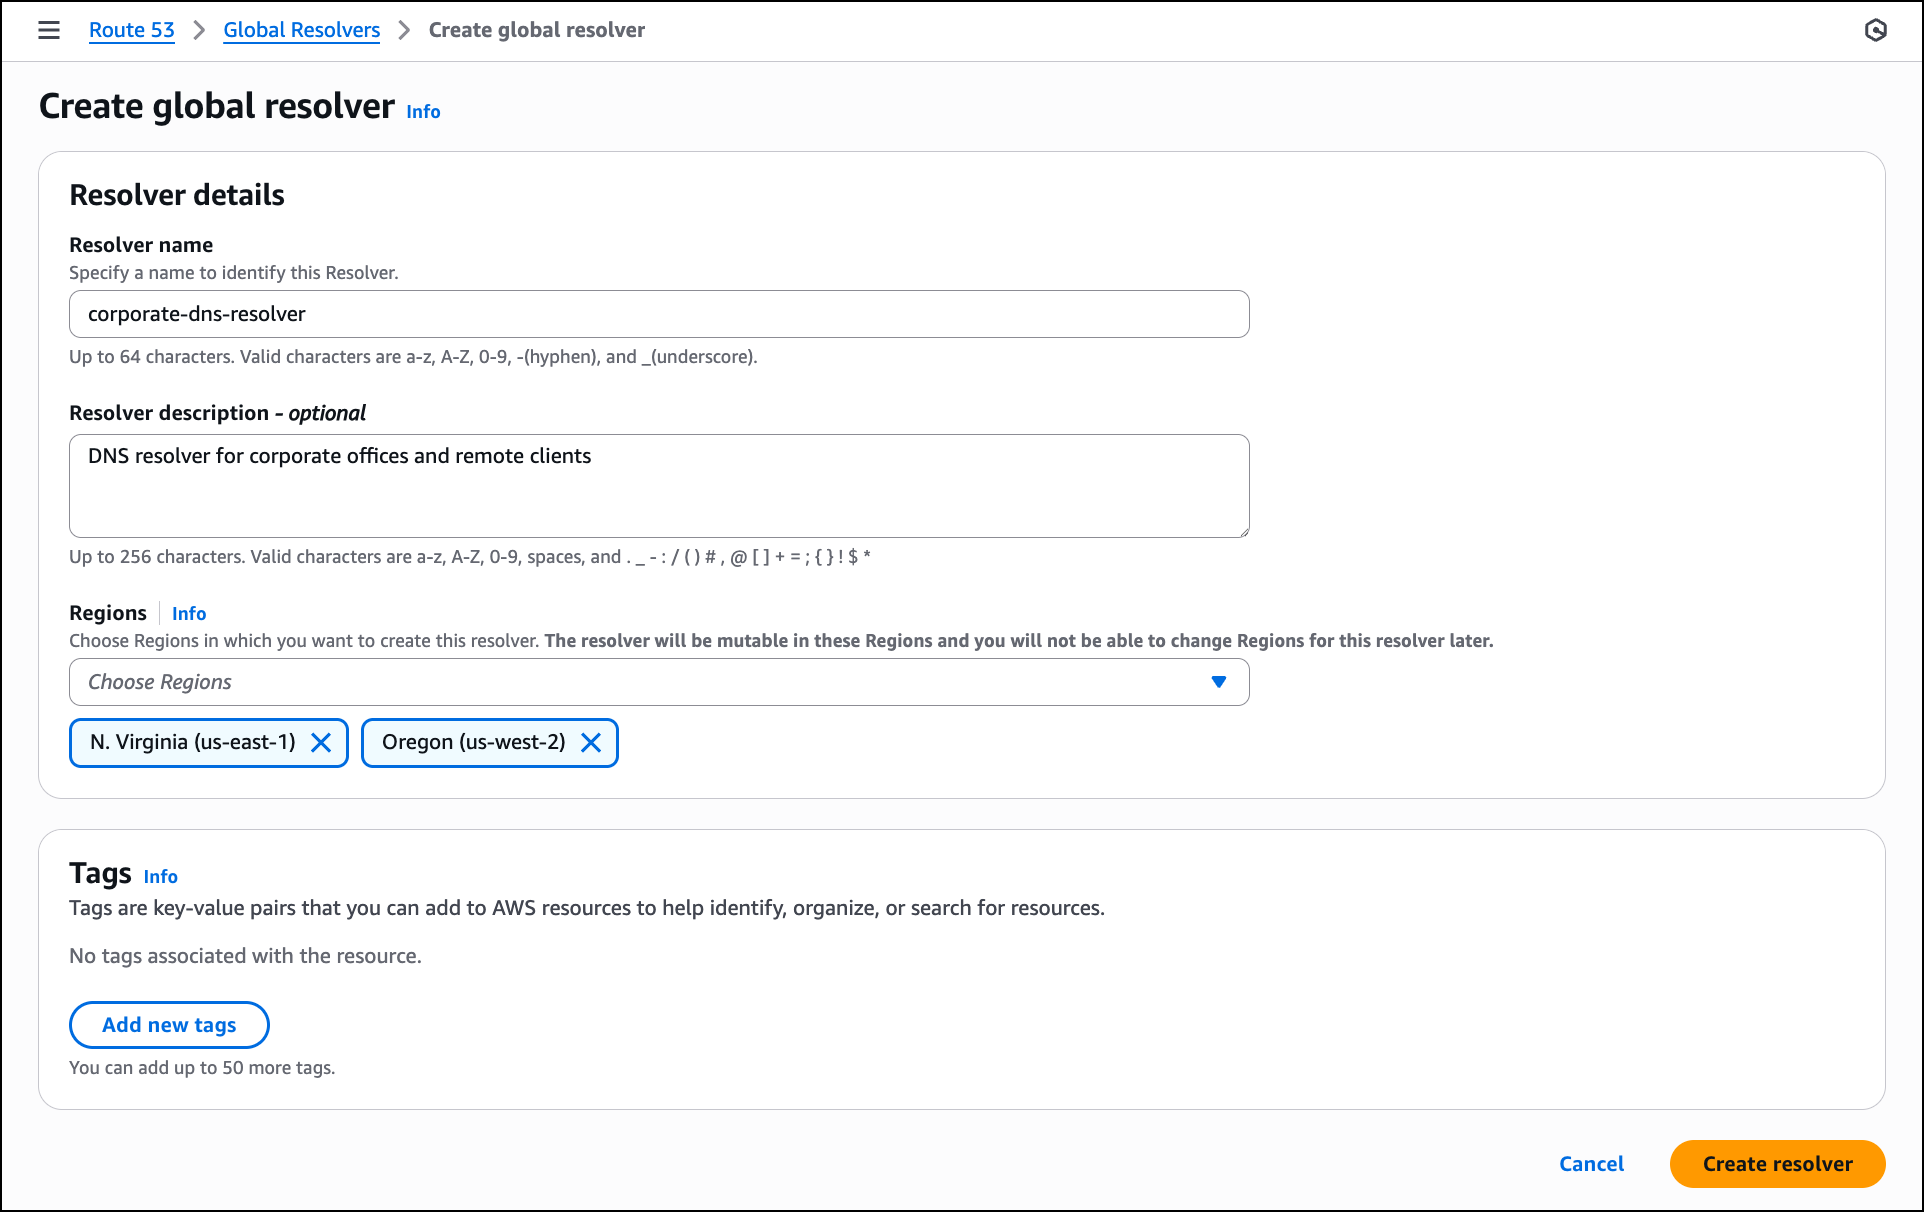
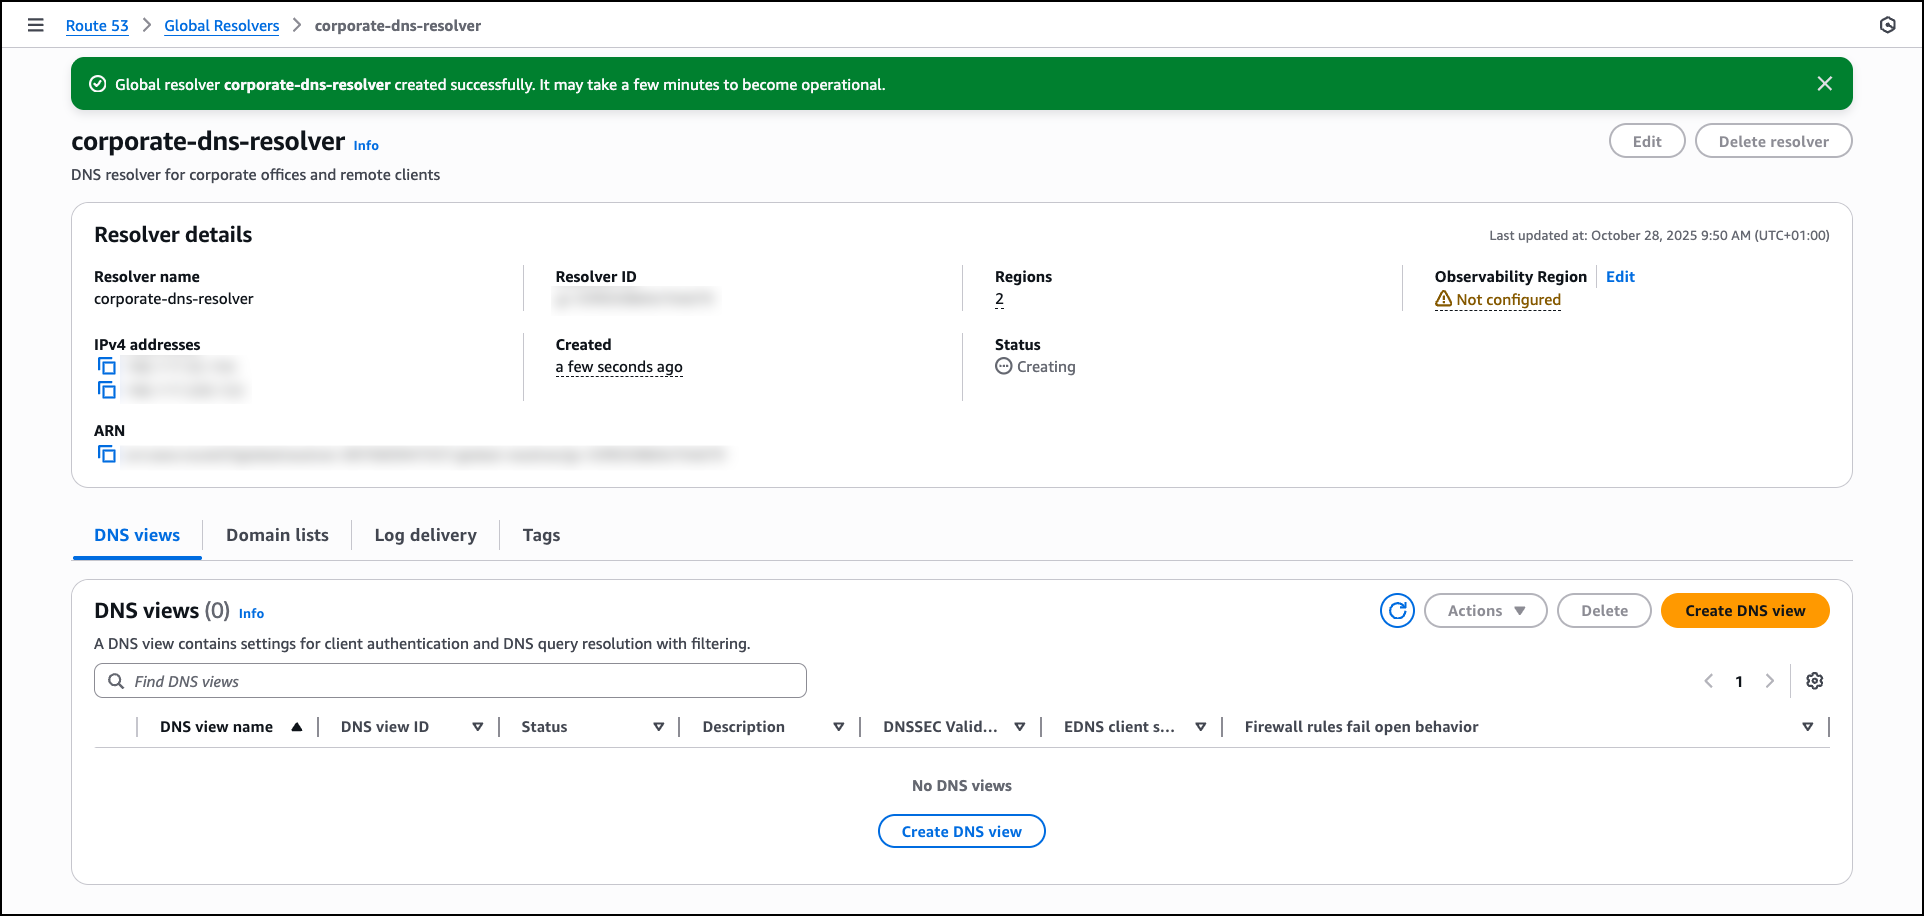
After the resolver is created, the console displays the resolver details, including the anycast IPv4 and IPv6 addresses that you will use for DNS queries. You can proceed to create a DNS view by choosing Create DNS view to configure client authentication and DNS query resolution settings.
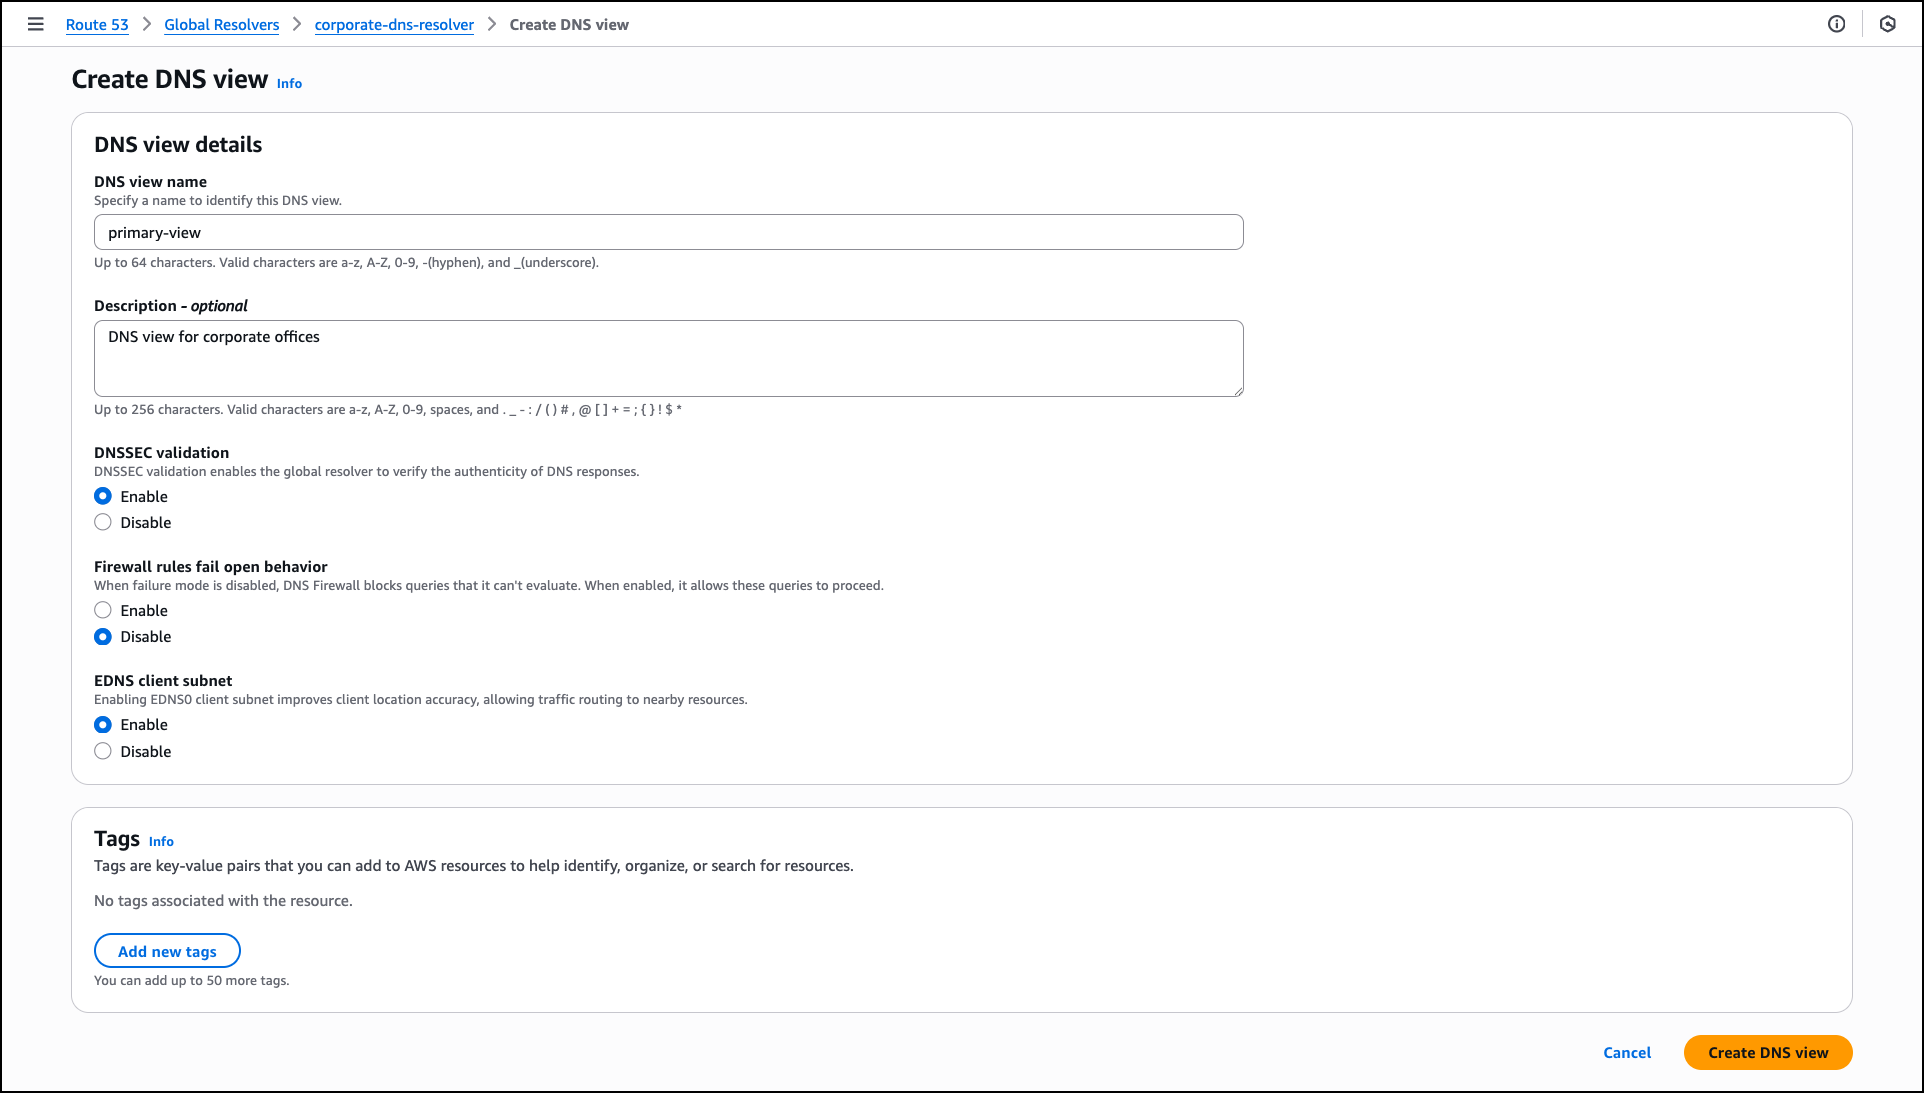
In the Create DNS view section, enter a DNS view name such as primary-view and optionally add a Description like DNS view for corporate offices. A DNS view helps you create different logical groupings for your clients and sources, and determine the DNS resolution for those groups. This helps you maintain different DNS filtering rules and private hosted zone resolution policies for different clients in your organization.
For DNSSEC validation, choose Enable to verify the authenticity of DNS responses from public DNS servers. For Firewall rules fail open behavior, choose Disable to block DNS queries when firewall rules can’t be evaluated, which provides additional security. For EDNS client subnet, keep Enable selected to forward client location information to DNS servers, which allows content delivery networks to provide more accurate geographic responses. DNS view creation might take a few minutes to become operational.
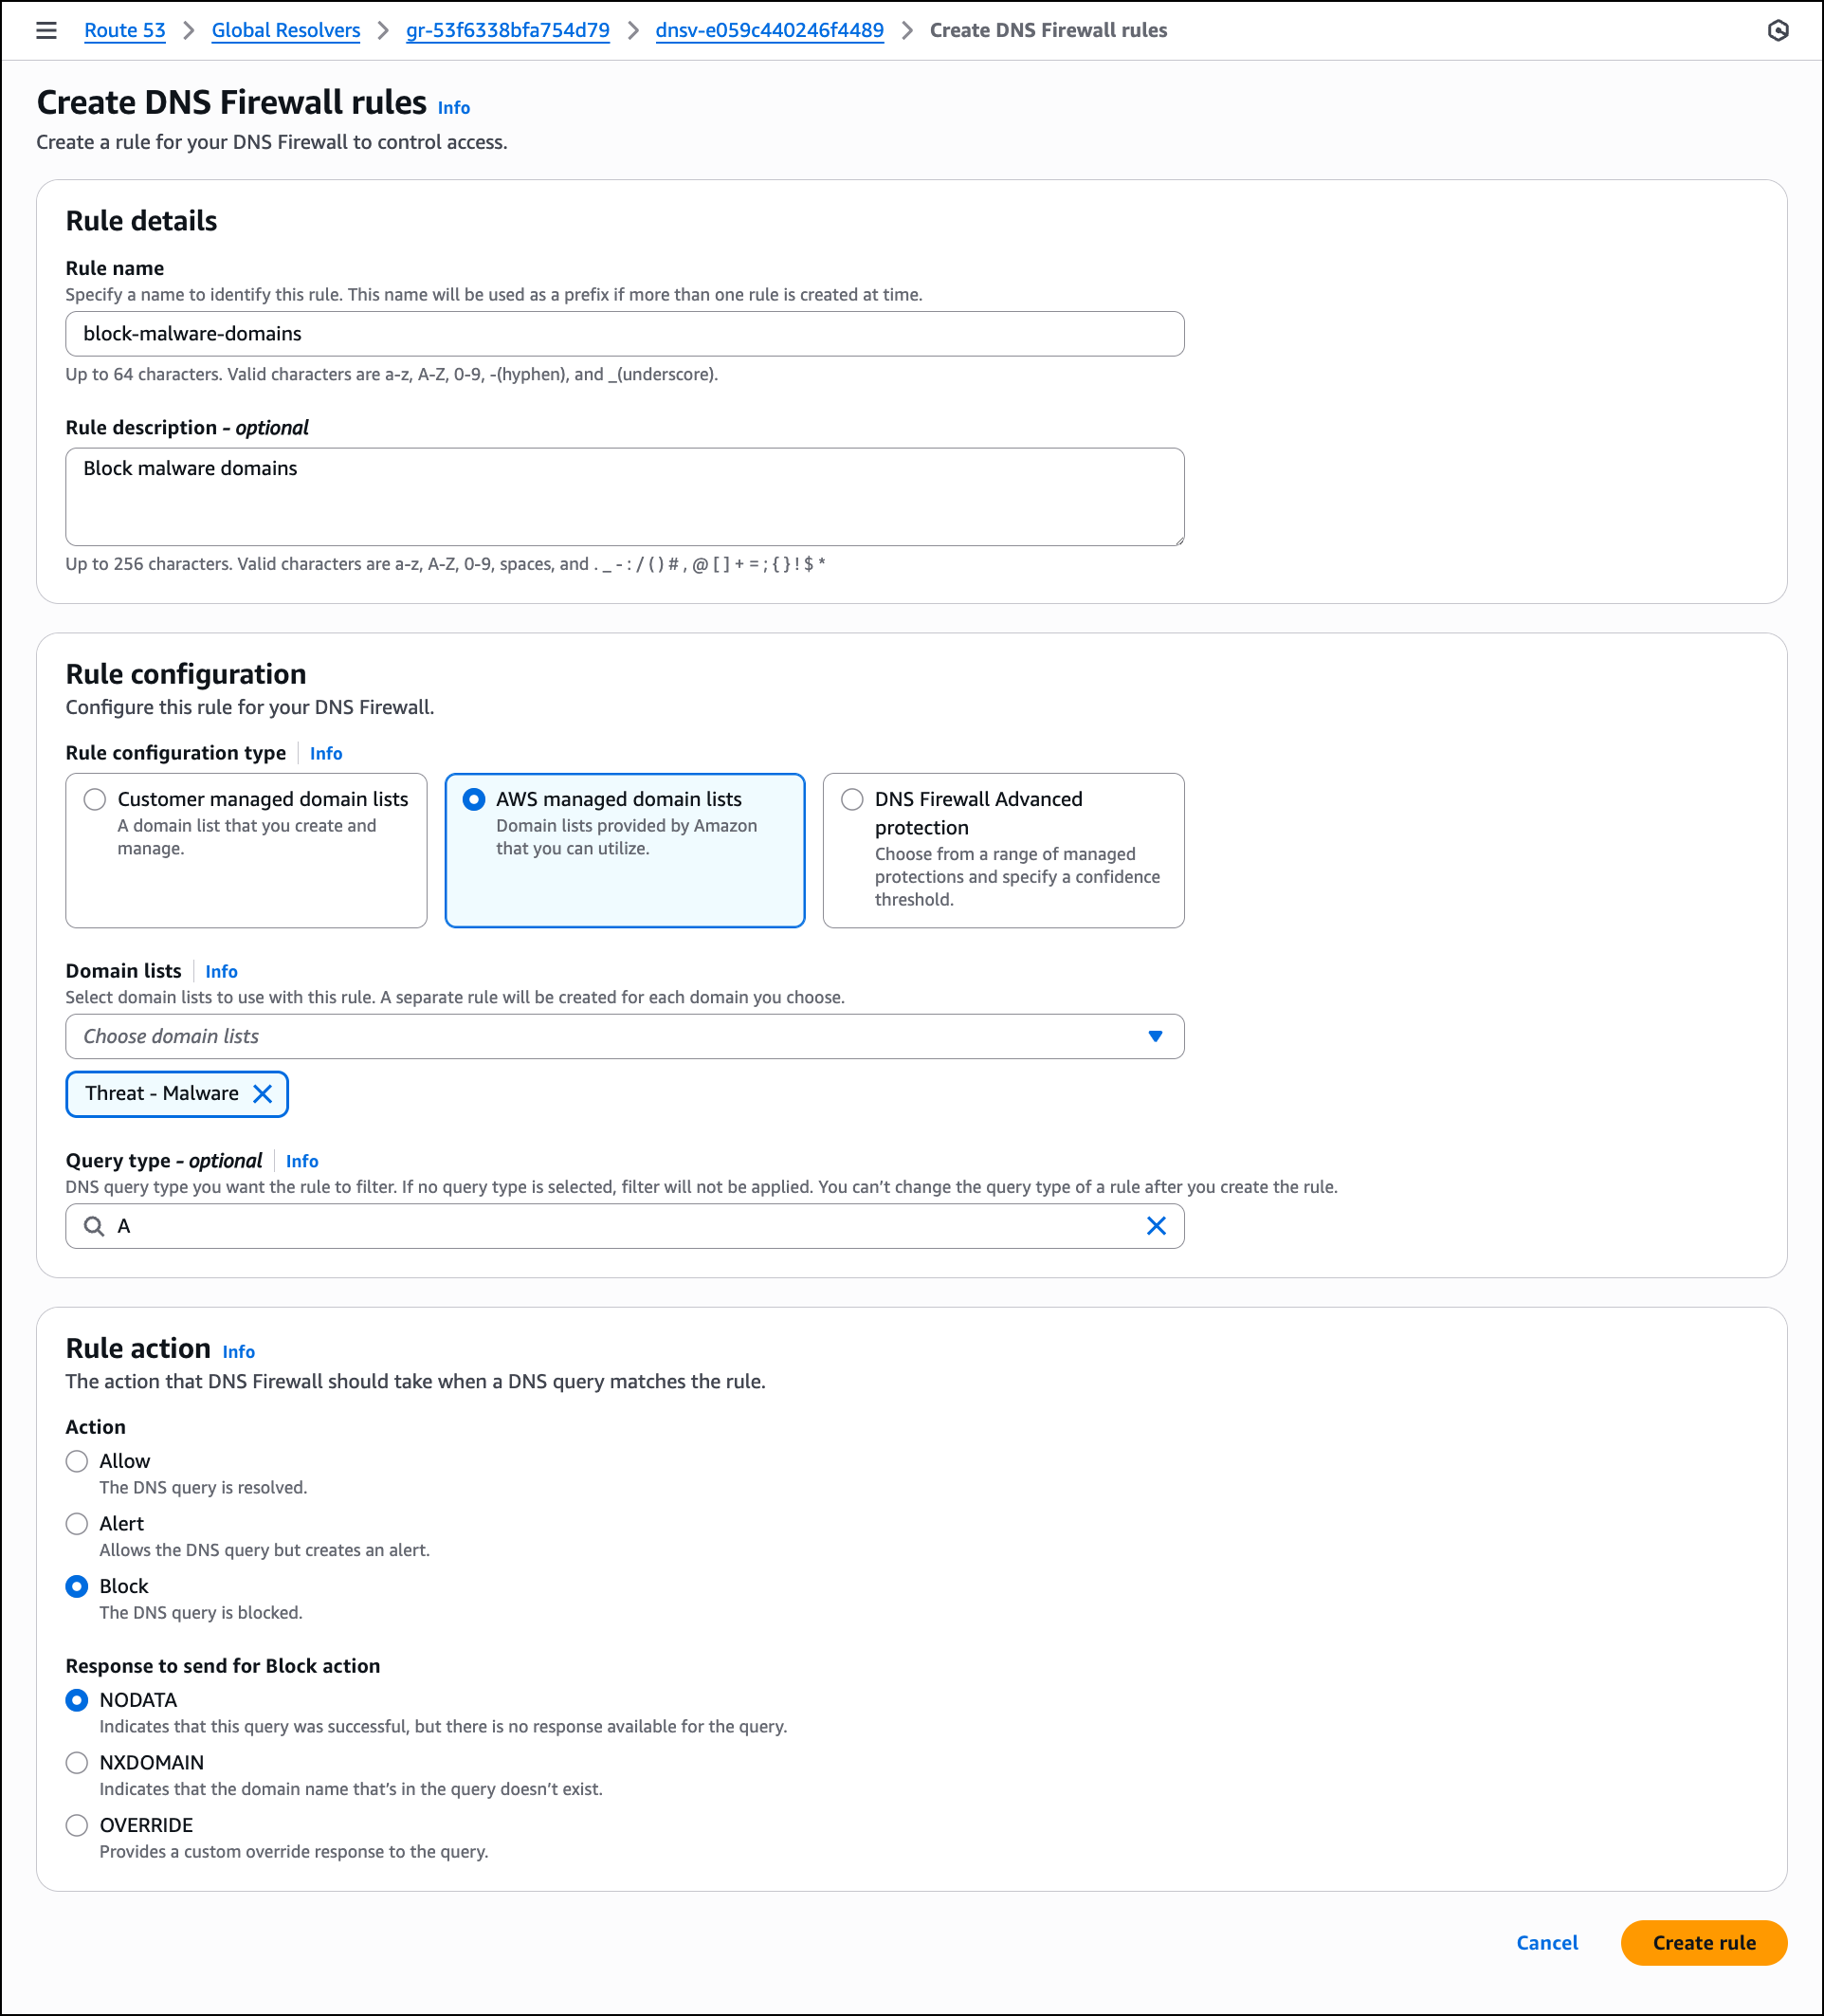
After the DNS view is created and operational, configure DNS Firewall rules to filter network traffic by choosing Create rule. In the Create DNS Firewall rules section, enter a Rule name such as block-malware-domains and optionally add a description. For Rule configuration type, you can choose Customer managed domain lists, AWS managed domain lists provided by AWS or DNS Firewall Advanced protection.
For this walkthrough, choose AWS managed domain lists. In the Domain lists dropdown, choose one or more AWS managed lists such as Threat – Malware to block known malicious domains. You can leave Query type empty to apply the rule to all DNS query types. In this example, choose A to apply this rule only to IPv4 address queries. In the Rule action section, select Block to prevent DNS resolution for domains that match the selected lists. For Response to send for Block action, keep NODATA selected to indicate that the query was successful but no response is available, then choose Create rules.
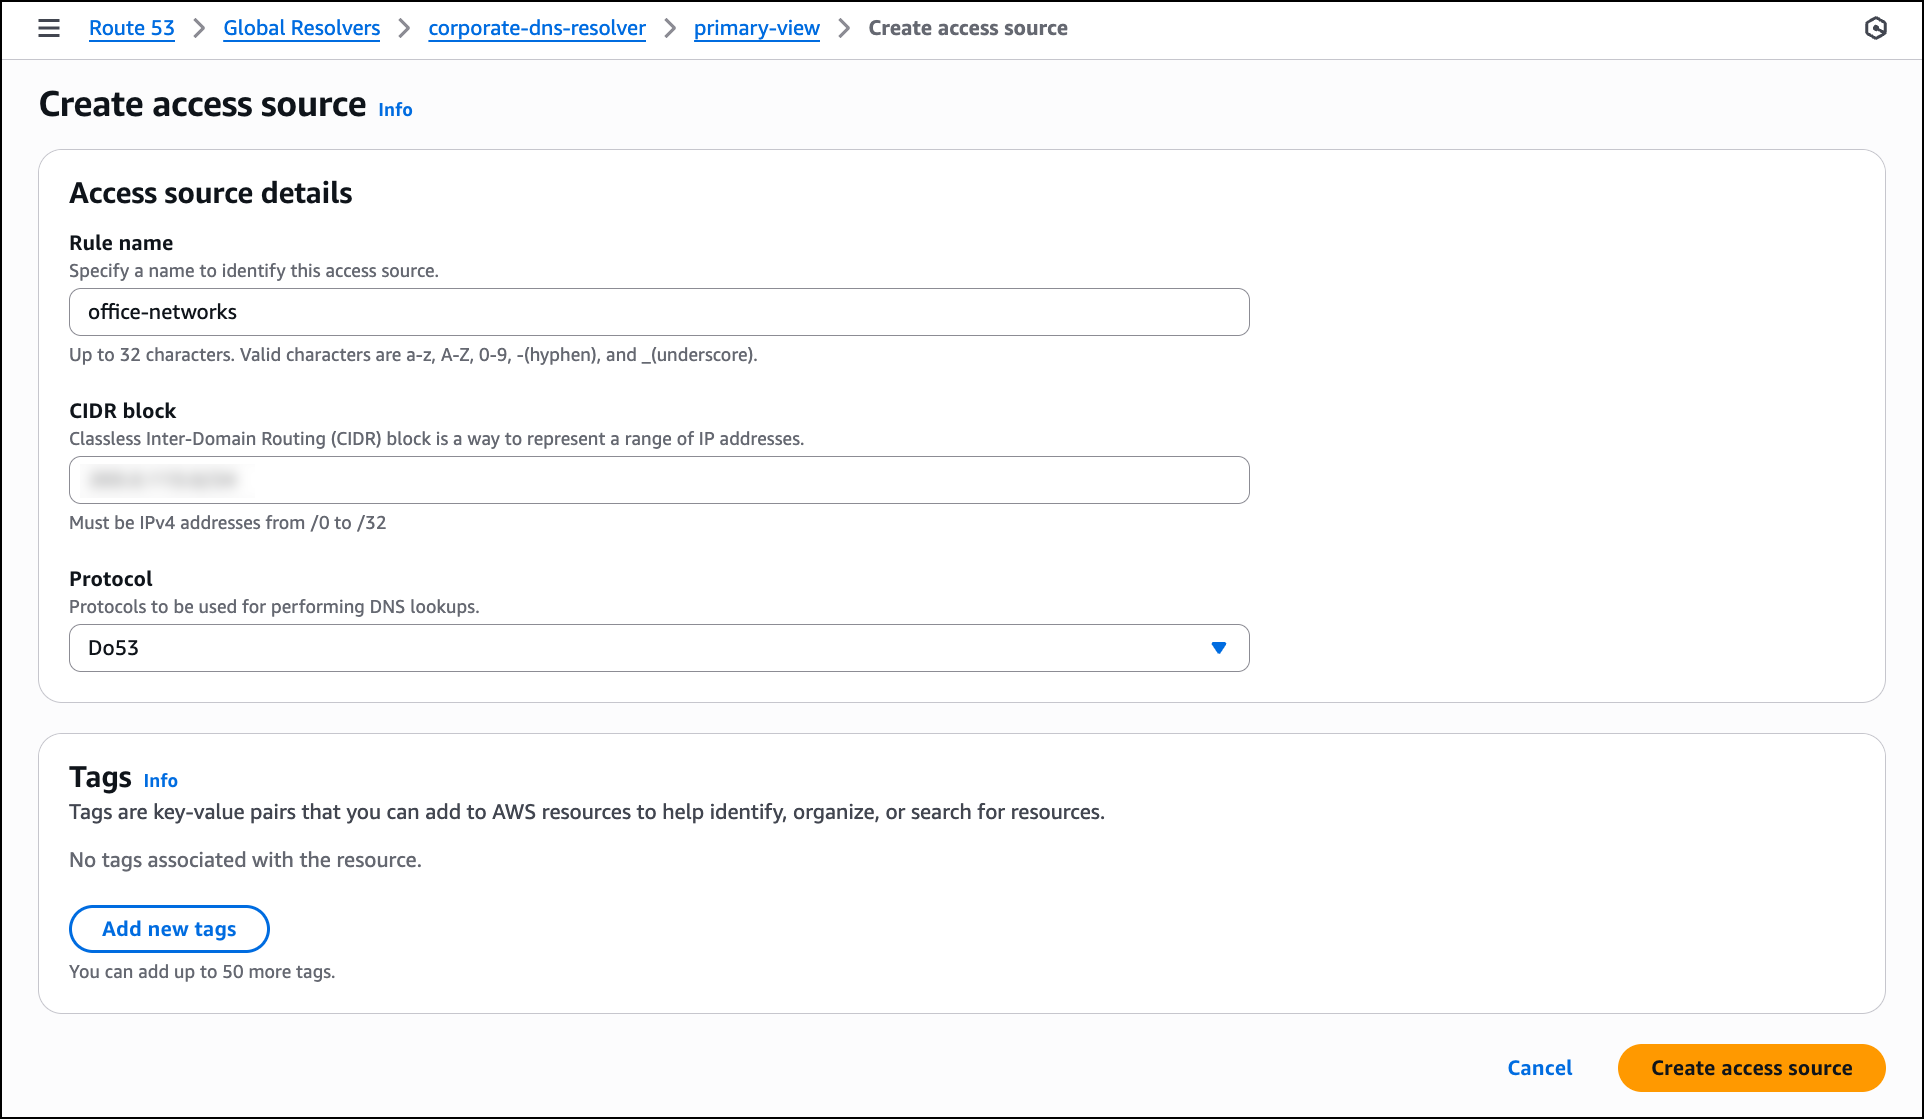
The next step is to configure access sources to specify which IP addresses or CIDR blocks are allowed to send DNS queries to the resolver. Navigate to the Access sources tab in the DNS view and then choose Create access source.
In the Access source details section, enter a Rule name such as office-networks to identify the access source. In the CIDR block field, enter the IP address range for your offices to allow queries from that network. For Protocol, select Do53 for standard DNS queries over UDP or choose DoH or DoT if you want to require encrypted DNS connections from clients. After configuring these settings, choose Create access source to allow the specified network to send DNS queries to the resolver.
Next, navigate to the Access tokens tab in the DNS view to create token-based authentication for clients and choose Create access token. In the Access token details section, enter a Token name such as remote-clients-token. For Token expiry, select an expiration period from the dropdown based on your security requirements, such as 365 days for long-term client access, or choose a shorter duration like 30 days or 90 days for tighter access control. After configuring these settings, choose Create access token to generate the token, which clients can use to authenticate DoH and DoT connections to the resolver.
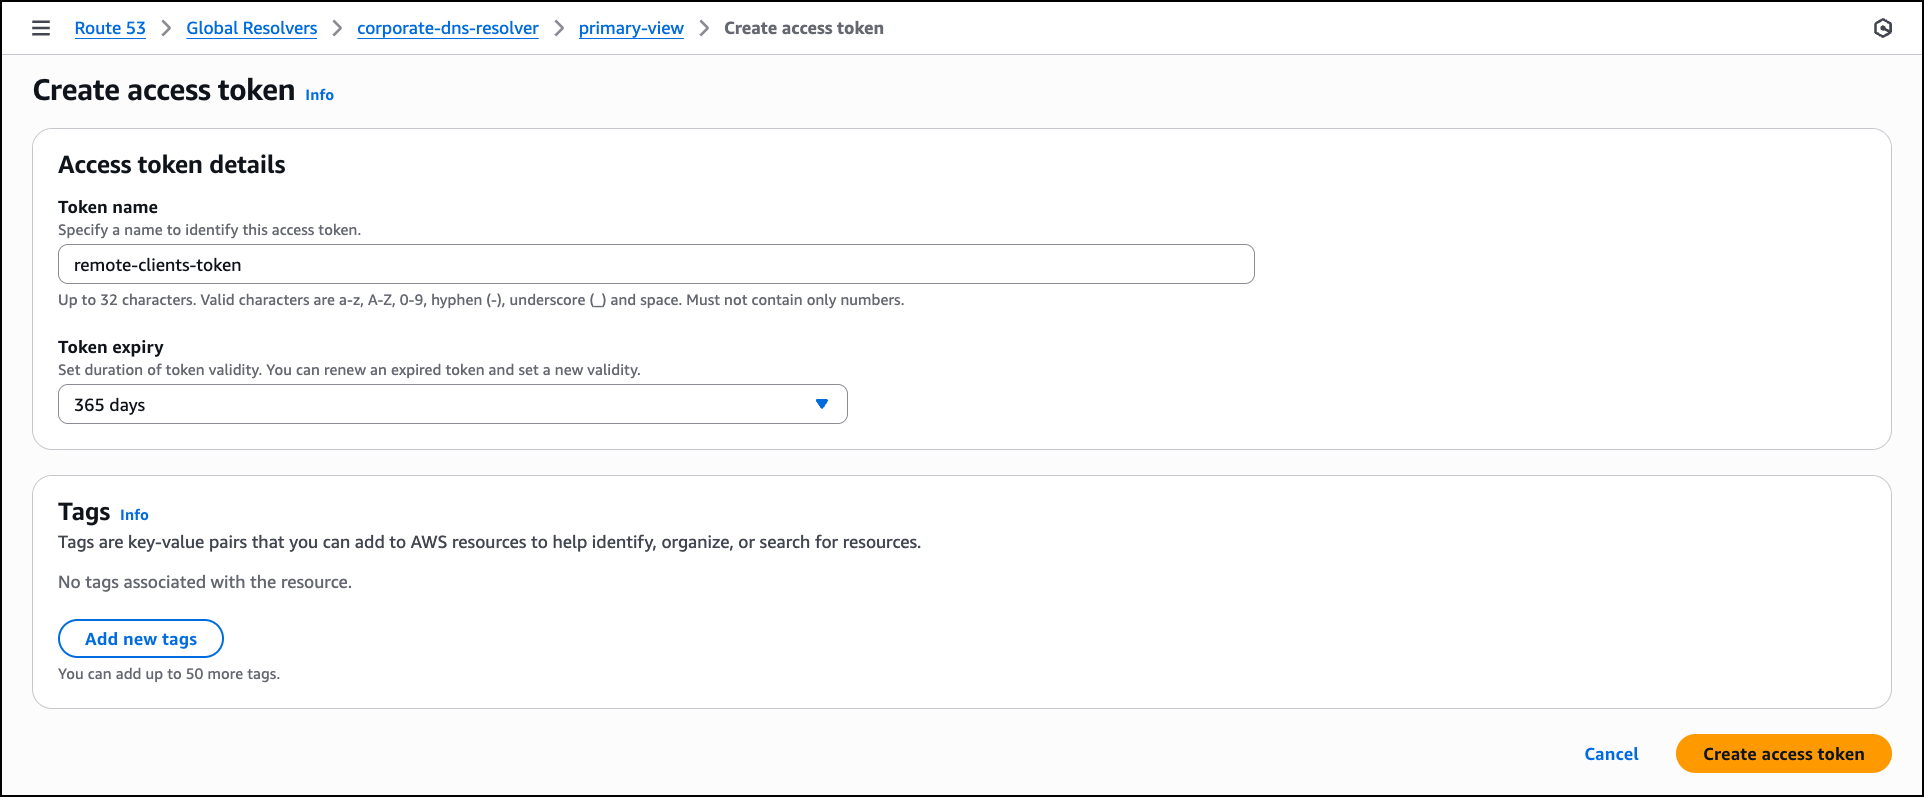
After the access token is created, navigate to the Private hosted zones tab in the DNS view to associate Route 53 private hosted zones with the DNS view so that the resolver can resolve queries for your private application domains. Choose Associate private hosted zone and in the Private hosted zones section, select a private hosted zone from the list that you want the resolver to handle. After selecting the zone, choose Associate to enable the resolver to respond to DNS queries for these private domains from your configured access sources.
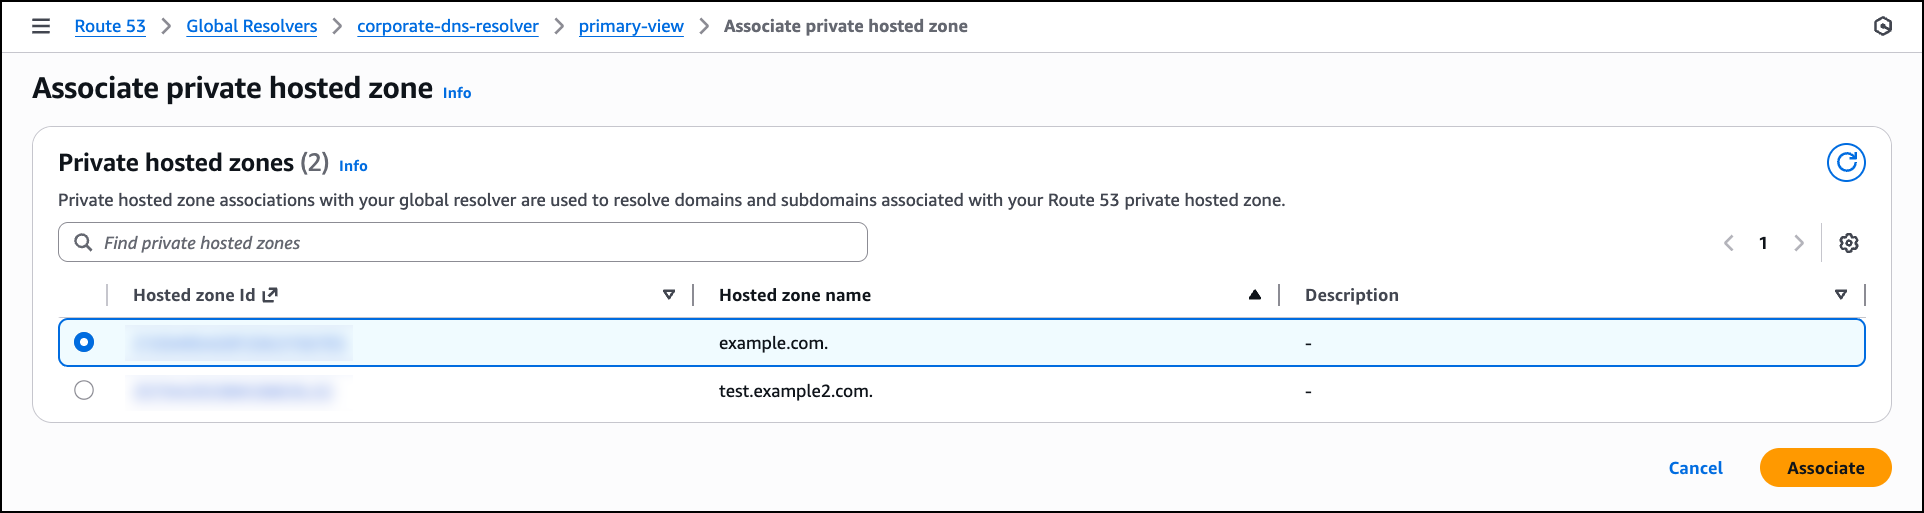
With the DNS view configured, firewall rules created, access sources and tokens defined, and private hosted zones associated, the Route 53 Global Resolver setup is complete and ready to handle DNS queries from your configured clients.
After creating your Route 53 Global Resolver, you need to configure your DNS clients to send queries to the resolver’s anycast IP addresses. The configuration method depends on the access control you configured in your DNS view:
- For IP-based access sources (CIDR blocks) – Configure your source clients to point DNS traffic to the Route 53 Global Resolver anycast IP addresses provided in the resolver details. Global Resolver will only allow access from allowlisted IPs that you have specified in your access sources. You can also associate the access sources to different DNS views to provide more granular DNS resolution views for different sets of IPs.
- For access token–based authentication – Deploy the tokens on your clients to authenticate DoH and DoT connections with Route 53 Global Resolver. You must also configure your clients to point the DNS traffic to the Route 53 Global Resolver anycast IP addresses provided in the resolver details.
For detailed configuration instructions for your specific operating system and protocol, refer to the technical documentation.
Additional things to know
We’re renaming the existing Route 53 Resolver to Route 53 VPC Resolver. This naming change clarifies the architectural distinction between the two services. VPC Resolver operates Regionally within your VPCs to provide DNS resolution for resources in your Amazon VPC environment. VPC Resolver continues to support inbound and outbound resolver endpoints for hybrid DNS architectures within specific AWS Regions.
Route 53 Global Resolver complements Route 53 VPC Resolver by providing internet-reachable, global and private DNS resolution for on-premises and remote clients without requiring VPC deployment or private connections.
Existing VPC Resolver configurations remain unchanged and continue to function as configured. The renaming affects the service name in the AWS Management Console and documentation, but API operation names remain unchanged. If your architecture requires DNS resolution for resources within your VPCs, continue using VPC Resolver.
Join the preview
Route 53 Global Resolver reduces operational overhead by providing unified DNS resolution for public and private domains through a single managed service. The global anycast architecture improves reliability and reduces latency for distributed clients. Integrated security controls and centralized logging help organizations maintain consistent security policies across all locations while meeting compliance requirements.
To learn more about Amazon Route 53 Global Resolver, visit the Amazon Route 53 documentation.
You can start using Route 53 Global Resolver through the AWS Management Console in US East (N. Virginia), US East (Ohio), US West (N. California), US West (Oregon), Europe (Frankfurt), Europe (Ireland), Europe (London), Asia Pacific (Mumbai), Asia Pacific (Singapore), Asia Pacific (Tokyo), and Asia Pacific (Sydney) Regions.
AWS Clean Rooms launches privacy-enhancing synthetic dataset generation for ML model training
Post Syndicated from Micah Walter original https://aws.amazon.com/blogs/aws/aws-clean-rooms-launches-privacy-enhancing-synthetic-dataset-generation-for-ml-model-training/
Today, we’re announcing privacy-enhancing synthetic dataset generation for AWS Clean Rooms, a new capability that organizations and their partners can use to generate privacy-enhancing synthetic datasets from their collective data to train regression and classification machine learning (ML) models. You can use this feature to generate synthetic training datasets that preserve the statistical patterns of the original data, without the model having access to original records, opening new opportunities for model training that were previously not possible due to privacy concerns.
When building ML models, data scientists and analysts typically face a fundamental tension between data utility and privacy protection. Access to high-quality, granular data is essential for training accurate models that can recognize trends, personalize experiences, and drive business outcomes. However, using granular data such as user-level event data from multiple parties raises significant privacy concerns and compliance challenges. Organizations want to answer questions like, “What characteristics indicate a high-probability customer conversion?”, but training on the individual-level signals often conflicts with privacy policies and regulatory requirements.
Privacy-enhancing synthetic dataset generation for custom ML
To address this challenge, we’re introducing privacy-enhancing synthetic dataset generation in AWS Clean Rooms ML, which organizations can use to create synthetic versions of sensitive datasets that can be more securely used for ML model training. This capability uses advanced ML techniques to generate new datasets that maintain the statistical properties of the original data while de-identifying subjects from the original source data.
Traditional anonymization techniques such as masking still carry the risk of re-identifying individuals in a dataset—knowing attributes about a person such as zip code and date of birth can be sufficient to identify them with census data. Privacy-enhancing synthetic dataset generation addresses this risk through a fundamentally different approach. The system trains a model that learns the essential statistical patterns of the original dataset, then generates synthetic records by sampling values from the original dataset and using the model to predict the predicted value column. Rather than merely copying or perturbing the original data, the system uses a model capacity reduction technique to mitigate the risk that the model will memorize information about individuals in the training data. The resulting synthetic dataset has the same schema and statistical characteristics as the original data, making it suitable for training classification and regression models. This approach quantifiably reduces the risk of re-identification.
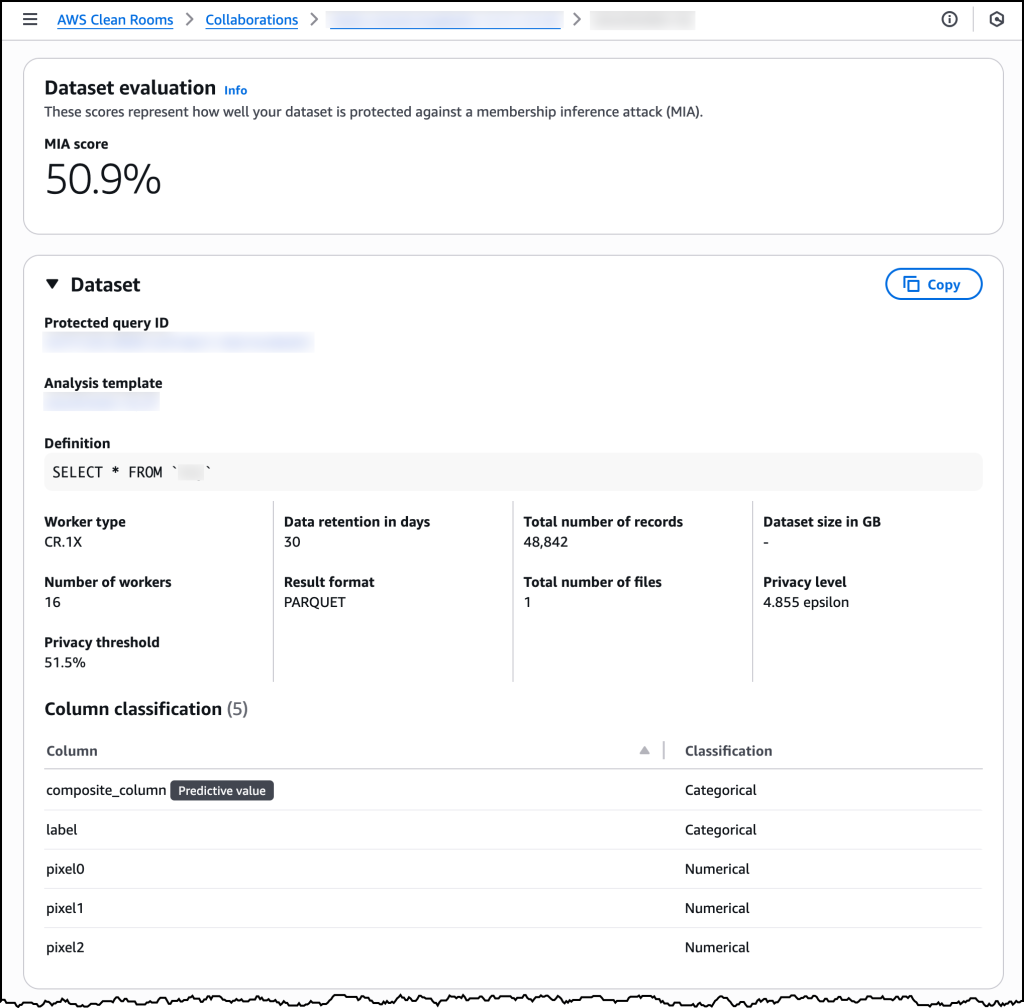
Organizations using this capability have control over the privacy parameters, including the amount of noise applied and the level of protection against membership inference attacks, where an adversary attempts to determine whether a specific individual’s data was included in the training set. After generating the synthetic dataset, AWS Clean Rooms provides detailed metrics to help customers and their compliance teams understand the quality of the synthetic dataset across two critical dimensions: fidelity to the original data and privacy preservation. The fidelity score uses KL-divergence to measure how similar the synthetic data is to the original dataset, and the privacy score quantifies how likely the dataset is protected from membership inference attacks.
Working with synthetic data in AWS Clean Rooms
Getting started with privacy-enhancing synthetic dataset generation follows the established AWS Clean Rooms ML custom models workflow, with new steps to specify privacy requirements and review quality metrics. Organizations begin by creating configured tables with analysis rules using their preferred data sources, then join or create a collaboration with their partners and associate their tables with that collaboration.
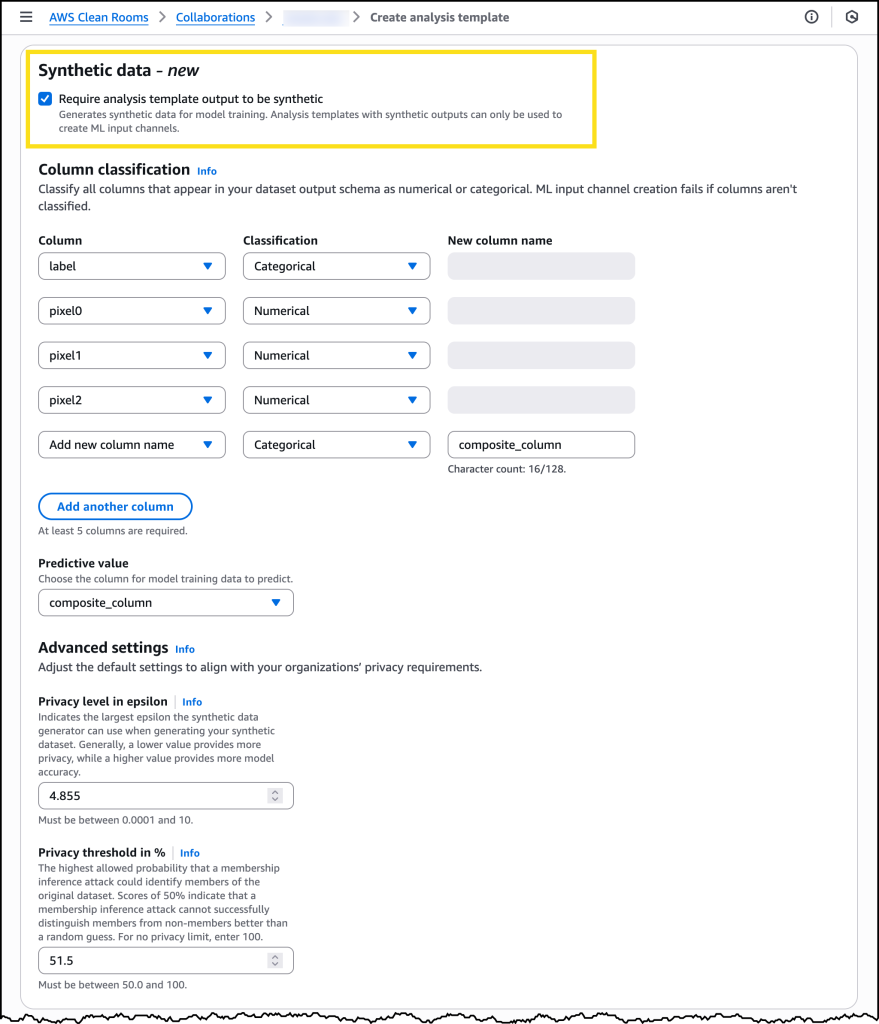
The new capability introduces an enhanced analysis template where data owners define not only the SQL query that creates the dataset but also specify that the resulting dataset must be synthetic. Within this template, organizations classify columns to indicate which column the ML model will predict and which columns contain categorical versus numerical values. Critically, the template also includes privacy thresholds that the generated synthetic data must meet to be made available for training. These include an epsilon value that specifies how much noise must be present in the synthetic data to protect against re-identification, and a minimum protection score against membership inference attacks. Setting these thresholds appropriately requires understanding your organization’s specific privacy and compliance requirements, and we recommend engaging with your legal and compliance teams during this process.
After all data owners review and approve the analysis template, a collaboration member creates a machine learning input channel that references the template. AWS Clean Rooms then begins the synthetic dataset generation process, which typically completes within a few hours depending on the size and complexity of the dataset. If the generated synthetic dataset meets the required privacy thresholds defined in the analysis template, a synthetic machine learning input channel becomes available along with detailed quality metrics. Data scientists can review the actual protection score achieved against a simulated membership inference attack.
Once satisfied with the quality metrics, organizations can proceed to train their ML models using the synthetic dataset within the AWS Clean Rooms collaboration. Depending on the use case, they can export the trained model weights or continue to run inference jobs within the collaboration itself.
Let’s try it out
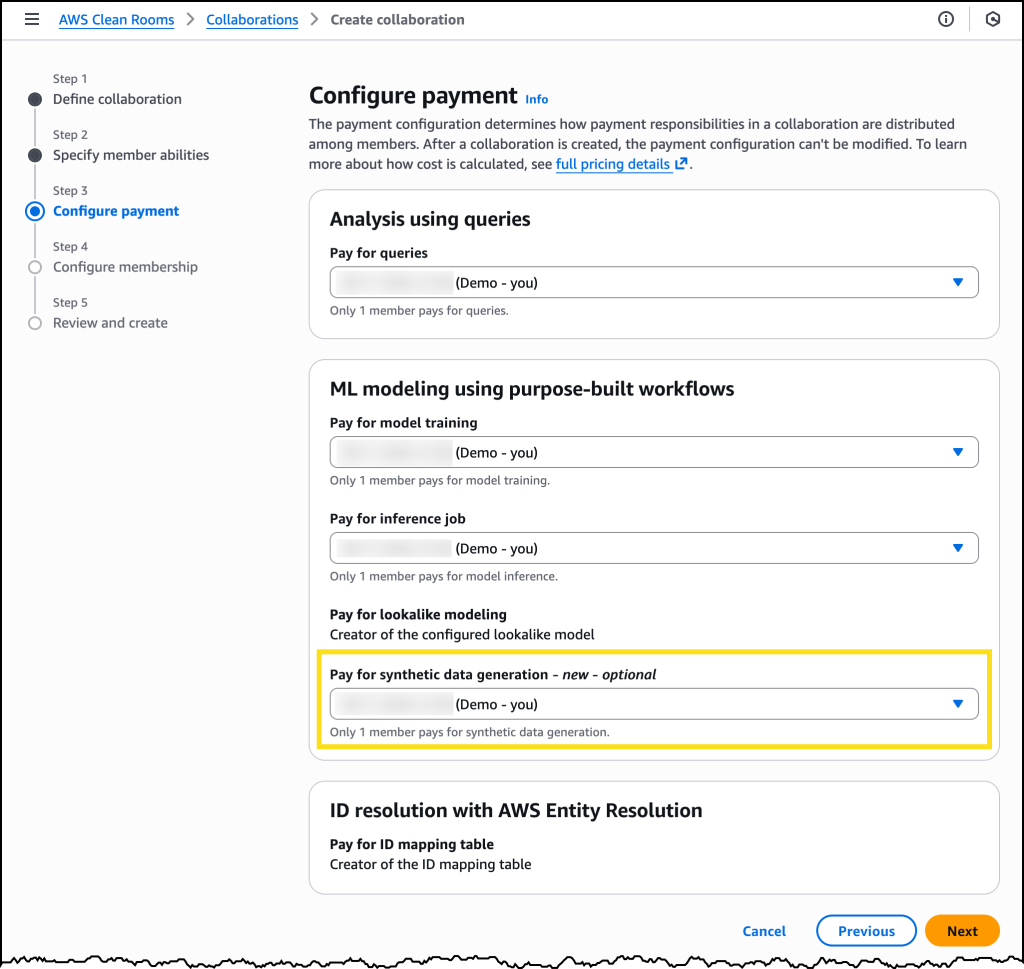
When creating a new AWS Clean Rooms collaboration, I can now set who pays for synthetic dataset generation.
After my Collaboration is configured, I can choose Require analysis template output to be synthetic when creating a new analysis template.
After my synthetic analysis template is ready, I can use it when running protected queries and view all the relevant ML input channel details.
Now available
You can start using privacy-enhancing synthetic dataset generation through AWS Clean Rooms today. The feature is available in all commercial AWS Regions where AWS Clean Rooms is available. Learn more about it in the AWS Clean Rooms documentation.
Privacy-enhancing synthetic dataset generation is billed separately based on usage. You pay only for the compute used to generate your synthetic dataset, charged as Synthetic Data Generation Units (SDGUs). The number of SDGUs varies based on the size and complexity of your original dataset. This fee can be configured as a payer setting, meaning any collaboration member can agree to pay the costs. For more information on pricing, refer to the AWS Clean Rooms pricing page.
The initial release supports training classification and regression models on tabular data. The synthetic datasets work with standard ML frameworks and can be integrated into existing model development pipelines without requiring changes to your workflows.
This capability represents a significant advancement in privacy-enhanced machine learning. Organizations can unlock the value of sensitive user-level data for model training while mitigating the risk that sensitive information about individual users could be leaked. Whether you’re optimizing advertising campaigns, personalizing insurance quotes, or enhancing fraud detection systems, privacy-enhancing synthetic dataset generation makes it possible to train more accurate models through data collaboration while respecting individual privacy.