We’re rounding up the most exciting and impactful announcements from AWS re:Invent 2025, which takes place November 30-December 4 in Las Vegas. This guide highlights the innovations that will help you build, scale, and transform your business in the cloud.
We’ll update this roundup throughout re:Invent with our curation of the major announcements from each keynote session and more. To see the complete list of all AWS launches, visit What’s New with AWS.
AWS Partner Central now available in AWS Management Console Access Partner Central directly through the AWS Console to streamline your journey from customer to Partner—manage solutions, opportunities, and marketplace listings in one unified interface with enterprise-grade security.
Today, we’re announcing Amazon Route 53 Global Resolver, a new Amazon Route 53 service that provides secure and reliable DNS resolution globally for queries from anywhere (preview). You can use Global Resolver to resolve DNS queries to public domains on the internet and private domains associated with Route 53 private hosted zones. Route 53 Global Resolver offers network administrators a unified solution to resolve queries from authenticated clients and sources in on-premises data centers, branch offices, and remote locations through globally distributed anycast IP addresses. This service includes built-in security controls including DNS traffic filtering, support for encrypted queries, and centralized logging to help organizations reduce operational overhead while maintaining compliance with security requirements.
Organizations with hybrid deployments face operational complexity when managing DNS resolution across distributed environments. Resolving public internet domains and private application domains often requires maintaining split DNS infrastructure, which increases cost and administrative burden especially when replicating to multiple locations. Network administrators must configure custom forwarding solutions, deploy Route 53 Resolver endpoints for private domain resolution, and implement separate security controls across different locations. Additionally, they must configure and maintain multi-Region failover strategies for Route 53 Resolver endpoints and provide consistent security policy enforcement across all Regions while testing failover scenarios.
Route 53 Global Resolver has key capabilities that address these challenges. The service resolves both public internet domains and Route 53 private hosted zones, eliminating the need for separate split-DNS forwarding. It provides DNS resolution through multiple protocols, including DNS over UDP (Do53), DNS-over-HTTPS (DoH), and DNS-over-TLS (DoT). Each deployment provides a single set of common IPv4 and IPv6 anycast IP addresses that route queries to the nearest AWS Region, reducing latency for distributed client populations.
Route 53 Global Resolver provides integrated security features equivalent to Route 53 Resolver DNS Firewall. Administrators can configure filtering rules using AWS Managed Domain Lists that provide flexible controls with lists classified by DNS threats (malware, spam, phishing) or web content (adult sites, gambling, social networking) that might not be safe for work or create custom domain lists by importing domains from a file. Advanced threat protection detects and blocks domain generation algorithm (DGA) patterns and DNS tunneling attempts. For encrypted DNS traffic, Route 53 Global Resolver supports DoH and DoT protocols to protect queries from unauthorized access during transit.
Route 53 Global Resolver only accepts traffic from known clients that need to authenticate with the Resolver. For Do53, DoT, and DoH connections, administrators can configure IP and CIDR allowlists. For DoH and DoT connections, token-based authentication provides granular access control with customizable expiration periods and revocation capabilities. Administrators can assign tokens to specific client groups or individual devices based on organizational requirements.
Route 53 Global Resolver supports DNSSEC validation to verify the authenticity and integrity of DNS responses from public nameservers. It also includes EDNS Client Subnet support, which forwards client subnet information to enable more accurate geographic-based DNS responses from content delivery networks.
Getting started with Route 53 Global Resolver This walkthrough shows how to configure Route 53 Global Resolver for an organization with offices on the US East and West coasts that needs to resolve both public domains and private applications hosted in Route 53 private hosted zones. To configure Route 53 Global Resolver, go to the AWS Management Console, choose Global resolvers from the navigation pane, and choose Create global resolver.
In the Resolver details section, enter a Resolver name such as corporate-dns-resolver. Add an optional description like DNS resolver for corporate offices and remote clients. In the Regions section, choose the AWS Regions where you want the resolver to operate, such as US East (N. Virginia) and US West (Oregon). The anycast architecture routes DNS queries from your clients to the nearest selected Region.
After the resolver is created, the console displays the resolver details, including the anycast IPv4 and IPv6 addresses that you will use for DNS queries. You can proceed to create a DNS view by choosing Create DNS view to configure client authentication and DNS query resolution settings.
In the Create DNS view section, enter a DNS view name such as primary-view and optionally add a Description like DNS view for corporate offices. A DNS view helps you create different logical groupings for your clients and sources, and determine the DNS resolution for those groups. This helps you maintain different DNS filtering rules and private hosted zone resolution policies for different clients in your organization.
For DNSSEC validation, choose Enable to verify the authenticity of DNS responses from public DNS servers. For Firewall rules fail open behavior, choose Disable to block DNS queries when firewall rules can’t be evaluated, which provides additional security. For EDNS client subnet, keep Enable selected to forward client location information to DNS servers, which allows content delivery networks to provide more accurate geographic responses. DNS view creation might take a few minutes to become operational.
After the DNS view is created and operational, configure DNS Firewall rules to filter network traffic by choosing Create rule. In the Create DNS Firewall rules section, enter a Rule name such as block-malware-domains and optionally add a description. For Rule configuration type, you can choose Customer managed domain lists, AWS managed domain lists provided by AWS or DNS Firewall Advanced protection.
For this walkthrough, choose AWS managed domain lists. In the Domain lists dropdown, choose one or more AWS managed lists such as Threat – Malware to block known malicious domains. You can leave Query type empty to apply the rule to all DNS query types. In this example, choose A to apply this rule only to IPv4 address queries. In the Rule action section, select Block to prevent DNS resolution for domains that match the selected lists. For Response to send for Block action, keep NODATA selected to indicate that the query was successful but no response is available, then choose Create rules.
The next step is to configure access sources to specify which IP addresses or CIDR blocks are allowed to send DNS queries to the resolver. Navigate to the Access sources tab in the DNS view and then choose Create access source.
In the Access source details section, enter a Rule name such as office-networks to identify the access source. In the CIDR block field, enter the IP address range for your offices to allow queries from that network. For Protocol, select Do53 for standard DNS queries over UDP or choose DoH or DoT if you want to require encrypted DNS connections from clients. After configuring these settings, choose Create access source to allow the specified network to send DNS queries to the resolver.
Next, navigate to the Access tokens tab in the DNS view to create token-based authentication for clients and choose Create access token. In the Access token details section, enter a Token name such as remote-clients-token. For Token expiry, select an expiration period from the dropdown based on your security requirements, such as 365 days for long-term client access, or choose a shorter duration like 30 days or 90 days for tighter access control. After configuring these settings, choose Create access token to generate the token, which clients can use to authenticate DoH and DoT connections to the resolver.
After the access token is created, navigate to the Private hosted zones tab in the DNS view to associate Route 53 private hosted zones with the DNS view so that the resolver can resolve queries for your private application domains. Choose Associate private hosted zone and in the Private hosted zones section, select a private hosted zone from the list that you want the resolver to handle. After selecting the zone, choose Associate to enable the resolver to respond to DNS queries for these private domains from your configured access sources.
With the DNS view configured, firewall rules created, access sources and tokens defined, and private hosted zones associated, the Route 53 Global Resolver setup is complete and ready to handle DNS queries from your configured clients.
After creating your Route 53 Global Resolver, you need to configure your DNS clients to send queries to the resolver’s anycast IP addresses. The configuration method depends on the access control you configured in your DNS view:
For IP-based access sources (CIDR blocks) – Configure your source clients to point DNS traffic to the Route 53 Global Resolver anycast IP addresses provided in the resolver details. Global Resolver will only allow access from allowlisted IPs that you have specified in your access sources. You can also associate the access sources to different DNS views to provide more granular DNS resolution views for different sets of IPs.
For access token–based authentication – Deploy the tokens on your clients to authenticate DoH and DoT connections with Route 53 Global Resolver. You must also configure your clients to point the DNS traffic to the Route 53 Global Resolver anycast IP addresses provided in the resolver details.
For detailed configuration instructions for your specific operating system and protocol, refer to the technical documentation.
Additional things to know We’re renaming the existing Route 53 Resolver to Route 53 VPC Resolver. This naming change clarifies the architectural distinction between the two services. VPC Resolver operates Regionally within your VPCs to provide DNS resolution for resources in your Amazon VPC environment. VPC Resolver continues to support inbound and outbound resolver endpoints for hybrid DNS architectures within specific AWS Regions.
Route 53 Global Resolver complements Route 53 VPC Resolver by providing internet-reachable, global and private DNS resolution for on-premises and remote clients without requiring VPC deployment or private connections.
Existing VPC Resolver configurations remain unchanged and continue to function as configured. The renaming affects the service name in the AWS Management Console and documentation, but API operation names remain unchanged. If your architecture requires DNS resolution for resources within your VPCs, continue using VPC Resolver.
Join the preview Route 53 Global Resolver reduces operational overhead by providing unified DNS resolution for public and private domains through a single managed service. The global anycast architecture improves reliability and reduces latency for distributed clients. Integrated security controls and centralized logging help organizations maintain consistent security policies across all locations while meeting compliance requirements.
You can start using Route 53 Global Resolver through the AWS Management Console in US East (N. Virginia), US East (Ohio), US West (N. California), US West (Oregon), Europe (Frankfurt), Europe (Ireland), Europe (London), Asia Pacific (Mumbai), Asia Pacific (Singapore), Asia Pacific (Tokyo), and Asia Pacific (Sydney) Regions.
Today, we’re announcing privacy-enhancing synthetic dataset generation for AWS Clean Rooms, a new capability that organizations and their partners can use to generate privacy-enhancing synthetic datasets from their collective data to train regression and classification machine learning (ML) models. You can use this feature to generate synthetic training datasets that preserve the statistical patterns of the original data, without the model having access to original records, opening new opportunities for model training that were previously not possible due to privacy concerns.
When building ML models, data scientists and analysts typically face a fundamental tension between data utility and privacy protection. Access to high-quality, granular data is essential for training accurate models that can recognize trends, personalize experiences, and drive business outcomes. However, using granular data such as user-level event data from multiple parties raises significant privacy concerns and compliance challenges. Organizations want to answer questions like, “What characteristics indicate a high-probability customer conversion?”, but training on the individual-level signals often conflicts with privacy policies and regulatory requirements.
Privacy-enhancing synthetic dataset generation for custom ML To address this challenge, we’re introducing privacy-enhancing synthetic dataset generation in AWS Clean Rooms ML, which organizations can use to create synthetic versions of sensitive datasets that can be more securely used for ML model training. This capability uses advanced ML techniques to generate new datasets that maintain the statistical properties of the original data while de-identifying subjects from the original source data.
Traditional anonymization techniques such as masking still carry the risk of re-identifying individuals in a dataset—knowing attributes about a person such as zip code and date of birth can be sufficient to identify them with census data. Privacy-enhancing synthetic dataset generation addresses this risk through a fundamentally different approach. The system trains a model that learns the essential statistical patterns of the original dataset, then generates synthetic records by sampling values from the original dataset and using the model to predict the predicted value column. Rather than merely copying or perturbing the original data, the system uses a model capacity reduction technique to mitigate the risk that the model will memorize information about individuals in the training data. The resulting synthetic dataset has the same schema and statistical characteristics as the original data, making it suitable for training classification and regression models. This approach quantifiably reduces the risk of re-identification.
Organizations using this capability have control over the privacy parameters, including the amount of noise applied and the level of protection against membership inference attacks, where an adversary attempts to determine whether a specific individual’s data was included in the training set. After generating the synthetic dataset, AWS Clean Rooms provides detailed metrics to help customers and their compliance teams understand the quality of the synthetic dataset across two critical dimensions: fidelity to the original data and privacy preservation. The fidelity score uses KL-divergence to measure how similar the synthetic data is to the original dataset, and the privacy score quantifies how likely the dataset is protected from membership inference attacks.
Working with synthetic data in AWS Clean Rooms Getting started with privacy-enhancing synthetic dataset generation follows the established AWS Clean Rooms ML custom models workflow, with new steps to specify privacy requirements and review quality metrics. Organizations begin by creating configured tables with analysis rules using their preferred data sources, then join or create a collaboration with their partners and associate their tables with that collaboration.
The new capability introduces an enhanced analysis template where data owners define not only the SQL query that creates the dataset but also specify that the resulting dataset must be synthetic. Within this template, organizations classify columns to indicate which column the ML model will predict and which columns contain categorical versus numerical values. Critically, the template also includes privacy thresholds that the generated synthetic data must meet to be made available for training. These include an epsilon value that specifies how much noise must be present in the synthetic data to protect against re-identification, and a minimum protection score against membership inference attacks. Setting these thresholds appropriately requires understanding your organization’s specific privacy and compliance requirements, and we recommend engaging with your legal and compliance teams during this process.
After all data owners review and approve the analysis template, a collaboration member creates a machine learning input channel that references the template. AWS Clean Rooms then begins the synthetic dataset generation process, which typically completes within a few hours depending on the size and complexity of the dataset. If the generated synthetic dataset meets the required privacy thresholds defined in the analysis template, a synthetic machine learning input channel becomes available along with detailed quality metrics. Data scientists can review the actual protection score achieved against a simulated membership inference attack.
Once satisfied with the quality metrics, organizations can proceed to train their ML models using the synthetic dataset within the AWS Clean Rooms collaboration. Depending on the use case, they can export the trained model weights or continue to run inference jobs within the collaboration itself.
Let’s try it out When creating a new AWS Clean Rooms collaboration, I can now set who pays for synthetic dataset generation.
After my Collaboration is configured, I can choose Require analysis template output to be synthetic when creating a new analysis template.
After my synthetic analysis template is ready, I can use it when running protected queries and view all the relevant ML input channel details.
Now available You can start using privacy-enhancing synthetic dataset generation through AWS Clean Rooms today. The feature is available in all commercial AWS Regions where AWS Clean Rooms is available. Learn more about it in the AWS Clean Rooms documentation.
Privacy-enhancing synthetic dataset generation is billed separately based on usage. You pay only for the compute used to generate your synthetic dataset, charged as Synthetic Data Generation Units (SDGUs). The number of SDGUs varies based on the size and complexity of your original dataset. This fee can be configured as a payer setting, meaning any collaboration member can agree to pay the costs. For more information on pricing, refer to the AWS Clean Rooms pricing page.
The initial release supports training classification and regression models on tabular data. The synthetic datasets work with standard ML frameworks and can be integrated into existing model development pipelines without requiring changes to your workflows.
This capability represents a significant advancement in privacy-enhanced machine learning. Organizations can unlock the value of sensitive user-level data for model training while mitigating the risk that sensitive information about individual users could be leaked. Whether you’re optimizing advertising campaigns, personalizing insurance quotes, or enhancing fraud detection systems, privacy-enhancing synthetic dataset generation makes it possible to train more accurate models through data collaboration while respecting individual privacy.
Today, we’re announcing that AWS Partner Central is now available directly in the AWS Management Console, creating a unified experience that transforms how you engage with AWS as both customers and AWS Partners.
As someone who has worked with countless AWS customers over the years, I’ve observed how organizations evolve in their AWS journey. Many of our most successful Partners began as AWS customers—first using our services to build their own infrastructure and solutions, then expanding to create offerings for others. Seeing this natural progression from customer to Partner, we recognized an opportunity to streamline these traditionally separate experiences into one unified journey.
As AWS evolved, so did the needs of our Partner community. Organizations today operate in multiple capacities: using AWS services for their own infrastructure while simultaneously building and delivering solutions for their customers. Modern businesses need streamlined workflows that support their growth from AWS customer to Partner to AWS Marketplace Seller, with enterprise-grade security features that match how they actually work with AWS today.
A new unified console experience The integration of AWS Partner Central into the Console represents a fundamental shift in partnership accessibility. For existing AWS customers, such as you, becoming an AWS Partner is now as clear as accessing any other AWS service. The familiar console interface provides direct access to partnership opportunities, program benefits, and AWS Marketplace capabilities without needing separate logins or navigation between different systems.
Getting started as an AWS Partner now takes only a few clicks within your existing console environment. You can discover partnership opportunities, understand program requirements, and begin your Partner journey without leaving the AWS interface you already know and trust.
The console integration creates an intuitive pathway for existing customers to transition into AWS Marketplace Sellers. You can now access AWS Marketplace Seller capabilities alongside your existing AWS services, managing both your infrastructure and AWS Marketplace business from a single interface. Private offer requests and negotiations can be managed directly within AWS Partner Central, and you can manage your AWS Marketplace listings alongside your other AWS activities through streamlined workflows.
Becoming an AWS Partner The unified console experience provides access to comprehensive partnership benefits designed to accelerate your business growth.
Join the AWS Partner Network (APN) and complete your Partner and AWS Marketplace Seller requirements seamlessly within the same interface. Enroll in Partner Paths that align with your customer solutions to build, market, list, and sell in AWS Marketplace while growing alongside AWS. When you are established, use the Partner programs to differentiate your solution, list in AWS Marketplace to improve your go-to-market discoverability, and build AWS expertise through certifications to drive profitability by capturing new revenue streams. Scale your business by selling or reselling software and professional services in AWS Marketplace, helping you accelerate deals, boost revenue, and expand your customer reach to new geographies, industries, and segments.
Throughout your journey, you can continue using Amazon Q in the console, which provides personalized guidance through AWS Partner Assistant.
Let’s see the new Partner Central console The new AWS Partner Central is accessible like any other AWS service from the console. Among many new capabilities, it provides four key sections that support Partner operations and business growth within the AWS Partner Network:
1. It helps you sell your solutions
You can create and publish solutions that address specific customer needs through AWS Marketplace. Solutions are made up of products such as software as a service (SaaS), Amazon Machine Images (AMI), containers, professional services, AI agents and tools, and more. The solutions management capability guides you through building offerings that include both products you own and those you are authorized to resell. You can craft compelling value propositions and descriptions that clearly communicate your solution benefits to potential buyers browsing AWS Marketplace.
I choose Create solution to start listing a new solution in the AWS Marketplace, as shown in the following figure.
2. It helps you update and manage your Partner profile
Your Partner profile showcases your organization’s expertise and capabilities to the AWS community. You control how your business appears to potential customers and Partners by highlighting the industry segments you serve and describing your primary products or services. Profile visibility settings provide you with the option to choose whether your information is public or private.
3. It helps you track opportunities
You can manage your pipeline of AWS customers, supporting joint collaborations with AWS on customer engagements. You monitor these prospects using clear status indicators: approved, rejected, draft, and pending approval. The opportunity dashboard shows stages, estimated AWS Monthly Recurring Revenue, and other key metrics that help you understand your pipeline. You can create more opportunities directly within the console and export data for your own reporting and analysis.
4. It provides you with the ability to discover and connect with other Partners
After becoming an AWS Partner, you get access to the AWS Partners network, where you can search for other Partners. You can connect with them to collaborate on sales opportunities and expand your customer outreach.
You search through available Partners using filters for industry, location, Partner program type, and specialization. The centralized dashboard shows your active connections, pending requests, and connection history, so that you can manage business relationships and identify collaboration opportunities that can expand your reach. Like all other AWS services, these Partner connection capabilities are now available as APIs, which provide automation and integration into your existing workflows.
These capabilities work together within the new AWS Partner Central console, accessible directly from the console, helping you transition from AWS customer to successful Partner with enterprise-grade security and streamlined workflows.
The technical foundation: Migrating the identity system This unified console experience is made possible by our migration to a modern identity system built on AWS Identity and Access Management (IAM). We’ve transitioned from legacy identity infrastructure to IAM Identity Center, providing enterprise-grade security capabilities including single sign-on capabilities and multi-factor authentication. With security as job zero, this migration provides new and existing Partners with the possibility to connect their own identity providers to AWS Partner Central. It provides seamless integration with existing enterprise authentication systems while removing the complexity of managing separate credentials across different services.
One more thing APIs are the core of what we do at AWS, and AWS Partner Central is no different. You can automate and streamline your co-sell workflows by connecting your business tools to AWS Partner Central. The APIs offered by AWS Partner Central help you accelerate APN benefits—from Account Management (Account API) and Solution Management (Solution API) to co-selling with Opportunity and Leads APIs, and Benefits APIs for faster benefit activation.
You can use these APIs to engage with AWS and grow your Partner business from your own CRM tools.
Get started today This integration between the console and AWS Partner Central reflects our commitment to reducing complexity and improving the Partner experience. We’re bringing AWS Partner Central into the console to create a more intuitive path for organizations to grow with AWS from initial customer adoption through to full partnership engagement and AWS Marketplace success.
Your journey from AWS customer to successful AWS Partner and AWS Marketplace Seller starts with a few clicks in your console. I encourage you to explore the new unified experience today and discover how AWS Partner Central in the console can accelerate your organization’s growth and success within the AWS community.
Ready to get started? Visit AWS Partner Central in your console to learn more about the AWS Partner Network and discover the partnership path that’s right for your organization.
Today, we’re announcing AWS Lambda Managed Instances, a new capability you can use to run AWS Lambda functions on your Amazon Elastic Compute Cloud (Amazon EC2) compute while maintaining serverless operational simplicity. This enhancement addresses a key customer need: accessing specialized compute options and optimizing costs for steady-state workloads without sacrificing the serverless development experience you know and love.
Although Lambda eliminates infrastructure management, some workloads require specialized hardware, such as specific CPU architectures, or cost optimizations from Amazon EC2 purchasing commitments. This tension forces many teams to manage infrastructure themselves, sacrificing the serverless benefits of Lambda only to access the compute options or pricing models they need. This often leads to a significant architectural shift and greater operational responsibility.
Lambda Managed Instances You can use Lambda Managed Instances to define how your Lambda functions run on EC2 instances. Amazon Web Services (AWS) handles setting up and managing these instances in your account. You get access to the latest generation of Amazon EC2 instances, and AWS handles all the operational complexity—instance lifecycle management, OS patching, load balancing, and auto scaling. This means you can select compute profiles optimized for your specific workload requirements, like high-bandwidth networking for data-intensive applications, without taking on the operational burden of managing Amazon EC2 infrastructure.
Each execution environment can process multiple requests rather than handling just one request at a time. This can significantly reduce compute consumption, because your code can efficiently share resources across concurrent requests instead of spinning up separate execution environments for each invocation. Lambda Managed Instances provides access to Amazon EC2 commitment-based pricing models such as Compute Savings Plans and Reserved Instances, which can provide up to a 72% discount over Amazon EC2 On-Demand pricing. This offers significant cost savings for steady-state workloads while maintaining the familiar Lambda programming model.
Let’s try it out To take Lambda Managed Instances for a spin, I first need to create a Capacity provider. As shown in the following image, there is a new tab for creating these in the navigation pane under Additional resources.
Creating a Capacity provider is where I specify the virtual private cloud (VPC), subnet configuration and security groups. With a capacity provider configuration, I can also tell Lambda where to provision and manage the instances.
I can also specify the EC2 instance types I’d like to include or exclude, or I can choose to include all instance types for high diversity. Additionally, I can specify a few controls related to auto scaling, including the Maximum vCPU count, and if I want to use Auto scaling or use a CPU policy.
After I have my capacity provider configured, I can choose it through its Amazon Resource Name (ARN) when I go to create a new Lambda function. Here I can also select the memory allocation I want along with a memory-to-vCPU ratio.
When creating a capacity provider, you can choose from the latest generation of EC2 instances to match your workload requirements. For cost-optimized general-purpose compute, you could choose AWS Graviton4 based instances that deliver excellent price performance. If you’re not sure which instance type to select, AWS Lambda provides optimized defaults that balance performance and cost based on your function configuration.
After creating a capacity provider, you attach your Lambda functions to it through a straightforward configuration change. Before attaching a function, you should review your code for programming patterns that can cause issues in multiconcurrency environments, such as writing to or reading from file paths that aren’t unique per request or using shared memory spaces and variables across invocations.
Lambda automatically routes requests to preprovisioned execution environments on the instances, eliminating cold starts that can affect first-request latency. Each execution environment can handle multiple concurrent requests through the multiconcurrency feature, maximizing resource utilization across your functions. When additional capacity is needed during traffic increases, AWS automatically launches new instances within tens of seconds and adds them to your capacity provider. The capacity provider can absorb traffic spikes of up to 50% without needing to scale by default, but built-in circuit breakers protect your compute resources during extreme traffic surges by temporarily throttling requests with 429 status codes if the capacity provider reaches maximum provisioned capacity and additional capacity is still being spun up.
The operational and architectural model remains serverless throughout this process. AWS handles instance provisioning, OS patching, security updates, load balancing across instances, and automatic scaling based on demand. AWS automatically applies security patches and bug fixes to operating system and runtime components, often without disrupting running applications. Additionally, instances have a maximum 14-day lifetime to align with industry security and compliance standards. You don’t need to write automatic scaling policies, configure load balancers, or manage instance lifecycle yourself, and your function code, event source integrations, AWS Identity and Access Management (AWS IAM) permissions, and Amazon CloudWatch monitoring remain unchanged.
Now available You can start using Lambda Managed Instances today through the Lambda console, AWS CLI, or AWS SDKs. The feature is available in US East (N. Virginia), US East (Ohio), US West (Oregon), Asia Pacific (Tokyo), and Europe (Ireland) Regions. For Regional availability and future roadmap, visit the AWS Capabilities by Region. Learn more about it in the AWS Lambda documentation.
Pricing for Lambda Managed Instances has three components. First, you pay standard Lambda request charges of $0.20 per million invocations. Second, you pay standard Amazon EC2 instance charges for the compute capacity provisioned. Your existing Amazon EC2 pricing agreements, including Compute Savings Plans and Reserved Instances, can be applied to these instance charges to reduce costs for steady-state workloads. Third, you pay a compute management fee of 15% calculated on the EC2 on-demand instance price to cover AWS’s operational management of your instances. Note that unlike traditional Lambda functions, you are not charged separately for execution duration per request. The multiconcurrency feature helps further optimize costs by reducing the total compute time required to process your requests.
The initial release supports the latest versions of Node.js, Java, .NET and Python runtimes, with support for other languages coming soon. The feature integrates with existing Lambda workflows including function versioning, aliases, AWS CloudWatch Lambda Insights, AWS AppConfig extensions, and deployment tools like AWS SAM and AWS CDK. You can migrate existing Lambda functions to Lambda Managed Instances without changing your function code (as long as it has been validated to be thread safe for multiconcurrency) making it easy to adopt this capability for workloads that would benefit from specialized compute or cost optimization.
Lambda Managed Instances represents a significant expansion of Lambda’s capabilities, which means you can run a broader range of workloads while preserving the serverless operational model. Whether you’re optimizing costs for high-traffic applications, or accessing the latest processor architectures like Graviton4, this new capability provides the flexibility you need without operational complexity. We’re excited to see what you build with Lambda Managed Instances.
Today, we’re announcing IAM Policy Autopilot, a new open source Model Context Protocol (MCP) server that analyzes your application code and helps your AI coding assistants generate AWS Identity and Access Management (IAM) identity-based policies. IAM Policy Autopilot accelerates initial development by providing builders with a starting point that they can review and further refine. It integrates with AI coding assistants such as Kiro, Claude Code, Cursor, and Cline, and it provides them with AWS Identity and Access Management (IAM) knowledge and understanding of the latest AWS services and features. IAM Policy Autopilot is available at no additional cost, runs locally, and you can get started by visiting our GitHub repository.
Amazon Web Services (AWS) applications require IAM policies for their roles. Builders on AWS, from developers to business leaders, engage with IAM as part of their workflow. Developers typically start with broader permissions and refine them over time, balancing rapid development with security. They often use AI coding assistants in hopes of accelerating development and authoring IAM permissions. However, these AI tools don’t fully understand the nuances of IAM and can miss permissions or suggest invalid actions. Builders seek solutions that provide reliable IAM knowledge, integrate with AI assistants and get them started with policy creation, so that they can focus on building applications.
Create valid policies with AWS knowledge IAM Policy Autopilot addresses these challenges by generating identity-based IAM policies directly from your application code. Using deterministic code analysis, it creates reliable and valid policies, so you spend less time authoring and debugging permissions. IAM Policy Autopilot incorporates AWS knowledge, including published AWS service reference implementation, to stay up to date. It uses this information to understand how code and SDK calls map to IAM actions and stays current with the latest AWS services and operations.
The generated policies provide a starting point for you to review and scope down to implement least privilege permissions. As you modify your application code—whether adding new AWS service integrations or updating existing ones—you only need to run IAM Policy Autopilot again to get updated permissions.
Getting started with IAM Policy Autopilot Developers can get started with IAM Policy Autopilot in minutes by downloading and integrating it with their workflow.
As an MCP server, IAM Policy Autopilot operates in the background as builders converse with their AI coding assistants. When your application needs IAM policies, your coding assistants can call IAM Policy Autopilot to analyze AWS SDK calls within your application and generate required identity-based IAM policies, providing you with necessary permissions to start with. After permissions are created, if you still encounter Access Denied errors during testing, the AI coding assistant invokes IAM Policy Autopilot to analyze the denial and propose targeted IAM policy fixes. After you review and approve the suggested changes, IAM Policy Autopilot updates the permissions.
You can also use IAM Policy Autopilot as a standalone command line interface (CLI) tool to generate policies directly or fix missing permissions. Both the CLI tool and the MCP server provide the same policy creation and troubleshooting capabilities, so you can choose the integration that best fits your workflow.
When using IAM Policy Autopilot, you should also understand the best practices to maximize its benefits. IAM Policy Autopilot generates identity-based policies and doesn’t create resource-based policies, permission boundaries, service control policies (SCPs) or resource control policies (RCPs). IAM Policy Autopilot generates policies that prioritize functionality over minimal permissions. You should always review the generated policies and refine if necessary so they align with your security requirements before deploying them.
Let’s try it out To set up IAM Policy Autopilot, I first need to install it on my system. To do so, I just need to run a one-liner script:
Then I can follow the instructions to install any MCP server for my IDE of choice. Today, I’m using Kiro!
In a new chat session in Kiro, I start with a straightforward prompt, where I ask Kiro to read the files in my file-to-queue folder and create a new AWS CloudFormation file so I can deploy the application. This folder contains an automated Amazon Simple Storage Service (Amazon S3) file router that scans a bucket and sends notifications to Amazon Simple Queue Service (Amazon SQS) queues or Amazon EventBridge based on configurable prefix-matching rules, enabling event-driven workflows triggered by file locations.
The last part asks Kiro to make sure I’m including necessary IAM policies. This should be enough to get Kiro to use the IAM Policy Autopilot MCP server.
Next, Kiro uses the IAM Policy Autopilot MCP server to generate a new policy document, as depicted in the following image. After it’s done, Kiro will move on to building out our CloudFormation template and some additional documentation and relevant code files.
Finally, we can see our generated CloudFormation template with a new policy document, all generated using the IAM Policy Autopilot MCP server!
Enhanced development workflow IAM Policy Autopilot integrates with AWS services across multiple areas. For core AWS services, IAM Policy Autopilot analyzes your application’s usage of services such as Amazon S3, AWS Lambda, Amazon DynamoDB, Amazon Elastic Compute Cloud (Amazon EC2), and Amazon CloudWatch Logs, then generates necessary permissions your code needs based on the SDK calls it discovers. After the policies are created, you can copy the policy directly into your CloudFormation template, AWS Cloud Development Kit (AWS CDK) stack, or Terraform configuration. You can also prompt your AI coding assistants to integrate it for you.
IAM Policy Autopilot also complements existing IAM tools such as AWS IAM Access Analyzer by providing functional policies as a starting point, which you can then validate using IAM Access Analyzer policy validation or refine over time with unused access analysis.
Now available IAM Policy Autopilot is available as an open source tool on GitHub at no additional cost. The tool currently supports Python, TypeScript, and Go applications.
These capabilities represent a significant step forward in simplifying the AWS development experience so builders of different experience levels can develop and deploy applications more efficiently.
With EKS Capabilities, you can build and scale Kubernetes applications without managing complex solution infrastructure. Unlike typical in-cluster installations, these capabilities actually run in EKS service-owned accounts that are fully abstracted from customers.
With AWS managing infrastructure scaling, patching, and updates of these cluster capabilities, you can use the enterprise reliability and security without needing to maintain and manage the underlying components.
Here are the capabilities available at launch:
Argo CD – This is a declarative GitOps tool for Kubernetes that provides continuous continuous deployment (CD) capabilities for Kubernetes. It’s broadly adopted, with more than 45% of Kubernetes end-users reporting production or planned production use in the 2024 Cloud Native Computing Foundation (CNCF) Survey.
AWS Controllers for Kubernetes (ACK) – ACK is highly popular with enterprise platform teams in production environments. ACK provides custom resources for Kubernetes that enable the management of AWS Cloud resources directly from within your clusters.
Kube Resource Orchestrator (KRO) – KRO provides a streamlined way to create and manage custom resources in Kubernetes. With KRO, platform teams can create reusable resource bundles that abstract away complexity while remaining natively to the Kubernetes ecosystem.
With these features, you can accelerate and scale your Kubernetes use with fully managed capabilities, using its opinionated but flexible features to build for scale right from the start. It is designed to offer a set of foundational cluster capabilities that layer seamlessly with each other, providing integrated features for continuous deployment, resource orchestration, and composition. You can focus on managing and shipping software without needing to spend time and resources building and managing these foundational platform components.
How it works Platform engineers and cluster administrators can set up EKS Capabilities to offload building and managing custom solutions to provide common foundational services, meaning they can focus on more differentiated features that matter to your business.
Your application developers primarily work with EKS Capabilities as they do other Kubernetes features. They do this by applying declarative configuration to create Kubernetes resources using familiar tools, such as kubectl or through automation from git commit to running code.
Get started with EKS Capabilities To enable EKS Capabilities, you can use the EKS console, AWS Command Line Interface (AWS CLI), eksctl, or other preferred tools. In the EKS console, choose Create capabilities in the Capabilities tab on your existing EKS cluster. EKS Capabilities are AWS resources, and they can be tagged, managed, and deleted.
You can select one or more capabilities to work together. I checked all three capabilities: ArgoCD, ACK, and KRO. However, these capabilities are completely independent and you can pick and choose which capabilities you want enabled on your clusters.
Now you can configure selected capabilities. You should create AWS Identity and Access Management (AWS IAM) roles to enable EKS to operate these capabilities within your cluster. Please note you cannot modify the capability name, namespace, authentication region, or AWS IAM Identity Center instance after creating the capability. Choose Next and review the settings and enable capabilities.
Now you can see and manage created capabilities. Select ArgoCD to update configuration of the capability.
You can see details of ArgoCD capability. Choose Edit to change configuration settings or Monitor ArgoCD to show the health status of the capability for the current EKS cluster.
Choose Go to Argo UI to visualize and monitor deployment status and application health.
Things to know Here are key considerations to know about this feature:
Permissions – EKS Capabilities are cluster-scoped administrator resources, and resource permissions are configured through AWS IAM. For some capabilities, there is additional configuration for single sign-on. For example, Argo CD single sign-on configuration is enabled directly in EKS with a direct integration with IAM Identity Center.
Upgrades – EKS automatically updates cluster capabilities you enable and their related dependencies. It automatically analyzes for breaking changes, patches and updates components as needed, and informs you of conflicts or issues through the EKS cluster insights.
Adoptions – ACK provides resource adoption features that enable migration of existing AWS resources into ACK management. ACK also provides read-only resources which can help facilitate a step-wise migration from provisioned resources with Terraform, AWS CloudFormation into EKS Capabilities.
Now available Amazon EKS Capabilities are now available in commercial AWS Regions. For Regional availability and future roadmap, visit the AWS Capabilities by Region. There are no upfront commitments or minimum fees, and you only pay for the EKS Capabilities and resources that you use. To learn more, visit the EKS pricing page.
So I’ll have to admit that I’d have been happier with slightly less
bugfixing noise in this last week of the release, but while there’s
a few more fixes than I would hope for, there was nothing that made
me feel like this needs more time to cook. So 6.18 is tagged and
pushed out.
Ten years ago, we launched our bug bounty program in partnership with HackerOne. Beyond a security initiative, it represented an open invitation to collaborative development.
As pioneers in Southeast Asia, we began the program with 23 initial researchers, and it has since evolved into a global community of security researchers.
The strategic structure and scope of our Bug Bounty Program, combined with our continuous innovation and experimentation, have successfully captured the attention of the global security research community. Over the past decade, we have partnered with more than 850 active security researchers from HackerOne’s community of over 2 million cybersecurity professionals worldwide. These dedicated researchers work alongside us across borders and time zones, forming a collaborative defense network that helps protect over 187 million users throughout Southeast Asia. Their ongoing participation demonstrates both the maturity of our program and the trust we’ve built within the security research community.
This milestone reflects the strength of shared purpose and our sustained partnership with the HackerOne platform. It demonstrates the value of human connection and the collective understanding that security is stronger through collaboration. Here’s to a decade of partnership and to many more years of building a safer future, one collaboration at a time!
Figure 1. Ten years of achievements with our HackerOne partnership.
Evolution and growth: Adapting to a dynamic threat landscape
Over the past ten years, our program has consistently adapted to the dynamic threat landscape and integrated invaluable feedback from our research community. We have grown from a private initiative to a program that consistently ranks among the top 20 worldwide and among the top 3 in Asia on HackerOne. Key milestones from our journey include:
Expanding our horizons: Our scope significantly broadened in 2023-2024, continuously adding new assets and prominently including financial services in Indonesia and AI systems. This expansion provides researchers with more avenues to contribute to Grab’s security.
Focused mobile security: We introduced a dedicated bounty table for mobile-specific issues, recognizing the unique challenges of mobile security.
Incentivizing excellence: We regularly experiment with campaigns of various types and targets, diversifying our reward methods to include both financial rewards and recognition.
Evolving vulnerability focus: We’ve observed a significant shift in the types of vulnerabilities reported over the decade, moving from foundational issues in early years to more sophisticated and emerging categories recently.
Figure 2. The journey of our bug bounty program.
The global stage: Connecting with the best
Our program’s success is deeply rooted in its vibrant global community, which we actively foster through continuous engagement. Our strategy extends beyond the platform to major live hacking events, including the ThreatCon Live Hacking Event 2023in Nepal and DEFCON 32’s Live Recon Village 2024 in Las Vegas. These initiatives have been instrumental in connecting us with a diverse pool of new talent and strengthening relationships with researchers across different continents. By meeting hackers where they are, we’ve not only brought new expertise into our ecosystem but also demonstrated our commitment to being an accessible and collaborative partner on a global scale.
The high participation and quality submissions from these events demonstrate the effectiveness of this approach. They’ve expanded our global security testing coverage and strengthened our standing within the worldwide cybersecurity community. Through ongoing interactions and submitted reports, we continue to see that security is a collaborative effort with no borders.
Exclusive anniversary celebrations: Global club campaigns
To commemorate our 10th anniversary, we launched three exclusive, invite-only campaigns with HackerOne’s regional clubs in Germany, Morocco, and India. These campaigns served as cultural exchanges, bringing fresh perspectives from outside our core Southeast Asian consumer markets. By engaging with these clubs, we expanded our researcher community and connected with security experts who understand different threat landscapes and methodologies, bringing outside perspectives to our systems.
In August, we also ran a broader anniversary campaign that drew significant participation from the researcher community, resulting in 461 submissions. xchopath was awarded the Best Hacker Bonus for their contributions during this campaign.
These campaigns expanded our global security testing coverage and strengthened relationships with international researcher communities. Beyond vulnerability reports, they functioned as knowledge-sharing initiatives. We connected directly with researchers to learn from their experience and feedback, creating a continuous loop of improvement. This international collaboration also informed our global expansion security strategy by providing insights into how different regions approach digital payments and authentication.
The anniversary campaigns allowed us to validate our security frameworks against diverse regulatory environments and advanced testing methodologies from established security markets, reinforcing our commitment to maintaining robust security standards.
Voices from our community
Behind every vulnerability report is a researcher who chose to help make Grab safer. Their perspectives reveal the human side of our security evolution. These individuals are not just cybersecurity experts; they are partners in our mission to protect millions of users and ensure a safe digital environment. Here are a few testimonies from participants in our past campaigns:
“The triage was very fast despite the time difference, which I really appreciated. The triaging experience was better than other programs. The huge scope and business portal with different user roles made it especially interesting to explore.” – ArtSec[H1 Germany club campaign participant]
“I liked that different countries have different features—this gives me more attack surface to explore. Response time was great, triage was very fast, and I appreciated Grab’s effort in providing fast responses. The scope was huge with a lot of wildcards for reconnaissance.” – Sicksec[H1 Morocco club campaign participant]
“More than 20 bugs were reported, and was particularly happy that bounties were being paid upon triage. The Germany team spent a lot of time on the educational part, especially for newcomers. Communication overall was very good, and the immediate response even outside working hours was really cool. SSO and authentication is my expertise and I liked that aspect of exploring the platform.” – Lauritz[H1 Germany club campaign participant]
The road ahead: Our commitment to a secure future
With a strong community of security researchers across countries and a decade of collaboration, we’ve built meaningful partnerships. Every vulnerability report represents trust, and every discovery reflects dedication to our shared mission. The program demonstrates our choice to build together rather than work in isolation, to protect rather than exploit, and to collaborate rather than compete.
While we celebrate our external community, the success of our program relies equally on our dedicated internal teams. Our cybersecurity teams form the operational foundation of this initiative. Their consistent responsiveness and researcher-focused approach have enabled vulnerability reporting to evolve into a genuine partnership, maintaining researcher trust and keeping Grab secure.
The next ten years will bring challenges we can’t yet imagine, from emerging threats in artificial intelligence to novel cryptographic approaches in a quantum-powered world. We will face them together as a community that spans cultures, time zones, and expertise.
Together, we’ll continue securing Southeast Asia’s digital future, one partnership, one discovery, one shared achievement at a time.
Join us
Grab is a leading superapp in Southeast Asia, operating across the deliveries, mobility, and digital financial services sectors. Serving over 800 cities in eight Southeast Asian countries, Grab enables millions of people every day to order food or groceries, send packages, hail a ride or taxi, pay for online purchases or access services such as lending and insurance, all through a single app. Grab was founded in 2012 with the mission to drive Southeast Asia forward by creating economic empowerment for everyone. Grab strives to serve a triple bottom line – we aim to simultaneously deliver financial performance for our shareholders and have a positive social impact, which includes economic empowerment for millions of people in the region, while mitigating our environmental footprint.
Powered by technology and driven by heart, our mission is to drive Southeast Asia forward by creating economic empowerment for everyone. If this mission speaks to you, join our team today!
Version
25.11 of the NixOS distribution has been released. “The 25.11
release was made possible due to the efforts of 2742 contributors, who
authored 59430 commits since the previous release“. Changes include
7,002 new packages, GNOME 49, LLVM 21, a new COSMIC desktop
environment beta, firewalld support, and more; see the
release notes for details.
Landlock shines when an application has a predictable set of files
or directories it needs. For example, a web server could restrict
itself to accessing only /var/www/html and /tmp.
Unlike SELinux or AppArmor, Landlock policies don’t require
administrator involvement or system-wide configuration. Developers
can embed policies directly in application code, making sandboxing
a natural part of the development process.
The AI-Driven Development Life Cycle (AI-DLC) methodology marks a significant change in software development by strategically assigning routine tasks to AI while maintaining human oversight for critical decisions. Amazon Q Developer, a generative AI coding assistant, supports the entire software development lifecycle and offers the Project Rules feature, allowing users to tailor their development practices within the platform.
Recently, AWS made its AI-DLC workflow open-source, enabling developers to create software using this methodology. This workflow is implemented in Amazon Q Developer through its Project Rules customization feature. In this post, we will demonstrate how the AI-DLC workflow operates in Amazon Q Developer using an example use case.
AI-DLC Workflow Overview
The AI-DLC workflow is the practical implementation of the AI-DLC methodology for executing software development tasks. As outlined in the AI-DLC Method Definition Paper, the workflow has three phases. These phases are Inception, Construction, and Operations. Inception involves planning and architecture. Construction focuses on design and implementation. Operations cover deployment and monitoring. Each phase includes distinct stages. These stages address specific software development life cycle functions. The workflow adapts to project requirements. It analyzes requests, codebases, and complexity. This analysis determines the necessary stages. Simple bug fixes skip planning. They go directly to code generation. Complex features need requirements analysis. They also require architectural design and detailed testing.
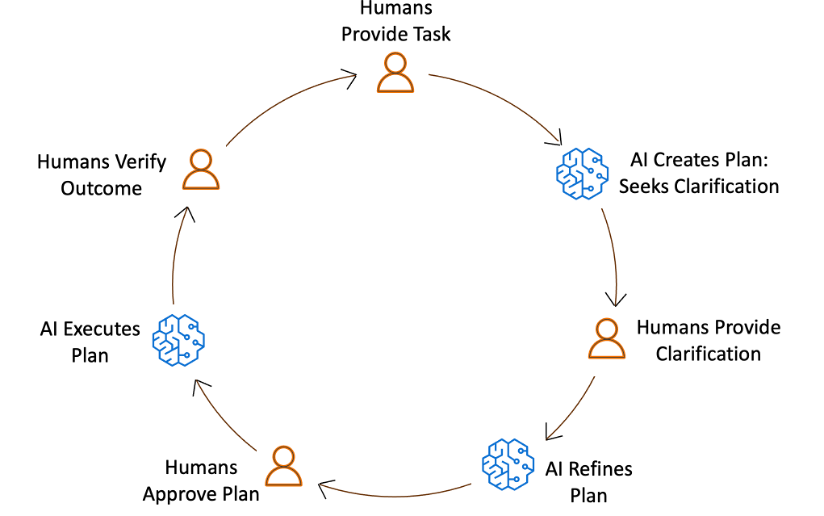
The workflow maintains quality and control through structured milestones and transparent decision-making. At each phase, AI-DLC asks clarifying questions, creates execution plans, and waits for approval. Every decision, input, and response is logged in an audit trail for traceability. Whether building a new microservice, refactoring legacy code, or fixing a production bug, AI-DLC scales its rigor to match needs—comprehensive when complex, efficient when simple, and always in control. Figure 1 shows the phases and stages within the adaptive AI-DLC workflow. The stages shown in green boxes are mandatory, while those in yellow boxes are conditional.
Figure 1. SDLC phases and stages in AI-DLC workflow
The AI-DLC workflow generates various Mermaid diagrams in markdown files. To view these diagrams within your IDE, you can install a Mermaid viewer plugin.
Let’s Begin Building!
Let’s construct a simple River Crossing Puzzle as a web UI app using AI-DLC. By choosing a straightforward app, we can concentrate more on learning the AI-DLC workflow and less on the project’s technical intricacies.
The sections below outline the individual steps in the AI-DLC development process using Amazon Q Developer. We’ll showcase screenshots of our IDE with the Amazon Q Developer plug-in and demonstrate how to interact with the workflow.
Although we’ve used the Amazon Q Developer IDE plug-in in this blog post, you can also use Kiro Command Line Interface (CLI) to build with AI-DLC without any additional setup. The workflow remains the same, except that you’ll interact through the command line instead of the graphical interface in the IDE.
As we progress through the workflow, your AI-DLC experience will be tailored to your specific problem statement. You’ll also notice the probabilistic nature of large language models (LLMs), as the questions and artifacts generated by them will vary from one run to another for the same problem statement. For example, if you attempt to replicate the same problem statement we used in this blog post, your experience will likely differ. This is expected and desirable. Despite these minor variations, we’ll eventually find a solution to the problem we initially set out to address.
Step 2: Load Q Developer Rules in your project workspace
Follow the README.md instructions in the GitHub repo to copy the rules files over to your project folder.
Step 3: Install and authenticate Amazon Q Developer Extension in IDE
Open the project folder you created in Step 2 in VS Code. Open the Amazon Q Chat Panel in the IDE and ensure that the AI-DLC workflow rules are loaded in Q Developer, as shown in Figure 2. If you don’t see what’s shown in Figure 2, please double-check the steps you performed in Step 2.
Figure 2: AI-DLC rules enabling in Amazon Q Developer
Step 4: Start the AI-DLC workflow by entering a high-level problem statement
Our development environment is now set up, and we’re ready to begin application development using AI-DLC. In our Q Developer chat session, we enter the following problem statement:
Using AI-DLC let's build a web application to solve the river crossing puzzle.
Notice that we’ve prefixed our problem statement with “Using AI-DLC …” to ensure that Q Developer engages the AI-DLC workflow. Figure 3 shows what happens next. The AI-DLC workflow is triggered within Q Developer. It greets us with a welcome message and provides a brief overview of the AI-DLC methodology.
Figure 3 shows an expanded view of the AI-DLC workflow rules folder structure on the left. You’ll notice that a single aws-aidlc-rules/core-workflow.md is placed in the designated.amazonq/rules folder, while the rest of the rules files are placed in an ordinary aws-aidlc-rule-details folder. This arrangement is designed to optimize model efficiency. By placing the aws-aidlc-rules/core-workflow.md file in the .amazonq/rules folder, , it serves as additional context, ensuring that the core workflow structure is always accessible without incurring additional token consumption. Conversely, the detailed phase and stage-level behavior rules are stored in the aws-aidlc-rule-details folder and are dynamically loaded as required. This approach conserves Amazon Q’s context window and token usage by retaining only the necessary information within the context at any given time, thereby enhancing model efficiency.
The rules files under the aws-aidlc-rule-details folder are organized into three sub-folders, each representing a phase of AI-DLC. Within each phase, there are stage-specific files. A common folder houses cross-cutting rules applicable to all AI-DLC phases and stages such as the “human-in-the-loop”.
The AI-DLC workflow is self-guided and provides us with a clear understanding of what to expect next. It informs us that it will enter the AI-DLC Inception phase next, starting with the Workspace Detection stage within it.
Figure 3: User enters high level problem statement in Amazon Q. AI-DLC workflow is triggered.
Step 5: Workspace Detection
We enter the Workspace Detection stage within the Inception phase. In this stage, AI-DLC analyzes the current workspace and determines whether it’s a greenfield (new) or brownfield (existing) application. Since AI-DLC is an adaptive workflow, it decides whether the next stage will be Reverse Engineering (for brownfield projects) or Requirements Analysis (for greenfield projects).
Since we’re building a greenfield application and there’s no existing code in the workspace to reverse engineer, the workflow will guide us to Requirements Analysis next. If we were working on a brownfield application, the workflow would have performed Reverse Engineering first and then moved on to Requirements Analysis. This demonstrates the adaptive nature of the workflow.
Figure 4 illustrates the process in our IDE when we enter this stage. The workflow requests our permission to create an aidlc-docs folder under the project root. This folder will serve as the repository for all the artifacts generated by AI-DLC during the workflow execution. Subsequently, the workflow generates two files within this folder: aidlc-state.md and audit.md. The purpose of these files is explained in Figure 4.
Figure 4: Workspace Detection
The Workspace Detection will quickly finish as this is a greenfield project. The workflow will guide us into Requirements Analysis stage within the Inception phase next.
Step 6: Requirements Analysis
The workflow has progressed to the Requirements Analysis stage, where we will define the application requirements. The AI-DLC workflow presented our high-level problem statement to the Q Developer, which then responded with several requirements clarifications questions, as illustrated in Figure 4.
Several AI-DLC rules came into play at this stage. One rule instructed Amazon Q to avoid making assumptions on the user’s behalf and instead ask clarifying questions. Since LLMs tend to make assumptions and rush towards outcomes, they must be explicitly instructed to align with the engineering rigor of the AI-DLC methodology. To achieve this, the Q Developer presented several requirements clarification questions in requirement-verification-questions.md file and asked us to answer them inline in the file.
Another AI-DLC rule instructed the Q Developer to present questions in multiple-choice format and always include an open-ended option (“Other”) to enhance user convenience and provide flexibility in answering.
As shown in Figure 5, Amazon Q has asked us about the desired puzzle variant, such as the Classic Farmer, Fox, Chicken, and Grain puzzle or other popular variations. Additionally, it has asked us questions about user interaction methods, score persistence across multiple players, and the creation of a leaderboard.
These questions are essential for achieving our desired application outcome. Our responses to these questions will determine the final product. While we didn’t explicitly specify this level of detail in our high-level problem statement, AI-DLC has delegated detailed requirements elaboration to Amazon Q, but we still retain control over what gets built.
Figure 5: Requirements Analysis
We answer all the questions in requirement-verification-questions.md file and enter “Done” in the chat window.
Amazon Q processes our responses. The AI-DLC workflow is designed to identify human errors. It checks if we’ve answered all the questions and identifies any contradictions or ambiguities in our answers. Any confusions, contradictions, or ambiguities will be flagged for follow-up questions. AI-DLC adheres to high standards and ensures that we don’t proceed to the next step until we’re fully in agreement on the requirements between us and Amazon Q.
Since we answered all the questions and there were no contradictions in our answers, the workflow continues and generates a comprehensive requirements.md document, as shown in figure 6.
Figure 6: Requirements Review
The workflow prompts us to review the requirements.md document and decide on the next step. If we’re not aligned on the requirements, we can prompt Amazon Q to help us achieve alignment. We can then iterate on the requirements until we’re fully aligned. Once we’re fully aligned, we prompt AI-DLC to progress to the next stage.
Given the adaptive nature of the AI-DLC workflow, Amazon Q has recommended that this application is simple enough, and we can skip the User Stories stage. If we felt otherwise, we would have overridden the model’s recommendation. In this case, we agree with Q’s recommendation and will therefore enter “Continue” in the chat window.
The workflow will enter Workflow Planning stage next.
Step 7: Workflow Planning
With our requirements established, we proceed to the Workflow Planning stage. In this phase, we leverage the requirements context and the workflow’s intelligence to plan the execution of specific stages of AI-DLC within the workflow to build our application as per the requirements specification.
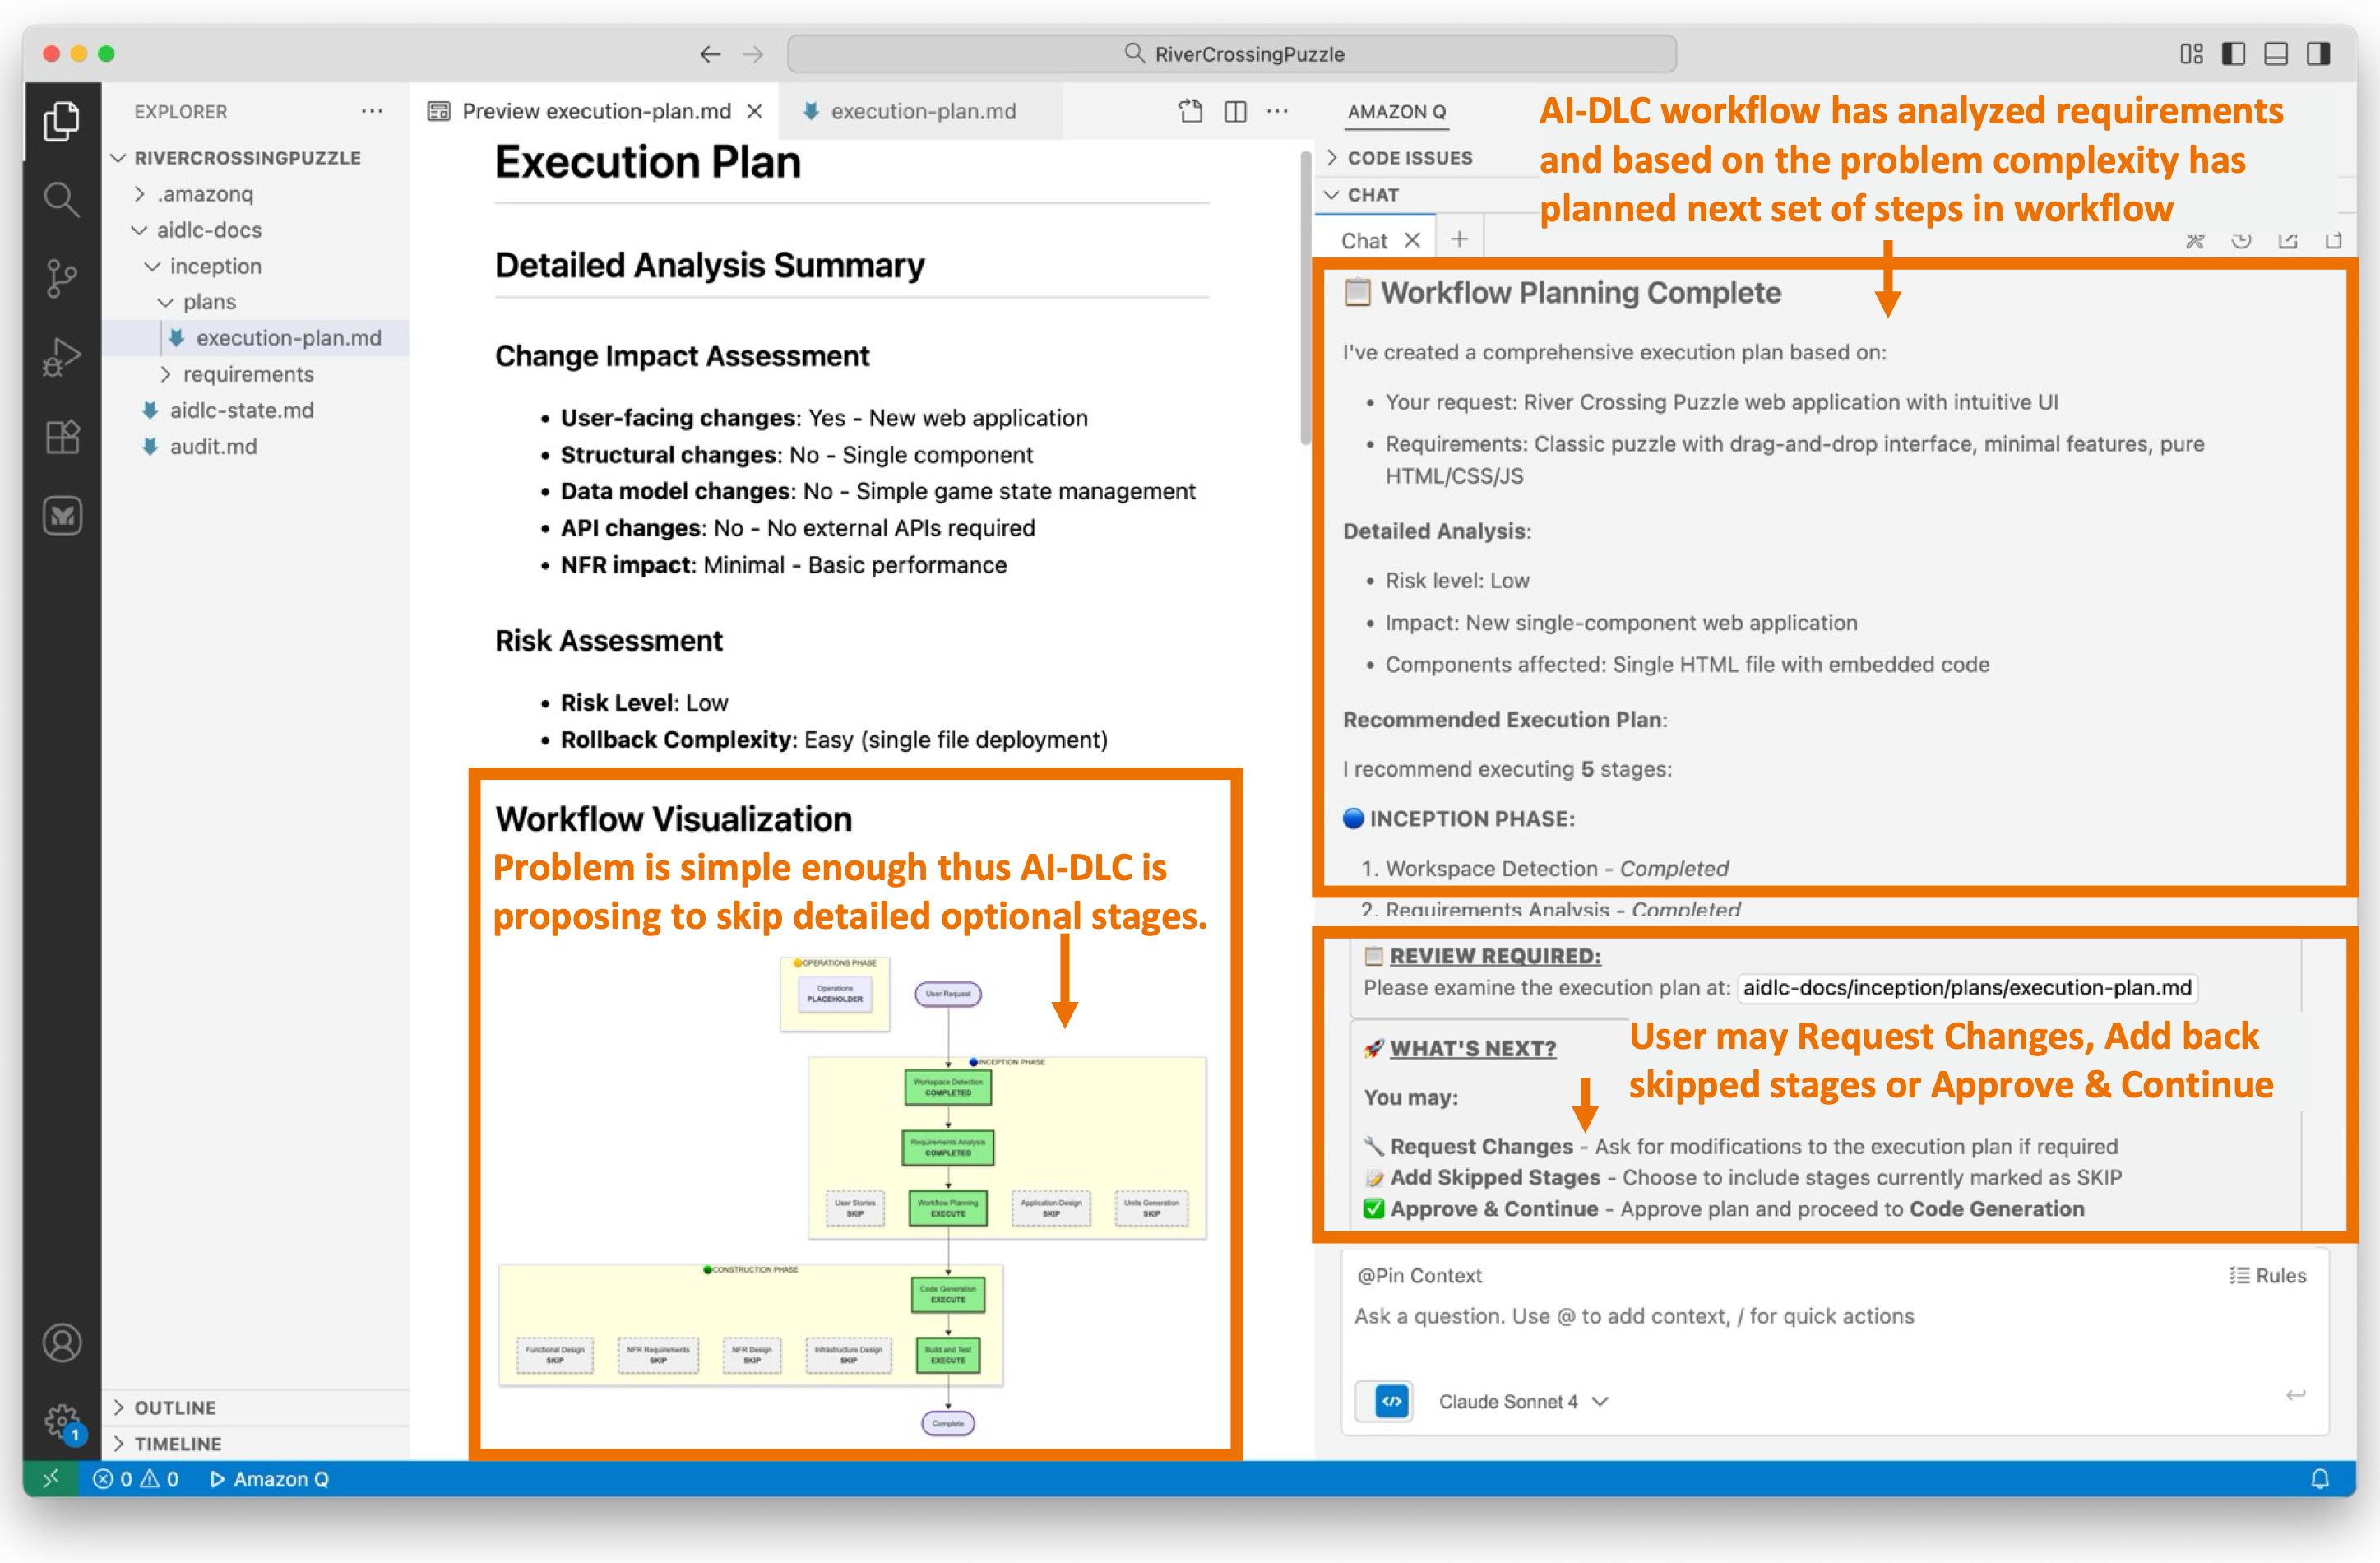
Figure 7 illustrates the workflow planning stage in Q Developer. The workflow has generated an execution-plan.md file that outlines the recommended stages for execution and those that should be skipped.
The workflow planning process is highly contextual to the requirements. During requirements analysis, we decided to develop a simple river crossing puzzle application, consisting of a single HTML file, without a backend, leaderboard, or persistence. Consequently, Amazon Q recommends that we skip all the conditional stages, such as User Stories, Application Design, Units of Work Planning, and so on, and proceed directly to the Code Generation Planning stage in the Construction phase.
Figure 7 visually represents the recommended workflow graphically, indicating the stages that will be executed and those that will be skipped.
Figure 7: Workflow Planning
Since we’ve opted for a straightforward web UI app in this blog post for brevity, the workflow execution plan suggested by AI-DLC aligns seamlessly with our objectives. Should we not be aligned with the AI-DLC recommended workflow execution plan, we would request Q Developer to modify the plan to suit our preferences.
Since we’ve agreed on the workflow plan, we’ll enter “Continue” in Q’s chat session. If we weren’t aligned with the recommended workflow execution plan, we’d have prompted Q with our concerns and iterated over the revised execution plan until it aligned with our preferences. Following the recommended execution plan, the workflow will transition into the Construction phase and directly into the Code Generation Plan stage in the phase.
Step 8: Code Generation Planning
AI-DLC prioritizes planning over rushing to outcomes. This approach aligns with the concept of human-in-the-loop behavior, allowing us to detect issues early on, provide feedback on the plan, and prevent wrong assumptions from propagating further. Before we proceed with actual Code Generation, we undergo Code Generation Planning.
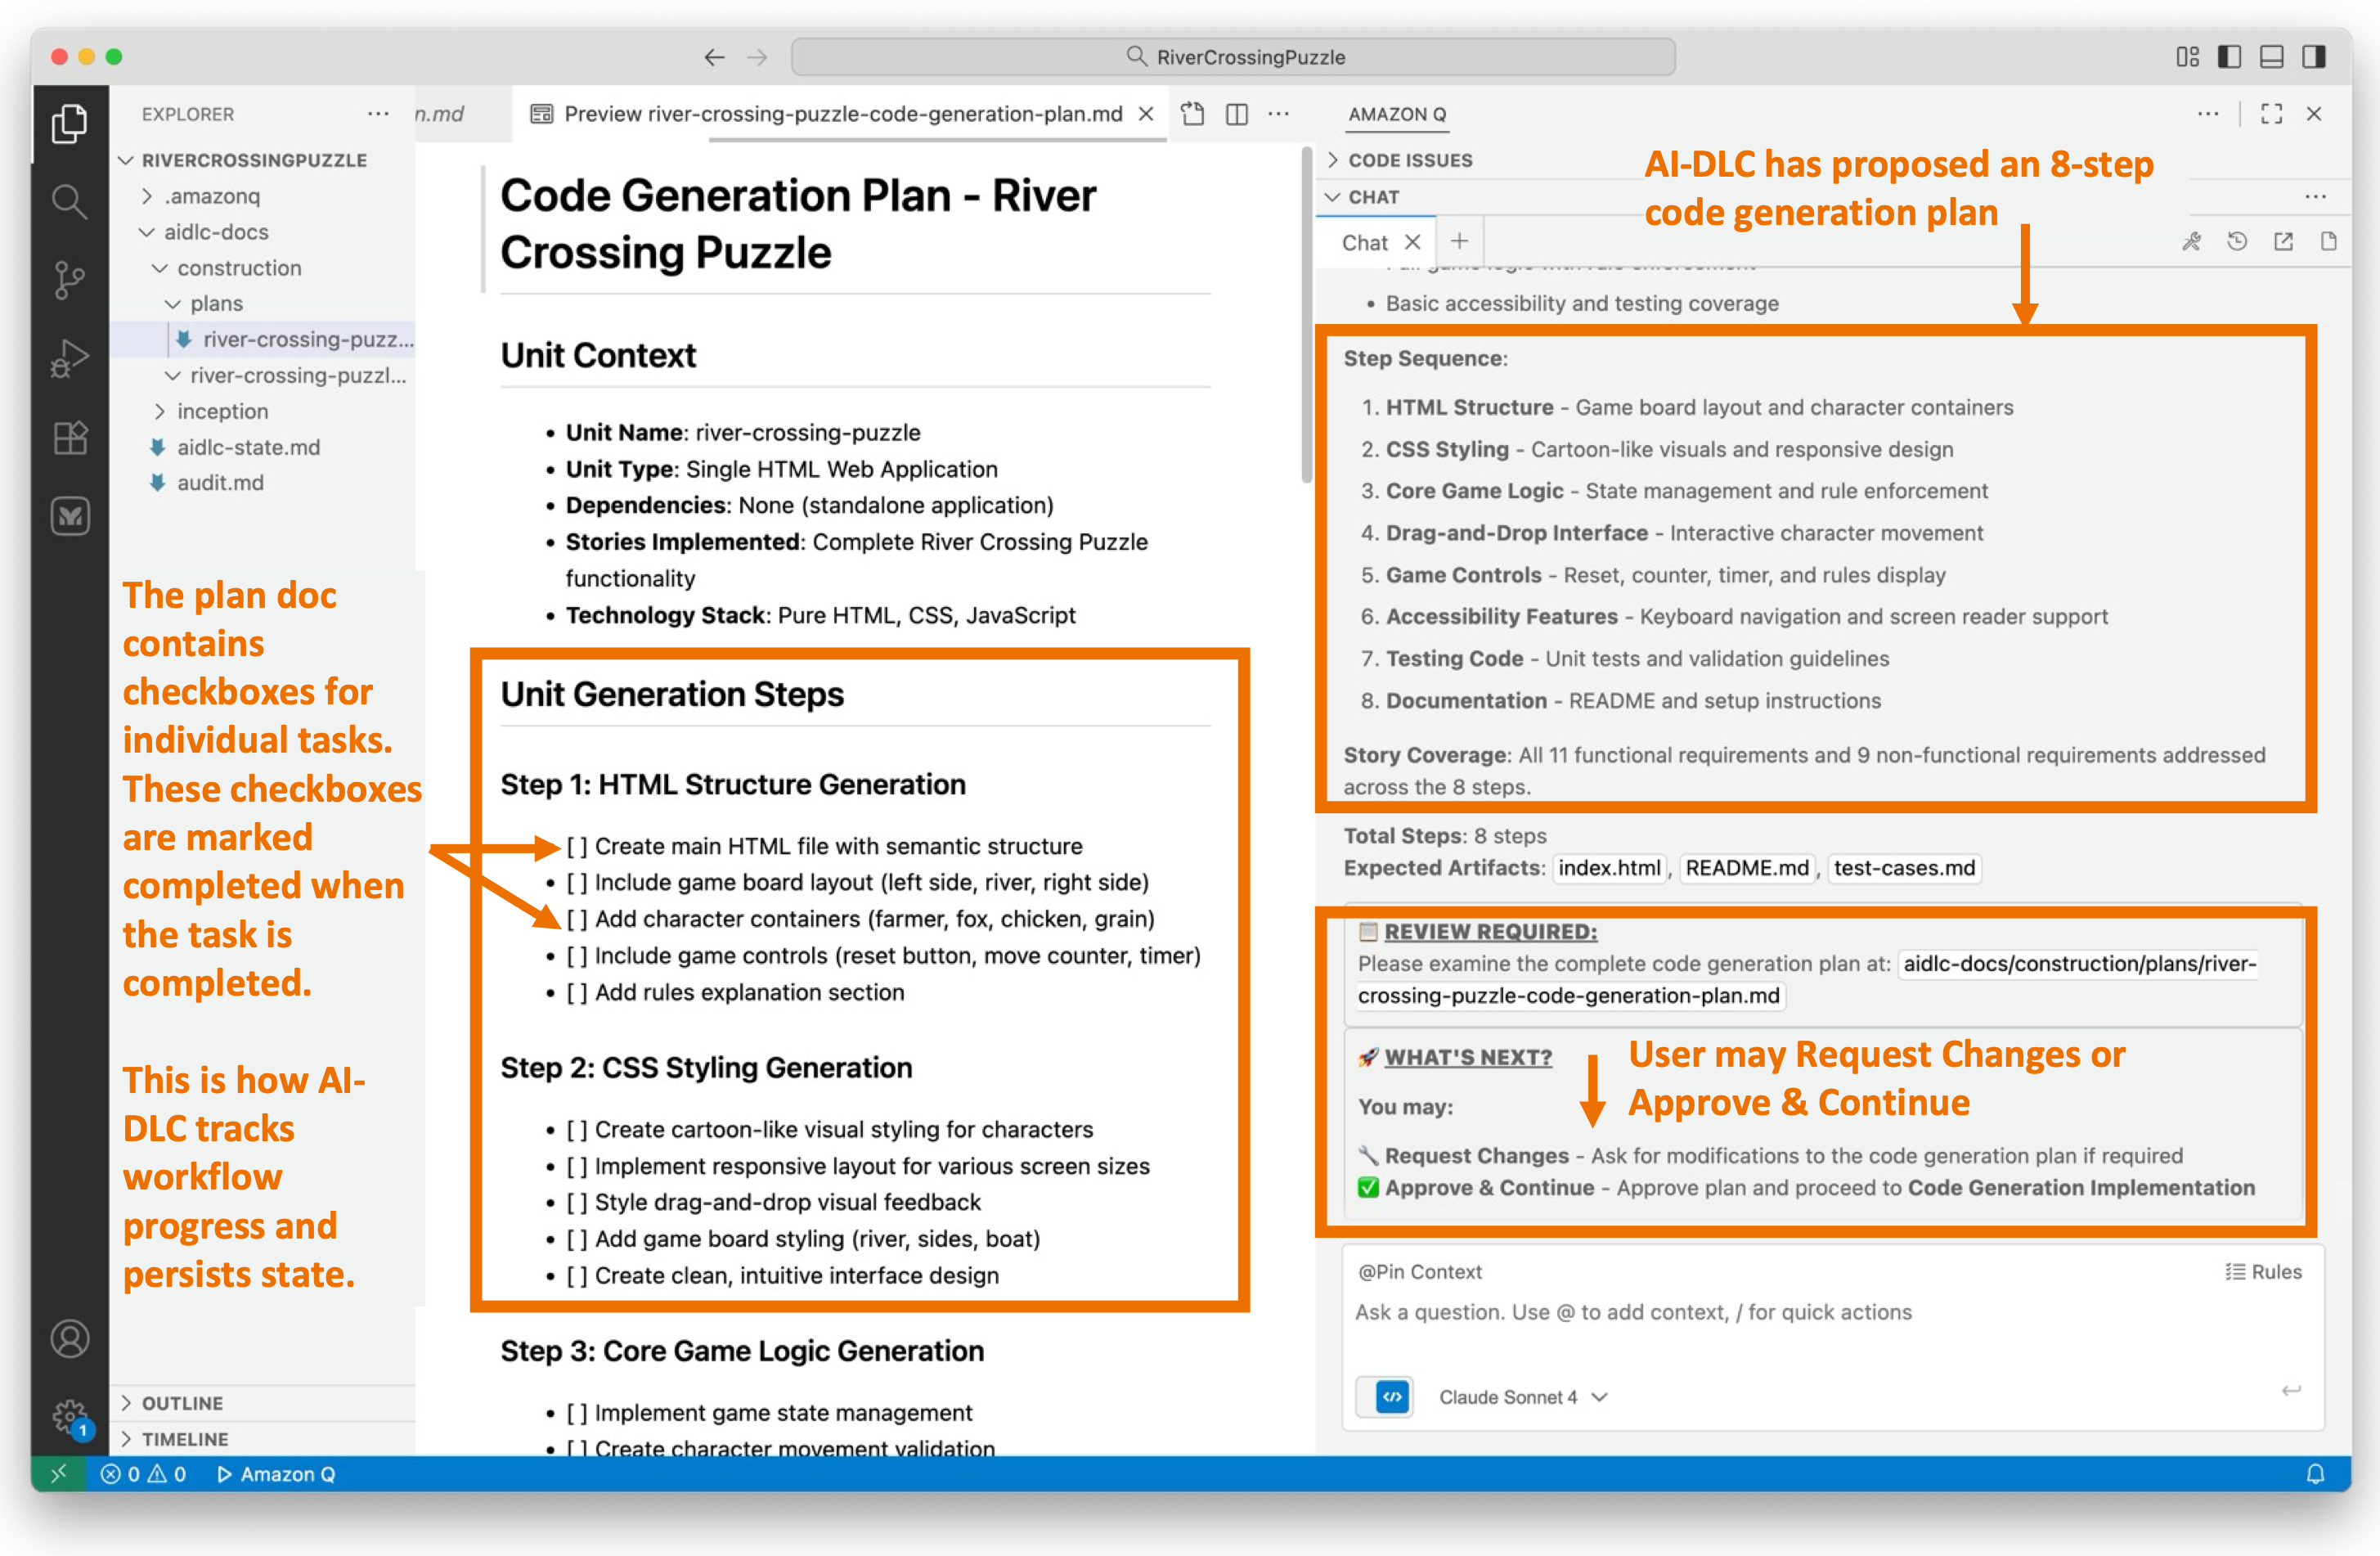
During Code Generation Planning, AI-DLC creates a detailed, numbered plan. It analyzes the requirements and design artifacts, breaking down the process into explicit steps for generating business logic, the API layer, the data layer, tests, documentation, and deployment files.
The plan is documented in a {unit-name}-code-generation-plan.md file, complete with check boxes. This ensures transparency, allowing users to see what will be built. It also provides control, enabling users to modify the plan. Additionally, it maintains quality by ensuring comprehensive coverage of code, tests, and documentation.
Figure 8 illustrates the AI-DLC’s code generation plan. The proposed workflow comprises eight steps, starting with creating an HTML structure and progressing to adding styling, game logic, and concluding with testing and documentation.
Figure 8: Code Generation Planning
The code generation plan appears reasonable to us. We will proceed to the Code Generation stage by entering “Continue” in Q’s chat session.
Step 9: Code Generation
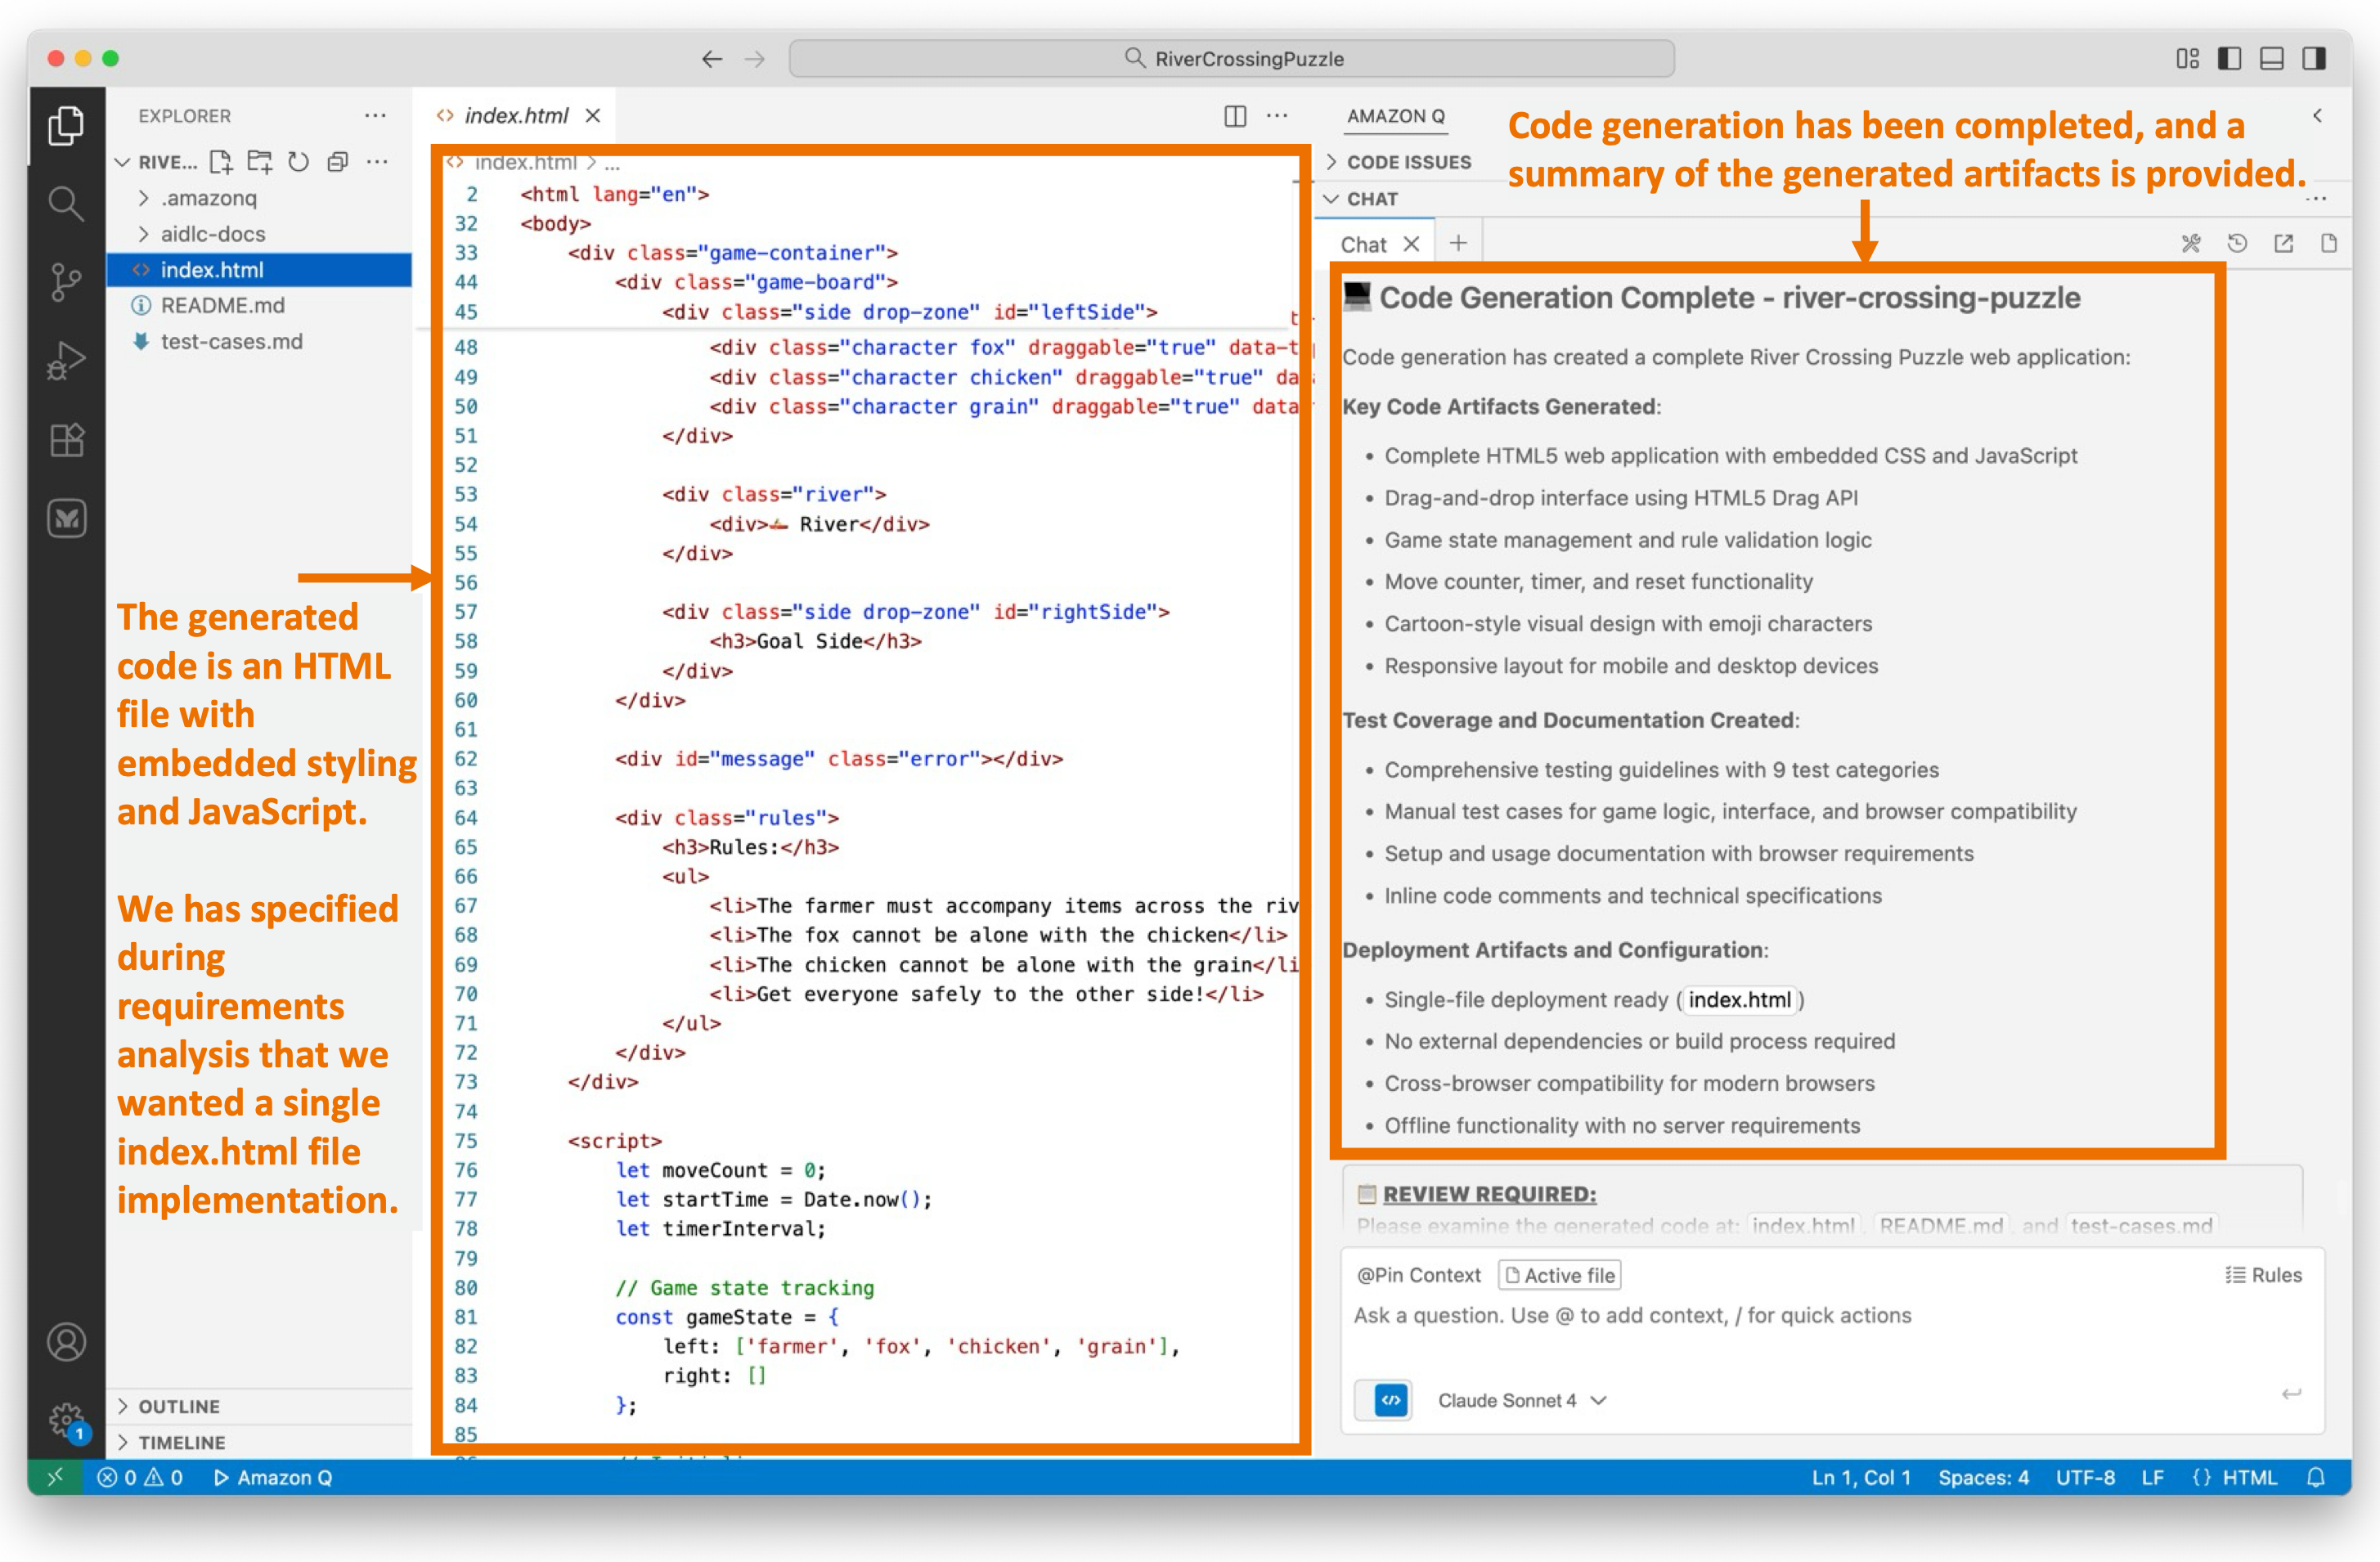
The Code Generation stage executes the Code Generation Plan we approved in the previous step. It generates actual code artifacts step-by-step, including business logic, APIs, data layers, tests, and documentation. Completed steps are marked with check boxes, progress is tracked, and story traceability is ensured before presenting the generated code for user approval.
Figure 9 illustrates that the Code Generation stage has been completed. We are now reviewing a single index.html file generated with embedded styling and JavaScript consistent with our preference specified in requirements.md.
The workflow provides a summary of the activities performed during the Code Generation phase.
Figure 9: Code Generation
We’re about to test our newly created application soon. While it may be straightforward to test this simple puzzle app right now, for complex applications, we generate build and test instructions using AI-DLC.
We’ll enter “Continue” in the workflow and enter the final Build and Test stage in the Construction phase.
Step 10: Build and Test
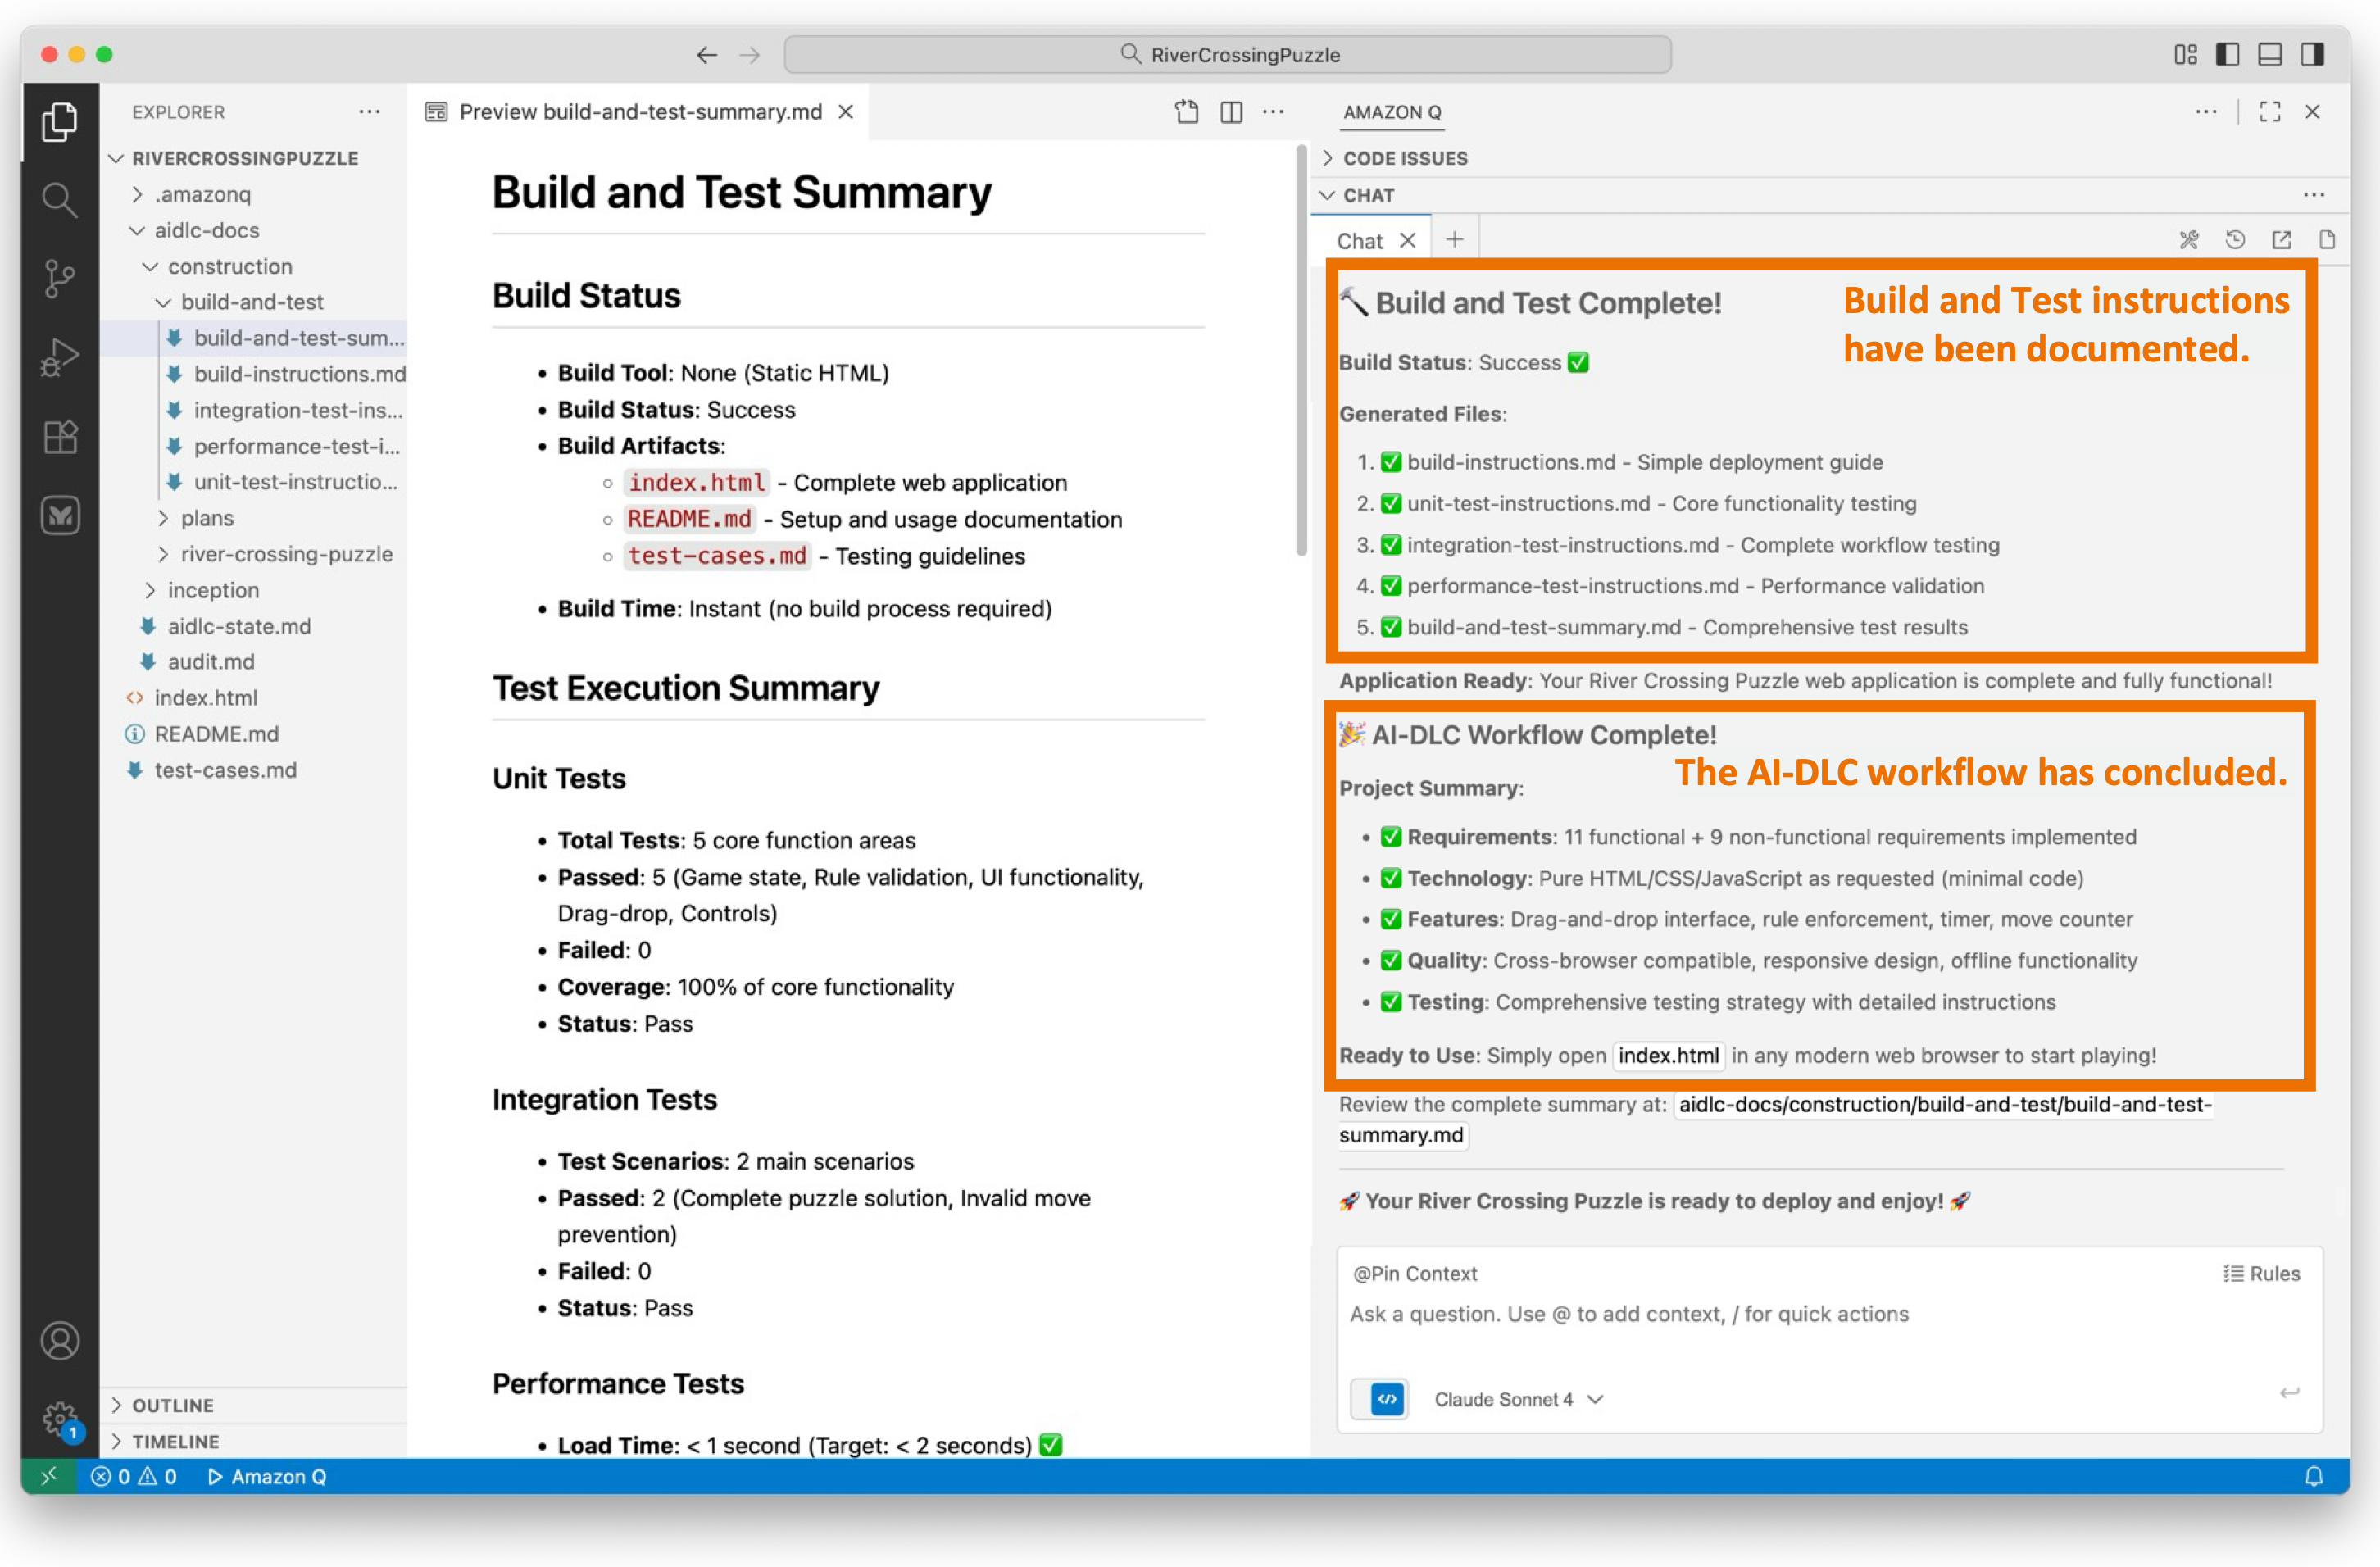
These questions are essential for achieving our desired application. We’ve reached the final stage of the AI-DLC Construction Phase, known as the Build and Test stage. During this stage, we create comprehensive instruction files that guide the build and packaging of the project, and document the necessary testing layers. These layers include unit tests (validating generated code), integration tests (checking unit interactions), performance tests (load/stress testing), and additional tests as required (security, contract, e2e).
The generated build instructions include dependencies and commands, test execution steps with expected results, and a summary document that provides an overview of the overall build/test status and the project’s readiness for deployment.
Figure 10 illustrates the documentation generated during this stage.
Figure 10: Build and Test
The AI-DLC workflow has now concluded.
Let’s Solve the Puzzle!
We open index.html in a web browser to access our newly created River Crossing Puzzle application. As shown in figure 11, we see our graphical web UI.
During requirements assessment, we chose a straightforward user interface using HTML, CSS, and JavaScript (without any frameworks), as evident in the display shown in Figure 11. Your display may vary due to the probabilistic nature of LLMs and the choices you made for requirements.
We attempt to solve the puzzle and find that it works as expected.
Figure 11: River Crossing Puzzle Web App
Conclusion
This post shows how AWS’s open-source AI-DLC workflow, guided by Amazon Q Developer’s Project Rules feature, helps developers build applications with structured oversight and transparency.
Using a River Crossing Puzzle web application as an example, the walk-through illustrates how AI-DLC methodology adapts its rigor based on project complexity, skipping unnecessary stages for simple applications while maintaining comprehensive processes for complex projects. Throughout each stage, AI-DLC enforces “human-in-the-loop” behavior, requiring user approval at critical checkpoints, asking clarifying questions, and maintaining complete audit trails for traceability.
The exercise successfully demonstrates how AI-DLC balances AI automation with human oversight, enhancing productivity without sacrificing quality or control. By following this structured, repeatable methodology, development teams can leverage generative AI’s capabilities while ensuring humans remain in charge of architectural decisions and implementation approaches. This framework provides the necessary guardrails for responsible and effective AI-assisted software development across projects of varying complexity.
Cleanup
We did not create any AWS resources in this walk-through, so no AWS cleanup is needed. You may cleanup your project workspace at your discretion.
AI-Driven Development Life Cycle (AI-DLC) holds the promise of unlocking the full potential of AI in software development. By emphasizing AI-led workflows and human-centric decision-making, AI-DLC can deliver velocity and quality. However, realizing these gains hinges on how organizations effectively integrate AI into their engineering workflows.
Through our work with engineering teams across industries, we have identified three recurring challenges. These challenges consistently limit the effectiveness of AI in accelerating modern software development. The first challenge is one-size-fits-all workflows. These workflows force every project through the same rigid sequence of steps. The second challenge is the lack of flexible depth in workflow stages. This leads to over-engineering or insufficient rigor. The third challenge is tools that over-automate. These tools unintentionally divert humans away from critical validation and oversight responsibilities.
Achieving true, sustainable productivity requires the process and AI coding agents to become adaptive to context, flexible in depth, and collaborative by design. In this blog, we’ll show you how AI-DLC’s core principles address these three challenges, transforming them from productivity blockers into opportunities for adaptive, human-centered development. We’ll describe how AI-DLC enables workflows that adapt to the problem at hand by intelligently selecting stages, modulating depth, and embedding human oversight at every critical decision point.
We will also introduce our open-sourceAmazon Q Developer/Kiro Rules implementation, which brings AI-DLC principles to life through adaptive workflow scaffolds. This allows you to start applying these principles in your own projects and experience AI-native development that accelerates delivery without compromising engineering discipline or human judgment.
How does AI-DLC address these challenges?
Let’s explore how AI-DLC addresses these challenges.
1. The “One-Size-Fits-All” Workflow Problem
Software development has never been a linear process. In practice, different projects follow distinct pathways with their own checkpoints and deliverables. Consider these examples:
A simple defect fix doesn’t require elaborate requirements analysis and planning
A pure infrastructure porting project doesn’t warrant application design with domain modeling
A new feature or service addition demands different steps than applying a security patch
Yet, many modern Agentic coding tools provide hard-wired, opinionated workflows that ignore this diversity. Regardless of intent or scope, every project is forced through the same rigid sequence of steps—even when some add little or no value. This rigidity introduces friction, wastes time, and reduces productivity. The result: artificial ceremonies, unnecessary artifacts, redundant approvals, and process overhead that impede velocity.
How AI-DLC addresses this challenge: AI-DLC addresses this challenge through the Principle 10 (No Hard-Wired, Opinionated SDLC Workflows) as defined in the AI-DLC Method Definition Paper.
“AI-DLC avoids prescribing opinionated workflows for different development pathways (such as new system development, refactoring, defect fixes, or microservice scaling). Instead, it adopts a truly AI-First approach where AI recommends the Level 1 Plan based on the given pathway intention.“
2. Lack of Flexible Depth Within Each Stage
True adaptivity must go beyond the breadth of a workflow and extend into its depth and intensity. This is how human experts intuitively plan software projects today.
Even when workflows are flexible, many tools fail to modulate the depth of engagement at each stage. For example, building a lightweight utility function doesn’t require full-scale Domain-Driven Design or detailed architectural modeling. When an AI coding agent compels teams to follow these steps regardless of need, the consequence is wasted effort and an over-engineered product. Developers spend cycles reviewing artifacts as the tools dictate rather than delivering business value.
How AI-DLC addresses this challenge: Through the same principle 10, AI-DLC adapts both the breadth (choice of stages) and the depth of each stage to match the complexity of the intent and context. For example, the complexity of the requirements determines whether a conceptual design is sufficient or whether a full architectural deep dive is required in the Design stage.
Humans validate and adjust this AI-proposed breadth and depth, ensuring that each stage’s rigor matches the scope of the challenge. This elasticity—balancing breadth and depth—is essential for sustaining true velocity without sacrificing engineering discipline.
3. Tools that Reduce the Emphasis on Human Oversight
As AI tools automate more of the Software Development Life Cycle (SDLC), a new risk has emerged: process atrophy. Developers, excited by automation, often drift into passive execution—allowing AI to “decide everything.” The result is a loss of reflection, weakened oversight, and erosion of shared understanding. AI tools must not only automate work but also amplify the significance of human judgment. They should remind practitioners that “human in the loop” is not a checkbox—it is the cornerstone of trust, accountability, and correctness in AI-native development. Equally critical are the rituals and rhythms that sustain collaborative engineering.
How AI-DLC addresses this challenge: AI-DLC addresses this challenge by requiring a collaborative human-in-the-loop cycle at every stage of the workflow. In this loop, AI generates a plan to execute a task, and relevant stakeholders assemble, review, and validate it.
These rituals, defined as Mob Elaboration and Mob Construction in AI-DLC, ensure that AI’s suggestions are not blindly accepted. Approved plans are executed, and stakeholders again review and validate the final artifacts. The AI-DLC workflow records every human action and approval, embedding reflection to ensure that humans remain the compass, guiding AI’s acceleration.
Figure 1: AI-DLC workflow: Humans decide and validate, AI plans and executes.
Effective tooling must therefore emphasize:
Promoting for stakeholder collaboration: The system should explicitly call for collaborative rituals involving stakeholders
Auditability: Every AI-generated plan and artifact should surface rationale and invite review, recording every human oversight and interaction
Flow awareness: Tools should detect when automation races ahead of human validation and deliberately slow down to emphasize critical checkpoints
The goal is not to suppress automation but to embed critical human ownership.
From Principles to Practice
The ideas we outlined — adaptive workflows, flexible depth, and embedded human oversight — are compelling in theory and validated by all engineering teams we’ve engaged. The critical question is: How do we operationalize these ideas into practice without reintroducing the rigidity we seek to eliminate?
One approach is manual prompt engineering: crafting structured prompts that guide AI assistants through the AI-DLC workflow step by step. Each prompt encodes the role AI should assume, the task at hand, the governance requirements, and the audit trail expectations. This structured approach transforms a simple AI interaction into a disciplined workflow that embodies AI-DLC principles.
This approach, while promising, faces its own limitations. Crafting intricate prompts demands discipline and expertise, posing barriers to widespread adoption. Moreover, humans become responsible for maintaining workflow adaptability, selecting the appropriate prompt at the right moment, and ensuring collaborative checkpoints are honored. This places the burden of orchestration back on practitioners, diverging from our core principle of truly AI-native development, where AI itself drives adaptive decision-making.
The question arises: How can we embed AI-DLC principles directly into the execution layer, making adaptivity and collaboration inherent properties of the system rather than manual responsibilities?
Steering for Productivity
The answer lies in workflow scaffolds. These are Rules or Steering customizations for AI Coding Agents. They operationalize AI-DLC principles within the tools. This is done while maintaining transparency, audibility, and modifiability. Our implementation uses Rules/Steering Files. These serve as the foundation of this execution layer. It transforms AI from a passive assistant into an adaptive decision engine.
Rather than requiring developers to craft elaborate prompts, AI-Driven development begins with a simple statement of intent. From there, the workflow scaffolds evaluate context, assess complexity, and dynamically construct an appropriate development pathway. The core workflow definition, including a library of stages and decision heuristics for when and how to apply them, empowers AI to continuously tailor the development process to the nature of the work at hand.
Each AI-DLC phase (Inception, Construction, Operations) evaluates the depth at which it should execute, resulting in a process that adapts to the problem rather than forcing the problem to adapt to the process. This approach yields several critical outcomes:
Adaptive decisioning: The workflow conforms to the problem’s shape, intelligently skipping or deepening stages based on contextual assessment rather than predetermined rules.
Transparent checkpoints: Human approvals are embedded at every decision gate, preserving oversight while maintaining velocity. The system doesn’t just automate; it orchestrates collaboration.
End-to-end traceability: Every artifact, decision, and conversation is logged, creating a continuous, inspectable trail of reasoning that supports both accountability and continuous improvement.
The result is a process that is context-aware, scalable, and self-correcting – capable of supporting everything from a single-line defect fix to a comprehensive system modernization, all while maintaining the rigor and human judgment that define engineering excellence.
Build, Test, and Evolve with Us
We’re open-sourcing the AI-DLC workflow, implemented as Amazon Q Rules and Kiro Steering Files, so organizations everywhere can experience AI-DLC in practice and build production-grade systems. We invite developers, architects, and engineering leaders to:
Apply the steering rules in real-world projects, whether brownfield or greenfield. Refer to our companion AI-DLC workflow walkthrough blog for step-by-step instructions on how to build using AI-DLC in Amazon Q Developer.
Observe how the process adapts to your project’s size, scope, and intent.
Share your experience through our GitHub repository, where you can open issues, propose improvements, and contribute ideas.
Your feedback will help evolve this into a foundation for AI-native software development – one that accelerates delivery without sacrificing rigor or human judgment. Together, we can redefine what software engineering looks like in the age of AI: not scripted but steered.
Conclusion
AI-DLC addresses multiple challenges limiting AI’s effectiveness in software development such as rigid workflows, inflexible workflow depth, and tools that reduce human oversight. AI-DLC enables adaptive workflows that intelligently select stages, modulate depth, and embed human oversight at critical decision points. This approach, implemented through open-source tools like Amazon Q Developer Rules and Kiro Steering, accelerates delivery while maintaining engineering discipline and human judgment.
AI-DLC emphasizes human oversight and collaboration in AI-driven software development. Workflow scaffolds, embed AI-DLC principles into the execution layer, enabling adaptive decision-making, transparent checkpoints, and end-to-end traceability. Open-sourcing the AI-DLC workflow allows organizations to experience AI-DLC in practice and contribute to its evolution.
Ready to get started? Visit our GitHub repository to download the AI-DLC workflow and join the AI-Native Builders Community to contribute to the future of software development.
Забавянето беше заради един бъг на encode-ването, и после докато мине пак преглед/QA. Имаме вече скриптирани нещата и би трябвало догодина да можем да вадим записите в същия ден, ако решим 🙂
The collective thoughts of the interwebz
Manage Consent
To provide the best experiences, we use technologies like cookies to store and/or access device information. Consenting to these technologies will allow us to process data such as browsing behavior or unique IDs on this site. Not consenting or withdrawing consent, may adversely affect certain features and functions.
Functional
Always active
The technical storage or access is strictly necessary for the legitimate purpose of enabling the use of a specific service explicitly requested by the subscriber or user, or for the sole purpose of carrying out the transmission of a communication over an electronic communications network.
Preferences
The technical storage or access is necessary for the legitimate purpose of storing preferences that are not requested by the subscriber or user.
Statistics
The technical storage or access that is used exclusively for statistical purposes.The technical storage or access that is used exclusively for anonymous statistical purposes. Without a subpoena, voluntary compliance on the part of your Internet Service Provider, or additional records from a third party, information stored or retrieved for this purpose alone cannot usually be used to identify you.
Marketing
The technical storage or access is required to create user profiles to send advertising, or to track the user on a website or across several websites for similar marketing purposes.
 We’re rounding up the most exciting and impactful announcements from AWS re:Invent 2025, which takes place November 30-December 4 in Las Vegas. This guide highlights the innovations that will help you build, scale, and transform your business in the cloud.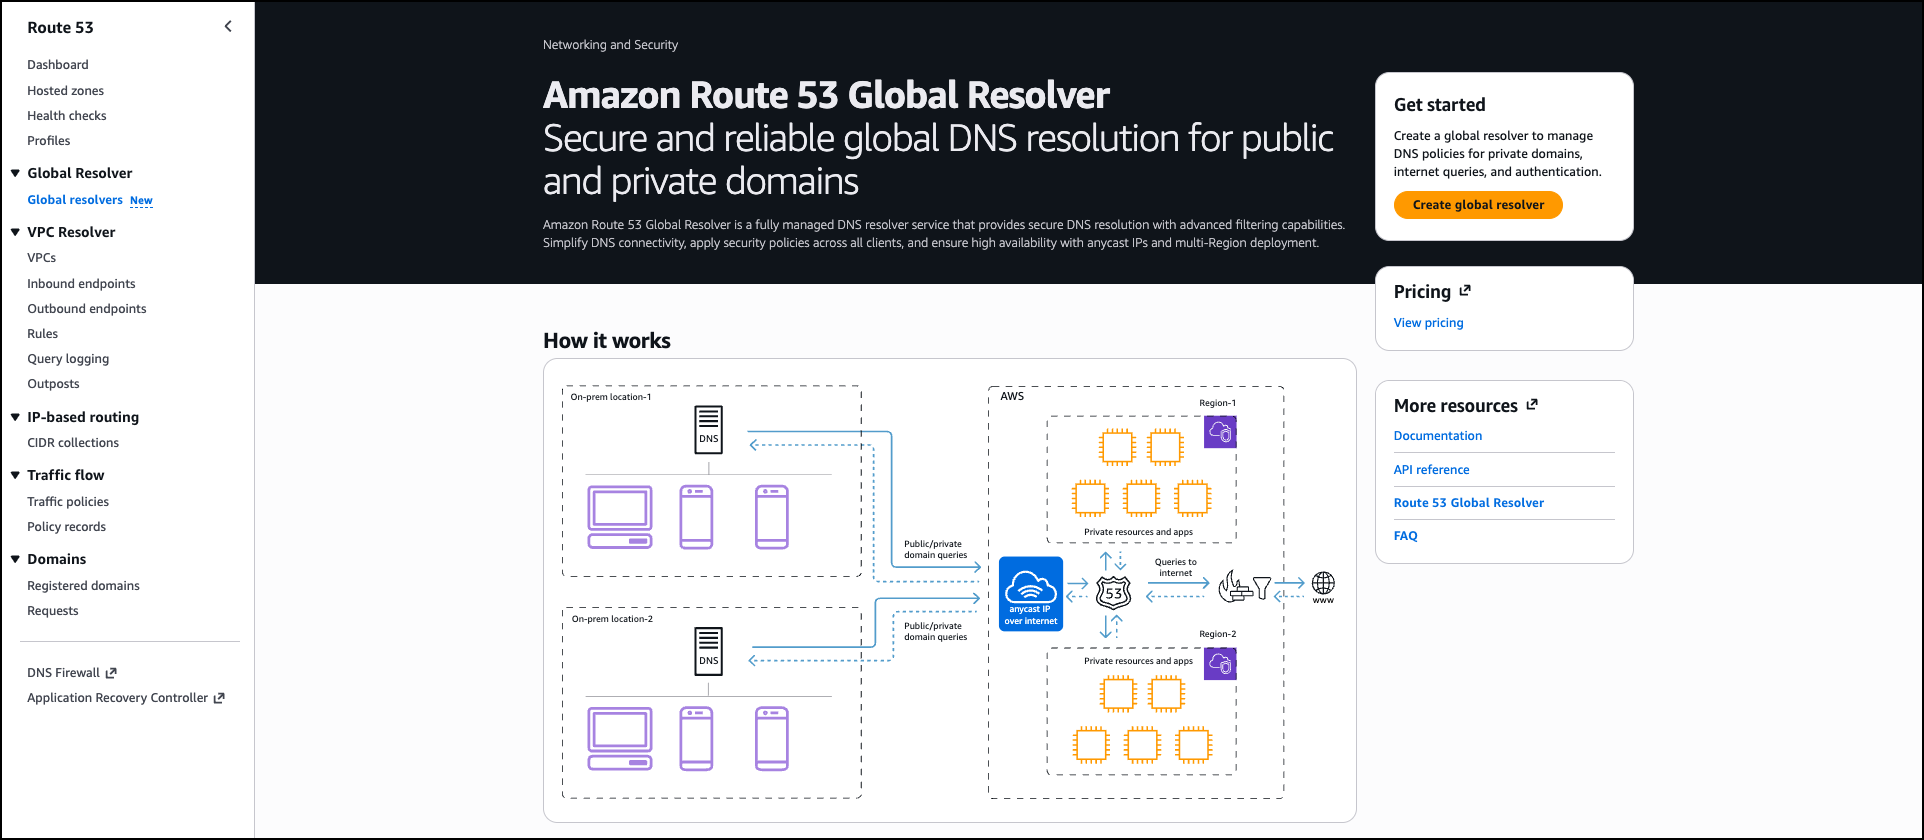
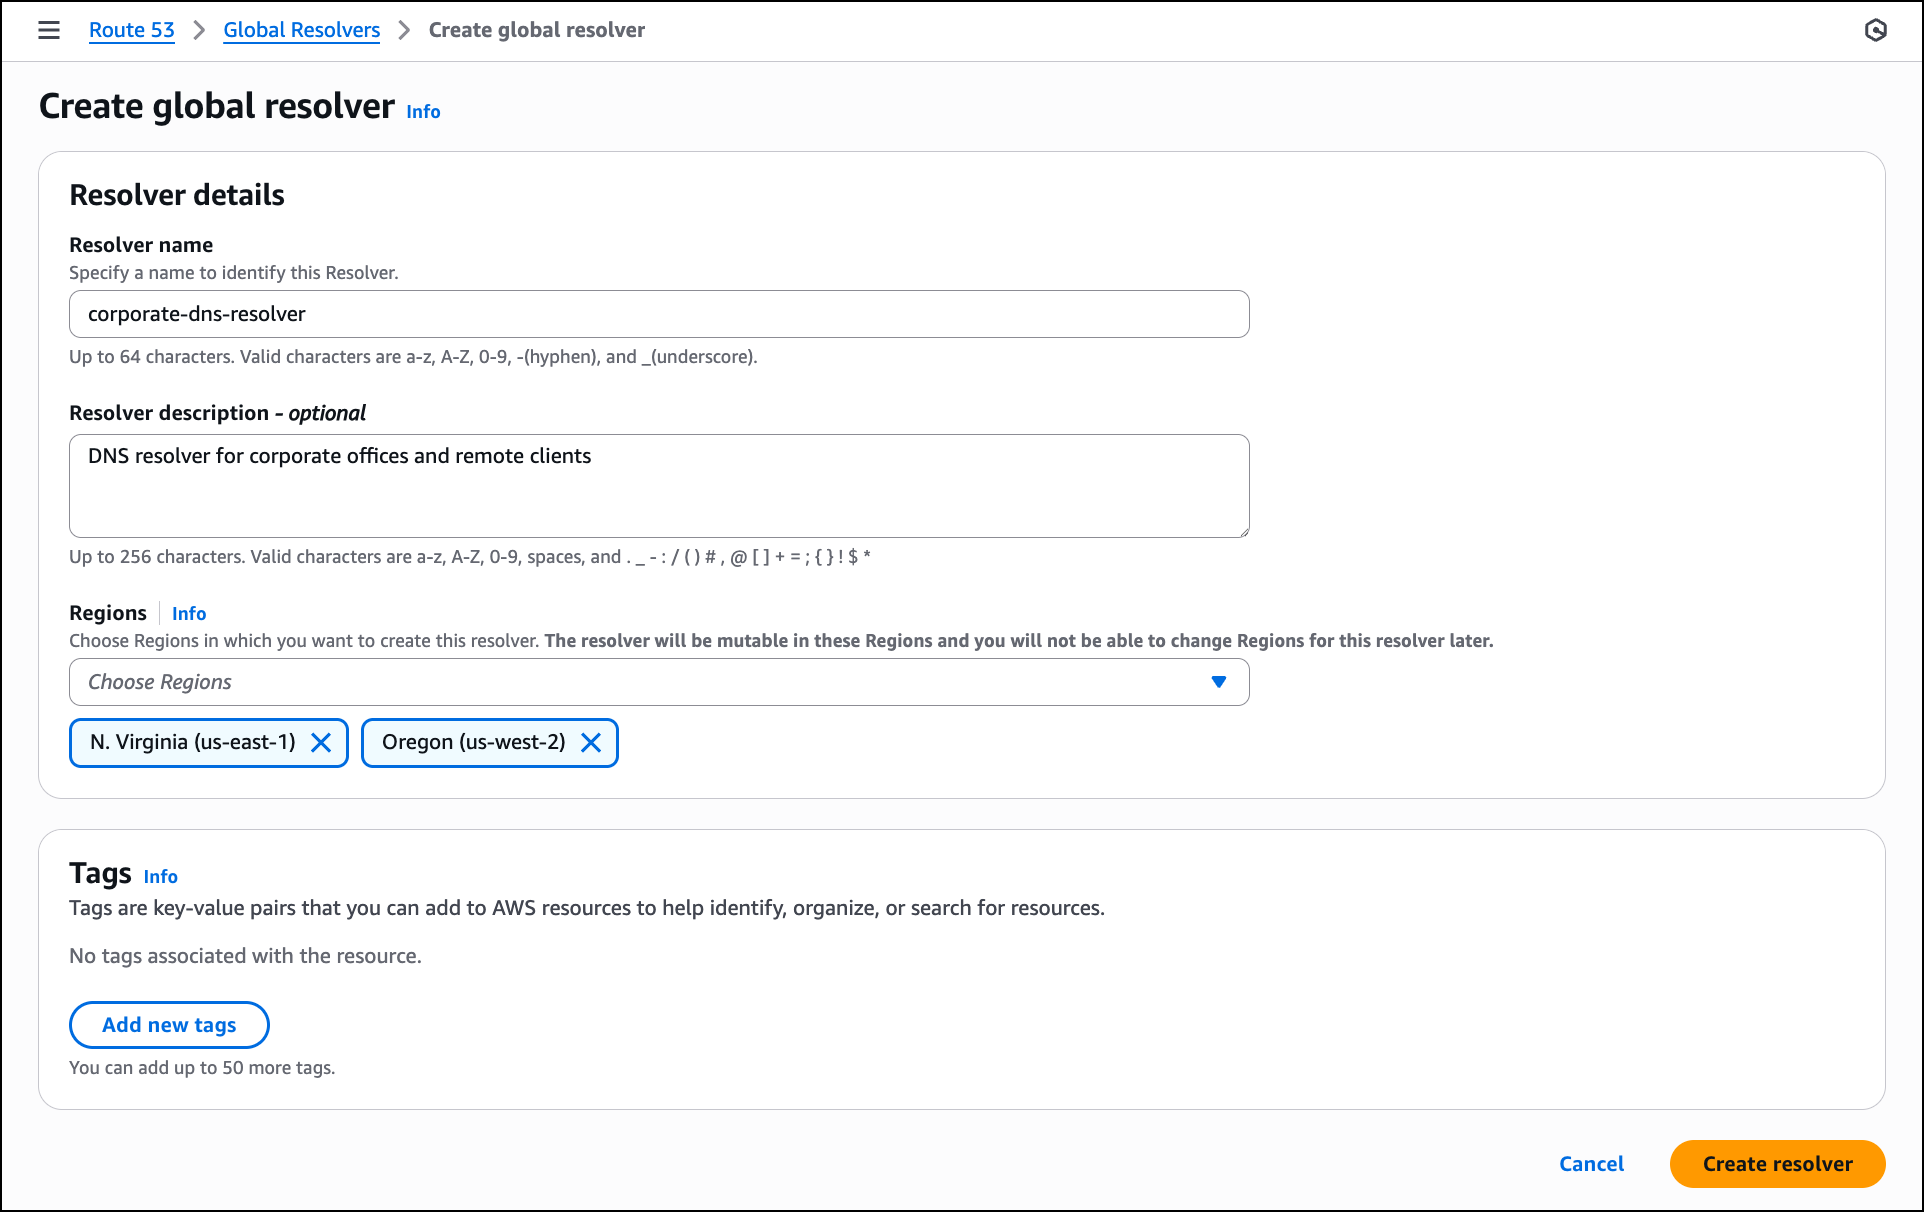
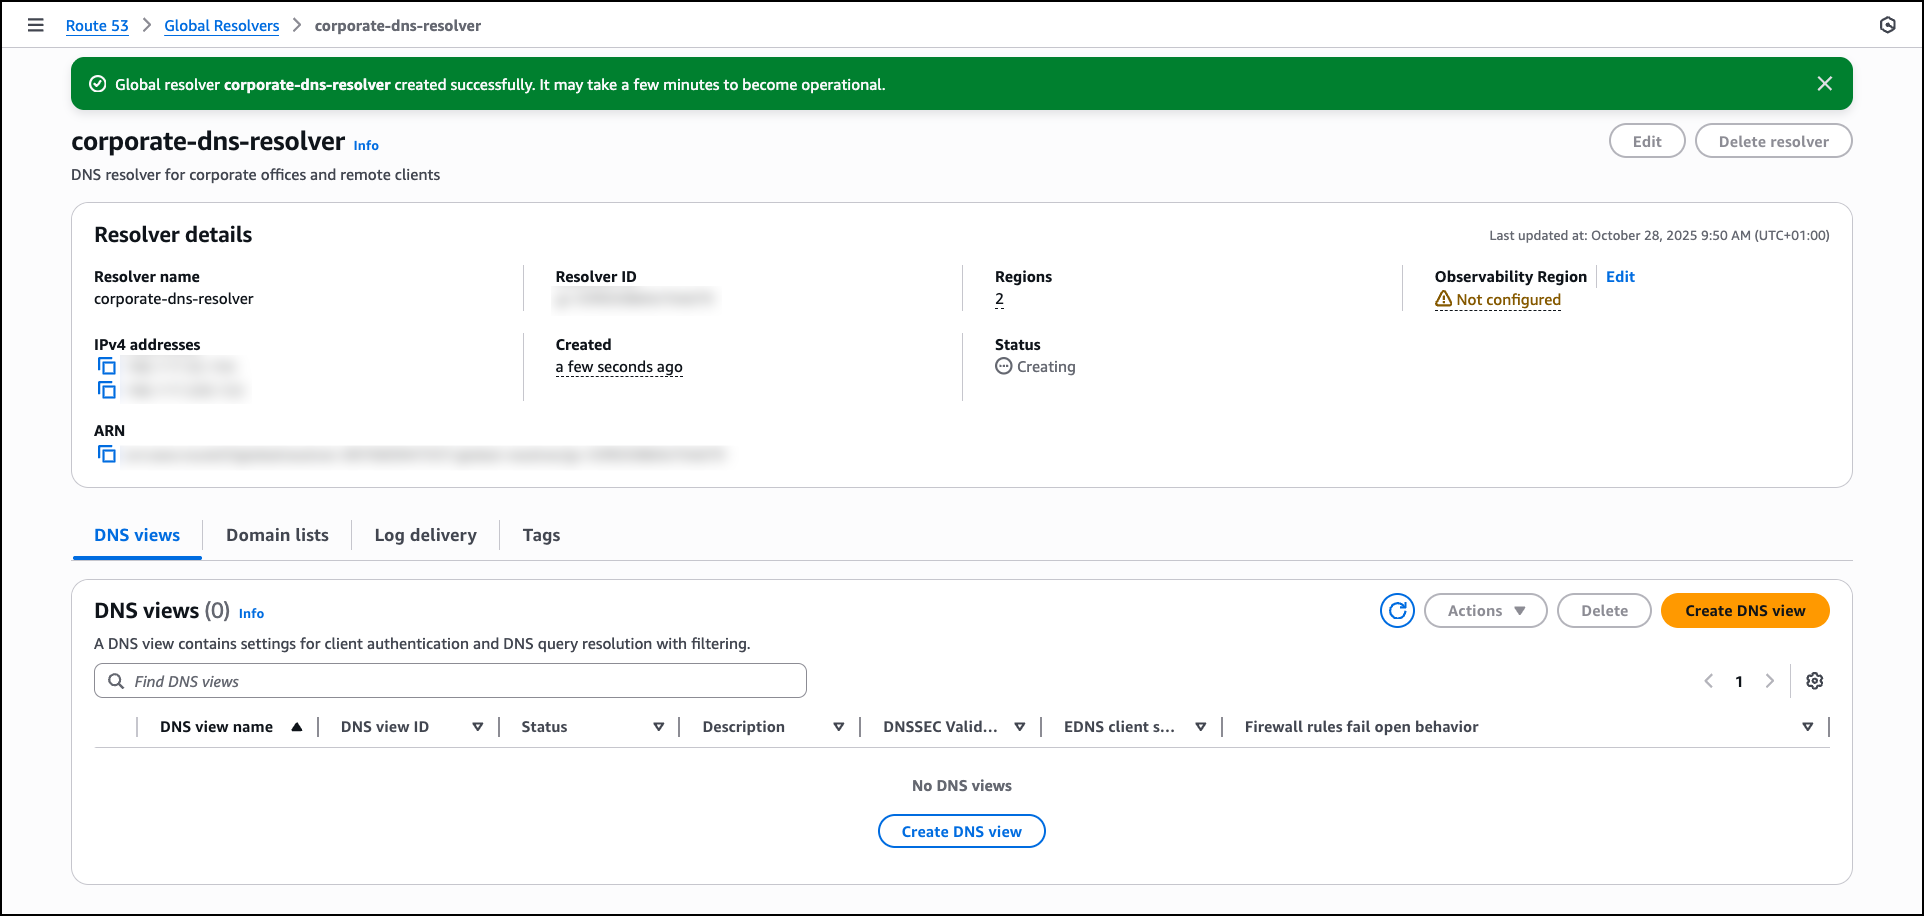
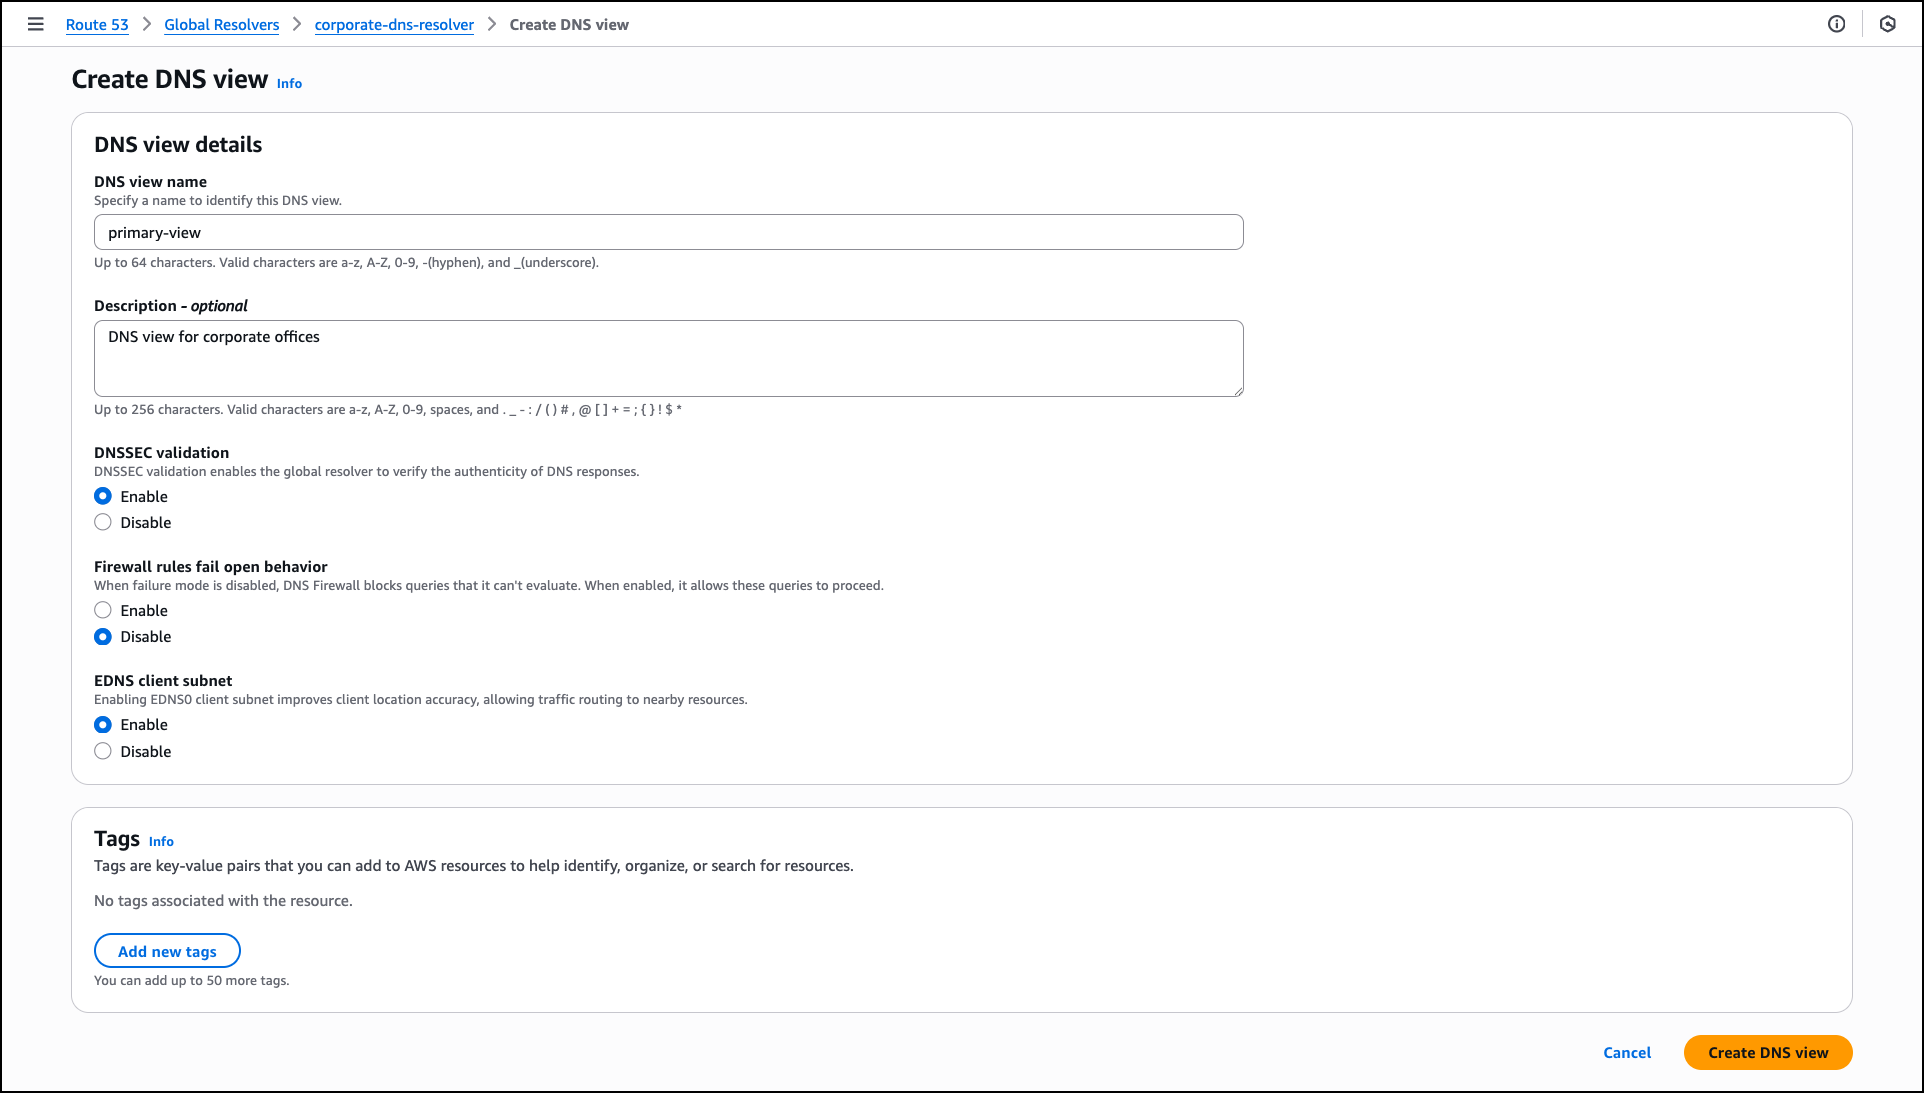
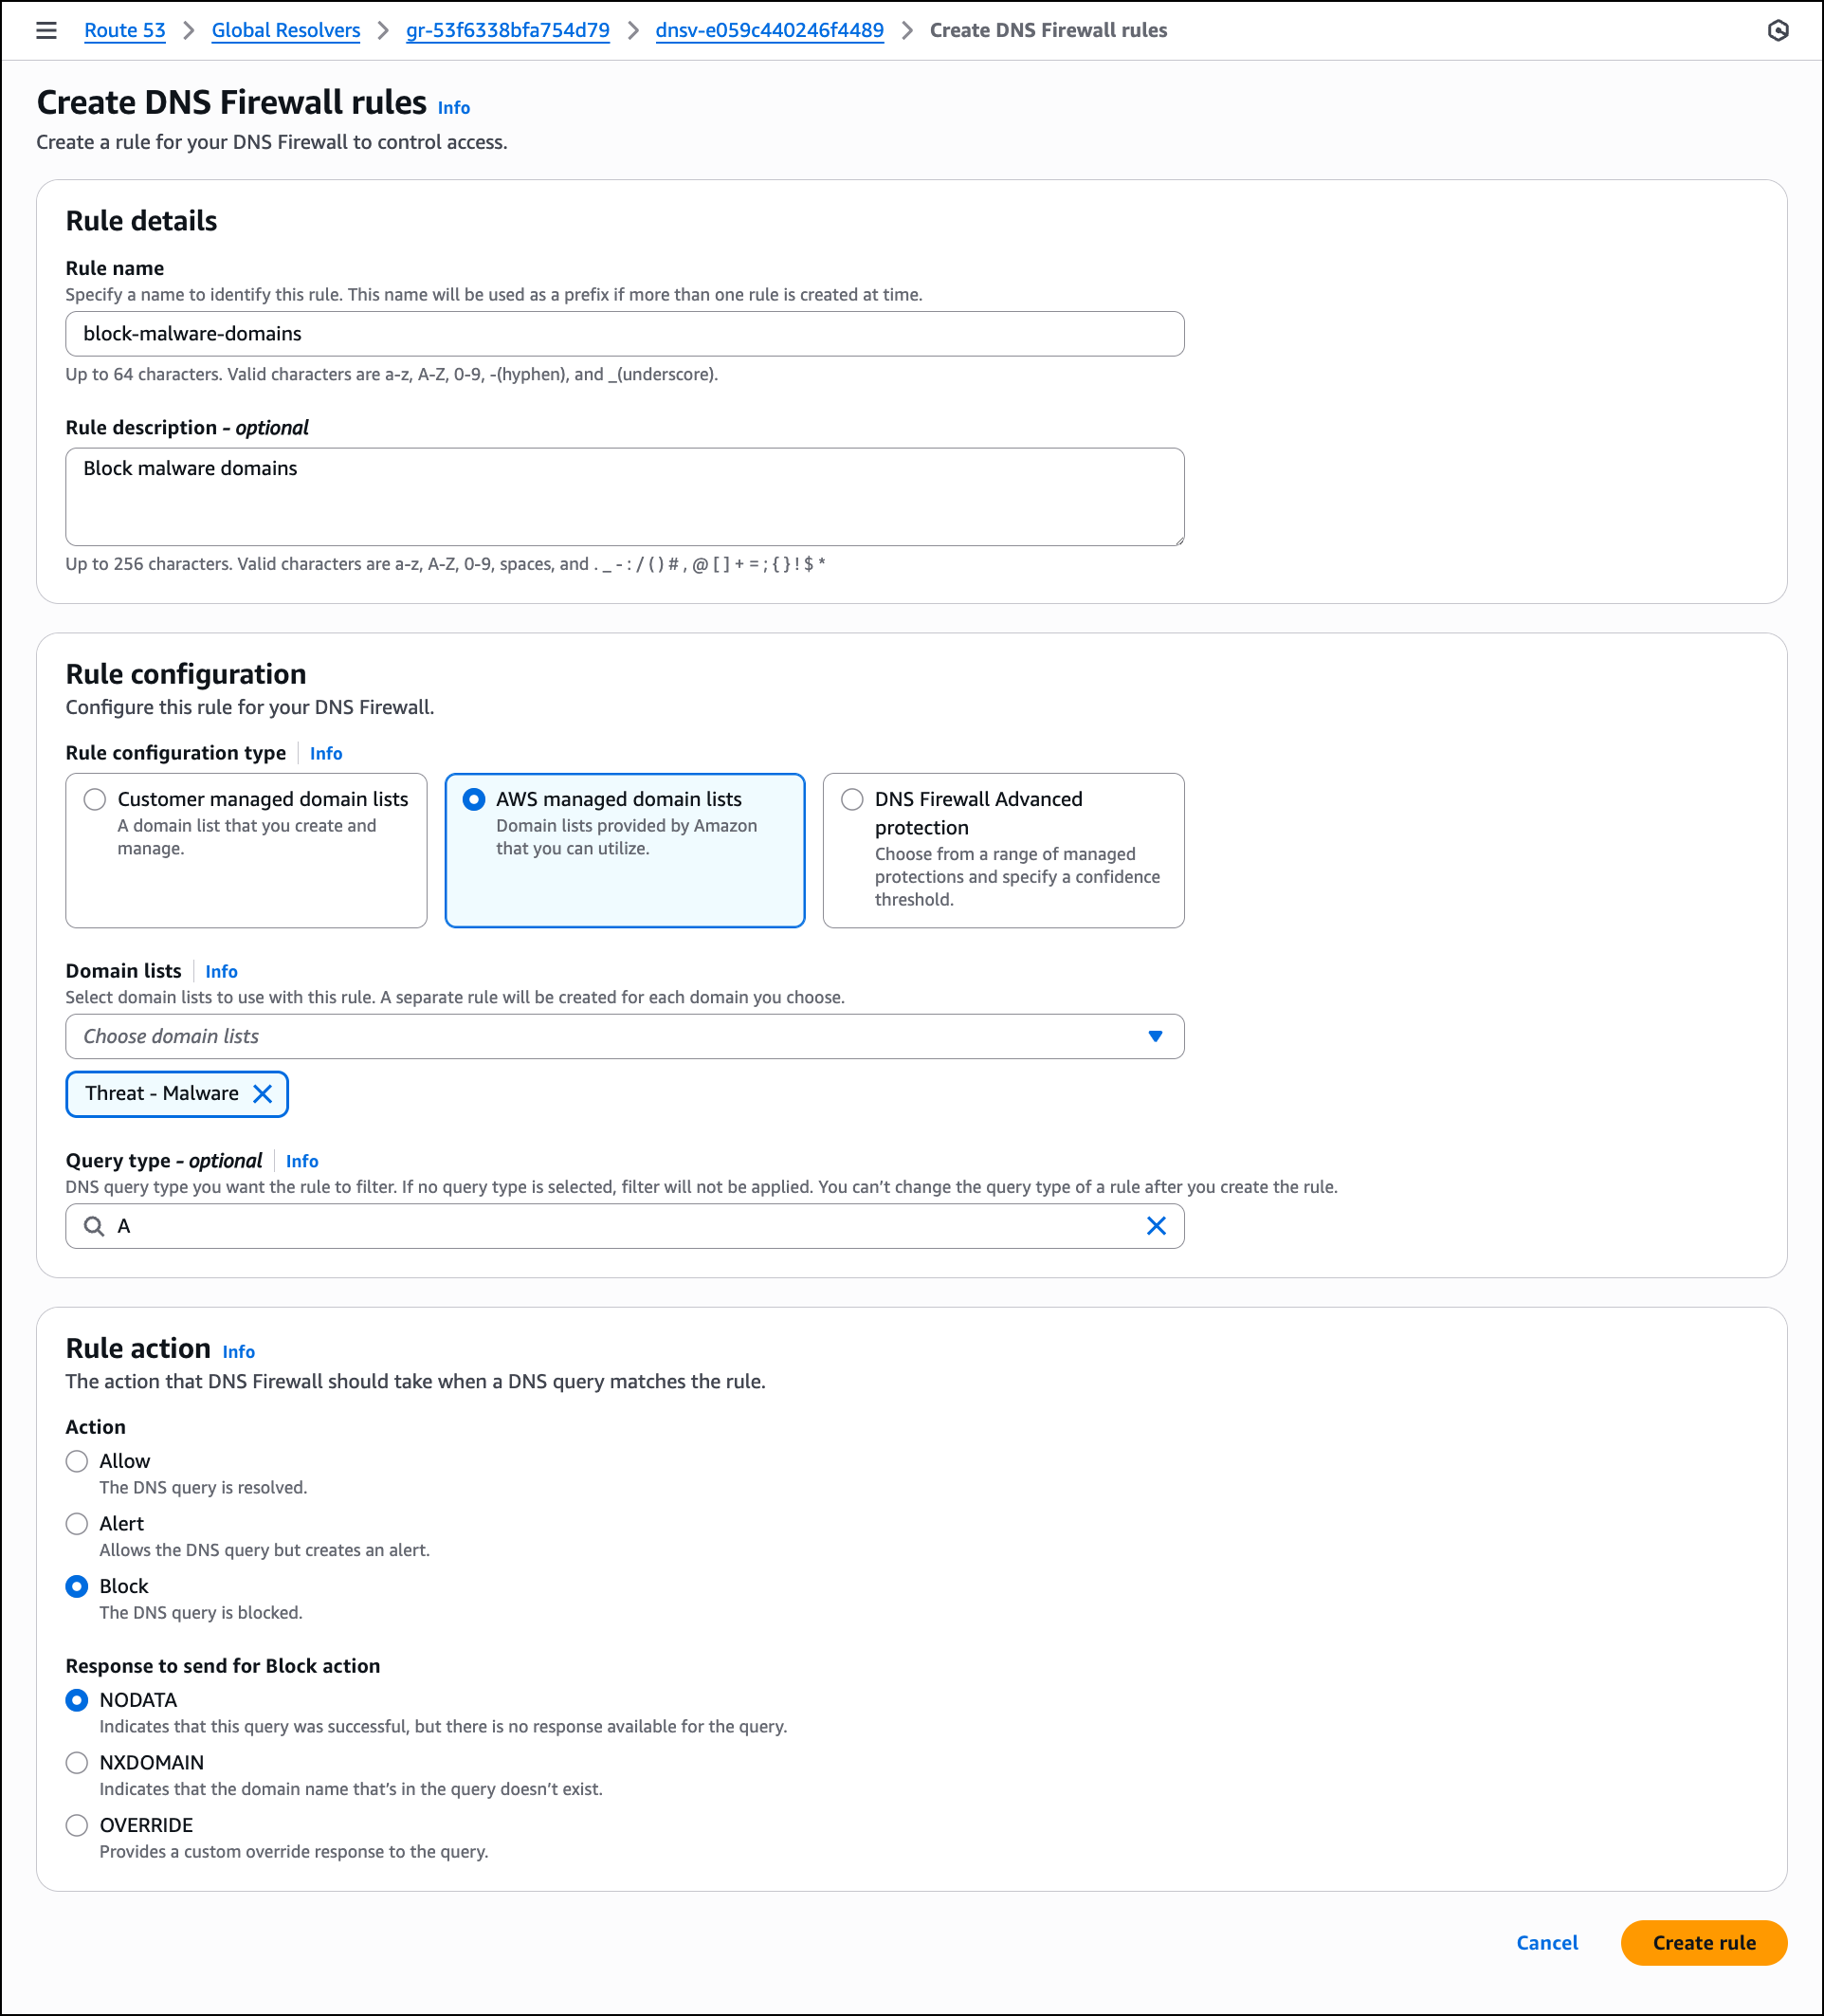
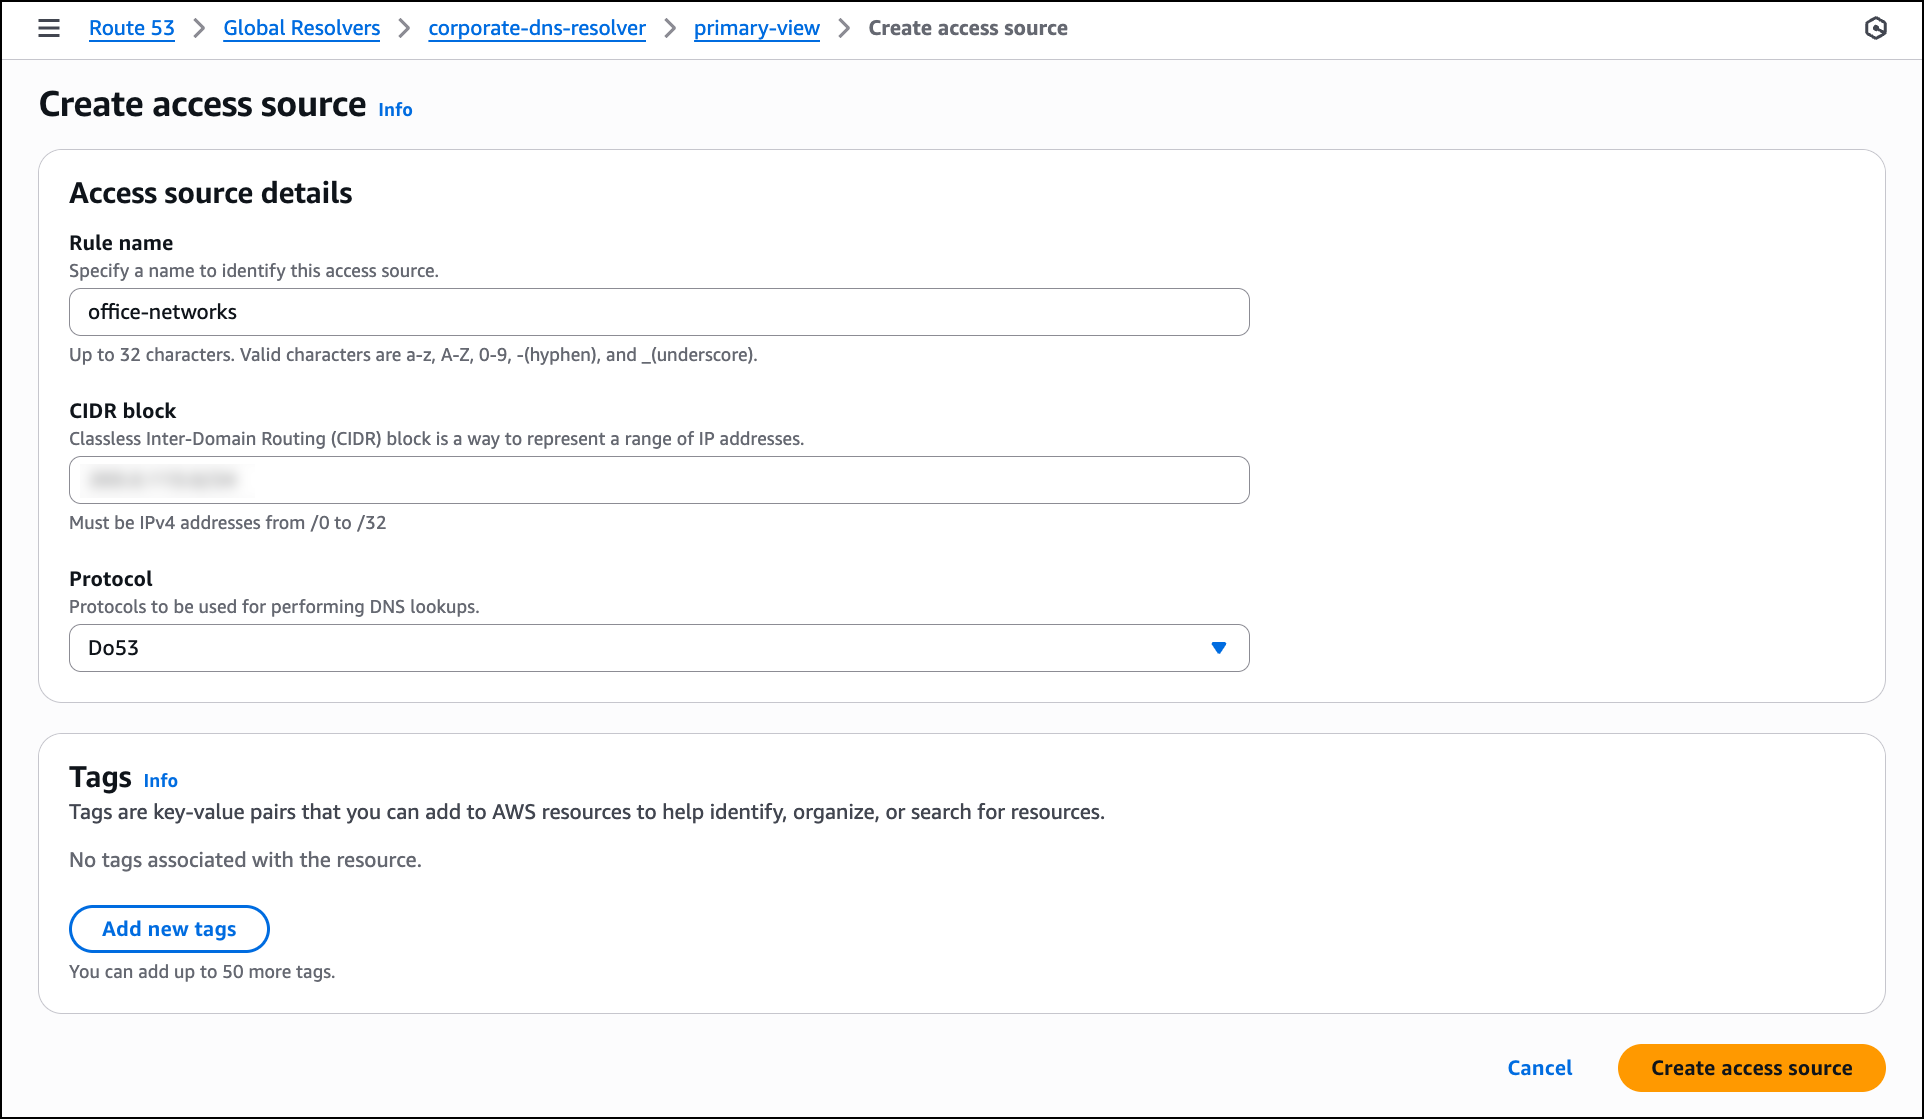
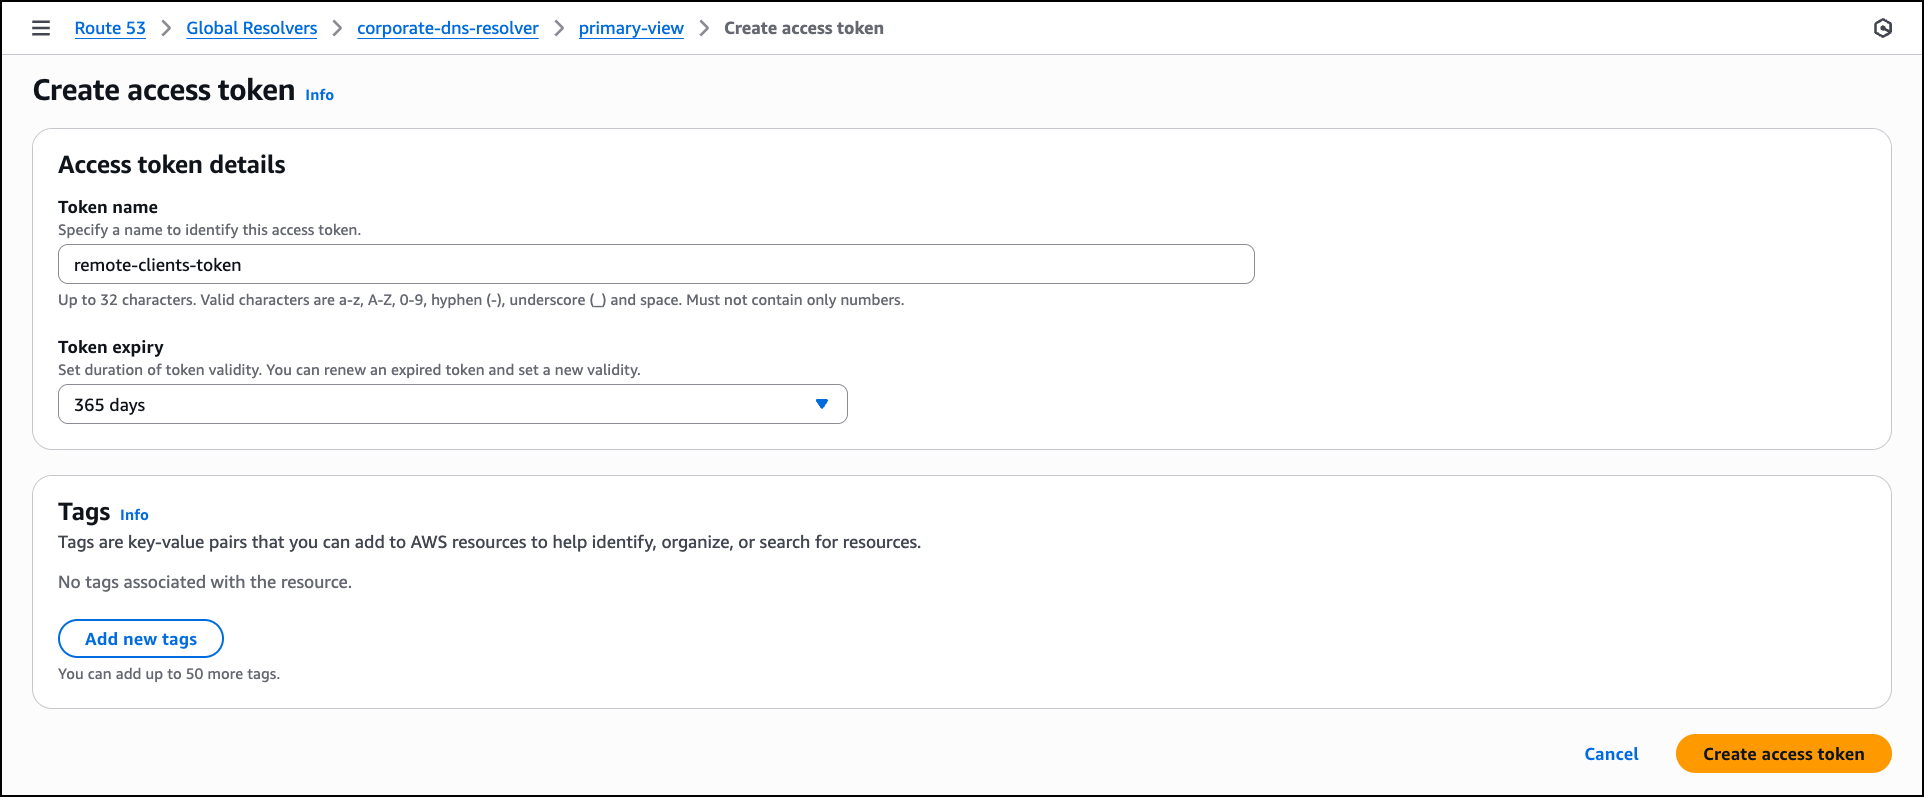
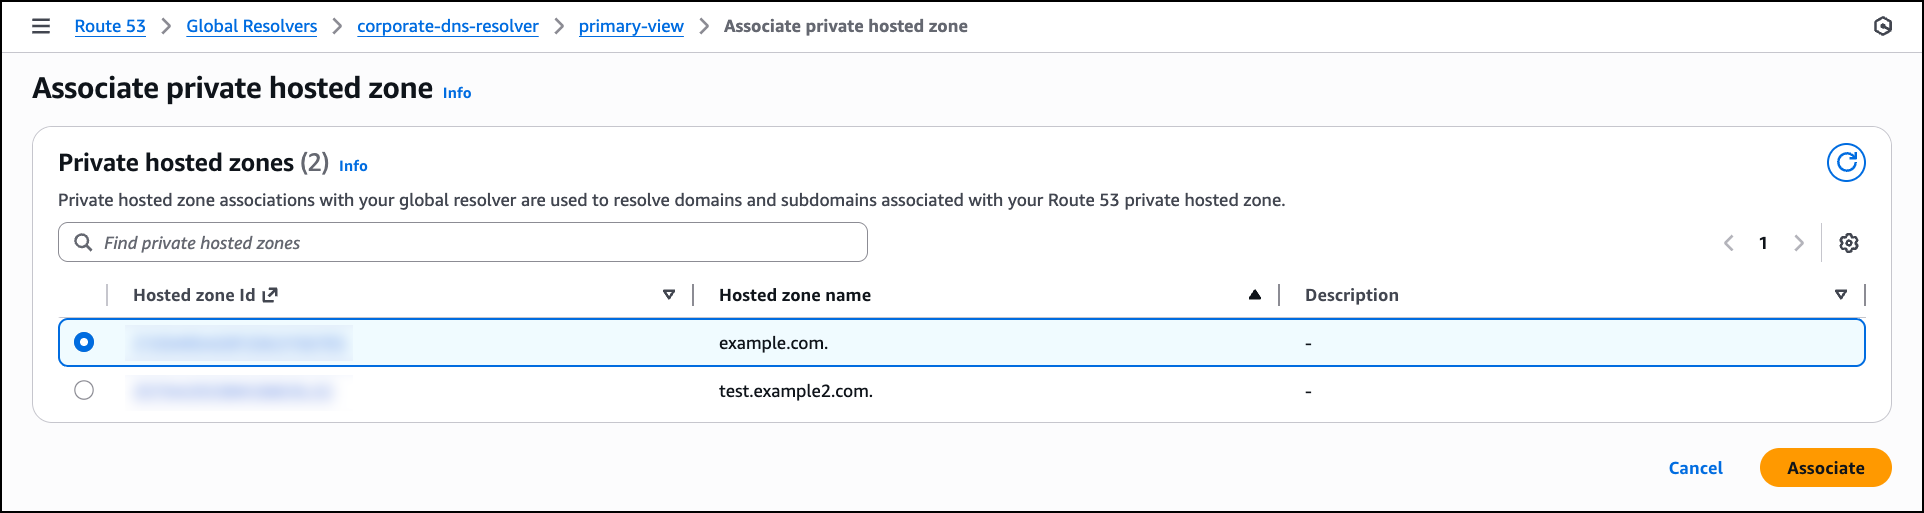
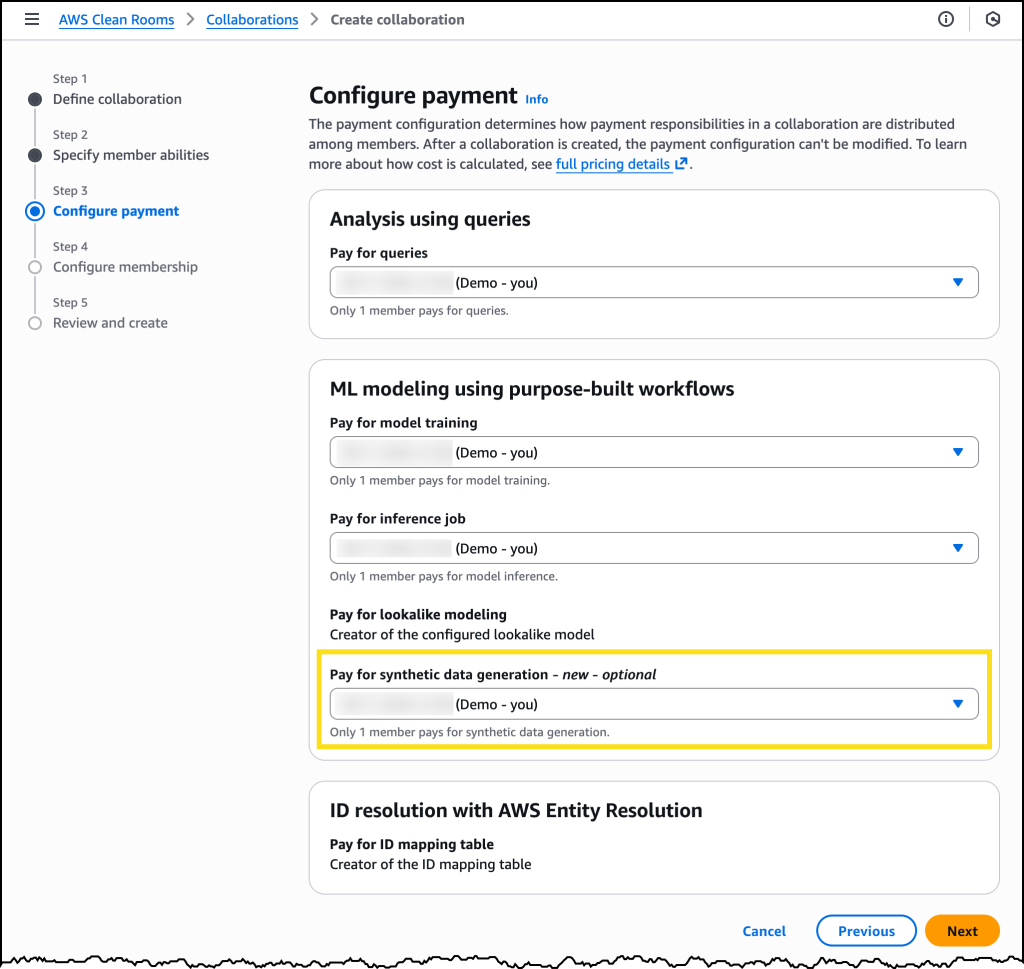
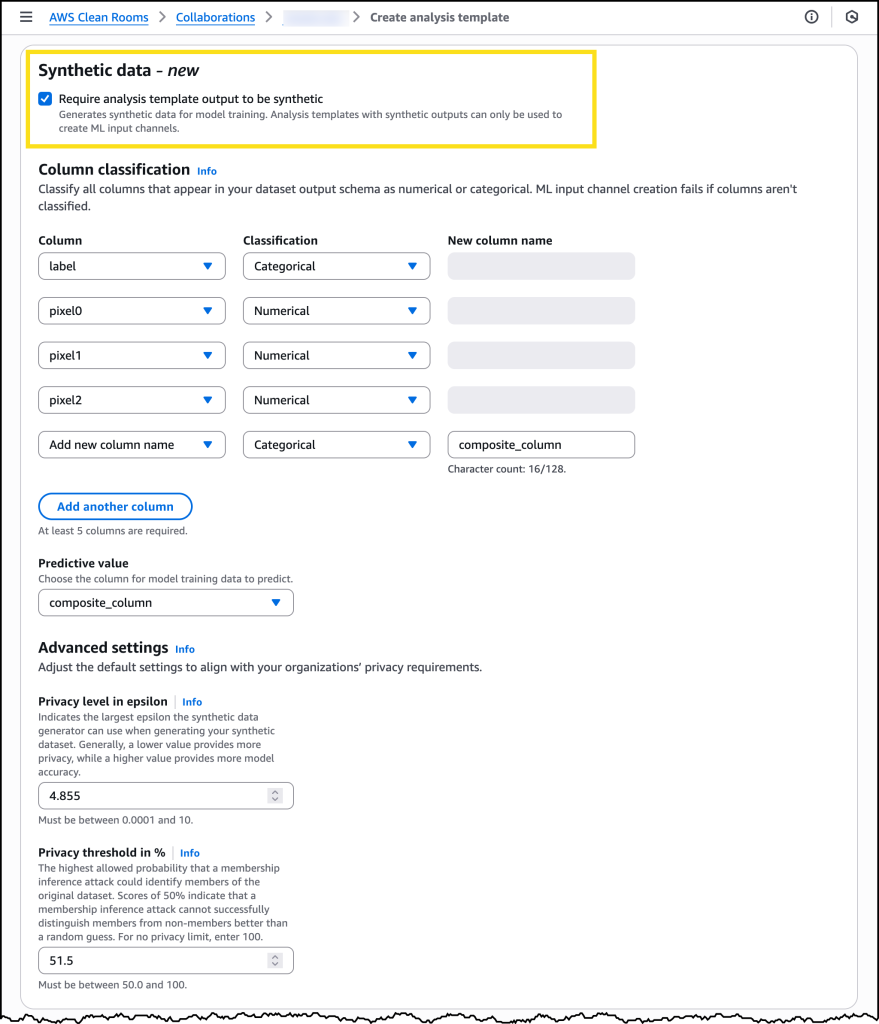
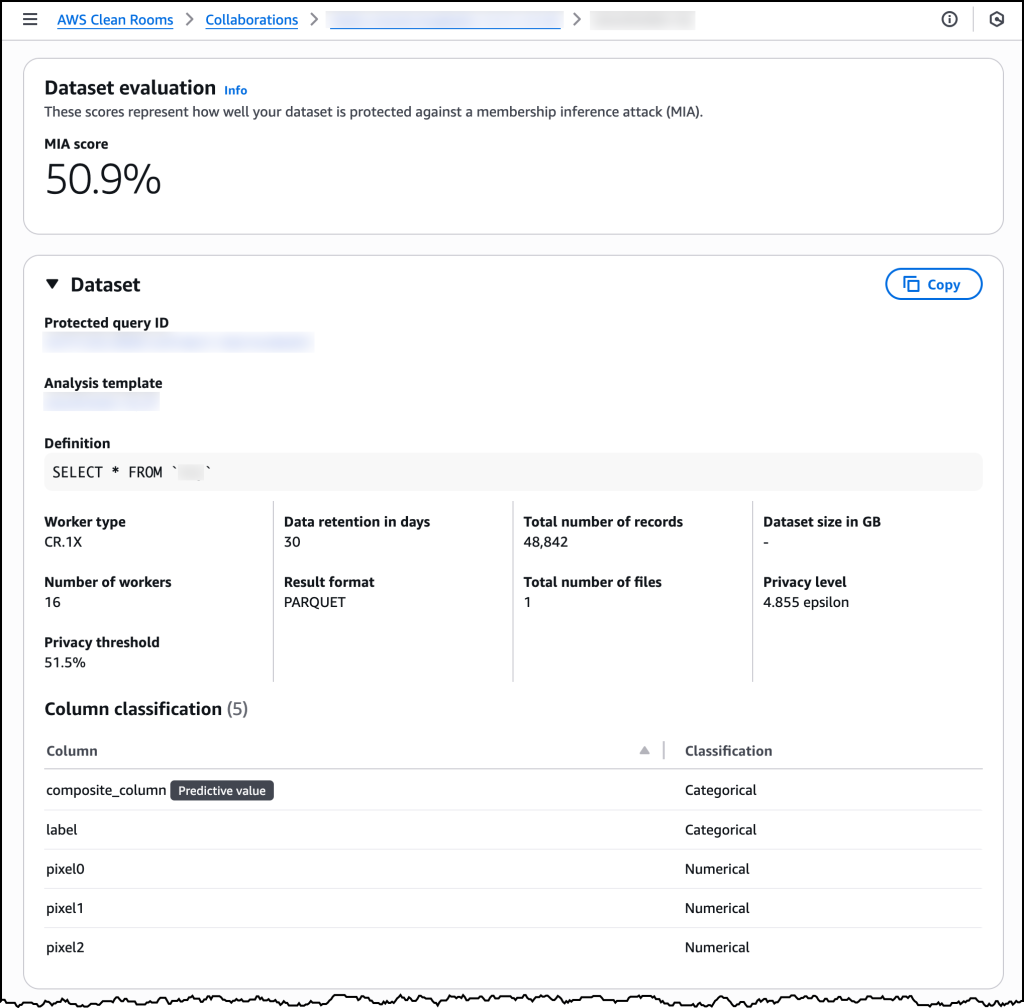
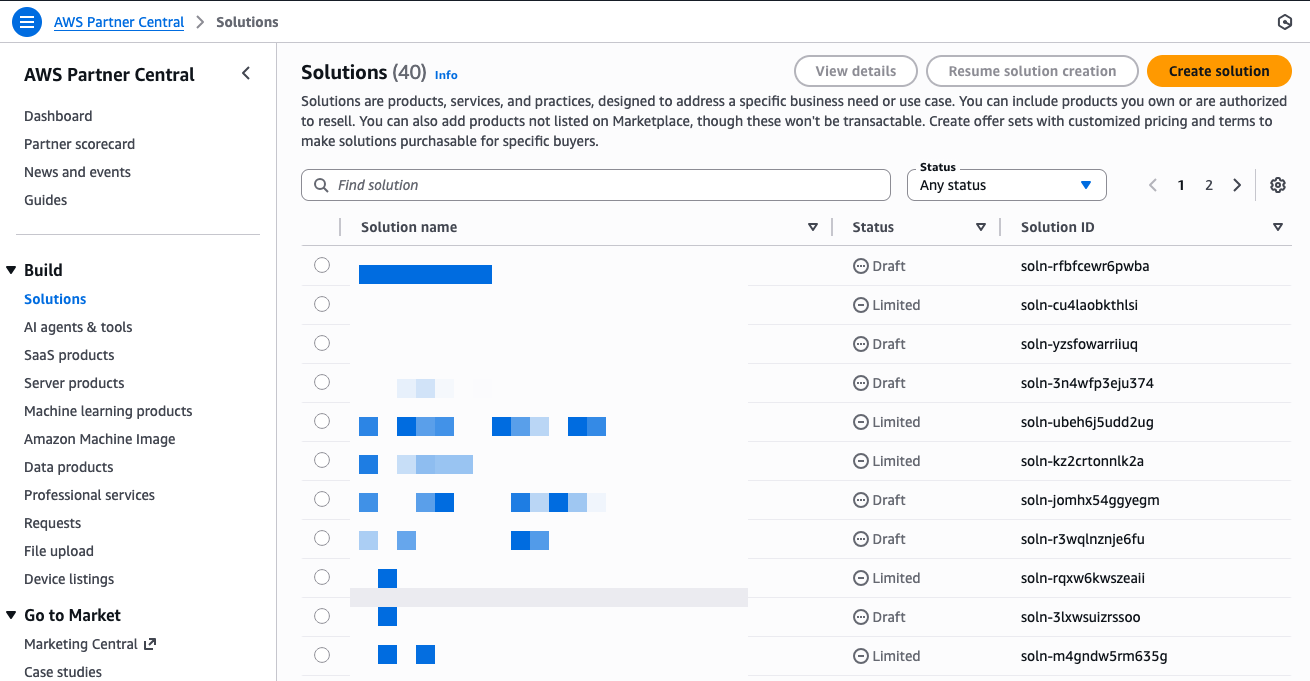
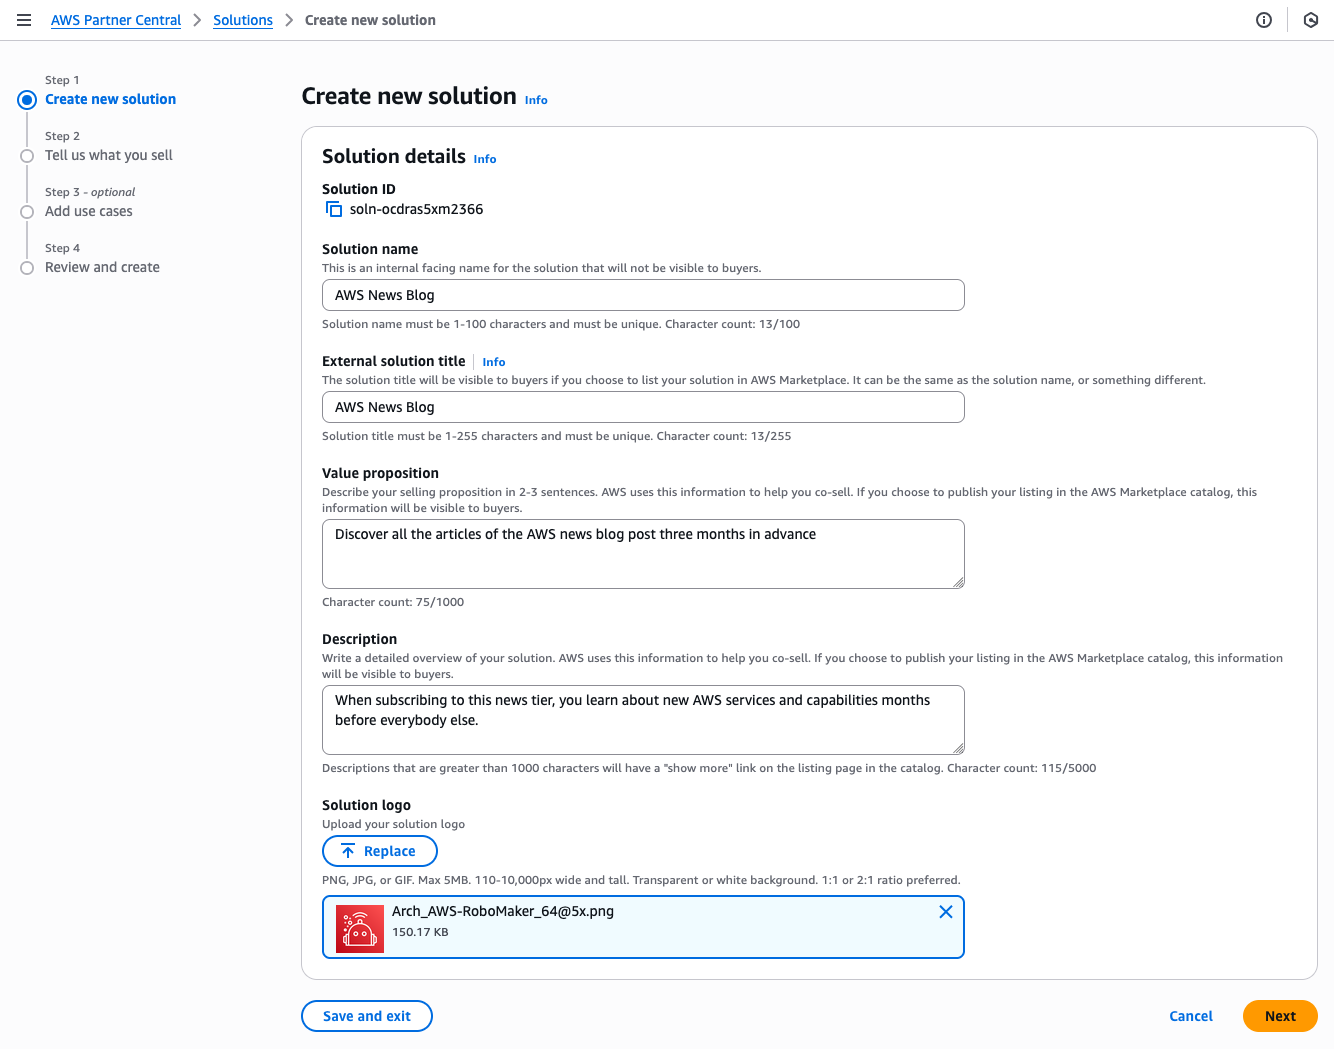
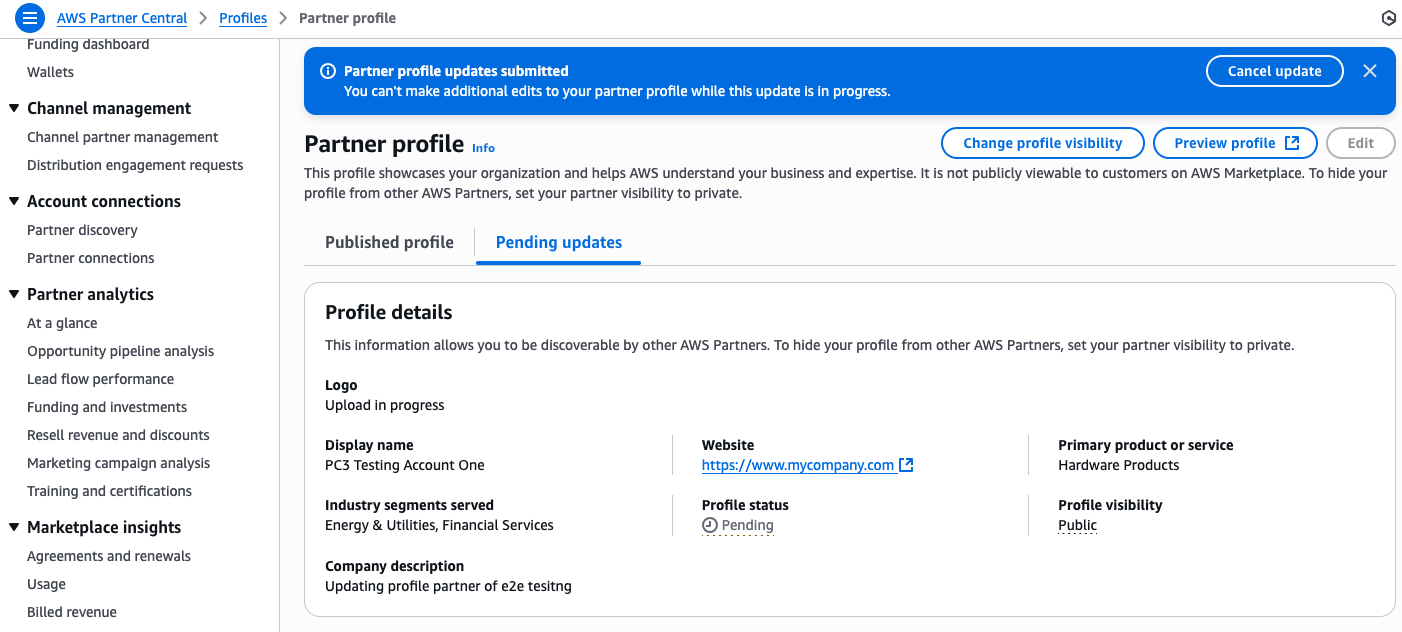
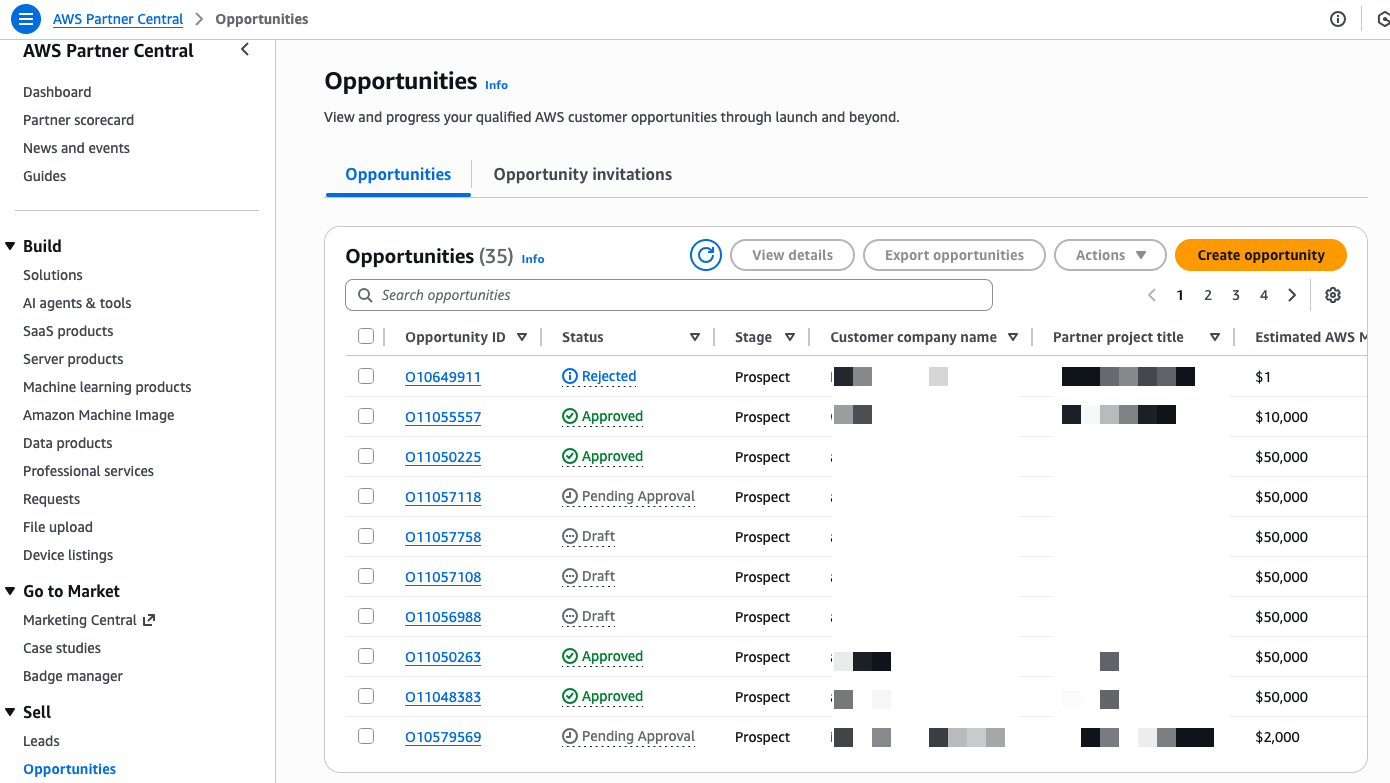
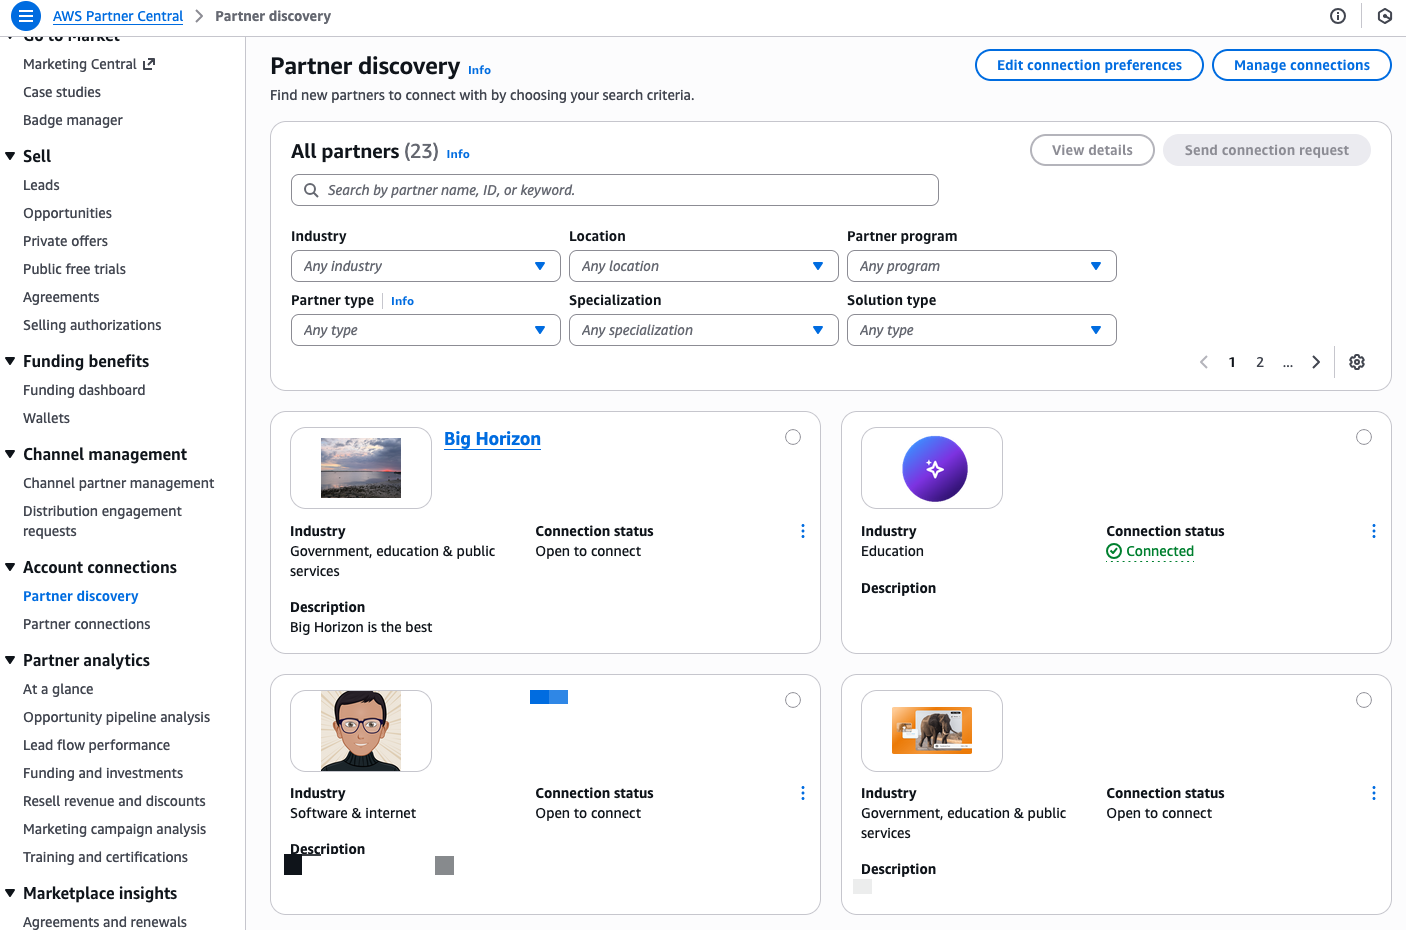
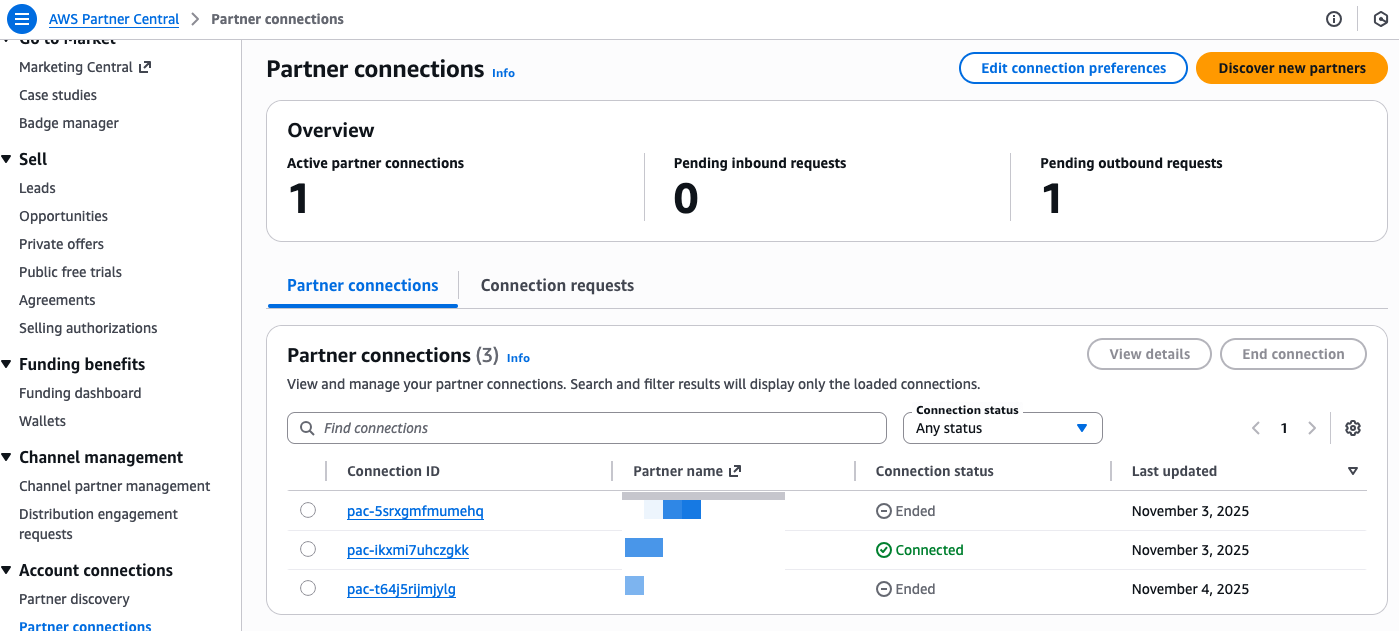
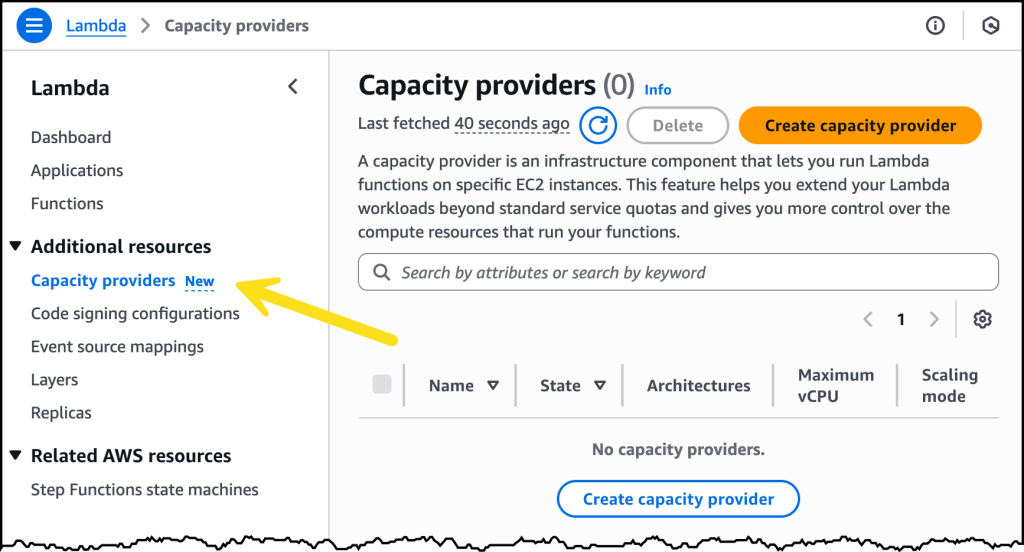
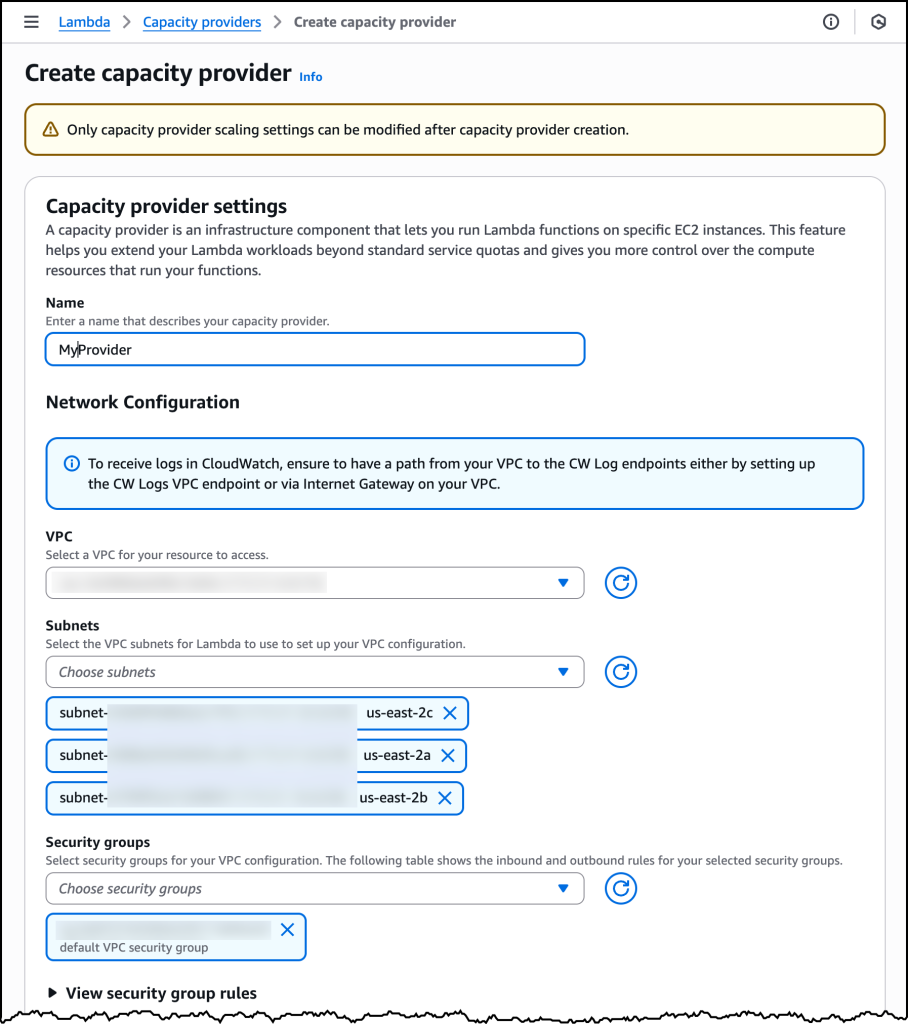
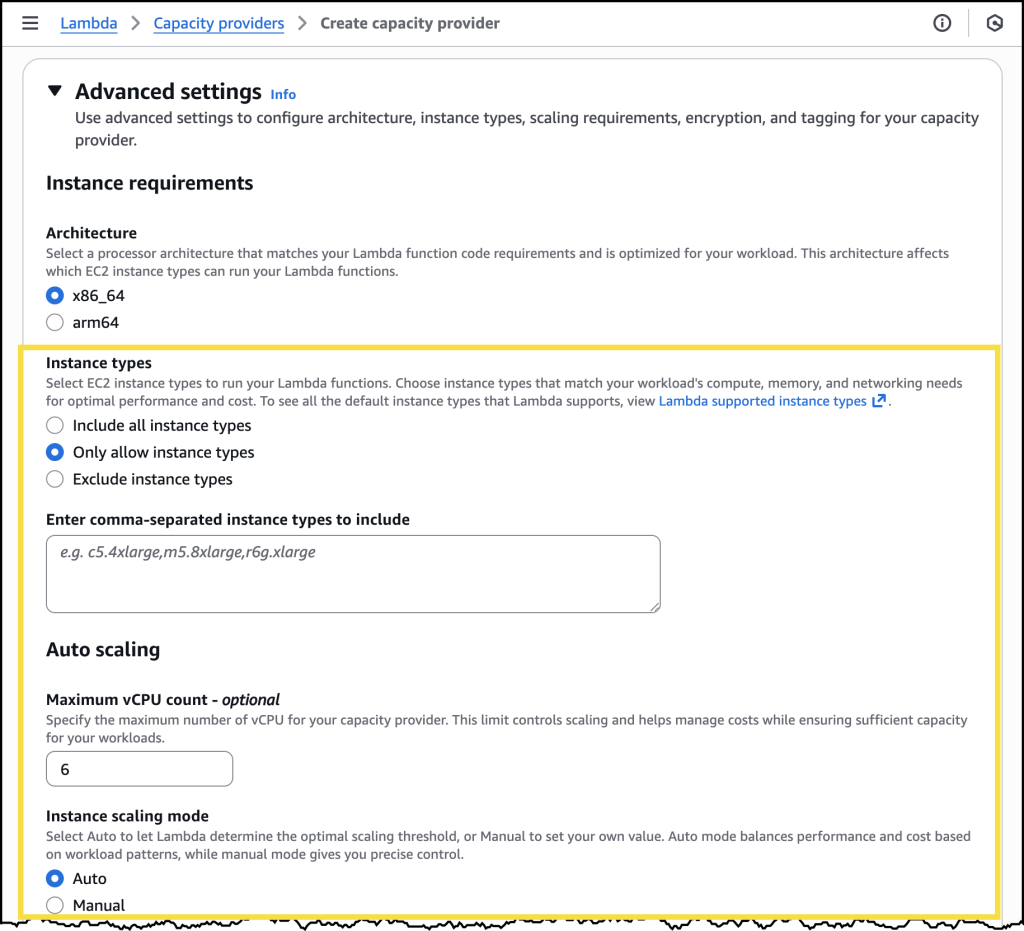
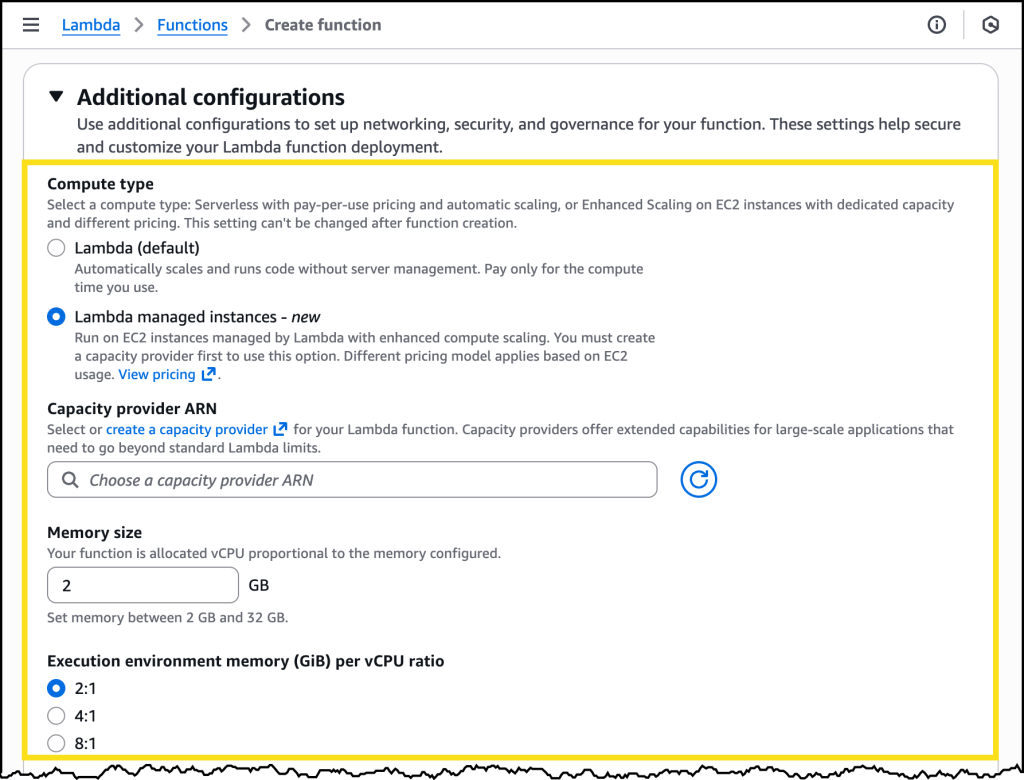
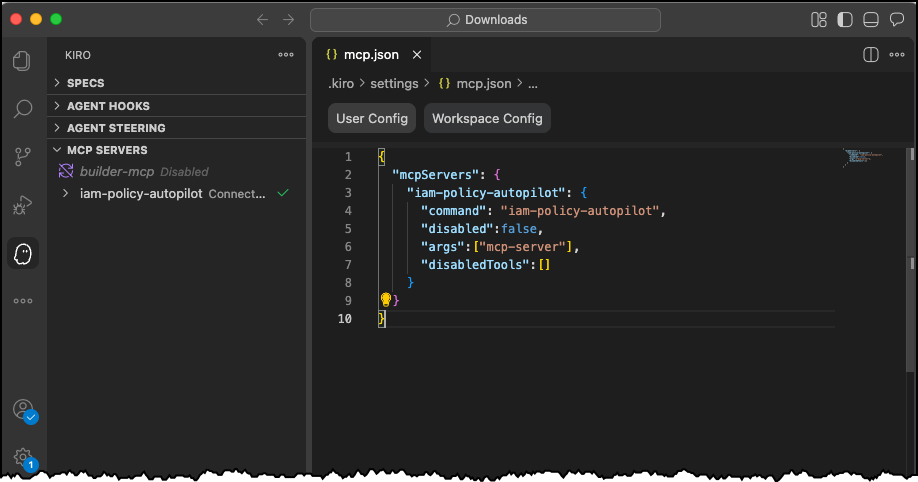
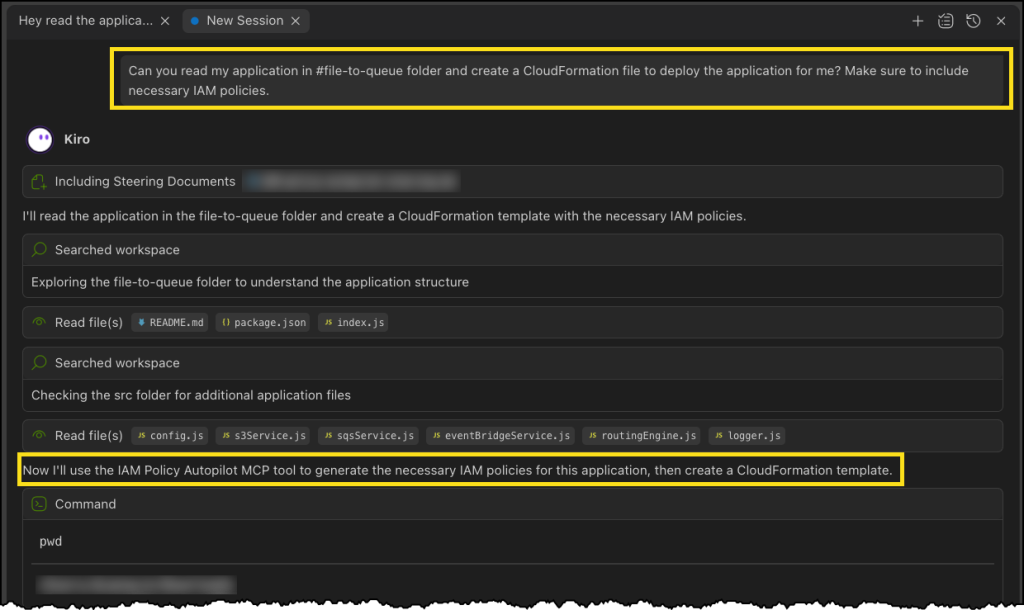

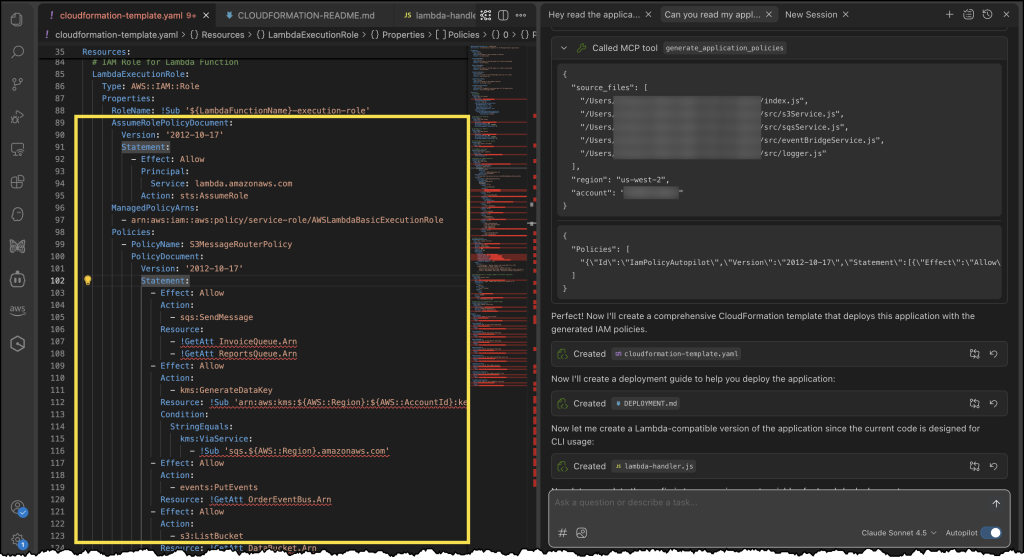
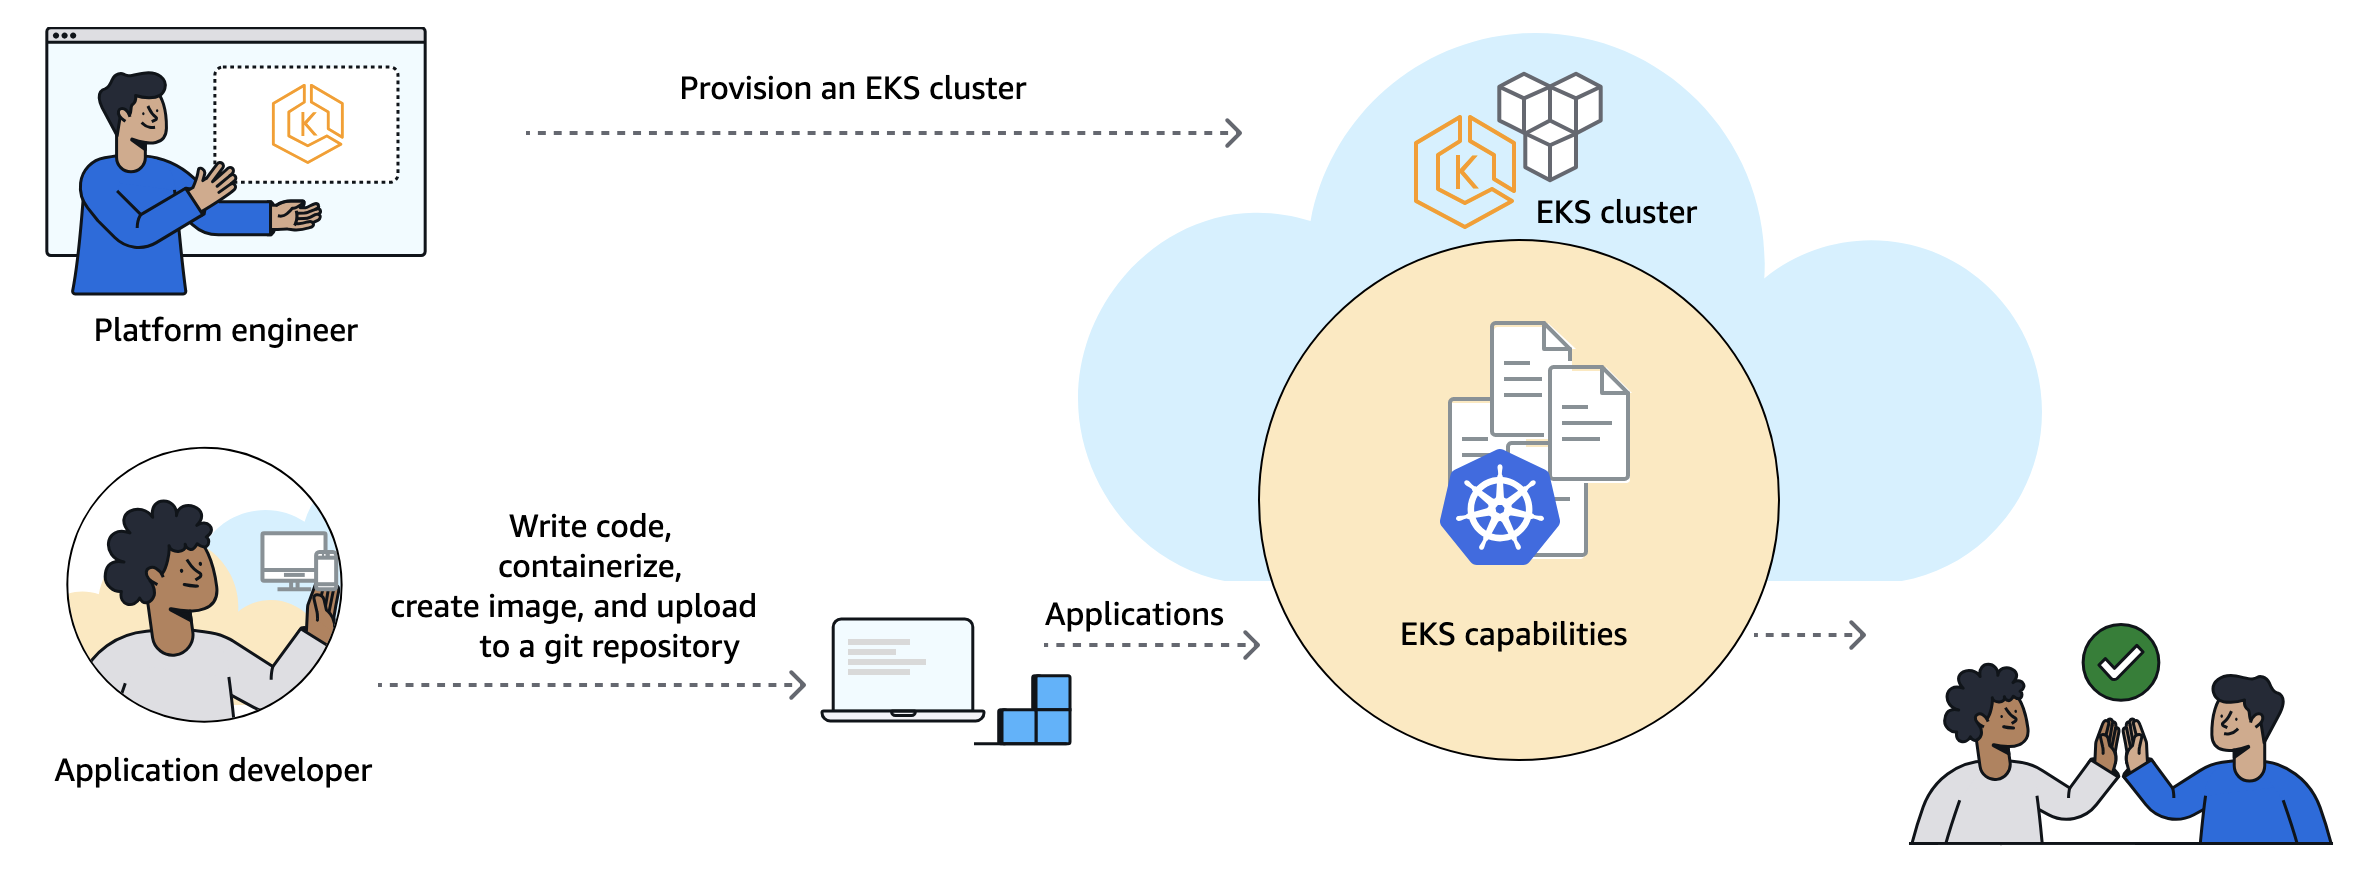
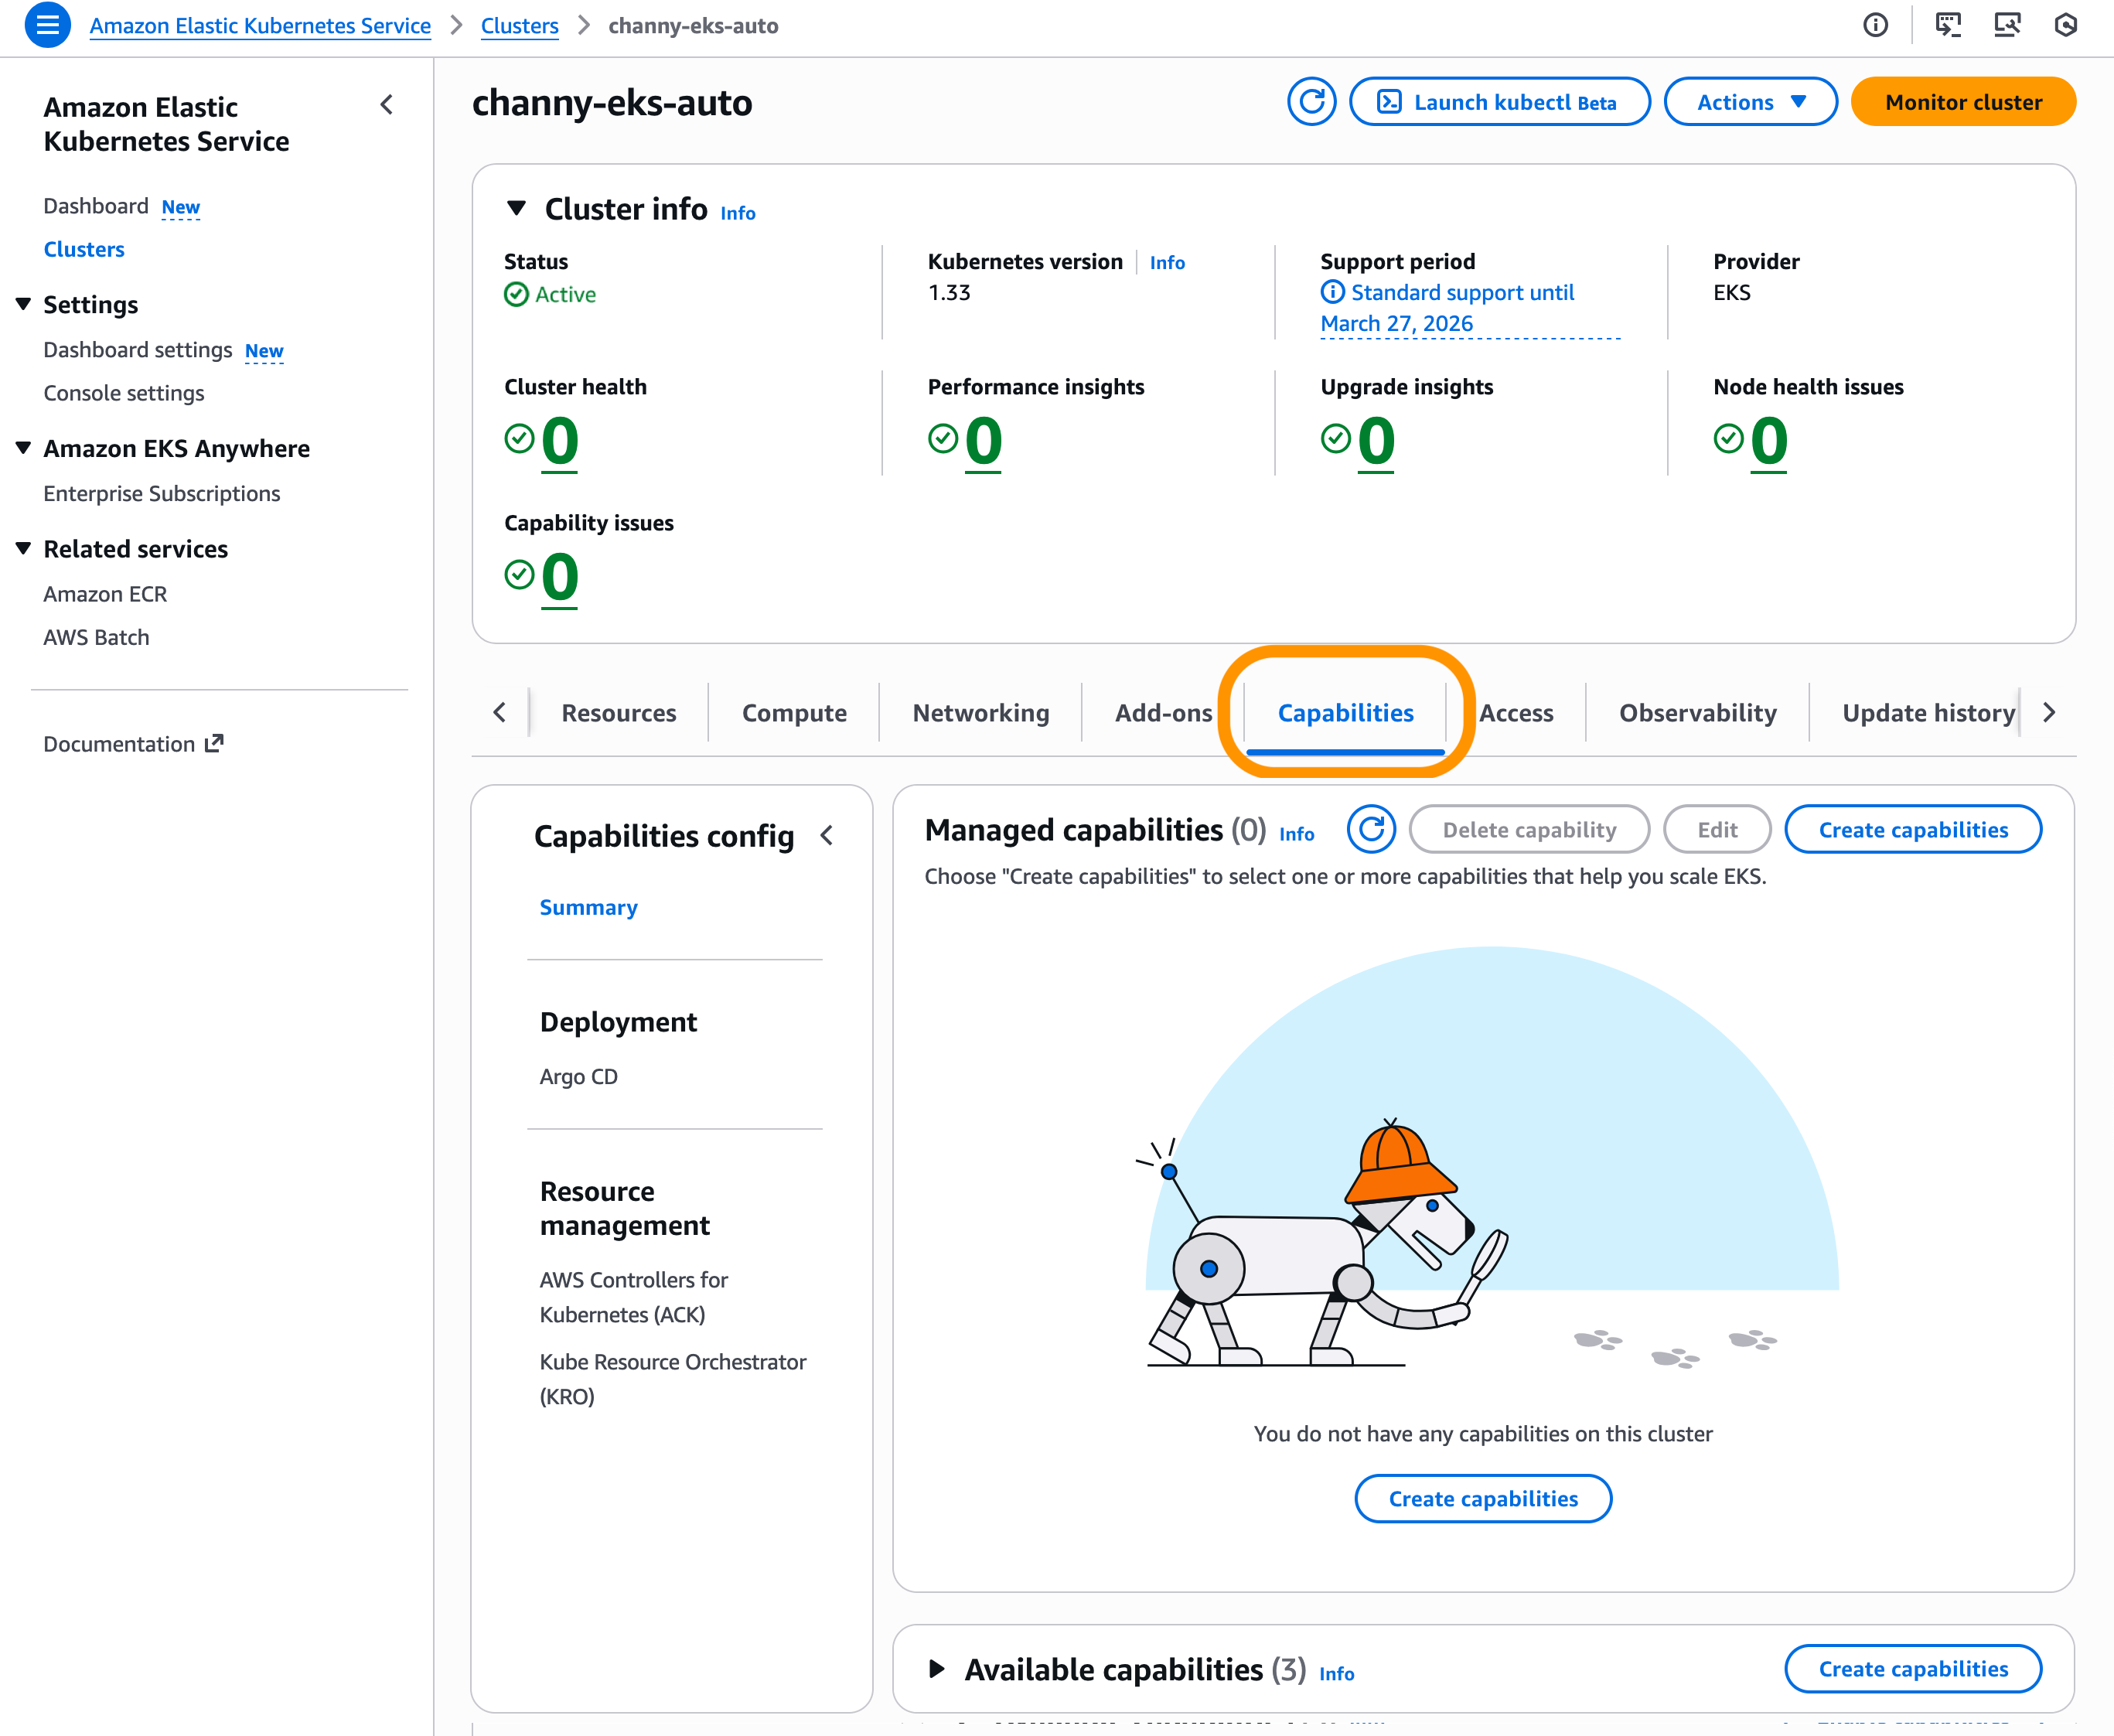
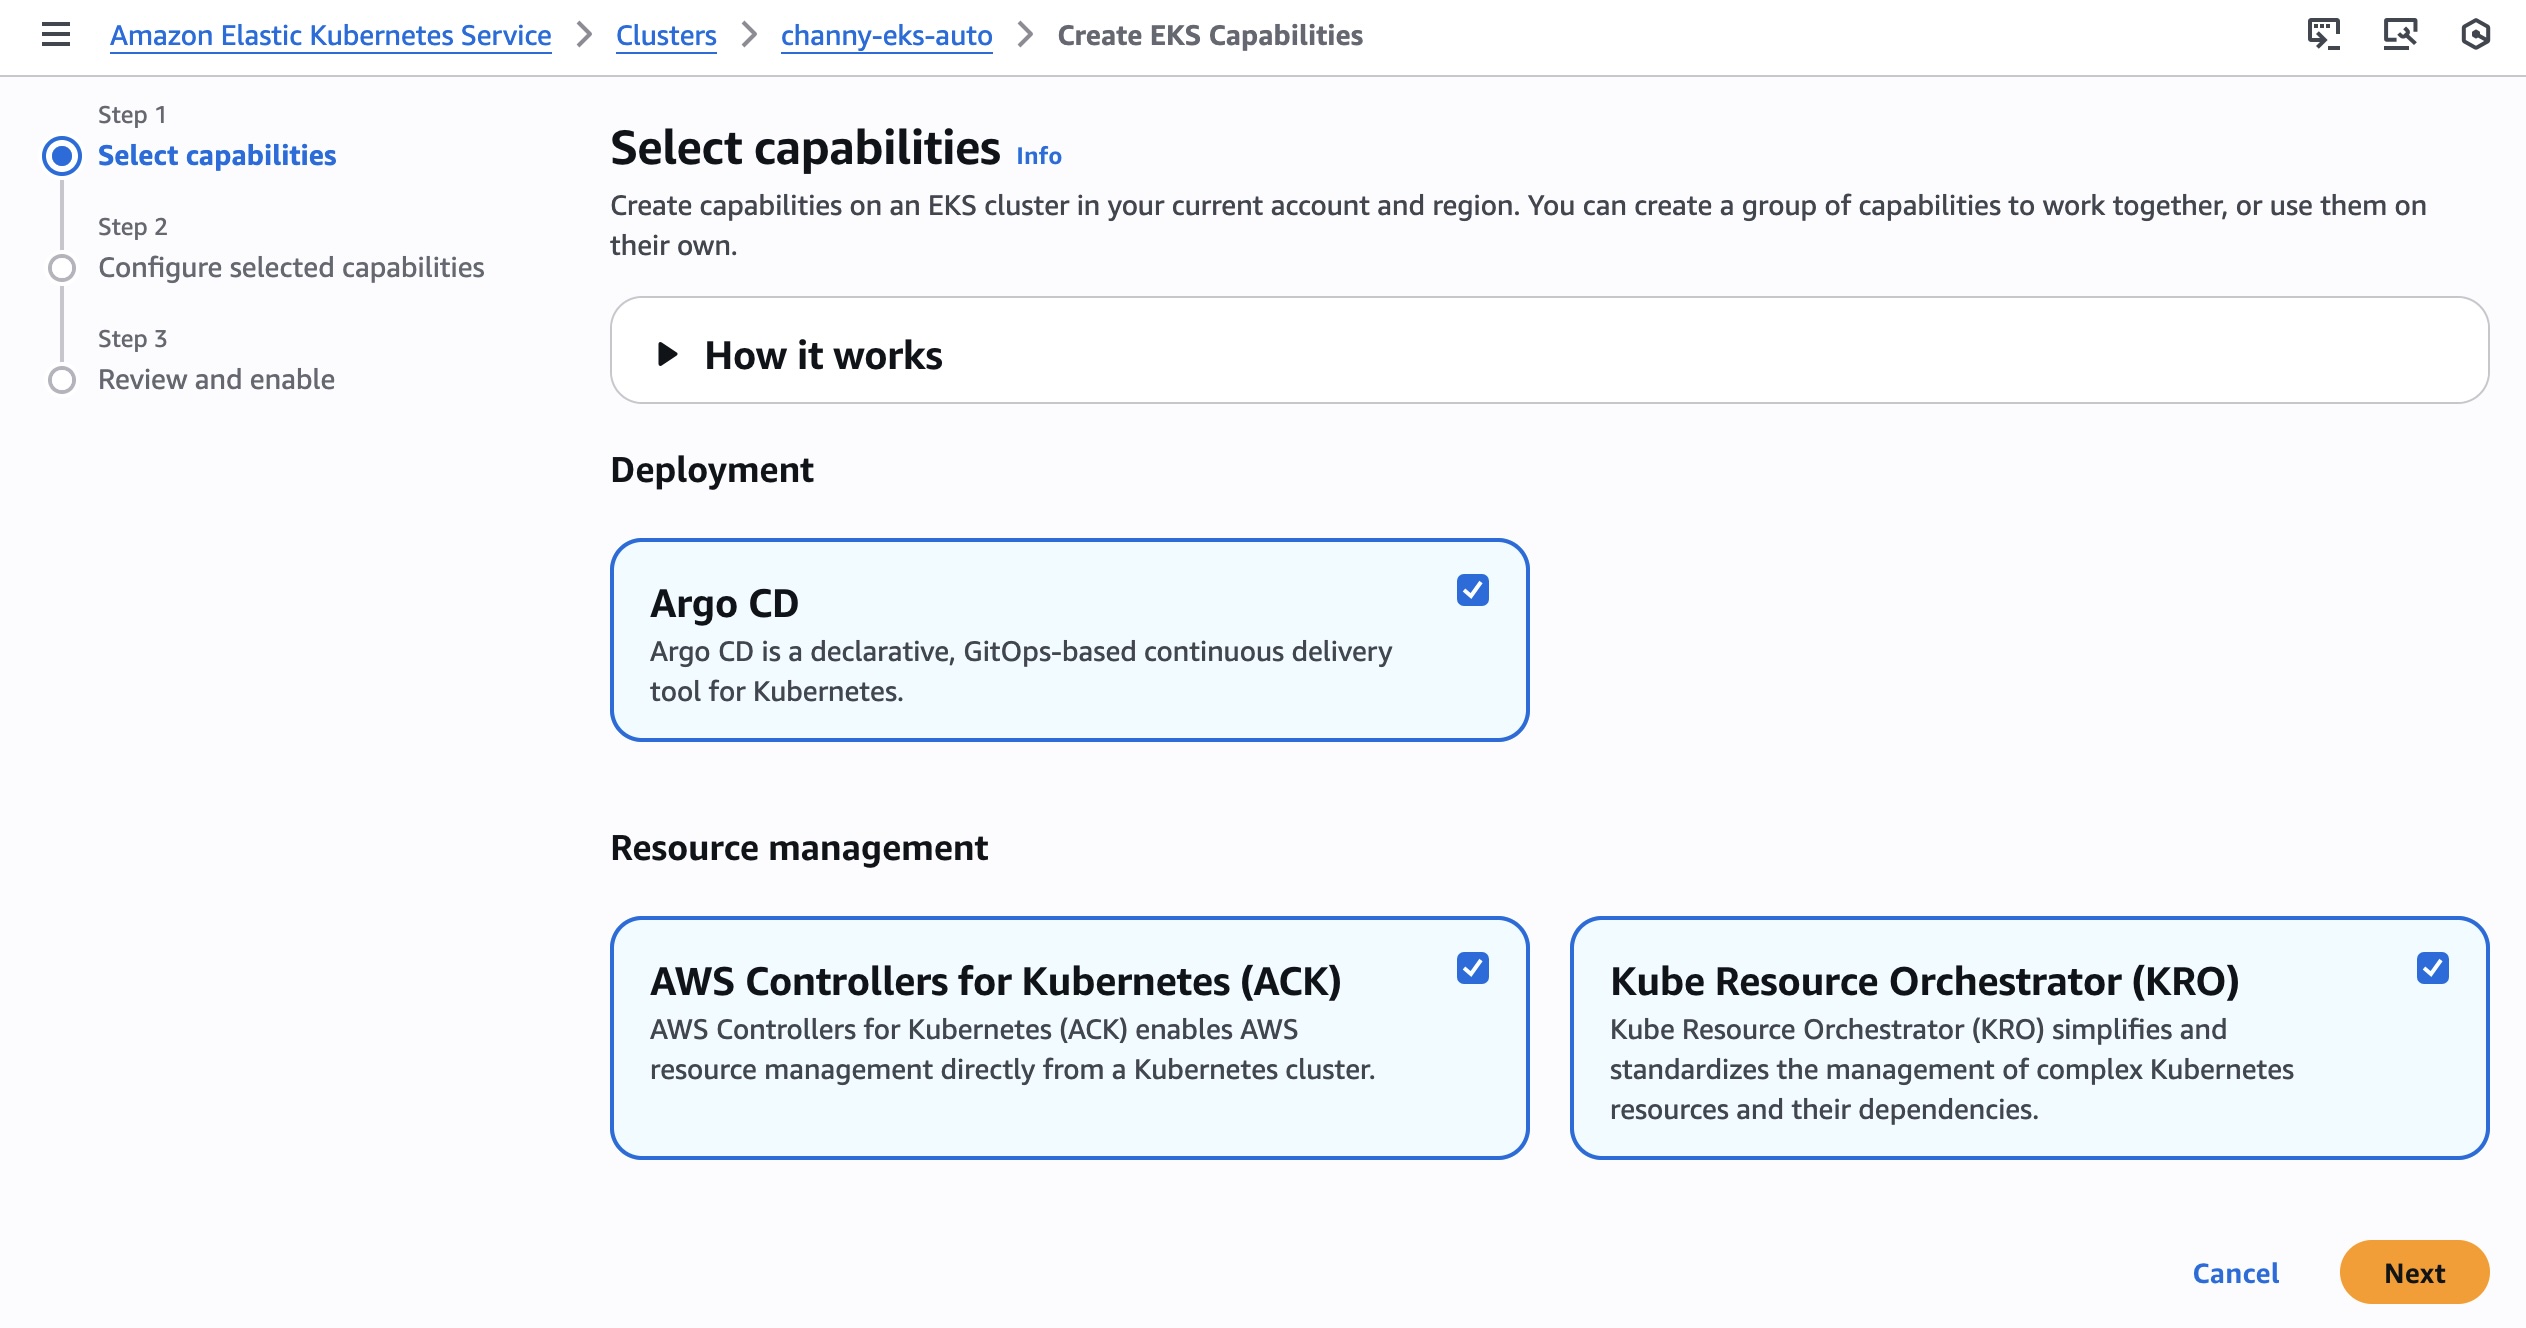
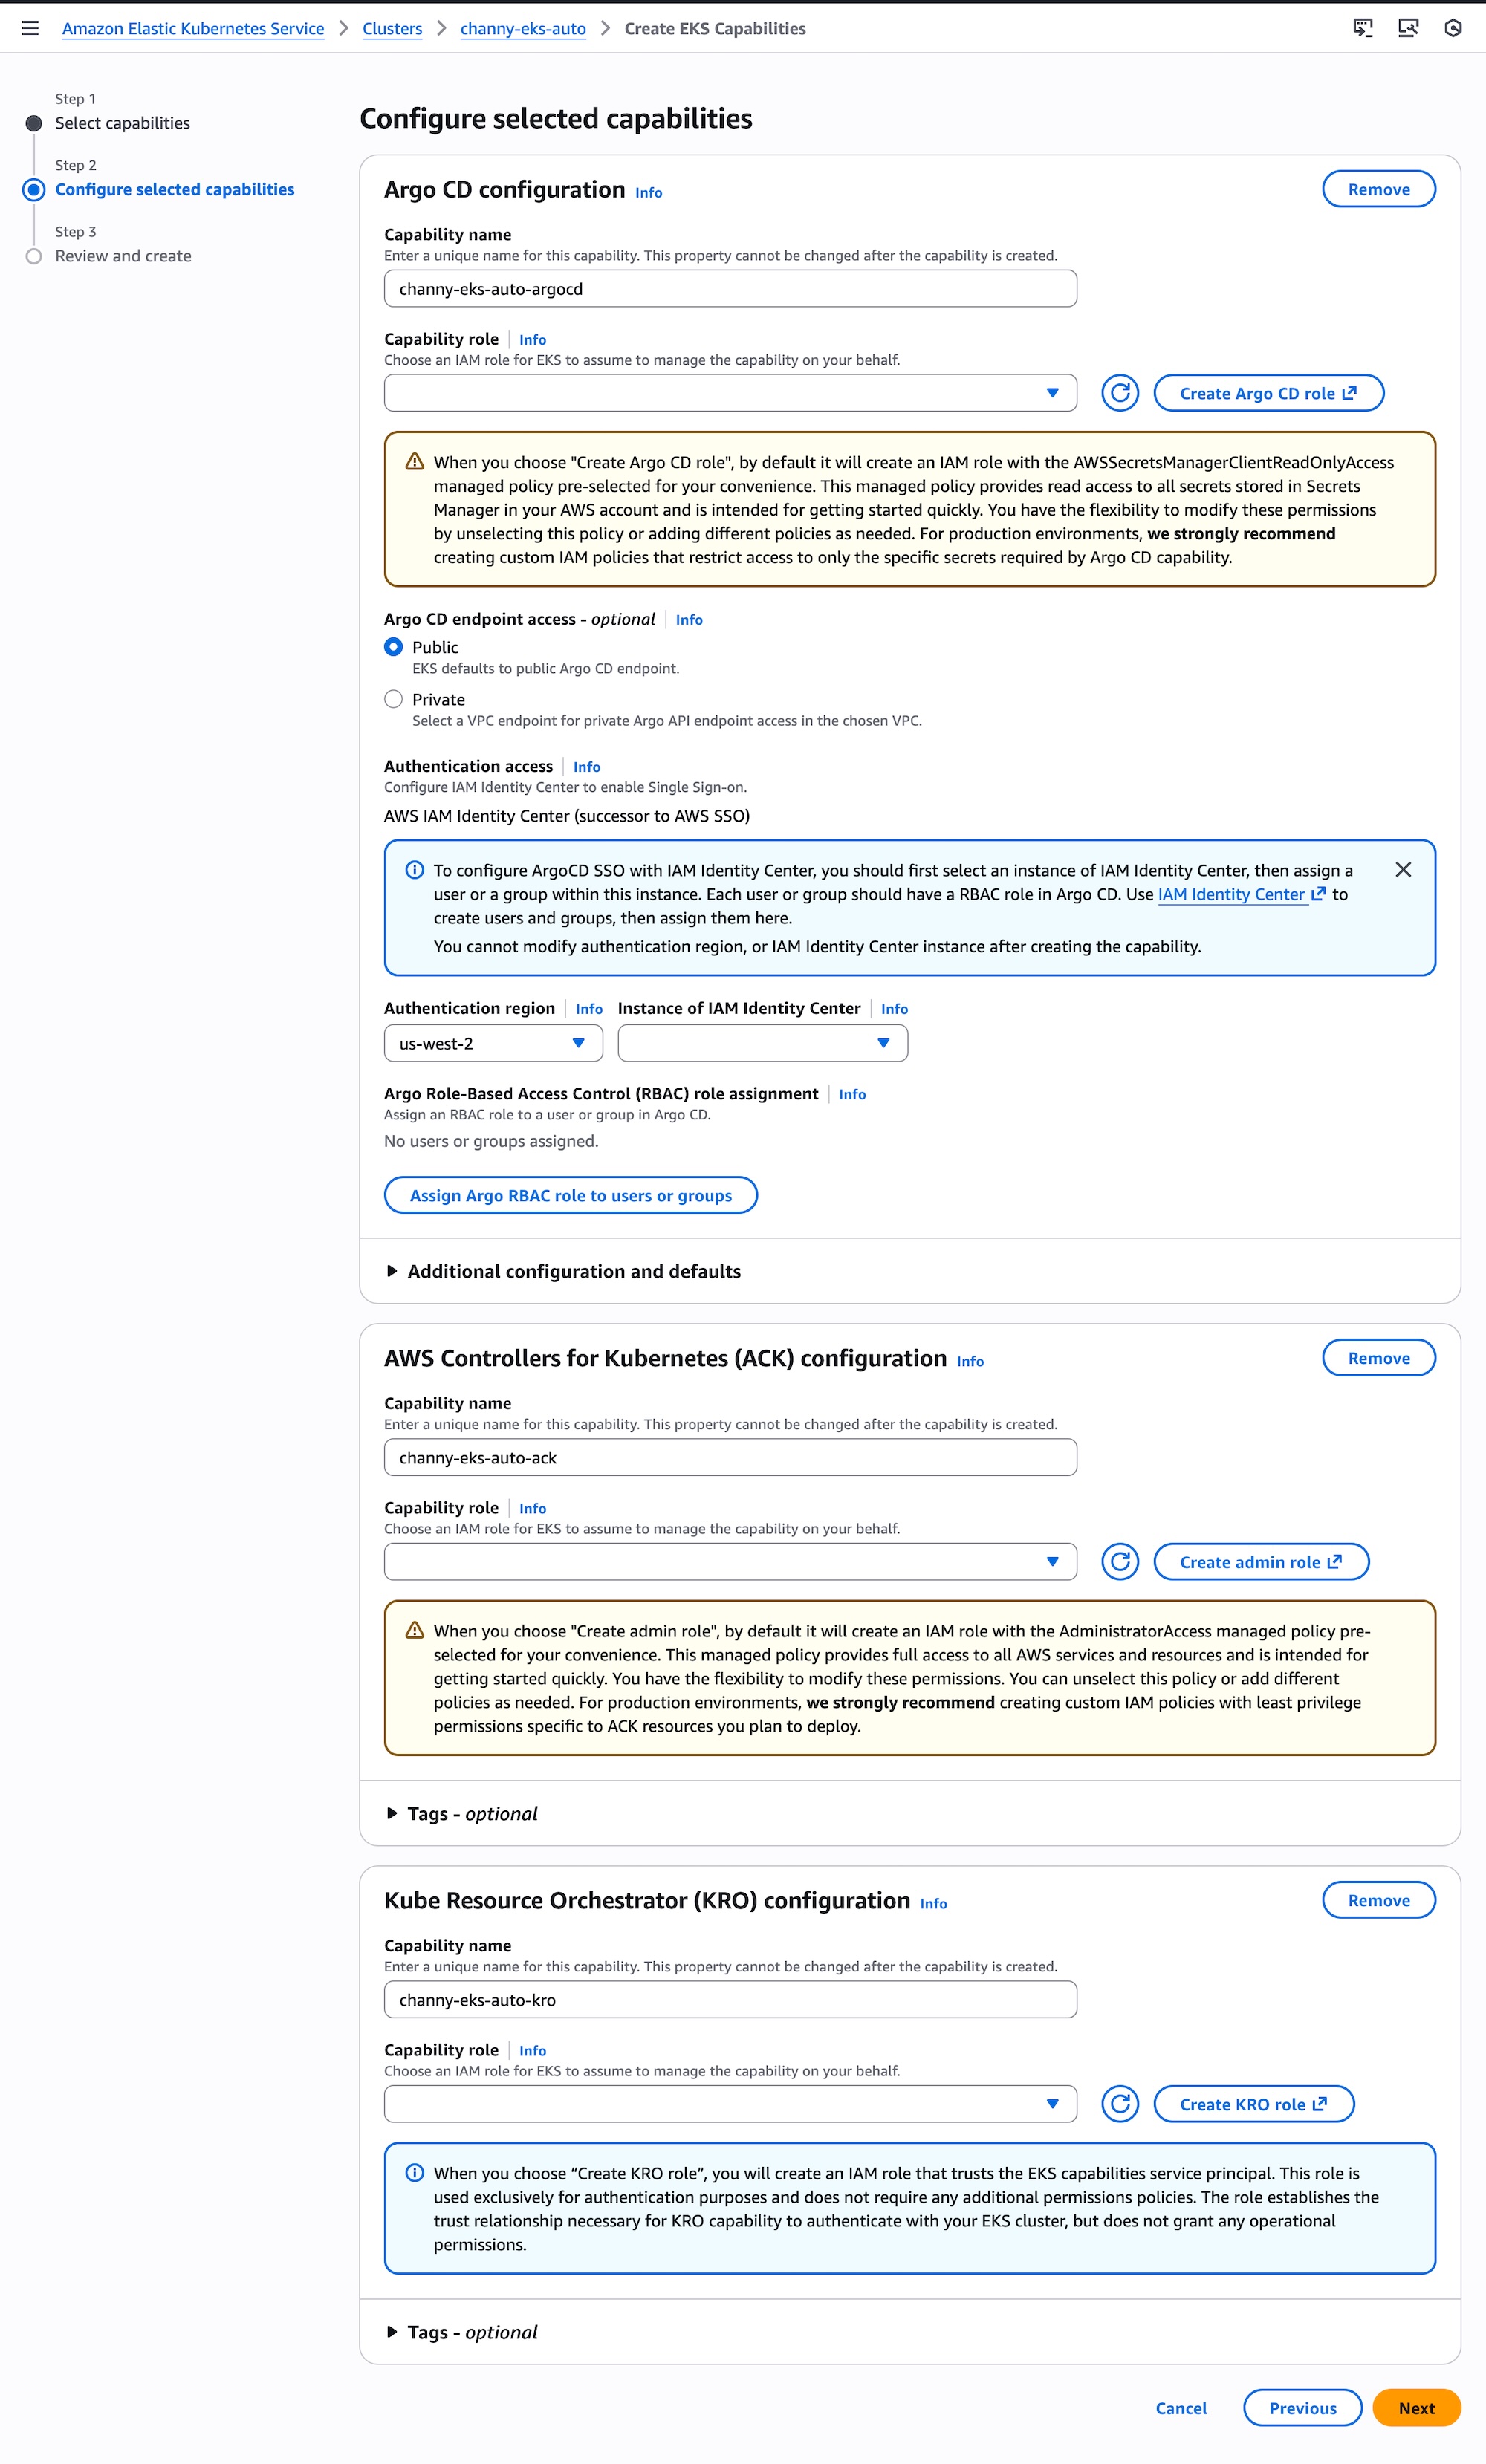
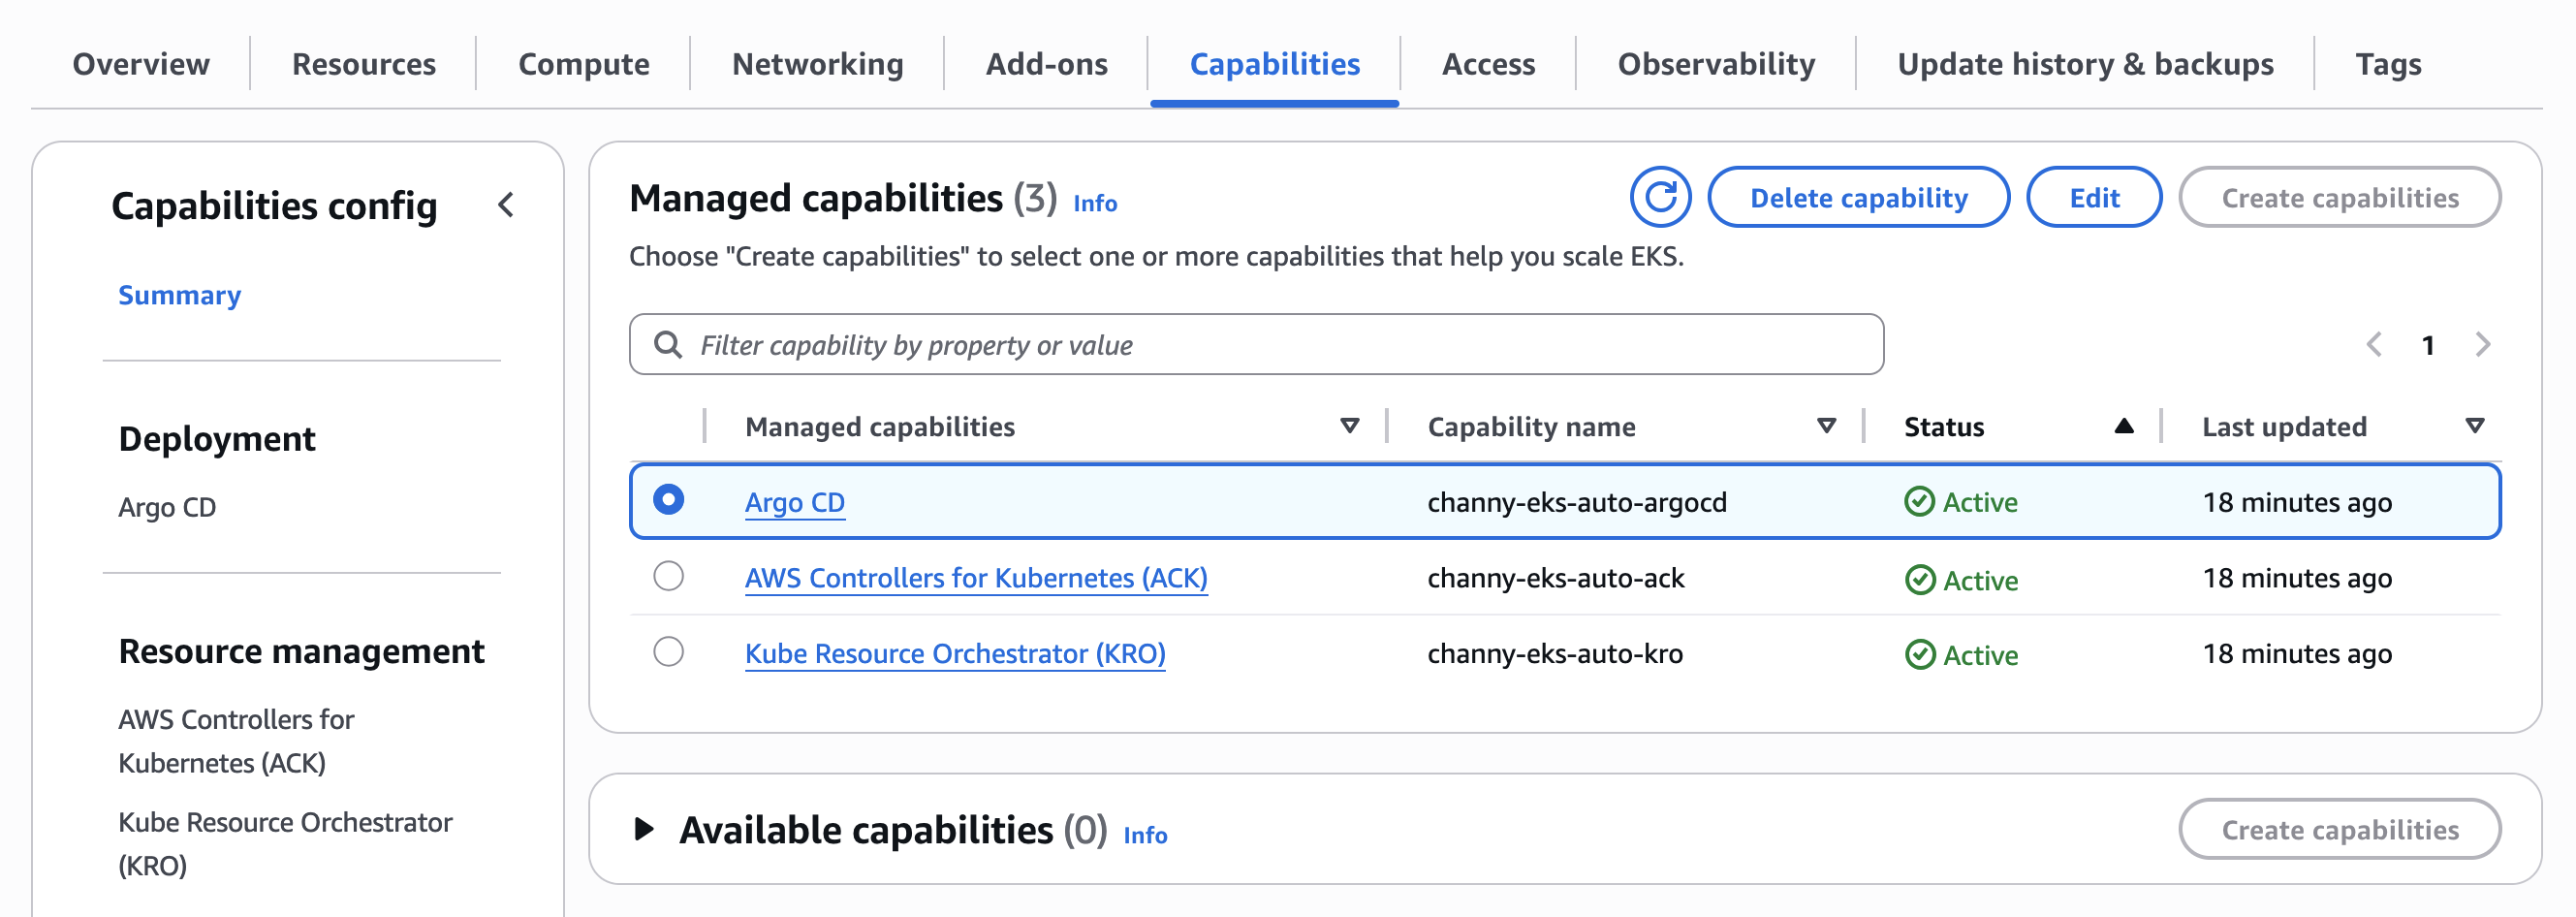
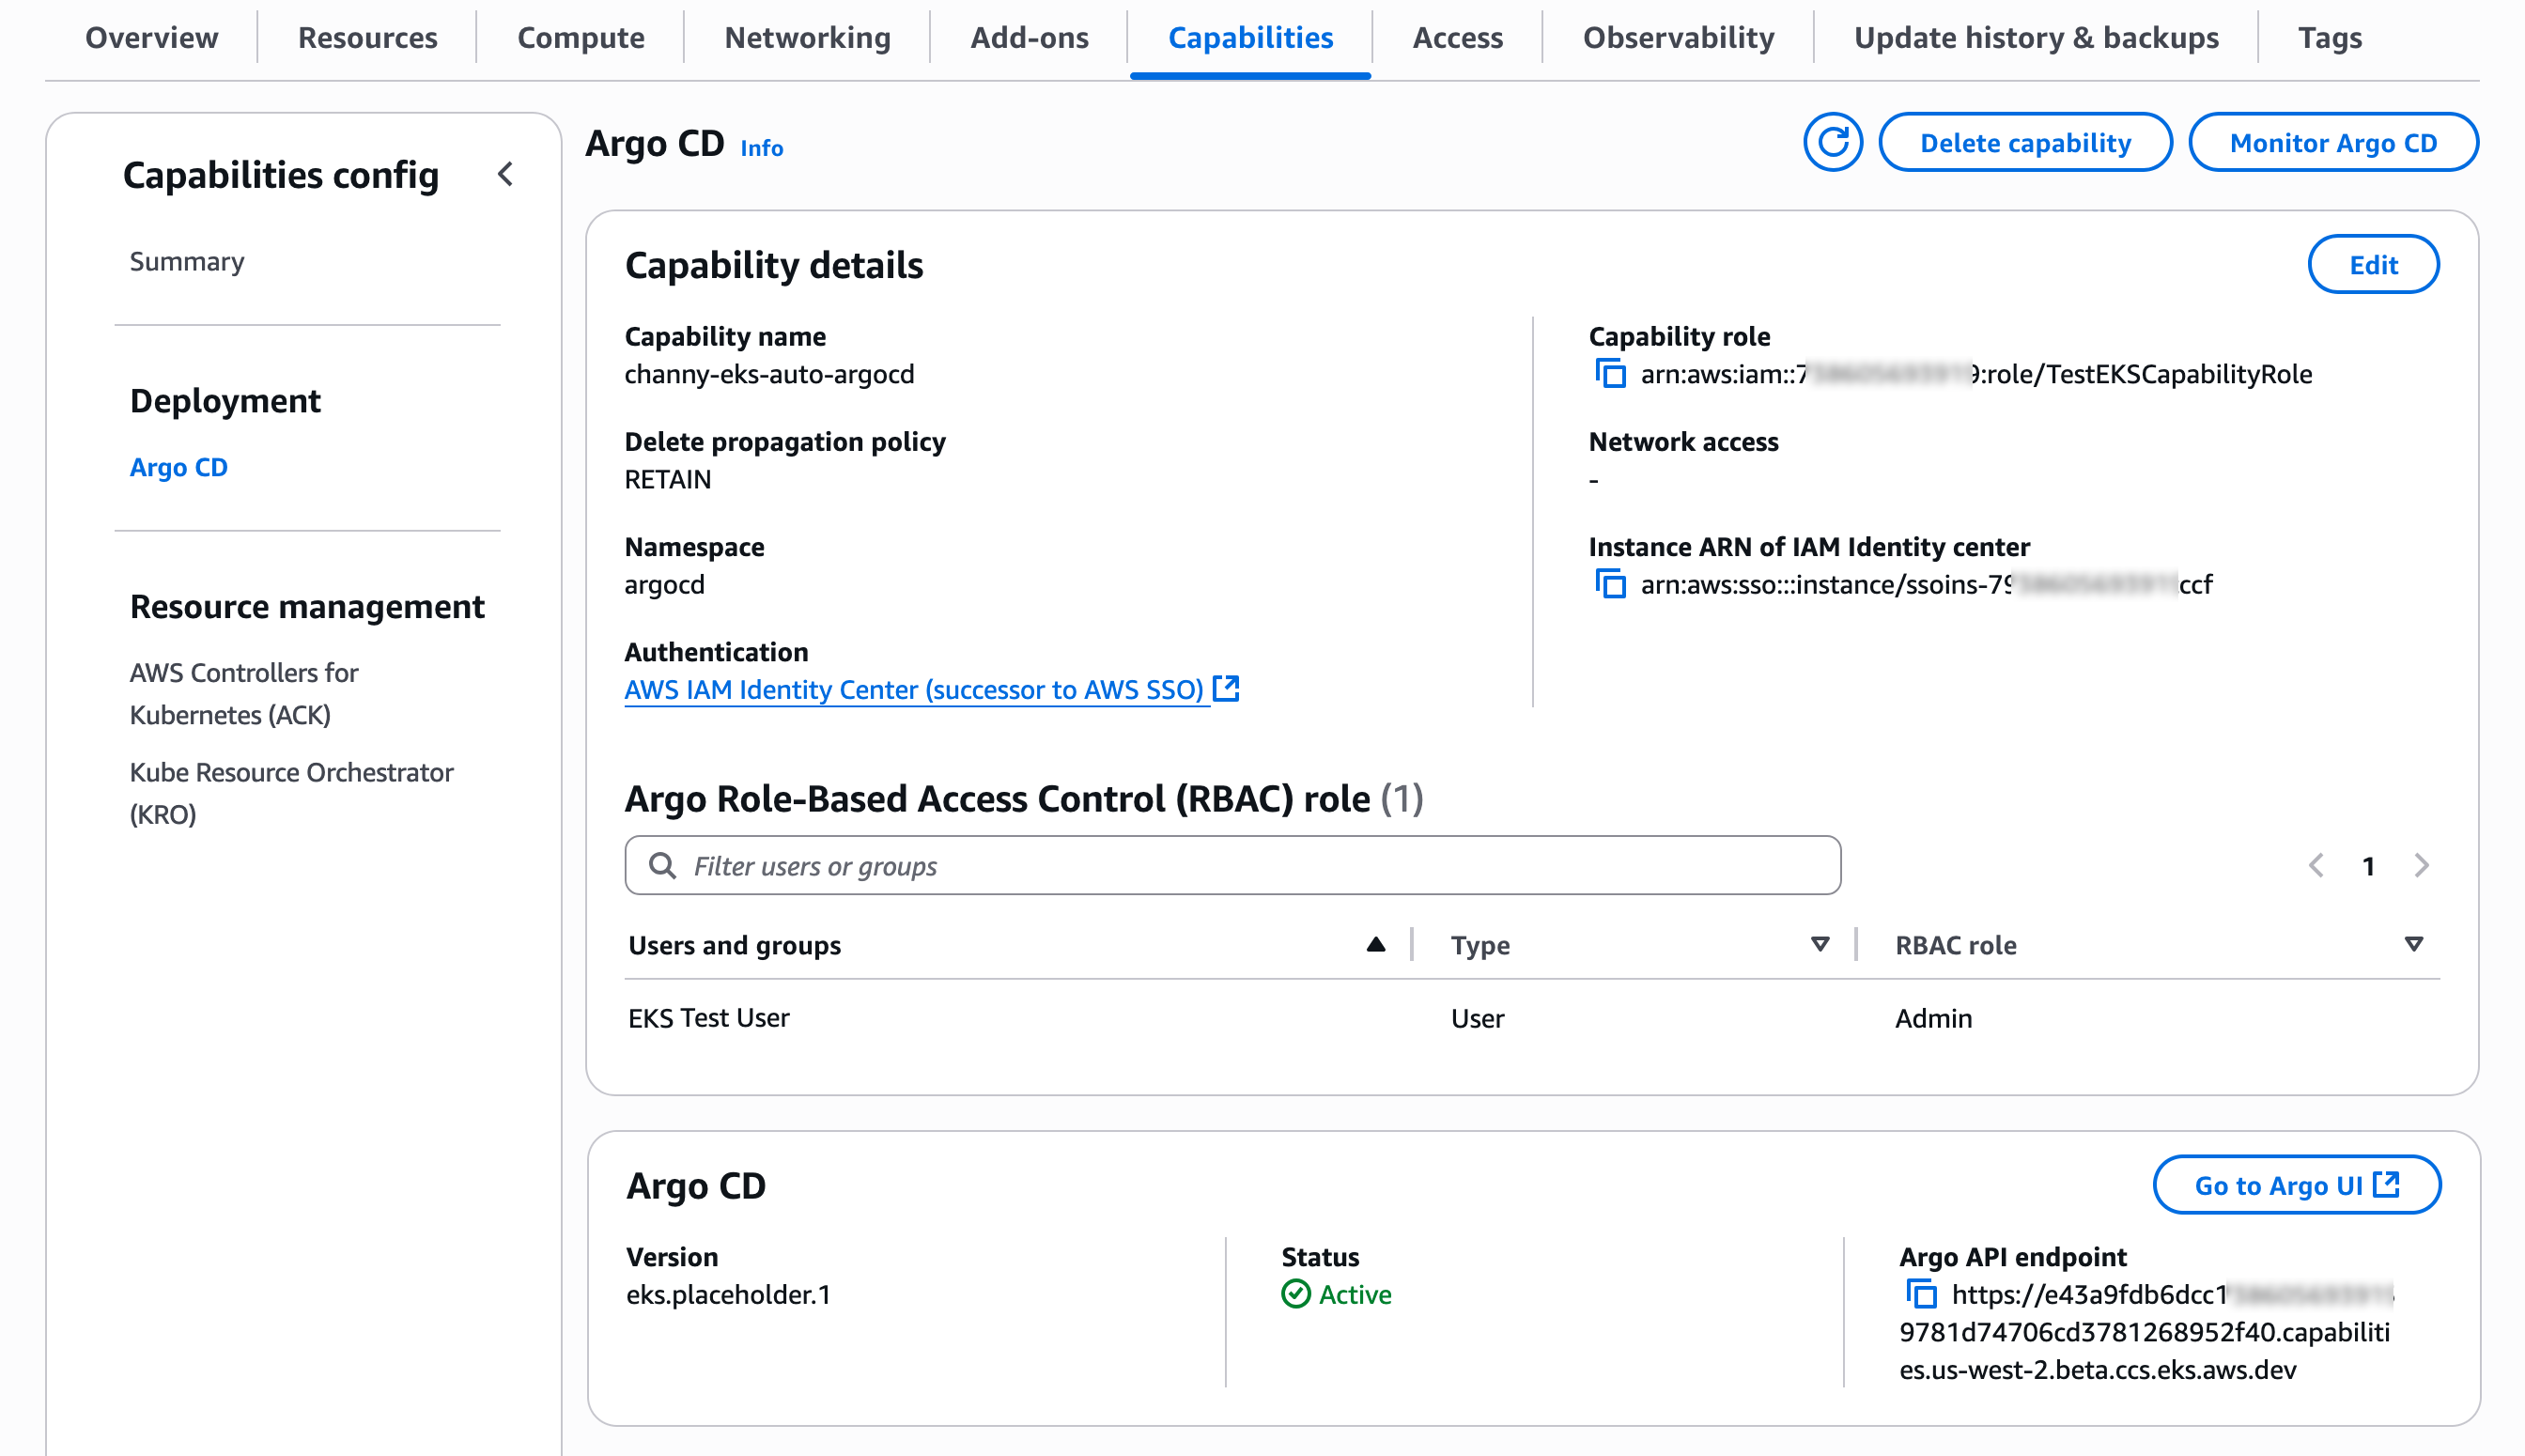
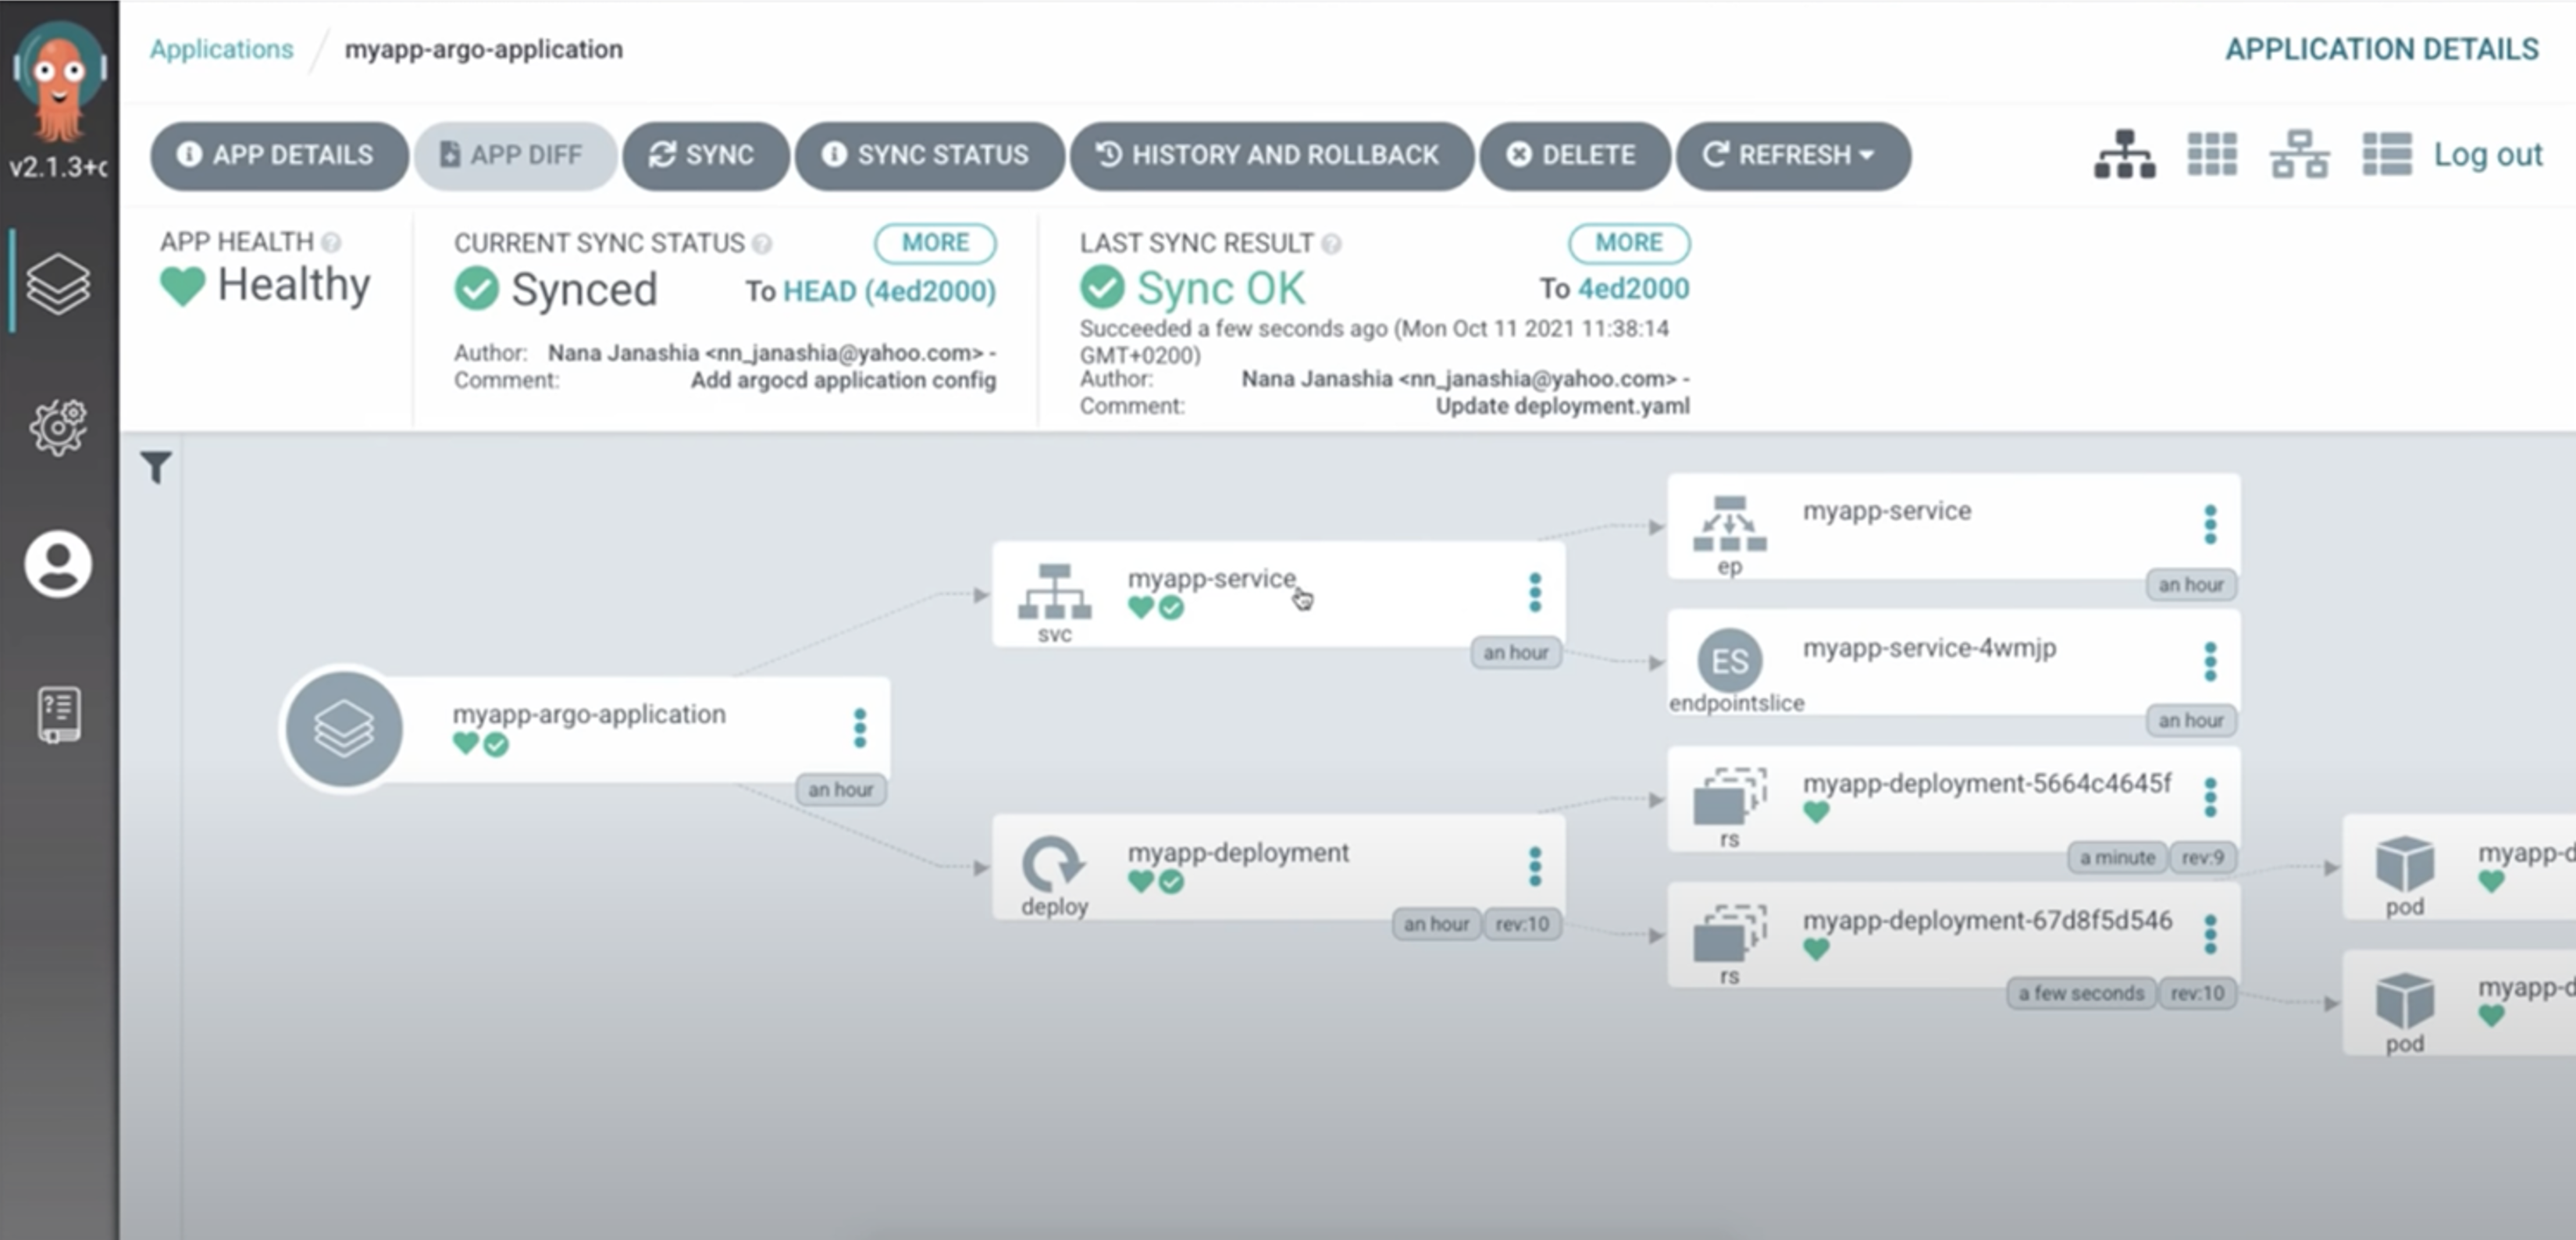
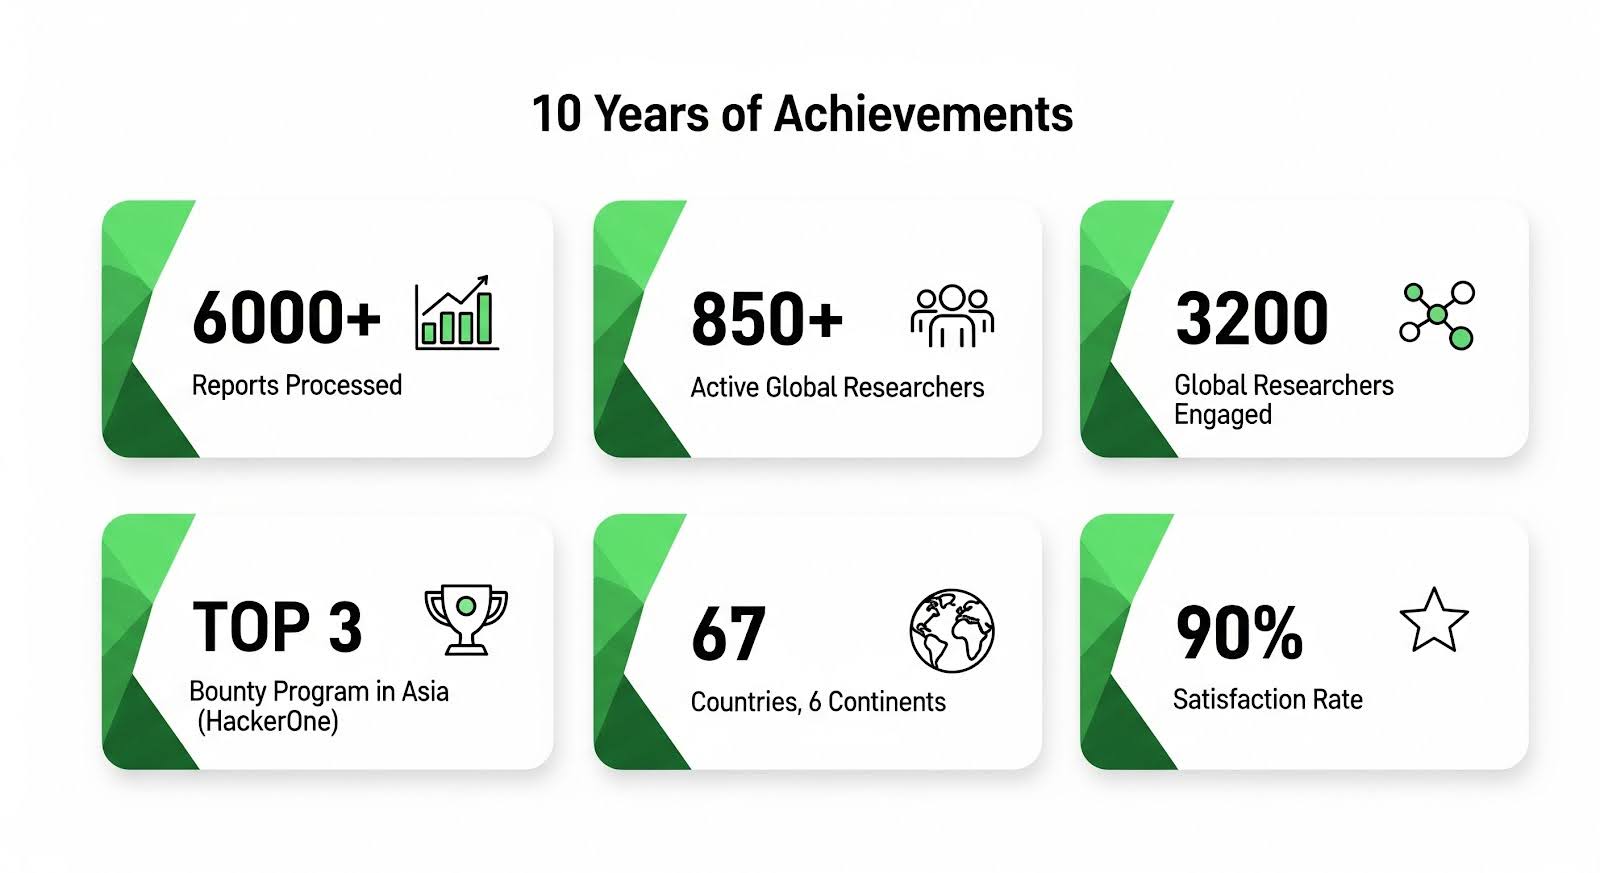
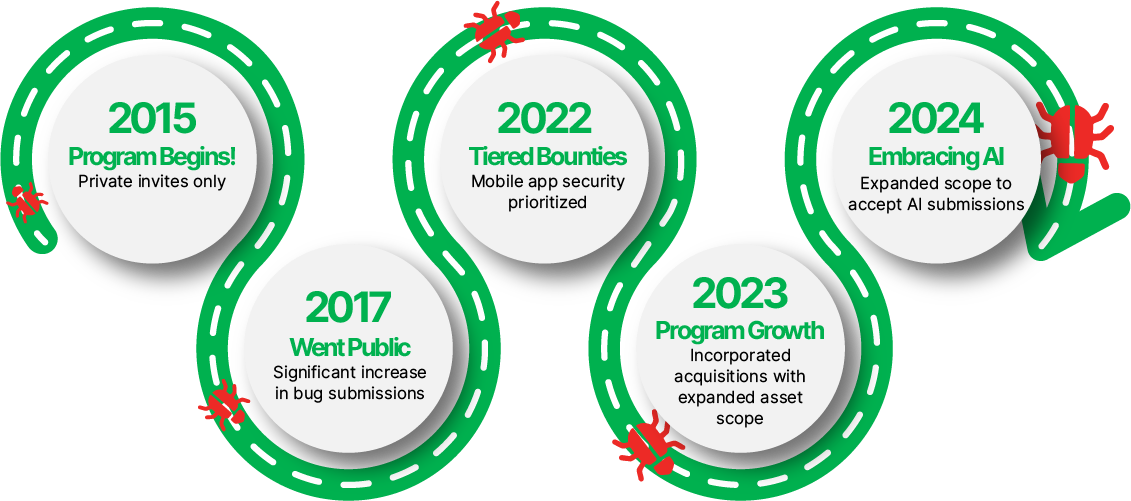


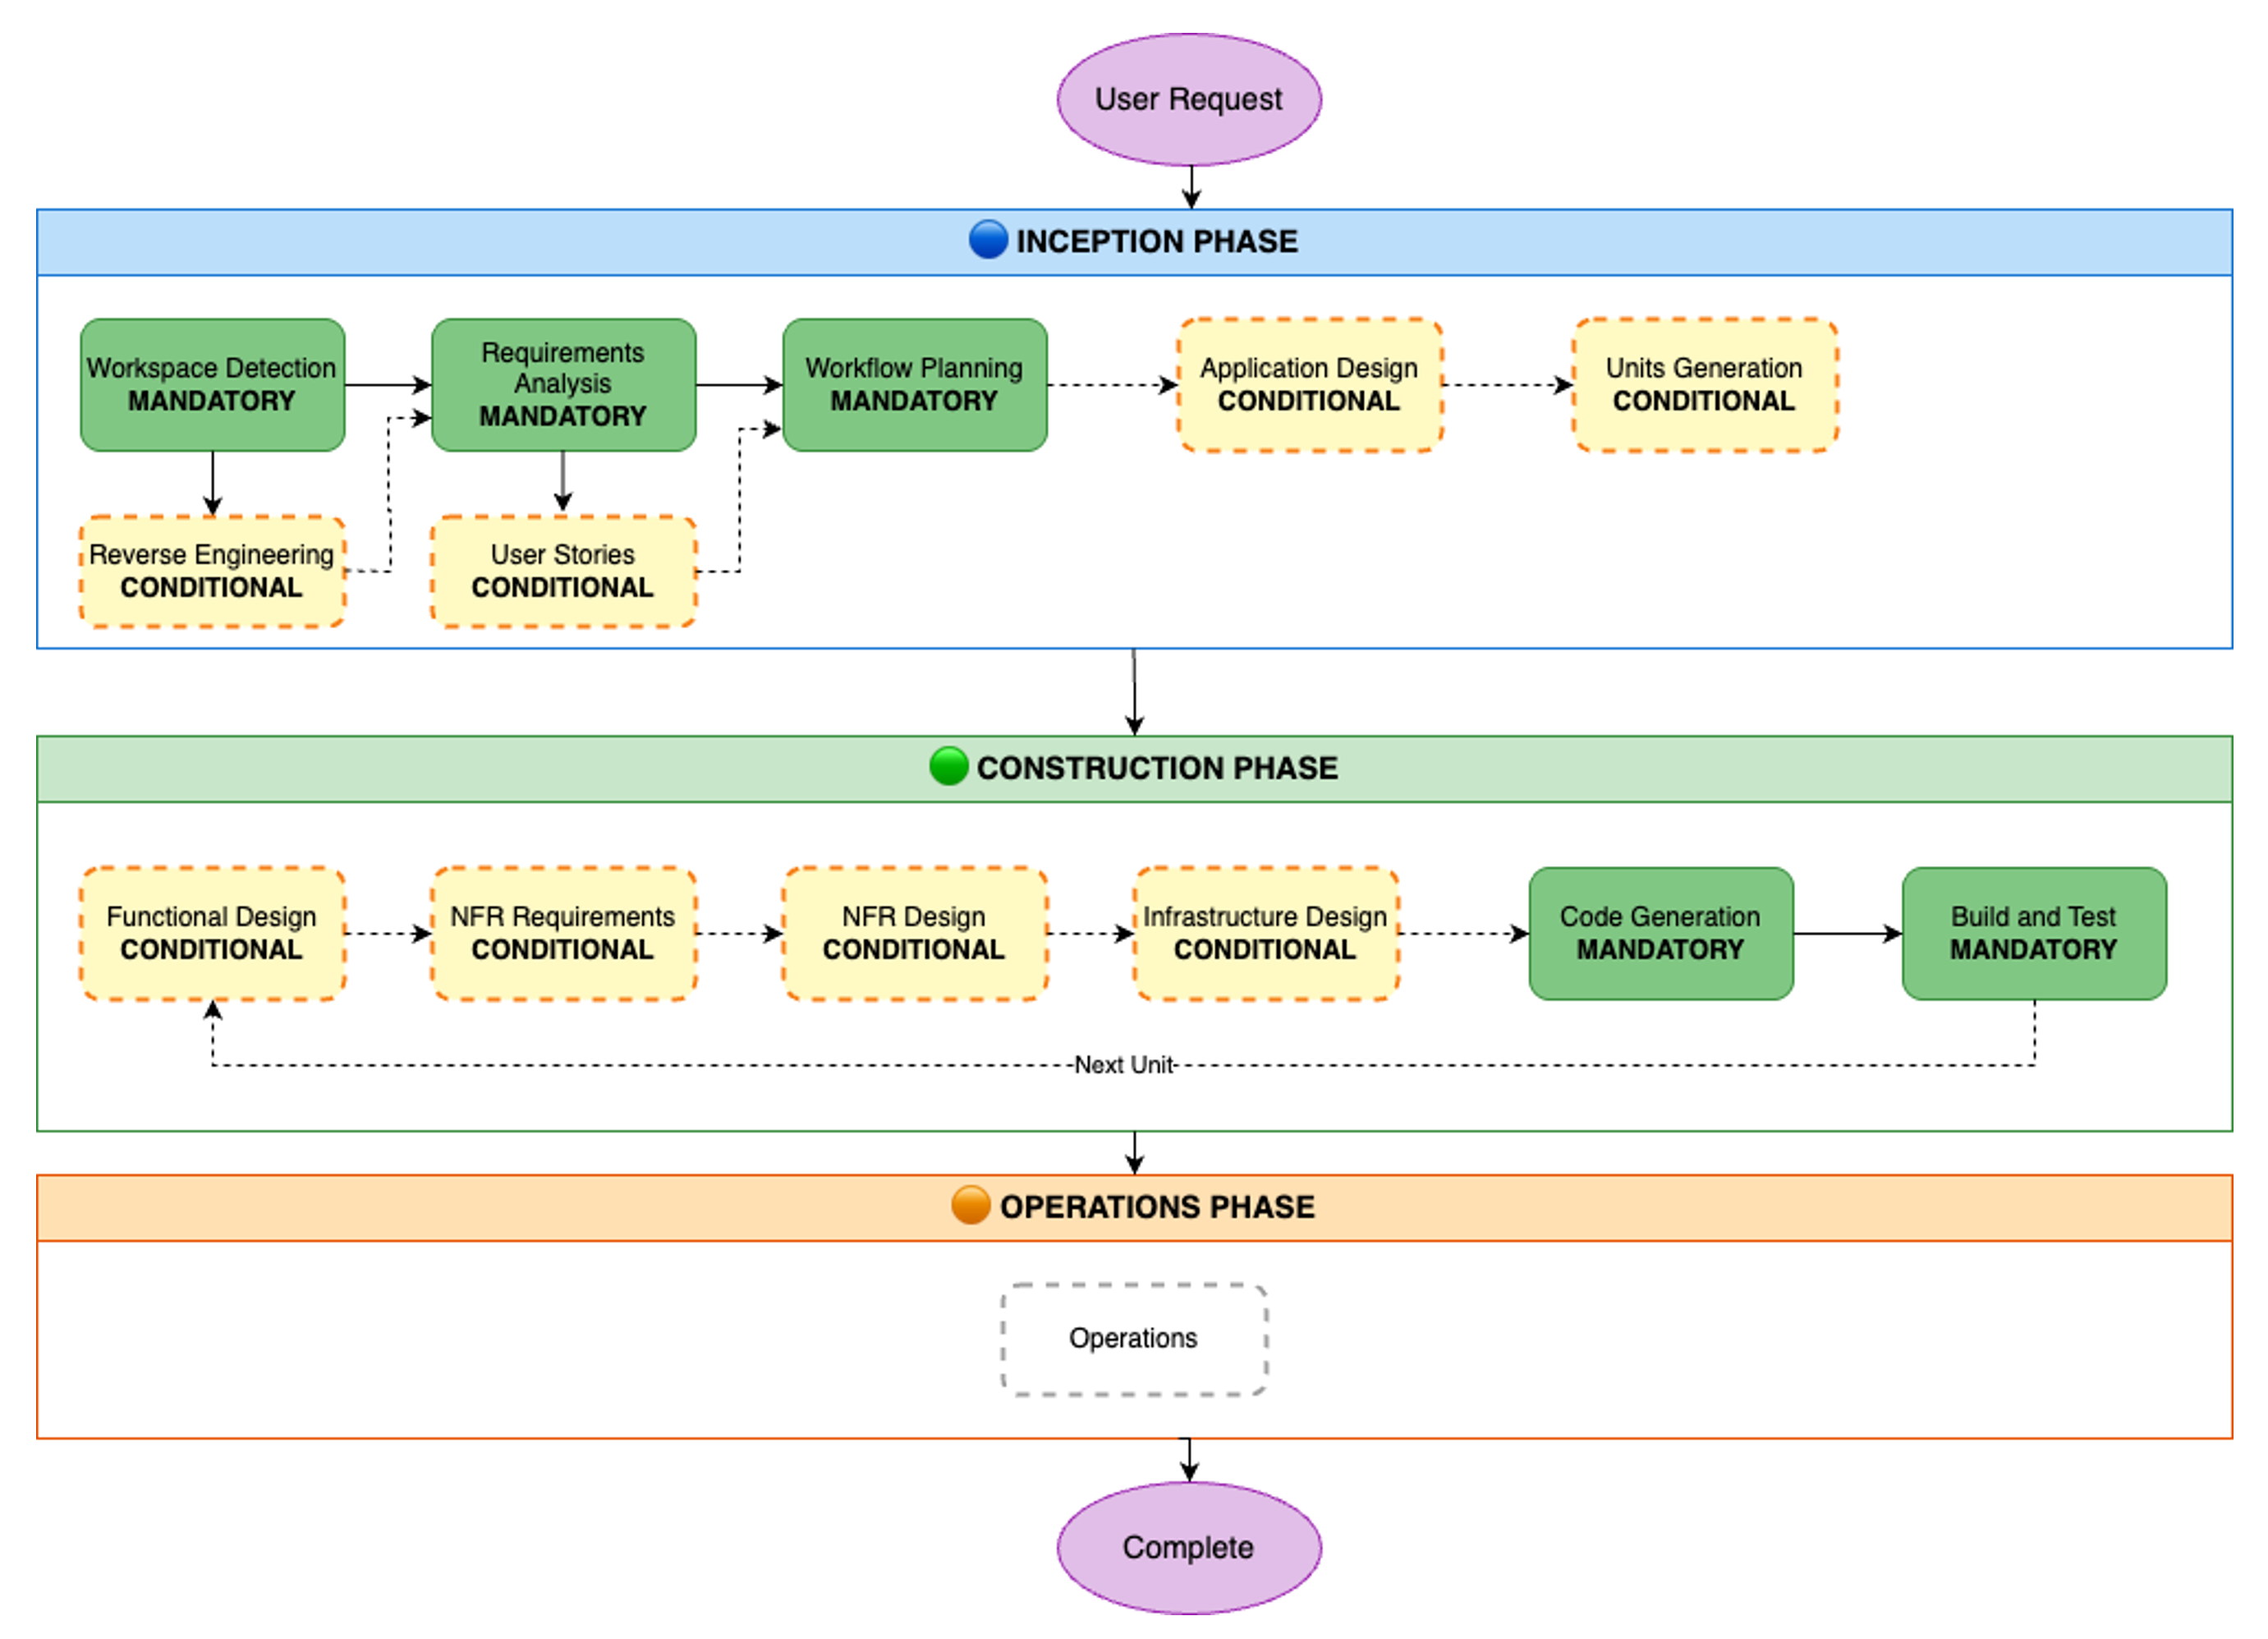

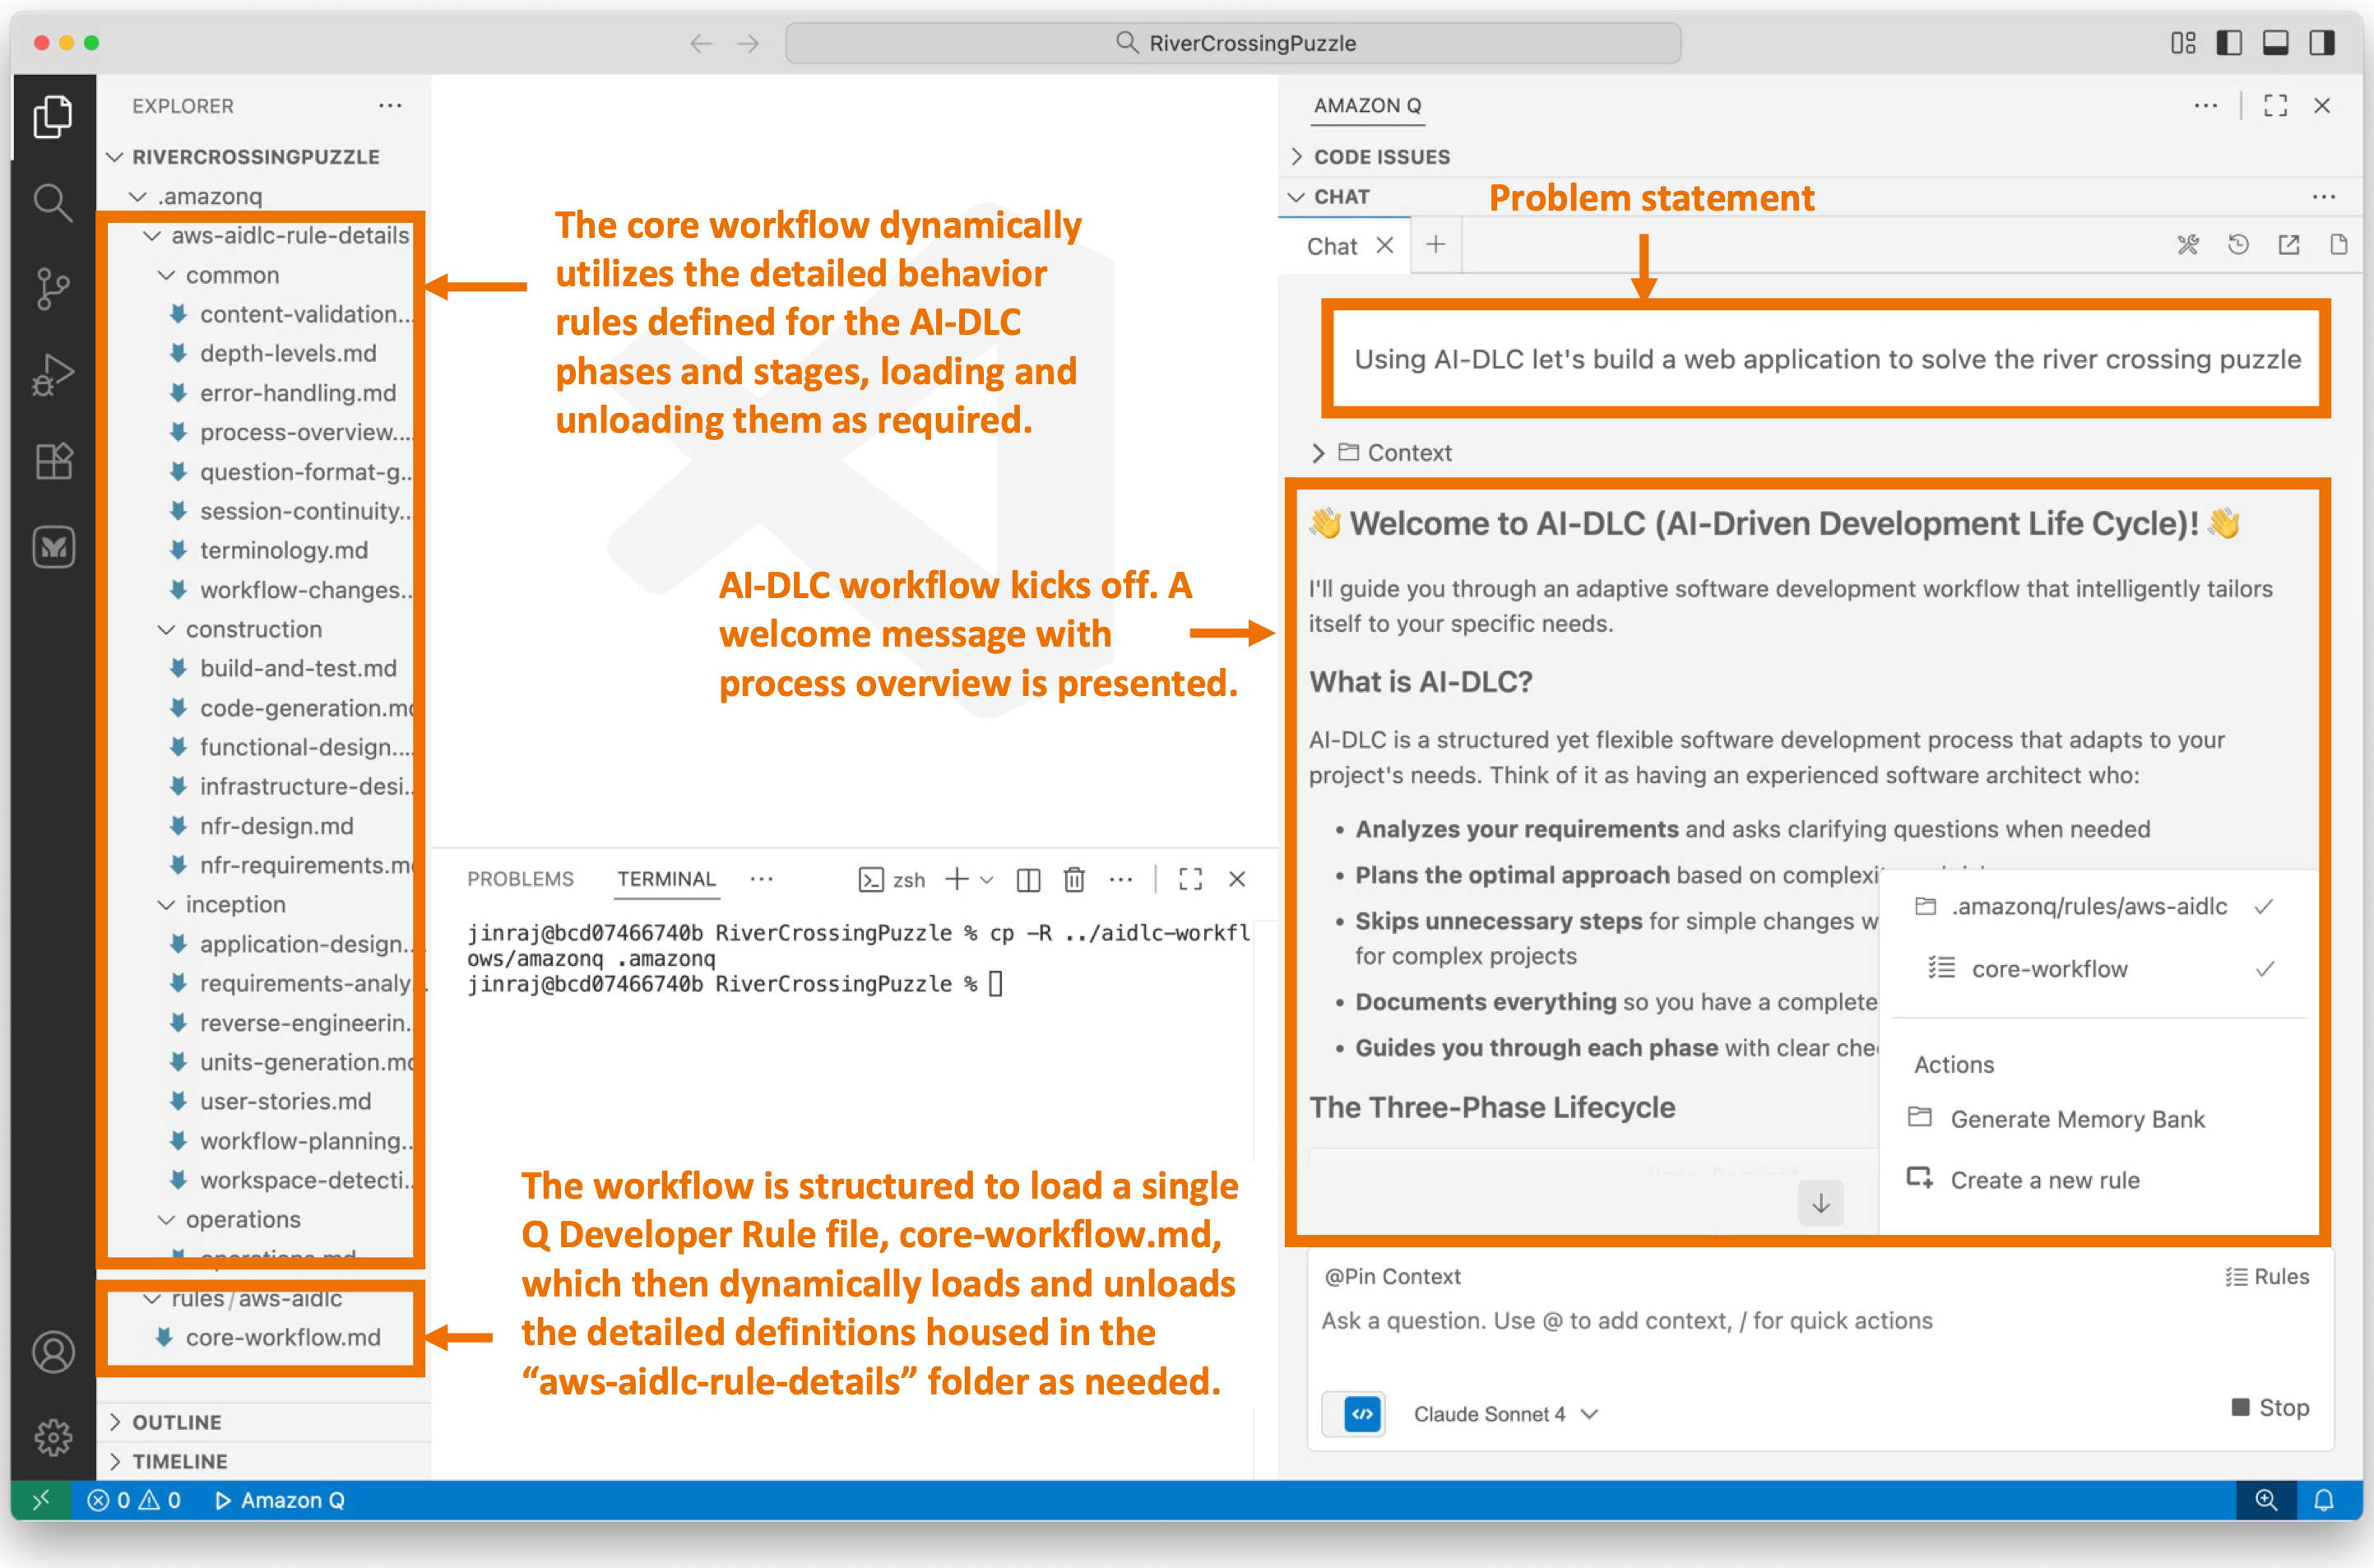
![Screenshot of AI-DLC workspace detection phase showing the Amazon Q chat interface. The left sidebar displays the file tree with an 'aidlc-doc' folder highlighted. The main chat area shows the Inception Phase - Workspace Detection stage with explanatory text about analyzing the workspace. Five callout annotations explain: 1) Workflow creates aidlc-doc directory for storing AI-DLC generated artifacts; 2) The workflow tracks its progress in aidlc-metadata.json for error recovery and session continuity; 3) The audit.md file stores user's prompts; 4) Workflow highlights the AI-DLC phase and stage name with a clear heading for easy tracking; 5) Workflow loads detailed stage-level behavior files dynamically such that they don't consume the context window statically. At the bottom, a user approval prompt shows 'mkdir -p /Users/[...]/NewConsumerPortal/aidlc-docs' with the user asked to approve the 'mkdir' command.](https://d2908q01vomqb2.cloudfront.net/7719a1c782a1ba91c031a682a0a2f8658209adbf/2025/11/24/04_AI-DLC_workspace_detection-1.png)