Post Syndicated from The Atlantic original https://www.youtube.com/watch?v=_rno_Nnq-TY
Nikkor Z 24-70mm f/2.8 S II – The Best Standard Zoom Lens
Post Syndicated from Matt Granger original https://www.youtube.com/watch?v=Q95EZxAgnRA
Arch Linux recent service outages
Post Syndicated from jzb original https://lwn.net/Articles/1034716/
The Arch Linux project has posted an
update about recent service
outages that have affected its infrastructure:
The Arch Linux Project is currently experiencing an ongoing denial
of service attack that primarily impacts our main webpage, the Arch
User Repository (AUR), and the Forums.We are aware of the problems that this creates for our end users
and will continue to actively work with our hosting provider to
mitigate the attack. We are also evaluating DDoS protection providers
while carefully considering factors including cost, security, and
ethical standards.
The post contains information on workarounds to use during the
service disruption, and notes that Arch is not sharing technical
details about the attack or mitigation while the attack is still
ongoing.
NVIDIA ConnectX-7 Quad Port 50GbE SFP56 Adapter Review
Post Syndicated from Rohit Kumar original https://www.servethehome.com/nvidia-connectx-7-quad-port-50gbe-sfp56-adapter-review/
We take a look at the NVIDIA ConnectX-7 quad port 50GbE SFP56 network adapter to see what it offers and how it performs
The post NVIDIA ConnectX-7 Quad Port 50GbE SFP56 Adapter Review appeared first on ServeTheHome.
Cloudflare incident on August 21, 2025
Post Syndicated from David Tuber original https://blog.cloudflare.com/cloudflare-incident-on-august-21-2025/
On August 21, 2025, an influx of traffic directed toward clients hosted in the Amazon Web Services (AWS) us-east-1 facility caused severe congestion on links between Cloudflare and AWS us-east-1. This impacted many users who were connecting to or receiving connections from Cloudflare via servers in AWS us-east-1 in the form of high latency, packet loss, and failures to origins.
Customers with origins in AWS us-east-1 began experiencing impact at 16:27 UTC. The impact was substantially reduced by 19:38 UTC, with intermittent latency increases continuing until 20:18 UTC.
This was a regional problem between Cloudflare and AWS us-east-1, and global Cloudflare services were not affected. The degradation in performance was limited to traffic between Cloudflare and AWS us-east-1. The incident was a result of a surge of traffic from a single customer that overloaded Cloudflare’s links with AWS us-east-1. It was a network congestion event, not an attack or a BGP hijack.
We’re very sorry for this incident. In this post, we explain what the failure was, why it occurred, and what we’re doing to make sure this doesn’t happen again.
Cloudflare helps anyone to build, connect, protect, and accelerate their websites on the Internet. Most customers host their websites on origin servers that Cloudflare does not operate. To make their sites fast and secure, they put Cloudflare in front as a reverse proxy.
When a visitor requests a page, Cloudflare will first inspect the request. If the content is already cached on Cloudflare’s global network, or if the customer has configured Cloudflare to serve the content directly, Cloudflare will respond immediately, delivering the content without contacting the origin. If the content cannot be served from cache, we fetch it from the origin, serve it to the visitor, and cache it along the way (if it is eligible). The next time someone requests that same content, we can serve it directly from cache instead of making another round trip to the origin server.
When Cloudflare responds to a request with the cached content, it will send the response traffic over internal Data Center Interconnect (DCI) links through a series of network equipment and eventually reach the routers that represent our network edge (our “edge routers”) as shown below:

Our internal network capacity is designed to be larger than the available traffic demand in a location to account for failures of redundant links, failover from other locations, traffic engineering within or between networks, or even traffic surges from users. The majority of Cloudflare’s network links were operating normally, but some edge router links to an AWS peering switch had insufficient capacity to handle this particular surge.
At approximately 16:27 UTC on August, 21, 2025, a customer started sending many requests from AWS us-east-1 to Cloudflare for objects in Cloudflare’s cache. These requests generated a volume of response traffic that saturated all available direct peering connections between Cloudflare and AWS. This initial saturation became worse when AWS, in an effort to alleviate the congestion, withdrew some BGP advertisements to Cloudflare over some of the congested links. This action rerouted traffic to an additional set of peering links connected to Cloudflare via an offsite network interconnection switch, which subsequently also became saturated, leading to significant performance degradation. The impact became worse for two reasons: One of the direct peering links was operating at half-capacity due to a pre-existing failure, and the Data Center Interconnect (DCI) that connected Cloudflare’s edge routers to the offsite switch was due for a capacity upgrade. The diagram below illustrates this using approximate capacity estimates:

In response, our incident team immediately engaged with our partners at AWS to address the issue. Through close collaboration, we successfully alleviated the congestion and fully restored services for all affected customers.
|
Time |
Description |
|---|---|
|
2025-08-21 16:27 UTC |
Traffic surge for single customer begins, doubling total traffic from Cloudflare to AWS IMPACT START |
|
2025-08-21 16:37 UTC |
AWS begins withdrawing prefixes from Cloudflare on congested PNI (Private Network Interconnect) BGP sessions |
|
2025-08-21 16:44 UTC |
Network team is alerted to internal congestion in Ashburn (IAD) |
|
2025-08-21 16:45 UTC |
Network team is evaluating options for response, but AWS prefixes are unavailable on paths that are not congested due to their withdrawals |
|
2025-08-21 17:22 UTC |
AWS BGP prefixes withdrawals result in a higher amount of dropped traffic IMPACT INCREASE |
|
2025-08-21 17:45 UTC |
Incident is raised for customer impact in Ashburn (IAD) |
|
2025-08-21 19:05 UTC |
Rate limiting of single customer causing traffic surge decreases congestion |
|
2025-08-21 19:27 UTC |
Network team additional traffic engineering actions fully resolve congestion IMPACT DECREASE |
|
2025-08-21 19:45 UTC |
AWS begins reverting BGP withdrawals as requested by Cloudflare |
|
2025-08-21 20:07 UTC |
AWS finishes normalizing BGP prefix announcements to Cloudflare over IAD PNIs |
|
2025-08-21 20:18 UTC |
IMPACT END |
When impact started, we saw a significant amount of traffic related to one customer, resulting in congestion:

This was handled by manual traffic actions both from Cloudflare and AWS. You can see some of the attempts by AWS to alleviate the congestion by looking at the number of IP prefixes AWS is advertising to Cloudflare during the duration of the outage. The lines in different colors correspond to the number of prefixes advertised per BGP session with us. The dips indicate AWS attempting to mitigate by withdrawing prefixes from the BGP sessions in an attempt to steer traffic elsewhere:

The congestion in the network caused network queues on the routers to grow significantly and begin dropping packets. Our edge routers were dropping high priority packets consistently during the outage, as seen in the chart below, which shows the queue drops for our Ashburn routers during the impact period:

The primary impact to customers as a result of this congestion would have been latency, loss (timeouts), or low throughput. We have a set of latency Service Level Objectives defined which imitate customer requests back to their origins measuring availability and latency. We can see that during the impact period, the percentage of requests whose latency fails to meet the target SLO threshold dips below an acceptable level in lock step with the packet drops during the outage:

After the congestion was alleviated, there was a brief period where both AWS and Cloudflare were attempting to normalize the prefix advertisements that had been adjusted to attempt to mitigate the congestion. That caused a long tail of latency that may have impacted some customers, which is why you see the packet drops resolve before the customer latencies are restored.
This event has underscored the need for enhanced safeguards to ensure that one customer’s usage patterns cannot negatively affect the broader ecosystem. Our key takeaways are the necessity of architecting for better customer isolation to prevent any single entity from monopolizing shared resources and impacting the stability of the platform for others, and augmenting our network infrastructure to have sufficient capacity to meet demand.
To prevent a recurrence of this issue, we are implementing a multi-phased mitigation strategy. In the short and medium term:
-
We are developing a mechanism to selectively deprioritize a customer’s traffic if it begins to congest the network to a degree that impacts others.
-
We are expediting the Data Center Interconnect (DCI) upgrades which will provide network capacity significantly above what it is today.
-
We are working with AWS to make sure their and our BGP traffic engineering actions do not conflict with one another in the future.
Looking further ahead, our long-term solution involves building a new, enhanced traffic management system. This system will allot network resources on a per-customer basis, creating a budget that, once exceeded, will prevent a customer’s traffic from degrading the service for anyone else on the platform. This system will also allow us to automate many of the manual actions that were taken to attempt to remediate the congestion seen during this incident.
Customers accessing AWS us-east-1 through Cloudflare experienced an outage due to insufficient network congestion management during an unusual high-traffic event.
We are sorry for the disruption this incident caused for our customers. We are actively making these improvements to ensure improved stability moving forward and to prevent this problem from happening again.
The Greatest Art Theft of the 20th Century.
Post Syndicated from The History Guy: History Deserves to Be Remembered original https://www.youtube.com/shorts/U-eaT75F_i0
Comic for 2025.08.22 – 15th Century
Post Syndicated from Explosm.net original https://explosm.net/comics/15th-century
New Cyanide and Happiness Comic
Coastline Similarity
Post Syndicated from xkcd.com original https://xkcd.com/3132/

Simplify multi-tenant encryption with a cost-conscious AWS KMS key strategy
Post Syndicated from Itay Meller original https://aws.amazon.com/blogs/architecture/simplify-multi-tenant-encryption-with-a-cost-conscious-aws-kms-key-strategy/
Organizations face diverse challenges when it comes to managing encryption keys. While some scenarios demand strict separation, there are compelling use cases where a centralized approach can streamline operations and reduce complexity. In this post, our focus is on a software-as-a-service (SaaS) provider scenario, but the principles we discuss can be adopted by large organization facing similar key management challenges.
Managing encryption across a multi-tenant, multi-service architecture presents a significant challenge. Many organizations find themselves struggling with the complexity and costs associated with provisioning separate AWS Key Management Service (AWS KMS) customer managed keys for each tenant and service. This approach, while secure, often leads to growing operational overhead and increased AWS KMS usage costs over time.
But what if there was a more efficient way?
In this post, we unveil a strategy that uses a single customer managed key (symmetric) per tenant across services. By the end of this post, you’ll learn:
- How to implement a scalable, secure, and cost-effective encryption model
- Techniques for using one customer managed key per tenant across multiple services and environments
- Methods for encrypting tenant data in Amazon DynamoDB and other storage types while maintaining tenant isolation
Multi-tenant encryption requirements for SaaS providers
Data isolation is fundamental to multi-tenant SaaS architectures, serving both compliance requirements and customer confidence. Many SaaS providers need to encrypt sensitive information—from API keys and credentials to personal data—across storage solutions such as DynamoDB and Amazon Simple Storage Service (Amazon S3).
While these storage services provide default encryption at rest, they typically use a single shared key across data items. Consider DynamoDB in a shared pool model, where one table contains data from multiple tenants. In this setup, the tenant data is encrypted using the same AWS KMS Key, regardless of ownership.
KMS key represents a container for top-level key material and is uniquely defined within the KMS, for more information on the different keys involved when encrypting or decrypting data using KMS, see AWS KMS key hierarchy.
This shared-key approach often proves insufficient for SaaS providers operating under strict security and compliance frameworks. Some customers require:
- Bring your own key (BYOK) capabilities
- Logical isolation of their data through dedicated encryption keys
To meet these requirements, providers can implement customer-specific AWS KMS managed keys, helping to ensure that each customer’s sensitive data remains isolated and inaccessible to other tenants.
Alternatively, providers might consider a silo model with separate tables for each customer. However, this approach introduces its own challenges—as the tenant base grows, managing numerous individual tables becomes increasingly complex and service quota limits might become a constraint.
Managing growth: KMS key management at scale
When scaling a SaaS platform, empowering teams to develop services independently is crucial. A quick way to scale is to have each team develop independently using a dedicated account. This often leads to a decentralized approach where each service manages its own KMS keys per customer. However, this autonomy comes with hidden costs as your customer base and service portfolio expand.
The challenge of key proliferation
As the company grows, the number of keys multiplies with each new customer and service addition. This proliferation creates several organizational challenges:
- Cost impact: A single AWS KMS key costs $1 monthly, increasing to a maximum of $3 per month with two or more key rotations.
- Operational complexity: Managing many KMS keys across environments and accounts is error-prone and hard to scale.
- Organizational waste: Duplicate efforts across teams because each develops and maintains their own code for managing customer key lifecycles.
- Governance overhead: It becomes difficult to enforce consistent policies or track KMS key usage across multiple AWS accounts.
A streamlined approach
The solution lies in implementing a centralized key management strategy. One KMS key per tenant, maintained in a central AWS account. This approach effectively addresses the cost, operational, and governance challenges while maintaining security.
In the following sections, we explore how to implement this centralized approach and securely share KMS keys across various services and AWS accounts.
Solution overview: Centralizing tenant key management
At the heart of our solution lies a centralized tenant key management service (shown as Service A in the following figure). This service handles every aspect of customer KMS key lifecycle—from creation during tenant onboarding to managing aliases, access policies and deletion.
The service achieves secure, scalable key usage across the organization through cross-account AWS Identity and Access Management (IAM) access. It grants other services (for example, the customer-facing service in Account B in the following figure) a permission to perform specific encryption operations using tenant-specific KMS keys through role delegation. This implementation follows AWS best practices for cross-account access, utilizing IAM and AWS Security Token Service (AWS STS) role assumption as described in the AWS documentation and this blog post.
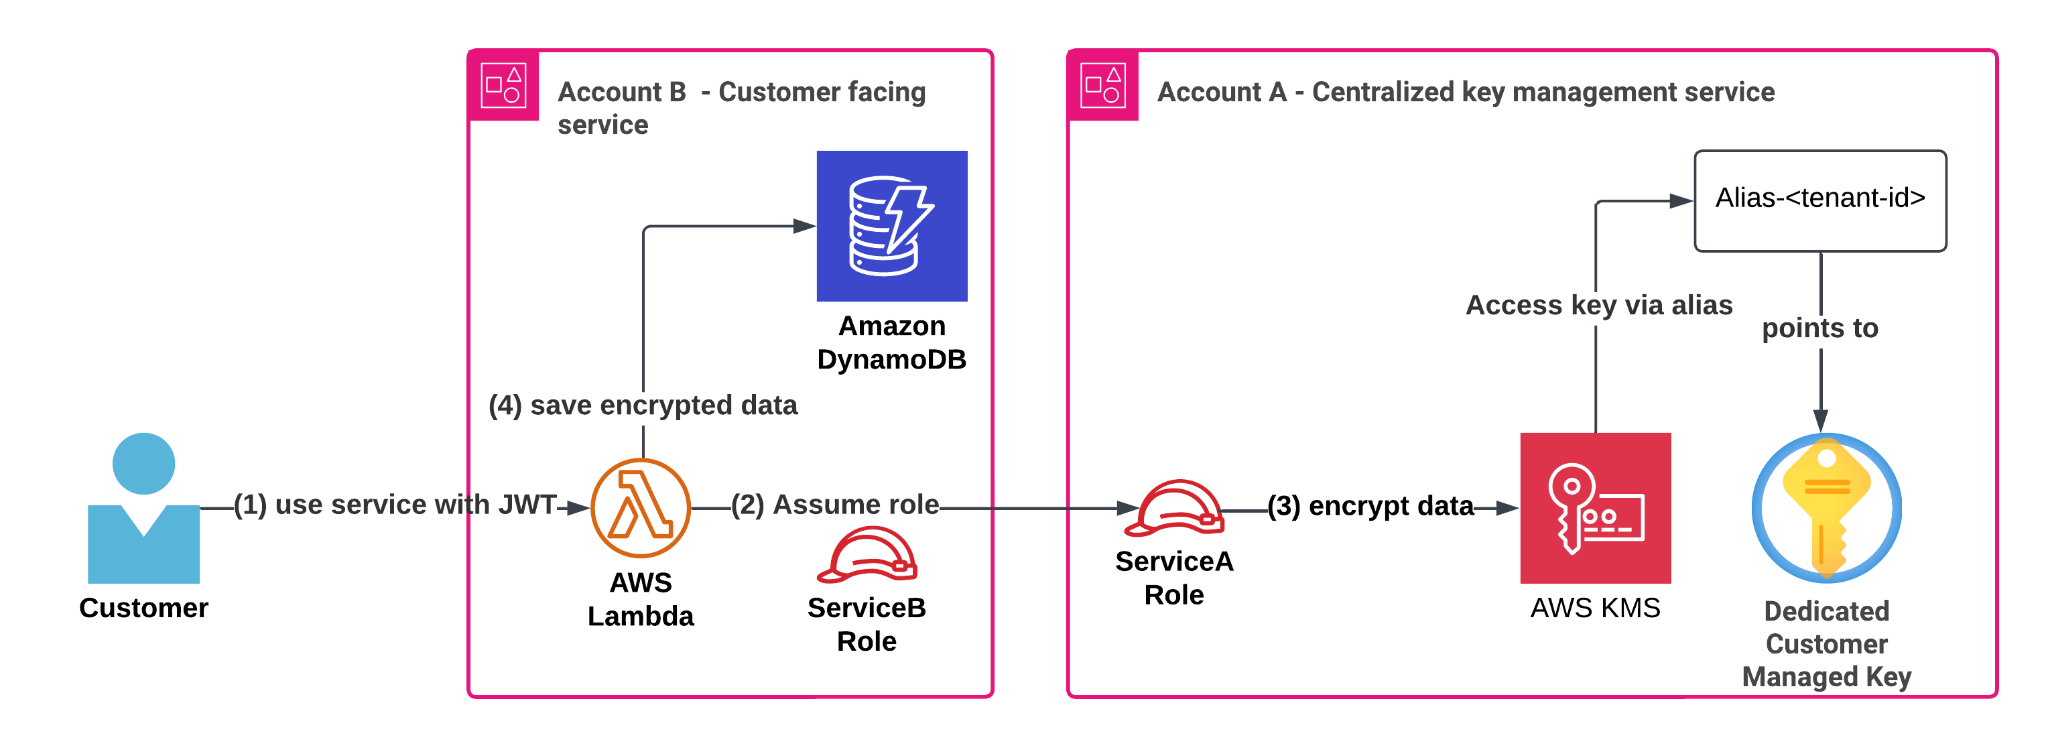
Centralized key management in practice: Encrypting customer data
Let’s examine how this works in practice with a common scenario:
- Service A: Our centralized tenant key management service in Account A
- Service B: A customer-facing workload running in Account B
When a customer interacts with Service B, it needs to store sensitive information securely, whether that’s secrets, API keys, or license information in a DynamoDB table. Instead of relying on shared KMS keys or default encryption, Service B encrypts data using the customer’s dedicated KMS key managed by Service A. The process works through AWS Identity and Access Management (IAM) role delegation. Service B temporarily assumes a role (ServiceARole) in Account A, receiving fine-grained, scoped down permissions for the specific tenant’s KMS key. With these temporary credentials, Service B can perform client-side encryption operations on sensitive information using the AWS SDK or the AWS Encryption SDK.
In this blog post, we used Boto3. For more advanced use-cases requiring data key caching or keyrings, use the AWS Encryption SDK.
Solution walkthrough
Let’s expand the technical aspects of the solution depicted above. Assumptions and definitions:
- Incoming requests include an authentication header with a JSON Web Token (JWT) that includes data identifying the current tenant’s ID. These tokens are signed by an identity provider, making sure that the JWT cannot be modified, and the tenant identity can be trusted.
- Account A: Centralized key management service.
- Account B: Business service that serves customer requests.
alias/customer-<tenant-id>is the format of the aliases in account A. Each alias points to the KMS key of the corresponding customer identified by value of<tenant-id>. Service A creates these aliases during tenant onboarding and deletes them during tenant offboarding.ServiceARole: A role in Account A that can encrypt and decrypt a KMS key that has an alias prefixed withalias/customer-*. The permissions are scoped down further using session policies whenServiceBRoleassumesServiceARole.ServiceBRole: A role in Account B that can assumeServiceARolein Account A to gain access to the customer’s KMS key. This will be the AWS Lambda function’s execution role.
Note that Service B’s compute layer in this case is a Lambda function, but the solution works for other compute architectures. Let’s go over the flow in more detail:
Use service with JWT
A customer who belongs to a tenant signs in to the SaaS solution and is given a JWT that identifies its tenants with a tenant ID (<tenant-id>). The customer makes an action in ServiceB and sends sensitive information.
ServiceB handles the request (in a Lambda function), verifies the JWT token and wants to:
-
- Encrypt the customer’s sensitive data
- Save the encrypted data along with other data in the DynamoDB table
Assume role
In this example, the Lambda function uses its execution role credentials to assume the ServiceA role in the ServiceA account. Another way to grant cross-account access to KMS keys is by using KMS grants, to learn more, see Allowing users in other accounts to use a KMS key.
Let’s review the ServiceRoleA IAM policy:
Grants encrypt and decrypt access to a KMS key using the alias/customer-* pattern.
To encrypt tenant secrets securely and at scale, we grant application roles cross-account access to KMS keys—but only through their alias, which maps to a tenant identifier present in their JWT authentication token, enforcing strong isolation.
You can control access to KMS keys based on the aliases that are associated with each KMS key. To do so, use the kms:RequestAlias and kms:ResourceAliases condition keys as specified in the Use aliases to control access to KMS keys.
In addition, the trust relationship policy of the ServiceARole allows the ServiceBRole in account B to assume it:
Depending on your environment, you can add additional conditions to this trust policy to further reduce the scope of who can assume this role. For more information, see IAM and AWS STS condition context keys.
Then, each KMS customer managed key will have the following policy. For example, a KMS key for a customer with <tenant-id>: 123 will have a policy that restricts access to the key using the specific customer alias and only through ServiceRoleA.
The following is a Python code example demonstrating how Service B dynamically assumes a role in Account A to encrypt data for a specific tenant using a session-scoped IAM policy that allows access only to that tenant’s KMS key alias.
This pattern follows the same principles outlined in Isolating SaaS Tenants with Dynamically Generated IAM Policies. The idea is to generate and attach a tenant-specific IAM policy at runtime, granting the minimum required permissions to operate on tenant-owned resources—in this case, a KMS key alias. The credentials will allow the Lambda function to use only the KMS key that belongs to a customer (identified by tenant_id).
We will call the assume_role_for_tenant for every tenant.
The condition of "StringEquals" - "kms:RequestAlias": alias is the magical AWS STS sauce, it restricts ServiceB to use the current tenant’s alias in its encryption SDK calls and relies on alias authorization
Encrypt data and save in DynamoDB
Now, what remains to do is use the assumed role credentials and use AWS SDK to encrypt the sensitive customer data and store it in the DynamoDB table.
This post doesn’t address isolation between different services, only between tenants. If such service isolation is required, you can use encryption context, an optional set of non-secret key/value pairs that can contain additional contextual information about the data, for example the service identifier. This helps ensure that services can only encrypt or decrypt data using the relevant service encryption context.
Benefits of centralized key management
Let’s examine how this solution addresses our earlier challenges.
Tenant isolation by design
Despite reducing the total number of KMS keys, we maintain strict tenant isolation. Each customer’s sensitive data remains encrypted with their dedicated key, identified by a unique alias (alias/customer-<tenant-id>). Access control to the tenant key is tightly managed through IAM role delegation, following least privilege principles:
- Service A exclusively controls the management of the tenants’ KMS keys.
- Service B can only assume a role that grants restricted encrypt, decrypt, and GenerateDataKey access for the customer managed key designated by the alias:
alias/customer-<tenant-id>.
Optimized cost management
Our approach significantly reduces costs by moving from multiple service-specific KMS keys per tenant to a single KMS key per tenant that is shared securely across services and environments. This behavior introduces a new centralized account (Account A) that provides access to encryption keys under the right circumstances. It is important to understand AWS STS limits, specifically for AssumeRole calls and consider temporary IAM credentials caching mechanisms if those limits become a bottleneck. Additionally, if KMS limits are a bottleneck, consider using data key caching by using the AWS Encryption SDK.
Streamlined operations and governance
By centralizing key management in Service A, you can achieve:
- Consistent KMS key lifecycle management across the organization
- Improved audit capabilities using AWS CloudTrail to better understand key access patterns by service
- Reduced operational overhead
- Simplified compliance monitoring
The only additional complexity is the initial cross-account role delegation setup between Service A and other services. After being established, this framework can be scaled to accommodate new tenants and services.
It’s best to encapsulate the assume-role logic, policy generation, and AWS SDK client initialization within a shared organization-wide SDK. This abstraction reduces cognitive load for developers and minimizes the risk of misconfigurations. You can take it a step further by exposing high-level utility functions such as encrypt_tenant_data() and decrypt_tenant_data(), hiding the underlying complexity while promoting secure and consistent usage patterns across teams.
Conclusion
In this post, we explored an efficient approach to managing encryption keys in a multi-tenant SaaS environment through centralization. We examined common challenges faced by growing SaaS providers, including key proliferation, rising costs, and operational complexity across multiple AWS accounts and services. The solution, centralizing key management, uses AWS best practices for IAM role delegation and cross-account access, enabling organizations to maintain security and compliance while reducing operational overhead. By implementing this approach, SaaS providers or large organizations facing similar challenges can effectively manage their encryption infrastructure as they scale, without compromising on security or increasing complexity.
About the authors
Amazon SageMaker Catalog expands discoverability and governance for Amazon S3 general purpose buckets
Post Syndicated from Priya Tiruthani original https://aws.amazon.com/blogs/big-data/amazon-sagemaker-catalog-expands-discoverability-and-governance-for-amazon-s3-general-purpose-buckets/
In July 2025, Amazon SageMaker announced support for Amazon Simple Storage Service (Amazon S3) general purpose buckets and prefixes in Amazon SageMaker Catalog that delivers fine-grained access control and permissions through S3 Access Grants. This integration addresses the challenge data teams face when manually managing data discovery and Amazon S3 permissions as separate workflows. Data consumers, such as data scientists, engineers, and business analysts, can now discover and access S3 buckets or prefixes data assets through SageMaker Catalog, while administrators can maintain granular access controls using S3 Access Grants permissions.
Building upon existing SageMaker support for structured data in Amazon S3 Tables buckets, the added support for S3 general purpose buckets makes it straightforward for teams to find, access, and collaborate on different types of data, including unstructured data such as documents, images, audio, and video, while providing access management. Data administrators and data stewards can now implement fine-grained access permissions for a bucket or a prefix using S3 Access Grants, supporting secure and appropriate data usage across their organization.
In this post, we explore how this integration addresses key challenges our customers have shared with us, and how data producers, such as administrators and data engineers, can seamlessly share and govern S3 buckets and prefixes using S3 Access Grants, while making it readily discoverable for data consumers. We walk you through a practical example of bringing Amazon S3 data into your projects and implementing effective governance for both analytics and generative AI workflows.
Challenges in working with unstructured data
Organizations face challenges in maximizing the value of their unstructured data assets. Although customers want to incorporate insights derived from unstructured data for comprehensive analysis, they often resort to building bespoke integrations to extract structured information from unstructured sources, leading to inefficient and fragmented solutions. Three critical roadblocks have historically hindered enterprises:
- Organizations struggle to maintain a catalog that offers equal discoverability for both structured and unstructured data, often resulting in separate systems for different data types.
- Data consumers throughout organizations want to analyze unstructured data using familiar tools like notebooks, just as they do with structured data, but are forced to use separate interfaces and workflows instead.
- Working with unstructured data lacks streamlined access management—users who discover relevant data can’t readily request access from owners, load information into analytics tools, or collaborate with colleagues directly from the workspaces or projects.
Amazon S3 unstructured data as a managed asset in Amazon SageMaker
SageMaker Catalog now supports S3 general purpose buckets. Data producers can publish S3 buckets and prefixes as S3 Object Collection assets, making those assets searchable and discoverable. As managed S3 Object Collection assets in SageMaker Catalog, access permissions are automatically handled using S3 Access Grants when data consumer teams subscribe to cataloged datasets, replacing bespoke data discovery and permission management workflows. Data producers can add business context to technical metadata, including glossary terms and descriptions. Data consumers can search, review, and request access to data assets through a unified workflow. Teams can then collaborate in SageMaker projects, incorporating datasets and conducting analysis while maintaining security and governance standards.The key benefits in the simplified discoverability and access to S3 data in SageMaker Catalog include:
- Seamless S3 data integration – You can use existing Amazon S3 data in SageMaker without migration or restructuring
- Enhanced cataloging and governance – SageMaker Catalog facilitates data publishing, discovery, and subscription with business metadata and security controls
- Improved data sharing – Cataloged Amazon S3 data becomes discoverable organization-wide, accelerating insights and collaboration
- Self-service data access – SageMaker provides tools for data preparation, ETL (extract, transform, and load), and connectivity from various sources, supporting faster analytics and AI solution development
With these benefits, you can accelerate time-to-insight and unlock the full potential of organizational data assets across teams.
Customer spotlight
Across industries, the true power of data emerges when organizations can seamlessly connect and analyze different types of information across their operations. Bayer, a leading pharmaceutical and biotechnology company, has vast sets of unstructured data organized across multiple S3 buckets and prefixes.
“Bringing a new drug to market is widely known across the industry to be a lengthy and expensive process, often taking 10–15 years and costing $1–2 billion on average, with a low overall success rate ranging from around 8% to 12%. SageMaker now allows us to easily discover and securely access data, structured and unstructured, while maintaining governance controls using S3 Access Grants. With SageMaker Catalog, we now have a streamlined approach to data management that enables us to combine datasets, both structured and unstructured, reducing research time and increasing productivity throughout the drug development lifecycle,” said Avinash Erupaka, Principal Engineer Lead, Bayer Pharma Drug Innovation Platform.
Solution overview
In life sciences organizations, unstructured and semi-structured data files are prevalent in research, development, bio-manufacturing, and diagnostics divisions. These might include digital pathology images, genetic sequence data, microwell plate readouts, analytical spectra, and chromatograms. Along with unstructured and semi-structured data, data engineers collect various business metadata, including study, project, laboratory protocol, and assay information, and operational metadata, including algorithmic steps, compute tasks, and process outputs.Scientists and business users can use SageMaker Catalog search for data assets using keywords that are found in the associated business metadata and operational metadata that are captured as metadata forms. For example, there might be searches for sample ID, experiment ID, group, platform, file names, dates, or keywords within the experimental description. These searches return a list of data assets that have association with those keywords, which are collections of S3 objects. Scientists and business users are given access to those collections of S3 objects.In the following sections, we walk through the setup step-by-step. We use the example of digital pathology images use case from the life sciences industry to demonstrate how researchers discover and get access to S3 objects using SageMaker.
Prerequisites
If you’re new to SageMaker, refer to the Amazon SageMaker User Guide to get started.
To follow along with this post, refer to Setting up Amazon SageMaker to set up a domain and create projects. This domain setup and project creation is a prerequisite for the other tasks in SageMaker.
Get data ready in Amazon S3
To store digital pathology images, create an S3 bucket (for example, researchdatafordigitalpathology), create a folder (for example, dpimages) under it, and upload digital pathology images. Ideally, you will have a collection of images under a given prefix, but for this example, we have chosen just one image file (dp_cancer.jpg). For instructions to create a bucket, refer to Creating a general purpose bucket.
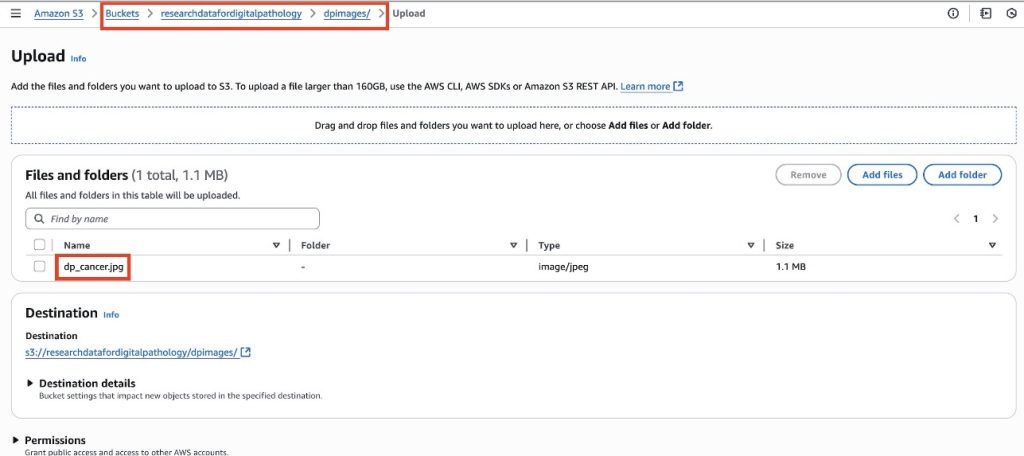
Set up a data producer project
For data engineers, create a producer project in Amazon SageMaker Unified Studio to create digital pathology images as data assets. For more details on how to create projects, refer to Create a project. Add data engineers as members of the projects. For instructions to add members, refer to Add project members.
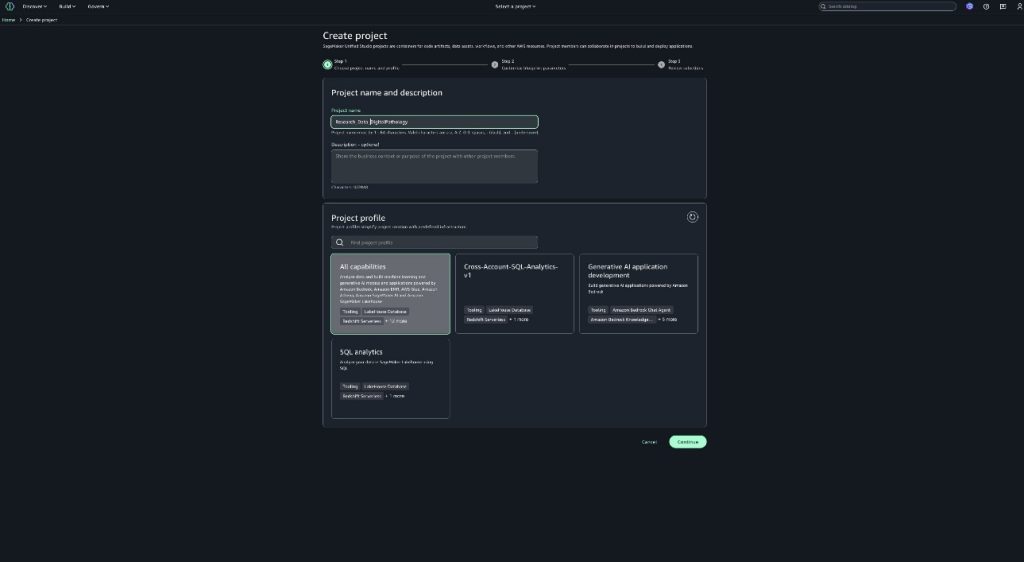
Add an Amazon S3 location
To add the collection of digital pathology images (to bring your own S3 buckets), complete the following steps:
- In SageMaker Unified Studio, go to the project where you want to add Amazon S3.
- Choose Data in the navigation pane, then choose the plus sign.
- On the Add data page, choose Add S3 location, then choose Next.
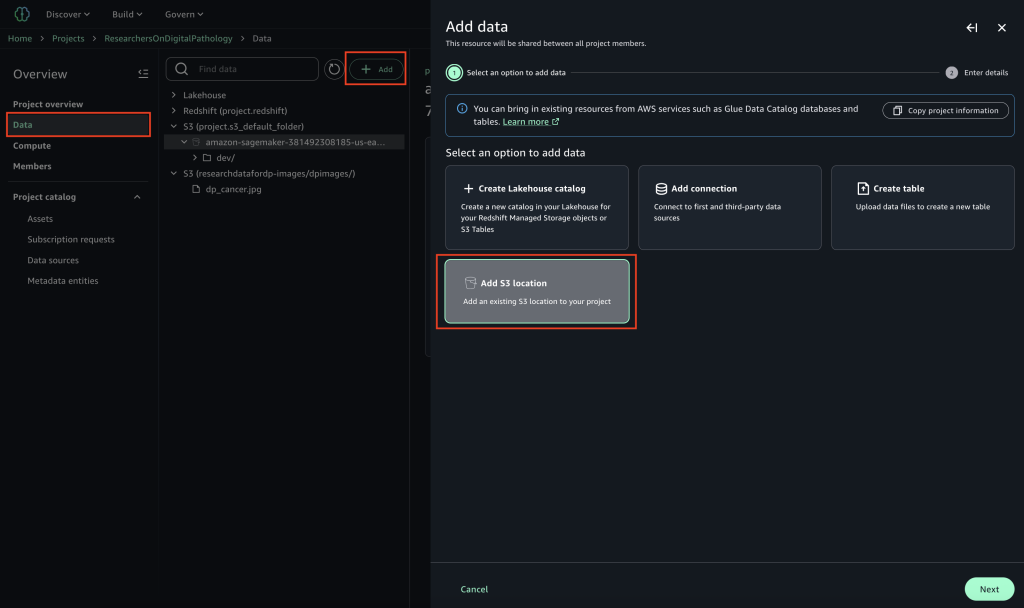
To obtain the details to create a connection, you can choose from two options:
- Using the project role:
- You, the project user, retrieves the project role and shares it with the AWS Management Console admin.
- The admin opens the AWS Identity and Access Management (IAM) console to update the project role with permissions.
- The admin opens the Amazon S3 console and adds a CORS policy to each bucket.
- Using an access role Amazon Resource Name (ARN), which is required for cross-account:
- You, the project user, shares the project ID and project role with the admin and requests access to the S3 bucket.
- The admin creates an access role (or uses an existing role) with permissions, adds a trust policy to the project, and tags it with the project ID.
- The admin opens the Amazon S3 console and adds a CORS policy to the bucket.
- The admin sends the Amazon S3 URI and access role details back to you.
After you have necessary permissions configured for the Amazon S3 location and project role, continue with the remaining steps.
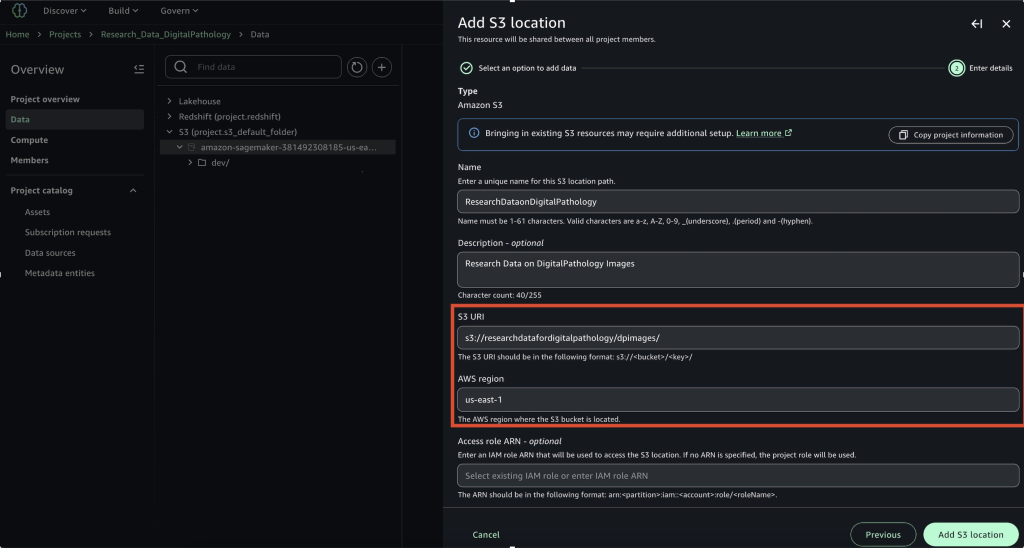
- On the Add S3 location page, enter the following details:
- Enter a name for the location path.
- (Optional) Add a description of the location path.
- Use the S3 URI and AWS Region provided by your admin.
- If your admin granted you access using an access role instead of the project role, enter the access role ARN obtained from your admin.
- Choose Add S3 location.
For more details, see Adding Amazon S3 data.
Publish data to SageMaker Catalog to make it discoverable
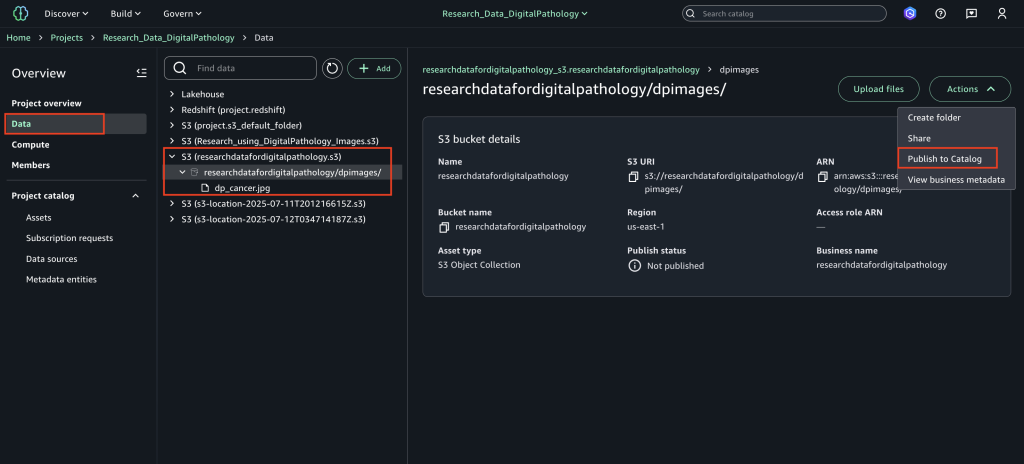
After you add the Amazon S3 location, complete the following steps to publish the data:
- In SageMaker Unified Studio, go to your project.
- Choose Data in the navigation pane and choose the Amazon S3 location.
- On the Actions dropdown menu, choose Publish to Catalog.
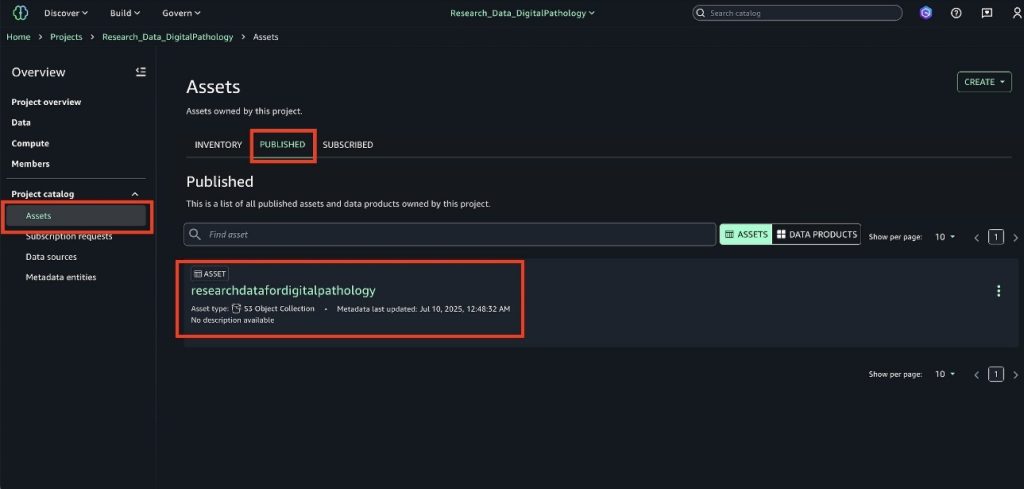
After you publish the assets, you can find the assets on the Published tab in the Assets page under Project catalog in the navigation pane.
Create a consumer project
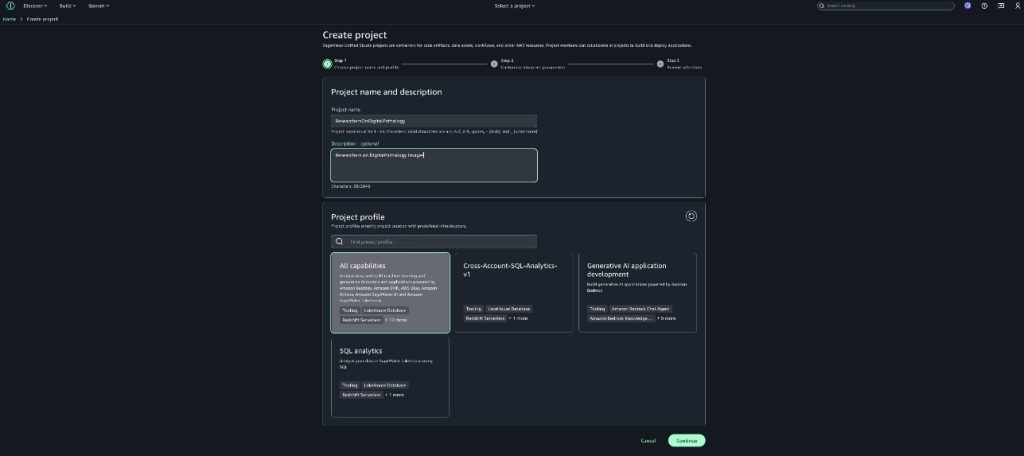
Create a consumer project for researchers to collaborate and bring necessary assets for their analysis and add researchers as members to the project. Consumers can search for available (published) data assets on digital pathology images for cancer research and then subscribe to work with it using JupyterLab notebooks in SageMaker. For more details on how to create projects, refer to Create a project. For instructions to add members, refer to Add project members.
Find relevant assets and request access
Researchers can search the SageMaker Catalog for available (published) data assets using the string digitalpathology. Complete the following steps:
- In SageMaker Unified Studio, on the Discover dropdown menu, choose Data Catalog.
- Find the asset you want to subscribe to by browsing or entering the name of the asset into the search bar.
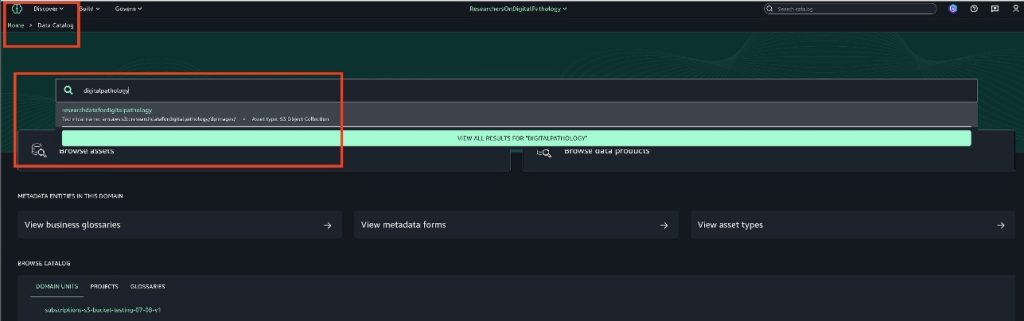
- Choose Subscribe.
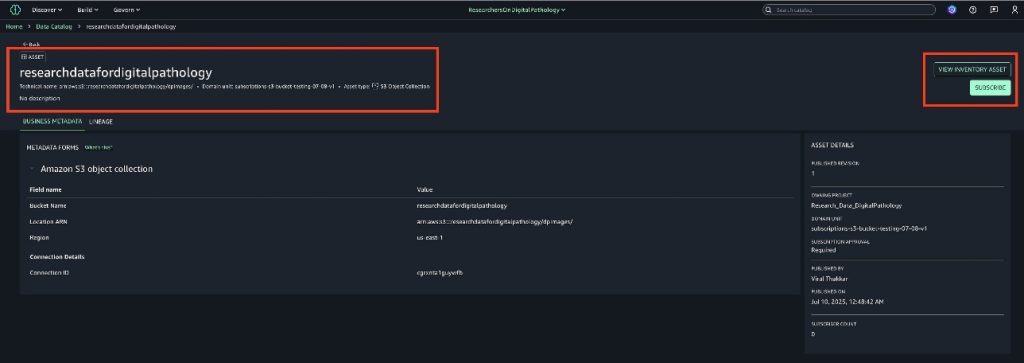
- Provide the following information:
- The project to which you want to subscribe the asset.
- A short justification for your subscription request. This information is used by the data producer to validate the request to grant access.
- Choose Request.
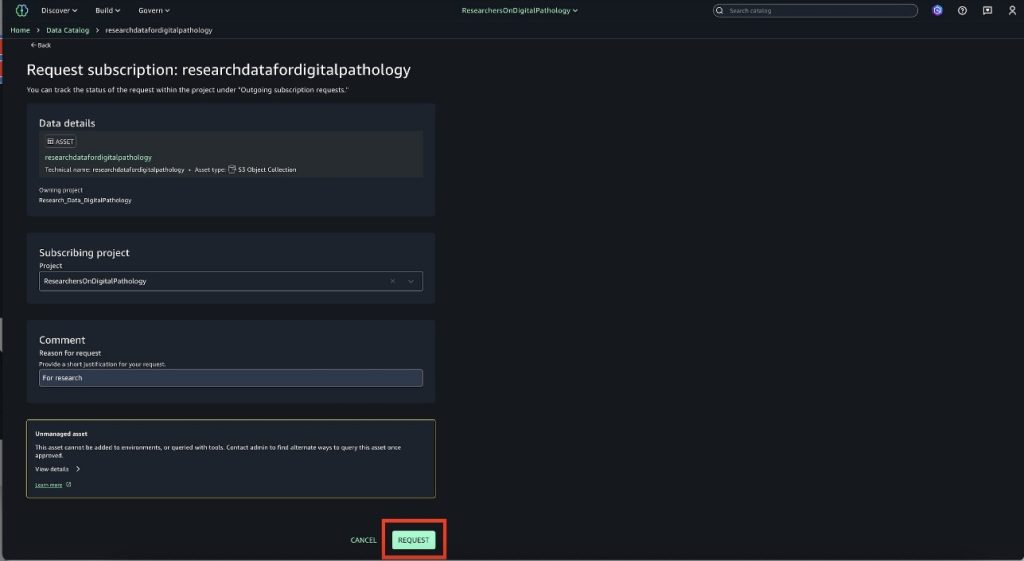
After you’re approved, the project will be subscribed to the asset and access is granted automatically. To provide access, SageMaker Catalog uses S3 Access Grants to grant read permission to the subscribing project for the specific S3 bucket or prefix.
To view the status of the subscription request, go to the project with which you subscribed to the asset. Choose Subscription requests in the navigation pane, then choose the Outgoing requests tab. This page lists the assets to which the project has requested access. You can filter the list by the status of the request.
Review and approve the subscription request
The data producer or engineer of the publishing project must receive the request from the researcher and approve the request. After the request is approved, the researcher will have access to the objects for the S3 bucket (or prefix).
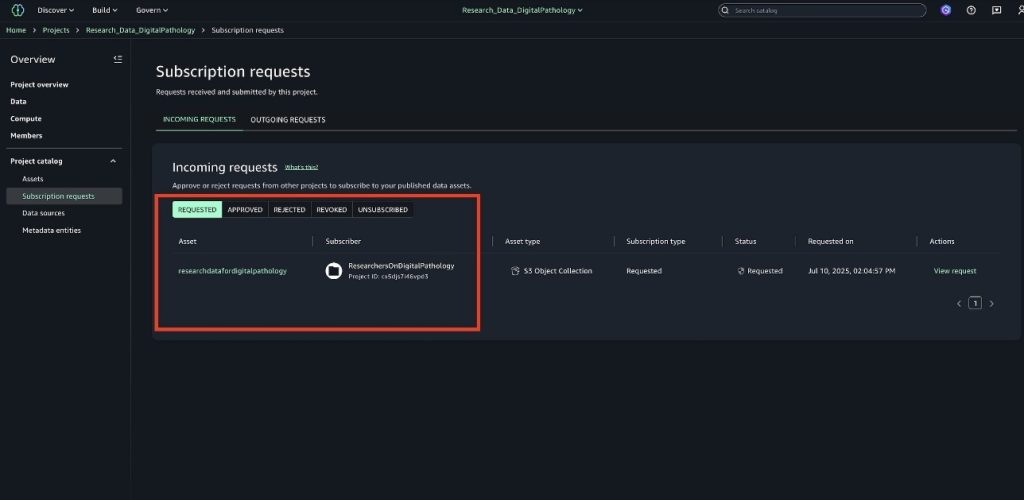
Before approving, the data producer can view the details of the subscription request to make sure they know who will get access to the data they own.
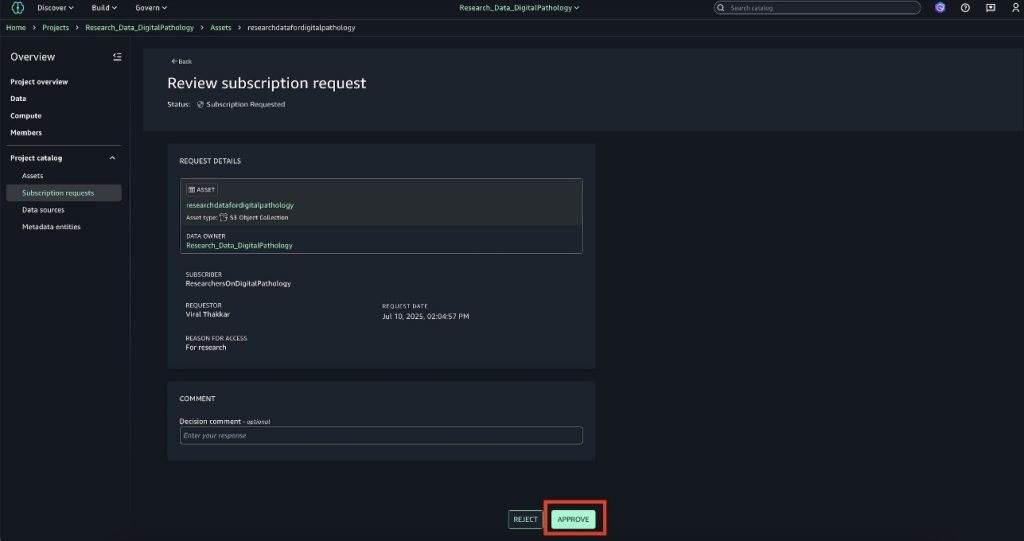
After they approve the request, the data producers can audit the different requests they have for the assets they own.
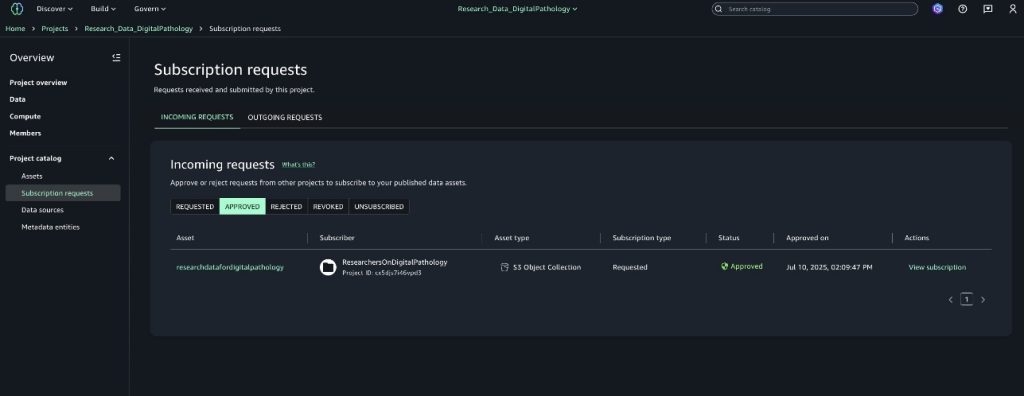
Access the subscribed data in notebooks
After the access request is approved, the researcher can open a JupyterLab notebook from SageMaker Unified Studio and access S3 objects to work on their research.To navigate to the JupyterLab notebook, complete the following steps:
- In SageMaker Unified Studio, open your project.
- On the Build dropdown menu, choose JupyterLab.
The following is sample Python code to access subscribed data. This sample code retrieves the S3 object that the researcher has been given access to and uses Matplotlib (a comprehensive 2D plotting library for Python language) to display the image in the notebook. In a real-world use case, a researcher typically uses these images for displaying or training machine learning models or performing multimodal analysis.
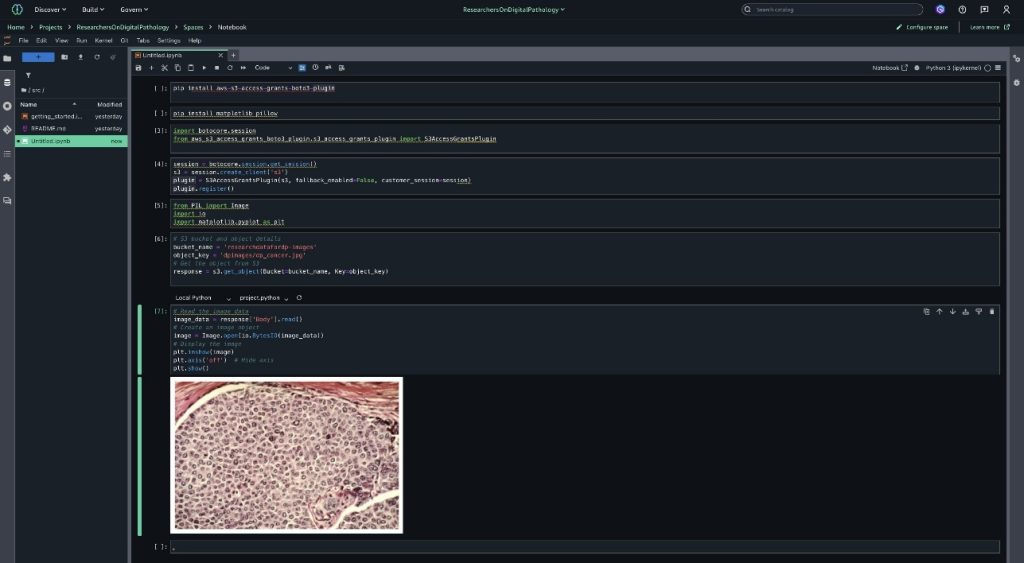
SageMaker and S3 Access Grants integrations
The SageMaker Catalog integration with S3 Access Grants facilitates secure data access across Amazon EMR Serverless, AWS Glue, Amazon EMR on Amazon EC2, and JupyterLab notebooks through simple configuration settings. By enabling S3 Access Grants with two properties ('fs.s3.s3AccessGrants.enabled': 'true' and 'fs.s3.s3AccessGrants.fallbackToIAM': 'true'), users gain streamlined access control while maintaining IAM as a fallback option. These configurations are automated in SageMaker Unified Studio. To learn more about S3 Access Grants integrations, see S3 Access Grants integrations, and for Boto3 S3 Access Grants support, refer to the following GitHub repo.
Conclusion
In this post, we discussed the added support for S3 general purpose buckets in SageMaker, and how they can be cataloged in SageMaker Catalog to help users quickly discover and securely manage access when sharing with other teams.
To learn more about SageMaker and how to get started, refer to the Amazon SageMaker User Guide and Amazon S3 data in Amazon SageMaker Unified Studio.
About the authors
 Priya Tiruthani is a Senior Technical Product Manager with Amazon DataZone at AWS. She focuses on improving data discovery and curation required for data analytics. She is passionate about building innovative products to simplify customers’ end-to-end data journey, especially around data governance and analytics. Outside of work, she enjoys being outdoors to hike, capture nature’s beauty, and recently play pickleball.
 Subrat Das is a Principal Solutions Architect and part of the Global Healthcare and Life Sciences industry division at AWS. He is passionate about modernizing and architecting complex customer workloads. When he’s not working on technology solutions, he enjoys long hikes and traveling around the world.
 Santhosh Padmanabhan is a Software Development Manager at AWS, leading the Amazon SageMaker Catalog engineering team. His team designs, builds, and operates services specializing in data, machine learning, and AI governance. With deep expertise in building distributed data systems at scale, Santhosh plays a key role in advancing AWS’s data governance capabilities.
 Yuhang Huang is a Software Development Manager on the Amazon SageMaker Unified Studio team. He leads the engineering team to design, build, and operate scheduling and orchestration capabilities in SageMaker Unified Studio. In his free time, he enjoys playing tennis.
Why I Downsized My Home Network Rack
Post Syndicated from Crosstalk Solutions original https://www.youtube.com/shorts/L2x8CtEnCLA
From Facts & Metrics to Media Machine Learning: Evolving the Data Engineering Function at Netflix
Post Syndicated from Netflix Technology Blog original https://netflixtechblog.com/from-facts-metrics-to-media-machine-learning-evolving-the-data-engineering-function-at-netflix-6dcc91058d8d
By Dao Mi, Pablo Delgado, Ryan Berti, Amanuel Kahsay, Obi-Ike Nwoke, Christopher Thrailkill, and Patricio Garza
At Netflix, data engineering has always been a critical function to enable the business’s ability to understand content, power recommendations, and drive business decisions. Traditionally, the function centered on building robust tables and pipelines to capture facts, derive metrics, and provide well modeled data products to their partners in analytics & data science functions. But as Netflix’s studio and content production scaled, so too have the challenges — and opportunities — of working with complex media data.
Today, we’re excited to share how our team is formalizing a new specialization of data engineering at Netflix: Media ML Data Engineering. This evolution is embodied in our latest collaboration with our platform teams, the Media Data Lake, which is designed to harness the full potential of media assets (video, audio, subtitles, scripts, and more) and enable the latest advances in machine learning, including latest transformer model architecture. As part of this initiative, we’re intentionally applying data engineering best practices — ensuring that our approach is both innovative and grounded in proven methodologies.
The Evolution: From Traditional Tables to Media Tables
Traditional data engineering at Netflix focused on building structured tables for metrics, dashboards, and data science models. These tables were primarily structured text or numerical fields, ideal for business intelligence, analytics and statistical modeling.
However, the nature of media data is fundamentally different:
- It’s multi-modal (video, audio, text, images).
- It contains derived fields from media (embeddings, captions, transcriptions…etc)
- It’s unstructured and massive in scale when parsed out.
- It’s deeply intertwined with creative workflows and business asset lineage.
As our studio operations (see below) expanded, we saw the need for a new approach — one that could provide centralized, standardized, and scalable access to all types of media assets and their metadata for both analytical and machine learning workflows.

The Rise of Media ML Data Engineering
Enter Media ML Data Engineering — a new specialization at Netflix that bridges the gap between traditional data engineering and the unique demands of media-centric machine learning. This role sits at the intersection of data engineering, ML infrastructure, and media production. Our mission is to provide seamless access to media assets and derived data (including outputs from machine learning models) for researchers, data scientists, and other downstream data consumers.
Key Responsibilities
- Centralized Media Data Access: Building, cataloging and maintaining the data and pipelines that populates the Media Data Lake, a data platform for storing and serving media assets and their metadata.
- Asset Standardization: Standardizing media assets across modalities (video, images, audio, text) to ensure consistency and quality for ML applications in partnership with domain engineering teams.
- Metadata Management: Unifying and enriching asset metadata, making it easier to track asset lineage, quality, and coverage.
- ML-Ready Data: Exposing large corpora of assets for early-stage algorithm exploration, benchmarking, and productionization.
- Collaboration: Partnering closely with domain experts, algorithm researchers, upstream content engineering teams and (machine learning & data) platform colleagues to ensure our data meets real-world needs.
This new role is essential for bridging the gap between creative media workflows and the technical demands of cutting-edge ML.
Introducing the Media Data Lake
To enable the next generation of media analytics and machine learning, we are building the Media Data Lake at Netflix — a data lake designed specifically for media assets at Netflix using LanceDB. We have partnered with our data platform team on integrating LanceDB into our Big Data Platform.
Architecture and Key Components
- Media Table: The core of the Media Data Lake, this structured dataset captures essential metadata and references to all media assets. It’s designed to be extensible, supporting both traditional metadata and outputs from ML models (including transformer-based embeddings, media understanding research and more).
- Data Model: We are developing a robust data model to standardize how media assets and their attributes are represented, making it easier to query and join across schemas.
- Data API: An pythonic interface that will provide programmatic access to the Media Table, supporting both interactive exploration and automated workflows.
- UI Components: Off-the-shelf UI interfaces enable teams to visually explore assets in the media data lake, accelerating discovery and iteration for ICs.
- Online and Offline System Architecture: Real-time access for lightweight queries and exploration of raw media assets; scalable large batch processing for ML training, benchmarking, and research.
- Compute: distributed batch inference layer capable of processing using GPUs and media data processing at scale using CPUs.
Starting Small with New Technology
Our initial focus this past year has been on delivering a “data pond” — a mini-version of the Media Data Lake targeted at video/audio datasets for early stage model training, evaluation and research. All data for this phase comes from AMP, our internal asset management system and annotation store, and the scope is intentionally small to ensure a solid, extensible foundation could be built while introducing a new technology into the company. We are able to perform data exploration of the raw media assets to build up an intuitive understanding of the media via lightweight queries to AMP.
Media Tables: The New Foundation for ML and Innovation
One of the most exciting developments is the rise of media tables — structured datasets that not only capture traditional metadata, but also include the outputs of advanced ML models.

These media tables power a range of innovative applications, such as:
- Translation & Audio Quality Measures: Managing audio clips and features via text-to-speech models for engineering localization quality metrics.
- Media Fidelity Restoration: Research on restoration of videos to HDR for remastering and other image technology use-cases.
- Story Understanding and Content Embedding: Structuring narrative elements extracted from textual evidence and video of a title to increase operational efficiency in title launch preparation and ratings, e.g. detection of smoking, gore, NSFW scenes in our titles.
- Media Search: Leverage multi-modal vector search to find similar keyframes, shots, dialogue to facilitate research and experimentation.
These tables built on top of LanceDB are designed to scale, support complex queries, and serve both research and other data science & analytical needs.
The Human Side: New Roles and Collaboration
Media ML Data Engineering is a team sport. Our data engineers partner with domain experts, data scientists, ML researchers, upstream business ops and content engineering teams to ensure our data solutions are fit for purpose. We also work closely with our friendly platform teams to ensure technological breakthroughs that are beneficial beyond our small corner of the universe could become horizontal abstractions that benefit the rest of Netflix. This collaborative model enables rapid iteration, high data quality, innovative use cases and technology re-use.

Looking Ahead
The evolution from traditional data engineering to Media ML data engineering — anchored by our media data lake — is unlocking new frontiers for Netflix:
- Richer, more accurate ML models trained on high-quality, standardized media data.
- Supercharge ML Model evaluations via quick iteration cycles on the data.
- Faster experimentation and productization of new AI-powered features.
- Deeper insights into our content and creative workflows via metrics constructed from Media ML algorithms inferred features.
As we continue to grow the media data lake, be on the lookout for subsequent blog posts sharing our learnings and tools with the broader media ml & data engineering community.

From Facts & Metrics to Media Machine Learning: Evolving the Data Engineering Function at Netflix was originally published in Netflix TechBlog on Medium, where people are continuing the conversation by highlighting and responding to this story.
How a volunteer-run wildfire site in Portugal stayed online during DDoS attacks
Post Syndicated from João Tomé original https://blog.cloudflare.com/wildfire-fogos-pt-portugal-ddos-attack/
On July 31, 2025, just as Portugal entered the peak of another intense wildfire season, João Pina, also known as Tomahock, received an automated alert from Cloudflare. His volunteer-run project, fogos.pt, now a trusted source of real-time wildfire information for millions across Portugal, was under attack.

One of the several alerts fogos.pt received related to the DDoS attack
What started in 2015 as a late-night side project with friends around a dinner table in Aveiro has grown into a critical public resource. During wildfires, the site is where firefighters, journalists, citizens, and even government agencies go to understand what’s happening on the ground. Over the years, fogos.pt has evolved from parsing PDFs into visual maps to a full-featured app and website with historical data, weather overlays, and more. It’s also part of Project Galileo, Cloudflare’s initiative to protect vulnerable but important public interest sites at no cost.
Wildfires are not just a Portuguese challenge. They are frequent across southern Europe (Spain, Greece, currently also under alert), California, Australia, and in Canada, which in 2023 faced record-setting fires. In all these cases, reliable information can be crucial, sometimes life-saving. Other organizations offering similar public services can also apply to join Project Galileo to receive protection and handle heavy traffic.
Fogos.pt began with a simple question: why was fire data only available in hard-to-read PDF documents? João and a group of friends, including volunteer firefighters, decided to build something better. They pulled the data, geolocated the fire reports, and visualized them on a map.
Soon, thousands of people were using it. Then tens of thousands. Today, fogos.pt is integrated into official communications, including mentions from the Portuguese government on social media and direct links from the national wildfire information portal (SGIFR.gov.pt).
In 2018, fogos.pt formally joined forces with VOST Portugal, a digital volunteer organization that was early on also part of our Project Galileo — whose story was also featured in an earlier case study. João Pina is also a co-founder of VOSTPT. Together, they created a complementary model: fogos.pt provides data and the platform; VOSTPT validates and communicates it to the public in real-time during emergencies.
It’s an operation run entirely by volunteers, with no funding, no formal team — just passion, and the help of partners.

Homepage of fogos.pt on August 20, 2025, highlighting a major wildfire near Piódão in central Portugal.
On July 31 and August 1, 2025, two Distributed Denial of Service (DDoS) attacks targeted fogos.pt. Cloudflare automatically detected and mitigated both attacks.
July 31 attack:
• Duration: 7 minutes
• Peak: 33,000 requests per second at 11:27 UTC
• Bandwidth: 1.7 Gbps (Max)
How the attack looks like in requests per second:

August 1 attack:
• Duration: 5 minutes
• Peak: 31,000 requests per second at 10:24 UTC
• Bandwidth: 849 Mbps (Max)
How the attack looks like in requests per second from our perspective:

By Cloudflare’s standards, these were small. For comparison, last year we mitigated an attack exceeding 700,000 requests per second against a high-profile US election campaign site. But for an civic project like fogos.pt, even tens of thousands of requests per second — if unprotected — can be enough to take services offline at the worst possible time.
Attackers typically use three main methods for DDoS attacks:
-
IoT devices: hacked cameras, routers, or smart gadgets sending traffic.
-
Proxies: open or misconfigured servers, residential proxy networks, or anonymity tools that hide attackers’ IPs.
-
Cloud machines: compromised or rented servers from cloud providers.
The July 31 attack likely relied on open proxies, with much of the traffic arriving unencrypted (a common sign of proxy-based attacks). The August 1 attack, in contrast, came largely from cloud machines, matching patterns we see from botnets that exploit cloud infrastructure.
These attacks were blocked without disruption. Cloudflare’s autonomous mitigation systems kicked in, and email alerts were automatically sent to João and the team. No downtime, no manual intervention required.
Fogos.pt has used Cloudflare’s free services since the beginning, starting with DNS and gradually expanding to DDoS mitigation, caching, rate limiting, and more. The site joined Project Galileo, which protects journalists, human rights defenders, and public service projects, to get stronger, upgraded features and service at no cost.
“Without Cloudflare, the site would have gone down many times during fire season,” says João Pina. “We use almost every product — but protection against attacks is critical.”

August 11, 2025, detail the area of interest of a wildfire in central Portugal.
Traffic to fogos.pt surges when wildfires hit the news or get mentioned by authorities. These spikes can bring tens of thousands of visitors per day. And as attention grows, so does the risk. Attacks can be used to silence or disrupt critical services, or simply as distractions for more malicious activity. In August 2025, the site often had close to 60,000 people browsing at the same time, with around 40,000 being the norm across the web and app services.

In just two weeks (with an August 15 peak of almost 70 million requests), fogos.pt handled over 550 million requests (more than 25 million per day) 9 TB of data transfer, nearly 100 million page views, 15 million visits, and 240 million API calls. A massive load for a volunteer-run project, as the next screenshot from the fogos.pt team shows:

In a time when timely wildfire updates can mean the difference between safety and danger, keeping the site online is essential.
Fogos.pt is a reminder of what’s possible when public service meets technology, and why we launched Project Galileo: to protect the digital infrastructure that keeps people informed and safe. Built with no formal funding or full-time team, it runs on volunteers, partners, and a shared sense of purpose, an authenticity that João Pina believes is why it works, and why it matters.
And while this story is about Portugal, wildfires are a global challenge. Other organizations providing critical public services can also apply to join Project Galileo and receive this protection.
From a dinner-table idea by an engineer to critical national infrastructure, fogos.pt shows the Internet at its best. Cloudflare is proud to help protect it.
[$] Bringing restartable sequences out of the niche
Post Syndicated from corbet original https://lwn.net/Articles/1033955/
The restartable sequences feature, which
was added to the 4.18 kernel in 2018, exists to enable better performance
in certain types of threaded applications. While there are users for
restartable sequences, they tend to be relatively specialized code; this is
not a tool that most application developers reach for. Over time, though,
the use of restartable sequences has grown, and it looks to grow further as
the feature is tied to new capabilities provided by the kernel. As
restartable sequences become less of a niche feature, though, some problems
have turned up; fixing one of them may involve an ABI change visible in
user space.
CrowPi 3: Your First Robot? (Easy Setup & Cool AI Features)
Post Syndicated from BeardedTinker original https://www.youtube.com/shorts/90ubYYR20uQ
Неразбиране и лобизъм срещу глобите за висока средната скорост
Post Syndicated from Боян Юруков original https://yurukov.net/blog/2025/sredna-skorost/
Тия дни излезе становище за следенето на средната скорост, което ми се стори толкова абсурдно, че веднага реших, че е излязло от Диана Русинова. Това е същата, която дежури в медиите с фалшива жилетка и още по-измислени тези, но известна с това, че стои зад „експертно“ становище проправил пътя за онзи 215 метров небостъргач в София. Не, в случая става дума за друга организация нямаща общо с официалните институции, която настоява, че системата за следене на средна скорост била пред провал, защото тол камерите не били направени за тази цел. Повтарят и една отколешна теза, че трябвало да се сертифицират камерите, за да можело да следят така движението.
Твърдението беше публикувано от БТА и цитирано от Сега, БНР, Дарик News и много други. Зад института стои Богдан Милчев. Той е бивш шеф на КАТ София и е отстранен от поста преди 12 години от тогавашния министър Йовчев от кабинета на Орешарски за несправяне с многото жертви по пътя. Същият Милчев отново преди два дни настоява, че „война по пътищата няма“, а през април възхвалява Пеевски като спасение за безопасността по пътищата. Критикува участието на Русинова в медии и покани от институции, но видимо нивото на компетентност, популизъм и търговия с медийно влияние и експертизи е на същото ниво.
По-важно тук е твърдението за преброителните камерите и следенето на средната скорост. То нито е негово, нито е ново, нито е вярно. Всъщност, както виждаме доста често в последните седмици, поемат се нашумели теми, извъртат се в нещо сензационно и несвързано и се яхват къде за политически, къде за бизнес цели.

Нека го обясня просто, така че дори Русинова и Милчев да го разберат.
Представете си, че си правите селфи разклона на Ветрен при Бургас и го пускате в инста и фейса, защото без content накъде сме. След точно два часа си правите ново селфи на влизане в София и пускате веднага във фейса, защото бързате за поредното дежурене по студията. Всичко шест.
Проблемът е, че имаме две точки, където се знае кога сте били, защото цялата ви работа е да сте пред камерите и соцалките. А разстоянието между тези две точки е грубо 356 км. При нормално каране това ще отнеме поне три часа, но да приемем, че няма ремонти, хранилките на ГЕРБ и ДПС не са крали от дебелината на пътя, та е качествен и няма натоварване и други граничения. Та да кажем, че карате неотклонно със 140 км/ч както е разрешено. Тогава ви трябват точно 2 часа и 32 минути. Минали сте го обаче по-бързо – средно с около 178 км/ч. Браво, юнаци! Има ли значение какъв модел е телефона ви, колата и прочие? Има значение единствено да е ясно в колко часа сте били на дадено място.
Преброителните камерите имат една единствена функция и са сертифицирани отдавна за нея. Те записват номер на кола, която е минала в даден час на дадено място. Това е. Всъщност, записват и доста други параметри, но това е най-важното в случая. Това значи, че въпросните камери си вършат работата и технически данните им могат да се използват за административни процедури и актове за разлика от споделянето в социалките или снимки от лични телефони, тъй като системата е в тол агенцията и е сетрифицирана.
Следенето дали някой има винетка (или тол такса за камионите), гражданска и технически прегледи съответно автоматичното им глобяване е въпрос единствено на използване на тези нормативно издържани данни като се установи, че превозно средство е било на пътя в даден ден при наличието или липсата на друго обстоятелства. С малко повече работа по снимките може да се приложи същото за камините за боклук, дървесен материал и опасни материали , карането в сервизната лента, карането на тирове в забранени части на деня (шум, жега, натоварено движение) и прочие.
Аналогично, по примера горе, тези данни могат да се използват да се установи, че една кола е изминала определено разстояние непонятно бързо. Технически това винаги е било възможно. Оправданието до преди няколко години беше липсата на нормативна уредба да го позволи на КАТ. Всъщност, още преди две години беше готово технически да се следи средната скорост. Тогава именно МВР блокира усилията с аналогични на горните непонятни изисквания за някакво сертифициране. Освен, че пилеят публични ресурси, липсва и обяснение кое налага това технически или нормативно извън желанието на самата полиция да протака тази мярка.
Нещо повече, от самото начало на тол агенцията и преброителните камери, МВР винаги е могла да следи за средна скорост с малко усилия. Има всички данни за всеки минавал някога през дадено място. Това включва както коли на службите и НСО, така и колите на всички, които четем всяка седмица, че са размазали някого на пътя. Да, тези данни не включват камерите от градовете и не включват цялата пътна мрежа, но това е най-вече заради нежелание на МВР. Това означава, че ако е искала, МВР е можела да следи средна скорост, ако не за глоби, то поне за оценка на риска и маркиране на редовно нарушаващи скоростта номера.
Всичко това следва да ви говори за огромно нежелание и лобиране да се спре тази мярка, както и да се следят системните нарушители. При това идва именно от институции и говорещи глави с редовни заявки в посока намаляване на жертвите по пътищата. Вместо това, първите искат с парите предназначени за тази цел да си напазаруват луксозни коли по спорни критерии. Макар сега законът да предвижда следене само на 50 участъка, дори със сегашните камери е възможно много повече, а с добавянето на още, включително общинските, ще може да се покрият и градовете.
Не мислих да се занимавам с темата за следенето на средната скорост и глобите за превишаването ѝ. Питаха ме дори дали няма да правя карта на отсечките. Не писах до сега и не направих карта не защото липсваше разбиране по темата, а защото ми се стори, че именно това неразбиране може би ще подтикне хората все пак да спазват ограниченията.
Наистина, в последните две седмици прекосих България и се виждаше именно това – почти липсваха мигащите, пресвяткащите и натискащите се да карат със 180 докато изпреварваш колона от тирове, например. Едно пътуване е, възможно да е краткотрайно или да съм имал късмет. Вие забелязвате ли разлика?
The post Неразбиране и лобизъм срещу глобите за висока средната скорост first appeared on Блогът на Юруков.
Security updates for Thursday
Post Syndicated from jake original https://lwn.net/Articles/1034650/
Security updates have been issued by AlmaLinux (libarchive, mingw-sqlite, pki-deps:10.6, and tomcat), Debian (chromium and firefox-esr), Fedora (python3.6 and suricata), Oracle (go-toolset:rhel8, kernel, libarchive, mingw-sqlite, tomcat, and xterm), Red Hat (kernel), Slackware (mozilla), SUSE (aws-efs-utils, docker-machine-driver-kvm2, nova, pluto, polaris, and python310), and Ubuntu (ceph, gcc-10, gcc-11, gcc-12, linux-aws-6.8, linux-gcp, linux-gcp-6.8, linux-gkeop, linux-ibm,
linux-ibm-6.8, linux-hwe-6.14, linux-oem-6.14, linux-ibm, linux-intel-iotg, linux-oracle, linux-raspi, linux-iot, poppler, and tiff).
Comic for 2025.08.21 – 17th Century Comedian Part 3
Post Syndicated from Explosm.net original https://explosm.net/comics/17th-century-comedian-part-3
New Cyanide and Happiness Comic
Code, confidence, and community: A look back at Astro Pi 2024–25
Post Syndicated from Fergus Kirkpatrick original https://www.raspberrypi.org/blog/code-confidence-and-community-a-look-back-at-astro-pi-2024-25/
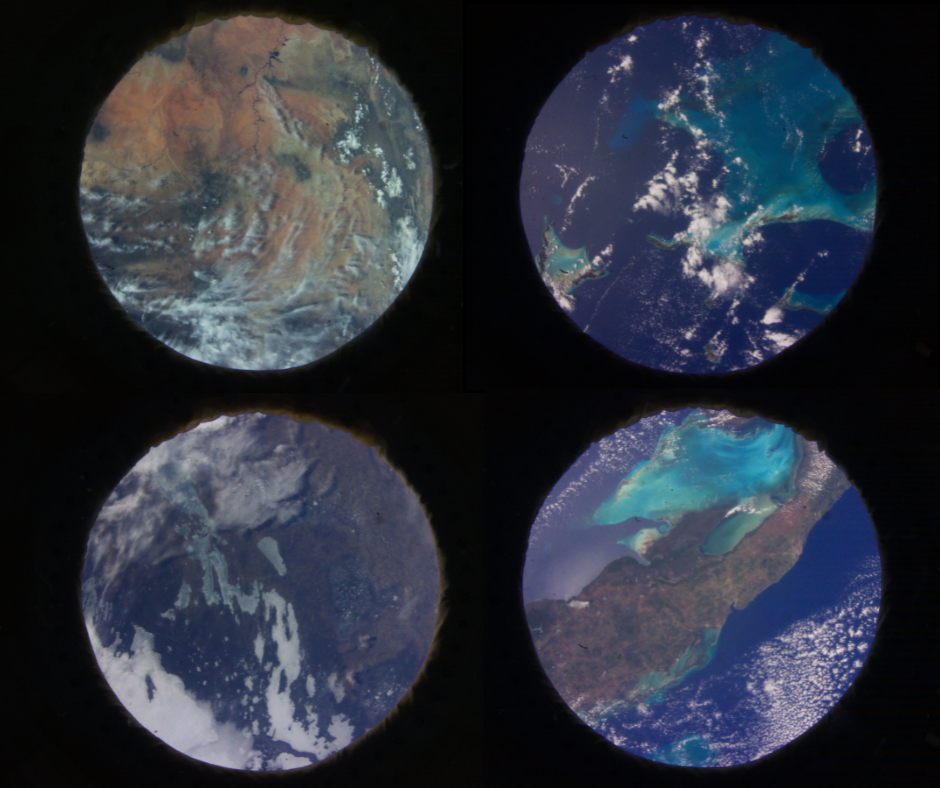
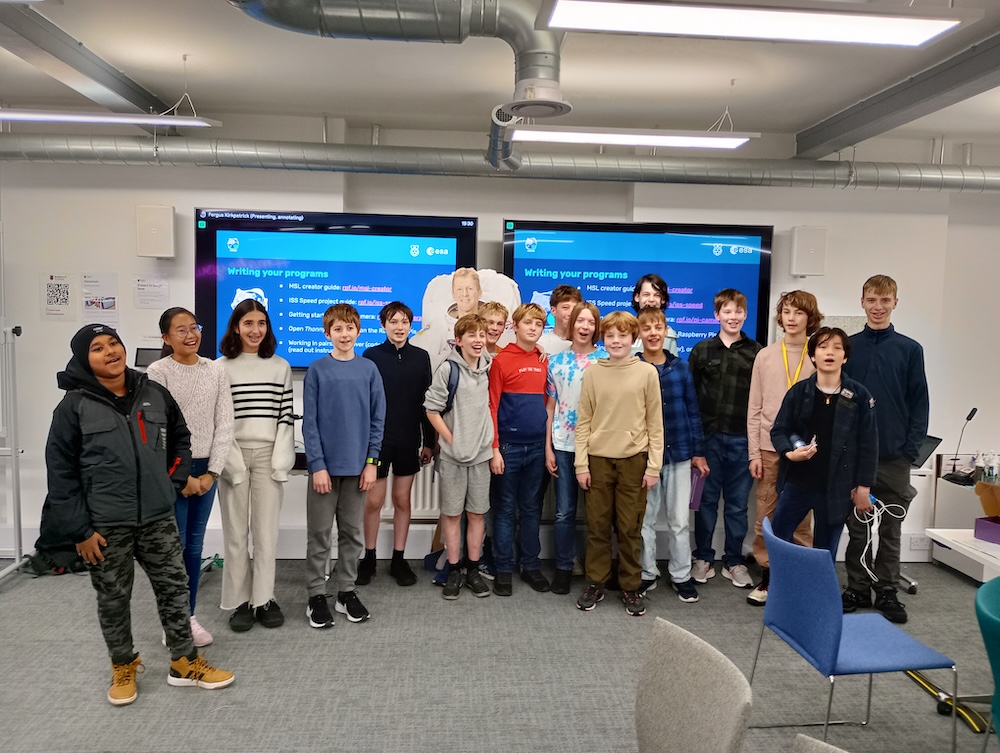
Taking part in the European Astro Pi Challenge builds young people’s confidence and motivates them to try further digital making and programming activities, according to their mentors. The challenge, a European Space Agency (ESA) Education project run in collaboration with the Raspberry Pi Foundation, offers young people the amazing opportunity to write a short computer program to run on Raspberry Pi computers on board the International Space Station (ISS).
An incredible 27,304 young people from 27 countries got involved in Astro Pi 2024–25, with 26,294 succeeding in having their code run in space across the two challenge activities, Mission Zero and Mission Space Lab. As in past years, we’ve asked mentors and their teams about their experience and the impact participating had on them. So what did they say?
How we listened to feedback
To find out what worked well, what we could improve, and the impact Astro Pi has had on young people’s lives this year, we encouraged mentors to complete a survey after teams submitted their computer programs. We also ran focus group discussions to deepen our understanding. A huge thank you to the 99 Mission Zero and 26 Mission Space Lab mentors who completed our surveys, and the five mentors who participated in our focus groups.
What is working well
Low stakes but high impact
Mentors believe that Astro Pi is a great opportunity for young people to build their coding skills and knowledge of STEM concepts. Close to 80% of mentors for Mission Zero and 90% for Mission Space Lab agreed that these outcomes were being achieved for the young people in their teams. Mentors also appreciated that while the programme had real-world application, the learning experience was relaxed and low pressure.
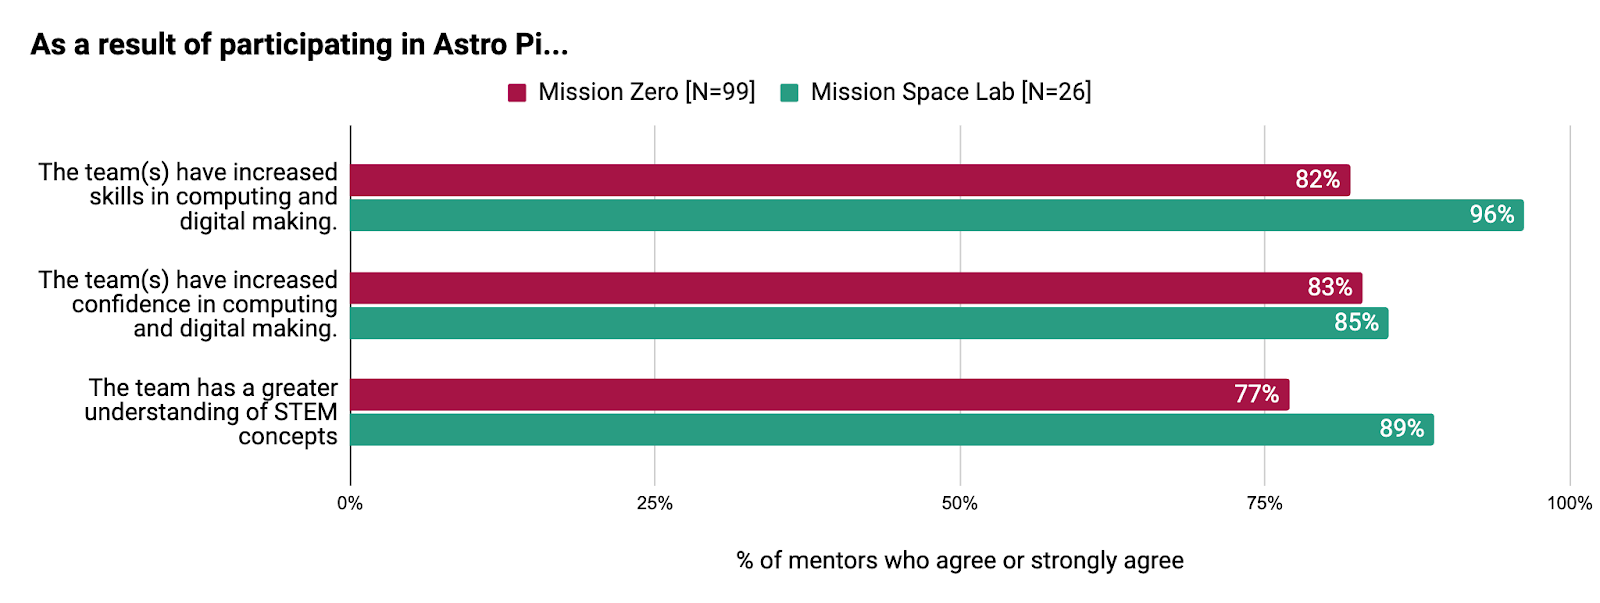
Many of our young participants come from areas of educational disadvantage or traditionally underrepresented groups where confidence with technology and STEM subjects can be low. Mentors reported that the programme empowers young people, increasing their confidence with computing and digital making, and helping them connect with a wider community of learners from around the world.
“They [young people] come from complicated environments and sometimes their confidence is very low. They don’t believe in themselves and this [Mission Zero challenge] really empowers them.” — Mission Zero mentor
“I think having a space mission, having Mission Zero is a way of connecting not only to a worldwide group of learners, but also explorers, future scientists, future astronauts. To see them as part of a larger community, not just an activity or assignment that they have to do in class. They discover their own abilities and potential, and exercise their creativity in a very low stakes environment… and then to see it come to life in that global way I think is extremely valuable.” — Mission Zero mentor
This increased confidence also encourages young people to take on other opportunities. 78% of Mission Zero mentors and 96% of Mission Space Lab mentors believe that it is likely that their students will participate in other coding and digital making challenges in the future.
Space is cool!
The connection to space and the ISS continues to be a strong motivator, not just for young people but also mentors and other peers. In our survey, 90% of mentors in Mission Zero and 92% in Mission Space Lab reported that the young people participating were highly motivated by the possibility of having their code run on the ISS. In focus groups, mentors highlighted how the excitement of working on a space project extended to them and other adults too.
“They’ve always really enjoyed the sheer fact that you get to send stuff into space because it is really cool.” — Mission Zero mentor
“You know, even the adults I tell about this say, ‘oh, that sounds amazing. Can I do it?’ I go, ‘No, you’re too old. I’m too old.’” — Mission Zero mentor
“We want our code to run in space! We are fascinated by discovery and the opportunity to contribute to a real science experiment on the ISS.” — Mission Space Lab mentor
The resources and guidance are useful
We know how crucial mentors are to the success of Astro Pi. Mentors come from diverse backgrounds and we are committed to making sure they feel prepared and supported. We were thrilled to hear that over 90% of Mission Zero mentors and 80% of Mission Space Lab mentors found the Astro Pi resources useful.
“I had no skills but the support proved to be excellent” — Mission Zero mentor
“Step-by-step instructions were excellent and really clear. Very easy to follow.” — Mission Zero mentor
For Mission Space Lab, the more technical activity, we’ve been working on providing additional support. In 2024–25 we introduced a new online simulator tool for teams to test their programs with historical ISS data. Mentors found the tool to be helpful, allowing them to troubleshoot their code.

What could be improved?
While we celebrate the successes, we’re always keen to understand how we can improve the programme.
As in previous years, mentors reported that young people whose computer programs passed the eligibility criteria and ran on the ISS (or “achieved flight status”, as we call it) benefited most from the experience. While 12% more Mission Space Lab teams achieved flight status this year compared to last year, some registered teams still did not submit programs.
To understand why, we surveyed mentors who had registered but who did not then submit computer programs. In the 55 responses, the main reasons given were a shortage of time due to other school commitments, and their teams finding the challenge difficult.
Some survey respondents suggested a need for more simplified, step-by-step instructions for less experienced learners. Additionally, a few teams faced technical issues with the online portal and the testing tool.
Thank you to all the mentors who provided their honest feedback. We’ve read and considered all of it and will use it to make Astro Pi even better in the future.
Astro Pi will be launching for its 10th year on Monday, 8 September 2025. We’ve been working on making it easier than ever to take part in both missions and are looking forward to supporting you and your teams in getting your code into space. If you’re interested in taking part, sign up to our newsletter and get the latest news and information about our resources for this year’s missions.
Important dates:
8 September 2025: The Astro Pi Challenge opens for registration
16 February 2026: Closing date for Mission Space Lab
23 March 2026: Closing date for Mission Zero
The post Code, confidence, and community: A look back at Astro Pi 2024–25 appeared first on Raspberry Pi Foundation.
Jim Sanborn Is Auctioning Off the Solution to Part Four of the Kryptos Sculpture
Post Syndicated from Bruce Schneier original https://www.schneier.com/blog/archives/2025/08/jim-sanborn-is-auctioning-off-the-solution-to-part-four-of-the-kryptos-sculpture.html
Well, this is interesting:
The auction, which will include other items related to cryptology, will be held Nov. 20. RR Auction, the company arranging the sale, estimates a winning bid between $300,000 and $500,000.
Along with the original handwritten plain text of K4 and other papers related to the coding, Mr. Sanborn will also be providing a 12-by-18-inch copper plate that has three lines of alphabetic characters cut through with a jigsaw, which he calls “my proof-of-concept piece” and which he kept on a table for inspiration during the two years he and helpers hand-cut the letters for the project. The process was grueling, exacting and nerve wracking. “You could not make any mistake with 1,800 letters,” he said. “It could not be repaired.”
Mr. Sanborn’s ideal winning bidder is someone who will hold on to that secret. He also hopes that person is willing to take over the system of verifying possible solutions and reviewing those unending emails, possibly through an automated system.
Here’s the auction listing.